

Page 1

User’s Guide
Guide de L’utilisateur
2003-12
Page 2

PET CONTAINMENT SYSTEM
Training, Installation and
Troubleshooting Guide
Important Information
please keep this manual for future reference
Questions? see our website at:
www.multivet-inter.com
Table of contents:
I. How the system works 5
II. Equipment needed for installation 6
III. Installation procedures 7
IV. Spray receiver collar 13
V. Operating your system 14
VI. Training your pet 15
VII. Troubleshooting 20
CAUTION: This Pet Containment System is NOT a solid barrier. The system is designed to act
as a deterrent to remind animals by spray stimulation to remain within the boundary established.
This system is to be used only in the intended manner as specified in this instruction manual. Any
misuse of the system other than as recommended in this instruction manual may result in electric
shock or fire. It is your responsibility to properly train your animal to remain within the
established boundary. It is important you reinforce training if needed. Since the tolerance level to
spray varies from pet to pet, Multivet CANNOT guarantee that this system will, in all cases, keep
your pet within the established boundary. NOT ALL PETS CAN BE TRAINED TO AVOID
CROSSING THE BOUNDARY. Therefore, if you have reason to believe that your pet may pose
a danger to others or harm itself if it is not kept from crossing the boundaries, the Purchaser/User
should NOT rely solely upon the Pet Containment System to confine your pet. Multivet shall
NOT be liable for any property damage, economic loss or any consequential damages sustained
as a result of an animal crossing the boundary.
Do not allow children to use this pet training system.
This product is intended for residential use and for containment of healthy pets only. It is not
intended for containment of guard dogs or vicious animals. Seek the advice of your veterinarian
to determine your pet’s health and suitability for this pet training system.
Thank You!
Thank you for purchasing the world’s finest pet containment system. This manual will explain
how to operate, install your system and train your pet. The Pet Containment System eliminates
the expense and maintenance of conventional fencing. Plus, it is portable! You may have to bury
new wire, but the rest of the system can be moved with you when you move!
Page 3

We want to make sure you are a satisfied customer. You can help ensure this by taking time to
carefully read the following instructions on training and installation. We have also included a
detailed installation and training video. We recommend you watch the video first then follow the
manual as a guide. Your Pet Containment System is easy to install. The time will vary depending
on the size of your yard.
Please take this opportunity to complete and mail the warranty card to insure proper service if
something in your kit becomes damaged.
Again, we sincerely appreciate your purchase and hope it provides you and your pet with years of
service.
QUESTIONS & ANSWERS
Q: How much area can the transmitter in my kit cover?
A: The transmitter will cover up to 25 acres (100,000 m2).
Q: Will the spray hurt my pet?
A: No. Spray is harmless. The spray will only startle your pet.
Q: How deep do you have to bury the wire?
A: From 2.5 to 7.5 cm (1” to 3”). The only reason for burying is so you don’t accidentally trip
over it or cut it.
Q: How many dogs can be put on the system?
A: A large number but each must be wearing a receiver collar.
Q: What size or type pet can be used on the system?
A: The pet must be trainable and able to comfortably wear the receiver. It SHOULD NOT be
used on vicious or attack dogs. If your pet is in ill health, you should consult with your
veterinarian.
Q: Can the receiver be used on my pet’s present collar?
A: Yes.
Q: How long does it take to install?
A: Allow about 2 to 3 hours for a 150 m (500’) fence. It depends on layout, soil conditions, tools,
etc. A typical installation can be completed in one afternoon.
I. How The System Works
The Pet Containment System is simple and straightforward. It consists of three primary parts: the
TRANSMITTER, the RECEIVER, and the ANTENNA (boundary wire). The transmitter is an
ultra-low frequency radio transmitter that plugs into a standard 120 volt outlet. The signal it
transmits is carried by the boundary wire which serves as an antenna. The range of the signal (i.e.
the distance from the boundary that the receiver picks up the signal) can be adjusted from a few
Page 4
steps up to 9 m (30’) by the range adjustment knob located on the transmitter. (Note: There may
be some variations in these distances due to different ground and wire conditions, and the depth
that the wire is buried. The deeper the wire, the weaker the signal.)
CAUTION: While all Pet Containment System transmitters use a microprocessor to send a coded
signal, it is still possible that a stray signal can be picked up. This most often is the case around
TV’s. You may want to put the receiver battery in and hold it near various appliances in the
home. If it beeps near one, then you should either have your pet avoid these appliances or remove
the collar when your pet enters the house.
II. Equipment needed for installation
1. Transmitter
2. Receiver
3. Collar for receiver
4. Battery
5. Video
6. Wire nuts for splicing
7. Wire and flags
* Wire must be 18 gauge and 30 strands. We strongly recommend buying only wire supplied for
this product. Extra wire and flags are sold separately.
In addition to the contents of the kit, the following items are necessary to install the Pet
Containment System.
A. Straight-edged spade, a lawn edger or a shovel. Installation in small to medium sized yards
should only require use of the spade or shovel. For a large yard we recommend that you rent a
power edger to make installation easier.
B. Wire stripping pliers, electrical tape, and waterproofing compound (e.g. silicone caulk) for
insulating splice connectors (wire nuts).
C. If you are going to cross brick, asphalt or concrete surfaces, you will need a circular saw fitted
with a masonry blade. You will also need a patching compound suitable for the surface you will
Page 5

be crossing. If you are crossing a gravel or dirt drive, you will need to protect your wire, such as
by running it through PVC pipe.
D. NECESSARY: For transmitters, a grounding rod and ground clamp can be obtained at any
electrical distributor.
III. Installation Procedures
As with any project, careful planning will make the job much easier. To begin, lay out the area
you plan to “fence” on a sheet of graph paper. The transmitter will transmit a signal up to 9 m
(30’) from your boundary wire. You want to be sure to leave enough area so that your dog can
move about freely within the boundaries.
There are a few other things you need to keep in mind when planning your “fence”.
1) The wire must make a continuous loop back to the transmitter.
2) Twisting the wires cancels the signal. (See Illustration.) However, twisting three or more wires
does not cancel the signal. Wires must be traveling in opposite directions to cancel the signal.
Example: When you connect wire to the terminal to begin your “fence”, make your completed
loop and twist the wires when you are coming back to the terminal. Make at least 32 twists per
meter.
3) Always round corners (make 2 m (6’) radius turns) when you are making turns. Square corners
confuse the signal.
Note: When installing a double loop as illustrated in samples B, C, F, wire must be separated 1 m
to 1.5 m (3’ to 5’) to avoid canceling the signal.
After you have planned your fence design you are ready to begin installation.
Step 1: Select location for transmitter.
Transmitter should be located INDOORS ONLY in a dry, protected area that is above 32 degrees
Fahrenheit (0° Celsius), not exposed to the sun, typically in a garage. To avoid signal interference
install away from any major appliances such as: hot water heater, metal shelving, air conditioner,
and metal on garage doors. DO NOT mount your transmitter next to a breaker box. Do not run
wire along with electrical wires, telephone wires, television cables, antenna wires, and near
satellite dishes. Be sure to avoid crossing power lines. If you are unsure of the location of your
cables or power lines, check with your local utilities before installation.
CAUTION: Do Not install in a barn or metal shed.
A risk of electric shock or fire could result if transmitter is exposed to water or cold weather
damage.
Before burying the wire, lay the wire along your proposed boundary, connect it to the transmitter
and turn the system on. Then, test the collar on boundary wire to ensure it is working properly.
Burying the wire is not necessary for the transmission of the radio signal. Burying is
recommended to prevent damage to the wire or transmitter and to avoid possible injuries to
persons tripping over the exposed wire.
VERY IMPORTANT: Be sure to thoroughly test your system before burying wire.
Step 2: Cut a trench one to three inches deep along your previously planned boundary.
Page 6

Note: Avoid running the boundary wire close to chain link fences. If crossing chain link fences,
do so at right angles, after crossing continue for at least 5 feet before running parallel with other
cables or metal fencing.
Step 3: Splicing
Note: If you use more than the 150 m (500’) of wire, you will need to splice the wire together
with the wire nuts.
Very Important: Be sure to note location of all splices in the space provided at the end of this
manual. Most wire breaks occur near the splices. Keep manual in a safe place for further
reference.
Begin by stripping both ends of the wire to be spliced. Insert stripped ends into the wire nut and
twist, then pull making sure of a solid connection. Apply water-proofing compound (like silicon)
in and around wire nut. After the compound dries, you may also want to wrap wires and wire nut
with electrical tape to prevent them from pulling loose and to protect from moisture.
CAUTION: If your splice or connection pulls loose, your entire system will fail. Make sure of a
secure connection.
Step 4: Crossing hard surfaces.
If you have to cross concrete, brick or asphalt surfaces, either lay the wire in a convenient
expansion joint or use a circular saw with a masonry blade to create a groove. Place the wire in
groove and cover with an appropriate patching compound. Your local hardware store can help
you choose the right compound for your type of driveway.
Step 5: Hooking up your transmitter
Wires to and from the terminals (Less than 1000 feet or more than 1000 feet terminals) need to be
tightly twisted (at least 25 to 32 twists per meter is recommended.)
Standard Transmitter:
One end of the fence wire must be connected to the red connector of one terminal and the other
one to the black connector of that same terminal. With the system on and the range adjuster knob
turned all the way up (to the right, clockwise), measure how far you can pick up a signal by
walking toward your boundary wire holding the receiver/collar. You will know you have picked
up the signal by the beeping sound the receiver makes.
Step 6: Grounding
WARNING :
Transmitters are highly susceptible to lightning damage. To avoid lightning damage,
always disconnect both loop wires and unplug transmitter if you expect an approaching storm.
Page 7
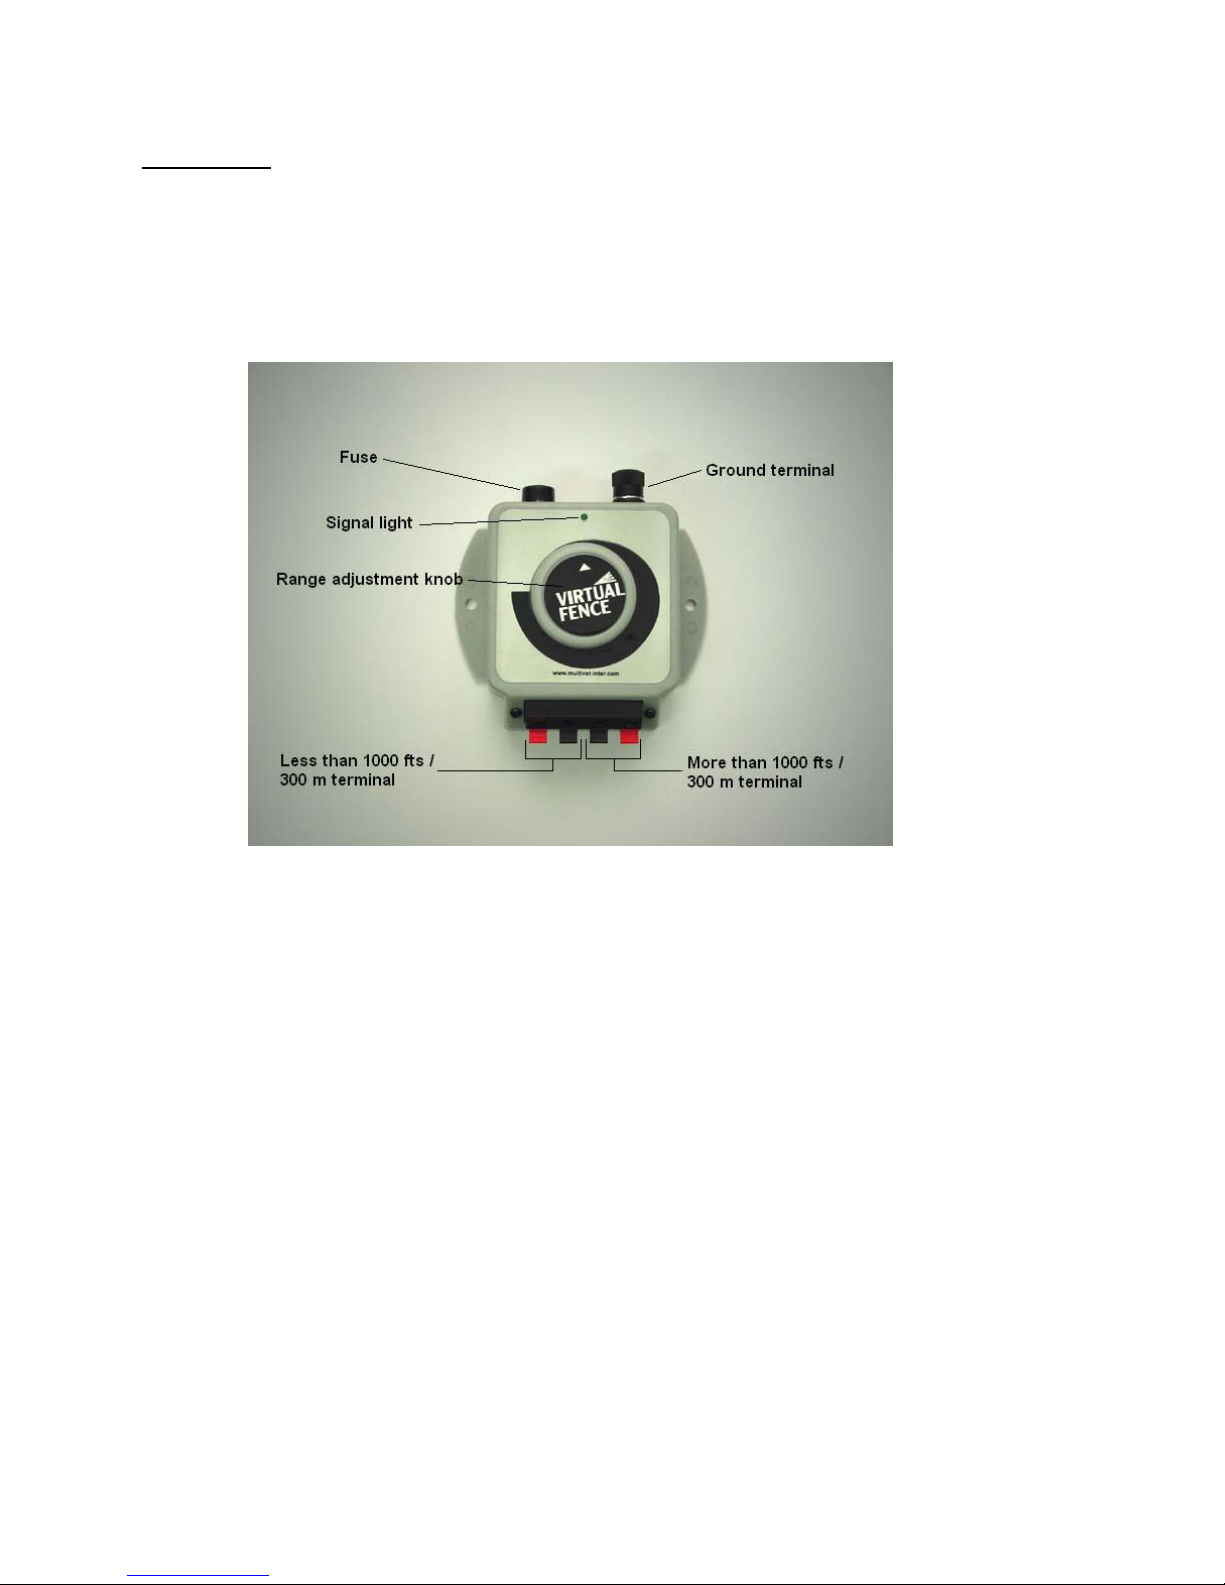
OPTIONAL:
Proper grounding is necessary to reduce the chance of lightning damage to your
transmitter. It is therefore important to connect a wire between the ground terminal of the
transmitter and a ground rod buried at least 1 m (3’) into the ground. Use a heavy gauge wire to
make this connection (#12 or larger). Please consult your local electrician since the grounding
process can vary from one place to another.
Step 7: Boundary flags
Place boundary flags 3 m (10’) apart and at the point where the warning beep starts. Beep should
be at least 1 m to 1.5 m (3’ to 5’) from boundary line. These serve as a temporary visual
boundary for your pet and enable him to learn the area he is to remain within. The flags will later
be removed when your pet has become familiar with the “free zone”.
CONGRATULATIONS!
Your new Pet Containment System is now installed!
IV. Receiver SPRAY Collar
Step 1:
Fill the unit with spray. Put the device on a flat surface with filling valve upright. Hold spray
refill upside down. Insert nozzle into refill valve and apply pressure for about 15 seconds. This
should give your device 15 strong sprays.
Page 8

Step 2:
Insert a 6.0 volt battery into device respecting proper polarity. BATTERY SHOULD ALWAYS
BE REMOVED WHEN UNIT IS NOT IN USE.
Step 3:
Place strap on receiver spray collar. Thread through the clasp. Check that once buckled, the strap
doesn’t slip from clasp. If it does you have threaded the strap improperly.
Step 4:
Place the collar on the dog making sure that the spraying valve is toward the dog’s snout. Adjust
the strap for correct fit.
V. Operating your system
Standard Transmitter:
Step 1: Power
Simply plug in the transmitter using the power adaptor supplied.
Step 2: Range Adjustment
The range adjustment knob affects the size of the zone. Turning the range adjuster knob (see
figure below) increases or decreases the range. A range of 1.5 m to 3 m (5’ to 10’) is
recommended. Turn the knob all the way to the right and, then, holding the receiver, approach the
boundary until warning beep is heard. Adjust knob to desired range.
Page 9
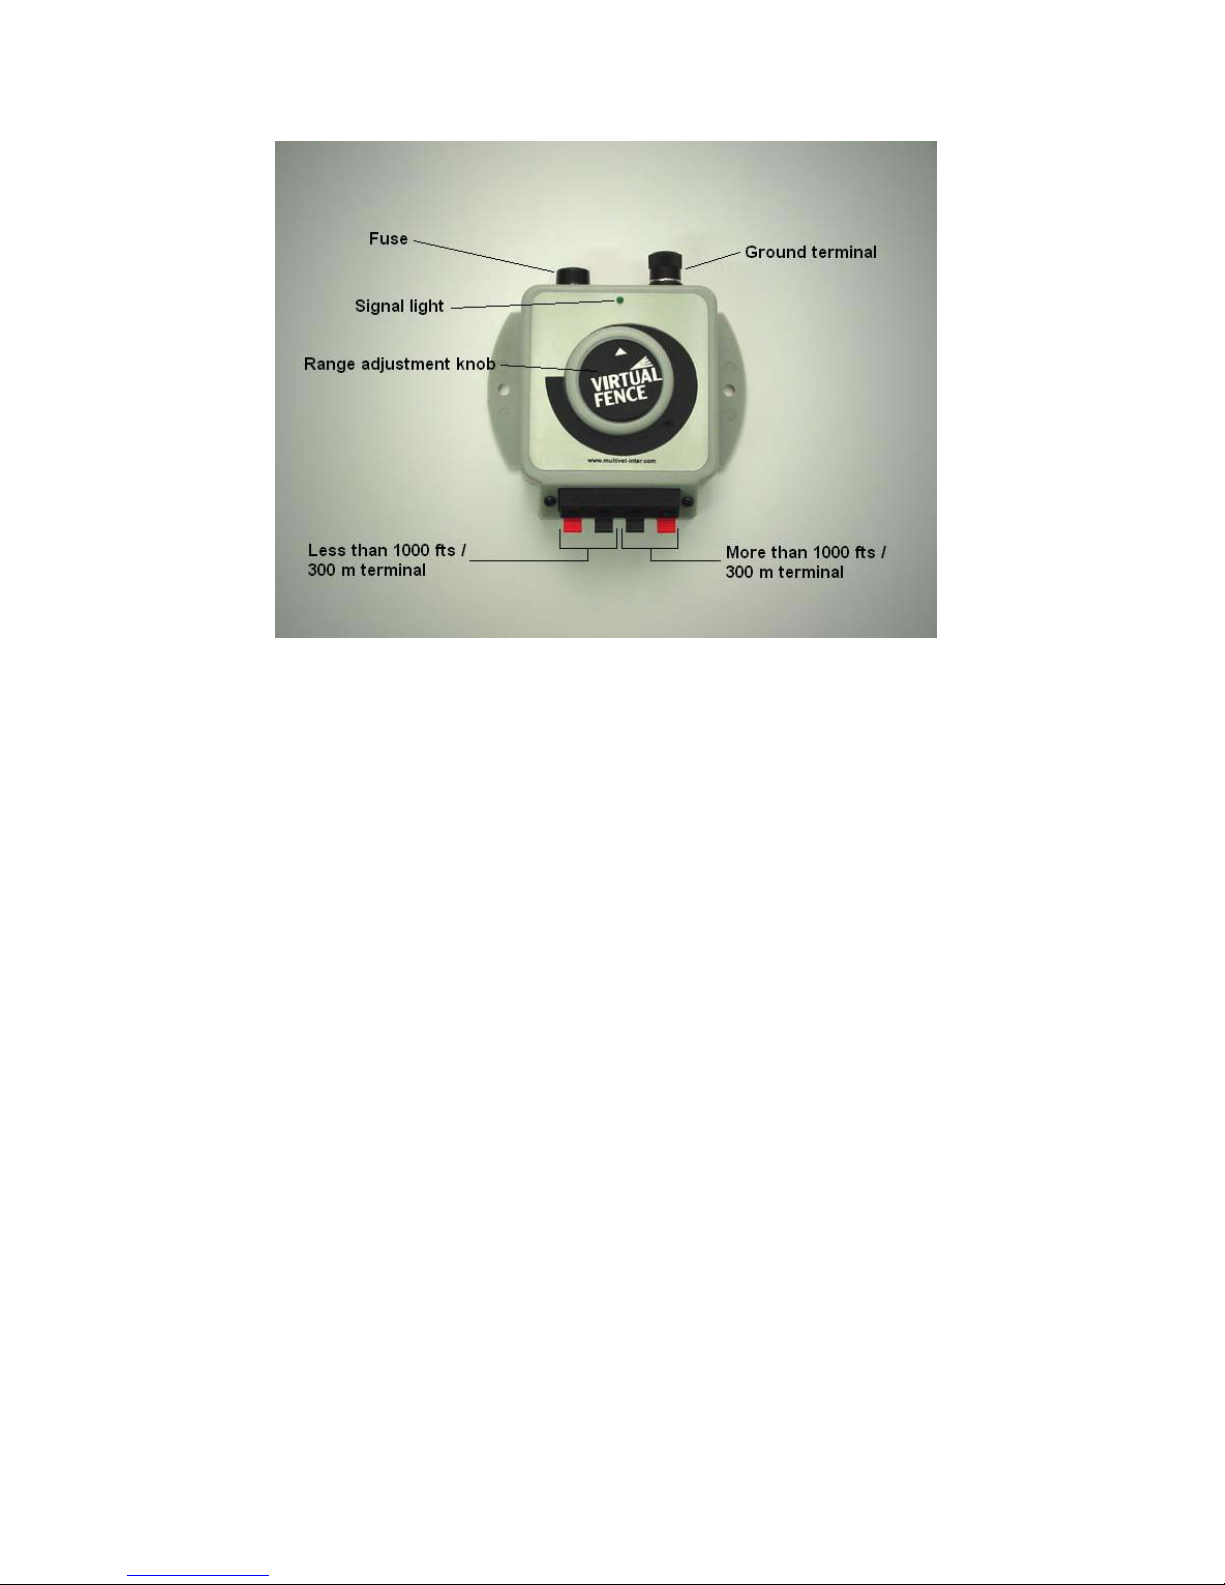
Note: The signal light on the standard transmitter is illuminated and turned off afterward when
power is applied and no fence is connected. This light will stay on when a fence is connected and
the system is in boundary line adjustment mode.
Note: Check your fence for proper operation occasionally. To do this, use the Pet Containment
System receiver collar. Be sure to hold the receiver in the same position as your dog wears it. As
you approach the boundaries, the collar should begin to beep.
WARNING: Dead batteries can allow your pet to cross the boundary. To avoid injury to your pet
it is necessary to check the battery in your collar once a month. This can be done by removing the
collar from your pet and approaching the boundary. If a beep is not heard replace battery before
further use. Do Not risk your pet’s safety, replace battery as needed in order to ensure proper
operation of the system. Battery life will vary depending on how often your pet “tests” the system
and which type of battery is used. (An alkaline battery has a shorter life than a lithium battery.)
VI. Training Your Pet
Remember, the Pet Containment System is a psychological, not a physical boundary. Training is
critical to the system’s success. Even though your dog may appear trained after one or two days,
it is important to continue the “learning” for the entire fourteen day period.
During the training period, your pet should only be allowed in your yard with a leash. It should
not freely cross the boundary at any time.
WARNING: An improperly or poorly trained pet will always be able to escape the system.
Page 10

Training can be very tiring for your pet so limit training periods to 10 or 15 minutes. Also, let
other family members share in the training so that your pet doesn’t relate the training to only one
member of the family.
Step 1: Where to start
Holding the Pet Containment System receiver collar in one hand, walk your pet to the Pet
Containment System boundary. The pet should not be wearing the Pet Containment System
receiver collar at this point. The pet should be wearing a regular collar with a lead only. Shake a
boundary flag and give your pet a strong “NO” command, allowing it to hear the beeping from
the Pet Containment System receiver.
Step 2:
Lead him back to a “safe” area and praise him.
Step 3:
Repeating steps 1 and 2 continue around the boundary.
Step 4:
After a short rest/play period, place the Pet Containment System receiver collar on your pet (this
is in addition to the collar with the leash).
Step 5:
Let your pet experience a “correction” by walking into the signal field on his own. Then,
immediately lead him back into the “safe” area and praise him. Shake the boundary flag again
with a strong “NO” command.
NOTE: The person doing the training should not encourage the pet to cross the boundaries, as
this will confuse him. (If the pet will not venture into the signal field on its own, have someone
else cross the boundary and allow the pet to follow. It needs to feel the correction to ensure the
boundaries are recognized).
Step 6:
Repeat step 5 again around the perimeter boundaries.
Your pet should receive a “correction” only when it willingly attempts to cross the boundaries.
Step 7:
Remove the Pet Containment System collar. DO NOT leave your pet alone with the collar until
fully trained.
Page 11

DAYS 2 THROUGH 14:
Repeat steps 4 through 7 at least once per day. You should notice your pet starting to avoid the
boundaries. This indicates learning.
SECOND WEEK’S TRAINING
When your pet shows learning progress, remove the training leash and allow it full use of the
“free zone”.
Over several days gradually remove the boundary flags every other one every other day. Should
your pet venture out of the boundaries, remove the Pet Containment System receiver collar and
lead it back within the boundaries and replace the collar.
MONTHLY REINFORCEMENT
While most pets will be fully trained after the two week training process, it is highly
recommended that you repeat steps 4 through 7 once every month to reinforce the training. It
should take approximately 15 minutes of your time each month and will help reinforce your pet’s
training.
Leaving and entering the boundary
You can train your pet to leave the boundaries with a leash through an imaginary gate.
Step 1:
Remove the Pet Containment System collar and replace with a regular collar and leash.
Step 2:
Walk your pet out to a specific place in your yard, preferably the end of your driveway. Always
lead it out at this spot and with the lead. If he refuses to cross, put him in the car and drive him in
and out a few times.
Step 3:
Your pet will gradually learn that it must wear a leash to venture outside the boundaries of the Pet
Containment System. Alternate several members of your family during this process so that your
pet identifies leaving with the leash and not with the person.
NOTE: All pets react differently. Some pets will be conditioned in a few days, others will require
a few weeks. However, some pets may become frightened by the training process altogether. If
this happens, remove the Pet Containment System collar from your pet and take it to a “safe”
area. Resume training the next day and alternate every other day after that. Soon your pet will
become comfortable with the Pet Containment System as it learns the “safe” area.
VII. Troubleshooting
Visit our website
for additional troubleshooting tips
Page 12

www.multivet-inter.com
SYMPTOM
PROBLEM: The receiver does not beep until it is a few inches from the boundary wire.
PROBLEM: The receiver does not beep or spray.
PROBLEM: The receiver beeps all over your yard.
PROBLEM: The signal light does not stay on.
PROBLEM: The signal light does not come on.
PROBLEM: The fuse blows continuously.
POSSIBLE CAUSE
1. a) The wire is broken.
b) The insulation around the wire has sustained damage, allowing a short to ground.
c) A splice has come undone.
2. The range setting on the transmitter is too low. Turn knob clockwise.
3. The transmitter or the boundary wire is too close to metal.
1. The wire is broken.
2. The receiver’s battery is too weak.
3. The transmitter is turned down or off.
4. The receiver is damaged and needs repair.
1. The range on the transmitter is set too high.
2. The signal is reflecting off of metal which is too close to the boundary wire or the
transmitter.
1. The wire is broken.
2. The transmitter is turned down or off.
Page 13

3. The transmitter is damaged and needs repair.
1. The transmitter is unplugged or turned off.
2. The fuse has blown.
3. The transmitter is damaged and needs repair.
1. The fuse is the wrong type.
2. The transmitter is damaged and needs repair.
Very important
Short loop test
To diagnose what may be wrong with your fence, the best and simplest method is the short loop
test. It’s quick and easy and will help you determine whether your problem is in the fence wire,
the transmitter, or the receiver.
Step 1:
Turn off the transmitter.
Step 2:
Disconnect the boundary wire and the ground wire from the transmitter (keep braid tight).
Step 3:
Cut a 3 m (10’) piece of boundary wire and strip about
1 cm (1/2”) of insulation from both ends. Connect the 10’ piece of wire to the less than 1000 feet
terminals and spread the wire out in a circle.
Step 4:
Turn the range knob down all the way. The signal light will be on and turned off almost instantly.
Begin to turn the range knob back up. The signal light should begin to stay on continuously. If it
does not, then there may be a problem with your transmitter. See return procedure on page 22.
Step 5:
First, double check to make sure the battery in your receiver is in correctly. Then, bring the
receiver collar toward the test loop wire. The receiver should begin to beep at least 15 to 25 cm
(6” to 10”) away from the test loop wire. If it does, then your system is operating properly and the
problem is in the boundary wire. If it does not, then there may be a problem with your receiver.
Remove the collar and battery and return to MULTIVET. See return procedures on page 22.
Return Procedure
To make repair simple and fast, we have set up the following return procedure for you. There is
no need to call. Just send your product and a brief description back to us at the address below.
Your product will be repaired or replaced immediately and shipped back to you. There is a
nominal service charge for out of warranty products but all parts are free during the warranty
period. If you have had your system for more than one year, call the customer service at 1 800
303-0244 to determine service charge.
You must pay the postage or freight charges to us. We will then pay the freight charges back to
you.
Page 14

Multivet International inc.
P.O. Box 651, St-Hyacinthe, QC
Canada J2S 7P5
1-800-303-0244
Outside Canada and US: 1-450-778-0244
E-Mail: info@multivet-inter.com
Need information?
www.multivet-inter.com
rspcm/003
DISPOSITIF DE CONFINEMENT POUR ANIMAL DE COMPAGNIE
Guide de dressage, d’installation
et de dépannage
AVIS IMPORTANT
Veuillez conserver ce livret pour vous y reporter au besoin.
Des questions? Visitez notre site WEB :
www.multivet-inter.com
MISE EN GARDE : Le Dispositif de confinement pour animal de compagnie NE constitue PAS
une barrière solide. Il a pour but d’exercer un effet dissuasif au moyen d’un brumisateur et ce,
afin de rappeler aux animaux de ne pas quitter le périmètre établi. On ne doit employer ce
dispositif que pour l’usage auquel il est destiné et de la manière décrite dans le présent livret.
Toute mauvaise utilisation pourrait engendrer un choc électrique ou un incendie. C’est à vous
qu’incombe la responsabilité de bien dresser votre animal pour qu’il demeure à l’intérieur des
Page 15

limites fixées. Il importe que vous renforciez ce dressage au besoin. Comme le seuil de tolérance
à la citronnelle varie d’un animal à l’autre, il est IMPOSSIBLE pour Multivet de garantir que le
présent dispositif vous permettra de confiner votre animal à l’intérieur du périmètre défini. EN
EFFET, CE NE SONT PAS TOUS LES ANIMAUX À QUI L’ON PEUT APPRENDRE À
RESPECTER LES LIMITES FIXÉES. C’est pourquoi lorsqu’il y a lieu de croire qu’un animal
pourrait constituer une menace pour autrui ou se blesser s’il quitte un périmètre donné, l’acheteur
/ utilisateur NE devrait PAS s’en remettre au seul Dispositif de confinement pour animal
domestique afin de le retenir. Multivet ne saurait être tenue responsable de tous dégâts matériels,
préjudices financiers ou dommages indirects subis parce qu’un animal a quitté le périmètre établi.
Ne laissez pas les enfants utiliser ce dispositif de dressage pour animal de compagnie.
Ce produit ne doit être utilisé qu’en milieu résidentiel, c’est-à-dire à la maison, et seulement pour
confiner un animal de compagnie sain. Il n’est pas destiné à assurer le confinement de chiens de
garde ou d’animaux agressifs. Consultez votre vétérinaire pour connaître l’état de santé de votre
animal et déterminer si ce dispositif de dressage lui convient.
Merci!
Nous vous remercions d’avoir fait l’achat du plus merveilleux dispositif de confinement pour
animal de compagnie au monde. Le présent livret explique comment l’installer, l’utiliser et
dresser votre animal. Grâce au Dispositif de confinement pour animal de compagnie, plus besoin
d’assumer les coûts et l’entretien d’une clôture traditionnelle. Il s’agit en outre d’une solution
portative! Ainsi, s’il vous arrive de déménager, vous devrez peut-être enfouir un nouveau fil,
mais vous n’aurez pas à laisser les autres éléments du système derrière vous.
Votre satisfaction nous tient à cœur. C’est pourquoi nous vous prions de prendre quelques
minutes afin de bien lire les instructions contenues dans le présent livret en ce qui a trait à
l’installation du dispositif et au dressage de votre animal. Vous trouverez également ci-inclus une
vidéocassette qui traite ces deux sujets en détail. Nous vous recommandons d’en prendre
connaissance pour ensuite suivre les indications du présent livret. Le Dispositif de confinement
pour animal domestique est facile à installer. Le temps qu’il vous faudra pour y parvenir peut
varier selon l’étendue de votre terrain.
Veuillez prendre quelques instants pour remplir la fiche de garantie et nous la poster afin de
bénéficier d’un service après-vente approprié.
Nous vous sommes sincèrement reconnaissants d’avoir fait l’acquisition de notre dispositif. Nous
espérons que vous et votre animal en profiterez pendant de nombreuses années.
QUESTIONS ET RÉPONSES
Q : Quelle est la superficie couverte par l’émetteur faisant partie de l’ensemble que j’ai acheté?
R : L’émetteur de série peut couvrir une superficie de 25 acres (100 000 m2).
Q : Le jet atomisé fera-t-il du mal à mon animal?
R : Non. Le jet atomisé est sans danger. Le jet atomisé ne fera que surprendre votre animal.
Q : À quelle profondeur faut-il enfouir le fil?
Page 16

R : De 2,5 à 7,5 cm (1” à 3”) de la surface. On doit enterrer le fil pour éviter de s’y prendre le
pied ou de le rompre par mégarde.
Q : Combien d’animaux peut-on assujettir au dispositif?
R : Plusieurs animaux (jusqu’à 5 animaux), à condition que chacun d’entre eux porte un collier
récepteur.
Q : À quel(s) type(s) ou taille(s) d’animaux ce dispositif convient-il?
R : Ce dispositif convient aux chiens qu’il est possible de dresser et qui peuvent porter le
récepteur en tout confort. Il N’EST PAS destiné aux chiens agressifs ni aux chiens dressés à
l’attaque. Si votre animal éprouve des ennuis de santé, demandez l’avis de votre vétérinaire.
Q : Le récepteur peut-il être fixé au présent collier de mon animal?
R : Oui.
Q : Combien de temps l’installation exige-t-elle?
R : De deux à trois heures environ dans le cas d’une clôture de 150 m (500’). Le temps nécessaire
varie en fonction du tracé, de l’état du sol, des outils utilisés et autres. Une installation typique
peut être menée à bien en un après-midi.
I. Le fonctionnement du système
Le Dispositif de confinement pour animal domestique s’avère des plus simples. Il comporte trois
éléments clés : un ÉMETTEUR, un RÉCEPTEUR et une ANTENNE (fil de périmètre).
L’émetteur se branche dans une prise de courant ordinaire de 120 volts et génère un signal radio à
très basse fréquence. Ce signal est transmis par le fil de périmètre, qui joue le rôle d’une antenne.
Un bouton de réglage fixé à l’émetteur permet d’en faire varier la portée (la distance qui sépare le
récepteur du périmètre lorsqu’il en capte le signal) de quelques pas à 9 m (30’) environ. (Note : Il
arrive que la portée réelle diffère en raison des conditions du terrain, de l’état du fil et de la
profondeur à laquelle il se trouve. Ainsi, plus le fil est profondément enfoui, plus le signal est
faible.)
MISE EN GARDE : Bien que l’émetteur de tout Dispositif de confinement pour animal
domestique utilise un microprocesseur afin de générer un signal codé, la réception d’un signal
parasite demeure possible. Elle survient le plus fréquemment à proximité d’un téléviseur. Nous
vous suggérons de munir le récepteur de sa pile et de l’approcher des divers appareils électriques
de votre demeure. Si le récepteur émet un bip sonore à proximité de l’un d’entre eux, assurezvous que votre animal évite cet appareil ou retirez-lui son collier lorsqu’il entre dans la maison.
II. LE MATÉRIEL REQUIS POUR L’INSTALLATION
1. Émetteur
2. Récepteur
3. Collier pour récepteur
4. Pile
5. Vidéocassette
6. Serre-fils pour l’épissage
Page 17

7. Fil et fanions
* Le fil utilisé doit être de calibre 18 et à 30 torons. Nous vous recommandons fortement de
n’acheter que le fil proposé pour ce produit. Fil et fanions supplémentaires vendus séparément.
Vous aurez également besoin pour installer le tout des éléments ci-après.
A. Une bêche à tranchant droit, un coupe-gazon ou une pelle. Dans le cas d’un terrain de
dimensions réduites ou moyennes, une bêche ou une pelle suffit en général. Dans le cas d’un
terrain de grandes dimensions, il est recommandé de louer un coupe-gazon motorisé pour faciliter
l’installation.
B. Une pince à dénuder, du ruban isolant et un produit d’étanchéité (tel un produit de
calfeutrage à base de silicone) pour isoler les capuchons de connexion (serre-fils).
C. Si le fil doit traverser une étendue en briques, en asphalte ou en béton, vous aurez besoin
d’une scie circulaire munie d’une lame pour maçonnerie. Il vous faudra également un produit de
colmatage adapté à la surface en cause. Si le fil doit traverser une entrée de gravier ou de terre
battue, assurez-vous de le protéger, en le faisant par exemple passer dans un tuyau CPV.
D. NÉCESSITÉ : Une bonne mise à la terre réduisant les risques que votre émetteur soit
endommagé par la foudre est indispensable (voir 6e étape).
III. Le mode d’installation
Comme pour tout autre projet, une planification soignée vous rendra la tâche bien plus facile.
Commencez par tracer sur une feuille de papier quadrillé le plan de l’étendue que vous souhaitez
«clôturer». L’émetteur peut transmettre un signal jusqu’à quelque 9 m (30’) du fil de périmètre.
Assurez-vous de laisser suffisamment d’espace à votre animal pour qu’il puisse s’ébattre
librement à l’intérieur des limites prévues.
Voici quelques autres éléments dont il faut tenir compte au moment de définir le tracé de votre
«clôture».
1) Le fil doit partir de l’émetteur et y revenir pour former une boucle continue.
Page 18

2) En tordant deux fils ensemble, on neutralise le signal (voir la figure). Ce n’est cependant
pas le cas lorsque l’on réunit de cette manière trois fils ou plus. Les fils doivent par ailleurs courir
en direction opposée pour que le signal soit neutralisé. Ainsi, après avoir raccordé le fil à la borne
pour entreprendre l’installation de votre «clôture», faites-lui suivre le tracé voulu, puis enroulezle en torsade avec la première section pour revenir à la borne. Assurez-vous que les deux
extrémités du fil passent l’une sur l’autre au moins 32 fois par mètre.
3) Lorsqu’il vous faut changer de direction, ne faites décrire au fil que des angles ronds
(d’un rayon de 2 m (6’) environ). Les angles droits embrouillent en effet le signal.
Note : Dans le cas d’une boucle double comme celle que l’on voit aux figures B, C et F, il
importe de laisser 1 m à 1,5 m (3’ à 5’) entre les portions parallèles du fil pour éviter que le signal
ne soit neutralisé.
Après avoir établi le tracé de votre «clôture», vous voilà prêt(e) à commencer l’installation.
1ère étape : Choisir l’emplacement de l’émetteur
L’émetteur doit NÉCESSAIREMENT se trouver à l’intérieur et à l’abri du soleil dans un endroit
sec et protégé où la température est supérieure à 0 °C, soit le plus souvent dans un garage. Afin
de prévenir les parasites, installez-le loin de tout élément tel que chauffe-eau, rayonnage en
métal, climatiseur et pièce métallique de porte de garage. Prenez soin de NE PAS fixer l’émetteur
à côté d’un panneau de disjoncteurs. N’en faites pas courir le fil le long de fils électriques ou
téléphoniques, de câbles de télévision et de conducteurs d’antenne, ni près d’une antenne
parabolique. Assurez-vous que le fil ne traverse aucune ligne électrique. Si vous ignorez où se
trouvent ces éléments, renseignez-vous auprès des entreprises de service public en cause avant de
procéder à l’installation.
MISE EN GARDE : Assurez-vous de NE PAS installer l’émetteur dans une grange ou une remise
en métal.
L’eau et le froid peuvent endommager l’émetteur et ainsi entraîner un risque de choc électrique
ou d’incendie.
Avant d’enfouir le fil, étendez-le le long du périmètre choisi, raccordez-le à l’émetteur et allumez
l’appareil. Vérifiez ensuite le bon fonctionnement du collier en l’approchant du fil. Il n’est pas
nécessaire d’enfouir le fil pour que le signal radio puisse être transmis. Nous recommandons de le
faire afin d’éviter que le fil ou l’émetteur ne soit endommagé et de prévenir les blessures que
pourrait entraîner une chute causée par un fil non enterré.
TRÈS IMPORTANT : Assurez-vous de bien vérifier le fonctionnement du système avant
d’enfouir le fil.
2e étape : Creuser une tranchée profonde de 2,5 à 7,5 cm (1” à 3”) le long du périmètre
précédemment défini
NOTE : Évitez d’installer le fil de périmètre à proximité d’un grillage à mailles losangées. S’il
vous faut traverser ce type de clôture, faites-le à angle droit et éloignez-vous d’au moins 1,5 m
Page 19

(5’) avant de faire courir le fil de périmètre parallèlement à d’autres câbles ou à une clôture
métallique.
3e étape : Épisser les fils
NOTE : Si vous utilisez plus de 150 m (500’) de fil, il vous faudra raccorder les différentes
sections avec les serre-fils.
Très important : Prenez soin de noter, sur les pages prévues à cet effet à la fin du présent livret,
l’emplacement de toute épissure. Lorsqu’il y a rupture du fil, c’est le plus souvent près d’un tel
raccord. Conservez donc le présent livret en lieu sûr pour vous y reporter au besoin.
Dans un premier temps, dénudez l’extrémité des fils à épisser. Insérez-les ensuite dans le serrefils et tournez, puis tirez afin de vous assurer que le raccord tient bon. Ceci fait, appliquez un
produit d’étanchéité (telle une pâte à base de silicone) dans le serre-fils et autour de celui-ci.
Vous pouvez aussi, une fois que ce produit sera sec, entourer les fils et le serre-fils de ruban
isolant afin d’éviter qu’ils ne se détachent et de les protéger de l’humidité.
MISE EN GARDE : Si un raccord ou une épissure se défait, l’ensemble du système cessera de
fonctionner. Veillez donc à raccorder solidement les fils.
4e étape : Traverser les surfaces dures
Si vous devez traverser une étendue de béton, de briques ou d’asphalte, faites courir le fil à
l’intérieur d’un joint de dilatation bien situé ou taillez un sillon dans la surface en cause à l’aide
d’une scie circulaire munie d’une lame pour maçonnerie. Étalez ensuite le fil dans ce sillon puis
couvrez le tout d’un produit de colmatage approprié. Votre quincaillier pourra vous aider à
choisir le produit convenant le mieux à votre type d’entrée.
5e étape : Brancher l’émetteur
Le fil qui mène au périmètre et celui qui en revient doivent être étroitement enroulés en torsade
(soit passer l’un sur l’autre au moins de 25 à 32 fois par mètre).
Émetteur de série :
À ce stade, choisissez l’une des deux options de connecteurs (moins de 300 m ou plus de 300 m).
Une extrémité du fil de périmètre doit être reliée à la borne rouge et l’autre extrémité à la borne
noire de la même option de borne choisie. Après avoir allumé l’appareil et réglé la portée au
maximum (en tournant le bouton de réglage vers la droite, soit dans le sens des aiguilles d’une
montre), approchez-vous du fil de périmètre avec le collier récepteur afin de déterminer à quelle
distance il peut capter le signal. Vous saurez que le récepteur a capté le signal lorsqu’il émettra
un bip.
6e étape : Mise à la terre
MISE EN GARDE
:
Page 20

Les émetteurs sont particulièrement vulnérables aux dommages occasionnés par la foudre. En cas
de prévision d’orage, il est préférable de déconnecter les deux extrémités des fils
connectés et le fil d’alimentation électrique de l’émetteur.
OPTIONNEL:
Une mise à terre sécuritaire est nécessaire pour réduire les chances que l’émetteur soit
endommagé par la foudre. Il est donc important de relier la borne de mise à terre de l’émetteur à
un piquet de terre enfoncé d’une profondeur d’au moins 1 m (3’) dans le sol. Pour ce faire,
utilisez un fil de calibre 12 ou plus. Veuillez consulter un électricien à ce sujet car la procédure de
mise à terre peut varier d’un endroit à l’autre.
7e étape : Planter les fanions de bornage
Installez les fanions à 3 m (10’) les uns des autres le long de la ligne où le bip d’avertissement
commence à se faire entendre, ce qui devrait se produire à une distance d’au moins 1 m à 1,5 m
(3’ à 5’) du périmètre. Ces fanions se veulent une indication visuelle temporaire qui permettra à
votre animal d’apprendre à connaître la zone qu’il ne doit pas quitter. Vous les enlèverez une fois
que cette zone lui sera devenue familière.
FÉLICITATIONS!
Votre Dispositif de confinement pour animal domestique
est maintenant installé!
IV. Le collier récepteur-brumisateur
Page 21

1ère étape :
Remplissez le dispositif d’aérosol. Pour ce faire, déposez le boîtier sur une surface plane, la valve
de remplissage vers le haut. Tenez la recharge aérosol tête en bas. Introduisez son embout dans la
valve de remplissage et pressez pendant une quinzaine de secondes. Le collier devrait maintenant
contenir suffisamment d’aérosol pour générer quinze puissants jets atomisés.
2e étape :
Mettez une pile de 6 volts en place dans l’appareil en respectant la polarité. IL CONVIENT DE
TOUJOURS RETIRER LA PILE LORSQUE LE DISPOSITIF N’EST PAS EN SERVICE.
3e étape :
Fixez la courroie au récepteur. Faites-la passer dans le fermoir, puis vérifiez la courroie une fois
attachée. Si la courroie glisse du fermoir, vous ne l’y avez pas fait passer correctement.
4e étape :
Munissez votre chien du collier en vous assurant que la valve de brumisation est dirigée vers son
museau. Réglez la courroie pour que le collier tienne bien à son cou.
V. L’utilisation du dispositif
Émetteur :
1ère étape : La mise sous tension
Branchez simplement l’émetteur au moyen de l’adaptateur de courant fourni.
2e étape : le réglage de la portée
Le bouton de réglage de la portée influe sur l’étendue couverte. Il suffit de le tourner (voir la
figure ci-dessous) pour accroître ou diminuer la portée de l’émetteur. Nous vous recommandons
de régler la portée à une valeur entre 1,5 et 3 m (5’ et 10’). Pour ce faire, tournez le bouton au
maximum vers la droite. Approchez ensuite du périmètre, récepteur à la main, jusqu’à ce qu’un
bip se fasse entendre. Réglez ensuite l’émetteur à la portée désirée.
Page 22

Note 1: Le voyant de l’émetteur de série s’allume et s’éteint aussitôt lorsque le dispositif est sous
tension sans qu’une clôture n’y soit reliée. Il demeure allumé lorsqu’une clôture est reliée au
dispositif et que celui-ci se trouve en mode réglage du périmètre.
Note 2: Vérifiez de temps à autre le bon fonctionnement de votre clôture. Pour ce faire, utilisez le
collier récepteur de votre dispositif de confinement. Assurez-vous de le tenir dans la position où
il se trouve lorsque votre chien le porte. Ce collier devrait faire entendre un bip lorsque vous
approchez les limites du périmètre.
MISE EN GARDE : Votre animal pourrait quitter le périmètre si les piles sont épuisées. Afin
d’éviter que votre animal ne se blesse, il importe de vérifier chaque mois l’état de la pile du
collier. Il suffit pour cela d’enlever le collier à votre animal et de vous approcher du périmètre en
le tenant. Si aucun bip ne se fait entendre, remplacez la pile avant toute nouvelle utilisation. Ne
faites courir aucun risque à votre animal : remplacez la pile au moins tous les trois à six mois de
manière à garantir le bon fonctionnement du système. La durée de vie de la pile variera suivant la
fréquence à laquelle votre animal met le dispositif à l’épreuve et le type de pile utilisé (les piles
alcalines s’épuisant plus vite que les piles au lithium).
VI. Le dressage de votre animal
Rappelez-vous que le dispositif de confinement pour animal de compagnie constitue une barrière
psychologique et non pas physique. Il est donc essentiel que vous dressiez votre chien pour que le
dispositif puisse bien remplir son rôle. Même si votre animal peut sembler avoir fait
l’apprentissage voulu au bout d’un ou deux jours, il importe de continuer le dressage pendant une
période de quatorze jours.
Page 23

Au cours de cette période, ne laissez sortir votre animal qu’en laisse et ne lui permettez en aucun
cas de franchir librement les limites du périmètre.
MISE EN GARDE : Un animal mal dressé pourra toujours s’échapper du périmètre.
Les séances de dressage peuvent exiger beaucoup de votre animal. Assurez-vous par conséquent
que leur durée ne dépasse pas 10 à 15 minutes. Permettez aussi à d’autres membres de la famille
de prendre part au dressage afin que votre animal n’associe pas cette activité à une seule
personne.
1ère étape : Par où commencer
Conduisez votre animal jusqu’à la limite du périmètre défini en tenant à la main le collier
récepteur du dispositif de confinement. À cette étape du processus, votre animal ne devrait pas
porter le collier en question, mais bien plutôt simplement un collier ordinaire muni d’une laisse.
Agitez l’un des fanions de bornage et adressez à votre chien un «non» ferme, tout en lui
permettant d’entendre le bip émis par le récepteur du Dispositif de confinement pour animal
domestique.
2e étape :
Ramenez votre animal dans une zone «sûre» et félicitez-le.
3e étape :
Faites le tour du périmètre en répétant les deux étapes précédentes.
4e étape :
Après une courte période de repos / de jeu, munissez votre animal du collier récepteur de votre
dispositif de confinement (sans lui ôter son collier ordinaire avec laisse).
5e étape :
Laissez votre animal pénétrer dans le champ de l’émetteur pour qu’il fasse l’apprentissage de
«l’effet surprise de la vaporisation», puis ramenez-le immédiatement dans la zone permise et
félicitez-le. Agitez de nouveau un fanion de bornage tout en adressant à votre animal un «non»
ferme.
NOTE : La personne qui effectue le dressage ne doit pas inciter l’animal à franchir les limites
définies, car cela créerait chez lui de la confusion. (Si votre animal refuse de s’aventurer seul
dans le champ de l’émetteur, demandez à quelqu’un d’autre de franchir le périmètre et laissez
votre animal suivre cette personne. Il importe en effet que votre animal fasse l’apprentissage de
l’effet surprise de la vaporisation pour qu’il en vienne à reconnaître les limites fixées.)
6e étape :
Page 24

Répétez l’étape précédente tout autour du périmètre. Votre animal ne devrait être «réprimandé»
que s’il tente volontairement d’en franchir les limites.
7e étape :
Retirez à votre animal le collier récepteur. Jusqu’à ce que votre animal soit bien dressé, NE LE
LAISSEZ JAMAIS SEUL lorsqu’il porte le collier du dispositif de confinement.
DE LA 2e À LA 14e JOURNÉE :
Répétez le processus, de la 4e à la 7e étape inclusivement et ce, au moins une fois par jour. Votre
animal devrait commencer à éviter les limites du périmètre, ce qui est signe d’un apprentissage.
DEUXIÈME SEMAINE DE DRESSAGE
Lorsque votre animal aura fait des progrès, enlevez-lui sa laisse et laissez-le s’ébattre librement à
l’intérieur de la zone permise. Retirez les fanions de bornage à raison d’un fanion tous les deux
jours (éliminez-en ainsi tout d’abord un sur deux). Si votre animal s’aventure à l’extérieur du
périmètre, enlevez-lui le collier récepteur du dispositif de confinement, ramenez-le à l’intérieur
des limites fixées, puis remettez-lui le collier.
RENFORCEMENT MENSUEL
La plupart des animaux auront bien appris la leçon au bout de la période de dressage de deux
semaines. Il est cependant fortement recommandé de répéter chaque mois le processus décrit de
la 4e à la 7e étape inclusivement. Pareille action n’exigera chaque mois qu’une quinzaine de
minutes de votre temps et renforcera chez votre animal l’apprentissage réalisé.
SORTIR DU PÉRIMÈTRE ET Y ENTRER
Vous pouvez dresser votre animal à sortir du périmètre en laisse par une porte imaginaire.
1ère étape :
Enlevez à votre animal son collier récepteur et remplacez-le par un collier ordinaire muni d’une
laisse.
2e étape :
Menez votre animal à un endroit précis de votre terrain, soit de préférence à l’extrémité de votre
entrée. Faites-lui toujours quitter le périmètre à cet endroit et en le tenant en laisse. Si votre
animal refuse de franchir la limite du périmètre, embarquez-le dans votre automobile et utilisez-la
pour le faire à quelques reprises sortir de votre entrée et y revenir.
3e étape :
Votre animal comprendra peu à peu qu’il doit porter une laisse pour quitter le périmètre défini.
Plusieurs membres de votre famille devraient avoir part, tour à tour, à ce processus de dressage
Page 25

afin que votre animal associe son droit de sortie au port de la laisse et non à la présence d’une
personne donnée.
NOTE : Les animaux réagissent chacun différemment, de sorte que leur conditionnement peut
exiger de quelques jours à quelques semaines. Il arrive par ailleurs que le processus de dressage
en effraie certains. Si c’est le cas de votre animal, enlevez-lui son collier récepteur et conduisezle dans une zone «sûre». Reprenez le processus de dressage le lendemain et poursuivez-le tous les
deux jours. En se familiarisant avec les limites de la zone permise, votre animal se sentira bientôt
à l’aise en présence du Dispositif de confinement pour animal de compagnie.
TRÈS IMPORTANT
Essai en boucle courte
Si votre clôture virtuelle fait défaut, le moyen le meilleur et le plus simple pour découvrir
l’origine du problème consiste à effectuer un essai en boucle courte. Rapide et facile à réaliser,
pareil essai vous aidera à déterminer si le problème observé est attribuable au fil de périmètre, à
l’émetteur ou au récepteur.
1ère étape :
Éteignez l’émetteur.
2e étape :
Débranchez de l’émetteur les fils de périmètre et de mise à la terre (assurez-vous que la torsade
demeure serrée).
3e étape :
Coupez une portion de fil de périmètre longue d’environ 3 m (10’) et dénudez ses extrémités sur
un peu plus de 1 cm (1/2”). Raccordez ce bout de fil aux bornes du connecteur indiquant moins
de 300 mètres. Ceci fait, étalez le fil pour qu’il forme un cercle.
4e étape :
Tournez le bouton de réglage de manière que la portée soit à son minimum. Le voyant de boucle
s’allumera et s’éteindra aussitôt. Tournez lentement le bouton de réglage de la portée vers la
droite. Le voyant de boucle devrait presque aussitôt rester allumé. Si tel n’est pas le cas, il se peut
que votre émetteur soit défectueux (voir alors à la page 22 la marche à suivre pour nous retourner
l’appareil).
5e étape :
Assurez-vous tout d’abord que la pile du récepteur est placée comme il se doit. Ceci fait,
approchez le collier récepteur de la courte boucle de fil raccordée à l’émetteur. Le récepteur
devrait commencer à faire entendre un bip à une distance d’au moins 15 à 25 cm (6” à 10”) du fil.
Si tel est le cas, votre dispositif fonctionne correctement et le problème provient du fil de
périmètre. S’il en va autrement, il se peut que votre récepteur soit défectueux. Retirez alors le
collier et la pile pour ensuite retourner l’appareil à MULTIVET(voir la marche à suivre à la page
22).
Page 26

Marche à suivre pour le retour d’un appareil
Voici la marche à suivre que nous avons établie pour simplifier et accélérer les réparations. Nul
besoin de nous appeler. Faites-nous simplement parvenir votre produit à l’adresse ci-dessous, en
y joignant une brève description du problème. Nous verrons à réparer votre produit et à vous le
retourner ou à le remplacer sans délai. Des frais de main-d’œuvre minimes s’appliquent à la
réparation de tout produit qui n’est pas sous garantie. Toute pièce sera cependant remplacée sans
frais pendant la durée de la garantie. Si vous possédez votre dispositif depuis plus d’un an,
appelez notre service à la clientèle au 1-800-303-0244 pour connaître les frais de main-d’œuvre
applicables.
Vous devez nous retourner votre produit port payé. Nous vous le réexpédierons par la suite à nos
frais.
Multivet International inc.
Boîte postale 651, St-Hyacinthe, QC
Canada J2S 7P5
1-800-303-0244
Extérieur du Canada et USA: 1-450-778-0244
Courriel : info@multivet-inter.com
Pour plus de renseignements, visitez notre site WEB :
www.multivet-inter.com
rspcm/003
Page 27

Compliance Statement ( Part 15.19)
This device complies with Part 15 of FCC rules and RSS-210 of Industry Canada.
Operation is subject to the following two conditions:
1) this device may not cause harmful interference and,
2) this device must accept any interference received, including interference that may cause
undesired operation.
Warning ( Part 15.21)
Changes or modifications not expressly approved by the party responsible for compliance
could void the user’s authority to operate the equipment.
Ce dispositif est conforme aux normes CNR-210 d’Industrie Canada.
L’utilisation de ce dispositif est autorisée seulement aux conditions suivantes :
1) il ne doit pas produire de brouillage et
2) l’utilisateur du dispositif doit être prêt à accepter tout brouillage radioélectrique reçu,
The term ‘IC’ before the certification/registration number only signifies that the Industry
Canada technical specifications were met.
Les lettres ‘IC’ n’ont aucune autre signification ni aucun autre but que d’identifier ce qui suit
comme le numéro de certification/d’enregistrement d’Industrie Canada.
Multivet International Inc.
Transmitter Receiver
MODEL: Virtual Fence MODEL: Spray Receiver Collar
PRODUCT NO: DSP13201 PRODUCT NO: DSP13205
FCC ID: RB3-13201 IC:4684A 13205
IC: 4684A 13201 Made in China
Made in China
même si ce brouillage est susceptible de compromettre le fonctionnement du
dispositif.
Page 28

DECLARATION OF CONFORMITY
Manufacturers Name: Multivet International Inc.
Manufacturers Address: C.P. 651
St-Hyacinthe, QC
Canada J2S 7P5
Declares that the product
Product Name: Virtual Fence
Model Number: DSP13201
Conforms to the following Product Specifications:
Radio: EN 300 220-3: 2001
EMC: CISPR 11: 1999 / Amendment 2 : 2002
IEC 61000-4-2 : 2001
IEC 61000-4-3 : 2002
The product herewith complies with the requirements of the following Directives
and carries the CE Marking accordingly:
R&TTE Directive 1999/5/EC
EMC Directive 89/336/EEC
This product was tested in a typical configuration by L. S. Compliance, Inc.
European Union Notified Body Number: 1243.
Last Review Date: 2003-07-24
Prepared by Mark Garon
 Loading...