

Page 1

User’s Guide
Guide de L’utilisateur
2003-12
Page 2

Training Your
Dog with
Virtual Barrier
How good the results
you get with
Virtual Barrier
depend on
your assimilating the instructions
in this booklet.
Summary
Unpacking 3
What Is Virtual Barrier? 3
Warning 3
Operation 3
How to Install Your Virtual Barrier 4
How to Operate Your Virtual Barrier 5
Troubleshooting Guide 6
Problems:
1. The system is not functioning at all. 6
2. The system affects my radio and
my sound system, what should I do? 6
3. The range is too short, how do we cope with this
problem? 7
4. There is no spray or it is very weak. 7
5. My batteries have a very short service life. 8
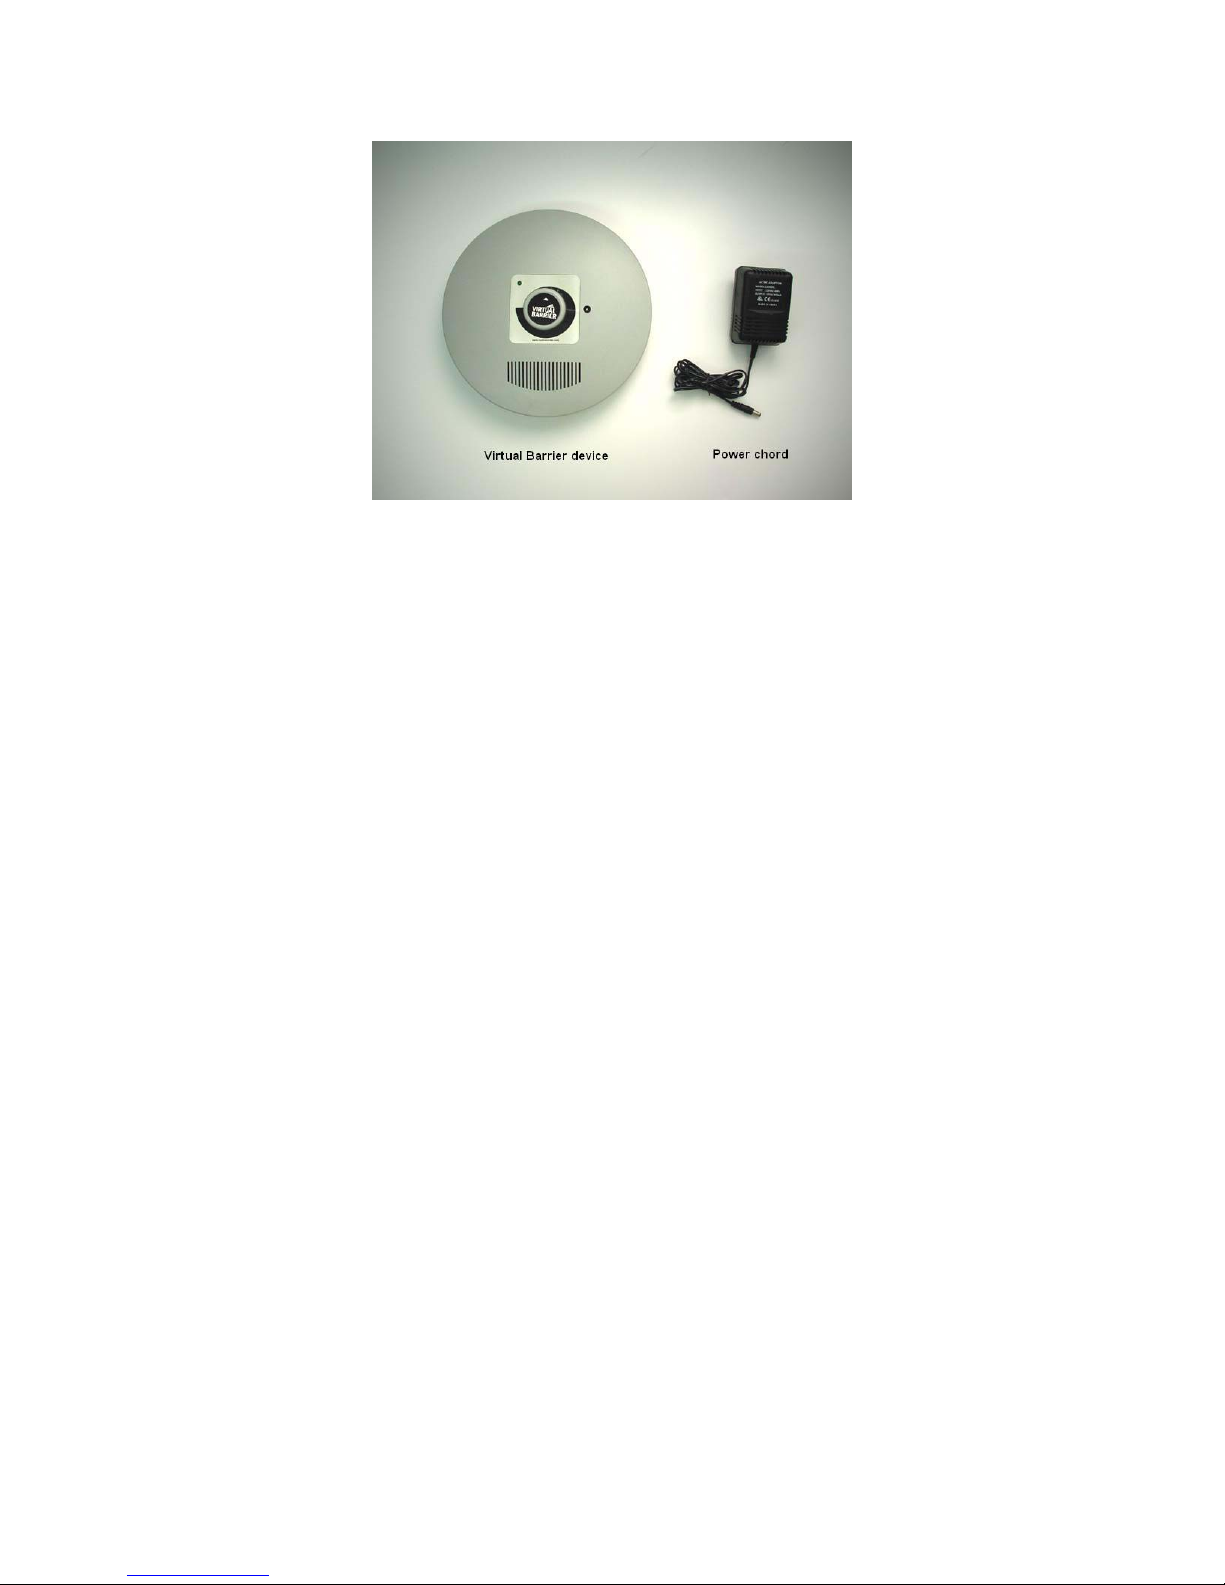
UNPACKING
The system is composed of two main parts :
1. A transmitter with an adapter equipped with a
4 m (12’) cord.
2. A collar with a receiver (sold separately).
Page 3
WHAT IS VIRTUAL BARRIER?
It is a simple apparatus created to keep your pets away from one or many areas in your house. For
example, Virtual Barrier prevents your pet (or pets) from reaching your bedroom, from
approaching the new sofa or the kitchen table. Although the transmitter is made to operate
indoors, you can also use it in a garage or a patio which is close to an accessible electrical outlet.
WARNING
In order to reduce the risk of an electric shock or damage to the transmitter, avoid placing the
transmitter on wet surfaces, in moist or humid areas, close to a swimming pool, a Jacuzzi, etc. To
prevent damaging the transmitter, do not expose to snow, rain or other sources of water.
OPERATION
The transmitter creates around itself a 360-degree electrical field with a modulation. You
can adjust the beam between 60 cm (2’) and 3 m (10’) with the button located on the transmitter.
The maximum range depends on the location of the transmitter and the surroundings. When the
animal (wearing the receiver collar) gets close to the protected area, it immediately hears a
warning signal which indicates that it is approaching the forbidden zone. After, if it continues to
advance in that zone, it receives a spray. This keeps it away from the forbidden zone. At that
moment the spraying stops.
HOW TO INSTALL YOUR VIRTUAL BARRIER
1. ATTACH THE RECEIVER TO YOUR ANIMAL
1st step:
The spray receiver collar (sold separately) comes with its own collar but if you wish, you can use
another collar with the spray receiver collar.
2nd step:
Place the collar correctly. Once the collar is correctly attached, you should be able to insert a
finger between the receiver and the skin of the dog.
Page 4

2. INSTALL THE TRANSMITTER
The transmitter can be installed anywhere you do not wish your dog to go. In order to get
maximum results, certain places are to be avoided.
Avoid placing the transmitter on metallic surfaces, on a table having a metal rim or near massive
metallic objects like a refrigerator, a washing machine, a dryer, a metal wall. Metallic objects can
alter the magnetic field and change the range of the signal. The effects on the range depend on the
size and the form of these objects. Metallic objects can also change the warning signal and the
rate of correction. The range will also be reduced if you place the transmitter on a concrete floor.
This is due to the metallic reinforcement under the cement. It is possible that the transmitter could
affect certain types of loudspeakers causing crackling sounds. Avoid placing the transmitter near
audio systems.
You will get a maximal range by placing the transmitter on a non-conducting surface like a
wooden floor or table. You can get a 3 m (10’) range when the transmitter is placed on a wooden
floor. You can also hang the transmitter on a wall. In that position, the signal range is very
directional. The signal is very strong directly in front and behind the transmitter. It is weaker on
the sides of the apparatus. However, never hang the transmitter on a metallic wall.
HOW TO OPERATE YOUR VIRTUAL BARRIER
1. TURNING ON THE TRANSMITTER
Plug in the adapter and connect the other end of the cord to the transmitter. Switch on the
transmitter by turning the setting button clockwise until you hear a click. The light indicator
should turn itself on.
2. SETTING THE RANGE
The range setting button (which is also the ON/OFF switch) adjusts the length of the zone
between the transmitter and the limit where the receiver will pick up the signal (adjustable from
Page 5

50 cm (2’) to about 3 m (10’) according to the surrounding conditions and the type of surface on
which you have placed the transmitter). By turning the directional button to the right you increase
the range of the signal. To determine the maximal range in the environment and/or on the
selected surface, turn the button all the way to the right and move back with the device in your
hands until you hear the warning signal. If the range is too long, turn the button to the left. Repeat
the operation until you get the desired range.
If you place your transmitter on a wooden floor, the warning zone will be about the same size as
the correction zone. However, on a concrete floor the warning zone could become smaller than
the correction zone.
NOTE: If the transmitter is placed directly on a metallic surface (i.e. a microwave oven),
according to the size of the surface, the range can be reduced up to 50%. You can reduce the
interference that this metallic surface creates by placing the transmitter on a non- conducting
material with a thickness of 7 to 10 cm (3-4”). For this, you can use books or a wooden shelf
placed between the metallic surface and the transmitter.
It is important to replace the batteries every 3 to 6 months in order to insure good operation of the
system. Battery life depends on the number of times your dog activates the system.
TROUBLESHOOTING GUIDE
1. PROBLEM:
The system is not functioning at all.
1.1 Is the indicator light on?
No: See point 1.2.
Yes: Your system is operating correctly. Turn the range button clockwise all the way.
Bring the receiver with you and move away from the transmitter at a distance of about 1 to 1.5 m
(4 to 5’).
Is the receiver emitting the signal correctly?
Yes: Your system is operating correctly.
No: Test the receiver battery.
Does it have at least 6 volts on its terminals?
No: Change the battery.
Yes: It is possible that your receiver could be damaged. If you have another receiver, try
to test it to see if it is operating.
Is the receiver emitting the warning signal now?
Yes
or no: The receiver is damaged. Call us at 1-800-303-0244.
1.2 No: The fuse is burned out or missing OR the electrical outlet is not functioning
correctly.
2. PROBLEM:
The system affects my radio and
my sound system, what should I do?
2.1 The speakers emit a crackling sound. Is the radio on?
No: Put the transmitter further away from the loudspeakers.
Yes: Turn off the radio.
Do you still hear any crackling sounds?
No: Put the transmitter in another place. Keep it away from the radio to avoid the same
problem each time you listen to the radio.
Page 6

Yes: Put the transmitter in another place. Keep it away from the loudspeakers.
If the problem persists, please call 1-800-303-0244.
3. PROBLEM:
The range is too short,
how do we cope with this problem?
3.1 Is the transmitter placed on a metallic surface or near a large metallic object?
No: Your transmitter is probably defective.
Call us at 1-800-303-0244.
Yes: Move the transmitter, place it on a wooden floor and check the range again.
Does that improve the range?
Yes: Your system is operating correctly. For maximum results, keep your transmitter
away from any metallic object.
No: Test the receiver battery.
Does it have at least 6 volts at its terminals?
No: Change the battery.
Yes: The receiver is damaged and should be replaced.
Call us at 1-800-303-0244.
4. Problem:
There is no spray or it is very weak.
Do you have the impression that the dog does not feel the correction and/or that the receiver is
not sending any spray?
For a longhaired dog, you can begin by cutting the hair at the neck level so that there is a better
contact between the collar and is throat. Be sure that the collar is correctly adjusted (without
being too tight).
If the receiver does not send any spray and the dog does not feel any correction, the receiver is
probably damaged.
Call us at 1-800-303-0244.
5. Problem:
My batteries have a very short service life.
If your dog tests the boundaries too often, the batteries will wear out more rapidly. In that case,
further training would be good. Do not store the receiver near a TV set or any other electronic
appliance. The receiver will not be active but will be alert and will interpret lost signals. We
suggest that you take the batteries out of the receiver when it is not in use.
5.1 You have tried all the recommendations above and the batteries still wear out rapidly?
Your receiver is damaged and consequently battery life is shorter.
Call us at 1-800-303-0244.
Page 7

Dresser
son chien avec
Virtual Barrier
La qualité des
résultats
obtenus avec
Virtual Barrier
dépend de la connaissance des indications
contenues dans ces pages.
Sommaire
Déballage 3
Qu’est-ce que le Spray Barrier? 3
Mise en garde 3
Fonctionnement 3
Comment installer le Virtual Barrier 4
Comment faire fonctionner votre Virtual Barrier 5
Guide de dépannage
Problèmes :
1. Le système ne fonctionne pas du tout 6
2. Le système a un effet sur ma radio et mes
enceintes acoustiques; que dois-je faire? 7
3. La portée est trop courte, comment
remédier à ce problème? 7
4. Il n’y a pas de jet aérosol ou le
jet est très faible 8
5. Mes piles ont une durée de vie
très courte 8
DÉBALLAGE
Le système est composé de deux éléments :
1. Un émetteur et un adaptateur muni d’un cordon
électrique de 4 m (12 pi).
2. Un collier récepteur (vendu séparément).
Page 8

QU’EST-CE QUE LE VIRTUAL BARRIER?
Il s’agit d’un appareil simple conçu pour éloigner vos animaux de compagnie d’un ou plusieurs
endroits dans votre maison. Par exemple, Virtual Barrier empêche votre animal (ou vos animaux)
d’avoir accès à votre chambre à coucher, de s’approcher du canapé neuf ou de la table de cuisine.
Bien que l’émetteur soit conçu pour une utilisation intérieure, vous pouvez également l’utiliser
dans un garage ou sur un patio près d’une prise électrique facilement accessible.
MISE EN GARDE
Afin de réduire les risques de décharge électrique ou de dommage à l’émetteur, éviter de placer
l’émetteur sur une surface mouillée, dans un endroit moite ou humide, près d’une piscine, d’un
jacuzzi, etc. Pour éviter d’endommager l’émetteur, ne l’exposer pas à la neige, la pluie ou
d’autres sources d’eau.
FONCTIONNEMENT
L’émetteur crée un champ électrique modulé sur 360 degrés autour de lui-même. Vous pouvez
régler la portée entre 60 cm(2 pi) et 3 m (10 pi) grâce au bouton situé sur l’émetteur. La portée
maximale dépend de l’emplacement de l’émetteur et de l’espace environnant. Quand l’animal
(portant le collier récepteur) s’approche de l’espace protégé, il perçoit d’abord un signal
d’avertissement sonore lui indiquant qu’il s’approche de la zone interdite. Ensuite, s’il continue
d’avancer dans cette zone, il reçoit une première brumisation. Ceci l’éloigne de la zone interdite.
Les brumisations cessent alors aussitôt.
Page 9

INSTALLATION DU VIRTUAL BARRIER
1. ATTACHER LE RÉCEPTEUR À VOTRE ANIMAL
1e étape :
Le collier récepteur est vendu séparément. Si vous le désirer, vous pouvez utiliser plus d’un
collier récepteur avec le Virtual Barrier.
2e étape :
Attachez le collier récepteur au cou de votre chien. Une fois le collier correctement attaché, vous
devez être capable de passer un doigt entre le récepteur et la peau du chien.
2. INSTALLEZ L’ÉMETTEUR
L’émetteur peut être installé en tout lieu où vous ne désirez pas que votre animal aille. Afin
d’obtenir le maximum de résultats, certains endroits sont à proscrire :
Éviter de placer l’émetteur sur une surface métallique, sur une table ayant un rebord de métal ou
près d’un objet métallique d’importante taille comme un réfrigérateur, une machine à laver, un
sèche-linge ou un mur en métal. Les objets métalliques peuvent altérer le champ magnétique et
changer la portée de l’émission. Les effets sur la portée dépendent de la taille et de la forme de
ces objets. Les objets métalliques peuvent également changer le signal d’avertissement et le taux
de correction. La portée sera également réduite si vous placez l’émetteur sur un sol de béton. Ceci
est dû à l’armature métallique sous le béton. Il se peut que l’émetteur ait un effet sur certains type
d’enceintes acoustiques causant ainsi des grésillements. Éviter donc de placer l’émetteur près
d’enceintes acoustiques.
Page 10

Vous obtiendrez une portée maximale en plaçant l’émetteur sur une surface non
conductrice comme un parquet ou une table en bois. Vous pouvez obtenir une portée de 3m (10
pi) quand l’émetteur est placé sur un parquet. Vous pouvez également accrocher l’émetteur à un
mur. Dans cette position, l’émission du signal est très directionnelle. Le signal est très fort
directement devant et derrière l’émetteur. Il est plus faible sur les côtés de l’appareil. Toutefois,
n’accrocher pas l’émetteur à un mur métallique.
FONCTIONNEMENT DU VIRTUAL BARRIER
1. MISE EN MARCHE DE L’ÉMETTEUR
Brancher l’adaptateur et connecter l’autre bout du cordon à l’émetteur. Allumez
l’émetteur en tournant le bouton marche-arrêt dans le sens des aiguilles d’une montre jusqu’à ce
que vous entendiez un clic. Le voyant de marche devrait s’allumer.
2. RÉGLAGE DE LA PORTÉE
Le bouton de réglage de la portée (qui est également l’interrupteur marche-arrêt) fixe la
longueur de la zone entre l’émetteur et la limite où le récepteur captera le signal (réglage de 50
cm, soit à 2 pi, à environ 3m, soit 10 pi, selon les conditions environnantes et le type de surface
sur laquelle vous avez placé l’émetteur). En tournant ce bouton vers la droite, vous augmentez la
portée du signal. Pour déterminer la portée maximale de l’environnement et/ou sur la surface
choisie, tourner le bouton complètement vers la droite et reculez avec le dispositif dans vos mains
jusqu’à ce que vous entendiez le signal avertisseur. Si la portée est trop grande, tourner le bouton
vers la gauche. Répéter cette opération jusqu’à ce que vous obteniez la portée désirée.
Si vous placez votre émetteur sur un parquet, la zone d’avertissement sera environ de la
même taille que la zone de correction. Cependant, sur un sol en béton, la zone d’avertissement
peut devenir inférieure à la zone de correction.
NOTE : Si l’émetteur est placé directement sur une surface métallique (par exemple un
four à micro-onde), selon la taille de cette surface, la portée peut être réduite
jusqu'à 50%. Vous pouvez réduire l’interférence que cette surface métallique
provoque en plaçant l’émetteur sur un matériau non-conducteur d’une épaisseur de
7 à 10 cm(3-4 po). À cette fin, vous pouvez utiliser une tablette en bois ou des
livres placés entre la surface métallique et l’émetteur.
Il est important de changer les piles à tous les 3 à 6 mois afin de vous assurer un bon
fonctionnement du système. La durée de vie des piles dépend du nombre de fois que votre chien
actionne le système.
GUIDE DE DÉPANNAGE
1. Problème : Le système ne fonctionne pas du tout
1.1 Est-ce que le voyant de marche est allumé?
NON : Voir le point 1.2 à la page 7.
Page 11

OUI : Votre système fonctionne correctement. Tourner à fond, dans le sens des
aiguilles d’une montre, le bouton de réglage de la portée. Prenez le récepteur avec
vous et éloignez-vous de l’émetteur à une distance d’environ 1 à 1,5 m (4 ou 5 pi).
Est-ce que le récepteur émet le signal correctement?
OUI : Votre système fonctionne correctement.
NON : Testez la pile du récepteur.
Est-ce que la pile a au moins 6 volts à ses bornes?
NON : Changer la pile
OUI : Il se peut que votre récepteur soit endommagé. Si vous avez un autre
récepteur, essayez-le pour vérifier s’il fonctionne.
Est-ce que le récepteur émet le signal de correction maintenant?
OUI : Votre second récepteur est endommagé.
Communiquer avec nous au 1-800-303-0244.
NON : Votre récepteur est endommagé.
Communiquer avec nous au 1-800-303-0244.
1.2 Si NON : Soit le fusible est grillé ou manquant, soit la prise de courant ne
fonctionne pas
2. Problème : Le système a un effet sur ma radio et mes enceintes acoustiques,
que dois-je faire?
2.1 Les enceintes acoustiques grésillent.
Est-ce qu la radio est allumée?
NON : Éloignez l’émetteur des enceintes acoustiques.
OUI : Éteignez la radio.
Entendez-vous toujours des grésillements?
NON : Changer l’émetteur de place. Éloigner le de la radio pour éviter le même
problème à chaque fois que vous écouterez la radio.
OUI : Changer l’émetteur de place. Éloignez- le des enceintes acoustiques.
Si le problème persiste toujours, veuillez rappeler au 1-800-303-0244.
3. Problème : La portée est trop courte, comment remédier à ce problème?
3.1 Est-ce que l’émetteur est placé sur une surface métallique ou près d’un
gros objet métallique?
NON : Votre émetteur est peut être défectueux.
Communiquer avec nous au 1-800-303-0244
OUI : Déplacer l’émetteur, déposer-le sur un sol en bois et vérifier la portée à
nouveau.
Page 12

Est-ce que cela améliore la longueur de la portée?
OUI : Votre système fonctionne correctement. Pour un maximum de résultats,
tenez votre émetteur loin de tout objet métallique.
NON : Testez la pile du récepteur.
Est-ce que la pile a au moins 6 volts à ses bornes?
NON : Changer la pile
OUI : Le récepteur est endommagé et doit être remplacé.
Communiquer avec nous au 1-800-303-0244.
4. Problème : Il n’y a pas de jet aérosol ou le jet est très faible
Avez-vous l’impression que le chien ne ressent pas la correction et/ou que le récepteur
n’envoie aucun jet ?
Pour les chiens à poil long, vous pouvez commencer par couper le poil au niveau du cou
pour qu’il y ait un meilleur contact. Assurer vous également que le collier soit
correctement ajusté (sans trop être serré).
Si le récepteur n’envoie pas de jet et que le chien ne ressent donc aucune correction, le
récepteur peut être endommagé.
Communiquer avec nous au 1-800-303-0244.
5. Problème : Mes piles ont une durée de vie très courte
Si votre chien teste les limites trop souvent, les piles vont s’user plus rapidement. Dans ce
cas, il serait bon de faire des entraînements supplémentaires. Ne rangez pas le récepteur
près d’un téléviseur ou d’un autre appareil électronique. Le récepteur ne sera pas actif
mais sera en éveil et interprétera les signaux perdus. Nous vous conseillons de retirer les
piles du récepteur lorsqu’il n’est pas utilisé.
5.1 Vous avez essayé tous les conseils ci-dessus et les piles s’usent toujours
aussi rapidement?
Votre récepteur est endommagé et par conséquent, la durée de vie des piles est plus
courte. Communiquer avec nous au 1-800-303-0244.
Page 13

Page 14

Compliance Statement ( Part 15.19)
This device complies with Part 15 of FCC rules and RSS-210 of Industry Canada.
Operation is subject to the following two conditions:
1) this device may not cause harmful interference and,
2) this device must accept any interference received, including interference that may cause
undesired operation.
Warning ( Part 15.21)
Changes or modifications not expressly approved by the party responsible for compliance
could void the user’s authority to operate the equipment.
Ce dispositif est conforme aux normes CNR-210 d’Industrie Canada.
L’utilisation de ce dispositif est autorisée seulement aux conditions suivantes :
1) il ne doit pas produire de brouillage et
2) l’utilisateur du dispositif doit être prêt à accepter tout brouillage radioélectrique reçu,
The term ‘IC’ before the certification/registration number only signifies that the Industry
Canada technical specifications were met.
Les lettres ‘IC’ n’ont aucune autre signification ni aucun autre but que d’identifier ce qui suit
comme le numéro de certification/d’enregistrement d’Industrie Canada.
Multivet International Inc.
Transmitter Receiver
MODEL: Virtual Barrier MODEL: Spray Receiver Collar
PRODUCT NO: DSP13202 PRODUCT NO: DSP13205
FCC ID: RB3-13202 IC: 4684A 13205
IC: 4684A 13202 Made in China
Made in China
même si ce brouillage est susceptible de compromettre le fonctionnement du
dispositif.
Page 15

DECLARATION OF CONFORMITY
Manufacturers Name: Multivet International Inc.
Manufacturers Address: C.P. 651
St-Hyacinthe, QC
Canada J2S 7P5
Declares that the product
Product Name: Virtual Barrier
Model Number: DSP13202
Conforms to the following Product Specifications:
Radio: EN 300 220-3: 2001
EMC: CISPR 11: 1999 / Amendment 2 : 2002
IEC 61000-4-2 : 2001
IEC 61000-4-3 : 2002
The product herewith complies with the requirements of the following Directives
and carries the CE Marking accordingly:
R&TTE Directive 1999/5/EC
EMC Directive 89/336/EEC
This product was tested in a typical configuration by L. S. Compliance, Inc.
European Union Notified Body Number: 1243.
Last Review Date: 2003-07-24
Prepared by Mark Garon
 Loading...