

Page 1

Models MT3410ZLX
and MT3410ZLX-T/2
Owner’s Manual
Page 2

Owner’s Manual
MultiMobile
TM
Model # MT3410ZLX & MT3410ZLX-T/2
P/N 82065001
This publication may not be reproduced, in whole or in
part, without prior expressed written permission from MultiTech Systems, Inc. All rights reserved.
Copyright © 1998 by Multi Tech Systems, Inc.
Multi-Tech Systems, Inc. makes no representations or
warranties with respect to the content hereof and
specifically disclaims any implied warranties of
merchantability or fitness for any particular purpose.
Furthermore, Multi-Tech Systems, Inc. reserves the right to
revise this publication and to make changes from time to
time in the content hereof without obligation of Multi-Tech
Systems, Inc. to notify any person or organization of such
revisions or changes.
Record of Revisions
Revision Description
B Minor technical, editorial and format
(8/4/97) changes.
TRADEMARKS
Trademarks of Multi-Tech Systems, Inc. are as follows:
MultiMobile, Multi-Tech, and the Multi-Tech logo. All other
trademarks are owned by their respective companies.
Multi-Tech Systems, Inc.
Mounds View, Minnesota 55112 U.S.A.
BBS (612) 785-3702 or (800) 392-2432
Internet Address: http://www.multitech.com
Technical Writer: mark@ multitech.com
2205 Woodale Drive
(612) 785-3500 or (800) 328-9717
U. S. FAX 612-785-9874
Fax-Back Service 612-717-5888
Technical Support (800) 972-2439
Page 3

Contents
Chapter 1 - Introduction and Description
About This Manual....................................................7
About This Product ...................................................7
Specifications ...........................................................8
PC Card Interface..............................................8
Dimensions........................................................8
Weight ................................................................ 8
Power.................................................................8
Power Consumption .......................................... 8
Cable and Connector ........................................8
Network .............................................................8
Modem Characteristics .....................................9
Fax .....................................................................9
Features....................................................................9
System Requirements ............................................10
Ship Kit Contents....................................................10
Chapter 2 - Installation
Safety Warnings .....................................................12
Installing The MT3410ZLX or MT3410ZLX-T/2
Card(s)..................................................................13
Driver Software Installation ....................................14
Novell NetWare Installation....................................14
Menu Installation .............................................14
Manual Driver Installation ............................... 15
Novell Client Installation.........................................17
Microsoft LAN Manager Installation.......................19
Packet Driver Installation .......................................21
Windows for Workgroups Installation
(NDIS3 Driver for Workgroup).............................21
NDIS2 Driver for Workgroup ..................................23
ODI Driver for Workgroups.....................................24
Windows NT 3.51 / NT 4.0 Installation ..................26
Windows 95 Installation .........................................27
Artisoft Lantastic 6.0 Installation ............................28
3
Page 4

MultiMobile Owner’s Manual
Chapter 3 - Comprehensive Driver Notes
Introduction.............................................................29
Factory Default Settings.........................................2 9
Quick Start ..............................................................29
PC Card Software - Manual Installation .........29
Getting Started ....................................................... 3 1
Using DOS Extended Memory Managers..............31
Driver Directory Structure......................................32
Driver Upgrades .....................................................33
Notes for NDIS Driver.............................................34
Notes for Packet Driver ..........................................35
Notes for Windows For Workgroups ......................36
Chapter 4 - Troubleshooting
Introduction.............................................................37
No response to AT commands ........................37
The modem does not execute the command
line .................................................................38
The modem does not give a response after
an AT command was executed .....................38
The modem gives an ‘ERROR’ response
after an AT command was executed.............38
The modem goes off-hook and disables the
telephone line. ............................................... 3 8
The modem does not auto-answer the phone 39
The software does not control the modem
properly or can not detect the modem..........39
The characters on the screen are doubled.....39
No text appears on the screen in Data mode.40
No text appears on the screen when in
Command mode ............................................ 4 0
The modem does not dial a phone number
after Execution of AT dial command .............40
communications software dials, but Fails ....... 40
The modem Connects with some modems,
but not others ................................................41
When dialing another modem, You receive a
‘CONNECT’ response, but nothing else .......41
4
Page 5

The modem speaker does not make any
sound when Connecting to another modem 41
The modem loses the connection when in
use ................................................................41
The modem does not connect with another
modem..........................................................42
Occasionally, the modem gives a burst of
errors. ...........................................................42
The modem gets random errors in
transmitted data. ..........................................42
After Downloading a file, the File does not
store on your disk drive ................................43
The text on the screen is not legible...............43
When using V.42bis or MNP5, some features
are disabled...................................................44
When connecting to another modem, the
modem reports a higher Connect baud rate
than it is really using .....................................44
When I run CARDEN, “PC-Card is not
enabled successfully” is displayed ..............44
Enabling the MT3410ZLX ............................... 45
Installing the Win 95 Driver over SystemSoft .....
CardWorks....................................................46
The NetWare driver runs successfully but
fails to login to the Netware server ..............47
COM Port and IRQ Conflicts ..................................47
Windows 3.1x ..................................................47
Windows 95 ..................................................... 4 8
Chapter 5 - Service
Limited Warranty .................................................... 4 9
On-line Warranty Registration................................50
Software User License Agreement ........................50
Tech Support ..........................................................52
Recording Modem Information...............................52
Service .................................................................... 53
About the Multi-Tech BBS ......................................54
How to Use the Multi-Tech BBS .............................54
About CompuServe/Internet ...................................5 5
About the Multi-Tech Fax-Back System .................56
5
Page 6

MultiMobile Owner’s Manual
Appendix A - Technical Specifications
Appendix B - AT Commands,
S-Registers & Result Codes
Introduction.............................................................59
How To Use AT Commands....................................59
Basic AT Commands ..............................................60
AT& (Ampersand) Commands ...............................64
AT% (Percent) Commands .....................................67
AT\ (Back Slash) Commands ................................67
AT- (Dash) Commands ...........................................71
S-Registers (ATSn=x) .............................................7 2
Result Codes ..........................................................78
Appendix C - Regulatory Agency
Information
FCC Regulatory Statements ..................................81
FCC Fax Update.....................................................85
Canadian Limitations Notice ..................................85
Index
6
Page 7

1 - Introduction and Description
Chapter 1 - Introduction and Description
About This Manual
This manual explains how to install and use your
MT3410ZLX PCMCIA Ethernet/Fax/Modem card.
About This Product
The MT3410ZLX is a multifunction communication
device that lets you perform multiple communication
tasks at the same time:
• transmit and receive data at up to 33,600 bps,
• send and receive faxes from computers or fax
machines, and
• connect to an Ethernet 10BaseT LAN
And it uses only one PCMCIA slot while performing
these functions.
The MT3410ZLX is a credit-card-size Type II
PCMCIA card that complies with the PCMCIA 2.1
and JEIDA 4.1 standards and works with computers
that incorporate a compatible interface.
It is Bell, ITU-T and AT command compatible,
allowing it to be used worldwide with today’s popular
communication software programs. You can send
and receive faxes with any Group 3 fax machine.
Using standard phone lines and 10BaseT Ethernet,
the data communication functions of the
MT3410ZLX permits you access the servers on a
LAN and connect to the Internet, transmit E-Mail,
send and receive information and communicate with
other PCs, Bulletin Board Services (BBS) or on-line
computer networks such as CompuServe and
America On line
7
Page 8

MultiMobile Owner’s Manual
Specifications
PC Card Interface
PCMCIA Type II
Dimensions
3.37” X 2.128” X 0.197”
(85.6 mm X 54 mm X 5 mm)
Weight
1.225 oz. (35 g)
Power
+5V ±5%, @220mA
Power Consumption
Sleep Mode: 400mW (80 mA)
Operating Mode: 750mW (150 mA)
Cable and Connector
Model MT3410ZLX:
one cable with a 15-pin detachable
connector (to PC card) terminated on one
end; with the other end of the cable
splitting into one RJ-11 plug for PSTN
connection and one RJ-45 plug for LAN
connection.
Model MT3410ZLX-T/2:
one cable with a 15-pin detachable
terminated connector (to PC card); with the
other end of the cable terminated with one
RJ-11 receptacle connector for PSTN and
one receptacle connector converting
10Base-T to 10Base2 BNC T- for LAN.
Network
IEEE 802.3 10BaseT (MT3410ZLX),
10Base2(MT3410ZLX-T/2)--10M bps
NE2000 compatible
8
Page 9

1 - Introduction and Description
Modem Characteristics
V.34bis 33600bps, V.34 28800bps, V.32bis
14400bps
V.42 bis & MNP 2-5 data compression and
error correction, AT Command Set
Enhanced Throughput Cellular (ETC)
protocol for mobile cellular connections
Fax
Group 3, V.17 14400bps and V.29 9600bps
Fax Service Class 1 and Class 2 compliant
Features
• Compatible with most notebook, laptop and
portable computers
• Compatible with Card and Socket Services
• Easy to install and use
• Card is hot swappable
• Supports popular Network OSs (e.g., LANtastic,
NetWare, LAN Manager, Windows 3.x,
Windows for Workgroups, Windows NT, and
Windows 95
• Supports popular Fax/Modem communication
programs
• Multifunction capabality provides concurrent
LAN and Modem operation
• Multifunction CIS
• NE2000 compatible
• Concurrent, Low Power, and Sleep modes
• Auto-Sync protocol support
• POST and Loopback Tests
• Pulse/Tone and Adaptive Dialing
9
Page 10

MultiMobile Owner’s Manual
System Requirements
• An IBM compatible PC or notebook computer
with 386SX or faster processor
• At least one type II PCMCIA socket
• PCMCIA release 2.1 compliant Card Services
and Socket Services
• Drivers and utilities (provided with this product)
• an RJ11 jack for connecting to a phone
receptacle
• an RJ45 jack for 10BaseT connection to your
Ethernet LAN (MT3410ZLX)
• an BNC T-connector for 10Base2 connection to
your Ethernet LAN (MT3410ZLX-T/2)
• Driver software loaded on your PC
• Data and/or Fax communications software
Ship Kit Contents
Your MT3410ZLX is shipped from the factory with
the following:
• an MT3410ZLX PCMCIA LAN/Fax/Modem Card
• one cable with a 15-pin detachable connector
(to PC card) terminated on one end; with the
other end of the cable splitting into one RJ-11
plug for PSTN connection and one RJ-45 plug
for LAN connection.
• one 3-1/2” Software Drivers diskette
• User’s Manual (this manual)
• Fax/Modem communications software disk
Your MT3410ZLX-T/2 is shipped from the factory
with the following:
• an MT3410ZLX-T/2 PCMCIA LAN/Fax/Modem
Card
• Phone cord with RJ-11 plug
10
Page 11

1 - Introduction and Description
• one 3-1/2” Software Drivers diskette
• User’s Manual (this manual)
• Fax/Modem communications software disk
• one cable with a 15-pin detachable terminated
connector (to PC card); with the other end of
the cable terminated with one RJ-11 receptacle
connector for PSTN and one receptacle
connector converting 10Base-T to 10Base2
BNC T- for LAN.
11
Page 12

MultiMobile Owner’s Manual
Chapter 2 - Installation
Safety Warnings
1. Never install telephone wiring during a lightning
storm.
2. Never install telephone jacks in wet locations
unless the jack is specifically designed for wet
locations.
3. This product is to be used with UL and
listed computers.
4. Never touch uninsulated telephone wires or
terminals unless the telephone line has been
disconnected at the network interface.
5. Use caution when installing or modifying
telephone lines.
6. Avoid using a telephone (other than a cordless
type) during an electrical storm. There may be
a remote risk of electrical shock from lightning.
7. Do not use the telephone to report a gas leak in
the vicinity of the leak.
CUL
12
Page 13

2 - Installation
Installing The MT3410ZLX or MT3410ZLX-T/2 Card(s)
1. Insert the MT3410xx into the computer’s
PCMCIA slot with the 68-pin connector facing
the PCMCIA slot and the label facing up and
slide the card into the slot.
2. Plug the 15 pin connector into the 15 pin socket
of the PC card. On the other end of the 15-pin
cable, leave both RJ-11 telephone and RJ-45
network cables exposed until PSTN and LAN
connections are made; hardware installation is
now complete. The MT3410ZLX is powered
directly from the PC.
2a
. Plug the 15 pin connector into the 15 pin socket
of the PC card. On the other end of the 15-pin
cable, leave both RJ-11 telephone cable and
BNC T-cable receptacles exposed until PSTN
and LAN connections are made; hardware
installation is now complete. The MT3410ZLX-
T/2 is powered directly from the PC.
3. Connect the MT3410ZLX to the network (LAN)
using the RJ-45 (8-pin) plug.
3a
. Connect the MT3410ZLX-T/2 to the network
(LAN) using a “thin coax” cable. Allign the
notches of the cable to that of the BNC Tconnector, and twist clock wise approximately
one-quarter turn.
4. Connect the MT3410ZLX to the telephone
system using the RJ-11 (6-pin) plug into an
available PSTN connection.
4a
. Connect the MT3410ZLX-T/2 to the telephone
system by plugging an RJ-11 into the cables’s
RJ11 receptacle (6-pin), and with the other end
of that RJ11 into an available PSTN receptacle.
13
Page 14
MultiMobile Owner’s Manual
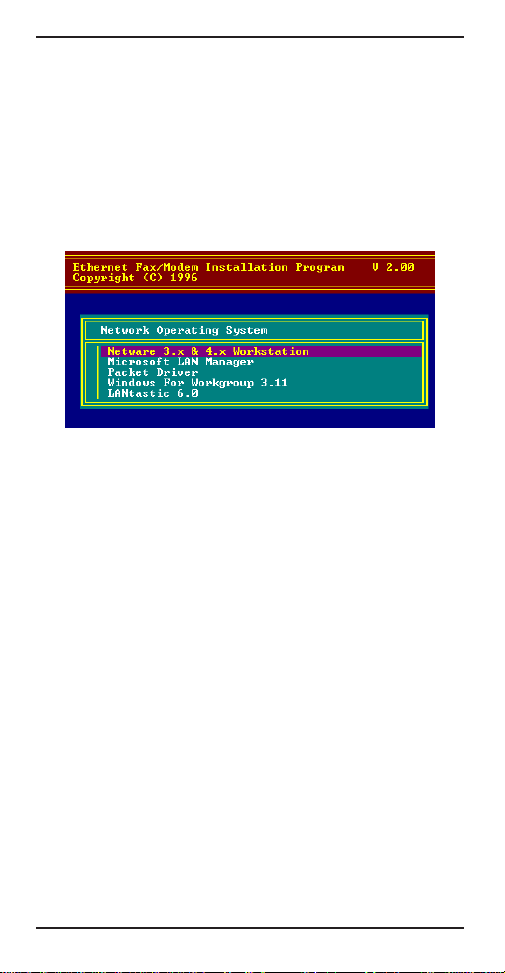
Driver Software Installation
1. Insert the Driver diskette into the floppy drive
and set the current drive to the floppy drive.
2. Run INSTALL to install the drivers (such as ODI
or NDIS 2.x or Packet Drivers) onto the target
disk. The NOS selection screen is displayed:
Figure 2-1. NOS Selection Screen
Novell NetWare Installation
There are two methods to install the MT3410ZLX
under NetWare: Menu Installation and Novell Client
Installation (for NetWare versions 3.12 and 4.x).
Menu Installation
1. Run INSTALL.EXE from Driver diskette‘s root
directory.
2. Select the NetWare 3.x and 4.x Workstation
item from the Installation menu.
3. If the current settings are acceptable, select
Start Installation and go to step 5. Otherwise,
select Modify Parameters to make setting
changes.
14
Page 15
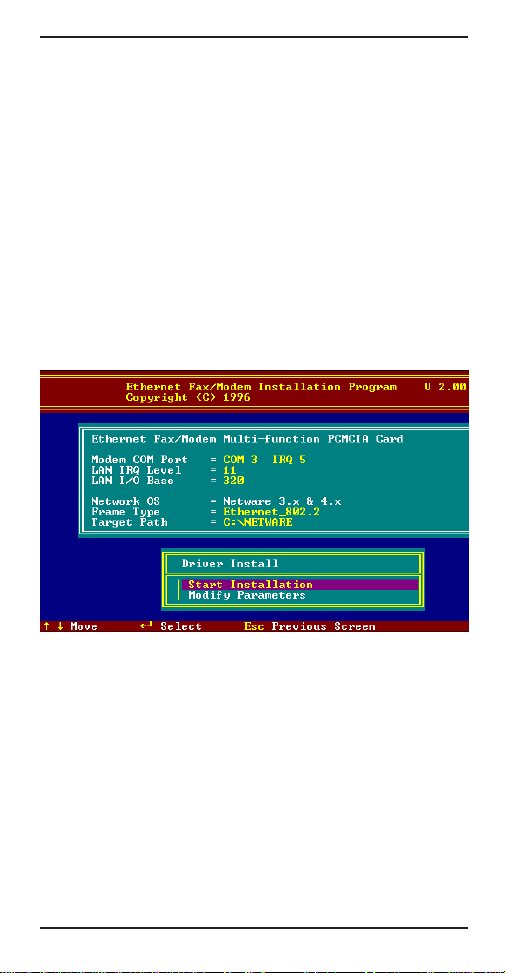
2 - Installation
4. Move the cursor to highlight the settings you
want to change and press Enter to select an
appropriate value. When the configurations
are set completely, press Enter on the OK
field to exit the screen. The Installation
program copies related files from the Drivers
diskette to the destination directory and
modifies the AUTOEXEC.BAT and NET.CFG
files as specified. The installation is complete.
5. Reboot the computer to make the NetWare
connections. The Driver Install screen is
displayed:
Figure 2-2. Driver Installation Screen
Manual Driver Installation
If you wanted to install the ODI driver manually,
perform the following instructions:
1. Copy the files LM28ODI.COM and NET.CFG
from the directory \NETWARE and the file
CARDEN.EXE and LMVXD.386 from the
directory \ENABLER on the Driver diskette.
15
Page 16

MultiMobile Owner’s Manual
2. Use a text editor to edit the NET.CFG file for
setting the Frame Type. On the NetWare
server, the Frame Type default is 802.3 for
NetWare 3.11, and 802.2 for NetWare 3.12 and
4.x. The Frame Type set in NET.CFG must
match Frame Type set at the NetWare server,
or the client will not attach to the server.
3. Follow Novell’s instructions on using ODI
programs. You can substitute the
LM28ODI.COM whenever a reference is made
to the Hardware Specific Module.
4. A typical ODI workstation startup batch file
includes:
>CARDEN /IOP=nnn /IRQ=nnn /COM=n /
MIR=n
>LSL ;Link Support Layer Module
provided by Novell
>LM28ODI ;Hardware Specific Module
>IPXODI ;IPX Protocol Stack Module
provided by Novell
>NETx ;Shell Support Module provided by
Novell
16
>LOGIN
Page 17

2 - Installation
Novell Client Installation
1. Run the NetWare Client Install V1.21 software.
Either:
a. get the four Client disks from the network
administrator,
or
b. run the \NWCLIENT\INSTALL.EXE used in a
previous Installation.
A message appears on the screen asking if you
want the program to perform modifications on
your AUTOEXEC.BAT and CONFIG.SYS files.
2. Answer Yes.
The program then modifies your
AUTOEXEC.BAT and CONFIG.SYS files
accordingly and creates backup copies. The
following message appears: “
for MS Windows? (Y/N):
3. Answer accordingly and provide a path if
necessary. The program displays the following:
”.
Configure your workstation for backup by a
NetWare server running software such as
BACKUP? (Y/N): No
Install support
4. Answer accordingly and provide a path if
necessary.
5. Select a driver for your MT3410ZLX.
6. From the driver list, select Other Drivers.
7. Go to the Insert the Driver Disk dialog box and
specify the path where the ODI driver and INS
files reside. For example: C:\ODI.DOS.
8. Press Enter and select the target ODI driver.
9. Specify the driver’s optional settings.
17
Page 18

MultiMobile Owner’s Manual
10. Press F10 to save to new configuration.
11. Highlight Install press here and press <Enter>
to install. The program copies the necessary
files for NetWare Client.
12. Continue the installation procedure to
completion. On completion, a new NET.CFG file
is created in your DOS directory. Typically, this
file contains the following lines:
Link Driver LM28ODI
FRAME Ethernet_802.3
#FRAME Ethernet_802.2
13. Copy the file CARDEN.EXE and LMVXD.386
from the directory \ENABLER on the Driver
diskette to the NetWare Client directory.
14. Use a text editor to edit the STARTNET.BAT for
adding a running CARDEN command at the
beginning of the file. A sample STARTNET.BAT
for the ODI workstation is shown next:
CARDEN /IOP=nnn /IRQ=n /COM=n /MIR=n
SET NWLANGUAGE=ENGLISH
--(sets NetWare 4.X to English
language)
LSL
--Link Support Layer Module
provided by Novell
LM28ODI
IPXODI
--Hardware Specific Module
--IPX Protocol Stack Module
provided by Novell
VLM
--DOS Support Module provided
by Novell
F:
LOGIN .ADMIN
--Change to connected device
--Login to file server as user
ADMIN
15. Run STARTNET to access the Novell network.
18
Page 19

2 - Installation
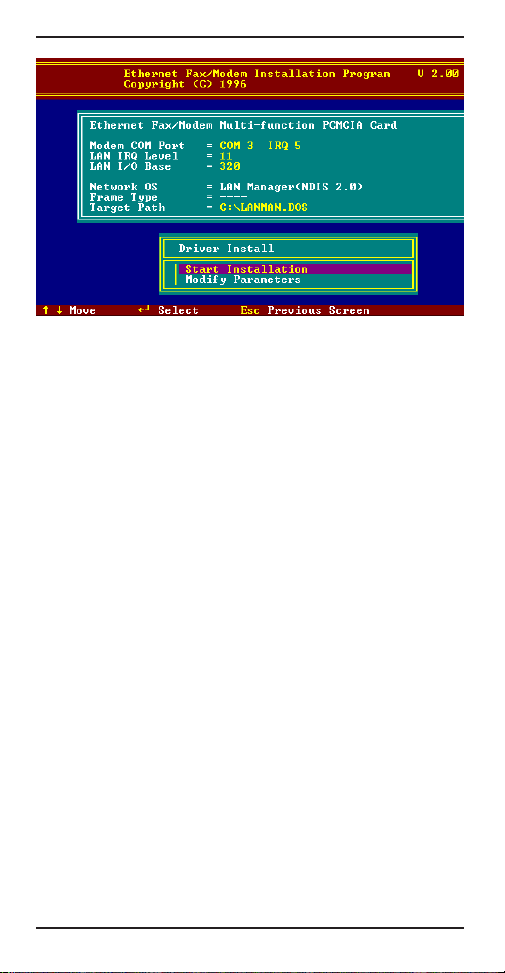
Microsoft LAN Manager Installation
1. View the README.TXT on the installation
diskette in the \NDIS2 directory. Before
installing the drivers, ensure that the Microsoft
LAN Manager has been installed in the target
path. The installation program will check and
modify the PROTOCOL.INI file for LAN
Manager.
2. Run INSTALL.EXE from root directory of driver
diskette.
3. Select the Microsoft LAN Manager item on the
menu screen.
4. If the current settings are acceptable, select
Start Installation and go to step 6. Otherwise,
select Modify Parameters to make setting
changed.
5. Move the cursor to each field you want to
change and press Enter to select a new value.
When the selections are set completely, press
Enter on the OK field to exit the screen and go
back to step 4.
6. The Installation program copies related files
from the Drivers diskette to the destination
directory and modifies the CONFIG.SYS and
PROTOCOL.INI files as specified.
7. Reboot the computer to load the selected
Driver.
8. Highlight “Start Installation” and press Enter to
start the LAN Manager in batch mode.
19
Page 20
MultiMobile Owner’s Manual
Figure 2-3. Microsoft LAN Manager Installation
Screen
A sample LAN Manager PROTOCOL.INI file:
[PROTMAN]
DRIVERNAME = PROTMAN$
DYNAMIC = YES
PRIORITY = NETBEUI
[NETBEUI_XIF]
Drivername = netbeui$
SESSIONS = 6
NCBS = 12
BINDINGS = “LM28NDS2_NIF”
LANABASE = 0
[LM28NDS2_NIF]
; protocol.ini session for multifunction
LAN/MODEM driver.
IOADDRESS = 0x320
INTERRUPT = 11
DRIVERNAME = LM28NDS$
20
Page 21

2 - Installation
Packet Driver Installation
1. Run INSTALL.EXE from the root directory of the
Drivers diskette.
2. Select the Packet Driver item on the Menu
screen.
3. If the current settings are acceptable, select
Start Installation and go to step 4. Otherwise,
select Modify Parameters to make setting
changed.
4. Move the cursor to the field you want to change
and press Enter to select a new value. When
the configuration is set completely, press Enter
on the OK field to exit the screen and go back
to step 3. The Installation program copies
related files from the Drivers diskette to the
destination directory and modifies the
AUTOEXEC.BAT file as defined.
5. Reboot the computer to load the selected
driver.
Windows for Workgroups Installation (NDIS3 Driver for Workgroup)
1. Run Windows for Workgroups and click the
Network Setup icon in the Network group.
2. In Network Settings dialog box, click
Networks... button to select the network
operating system.
3. In Networks dialog box, check the radio button
before Install Microsoft Windows Network
and No Additional Network. Press OK to go
back the Network Settings screen.
4. Click the Drivers... button to select network
driver.
21
Page 22

MultiMobile Owner’s Manual
5. In the Network Drivers dialog box, press Add
Adapter... button to enter Add Network
Adapter dialog box. Select Unlisted or
Updated Network Adapter and press OK.
Windows will prompt a Install Driver dialog
box.
6. Place the Drivers diskette into the floppy drive
and press OK.
7. Select the Enhanced mode NDIS3 for.... string
and press OK.
8. Follow Windows instructions to complete the
installation and exit Windows
9. Select Windows for Workgroup in the Network
Operating System screen.
10. If the current settings are acceptable, select
Start Installation and go to step 13. Otherwise,
select Modify Parameters to make settings
changed.
11. Move the cursor to the setting you want to
change and press Enter to select a new value.
When the configuration is accepted, press
Enter on the OK field to exit the screen and go
back to step 10.
12. Select NDIS Server (LAN Manager,...) as the
network server that you will attach to and press
the Enter key. The Installation program copies
the related files to the destination directory and
modifies the AUTOEXEC.BAT and
PROTOCOL.INI files as specified.
13. Reboot the computer to have the selected
driver take effect.
22
Page 23

2 - Installation
NDIS2 Driver for Workgroup
1. Run Windows for Workgroups and click the
Network Setup icon in the Network group.
2. In the Network Settings dialog box, click the
Networks... button to select the network
operating system.
3. In the Networks dialog box, check the radio
button before Install Microsoft Windows
Network and No Additional Network. Press
OK to go back the Network Settings screen.
4. Click the Drivers... button to select network
driver.
5. In the Network Drivers dialog box, press the
Add Adapter... button to enter the Add
Network Adapter dialog box. Select Unlisted
or Updated Network Adapter and press OK.
Windows displays a Install Driver dialog box.
6. Place the Drivers diskette in the floppy drive
and press OK.
7. Select the Real mode NDIS2 for... string and
press OK.
8. Follow the Windows instructions to complete
the installation, then exit Windows.
9. Run INSTALL.EXE from root directory of the
Drivers diskette.
10. Select Windows for Workgroup in Network
Operating System screen.
11. If the current settings are acceptable, select
Start Installation and go to step 13.
Otherwise, select Modify Parameters to
change settings.
23
Page 24

MultiMobile Owner’s Manual
12. Move the cursor to the setting(s) you want to
change and press Enter to select a new value.
When the configuration is set completely, press
Enter on the OK field to exit the screen and go
back to step 11.
13. Select NDIS Server (LAN Manager,...) as the
network server to which you will attach and
press the Enter key. The Installation program
copies the related files to the destination
directory and modifies the AUTOEXEC.BAT file
as specified.
14. Reboot the computer to have the selected
driver take effect.
ODI Driver for Workgroups
1. Run Windows for workgroups and click
Network Setup icon in Network group.
2. In the Network Settings dialog box, click the
Networks... button to select the network
operating system.
3. In the Networks dialog box, check the radio
button before Install Microsoft Windows
Network and Others:. Select Netware Shell,
3.X or 4.0 and above, and press OK to go back
the Network Settings screen.
4. Click on the Drivers... button to select network
driver.
5. In the Network Drivers dialog box, press the
Add Adapter... button to enter the Add
Network Adapter dialog box. Select Unlisted
or Updated Network Adapter and press OK.
Windows will prompt a Install Driver dialog
box.
24
Page 25

2 - Installation
6. Place the driver diskette in the floppy drive and
press OK.
7. Select the Netware ODI Driver ... string and
press OK.
8. Follow the on-screen Windows’ instructions to
complete the installation, then exit Windows.
9. Run INSTALL.EXE from the root directory of the
Drivers diskette.
10. Select Windows for Workgroup on the
Network Operating System screen.
11. If the current settings are acceptable, select
Start Installation and go to step 13. Otherwise,
select Modify Parameters to make settings
changed.
12. Move the cursor to the setting you want to
change and press Enter to select a new value.
When the configuration is set completely, press
Enter on the OK field to exit the screen.
13. Select Novell Netware Server as the network
server to which you will attach and press the
Enter key. The Installation program copies
related files to the destination directory and
modifies the AUTOEXEC.BAT and NET.CFG
files under user‘s agreement.
14. Reboot the computer to have the selected
driver take effect.
25
Page 26

MultiMobile Owner’s Manual
Windows NT 3.51 / NT 4.0 Installation
1. Install the PCMCIA support for your particular
make and model of laptop from the Service
Packs.
Note that: These must be verified to be working
properly before continuing, and Support for this
level of driver is from the laptop manufacturer
only.
2. From the Main window, select Control Panel.
3. In the Control Panel, select Network Icon.
4. In Network Setup, select Add Adapter.
Windows NT will display a list of all available
drivers.
5. Select OTHERS for third-party adapters not
included in the list. The program prompts for the
directory containing the Ethernet drivers.
6. Insert the Driver disk in the floppy (e.g., A) drive
and type A:\ . Windows NT tries to locate the
OEMSETNT.INF file in the specified path. If it
exists there, Windows NT will then copy the
appropriate drivers to the Windows NT system.
The drivers are now properly installed Proceed
to the next steps, and refer to your Windows NT
installation guide for information on these steps.
7. Windows NT pops up a window to ask the
values of some keywords (e.g., IO Port, IRQ
Number, and Memory Base). After initial
installation, the drivers are permanently
installed to the Windows NT system.
Subsequent access of the Network Drivers list
will include these drivers as options.
26
Page 27
2 - Installation
Windows 95 Installation
1. We assume that the PCMCIA Chipset drivers
are loaded and functioning. The System Icon in
the control panel can report on its functionality.
Any questions on this layer must be taken up
with the computer’s manufacturer.
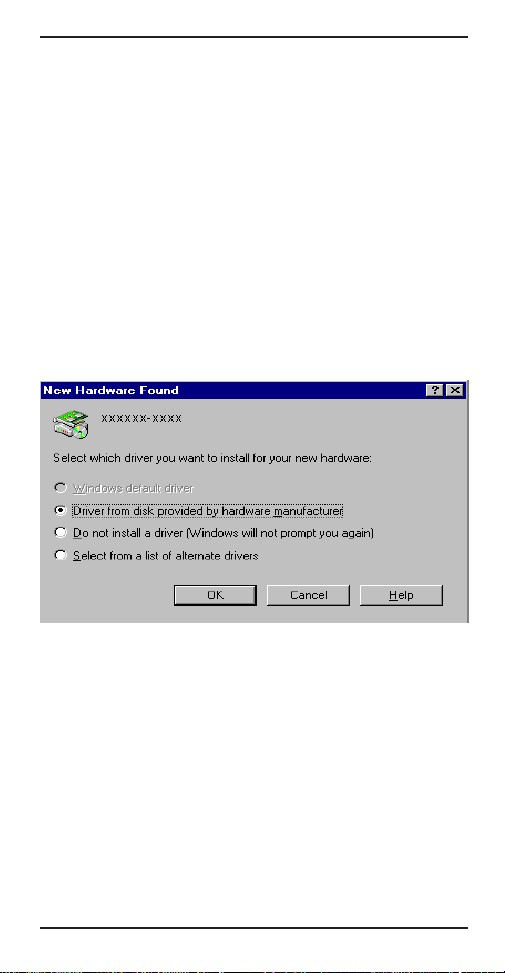
2. Insert the MT3410ZLX into PCMCIA slot.
Windows 95 will prompt New Hardware Found
dialog box (shown below).
3. In New Hardware Found dialog box, select
Driver from disk provided by hardware
manufacturer.
Figure 2-4. Windows 95 Driver Installation
Screen
3. Type the full path (e.g., “A:\”) and insert the
Installation disk. The driver will install and it
may ask for the installation CD/disks. After
installation it will reboot the computer, and the
MT3410ZLX will be fully functional.
27
Page 28

MultiMobile Owner’s Manual
4. For a first-time MT3410ZLX installation, click
Network icon in Control Panel of the Main
Group to add the desired Protocols, Client and
Service.
5. Reboot the computer; the card is now fully
functional.
Artisoft Lantastic 6.0 Installation
1. Install LANTASTIC 6.0 first.
2. Run INSTALL.EXE from Driver diskette‘s root
directory.
3. Select LANTASTIC 6.0 on the Network
Operating System screen and enter the Driver
Install screen.
4. If the current settings are acceptable, select
Start Installation and go to step 6. Otherwise,
select Modify Parameters to change settings.
5. Move the cursor to highlight each field you want
to change, and press Enter to select a new
value. Then press Enter on the OK field to go
back to step 4.
6. The Installation program copies related files
from the Drivers diskette to the destination
directory, and modifies the CONFIG.SYS,
PROTOCOL.INI, and STARTNET.BAT files
automatically. Driver installation is complete.
7. Reboot the computer to have the selected
driver take effect.
28
Page 29

3 - Comprehensive Driver Notes
Chapter 3 - Comprehensive Driver Notes
Introduction
This chapter provides general information on the
MT3410ZLX software drivers, as well as specific
information on the NDIS, Packet Driver, and
Windows for Workgroups drivers.
Factory Default Settings
The MT3410ZLX was shipped from the factory with
the following default settings:
Modem COM Port COM3 , IRQ5
LAN IRQ Level 11
LAN I/O Base Addr. 320
Network OS Netware 3.x and 4.x
Frame Type Ethernet 802.2
Target Path C:\NETWARE
Quick Start
For a quick start, simply run INSTALL.EXE, located
at the root directory on the Driver diskette.
PC Card Software - Manual Installation
The installation software has been carefully
designed to detect a combination of hardware and
software installed on the PC. Proper detection
allows the PC’s PC Card drivers to enable the
MT3410ZLX. If the installation software fails, the
enabler must be manually copied from the driver
disk to the PC. If you are using Windows for
Workgroup 3.11, Windows NT, or Windows 95,
follow the instructions for installing PC Cards in your
PC’s manual.
29
Page 30

MultiMobile Owner’s Manual
Determine if any third party generic enablers
installed on the PC. These are identified by a
search through the CONFIG.SYS file for the
following lines:
Vendor Device Loaded in CONFIG.SYS
Awards Software
System Soft
Phoenix
DEVICE=C:\CARDWARE\PCENABLE.EXE
DEVICE=C:\CARDSOFT\CARDID.EXE
DEVICE=C:\PCMPLUS\PCMSCD.EXE
If one of these lines exists in your CONFIG.SYS, it
can be used to enable the MT3410ZLX PC Card.
Follow the PCMCIA driver installation instructions in
the PC’s manual. If the PC Card drivers do not
support multi-function cards, use the Multi-Tech
supplied enabler.
Disable all current PC Card drivers by editing the
CONFIG.SYS and AUTOEXEC.BAT. If it is
necessary to keep these drivers for other adapters,
skip to next section.
1. Insert the Drivers disk in drive A:.
2. Type C: at the command prompt.
3. Type MD LMCARD to make a new directory.
4. Type COPY A:\ENABLER\*.* C:\LMCARD to
copy the enabler to your directory.
5. Modify the PATH= statement in your
AUTOEXEC.BAT to include the path
C:\LMCARD.
6. Change from PATH=<Original Path> to
PATH=<Original Path>;C:\LMCARD
7. Use CARDEN.EXE to enable MT3410ZLX
when the PC is loading Card Services.
30
Page 31

3 - Comprehensive Driver Notes
Getting Started
For Novell, Lan Manager, and Packet Driver, first
insert the MT3410ZLX PC Card into an open
PCMCIA card slot, and remove all other PC Cards
from your computer. Insert the MT3410ZLX driver
disk into Drive A and type A:\INSTALL at the
command prompt. The installation program will
copy files to the destination directory and modify
your related files (CONFIG.SYS, AUTOEXEC.BAT,
and NET.CFG).
For Windows for Workgroup, Windows NT and
Windows 95, use the
provided by Windows system to install the
MT3410ZLX. On this disk you will find subdirectories for each of the Microsoft products. Each
directory has a README.TXT that will help install
that particular Microsoft product.
After installation, reboot your computer to enable
the MT3410ZLX.
“Network Setup”
utility
Using DOS Extended Memory Managers
Under PCMCIA, all I/O cards (including Ethernet
and Modems) must be initialized as memory cards
and then switched into I/O mode operation by an
enabler software.
Therefore, the enabler software (e.g.,
CARDEN.EXE) must see the PC Card memory
when it is executed. DOS extended memory
managers such as EMM386 and QEMM take control
of the PC memory space which effects PC Card
initialization.
31
Page 32

MultiMobile Owner’s Manual
There are two available solutions:
1) Run enabler (CARDEN or existing PC Card
drivers + CARDEN) before EMM386 or QEMM
is loaded,
or
2) Exclude at least 4K of memory from EMM386’s
or QEMM’s use. An exclusion of X=D000D3FF will work well. There may also be
additional exclusions for your PCMCIA drivers;
don’t modify these.
Driver Directory Structure
The network drivers on this disk is organized in the
following structure. Each directory contains a
README.TXT file which provides detailed
installation instructions for the drivers in that
directory:
CARDEN.EXE Direct PCMCIA Card Enabler for
DOS; supports MT3410ZLX and
Intel compatible, Compaq and
Databook controllers.
LM28ODI.COM MT3410ZLX DOS/ODI Driver
working with direct enabler (LAN
& MODEM run concurrently).
Supports Intel compatible,
Compaqand Databook controllers.
LM28NDS.DOS MT3410ZLX DOS real mode
NDIS Driver.
LM28PD.COM MT3410ZLX DOS real mode
Packet Driver.
LM28NDS.386 MT3410ZLX Enhanced Mode
NDIS Driver for Windows for
Workgroups.
LM28NDS.SYS MT3410ZLX Enhanced Mode
NDIS Driver for Windows 95.
32
Page 33

3 - Comprehensive Driver Notes
LM28NDS.SYS MT3410ZLX Enhanced Mode
NDIS Driver for Windows NT.
Driver Upgrades
We are continuously improving and upgrading our
drivers. You are welcome to browse through our
BBS, and download any drivers, utilities and help
files at any time.
If using the downloaded drivers does not get the
MT3410ZLX working properly, our technical experts
are always ready to help. Please be at your
computer, have your MT3410ZLX, Driver Disk, and
the following information available:
• Version number of CARDEN.EXE and any
drivers you are running,
• the exact text of any error message displayed
on your screen,
• the type of computer you are using, and
• the type of network to which you’re computer is
connected.
Refer to Chapter 5 of this manual for information on
contacting Tech Support.
33
Page 34

MultiMobile Owner’s Manual
Notes for NDIS Driver
The following are examples of partial CONFIG.SYS
and AUTOEXEC.BAT files for loading System Soft‘s
Card Services and NDIS2 driver:
Example of partial CONFIG.SYS file:
device=c:\cardsoft \ss365sl.exe
device=c:\cardsoft \cs.exe
device=c:\cardsoft \csalloc.exe c:\cardsoft\csalloc.ini
device=c:\lanman.dos\drivers\ethernet\lm28\carden.exe
device=c:\cardsoft \cardid.exe
device=c:\lanman.dos\deivers\protman.dos/i:c:\lanman.dos
device=c:\lanman.dos\drivers\ethernet\lm28\lm28nds.dos
Example of partial AUTOEXEC.BAT file:
set path= c:\lanman.dos\netprog;%path%
net start workstation
load netbeui
The Ethernet function configuration information for
the DOS NDIS driver is contained in the
PROTOCOL.INI file. To make allowances for
passing the requested modem COM port (COM1, 2,
3, or 4) to the driver, there has been another field
added. The section of the PROTOCOL.INI file that
contains configuration information for this card must
begin with [LM28NDS2_NIF].
/iop=nnn /irq=n /com=n /mir=n
The valid PROTOCOL.INI file entries are listed
below:
34
Page 35

3 - Comprehensive Driver Notes
[LM28NDS2_NIF]
DRIVERNAME - LM28NDS$
(This line must always be present.)
IOADDRESS - value
where value is one of the following
addresses: 0x300, 0x320, 0x340, 0x360.
(The leading 0x for the hex notation is required.)
(To have Card Services select the address base
from it’s pool of available addresses, use a value of 0.)
INTERRUPT - value
where values is one of the following
interrupts:
3, 4, 5, 7, 9, 10, 11, 12, 15
.
(To have Card Services select an available
interrupt resource, place a value of 0 at this
location.)
Notes for Packet Driver
The following is an example of a partial
CONFIG.SYS file for loading System Soft‘s Card
Services and Packet Driver:
device=c:\cardsoft\ss365sl.exe
device=c:\cardsoft\cs.exe
device=c:\cardsoft\csalloc.exe c:\cardsoft\csalloc.ini
device=c:\tcpip\carden.exe /iop=nnn /irq=n /com=n /mir=n
device=c:\cardsoft\cardid.exe
device=c:\tcpip\lm28pd.com
35
Page 36

MultiMobile Owner’s Manual
Notes for Windows For Workgroups
After installation of the MT3410ZLX drivers, the
system will automatically update the CONFIG.SYS
and AUTOEXEC.BAT files so that the driver will be
loaded at system startup. When modifying the two
files, the system will make a dual copy named
CONFIG.ABO and AUTOEXEC.ABO in the system’s
directory. If the MT3410ZLX driver is not
successfully loaded, replace the two *.ABO file for a
related file and try to start the system again.
The following are examples of partial CONFIG.SYS
file and AUTOEXEC.BAT for loading System Soft’s
Card Services and drivers for Windows for
Workgroups:
Example of partial CONFIG.SYS file:
device=c:\cardsoft\ss365sl.exe
device=c:\cardsoft\cs.exe
device=c:\cardsoft\csalloc.exe c:\cardsoft\csalloc.ini
device=c:\wfw311\carden.exe /iop=nnn /irq=n /com=n
/mir=n
device=c:\cardsoft\cardid.exe
device=c:\wfw311\ifshlp.sys
Example of a partial AUTOEXEC.BAT file:
C:\WFW311\NETSTART
36
Page 37

4 - Troubleshooting
Chapter 4 - Troubleshooting
Introduction
This chapter provides general and specific problem
solving steps. Below are a number of examples of
Problems (in bold text:), Causes (C:), and Solutions
(S:). If your MT3410ZLX is not working properly,
look up the problem and solution here; if
unsuccessful, call Tech Support (see Chapter 5). At
the end of this chapter is some specific steps for
resolving IRQ and COM port conflicts.
No Response to AT Commands
C: The COMx port that the modem is set to may be
used by another card in the computer already.
S: Change the COMx port of MT3410ZLX to a
different unused port. It might be best to set it to
COM3 or COM4. Even if you are not using a
serial port which is set to the same COMx port
as the modem, it can still interfere with the
modem. Be sure to update your software COMx
port setting as well.
C: The Interrupt that the modem is using may be
the same Interrupt that another card is using.
S: Change the IRQ settings to a different, unused,
IRQ. Even if you are not using a serial port
which is set to the same IRQ as the modem, it
can still interfere with the modem.
37
Page 38

MultiMobile Owner’s Manual
The Modem Does Not Execute the Command Line
C: Make sure you are typing
‘AT’
at the beginning
of command line (and hit Enter at the end).
C: Make sure the modem is not in Data Mode.
Type
+++
if necessary.
C: Make sure your software is set to the same
COMx port as your MT3410ZLX.
The Modem Does Not Give a Response After an AT Command Was Executed
C: The echo and/or responses may be turned off
by the
ATE0Q1
commands. Enable the
AT&V1
to check Result Codes.
S: Use
ATE1Q0
then Enter to change them back.
C: Make sure the modem is in Command Mode
and not Data Mode when you type the AT
command.
The Modem Gives an ‘ERROR’ Response After
an AT Command was Executed
C: Make sure you did not type an invalid
command.
C: Make sure your command line is 40 characters
or less.
The Modem Goes Off-Hook and Disables the Telephone Line.
C: The modem may be set to auto-answer the
phone when it rings.
S: Disable auto-answer by typing
ATS0=0
then
Enter at the command line.
38
Page 39

4 - Troubleshooting
The Modem Does Not Auto-Answer the Phone
C: If necessary, make sure the software is
configured to auto-answer the phone.
A: To set auto-answer mode on from AT command
mode, type
ATS0=n
then press Enter. The
n
stands for which number of rings the modem
answers. For example:
ATS0=3
causes the
modem to answer on the third ring.
The Software Does Not Control the Modem Properly or Can Not Detect the Modem
S: Make sure the software has been set up
correctly. Check the initialization string and dial
string.
C: Some TSRs (programs that stay in memory
after they are loaded) may conflict with the
communications software.
S: Try starting your computer without loading any
TSRs.
The Characters on the Screen Are Doubled
C: Both the modem and the software have the
echo feature turned on.
S: Since only one needs an echo, turn the
software echo feature off.
C: The remote modem is echoing your typed
characters.
S: Type
ATE1
then Enter at the command line.
Then turn off the software echo feature.
39
Page 40

MultiMobile Owner’s Manual
No Text Appears on the Screen in Data Mode
C: The remote modem is not echoing your typed
characters.
S: Type
ATE0
then press Enter at the command
line. Then turn the software echo feature on.
C: Your software may not be set to use Full Duplex
or the remote modem may not be set to use Full
Duplex either.
C: The remote modem may be waiting for you to
type a command before it will reply with text.
No Text Appears on the Screen When in Command Mode
S: If you can’t see the characters you are typing,
then type
ATE1
then press Enter.
The Modem Does Not Dial a Phone Number After Execution of AT Dial Command
C: If you are using touch tone dialing on a phone
line that requires pulse dialing, then it may not
work.
S: Use
ATDT
in place of
A TDP
.
Communications Software Dials, but Fails
C: Make sure the software dialing prefix is
ATDT
.
C: Make sure the software and modem are set to
the same COMx port.
C: The modem may not have hung up the phone
line since the last call.
S: Change to Command mode and type
ATH
then
press Enter.
40
Page 41

4 - Troubleshooting
The Modem Connects with Some Modems, but Not Others
C
: The remote modem may not support data
compression or error correction, which might
cause it to take too long to negotiate a link.
S: You might try changing the way the modem
negotiates by using the
ATS37=n
with
commands. It might be best to start
AT&Q0N1
.
AT&Qn, ATNn
, and
When Dialing Another Modem, You Receive a
‘CONNECT’ Response, but Nothing Else
C: The remote modem may be waiting for you to
type a command.
S: Try to log on to the remote site (press Enter).
S: Type an AT command, then press Enter.
The Modem Speaker Does Not Make Any Sound
When Connecting to Another Modem
C: The software may have the speaker disabled.
S: Change the setting in your software or use the
ATMn
command to turn the speaker on.
The Modem Loses the Connection When in Use
C: The remote modem may have locked up.
S: Run the Remote Digital Loopback Test (
&T4
command).
C: The telephone switch may have disconnected
your call.
C: Your software may have turned off the DTR
signal.
41
Page 42

MultiMobile Owner’s Manual
The Modem Does Not Connect with Another Modem
C: There may be a problem with the remote
modem if you do not hear the high pitched tone
from the remote modem.
S: Run the Remote Digital Loopback Test (
&T4
command).
Occasionally, the Modem Gives a Burst of Errors.
C: The telephone line may be noisy or bad.
S: Hang up the call and try to connect again for
getting a better telephone line.
C: If there are other telephones on the same line
that your modem is using, someone may have
picked up a telephone on that extension.
C: Your telephone line may have the call waiting
feature.
S: Try adding
*70
to your
ATDT
dialing command
line. If it doesn’t help, ask your telephone
company how to temporarily disable call
waiting.
The Modem Gets Random Errors in Transmitted Data.
S: Try to use V.42 or MNP1-4 if possible.
S: Connect the modems at a slower baud rate.
42
Page 43

4 - Troubleshooting
After Downloading a File, the File Does Not Store on Your Disk Drive
C: If both modems are using MNP or V.42
protocol, then flow control may not be enabled.
S: Configure your software to use RTS/CTS flow
control to cause your computer to pause long
enough for the file to be stored to disk.
The Text on the Screen Is Not Legible
C: Your software settings may not match the
settings of the remote device.
S: Make sure your data bits, stop bits, and parity
settings match the settings that the other
computer is using. The two most common
settings are: 8 data bits, None parity, and 1 stop
bit (8,N,1) or 7 data bits, Even parity, and 1 stop
bit (7,E,1).
C: If the telephone line is very noisy, you may see
corrupted data on your screen.
C: Due to poor telephone line conditions, the
modem may have fallen back to a slower
communication speed. You may need to change
the baud rate setting in your software to match
this slower speed. To return the modem to the
higher speed, disconnect the link and reestablish again.
43
Page 44

MultiMobile Owner’s Manual
When Using V.42bis or MNP5, Some Features Are Disabled
C: You may be using a non-streaming protocol,
like Xmodem or Ymodem to transfer files.
Those are fine unless you are using V.42bis or
MNP5
S: When using V.42bis or MNP5, you should use a
streaming transfer protocol like Ymodem-G or
Zmodem.
S: Configure your software to use hardware flow
control (RTS/CTS ON).
When Connecting to Another Modem, the Modem Reports a Higher Connect Baud Rate than it Is Really Using
C: The modem defaults to report the modem-to-
computer baud rate when it responds with
CONNECT
.
S: Go to Command mode with your
communication program (like Telix) and type
ATW2
, then press Enter. This tells the modem
to report the modem-to-modem baud rate
instead.
When I Run CARDEN, “PC-Card Is Not Enabled
Successfully” Is Displayed
C: Your computer does not have enough memory
to map the attribute memory of your
MT3410ZLX.
S: If memory management software (e.g.,
EMM386) is installed, you must reserve an area
in upper memory (C000:0 — EFFF:F) for
MT3410ZLX attribute memory when enabling
the card.
44
Page 45

4 - Troubleshooting
Example:
Device=C:\DOS\EMM386.EXE RAM
X=D000-D3FF
Reserve D000 - D3FF for attribute memory.
C: No free I/O space or interrupt request can be
assigned to the MT3410ZLX.
S: The MT3410ZLX needs 32 contiguous I/O ports
and one interrupt request for its LAN
connection. It also need 8 contiguous I/O ports
and another interrupt request for Fax/Modem.
The LAN ports must be located at one of the
following I/O addresses: 0x300, 0x320, 0x340,
0x360. The Fax/Modem ports must be located
at one of these addresses: 0x2F8, 0x3E8,
0x3E8. (There are also compatibility issues with
certain Fax/Modem software applications.) We
recommend assigning the Modem Interrupt
(MIR) a value less than 7 (IRQ3 to 6). Make
sure that these resources are available for the
MT3410ZLX.
Enabling The MT3410ZLX
S: If the Card Service is installed, you can check
by hearing the beep when card insertion.
S: Run CARDEN /CHK to check if the
MT3410ZLX has been enabled. The resources
allocated for the card are shown as below at the
last line of the display message.
IOP=0Xnnn IRQ=nn COM=nn MIR=nn
45
Page 46

MultiMobile Owner’s Manual
Installing The Win 95 Driver Over SystemSoft CardWorks
S: 1. Start Windows 95, then plug the MT3410ZLX
into the PCMCIA slot. The SystemSoft
Cardwizard window should appear.
2. Select the appropriate slot number containing
the MT3410ZLX.
3. Select the View pull down menu
4. Select Properties.
5. Select Drivers in Properties.
6. Select Change Card Driver to active the
selective items above it.
7. Select Use Plug and Play.
8. Press OK. Win 95 will ask you to remove the
card.
9. Insert the card again.
10. Follow the instruction to insert the diskette and
type the path A:\ for the MT3410ZLX driver.
11. Add client and service as desired at the
Network icon in Control Panel.
12. Reboot the computer.
46
Page 47

4 - Troubleshooting
The NetWare Driver Runs Successfully but Fails to Login to The NetWare Server
C: The client Frame type is incompatiable with the
server Frame type.
S: The default frame type for Netware 3.11 and
below is 802.3 but it changed to 802.2 in
Netware 4.x and 3.12. Check the content of
NET.CFG to see if the Frame type is acceptable
by the server. If the Frame type can not be
accepted by the server, edit NET.CFG to
change the Frame type at the client site, or add
the Frame type which can be accepted at the
server site.
COM Port and IRQ Conflicts
If you have isolated the problem to an IRQ or COM
port conflict, refer to the following sections for
resolving IRQ and COM port conflicts in Windows
3.1 or Windows 95.
Windows 3.1x
To look for COM port or IRQ conflicts in Windows
3.1x, select File | Run in Program Manager, type
MSD, and press Enter. Then select
Ports
, and
IRQ Status
IRQs that are in use. If you find an IRQ conflict,
note which IRQs are not being used, then change
one of the conflicting devices to use one of the
unused IRQs. If you find an address conflict, change
the address of one of the conflicting devices.
and note the addresses and
Mouse, COM
To change a port address or IRQ in Windows 3.1x,
double-click the
icon. Click on the port you want to change, click
Settings
, click
Control Panel
Advanced
, and select the new port
icon, then the
Ports
47
Page 48

MultiMobile Owner’s Manual
address and/or interrupt. If you wish to use COM3
or COM4, note that COM3 shares an IRQ with
COM1, as does COM4 with COM2, so you should
change their IRQs to unused ones, if possible.
Windows 95
In Windows 95, right-click on My Computer, select
Properties from the menu, click on the Device
Manager
click on the
connected to. In the port’s
the
range and Interrupt Request. If another device is
using the same address range or IRQ, it will appear
in the Conflicting Device List. Uncheck “Use
Automatic Settings” to change the port’s settings so
they do not conflict with the other device, or select
the port the conflicting device is on and change it
instead. If you need to open your computer to
change switches or jumpers on the conflicting
device, refer to the device’s documentation.
tab, double-click on
Communications Port
Resources
tab to see the port’s Input/Output
Ports
, then double-
your modem is
Properties
sheet, click on
48
Page 49

5 - Service
Chapter 5 - Service
This chapter begins with the terms of your modem’s
warranty. Read carefully the next section, Tech
Support, if you have questions or problems with
your modem. It includes the technical support
telephone numbers and an explanation of how to
send in your modem should you require service. The
final sections explain how to use our bulletin board
service (BBS), and get support through
CompuServe, the Internet and the Multi-Tech FaxBack System.
Limited Warranty
Multi-Tech® Systems, Inc. (“MTS”) warrants that this
product will be free from defects in material or
workmanship for the period specified on the
enclosed Warranty Registration Card. Please
complete the card and return to Multi-Tech postage
pre-paid. MTS MAKES NO OTHER WARRANTY,
EXPRESSED OR IMPLIED, AND ALL IMPLIED
WARRANTIES OF MERCHANTABILITY AND
FITNESS FOR A PARTICULAR PURPOSE ARE
HEREBY DISCLAIMED. This warranty does not
apply to any products that have been damaged by
lightning storms, water, or power surges, or that
have been neglected, altered, abused, used for a
purpose other than the one for which they were
manufactured, repaired by the customer or any
party without MTS’s written authorization, or used in
any manner inconsistent with MTS’s instructions.
MTS’s entire obligation under this warranty shall be
limited (at MTS’s option) to repair or replacement of
any products that prove to be defective within the
warranty period, or, at MTS’s option, issuance of a
refund of the purchase price. Defective products
must be returned by Customer to MTS’s factory
transportation prepaid.
49
Page 50

MultiMobile Owner’s Manual
MTS WILL NOT BE LIABLE FOR
CONSEQUENTIAL DAMAGES AND UNDER NO
CIRCUMSTANCES WILL ITS LIABILITY EXCEED
THE PURCHASE PRICE FOR DEFECTIVE
PRODUCTS.
On-line Warranty Registration
To register your Multi-Tech product on-line, click on
the following link:
http://www.multitech.com/support/register.htm
Software User License Agreement
The MT3410ZLX software is licensed by Multi-Tech
Systems, Inc. to the original end-user purchaser of
the product, hereafter referred to as “licensee”. The
License includes the distribution diskette, other
accompanying programs, and the documentation.
The MT3410ZLX software, hereafter referred to as
“software”, consists of the computer program files
included on the original distribution diskette.
Licensee agrees that by purchase and/or use of the
Software, he hereby accepts and agrees to the
terms of this License Agreement.
In consideration of mutual covenants contained
herein, and other good and valuable considerations,
the receipt and sufficiency of which is
acknowledged, Multi-Tech Systems, Inc. does
hereby grant to the Licensee a nontransferable and
non-exclusive license to use the Software and
accompanying documentation, on the following
conditions and terms:
50
Page 51

5 - Service
The Software is furnished to the Licensee for
execution and use on a single computer system only
and may be copied (with the inclusion of the MultiTech Systems, Inc. copyright notice) only for use on
that computer system. The Licensee hereby agrees
not to provide or otherwise make available any
portion of this software in any form to any third party
without the prior express written approval of MultiTech Systems, Inc.
Licensee is hereby informed that this software
contains confidential, proprietary and valuable trade
secrets developed by or licensed to Multi-Tech
Systems, Inc. and agrees that sole ownership shall
remain with Multi-Tech Systems, Inc.
The Software is copyrighted. Except as provided
herein, the Software and documentation supplied
under this agreement may not be copied,
reproduced, published, licensed, sub-licensed,
distributed, transferred, or made available in any
form, in whole or in part, to others without expressed
written permission of Multi-Tech Systems, Inc.
Copies of the software may be made to replace
worn or deteriorated copy for archive or emergency
back-up procedures.
Licensee agrees to implement sufficient security
measures to protect Multi-Tech Systems, Inc.
proprietary interests and not to allow the use,
copying or transfer by any means, other than in
accordance with this agreement.
Licensee agrees that any breach of this agreement
will be damaging to Multi-Tech Systems, Inc.
51
Page 52

MultiMobile Owner’s Manual
Tech Support
Multi-Tech has an excellent staff of technical support
personnel available to help you get the most out of
your Multi-Tech product. If you have any questions
about the operation of your Multi-Tech modem,
please call 1-800-972-2439. Please fill in the
modem information form (below), and have it
available when you call. If your modem requires
service, the technical support specialist will guide
you on how to send in your modem (see
“Service”section).
Recording Modem Information
Please fill in the following information on your MultiTech modem. This will help Tech Support in
answering your questions. (The same information is
requested on the warranty registration card.)
Modem model #
Modem serial#______________________________
Modem firmware version #
Software name
Software version #
The modem model number and serial number are
printed on a label on the bottom of your modem.
The software version numbers are printed on the
diskette labels. You can also find the software
version numbers by selecting Help >> About... from
the software menu bars. Enter the ATI1 command to
display the modem firmware version number.
Before calling Tech Support, please check your
cables to ensure they are connected properly; then
note the status of your modem including status
indicators, screen messages, diagnostic test results,
problems with a specific application, etc.
52
____________________________
____________________
_____________________________
__________________________
Page 53

5 - Service
Service
If your tech support specialist decides that service is
required, you may send your modem to our factory
(freight prepaid). Return shipping charges will be
paid by Multi-Tech Systems (with North America).
Include the following with your modem:
• A description of the problem.
• Return billing and return shipping addresses.
• Contact name and phone number.
• Check or purchase order number for payment if
the modem is out of warranty. (The standard
repair charge for this modem is $95. This price
is valid at the time of this publication, but could
change in the future. Check with your technical
support specialist.)
• If possible, note the name of the technical
support specialist with whom you spoke.
If you need to inquire about the status of the
returned product, be prepared to provide the
number
Information”).
of the product sent (see “Recording Modem
serial
Send modems to the following address:
Multi-Tech Systems, Inc.
2205 Woodale Drive
Mounds View, MN 55112
Attn.: Service or Repairs
53
Page 54

MultiMobile Owner’s Manual
About the Multi-Tech BBS
Multi-Tech Systems maintains a bulletin board
system (BBS) for its customers. The information
available via the BBS includes new product
information, product upgrade data, problem-solving
tips, and a message service you can use to request
additional information. The phone number for the
Multi-Tech BBS is (612) 785-3702 or (800) 392-2432
(USA and Canada).
The BBS can be accessed by any asynchronous
modem operating at speeds of 1200 bps to 33,600
bps at a setting of 8 bits word length, no parity, and
1 stop bit (8-N-1).
How to Use the Multi-Tech BBS
To use Multi-Tech’s BBS, perform the following
steps.
1. Set your communications program to 8-N-1, and
to emulate ANSI (with MultiExpress™ software,
press ALT+Z and choose “ANSI”).
2. Dial our BBS at 1-800-392-2432 (USA and
Canada) or 612-785-3702 (international).
3. At the prompts, type your first name, last name,
and password; then press RETURN. If you are
a first-time caller, after you press RETURN, the
BBS will ask if your name is spelled correctly. If
you answer yes, our questionnaire will be
displayed. You can use our BBS on your first
call.
4. There are four BBS areas: the Main Menu, the
Files Menu, Bulletins (from the Main Menu), and
the Message Menu. All bulletins are menudriven. To read the bulletins, enter the number
of the bulletin you wish to read.
54
Page 55

5 - Service
5. Files Menu: From the Main Menu, type F to
display the Files Menu. If you want a list of
directories, type L (list directory) and then type
L again for a list of all directories. If you do not
type the second L, you will list all of the files on
the BBS. At the list of directories, select the
number of the directory required. A list of files
and a description for each of the files will be
displayed. Select a file that you would like to
download. If you already know the file name,
type D at the Files Menu to download the
selected file(s). Type V to view a text file.
6. At the Message Menu, you can leave a
message to the sysop (you cannot read
messages at this point). The BBS will tell you if
you have a personal message (mail). At the
prompt
for “read now”. You must read your message(s)
when you first access the BBS.
Would you like to read it now?,
type R
About CompuServe/Internet
In addition to the BBS, Multi-Tech provides support
through CompuServe’s Modem Vendor Forum (GO
MODEMVEN) under GO MULTITECH. You can
download manuals, Help files, drivers, ARA and
Microsoft Mail scripts, and product descriptions from
Multi-Tech’s forum library. Please refer to your
CompuServe documentation for special operating
procedures.
Multi-Tech is a commercial user on the Internet, and
we retrieve messages from our customers on a
periodic basis. If you prefer to receive technical
support via the Internet, you can contact Tech
Support via e-mail.
Multi-Tech also has a home page on the World Wide
Web. The address is: http://www.multitech.com
.
55
Page 56

MultiMobile Owner’s Manual
About the Multi-Tech Fax-Back System
Multi-Tech’s fax-back system provides 24-hour
access to sales/marketing and technical literature.
Dial (612) 717-5888, follow the voice prompts, and
enter the document number for either the “Sales and
Marketing” catalog or the “Technical Support”
catalog of available documents. For convenience,
have your fax number handy:__________________.
From the Sales and Marketing catalog, you can
request to have newsletters, white papers, press
releases, brochures, and other marketing literature
faxed to you. From the Technical Support catalog,
you may request basic modem operation information
and troubleshooting guides. With either catalog,
simply enter the applicable FB Doc. # of the
literature you wish to receive from the left column of
the catalog.
56
Page 57

Appendices
Appendix A - Technical Specifications
Data:
• V.34bis 33.6K bps, V.34 28.8K bps, V.32bis
14.4K bps
• AT Command Set Compatible
• V.42bis & MNP 5 Data Compression
• V.42 & MNP 2-4 Error Correction
• Enhanced Throughput Cellular (ETC) protocol
for mobile cellular connection
Fax:
• G3, V.17 14.4K bps, V.29 9.6K bps, V.27ter
2.4K bps
• Fax Service Class 1 and Class 2 Compliant
LAN:
• IIEEE 802.3 10BaseT (MT3410ZLX),
• 10Base2 (MT3410ZLX-T/2)
• 10Mbps speed
• Internal buffer memory (no system memory
used)
• NE2000 compatible
• ODI client, Packet driver, and NDIS 2.x, 3.x
supported
Operating Systems:
• Novell Netware 3.x, 4.x
• Microsoft LAN Manager
• Packet Driver
• Microsoft Windows 95
• Microsoft Windows 3.1
• Microsoft Windows NT 3.51, NT4.0
• Microsoft Windows for Workgroups 3.11
57
Page 58

MultiMobile Owner’s Manual
Physical:
• PCMCIA Type II
• 3.37 in. x 2.128 in. x 0.197 in.
(85.6mm x 54mm x 5mm)
• Weight: 1.225 oz. (35 g)
• Power: +5V ±5%, @220mA
Sleep Mode: 400mW (80 mA)
Operating Mode: 750mW (150 mA)
• One 15-pin connector with RJ-11 and RJ-45
plugs (MT3410ZLX)
• One 15-pin connector with RJ-11 and BNC-T
receptacles (MT3410ZLX-T/2)
58
Page 59

Appendices
Appendix B - AT Commands,
S-Registers & Result Codes
Introduction
This chapter describes how to use MT3410ZLX AT
commands, S-Registers and Result Codes.
How To Use AT Commands
Usually, your fax and data comm software controls
the modem for you. However, you may also want to
use the AT commands. These commands give you
complete control over your modem. You need to be
careful when using these commands, because they
can cause your software to loose its ability to control
the modem. If you do find that an AT command has
caused a problem, then turn the computer off and
then back on. That will reset most AT commands to
the factory default settings. You can also type
AT&F&WZ
To use an AT command, you must first:
1. Run your communication software.
to go back to the factory default setting.
2. Configure the software for the appropriate COM
port and IRQ settings, if necessary.
3. Enter Terminal mode (also “Command mode”,
“Local mode”, or “Direct mode”). This is the
mode in which most data comm software
packages start up. You can then type the
desired AT command, then press the Enter key.
59
Page 60

MultiMobile Owner’s Manual
For example, type:
ATH0<Enter> to hang up the modem connection,
or
AT&K3<Enter> to enable bi-directional CTS/RTS
hardware flow control.
Most of the AT commands can be entered in
“strings” (i.e., on the same command line) without
spaces between the individual commands. For
example:
AT&K3H0<Enter>
As shown above, it is not necessary to put spaces
between the commands. So, there are no spaces
between AT,
&K3
, and H0.
The modem usually returns a response (or “Result
Code”) at the next line if it understands the
command. The response is usually OK or
ERROR
unless the AT command provides other (extended)
messages.
Basic A T Commands
Command OptionsFunction & Description
A/ Re-execute the last command string
<any key> Terminate the current connection
All the following commands require an “AT” prefix
A Go off-hook and attempt to establish a
Bn Line modulation options
B0 Select ITU-T V.22 mode for 1200 bps
60
attempt when entered in handshaking
state
connection without waiting for a ring
connection and V.21mode for 300 bps
Page 61

Appendices
Command OptionsFunction & Description
B1 * Select Bell 212A for 1200 bps
B2 Select V.23 1200 bps for receiving, 75
B3 Select V.23 75 bps for receiving, 1200
Dn Dial command, beginning the dialing
P Pulse dial. Only digits 0 to 9 can be
R Reverse dial. Originate call in answer
Sn Dial the phone number stored in
T DTMF tone dial. Any digit 0 to 9, *, #,
W Wait for second dial tone. The modem
, Pause. Cause the modem to pause for
! Flash hook (for call transfer). Cause
@ Wait for 5 seconds of silence after
; Return to command state after dialing
* Factory default setting
connection and Bell 103 for 300 bps
bps for transmitting in originate mode;
75 bps for receiving and 1200 bps for
transmitting in answer mode
bps for transmitting in originate mode;
1200 bps for receiving and 75 bps for
transmitting in answer mode
sequence. The string “n” (telephone
number and modifiers) listed as
follows is entered after the “D”
command
dialed
mode (go on-line in answer mode)
NVRAM at location “n” (n=0, 1, 2, 3)
A, B, C… may be dialed as a tone
waits for the second dial tone before
processing the dial string
a time before processing the dial string
(designed by S8 register)
the modem to go on-hook for 0.5
second then return off-hook
dialing number
a number without disconnecting the
call
61
Page 62

MultiMobile Owner’s Manual
Command Options Function & Description
En AT command echo options
E0 Echo disabled
E1* Echo enabled
Hn Switch-hook control
H0 Modem goes on-hook
H1 Modem goes off-hook
Mn Speaker control
M0 Speaker always off
M1 * Speaker on until carrier present
M2 Speaker always on
M3 Speaker off during dialing and on until
Nn Select negotiate handshake
N0 When originating or answering,
N1 * When originating or answering, start
On Go on-line
O0 Return modem to a previously
O1 Begin an equalizer retrain sequence,
O3 to O14 Force modem to a new rate that is
P Enable pulse dialing
Qn Result code display options
Q0 * Result code enabled
* Factory default setting
carrier present
handshake only at the communication
rate specified by S37 register and
“ATBn” and no fallback
handshaking only at the
communication standard specified by
S37 register and “ATBn” During
handshake, fallback to a lower speed
may occur except in “AT\N1” mode
established state
then return to on-line state
user defined. New rates are defined in
S62 register
62
Page 63

Appendices
Command OptionsFunction & Description
Q1 Result code disabled
T Enable tone dialing
Vn Result code form
V0 Display result code in numeric form
V1 * Display result code in verbose form
Wn Select extended result codes
W0 * CONNECT result code reports DTE
W1 CONNECT result code reports DTE
W2 CONNECT result code reports DCE
Xn Select result codes/call progress
X0 Display CONNECT or “1” for all
X1 Display connect message according to
X2 Display connect message according to
X3 Display connect message according to
X4 * Display connect message according to
Zn Recall stored profile
Z0 Reset and recall user profile 0
Z1 Reset and recall user profile 1
* Factory default setting
(see also the result code options table)
speed (see also the “Result Code
Options Table”)
speed; enable the CARRIER,
COMPRESSION, and PROTOCOL
extended result code
speed
options
speeds
“ATW” and “AT\V”, blind dial, ignore
busy tone
“ATW” and “AT\V”, wait for dial tone,
ignore busy tone
“ATW” and “AT\V”, blind dial, check
busy tone after dialing
“ATW” and “AT\V”, wait for dial tone,
check busy tone after dialing
63
Page 64

MultiMobile Owner’s Manual
A T& (Ampersand) Commands
Command OptionsFunction & Description
&Bn Auto-retrain
&B0 Hang up on a poor received signal
&B1 * Retrain on a poor received signal.
&B2 Don’t hang up; do not retrain (tolerate
&Cn Data carrier detect option
&C0 State of carrier from remote modem is
&C1 * State of carrier from remote modem is
&Dn Data Terminal Ready (DTR) option.
&D0 DTR ignored
&D1 Go to command mode on on-to-off
&D2 * Hang up and go to command mode on
&D3 Hang up and reset from user profile 0
&F Recall factory default setting as active
&Gn Guard tone option
&G0 * No guard tone
&G1 550 Hz guard tone
&G2 1800 Hz guard tone
&Jn Dummy command for AutoSync
&J0 Send OK to DTE
Hang up if condition persists longer
than the threshold set in S7 register
any line)
ignored. RLSD (Receive Line Signal
Detect) circuit is always on
tracked. RLSD circuit reflects the state
of carrier
DTR transition
on-to-off DTR transition. Auto-answer
is disabled if DTR is low
on on-to-off DTR transition
configuration
compatibility
* Factory default setting
64
Page 65

Appendices
Command OptionsFunction & Description
&J1 Send OK to DTE
&Kn Set flow control
&K0 Disable flow control
&K3 * Enable bi-directional hardware flow
&K4 Enable bi-directional software flow
&Mn Sync, Async, or AutoSync mode
&M0 * Async mode
&M4 Hayes AutoSync mode
&Pn Dial Pulse make/break ratio
&P0 * Make=39%, Break=61% for use in the
&P1 Make=33%, Break=67% for use in
&Rn CTS/RTS option (for non-CTS flow
&R0 * CTS follows RTS
&R1 CTS always true
&Sn Data Set Ready (DSR) option
&S0 * DSR always on
&S1 DSR on during handshake and on-line,
&Tn Self-test commands
&T0 Terminate test
&T1 Local analog loopback test
&T3 Local activated remote digital loopback
* Factory default setting
control (CTS/RTS)
control (XON/XOFF)
selection
United States, international version
Make=33%, Break=67% for use in 10
pps, Japan version
other countries, international version
Make=33%, Break=67% for use in 20
pps, Japan version
control mode and synchronous mode
only)
off in test mode or idle mode
(RDL) test
65
Page 66

MultiMobile Owner’s Manual
Command OptionsFunction & Description
&T4 * Grant request from remote for RDL
&T5 Deny request from remote for RDL test
&T6 Remote digital loopback test
&T7 Remote digital loopback with self-test
&T8 Local analog loopback with self-test
&Vn View active configuration and stored
&V0 View active file, stored profile #0 and
&V1 View active file, stored profile #1 and
&Wn Store active profile
&W0 Save active configuration as user
&W1 Save active configuration as user
&Yn Select stored profile on power-up
&Y0 Recall user profile 0 on power-up
&Y1 Recall user profile 1 on power-up
&Zn=x Store telephone number n=0 to 3
* Factory default setting
test
profile
stored phone numbers
stored phone numbers
profile #0
profile #1
x=<string> see also the dial modifier
in ”ATDn” command. The maximum
number of digits per string is 36.
66
Page 67

Appendices
A T% (Percent) Commands
Command OptionsFunction & Description
%An Set auto-reliable fallback character
n=1-127
Specify the ASCII character that tells
the modem to return (or fallback) from
auto-reliable (MNP) mode to a normal
connection on the answering modem
%Cn Data compression option
%C0 No compression
%C1 * MNP 5 compression
%Gn Auto fallback/fall-forward options
%G0 * Disabled
%G1 Enabled
A T\ (Back Slash) Commands
Command OptionsFunction & Description
\An Block size for V.42
\A0 Max. 64 characters
\A1 Max. 128 characters
\A0 Max. 192 characters
\A0 * Max. 256 characters
\Cn Set auto-reliable buffer
\C0 * Doesn’t buffer data
\C1 Buffer data on answering mode for 4
seconds, until 200 characters have
been buffered, and then switch to
normal mode and the buffered
characters are passed to the serial
port. If a SYN character is detected,
reliable mode is attempted
\C2 Doesn’t buffer data on answering
mode upon receipt of auto-reliable
character and passes it to serial port
* Factory default setting
67
Page 68

MultiMobile Owner’s Manual
Command OptionsFunction & Description
\Gn Set modem port flow control
\G0 * Disable port flow control
\G1 Set port flow control to XON/XOFF
\Jn Constant DTE speed option
\J0 * DCE and DTE rates are independent
\J1 DTE rate adjusts to DCE connection
\K=n Set break control
* Factory default setting
rate after on-line
In on-line data state with V.42 protocol
or normal mode, then break signal to
DTE through RS-232
n=0 or 2 or 4
Enter on-line command state but do
not send
break to the remote modem
n=1
Empty the data buffers and send break
to the remote modem immediately
n=3
Send break to the remote modem
immediately
n=5
Send break to the remote modem in
sequence with data in on-line data
state withdirect mode, then receive
break signal at serial port
n=0 or 2 or 4
Immediately send break and enter on-
line command state
n=1 or 3 or 5
Immediately send break through In on-
line command state with V.42 protocol
or normal mode, and the DTE issues a
transmit break command
68
Page 69

Appendices
Command OptionsFunction & Description
n=0 or 1
Empty the data buffers and send the
break to the remote modem
n=2 or 3
Send break to the remote modem
immediately
n=4 or 5
Send break to the remote modem in
sequence with data. In on-line data
state with normal mode, receive break
signal from remote at modemport,
send to serial port
n=0 or 1
Empty the data buffers and send the
break to the local DTE
n=2 or 3
Send break to local DTE immediately
n=4 or 5
Send break to the local DTE in
sequence with data
\Nn Modem protocol options
\N0 Normal mode. No protocol, but flow
\N1 Direct mode. No protocol and no flow
\N2 MNP reliable mode
\N3 * LAPM, MNP or normal mode
\N4 LAPM or MNP mode
\Qn DTE flow control options
\Q0 Disable flow control
\Q1 XON/XOFF software flow control
\Q2 CTS flow control to DTE
\Q3 RTS/CTS hardware flow control
* Factory default setting
control is allowed
control is allowed
69
Page 70

MultiMobile Owner’s Manual
Command OptionsFunction & Description
\Tn Set inactive timer
n=0 *
Disable inactive timer
n=1 - 90
Enable inactive timer. Length in
minutes
\Vn Protocol result codes
\V0 * Disable protocol result code (e.g.
\V1 Enable protocol result code (e.g.
\Xn XON/XOFF pass-through options
\X0 * Process XON/XOFF per “AT\Gn” and
\X1 Process XON/XOFF per “AT\Gn” and
* Factory default setting
CONNECT 9600)
CONNECT 9600/LAP-M)
“AT\Qn” option, if XON/XOFF flow
control is enabled, do not pass XON/
XOFF to the remote modem or local
DTE
“AT\Qn” option, always pass XON/
XOFF to the remote modem or local
DTE
70
Page 71

Appendices
A T- (Dash) Commands
Command Options Function & Description
-Jn Set V.42 detection phase
-J0 Disable V.42 detection phase
-J1 * Enable V.42 detection phase
-V Display firmware version number
“Hn V.42bis compression control
“H0 Disable V.42bis
“H1 Enable V.42bis only when transmitting
“H2 Enable V.42bis only when receiving
“H3 * Enable V.42bis for both transmitting
* Factory default setting
data
data
and receiving directions
71
Page 72

MultiMobile Owner’s Manual
S-Registers (ATSn=x)
Certain modem parameters are stored in memory
locations called S-Registers. Use the S command
to read or alter the contents of S-Registers.
S0= 0-255
S0 sets the number of the rings required before the
modem automatically answers a call. Set “S0=0” to
disable auto-answer mode. The factory default
setting is 0.
S1= 0-255
S1counts the incoming rings and stores the value to
this register. The value of this register is
incremented with each ring. If no rings occur over an
8 seconds interval, this register is cleared. User can
read but should not change this value. The factory
default setting is 0.
S2= 0-255
S2 holds the decimal value of the ASCII character
used as the escape character. The default value
(043) corresponds to an ASCII character “+” (plus).
A value of 128 to 255 disables the escape process,
i.e., no escape character will be recognized 043.
S3= 0-127
S3 holds the decimal value of the Carriage Return
<CR> character used as the command line and
result code terminator (asynchronous operation
only). The factory default is 013.
72
Page 73

Appendices
S4= 0-127
S4 holds the decimal value of the character
recognized as a line feed (asynchronous operation
only). The line feed control character is output after
the carriage return control character, if verbose
result codes are enabled. The factory default is 010.
S5= 0-127
S5 holds the decimal value of the character
recognized as a backspace (asynchronous
operation only). The modem will not recognize the
backspace character if this register is set to a value
greater than 32. The factory default is 008.
S6 = 0-255
S6 sets the length of time, in seconds, that the
modem must wait (minimum 2 seconds even if the
value is less than 2) after going off-hook before
dialing the first digit of the telephone number
The factory default is 002.
S7=1-255 for international version. The factory
default is 060.
S7=0-58for Japan version. The factory default is
058.
Set the time, in seconds, that the modem must wait
before hanging up because carrier is not detected.
S8= 0-255
S8 sets the time, in seconds, that the modem must
pause when the “,” dial modifier is encountered in
the dial string. The factory default is 002.
73
Page 74

MultiMobile Owner’s Manual
S9=1-255
S9 sets the time, in tenths of a second, that the
carrier must be present before the modem considers
it valid and turns on RLSD. The factory default is
006.
S10=1-255
S10 sets the length of time, in tenths of a second,
that the modem waits before hanging up after a loss
of carrier. The factory default is 014.
S11=50-255
S11 sets the DTMF duration and inter digit delay in
mini-seconds, in DTMF touch tone dialing. The
factory default is 095.
S12=0-255
S12 defines the maximum period, in 2-hundredths of
a second, allowed between consecutive
asynchronous escape character “+” (plus) for the
escape sequence to be considered valid. The
factory default is 050.
S18=0-255
S18 sets the length of time, in seconds, that the
modem conducts a test (commanded by “AT&Tn”)
before returning to command mode. If this register
value is zero, the test automatically terminates, the
test progress must be ended by issuing “AT&T0” or
“ATH” commands. The factory default is 000.
S25=0-225
S25 sets the length of time, in hundredths of a
second, that the modem ignores DTR for before
hanging up. The factory default setting is 005.
74
Page 75

Appendices
S30=0-90
S30 controls the Inactivity timer, which sets the
length of time, in minutes, that the modem counts
when there is no data flow in or out the DTE serial
port. A connection is disengaged when the counter
reaches the preset value. Setting to S30 =0 disables
the inactivity timer. The factory default settings is
000.
S37=Desired DCE speed (line speed). The factory
default settings is 000.
0 Attempt to connect at the last “AT” speed
3 Attempt to a 300 bps connection
5 Attempt to a 1200 bps connection
6 Attempt to a 2400 bps connection
7 Attempt to a 4800 bps connection
8 Attempt to a 7200 bps connection
9 Attempt to a 9600 bps connection
10 Attempt to a 12000 bps connection
11 Attempt to a 14400 bps connection
12 Attempt to a 16800 bps connection
13 Attempt to a 19200 bps connection
14 Attempt to a 21600 bps connection
15 Attempt to a 24000 bps connection
16 Attempt to a 26400 bps connection
17 Attempt to a 28800 bps connection
18 Attempt to a 33600 bps connection
S46=0-255
S46 Sets the length of time in 100 mSec, before the
modem goes into standby mode. A value of 255
prevents standby mode. The factory default settings
is 100.
75
Page 76

MultiMobile Owner’s Manual
S62 DTE rate status. The factory default is 016.
0 300 bps 16 57600 bps
1 600 bps 17 115200 bps
2 1200 bps
3 2400 bps
4 4800 bps
5 9600 bps
6 7200 bps
7 12000 bps
8 14400 bps
9 16800 bps
10 19200 bps
11 21600 bps
12 24000 bps
13 26400 bps
14 28800 bps
15 38400 bps
S64 = 9-20
Transmitting power level adjustment (Japan version
only)
Range: -9 dBm to -20 dBm
Default: -15 dBm015
76
Page 77

Appendices
S72 selects DTE speed during data transfer. The
factory default settings is 000.
0 300 bps 17 57600 bps
1 600 bps 18 115200 bps
2 600 bps
3 1200 bps
4 2400 bps
5 4800 bps
6 9600 bps
7 7200 bps
8 12000 bps
9 14400 bps
10 16800 bps
11 19200 bps
12 21600 bps
13 24000 bps
14 26400 bps
15 28800 bps
16 38400 bps
77
Page 78

MultiMobile Owner’s Manual
Result Codes
In Command mode, the MT3410ZLX can send
information and status responses, or Result Codes,
to your computer. Result Codes are used by
communications programs and can also appear on
your monitor. The form of the Result Code
information displayed can be defined using the Qn,
Vn, Wn
Basic Result Codes
Example: CONNECT 57600
ATW2: report DCE rate
Example: CONNECT 28800
AT\V1: report connection protocol
CONNECT DTE_or_DCE_speed
connection_protocol
Example: CONNECT 57600/NONE for
and Xn commands.
ATW0: report DTE rate
normal mode connection
78
CONNECT 28800/MNP for MNP
connection
CONNECT 115200/LAP-M for V.42
LAPM connection
Page 79

Appendices
ATV0 ATV1 X0 X1 X2 X3 X4
0 OK
1 CONNECT
2 RING
3 NO CARRIER
4 E RROR
5 CONNECT 1200 @ @ @ @
6 NO DIAL TONE
7 BUSY
8 NO ANSWER
10 CONNECT 2400 @ @ @ @
11 CONNECT 4800 @ @ @ @
12 CONNECT 9600 @ @ @ @
13 CONNECT 14400 @ @ @ @
14 CONNECT 19200 @ @ @ @
15 CONNECT 16800 @ @ @ @
18 CONNECT 57600 % % % %
24 CONNECT 7200 @ @ @ @
25 CONNECT 12000 @ @ @ @
26 CONNECT 1200/75 # # # #
27 CONNECT 75/1200 # # # #
28 CONNECT 38400 % % % %
29 CONNECT 21600 @ @ @ @
30 CONNECT 24000 @ @ @ @
31 CONNECT 26400 @ @ @ @
32 CONNECT 28800 @ @ @ @
33 CONNECT 152000 % % % %
3 3 3 3 3
3 3 3 3 3
3 3 3 3 3
3 3 3 3 3
3 3 3 3 3
3 3 3
3 3 3
3 3 3 3 3
Extended Result Codes
ATW1: report DCE & DTE speed and
enable extended result code
Example: CARRIER DCE_speed
PROTOCOL: connection_protocol
(MNP 2, 3, 4 or LAP-M)
COMPRESSION:
compression_protocol (MNP 5 or
V.42bis)
CONNECT DTE_speed (see
“Basic Result Code Options
Table”)
79
Page 80

MultiMobile Owner’s Manual
ATV0 ATV 1 X0 X1 X2 X3 X4
40 CARRIER 300
42 CA RRIER 75/1200
43 CARRIER 1200/75
46 CARRIER 1200
47 CARRIER 2400
48 CARRIER 4800
49 CARRIER 7200
50 CARRIER 9600
51 CARRIER 12000
52 CARRIER 14400
53 CARRIER 16800
54 CARRIER 19200
55 CARRIER 21600
56 CARRIER 24000
57 CARRIER 26400
58 CARRIER 28800
59 CARRIER 31200
60 CARRIER 33600
66 COMPRESSION: CLASS 5
67 COMPRESSION: V.42bis
69 COMPRESSION: NONE
70 PROTOCOL: NONE
77 PROTOCOL: LAP-M
80 PROTOCOL: MNP
81 PROTOCOL: MNP 2
82 PROTOCOL: MNP 3
83 PROTOCOL: MNP 2,4
84 PROTOCOL: MNP 3,4
3 3 3 3
3 3 3 3
3 3 3 3
3 3 3 3
3 3 3 3
3 3 3 3
3 3 3 3
3 3 3 3
3 3 3 3
3 3 3 3
3 3 3 3
3 3 3 3
3 3 3 3
3 3 3 3
3 3 3 3
3 3 3 3
3 3 3 3
3 3 3 3
3 3 3 3
3 3 3 3
3 3 3 3
3 3 3 3
3 3 3 3
3 3 3 3
3 3 3 3
3 3 3 3
3 3 3 3
3 3 3 3
80
Page 81

Appendices
Appendix C - Regulatory Agency
Information
FCC Regulatory Statements
Consumer Instructions
1. This equipment complies with part 68 of the
Federal Communications Commission Rules. On
the outside surface of this equipment is a label that
contains, among other information, the FCC
registration number and ringer equivalence number
(REN). If requested, this information must be
provided to the telephone company.
2. As indicated below, the suitable jack (Universal
Service Order Code connecting arrangement) for
this equipment is shown. If applicable, the facility
interface codes (FIC) and service order codes
(SOC) are shown.
3. An FCC-compliant telephone and modular plug is
provided with this equipment. This equipment is
designed to be connected to the telephone network
or premises wiring using a compatible modular jack
which is Part 68 compliant. See installation
instructions for details.
4. The ringer equivalence number (REN) is used to
determine the quantity of devices not ringing in
response to an incoming call. In most, but not all
areas, the sum of the REN’s should not exceed five
(5.0). To be certain of the number of devices tat
may be connected to the line, as determined by the
total REN’s, contact the telephone company to
determine the maximum REN for the calling area.
81
Page 82

MultiMobile Owner’s Manual
5. If this equipment causes harm to the telephone
network, the telephone company will notify you in
advance that temporary discontinuance of service
may be required. But if advance notice is not
practical, the telephone company will notify the
customer as soon as possible. Also, you will be
advised of your right to file a complaint with the FCC
if you believe it is necessary.
6. The telephone company may make changes in
its facilities, equipment, operations, or procedures
that could affect the operation of the equipment. If
this happens, the telephone company will provide
advance notice in order for you to make necessary
modifications in order to maintain uninterrupted
service.
7. If trouble is experienced with this equipment (the
model of which is indicated below) please contact
Multi-Tech Systems, Inc. at the address shown
below for details of how to have repairs made. If the
equipment is causing harm to the network, the
telephone company may request you to remove the
equipment from the network until the problem is
resolved.
8. No repairs are to be made by you. Repairs are
to be made only by Multi-Tech Systems or its
licensees. Unauthorized repairs void registration
and warranty.
9. This equipment cannot be used on public coin
service provided by the telephone company.
Connection to Party Line Service is subject to state
tariffs. (Contact the state public utility commission,
public service commission or corporation
commission for information.)
10. If so required, this equipment is hearing-aid
compatible.
82
Page 83

Appendices
Manufacturer: Multi-Tech Systems, Inc.
Trade Name: MultiMobile
Model Number: MT3410ZLX and
MT3410ZLX-T/2
FCC Registration #: 503TAI-30556-PT-E
Ringer Equivalence: 0.6B
Modular Jack (USOC): RJ11C or RJ11W (single
line)
Service Center in USA: Multi-Tech Systems, Inc.
2205 Woodale Drive
Mounds View, MN 55112
Phone: (612) 785-3500
Fax: (612) 785-987
83
Page 84

MultiMobile Owner’s Manual
NOTE: This equipment has been tested and found
to be comply with the limits for a Class B digital
device, pursuant to Part 15 of the FCC rules. These
limits are designed to provide reasonable protection
against harmful interference when the equipment is
operated in a residential installation. This
equipment generates, uses and can radiate radio
frequency energy, and if not installed and used in
accordance with the instruction manual, may cause
harmful interference to radio communications.
However there is no guarantee that interference will
not occur in a particular installation. If this
equipment does cause harmful interference to radio
or television reception, which can be determined by
turning the equipment off and on, the user is
encouraged to try to correct the interference by one
or more of the following measures:
Reorient or relocate the receiving antenna
Increase the separation between the equipment and
receiver.
Connect the equipment into an outlet on a circuit
different from that to which the receiver is
connected.
Consult the dealer or an experienced radio/TV
technician for help.
This device complies with Part 15 of the FCC rules.
Operation is subject to the following two conditions:
(1) This device may not cause harmful interference.
(2) This device must accept any interference that
may cause undesired operation.
84
Page 85

Appendices
Warning: Changes or modifications to this unit not
expressly approved by the party responsible for
compliance could void the user’s authority to
operate the equipment.
FCC Fax Update
The Telephone Consumer Protection Act of 1991
makes it unlawful for any person to use a computer
or other electronic device to send any message via
a telephone fax machine unless such message
clearly contains in a margin at the top or bottom of
each page or the first page of the transmission, the
date and time it is sent and an identification of the
business or other entity, or other individual sending
the message and the telephone number of the
sending machine or such business, other entity, or
individual. See the cover page of your fax software
manual for setup details.
Canadian Limitations Notice
Notice: The ringer equivalence number (REN)
assigned to each terminal device provides an
indication of the maximum number of terminals
allowed to be connected to a telephone interface.
The termination of a interface may consist of any
combination of devices subject only to the
requirement that the sum of the ringer equivalence
numbers of all the devices does not exceed 5.
Notice: The Industry Canada label identifies
certificated equipment. This certification means that
the equipment meets certain telecommunications
network protective, operational and safety
requirements. The Industry Canada does not
guarantee the equipment will operate to the user’s
satisfaction.
85
Page 86

MultiMobile Owner’s Manual
Before installing this equipment, users should
ensure that it is permissible to be connected to the
facilities of the local telecommunications company.
The equipment must also be installed using an
acceptable method of connection. The customer
should be aware that compliance with the above
conditions may not prevent degradation of service in
some situations.
Repairs to certified equipment should be made by
an authorized Canadian maintenance facility
designated by the supplier. Any repairs or
alterations made by the user to this equipment, or
equipment malfunctions, may give the
telecommunications company cause to request the
user to disconnect the equipment.
Users should ensure for their own protection that the
electrical ground connections of the power utility,
telephone lines and internal metallic water pipe
system, if present, are connected together. This
precaution may be particularly important in rural
areas.
Caution: Users should not attempt to make such
connections themselves, but should contact the
appropriate electric inspection authority, or
electrician, as appropriate.
86
Page 87

Index
Index
A
About This Manual ...................................... 7
About This Product ...................................... 7
Ampersand Commands ............................. 64
Artisoft Lantastic 6.0 Installation ................ 28
AT Commands, S-Registers and
Result Codes ........................................... 59
Auto-answer ....................................... 39, 72
B
Back Slash Commands ............................. 67
backspace character ................................. 73
Basic AT Commands .......................... 60, 62
Basic Result Codes ................................... 78
Bulletin board systems
Multi-Tech BBS ................................... 54
C
Cable and Connector .................................. 8
Canadian Limitations Notice ...................... 85
CARDEN ................................................... 44
Carriage Return <CR> character .............. 72
Characters echo ................................. 39, 40
COM Port and IRQ Conflicts ..................... 47
Comprehensive Driver Notes .................... 29
CompuServe
Multi-Tech support .............................. 55
CompuServe/Internet ................................ 55
‘CONNECT’ response problem ................. 41
Connection problem .................................. 42
Consumer Instructions .............................. 81
87
Page 88

MultiMobile Owner’s Manual
D
Dash Commands ...................................... 71
Data Specifications ................................... 57
Desired DCE speed .................................. 75
Dimensions ................................................. 8
DOS Extended Memory Managers ........... 31
Driver Directory Structure ......................... 32
Driver Installation Screen .......................... 15
Driver Software Installation ....................... 14
Drivers Upgrades ...................................... 33
DTE speed ................................................ 77
DTMF duration and inter digit delay .......... 74
DTR ........................................................... 74
E
‘ERROR’ response .................................... 38
Errors ........................................................ 42
Escape character ...................................... 72
F
Factory Default Settings ............................ 29
Fax .............................................................. 9
Fax Specifications ..................................... 57
FCC Fax Update ....................................... 85
FCC Regulatory Statements ..................... 81
H
How To Use AT Commands ....................... 59
88
Page 89

Index
I
Inactivity timer ........................................... 75
Incoming rings ........................................... 72
Installation .......................................... 12, 29
Installing The MT3410ZLX or
MT3410ZLX-T/2 Card(s) ........................ 12
Introduction and Description ................. 7, 37
L
LAN Specifications .................................... 57
Line feed character ................................... 73
Loss of carrier setting ................................ 74
M
Manual Driver Installation .......................... 15
Microsoft LAN Manager Installation Screen 20
Microsoft LAN Manager Installation .......... 19
Modem Characteristics ............................... 9
Modem connection problem ...................... 41
Modem does not connect .......................... 42
Modem does not give a response after an AT
command .................................................. 38
Modem loses connection ........................... 41
Modem speaker control ............................. 41
Multi-Tech BBS .......................................... 54
Multi-Tech Fax-Back System ..................... 56
Multi-Tech's BBS ....................................... 54
89
Page 90

MultiMobile Owner’s Manual
N
NDIS Driver ............................................... 34
NDIS2 Driver for Workgroup ..................... 23
NDIS3 Driver for Workgroup ..................... 21
NetWare driver/NetW are Server ............... 47
Network ....................................................... 8
NOS Selection Screen .............................. 14
Novell Client Installation ............................ 17
Novell NetWare Installation ....................... 14
O
ODI Driver for Workgroups ........................ 24
Operating Systems .................................... 57
P
Packet Driver ............................................. 35
Packet Driver Installation .......................... 21
PC Card Interface ....................................... 8
PC Card Software - Manual Installation .... 29
Power .......................................................... 8
Power Consumption .................................... 8
Q
Quick Start ................................................ 29
R
Random errors in transmitted data ............ 42
Registration ........................................ 49, 52
90
Page 91

Index
S
S-Registers ............................................... 72
Service ............................................... 49, 53
Ship Kit Contents ...................................... 10
Software Installation .................................. 14
software problem ....................................... 39
Software User License Agreement ............ 50
Specifications ............................................ 57
T
Technical support ..................52, 53, 54, 55
Transmitting power level adjustment ......... 76
Troubleshooting ......................................... 37
V
V.42bis/MNP5 ............................................ 44
W
Warranty ............................................. 49, 53
Weight ......................................................... 8
Windows 3.1x ............................................ 47
Windows 95 ............................................... 48
Windows 95 Driver Installation Screen ...... 27
Windows 95 Installation ............................. 27
Windows For Workgroups ......................... 36
Windows for Workgroups Installation ........ 21
Windows NT 3.51 / NT 4.0 Installation ...... 26
91
 Loading...