

Page 1
Models MT3334ZDX
and MT3334ZDXV
Data/Fax Modem
Data/Fax/Voice Modem
Owner's Manual (User Guide)
Page 2

User Guide
S000343A Revision A
Models MT3334ZDX and MT3334ZDXV
This publication may not be reproduced, in whole or in part, without prior
expressed written permission from Multi-Tech Systems, Inc.
All rights reserved.
Copyright © 1997-2004, by Multi-Tech Systems, Inc.
Multi-Tech Systems, Inc. makes no representations or warranties with
respect to the contents hereof and specifically disclaims any implied
warranties of merchantability or fitness for any particular purpose.
Furthermore, Multi-Tech Systems, Inc. reserves the right to revise this
publication and to make changes from time to time in the content hereof
without obligation of Multi-Tech Systems, Inc. to notify any person or
organization of such revisions or changes.
Patents
This Product is covered by one or more of the following U.S. Patent Numbers:
5.301.274; 5.309.562; 5.355.365; 5.355.653; 5.452.289; 5.453.986; 5,535,204
Patents Pending.
Revision Description
A Initial release for publication on CD
(4/26/04)
Previous release incorporated new commands.
(11/24/97)
MultiModem, MultiModemZDX/V, Multi-Tech, and the Multi-Tech logo are
trademarks of Multi-Tech Systems, Inc.
Microsoft, Windows, and Windows 95 are registered trademarks of the
Microsoft Corporation.
All brand and product names mentioned in this publication are trademarks
or registered trademarks of their respective companies.
. Other
Multi-Tech Systems, Inc.
Mounds View, Minnesota 55112 U.S.A.
Internet Address: http://www.multitech.com
2205 Woodale Drive
(763) 785-3500 or (800) 328-9717
U. S. FAX 763-785-9874
Technical Support (800) 972-2439
Page 3

Contents
Chapter 1 - Introduction and Description
Introduction.................................................................................................................... 5
Requirements ................................................................................................................ 5
Computer............................................................................................................... 5
Serial Cable........................................................................................................... 5
Telephone Line...................................................................................................... 5
Communications Software ................................................................................... 6
Product Features........................................................................................................... 6
Data ....................................................................................................................... 6
Fax ......................................................................................................................... 7
Voice (Model MT3334ZDXV only)........................................................................ 7
About this Manual ......................................................................................................... 7
Chapter 1 - Introduction and Description............................................................. 7
Chapter 2 - Installation and Connection .............................................................. 7
Chapter 3 - AT Commands, S-Registers and Result Codes............................... 8
Chapter 4 - Testing Your Modem ......................................................................... 8
Chapter 5 - Service, Warranty & Technical Support............................................ 8
Appendices............................................................................................................ 8
Chapter 2 - Installation
Introduction.................................................................................................................... 9
Safety Warnings ............................................................................................................ 9
Installation Process....................................................................................................... 9
LED Indicators............................................................................................................. 12
Is Your MultiModemZDX Ready for Use? .................................................................. 14
Operating Your MultiModemZDX................................................................................ 15
Simple Operations .............................................................................................. 15
Remote Configuration................................................................................................. 16
Software Configuration ............................................................................................... 17
Hardware/Software Confirmation ....................................................................... 18
Troubleshooting ........................................................................................................... 19
None of the LEDs Light When the Modem Is On.............................................. 19
The Modem Does Not Respond to Commands ................................................ 20
The Modem Dials But Cannot Make Connection .............................................. 22
The Modem Disconnects While Online.............................................................. 24
The Modem Cannot Connect When Answering ................................................ 24
Slow File Transfer ............................................................................................... 25
Losing Data ......................................................................................................... 25
Garbage Characters on the Monitor .................................................................. 2 6
Chapter 3 - AT Commands, S-Registers and
Result Codes
Command Summary ................................................................................................... 27
S-Registers.................................................................................................................. 36
Result Codes............................................................................................................... 41
iii
Page 4

Chapter 4 - Modem T esting
Local Analog Loopback Test/V.54 Loop 3.................................................................. 4 2
Digital Loopback Test/V.54 Loop 2 (Local/Manual) ................................................... 43
Digital Loopback Test/V.54 Loop 2 (Remote/Auto).................................................... 44
Chapter 5 - Service, Warranty and Tech Support
Introduction.................................................................................................................. 46
Limited Warranty ......................................................................................................... 46
On-line Warranty Registration............................................................................ 4 7
Tech Support ............................................................................................................... 47
Recording Modem Information ........................................................................... 47
Service ................................................................................................................. 4 8
About the Multi-Tech BBS..........................................................................................49
Logging on to the Multi-Tech BBS ..................................................................... 49
Downloading a File ............................................................................................. 49
Reading a Message ............................................................................................ 50
Leaving a Message............................................................................................. 50
Bulletins............................................................................................................... 51
About CompuServe/Internet ....................................................................................... 51
About the Multi-Tech Fax-Back Service ..................................................................... 51
Appendix A - Technical Specifications
Appendix B - T one Dial Frequencies
Appendix C - Regulatory Information
FCC Regulations for Telephone Line Interconnection ............................................... 5 7
Canadian Limitations Notice....................................................................................... 60
Compliance with BABT Requirements ....................................................................... 61
European Low Voltage Directive........................................................................ 61
Compliance with BS6305 Clause 6.2, BS6320 Clause 7.2, and BABT/SITS/82/
005S/D................................................................................................................. 62
Compliance with BS6789: Section 3.1 and Part 2 ............................................ 63
Compliance with BS6328 Part 1 ........................................................................ 63
Modem CE Mark EMC and Safety Compliance ........................................................ 64
Australian and New Zealand Modem Warning Notice ............................................... 6 4
Australian Modem Warning Notice ..................................................................... 64
New Zealand Telecom Warning Notice.............................................................. 65
Index
iv
Page 5

1 - Introduction and Description
Chapter 1 - Introduction and Description
Introduction
Welcome to the world of data communications. You have acquired one
of the finest intelligent data/fax modems available today, the
MultiModemZDX, from Multi-Tech Systems. This Owner’s Manual will
help you install, configure, test and use your MultiModemZDX.
Requirements
In addition to the contents of the MultiModemZDX package, you will need
the following equipment.
Computer
The MultiModemZDX (MT3334ZDX or MT3334ZDXV) can be connected
to any computer with an RS-232 serial port, such as the IBM PC, XT, AT,
and PS/2 computers, and most IBM compatibles.
system should have a processing speed of at least 75 MHz in order to take
full advantage of the telephony features of this product.
Serial Cable
Note that your computer
You will need a serial cable to connect the MultiModemZDX to your
computer. Serial cables are available at computer stores and many office
supply stores. The cable must have a DB-25P connector at the modem
end. For IBM and compatible computers, the other end may have a DB25P connector or a DB-9S connector, depending on your particular
computer and whether you are using the COM1 or the COM2 serial port.
Telephone Line
You must have a telephone line with a conveniently located connector
(jack) to accept the cable that comes with the MultiModemZDX. If you do
not have a telephone jack near your computer, you should install an
extension before proceeding.
5
Page 6

MT3334ZDX/V Owner's Manual
Communications Software
You will need data communications (datacomm), fax communications
software and, for the MultiModemZDX, an appropriate application software
package to access the Personal Voice-Mail features of the
MultiModemZDXV. The MultiModemZDX is also compatible with
datacomm and fax programs you may already own.
Product Features
General features include:
• Compliance with major ITU-T, TIA, and EIA international standards
to ensure compatibility with other modems.
• Distinguishes data, fax, or voice calls using DTMF and tone detection
with software packages supporting these features.
• Caller ID to identify your caller’s phone number (available on U.S.
products).
Data
• Supports the enhanced ITU-T V.34 standard, with data transmission
speeds to 33.6K bps, while also maintaining compatibility with lowerspeed modems.
• Supports asynchronous data rates at 33.6K, 31.2K, 28.8K, 26.4K,
24K, 21.6K, 19.2K, 16.8K, 14.4K, 12K, 9600, 4800, 2400, 1200, and
300 bps.
• Automatic fallback to slower speeds in noisy line conditions, and fallforward to faster speeds as conditions improve.
• ITU V.42 LAP-M and MNP Class 3 and 4 error correction.
• ITU V.42bis (4-to-1) and MNP 5 (2-to-1) data compression.
• Automatic disabling of compression when transferring alreadycompressed files.
• Autodial, redial, pulse (rotary) and touch-tone dial.
• Dial tone and busy signal detection for reliable call-progress detection.
• Compatibility with the standard AT command set used by most
communication programs.
6
Page 7

1 - Introduction and Description
Fax
• Supports V.17, Group 3 fax communication standards, allowing it to
communicate with other fax modems as well as with fax machines.
• Responds to Class 1 fax commands, enabling it to exchange editable
and encrypted faxes with other Windows 95 computers.
• Sends and receives faxes from your computer at 14,400 bps, 9600
bps, 7200 bps, 4800 bps, 2400 bps, or 300 bps.
Voice (Model MT3334ZDXV only)
• Full-duplex speakerphone support with adjustable speaker volume
control. Can record and play back answering machine messages
using optional microphone and speaker.
• Remote/local telephone answering machine (TAM) capabilities
include voice mail control, record/playback, and call screening.
• Supports the TIA/EIA IS-101 AT+V voice command set.
Note: For more information on +V commands supported by the
MT3334ZDXV refer to Multi-Tech's Voice +V Commands Developer's Kit
(P/N 82039200). This document is available upon request.
About this Manual
This manual is divided into five chapters and three appendices. The
information contained in each chapter and appendix is as follows:
Chapter 1
Chapter 1 begins with a short product introduction and description;
followed by a guide (which you are now reading) to the use of this manual.
Chapter 2
Chapter 2 documents the procedure for connecting the MultiModemZDX
to your computer and to the phone line. Details are given, supported by
illustrations as a guide for installing your MultiModemZDX to the point of
operation. There is also a Troubleshooting section in the event your
MultiModemZDX is not operating properly.
-
Introduction and Description
-
Installation and Connection
7
Page 8

MT3334ZDX/V Owner's Manual
Chapter 3
Chapter 3 documents default and option ATcommands, S-Registers and
Result Codes supported by the MultiModemZDX.
-
AT Commands, S-Registers and Result Codes
Chapter 4 - Testing Your Modem
Chapter 4 covers the modem's built-in test features. These are: Poweron Self Test, Local Analog Loopback, Digital Loopback and Remote
Digital Loopback Tests. We have included a description of each test and
how to use each test procedure.
Chapter 5
Chapter 5 provides instructions for getting modems serviced at the
factory, statements on your ten-year warranty, information about our user
Bulletin Board Service (
CompuServe and Internet forums.
-
Service, Warranty & Technical Support
BBS
) and receiving technical support via the
Appendices
Appendix A - Technical Specifications
Appendix B - Tone Dial Frequencies
Appendix C - Regulatory Information
8
Page 9
2 - Installation
Chapter 2 - Installation
Introduction
This chapter will provide you with the basic steps necessary to install and
configure your MultiModemZDX. Before attempting any procedure, be
sure to read the safety warnings in the following section.
Safety Warnings
1. Never install telephone wiring during a lightning storm.
2. Never install telephone jacks in wet locations unless the jack is
specifically designed for wet locations.
3. Never touch uninsulated telephone wires or terminals unless the
telephone line has been disconnected at the network interface.
4. Use caution when installing or modifying telephone lines.
5. Avoid using a telephone (other than a cordless type) during an
electrical storm. There may be a remote risk of electrical shock from
lightning.
6. Do not use the telephone to report a gas leak in the vicinity of the leak.
Installation Process
The installation of the MultiModemZDX consists of making the physical
connections necessary to render the modem functional with your computer.
This includes making the proper serial, phone line, and power connections.
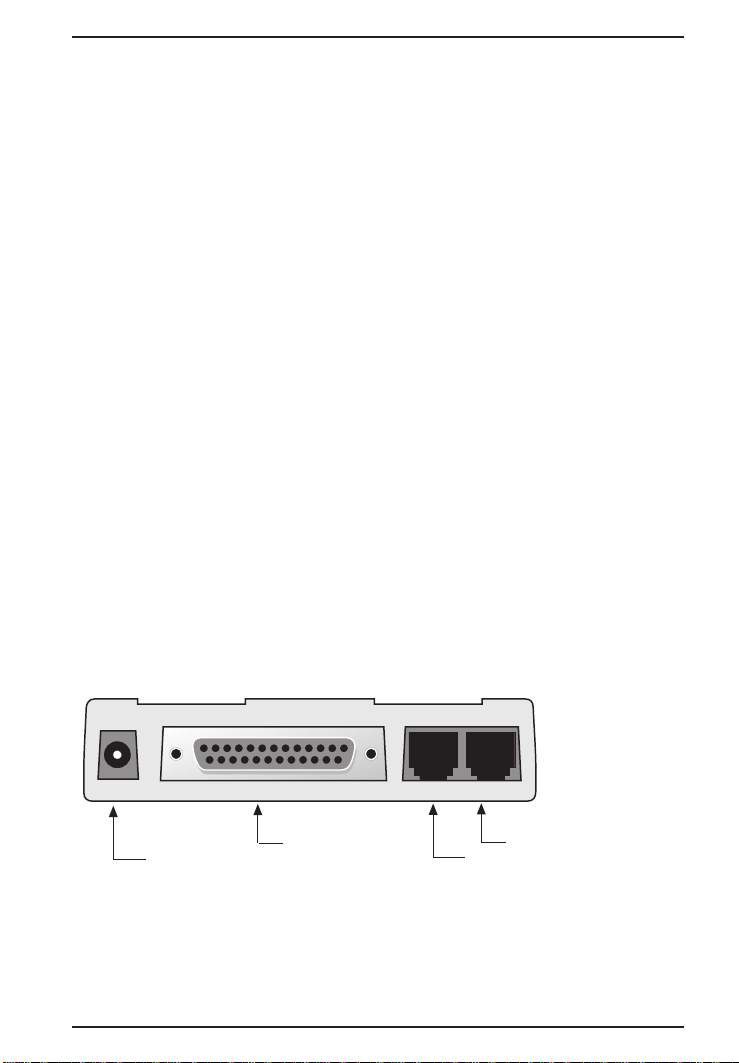
POWER
Power Connector
(to Transformer)
RS232
DB25 to Computer
PHONE LINE
RJ11/Phone Connection
RJ11/PSTN Connection
Figure 2-1. MultiModemZDX Connections
9
Page 10

MT3334ZDX/V Owner's Manual
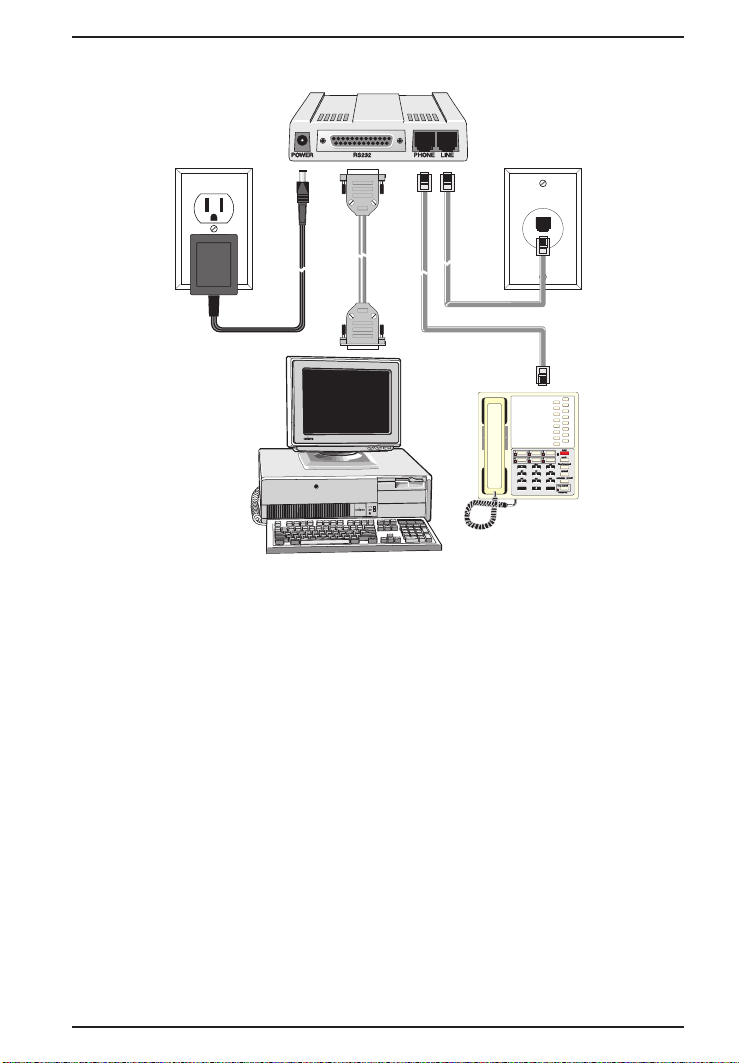
To install your MultiModemZDX:
1. Attach the MultiModemZDX to dial-up phone lines using the RJ11
telephone cord. This is accomplished by plugging one end of the
cable provided with the MultiModemZDX into the telephone jack in
your home or office; and plugging the other end into the LINE jack on
the MultiModemZDX.
The LINE jack is not interchangeable with the PHONE jack on the
MultiModemZDX. Do not plug the telephone into the LINE jack or the
line cable into the PHONE jack.
2. Attach your MultiModemZDX to your PC or terminal with an RS232
(or V.24) cable (see Figure 2-1). Be sure to tighten the mounting
screws on the DB connectors.
3. Connect your telephone set to phone jack via RJ11 cable.
4. Attach your MultiModemZDX to the AC Power transformer and
plugging the AC connector into a live AC outlet.
5. Turn on power by flipping the
MultiModemZDX to the
"ON"
"ON/OFF"
position.
switch on the side of the
Note: Use only the power supply provided with the MultiModemZDX.
Use of any other power supply will void the warranty and could damage
the modem.
6. Make sure modem and computer/terminal serial port baud rates are
adjusted. (Note that several programs can check this for you. If you
have MS-DOS 5.0 or higher, a program called MSD.EXE [Microsoft
Diagnostics] is in your DOS directory. Typing MSD at the DOS
prompt brings up a screen that provides a variety of information about
your computer. Select COM ports and it lists information about your
com port, e.g., UART Type, Address, and IRQ, to name a few. Once
you know your serial port's UART type, you can set your
communications's software appropriately.)
7. Proceed to Chapter 3 of this manual, or to your data communications
software manual.
10
Page 11
✳
#
2 - Installation
Figure 2-2. MultiModemZDX Connections
11
Page 12
MT3334ZDX/V Owner's Manual
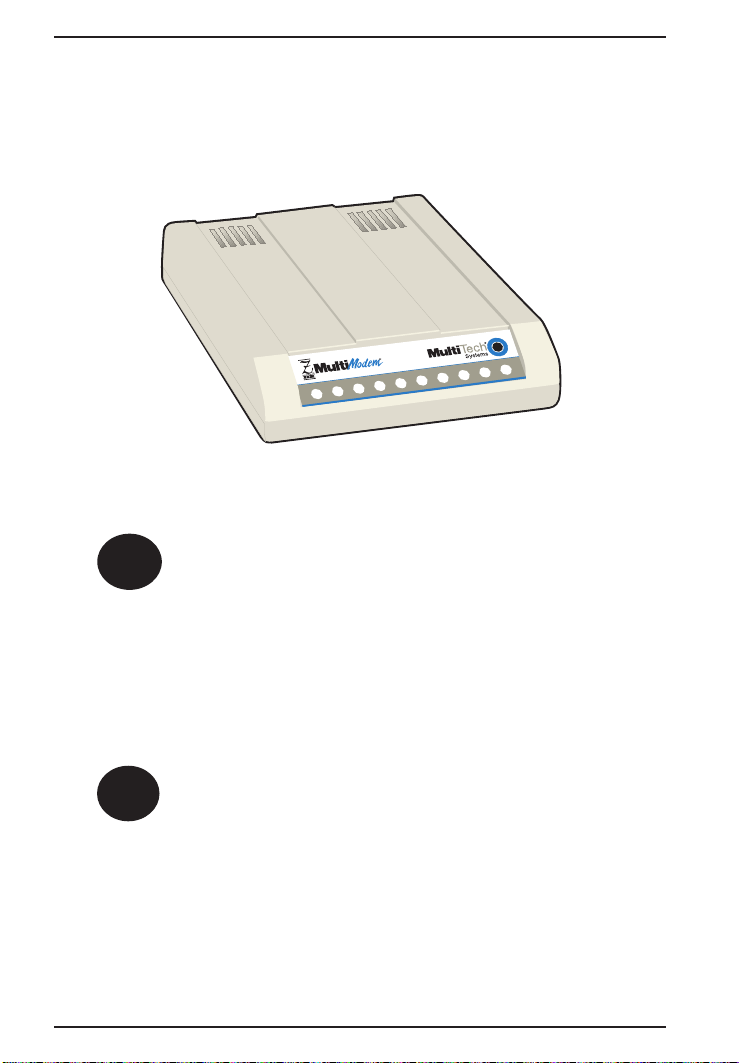
LED Indicators
The MultiModemZDX has ten LED indicators (Figure 2-3) to report status
(such as verifying proper installation) and line activity (such as monitoring
the status of a connection).
Figure 2-3. Front Panel
TD
Transmit Data. The TD LED flashes when data is being transmitted (on
for a space, off for a mark). Signals on this circuit are generated by the
terminal and transferred to the transmitter of the MultiModemZDX. The
transmitting terminal should hold this line in the marking state when no
data is being transmitted, including intervals between characters or
words. The TRANSMIT (TD) LED indicates the status of this circuit.
RD
Receive Data. The RD LED flashes when data is being received (on for
a space, off for a mark). Data signals received from the remote
MultiModemZDX are presented on this line. When no carrier signal is
being received (pin 8 negative), this line will be forced into a marking
condition. The RECEIVE (RD) LED indicates the status of this signal.
12
Page 13

2 - Installation
CD
Carrier Detect. This LED lights when a valid carrier signal from another
modem is detected.
33
V.34. This LED is lit when the modem is connected in V.34 mode at
33,600 bps.
14
V.32
bis
. This LED is lit when the modem is connected in V.32
Note at speeds lower than a V.32
speed LEDs remain unlit.
bis
connection, the MultiModemZDX
bis
mode.
96
9600bps
. This LED is lit when the modem is connected at 9600 bps.
OH
Off Hook. The condition of Off Hook indicates to the central office that the
MultiModemZDX wants the phone line to do something (i.e., dial or
answer a call). This LED is also lit when the MultiModemZDX has
achieved on-line status.
13
Page 14

MT3334ZDX/V Owner's Manual
TR
Terminal Ready. When TR is lit, the MultiModemZDX can answer an
incoming call. This signal (TR or DTR) provides a means for the terminal
or computer to control the MultiModemZDX's connection to the
communications channel. A high DTR signal is required by the
MultiModemZDX to be able to communicate. The state of the TR LED
matches that of the DTR circuit on pin 20 of the RS232/V.24 interface.
EC
Error Correction. This LED is lit when the modem is set for V.42 error
correction, and flashes on and off when data compression is activated.
FX
Fax. This LED is lit when the modem is connected in Fax mode.
Is Your MultiModemZDX Ready for Use?
As soon as you have connected power to the modem, if you’re an
experienced modem user, you may simply want to check your modem’s
settings for data compression, error correction, and so on. You may find
that you can get moving quite quickly if you just issue the
command. This command lists how your modem is currently configured.
If you come across a setting you’re unsure of, refer to Chapter 3 of this
manual for AT command and S-Register explanations and defaults. If
you’re a novice, please continue to the next sections of this chapter.
14
AT&V<cr>
Page 15

2 - Installation
Operating Your MultiModemZDX
You control your MultiModemZDX by issuing AT commands and setting
S-Registers. Right now your MultiModemZDX is set up for the most typical
user application, that is, as a traditional modem set to make a dial-up call
to a remote installation where the call is answered automatically; therefore,
you shouldn’t need to change the current default configuration. (If
however, you know that your application does not follow this profile,
please refer to Chapter 3 for AT Commands and S-Registers.)
In operating your MultiModemZDX it is likely that you will use your data
communications software to either:
• enter “terminal” mode, where you can “speak most directly” to the
modem by issuing AT commands, or to
• launch a datacomm session through a set of modem configurations
which you select and then associate with a target telephone number.
Once you have created, saved, and named this set of information
according to your connection needs and your datacomm software’s
conventions, the software then simplifies your dialing because you
needn’t reconfigure your modem, nor run the risk of mistakenly
keying-in incorrect information.
Either way, you need to understand that an AT command is the method
by which your modem is controlled, and must therefore prefix nearly all
commands. AT stands for attention, and alerts the modem that a
command follows. You may enter these commands with either upper- or
lower-case characters. Entering AT automatically sets the modem’s
serial baud rate to match your computer’s and also sets the modem’s
parity. It also clears the modem’s command buffer. Once you’re in
terminal mode, enter AT followed by <CR> to check whether your modem
is operational. If everything’s fine, your modem will respond OK.
Simple Operations
You can dial by using the ATD command and the phone number of the
modem with which you wish to connect, e.g., ATD6127853500. Your
modem will dial the number; a “scrambling” noise is heard as the modem
negotiates the kind of connection it can make, and once the modems have
settled on a common connection, a connect message on your computer’s
video is displayed. To hang up a call, enter +++ATH<CR>. Your modem
will return on hook, just as if you had returned a phone’s handset to its
cradle. Your video now displays OK, signifying that your modem is ready
for your next command.
15
Page 16

MT3334ZDX/V Owner's Manual
Remote Configuration
The Remote Configuration feature is a network management tool that
allows you to configure modems remotely. This means you could
configure modems anywhere in your network from one location without
having to visit the sites or rely on remote users to follow your instructions.
You can download new parameters and implement new features.
S-Register S9 has been set up to contain the special Remote Configuration
escape code. When calling a Remote Configuration equipped modem,
you enter the proper Remote Escape Code entering your Set-up Password.
You can then execute AT commands as if you were connected locally. If
you set S-Register S9 to 0 (zero), Remote Configuration is disabled.
Setting S9 to a value other than zero, defines the escape key. For
example, if S9 = 37, the % (percent sign) would be the escape key. The
S9 value can be stored with the &W0 command.
To store the remote configuration password, type the following:
AT#S=password<RETURN>
The password can be from 1 to 8 characters in length and is case
sensitive. This password can be changed in command mode but not in
remote configuration. If no user password has been stored, the default
password is "MTSMODEM". If a user password has been set, the default
password is disabled.
To enter Remote Configuration from online mode, enter the value in S9
three times, the type ATpassword <RETURN>. For example:
If S9 = 37, enter: %%%ATpassword<RETURN> and you will be
in command mode.
Note: If an AT&F (load factory defaults) command is entered, or if an ATZ
(modem reset) command is entered and S9 has not been saved, S9 will
return to zero. However, if either of these two commands are entered, the
password will remain saved.
16
Page 17
2 - Installation
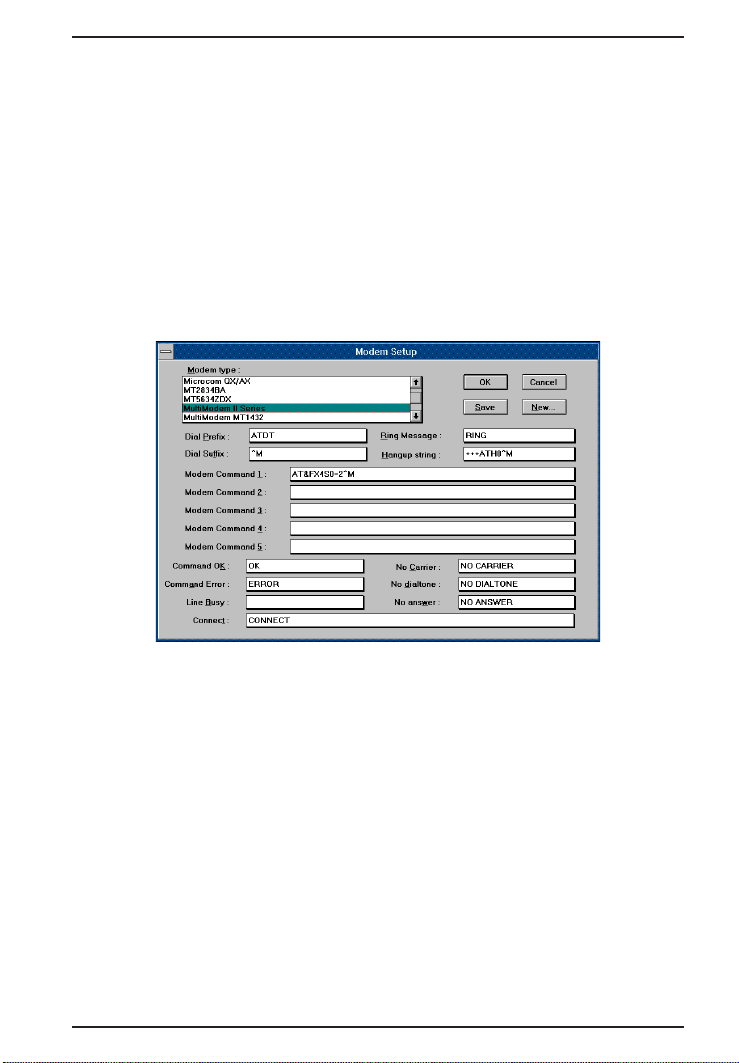
Software Configuration
Communications software must be configured to work with the
MultiModemZDX, your computer, and the remote system it is calling.
Fortunately, most communications programs make the process easy by
providing a default initialization string to your modem as well as defaults
for most of the other required parameters.
Some software programs allow you to select your modem type from a
menu. By this method, initialization strings that correspond to a particular
modem type can be selected to operate optimally with the software it is
utilizing.
Figure 2-4. MultiModemZDX Initialization Setup
Other software programs require you enter an initialization string in the
software modem setup screen. If this is the requirement in your software
application, enter the following command string to initialize your modem:
AT&F<cr>
This setting configures your modem to operate optimally with the software
it is utilizing.
Note: Refer to your respective software manual for further information on
your communications software.
17
Page 18
MT3334ZDX/V Owner's Manual
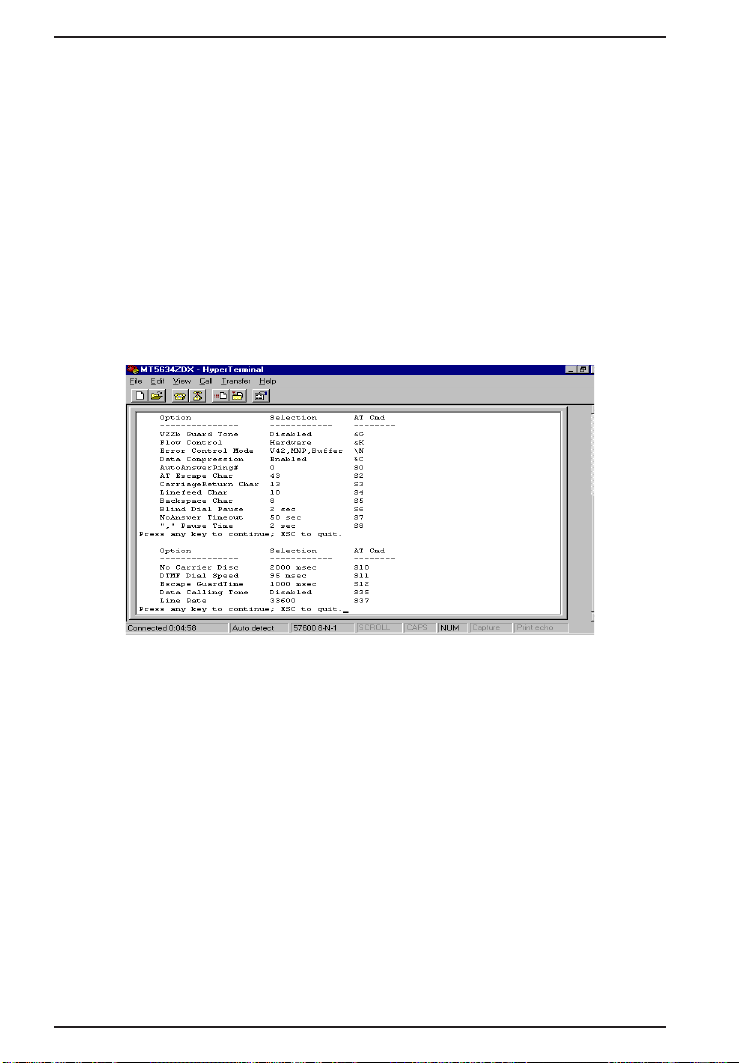
Hardware/Software Confirmation
To confirm that your modem (hardware) and communications package
(software) is working properly:
1. Go into terminal mode in your communications package.
2. To determine if your computer and modem are communicating
properly, Enter: AT<CR> At this point your video monitor should
display
characters appear, see the troubleshooting section of this chapter.
3. To confirm how your MultiModemZDX is configured, enter
What is then reported is how the MultiModemZDX is currently
configured.
OK.
If the characters you typed do not appear or if double
AT&V<cr>
.
18
Figure 2-5. MultiModemZDX Configuration Confirmation
Page 19

2 - Installation
Troubleshooting
Your MultiModemZDX was thoroughly tested at the factory before it was
shipped. If you are unable to make a successful connection or if you
experience data loss or garbled characters during your connection, it is
possible that the modem is defective. However, it is more likely that the
source of your problem lies elsewhere. Problems you may encounter
include:
• None of the LEDs light when the modem is on;
• The modem does not respond to commands;
• The modem dials but is unable to make a connection;
• The modem disconnects while online;
• The modem cannot connect when answering;
• Slow file transfer;
• Losing data; or
• Garbage characters on the monitor.
None of the LEDs Light When the Modem Is On
When you turn on the MultiModemZDX, the LED indicators on the front
panel should flash briefly as the modem runs a self-test. If the LEDs
remain off, the modem is probably not receiving power.
• Make sure the modem’s power switch is on, especially if you normally
turn on the modem by turning on a power strip.
• If the power supply is plugged into a power strip, make sure the power
strip is plugged in, and its power switch is on.
• Make sure the power supply module is firmly connected to the
modem and to the wall outlet or power strip.
• If the power strip is on and the modem switch is on, try moving the
modem power supply to another outlet on the power strip.
• Test the outlet is live by plugging a lamp into it.
• The modem or power supply may be defective. If you have another
Multi-Tech modem, try swapping modems. If the problem goes away,
the first modem or power supply may be defective. Call Tech Support
for assistance.
Note: Do not under any circumstances replace the power supply module
with one designed for another product, as it may damage the modem and
void your warranty.
19
Page 20

MT3334ZDX/V Owner's Manual
The Modem Does Not Respond to Commands
• Make sure the modem is plugged in and turned on. (See “None of the
LEDs Light When the Modem Is On.”)
• Make sure you are issuing the modem commands from the data
communications software, either manually in terminal mode or
automatically once you have configured the software. (You cannot
send commands to the modem from the DOS prompt.)
• Make sure you are in terminal mode in your data communications
program, then type AT and press ENTER. If you get an OK response,
your connections are good and the problem likely is in your phonebook
entry or session settings.
• Try resetting your modem by turning it off and on. Make sure there is
a reset command (&F) in your initialization string, or your modem
may not initialize correctly.
• If you don’t get an OK, the problem may still be in the communications
software. Make sure you have done whatever is necessary in your
software to make a port connection. Not all communications programs
connect to the COM port automatically. Some connect when the
software loads and remain connected until the program terminates.
Others can disconnect without exiting the program. Many
communications software packages also allow multiple terminals to
be open, but only one can access the modem at a time. If your
package reports that it cannot make a connection, yet the modem’s
TR
indicator is on, click on the Window menu to see if more than one
terminal is open. The modem’s TR indicator shows that the software
has made a connection with the modem through the COM port.
• Your communications software settings may not match the physical
port the modem is connected to. The serial cable may be plugged into
the wrong connector—check your computer documentation to make
sure. Or you may have selected a COM port in your software other
than the one the modem is physically connected to—compare the
settings in your software to the physical connection.
• If the modem is on, the cable is plugged into the correct port, the
communications software is configured correctly, and you still don’t
get an OK, the fault may be in the serial cable. Make sure it is firmly
connected at both ends.
• Is this the first time you have used the cable? If so, it may not be
correct. Check the cable description on the packaging to make sure
the cable is the right one for your computer.
20
Page 21

2 - Installation
• Peripheral expansion cards, such as bus mouse and sound cards,
may include a serial port preconfigured as COM1 or COM2. The extra
serial port, or the card itself, may use the same COM port, memory
address, or interrupt request (IRQ) as your communications port. Be
sure to disable any unused ports.
To look for address or IRQ conflicts if you use Windows 3.1x, select
File, Run
select
and IRQs that are in use. If you find an IRQ conflict, note which IRQs
are not being used, then change one of the conflicting devices to use
one of the unused IRQs. If you find an address conflict, change the
address of one of the conflicting devices.
To change a port address or IRQ in Windows 3.1x, double-click the
Control Panel
change, click
address and/or interrupt. If you wish to use COM3 or COM4, note that
COM3 shares an IRQ with COM1, as does COM4 with COM2, so you
should change their IRQs to unused ones, if possible.
If you use Windows 95, right-click on
from the menu, click on the
Ports
connected to. In the port’s Properties sheet, click on the
tab to see the port’s Input/Output range and Interrupt Request. If
another device is using the same address range or IRQ, it will appear
in the Conflicting Device List. Uncheck Use Automatic Settings to
change the port’s settings so they do not conflict with the other
device, or select the port the conflicting device is on and change it
instead. If you need to open your computer to change switches or
jumpers on the conflicting device; refer to the device’s documentation.
• The serial port may be defective. If you have another serial port,
install the modem on it, change the COM port setting in your software,
and try again.
• The modem may be defective. If you have another Multi-Tech
modem, try swapping modems. If the problem goes away, the first
modem is possibly defective. Call Tech Support for assistance (see
Chapter 5).
in Program Manager, type
Mouse, COM Ports
icon, then the
Settings
, then double-click on the
, and
Ports
, click
MSD
, and press ENTER. Then
IRQ Status
icon. Click on the port you want to
Advanced
Device Manager
Communications Port
and note the addresses
, and select the new port
My Computer
, select
tab, double-click on
your modem is
Properties
Resources
21
Page 22

MT3334ZDX/V Owner's Manual
The Modem Dials But Cannot Make Connection
There can be several reasons the MultiModemZDX fails to make a
connection. Possibilities include
• lack of a physical connection to the telephone line.
• a wrong dial tone.
• a busy signal.
• a wrong number.
• no modem at the other end.
• a faulty modem, computer, or software at the other end.
• incompatibility between modems.
You can narrow the list of possibilities by using extended result codes. To
enable them, enter ATV1X4 and press ENTER while in terminal mode, or
include V1X4 in the modem’s initialization string. When you dial again, the
modem will report the call’s progress.
• If the modem reports
telephone line cable is connected to both the modem’s LINE jack (not
the PHONE jack) and the telephone wall jack. If the cable looks
secure, try replacing it. If that doesn’t work, the problem may be in
your building’s telephone installation. To test the building installation,
plug a telephone into your modem’s telephone wall jack and listen for
a dial tone. If you hear a dial tone, your modem may be installed
behind a company phone system (PBX) with an internal dial tone that
sounds different from the normal dial tone. In that case, the modem
may not recognize the dial tone and may treat it as an error. Check
your PBX manual to see if you can change the internal dial tone; if you
can’t, change your modem’s initialization string to replace X4 with X3,
which will cause the modem to ignore dial tones.
• If the modem reports
case you should try again later, or it may indicate that you have failed
to add a 9, prefix to the phone number if you must dial 9 for an outside
line.
If you must dial 9 to get an outside line, the easiest way to dial it
automatically is to include it in the modem’s dial prefix, e.g., ATDT9,.
Note the comma, which inserts a pause before the number is dialed.
By inserting 9, into the dial prefix, you do not have to include it in each
directory entry.
NO DIALTONE
BUSY
, the other number may be busy, in which
, check that the modem’s
22
Page 23

2 - Installation
To change the dial prefix in your communications package, select
Setup, Modem
; then select the modem type you are using, and type
the new prefix in the Dial Prefix box. To change the dial prefix in
Windows Terminal, select
it in Windows 95 HyperTerminal, select
bar, click
boxes in
Dialing Properties
How I Dial from This Location
• If the modem reports
Settings
, Modem Commands. To change
Call
, Connect from the menu
, and type 9 in the local and long distance
.
NO ANSWER
, the other system has failed to go
off-hook, or you might have dialed a wrong number. Check the
number.
• If the modem reports
NO CARRIER
, the phone was answered at the
other end, but no connection was made. You might have dialed a
wrong number, and a person answered instead of a computer, or you
might have dialed the correct number but the other computer or
software was turned off or faulty. Check the number and try again, or
try calling another system to make sure your modem is working. Also,
try calling the number on your telephone. If you hear harsh sounds,
then another modem is answering the call, and the modems may be
having problems negotiating because of modem incompatibilities or
line noise. Try connecting at a lower speed.
23
Page 24

MT3334ZDX/V Owner's Manual
The Modem Disconnects While Online
• If you have call waiting on the same phone line as your modem, it may
interrupt your connection when someone tries to call you. If you have
call waiting, disable it before each call. In most telephone areas, you
can disable call waiting by preceding the telephone number with
(check with your local telephone company).
You can automatically disable call waiting by including the disabling
code in the modem’s dial prefix (e.g., ATDT*70,—note the comma,
which inserts a pause before the number is dialed). To change the
dial prefix in your communications package, select
then select the modem type you are using, and type the new prefix
in the Dial Prefix box. To change the dial prefix in Windows Terminal,
select
Settings
HyperTerminal, select
Properties
correct code for your phone service.
• If you have extension phones on the same line as your modem, you
or someone else can interrupt the connection by picking up another
phone. If this is a frequent problem, disconnect the extension phones
before using the modem, or install another phone line especially for
the modem.
• Check for loose connections between the modem and the computer,
the telephone jack, and AC power.
• You may have had a poor connection because of line conditions or
the problem may have originated on the other end of the line. Try
again.
• If you were online with a BBS, it may have hung up on you because
of lack of activity on your part or because you exceeded your time limit
for the day. Try again.
, Modem Commands. To change it in Windows 95
Call
, Connect from the menu bar, click
, check This Location has Call Waiting, and select the
Setup, Modem
*70
;
Dialing
The Modem Cannot Connect When Answering
• Auto-answer may be disabled. Turn on auto-answer in your datacomm
program or send the command
mode.
24
ATS0=1
to your modem in terminal
Page 25

2 - Installation
Slow File Transfer
• You may have an older UART. For best throughput, install a 16550AFN
UART or a Multi-Tech ISI serial port card.
• If you are running under Windows 3.1 and have a 16550AFN UART,
you must replace the Windows serial driver, COMM.DRV, to take full
advantage of the UART’s speed.
• If you are using a slow transfer protocol, such as Xmodem or Kermit,
try Zmodem or Ymodem/G instead.
• Is your line noisy? If there is static on your line, the modem has to
resend many blocks of data to insure accuracy. You must have a
clean line for maximum speed.
• Are you downloading a compressed file with MNP 5 hardware
compression enabled? Since hardware data compression cannot
compress a file already compressed by an archiving program, the
transfer can be marginally slower with data compression enabled.
• Try entering the &V (View Parameters) command, making a screen
print of the diagnostics listing, and checking for parameters that may
be unacceptable.
Losing Data
• If you are using data compression and a high speed serial port, set
the serial port baud rate to four times the data rate.
• Your UART may not be reliable at serial port speeds over 9600 bps
or 19,200 bps. Turn off data compression, reset your serial port
speed to a lower rate, or replace your serial port with a faster one.
• Make sure the flow control method you selected in software matches
the method selected in the modem.
• If you are running under Windows 3.1 and have a 16550AFN UART,
you may need to turn on the 16550’s data buffers and/or replace the
Windows serial driver, COMM.DRV.
• Try entering the &V (View Parameters) command, making a screen
print of the diagnostics listing, and checking for parameters that may
be unacceptable.
25
Page 26

MT3334ZDX/V Owner's Manual
Garbage Characters on the Monitor
• Your computer and the remote computer may be set to different word
lengths, stop bits, or parities. If you have connected at 8-N-1, try
changing to 7-E-1, or vice-versa, using your communications software.
• You may be experiencing line noise. Enable error correction, if it is
disabled, or hang up and call again; you may get a better connection.
• At speeds above 2400 bps, the remote modem might not use the
same transmission or error correction standards as your modem. Try
connecting at a slower speed or disabling error correction. (With no
error correction, however, line noise can cause garbage characters.)
• Try entering the &V (View Parameters) command, making a screen
print of the diagnostics listing, and checking for parameters that may
be unacceptable.
26
Page 27

3 - AT Commands, S-Registers and Result Codes
Chapter 3 - AT Commands, S-Registers and
Result Codes
Command Summary
This section summarizes your modem’s AT commands, S-Registers and
Result codes.
Command: AT Attention Code
Values: n/a
Description: The attention code precedes all command lines
except A/ and the escape sequence.
Command: ENTER or Carriage Return <CR> Key
Values: n/a
Description: Press the ENTER or Carriage Return key to execute
most commands.
Command: A Answer
Values: n/a
Description: Answer an incoming call before the final ring.
Command: A/ Repeat Last Command
Values: n/a
Description: Repeat the last command string. Do not precede
this command with AT. Do not press ENTER to
execute.
Command: B
Values:
Default: 1
Description: B0 Select ITU-T V.22 mode when modem is at 1200
Command: C
Values:
Default: 1
Description: C1 Normal transmit carrier switching (included for
n
Communication Standard Setting
n
= 0 or 1
bps.
B1 Select Bell 212A when modem is at 1200 bps.
n
Carrier Control
n =
1
backward compatibility with some software).
27
Page 28

MT3334ZDX/V Owner's Manual
Command: D
Values:
s
Dial
s
= dial string (phone number and dial modifiers)
Default: none
Description: Dial telephone number s, where s may be up to 40
characters long and include the 0–9, *, #, A, B, C,
and D characters, and the L, P, T, V, W, S, comma
(,), semicolon (;), !, @, ^ and $ dial string modifiers.
Dial string modifiers:
L Redial last number. (Must be placed immediately
after ATD.)
P Pulse-dial following numbers in command .
T Tone-dial following numbers in command (default).
V Switch to speakerphone mode and dial the following
number. Use ATH command to hang up.
W Wait for a new dial tone before continuing to dial.
(X2, X4, X5, X6, or X7 must be selected.)
S Dial a telephone number previously stored using
the &Zn=x command (see &Zn=x command for
further information). The range of n is 0-3.
, Pause during dialing for time set in register S8.
; Return to command mode after dialing. (Place at
end of dial string.)
! Hook flash. Causes the modem to go on-hook for
one-half second, then off-hook again.
@ Wait for quiet answer. Causes modem to wait for
a ringback, then 5 seconds of silence, before
processing next part of command. If silence is not
detected, the modem returns a NO ANSWER
code.
$ Calling Card “Bong” Detection
^ Disable data calling tone transmission.
Command: E
Values:
n
n
= 0 or 1
Echo Command Mode Characters
Default: 1
Description: E0 Do not echo keyboard characters to the computer.
E1 Do echo keyboard characters to the computer.
28
Page 29

3 - AT Commands, S-Registers and Result Codes
Command: F
Values:
Default: 1
Description: F0 Enable online data character echo. (Not supported.)
n
n =
F1 Disable online data character echo (included for
Echo Online Data Characters
1
backward compatibility with some software).
Command: H
Values:
Default: 0
Description: H0 Go on-hook to hang up.
Command: I
Values:
Default: None
Description: I0 Display default speed and controller firmware
Command: L
Values:
Default: 2
Description: L0 Select low volume.
Command: M
Values:
Default: 1
Description: M0 Speaker always off.
n
On-Hook/Off-Hook Control
n
= 0 or 1
H1 Go off-hook to make the phone line busy.
n
n
= 0–4
I1 Calculate and display ROM checksum (e.g.,
I2 Check ROM and verify the checksum, displaying
I3 Display default speed and controller firmware
I4 Display firmware version for data pump (e.g., “94”).
n
n
= 0, 1, 2, or 3
L1 Select low volume.
L2 Select medium volume.
L3 Select high volume.
n
M1 Speaker on until carrier signal detected.
M2 Speaker always on when modem is off-hook.
M3 Speaker on until carrier is detected, except while
Information Request
version.
“12AB”).
OK
or
ERROR
version.
Monitor Speaker Volume
n
Monitor Speaker Mode
= 0, 1, 2, or 3
dialing.
.
29
Page 30

MT3334ZDX/V Owner's Manual
Command: N
Values:
Default: 1
Description: N0 Modem performs handshake only at
n
Modulation Handshake
n
= 0 or 1
communication standard specified by S37 and the
B
command.
N1 Modem begins handshake at communication
standard specified by S37 and the B command.
During handshake, fallback to a lower speed can
occur.
Command: O
Values: 0 or 1
Default: None
Description: O0 Exit online command mode and return to data
Command: Q
Values:
Default: 0
Description: Q0 Enable Result Codes.
Command: Sr=
Values:
Default: None
Description: Set value of register Sr to value of n, where n is
Command: Sr? Read Register Value
Values:
Default: None
Description: Read value of register Sr and display value in 3-
Command: V
Values:
Default: 1
Description: V0 Displays Result Codes as digits (terse response).
n
Return Online to Data Mode
mode (see +++AT<CR> Escape Sequence
command).
O1 Issue a retrain and return to online data mode.
n
Enable/Disable Result Codes
n
= 0 or 1
Q1 Disable Result Codes.
n
Set Register Value
r
= S-register number; n varies
entered in decimal format.
r
= S-register number
digit decimal form.
n
n
= 0 or 1
V1 Displays Result Codes as words (verbose
Terse/Verbose Result Code Format
response).
30
Page 31

3 - AT Commands, S-Registers and Result Codes
Command: X
Values:
Default: 4
Description: X0 Basic Result Codes (
n
Result Code Selection
n
= 0–4
look for dial tone or busy signal.
X1 Extended Result Codes (
etc.); does not look for dial tone or busy signal.
X2 Extended Result Codes with
not look for busy signal.
X3 Extended Result Codes with
for dial tone.
X4 Extended Result Codes with
BUSY
.
e.g., CONNECT
); does not
CONNECT 33600 V42bis
NO DIALTONE
BUSY
; does not look
NO DIALTONE
,
; does
and
Command: Y
Values:
Default: 0
Description: Y0 Disable sending or responding to long space break
Command: Z
Values:
Default: None
Description: Z0 Reset modem to profile saved by the last
Command: &C
Values:
Default: 1
Description: &C0 Ignores the state of carrier on the remote modem
n
Long Space Disconnect
n
= 0
signal on disconnect.
Y1 Enable sending or responding to long space break
signal on disconnect. (Not supported.)
n
n
Modem Reset
= 0 or 1
&W
command.
Z1 Same as Z0.
n
Data Carrier Detect (DCD) Control
n
= 0 or 1
and DCD circuit is always on.
&C1 DCD turns on when the remote modem’s carrier
signal is detected and DCD is off when the carrier
signal is not detected.
31
Page 32

MT3334ZDX/V Owner's Manual
Command: &D
Values:
Default: 2
Description: &D0 Modem ignores the true status of the DTR signal
n
Data Terminal Ready (DTR) Control
n
= 0, 1, 2, or 3
and responds as if it is always on.
&D1 When DTR drops while in online data mode, the
modem enters command mode, issues an OK, and
remains connected.
&D2 When DTR drops while in online data mode, the
modem hangs up.
&D3 When DTR drops, the modem hangs up and resets
as if an ATZ command were issued.
Command: &F
Values:
Default: None
Description: &F0 Load factory settings as active configuration.
Command: &G
Values:
Default: 0
Description: &G0 Disable guard tone.
Command: &J
Values: n
Default: 0
Description: &J0 The auxiliary relay is never closed.
Command: &K
Values:
Defaults: 3
Description: &K0 Flow control disabled.
Command: &M
Values:
Defaults: 0
Description: &M0 Asynchronous mode.
n
Load Factory Default Settings
n
= 0
n
V.22bis Guard Tone Control
n
= 0, 1, or 2
&G1 Enable 550 Hz guard tone.
&G2 Enable 1800 Hz guard tone.
n
Auxiliary Relay Control
= 0
&J1 Not supported—responds ERROR.
n
Flow Control Selection
n
= 0, 3, or 4
&K3 Enable CTS/RTS hardware flow control.
&K4 Enable XON/XOFF software flow control.
n
Communications Mode
n
= 0
32
Page 33

3 - AT Commands, S-Registers and Result Codes
Command: &Q
Values:
Defaults: 5
Description: &Q0 Asynchronous with data buffering. Same as
n
Asynchronous Communications Mode
n
= 0, 5, or 6
&Q5 Error control with data buffering. Same as
&Q6 Asynchronous with data buffering. Same as
\N3
\N0
.
\N0
.
.
Command: &S
Values:
Default: 0
Description: &S0 Force DSR high (on).
Command: &T
Values:
Default: None
Description: &T0 Abort. Stop any test in progress.
Command: &V View Current Configuration
Values: n/a
Description: Displays the active modem settings.
Command: &W
Values:
Default: None
Description: &W0 Store active modem settings in NVRAM; load them
Command: &Y
Values:
Default: 0
Description: &Y0 Select stored configuration 0 on power-up. (For
n
Data Set Ready (DSR) Control
n
= 0 or 1
&S1 Let DSR follow CD.
n
Test Commands
n
= 0, 1, 3 or 6
&T1 Local analog loop test.
&T3 Local digital loopback test.
&T6 Remote digital loopback test.
n
Store Current Configuration
n
= 0
at power-on or following the ATZ command instead
of loading the factory defaults from ROM.
n
Select Stored Configuration for Hard Reset
n
= 0
backward compatibility with some software.)
Command: &Zn=xStore Telephone Number
Values:
Default: None
Description: Stores telephone dial string x in memory location
n
= 0, 1, 2 or 3
x = Dialing string
n
. Dial the stored number using the command
ATDS=n
.
33
Page 34

MT3334ZDX/V Owner's Manual
Command: \K
Values:
Default: 5
Description: \K5 Modem sends break signal received from the DTE
n
n
Set Break Control
= 5
to the remote modem.
Command: \N
Values:
Default: 3
Description: \N0 Non-error correction mode with data buffering
Command: \V
Values:
Default: 1
Description: \V0 Disable protocol Result Code appended to DCE
Command: %C
Values:
Default: 1
Description: %C0 Disable V.42bis/MNP 5 data compression.
Command: $D DTR Dialing
Values:
Default: 0
Description: $D0 Disables DTR Dialing.
n
Error Correction Mode Selection
n
= 0–5
(same as
\N1 Direct mode.
\N2 MNP reliable mode.
\N3 V.42/MNP auto-reliable mode.
\N4 V.42 reliable mode.
\N5 V.42, MNP, or non-error correction (same as
n
Protocol Result Code
n
= 0 or 1
speed.
\V1 Enable protocol Result Code appended to DCE
speed.
n
Data Compression Control
n
= 0 or 1
%C1 Enable V.42bis/MNP 5 data compression.
n
= 0 or 1
$D1 Enables DTR Dialing.
&Q6
).
\N3
).
34
Page 35

3 - AT Commands, S-Registers and Result Codes
Command: $MB Modem Baud Rate
Values:
n
= speed
Default: 33600
Description: $MB75 Selects CCITT V.23 mode.
$MB300 Selects 300 bps on-line.
$MB1200 Selects 1200 bps on-line.
$MB2400 Selects 2400 bps on-line.
$MB4800 Selects 4800 bps on-line.
$MB9600 Selects 9600 bps on-line.
$MB14400 Selects 14400 bps on-line.
$MB19200 Selects 19200 bps on-line.
$MB28800 Selects 28800 bps on-line.
$MB33600 Selects 33600 bps on-line.
Command: $SB Serial Port Baud Rate
Values:
n
= speed
Default: 115200
Description: $SB300 Selects 300 bps at serial port.
$SB1200 Selects 1200 bps at serial port.
$SB2400 Selects 2400 bps at serial port.
$SB4800 Selects 4800 bps at serial port.
$SB9600 Selects 9600 bps at serial port.
$SB19200 Selects 19200 bps at serial port.
$SB38400 Selects 38400 bps at serial port.
$SB57600 Selects 57600 bps at serial port.
$SB115200 Selects 115200 bps at serial port.
35
Page 36

MT3334ZDX/V Owner's Manual
S-Registers
Certain Command Mode configurations are stored in memory registers
called, S-Registers. The S command is used to assign a value to, and to
read the current value of an S-Register. To assign a value to an SRegister, enter the letter S, followed by the S-Register number and an
equals sign (=). To read an S-Register value, enter the letter S followed
by the S-Register number and a question mark (?), then hit RETURN. To
verify that the S-Register value was entered correctly, enter for example,
ATS8?
and hit RETURN. You should receive a response of the assigned
value given to that S-Register.
Register:
Unit: rings
Range: 0, 1–255
Default: 0
Description: Sets the number of rings before the modem
Register:
Unit: rings
Range: 0, 1–255
Default: 0
Description: Counts the number of rings that have occurred.
Register:
Unit: decimal
Range: 0-127
Default: 43(+)
Description: Sets ASCII code for the escape character. Values
Register:
Unit: decimal
Range: 0-127
Default: 13(^M)
Description: Sets ASCII code for the carriage return character.
Register:
Unit: decimal
Range: 0–127
Default: 10(^J)
Description: Sets ASCII code for the line feed character.
S0
S1
S2
128-255
S3
S4
answers.
completely.
greater than 127 disable the escape sequence.
ATS0=0
disables auto-answer
36
Page 37

3 - AT Commands, S-Registers and Result Codes
Register:
S5
Unit: decimal
Range: 0-32, 33-127
Default: 8(^H)
Description: Sets ASCII code for the backspacecharacter.
Values greater than 32 disable the backspace
character.
Register:
S6
Unit: seconds
Range: 2-65
Default: 2
Description: Sets the time the modem waits after it goes off-
hook before it begins to dial the telephone number.
Register:
S7
Unit: seconds
Range: 1-255
Default: 50
Description: Sets the time the modem waits for a carrier signal
before aborting a call. Also sets the wait for silence
time for the @ dial modifier.
Register:
S8
Unit: seconds
Range: 0-65
Default: 2
Description: Sets the length of a pause caused by a comma
character in a dialing command.
Register:
S9
Unit: ASCII
Range: 0-127
Default: 0
Description: Defines Remote Configuration Escape Character.
Register:
S10
Unit: 100ms
Range: 1-254
Default: 20
Description: Sets how long a carrier signal must be lost before
the modem disconnects.
37
Page 38

MT3334ZDX/V Owner's Manual
Register:
S11
Unit: 1 ms
Range: 50-150
Default: 95
Description: Sets spacing and duration of dialing tones.
Register:
S28
Unit: decimal
Range: 0, 1-255
Default: 1
Description: 0 disables, 1–255 enables V.34 modulation.
Register:
S30
Unit: 1 minute
Range: 0-255
Default: 0
Description: S30 specifies the length of time (in minutes) that
the modem waits before disconnecting when no
data is sent or received. This function is only
applicable to buffer mode.
Register:
S35
Unit: decimal
Range: 0-1
Default: 0
Description: 0 disables, 1 enables the V.25 data calling tone,
which allows remote data/fax/voice discrimination.
Register:
S36
Unit: decimal
Range: {0,2}, {1,3}, {4,6}, {5,7}
Default: NA
Description: This register specifies the action to take in the
event of negotiation failure when error control is
selected. (See S48.)
38
Page 39

3 - AT Commands, S-Registers and Result Codes
Register:
S37
Unit: decimal
Range: 0-19
Default: 0
Description: Sets the maximum dial line rate.
0 = maximum modem speed
1 = reserved
2 = 1200/75 bps
3 = 300 bps
4 = reserved
5 = 1200 bps
6 = 2400 bps
7 = 4800 bps
8 = 7200 bps
9 = 9600 bps
10 = 12000 bps
11 = 14400 bps
12 = 16800 bps
13 = 19200 bps
14 = 21600 bps
15 = 24000 bps
16 = 26400 bps
17 = 28800 bps
18 = 31200 bps
19 = 33600 bps
Register:
S42
Unit: decimal
Range: 0-1
Default: 1
Description:
For testing and debugging only.
the V.32bis and V.22bis auto rate. Retrain and
fallback are disabled in data mode. 0 = disable; 1
= enable.
Enables/disables
Register:
S43
Unit: decimal
Range: 0-1
Default: 1
Description:
For testing and debugging only.
Enables/disables
V.32bis start-up auto mode operation. 0 = disable;
1 = enable.
39
Page 40

MT3334ZDX/V Owner's Manual
Register:
S48
Unit: decimal
Range: 7 or 128
Default: 7
Description: The following chart lists the S36 and S48
configuration settings necessary to negotiate
certain types of connections.
Register:
S89
Unit: seconds
Range: 0, 5-255
Default: 10
Description: Sets the length of time in the off-line command
mode before the modem goes into standby mode.
A value of zero prevents standby mode; a value of
1–4 sets the value to 5.
40
Page 41

3 - AT Commands, S-Registers and Result Codes
Result Codes
When the modem receives an AT command from the terminal or PC, it
tries to execute the command, then sends a status message to the PC or
terminal which reports the "results" of the command (hence the name
"result codes"). The MultiModemZDX Command mode provides you with
several responses, or
during Command mode operation. These Result Codes are displayed on
your PC's video monitor.
Terse Verbose Description
“Result Codes”
, that provide visual responses
0OK
1 CONNECT
2 RING
3 NO CARRIER
4 ERROR
5* CONNECT 1200
6 NO DIALTONE
7 BUSY
8 NO ANSWER
10* CONNECT 2400
11* CONNECT 4800
12* CONNECT 9600
13* CONNECT 14400
14* CONNECT 19200
24* CONNECT 7200
25* CONNECT 12000
26* CONNECT 16800
40* CONNECT 300
55* CONNECT 21600
56* CONNECT 24000
57* CONNECT 26400
58* CONNECT 28800
59* CONNECT 31200
60* CONNECT 33600
88 DELAYED
89 BLACKLISTED
90 BLACKLIST FULL
* EC is added to these Result Codes when the extended Result Codes configuration option is
enabled.
EC
connection:
error control [LAP-M] only);
(MNP 4 error control only);
is replaced by one of the following codes, depending on the type of error control
V42bis
(V.42 error control [LAP-M] and V.42bis data compression);
MNP5
NoEC
Command executed
Modem connected to line
Ring signal detected
Carrier signal lost or not detected
Invalid command
Connected at 1200 bps
No dial tone detected
Busy signal detected
No answer at remote end
Connected at 2400 bps
Connected at 4800 bps
Connected at 9600 bps
Connected at 14400 bps
Connected at 19200 bps
Connected at 7200 bps
Connected at 12000 bps
Connected at 16800 bps
Connected at 300 bps
Connected at 21600 bps
Connected at 24000 bps
Connected at 26400 bps
Connected at 28800 bps
Connected at 31200 bps
Connected at 33600 bps
Delay is in effect for the dialed number
Dialed number is blacklisted
Blacklist is full
V42
(MNP 4 error control and MNP 5 data compression);
(No error control protocol).
(V.42
MNP4
41
Page 42

MT3334ZDX/V Owner's Manual
Chapter 4 - Modem Testing
Local Analog Loopback Test/V.54 Loop 3
In this test, data from your computer or terminal is sent to your modem's
transmitter, converted into analog form, looped back to the receiver,
converted into digital form and then received back at your monitor for
verification. No connection to the phone line is required. See Figure 4-1.
Figure 4-1. Local Analog Loopback Test
The test procedure is as follows:
1. Connect the modem to your computer. With your communication
software, set the desired baud rate.
2. Type
3. Once you receive a connect message (if responses are enabled),
4. For a more complete test, you should also test the modem in Answer
5. Your modem passes this test if the data entered from your keyboard
42
AT&T1
and hit ENTER. This places your modem in Analog
Loopback mode, in the Originate mode. The modem is now out of the
Command mode and in a pseudo On-Line mode.
enter data from your keyboard. For this test, typing multiple upper
case
"U"
characters is a good way to send an alternating test pattern
of ones and zeros.
mode. To do this, you must “escape” from Originate mode by entering
an Escape Sequence (
ENTER to place the modem in Analog Loopback mode, in the Answer
mode. Then repeat step 3.
are the same as the data received on your monitor. If different data
is appearing on your monitor, your modem is probably causing the
problem, although it could also be your computer. If your modem
passes this test, but you are receiving errors while On-line, the
remote modem or the phone line could be at fault.
+++AT<CR>
) . Then type
AT&T1
and hit
Page 43

4 - Testing Your Modem
Digital Loopback Test/V.54 Loop 2 (Local/Manual)
The Digital Loopback Test is an on-line test that loops data sent from one
modem across the phone line to another modem, then back to the first
modem. See Figure 4-2.
There are two ways to put a modem into Digital Loopback mode.
1. Locally or Manually, described in this section.
2. Remotely or Automatically, see next section.
Note: If you wish to abort any test in progress, enter
All loopback tests will operate at all speeds except 300 bps.
Disable error correction (
tests.
In this test the local modem is placed in Digital Loopback mode. Data is
entered and transmitted from the remote modem (which is not in digital
loopback mode), sent across the phone line to the local modem and
looped back to the remote modem.
The test procedure is as follows:
1. Go into Terminal mode. Type
OK
message.
2. Dial the remote modem by entering the Dial command and the phone
number, to establish On-line mode.
3. Type the Escape Sequence (
into Command mode, while still maintaining the pseudo On-line
mode with the remote modem.
4. Type
5. Data is typed from the remote keyboard. For this test, typing multiple
AT&T3
OK
message from your modem (if responses are enabled), the local
modem is placed in Digital Loopback mode.
upper case
pattern of ones and zeros. The data received by the local modem will
enter its analog receiver, be converted to digital data, be reconverted
into analog, and then looped through its transmitter back to the
remote modem. Your modem passes this test if the data entered from
the remote keyboard is the same as the data received on the remote
monitor.
"U"
AT\N0&W0<CR>
AT
+++AT<CR>
from the local PC and hit ENTER. Once you receive an
characters is a good way to send an alternating test
) before engaging in loopback
and hit ENTER; you should get an
) which brings your modem
AT&T0<CR>
.
43
Page 44

MT3334ZDX/V Owner's Manual
Figure 4-2. Digital Loopback Test(local/manual)
6. When testing is complete, you may end the test by typing an Escape
Sequence (
The modem should respond with an OK message. If you wish to stay
On-line with the remote modem for normal data transmission, type
ATO0
and hit ENTER to hang up.
+++AT<CR>
and hit ENTER. If you wish to terminate the call, type
) to bring your modem into Command mode.
Digital Loopback Test/V.54 Loop 2 (Remote/Auto)
In this test, your modem must be On-line with another modem set up to
respond to a request for Digital Loopback (note that some modems may
not support Remote Loopback or may have this feature disabled). The
test procedure is as follows:
ATH0
1. Go into Terminal mode. Type
OK
message.
2. Dial the remote modem by entering the Dial command and the phone
number, to establish On-line mode. Note: The
be set on the remote modem to run this test.
3. Type the Escape Sequence (
into Command mode, while still maintaining the connection with the
remote modem.
4. Type
44
AT&T6
command by transmitting an unscrambled marking signal, which
causes the remote modem to place itself in Digital Loopback mode.
Then the local modem exits Command mode and enters pseudo Online mode.
and hit ENTER. The local modem responds to this
AT
and hit ENTER; you should get an
&T6
command must
+++AT<CR>
) which brings your modem
Page 45

4 - Testing Your Modem
5. Type data from your keyboard. For this test, typing multiple upper
case
"U"
characters is a good way to send an alternating test pattern
of ones and zeros. The data received by the remote modem will enter
its analog receiver, be converted to digital data, be reconverted into
analog, and then looped through its transmitter back to the local
modem. Your modem passes this test if the data entered from the
local keyboard is the same as the data received on your monitor.
Figure 4-3. Digital Loopback Test (remote/automatic)
45
Page 46

MT3334ZDX/V Owner's Manual
Chapter 5 - Service, Warranty and Tech Support
See New Warranty Policy - Multi-Tech Web Site
This chapter starts out with statements about your modem's 10-year
warranty (limited to customers in the U.S., Canada, Mexico and the
United Kingdom). The next section, Tech Support, should be read
carefully if you have questions or problems with your modem. It includes
the technical support telephone numbers, space for recording your
modem information, and an explanation of how to send in your modem
should you require service.
Limited Warranty
Multi-Tech Systems, Inc. (
from defects in material or workmanship for a period of ten years from the
date of purchase, or if proof of purchase is not provided, ten years from
date of shipment. MTS MAKES NO OTHER WARRANTY, EXPRESSED
OR IMPLIED, AND ALL IMPLIED WARRANTIES OF MERCHANTABILITY
AND FITNESS FOR A PARTICULAR PURPOSE ARE HEREBY
DISCLAIMED. This warranty does not apply to any products which have
been damaged by lightning storms, water, or power surges or which have
been neglected, altered, abused, used for a purpose other than the one
for which they were manufactured, repaired by the customer or any party
without MTS’s written authorization, or used in any manner inconsistent
with MTS’s instructions.
MTS’s entire obligation under this warranty shall be limited (at MTS’s
option) to repair or replacement of any products which prove to be
defective within the warranty period, or, at MTS’s option, issuance of a
refund of the purchase price. Defective products must be returned by
Customer to MTS’s factory transportation prepaid.
MTS WILL NOT BE LIABLE FOR CONSEQUENTIAL DAMAGES AND
UNDER NO CIRCUMSTANCES WILL ITS LIABILITY EXCEED THE
PURCHASE PRICE FOR DEFECTIVE PRODUCTS.
“MTS”
) warrants that its products will be free
46
Page 47

5 - Service, Warranty and Tech Support
On-line Warranty Registration
To register your Multi-Tech product on-line, click on the following link:
http://www.multitech.com/support/register.htm
Tech Support
Multi-Tech has an excellent staff of technical support personnel available
to help you get the most out of your Multi-Tech product. If you have any
questions about the operation of this unit, call 1-800-972-2439. Please fill
out the modem information (below), and have it available when you call.
If your modem requires service, the tech support specialist will guide you
on how to send in your modem (see Section 5.3.2).
Recording Modem Information
Please fill in the following information on your Multi-Tech modem. This will
help tech support in answering your questions.
Modem Model No.: _______________________________________
Modem Serial No.: _______________________________________
Modem Firmware Version: _________________________________
DataComm/FAX/Voice
Software Version: _______________________________________
COM Port #: ___________________________________________
The modem model and serial numbers are silkscreened on the bottom of
your modem. The software versions are printed on the diskette labels.
Type ATI4 to display the modem firmware version. Please note the status
of your modem before calling tech support. This screen messages,
diagnostic test results, problems with a specific application, etc. Use the
space below to note modem status:
_______________________________________________________
________________________________________________________
________________________________________________________
_________________________________________________________
________________________________________________________
_________________________________________________________
47
Page 48

MT3334ZDX/V Owner's Manual
Service
If your tech support specialist decides that service is required, modems
may be sent (freight prepaid) to our factory. Return shipping charges will
be paid by Multi-Tech Systems (within North America).
Include the following with your modem:
• a description of the problem.
• return billing and return shipping addresses.
• contact name and phone number.
• check or purchase order number for payment if the modem is out of
warranty. (The standard repair charge for this modem is $95. This
price is valid at the time of this publication but could change in the
future. Check with your technical support specialist.)
• if possible, note the name of the technical support specialist with
whom you spoke.
If you need to inquire about the status of the returned product, be
prepared to provide the serial number of the product sent (see previous
section).
Send modems to this address:
MULTI-TECH SYSTEMS, INC.
2205 WOODALE DRIVE
MOUNDS VIEW, MINNESOTA 55112
ATTN: SERVICE OR REPAIRS
48
Page 49

5 - Service, Warranty and Tech Support
About the Multi-Tech BBS - No Longer Available
Multi-Tech Systems maintains a Bulletin Board Service (
customers. The information available via the BBS includes: new product
information, product upgrade data, problem solving tips, and a message
service for you to leave questions for which you would like additional
information. The phone number for the Multi-Tech BBS is (612) 785-3702
or (800) 392-2432 (U.S.A. and Canada).
The BBS can be accessed by any asynchronous modem operating at
speeds of 33,600-1200 bps (V.34 and downward compatible) with a
setting of word length of 8 bits, 1 stop bit, and no parity.
BBS
) for its
Logging on to the Multi-Tech BBS
To log on to the Multi-Tech BBS, perform the following steps:
1. Set your communications program to 8-N-1.
2. Dial to our BBS at (800) 392-2432 (USA and Canada) or (612) 7853702 (international and local).
3. At the prompt, type your first name, last name, and password; then
press RETURN. If you are a first time caller, the BBS will ask if your
name is spelled correctly. If you answer yes, a questionnaire will
appear. You must complete the questionnaire to use the BBS on your
first call.
4. Press RETURN until the Main Menu appears. From the Main Menu
you have access to three main areas: the Files Menu, and Message
Menu, and Bulletins. For help on menu commands, type ?.
Downloading a File
If you know the file name:
1. From the Maim Menu, type F to access the Files Menu, then type D.
2. Enter the name of the file you wish to download from the BBS.
3. If a password is required, enter the password.
4. Answer Y or N to the automatic logoff question.
5. Select a file transfer protocol by typing the indicated letter, such as
Z for Zmodem (the recommended protocol).
49
Page 50

MT3334ZDX/V Owner's Manual
6. If you select Zmodem, the transfer will begin automatically. If you
select another protocol, you may have to initiate the transfer yourself.
(In most data communications programs, the PAGE DOWN key
initiates the download.)
If you don’t know the file name:
1. From the Main Menu, type F to access the Files Menu. For a list of file
areas, type L twice. (If you do not type the second L, you will list all
of the files on the BBS.)
2. Mark the file areas you would like to examine by typing each file
area’s list number and a RETURN.
3. Enter L to list all the files in the selected file areas. Enter C to go
forward in the file list and P to go back.
4. Mark one or more files for download by entering M, the list numbers
of the files, and a RETURN
5. Enter D. You will see a list of the files you have marked. Enter E if you
would like to edit the list; otherwise enter D again to start the
download process.
6. Select a file transfer protocol by typing the indicated letter, such as
Z for Zmodem (the recommended protocol).
7. If you select Zmodem, the file will transfer automatically. If you select
another protocol, you may have to initiate the transfer yourself. (In
MEWTERM and many other communications programs, the PAGE
DOWN key initiates the download.)
8. When the download is complete, enter S to return to the File Menu.
Reading a Message
When you log on, the BBS will tell you if you have a personal message
(mail). At the prompt
message. This is the only point at which you can read your mail, since you
cannot read any messages from the Message Menu.
Would you like to read it now?,
type R to read the
Leaving a Message
The Multi-Tech BBS has no public discussion areas. To leave a personal
message, select the Message Menu by typing M at the Main Menu. Type
E, then press RETURN to select the Sysop conference. Enter the name
of the recipient (or “Sysop”), the subject, and the message text. Press
ESCAPE to finish, then type S to save the message and exit. To abort the
message at any point, leave any of the fields blank and press RETURN.
50
Page 51

5 - Service, Warranty and Tech Support
Bulletins
When you log on, the BBS will ask if you would like to view the bulletin
menu. The bulletins are menu-driven; to read a bulletin, enter its number.
You can also access the bulletins by typing B at the Main Menu.
About CompuServe/Internet - No Longer Available
In addition to the BBS, Multi-Tech provides support through CompuServe's
Modem Vendor Forum (
to your CompuServe documentation for special operating procedures.
Multi-Tech is a commercial provider on the Internet, and we retrieve
e-mail messages from the following mailboxes on a periodic basis:
GOMODEMVEN
) under
GO MULTITECH
. Refer
mtsmktg@multitech.com
mtssales@multitech.com
international@multitech.com
writers@multitech.com
If you prefer to recieve support via the internet, you can contact Tech
Support via e-mail.
Multi-Tech's presence includes a Web site at:
http://www.multitech.com
and an ftp site at:
ftp://ftp.multitech.com
Marketing Dept.
Sales Dept.
International Marketing &
Sales
Publications Dept.
Multi-Tech Fax-Back Service - No Longer Available
Multi-Tech's fax-back system provides 24-hour access to sales, marketing,
and technical literature. Dial 612-717-5888, follow the voice prompts,
and request document number 10 for a catalog of available documents.
For convenience, have your fax number handy: __________________ .
From the catalog of available documents, you can order newsletters,
white papers, press releases, etc. from the sales and marketing index
(pages 1-4), or order basic modem operation and troubleshooting guides
from the technical support and engineering index. Just enter the applicable
FB Doc. # from the left column of the catalog.
51
Page 52

MT3334ZDX/V Owner's Manual
Appendix A - Technical Specifications
Your MultiModemZDX meets the following specifications:
Tradename
Model Numbers
Data Rates (modem)
Data Rates (fax)
Data Format
Compatibility
Fax Compatibility
Voice Compatibility
Error Correction/
Data Compression
MultiModemZDX
MT3334ZDX, and MT3334ZDXV
33,600, 31,200, 28,800, 26,400, 24,000,
21,600, 19,200, 16,800, 14,400, 12,000,
9600, 7200, 4800, 2400, 1200, 0-300 bps
14,400, 9600, 7200, 4800, 2400 bps
Serial, binary, asynchronous at 75-300,
1200, 2400, 4800, 7200, 9600, 14,400,
16,800 or 19,200, 21,600, 24,000, 26,400,
28,800, 31,200, 33,600 bps
ITU V.42
V.32
ITU V.17, Group 3 T.4, T.30 and EIA TR29 Class 2
ITU-T V.17, Group 3, V.29, V.27
EIA TR-29 Class 2
IS-101 AT+V command compatible
(MT3334ZDXV only)
V.42 (LAP-M or MNP 3 & 4),
V.42
throughput)
bis
, V.42,
Enhanced
bis
, V.32, V.21, V.22
bis
, (4:1 throughput), MNP 5 (2:1
V.34, ITU
bis
, V.22, V.23,
ter
and
Speed Conversion
Flow Control
Mode of Operation
52
Serial port data rates adjustable to 300,
1200, 2400, 4800, 9600, 19,200, 38,400,
57,600 and 115,200 bps
Xon/Xoff, Hardware RTS/CTS, ENQ/ACK
Fax On-line modes, and
modes supporting Full duplex over dialup lines,
Answering Machine and Voice Mail
functions
"+V AT"
(for MT3334ZDXV only)
“AT”
command
Page 53

Intelligent Features
Appendices
Automatic or manual dialing, Automatic
or manual answer, Microprocessorcontrolled, remote configuration, EIA
extended Automode, adaptive line
probing, automatic symbol rate and carrier
frequency during start-up, retrain and rate
renegotiation, DTMF detection, Autodial,
Redial, Repeat dial, Dial linking, Tone
dial, Dial pauses, Call status display,
Auto-parity and data rate selection,
Keyboard-controlled modem options,
Nonvolatile memory and on-screen
displays for modem option parameters
and two telephone numbers/command
lines of up to 60 digits each, Help menus
Command Buffer
Data Modulation
Fax Modulation
Carrier Frequencies
Voice Compression
and Sampling Rate
60 characters
Trellis Coded Modulation (
33,600, 31,200, 28,800, 26,400, 24,000,
21,600, 19,200, 16,800, 14,400, 12,000
and 9600 bps, Quadrature Amplitude
Modulation (QAM) at 9600 (non-trellis),
4800 and 2400 bps, PSK at 1200 bps,
FSK at 300 bps
V.17 TCM at 14400, 12000, 9600, and
7200 bps V.29 QAM at 9600 and 7200
bps V.27
V.21CH2 FSK at 300 bps (Half Duplex)
1800 Hz V.32/V.32
33.6K/31.2K/28.8K/26.4K/24K/21.6K/
19.2K/16.8K/14.4K/12K/9.6K/4.8K
PCM 128, 8000 kHz or
IMA ADPCM 8000 kHz (selectable via +V
commands).
ter
DPSK at 4800 and 2400 bps
bis
/Enhanced V.34/
Note that your computer
TCM
) at
system should have a processing speed
of at least 75 MHz to take full advantage
of the telephony features of this product.
53
Page 54

MT3334ZDX/V Owner's Manual
Carrier Frequencies
2400 & 1200 bps
(V.22bis/V.22)
Carrier Frequencies
Transmit Originate: 1200 Hz
Transmit Answer: 2400 Hz
Receive Originate: 2400 Hz
Receive Answer: 1200 Hz
V.21
V.23
Carrier Frequencies Fax
V.21 CH2
(Half Duplex)
V.27ter
V.29 QAM
980 Hz Mark, 1180 Hz Space for
Transmit Originate
1650 Hz Mark, 1850 Hz Space for
Transmit Answer
1650 Hz Mark, 1850 Hz Space for
Receive Originate
980 Hz Mark, 1180 Hz Space for
Receive Answer
390 Hz Mark, 450 Hz Space for
Transmit Originate
1300 Hz Mark, 2100 Hz Space for
Transmit Answer
1300 Hz Mark, 2100 Hz Space for
Receive Originate
390 Hz Mark, 450 Hz Space for
Receive Answer
Transmit Originate: 1650 Hz Mark,
1850 HzSpace
Transmit Answer: 1650 Hz Mark,
1850 Hz Space
Originate/Answer: 1800 Hz
Originate/Answer: 1800 Hz
V.17 TCM
Transmit Level
Frequency Stability
Receiver Sensitivity
AGC Dynamic Range
54
Originate/Answer: 1800 Hz
-11dBm (dial-up)
±0.01%
-43 dBm under worst-case conditions
43 dB
Page 55

Interface
Appendices
EIA RS232C/CCITT V.24
Connectors
Diagnostics
Indicators
Controls
Speaker
Operating
Temperature
Power Requirement
Power Consumption
Dimensions
Weight
Limited Warranty
DB25 (
modular phone jack: for line, and
telephone set, power jack.
Power-on Self Test, Local Analog Loop,
Local Digital Loop, Remote Digital Loop.
LEDs for Send Data, Receive Data,
Carrier Detect, various speed indicators,
Off Hook, Terminal Ready, Error
Correction, Fax.
Power ON/OFF Switch
Speaker with software- or command-
controlled volume.
0° to 50° C
115 Volts AC, 60 Hz, .3 amp (2-prong
outlet-mounted transformer); 240V/50Hz
optional (international)
5 Watts
14.8 x 10.8 x 2.9 cm (L x W x D)
224 grams
Five years
RS232C
) connector; Two RJ11
55
Page 56

MT3334ZDX/V Owner's Manual
Appendix B - Tone Dial Frequencies
Hz Digits
697
770
852
941
Hz 1209 1336 1477 1633
The tone-dialing method combines two frequencies for each of the twelve
digits found on a Touch Tone dial pad. This method is referred to as DualTone Multi-Frequency (
Touch-Tone keypad use the four low frequencies (697, 770, 852, 941 Hz),
while the three vertical columns use the three high frequencies (1209,
1336, 1477 Hz). The generally accepted tone frequency tolerance is
+0.02%.
For example, the digit 4 would be dialed by combining two tone frequencies.
It would use the frequency 770 Hz from the second row, and the frequency
1209 Hz from the first column. In another example, the digit 9 would be
dialed with the tone frequencies of 852 Hz and 1477 Hz.
The extended DTMF characters (A, B, C, D) are the high-end frequencies
(1633 Hz) defined on some telephone sets with a fourth vertical column
of buttons. This fourth column provides for extended PBX control functions;
the actual functions provided are dependent on the PBX manaufacturer's
implementation and feature set.
1 2 3 A
4 5 6 B
7 8 9 C
*
0 # D
DTMF
) dialing. The four horizontal rows on a
56
Page 57

Appendices
Appendix C - Regulatory Information - See Web Site
Multi-Tech Web Site Publishes Current Regulations
1. This equipment complies with Part 68 of the Federal Communications
Commission (FCC) rules. On the outside surface of this equipment
is a label that contains, among other information, the FCC registration
number and ringer equivalence number (REN). If requested, this
information must be provided to the telephone company.
2. As indicated below, the suitable jack (Universal Service Order Code
connecting arrangement) for this equipment is shown. If applicable,
the facility interface codes (FIC) and service order codes (SOC) are
shown.
An FCC-compliant telephone cord and modular plug is provided with
this equipment. This equipment is designed to be connected to the
telephone network or premises wiring using a compatible modular
jack which is Part 68 compliant. See installation instructions for
details.
3. The ringer equivalence number (REN) is used to determine the
quantity of devices which may be connected to the telephone line.
Excessive REN’s on the telephone line may result in the devices not
ringing in response to an incoming call. In most, but not all areas, the
sum of the REN’s should not exceed five (5.0). To be certain of the
number of devices that may be connected to the line, as determined
by the total REN’s, contact the telephone company to determine the
maximum REN for the calling area.
4. If this equipment causes harm to the telephone network, the telephone
company will notify you in advance that temporary discontinuance of
service may be required. But if advance notice isn’t practical, the
telephone company will notify the customer as soon as possible.
Also, you will be advised of your right to file a complaint with the FCC
if you believe it is necessary.
5. The telephone company may make changes in its facilities, equipment,
operations, or procedures that could affect the operation of the
equipment. If this happens, the telephone company will provide
advance notice in order for you to make necessary modifications in
order to maintain uninterrupted service.
57
Page 58

MT3334ZDX/V Owner's Manual
6. If trouble is experienced with this equipment (the model of which is
indicated below) please contact Multi-Tech Systems, Inc. at the
address shown below for details of how to have repairs made. If the
equipment is causing harm to the telephone network, the telephone
company may request you remove the equipment from the network
until the problem is resolved.
7. No repairs are to be made by you. Repairs are to be made only by
Multi-Tech Systems or its licensees. Unauthorized repairs void
registration and warranty.
8. This equipment cannot be used on public coin service provided by
the telephone company. Connection to Party Line Service is subject
to state tariffs. (Contact the state public utility commission, public
service commission or corporation commission for information.)
9. If so required, this equipment is hearing-aid compatible.
Manufacturer: Multi-Tech Systems, Inc.
Model Numbers: MT3334ZDX, MT3334ZDXV
FCC Registration #: AU7USA-31068-MME
Ringer Equivalence: 0.4B
Modular Jack (USOC) RJ11C or RJ11W (single line)
Service Center in USA: Multi-Tech Systems Inc.
2205 Woodale Drive
Mounds View, MN 55112
Voice (612) 785-3500/
FAX (612) 785-9874
58
Page 59

Appendices
NOTE: This equipment has been tested and found to comply with the
limits for a Class B digital device, pursuant to Part 15 of the FCC Rules.
These limits are designed to provide reasonable protection against
harmful interference when the equipment is operated in a residential
installation. This equipment generates, uses and can radiate radio
frequency energy, and if not installed and used in accordance with the
instruction manual, may cause harmful interference to radio
communications. However, there is no guarantee that interference will
not occur in a particular installation. If this equipment does cause harmful
interference to radio or television reception, which can be determined by
turning the equipment off and on, the user is encouraged to try to correct
the interference by one or more of the following measures:
Reorient or relocate the receiving antenna.
Increase the separation between the equipment and receiver.
Connect the equipment into an outlet on a circuit different from that of
which the receiver is connected.
Consult the dealer or an experienced radio/TV technician for help.
WARNING: Changes or modifications to this unit not expressly approved
by the party responsible for compliance could void the user’s authority to
operate this equipment.
The Telephone Consumer Protection Act of 1991 makes it unlawful for
any person to use a computer or other electronic device to send any
message via a telephone fax machine unless such message clearly
contains in a margin at the top or bottom of each page or the first page of
the transmission, the date and time it is sent and an identification of the
business or other entity, or other individual sending the message and the
telephone number of the sending machine or such business, other entity,
or individual. See the cover page of your fax software manual for setup
details.
This device complies with Part 15 of the FCC rules. Operation is subject
to the following conditions: (1) This device may not cause harmful
interference, and (2) this device must accept any interference received,
including interference that may cause undesired operation.
59
Page 60

MT3334ZDX/V Owner's Manual
Canadian Limitations Notice
Notice: The ringer equivalence number (REN) assigned to each terminal
device provides an indication of the maximum number of terminals
allowed to be connected to a telephone interface. The termination of a
interface may consist of any combination of devices subject only to the
requirement that the sum of the ringer equivalence numbers of all the
devices does not exceed 5. The ringer equivalence number for this
product is 0.2.
Notice: The Industry Canada label identifies certificated equipment. This
certification means that the equipment meets certain telecommunications
network protective, operational and safety requirements. The Industry
Canada does not guarantee the equipment will operate to the user’s
satisfaction.
Before installing this equipment, users should ensure that it is permissible
to be connected to the facilities of the local telecommunications company.
The equipment must also be installed using an acceptable method of
connection. The customer should be aware that compliance with the
above conditions may not prevent degradation of service in some situations.
Repairs to certified equipment should be made by an authorized Canadian
maintenance facility designated by the supplier. Any repairs or alterations
made by the user to this equipment, or equipment malfunctions, may give
the telecommunications company cause to request the user to disconnect
the equipment.
Users should ensure for their own protection that the electrical ground
connections of the power utility, telephone lines and internal metallic
water pipe system, if present, are connected together. This precaution
may be particularly important in rural areas.
Caution: Users should not attempt to make such connections themselves,
but should contact the appropriate electric inspection authority, or
electrician, as appropriate.
60
Page 61

Appendices
Compliance with BABT Requirements
Approved for connection to telecommunications system specified in the
instructions for use subject to the conditions set out in them.
Warning:
marked "SAFETY WARNING see instructions for use" with ports marked
or not so marked may produce hazardous conditions on the network.
Advice should be obtained from a competent engineer before such a
connection is made.
This apparatus has been approved for the use of the following facilities:
• Auto-calling
• Loop disconnect and MF dialing
• Phone number storage and retrieval by a predetermined code
• Operation in the absence of proceed indication
• Automatic storage of last number dialed
• Tone detection-busy
• Auto clear from the originating end
• DTR dialing
• Modem
• PBX timed break register recall
Interconnection directly, or by way of other apparatus, of ports
European Low Voltage Directive
When correctly installed and maintained, the modem will present no
hazard to the user. When correctly installed the modem will be connected
to the PSTN or a PW and to a Data Terminal Equipment (DTE), whose
modem connections comply with ITU recommendation V28. The DTE
connections are therefore taken to be safe voltages (less than ± 30 volts).
The main power source shall be installed near to the equipment and shall
be easily accessible. The plug that connect to the apparatus to the main
power supply must be fitted with a 5A fuse that complies with BSI1362.
Ports which are capable of connecting to other apparatus are defined as
SELV. To ensure conformity with EN41003, ensure that these ports are
only connected to ports of the same type on other apparatus.
61
Page 62

MT3334ZDX/V Owner's Manual
Compliance with BS6305 Clause 6.2, BS6320 Clause 7.2, and BABT/SITS/82/005S/D
a. The modem is suitable for connection to the Public Switched
Telephone Network (PSTN) provided by British Telecommunications
plc or Kingston Communications (Hull) plc. Circuit supply by British
Communications, Mercury Communication, or Hull City Council.
Only direct exchange lines may be used, not shared service.
b. The modem is suitable for household, office, and similar general
indoor use. It is not suitable for use as an extension to a payphone.
c. BT lines supplied must support either loop disconnect or
multifrequency tone signalling.
d. REN (Ringer Equivalence Number).
The REN value of a unit is calculated from 3/n where n is the total
number of units which can be connected in parallel which will still
cause the standard bell (as defined in BS6305 Appendix D) to ring.
REN values of less than 0.3 cannot be assigned.
REN = 1
If a telephone or other device is connected in parallel with the modem, the
combined REN must not exceed 4. A BT supplied telephone may be
assumed to have REN of 1.0 unless otherwise noted.
The approval of this modem for connection to the British Telecom public
switched telephone network is INVALIDATED if the apparatus is subject
to any modification in any material way not authorized by BABT or if it is
used with or connected to:
i. internal software that has not been formally accepted BABT.
ii. external control software or external control apparatus which cause
the operation of the modem associated call set-up equipment to
contravene the requirements of the standard set out in BABT/SITS/
82/005S/D.
All other apparatus connected to this modem and thereby connected
directly or indirectly to the British Telecom public switched telephone
network must be approved apparatus as defined in Section 22 of the
British Telecommunications Act 1984.
The REN number for this apparatus = 1
62
Page 63

Appendices
Compliance with BS6789: Section 3.1 and Part 2
a. The modem is not capable of allowing Auto Call using '999' or other
PABX emergency numbers.
b. Modes other than modes 1, 2, or 3 should not be used on the BT
PSTN. This modem is a mode 1 device.
c. Users are advised to check the numbers entered during the Auto Call
set up phase prior to dialing.
d. The user should not issue any sequence of commands to the modem
which would cause the modem to exceed the maximum allowable
pause of 8 seconds from the time the modem goes off hook until
dialing begins.
e. For correct operation of the call progress monitor, the power has to
be properly connected and switched on.
Compliance with BS6328 Part 1
a. The modem is not suitable for use on circuits with British
Telecommunications signaling at a normal frequency of 2280 Hz.
b. The modem does not require signaling or otherwise employ the
frequency range dc to 200 Hz.
c. The modem may be connected to a point to point two-wire or four-
wire Private Circuit.
d. The modem does not require dc from the Private Circuit for correct
operation. The modem may be damaged if connected, in a private
circuit mode, to a circuit supplying dc current (the maximum permissible
direct current is zero amps).
63
Page 64

MT3334ZDX/V Owner's Manual
Modem CE Mark EMC and Safety Compliance
The CE mark is affixed to the enclosed Multi-Tech product to confirm
compliance with the following European Community Directives:
Council Directive 89/336/EEC of 3 May 1989 on the approximation of laws
of Member States relating to electromagnetic compatibility;
and
Council Directive 73/23/EEC of 19 February 1973 on the harmonization
of the laws of Member States relating to electrical equipment designed for
use within certain voltage limits;
both amended by
Council Directive 93/68/EEC of 22 July 1993 on the harmonization of CE
marking requirements.
Australian and New Zealand Modem Warning Notice
Australian Modem Warning Notice
Modems connected to the Australian telecommunications network must
have a valid AUSTEL permit. This modem has been specifically configured
to ensure compliance with AUSTEL Standards. The following commands
can affect compliance and must not be set outside the acceptable range.
Modem Commands:
Command Default Permissible Range
A: - Do not use
ATB B0 Do not change
AT&G &G2 Do not change
AT&P &P1 Do not change
ATSn see table below
S-Register Default Permissible Range
S6 4 2 - 5
64
Page 65

Appendices
Call Attempts/Retries:
Applications software shall be configured so that no more than 3 attempts
are made to establish a connection to a given number (Note: if the modem
can detect service tones, up to 10 attempts can be made). There must be
at least 2 seconds between call attempts. If the call sequence is
unsuccessful, there shall be a delay of at least 30 minutes before
attempting to call the number again.
Failure to set the modem, and any communications software used
with the modem, to the values shown above will result in the modem
being operated in a non-compliant manner. Consequently, there
would be no permit in force for this equipment, and the
Telecommunications Act 1991 prescribes a penalty of $12,000 for
the connection of non-permitted equipment.
For Voice Modems:
“Distortion may be generated because of low bit rate voice, and reduced
voice quality may result.”
“WARNING: For safety reasons, only connect AUSTEL permitted or
AUSTEL certified equipment.”
Refer to the applicable MultiModemII Owner’s Manual for additional
information.
Protection Against Contact with TNV Circuit (Internal PC Cards)
The protective cover is fastened to the modem card by means that will
only allow a tool to remove the cover. “Warning: removal of the protective
cover will render the AUSTEL permit void.”
New Zealand Telecom Warning Notice
“Use of pulse dialing, when this equipment is connected to the same line
as other equipment, may give rise to “bell tinkle” or noise and may also
cause a false answer condition. Should such problems occur, the user
should NOT contact the Telecom Faults Service.”
“The preferred method of dialing is to use DTMF tones, as this is faster
than pulse (decadic) dialing and is readily available on almost all New
Zealand telephone exchanges.”
“WARNING NOTICE: No ‘111’ or other calls can be made from this
device during a mains power failure”.
65
Page 66

MT3334ZDX/V Owner's Manual
Index
A
About CompuServe ................................................................. 51
About the Multi-Tech BBS ........................................................ 49
AGC Dynamic Range .............................................................. 54
Answer ..................................................................................... 27
Answering Machine
Capabilities ............................................................................. 7
Asynchronous Communications Mode .................................... 33
A T Commands ........................................................................... 6
Attention Code ......................................................................... 27
Auto Answer (S0) .......................................... 36, 37, 38, 39, 40
Auxiliary Relay Control ............................................................ 32
B
BBS ......................................................................................... 49
British T elecommunications......................................................... 62
Bulletins ................................................................................... 51
C
Call Status ............................................................................... 13
Call Waiting .............................................................................. 24
Canadian Limitations Notice .................................................... 60
Carrier Control ......................................................................... 27
Carrier Detect .......................................................................... 13
Carrier Frequencies Fax .......................................................... 54
COM Ports ................................................................................. 5
COMM.DRV ............................................................................. 25
Comma Pause ......................................................................... 37
Command Buffer ...................................................................... 53
Communication Standard Setting ............................................ 27
Communications Mode ............................................................ 32
Compatibility ............................................................................ 52
Compliance with BABT Requirements ..................................... 61
Compliance with BS6328 Part 1 .............................................. 63
66
Page 67

Index
Compression, data .................................................................... 6
CompuServe/Internet .............................................................. 51
Connection .............................................................................. 22
Connectors .............................................................................. 55
Controls ................................................................................... 55
D
Data ........................................................................................... 6
Carrier Detect (DCD) Control ............................................... 31
Compression ........................................................................ 52
Compression Control ............................................................ 34
Features ................................................................................. 6
Format .................................................................................. 52
Modulation ............................................................................ 53
Data Rates (bps) .................................................................. 52
Data Set Ready (DSR) Control ................................................ 33
Data Terminal Ready (DTR) Control ........................................ 32
Datacomm software ............................................................ 6, 20
DB-25 Connector ....................................................................... 5
DB-9 Connector ......................................................................... 5
Diagnostics .............................................................................. 55
Dial Command ......................................................................... 28
Dimensions .............................................................................. 55
Downloading a File .................................................................. 49
E
Echo Command Mode Characters Command ......................... 28
Echo Online Data Characters Command ................................ 29
Enable/Disable Result Codes .................................................. 30
ENTER or Carriage Return <CR> Key .................................... 27
Error Correction .................................................................14, 52
Mode Selection ..................................................................... 34
European Low Voltage Directive .............................................. 61
Extended DTMF Characters .................................................... 56
67
Page 68

MT3334ZDX/V Owner's Manual
F
Fall-forward ................................................................................ 6
Fallback ..................................................................................... 6
Fax ........................................................................................ 6, 7
Command set ......................................................................... 7
Features ................................................................................. 7
Transmission speeds .............................................................. 7
Fax Modulation ........................................................................ 53
Fax-Back Service .................................................................... 51
FCC Regulations ..................................................................... 57
Flow Control ............................................................................ 52
Flow Control ............................................................................ 25
Frequency Stability .................................................................. 54
Front Panel .............................................................................. 19
G
Garbage Characters ................................................................ 26
Guard T one Control ................................................................. 32
H
Hardware/Software Confirmation ............................................. 18
I
Indicators ................................................................................. 55
Information Request Command ............................................... 29
Initialization Strings ............................................................20, 22
Installation ................................................................................. 9
Intelligent Features .................................................................. 53
Interface ................................................................................... 55
Internet .................................................................................... 51
K
Kingston Communications (Hull) ............................................. 62
68
Page 69

Index
L
Leaving a Message ................................................................. 50
LED Indicators ......................................................................... 12
LEDs ........................................................................................ 19
Limited Warranty ................................................................46, 55
Line Feed Character (S4) ........................................................ 36
Load Factory Default Settings ................................................. 32
Logging on to the BBS ............................................................. 49
Long Space Disconnect ........................................................... 31
Losing Data ............................................................................. 25
M
MNP 5 ...................................................................................... 25
Data compression .................................................................. 6
MNP error correction ................................................................. 6
Mode of Operation ................................................................... 52
Model Number ......................................................................... 52
Modem Cannot Connect When Answering .............................. 24
Modem CE Mark EMC and Safety Compliance ....................... 64
Modem Disconnects While Online ........................................... 24
Modem Does Not Respond to Commands .............................. 20
Modem Reset .......................................................................... 31
Modulation Handshake ............................................................ 30
Monitor Speaker Mode ............................................................ 29
Monitor Speaker Volume Command ........................................ 29
MT5634ZDXv Connections .................................................. 9, 11
MT5634ZDXv Initialization setup ............................................. 17
Multi-Tech BBS ........................................................................ 49
MultiExpress for Windows .................................................23, 24
O
On-hook/off-hook ..................................................................... 29
On-Hook/Off-Hook Control ...................................................... 29
Operating T emperature ............................................................ 55
69
Page 70

MT3334ZDX/V Owner's Manual
P
Pause, Dialing ......................................................................... 37
Power Requirements ............................................................... 55
Power Supply ....................................................................10, 19
Protocol Result Code ............................................................... 34
Protocols .................................................................................. 25
R
Read Register Value ................................................................ 30
Reading a Message ................................................................. 50
Receive Data ........................................................................... 12
Receiver Sensitivity ................................................................. 54
Repeat Last Command ............................................................ 27
Result Code Selection ............................................................. 31
Result Codes ........................................................................... 22
Return Character (S3) ............................................................. 36
Return Online to Data Mode .................................................... 30
Ringer Equivalence Number .................................................... 62
RS-232 ...................................................................................... 5
S
Select Stored Configuration for Hard Reset ............................ 33
Serial Cable ............................................................................. 20
Serial Port ..........................................................................21, 25
Set Break Control .................................................................... 34
Set Register V alue ................................................................... 30
Software User License Agreement .......................................... 47
Speaker ................................................................................... 55
Speakerphone ........................................................................... 7
Speed Conversion ................................................................... 52
Speed, transmission
Data ........................................................................................ 6
Fax ......................................................................................... 7
Store Current Configuration ..................................................... 33
Store T elephone Number ......................................................... 33
70
Page 71

Index
T
T elephone line ..................................................................... 5, 22
Terminal mode ......................................................................... 20
Terse/Verbose .......................................................................... 41
Result Code Format ............................................................. 30
Test Commands ....................................................................... 33
Testing ...............................................................................19, 22
Self-test ................................................................................ 19
Tradename .............................................................................. 52
Transmit Data .......................................................................... 12
Transmit Level ......................................................................... 54
U
UARTs ..................................................................................... 25
16550 ................................................................................... 25
V
V.22 mode ................................................................................ 27
V.22bis Guard Tone command ................................................. 32
V.42 error correction .................................................................. 6
V.42bis data compression .......................................................... 6
View Current Configuration Command .................................... 33
Voice .......................................................................................... 7
Command set ......................................................................... 7
Features ................................................................................. 7
Voice Compatibility .................................................................. 52
Voice Compression .................................................................. 53
Voice Compression and Sampling Rate .................................. 53
W
Warranty ............................................................................10, 46
Weight ..................................................................................... 55
Windows 3.1 ............................................................................ 25
serial port driver .................................................................... 25
X
Xmodem .................................................................................. 25
71
 Loading...