

Page 1
GFU19 Multi-Tech CDMA Quick Guide
July, 2005
GFU19 Multi-Tech CDMA Modem
This guide describes how to configure your GPS1200
sensor and Multi-Tech CDMA for connection to a network
using a Verizon Wireless Internet data plan.
Topics
• (Over the air) OTA Activation Using Your Internet Data Plan
• Setting Up the Multi-Tech CDMA Modem
• Connecting to a Network Using the Multi-Tech CDMA Modem
Page 2

GFU19 Multi-Tech CDMA Modem
Table of Contents
Introduction..........................................................................................................................3
OTA Activation Using Your Internet Data Plan ................................................................... 4
Setting Up the Multi-Tech CDMA Modem ...........................................................................8
Connecting to a Network Using the Multi-Tech CDMA Modem ........................................ 16
GPS1200 GFU19 MultiTech CDMA Modem Quick Guide July, 2005
Page 2/18
Page 3

GFU19 Multi-Tech CDMA Modem
Introduction
About this
Quick Guide
Firmware
Version 2.00
This Quick Guide is designed to provide a step by step guide to configuring the
GPS1200 sensor and Multi-Tech CDMA for connection to a network using a Verizon
Wireless Internet data plan.
This Quick Guide assumes that the user is familiar with general GPS surveying
procedures and real time applications.
Note: Please setup an Internet Data plan from Verizon Wireless and have it
activated before using this manual. Also, be sure to obtain your MIN and MDM
number. If the two numbers are different, please refer to Appendix 1 for activation.
This Quick Guide has been designed for GPS System 1200 – Firmware Version 2.00
or higher. If using a different firmware version, you may notice slight differences in
the menu commands.
User Manuals
A number of user manuals are available on the GPS System 1200 Software CD.
These manuals are provided in Adobe Acrobat format and include Adobe Acrobat
Reader. They contain a wealth of information about the GPS1200 System, including
system specifications and operation procedures for real time as well as postprocessed static, rapid static and kinematic surveys.
More detailed information relative to real time surveying is also available in the
following Leica manuals:
GPS Equipment User Manual – provides a general system overview and contains
information on technical specifications and care and usage of the equipment.
Getting Started with Real Time Surveys – contains instructions on equipment
setup and procedures specific to real time surveying.
Technical Reference Manual – this comprehensive manual provides detailed
information on nearly all aspects of the GPS System 1200, including many of the
procedures mentioned in this quick guide.
GPS1200 GFU19 MultiTech CDMA Modem Quick Guide July, 2005
Page 3/18
Page 4
GFU19 Multi-Tech CDMA Modem
OTA Activation Using Your Internet Data Plan
Activate your
Internet plan
Step Action Display
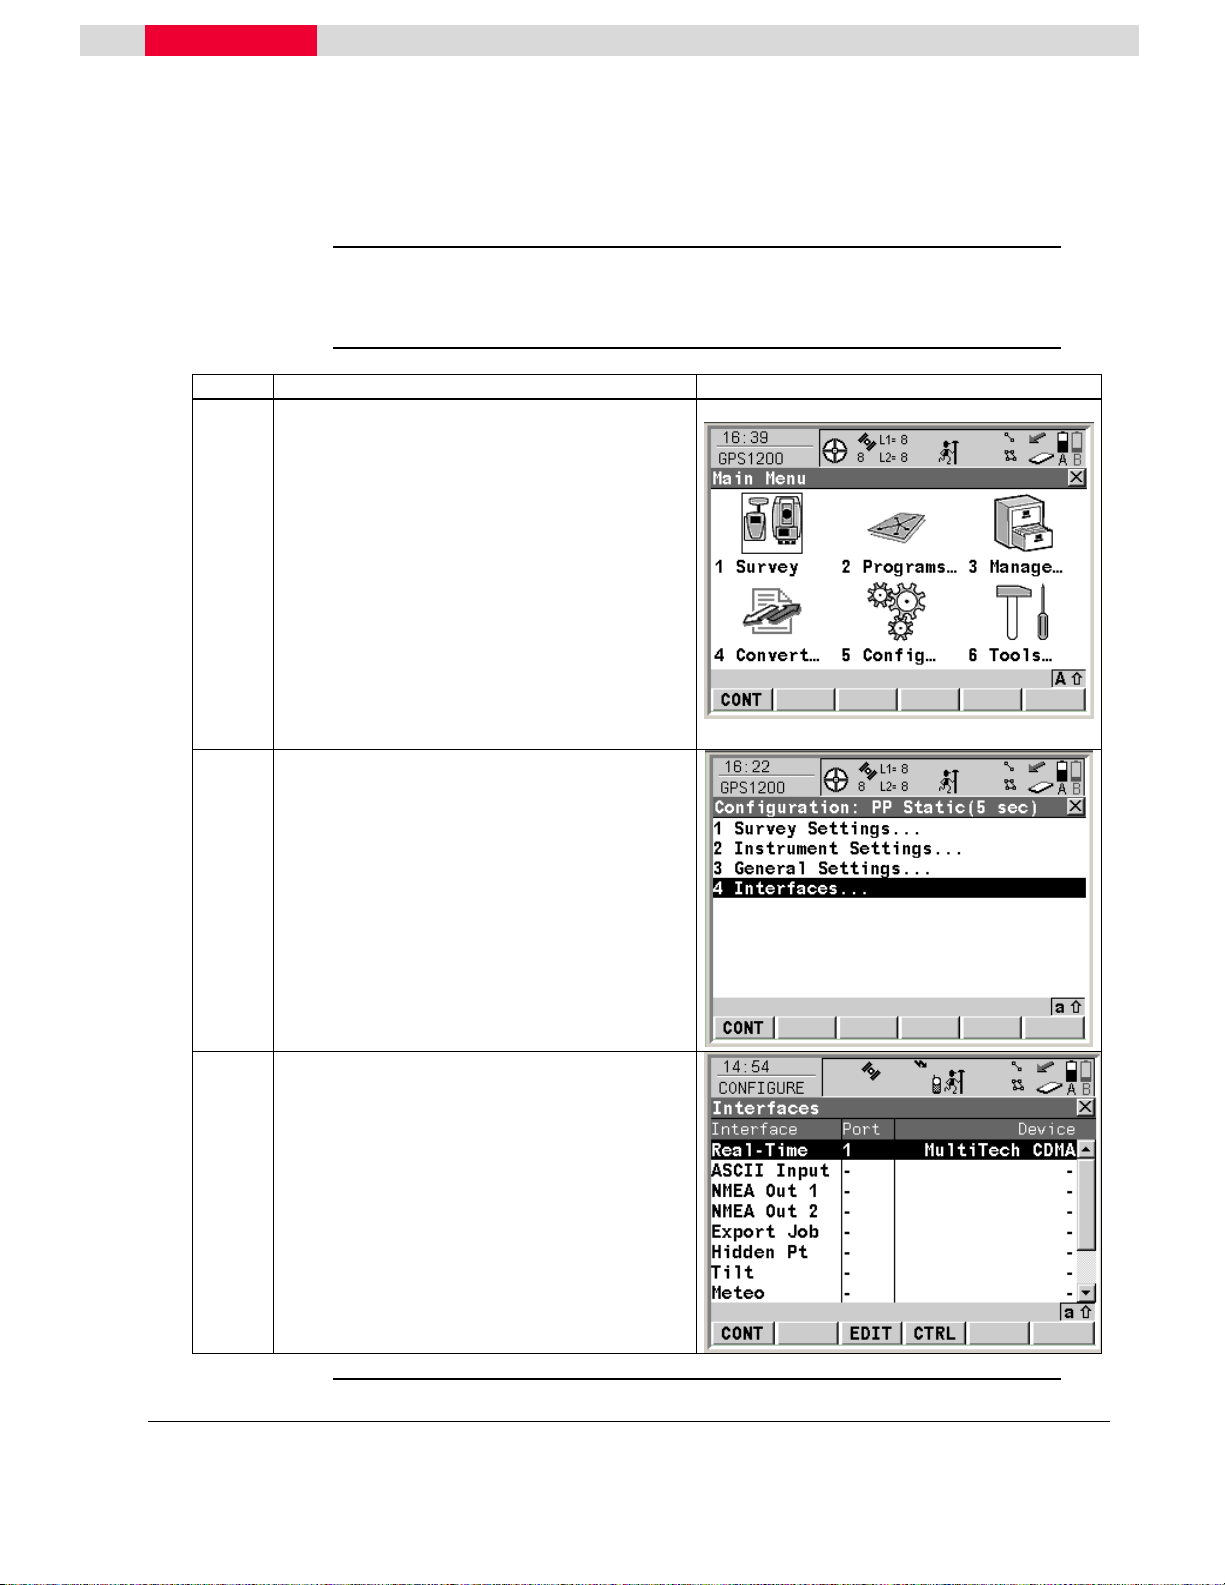
1
2
3
Follow the steps below to configure and activate your Verizon Wireless Internet
plan for use with the GPS1200 sensor and the Multi-Tech CDMA modem.
Begin with the sensor turned off.
• Attach your CDMA module to Port 1
or 3 on the sensor.
• Press the ON (PROG) button to turn
on the sensor.
• Select 5 Config… from the Main
Menu.
This takes you to the GPS1200 Configuration
screen
From the GPS1200 Configuration screen:
• Select 4 Interfaces…
This takes you to the CONFIGURE Interfaces
screen.
From the CONFIGURE Interfaces screen:
• Highlight Real-Time and press the F3
(EDIT) button.
This takes you to the CONFIGURE RealTime Interface screen
Continued on next page
GPS1200 GFU19 MultiTech CDMA Modem Quick Guide July, 2005
Page 4/18
Page 5
GFU19 Multi-Tech CDMA Modem
OTA Activation Using Your Internet Data Plan
Step Action Display
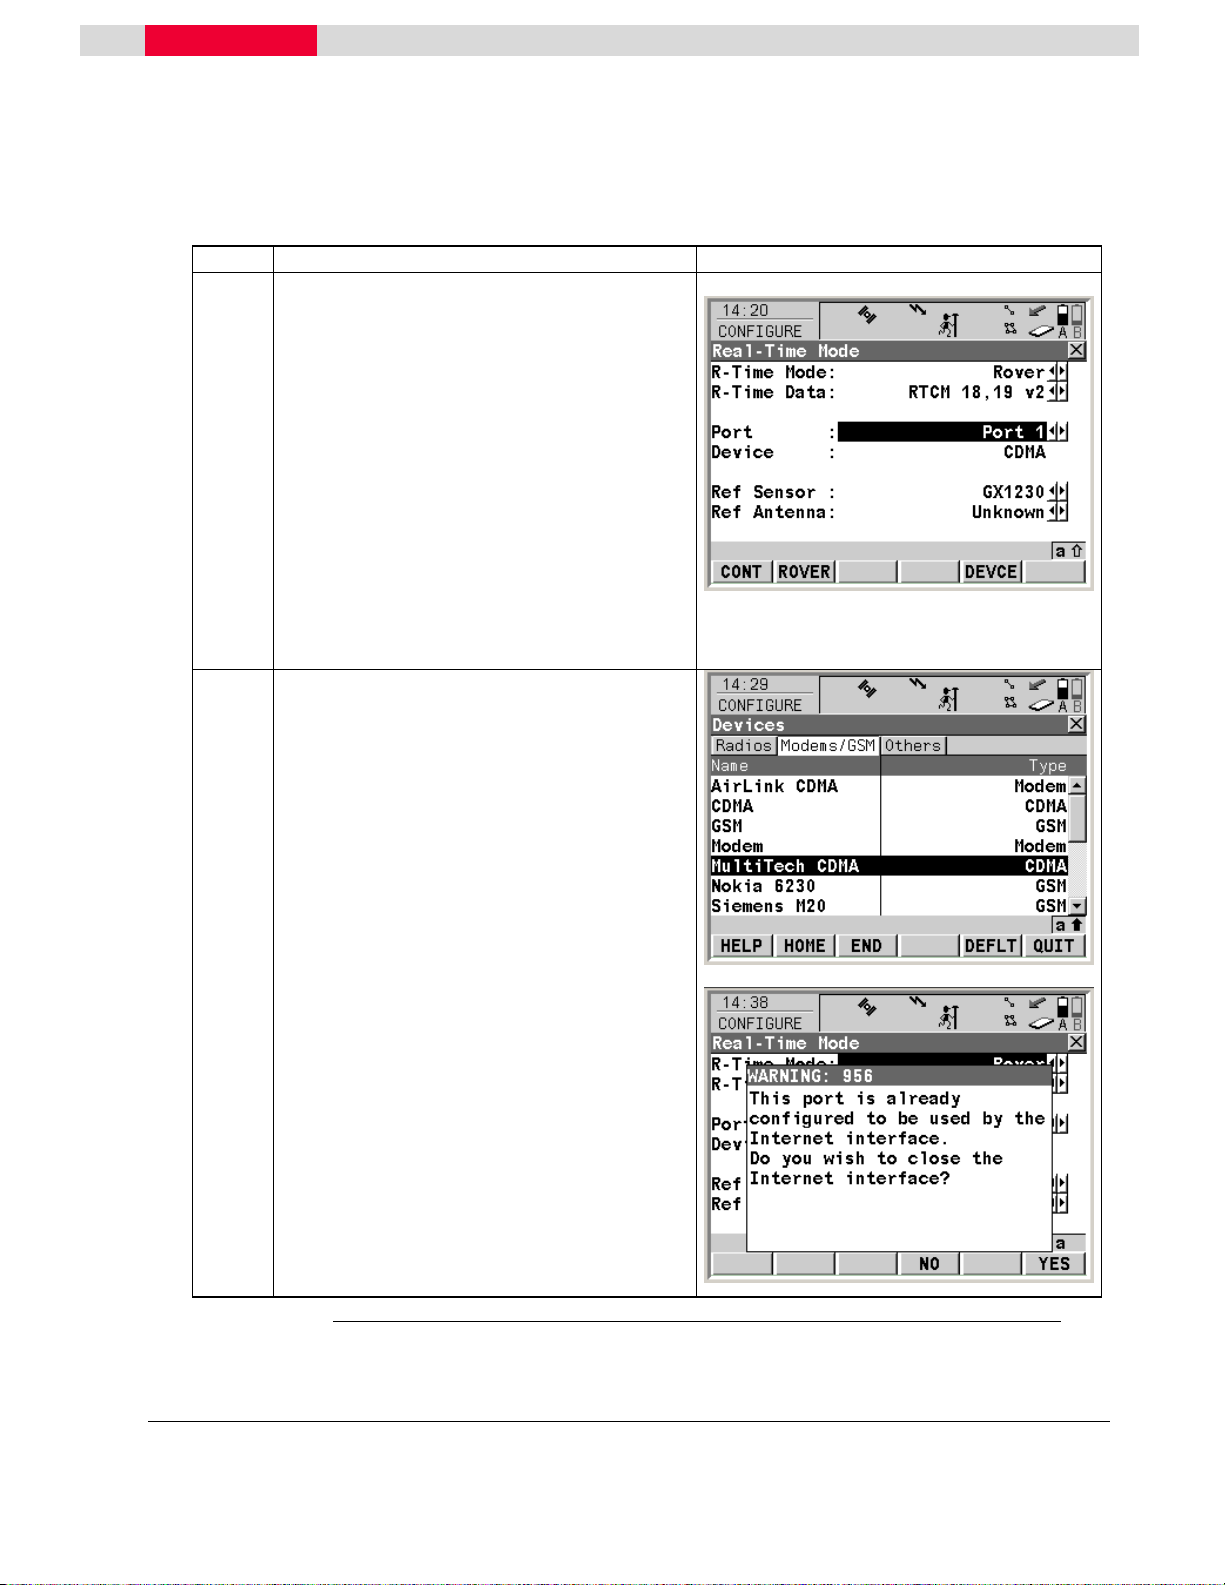
From the CONFIGURE Real-Time Mode
4
screen:
• Ensure that the R-Time Mode and R-
Time Data fields are set
appropriately.
• Select the port to which your modem
is attached in the Port field.
• Press the F5 (DEVCE) button.
This takes you to the CONFIGURE Devices
screen.
From the CONFIGURE Devices screen:
5
• Press the F6 (PAGE) button once to
access the “Modems/GSM” page.
• Highlight the MultiTech CDMA
modem and press the SHIFT – F5
(DEFLT) button to ensure that the
modem’s default settings are active.
• Press the F1 (CONT) button to
accept this device configuration and
return to the CONFIGURE Interfaces
screen.
• At this point a “Warning: This port
is already configured to be used
by the Internet interface. Do you
wish to close the Internet
interface?” message might appear.
If it does, press the F6 (YES) button.
This returns you to the CONFIGURE
Interfaces screen.
Continued on next page
GPS1200 GFU19 MultiTech CDMA Modem Quick Guide July, 2005
Page 5/18
Page 6
GFU19 Multi-Tech CDMA Modem
OTA Activation Using Your Internet Data Plan
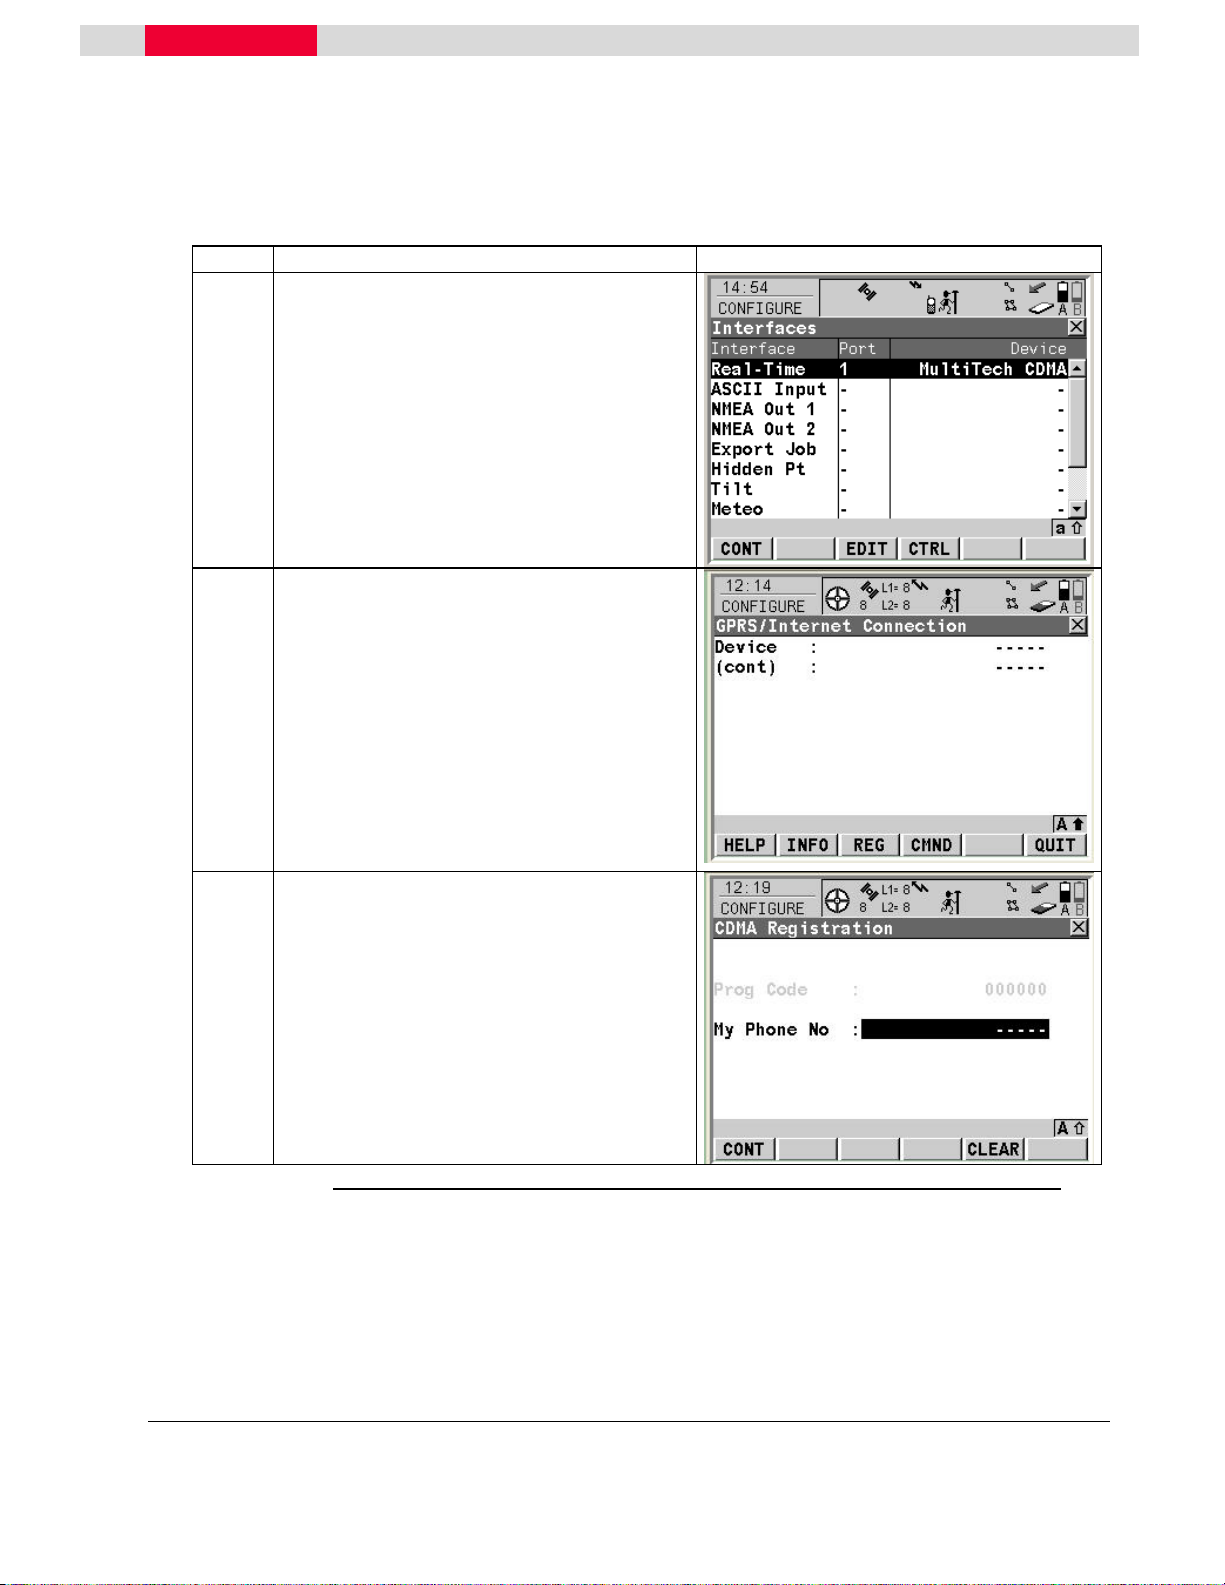
Step Action Display
From the CONFIGURE Interfaces screen:
6
• Highlight Real-Time and press the F4
(CTRL) button.
This takes you to the CONFIGURE
GPRS/Internet Connection screen.
In the CONFIGURE GPRS/Internet
7
Connection screen:
• Press the SHIFT button and the
following screen appears.
• Press the F3 (REG) button
This takes you to the CONFIGURE CDMA
Registration screen.
From the CONFIGURE CDMA Registration
8
screen:
• Enter the Verizon number assigned
to your modem in the My Phone No
field.
• Press the F1 (CONT) button.
This begins the modem activation process.
Continued on next page
GPS1200 GFU19 MultiTech CDMA Modem Quick Guide July, 2005
Page 6/18
Page 7

GFU19 Multi-Tech CDMA Modem
OTA Activation Using Your Internet Data Plan
Step Action Display
During the modem activation process:
9
• Press the F4 (OK) button when the
Information box shown on the right
appears. The activation might take
up to a few minutes. The modem will
be ready for use a few minutes after
activation.
If the modem activation process fails:
10
• Re-enter your phone number and
Retry.
Note: If modem activation still fails, refer to
Appendix 1 for an alternative method of
activation.
GPS1200 GFU19 MultiTech CDMA Modem Quick Guide July, 2005
Page 7/18
Page 8

GFU19 Multi-Tech CDMA Modem
Setting Up the Multi-Tech CDMA Modem
Set up the
Multi-Tech
CDMA Modem
Step Action Display
1
2
3
Follow the steps below to setup the GPS1200 sensor to use the GFU19 Multi-Tech
CDMA modem.
Begin with the sensor turned off.
• Attach your CDMA module to Port 1
or 3 on the sensor.
• Press the ON (PROG) button to turn
on the sensor.
• Select 5 Config… from the Main
Menu.
This takes you to the GPS1200 Configuration
screen.
From the GPS1200 Configuration screen:
• Select 4 Interfaces…
This takes you to the CONFIGURE Interfaces
screen.
From the CONFIGURE Interfaces screen:
• Highlight Internet and press the F3
(EDIT) button.
This takes you to the CONFIGURE Internet
Interface screen.
Continued on next page
GPS1200 GFU19 MultiTech CDMA Modem Quick Guide July, 2005
Page 8/18
Page 9

GFU19 Multi-Tech CDMA Modem
Setting Up the Multi-Tech CDMA Modem
Step Action Display
From the CONFIGURE Internet Interface
4
screen:
• Set Internet to Yes.
• Set the Port to 1 or 3 as applicable.
• Set the IP Address to Dynamic or
Static, depending on your plan.
Note: If you are using a Static IP Address,
be sure to obtain it from Verizon Wireless and
enter it in the Set IP Adr field.
• Press the F5 (DEVCE) button.
This takes you to the CONFIGURE GPRS
Internet Devices screen.
From the CONFIGURE GPRS Internet
5
Devices screen:
• Highlight MultiTech CDMA and
press the F3 (EDIT) button.
This takes you to the CONFIGURE Edit
Device: Multitech CDMA screen.
Continued on next page
GPS1200 GFU19 MultiTech CDMA Modem Quick Guide July, 2005
Page 9/18
Page 10

GFU19 Multi-Tech CDMA Modem
Setting Up the Multi-Tech CDMA Modem
Step Action Display
From the CONFIGURE Edit Device:
6
MultiTech CDMA screen:
• Ensure the settings are as shown:
GPRS/Internet: Yes
Baud Rate: 115200
Parity: None
Data Bits: 8
Stop Bit: 1
Flow Control: RTS/CTS
• Press the F4 (ATCMD) button.
This takes you to the CONFIGURE
GSM/Modem AT Command Lines screen.
In the CONFIGURE GSM/Modem AT
7
Command Lines screen:
• Press the F6 (PAGE) button to
access the GPRS/Internet tab.
• Enter the AT commands as shown on
the right.
Note: These commands are correct for
Verizon Wireless modems.
• Press the F1 (STORE) button to save
the changes.
This returns you to the CONFIGURE Edit
Device: MultiTech CDMA screen.
GPS1200 GFU19 MultiTech CDMA Modem Quick Guide July, 2005
Continued on next page
Page 10/18
Page 11

GFU19 Multi-Tech CDMA Modem
Setting Up the Multi-Tech CDMA Modem
Step Action Display
In the CONFIGURE Edit Device: MultiTech
8
CDMA screen:
• Press the F1 (STORE) button to save
the changes.
This returns you to the CONFIGURE GPRS
Internet Devices screen.
• Highlight MultiTech CDMA and
press the F1 (CONT) button.
This returns you to the CONFIGURE Internet
Interfaces screen.
In the CONFIGURE Internet Interfaces
9
screen:
• Press the F1 (CONT) button.
This returns you to the CONFIGURE
Interfaces screen.
In the CONFIGURE Interfaces screen:
10
• Press the F1 (CONT) button.
This concludes the Multi-Tech CDMA setup
and returns you to the Main Menu.
GPS1200 GFU19 MultiTech CDMA Modem Quick Guide July, 2005
Page 11/18
Page 12

GFU19 Multi-Tech CDMA Modem
Connecting to a Network Using the Multi-Tech CDMA Modem
Connect with
the Multi-Tech
CDMA modem
Step Action Display
1
2
GPS1200 GFU19 MultiTech CDMA Modem Quick Guide July, 2005
Follow the steps below to connect the GPS1200 sensor to a network using the MultiTech CDMA modem.
Continuing from the previous section:
• In the Main Menu select 5 Config…
• In the Configuration Menu select
4 Interfaces…
• In the Interfaces Menu highlight Real-
Time and press the F3 (EDIT) button.
This takes you to the Real-Time Mode
screen.
In the Real-Time Mode screen:
• In the R-Time Mode field, select
Rover.
• In the Port field, select NET1-3 to
define the port through which you
wish to connect.
• Press the F1 (CONT) button to save
your settings.
This returns you to the Interfaces screen.
Continued on next page
Page 12/18
Page 13

GFU19 Multi-Tech CDMA Modem
Connecting to a Network Using the Multi-Tech CDMA Modem
Step Action Display
In the Interfaces screen:
3
• Press the F4 (CTRL) button to set up
your IP information.
This takes you to the Set NET Port screen.
In the Set NET Port screen:
4
• In the User field, select Client.
• Enter the IP address and Port
number of the station you are
connecting to in the IP Address and
TCP/IP Port fields, respectively.
Note: Leave the Auto CONEC field set to
No, as shown.
• Press the F1 (CONT) button to save
your settings.
This returns you to the Interfaces screen.
In the Interfaces screen:
5
• Press the F1 (CONT) button to return
to the Main Menu.
• In the Main Menu, select 1 Survey.
This takes you to the Survey Begin screen.
Continued on next page
GPS1200 GFU19 MultiTech CDMA Modem Quick Guide July, 2005
Page 13/18
Page 14

GFU19 Multi-Tech CDMA Modem
Connecting to a Network Using the Multi-Tech CDMA Modem
Step Action Display
In the Survey Begin screen:
6
• Review the job information and make
any changes needed.
• Press the F1 (CONT) button to begin
the survey.
This takes you to the Survey: Default screen.
In the Survey: Default screen:
7
• Press the SHIFT -F3 (CONEC)
button to establish a connection with
the reference station.
This will establish a connection with the
8
reference station. You should see the NET1:
Successfully connected message at the
bottom of the screen
• To disconnect, press the SHIFT - F3
(DISCO) button.
Continued on next page
GPS1200 GFU19 MultiTech CDMA Modem Quick Guide July, 2005
Page 14/18
Page 15

GFU19 Multi-Tech CDMA Modem
Connecting to a Network Using the Multi-Tech CDMA Modem
Step Action Display
This disables the connection with the
9
reference station. You should see the NET1:
Disconnected message at the bottom of the
screen
This concludes the Connecting to a Network
Using the Multi-Tech CDMA section.
GPS1200 GFU19 MultiTech CDMA Modem Quick Guide July, 2005
Page 15/18
Page 16

GFU19 Multi-Tech CDMA Modem
Appendix 1: Alternative Method of Activation
Alternative
method
Step Action Display
1
Please verify all of your account information with Verizon
Wireless.
Ask for both your MIN and MDM number, it is possible that they are
different.
MDM Number - Verizon phone number
MIN - Mobile Identification Number
Note: If your MIN and MDM number are different please note the numbers and
follow the alternative procedure below.
This step continues from Section 1.1, Step 6.
Make sure that you have selected the Real-
Time interface and not the Internet. From
the CONFIGURE GPRS/Internet Connection
screen:
• Press the SHIFT button and the
following screen appears.
• Press the F4 (CMND) button.
This takes you to the CONFIGURE Send
Command to Device screen
Continued on next page
GPS1200 GFU19 MultiTech CDMA Modem Quick Guide July, 2005
Page 16/18
Page 17

GFU19 Multi-Tech CDMA Modem
Appendix 1: Alternative Method of Activation
Step Action Display
From the CONFIGURE Send Command to
2
Device screen:
Activate you MDM number:
• Enter the following commands
exactly as shown and press the F3
(SEND) button after each one has
been entered. The response should
be OK for each entry.
• AT+WSPC=1,000000 (INCLUDE
COMMA!)
• AT+WMDN=n Where n is your 10-
digit Verizon phone number. This
number may extend into the (cont)
field.
• AT+WCMT=1 Wait 10 seconds while
the number is stored.
Activate you MIN:
• AT+WSPC=1,000000 (INCLUDE
COMMA!)
• AT+WIMI=31000n Where n is your
10-digit Verizon MIN. This number
may extend into the (CONT) field.
• AT+WCMT=1 Wait 10 seconds while
the number is stored.
• ATD*22899; Starts OTA activation
(INCLUDE SEMICOLON!)
Continued on next page
GPS1200 GFU19 MultiTech CDMA Modem Quick Guide July, 2005
Page 17/18
Page 18

GFU19 Multi-Tech CDMA Modem
Appendix 1: Alternative Method of Activation
Step Action Display
During activation you may see the following
3
messages displayed at the bottom of the
screen:
+WOTS: “SPL unlocked”
+WOTP: “PRL download OK”
+WOTM: “MDM download OK”
+WOT2: “Programming Successful”
Your Modem is now ready for use!
GPS1200 GFU19 MultiTech CDMA Modem Quick Guide July, 2005
Page 18/18
 Loading...