

Page 1
ADMINISTRATOR USER GUIDE
FaxFinder™ FF200
2-Port V.34 Fax Server
Administrator User Guide
Page 2

FaxFinder
TM
Administrator User Guide
Model FF200
PN S000378A, Version A
Copyright
This publication may not be reproduced, in whole or in part, without prior expressed written permission
from Multi-Tech Systems, Inc. All rights reserved.
Copyright © 2005, by Multi-Tech Systems, Inc.
Multi-Tech Systems, Inc. makes no representations or warranties with respect to the contents hereof and
specifically disclaims any implied warranties of merchantability or fitness for any particular purpose.
Furthermore, Multi-Tech Systems, Inc. reserves the right to revise this publication and to make changes
from time to time in the content hereof without obligation of Multi-Tech Systems, Inc. to notify any person
or organization of such revisions or changes.
Revision Date Description
A
B
07/15/05 Initial release.
05/12/06 Initial Release, Rev B. Describes 1.05.08 FF Client SW & 1.05.08
Dev Mgr SW and minor incremental releases beyond.
Patents
This device covered by the following patent: 5,673,268
Trademarks
Multi-Tech Trademarks: FaxFinder, Multi-Tech, and the Multi-Tech logo.
All other products and technologies are the trademarks or registered trademarks of their respective
holders.
World Headquarters
Multi-Tech Systems, Inc.
2205 Woodale Drive
Mounds View, Minnesota 55112
Phone: 763-785-3500 or 800-328-9717
Fax: 763-785-9874
Technical Support
Country By Email By Phone
France: support@multitech.fr (33) 1-64 61 09 81
India: support@multitechindia.com 91 (124) 2340780
Europe, Asia, Africa: support@multitech.co.uk (44) 118 959 7774
U.S., Canada, &
rest of the World: support@multitech.com (800) 972-2439
(763) 717-5863
Internet Address: http://www.multitech.com
Page 3

Table of Contents
CHAPTER 1 – PRODUCT DESCRIPTION AND SPECIFICATI ON S................................................................6
PRODUCT DESCRIPTION..............................................................................................................................................6
PRODUCT FEATURES ..................................................................................................................................................7
PREREQUISITE: DETERMINING PBX COMPATIBILITY & CONFIGURATION .................................................................8
SAFETY WARNINGS....................................................................................................................................................8
TECHNICAL SPECIFICATIONS ......................................................................................................................................9
RELATED MANUALS...................................................................................................................................................9
DISTRIBUTING DOCUMENTS TO CLIENT USERS ........................................................................................................10
CHAPTER 2 – SYSTEM OVERVIEW...................................................................................................................11
Our Sample FaxFinder Systems ..........................................................................................................................11
Server Setup for Sample FaxFinder System – Acme99, Inc.................................................................................13
Receiving a Fax, Server Perspective – Acme99 Gets a Fax................................................................................14
Receiving a Fax, Client Perspective – Joe Gets a Product Order.......................................................................15
Sending a Fax, Server Perspective – Acme99 Sends a Fax.................................................................................16
Sample Client Setup – Joe, the Acme99 Order Processor...................................................................................17
Sending a Fax, Client Perspective – Mary Sends Spec Sheet to Client...............................................................18
Fax Message Components...................................................................................................................................19
CHAPTER 3 – SERVER INSTALLATION...........................................................................................................20
PREREQUISITE: DETERMINING PBX COMPATIBILITY & CONFIGURATION ...............................................................20
WE SUPPLY ..............................................................................................................................................................20
YOU SUPPLY ............................................................................................................................................................20
PART A: CABLING -- CONNECTING THE FAXFINDER TO POWER OUTLET, PHONE LINES, AND ETHERNET................21
1. Connect FaxFinder to AC Outlet.....................................................................................................................21
2.Verify powering. ...............................................................................................................................................21
3. Connect FaxFinder to Ethernet Network.........................................................................................................21
PART B: CONNECTING TO TELEPHONY SERVICE......................................................................................................22
PART C: CONFIGURING THE FAXFINDER SERVER.....................................................................................................23
Summary of Configuration Data..........................................................................................................................23
1. Setting Admin PC to Startup IP Address...................................................................................... ...................24
2. Logging In (I)...................................................................................................................................................25
3. Setting FaxFinder IP Addresses......................................................................................................................26
4. Resetting Admin PC to Its Regular IP Address................................................................................................27
5. Logging In (II).................................................................................................................................................27
6. Setting Administrative Functions.....................................................................................................................27
7. Setting Up the Mail Server...............................................................................................................................30
8. Configuring the FaxFinder’s Modem..............................................................................................................30
9. Changing Admin’s Server Password...............................................................................................................33
10. Specifying Administrator’s Client Password.................................................................................................34
11. Sending Test Fax from Fax Machine to FaxFinder.......................................................................................34
12. Adding Client/Users to the Phone Book........................................................................................................36
CHAPTER 4 – FAXFINDER SERVER SOFTWARE SCREENS.......................................................................37
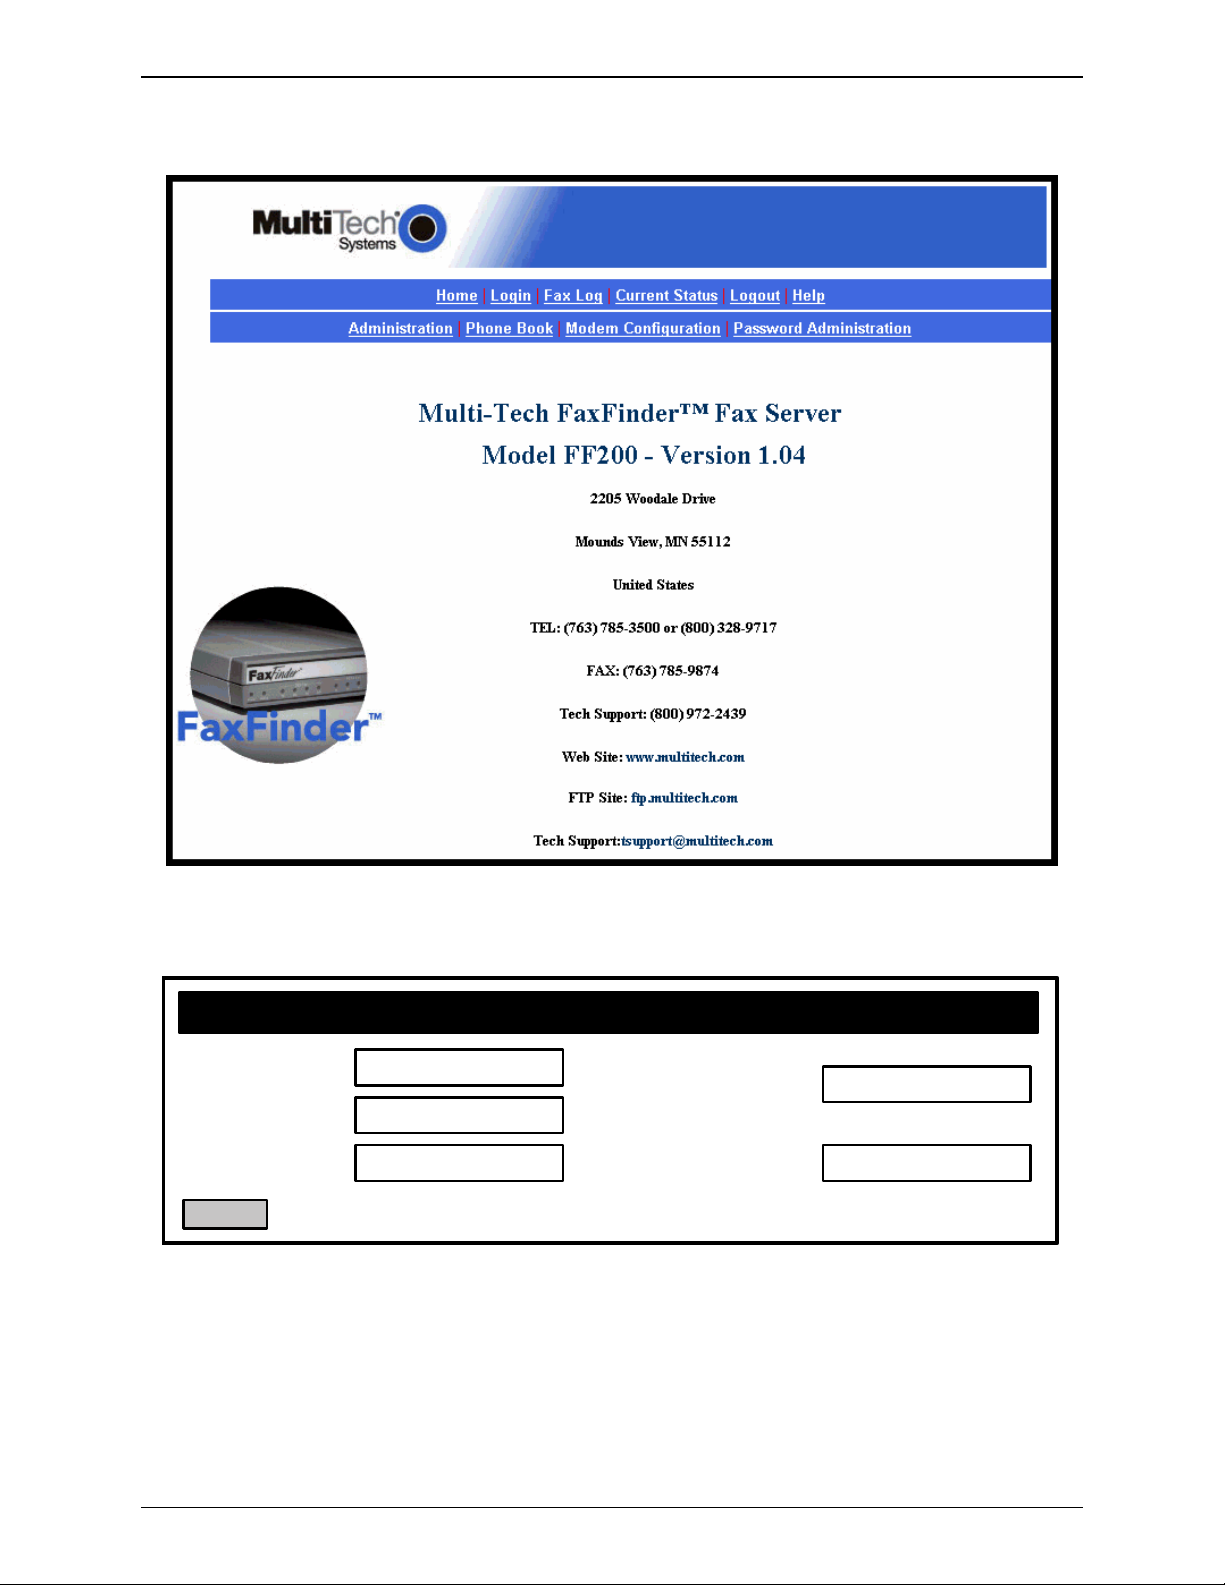
Home Screen........................................................................................................................................................37
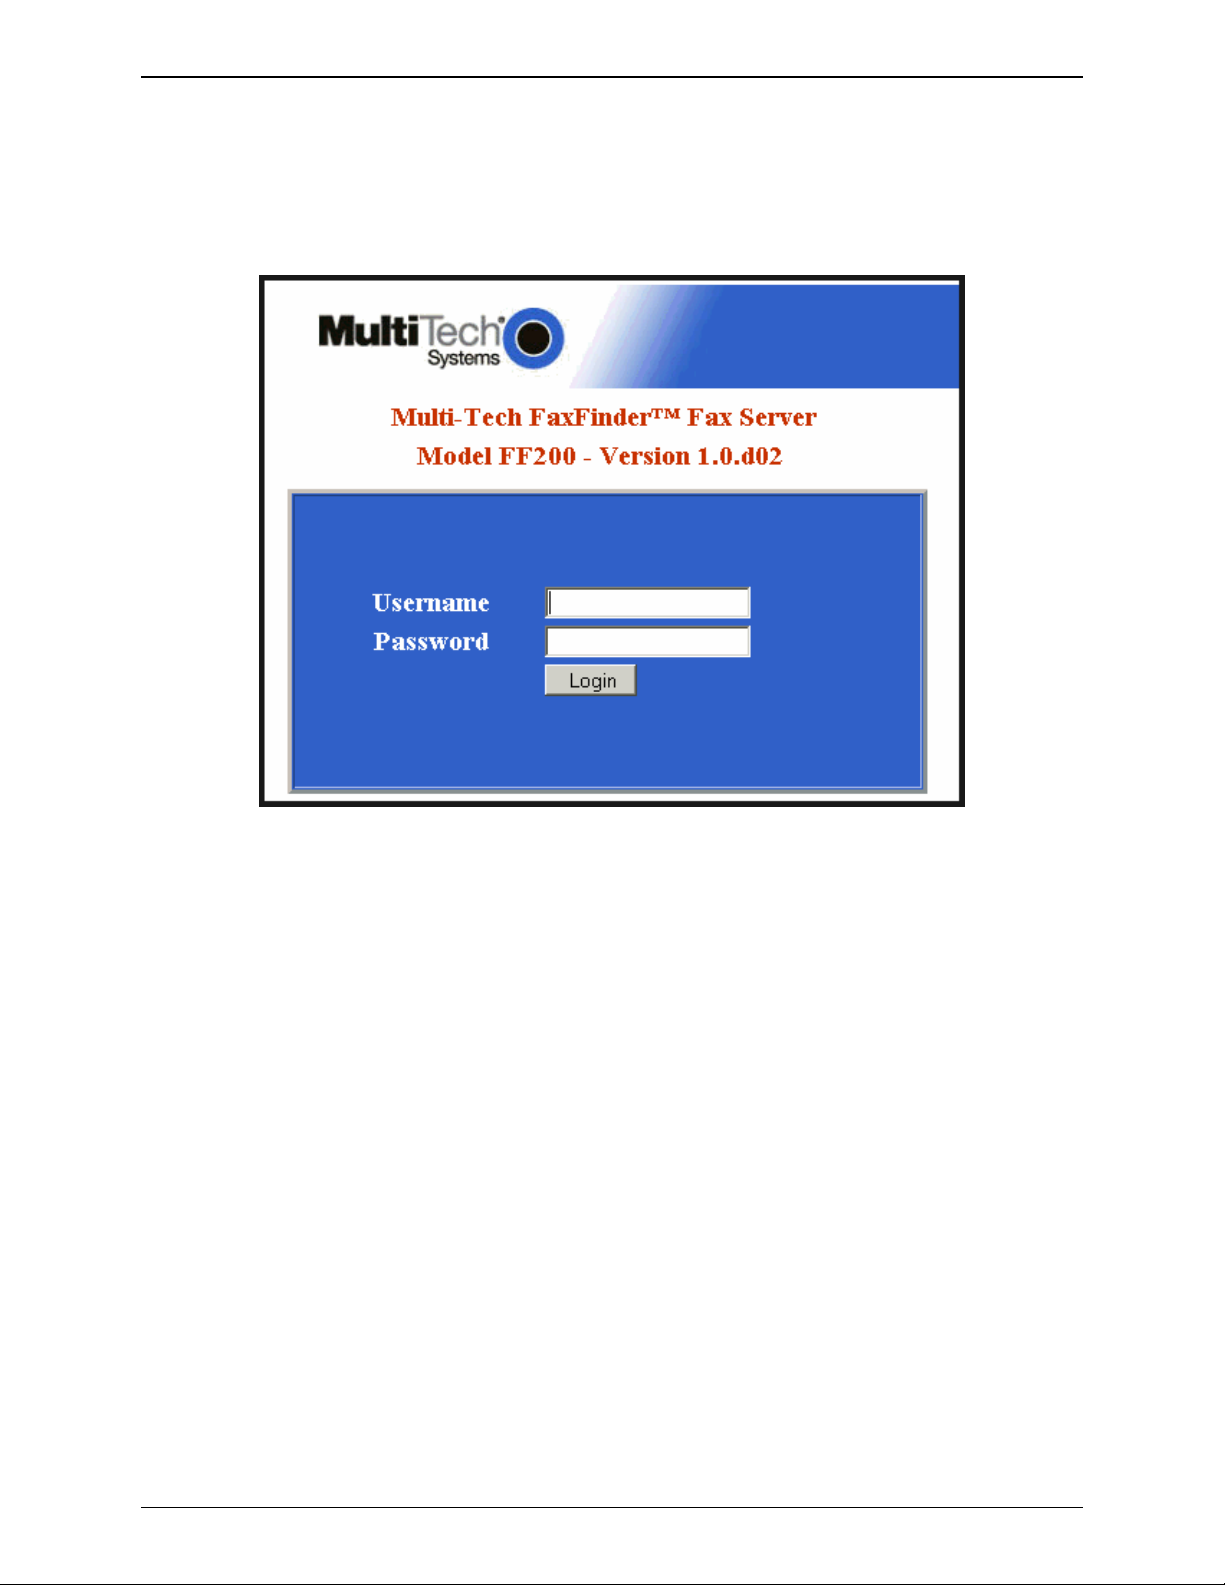
Login Screen........................................................................................................................................................38
Fax Log Screen....................................................................................................................................................39
Fax Details Screen...............................................................................................................................................40
Current Status Screen..........................................................................................................................................42
Logout Option......................................................................................................................................................44
Help Screen..........................................................................................................................................................44
Administration Screen .........................................................................................................................................45
Phone Book Screen..............................................................................................................................................49
Modem Configuration Screen – POTS Modem....................................................................................................51
Multi-Tech Systems, Inc. FF200 FaxFinder Fax Server Admin User Guide 3
Page 4

Password Administration Screen.........................................................................................................................55
CHAPTER 5 – FAXFINDER CLIENT SOFTWARE C ONFIGURATION........................................................56
INSTALLING FAXFINDER CLIENT SOFTWARE ...........................................................................................................56
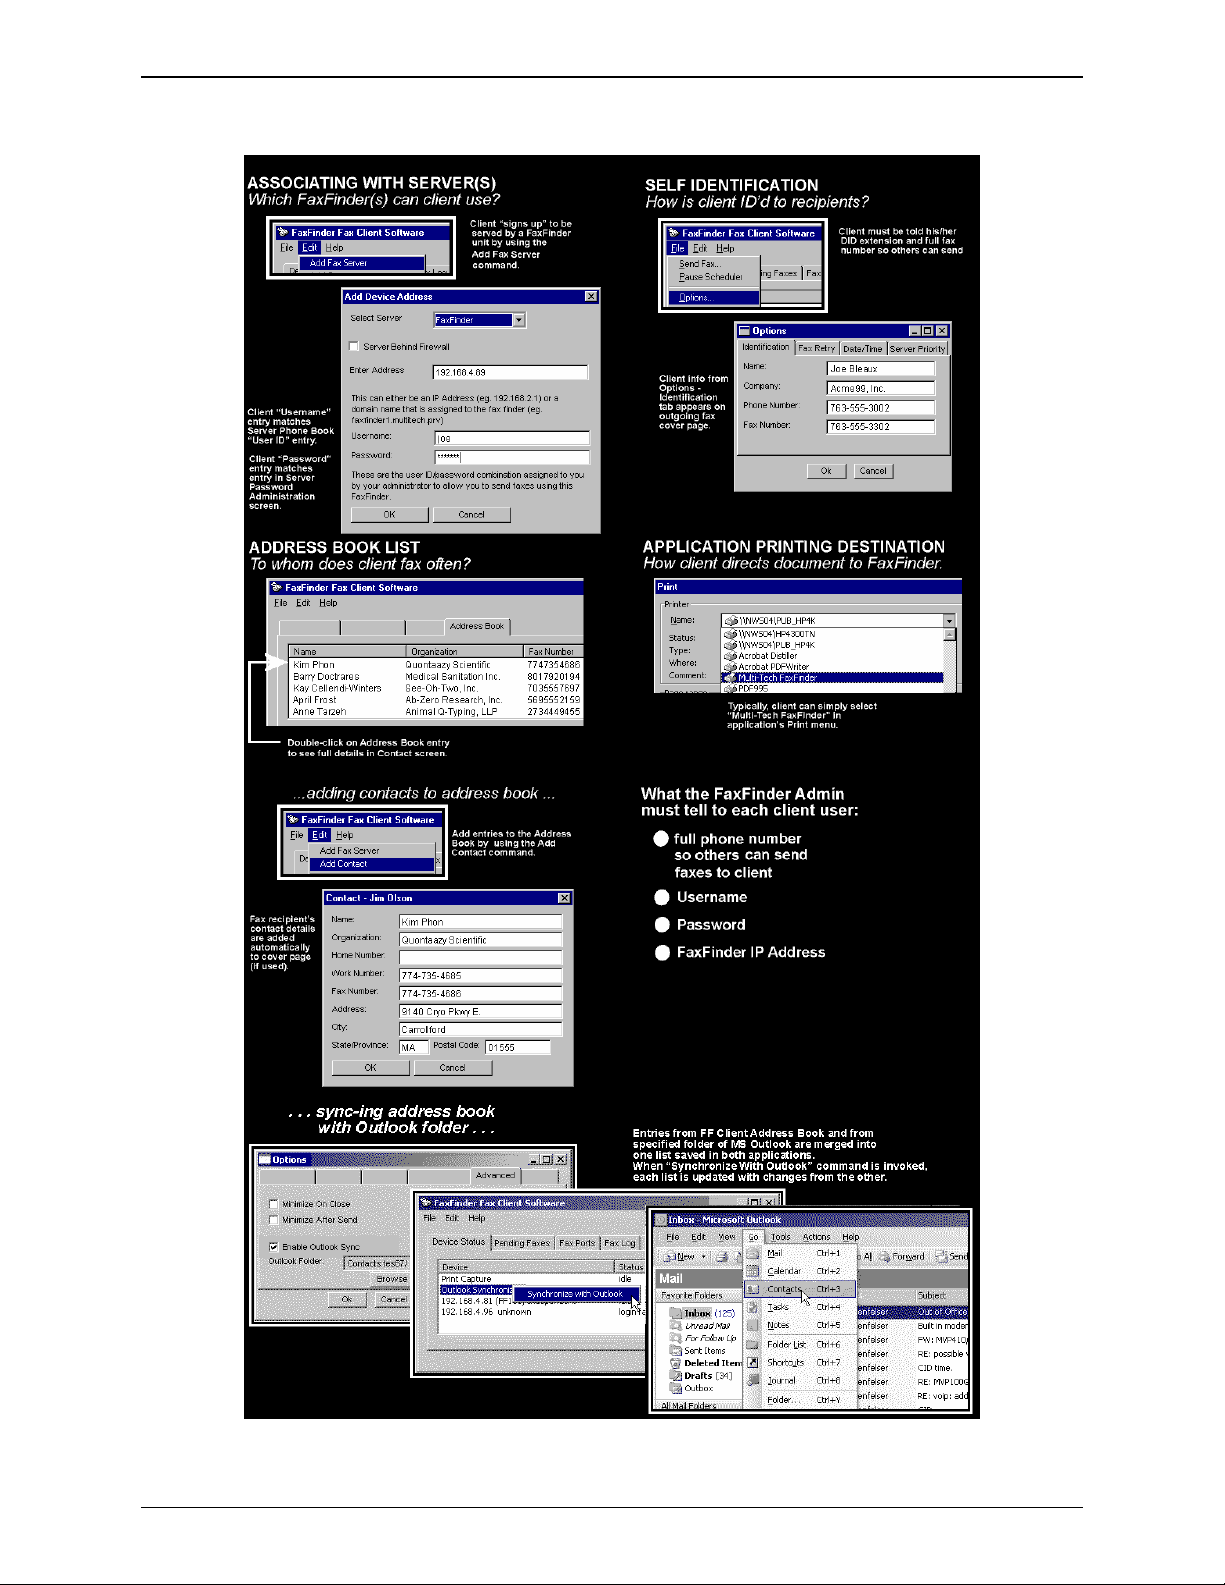
ASSOCIATING CLIENT WITH SPECIFIC FAXFINDER UNIT(S)......................................................................................61
DIS-ASSOCIATING THE CLIENT FROM A SPECIFIC FAXFINDER UNIT ........................................................................63
DISABLING AND RE-ENABLING A CLIENT’S FAXFINDER SERVICE ...........................................................................64
SENDING TEST FAX ..................................................................................................................................................64
FAXFINDER FAX CLIENT SOFTWARE MENU COMMAND DEFINITIONS .....................................................................65
CHAPTER 6: FAXFINDER CLIENT SOFTWARE OPERATION....................................................................73
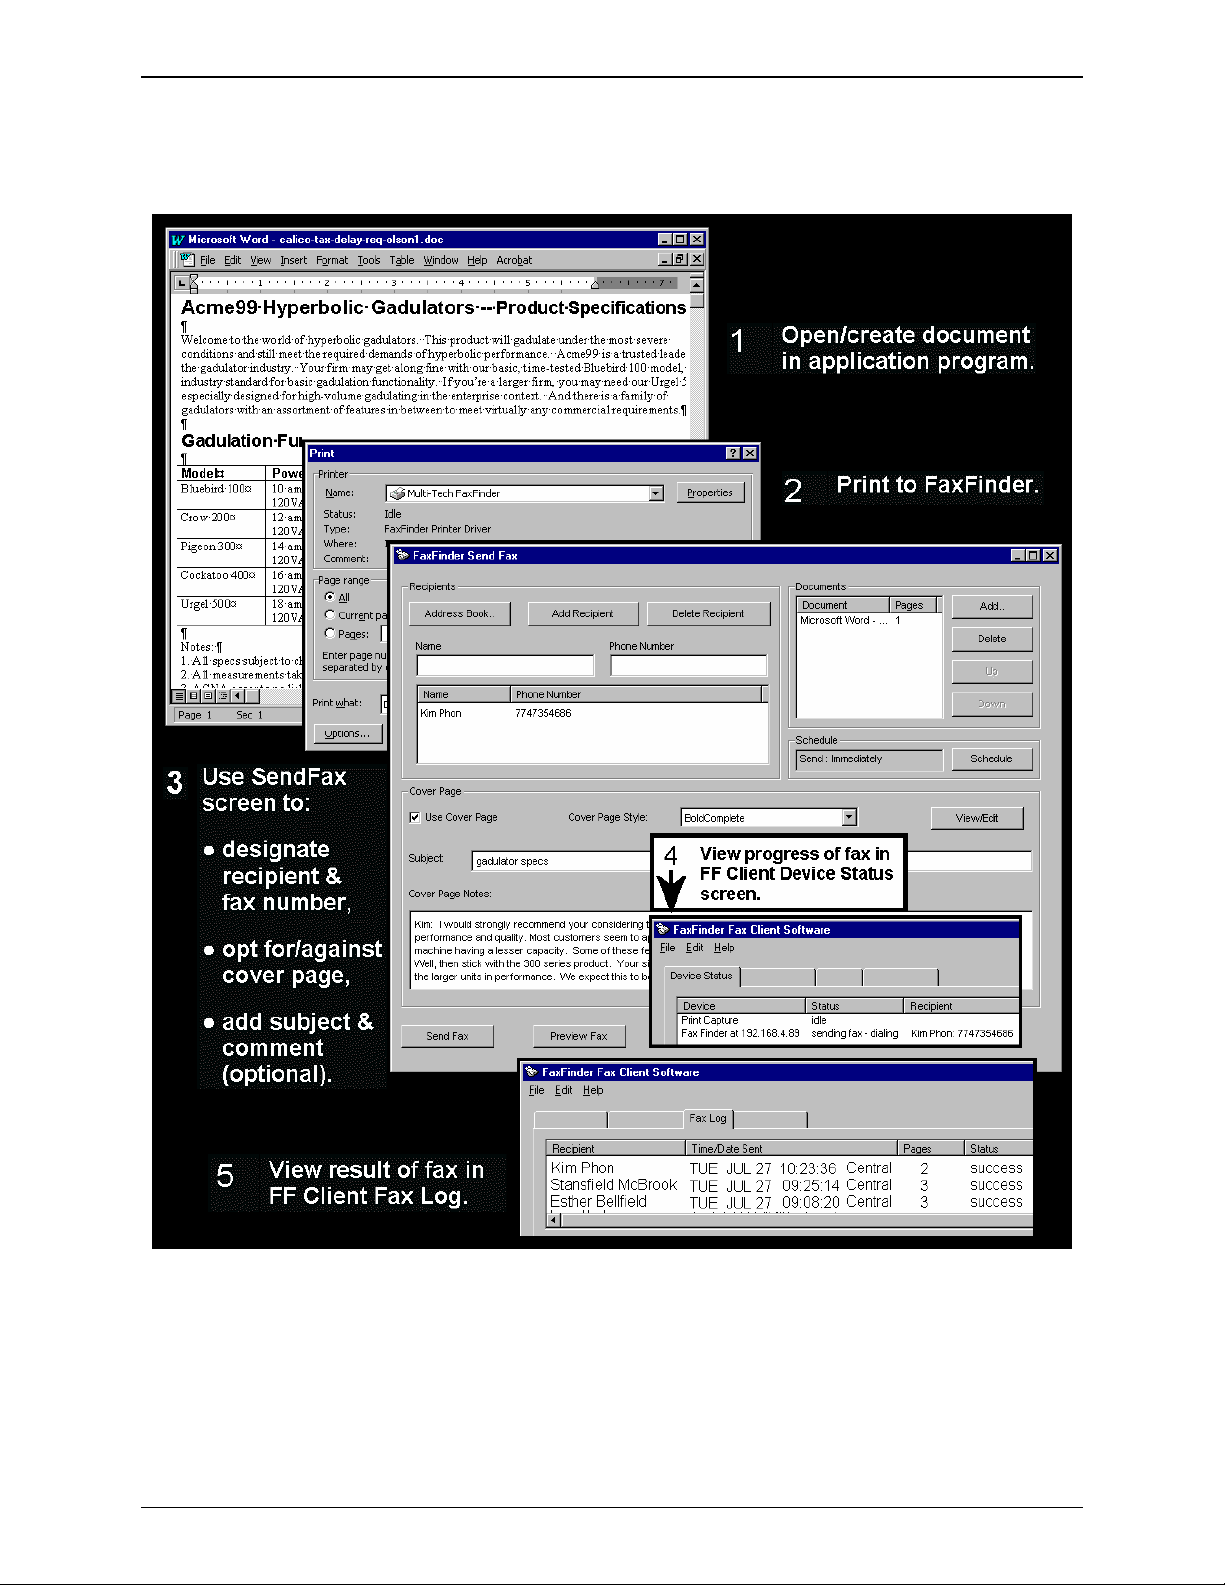
SENDING A FAX........................................................................................................................................................74
SCHEDULING FAX TRANSMISSIONS ..........................................................................................................................80
RE-SENDING A FAILED FAX .....................................................................................................................................81
PUTTING PENDING FAXES ON HOLD AND RESCINDING THE HOLD............................................................................82
CANCELING A FAX ...................................................................................................................................................85
SETTING FAX RETRY NUMBER AND INTERVAL ........................................................................................................86
SENDING ONE FAX CONTAINING MULTIPLE DOCUMENTS........................................................................................87
FORWARDING A FAX ................................................................................................................................................89
RECEIVING A FAX.....................................................................................................................................................91
Receiving Faxes in POTS Mode..........................................................................................................................91
Receiving Faxes in PBX Routing Mode...............................................................................................................93
USING THE MULTI-TECH TIFF VIEWER.....................................................................................................................95
Frequently Used Commands – Toolbar Icons.....................................................................................................95
Importing Fax Images into Other Application Programs..................................................................................100
SETTING UP YOUR ADDRESS BOOK MANUALLY....................................................................................................101
SETTING UP YOUR ADDRESS BOOK BY SYNCHRONIZING WITH OUTLOOK .............................................................103
What Synchronization Means............................................................................................................................103
Synchronization Procedure ...............................................................................................................................103
USING STOCK COVER PAGES..................................................................................................................................106
CREATING OR MODIFYING COVER PAGE STYLES ...................................................................................................112
Creating New Cover Page Templates................................................................................................................112
Modifying Existing Cover Page Templates........................................................................................................120
COVER PAGE GENERATOR MENU/ICON COMMAND DESCRIPTIONS........................................................................126
File Menu...........................................................................................................................................................126
Edit Menu ..........................................................................................................................................................127
Insert Menu........................................................................................................................................................127
View Menu.........................................................................................................................................................129
Settings Menu ....................................................................................................................................................130
REPORTING FAILED FAXES TO THE ADMINISTRATOR .............................................................................................131
CHAPTER 7 – SERVER OPERATION...............................................................................................................132
FAX LOG EMAIL MESSAGES...................................................................................................................................132
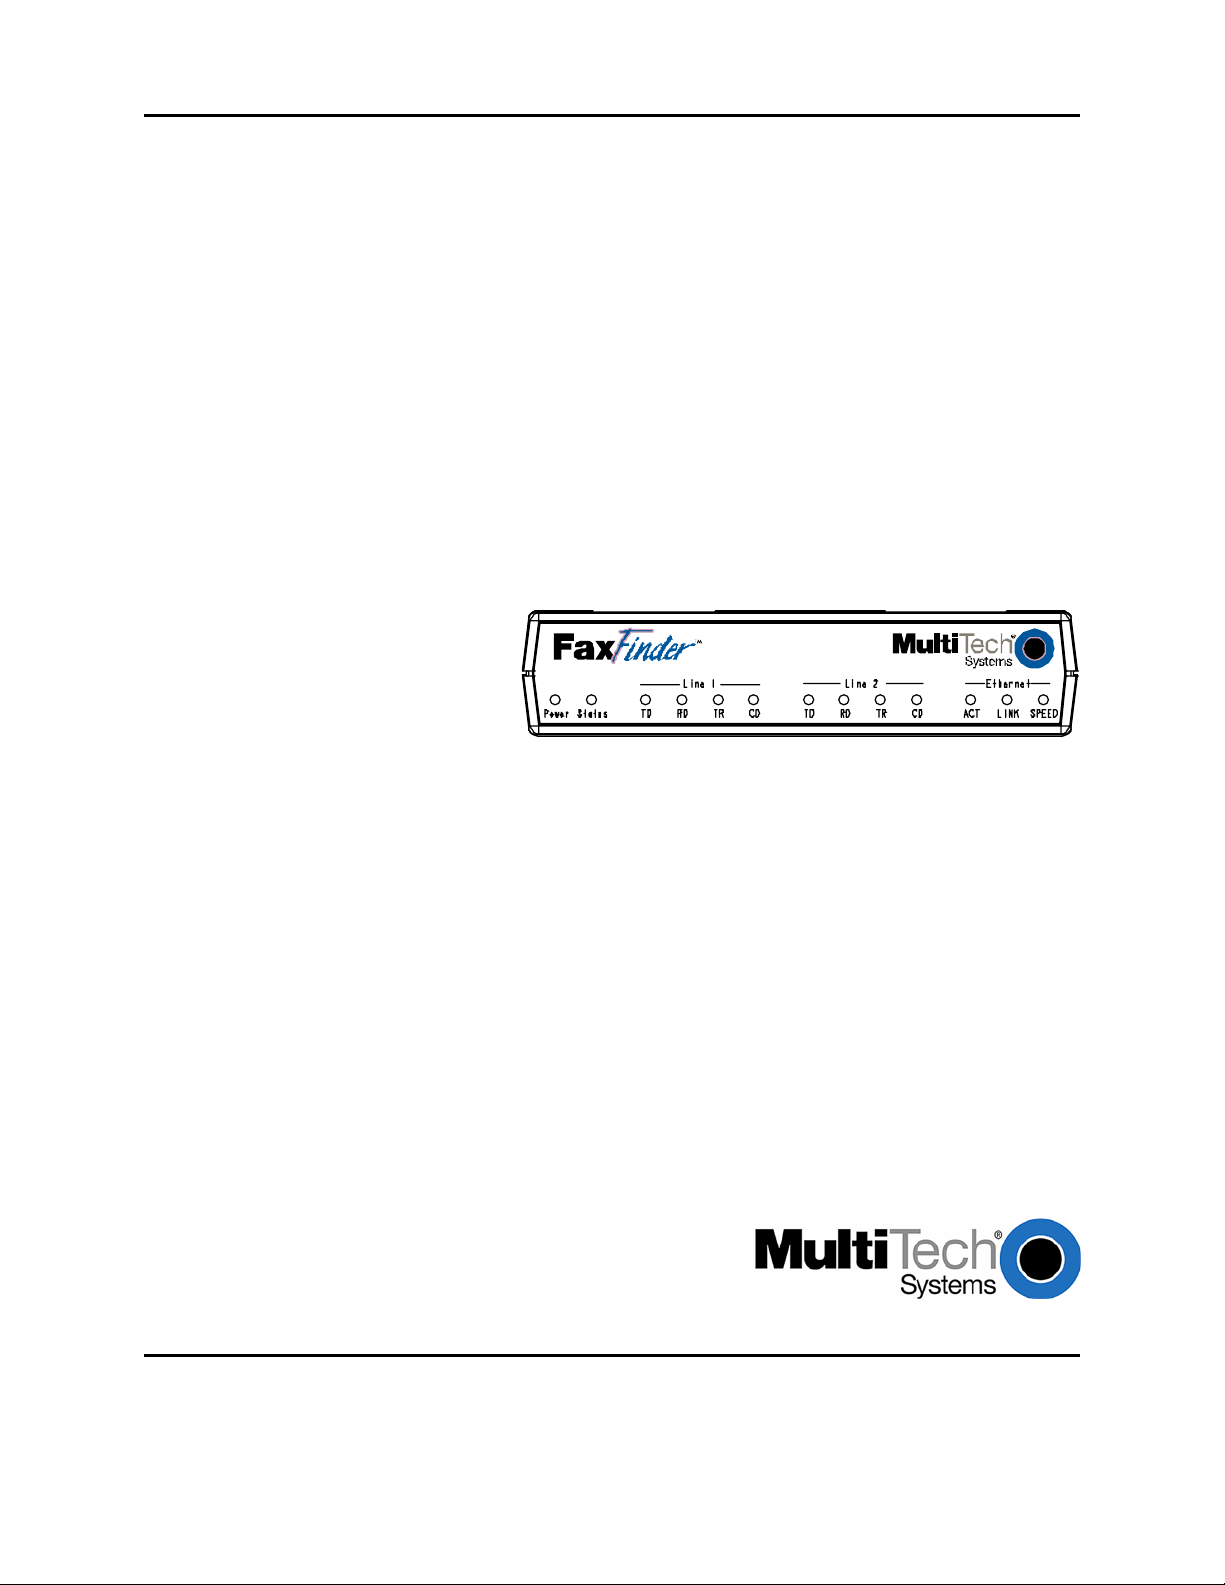
FRONT PANEL LEDS ..............................................................................................................................................133
DEALING WITH FAILED FAX REPORTS....................................................................................................................134
Failure Analysis: Factors to Consider.............................................................................................................134
Possible Solutions to Fax Failure Problems .....................................................................................................134
CHAPTER 8 - DEVICE MANAGER INSTALLATION & OPERATION.......................................................135
Installing Device Manager Software.................................................................................................................135
Operation: Applicability of Device Manager...................................................................................................136
Access to Commands .........................................................................................................................................136
Device Manager Command Summary...............................................................................................................136
Opening the Device Manager Software.............................................................................................................138
Device Manager Main Screen ...........................................................................................................................139
Device Manager “Edit” Menu ..........................................................................................................................141
Right-Click Menu for Selected FaxFinder Device.............................................................................................145
FIRMWARE UPDATING PROCESS - DETAILED..........................................................................................................151
Multi-Tech Systems, Inc. FF200 FaxFinder Fax Server Admin User Guide 4
Page 5

FaxFinder Modem Firmware Update................................................................................................................151
FaxFinder Server Firmware Update.................................................................................................................155
Uninstalling or Reinstalling the Device Manager Software..............................................................................158
CHAPTER 9 – TROUBLESHOOTING................................................................................................................161
1. What if I can't see the web page for my FaxFinder ?....................................................................................161
2. What if I don't get an email when I set the mail server address ? .................................................................161
3. What if the FaxFinder doesn't answer a fax call?.........................................................................................163
4. What if I don't get the email to me of the test fax that I sent?........................................................................163
CHAPTER 10 – REGULATORY INFORMATION............................................................................................164
47 CFR PART 68 TELECOM ....................................................................................................................................164
47 CFR PART 15 REGULATION...............................................................................................................................165
FAX BRANDING STATEMENT..................................................................................................................................165
CANADIAN LIMITATIONS NOTICE...........................................................................................................................166
INDUSTRY CANADA................................................................................................................................................166
WEEE STATEMENT................................................................................................................................................167
CHAPTER 11: WARRANTY, SERVICE, & REPAIR .......................................................................................168
Multi-Tech Systems, Inc. FF200 FaxFinder Fax Server Admin User Guide 5
Page 6
Chapter 1: Product Description and Specifications
Chapter 1 – Product Description and
Specifications
Product Description
The FF200 2-Port V.34 FaxFinder unit is a complete, economical, easy-to-use network fax server. With it,
you can receive faxes as emails and send faxes from any application that can print. The FF200
FaxFinder operates in two modes: PBX Routing Mode and POTS Mode.
PBX Routing Mode. When connected to a station port on a PBX
2
server with two-way fax service. Multiple PBX extension numbers are dedicated to incoming fax traffic
which is routed to the FF200. (Only one station port is needed. Faxes transmitted to any of the PBX’s
fax-dedicated extension numbers all go to the station port serving the FF200.) The FF200 converts the
incoming faxes into graphic files that are sent as email attachments to fax recipients on or beyond the
ethernet network. (Because faxes are delivered in the form of email, the fax recipient could be at any
reach-able email address. So, for example, a sales person could receive faxes while traveling by using a
regular company fax number and picking up the email messages remotely.) Each fax-dedicated PBX
extension number is associated with a particular email address.
1
, the FF200 functions as a network fax
Receiving. Fax clients receive faxes in the form of email attachments. From the remote fax sender’s
perspective, PBX extension phone numbers are functionally identical to ordinary fax phone lines.
Sending. Fax clients on the network can send faxes directly from their PCs using any application
program that can print. The application program must be set so that the FaxFinder itself is its printing
destination. In response to the ‘Print’ command, the FF200 turns the ‘print file’ image into a fax. The
FF200 transmits the fax to the public phone system (PSTN) or to another PBX extension.
POTS Mode. When connected directly to a regular POTS line (or to a PBX without ‘convergent’ routing
capability), the FF200 functions as an outgoing fax server with incoming fax service going through an
attendant. Outgoing faxes work the same as in PBX Routing Mode. That is, to send a fax, the user prints
to the FaxFinder from an application program. However, all incoming faxes go to a single email recipient,
the attendant, who then sends them on, as needed, to the intended recipient.
Being a 2-port device, the FF200 can send and receive faxes simultaneously.
1
The mode is set inthe Routing field of the Modem Configuration screen of the FaxFinder Server
software.
2
For FF200 compatibility in PBX Routing Mode, the PBX must support ‘convergent routing,’ that is,
the routing of multiple extension numbers to a single station port. PBXs lacking this functionality
can still be used with the FaxFinder in POTS Mode.
Multi-Tech’s FF200 FaxFinder
TM
2-Port V.34 Fax Server
The FaxFinder product consists of the hardware unit, server software pre-installed on the hardware unit,
server management software (the Device Manager program), and a suite of client software programs (the
Multi-Tech Systems, Inc. FF200 FaxFinder Fax Server Admin User Guide 6
Page 7

Chapter 1: Product Description and Specifications
main fax-sending client program, a viewer for TIFF files, and a program for creating and modifying fax
cover pages).
Product Features
• Faxes routed to email via PBX extension numbers
• Faxes converted to TIFF files
• Uses two PBX station ports
• Allows available PBX extensions to serve as incoming fax numbers for users
• Loop-start port for outbound/inbound faxing
• Super G3 V.34/33.6K fax communication
• Compression in MH, MR, and MMR modes
• Error Correction Mode (ECM) for fast and reliable faxing
• Web server interface for system configuration and management
• Email notification of failed outbound fax transmissions
• V.92/56K data mode
• Tone and pulse dialing
• Connects to 10/100BaseT Ethernet
• Flash memory for easy software updates
• Small desktop-size external chassis
• Two-year warranty
Multi-Tech Systems, Inc. FF200 FaxFinder Fax Server Admin User Guide 7
Page 8

Chapter 1: Product Description and Specifications
Prerequisite: Determining PBX Compatibility &
Configuration
To operate the FF200 FaxFinder system in conjunction with a PBX (“PBX Routing Mode”), that PBX must
be able to route incoming calls to many PBX extension numbers to a single PBX station port. This
multiple-extension-to-single-port capacity allows multiple PBX users to have their own unique directory
numbers for receiving faxes.
If you are using the FF200 in conjunction with a PBX, be sure that the PBX has this multiple-extension-tosingle-port functionality and that it is activated. PBXs lacking this functionality can still be used with the
FaxFinder in POTS Mode.
Safety Warnings
• Use this product only with UL- and CUL-listed computers (US).
• Never install phone wiring during a lightning storm.
• Never install a phone jack in a wet location unless the jack is specifically designed for wet locations.
• Never touch uninsulated phone wires or terminals unless the phone line has been disconnected at the
network interface.
• Use caution when installing or modifying phone lines.
• Avoid using a phone during an electrical storm; there is a risk of electrical shock from lightning.
• Do not use a phone in the vicinity of a gas leak.
• To reduce the risk of fire, use only 26 AWG or larger telephone line cord.
Multi-Tech Systems, Inc. FF200 FaxFinder Fax Server Admin User Guide 8
Page 9

Technical Specifications
The FF200 FaxFinder meets the following specifications:
Connectors
RJ11-Line Jack, RJ45 - Ethernet Jack
Chapter 1: Product Description and Specifications
Size
Weight
Power Consumption
Operating
Environment
EMC Approvals
Safety Approvals
Telecom Approvals
6”w, 1.5”h, 9”d
15.2 cm x 3.8 cm x 22.9 cm
32 oz (900 g)
Typical 3.75W (0.750A @5v DC)
Maximum 7.7W (1.4A @5.5v DC)
32-104 degrees F (0-40 degrees C)
relative humidity 20 to 90% noncondensing
FCC Part 15 Class B, Canada Class B, EN
55022 Class B, EN55024,
UL, cUL, UL60950, CSA 950, EN60950,
AS3260, CCIB (China)
FCC Part 68, CS03
Related Manuals
The FF200 FaxFinder unit comes with 5 manuals that serve different purposes:
Title Format Purpose
Administrator User Guide
(this manual)
Client User Guide on CD Comprehensive user info for FaxFinder clients.
Client Operation Primer on CD Brief instructions for sending and receiving
Quick Start Guide in print FaxFinder Administrator should use this
FaxFinder Reference Guide
(IP Office PBX Interface)
Multi-Tech manuals and other resources are available on the Multi-Tech Web page at
http://www.multitech.com.
on CD Presents comprehensive info about FaxFinder
unit, server software, & client software.
faxes via the FaxFinder system. Multi-Tech
recommends that you give a copy of this
document to each client user.
manual to configure the FaxFinder unit, the
server software, and software for each client.
on MTS
web site
FaxFinder Administrator should use this
manual to configure the FaxFinder unit in
conjunction with the Avaya IP Office PBX.
Multi-Tech Systems, Inc. FF200 FaxFinder Fax Server Admin User Guide 9
Page 10

Chapter 1: Product Description and Specifications
Distributing Documents to Client Users
The person acting as FaxFinder Administrator should see to it that client users get copies of the Client
Operation Primer (the file name is S000407_.PDF) and the Client User Guide (the file name is
S000406_.PDF). You could distribute this information either by printing out and/or photocopying hard
copies of these manuals for client users or else by supplying them with the electronic PDF files for these
documents either as email attachments or via some memory storage medium (CD, diskette, etc.). Client
users will need this information to take advantage of the capabilities of the FaxFinder system.
Multi-Tech Systems, Inc. FF200 FaxFinder Fax Server Admin User Guide 10
Page 11

Chapter 2: System Overview
Chapter 2 – System Overview
Our Sample FaxFinder Systems
The FaxFinder system handles faxes in a non-conventional way. A regular fax machine is a centralized
resource. The FaxFinder system decentralizes fax functions throughout a network of PCs served by the
FaxFinder unit and by an email server in a common Ethernet network. In this chapter, we will give you
the big picture of how the FaxFinder FF200 Server unit and the FaxFinder Client software can deliver this
convenient functionality.
To show what you must do to implement FaxFinder functionality, we use a two fictitious companies as
examples in this manual. The first “Acme99, Inc.,” is a small manufacturing firm that we describe in this
chapter. We show, in this small sample system, the parameters that must be set in any FaxFinder
system, both for the server and for clients. The second fictitious example entity is “Rocky Mountain
Construction, Inc.,” a housing developer. References to this company will appear in later chapters of this
manual.
A regular fax machine typically operates in a common office area and is shared by multiple parties.
Usually no individual’s fax traffic is heavy enough to justify a dedicated personal fax machine. Commonly,
many parties go to the same fax machine to send and receive on a single ordinary phone line.
Compared to the centralized and non-private nature of faxing with an ordinary fax machine, the FaxFinder
system offers fax users decentralized functionality, autonomy, and privacy. For outgoing faxes, the
conversion of documents into electronic fax files is now done by FaxFinder Client software (that resides
on the PC of each user) working with the print output of any application program. Faxes can be sent to
multiple parties with one mouse click. Outgoing faxes can consist of multiple documents and come from
different application programs (word processors, graphics programs, spreadsheets, etc.).
For incoming faxes, the FaxFinder system works differently in “PBX Routing Mode” than in “POTS Mode.”
In PBX Routing Mode, each client on the FaxFinder network has a private phone number for receiving
faxes. Available extension numbers on the PBX allow each FaxFinder unit to serve numerous clients
from a single phone line. The FaxFinder transforms each incoming fax message into a graphics file and
routes it, as an email attachment, to the intended recipient.
In POTS Mode, all incoming faxes go to a fax attendant who then forwards them to their intended
recipients. All clients on the FaxFinder system use the same incoming fax number.
In either mode, the fax recipients can be at any accessible email address, inside or outside of the local
network.
Multi-Tech Systems, Inc. FF200 FaxFinder Fax Server Admin User Guide 11
Page 12
Chapter 2: System Overview
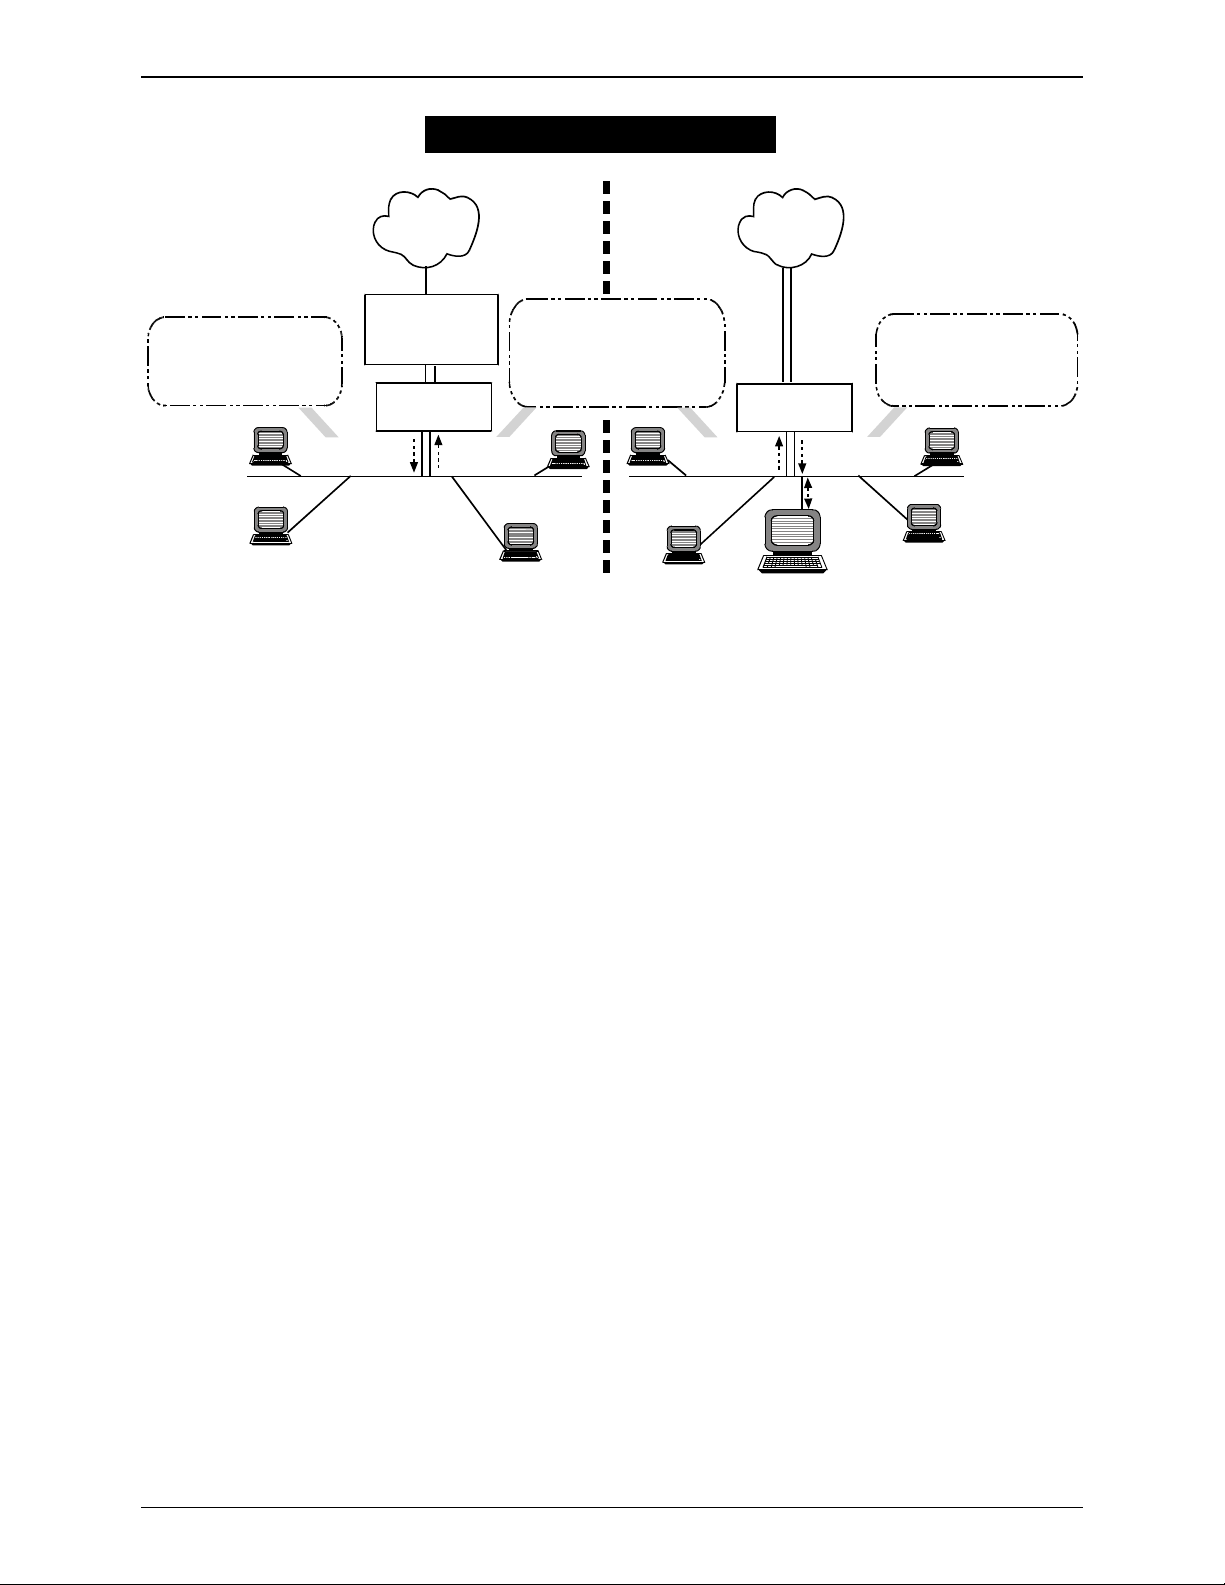
FF200 FaxFinder Modes
PBX Routing Mode POTS Mode
FaxFinder
Faxes
PSTN
POTS Lines
FF200
Inbound
Faxes
Attendant
Inbound Faxing:
Email attachments are
sent to Attendant and
forwarded to recipients.
. . .
PSTN
T1 Line
Inbound Faxing:
Email attachments
are sent direc t ly
to recipients.
PBX
Station Ports
FF200
Outbound Faxing:
Users set FaxFinder
as printing destination
in application program.
Then ‘print-to-FaxFinder.’
FaxFinder
Outbound
Faxes
. . .
Inbound
Faxes
Ethernet
LAN
For outgoing faxes, the FaxFinder works the same in both PBX Routing Mode and POTS Mode. Each
client must be ‘registered’ with the FaxFinder Server unit. To send a fax, the client/user ‘prints to
FaxFinder’ from an application program. That is, the client/user picks the FaxFinder as the destination
printer in a particular application program and then prints the document to send the fax.
In the remainder of this chapter, we introduce our fictitious sample Faxfinder systems. First, we show the
server software parameters that must be set for this simple system. Next we show two pairs of
illustrations about fax reception and fax transmission. In the first pair, we show what happens in the
FaxFinder system when a fax is received, from both server and client perspectives. In the second pair,
we show what happens when a fax is sent. The server perspective comes first. We then show sending
from the client perspective along with a setup for that client. We briefly explain each step of the process.
Finally, we show how the FaxFinder assembles the components of the fax message for the convenience
of the user.
These illustrations explain how the FaxFinder system fits into your Ethernet network and what client users
will encounter when they begin to use the FaxFinder Client software.
Outbound
Ethernet
LAN
Multi-Tech Systems, Inc. FF200 FaxFinder Fax Server Admin User Guide 12
Page 13
Server Setup for Sample FaxFinder System – Acme99, Inc.
FaxFinder Server
Software Setup
Administration: Time Configuration
time.nist.gov
(GMT-06:00) Mountain Time (US & Canada)
Days Hours Minutes
0
time.nist.gov
IP Address
Subnet Mask
Name Server
update
Administration: IP Configuration
192.168.4.89
255.255.255.0
192.168.4.251
Default Gateway
Secondary
Name Server
192.168.4.1
Time Server
Time Zone
Request Interval
update
Time Server
A time server pro-
Telco Setup
Company in example has 30 PBX station
ports and 20 additional extension numbers
to assign to users who need incoming fax
numbers:
PSTN
vides current time
to the FaxFinder
upon request. The
time server uses
Simple Network
Time Prot ocol
(SNTP).
PBX
Station Ports
Chapter 2: System Overview
24
0
Internet
Email: pete
@acme99.com
PBX Ext 3049
Pat
Admin
PC of FaxFinder
Administrator
Email: pat@acme99.co m
All incoming faxes are labeled
as coming from the admin.
Admin is typically recipient
of all faxes sent to unassigned
PBX extensions (faxes to
“Unassigned Number”).
Admin uses FaxFinder
Phone Book to assign
PBX extension numbers
to email addresses of clients.
Admin receives fax log
report as email attachment
after every nth fax.
Faxing PBX Ext: 3033
Ethernet LAN
Mary
POTS
Modem
Modem
FF200
Pete
Faxing PBX Ext: 3031
Email: mary
@acme99.com
FaxFinder
Server
192.168.4.89
faxfinder.acme99.com
Joe
Ethernet Port
Faxing PBX Ext: 3032
Email: joe
@acme99.com
Phone Book
Name
Pat -- Admin admin pat@acme99.com
Unassigned Number pat@acme99.com
Pat pat@acme99.com 3049
Pete pete pete@acme99.com 3033
Joe joe joe@acme99.com 3032
Mary mary mary@acme99.com 3031
User ID Email Address
POTS
mail.acme99.com
A Domain Name Server
(DNS) resolves domain
names (www.acme99.com)
into actual IP addresses
(192.168.4.200).
Name Server
192.168.4.251
Mail Server must support
Simple Mail Transport
Mail Server
Administration: SMTP Configuration
SMTP Server Address mail.acme99.com
Function
Ext
update
update
update
update
update
update
update
add
Protocol (SMTP), which
FaxFinder uses for
outputting faxes in
email form.
delete
delete
delete
delete
FaxFinder
Software
update
Server
Setup
Multi-Tech Systems, Inc. FF200 FaxFinder Fax Server Admin User Guide 13
Page 14
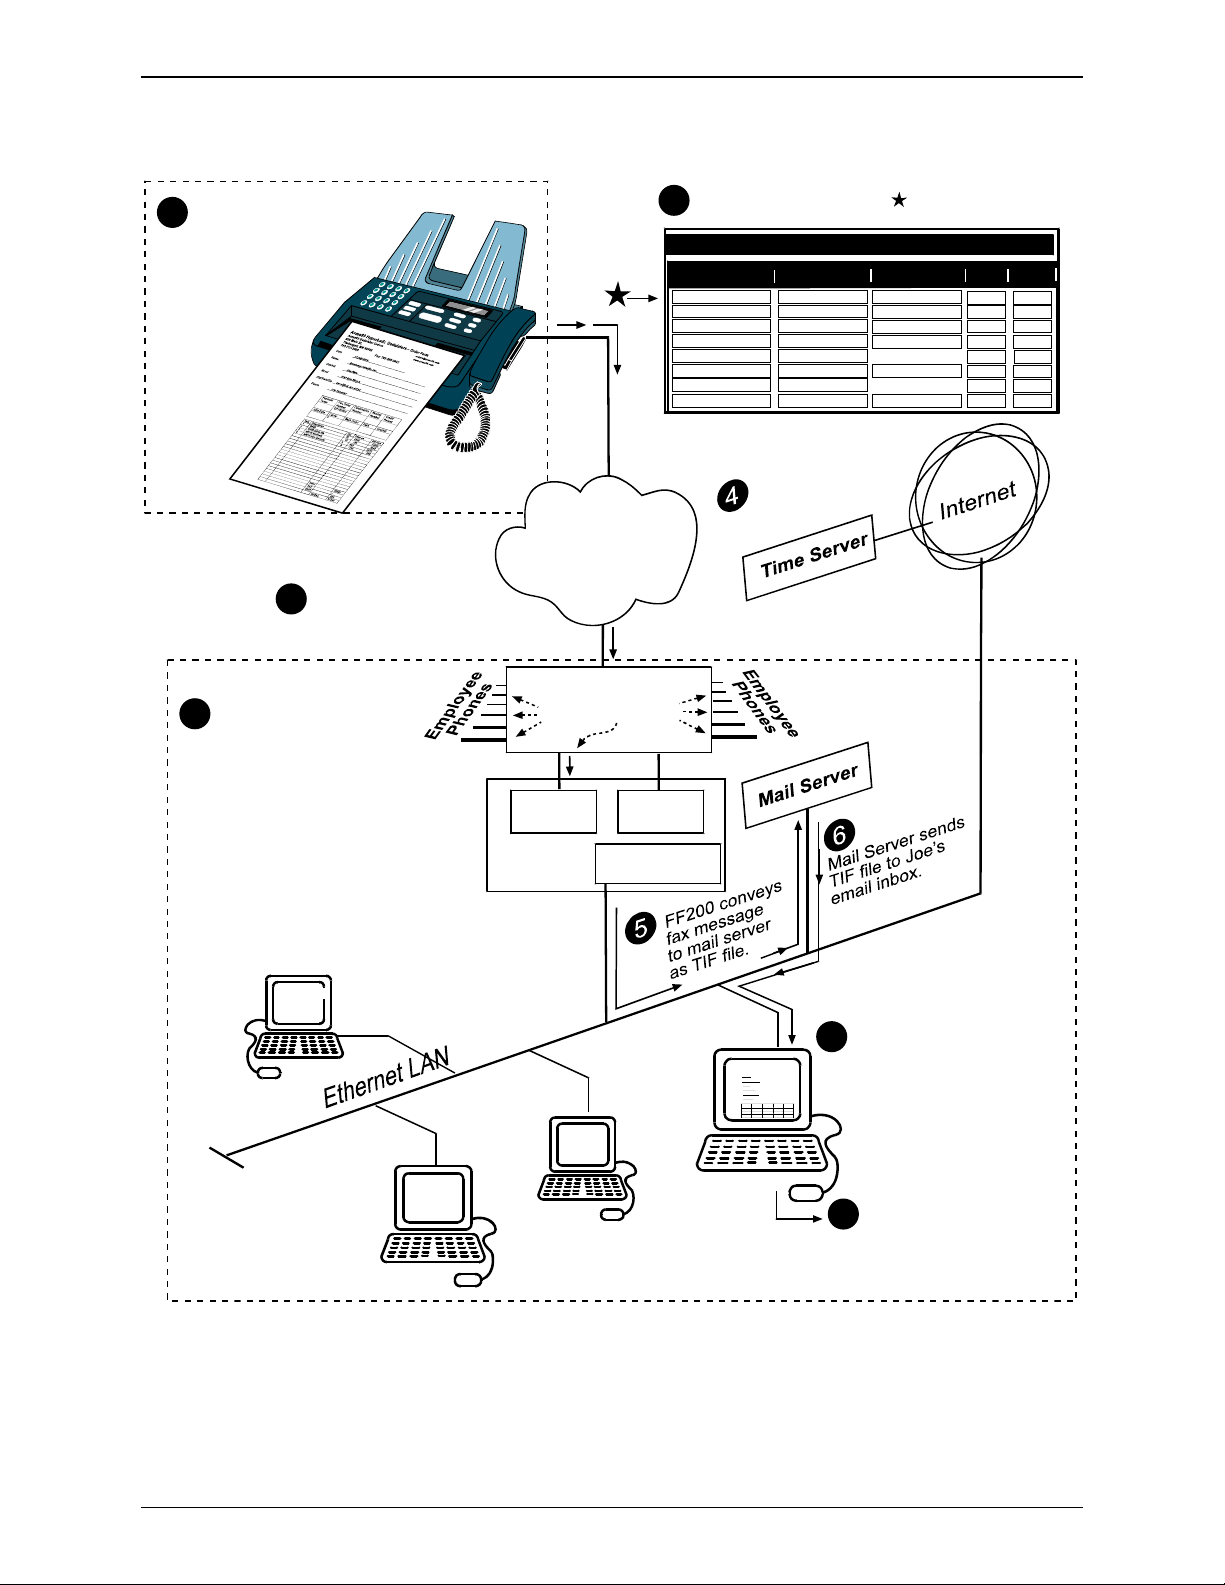
Receiving a Fax, Server Perspective – Acme99 Gets a Fax
FaxFinder Server fax log ( )
Customer faxes order
1
to Joe at Acme99.
Uses Joe’s PBX
fax number:
7635553032
9
indicates successful fax reception.
Time
07/27/2004 12:47:31 PM
07/27/2004 10:48:46 A M
07/27/2004 10:32:06 A M
07/27/2004 09:49:39 A M
07/27/2004 09:39:31 A M
07/27/2004 09:20:02 AM
07/27/2004 08:07:26 AM
07/27/2004 07:33:19 AM
Chapter 2: System Overview
Fax Log
Name
Joe
Pat
Pete
Pat
Joe
Pete
Pete
Mary
Remote ID
7747354686
7175782
3033258763
9857979
2123670278
8017920194
Result
pass
pass
pass
pass
pass
pass
pass
pass
Receive
Send
receive
send
send
send
receive
send
receive
send
Acme99 Office
Fax message reaches
3
PBX. Calls to all fax extensions are directed to
FF200 FaxFinder Server.
Quontaazy Scientific
Fax message traverses
2
public phone network.
Pete
Email:pete
@acme99
.com
PBX Ext 3049
Pat -Admin
PBX Ext 3033
Email:pat
@acme99
.com
Office
PSTN
PBX
Station Ports
POTS
Modem
FF200
FaxFinder
Server
PBX Ext 3031
Mary
Email:mary
@acme99
.com
POTS
Modem
Ethernet Port
PBX Ext 3032
Joe
Acme99 Hyperbolic Gadulators
– Order Form
Acme99 Gadulator Orders
orders@acme99.com
926 Main St.
www.acme99.com
Timbergull, MN 55555
763-717-3000 Fax: 763-555-3 033
Date _27 July 2004__________________________
Name: _
__________________________________
Quontaazy Scientific, Inc.
Contact __
____________________________________________
Kim Phon
Street __ 9140 Cryo Pkwy E.________________________________________
City/State/Zip__
_____________________________________
Carrollford, MA 01555
Phone __
___________________________________________
774-735-4685
Payment
Pur. Order
Confirmation
Routing
Terms
Number
Number
Number
QP180023
Ship Date Carrier Back Order RMA Voucher
F
Fax message from customer
7
(Quontaazy’s order)
arrives as attachment
Credit/
Refund
(TIF file) in Joe’s email inbox:
joe@acme99.com.
Joe opens TIF file
8
of customer order
message using
Multi-Tech Tiff
Viewer program.
Multi-Tech Systems, Inc. FF200 FaxFinder Fax Server Admin User Guide 14
Page 15
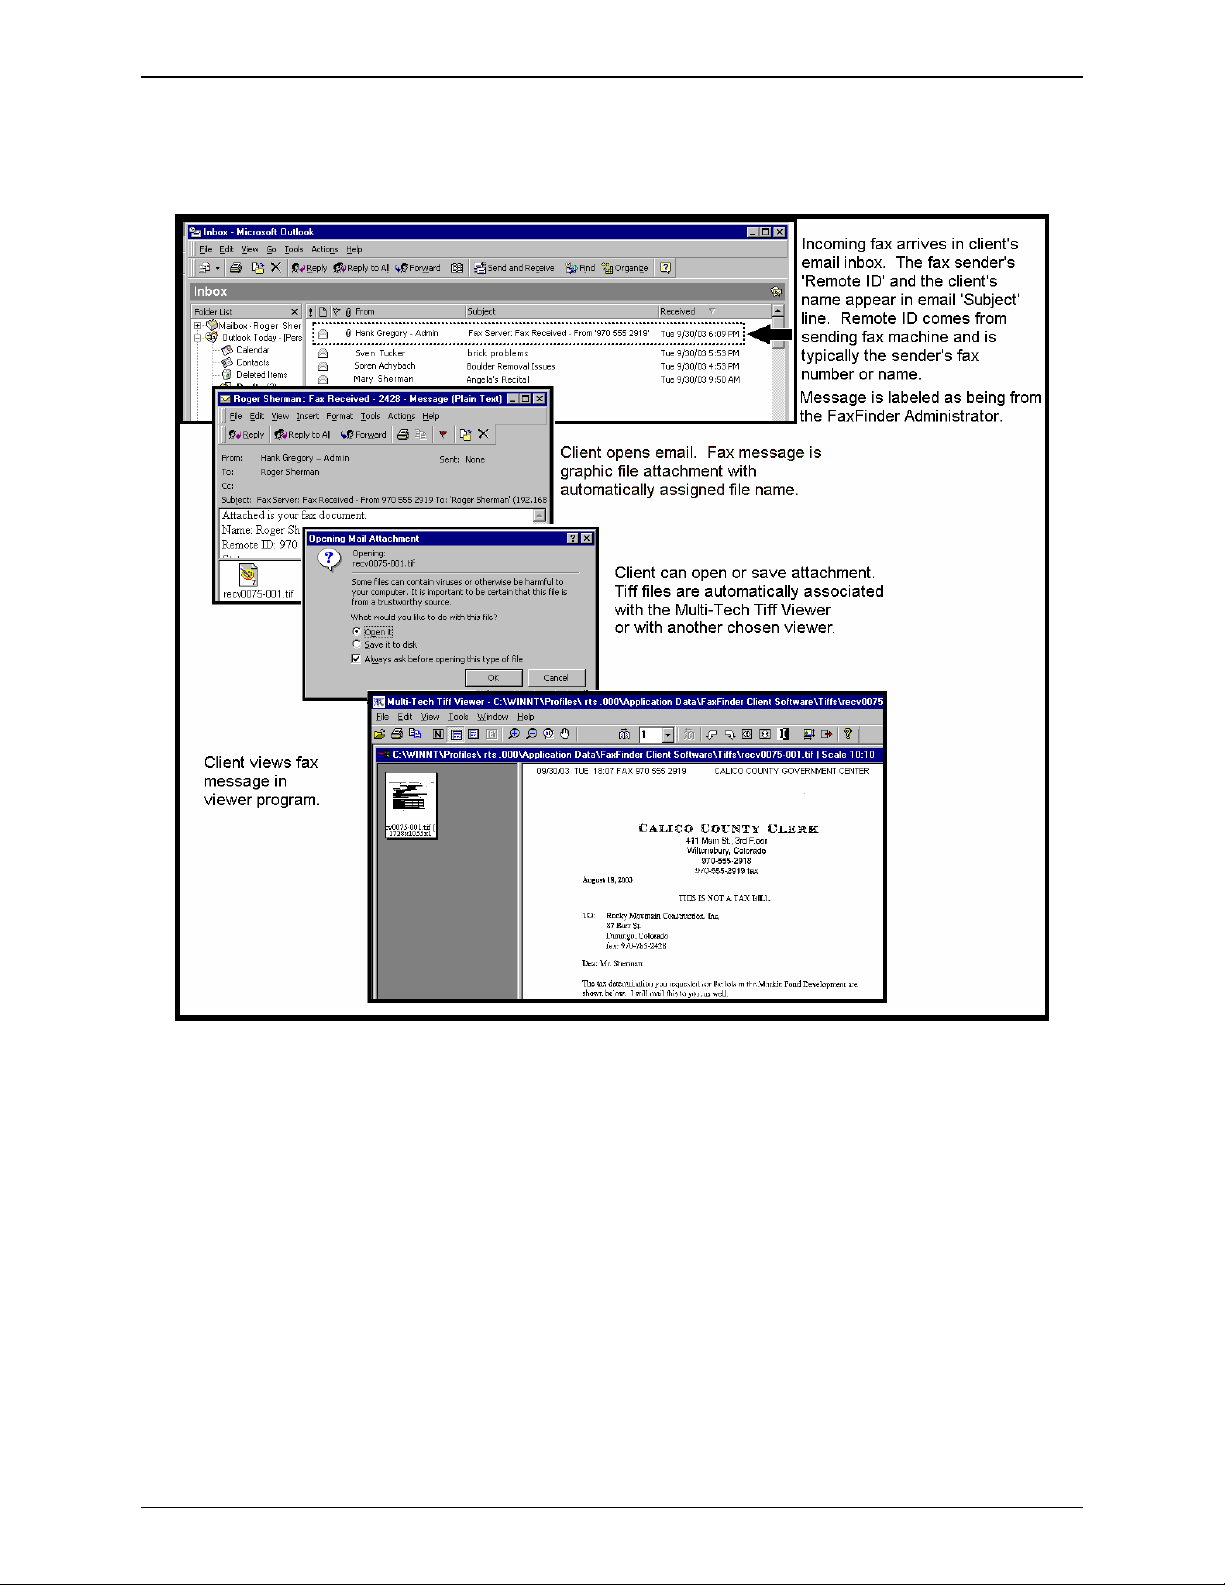
Chapter 2: System Overview
Receiving a Fax, Client Perspective – Joe Gets a Product Order
Multi-Tech Systems, Inc. FF200 FaxFinder Fax Server Admin User Guide 15
Page 16
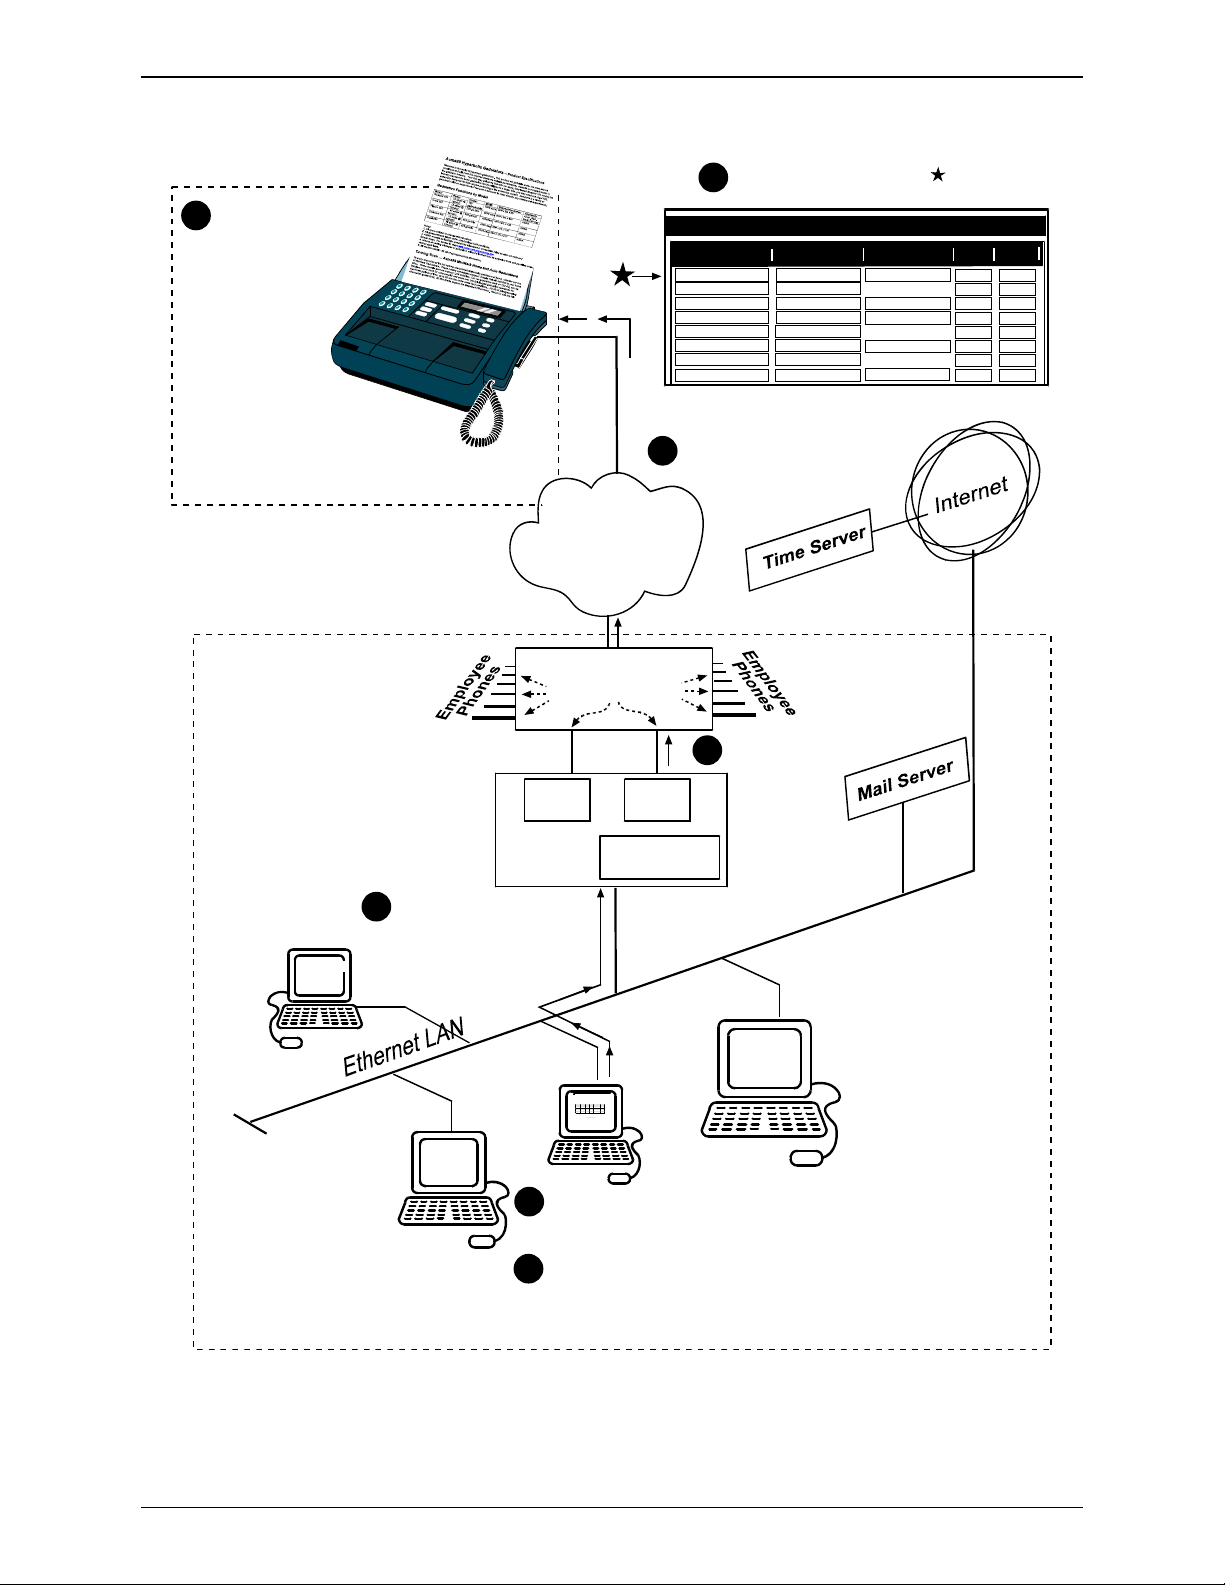
Sending a Fax, Server Perspective – Acme99 Sends a Fax
FaxFinder Server fax log ( )
7
indicates successful fax transmission.
6
Customer receives
Mary’s FAX message
about product
specifications.
Customer’s
Time
07/27/2004 10:23:36 AM
07/27/2004 09:56:46 AM
08/20/2003 09:53:23 AM
08/20/2003 09:48:37 AM
08/20/2003 09:40:57 AM
08/20/2003 09:25:14 AM
08/20/2003 09:08:20 AM
08/20/2003 08:53:11 AM
Fax message traverses
5
public phone network.
Joe
Office
PSTN
T1
Acme99 Office
PBX
Station Ports
Chapter 2: System Overview
Fax Log
Send
Name
Mary
Pete
Pat
Pat
Mary
Mary
Pete
Remote ID
7747354686
9857979
3039187171
8017920194
7175854
Result
pass
pass
pass
pass
pass
pass
pass
pass
Receive
send
receive
send
send
receive
receive
receive
send
POTS modem
4
sends Mary’s
POTS
Modem
FF200
FaxFinder
POTS
Modem
Ethernet Port
fax message
to the public
phone network
through the
PBX.
Server
Mary’s FaxFinder
3
Pete
Email:pete
@acme99
.com
Pat
Admin
Client SW communicates
with the FF200 over
Acme99’s Ethernet
network.
PBX Ext 3033
PBX Ext 3049
Email:pat
@acme99
.com
PBX Ext 3031
Mary
1
-- Product Speci fic a t i on s
Acme99 Hyperbolic Gadulators
Welcome to the world of hyperbolic gadulators. This product will gadulate under the most severe
conditions and still meet the required demands of hyperbolic performance. Acme99 is a trusted leader in
the gadulator industry. Your firm may get along fine with our basic, time-tested Bluebird 100 model, the
industry standard for basic gadulation functionality.If you’re a larger firm, you may need our Urgel 500,
especially designed for high-volume gadulating in the enterprise context. And there is a family of
Email:grs
gadulators with an assortment of features in between to meet virtually any commercial requirements.
Gadulation Functions by Model
(inches)
Model Power O utput MTBF Dimensio ns
Approvals
32W x 24L x 9D
Bluebird 100 10 amps @
100
1000 days
Amer. Gad.
120VAC
gadnerks/min
NerkCraft Ag y
36W x 24L x 12D
Crow 200 12 amps @
200 gn./min2000 day s
AGNA
120VAC
Pigeon 300 14 amps @
300 gn/min 3000days39W x 27L x 17D AGNA
120VAC
42W x 29L x 19D
Cockatoo 400 16 amps @
400 gn/min.4000 day s
AGNA
120VAC
@rmc83
56W x 32L x 21D
Urgel 500 18 amps @
500 gn/min 5000 days
AGNA
120VAC
Notes:
1. All specs subject to change without notice.
2. All measurements taken under standardized field conditions.
3. AGNA accepts no liabilityfor gadulations attempted in excessivenerk fields as shown on state and
federal maps. For access to maps, seewww.agna-nerk.org/nerkmap.htm.
4. Misuse of nerking privileges or gadulation without a license may be subject to fines and penalties under
various state laws.
5. All models exhibit –90 dB of splodgenocking attenuation.
Coming Soon … Acme99 MiniNerk Home and Auto Gadulateers
.com
To enjoy simulation of the full nerking characteristics of hyperbolic gadulators at home, consider our line
of MiniNerk Gadulateers. These models come in asuper-compact chassis that will add flair to your home
décor. Home models work on ordinary 1.5V batteries. Our car gadulators work on 12V AC, can be
installed in your trunk for extra security and cross over into full-fledged gadulation operations for
significant periods of time, up to 25 minutes under some field conditions. –75 dB of splodgenocking
attenuation guaranteed. All Mini-Nerks support the MegablarkTM protocol. Watch for ads this fall.
Mary prints to FaxFinder
to fax product specifications
PBX Ext 3032
Joe
Email:joe
@acme99
.com
to a customer.
FaxFinder client SW captures
2
word processor output and
assembles outgoing message
from FF Client screens and
cover page.
Multi-Tech Systems, Inc. FF200 FaxFinder Fax Server Admin User Guide 16
Page 17
Sample Client Setup – Joe, the Acme99 Order Processor
Chapter 2: System Overview
Multi-Tech Systems, Inc. FF200 FaxFinder Fax Server Admin User Guide 17
Page 18
Chapter 2: System Overview
Sending a Fax, Client Perspective – Mary Sends Spec Sheet to Client
Multi-Tech Systems, Inc. FF200 FaxFinder Fax Server Admin User Guide 18
Page 19
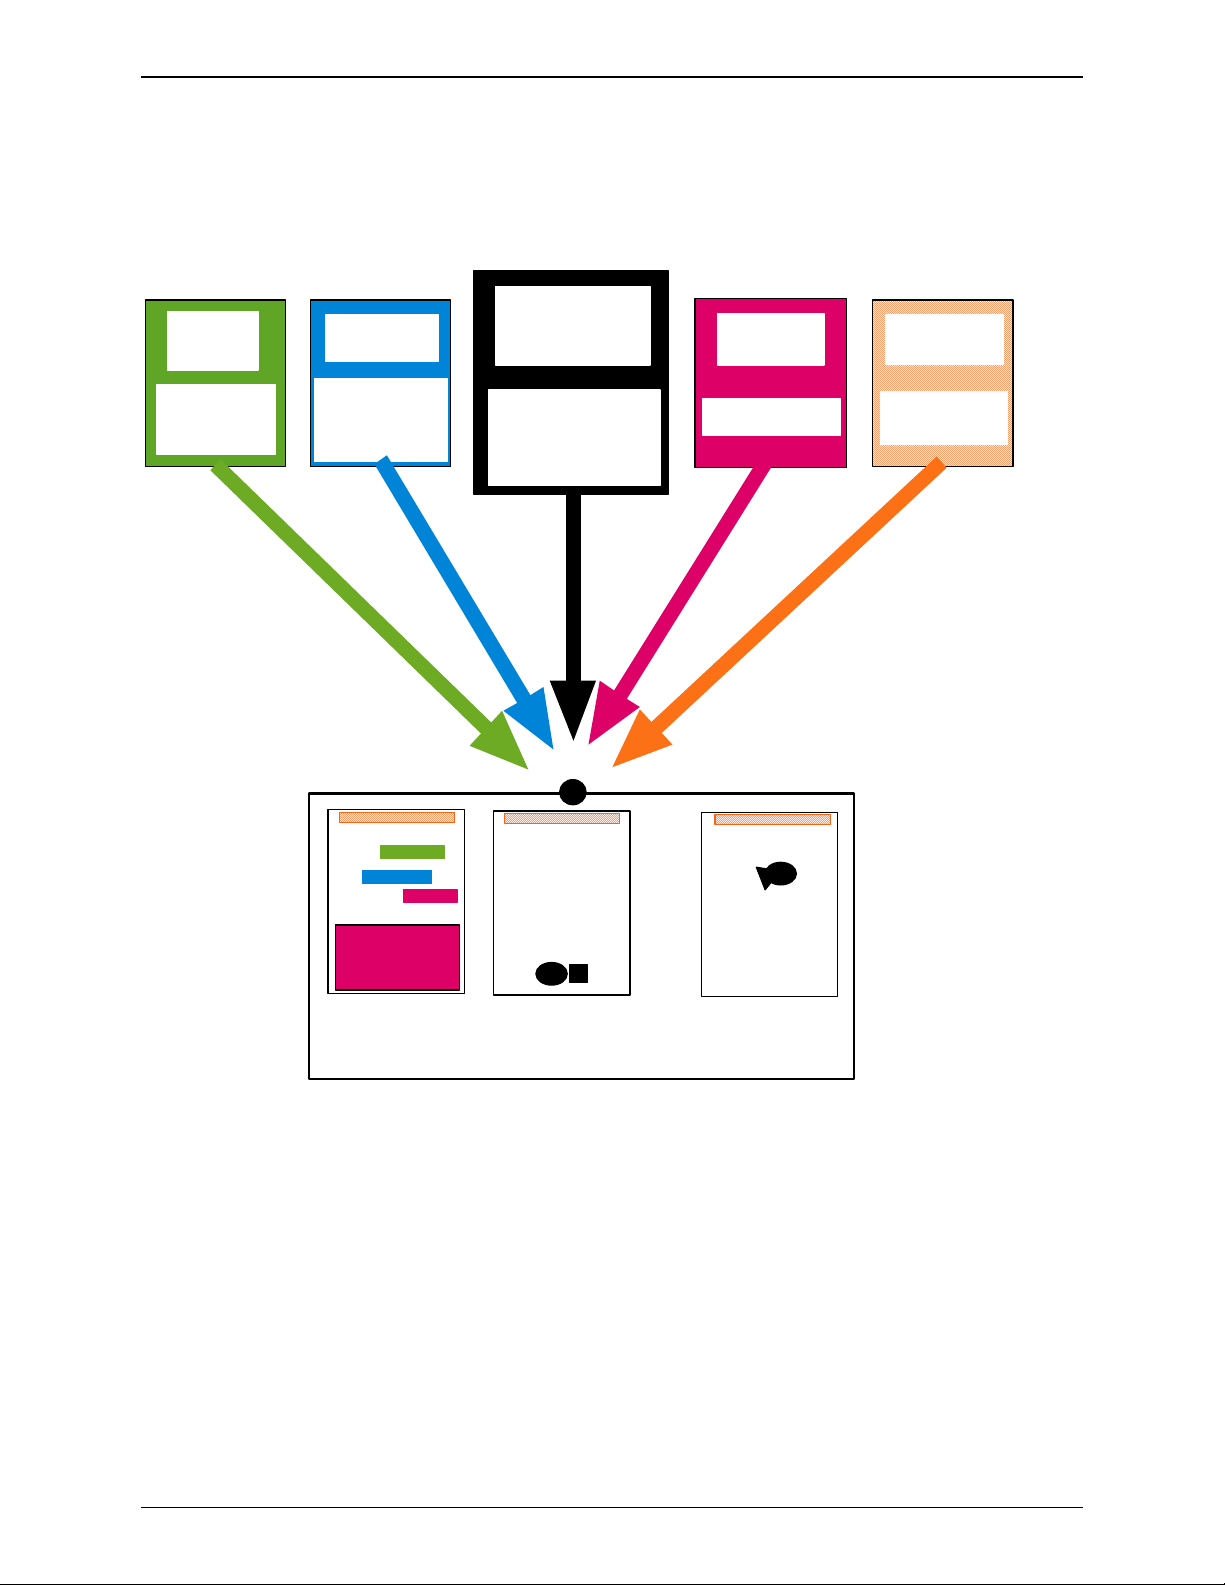
Fax Message Components
How the FaxFinder’s outgoing fax
Sender
Info
Recipient
Info
comes toge ther.
Main Body
of
Fax Message
Subject,
Comment
Chapter 2: System Overview
Fax Stamp
Info
FROM
FF Fax Clie nt
Software
screen
Options
FROM
FFAddress Book
screen
Contact
OR
FF
Send Fax
screen
Cover Page
From:
To:
S ub ject :
Comment :
file of application program.
FROM
For example,
word processor
or
graphics program.
Dear Mr Jones:
We wer e pleas e d at yo u r inq u i r y
about our housing to be offered
at th e M u rk i e P o nd ho us in g
development. We expect the
project to take off within the next
several mont hs . Our forec asts
fo r ho usi ng ne ed s sh ow a hi gh
demand in the coming years.
This is a chance for you to get in
on the ground floor of what could
become a great opportunity.
Bl ah , bl ah , b la h, bl ah , bl a h .
...
FROM
FF
Send Fa x
Th e tim e has co m e for all good
persons to come to the aid of their
respective countries.
We wer e pleased at your inq uiry
about our housing to be offered
at th e M u rk i e P o nd ho us in g
development. We expect the
project to take off within the next
several mont hs . Our forec asts
fo r ho usi ng ne ed s sh ow a hi gh
demand in the coming years.
This is a chance for y ou to get in
.
screen
FF
FROM
Server
screens
Software
Outgoing Fax Tran smission
Multi-Tech Systems, Inc. FF200 FaxFinder Fax Server Admin User Guide 19
Page 20

Chapter 3: Server Installation
Chapter 3 – Server Installation
This chapter shows you how to set up your Multi-Tech Model FF200 FaxFinder.
The setup process includes both cabling of the FF200 unit and configuration of the FaxFinder server
software. The FaxFinder server software resides on the FaxFinder unit and does not need to be installed.
Prerequisite: Determining PBX Compatibility &
Configuration
To operate the FF200 FaxFinder system in conjunction with a PBX and in “PBX Routing Mode,” that PBX
must be able to do convergent routing. That is, it must route incoming calls made to many PBX
extension numbers to a single PBX station port. For example, fax calls to twenty PBX extension numbers
(555-3101 through 555-3120) might be directed to a FaxFinder unit at 555-3121.This multiple-extensionto-single-port capacity allows multiple PBX users to have their own unique directory numbers for receiving
faxes.
If you are using the FF200 in conjunction with a PBX and in “PBX Routing Mode,” be sure that the PBX
has this multiple-extension-to-single-port capacity and that this capacity is activated.
We Supply
• An FF200 FaxFinder with factory-installed software
• One universal power supply with power cord
• Two common telephone cables (RJ-11 at both ends)
• A product CD with software for client PCs and additional documentation for both administrators
and client/users
• A printed Quick Start Guide
You Supply
• A nearby AC power outlet
• A connection to your Ethernet LAN
• A telephony connection
either - a PBX station port
or - a common subscriber (POTS) phone line jack
• An admin PC (with web browser) to configure the FaxFinder
• Client PCs (Windows NT/2000/XP) with email and printing applications. Network clients receive
faxes in their email inboxes. They will send faxes by printing to the FaxFinder server from application
programs.
Multi-Tech Systems, Inc. FF200 FaxFinder Fax Server Admin User Guide 20
Page 21
Chapter 3: Server Installation
Part A: Cabling -- Connecting the FaxFinder to Power Outlet,
Phone Lines, and Ethernet
Summary: Place the FaxFinder in a convenient location, and then connect it to your AC power outlet and
Ethernet.
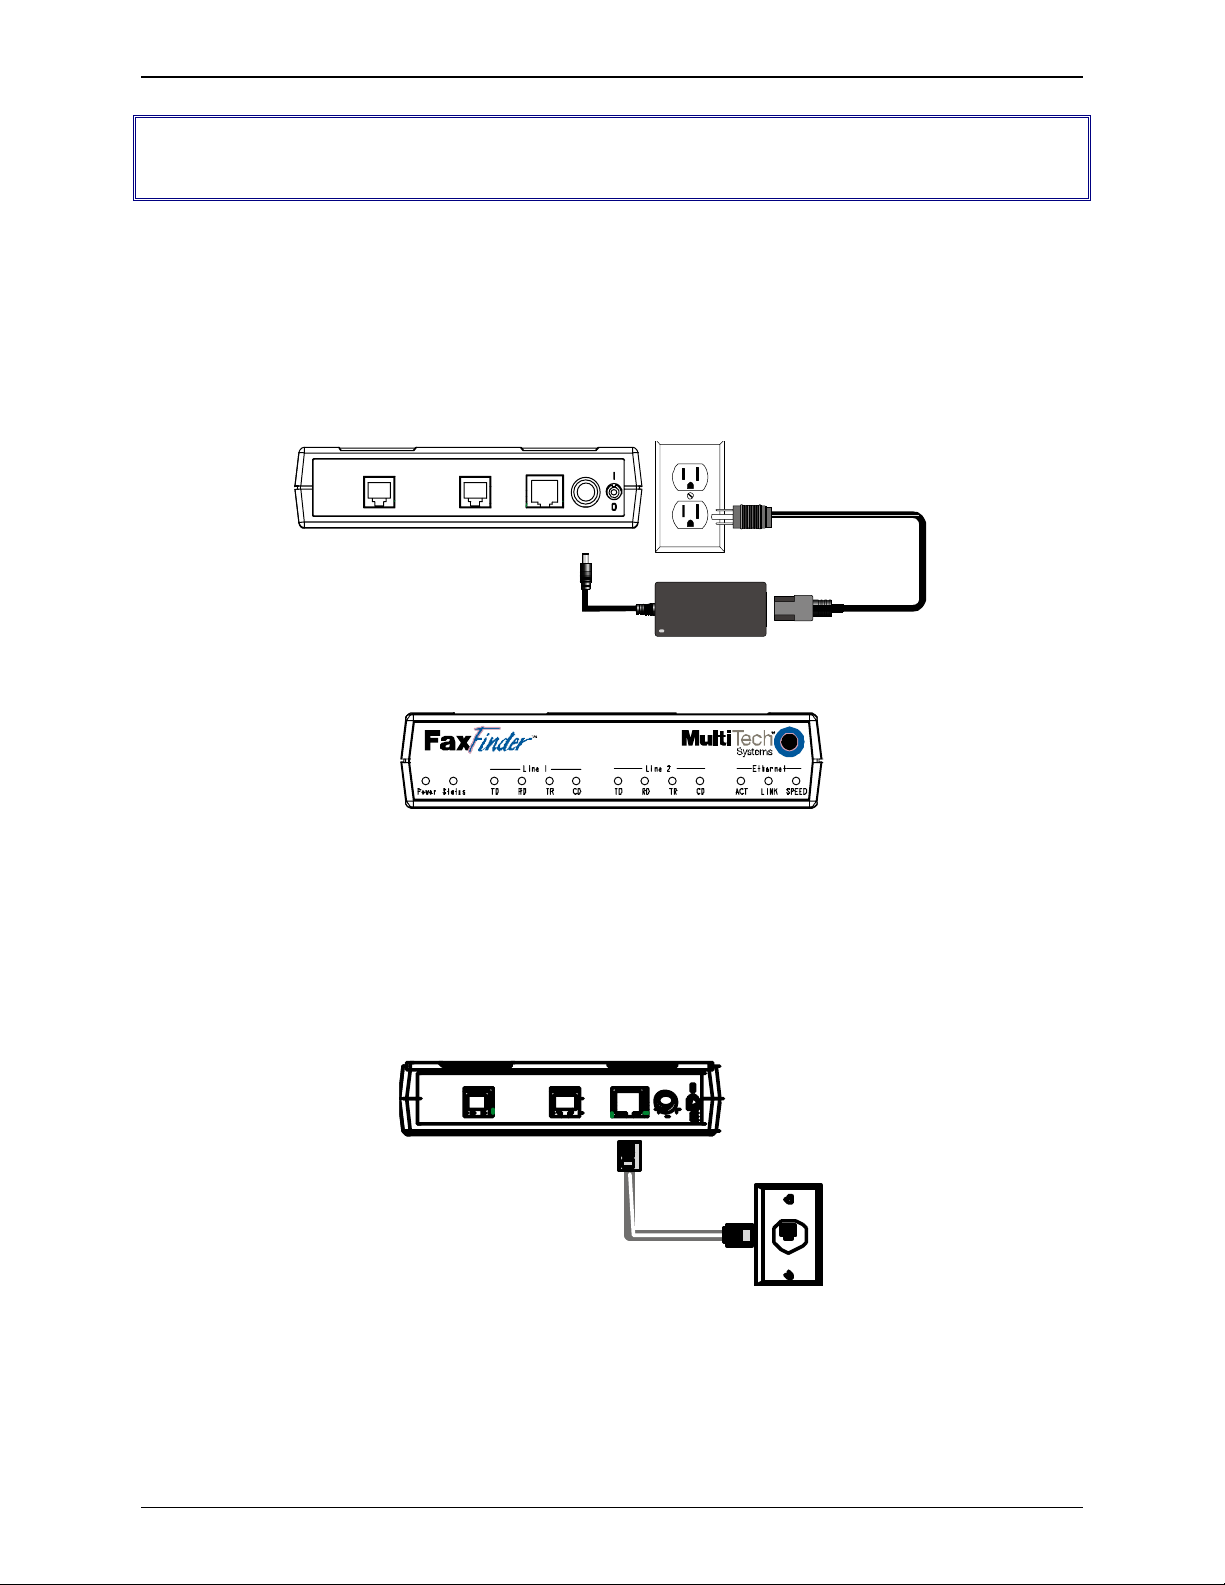
1. Connect FaxFinder to AC Outlet
Plug the DC power transformer into a power outlet or power strip. Secure the other end to the PWR jack
on your FaxFinder. The DC power transformer is included with your FaxFinder.
Caution: Use only the DC power transformer supplied with the FaxFinder. Use of any other
transformer voids the warranty and can damage the FaxFinder.
POWER
Line 2
Line 1
Ethernet
10/100
5Vdc
2.Verify powering.
After power is applied, the Power LED comes on immediately but there is a 4-second delay before the
Status LED comes on. In normal operation, the Status LED will be flashing.
When you apply power, the FaxFinder performs a diagnostic self-test. The Status indicator flashes when
the test is complete and the unit is ready. If this does not happen, check that the power supply is solidly
connected and that the AC outlet is live.
3. Connect FaxFinder to Ethernet Network.
Plug one end of your RJ45 ethernet cable into the FaxFinder’s ethernet jack and the other end into your
network ethernet hub. This ethernet cable is not included with your FaxFinder unit.
PO W ER
Line 2 Line 1
Ethernet
10/ 100
5V dc
Caution: Before connecting to the Ethernet Network, make sure that the network to which you are
connecting the FaxFinder is not a 192.168.2.x subnet. Because the FaxFinder’s factory
default IP address is 192.168.2.1, connecting it to a network that has a different device at
that same IP address would cause data interference.
Multi-Tech Systems, Inc. FF200 FaxFinder Fax Server Admin User Guide 21
Page 22
Chapter 3: Server Installation
If it is a 192.168.2.x subnet, connect from the Administrative PC to the FaxFinder until the
FaxFinder’s IP address has been configured. Thereafter, connect the FaxFinder into the
network.
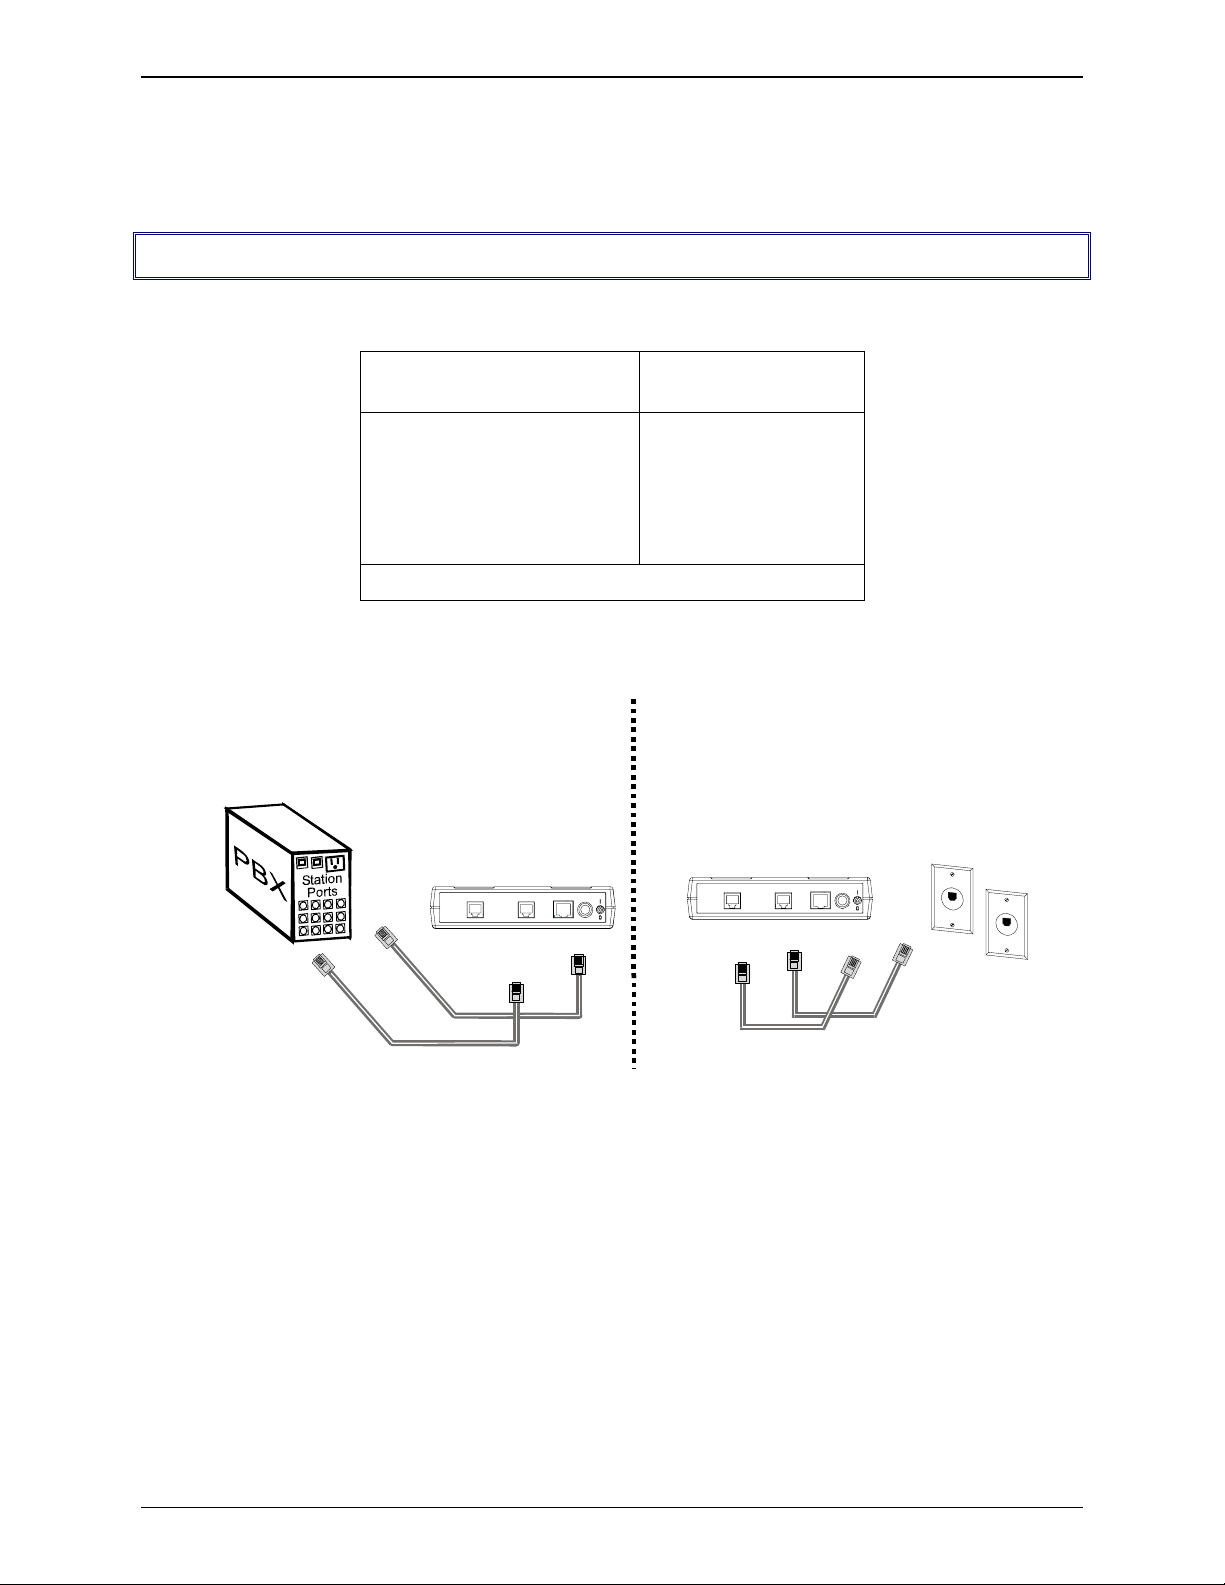
Part B: Connecting to Telephony Service
The FF200’s fax modems can either be connected to a PBX (for use in PBX Routing Mode) or to a
POTS line (for use in POTS Mode).
Connection for
PBX Routing Mode
Plug one end of the phone
cable into the FaxFinder’s
LINE jack and the other into
an available Station Port on
the PBX.
An RJ11-to-RJ11 cable is included with your FaxFinder.
PBX Routing Mode
POWER
Line 2
Ethernet
Line 1
5Vdc
10/100
Connection for
POTS Mode
Plug one end of the
phone cable into the
FaxFinder’s LINE jack
and the other end into
your standard
telephone receptacle.
POTS Mode
POWER
Line 2
Ethernet
Line 1
10/100
5Vdc
Multi-Tech Systems, Inc. FF200 FaxFinder Fax Server Admin User Guide 22
Page 23

Chapter 3: Server Installation
Part C: Configuring the FaxFinder Server
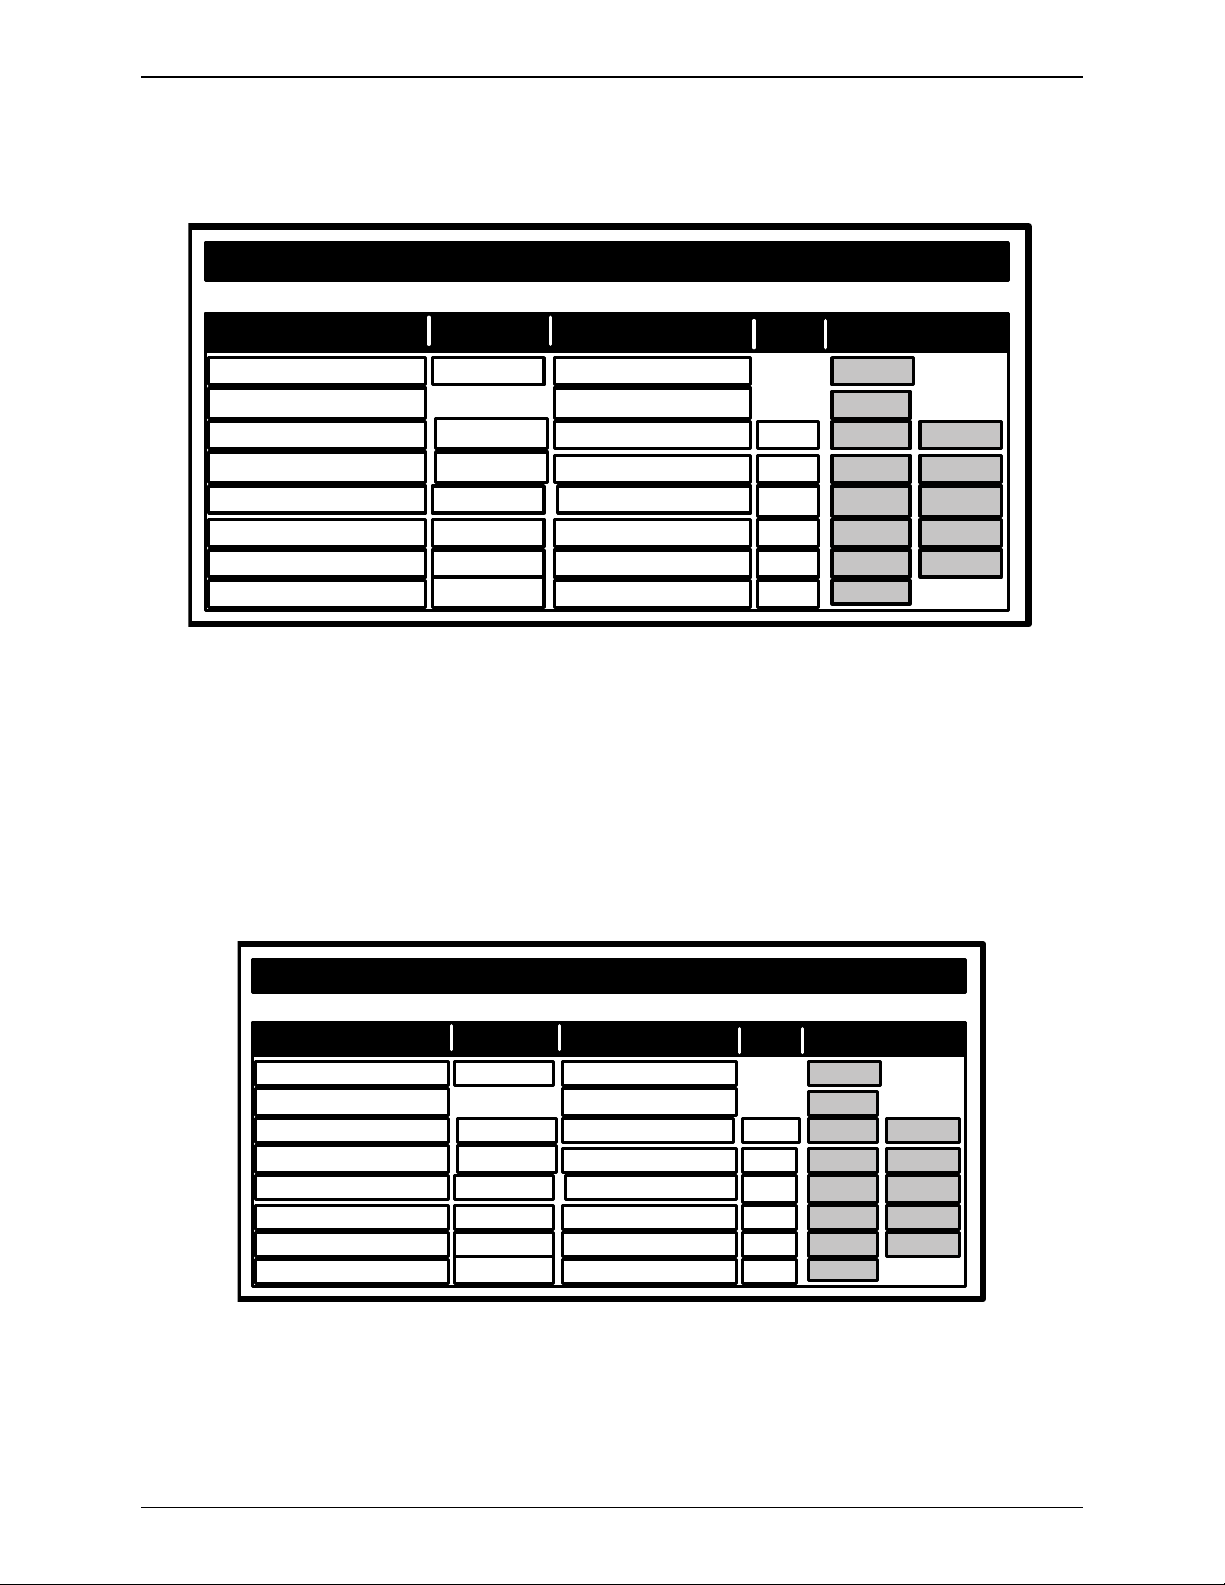
Summary of Configuration Data
The table below lists the information you will need to fill in on the various FaxFinder Server screen.
Gathering this information in advance will expedite the FaxFinder configuration process.
Server Parameters
Values for this FaxFinder
(for Server Admin screen)
IP Address (of FaxFinder unit)
Subnet Mask
(Domain) Name Server
Secondary Name Server (optional)
Default Gateway
Time Server (typically time.nist.gov)
SMTP (Mail) Server Address
Routing (“None” = POTS Mode;
“PBX Routing” = PBX Routing Mode)
User Parameters
(for Server Phonebook, Client Options, & Client Add FaxFinder screens)
Name User ID/
Email Address PBX Extension Password
Username
Multi-Tech Systems, Inc. FF200 FaxFinder Fax Server Admin User Guide 23
Page 24

Chapter 3: Server Installation
1. Setting Admin PC to Startup IP Address
a. Connect a pc to your network.
b. Set the pc IP address to 192.168.2.x subnet (using any address excluding 192.168.2.1).
Windows XP
a. From the Windows desktop,
right-click on “My Network Places,”
and select “Properties.”
b. In the Network Connection
screen, right-click on “Local Area
Connection.”
c. In the Local Area Connection
Properties screen, on the
“General” tab, scroll to the “Internet
Protocol (TCP/IP)” entry and select
it. Click “Properties.”
d. In the Internet Protocol
(TCP/IP) Properties screen, record
the existing IP address. Then reset
the IP address to 192.168.2.2.
Windows NT
a. From the Windows desktop, right-click on “Network Neighborhood,” and
select “Properties.”
b. In the Network screen, on the “Protocols” tab, select “TCP/IP Protocol” in
the list of Network Protocols. Click “Properties.”
c. In the Microsoft Internet Protocol (TCP/IP) Properties screen, record
the existing IP address. Then reset the IP address to 192.168.2.2.
Windows 2000
a. From the Windows desktop, rightclick on “My Network Places,” and
select “Properties.”
b. In the Network and Dialup
Connections screen, right-click on
“Local Area Connection” and select
“Properties.”
c. In the Local Area Connection
Properties screen, select the
“Internet Protocol (TCP/IP)” entry.
Click “Properties.”
d. In the Internet Protocol (TCP/IP)
Properties screen, record the
existing IP address. Then reset the
IP address to 192.168.2.2.
Multi-Tech Systems, Inc. FF200 FaxFinder Fax Server Admin User Guide 24
Page 25
Chapter 3: Server Installation
2. Logging In (I)
a. Bring up a Web browser on your pc. At the browser’s address line, type the default Gateway address:
http://192.168.2.1 and press Enter.
b. The Login screen will appear.
At this point you can be assured that the FaxFinder is connected to the network.
If the Login screen does not appear, see item #1, “What if I can’t see the web page for my
FaxFinder?” in Chapter 9: Troubleshooting.
c. At the Login screen, enter admin (all lower case) in the Username field.
d. Enter admin (all lower case) in the Password field.
Multi-Tech Systems, Inc. FF200 FaxFinder Fax Server Admin User Guide 25
Page 26
Chapter 3: Server Installation
e. Click the Login button. The Web Management Home screen will appear. From this screen, you can
access all of the FaxFinder Server software screens.
3. Setting FaxFinder IP Addresses
a. In the FaxFinder Administration screen, go to the IP Configuration fields.
Administration: I P Configurat ion
IP Address
Subnet Mask
Name Server
update
b. Fill in the IP information that applies to your FF200 FaxFinder Server unit. The fields for “IP Address,”
“Subnet Mask,” “Default Gateway” and “Name Server” are required. A “Secondary Name Server”
may be considered optional.
c. Click Update. After the Update button has been clicked, it takes 5 seconds for the FF200 to update
the addresses.
192.168.4.89
255.255.255.0
192.168.11.251
Default Gateway
Secondary
Name Server
192.168.4.1
Multi-Tech Systems, Inc. FF200 FaxFinder Fax Server Admin User Guide 26
Page 27
Chapter 3: Server Installation
4. Resetting Admin PC to Its Regular IP Address
In step #1 above, you recorded the original IP address of the administrator’s PC and then reset it to the IP
address required to allow communication with the FaxFinder unit. You may now set the IP address of the
administrator’s PC back to its original value or to any other value that will allow you to communicate with
the FaxFinder at its new IP address.
5. Logging In (II)
Having reset the IP address of the administrator’s PC, you must log into the FaxFinder Server software
again. Go to the Login screen, enter admin as User Name and admin as Password.
6. Setting Administrative Functions
Go to the FaxFinder Phone Book screen.
Note: The first two rows of the Phone Book list are for special purposes.
The first row is for the “Administrator” function. No matter what values are used for the
Name, User ID and Email Address fields, the first row will still apply to the person doing
the Administrator function for the FaxFinder system. The Administrator is the party
privileged to configure the FaxFinder Server.
The second row is for the “Unassigned Number” function. Again, no matter what values
are used for the Name, User ID and Email Address fields, the second row will still apply
to the person doing the Unassigned Number function for the FaxFinder system. If the
FaxFinder is operating in POTS Mode, this Unassigned Number ‘attendant’ will receive
all emails and will have to distribute them to their final recipients. If the FaxFinder is
operating in PBX Routing Mode, this Unassigned Number attendant will instead receive
all emails that are undeliverable to any end-user on the FaxFinder system.
Name
Administrat or admin
Unass ign ed N um ber
a. Administator Row: Email Address
i. In the “Administrator” row of the Phone Book screen, enter the name and user ID to be used
for the FaxFinder administrator (it need not be literally “Administrator”). All incoming faxes will
be marked as coming from this administrator. Then enter the email address of the party who
will act as the FaxFinder administrator.
ii. Click on Update in the “Administrator” row. At this point, a Login screen will appear and you
will be asked to log in again. Log in using the administrator’s User ID (as listed in the “User ID”
column) and the administrator’s current password (at this point, it should be admin).
Phone Book
U ser ID Em ail Ad dr es s
Ext
Function
update
update
update
update
update
update
update
add
delete
delete
delete
delete
delete
Multi-Tech Systems, Inc. FF200 FaxFinder Fax Server Admin User Guide 27
Page 28
Chapter 3: Server Installation
At this point, the FaxFinder ‘home’ page is displayed. Click on Phone Book to see the updated
values.
Ph on e Boo k
Name
Pat -Admin pat-admin pat@acme99.com
Unassi gned N umber
b1. Unassigned Number Row: PBX Routing
Mode only
In the “Unassigned Number” row of the Phone Book screen, enter the email address of the
person whom you want to receive all inbound faxes sent to unassigned PBX phone numbers.
(For example, suppose extra PBX extensions were allocated to incoming faxes but were not
specifically assigned to any individual employee. Faxes sent to those PBX extensions would
go to the Unassigned Number email address.)
U ser ID E mai l Ad dr es s
Ext Function
update
update
update
update
update
update
update
add
delete
delete
delete
delete
delete
b1. Unassigned Number Row: POTS Mode only
In the “Unassigned Number” row of the Phone Book screen, enter the email address of the
person whom you want to receive all faxes sent to the FaxFinder system. This party becomes
essentially the ‘fax attendant’ for the FaxFinder system. This is the person who forwards
received faxes to their intended recipients, typically by forwarding the email to which the fax is
attached.
Multi-Tech Systems, Inc. FF200 FaxFinder Fax Server Admin User Guide 28
Page 29
b3. Unassigned Number Row: Finishing
Click on Update in the “Unassigned Number” row. The message “Success: Unassigned
Number was updated” will appear above the Phone Book list.
Chapter 3: Server Installation
Ph on e Bo o k
Name
Pa t-Ad min pat-admin pat @acm e99.com
Una s s ign ed Number
c. Personal Email Address for Administrator (optional)
i. Just below the “Unassigned Number” row of the Phone Book screen, enter the name and user
ID that the FaxFinder Administrator can use to send and receive (PBX Routing Mode only)
personal faxes. In PBX Routing Mode, enter, in the Ext field, the Administrator’s PBX fax
extension. In POTS Mode, leave the Ext field blank. (Generally, the administrator should have
an additional phonebook entry for receiving ordinary fax traffic for his/her own use that is
separate from the administrator function.) Then enter the email address at which the FaxFinder
administrator will receive such fax traffic.
ii. Click on Update for this row. The message “Success: [name] was updated” will appear above
the Phone Book list.
U ser ID Em ail Ad dr es s
pa t@a cme99 .com
Ext Function
update
update
update
update
update
update
update
add
delete
delete
delete
delete
delete
Phone Book
Name
Pat-Admin
Unass ign ed Nu m ber
Pat Murp hy
Multi-Tech Systems, Inc. FF200 FaxFinder Fax Server Admin User Guide 29
User ID Email Address
pat-admin pat@acme99.com
pat@acme99.com
patm
patm@acme99.com 3048
Ext Function
update
update
update
update
update
update
update
add
delete
delete
delete
delete
delete
Page 30
Chapter 3: Server Installation
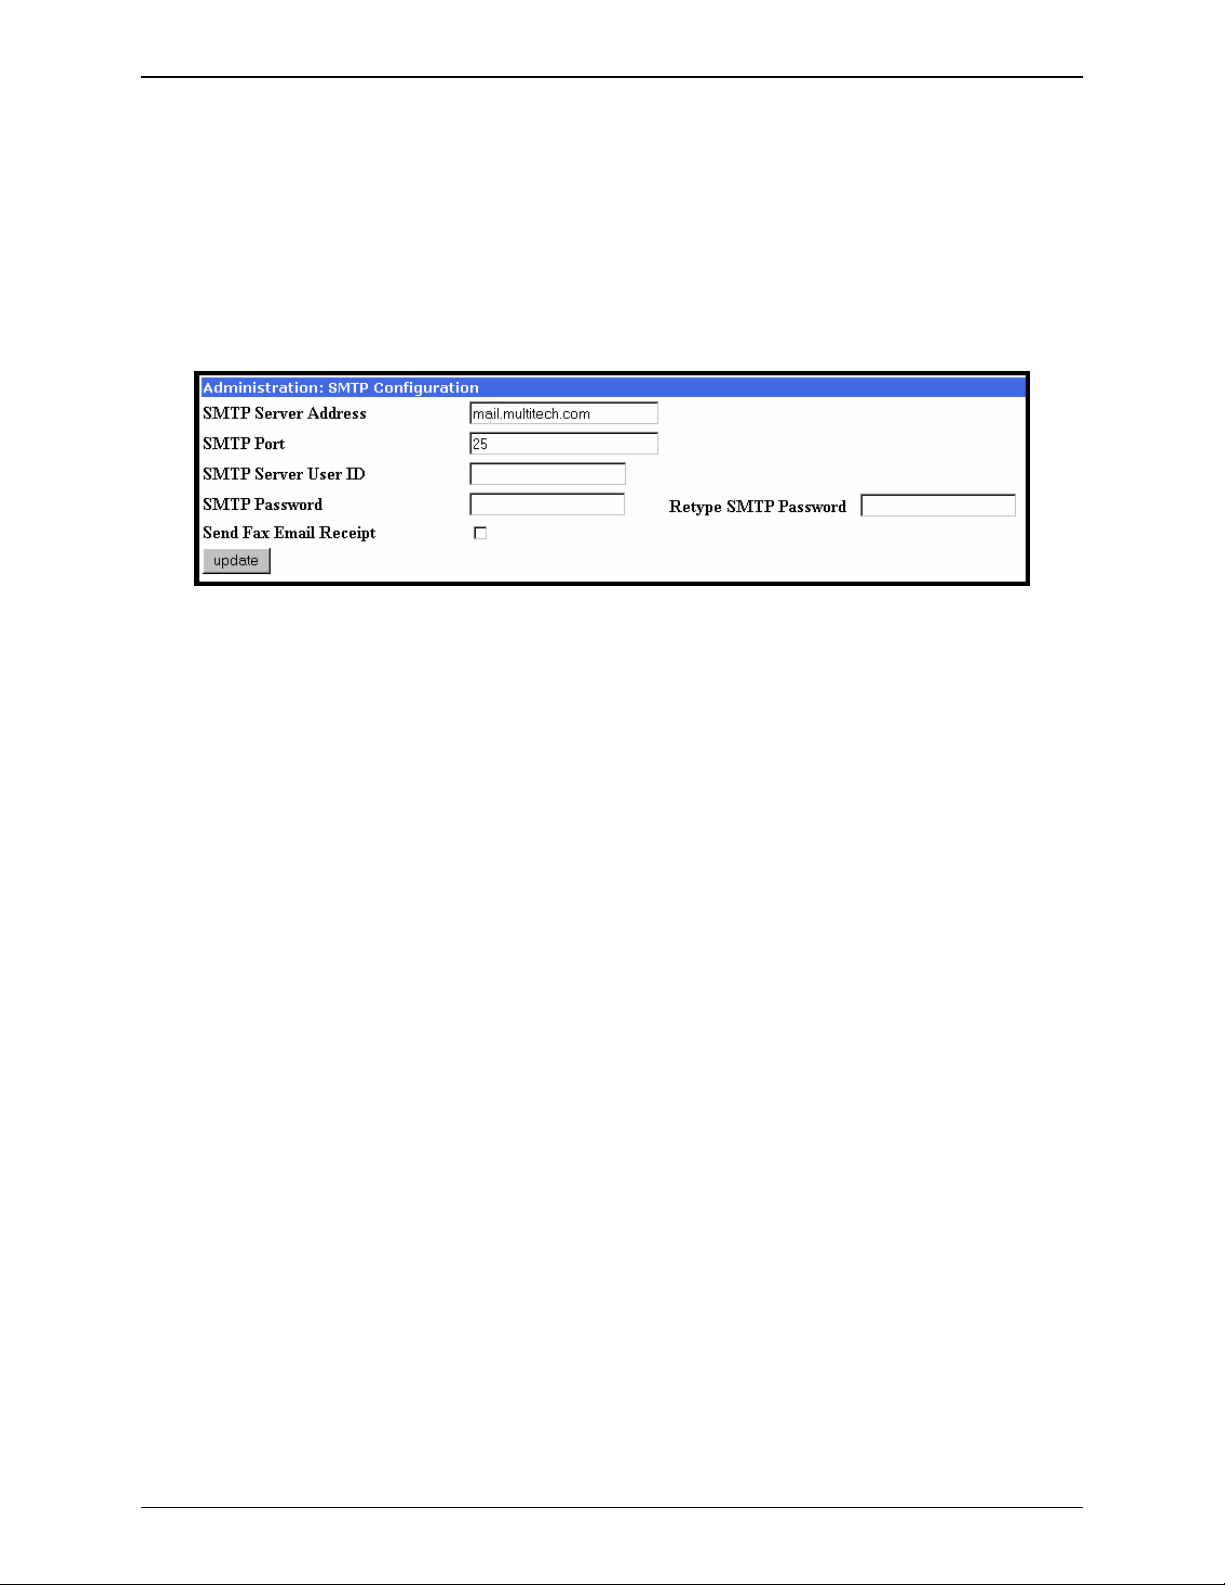
7. Setting Up the Mail Server
The FaxFinder uses a mail server to send fax log reports, by email, to the administrator. An email is
also sent to the administrator each time the FaxFinder is powered up. In all cases, you must specify
the address of the mail server and the email address of the administrator. Some email servers require
authentication before allowing the FaxFinder access. In these cases, the FaxFinder unit must be
assigned a Server User ID and a password. If the mail server does not require authentication, the
related SMTP Configuration fields (“SMTP Server User ID,” “SMTP Password,” and “Retype SMTP
Password”) must be left blank.
a. In the FaxFinder Administration screen, go to the SMTP Configuration fields.
b. Fill in the network IP address or domain name of your mail server. Click Update.
c. Enter the email address of the administrator (the party that you want to receive fax log reports).
d. At this point the Administrator should receive an email from your FaxFinder saying that the mail server
address has been updated.
e. Email Server Authentication Parameters. If your email server requires authentication in order to
give the FaxFinder access, fill in the three related SMTP fields (SMTP Server User ID, SMTP
Password, Retype SMTP Password). If you can enter the network email program and send
messages without entering a User ID and Password, then you must leave these fields blank.
However, if your network email program does require a User ID and Password in order to send email
messages, you must fill in these three fields. If authentication is required and these fields are left
blank, then the error “SMTP Authentication Error” will appear on the Current Status screen in the
“Email Status” field. If authentication is not required and these fields are filled in, then an error will
also occur. You must know how your email server works in this regard a nd complete the
Administration: SMTP Configuration screen accordingly.
f. If you do not receive an email saying that the mail server address has been updated, see item #2
“What if I don’t get an email when I set the mail server address?” in the Troubleshooting section of
the Administrator User Guide.
8. Configuring the FaxFinder’s Modem
The FaxFinder’s Modem directs inbound faxes to client email addresses.
a. In the FaxFinder Server software, go to the Modem Configuration screen.
b. In the Modem Configuration: POTS Modem 1, screen, enter the modem characteristics needed in
your FaxFinder system. The default values have been designed to work well in many situations.
Multi-Tech Systems, Inc. FF200 FaxFinder Fax Server Admin User Guide 30
Page 31

Chapter 3: Server Installation
c. Specify a Country Code that fits your location.
d. Use the Routing field to set the FaxFinder’s operating mode.
For POTS Mode, set the Routing field to “POTS Line.”
For PBX Routing Mode, set the Routing field to “DTMF Digits,” or, if a mode code for your PBX is
listed in the drop-down box, select that mode code.
The "Avaya Mode Code" setting applies to Avaya PBXs in which a centralized voice-mail system (like Merlin
Messaging or Intuity Audix) has been installed. FaxFinder supports such Avaya PBXs as Magix, Definity,
S8500, and other models.
The "Siemens HiCom Mode Code" setting applies to the model 300H and other Siem ens PBXs in which a
centralized voice-mail system has been installed.
The "Alcatel Mode Code" setting applies to the Alcatel model Omni-PCX4400 PBX equip ped with an inband
DTMF protocol for connecting to voice-mail.
e. Set the Max DTMF Digits field per the requirements of the PBX with which the FaxFinder will
interface (if applicable).
f. Fax ID. The value entered in the “Fax ID” field will appear in the fax log printed by the sender’s fax
machine and, typically, will be printed at the top of each page of the transmitted fax.
In PBX Routing Mode (where the Routing field is set to “DTMF Digits” or a ‘mode code’ option for a
particular PBX brand), the Fax ID is typically the PBX fax extension number of the FaxFinder
Administrator or the number of the phone line to which the FaxFinder is connected.
In POTS Mode (where the Routing field is set to “Pots Line”), the Fax ID is typically the number of
the phone line to which the FaxFinder is connected.
In either mode, an organizational identifier, like the company name, might be used as the Fax ID
instead of any fax number.
g. Smart Dial. When Smart Dial mode is ON, the FaxFinder will look for a dial tone before dialing. If,
under normal circumstances, no dial tone is presented to the FaxFinder, then set Smart Dial to OFF.
Multi-Tech Systems, Inc. FF200 FaxFinder Fax Server Admin User Guide 31
Page 32

Chapter 3: Server Installation
When Smart Dial is OFF, the FaxFinder modem will seize the phone line and dial after a 3-second
pause whether a dial tone is present or not.
Hint: If ‘no dial tone’ messages appear consistently,
set Smart Dial to OFF.
h. Dial Prefix (or ‘access digit’). When the FaxFinder is attached to an extension of a PBX or key phone
system, an access digit is often required to ‘get an outside line’ (that is, to make a connection to the
PSTN). Often a “9” or an “8” is used for this purpose. You can also add a comma (“,”) to insert a
pause that may be required to receive dial tone for the outside line.
If needed, enter the access digit and optional comma in the “Dial prefix” field. Inform FaxFinder client
users that they should not insert any access digits when entering fax numbers in the FaxFinder Send
Fax screen or in their FaxFinder Address Books. Instead, client users should enter fax numbers the
way they would dial the number from an ordinary residential phone line. Finally, avoid any access
digit combination that might predispose client users to make fax calls accidentally to 911 or any other
official/emergency phone number.
i. Click Update.
j. Click on Current Status. Watch the Current Status: POTS Modem 1 portion of the screen. The
“State” of the POTS Modem should be “Waiting for Ring.”
k1. Test Call - for PBX Routing Mode (where the Routing field is set either to “DTMF Digits” or to the
mode code of a specified brand of PBX). From an ordinary POTS phone, dial one of the PBX phone
numbers used for incoming faxes in the FaxFinder system. Dial the PBX phone number as you
would from an outside line (it will not work to dial the number as if it were an ordinary 3- or 4-digit
extension).
k2.Test Call - for POTS Mode (where the Routing field is set to “Pots Line”). From a different POTS
phone, dial the number of the phone line to which the FF200 FaxFinder is attached.
l. In the Current Status: POTS Modem 1 screen, the "State" field should change to "Waiting for
Connect." On the phone, you should hear modem dialup/negotiation tones.
m. If you both observe the "Waiting for Connect" state and hear the tones, then the FaxFinder's Modem
has been configured properly.
If either of these is absent, see item #3 “What if the FaxFinder doesn’t answer a fax call?” in the
“Chapter 8: Troubleshooting.”
n. Repeat steps 8b through 8m for the FaxFinder’s second modem.
Multi-Tech Systems, Inc. FF200 FaxFinder Fax Server Admin User Guide 32
Page 33

Chapter 3: Server Installation
9. Changing Admin’s Server Password
a. In the Password Administration screen, enter a new Password for the FaxFinder Administrator
(something other than “admin”). This password is to be used in that person’s capacity as
administrator. Then re-enter the password in the “Confirm Password” field. Passwords can be as
short as 1 character, as long as 40 characters, and are case-sensitive.
Notes: 1. Changes to any “User ID” must be done in the Phone Book screen.
2. As a default, the FaxFinder software automatically assigns as a password a string that is
identical to the ‘User ID’ string.
b. Click on Update for this row. The Login screen will appear.
Password A dministration
Confirm
Name
Pat-Admin
Pa t Murph y patm
U ser ID Pas sw ord
pat-admin
*****
Password
*****
Funct ion
update
update
Multi-Tech Systems, Inc. FF200 FaxFinder Fax Server Admin User Guide 33
Page 34

Chapter 3: Server Installation
10. Specifying Administrator’s Client Password
a. In the Password Administration screen, enter a new Password for the FaxFinder Administrator to
be used for sending in that person’s capacity as client/user of the FaxFinder system. Then re-enter
the password in the “Confirm Password” field. Passwords must be at least 1 character in length, can
be as long as 40 characters, and are case-sensitive.
Notes: 1. Changes to any “User ID” must be done in the Phone Book screen.
2. As a default, the FaxFinder software automatically assigns as a password a string that is
identical to the ‘User ID’ string.
b. Click on Update for this row.
Password Admini stration
Confirm
Name
Pat-Admin
Pat Murphy patm ***** *****
U ser ID P asswo rd
pat-admin
Password
11. Sending Test Fax from Fax Machine to FaxFinder
a. Using a conventional fax machine, send a fax to the fax number established for the FaxFinder
Administrator.
Function
update
update
Multi-Tech Systems, Inc. FF200 FaxFinder Fax Server Admin User Guide 34
Page 35

Chapter 3: Server Installation
b. Verify that the fax message sent reaches the email inbox of the administrator.
If the email does not appear within 5 minutes, see “Chapter 9: Troubleshooting,” specifically item #4
“What if I don’t get the email to me of the test fax that I sent?”
c. Verify also that you can open the fax in a Tiff viewer program on your computer. The viewer program
you use could be either the Multi-Tech Tiff Viewer or a graphic file viewer included with or installed in
your PC. (The Multi-Tech Tiff viewer is included on the Product CD and installed with other client
programs. During installation, you can choose to associate all Tiff files with the Multi-Tech Tiff Viewer
or with another program.) In your email program, double-click on the file attached to the email
message. The Tiff viewer program will come up automatically displaying the tiff file of the fax.
Multi-Tech Systems, Inc. FF200 FaxFinder Fax Server Admin User Guide 35
Page 36

Chapter 3: Server Installation
12. Adding Client/Users to the Phone Book
a. In the Phone Book screen just below the entries for the FaxFinder administrator, make entries for
the other persons in your office who will send and receive faxes through the FaxFinder. For each
such FaxFinder client/user, enter the name, user ID, and email address in the a ppropriate fields.
In PBX Routing Mode, enter, in the Ext column, the PBX extension assigned to each client user.
In POTS Mode, leave the Ext field blank; all incoming faxes will go to the ‘Attendant’ (the user
specified in the Phone Book’s Unassigned Number field) who will distribute them by email.
In POTS mode, even though received faxes are routed to client users by an attendant, those client
users must still be entered in the Phone Book in order to use the FaxFinder to send faxes.
b. Click on Add for each row. The message “Success: [name] was updated” will appear abo ve the
Phone Book list.
Ph on e Bo ok
Name
Pa t-Adm in pat-admin pat@a cme99.com
Unassigned Numbe r pat@acm e99.com
Pa t Mur phy patm patm@ ac m e99.com 3049
Pete pete pete@acme99.com 3033
Jo e joe joe@acme99.com 3032
Mary mary mary@acme99.com 3031
U ser ID E m ail Add res s
Ext Function
update
update
update
update
update
update
add
delete
delete
delete
delete
Multi-Tech Systems, Inc. FF200 FaxFinder Fax Server Admin User Guide 36
Page 37

Chapter 4: FaxFinder Server Software Screens
Chapter 4 – FaxFinder Server
Software Screens
In this chapter, we present the screens of the FaxFinder server software. We describe each field in each
screen and some of the command buttons. (We do not describe command buttons that have functions
that would be readily understood by users of Windows software. Examples of such self-evident functions
include buttons like “OK,” “Cancel,” “Next,” etc.)
Home Screen
The FaxFinder Home screen offers access to all other FaxFinder software screens.
Multi-Tech Systems, Inc. FF200 FaxFinder Fax Server Admin User Guide 37
Page 38

Chapter 4: FaxFinder Server Software Screens
Login Screen
The FaxFinder Server Login screen is the primary security device for the Server software.
The FaxFinder has a default setting that allows use of “admin” as both the User Name and the Password
at initial startup. After you have begun configuring your FaxFinder fax server system, you should change
the password in the Password Administration screen described later in this chapter.
Multi-Tech Systems, Inc. FF200 FaxFinder Fax Server Admin User Guide 38
Page 39

Fax Log Screen
Chapter 4: FaxFinder Server Software Screens
Sorting Function. You can sort the entries of this screen by doing a mouse-over on the name/identifier
of any column that has variable entries. After you click on the column name, the entries will be re-sorted
by that column’s parameter in ascending alphabetical or numerical order.
Fax Log Screen Field Definitions
Column Values Description
Time mm/dd/yyyy Time that fax was sent or received.
Name alphanumeric Client party sending or receiving fax.
Remote ID phone number Fax number of remote party involved in fax
transmission (this could be sender or receiver).
Result pass/fail Indicates whether fax transmission passed or
failed.
Send/Receive send, receive Indicates whether the FaxFinder client is the
sender or receiver of the fax.
Pages numeric Indicates number of pages in fax transmission.
Details (button) -- Click to access the “Fax Details” screen.
Multi-Tech Systems, Inc. FF200 FaxFinder Fax Server Admin User Guide 39
Page 40

Chapter 4: FaxFinder Server Software Screens
Fax Details Screen
The Fax Details screen is a secondary screen accessible from the Fax Log screen. It presents detailed
technical information about a fax selected in the Fax Log screen.
Fax Details Screen Field Definitions
Field Values Description
Name alphanumeric Name of local client participating in fax
transmission (sending or receiving).
Fax Direction send or receive Indicates which side of fax transmission the client
is on (sending or receiving).
Fax Number nnnn Phone number at which client receives in fax
transmissions.
Init Time mm/dd/yyyy
hh:mm:ss
Resolution standard, fine Coarseness or fineness of the fax image.
Baud Rate 2400, 4800, 7200,
9600, 12000,
14400, 16800,
19200, 21600,
24000, 26400,
28800, 31200,
33600 bps
Scan Line Time 0, 5, 10, 20, 40
milliseconds
Remote ID numeric (fax
number) or
alphanumeric
Number of Pages alphanumeric Number of pages included in fax transmission.
Total Bytes numeric Number of bytes in fax transmission.
Time at which the FaxFinder modem was
initiated for this fax transmission (receive or
send).
Standard = 92x204 dpi. Fine = 196x204 dpi.
The data transmission speed in bits per second
at which the current fax transmission is
occurring.
The minimum duration of each line of the fax. For
non-error-corrected faxes, this prevents data loss
on the receiving fax machine by adding buffer
time at the end of lines.
0 means no extra data
Typically, this is the fax number of remote party
involved in the fax transmission (this could be fax
sender or recipient). Remote ID could also
simply be an alphanumeric string.
Multi-Tech Systems, Inc. FF200 FaxFinder Fax Server Admin User Guide 40
Page 41

Chapter 4: FaxFinder Server Software Screens
Fax Details Screen Field Definitions
Field Values Description
Off-Hook Time mm/dd/yyyy
hh:mm:ss
The time at which the modem went off-hook for
the fax transmission.
Width numeric (in pixels) Width of fax. This is typically 1728 pixels.
Data Compression mh, mr, mmr Data Compression reduces the fax data stream
taking advantage of the fact that most documents
have commonly-used runs of black and white
horizontally and the fact that most documents
differ very little from one scanned line to the next.
MH is a one-dimensional compression along the
horizontal axis. MR is a combination of one-
dimensional compression and compression of
differences between lines (two-dimensional
compression). Error Correction is not required if
MH or MR compression is used. MMR is two-
dimensional compression only and requires error
correction.
MH = modified Huffman, MR = modified READ,
MMR = modified modified READ
Default = MH.
Status pass/fail Indicates whether the current fax has been
transmitted successfully or not.
Elapsed time (in seconds) Indicates the duration of the current fax
transmission.
Email Attachments numeric Indicates the number of email attachments into
which an incoming fax was divided.
Connect Time mm/dd/yyyy
hh:mm:ss
Height: Letter, Legal,
Variable
Error Correction:
on, off Indicates whether the function to detect and right
Indicates the time at which the connection for the
current fax began.
Height of fax expressed in common page sizes
(Letter = 8.5” x 11”; Legal = 8.5” x 14”)
faulty data is on or off.
ini t t ime
off-hook time
connect time
elaps ed time
h a ng- up t i m e
Multi-Tech Systems, Inc. FF200 FaxFinder Fax Server Admin User Guide 41
Page 42

Current Status Screen
Chapter 4: FaxFinder Server Software Screens
Current Status Screen Field Definitions
Field Name Values Description
System fields group
Current Time weekday, mo, dd
hh:mm:ss yyyy
Pending Msgs numeric Emails that have arrived in the FaxFinder Server
Email To: a@b.c Email recipient of latest fax message (either the
Subject: alphanumeric Subject line of email version of pending/last fax
Time Server Status Initializing,
No Errors,
SNTP Error: type
The present time of day.
that have not yet been conveyed to clients.
These include faxes received from remote
senders and administrative emails of several
kinds: fax log messages, debug log messages,
send-fax error messages, mail server change
notification message (relating to the “SMTP
Server Address” field of Administration screen),
reboot message indicating that FF200 is online.
last message sent or, if a message is pending,
that pending message.
message.
The FaxFinder synchronizes its fax time stamps
to an Internet source, usually a government
standards site. It will attempt contact with the
standards web site 5 times in 20 seconds. If
contact fails, it will try 5 times again 5 minutes
later. If contact succeeds, the FaxFinder will
update its stamping time periodically per an
interval set in the Administration screen.
Multi-Tech Systems, Inc. FF200 FaxFinder Fax Server Admin User Guide 42
Page 43

Chapter 4: FaxFinder Server Software Screens
Current Status Screen Field Definitions (cont’d)
Field Name Values Description
System fields group
Up Time x days yy hours:
Operation time since last reboot.
zz minutes
Email Status No Errors,
Bad MailServer
Address,
Indicates whether the FaxFinder’s email
transmissions, both faxes and administrative
messages, are proceeding with or without errors.
Mail Server
Connect Failed,
SMTP Invalid
Response, SMTP
Client Timeout
POTS Modem1/2 fields group
State Waiting for Ring,
Initializing Modem,
Indicates the modem’s current operating
condition.
Waiting for
Connect,
Negotiating,
Receiving Page,
Postpage
Processing,
Processing,
Busied Out
Baud Rate 2400, 4800, 7200,
9600, 12000,
14400, 16800,
The data transmission speed in bits per second
at which the current fax transmission is
occurring.
19200, 21600,
24000, 26400,
28800, 31200,
33600 bps
Connect Time mm/dd/yyyy,
hh:mm:ss
For the current fax, the date and time at which
the connection began.
Page numeric For the current fax, this indicates the page
number currently being received. “0” indicates
that no fax is currently being sent or received.
Width
numeric, in pixels
Width of received fax.
Elapsed Seconds numeric The duration of the current fax transmission in
seconds.
Vertical Resolution standard, fine Horizontal resolution is 204 bpi. Vertical
resolution can be either 98 bpi (standard) or 196
bpi (fine).
Length letter, legal, or
Length, in paper size, of the received fax.
variable
Remote ID numeric (phone
number) or
alphanumeric
The fax number or other identifier for the off-
premises fax machine (sender or receiver)
involved with this fax transmission.
Initialize Modem (button) Initializes the modem, clearing a busied-out
state. This can only be done by a user with
administrative rights.
Make Busy (button)
Imposes a busied state on the modem. This can only
be done by a user with administrative rights.
Multi-Tech Systems, Inc. FF200 FaxFinder Fax Server Admin User Guide 43
Page 44

Chapter 4: FaxFinder Server Software Screens
The “Initialize Modem” and “Make Busy” button commands can be legitimately invoked only by a user with
administrative rights. If a non-administrator clicks on either of these buttons, that party will be logged out
of the FaxFinder Server program and the following error message will appear.
Logout Option
When you click on Logout in the FaxFinder Home screen, you will be logged out of the FaxFinder Server
software. The Login screen will appear to allow access to re-enter the program.
Help Screen
Online Help has not yet been implemented.
Multi-Tech Systems, Inc. FF200 FaxFinder Fax Server Admin User Guide 44
Page 45

Administration Screen
Chapter 4: FaxFinder Server Software Screens
Multi-Tech Systems, Inc. FF200 FaxFinder Fax Server Admin User Guide 45
Page 46

IP Address
Chapter 4: FaxFinder Server Software Screens
Administration Screen Field Definitions
Field Name Values Description
IP Configuration Fields
n.n.n.n
The IP address of the fax server.
for n = 0-255
Subnet Mask
Name Server
Default Gateway Name
Secondary Name Server
Update (button)
n.n.n.n
for n = 0-255
This subnet mask is the subnet for the network to
which the fax server is connected. A subnet
mask is used in conjunction with the IP address
to determine if a data destination is on the same
immediate network or not (in the case of
networks made of hubs and ethernet cards). The
default value, often used, is 255.255.255.0.
The IP address of a local DNS server.
n.n.n.n
for n = 0-255
n.n.n.n
for n = 0-255
Address used to route data out of the immediate
network.
The IP address of a backup DNS server, which is
typically at a separate location.
Click on this button to make changes to IP
Configuration fields take effect.
Multi-Tech Systems, Inc. FF200 FaxFinder Fax Server Admin User Guide 46
Page 47

Chapter 4: FaxFinder Server Software Screens
Administration Screen Field Definitions
Field Name Values Description
SMTP Configuration Fields
SMTP Server Address
SMTP Port
Server User ID
Password
Retype Password
Send Fax Email Receipt
Update (button)
n.n.n.n
for n = 0-255
25 (default)
Range: 0 - 65535
Domain name or IP address for mail server
(SMTP must be supported on mail server).
The IP port on which the SMTP server is
listening.
alphanumeric Identifier used by FaxFinder when interfacing
with mail server. FaxFinder uses mail server to
send call reports to administrator. Some email
servers require authentication when accessed for
this purpose. To satisfy this authentication
requirement (where needed), a User ID must be
specified for the FaxFinder unit. Leave this field
blank if authentication is not needed.
alphanumeric Password used by FaxFinder unit when
accessing mail server. Leave this field blank if
authentication is not needed.
alphanumeric Reiteration of above password.
Y/N When selected, email confirmation notice is sent
attesting that the fax message sent by the
FaxFinder client user has been transmitted with
no errors to the remote fax machine.
Click on this button to make changes to SMTP
Configuration take effect.
Time Server
Add Time Server
Request Interval
Time Zone
Date Format
Time Configuration Fields
URL Location of time-tracking computer that supports
SMTP. This server is the functional substitute for
a real-time clock in the FaxFinder server.
URL Used to add a user-supplied time server.
This value (to be set by user) indicates how often
the FaxFinder will update its clock from the Time
Server.
alphanumeric Indicates the time zone in which the FaxFinder
server is located.
mm/dd/yyyy
OR
dd/mm/yyyy
The date can be set to one fo three orders, where
mm is the month, dd is the day of the month,
and yyyy is the year.
OR
yyyy/mm/dd
Multi-Tech Systems, Inc. FF200 FaxFinder Fax Server Admin User Guide 47
Page 48

Chapter 4: FaxFinder Server Software Screens
Administration Screen Field Definitions
Field Name Values Description
SMTP Configuration Fields
Time Format
Update (button)
Reset button
12-hour or 24-hour Indicates whether time is presented in a 12-hour
scheme with an am/pm designation or in a 24-
hour scheme.
Click on this button to make changes to Time
Configuration settings take effect.
Reset Unit fields
Click on this button to re-boot the server.
Multi-Tech Systems, Inc. FF200 FaxFinder Fax Server Admin User Guide 48
Page 49

Chapter 4: FaxFinder Server Software Screens
Phone Book Screen
The Phone Book screen maps the PBX extension phone numbers of clients to their respective email
inbox addresses at which they will receive incoming faxes as viewable drawing files.
Ph on e Bo o k
Name
Pa t-Adm in pat-admin pat@acme99.com
Unassigned Numbe r pat@acme99.com
P a t M u rp h y p a tm pa tm@acme 9 9 .c o m 3 0 4 9
Pe te pete pete@acme99 .co m 303 3
Jo e j oe joe@acme 99.com 3032
Mary mary mary@acme99.com 3031
Sorting Function. You can sort the entries of this screen by doing a mouse-over on the name/identifier
of any column that has variable entries. After you click on the column name, the entries will be re-sorted
by that column’s parameter in ascending alphabetical or numerical order.
Field Name Values Description
Name column alphanumeric For each client entry, this column shows the
User ID column alphanumeric For each client entry, this column lists an
Email Address column alphanumeric in
Ext # column numeric For each client entry, this column shows the
Function column Buttons for
U ser I D Em ail Ad dr es s Ext #
Phone Book Screen Field Definitions
client’s name.
additional one-word identifier for each client that
is typically shorter than the client’s name. Often
this consists of initials, first name only, first initial
plus last name, etc. The “User ID” field of the
FaxFinder Server Phone Book corresponds to
the “Username” field of the FaxFinder Fax Client
Software (see “Add FaxFinder Address” screen).
For each client entry, this column shows the
email name format
Update, Delete,
and Add functions
client’s email address.
client’s PBX extension phone number. This is
the directory number for incoming faxes only.
For each client entry, this column presents
functions that can be invoked upon the entry.
Function
update
update
update
update
update
update
update
add
delete
delete
delete
delete
Multi-Tech Systems, Inc. FF200 FaxFinder Fax Server Admin User Guide 49
Page 50

Chapter 4: FaxFinder Server Software Screens
If the FaxFinder is operating in POTS Mode, this Unassigned Number ‘attendant’ will receive all emails
and will have to distribute them to their final recipients. If the FaxFinder is operating in PBX Routing
Mode, this Unassigned Number attendant will instead receive all emails that are undeliverable to any enduser on the FaxFinder system.
Phone Book Screen Field Definitions (cont’d)
Field Name Values Description
Delete button -- Use to remove a client user from the Phone
Book.
Admin row -- The party whose email address is entered here
has extensive special rights to configure the
FaxFinder client and server software.
The faxes in email form received by FaxFinder
client users will be shown as coming from the
party having the name and email address listed
in the Admin row. The FaxFinder administrator
also receives fax logs every n faxes (where n can
be set as needed).
The first row is always for the “Administrator”
function. No matter what values are used for the
Name, User ID and Email Address fields of this
row, it still applies to the person doing the
Administrator function for the FaxFinder system.
Unassigned Number row The second row is for the “Unassigned Number”
function. No matter what values are used for the
Name, User ID and Email Address fields of this
row, it still applies to the person (attendant) doing
the Unassigned Number function for the
FaxFinder system.
The Unassigned Number row functions
differently in POTS Mode than in PBX Routing
Mode.
PBX Routing Mode (or operating with PBX
Mode Codes).
‘attendant’ will receive all emails that are
undeliverable to any end-user on the FaxFinder
system.
The Unassigned Number
POTS Mode. The Unassigned Number
‘attendant’ will receive all emails and will have to
distribute them to their final recipients.
User Update button You must click this button after changing values
on Phone Book entries in order to update the
Phone Book.
Multi-Tech Systems, Inc. FF200 FaxFinder Fax Server Admin User Guide 50
Page 51

Modem Configuration Screen – POTS Modem
Chapter 4: FaxFinder Server Software Screens
“Modem Configuration: POTS Modem” Screen Field Definitions
Field Name Values Description
Country Code country names Sets modem telephony parameters as required
for the listed country.
Answer On number of rings This setting determines the number of rings after
which an incoming fax call to the POTS modem
will be answered. Default = 2.
Multi-Tech Systems, Inc. FF200 FaxFinder Fax Server Admin User Guide 51
Page 52

Chapter 4: FaxFinder Server Software Screens
“Modem Configuration: POTS Modem” Screen Field Definitions (cont’d)
Field Name Values Description
Routing Pots Line,
DTMF Digits,
Alcatel Mode Code,
Siemens HiCom
Mode Code,
Avaya Mode Code
The value chosen for this field determines
whether the FaxFinder is in POTS Mode (the
“Pots Line” option) or PBX Routing Mode. And if
the FaxFinder is in PBX Routing Mode, this field
also determines whether it is in generic PBX
Routing Mode (the “DTMF Digits” option) or if a
specific mode-code is used (mode codes are
available for certain specific PBX models).
The model-specific mode codes are as follows:
The "Avaya Mode Code" setting applies to Avaya
PBXs in which a centralized voice-mail system (like
Merlin Messaging or Intuity Audix) has been
installed. FaxFinder supports such Avaya PBXs as
Magix, Definity, S8500, and other models.
The "Siemens HiCom Mode Code" setting applies
to the model 300H and other Siemens PBXs in
which a centralized voice-mail system has been
installed.
The "Alcatel Mode Code" setting applies to the
Alcatel model Omni-PCX4400 PBX equipped with
an inband DTMF protocol for connecting to voicemail.
Additional mode codes may be added from time to
time.
If the FaxFinder is working in conjunction with
any other PBX that supports convergent routing
(that is, if the PBX allows calls to multiple
extensions to be directed to a single Station
Port), then select “DTMF Digits” for this field.
When the value of the Routing field is anything
other than “PBX Routing,” then the FaxFinder is
said to be in “PBX Routing Mode.”
If the FaxFinder is either connected directly to a
POTS phone line or is working in conjunction
with a PBX that does not support convergent
routing, then select “Pots Line” for this field.
When the value of the Routing field is “Pots
Line,” the FaxFinder is said to be in “POTS
Mode.
Max Baud Rate 2400 – 33,600 bps The value in this field determines the maximum
baud rate used for fax calls on the POTS
modem. It is typically set at less than 33,600 bps
only if there are quality problems with the phone
line.
Tone Dial on, off Set this field to “on” if your POTS line supports
tone (DTMF) dialing. Set this field to “off” if the
POTS line supports rotary dialing only.
Default = on.
Multi-Tech Systems, Inc. FF200 FaxFinder Fax Server Admin User Guide 52
Page 53

Chapter 4: FaxFinder Server Software Screens
“Modem Configuration: POTS Modem” Screen Field Definitions (cont’d)
Field Name Values Description
Dial Prefix Numeric string,
5 characters, max.
Use of a comma is
optional. The
comma denotes a
brief delay to
establish dial tone
for an outside line.
When the FaxFinder is used on a phone line in a
PBX or key system, this is the digit that must be
dialed to access an outside line (that is, a line on
the PSTN rather than extensions of the PBX or
key telephone system). The digit “9” is most
frequently used.
If “9” is specified in this field, clients will not need
to include the “9” in the individual entries in their
address books or when ‘Adding Recipients’ in the
FaxFinder Send Fax screen.
The FaxFinder administrator must inform clients
as to whether they must include or omit the “9”
when entering fax numbers.
Fax Debugging on, off This field allows you to turn on or off a fax
debugging feature. When Fax Debugging is on,
the FaxFinder produces detailed technical
reports on failed faxes. Generally, this feature is
for use by the user in conjunction with MultiTech
tech support personnel. This feature helps to
identify and clarify unusual or difficult problems
that may occur.
Extra Init String In this field, the administrator can enter AT
commands that the FaxFinder modem will
implement each time the modem is initialized
(between each fax call).
Update (button) Click on this button to implement configuration
changes on the FaxFinder modem. That is, after
changing any fields in the Modem
Configuration screen, you must click the
Update button for those changes to be activated.
Update All Modems
(button)
Max DTMF Digits 1-15
This button updates changes to both modems of
the FaxFinder.
Indicates the maximum number of dual-tone
multiple frequency phone-dialing digits that can
be received by the FaxFinder in this system.
Default = 4.
Fax ID alphanumeric;
20 characters,
max.
The value in this field will be printed at the top of
each page of the transmitted fax. The value in
this field is usually the phone number of the line
to which the POTS modem is attached.
However, any alphanumeric string up to 20
characters is allowed. Sometimes company
names or abbreviations are included in this
string. Some governments may require that the
originating phone number be printed on each fax
page.
Multi-Tech Systems, Inc. FF200 FaxFinder Fax Server Admin User Guide 53
Page 54

Chapter 4: FaxFinder Server Software Screens
“Modem Configuration: POTS Modem” Screen Field Definitions (cont’d)
Field Name Values Description
Error Correction on, off By setting Error Correction to "on," you are
requesting that faxes be sent in an error-free
condition, which can be achieved only if the
remote fax machine with which you are
communicating also supports Error Correction
and has this feature enabled. The Error
Correction feature slows down fax transmissions.
If you are operating at speeds below 16,800 bps,
you can set Error Correction "off" to achieve
faster transmissions of faxes, although the
quality of the fax transmissions may be
compromised. However, if you have set the fax
baud rate to 16,800 bps or higher, then error
correction is automatically enabled.
Default = on.
Smart Dial on, off If set to “on,” the POTS modem will detect dial
tones and busy signals. If ‘no dial tone’
messages appear consistently, the Smart Dial
feature may be having difficulty detecting PBX
dial tone. In such cases, set Smart Dial to “off.”
Default = on.
Fax Direction both, inbound,
outbound,
In this field, you can set the faxfinder to allow
only incoming faxes, only outgoing faxes, or to
allow both.
Multi-Tech Systems, Inc. FF200 FaxFinder Fax Server Admin User Guide 54
Page 55

Chapter 4: FaxFinder Server Software Screens
Password Administration Screen
Use the Password Administration screen to assign password to client users in the FaxFinder system.
In this screen, you specify each client’s name, user ID, and password. You must click “Update” to make
changes for any client permanent. The User ID, Password, and Confirm Password fields are casesensitive.
Sorting Function. You can sort the entries of this screen by doing a mouse-over on the name/identifier
of any column that has variable entries. After you click on the column name, the entries will be re-sorted
by that column’s parameter in ascending alphabetical or numerical order.
“Password Administration” Screen Field Definitions
Column Name Values Description
Name alphanumeric Name of client user. This entry must match the
“Name” entry in the Phone Book.
User ID alphanumeric Identifier for client user. This entry must match
the “User ID” entry in the Phone Book.
Password alphanumeric Security code for user. This allows the user to
send faxes using this server. It gives the user
access to the FaxFinder Server software but
Passwords must be
Confirm Password alphanumeric
without administrative rights.
at least 1 character in length, can be as long as 40
characters, and are case-sensitive.
After a password is entered in the Password
column, an exactly matching entry must be made
here to validate that password.
Function Update (button) When you add or change a client password, you
must click on this button to make the change
permanent.
Multi-Tech Systems, Inc. FF200 FaxFinder Fax Server Admin User Guide 55
Page 56

Chapter 5: FaxFinder Client Software Configuration
Chapter 5 – FaxFinder Client Software
Configuration
To configure the FaxFinder Client Software, you must first install the software on a PC and then associate
that installed client software with one or more specific FaxFinder hardware units.
Installing FaxFinder Client Software
1. Insert the FaxFinder Product CD into the CD-ROM drive of the client PC. Launch the installation
program by clicking on the setup.exe file on the CD. Transient screens will appear.
Multi-Tech Systems, Inc. FF200 FaxFinder Fax Server Admin User Guide 56
Page 57

2. At the Welcome screen, click Next.
Chapter 5: FaxFinder Client Software Configuration
3. At the Choose Destination Location screen, designate the desired file location for the FaxFinder
client software. In most cases, the default file location is recommended.
Specify the desired file location and click Next.
Multi-Tech Systems, Inc. FF200 FaxFinder Fax Server Admin User Guide 57
Page 58

Chapter 5: FaxFinder Client Software Configuration
4. At the Select Program Folder screen, you can designate a program folder for the FaxFinder software.
Again, in most cases, the default is recommended unless you have other plans.
Designate a folder and click Next.
5. A transient screen will appear while files are being copied.
Multi-Tech Systems, Inc. FF200 FaxFinder Fax Server Admin User Guide 58
Page 59

Chapter 5: FaxFinder Client Software Configuration
6. You will be asked whether or not you want to associate TIF and CPG files with the Multi-Tech Tiff
Viewer. Click Yes (unless you prefer to use a different viewer program).
7. If a Question screen appears asking "Warning - the extension TIF is already registered, Overwrite?,”
you must respond. Click Yes if you wish to use the TIFF viewer installed with the FaxFinder Client
Software. Click No if you prefer to use a different software package for viewing TIF files.
8. Then the ‘completion’ screen will appear.
Click Finish.
Multi-Tech Systems, Inc. FF200 FaxFinder Fax Server Admin User Guide 59
Page 60

Chapter 5: FaxFinder Client Software Configuration
The FaxFinder Fax Client Software starts automatically when the installation is complete.
Icons for the FaxFinder software applications will appear in the Windows Start menu. After installation,
the Client Software starts up whenever the computer is booted. A FaxFinder icon appears in the tray area
at the lower-right corner of the screen. The FaxFinder Fax Client Software screen can be opened from
either the Start menu icon or the tray icon. (If the Client Software is shut down, it can be re-opened from
the Start menu or by double-clicking on the FF110.EXE file, which, following a typical, default installation,
would be located at C:\Program Files \ Multi-Tech Systems\FaxFinder Client Software\.)
Multi-Tech Systems, Inc. FF200 FaxFinder Fax Server Admin User Guide 60
Page 61

Chapter 5: FaxFinder Client Software Configuration
Associating Client with Specific FaxFinder Unit(s)
Sometimes more than one FaxFinder unit is connected to an Ethernet network. In some cases, certain
client users might be assigned to some FaxFinder units and not assigned to others. After the FaxFinder
client software is installed, you must associate it with one or more FaxFinder units. This procedure shows
you how to make this association so that faxes may be sent from a particular FaxFinder unit to the email
inbox of your PC. To do this procedure, you will need to know the IP address of the FaxFinder unit. Be
aware that an individual FaxFinder client user can be associated with more than one FaxFinder unit. This
could easily be the case in an office that is large and/or an office that has a great deal of fax traffic.
1. At the main screen of the FaxFinder Fax Client Software, click on Edit and select “Add Fax Server.”
2. At the Add Device Address screen, in the “Select Server” field, highlight “FaxFinder.”
In the “Enter Address” field, enter the IP address or domain name of the FaxFinder unit that the client
will use.
A client can be associated with more than one FaxFinder unit, but the associations must be
established one at a time.
3. Enter, in the appropriate fields, the Username and Password that the client will use when accessing
this FaxFinder unit. If the client is to be associated with multiple FaxFinder units, a different
Username and Password could be established for each. However, in most cases, it is advisable (for
Multi-Tech Systems, Inc. FF200 FaxFinder Fax Server Admin User Guide 61
Page 62

Chapter 5: FaxFinder Client Software Configuration
the sake of simplicity and convenience) to use the same Username and Password for all FaxFinder
units.
NOTE: The Username entered here must match the entry used in the “User ID” field of the Phone
Book screen in the FaxFinder Server Software. The password entered here must match
the password entered for this client in the Password Administration screen in the
FaxFinder Server software.
Click OK.
4. A new FaxFinder entry should appear on the “Device Status” tab of the FaxFinder Fax Client
Software screen.
The status of the newly registered FaxFinder unit should momentarily go from “Logging in” to “Idle.”
If it goes to Login Failure, then one of two things is wrong:
a. The IP address or domain name is wrong. If that is the case, delete that entry (by right-click
DELETE), and enter a new one; otherwise,
b. The Username/Password combination may be wrong. Verify that the Username/Password
combination in the client software screen matches the UserID/Password combination established
in the FaxFinder Server software screen.
Multi-Tech Systems, Inc. FF200 FaxFinder Fax Server Admin User Guide 62
Page 63

Chapter 5: FaxFinder Client Software Configuration
Dis-Associating the Client from a Specific FaxFinder Unit
In this procedure, you will un-do the procedure “Associating Client with a Specific FaxFinder Unit.” This
situation might occur when changes are being made in the network faxing system. In any event, this
procedure severs the tie between your PC and a specific FaxFinder unit so that you will no longer be
connected to it for sending fax messages. (Faxes can be received in email form from the FaxFinder
server, despite dis-associating from the FaxFinder server, as long as the receiving party is entered in the
FaxFinder Phone Book.) In cases where the client is currently associated with more than one FaxFinder
unit, you will need to know the IP address of the specific FaxFinder unit from which you want to
disconnect.
1. Open the FaxFinder Client Software program and go to the Device Status tab. Select the
FaxFinder unit from which you want to disconnect (you can identify the FaxFinder unit by its IP
address or domain name). Right-click on it and select delete.
2. Your FaxFinder Client Software will no longer be able to send faxes through this particular
FaxFinder unit.
Multi-Tech Systems, Inc. FF200 FaxFinder Fax Server Admin User Guide 63
Page 64

Chapter 5: FaxFinder Client Software Configuration
Disabling and Re-Enabling a Client’s FaxFinder Service
Disabling a FaxFinder’s service to a specific client is simply a temporary version of dis-associating
the client from that FaxFinder. When a client has disabled the FaxFinder’s service to that client, the
client/user cannot send faxes through the FaxFinder. (Faxes can be received in email form from the
FaxFinder server, despite this disabling, as long as the receiving party is entered in the FaxFinder
Phone Book.) The client can easily re-establish FaxFinder service by toggling the Disable command
(now shown with a “Ê” beside it), thus enabling service once again.
1. Open the FaxFinder Client Software program and go to the Device Status tab. Select the
FaxFinder unit from which you want to disconnect temporarily (you can identify the FaxFinder unit by
its IP address or domain name). Right-click on it and select disable.
2. When disabled, a check mark will appear beside the disable command.
3. To re-enable the FaxFinder unit for your use, that is to avail your PC of its service once again,
open the FaxFinder Client Software program and go to the Device Status tab. Select the FaxFinder
unit to which you want to re-connect. Right-click on it and select Ê disable. You will now be reconnected to service by this FaxFinder unit.
Sending Test Fax
To verify that the software installation has succeeded, you should use the FaxFinder client software to
send a fax to a regular fax machine (preferably a local fax machine). To do so, follow the instructions for
the “Sending a Fax” procedure in Chapter 6.
Multi-Tech Systems, Inc. FF200 FaxFinder Fax Server Admin User Guide 64
Page 65

Chapter 5: FaxFinder Client Software Configuration
FaxFinder Fax Client Software Menu Command Definitions
FaxFinder Fax Client Software Menu Command Definitions
Command Name Values Description
File menu commands
Send Fax --
Pause Scheduler -- When you invoke the Pause Scheduler
Options
Exit Closes the FaxFinder Fax Client Software
Brings up the FaxFinder Send Fax screen, the
first step in transmitting a fax message via the
FaxFinder system.
command, any faxes currently pending will not
be sent and any fax transmissions attempted
while this command is in force will not be sent.
When the scheduler has been paused, you must
select Ê Pause Scheduler to rescind the
command. That is to say, this command toggles
on and off when selected repeatedly.
If the computer is rebooted, the FaxFinder Fax
Client Software will cancel the Pause Scheduler
command at startup. Any faxes that had been
paused and left unsent when the computer was
turned off will be sent immediately when the
computer is turned on again.
Brings up the Options screen. The Options
screen consists of the Identification tab where
info about the client user should be entered and
the Fax Retry tab where the client user can
specify, for faxes that were not successfully on
the first attempt, the number of subsequent
attempts to be made and the interval between
these attempts.
program.
Multi-Tech Systems, Inc. FF200 FaxFinder Fax Server Admin User Guide 65
Page 66

Chapter 5: FaxFinder Client Software Configuration
FaxFinder Fax Client Software Menu Command Definitions (cont’d)
Command Name Values Description
Edit menu commands
Add Fax Server --
Brings up the Add Device Address screen so
that a FaxFinder or HylaFax server on the
network can be associated with the client. A
client can be served by more than one FaxFinder
unit.
Add Contact -- Brings up the New Contact screen so that an
recipient can be added to the Address Book.
Once a recipient’s contact info has been entered
into the Address Book, faxes sent to that party
will have the destination fax number
automatically conveyed to the FaxFinder unit.
Info from recipient’s Address Book entry will also
be included in automated fields on fax cover
pages where applicable (for example, the voice
phone number, company name, and city of the
recipient might be two fields included on the
cover page).
Edit Cover Page
Template
Help menu commands
-- Brings up the Cover Page Generator program so
that fax cover pages can be created or modified.
Not currently supported. See User Guides.
Multi-Tech Systems, Inc. FF200 FaxFinder Fax Server Admin User Guide 66
Page 67

Chapter 5: FaxFinder Client Software Configuration
FaxFinder Fax Client Software Menu Command Definitions (cont’d)
Field Name Values Description
Device Status tab
Device (column) alphanumeric Shows FaxFinder or HylaFAX server units with
which the client is associated. Also shows Print
Capture function.
Status (column) idle, negotiating,
preparing to
capture, capturing
page n, sending
Shows the status of the FaxFinder or HylaFAX
fax server unit pertaining to its fax sending and
receiving capabilities and to its print/image
capturing capabilities.
fax page n,
receiving fax page
n, success,
unsuccessful- user
aborted,
unsuccessful-no
carrier,
unsuccessful- no
dial tone,
unsuccessful-error
<descriptor>
Recipient (column) alphanumeric Shows the name and fax number of recipient to
whom fax is currently being sent.
Print Capture (row) idle,
preparing to
Indicates status of the FaxFinder’s Print
Capturing software module.
capture,
capturing page n
Multi-Tech Systems, Inc. FF200 FaxFinder Fax Server Admin User Guide 67
Page 68

FaxFinder Fax Client Software Menu Command Definitions (cont’d)
Command Name Values Description
Device Status tab (cont’d)
Commands accessed by
Right-Clicking on a
selected FaxFinder
Delete Dis-associates the client from the selected
Disable -- Temporarily dis-associates the client from the
Abort -- Discontinues a fax transmission in progress.
Abort and Pause -- Discontinues a fax transmission in progress and
Properties -- Brings up the FaxFinder <IP address><domain
Chapter 5: FaxFinder Client Software Configuration
FaxFinder or HylaFAX unit so that the client can
no longer send faxes through that FaxFinder unit.
(The FaxFinder Server’s IP address is removed
from the Device Status list of the FaxFinder
Client Software.)
selected FaxFinder or HylaFAX unit so that the
client can no longer send faxes through that unit.
To restore the connection to the
FaxFinder/HylaFAX unit, select Ê Disable.
(Because the FaxFinder Server’s IP address
remains in Device Status list of the FaxFinder
Client Software, service can be restored by
toggling the
Disable command, thus enabling the
association once again.)
puts all pending faxes on hold. After this
command has been invoked, no more faxes will
be sent from this client until
(a) the client PC is turned off and on again, or
(b) the command has been turned off by
selecting Ê Pause Scheduler in the File menu
of the FaxFinder Fax Client Software.
name> screen. This screen simply shows the IP
address or domain name of the selected
FaxFinder unit.
Multi-Tech Systems, Inc. FF200 FaxFinder Fax Server Admin User Guide 68
Page 69

Chapter 5: FaxFinder Client Software Configuration
FaxFinder Fax Client Software Menu Command Definitions (cont’d)
Field/Command Name Values Description
Pending Faxes tab
Recipient (column) -- Identifies recipient of each fax for which
transmission is incomplete.
Scheduled Time/Date -- Identifies time at which a pending fax is set to be
transmitted.
Pages (column) -- Shows the number of pages of each fax.
Commands accessed by
right-clicking on a
selected pending fax
message
Delete -- Cancels the transmission of the selected pending
fax message.
Reschedule -- Brings up the Fax Scheduling screen so that
transmission of a pending fax can be scheduled
for a different time.
Properties -- Brings up the Fax Details screen for the selected
pending fax . The Fax Details screen presents
information about the recipient, transmission
status, cover page, and original source file of the
selected pending fax.
Multi-Tech Systems, Inc. FF200 FaxFinder Fax Server Admin User Guide 69
Page 70

Chapter 5: FaxFinder Client Software Configuration
FaxFinder Fax Client Software Menu Command Definitions (cont’d)
Field Name Values Description
Fax Ports tab
Device (column) alphanumeric Shows FaxFinder units with which the client is
associated.
Port (column) ttys0, ttys1
ttys_0-3 for FF420
ttys_0-7 for FF820
The fax modem (within) the FaxFinder server
unit, the status of which is being tracked.
ttys0 denotes POTS Modem 1 of the listed
faxfinder unit;
ttys1 denotes POTS Modem 2 of the listed
faxfinder unit, etc., for all modems in the FF420/820 unit.
Status (column) idle, negotiating,
preparing to
capture, capturing
page n, sending
Shows the status of the FaxFinder fax server unit
pertaining to its fax sending and receiving
capabilities and to its print/image capturing
capabilities.
fax page n,
receiving fax page
n, success,
unsuccessful- user
aborted,
unsuccessful-no
carrier,
unsuccessful- no
dial tone,
unsuccessful-error
<descriptor>
Recipient (column) alphanumeric Shows the name and fax number of recipient to
whom fax is currently being sent.
List All Fax Ports Y/N When selected, all fax ports are listed; when not
selected, only the current active fax port is listed.
Multi-Tech Systems, Inc. FF200 FaxFinder Fax Server Admin User Guide 70
Page 71

Chapter 5: FaxFinder Client Software Configuration
FaxFinder Fax Client Software Menu Command Definitions (cont’d)
Field/Command Name Values Description
Fax Log tab
Recipient (column) Identifies recipient of each outgoing fax.
Time/Date Sent (column)
day, date, time, zone
in the form
ddd mmm nn
hh:mm:ss zzzzzz
Indicates when each outgoing fax was sent.
Pages (column) integer Shows the number of pages in each fax.
Status (column) success,
unsuccessful- user
Indicates whether each fax was sent successfully
or not and, if not, indicates reason for failure.
aborted,
unsuccessful-no
carrier,
unsuccessful- no
dial tone,
unsuccessful-error
<descriptor>
Commands accessed by
right-clicking on a
selected fax log entry
delete -- Cancels the selected fax log entry.
resend -- Resends the selected fax. The Fax Scheduling
screen will appear to set a time for the resending
to occur.
properties -- Brings up the Fax Details screen for the selected
fax. The Fax Details screen presents information
about the recipient, transmission status, cover
page, and original source file of the selected
pending fax.
Multi-Tech Systems, Inc. FF200 FaxFinder Fax Server Admin User Guide 71
Page 72

Chapter 5: FaxFinder Client Software Configuration
FaxFinder Fax Client Software Menu Command Definitions (cont’d)
Field/Command Name Values Description
Address Book tab
Name (column) alphanumeric Shows the name of the the selected Address
Book entry.
Organization (column)
alphanumeric
Shows the organizational affiliation of the the
selected Address Book entry.
Fax Number (column) integers Shows the fax number of the selected Address
Book entry.
Commands accessed by
right-clicking on a
selected address book
entry
delete -- Removes the selected entry from the Address
Book. A confirmation screen appears before the
deletion is executed.
properties --
Brings up the Contact <name> screen screen
for the selected address book entry. The
Contact screen shows user contact details
(name, company name, fax number, phone
numbers, and street address info).
Multi-Tech Systems, Inc. FF200 FaxFinder Fax Server Admin User Guide 72
Page 73

Chapter 6: FaxFinder Client Software Operation
Chapter 6: FaxFinder Client Software
Operation
This chapter describes the things that a client user can do with the FaxFinder system. Three software
programs are involved: the FaxFinder Client Software, the Multi-Tech Tiff Viewer, and the Multi-Tech
Cover Page Generator. The programs work together with the FaxFinder Client Software acting as the
hub of activity. The FaxFinder Client Software interfaces with the FaxFinder Server, has a user interface,
and calls upon the Cover Page Generator and Tiff Viewer for their special functions. When sending
faxes, the FaxFinder Client Software calls up the Multi-Tech Cover Page generator if cover pages are
requested. When previewing outgoing faxes or viewing received faxes, the PC’s operating system calls
up the TIFF Viewer to display TIFF files. Note that client users can choose to display TIF files on a
different TIF viewing program (see Step 7 of “Installing FaxFinder Client Software” in Chapter 5).
Multi-Tech Systems, Inc. FF200 FaxFinder Fax Server Admin User Guide 73
Page 74

Chapter 6: FaxFinder Client Software Operation
Sending a Fax
To send a fax by printing from an application program on a client PC, follow the steps listed below.
1. The FaxFinder client software must be installed on the PC. (See the section “Installing FaxFinder
Client Software” earlier in this manual.)
2. The client PC and the FaxFinder server must both be connected to the same Ethernet LAN system.
(See the section “Chapter 3, Part C: Configuring the FaxFinder Server” earlier in this manual.)
3. The association must be made between the client PC and the FaxFinder Server. (See the section
“Associating Client with Specific FaxFinder Unit(s)” earlier in this manual).
4. After installation, the FaxFinder Fax Client Software program will be running whenever the PC is
on. You can view the FaxFinder program's main window by clicking on the FaxFinder icon at the
lower right of the PC’s monitor screen in its Application Tray. Then select “Show FaxFinder Client
Software.”
Note: The user can shut down the FaxFinder program by selecting "exit" either
from the tray icon or from the main FaxFinder program screen. If the
program has been shut down, it can be restarted from the Windows Start
menu.)
Multi-Tech Systems, Inc. FF200 FaxFinder Fax Server Admin User Guide 74
Page 75

Chapter 6: FaxFinder Client Software Operation
However, you can send faxes through the FaxFinder without bringing up the FaxFinder Client
Software screen.
Multi-Tech Systems, Inc. FF200 FaxFinder Fax Server Admin User Guide 75
Page 76

Chapter 6: FaxFinder Client Software Operation
5. At the application program (for example, a word processing program or drawing program), print to the
FaxFinder.
Setting the destination of the printing job varies from program to program. For the common Notepad
text editor program, for example, you must set the destination printer in the Page Setup screen. In
most cases, however, the destination printer can be set in a Print menu that appears when each
printing job is initiated.
Application programs may sometimes ‘complain’ about the image size not fitting on the fax page.
Although such messages can sometimes safely be ignored (in the illustration below, simply by
clicking “Yes” to proceed), you must confirm this with your own application programs.
Multi-Tech Systems, Inc. FF200 FaxFinder Fax Server Admin User Guide 76
Page 77

Chapter 6: FaxFinder Client Software Operation
To assign the FaxFinder as the default printer simultaneously for all application programs that print,
use the Windows Printers dialog box.
To adjust fax-specific parameters (like resolution and paper size), right-click on the Print dialog box
within the application and select “Properties.” The MULTI-TECH FAXFINDER Properties screen will
appear.
Multi-Tech Systems, Inc. FF200 FaxFinder Fax Server Admin User Guide 77
Page 78

Chapter 6: FaxFinder Client Software Operation
6. After the printing has been initiated by the application program, the FaxFinder Send Fax screen will
appear.
Click on Address Book. When the Address Book screen appears, click “Add.” At the New
Contact screen, enter the recipient’s name, fax number, and any other contact information you want
to retain.
The recipient’s fax number should be entered as you would dial it from a phone on the public phone
network (as from a residential phone). Click OK. At the Address Book screen, highlight the
recipient in the list and click “Select.” The party will appear in the “Recipients” list in the FaxFinder
Send Fax screen.
Additional recipients can be added. The same fax message will be sent to all recipients.
A recipient can also be specified directly in the FaxFinder SendFax screen by typing his/her name in
the “Name” field, typing his/her fax number in the “Phone Number” field, and then clicking on “Add
Recipient.” If the recipient is specified in this way, the user will be prompted about entering the
recipient in the Address Book but such recipients will not be added to the Address Book
automatically.
You can also access the Address Book directly to add and edit entries. At the FaxFinder Fax Client
Software screen, go to Edit | Add Contact.
7. If you want to include a cover page with your fax, click in the “Use Cover Page” checkbox. Enter
information as needed in the “Subject” and “Cover Page Notes” fields.
Automated fields, like sender information (individual name, company name, street address, phone
number, fax number, etc.) should be entered in the Address Book. The Address Book is accessible
in the “Options” menu of the FaxFinder Fax Client Software screen. For more information about
addresses and the automated fields used in cover pages, see the section “Setting Up Your Addres s
Book” later in this chapter.
Multi-Tech Systems, Inc. FF200 FaxFinder Fax Server Admin User Guide 78
Page 79

Chapter 6: FaxFinder Client Software Operation
The “Cover Page Style” chosen will determine how this information will appear on the fax cover page.
You can select a standard style from the “Cover Page Style” drop-down menu or create a style of
your own in the Template Editor. To access the Template Editor software, click on the “View/Edit”
button. (For more information, see the section “Creating or Modifying Cover Page Styles” later in this
chapter.)
Click on the “Preview Fax” button to check the fax before you send it. The Mult-Tech Tiff Viewer
program will appear.
In it, you can view both the cover page and the main fax page(s). (For more information on this, see
the section “Using the Multi-Tech Tiff Viewer” later in this chapter.) When satisfied with your fax,
close the Multi-Tech Tiff Viewer program and return to the FaxFinder Send Fax screen.
8. At the FaxFinder Send Fax screen, click on the “Send Fax Now” button to send the fax.
9. Confirmation of having sent the fax(es) successfully will appear in the “Fax Log” tab of the FaxFinder
Fax Client Software screen.
Multi-Tech Systems, Inc. FF200 FaxFinder Fax Server Admin User Guide 79
Page 80

Chapter 6: FaxFinder Client Software Operation
Scheduling Fax Transmissions
The FaxFinder allows you to send a fax immediately or delay its transmission until a later time. Perhaps
the most common motivations for delayed faxing are to enjoy the lower phone rates that may apply at
night and on weekends or to broadcast faxes after business hours to avoid tying up fax transmission
resources during the busiest weekday hours. In any case, it is easy to schedule faxing for a later time.
1. Send the fax via FaxFinder in the normal way (see the procedure “Sending a Fax” earlier in this
chapter).
2. When the FaxFinder Send Fax screen appears, enter a recipient for the fax either from the Address
Book or by entering Name and Phone Number (fax number) in the appropriate fields and clicking Add
Recipient.
3. In the FaxFinder Send Fax screen, the recipient’s name and fax number will appear in the “Recipients”
list and the “Schedule” pane will no longer be grayed out. Click Schedule. The Fax Scheduling screen
will appear.
4. Click to uncheck the “send immediately” checkbox.
5. Enter the date and time at which you want the fax to be sent.
6. Click OK in the Fax Scheduling screen and then click Send Fax in the FaxFinder Send Fax screen.
Multi-Tech Systems, Inc. FF200 FaxFinder Fax Server Admin User Guide 80
Page 81

Chapter 6: FaxFinder Client Software Operation
7. The fax will be sent at the scheduled time. You can view the event as it happens in the FaxFinder
client software Device Status screen or after the fact in the Fax Log screen.
Re-Sending a Failed Fax
Locate the failed fax in the Fax Log tab of the FaxFinder Fax Client Software. Select the failed fax and
right-click on it. In the menu that appears, select Resend.
Multi-Tech Systems, Inc. FF200 FaxFinder Fax Server Admin User Guide 81
Page 82

Chapter 6: FaxFinder Client Software Operation
Putting Pending Faxes on Hold and Rescinding the Hold
Suppose you have sent a fax to 10 recipients and, shortly after clicking on Send Fax, you realize that
there is something incorrect in the content of your fax (it may be something you want to add, delete, or
change). You can prevent any pending faxes from being sent by selecting “Pause Scheduler” in the File
menu of the FaxFinder Fax Client screen. Suppose that 2 faxes have already been transmitted
completely and a third fax is in progress when you click “Pause Scheduler.” The FaxFinder will finish the
third fax but will not fax to recipients 4-10. The pausing function allows you to see details about the fax,
to view the fax again, and to delete the fax if you so desire.
As long as “Pause Scheduler” is selected, no fax message will advance beyond “Pending” status and, so,
none will be sent.
To rescind or call off the hold on pending faxes, open the FaxFinder Fax Client Software. From the File
menu, select Ê Pause Scheduler. The scheduler will resume normal operation and faxes will be sent.
Consider this example.
1. A fax is sent by FaxFinder to three recipients.
2. While the fax is being sent to the second party, the client user realizes that there is something wrong
with the fax. She brings up the FaxFinder Fax Client Software screen, opens the File menu, and selects
“Pause Scheduler.”
Multi-Tech Systems, Inc. FF200 FaxFinder Fax Server Admin User Guide 82
Page 83

Chapter 6: FaxFinder Client Software Operation
At that point, the FaxFinder will complete the fax in progress that is being sent to the second recipient.
However, the fax to the third recipient is still listed as “Pending” in the Pending Faxes tab of the
FaxFinder Fax Client Software.
The client user can take one of several actions.
She could click on “Pause Scheduler” again to cancel that command. In that case, the pending fax would
become active and could not be stopped.
She could select the fax in the Pending Faxes screen and right-click on it to bring up a menu.
Multi-Tech Systems, Inc. FF200 FaxFinder Fax Server Admin User Guide 83
Page 84

Chapter 6: FaxFinder Client Software Operation
She could view the details of the fax and, at her option, view the fax again.
She could re-schedule the fax for a later time.
Multi-Tech Systems, Inc. FF200 FaxFinder Fax Server Admin User Guide 84
Page 85

Chapter 6: FaxFinder Client Software Operation
She could “delete” the fax, which means that that fax transmission would never be completed.
Pause is canceled on reboot. If she shuts down her computer for the day while leaving this fax in a
“pending” state, that fax will be sent shortly after booting up her computer again, that is shortly after the
FaxFinder client software is functioning again. So, any faxes put in the pending state by using the
‘Pause Scheduler’ command will be sent the next time the FaxFinder software is activated.
Canceling a Fax
If the fax is in progress … Open the FaxFinder Fax Client Software. On the Device Status tab, select
the FaxFinder unit that is in the process of sending your fax. In the list, right-click on that FaxFinder entry.
In the menu that appears, select Abort.
If the fax is pending … Open the FaxFinder Fax Client Software. On the Pending Faxes tab, select the
fax transmission that you want to cancel. In the list, right-click on that fax message entry (the recipient
will be shown). In the menu that appears, select Delete.
To cancel the current fax and simultaneously put a hold on sending any other faxes from your PC, select
Abort and Pause. To resume faxing, go to the File menu and cancel the pause by selecting
Ê Pause Scheduler. Any pause applied to a pending fax is cancelled when the computer is rebooted.
Any fax left pending with the FaxFinder Scheduler paused will be sent as soon as the FaxFinder client
program opens when the PC is turned on again.
Multi-Tech Systems, Inc. FF200 FaxFinder Fax Server Admin User Guide 85
Page 86

Chapter 6: FaxFinder Client Software Operation
Setting Fax Retry Number and Interval
You can set the FaxFinder client software to retry a fax transmission if it fails on the first attempt. You can
set both the number of additional attempts and the interval between each additional attempt. You can set
these parameters as follows.
1. In the FaxFinder Fax Client Software screen, open the File menu and select “Options.” When the
Options screen appears, click on the Fax Retry tab.
2. Set the number of retries and the interval between these repeated attempts and click OK.
Multi-Tech Systems, Inc. FF200 FaxFinder Fax Server Admin User Guide 86
Page 87

Chapter 6: FaxFinder Client Software Operation
Sending One Fax Containing Multiple Documents
The FaxFinder allows you to include multiple documents in a single fax transmission. Those multiple
documents could come from the same or different application programs.
1. Consider the example below where a text file and a drawing file are included in the same fax with a
single cover letter. Here’s how this multiple-document fax was sent.
a. The user printed the text file to the FaxFinder from the Notepad text editor program.
b. The FaxFinder Send Fax screen appeared. However rather than completing the fax
transmission, the user opened another application program.
c. The user printed the graphic file to the FaxFinder from the MacroMedia FreeHand drawing
program.
d. When the user returned to the FaxFinder Send Fax screen, both documents appeared in the
“Documents” list.
2. In the “Documents” pane of the FaxFinder Send Fax screen, you can add a cover page, re-arrange
the order of the files, or delete items from the list of files to be faxed.
Multi-Tech Systems, Inc. FF200 FaxFinder Fax Server Admin User Guide 87
Page 88

Chapter 6: FaxFinder Client Software Operation
3. You can also add to the list of files to be faxed out by including items that you have stored. In the
“Documents” pane of the FaxFinder Send Fax screen, click Add. You could then browse to find, for
example, a fax that you had received earlier, had stored as a TIF file, and now want to forward to another
party.
4. When all documents to be transmitted have been listed in the Documents list, click Send Fax. The
documents will be sent in the order listed.
Multi-Tech Systems, Inc. FF200 FaxFinder Fax Server Admin User Guide 88
Page 89

Chapter 6: FaxFinder Client Software Operation
Forwarding a Fax
Suppose you receive a fax using the FaxFinder system. Suppose that fax message is something you
want to pass along to another party in fax form at a later date (for example, Rocky Mountain Construction
Company receives tax information about lots on which it intends to build houses). In this case, you
should note the name of the TIF file in question. You can then browse to that TIF file and re-send it as a
fax message.
To forward a fax, follow these steps.
1. At the FaxFinder Fax Client Software screen, go to the File menu and select “Send Fax.” The
FaxFinder Send Fax screen will appear.
2. In the Documents pane, click “Add.” Then browse to the TIF file to be sent as a fax.
Click Open.
3. The selected file will appear in the “Documents” list in the FaxFinder Send Fax screen.
Multi-Tech Systems, Inc. FF200 FaxFinder Fax Server Admin User Guide 89
Page 90

Chapter 6: FaxFinder Client Software Operation
4. In the FaxFinder Send Fax screen, specify a recipient for the fax. The recipient could either come
from your Address Book or be entered by typing the Name and Phone Number in the appropriate
fields and clicking “Add Recipient.”
Then click Send Fax. The TIF file will be reconverted into a fax message that can be received by a fax
machine.
Multi-Tech Systems, Inc. FF200 FaxFinder Fax Server Admin User Guide 90
Page 91

Chapter 6: FaxFinder Client Software Operation
Receiving a Fax
The FaxFinder Server delivers incoming faxes to client PCs in their email inboxes.
Since faxes received through the FaxFinder are transformed into email attachments, they can be directed
anywhere email goes. The final recipient can be inside the office or across the ocean.
Fax reception works differently when the FaxFinder is operating in PBX Routing Mode than in POTS
Mode. In PBX Routing Mode, faxes come directly to client/users; in POTS Mode, all faxes come to an
attendant who forwards them to the intended recipient.
Receiving Faxes in POTS Mode
In POTS Mode, all faxes are emailed to an attendant using a single fax number.
1. The incoming fax arrives in the attendant’s email inbox as a message with an attachment.
2. The attendant uses email to forward the message to the appropriate recipient. Recipients could be on
the local Ethernet network or outside of it.
3. The recipient opens the email message. The incoming fax message takes the form of a graphic file
attachment. The FaxFinder Server has assigned the file an automatic file name.
4. The incoming fax arrives in the client’s email inbox as a message with an attachment.
The email message is marked as being from the FaxFinder Administrator.
The sender’s “Remote ID” and the client’s name appear in the “Sub ject” line of the email message.
(The Remote ID comes from the sending fax machine and is typically the sender’s fax number or
name.)
Multi-Tech Systems, Inc. FF200 FaxFinder Fax Server Admin User Guide 91
Page 92

Chapter 6: FaxFinder Client Software Operation
Multi-Tech Systems, Inc. FF200 FaxFinder Fax Server Admin User Guide 92
Page 93

Chapter 6: FaxFinder Client Software Operation
5. The FaxFinder client opens the email message. The incoming fax message takes the form of a
graphic file attachment. The FaxFinder Server has assigned the file an automatic file name.
6. The FaxFinder client can open the file or save the file.
a. Opening the fax message graphic file. Incoming fax messages are TIFF files. These TIFF files
are automatically associated with the chosen TIFF viewer program. The client can open the fax email
attachment directly in the TIFF viewer program.
b. Saving the fax message graphic file. In some TIFF viewer programs, the client can do a ‘Save
As,’ renaming the TIFF file attachment with a meaningful name for subsequent viewing or forwarding.
7. The client views the fax message in the TIFF viewer program.
Receiving Faxes in PBX Routing Mode
In PBX Routing Mode, the FaxFinder Server delivers incoming faxes to client PCs in their email inboxes.
1. A PBX extension number must be assigned to the client PC at the FaxFinder Server.
2. For fax reception, the client PC and the FaxFinder server need not both be connected to the same
Ethernet LAN system. (A sales representative, for example, could receive faxes sent to her home
office fax number even though she is traveling overseas, if she uses an Internet email account.)
3. A fax document is sent to the PBX extension number of a client/recipient on the FaxFinder system.
The fax call is routed to the FaxFinder server and there converted to a TIFF file. The TIFF file is
attached to an email message that is sent to the intended recipient’s email address (as specified in
the FaxFinder Phone Book).
4. The incoming fax arrives in the recipient’s email inbox as a message with an attachment.
The email message is marked as being from the FaxFinder Administrator.
The sender’s “Remote ID” and the recipient’s name appear in the “Subject” line of the email
message. (The Remote ID comes from the sending fax machine and is typically the sender’s fax
number or name.)
Multi-Tech Systems, Inc. FF200 FaxFinder Fax Server Admin User Guide 93
Page 94

Chapter 6: FaxFinder Client Software Operation
5. The fax recipient (a client of the FaxFinder Server) opens the email message. The incoming fax
message takes the form of a graphic file attachment. The FaxFinder Server has assigned the file an
automatic file name.
6. The FaxFinder client can open the file or save the file.
a. Opening the fax message graphic file. Incoming fax messages are TIFF files. These TIFF files
are automatically associated with the chosen TIFF viewer program. The client can open the fax email
attachment directly in the TIFF viewer program.
b. Saving the fax message graphic file. In some TIFF viewer programs, the client can do a ‘Save
As,’ renaming the TIFF file attachment with a meaningful name for subsequent viewing or forwarding.
7. The client views the fax message in the TIFF viewer program.
Multi-Tech Systems, Inc. FF200 FaxFinder Fax Server Admin User Guide 94
Page 95

Chapter 6: FaxFinder Client Software Operation
Using the Multi-Tech Tiff Viewer
The Multi-Tech Tiff Viewer program has a variety of features that enhance the viewing of fax messages in
graphic file form (thumbnails, zooming, spot magnification, scrolling, rotating, etc.). The program can also
manipulate and permanently alter the graphic files.
Frequently Used Commands – Toolbar Icons
The most commonly used functions are available as icons on the toolbar. In the next three diagrams, we
label and describe the functions of these icons.
Multi-Tech Systems, Inc. FF200 FaxFinder Fax Server Admin User Guide 95
Page 96

Chapter 6: FaxFinder Client Software Operation
Multi-Tech Systems, Inc. FF200 FaxFinder Fax Server Admin User Guide 96
Page 97

Chapter 6: FaxFinder Client Software Operation
While most of these features are common to many graphical programs, some warrant a bit of explanation.
Copy. The Copy function allows you to copy the fax file and insert it into a different application program.
See “Importing Fax Images into Other Application Programs” below.
Panning (Omni-Directional Scroll). The “hand” icon allows you to bring any desired portion of the image
into view.
Zoom to Selection. Click and drag with the mouse over the rectangular area you would like to view.
The Multi-Tech Tiff Viewer zooms in sufficiently to fill the screen with the selected area.
Multi-Tech Systems, Inc. FF200 FaxFinder Fax Server Admin User Guide 97
Page 98

Chapter 6: FaxFinder Client Software Operation
Spot Magnifying Glass. In this viewing mode, a magnifying glass icon (cursor) appears.
It can be used in one of three ways to magnify any portion of the image: (a) Click over Area, (b) Click-andHold Over Area, (c) Scan the Graphic.
Click over Area. A secondary window will appear that shows the ‘clicked-on’ area magnified. You can
adjust the size of the secondary window by dragging on its borders. You can re-locate the secondary
window by putting the cursor inside the window, clicking, holding, and dragging.
Multi-Tech Systems, Inc. FF200 FaxFinder Fax Server Admin User Guide 98
Page 99

Chapter 6: FaxFinder Client Software Operation
Click-and-Hold over Area. Two additional windows will appear. The cursor itself becomes a small
secondary window of fixed size. The same image also appears on a third window. You can adjust the
size of the secondary window by dragging on its borders. You can re-locate the secondary window by
putting the cursor inside the window, clicking and dragging.
Scan the Graphic. If you click, hold, and drag, you can scan the image in a magnified view. Two
magnifying windows will appear as in the “Click-and-Hold Over Area” description above.
Multi-Tech Systems, Inc. FF200 FaxFinder Fax Server Admin User Guide 99
Page 100

Chapter 6: FaxFinder Client Software Operation
Importing Fax Images into Other Application Programs
The Copy command in the Multi-Tech Tiff Viewer allows you to import the fax image into other application
programs. In the illustration below, a fax has been Copied from the Multi-Tech Tiff Viewer and Pasted
into a Microsoft Word document.
Multi-Tech Systems, Inc. FF200 FaxFinder Fax Server Admin User Guide 100
 Loading...