

Page 1
MA30120
Quick Start Guide
Page 2

Quick Start Guide
82001423L Revision D
MultiAccess Model MA30120
All rights reserved. This publication may not be reproduced, in whole or in part, without prior expressed written
permission from Multi-Tech Systems, Inc.
Copyright © 2006, by Multi-Tech Systems, Inc.
Multi-Tech Systems, Inc. makes no representations or warranties with respect to the contents hereof and
Specifically disclaims any implied warranties of merchantability or fitness for any particular purpose.
Furthermore, Multi-Tech Systems, Inc. reserves the right to revise this publication and to make changes from
time to time in the content hereof without obligation of Multi-Tech Systems, Inc. to notify any person or
organization of such revisions or changes.
Record of Revisions
Revision Date Description
A 11/17/03 Manual released.
B 12/06/04 Manual revised to include software version 1.08.
C 07/19/05 Manual updated for Modem Setup configuration. This includes software version 1.12.
D 06/06/06 Manual revised to include software version 1.14.
Patents
This device covered by one or more of the following patents: 6,031,867; 6,012,113; 6,009,082; 5,905,794;
5,864,560; 5,815,567; 5,815,503; 5,812,534; 5,809,068; 5,790,532; 5,764,628; 5,764,627; 5,754,589; 5,724,356;
5,673,268; 5,673,257; 5,644,594; 5,628,030; 5,619,508; 5,617,423; 5,600,649; 5,592,586; 5,577,041; 5,574,725;
5,559,793; 5,546,448; 5,546,395; 5,535,204; 5,500,859; 5,471,470; 5,463,616; 5,453,986; 5,452,289; 5,450,425;
5,355,365; 5,309,562; 5,301,274
Copyrights and Trademarks
Trademarks of Multi-Tech Systems, Inc.: Multi-Tech, the Multi-Tech logo and MultiAccess.
HylaFAX is a trademark of Silicon Graphics Corporation. Windows is a registere d trademark of Microsoft
Corporation in the United States and other countries.
All products or technologies are the trademarks or registered trademarks of their respective holders.
Technical Support
Country By Email By Phone
France: support@multitech.fr +(33) 1-64 61 09 81
India: support@multitechindia.com +91 (124) 2340780
Europe, Asia, Africa: support@multitech.co.uk +(44) 118 959 7774
U.S., Canada, all others: support@multitech.com (800) 972-2439 or +763-717-5863
World Headquarters
Multi-Tech Systems, Inc.
2205 Woodale Drive
Mounds View, Minnesota 55112
(763) 785-3500 or (800) 328-9717
Fax 763-785-9874
Internet Address: http://www.multitech.com
Page 3

Contents
Introduction and Description.................................................................................................. 1
WAN Communications..........................................................................................................................................................1
Management...........................................................................................................................................................................1
Remote Access.......................................................................................................................................................................1
About This Manual ................................................................................................................................................................1
Safety Recommendations for Rack Installations....................................................................................................................2
Ship Kit Contents...................................................................................................................................................................2
Front Panel.............................................................................................................................................................................3
Installation................................................................................................................................ 4
Site Planning..........................................................................................................................................................................4
Hardware Installation.............................................................................................................................................................5
Cabling Procedure - Back Panel ............................................................................................................................................5
Starting Your MultiAccess...................................................................................................... 6
Navigating Through the Screens............................................................................................................................................8
Network Setup .....................................................................................................................................................................10
Line Interfaces .....................................................................................................................................................................11
Modem Setup.......................................................................................................................................................................12
User Authentication .............................................................................................................................................................18
License Agreements..............................................................................................................22
Multi-Tech Systems, Inc. End User License Agreement (EULA).......................................................................................22
GNU GENERAL PUBLIC LICENSE.................................................................................................................................23
Page 4
MultiAccess Quick Start Guide Introduction and Description
Introduction and Description
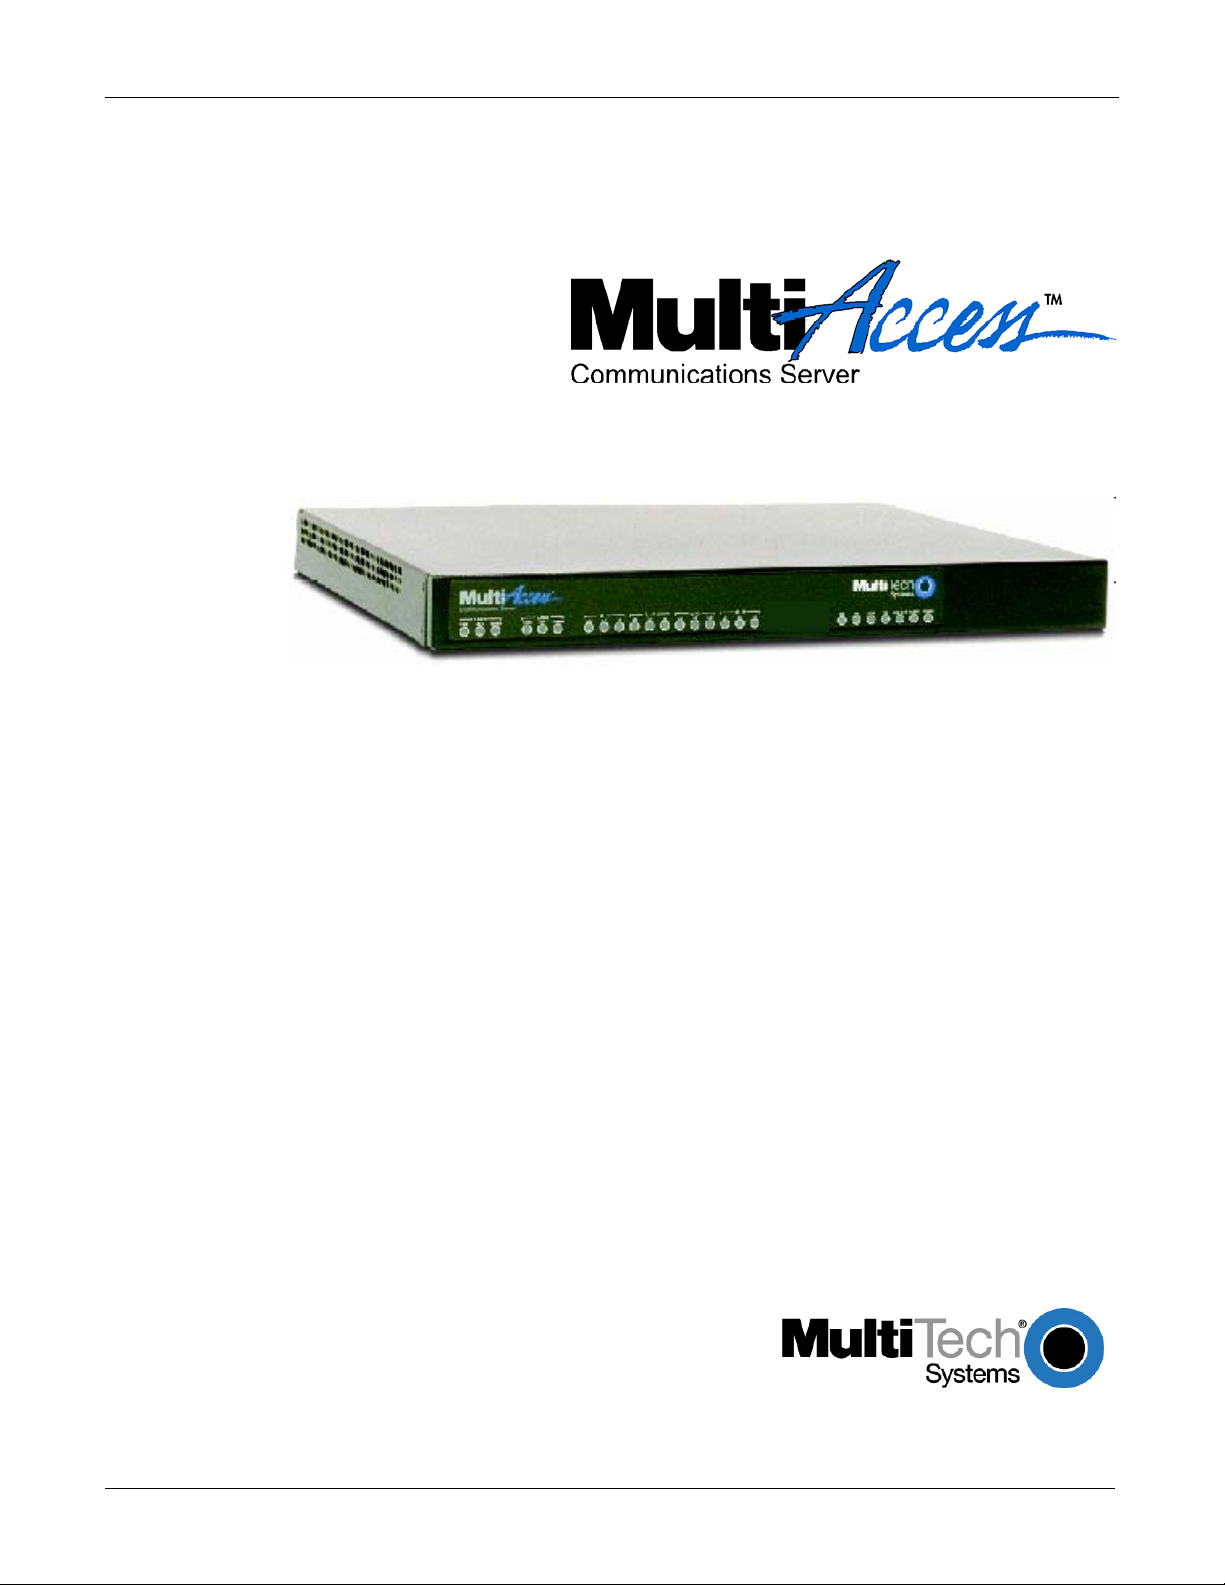
Welcome to Multi-Tech’s new MultiAccess Communications Server, Model MA30120. The MultiAccess
Communications Server is a high-performance digital remote access solution for Enterprise LANs and intranets or
internet service providers. MultiAccess is a V.92 remote access server (RAS) supporting up to four T1 line
interfaces implementing either RBS or PRI signaling for use in North America or up to four E1 line interfaces
implementing PRI signaling for international use. The MultiAccess Communications Server uses a web based
Graphical User Interface (GUI) for configuration, is a 1U (one-up) rackmountable unit that contains up to four
universal modem ports for dial-in communications.
WAN Communications
MultiAccess ships turnkey for T1/RBS or T1/E1 PRI ISDN and is populated with 30 modems on line interface 1 for
the basic configuration. Additional modem modules can be added to support up to four T1/E1 line interface s .
The high-density modems provide V.92/56K dial-up speeds. In addition, they are manageable from remote
locations using platform-independent, industry standard protocols.
Management
MultiAccess includes robust management support allowing a network administrator to secure ly manage the
devices either through a web browser or at the command line. The browser-based option uses the HTTPS
protocol, also know as SSL (Secure Sockets Layer) to provide 128-bit encryption to secure the management
session. The command line interface is accessible via SSH (Secure Shell) and suppo rts SCP (Secure Copy) and
sftp (Secure File Transfer Protocol) to help provide maintenance support.
SNTP Support. MultiAccess includes an industry standard Simple Network Time Protocol (SNTP) client that
enables it to synchronize its clock with a remote time/clock server on the Internet. This feature is useful for
accounting purposes.
Remote Access
Comprehensive Security. MultiAccess provides an industry standard Radius Server and Radius Client for
authentication and authorization of thousands of user profiles using PAP and CHAP. In addition, it uses Network
Address Translation (NAT) to hide internal, non-routable IP addresses. If a Radius Server does not exist, one is
provided as part of the MultiAccess system. This Radius Server could provide authentication and authorization
information for this and other Radius Clients in use at your site.
About This Manual
This Quick Start Guide is intended to provide the experienced system administrator the information needed to
quickly get the MultiAccess up and running. A User Guide with more detailed information is provided on the
MultiAccess system CD in Acrobat (pdf) format.
Multi-Tech Systems, Inc. PN 82001423L 1
Page 5

Introduction and Description MultiAccess Quick Start Guide
Safety Warnings
1. Use this product only with UL- and CUL-listed computers.
2. To reduce the risk of fire, use only 26 AWG or larger telephone wiring.
3. Never install telephone wiring during a lightning storm.
4. Never install a telephone jack in a wet location unless the jack is specifically de signed for wet locations.
5. Never touch uninsulated telephone wires or terminals unless the teleph one line has been disconnected at
the network interface.
6. Use caution when installing or modifying telephone lines.
7. Avoid using a telephone (other than a cordless type) during a n electrical storm; there is a risk of electrical
shock from lightning.
8. Do not use a telephone in the vicinity of a gas leak.
Caution: Danger of explosion if battery is incorrectly replaced. A lithium battery on the MultiAccess PC board
provides backup power for the time-keeping capability. The battery has an estimated life expectancy of ten years.
Contact Multi-Tech if you suspect a failed battery. If data and time are incorrect after having the unit powered off,
it may be due to a weak battery or incorrect setup.
Caution: The Ethernet ports are not designed to be connected to a Public Telecommunication Network.
Safety Recommendations for Rack Installations
• Ensure proper installation of the MultiAccess in a closed or multi-unit enclosure by following the
recommended installation as defined by the enclosure manufacturer. Do not place the MultiAccess
directly on top of other equipment or place other equipment directly on top of the MultiAccess.
• If installing the MultiAccess in a closed or multi-unit enclosure, ensure adequate airflow within the rack so
that the maximum recommended ambient temperature is not exceeded.
• Ensure that the MultiAccess is properly connected to earth ground via a grounded power cord. If a power
strip is used, ensure that the power strip provides adequate grounding of the attached apparat us.
• Ensure that the mains supply circuit is capable of handling the load of the MultiAccess. Refer to the power
label on the equipment for load requirements.
• Maximum ambient temperature for the MultiAccess is 40 degrees Celsius (104° F).
• This equipment should only be installed by properly qualified service personnel.
• Only connect like circuits. In other words, connect SELV (Secondary Extra Low Voltage) circuits to SELV
circuits and TN (Telecommunications Network) circuits to TN circuits.
Ship Kit Contents
The MultiAccess is shipped with the following:
• 1 MultiAccess
• 4 Power Cords (US,Euro, Austel, & UK)
• 1 Document CD
• 1 Recovery Image CD
• 1 printed Quick Start Guide manual
• 2 Rack Mounting Brackets and four mounting screws
If any of these items are missing, contact Multi-Tech Systems or your dealer or distributor. Inspect the contents
for signs of any shipping damage. If damage is observed, do not power up the MultiAccess; contact Multi-Tech’s
Tech Support
2 Multi-Tech Systems, Inc. PN 82001423L
for advice.
Page 6
MultiAccess Quick Start Guide Introduction and Description
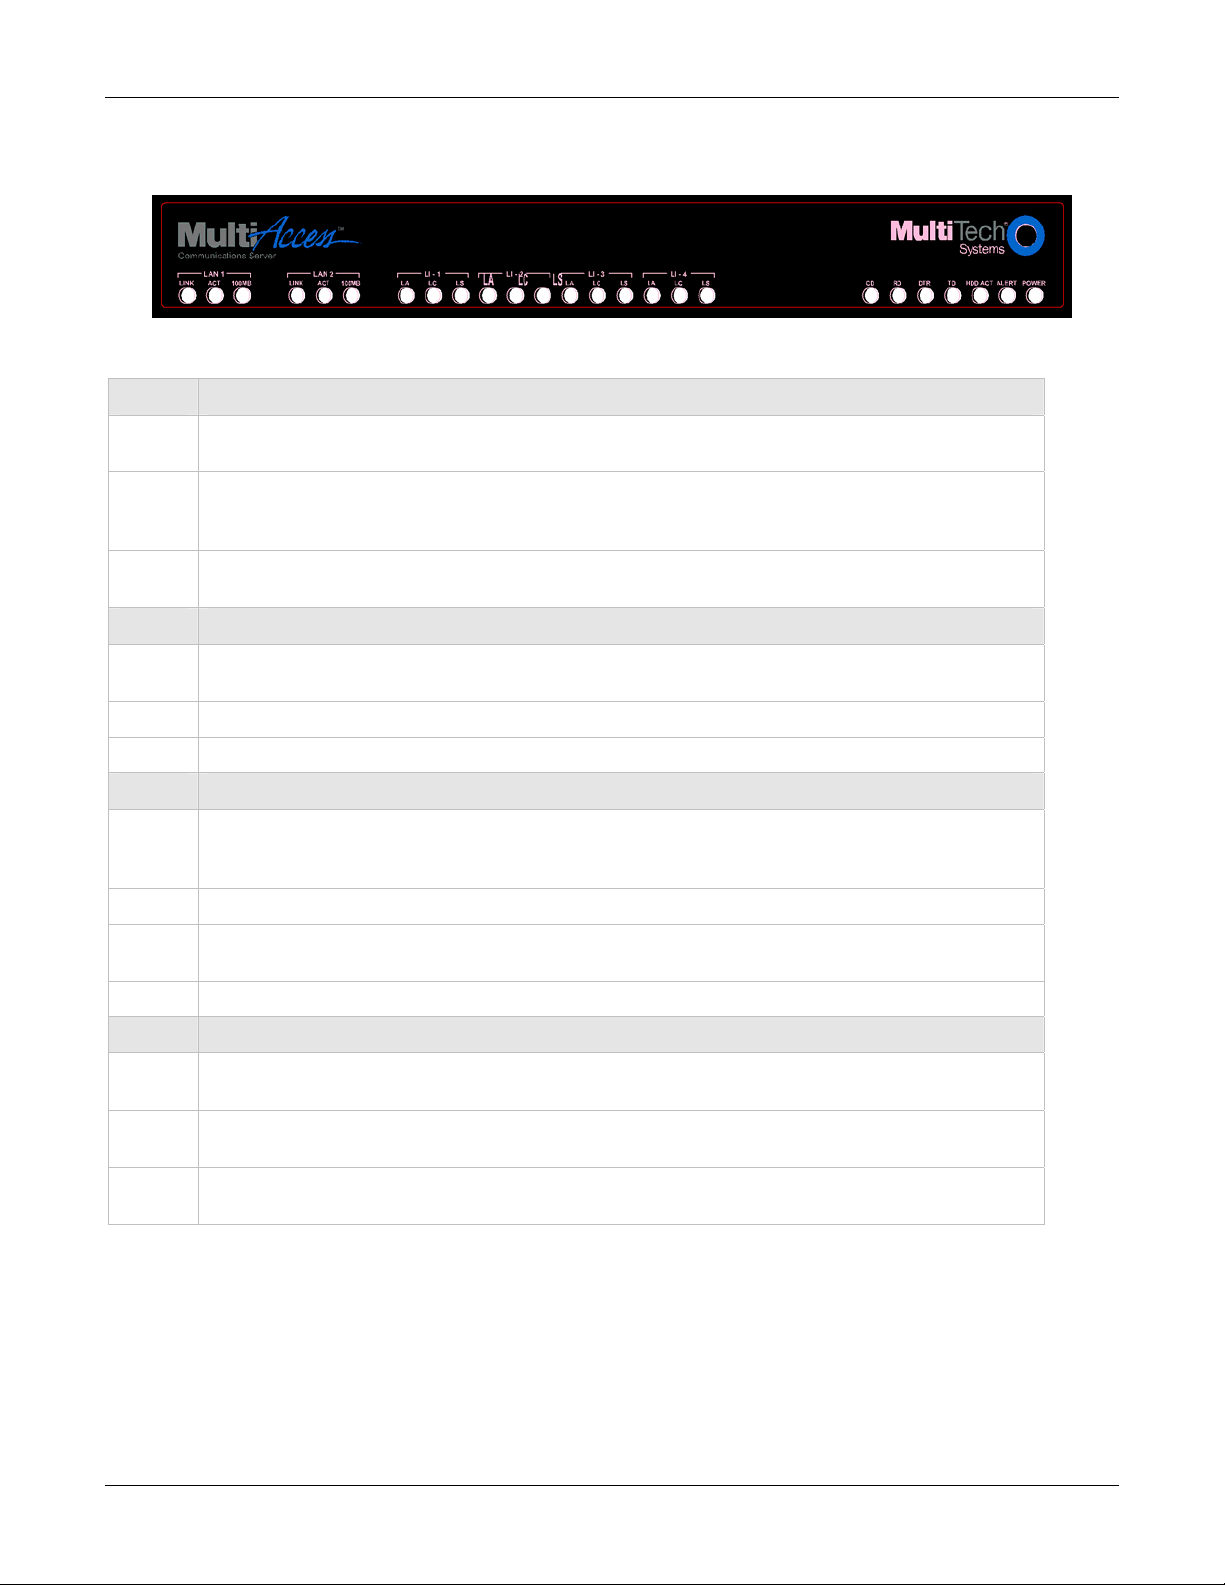
Front Panel
The MultiAccess has 16 front panel LEDs to provide operating status.
Front Panel LED Descriptions
LED Description of LAN 1 & 2 LEDs
LINK
ACT
100MB
The LINK LED indicates link integrity for the LAN Ethernet port. If the Ethernet link is valid at
either 10 Mbps or 100 Mbps, the LINK LED is lit. If the Ethernet link is invalid, the LINK LED is off.
The ACT (Activity) LED indicates either transmit or receive activity on the LAN Ethernet port.
When activity is present on the LAN Ethernet port, the ACT LED is lit. When no activity is present
on the LAN Ethernet port, the ACT LED is off.
The 100MB LED indicates the speed of the LAN Ethernet port. The 100MB LED is lit if the LAN
Ethernet port is linked at 100 Mbps. The 100 MB LED is off at 10 Mbps.
LED Description of LIne LI-1 thru LI-4 LEDs
LA
LC
LS
The LA (Link Active) indicates layer 1 is up. LA blinks when Los of Frame Alignment (LFA) but not
Loss of Signal (LOS).
The LC indicates a red alarm.
The LS indicates a yellow alarm.
LED Description of Support Modem LEDs
CD
RD
DTR
TD
The CD (Carrier Detect) LED lights when the modem detects a valid carrier signal from another
modem. It is on when the modem is communicating with the other modem. It is off when the link is
broken.
The RD (Read Data) LED flashes when the modem is receiving data from another modem.
The DTR (Data Terminal Ready) LED lights when the operating system detects and initializes the
modem.
The TD (Transmit Data) LED flashes when the modem is transmitting data to another modem.
LED Description of System LEDs
HDD
ACT
ALERT
POWER
The HDD ACT (Hard Disk Drive Activity) LED lights when the MultiAccess hard disk drive is
accessed.
The ALERT LED lights and the system beeps when memory DIMM is bad, missing, or if other
rudimentary hardware failure.
The POWER LED is off when the MultiAccess is in a reset state. When the POWER LED is lit, the
MultiAccess is not in a reset state.
Note: The Back Panel is described in the Cabling section.
Multi-Tech Systems, Inc. PN 82001423L 3
Page 7

Installation MultiAccess Quick Start Guide
Installation
Site Planning
With proper planning, your MultiAccess system can be installed quickly and in a short time. To implement the
suggested planning process, you must:
1. Plan for physical space, environmental, electronic and electrical needs. Identify physical installation site. The
environment should be properly ventilated with controlled temperature and humidity.
• Good AC power source with proper Earth Ground.
• EIA 19” rack, MultiComTower, or standalone installation.
• Determine where the termination point is for each T1, PRI, or E1 line.
• Determine physical access point to the Ethernet network.
• Identify high quality category 5 cable for Ethernet & T1 cabling. Depending on environment characteristics,
shielded T1 cable may be necessary.
• For initial setup and administrative purposes, a network workstation with a WEB browser supporting HTTPS will
be needed.
2. Define your users’ client computer needs
• Determine the number of dial in analog modem users
• Identify client workstation OS (PC running Windows®98/XP/2000, or MAC OS10)
• Identify client modem types (V.34, V.90, V.92)
• Identify dial up security protocol (CHAP & PAP)
• Third-Party Security Devices (SecurID)
• Identify the Security Database (i.e. user file in RADIUS server or Microsoft SAM\Active directory with IAS) and
make sure users have dial in rights with framed protocol PPP attribute
3. Identify applicable network resources (IP address of; gateway/default route, DNS, WINS, RADIUS server(s), etc)
• Identify the network MASK
• Identify available IP addresses (determine the static IP address that is to be assigned to the Multi Access)
• Determine IP assignment method (predefined pool/range) to be implemented by the MultiAccess (regarding the
IP addresses to be assigned to the remote dial in users).
• When Implementing RADIUS Authentication and Accounting, identify the UDP ports used by the RADIUS
server(s)
4. Define your line interfaces
• Obtain T1 or E1 PRI line provisioning information for your LEC
• Identify the telephone number(s) of the line or lines
• Identify the Framing Format
• Identify the Line Coding
• Identify the type of signaling (RBS or PRI for T1 or E1 PRI)
• For RBS, the signaling type can be referred to as the start method and/or the FXS signaling method (i.e.
Immediate, Wink, Ground, and Loop)
• For PRI signaling identify the type of central office switch\protocol, i.e. AT&T5ESS, DMS100/250, National
ISDN2
• Identify the Line Build-Out (LBO) i.e. what db level is presented on premise by the provider and what db level
should the premise equipment transmit at.
Note: For E1 lines the signaling type must be PRI. R2 signaling methods are not supported.
4 Multi-Tech Systems, Inc. PN 82001423L
Page 8
MultiAccess Quick Start Guide Installation
Hardware Installation
The MultiAccess is designed to install either on a desktop or in a standard EIA 19“ rack, and is shipped with the
mounting hardware to install the MultiAccess in the rack. If installing in a rack, use the provided mounting hardware
and follow the rack enclosure manufacturer’s instructions to safely and securely mount the MultiAccess in the rack
enclosure. Proceed to the cabling procedure.
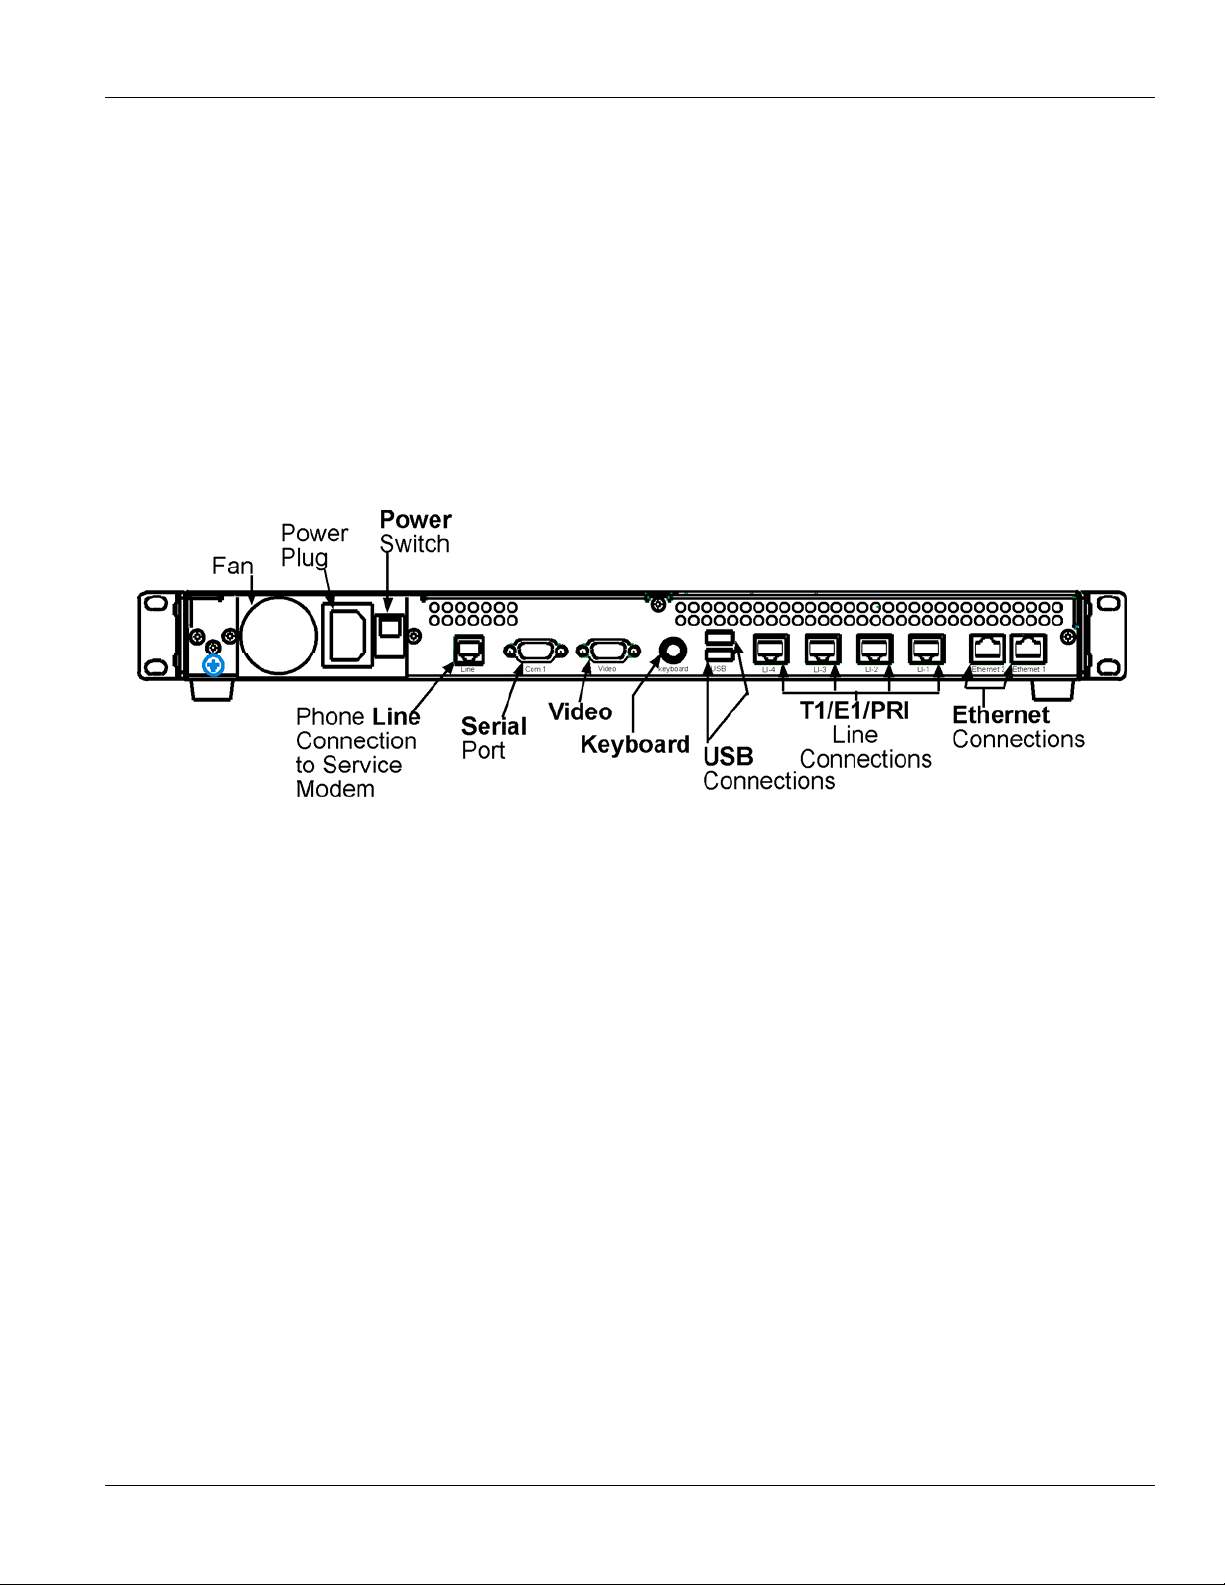
Cabling Procedure - Back Panel
Cabling your MultiAccess involves making the proper power, phone, and line (T1/E1/PRI) connections as described
and illustrated below.
The MultiAccess back panel has a fan, a power plug, POWER Switch (| / O), a RJ-11 phone LINE jack, a DB-9 COM1
jack, a DB-15 High-density DSUB (VIDEO) jack, two USB (Revision 1.1 compliant) jacks, four RJ-45 T1/E1/PRI line
jacks, and two Ethernet RJ-45 (Ethernet 1 & Ehternet 2) jacks.
1. Using an RJ-45 cable, connect one end to LI-1 (Line 1 Interface) on the back of the MultiAccess and the other
end to your first T1/E1/PRI line connection. If a second, third, or fourth line connection is required, connect an RJ45 cable for each of the line connections being used.
2. Connect a workstation to your local network, connect one end of an RJ-45 cable to the Ehternet 1 jack on the
back of the MultiAccess and the other end to the hub on your local network.
3. For advanced users, the Video and Keyboard connections are for manual intervention of the Operating System.
The default root level login password is linux (lower case) and the command to change the root level password is
“passwd”. The recommended mimumum password length is 8-characters. However, the MultiAccess will accept
less than 8-characters.
The Linux command to properly shut down the MultiAccess is shutdown -h now. The command to restart is
shutdown -r now.
4. With the MultiAccess Power switch in the off (Ο) position and using the supplied power cord, connect the
MultiAccess power plug to a live power outlet.
5. Place the MultiAccess Power switch to the on (|) position to turn on the MultiAccess
Caution:
process.
shut down before switching off Power, the next start may take a little longer, or in the worst case, data could be lost.
6. Proceed to Starting the MultiAccess.
Never switch off MultiAccess Power until after you have performed the Shutdown
Refer to Administration > System Tools in Chapter 3 of the User Guide. If the MultiAccess is not properly
Multi-Tech Systems, Inc. PN 82001423L 5
Page 9
Connecting & Starting the MultiAccess MultiAccess Quick Start Guide
Starting Your MultiAccess
This section of the Quick Start Guide covers the steps for connecting a workstation to the MultiAccess, starting up
the MultiAccess, opening the MultiAccess Communications Server Web Management program, performing the
time zone setup, and using the menu bar to navigate through the Web Management software screens.
1. Set the workstation IP address to 192.168.2.x subnet other than 192.168.2.1 which is the IP address of
Ethernet 1 (eth0) and 192.168.2.5 which is already assigned to Ethernet 2 (eht1).
2. Turn on power to the MultiAccess. When you hear 5 beeps, approximatel y 2 mi nutes after applying
power, continue with the next step.
Note: Depending on the version of MultiAccess (and other variables, like the previous shutdo wn and the
number of expansion modules) the duration needed to boot may vary. It may be helpful to connect an
external monitor and keyboard to determine the current status of the system. Five seconds after turning
on power, one beep is heard, indicating a successful POST of the mother board, next the BIOS detects
the hard drive from which the Linux operating system and appropriate drivers are loaded.
3. Bring up a Web browser on the workstation. At the browser’s address line, enter https://192.168.2.1 and
press the Enter key.
Important: Be sure to type https (http will not work).
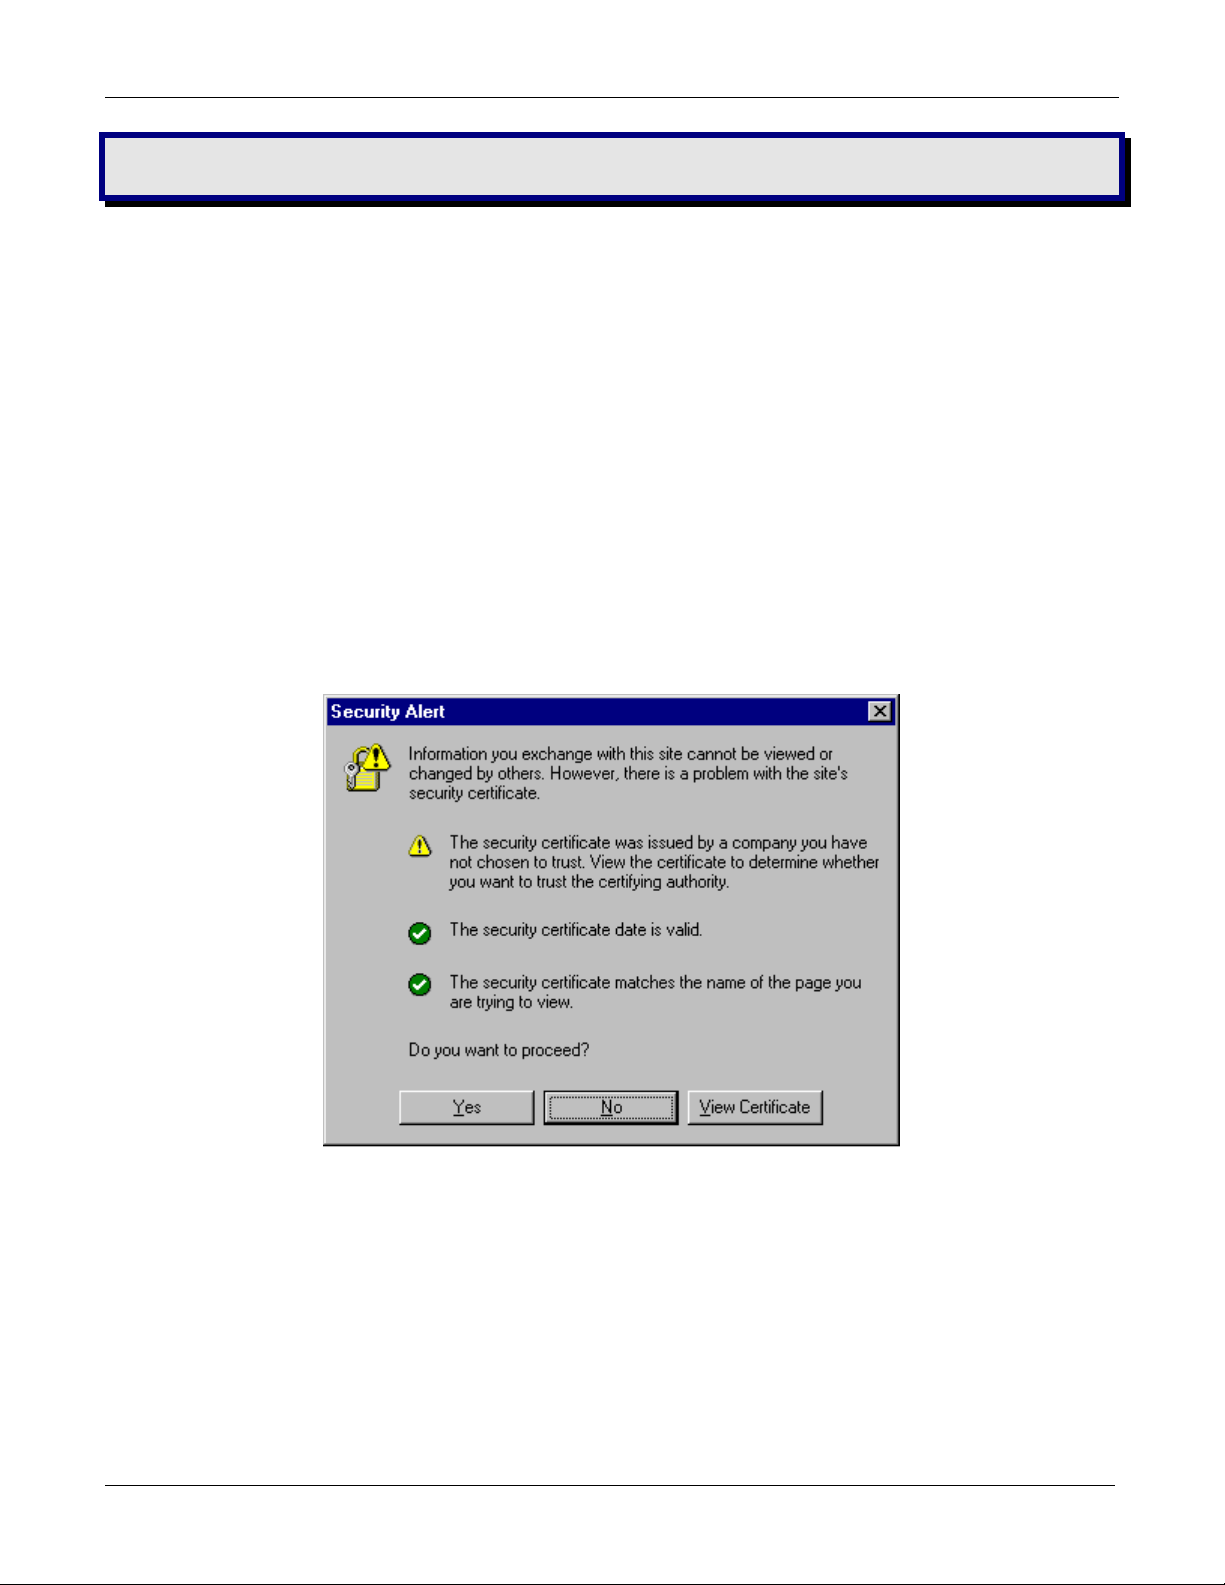
4. In some environments, one or more Security Alert screen(s) may display. At the initial Security Alert
screen, click Yes and follow any additional on-screen prompts.
Login
1. The Login screen is displayed.
• Type the default User name: admin (all lower-case)
• Tab to the Password entry and type the default password: admin (all lower-case).
• Click the Login button.
Note: The User name and Password entries are case-sensitive (both must be all lower-case) and can
be up to 12 characters each. Later, you will want to change the password from the default (admin) to
something else. (If Windows displays the AutoComplete screen, for security reasons, you may want to
click No to tell Windows OS to not remember the password.)
6 Multi-Tech Systems, Inc. PN 82001423L
Page 10

MultiAccess Quick Start Guide Connecting & Starting the MultiAccess
Changing the Password: You should change the default User and Password en tries. This can be
accomplished in the WEB Admin screen of the Administration menu.
Caution: Use a safe password! Your first name spelled backwards is not a sufficiently safe password; a
password such as xfT35$4 is better.
2. If someone else is already logged onto the MultiAccess or you were logged in recently, the following
message displays.
At the prompt Do you want to log the user out? Click Yes.
If you click No, you are returned to the Login screen.
3. The MultiAccess™ Communications Server Web Management Home screen is displayed.
Multi-Tech Systems, Inc. PN 82001423L 7
Page 11

Connecting & Starting the MultiAccess MultiAccess Quick Start Guide
d
d
r
r
r
Navigating Through the Screens
When you click one of the MultiAccess Menu Bar buttons, the first screen for that function displays. Once the first
screen opens, you can navigate to other screens within this function; they are listed on the left side of the screen.
Home: The main screen.
Administration: System setup such as Time & Date, Web management, and certificate. Provides for system
shutdown and restart, plus other administrative tools such as PING, Traceroute, and TCP Connect.
Networks & Services: Define networks, services, and groups to make them available to be used by other
functions such as allowed networks, and packet filters.
Network Setup: Set up the LAN 1, and LAN 2 Ethernet ports, etc.
DHCP Server: Configure the DHCP server settings.
System Update: Update services can be downloaded from the update server to keep your system continually
updated.
Logout: Logout and return to the login screen
Tracking: Set up tracking of all packets through the network ports.
Packet Filters: Define filter rules and ICMP rules.
User Authentication: Defines security protocol methods, passwords, and user database details.
Modem Setup: Defines the primary role of the modem; RAS, fax, or network modem pool.
Statistics & Logs: View and download all the statistics and log files maintained by your system.
Line Interfaces: Defines setup information of your PSTN lines.
Help: (Online Help) Describes what to do on each screen.
Options Under Each Menu
Home Administration Networks &
Services
Return to the
Main Menu
Tracking Packet Filters
Accounting Packet Filter Rules
System Setup
SSH
SNTP Client
Web Admin
Site Certificate
Database Setup
Backup Setup
Available Backups
Intrusion Detection
Network Tools
System Tools
Add User Define
Filters
ICMP
Networks
Services
Network Groups
Service Groups
User
Authentication
Local Users
Radius Client
Radius Serve
Network
Setup
Interface
Routes
Masquerading
SNAT
DNAT
Modem
Setup
Modem Setup
Modem Usage
Fax Setup
DHCP Server System Update Logout
Subnet Settings
Fixed Addresses
Statistics &
Logs
Setup
Uptime
Networks
Line Interfaces Status
Modem Connections
Server Connections
Interface
Accounting
Self Monito
View Logs
Available
Applie
Setup
Line
Interfaces
Line 1 Setup
Line 2 Setup
Line 3 Setup
Line 4 Setup
Exit the
Program
Help
Administration
Networks &
Services
Network Setup
DHCP Serve
System Update
Tracking
Packet Filters
User
Authentication
Modem Setup
Statistics & Logs
Line Interfaces
8 Multi-Tech Systems, Inc. PN 82001423L
Page 12

MultiAccess Quick Start Guide Connecting & Starting the MultiAccess
Setup Your Time Zone
1. Click Administration on the menu bar. The System Setup screen displays.
Set the System Time by selecting your Time Zone, the current Day, Month, Year, Hour, and Minute.
Administration
System Setup
System Time
Multi-Tech Systems, Inc. PN 82001423L 9
Page 13

Connecting & Starting the MultiAccess MultiAccess Quick Start Guide
Network Setup
In the Network Setup > Interface you can define a host name for your MultiAccess, change the Ethernet 1 (eth0)
to your local IP and subnet mask for your local network, and change the IP address of the default Gateway to
your local gateway address.
1. Enter the Host name you have established for your local MultiAccess. Click Save.
2. Enter in the External Name server window the IP address of your domain name server (DNS).
3. Click the Add button to connect to your name server.
4. Change the default IP Address for the Network Card 1 to the IP address of your local network and change
the default Subnet Mask for the Network Card 1 to the subnet mask for your local network. Cl ick Save.
5. Change your web browser address to the new address of your local network.
6. Change the Default Gateway IP address to the IP address of your gateway. Click Save.
The options for Network Card 2 are not shown in the above screen due to space limitations. The options
Note:
are the same as for Network Card 1.
10 Multi-Tech Systems, Inc. PN 82001423L
Page 14

MultiAccess Quick Start Guide Connecting & Starting the MultiAccess
Line Interfaces
To establish your line interfaces for the four LI1 through LI4 interfaces, click on Line Interfaces. The Current
Setup section reflects the current operating parameters of the indicated Line Interface.
1. Click on the Line Type down arrow and select your type of line interface; T1 RBS or T1 PRI for North
America or E1 PRI for the rest of the world, then wait for the screen to refresh.
2. Use the various pull down menus to match the parameters of the Line Interface with the line provisioning
information from your Telco.
Note: A common provisioning issue is the type of framing format which the telco usually refers to as ESF. But
the MultiAccess gives you a choice of ESF or ESF with error correction. Multi-Tech recommends that you
choose ESF with error correction.
3. Click Save and the Send button becomes active.
4. Click the Send button to cause the new parameters to become active. You must wait 45 seconds for the
screen to refresh and the new configuration to apply, then Current Setup section is updated.
Multi-Tech Systems, Inc. PN 82001423L 11
Page 15

Connecting & Starting the MultiAccess MultiAccess Quick Start Guide
Modem Setup
The Modem Setup group of menus configure the modems for usage with RAS, modem sharing, and faxing. The
default usage for each modem is RAS. The Modem Setup menu controls the parameters of the modems set to
RAS. If the MultiAccess modems are to be used for dialout, in a networking modem sharing environment, then
use the Modem Usage menu to change the usage to Modem Sharing. If the MultiAccess modems are to be used
for faxing with the integrated Hylafax™ Server, then use the Modem Usage menu to change the usa ge to Fax.
The Fax Setup menu is used to configure the Hylafax Server for sending and receivin g faxes.
Note: The MultiAccess modems also support faxing with fax servers that are external to the MultiAccess via the
Modem Sharing usage.
Modem Usage
If you are using all your MultiAccess modems to provide dial-in PPP access, you do not have to modify th e default
Modem Usage settings. The default usage is RAS. If you plan to use all or part of your MultiAccess modems for
dial-out, you will have to change the Modem usage settings for the selected modems to one of the Modem
Sharing options that best fit your needs. If you plan to use some or all your modems for faxing, you will have to
change the Modem Usage setting for the selected modems to Fax.
1. If you are using your MultiAccess in an RAS inbound PPP environment, you do not have to make any
changes in the Modem Usage menu.
Note: When implementing a combination of usage options, care must be given so that inbound calls do not
conflict with outbound calls. This may require changing the hunt group call distribution at the central office and
should be addressed with the provider of your T1/E1 digital line.
Caution: Modem sharing is accomplished by implementing a Telnet interface to the MultiAccess modems. Make
sure that care is taken to secure access to these ports via firewall or IP filter settings to prevent unauthorized use
of your modem resources.
12 Multi-Tech Systems, Inc. PN 82001423L
Page 16

MultiAccess Quick Start Guide Connecting & Starting the MultiAccess
If you are using your MultiAccess as a network modem pool, you will need to set up the Modem Usage menu to
support your configuration.
1. Click on the Usage drop down arrow and chose the Modem Sharing – authentication type that suits your
applicational needs.
2. Click on the Modem drop up or down arrow and select the tty modem(s) for modem sharing. You can choose
multiple modems by holding down the shift key.
3. When the Modem Usage is set to Modem Sharing, the following options become available:
Display Called Number - This parameter applies to inbound (received) calls when the Line Interface type is
PRI. The telephone number (or final digits) dialed by the originator will be displayed into the telnet socket
following the first “ring” message. The Called Number information (string of digits) is provided by the central
office switch and is commonly referred to as DNIS. The MA30120 does not support DNIS when the Line
Interface type is T1-RBS.
Reverse Dial - This parameter enables two features, comma dialing and reverse dial mode. When enabled,
the dial string can include the use of commas, used to create a pause between digits of the dial string (most
commonly used to specify the extension of the answering modem).
Example: “atdt18003334444,,,,,4321”. Each comma creates a 2 second pause. 4321 is the extension of the
desitination phone line\modem.
Reverse dial mode is where the dial string includes the letter “r” at the very end of the dial string, the purpose
of which is to instruct the MA30120 modem to switch from originate to answer mode after dialing. For
example: “atdt17637175549r”.
Please Note: When Reverse Dial is enabled, the dial string must include the tone (t) command, for example,
atdtstring .
Multi-Tech Systems, Inc. PN 82001423L 13
Page 17

Connecting & Starting the MultiAccess MultiAccess Quick Start Guide
Raw Mode - If Yes, this sets the TCP port to a RAW socket. User data is treated “as is” and the Telnet
Command Escape capability is disabled. If No, this allows the Telnet command parser to look for escape
sequences that are used to communicate control functions. A common example is to support RFC-2217 Com
Port Control.
Pool - If you want to access a specific modem, accept the default of No. Each modem will be given a specific
TCP port number, starting at 7000+. If you select pool = Yes, then all selected modems are accessed via port
number 6000 – creating a first available pool, starting with the lowest numbered tty port.
SSL - Support is made available when the usage is Modem Sharing with Authentication. This is only used
with SSL capable Telnet Clients. Site Certificate information needs to be configured appropriately. Contact
Multi-Tech Tech Support for additional information.
Idle Timer (seconds) - The Idle Timer, upon expiring, will hangup the modem and close the telnet socket.
Idle time is defined as no data flow in both directions. Any data sent or received across the socket will cause
the Idle Timer to start over. When there has been no data activity for the duration specified, the idle timer will
expire.
Monitor CD - Upon the modem disconnecting, the MultiAccess will close the telnet socket to the host
application server.
4. Click on the Save button.
If you are using your MultiAccess as a network fax server, you need to set up the Modem Usage menu to support
your configuration.
1. Click on the Usage drop down arrow and select Fax.
2. Click on the Modem up or down arrow and select the tty modem(s) for faxing. You can choose multiple
modems by holding down the shift key.
3. Click on the Save button.
14 Multi-Tech Systems, Inc. PN 82001423L
Page 18

MultiAccess Quick Start Guide Connecting & Starting the MultiAccess
Modem Setup
The Modem Setup screen only applies when the Modem Usage is set for RAS (Dial-in PPP). RAS usage is
defined in the Modem Usage Setup field of the Modem Usage screen.
1. Verify that the V.92 Setup parameters conform to your client’s characteristics.
2. Multi-Tech recommends that you set Retrain Limit to 4 and due to compatibility issues seen with various
modems, you may wish to disable Quick Connect and V.8bis.
3. If additonal modem commands are required, refer to Appendix B, Advanced Commands in the User Guide.
Multi-Tech Systems, Inc. PN 82001423L 15
Page 19

Connecting & Starting the MultiAccess MultiAccess Quick Start Guide
Fax Setup
Fax setup is initiated when you allocate modem(s) to the integrated Hylafax™ Fax Server. This is achieved by
setting the selected modem’s usage to Fax. The Fax Setup screen is used to configure the integrated Hlyfax
Server for sending and receiving faxes.
The sending of outbound faxes via the Hylafax Server requires the use of a Hylafax compatible Fax Client
software, e.g., Multi-Tech’s FaxFinder Client. The General Fax Setup group is used to add Fax Clients to the
Hylafax server.
The Fax Client must be installed on each workstation that you wish to send faxes from. The Fax Client must use
the credentials defined in the General Fax Setup group to submit faxes for sending. The Fax Client is not used for
receiving faxes.
Inbound faxes received from the T1/E1 digital line are converted to tiff files and then emailed from the Hylafax
server to the specified recepient. The Fax Delivery Setup group is used to configure the routing of inbound faxes.
16 Multi-Tech Systems, Inc. PN 82001423L
Page 20

MultiAccess Quick Start Guide Connecting & Starting the MultiAccess
Outbound Fax Client Data Base
The outbound fax client data base is generated in the General Fax Setup group. The current outbound fax client
data base is shown in the table at the bottom of the General Fax Setup group. The credentials defined here are to
be used by the fax client. The fax client uses these credentials when accessing the Hylafax server.
1. To establish a fax client data base, enter each user name and password in their respective windows and
click the Add button for each entry.
Note: All fax clients can use the same set of credentials, or a unique set for each client can be added.
Fax Modem Settings
These settings are used to define the fax station identity and other administrative variables. The default settings
are normally sufficient with the exception of the “Rings Before Answer” parameter. When the Called Number
feature is used, the Rings Before Answer must be set to 2 for all the ports. Each Fax Modem is to be configured
with a unique Local Identifier, which is used as the TSI (Transmit Station Identifier) when sending faxes and is
included in the body of the email when receiving faxes. You can limit the maximum number of pages being
received.
Inbound Fax Data Base
The Fax Delivery Setup group is used to configure the routing of inbound faxes. The current fax routing table is
shown at the bottom of this group. Who the fax should be delivered to (routed to) is determined by one of two
routing methods:
A) “Route by Device” (what tty port the fax was received on),
B) Route by Called Number” (number dialed by the remote sender).
Route by Device is a static delivery method, where all faxes that are received on that particular port will be sent
to the email address defined for that port.
1. To deliver the fax based on the port (device) it was received on, select the radio button “Route by Device” and
then highlight the ttyMXxx port(s) from the corresponding window in the Fax Delivery Setup group,
2. Enter the email address of the fax recipient in the Email window and then click add.
Route by Called Number is a dynamic delivery method that requires the use of a PRI line (T1-PRI or E1-PRI line
type). Route entries are to match the DNIS information (provided by Telco per call) to an email address. The
Telco switch will (via PRI signaling) provide DNIS digits to the MultiAccess at the time of ringing (call setup). How
many digits will Telco be providing? The remote originator of the fax may dial 11 digits (1-800-333-4444) but
Telco may only provide the last x number of digits (where x is commonly = 4). DNIS digits provided by Telco is a
variable to be determined at the time of ordering and installing the PRI service. If no Called Number route entries
can be matched to the DNIS provided for that call - the default route entry will be used.
1. To deliver the fax based on the number dialed, select the radio button “Route by Called Number”.
2. Enter the email address of the fax recipient in the Email window.
3. Enter the DNIS string matching the number dialed and then click add.
The entry should be added to the route table found at the bottom of the screen.
Multi-Tech Systems, Inc. PN 82001423L 17
Page 21

Connecting & Starting the MultiAccess MultiAccess Quick Start Guide
User Authentication
To determine User Authentication you must define how the Radius Client is going to be used, that is, are you
using an external Radius Server on your network or are you going to use the Radius Server in the MultiAccess.
The Radius Client can point to either an external Radius Server or the Radius Server within the MultiAccess.
Note: When using the internal Radius Server, you must use the IP address of network card 1 (eth0).
Radius Client
1. Choose User Authentication >Radius Client.
2. Click on Line Interface and select the Line number you selected up in the Line Interface screen.
3. You can choose an Authentication Type, but Multi-Tech recommends leaving the Authentication Type at the
default radius.
4. We recommend that you leave Allow Local Logins set to the default of no.
18 Multi-Tech Systems, Inc. PN 82001423L
Page 22

MultiAccess Quick Start Guide Connecting & Starting the MultiAccess
Catuion: If you change this to yes and put a “!” before the login name, you could be setting up a potential
security risk. You can use this in an emergency situation if your radius server goes down.
5. Enter the IP address of your main Radius server in RADIUS Server Address 1 window.
Note: When using the internal Radius Server, both server and client must use d the IP address network card 1
(eht0).
6. Enter the UDP port number used by your main Radius server in the first Port window.
7. Enter the IP address of your main Radius Accounting host in the RADIUS Accounting Address 1 window.
8. Enter the UDP port number used by your main Radius Accounting host in the second Port window.
9. If you have a second (backup) Radius server, enter the IP address for the backup Radius server in the
RADIUS Server Address 2 window. Follow that by enterring the port number of the backup Radius server in
the third Port window. Then enter the backup Radius Accounting host in the RADIUS Accounting Address 2
window followed by the port number for the backup host in the fourth Port window.
10. Enter the Shared Secret for the Radius Server in the RADIUS Shared Secret window.
11. In the Remote Host Address window, set this field to the starting IP address of your IP address pool
(addresses that are to be assigned to the dial in users). The IP address needs to have a + (plus symbol) after
the number (e.g., 192.168.1.150+). The plus symbol instructs “Portslave” to create an address pool starting
with the address you enterred. Portslave determines the “ending” address number by addi ng up all the Line
Interface selections that have their “Port Selection” set to “All”. If the MultiAccess server has multiple line
interface modules and all ports are to use an address pool, set this field to the same address
(192.168.1.150+) for each line interface.
12. Enter the IP address of your primary name server in the DNS Server Address 1. This establishes the name
server for remote access users. If you have a backup DNS server, enter the IP address of your backup DNS
Server in the DNS Server Address 2 window.
13. Click the Save button when you are finished.
14. Repeat the above procedure for each line interface.
Multi-Tech Systems, Inc. PN 82001423L 19
Page 23

Connecting & Starting the MultiAccess MultiAccess Quick Start Guide
Radius Server > General Setup
If you are going to use the Radius Server that comes with your MultiAccess, then you need to tell the Radius
Server who the Radius Clients are. You need one entry for each Network Access Server (NAS) in your network.
Note: When using the internal Radius Server, you must use the IP address of network card 1 (eth0).
1. You can enable the Radius Server by clicking on the Enabled window and then clicking on the Save button
activates the server.
2. Enter the IP address of network card 1 (eht0) in the Client window. This IP address tells the Radius Server
where the Radius Client is located.
3. Enter the same Radius Server Secret used in the Radius Client screen into the Shared Secret window. The
Shared Secret in the Radius Server and the Radius Server Secret in the Radius Client have to be the same in
order for the two to communicate.
4. You can enter an arbitrary name, unique name for each NAS in the Short Name window.
5. Select the manufacture of radius client/NAS that is being used in your system from the Type drop down
arrow. For example, multitech, livingston, or etc.
6. The three optional items are to restrict simultaneous logins.
7. Click Add when you are finished.
20 Multi-Tech Systems, Inc. PN 82001423L
Page 24

MultiAccess Quick Start Guide Connecting & Starting the MultiAccess
Radius Server > User Setup
The User Setup screen establishes who the remote access user is. A user name and password has to be
enterred for each remote user that is dialing in to the MultiAccess. The User name and password of the remote
user is all that is needed initially. If you check or enable Service Type through IP Address windows you will over
ride the Default User Setup.
1. Enter the remote user’s name in the Username window.
2. Enter the password of the remote user in the Password window.
3. The Authentication Type should remain at the default setting.
4. Click the Add button when you are finished.
Multi-Tech Systems, Inc. PN 82001423L 21
Page 25

License Agreements MultiAccess Quick Start Guide
License Agreements
This section provides the Multi-Tech Systems, Inc. End User License Agreement (EULA) as well as other applicable
Licensing Agreements.
Multi-Tech Systems, Inc. End User License Agreement (EULA)
IMPORTANT - READ BEFORE OPENING THE SOFTWARE PACKAGE
This is a basic multi-user software license granted by Multi-Tech Systems, Inc., a Minnesota corporation, with its mailing
address at 2205 Woodale Drive, Mounds View, MN 55112.
This is a legal agreement between you (either an individual or a single entity) and Multi-Tech Systems, Inc. for the Multi-Tech
software product enclosed, which includes computer software and may include associated media, printed materials, and
"online" or electronic documentation ("SOFTWARE PRODUCT"). The SOFTWARE PRODUCT also includes any updates
and supplements to the original SOFTWARE PRODUCT provided to you by Multi-Tech.
Any software provided along with the SOFTWARE PRODUCT that is associated with a separate end-user license
agreement is licensed to you under the terms of that license agreement. By installing, copying, downloading, accessing, or
otherwise using the SOFTWARE PRODUCT, you agree to be bound by the terms of that separate end-user license
agreement.
This copy of Multi-Tech Systems software is provided only on the condition that you, Customer, agree to the following
license agreement. READ THIS LICENSE CAREFULLY. If you do not agree to the terms contained in this license, return
the packaged program UNOPENED to the place you obtained it. If you agree to the terms contained in this license, fill out
the enclosed Software Registration Card, and return the card by mail. Registration may also be done on Multi-Tech Systems
web site at www.multitech.com/register. Opening the packaged program constitutes agreement to be bound by the terms
and conditions of this Software License Agreement. Your right to use the software terminates automatically if you violate any
part of this software license agreement.
Multi-Tech Software License Agreement
Multi-Tech Systems, Inc. (MTS) agrees to grant and Customer agrees to accept on the following terms and conditions, a
non-transferable and non-exclusive license to use the software program(s) delivered with this Agreement.
GRANT OF LICENSE. MTS grants Customer the right to use one copy of the software on a single product (the Licensed
System). You may not network the software or otherwise use it on more than one product at the same time.
COPYRIGHT. The software is owned by MTS and is protected by United States copyright laws and international treaty
provisions. Therefore, Customer must treat the software like any copyrighted material. Customer may install the software to
a single hard disk and keep the original for backup or archival purposes. Customer shall NOT copy, or translate into any
language, in whole or in part, any documentation which is provided by MTS in printed form under this Agreement.
OTHER RESTRICTIONS. The software may not be assigned, sublicensed, translated or otherwise transferred by Custo m er
without prior written consent from MTS. Customer may not reverse engineer, decompile, or disassemble the software. Any
updates shall be used only on the Licensed System, and shall remain subject to all other terms of this Agreement. Customer
agrees not to provide or otherwise make available the software including, but not limited to documentation, programs l istings,
object code, or source code, in any form, to any person other than Customer and his employees and /or agents, without prior
written consent from MTS. Customer acknowledges that the techniques, algorithms, and processes contained in the
software are proprietary to MTS and Customer agrees not to use or disclose such information except as necessary to use
the software.
Customer shall take reasonable steps consistent with steps taken to protect its own proprietary information to prevent the
unauthorized copying or use by third parties of the software or any of the other materials provided under this Agreeme nt. Any
previous version of the software must be destroyed or returned to Multi-Tech Systems, Inc. within 90 days of receipt of the
software upgrade or update.
LIMITED WARRANTY. MTS warrants that the software will perform substantially in accordance to the product specifications
in effect at the time of receipt by Customer. If the MTS software fails to perform accordingly, MTS will optionally repair any
defect, or replace it. This warranty is void if the failure has resulted from accident, abuse, or misapplication. A Software
Registration Card must be on file at MTS for this warranty to be in effect. In all other respects, the MTS software is provided
AS IS. Likewise, any
ALL OTHER WARRANTIES, EXPRESSED OR IMPLIED, INCLUDING, BUT NOT LIMITED TO, THE IMPLIED WARRANTIES OF
MERCHANTABILITY AND FITNESS FOR A PARTICULAR PURPOSE. IN NO EVENT WILL MTS BE LIABLE FOR CONSEQUENTIAL
DAMAGES RESULTING FROM USE OF THE LICENSED PROGRAM, WHETHER AS A RESULT OF MTS NEGLIGENCE OR NOT, EVEN
IF MTS HAS BEEN ADVISED OF THE POSSIBILITY OF SUCH DAMAGES. MTS ALSO DISCLAIMS ANY LIABILITY IN CONTRACT OR
OTHERWISE FOR THE DEFECT OR NON-PERFORMANCE OF ANY SEPARATE END-USER LICENSED SOFTWARE PRODUCT
INCLUDED WITH MTS' SOFTWARE.
other software provided with MTS software is provided AS IS. THE FOREGOING WARRANTY IS IN LIEU
22 Multi-Tech Systems, Inc. PN 82001423L
Page 26

MultiAccess Quick Start Guide License Agreement
INDEMNIFICATION. MTS will indemnify and defend Customer from any claim that the software infringes on any copyright,
trademark, or patent. Customer will indemnify and defend MTS against all other proceedings arising out of Customers use of
the software.
GENERAL. If any of the provisions, or portions thereof, of this Agreement are invalid under any applicable statute or rule of
law, they are to that extent deemed to be omitted.
This is the complete and exclusive statement of the Agreement between the parties, which supersed es all proposals, oral,
written and all other communications between the parties relating to the subject matter of this Agreement. This Agreement
may only be amended or modified in writing, signed by authorized representatives of b oth parties.
This Agreement shall be governed by the laws of the State of Minnesota.
The waiver of one breach or default hereunder shall not constitute the waiver of any subsequent breach or default. Licensee
also agrees to the following:
I am not a citizen, national, or resident of, and am not under the control of the government of:
Afghanistan, Cuba, Iran, Iraq, Libya, Montenegro, North Korea, Pakistan, Serbia, Sudan, Syria, nor any other country to
which the United States has prohibited export.
I will not download or by any other means export or re-export the Programs, either directly or indirectly, to the above
countries, nor to citizens, nationals or residents of the above countries.
I am not listed on the United States Department of Treasury lists of Specially Designated Nationals, Specially Designated
Terrorists, and/or Specially Designated Narcotics Traffickers, nor am I listed on the United States Department of Commerce
Table of Denial Orders.
I will not download or otherwise export or re-export the Programs, directly or indirectly, to persons on the above mentioned
lists.
I will not use the Programs for, and will not allow the Programs to be used for, any purposes prohibited by United States law,
including, without limitation, for the development, design, manufacture or production of nuclear, chemical, or biological
weapons of mass destruction.
Licensee agrees that by purchase and/or use of the Software, s/he hereby accepts and agrees to the terms of this License
Agreement.
GNU GENERAL PUBLIC LICENSE
Version 2, June 1991
Copyright (C) 1989, 1991 Free Software Foundation, Inc.
59 Temple Place, Suite 330, Boston, MA 02111-1307 USA
Everyone is permitted to copy and distribute verbatim copies of this license document, but changing it is not allowed.
Preamble
The licenses for most software are designed to take away your freedom to share and change it. By contrast, the GNU
General Public License is intended to guarantee your freedom to share and change free s oftware--to ma ke sure the software
is free for all its users. This General Public License applies to most of the Free Software Foundation's software and to any
other program whose authors commit to using it. (Some other Free Software Foundation software is covered by the GNU
Library General Public License instead.) You can apply it to your programs, too.
When we speak of free software, we are referring to freedom, not price. Our General Public Licenses are designed to make
sure that you have the freedom to distribute copies of free software (and charge for this service if you wish), that you receive
source code or can get it if you want it, that you can change the software or use pieces of it in new free programs; and that
you know you can do these things.
To protect your rights, we need to make restrictions that forbid anyone to deny you these rights or to ask you to surrender
the rights. These restrictions translate to certain responsibilities for you if you distribute copies of the software, or if you
modify it.
For example, if you distribute copies of such a program, whether gratis or for a fee, you must give the recipients all the rights
that you have. You must make sure that they, too, receive or can get the source code. And you must show them these
terms so they know their rights.
We protect your rights with two steps: (1) copyright the software, and (2) offer you this license which gives you legal
permission to copy, distribute and/or modify the software.
Also, for each author's protection and ours, we want to make certain that everyone understands that there is no warranty for
this free software. If the software is modified by someone else and passed on, we want its recipients to know that what they
have is not the original, so that any problems introduced by others will not reflect on the original authors' reputations.
Finally, any free program is threatened constantly by software patents. We wish to avoid the danger that redistributors of a
free program will individually obtain patent licenses, in effect making the program proprietary. To prevent this, we have
made it clear that any patent must be licensed for everyone's free use or not licensed at all.
The precise terms and conditions for copying, distribution and modification follow.
Multi-Tech Systems, Inc. PN 82001423L 23
Page 27

License Agreements MultiAccess Quick Start Guide
GNU GENERAL PUBLIC LICENSE
TERMS AND CONDITIONS FOR COPYING, DISTRIBUTION AND MODIFICATION
0. This License applies to any program or other work which contains a notice placed by the copyright holder saying it may be
distributed under the terms of this General Public License. The "Program", below, refers to any such program or work, and a
"work based on the Program" means either the Program or any derivative work under copyright law: that is to say, a work
containing the Program or a portion of it, either verbatim or with modifications and/or translated into another language.
(Hereinafter, translation is included without limitation in the term "modification".) Each licensee is addressed as "you".
Activities other than copying, distribution and modification are not covered by this License; they are outside its scope. The
act of running the Program is not restricted, and the output from the Program is covered only if its contents constitute a work
based on the Program (independent of having been made by running the Program). Whether that is true depends on what
the Program does.
1. You may copy and distribute verbatim copies of the Program's source code as you receive it, in any medium, provided
that you conspicuously and appropriately publish on each copy an appropri ate copyright notice and disclaimer of warranty;
keep intact all the notices that refer to this License and to the absence of any warranty; and give any other recipients of the
Program a copy of this License along with the Program.
You may charge a fee for the physical act of transferring a copy, and you may at your option offer warranty protection in
exchange for a fee.
2. You may modify your copy or copies of the Program or any portion of it, thus forming a work based on the Program, and
copy and distribute such modifications or work under the terms of Section 1 above, provided that you also meet all of these
conditions:
a) You must cause the modified files to carry prominent notices stating that you changed the files and the date of any change.
b) You must cause any work that you distribute or publish, that in whole or in part contains or is derived from the Program or any part
thereof, to be licensed as a whole at no charge to all third parties under the terms of this License.
c) If the modified program normally reads commands interactively when run, you must cause it, when started running for such interactive
use in the most ordinary way, to print or display an announcement including an appropriate copyright notice and a notice that there is no
warranty (or else, saying that you provide a warranty) and that users may redistribute the program under these conditions, and telling the
user how to view a copy of this License. (Exception: if the Program itself is interactive but does not normally print such an announcement,
your work based on the Program is not required to print an announcement.)
These requirements apply to the modified work as a whole. If identifiable sections of that work are not derived from the
Program, and can be reasonably considered independent and separate works in themselves, then this License, and its
terms, do not apply to those sections when you distribute them as separate works. But when you distribute the same
sections as part of a whole which is a work based on the Program, the distribution of the whole must be on the terms of this
License, whose permissions for other licensees extend to the entire whole, and thus to each and every part regar dless of
who wrote it.
Thus, it is not the intent of this section to claim rights or contest your rights to work written entirely by you; rather, the intent is
to exercise the right to control the distribution of derivative or collective works based on the Program.
In addition, mere aggregation of another work not based on the Program with the Program (or with a work based on the
Program) on a volume of a storage or distribution medium does not bring the other work under the scope of this License.
3. You may copy and distribute the Program (or a work based on it, under Section 2) in object code or executable form under
the terms of Sections 1 and 2 above provided that you also do one of the following:
a) Accompany it with the complete corresponding machine-readable source code, which must be distributed under the terms of Sections
1 and 2 above on a medium customarily used for software interchange; or,
b) Accompany it with a written offer, valid for at least three years, to give any third party, for a charge no more than your cost of physically
performing source distribution, a complete machine-readable copy of the corresponding source code, to be distributed under the terms of
Sections 1 and 2 above on a medium customarily used for software interchange; or,
c) Accompany it with the information you received as to the offer to distribute corresponding source code. (This alternative is allowed
only for noncommercial distribution and only if you received the program in object code or executable form with such an offer, in accord
with Subsection b above.)
The source code for a work means the preferred form of the work for making modifications to it. For an executable work,
complete source code means all the source code for all modules it contains, plus any associated interface definition files,
plus the scripts used to control compilation and installation of the executable. However, as a special exception, the source
code distributed need not include anything that is normally distributed (in either source or binary form) with the major
components (compiler, kernel, and so on) of the operating system on which the executable runs, unless that compo ne nt
itself accompanies the executable.
If distribution of executable or object code is made by offering access to copy from a designated place, then offering
equivalent access to copy the source code from the same place counts as distribution of the source code, even though third
parties are not compelled to copy the source along with the object code.
4. You may not copy, modify, sublicense, or distribute the Program except as expressly provided under this License. Any
attempt otherwise to copy, modify, sublicense or distribute the Program is void, and will automatically terminate your rights
under this License. However, parties who have received copies, or rights, from you under this License will not have their
licenses terminated so long as such parties remain in full compliance.
5. You are not required to accept this License, since you have not signed it. However, nothing else grant s you permission to
modify or distribute the Program or its derivative works. These actions are prohibited by law if you do not accept this
24 Multi-Tech Systems, Inc. PN 82001423L
Page 28

MultiAccess Quick Start Guide License Agreement
License. Therefore, by modifying or distributing the Program (or any work based on the Program), you indicate your
acceptance of this License to do so, and all its terms and conditions for copying, distributing or modifying the Program or
works based on it.
6. Each time you redistribute the Program (or any work based on the Program), the recipient automatically receives a license
from the original licensor to copy, distribute or modify the Program subject to these terms and conditions. You may not
impose any further restrictions on the recipients' exercise of the rights granted herein. You are not responsible for enforcing
compliance by third parties to this License.
7. If, as a consequence of a court judgment or allegation of patent infringement or for any other reason (not limited to patent
issues), conditions are imposed on you (whether by court order, agreement or otherwise) that contradict the conditions of
this License, they do not excuse you from the conditions of this License. If you cannot distribute so as to satisfy
simultaneously your obligations under this License and any other pertinent obligations, then as a consequence you may not
distribute the Program at all. For example, if a patent license would not permit royalty-free redistribution of the Program by
all those who receive copies directly or indirectly through you, then the only way you could satisfy both it and this License
would be to refrain entirely from distribution of the Program.
If any portion of this section is held invalid or unenforceable under any particular circumstance, the balance of the section i s
intended to apply and the section as a whole is intended to apply in other circumstances.
It is not the purpose of this section to induce you to infringe any patents or other property right claims or to contest validity of
any such claims; this section has the sole purpose of protecting the integrity of the free software distribution system, which is
implemented by public license practices. Many people have made generous contributions to the wide range of software
distributed through that system in reliance on consistent application of that system; it is up to the author/donor to decide if he
or she is willing to distribute software through any other system and a licensee cannot impose that choice.
This section is intended to make thoroughly clear what is believed to be a consequence of the rest of this License.
8. If the distribution and/or use of the Program is restricted in certain countries either by patents or by copyrighted interfaces,
the original copyright holder who places the Program under this License may add an explicit geographical distribution
limitation excluding those countries, so that distribution is permitted only in or among countries not thus excluded. In such
case, this License incorporates the limitation as if written in the body of this License.
9. The Free Software Foundation may publish revised and/or new versions of the General Pub lic License from time to time.
Such new versions will be similar in spirit to the present version, but may differ in detail to address new problems or
concerns.
Each version is given a distinguishing version number. If the Program specifies a version number of this Licens e which
applies to it and "any later version", you have the option of following the terms and conditi ons either of that version or of any
later version published by the Free Software Foundation. If the Program does not specify a version number of this Lice nse,
you may choose any version ever published by the Free Software Foundation.
10. If you wish to incorporate parts of the Program into other free programs whose distribution conditions are different, write
to the author to ask for permission. For software which is copyrighted by the Free Software Foundation, write to the Free
Software Foundation; we sometimes make exceptions for this. Our decision will be guided by the two goals of preserving
the free status of all derivatives of our free software and of promoting the sharing and reuse of software generally.
NO WARRANTY
11. BECAUSE THE PROGRAM IS LICENSED FREE OF CHARGE, THERE IS NO WARRANTY FOR THE PROGRAM, TO THE EXTENT
PERMITTED BY APPLICABLE LAW. EXCEPT WHEN OTHERWISE STATED IN WRITING THE COPYRIGHT HOLDERS AND/OR
OTHER PARTIES PROVIDE THE PROGRAM "AS IS" WITHOUT WARRANTY OF ANY KIND, EITHER EXPRESSED OR IMPLIED,
INCLUDING, BUT NOT LIMITED TO, THE IMPLIED WARRANTIES OF MERCHANTABILITY AND FITNESS FOR A PARTICULAR
PURPOSE. THE ENTIRE RISK AS TO THE QUALITY AND PERFORMANCE OF THE PROGRAM IS WITH YOU. SHOULD THE
PROGRAM PROVE DEFECTIVE, YOU ASSUME THE COST OF ALL NECESSARY SERVICING, REPAIR OR CORRECTION.
12. IN NO EVENT UNLESS REQUIRED BY APPLICABLE LAW OR AGREED TO IN WRITING WILL ANY COPYRIGHT HOLDER, OR
ANY OTHER PARTY WHO MAY MODIFY AND/OR REDISTRIBUTE THE PROGRAM AS PERMITTED ABOVE, BE LIABLE TO YOU FOR
DAMAGES, INCLUDING ANY GENERAL, SPECIAL, INCIDENTAL OR CONSEQUENTIAL DAMAGES ARISING OUT OF THE USE OR
INABILITY TO USE THE PROGRAM (INCLUDING BUT NOT LIMITED TO LOSS OF DATA OR DATA BEING RENDERED INACCURATE
OR LOSSES SUSTAINED BY YOU OR THIRD PARTIES OR A FAILURE OF THE PROGRAM TO OPERATE WITH ANY OTHER
PROGRAMS), EVEN IF SUCH HOLDER OR OTHER PARTY HAS BEEN ADVISED OF THE POSSIBILITY OF SUCH DAMAGES.
Multi-Tech Systems, Inc. PN 82001423L 25
Page 29

82001423L
 Loading...