

Multi-Tech RouteFinder RF550VPN User Manual
SOHO Internet Security Appliance
Model RF550VPN
User Guide

User Guide
RouteFinder SOHO Internet Security Appliance
Model RF550VPN
PN S000235E Revision E
Copyright © 2003
This publication may not be reproduced, in whole or in part, without prior expressed written permission
from Multi-Tech Systems, Inc. All rights reserved.
Multi-Tech Systems, Inc. makes no representations or warranties with respect to the contents hereof
and specifically disclaims any implied warranties of merchantability or fitness for any particular
purpose. Furthermore, Multi-Tech Systems, Inc. reserves the right to revise this publication and to
make changes from time to time in the content hereof without obligation of Multi-Tech Systems, Inc. to
notify any person or organization of such revisions or changes.
Revision Date Description
A 11/26/01 Initial release.
B 01/25/02 Changes to some screen captures. Formatting changes.
Renamed and modified the section entitled Configuring Your PC.
Added an Appendix to describe the SSH IPSec Client Setup.
C 05/17/02 New examples. New screen captures. SSH IPSec Sentinel new
version (v.1.3). Advanced features are discussed in the User
Guide only.
D 10/01/02 Changes to the Virtual Server section, Administrative Settings,
and VPN Connection. Software version 4.63.
E 04/16/03 Software version 4.64.
Trademarks
The Multi-Tech logo is a trademark of Multi-Tech System, Inc. Windows is a trademark of Microsoft. All
other trademarks are owned by their respective companies.
World Headquarters
Multi-Tech Systems, Inc.
2205 Woodale Drive
Mounds View, Minnesota 55112
(763) 785-3500 or (800) 328-9717
Fax (763) 785-9874
Internet Address: http://www.multitech.com

Contents
Chapter 1 – Introduction and Description.............................................................................. 5
Key Features...................................................................................................................... 5
RouteFinder Documentation............................................................................................... 7
RF550VPN Front Panel ...................................................................................................... 8
RF550VPN Back Panel....................................................................................................... 9
Chapter 2 – Installation...........................................................................................................10
Safety Warnings ................................................................................................................10
System Requirements .......................................................................................................10
Unpacking Your RouteFinder.............................................................................................10
Cabling Your RouteFinder .................................................................................................11
Chapter 3 – Configuring the PC.............................................................................................12
Chapter 4 – Navigating the Screens ......................................................................................19
Chapter 5 – Configuring the RouteFinder Using a Web Browser........................................20
About the Browser Interface...............................................................................................20
Setup Wizard.....................................................................................................................22
Chapter 6 – Managing the RouteFinder Using a Web Browser............................................33
Device Information.............................................................................................................33
Device Status ....................................................................................................................34
Advanced Settings.............................................................................................................37
System Tools.....................................................................................................................47
Chapter 7 – Troubleshooting .................................................................................................54
Chapter 8 – Frequently Asked Questions .............................................................................57
Appendix A – Specifications..................................................................................................60
Appendix B – Installing TCP/IP..............................................................................................61
Appendix C – Tools for Your RF550VPN...............................................................................63
PING..................................................................................................................................63
WINIPCFG and IPCONFIG................................................................................................63
TRACERT..........................................................................................................................63
Appendix D – Warranty and Repairs .....................................................................................64

Appendix E – Regulatory Compliance Information ..............................................................66
FCC Part 15 Regulation.....................................................................................................66
EMC, Safety, and R&TTE Directive Compliance................................................................67
Other Approvals.................................................................................................................67
Appendix F – Technical Support............................................................................................68
Glossary ..................................................................................................................................70
Index ........................................................................................................................................75

Chapter 1 – Introduction and Description
Chapter 1 – Introduction and
Description
Welcome to the world of Internet security. Your Multi-Tech SOHO RouteFinder VPN Internet security
appliance, Model RF550VPN, is ideal for the small branch office or telecommuter who needs secure
access to the corporate LAN.
In addition to providing a WAN Ethernet port for DSL or cable broadband Internet access, it also offers
both client-to-LAN and
LAN-to-LAN connectivity based on the IPSec protocol. The SOHO RouteFinder supports up to 5
IPSec tunnels and provides 3DES encryption with 700K bps throughput.
The RF550VPN is a cost-effective, easy-to-manage solution that is ideal for small- to medium-sized
businesses through the use of Network Address Translation (NAT). Since NAT provides for the
sharing of a single connection, you save the cost of multiple Internet accounts. See the Glossary for
more about NAT.
Key Features
· One WAN Ethernet port connects to a DSL or cable modem for shared Internet access.
· Supports up to 5 IPSec VPN tunnels for secure LAN-to-LAN and Client-to-LAN access over the
Internet.
· 3DES encryption throughput of 700K bps.
· Built-in 4-port 10/100M bps switch.
· Built-in firewall and DHCP services with Network Address Translation (NAT).
· Protects your LAN against Denial of Service (DoS) attacks.
· Internet access controls provide client and site filtering.
· Asynchronous port for automatic dial-backup.
· Network monitoring allows the network administrator to view all incoming and outgoing packets,
status of connections, and specific connection events via a Syslog server.
· Configuration and management using any Web browser.
· Works with H.323 Voice over IP products including Multi-Tech MultiVOIP gateways or Microsoft
NetMeeting.
· Provides email addresses for 10 users with one connection.
· PPPoE support.
· Supports Windows Plug and Play
· Flash memory allows easy firmware upgrades.
· IP address mapping/port forwarding.
· Two-year warranty.
Multi-Tech Systems, Inc. RF550VPN User Guide 5
Chapter 1 – Introduction and Description
· Secure VPN Connections. The SOHO RouteFinder VPN uses the IPSec industry standard
protocol, data encryption, and the Internet to provide high-performance, secure VPN connections.
· For LAN-to-LAN connectivity, the RouteFinder utilizes the IPSec protocol to provide up to 5
tunnels with strong 168-bit 3DES encryption using IKE and PSK key management. In addition, it
provides very high performance with 700K with 3 DES encryption throughput.
· For Client-to-LAN connectivity, Multi-Tech provides optional IPSec client software allowing
traveling employees and telecommuters secure access to the company’s internal network.
· Network Security Protection. Protects a network from invalid access.
· Prevention of DoS (Denial of Service) – Prevents the consequences of the Denial of Service,
such as network traffic congestion or ping of death.
· Hacker Attack Logging – Supports general hacker attack pattern monitoring and logging.
· Filtering – Prevents unauthorized packets from entering or leaving the local network.
· Connects up to 253 Users to the Internet with Broadband Speed. With the SOHO
RouteFinder VPN, up to 253 users are connected to the Internet with only one IP account.
· LAN Segmentation. For added LAN security, the RouteFinder can be used to segment the LAN
by connecting the corporate servers to one RouteFinder Ethernet port and the Internet Servers to
the other Ethernet port. This configuration puts the corporate servers behind a firewall and the
Internet servers outside the firewall. To continue to provide Internet access, connect a modem or
ISDN terminal adapter to the RouteFinder’s asynchronous port.
· Can Be Configured as a DHCP Server. The SOHO RouteFinder VPN can be configured as a
DHCP server to handle request for Internet services and route to and from the ISP. Server and
Client features include:
DHCP Server – Automatically assigns IP information to the network users.
DHCP Client – Automatically gets IP information from the ISP DHCP server.
PPPoE Client – Supports PPPoE client function to connect to the remote PPPoE server.
Idle Time – Lets you set a specified idle-time before automatically disconnecting.
Dial-on-Demand – Eliminates the need for dial-up; automatically logs to your ISP.
The RouteFinder RF550VPN
Multi-Tech Systems, Inc. RF550VPN User Guide 6

Chapter 1 – Introduction and Description
RouteFinder Documentation
The Quick Start Guide
The Quick Start Guide is a shorter version of this User Guide. It is included in printed form with your
RF550VPN. Both guides are intended to be used by systems administrators and network managers.
They provide the necessary information for a qualified person to unpack, cable, and configure the
device for proper operation.
This User Guide
The User Guide can be installed from the CD by clicking Install Manuals on the Installation screen or
downloading the file from our Web site at: http://www.multitech.com
Save or Print the User Guide
Once the User Guide is displayed on screen using Adobe Acrobat Reader, you can save the .pdf
file to your system or print a copy.
Setup Examples and Other Helpful Documents
There are five reference documents to help you setup and use your RF550VPN.
These reference guides are located on the CD that accompanies your RouteFinder and also on
the Multi-Tech Web site.
A Description of the Reference Guides:
1. Setup Examples for the RF550VPN - Document Number S000258C
The four examples show:
· A LAN-to-LAN VPN configuration between two RF550VPNs. One at Site A and one at Site
B. Both RouteFinders use static IP address at their WAN port gateways.
· A LAN-to-LAN VPN configuration between an RF550VPNs at Site A that uses a static IP
through its WAN port and an RF550VPN at Site B that uses a dynamic IP address through
its WAN port.
· A LAN-to-LAN VPN configuration between an RF550VPN at Site A that uses a static IP
address at the WAN port and an RF550VPN at Site B that uses dynamic IP addressing
through a modem connected to the serial port.
· A Client-to-LAN configuration between an RF550VPN at Site A and an SSH IPSec Client.
Each example includes a diagram, a summary chart of input values, an address table you can use
to keep track of your values, and explanations of the Web interface screens.
2. RF550VPN Using a NAT Box with an IPSec Pass-Through - Document Number S000259B
The two example show:
· AN SSH Sentinel IPSec client behind a NAT box doing IPSec Pass-Through to an
RF550VPN.
· An RF550VPN behind a NAT box doing IPSec Pass-Through to another RF550VPN.
3. RF550VPN File Sharing Across VPN - Document Number S000260B
4. Configuring IPSec Tunneling in Windows XP or 2000 and Connecting to an RF550VPN -
Document Number S000261C.
5. Advanced Settings - five examples - Document Number S000268B
Multi-Tech Systems, Inc. RF550VPN User Guide 7
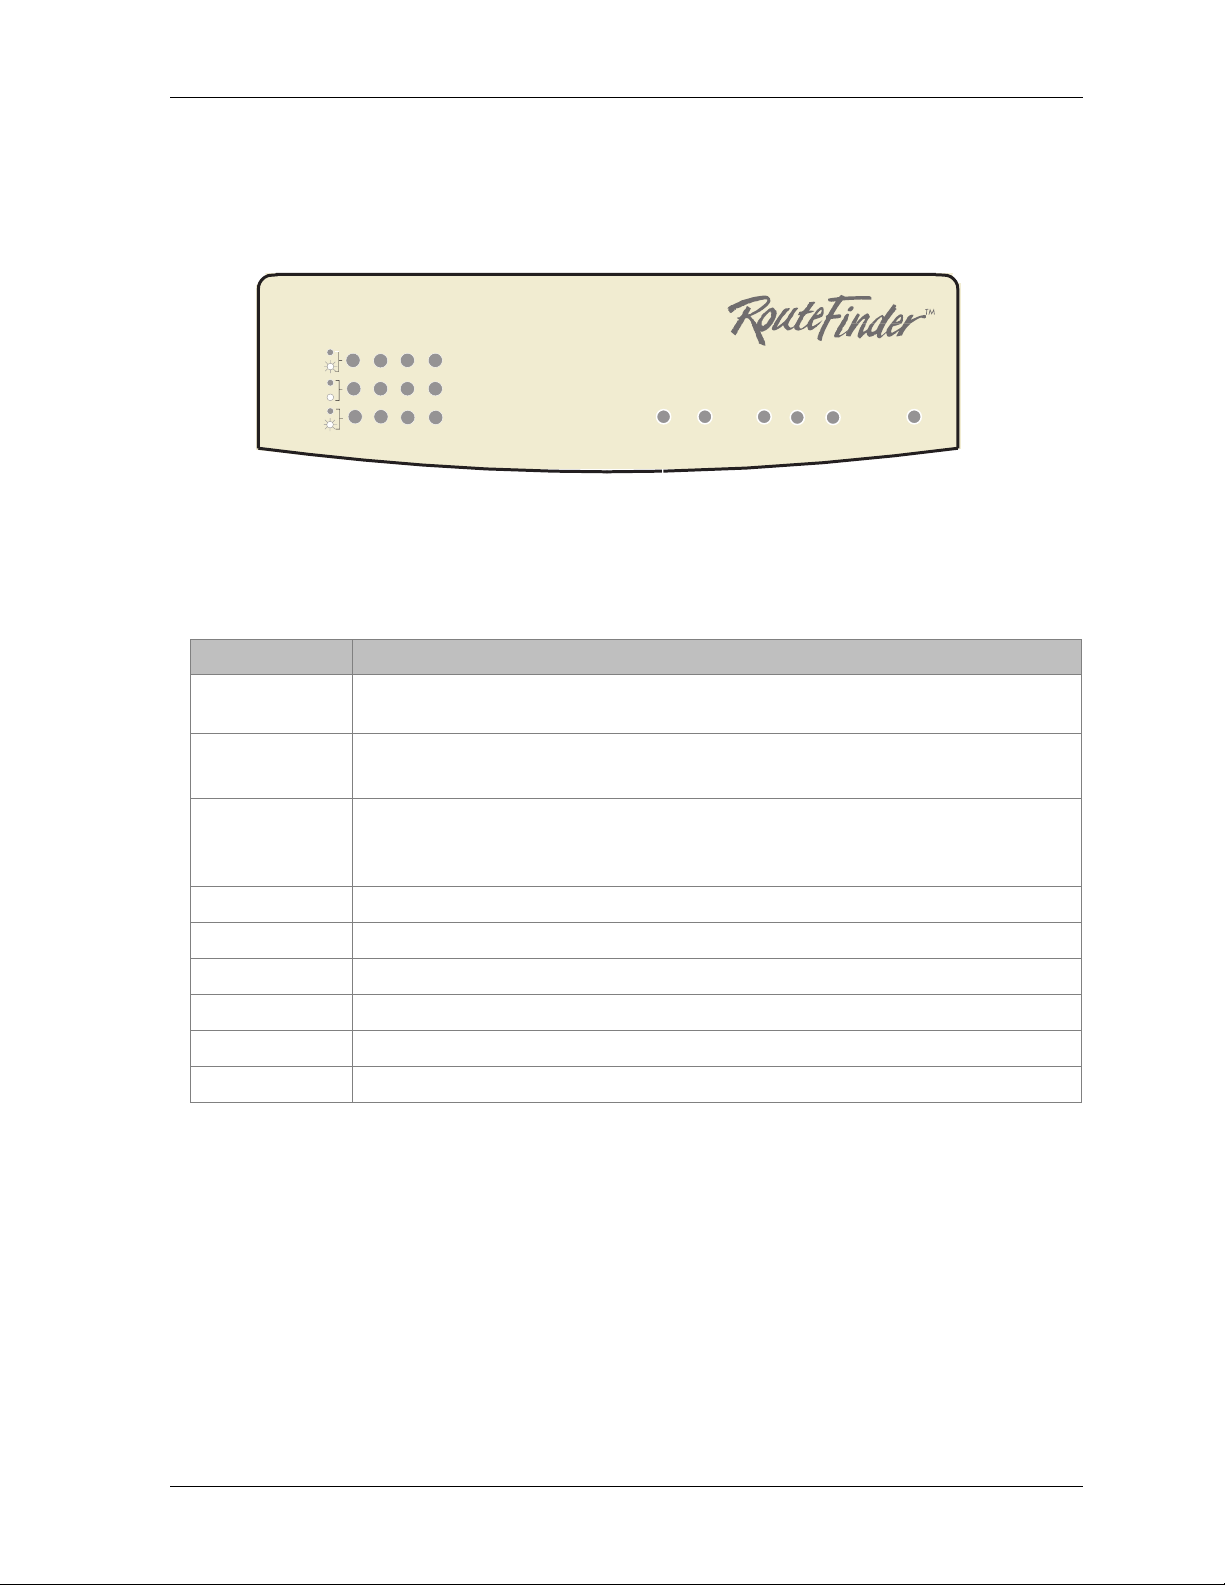
RF550VPN Front Panel
Link
ACT
100
10
FDX
COL
1234
RF550VPN Light Panel
LEDs Description
Data DCD
Chapter 1 – Introduction and Description
Serial
WAN
Link RXD TXD
PWR
Link ACT
100/10
FDX COL
Serial Data
Serial DCD
WAN Link
WAN RXD
WAN TXD
PWR
Lights when the LAN client is correctly connected to the Ethernet port. Blinks
when there is activity on the Ethernet port.
Lights when the LAN client is connected at 100MB.
Off when the LAN client is connected at 10MB.
Lights when the LAN client is connected as full duplex.
Off when the LAN client is connected as half duplex. Blinks when there are
collisions on the network.
Blinks when the Serial async port is receiving or transmitting data.
Lights when the Serial async port is properly connected to a remote site.
Lights when a successful connection to the 10BaseT WAN is established.
Lights when the WAN port is receiving data.
Lights when the WAN port is transmitting data.
Lights when power is being supplied to the router.
Multi-Tech Systems, Inc. RF550VPN User Guide 8
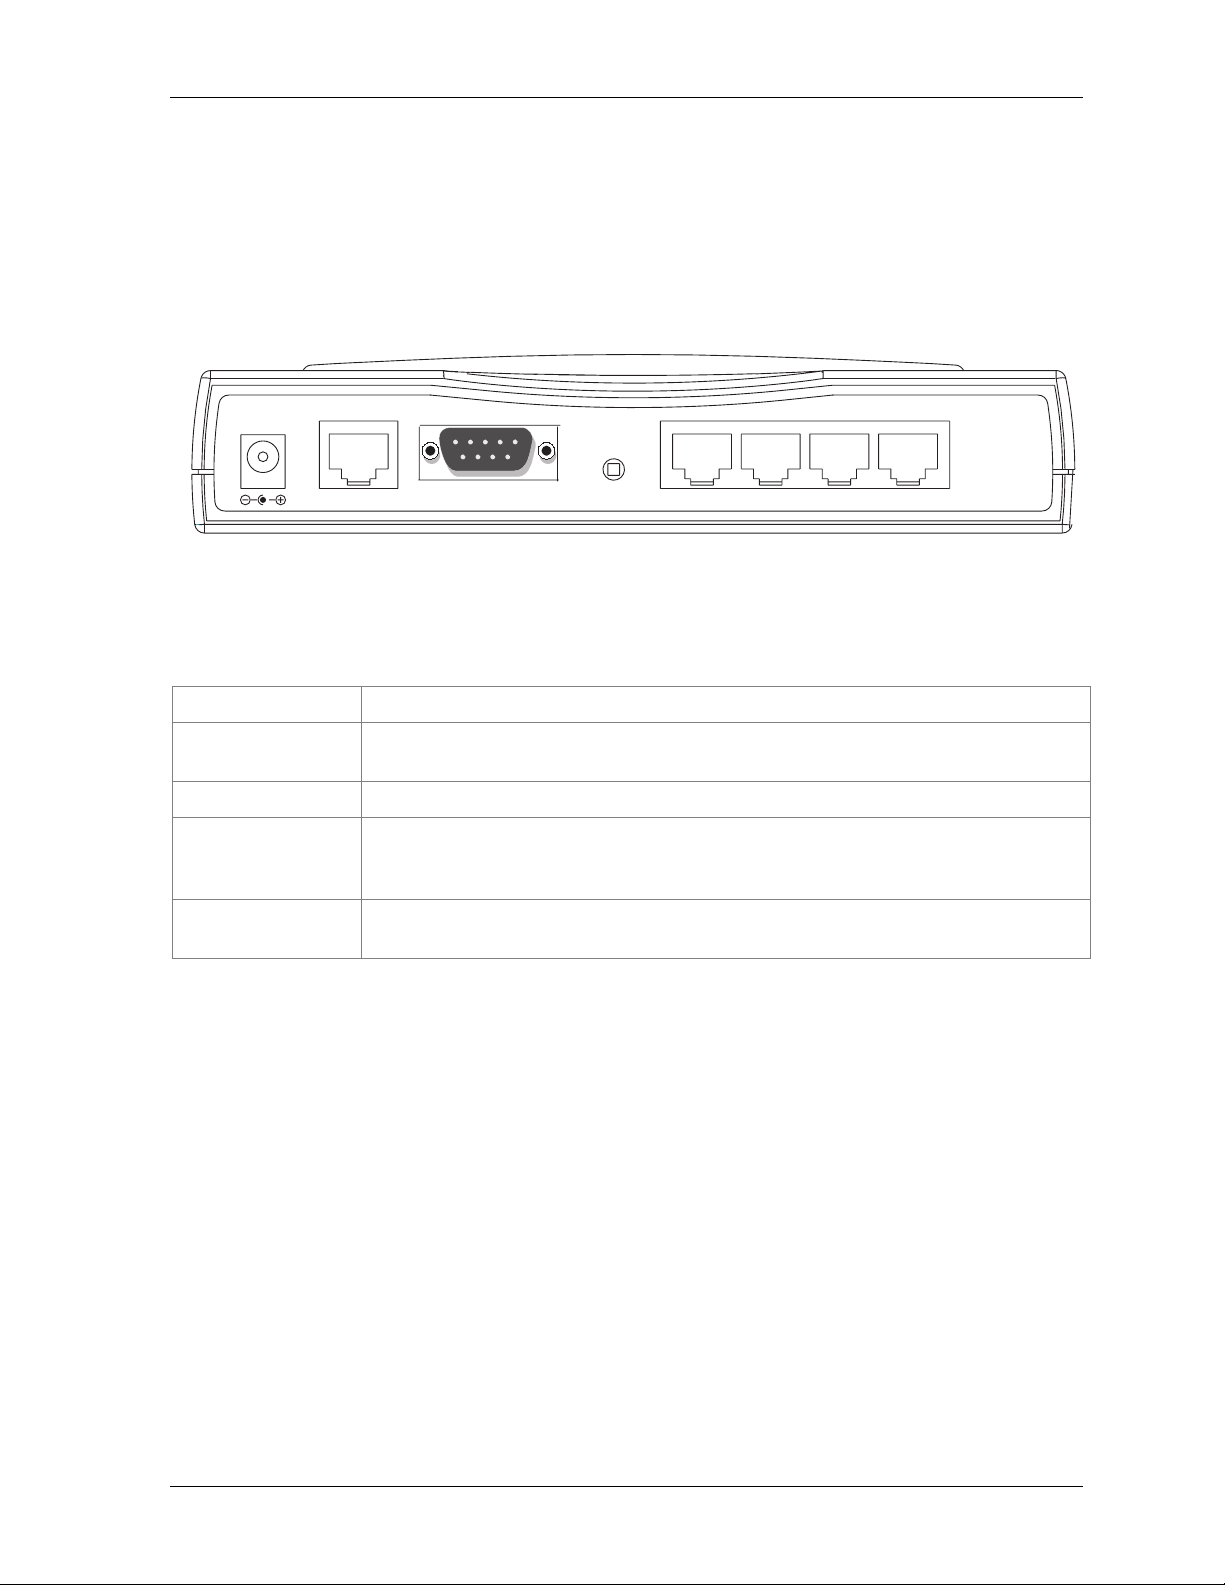
RF550VPN Back Panel
5VDC
Chapter 1 – Introduction and Description
Power 5VDC
10 BT WAN
(10Base-T)
Serial
Reset
Ports 1 - 4
WAN
Serial
Reset
1234
RF550VPN Back Panel
The power port connects the AC power adapter.
The WAN port connects the xDSL modem or cable modem.
The Serial port connects a standard modem (optional).
The Reset button resets the router to factory defaults. Press and hold button
until the serial LEDs of the RF550VPN blink, and then release the reset button.
Do not press this button unless you want to clear the current data.
There are 4 LAN ports. You can connect network devices such as PCs, FTP
servers, printers, or anything else you want to put on your network.
Multi-Tech Systems, Inc. RF550VPN User Guide 9

Chapter 2 – Installation
Chapter 2 – Installation
Safety Warnings
1. Never install telephone wiring during a lightning storm.
2. Never install telephone jacks in a wet location unless the jack is specifically designed for wet
locations.
3. This product is to be used with UL and cUL listed computers.
4. Never touch uninsulated telephone wires or terminals unless the telephone line has been
disconnected at the network interface.
5. Avoid using a telephone during an electrical storm. There may be a remote risk of electrical
shock from lightening.
6. Do not use the telephone to report a gas leak in the vicinity of the leak.
7. To reduce the risk of fire, use only No. 26 AWG or larger Telecommunications line cord.
System Requirements
· Microsoft I.E 4.0 or later version or Netscape Navigator 4.0 or later version
· One computer with an installed 10Mbps, 100Mbps or 10/100Mbps Ethernet card
· One Modem or ISDN TA (if a dialup backup connection is needed)
· One RJ-45 xDSL/Cable Internet connection
· TCP/IP protocol installed
· UTP network Cable with a RJ-45 connection
Unpacking Your RouteFinder
The RF550VPN shipping box contains the following items:
· The RouteFinder RF550VPN
· System CD
· Power Supply
· This Quick Start Guide
If any of the items is missing or damaged, please contact Multi-Tech Systems.
Multi-Tech Systems, Inc. RF550VPN User Guide 10
Chapter 2 – Installation
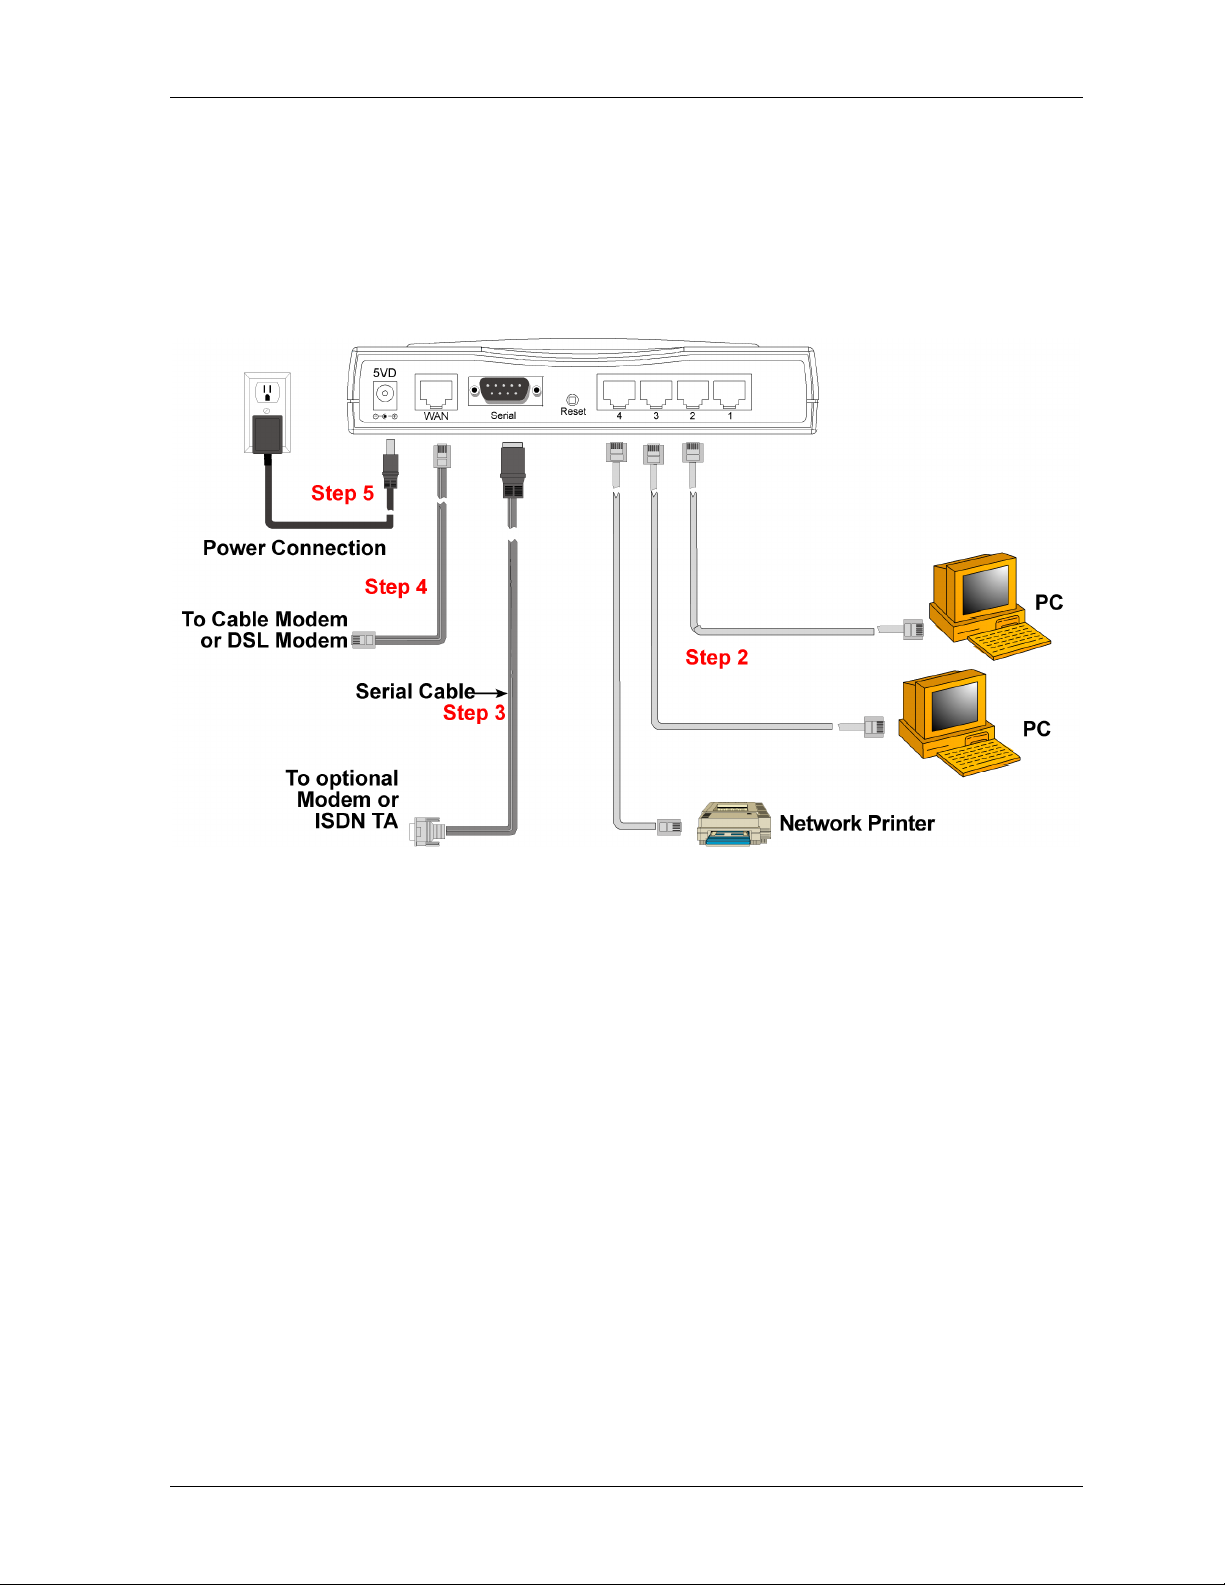
Cabling Your RouteFinder
Cabling your RouteFinder requires making the appropriate connections to PCs, Cable or DSL modem,
analog modem or ISDN TA (optional), AC power and the router. Because this device also provides
DHCP server functions, remote access, routing and firewall protection, after your device is properly
cabled, you will need to complete your configuration by following the instructions provided in the
following chapter or in the Quick Start Guide.
Cabling the RouteFinder RF550VPN
1. Turn the power off on all network devices (PCs, cable modems, DSL modems, analog
modems, ISDN TAs, and the router).
2. Plug one end of a cable into the Ethernet port and other into one of the 4 LAN ports. (If
you have more than one PC, connect the others in the same way to the other LAN ports).
3. If you are using an analog modem, connect it to the RF550VPN’s serial port.
4. Connect a network cable from the DSL modem or cable modem to the WAN port.
5. Connect the provided power supply cable to the 5VDC power port on the back of the
router. Plug the other end of the power supply into an AC power outlet as shown.
You are ready to configure software for your router and network PCs.
Multi-Tech Systems, Inc. RF550VPN User Guide 11
Chapter 3 – Configuring the PC
Chapter 3 – Configuring the PC
You must establish TCP/IP communication on each PC (make sure a Network Card or Adapter has
been installed into each PC).
If Your Operating System Is Windows 98/Me:
Note: The following procedures are based on Windows 98. Procedures may differ slightly in Windows
Me. For Windows 98, check to see that you have installed the Windows 98 patch dated August 1998.
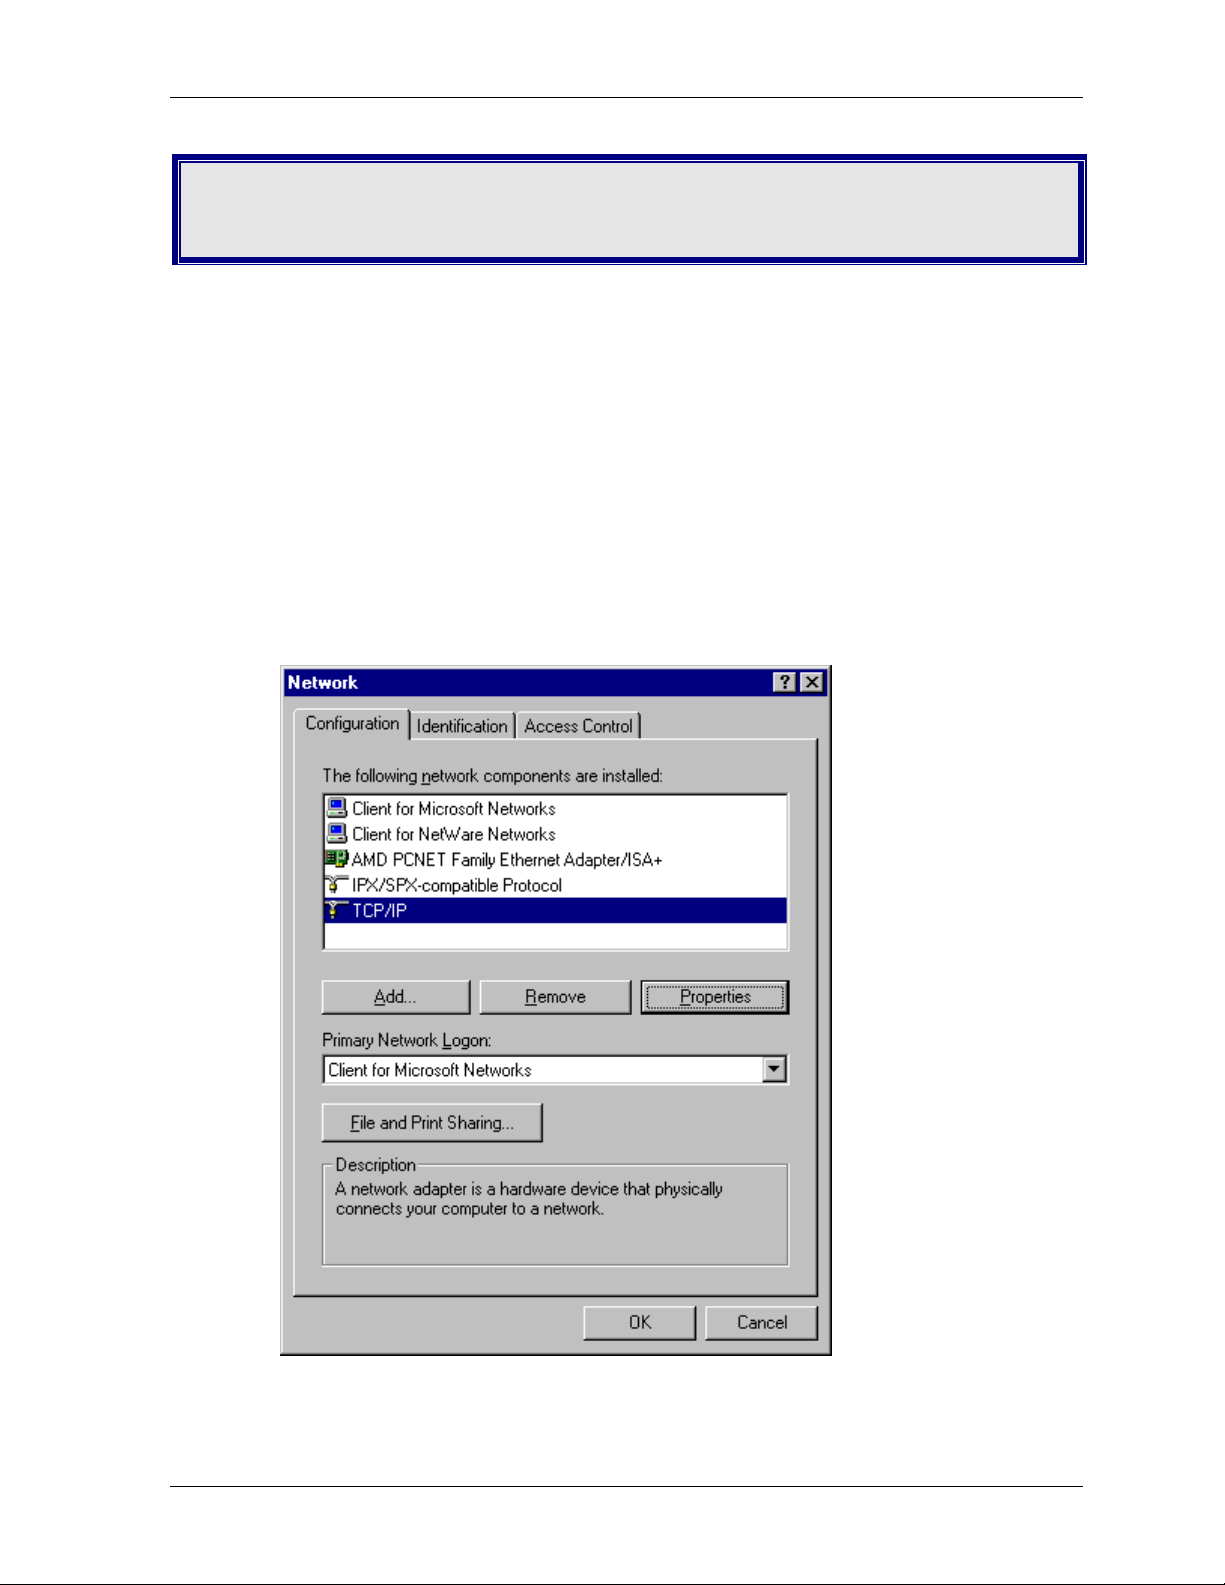
1. Click
2. Double-click the
3. On the
4. If the TCP/IP protocol line associated with your network card/adapter is listed, proceed to Step
5. Then click the Properties button.
Start | Settings | Control Panel.
Network icon.
Configuration tab, select the TCP/IP protocol line associated with your network
card/adapter.
5. If not listed, see Appendix B for installation directions.
Multi-Tech Systems, Inc. RF550VPN User Guide 12

Chapter 3 – Configuring the PC
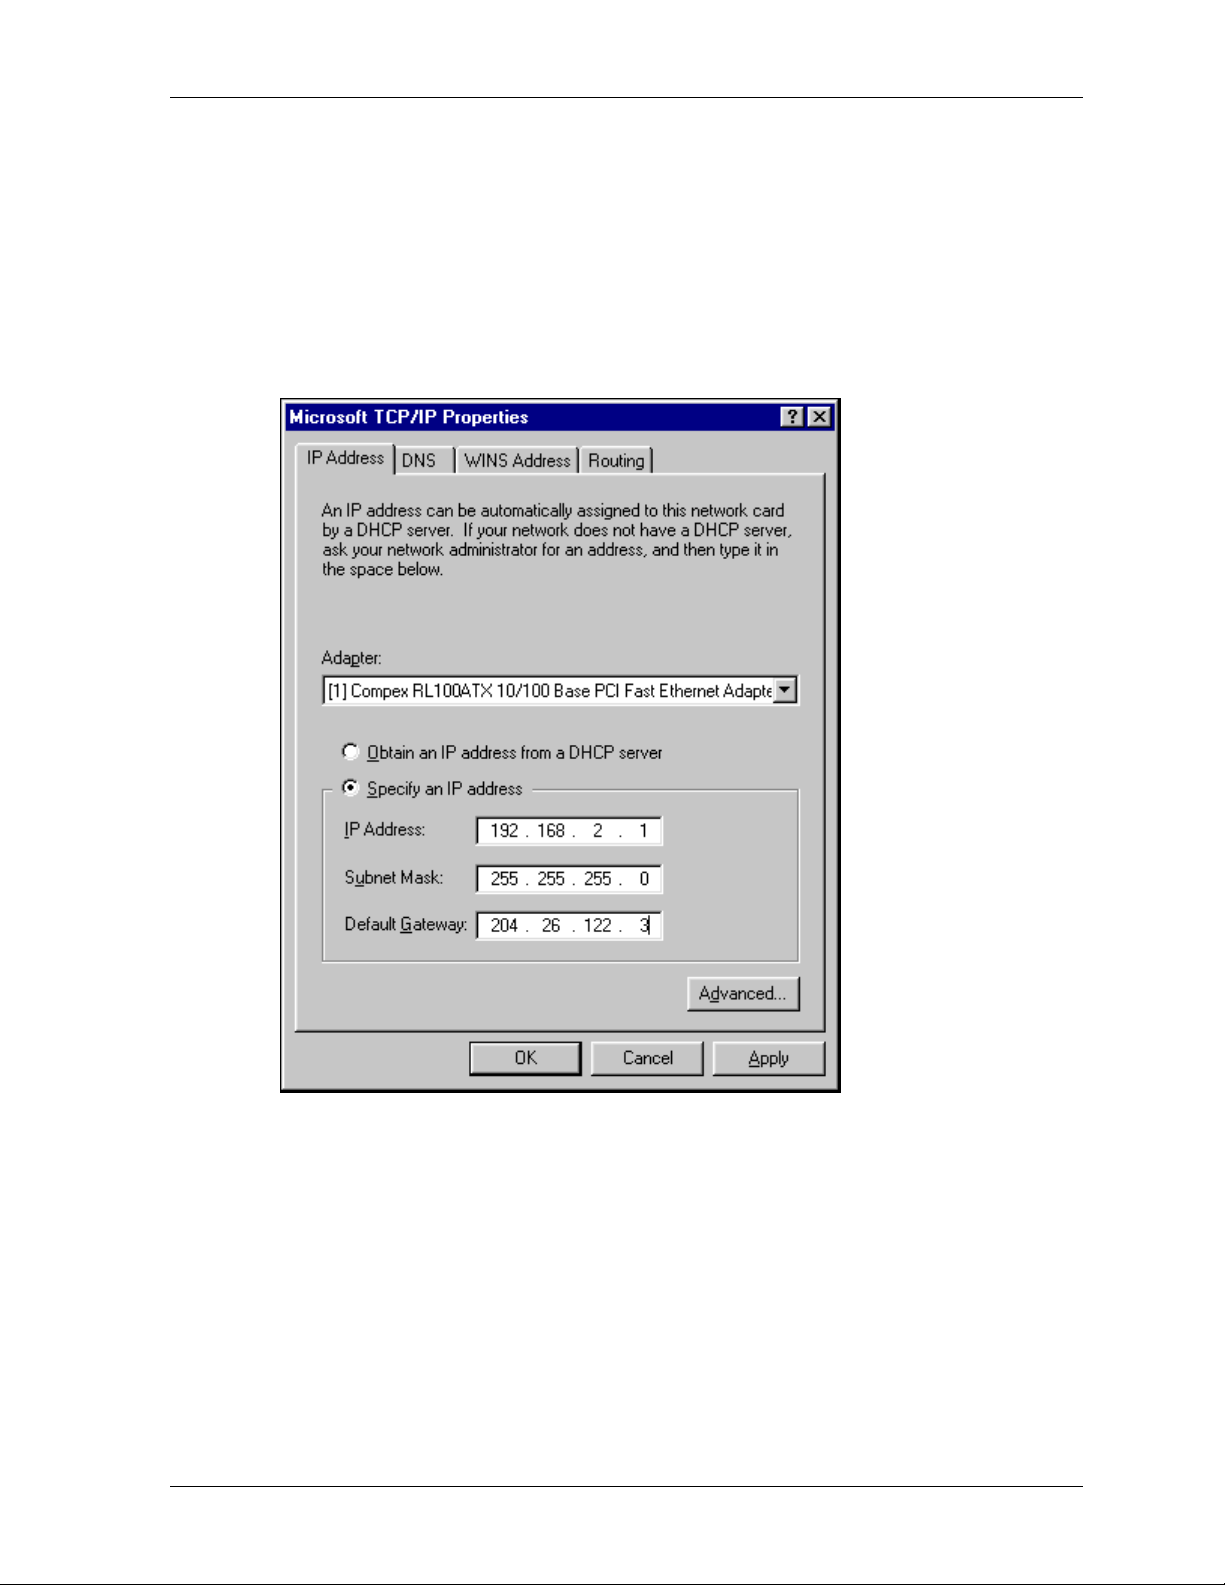
6. The TCP/IP Properties window displays. Click the IP Address tab to set your workstation’s IP
Address.
7. In the
IP Address dialog box, choose one of the following:
· To set a Dynamic IP Address, check
Obtain an IP Address Automatically. Dynamic
Addresses are used in the Example Reference Guide in
– Site B.
· To set a Fixed IP Address, check
Specify an IP address. Fixed Addresses are used in the
Example 2 – Site B and Example 3
Example Reference Guide in all the examples, except the two mentioned above. For our
example, set the address to
OK.
Click
192.168.2.x.
8. You have completed the client settings. Click OK to close out of the Network Control Panel.
9. Windows will ask you to restart the PC. Click the Yes button.
Note: Repeat these steps for each PC on your network.
Multi-Tech Systems, Inc. RF550VPN User Guide 13
Chapter 3 – Configuring the PC
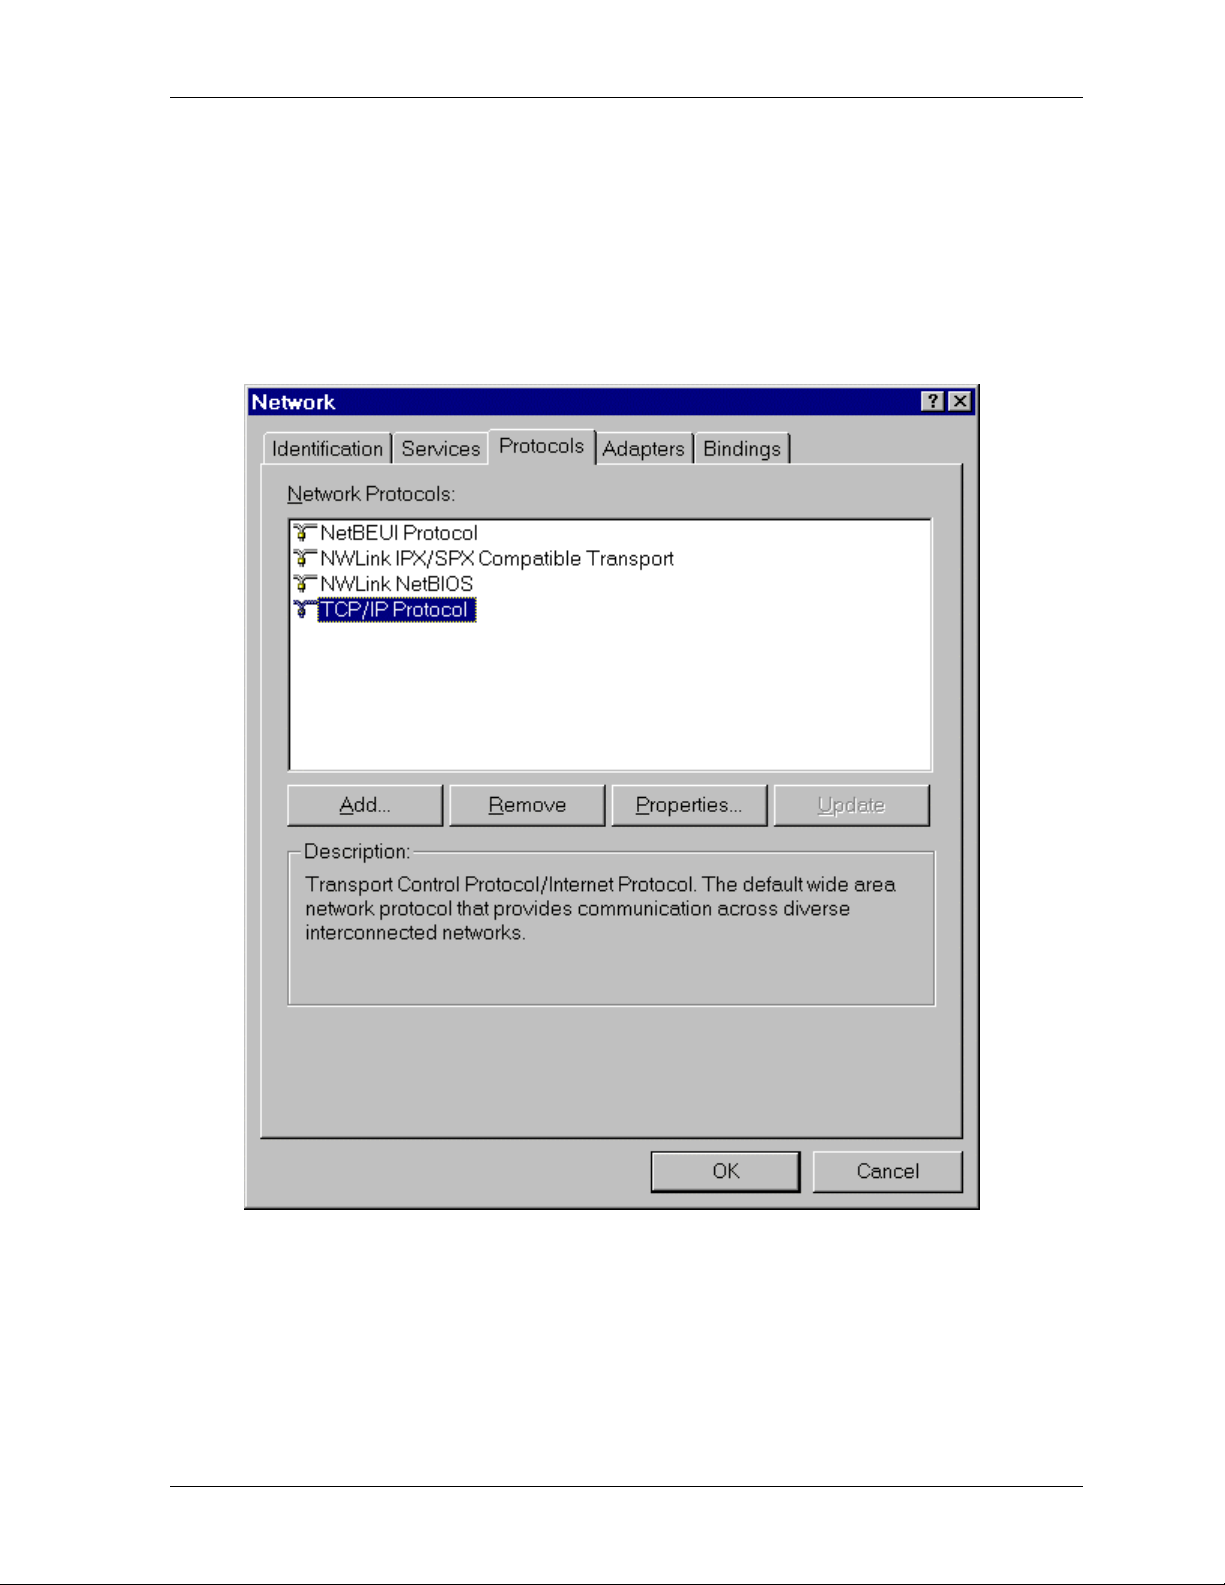
If Your Operating System Is Windows NT:
1. Click Start | Settings | Control Panel.
2. Double-click the
3. The Network dialog box displays. Click the Protocols tab. Select the TCP/IP protocol line
associated with your network card/adapter. If TCP/IP is not listed, see Appendix B for
installation directions.
4. Click the Bindings
Network icon.
tab.
Multi-Tech Systems, Inc. RF550VPN User Guide 14
Chapter 3 – Configuring the PC
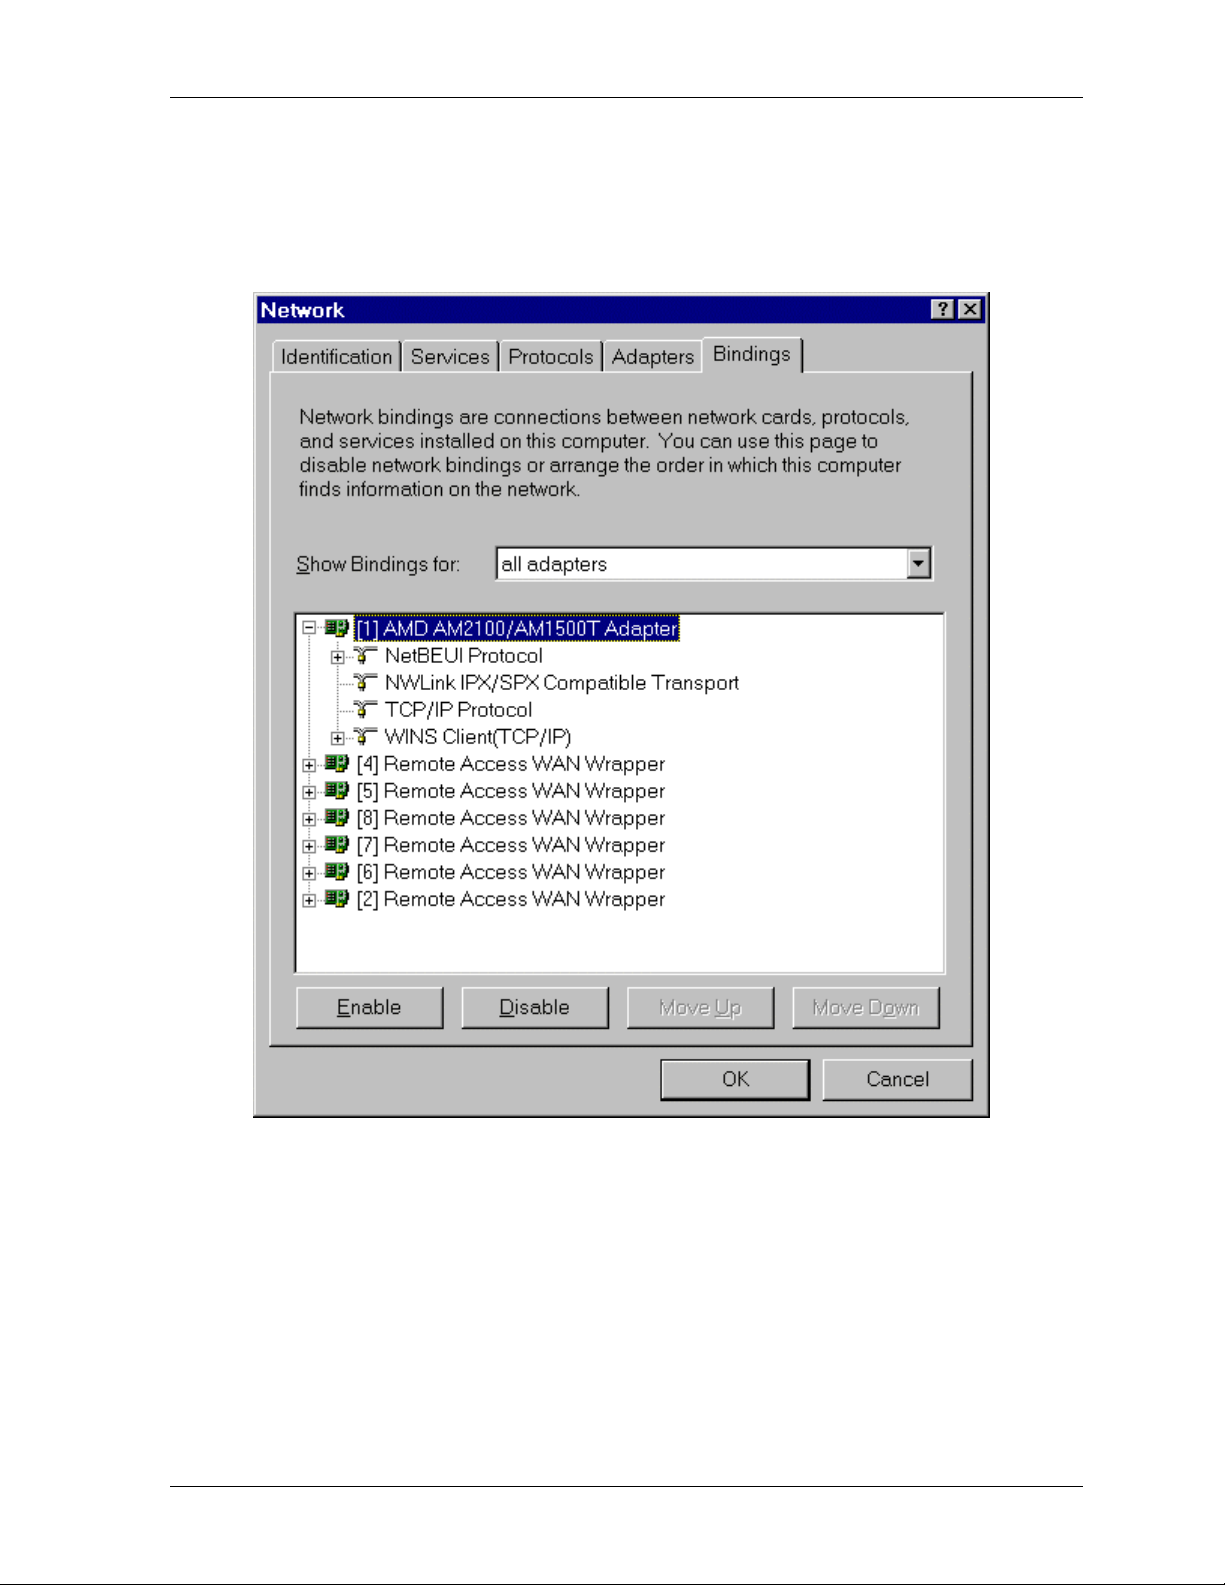
5. The Bindings dialog box displays.
In the Show Bindings for drop-down list box, select all adapters. A list of all adapters
displays on the lower part of the screen.
Double-click the entry for your Ethernet card adapter. This expands the list. Verify that TCP/IP
Protocol is included in the list below your adapter name.
6. TCP/IP and your adapter are now setup.
Multi-Tech Systems, Inc. RF550VPN User Guide 15
Chapter 3 – Configuring the PC
7. Next, select the Protocol tab to set your workstation’s IP Address.
8. Click the Properties button and choose one of the following:
· To set a Dynamic IP Address, check Obtain an IP Address Automatically. Dynamic Addresses
are used in the Example Reference Guide in
· To set a Fixed IP Address, check
Specify an IP address. Fixed Addresses are used in the
Example 2 – Site B and Example 3 – Site B.
Example Reference Guide in all the examples, except the two mentioned above. For our
example, set the address to
Click
OK.
192.168.2.x.
9. Close out of the Control Panel.
10. Repeat these steps for each PC on your network.
Multi-Tech Systems, Inc. RF550VPN User Guide 16
Chapter 3 – Configuring the PC
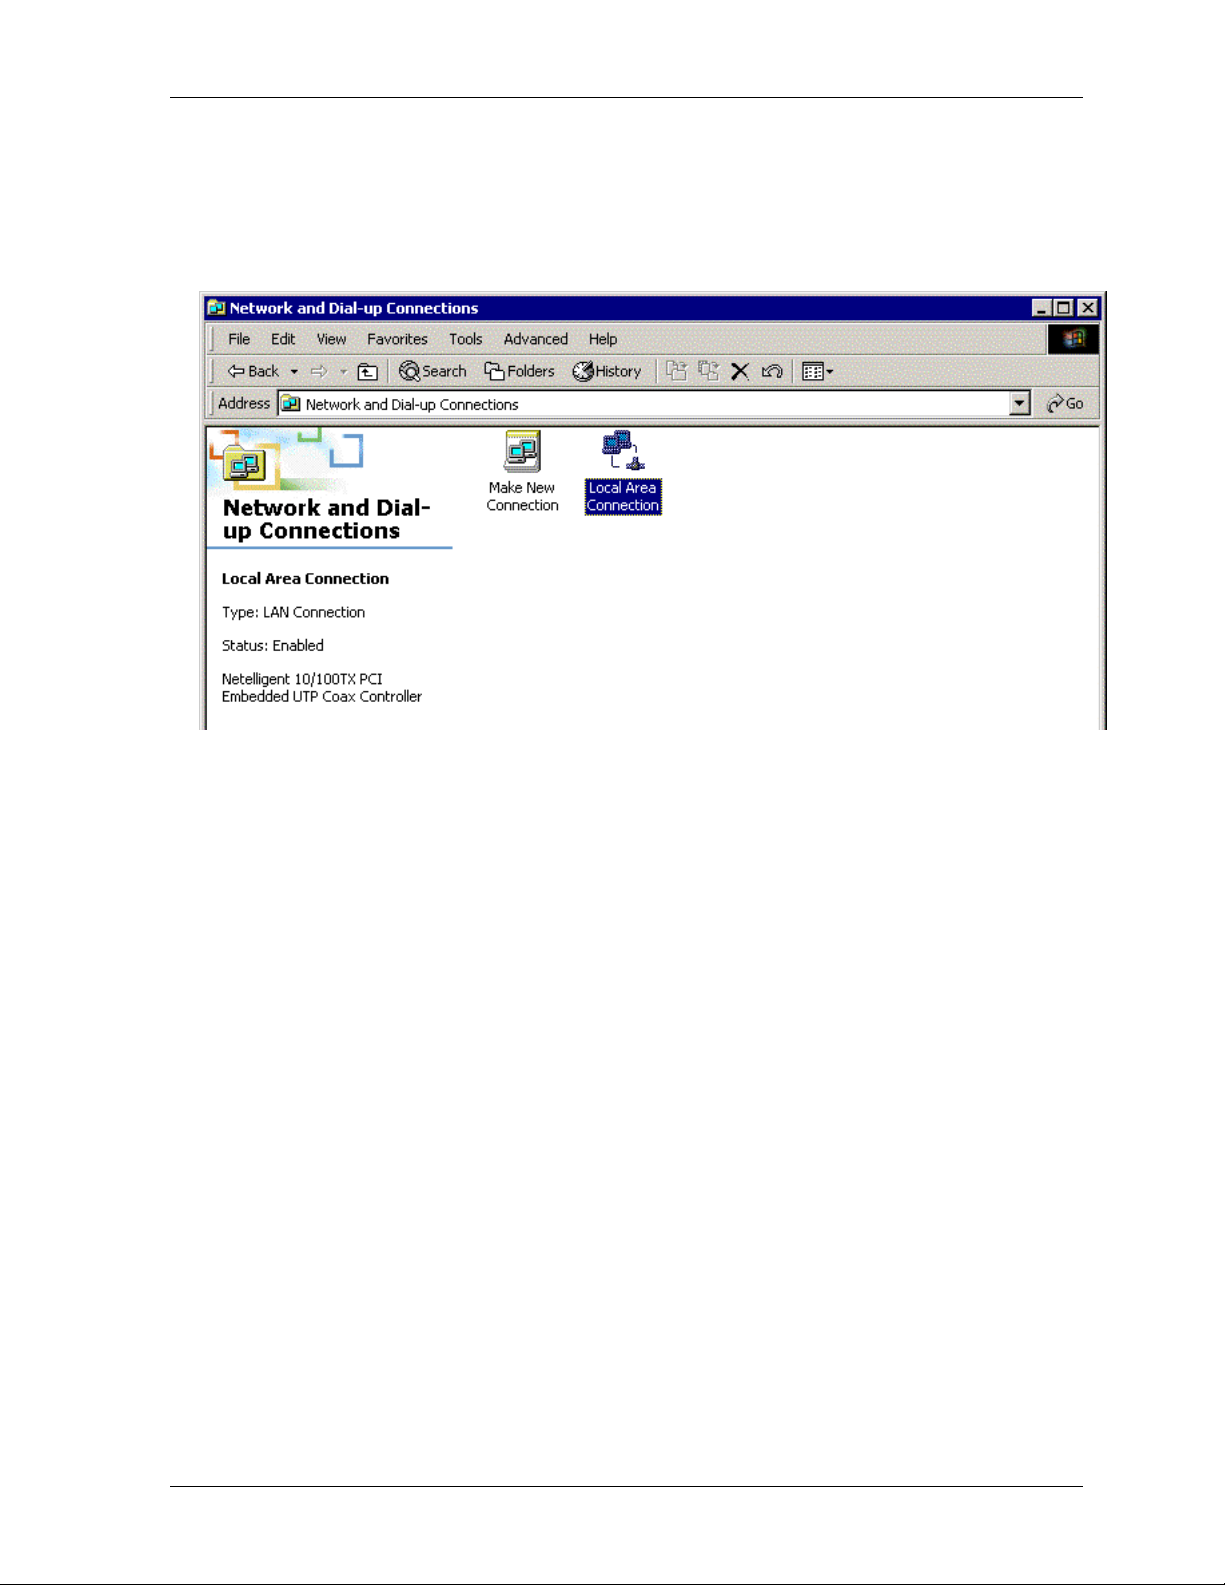
If Your Operating System Is Windows 2000/XP
1. Click Start | Settings | Control Panel. Double-click the Network and Dial-Up Connections icon.
2. The
Network and Dial-Up Connections screen displays. Right-click the Local Area Connection
icon and choose Properties.
Multi-Tech Systems, Inc. RF550VPN User Guide 17
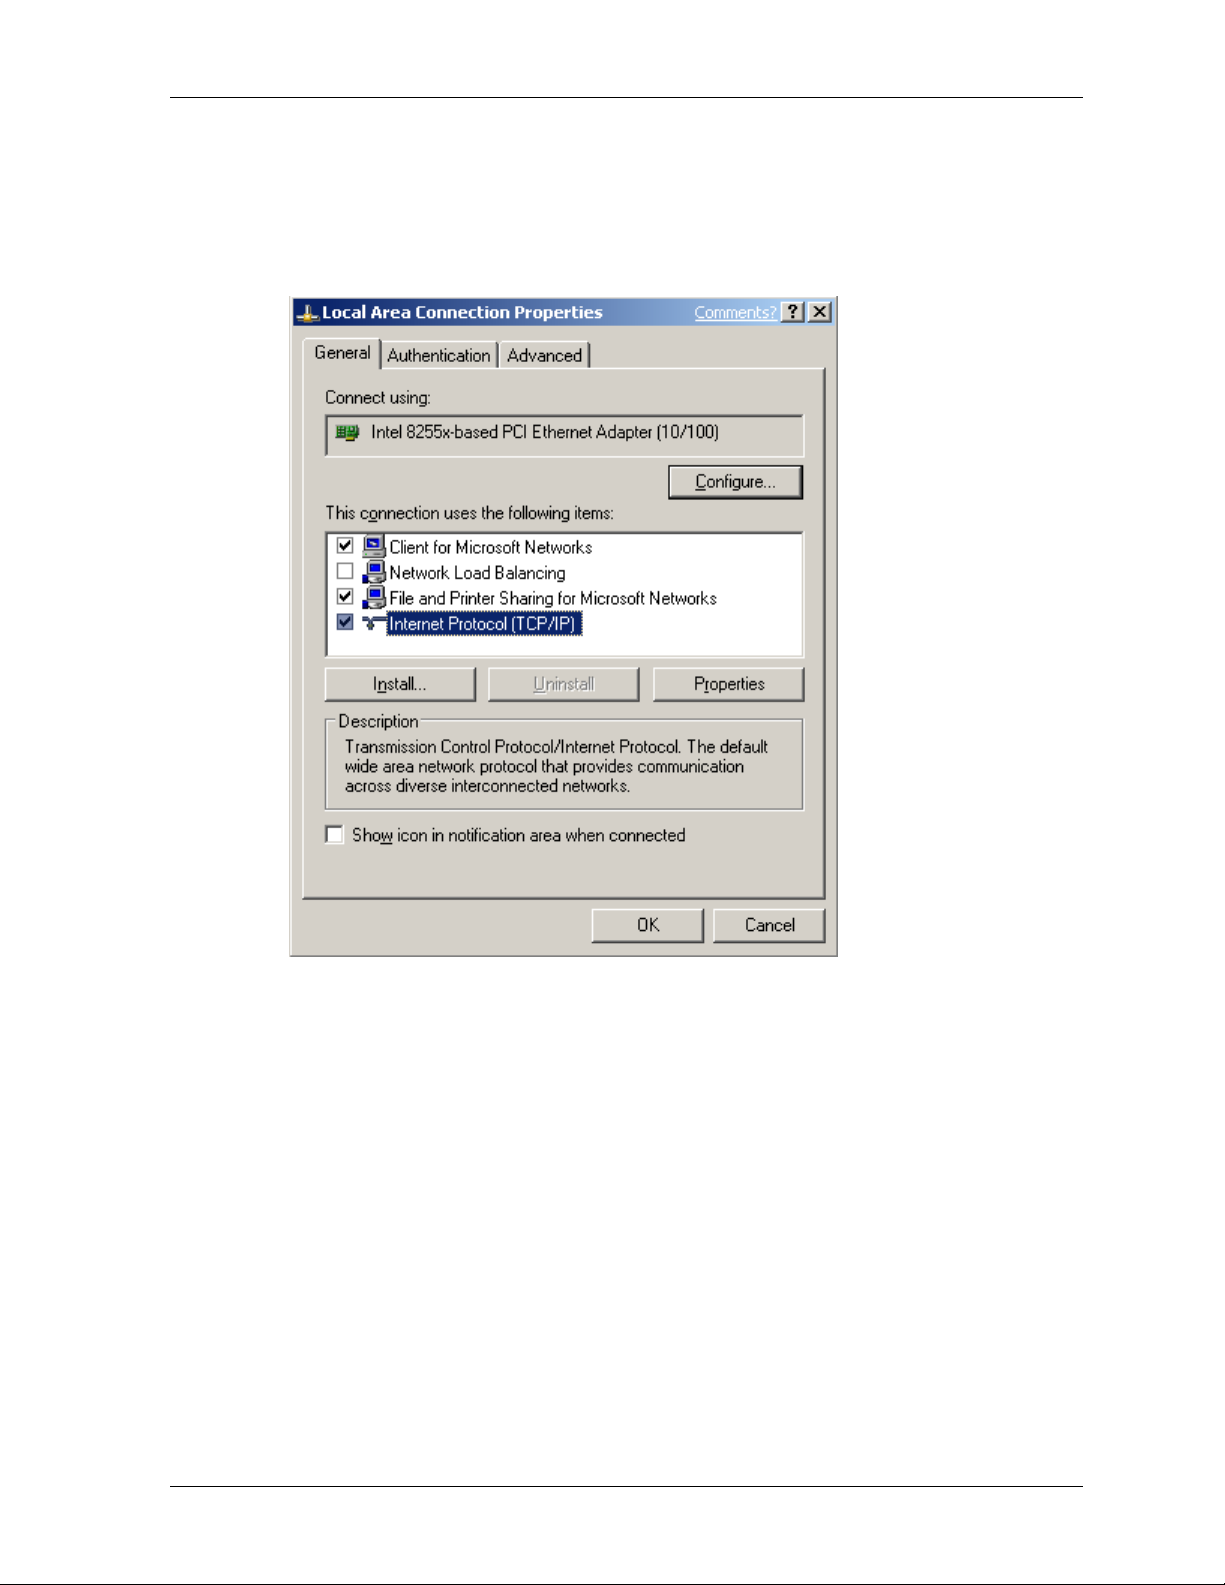
3. The Local Area Connection Properties dialog box displays.
Chapter 3 – Configuring the PC
· Select
Internet Protocol [TCP/IP]. Once the protocol is selected, the name of your adapter
card should display in the
· Click the
Properties button.
Connect using box.
4. The Internet Protocol (TCP/IP) Properties dialog box displays. You will set your workstation’s IP
Address.
· To set a Dynamic IP Address, check Obtain an IP Address Automatically. Dynamic
Addresses are used in Example 2 – Site B and Example 3 – Site B.
· To set a Fixed IP Address, check Specify an IP address. Fixed Addresses are used in all
the examples, except the two mentioned above. For our example, set the address to
192.168.2.x.
Click
OK.
5. Close out of the Control Panel.
6. Repeat these steps for each PC on your network.
Multi-Tech Systems, Inc. RF550VPN User Guide 18
Chapter 4 – Navigating the Screens
Chapter 4 – Navigating the Screens
Buttons on the Main Menu
When you select a function by clicking the button at the top of the screen, the button will change from
red to blue denoting that this is now the active screen.
Buttons on the Function Screens
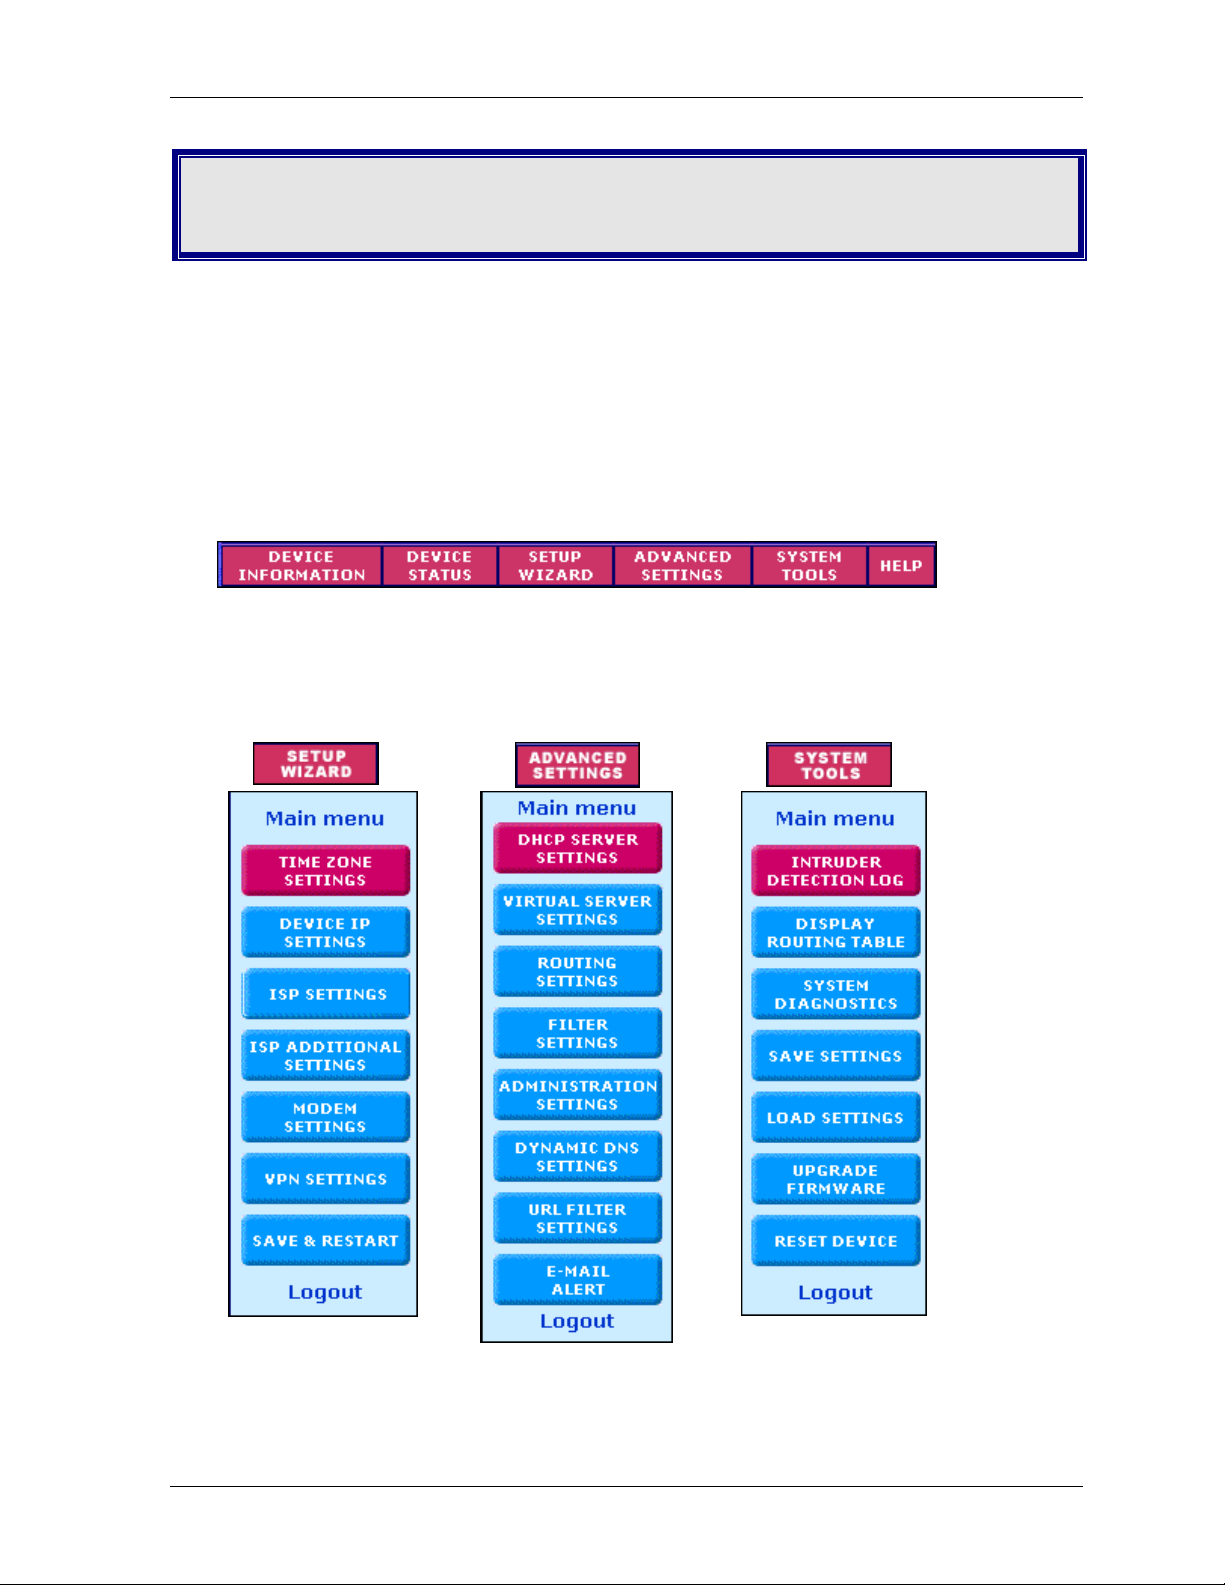
· Buttons at the Top of the Screen: These are the main function buttons. They allow you to move
from one function to another: Device Information, Device Status, Setup Wizard, Advanced
Settings, System Tools, and Help.
· Buttons on Side of the Screen: These are submenus under some of the main functions. When
you select one of these buttons, it will turn from red to blue denoting that this is now the active
selection.
· Links: Click on Main Menu to return to the Main Menu. Click on Logout to exit the program.
Multi-Tech Systems, Inc. RF550VPN User Guide 19
Chapter 5 – Managing the RouteFinder Using a Web Browser
Chapter 5 – Configuring the
RouteFinder Using a Web Browser
Now that the cabling is completed and each PC on the network is configured to accept the IP
addresses that the RouteFinder will provide, you are ready to configure your Router.
About the Browser Interface
Initial configuration is required in order for you to begin operation. The browser-based interface eases
VPN configuration and management.
About IPSec
The VPN functionality is based on the IPSec protocol and uses 168-bit Triple DES (3DES) encryption
to ensure that your information remains private.
Start the RF550VPN Configuration
1. Connect your workstation.
Be sure your workstation is connected to one of the RF550VPN’s LAN ports.
2. Apply power.
Apply power to the RF550VPN RouteFinder and allow the LEDs to stabilize on the unit.
3. Set the workstation IP address.
The directions for setting your workstation IP address are covered in Chapter 3.
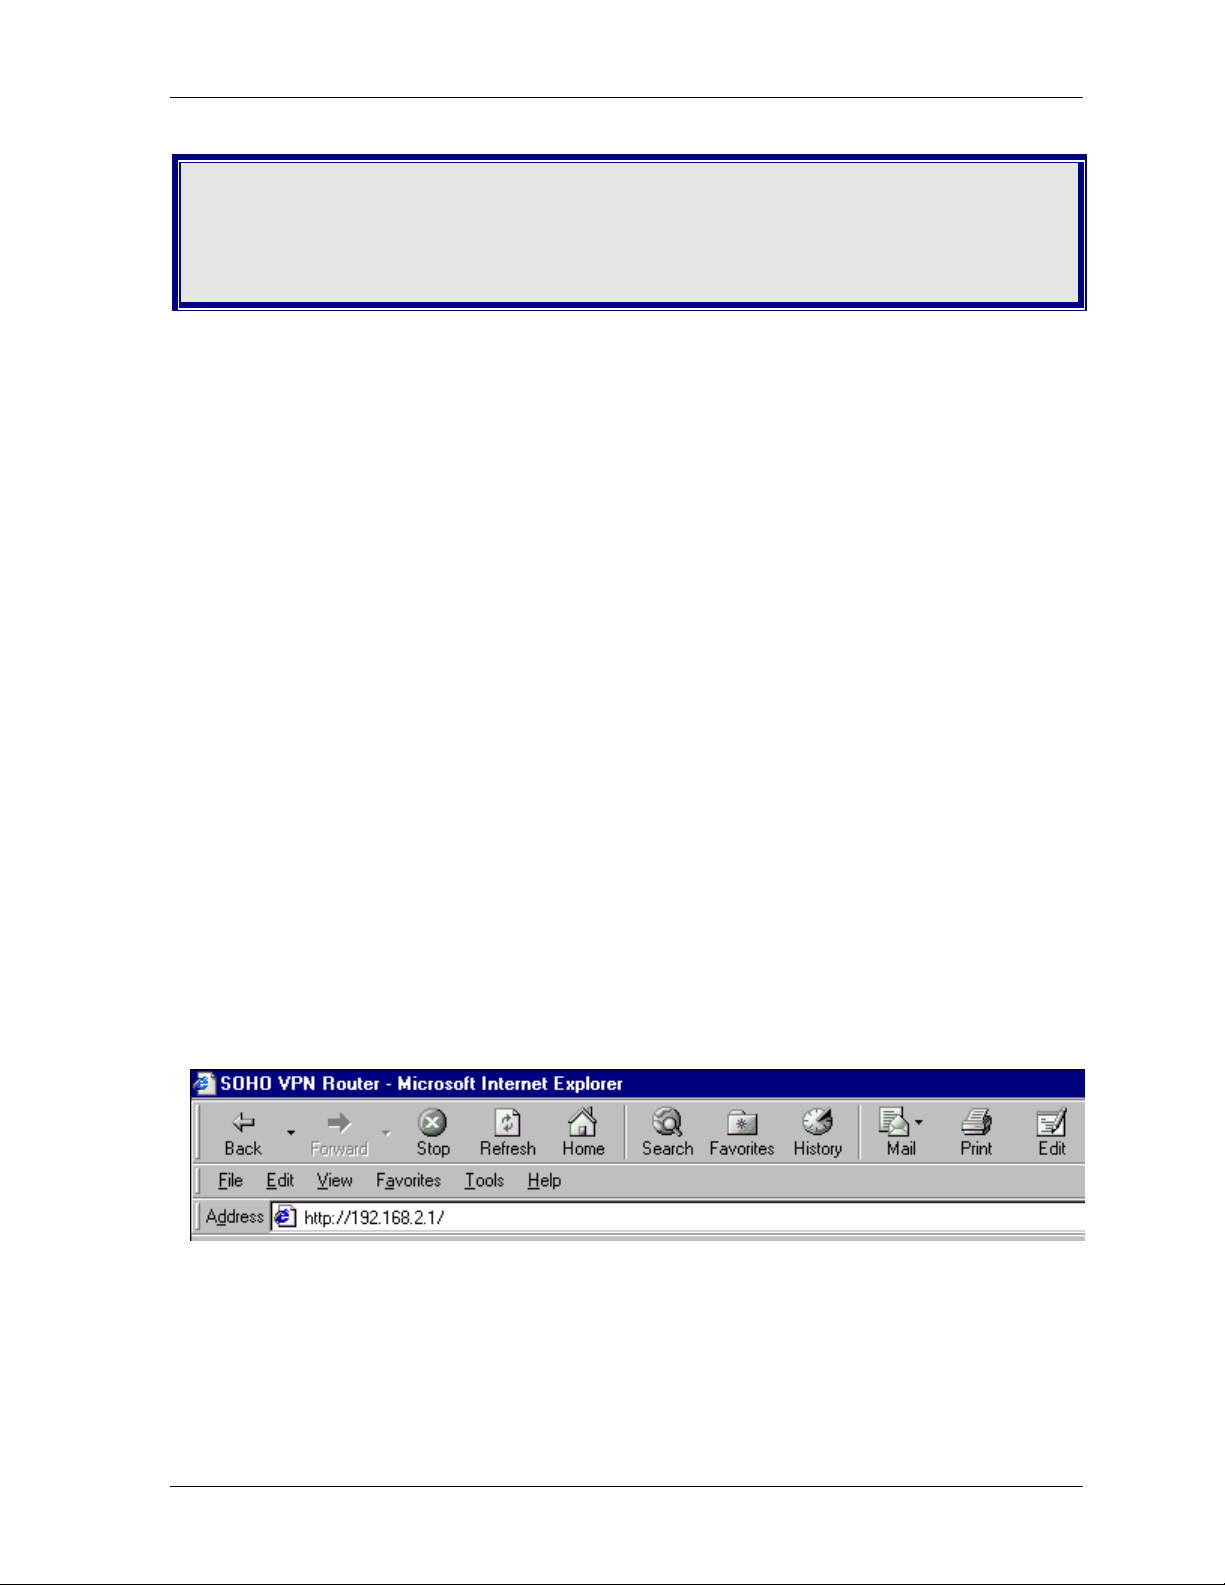
4. Open a Web browser.
· At the Web browser’s address line, type the RF550VPN IP address: http://192.168.2.1. This is
the default address of your RouteFinder.
· Press
Enter.
Note: Make sure your PC’s address is on the same network as the router’s address. WINIPCONFIG
and IPCONFIG are tools for finding out a PC’s IP configuration: the default gateway and the MAC
address. In Windows 95/98/Me, type
Multi-Tech Systems, Inc. RF550VPN User Guide 20
WINIPCONFIG. In Windows 2000/NT, type IPCONFIG.
Chapter 5 – Managing the RouteFinder Using a Web Browser
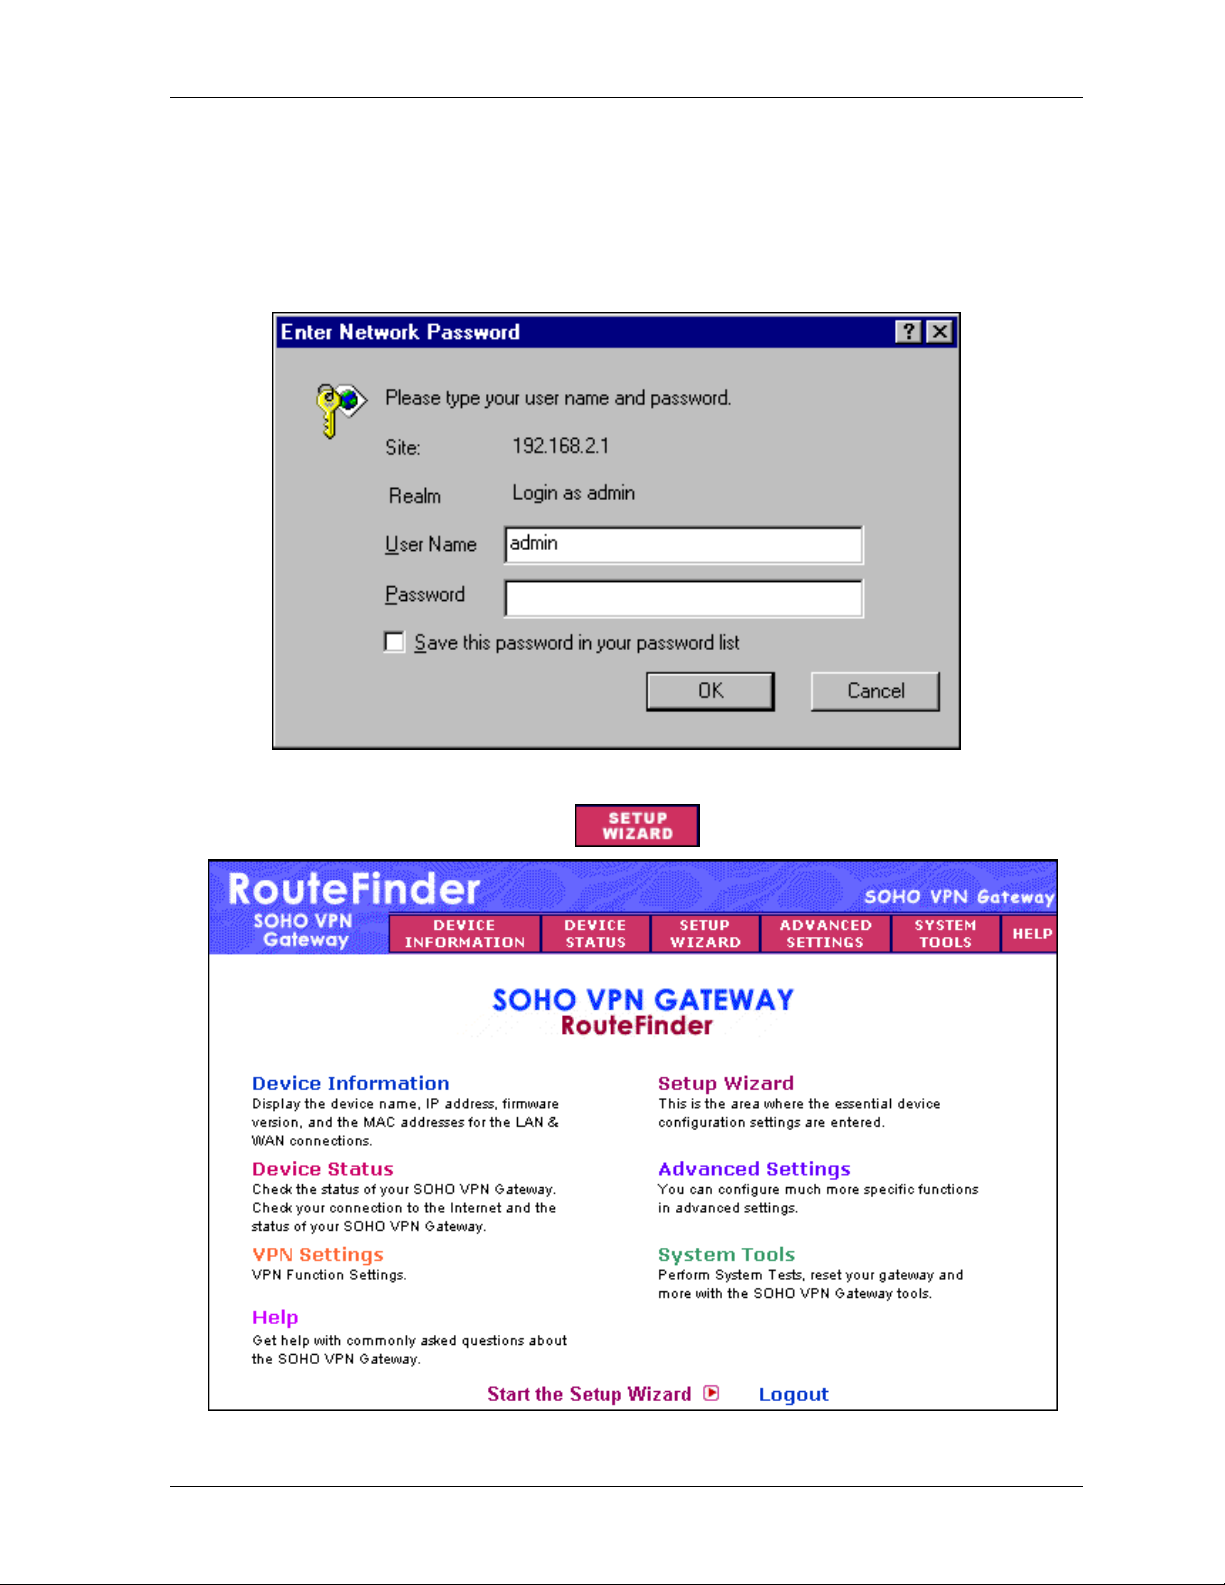
5. The Password dialog box displays. Type your network password.
· Type admin (admin is the default user name) in the user name box. Leave the password box
empty.
· Click
OK. The Setup Wizard screen displays.
Note: To change your password, select
Settings. See Chapter 6.
Advanced Settings and then choose Administrative
6. The Main Menu displays.
On the Main Menu, click the Setup Wizard button.
Multi-Tech Systems, Inc. RF550VPN User Guide 21
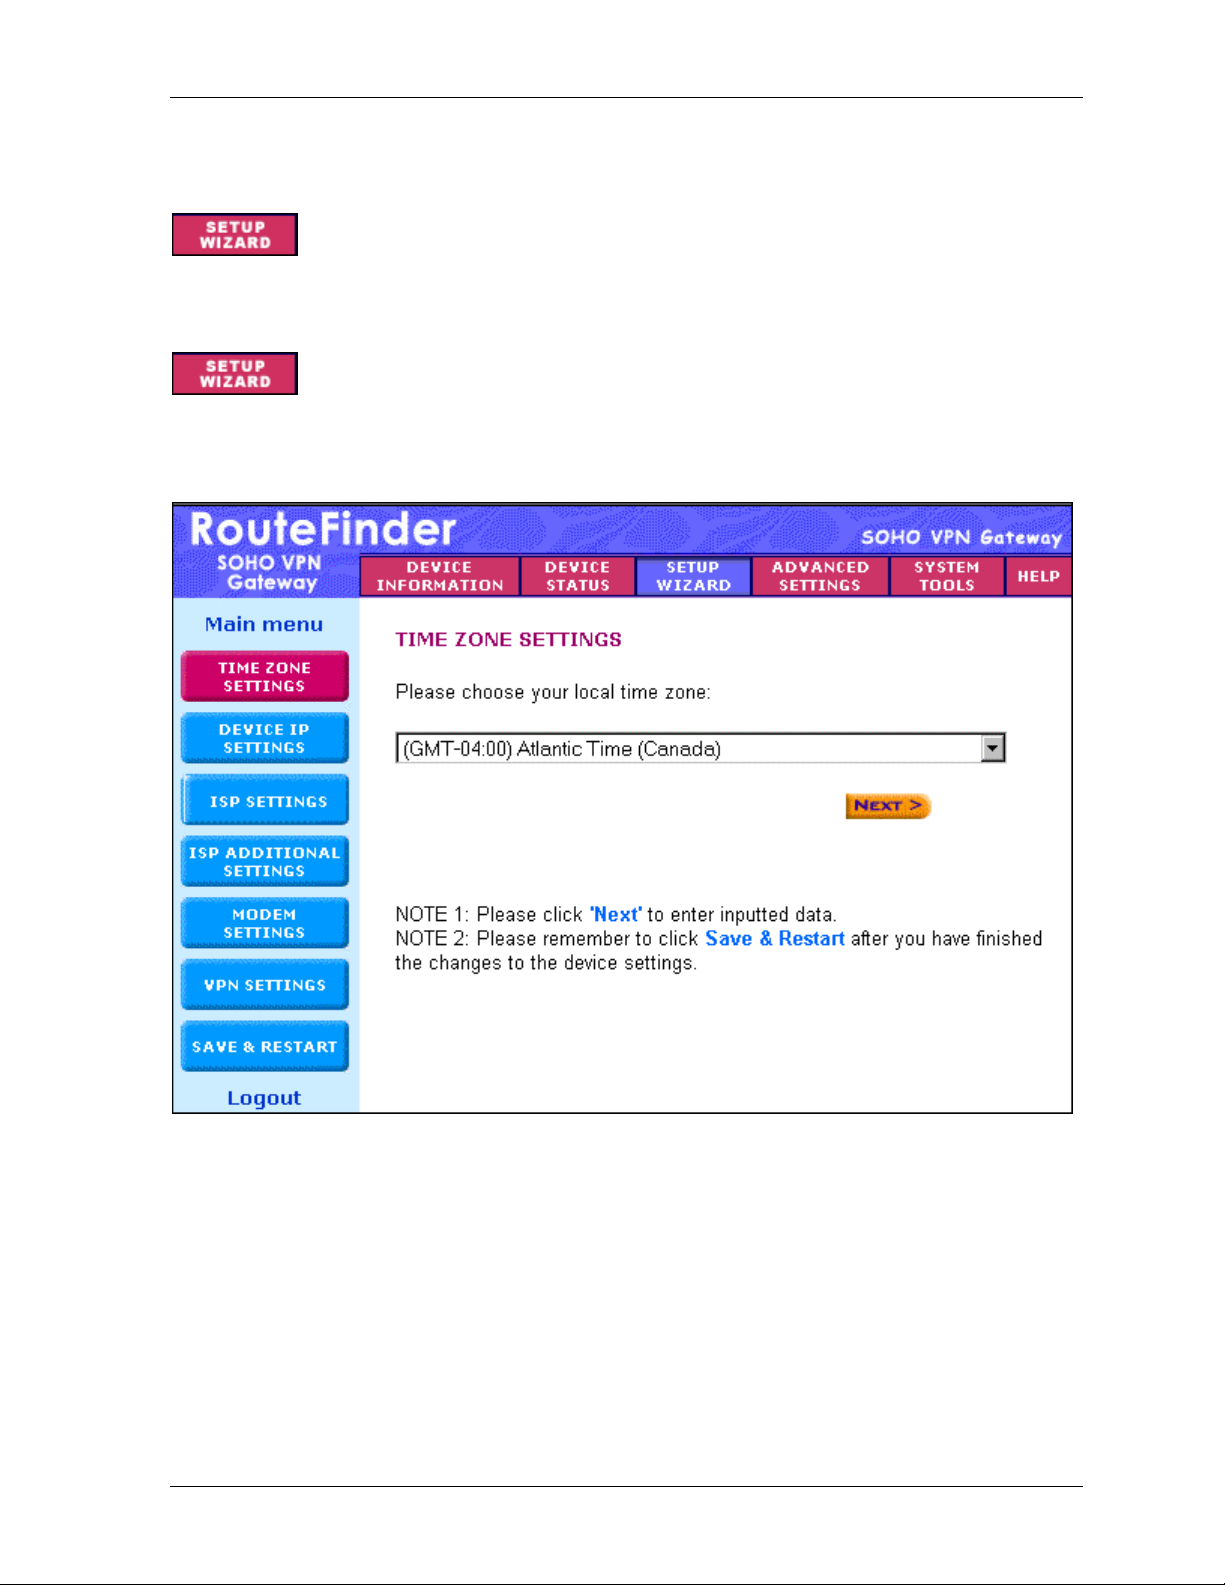
Setup Wizard
When the Setup Wizard screen displays, the Setup Wizard button will turn blue to
indicate that the screen is active.
Chapter 5 – Managing the RouteFinder Using a Web Browser
The following screen is the first
that lets you input all of the basic settings to configure your RF550VPN.
Setup Wizard screen. From here you will follow a step-by-step process
– Time Zone Selection
Select the time zone, and then click the Next button to continue. You can also click the buttons on the
left side of the screen. These buttons are useful when you want to change the information on
individual screens or to choose your own setup order.
Multi-Tech Systems, Inc. RF550VPN User Guide 22
Chapter 5 – Managing the RouteFinder Using a Web Browser
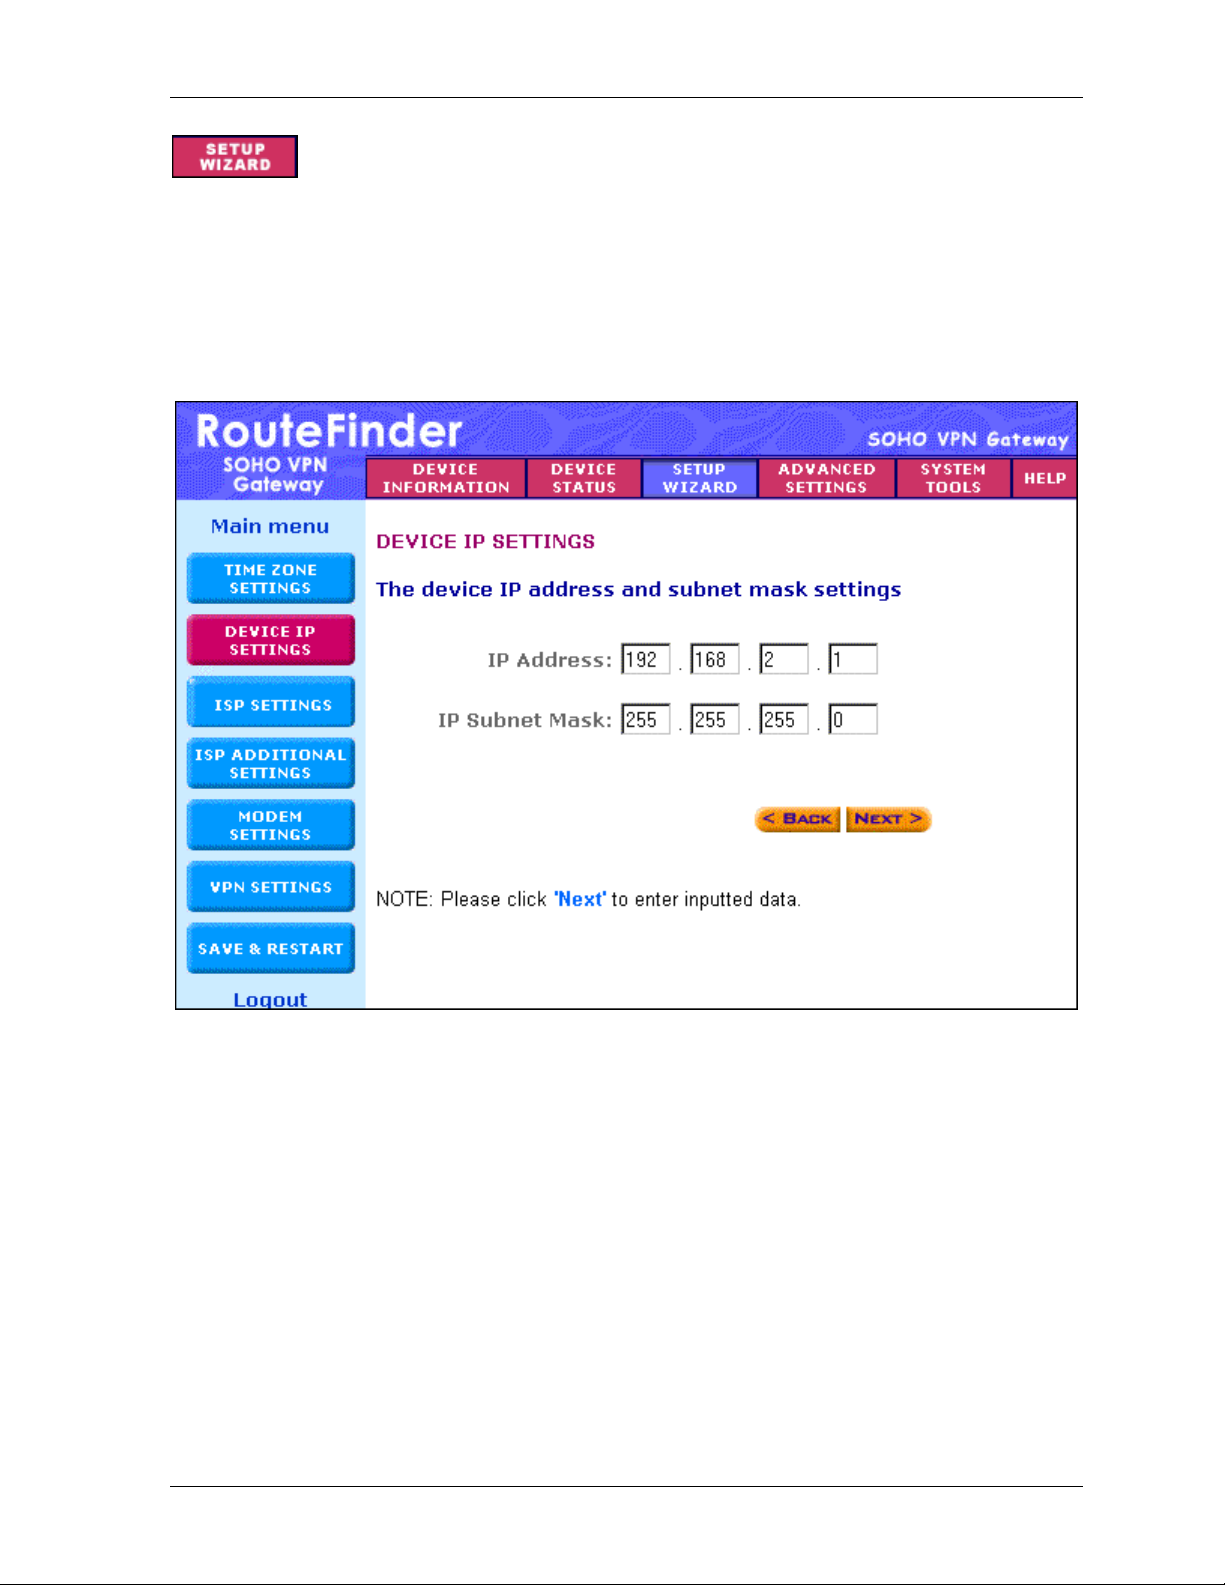
– Device IP Settings
On this screen, enter the internal LAN IP address that you want to assign to the LAN port of the
RF550VPN. This is not the IP address from your ISP – it is the local internal LAN IP address.
Device IP Address: The default IP address of your RF550VPN:
Device IP Subnet Mask: The subnet mask can usually be left at its default of
Click the Next button.
192.168.2.1.
255.255.255.0.
Multi-Tech Systems, Inc. RF550VPN User Guide 23
 Loading...