

Page 1

User Guide
Proxy
Model MTPSR1-100
Page 2

User Guide
82083700 Revision A
ProxyServer (Model No MTPSR1-100)
All rights reserved. Copyright © 1998, by Multi-Tech Systems, Inc.
This publication may not be reproduced, in whole or in part, without prior expressed written permission from
Multi-Tech Systems, Inc. Multi-Tech Systems, Inc. makes no representations or warranties with respect to
the contents hereof and specifically disclaims any implied warranties of merchantability or fitness for any
particular purpose. Furthermore, Multi-Tech Systems, Inc. reserves the right to revise this publication and to
make changes from time to time in the content hereof without obligation of Multi-Tech Systems, Inc. to notify
any person or organization of such revisions or changes.
Record of Revisions
Revision Description
A Manual released. All pages at revision A.
(6/1/98)
Patents
This Product is covered by one or more of the following U.S. Patent Numbers: 5.301.274; 5.309.562;
5.355.365; 5.355.653; 5.452.289; 5.453.986. Other Patents Pending.
TRADEMARK
The Multi-Tech logo is a trademark of Multi-Tech Systems, Inc.
Windows is a registered trademark of Microsoft.
Mounds View , Minnesota 55112
(612) 785-3500 or (800) 328-9717
Tech Support (800) 972-2439
BBS (612) 785-3702 or (800) 392-2432
Internet Address: http://www.multitech.com
Fax-Back (612) 717-5888
Multi-Tech Systems, Inc.
2205 Woodale Drive
Fax 612-785-9874
Page 3

Contents
Chapter 1 - Introduction and Description
Introduction ................................................................................................................................................ 5
The ProxyServer Utilities............................................................................................................................ 5
ProxyServer Features and Benefits ........................................................................................................... 6
Some ProxyServer FAQs........................................................................................................................... 6
Chapter 2 - ProxyServer Wizard
Introduction ................................................................................................................................................ 7
The ProxyServer Wizard ............................................................................................................................ 8
Step 1: Select the Device you Wish to Configure ................................................................................ 8
Step 2: Set the Device’s IP Address and Name................................................................................... 8
Step 3: Input your ISP Information for Internet Access ........................................................................ 9
Step 4: Input your ISP’s DNS Server IP Address .............................................................................. 10
Step 5: Select Modem and Set Baudrate...........................................................................................10
Step 6: Verify the Setup Configuration................................................................................................11
Final ProxyServer Wizard Notes .............................................................................................................. 12
Chapter 3 - ProxyServer Manager
Introduction .............................................................................................................................................. 13
Running the ProxyServer Manager from Your Desktop ........................................................................... 13
General Settings ...................................................................................................................................... 14
Server IP Address.............................................................................................................................. 14
Server Subnet Mask .......................................................................................................................... 14
External (Port) IP Address................................................................................................................. 14
DNS Server IP Address(s) ................................................................................................................. 14
Allow connection to be established by dial-in .................................................................................... 14
Callback T elephone Number.............................................................................................................. 15
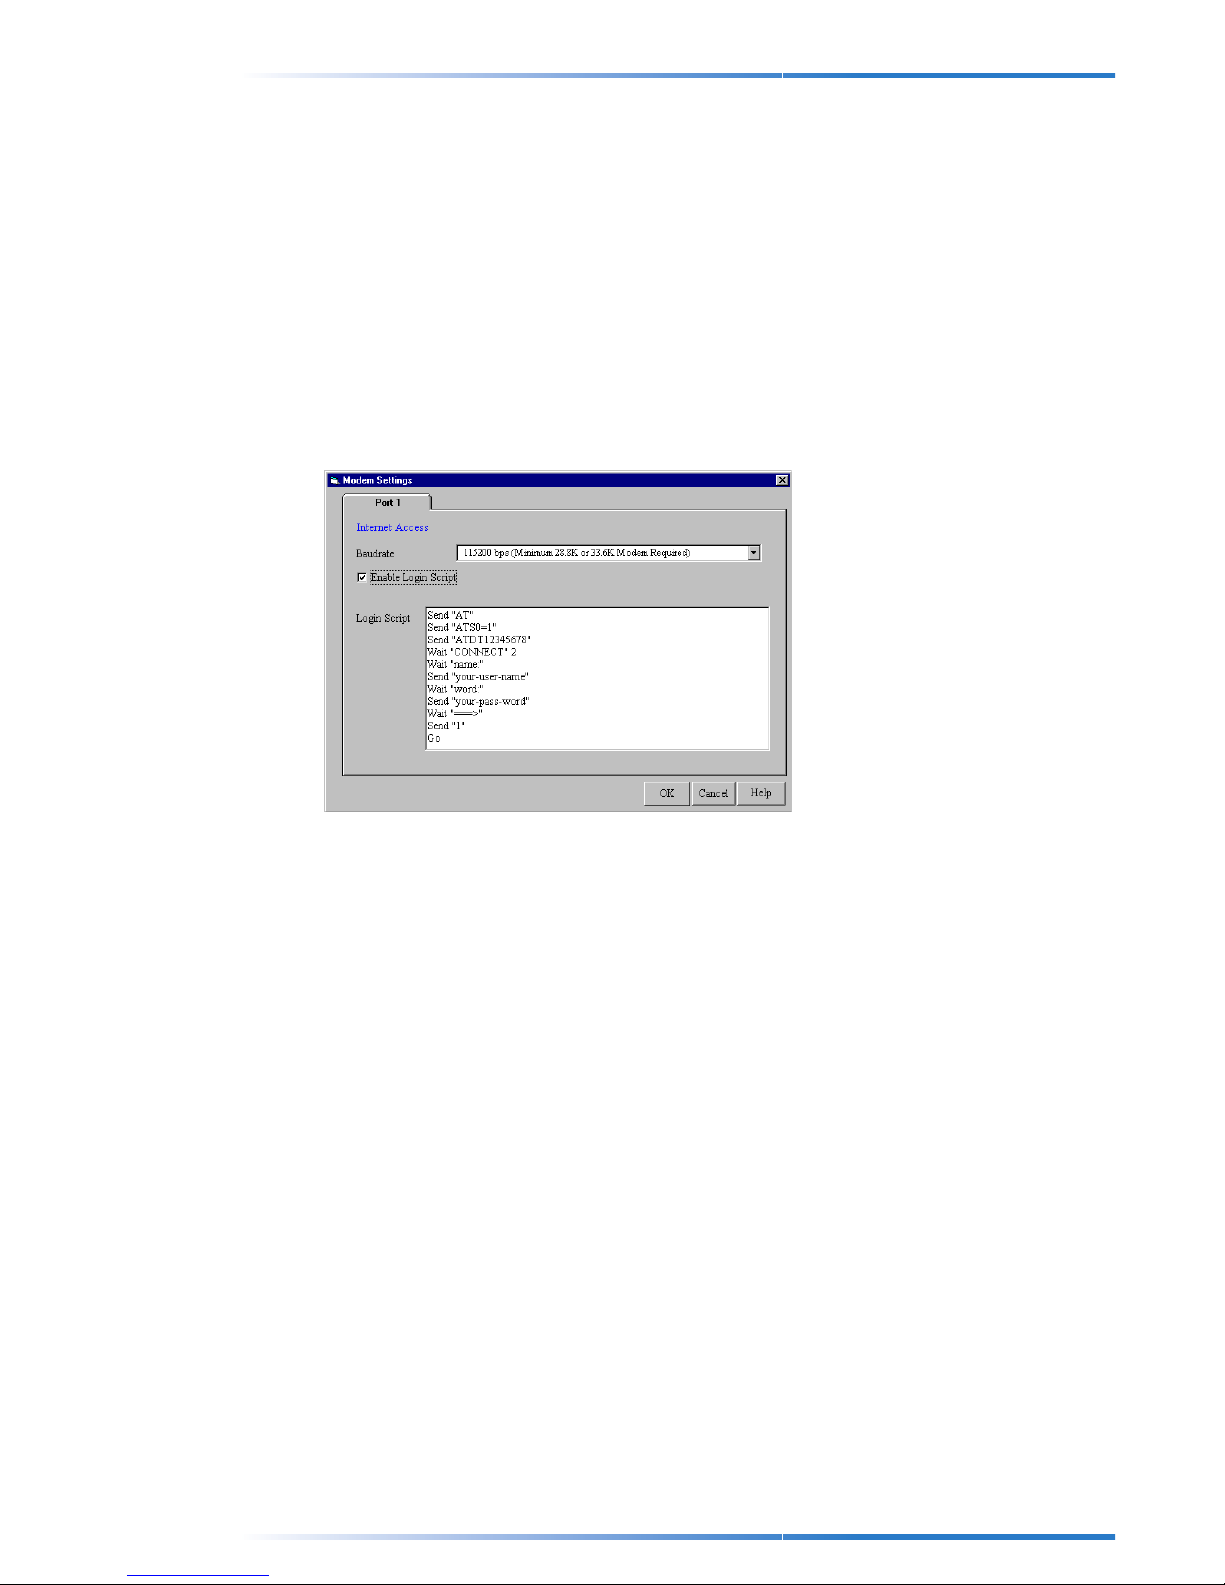
Modem Settings ....................................................................................................................................... 16
Baudrate ............................................................................................................................................ 16
Select Modem and Modem String Setting ......................................................................................... 16
Enable Login Script............................................................................................................................ 17
Writing a Login script................................................................................................................................ 18
Step A) Learn the ProxyServer Login Script Commands Available to you......................................... 18
Step B) Get Login Script Information ................................................................................................. 19
Step C) Make your login Script .......................................................................................................... 20
Dialup/Hangup Settings......................................................................................................... ................... 22
Individual Port Options....................................................................................................................... 22
DHCP Server ........................................................................................................................................... 23
DHCP Function .................................................................................................................................. 23
IP Address Pool ................................................................................................................................. 23
IP Address Mapping Reservation....................................................................................................... 23
Routing T able .................................................................................................................. ......................... 24
What is the purpose of the routing table? .......................................................................................... 24
Virtual Server Mapping............................................................................................................................. 26
Virtual Server Mapping Example (Web or other Server).................................................................... 26
Client Filter Settings ................................................................................................................................. 27
Server Name and Password .................................................................................................................... 27
Save Settings to File ................................................................................................................................ 28
Load Settings .................................................................................................................. ......................... 28
Upgrade Firmware ............................................................................................................... .................... 29
General Diagnostic................................................................................................................................... 29
iii
Page 4

Chapter 4 - ProxyServer Monitor
ProxyServer Monitor ................................................................................................................................ 31
Test Connection ................................................................................................................................. 32
Event Messages ................................................................................................................................ 32
T erminate Connection........................................................................................................................ 32
Save to File........................................................................................................................................ 32
TCP/IP Tab ........................................................................................................................................ 33
Connection Time Tab ......................................................................................................................... 33
Status Tab.......................................................................................................................................... 34
Chapter 5 - ProxyServer Clients
Setting Up ProxyServer Clients................................................................................................................ 35
Step 1 - Install TCP/IP Protocol on each ProxyServer Client PC ...................................................... 35
Step 2 - Assign IP Address to Each ProxyServer Client .................................................................... 37
Step 3 - Set Internet Applications to Connect Through LAN.............................................................. 39
Step 4 - Important Notes.................................................................................................................... 40
Chapter 6 - Troubleshooting
Tools for Your ProxyServer....................................................................................................................... 41
Tool A - ProxyServer Monitor ............................................................................................................. 41
Tool B - PING..................................................................................................................................... 41
Tool C - WINIPCFG and IPCONFIG ..................................................................................................42
Tool D - TRACERT............................................................................................................................. 42
Troubleshooting T ime ............................................................................................................................... 43
Chapter 7 - Warranty, Service and Technical Support
Introduction .............................................................................................................................................. 45
Limited Warranty ...................................................................................................................................... 45
Online Warranty Registration............................................................................................................. 46
Tech Support ............................................................................................................................................ 46
Recording ProxyServer Information................................................................................................... 46
Service ..................................................................................................................................................... 47
The Multi-Tech BBS ................................................................................................................................. 48
To log on to the Multi-Tech BBS......................................................................................................... 48
To Download a file.............................................................................................................................. 48
About CompuServe.................................................................................................................................. 50
About the Internet..................................................................................................................................... 50
About the Multi-Tech Fax-Back Service ................................................................................................... 50
Glossary
iv
Page 5

Introduction
If you haven’t already done so, go through your Installation Manual which details how to
install the ProxyServer and the ProxyServer utilities. Be sure to follow all instructions.
Congratulations on purchasing the best in networking technology . The ProxyServer acts
as a central dial-out Internet access point for all of your network clients. The
ProxyServer accomplishes this by allowing all of your network clients to simultaneously
share:
• 1 Modem or ISDN TA
• 1 regular dial-up account from your ISP.
• 1 IP address that can be either dynamic or static
The ProxyServer Utilities
The ProxyServer utilities include:
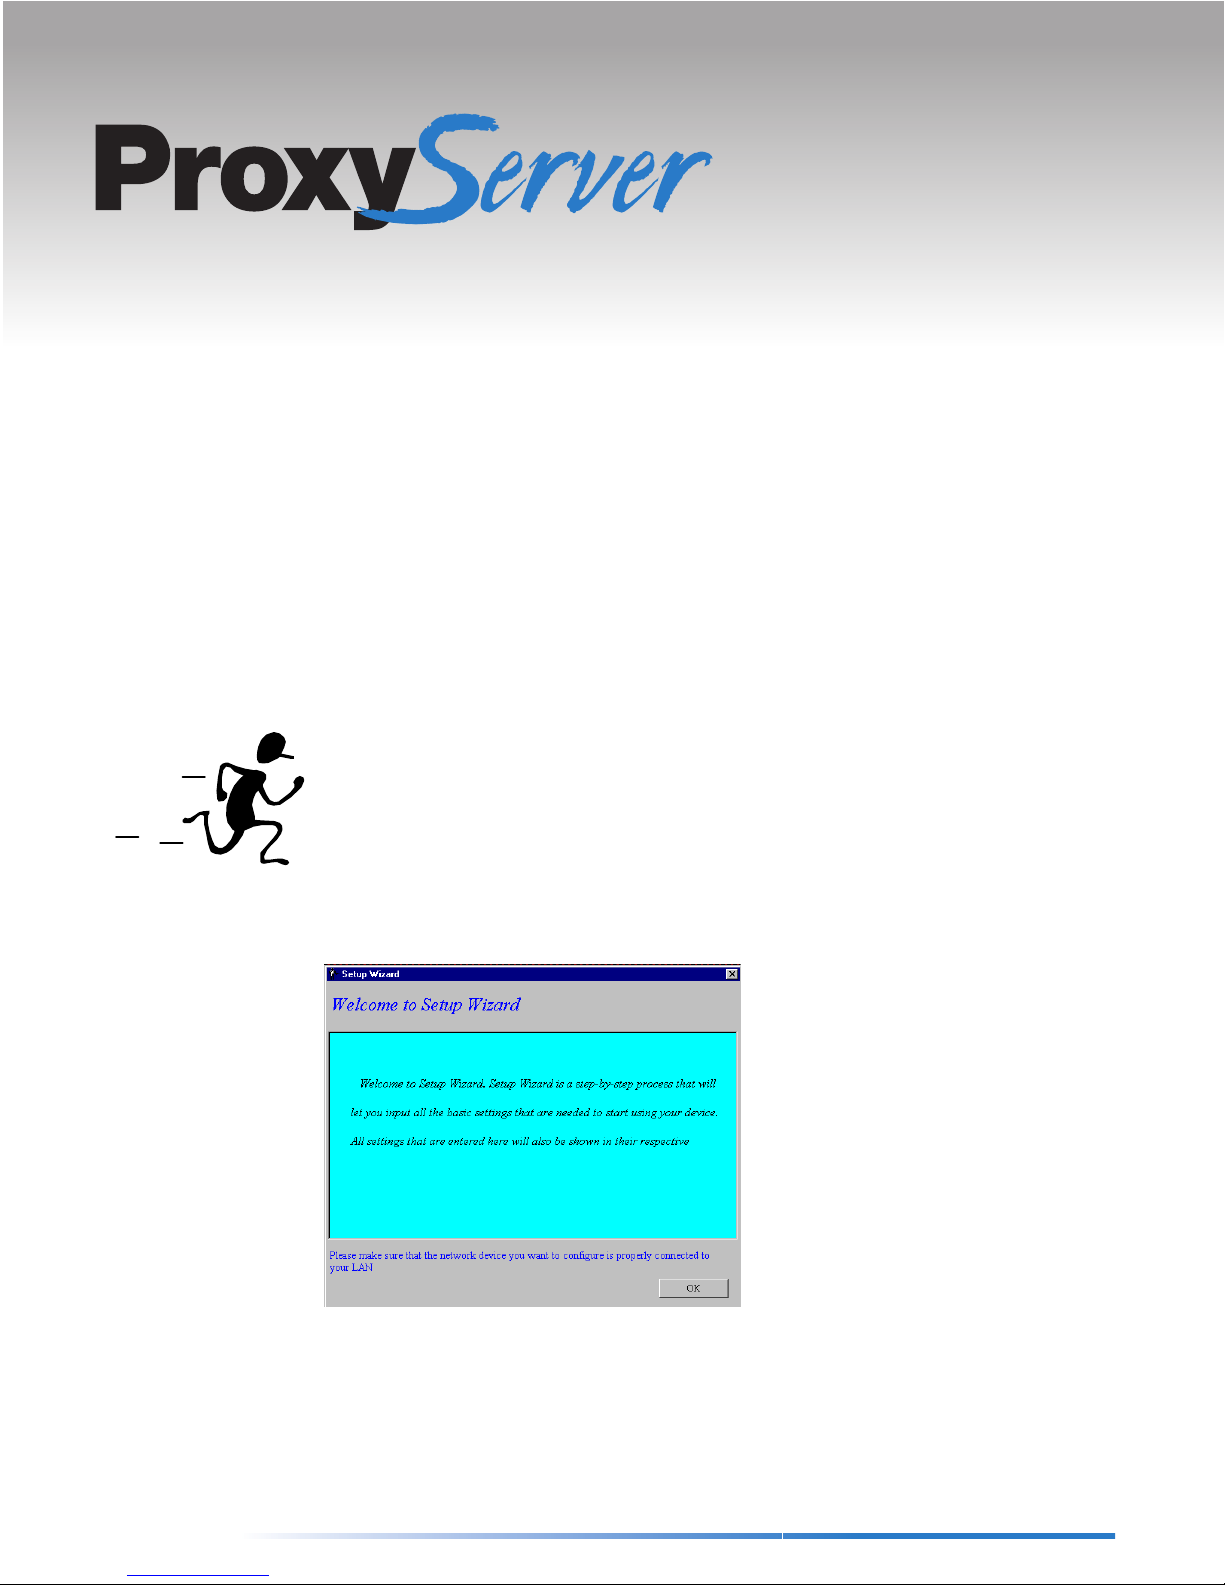
• ProxyServer Wizard: A step-by-step process that will let you input all the basic
settings that are needed to configure your ProxyServer for general usage. All
settings that are entered here will also be shown in their respective menus in
ProxyServer Manager.
Chapter
ONE
1
Introduction and Description
• ProxyServer Manager: ProxyServer Manager is the main program used to
configure all the settings of your ProxyServer.
• ProxyServer Monitor: ProxyServer Monitor is a multipurpose utility that was
designed for letting you know the status of your ProxyServer connection. It provides
a step-by-step event monitor whereby on each event you can point and click to bring
up an on-line help screen that will advise you of any troubleshooting procedures that
are needed.
5
Page 6

ProxyServer User Guide
ProxyServer Features and Benefits
• Built-in DHCP Server can automatically assign your network clients their IP
information and gateway.
• Dial-on-Demand eliminates the need for dial-up utilities and also dials-out only when
needed saving on phone and ISP charges.
• Idle-Time out automatically disconnects the connection if there has been no traffic
for a set period of time.
• Flash ROM allows firmware to be easily upgraded.
• Internal Firewall prevents unauthorized access to your network.
• Client Filter lets you decide which clients on your network are allowed access to
which services (Internet, E-mail, etc.).
• Virtual Server allows you to set up your own Web or FTP (File Transfer Protocol)
server. Also provides support for Internet Telephony, Chat and Video Conferencing.
• 460K bps baud rate easily supports 128K bps ISDN TAs or 56K bps analog
modems.
Some ProxyServer FAQs
Its a Proxy
who?
Q: Can the ProxyServer support both dynamic and fixed IP addresses?
A: Yes, the ProxyServer supports both dynamic and fixed IP addresses.
Q: How many simultaneous sessions can the ProxyServer handle?
A: The ProxyServer serial port can simultaneously handle 16 FTP sessions plus 32
others (Telnet, mail, etc.).
Q : How many simultaneous clients can the ProxyServer handle?
A : The serial port on the ProxyServer can handle 32 simultaneous clients.
Q : How many workstations on a LAN can the ProxyServer handle?
A : The ProxyServer can handle up to 253 workstations on your LAN.
Q : Can the ProxyServer be used with Novell or other Networks?
A : Yes, for the ProxyServer to work, just install TCP/IP protocol on client computers. The
computers don’t have to interact with Novell or any other servers to access the
ProxyServer.
6
Page 7
Introduction
Chapter
TWO
ProxyServer Wizard
2
ProxyServer Wizard
easily . It is a step-by-step process that will let you input all the basic settings that are
needed to configure your ProxyServer for general usage. All settings that are entered
here will also be shown in their respective menus in ProxyServer Manager.
After you have installed the ProxyServer utilities, you will automatically be brought into
ProxyServer Wizard
To Run
| ProxyServer Wizard.
ProxyServer
is a program that will let you configure your ProxyServer quickly and
.
Wizard from Windows 95/NT, click Start | Programs | ProxyServer
7
Page 8
ProxyServer User Guide
The ProxyServer Wizard
The following steps will guide through the installation and setup of your ProxyServer.
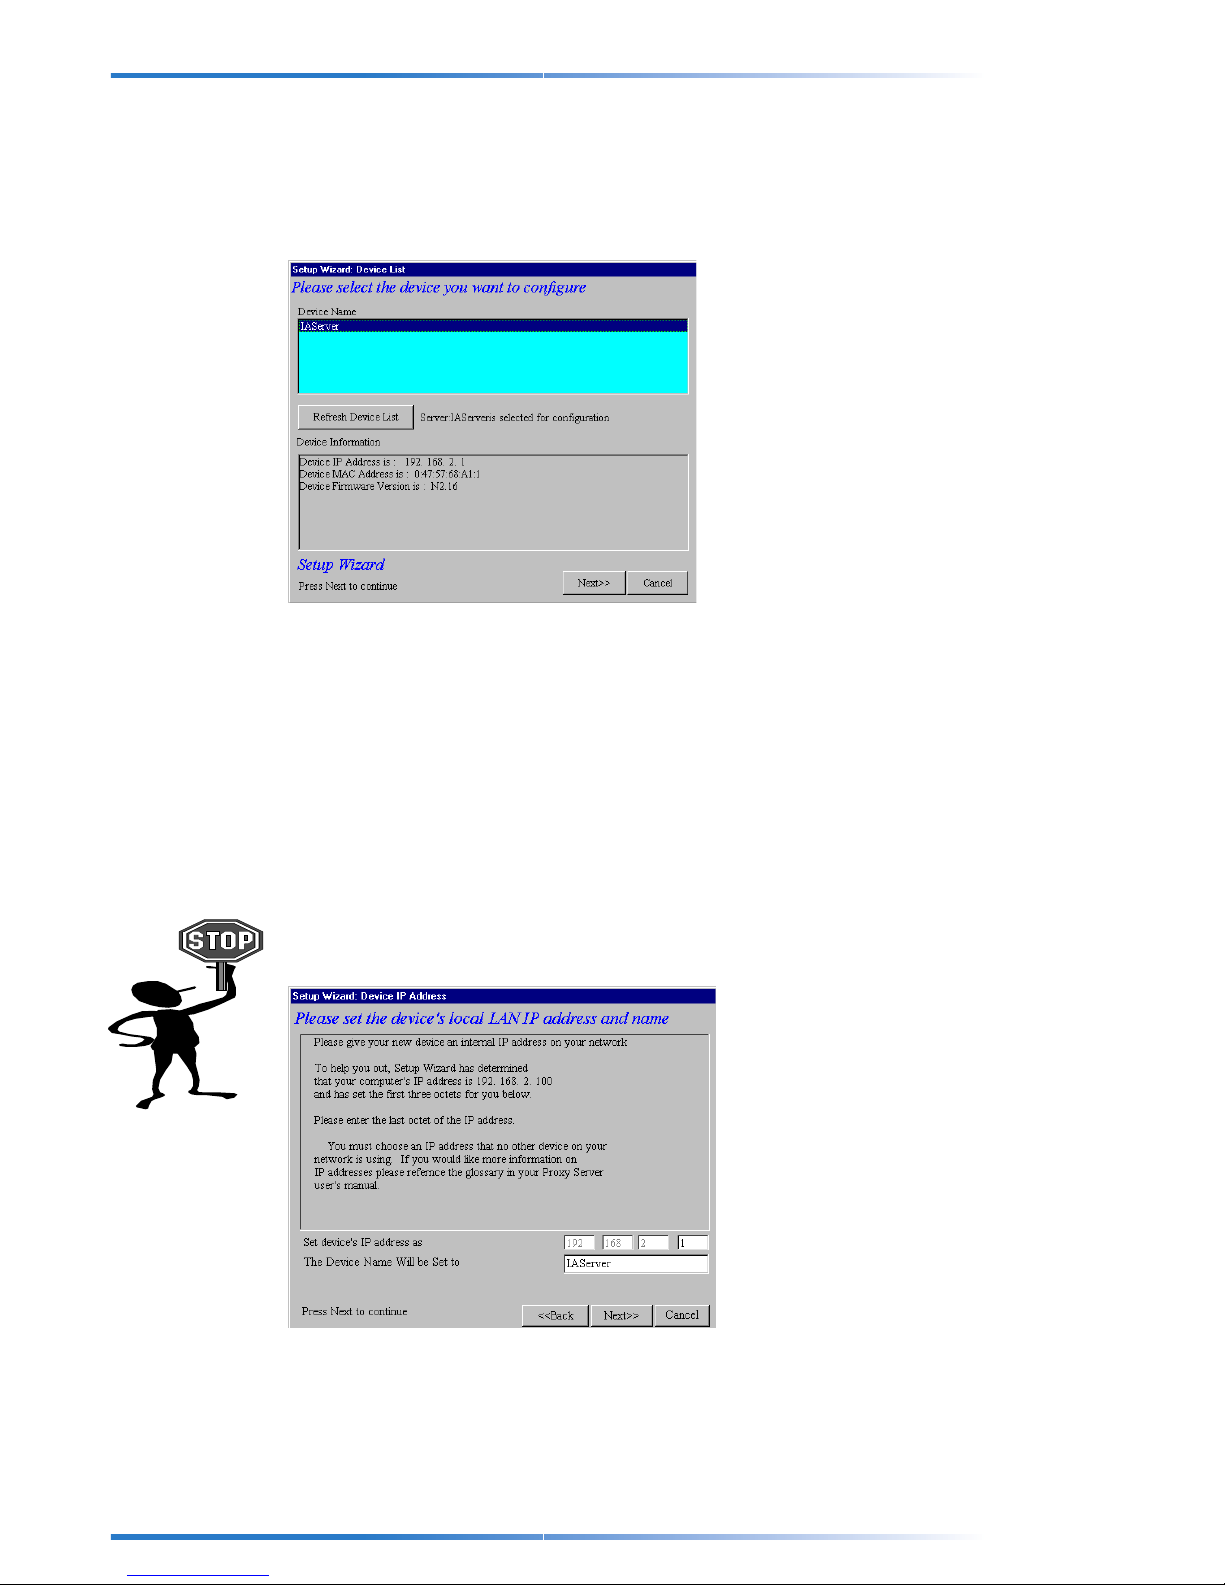
Step 1: Select the Device you Wish to Configure
ProxyServer Wizard
servers which will be displayed in the device list. You can click the “Refresh Device List”
button to update this list.
The first thing you must do is select the ProxyServer that you will be configuring from the
Device Name list.
Click Next to continue.
will automatically check your network for available ProxyServer
Step 2: Set the Device’s IP Address and Name
The next thing you must do is give your ProxyServer an IP address on your network.
This is NOT the IP address from your ISP but the local, internal LAN IP address.
Note: Please Pick an IP address that won’t conflict with any other PCs or devices on
your network.
The first three octets of every device or computer’s IP address on your network should
be the same. ProxyServer Wizard will help you by automatically detecting the IP
address of your computer and set the first three octets for you. You need only decide the
last octet.
When you are finished, click Next to Continue.
8
Page 9
Chapter 2 - ProxyServer Wizard
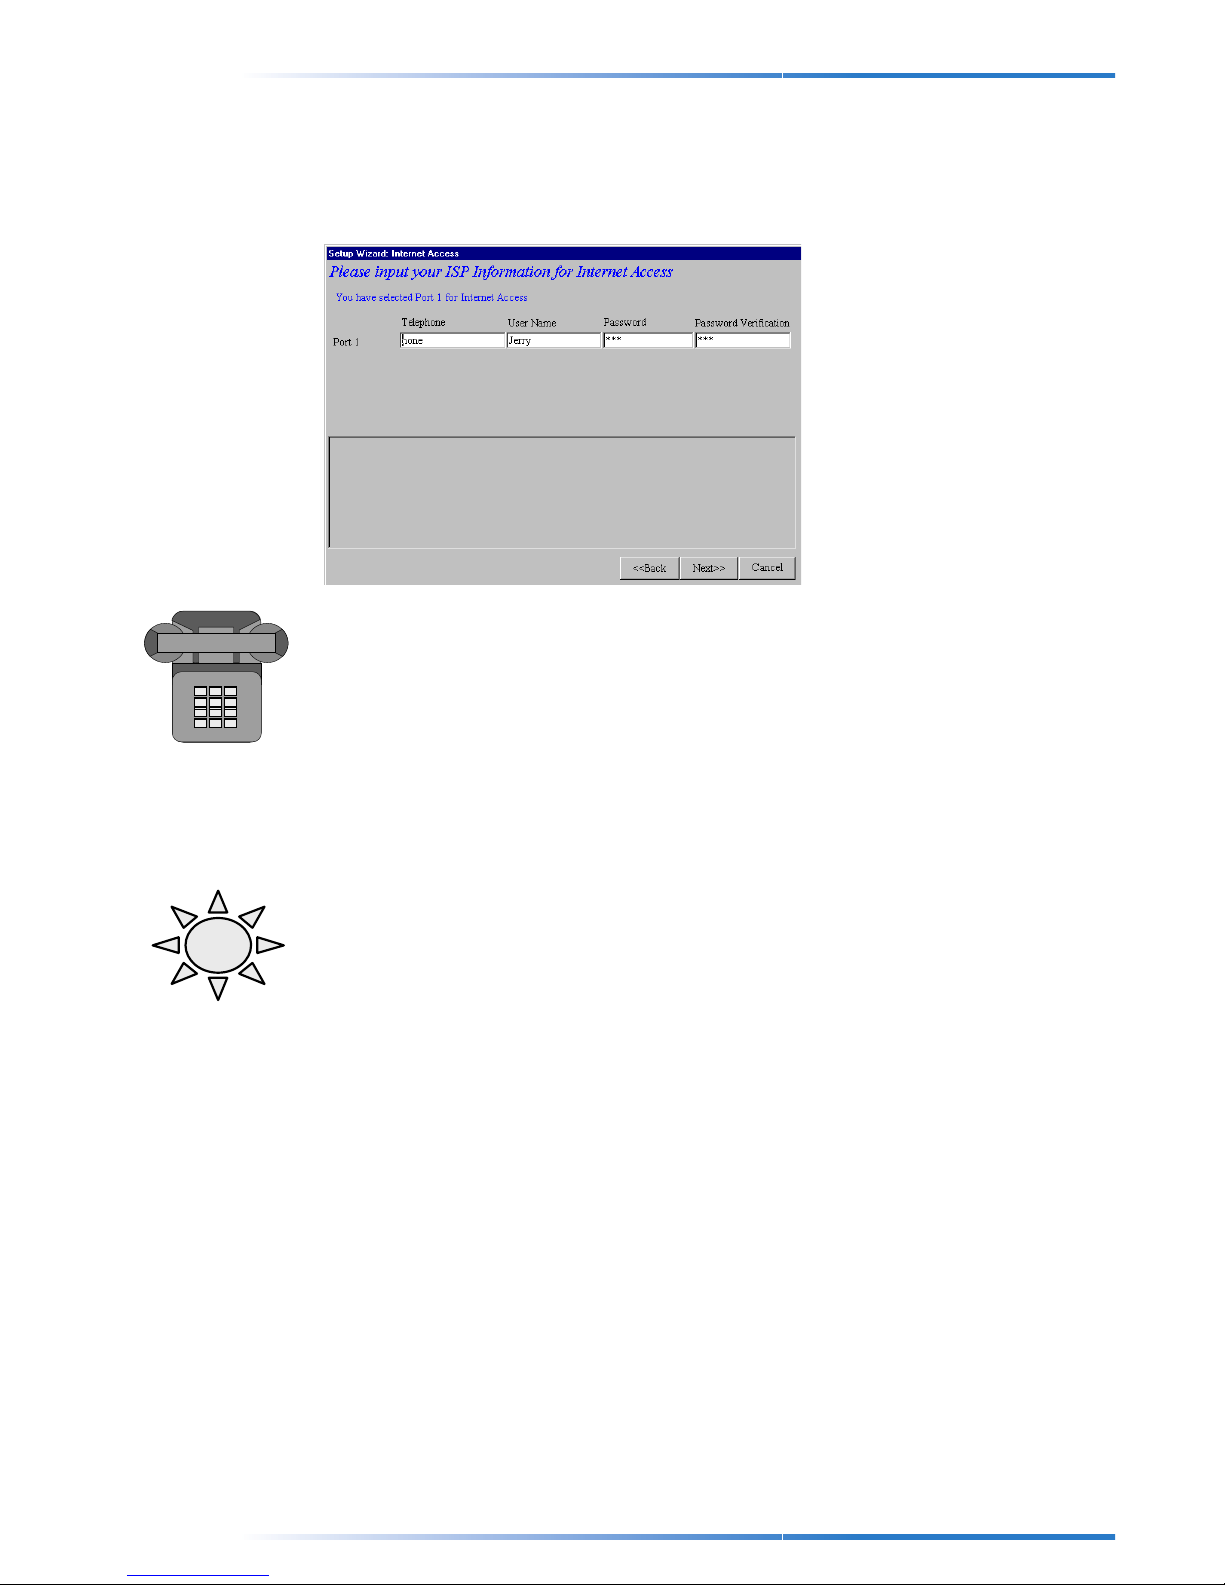
Step 3: Input your ISP Information for Internet Access
The next thing you must do is input your ISP (Internet Service Provider) information
which will be used to dial-up and login to your ISP when your clients use their Internet
applications.
Telephone Number
TA
Enter your ISP’s telephone number in the Telephone Number field.
Note: If in your office or company you must dial a number to get an outside line (For
example this is often the number “9” or “0”), you should enter the number plus a “w”
which will instruct the ProxyServer to wait until a dial-tone is received before dialing. For
example the phone number 555-2323 which uses 9 to get an outside line would be
entered as 9w555-2323. The ProxyServer also supports commas which function as
delay variables. So our example number could also be entered as 9,,5552323. Each
comma will provide around a 3-4 second delay.
Note: ISDN TA Setup
If you would like to bundle your two ISDN B-channels together, you need to enter the two
phone numbers in the T elephone Number field. Usually ISDN TAs support either the “+”
or “&” command so when entering the phone numbers you can enter them as either, for
example, “555-2323 + 555-2121” or “555-2323 & 555-2121”. If your ISDN TA doesn’t
support “+” or “&” you should see your ISDN TA user’s manual to see how it is possible
to enter the two phone numbers.
!!! Extremely Important !!!
Please also make sure you read the ISDN TA Setup note when you get to the “Select
Modem and Baudrate” step of
ProxyServer Wizard
.
User Name
Enter the user name of your ISP account in the User Name field.
Password
Enter the Password of your ISP account in the Password field and then re-confirm it be
entering it again in the Password Verification field.
When you have finished, click Next to continue
9
Page 10
ProxyServer User Guide
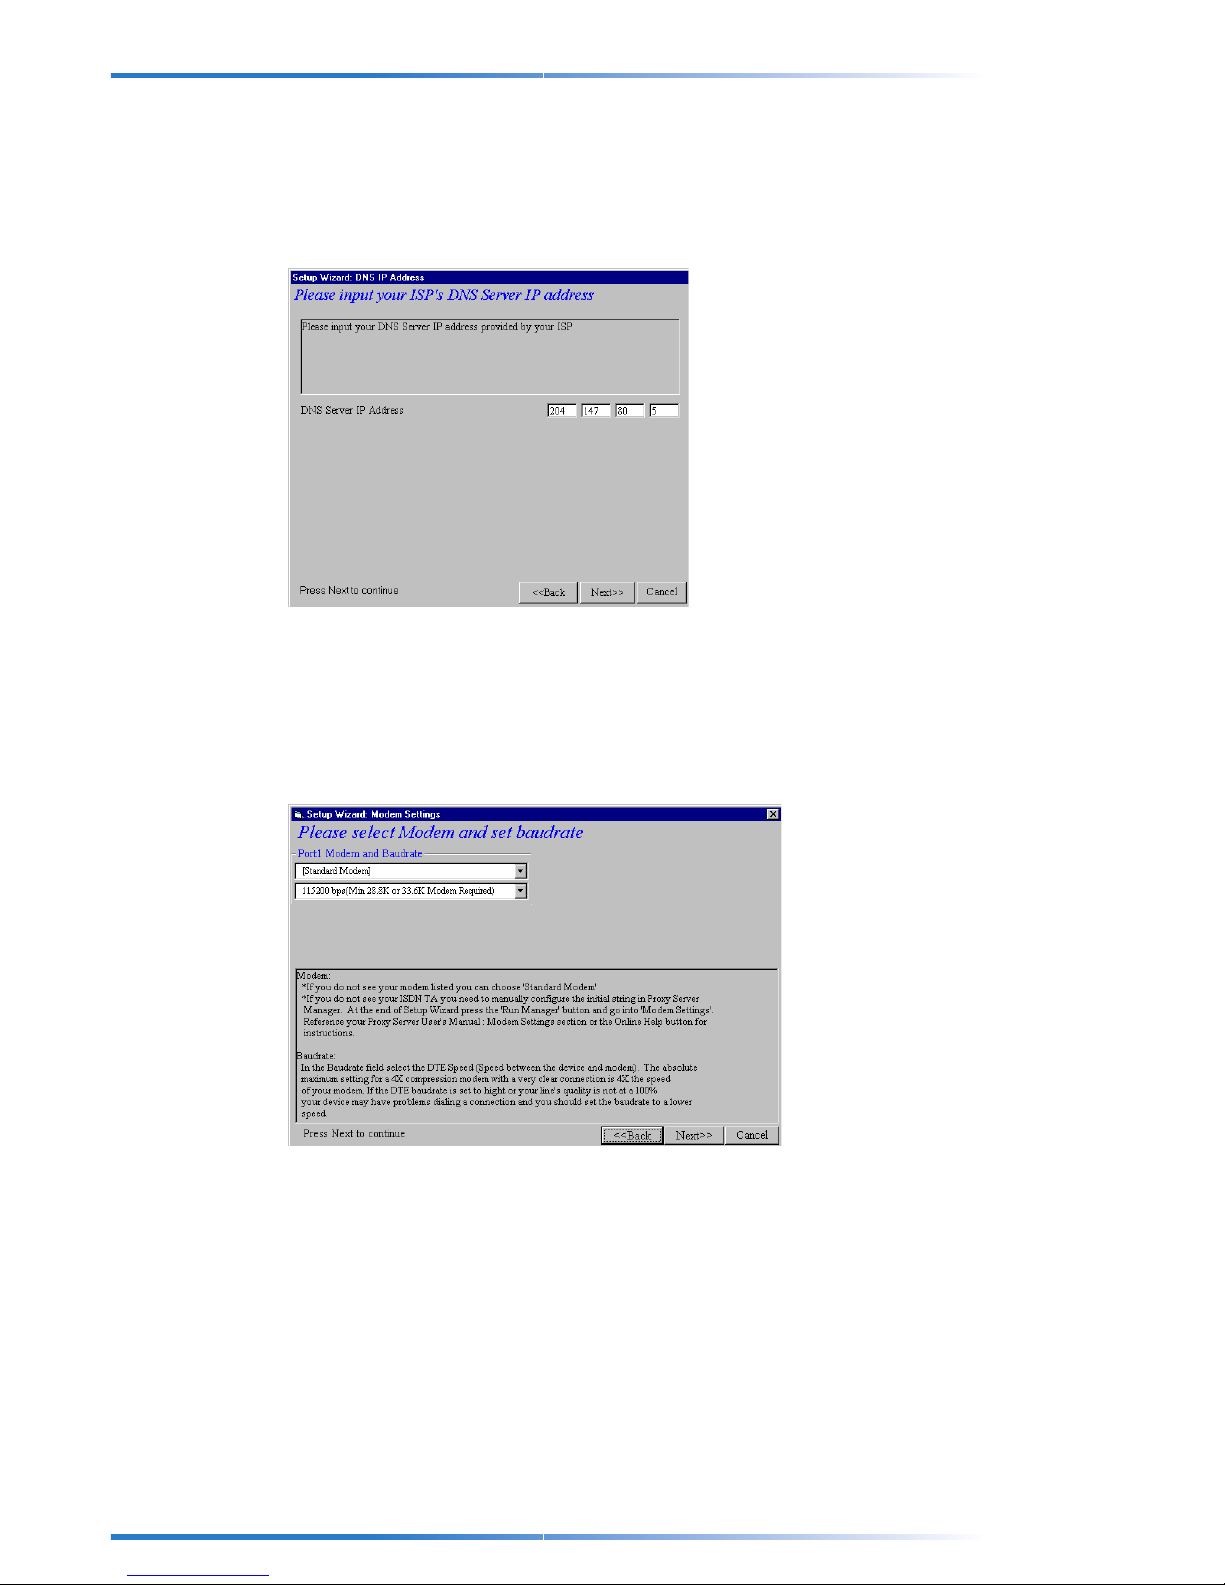
Step 4: Input your ISP’s DNS Server IP Address
Enter the DNS Server IP Address provided to you by your ISP. This information is usually
provided to you with the information package given to you by your ISP. If you can’t find
your ISP’s DNS Server IP address your easiest solution is to contact someone at your
ISP and ask them for their DNS Server IP address.
When you are finished, click Next to continue.
Step 5: Select Modem and Set Baudrate
Enter the modem that you are using and the baudrate (i.e., the speed of communication
between the ProxyServer and your modem or ISDN TA). This is a very important setting
and determines the communication between your ProxyServer and modem.
Modem
You can use the Select Modem button to select your Modem or ISDN TA. This setting
will configure the initial string in the ProxyServer so that it will know how to communicate
with your modem. If you are using an analog modem but do not see your modem in the
modem selection list, in most cases the default setting of Standard Modem will work.
10
Page 11
Note: ISDN TA Setup
Chapter 2 - ProxyServer Wizard
TA
!!! Extremely Important !!!
If you do not see your ISDN TA listed, you need to enter the initial string for this TA in
ProxyServer Manager’s Modem Settings menu. Once you have finished
Wizard
Modem Settings for instructions.
press the Run Manager button and refer to Chapter 3 - ProxyServer Manager :
ProxyServer
Baudrate
In the Baudrate field select the DTE Speed (i.e., the speed of communication between
the ProxyServer and modem or ISDN TA) Normally this can be about 4 times the speed
of your modem for 4 times compression modems.
Note: The absolute maximum you should set the baudrate for a given port on your
ProxyServer is 4 times the speed of your modem. If you set the baudrate too high, the
ProxyServer may not be able to dial-up a connection. For example if you have a 14.4K
bps modem, the highest you should set the baudrate is 57.6K bps. Also note that due to
ISP connections and phone line conditions this maximum speed is theoretical and not
guaranteed.
When you are finished, click Next to continue.
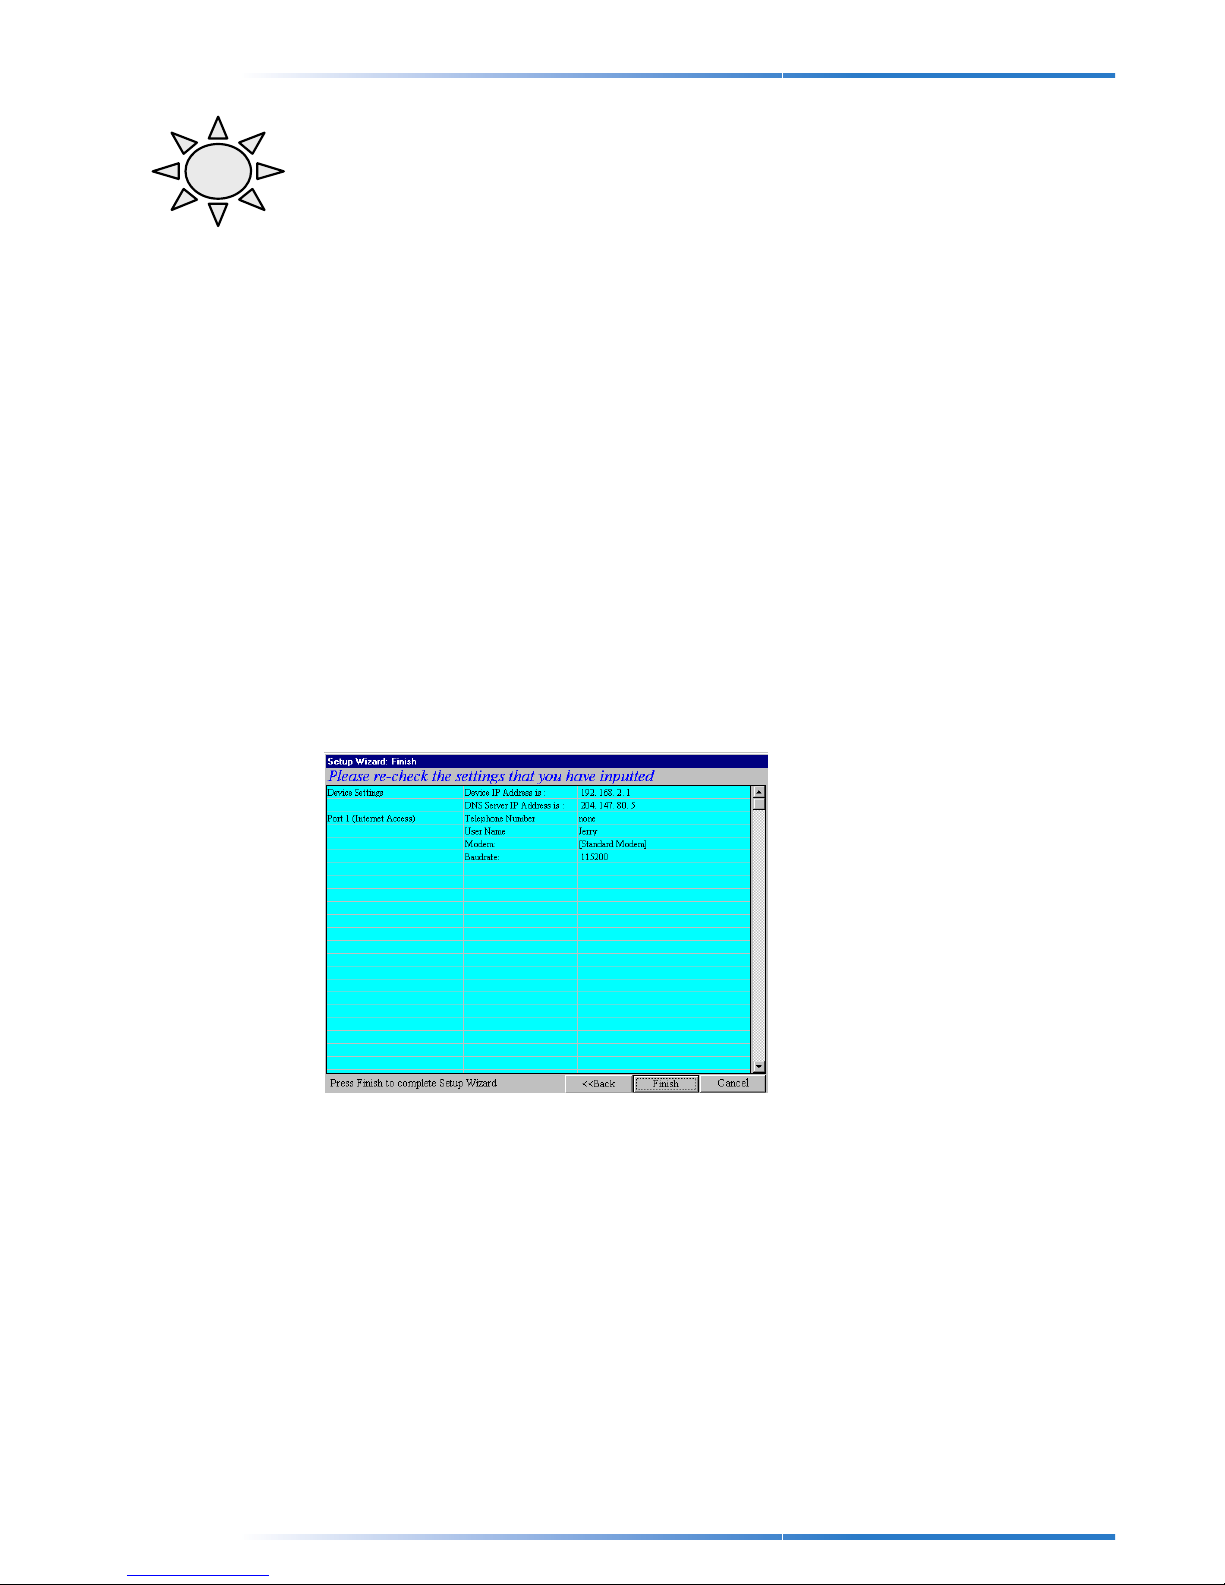
Step 6: Verify the Setup Configuration
The settings that you have just configured will be summarized here. Please check to
make sure that all the settings you have entered are correct.
If you see that you have configured a setting incorrectly , click Back to go back to the
screen with the mistake and correct it.
When you are satisfied with your configuration, click Finish to save your configuration to
the ProxyServer and complete the
ProxyServer
Wizard.
11
Page 12
ProxyServer User Guide
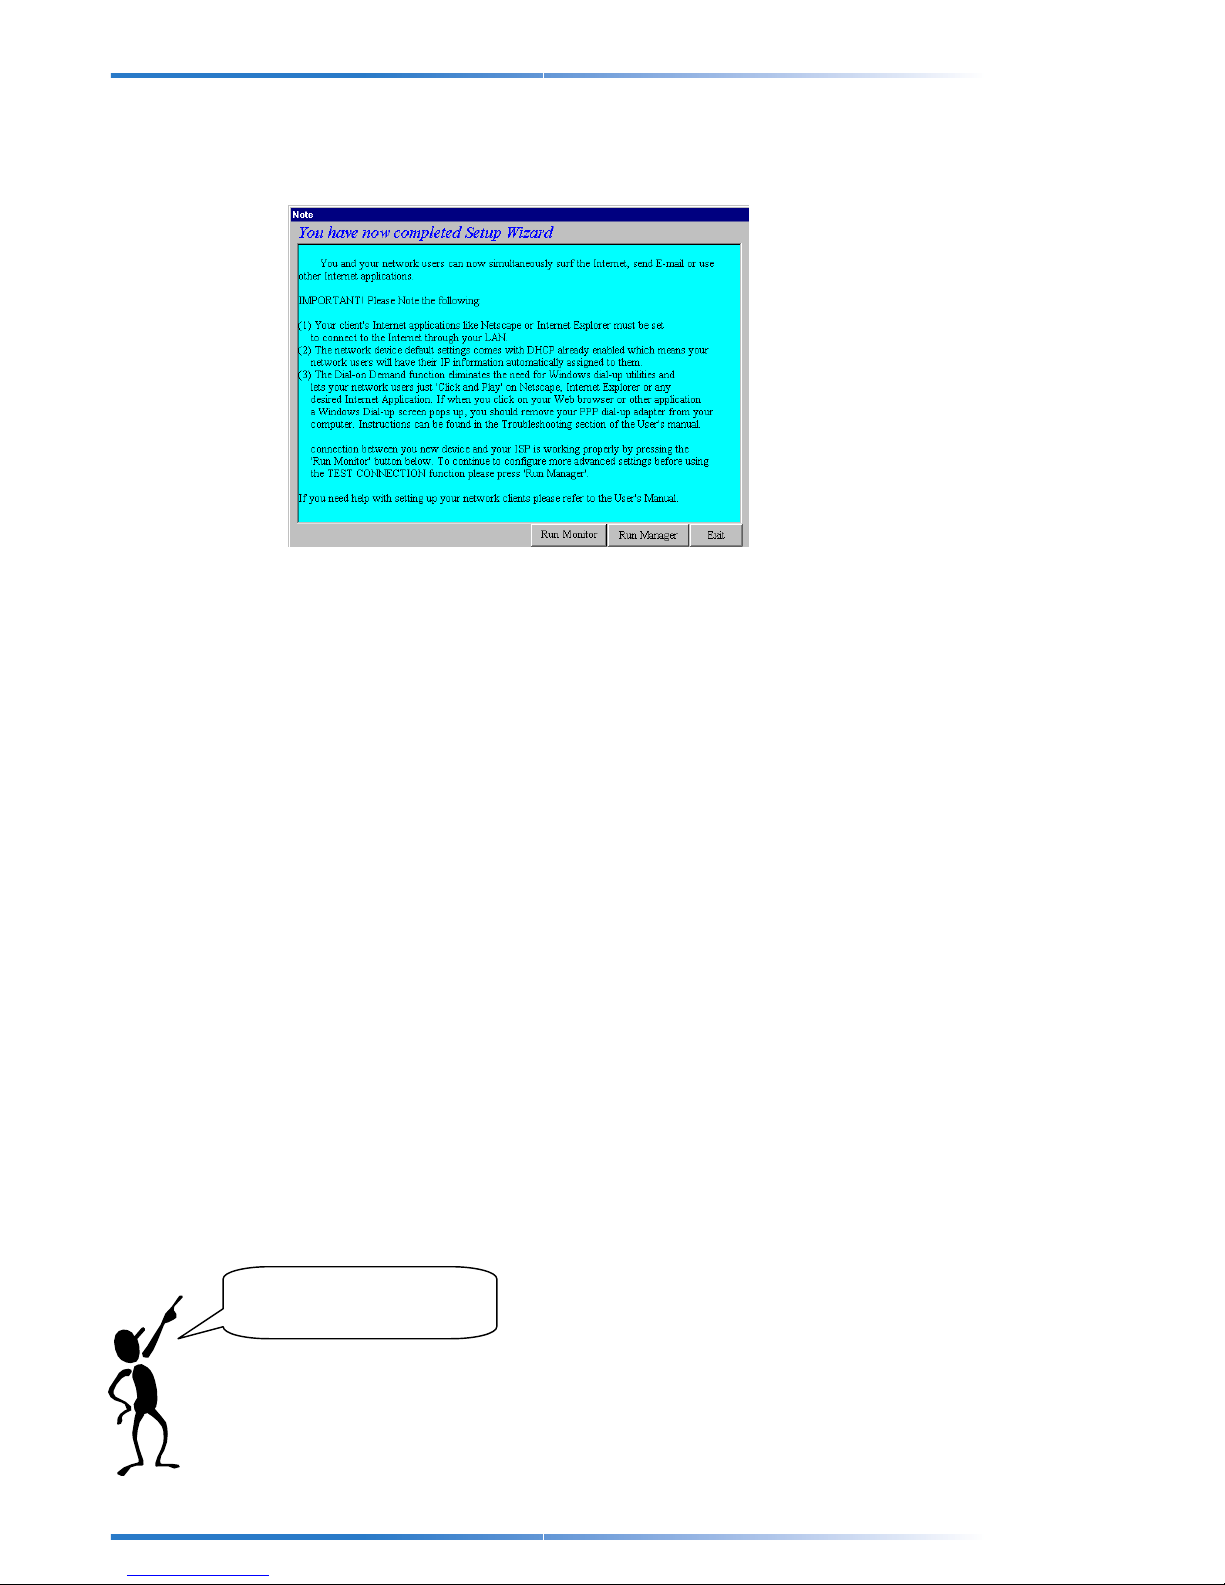
Final ProxyServer Wizard Notes
Once you have completed the
1) If you need to go into ProxyServer Manager to configure more advanced settings,
you can open the program directly from here by pressing the Run Manager button
on the bottom of your screen.
2) If you don’t need to configure anything else in ProxyServer Manager, click Run
Monitor and then use ProxyServer Monitor’s Test Connection function to see if
your ProxyServer can dial-up a connection with the settings that you have
configured. Please see Chapter 4 - ProxyServer Monitor for instructions.
ProxyServer Wizard
, the following screen appears:
3) Once Test Connection has verified your connection, go to Chapter 5 – Setting Up
Y our ProxyServer Clients and follow all instructions carefully.
Make Sure You Read
These Notes
12
Page 13

Page 14
ProxyServer User Guide
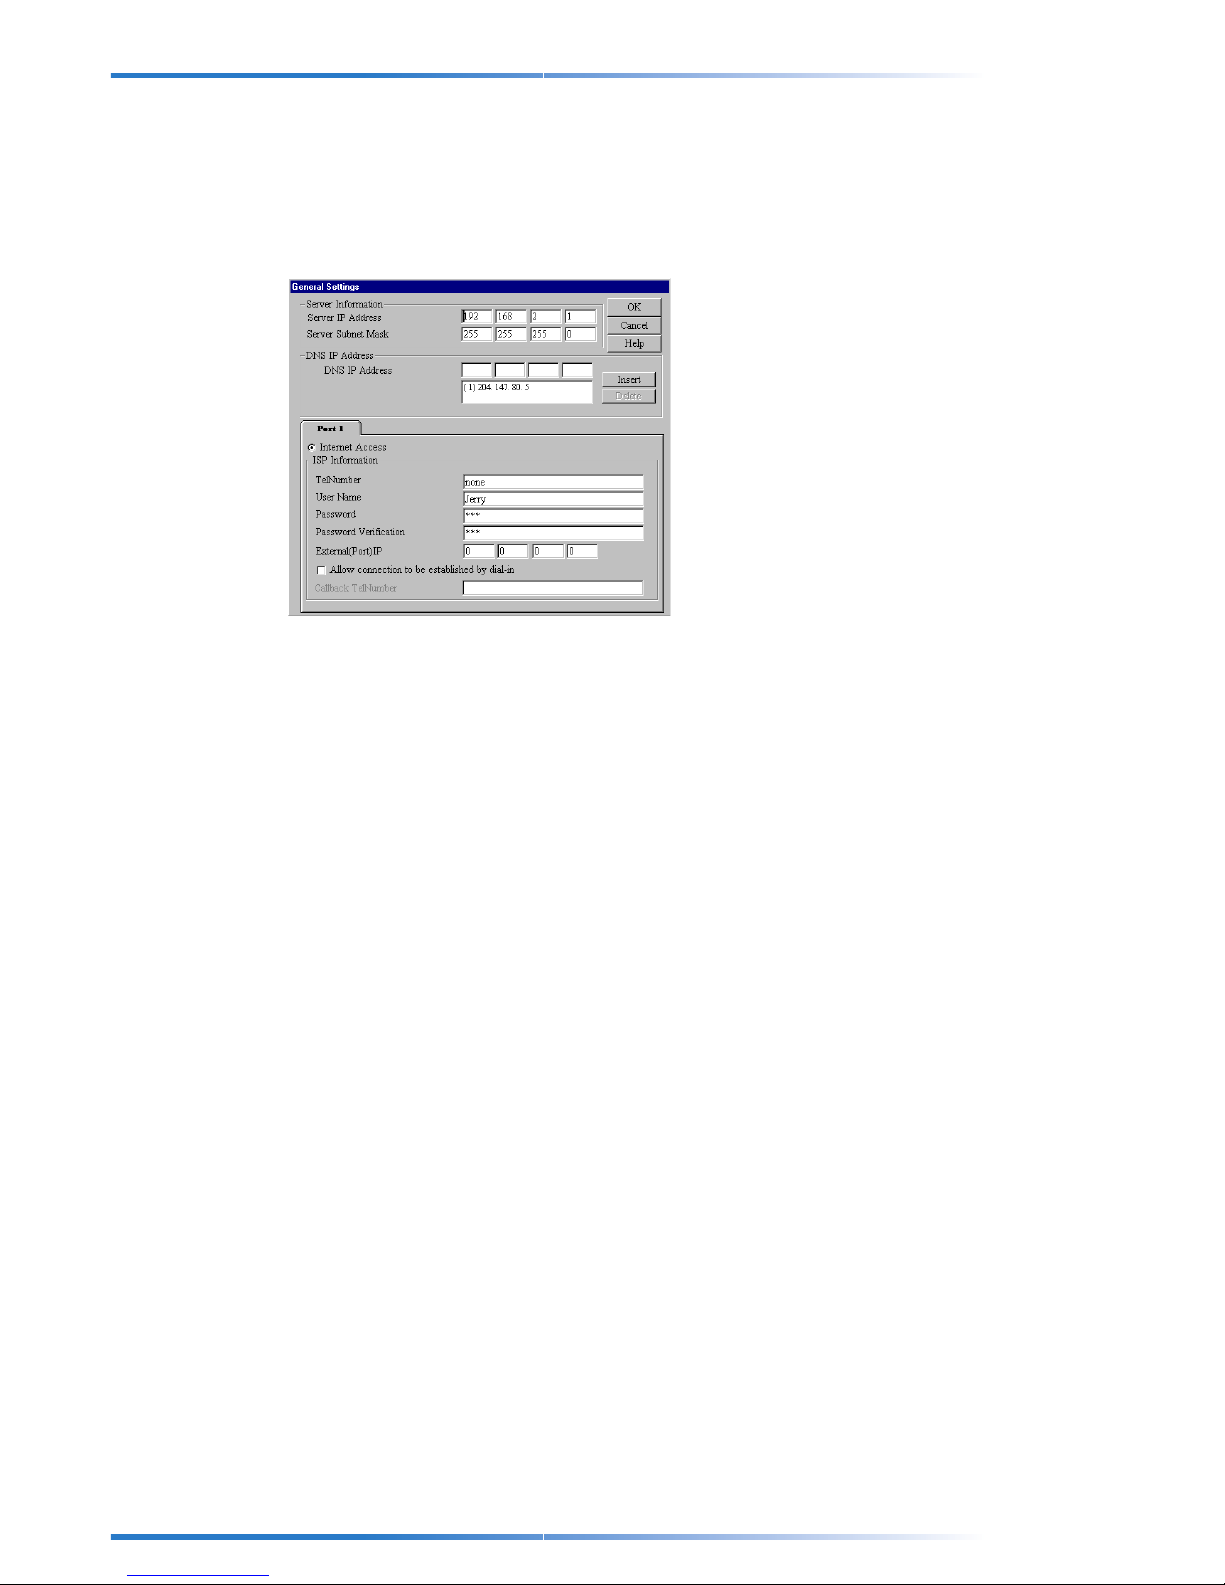
General Settings
General Settings contains all the major settings of your ProxyServer. This includes IP
information, DNS IP addresses and ISP information for dial-up Internet access. Most of
the information displayed here was entered in
be entered again.
ProxyServer Wizard
and does not need to
Server IP Address
The IP address of your ProxyServer is the unit’s LAN Address. In our example network
the IP address of 192.168.2.1, that we gave the ProxyServer in
displayed here.
ProxyServer Wizard
, is
Server Subnet Mask
The ProxyServer Subnet Mask can usually be left as it’s default entry 255.255.255.0.
External (Port) IP Address
The External (Port) IP address is the IP address that is given to you by your ISP. An IP
address is often dynamically assigned by your ISP (i.e., it changes every time you logon). To have this address assigned by the ISP leave this field as it’s default entry 0.0.0.0.
If you have been given a static IP address by your ISP you can enter it in this field.
DNS Server IP Address(s)
The DNS Server IP address that you entered in ProxyServer Wizard will be displayed
here. The ProxyServer supports multiple DNS Servers which can be entered here.
Allow connection to be established by dial-in
This option is usually employed for the Virtual Server function of the ProxyServer .
(Please see Chapter 3 – ProxyServer Manager : Virtual Server). This option does
NOT mean remote access as the ProxyServer does not support remote access.
However, the ProxyServer does support the function of letting your ISP dial-in to the
Internet Access to establish the connection. If you would like to allow the connection to
be established by dial-in, enable this option.
14
Page 15

Chapter 3 - ProxyServer Manager
Callback Telephone Number
If you have selected the “Allow connection to be established by dial-in” option, you
can use the Callback Telephone number function of the ProxyServer . You can use this
function if you do not want to have a permanent connection to your ISP up all the time
and your ISP will not support the telephone charge to dial-in to your network when people
try and access your static IP address or domain name. After you have entered your ISP’s
phone number in this field, when anyone calls up the ProxyServer, the ProxyServer will
automatically hang up and dial the ISP’s phone number establishing the Internet
connection. For information on the purpose of this function please see Chapter 3 –
ProxyServer Manager : Virtual Server.
15
Page 16
ProxyServer User Guide
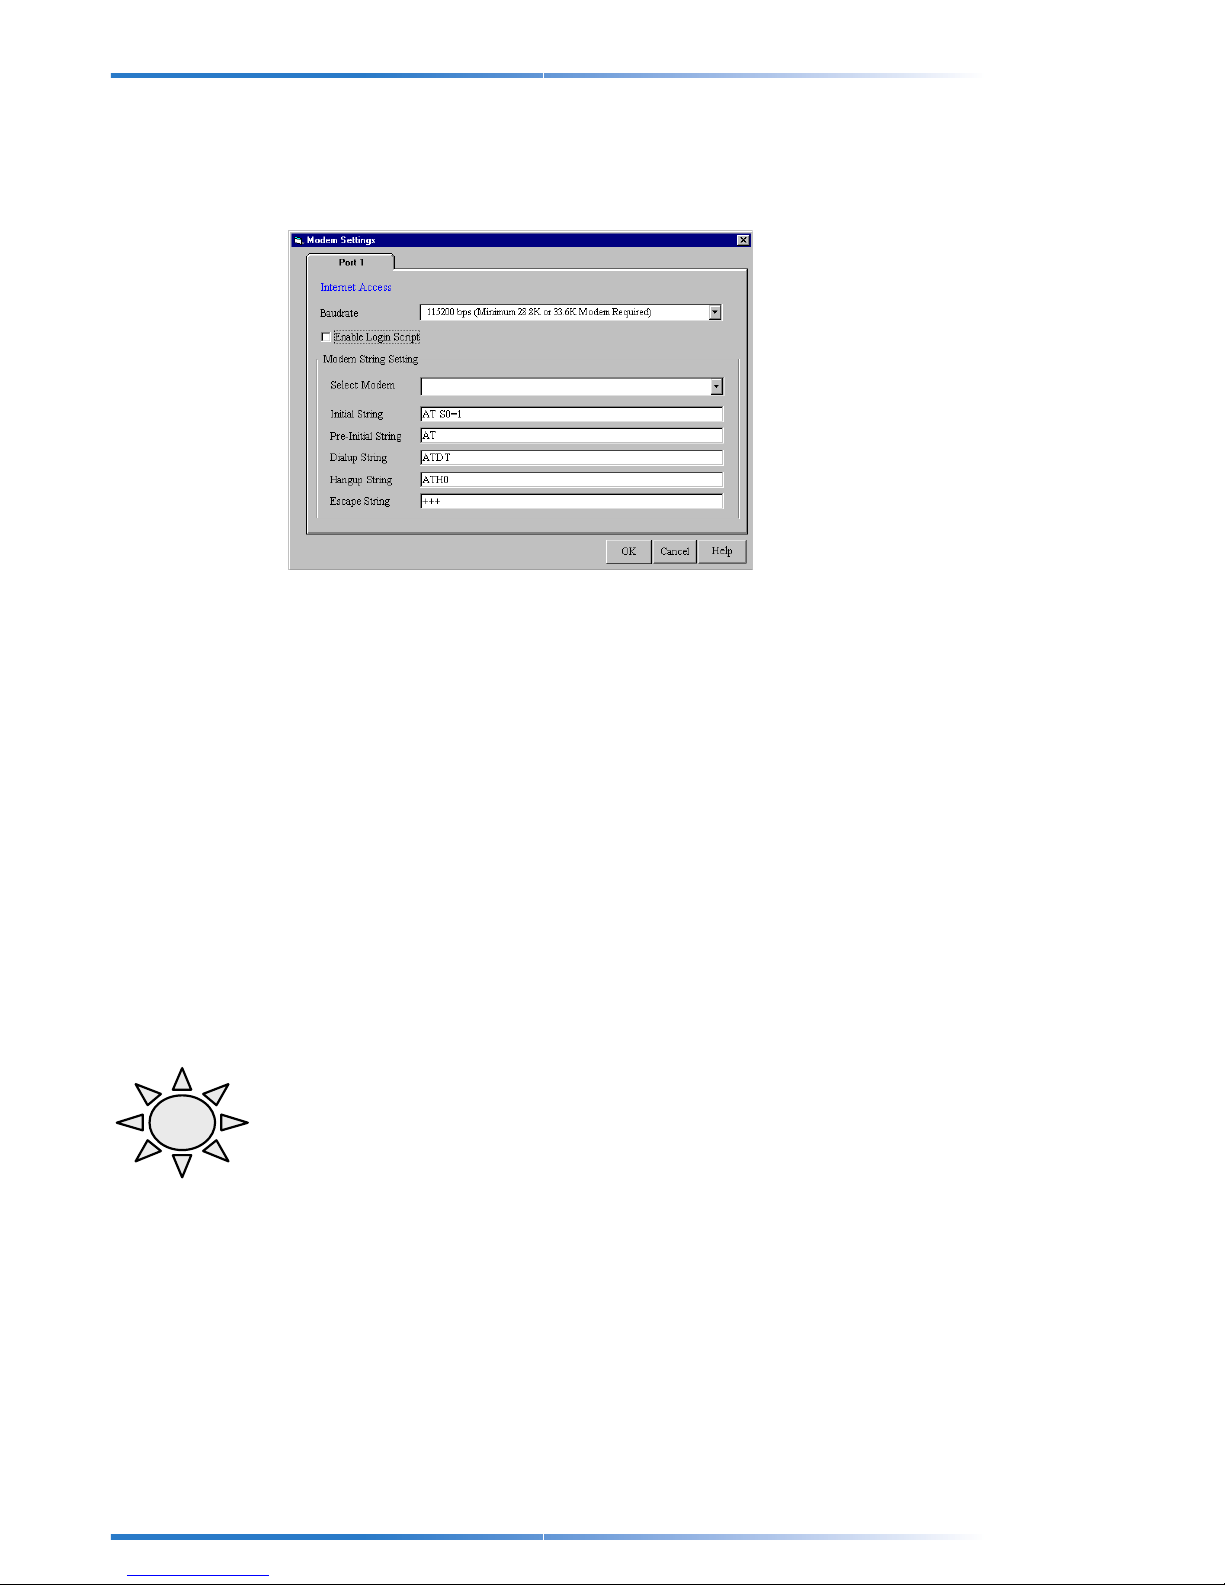
Modem Settings
The Modem Settings let the serial port on your ProxyServer know how to communicate
with the attached modem or ISDN TA.
Baudrate
TA
The baudrate that you entered in
Note: The absolute maximum you should set the baudrate for a given port on your
ProxyServer is 4 times the speed of your modem. If you set the baudrate too high, the
ProxyServer may not be able to dial-up a connection. For example if you have a 14.4K
bps modem, the highest you should set the baudrate is 57.6K bps. You should also be
aware of the fact that since some ISP connections and phone lines are not of the
greatest quality , this theoretical maximum speed is not attainable and you should set the
baudrate at a lower speed.
ProxyServer Wizard
will be displayed here.
Select Modem and Modem String Setting
The most important modem string is the initial string because the ProxyServer uses it to
establish communication with your modem or ISDN TA. The modem initial string
displayed here was configured automatically when you selected your modem or ISDN TA
in ProxyServer Wizard. If your modem is not listed in the Modem Selection List, the
Standard Modem selection will work with most modems.
Note: ISDN TA Setup
!!! Extremely Important !!!
Unfortunately, unlike most modems, ISDN initial strings vary between different ISDN TAs
and there is no “Standard ISDN TA” initial string. If your ISDN T A is not listed in the
modem selection list you must find out what your ISDN TA initial string is. Your ISDN
T A’s initial string should be listed in your ISDN TA user’s manual. There are probably
many initial strings listed for your ISDN TA. The one you are looking for is Asyn-to-Syn
PPP (Asynchronous to Synchronous PPP). You can enter this initial string if you would
like to use only one channel of your ISDN TA. If you would like to bundle both channels of
your ISDN TA together, you need to use a different initial string called Multilink-PPP. For
example, the initial strings for a Zyxel Omninet ISDN TA are:
1) ATB40 : Asyn-to-Syn PPP initial string
2) AT&J3: Multilink-PPP initial string
You should also verify that your ISDN TA supports the Dialup string A TDT. Most ISDN
16
Page 17
Chapter 3 - ProxyServer Manager
T As will support ATDT and usually the rest will support ATD or A TDI.
Please also note that to bundle the two channels of your ISDN TA together, you must
enter the two phone numbers in the T elephone Number field of the Modem settings
menu. See Chapter 3 – ProxyServer Manager : Modem Settings.
Enable Login Script
With the login script you can manually input the communication between your Modem
and ISP. Most ISPs support automatic PPP negotiation but if your ISP does not support
automatic PPP negotiation you will have to enter a login script. You can also use the
login script to enter a second backup ISP or write a script that makes the ProxyServer
redial until a successful connection has been established. To write a login script, first
click on the Enable Login Script option box. The ProxyServer login script commands
and some examples are provided on the next few pages.
17
Page 18

ProxyServer User Guide
Writing a Login script
Step A) Learn the ProxyServer Login Script Commands
Available to you
Example Commands Result
Send and SH
Send “ATZ” Resets Modem
Send “ATDT 555-3636” Dials phone number 555-3636
Send “JohnSmith” T ypes “JohnSmith” at ISP interface
SH “1234” Types the “1234” at ISP interface but displays **** in
Send “” Types Enter key at the ISP Interface (Important for ISPs like
Wait
Wait 5 Modem will wait for 5 seconds before going to next
Wait “CONNECT” Modem will wait for “CONNECT” to come onto screen before
Wait “CONNECT” 6 Modem will wait for “CONNECT” to come onto screen before
ProxyServer Monitor display to hide password
Compuserve)
command
going to next command
going to next command. If connect does not come onto
screen modem will go back to line 6 of Login Script
Other
Go Begins User Service
Jump 4 Will go back to command line 4
Hangup Hangs up Modem
18
Page 19

Chapter 3 - ProxyServer Manager
Step B) Get Login Script Information
Because every ISP has a different interface screen when logging in, you must check to
see when and how your ISP requests information from you. The ProxyServer uses PPP
user service so when logging into your ISP find out the selection for PPP Service.
You can get your ISP interface login screen by doing a simple dial-up connection using
the Dialup Networking utility in Windows 95. Your Windows 95 Dial-up Networking
folder is located in the My Computer icon.
For example, the screen below shows the opening display screen for an ISP called
“HINET”. The important parts of the screen where the ISP requests information are
highlighted.
Annex Command Line Interpreter * Copyright (C) 1988, 1995 Xylogics,
Inc.
Checking authorization, Please wait...
Enter username: Jerry
Enter password: ***
Last login: Mon May 19 12:20:53 1998 on 168.95.95.195/42 (022:03/
001:43)
Permission granted
(Welcome to HiNet) *********************************************
1. PPP users service
2. SLIP users service
3. Telnet service
4. Exit
( Please key-in your choice ) ===> 1
..Switching to PPP.
19
Page 20

ProxyServer User Guide
Step C) Make your login Script
Below are two examples of the login scripts for our example ISP. On the left is the actual
inputted login script. On the proceeding page we highlighted the important parts that you
needed to note which are again highlighted below where they are used.
Example 1: Script for Normal Reliable ISP
Login Script Meaning of Each Login Script Command
Send “ATZ” Resets modem
Send “A T S0 = 1” Sends initial string “AT S0 = 1” to modem
Send “ATDT 5552121” Dials phone number 555-2121
Wait “CONNECT” Waits for ISP to send reply “CONNECT”
Wait “username:” Waits for ISP to send reply “username”
SH “Jerry” Sends the user- name “Jerry” to ISP
Wait “password:” Waits for ISP to send reply “password”
Send “1234” Sends password “1234” to ISP”
Wait “ ===>” Waits for ISP to send reply “===>”
Send “1” Selects option 1 (PPP) for this ISP Starts PPP mode
Example 2: Script for Unreliable ISP (Redial until connected)
# Login Script Meaning of Each Login Script Command
1 Send “ATZ” Resets modem
2 Send “A T S0 = 1” Sends initial string “AT S0 = 1” to modem
3 Send “ATDT 5552121” Dials phone number 555-2121
4 Wait “CONNECT” 2 Waits for ISP to send reply “CONNECT” If not will go back to
line 2 to redial
5 Wait “username:” 12 Waits for ISP to send reply “username”. If no response will
go to line 12
6 Send “Jchan” Sends the username “Jchan” to ISP
7 Wait “password:” Waits for ISP to send reply “password”
8 SH “****” Sends password “****” to ISP”
9 Wait “ ===>” Waits for ISP to send reply “===>”
10 Send “1” Selects option 1 (PPP) for this ISP
1 1 Go Starts PPP mode
12 Hangup Hangs up Modem
13 Jump 2 Goes back to line 2 to redial
20
Page 21

Chapter 3 - ProxyServer Manager
Example 3: Script for unreliable ISP (2nd ISP backup)
# Login Script Example 2 Meaning of Each Login Script Command
1 Send “ATZ” Resets modem
2 Send “A T S0 = 1” Sends initial string “AT S0 = 1” to modem
3 Send “A TDT 5552121” Dials phone number 555-2121 (ISP #1)
4 Wait “CONNECT” 12 Waits for ISP to send reply “CONNECT”. If not will
go to line 12 for ISP #2
5 Wait “username:” 12 Waits for ISP to send reply “username”. If no
response will go to line 12 for ISP #2
6 Send “Jerry” Sends the username “Jerry” to ISP
7 Wait “password:” Waits for ISP to send reply “password”
8 SH “1234” Sends password “1234” to ISP”
9 Wait “ ===>” Waits for ISP to send reply “===>”
10 Send “1” Selects option 1 (PPP) for this ISP
11 Go Starts PPP mode (Rest of script ignored)
12 Hangup Hangs up Modem
13 Send “AT S0 = 1” Sends initial string “AT S0 = 1” to modem
14 Send “ATDT 5553333” Dials phone number 555-3333 (ISP #2)
15 Wait “CONNECT”23 Waits for ISP to send reply “CONNECT”. If not
received will go to line 23.
16 Wait “username:” 23 Waits for ISP to send reply “username”. If no
response will go to line 23.
17 Send “Dblair” Sends the user- name “DBlair” to ISP
18 Wait “password:” Waits for ISP to send reply “password”
19 SH “5678” Sends password “5678” to ISP”
20 Wait “ ===>” Waits for ISP to send reply “===>”
21 Send “1” Selects option 1 (PPP) for this ISP
22 Go Starts PPP mode (Rest of script ignored)
23 Hangup Hangs up Modem
24 Jump 2 Goes back to line 2 to redial ISP #1
21
Page 22

ProxyServer User Guide
Dialup/Hangup Settings
The Dialup/Hangup settings lets you choose when and how the ProxyServer dials up and
disconnects from your ISP (Internet Service Provider .)
Individual Port Options
Individual Port Options lets you set the idle-time out function for the serial port of your
ProxyServer. Here you can set the number of minutes you wish to let a connection stay
idle before disconnecting.
Note: If you turn off the idle-timer , once a client establishes a connection, the connection
will be maintained until you turn off your modem, unplug the ProxyServer or use the
Terminate Connection function in ProxyServer Monitor. See Chapter 5 – ProxyServer
Monitor.
22
Page 23

DHCP Server
DHCP Function
The default setting of the ProxyServer comes with the DHCP server already enabled. If
you would like to disable the DHCP server click on the Disabled circle.
Chapter 3 - ProxyServer Manager
IP
Address
IP Address Pool
The IP Address Pool contains the range of the IP addresses that will automatically be
assigned to the clients of your network. The default IP address range of the IP address
pool is 100 to 200. If you would like to change this range first select the range then enter
a new range and click Insert. To delete an IP address range first select it and then click
Delete.
IP Address Mapping Reservation
You can use the IP Address Mapping Reservation option to give particular computers
Reserved
IP
on your network the same static IP address every time they turn on their computer .
To assign a computer on your network a static IP address, enter the MAC address of the
computer and the static IP address that you wish to give it and click Insert.
In the example above, we have reserved the IP address “192.168.2.15” for the computer
with the MAC address of “1 : 3 : 2 : 34 : 32 : 1”.
To delete a static IP address first select it and then click Delete.
23
Page 24

ProxyServer User Guide
Routing Table
The routing table lets the ProxyServer know about other networks that are part of your
LAN. If there are no routers on your network you can skip this section.
For each router on your network:
1) Enter the IP address and Subnet Mask of the Network you wish to route to. In our
example below, our second network has IP addresses of “192.168.2.x” . W e have
thus entered the IP address “192.168.2.0” and a netmask of 255.255.255.0
The last digit “ 0 ” on the subnet mask defines the subnet of your network.
2) Enter the Gateway (IP address) of your network’s router. Usually a router has two IP
addresses; one for each side of the two networks that it routes between. You should
enter the router’s IP address that is on the same side as your ProxyServer. In our
example the IP address of our router is “213.0.0.10”
3) Set the Interface to Local Network
4) Click Insert.
5) Click OK.
What is the purpose of the routing table?
The routing table is important if you have routers on your LAN. The Internet is basically
one giant network that uses IP addresses to locate it’s different sites and works the same
way as IP addressing on your LAN. Say your LAN has two networks and someone on
Network 1 wants to send an E-mail locally to Network 2. How does that E-mail know to
stay in the LAN and not go out through your gateway (i.e., your ProxyServer)? The
reason is because your router sees the E-mail that has an IP address corresponding to
your other network and shouldn’t go out through the ProxyServer.
Network 1
Router
IAS
Network 2
ISP
24
Page 25

Chapter 3 - ProxyServer Manager
In this example the ProxyServer is setup on Network 2. The computers on Network 2
are on the same network subnet as the ProxyServer and will be able to access the
ProxyServer. But what about the computers on Network 1? They aren’t on the same
subnet. To let the computers on Network 1 access the ProxyServer , first you have to set
their gateway as the router. Then in the router itself you can set the router’s gateway as
the ProxyServer IP address. Lastly you have to setup the routing table in the
ProxyServer like the example given on the previous page. Once these two things are
done, the computers on Network 1 and the computers on Network 2 can both access
the ProxyServer.
Note: The Internet and your LAN use the same type of addressing system; IP
addresses. So if you have two networks on your LAN, it wouldn’t be a good idea to use
any IP addressing system on your network that used valid Internet IP addresses. Why?
Because this could result in packets that are meant for another network on your LAN
being sent through the ProxyServer. The solution is that there are certain IP addresses
that have been reserved for use on LANs and will never be a valid registered Internet IP
address. If you are setting up two networks on your LAN, it would be a good idea to use
one of the following IP address subnets:
1) 10 . x . x . x
2) 172 . 16 . x . x
3) 192 . 168 . x . x
- where x is any number between 0 and 255
What about Novell?
The newer Novell Servers support TCP/IP protocol and can be used to route another
network’s clients to the ProxyServer. If you are using a Novell server that doesn’t support
TCP/IP protocol to route between two networks, the subnet that does not contain the
ProxyServer network will not be able to access the ProxyServer.
25
Page 26

ProxyServer User Guide
Virtual Server Mapping
The Virtual Server function allows a reverse network address translation from W AN to
LAN. Normally when you use the ProxyServer to access the Internet you use the NAT
function from LAN to WAN.
Theoretically it is possible to use the Virtual Server to set up a Web page or FTP site
because the ProxyServer can let outside users access designated sites on your network
that you map in Virtual Server . However, please be aware of the fact that the speed that
they have access will be limited by the speed of your modem or ISDN TA. You can also
use the Virtual Server to support applications like chat programs and Internet Telephony.
To enable the Virtual Server function click the Enabled circle.
For each service that you want to set up on your Internet site:
A) Select which protocol (Either TCP or UDP) the service uses. Most services use TCP
(WWW, FTP, E-mail etc..).
B) Enter your IP address supplied by your ISP in the External IP field. If your ISP gives
you a dynamic IP address, you can set this as 0 . 0 . 0 . 0 . Virtual Server will then
use whatever dynamic IP address your ISP gives you as the external IP. Enter the
port number for the service that you will be using for this mapping.
C) Enter the IP address of the computer or device that will act as the “server” site on
your network in the Internal IP field. Enter the port number for the service that you
will be using for this mapping.
D) Click Insert to insert the mapping.
Note: A limitation of the Virtual Server is that you can only use one computer per port.
For example, if you set one computer to be mapped to support chat, only that computer
can use that program. All request packets from the Internet with a port number
corresponding to chat will then be sent to the internal IP in the mapping.
Virtual Server Mapping Example (Web or other Server)
In this example we have set up a mapping with a Web page and Telnet server:
• Both services use TCP. WWW service has a port number of 80 and Telnet has a port
number of 23
• The External IP address that we are using is dynamic so we have entered 0.0.0.0.
• Our Internet site server on our network has an IP address of 213.0.0.10
Now anyone who tries to access our dynamic IP address will automatically be forwarded
to our Internal network server at our internal IP address of 213.0.0.10.
Note: If you would like to keep the connection permanently open after you have dialedup your ISP, you should disable the idle-time out function. Please see Chapter 3 –
ProxyServer Manager : Dialup/Hangup Settings.
26
Page 27

Client Filter Settings
The
Client Filter
access to them. You can filter by 5 different services (Mail, WWW , FTP, Telnet, News)
For each service, you can set the Client Filter to allow all computers access, some
computers access or no computers access. To give certain computers access you must
enter the computer’s MAC addresses and click Insert.
lets you decide what services you allow on your network and who has
Chapter 3 - ProxyServer Manager
In the above example network we have given:
1) All clients access to E-Mail
2) 2 computers access to WWW, FTP, Telnet
3) No clients access to Newsgroups
Server Name and Password
1) Server Name
This field displays the name of the ProxyServer. If you would like to change this name,
enter the new name in this field.
2) Server Password and Password Verification
The ProxyServer Manager does not come with a password. If you choose to give the
ProxyServer a password, this password will be required the next time and subsequent
times that you want to configure the ProxyServer. To enter a password, type your
password in the Server Password field and type it again in the Password V erification
field.
Warning: If you choose to enter a password pick something that is easy to remember or
write it down in a safe location. If you have completely forgotten your password please
contact your place of purchase.
27
Page 28

ProxyServer User Guide
Save Settings to File
The Save Settings to File option lets you save the inputted settings to a file to be
retrieved at a later time. This will be useful if your settings are deleted accidentally or
you want to have more then one batch of settings.
To save the inputted settings to a file, enter the file name in the File Name field. You can
use the default File Type “.co1” or select your own file type. You can also use the
default directory listed in the File Directory field or choose your own.
Click OK to save the settings to a file.
Load Settings
The Load Saved Settings option lets you load the original default settings of the
ProxyServer or previously saved settings.
First choose whether you want to load the default settings or load settings from a
previously saved file. If you are loading previously saved settings from a file you can
choose the directory by entering it in the File Directory field.
Click OK to load and apply the previous settings to the ProxyServer.
28
Page 29

Upgrade Firmware
The Upgrade Firmware option allows you to upgrade the firmware that is in your
ProxyServer.
Note: This function upgrades the firmware in your ProxyServer and not the ProxyServer
Utilities on your Windows 95/NT.
Enter the location of the new firmware file in the Firmware File Directory. ProxyServer
Manager will automatically detect the new firmware name and it will be displayed in the
Firmware File Name field. The Firmware File V ersion will display the version number of
your new firmware. Click Upgrade to install your new firmware.
Chapter 3 - ProxyServer Manager
General Diagnostic
The general diagnostic function will perform a check up on your ProxyServer to make
sure that everything is functioning correctly .
To start the general diagnostic click General Diagnostic on the main menu.
Click OK to return to the main menu.
29
Page 30

ProxyServer User Guide
30
Page 31

ProxyServer Monitor
ProxyServer Monitor is a utility that lets you know what your ProxyServer is doing and
helps you with any problems.
To Run ProxyServer Monitor from your Desktop
In Windows 95/NT: Click Start | Programs | ProxyServer Monitor.
FOURChapter
ProxyServer Monitor
4
31
Page 32

ProxyServer User Guide
Test Connection
The Test Connection function lets you test the connection between your ProxyServer,
modem and ISP. This test verifies that the ProxyServer has been configured correctly
and whether any problems are due to the modem, ProxyServer or an incorrect setting.
To test a connection select the ProxyServer you want to test and click Test Connection.
Test Connection will then use the selected port and the modem attached to it to dial-up
your ISP and establish a connection.
Event Messages
The event message display located in the lower part of ProxyServer Monitor, displays the
communication occurring between your ProxyServer, modem or ISDN TA and ISP.
Note: You can use your mouse to point and click on any of the event messages to bring
up a help screen. If any errors have occurred you can use this as a guide to help you fix
the problem.
Terminate Connection
The Terminate Connection function was designed to allow the network administrator the
ability to terminate a connection of the ProxyServer instantly at any time.
To terminate a connection select the server in the Available servers box, and click
T erminate connection.
Save to File
If you would like to save the current monitoring session to a file you can click Save to
File. You can use the default File Name and File Directory or you can specify your
own.
32
Page 33

Chapter 4 - ProxyServer Monitor
TCP/IP Tab
The TCP/IP Tab displays all the TCP/IP requests made by your ProxyServer. For each
new IP address request:
• Date/Time will tell you when the request was made
• Port will tell you which port you are viewing
• T ype will tell you what type of request is being made
• Local IP will tell you which IP address the request originated from
• Remote IP will tell you what IP address that was requested
• Port will tell you what port was requested
Connection Time Tab
• Device power turned on will display the time when your ProxyServer was last
turned on.
• Total Power-On-Time will display the total time since your ProxyServer was last
turned on.
• T otal Connection T ime will display the total connection time to your ISP that has
been logged since the device was last turned on.
• Current Connect Time will display the time that has elapsed since the current
connection was established.
33
Page 34

ProxyServer User Guide
Status Tab
The Status tab will display four things:
1) Modem Power: This indicator lights if the ProxyServer detects that your modem is
2) Modem Ready: The ProxyServer will send pre-initial and initial commands to your
3) Modem Connected: This indicator lights if the ProxyServer has detected that your
4) PPP Connected: This indicator lights if, after the connection is established, the
turned on.
modem or ISDN TA. This indicator lights if the communication is successful and your
modem is ready to dial a connection.
modem or ISDN TA has successfully dialed up a connection to a remote site.
ProxyServer has detected that PPP has successfully started.
34
Page 35

Chapter
Setting Up ProxyServer Clients
The following steps will guide you through the set up and configuration of your
ProxyServer clients.
Step 1 - Install TCP/IP Protocol on each ProxyServer Client
PC
In order for a computer to use the ProxyServer, TCP/IP Protocol must be installed on
that computer. To install or check if TCP/IP protocol is installed on a PC:
A. In Windows 95/NT: Click Start | Settings | Control Panel. Double click the Network
icon to open the Network window.
FIVE
ProxyServer Clients
5
35
Page 36

ProxyServer User Guide
B. If you do not see TCP/IP protocol in “The following network components are
C. To install TCP/IP click Add on the Configuration tab. Select Protocol and click Add.
D. Choose Microsoft in the Manufacturers option box and TCP/IP in the Network
installed” window you must install it. The TCP/IP protocol component looks like this
or a variation like this. If you see that TCP/IP protocol is already installed on this
computer, please proceed to Step 2.
Protocols option box.
E. Click OK to return back to the Network window where you will see TCP/IP installed
under the “The following network components are installed” Window.
F. Please proceed to Step 2.
36
Page 37

Chapter 5 - ProxyServer Clients
Step 2 - Assign IP Address to Each ProxyServer Client
The default setting of Windows 95 lets the ProxyServer automatically extract IP
information from the built-in DHCP server in your ProxyServer . T o check or change this
setting:
In the same Network window as step 1 page, select TCP/IP in the “The Following
Network Components are Installed” window and click Properties.
Option A
If you would like to have the ProxyServer assign this computer an IP address
automatically , on the IP Address tab select “Obtain IP address automatically” and
press OK.
Note: If you select “Obtain IP address automatically”, this computer will also
automatically retrieve it’s other TCP/IP information from the ProxyServer, including
Gateway and DNS Configuration.
Warning: As a general rule you should only have one DHCP server working on your
network. If you decide to use a different DHCP Server instead of the DHCP server in
your ProxyServer, you should disable the ProxyServer DHCP Server. You should also
set the ProxyServer as your gateway in the other DHCP server .
37
Page 38

ProxyServer User Guide
Option B
If you would like to give this computer a static IP address you can enter it here. Please
note that when giving your computer a static IP address you must assign it’s:
1) IP address
2) Gateway
3) DNS Server IP Address
In the same Network window as step 1, select TCP/IP in the “The Following Network
Components are Installed” window and click Properties. On the IP Address tab select
Specify an IP address and enter the IP address you want to assign to this computer.
Also be sure to enter the Subnet Mask of this IP address which is probably
255.255.255.0
On the Gateway tab enter the IP address that you gave the ProxyServer in
Wizard
On the DNS Configuration tab enter the DNS Server IP address given to you by your
ISP and click Add.
In the above example we have set the IP address of our ProxyServer (192.168.0.3) in
the Gateway tab and our DNS Server IP address (204.147.80.5) in the DNS
Configuration tab.
When you have completed your entry , click OK to finish.
and click Add.
ProxyServer
38
Page 39

Chapter 5 - ProxyServer Clients
Step 3 - Set Internet Applications to Connect Through LAN
You and your network clients will be connecting to the ProxyServer through your LAN.
This means that when using applications (Netscape, Internet Explorer, etc.) you must set
the applications to connect through their LAN. Some examples follow:
Note: Unfortunately we can’t list all the Internet applications and versions that you might
be using but in all Internet programs there is probably an option field where you can
specify how you want to connect the application to the Internet. To use the ProxyServer
you must set it to connect through your LAN.
Setting Microsoft Internet Explorer 4.0
On the Internet Explorer View menu, click Options. Select the Connection tab and
select the Access the Internet via a Local Area Connection. Click Apply to enable the
new setting and click OK to exit.
Setting Microsoft Outlook/Microsoft Exchange
On the T ools menu select Services. On the Services tab select the E-mail profile that
you are using and click Properties. On the Connection tab choose “I use a LAN
connection”. Click Apply to enable the new setting and click OK to exit.
39
Page 40

ProxyServer User Guide
Setting Netscape Communicator
To set Netscape you must set the browser to Go Online through your LAN. You can do
this by selecting Go Online in the File Menu. The following display screen will open on
your screen.
Click Go Online. Netscape will then be able to access the Web through your LAN.
Step 4 - Important Notes
Note: The Dial-on-Demand function means ProxyServer clients can “Click and Play” on
their desired Internet application without the hassle of having to use dial-up utilities. If
dial-up windows are still popping up on your screen when you try and start your Internet
applications, take TCP/IP dial-up adapter off your computer . If this adapter is installed
your computer might sometimes get confused as to whether dial-up utilities are needed
or not to make a connection. If you are using the ProxyServer you don’t need dial-up
utilities since the ProxyServer will dial for you.
For more information on how to take TCP/IP dial-up adapter off a computer please see
Section 6 – Troubleshooting.
Note: To use the ProxyServer, the switch on the side of the ProxyServer must be set to
“NORMAL”. The Terminal setting on the side of the ProxyServer stands for Terminal
Setup Mode and is not needed for Windows 95. It is only used for Terminal and Remote
Configuration.
40
Page 41

Chapter
Tools for Your ProxyServer
Tool A - ProxyServer Monitor
So you’re having some problems. Many problems can be solved by checking out
ProxyServer Monitor where there is on-line help. Please see Chapter 4 – ProxyServer
Monitor which details all of the functions and help applications that it has.
Tool B - PING
Ping stands for Packet Internet Groper. Ping is a utility that conducts a test to determine
if there is a communications path between two devices on a network. Basically it lets
your computer ask another computer or device, “Is there anything alive at this IP
address?”. You can use the PING command in your DOS prompt. You can also type
either the IP address or the domain name of the ProxyServer you wish to PING. For
example both “PING 213.0.0.2” and “PING www.yahoo.com” will work. In the example
below we have sent a successful PING to an ProxyServer which has an IP address of
213.0.0.2 . So who cares right? Actually it’ s good. Y ou can ping your ProxyServer from
your computer to see if there’s a connection between your computer and your
ProxyServer. You can also ping an IP address on the Internet to make sure that your
computer has a connection via the ProxyServer to the Internet. It’s a great way to
eliminate some of the potential reasons for troubles.
SIX
6
Troubleshooting
41
Page 42

ProxyServer User Guide
Tool C - WINIPCFG and IPCONFIG
These two tools are great for finding out a computer’s IP Configuration, MAC address
and default gateway .
1) WINIPCFG is for Windows 95. In Windows 95: Click Start | Run and type winipcfg.
2) IPCONFIG is for Windows NT: At the DOS prompt type IPCONFIG. Unfortunately
In the example below this computer has an IP address of 213.0.0.199 and the
Default Gateway is 213.0.0.1. The default gateway should be the ProxyServer IP
address. The MAC address in Windows 95 is called the Adapter Address.
this utility will not display the MAC address. To display the MAC address of a
Windows NT computer: Click Start | Programs | Administrative Tools (Common) |
NT Diagnostics. Select the Network tab. On the bottom of the Network tab click
Transport. The MAC address you want to use will be the one that is under “ NO” in
the WAN column.
Tool D - TRACERT
Tracert is an extension of the PING utility that lets you trace the route to an IP address. It
reports the number of router hops, the time for each hop, and any failed attempts to
cross a hop. In this way you can locate the specific site of a failed Ping. You can run
Tracert in the DOS command prompt. In the example below we have traced a request for
www.yahoo.com
by typing in “Tracert
www.yahoo.com
”
42
Page 43

Troubleshooting Time
My computer can’t detect the ProxyServer on my network when I try
and configure it. (i.e., “Device Not Found”)
• Try pressing the “Refresh Device List” button.
• Make sure that the power is correctly connected by checking that the “PWR”
indicator light on the ProxyServer unit is lit.
• Make sure that the ProxyServer is properly connected to your Ethernet hub by
pressing “Refresh Device List” in either ProxyServer Manager or ProxyServer
Wizard. If the ProxyServer is correctly connected, the “Net” indicator light on the
ProxyServer will flash. If no flash occurs, the ProxyServer is not properly connected.
Try reconnecting the ProxyServer to your hub and try again. If there is still no flash, it
is possible your Ethernet cable or hub has a problem.
• Make sure your computer is a properly configured TCP/IP computer. Check by trying
to “ping” the computer you are using. If you can successfully ping yourself, your
computer has TCP/IP correctly installed. Then try pinging another computer on your
network. If ping is successful your computer is properly connected to the network.
• Take TCP/IP Dial-up Adapter off your computer (see below for instructions).
Chapter 6 - Troubleshooting
Other computers can connect to the ProxyServer but my computer
can’t.
Whenever I click on Internet Explorer or Netscape I still see the Windows Dial-up utility popping up on my screen asking for my phone
number and password to dial-up my ISP.
• Take TCP/IP dial-up adapter off all computers that will be using the ProxyServer to
access the Internet. TCP/IP dial-up adapter is not needed to use the ProxyServer to
connect to the Internet.
To take off TCP/IP Dial-up Adapter, click Start | Settings | Control Panel. Double
click on the Network icon. Click Dial-up Adapter and click Remove. Restart your
computer and try again.
• Make sure that you have a correct IP address. In Windows 95: Click Start | Run and
type winipcfg. If the IP address field is listed as “ 0. 0. 0. 0 ” that computer has no IP
address. Make sure that the automatic DHCP configuration is setup properly on that
computer (See Chapter 5 – Setting up Your ProxyServer Clients, Step 2)
• Make sure that the Web browser is set to connect via your LAN (See Chapter 5 –
Setting up Your ProxyServer Clients, Step 3)
43
Page 44

ProxyServer User Guide
I configured the ProxyServer but I can’t get it to communicate with
my modem.
• It’s possible that your initial string is configured incorrectly. If you are using an ISDN
• If after making sure that the initial string is correct, the ProxyServer will still not dial-
The ProxyServer dials-up a connection but can’t seem to communicate with the ISP
• This is most likely a problem due to the fact that your baudrate setting is set too high
T A and your ISDN TA was not listed when you were prompted to select your modem
in ProxyServer Wizard you must look up your ISDN T A’s initial string in your
ISDN TA user’s manual and input it in ProxyServer Manager’s Modem Settings
Menu to correct this problem. See Chapter 3 - ProxyServer Manager : Modem
Settings.
up a phone number, please use the ProxyServer Monitor which has on-line help.
Please see Chapter 4 – ProxyServer Monitor.
for your modem or ISDN TA. The maximum baud rate that your modem or ISDN TA
claims it can achieve is often not really attainable because of poor phone line quality ,
modem manufacturing quality and a myriad of other possible reasons. You should go
into ProxyServer Manager’s Modem Settings menu to correct this problem to set
to a lower baud rate and try again. See Chapter 3 - ProxyServer Manager :
Modem Settings.
• If after changing the baud rate, the ProxyServer still cannot connect to your ISP,
please use the ProxyServer Monitor which has on-line help. Please see Chapter 4 –
ProxyServer Monitor.
The ProxyServer dials-up a connection but can’t seem to communicate with the ISP.
• This is most likely a problem due to the fact that your baudrate setting is too high for
your modem or ISDN TA. Many times the maximum baud rate that your modem or
ISDN TA claims it can achieve is not really attainable because of phone line quality,
errors, etc. You should go into ProxyServer Manager’s Modem Settings Menu to
correct this problem. See Chapter 3 - ProxyServer Manager : Modem Settings.
Sometimes when I try and use the Internet or get my mail, the application can’t access the Internet immediately
• This is probably not an error or a problem. If you are the first person to use the
ProxyServer, there will be a delay while the Dial-on- Demand function automatically
dials-up a connection and logs on to your Internet Service Provider. Subsequent
users will then be able to use the existing connection that you have just established
without a delay .
• It is also possible that your modem is dialing but having problems connecting to your
ISP. For example your ISP may be returning a busy signal. You can use the
ProxyServer Monitor to see all events occurring between your modem and ISP.
(Please see Section 4 –ProxyServer Monitor)
The ProxyServer seems to slow down my modem when I install it
• The ProxyServer should have no effect on your modem speed. Of course if more
then one client is using the same modem through the ProxyServer the speed will be
reduced.
44
Page 45

Introduction
This chapter starts out with statements about your ProxyServer 2-year warranty . The
next section, Tech Support, should be read carefully if you have questions or problems
with your ProxyServer. It includes the technical support telephone numbers, space for
recording your product information, and an explanation of how to send in your
ProxyServer should you require service. The final three sections explain how to use our
bulletin board service (BBS), and get support through CompuServe and the Internet.
Limited Warranty
Multi-Tech Systems, Inc. (“MTS”) warrants that its products will be free from defects in
material or workmanship for a period of two years from the date of purchase, or if proof
of purchase is not provided, two years from date of shipment. MTS MAKES NO OTHER
WARRANTY, EXPRESSED OR IMPLIED, AND ALL IMPLIED WARRANTIES OF
MERCHANTABILITY AND FITNESS FOR A PARTICULAR PURPOSE ARE HEREBY
DISCLAIMED. This warranty does not apply to any products which have been damaged
by lightning storms, water, or power surges or which have been neglected, altered,
abused, used for a purpose other than the one for which they were manufactured,
repaired by the customer or any party without MTS’s written authorization, or used in any
manner inconsistent with MTS’s instructions.
SEVEN
Chapter
7
Warranty, Service and Technical Support
MTS’s entire obligation under this warranty shall be limited (at MTS’s option) to repair or
replacement of any products which prove to be defective within the warranty period, or,
at MTS’s option, issuance of a refund of the purchase price. Defective products must be
returned by Customer to MTS’s factory transportation prepaid.
MTS WILL NOT BE LIABLE FOR CONSEQUENTIAL DAMAGES AND UNDER NO
CIRCUMSTANCES WILL ITS LIABILITY EXCEED THE PURCHASE PRICE FOR
DEFECTIVE PRODUCTS.
45
Page 46

ProxyServer User Guide
Online Warranty Registration
To register your Multi-Tech product on-line, go to the following address:
http://www.multitech.com/support/register.htm
Tech Support
Multi-Tech has an excellent staff of technical support personnel available to help you get
the most out of your Multi-Tech product. If you have any questions about the operation of
this unit, call 1-800-972-2439. Please fill out the ProxyServer information (below), and
have it available when you call. If your ProxyServer requires service, the tech support
specialist will guide you on how to send in your ProxyServer (refer to the next section).
Recording ProxyServer Information
Please fill in the following information on your Multi-Tech ProxyServer. This will help tech
support in answering your questions. (The same information is requested on the
Warranty Registration Card.)
Model No.: _________________________
Serial No.: _________________________
Software Version: ____________________
The model and serial numbers are on the bottom of your ProxyServer.
Please note the type of external link device that is connected to your ProxyServer before
calling tech support. Also, note the status of your ProxyServer including LED indicators,
screen messages, diagnostic test results, DIP-Switch settings, problems with a specific
application, etc. Use the space below to note the ProxyServer status:
________________________________________________________________________________________________________
________________________________________________________________________________________________________
________________________________________________________________________________________________________
________________________________________________________________________________________________________
______________________________________________________________________________________________________________
______________________________________________________________________________________________________
______________________________________________________________________________________________________________
______________________________________________________________________________________________________
46
Page 47

Service
Chapter 6 - Troubleshooting
If your tech support specialist decides that service is required, your ProxyServer may be
sent (freight prepaid) to our factory . Return shipping charges will be paid by Multi-Tech
Systems.
Include the following with your ProxyServer:
• a description of the problem.
• return billing and return shipping addresses.
• contact name and phone number.
• check or purchase order number for payment if the ProxyServer is out of warranty.
(Check with your technical support specialist for the standard repair charge for your
ProxyServer).
• if possible, note the name of the technical support specialist with whom you spoke.
If you need to inquire about the status of the returned product, be prepared to provide the
serial number of the product sent.
Send your ProxyServer to this address:
MULTI-TECH SYSTEMS, INC.
2205 WOODALE DRIVE
MOUNDS VIEW, MINNESOTA 55112
ATTN: SERVICE OR REPAIRS
You should also check with the supplier of your ProxyServer on the availability of local
service and/or loaner units in your part of the country .
47
Page 48

ProxyServer User Guide
The Multi-Tech BBS
For customers who do not have Internet access, Multi-Tech maintains a bulletin board
system (BBS) that mirrors its FTP site. Information available from the BBS includes new
product information, product upgrade files, and problem-solving tips. The phone number
for the Multi-Tech BBS is (800) 392-2432 (USA and Canada) or (612) 785-3702
(international and local).
The BBS can be accessed by any asynchronous modem operating at 1200 bps to
33,600 bps at a setting of 8 bits, no parity , and 1 stop bit (8-N-1).
To log on to the Multi-Tech BBS
1. Set your communications program to 8-N-1.
2. Dial our BBS at (800) 392-2432 (USA and Canada) or (612) 785-3702 (international
and local).
3. At the prompts, type your first name, last name, and password; then press ENTER. If
you are a first time caller, the BBS asks if your name is spelled correctly. If you
answer yes, a questionnaire appears. You must complete the questionnaire to use
the BBS on your first call.
4. Press ENTER until the Main Menu appears. From the Main Menu you have access
to two areas: the Files Menu and News. For help on menu commands, type ?.
To Download a file
If you know the file name
1. From the Main Menu, type F to access the Files Menu, then type D.
2. Enter the name of the file you wish to download from the BBS.
3. If a password is required, enter the password.
4. Answer Y or N to the automatic logof f question.
5. Select a file transfer protocol by typing the indicated letter, such as Z for Zmodem
(the recommended protocol).
6. If you select Zmodem, the transfer will begin automatically. If you select another
protocol, you may have to initiate the transfer yourself. (In most datacomm programs,
the P AGE DOWN key initiates the download.)
7. When the download is complete, press ENTER to return to the File Menu.
8. To exit the BBS, type G and press ENTER.
48
Page 49

Chapter 7 - Warranty, Service and T ech Support
If you don’t know the file name
1. From the Main Menu, type F to access the Files Menu. For a list of file areas, type L,
press ENTER, then type L and press ENTER again. (If you do not type the second L,
you will list all of the files on the BBS.)
2. Mark each file area you would like to examine by typing its list number and pressing
ENTER.
3. Enter L to list all the files in the selected file areas. Enter C to go forward in the file
list and P to go back.
4. To mark one or more files for download, type M, press ENTER, type the list numbers
of the files, and press ENTER again.
5. Enter D. You will see a list of the files you have marked. Enter E if you would like to
edit the list; otherwise enter D again to start the download process.
6. Select a file transfer protocol by typing the indicated letter, such as Z for Zmodem
(the recommended protocol).
7. If you select Zmodem, the file will transfer automatically. If you select another
protocol, you may have to initiate the transfer yourself. (In most data communications
programs, the P AGE DOWN key initiates the download.)
8. When the download is complete, press ENTER to return to the File Menu.
9. To exit the BBS, type G and press ENTER.
49
Page 50

ProxyServer User Guide
About CompuServe
In addition to the BBS, Multi-Tech provides support through CompuServe’s Modem
Vendor Forum (GO MODEMVEN). Refer to your Compuserve documentation for special
operating procedures.
About the Internet
Multi-Tech is a commercial user on the Internet, and we retreive messages from our
customers on a periodic basis. If you prefer to receive technical support via the Internet,
you can contact Tech Support via e-mail by clicking on the following link:
http://www.multitech.com/_forms/email_tech_support.htm
Multi-Tech’s presence includes a Web site at:
http://www.multitech.com
and an ftp site at:
ftp://ftp.multitech.com
The ftp server mirrors the Multi-Tech BBS.
About the Multi-Tech Fax-Back Service
Multi-Tech’s fax-back system provides 24-hour access to sales, marketing, and technical
literature. Dial 612-717-5888, follow the voice prompts, and request document number
10 for a catalog of available documents. For convenence, have your fax number handy:
_________________________. From the catalog of available documents, you can order
newsletters, white papers, press releases, etc. from the sales and marketing index
(pages 1-4), or order basic modem operation and troubleshooting guides from the
technical support and engineering index. Just enter the applicable FB Doc. # from the left
column of the catalog.
50
Page 51

Glossary
Note: The best site for finding information is on the Internet. Much of the information for
this glossary was referenced from a great site at http://www .pcwebopedia.com . If you
want more information for any of these terms or some terms that may not be listed
please check out that site. It’s quite impressive.
Baudrate. Baudrate in regards to your ProxyServer refers to the number of bits per
second (Bps) that are transmitted between your ProxyServer and modem or ISDN TA.
DHCP (Dynamic Host Configuration Protocol) A protocol that was made to lessen the
administrative burden of having to manually configure TCP/IP Hosts on a network. DHCP
makes it possible for every computer on a network to extract it’s IP information from a
“DHCP server” instead of it having to be inputted manually by each network client (or
network administrator). Using the ProxyServer’ built-in DHCP server, every computer on
your network can automatically extract it’s IP information from the ProxyServer.
Why is it called “dynamic?” Each time a network client turns on their computer the
ProxyServer DHCP server will automatically give them an IP address from the IP
address pool configured in the DHCP Server menu of ProxyServer Manager . It is called
“dynamic” because the address that they get could be different each time they turn on
their computer depending on which addresses have already been assigned.
DNS (Domain Name System) Server IP Address. A DNS Server can be thought of as
the computer at your ISP whose job is to take all the DNS addresses that you type into
your web browser like www.yahoo.com and translate those addresses into their
corresponding IP addresses. So to send this “translator” all your requests for information,
you need to know his address and his address is known as the DNS Server IP address.
Ethernet. A LAN (Local Area Network) protocol developed by Xerox and DEC. It is a
very commonly used type of LAN
Firewalls. A method of protecting files and programs on one network from users on
another network. Firewalls are typically installed to give users access to the Internet
while protecting their Internal Information. The ProxyServer uses a firewall known as
NAT. (See NAT).
51
Page 52

ProxyServer User Guide
Firmware. Software that has been has been permanently or semi-permanently written
onto ROM. Your ProxyServer supports flash ROM which means you can upgrade the
fimware in the ProxyServer very easily by obtaining a copy of the new firmware and
using the upgrade firmware function.
FTP (File Transfer Protocol). A protocol which allows a user on one host to access, and
transfer files to and from, another host over a network.
Intranet. The Intranet is the use of Internet technologies within a company. Intranets
exist only within organizations while the Internet is a global network open to all. Intranets
run on private networks within companies and between their branch offices.
IP (Internet Protocol). The Internet Protocol is the network layer for the TCP/IP Protocol
Suite. It is a connectionless, best-effort packet switching protocol.
IP Addresses (Referenced from www.pcwebopedia.com)
A Computer on the Internet is identified by it’ s IP Address. A computer’s IP address is
like a telephone number because it identifies one address or in this case one computer
Device. Every computer or device on a network must have a different IP address. An IP
address consists of four groups of numbers called octets which are separated by
periods. For example, 213 .0 .0.1 is an IP address. An IP address consists of a network
portion and a host portion. The network portion identifies the subnet that the computer
belongs to. The host portion identifies the particular computer or node on that network. In
our example IP address, 213 . 0 . 0 . 1 refers to the network 213 . 0 . 0 with the computer
number 1. IP addresses can either be dynamic (temporary) or static (permanent, fixed). A
dynamic IP address is a temporary IP address that is assigned to you by a server
(Usually a DHCP server) when you turn on your computer . A static IP address is a
permanent IP address that you can set yourself in your computer . When the ProxyServer
dials-up your ISP your ISP can give it a fixed or dynamic IP address. Likewise when you
turn on your computer the ProxyServer can give your computer a dynamic or fixed IP
address.
ISDN TA. (Integrated Services Digital Network Terminal Adapter) ISDN is a high speed
digital telephone connection involving the digitization of the telephone network using
existing wiring. An ISDN Terminal Adapter can be though of like an “ISDN Modem”.
ISP (Internet Service Provider). An organization that provides Internet services. An ISP
is the company that will provide the connection from your computer or network to the
Internet. An ISP can offer a range of services, such as dial-up accounts, E-mail, web
hosting or News.
LAN (Local Area Network). A data network intended to serve an area of only a few
square kilometers or less. This often means a small private network in companies.
ML-PPP (Also called MP or MPPP) stands for Multilink Point to Point Protocol and is an
advancement of the PPP protocol that allows for the bridging or bundling of two ISDN or
analog channels for faster connections. What does that mean in practical terms? It
means that you can use one computer to use two or more modems to download a single
web page. For example, if I’m trying to access www.yahoo.com using two modems,
each modem will go get part of Yahoo, then your ProxyServer will bundle the information
together and then give it to your computer resulting in double the speed.
MAC address. The hardware address of a Device connected to a shared media. To find
out the MAC address of your computer please see Chapter 6 - Troubleshooting : Tool
C.
52
Page 53

Glossary
NA T Technology (Referenced from www.pcwebopedia.com)
The ProxyServer uses a technology called Network Address Translation (NAT)
(Sometimes called IP Address Masquerading) to let everyone on your network use one
IP address given to you by your ISP (Internet Service Provider). This technology is also a
firewall in itself.
How does it work? Every IP address on the Internet is a Registered or Legal IP address.
Therefore no two IP addresses on the Internet are the same. For you to use the
ProxyServer to access the Internet you need one of these registered IP address from
your ISP (Internet Service Provider). On your private Intranet or LAN, the IP addresses
of your computers are probably unregistered or “illegal” IP addresses.
When clients on your network start surfing the Internet, the ProxyServer will receive all
the requests for information. The ProxyServer will dial-up your ISP and will give your
ProxyServer a registered legal IP address. Your ProxyServer then uses that IP address
to ask for all that requested information saying, “ Send all information back to me at this
IP address.” So in essence it looks like all your network client’s requests are coming from
that one IP address (Hence the name IP masquerading). When all that information
comes back to the ProxyServer, it will then sort the data using an Address Translation
Table and give the data to the computer on your network that requested it.
In regards to the firewall, what happens if someone on the Internet tries to access your
network via the ProxyServer? Nothing! There’s nothing there but the ProxyServer which
will not reverse translate unless you have allowed it by using the Virtual Server function.
Internal IP
address only
LAN
valid on your
LAN
IAS
External IP Address given by your ISP and
valid on the Internet. This IP address will
be shared by all of your Network clients
ISP
Network Address. The network portion of an IP address. For a class A network, the
network address is the first byte of the IP address. For a class B network, the network
address is the first two bytes of the IP address. For a class C network, the network
address is the first three bytes of the IP address. In each case, the remainder is the host
address. In the Internet, assigned network addresses are globally unique.
Port Number. In addition to meaning a connector on your computer, a port also has
another meaning. The other meaning of port can be thought of as a “Service number”.
Every service that travels over phone lines and modems has a standard port number. For
example to use the World Wide Web service the standard port number is 80. The
standard port number for telnet is 23. Who came up with this system? Port numbers are
controlled and assigned by the IANA (Internet Assigned Numbers Authority). How do you
know what service has what port number? Most computers have a table in their systems
that lists which port numbers have been assigned to which services or you could also
find port number lists on the Web.
Protocol. A formal description of message formats and the rules two computers must
follow to exchange those messages. You can think of protocols like languages. If two
computers or devices aren’t speaking the same language to each other, they won’t be
able to understand or communicate.
53
Page 54

ProxyServer User Guide
PPP (Point-to-Point Protocol). PPP enables dial-up connections to the Internet and is
the method that your ProxyServer connects to the Internet. PPP is more stable than the
older SLIP protocol and provides error checking features.
Router. A device which forwards traffic between networks. If you request information
from a location on your network or the Internet using TCP/IP, your computer will
broadcast the IP Address request onto your LAN. The router’s job is to listen for
requests for IP addresses that are not part of your LAN and then route them to the
appropriate network which may either be the Internet or another subnetwork on your
LAN. For more on how the ProxyServer and router interact, see Chapter 3 -
ProxyServer Manager : Routing T able.
Server. A provider of resources (e.g., file servers and name servers). A computer that
uses the resources of a server is called a Client. For example the ProxyServer provides
Internet Access and is thus called an Internet Access Server. The computers that use
the ProxyServer are clients of the ProxyServer and are thus called ProxyServer Clients.
Subnet: A portion of a network that shares a common address component. On TCP/IP
networks, subnets are defined as all devices whose IP Addresses have the same prefix.
For example, all devices with IP addresses that start with 213 . 0 . 0 . would be part of
the same subnet.
Subnet Mask / IP Address Mask. Subnet mask is what is used to determine what
subnet an IP address belongs to. Subnetting enables the network administrator to
further divide the host part of the address into two or more subnets.
TCP/IP (T ransmission Control Protocol/ Internet Protocol ) is the standard protocol
used on the Internet. This means that every computer that wants to communicate with
another computer on the Internet must use TCP/IP protocol to transmit and route data
packets. TCP/IP uses IP addresses to locate different computers or devices on a
network.
UDP (User Datagram Protocol). An Internet Standard transport layer protocol. It is a
connectionless protocol which adds a level of reliability and multiplexing to IP.
Virtual Server. A very general term. In terms of your ProxyServer the “Virtual Server”
function is to reverse translate using NAT protocol from the WAN to your LAN. Please
see Chapter 3 - ProxyServer Manager: Virtual Server for more information.
54
 Loading...