

Page 1
MultiVOIP Gatekeeper
Model MVPGK1
Hardware User Guide
Page 2

User Guide
S0000122, Revision B
MultiVOIP Gatekeeper (Model MVPGK1)
This publication may not be reproduced, in whole or in part, without prior expressed written permission
from Multi-Tech Systems, Inc. All rights reserved.
Copyright © 2001, by Multi-Tech Systems, Inc.
Multi-Tech Systems, Inc. makes no representations or warranties with respect to the contents hereof
and specifically disclaims any implied warranties of merchantability or fitness for any particular
purpose. Furthermore, Multi-Tech Systems, Inc. reserves the right to revise this publication and to
make changes from time to time in the content hereof without obligation of Multi-Tech Systems, Inc. to
notify any person or organization of such revisions or changes.
Record of Revisions
RevisionDescription
A Manual released. All pages at revision A.
(1/21/00)
B Update of Regulatory Info.
(4/15/00)
Patents
This product is covered by one or more of the following U.S. Patent Numbers: 5.301.274;
5.309.562; 5.355.365; 5.355.653; 5.452.289; 5.453.986. Other Patents Pending.
Trademarks
Multi-Tech and the rademarks of Multi-Tech Systems, Inc. are as follows: MultiVOIP, RASExpress,
MultiExpressFax, and the Multi-Tech logo.
Multi-Tech Systems, Inc.
2205 Woodale Drive
Mounds View, Minnesota 55112
(763) 785-3500 or (800) 328-9717
Fax (763) 785-9874
Tech Support (800) 972-2439
Internet Address: http://www.multitech.com
2 MultiVOIP Gatekeeper User Guide
Page 3

Contents
1 Introduction/Description 5
System Overview .................................................................................................................................... 6
Introduction...................................................................................................................................... 6
Technical Specifications ........................................................................................................................... 7
Chassis ............................................................................................................................................ 7
Power Supply ................................................................................................................................... 7
SBC (Single Board Computer) ............................................................................................................. 8
Display: ........................................................................................................................................... 9
NIC Board (EN10100 PCI Card) ......................................................................................................... 10
2 Installation and Setup 13
Introduction ......................................................................................................................................... 14
Unpacking ............................................................................................................................................ 14
Safety Warning AC Power ...................................................................................................................... 14
Lithium Battery Caution.......................................................................................................................... 14
Laser Safety Caution ............................................................................................................................. 14
Safety Warnings Telecom ...................................................................................................................... 14
Rack Mounting ...................................................................................................................................... 15
Cable Connections ................................................................................................................................15
SBC Board Cabling .......................................................................................................................... 16
NIC Cabling .................................................................................................................................... 16
Powering Up ........................................................................................................................................ 17
3 Single Board Computer 19
Introduction ......................................................................................................................................... 20
About the SBC ................................................................................................................................20
Component Locations ...................................................................................................................... 21
4 PCI NIC Board 23
Introduction ......................................................................................................................................... 24
About Fast Ethernet ......................................................................................................................... 24
About Auto-negotiation .................................................................................................................... 24
About PCI Bus................................................................................................................................. 25
Features ........................................................................................................................................ 25
5 Hardware Removal/Replacement 27
Introduction ......................................................................................................................................... 28
Disconnecting Cables and Removal from Enclosure ................................................................................... 28
Card Cage Removal/Replacement ........................................................................................................... 29
Board Removal and Replacement ............................................................................................................ 31
Removing SBC Board....................................................................................................................... 31
Removing NIC Board ....................................................................................................................... 32
Hard Drive Removal/Replacement ........................................................................................................... 32
Floppy Disk Drive Removal/Replacement .................................................................................................. 33
CD ROM Drive Removal/Replacement ...................................................................................................... 33
Power Supply Removal/Replacement....................................................................................................... 34
MultiVOIP Gatekeeper User Guide 3
Page 4

6 Troubleshooting 35
Introduction ......................................................................................................................................... 36
Hardware Troubleshooting ..................................................................................................................... 36
Diagnostic Tests .............................................................................................................................. 38
Troubleshooting with Error Messages ...................................................................................................... 38
Calling Technical Support ....................................................................................................................... 39
7 Service, Warranty, and Technical Support 41
Introduction ......................................................................................................................................... 42
Limited Warranty .................................................................................................................................. 42
Addendum for North American Products ............................................................................................ 42
Addendum for International Products ................................................................................................. 42
Service ................................................................................................................................................ 43
Ordering Accessories ............................................................................................................................ 43
Tech Support ....................................................................................................................................... 44
Recording Gatekeeper Information .................................................................................................... 44
About the Internet................................................................................................................................. 44
Appendices 45
Appendix A Connector Pinouts ............................................................................................................. 46
SBC Connectors .............................................................................................................................. 46
NIC Board Connector ....................................................................................................................... 48
SBC Onboard Connectors ................................................................................................................. 49
Expansion Slots .............................................................................................................................. 54
How to Set Jumpers ........................................................................................................................ 57
Appendix B: SBC Mapping Parameters ..................................................................................................... 63
Appendix C - SBC Configuration Details.................................................................................................... 63
Flash BIOS Update .......................................................................................................................... 63
Watchdog Timer Configuration ......................................................................................................... 63
Green PC Function ................................................................................................................................63
Power Saving Block Diagram ............................................................................................................ 64
CPU Doze Mode .............................................................................................................................. 64
System Standby Mode ..................................................................................................................... 64
System Suspend Mode .................................................................................................................... 64
Award BIOS Setup .......................................................................................................................... 65
Entering Setup ...................................................................................................................................... 66
Setup Keyboard Commands ............................................................................................................. 66
The Standard CMOS Setup Menu ...................................................................................................... 67
Memory Installation ......................................................................................................................... 67
SBC Configuration ................................................................................................................................. 67
VGA Driver Utilities ................................................................................................................................68
VGA Drivers .................................................................................................................................... 68
The BIOS Features Setup Menu ........................................................................................................ 70
Chipset Features Setup.................................................................................................................... 73
DRAM Settings ................................................................................................................................74
Cache Features .............................................................................................................................. 74
PCI and IDE Configuration ................................................................................................................ 74
Power Management Setup ..................................................................................................................... 75
Power Management ....................................................................................................................... 75
Doze Mode ..................................................................................................................................... 76
Standby Mode ................................................................................................................................76
IDE HDD Auto Detection ................................................................................................................... 79
Appendix D Regulatory Information ..................................................................................................... 83
4 MultiVOIP Gatekeeper User Guide
Page 5

Chapter
1 Introduction/Description
Page 6

System Overview
Introduction
Welcome to Multi-Techs new MultiVOIP Gatekeeper, Model MVPGK1, a turnkey hardware and
software solution that enables network managers and intranet managers to define and control how
H.323 voice traffic is managed over IP networks. The MultiVOIP Gatekeeper is a complementary product
to the MultiVOIP 200 (MVP200), the 2-Voice/Fax channel product and the MultiVOIP 400/800 (MVP400),
4-Voice/Fax channel product, and the MVP800, the 8-Voice/Fax channel product. The MultiVOIP
GateKeeper is an industry-standard mechanism for call control and routing, basic telephony services,
H.323 bandwidth usage control, total network usage control, and overall system administration and
security policies. It includes fast, easy-to-use interfaces that network managers can use to modify or
update zone configurations when an individual on the network needs additional services. And, it
provides call centers with the capability to perform needs-based call routing as well as providing a
variety of other automatic call distribution features.
The MultiVOIP GateKeeper is a ruggedized, expandable, 19-inch rack mount unit that includes a built-in
hard drive, a 3.5-inch floppy drive, and a CD-ROM drive. Its removable card cage has six circuit board
slots: one slot on the lower left side of the card cage is dedicated to the single-board computer (SBC);
also, there is one combo slot (PCI or ISA) and four PCI slots.
The IPC-551 SBC is a full size plug-in PC board with PCI bus architecture, a 233 MHz processor, 256 MB
of DRAM, Award BIOS, and Green PC functions that enable the computer to operate at a decreased
power level after it senses a period of idleness. In one of the PCI slots is an EN10100PCI Ethernet
adapter card that is a Plug and Play device with data transfer rates of either 10 Mbps (Ethernet) or 100
Mbps (Fast Ethernet), selected via auto-negotiation.
6 MultiVOIP Gatekeeper User Guide
Page 7

Technical Specifications
Figure 1-1. MultiVOIP Gatekeeper
The Gatekeeper conforms to the following technical specifications.
Chassis
6-slot PCI/ISA backplane
SBC
10/100Mb PCI EtherNet NIC
One half-height 1.44Mb 3½-inch floppy disk drive
One half-height IDE hard drive
Chapter 1 - System Overview
One 250-watt power supply
One 32x CD-ROM Drive
Power on/off switch on front panel with built in power LED.
Full security locking
Power Supply
AC Input
Power requirement: 115/230V; 7A/4A (RMS) selectable by slide switch
Frequency: 50-60 Hz
Efficiency: >65% @ full load, nominal line
DC Output
Outputs: +5 @ 25A, +12 @ 10A, -5 @ 0.5A, -12 @ 0.5A
Inrush current: <30A peak @ 115VAC, cold start at 25o C
Line regulation: +/- 5% at full load for +/-5V, +/-12V, +/-10% for -12V
Hold Time: 12ms at full load @ 115VAC
Note: 3.3 volts, DC, is available at PCI expansion slots on one side of the backplane only,
because PCI expansion cards made by some other manufacturers may require 3.3 volts. Any
such boards must be installed in the Gatekeeper on the side of the chassis where the SingleBoard Computer is located. Since there is no 3.3-volt supply on the other side of the backplane,
such PCI expansion cards will not operate properly in those positions.
Dimensions and Weight
Height: 5.25 inches
Width: 19 inches
MultiVOIP Gatekeeper User Guide 7
Page 8

Depth: 17 inches
Weight: 28 lbs. (12.7 kg)
Environmental
Temperature: 040o C
Humidity: 1090% RH noncondensing
Fan Rating: 25 cfm
SBC (Single Board Computer)
Intel 54C/55C.
320/321 pin PGA socket.
233 MHz clock generator.
2.8V - 3.5V voltage regulator.
Memory:
Up to 256MB, EDO/Fast Page Mode DRAM.
Four 72-pin SIMM sockets on board.
Cache:
L1 Cache: 32k.
L2 Cache on board: 512k.
Real-Time Clock/Calendar:
CMOS data backup from BIOS setting or BIOS default.
Dallas DS 12887 Real Time Clock.
BIOS:
Award Flash BIOS with plug & play functionality.
Easily updated 128/256KB flash EEPROM.
Supports Green power-saving function .
Supports System IO Setup.
Keyboard Connector:
PC/AT type miniature DIN connector.
Supports PC/AT, PS/2 Keyboard or PS/2 Mouse; determined by jumper selection.
Bus Support and Speed:
External ISA bus at 8 MHz.
External PCI bus at 33 MHz.
Internal PCI bus, for VGA & IDE at 33 MHz.
PC-104 bus at 8 MHz.
8 MultiVOIP Gatekeeper User Guide
Page 9

Chapter 1 - System Overview
Display:
Supports SVGA for CRT.
Supports 32-bit PCI Local Bus.
VGA BIOS combines 128/256KB flash ROM with system BIOS.
Supports 15 pin connector 1024 x 768 resolution (256 colors) on SVGA Monitor.
Supports 2 MB video memory.
Watchdog Timer:
The watchdog timer is controlled by software. Once enabled, the system will reboot, unless the timer is
re-enabled before the specified timeout duration expires. Timeout durations range from zero to 30
seconds in two-second increments (+/- 25%).
To enable watchdog timer: use I / O port 0443H
To disable watchdog timer: use I / O port 0441H
IDE Interface:
Two IDE ports. Supports up to four Enhanced IDE devices.
Floppy Disk Driver Interface:
Supports up to two floppy disk drives: 3.5" and 5.25" (360K / 720K / 1.2M / 1.44M / 2.88M).
Serial Port:
Two high-speed 16550-compatible UARTs with Send / Receive 16-byte FIFOs.
MIDI Compatible.
Programmable Band Rate Generator.
Parallel Port:
Bi-directional parallel port, supports SPP, ECP, and EPP.
Green Power-Saving Function:
Software support determined by BIOS setup.
LED Indicators
System power (at jumper KBL1 on board).
Hard Disk access (at jumper HDL1 on board).
DMA Controller:
82C37 x 2
DMA Channels:
7
Interrupt Controllers:
82C59 x 2
15 levels
MultiVOIP Gatekeeper User Guide 9
Page 10

Operating Temperature:
0 to60°C (32 to 140°F).
System Power Requirements :
DC Voltage: +5V; minimum +4.75V, maximum 5.25V.
DC Ampere: 15A.
Board Dimensions:
338.5 mm x 122 mm (13.33 in. x 4.80 in.)
Board Net Weight:
0.4 Kg. (14.1 oz.)
NIC Board (EN10100 PCI Card)
The EN10100PCI card was designed to meet the following specifications:
Network Type:
· Fast Ethernet 100Base-TX (IEEE 802.3u standard for 100 Mbps baseband CSMA/CD LAN)
· Ethernet 10BASE-T (IEEE 802.3 standard for 10 Mbps baseband CSMA/CD local area network)
Jumperless Hardware, with auto-negotiation functionality
Media interface: RJ-45
LAN Chip Set:
· Interface controller: D-Link DL10030
· Transceiver interface: Davicom DM9101
EMI Compatibility:
· FCC Class B
· VCCI Class B
· CISPR B
· SMA Certification
· CE Certification, Class B
Host interface: PCI 2.1 Bus (Bus Master)
I/O & IRQ base address: assigned by Plug and Play system
Physical Dimensions: 13.9 cm x 7.3 cm
Environment:
· Storage: -20° to 80°C, (-4° to 176° F)
· Operating: 0° to 55° C, (32° to 131° F)
· Humidity: 10% to 90% non-condensing
10 MultiVOIP Gatekeeper User Guide
Page 11

Chapter 1 - System Overview
Power Consumption: 2W (400mA @ 5V) max
Check
http://www.multitech.com for drivers not listed and for the latest release of drivers.
1
Software drivers
for:
· Microsoft Windows NT4.0
· Banyan VINES v4.00 (2)
· DECnet PathWorks v4.0
· FTP PC/TCP
· IBM Communication Manager v1.0
· IBM LAN Server v4.0, v3.0, v2.0
· IBM LAN Support Program v1.3x
· Microsoft LAN Manager v2.1
· Microsoft Windows for Workgroups 3.11
· Novell Netware 3.x, 4.x ODI driver
· Win/TCP PathWay Access for DOS v1.1
MultiVOIP Gatekeeper User Guide 11
Page 12

12 MultiVOIP Gatekeeper User Guide
Page 13

Chapter
2 Installation and Setup
Page 14

Introduction
This chapter explains how to set up and connect cables for the Gatekeeper. This product includes the
Windows operating system and Gatekeeper software, and is ready to be connected to an Ethernet
concentrator. The operator needs only to connect a VGA (or SVGA) monitor, keyboard, Ethernet cable,
and mouse, boot the system, and enter some basic information. To connect the cables to a monitor and
keyboard, see the Cable Connections section of this chapter.
Unpacking
Check the items on the Gatekeeper shipping list to ensure that you have received the correct options
and accessories. Unpack the unit and inspect it for visible shipping damage. If damage is observed, do
not power-on the unit; contact Multi-Tech's Tech Support for advice. If no damage is observed, place
the Gatekeeper in its final location.
Safety Warning AC Power
Locate the AC outlet near the communication equipment. The AC power cord is your main AC
disconnecting device and must be easily accessible at all times. For your safety, the power cord
provided with your system has a grounding plug. Always use the power cord with a properly grounded
wall outlet to avoid the risk of electrical shock.
Lithium Battery Caution
A lithium battery on the product provides backup power for the devices timekeeping capability. The
battery has an estimated life expectancy of ten years.
When the battery starts to weaken, the date and time may be incorrect. If the battery fails, the unit
must be sent back to Multi-Tech Systems for battery replacement.
Warning: There is danger of explosion if the battery is incorrectly replaced.
Laser Safety Caution
Class 1 LED Product.
The CD-ROM drive contains a laser system and is classified as a Class 1 Laser Product under a U.S.
Department of Health and Human Services (DHHS) Radiation Performance standard according to the
Radiation Control for Health and Safety Act of 1968.
If the unit ever requires maintenance, contact an authorized repair location.
Safety Warnings Telecom
1.Never install telephone wiring during a lightning storm.
2.Never install telephone jacks in wet locations unless the jack is specifically designed for wet
locations.
3.This product is to be used with UL and cUL listed computers.
4.Never touch uninsulated telephone wires or terminals unless the telephone line has been
disconnected at the network interface.
5.Use caution when installing or modifying telephone lines.
14 MultiVOIP Gatekeeper User Guide
Page 15
6.Avoid using a telephone (other than a cordless type) during an electrical storm. There may be
a remote risk of electrical shock from lightning.
7.Do not use the telephone to report a gas leak in the vicinity of the leak.
8. To reduce the risk of fire, use only No. 26 AWG or larger Telecommunications line cord.
Rack Mounting
Caution: To prevent personal injury or damage to the unit, two people should mount the
Gatekeeper into the rack enclosure.
The Gatekeeper fits in a standard 19-inch rack enclosure. Attach it securely to the rack enclosure with
the four mounting screws included in your Gatekeeper kit.
When mounting the equipment in the rack, make sure the mechanical loading is even. Uneven
mechanical loading creates the risk that the equipment rack may tip or fall or present other related
hazards. The rack should safely support the combined weight of all the equipment that it holds.
Note: To keep the server cool enough, you need at least one inch of clearance behind the unit
to allow air flow. If mounted in a rack enclosure or as a desktop unit, there must be a
minimum of one inch between the back of the Gatekeeper and any wall or barrier.
Chapter 2 - Installation & Setup
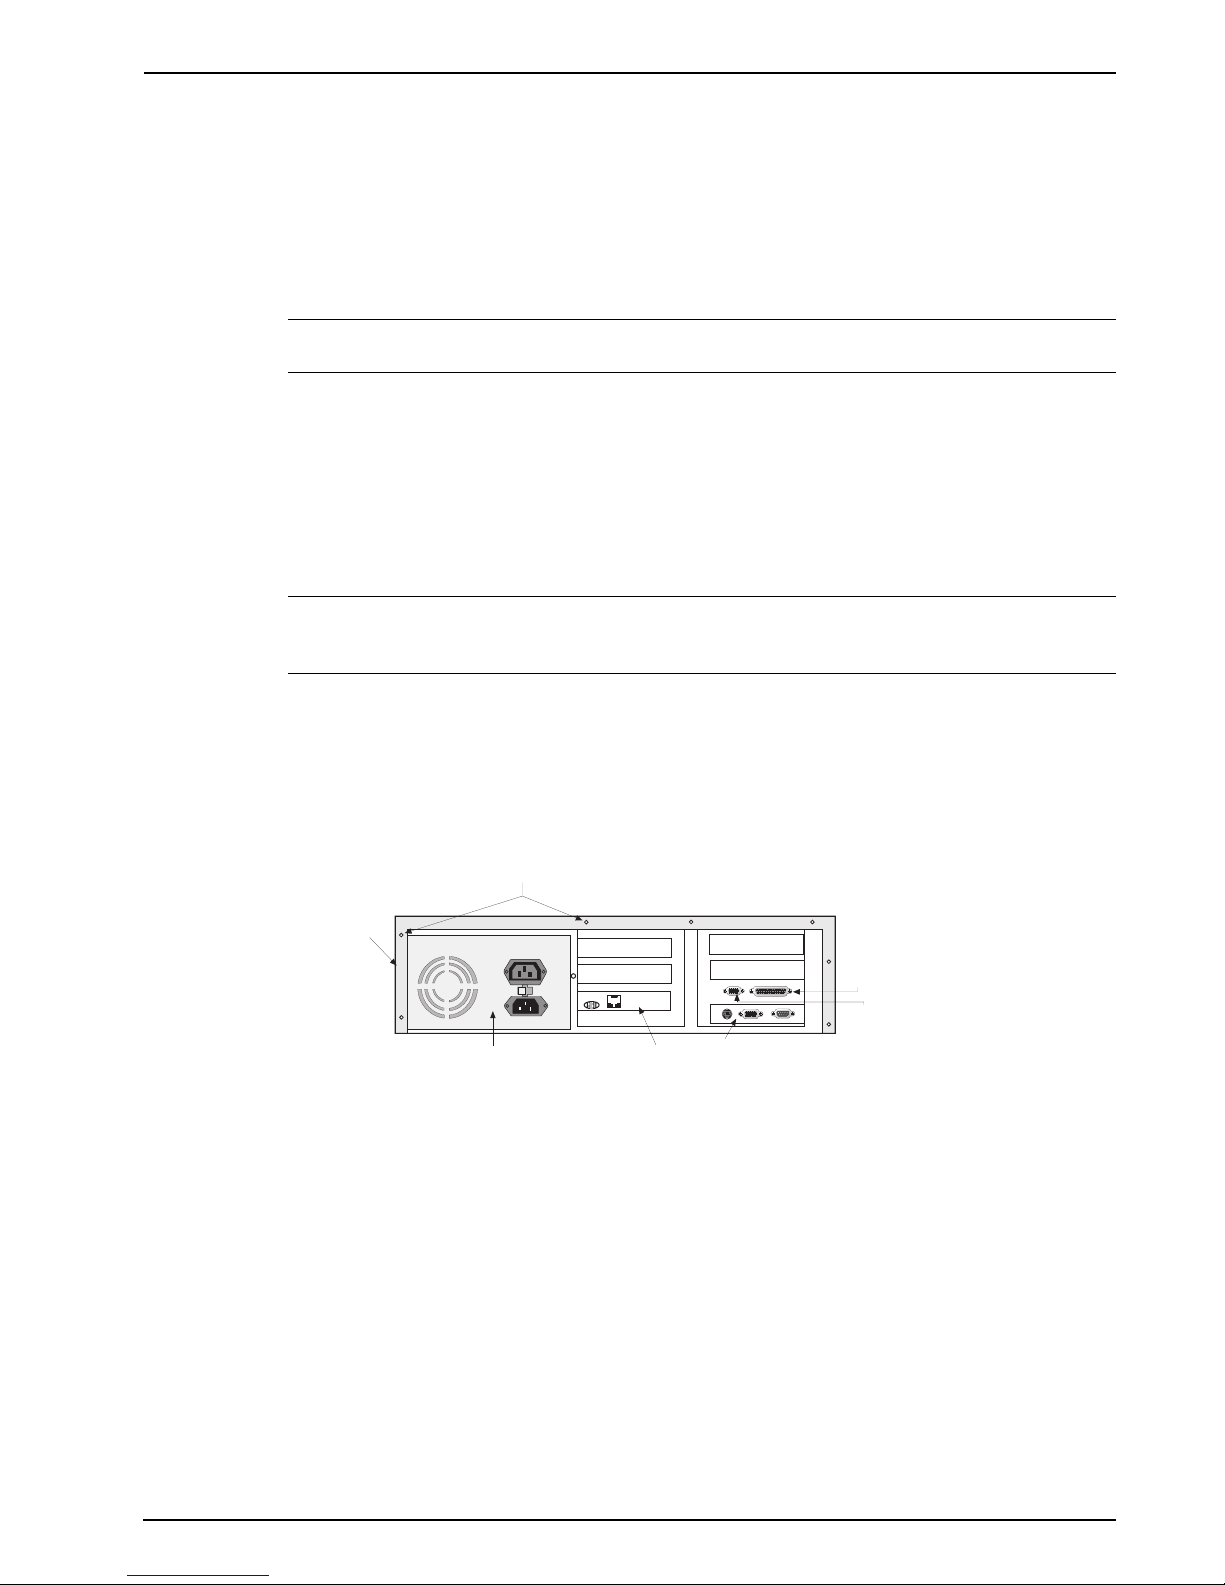
Cable Connections
The operator need only connect the Network Interface Card to the local area network.
The SBC board has cable connectors for adding a keyboard, a monitor, and a mouse or other serial
device (on COM1). Cable connectors and boards are shown in Figure 2-1.
Cover
Cover Mounting
Screws
120
Power Supply
100M
LINK
ACT
Network
Interface
SBC Backplane
Card
Figure 2-1. Back Panel Connectors
Printer Port
(DB25)
COM 2
(DB15)
MultiVOIP Gatekeeper User Guide 15
Page 16

SBC Board Cabling
The SBC board is located in the Gatekeeper as shown in Figure 2-1. The SBC board cabling may involve
connection to three back panel connectors (see Figure 2-2). The back panel connectors are:
Keyboard connector
Video connector
COM 1 connector
120
100M
LINK
ACT
SBC
Backplane
15-Pin Video
Connector
(to External
6-Pin Circular Jack
(To External Keyboard)
Display Monitor)
Fig. 2-2. SBC Backplane Connections
The left round connector is for a keyboard. The middle receptacle connects the video cable to a
monitor. The right connector (COM 1) on the SBCs backplane typically accommodates a mouse or
other pointing device. The SBC connector pinouts are shown and defined in Appendix A.
Note: Any cables connected to the Gatekeeper should be shielded to reduce interference.
COM 1 Connector
(DB9 male)
Connect RS-232C
Serial Cable (female end)
here
NIC Cabling
The 10/100Mb PCI EtherNet Network Interface Card is located as shown in Figure 2-4. The NIC has a
single RJ-45 connector and three LEDs.
120
100M
LINK
ACT
Network
Interface
Card
100M
Fig. 2-4. NIC Board Connectors
Connect the appropriate network cable to the NIC in the Gatekeeper. The RJ-45 NIC connector is shown
and defined in Appendix A.
Note: Any cables connected to the Gatekeeper should be shielded to reduce interference.
LINK
ACT
RJ-45 UTP
Connector
16 MultiVOIP Gatekeeper User Guide
Page 17
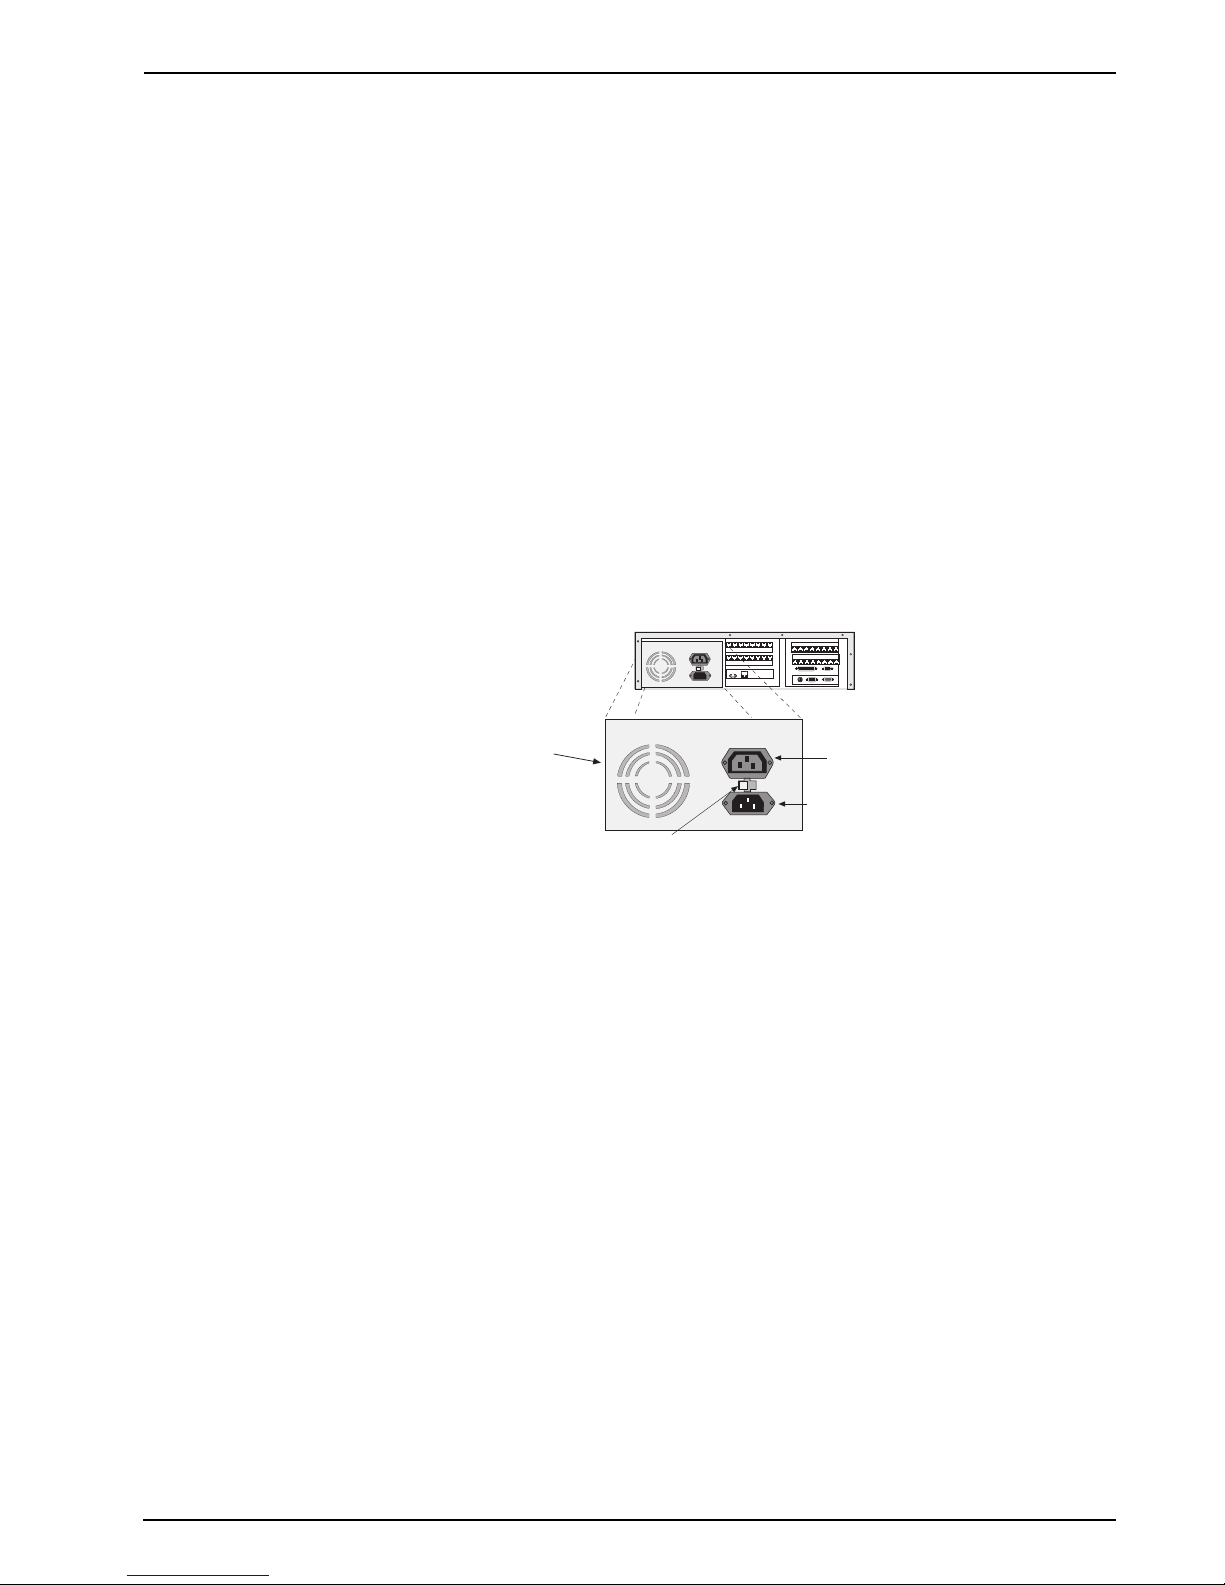
Powering Up
Note: This is pluggable equipment; the socket outlet must be installed near the equipment and must
be easily accessible.
When connecting the equipment to the power-supply circuit, be sure to check equipment nameplate
ratings to avoid overloading circuits. Overloaded circuits may cause damage to over-current protection
devices and to power-supply wiring.
Make sure that the voltage selector on the power supply is set to the proper voltage prior to connecting
this equipment to the main power. If the voltage selector needs to be changed, an ordinary pencil can
be used to change the switch to the position which best correlates with the known input voltage. If the
voltage selector is in the "115" position, input voltages from 100-120VAC may be applied to the
equipment. If the voltage selector is in the "230" position, input voltages from 200-240 VAC may be
applied to the equipment.
Connect the power cord supplied with the CommPlete 4000 to the power cord connector on the back of
the cabinet and to an AC outlet. Press the power switch on the front of the cabinet to the ON position.
The power switch contains an LED which should light when power is applied.
Chapter 2 - Installation & Setup
120
100M
LINK
ACT
Power Supply
Voltage Selector
Fig. 2-5. Power Supply Connectors
120
Monitor Power
Outlet
Power Cord
Input
MultiVOIP Gatekeeper User Guide 17
Page 18

18 MultiVOIP Gatekeeper User Guide
Page 19

Chapter
3 Single Board Computer
Page 20

Introduction
This chapter introduces some of the features of the Multi-Tech Single Board Computer (or SBC), Model
IPC-551, used in the Gatekeeper. Further details can be found in Appendixes A, B, and C.
About the SBC
The IPC-551 SBC is a full size plug-in PC board with PCI bus architecture, a 233 MHz Intel Pentium
processor with MMX, 256 MB of dynamic random access memory (DRAM), Award PnP flash ROM BIOS,
a watchdog timer, and a Green PC function that enables the system to operate at a decreased power
level after it senses a period of inactivity.
The memory interface on the SBC consists of four 72-pin single in-line memory module (SIMM) sockets
(two double DRAM banks) that can be used to configure memories ranging from 8MB to 256 MB.
(Details are provided in Appendix C.) The 256 MB memory supplied with each Gatekeeper consists of
four 64 MB memory modules.
The system BIOS and VGA BIOS on the SBC can be updated as necessary using the Awdflash.exe
program provided on the system CD-ROM. (Details are provided in Appendix C.)
A watchdog timer (WDT) is provided on the SBC in case your system configuration requires that the
Gatekeeper be remotely rebooted from time to time. Setup instructions for the WDT are also provided
in Appendix C.)
The default condition for the Green PC function on the SBC board is Off. When activated, however,
the green function slows down the Gatekeeper and shuts down certain computer functions in order to
reduce power consumption. The three reduced-power operating modes built into the green function
are: CPU Doze mode, System Standby mode, and System Suspend mode. See Appendix C for further
details concerning the Green PC function.
20 MultiVOIP Gatekeeper User Guide
Page 21
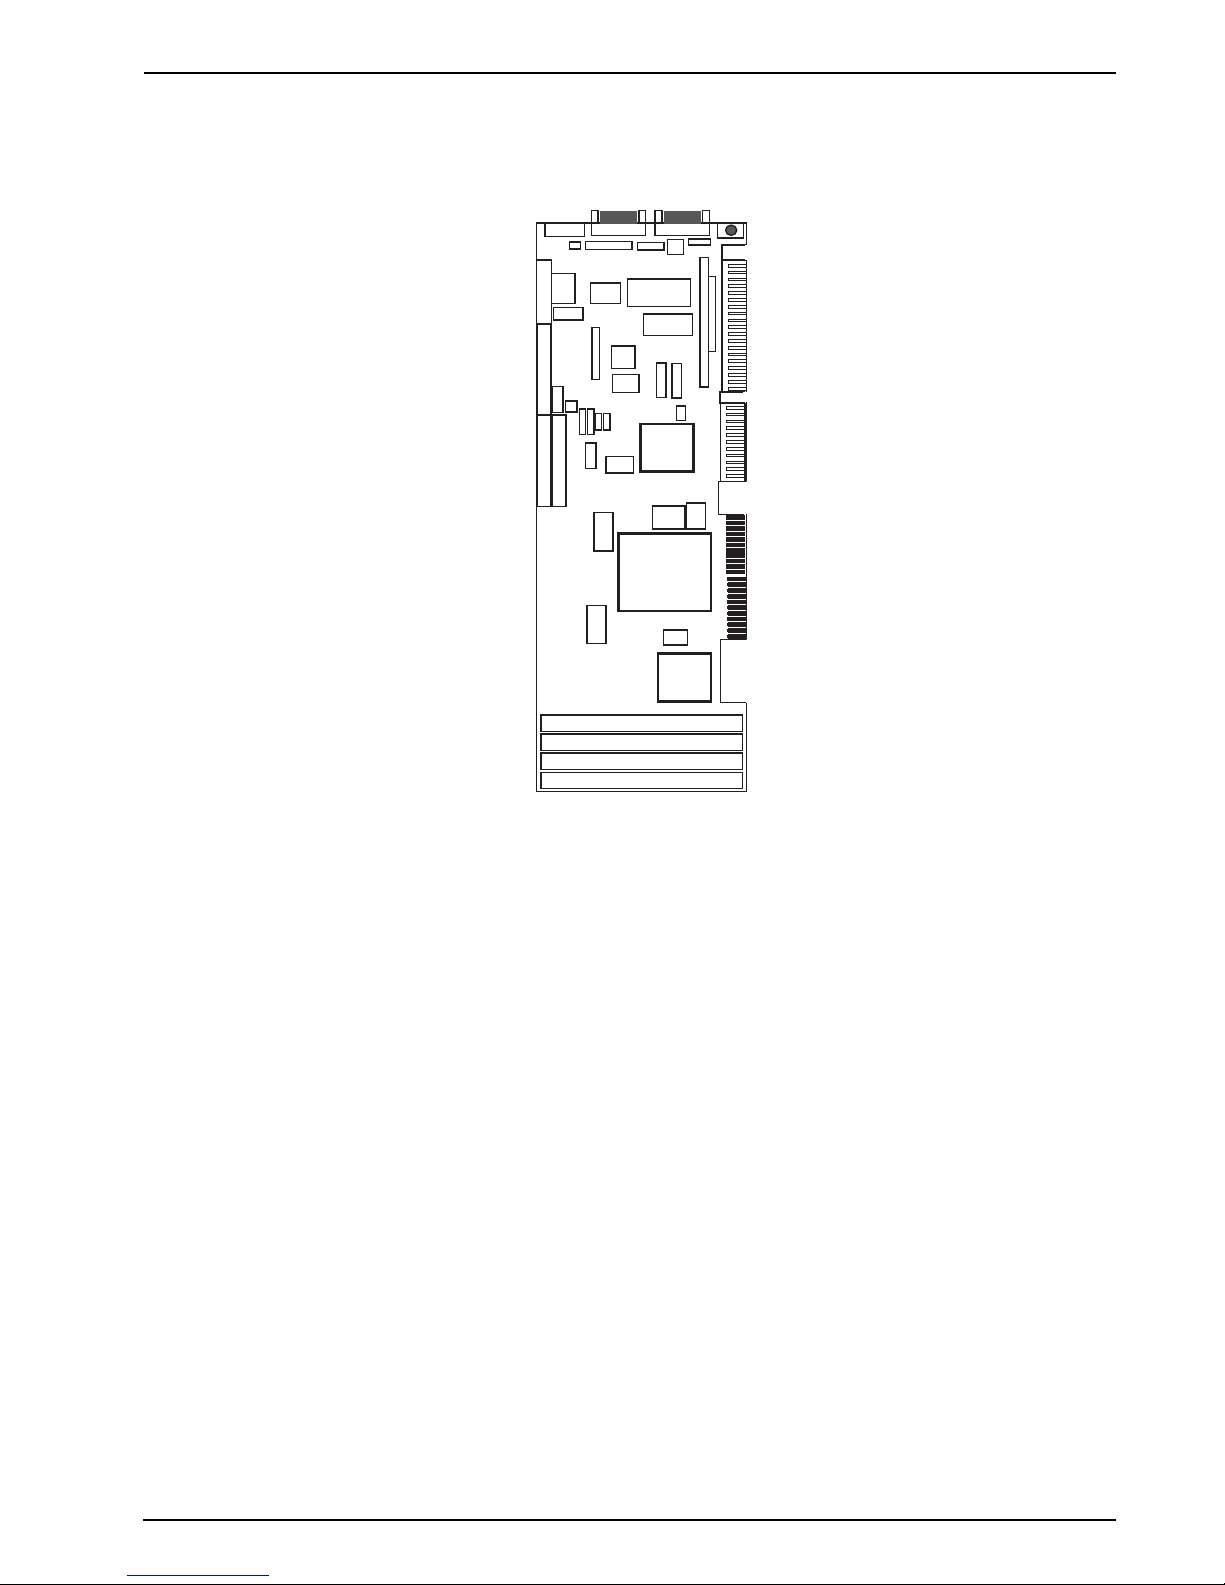
Component Locations
Figure 3-1 displays component locations on the SBC board.
BIOS
JP13
KB
Flash
BIOS
KBL
Flash
Disk
Real Time
Clock
Chipset
VGA
JP6
VRAM
EXKB
VRAM
GND
RST
PRT
FDD
PWR
JP11
JP12
2
COM
JP14
IDE 2
HDL
COM 1
JP7
SIO
Panel
SPK
JP10
USB
JP4
KB/
Mouse
PC-104
Chapter 3 - Single Board Computer
IDE 1
JP
9
JP2
JP
3
6xx86
CPU
JP
8
JP1
Chipset
SIMM 1
SIMM 2
SIMM 3
SIMM 4
Figure 3-1: Connector, Jumper and Component Locations on the SBC Board
MultiVOIP Gatekeeper User Guide 21
Page 22

22 MultiVOIP Gatekeeper User Guide
Page 23

Chapter
4 PCI NIC Board
Page 24
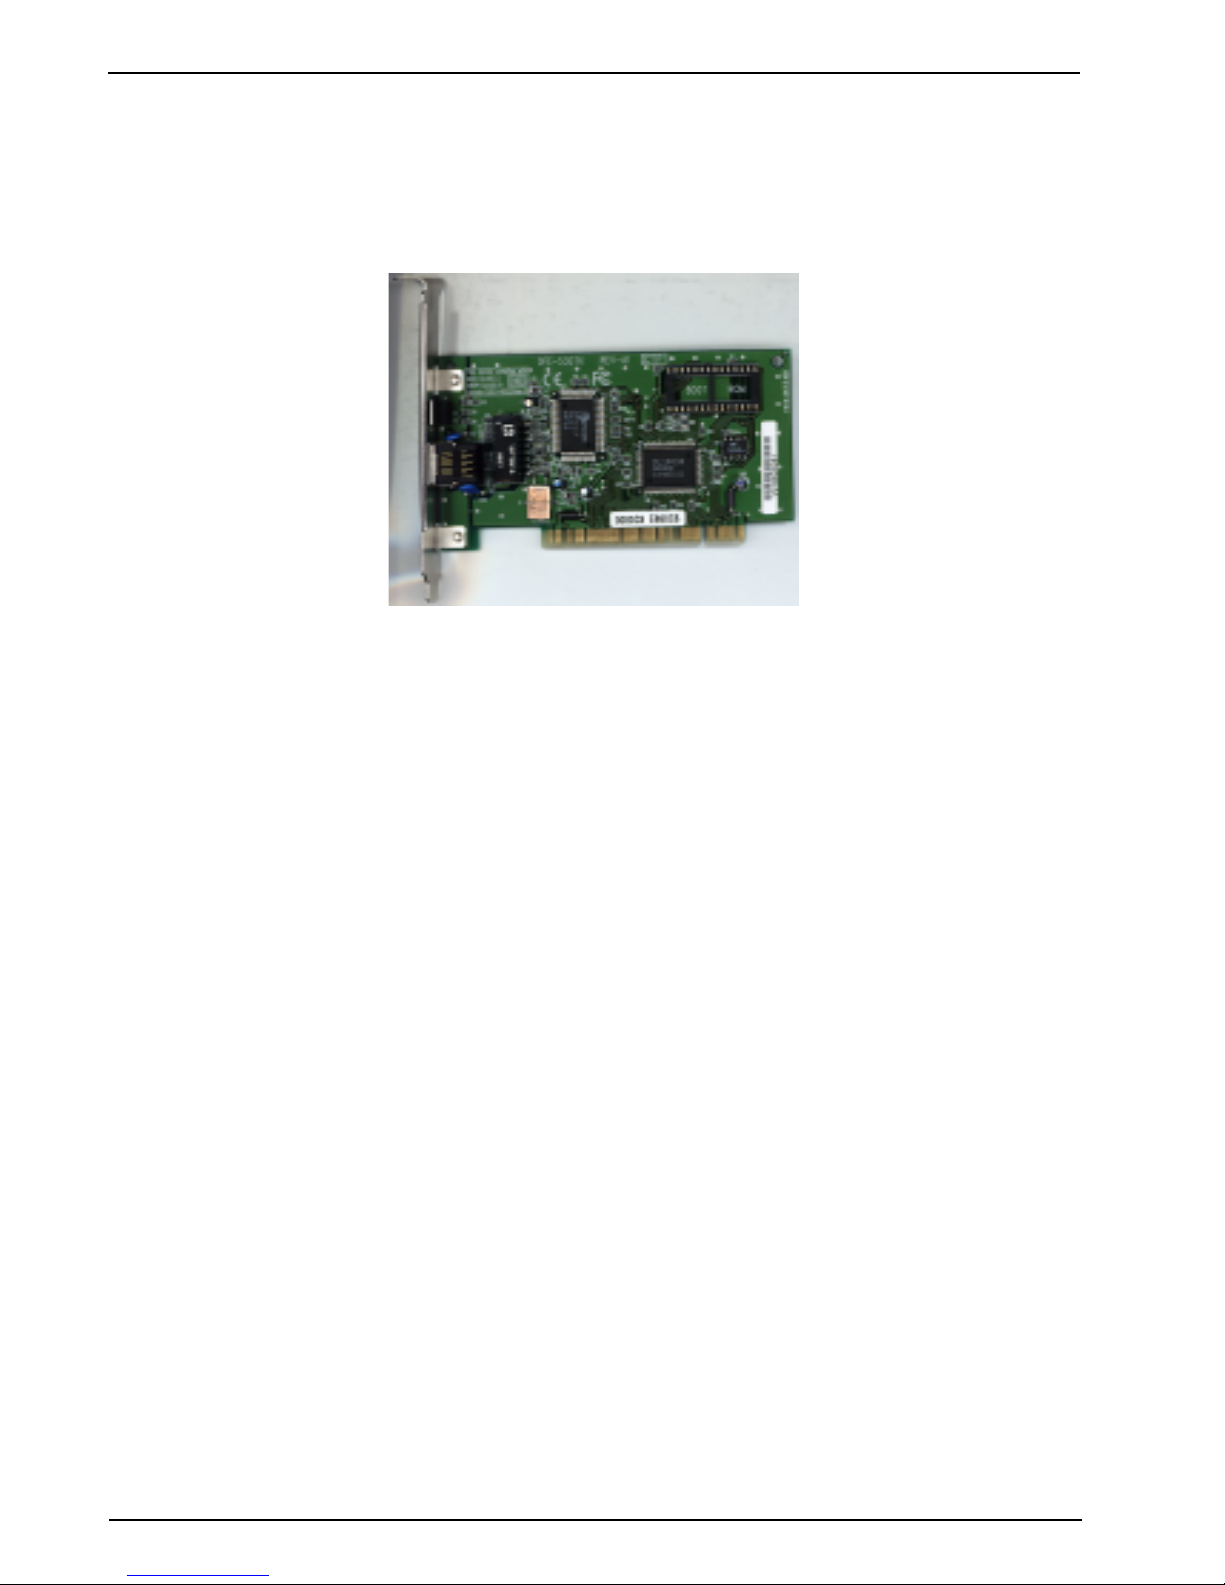
Introduction
This chapter documents the features and specifications for the Multi-Tech EN10100PCI (NIC board), a
10/100Mb Ethernet PCI bus NIC with Auto-negotiation (Figure 4-1).
Figure 4-1. NIC Board
About Fast Ethernet
Fast Ethernet is a network technology specified by IEEE Standard 802.3u. It extends the traditional
10Mbps Ethernet technology to achieve 100Mbps transmission and reception, while retaining the same
CSMA/CA Ethernet protocol. Thus while Fast Ethernet provides a tenfold increase in network capacity,
it is wholly compatible with traditional 10Mbps Ethernet network facilities. This compatibility is the key
to easy and efficient upgrades to 100Mbps in your network areas needing greater bandwidth.
Upgrading selected areas to Fast Ethernet does not require hardware or software changes in network
areas where traditional 10Mbps Ethernet is providing good service. For upgrading existing Ethernet
installations to 100Mbps, and especially for selectively upgrading areas needing upgrade, Fast Ethernet
is the clear choice in terms of cost-effectiveness, as well as convenience and smoothness in transition.
Fast Ethernet comprises two subtypes: 100Base-T4 and 100Base-TX. 100Base-T4 Fast Ethernet can
use existing Category 3 or Category 4 UTP network cabling, but does not provide full duplex operation.
100Base-TX requires Category 5 cabling, but does provide full duplex operation. Full duplex 100BaseTX operation enables simultaneous transmission and reception, both at 100Mbps, thus providing
service potentially equivalent to 200Mbps half-duplex service. The EN10100PCI Adapter does not
support the 100Base-T4 subtype. To provide compatibility in traditional 10Mbps Ethernet environments
(where, for example, EN10100PCI adapters are installed anticipating upgrade of supporting hub
equipment to Fast Ethernet), the EN10100PCI also supports traditional 10 Mbps Ethernet operation, in
full-duplex as well as half-duplex modes. Selection of the best operation mode in any given installation
is automatically governed by auto-negotiation.
About Auto-negotiation
You have probably had the experience of making a dialup connection through a modem, and have
heard the gravelly-sounding exchanges between your modem and the modem at the other end of the
telephone line (these exchanges are ordinarily played out through a speaker in your local modem). As
irritating as those few seconds of noise may be, they do let you know that your modem and the remote
modem are on the job, preparing for your intended communication with the remote computer. The
preparatory work of the two modems during those few seconds before you see the Connect message
is to negotiate the best data communication scheme which is supported by both modems, and which is
24 MultiVOIP Gatekeeper User Guide
Page 25

Chapter 4 - PCI NIC Board
suitable for the quality of the telephone line linkage between them. The parameters to be settled
between the two modems include best baud rate, compression method, and error correction method.
When the two modems have tested the phoneline quality and settled on the combination of shared
options and parameters which will provide the best data communication over the connecting phone
line, then you are given the Connect message which signals the end of the intermodem negotiation
and the beginning of your intended communication with the remote computer.
Auto-negotiation between devices within an Ethernet LAN is similar in concept, but much briefer. The
two devices involved in the auto-negotiation will be the EN10100PCI Adapter serving your station and
the hub through which it is connected into the LAN. The options to be negotiated between the
EN10100PCI and its supporting hub include Ethernet type (100BASE-TX Fast Ethernet or 10BASE-T
Ethernet) and duplex mode (half-duplex, being one-way-at-a-time, or full duplex, being simultaneous
transmit-and-receive). Startup communication between the two devices occurs when both devices are
power-on, the cable connection between them is good, and the Network Operating System software is
running. As soon as those conditions are satisfied, the preparatory process of auto-negotiation between
the EN10100PCI and its supporting hub proceeds automatically. If the hub has auto-negotiation
functionality, then it and the EN10100PCI exchange a series of messages in which each device signals
its capabilities and listens for corresponding information about the other. The auto-negotiation process
requires only a few milliseconds, and the two devices select the best communication parameters
supported by both devices. If the hub does not have auto-engotiation functionality, then its monotone
(single capability) message will be recognized by the EN10100PCIs auto-negotiation facility, and the
EN10100PCI will simply switch to one of its own capabilities which matches that of the hub.
When the preparatory procedure of auto-negotiation is completed, then the line is ready and will
provide a data channel which is optimal for the two devices. The line will remain ready without further
auto-negotiation action until the linkage is broken. Auto-negotiation then reoccurs at any time that the
linkage is restored, again making the line ready for optimal data communications.
About PCI Bus
Your EN10100PCI Adapter delivers outstanding performance by fully exploiting the advanced features of
your computers PCI bus. EN10100PCI Adapters utilize the Bus Master Mode of the PCI bus, enableing
direct transfers of Ethernet packet content between computer memory and the adapters controller,
thus minimizing network demand on the CPU. The adapters controller function provides the additional
benefit of reduced command processing overhead. The working relationship between a EN10100PCI
adapter and main memory working in Bus Master mode is powered by the Bridge/Memory Controller of
the PCI bus. This reduces the CPU role in network operations, thus freeing the CPU to service other
tasks, with resulting improvement in overall computing (multitasking) performance. At the same time, it
produces superior network throughput by reducing latency (waiting for CPU service) during
transmissions and receptions.
Features
Designed for versatility and performance, the EN10100PCI Adapter provides the following features:
· Operates in a PCI Bus Master slot of a Pentium computer, independent of CPU speed.
· PCI Bus Master memory access, for high throughput and low CPU demand.
· 32-bit Intelligent Ethernet controller.
· Complies with IEEE 802.3 100Base-TX and 10Base-T Ethernet standards.
· Plug and Play installation.
· RJ-45 connector for network cable connection.
· 100Mbps Fast Ethernet or 10Mbps Ethernet data transfer, selected via auto-negotiation.
MultiVOIP Gatekeeper User Guide 25
Page 26

· Full duplex or half-duplex operation, selected by auto-negotiation.
· Built-in FIFO buffers reduce overhead of memory transfers.
· Three LED indicators: 10Mbps/100Mbps, Link, Activity.
· Drivers for all leading Network Operating Systems.
LED Indicators
The EN10100PCI Adapter features three LED indicators to assist in the resolving of network diagnostics:
· 10Mbps/100Mbps SPEED Indicator
This LED shows steady green (on) when 100Mbps speed is selected. It is dark (off)
when10Mbps is negotiated.
· LINK Indicator
Steady green indicates good linkage between the EN10100PCI and its supporting hub.
· ACTIVITY Indicator
Flashing green indicates that the adapter is sending or receiving.
26 MultiVOIP Gatekeeper User Guide
Page 27

Chapter
5 Hardware Removal/
Replacement
Page 28

Introduction
This chapters procedures describe removal and replacement of the main hardware components of the
Gatekeeper. Before removing or replacing any component, disconnect the cables from the back of the
Gatekeeper and remove the Gatekeeper from its rack enclosure per instructions. The Gatekeeper has
been designed to make this process as efficient as possible, but if you experience problems, contact
Multi-Tech Technical Support (see chapter 7).
Disconnecting Cables and Removal from Enclosure
The steps below describe how to remove the Gatekeeper from its rack enclosure. These steps must be
followed before any internal component can be removed or replaced.
Warning: Any time power is removed, turn off the Master Power switch inside the front door.
Note: In order to make re-connection easier, be sure to note or label all cable connections
before disconnecting any cables from the Gatekeeper.
1 Shut down Windows NT Server.
2 Remove the power cord from the back of the Gatekeeper.
3 If connected, disconnect the video, COM 1, and keyboard cables from the back of the SBC.
Cover Mounting
Screws
Cover
Printer Port
(DB25)
COM 2
(DB15)
Power Supply
120
100M
LINK
ACT
Network
Interface
SBC Backplane
Card
Fig.4-1. Back Panel Connectors
4 If a LAN is connected to the Gatekeeper , disconnect twisted-pair cable at the NIC.
5 Remove the four rack enclosure mounting screws from the front of Gatekeeper and
remove the Gatekeeper from the rack enclosure. See Figure 4-2.
Enclosure
Mounting Holes
Handle
Fan Intake Vents
Rack Enclosure
Mounting
Screws
6 To re-attach cables and re-mount the Gatekeeper, follow steps 1-5 in reverse order and
sense. That is,
a. (Two people are needed.) Replace the Gatekeeper in the rack enclosure and
secure it using the four mounting screws that were removed in Step 5.
28 MultiVOIP Gatekeeper User Guide
Fig. 4-2. Rack Enclosure Mounting Screws
Page 29

Chapter 5 - Hardware Removal/Replacement
c. Reconnect the Network Interface Card to the LAN with its twisted-pair cable.
d. Reconnect the SBC cables (to video, keyboard, and COM1).
e. Restore power when ready.
Card Cage Removal/Replacement
The steps below describe how to remove the card cage. Note that card cage removal is not always
necessary to remove or replace some components. Specifically, expansion cards can be installed into
or removed from the SBC side of the card cage without removing the card cage.
1 Remove the Gatekeeper
procedure Disconnecting Cables and Removal from Enclosure presented above.
Summary: after powering down the unit and disconnecting all power and signal cables,
employ two people to remove its rack-mounting screws and lift the unit out of the rack.
2 To remove the top cover from the Gatekeeper , remove the seven cover mounting screws
located in the back of the Gatekeeper. The cover slides off the back of the chassis.
from rack enclosure (two people are needed). Follow the
Cover Mounting
Screws (7)
Cover
120
Fig. 4-3. Cover Mounting Screws
3 Remove two chassis mounting screws securing the card cage. See Figure 4-4.
Chassis
Mounting
Screw
7
T
E
K
C
O
S
K
LOC
1
M
2
M
3
M
1
K
N
4
M
A
B
1
K
N
A
B
Fig. 4-4. Chassis Mounting Screws
100M
LINK
ACT
Chassis
Mounting
Screw
4 Pull the card cage (including fan enclosure) straight up and out of the chassis. See Figure
4-5. Set it next to the chassis.
Note: Before placing the card cage back into the chassis, verify that the power connectors
from the power supply to the backplane are fully attached. Figure 4-5b shows the wire colors
and correct orientation of the power supply cables.
MultiVOIP Gatekeeper User Guide 29
Page 30

SBC Board
Fan Enclosure
7
T
E
K
C
O
S
LOCK
1
M
2
M
3
M
1
K
N
4
M
A
B
1
K
N
A
B
7
T
E
K
C
O
S
K
C
O
L
1
M
2
M
3
M
1
K
N
4
M
A
B
1
K
N
A
B
Figure 4-5a. Card Cage Removal
NIC Board
GateKeeper
(Front)
Figure 4-5b. Wire Colors and Orientation of Power Cables
30 MultiVOIP Gatekeeper User Guide
Red
Red
Red
White
Black
Black
Black
Black
Blue
Yellow
Red
Orange
Page 31

Chapter 5 - Hardware Removal/Replacement
Board Removal and Replacement
Removing SBC Board
1 Remove the Gatekeeper from rack enclosure (two people are needed). Follow the
procedure Disconnecting Cables and Removal from Enclosure presented above.
Summary: after powering down the unit and disconnecting all power and signal cables,
employ two people to remove its rack-mounting screws and lift the unit out of the rack.
2 Remove the top cover from the Gatekeeper by removing the seven cover mounting
screws located in the back of the Gatekeeper. (See Figure 4-3.)
3 Disconnect the four ribbon cables from the SBC. (See Figure 4-6.) Depending on
your configuration, you may not have all four ports in use.
KB
BIOS
Flash
BIOS
KBL
Flash
Disk
Real Time
Clock
Chipset
JP2
VGA
JP6
VRAM
VRAM
EXKB
GND
JP
3
KB/
Mouse
PC-104
COM 2
Connector
Printer Port
Connector
Floppy Drive
Connector
Hard Drive
Connector
PWR
RST
PRT
JP11
FDD
IDE 1
2
COM
JP12
IDE 2
JP14
HDL
COM 1
JP7
SIO
Panel
SPK
JP10
USB
JP
9
JP13
JP4
6xx86
CPU
Fanned
Heatsink
Location
Figure 4-6. SBC Board and Ribbon Cable Connectors
JP
8
JP1
Chipset
SIMM 1
SIMM 2
SIMM 3
SIMM 4
4 Remove the fanned heatsink from the processor.
5 Remove the screw that secures the SBC board to the chassis at the back of the
Gatekeeper, then unplug (remove) the SBC board from the midplane.
6 To replace the SBC board, verify SBC board configuration. Refer to the Hardware
Configuration and Installation instructions in the SBC manual.
7 Install the new SBC board by following steps 1-5 in reverse order and sense. That is,
a. Attach SBC to its midplane socket and secure SBC to rear of chassis with screw.
b. Re-connect ribbon cables and reinstall fanned heatsink.
c. Replace top cover (7 screws).
d. (Two people are needed.) Replace Gatekeeper into rack enclosure.
MultiVOIP Gatekeeper User Guide 31
Page 32

Removing NIC Board
1 Remove the Gatekeeper from rack enclosure (two people are needed). Follow the
procedure Disconnecting Cables and Removal from Enclosure presented above.
Summary: after powering down the unit and disconnecting all power and signal cables,
employ two persons to remove its rack-mounting screws and lift the unit out of the rack.
2 Remove the seven cover mounting screws (Figure 4-3), then slide the top cover off the
back of the Gatekeeper.
3 Remove the two chassis mounting screws (front corner and back) securing the card cage.
See figure 4-4.
4 Being careful to maintain slack in the power cables, lift the card cage up and over so
it rests alongside the chassis.
5 Remove the screw that secures the NIC board to the chassis at the back of the Gatekeeper.
6 Remove the NIC board from the midplane.
7 To replace the NIC board, verify NIC configuration.
8 Install the new NIC board by following steps 1-4 in reverse order and sense. That is,
a. Attach NIC to its midplane socket.
b. Secure NIC to rear of chassis with screw.
c. Reinstall card cage (2 screws). Make sure the power cables are securely attached.
d. Replace top cover (7 screws).
e. (Two people are needed.) Replace Gatekeeper in its rack enclosure.
Hard Drive Removal/Replacement
1 Remove the Gatekeeper from the rack enclosure (two people are needed). Follow the
procedure Disconnecting Cables and Removal from Enclosure presented above.
Summary: after powering down the unit and disconnecting all power and signal cables,
remove its rack-mounting screws and have two people lift the unit out of the rack.
2 Remove the top cover from the Gatekeeper by removing the seven cover mounting
screws located at the back of the Gatekeeper. See figure 4-3.
3 Disconnect the power and data cables from the back of the hard drive.
4 Remove the three screws that secure the hard drive to the drive chassis. You must lift the
card cage out of the chassis to gain access to the third screw.
5 Remove the hard drive by sliding it straight out the front of the drive chassis.
6 To install a new hard drive, follow steps 1-5 in reverse order and sense. That is,
a. Slide the hard drive straight back into the drive chassis.
b. Replace drive/chassis mounting screws(3).
c. Reconnect two cables (data and power).
d. Reinstall the card cage and secure it with two screws.
e. Replace top cover (7 screws).
f. (Two people are needed.) Reinstall Gatekeeper in rack enclosure.
32 MultiVOIP Gatekeeper User Guide
Page 33

Chapter 5 - Hardware Removal/Replacement
Floppy Disk Drive Removal/Replacement
1 Remove the Gatekeeper from rack enclosure (two people are needed). Follow the
procedure Disconnecting Cables and Removal from Enclosure presented above.
Summary: after powering down the unit and disconnecting all power and signal cables,
employ two people to remove its rack-mounting screws and lift the unit out of the rack.
2 Remove the top cover from the Gatekeeper by removing the seven cover mounting
screws located in the back of the Gatekeeper. See figure 4-3.
3 Remove the two chassis mounting screws from the card cage. See figure 4-4.
4 Being careful to maintain slack in the power cables, lift the card cage, including fan
housing, up and over so that it rests along side the chassis.
5 Disconnect the power and data cables from the back of the floppy disk drive.
6 Remove the four screws securing the floppy drive to the drive chassis.
7 Open the front door and remove floppy drive by sliding it out the front of the drive chassis.
8 To install a new floppy drive, follow steps 1-7 in reverse order and sense. That is,
a. Open front door and insert floppy drive into drive chassis.
b. Attach floppy drive to drive chassis (4 screws).
c. Reconnect power and data cables to floppy drive.
Note: Before installing card cage, make sure power connectors from power supply to midplane
are fully connected (Figure 4-5b).
d. Reinstall the card cage and attach it to chassis (2 screws).
e. Replace top cover (7 screws).
f. (Two people are needed.) Reinstall Gatekeeper in rack enclosure.
CD ROM Drive Removal/Replacement
1 Remove the Gatekeeper from rack enclosure (two people are needed). Follow the
procedure Disconnecting Cables and Removal from Enclosure presented above.
Summary: after powering down the unit and disconnecting all power and signal cables,
employ two people to remove its rack-mounting screws and lift the unit out of the rack.
2 Remove the top cover from the Gatekeeper by removing the seven cover mounting
screws located in the back of the Gatekeeper. See figure 4-3.
3 Remove the two chassis mounting screws from the card cage. See figure 4-4.
4 Being careful to maintain slack in the power cables, lift the card cage, including fan
housing, up and over so that it can rest alongside the chassis.
5 Disconnect the power and data cables from the back of the CD ROM drive.
6 Remove the four screws securing the CD ROM drive to the drive chassis.
7 Open the front door and remove CD ROM drive by sliding it out the front of the drive
chassis.
8 To install a new CD ROM drive, follow steps 1-7 in reverse order and sense. That is,
a. Open front door and replace CDROM drive in drive chassis.
b. Attach CD ROM to drive chassis (4 screws).
MultiVOIP Gatekeeper User Guide 33
Page 34

c. Reconnect power and data cables to CD ROM drive.
Note: Before installing card cage, make sure power connectors from power supply
to midplane are fully connected (Figure 4-5b).
d. Reinstall the card cage and attach it to chassis (2 screws).
e. Replace top cover (7 screws).
f. (Two people are needed.) Reinstall Gatekeeper in rack enclosure.
Power Supply Removal/Replacement
The card cage has to be removed in order to disconnect the power wiring before the power supply can
be removed.
1 Remove the Gatekeeper from rack enclosure (two people are needed). Follow the
procedure Disconnecting Cables and Removal from Enclosure presented above.
Summary: after powering down the unit and disconnecting all power and signal cables,
remove its rack-mounting screws and employ two people to lift the unit out of the rack.
2 Remove the top cover from the Gatekeeper by removing the seven cover mounting
screws located in the back of the Gatekeeper. See figure 4-3.
3 Remove the screw that holds the ground wire by the power switch.
4 Disconnect wires going to the power switch. Take note of which color wires are attached
to which connectors on the switch.
5 Remove the three power supply mounting screws from the back of the Gatekeeper.
6 Remove two screws and nuts that attach the power supply to the Gatekeeper chassis.
7 Remove the power supply from the chassis.
8 To install a new power supply, follow steps 1-7 in reverse order and sense.
a. Position the power supply in the chassis.
b. Attach power supply to chassis floor (2 screws and nuts).
c. Attach power supply to back of Gatekeeper chassis (3 screws)
d. Reattach power cables to hard drive, floppy drive, CDROM drive, and CPU fan.
e. Reattach power cabling to card cage.
g. Reattach power switch wires and ground wires.
h. Replace top cover (7 screws).
34 MultiVOIP Gatekeeper User Guide
Page 35

Chapter
6 Troubleshooting
Page 36

Introduction
This section provides a variety of approaches should the Gatekeeper fail to operate properly. Your
Gatekeeper was tested thoroughly at the factory before it was shipped. If you are unable to make a
successful connection, it is possible that the Gatekeeper is defective. However, it is more likely that the
source of your problem lies elsewhere. As with any microcomputer product, start with simple hardware
and software problems and work toward more complex problems (e.g., operating system and/or
applications).
Hardware Troubleshooting
The following material addresses some of the typical problems and provides some basic solutions. If a
problem arises while you are in an application, see the software documentation.
No Video
Verify that power is ON (LED in power switch is lit).
Verify that the SBC and NIC adapter board are connected properly.
Note: Make sure to turn power OFF to reconnect boards.
Verify that monitor is turned ON, power is connected to monitor, and video cable is
connected to video connector on SBC.
Verify that the two (or four) 72-pin memory SIMMs are connected properly on the SBC.
The SIMMs must be the same brand, type, size, and speed.
Disconnect all cables (except the video cable) from the SBC and NIC board, then power
ON the Gatekeeper . If the Gatekeeper now has video, then there is a problem with one
of the cables or one of the peripherals. Try each cable, one at a time, to isolate the bad
cable or peripheral.
Verify that blower fans are running. If power is on and a fan is stopped, check to be sure
power connectors from power supply to midplane are fully connected and in their proper
orientation, as shown on Figure TBD.
If problem persists, contact MultiTech's Technical Support department (see Chapter
TBD).
SBC does not boot correctly or hangs after video appears
Run BIOS Setup Utility to verify correct configuration for system and drives (i.e., press
DEL key as system boots to enter BIOS Setup).
If boot PROM is used, verify that network and NIC board are configured properly to see
the network.
Verify that SBC and NIC board are seated properly in backplane.
Note: Make sure to turn power off to reconnect boards.
Drive cables are not connected properly or parameters are not set properly in setup.
If a non-bootable diskette is in the floppy drive, remove it and try booting
again.
Verify that enough memory is installed to load the intended applications.
Verify that two (or four) 72-pin SIMMs are seated properly on the SBC. The SIMMs must
be the same brand, type, size and speed.
Remove NIC board. If system boots then, there was a conflict with the NIC board.
36 MultiVOIP Gatekeeper User Guide
Page 37

Chapter 6 - Troubleshooting
If problem persists, contact MultiTech's Technical Support department (see Chapter 6).
COM1, COM2, or LPT1 port does not respond correctly
Check Setup configuration and verify that the ports are enabled.
Check that cables are connected properly and peripherals are powered ON and
configured properly.
If problem persists, contact MultiTech's Technical Support department (see Chapter 6).
Keyboard does not respond to key strokes
Verify that the keyboard cable is plugged into the left round connector on the SBC.
If a PS/2 keyboard adapter is used to adapt a large 5-pin DIN to a small 6-PIN PS/2 DIN
connector, verify that it is not defective or the wrong type.
Verify that the keyboard works properly on a different system.
If problem persists, contact MultiTech's Technical Support department (see Chapter 6).
Gatekeeper fails during prolonged operation
A power glitch may have occurred.
Check for overheating by verifying that all fans are operating, including two blowers in
the front part of the card cage, CPU fanned-heatsink, and the power supply internal fan.
Verify that air vents surrounding the chassis are not blocked.
Verify that the room housing the Gatekeeper is not overly warm.
Check for possible power surges from other equipment in the room and/or building.
Verify that SBC and NIC board are operating reliably.
Verify that there is not a buildup of dust inside the Gatekeeper.
Check the event viewer in Windows NT Server for errors occurring in the system,
security, or application logs.
Invalid Time, Date or Setup
Battery is failing.
Last system boot was incomplete. Verify in Setup that configuration is correct, then
reboot system.
If problem persists, contact MultiTech's Technical Support department (see Chapter 6).
NIC Board Troubleshooting
If you experience any problems with the NIC board, verify that the appropriate driver is loaded, the
proper grade of cable is used for the network connection, and the supporting hub/switch is working
properly.
1. Make sure the NIC board is fully and firmly seated in the slot connector.
2. Check the length and rating of connecting cables.
3. Make sure the NIC boards PCI slot is activated at the BIOS level. The CMOS Setup utility in
PCI computers ordinarily provides the option to activate or deactivate PCI slots.
MultiVOIP Gatekeeper User Guide 37
Page 38

4. Replace the NIC board in question with a verified good unit, then repeat the diagnostic
tests.
5. Install the questioned NIC board in another PCI computer and repeat the diagnostic tests on it
there.
Diagnostic Tests
The Gatekeeper operates like any stand-alone PC and can run almost any off-the-shelf diagnostic
program or checkpoint card. These programs are available at any software re-seller and can quickly
help isolate component failures.
Troubleshooting with Error Messages
This section outlines errors that may occur during system operation and likely remedies for these
problems.This section describes error messages and their use in troubleshooting. Since many errors
can be caused by poor cable connections, you should first verify that all cables are connected firmly to
their proper receptacles. If error messages persist after the recommended adjustments have been
made, contact Multi-Tech Systems for maintenance.
Post Beep: The BIOS generates two beeping (audible) error codes.
(1) A single long beep followed by three short beeps indicates that a video error has occurred and
the BIOS cannot initialize the video screen to display any additional information.
(2) A single long beep sounded repeatedly indicates that a DRAM error has occurred.
CMOS Battery Failure: If the CMOS battery is low or dead, it should be replaced. Replacement
requires soldering. If the clock fails, return the SBC to Multi-Tech Systems for repair.
CMOS Checksum Error: This error indicates that the CMOS has been corrupted, possibly by a weak
battery. Reconfigure the CMOS settings, then check to see if this is a continuous problem.
Disk Boot Failure: When you cant find the boot device, insert a system disk into Drive A and press <
Enter >. Make sure that the controller and the cables are in their proper positions and that the hard
drive has been formatted correctly. Then reboot the system. Verify the hard drive and floppy drive
selections in the CMOS Setup.
Diskette Drives Or Types Mismatch Error: When the diskette drive type is different from the
settings specified in CMOS (BIOS Setup), run Setup and re-configure the drive.
Error Encountered Initializing Hard Drive: If you cannot initialize the hard drive, check that the
adapter has been installed correctly and that all cables are correctly and firmly attached. Also be sure
the correct hard-drive type has been selected in the BIOS Setup.
Error Initializing Hard Disk Controller: When this error occurs, check to see that the cable
connecting the hard drive to the motherboard is seated properly in its receptacle. Make sure the correct
hard-drive type has been selected in the BIOS Setup. Also, check to see that all of the jumpers in the
hard drive unit have been set correctly.
Floppy Disk Controller Error or No Controller Present: When you cannot find or initialize the
floppy drive controller, please check that the controller settings in the BIOS Setup screen match the
actual controller being used. If no floppy drives are installed in your PC, be sure the Diskette Drive
field of the Setup screen is set to NONE.
Keyboard Error Or No Keyboard Present: When this error message appears, check to see that
your keyboard is attached properly to its receptacle. Make sure JP6 is jumpered for keyboard. Also, be
sure that no keys are being pressed during the booting process. If you are purposely configuring the
system without a keyboard, set the error halt condition in Setup to HALT ON ALL, BUT KEYBOARD. This
will cause the BIOS to ignore the missing keyboard and continue the boot.
Memory Address Error: If the memory address indicates an error, use the specified location and the
memory map for your system to find and replace the bad memory chips.
Memory Verifying Error : It indicates an error verifying a value already written to memory. Try
reseating the memory SIMMs or replace them one at a time.
38 MultiVOIP Gatekeeper User Guide
Page 39

Offending Address Missing: This message is used in connection with the I/O CHANNEL CHECK and
RAM PARITY ERROR messages when the segment that has caused the problem cannot be isolated.
Reboot Error: When this error occurs, you must reboot. Press any key and the system will reboot.
System Halted: Indicates that the present boot attempt has been aborted and the system must be re-
booted. Press and hold down the CTRL and ALT keys and press DEL.
Calling Technical Support
For immediate help in finding and fixing Gatekeeper problems, record the error condition and call MultiTech's Technical Support department (800-972-2439).
Chapter 6 - Troubleshooting
MultiVOIP Gatekeeper User Guide 39
Page 40

Chapter
7 Service, Warranty, and
Technical Support
Page 41

Introduction
This chapter starts out with statements about your Gatekeeper 2-year warranty. The next section, Tech
Support, should be read carefully if you have questions or problems with your Gatekeeper. It includes
the technical support phone numbers, space for recording your product information, and an explanation
of how to send in your Gatekeeper should you require service. The final section explains how to receive
support from the Internet.
Limited Warranty
Multi-Tech Systems, Inc., (hereafter MTS) warrants that its products will be free from defects in
material or workmanship for a period of two years from date of purchase, or if proof of purchase is not
provided, two years from date of shipment.
MTS MAKES NO OTHER WARRANTY, EXPRESS OR IMPLIED, AND ALL IMPLIED WARRANTIES OF
MERCHANTABILITY AND FITNESS FOR A PARTICULAR PURPOSE ARE HEREBY DISCLAIMED.
This warranty does not apply to any products which have been damaged by lightning storms, water, or
power surges or which have been neglected, altered, abused, used for a purpose other than the one
for which they were manufactured, repaired by Customer or any party without MTSs written
authorization, or used in any manner inconsistent with MTSs instructions.
MTSs entire obligation under this warranty shall be limited (at MTSs option) to repair or replacement
of any products which prove to be defective within the warranty period or, at MTSs option, issuance of
a refund of the purchase price. Defective products must be returned by Customer to MTSs factory
transportation prepaid.
MTS WILL NOT BE LIABLE FOR CONSEQUENTIAL DAMAGES, AND UNDER NO CIRCUMSTANCES WILL ITS
LIABILITY EXCEED THE PRICE FOR DEFECTIVE PRODUCTS.
Addendum for North American Products
In the event that service is required, products can be shipped, freight prepaid, to our Mounds View,
Minnesota, factory (Multi-Tech Systems, Inc., 2205 Woodale Drive, Mounds View, MN 55112,
Attn: Repairs, Serial #_____). A Returned Materials Authorization (RMA) is not required. Return
shipping charges (surface) will be paid by MTS. Please include, inside the shipping box, a description of
the problem, a return shipping address (must have street address, not P.O. Box), a telephone number,
and if the product is out of warranty, a check or purchase order for repair charges.
Extended two-year overnight replacement agreements are available for selected products. Please refer
to our Overnight Replacement Agreement for details on rates and coverages. Please direct your
questions regarding technical matters, product configuration, verification that the product is defective,
etc., to our Technical Support department at 1-800-972-2439.
Please direct your questions regarding repair expediting, receiving, shipping, billing, etc., to our Repair
Accounting department at (800) 328-9717 or (763) 785-3500.
Repairs for damages caused by lightning storms, water, power surges, incorrect installation, physical
abuse, or user-caused damages are billed on a time-plus-materials basis.
Addendum for International Products
Distributors should contact Amex, Inc., for information about the repairs for your Multi-Tech product.
Amex, Inc.
2724 Summer Street NE Minneapolis, MN 55413
U.S.A. Tel: (763) 331-3251
Fax: (763) 331-3180
Please direct your questions regarding technical matters, product configuration, verification that the
product is defective, etc., to our Technical Support department nearest you. When calling the U.S.,
please direct your questions regarding repair expediting, receiving, shipping, billing, etc., to our Repair
Accounting department at (763) 785-3500 in the U.S.A., or a nearby Multi-Tech office which is listed on
the Multi-Tech Corporate Offices sheet in this International Distributor Resource Kit.
42 MultiVOIP Gatekeeper User Guide
Page 42

Repairs for damages caused by lightning storms, water, power surges, incorrect installation, physical
abuse, or Out of Warranty Repair Costs
Refer to Multi-Tech System's Web site at http://www.multitech.com for information about out of
warranty repair costs.
Service
If your tech support specialist decides that service is required, your Gatekeeper can be sent (freight
prepaid) to our factory. Return shipping charges will be paid by Multi-Tech Systems.
Include the following with your Gatekeeper:
a description of the problem
return billing and return shipping addresses
contact name and phone number
check or purchase order number for payment if the Gatekeeper is out of warranty (Check with
your technical support specialist for the standard repair charge for your Gatekeeper)
if possible, note the name of the technical support specialist with whom you spoke
If you need to inquire about the status of the returned product, be prepared to provide the serial
number of the product sent.
Send your Gatekeeper to this address:
Chapter 7 - Service, Warranty, & Technical Support
You should also check with the supplier of your Gatekeeper on the availability of local service and/or
loaner units in your part of the country.
Ordering Accessories
SupplyNet, Inc. supplies replacement transformers, cables and connectors for select Multi-Tech
products. You can place an order with SupplyNet via mail, phone, fax or the Internet at:
Mail: SupplyNet, Inc.
614 Corporate Way
Valley Cottage, NY 10989
Phone: 800 826-0279
Fax: 914 267-2420
Email: info@thesupplynet.com
Internet: http://www.thesupplynet.com
MULTI-TECH SYSTEMS, INC.
2205 WOODALE DRIVE
MOUNDS VIEW, MINNESOTA 55112
ATTN: SERVICE OR REPAIRS
MultiVOIP Gatekeeper User Guide 43
Page 43

Tech Support
Multi-Tech has an excellent staff of technical support personnel available to help you get the most out
of your Multi-Tech product. If you have any questions about the operation of this unit, call 1-800-972-
2439. Please fill out the Gatekeeper information (below), and have it available when you call. If your
Gatekeeper requires service, the tech support specialist will guide you on how to send in your
Gatekeeper (refer to the next section).
Recording Gatekeeper Information
Please fill in the following information on your Multi-Tech Gatekeeper. This will help tech support in
answering your questions. (The same information is requested on the Warranty Registration Card.)
Model No.: _________________________
Serial No.: _________________________
Software Version: ____________________
The model and serial numbers are on the bottom of your Gatekeeper.
Please note status of your Gatekeeper including LED indicators, screen messages, diagnostic test
results, problems with a specific application, etc. Use the space below to note the Gatekeeper status:
________________________________________________________________________________________________________
________________________________________________________________________________________________________
________________________________________________________________________________________________________
________________________________________________________________________________________________________
______________________________________________________________________________________________________________
______________________________________________________________________________________________________
About the Internet
Multi-Techs presence includes a Web site at:
http://www.multitech.com
and an ftp site at:
ftp://ftp.multitech.com
Page 44

Appendices
Page 45

Appendix A - Connector Pinouts
This appendix provides specifications for the various connectors located at the back of the Gatekeeper
(i.e., on the SBC board and the NIC board). Also included are the onboard connectors and jumpers on
the SBC board.
SBC Connectors
VGA 15-Pin Connector
This connector, mounted on the SBC board, provides video analog data and horizontal and vertical
synchronization signals for VGA monitors.
Pin Identification
PinDescription
1 Analog Red
2 Analog Green
3 Analog Blue
4 VESA Monitor Status Bit 2
5 Digital Ground
6 Digital Ground
7 Digital Ground
8 Digital Ground
9NC
10 Digital Ground
11 VESA Monitor Status Bit 0
12 VESA Monitor Status Bit 1
13 Horizontal Sync
14 Vertical Sync
15 NC
1
6
11
Figure A-1. 15-Pin VGA Connector
5
10
15
9-Pin DB9 (COM 1) Connector
This connector, also mounted on the SBC board, provides its COM 1 serial port connection, which is
generally used to connect a mouse to the SBC board.
46 MultiVOIP Gatekeeper User Guide
Page 46

Appendix A - Connector Pinouts
The same type connector, mounted on an adapter and cabled to the SBC board, is used for COM 2 in
this system.
Figure A-2. 9-Pin DB9 COM 1 (or COM 2) Connector
Pin Identification
Pin Description
1 DCD
2 RX Data
3 TX Data
4DTR
5 Ground
6 DSR
7RTS
8CTS
9RI
6-Pin Circular Jack
1
6
5
9
This connector is used to connect the keyboard to the SBC board.
6
4
2
Figure A-3. 6-Pin Mini-DIN Keyboard Connector
5
3
1
Pin Identification
Pin Description
1 +Keyboard Data
2NC
3 GND
4 +5V DC
5 +Keyboard Clock
6NC
MultiVOIP Gatekeeper User Guide 47
Page 47

25-Pin DB25 (LPT 1) Connector
This female connector, mounted on an adapter and cabled to the SBC board, is used for parallel port
LPT 1 (i.e., printer port) in this system.
Note: Top row (left to right) = Pins 1 - 13; bottom row = 14 - 25.
Figure A-4. 25-Pin DB25 LPT1 Parallel (Printer) Connector
Pin Identification
Pin Description
1 -Strobe
2 +Data Bit 0
3 +Data Bit 1
4 +Data Bit 2
5 +Data Bit 3
6 +Data Bit 4
7 +Data Bit 5
8 +Data Bit 6
9 +Data Bit 7
10 -Acknowledge
11 +Busy
12 +Paper End
13 +Select
14 -Auto Feed
15 - Error
16 -Initialize Printer
17 -Select Input
18 Ground
19 Ground
20 Ground
21 Ground
22 Ground
23 Ground
24 Ground
25 Ground
48 MultiVOIP Gatekeeper User Guide
Page 48

NIC Board Connector
RJ-45 Connector
This connector ties the NIC board to a 10BaseT network.
18
Figure A-5. RJ-45 Connector (viewed from connector side)
Pin Identification
Pin Description
1 + Transmit Data
2 - Transmit Data
3 + Receive Data
4 No Connect
5 No Connect
6 -Receive Data
7 No Connect
8 No Connect
Appendix A - Connector Pinouts
SBC Onboard Connectors
Figure A-6 displays component locations on the SBC board.
PWR
RST
2
COM
PRT
JP11
FDD
JP12
IDE 2
IDE 1
JP14
HDL
SIO
Panel
SPK
USB
JP
JP
8
COM 1
JP7
KB
BIOS
Flash
BIOS
JP13
JP10
JP4
9
KBL
Flash
Disk
Real Time
Clock
Chipset
JP2
6xx86
CPU
VGA
EXKB
JP6
VRAM
VRAM
GND
JP
JP1
Chipset
KB/
Mouse
PC-104
3
Figure A-6. Connector, Jumper and Component Locations on the SBC Board
MultiVOIP Gatekeeper User Guide 49
SIMM 1
SIMM 2
SIMM 3
SIMM 4
Page 49

##?## begin insert ##?##
34-Pin Floppy Disk Drive Connector
This connector provides signal and data connection between the floppy drive and the SBC board.
2
1
Pin Description Pin Description
1 Ground 18 Direction (Stepper Motor)
2 RPM/RWC 19 Ground
3 Ground 20 Step Pulse
4 Not Used 21 Ground
5 Ground 22 Write Data
6 Not Used 23 Ground
7 Ground 24 Write Enable
8 Index 25 Ground
9 Ground 26 Track 0
10 Motor Enable 1 27 Ground
11 Ground 28 Write Protect
12 Drive Select 2 29 Ground
13 Ground 30 Read Data
14 Drive Select 1 31 Ground
15 Ground 32 Select Head
16 Motor Enable 2 33 Ground
17 Ground 34 /DCHNG
Printer Port Connector
34
33
Figure A-7. Floppy Disk Connector
This 25-pin connector provides parallel printer data and control signals to and from the SBC board.
2
1
Figure A-8. Printer Port Connector
26
25
Pin Description Pin Description
1 -Strobe 10 -Acknowledge
2 +Data Bit 0 11 +Busy
3 +Data Bit 1 12 +Paper End
4 +Data Bit 2 13 +Select
5 +Data Bit 3 14 -Auto Feed
6 +Data Bit 4 15 -Error
7 +Data Bit 5 16 -Initialize Printer
8 +Data Bit 6 17 -Select Input
9 +Data Bit 7 18-25 Ground
50 MultiVOIP Gatekeeper User Guide
Page 50

Appendix A - Connector Pinouts
COM 2 Port Connector
This 10-pin connector transfers serial data to and from the COM 2 port.
2
1
Figure A-9. COM 2 Port Connector
10
9
PinSignal Name (Direction)
1 Carrier Detect (Input)
2 Data Set Ready (Input)
3 Receive Data (Input)
4 Request To Send (Output)
5 Transmit Data (Output)
6 Clear To Send (Input)
7 Data Terminal Ready (Output)
8 Ring Indicator
9 Signal Ground
10 Unused
Hard Disk Connector
This connector supplies hard disk drive signals which interface with the software I/O drivers to provide
the read/write functions.
2
1
40
39
Pin Description Pin Description
##?## end insert ##?##
Figure A-10. Hard Disk Connector
1 /Reset 21 NC
2 Ground (GND) 22 Ground (GND)
3 Data Bit 7 (SD7) 23 -I/O Write (-IOW)
4 Data Bit 8 (SD8) 24 Ground (GND)
5 Data Bit 6 (SD6) 25 -I/O Read (-IOR)
6 Data Bit 9 (SD9) 26 Ground (GND)
7 Data Bit 5 (SD5) 27 IOCHRDY
8 Data Bit 10 (SD10) 28 ALE\
9 Data Bit 4 (SD4) 29 NC
10 Data Bit 11 (SD11) 30 Ground (GND)
11 Data Bit 3 (SD3) 31 IRQ14
12 Data Bit 12 (SD12) 32 /IOCS16
13 Data Bit 2 (SD2) 33 Address Bit 1 (SA1)
14 Data Bit 13 (SD13) 34 NC
15 Data Bit 1 (SD1) 35 Address Bit 0 (SA0)
16 Data Bit 14 (SD14) 36 Address Bit 2 (SA2)
17 Data Bit 0 (SD0) 37 Chip Select 0 (-CS0)
18 Data Bit 15 (SD15) 38 Chip Select 1 (-CS1)
19 Ground (GND) 39 /HDLED
20 NC 40 Ground (GND)
MultiVOIP Gatekeeper User Guide 51
Page 51

COM2 Connector
COM2
5
1
Figure A-11. COM2 Connector
The COM2 Connector assignments are as follows:
PIN SIGNAL FUNCTION
1 DCD T X- DATA2 RX TX+ DATA+
3 T X RX+ NC
4 DTR RX- NC
5 GND GND GND
6 DSR RTS- NC
7RTS RTS+NC
8 CTS CTS+ NC
9 RI CTS- NC
10 NC NC NC
RS-232 RS-422 RS-485
External Keyboard Connector
EXKB : external keyboard connector
Figure A-12. External Keyboard Connector
The pin assignments are as follows:
PIN SIGNAL FUNCTION
1 KBCLK
2 KBDATA
3NC
4 GND
5Vcc
10
6
EXKB
1
Reset Connector
JP10 : Reset Connector.
The pin assignments are as follows:
PIN SIGNAL FUNCTION
1 Reset
2 Ground
Floppy Disk Drive Connector
Figure A-14. Floppy Disk Drive Connector
FDD : Floppy Disk Drive Connector
The pin assignments are as follows:
52 MultiVOIP Gatekeeper User Guide
1
JP10
Figure A-13. Reset Connector
33
34
1
2
FDD
Page 52

PIN SIGNAL FN PIN SIGNAL FUNCTION
1 GND 2 RPM
3 GND 4 NC
5 GND 6 RATE0
7 GND 8 INDEX
9 GND 10 MTR 0
11 GND 12 DRV1
13 GND 14 DRV0
15 GND 16 MTR1
17 GND 18 DIR
19 GND 20 STEP
21 GND 22 WDATA
23 GND 24 WGATE
25 GND 26 TRK0
27 GND 28 WRPRT
29 GND 30 RDATA
31 GND 32 SEL
33 GND 34 DSKCHG
Hard drive Connector
Appendix A - Connector Pinouts
39
40
1
2
IDE1
Figure A-15. Hard drive Connector for IDE1
IDE1: Hard drive Connector
The Gatekeeper has two HDD connectors, IDE1 and IDE2. The pin assignments are as follows:
PIN SIGNAL FUNCTION PIN SIGNAL FUNCTION
1 IDERST 21 IDEREQ0
2 GND 22 GND
3 IDED7 23 IDEIOW
4 IDED8 24 GND
5 IDED6 25 IDEIOR
6 IDED9 26 GND
7 IDED5 27 IDERDY
8 IDED10 28 PULL HI
9 IDED4 29 IDEACK0
10 IDED11 30 GND
11 IDED3 31 IRQ14
12 IDED12 32 IOCS16
13 IDED2 33 IDEA1
14 IDED13 34 GND
15 IDED1 35 IDEA0
16 IDED14 36 IDEA2
17 IDED0 37 IDECS1P
18 IDED15 38 IDECS3P
19 GND 39 IDELEDP
20 N.C. 40 GND
39
40
1
2
IDE2
IDE2: Hard drive Connector
The pin assignments are as follows:
PIN SIGNAL FN PIN SIGNAL FUNCTION
1 IDERST 21 IDEREQ1
2 GND 22 GND
3 IDED7 23 IDEIOW
4 IDED8 24 GND
5 IDED6 25 IDEIOR
6 IDED9 26 GND
7 IDED5 27 IDERDY
8 IDED10 28 PULL HI
9 IDED4 29 IDEACK1
10 IDED11 30 GND
11 IDED3 31 IDESIRQ
12 IDED12 32 IOCS16
13 IDED2 33 IDEA1
14 IDED13 34 GND
15 IDED1 35 IDEA0
MultiVOIP Gatekeeper User Guide 53
Figure A-16. Hard drive Connector for IDE2
Page 53

16 IDED14 36 IDEA2
17 IDED0 37 IDECS1S
18 IDED15 38 IDECS3S
19 GND 39 IDELEDS
20 N.C. 4 0 GND
Hard drive LED Connector
Figure A-17. Hard Drive LED Connector
HDL : Hard driver LED Connector (on Motherboard)
The pin assignments are as follows:
PIN SIGNAL FUNCTION
1Vcc
2 HDD Active Signal
3 HDD Active Signal
4Vcc
Power LED & Keylock Connector
1
HDL
1
KBL : Power LED & keylock Connector (on Motherboard)
The pin assignments are as follows:
PIN SIGNAL FUNCTION
1 Power LED
2NC
3 Ground
4 Keyboard INT
5 Ground
5 GND 1 3 HSYNC
6 GND 14 VSYNC
7 GND 15 NC
8 GND
Power Connector
PWR : Power Connector
The pin assignments are as follow :
KBL
Figure A-18. Power LED and Keylock Connector
1
6
PWR
Figure A-19. Power Connector
54 MultiVOIP Gatekeeper User Guide
Page 54

PIN SIGNAL FUNCTION
1NC
2 +5V
3 +12V
4 -12V
5 GND
6 GND
Printer Connector
Appendix A - Connector Pinouts
PRT : Printer Connector
As to link the Printer to the card, you need a cable to connect both DB25 connector and parallel port.
The pin assignments are as follows:
PIN SIGNAL FN PIN SIGNAL FUNCTION
1 STB 14 AUTFE
2 P 0 15 ERROR
3P1 16INIT
4 P2 17 SLCTIN
5 P 3 18 GND
6 P 4 19 GND
7 P 5 20 GND
8 P 6 21 GND
9 P 7 22 GND
10 ACK 23 GND
11 BUSY 2 4 GND
12 PE 25 GND
13 SLCT 26 NC
External Speaker Connector
13
26
Figure A-20. Printer Connector
1
SPK
1
14
PRT
Figure A-21. External Speaker Connector
SPK : External Speaker Connector
The pin assignments are as follows:
PIN SIGNAL FUNCTION
1Vcc
2 Ground
3NC
4 Speaker Signal
Expansion Slots
This appendix presents the pin assignments for the PC-104 connector, the ISA bus, and the PCI bus.
PC-104 CONNECTOR PIN ASSIGNMENT
104AB, 104CD : PC-104 Connector
B1
A1
104AB
C1
D1
Figure A-22. PC104 Connector
The PC-104 can support multiple PC-104 modules. This card has two connectors : one (104AB) consists
of 64 pins; the other one (104CD) consists of 40 pins, both are dual-in-line headers.
The pin assignments for connectors 104AB & 104CD are as follows:
B32
A32
C32
D32
MultiVOIP Gatekeeper User Guide 55
Page 55

Pin
A1
A2
A3
A4
A5
A6
A7
A8
A9
A10
A11
A12
A13
A14
A15
A16
A17
A18
A19
A20
A21
A22
A23
A24
A25
A26
A27
A28
A29
A30
A31
A32
104AB
Assignment
IOCHK
D7
D6
D5
D4
D3
D2
D1
D0
iOCHRDY
AEN
A19
A18
A17
A16
A15
A14
A13
A12
A11
A10
A9
A8
A7
A6
A5
A4
A3
A2
A1
A0
GND
Pin
Assignment
B1
B2
B3
B4
B5
B6
B7
B8
B9
B10
B11
B12
B13
B14
B15
B16
B17
B18
B19
B20
B21
B22
B23
B24
B25
B26
B27
B28
B29
B30
B31
B32
GND
RESET
VCC
IRQ9
-5V
DRQ2
-12V
OWS
+12V
GND
SMEMW
SMEMR
IOW
IOR
DACK3
DRQ3
DACK1
DRQ1
REFRESH
CLK
IRQ7
IRQ6
IRQ5
IRQ4
IRQ3
DACK2
T/C
BALE
VCC
OSC
GND
GND
C10
C11
C12
C13
C14
C15
C16
C17
C18
C19
C20
Pin
Assignment
C1
C2
C3
C4
C5
C6
C7
C8
C9
104CD
GND
SBHE
LA23
LA22
LA21
LA20
LA19
LA18
LA17
MEMR
MEMW
D8
D9
D10
D11
D12
D13
D14
D15
KEY PIN
Assignment
Pin
D1
D2
D3
D4
D5
D6
D7
D8
D9
D10
D11
D12
D13
D14
D15
D16
D17
D18
D19
D20
GND
MEMCS16
IOCS16
IRQ10
IRQ11
IRQ12
IRQ15
IRQ14
DACK0
DRQ0
DACK5
DRQ5
DACK6
DRQ6
DACK7
DRQ7
+5V
MASTER
GND
GND
Figure A-23. PC-104 Pin Assignments
ISA Bus Pin Assignments
There are two edge connectors on this CPU Card. The one closest to the edge bracket is the ISA bus
connector; the other is the PCI bus connector. The ISA-bus connector is divided into two sets : one
consists of 62 pins; the other consists of 36 pins.
Figure A-24. ISA Bus Connector
The pin assignments are as follows:
Pin
B1
B2
B3
B4
B5
B6
B7
B8
B9
B10
B11
B12
B13
B14
B15
B16
B17
B18
B19
B20
B21
B22
B23
B24
B25
B26
B27
B28
B29
B30
B31
A31
B31
C18
D18
Assignment
GND
RESET
VCC
IRQ9
-5V
DRQ2
-12V
OWS
+12V
GND
-SMEMW
-SMEMR
-IOW
-IOR
-DACK3
-DRQ3
-DACK1
-DRQ1
-REFRESH
BCLK
IRQ7
IRQ6
IRQ5
IRQ4
IRQ3
-DACK2
T/C
BALE
+5V
OSC
GND
COMPONENT SIDE
Assignment
Pin
-IOCHK
A1
SD07
A2
SD06
A3
SD05
A4
SD04
A5
SD03
A6
SD02
A7
SD01
A8
SD00
A9
-IOCHRDY
A10
AEN
A11
SA19
A12
SA18
A13
SA17
A14
SA16
A15
SA15
A16
SA14
A17
SA13
A18
SA12
A19
SA11
A20
SA10
A21
SA09
A22
SA08
A23
SA07
A24
SA06
A25
SA05
A26
SA04
A27
SA03
A28
SA02
A29
SA01
A30
SA00
A31
Pin
D1
D2
D3
D4
D5
D6
D7
D8
D9
D10
D11
D12
D13
D14
D15
D16
D17
D18
C1
D1
Assignment
-MEMCS16
-IOCS16
IRQ10
IRQ11
IRQ12
IRQ15
IRQ14
-DACK0
DRQ0
-DACK5
DRQ5
-DACK6
DRQ6
-DACK7
DRQ7
+5V
-MASTER
GND
Pin
Assignment
C1
C2
C3
C4
C5
C6
C7
C8
C9
C10
C11
C12
C13
C14
C15
C16
C17
C18
A1
B1
SBHE
LA23
LA22
LA21
LA20
LA19
LA18
LA17
MEMR
MEMW
SD08
SD09
SD10
SD11
SD12
SD13
SD14
SD15
56 MultiVOIP Gatekeeper User Guide
Figure A-25. ISA Bus Pin Assignments
Page 56

Appendix A - Connector Pinouts
PCI Bus Pin Assignments
Like the ISA-BUS connector, the PCI-BUS edge connector is also divided into two parts: one consists of
98 pins; the other consists of 22 pins. The standard of PCI-MG 32-bit PCI-ISA connector contains 218
pins in total.
F62
E62
Figure A-26. PCI Bus Connector
The pin assignments are as follows:
Pin
Assignment
F1
-12V
F2
TCK
F3
GND
F4
TDO
F5
+5V
F6
+5V
F7
INTB#
F8
INTD#
F9
REQ3#
F10
REQ1#
F11
GNT3#
F12
GND
F13
GND
F14
CLKA
F15
GND
F16
CLKB
F17
GND
F18
REQ0#
F19
+5V(I/O)
F20
AD31
F21
AD29
F22
GND
F23
AD27
F24
AD25
F25
+3.3V
F26
C/BE3#
F27
AD23
F28
GND
F29
AD21
F30
AD19
F49
F52
E52
E49
F
Pin
E1
E2
E3
E4
E5
E6
E7
E8
E9
E10
E11
E12
E13
E14
E15
E16
E17
E18
E19
E20
E21
E22
E23
E24
E25
E26
E27
E28
E29
E30
E
Assignment
TRST#
+12V
TMS
TDI
+5V
INTA#
INTC#
+5V
CLKC
+5V(I/O)
CLKD
GND
GND
GNT1#
RST#
+5V(I/O)
GNT0#
GND
REQ2#
AD30
+3.3V
AD28
AD26
GND
AD24
GNT2#
+3.3V
AD22
AD20
GND
Pin
F31
F32
F33
F34
F35
F36
F37
F38
F39
F40
F41
F42
F43
F44
F45
F46
F47
F48
F49
F52
F53
F54
F55
F56
F57
F58
F59
F60
F61
F62
COMPONENT SIDE
F
Assignment
+3.3V
AD17
C/BE2#
GND
IRDY#
+3.3V
DEVSEL#
GND
LOCK#
PERR#
+3.3V
SERR#
+3.3V
C/BE1#
AD14
GND
AD12
AD10
GND
AD08
AD07
+3.3V
AD05
AD03
GND
AD01
+5V(I/O)
ACK64#
+5V
+5V
Pin
E31
E32
E33
E34
E35
E36
E37
E38
E39
E40
E41
E42
E43
E44
E45
E46
E47
E48
E49
E52
E53
E54
E55
E56
E57
E58
E59
E60
E61
E62
Assignment
AD18
AD16
+3.3V
FRAME#
GND
TRDY#
GND
STOP#
+3.3V
SDONE
SB0#
GND
PAR
AD15
+3.3V
AD13
AD11
GND
AD09
C/BE0#
+3.3V
AD06
AD04
GND
AD02
AD00
+5V(I/O)
REQ64#
+5V
+5V
F1
E1
E
Figure A-27. PCI Pin Assignments
How to Set Jumpers
Jumpers and Caps. Your PC is configured by the positions of jumpers on the circuit board. A jumper
consists of two or more metal pins with a plastic base mounted on the card. A small plastic cap (with
a metal contact inside) is used to connect the pins. For two-pin jumpers, the active value for userchangeable parameters depends on jumper pins being closed (electrically connected by a cap) or open
(not electrically connected). For parameters having more than two values, groups of jumpers (or
jumper blocks) are used to determine the active value. For example, if a jumper has three pins
labeled PIN1, PIN2, and PIN3, you can use a jumper cap to connect PIN1 & PIN2 to activate one value
for the parameter. Connecting PIN2 and PIN3 would activate another value.
This manual contains many illustrations of jumper configurations. Jumper caps are depicted as shaded
boxes connecting pairs of pins on jumper blocks
MultiVOIP Gatekeeper User Guide 57
Page 57

Jumper Settings
12
23
JP7
24
12
23
JP7
24
The SBC is equipped with a 233 MHz Pentium CPU with MMX. Its JP7 jumper settings for RS-422 and
RS-485 are shown below.
Figure A-28. RS-422 at COM2
*** Factory default = RS-232 (no jumpers).
AT Keyboard / PS2 Mouse Selection
JP6 : AT keyboard / PS2 mouse selection
The jumper settings are as follows:
Figure A-30. AT Keyboard Jumper (Default)
58 MultiVOIP Gatekeeper User Guide
Figure A-29. RS-485 at COM2
12
56
JP6
Page 58

12
56
JP6
Note: Jumpers JP8 and JP9 are used to set the CPU core voltage.
CPU TYPE & CLOCK SELECTION
JP2 : Bus Frequency Ratio Selection
JP4 : CPU Clock Selection +
Figure A-31. PS2 Mouse Jumper
Appendix A - Connector Pinouts
MultiVOIP Gatekeeper User Guide 59
Page 59

Appendix B - SBC Mapping Parameters
This appendix presents mappings of six parameter sets:
Interrupts
RTC & CMOS RAM Assignments
Timer Channels
DMA Channels
Memory Functions
Input/Output Functions
Table B-1. Interrupt Map
QRItnemngissA
00-remiTmorftpurretniREMITmetsyS
1llufreffubtuptuodraobyeK
251-8QRIrofedacsaC
32troPlaireS
41troPlaireS
52troPlellaraP
6retpadAksiDyppolF
71troPlellaraP
8kcolCCTR
9elbaliavA
01elbaliavA
11elbaliavA
21elbaliavA
31rossecorP-oChtaM
41retpadAksiDdraH
51elbaliavA
60 MultiVOIP Gatekeeper User Guide
Page 60

Table B-2. RTC & CMOS Map
edoCtnemngissA
00sdnoceS
10mralAdnoceS
20setuniM
30mralAetuniM
40sruoH
50mralAsruoH
60keeWfoyaD
70htnoMfoyaD
80htnoM
90raeY
A0AretsigeRsutatS
B0BretsigeRsutatS
C0CretsigeRsutatS
D0DretsigeRsutatS
E0etyBsutatScitsongaiD
F0etyBnwodtuhS
01etyBepyTevirDksiDyppolF
11devreseR
21etyBepyTevirDksiDdraH
31devreseR
41etyBtnempiuqE
51etyBwoLyromeMesaB
61etyBhgiHyromeMesaB
71etyBwoLyromeMnoisnetxE
81etyBhgiHyromeMnoisnetxE
03etyBwoLyromeMnoisnetxErofdevreseR
13etyBhgiHyromeMnoisnetxErofdevreseR
23etyByrutneCetaD
33galFnoitamrofnI
F3-43devreseR
F7-04ataDgnitteStespihCrofdevreseR
Appendix B - SBC Mapping Parameters
MultiVOIP Gatekeeper User Guide 61
Table B-3. Timer Channels Map
remiT
lennahC
0tpurretnIremiTmetsyS
1tseuqeRhserfeRMARD
2rotareneGenoTrekaepS
tnemngissA
Page 61

Table B-4. DMA Channels Map
lennahCAMDtnemngissA
0elbaliavA
1CLDSMBI
2retpadAksiDyppolF
3elbaliava;3lennahC
41rellortnoCAMDrofedacsaC
5elbaliavA
6elbaliavA
7elbaliavA
Table B-5. Memory Map
paMyromeMtnemngissA
FFFF900-0000000
FFFFB00-0000A00
FFFFE00-0000E00MORecivedICProfdevreseR
FFFFF00-0000F00MORSOIBmetsyS
FFFFFFF-0000010yromemnoisnetxemetsyS
.noitacilppa
dnaSODybdesuyromemmetsyS
rofyromemreffubyalpsiD
.retpadaemorhconom/AGC/AGE/AGV
Table B-6. I/O Map
paMO/ItnemngissA
F10-000)retsaM(rellortnoCAMD
120-020)retsaM(rellortnoCtpurretnI
320-220stroPO/I,sretsigeR:rellortnoCtespihC
F50-040sretsigeRlortnoCremiT
F60-060)2408(rellortnoCecafretnIdraobyeK
F70-070stroPO/ISOMC&stroPCTR
F90-080retsigeRAMD
FB0-0A0)evals(rellortnoCtpurretnI
FD0-0C0)evals(rellortnoCAMD
FF0-0F0rossecorP-oChtaM
8F1-0F1rellortnoCksiDdraH
F72-8722troPlellaraP
FD2-0B2rellortnoCretpadAscihparG
FF2-8F22troPlaireS
F63-063stroPkrowteN
F73-8731troPlellaraP
FB3-0B3retpadAretnirP&emorhconoM
FC3-0C3retpadAAGE
FD3-0D3retpadAAGC
7F3-0F3rellortnoCksiDyppolF
FF3-8F31troPlaireS
62 MultiVOIP Gatekeeper User Guide
Page 62

Appendix C - SBC Configuration Details
Appendix C - SBC Configuration Details
Flash BIOS Update
BIOS updates are revised versions of the BIOS that have been modified to remedy known bugs. When
necessary, use the program Awdflash.exe on your System CD-ROM to update the system BIOS and
the VGA BIOS. Check periodically with MultiTech to see if a new flash BIOS update is available.
Watchdog Timer Configuration
The watchdog timer does not run constantly. It must be started in DOS Debug mode or from another
application program, customized for this purpose, that runs on the system. The watchdog timer is
especially useful for remote rebooting of the PC.
The watchdog timer is defined at I/O port 0443H. To enable the watchdog timer, write I/O port
0443H, then the system will reset itself. To disable the function, write I/O port 0441H and the system
will stop the Watchdog timer.
Since the timers intervals have a tolerance of 25%, you should specify that the timer be refreshed
about once every second. To program your watchdog timer, follow these steps:
Watchdog enable program:
MOV AX, 000FH (choose the values you need; start from 0)
MOV DX, 0443H
OUT DX, AX
Watchdog disable program:
MOV AX, 000FH (this value can be ignored)
MOV DX, 0441H
OUT DX, AX
The Watchdog Timer control table is as follows:
Level Value Time/sec Level Value Times/sec
1 F 0 9 7 16
2E210618
3D411520
4C612422
5B813324
6 A 10 14 2 26
7 9 12 15 1 28
8 8 14 16 0 30
Green PC Function
The Gatekeeper is equipped with a green function that enables it to operate using reduced electrical
power when the machine is inactive. When in green mode, the Gatekeeper slows down and shuts down
certain computer functions in order to reduce power consumption. There are three reduced-power
operating modes (presented in order of increasing power savings):
(1) CPU Doze Mode,
(2) System Standby Mode,
(3) System Suspend Mode .
By default, however, the green function is turned off.
MultiVOIP Gatekeeper User Guide 63
Page 63

Power Saving Block Diagram
Keyboard/Mouse Wake-Up
Timer Control into Doze
Keyboard/Mouse
Wake-Up
Timer Control into Standby
Doze
External Switch &
Timer Control into Suspend
Suspend
Timer Control into Suspend
Keyboard/Mouse Wake-Up
Timer Control
into Standby
Standby
Timer Control into Suspend
On
Figure C-1: Power On & Three Reduced-Power States
CPU Doze Mode
1. After a pre-determined period of inactivity has elapsed, the CPU will slow to 8 MHz.
2. The computer will emit one beep sound.
3. The green function will monitor PC activity according to the settings on the Power Management
Setup screen.
4. As soon as any activity occurs, the system will switch from Doze Mode to On Mode.
System Standby Mode
1. After a predetermined period of inactivity has elapsed, the CPU will slow to 8 MHz.
2. The computer will emit two beeps.
3. The Level 1 cache will be disabled.
4. The VGA monitor will display a blank screen.
5. The hard drive will be powered down.
6. As soon as any activity occurs, the system will switch from Doze Mode to On Mode.
System Suspend Mode
1. After a pre-determined period of inactivity has elapsed, the CPU will slow to 8 MHz.
2. The computer will emit three beeps.
3. The Level 2 cache will be disabled.
4. The VGA monitor will display a blank screen.
5. The hard drive will be powered down.
6. The green function will monitor PC activity according to the settings on the Power Management
Setup screen.
7. When the system is in Suspend Mode, input from the keyboard, or the mouse, or alarm is required
to wake up the PC.
64 MultiVOIP Gatekeeper User Guide
Page 64

Appendix C - SBC Configuration Details
Award BIOS Setup
This chapter describes how the BIOS manages the features of your system and explains how to
configure the BIOS in its Setup Menu. The IPC-551 single-board computer is equipped with a system
BIOS chipset from Award Software Inc.
Your application programs (such as word processing, spreadsheets, and games) rely on an operating
system such as DOS or OS/2 to manage such things as keyboard, monitor, disk drives, and memory.
The operating system, in turn, relies on a BIOS (Basic Input and Output system), a program stored on a
ROM (Read-only Memory) chip, to initialize and configure your computers hardware. As the interface
between the hardware and the operating system, the BIOS enables you to make basic changes to your
systems hardware without having to write a new operating system.
The following diagram illustrates the interlocking relationships between the system hardware, BIOS,
operating system, and an application program:
Application Program
Operating System
BIOS
System Hardware
Figure C-2. PC Subsystem Relationships
The Setup program built into the Award BIOS lets users modify the basic system configuration. This
special configuration information is then stored in battery-backed RAM so that the PC retains the Setup
information when the power is turned off.
The Award BIOS is a custom version of an industry standard BIOS. It supports Intel/Cyrix/AMD
processors in a standard IBM-AT compatible input/output system. The BIOS provides critical low-level
support for standard devices such as disk drives and serial and parallel ports.
The Award BIOS has been customized by adding important, but non-standard, features such as virus
and password protection as well as special support for detailed fine-tuning of the chipset that controls
the entire PC system.
Descriptions in this chapter will help you configure your system using the BIOS Setup screens.
Note: MultiTech has pre-set the BIOS before shipping the Gatekeeper. In most cases, the user will not need to change
any BIOS settings. However, if any hardware within the Gatekeeper has been changed, or if the boot sequence has been
changed, the user will need to revise the BIOS accordingly.
MultiVOIP Gatekeeper User Guide 65
Page 65

Entering Setup
To enter the BIOS Setup screen, power on the computer and then press the Delete key immediately.
The other way to enter Setup is to power on the computer and then, when the below message appears
briefly at the bottom of the screen during the POST (Power On Self Test), press the Delete key or
simultaneously press <Ctrl>, < Alt >, and < Esc > keys (Control, Alternate, & Escape).
TO ENTER SETUP BEFORE BOOT PRESS <CTRL-ALT-ESC> OR <DEL> KEY
As long as the above message is present on the screen you may press the <Del> key (the one that
shares the decimal point at bottom of the number keypad) to access the Setup program. After a
moment, the main menu of the Award SETUP program will appear on the screen:
ROM / PCI / ISA BIOS (2A59FP6C)
CMOS SETUP UTILITY
AWARD SOFTWARE, INC.
STANDARD CMOS SETUP
BIOS FEATURES SETUP
CHIPSET FEATURES SETUP
POWER MANAGEMT SETUP
PNP/PCI CONFIGURATION
LOAD BIOS DEFAULTS
LOAD SETUP DEFAULTS
Esc: Quit
F10: Save & Exit Setup
Time, Date, Hard Disk Type .........
INTERGRATED PERIPHERALS
PASSWORD SETTING
IDE HDD AUTO DETECTION
HDD LOW LEVEL FORMAT
SAVE & EXIT SETUP
EXIT WITHOUT SAVING
:SELECT ITEM
(Shift) F2: Change Color
Figure C-3. Setup Program Initial Screen
Setup Keyboard Commands
A common set of keyboard commands is used for all BIOS-related screens. For example, you may use
the cursor up/down keys to highlight the individual menu items. As you highlight each item, a brief
description of that items function will appear in the lower window. If you have a color monitor you can
use the Shift F2 keys to scroll through the various color combinations available.
In general, you use the arrow keys to highlight items and then press Enter to select. Use the PageUp
and PageDown keys to change entries. Press F1 for help. Press Esc to quit. The following table provides
more detail about how to navigate in the Setup program using the keyboard.
Up arrow Move to previous item
Down arrow Move to next item
Left arrow Move to the item in the left hand
Right arrow Move to the item in the right hand
Esc key Main Menu Quit but do not save changes into CMOS
Submenu Exit current page and return to Main Menu
PgUp key Increase the numeric value or make changes
PgDn key Decrease the numeric value or make changes
+ key Increase the numeric value or make changes
- key Decrease the numeric value or make changes
F1 key General help
66 MultiVOIP Gatekeeper User Guide
Page 66

(Shift)F2 Change color from total 16 colors. F2 selects key color forward;
Shift-F2 selects color backwards.
F4 key Reserved
F5 key Restore the previous CMOS value from CMOS
F6 key Load the default CMOS value from BIOS default table
F7 key Load the default value of the parameter
F8 key, F9 key Reserved
F10 key Save all the CMOS changes, only for Main Menu
The Standard CMOS Setup Menu
Highlight STANDARD CMOS SETUP and press < ENTER >. The following screen display will appear:
Memory Installation
The IPC-551 Pentium Embedded Computer will support two double DRAM banks, bank 0 and bank 1,
each consisting of two 72-pin SIMM sockets.
Note: SIMM 1,2,3,4 for double-bank DRAM module (72pin x 32bit x 4).
Appendix C - SBC Configuration Details
DRAM BANK CONFIGURATION
SIMM 1 SIMM 2 SIMM 3 SIMM 4 TOTAL
BANK 0 BANK 1 MEMORY
4M 4M 8M
4M 4M 4M 4M 16M
8M 8M 16M
8M 8M 4M 4M 24M
8M 8M 8M 8M 32M
16M 16M 32M
16M 16M 4M 4M 40M
16M 16M 8M 8M 48M
16M 16M 16M 16M 64M
32M 32M 64M
32M 32M 4M 4M 72M
32M 32M 8M 8M 80M
32M 32M 16M 16M 96M
32M 32M 32M 32M 128M
64M 64M 128M
64M 64M 4M 4M 136M
64M 64M 8M 8M 144M
64M 64M 16M 16M 160M
64M 64M 32M 32M 192M
64M 64M 64M 64M 256M
128M 128M 256M
SBC Configuration
This section presents detailed information on VGA video mode and the Watchdog function. It also
describes how to install configurations.
Sections include:
VGA Drivers Utilities
Flash BIOS Update
Watchdog Timer Configuration
MultiVOIP Gatekeeper User Guide 67
Page 67

VGA Driver Utilities
VGA Drivers
The VGA interface for the SBC supports a wide range of display modes, such as SVGA, STN, TFT,
EL,.etc.
This single-board computer is shipped with a CD-ROM containing two files, VGA.EXE and
AWDFLASH.EXE, for VGA driver setup and Flash BIOS update.
......... 1. Awdflash 5.35A program update for Awardflash BIOS
......... 3. Win95 program for Win95 system
......... 4. WinNT 3.5x program for WinNT3.5x
......... 5. WinNT 4.0 program for WinNT4.0
......... 6. Win 2000 program for Win 2000 system
..........7. OS/2 Video Device Driver for OS/2 3.0 system
Before you change any setup for VGA or system BIOS, you must first install your utility CD-ROM. Then
the file will automatically be decompressed (unzipped) and a sub-directory will be created on your
hard drive.
Date (mm:dd:yy) : Fri, Sep 5 1997
Time (hh:mm:ss) : 10 : 17 : 37
Primary Master
Primary Slave
Secondary Master
Secondary Slave
Drive A: 1.44M, 3.5in.
Drive B: None
Video: EGA/VGA
Halt On: All Errors
Esc: Quit
F1:Help
ROM PCI / ISA BIOS (2A59FP6C)
STANDARD CMOS SETUP
AWARD SOFTWARE, INC.
Type
Size
:Auto
:Auto
:Auto
:Auto
(Shift) F2: Change Color
Heads
Cyls.
0
0
0
0
0
0
:SELECT ITEM
0
0
0
0
0
0
Base Memory: 640K
Extended Memory: 31744K
Other Memory: 384K
__________________________
Total Memory: 32768K
PreComp
Land-
zone
0
0
0
0
Sectors
0
0
0
0
Pu/Pd/+/-: Modify
Mode
:Auto
0
:Auto
0
:Auto
0
:Auto
0
Figure C-4. Standard CMOS Setup Screen
The base memory size and the extended memory size are displayed in the above table. This is
automatically read from your system. You do not need to set these parameters. The screen displays
the date and time, which the operator must set correctly after powering up the computer. The format
of the date/time display is as follows:
Date:
< Month >, < Date > and <Year >. Ranges for each value are on the CMOS Setup Screen, and the
week-day will be skipped automatically.
Time:
< Hour >, < Minute >, and < Second >. Use 24 hour clock format, i.e., for p.m. numbers, add 12 to
the hour. For example, 4:30 p.m. should be expressed as 16:30:00.
68 MultiVOIP Gatekeeper User Guide
Page 68

Appendix C - SBC Configuration Details
Drives: Primary Master/Slave & Secondary Master/Slave
In general, the SBC can handle four disk drives: a primary master, a primary slave, a secondary
master, and a secondary slave. The hard drive shipped with the Gatekeeper is a Primary Master drive
designated as Drive C. An IDE CDROM is supplied and functions as a Primary Slave drive and is
designated as Drive D. The type and mode settings for the primary master and the primary slave
drives should, in most cases, be AUTO.
When this field of the Standard CMOS Setup screen is set to AUTO, the SBC will automatically detect
the hard drive(s) in the system. The SBC can auto-detect 45 specific drive types (designated 1-45 in
this field).
The drive type can also be entered manually. If entered manually, the drive in use must match the type
entered in this field. If the drive being used is not of the type specified in this field, it will not work
properly in the Gatekeeper. For drives not on the list of 45 types, a user-defined drive can also be
specified in this field (as type User). When User is selected for this field, the operator needs to
specify the parameters of the hard drive (number of cylinders, heads, etc.). This information should be
provided in the documentation for the hard drive unit (this information is often specified on the exterior
of the hard drive unit, as well).
Note: If your SBC has trouble detecting your hard drive when the Type field in the Standard CMOS Setup screen is set
to AUTO, then you should enable the IDE HDD Auto Detection function in the CMOS Setup Utility screen. If the hard
drive is still not detected, designate the Type as User and enter the hard-drive values into the Standard CMOS Setup
screen
If the controller of the hard-disk drive interface is ESDI, the selection shall be Type 1.
If the controller of the hard-disk drive interface is SCSI, the selection shall be None
If the controller of the hard-disk drive interface is CD-ROM, the selection shall be None
Type:
Describes the hard drive. Default value is AUTO. Other values: 1-45, user, and none.
CYLS.:
Denotes the number of cylinders in the specified drive type.
HEADS:
Denotes the number of heads in the specified drive type.
PRECOM:
Precom is the read delay circuitry which takes into account the timing differences between the inner
and outer edges of the surface of the disk platter. This number designates the starting cylinder of the
signal.
LZONE:
Lzone is the landing zone of the heads. This number determines the cylinder location where the heads
will normally park when the system is shut down.
SECTORS:
Denotes the number of sectors in the specified drive type.
Size (Capacity):
Denotes the formatted capacity of the drive based on the following formula: (# of heads) X (# of
cylinders) X (# of sectors) X ( 512bytes/sectors)
Drive A and Drive B:
The options are 360 KB 5.25in, 1.2 KB 5.25in, 720 KB 3.5in, 1.44 MB 3.5in, 2.88 MB 3.5in and None. Not
Installed could be used as an option for workstations without disk drives.
MultiVOIP Gatekeeper User Guide 69
Page 69

Video:
Options are Monochrome, Color 40, VGA/EGA (default), Color 80.
Halt On:
Options are No Errors, All but Keyboard, All but Diskette, All but Diskette/Keyboard, All Errors. Default is
No Errors.
Hard Disk Attributes:
Type
10
11
12
13
14
15
16
17
18
19
20
21
22
23
24
25
26
27
28
29
30
31
32
33
34
35
36
37
38
39
40
41
42
43
44
45
47
1
2
3
4
5
6
7
8
9
Cylinders
306
615
615
940
940
615
642
733
900
820
855
855
306
733
000
612
977
977
1024
733
733
733
306
977
1024
1224
1224
1224
1024
1024
918
925
1024
1024
1024
1024
1024
1024
918
820
1024
1024
809
809
776
Heads
4
4
6
8
6
4
8
5
15
3
5
7
8
7
0
4
5
7
7
5
7
5
4
5
9
7
11
15
8
11
11
9
10
12
13
14
2
16
15
6
5
5
6
6
8
V-P comp
128
300
300
512
512
65535
256
65535
65535
65535
65535
65535
128
65535
0000
0000
300
65535
512
300
300
300
0000
65535
65535
65535
65535
65535
65535
65535
65535
65535
65535
65535
65535
65535
65535
65535
65535
65535
65535
65535
65535
65535
65535
AUTO
LZone
305
615
615
940
940
615
511
733
901
820
855
855
319
733
000
663
977
977
1023
732
732
733
336
976
1023
1223
1223
1223
1023
1023
1023
926
1023
1023
1023
1023
1023
1023
1023
820
1023
1023
852
852
775
Sect
17
17
17
17
17
17
17
17
17
17
17
17
17
17
00
17
17
17
17
17
17
17
17
17
17
17
17
17
17
17
17
17
17
17
17
17
17
17
17
17
17
26
17
26
33
Capacity
10
20
30
62
46
20
30
30
112
20
35
49
20
42
00
20
40
56
59
30
42
30
10
40
76
71
111
152
68
93
83
69
85
102
110
119
17
136
114
40
42
65
40
61
100
Figure C-5. Award Hard Disk Type Table
The BIOS Features Setup Menu
The BIOS FEATURES SETUP menu presents configuration options for the support chipset and the
shadowing of RAM. When you select BIOS FEATURES SETUP in the CMOS Setup Utility menu, this
screen appears:
ROM / PCI / ISA BIOS (2A59FP6C)
BIOS FEATURES SETUP
Virus Warning :Disabled
CPU Internal Cache :Enabled
External Cache :Enabled
Quick Power-On Self-Test :Disabled
Boot Sequence :A, C, SCSI
Swap Floppy Drive :Disabled
Boot-Up Floppy Seek :Enabled
Boot-Up Numlock Status :ON
Boot-Up System Speed :High
Gate A20 Option :Fast
Typematic Rate Setting :Disabled
Typematic Rate (char/sec) :6
Typematic Delay (msec) :250
Security Option :Setup
PCI/VGA prelatal snoop :Disabled
OS Select for DRAM>64Mb :Non-OS2
Figure C-6. BIOS Features Setup
AWARD SOFTWARE, INC.
Video BIOS Shadow :Enabled
C8000-CBFFF Shadow :Disabled
CC000-CFFF Shadow :Disabled
D000-D3FFF Shadow :Disabled
D4000-D7FFF Shadow :Disabled
D8000-DBFFF Shadow :Disabled
DC000-DFFFF Shadow :Disabled
Esc: Quit
F1: Help
F5: Old Values
F6: Load BIOS Defaults
F7: Load Setup Defaults
:SELECT ITEM
Pu/Pd/+/-: Modify
(Shift) F2: Color
70 MultiVOIP Gatekeeper User Guide
Page 70

Appendix C - SBC Configuration Details
The parameters accessible on this screen govern the systems default speed, boot-up sequence,
keyboard operation, shadowing, and security.
Note: MultiTech presets all BIOS features before shipping the Gatekeeper. BIOS features should not be changed except
by expert operators.
Virus Warning
When this item is enabled, the Award BIOS will monitor the boot sector and partition table of the hard
disk drive for any attempt at modification. If an attempt is made, the BIOS will halt the system and the
following error message will appear.
! WARNING !
Disk boot sector is to be modified
Type Y to accept write or N to abort write
Award Software, Inc.
Afterwards, if necessary, you will be able to run an anti-virus program to locate and remove the
problem before any damage is done.
Enabled: Activates automatically when the system boots up. Causes a warning message to appear
when anything attempts to access the boot sector or hard disk partition table.
Disabled: No warning message will appear when anything attempts to access the boot sector or hard
disk partition table. (Default.)
NOTE: Many disk diagnostic programs which attempt to access the boot sector table can cause the above warning
message. If you will be running such a program, we recommend that you disable Virus Protection beforehand. When
enabled, this feature can cause problems when installing Windows 95.
CPU Internal Cache/External Cache
These two settings affect memory access speed, generally increasing access speed when enabled. The
default value is Enabled.
Enabled: Enable cache
Disabled: Disable cache
Quick Power On Self Test
This setting affects the duration of the Power On Self Test (POST), which occurs after you power up
the computer. If enabled, the BIOS will shorten or skip some check items during the POST.
Enabled: Enable quick POST (Default)
Disabled: Normal POST
Boot Sequence
This setting determines which drive to search first for booting files at startup. The default value is C, A.
C, A System will first search for a hard disk then a floppy disk drive.
A, C System will first search for a floppy disk drive, then for a hard drive.
Boot Up Floppy Seek
During POST, BIOS will determine if the floppy disk drive installed has 40 or 80 tracks. 360K type has
40 tracks while 760K, 1.2M and 1.44M are all 80-track devices.
Enabled: BIOS searches for the floppy disk drive to determine if it is 40 or 80 tracks. Note that BIOS
cannot tell from 720K, 1.2M or 1.44M drive type as they are all 80 tracks (Default).
Disabled: BIOS will not search for the type of floppy disk drive by track number. Note that there will
not be any warning message if the drive installed is 360K.
MultiVOIP Gatekeeper User Guide 71
Page 71

Boot Up NumLock Status
This enables you to determine the default state of the numeric keypad. By default, the system boots up
with NumLock on.
On Keypads number keys are active.
Off Keypads arrow keys are active.
Boot Up System Speed
Selects the default system speed the normal operating speed at power up.
High Sets the speed to high (default)
Low Sets the speed to low
Regardless of which setting is chosen, the operator can still use the turbo switch to toggle between
High and Low modes during operation.
Gate A20 Option
This entry enables you to select how gate A20 is handled. Gate A20 is a device used to address
memory above 1 Mbyte. Initially, Gate A20 was handled by a pin on the keyboard. Today, while
keyboards still provide this support, it is more common, and much faster, for the system chipset to
provide support for gate A20.
Normal keyboard (default)
Fast chipset
Typematic Rate Setting
Enable the typematic function if you want to be able to configure the key-repetition characteristics of
your keyboard. When typematic is disabled, continually holding down a key on your keyboard will
generate only one instance. In other words, the BIOS will only report that the key is down. When the
typematic rate is enabled, the BIOS will report as before, but it will then wait a moment, and, if the key
is still down, it will begin the report that the key has been depressed repeatedly. For example, you
would use such a feature to accelerate cursor movements with the arrow keys.
Enabled Enable typematic rate
Disabled Disable typematic rate (default)
Typematic Rate (Chars/Sec)
When the typematic rate is enabled, the typematic rate selection enables you select the rate at which
a held-down key will produce acceleration. Acceleration refers to multiple instances of a
character (letter, number, or symbol) or other multiple keyboard effects (like cursor movement with
arrow keys and character removal with the Delete keys).
6 6 characters per second (default)
8 8 characters per second
10 10 characters per second
12 12 characters per second
15 15 characters per second
20 20 characters per second
24 24 characters per second
72 MultiVOIP Gatekeeper User Guide
Page 72

30 30 characters per second
Typematic Delay (Msec)
When the typematic rate is enabled, this selection enables you to select the delay between when the
key is first depressed and when the acceleration begins.
250 250 msec (default)
500 500 msec
750 750 msec
1000 1000 msec
Security Option
Enables you to limit access to the computer system or to the BIOS Setup menus. When System security
is enabled, the system will not boot and access to Setup will be denied if the correct password is not
entered at the prompt. When Setup security is enabled, the system will boot, but access to Setup will
be denied if the correct password is not entered at the prompt.
System security boot & BIOS access require password
Setup security BIOS access requires password (default)
Appendix C - SBC Configuration Details
No security password not required
Note: To disable security, select PASSWORD SETTING at the CMOS Setup Utility menu. You will be asked to enter a
password. Do not type anything; just press Enter, and security will be disabled. Once its disabled, the system will boot
and you can enter Setup freely.
Video BIOS Shadow
Determines whether the video BIOS will be copied to RAM. However, it is optional depending on chipset
design. Video Shadow will increase the video speed.
Enabled Video shadow is enabled (default)
Disabled Video shadow is disabled
C8000 - CFFFF Shadow/DC000 - DFFFF Shadow
Determines whether option ROMs will be copied to RAM or not. An example of such option ROM would
be support of on-board SCSI hard-drive functionality.
Enabled Optional shadow is enabled
Disabled Optional shadow is disabled (Default)
Chipset Features Setup
This menu lets you configure the system based on the specific features of the installed chipset. This
chipset manages bus speeds and access to system memory resources, such as DRAM and the external
cache. It also coordinates communications between the conventional ISA bus and the PCI bus.
However, these parameters should never need to be altered. The default settings have been chosen
because they provide the best operating conditions for your system. The only time you might consider
making any changes would be if you discovered that data was being lost while using your system.
If you choose CHIPSET FEATURES SETUP from the CMOS Setup Utilities menu, the following screen appears.
MultiVOIP Gatekeeper User Guide 73
Page 73

Figure C-7. Chipset Features Setup
By moving cursor to the desired field and pressing < F1 > key, all values for that field will be displayed.
Auto Configuration Function:
When this option is Enabled, the BIOS automatically configures cache and clock settings based on
detection of the CPU clock speed. The user cannot change the other parameters. Set this option to
Disabled to do manual setting of DRAM , cache, and I/O bus clock operating parameters. Enabled
is the default.
DRAM Settings
The first chipset settings deal with CPU access to dynamic random access memory (DRAM). The default
timings have been carefully chosen and should only be altered if data is being lost. One data-loss
scenario that relates to DRAM timing values occurs when the computer contains mixed-speed DRAM
chips; greater delays may be required to preserve the integrity of the data held in the slower memory
chips and, consequently, data may be lost.
ROM / PCI / ISA BIOS (2A59FP6C)
BIOS FEATURES SETUP
AWARD SOFTWARE, INC.
Auto Configuration :Enable
DRAM Timing : 70 ns
DRAM RAS# Precharge Time :4
DRAM R/W Leadoff Timing :7/6
Fast RAS# to CAS# Delay :3
DRAM Read BUrst (EDO/FPM) :x333/x444
DRAM Write Burst Timing :x333
Turbo Read Leadoff :Disabled
DRAM Speculative Leadoff :Disabled
Turn-Around Insertion :Disabled
ISA Clock :PCICLK/4
System BIOS Cacheable :Disabled
Video BIOS Cacheable :Disabled
8-Bit I/O Recovery Time :1
16-Bit I/O Recovery Time :1
Memory Hole at 15M-16M :Disabled
Peer Concurrency :Enabled
Chipset Special Features :Enabled
DRAM ECC/Parity Select :Parity
Memory Parity / ECC Check :Auto
Single Bit Error Report :Enabled
L2 Cache Cacheable Size :64MB
Chipset NA# Asserted :Enabled
Pipeline Cache Timing :Faster
Passive Release :Enabled
Delayed Transaction :Disabled
Esc: Quit
F1: Help
F5: Old Values
F6: Load BIOS Defaults
F7: Load Setup Defaults
:SELECT ITEM
Pu/Pd/+/-: Modify
(Shift) F2: Color
ISA Clock:
Defines the clock value for the ISA bus. Usually, the ISA bus clock should be programmed to 8 Mhz. For
example, when the PCI clock is 33MHz, choose PCICLK/4. PCICLK/4 is the default value.
Cache Features
System BIOS Cacheable
When enabled, accesses to the system BIOS ROM addressed at F0000H-FFFFFH are cached.
Enabled BIOS access cached
Disabled BIOS access not cached
Disabled is the default.
Video BIOS Cacheable
As with caching the System BIOS above, enabling the Video BIOS cache will cause access to video BIOS addressed
at C0000H to C7FFFH to be cached.
Enabled Video BIOS access cached
Disabled Video BIOS access not cached
Disabled is the default.
PCI and IDE Configuration
8 Bit I/O Recovery Time
74 MultiVOIP Gatekeeper User Guide
Page 74

The recovery time is the length of time, measured in CPU clock periods, that the system will delay after
completing an input/output request. This delay occurs because the CPU operates much faster than the
input/output bus and, therefore, the CPU must be delayed to allow for the completion of the I/O.
This setting determines the recovery time allowed for 8 bit I/O. Choices are from 1 to 8 CPU clock
periods.
3 clock periods is the default setting.
16 Bit I/O Recovery Time
This setting determines the recovery time allowed for 16 bit I/O. Choices are from 1 to 4 CPU clock
periods.
2 clock periods is the default setting.
Memory Hole At 15M-16M
In order to improve performance, certain space in memory can be reserved for ISA cards. This
memory must be mapped into the memory space below 16 MB.
Enabled memory hole supported
Disabled memory hole not supported (default)
Power Management Setup
Appendix C - SBC Configuration Details
The Power Management Setup enables you to configure your system to save energy most effectively
while still meeting your computing needs. When you specify Max Saving, all power-saving timeouts
are set to their minimum value and power saving is implemented at the lowest possible threshold.
ROM / PCI / ISA BIOS (2A59FP6C)
POWER MANAGEMENT SETUP
AWARD SOFTWARE, INC.
Power Management :Disable
PM Control by APM :Yes
Video Off Method :V/H SYNC + Blank
MODEM Use IRQ :3
Doze Mode :Disable
Standby Mode :Disable
Suspend Mode :Disable
HDD Power-Down :Disable
**Wake Up Events in Doze & Standby **
IRQ3 (Wake-Up Event) :ON
IRQ4 (Wake-Up Event) :ON
IRQ8 (Wake-Up Event) :ON
IRQ12 (Wake-Up Event) :ON
** Power-Down & Resume Events **
IRQ3 (COM 2) :ON
IRQ4 (COM 1) :ON
IRQ5 (LPT 2) :ON
IRQ6 (Floppy Disk) :OFF
IRQ7 (LPT1) :ON
IRQ8 (RTC Alarm) :OFF
IRQ9 (IRQ2 Redir) :ON
IRQ10 (Reserved) :ON
IRQ11 (Reserved) :ON
IRQ12 (PS/2 Mouse) :ON
IRQ13 (Co-Processor) :ON
IRQ14 (Hard Disk) :ON
IRQ15 (Reserved) :ON
Esc: Quit
F1: Help
F5: Old Values
F6: Load BIOS Defaults
F7: Load Setup Defaults
:SELECT ITEM
Pu/Pd/+/-: Modify
(Shift) F2: Color
Figure C-8. Power Management Setup
Power Management
This field lets you select the type (or degree) of power saving used. There are four modes of power
management:
1. Doze Mode
2. Standby Mode
3. Suspend Mode
4. HDD Power Down
There are four selections for Power Management, three of which have fixed mode settings.
Disable (default) No power management. Disables all four modes.
MultiVOIP Gatekeeper User Guide 75
Page 75

Min. Power Saving Minimum power management.
Max. Power Saving Maximum power management ONLY AVAILABLE FOR SL CPUs.
User Defined. Enables you to set each mode individually. When not disabled, each of the
ranges are from 1 min. to 1 hr. except for HDD Power Down which ranges from 1 min. to
15 min. (HDD can also be disabled).
PM Control APM
When enabled ( YES ), an Advanced Power Management device will be activated to enhance the
Maximum Power Saving mode and to stop the CPU internal clock. The Advanced Power Management
function operates only if Maximum Power Saving is enabled. When enabled ( YES ), the system BIOS
will wait for APMs prompt before it enters any PM mode (Doze, Standby or Suspend). If APM is
installed, and if a task is running and the timer has timed out, APM will not prompt the BIOS to employ
any power saving mode.
Video Off Method
This determines how the monitor is blanked (V/H SYNC+Blank). This selection will cause the system
to turn off the vertical and horizontal synchronization ports and write blanks to the video buffer (Blank
Screen). This option only writes blanks to the video buffer.
Doze Mode = 1hr.,
Standby Mode = 1 hr.,
Suspend Mode = 1hr., and
HDD Power Down = 15 min.
Doze Mode = 1 min.,
Standby Mode = 1 min.,
Suspend Mode = 1 min., and
HDD Power Down = 1 min.
Note: Doze, Standby, and Suspend are configurable only when User Defined power management has been selected.
Doze Mode
This timeout setting determines how long the PC must be idle before entering Doze mode. Values
range from 10 seconds to 2 hours. Doze mode can also be disabled. In Doze mode, the CPU clock runs
at a slower speed while all other devices continue operating at full speed.
Standby Mode
This timeout setting determines how long the PC must be idle before entering Standby mode. Values
range from 30 seconds to 2 hours. Standby can also be disabled. When Standby mode is engaged, the
PCs hard drive and its video are turned off while all other devices continue operating at full speed.
Suspend Mode
This timeout setting determines how long the PC must be idle before entering Suspend mode. Values
range from 30 seconds to 2 hours. Suspend can also be disabled. In Suspend mode, all devices except
the CPU are shut off.
HDD Power Down
This timeout setting determines how long the PC must be idle before entering HDD Power Down mode.
In HDD Power Down mode, the hard disk drive will be shut off but all other devices remain active.
PnP/PCI Configuration
If you choose PNP/PCI CONFIGURATION from the CMOS Setup Utility menu, the following screen will
appear:
76 MultiVOIP Gatekeeper User Guide
Page 76

You can manually configure the Plug-and-Play/PCI Devices IRQ. The default setting is Auto.
PCI IRQ Activated by
This sets the method by which the PCI bus recognizes that an IRQ service is being requested by a
device. Under all circumstances, you should retain the default configuration unless advised otherwise by
your systems manufacturer.
Choices are Level (default) and Edge.
Appendix C - SBC Configuration Details
ROM / PCI / ISA BIOS (2A59FP6C)
PNP/PCI CONFIGURATION
AWARD SOFTWARE, INC.
Resources Controlled by :Manual
Reset Configuration Data :Disabled
IRQ3 assigned to :Legacy ISA
IRQ4 assigned to :Legacy ISA
IRQ5 assigned to :PCI/ISA PnP
IRQ6 assigned to :Legacy ISA
IRQ7assigned to :PCI/ISA PnP
IRQ8 assigned to :PCI/ISA PnP
IRQ9 assigned to :PCI/ISA PnP
IRQ10 assigned to :PCI/ISA PnP
IRQ11 assigned to :PCI/ISA PnP
IRQ12 assigned to :PCI/ISA PnP
IRQ13 assigned to :PCI/ISA PnP
IRQ14 assigned to :PCI/ISA PnP
IRQ15 assigned to :PCI/ISA PnP
DMA-1 assigned to :PCI/ISA PnP
DMA-3 assigned to :PCI/ISA PnP
DMA-5 assigned to :PCI/ISA PnP
DMA-6 assigned to :PCI/ISA PnP
DMA-7 assigned to :PCI/ISA PnP
PCI IRQ Active by :Level
PCI IDE IRQ Map to :PCI-Auto
Primary IDE INT# :A
Secondary IDE INT# :B
Onboard PCI SCSI Chip :Enabled
Used MEM base addr :N/A
Esc: Quit
F1: Help
F5: Old Values
F6: Load BIOS Defaults
F7: Load Setup Defaults
Figure C-9. PNP/PCI Configuration
:SELECT ITEM
Pu/Pd/+/-: Modify
(Shift) F2: Color
PCI IDE IRQ Map to
This enables you to configure your system to the type of IDE disk controller in use, ISA or PCI (default
value is PCI Auto). PCI Auto enables the system to determine automatically how your IDE disk system is
configured. Remember that this setting refers to the hard disk drive itself, rather than individual
partitions. Since each IDE controller supports two separate hard drives, you can select the interrupt
number (the INT#; the possible values are A, B, C, or D) for each. Note that the primary drive always
has a lower interrupt than the secondary drive.
Onboard PCI SCSI Chip
Default is Disabled. The IPC-551 SBC does not support SCSI.
Load BIOS Defaults
Auto Configuration with BIOS Defaults
Choosing LOAD BIOS DEFAULTS from the CMOS Setup Utility menu will restore default BIOS values to
the PC. Invoking LOAD BIOS DEFAULTS will bring up this dialog box:
To use the BIOS defaults, change the prompt to Y and press Enter ; the default BIOS values will be
loaded into CMOS automatically the next time you power up the SBC. Load BIOS Defaults are the same
as Load Setup Defaults.
Load Setup Defaults
Load BIOS Default ( Y ? N ) ? Y
Auto Configuration with Setup Defaults
Choosing LOAD SETUP DEFAULTS from the CMOS Setup Utility menu will restore default SETUP values
to the PC. Invoking LOAD SETUP DEFAULTS brings up this dialog box:
MultiVOIP Gatekeeper User Guide 77
Load SETUP Default ( Y ? N ) ? Y
Page 77

To use the SETUP defaults, change the prompt to Y and press <Enter>; the default SETUP values will
be loaded into the CMOS automatically the next time you power up the SBC. Load Setup Defaults are
the same as Load BIOS Defaults.
Integrated Peripherals
If you choose INTEGRATED PERIPHERALS from the CMOS Setup Utility menu, this screen will appear:
Password Setting
Access to the computer system in general or to the BIOS settings in particular can be put under
password protection using this function. When you select PASSWORD SETTING on the CMOS Setup
Utility menu, the following dialog box will appear at the center of the screen to assist you in creating a
password.
ROM / PCI / ISA BIOS (2A59FP6C)
INTEGRATED PERIPHERALS
AWARD SOFTWARE, INC.
IDE HDD Block Mode :Enabled
PCI Slot IDE 2nd Channel :Enabled
On-Chip Primary PCI IDE :Enabled
On-Chip Secondary PCI IDE :Enabled
IDE Primary Master PIO :Auto
IDE Primary Slave PIO :Auto
IDE Secondary Master PIO :Auto
IDE Secondary Slave PIO :Auto
USB Controller :Enabled
USE Keyboard Support :Disabled
Onboard FDC Controller :Enabled
Onboard UART 1 :Auto
UART 1 operation mode :Standard
Onboard UART 2 :Auto
UART 2 operation mode :Standard
Onboard Parallel Port 378/IRQ7
Parallel Port Mode :Normal
Esc: Quit
F1: Help
F5: Old Values
F6: Load BIOS Defaults
F7: Load Setup Defaults
Figure C-10. Integrated Peripherals
:SELECT ITEM
Pu/Pd/+/-: Modify
(Shift) F2: Color
Enter Password
Type the password, up to eight characters in length, and press Enter. The password typed now will
clear any previously entered password from CMOS memory. You will be asked to confirm the
password. Type the password again and press Enter. You may also press Esc to abort the selection
and not enter a password.
Caution: Losing or forgetting your system password will render your computer unusable. Assign a password only if it is
necessary for security purposes. Restoring access after loss of a password is nontrivial and requires the clearing and reloading of BIOS settings. If a password is forgotten or lost, contact MultiTech Technical Support to establish a new
password.
To disable a password, just press Enter when you are prompted to enter the password. A message
will confirm that the password is to be disabled. Once the password has been disabled, the system will
boot and you can enter Setup freely.
Password Disabled
When a password has been enabled, you will be prompted to enter it every time you try to enter Setup.
This prevents an unauthorized person from changing any part of your system configuration.
Additionally, when a password is enabled, you can also require the BIOS to request a password every
time your system is rebooted. This would prevent unauthorized use of your computer.
78 MultiVOIP Gatekeeper User Guide
Page 78

Appendix C - SBC Configuration Details
You determine when the password is required within the BIOS Features Setup menu and its Security
option (presented earlier). If the Security option is set to System, the password will be required both
at boot and at entry to Setup. If set to Setup, prompting only occurs when trying to enter Setup.
IDE HDD Auto Detection
The parameters presented on this menu are pre-set at the factory. They should be altered only by
expert users.
This feature automatically detects and configures hard disk drive parameters. If you are uncertain of
your hard disk drives parameters, this features will display them. Generally, the IDE HDD Auto
Detection function is needed only if you change your hard disk drive.
When you select IDE HDD AUTO DETECTION from the CMOS Setup Utility menu, this screen will
appear:
ROM / PCI / ISA BIOS (2A59FP6C)
STANDARD CMOS SETUP
Primary Master :( Mb)
Primary Slave :
Secondary Master :
Secondary Slave
:
AWARD SOFTWARE, INC.
CYLS.
0
Select Secondary Slave Option (N=Skip) :N
HEADS
0
PRECOMP
0
LANDZONE
0
SECTORS
0
MODE
--------
Sectors
Size
Option
2(Y)
1
3
Note: Some OSes (like SCO-UNIX) must use Normal for installation
540
541
540
Cyls
524
1049
524
Heads
32
16
32
Precomp
0
65535
65535
Esc: Skip
Landzone
1048
1048
1048
Mode
63
LBA
63
Normal
63
LARGE
Figure C-11. IDE HDD Auto Detection Screen
Generally speaking, hard disk drives are categorized by size as follows:
Normal: HDD Size < 528MB
LBA: 528MB< HDD Size < 8.4 GB
Large: HDD Size > 8.4GB
If you specify a sub-standard mode for a hard disk drive when formatting, part of the drive will remain
unformatted and therefore inaccessible. For example, if you format a 4GB hard disk drive as a Normal
drive, only 528MB would be formatted and nearly 3.5GB would be unusable.
Auto Detection
The BIOS Setup will display all the possible modes that are supported by the HDD including NORMAL,
LBA, & LARGE. The user can select the appropriate mode.
HDD Mode
The Award BIOS supports 3 HDD mode: NORMAL, LBA, & LARGE
NORMAL mode:
Generic access mode in which neither the BIOS nor the IDE controller will make any transformations
during accessing.
The maximum number of cylinders, heads & sectors for NORMAL mode are 1024, 16, and 63.
x no. Cylinder (1024)
x no. Head ( 16)
MultiVOIP Gatekeeper User Guide 79
Page 79

x no. Sector ( 63)
x no. Bytes per Sector ( 512)
Total: 528 megabytes
If the user sets the HDD to NORMAL mode, the maximum accessible HDD size will be 528 Megabytes
even though its physical size may be greater than that.
LBA (Logical Block Addressing) mode:
This new HDD accessing method overcomes the 528 megabyte bottleneck. The number of cylinders,
heads and sectors shown in Setup may not be the number physically contained in the HDD.
During HDD accessing, the IDE controller will transform the logical address described by the sector,
head, and cylinder numbers into its own physical address inside the HDD.
The maximum HDD size supported by LBA mode is 8.4 gigabytes, which is obtained by the following
formula:
x no. Cylinder (1024)
x no. Head ( 255)
x no. Sector ( 63)
x no. of Bytes per Sector ( 512)
Total: 8.4 gigabytes
LARGE mode:
Some IDE HDDs contain more than 1024 cylinder without LBA support (in some cases, users do not
want LBA). The BIOS provides another alternative to support these kinds of HDD.
CYLS HEADS SECTOR MODE
1120 16 59 NORMAL
560 32 59 LARGE
The BIOS tricks DOS (or other OS) that the number of cylinders is less than 1024 by dividing it by 2. At
the same time, the number of heads is multiplied by 2. A reverse transformation process will be made
inside INT 13h in order to access the right HDD address.
Maximum HDD size in Large Mode:
x no. Cylinder (1024)
x no. Head ( 32)
x no. Sector ( 63)
x no. Per sector ( 512)
-
Total: 1 gigabyte
Note: Support of the LBA or LARGE mode of HDDs, requires some special software. All such software packages are
located in the Award HDD Service Routine (INT 13h). If the PC is running under a Operating System that replaces the
whole INT 13h, that PC may fail to access a HDD set to LBA or LARGE mode.
HDD Low Level Format
If you choose HDD LOW LEVEL FORMAT from the CMOS Setup Utility menu, the following screen will
appear:
80 MultiVOIP Gatekeeper User Guide
Page 80

Appendix C - SBC Configuration Details
Hard Disk Low Level Format Utility NO. CYLS HEAD
- - - - -- SELECT DRIVE - - - - - -
- - -- - - BAD TRACK LIST - - - - -
- - - - - PREFORMAT - - - - - Current Select drive is : C
DRIVE : C CYLINDER : 0 HEAD : 0
SIZE
HEAD
Primary Master
Primary Slave
Secondary Master
Secondary Slave
Up/Down - Select item Enter - Accept ESC - Exit / Abort
Copyright (C) Award Software, Inc. 1992-94 All Rights Reserved
541
PRECOMP
16
0
0
0
0
0
0
65535
0
0
0
LANDZ
1048
0
0
0
SECTOR
63
0
0
0
MODE
AUTO
AUTO
AUTO
AUTO
Figure C-12. HDD Low Level Format
Low-level formatting will sometimes remedy corrupt disk sectors. Unlike DOS formatting which can
format disk partitions separately, Low-level formatting formats the entire physical hard disk drive. To
invoke low-level formatting, select PREFORMAT and press Enter.
Caution: Low-level formatting will destroy all data on the hard disk drive. If you really want to reformat a hard disk
drive, back up your data first.
Save & Exit Setup
When all required adjustments are complete, you must save these settings into the CMOS RAM. Select
SAVE & EXIT SETUP and press Enter.
When you confirm that you want to save the settings, your machine will automatically reboot and the
changes you have made will be implemented. You can call up the setup program at any time to adjust
any of the individual items by pressing the <Del> key during boot up.
To cancel any changes you have made, select QUIT WITHOUT SAVING (see figure below) and the
original settings stored in CMOS will be retained.
ROM / PCI / ISA BIOS (2A59FP6C)
CMOS SETUP UTILITY
STANDARD CMOS SETUP
BIOS FEATURES SETUP
CHIPSET FEATURES SETUP
POWER MANAGEMT SETUP
PNP/PCI CONFIGURATION
LOAD BIOS DEFAULTS
LOAD SETUP DEFAULTS
AWARD SOFTWARE, INC.
SAVE to CMOS and EXIT (Y/N)? N
Esc: Quit
F10: Save & Exit Setup
Save Data to CMOS & Exit SETUP
INTERGRATED PERIPHERALS
PASSWORD SETTING
IDE HDD AUTO DETECTION
HDD LOW LEVEL FORMAT
SAVE & EXIT SETUP
EXIT WITHOUT SAVING
:SELECT ITEM
(Shift) F2: Change Color
Figure C-13. Saving a CMOS Setup Configuration
ROM / PCI / ISA BIOS (2A59FP6C)
CMOS SETUP UTILITY
STANDARD CMOS SETUP
BIOS FEATURES SETUP
CHIPSET FEATURES SETUP
POWER MANAGEMT SETUP
PNP/PCI CONFIGURATION
LOAD BIOS DEFAULTS
LOAD SETUP DEFAULTS
AWARD SOFTWARE, INC.
QUIT Without Saving (Y/N)? Y
Esc: Quit
F10: Save & Exit Setup
Abandon All Data and Exit SETUP
INTERGRATED PERIPHERALS
PASSWORD SETTING
IDE HDD AUTO DETECTION
HDD LOW LEVEL FORMAT
SAVE & EXIT SETUP
EXIT WITHOUT SAVING
:SELECT ITEM
(Shift) F2: Change Color
Figure C-14. Exiting Setup Mode without Saving
MultiVOIP Gatekeeper User Guide 81
Page 81

Appendix D Regulatory Information
FCC Regulations for Telephone Line Interconnection
1. This equipment complies with Part 68 of the Federal Communications Commission (FCC)
rules. On the outside surface of this equipment is a label that contains, among other
information, the FCC registration number and ringer equivalence number (REN). If
requested, this information must be provided to the telephone company.
2. As indicated below, the suitable jack (Universal Service Order Code connecting
arrangement) for this equipment is shown. If applicable, the facility interface codes (FIC)
and service order codes (SOC) are shown.
An FCC-compliant telephone cord and modular plug is provided with this equipment. This
equipment is designed to be connected to the telephone network or premises wiring using
a compatible modular jack which is Part 68 compliant.
82 MultiVOIP Gatekeeper User Guide
Page 82

Appendix D - Regulatory Information
3. The ringer equivalence number (REN) is used to determine the quantity of devices that
may be connected to the telephone line. Excessive RENs on the telephone line may result
in the devices not ringing in response to an incoming call. In most, but not all areas, the
sum of the RENs should not exceed five (5.0). To be certain of the number of devices that
may be connected to the line, as determined by the total RENs, contact the telephone
company to determine the maximum REN for the calling area.
4. If this equipment causes harm to the telephone network, the telephone company will notify
you in advance that temporary discontinuance of service may be required. But if advance
notice isnt practical, the telephone company will notify the customer as soon as possible.
Also, you will be advised of your right to file a complaint with the FCC if you believe it is
necessary.
5. The telephone company may make changes in its facilities, equipment, operations, or
procedures that could affect the operation of the equipment. If this happens, the telephone
company will provide advance notice in order for you to make necessary modifications in
order to maintain uninterrupted service.
6. If trouble is experienced with this equipment (the model of which is indicated below)
please contact Multi-Tech Systems, Inc. at the address shown below for details of how to
have repairs made. If the equipment is causing harm to the telephone network, the
telephone company may request you remove the equipment from the network until the
problem is resolved.
7. No repairs are to be made by you. Repairs are to be made only by Multi-Tech Systems or
its licensees. Unauthorized repairs void registration and warranty.
8. This equipment cannot be used on public coin service provided by the telephone company.
Connection to Party Line Service is subject to state tariffs. (Contact the state public utility
commission, public service commission or corporation commission for information.)
9. If so required, this equipment is hearing-aid compatible.
Manufacturer: Multi-Tech Systems, Inc.
Model Number: MVPGTK1
FCC registration number: AU7USA-XXXXXXXXXXXX
Ringer Equivalence No: TBD
Modular Jack (USOC) RJ11C or RJ11W (single line)
Service Center in USA: Multi-Tech Systems Inc.
2205 Woodale Drive
Mounds View, MN 55112
Voice (763) 785-3500/
FAX (763) 785-9874
Canadian Limitations Notice
Notice: The ringer equivalence number (REN) assigned to each terminal device provides an indication
of the maximum number of terminals allowed to be connected to a telephone interface. The
termination of a interface can consist of any combination of devices subject only to the requirement
that the sum of the ringer equivalence numbers of all the devices does not exceed 5.
Notice: The Industry Canada label identifies certificated equipment. This certification means that the
equipment meets certain telecommunications network protective, operational and safety requirements.
The Industry Canada does not guarantee the equipment will operate to the users satisfaction.
Before installing this equipment, users should ensure that it is permissible to be connected to the
facilities of the local telecommunications company. The equipment must also be installed using an
acceptable method of connection. The customer should be aware that compliance with the above
conditions may not prevent degradation of service in some situations.
MultiVOIP Gatekeeper User Guide 83
Page 83

Repairs to certified equipment should be made by an authorized Canadian maintenance facility
designated by the supplier. Any repairs or alterations made by the user to this equipment, or
equipment malfunctions, may give the telecommunications company cause to request the user to
disconnect the equipment.
Users should ensure for their own protection that the electrical ground connections of the power utility,
telephone lines and internal metallic water pipe system, if present, are connected together. This
precaution may be particularly important in rural areas.
Caution: Users should not attempt to make such connections themselves, but should contact the
appropriate electric inspection authority, or electrician, as appropriate.
Compliance with BABT Requirements
Approved for connection to telecommunications system specified in the instructions for use subject to the
conditions set out in them.
Warning: Interconnection directly, or by way of other apparatus, of ports marked "SAFETY WARNING see
instructions for use" with ports marked or not so marked may produce hazardous conditions on the
network. Advice should be obtained from a competent engineer before such a connection is made.
It is a condition of approval that the power required by the host and the total of all adapter cards installed
within the host environment, together with any auxiliary apparatus, does not exceed the power
specification as stated in the Technical Reference Material of the host apparatus.
The power requirements for the MULTIMODEMISI are:
Modem operating voltages: +12V D.C., -12V D. C., +5V D.C.
Modem Power Consumption: 8 Watts
In order to maintain the independent approval of this card, it is essential that when other option cards are
introduced which use or generate a hazardous voltage, the minimum creepages and clearances specified in
the following table are maintained. A hazardous voltage is one which exceeds 42.4V peak a.c or 50V d.c. If
you have any doubt, seek advice from a competent engineer before installing other adapters into the host
equipment.
The equipment must be installed such that with the exception of connection to the host, clearance and
creepage distances shown in the following table are maintained between the card and any other
assemblies which use or generate a voltage shown in that table. The larger the distance shown in brackets
applies where the local environment within the host is subject to conductive pollution or dry
nonconductive pollution which could become conductive due to condensation. Failure to maintain these
minimum distances would invalidate approval.
84 MultiVOIP Gatekeeper User Guide
Page 84

Appendix D - Regulatory Information
)mm(ecnaraelC)mm(egapeerC
0.2)8.3(4.2cdVrosmV05otpU
6.2)8.4(0.3cdVrosmV521otpU
0.4)0.8(0.5cdVrosmV052otpU
0.4)0.01(4.6cdVrosmV003otpU
Communication Module
Power Supply Unit
or other source of
excessive voltage
X
Y
detareneGrodesUegatloV
sdraCrehtOrotsoHyb
Carrier Card Expansion Card
X
Y
Example Diagram Showing Creepage
and Clearance Distances
Fig. B-1. Example Diagram Showing Creepage and Clearance Distances
Except at the edge connector which plugs into the host's expansion slot, clearance distance (Xmm) and
creepage distance (Ymm) as given in the table above, must be maintained between the communication
card and any assemblies which use or generate hazardous voltage.
This apparatus has been approved for the use of the following facilities:
Auto-calling
Loop disconnect and MF dialing
Phone number storage and retrieval by a predetermined code
Operation in the absence of proceed indication
Automatic storage of last number dialed
Tone detection-busy
Auto clear from the originating end
DTR dialing
Modem
PBX timed break register recall
European Low Voltage Directive
When correctly installed and maintained, the modem will present no hazard to the user. When correctly
installed, the modem will be connected to the PSTN or a PW and to a Data Terminal Equipment (DTE)
whose modem connections comply with CCITT recommendation V28. The DTE connections are therefore
taken to be safe voltages (less than ± 30 volts).
MultiVOIP Gatekeeper User Guide 85
Page 85

Ports that are capable of connecting to other apparatus are defined as SELV. To ensure conformity with
EN41003, ensure that these ports are only connected to ports of the same type on other apparatus.
Compliance with BS6305 Clause 6.2, BS6320 Clause 7.2, and BABT/
SITS/82/005S/D
a. The modem is suitable for connection to the Public Switched Telephone Network (PSTN)
provided by British Telecommunications plc or Kingston Communications (Hull) plc. Circuit
supply by British Communications, Mercury Communication, or Hull City Council. Only direct
exchange lines may be used, not shared service.
b. The modem is suitable for household, office, and similar general indoor use. It is not
suitable for use as an extension to a payphone.
c. BT lines supplied must support either loop disconnect or multifrequency tone signalling.
d. REN (Ringer Equivalence Number).
The REN value of a unit is calculated from 3/n where n is the total number of units which can
be connected in parallel which will still cause the standard bell (as defined in BS6305
Appendix D) to ring.
REN values of less than 0.3 cannot be assigned.
REN = 1
If a telephone or other device is connected in parallel with the modem, the combined REN must not
exceed 4. A BT supplied telephone can be assumed to have REN of 1.0 unless otherwise noted.
The approval of this modem for connection to the British Telecom public switched telephone network is
INVALIDATED if the apparatus is subject to any modification in any material way not authorized by
BABT or if it is used with or connected to:
i. internal software that has not been formally accepted BABT.
ii. external control software or external control apparatus which cause the operation of
the modem associated call set-up equipment to contravene the requirements of the
standard set out in BABT/SITS/82/005S/D.
All other apparatus connected to this modem and thereby connected directly or indirectly to the British
Telecom public switched telephone network must be approved apparatus as defined in Section 22 of
the British Telecommunications Act 1984.
Compliance with BS6789: Section 3.1 and Part 2
a. The modem is not capable of allowing Auto Call using '999' or other PABX emergency
numbers.
b. Modes other than modes 1, 2, or 3 should not be used on the BT PSTN. This modem
is a mode 1 device.
c. Users are advised to check the numbers entered during the Auto Call set up phase
prior to dialing.
d. The user should not issue any sequence of commands to the modem which would
cause the modem to exceed the maximum allowable pause of 8 seconds from the
time the modem goes off hook until dialing begins.
e. For correct operation of the call progress monitor, the power has to be properly connected
and switched on.
Compliance with BS6328 Part 1
86 MultiVOIP Gatekeeper User Guide
Page 86

Appendix D - Regulatory Information
a. The modem is not suitable for use on circuits with British Telecommunications signaling at
a normal frequency of 2280 Hz.
b. The modem does not require signaling or otherwise employ the frequency range dc to 200
Hz.
c. The modem does not require dc from the Private Circuit for correct operation. The modem
may be damaged if connected, in a private circuit mode, to a circuit supplying dc current
(the maximum permissible direct current is zero amps).
EMC, Safety, and Terminal Directive Compliance
The CE mark is affixed to this product to confirm compliance with the following European Community
Directives:
Council Directive 89/336/EEC of 3 May 1989 on the approximation of laws of Member States relating to
electromagnetic compatibility;
and
Council Directive 73/23/EEC of 19 February 1973 on the harmonization of the laws of Member States
relating to electrical equipment designed for use within certain voltage limits;
and
Council Directive 98/13/EEC of 22 March 1998 on the approximation of the laws of the Member States
concerning telecommunications terminal and satellite earth station equipment.
MultiVOIP Gatekeeper User Guide 87
Page 87

back page = blank page
S0000122, Rev B
 Loading...