

Multitech MultiVOIP MVP210-SS, MultiVOIP MVP410-SS, MultiVOIP MVP810-SS Configuration Manual
Page 1

®
MultiVOIP
Survivable SIP Gateway and Server
SS
Configuration Guide for
Inter-Operation between
MultiVOIP SS Models and
3Com VCX PBX Systems
Page 2

MultiVOIP SS Configuration Guide: 3Com VCX PBX Systems
MultiVOIP SS Configuration Guide
Inter-Operation with 3Com VCX PBX Systems
PN S000428A, Version A
Copyright
This publication may not be reproduced, in whole or in part, without prior expressed written permission from MultiTech Systems, Inc. All rights reserved.
Copyright © 2007, by Multi-Tech Systems, Inc.
Multi-Tech Systems, Inc. makes no representations or warranty with respect to the contents hereof and specifically
disclaims any implied warranties of merchantability or fitness for any particular purpose. Furthermore, Multi-Tech
Systems, Inc. reserves the right to revise this publication and to make changes from time to time in the content hereof
without obligation of Multi-Tech Systems, Inc. to notify any person or organization of such revisions or changes.
Check Multi-Tech’s Web site for current versions of our product documentation
Revisions
Revision Level Date Description
A 01/22/07 Initial release.
Trademarks
MultiVOIP, Multi-Tech, and the Multi-Tech logo are trademarks of Multi-Tech Systems, Inc.
Microsoft, Windows 2000, 2003, and XP are registered trademarks or trademarks of Microsoft Corporation in the
United States and/or other countries.
Patents
This Product is covered by one or more of the following U.S. Patent Numbers: 6151333, 5757801, 5682386,
5.301.274; 5.309.562; 5.355.365; 5.355.653; 5.452.289; 5. 45 3.986. Other Patents Pending.
World Headquarters
Multi-Tech Systems, Inc.
2205 Woodale Drive
Mounds View, Minnesota 55112
Phone: 763-785-3500 or 800-328-9717
Fax: 763-785-9874
Technical Support
Country By Email By Phone
France: support@multitech.fr +(33) 1-64 61 09 81
India: support@multitechindia.com +91 (124) 2340780
Europe, Asia, Africa: support@multitech.co.uk +(44) 118 959 7774
U.S., Canada, all others: support@multitech.com (800) 972-2439 or (763) 717-5863
Internet Address: http://www.multitech.com
2
Page 3
MultiVOIP SS Configuration Guide: 3Com VCX PBX Systems
Introduction
This configuration guide includes setup information for 3COM PBX model VCX vs. 7.1, IP phone models 3102a and
3102b vs. 7.1.27.27 and Multi-Tech MultiVOIP models MVP210-SS, MVP410-SS and MVP810-SS vs. 3.08.2W.
This guide will step you through the PBX settings and MultiVOIP settings which will allow the Mu ltiVOIP channels to
register and provide analog station(s) or analog trunk port(s).
In this example, we will have 2 channels register as analog trunks and 2 as analog stations, you may use any number or
combination of ports for your application. When the VCX is online, calls will route through the VCX to their
destination. When the VCX is offline, the VCX IP phones will register to the MultiVOIP.
IP phones and analog stations will be able to call each other and call through the analog trunks connected to PSTN lines.
This allows for 911 calls or non emergency calls to be placed if the PBX is unavailable.
MultiVOIP channel interface definitions:
FXS=analog station, connects to an analog phone, fax machine or CO/Line port on a PBX.
FXO=analog trunk, connects to PSTN line or station port on a PBX.
3COM VCX vs. 7.1 Configuration
Steps 1-12 will create users and extensions for the Mu ltiVOIP FXS ports.
Steps 13-20 will create the identity for the MultiVOIP and FXS/FXO ports.
Steps 21-23 will create the voice mail credentials for MultiVOIP FXS ports.
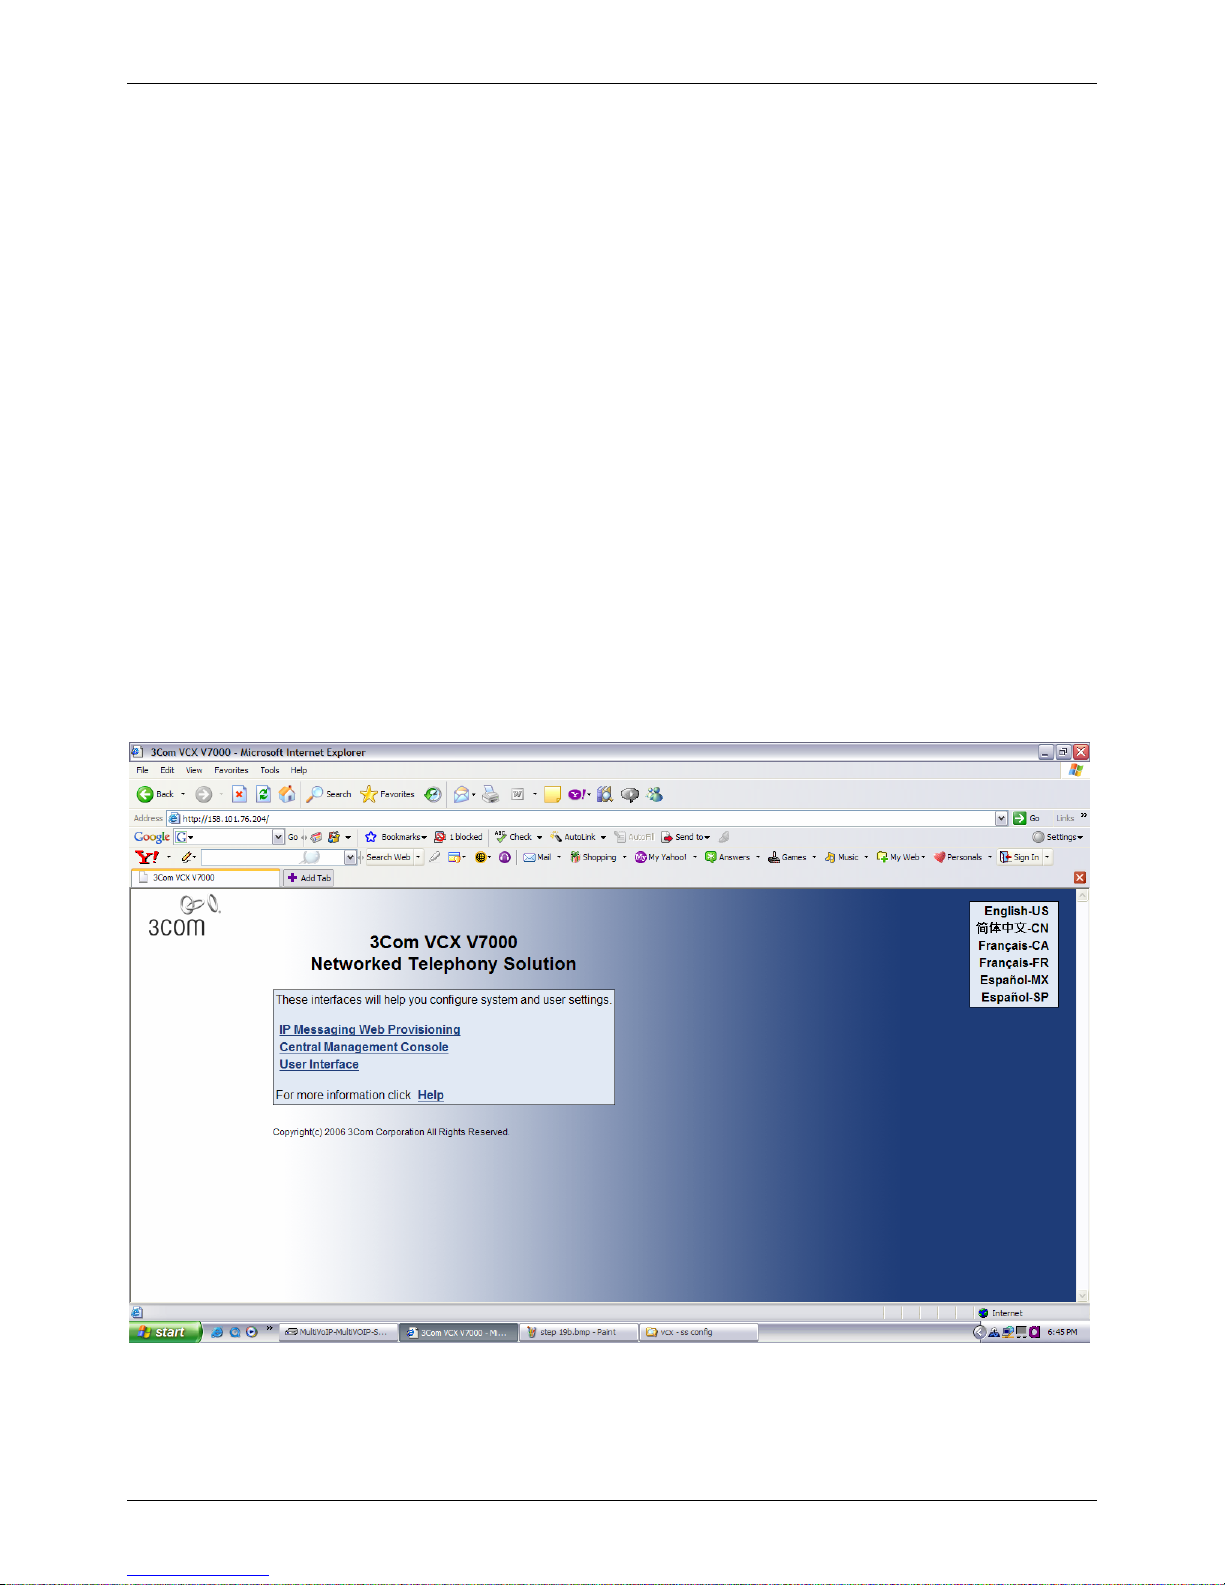
1. Connect to the VCX by entering the IP address of the PBX into your browser.
2. Click on “Central Management Console”.
3
Page 4
MultiVOIP SS Configuration Guide: 3Com VCX PBX Systems
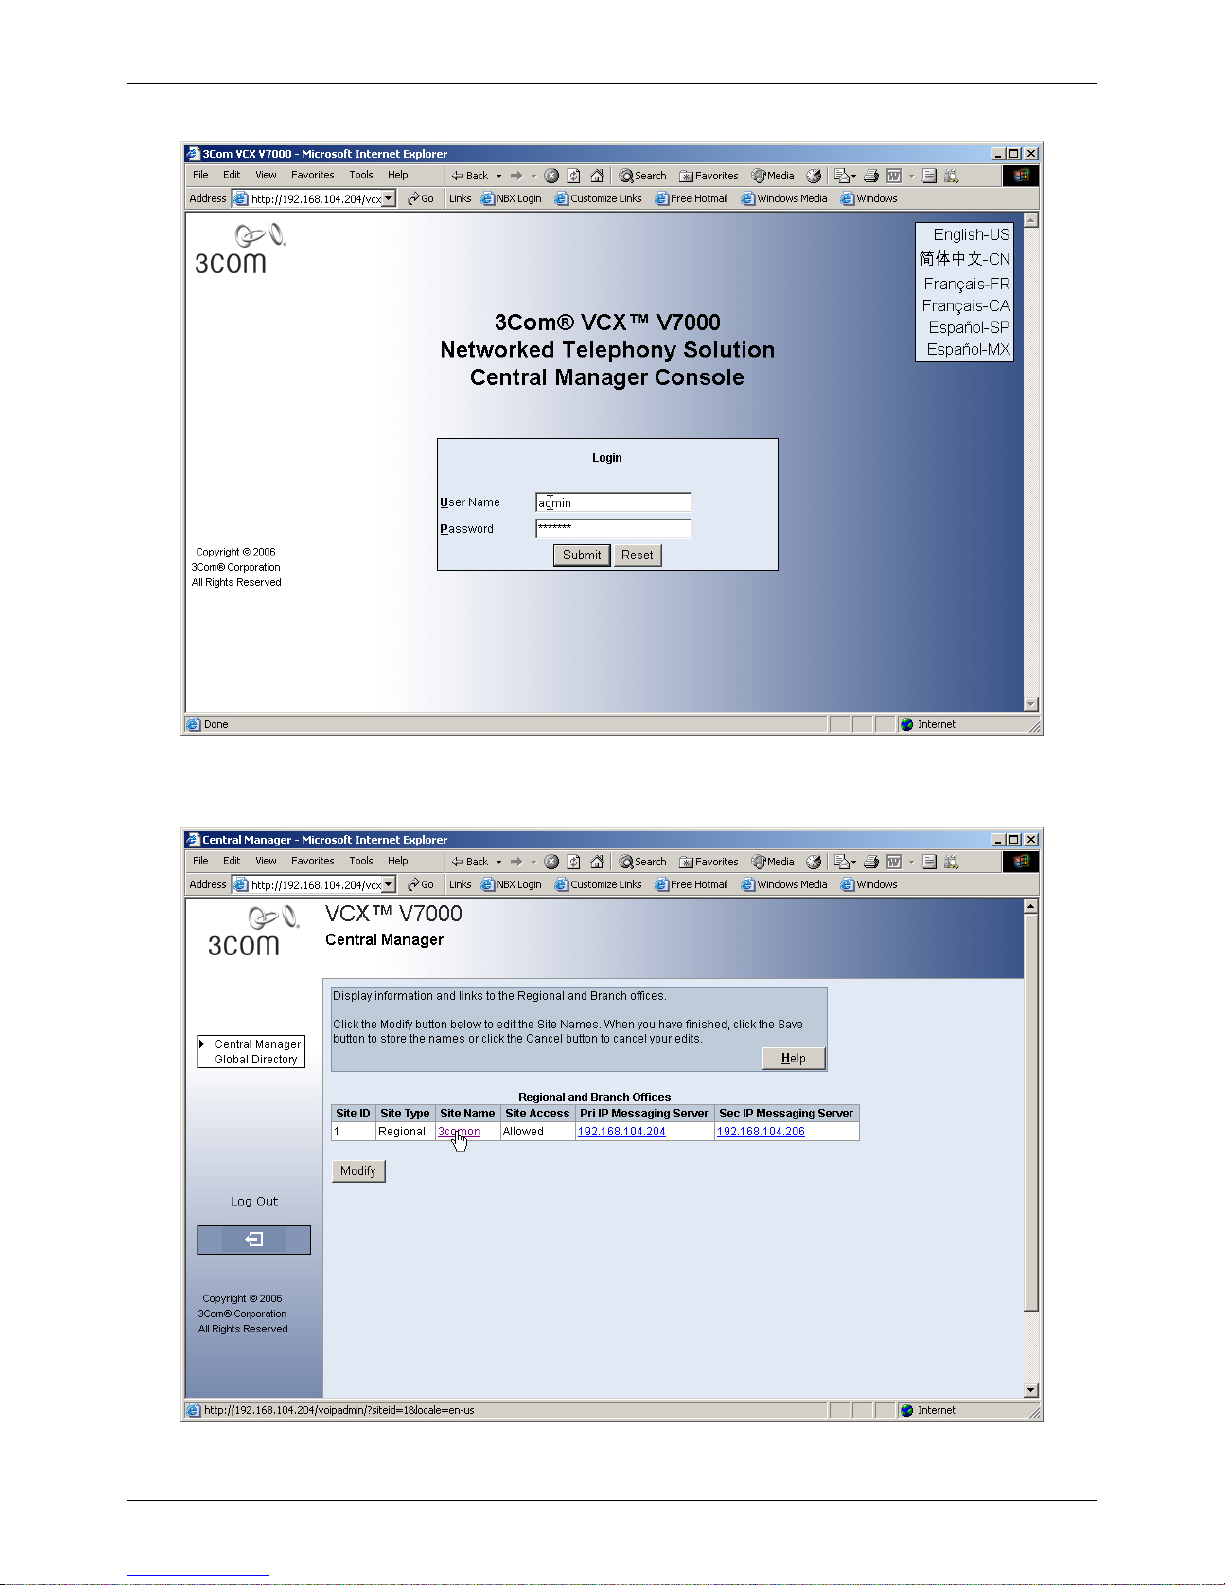
3. Login
4. Click on Site Name.
4
Page 5
MultiVOIP SS Configuration Guide: 3Com VCX PBX Systems
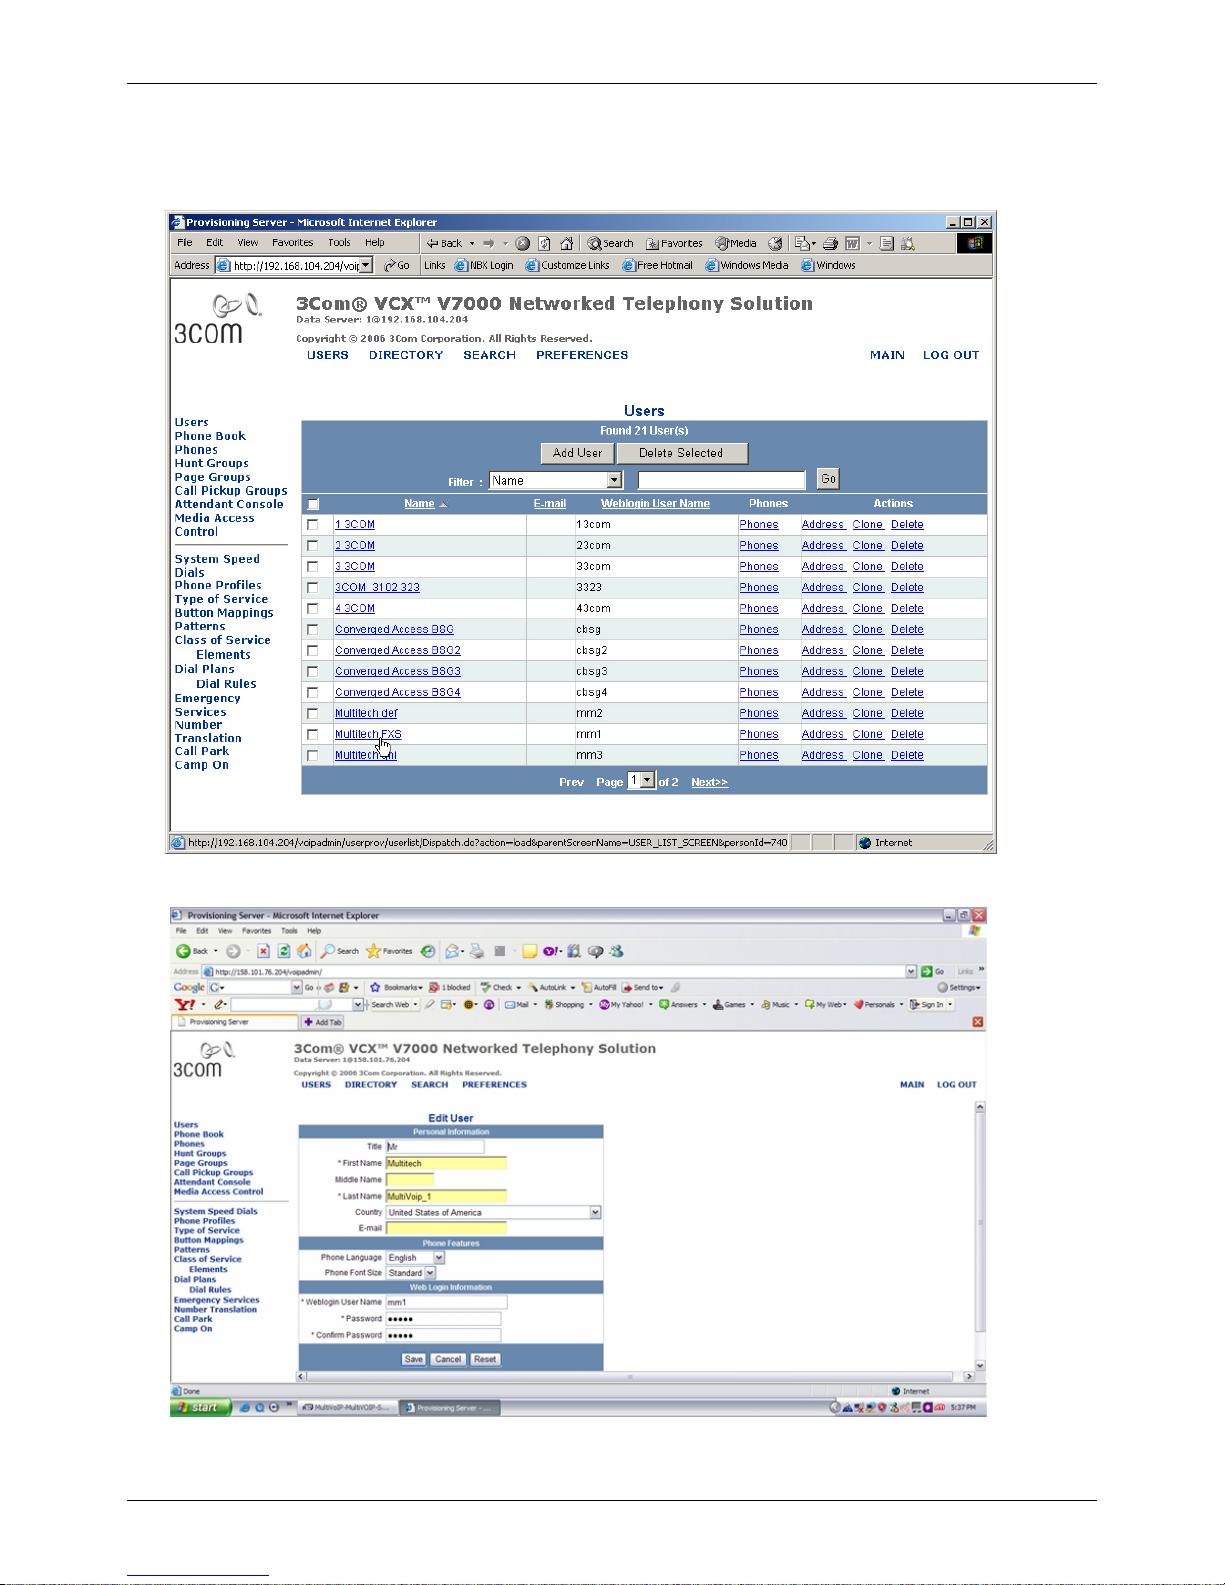
5. Click on Add User, this is for Analog Stations or FXS ports which will be analog phones or fax machines. The
password will be used later when configuring the MultiVOIP inbound phone book entry. Enter the password
and click on Save.
Repeat step 5 for each MultiVOIP FXS port and make a note of the password used for each.
5
Page 6
MultiVOIP SS Configuration Guide: 3Com VCX PBX Systems
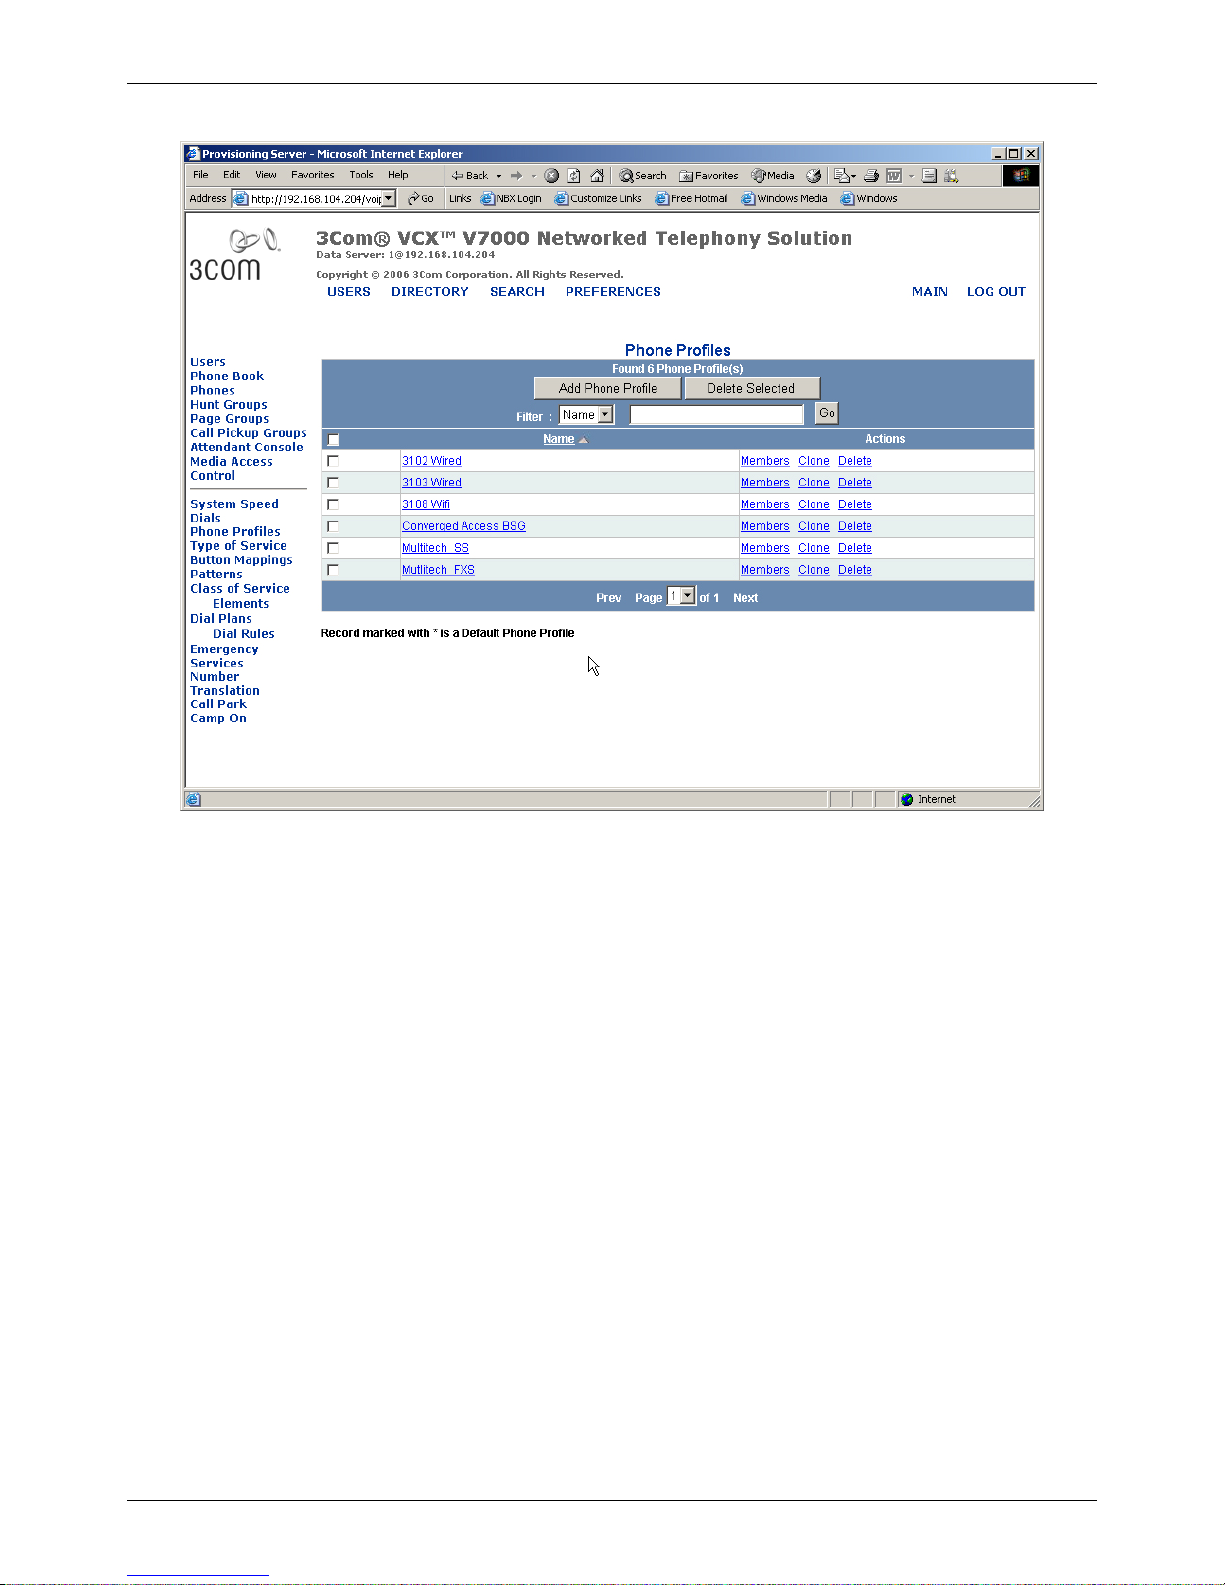
6. Click on Phone Profiles, then click on Add Phone Profile.
6
Page 7
MultiVOIP SS Configuration Guide: 3Com VCX PBX Systems
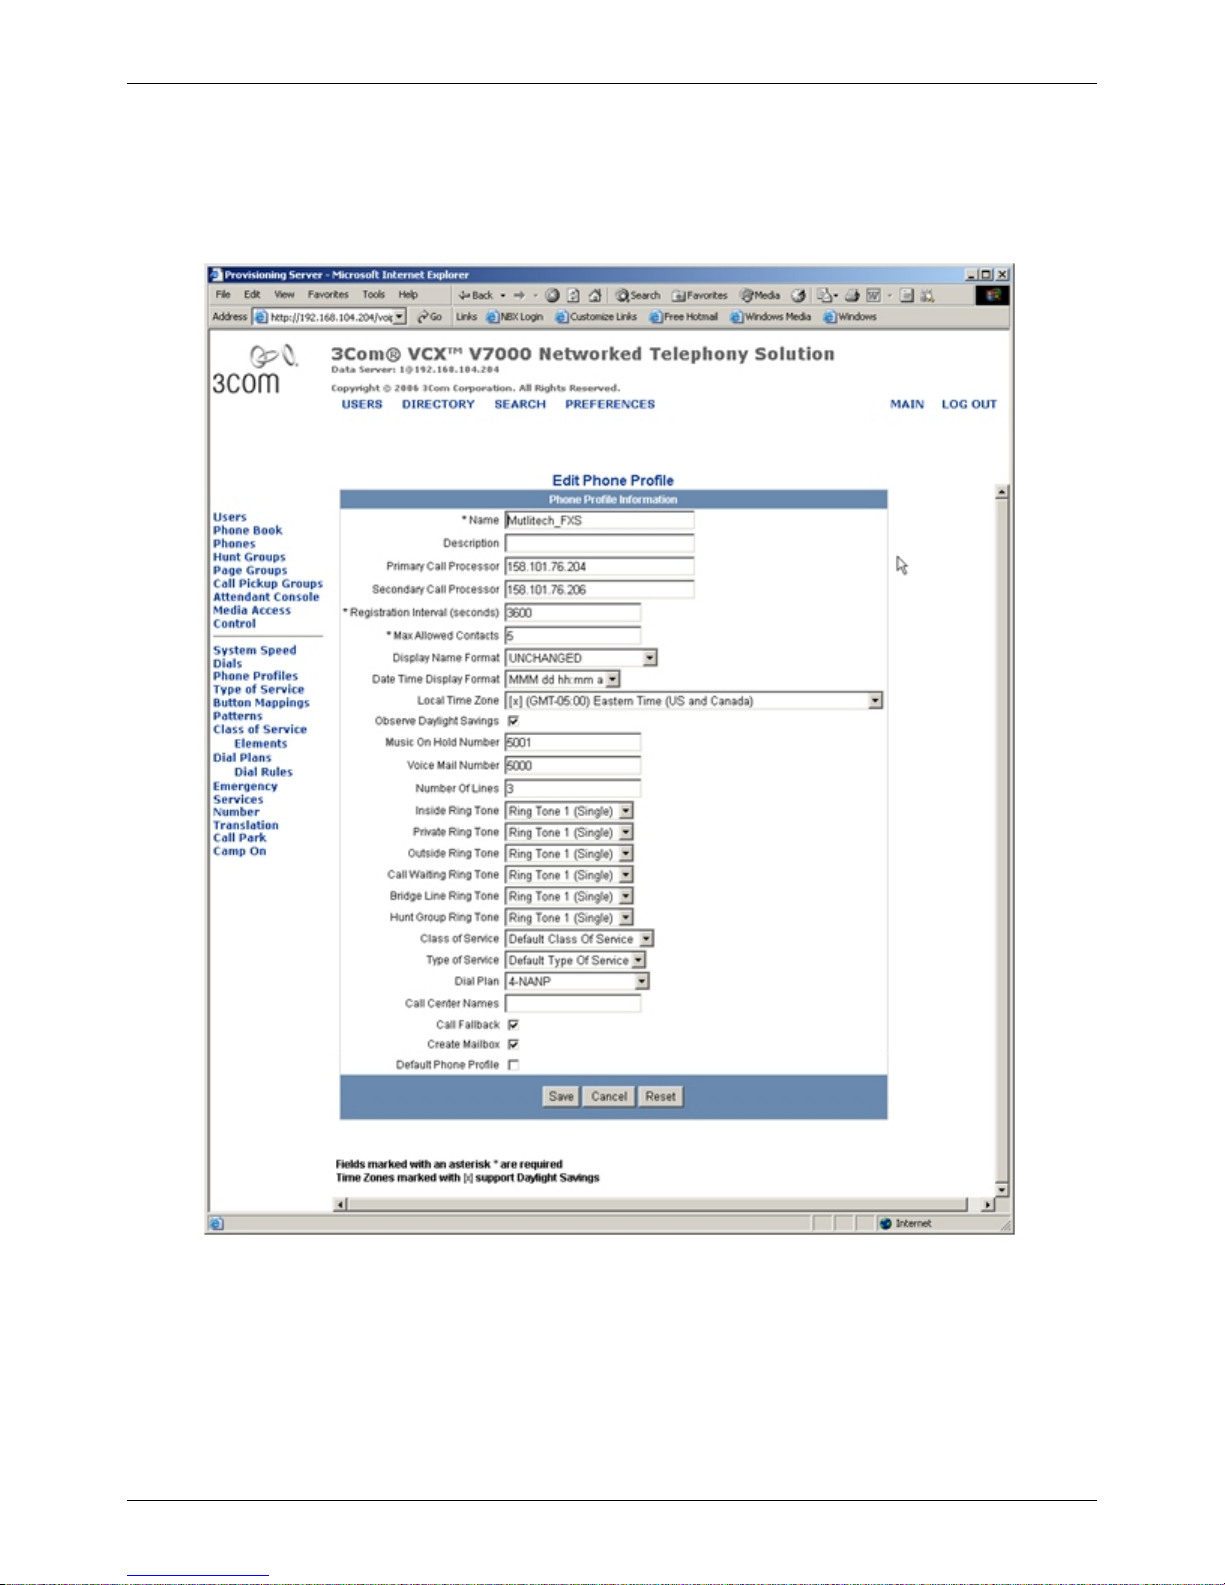
7. Enter Name, Primary Call Processor, Secondary Call Processor, Voice Mail Number, Music on Hold Number
and Dial Plan.
Dial plan should match appropriate site specifications.
Profile applies to all FXS stations and does not need to be repeated.
Click Save when finished.
7
Page 8
MultiVOIP SS Configuration Guide: 3Com VCX PBX Systems
8. Click on Phones, then click on Add Phones.
8
Page 9
MultiVOIP SS Configuration Guide: 3Com VCX PBX Systems
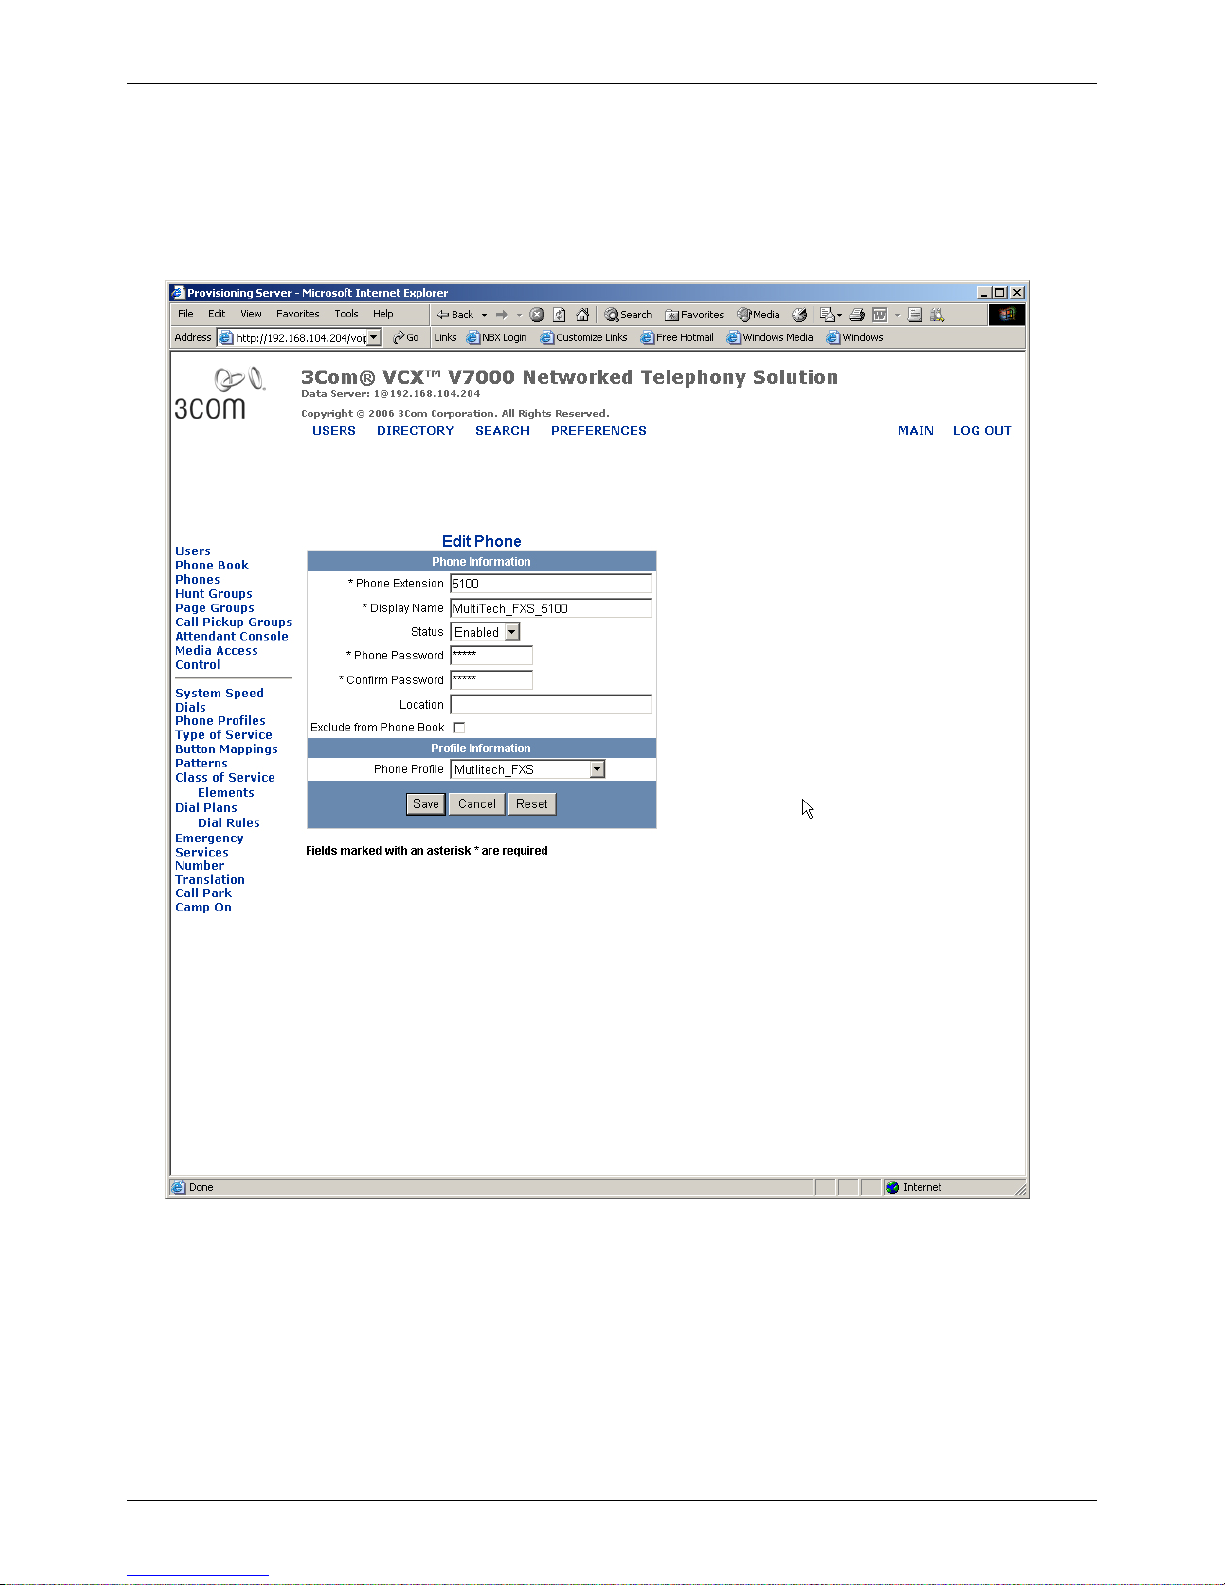
9. Enter extension which will correspond with the MultiVOIP FXS port. This number will be used when
configuring MultiVOIP inbound phone book.
Enter Display Name.
Enter Password from step 5, and Phone Profile from step 7.
Click Save when finished.
Repeat step 9 for each MultiVOIP FXS port.
9
Page 10
MultiVOIP SS Configuration Guide: 3Com VCX PBX Systems
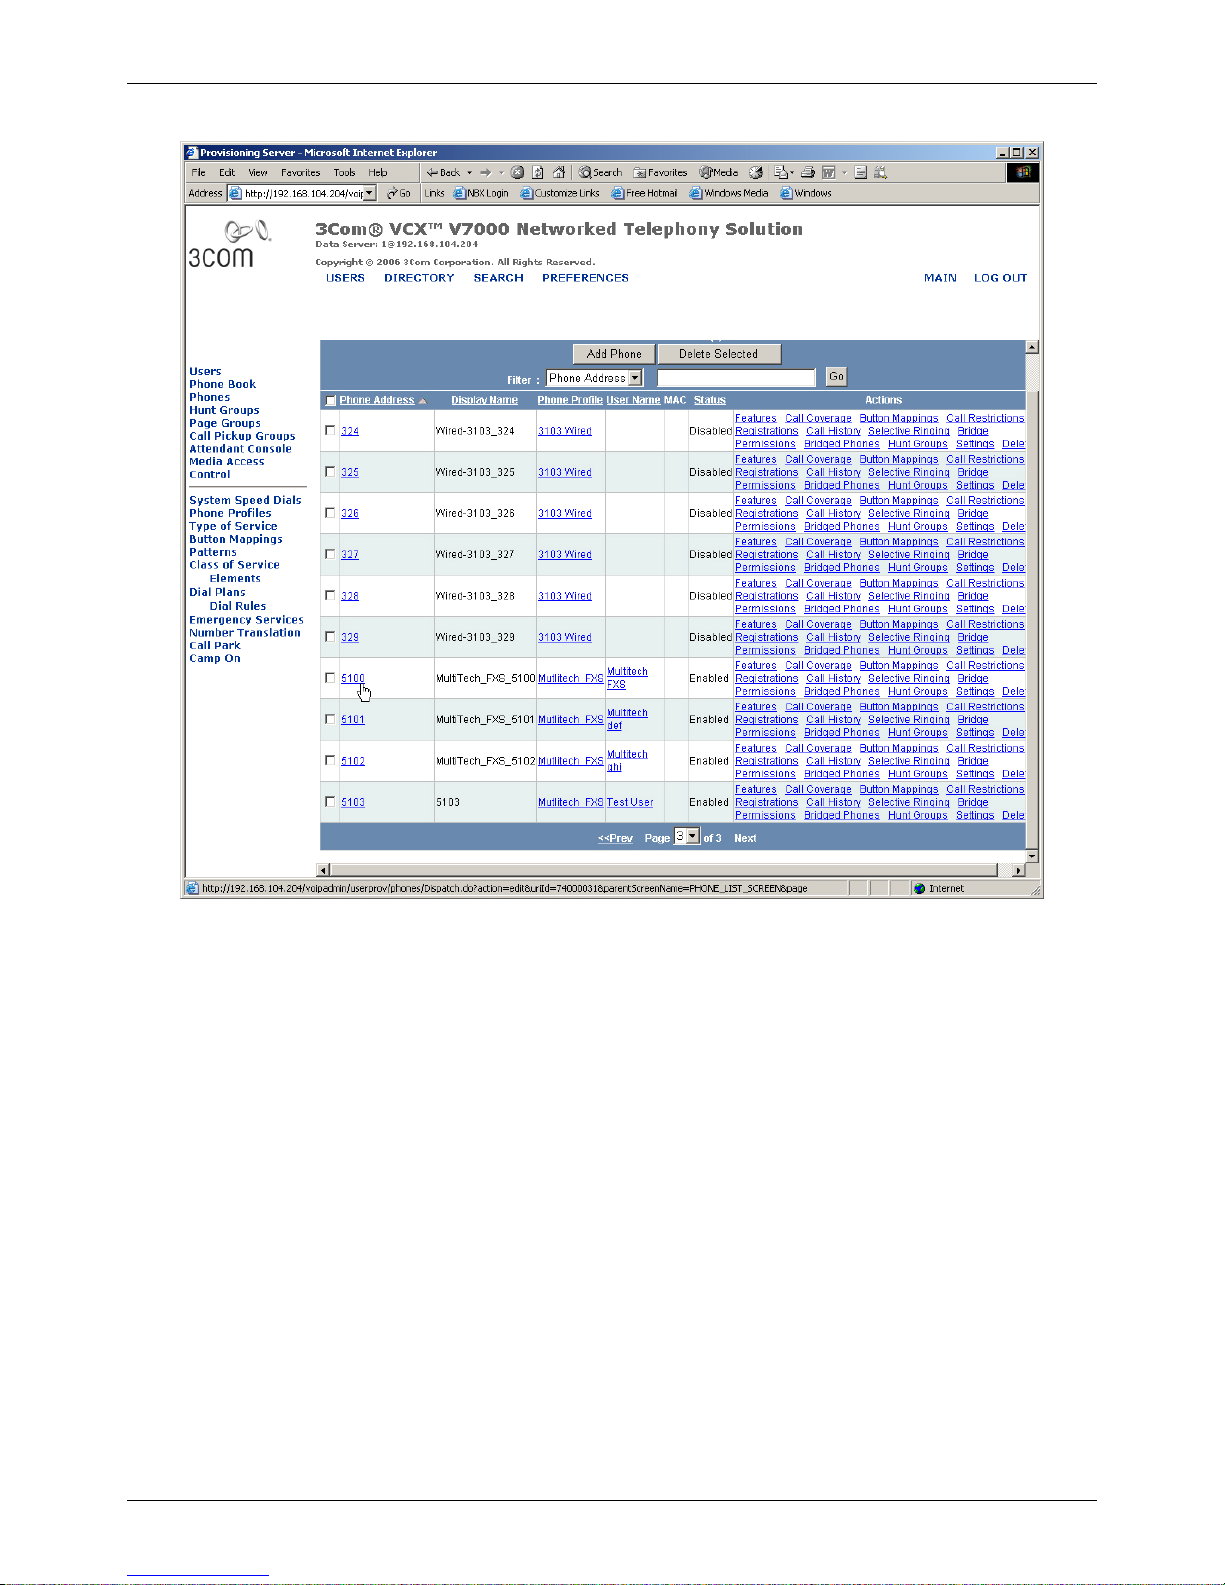
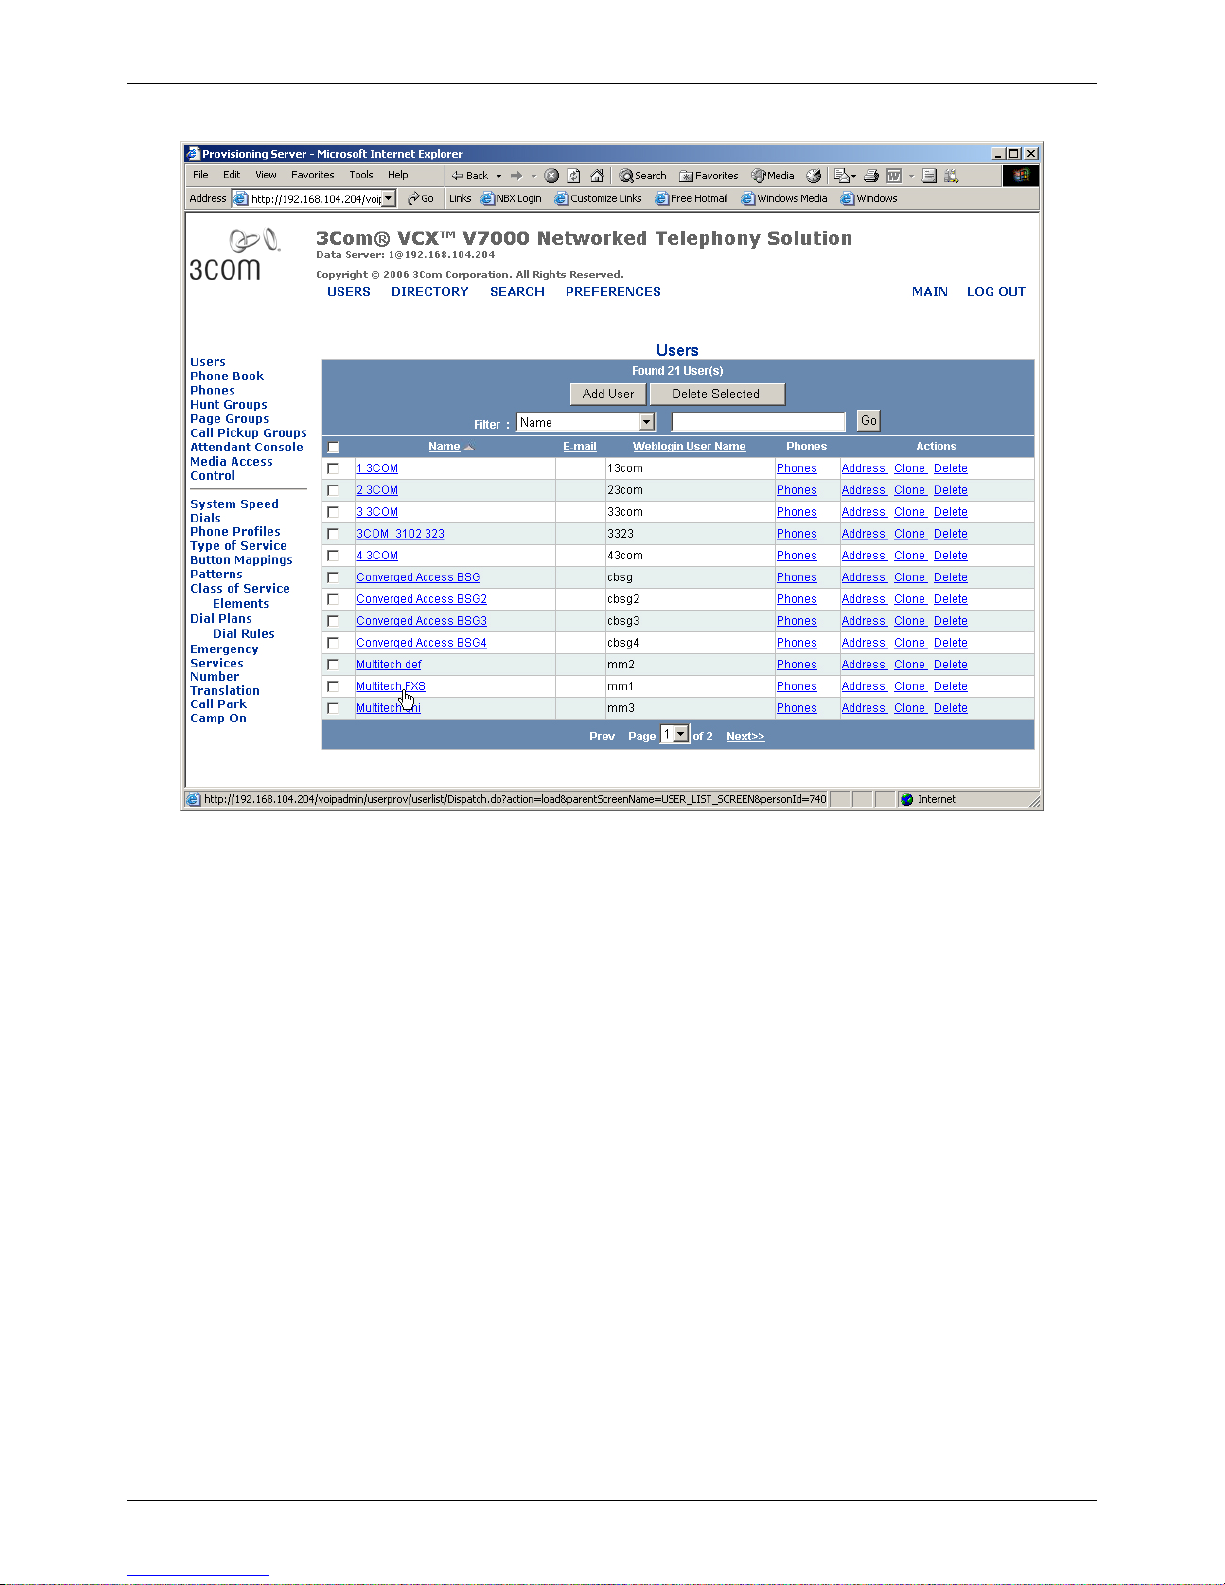
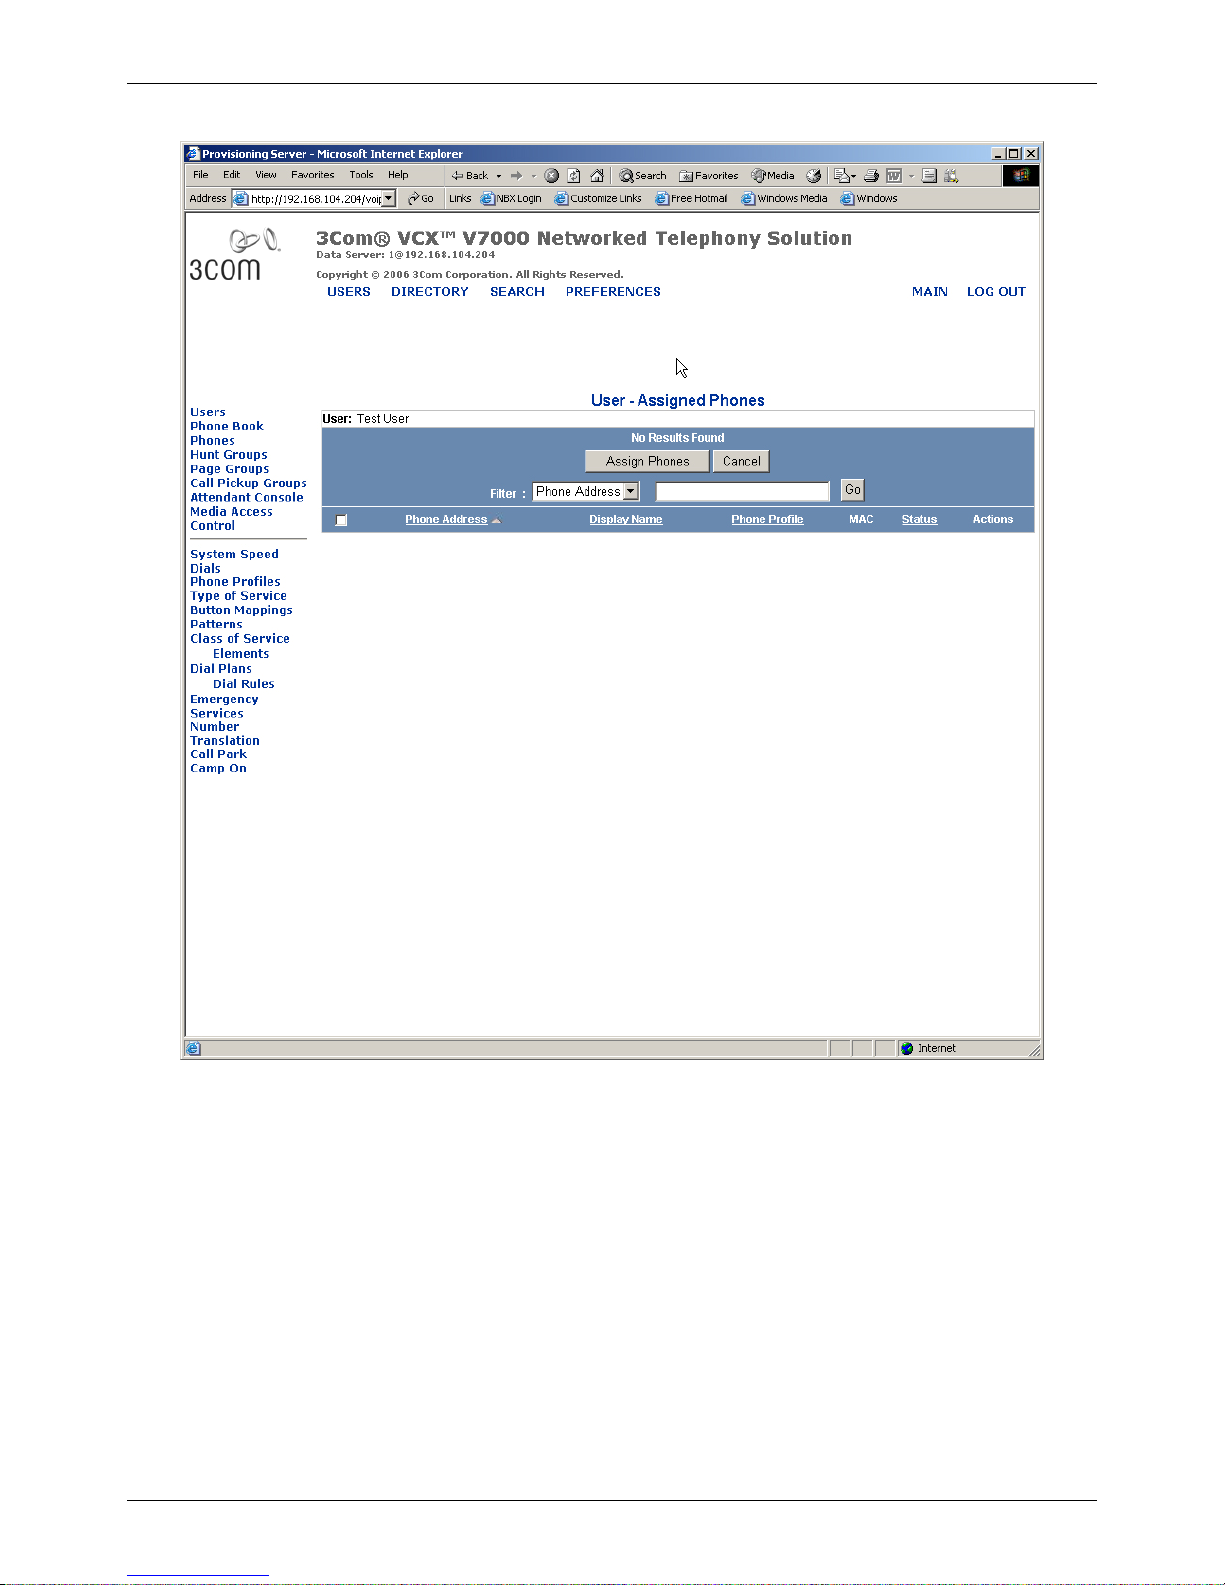
10.Click on Users and locate the users created in step 5, click on Phones in Phones column.
10
Page 11
MultiVOIP SS Configuration Guide: 3Com VCX PBX Systems
11a. Phones menu, there are no phones assigned yet, click on Assign Phones.
11
Page 12

MultiVOIP SS Configuration Guide: 3Com VCX PBX Systems
11b. Locate extension from step 9, select the user and click Assign Phones.
12. Repeat steps 11a-b for each MultiVOIP FXS port.
12
Page 13

MultiVOIP SS Configuration Guide: 3Com VCX PBX Systems
13. Click on Directory, shown is a route plan for dialing 9 to reach the Multi-Tech SIP trunk ports.
14. Click on Route Plan Wizard.
13
Page 14

MultiVOIP SS Configuration Guide: 3Com VCX PBX Systems
15. Add Route Plan Name, enter Dialed Number to be Routed, then click on Add.
14
Page 15

MultiVOIP SS Configuration Guide: 3Com VCX PBX Systems
16. Choose new route and click Next.
15
Page 16

MultiVOIP SS Configuration Guide: 3Com VCX PBX Systems
17. Click on endpoint, enter name from step 16.
Enter site id and IP address of MultiVOIP, then click Add.
16
Page 17

MultiVOIP SS Configuration Guide: 3Com VCX PBX Systems
18. Choose new endpoint and move to selected field, then click on Next.
17
Page 18

MultiVOIP SS Configuration Guide: 3Com VCX PBX Systems
19. Click on Save Changes.
18
Page 19

MultiVOIP SS Configuration Guide: 3Com VCX PBX Systems
19
Page 20

MultiVOIP SS Configuration Guide: 3Com VCX PBX Systems
20. Make MultiVOIP a trusted host.
SSH will be used to create trused host on primary and secondary call proccessors.
-bash-2.05b# cd /opt/3com/VCX/callprocessor/remoteCli/bin
-bash-2.05b# ./remoteCli –callp
remoteCli v5.0.2.3 Jul 24 2006 (DMR v1.3.2.2 Jul 24 2006)
Copyright(c) 2006
3Com Corporation
All Rights Reserved.
remoteCli connecting to 158.101.76.204:7777....
Wed Dec 13 23:36:59 2006 INFO NmPlugin
CLI apoc version 5.0.2.3 started successfully.
VCX 7210 IP CallProcessor v7.1.29.31 Aug 23 2006 (DMR v1.3.2.2 Aug 23
2006)
Copyright(c) 2006
3Com Corporation
All Rights Reserved.
> show cctrusted
cctrusted
-Index -RowStatus -TrustedAddress -Netmask
1 1 158.101.76.204 255.255.255.255
2 1 158.101.76.206 255.255.255.255
3 1 158.101.76.211 255.255.255.255
4 1 158.101.76.219 255.255.255.255
> conf cctrusted index=5 row=4 trust=158.101.76.220
netmask=255.255.255.255
cctrusted
key index = 5 Index is 5 since it’s the next free slot
row = 4
trust = 158.101.76.220
netmask = 255.255.255.255
> show cct
cct
-Index -RowStatus -TrustedAddress -Netmask
1 1 158.101.76.204 255.255.255.255
2 1 158.101.76.206 255.255.255.255
3 1 158.101.76.211 255.255.255.255
4 1 158.101.76.219 255.255.255.255
5 1 158.101.76.220 255.255.255.255
20
Page 21

MultiVOIP SS Configuration Guide: 3Com VCX PBX Systems
21. Choose IP Messaging WEB Provisioning.
22. Login and click on Create/Delete Mailboxes.
21
Page 22

MultiVOIP SS Configuration Guide: 3Com VCX PBX Systems
23. Enter MultiVOIP FXS extension number and password.
Note: Users will need to change password after accessing mail box for the first time.
This change will also be required on the MultiVOIP FXS channels under Interface,Voice Mail Password. Please
make a note of extensions and passwords for later reference.
22
Page 23

MultiVOIP SS Configuration Guide: 3Com VCX PBX Systems
MultiVOIP Upgrade
1. Connect the command cable from your computer to the MultiVOIP command port and power on the
MultiVOIP.
2. Browse to http://multitech.com/SUPPORT/Families/MultiVOIPSS/firmware.asp .
3. Download file : MVP-3COM_3.08.2w.exe
4. Run the file and it will extract to c:\mvp-3com3082w .
5. Run setup.exe
6. Click on Start, Programs, MultiVOIP-SS 3.08.2w, upgrade software.
23
Page 24

MultiVOIP SS Configuration Guide: 3Com VCX PBX Systems
7. When prompted, click on “download factory defaults.
8. When prompted, enter IP address, then click OK to continue. We will enter this in the next section.
9. The firmware will download to the MultiVOIP and when finished, the MultiVOIP GUI will close.
Verify that the boot light is off and go to next section for configuration.
24
Page 25

MultiVOIP SS Configuration Guide: 3Com VCX PBX Systems
MultiVOIP configuration
1. Connect to the MultiVOIP using the configuration software and command cable which is provided.
Once the IP address is configured and connected to the network, configuration may be done using internet explorer
with Java. The default IP address of the MultiVOIP is 192.168.3.143.
2. Click on Configuration , Ethernet / IP, enter the IP Address, IP Mask and Gateway or Local router IP.
Then click on OK.
25
Page 26

MultiVOIP SS Configuration Guide: 3Com VCX PBX Systems
3. Click on SIP Call Signaling.
Check “use SIP Proxy”
Enter Primary Proxy and Alternate Proxy along with Dialing Domain. Proxy would be your primary ipmsg call
processor and alternate if there is a secondary call processor. Dialing Domain should be the same for both primary
and alternate proxy.
Enter Primary Voice Mail Server and Secondary Voice Mail Server.
Click on OK
26
Page 27

MultiVOIP SS Configuration Guide: 3Com VCX PBX Systems
4. Click on SIP Server, Configuration.
Set operating mode to “Survivability”.
Check “Allow Undefined Registrations”.
Click OK.
27
Page 28

MultiVOIP SS Configuration Guide: 3Com VCX PBX Systems
5. Click on Phone Book, Inbound Phone Book, Add entry.
This entry is for an analog station or FXS port and will be an extension number programed on the VCX in Step 9 of
the VCX configuration section.
Enter the extension number in the Remove Prefix field.
Select the Channel associated with this extension which will be configured as FXS and have an analog phone or fax
machine connected.
Check Register with SIP Proxy, and enter the Password which was configured in Step 5 of the VCX configuration
section.
If this extension is to have voice mail, check Subscribe with Voice Mail server.
If a fax machine is connected, voice mail would be disabled.
Click OK and repeat step 5 for each FXS extension port.
28
Page 29

MultiVOIP SS Configuration Guide: 3Com VCX PBX Systems
6. Click on Phone Book, Inbound Phone Book, Add entry.
This entry is for an analog trunk or FXO port and will be a dialing pattern programmed on the VCX in Step 15 of
the VCX configuration section.
Enter the route number into the Remove Prefix field, the MultiVOIP will absorb this digit and pass the remaining
digits to the PSTN line connected to the FXO port(s). If you want to send this route digit to the PSTN line, then
you would also put it in the Add Prefix field, this is typically only required if using Centrex lines or connecting to
an analog station port on a PBX.
Select the channel which will be configured as FXO.
Click OK.
Repeat step 6 for each route pattern and FXO channel.
If your route pattern is 9 and you have two channels as FXO you will need two entries.
One entry for channel 1 and one for channel 2.
29
Page 30

MultiVOIP SS Configuration Guide: 3Com VCX PBX Systems
7. Click on Phone Book, Outbound Phone Book, Add entry.
This entry is for calls originating from the FXO or FXS ports over IP to the VCX, it could be an extension on the
VCX or route pattern on the VCX. In this case we are using a wild card or accept any number. It will be up to the
VCX to deny certain calling patterns if required. An alternative method would be to create multiple entries with
each destination pattern allowed, this would allow the MultiVOIP to control the dialing patterns.
Check “Accept Any Number”
Check “Use Proxy”
Click OK
30
Page 31

MultiVOIP SS Configuration Guide: 3Com VCX PBX Systems
8. Click on Configuration, Voice/Fax.
This example is an FXO port with a PSTN line attached.
Change Out Of Band Mode to Rfc2833.
Change Selected Coder to g711/g729.
Under Advanced Features, disable silence compression.
Set Auto Call/Off Hook Alert to Auto Call.
Enter the Phone Number which the FXO call will ring when a PSTN call rings the FXO port.
In our example, we sent calls to the auto attendant or 5002
You may send FXO incoming PSTN calls to the number of your choice.
If auto call is left at none, then the PSTN caller would get a 2
nd
dial tone from the FXO port and could dial any
number allowed on the VCX.
Click OK.
Repeat for each Channel which will be configured for FXO.
31
Page 32

MultiVOIP SS Configuration Guide: 3Com VCX PBX Systems
9. Click on Configuration, Voice/Fax.
This example is an FXS port with an analog phone or fax machine attached.
Change Out Of Band Mode to Rfc2833.
Change selected Coder to g711/g729.
Under Advanced Features, disable Silence Compression.
Click OK.
Repeat for each Channel which will be configured for FXS.
32
Page 33

MultiVOIP SS Configuration Guide: 3Com VCX PBX Systems
10. Click on Configuration, Interface.
This example is an FXO port with a PSTN line attached.
Set Interface Type to FXO
Enable Caller-ID
Click OK
Repeat for channels to be configured as FXO.
33
Page 34

MultiVOIP SS Configuration Guide: 3Com VCX PBX Systems
11. Click on Configuration, Interface.
This example is an FXS port with an analog phone or fax machine attached.
Set Interface Type to FXS Soop Start.
Enable Caller-ID.
Set Message Waiting Indication to Light if your phone has a light, or Stutter Dial Tone.
Enter the vm password configured in Step 24 of the VCX voice mail configuration section.
Note: When the extension user accesses vm for the first time this password will need to be changed.
Click OK
Repeat for channels to be configured as FXS.
34
Page 35

MultiVOIP SS Configuration Guide: 3Com VCX PBX Systems
12. Click on Configuration, Supplementary Services.
Enable Call Transfer, Call Hold, Call Waiting features, and if desired, change the sequence to activate the feature.
The sequence is what the Analog FXS phone user will dial to use each feature.
Click OK
Repeat for each FXS Channel and FXO if you want the PSTN callers to have these features.
13. Click on Save Setup, Save and Reboot.
Once the MultiVOIP is done rebooting, it will register to the VXC and you will be able to test the calling patterns
allowed.
Please refer to the MultiVOIP user guide for advanced feature descriptions.
Contact Multi-Tech Technical support with questions at 800-972-2439, option 2.
35
Page 36

MultiVOIP SS Configuration Guide: 3Com VCX PBX Systems
3COM IP phone configuration steps for survivability mode:
Set the Secondary Call Processor IP address:
1 Press the Program Button. (Upper right most button)
2 Press 5
3 Press 2
4 Enter IP address of the MultiVOIP SS
5 Press # to save
Logout the Phone
1 Press the Program Button. (Upper right most button)
2 Press 5
3 Press 6
Login the phone
1 Press the Program Button. (Upper right most button)
2 Press 5
3 Press 6
( If prompted for password supply Phone Extension Password and press #)
For more information, reference the VCX Administration Guide, Chapter 5, Configuring Telephone Communication
Settings.
36
 Loading...