

Multitech MultiVOIP MVP130-AV-FXS Quick Start Manual

Vo i ce/Fax over IP Networks
MVP130-AV-FXS
Analog Voice/IP Gateway
Quick Start Guide

Quick Start Guide
MultiVOIP MVP130-AV-FXS
S000355A, Revision A
This publication may not be reproduced, in whole or in part, without
prior expressed written permission from Multi-Tech Systems, Inc. All
rights reserved.
Copyright © 2004, by Multi-Tech Systems, Inc.
Multi-Tech Systems, Inc. makes no representations or warranties with
respect to the contents hereof and specifically disclaims any implied
warranties of merchantability or fitness for any particular purpose.
Furthermore, Multi-Tech Systems, Inc. reserves the right to revise this
publication and to make changes from time to time in the content
hereof without obligation of Multi-Tech Systems, Inc. to notify any
person or organization of such revisions or changes.
Record of Revisions
Revision Description
A Initial Release
(07/22/04)
Trademark
Trademark of Multi-Tech Systems, Inc. is the Multi-Tech
logo. Windows and NetMeeting are registered
trademarks of Microsoft.
Multi-Tech Systems, Inc.
2205 Woodale Drive
Mounds View, Minnesota 55112
(763) 785-3500 or (800) 328-9717
U.S. Fax: 763-785-9874
Technical Support: (800) 972-2439
http://www.multitech.com
MultiVOIP Quick Start Guide

CONTENTS
QUICK START GUIDE............................................................1
NTRODUCTION ........................................................................4
I
SAFETY WARNINGS..................................................................4
Lithium Battery Caution......................................................4
Safety Warnings Telecom ....................................................5
M
ULTIVOIP STARTUP TASKS..................................................6
Phone/IP Details *Required* Before Installation...............8
Gather IP Information ...............................................................8
Gather Telephone Information ..................................................9
Obtain Email Address for VOIP (Optional)............................10
Identify Remote VOIP Site to Call..........................................11
Identify VOIP Protocol to be Used .........................................11
Placement..........................................................................12
Command/Control Computer Setup (Specs & Settings)....12
Load MultiVOIP Control Software onto PC .....................14
Phone/IP Starter Configuration ........................................15
Phonebook Starter Configuration (with remote voip).......22
Outbound Phonebook..............................................................23
Inbound Phonebook ................................................................33
Phonebook Tips.................................................................40
Phonebook Example..........................................................47
Connectivity Test ...............................................................54
Troubleshooting ................................................................60
3 MultiVOIP Quick Start Guide

Safety Warnings
Introduction
This manual will get your MultiVOIP up and running
quickly. For more details, see the MultiVOIP User Guide.
Safety W arnings
Lithium Battery Caution
A lithium battery on the voice/fax channel board provides
backup power for the timekeeping capability. The battery
has an estimated life expectancy of ten years.
When the battery starts to weaken, the date and time may
be incorrect. If the battery fails, the board must be sent
back to Multi-Tech Systems for battery replacement.
Warning: There is danger of explosion if the battery is
incorrectly replaced.
MultiVOIP Quick Start Guide 4

Safety Warnings
Safety W arnings Telecom
1. Never install telephone wiring during a lightning
storm.
2. Never install a telephone jack in wet locations unless
the jack is specifically designed for wet locations.
3. This product is to be used with UL and cUL listed
computers.
4. Never touch uninsulated telephone wires or terminals
unless the telephone line has been disconnected at the
network interface.
5. Use caution when installing or modifying telephone
lines.
6. Avoid using a telephone (other than a cordless type)
during an electrical storm. There may be a remote risk
of electrical shock from lightning.
7. Do not use a telephone in the vicinity of a gas leak.
8. To reduce the risk of fire, use only 26 AWG or larger
telecommunication line cord.
5 MultiVOIP Quick Start Guide

MultiVOIP Startup Tasks
Task Summary
Startup Tasks
● Collecting
Phone/IP Details
( vital! )
The MultiVOIP must be
configured to interface with your
particular phone system and IP
network. To do so, certain
details must be known about
those phone and IP systems.
● Placement Decide where you’ll mount the
voip.
● Command/Control
Computer Setup:
Specs & Settings
Some modest minimum
specifications must be met. A
COM port must be set up.
● Hookup Connect power, phone, and data
cables per diagram.
● Software
Installation
MultiVOIP Quick Start Guide 6
This is the configuration
program.
It’s a standard Windows
software installation.

Gathering Phone/IP Details
Startup Task Summary
● Phone/IP Starter
Configuration
● Phonebook
Starter
Configuration
You will enter phone numbers
and IP addresses. You’ll use
default parameter values where
possible to get the system
running quickly.
The phonebook is where you
specify how calls will be routed.
To get the system running
quickly, you’ll make phonebooks
for just two voip sites.
● Connectivity Test You’ll find out if your voip
system can carry phone calls
between two sites. That means
you’re up and running!
● Troubleshooting Detect and remedy any problems
that might have prevented
connectivity.
7 MultiVOIP Quick Start Guide

Gathering Phone/IP Details
Phone/IP Details *Required*
Before Installation
The MultiVOIP will interface with both the IP network
and the phone system. You must gather information
about the IP network and about the phone system so that
the MultiVOIP can be configured to operate with them
properly.
Gather IP Information
Ask your computer network administrator.
➼
IP Network Parameters:
#
• IP Address
• IP Mask
• Gateway
• Domain Name Server (DNS) Info
(not implemented; for future use)
Record for each VOIP Site
in System
MultiVOIP Quick Start Guide 8

Gathering Phone/IP Details
Phone/IP Details *Absolutely Needed*
Gather T elephone Information
Analog Phone Parameters
➼
Ask phone company or
telecom manager.
Analog Telephony Interface Parameters:
#
• Interface type (or “signaling”) used? FXS
• Determine whether the line will be used for a
phone, fax, or KTS (key telephone system)
Record for this VOIP Site
9 MultiVOIP Quick Start Guide
Gathering Phone/IP Details
Obtain Email Address for VOIP (Optional)
required if log reports of
VOIP call traffic are to be
sent by email
SMTP Parameters
Preparation Task:
Ask Mail Server
administrator to set up
email account (with
password) for the
MultiVOIP unit itself. Be
sure to give a unique
identifier to each individual
MultiVOIP unit.
Get the IP address of the
mail server computer, as
well.
Optional
To: I.T. Department
re: email account for VOIP
voip-unit2@biggytech.com
MultiVOIP Quick Start Guide 10

VOIP Protocol & Site to Call
Identify Remote VOIP Site to Call
When you’re done installing the MultiVOIP, you’ll want
to confirm that it is configured and operating properly. To
do so, it’s good to have another voip that you can call for
testing purposes. You’ll want to confirm end-to-end
connectivity. You’ll need IP and telephone information
about that remote site.
If this is the very first voip in the system, you’ll want to
coordinate the installation of this MultiVOIP with an
installation of another unit at a remote site.
Identify VOIP Protocol to be Used
Will you use H.323, SIP, or SPP? Each has advantages and
disadvantages. Although it is possible to mix protocols in
a single VOIP system, it is highly desirable to use the
same VOIP protocol for all VOIP units in the system. SPP
is a non-standard protocol developed by Multi-Tech. SPP
is not compatible with the “Proprietary” protocol used in
Multi-Tech’s earlier generation of voip gateways.
11 MultiVOIP Quick Start Guide

VOIP Placement
Placement
Mount your MultiVOIP in a safe and convenient location
where cables for your network and phone system are
accessible. Detailed instructions for unpacking and
cabling the MVP130 are in Chapter 3: Mechanical Installation
& Cabling of the User Guide.
Command/Control Computer Setup
(Specs & Settings)
The computer used for command and control of the
MultiVOIP
(a) must be an IBM-compatible PC,
(b) must use a Microsoft operating system,
(c) must have an available serial COM port.
The configuration tasks and control tasks the PC will have
to do with the MultiVOIP are not especially demanding.
Still, we recommend using a reasonably new computer.
The computer that you use to configure your MultiVOIP
need not be dedicated to the MultiVOIP after installation
is complete.
COM port on controller PC. You’ll need an available
COM port on the controller PC. You’ll need to know
which COM port is available for use with the MultiVOIP
(COM1, COM2, etc.).
MultiVOIP Quick Start Guide 12
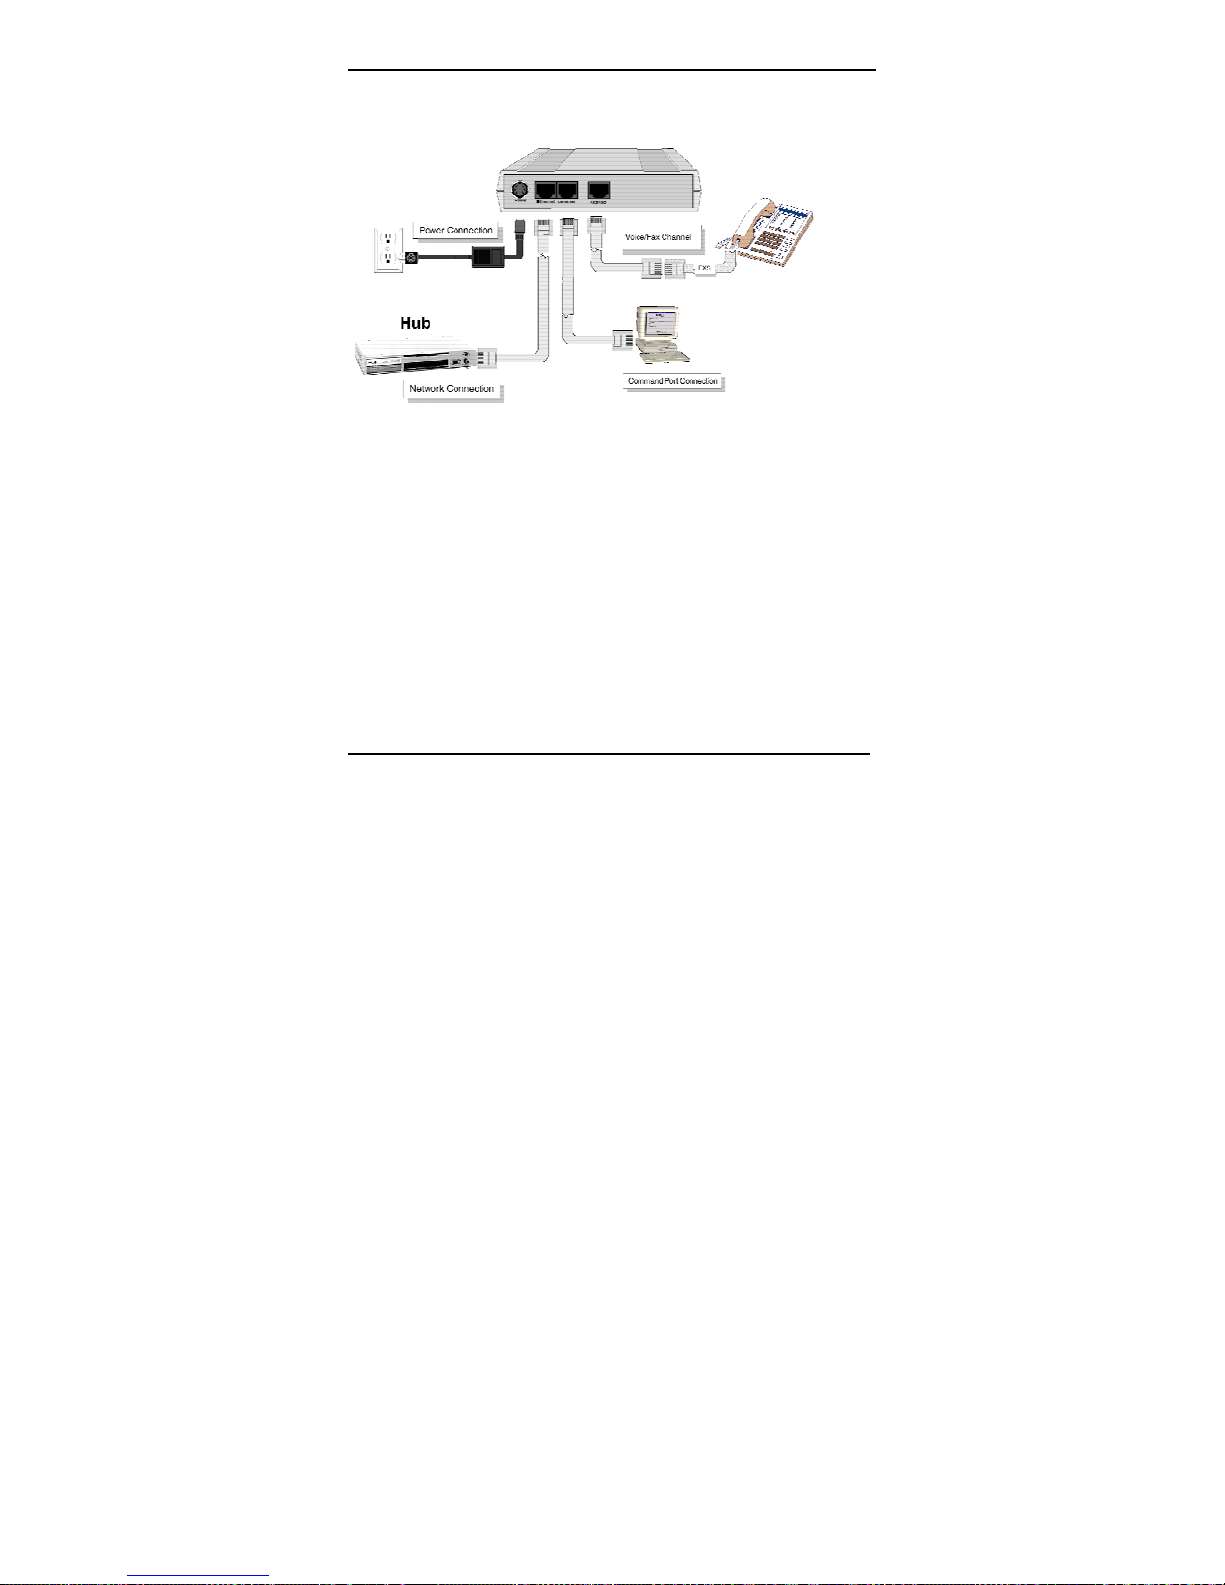
Quick Hookup
Hookup for MVP130
13 MultiVOIP Quick Start Guide

Software Installation
Load MultiV OIP Control Software onto PC
For more details, see Chapter 4: Software Installation in User
Guide.
1. MultiVOIP must be properly cabled. Power must
be turned on.
2. Insert MultiVOIP CD into drive. Allow 10-20
seconds for Autorun to start. If Autorun fails, go to
My Computer |CD ROM drive |Open. Click
Autorun icon.
3. At first dialog box, click Install Software.
4. At ‘welcome’ screen, click Next.
5. Follow on-screen instructions. Accept default
program folder location and click Next.
6. Accept default icon folder location. Click Next.
Files will be copied.
7. Select available COM port on command/control
computer.
8. At completion screen, click Finish.
9. At the prompt “Do you want to run MultiVOIP
Configuration?,” click No. Software installation is
complete.
MultiVOIP Quick Start Guide 14

Phone/IP Starter Config.
Phone/IP Starter Configuration
For full details, see
Chapter 6: Technical Configuration for
Analog/BRI MultiVOIPs in User Guide
1. Open MultiVOIP program: Start |MultiVOIP xxx |
Configuration.
2. Go to Configuration | IP. Enter the IP parameters
for your voip site.
3. Do you want to configure and operate the
MultiVOIP unit using the web browser GUI? (It has
the same functionality as the local Windows GUI,
but offers remote access.)
If NO, skip to step 5.
If YES, continue with step 4.
15 MultiVOIP Quick Start Guide

Phone/IP Starter Config.
4. Enable Web Browser GUI (Optional). To do
configuration and operation procedures using the
web browser GUI, you must first enable it. To do so,
follow these steps. (Browser must be Internet
Explorer 6.0 or above; or Netscape 6.0 or above.)
A. Be sure an IP
address has been
assigned to the
MultiVOIP unit
(this must be done
in the MultiVOIP
Windows GUI).
C. Close the
MultiVOIP
Windows GUI.
E. Open web browser.
(Note: The PC being used must be connected to and
have an IP address on the same IP network that the
voip is on.)
MultiVOIP Quick Start Guide 16
B. Save Setup in Windows
GUI.
D. Install Java program from
MultiVOIP product CD.
(Must be Java Runtime
Environment 1.4.0_01 or
above.)
NOTE: Required on first
use of Web Browser GUI
only.

Phone/IP Starter Config.
4. (cont’d) Enable Web Browser GUI (Optional)
F. Browse to IP address of
MultiVOIP unit.
H. Use web browser GUI to configure or operate voip.
Need more
See “Web Browser Interface” in
info?
G. If username and
password have been
established, enter
them when
prompted by voip.
Operation & Maintenance
chapter of
User Guide
(on CD).
Once you’ve begun using the web browser GUI, you
can go back to the MultiVOIP Windows GUI at any
time. However, you must log out of the web
browser GUI before using the MultiVOIP Windows
GUI.
17 MultiVOIP Quick Start Guide

Phone/IP Starter Config.
Phone/IP Starter Configuration (continued)
5. Go to Configuration | Voice/Fax. Select Coder |
“Automatic.” At the right-hand side of the dialog
box, click OK. If you know any specific parameter
values that will apply to your system, enter them.
Click OK to exit from the dialog box.
6. Enter telephone system information.
Go to Configuration | Interface. Enter parameters
obtained from phone company or PBX
administrator.
7.
Go to Configuration | Regional Parameters. Select the
Country/Region that fits your situation. Click OK and
confirm. Click OK to exit from the dialog box.
8. Do you want the phone-call logs produced by the
MultiVOIP to be sent out by email (to your Voip
Administrator or someone else)?
If NO, skip to step 10.
If YES, continue with step 9.
9. Go to Configuration | SMTP.
SMTP lets you send phone-call log records to the
Voip Administrator by email. Select Enable SMTP.
You should have already obtained an email address
for the MultiVOIP itself (this serves as the
origination email account for email logs that the
MultiVOIP can email out automatically).
MultiVOIP Quick Start Guide 18

Phone/IP Starter Config.
Enter this email address in the “Login Name” field.
Type the password for this email account.
Enter the IP address of the email server where the
MultiVOIP’s email account is located in the “Mail
Server IP Address” field.
Typically the email log reports are sent to the Voip
Administrator but they can be sent to any email
address. Decide where you want the email logs sent
and enter that email address in the “Recipient
Address” field.
Whenever email log messages are sent out, they
must have a standard Subject line. Something like
“Phone Logs for Voip N” is useful. If you have
more than one MultiVoip unit in the building, you’ll
need a unique identifier for each one (select a useful
name or number for “N”). In this “Subject” field,
enter a useful subject title for the log messages.
In the “Reply-To Address” field, enter the email
address of your Voip Administrator.
19 MultiVOIP Quick Start Guide
 Loading...