

Page 1

MultiVOIP®
Voice/Fax over IP Gateways
MVP130
MVP130-FXS
User Guide
Page 2

User Guide
S000386C
Analog MultiVOIP Units (Models MVP130)
(Models MVP130-FXS)
This publication may not be reproduced, in whole or in part, without prior expressed written permission from MultiTech Systems, Inc. All rights reserv ed.
Copyright © 2008, by Multi-Tech Systems, Inc.
Multi-Tech Systems, Inc. makes no representations or warranty with respect to the contents hereof and
specifically disclaims any implied warranties of merchantability or fitness for any particular purpose. Furthermore,
Multi-Tech Systems, Inc. reserves the right to revise this publication and to make changes from time to time in the
content hereof without obligation of Multi-Tech Systems, Inc. to notify any person or organization of such revisions
or changes. Check Multi-Tech’s Web site for current versions of our product documentation.
Record of Revisions
Revision Date Description
A 09/26/05 Doc re-organization. Follows S000249K. Describes 1.08 software release.
B 04/25/07 Update tech support contact list & revise warranty.
C 02/08/08 Format revision and software version 1.11 update.
Patents
This Product is covered by one or more of the following U.S. Patent Numbers: 6151333, 5757801, 5682386,
5.301.274; 5.309.562; 5.355.365; 5.355.653; 5.452.289; 5.453.986. Other Patents Pending.
Trademark
Registered trademarks of Multi-Tech Systems, Inc. are MultiVOIP, Multi-Tech, and the Multi-Tech logo. Windows
and NetMeeting are registered trademarks of Microsoft.
World Headquarters
Multi-Tech Systems, Inc.
2205 Woodale Drive
Mounds View, Minnesota 55112
Phone: 763-785-3500 or 800-328-9717
Fax: 763-785-9874
http://www.multitech.com
Technical Support
Country By Email By Phone
Europe, Middle East, Africa: support@multitech.co.uk (44) 118 959 7774
U.S., Canada, all others: support@multitech.com
(800) 972-2439 or (763) 717-5863
Multi-Tech Systems, Inc. 2
Page 3

CONTENTS
Chapter 1 – Description and Specifications...................................................................................................... 6
Introduction............................................................................................................................................................6
Interface............................................................................................................................................................................6
Front Panel LEDs .............................................................................................................................................................7
Computer Requirements.......................................................................................................................................7
Specifications ........................................................................................................................................................7
Chapter 2 – Installing and Cabling the MultiVOIP............................................................................................. 8
Introduction............................................................................................................................................................8
Safety Warnings....................................................................................................................................................8
Unpacking Your MultiVOIP....................................................................................................................................8
Cabling Procedure for MVP130.............................................................................................................................9
Chapter 3 – Software Installation...................................................................................................................... 10
Introduction..........................................................................................................................................................10
Loading MultiVOIP Software onto the PC...........................................................................................................10
Setup Overview...................................................................................................................................................13
Ethernet/IP......................................................................................................................................................................14
Voice/Fax........................................................................................................................................................................15
Interface..........................................................................................................................................................................17
Call Signaling..................................................................................................................................................................19
Regional..........................................................................................................................................................................21
Phone Book....................................................................................................................................................................22
Save & Reboot................................................................................................................................................................23
Chapter 4 – Configuring Your MultiVOIP......................................................................................................... 24
Introduction..........................................................................................................................................................24
Software Categories Covered in This Chapter....................................................................................................24
How to Navigate Through the Software ..............................................................................................................25
Web Browser Interface........................................................................................................................................25
Configuration Information Checklist ....................................................................................................................25
Ethernet/IP......................................................................................................................................................................26
Voice/Fax........................................................................................................................................................................29
Configurable Payload Type.......................................................................................................................................33
Interface..........................................................................................................................................................................34
FXS Loop Start Parameters......................................................................................................................................35
Message Waiting.......................................................................................................................................................37
FXO Parameters.......................................................................................................................................................38
DID Parameters ........................................................................................................................................................43
Call Signaling..................................................................................................................................................................44
H.323 ........................................................................................................................................................................44
SIP............................................................................................................................................................................46
SPP...........................................................................................................................................................................48
SNMP .............................................................................................................................................................................50
Regional..........................................................................................................................................................................51
SMTP..............................................................................................................................................................................54
RADIUS..........................................................................................................................................................................57
Logs/Traces....................................................................................................................................................................59
NAT Traversal.................................................................................................................................................................60
Multi-Tech Systems, Inc. 3
Page 4

Supplementary Services.................................................................................................................................................61
Save Settings..................................................................................................................................................................64
Save & Reboot..........................................................................................................................................................64
Connection......................................................................................................................................................................64
Settings.....................................................................................................................................................................64
Troubleshooting Software Issues..............................................................................................................................65
Chapter 5 – Phone Book Configuration........................................................................................................... 66
Introduction..........................................................................................................................................................66
Identify Remote VOIP Site to Call.......................................................................................................................66
Identify VOIP Protocol to be Used.......................................................................................................................66
Phonebook Starter Configuration........................................................................................................................67
Outbound Phonebook.....................................................................................................................................................67
Inbound Phonebook........................................................................................................................................................69
Phone Book Descriptions....................................................................................................................................70
Outbound Phone Book/List Entries.................................................................................................................................70
Add/Edit Outbound Phone Book ...............................................................................................................................71
Inbound Phone Book/List Entries....................................................................................................................................75
Add/Edit Inbound Phone Book..................................................................................................................................76
Phone Book Save and Reboot........................................................................................................................................78
Phonebook Examples .........................................................................................................................................79
North America.................................................................................................................................................................79
Europe............................................................................................................................................................................82
Variations of Caller ID .........................................................................................................................................88
Chapter 6 – Using the Software........................................................................................................................ 91
Introduction..........................................................................................................................................................91
Software Categories Covered in This Chapter....................................................................................................91
Statistics Section.................................................................................................................................................93
Call Progress..................................................................................................................................................................93
Logs................................................................................................................................................................................95
IP Statistics.....................................................................................................................................................................97
Link Management ...........................................................................................................................................................99
Registered Gateway Details .........................................................................................................................................100
Servers .........................................................................................................................................................................101
H.323 GateKeepers ................................................................................................................................................101
SIP Proxies .............................................................................................................................................................102
SPP Registrars........................................................................................................................................................103
Advanced......................................................................................................................................................................104
Packetization Time..................................................................................................................................................104
MultiVOIP Program Menu Items........................................................................................................................105
Updating Firmware .......................................................................................................................................................106
Implementing a Software Upgrade ...............................................................................................................................107
Identifying Current Firmware Version......................................................................................................................107
Downloading Firmware ...........................................................................................................................................108
Downloading Factory Defaults ................................................................................................................................109
Downloading IFM Firmware..........................................................................................................................................110
Setting and Downloading User Defaults .......................................................................................................................112
Setting a Password.......................................................................................................................................................113
Windows Interface...................................................................................................................................................113
Web Browser Interface............................................................................................................................................114
Multi-Tech Systems, Inc. 4
Page 5

Upgrading Software......................................................................................................................................................115
FTP Server File Transfers (“Downloads”) .........................................................................................................116
Web Browser Interface......................................................................................................................................121
SysLog Server Functions..................................................................................................................................123
Appendix A – Cable Pin-outs.......................................................................................................................... 124
Appendix B – TCP/UDP Port Assignments.................................................................................................... 125
Appendix C – Warranty and Repair Policies ................................................................................................. 126
Appendix D – Regulatory Information............................................................................................................ 128
Appendix E – Waste Electrical and Electronic Equipment (WEEE) Statement.......................................... 130
Appendix F – C-ROHS HT/TS Substance Concentration............................................................................. 131
Multi-Tech Systems, Inc. 5
Page 6
Chapter 1 – Description and
Specifications
Introduction
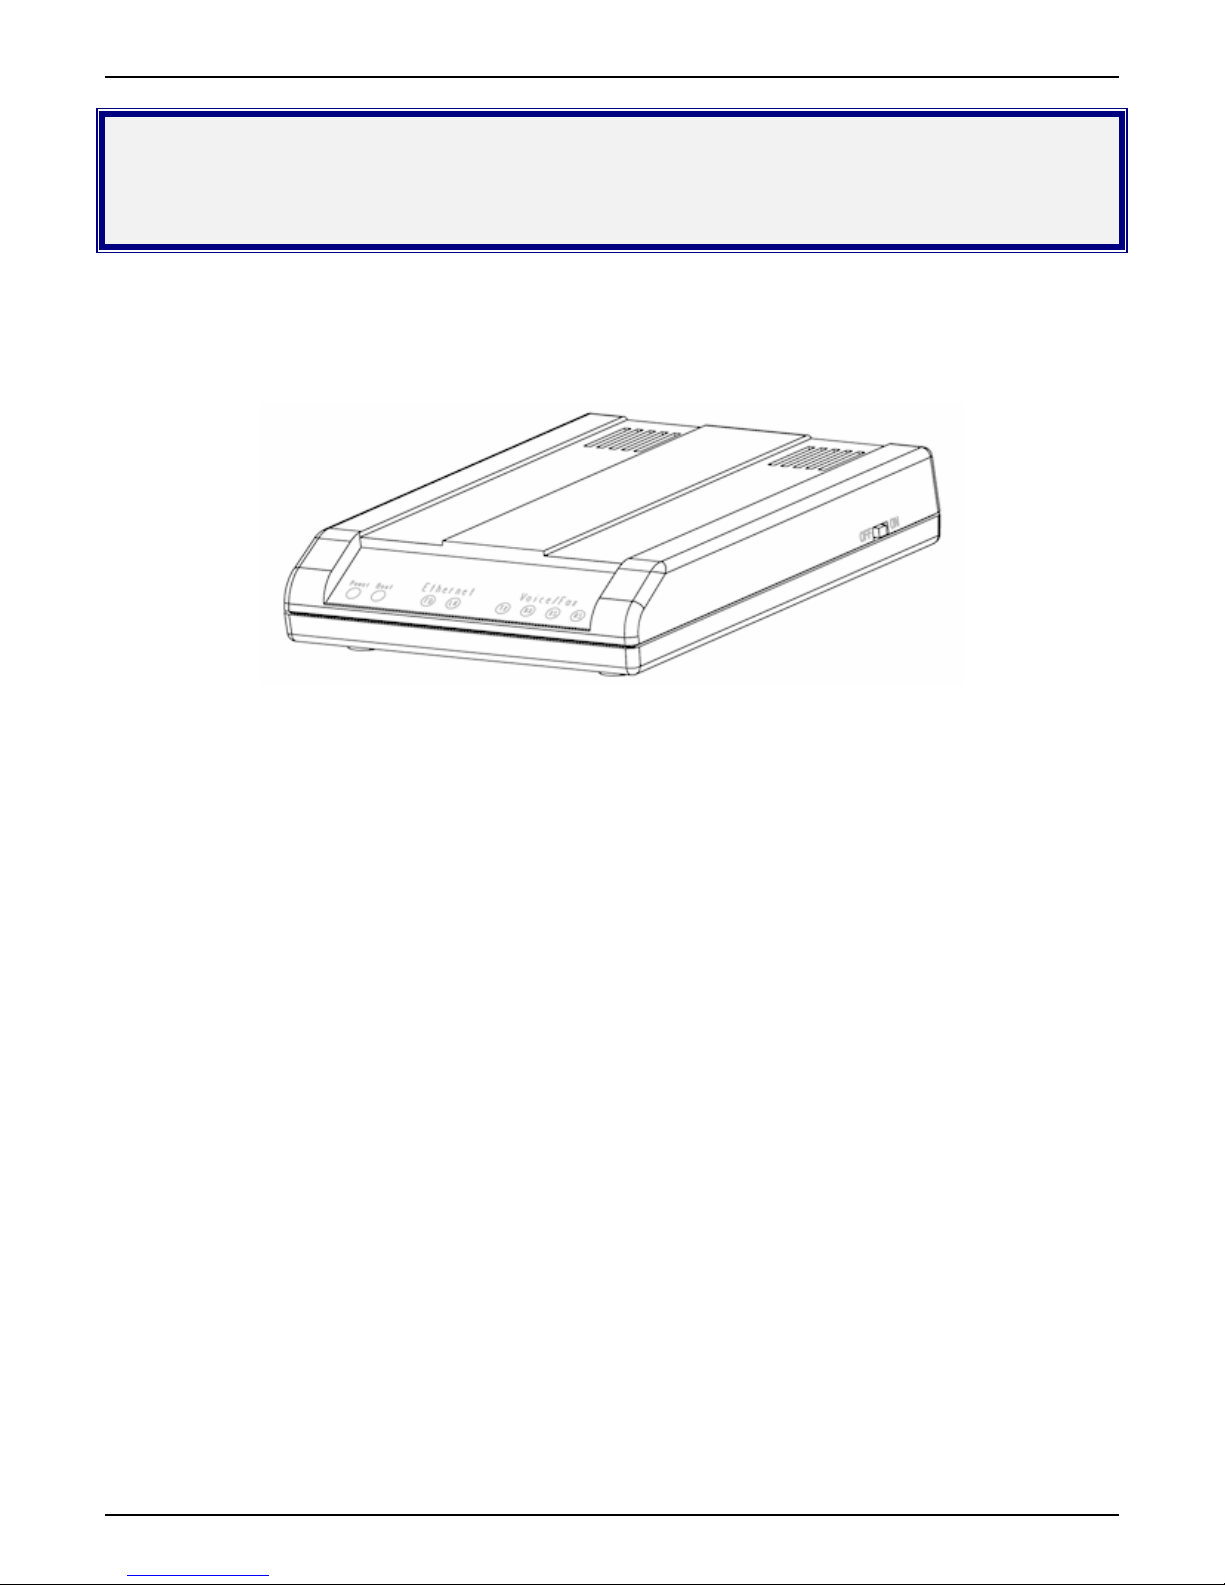
The MultiVOIP MVP130 is a single-channel unit and the MVP130FXS is a single-channel unit that supports the
FXS telephony interface only. Both of these MultiVOIP units have a 10/100Mbps Ethernet interface and a
command port for configuration. The MVP130 and MVP130FXS are table-top models.
Figure 1-1: MVP130 Chassis
These MultiVOIPs inter-operate with a telephone switch or PBX, acting as a switching device that directs voice
and fax calls over an IP network. The MultiVOIPs have “phonebooks,” directories that determine to who calls may
be made and the sequences that must be used to complete calls through the MultiVOIP. The phonebooks allow
the phone user to interact with the VOIP system just as they would with an ordinary PBX or telephone company
(telco) switch. When the phonebooks are set, special dialing sequences are mini mized or eliminated altogether.
Once the call destination is determined, the phonebook settings determine whether the de stination VOIP unit
must strip off or add dialing digits to make the call appear at its destination to be a local call.
Interface
There are two options for accessing your MultiVOIP, one is the Windows software that is included and is
necessary for the initial setup, and the other is a web-based interface that uses your web browser to access the
unit. While the web interface appears differs slightly, its content and organization are essentially the same as that
of the Windows interface (except for logging). These will be addressed in the following chapters.
Multi-Tech Systems, Inc. 6
Page 7
Chapter 2: Quick Start
Front Panel LEDs
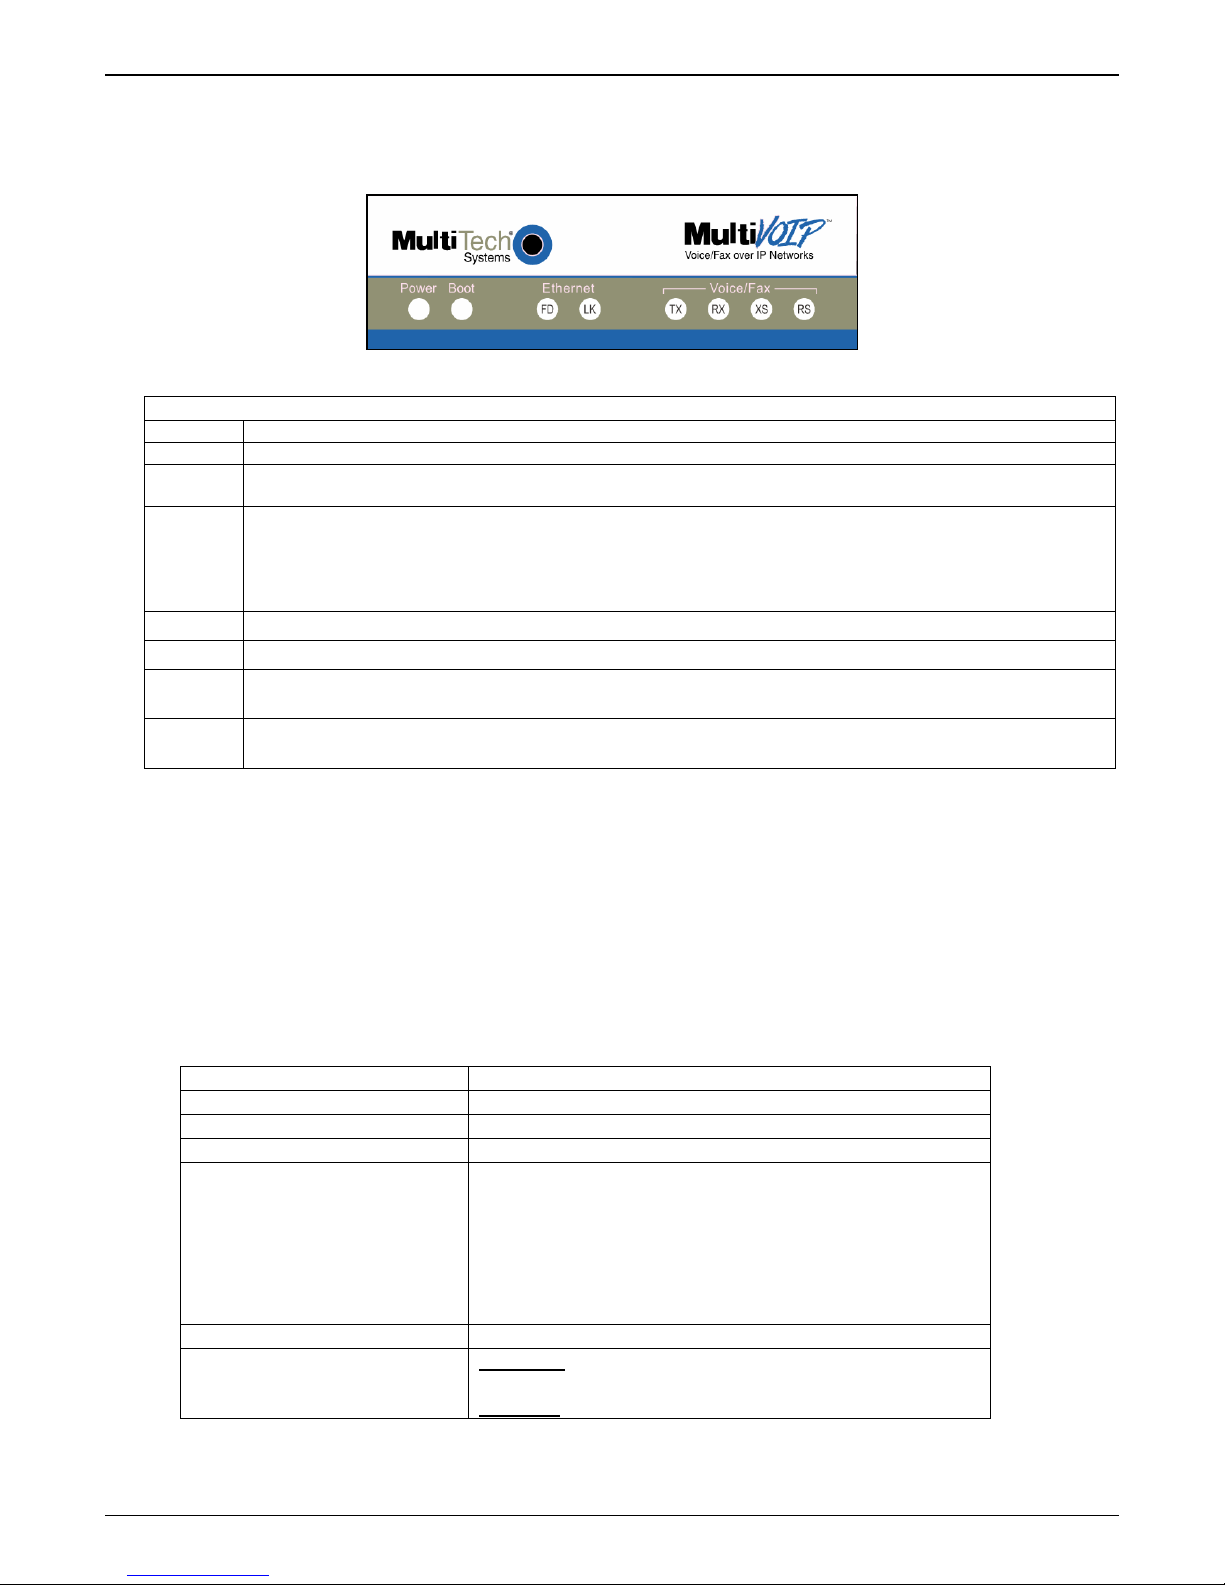
On both the MVP130 and MVP130-FXS models, there are eight LEDs. These are explained in the table below.
Figure 1-2. MVP130/130-FXS LEDs
Front Panel LED Definitions
LED Description
Power
Boot
Ethernet
TX
RX
XS
RS
Indicates presence of power
After power up, the Boot LED will be on briefly while the MultiVOIP is booting. It lights whenever the
MultiVOIP is booting or downloading a setup configuration data set
FD. LED indicates whether Ethernet connection is half-duplex or full-duplex and, in half-duplex mode,
indicates occurrence of data collisions. LED is on constantly for full-duplex mode; LED is off constantly for
half-duplex mode. When operating in half-duplex mode, the LED will flash during data collisions.
LK. Link/Activity LED. This LED is lit if Ethernet connection has been made. It is off when the link is down
(i.e., when no Ethernet connection exists). While link is up, this LED will flash off to indicate data activity.
Transmit. This indicator blinks when voice packets are being transmitted to the local area network.
Receive. This indicator blinks when voice packets are being received from the local area net work.
Transmit Signal. This indicator lights when the FXS-configured channel is off-hook or the FXO-configured
channel (MVP130 only) is receiving a ring from the Telco or PBX.
Receive Signal. This indicator lights when the FXS-configured channel is ringing or the FXO-configured
channel (MVP130 only) has taken the line off-hook.
Computer Requirements
The computer on which the MultiVOIP’s configuration program is installed must meet these requirements:
• must be IBM-compatible PC with MS Windows operating system;
• must have an available COM port for connection to the MultiVOIP.
However, this PC does not need to be connected to the MultiVOIP permanently. It only needs to be connected
when local configuration and monitoring are done. Nearly all configuration and monitorin g functions can be done
remotely via the IP network.
Specifications
MVP130 & MVP130-FXS
Operating Voltage/Current
Mains Frequencies
Power Consumption
Mechanical Dimensions
Weight
Ambient temperature range
100-240VAC / 1.0 A
50/60 Hz
4.5 watts (9.7 watts with phone off hook)
1.0” H
4.3” W x
5.6” D x
----------------
2.5 cm H
10.9 cm W x
14.2 cm D x
8 oz. (23 g)
Maximum
: 60 degrees Celsius (140 degrees Fahrenheit)
@ 20-90% non-condensing relative humidity.
Minimum
: 0 degrees Celsius (32 degrees Fahrenheit).
Multi-Tech Systems, Inc. 7
Page 8

Chapter 2 – Installing and Cabling the
MultiVOIP
Introduction
The MVP130 MultiVOIP models are tabletop units that can be handled easily by one person. These products
must be installed by qualified service personnel in a restricted-access area, in accordan ce with Articles 110-16,
10-17, and 110-18 of the National Electrical Code, ANSI/NFPA 70.
Safety Warnings
Lithium Battery Caution
A lithium battery on the voice/fax channel board provides backup power for the timekeeping capability. The
battery has an estimated life expectancy of ten years. When the battery starts to weaken, the date and time may
be incorrect. If the battery fails, the board must be sent back to Multi-Tech Systems for replacement.
Warning: There is danger of explosion if the battery is incorrectly replaced.
Safety Warnings Telecom
1. Never install telephone wiring during a lightning storm.
2. Never install a telephone jack in wet locations unless the jack is specifically designed for wet locations.
3. This product is to be used with UL and UL listed computers.
4. Never touch un-insulated telephone wires or terminals unless the telephone line has been disconnected at the
network interface.
5. Use caution when installing or modifying telephone lines.
6. Avoid using a telephone (other than a cordless type) during an electrical storm. There may be a remote risk of
electrical shock from lightning.
7. Do not use a telephone in the vicinity of a gas leak.
8. To reduce the risk of fire, use only a UL-listed 26 AWG or larger telecommunication line cord.
Unpacking Your MultiVOIP
When unpacking your MultiVOIP, check to see that all of the items are included in the box. For the various
MultiVOIP models, the contents of the box will be different. If any box contents are missing, contact Multi-Tech
Tech Support at 1-800-972-2439.
MVP130 models content list:
• MVP130 or MVP130-FXS
• DB9 to RJ45 cable
• Power transformer
• Power cord
• RJ-11 phone cord
• Printed Cabling Guide
• Product CD
Multi-Tech Systems, Inc. 8
Page 9
Chapter 2: Installing and Cabling the MultiVOIP
Cabling Procedure for MVP130
Cabling involves connecting the MultiVOIP to your LAN and telephone equipment.
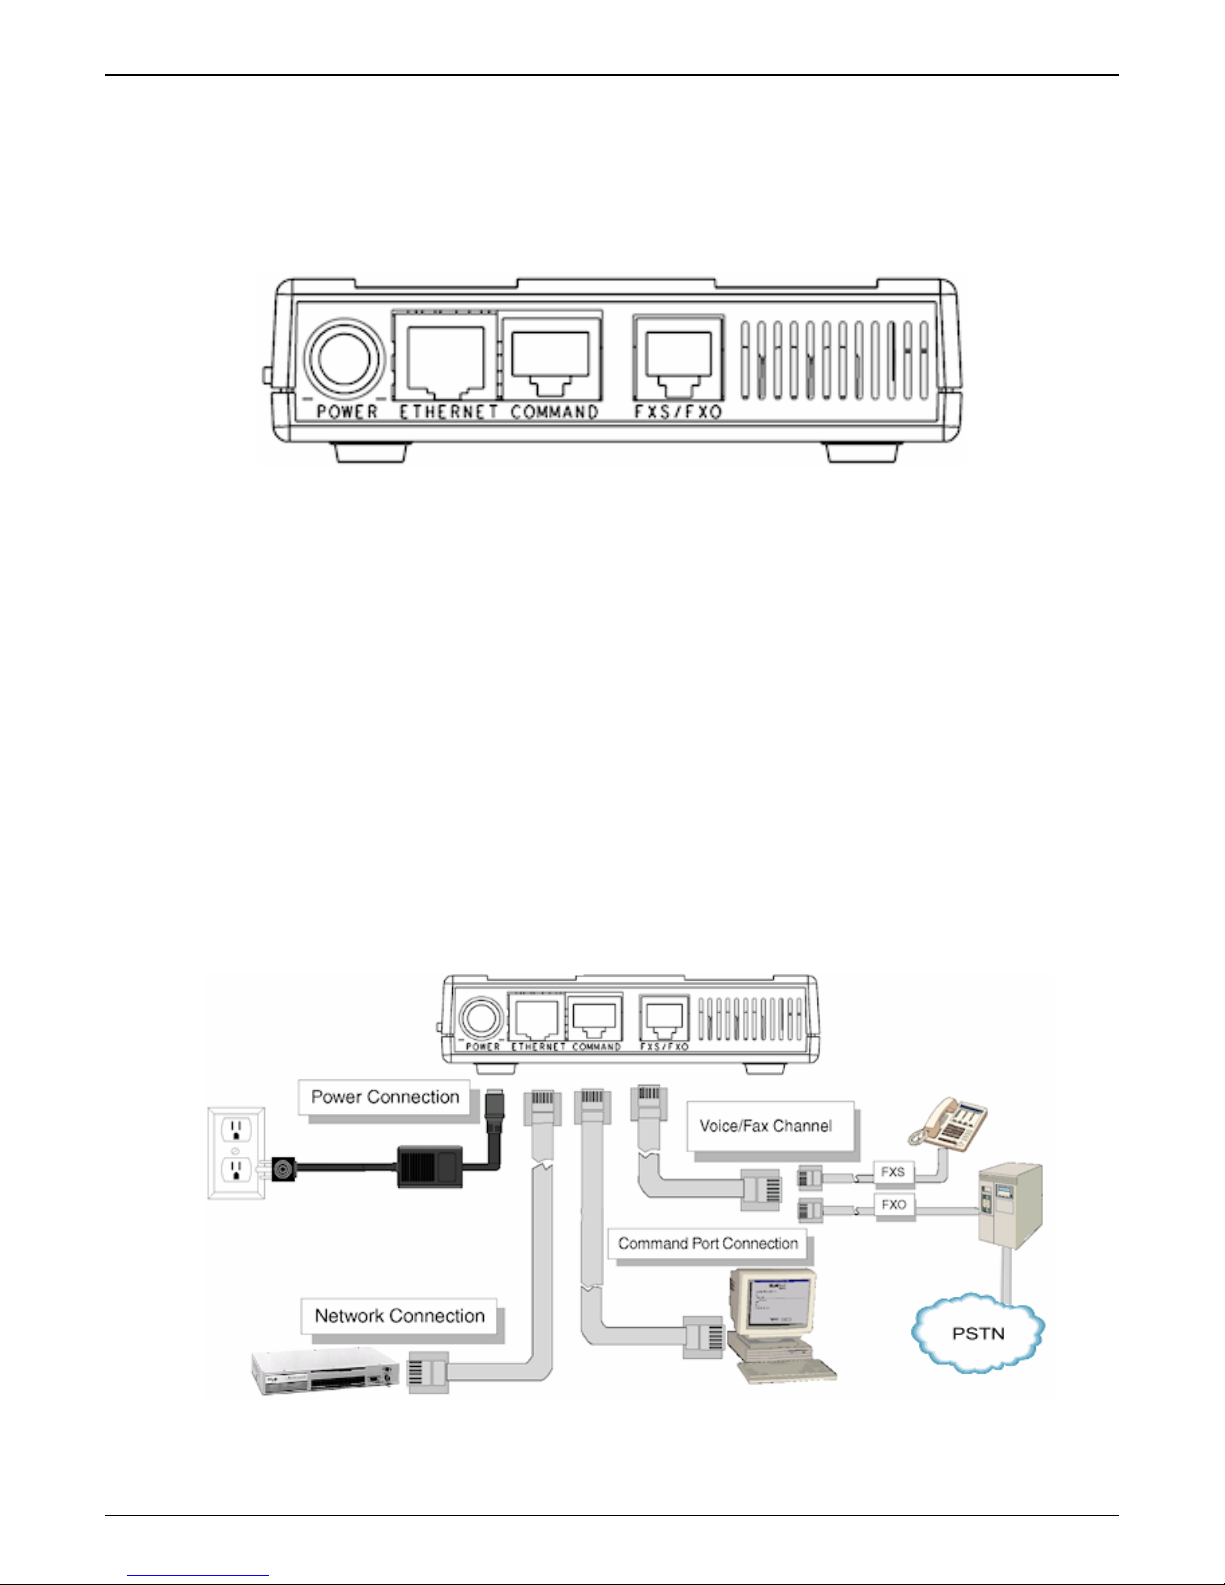
1. Connect the power cord supplied with your MultiVOIP to the power connector on the back of the
MultiVOIP and to a live AC outlet.
Figure 2-1: Rear connections for MVP130
2. Connect the MultiVOIP to a PC by using the RJ-45 (male) to DB-9 (female) cable. Plug the RJ-45 end of
the cable into the Command port of the MultiVOIP and the other end into the PC serial port.
3. Connect a network cable to the ETHERNET connector on the back of the MultiVOIP. Connect the other
end of the cable to your network.
a. For an FXS or FXO connection (FXS only for the MVP130-FXS).
(FXS Examples: analog phone, fax machine |
FXO Examples: PBX extension, POTS line from telco central office)
Connect one end of an RJ-11 phone cord to the FXS/FXO connector on the back of the
MultiVOIP. Connect the other end to the device or phone jack.
b. For a DID connection. (Not supported by the MVP130-FXS)
(DID Example: DID fax system or DID voice phone lines)
Connect one end of an RJ-11 phone cord to the FXS/FXO connector on the back of the
MultiVOIP. Connect the other end to the DID jack.
NOTE: DID lines are polarity sensitive. If, during testing, the DID line rings busy consistently, you will need
to reverse the polarity of one end of the connector (swap the wires to the two middle pins of one RJ-11
connector).
4. Turn on power to the MultiVOIP by placing the ON/OFF switch on the side to the ON position. Wait for the
BOOT LED on the MultiVOIP to go off before proceeding. This may take a few minutes.
5. Proceed to the Software Installation chapter to load the MultiVOIP software.
Multi-Tech Systems, Inc. 9
Figure 2-2: Cable connections
Page 10
Chapter 3 – Software Installation
Introduction
Configuring software for your MultiVOIP entails three tasks:
Loading the software onto the PC (this is “Software Installation” and is discussed in this chapter).
Setting values for telephony and IP parameters that will fit your system (details are in Chapter 4).
Establishing “phonebooks” that contain the various dialing patterns for VOIP calls made to different locations (a
detailed discussion of this is found in Chapter 5).
Loading MultiVOIP Software onto the PC
The software loading procedure does not present every screen or option in the loading process. It is assumed that
someone with a thorough knowledge of Windows and the software loading process is performing the installation.
1. Be sure that your MultiVOIP has been properly cabled and that the power is turned on.
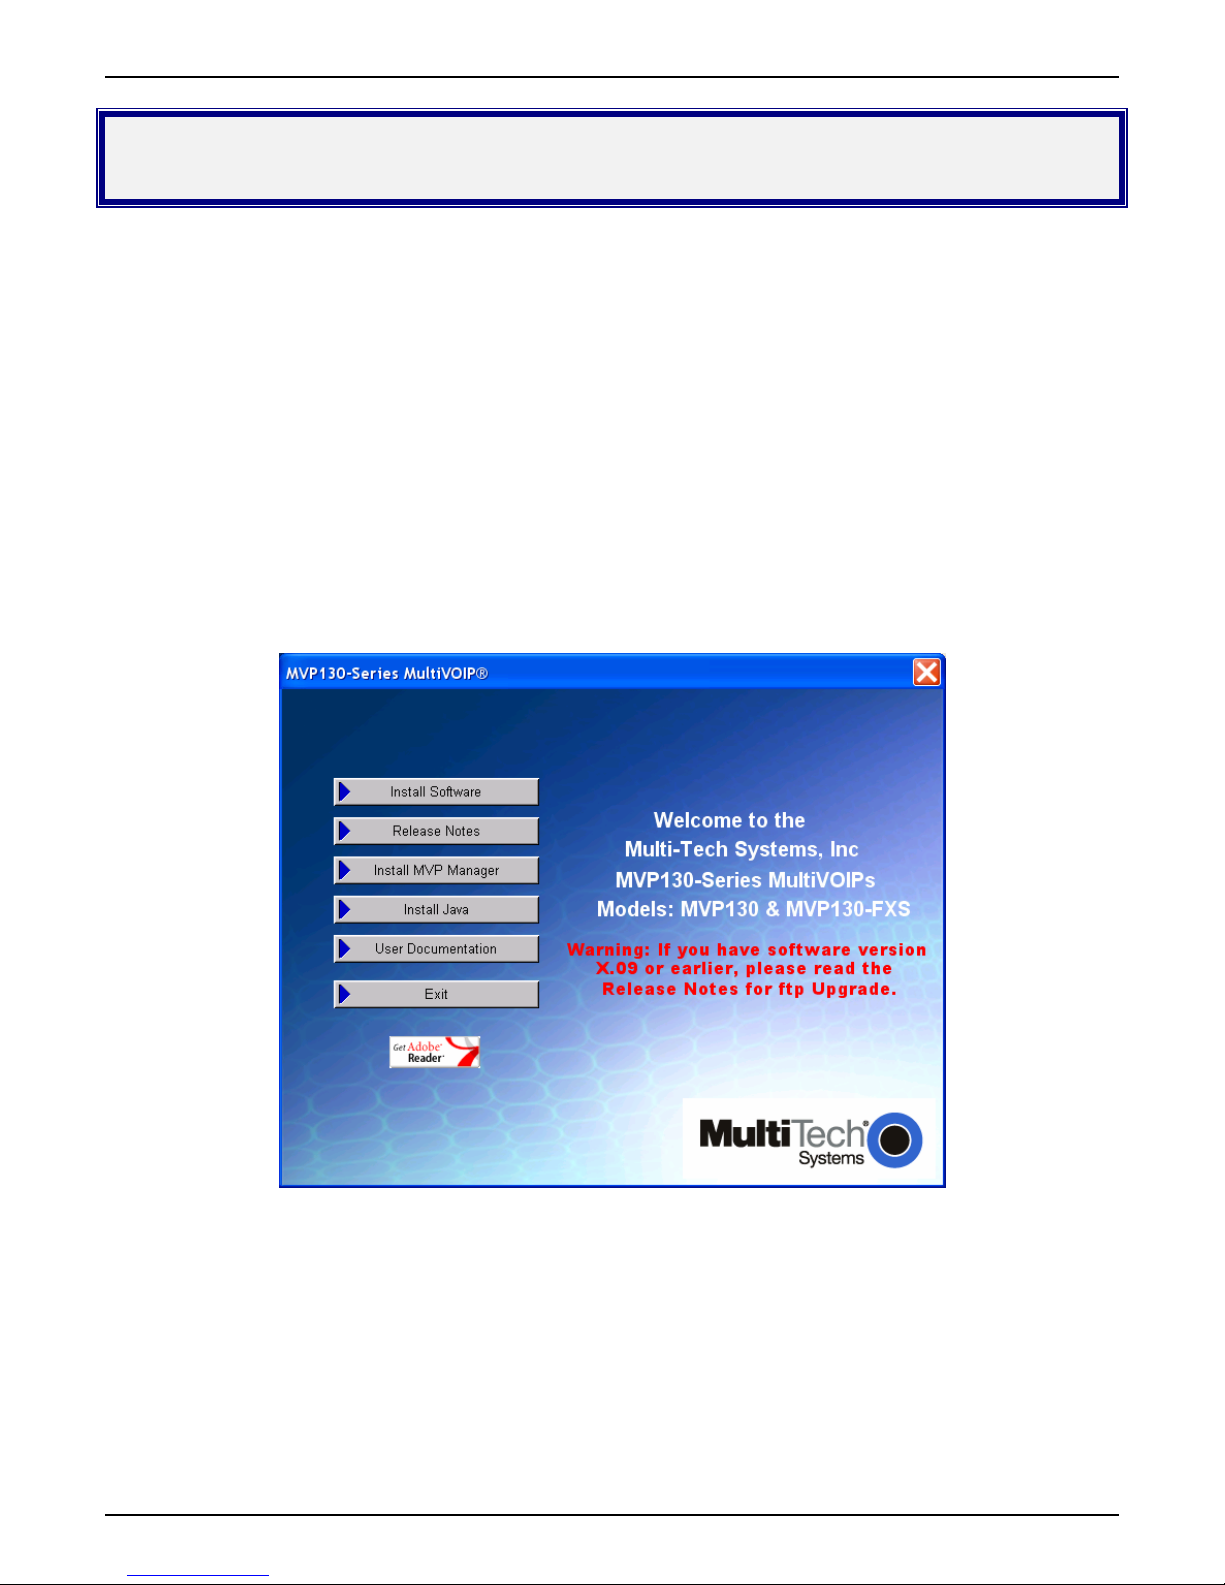
2. Insert the MultiVOIP CD into your CD-ROM drive. The CD starts automatically. It may take a few moments for
the Multi-Tech CD installation window to display.
3. When the Multi-Tech Installation CD dialog box appears, click the Install Software icon.
Multi-Tech Systems, Inc. 10
Figure 3-1: splash screen
Page 11
Chapter 3: Software Installation
4. A secondary screen appears. Click on the button that matches the model you have purchased. The
installation wizard will start.
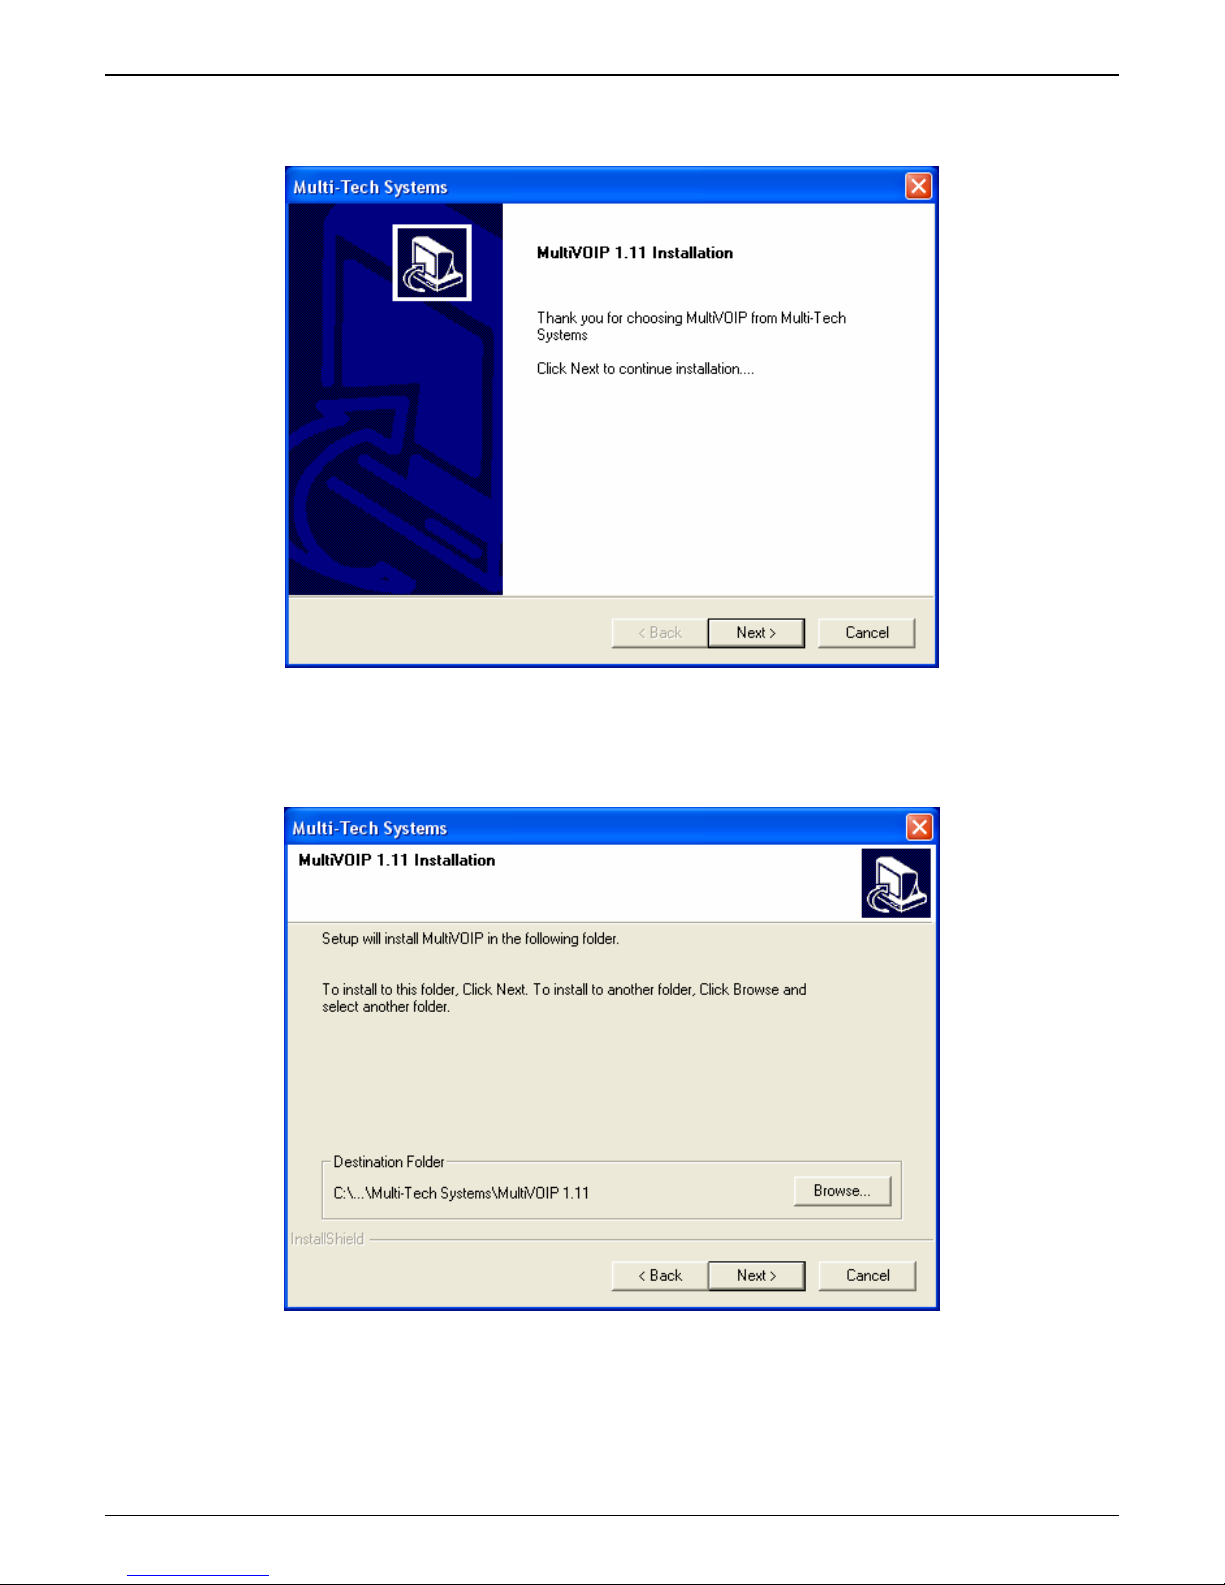
Figure 3-2: Initial screen
Press Enter or click Next to continue.
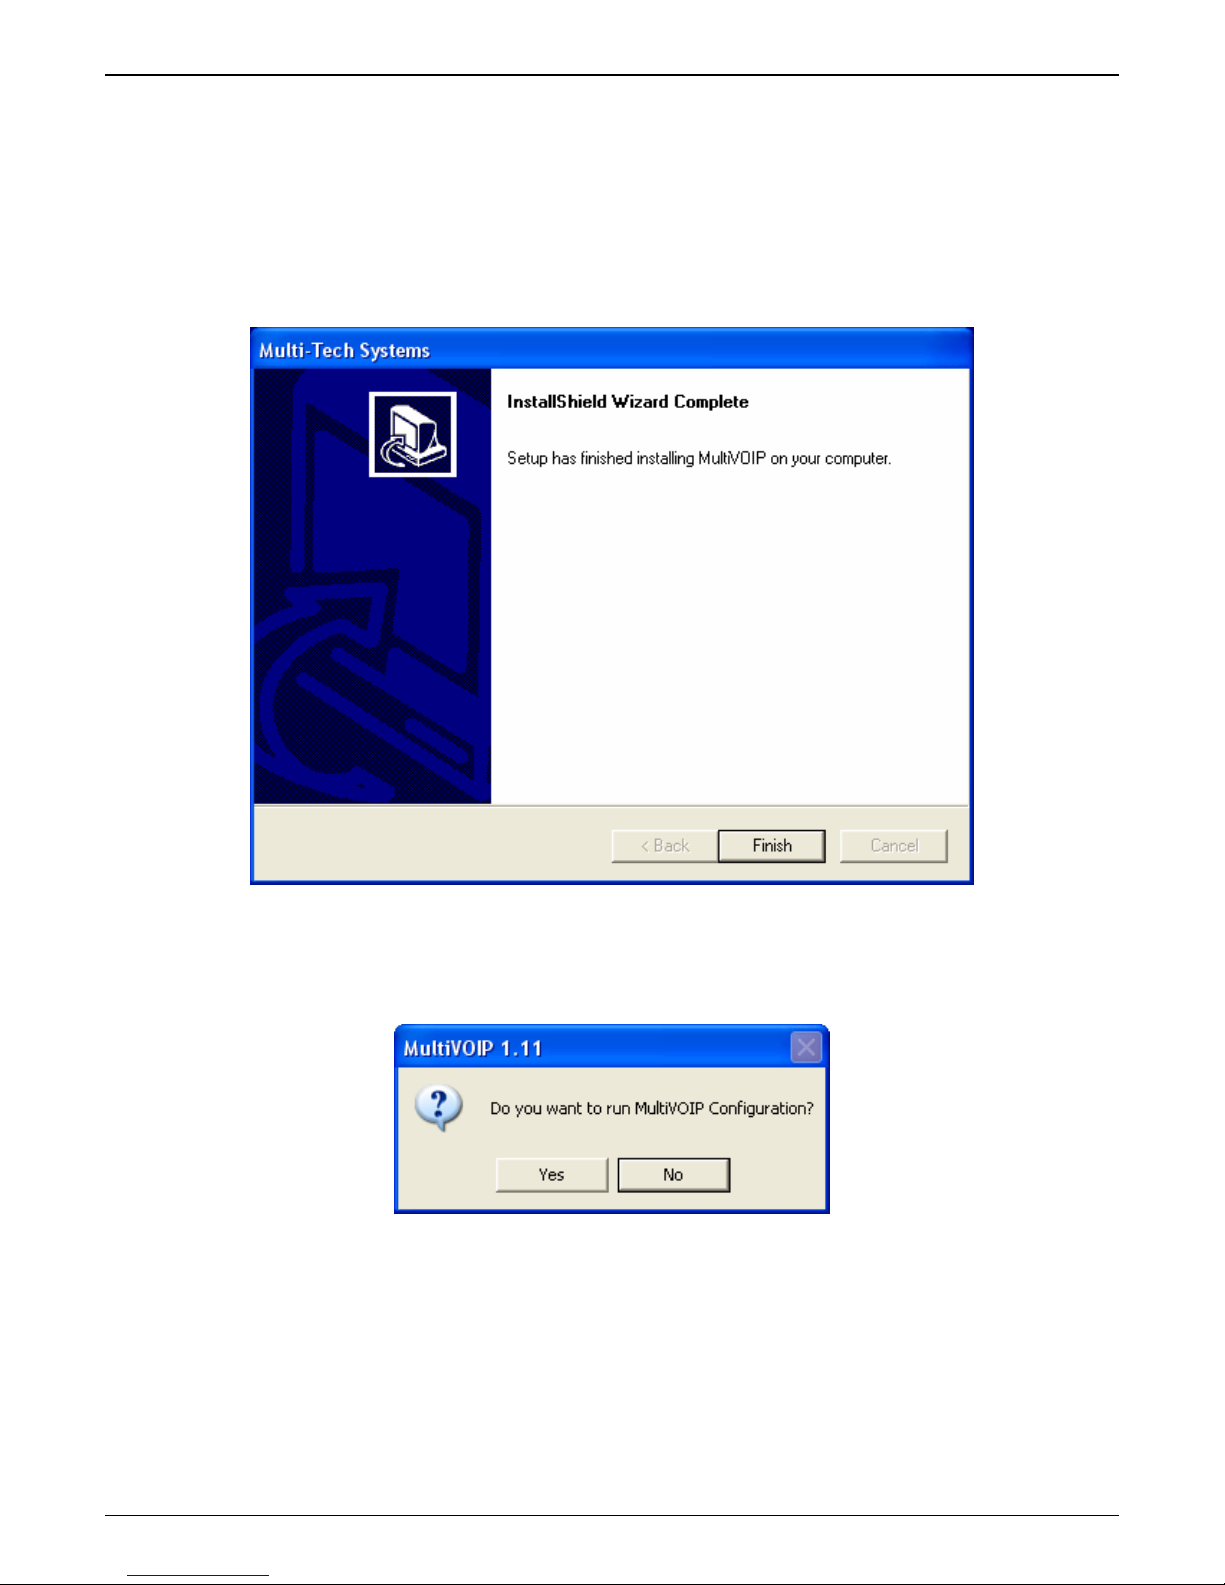
5. Follow the on-screen instructions to install your MultiVOIP software. The first screen asks you to choose the
destination for the MultiVOIP software.
Choose a location and click Next.
6. At the next screen, you must select a program folder location for the MultiVOIP software program icon.
Click Next. Transient progress screens will appear while files are being copied.
Multi-Tech Systems, Inc. 11
Figure 3-3: Destination
Page 12
Chapter 3: Software Installation
7. On the next screen you can select the COM port that the command PC will use when communicating with the
MultiVOIP unit. After software installation, the COM port can be re-set in the MultiVOIP Software (from the
sidebar menu, select Connection | Settings to access the COM Port Setup screen or use keyboard shortcut
Ctrl + G).
Note: If the COM port setting made here conflicts with the actual COM port resources available in the
command PC, the “Error in Opencomm handle” message will appear when the MultiVOIP program is
launched. If this occurs, you must reset the COM port.
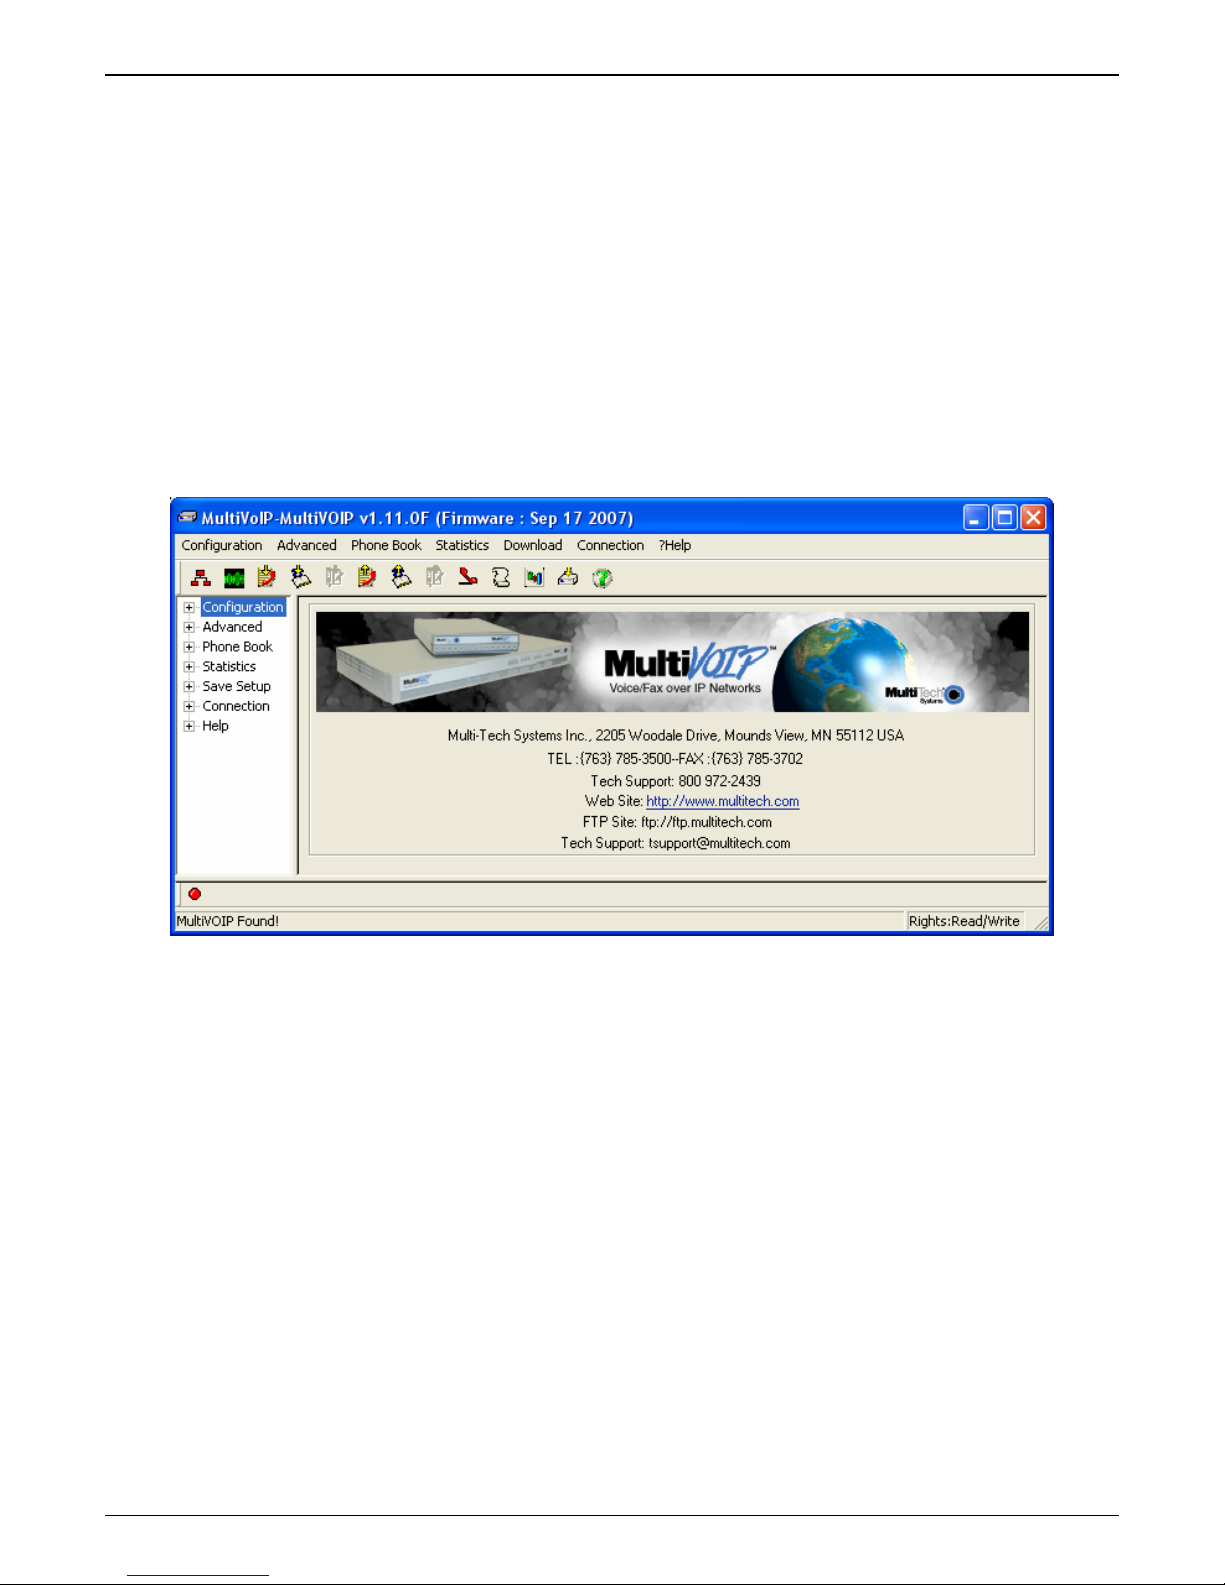
8. A completion screen will appear.
Figure 3-4: Completion
Click Finish.
9. When setup of the MultiVOIP software is complete, you will be prompted to run the MultiVOIP software to
configure the VOIP.
Figure 3-5: Configuration
Software installation is now complete.
Multi-Tech Systems, Inc. 12
Page 13
Chapter 3: Software Installation
Setup Overview
With the software now installed, you are ready to get your MultiVOIP set up and working. There are a few
necessary settings that need to be entered in the configuration software to achieve this and they are noted in the
action lists for the categories below. The following chapters will cover all aspects in detail, but here we will cover
the basic configuration needed to start VOIP communications. Below you will find the list of categories requiring
information to be set before VOIP communication will be ready.
⇒ Ethernet/IP
⇒ Voice/Fax
⇒ Interface
⇒ Call Signaling
⇒ Regional
⇒ Phone Book
This setup process is followed by the Save & Reboot step which is very important.
Figure 3-6: Main Screen
Multi-Tech Systems, Inc. 13
Page 14
Chapter 3: Software Installation
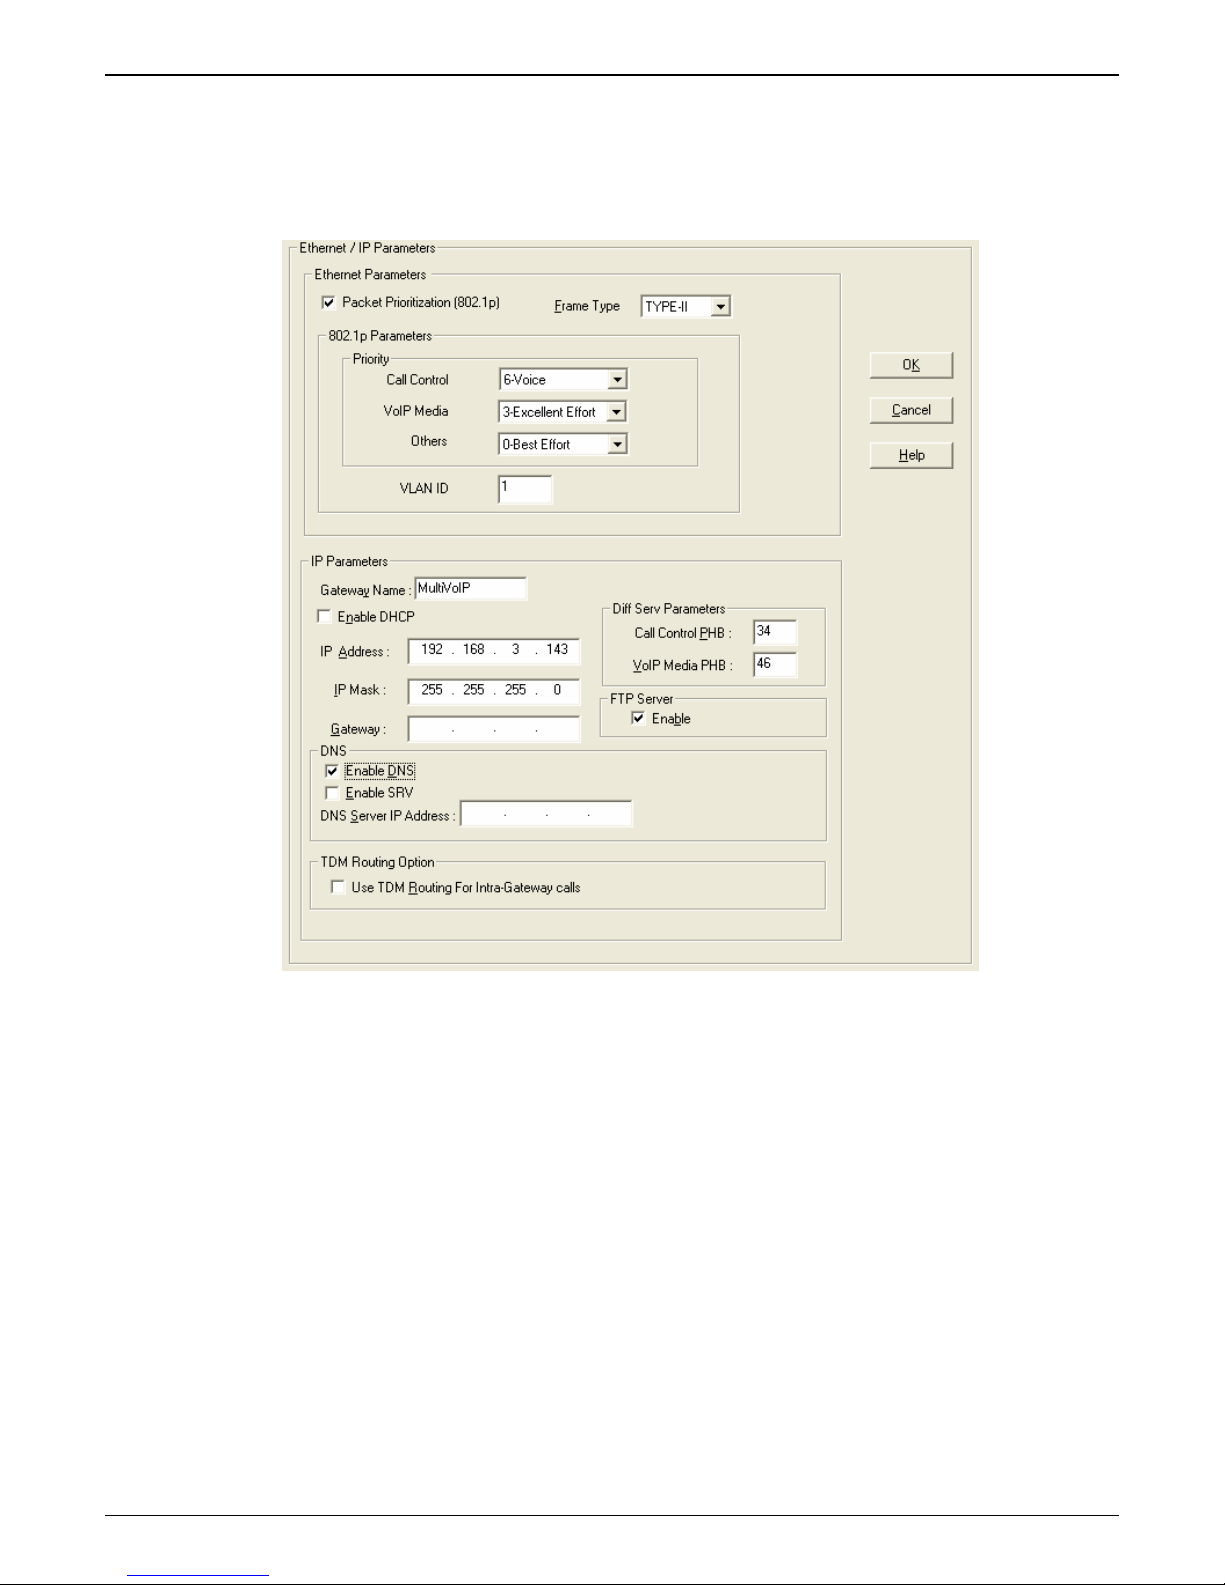
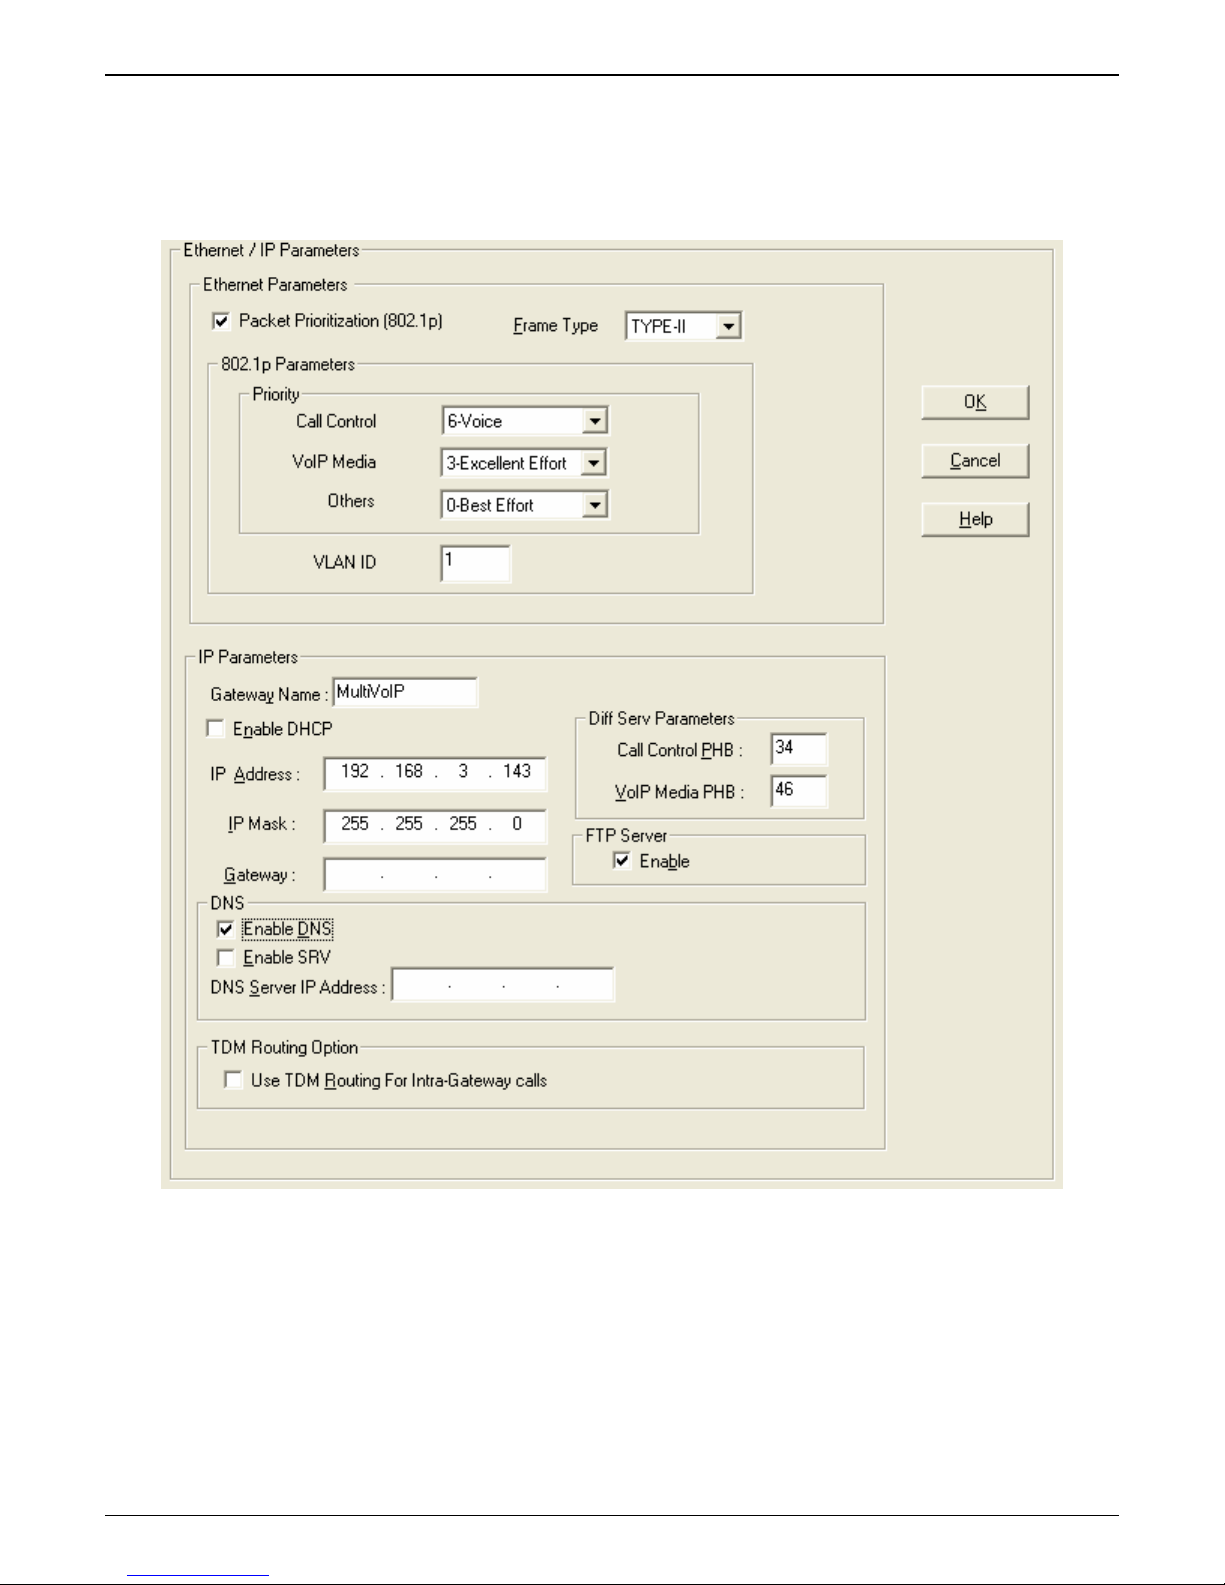
Ethernet/IP
A unique LAN IP address is required for the MultiVOIP unit as well as a subnet mask and Gateway IP for minimal
functionality. Other settings in this category pertain to specific features and protocols that can be used, but are not
necessary for basic operation. Details for all settings are provided in chapter 4.
Figure 3-7: IP settings
Actions:
• Select Packet Prioritization if used
o Set 802.1p Priority Parameters as needed
The Priority levels can be from 0 – 7, where 0 is lowest priority (details in Chapter 4)
VLAN ID identifies a virtual LAN by a number (1 to 4094)
• Set the Frame Type to match the network that the MultiVOIP is attached to
o TYPE II or SNAP
• Enter Gateway Name
o Check to enable DHCP if used
• Enter IP Address for the MultiVOIP unit
• Enter Subnet IP Mask for the MultiVOIP unit
• Enter Gateway IP
• Enable DNS if desired
o Enter DNS Server IP Address
• Enable SRV support if needed
• Diff Serv Parameters are for routers that are Diff Serv compatible
o Setting both values to 0 effectively disables Diff Serv
• FTP Server Enable is only needed for firmware and software updates to the MultiVOIP
• TDM Routing can be used if necessary
Multi-Tech Systems, Inc. 14
Page 15
Chapter 3: Software Installation
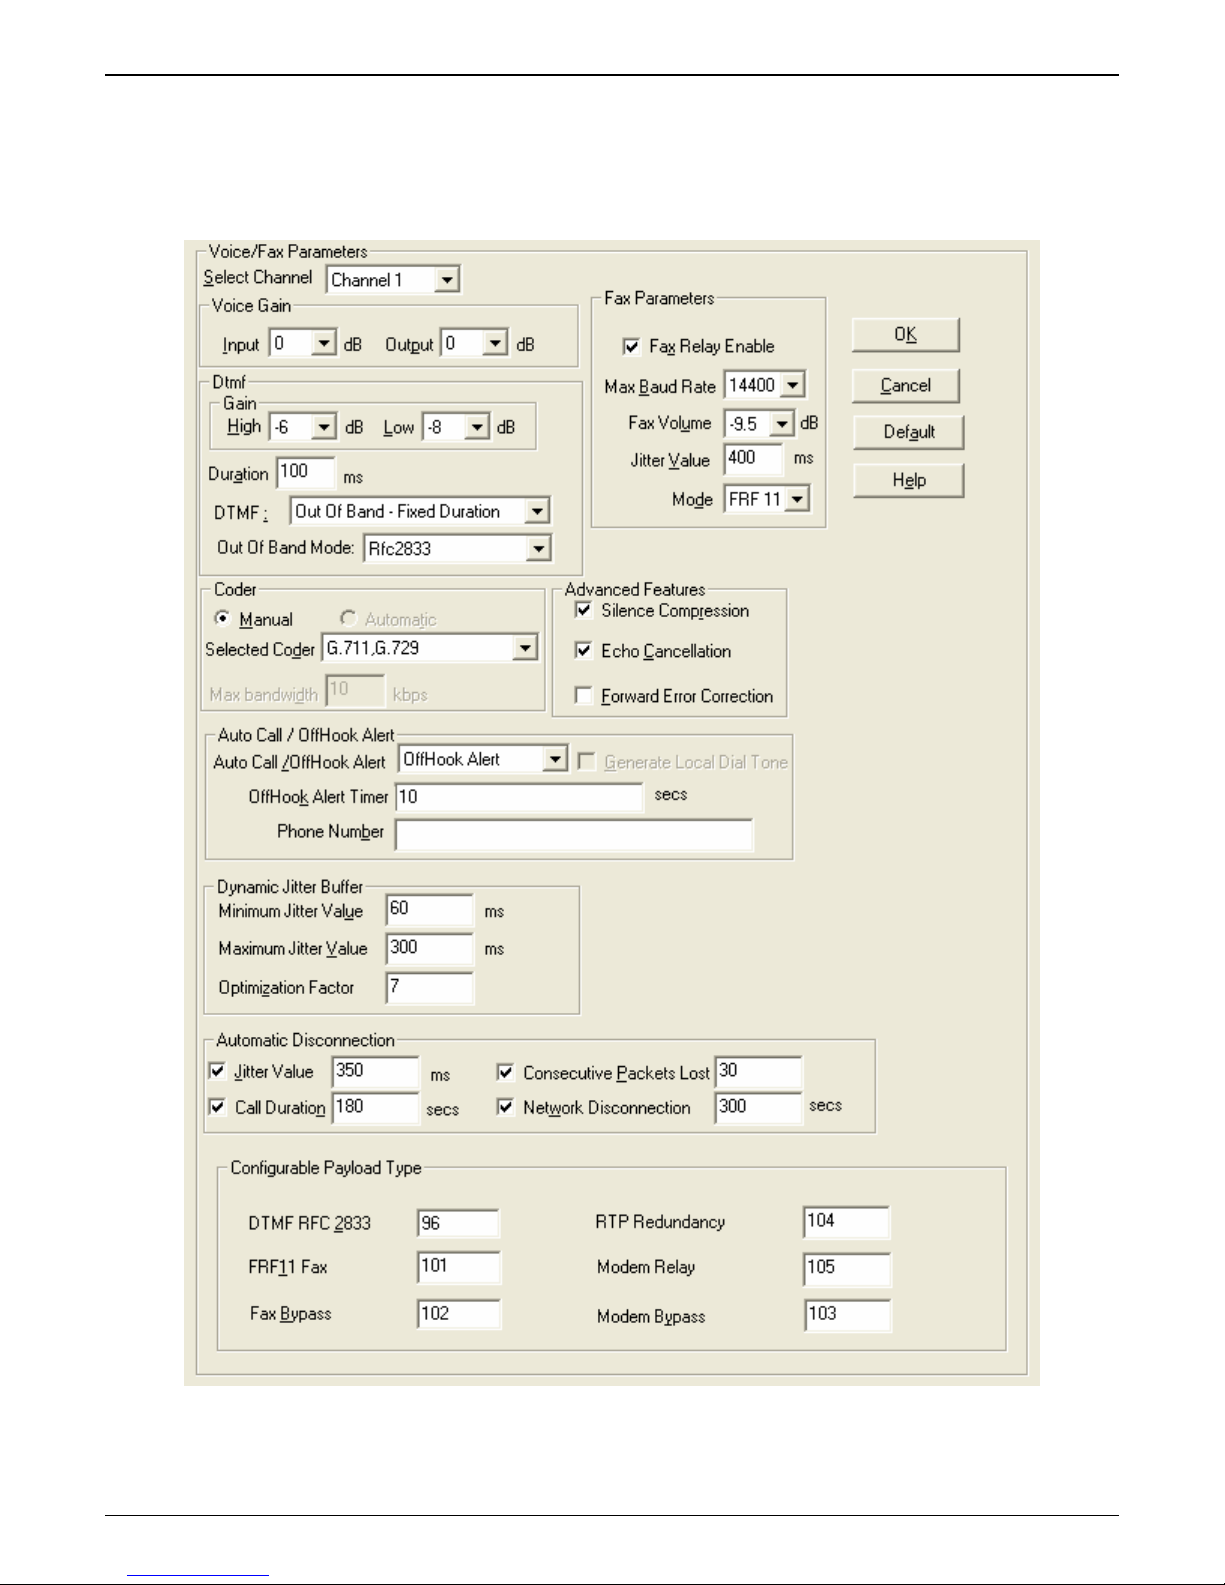
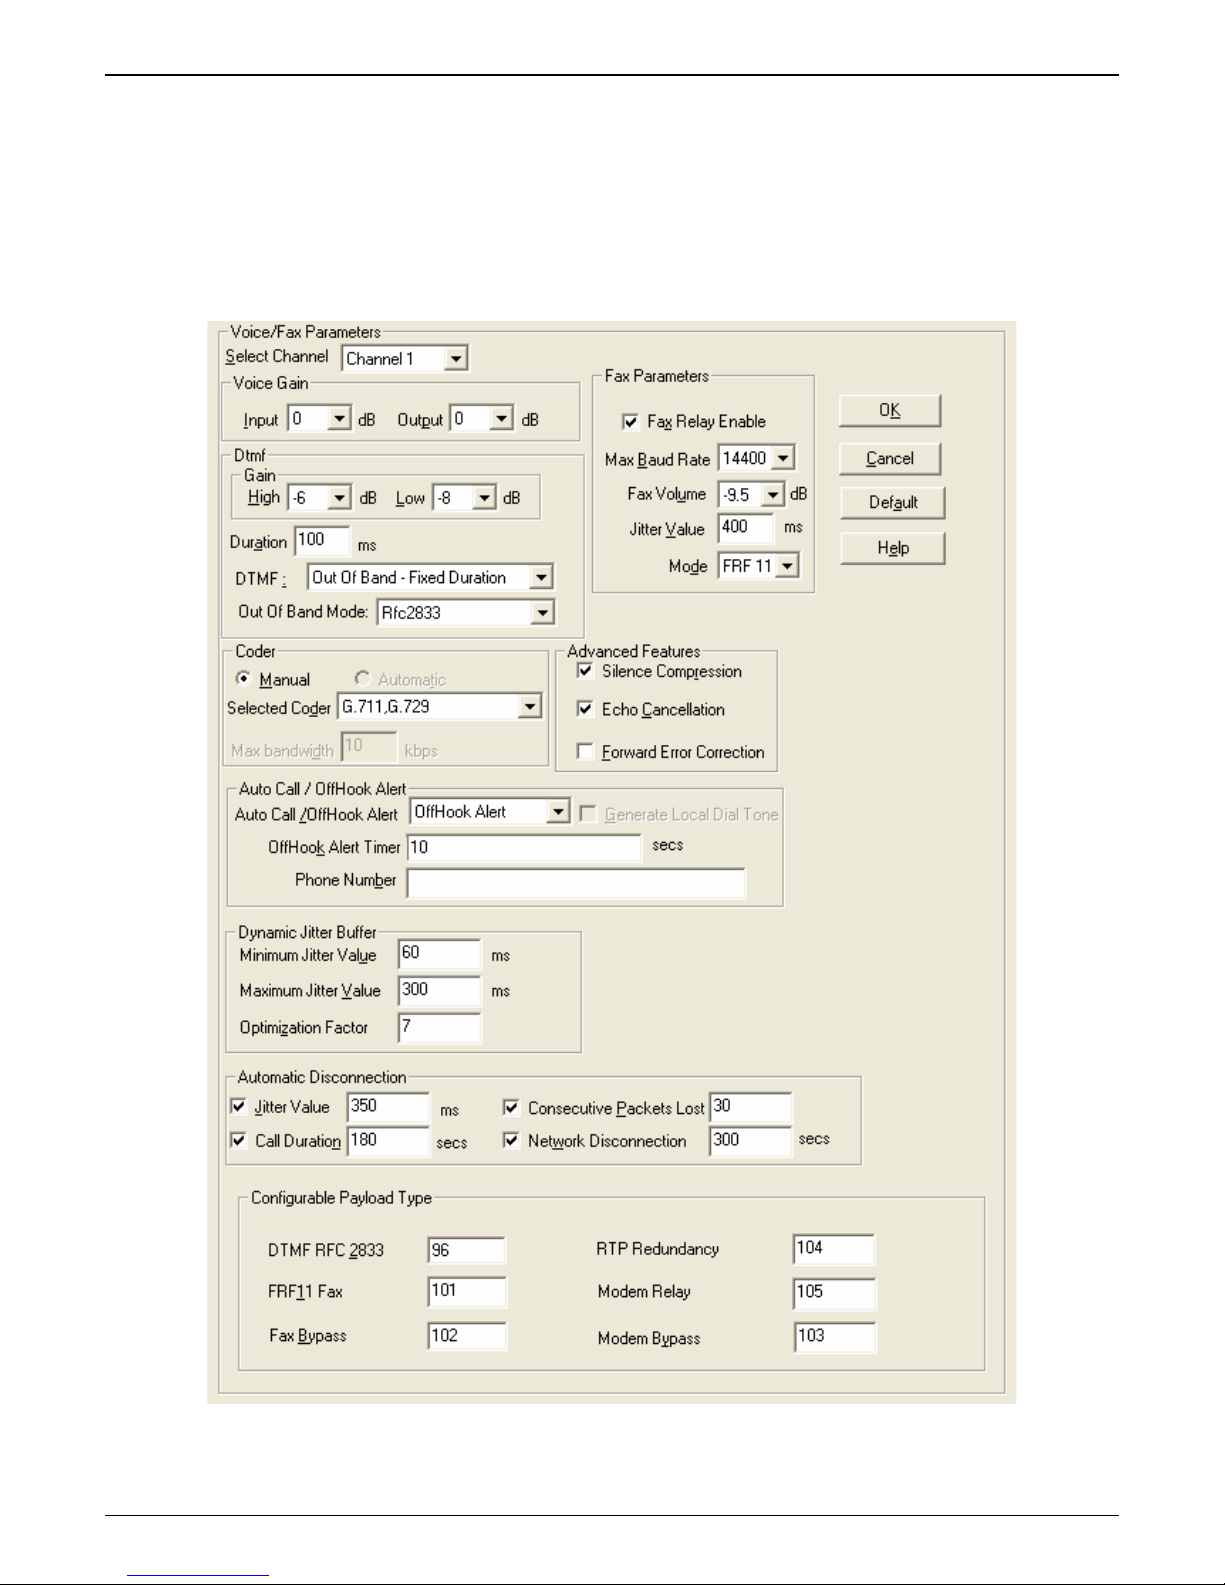
Voice/Fax
The individual channels must be set up before use. The Copy Channel button can save a lot of time during this
step if channels are to be set with the same parameters. Some options should be noted for future changes if
necessary, but the defaults are likely to work without adjustment.
Multi-Tech Systems, Inc. 15
Figure 3-8: Voice & Fax settings
Page 16

Actions:
• Select Channel
o Choose ch annel parameters:
Set the Fax parameters to meet your needs
• Set Max Baud Rate to match fax machine (2400 to 14400 bps)
• Fax Volume should not be changed as it may impair function
• Jitter Value affects the time for packet reassembly
• Mode: Select T.38 or FRF 11
Modem Relay Enable allows modem traffic through the VOIP system
Adjusting Voice Gain and DTMF should not be done as it may adversely affect quality
Select a Coder or allow Automatic negotiation
Advanced Features
• Silence Compression, when enabled, will not send silence packets
• Echo Cancellation removes echo to improve voice quality
• Forward Error Correction allows some bad packets to be recovered
Choose Auto Call / OffHook Alert settings
• For automatically calling a remote VOIP without dialing (details in Chapter 4)
Change Dynamic Jitter values if necessary (details in Chapter 4)
Select any Automatic Disconnection options needed to ensure lines are not left “open”
Configurable Payload Types are best left at their defaults.
o The Copy Channel button is available for easily transferring these settings to the other channels
• Repeat for all channels to be used
Chapter 3: Software Installation
Multi-Tech Systems, Inc. 16
Page 17
Chapter 3: Software Installation
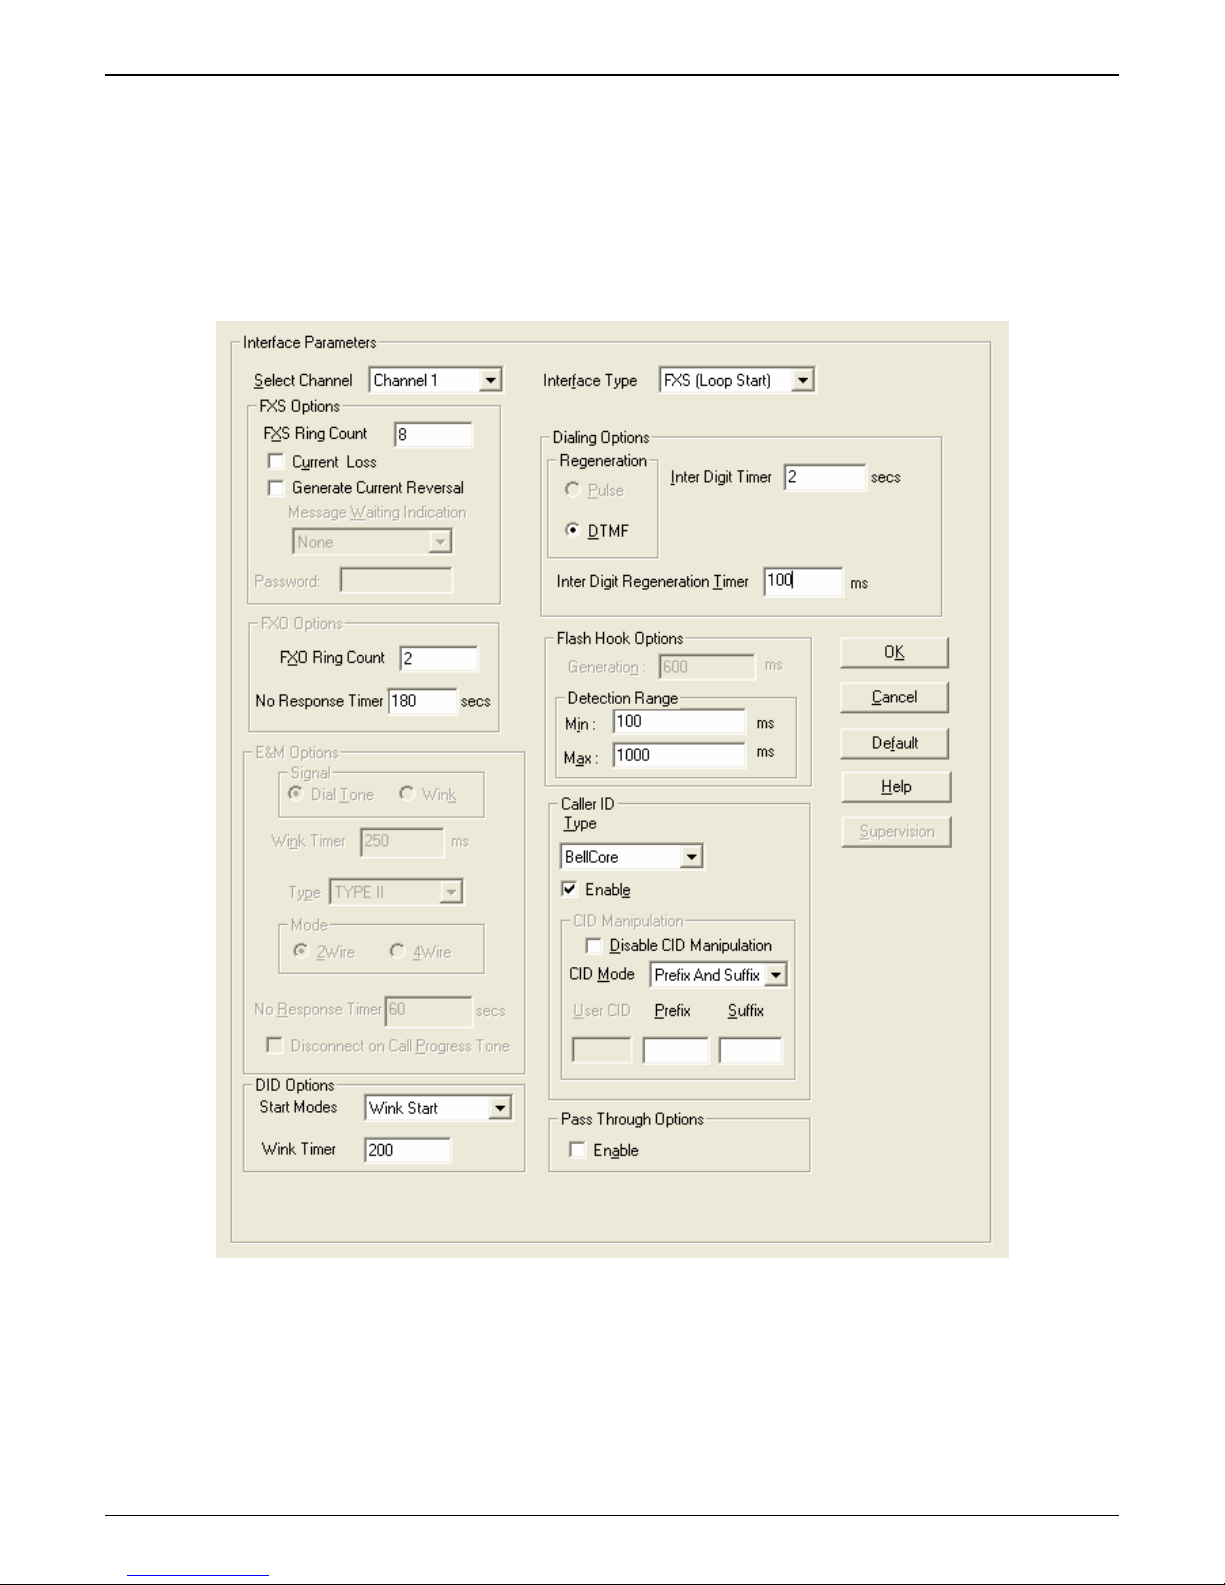
Interface
The Interface Parameters are the telephony settings that are to be applied to the MultiVOIP channel.
Note: Feature options are enabled or unavailable depending on the selected interface type. The one optio n
available for all interface types is the inter digit timer option. This option defines the maximum amount of time that
the unit will wait before mapping the dialed digits to an entry in the phone book database. If too much time
elapses between digits, and the wrong numbers are mapped, you will hear rapid busy signal. If this happens,
hang up and dial again.
Multi-Tech Systems, Inc. 17
Figure 3-9: Interface Parameters
Page 18

Actions:
• Select Channel
o Select Interface Type: FXS, FXO, or DID (FXS only for the MVP130-FXS)
o Regeneration
Choose how signal is regenerated; as Pulse or DTMF
o Inter Digit Timer
Time the MultiVOIP waits between digits
o Message Waiting Indication is available if desired
o Inter Digit Regeneration Timer
Length of time between sent DTMF digits
• Flash Hook Options
o Generation (used in conjunction with FXO)
o Detection Range (used in conjunction with FXS)
• Caller ID
o Bellcore is the only option available
o CallerID Manipulation is available if needed
• Pass Through (opens an audio path through the MultiVOIP)
• FXS Options
o Set Ring Count (the number of rings allowed before call abandoned; default is 8)
o Use Current Loss (MultiVOIP interrupts current to disconnect)
o Generate Current Reversal (activates Answer/Disconnect Supervision to FXO)
• FXO Options (not available for the MVP130-FXS)
o Ring Count (set number of rings before MultiVOIP answers)
o No Response Timer (set time to attempt call before abandoning)
o Supervision Button (for call answering and disconnection settings)
Answer Fields:
• Current Reversal (use current reversal to answer)
• Answer Delay
• Answer Delay Timer (in seconds)
• Tone Detection (allow tone sequence to disconnect)
• Available Tones
• Answer Tones (shows current selection from Available Tones)
Disconnect Fields
• Current Reversal (use current reversal to disconnect)
• Current Loss (loss of current will trigger disconnect)
• Current Loss Timer (time after current loss to disconnect; in milliseconds)
• Silence Detection Enable (use silence detection to disconnect)
• Silence Detection Type (one-way or two-way)
• Silence Timer (time of silence needed to trigger disconnect; in seconds)
• DTMF Tone (use tones to disconnect)
• Disconnect Tone Sequence (select tone pairs to use for disconnecting)
• Tone Detection (disconnect from termination of tone)
• Available Tones
• Disconnect Tones (shows current selection from Available Tones)
• DID Options (not available for the MVP130-FXS)
o Start Modes (Immediate, Wink or Delay Dial)
o Wink Timer (in milliseconds)
Chapter 3: Software Installation
Multi-Tech Systems, Inc. 18
Page 19
Chapter 3: Software Installation
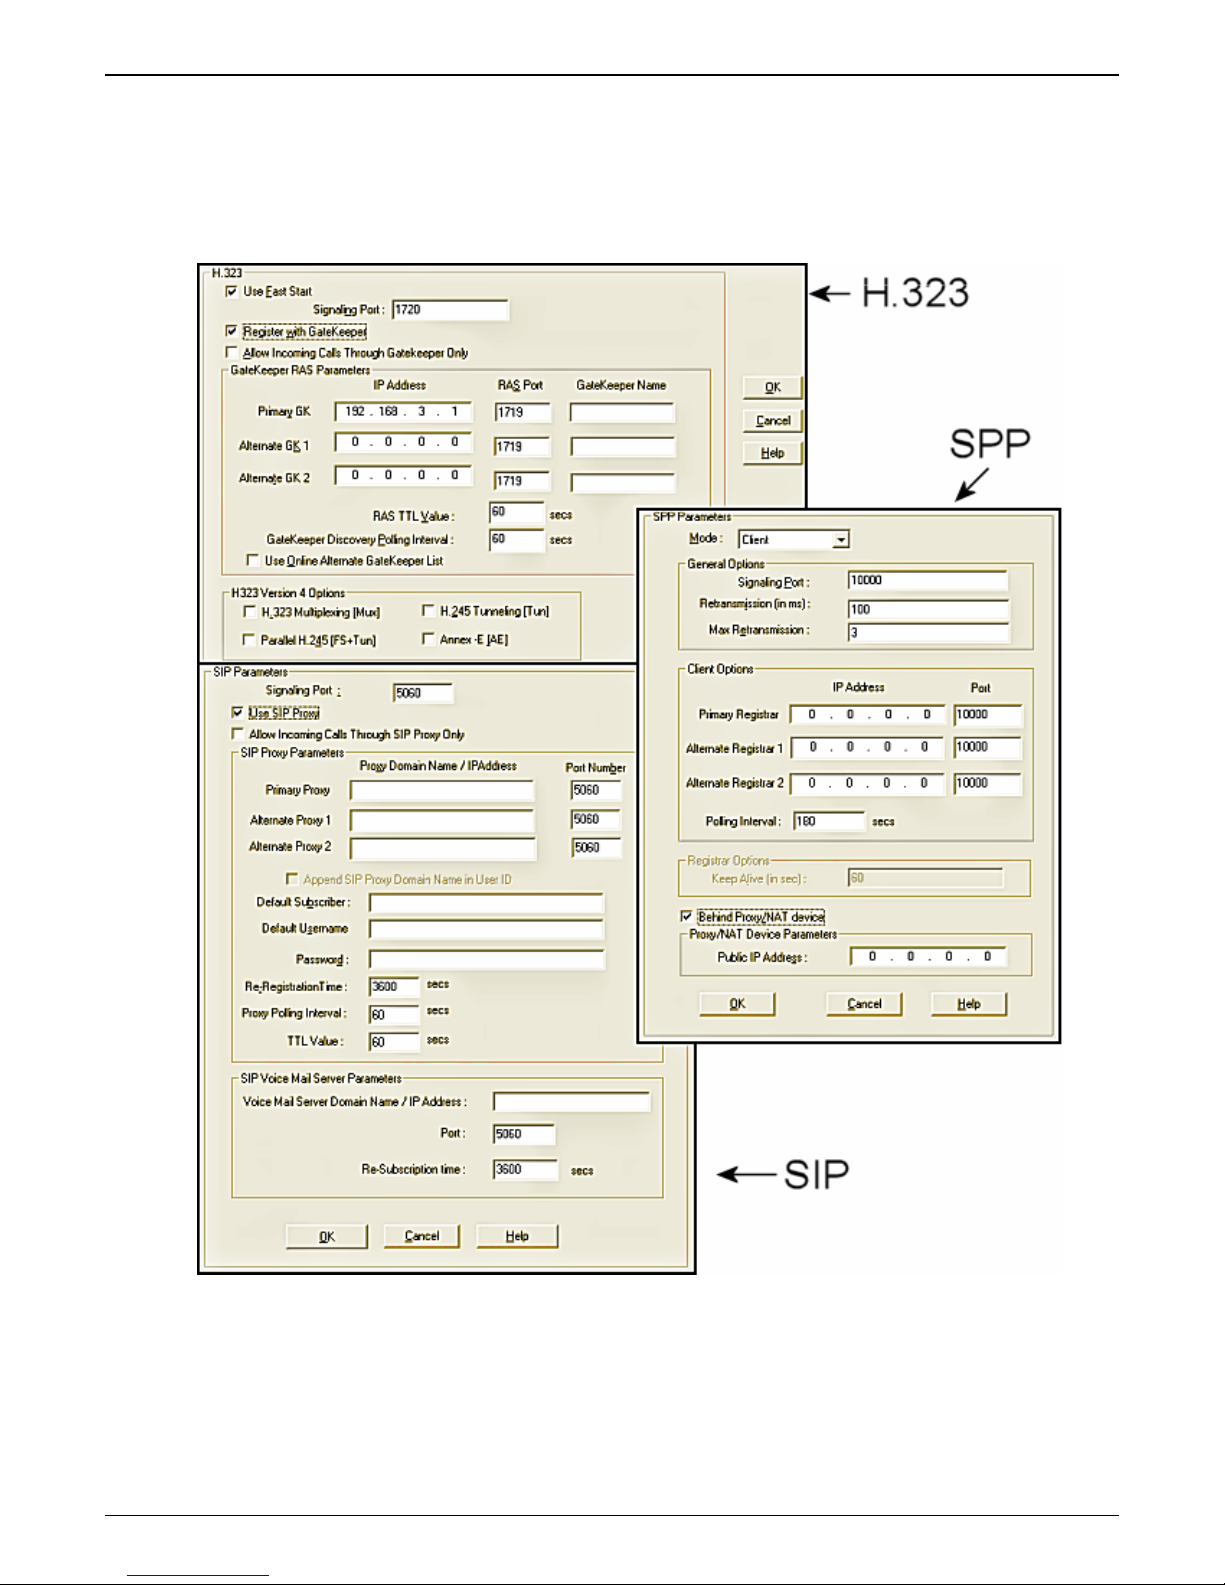
Call Signaling
There are three choices for Call Signaling: H.323, SIP and SPP. It is best to select one of these as the protocol to
be used, rather than mixing them. Single Port Protocol (SPP) is a non-standard protocol created by Multi-Tech
that allows dynamic IP allocation. Generally, the default settings will work for most users and the individual
parameters may be changed if the need arises. Additional details for all settings are found in Chapter 4.
Multi-Tech Systems, Inc. 19
Figure 3-10: Signaling Protocols
Page 20

Actions:
• Configure your chosen Call Signal type
o H.323
o SIP
o SPP
Chapter 3: Software Installation
Use Fast Start (may be needed for third-party vendor compatibility)
Signaling Port (default is 1720)
Register with Gatekeeper (needed if the VOIP is to be controlled by a gatekeeper)
Allow Incoming Calls Through Gatekeeper Only
Gatekeeper RAS Parameters
• Enter parameters for Primary and any Alternate Gatekeepers
• RAS TTL Value (“Time To Live” in seconds)
• Gatekeeper Discovery Polling Interval (time between attempts connecting to
gatekeepers)
• Use Online Alternate Gatekeeper List
H.323 Version 4 Options (detailed descriptions of these can be found in Chapter 4)
Signaling Port (default is 5060)
Use SIP Proxy (enable to work with a proxy server)
Allow Incoming Calls Through SIP Proxy Only
SIP Proxy Parameters
• Enter information for Primary and any Alternate Proxy servers
• Append SIP Proxy Domain Name in User ID
• Enter User Name and Password
• Re-Registration Time (in seconds)
• Proxy Polling Interval (time between proxy server connect attempts)
• TTL Value (in seconds)
Mode (Direct, Client or Registrar)
Signaling Port (must be unique for any VOIP unit behind same firewall)
Retransmission (time before retransmission of lost packets)
Max Retransmission (number of retransmission attempts)
Client Options
• Enter information for the Primary and Alternate Registrars
• Polling Interval (time between connect attempts)
Keep Alive (time out for client un-registering)
Behind Proxy/NAT device
• Enter Public IP of Proxy/NAT server
Multi-Tech Systems, Inc. 20
Page 21
Chapter 3: Software Installation
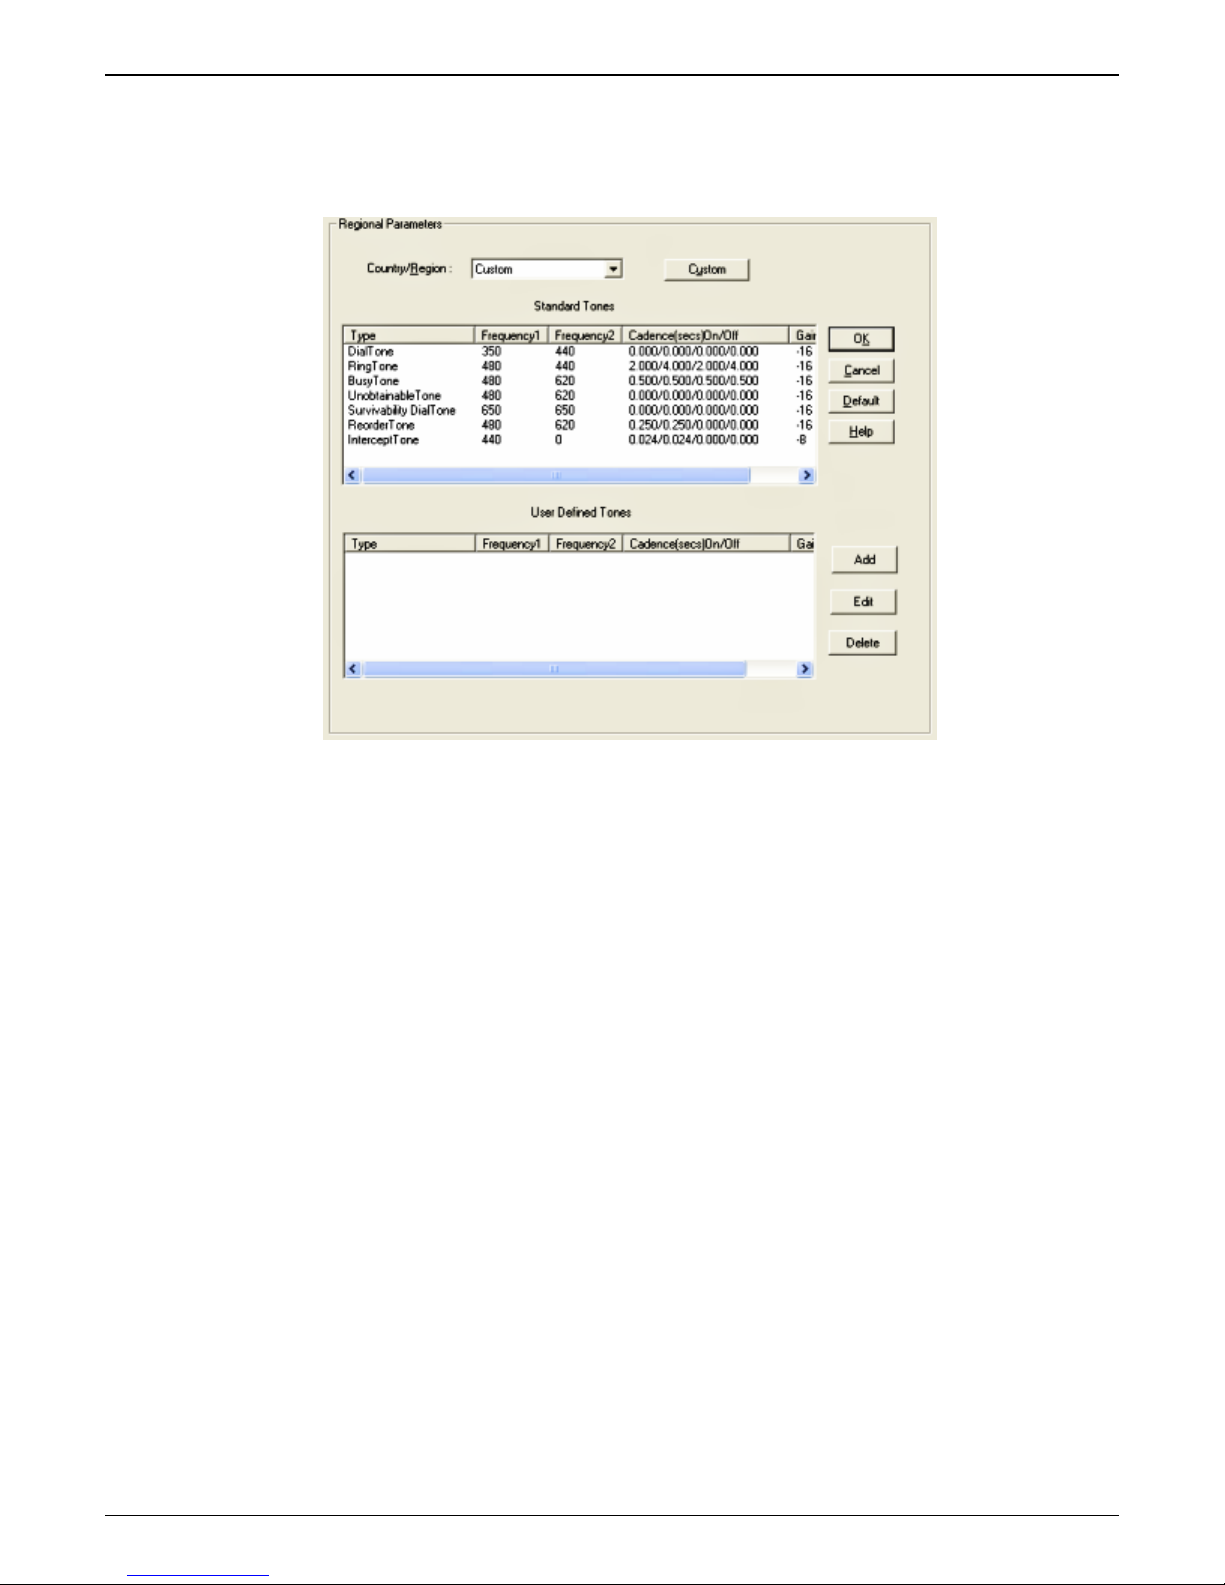
Regional
Select the country or region that the MultiVOIP unit will operate in, or use the custom option if the available
settings are not adequate.
Figure 3-11: Regional Parameters
Actions:
• Select the choice that matches the location of the MultiVOIP from the Country/Region field
o If there is not a selection to fit your needs, you may select Custom and set the tones manually
o User Defined tones can be created for use in conjunction with FXO Supervision with the Add
button
Multi-Tech Systems, Inc. 21
Page 22

Chapter 3: Software Installation
Phone Book
Without a populated phone book, the VOIP unit is unable to translate call traffic. You will need the information for
both a local and any remote sites that are to be used.
Detailed descriptions and examples are available in chapter 5.
Figure 3-12: Phone Book screens
Multi-Tech Systems, Inc. 22
Page 23

Actions:
• Select Outbound Phone Book
o Select Add Entry
o Accept Any Number may be selected to allow unmatched destinations an alternative
o Enter the number necessary to get out from the PBX system followed by the calling code of the
destination in the Destination Pattern field
o Enter the PBX access digit (same number as needed to get out of the PBX system) in the
Remove Prefix field
o Any digits that need to be added should be put in the Add Prefix field
o Enter the IP address of the call destination (add a Description if you like)
o Select a Protocol type
For H.323:
• Enter Gateway settings
For SIP:
• Select Transport Protocol, Proxy and URL if needed
For SPP:
• Enter Registrar settings if needed
o The Advanced Button will allow an Alternate IP Address to be entered for outbound traffic
• Select Inbound Phone Book
o Select Add Entry
o Accept Any Number for inbound traffic does not work when external routing devices are used
o Enter any access digits followed by the local calling code in the Remove Prefix field
o Enter any digits needed to access an outside line in the Add Prefix field
o Select Hunting in the Channel Number field to have the VOIP use the next available channel
o Add a description if you like
o Call Forward may be set up (details available in Chapter 5)
o Select Registration Option
• Repeat the Phone Book steps for any additional entries needed
Chapter 3: Software Installation
Save & Reboot
Any time that you change settings on the VOIP unit, you must choose the Save & Reboot option; otherwise all
changes made will be lost when the MultiVOIP is reset or shutdown.
Multi-Tech Systems, Inc. 23
Page 24

Chapter 4 – Configuring Your MultiVOIP
Introduction
There are two methods of using your MultiVOIP; one is through a web interface, and the other is through the
Windows software interface. There are eight necessary parameters that must be set for the MultiVOIP unit to
operate properly, with some additional settings that are optional. You must know the IP address that will be used,
the IP mask, the Gateway IP, the Domain Name Server information, and the telephone interface type. The
MultiVOIP must be configured locally at first, but changes to this initial configuration can be done locally or
remotely. Local configuration is done through a connection between the “Command” port of the MultiVOIP and the
COM port of the computer; the MultiVOIP configuration software is used for this.
Alternatively, MultiVoipManager is a Simple Network Management Protocol (SNMP) agent program that extends
the capabilities of the MultiVOIP configuration software. MultiVoipManager allows the user to manage any number
of VOIPs on a network, whereas the MultiVOIP configuration software manages only one. The MultiVoipManager
can configure multiple VOIPs simultaneously. MultiVoipManager may reside on the same PC as the MultiVOIP
configuration software.
This chapter will explain the setup portion of the software pertaining to the list below, while Chapter 5 will cover
the Phone Book setup and Chapter 6 will discuss the Statistics options and overall maintenance of the MultiVOIP.
Software Categories Covered in This Chapter
¾ Ethernet/IP
¾ Voice/Fax
¾ Interface
¾ Call Signaling
o H.323/SIP/SPP
¾ SNMP
¾ Regional
¾ SMTP
¾ RADIUS
¾ Logs/Traces
¾ NAT Traversal
¾ Supplementary services
¾ Save Setup
¾ Connection
o Settings
Multi-Tech Systems, Inc. 24
Page 25

Chapter 4: Configuring your VOIP
How to Navigate Through the Software
The MultiVOIP software is launched from the Start button and is found in the All Programs area under the title of
MultiVOIP n.nn (where n represents version number). The top option is “Configuration” – choose this.
Within the software, there are several ways to arrive at the parameter that you want to use: through the left-hand
panel, from the drop-down menu, clicking a taskbar icon (if available) or a keyboard shortcut (if available). Once
the initial settings are entered, you may choose to configure the MultiVOIP through a Web browser instead.
Web Browser Interface
The MultiVOIP web browser interface gives access to the same commands and configuration para meters as are
available in the MultiVOIP Windows interface except for logging functions. When using the web browser interface,
logging can be done by email (the SMTP option).
Set up the Web Browser interface (Optional). After an IP address for the MultiVOIP unit has been establ ished,
you can choose to configure the unit by using the MultiVOIP web browser interface. If you want to do
configuration work using the web browser interface, you must first set it up:
• Set IP address of MultiVOIP unit using the MultiVOIP Configuration program (the Windows interface).
• Save Setup in Windows interface.
• Close Windows interface.
• Install Java program from MultiVOIP product CD (on first use only).
• Open web browser.
• Browse to IP address of MultiVOIP unit.
• If username and password have been established, enter them when prompted.
• Set browser to allow pop-ups. The MultiVOIP Web interface makes use of pop-up windows.
• The configuration screens in the web browser will have the same content as their counterparts in the
software; only the presentation differs.
Configuration Information Checklist
To assist with the organization of the information needed, below is a chart summarizing what is necessary.
Type of Configuration Info
Gathered:
IP info for VOIP unit
• IP address
• Gateway
• DNS IP (if used)
• 802.1p Prioritization (if used)
Interface Type
• FXS/FXO*
• DID-DPO
DID info (only if DID used)
• Wink
• Immediate
• Delay Dial
Country code
Email address for VOIP (optional)
Reminder: Be sure to Save Setup after entering configuration values.
Configuration screen where info is entered:
Ethernet/IP parameters
Interface parameters
In FXS/FXO systems, channels used for phone, fax,
(*
or key system are FXS; channels used for analog
PBX extensions or analog telco lines are FXO
Interface parameters
Regional parameters
SMTP parameters
Info
Obtained?
D
).
Info
Entered?
D
Multi-Tech Systems, Inc. 25
Page 26
Chapter 4: Configuring your VOIP
Ethernet/IP
This section covers the Ethernet settings needed for the MultiVOIP unit. In each field, enter the values that fit the
network to which the MultiVOIP will be connected to. For many of the settings, the default values will work best –
try these settings first unless you know you definitely need to change a parameter.
The Ethernet/IP Parameters fields are described in the tables and text passages below. Note that both Diff Serv
parameters (Call Control PHB and VOIP Media PHB) must be set to zero if you enable Packet Prioritization
(802.1p). Nonzero Diff Serv values negate the prioritization scheme.
Multi-Tech Systems, Inc. 26
Figure 4-1: Network parameters
Page 27

Chapter 4: Configuring your VOIP
Ethernet/IP Parameter Definitions
Field Name Values Description
Ethernet Parameters
Packet Prioritization
(802.1p)
Frame Type Type II, SNAP Must be set to match network’s frame type. Default is Type II.
802.1p A draft standard of the IEEE about data traffic prioritization on Ethernet networks. The 802.1p
Call Control Priority 0-7, where 0 is
VOIP Media Priority 0-7, where 0 is
Others (Priorities) 0-7, where 0 is
VLAN ID 1 - 4094 The 802.1Q IEEE standard allows virtual LANs to be defined within a network.
IP Parameter fields
Gateway Name alphanumeric Descriptor of current VOIP unit to distinguish it from other units in system.
Enable DHCP Y/N
IP Address
IP Mask
Gateway
Table is continued on next page…
Y/N Select to activate prioritization under 802.1p protocol (described below).
draft is an extension of the 802.1D bridging standard. 802.1D determines how prioritization will
operate within a MAC-layer bridge for any kind of media. The 802.1Q draft for virtual local-areanetworks (VLANs) addresses the issue of prioritization for Ethernet networks in particular.
802.1p enacts this Quality-of-Service feature using 3 bits. This 3-bit code allows data switches to
reorder packets based on priority level. The descriptors for the 8 priority levels are given below.
802.1p PRIORITY LEVELS:
LOWEST PRIORITY
1 – Background: Bulk transfers and other activities permitted on the network, but should not
affect the use of network by other users and applications.
2 – Spare: An unused (spare) value of the user priority.
0 – Best Effort (default): Normal priority for ordinary LAN traffic.
3 – Excellent Effort: The best effort type of service that an information services organization
would deliver to its most important customers.
4 – Controlled Load: Important business applications subject to some form of “Admission
Control”, such as preplanning of Network requirement, characterized by bandwidth
reservation per flow.
5 – Video: Traffic characterized by delay < 100 ms.
6 – Voice: Traffic characterized by delay < 10 ms.
7 - Network Control: Traffic urgently needed to maintain and support network infrastructure.
HIGHEST PRIORITY
lowest priority
lowest priority
lowest priority
disabled by
default
n.n.n.n
n.n.n.n
n.n.n.n
Sets the priority for signaling packets.
Sets the priority for media packets.
Sets the priority for SMTP, DNS, DHCP, and other packet types.
This field identifies each virtual LAN by number.
Dynamic Host Configuration Protocol is a method for assigning IP address and
other IP parameters to computers on the IP network in a single message with
great flexibility. IP addresses can be static or temporary depending on the
needs of the computer.
The unique LAN IP address assigned to the MultiVOIP.
Subnetwork address that allows for sharing of IP addresses within a LAN.
The IP address of the device that connects your MultiVOIP to the Internet.
Multi-Tech Systems, Inc. 27
Page 28

Chapter 4: Configuring your VOIP
Ethernet/IP Parameter Definitions (continued)
Field Name Values Description
Diff Serv
Parameter
fields
Call Control
PHB
VOIP Media
PHB
FTP Parameter fields
FTP Server
Enable
DNS Parameter fields
Enable DNS Y/N
Enable SRV Y/N Enables ‘service record’ function. Service record is a category of data in the Internet
DNS Server IP
Address
Diff Serv PHB (Per Hop Behavior) values pertain to a differential prioritizing system for IP packets as
handled by Diff Serv-compatible routers. There are 64 values, each with an elaborate technical
description. These descriptions are found in TCP/IP standards RFC2474, RFC2597, and, for present
purposes, in RFC3246, which describes the value 34 (34 decimal; 22 hex) for Assured Forwarding
behavior (default for Call Control PHB) and the value 46 (46 decimal; 2E hexadecimal) for Expedited
Forwarding behavior (default for VOIP Media PHB). Before using values other than these default
values of 34 and 46, consult these standards documents and/or a qualified IP telecommunications
engineer.
To disable Diff Serv, configure both fields to 0 decimal.
0 – 63
default = 34
0 – 63
default = 46
Y/N
Default =
disabled
See “FTP
Server File
Transfers” in
Chapter 6
Default =
disabled
n.n.n.n
Value is used to prioritize call setup IP packets.
Setting this parameter to 0, in conjunction with VOIP Media PHB below will disable
Diff Serv.
Value is used to prioritize the RTP/RTCP audio IP packets.
Setting this parameter to 0, in conjunction with Call Control PHB above will disable
Diff Serv.
MultiVOIP unit has an FTP Server function so that firmware and other important
operating software files can be transferred to the VOIP via the network.
Enables Domain Name Space/System function where computer names are resolved
using a worldwide distributed database.
Domain Name System specifying information on available servers for a specific
protocol and domain, as defined in RFC 2782. Newer internet protocols like SIP,
STUN, H.323, POP3, and XMPP may require SRV support from clients. Client
implementations of older protocols, like LDAP and SMTP, may have been enhanced
in some settings to support SRV.
IP address of specific DNS server to be used to resolve Internet computer names.
Multi-Tech Systems, Inc. 28
Page 29
Chapter 4: Configuring your VOIP
Voice/Fax
Setting the Voice/FAX Parameters. The Voice/Fax section needs to be set for your system. The majority of the
settings should be left at their default settings as changes often introduce problems with signal quality. In each
field, enter the values that fit your particular setup.
Modem relay is not supported in MVP130 and MVP130-FXS models. Instead, modem bypass is supported
automatically when modems are used for communication. It is recommended to disable the FAX relay when doing
modem bypass for a higher success rate.
The Voice/FAX Parameters settings are described in the tables below.
Multi-Tech Systems, Inc. 29
Figure 4-2: Voice/Fax parameters
Page 30

Chapter 4: Configuring your VOIP
Voice/Fax Parameter Definitions
Field Name Values Description
Default -- When this button is clicked, all Voice/FAX parameters are set to their default values.
Select Channel 1-2 (210)
1-4 (410)
1-8 (810)
Copy Channel -- Copies the Voice/FAX attributes of one channel to another channel. Attributes can be
Voice Gain -- Signal amplification (or attenuation) in dB.
Input Gain +31dB to
–31dB
Output Gain +31dB to
–31dB
DTMF Gain --
DTMF Gain,
High Tones
DTMF Gain, Low
Tones
DTMF Parameters
Duration (DTMF) 60 – 3000
DTMF
In/Out of Band
Out of Band
Mode
FAX Parameters
Fax Enable Y/N Enables or disables fax capability for a particular channel.
Max Baud Rate
(Fax)
Fax Volume
(Default =
-9.5 dB)
Jitter Value (Fax) Default =
Mode (Fax) FRF 11;
Table is continued on next page…
+3dB to
-31dB &
“mute”
+3dB to
-31dB &
“mute”
ms
Out of
Band, or
Inband
RFC 2833,
SIP Info
2400,
4800,
7200,
9600,
12000,
14400 bps
-18.5 dB
to –3.5 dB
400 ms
T.38
Channel to be configured is selected here.
copied to multiple channels or all channels at once.
Modifies audio level entering voice channel before it is sent over the network to the
remote VOIP. The default & recommended value is 0 dB.
Modifies audio level being output to the device attached to the voice channel. The
default and recommended value is 0 dB.
The DTMF Gain (Dual Tone Multi-Frequency) controls the volume level of the DTMF
tones sent out for Touch-Tone dialing.
Default value: -4 dB. Not to be changed except under supervision of Multi-Tech
Technical Support.
Default value: -7 dB. Not to be changed except under supervision of Multi-Tech
Technical Support.
When DTMF: Out of Band is selected, this setting determines how long each DTMF
digit ‘sounds’ or is held. Default = 100 ms.
When DTMF Out of Band is selected, the MultiVOIP detects DTMF tones at its input
and regenerates them at its output. When DTMF Inband is selected, the DTMF digits
are passed through the MultiVOIP unit as they are received.
RFC2833 method. Uses an RTP mode defined in RFC 2833 to transmit the DTMF
digits.
SIP Info method. Generates dual tone multi frequency (DTMF) tones on the
telephony call leg. The SIP INFO message is sent along the signaling path of the call.
You must set this parameter per the capabilities of the remote endpoint with which
the VOIP will communicate. The RFC2833 method is the more common of the two
methods.
Set to match baud rate of fax machine connected to channel (see Fax machine’s user
manual).
Default = 14400 bps.
Controls output level of fax tones. To be changed only under the direction of MultiTech’s Technical Support.
Defines the inter-arrival packet deviation (in milliseconds) for the fax transmission. A
higher value will increase the delay, allowing a higher percentage of packe ts to be
reassembled. A lower value will decrease the delay allowing fewer packets to be
reassembled.
FRF11 is frame-relay FAX standard using these coders: G.711, G.728, G.729,
G.723.1.
T.38 is an ITU-T standard for real time faxing of Group 3 faxes over IP networks. It
uses T.30 fax standards and includes special provisions to preclude FAX timeouts
during IP transmissions.
Multi-Tech Systems, Inc. 30
Page 31

Coder Parameters
Coder Manual or
Automatic
Selected Coder
Selected Coder:
“Coder Priority”
Max bandwidth
(coder)
Silence
Compression
Echo
Cancellation
Forward Error
Correction
Table is continued on next page…
G.711 a/u law 64 kbps;
G.726, @ 16/24/32/40 kbps;
G.727, @ nine bps rates;
G.723.1 @ 5.3 kbps, 6.3 kbps;
G.729, 8kbps;
Net Coder @
6.4, 7.2, 8, 8.8, 9.6 kbps
G.711, G.729
-or-
G.729, G.711
11 – 128 kbps
Advanced Features
Y/N Determines whether silence compression is enabled (checked)
Y/N Determines whether echo cancellation is enabled (checked) for
Y/N Determines whether forward error correction is enabled
Chapter 4: Configuring your VOIP
Voice/Fax Parameter Definitions (continued)
Determines whether selection of coder is manual or automatic.
When Automatic is selected, the local and remote voice channels
will negotiate the voice coder to be used by selecting the highest
bandwidth coder supported by both sides without exceeding the
Max Bandwidth setting. G.723, G.729, or G.711 is negotiated.
Select from a range of coders with specific bandwidths. The
higher the bps rate, the more bandwidth is used. The channel
that you are calling must have the same voice coder selected.
Default = G.723.1 @ 6.3 kbps, as required for H.323. Here 64K
of digital voice is compressed to 6.3K, allowing several
simultaneous conversations over the same bandwidth that would
otherwise carry only one.
To make selections from the Selected Coder drop-down list, the
Manual option must be enabled.
Coder Priority has two options (G.711, G.729 or G.729, G711)
on the Selected Coder listing of the Coder group on the
Voice/Fax screen. If G.711 is the higher priority, i.e., G.711 is
preferred to G729 on the sending side, then G.711, G.729 option
is selected. Similarly, if G.729 has the higher priority, then G.729,
G.711 option is selected.
It is used whenever a user wants to advertise both G.711 and
G.729 coders with higher preference to a particular coder.
It is useful when the calls are made from a particular channel on
the VOIP to two different destinations where one supports G.711
and the other supports G.729.
This drop-down list enables you to select the maximum
bandwidth allowed for this channel. The Max Bandwidth dropdown list is enabled only if the Coder is set to Automatic.
If coder is to be selected automatically (“Auto” setting), then enter
a value for maximum bandwidth.
for this voice channel.
With Silence Compression enabled, the MultiVOIP will not
transmit voice packets when silence is detected, thereby
reducing the amount of network bandwidth that is being used by
the voice channel (default = on).
this voice channel.
Echo Cancellation removes echo and improves sound quality
(default = on).
(checked) for this voice channel.
Forward Error Correction enables some of the voice packets
that were corrupted or lost to be recovered. FEC adds an
additional 50% overhead to the total network bandwidth
consumed by the voice channel (default = Off).
Multi-Tech Systems, Inc. 31
Page 32

Chapter 4: Configuring your VOIP
Voice/Fax Parameter Definitions (continued)
Field Name Values Description
AutoCall/Offhook Alert
Parameters
Auto Call / Offhook
Alert
Generate Local Dial
Tone
Offhook Alert Timer 0 – 3000
Phone Number -- Phone number used for Auto Call function or Offhook Alert Timer function. This
Table is continued on next page…
AutoCall,
Offhook
Alert
Y/N Used for AutoCall only. If selected, dial tone will be generated locally while the
seconds
The AutoCall option enables the local MultiVOIP to call a remote MultiVOIP
without the user having to dial a Phone Directory Database number. As soon as
you access the local MultiVOIP voice/fax channel, the MultiVOIP immediately
connects to the remote MultiVOIP identified in the Phone Number box of this
option.
If the “Pass Through Enable” field is checked in the Interface Parameters
screen, AutoCall must be used.
The Offhook Alert option applies only to FXS channels.
The Offhook Alert option works like this: if a phone goes off hook and yet no
number is dialed within a specific period of time (as set in the Offhook Alert
Timer field), then that phone will automatically dial the Alert phone number for
the VOIP channel. (The Alert phone number must be set in the Voice/Fax
Parameters | Phone Number field; if the VOIP system is working without a
gatekeeper unit, there must also be a matching phone number entry in the
Outbound Phonebook.). One use of this feature would be for emergency use
where a user goes off hook but does not dial, possibly indicating a crisis
situation. The Offhook Alert feature uses the Intercept Tone, as listed in the
Regional Parameters screen. This tone will be outputted on the phone that
was taken off hook but that did not dial. The other end of the connection will
hear audio from the “crisis” end as is it would during a normal phone call.
Both functions apply on a channel-by-channel basis. It would not be appropriate
for either of these functions to be applied to a channel that serves in a pool of
available channels for general phone traffic. Either function requires an entry in
the Outgoing phonebook of the local MultiVOIP and a matched setting in the
Inbound Phonebook of the remote VOIP.
call is being established between gateways. The capability to generate dial tone
locally would be particularly useful when there is a lengthy network delay.
The length of time that must elapse before the off hook alert is triggered and a
call is automatically made to the phone number listed in the Phone Number
field.
phone number must correspond to an entry in the Outbound Phonebook of the
local MultiVOIP and in the Inbound Phonebook of the remote MultiVOIP (unless
a gatekeeper unit is used in the VOIP system).
Multi-Tech Systems, Inc. 32
Page 33

Voice/Fax Parameter Definitions (continued)
Field Name Values Description
Dynamic Jitter
Dynamic Jitter Buffer
Minimum Jitter Value 60 to 400
ms
Maximum Jitter Value 60 to 400
ms
Optimization Factor 0 to 12
Auto Disconnect
Automatic
Disconnection
Jitter Value 1-65535
Call Duration 1-65535
Consecutive Packets
Lost
Network
Disconnection
--
1-65535
1 to 65535;
Default =
30 sec.
Configurable Payload Type
Chapter 4: Configuring your VOIP
Dynamic Jitter defines a minimum and a maximum jitter value for voice
communications. When receiving voice packets from a remote MultiVOIP,
varying delays between packets may occur due to network traffic problems.
This is called Jitter. To compensate, the MultiVOIP uses a Dynamic Jitter
Buffer. The Jitter Buffer enables the MultiVOIP to wait for delayed voice
packets by automatically adjusting the length of the Jitter Buffer between
configurable minimum and maximum values. An Optimization Factor
adjustment controls how quickly the length of the Jitter Buffer is increased
when jitter increases on the network. The length of the jitter buffer directly
affects the voice delay between MultiVOIP gateways.
The minimum dynamic jitter buffer of 60 milliseconds is the minimum delay
that would be acceptable over a low jitter network.
Default = 150 ms
The maximum dynamic jitter buffer of 400 milliseconds is the maximum delay
tolerable over a high jitter network.
Default = 300 ms
The Optimization Factor determines how quickly the length of the Dynamic
Jitter Buffer is changed based on actual jitter encountered on the network.
Selecting the minimum value of 0 means low voice delay is desired, but
increases the possibility of jitter-induced voice quality problems. Selecting the
maximum value of 12 means highest voice quality under jitter conditions is
desired at the cost of increased voice delay.
Default = 7.
The Automatic Disconnection group provides four options which can be
used singly or in any combination.
The Jitter Value defines the average inter-arrival packet deviation (in
milliseconds) before the call is automatically disconnected. The default is 300
milliseconds. A higher value means voice transmission will be more accepting
of jitter. A lower value is less tolerant of jitter.
Inactive by default. When active, default = 300 ms. However, value must equal
or exceed Dynamic Minimum Jitter Value.
Call Duration defines the maximum length of time (in seconds) that a call
remains connected before the call is automatically disconnected.
Inactive by default.
When active, default = 180 sec.
This may be too short for some configurations, requiring upward adjustment.
Consecutive Packets Lost defines the number of consecutive packets that
are lost after which the call is automatically disconnected.
Inactive by default.
When active, default = 30
Specifies how long to wait before disconnecting the call when IP network
connectivity with the remote site has been lost.
The Configurable Payload Type is located on the bottom of the Voice/Fax screen. The Configurable Payload
Type is used when the remote side uses a different payload type for the associated features. In previous
firmware versions, MultiVOIP’s used 101 for DTMF RFC2833. If the remote side uses some other dynamic
payload type such as 110, it will fail. To avoid these failures, the payload types are made configurable.
DTMF RFC2833 Configurable Payload Type is supported only for SIP & SPP but not for H.323.
Whenever you interoperate with older MultiVOIP products (i.e., earlier than release n.11), for backward
compatibility, make sure to configure the payload type values to default ones, which match the values of
older MultiVOIP’s.
Multi-Tech Systems, Inc. 33
Page 34

Chapter 4: Configuring your VOIP
Interface
The Telephony Interface parameters are set individually for each channel and include the line types as well as
some specific situational settings for those that need them. The kinds of parameters for which values must be
chosen depend on the type of telephony supervisory signaling or interface used. Here you will find the various
parameters grouped and organized by interface type. In each field, enter the values that fit your particular setup.
The screen below shows more options available than are actually used for clarity. Your settings will determine
what fields are available.
Multi-Tech Systems, Inc. 34
Figure 4-3: Telephony parameters
Page 35

Chapter 4: Configuring your VOIP
FXS Loop Start Parameters
The parameters applicable to FXS Loop Start are shown in the figure below and described i n the table
that follows.
Figure 4-4: FXS Loop Start parameters
FXS Loop Start Interface: Parameter Definitions
Field Name Values Description
Dialing Options fields
FXS (Loop Start) Y/N Enables FXS Loop Start interface type.
Inter Digit Timer 1 - 10 seconds This is the length of time that the MultiVOIP will wait between digits.
Message Waiting
Indication
Inter Digit
Regeneration Time
FXS Options fields
FXS Ring Count,
FXS
Current Loss Y/N When enabled, the MultiVOIP will interrupt loop current in the FXS
Generate Current
Reversal
Table is continued on next page…
in milliseconds
1-99 Maximum number of rings that the MultiVOIP will issue before giving
Y/N When selected, this option implements Answer Supervision and
--
When the time expires, the MultiVOIP will look in the outbound
phonebook for the number entered and place the call accordingly.
Default = 2.
See details below.
The length of time between the outputting of DTMF digits.
Default = 100 ms.
up the attempted call.
circuit to initiate a disconnection. This tells the device connected to the
FXS port to hang up. The Multi-VOIP cannot drop the call; the FXS
device must go on hook.
Disconnect Supervision to the FXO interface using current reversal to
indicate events. Applicable only when FXS and FXO interfaces are
connected back to back.
Multi-Tech Systems, Inc. 35
Page 36

Chapter 4: Configuring your VOIP
FXS Loop Start Interface: Parameter Definitions (continued)
Field Name Values Description
Flash Hook Options fields
Generation
Detection Range
Pass Through
Enable
Caller ID fields
Type Bellcore The MultiVOIP currently supports only one implementation of Caller
Enable Y/N Caller ID information is a description of the remote calling party
CID Manipulation Enabled by
CID Mode Transparent,
-- Not applicable to FXS interface
for Min. and
Max., 50 - 1500
milliseconds
Y/N When enabled, this parameter creates an open audio path through the
default with
Caller ID enable
above
Disable
User CID,
Prefix,
Suffix
For a received flash hook to be regarded as such by the MultiVOIP, its
duration must fall between the minimum and maximum values given
here
MultiVOIP.
If the Pass-Through feature is enabled, the AutoCall feature must be
enabled for this VOIP channel in the Voice/Fax Parameters screen
ID. That implementation is Bellcore type 1 with Caller ID placed
between the first and second rings of the call.
received by the called party. The description has three parts: name of
caller, phone number of caller, and time of call. The ‘time-of-call’
portion is always generated by the receiving MultiVOIP unit (on FXS
channel) based on its date and time setup.
The forms of the ‘Caller Name’ and ‘Caller Phone Number’ differ
depending on the IP transmission protocol used (H.323, SIP, or SPP)
and upon entries in the phonebook screens of the remote (CID
generating) VOIP unit. The CID Name and Number appearing on the
phone at the terminating FXS end will come either from a central office
switch (showing a PSTN phone number), or the phonebook of the
remote (CID sending) VOIP unit.
Caller ID Manipulation is used whenever the user wants to manipulate
the Caller ID before sending it to the remote end. Caller ID
Manipulation is activated on the Interface Screen. By enabling Caller
ID option, you can set manipulation to Transparent, User CID, Prefix,
Suffix, or Prefix and Suffix. Caller ID Manipulation is a feature, where
the Caller ID detected from the PSTN line can be changed and then
sent to the remote side over IP.
The MultiVOIP is not allowed to modify the caller ID info and then
send it to the PSTN side. It only allows it to detect the caller ID
from the PSTN line, modify it and then send them via IP to the
remote end point.
Transparent
without any manipulation.
User CID: the CID received from PSTN will be replaced by this User
CID value.
Prefix
Suffix
: the CID received from PSTN will be sent out as such,
: the CID received from PSTN will be prefixed with this value.
: the CID received from PSTN will be suffixed with this value.
Multi-Tech Systems, Inc. 36
Page 37

Chapter 4: Configuring your VOIP
Message Waiting
Message Waiting Indication is a feature that displays an audible or visible indication that a message
available. A type of message waiting is sounding a special dial tone (called stutter dial tone), lighting a light,
or indicator on the phone.
When a user enables a subscription for message waiting indication, a subscription is made with the Voice
Mail Server (VMS) for that particular event. Whenever the Voice Mail Server finds a change in the state of a
corresponding mailbox or some event happens (e.g., when a new voice message is recorded or a message
is deleted, then the VMS server sends a notification to the gateway. Its indication to the user is a flashing
LED or sounding a stutter dial tone.
The message waiting feature is active when the Use SIP Proxy option is selected on the Call Signaling SIP
screen, a Primary Proxy IP address is entered in the SIP Proxy Parameters Primary Proxy field, the Voice
Mail Server Domain Name or IP Address is entered in the SIP Voice Mail Server Parameters Group, and the
Interface Type is set to FXS (Loop start). Then the FXS Options Group becomes active. The Message
Waiting Indication options are None, Light, or Stutter Dial Tone.
Figure 4-5: Message Waiting
To receive messages from the VMS (Voice Mail Server/System), the subscription needs to be enabled and
the voice mail server address has to be entered in the SIP Voice Mail Server Parameters Group.
The Voice Mail server IP Address, Port and Re-subscription time are configured on the SIP Call Signaling
screen. When this is configured, the “Subscribe with Voice Mail Server” option is activated in the inbound
phone book. Only when this option is enabled, the subscribe message will be sent to the VMS.
The following sequence needs to be done to enable all of the Message Waiting Features:
1. The "Use SIP Proxy" must be enabled, and the SIP Proxy Parameters and Voice Mail Server Parameters
in the SIP Call Signaling Menu must be set, and the Interface Type option must be set to FXS (Loop Start)
on the Interface menu's "Message Waiting Indication" options become active.
2. Then the "Message Waiting Indication" options must be set to light or stutter tone for the "Subscribe to
Voice Mail Server" option to become available in the Inbound phone book entry with that channel selected.
3. In order to send Subscriptions for Inbound Phone Book entries, all the following four condition s have to be
satisfied:
• The user needs to enter a valid voice mail server domain name or IP address in the Voice Mail Server
Domain Name/IP Address field on the Call Signaling screen.
• For an Inbound Phone Book entry, a subscription with Voice Mail Server checkbox is enabled on the
Add or Edit Inbound Phone Book entries screen.
• The Channel type corresponding to that Inbound phone book entry has to be FXS on the Interface
screen.
• The Message Waiting Indication has to be either Light or Stutter Dial Tone on the Interface
Parameters screen.
The password on the Interface screen is used for that particular channel when a “SUBSCRIBE” request is
sent (i.e., if the MultiVOIP gets a 401/407 response from a subscribe request. Then it will take the configured
password, calculate the response, and resend the “SUBSCRIBE” request.
Multi-Tech Systems, Inc. 37
Page 38

Chapter 4: Configuring your VOIP
FXO Parameters
The parameters applicable to the FXO telephony interface type are shown in the figure below and
described in the table that follows.
Multi-Tech Systems, Inc. 38
Figure 4-6: FXO parameters
Page 39

Chapter 4: Configuring your VOIP
FXO Interface: Parameter Definitions
Field Name Values Description
Interface Type FXO Enables FXO functionality
Dialing Options
Regeneration Pulse, DTMF Determines whether digits generated and sent out will be pulse tones
Inter Digit Timer 1 to 10 seconds This is the length of time that the MultiVOIP will wait between digits.
Message Waiting
Indication
Inter Digit
Regeneration Time
FXO Options
FXO Ring Count 1-99 Number of rings required before the MultiVOIP answers the incoming
No Response
Timer
Flash Hook Options fields
Generation 50 - 1500
Detection Range
Caller ID fields
Caller ID Type Bellcore The MultiVOIP currently supports only one implementation of Caller
Caller ID enable Y/N Caller ID information is a description of the remote calling party
CID Manipulation Enabled by
CID Mode Transparent,
50 to 20,000
milliseconds
1 – 65535
(in seconds)
milliseconds
--
default with
Caller ID enable
above
Disable
User CID,
Prefix,
Suffix
--
or DTMF.
When the time expires, the MultiVOIP will look in the phonebook for
the number entered.
Default = 2.
Not applicable to FXO interface
The length of time between the outputting of DTMF digits.
Default = 100 ms.
call.
Length of time before call connection attempt is abandoned.
Length of flash hook that will be generated and sent out when the
remote end initiates a flash hook and it is regenerated locally. Default
= 600 ms.
Not applicable to FXO.
ID. That implementation is Bellcore type 1 with caller ID placed
between the first and second rings of the call.
received by the called party. The description has three parts: name of
caller, phone number of caller, and time of call. The ‘time-of-call’
portion is always generated by the receiving MultiVOIP unit (on FXS
channel) based on its date and time setup. The forms of the ‘Caller
Name’ and ‘Caller Phone Number’ differ depending on the IP
transmission protocol used (H.323, SIP, or SPP) and upon entries in
the phonebook screens of the remote (CID generating) VOIP unit. The
CID Name and Number appearing on the phone at the terminating
FXS end will come either from a central office switch (showing a PSTN
phone number), or the phonebook of the remote (CID sending) VOIP
unit.
Caller ID Manipulation is used whenever the user wants to manipulate
the Caller ID before sending it to the remote end. Caller ID
Manipulation is activated on the Interface Screen. By enabling Caller
ID option, you can set manipulation to Transparent, User CID, Prefix,
Suffix, or Prefix and Suffix. Caller ID Manipulation is a feature, where
the Caller ID detected from the PSTN line can be changed and then
sent to the remote side over IP.
The MultiVOIP is not allowed to modify the caller ID info and then
send it to the PSTN side. It only allows it to detect the caller ID
from the PSTN line, modify it and then send them via IP to the
remote end point.
Transparent
without any manipulation.
User CID
CID value.
Prefix:
Suffix
: the CID received from PSTN will be sent out as such,
: the CID received from PSTN will be replaced by this User
the CID received from PSTN will be prefixed with this value.
: the CID received from PSTN will be suffixed with this value.
Multi-Tech Systems, Inc. 39
Page 40

Chapter 4: Configuring your VOIP
FXO Supervision
When the selected Interface type is FXO, the Supervision button is active. Click on this button to access
call answering supervision parameters and call disconnection para meters that relate to the FXO interface
type.
The table below describes the settings for FXO Supervision.
Multi-Tech Systems, Inc. 40
Figure 4-7: FXO Supervision
Page 41

Chapter 4: Configuring your VOIP
FXO Supervision Parameter Definitions
Field Name Values Description
Answer Supervision fields
Current Reversal Y/N When this option is selected, the FXO interface sends notice to make
Answer Delay Y/N When this option is selected, the FXO interface sends the conn ection
Answer Delay
Timer
Tone Detection Y/N When selected, call disconnection will be triggered by a tone
Available Tones dial tone,
Answer Tones any tone from
Disconnect Supervision fields
Current Reversal Y/N Disconnection to be triggered by reversal of current from the PBX.
Current Loss Y/N Disconnection to be triggered by loss of current. That is, when Current
Current Loss Timer 200 to 2000
Silence Detection
Enable
Silence Detection
Type
Silence Timer in
seconds
Table is continued on next page…
1 – 65535
(in seconds)
ring tone,
busy tone,
unobtainable tone
(fast busy),
survivability tone,
re-order tone
Available Tones list
(in milliseconds)
Y/N Enables/disables silence-detection method of supervising call
One-Way or
Two-Way
integer value Duration of silence required to trigger disconnection.
connection upon detecting current reversal from the PBX (which
occurs when the called extension goes off hook).
notice to the calling party only when the Answer Delay Timer expires.
The connection notice is sent regardless of whether or not the called
extension has gone off hook.
When Answer Delay is enabled, this value determines when the FXO
interface sends the connection notice.
sequence
List from which tones can be chosen to signal call answer.
Currently chosen call-answer supervision tone.
There are four possible criteria for disconnection under FXO: current
reversal, current loss, tone detection, and silence detection.
Disconnection can be triggered by more than one of the three criteria.
Loss is enabled (“Y”), the MultiVOIP will hang up the call at a specified
interval after it detects a loss of current initiated by the attached
device.
Determines the interval after detection of current loss at which the call
will be disconnected.
disconnection.
Disconnection to be triggered by silence in one direction only or in
both directions simultaneously
Multi-Tech Systems, Inc. 41
Page 42

Chapter 4: Configuring your VOIP
FXO Supervision Parameter Definitions (continued)
Field Name Values Description
Disconnect Supervision fields
DTMF Tone Enables supervision of call disconnection using DTMF tones.
DTMF Tone Pairs
Low Tones
High Tones
1 2 3 A
4 5 6 B
7 8 9 C
* 0 # D
1209Hz 1336Hz 1447Hz 1633Hz
697Hz
770Hz
852Hz
941Hz
Disconnect
Tone
Sequence
Tone Detection Y/N Enables supervision of call disconnection by detecting cessation of a
Available
Tones
Disconnect
Tones
1st tone pair
+
2nd tone pair
dial tone,
ring tone,
busy tone,
unobtainable tone
(fast busy),
survivability tone,
re-order tone
any tone from
Available Tones list
These are DTMF tone pairs.
Values for first tone pair are: *, #, 0, 1-9, and A-D.
Values for second tone pair are: none, 0, 1-9, A-D, *, and #.
The tone pairs 1-9, 0, *, and # are the standard DTMF pairs found on
phone sets. The tone pairs A-D are “extended DTMF” tones, which are
used for various PBX functions.
pre-specified tone from the PBX.
List from which tones can be chosen to signal call disconnection.
Currently chosen disconnection supervision tone.
Multi-Tech Systems, Inc. 42
Page 43

Chapter 4: Configuring your VOIP
DID Parameters
The parameters applicable to the Direct Inward Dial (DID) telephony interface ty pe are shown in the figure
below and described in the table that follows. The DID interface allows one phone line to direct incoming
calls to any one of several extensions without a switchboard operator. Of course, one DID line can handle
only one call at a time. The parameters described here pertain to the customer-premises side of the DID
connection (DID-DPO, dial-pulse originating); the network side of the DID connection (DID-DPT, dialpulse terminating) is not supported.
The –FXS model does not support DID.
Figure 4-8: DID parameters
DID Interface Parameter Definitions
Field Name Values Description
Interface DID-DPO Enables the customer-premises side of DID functionality
DID Options
Start Modes Immediate Start,
Wink Start,
Delay Dial
Wink Timer
(in ms)
Dialing Options
Inter Digit Timer Integer values,
Message Waiting
Indication
Inter-Digit
Regeneration
Timer
Integer values,
in milliseconds
in seconds
-- Not applicable to DID-DPO interface.
Integer values,
in milliseconds
MultiVOIP’s use of DID applies only for incoming DID calls. The Start
Mode used by the MultiVOIP must match that used by the originating
telephony equipment; else DID calls cannot be completed.
For Immediate Start, the VOIP detects the off-hook condition initiated
by the telco central-office call and becomes ready to receive dial digits
immediately.
For Wink Start, the VOIP detects the off-hook condition. Then the
VOIP reverses battery polarity for a specified time (140-290 ms; a
“wink”) and then becomes ready to receive dial digits.
For Delay Dial, the VOIP detects the off-hook condition. Then the
VOIP reverses battery polarity for a specified time (reverse polarity
duration has wider acceptable range than for Wink Start) and then
becomes ready to receive dial digits.
This is the length of the wink for Wink Start and Delay Dial signaling
modes.
Applicable only when Start Mode parameter is set to “Wink Start” or
“Delay Dial.”
This is the length of time that the MultiVOIP will wait between digits.
When the time expires, the MultiVOIP will look in the phonebook for
the number entered.
Default = 2.
This parameter is applicable when digits are dialed onto a DID-DPO
channel after the connection has been made. The length of time
between the outputting of DTMF digits.
Default = 100 ms.
Multi-Tech Systems, Inc. 43
Page 44

Chapter 4: Configuring your VOIP
Call Signaling
There are three types of Call Signaling available: H.323, SIP and SPP. Each type has some individual features
that may make it more appealing to use than the others, depending on your needs.
H.323
H.323 is an ITU-T recommended set of standards for audio and video communications. The fields for this
screen are defined in the table below.
Figure 4-9: H.323 call signaling
Multi-Tech Systems, Inc. 44
Page 45

Chapter 4: Configuring your VOIP
H.323 Call Signaling Parameter Definitions.
Field Name Values Description
Use Fast Start Y/N Enables the H.323 Fast Start procedure. Ma y need to be enabled / disabled for
compatibility with third-party VOIP gateways.
Signaling Port
Register with
Gatekeeper
Allow Incoming
Calls Through
Gatekeeper Only
GateKeeper RAS Parameters
Primary GK -- This is the preferred gatekeeper for controlling the traffic of the current VOIP.
Alternate GK
1 and 2
IP Address
RAS Port 1719 Well-known port number for GateKeepers. Must match port number (1719).
Gatekeeper
Name
RAS TTL Value
Gatekeeper
Discovery Polling
Interval
Use Online
Alternate
Gatekeeper List
H.323 Version 4 Options
H.323
Multiplexing
H.245 Tunneling
(Tun)
Parallel H.245
(FS + Tun)
Annex –E (AE) Y/N Multiplexed UDP call signaling transport. Annex E is helpful for high-volume VOIP
port
Y/N Check this field to have traffic on current VOIP gateway controlled by a
Y/N When selected, incoming calls are accepted only if those calls come through the
-- A first and a second alternate gatekeeper can be specified for use by the current
n.n.n.n
alphanumeric
seconds
integer
60 - 300
When selected, VOIP will seek an alternate gatekeeper (when none of the 3 gatekeepers
shown on this screen are available) from a list. The list will reside on the Primary gatekeeper
or one of the Alternate gatekeepers. The gatekeeper holding the list would download that list
onto the VOIP gateways within the system.
Y/N Signali ng for multiple phone calls can be carried on a single port rather than
Y/N H.245 messages are encapsulated within the Q.931 call-signaling channel.
Y/N FS (Fast Start) is a Q.931 feature of H.323v2 to hasten call setup as well as ‘pre-
Default: 1720 (H.323)
gatekeeper.
gatekeeper.
VOIP for situations where the Primary GK is busy or otherwise unavailable.
IP address of the GateKeeper.
Optional. The name of the GateKeeper with which this MultiVOIP is trying to
register. A primary gatekeeper and two alternate units are listed.
The H.323 Gatekeeper “Time to Live” value. As soon as a MultiVOIP gateway
registers with a gatekeeper a countdown timer begins. The RAS TTL Value is the
interval of the countdown timer. Before the TTL countdown expires, the MultiVOIP
gateway needs to register with the gatekeeper in order to maintain the
connection. If the MultiVOIP does not register before the TTL interval expires, the
MultiVOIP gateway’s registration with the gatekeeper will expire and the
gatekeeper will no longer permit call traffic to or from that gateway. Calls in
progress will continue to function even if the gateway becomes de-registered
The interval between the VOIP gateway’s successive attempts to connect to and
be governed by a higher level gatekeeper. The Primary GK is the highest level
gatekeeper. Alternate GK1 is second; Alternate GK2 is the lowest.
opening a separate signaling port for each. This conserves bandwidth resources.
Among other things, the H.245 messages let the two endpoints tell each other
what their technical capabilities are and determine who, during the call, will be the
client and who the server. Tunneling is the process of transmitting these H.245
messages through the Q.931 channel. The same TCP/IP socket (or logical port)
already being used for the Call Signaling Channel is then also used by the H.245
Control Channel. This encapsulation reduces the number of logical ports (sockets)
needed and reduces call setup time.
opening’ the media channel before the CONNECT message is sent. This preopening is a requirement for certain billing activities. Under Parallel H.245 FS +
Tun, this Fast Connect feature can operate simultaneously with H.245 Tunneling.
system endpoints. Gateways with lesser volume can afford to use TCP to
establish calls. However, for larger volume endpoints, the call setup times and
system resource usage under TCP can become problematic. Annex E allows
endpoints to perform call-signaling functions under the UDP protocol, which
involves substantially streamlined overhead (this feature should not be used on
the public Internet due to potential problems with security and bandwidth usage).
Multi-Tech Systems, Inc. 45
Page 46

Chapter 4: Configuring your VOIP
SIP
Session Initiation Protocol is the second option available for application layer control of the MultiVOIP. The
fields are detailed in the table below.
Multi-Tech Systems, Inc. 46
Figure 4-10: SIP call signaling
Page 47

Chapter 4: Configuring your VOIP
SIP Call Signaling Parameter Definitions
Field Name Values Description
SIP Proxy Parameters
Signaling Port
Use SIP Proxy Y/N Allows the MultiVOIP to work in conjunction with a proxy server.
Allow Incoming
Calls Through
SIP Proxy Only
Primary Proxy -- This is the preferred SIP proxy server for controlling the traffic of the current VOIP.
Alternate Proxy
1 and 2
Proxy Domain
Name / IP
Address
Append SIP
Proxy Domain
Name in User
ID
Port Number
Default
Subscriber
Default
Username
Password
Re-Registration
Time
Proxy Polling
Interval
TTL Value SIP proxy
port
Y/N When selected, incoming calls are accepted only if those calls come through the
-- A first and a second alternate SIP proxy server can be specified for use by the
n.n.n.n
Y/N When checked, the domain name of the SIP Proxy serving the MultiVOIP gateway
port
name
password
10–65535
seconds
60 - 300 The interval be tween the VOIP gateway’s successive attempts to connect to and
“Time to
Live”
value.
(in
seconds)
Port number on which the MultiVOIP UserAgent software module will be waiting for
any incoming SIP requests. Default = 5060
proxy.
VOIP for situations where the Primary proxy server is otherwise unavailable.
Network address of the proxy server that the VOIP is using.
will be included as part of the User ID for that gateway. If unchecked, the SIP
Proxy’s IP address will be included as part of the User ID instead of the SIP
Proxy’s domain name.
Logical port number for proxy communications. Default = 5060
This is used as the default end point register with a Proxy.
If the Username is not populated in the Phone Book, this is the Username that will
be used. This works the same for the password as well.
Password for proxy server function. See “Default Username” description above.
This is the timeout interval for registration of the MultiVOIP with a SIP proxy server.
The time interval begins the moment the MultiVOIP gateway registers with the SIP
proxy server and ends at the time specified by the user in the Re-Registration Time
field (this field). When/if registration lapses, call traffic routed to/from the MultiVOIP
through the SIP proxy server will cease. However, calls in progress will continue to
function until they end.
be governed by a higher level SIP proxy server. The Primary Proxy is the highest
level gatekeeper. Alternate Proxy 1 is second; Alternate Proxy 2 is the lowest order
SIP proxy server.
As soon as a MultiVOIP gateway registers with a SIP proxy server (allowing the
proxy server to control its call traffic) a countdown timer begins. The TTL Value is
the interval of the countdown timer. Before the TTL countdown expires, the
MultiVOIP gateway needs to register with the gatekeeper in order to maintain the
connection. If the MultiVOIP does not register before the TTL interval expires, the
MultiVOIP gateway’s registration with the proxy server will expire and the proxy
server will no longer permit call traffic to or from that gateway. Calls in progress will
continue to function even if the gateway becomes de-registered.
Multi-Tech Systems, Inc. 47
Page 48

Chapter 4: Configuring your VOIP
SPP
Single Port Protocol was developed by Multi-Tech to allow for dynamic IP addressing when it is set to
Registrar/Client mode. The other choice, Direct mode, has IP addresses assigned to the gateways. The
table below describes all fields in the general SPP Call Signaling screen.
Multi-Tech Systems, Inc. 48
Figure 4-11: SPP call signaling
Page 49

Chapter 4: Configuring your VOIP
SPP Call Signaling Parameter Definitions
Field Name Values Description
Mode Direct,
Client, or
Registrar
General Options
Port
Re-transmission 50 -
Max Retransmission
Client Options
Primary Registrar -- This is the preferred SPP registrar gateway for controlling the traffic of the current
Alternate
Registrar 1 and 2
Registrar IP
Address
Registrar Port 100 00 or
Polling Interval integer
Registrar Options
Keep Alive 30 – 300
Proxy/NAT Device Parameters
Behind
Proxy/NAT
device
Proxy/NAT
Device
Parameters –
Public IP Address
port
5000ms
0 - 20 Number of times the VOIP will re-transmit a lost packet (if no acknowledgment
-- A first and a second alternate SPP Registrar gateway can be specified for use by
n.n.n.n
other
60 - 300
(seconds)
Y/N Enables MultiVOIP (running in SPP Registrar mode) to operate ‘behind’ a
n.n.n.n
In direct mode, all VOIP gateways have static IP addresses assigned to them.
In registrar/client mode, one VOIP gateway serves as registrar and all other
gateways, being its clients, point to that registrar. The registrar assigns IP
addresses dynamically.
The UDP port on which data transmission will occur. Each client VOIP has its own
port. If two client VOIPs are both behind the same firewall, then they must have
different ports assigned to them.
If there are two clients and each is behind a different firewall, then the clients
could have different port numbers or the same port number.
(Default port number = 10000.)
If packets are lost (as indicated by absence of an acknowledgment) then the
endpoint will retransmit the lost packets after this designated time duration has
elapsed. (Default value = 2000 milliseconds.)
has been received). (Default value = 3)
Client Option fields are active only in registrar/client mode and only for client VOIP
units.
VOIP.
the current VOIP for situations where the Primary Registrar gateway is busy or
otherwise unavailable.
This is the IP address of the registrar VOIP to which this client is assigned.
(Default value = 0.0.0.0; effectively, there is no useful default value.)
This is the port number of the registrar VOIP to which this client is assigned.
(Default port number = 10000.)
The interval between the VOIP gateway’s successive attempts to connect to and
be governed by a higher level SPP registrar gateway. The Primary Registrar is
the highest level registrar gateway. Alternate Registrar 1 is second; Alternate
Registrar 2 is the lowest order SPP registrar gateway.
Registrar Option fields are active only in registrar/client mode and only for
registrar VOIP units.
Time-out duration before a registrar wills un-register a client that does not send its
“I’m here” signal. Client normally sends its “I’m here” signal every 20 seconds.
Timeout default = 60 seconds.
proxy/NAT device (NAT = Network Address Translation).
The public IP address of the proxy/NAT device which the MultiVOIP is behind.
Multi-Tech Systems, Inc. 49
Page 50

Chapter 4: Configuring your VOIP
SNMP
If you intend to manage your MultiVOIP remotely using the MultiVoipManager software, you will need to set the
Simple Network Management Protocol parameters. To make the MultiVOIP controllable by a remote PC running
the MultiVoipManager software, check the “Enable SNMP Agent” box on the SNMP Parameters screen.
The MVP130 MultiVOIPs only have limited SNMP functionality available. If this is something you wish to use,
please contact Multi-Tech Support for assistance.
Figure 4-12: SNMP parameters screen
The SNMP Parameter fields are described in the table below.
SNMP Parameter Definitions
Field Name Values Description
Enable SNMP
Agent
Trap Manager Parameters
Address
Community
Name
Port Number 162 The default port number of the SNMP manager receiving the traps is the
Community
Name 1
Permissions Read-Only,
Community
Name 2
Permissions Read-Only,
Y/N Enables the SNMP code in the firmware of the MultiVOIP. This must be
enabled for the MultiVOIP to communicate with and be controllable by the
MultiVoipManager software.
Default: disabled
n.n.n.n
-- A “community” is a group of VOIP endpoints that can communicate with each
Length = 19
characters (max.)
Case sensitive.
Read/Write
Length = 19
characters (max.)
Case sensitive.
Read/Write
IP address of MultiVoipManager PC.
other. Often “public” is used to designate a grouping where all end users
have access to entire VOIP network. However, calling permissions can be
configured to restrict access as needed.
standard port 162.
First community grouping.
If this community needs to change MultiVOIP settings, select Read/Write.
Otherwise, select Read-Only to view settings.
Second community grouping
If this community needs to change MultiVOIP settings, select Read/Write.
Otherwise, select Read-Only to view settings.
Multi-Tech Systems, Inc. 50
Page 51

Chapter 4: Configuring your VOIP
Regional
The Regional Parameters are used to set the phone signaling tones and cadences. For the country selected, the
standard set of frequency pairs will be listed for dial tone, busy tone, ‘unobtainable’ tone (fast busy or trunk busy),
ring tone, and other, more specialized tones. If you need settings that are not available, the Custom selection will
let you set the tones to what is necessary. The Regional Parameters fields are described in the table below.
Figure 4-13: Regional parameters
Multi-Tech Systems, Inc. 51
Page 52

Chapter 4: Configuring your VOIP
“Regional Parameter” Definitions
Field Name Values Description
Country/Region USA,
Japan,
UK,
Custom
Advisory screen This message screen appears whenever the
Name of a country or region that uses a certain set of tone pairs for dial tone, ring
tone, busy tone, unobtainable tone (fast busy tone), survivability tone (tone
heard briefly, 2 seconds, after going off hook denoting survivable mode of VOIP
unit), re-order tone (a tone pattern indicating the need for the user to hang up the
phone), and intercept tone (a tone that warns an a party that has gone off hook but
has not begun dialing, within a prescribed time, that an automatic emergency or
attendant number will be called; the automatic call can be used to direct an
attendant’s attention to a disabled or distressed caller, allowing an appropriate
response to be made).
In some cases, the tone-pair scheme denoted by a country name may also be used
outside of that country. The “Custom” option (button) assures that any tone-pairing
scheme worldwide can be accommodated.
Note 1:
been chosen in the Interface screen and when the AutoCall / OffHook Alert field is
set to OffHook Alert in the Voice/Fax Parameters screen. The time allowed for
dialing before the automatic calling process begins is set in the OffHook Alert Timer
field of the Voice/Fax Parameters screen.
Note 2: “Survivability” tone indicates a special type of call-routing redundancy &
applies to MultiVantage VOIP units only
Intercept tone is applicable only when the FXS telephony interface has
Country field is changed. It informs the operator
that, upon change of the Country field value, all
User Defined Tones will be deleted.
Standard Tones fields
Type column dial tone,
ring tone,
busy tone,
unobtainable tone
(fast busy),
survivability tone,
re-order tone
Frequency 1 freq. in Hertz Lower frequency of pair.
Frequency 2 freq. in Hertz Higher frequency of pair.
Gain 1 gain in dB
+3dB to –31dB
and “mute” setting
Gain 2 gain in dB
+3dB to –31dB
and “mute” setting
Cadence
(ms) On/Off
Custom (button) --
Table is continued on next page…
n/n/n/n
four integer time
values in
milliseconds; zero
value for dial-tone
indicates continuous
tone
Type of telephony tone-pair for which frequency, gain, and cadence are
being presented.
Amplification factor of lower frequency of pair.
This applies to the dial, ring, busy and ‘unobtainable’ tones that the
MultiVOIP outputs as audio to the FXS or FXS port.
Default: -16dB
Amplification factor of higher frequency of pair.
This applies to the dial, ring, busy, and ‘unobtainable’ (fast busy) tones
that the MultiVOIP outputs as audio to the FXS or FXO port.
Default: -16dB
On/off pattern of tone durations used to denote phone ringing, phone
busy, connection unobtainable (fast busy), dial tone (“0” indicates
continuous tone), survivability, and re-order. Default values differ for
different countries/regions. Although most cadences have only two parts
(an “on” duration and an “off” duration), some telephony cadences have
four parts. Most cadences, then, are expressed as two iterations of a
two-part sequence. Although this is redundant, it is necessary to allow
for expression of 4-part cadences.
Click on the “Custom” button to bring up the Custom Tone Pair
Settings screen. (The “Custom” button is active only when “Custom” is
selected in the Country/Region field.) This screen allows the user to
specify tone pair attributes that are not found in any of the standard
national/regional telephony toning schemes.
Multi-Tech Systems, Inc. 52
Page 53

Chapter 4: Configuring your VOIP
“Regional Parameter” Definitions (continued)
Field Name Values Description
Country Selection for
Built-In Modem
(not applicable to
MVP130 or 130-FXS)
User Defined Tones fields
Type column
Frequency 1 Freq. in Hertz Lower frequency of pair.
Frequency 2 Freq. in Hertz Higher frequency of pair.
Gain 1 +3dB to –31dB
Gain 2 +3dB to –31dB
Cadence
(ms) On/Off
country name MultiVOIP units operating with the X.06 software release (and above)
include a built-in modem. The administrator can dial into this modem to
configure the MultiVOIP unit remotely. The country name values in this
field set telephony parameters that allow the modem to work in the listed
country. This value may be different than the Country/Region value. For
example, a user may need to choose “Europe” as the Country/Region
value but “Denmark” as the Country-Selection-for-Built-In-Modem value.
alphanumeric
name
and “mute”
setting
and “mute”
setting
n/n/n/n
four integer time
values in
milliseconds;
(zero value
indicates
continuous tone)
Name of supervisory tone pair. Cannot be same as name of any
standard tone pair.
Amplification factor of lower frequency of pair.
This applies to any supervisory tones that the MultiVOIP outputs as
audio to the FXS or FXS port. Default: “Mute”
Amplification factor of higher frequency of pair.
This applies to any supervisory tones that the MultiVOIP outputs as
audio to the FXS or FXO port. Default: “Mute”
On/off pattern of tone durations used to denote supervisory tones
specified by user. Supervisory tones relate to answering and
disconnection of calls. Although most cadences have only two parts (an
“on” duration and an “off” duration), some telephony cadences have four
parts. Most cadences, then, are expressed as two iterations of a two-part
sequence. Although this is redundant, it is necessary to allow for
expression of 4-part cadences.
Setting Custom Tones and Cadences (optional). The Regional Parameters dialog box has a secondary dialog
box that allows you to customize DTMF tone pairs to create unique ring-tones, dial-tones, busy-tones or
“unobtainable” tones or “re-order” tones or “survivability” tones for your system. This screen all ows the user to
specify tone-pair attributes that are not found in any of the standard national/regional telephony toning schemes.
To access this customization feature, click on the Custom button on the Regional Parameters screen. The
“Custom” button is active only when “Custom” is selected in the Country/Region field.
Custom Tone-Pair Settings Definitions
Field Name Values Description
Tone Pair dial tone, busy tone
ring tone, ‘unobtainable’
tone, survivability tone,
re-order tone
Tone Pair Values About Defaults: US telephony values are used as defaults on this screen.
Frequency 1 Frequency in Hertz Frequency of lower tone of pair.
Frequency 2 Frequenc y in Hertz Frequency of higher tone of pair.
Gain 1 +3dB to –31dB
and “mute” setting
Gain 2 +3dB to –31dB
and “mute” setting
Cadence 1 integer time value in
milliseconds; zero value
for dial-tone indicates
continuous tone
Cadence 2 duration in milliseconds Cadence 2 is duration of first “off” period in signaling cadence.
Cadence 3 duration in milliseconds Cadence 3 is duration of second “on” period in signaling cadence.
Cadence 4 duration in milliseconds Cadence 4 is duration of second “off” period in the signaling cadence.
Identifies the type of telephony signaling tone for which frequencies are
being specified.
This outbound tone pair enters the MultiVOIP at the input port.
This outbound tone pair enters the MultiVOIP at the input port.
Amplification factor of lower frequency of pair. This figure describes
amplification that the MultiVOIP applies to outbound tones entering the
MultiVOIP at the input port. Default: -16dB
Amplification factor of higher frequency of pair. This figure describes
amplification that the MultiVOIP applies to outbound tones entering the
MultiVOIP at the input port. Default: -16dB
On/off pattern of tone durations used to denote phone ringing, phone busy,
dial tone (“0” indicates continuous tone) survivability and re-order. Cadence
1 is duration of first period of tone being “on” in the cadence of the
telephony signal.
Multi-Tech Systems, Inc. 53
Page 54

Chapter 4: Configuring your VOIP
SMTP
Setting the SMTP Parameters (Log Reports by Email). The SMTP Parameters screen is applicable when the
VOIP administrator has chosen to receive log reports by email (this is done by selecting the “SMTP” checkbox in
the Others screen and selecting “Enable SMTP” in the SMTP Parameters screen.)
Email Address for VOIP (for email call log reporting)
This is needed only if log reports of VOIP call traffic are to be sent by email.
Ask Mail Server administrator to set up email account (with password) for the MultiVOIP unit itself. Be sure to give
a unique identifier to each individual MultiVOIP unit. Get the IP address of the mail server computer, as well.
MultiVOIP as Email Sender. When SMTP is used, the MultiVOIP will actually be given its own email account
(with Login Name and Password) on some mail server connected to the IP network. Using this account, the
MultiVOIP will then send out email messages containing log report information. The “Recipient” of the log report
email is ordinarily the VOIP administrator. Because the MultiVOIP cannot receive email, a “Reply-To” address
must also be set up. Ordinarily, the “Reply-To” address is that of a technician who has access to the mail server
or MultiVOIP or both, and the VOIP administrator might also be designated as the “Reply-To” party. The main
function of the Reply-To address is to receive error or failure messages regarding the emailed reports.
The SMTP Parameters screen is shown below:
Multi-Tech Systems, Inc. 54
Figure 4-14: SMTP parameters
Page 55

Chapter 4: Configuring your VOIP
“SMTP Parameters” Definitions
Field Name Values Description
Enable SMTP Y/N In order to send log re ports by email, this box must be checked. Ho wever, to
enable SMTP functionality, you must also select “SMTP” in the Logs
screen.
Requires
Authentication
Login Name
Password
Mail Server IP
Address
Port Number 25 25 is a standard port number for SMTP.
Mail Type text or html Mail type in which log reports will be sent.
Subject text User specified. Subject line that will appear for all emailed log reports for
Reply-To Address
Recipient Address
Mail Criteria
Number of Records integer This is the number of log records that must accumulate to trigger the
Number of Days integer This is the number of days that must pass before triggering the sending of a
Y/N If this checkbox is checked, the MultiVOIP will send Authentication
information to the SMTP server. The authentication information indicates
whether or not the email sender has permission to use the SMTP server.
alpha-numeric
alpha-numeric
n.n.n.n
email address
email address
This is the User Name for the MultiVOIP unit’s email account.
Login password for MultiVOIP unit’s email account.
This is the mail server’s IP address. This mail server must be accessible on
the IP network to which the MultiVOIP is connected.
this MultiVOIP unit.
User specified. This email address functions as a source email identifier for
the MultiVOIP, which, of course, cannot usefully receive email messages.
The Reply-To address provides a destination for returned messages
indicating the status of messages sent by the MultiVOIP (esp. to indicate
when log report email was undeliverable or when an error has occurred).
Email address where VOIP administrator will receive log reports.
Criteria for sending log summary by email. The log summary email will be
sent out either when the user-specified number of log messages has
accumulated, or once every day or multiple days, whichever comes first.
sending of a log-summary email.
log-summary email.
Multi-Tech Systems, Inc. 55
Page 56

Chapter 4: Configuring your VOIP
The SMTP Parameters dialog box has a secondary dialog box, accessed by the Select Fields button, which
allows you to customize email logging. The MultiVOIP software logs data about many aspects of the call traffic
going through the MultiVOIP. The Custom Fields screen lets you pick which aspects will be included in the email
log reports.
“Custom Fields” Definitions
Field Description Field Description
Select All Log report to
include all fields shown.
Channel
Number
Duration Length of call. Packets
Packets Sent T otal packets sent in call. Bytes
Bytes Sent Total bytes sent in call. Coder Voice Coder /Compression Rate used
Packets Lost Packets lost in call. Prefix
Outbound
Digits
Received
Call Status Successful or unsuccessful.
Call Direction Indicates call’s originating party.
Server
Details
Disconnect
Reason
Gateway
Number
IP Address IP address where call originated. IP Address IP address where call was completed
Descript Identifier of site where call orig inated. Descript Identifier of site where call was
Options When selected, log will not Silence
Data channel carrying call. Call Mode Voice or fax.
The DTMF dialing digits received by this
gateway from the remote gateway
presuming that DTMF is set to "Out of
Band."
The IP address of the traffic control
server (if any) being used (whether an
H.323 gatekeeper, a SIP proxy, or an
SPP registrar gateway) will be displayed
here if the call is handled through that
server.
Indicates whether the call was
disconnected simply because the
desired conversation was done or some
other irregular cause occasioned
disconnection (e.g., a technical error or
failure). Values are "Normal" and
"Local" disconnection.
From Details To Details
Originating gateway Gateway
Compression and Forward Error
Correction by call originator.
Start Date,
Time
Received
Received
Matched
Call Type Indicates the Call Signaling protocol
DTMF
Capability
Outbound
Digits Sent
Name
Options When selected, log will not use Silence
Date and time the phone call began.
Total packets received in call.
Total bytes received in call.
for call will be listed in log.
When selected, the phonebook prefix
matched in processing the call will be
listed in log.
used for the call (H.323, SIP, or SPP).
Indicates whether the DTMF dialing
digits are carried "Inband" or "Out of
Band." The corresponding field values
differ for the 3 different VOIP
protocols.
For H.323, this field can display "Out
of Band" or "Inband". For SIP it can
display either "Out of Band RFC2833"
or "Out of Band SIP INFO" to indicate
the out-of-band condition or "Inband"
to indicate the in-band condition. For
SPP it can display "Out of Band
RFC2833" or "Inband".
The dialing digits sent by this gateway
to the remote gateway presuming that
DTMF is set to "Out of Band.”
Completing or answering gateway
or answered.
completed or answered.
Compression and Forward Error
Correction by party answering call.
Multi-Tech Systems, Inc. 56
Page 57

Chapter 4: Configuring your VOIP
RADIUS
In general, RADIUS is concerned with authentication, authorization, and accounting. The MultiVOIP supports the
accounting and authentication functions. The accounting function is well suited for billing of VOIP telephony
services. In the Select Attributes secondary screen (accessed by clicking on Select Attributes button), the VOIP
administrator can select the parameters to be tallied by the RADIUS server.
Figure 4-15: RADIUS settings
Multi-Tech Systems, Inc. 57
Page 58

Chapter 4: Configuring your VOIP
The fields of the RADIUS screen are described in the table below.
RADIUS Screen Field Definitions
Field Name Values Description
Enable Accounting Y/N When checked, the MultiVOIP will access the accounting functionality of the
RADIUS server.
Server Address
Accounting Port 1 - 65535 TDM time slot at which RADIUS accounting information will be transmitted
Retransmission
Interval
Number of
Retransmissions
Shared Secret alpha-numeric Client encryption key for the current VOIP unit.
Select Attributes
(button)
n.n.n.n
0 - 255
-- Gives access to RADIUS Attributes screen. On Attributes screen, one can
IP address of the RADIUS server that handles accounting (billing) for the
current MultiVOIP unit.
and received.
If the MultiVOIP sends out a packet to the RADIUS server and doesn't
receive a response in the retransmit interval, it will retransmit that packet
again and wait the retransmit interval again for a response. How many times
it does this is determined by the setting in the Number of Retransmissions
field.
specify the parameters to be tallied by the RADIUS server for accounting
(usually billing) purposes.
The RADIUS dialog box has a secondary dialog box, RADIUS Attributes, which allows you to customize
accounting information sent to the RADIUS server by the MultiVOIP. The MultiVOIP software logs data about
many aspects of the call traffic going through the MultiVOIP. The RADIUS Attributes screen lets you pick which
aspects will be included in the accounting reports sent to the RADIUS se rver.
“RADIUS Attributes” Definitions
Field Description Field Description
Select All Log report to include all fields
shown.
Channel
Number
Duration Length of call. Packets Received Total packets received in call.
Packets Sent Total packets sent in call. Bytes Received Total bytes received in call.
Bytes Sent Total bytes sent in call. Coder Voice Coder /Compression Rate used for
Packets Lost Packets lost in call. Prefix Matched When selected, the phonebook prefix
Outbound
Digits Sent
Server Details The IP address of the traffic control server being used will be displayed here if the call is handled
Gateway
Number
IP Address IP address where call originated. IP Address IP address where call was completed/answered.
Descript Identifier of where call originated. Descript Identifier of where call was completed/answered.
Options When selected, log will not use
Data channel carrying call. Call Mode Voice or fax.
DTMF digits received by this
gateway from remote gateway
(if that DTMF set to "Out of
Band").
through that server. The Options field refers to non-mandatory server features that might be
activated. For example, with H.323, various H.323 Version 4 options might be listed.
From Details To Details
Originating gateway Gateway
Silence Compression and Forward
Error Correction by call originator.
Start Date, Time Date and time the phone call began.
call will be listed in log.
matched in processing the call will be listed
in log.
Call Status Successful or unsuccessful.
Completing or answering gateway
Name
Options When selected, log will not use Silence
Compression and Forward Error Correction by
party answering call.
Multi-Tech Systems, Inc. 58
Page 59

Chapter 4: Configuring your VOIP
Logs/Traces
The Logs/Traces screen lets you choose how the VOIP administrator will receive log reports about the
MultiVOIP’s performance and the phone call traffic that is passing through it. Log reports can be received in one
of three ways:
• in the MultiVOIP program (interface),
• via email (SMTP), or
• at the MultiVoipManager remote VOIP system management program (SNMP).
Figure 4-16: Logs and Filters screens
If you enable console messages, you can customize the types of messages to be included/excluded in log reports
by clicking on the Filters button and using the Console Messages Filter Settings screen. If you use the logging
function, select the logging option that applies to your VOIP system design. If you intend to use a SysLog Server
program for logging, click in that Enable check box. The common SysLog logical port number is 514. If you intend
to use the MultiVOIP web browser interface for configuration and control of MultiVOIP units, be aware that the
web browser interface does not support logs directly. However, when the web browser interface is used, log files
can still be sent to the VOIP administrator via email (which requires using the SMTP logging option).
“Logs” Screen Definitions
Field Name Values Description
Enable Console
Messages
Filters (button) Click to access secondary screen on where console messages can be
Turn Off Logs Y/N Check to disable log-reporting function.
Logs Buttons Only one of these three log reporting methods, GUI, SMTP, or SNMP, may be chosen.
GUI
SNMP
SMTP
SysLog Server
Enable
IP Address
Port 514 Logical port for SysLog Server. 514 is commonly used.
Online Statistics
Updation Interval
Y/N Allows MultiVOIP debugging messages to be read via a basic terminal program like
HyperTerminal ™ or equivalent. Normally, this should be disabled because it uses
MultiVOIP processing resources. Console messages are meant for IT support
personnel.
included/excluded by category and on a per-c hannel basis.
User must view logs at the MultiVOIP configuration program.
•
Log messages will be delivered to the MultiVoipManager application program.
•
Log messages will be sent to user-specified email address.
•
Y/N This box must be checked if logging is to be done in conjunction with a SysLog Server
program.
n.n.n.n
integer Set the interva l (in seconds) at which logging information will be updated.
IP address of computer, in VOIP network, on which SysLog Server program is running.
Multi-Tech Systems, Inc. 59
Page 60

Chapter 4: Configuring your VOIP
NAT Traversal
Setting the NAT Traversal parameters. NAT (Network Address Translation) parameters are applicable only when
the MultiVOIP is operating in SIP mode. STUN (Simple Traversal of UDP through NATs) is a protocol for assisting
devices behind a NAT firewall or router with their packet routing.
Figure 4-17: NAT Traversal
Descriptions for NAT Traversal screen fields are presented in the table below.
NAT Traversal Definitions
Field Name Values Description
Enable (STUN) Y/N Enables STUN client functionality in the MultiVOIP.
STUN (Simple Traversal of UDP through NATs (Network Address Translation))
is a protocol that allows a server to assist client gateways behind a NAT firewall
or router with their packet routing.
Name/IP (Server)
Port (Server;
NAT/STUN)
Keep Alive (Timers;
NAT/STUN)
n.n.n.n
port;
default=
3478
60 – 3600
(seconds)
IP address of the STUN server.
The data port (TDM time slot) at which STUN info will be transmitted and
received.
The interval at which the STUN client sends indicator (“Keep Alive”) packets to
the STUN server to determine whether or not the STUN server is available.
Multi-Tech Systems, Inc. 60
Page 61

Chapter 4: Configuring your VOIP
Supplementary Services
Supplementary Services features derive from the H.450 standard, which brings to the VOIP telephony
functionality once only available with PSTN or PBX telephony. Even though the H.450 standard refers only to
H.323, Supplementary Services are still applicable to the SIP and SPP VOIP protocols.
Of the features implemented under Supplementary Services, three are very closely related: Call Transfer, Call
Hold, and Call Waiting. Call Name Identification is similar but not identical to the premium PSTN feature
commonly known as Caller ID.
Call Transfer. Call Transfer allows one party to re-connect the party with whom they have been speaking to a
third party. The first party is disconnected when the third party becomes connected. Feature is used by a
programmable phone keypad sequence (for example, #7).
Call Hold. Call Hold allows one party to maintain an idle (non-talking) connection with another party while
receiving another call (Call Waiting), while initiating another call (Call Transfer), or while performing some other
call management function. Feature is used by a programmable phone keypad sequence (for example, #7).
Call Waiting. Call Waiting notifies an engaged caller of an incoming call and allo ws them to receive a call from a
third party while the party with whom they have been speaking is put on hold. Feature is used by a programmable
phone keypad sequence (for example, #7).
Call Name Identification. When enabled for a given VOIP unit (the ‘home’ VOIP), this feature gives notice to
remote VOIPs involved in calls. Notification goes to the remote VOIP administrator, not to individual phone
stations. When the home VOIP is the caller, a plain English descriptor will be sent to the remote VOIP identifying
the channel over which the call is being originated (for example, “Calling Party - Omaha Sales Office Line 2”). If
that VOIP channel is dedicated to a certain individual, the descriptor could say that, as well (for example “Calling
Party - Harold Smith in Omaha”). When the home VOIP receives a call from any remote VOIP, the home VOIP
sends a status message back to that caller. This message confirms that the home VOIP’s phone channel is either
busy or ringing or that a connection has been made (for example, “Busy Party - Omaha Sales Office Line 2”).
These messages appear in the Statistics – Call Progress screen of the remote VOIP.
The Supplementary Services fields are described in the tables below.
Multi-Tech Systems, Inc. 61
Figure 4-18: Supplementary Services
Page 62

Chapter 4: Configuring your VOIP
Supplementary Services Parameter Definitions
Field Name Values Description
Select Channel Channel 1 The channel to be configured is selected here.
Call Transfer Enable Y/N Select to enable the Call Transfer function in the VOIP unit.
This is a “blind” transfer and the sequence of events is as follows:
Callers A and B are having a conversation.
Caller A wants to put B into contact with C.
Caller A dials call transfer sequence.
Caller A hears dial tone and dials number for caller C.
Caller A gets disconnected while Caller B gets connected to caller C.
A brief musical jingle is played for the caller on hold.
Transfer Sequence Any phone keypad
character
Call Hold Enable Y/N Select to enable Call Hold function in VOIP unit.
Hold Sequence phone keypad
characters
Call Waiting Enable Y/N Select to enable Call Waiting function in VOIP unit.
Retrieve Sequence Phone keypad
characters, two
characters in length
Call Name
Identification Enable
Table is continued on next page…
Enables CNI function. Call Name Identification is not the same as Caller ID. When enabled on
a given VOIP unit currently being controlled by the MultiVOIP interface (the ‘home VOIP’), Call
Name Identification sends an identifier and status information to the administrator of the
remote VOIP involved in the call. The feature operates on a channel-by-channel basis (each
channel can have a separate identifier).
If the home VOIP is originating the call, only the Calling Party field is applicable. If the
home VOIP is receiving the call, then the Alerting Party, Busy Party, and Connected Party
fields are the only applicable fields (and any or all of these could be enabled for a given VOIP
channel). The status information confirms back to the originator that the home VOIP, is either
busy, or ringing, or that the intended call has been completed and is currently connected.
The identifier and status information are made available to the remote VOIP unit and
appear in the Caller ID field of its Statistics – Call Progress screen. (This is how MultiVOIP
units handle CNI messages; in other VOIP brands, H.450 may be implemented differently and
then the message presentation may vary.)
The numbers and/or symbols that the caller must press on the phone
keypad to initiate a call transfer.
The call-transfer sequence can be 1 to 4 characters in length using
any combination of digits or characters (* or #).
The sequences for call transfer, call hold, and call waiting can be
from 1 to 4 digits in length consisting of any combination of digits
1234567890*#.
Call Hold allows one party to maintain an idle (non-talking) connection
with another party while receiving another call (Call Waiting), while
initiating another call (Call Transfer), or while performing some other
call management function.
The numbers and/or symbols that the caller must press on the phone
keypad to initiate a call hold.
The call-hold sequence can be 1 to 4 characters in length using any
combination of digits or characters (* or #).
The numbers and/or symbols that the caller must press on the phone
keypad to initiate retrieval of a waiting call.
The call-waiting retrieval sequence can be 1 to 4 characters in length
using any combination of digits or characters (* or #).
This is the phone keypad sequence that a user must press to retrieve
a waiting call. Customize-able. Sequence should be distinct from
sequence that might be used to retrieve a waiting call via the PBX or
PSTN.
Multi-Tech Systems, Inc. 62
Page 63

Chapter 4: Configuring your VOIP
Supplementary Services Definitions (continued)
Field Name Description
Calling Party,
Allowed Name
Type (CNI)
Alerting Party,
Allowed Name
Type (CNI)
Busy Party,
Allowed Name
Type (CNI)
Connected
Party, Allowed
Name Type
(CNI)
Caller ID This is the iden tifier of a specific channel of the ‘home’ VOIP unit. The Caller Id field typically
Default When this button is clicked, all Supplementary Service parameters are set to their default valu es.
Copy Channel Copies the Supplementary Service attributes of one channel to another channel. Attributes can be
If the ‘home’ VOIP unit is originating the call and Calling Party is selected, then the identifier (from
the Caller Id field) will be sent to the remote VOIP unit being called. The Caller Id field gives the
remote VOIP administrator a plain-language identifier of the party that is originating the call
occurring on a specific channel.
This field is applicable only when the ‘home’ VOIP unit is originating the ca ll.
Example. Suppose a VOIP system has offices in both Denver and Omaha. In the Omaha VOIP
unit (the ‘home’ VOIP in this example), Call Name Identification has been enabled, Calling Party
has been enabled as an Allowed Name Type, and “Omaha Sales Office Voipchannel 2” has been
entered in the Caller Id field.
When channel 2 of the Omaha VOIP is used to make a call to any other VOIP phone station (for
example, the Denver office), the message “Calling Party - Omaha Sales Office Voipchannel 2” will
appear in the “Caller Id” field of the Statistics - Call Progress screen of the Denver VOIP.
If the ‘home’ VOIP unit is receiving the call and Alerting Party is selected, then the identifier (from
the Caller Id field) will tell the originating remote VOIP unit that the call is ringing.
This field is applicable only when the ‘home’ VOIP unit is receiving the call.
Example. Suppose a VOIP system has offices in both Denver and Omaha. In the Omaha VOIP
unit (the ‘home’ VOIP unit in this example), Call Name Identification has been enabled, Alerting
Party has been enabled as an Allowed Name Type, and “Omaha Sales Office Voipchannel 2” has
been entered in the Caller Id field of the Supplementary Services screen.
When channel 2 of the Omaha VOIP receives a call from any other VOIP phone station (for
example, the Denver office), the message “Alerting Party - Omaha Sales Office Voipchannel 2” will
be sent back and will appear in the Caller Id field of the Statistics – Call Progress screen of the
Denver VOIP. This confirms to the Denver VOIP that the phone is ringing in Omaha.
If the ‘home’ VOIP unit is receiving a call directed toward an already engaged channel or phone
station and Busy Party is selected, then the identifier (from the Caller Id field) will tell the
originating remote VOIP unit that the channel or called party is busy.
This field is applicable only when the ‘home’ VOIP unit is receiving the call.
Example. Suppose a VOIP system has offices in both Denver and Omaha. In the Omaha VOIP
unit (the ‘home’ VOIP unit in this example), Call Name Identification has been enabled, Busy
Party has been enabled as an Allowed Name Type, and “Omaha Sales Office Voipchannel 2” has
been entered in the Caller Id field of the Supplementary Services screen.
When channel 2 of the Omaha VOIP is busy but still receives a call attempt from any other VOIP
phone station (for example, the Denver office), the message “Busy Party - Omaha Sales Office
Voipchannel 2” will be sent back and will appear in the Caller Id field of the Statistics – Call
Progress screen of the Denver VOIP. This confirms to the Denver VOIP that the channel or phone
station is busy in Omaha.
If the ‘home’ VOIP unit is receiving a call and Connected Party is selected, then the identifier
(from the Caller Id field) will tell the originating remote VOIP unit that the attempted call has been
completed and the connection is made.
This field is applicable only when the ‘home’ VOIP unit is receiving the call.
Example. Suppose a VOIP system has offices in both Denver and Omaha. In the Omaha VOIP
unit (the ‘home’ VOIP unit in this example), Call Name Identification has been enabled,
Connected Party has been enabled as an Allowed Name Type, and “Omaha Sales Office
Voipchannel 2” has been entered in the Caller Id field of the Supplementary Services screen.
When channel 2 of the Omaha VOIP completes an attempted call from any other VOIP phone
station (for example, the Denver office), the message “Connect Party - Omaha Sales Office
Voipchannel 2” will be sent back and will appear in the Caller Id field of the Statistics – Call
Progress screen of the Denver VOIP. This confirms to the Denver VOIP that the call has been
completed to Omaha.
describes a person, office, or location, for example, “Harry Smith,” or “Bursar’s Office,” or
“Barnesville Factory.”
copied to multiple channels or all channels at once.
Multi-Tech Systems, Inc. 63
Page 64

Save Settings
Save & Reboot
Saving the MultiVOIP Configuration. When values have been set for all of the MultiVOIP’s various
operating parameters, click on Save Setup in the sidebar, then Save & Reboot.
Creating a User Default Configuration. When a “Setup” (complete grouping of parameters) is being
saved, you will be prompted about designating that setup as a “User Default” setup. A User Default setup
may be useful as a baseline of site-specific values to which you can easily revert. Establishing a User
Default Setup is optional.
Connection
Settings
This is also accessible from the Start menu in the MultiVOIP software folder.
Set Baud Rate. The Connection option in the sidebar menu has a “Settings” item that includes the baud-
rate setting for the COM port of the computer running the MultiVOIP software.
First, it is important to note that the default COM port established by the MultiVOIP program is COM1. Do
not accept the default value until you have checked the COM port allocation on your PC. To do this,
check for COM port assignments in the system resource manager of your Windows operating system. If
COM1 is not available, you must change the COM port setting to a COM port that you have confirmed as
being available on your PC.
Chapter 4: Configuring your VOIP
Multi-Tech Systems, Inc. 64
Figure 4-19: COM port setup
Page 65

Chapter 4: Configuring your VOIP
Troubleshooting Software Issues
In the lower left corner of the screen, the connection status of the MultiVOIP will be displayed. The
messages in the lower left corner will change as detection occurs. The message “MultiVOIP Found”
confirms that the MultiVOIP is in contact with the MultiVOIP configuration program. If the message
displayed is “MultiVOIP Not Found!” please try the resolutions below.
Fixing a COM Port Problem
If the MultiVOIP main screen appears but is grayed out and seems inaccessible, the COM port that was
specified for its communication with the PC is unavailable and must be changed. An erro r message will
appear.
Figure 4-20: Error pop-up
To change the COM port setting, use the COM Port Setup dialog box, by going to the Connection pulldown menu and choosing “Settings” or use the left side control panel. In the “Select Port” field, select a
COM port that is available on the PC (if no COM ports are currently available, re-allocate COM port
resources in the computer’s MS Windows operating system to make one available).
Fixing a Cabling Problem
If the MultiVOIP cannot be located by the computer, three error messages will appear (saying “Multi-VOIP
Not Found”, “Phone Database Not Read” and “Password Phone Database Not Read).
Figure 4-21: Cabling errors
In this case, the MultiVOIP is simply disconnected from the network. For instructions on MultiVOIP cable
connections, see the Cabling section of Chapter 3.
Multi-Tech Systems, Inc. 65
Page 66

Chapter 5 – Phone Book Configuration
Introduction
When a VOIP serves a PBX system, it’s important that the operation of the VOIP be transparent to the telephone
end user. That is, the VOIP should not entail the dialing of extra digits to reach users elsewhere on the network
that the VOIP serves. On the contrary, VOIP service more commonly reduces dialed digits by allowing users
(served by PBXs in facilities in distant cities) to dial their co-workers with 3-, 4-, or 5-digit extensions as if they
were in the same facility.
Furthermore, the setup of the VOIP generally should allow users to make calls on a non-toll basi s to any numbers
accessible without toll by users at all other locations on the VOIP system. Consider, for example, a company with
VOIP-equipped offices in New York, Miami, and Los Angeles, each served by its own PBX. When the VOIP
phone books are set correctly, personnel in the Miami office should be able to make calls without toll not only to
the company’s offices in New York and Los Angeles, but also to any number that’s local in those two cities.
To achieve transparency of the VOIP telephony system and to give full access to all types of non-toll calls made
possible by the VOIP system, the VOIP administrator must properly configure the “Outbound” and “Inbound”
phone-books of each VOIP in the system.
The “Outbound” phonebook for a particular VOIP unit describes the dialing sequences required for a call to
originate locally (typically in a PBX in a particular facility) and reach any of its possible destinations at remote
VOIP sites, including non-toll calls completed in the PSTN at the remote site.
The “Inbound” phonebook for a particular VOIP unit describes the dialing sequences required for a call to
originate remotely from any other VOIP sites in the system, and to terminate on that particular VOIP.
Briefly stated, the MultiVOIP’s Outbound phonebook lists the phone stations it can call; its Inbound phonebook
describes the dialing sequences that can be used to call that MultiVOIP and how those calls will be directed. The
phone numbers are not literally “listed” individually, but are, instead, described by rule.
Identify Remote VOIP Site to Call
When you’re done installing the MultiVOIP, you’ll want to confirm that it is configured and operating properly. To
do so, it’s good to have another VOIP that you can call for testing purposes. You’ll want to confirm end-to-end
connectivity. You’ll need IP and telephone information about that remote site.
If this is the very first VOIP in the system, you’ll want to coordinate the installation of this MultiVOIP with an
installation of another unit at a remote site.
Identify VOIP Protocol to be Used
Will you use H.323, SIP, or SPP? Each has advantages and disadvantages. Although it is possible to mix
protocols, it is highly desirable to use the same VOIP protocol for all VOIP units in the system. SPP is a nonstandard protocol developed by Multi-Tech. SPP is not compatible with the “Proprietary” protocol used in MultiTech’s earlier generation of VOIP gateways.
Multi-Tech Systems, Inc. 66
Page 67

Chapter 5: Phonebook Configuration
Phonebook Starter Configuration
This section will walk you through the phone book setup with examples that will aid in entering the correct
numbers needed to have the MultiVOIP working correctly. To do this part of the setup, you need access to
another VOIP that you can call to conduct a test. It should be at a remote location, typically somewhere outside of
your building. You must know the phone number and IP address for that site. We are assuming here that the
MultiVOIP will operate in conjunction with a PBX.
You must configure both the Outbound Phonebook and the Inbound Phonebook. A starter configuration only
means that two VOIP locations will be set up to begin the system and establish VOIP communication. Once this is
accomplished, you can easily add other VOIP sites to the network.
Outbound Phonebook
1. Open the MultiVOIP program. (Start | MultiVOIP n.nn | Configuration)
2. Go to Phone Book | Outbound Phonebook | Add Entry.
3. On a sheet of paper, write down the calling code of the remote VOIP (area code, country code, city code,
etc.) that you’ll be calling.
Follow the example that best fits your situation:
North America,
Long-Distance Example
Technician in Seattle (area 206)
must set up one VOIP there,
another in Chicago (area 312,
downtown).
Answer: Write down 312.
Euro, National Call Example Euro, International Call
Example
Technician in central London
(area 0207) to set up VOIP there,
another in Birmingham (area
0121).
Answer: write down 0121.
Technician in Rotterdam (country
31; city 010) to set up one VOIP
there, another in Bordeaux
(country 33; area 05).
Answer: write down 3305.
4. Suppose you want to call a phone number outside of your building using a phone station that is an
extension from your PBX system (if present). What digits must you dial? Often a “9” or “8” must be dialed to
“get an outside line” through the PBX (i.e., to connect to the PSTN). Generally, “1 “or “11” or “0” must be
dialed as a prefix for calls outside of the calling code area (long-distance calls, national calls, or
international calls).
On a sheet of paper, write down the digits you must dial before you can dial a remote area code.
North America,
Long-Distance Example
Seattle/Chicago system.
Seattle VOIP works with PBX
that uses “8” for all VOIP calls.
“1” must immediately precede
area code of dialed number.
Answer: write down 81.
Euro, National Call Example Euro, International Call
Example
London/Birmingham system.
London VOIP works with PBX
that uses “9” for all out-ofbuilding calls whether by VOIP or
by PSTN. “0” must immediately
precede area code of dialed
Rotterdam/Bordeaux system.
Rotterdam VOIP works with PBX
where “9” is used for all out-ofbuilding calls. “0” must precede
all international calls.
Answer: write down 90.
number.
Multi-Tech Systems, Inc. 67
Answer: write down 90.
Page 68

Chapter 5: Phonebook Configuration
5. In the “Destination Pattern” field of the Add/Edit Outbound Phonebook screen, enter the digits from step
4 followed by the digits from step 3.
North America,
Long-Distance Example
Seattle/Chicago system.
Answer: enter 81312 as
Destination Pat-tern in
Outbound Phone-book of
Seattle VOIP.
Euro, National Call Example Euro, International Call
Example
London/Birmingham system.
Leading zero of Birmingham area
code is dropped when combined
with national-dialing access
code. (Such practices vary by
Rotterdam/Bordeaux system.
Answer: enter 903305 as
Destination Pattern in
Outbound Phonebook of
Rotterdam VOIP.
country.)
Answer: enter 90121 as
Destination Pattern in Outbound
Phonebook of London VOIP.
Not 900121.
6. In the “Remove Prefix” field, enter the initial PBX access digit (“8” or “9”).
North America,
Long-Distance Example
Seattle/Chicago system.
Answer: enter 8 in “Remove Prefix”
field of Seattle Outbound
Phonebook.
Note: Some PBXs will not ‘hand off’ the “8” or “9” to the VOIP. But for those PBX units that do, it’s important to enter the
“8” or “9” in the “Remove Prefix” field in the Outbound Phonebook. This precludes the problem of having to make two
inbound phonebook entries at remote VOIPs, one to account for situations where “8” is used as the PBX access digit
and another for when “9” is used.
Euro, National Call Example Euro, International Call
Example
London/Birmingham system.
Answer: enter 9 in “Remove Prefix”
field of London Outbound
Phonebook.
Rotterdam/Bordeaux system.
Answer: enter 9 in “Remove Prefix”
field of Outbound Phonebook for
Rotterdam VOIP.
7. In the “Protocol Type” field group, select the VOIP protocol that you will use (H.323, SIP, or SPP). Use the
appropriate screen under Configuration | Call Signaling to configure the VOIP protocol in detail.
8. Click OK to exit from the Add/Edit Outbound Phonebook screen.
Multi-Tech Systems, Inc. 68
Page 69

Chapter 5: Phonebook Configuration
Inbound Phonebook
1. Open the MultiVOIP program. (Start | MultiVOIP n.nn | Configuration)
2. Go to Phone Book | Inbound Phonebook | Add Entry.
3. In the “Remove Prefix” field, enter your local calling code (area code, country code, city code, etc.)
preceded by any other “access digits” that are required to reach your local site from the remote VOIP
location (think of it as though the call were being made through the PSTN – even though it will not be).
North America,
Long-Distance Example
Seattle/Chicago system.
Seattle is area 206. Chicago
employees must dial 81 before
dialing any Seattle number on the
VOIP system.
Answer: 1206 is prefix to be
removed by local (Seattle)
VOIP.
Euro, National Call Example Euro, International Call
Example
London/Birmingham system.
Inner London is 0207 area.
Birmingham employees must dial 9
before dialing any London number
on the VOIP system.
Answer: 0207 is prefix to be
removed by local (London)
VOIP.
Rotterdam/Bordeaux system.
Rotterdam is country code 31, city
code 010. Bordeaux employees
must dial 903110 before dialing any
Rotterdam number on the VOIP
system.
Answer: 03110 is prefix to be
removed by local
(Rotterdam) VOIP.
4. In the “Add Prefix” field, enter any digits that must be dialed from your local VOIP to gain access to the
PSTN.
North America,
Long-Distance Example
Seattle/Chicago system.
On Seattle PBX, “9” is used to get an
outside line.
Answer: 9 is prefix to be added by
local (Seattle) VOIP.
Euro, National Call Example Euro, International Call
Example
London/Birmingham system.
On London PBX, “9” is used to get
an outside line.
Answer: 9 is prefix to be added by
local (London) VOIP.
Rotterdam/Bordeaux system.
On Rotterdam PBX, “9” is used to
get an outside line.
Answer: 9 is prefix to be added by
local (Rotterdam) VOIP.
5. In the “Channel Number” field, enter “Hunting.” A “hunting” value means the VOIP unit will assign the call to
the first available channel. If desired, specific channels can be assigned to specific incoming calls (i.e., to
any set of calls received with a particular incoming dialing pattern).
6. In the “Description” field, it is useful to describe the ultimate destination of the calls. For example, in a New
York City VOIP system, “incoming calls to Manhattan office,” might describe a phonebook entry, as might
the descriptor “incoming calls to NYC local calling area.” The description should make the routing of calls
easy to understand. For this, 40 characters are the maximum.
North America,
Long-Distance Example
Seattle/Chicago system.
Possible Description:
Free Seattle access, all employees
Euro, National Call Example Euro, International Call
Example
London/Birmingham system.
Possible Description:
Local-rate London access, all
employees
Rotterdam/Bordeaux system.
Possible Description:
Local-rate Rotterdam access, all
employees
7. Repeat steps 2-6 for each inbound phonebook entry. When all entries are complete, go to step 8.
8. Click OK to exit the inbound phonebook screen.
9. Click on Save Setup. Highlight Save and Reboot. Click OK.
Your starter inbound phonebook configuration is complete.
Multi-Tech Systems, Inc. 69
Page 70

Chapter 5: Phonebook Configuration
Phone Book Descriptions
Outbound Phone Book/List Entries
Fields in the “Details” section will differ depending on the protocol (H.323, SIP, or SPP) of the selected list entry to
which the details pertain.
Figure 5-1: Outbound Phone Book
Multi-Tech Systems, Inc. 70
Page 71

Add/Edit Outbound Phone Book
Chapter 5: Phonebook Configuration
Enter Outbound Phone Book data for your MultiVOIP unit. Note that the Advanced button gives access to the
Alternate IP Routing feature, if needed. Alternate IP Routing can be implemented in a secondary screen (as
described after the primary screen field definitions below).
The fields of the Add/Edit Outbound Phone Book screen are described in the table below.
Multi-Tech Systems, Inc. 71
Figure 5-2: Add/Edit screen
Page 72

Chapter 5: Phonebook Configuration
Add/Edit Outbound Phone Book: Field Definitions
Field Name Values Description
Accept Any
Number
Destination
Pattern
Total Digits as needed Number of digits the phone user must dial to reach specified destination. This
Remove Prefix dialed digits Portion of dialed number to be removed before completing call to destination.
Add Prefix dialed digits Digits to be added before completing call to destination.
IP Address
Description alp ha-numeric Describes the facility or geographical l ocation at which the call will be
Protocol Type SIP or H.323
H.323 fields
Use Gatekeeper Y/N Indicates whether or not gatekeeper is used.
Gateway H.323
ID
Gateway Prefix numeric This number becomes registered with the GateKeeper. Call requests sent to
H.323 Port
Number
Table is continued on next page…
Y/N W hen checked, “Any Number” appears as the value in the Destination
Pattern field.
The Any Number feature works differently depending on whether or not an
external routing device is used (Gatekeeper for H323 protocol, Proxy for SIP
protocol, Registrar for SPP protocol).
When no external routing device is used. If Any Number is selected, calls
to phone numbers not matching a listed Destination Pattern will be directed to
the IP Address in the Add/Edit Outbound Phone Book screen. “Any Number”
can be used in addition to one or more Destination Patterns.
When external routing device is used. If Any Number is selected, calls to
phone numbers not matching a listed Destination Pattern will be directed to
the external routing device used (Gatekeeper for H323 protocol, Proxy for
SIP protocol, Registrar for SPP protocol). The IP Address of the external
routing device must be set in the Phone Book Configuration screen.
prefixes,
area codes,
exchanges,
line numbers,
extensions
n.n.n.n
or SPP
alpha-numeric The H.323 ID assigned to the destination MultiVOIP. Only valid if “Use
1720 This parameter pertains to Q.931, which is the H.323 call signaling protocol
Defines the beginning of dialing sequences for calls that will be connected to
another VOIP in the system. Numbers beginning with these sequences are
diverted from the PSTN and carried on Internet or other IP network.
field not used in North America
The IP address to which the call will be directed if it begins with the
destination pattern given.
completed.
Indicates protocol to be used in outbound transmission. Single Port Protocol
(SPP) is a non-standard protocol designed by Multi-Tech.
Gatekeeper” is enabled for this entry.
the gatekeeper and preceded by this prefix will be routed to the VOIP
gateway.
for setup and termination of calls (aka ITU-T Recommendation I.451). H.323
employs only one “well-known” port (1720) for Q.931 signaling. If Q.931
message-oriented signaling protocol is used, 1720 must be chosen as the
H.323 Port Number.
Multi-Tech Systems, Inc. 72
Page 73

Chapter 5: Phonebook Configuration
Add/Edit Outbound Phone Book: Field Definitions (continued)
Field Name Values Description
SIP Fields
Use Proxy Y/N Select if proxy server is used.
Transport
Protocol
SIP Port
Number
SIP URL sip.userphone@hostserver,
Use
Registrar
Port Number numeric When operating in “Registrar/Client” mode, this is the port by which the
Alternate
Phone
Number
Remote
Device is
[legacy
VOIP]
Advanced
button
TCP or
UDP
5060 or other
*See RFC 3087 (“Control of
Service Context using SIP
Request-URI,” by the
Network Working Group).
where “userphone” is the
telephone number and
“hostserver” is the domain
name or an address on the
network
SPP Fields
Y/N
numeric Phone number associated with alternate IP routing.
Y/N When checked, this MultiVOIP can operate with ‘first-generation’
Gives access to secondary screen where an Alternate IP Route can be specified for backup or
redundancy of signal paths. For SIP & H.323 operation only.
VOIP administrator must choose between UDP and TCP transmission
protocols. UDP is a high-speed, low-overhead connectionless protocol
where data is transmitted without acknowledgment, guaranteed delivery,
or guaranteed packet sequence integrity. TCP is slower connectionoriented protocol with greater overhead, but having acknowledgment and
guarantees delivery and packet sequence integrity.
The SIP Port Number is a UDP logical port number. The VOIP will “listen”
for SIP messages at this logical port. If SIP is used, 5060 is the default,
standard or “well known” port number to be used. If 5060 is not used, then
the port number used is that specified in the SIP Request URI (Universal
Resource Identifier).
Looking similar to an email address, a SIP URL identifies a user's
address.
In SIP communications, each caller or recipient is identified by a SIP URL:
sip:user_name@host_name. The format of a sip URL is very similar to an
email address, except that the “sip:“ prefix is used.
Select this checkbox to use registrar when VOIP system is operating in
the “Registrar/Client” SPP mode. In this mode, one VOIP (the registrar, as
set in Phonebook Configuration screen) has a static IP address and all
other VOIPs (clients) point to the registrar’s IP address as functionally
their own. However, if your VOIP system overall is operating in
“Registrar/Client” mode but you want to make an exception and use Direct
mode for the destination pattern of this particular Add/Edit Phonebook
entry, leave this checkbox unselected. Also do not select this if your
overall VOIP system is operating in the Direct SPP mode – in this mode
all VOIPs are peers with unique static IP addresses.
gateway receives all SPP data and control messages from the registrar
gateway. (This ability to receive all data and messages via one port allows
the VOIP to operate behind a firewall with only one port open.)
When operating in “Direct” mode, this is the Port by which peer VOIPs
receive data and messages.
MultiVOIP units in the same IP network. These include MVP110/120/200/400/800.
Multi-Tech Systems, Inc. 73
Page 74

Chapter 5: Phonebook Configuration
Clicking on the Advanced button brings up the Alternate Routing secondary screen. This fea ture provides an
alternate path for calls if the primary IP network cannot carry the traffic. Often in cases of failure, call traffic is
temporarily diverted into the PSTN. However, this feature could also be used to divert traffic to a redundant
(backup) unit in case one VOIP unit fails. The user must specify the IP address of the alternate route for each
destination pattern entry in the Outbound Phonebook.
Figure 5-3: Advanced button
Alternate Routing Field Definitions
Field Name Values Description
Alternate IP
Address
Round Trip
Delay
n.n.n.n
Default is
300
milliseconds
Alternate destination for outbound data traffic in case of excessive delay in data
transmission.
The Round Trip Delay is the criterion for judging when a data pathway is
considered blocked. When the delay exceeds the threshold specified her e, the data
stream will be diverted to the alternate destination specified as the Alternate IP
Address.
The Alternate Routing function facilitates PSTN Failover protection, that is, it allows you to re-route VOIP calls
automatically over the PSTN if the VOIP system fails. The MultiVOIP can be programmed to respond to excessive
delays in the transmission of voice packets, which the MultiVOIP interprets as a failure of the IP network. Upon
detecting an excessive delay in transmission of voice packets (overly high “latency” in the network) the MultiVOIP
diverts the call to another IP address, which itself is connected to the PSTN (for example, via an FXO port on the
self-same MultiVOIP could be connected to the PSTN).
PSTN Failover Feature. The MultiVOIP can be programmed to divert calls to the PSTN temporarily in case the IP
network fails. See Figure 5-4 below for example.
3. Call diverts to
Alt IP address in voip
accessing PSTN line.
FXS
1. Call originates.
FXO
VOIP
PSTN Line
IP
NETWORK
2. IP network fails.
VOIP
4. Call completed
via PSTN.
PBX
Figure 5-4: PSTN failover
Multi-Tech Systems, Inc. 74
Page 75

Chapter 5: Phonebook Configuration
Inbound Phone Book/List Entries
The “Details” and “Registration Options” sections will display information based on the setup and protocols
chosen. The “Subscription Options” area is used in conjunction with a Voice Mail Server.
Figure 5-5: Inbound phonebook entries
Multi-Tech Systems, Inc. 75
Page 76

Add/Edit Inbound Phone Book
Chapter 5: Phonebook Configuration
Multi-Tech Systems, Inc. 76
Figure 5-6: Add/Edit Inbound Phone Book
Page 77

Chapter 5: Phonebook Configuration
Enter Inbound Phone Book data for your MultiVOIP. The fields of the Add/Edit Inbound Phone Book screen are
described in the table below.
Add/Edit Inbound Phone Book: Field Definitions
Field Name Values Description
Accept Any
Number
Remove Prefix dialed digits portion of dialed number to be removed before completing call to destination
Add Prefix dialed digits digits to be added before completing call to destination
Channel
Number
Description -- Describes the facility or geographical location at which the call originated.
Call Forward Parameters
Enable Y/N Click the check-box to enable the call-forwarding feature.
Forward
Condition
Forward
Destination
Ring Count integer When “No Response” is condition for forwarding calls, this determin es how many
Registration
Option
Parameters
Y/N When checked, “Any Number” appears as the value in the Remove Prefix field.
The Any Number feature of the Inboun d Phone Book does not work when an
external routing device is used (Gatekeeper for H.323 protocol, Proxy for SIP
protocol, Registrar for SPP protocol).
When no external routing device is used. If Any Number is selected, calls
received from phone numbers not matching a listed Prefix (shown in the Remove
Prefix column of the Inbound Phone Book) will be admitted into the VOIP on the
channel listed in the Channel Number field. “Any Number” can be used in
addition to one or more Prefixes.
(often a local PBX)
(often a local PBX)
channel, or
“Hunting”
Unconditional,
Busy,
No Response
IP address,
phone number,
port number,
etc
In an H.323 VOIP system, gateways can register with the system using one of these identifiers: an
E.164 identifier, a Tech Prefix identifier, or an H.323 ID identifier.
In a SIP VOIP system, gateways can register with the SIP Proxy.
In an SPP VOIP system, gateways can register with the SPP Registrar VOIP unit.
Channel number to which the call will be assigned as it enters the local telephon y
equipment (often a local PBX). “Hunting” directs the call to any available channel.
Unconditional. When selected, all calls received will be forwarded.
Busy. When selected, calls will be forwarded when station is busy.
No Response. When selected, calls will be forwarded if called party does not
answer after a specified number of rings, as specified in Ring Count field.
Forwarding can be conditioned on both “Busy” and “No Response
Phone number or IP address to which calls will be directed.
For H.323 calls, the Forward Destination can be either a Phone Number or an IP
Address.
For SIP calls, the Forward Destination can be one of the following:
(a) phone number,
(b) IP address,
(c) IP address: port number,
(d) phone number: IP address: port number,
(e) SIP URL, or
(f) phone #: IP address.
For SPP calls, the Forward Destination can be one of the following:
(a) phone number,
(b) IP address: port, or
(c) phone number: IP address: port.
unanswered rings are needed to trigger the forwarding.
Multi-Tech Systems, Inc. 77
Page 78

Authorized User Name and Password for SIP
To enable the Registration Options on the Add/Edit Inbound Phone Book, you have to activate Use SIP
Proxy Option on the Call Signaling, SIP Parameters Screen. Then add the IP address for the Primary
Proxy in the SIP Proxy Parameters. This allows you to add a Username and Password to the Inbound
Phone Book entry.
This feature is used when the MultiVOIP registers with the proxies that support authorization and need
the username, password and the endpoint name to be unique.
The VOIP sends Register request to Registrar for each entry with its configured Username and
Password. When Authentication is enabled for the endpoint, then the registrar/proxy sends “401
Unauthorized/407 Proxy Authentication Required” response when it receives a REGISTER/INVITE
request. Now, the endpoint has to send the authentication details in the Authorization header. In this
header one of the fields is “username”.
Generally proxies accept requests even if both Endpoint Name and Username are same. But some
proxies expect that the Endpoint Name and Username should be different.
To support these proxies, we have the username and password configuration for every inbound phone
book entry which gets registered with a proxy.
If the username and password are not configured in the inbound phone book, then the registration will
happen with the default username and password that are configured in the SIP Call Signaling Page.
Chapter 5: Phonebook Configuration
Phone Book Save and Reboot
When your Outbound and Inbound Phonebook entries are completed, click on Save Setup in the sidebar menu to
save your configuration. You can change your configuration at any time as needed for your system.
Remember that the initial MultiVOIP setup must be done locally or via the built-in Remote
Configuration/Command Modem using the MultiVOIP program. After the initial configuration is complete, all of the
MultiVOIP units in the VOIP system can be configured, re-configured, and updated from one location using the
MultiVOIP web interface software program or the MultiVOIP program (in conjunction with the built-in modem).
Multi-Tech Systems, Inc. 78
Page 79

Chapter 5: Phonebook Configuration
Phonebook Examples
North America
The following example demonstrates how Outbound and Inbound Phoneboo k entries work in a situation of
multiple area codes. Consider a company with offices in Minneapolis and Baltimore.
Notice first the area code situation in those two cities: Minneapolis’s local calling area consists of multiple
adjacent area codes; Baltimore’s local calling area consists of a base area code plus an overlay area code.
Company
VOIP/PBX
NW
Suburbs
763
5
SIte
Mpls
612
SW Suburbs
952
Outstate MD
St. Paul
& Suburbs
651
...
5
Company
VOIP/PBX
SIte
Baltimore
410
Figure 5-7: North America example
Baltimore/
Overlay
443
An outline of the equipment setup in both offices is shown below.
Multi-Tech Systems, Inc. 79
Figure 5-8: Equipment setup example
Page 80

Chapter 5: Phonebook Configuration
The screen below shows Outbound Phonebook entries for the VOIP located in the company’s Baltimore facility.
Figure 5-9: Baltimore example
The entries in the Minneapolis VOIP’s Inbound Phonebook match the Outbound Phonebook entries of the
Baltimore VOIP, as shown below.
To call the Minneapolis/St. Paul area, a Baltimore employee must dial eleven digits. (In this case, we are
assuming that the Baltimore PBX does not require an “8” or “9” to seize an outside phone line.)
If a Baltimore employee dials any phone number in the 612 area code, the call will automatically be handled by
the company’s VOIP system. Upon receiving such a call, the Minneapolis VOIP will remove the digits “1612”. But
before the suburban-Minneapolis VOIP can complete the call to the PSTN of the Minneapolis local calling area, it
must dial “9” (to get an outside line from the PBX) and then a comma (which denotes a pause to get a PSTN dial
tone) and then the 10-digit phone number which includes the area code (612 for the city of Minneapolis; which is
different than the area code of the suburb where the PBX is actually located -- 763).
A similar sequence of events occurs when the Baltimore employee calls number in the 651 and 952 area codes
because number in both of these area codes are local calls in the Minneapolis/St. Paul area.
Multi-Tech Systems, Inc. 80
Figure 5-10: Minneapolis example
Page 81

Chapter 5: Phonebook Configuration
The simplest case is a call from Baltimore to a phone within the Minneapolis/St. Paul area code where the
company’s VOIP and PBX are located, namely 763. In that case, that local VOIP removes 1763 and dials 9 to
direct the call to its local 7-digit PSTN.
Finally, consider the longest entry in the Minneapolis Inbound Phonebook, “17637175. Note that the main phone
number of the Minneapolis PBX is 763-717-5170. The destination pattern 17637175 means that all calls to
Minneapolis employees will stay within the suburban Minneapolis PBX and will not reach or be carried on the
local PSTN. Similarly, the Inbound Phone Book for the Baltimore VOIP (shown first below) generally matches the
Outbound Phone Book of the Minneapolis VOIP (shown second below).
Figure 5-11: Inbound Baltimore example
Notice the extended prefix to be removed: 14103257. This entry allows Minneapolis users to contact Baltimore
co-workers as though they were in the Minneapolis facility, using numbers in the range 7000 to 7999.
Note also that a comma (as in the entry 9,443) denotes a delay in dialing. A one-second delay is commonly used
to allow a second dial tone to be generated for calls going outside of the facility’s PBX system.
The Outbound Phone Book for the Minneapolis VOIP is shown below. The third destination pattern, “7” facilitates
reception of co-worker calls using local-appearing-extensions only. In this case, the “Add Prefix” field value for this
phonebook entry would be “1410325”.
Figure 5-12: Outbound Minneapolis example
Multi-Tech Systems, Inc. 81
Page 82

Chapter 5: Phonebook Configuration
Europe
The most direct use of the VOIP system is making calls between the offices where the VOIPs are located.
Consider, for example, the Wren Clothing Company. This company has VOIP-equipped offices in London, Paris,
and Amsterdam, each served by its own PBX. VOIP calls between the three offices completely avoid international
long-distance charges. These calls are free. The phonebooks can be set up to allow all Wren Clothing employees
to contact each other using 3-, 4-, or 5-digit numbers, as though they were all in the same building.
United Kingdom
Wren Clothing Co.
VOIP/PBX Site
London
5
Wren Clothing Co.
VOIP/PBX Site
5
Amsterdam
The
Netherlands
Wren Clothing Co.
VOIP/PBX Site
Paris
5
Free VOIP Calls
France
Figure 5-13: Free VOIP calls
In another use of the VOIP system, the local calling area of each VOIP location becomes accessible to all of the
VOIP system’s users. As a result, international calls can be made at local calling rates. For example, suppose that
Wren Clothing buys its zippers from The Bluebird Zipper Company in the western part of metropolitan Lon don. In
that case, Wren Clothing personnel in both Paris and Amsterdam could call the Bluebird Zipper Company without
paying international long-distance rates. Only London local phone rates would be charged. This applie s to calls
completed anywhere in London’s local calling area. Generally, local calling rates apply only within a single area
code, and, for all calls outside that area code, national rates apply. There are, however, some European cases
where local calling rates extend beyond a single area code. Local rates between Inner and Outer London are one
example of this. It is also possible, in some locations, that calls within an area code may be national calls - but this
is rare.
United Kingdom
Bluebird Zipper Co.
London
Wren Clothing Co.
VOIP/PBX Site
London
5
Wren Clothing Co.
VOIP/PBX Site
5
Amsterdam
The
Netherlands
Wren Clothing Co.
VOIP/PBX Site
Paris
5
Calls at London local rates
Local Calling Area
France
Figure 5-14: Local calling area
Multi-Tech Systems, Inc. 82
Page 83

This next example will have the following features:
• Employees in all cities will be able to call each other over the VOIP system using 4-digit extensions.
• Calls to Outer London and Inner London, greater Amsterdam, and g reater Paris will be accessible to
all company offices as local calls.
• Vendors in Guildford, Lyon, and Rotterdam can be contacted as national calls by all company offices.
Chapter 5: Phonebook Configuration
France Country Code: 33
Lille
Paris: Area 01
Rouen
Nantes
Reims
Strasbourg
Figure 5-15: UK & France codes
The Netherlands
Country Code: 31
Texe l 02 22
Den Helder 0223
Beverwijk 0251
Haarlem 023
Aalsmeer0297
070
The Hague
Rotterdam
0299 Purmerend
020 Amsterdam
0294 Weesp
010
058
Leeuwarden
038 Zwolle
Arnhem
026
050
Groningen
053
Enschede
Bordeaux
Toulouse
Lyon
Marseille
0118
Middelburg
Multi-Tech Systems, Inc. 83
040
Eindhoven
043
Maastricht
Figure 5-16: Netherlands codes
Page 84

An outline of the equipment setup in these three offices is shown below.
Chapter 5: Phonebook Configuration
Multi-Tech Systems, Inc. 84
Figure 5-17: Setup example
Page 85

Chapter 5: Phonebook Configuration
The screen below shows Outbound Phone Book entries for the VOIP located in the company’s London facility.
Figure 5-18: London example outbound
The Inbound Phone Book for the London VOIP is shown below.
NOTE: Commas are allowed in the Inbound Phonebook, but not in the Outbound Phonebook. Comma s denote a
brief pause for a dial tone, allowing time for the PBX to get an outside line.
Multi-Tech Systems, Inc. 85
Figure 5-19: London example inbound
Page 86

Chapter 5: Phonebook Configuration
The screen below shows Outbound Phone Book entries for the VOIP located in the company’s Paris facility.
Figure 5-20: Paris example outbound
The Inbound Phone Book for the Paris VOIP is shown below.
Multi-Tech Systems, Inc. 86
Figure 5-21: Paris example inbound
Page 87

Chapter 5: Phonebook Configuration
The screen below shows Outbound Phone Book entries for the VOIP in the company’s Amsterdam facility.
Figure 5-22: Amsterdam example outbound
The Inbound Phone Book for the Amsterdam VOIP is shown below.
Multi-Tech Systems, Inc. 87
Figure 5-23: Amsterdam example inbound
Page 88

Chapter 5: Phonebook Configuration
Variations of Caller ID
The Caller ID feature has dependencies on both the telco central office and the MultiVOIP phone book. See the
diagram series below:
Call is received
here.
xxxyyyzzzz
J.Q. Public
Display shows:
FXS
CID
Terminating
VoIP
Clock:
5-31,
1:42pm
CID Number: 763-555-8794
CID Name: Melvin Jones
Tim e Stamp : Date: 05/31
Time:1:42pm
In x.06 release, when SIP protocol is used,
*
CID Name field will duplicate value in
CID Number field.
CID Flow
CID
Generating
IP
VoIP
FXO
Network
H.323 or SPP
Protocol
*
Figure 5-24: Caller ID example 1
Central Office
with
standard telephony
Caller ID ser v ic e
Call originates here
at 1:42pm, May 31.
xxxyyyzzzz
J.Q. Public
phone of:
Melvin Jones
763-555-8794
Figure 5-25: VOIP Caller ID Case #1 – Call, through telco central office with standard CID, enters VOIP system.
Call is received
here.
xxxyyyzzzz
J.Q. Public
FXS
CID
Terminating
VoIP
Clock:
7/10, 4:19pm
Display shows:
CID Number: 423
CID Name: Anoka-Whse-VP3
Time Stamp: Date: 7/10
Time: 4:19pm
In x.06 release, when SIP protocol is used,
*
CID Name field will duplicate value in
CID Number fi eld.
CID Flow
IP
Network
H.323 Protocol
CID
VoIP
Ch2
Ch3
Ch4
Ch1
FXO
Generating
*
Phone Book Configuration
Gateway Name:
Q.931 Parameters
Gatekeeper RAS Parameters
Anoka-Whse-VP3
Call originates here
Central Office
without
standard telephony
Caller ID service
at 4:19pm, July 10.
xxxyyyzzzz
J.Q. Public
phone of:
Wilda Jameson
763-555-4071
Inbound Phone Book
Remove Prefix Add Prefix Forward/Addr
423
748
{Channel 2}
Figure 5-25: Caller ID example 2
Figure 5-26: VOIP Caller ID Case #2 – Call, through telco central office without standard CID, enters H.323 VOIP
system.
Multi-Tech Systems, Inc. 88
Page 89

Chapter 5: Phonebook Configuration
Call is received
here.
x xxyyy zzzz
J.Q. Publ ic
Display shows:
FXS
Term inating
VoIP
Clo ck:
1 5:26, 5-31
CID Flow
IP
Network
SPP Protocol
Ch1
Generating
VoIP
Ch2
Ch3
Ch4
FXO
st andard tele phony
Central Office
without
Cal l er ID ser vi c e
Call originates here
at 5:47p m , Sept 27.
xx xyyyz zzz
J.Q. Publ ic
phone of:
Henry Brampton
763-555-4077
CI D Numbe r: 423
CID Name: Shipping Dept
Time St amp: Date: 0927
Time: 1747
... if “De s c rip tion” f ield in Add/Edit
Inbound Phon e Book is used
OR
CI D Numbe r: 423
CI D Name: Anoka -Wh s e -VP3
Time St amp: Date: 0927
Time: 1747
... if “Description” in Add/Edit
Inbou nd P hon e Book is b lank
Inbound Phone Book
Re m ove Prefix Add P refix For ward/Addr
423
748
Phone Boo k Configurati on
Gate w ay Name :
Add/Edit Inbound Phone Book
Use as default entry
Remove Prefix:
Add Prefix:
Channel Number:
Description:
Q.931 Parameters
Gatekeeper RAS Parameters
Channel 2
Shi pp i ng Dept
Anoka-Whse-VP3
{Channel 2}
Figure 5-26: Caller ID example 3
Figure 5-27: VOIP Caller ID Case #3 – Call, through telco central office without standard CID, enters SPP VOIP
system.
Call is received
here.
xxxyyyzzzz
J.Q. Public
FXS
CID
Terminating
VoIP
Clock:
10/03, 4:51pm
Display shows:
CID Number: 423
CID Name: Anoka-Whse-VP3
Time Stamp: Date: 10/03
Time: 4:51pm
In x.06 release, when SIP protocol is used,
*
CID Name field will duplicate val ue in
CID Number field.
CID Flow
IP
Network
H.323 Protocol
CID
Generating
VoIP
Ch2
Ch3
Ch4
Ch1
401
402
403
404
FXS
*
Phone Book Configuration
Gateway Name:
Q.931 Parameters
Gatekeeper RAS Parameters
Anoka-Whse-VP3
xxxyyyzzzz
J.Q. Public
phone of:
Inbound Phone Book
Remove Prefix Add Prefix Forward/Addr
Figure 5-27: Caller ID example 4
Figure 5-28: VOIP Caller ID Case #4 – Remote FXS call on H.323 VOIP system.
Call originates here
at 4:51pm, Oct 3.
Nigel Thurston
763-555-9401
{Channel 2}
423
748
Multi-Tech Systems, Inc. 89
Page 90

Chapter 5: Phonebook Configuration
Call is received
here.
xxxyyyzzzz
J.Q. Public
FXS
CID
Terminating
VoIP
Clock:
11/15, 6:17pm
Display shows:
CID Number: 423
CID Name: Anoka-Whse-VP3
Time Stamp: Date: 11/15
Time: 6:17pm
In x.06 release, when SIP protocol is used,
*
CID Name field will duplicate value in
CID Number field.
CID Flow
IP
Network
H.323 Protoco l
CID
VoIP
Ch2
Ch3
Ch4
Ch1
DID
Generating
*
Phone Book Configuration
Gateway Name:
Q.931 Parameters
Gatekeeper RAS Parameters
Anoka-Whse-VP3
Call originates here
Central Office
without
standard telephony
Caller ID service
at 6:17pm, Nov 15.
xxxyyyzzzz
J.Q. Public
phone of:
Edwin Smith
763-743-5873
Inbound Phone Book
Remove Prefix Add Prefix Forward/Addr
423
748
{Channel 2}
Figure 5-28: Caller ID example 5
Figure 5-29: VOIP Caller ID Case #5 – Call through telco central office without standard CID enters DID channel
in H.323 VOIP system.
Multi-Tech Systems, Inc. 90
Page 91

Chapter 6 – Using the Software
Introduction
This chapter will primarily cover the day to day operation and maintenance sections of the MultiVOIP software.
How to update the firmware and software are also covered here should either be needed. This section will mainly
focus on the Statistics section of the configuration software, but there are references to a few of the other sections
as they are used more in the daily operations than in a setup situation.
Software Categories Covered in This Chapter
¾ System Information
¾ Call Progress
¾ Logs
¾ IP Statistics
¾ Link Management
¾ Registered Gateway Details
¾ Servers
o H.323 GateKeepers
o SIP Proxies
o SPP Registrars
¾ Advanced
o Packetization Time
Multi-Tech Systems, Inc. 91
Page 92

Chapter 6: Using the Software
System Information screen
This screen presents system information at a glance. It is found under the Configuration section and its primary
use is in troubleshooting. The information presented in figure 6-1 is for reference only and is not meant to be an
exact match of your system.
Figure 6-1: System information
System Information Parameter Definitions
Field Name Values Description
Boot Version
Firmware Version
Configuration Version
Phone Book Version
IFM Version
Mac Address numeric Denotes the number assigned as the VOIP unit’s unique Ethernet address.
Up Time days:
Hardware ID alpha-
nn.nn
alphanumeric
nn.nn.nn
alphanumeric
nn.nn.
nn.nn
alphanumeric
nn.nn
alphanumeric
nn
alphanumeric
hours:
mm:ss
numeric
Indicates the version of the code that is used at the startup (booting) of the VOIP.
The boot code version is independent of the software version.
Indicates the version of the MultiVOIP firmware.
Indicates the version of the MultiVOIP configuration software.
Indicates the version of the MultiVOIP phone book being used.
Indicates version of the IFM module, the device that performs the transformation
between telephony signals and IP signals.
Indicates how long the VOIP has been running since its last booting.
Indicates version of the MultiVOIP circuit board assembly being used.
Multi-Tech Systems, Inc. 92
Page 93

Chapter 6: Using the Software
The frequency with which the System Information screen is updated is determined by a setting in the Logs/Traces
screen (which is under the Configuration section).
Figure 6-2: Logs/Traces screen
Statistics Section
Ongoing operation of the MultiVOIP, whether it is in a MultiVOIP/PBX setting or MultiVOIP/telco-office setting, can
be monitored for performance using the Statistics functions of the MultiVOIP software. The following screens are
examples of what can be shown and are followed by detailed descriptions of the categories involved. The model
and signaling used will affect what is available for display.
Call Progress
Multi-Tech Systems, Inc. 93
Figure 6-3: Call progress screen
Page 94

Chapter 6: Using the Software
Call Progress Details: Field Definitions
Field Name Values Description
Channel 1-n Number of data channel or time slot on which the call is carried. This is the
channel for which call-progress details are being viewed.
Call Details
Duration H/M/S The length of the call in hours, minutes, and seconds (hh:mm:ss).
Mode Voice or FAX Indicates whether the call being described was a voice call or a FAX call.
Voice Coder G.723, G.729,
G.711, etc.
IP Call Type H.323, SIP, or
SPP
IP Call Direction incoming,
outgoing
Packet Details
Packets Sent integer value The number of data packets sent over the IP net work in the course of this
Packets Rcvd integer value The number of data packets received over the IP network in the course of
Bytes Sent integer value The number of bytes of data sent over the IP network in the course of this
Bytes Rcvd integer value The number of bytes of data received over the IP network in the course of
Packets Lost integer value The number of voice packets from this call that were lost after being
From – To Details Description
Gateway Name
(from)
IP Address (from)
Options SC, FEC Displays VOIP transmission options in use on the current call. These may
Gateway Name (to) alphanumeric
IP Address (to)
Options SC, FEC Displays VOIP transmission options in use on the current call. These may
DTMF/Other Details
Prefix Matched specified
Outbound Digits Sent 0-9, #, * The digits transmitted by the MultiVOIP to the PBX/telco for this call.
Outbound Digits
Received
Server Details
DTMF Capability inb and,
Table is continued on next page…
alphanumeric
string
n.n.n.n
string
n.n.n.n
dialing digits
0-9, #, * Of the digits transmitted by the MultiVOIP to the PBX/telco for this call,
n.n.n.n
and/or other
related
descriptions
out of band
Expressions
differ slightly
for different
Call Signaling
protocols
(H.323, SIP, or
SPP).
The voice coder being used on this call.
Indicates the Call Signaling protocol used for the call (H.323, SIP, or SPP).
Indicates whether the call in question is an incoming call or an outgoing
call.
call.
this call.
call.
this call.
received from the IP network.
Identifier for the VOIP gateway that handled the origination of this call.
IP address from which the call was received.
include Forward Error Correction or Silence Compression.
Identifier for the VOIP gateway that handled the completion of this call.
IP address to which the call was sent.
include Forward Error Correction or Silence Compression.
Displays the dialed digits that were matched to a phonebook entry.
these are the digits that were confirmed as being received.
The IP address (etc.) of the traffic control server (if any) being used
(whether an H.323 gatekeeper, a SIP proxy, or an SPP registrar gateway)
will be displayed here if the call is handled through that server.
Indicates whether the DTMF dialing digits are carried "Inband" or "Out of
Band." The corresponding field values differ for the 3 different VOIP
protocols.
For H.323, this field can display "Out of Band" or "Inband". For SIP it can
display either "Out of Band RFC2833" or "Out of Band SIP INFO" to
indicate the out-of-band condition or "Inband" to indicate the in-band
condition. For SPP it can display "Out of Band RFC2833" or "Inband".
Multi-Tech Systems, Inc. 94
Page 95

Chapter 6: Using the Software
Call Progress Details: Field Definitions (continued)
Field Name Values Description
Supplementary Services Status
Call on Hold alphanumeric Describes held call by its IP address source, location/gateway identifier,
Call Waiting alphanumeric Describes waiting call by its IP address source, location/gateway identifier,
Caller ID “Calling Party
+ identifier”;
“Alerting Party
+ identifier”;
“Busy Party
+ identifier”;
“Connected
Party +
identifier”
Call Status fields
Call Status hangup, active Shows condition of current call.
Call Control Status Tun, FS + Tun,
AE, Mux
Silence Compression SC
Forward Error
Correction
FEC
and hold duration. Location/gateway identifiers come from Gateway Name
field in Phone Book Configuration screen of remote VOIP.
and hold duration. Location/gateway identifiers come from Gateway Name
field in Phone Book Configuration screen of remote VOIP.
This field shows the identifier and status of a remote VOIP (which has Call
Name Identification enabled) with which this VOIP unit is currently engaged
in some VOIP transmission. The status of the engagement (Connected,
Alerting, Busy, or Calling) is followed by the identifier of a specific channel
of a remote VOIP unit. This identifier comes from the “Caller Id” field in the
Supplementary Services screen of the remote VOIP unit.
Displays the H.323 version 4 features in use for the selected call. These
include tunneling (Tun), Fast Start with tunneling (FS + Tun), Annex E
multiplexed UDP call signaling transport (AE), and Q.931 Multiplexing
(Mux).
“SC” stands for Silence Compression. With Silence Compression
enabled, the MultiVOIP will not transmit voice packets when silence is
detected, thereby reducing the amount of network bandwidth that is being
used by the voice channel.
“FEC” stands for Forward Error Correction. Forward Error Correction
enables some of the voice packets that were corrupted or lost to be
recovered. FEC adds an additional 50% overhead to the total network
bandwidth consumed by the voice channel. Default = Off
Logs
Figure 6-4: Log statistics screen
Multi-Tech Systems, Inc. 95
Page 96

Chapter 6: Using the Software
Logs Screen Details: Field Definitions
Field Name Values Description
Log # column 1 or higher All calls are assigned an event number in chronological order, with the
most recent call having the highest event number.
Start Date, Time
column
Duration column hh:mm:ss This describes how long the call lasted in hours, minutes, and seconds.
Type H.323, SIP, SPP Indicates the Call Signaling protocol used for the call (H.323, SIP, or SPP).
Status column success or failure Displays the status of the call (whether the call was completed or not).
IP Direction incoming,
Mode column voice or FAX Indicates whether the event b eing described was a voice call or a FAX call.
From column gateway name Displays the name of the voice gateway that originates the call.
To column gateway name Displays the name of the voice gateway that completes the call.
Special Buttons
Previous -- Displays log entry before currently selected one.
Next -- Displays log entry after currently selected one.
First -- Displays first log entry
Last -- Displays last log entry.
Delete File -- Deletes selected log file.
Call Details
Voice coder Coder protocol The voice coder being used on this call.
Disconnect Reason "Normal" or
DTMF Capability inband,
Outbound Digits
Received
Outbound Digits
Sent
Server Details
Packets sent integer value Number of data packets sent over the IP network in the cou r se of this call.
Packets received integer value Number of data packets received over the IP network in the course of this
Packets lost integer value Number of voice packets from this call that were lost after being received
Bytes sent integer value
Bytes received integer value Number of bytes of data received over the IP network in the course of this
FROM Details
Gateway Name alphan umeric Identifier for the VOIP gateway that originated this call.
IP Address
Options FEC, SC Displays VOIP transmission options used by the VOIP gatewa y originating
TO Details
Gateway Name alphanumeric Identifier for the VOIP gateway that completed (terminated) this call.
IP Address
Options Displays transmission options used b y VOIP gateway terminating the call.
Supplementary Services Info
Call Transferred To phone number Number of party called in transfer.
Call Forwarded To phone number Number of party called in forwarding.
dd:mm:yyyy
hh:mm:ss
outgoing
"Local"
disconnection.
out of band
Expressions
differ slightly for
different Call
Signaling
protocols.
0-9, #, * The digits, sent by MultiVOIP to PBX/telco, that were acknowledged as
0-9, #, * The digits transmitted by the MultiVOIP to the PBX/telco for this call.
n.n.n.n
n.n.n.n
n.n.n.n
The starting time of the call. The date is presented as a day and a month of
one or two digits, and a four-digit year. This is followed by a time-of-day in
a two-digit hour, a two-digit minute, and a two-digit seconds value.
Indicates whether the call is "incoming" or "outgoing" with respect to the
gateway.
Indicates whether the call was disconnected simply because the desired
conversation was done or some other irregular cause occasioned
disconnection (e.g., a technical error or failure).
Indicates whether the DTMF dialing digits are carried "Inband" or "Out of
Band." The corresponding field values differ for the 3 different VOIP
protocols.
For H.323, this field can display "Out of Band" or "Inband". For SIP it can
display either "Out of Band RFC2833" or "Out of Band SIP INFO" to
indicate the out-of-band condition or "Inband" to indicate the in-band
condition. For SPP it can display "Out of Band RFC2833" or "Inband".
having been received by the remote VOIP gateway.
When the MultiVOIP is operating in the non-direct mode (with Gatekeeper
in H.323 mode; with proxy in SIP mode; or in the client/server configuration
of SPP mode), this field shows the IP address of the server that is directing
IP phone traffic.
call.
from the IP network.
Number of bytes of data sent over the IP network in the course of this call.
call.
IP address of the VOIP gateway from which the call was received.
the call. These may include Forward Error Correction or Silence
Compression.
IP address of the VOIP gateway at which the call was completed.
Multi-Tech Systems, Inc. 96
Page 97

IP Statistics
Chapter 6: Using the Software
Figure 6-5: IP statistics screen
UDP versus TCP. (User Datagram Protocol versus Transmission Control Protocol). UDP provides unguaranteed,
connectionless transmission of data across an IP network. By contrast, TCP provides reliable, conne ctionoriented transmission of data.
Both TCP and UDP split data into packets called “datagrams.” However, TCP includes extra headers in th e
datagram to enable retransmission of lost packets and reassembly of packets into their correct order if they arrive
out of order. UDP does not provide this. Lost UDP packets are irretrievable; that is, out-of-order UDP packets
cannot be reconstituted in their proper order.
Despite these obvious disadvantages, UDP packets can be transmitted much faster than TCP packets -- a s much
as three times faster. In certain applications, like audio and video data transmission, the need for high speed
outweighs the need for verified data integrity. Sound or pictures often remain intelligible despite a certain amount
of lost or disordered data packets (which comes through as static).
Multi-Tech Systems, Inc. 97
Page 98

IP Statistics: Field Definitions
Field Name Values Description
IP Address
“Clear” button -- Clears packet tallies from memory.
Total Packets
Transmitted integer
Received integer
Received with
Errors
UDP Packets
Transmitted integer
Received integer
Received with
Errors
TCP Packets
Transmitted integer
Received integer
Received with
Errors
RTP Packets
Transmitted integer
Received integer
Received with
Errors
RTCP Packets
Transmitted integer
Received integer
Received with
Errors
n.n.n.n
value
value
integer
value
value
value
integer
value
value
value
integer
value
value
value
integer
value
value
value
integer
value
IP address of the MultiVOIP. For an IP address to be displayed here, the MultiVOIP must
have DHCP enabled. Its IP address, in such a case, is assigned by the DHCP server.
Sum of data packets of all types.
Total number of packets transmitted by this VOIP gateway since the last “clearing” or
resetting of the counter within the MultiVOIP software.
Total number of packets received by this VOIP gateway since the last “clearing” or
resetting of the counter within the MultiVOIP software.
Total number of error-laden packets received by this VOIP gateway since the last
“clearing” or resetting of the counter within the MultiVOIP software.
User Datagram Protocol packets.
Number of UDP packets transmitted by this VOIP gateway since the last “clearing” or
resetting of the counter within the MultiVOIP software.
Number of UDP packets received by this VOIP gateway since the last “clearing” or
resetting of the counter within the MultiVOIP software.
Number of error-laden UDP packets received by this VOIP gateway since the last
“clearing” or resetting of the counter within the MultiVOIP software.
Transmission Control Protocol packets.
Number of TCP packets transmitted by this VOIP gateway since the last “clearing” or
resetting of the counter within the MultiVOIP software.
Number of TCP packets received by this VOIP gateway since the last “clearing” or
resetting of the counter within the MultiVOIP software.
Number of error-laden TCP packets received by this VOIP gateway since the last
“clearing” or resetting of the counter within the MultiVOIP software.
Voice signals are transmitted in Realtime Transport Protocol packets. RTP packets are a
type or subset of UDP packets.
Number of RTP packets transmitted by this VOIP gateway since the last “clearing” or
resetting of the counter within the MultiVOIP software.
Number of RTP packets received by this VOIP gateway since the last “clearing” or
resetting of the counter within the MultiVOIP software.
Number of error-laden RTP packets received by this VOIP gateway since the last
“clearing” or resetting of the counter within the MultiVOIP software.
Realtime Transport Control Protocol packets convey control information to assist in the
transmission of RTP (voice) packets. RTCP packets are a type or subset of UDP packets.
Number of RTCP packets transmitted by this VOIP gateway since the last “clearing” or
resetting of the counter within the MultiVOIP software.
Number of RTCP packets received by this VOIP gateway since the last “clearing” or
resetting of the counter within the MultiVOIP software.
Number of error-laden RTCP packets received by this VOIP gateway since the last
“clearing” or resetting of the counter within the MultiVOIP software.
Chapter 6: Using the Software
Multi-Tech Systems, Inc. 98
Page 99

Chapter 6: Using the Software
Link Management
The Link Management screen is essentially an automated utility for pinging endpoints on your VOIP network. This
utility generates pings of variable sizes at variable intervals and records the response to the pings.
Figure 6-6: Link management
Link Management screen Field Definitions
Field Name Values Description
Monitor Link fields
IP Address to Ping
Pings per Test 1-999 This field determines how many pings will be generated b y the Start Now
Response Timeout 500 – 5000
Ping Size in Bytes 32 – 128 bytes This field determines how long or large the ping will be.
Timer Interval
between Pings
Start Now command
button
Clear command
button
Link Status Parameters
IP Address column
No. of Pings Sent as listed Number of pings sent to target endpoint.
No. of Pings
Received
Round Trip Delay
(Min/Max/Avg)
Last Error as listed Indicates when last data error occurred.
n.n.n.n
milliseconds
0 or 30 – 6000
minutes
-- Initiates pinging.
-- Erases ping parameters in Monitor Link field group and restores default
n.n.n.n
as listed Number of pings received by target endpoint.
as listed,
in milliseconds
This is the IP address of the target endpoint to be pinged.
command.
The duration after which a ping will be considered to have failed.
This field determines how long of a wait there is between one ping and the
next.
values.
These fields summarize the results of pinging.
Target of ping.
Displays how long it took from time ping was sent to time ping response
was received.
Multi-Tech Systems, Inc. 99
Page 100

Chapter 6: Using the Software
Registered Gateway Details
The Registered Gateway Details screen presents a real-time display of the special op erating parameters of the
Single Port Protocol (SPP). These are configured in the Call Signaling screen and in the Add/Edit Outbound
Phone Book screen.
Figure 6-7: Registered endpoints
Registered Gateway Details: Field Definitions
Field Name Values Description
Column Headings
Description alphanumeric This is a descriptor for a particular VOIP gateway unit. This descriptor should
generally identify the physical location of the unit (e.g., city, building, etc.) and
perhaps even its location in an equipment rack.
IP Address
Port
Register
Duration
Status Registered/
No. of Entries The number of gateways currently registered to the Registrar. This includes all SPP
Count of
Registered
Numbers
List of
Registered
Numbers
n.n.n.n
n
The time remain ing in seconds be fore the Time ToLive ti mer expire s. If the gateway
unregistered
Details
If a registered gateway is selected (by clicking on it in the screen), The "Count of
Lists all of the registered phone numbers for the selected gateway.
The RAS address for the gateway.
Port by which the gateway exchanges H.225 RAS messages with the gatekeeper.
fails to reregister within this time, the endpoint is unregistered.
The current status of the gateway either registered or unregistered.
clients registered and the Registrar itself.
Registered Numbers" will indicate th e number o f reg istere d phone numbers fo r the
selected gateway. When a cli ent registers, all of its inbound phonebook's phone
numbers become registered.
Multi-Tech Systems, Inc. 100
 Loading...