

Page 1

MVP100GK
User Guide
Page 2

User Guide
Gatekeeper
MVP100GK
S000353B Revision B
This publication may not be reproduced, in whole or in part, without prior expressed written permission from MultiTech Systems, Inc. All rights reserved.
Copyright © 2004 by Multi-Tech Systems, Inc.
Multi-Tech Systems, Inc. makes no representations or warranty with respect to the contents hereof and
specifically disclaims any implied warranties of merchantability or fitness for any particular purpose. Furthermore,
Multi-Tech Systems, Inc. reserves the right to re vise this pu blication and to make changes from time to time in the
content hereof without obligation of Multi-Tech Systems, Inc. to notify any person or organization of such revisions
or changes.
Record of Revisions
Revision Date Description
A 08/01/04 Manual released.
B 09/20/04 Manual updated to include new 25 user license and version 8.06.A7 software.
Patents
This device covered by one or more of the following patents: 6,031,867; 6,012,113; 6,009,082; 5,864,560;
5,815,503; 5,812,534; 5,790,532; 5,764,628; 5,764,627; 5,754,589; 5,724,356; 5,673,268; 5,673,257; 5,628,030;
5,619,508; 5,617,423; 5,600,649; 5,592,586; 5,577,041; 5,574,725; 5,559,793; 5,546,448; 5,546,395; 5,535,204;
5,500,859; 5,471,470; 5,463,616; 5,453,986; 5,452,289; 5,450,425; 5,309,562; 5,301,274
Trademarks
Trademarks of Multi-Tech Systems, Inc.: Multi-Tech, and Multi-Tech logo.
Windows is a registered trademark of Microsoft Corporation in the United States and other countrie s.
All products or technologies are the trademarks or registered trademarks of their respective holders.
Technical Support
Country By Email By Phone
France: support@multitech.fr (33) 1-64 61 09 81
India: support@multitechindia.com 91 (124) 6340778
U.K.: support@multitech.co.uk (44) 118 959 7774
U.S. and Canada: support@multitech.com (800) 972-2439
Rest of the World: support@multitech.com (763) 717-5863
World Headquarters
Multi-Tech Systems, Inc.
2205 Woodale Drive
Mounds View, Minnesota 55112
(763) 785-3500 or (800) 328-9717
Fax 763-785-9874
Internet Address: http://www.multitech.com
Page 3

Contents
CHAPTER 1 - INTRODUCTION AND DESCRIPTION.............................................................. 4
Gatekeeper Basics......................................................................................................................................................................4
Features ......................................................................................................................................................................................6
Front Panel.................................................................................................................................................................................7
Back Panel..................................................................................................................................................................................8
Specifications..............................................................................................................................................................................8
CHAPTER 2 - INSTALLATION................................................................................................. 9
Safety Warnings.........................................................................................................................................................................9
Safety Recommendations for Rack Installations ....................................................................................................................9
Cabling......................................................................................................................................................................................10
Loading Gatekeeper Software ................................................................................................................................................12
Gatekeeper Configuration ......................................................................................................................................................16
CHAPTER 3 – GATEKEEPER FUNCTIONALITY.................................................................. 27
Getting Started.........................................................................................................................................................................27
VOIP Network Example .........................................................................................................................................................29
CHAPTER 4 - GATEKEEPER PROTOCOLS........................................................................ 51
CHAPTER 5 – GATEKEEPER SOFTWARE .......................................................................... 53
Configuration ...........................................................................................................................................................................54
Statistics....................................................................................................................................................................................61
Connection................................................................................................................................................................................63
GateKeeper...............................................................................................................................................................................64
Software User License Agreement .........................................................................................................................................83
CHAPTER 6 - WARRANTY, SERVICE, AND TECH SUPPORT............................................ 84
Repair Procedures for U.S. and Canadian Customers......................................................................................................... 84
Technical Support....................................................................................................................................................................85
Regulatory Information ..........................................................................................................................................................85
FCC Declaration ......................................................................................................................................................................86
INDEX...................................................................................................................................... 88
Page 4

Chapter 1 – Introduction and Description
Chapter 1 - Introduction and
Description
Welcome to Multi-Tech’s new MultiVOIP™ Gatekeeper, Model MVP100GK, a turnkey hardware an d software
solution that enables network managers and intranet managers to define and control how H.323 voice traffic is
managed over IP networks. The Gatekeeper is a complementary product to the MultiVOIP family. The
Gatekeeper is an industry-standard mechanism for call control and routing, basic teleph ony services, H.323
bandwidth usage control, total network usage control, and overall system administration and security policies. It
includes fast, easy-to-use interfaces that network managers can use to modify or update zone configurations
when an individual on the network needs additional services. And, it provides call centers with the capability to
perform needs-based call routing as well as providing a variety of other automatic call distribution features.
Figure 1-1. Gatekeeper
Gatekeeper facilitates interoperability between PBX dial plans and IP-based terminals. With it, call centers can
route call on the basis of need and implement other automatic call distribution features, as well.
Gatekeeper Basics
Gatekeepers are optional within H.323 networks. However, when they are present, gateways (voip units) and
other network endpoint devices (like terminals and Multipoint Control Units used in co nferences) must use
Gatekeeper services. There are four functions that H.323 Gatekeepers must provide to the network and many
other functions, both standard and proprietary, that the Gatekeeper may offer to network participants.
Mandatory Gatekeeper Functions
The mandatory Gatekeeper functions are address translation, admission control, band width control, and zone
management.
Address Translation
The Gatekeeper supports aliases, such as conventional E.164 phone numbe rs, for e ach endpoint re gistered
within the zone. Users call each other within a zone by simply dialing a number or string of cha racters instead of
an IP address. This function is particularly important when a phone on the circuit-switched network tries to call a
phone connected to a gateway on an IP network.
Admission Control
The Gatekeeper determines which network participants can and cannot make calls, according to established
network permissions and rules. The Gatekeeper controls admission using H.225 “RAS” messages (Registration,
Admission, Status).
Multi-Tech Systems, Inc. MultiVOIP Gatekeeper User Guide 4
Page 5

Chapter 1 – Introduction and Description
Bandwidth Control
With the Gatekeeper, the network administrator can specify bandwidth limitations within a Gatekeeper’s zone and
can specify a bandwidth limit for gateway endpoints. The Gatekeeper controls bandwidth using H.225 RAS
messages. A Gatekeeper may determine there is no bandwidth available for a call or no additional ban dwidth
available for an ongoing call requesting an increase. Dynamic (situation-dependent) changes in bandwidth
allocation are typically called “bandwidth management,” which is considered an optional Gatekeeper function.
Zone Management
The Gatekeeper allows or disallows call traffic within the Gatekeeper’s zone, depending upon establish ed
permissions. The zone might be defined geographically (such as different branch locations), by physical network
connections (a range of IP addresses may comprise a zone, as may a subnet on a particular floor of a building),
or by a functional (organizational) paradigm.
Optional Gatekeeper Functions
The Gatekeeper supports the three main optional Gatekeeper functions: call control signaling, call authorization,
and bandwidth management.
Call Control Signaling
The Gatekeeper can, in “routed” mode, act as an intermediary for H.225 call-control signals between two
endpoints participating in a call. In “direct” mode, this function is turned off and the endpoints exchange H.225
call-control messages directly.
Call Authorization
The Gatekeeper can be programmed to restrict access (ad m ission and registration) according to criteria set by
the user.
Bandwidth Management
This is essentially dynamic bandwidth control (see “Bandwidth Co ntrol” section above).
Multi-Tech Systems, Inc. MultiVOIP Gatekeeper User Guide 5
Page 6

Chapter 1 – Introduction and Description
Features
• H.323 Version 2 compliance
• Admissions control determines whether H.323 devices are allowed to a ccess re sources (make calls)
• Address translation routes calls across your network
• Bandwidth control monitors and controls H.323 bandwidth usage to provide superior QoS
• Zone control and managemnt provides all defined call control services to all registered endpoints in the
gatekeeper’s zone
• Bandwidth management controls and limits the number of H.323 devices that are allowed to simultaneously
use the network
• Call routing allows you to direct calls to specified groups of gateways
• Call authorization/access authorizes or rejects a given call based on type of service, gateway restrictions or
lack of available bandwidth
• Support for Zone Prefix 1 and 2 where we accept calls from neighbouring gatekeepers (Inter Zone Calls)
using these two zone prefixes
• Intra-zone security mechanism to control calling activity within a zone using PBX-like prefix dialing
• Support for non-RAS endpoints such as Microsoft NetMetting
Multi-Tech Systems, Inc. MultiVOIP Gatekeeper User Guide 6
Page 7
Chapter 1 – Introduction and Description
Front Panel
The front panel has 4 front panel LEDs that provide operating status.
The Front Panel
Figure 1-2. Front Panel
Front Panel LED Descriptions
LED
Power Indicates the presence of power.
Boot After power up, the Boot LED will be on briefly while the Gatekeeper is booting. It lights whenever the
Gatekeeper is booting or downloading a set of configuration data.
LED Description of Ethernet LE Ds
LNK The LINK (LNK) LED indicates link integrity for the Ethernet port. When the LNK LED is on, the
Ethernet link is valid. When the LNK LED is blinking, the Ethernet link is active.
FDX
The Full DupleX (FDX) LED indicates either 10Mbps, 100Mbps, or a collision has occurred on the
Ethernet link. When the FDX LED is off, the Ethernet link is responding at 10Mbps. When the FDX
LED is on, the link is responding at 100Mbps. When the FDX LED is blinking, a collision has
occurred.
Multi-Tech Systems, Inc. MultiVOIP Gatekeeper User Guide 7
Page 8
Chapter 1 – Introduction and Description
Back Panel
The Gatekeeper back panel has a power plug, power switch, Comman d Port (RS232) for configuration, an
Ethernet jack (RJ45) for connection to your network, and a Command Modem for remote configuration.
Back panel
The back panel components are described in detail in the Cabling Procedure section in Chapter 2 of this manual.
Specifications
The Gatekeeper conforms to the following technical specifications.
• 10/100Mb EtherNet network
• Power requirement: 100-240V; 1.2 – 0.6V
• Frequency: 50-60 Hz
• Power Consumption: 27 Watts
• 1.75 inches high x 17.4 inches wide x 8.75 inches deep (4.5cm H x 44.2cm W x 22.2cm D)
• 7.1 lbs (3.2 kg)
Multi-Tech Systems, Inc. MultiVOIP Gatekeeper User Guide 8
Page 9

Chapter 2 – Installation
Chapter 2 - Installation
This chapter explains how to set up and connect cables for the Gatekeepe r. This product includes the Windows
operating system and Gatekeeper software, and is ready to be connected to an Ethernet concentrator.
Safety Warnings
1. Use this product only with UL- and CUL-listed computers.
2. To reduce the risk of fire, use only 26 AWG or larger telephone wiring.
3. Never install telephone wiring during a lightning storm.
4. Never install a telephone jack in a wet location unless the jack is specifically desig ned for wet locations.
5. Never touch uninsulated telephone wires or terminals unless the telephone line has been disconnected
at the network interface.
6. Use caution when installing or modifying telephone lines.
7. Avoid using a telephone during an electrical storm; there is a risk of electrical shock from lightning.
8. Do not use a telephone in the vicinity of a gas leak.
Caution: Danger of explosion if battery is incorrectly replaced. A lithium battery on the Gatekeeper board
provides backup power for the time-keeping capability. The battery has an estimated life expectancy of ten years.
Contact Multi-Tech if you suspect a failed battery. If date and time is incorrect after having the unit powered off, it
may be due to a weak battery or incorrect setup.
Caution: The Ethernet ports are not designed to be connected to a Public Telecommunication Network.
Safety Recommendations for Rack
Installations
• Ensure proper installation of the Gatekeeper in a closed or multi-unit enclosure by following the
recommended installation as defined by the enclosure manufacturer. Do not place the Gatekeeper di rectly
on top of other equipment or place other equipment directly on top of the Gatekeeper.
• If installing the Gatekeeper in a closed or multi-unit enclosure, ensure adequate airflow within the rack so
that the maximum recommended ambient temperature is not exceeded.
• Ensure that the Gatekeeper is properly connected to earth ground via a ground ed power cord. If a power
strip is used, ensure that the power strip provides adequate grounding of the attached apparatus.
• Ensure that the main supply circuit is capable of handling the load of the Gatekeeper. Refer to the power
label on the equipment for load requirements.
• Maximum ambient temperature for the Gatekeeper is 40 degrees Celsius (104° F).
This equipment should only be installed by properly qualified service personnel.
• Connect like circuits. In other words, connect SELV (Secondary Extra Low Voltage) circuits to SELV circuits
and TN (Telecommunications Network) circuits to TN circuits.
Multi-Tech Systems, Inc. MultiVOIP Gatekeeper User Guide 9
Page 10
Chapter 2 – Installation
Unpacking
Check the items on the Gatekeeper shipping list to ensure that you have received the correct options and
accessories. Unpack the unit and inspect it for visible shipping damage. If damage is observed, do not po wer-on
the unit; contact Multi-Tech's Tech Support for advice. If no damage is observed, place the Gatekeeper in its final
location.
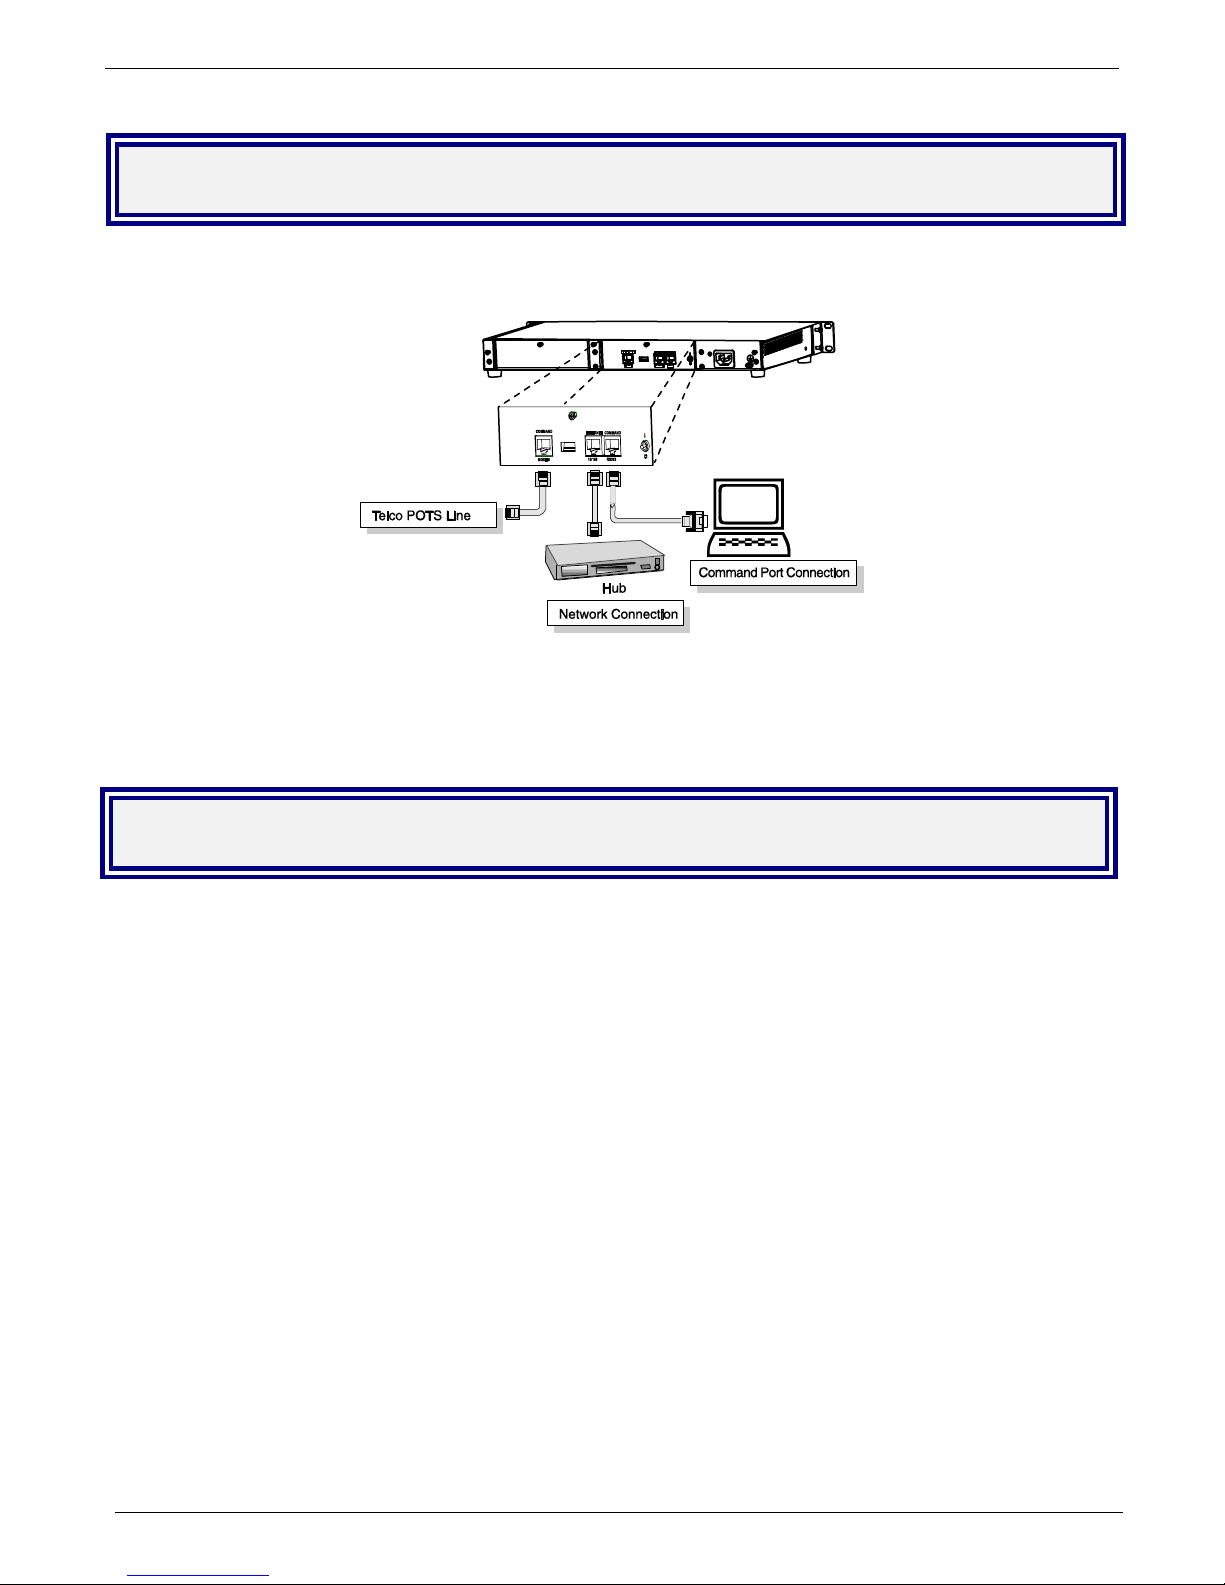
Cabling
Cabling your Gatekeeper entails making the proper connections for po wer, command port, and Ethernet network.
Figure 2-1 shows the back panel connectors and the associated cable connections. The following procedure
details the steps necessary for cabling your Gatekeeper.
1. Connect the power cord to a live AC outlet, then connect it to the Gatekeeper’s power receptacle shown at
top right in Figure 2-1.
Figure 2-1. Cabling
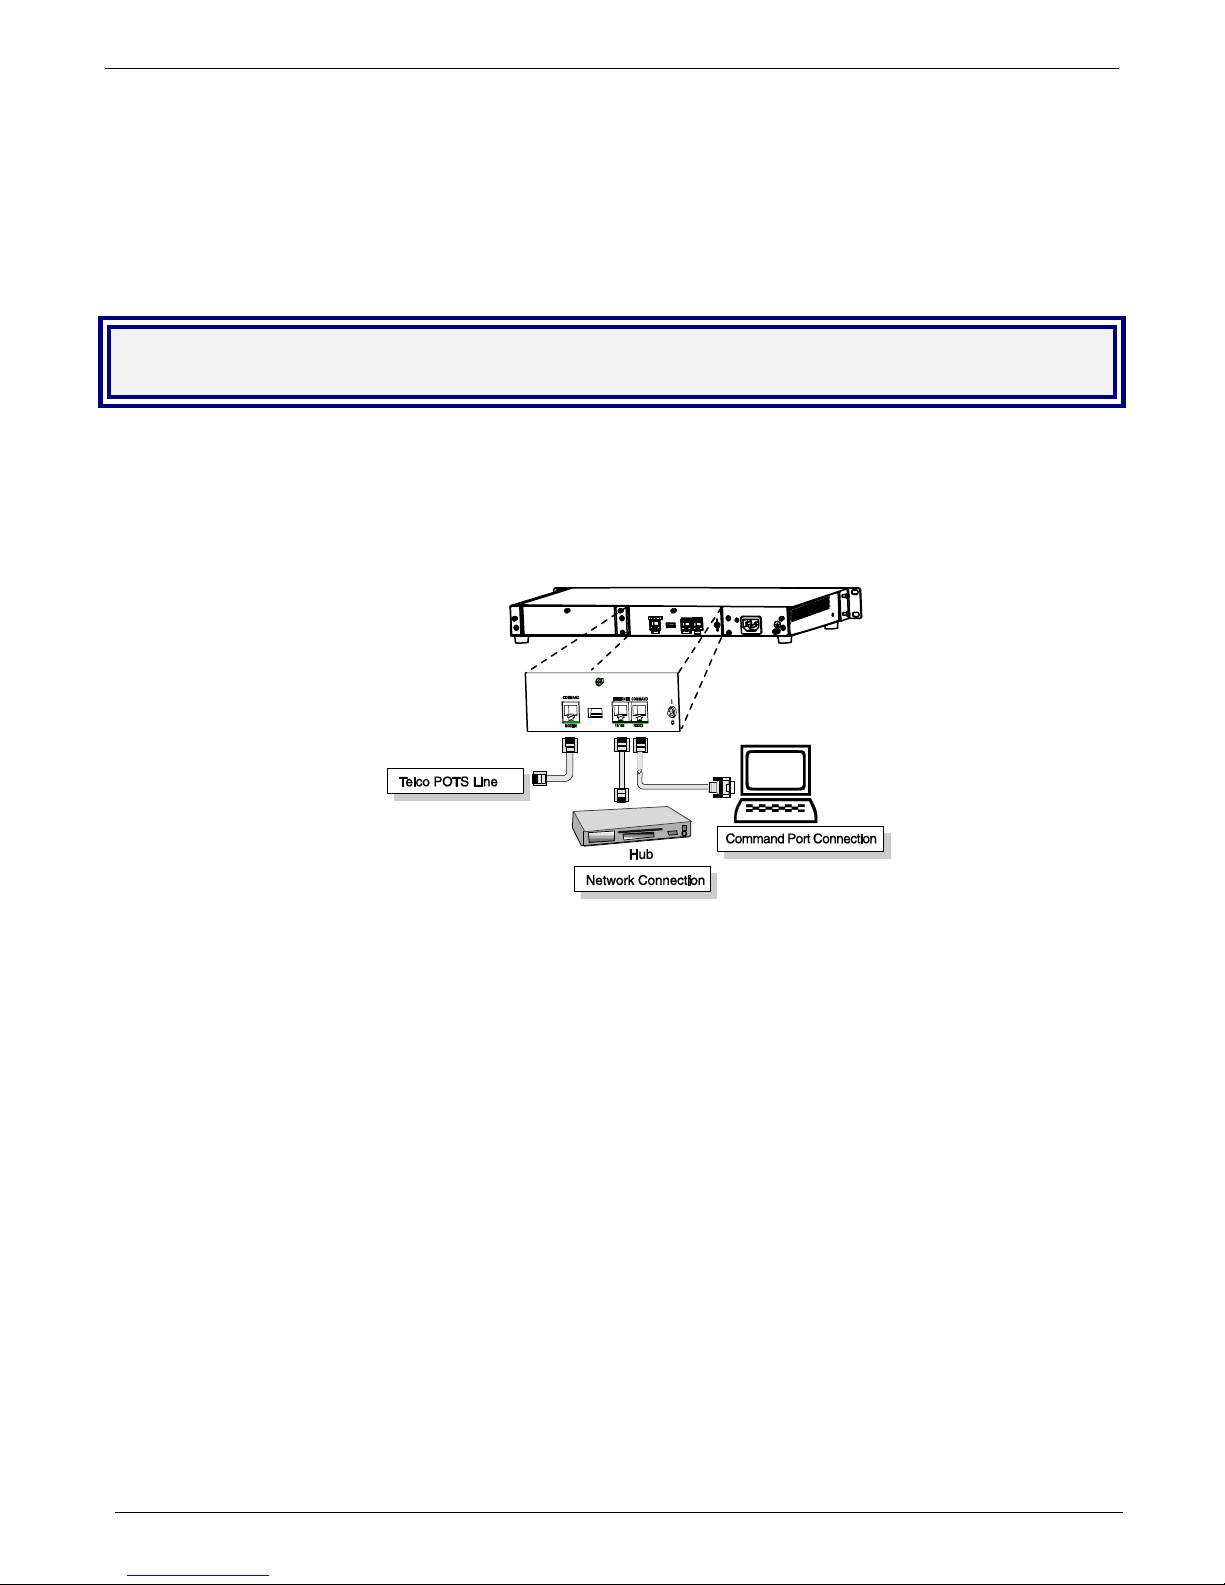
2. Connect the Gatekeeper to the PC (the computer that will hold the Gatekeeper software) using the RJ-45 to
DB9 (female) cable provided with your unit. Plug the RJ-45 end of the cable into the Command port of the
Gatekeeper and connect the other end (the DB9 connector) to the PC serial port you are using (typically
COM1 or COM2).
3. Connect a network cable to the Ethernet connector on the back of the Gatekeeper. Connect the other end
of the cable to your network.
4. If you intend to configure the Gatekeeper remotely using the Gatekeeper Windows GUI, connect an RJ-11
phone cable between the Command Modem connector (at the rear of the Gateke eper) and a receptacle
served by a telco POTS line. See Figure 2-2
Multi-Tech Systems, Inc. MultiVOIP Gatekeeper User Guide 10
Page 11
Chapter 2 – Installation
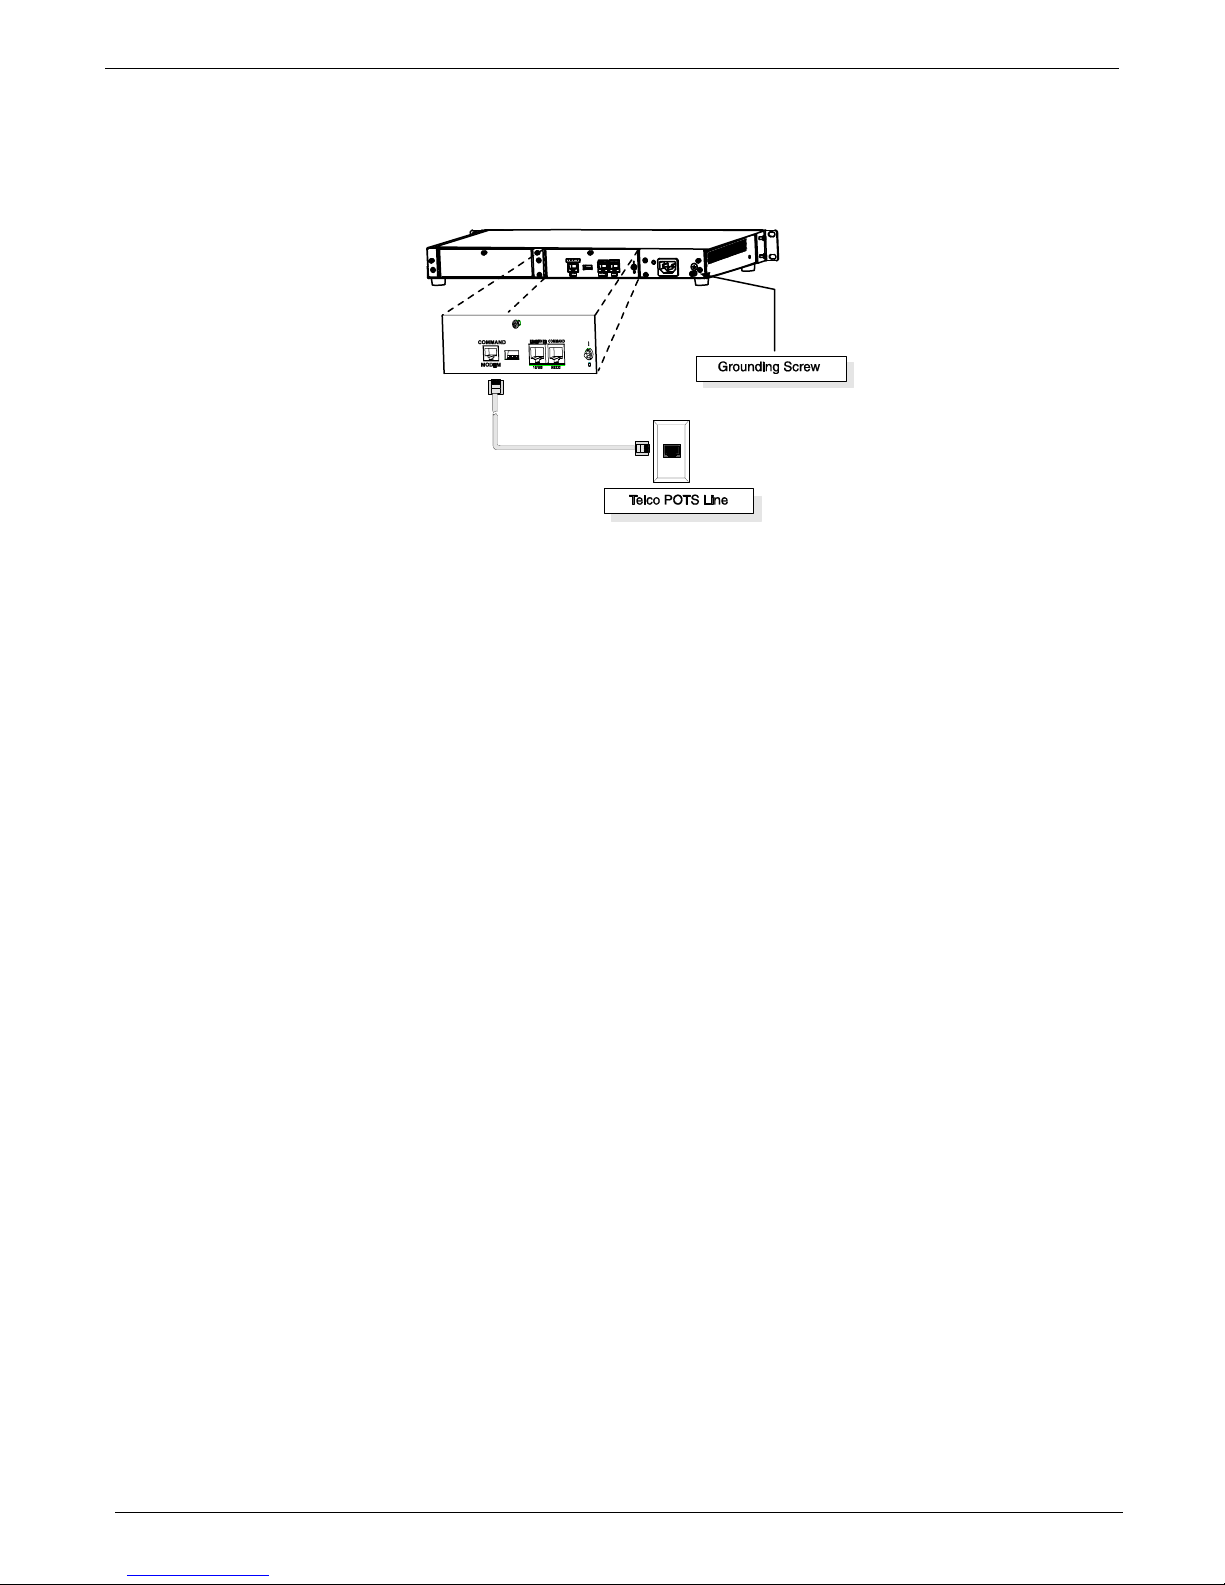
The Command Modem is built into the Gatekeeper unit. To configure the Gatekeeper remotely using its Windows
GUI, you must call into the Gatekeeper’s Command Modem. Once a connection is made, the configuration
process is identical to local configuration with the Windows GUI.
Figure 2-2. GND & Remote Config Modem Connections
5. Ensure that the unit is properly connected to earth ground by verifying that it is reliably g rounded when
mounted within a rack.
This can be accomplished by connecting a grounding wire between the chassis grounding screw (see
Figure 3-9) and a metallic object that will provide an electrical ground.
6. Turn on power to the Gatekeeper by setting the power switch on the right side panel to the ON position.
Wait for the Boot LED on the Gatekeeper to go off before proceeding. This may take a couple of minutes.
Proceed to Loading Gatekeeper Software section.
Multi-Tech Systems, Inc. MultiVOIP Gatekeeper User Guide 11
Page 12

Chapter 2 – Installation
Loading Gatekeeper Software
The software loading procedure does not present every screen or option in the loading process. It is assumed
that someone with a thorough knowledge of Windows and the software loading process is performing the
installation.
The MultiVOIP Gatekeeper software and User Guide are contained on the Gatekeeper product CD. Because the
CD is auto-detectable, it will start up automatically when you insert it into your CD-ROM drive. When you have
finished loading your Gatekeeper software, you can view and print the User Guide by clicking on the View
Manuals icon.
1. Be sure that your Gatekeeper has been properly cabled and that the power is turned on.
2. Insert the Gatekeeper CD into your CD-ROM drive. The CD should start automatically. It may take 10 to
20 seconds for the MultiVOIP Gatekeeper MVP100GK AutoRun screen to display.
If the AutoRun screen does not display automatically, click My Computer, then right click the CD ROM
drive icon, click Open, and then click the Autorun icon.
3. When the AutoRun screen appears, click the Install Software icon.
Multi-Tech Systems, Inc. MultiVOIP Gatekeeper User Guide 12
Page 13

4. A ‘Thank you for choosing..’ screen appears.
Chapter 2 – Installation
Press Enter or click Next to continue.
5. Follow the on-screen instructions to install your Gatekeeper software. The first screen asks you to choose
the folder location of the files of the Gatekeeper software.
Choose a location and click Next.
Multi-Tech Systems, Inc. MultiVOIP Gatekeeper User Guide 13
Page 14
Chapter 2 – Installation
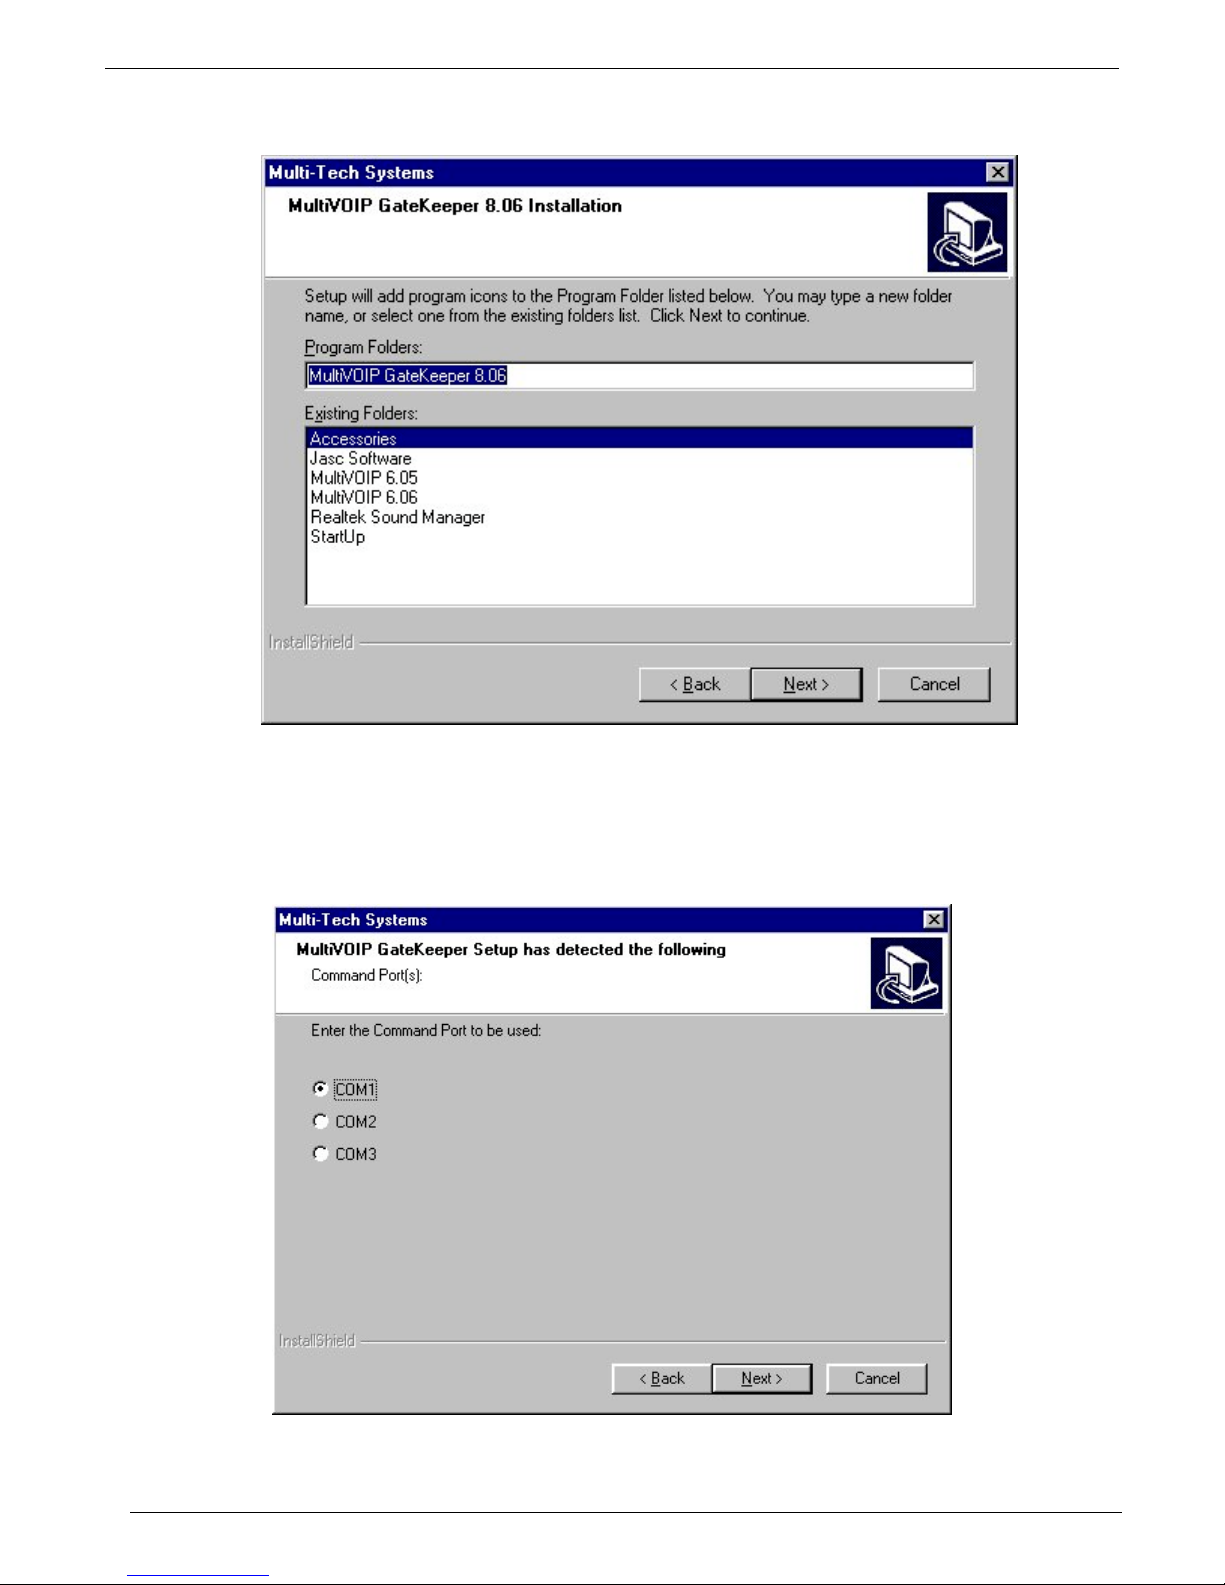
6. At the next screen, you must select a program folder location for the Gatekeeper software program icon.
Click Next. Transient progress screens will appear while files are being copied.
7. On the next screen you can select the COM port that the command PC will use when communicating with
the Gatekeeper unit. After software installation, the COM port can be re-set in the Gatekeeper Software
(from the sidebar menu, select Connection | Settings to access the COM Port Setup screen or use the
keyboard shortcut Ctrl + G).
Multi-Tech Systems, Inc. MultiVOIP Gatekeeper User Guide 14
Page 15

Chapter 2 – Installation
NOTE: If the COM port setting made
here conflicts with the actual COM
port resources available in the
command PC, this error message will
appear when the Gatekeeper program
is launched. If this occurs, you must
reset the COM port.
To change the COM port setting, use the COM Port Setup dialog box, which is accessible via the keyboard
shortcut Ctrl + G or by going to the Connection pull-down menu and choosing “Settings.” In the “Select
Port” field, select a COM port that is available on the PC. (If no COM ports are currently available, reallocate COM port resources in the computer’s MS Windows operating system to make one available.)
8. A completion screen will appear.
Click Finish.
When setup of the Gatekeeper software is complete, you will be prompted to run the Gatekeeper software
to configure the VOIP.
Software installation is complete at this point.
Multi-Tech Systems, Inc. MultiVOIP Gatekeeper User Guide 15
Page 16
Chapter 2 - Gatekeeper Configuratrion
Gatekeeper Configuration
Three methods of configuring a Gatekeeper can be used; 1) Local configuration, 2) Remote configuration through
the command modem, or 3) Web-browser configuration. Also determining the configuration method is where the
Gatekeeper network is located. If the Gatekeeper’s network is within the contential United States, the Gatekeepe r
can be configured either using local configuration, where a PC is connected to the Command Port on the
Gatekeeper or remotely using the internal Command Modem connected to a dial up line and a remote PC
connected to a dial up line.
If the Gatekeeper’s network is outside the contential United States, then a minimual local configuration needs to
be accomplished, that is the Regional Parameters have to be set for the internal Command Modem. Then the
Gatekeeper could be shipped to its site, connected to its network, the internal Comm and Modem connected to a
dial up line, and then the configuration process could be finished using remote configuration.
Web-browser configuration can be used after the Gatekeeper’s IP address has been set.
Gatekeeper local configuration begins with the following procedure. If you are remotely configuring the
Gatekeeper through the command modem and the Gatekeeper’s network is within the contential US, you can skip
to the Remote Configuration procedure. If the Gatekeeper’s network is outside the contential US, you will have to
perform the local configuration procedure setting up the Regional Parameters and then you could proceed with
Remote Configuration through the command modem. If you want to use the Web-browser for configuration, you
will have to perform the local configuration setting up the Gatekeeper’s IP address. Then you can use the Webbrowser.
1. Start Gatekeeper Configuration Program. Launch the Gatekeeper program from the Windows Start |
Programs | Gatekeeper X.XX (Version number) |Configuration and click .
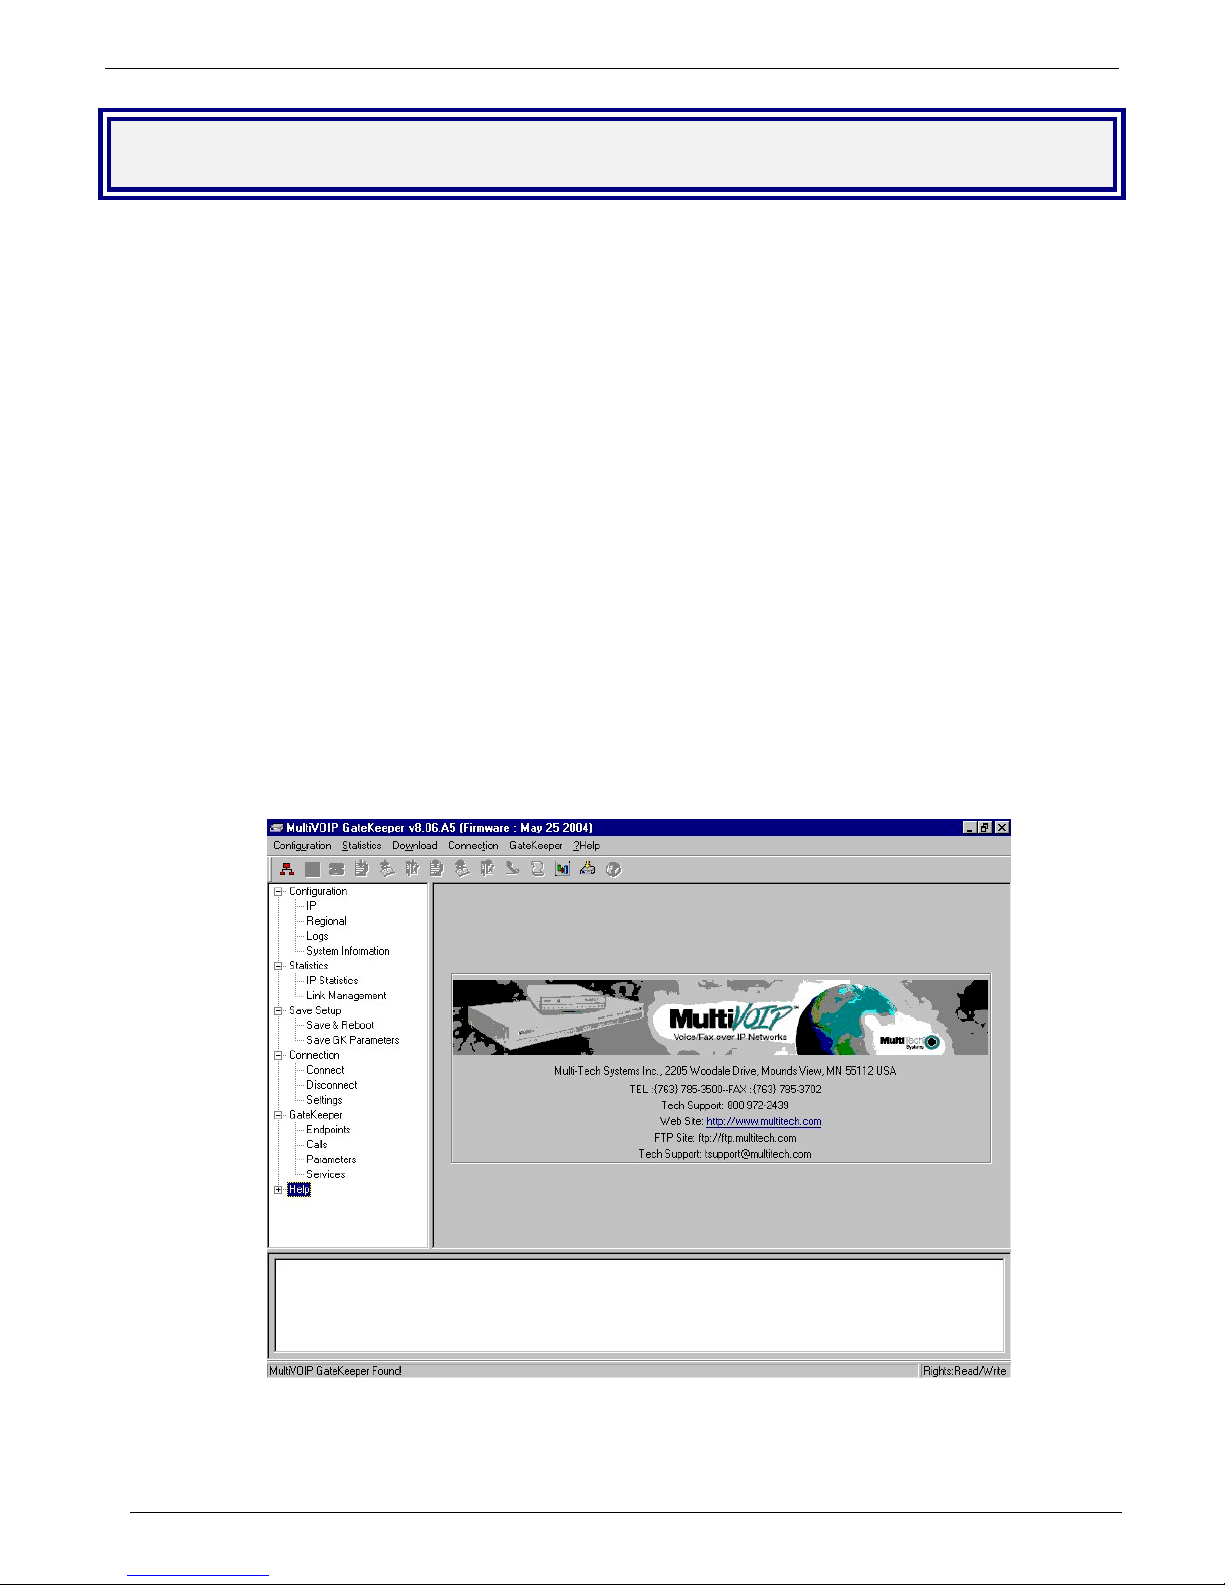
2. The Gatekeeper main screen appears. If the main screen appears grayed out and seems inaccessible, verify
command port connection.
In the lower left corner of the screen, the connection status of the Gatekeeper will be displayed. The
messages in the lower left corner will change as detection occurs. The message “Gatekeeper Found”
confirms that the Gatekeeper is in contact with the Gatekeeper configuration program.
Multi-Tech Systems, Inc. MultiVOIP Gatekeeper User Guide 16
Page 17
Chapter 2 - Gatekeeper Configuratrion
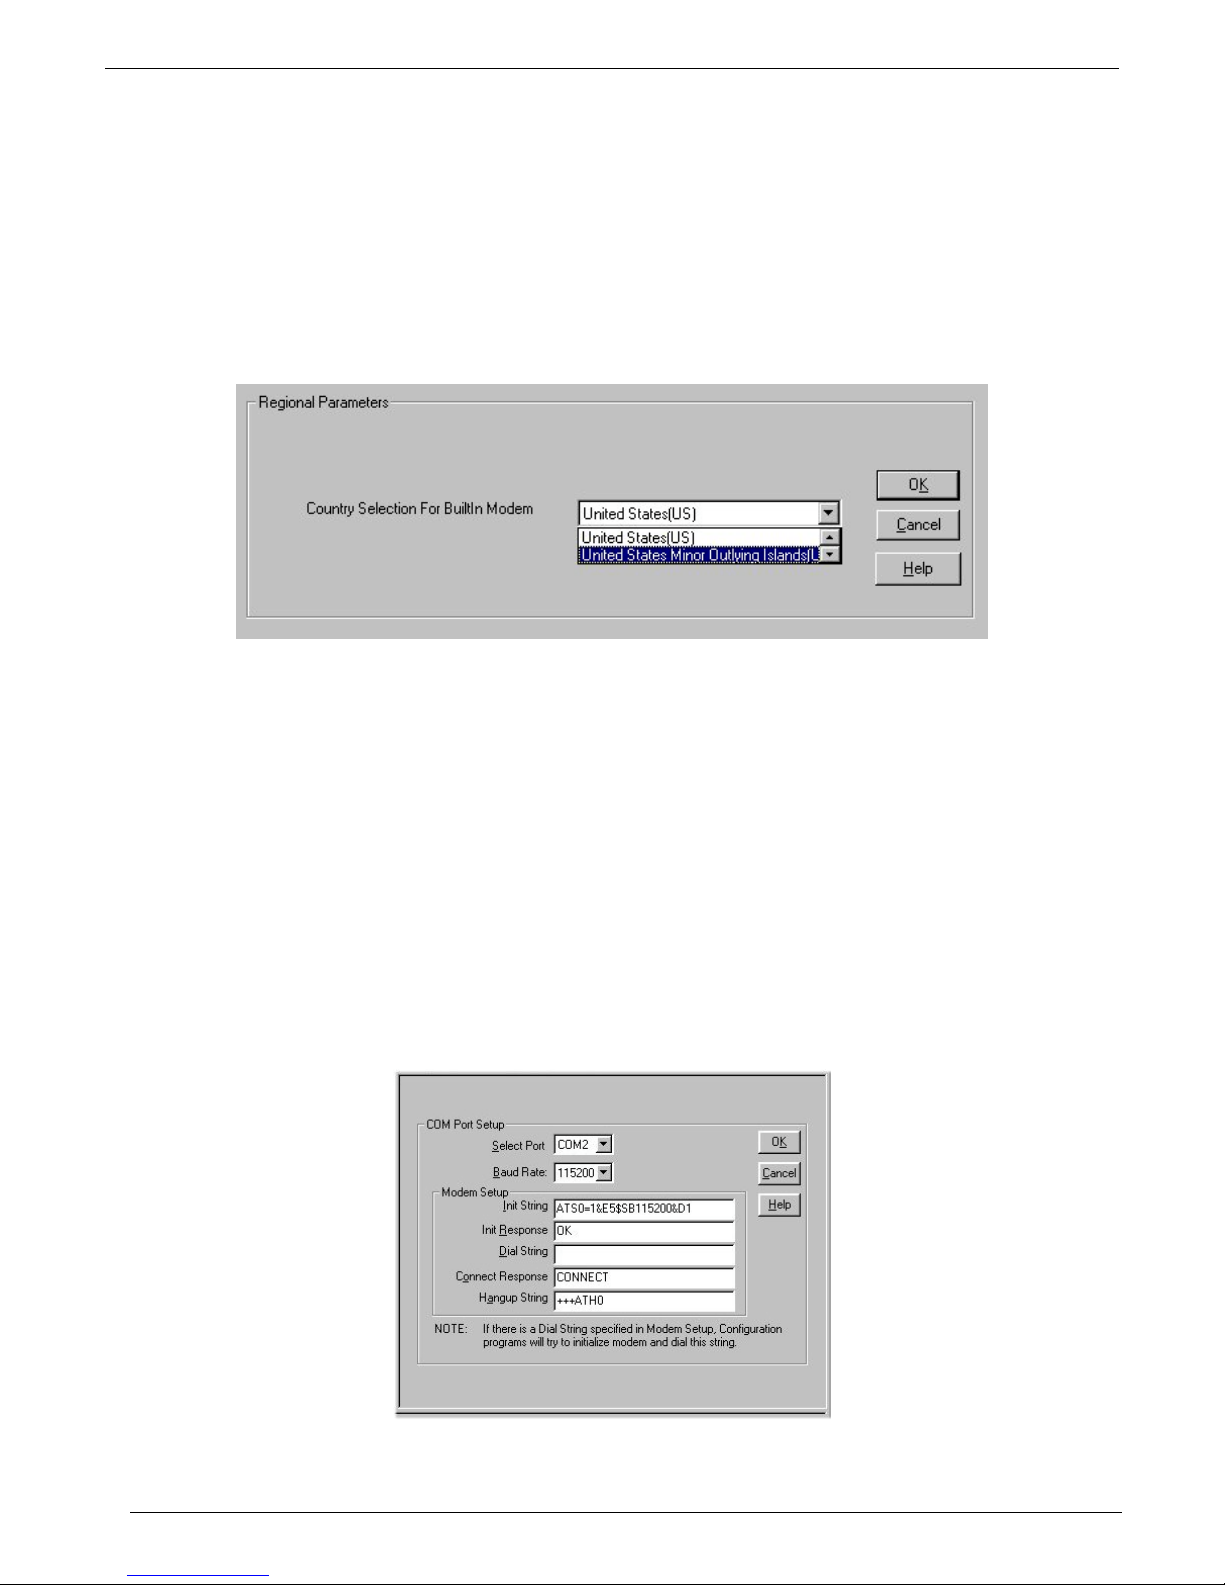
Regional Parameters
If you are going to continue with the local configuration of the Gatekeeper and don’t plan to remotely access the
Gatekeeper through the command modem, you do not have to consider the Regional Parameters. Skip the
Regional Parameters and continue on with the setting of the Gatekeeper’s IP Address in the next section.
If you would like to configure the Gatekeeper once it is connected into the network that it is going to be used in,
you need to consider the Regional Parameters. If the Gatekeeper is being used in the United States, the default
parameter setting, the Regional Parameter does not have to be changed.
If the Gatekeeper is being used in any other country/region, the Regional Parameters have to be changed to that
country/region’s requirements.
Modem Configuration
Before you can remotely configure the Gatekeeper, the Command Modem on the Gateke eper has to be
connected to a dial up line, the phone number of that dial up line has to be known by the person configuring the
Gatekeeper remotely. The following modem configuration procedure provides you with the steps necessary to
connect the command modem to a dial up line once the Gatekeeper is connected to its network, the Gatekeeper
software loaded on the PC, and the dial up connection is established.
1. Once the Gatekeeper is connected to its network, connect an RJ-11 phone cable between the Command
Modem connector on the back panel of the Gatekeeper and a telephone jack that is connected telephone
line.
2. Find out the telephone number of this connection so that the person configuring the remote PC can enter
this phone number into the Dial String on the Com Port Setup screen.
3. Now, all activity is from the remote PC. Connect the remote PC to a dial up line.
4. Load the Gatekeeper software on the remote PC.
5. From your desktop, click on StartProgramsMultiVOIP Gatekeeper x.xx (x.xx is version number)
Configuration Port Setup and the COM Port Setup screen is displayed.
Multi-Tech Systems, Inc. MultiVOIP Gatekeeper User Guide 17
Page 18

Chapter 2 - Gatekeeper Configuratrion
6. Set the COM Port Setup Select Port and Baud Rate settings to match the communications port settings
of your local PC.
7. Enter the Gatekeeper’s Command Modem phone number in the Dial String window of the Modem Setup
preceeded by the AT dial command (atdt).
8. Click the OK button and the dialing sequence begins. The Reading Setup dialog box is displayed and
then the main Gatekeeper screen is displayed. This is the main screen of the remote Gatekeeper.
9. Click on Configuration|IP and you are ready to move to setting the IP address of the Gatekeeper.
Continue to the next section for setting the IP address.
Multi-Tech Systems, Inc. MultiVOIP Gatekeeper User Guide 18
Page 19
Chapter 2 - Gatekeeper Configuratrion
Set IP Parameters
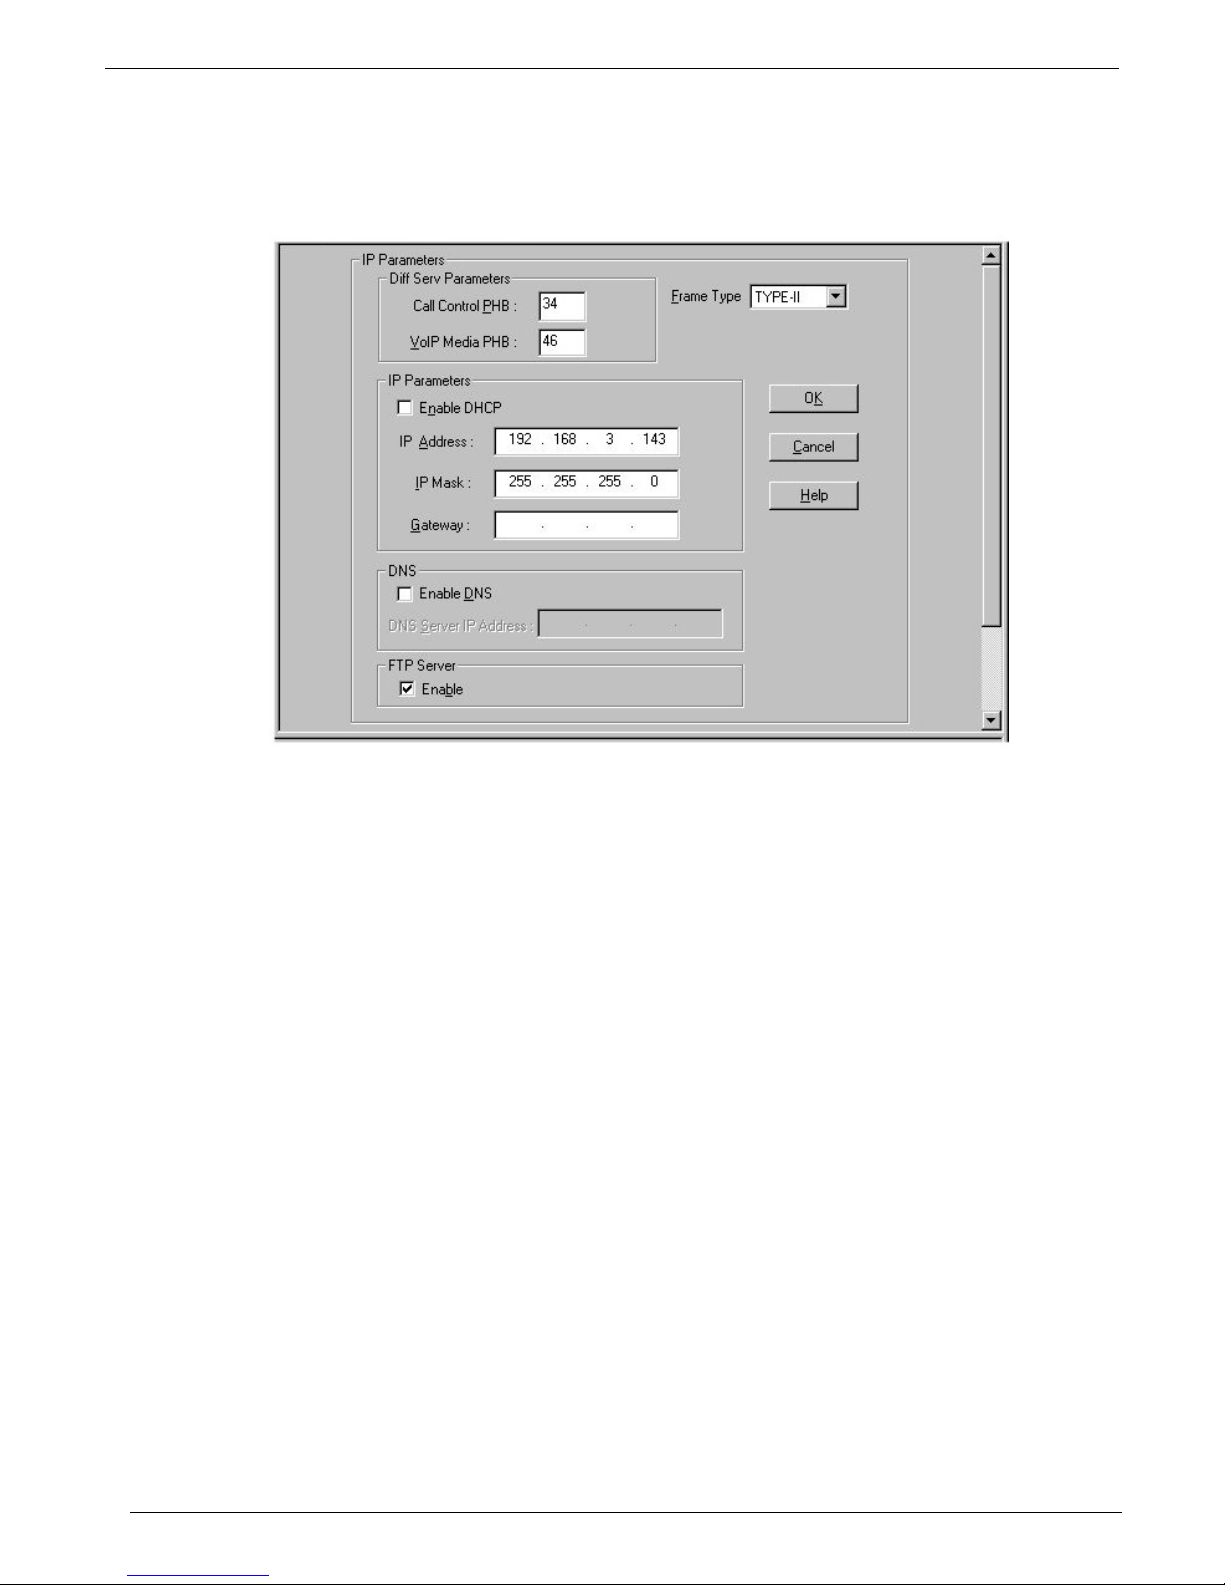
From the Main Gatekeeper screen, click on Configuration|IP. In each field, enter the values that fit your
particular network.
1. Diff Serv Parameters group’s values pertain to a differential prioritizing system for IP packets as handled
by Diff Serv-compatible routers. The Call Control PHB (Per Hop Behavior) value prioritizes call se tup IP
packets. The Voip Media PHB value prioritizes the RTP/RTCP audio IP packets. Before changing these
default values, consult with a qualified IP telecommunications engineer or refer to the TCP/IP standards
described in the Gatekeeper Software Chapter 5, Configuration IP Parameters section of this User Guide.
2. Enter the IP address of your network in the IP Address window.
3. Enter the IP Mask address for your network in the IP Mask window.
4. If a gateway device connects the Gatekeeper to the Internet, enter the gateway’s IP address in the
Gateway window.
Multi-Tech Systems, Inc. MultiVOIP Gatekeeper User Guide 19
Page 20
Chapter 2 - Gatekeeper Configuratrion
Change Gatekeeper Name.
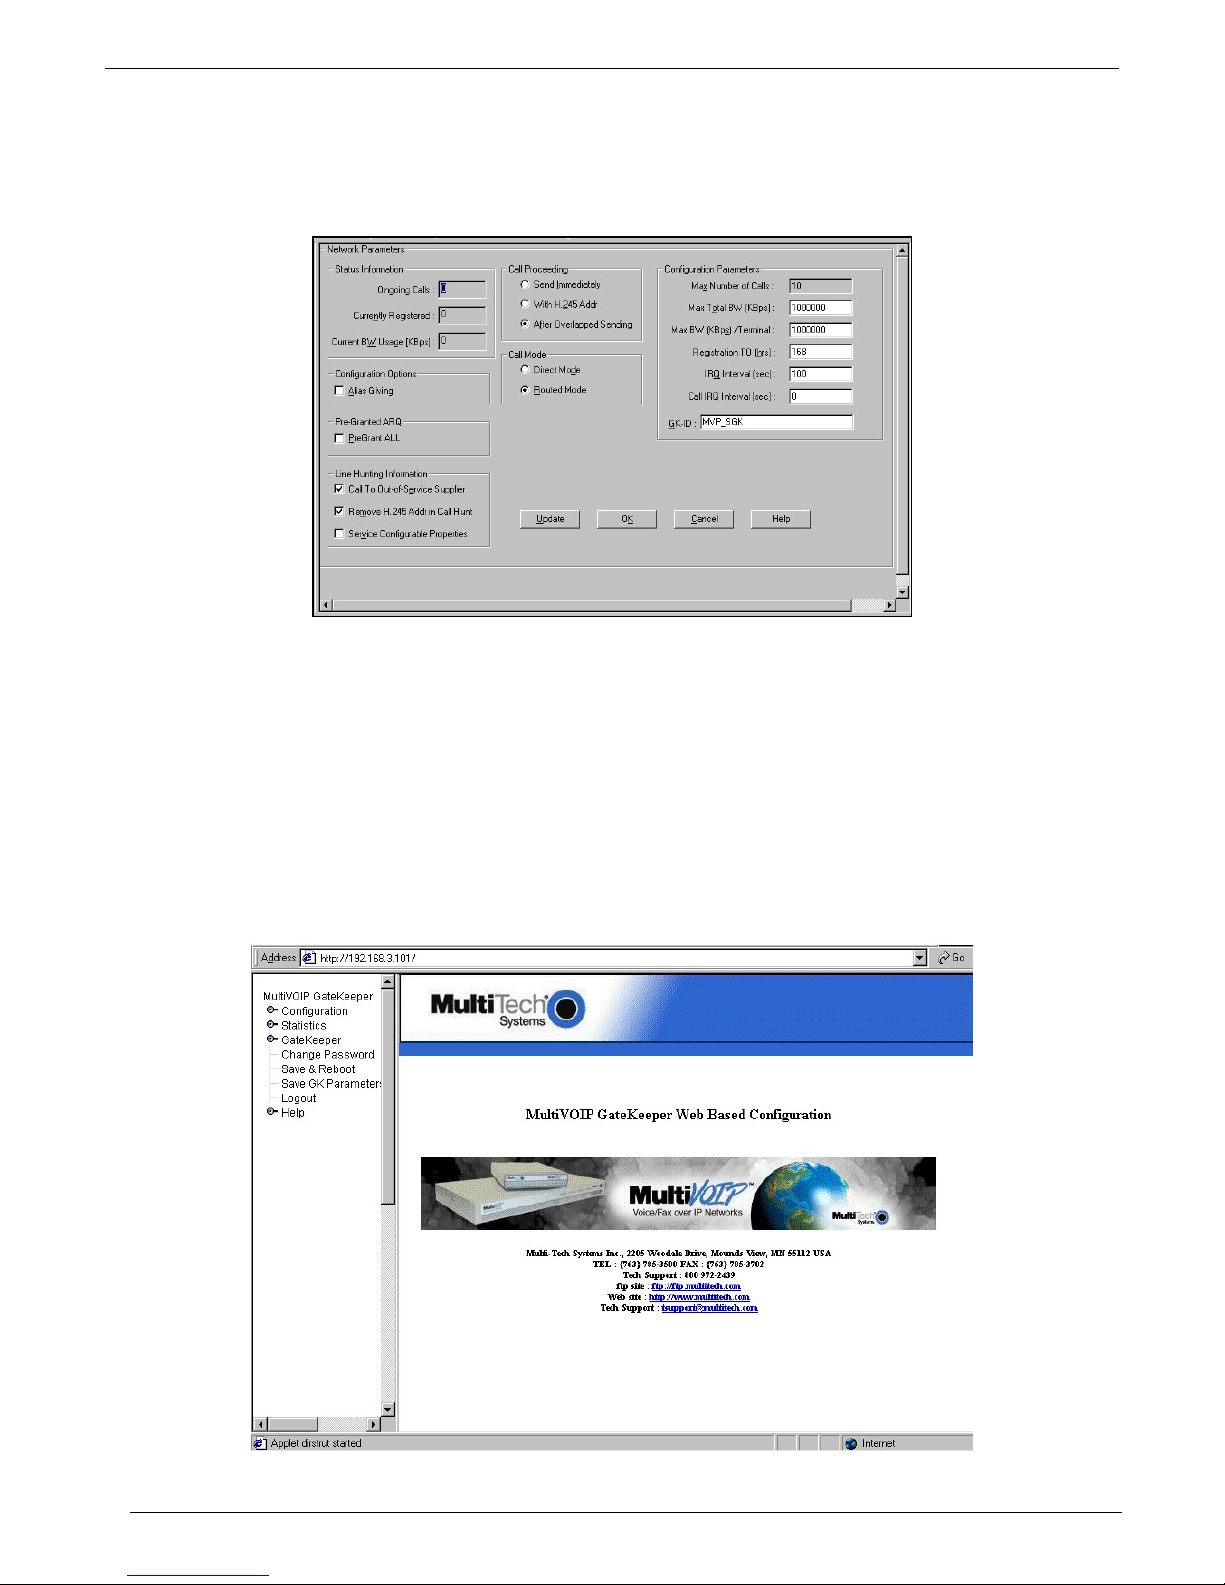
From the Main Gatekeeper screen, click on Gatekeeper|Parameters and the Network Parameters scre en is
displayed
1. In the GK-ID window change the default Gatekeeper name -MVP_SGK to your Gatekeeper name.
2. Click OK to save your new Gatekeeper name.
Web-browser Configuration
In most aspects of configuration, the Web-browser and Windows GUI differ only graphically, not functionally. The
Web-browser version number has to be at least 6 for Internet Explorer and Netscape. The Java Plug in on the
CD has to be loaded on to the PC using the Web-browser. Java is needed to support drop-down menus and
multiple windows in the Web-browser.
The initial configuration of assigning the Gatekeeper’s IP address has to be done locally. On ce the IP address is
assigned, then a PC on the same network and sub-net can access the Gatekeeper using a Web-browser. The
primary advantage of the Web-browser is remote access to a Gatekeeper.
Multi-Tech Systems, Inc. MultiVOIP Gatekeeper User Guide 20
Page 21
Chapter 2 - MultiVOIP Phone Book Configuration
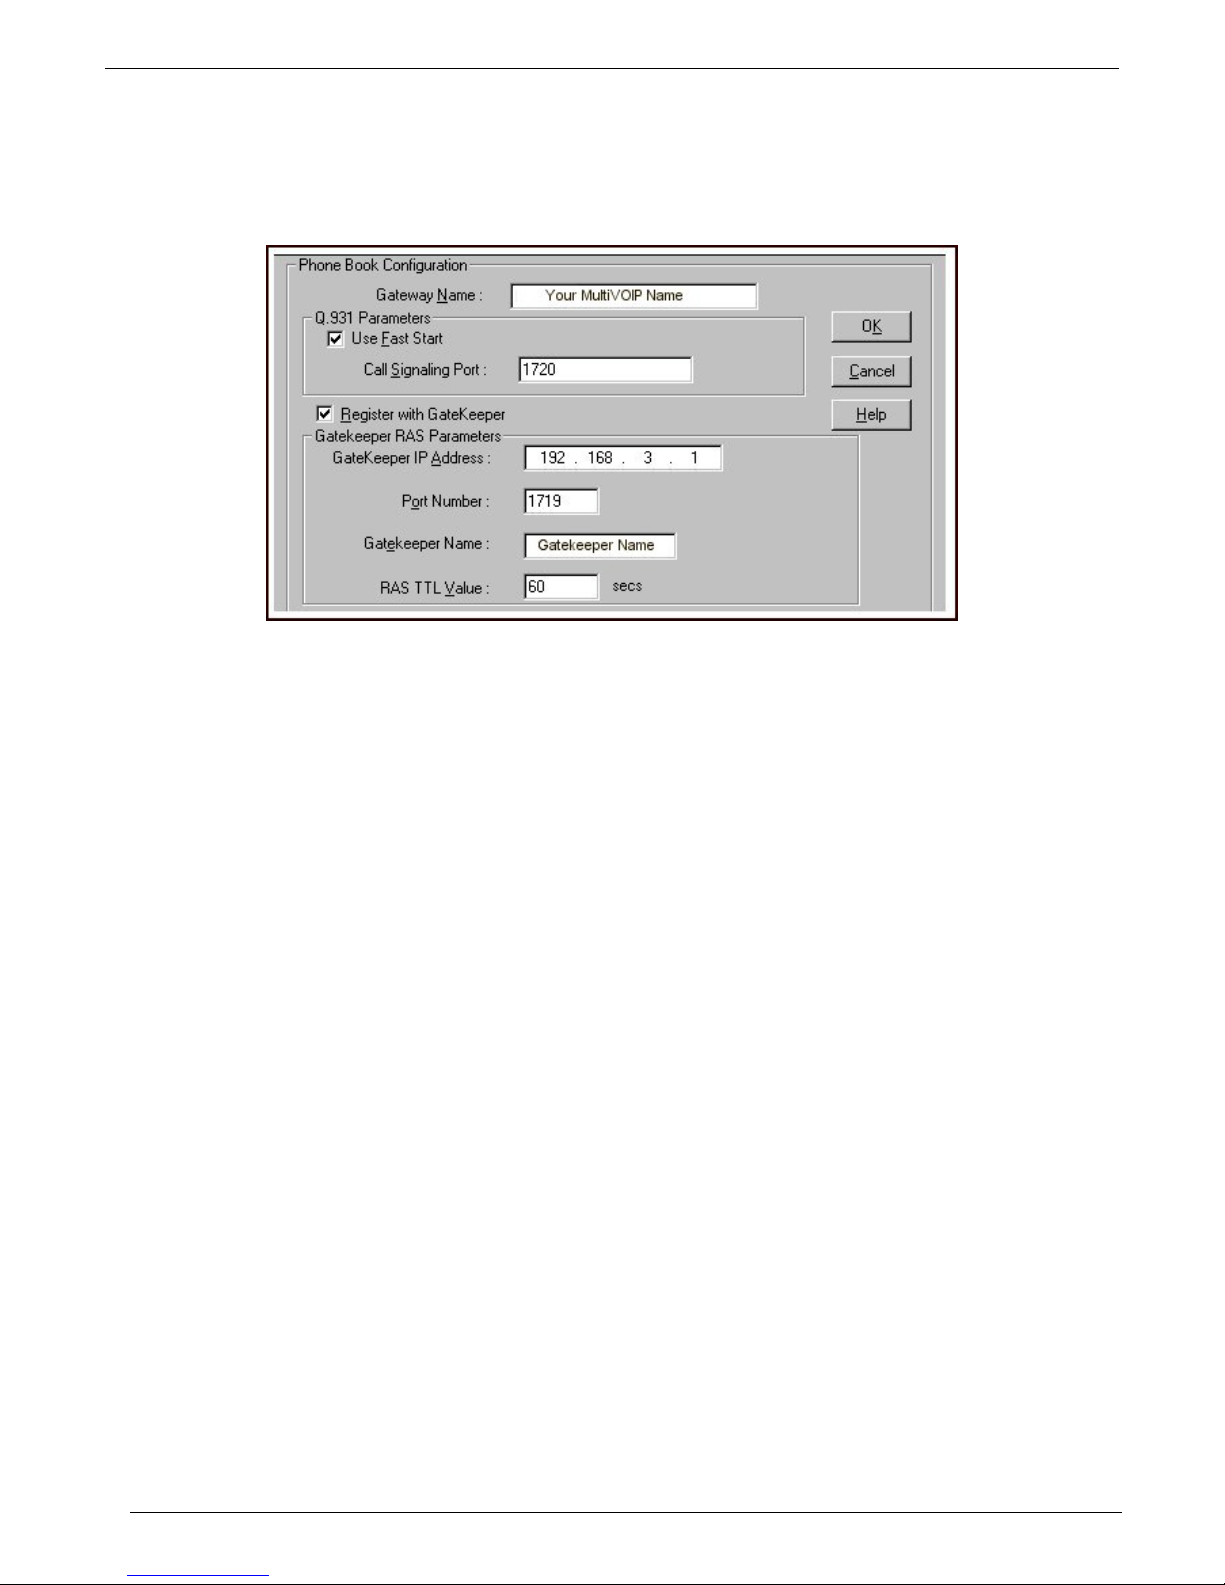
MultiVOIP Phone Book Configuration
The Phone Book Configuration screen for each MultiVOIP registering with the Gatekeeper has to contain the
Gatekeeper IP address, Gatekeeper Name, and click on Register with Gatekeeper. A generic Phone Book
Configuration screen for a MVP410 and MVP 2410 is shown below.
The Gateway Name should have already been changed to the name for this MultiVOIP. The generic Phone Book
Configuration screen is shown for example and field definition purposes only.
1. To open the Phone Book Configuration screen, click Phone Book|Phone Book Configuration.
2. When you click the Register with Gatekeeper box, the Gatekeeper RAS Parameters group becomes active.
3. Enter the IP address of your Gatekeeper in the Gatekeeper IP Address window.
4. Enter your Gatekeeper Name in the Gatekeeper Name window.
5. Click OK to save your settings.
Multi-Tech Systems, Inc. MultiVOIP Gatekeeper User Guide 21
Page 22
Chapter 2 - MultiVOIP Phone Book Configuration
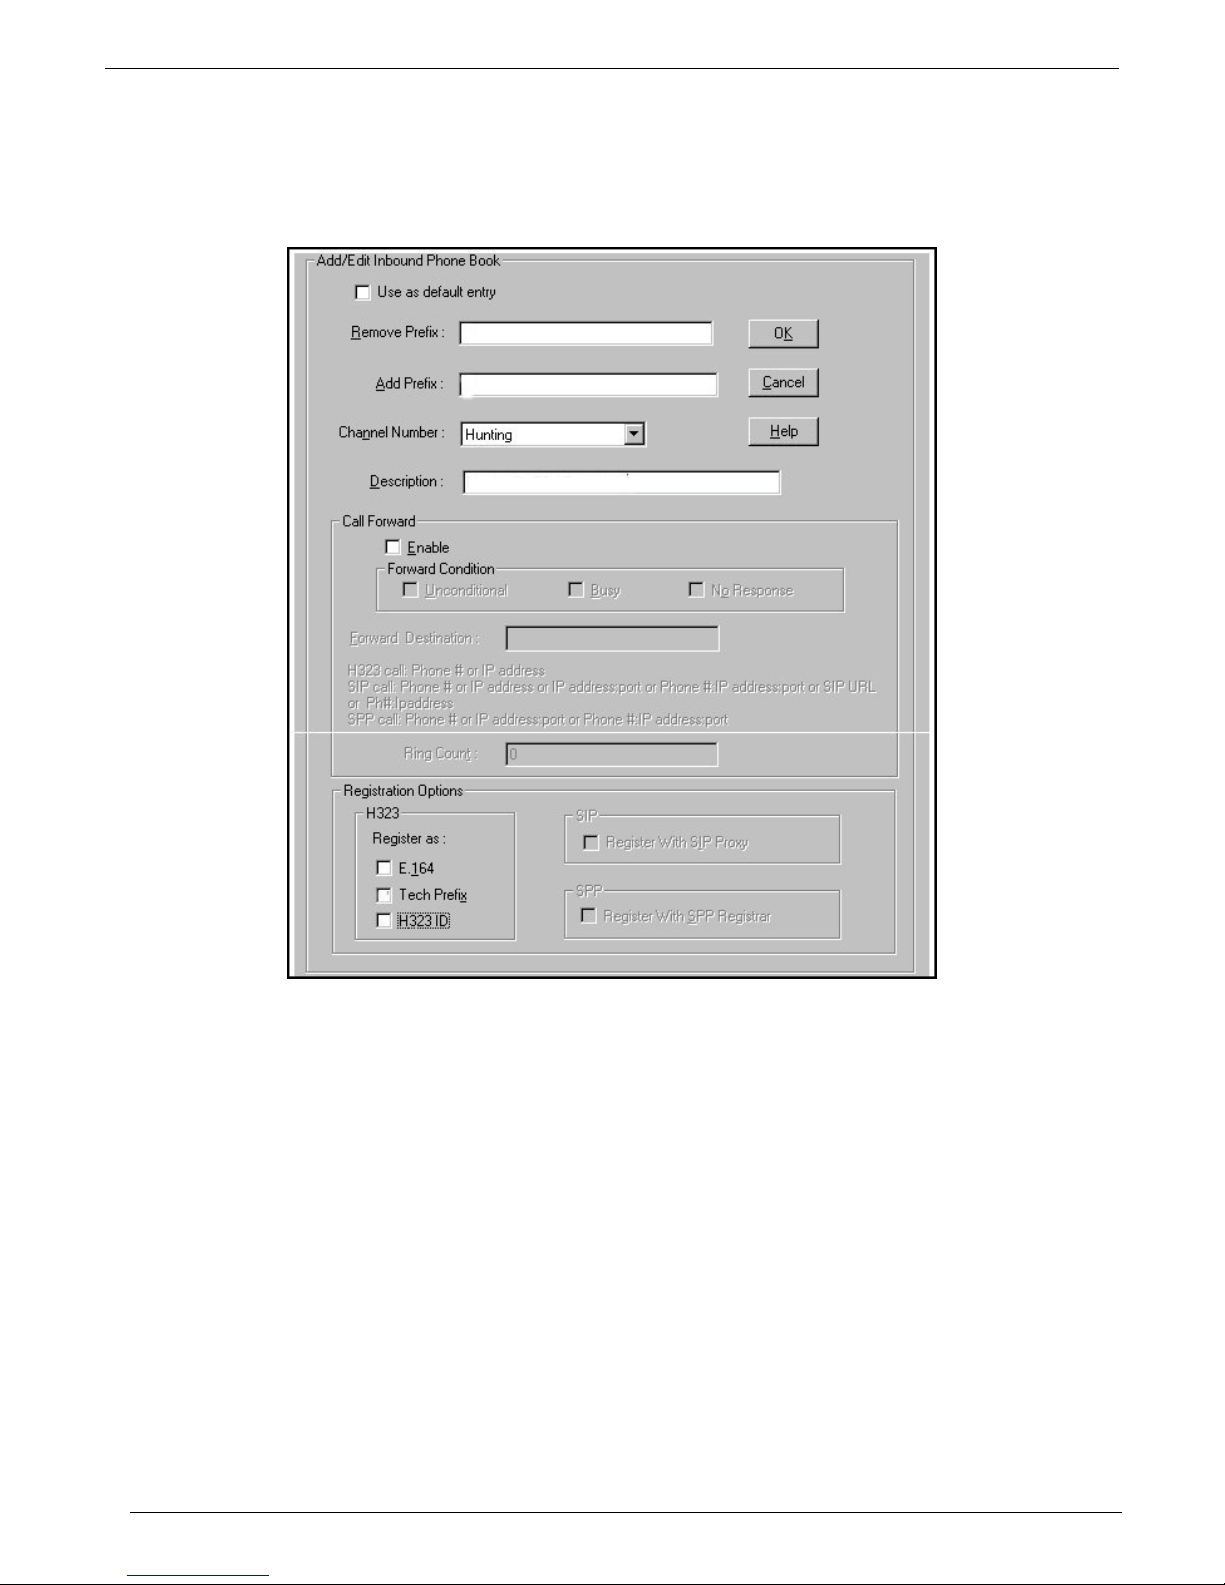
MultiVOIP Inbound Phone Book Configuration
Each MultiVOIP in your network requires at least one entry to receive a phone call from another MultiVOIP in your
network. Typically, a multiVOIP will have two Inbound Phone Book entries; one set for access to its local PBX
extensions and a second set for access to its local area PSTN.
Your first set of entries will typically provide access to this MultiVOIP’s local PBX extensions. You will need to
consider the Remove Prefix entry, Add Prefix entry, and the Registration Option at the lower left area of this
screen. The Registration Option that needs to be checked to provide access to the local PBX extensions is Tech
Prefix.
1. To open the Add/Edit Inbound Phone Book screen, click Phone Book|Phone Book Modify|Inbound
Phone Book|Add Entry.
2. Enter your remove prefix number in the Remove Prefix window to allow acces s to this MultiVOIP’s local
PBX extensions.
3. Enter your add prefix number in the Add Prefix window to allow access to this MultiVOIP’s local PBX
extensions.
4. If you want this MultiVOIP to allow any channel access to its PBX extensions, leave the Channel Number
option set for Hunting.
5. Enter a description (MultiVOIP’s location or site name, and possibly the words PBX extensions) in the
Description window. This will distinguish this Inbound Phone Book.
6. In the Registration Options group at the bottom of the screen, click on the Tech Prefix option.
7. Click OK when you have finished your entries in this Add/Edit Inbound Phone Book screen.
Multi-Tech Systems, Inc. MultiVOIP Gatekeeper User Guide 22
Page 23

Chapter 2 - MultiVOIP Phone Book Configuration
Your second set of entries in the Inbound Phone Book will typically provide access to this MultiVOIP’s local area
PSTN. You will need to consider the Remove Prefix entry, Add Prefix entry, and the Registration Option at the
lower left area of this screen. The Registration Option that needs to be checked to provide access to the local
area PSTN is H323 ID.
8. Enter your remove prefix number in the Remove Prefix window to allow acces s to this MultiVOIP’s local
area PSTN.
9. Enter your add prefix number in the Add Prefix window to allow access to this MultiVOIP’s local area PSTN.
10. If you want this MultiVOIP to allow any channel access to its local PSTN, leave the Channel Number option
set for Hunting.
11. Enter a description (MultiVOIP’s location or site name, and possibly the words Area PSTN) in the
Description window. This will distinguish this Inbound Phone Book.
12. In the Registration Options group at the bottom of the screen, click on the H323 ID option.
13. Click OK when you have finished your entries in this Add/Edit Inbound Phone Bo ok screen.
Multi-Tech Systems, Inc. MultiVOIP Gatekeeper User Guide 23
Page 24

Chapter 2 - MultiVOIP Phone Book Configuration
MultiVOIP Outbound Phone Book Configuration
Each MultiVOIP in your network requires at least one Outbound phone entry to call another MultiVOIP in your
network. Typically, a MultiVOIP will have two outbound Phone Book entries; one set to provide access to each
locations PBX extensions and a second set for access to each locations area PSTN.
Your first set of entries will typically allow access to a neighboring MultiVOIP’s PBX extensions. This will allow
your local phone users to dial out of the local area to a neighboring MultiVOIP location. You need to consider the
Destination Pattern and Remove Prefix in the Phone Number Details group, Description of this outbound phone
book, and check Use Gatekeeper box and enter your Gateway Prefix in the H.323 group.
1. To open the Add/Edit Outbound Phone Book screen, click Phone Book|Phone Book Modify|Outbound
Phone Book|Add Entry.
2. Enter your destination pattern value in the Destination Pattern window to provide access to the neighboring
MultiVOIP’s PBX extensions.
3. Enter your remove prefix value in the Remove Prefix window to provide access to the neighboring
MultiVOIP’s PBX extensions.
4. Enter a description (neighboring MultiVOIP’s location or site name, and possibly the words PBX extension)
in the Description window. This will distinguish this Outbound Phone Book.
Multi-Tech Systems, Inc. MultiVOIP Gatekeeper User Guide 24
Page 25

Chapter 2 - MultiVOIP Phone Book Configuration
5. In the H.323 group, click on the Use Gatekeeper option box.
6. Enter your gateway prefix value in the Gateway Prefix window.
7. Click OK when you have finished your entries in this Add/Edit Outbound Phone Book screen.
Your second set of entries will typically allow access to a neighboring MultiVOIP’s PSTN. This will allow your local
phone users to dial out of the local area to a neighboring MultiVOIP location. You need to consider the
Destination Pattern in the Phone Number Details group, Description of this outbound phone book, and check Use
Gatekeeper box and enter your Gateway H.323 ID in the H.323 group.
8. To open the second the Add/Edit Outbound Phone Book screen, click Phone Book|Phone Book
Modify|Outbound Phone Book|Add Entry.
9. Enter your destination pattern value in the Destination Pattern window to provide access to the neighboring
MultiVOIP’s PSTN.
11. Enter a description (neighboring MultiVOIP’s location or site name, and possibly the words PSTN) in the
Description window. This will distinguish this Outbound Phone Book.
12. In the H.323 group, click on the Use Gatekeeper option box.
13. Enter your Gateway H.323 ID value in the Gate way H.323 ID window.
14. Click OK when you have finished your entries in this Add/Edit Outbound Phone Boo k scre en.
Multi-Tech Systems, Inc. MultiVOIP Gatekeeper User Guide 25
Page 26
Chapter 2 - Connectivity Test
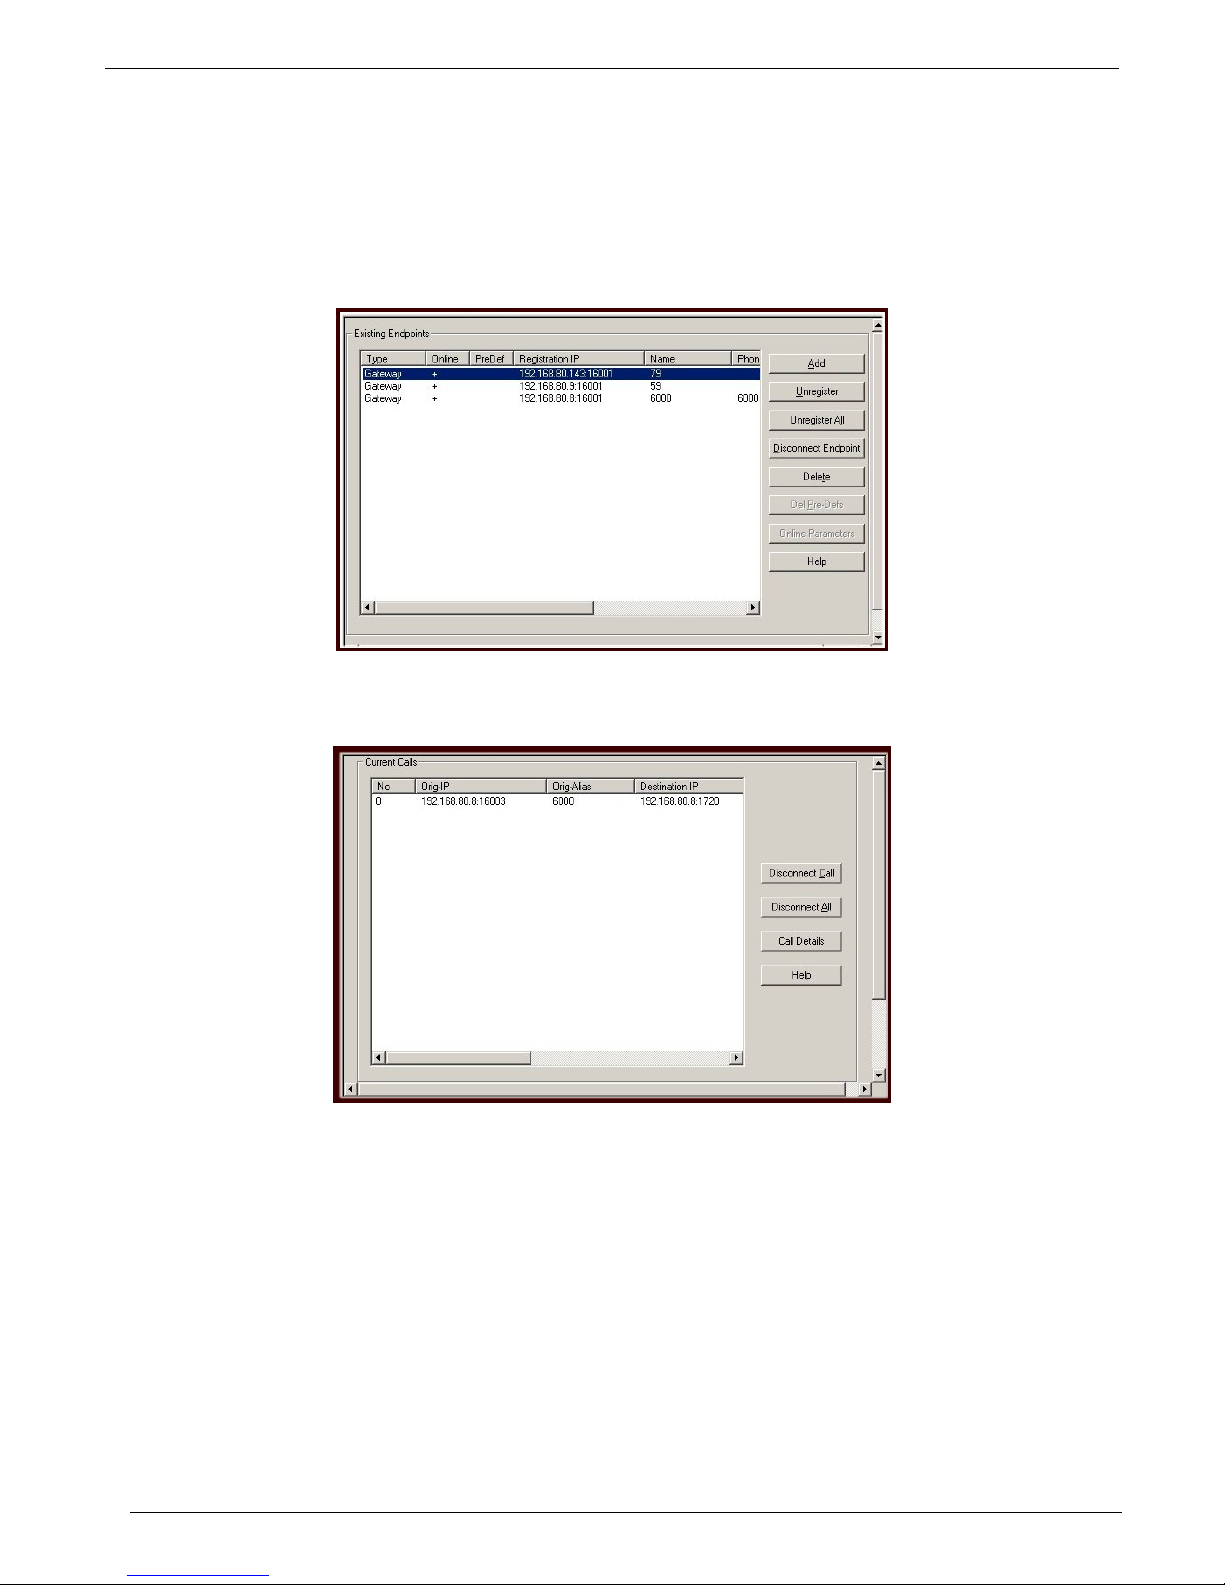
Connectivity Test
When you have finished configuring your inbound and outbound phone books for your VOIP network, verify that
your gateways are registered with the gatekeeper and then make a call to a VOIP in your network and verify that
the Gatekeeper is conducting the call correctly.
1. From the Gatekeeper main screen, click on GateKeeper|Endpoints and verify that gateways are
registered with the Gatekeeper.
2. From one of the gateways, dial another gateway in your network and verify that the call connected. From
the Gatekeeper main screen, click GateKeeper|Calls and your call should be viewed in the Current Calls
screen.
Your Gatekeeper is operational.
Multi-Tech Systems, Inc. MultiVOIP Gatekeeper User Guide 26
Page 27
Chapter 3 – Gatekeeper Functionality
Chapter 3 – Gatekeeper Functionality
This chapter describes how to configure and manage the Gatekeeper software. With Gatekeeper functionality,
network managers can define and control the flow of H.323 voice traffic across the IP network. In this chapter, we
will present both a general description of how Gatekeepers work and very specific information on how MultiTech’s
Gatekeeper unit operates. In cases where the actual Gatekeeper functionality implemented in the current
software release differs from theoretically possible Gatekeeper functionality, the differences will be noted (i.e., we
describe some Gatekeeper functionality that will only become available in a later software release and note all
such cases).
A Gatekeeper unit controls a “zone” on the IP network. (In fact, that is how a H.323 zone is defined; as the set of
endpoints controlled by a Gatekeeper.) One Gatekeeper unit is needed to control a single zone.
Network managers can configure, monitor, and manage the activity of registered net work endpoints. They can set
policies and control bandwidth usage, thus customizing their network fo r better advantage. Gatekeeper facilitates
interoperability between PBX dial plans and IP-based terminals. With it, call centers can route calls on the basis of
need and implement other automatic call distribution features, as well.
Getting Started
Gatekeeper units require configuration of their Gatekeeper parameters before they can control a group of voip
gateways.
Gatekeepers can be configured to enact a wide range of functionality, but they are primarily node points that
direct and manage traffic to other endpoints. The essential question of “whose messages go where?” can be
answered either by a Gatekeeper that acts as a coordinating node or clearinghouse for the system or by
phonebooks coordinated among the set of peer endpoints (gateways) that make up the system.
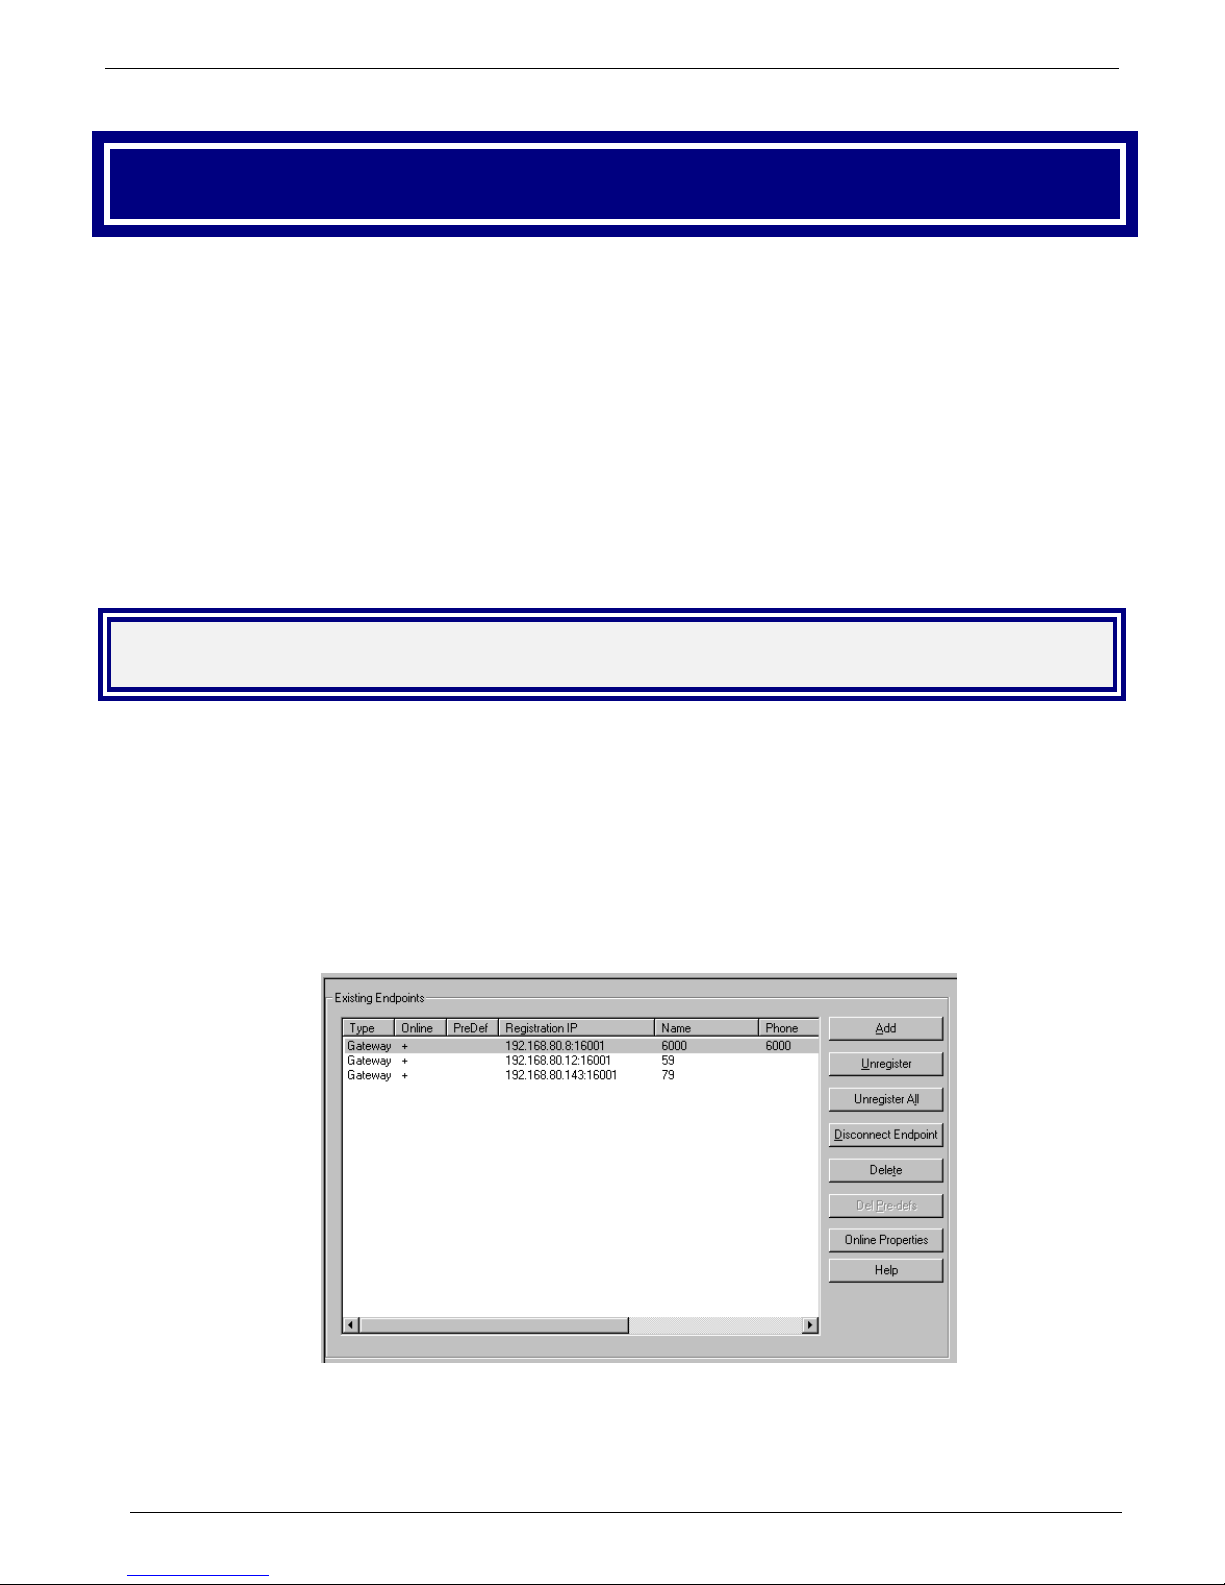
In its role as a node point, the Gatekeeper directs call traffic between pairs of endpoints enga ged in the call. To
facilitate this node-point control, all endpoints (voip gateways) must be registered with the Gatekeeper. This
registration is done in the
Gatekeeper | Existing Endpoints screen.
The basic function of directing calls to specified endpoints is done differently in Gatekeeper-controlled systems
than in systems controlled only by phonebooks. Phonebooks use “destinatio n patterns” like area codes and local
Multi-Tech Systems, Inc. MultiVOIP Gatekeeper User Guide 27
Page 28
Chapter 3 – Gatekeeper Functionality
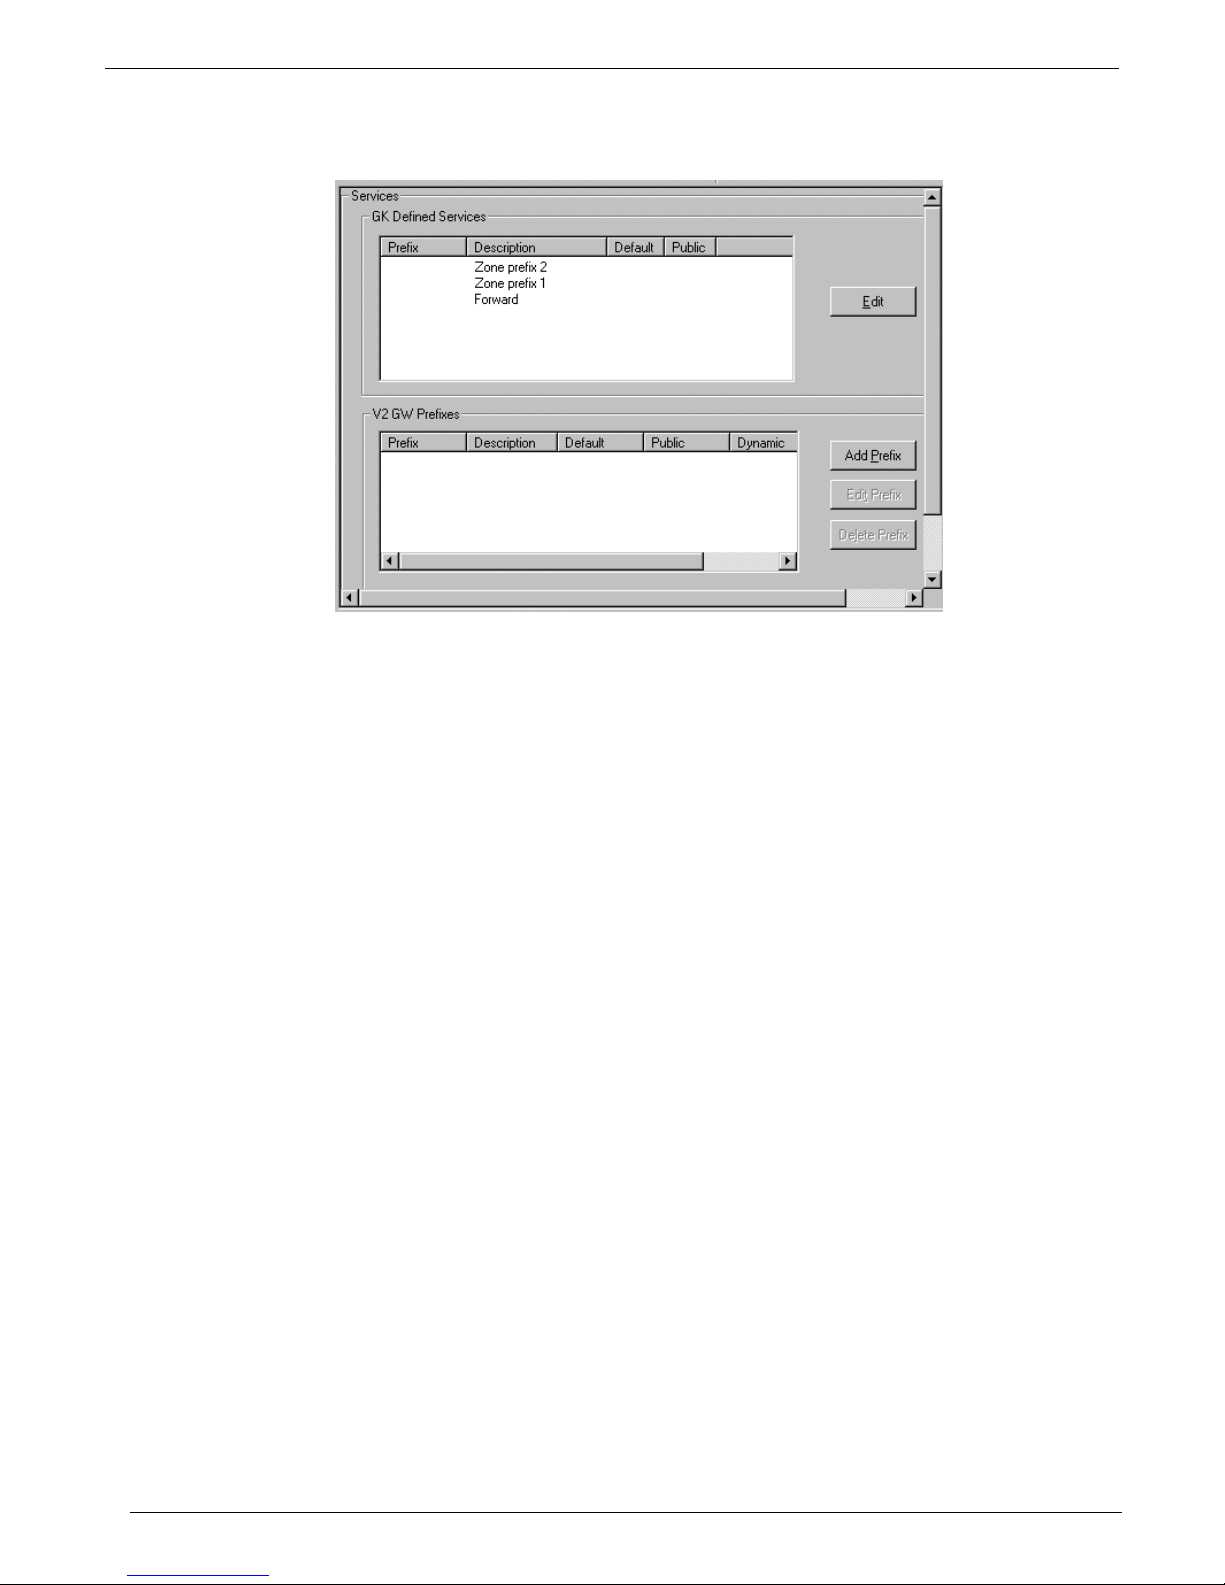
prefixes to route calls to specific endpoints. When Gatekeepers perform this directive function, they do so by
using “services,” which one configures in the Gatekeeper | Services screen.
Suppose a voip system consists of three endpoints in three different cities all having different area codes. If this
voip system were controlled only by phonebooks, three different destination patterns (at least) would be needed; if
controlled by a Gatekeeper, three different services (at least) would be needed.
Also, generally, it’s best to configure the Gatekeeper as fully as possible before configuring other gateways in the
system. This is so because certain parameters that describe the Gatekeeper unit must be entered in the
configuration screens of the ordinary voip gateway units.
Furthermore and very importantly, several settings needed in the
Gatekeeper | Services screen must also be set in the Phonebook Configuration screen.
the
Gatekeeper | Existing Endpoints screen and in
Multi-Tech Systems, Inc. MultiVOIP Gatekeeper User Guide 28
Page 29

Chapter 3 – Gatekeeper Functionality
VOIP Network Example
The present example shows a voip network with three gateways, and a Gatekeeper directing voip traffic. The
network design gives phone users at each office toll-free access to both the company employee phones (most are
on PBXs) at the remote sites as well as the local PSTNs surrounding the remote sites. To implement this network
you should configure the voip gateways at the three sites and then configure the Gatekeeper.
The top gateway is a T1 digital voip gateway (MVP2410) connected to a PBX at the company’s headquarters in
“Mucksville.” Also, at the company’s headquarters is a Gatekeeper with a separate IP conne ction to the IP
network for directing the voip traffic. The Gatekeeper should be configured after the voip gateways a re
configured. The second gateway, located in one of the company’s small sales offices in “Rootersville,” is a firstgeneration MultiTech gateway with two analog channels (MVP200), one serving an analog phone (via FXS
interface) and the other giving access to its local area PSTN (via FXO interfa ce ). The third gateway is an analog
model (MVP410) whose four channels are all connected (via FXO interface) to a PBX at a company’s factory site
in “Compton.”
To implement this network, lets start with the MultiVOIP gateway at the company’s headquarters.
MVP2410. For the MVP2410 at the company headquarters in Mucksville, we need to first configure its
1.
phonebook with the Gatekeeper in mind. We will presume here that technical configuration is already
complete so that the MVP2410’s IP address and other technical configuration parameters have already
been duly set.
9, xxx- xxx-xxxx
Mucksville area
PSTN
Roo ters vil le -- sa les off ice
Ch1 H.323 ID = 6 (access to
Ch2 H.323 ID = 6000 (access
Channels 1-24
Roo ters vi lle P ST N)
to analog phone)
Mucksville -- company headquarters
PBX
T1
H.323 ID = 79 (access to
MVP2410
Gat eway
IP = 192.168.80.8
600 0
analog phone
Rootersville area
ext ensi ons
GW Pref ix = 7 ( access to
MVP200
Gat eway
CH2
FXS
PSTN
7000 – 7300
Mucksville PSTN)
IP = 192.168.80.143
CH1
FXO
MVP410
Gatewa y
Channels 1-4
PBX extensions)
IP
NETWORK
GW Pref ix = 5 (access t o
FXO
H.323 ID = 59 (access to
PBX
Mucksville -- company
headquarters
IP = 19 2.16 8. 80. 12
Com pton -- factory
IP = 192.168.80.9
PBX extensions)
Compton PSTN)
Gat eKeep er
Multi-Tech Systems, Inc. MultiVOIP Gatekeeper User Guide 29
Page 30

“Mucksville” MVP2410 Gateway Functions and Settings
Function PhBk Config
Scn Settings
Put MVP2410
under control
of Gatekeeper
Register with
Gatekeeper
Gatekeeper IP
Address =
192.168.80.12
Gatekeeper
Name:MVP_SGK
Give remote
users access
to Mucksville
office PBX
extensions
Give remote
users access
to Mucksville
area PSTN
Get access to
Compton
factory PBX
extensions
Get access to
Compton area
PSTN
Get access to
Rootersville
office phone
Get access to
Rootersville
area PSTN
--
--
1. “PhoneBook Configuration
screen settings”
1
Inbound PhoneBook
Screen Settings
-- --
Remove Prefix = 7;
Add Prefix = 7
Description: Mucksville PBX
Extensions
H323 Register as: Tech
Prefix
Remove Prefix = 79;
Add Prefix= 9
Description: Mucksville
PSTN
H323 Register as: H323 ID
Outbound PhoneBook
Screen Settings
Destination Pattern = 5
RemovePrefix = 5
Select “Use Gatekeeper”
Gateway H.323ID = none
Gateway Prefix = 5
Destination Pattern = 59
RemovePrefix = none
Select “Use Gatekeeper”
Gateway H.323ID = 59
Gateway Prefix = none
Destination Pattern = 6000
RemovePrefix = none
Select “Use Gatekeeper”
Gateway H.323ID = 6000
Gateway Prefix = none
Destination Pattern = 6
RemovePrefix = none
Select “Use Gatekeeper”
Gateway H.323ID = 6
Gateway Prefix = none
3
Phone User’s
Actions
Dial 4 digits
beginning with “7”
Dial “79” plus
Mucksville local
number
Dial 4 digits
beginning with “5”
Dial “59” plus
Compton local
number
Dial 6000.
Dial “6”.
Dial R’ville local
phone number.
Chapter 3 – Gatekeeper Functionality
Multi-Tech Systems, Inc. MultiVOIP Gatekeeper User Guide 30
Page 31

Chapter 3 – Gatekeeper Functionality
2. MVP2410. For the MVP2410 at Mucksville, we begin with the PhoneBook Configuration screen. Enter the
Gateway Name: (e.g., sit name, in our Mucksville example is the site name and you have a MVP2410 at
the site). Click on Register with Gatekeeper option and a check mark appears in the box. This turns on
the Gatekeeper information.
Mucksville MVP2410 MultiVOIP
Enter the Gatekeeper IP Address, in our example the Gatekeeper is located with the MVP2410 at the company
headquarter’s. The Gatekeeper has its own network link with an IP address of 192.168. 80.12. The Gatekeeper
Name is the next entry; the Gatekeeper name can be customezed for your needs. The default name is
MVP_SGK.
Multi-Tech Systems, Inc. MultiVOIP Gatekeeper User Guide 31
Page 32

Chapter 3 – Gatekeeper Functionality
3. MVP2410. The Inbound Phonebook of the MVP2410 requires two entries, one for access to Mucksville
PBX extensions, another for access to the Mucksville area PSTN.
Mucksville MVP2410 MultiVOIP
The first entry in the Add/Edit Inbound Phone Book is to enter a 7 in the Remove Prefix window. Then enter
a 7 in the Add Prefix window. The Channel Number can remain at the default of Hunting which enables the
MVP2410 to direct the calls to any available channel. Now add a description for this Inboun d Phone Book
entry; the 7 provides access to the Mucksville PBX extensions in our example. The next Inbound Phone
Book entry would be to define this entry in the Registration Options at the bottom of the Inbound Phone
Book screen. Gateways can register with the Gatekeeper in one of three ways; E.164, Tech Prefix, or H323
ID. This Phone Book entry has to be register as Tech Prefix.
Multi-Tech Systems, Inc. MultiVOIP Gatekeeper User Guide 32
Page 33

Chapter 3 – Gatekeeper Functionality
The second Inbound Phone Book entry allows access to the Mucksville area PSTN. To create this entry,
click on the Add/Edit Inbound Phone Book and enter the following information as shown below.
Mucksville MVP2410 MultiVOIP
The first entry in the Add/Edit Inbound Phone Book is to enter a 79 in the Remove Prefix window. Then
enter a 9 in the Add Prefix window. The Channel Number can remain at the default of Hunting which
enables the MVP2410 to direct the calls to any available channel. Now add a description for thi s Inbou nd
Phone Book entry; the 7 provides access to the Mucksville PSTN in our example. The next Inbound Phone
Book entry would be to define this entry in the Registration Options at the bottom of the Inbound Phone
Book screen. Gateways can register with the Gatekeeper in one of three ways; E.164, Tech Prefix, or H323
ID. This Phone Book entry has to be register as the H323 ID.
Multi-Tech Systems, Inc. MultiVOIP Gatekeeper User Guide 33
Page 34

Chapter 3 – Gatekeeper Functionality
4. MVP2410. Two outbound phonebook entries are to gain access to Compton’s PBX extensions and its
local PSTN. To create each of these entries, you must click on “Add” at the Outbound PhoneBook screen
and enter the details for each entry in a separate Add/Edit Outbound PhoneBook screen.
Mucksville MVP2410G MultiVOIP: Adding Outbound Phonebook Entries
gaining access to a remote site PBX … and … to a remote area PSTN
Another two outbound phonebook entries are for Rootersville, one describing access to its local PSTN and
the other describing access to its office phone.
Mucksville MVP2410 MultiVOIP: Adding Outbound Phonebook Entries
gaining access to a remote area PSTN … and … to a remote office phone
Multi-Tech Systems, Inc. MultiVOIP Gatekeeper User Guide 34
Page 35

Chapter 3 – Gatekeeper Functionality
The four outbound entries for the Mucksville MVP 2410 are displayed in the Outbound Phone Book.
Mucksville MVP2410 MultiVOIP
5. MVP2410. Save the MVP2410 PhoneBook Configuration (the Save Setup command is in the sidebar
menu).
Multi-Tech Systems, Inc. MultiVOIP Gatekeeper User Guide 35
Page 36

Chapter 3 – Gatekeeper Functionality
6. MVP200. A summary of the required MVP200 phonebook configuration is shown below. (We are
presuming that the MVP200’s IP address has been duly set in the IP Parameters screen and that its
channels have been set in the Voice Channels screen as follows:
Ch1 = FXO; CH2 = FXS.) Again, it is useful to begin the configuration process by listing the system
functionality that this particular voip unit will have to perform.
“Rootersville” MVP200 Gateway Functions & Settings
Function Phonebook
Directory DataBase screen settings
Put MVP200
gateway
under
Gatekeeper
control
Select
“Gatekeeper” radio
button.
RAS Parameters
IP Address =
192.168.80.12;
Allow remote
users access
to
Rootersville
Phone Number
= 6000
Destination Details
= 6000
office phone
Allow remote
users access
to
Rootersville
Phone Number
= 6
Destination Details
= 6
area PSTN
Add/Edit PhoneBook Entries
screen settings
IP Address =
192.168.80.8
Phone Number
= 6000
Ch2 H.323 ID
= 6000
Phone Number
= 6
Ch1 H.323 ID = 6
Phone User’s
Actions
--
Dial “6000”
Dial “6”.
Dial local R’ville
phone number.
Get access
to Compton
factory PBX
extensions
Get access
to Compton
area PSTN
Get access
to Mucksville
office PBX
extensions
Get access
to Mucksville
area PSTN
These functions are provided by
Gatekeeper within MVP_SGK.
Dial 4 digits
beginning with “5”
Dial “59” plus
Compton local
number
Dial 4 digits
beginning with “7”
Dial “79” plus
Mucksville local
number
Multi-Tech Systems, Inc. MultiVOIP Gatekeeper User Guide 36
Page 37

Chapter 3 – Gatekeeper Functionality
7. MVP200. From the main Gatekeeper200 screen, select Phone Book.
Rootersville MVP200 MultiVOIP
8. MVP200. In the Phone Directory Database screen, click on the “Gatekeeper” radio button to put the
MVP200 under the control of the Gatekeeper. Under “RAS Parameters” in the IP Address field, enter the
IP address of the gatekeeeper, 192.168.80.12. Then add the two required destination patterns: 6000 will
direct calls to the analog phone in the Rootersville office; 6 will give remote users access to the
Rootersville area PSTN (calls can be completed in a single dialing sequence).
Rootersville MVP200 MultiVOIP
9. MVP200.When you have completed the configuration, click OK on the Phonebook Directory Database
screen.Then go to the MultiVOIP 200 main screen and click on Download Setup to save the
configuration.
Multi-Tech Systems, Inc. MultiVOIP Gatekeeper User Guide 37
Page 38

Chapter 3 – Gatekeeper Functionality
10. MVP410. For the MVP410 at Compton, we need first to configure its phonebook with the Gatekeeper
configuration in mind. (We’ll presume that its technical configuration has already been completed. Its IP
address would have been set in the
Configuration | IP Parameters screen and its four channels would have
been set to “FXO” in its Configuration | Interface screen. )
The required MVP410 phonebook configuration is shown below.
“Compton” MVP410 Gateway Functions and Settings
Function
Put MVP410
gateway under
Gatekeeper
control
PhBk Config
Scn Settings
Register with
Gatekeeper
Gatekeeper IP
Address =
192.168.80.12
Gatekeeper
Name: MVP_SGK
Give remote
users access
to Compton
factory PBX
extensions
Give remote
users access
to Compton
area PSTN
Get access to
Mucksville
office PBX
extensions
Get access to
Mucksville
area PSTN
Get access to
Rootersville
office phone
Get access to
Rootersville
area PSTN
--
--
--
--
1. “PhoneBook Configuration
screen settings”
1
Inbound PhoneBook
Screen Settings
-- --
Remove Prefix = 5;
Add Prefix = 5
Description: Compton PBX
Extensions
H323 Register as: Tech Prefix
Remove Prefix = 59;
Add Prefix= 9
Description: Compton PSTN
H323 Register as: H323 ID
Outbound PhoneBook
Screen Settings
Destination Pattern = 7
RemovePrefix = 7
Select “Use Gatekeeper”
Gateway H.323ID = none
Gateway Prefix = 7
Destination Pattern = 79
RemovePrefix = none
Select “Use Gatekeeper”
Gateway H.323ID = 79
Gateway Prefix = none
Destination Pattern = 6000
RemovePrefix = none
Select “Use Gatekeeper”
Gateway H.323ID = 6000
Gateway Prefix = none
Destination Pattern = 6
RemovePrefix = none
Select “Use Gatekeeper”
Gateway H.323ID = 6
Gateway Prefix = none
Phone User’s
Actions
Dial 4 digits
beginning with “5”
Dial “59” plus
Compton local
number
Dial 4 digits
beginning with “7”
Dial “79” plus
Mucksville local
number
Dial 6000.
Dial “6”;
get second dial
tone. Dial Hoot #.
Multi-Tech Systems, Inc. MultiVOIP Gatekeeper User Guide 38
Page 39

Chapter 3 – Gatekeeper Functionality
11. MVP410. We begin with the PhoneBook Configuration screen. Enter the Gateway Name: (e.g., site name,
in our example Compton is the site name and you have a MVP410 at that site). Click on the Register with
Gatekeeper option and a check mark appears in the box. This turns on the Gatekeeper information.
Compton MVP410 MultiVOIP
Enter the Gatekeeper IP Address, in our example the Gatekeeper is located at the company headquarter’s
with an IP Address of 192.168.80.12. The Gatekeeper Name is the next entry; the Gatekeeper name can be
customized for your needs. The default name is MVP_SGK.
Multi-Tech Systems, Inc. MultiVOIP Gatekeeper User Guide 39
Page 40

Chapter 3 – Gatekeeper Functionality
12. MVP410. The Inbound Phonebook of the MVP410 requires two entries, one for access to Compton PBX
extensions, another for access to the Compton area PSTN.
Compton MVP410 MultiVOIP
The first entry in the Add/Edit Inbound Phone Book is to enter a 5 in the Remove Prefix window. Then enter
a 5 in the Add Prefix window. The Channel Number can remain at the default of Hunting which enables
MVP410 to direct the calls to any available channel. Now add a description for this Inbound Phone Book
entry; the 5 provides access to the Compton PBX extensions in our example. The next Inbound Phone
Book entry would be to define this entry in the Registration Options group at the bottom of the Inbound
Phone Book screen. Gateways can register with the Gatekeeper in one of three ways; E.164, Tech Prefix,
or H323 ID. This Phone Book entry has to be register as Tech Prefix.
Multi-Tech Systems, Inc. MultiVOIP Gatekeeper User Guide 40
Page 41

Chapter 3 – Gatekeeper Functionality
The second Inbound Phone Book entry allows access to the Comptom Area PSTN. To create this entry,
click on the Add/Edit Inbound Phone Book and enter the following information as shown below.
Compton MVP410 MultiVOIP
The first entry in this Add/Edit Inbound Phone Book is to enter a 59 in the Remove Prefix window. Then
enter a 9 in the Add Prefix window. The Channel Number can remain at the default of Hunting which
enables MVP410 to direct the calls to any available channel. Now add a description for this Inbound Phone
Book entry; the 9 provides access to the Compton area PSTN in our example. The next Inbound Phone
Book entry would be to define this entry in the Registration Options group at the bottom of the Inbound
Phone Book screen. Gateways can register with the Gatekeeper in one of three ways; E.164, Tech Prefix,
or H323 ID. This Phone Book entry has to be register as the H323 ID.
Multi-Tech Systems, Inc. MultiVOIP Gatekeeper User Guide 41
Page 42

Chapter 3 – Gatekeeper Functionality
13. MVP410. Two outbound phonebook entries are fo r Rootersville, one describing access to its local PSTN
and the other describing access to its office phone. To create each of these entries, you must click on
“Add” at the Outbound PhoneBook screen and enter the details for each entry in a separate Add/Edit
Outbound PhoneBook screen.
Compton MVP410 MultiVOIP: Adding Outbound Phonebook Entries
gaining access to a remote area PSTN … and … to a remote office phone
Another two outbound phonebook entries are for Mucksville for access to its PBX extensions and its local
PSTN.
Compton MVP410 MultiVOIP: Adding Outbound Phonebook Entries
gaining access to a remote site PBX … and … to a remote area PSTN
Multi-Tech Systems, Inc. MultiVOIP Gatekeeper User Guide 42
Page 43

Chapter 3 – Gatekeeper Functionality
The four outbound entries for the Compton MVP410 are displayed in the Outbound Phone Book.
Compton MVP410 MultiVOIP
14. MVP410. Save the MVP410 PhoneBook Configuration (the Save Setup command is in the sidebar menu)
before proceeding to Gatekeeper configuration. Click on
Save & Reboot and then click OK on the screen
that will appear directly thereafter.
Multi-Tech Systems, Inc. MultiVOIP Gatekeeper User Guide 43
Page 44

Chapter 3 – Gatekeeper Functionality
15. MVP100GK Gatekeeper Function. We will configure the Gatekeeper as summarized in the table below. It
is useful to begin the configuration process by listing the functionality that you want to implement in your
system.
Gatekeeper Functions & Settings
Function GK Services
Screen Settings
Activate
Gatekeeper
function
Access to
Compton
factory PBX
extensions
Access to
Compton area
PSTN
Access to
Mucksville
office PBX
extensions
Access to
Mucksville
area PSTN
Access to
Rootersville
GK Defined Services
Prefix = 6000
office phone
Access to
Rootersville
GK Defined Services
Prefix = 6
area PSTN
--
--
--
--
--
GK General
Settings Screen
Reg Pol. = All Endpts
Accepts Calls Y
GK Active Y
GK Service
Properties
Screen Settings
“Allow as default to
online endpoints”
= Y
“Allow as public for Out-ofZone Endpoints”
“Allow as default to
online endpoints”
= Y
= Y
“Allow as default to
online endpoints”
= Y
“Allow as public for Out-ofZone Endpoints”
“Allow as default to
online endpoints”
= Y
= Y
“Allow as default to
online endpoints”
= Y
“Allow as default to
online endpoints”
= Y
Phone User’s
Actions
--
Dial 4 digits
beginning with “5”
Dial “59” plus
Compton local
number
Dial 4 digits
beginning with “7”
Dial “79” plus
Mucksville local
number
Dial 6000.
Dial “6”.
Dial local R’ville
number.
Multi-Tech Systems, Inc. MultiVOIP Gatekeeper User Guide 44
Page 45

Chapter 3 – Gatekeeper Functionality
16. MVP100GK. Begin at the GK General Settings screen. The required settings are default values.
Gatekeeper MVP100GK
17. MVP100GK. Adding “services” and “prefixes” in the Gatekeeper Services screen fulfills the same role as
setting “destination patterns” in outbound phonebook screens. Even though they serve a function similar
to destination patterns, the “service” and “prefix” Gatekeeper entries do not eliminate the need for
phonebook destination patterns; nor do phonebook destination patterns eliminate the nee d for
Gatekeeper services and prefixes. They all work together and all must be present for proper operation.
(Note also that “Services” constitutes a wider category than we are discussing here. Generally, services
can also be, essentially, features, like call forwarding.)
Gatekeeper MVP100GK
Multi-Tech Systems, Inc. MultiVOIP Gatekeeper User Guide 45
Page 46

Chapter 3 – Gatekeeper Functionality
To create each of the two required ‘GK-Defined-Services’, you must click on “Add” in t he Gatekeeper Services
screen and enter the details for each entry in a separate Service Properties screen, as shown below.
Gatekeeper MVP100GK
Multi-Tech Systems, Inc. MultiVOIP Gatekeeper User Guide 46
Page 47

Chapter 3 – Gatekeeper Functionality
To give network-wide access to the Mucksville office PBX extensions, the Gateway Prefix field of the
MVP2410’s PhoneBook Configuration screen has already been set to 7 and this setting appears automatically
V2 GW Prefix screen. (There is no need to add this item manually in the V2 GW Prefixes screen.)
in the
Similarly, to give network-wide access to the Compton factory PBX extensions, the Gateway Prefix of the
Compton factory MVP410’s
made, and when that voip contacts the Gatekeeper, the setting will appear automatically in the
PhoneBook Configuration screen must be set to 5. When this setting has been
V2 GW Prefix
screen of the Gatekeeper. (Again, there is no need to add this item manually in the Services |V2 GW Prefixes
screen pane.) The Service Properties screens for these two V2 GW Prefixes are shown below.
Gatekeeper MVP100GK
18. MVP100GK. Save the MVP100GK Gatekeeper configuration (the Save Setup | Save GK Parameters
command is in the sidebar menu).
Multi-Tech Systems, Inc. MultiVOIP Gatekeeper User Guide 47
Page 48

Chapter 3 – Gatekeeper Functionality
19. MVP100GK. The Gatekeeper Online Parameters screen (go to Gatekeeper | Endpoints and click the “Online
Parameters” button) for the Mucksville MVP2410 shows a useful summary of system capabilities and
denotes those that have been enabled for the MVP2410 in particular.
Mucksville MVP2410 MultiVOIP: its Gatekeeper Online Parameters
“allowed” services are system-wide … whereas … “supported” services are those that
(as seen in the Gatekeeper’s software display)
are active in that particular voip endpoint
The Gatekeeper will route calls to an endpoint only if the service (dialing pattern) is supported by that
endpoint. (Services may be “allowed” in the system but not “supported” by an endpoint.)
“GK Allowed Services” are the set of all services (roughly the equivalent of destination patterns in
phonebooks) used in the voip system that the Gatekeeper is overseeing. “GK Supported Services” are all
services (destination patterns) that direct calls to the MVP2410 gateway.
Multi-Tech Systems, Inc. MultiVOIP Gatekeeper User Guide 48
Page 49

Chapter 3 – Gatekeeper Functionality
20. Calls. We will now consider examples of different types of voip calls that can be made within the system.
We dial a sequence, complete the call, and then look at the Call Progress screen of the voip unit at which the
call is completed.
MVP200. A call from the Rootersville office to its local PSTN can be dialed 67637175592.
21.
Rootersville MVP200 MultiVOIP
22. MVP410. A call from the Rootersville analog phone to a PBX extension at the Compton office can be
dialed 5592.
Compton MVP410G MultiVOIP
Multi-Tech Systems, Inc. MultiVOIP Gatekeeper User Guide 49
Page 50

Chapter 3 – Gatekeeper Functionality
23. MVP410. A call from the Rootersville analog phone to a Compton area PSTN number can be dialed 59
7637172522.
Compton MVP410 MultiVOIP
24. MVP2410. A call from a Compton PBX user to a Mucksville area PSTN number can be dialed
796515551212.
Mucksville MVP2410 MultiVOIP
End of Example.
Multi-Tech Systems, Inc. MultiVOIP Gatekeeper User Guide 50
Page 51

Chapter 4 – Gatekeeper Protocols
Chapter 4 - Gatekeeper Protocols
H.323 is an umbrella standard that consists of many subordinate protocols. Three protocols, Q.931, H.225, and
H.245, are particularly relevant to Gatekeepers.
The Q.931 protocol pertains to the setup and teardown of call connections between network endp oints.
The H.225 Call Signaling Protocol pertains to Registration, Admission, and Status (RAS). (Note that RAS in
H.323 has nothing to do with the Remote Access Service that is used in ordinary TCP/IP networks.) H.323 RAS
messages are concerned with general participation on the network (registration), specific involvement in particular
calls between endpoints within and perhaps outside of the network zone (admission), and the status of endpoints
(e.g., are they still “alive” or participating?).
H.245 is the conference control protocol. It pertains to negotiation between endpoints to establish a compatible
set of media capabilities.
Because many user-settable parameters of the MultiTech Gatekeeper software refer directly or indirectly to the
H.225 protocol, we present a summary of common H.225 messages below.
Summary of
H.323 RAS* Messages (Registration, Admission, & Status)
of the H.225 Call Signaling Protocol
In a Gatekeeper-controlled H.323 network, when call is made, the RAS channel
between Gatekeeper and endpoint is the first logical channel opened.
Admission Control
Messages
ARQ Admission Request.
ACF Admission Confirmation.
ARJ Admission Rejection.
DRQ Disengagement Request.
DCF Disengagement Confirmation.
Bandwidth Control
Messages
* RAS in H.323 has nothing to do with the Remote Access Service that is used in
ordinary TCP/IP networks.
With an ARQ, an endpoint asks to participate in a phone
call. The Gatekeeper can either grant the request (by
sending an ACF message) or deny the request
(by sending an ARJ message). When admission is granted,
the endpoints participating in the call can exchange (H.225)
call signaling messages directly between themselve s.
When the call is done, each endpoint, in turn, requests
disengagement (DRQ) and is granted disengagement (DCF)
by the Gatekeeper.
With a BRQ, an endpoint requests a certain amount of digital
bandwidth for a call.
If the Gatekeeper grants the request,
it returns a BCF message.
If the Gatekeeper denies the request,
it returns a BRJ message, typically because all allocated data
channels are in use.
If a bandwidth request is rejected, it is possible for a call to be
conducted
Multi-Tech Systems, Inc. MultiVOIP Gatekeeper User Guide 51
Page 52

Chapter 4 – Gatekeeper Protocols
Summary of H.225 RAS Messages (cont’d)
BRQ Bandwidth Request
BCF Bandwidth Confirmation
BRJ Bandwidth Rejection
Address Translation
Messages for
Out-of-Zone Calling
An LRQ is a request message between two H.323
Gatekeepers to find the address of an H.323 endpoint. One
Gatekeeper is requesting the address translation services of
the other.
If the request is granted, an LCF message is returned.
If the request is denied, an LRJ message is returned.
LRQ Location Request.
LCF Location Confirmation.
LRJ Location Request Rejection.
Registration Control
Messages
With an RRQ, an endpoint asks to be a participant in the
network zone controlled by the Gatekeeper. The Gatekeeper
can either grant the request (by sending an RCF message )
or deny the request (by sending an RRJ message).
If an endpoint’s registration with the Gatekeeper is
temporary, its duration is specified in a TimeToLive field in
the RCF message sent by the Gatekeeper. After the
registration duration has elapsed, the Gatekeeper will send
two IRQ messages (see “IRQ Interval” field in the Network
Parameters screen) to see if the endpoint is still “alive.” If
the endpoint responds with an IRR, the registration will be
extended. If not, the Gatekeeper will send a URQ message
to terminate the endpoint’s registration. Thereafter, the
endpoint must re-register with a full RRQ.
RRQ Registration Request.
RCF Registration Confirmation.
RRJ Registration Rejection.
IRQ Information Request
IRR Extend Registration Request.
(aka “keep-alive” request)
URQ Unregister Request.
App URQ When registration has timed out, the user application must
decide how to respond.
Multi-Tech Systems, Inc. MultiVOIP Gatekeeper User Guide 52
Page 53

Chapter 5 – Gatekeeper Software
Chapter 5 – Gatekeeper Software
This chapter describes each screen and its function in the Gatekeeper software. The Main screen below shows
the break down of the Gatekeeper software; the Configuration section allows you to configure the IP address for
the Gatekeeper, the Statistics, Save Setup, Connection controls the interface for the PC configuring the
Gatekeeper, and the Gatekeeper section defines the Endpoints, Calls, Parameters, and services in which the
Gatekeeper monitors call progress and bandwidth control.
The main screen for the Gatekeeper is located at the Windows Start|Programs|Gatekeeper X.XX (Version
Number) |Configuration.
Multi-Tech Systems, Inc. MultiVOIP Gatekeeper User Guide 53
Page 54

Chapter 5 – Gatekeeper Software
Configuration
The Configuration parameters allow you set IP parameters, define the country/region is whi ch the Gatekeeper is
operating in, view logs, and display system information.
IP Parameters
The IP parameters screen allows you to set the IP parameters for the Gatekeeper, set the Diff Serv Parameters,
Frame Type, DNS, and FTP Server.
The fields within the IP Parameters screen are defined in the table below.
Multi-Tech Systems, Inc. MultiVOIP Gatekeeper User Guide 54
Page 55

IP Parameter Definitions
Field Name Values Description
Diff Serv Parameter
fields
Diff Serv PHB (Per Hop Behavior) values pertain
to a differential prioritizing system for IP packets
as handled by Diff Serv-compatible routers. There
are 64 values, each with an elaborate technical
description. These descriptions are found in
TCP/IP standards RFC2474, RFC2597, and, for
present purposes, in RFC3246, which describes
the value 34 (34 decimal; 22 hex) for Assured
Forwarding behavior (default for Call Control
PHB) and the value 46 (46 decimal; 2E
hexadecimal) for Expedited Forwarding behavior
(default for Voip Media PHB). Before using
values other than these default values of 34 and
46, consult these standards documents and/or a
qualified IP telecommunications engineer.
To disable Diff Serv, configure both fields to 0
decimal.
The next page explains Diff Serv in the context of
the IP datagram.
Call Control PHB 0 – 63
default = 34
Voip Media PHB 0 – 63
default = 46
Frame Type Type II,
SNAP
Value is used to prioritize call
setup IP packets.
Value is used to prioritize the
RTP/RTCP audio IP packets.
Must be set to match network’s
frame type. Default is Type II.
Chapter 5 – Gatekeeper Software
The IP Datagram with Header, Its Type-of-Service Field, & DiffServ
bits =>
0 4 8 16 19 24 31
VERS HLEN
IDENTIFICATION FLAGS FRAGMENT OFFSET
TIME TO LIVE PROTOCOL HEADER CHECKSUM
TYPE OF
SERVICE
SOURCE IP ADDRESS
DESTINATION IP ADDRESS
IP OPTIONS (if any)
DATA
…
TOTAL LENGTH
PADDING …
end of header
The TOS field consists of eight bits, of which only the first six are used. These six bits are called the
“Differentiated Service Codepoint” or DSCP bits.
Multi-Tech Systems, Inc. MultiVOIP Gatekeeper User Guide 55
Page 56

Chapter 5 – Gatekeeper Software
The Type of Service or “TOS” field
01234567
PRECEDENCE D T R
unused
The three precedence have eight values, 0-7, ranging from “normal” precedence (value of 0) to “network control”
(value of 7). When set, the D bit requests low delay, the T bit requests high throughput, and the R bit requests
high reliability.
Routers that support DiffServ can examine the six DSCP bits and prioritize the packet based on the DSCP value.
The Diff Serv Parameters fields in the IP Parameters screen allow you to configure the DSCP bits to values
supported by the router. Specifically, the Voip Media PHB field relates to the prioritizing of audio packets (RTP
and RTCP packets) and the Call Control PHB field relates to the prioritzing of non-audio packets (packets
concerning call set-up and tear-down, Gatekeeper registration, etc.).
The Call Control PHB parameter defaults to 34 decimal (22 hex; 100010 binary – consider vis-à-vis TOS field
above) for Assured Forwarding behavior. The Voip Media PHB parameter defaults to the value 46 de cimal (2E
hex; 101110 binary – consider vis-à-vis TOS field above). To disable Diff Serv, configure both fields to 0 de cimal.
IP Parameter Definitions (cont’d)
Field Name Values Description
IP Parameter fields
Enable DHCP Y/N
disabled by
default
Dynamic Host Configuration Protocol
is a method for assigning IP address
and other IP parameters to computers
on the IP network in a single message
with great flexibility. IP addresses
can be static or temporary depending
on the needs of the computer.
IP Address 4-places, 0-255 The unique LAN IP address assigned
to the Gatekeeper.
IP Mask 4-places, 0-255 Subnetwork address that allows for
sharing of IP addresses within a LAN.
Gateway 4-places, 0-255 The IP address of the device that
connects your Gatekeeper to the
Internet.
DNS Parameter fields
Enable DNS Y/N Enables Domain Name
Space/System function where
computer names are resolved using a
worldwide distributed database.
DNS Server IP
Address
4-places, 0-255. IP address of specific DNS server to
be used to resolve Internet computer
names.
FTP Parameter fields
FTP Server
Enable
Y/N Gatekeeper unit has an FTP Server
function so that firmware and other
important operating software files can
be transferred to the Gatekeeper via
the network.
Multi-Tech Systems, Inc. MultiVOIP Gatekeeper User Guide 56
Page 57

Chapter 5 – Gatekeeper Software
Regional
The Regional Parameters screen allows you to configure the built-in Command Modem to be able to change the
Gatekeeper’s paramaters remotely. Before the built in Command Modem can be used remotely, other than the
United States (US), the country/region has to be set in this screen.
The built-in command modem is a receive only modem, that is it has to be connected to a telco POTS line and a
remote PC has to be configured to dial the PSTN number of the command modem. In order for the remote PC to
be able to reconfigure the Gatekeeper, the Gatekeeper software would have to be loaded on the remote PC.
If the Gatekeeper is located in other than the United States (US), the Regional Parameters would have to be
changed before remote configuration can occur.
To change the Regional Parameters, click on the Country Selection For BuiltIn Modem down arrow and then hold
down on either the up or down arrow until you see the country/region of your choice. Click OK and the Command
Modem is ready receive a call from the remote PC.
Multi-Tech Systems, Inc. MultiVOIP Gatekeeper User Guide 57
Page 58

Chapter 5 – Gatekeeper Software
Logs
The Configuration Logs screen allows you to display log messages via a PC connected to the Command Port on
the Gatekeeper or enabling the SysLog Server. The log messages can be displayed from either the print console
via the command port or via SysLog Server by enabling it and entering the IP address of the server.
The default setting in the Console message Settings group and the default setting in the Console Messages Filter
Settings screen allow you to print all console messages. To disable all messages, uncheck the Enable Console
Messages check box. As long as the SysLog Server is not enabled, no messages are provided.
To view messages from the print console, enable HyperTerminal from your Windows Program menu, make a
phone call, and you will see the messages displayed as shown in the partial call setup message presented in the
following example.
Multi-Tech Systems, Inc. MultiVOIP Gatekeeper User Guide 58
Page 59

Chapter 5 – Gatekeeper Software
HyperTerminal
Limited Call setup message
[00111305] eventNewCall
[00111305] <
>| admission request (origin) from 192.168.1.8:16001. endpoint=65535
[00111310] <
>| ARJ (reason = CallerNotRegistered)
[00111320] <c:0 s:192.168.1.8:16009 s: d:0.0.0.0:0 d:
>| clearing
[00111520]
[00111520] New message recv <- Registration Request from ip
192.168.1.8:16001
[00111560] New message sent -> Registration Confirm
[00111560] No.|Type |RAS Add. |Call Signalling Add.|Phone
|Terminal ID.
[00111560] 0 |gateway |192.168.1.8:16001 |192.168.1.8:1720 |6000
|6000
[00111560] | |Trans. Name |Party Num. |EMail
|URL
[00111560] | | | | |
A complete call message displayed in HyperTerminal may take up a full page.
To display limited messages from the print console, the default Enable Console Messages box remains checked
and then you have to click on the Filters button and highlight Gatekeeper in the Trace On for Functions in the
Console Messages Filter Settings and click on the << button and the word Gatekeeper is move to the Trace Off of
Functions window.
To display similar messages from the SysLog Server, click on the Enable box in the Logs screen under the
SysLog Server group. Enter the IP address of the server in the IP Address window. The default port for the Server
is 514. If your server is using a different port number, enter the new port number in the Port window.
Multi-Tech Systems, Inc. MultiVOIP Gatekeeper User Guide 59
Page 60

Chapter 5 – Gatekeeper Software
System Informtion
The System Information screen displays the Gatekeeper boot,firmware and configuration version levels. Also, the
MAC address and an uptime meter.
The System Information screen is useful for determining the firmware and software levels used on the
Gatekeeper during a tech support call to ensure that you are both talking about the same software or firmware
version.
Multi-Tech Systems, Inc. MultiVOIP Gatekeeper User Guide 60
Page 61

Chapter 5 – Gatekeeper Software
Statistics
The displayed statistics parameters provide various transmitted and received packets totals,
IP Statistics
The IP Statistics screen displays the Gatekeeper IP Address, various transmitted and recei ve d packets and
packets received with errors.
Multi-Tech Systems, Inc. MultiVOIP Gatekeeper User Guide 61
Page 62

Chapter 5 – Gatekeeper Software
Link Management
The Statistics Link Management screen provides useful information to troubleshoot a faulty Ethernet link.
Link Management allows you to ping a remote system by entering the IP address of the remote unit in the IP
Address to Ping. The Link Status window displays the results of the ping.
Each ping test sends a user configurable number of pings to the remote unit. Configure the Time Interval between
Tests to the number of minutes (0-30) to wait between each ping test. If this field is set to 0, only one ping test is
performed. The Ping Size in Bytes and Response Timeout values can be chang ed to accommodate various
packet sizes or Timeout values can be changed to accommodate various packet sizes or network delay
conditions. The results are displayed under Link Status and consist s of IP Adress, No of Pings Se nt, No of Pings
Received, Round Trip Delay (Min/Max/Avg), and last error. You can compare the number of pings sent/received
and Round Trip Delay to determine the condition of the network between the two units. Ping test s are
disconnected when you exit the Link Management screen.
Multi-Tech Systems, Inc. MultiVOIP Gatekeeper User Guide 62
Page 63

Chapter 5 – Gatekeeper Software
Connection
The Connection group allows you to connect, disconnect, and set up the command port parameters. The
connection group can also be used to remotely reconfigure the Gatekeeper using the command modem port on
the back of the unit.
Modem Configuration
Modem configuration allows you to view and change the configuration of a remote Gatekeeper. Before modem
configuration can be initiated, the remote Gatekeeper has to be configured for the country/region that the
Gatekeeper is operating in. The country/region has to be set in the Gatekeeper locally. The command modem in
the Gatekeeper has to be connected to a PSTN line and the telephone number of that conn ection has to be
known by the person configuring the PC.
The local PC needs to be connected to a dial-up line and the Gatekeeper software be loaded o n the local PC.
From your desktop, click StartProgramsMultiVOIP Gatekeeper x.xx (x.xx is the version number)Configuration
Port Setup and the COM Port Setup screen is displayed.
The Select Port and Baud Rate settings have to match the communications port requirements o n yo ur local PC.
The only change in the Modem Setup group should be the Dial String has to be given an AT command for dialing
(atdt) plus the phone number of the remote Gatekeeper. When you click on the OK button, the dialing sequence
begins. The Reading Setup dialog box is displayed and then the main Gatekeeper screen is di splayed. This is the
main screen of the remote Gatekeeper. Now, you can change any of the configuration para meters of the remote
Gatekeeper. When you are finished, click Save and Reboot to update the configuration of the remote Gatekeepe r.
Multi-Tech Systems, Inc. MultiVOIP Gatekeeper User Guide 63
Page 64

Chapter 5 – Gatekeeper Software
GateKeeper
The Gatekeeper group defines registration of endpoints, current calls, and call details. The GK (GateKeeper)
General Settings screen is accessable by clicking on the Gatekeeper bar at the top of the main Gate keeper
screen or clicking on the word GateKeeper in the pull down menu.
General Settings
The Gatekeeper General Settings screen can be accessed by clicking on G ateKeeper in the status bar at the top
of the main Gatekeeper screen or by clicking on the word GateKeeper in the pull down menu at the left of the
screen. You will not see General Settings if you expand the GateKeeper pull down.
The fields in the General Settings screen are described in the table below.
Field Name Values Description
Registration Policy
No
Endpoints
Predefined
Endpoints
All
Endpoints
Multi-Tech Systems, Inc. MultiVOIP Gatekeeper User Guide 64
Y/N When selected, sets a policy whereby the Gatekeeper
Y/N When selected, sets a st rict zone policy, in which the
Y/N When selected, sets an open zone policy, in which the
GK General Settings Definitions
accepts no registrations.
Gatekeeper accepts only registrations that arrive from
predefined endpoints. A strict zone policy controls
network resources and services more tightly than an
open zone policy.
Gatekeeper accepts any legal registration. Under this
policy, the Gatekeeper can operate in “plug-and-play”
mode.
Page 65

Chapter 5 – Gatekeeper Software
Activity Configuration
Accepts Calls Y/N When checked, the voip unit will accept calls.
GK Active Y/N When checked, the voip unit’s Gatekeeper function is
active.
Debug Level 0-100 The higher the value, the greater the details in Syslog
or Console reports.
Buttons
Memory
Settings
Launches secondary screen on Memory issues. (See
next table.)
Click on the Memory Setting button to access the Memory screen.
GK General Settings Definitions (cont’d)
Field Name Values Description
GK Memory Values
Maximum
Calls
Maximum
Registrations
Multi-Tech Systems, Inc. MultiVOIP Gatekeeper User Guide 65
25 The maximum number of concurrent calls.
250 Maximum number of endpoints that can be
registered on the Gatekeeper-controlled
Page 66

Chapter 5 – Gatekeeper Software
network.
GK General Settings Definitions (cont’d)
Field Name Values Description
RAS Parameters
In H.323, RAS parameters pertain to Registration,
Admission, and Status in the H.225 Call Signaling
Protocol.
Response
TO
The timeout (in seconds) before re-transmission of a
RAS message that had previously fetched no
response.
RAS Port The RAS port for Gatekeeper communication with
endpoints.
Default value = 1719
Q.931 Parameters
In H.323, Q.931 parameters are those that pertain to
the set-up and tear- down of connections between
H.323 endpoints.
Response
The timeout (in seconds) waiting for the TCP reply.
TO (sec)
Connect TO
(sec)
Q.931
Signaling
The timeout (in seconds) waiting for the Connect
message of a call.
Logical port through which Q.931 protocol messages
are handled. Default value = 1721
Port
Buttons
Default Invokes default values for all parameters on the GK
General Settings screen.
Multi-Tech Systems, Inc. MultiVOIP Gatekeeper User Guide 66
Page 67

Chapter 5 – Gatekeeper Software
Endpoints
The existing endpoints screen shows the registered endpoints with the Gatekeeper. The existing endpoint
parameter fields are described in the table below.
About Registration. When an endpoint registers with the Gatekeeper, the endpoint is activated. That is, it
becomes an acknowledged participant on the network (or on a particula r zone of a network). Registration tells the
Gatekeeper that the endpoint is active and ready to receive calls. An endpoint’s registration can be static
(essentially permanent) or dynamic (timed or conditional).
Existing Endpoints Parameter Definitions
Field Name Values Description
Type Gatekeeper,
Gateway,
MCU,
Terminal, or
Undefined.
Online +
or
[blank]
PreDef +
or
[blank]
The endpoint type . When an endpoint attempts to
register with the Gatekeeper, the Gatekeeper
compares the endpoint type with the predefined
value. If the Gatekeeper detects a discrepancy, the
registration is not accepted. If you are not sure of
the endpoint type, select Undefined, which allows
any endpoint of any type to register with the
Gatekeeper.
(Multipoint Control Units, MCUs, are used to
facilitate conference calls.)
When “+” appears, the endpoint’s registration is
dynamic or “online.”
When “+” appears, the endpoint’s registration is
static or “predefined.”
Multi-Tech Systems, Inc. MultiVOIP Gatekeeper User Guide 67
Page 68

Chapter 5 – Gatekeeper Software
Existing Endpoints Parameter Definitions (cont’d)
Field Name Values Description
Registration IP n.n.n.n
The RAS address and RAS port of the endpoint.
0-255
Name The H.323 ID alias of the endpoint.
Phone The e164 alias number (conventional PSTN phone
number)of the endpoint.
Other Aliases Additional aliases for the endpoint: URL, e-mail
address, transport address, party.address, or private
network number (per ISO/IEC 11571).
Alias addresses must be unique within a zone.
Gatekeepers themselves cannot have aliases.
Msg LRQ, RRQ,
URQ, or
AppURQ
The type of message sent by the endpoint when the
mode for processing registration is manual. This can
be an LRQ, RRQ, URQ, or AppURQ (which is a
URQ sent by the Gatekeeper).).).
TTL seconds The time remaining in seconds before the
TimeToLive timer expires. If the endpoint fails to
reregister within this time, the endpoint is
unregistered.
Command Buttons
Add -- Opens an empty Predefined Properties dialog box
where you can predefine a new registration.
Unregister -- Sends a URQ message to the selected endpoint,
deleting the online (or dynamic) registration
properties and unregistering the endpoint.
Unregister All -- Sends a URQ to all the online endpoints in order to
unregister them.
Disconnect
Endpoint
-- Disconnects all calls with which the endpoint is
involved.
Delete -- Deletes the endpoint from the Gatekeeper database.
A URQ will not be sent to the endpoint.
Del Pre-def -- Deletes the predefined (static) properties of the
endpoint.
Online Properties -- Opens the Online properties screen or the selected
endpoint whereupon are shown details of that
endpoint’s configuration.
Multi-Tech Systems, Inc. MultiVOIP Gatekeeper User Guide 68
Page 69

Chapter 5 – Gatekeeper Software
Calls
The current calls are displayed in the Current Calls screen with the originating IP address, the originating alias
name, and the destination IP address. The details of a current call can be viewed by clicking on the Call Details
button. The current calls are displayed in the following screens and described in the tables below.
The Calls window displays a list of all the calls currently taking place and the basic details of the calls:
Current Calls Field Definitions
Field Name Values Description
No
ORIG IP
ORIG ALIAS Originating Alias. The first alias given by the call’s
DEST IP n.n.n.n
Disconnect
Call (button)
Disconnect
All (button)
Call Details Laun ches Call Details screen that presents technical
numeric
n.n.n.n
0-255
0-255
Number. A sequential number for identification in the
list.
Originating IP Address. IP Address of endpoint
originating the call.
origin. The H.323 ID alias of the endpoint originating
the call.
Destination IP Address. The IP Address of the
endpoint completing the call.
Disconnects the selected call.
Causes all current calls to disconnect.
particulars of an ongoing call.
Multi-Tech Systems, Inc. MultiVOIP Gatekeeper User Guide 69
Page 70

Chapter 5 – Gatekeeper Software
Call Details
A Call Details screen for a call in progress can be launched either by cli cking on the “Call Details” button for a
selected call in the Current Calls screen, or by double-clicking on a selected call listed in the Current Calls screen.
The Call Details screen contains general information about the call, as well as details about the call’s source
endpoint and destination endpoint.
Clicking on an inprogress call, or using
the “Call Details” button,
yields full details about
the call
The Call Details screen consists of three panes: Call General Info, Destination Info, and Source Info. We
describe the fields for each of these panes in a separate table below.
Multi-Tech Systems, Inc. MultiVOIP Gatekeeper User Guide 70
Page 71

Chapter 5 – Gatekeeper Software
Call Details Field Definitions
Field Name Values Description
Call General Info
Call No. Call Number. Accession number identifying a call in progress.
Cid Sum
The conference ID number (CID) is a unique non-zero value created
by the calling endpoint and passed in various H.225.0 messages.
The CID identifies the conference with which the message is
associated. Therefore, messages from all endpoints participating in
the same conference will have the same CID.
Call ID Sum
The call ID number is a globally unique non-zero value created by
the calling endpoint and passed in various H.225.0 messages. The
Call ID identifies the call with which the message is associated.
Call Model direct
OR
routed
Total BW
Conf. Goal
State
Indicates whether the call is direct or routed. .
For direct-mode calls, the Gatekeeper gives each endpoint involved in the
call the destination address of the other and establishes a common callsignaling channel for them to use during the call. Then the two endpoints
conduct the call without further Gatekeeper involvement.
For routed-mode calls, the Gatekeeper establishes a connection between
the two endpoints but keeps itself involved in call signaling for the duration
of the call. In routed mode, the Gatekeeper keeps a call-signaling channel
open for the entire duration of the call. As a call-management service, the
Gatekeeper can change the routing of the call (by line hunting) while the
calls is in progress. If the Gatekeeper is to implement supplementary
(H.450) services, it must operate in routed mode.
The total amount of bandwidth used by the call.
The type of conference request: create, invite or join.
The last reported state of the call.
Reason
The reason associated with the last state of the call.
Multi-Tech Systems, Inc. MultiVOIP Gatekeeper User Guide 71
Page 72

Call Details Field Definitions
Field Name Values Description
Source Info fields
Names
Phone
Numbers
Other Aliases:
Email
OtherAliases:
Trans. Name
Other Aliases:
URL
Call
Signaling IP
Req.
Bandwidth
App.
Bandwidth
The H.323 alias name(s) for the originating endpoint.
The e164 alias phone number(s) of the originating
endpoint.
An e-mail address of the originating endpoint.
Transport Name. An alias of the originating endpoint
consisting of an IP address and port number.
A Internet-type address of the originating endpoint.
The call signaling transport address of the originating
endpoint.
Requested Bandwidth. The bandwidth requested by the
calling endpoint for this call.
Approved Bandwidth. The bandwidth the Gatekeeper
made available to the calling endpoint.
Chapter 5 – Gatekeeper Software
Multi-Tech Systems, Inc. MultiVOIP Gatekeeper User Guide 72
Page 73

Chapter 5 – Gatekeeper Software
Call Details Field Definitions
Field Name Values Description
Destination Info fields
Names The H.323 alias name used to make the call.
Phone
The e164 alias phone number used to make the call.
Numbers
Other Aliases:
An e-mail address used to make the call.
Email
OtherAliases:
Trans. Name
Other Aliases:
A transport name alias used to make the call,
consisting of an IP address and port number.
A URL alias used to make the call.
URL
Call Signaling
IP
Reg.
Bandwidth
The call signaling transport address of the called
endpoint.
Requested Bandwidth. The bandwidth the called
endpoint requested for the call, as it appears in the
ARQ/BRQ messages.
App. Bandwidth Approved Bandwidth. The bandwidth the Gatekeeper
made available to the called endpoint for the call.
Additional
These allow calling with more than one B-channel.
Phone
Numbers
Remote
Extension
Phone
Remote
Extension
Name
This is the phone number of the called endpoint on the
remote LAN. It is used for calls between multiple
gateways.
This is the identifier (name) of the called endpoint on
the remote LAN. It is used for calls between multiple
gateways.
Multi-Tech Systems, Inc. MultiVOIP Gatekeeper User Guide 73
Page 74

Chapter 5 – Gatekeeper Software
Parameters
The network parameters screen shows the status and current network information and each field is described in
the table below.
Network Parameter Definitions
Field Name Values Description
Status Information
Ongoing Calls
Currently
Registered
Current BW
Usage
number
number
number
Use Update button to refresh the Status Information fields.
The number of current calls with the Gatekeeper.
The number of endpoints registered with the
Gatekeeper.
The current bandwidth usage of the ongoing calls in
Kbps.
Multi-Tech Systems, Inc. MultiVOIP Gatekeeper User Guide 74
Page 75

Chapter 5 – Gatekeeper Software
Network Parameter Definitions (cont’d)
Field Name Values Description
Configuration Options
Alias Giving Y/N When an endpoint sends an RRQ message, the
Gatekeeper uses the additional aliases that were
predefined for the endpoint as online aliases. This
enables the Gatekeeper to assign terminal alias
names through which the terminal can be accessed
by others. The following are two examples of how this
option can be used:
• Example of Alias Giving for a Terminal. To make
a terminal accessible by dialing 100, add the alias
100 to the terminal’s predefined information, and
select the Alias Giving option. When the terminal
sends an RRQ message, the 100 alias becomes a
dynamic (online) alias, and all calls to 100 will be
directed to the terminal.
• Example of Alias Giving for Gateways. To make
all Gateways supply Service 80, add Service 80 to
the Service Table, add the 80 alias as predefined
information to all registered gateways, and select
the Alias Giving option. When the gateways
register, they will support Service 80.
Pre-Granted ARQ
PreGrant ALL Y/N Select to cause the Gatekeeper to send a pregranted
ARQ permission in the RCF message for each
endpoint that wishes to register. The pregranted ARQ
permission is given to both makeCall and answerCall
with routed mode. When an endpoint receives the
permission, it may start the call with a Setup message
or directly answer the call with a Connect message.
Line Hunting Information
Call to Out-ofService Supplier
Y/N “Y” enables the sending of RAI messages. In a
normal scenario, the Gatekeeper will hunt among all
the available endpoints that have been registered
using the same tech-prefix. Each endpoint can inform
the Gatekeeper about its resource availability using an
RAI (Resource Available Indication) message. Upon
receiving an RAI message from an endpoint, the
Gatekeeper would consider that endpoint as an Outof-Service Supplier. The ‘Almost Out of Resources’
configuration would allow the Gatekeeper to hunt such
Out-of-Service Supplier endpoints for routing the calls.
Remove H.245
Addr in Call Hunt
Y/N When selected, the Gatekeeper will not convey in its
outgoing setup message the H.245 address received
in an incoming setup message. This prevents H.323
terminals from establishing a channel for a call only to
refuse the call later.
Service
Configurable
Properties
Y/N When “Y” is selected, the Gatekeeper will perform a
Priority Based Line Hunting among those destinations
registered using the same tech-prefix.
Multi-Tech Systems, Inc. MultiVOIP Gatekeeper User Guide 75
Page 76

Chapter 5 – Gatekeeper Software
Network Parameter Definitions (cont’d)
Field Name Values Description
Call Proceeding
This parameter group pertains to the Gatekeeper’s
handling of Q.931 “call-proceeding” messages.
Send
Immediately
Y/N Immediate return of call-proceeding message to
originating endpoint. When selected, the Gatekeeper
will send the Q.931 call –proceeding message to the
originating endpoint immediately after receiving that
endpoint’s call setup request.
With H.245 Addr Y/N When enabled, Gatekeeper supplementary services will
remove the H.245 address from the outgoing setup in
order to prevent early H.245 establishment to the call’s
destination. This destination can be changed during
Forward on Busy or during Forward on No Response
(CFNR).
After Overlapped
Sending
Y/N Delayed return of call-proceeding message to originating
endpoint. When selected (in routed mode), the
Gatekeeper will send a Q.931 call-proceeding message
to the originating endpoint after it receives a return callproceeding message back from the destination
endpoint.
Call Mode
Direct Mode Sets the call mode to direct. In this mode, terminals
send ARQ messages to the Gatekeeper, but pass the
call signaling and media control signaling directly
between them.
Routed Mode Sets the call mode to routed. In this mode, terminals
pass admission requests and call signaling through the
Gatekeeper. Media control information is sent directly
between the terminals.
Note: Though direct calls consume fewer Gatekeeper
resources, call control is better for indirect (or routed)
calls.
Configuration Parameters
Max Number of
Calls
Max Total BW
(KBps)
Registration TO
(hrs)
10 The maximum number of concurrent calls allowed in the
zone.
The amount of bandwidth in Kbps that call traffic can
consume at any given time.
Registration Timeout. Sets the number of hours of
inactivity after which the dynamic registration of a terminal expires. Only the dynamic (online) properties will
be unregistered. If the endpoint is also static
(predefined), the static properties remain valid.
Multi-Tech Systems, Inc. MultiVOIP Gatekeeper User Guide 76
Page 77

Chapter 5 – Gatekeeper Software
Network Parameter Definitions (cont’d)
Field Name Values Description
Configuration Parameters
IRQ Interval (sec) The interval, in seconds, between IRQ messages sent
by the Gatekeeper. IRQ messages are sent to all
online endpoints registered as dynamic in order to
verify that the endpoints are online. The number you
set determines the delay between two IRQ messages
to the same endpoint. Choosing the desired delay
should take into account the following factors:
• IRQ messages add to the traffic already present over
the network, and the shorter the delay, the more IRQ
messages are sent. However, the longer the delay,
the longer it takes for the Gatekeeper to detect
dynamic registrations that have ceased to be online.
• The delay parameter relates to the interval between
two IRQ messages per one endpoint, so the actual
number of the IRQ messages the Gatekeeper
creates during this interval should be multiplied by
the number of endpoints registered dynamically.
• To disable the IRQ polling, set this value to zero.
• The effective IRQ interval cannot fall below three
times the RAS timeout.
• IRQ messages will not be sent at a rate exceeding 20
per second.
Call IRQ Interval The interval, in seconds, between IRQ messages sent
by the Gatekeeper to query the status of calls. IRQ
messages are sent to all online endpoints registered as
dynamic and having ongoing calls in order to verify that
the calls are still ongoing. The number you set
determines the delay between two IRQ messages to
the same endpoint regarding the same call. Choosing
the desired delay should take into account the following
factors:
• IRQ messages add to the traffic already present over
the network, and the shorter the delay, the more IRQ
messages are sent. However, the longer the delay,
the longer it takes for the Gatekeeper to detect calls
that are stale.
• The delay parameter relates to the interval between
two IRQ messages per one call, so the actual
number of the IRQ messages the Gatekeeper
creates during this interval should be multiplied by
the number of ongoing calls registered dynamically.
• To disable the IRQ polling, set this value to zero.
The effective IRQ interval cannot fall below three
times the RAS timeout.
IRQ messages will not be sent at a rate exceeding 20
per second.
Multi-Tech Systems, Inc. MultiVOIP Gatekeeper User Guide 77
Page 78

Network Parameter Definitions (cont’d)
Field Name Values Description
Configuration Parameters
GK-ID
The name of the Gatekeeper. The terminals identify the
Gatekeeper by this name during the discovery
process. The Gatekeeper responds only to Discovery
requests that either contain a matching Gatekeeper
identifier or have no Gatekeeper identifier.
Update
(button)
--
Click to update information in the “Status Information”
fields of the Network Parameters screen.
Chapter 5 – Gatekeeper Software
Multi-Tech Systems, Inc. MultiVOIP Gatekeeper User Guide 78
Page 79

Services
The GK (Gatekeeper) Defined Services fields are described in the table below.
Chapter 5 – Gatekeeper Software
Services Screen Definitions
Field Name Values Description
GK Defined Services
Prefix
Description
Default
Public
A prefix that identifies the service.
A description of the service that is accessible by
dialing the prefix. See “GK Defined Service Types”
section on following pages.
For any GK-defined service being used, the user must
select either “Default” or “Public.” When Default is
selected, the service is accessible to all endpoints that
are not predefined in the zone.
For any GK-defined service being used, the user must
select either “Default” or “Public.” When Public is
selected, the service is accessible to all endpoints that
are not part of the zone.
Multi-Tech Systems, Inc. MultiVOIP Gatekeeper User Guide 79
Page 80

Services Screen Definitions (cont’d)
Field Name Values Description
V2 GW Prefixes
Prefix
Description
Default
Public
H.323 Version 2 enables the gateway to specify prefixes that
the user should dial before the WAN number in order to
make a call using a certain medium. E.g., the user could dial
the prefix 3 for voice calls or 77 for H.320 video calls. The
prefixes are defined in the RRQ message at registration.
Prefix can be any H.323 alias, including an H.323 ID & mail
address.
When a terminal places a LAN to WAN call, it should add
one of the prefixes to the dialed number. The Gatekeeper
identifies the prefix & routes the call to the appropriate
gateway. If more than one gateway supplies the same
prefix, line hunting is possible between the gateways.
Identifies the service. The prefix can be a numeric code,
alphanumeric string, name, or phone number that the user
dials. Per H.323 Vers. 2, prefixes can also be of URL and email type. Also for H.323 Vers. 2, the type must precede the
prefix. For example, TEL: 3 or NAME: John.
A description of the service that is accessible by dialing the
prefix.
Select to make the service accessible to all endpoints that
are not predefined in the zone.
Select to make the service accessible to all endpoints that
are not part of the zone.
V2 GW Prefixes
Dynamic Y/N
Buttons
Indicates whether the service is static (essentially
permanent) or timed & conditional (dynamic). This field
indicates whether the service has been added manually
(non-dynamically; field value =N) or dynamically (field value
= Y) as part of registration from endpoints.
These buttons allow you add, edit, or delete a selected
service or prefix.
Chapter 5 – Gatekeeper Software
Multi-Tech Systems, Inc. MultiVOIP Gatekeeper User Guide 80
Page 81

Chapter 5 – Gatekeeper Software
GK Defined Service Types
You can either define your own Gatekeeper services, or use any of the built-in services, which are predefined
internally and supported by the Gatekeeper.
Example of a Gatekeeper Service
You can define a service named TECHSUPP and register five different terminals that provide technical support.
Any call directed to TECHSUPP can connect to one of the five terminals.
To do so:
1. Add a service with a prefix TECHSUPP.
2. Make sure the terminals register with the additional alias TECHSUPP.
3. When a call for TECHSUPP arrives, the Gatekeeper automatically routes the call to
one of terminals that provides the TECHSUPP Service.
Endpoints must be registered with the service name to receive calls for the service. This is achieved using one of
the following methods:
• The endpoint is pre-configured using its own configuration. Then, using RAS messages, the
endpoint is registered with a name or a phone number identical to the service prefix.
• The service prefix is predefined for the endpoint, using the configuration application of the
Gatekeeper as an ID or phone number, and the Alias Giving option is activated. See the
description of the Alias Giving option in the Network Parameters window section.
Service Types: Zone Prefixes (1 and 2)
Gatekeeper can operate in multiple zones. You can define one or two prefixes for a zone by entering the prefix
for the services. The zone prefix functions in the same way as a telephone area code.
When one of the zone prefixes is defined, no calls from other zones can reach this zone, unless preceded by the
prefix. If an endpoint in a zone dials a zone prefix before its number, and the Gatekeeper cannot resol ve it in its
zone, the Gatekeeper attempts to locate and route the call to a Neighbor Gatekeeper with the same prefix. For
such calls, the Gatekeeper strips the zone prefix and then applies the destination location mechanism to route the
call to its final destination.
Multi-Tech Systems, Inc. MultiVOIP Gatekeeper User Guide 81
Page 82

Chapter 5 – Gatekeeper Software
You can use the zone prefix to devise a dialing plan in a multi-zone environment. If zone prefixes are not defined,
the zone accepts the following calls:
• Calls prefixed to a service defined in the zone and allowed as default.
• Calls to on-line terminals in the zone.
• Calls to terminals marked as Forward in the zone.
Example of comparing Zone prefix use when using Zone prefixes
• Zone A has a 01 prefix. In this zone, the phone number of user A1 is 123 and the phone number
of user A2 is 456. The Gateway service has a prefix of 8.
• Zone B has a 02 prefix. In this zone, the phone number of user B1 is 123 and the phone number of
user B2 is 456. The Gateway number is 555444 and the Gateway service has a prefix of 9.
• A1 calls A2 by dialing 456.
• A1 calls using zone A Gateway 8555444.
• A1 calls B1 by dialing 02123.
Note: The call is completed only if the Gateway service is allowed as default in Zone B.
Service Types: Forward
This call-forwarding feature is non-contingent, i.e., it forwards all calls for a selected station to another destination.
Multi-Tech Systems, Inc. MultiVOIP Gatekeeper User Guide 82
Page 83

Chapter 5 – Gatekeeper Software
Software User License Agreement
The MultiVOIP Gatekeeper software is licensed by Multi-Tech Systems, Inc., to the original end-user purchaser of the
product, hereafter referred to as “Licensee.” The License includes the distribution disc, other accompanying programs,
and the documentation. The MultiVOIP Gatekeeper software, hereafter referred to as “Software,” consists of the computer program files included on the original distribution disc.
Licensee agrees that by purchase and/or use of the Software, he hereby accepts and agrees to the terms of this
License Agreement.
In consideration of mutual covenants contained herein, and other good and valuable considerations, the receipt and
sufficiency of which is acknowledged, Multi-Tech Systems, Inc. does hereby grant to the Licensee a non-transferable
and non-exclusive license to use the Software and accompanying documentation on the following conditions and terms:
The software is furnished to the Licensee for execution and use on a single computer system only and may be copied
(with the inclusion of the Multi-Tech Systems, Inc. copyright notice) only for use on that computer system. The Licensee
hereby agrees not to provide or otherwise make available any portion of this software in any form to any third party
without the prior express written approval of Multi-Tech Systems, Inc.
Licensee is hereby informed that this Software contains confidential proprietary and valuable trade secrets developed
by or licensed to Multi-Tech Systems, Inc. and agrees that sole ownership shall remain with Multi-Tech Systems, Inc.
The Software is copyrighted. Except as provided herein, the Software and documentation supplied under this
agreement may not be copied, reproduced, published, licensed, sub-licensed, distributed, transferred, or made
available in any form, in whole or in part, to others, without expressed written permission of Multi-Tech Systems, Inc.
Copies of the Software may be made to replace worn or deteriorated copies for archival or backup procedures.
Licensee agrees to implement sufficient security measures to protect Multi-Tech Systems, Inc. proprietary interests and
not to allow the use, copying or transfer by any means, other than in accordance with this agreement. Licensee agrees
that any breach of this agreement will be damaging to Multi-Tech Systems, Inc.
Licensee agrees that all warranties, implied or otherwise, with regard to this Software, including all warranties of
merchantability and fitness for any particular purpose are expressly waived, and no liability shall extend to any
damages, including consequential damages, whether known to Multi-Tech Systems, Inc. It is hereby expressly agreed
that Licensee’s remedy is limited to replacement or refund of the license fee, at the option of Multi-Tech Systems, Inc.,
for defective distribution media. There is no warranty for misused materials.
This package contains a compact disc. Neither this software nor the accompanying documentation may be modified or
translated without the written permission of Multi-Tech Systems, Inc.
This agreement shall be governed by the laws of the State of Minnesota. The terms and conditions of this agreement
shall prevail regardless of the terms of any other submitted by the Licensee. This agreement supersedes any proposal
or prior agreement. Licensee further agrees that this License Agreement is the complete and exclusive statement of
Agreement, oral, written, or any other communications between Multi-Tech Systems, Inc. and Licensee relating to the
subject matter of this agreement. This agreement is not assignable without written permission of an authorized agent of
Multi-Tech Systems, Inc.
Multi-Tech Systems, Inc. MultiVOIP Gatekeeper User Guide 83
Page 84

Chapter 6 – Warranty, Service, and Tech Support
Chapter 6 - Warranty, Service, and Tech
Support
Multi-Tech Systems, Inc. (“MTS”) warrants that its products will be free from defects in material or workmanship for a
period of two years from the date of purchase, or if proof of purchase is not provided, two years from date of shipment.
MTS MAKES NO OTHER WARRANTY, EXPRESSED OR IMPLIED, AND ALL IMPLIED WARRANTIES OF
MERCHANTABILITY AND FITNESS FOR A PARTICULAR PURPOSE ARE HEREBY DISCLAIMED. This warranty
does not apply to any products which have been damaged by lightning storms, water, or power surges or which have
been neglected, altered, abused, used for a purpose other than the one for which they were manufactured, repaired by
the customer or any party without MTS’s written
instructions.
MTS’s entire obligation under this warranty shall be limited (at MTS’s option) to repair or replacem ent of any
products which prove to be defective within the warranty period, or, at MTS’s option, issuance of a refund of the
purchase price. Defective products must be returned by Customer to MTS’s factory—transportation prepaid.
MTS WILL NOT BE LIABLE FOR CONSEQUENTIAL DAMAGES AND UNDER NO CIRCUMSTANCES WILL ITS
LIABILITY EXCEED THE PURCHASE PRICE FOR DEFECTIVE PRODUCTS.
authorization, or used in any manner inconsistent with MTS’s
Repair Procedures for U.S. and Canadian
Customers
In the event that service is required, products may be shipped, freight prepaid, to our Mound s View, Minnesota
factory:
Multi-Tech Systems, Inc.
2205 Woodale Drive
Mounds View, MN 55112
Attn: Repairs, Serial # ________________
A Returned Materials Authorization (RMA) is not required. Return shipping charges (surface) will be paid by
MTS.
Please include, inside the shipping box, a description of the problem, a return shipping add re ss (it must be a
street address, not a P.O. Box number), your telephone number, and if the product is out of warranty, a check or
purchase order for repair charges.
For out-of-warranty repair charges, go to www. multitech.com/documents/warranties
Extended two-year overnight replacement service agreements are available for selected products. Please call
MTS at (888) 288-5470, extension 5308, or visit our web site at www.multitech.com/programs/orc
for details on rates and coverages.
Please direct your questions regarding technical matters, product configuration, verification that the product is
defective, etc., to our Technical Support department at (800) 972-2439 or email
tsupport@multitech.com. Please direct your questions regarding repair expediting, receiving, shipping, billing,
etc., to our Repair Accounting department at (800) 328-9717 or (763) 717-5631, or email
mtsrepair@multitech.com.
Repairs for damages caused by lightning storms, water, power surges, incorrect installation, physical abuse, or
used-caused damages are billed on a time-plus-materials basis.
Multi-Tech Systems, Inc. MultiVOIP Gatekeeper User Guide 84
Page 85

Chapter 6 – Warranty, Service, and Tech Support
Technical Support
Multi-Tech Systems has an excellent staff of technical support personnel available to help you get the most out of
your Multi-Tech product. If you have any questions about the operation of this unit, or experience difficulty during
installation you can contact Tech Support via the following:
Contacting Technical Support
Country By E-mail By telephone
France support@multitech.fr (33) 1-64 61 09
81
India support@
multitechindia.com
U.K. support@
multitech.co.uk
U.S. &
Canada
Rest of
World
tsupport@
multitech.com
support@
multitech.com
(91) 124-340778
(44) 118 959
7774
(800) 972-2439
(763) 785-3500
Internet: http://www.multitech.com/ _forms/email_tech_support.htm
Please have your product information available, including model and serial number.
Regulatory Information
EMC, Safety, and R&TTE Directive Compliance
The CE mark is affixed to this product to confirm compliance with the following European Community Directives:
Council Directive 89/336/EEC of 3 May 1989 on the approximation of the laws of Member States relating to
electromagnetic compatibility,
and
Council Directive 73/23/EEC of 19 February 1973 on the harmonization of the laws of Member States relating to
electrical equipment designed for use within certain voltage limits,
and
Council Directive 1999/5/EC of 9 March 1999 on radio equipment and telecommunications terminal equipment
and the mutual recognition of their conformity.
Multi-Tech Systems, Inc. MultiVOIP Gatekeeper User Guide 85
Page 86

Chapter 6 – Warranty, Service, and Tech Support
FCC Declaration
NOTE: This equipment has been tested and found to comply with the limits for a Class A digital device, pursuant
to Part 15 of the FCC Rules. These limits are designed to provide reasonable protection against harmful
interference when the equipment is operated in a commercial environment. This equipment gene rates, uses and
can radiate radio frequency energy, and if not installed and used in accordance with the inst ructions, may cause
harmful interference to radio communications. Operation of this equipment in a residential area is likely to cause
harmful interference in which case the user will be required to correct the interference at his own expense.
This device complies with Part 15 of the FCC rules.
Operation is subject to the following two conditions:
(1) This device may not cause harmful interference.
(2) This device must accept any inte rf erence that may cause undesired operation.
Warning: Changes or modifications to this unit not expressly approved by the party responsible for complia nce
could void the user’s authority to operate the equipment.
Industry Canada
This Class A digital apparatus meets all requirements of the Canadi an Interference-Causing Equipment
Regulations.
Cet appareil numérique de la classe A
respecte toutes les exigences du
Reglement Canadien sur le matériel brouilleur.
FCC Part 68 Telecom
1. This equipment complies with part 68 of the Federal Communications Commission Rules. On the outside
surface of this equipment is a label that contains, among other information, the FCC registration number.
This information must be provided to the telephone company.
2. As indicated below, the suitable jack (Universal Service Order Code connecting arrangement) for this
equipment is shown. If applicable, the facility interface codes (FIC) and service order codes (SOC) are
shown.
3. An FCC compliant telephone cord and modular plug is provided with this equipment. This equipment is
designed to be connected to the telephone network or premises wiring using a compatible modular jack
that is Part 68 compliant. See installation instructions for details.
4. If this equipment causes harm to the telephone network, the telephone company will notify you in
advance that temporary discontinuance of service may be required. If advance notice is not practical, the
telephone company will notify the customer as soon as possible.
5. The telephone company may make changes in its facilities, equipment, operation, or procedures that
could affect the operation of the equipment. If this happens, the telephone company will provide advance
notice to allow you to make necessary modifications to maintain uninterrupted service.
6. If trouble is experienced with this equipment (the model of which is indicated below), please contact
Multi-Tech Systems, Inc. at the address shown below for details of how to have repairs made. If the
equipment is causing harm to the network, the telephone company may request you to remove the
equipment form t network until the problem is resolved.
7. No repairs are to be made by you. Repairs are to be made only by Multi-Tech Systems or its licensees.
Unauthorized repairs void registration and warranty.
Multi-Tech Systems, Inc. MultiVOIP Gatekeeper User Guide 86
Page 87

Chapter 6 – Warranty, Service, and Tech Support
8. Manufacturer: Multi-Tech Systems, Inc.
Trade name: Gatekeeper
Model number: MVP100GK
FCC registration number: US: AU7DDNAN46050
Modular jack (USOC): RJ-48C
Service center in USA: Multi-Tech Systems, Inc.
2205 Woodale Drive
Mounds View, MN 55112
Tel: (763) 785-3500
FAX: (763) 785-9874
Canadian Limitations Notice
Notice: The Industry Canada label identifies certified equipment. This ce rtification means that the equipment
meets certain telecommunications network protective, operational and safety requirements. The Department does
not guarantee the equipment will operate to the user’s satisfaction.
Before installing this equipment, users should ensure that it is permissible to be connected to the facilities of the
local telecommunications company. The equipment must also be installed using an acceptable method of
connection. The customer should be aware that compliance with the above conditions may not prevent
degradation of service in some situations.
Repairs to certified equipment should be made by an authorized Canadian maintena nce facility designated by the
supplier. Any repairs or alterations made by the user to this equipment, or equipment malfunctions, may give the
telecommunications company cause to request the user to disconnect the equipment.
Users should ensure for their own protection that the electrical ground connections of the power utility, telephon e
lines and internal metallic water pipe system, if present, are connected together. This precaution may be
particularly important in rural areas.
Caution: Users should not attempt to make such connections themselves, but should contact the appropriate
electric inspection authority, or electrician, as appropriate.
Multi-Tech Systems, Inc. MultiVOIP Gatekeeper User Guide 87
Page 88

Index
1
10/100Mb PCI EtherNet NIC ..................................................8
100-120/220-240V...................................................................8
5
50-60 Hz ..................................................................................8
A
Accepts Calls option (General Settings screen) .....................65
accessing Call Details screen................................................. 70
ACF Admission Confirmation messages (H.225).................. 51
Add endpoints command .......................................................68
Additional Phone Numbers field (Call Details, Destination
Info)................................................................................... 73
address translation....................................................................4
address translation messages (H.225)
LCF ................................................................................... 52
LRJ .................................................................................... 52
LRQ................................................................................... 52
admission control..................................................................... 4
admission control messages (H.225)
ACF ................................................................................... 51
ARJ.................................................................................... 51
ARQ ..................................................................................51
DCF ................................................................................... 51
DRQ ..................................................................................51
Alias Giving field (Network Parameters)...............................75
alias giving, description ......................................................... 75
Alias Giving, example ...........................................................81
alias giving, examples............................................................ 75
aliases..................................................................................... 72
All endpoints option (General Settings screen)...................... 64
App. (approved) Bandwidth................................................... 73
App. (approved) Bandwidth field (Call Details, Source Info) 72
ARJ Admission Rejection messages (H.225)......................... 51
ARQ Admission Request messages (H.225).......................... 51
B
bandwidth ........................................................................ 72, 76
bandwidth control .................................................................... 5
bandwidth control messages (H.225)
BCF ...................................................................................52
BRJ.................................................................................... 52
BRQ................................................................................... 52
bandwidth management ........................................................... 5
with gatekeeper.................................................................... 5
bandwidth management, versus control................................... 5
bandwidth usage control .......................................................... 4
bandwidth, requested/approved.............................................. 73
BCF Bandwidth Confirmation messages (H.225) .................... 52
BRJ Bandwidth Rejection messages (H.225) .......................... 52
Index
BRQ Bandwidth Request messages (H.225) ........................... 52
C
call authorization......................................................................5
Call Control PHB field...........................................................55
call control signaling................................................................ 5
Call Details (Destination Info) screen fields
Additional Phone Numbers ...............................................73
App. Bandwidth................................................................. 73
Names................................................................................ 73
Other Aliases
Email............................................................................. 73
Trans. Name.................................................................. 73
URL ..............................................................................73
Phone Numbers .................................................................73
Remote Extension Name ................................................... 73
Remote Extension Phone................................................... 73
Req. Bandwidth................................................................. 73
Call Details (Source Info) screen fields
App. Bandwidth................................................................. 72
Call Signallng IP ...............................................................72
Names................................................................................ 72
Other Aliases
Trans. Name.................................................................. 72
Phone Numbers .................................................................72
Req. Bandwidth................................................................. 72
Call Details button (Current Calls) ........................................ 69
Call Details button Current Calls screen)............................... 69
Call Details gatekeeper (Source Info) screen fields
Other Aliases
Email............................................................................. 72
URL ..............................................................................72
Call Details gatekeeper screen fields
Call No. ............................................................................. 71
Call Details screen fields
Call ID Sum....................................................................... 71
Call Model......................................................................... 71
Cid Sum............................................................................. 71
Conf. (conference)Goal ..................................................... 71
Reason ............................................................................... 71
State................................................................................... 71
Total BW........................................................................... 71
Call Details screen, accessing................................................ 70
Call ID Sum field (Call Details) ............................................71
call IRQ interval ....................................................................77
Call IRQ Interval field (Network Parameters)................. 77, 78
Call Model field (Call Details)...............................................71
Call Models field (Call Details)............................................. 71
call modes.............................................................................. 76
Call No. field (Call Details)................................................... 71
Call Number (Call Details).................................................... 71
Call Proceeding fields (Network Parameters) ........................ 76
call setup................................................................................ 51
Call Signaling IP field (Call Details, Source Info)................. 72
call tear-down ........................................................................51
Canadian Class A requirements ............................................. 86
Multi-Tech Systems, Inc. MultiVOIP Gatekeeper User Guide 88
Page 89

Canadian Limitations Notice (regulatory)..............................87
Cid Sum field (Call Details)...................................................71
COM Port Setup screen .........................................................14
concurrent calls
maximum number.............................................................. 76
concurrent calls supported .....................................................65
Conf. (conference) Goal field (Call Details) .......................... 71
Conf. Goal field (Call Details)............................................... 71
conference media compatibility
H.225................................................................................. 51
Configuration Options field ................................................... 75
Configuration Options field (Network Parameters) ............... 75
Configuration Parameters fields (Network Parameters)... 77, 78
conflicts
COM port ..........................................................................15
Connect TO field (GK General Settings, Q.931 Parameters). 66
contacting technical support...................................................85
Current Bandwidth Usage field..............................................74
Current Bandwidth Usage field (Network Parameters).......... 74
Current Calls fields
Call Details (button) .......................................................... 69
DEST IP ............................................................................69
Disconnect All (button) ..................................................... 69
Disconnect Call (button).................................................... 69
No (number) ...................................................................... 69
ORIG ALIAS ....................................................................69
ORIG IP............................................................................. 69
Currently Registered field...................................................... 74
Currently Registered field (Network Parameters).................. 74
D
DCF Disengagement Confirmation messages (H.225) ............51
Debug Level (General Settings screen).................................. 65
Default button (Memory screen)............................................ 66
Default field (Services, GK Defined).....................................79
Default field (Services, V2 GW Prefixes).............................. 80
defined services...................................................................... 81
Delete endpoints command.................................................... 68
Delete Predefined endpoints command (Del Pre-def)............ 68
Description field (Services, GK Defined).............................. 79
Description field (Services, V2 GW Prefixes) ....................... 80
DEST IP field (Current Calls screen).....................................69
DEST IP field (Current Calls)................................................ 69
DiffServ and IP datagram ......................................................55
DiffServ PHB, Per Hop Behavior, value................................ 55
direct call mode...................................................................... 76
Direct Mode option (Network Parameters)............................ 76
Direct Mode option (Network Parameters, Call Mode) .........76
direct mode, call control signaling........................................... 5
direct-mode calls.................................................................... 71
Disconnect All button (Current Calls screen) ........................ 69
Disconnect All button (Current Calls) ...................................69
Disconnect Call button (Current Calls screen)....................... 69
Disconnect Call button (Current Calls).................................. 69
Disconnect endpoints command
gatekeeper.......................................................................... 68
DNS Server IP Address .........................................................56
DRQ Disengagement Request messages (H.225).................... 51
dynamic endpoint registration................................................ 77
Dynamic field (Services, V2 GW Prefixes)........................... 80
E
Index
e164 aliases............................................................................ 73
EMC, Safety, R&TTE Directive Compliance........................ 85
Enable DNS field................................................................... 56
endpoint types........................................................................ 67
endpoint types,....................................................................... 67
Endpoints fields
Msg.................................................................................... 68
error message
COM port conflict ............................................................. 15
European Community Directives........................................... 85
Existing Endpoints fields
Msg.................................................................................... 68
Existing Endpoints screen commands
Add.................................................................................... 68
Del Pre-def ........................................................................68
Delete ................................................................................68
Disconnect......................................................................... 68
Unregister.......................................................................... 68
Unregister All.................................................................... 68
F
factory repair for customers U.S. & Canada.......................... 84
FCC Declaration .................................................................... 86
FCC Part 68 Telecom rules.................................................... 86
FCC registration number........................................................ 87
FCC rules, Part 15.................................................................. 86
Forward, gatekeeper defined service......................................82
Front Panel............................................................................... 7
FTP Server Enable field......................................................... 56
G
Gatekeeper ............................................................................... 4
gatekeeper bandwidth management......................................... 5
Gatekeeper Basics.................................................................... 4
gatekeeper defined services, built-in
Forward ............................................................................. 82
Zone Prefixes 1 and 2........................................................ 81
gatekeeper functionality......................................................... 27
gatekeeper functions
optional................................................................................ 5
gatekeeper functions, mandatory ............................................. 4
gatekeeper protocols .............................................................. 51
gatekeeper service (user defined), example ........................... 81
Gatekeeper software
program icon location........................................................ 14
gatekeeper software license ................................................... 83
Gateway, IP Parameters, field................................................ 56
gateway-supported services ...................................................80
GK (gatekeeper) General Settings screen .............................. 64
GK (General Settings fields................................................... 66
GK (General Settings screen fields
Debug Level ...................................................................... 65
GK Active option (General Settings screen).......................... 65
GK Defined Service Types .................................................... 81
GK General Settings fields ..............................................64, 65
GK General Settings screen fields
Activity Configuration....................................................... 65
Memory Settings (button).................................................. 65
Registration Policy ............................................................ 64
GK identifier ......................................................................... 78
E.164 phone numbers...............................................................4
Multi-Tech Systems, Inc. MultiVOIP Gatekeeper User Guide 89
Page 90

H
H.225 protocol ....................................................................... 51
H.225 RAS messages............................................................... 5
H.245
conference media compatibility......................................... 51
H.320 .....................................................................................80
H.323 .......................................................................................4
H.323 aliases.............................................................. 72, 73, 80
H.323 protocols...................................................................... 51
I
Industry Canada requirements................................................86
IP Address field .....................................................................56
IP Mask field.......................................................................... 56
IP Parameter fields
Enable DHCP .................................................................... 56
IRQ Information Request messages (H.225)........................... 52
IRQ interval ........................................................................... 77
IRQ Interval field (Network Parameters)............................... 77
IRQ polling ............................................................................ 77
IRR Extend Registration Request messages (H.225)............... 52
L
Index
Network Parameters screen fields
After Overlapped Sending (Call Proceeding option)......... 76
Alias Giving ......................................................................75
Call IRQ Interval.............................................................. 78
Call Proceeding ................................................................. 76
Call to Out-of-Service Supplier......................................... 75
Configuration Parameters.................................................. 78
Current BW Usage ............................................................74
Currently Registered.......................................................... 74
Direct Mode (Call Mode option)....................................... 76
IRQ Interval....................................................................... 77
Max Number of Calls ........................................................ 76
Max Total BW (Kbps)....................................................... 76
Ongoing Calls.................................................................... 74
Registration TO (time-out) ................................................ 76
Remove H.245 Addr in Call Hunt (Line Hunting
Information) .................................................................. 75
Routed Mode (Call Mode option)...................................... 76
Send Immediately (Call Proceeding option)...................... 76
Service Configurable Properties (Line Hunting Information)
...................................................................................... 75
With H.245 Addr (Call Proceeding option)....................... 76
No (number) field (Current Calls screen) ..............................69
No endpoints option (General Settings screen)...................... 64
No. (number) field (Current Calls).........................................69
LCF Location Confirmation messages (H.225)....................... 52
license, gatekeeper software ..................................................83
limitations notice (regulatory), Canadian............................... 87
limited warranty..................................................................... 84
LRJ Location Request Rejection messages (H.225) ................ 52
LRQ Location Request messages (gatekeeper, H.225) .......... 68
LRQ Location Request messages (H.225)............................... 52
M
Max Number of Calls field (Network Parameters) ................76
Max Total BW field (Network Parameters)........................... 76
Maximum Calls field (General Settings, Memory)................ 65
maximum number of concurrent calls.................................... 76
Memory (General Settings) screen fields
GK Memory Values ..........................................................65
Maximum Calls ................................................................. 65
Maximum Registrations ....................................................65
Q.931 Parameters ..............................................................66
RAS Parameters ................................................................66
RAS Port ...........................................................................66
Response TO (time-out, RAS)........................................... 66
Memory secondary screen .....................................................65
Memory Settings button (General Settings screen)................ 65
MultiVOIP 200 ........................................................................ 4
MultiVOIP GateKeeper ........................................................... 4
MVPGK1................................................................................. 4
N
Name field .............................................................................68
Name field (Existing Endpoints)............................................ 68
Names field (Call Details, Destination Info).......................... 73
Names field (Call Details, Source Info)................................. 72
neighboring zones .................................................................... 5
Network Parameters (gatekeeper) screen fields
Configuration Parameters.................................................. 77
Network Parameters screen
Update button.................................................................. 78
O
Ongoing Calls field................................................................ 74
Ongoing Calls field (Network Parameters)............................ 74
Online field............................................................................ 67
Online field (Existing Endpoints) .......................................... 67
ORIG ALIAS field (Current Calls screen)............................. 69
ORIG ALIAS field (Current Calls)........................................ 69
ORIG IP field (Current Calls screen)..................................... 69
ORIG IP field (Current Calls)................................................ 69
Other Aliases
Email field (Call Details, Destination Info)....................... 73
Email field (Call Details, Source Info).............................. 72
Trans (transport) Name field (Call Details, Source Info) .. 72
Trans Name field (Call Details, Source Info).................... 72
Trans. (transport) Name field (Call Details, Destination
Info) ..............................................................................73
URL field (Call Details, Destination Info) ........................ 73
URL field (Call Details, Source Info)................................ 72
Other Aliases field ................................................................. 68
Other Aliases field (Existing Endpoints) ...............................68
overall system administration .................................................. 4
P
packet priority and DiffServ .................................................. 55
Phone field............................................................................. 68
Phone field (Existing Endpoints ............................................68
Phone Numbers field (Call Details, Destination Info) ........... 73
Phone Numbers field (Call Details, Source Info)................... 72
polling, IRQ ........................................................................... 77
PreDef field............................................................................ 67
PreDef field (Existing Endpoints).......................................... 67
Predefined endpoints option (General Settings screen).......... 64
Prefix field (Services, GK Defined)....................................... 79
Prefix field (Services, V2 GW Prefixes)................................ 80
prefixes ..................................................................................80
pregranted ARQ permissions................................................. 75
protocols
Multi-Tech Systems, Inc. MultiVOIP Gatekeeper User Guide 90
Page 91

gatekeeper.......................................................................... 51
Public field (Services, GK Defined) ...................................... 79
Public field (Services, V2 GW Prefixes) ............................... 80
Q
Q.931 Parameters fields
Connect TO (time-out) ...................................................... 66
Q.931 Signaling Port ......................................................... 66
Response TO (time-out) .................................................... 66
Q.931 Signaling Port field (Memory screen) ......................... 66
R
Rack Installation ...................................................................... 9
RAS (H.323) vs TCP/IP RAS................................................. 51
RAS Parameters fields Memory screen)................................ 66
RAS Port field Memory screen).............................................66
RCF messages........................................................................ 75
RCF Registration Confirmation messages (H.225).................. 52
Reason field (Call Details)..................................................... 71
registration ............................................................................. 67
timeout............................................................................... 76
registration control messages (H.225)
IRQ (Information Request)................................................ 52
IRR (Extend Registration Request) ................................... 52
RCF (Registration Confirmation)...................................... 52
RRJ (Registration Rejection)............................................. 52
RRQ (Registration Request).............................................. 52
URQ (Unregister Request) ................................................ 52
registration description........................................................... 67
Registration IP field............................................................... 68
Registration IP field (Existing Endpoints) ............................. 68
registration of endpoints dynamic.......................................... 77
Registration Policy field (General Settings screen)................64
Registration TO (time-out) field (Network Parameters) .......76
Registration TO (time-out) field (Network Parameters.......... 76
registration with gatekeeper................................................... 67
Remote Extension Name field (Call Details, Destination Info)
........................................................................................... 73
Remote Extension Phone field (Call Details, Destination Info)
........................................................................................... 73
Remove H.245 Addr in Call Hunt field (Network Parameters)
........................................................................................... 75
repair procedures for customers U.S. & Canada .................... 84
Req. (requested) Bandwidth............................................. 72, 73
Response TO field (GK General Settings, Q.931 Parameters)
........................................................................................... 66
Response TO field (GK General Settings, RAS Parameters). 66
routed call mode..................................................................... 76
routed mode (call control signaling) ........................................ 5
Routed Mode option (Network Parameters) .......................... 76
Routed Mode option (Network Parameters, Call Mode)........76
routed-mode calls................................................................... 71
RRJ Registration Rejection messages (H.225) ........................52
RRQ messages ....................................................................... 75
RRQ Registration Request messages (H.225) ...................52, 68
Index
Send Immediately option (Network Parameters, Call
Proceeding)........................................................................ 76
Service Configurable Properties field (Network Parameters) 75
Services screen....................................................................... 79
Services screen fields
Default (GK Defined Services) .........................................79
Default (Services, V2 GW Prefixes)..................................80
Description (GK Defined Services)................................... 79
Description (Services, V2 GW Prefixes)........................... 80
Dynamic (Services, V2 GW Prefixes)............................... 80
Prefix (GK Defined Services)............................................ 79
Prefix (Services, V2 GW Prefixes).................................... 80
Public (GK Defined Services) ........................................... 79
Public (Services, V2 GW Prefixes) ................................... 80
V2 GW Prefixes ................................................................ 80
software license, gatekeeper ..................................................83
software loading..................................................................... 12
software version numbers ...................................................... 13
State field (Call Details).........................................................71
Status Information fields........................................................ 74
Status Information fields (Network Parameters).................... 74
support, technical................................................................... 85
T
technical support.................................................................... 85
Time To Live (TTL) timer field............................................. 68
TimeToLive (RCF message)
details about....................................................................... 52
Total BW field (Call Details)................................................. 71
total network usage control...................................................... 4
transport name alias ......................................................... 72, 73
TTL........................................................................................ 68
Type field............................................................................... 67
Type field (Existing Endpoints)............................................. 67
Type-of-Service IP header Field & DiffServ......................... 55
U
Unpacking.............................................................................. 10
Unregister All endpoints command .......................................68
Unregister endpoints command ............................................. 68
URQ Unregister Request messages (H.225)...................... 52, 68
V
V2 GW Prefixes fields........................................................... 80
version numbers..................................................................... 13
VOIP, example network.........................................................29
W
warranty................................................................................. 84
With H.245 Addr option (Network Parameters) .................... 76
With H.245 Addr option (Network Parameters, Call
Proceeding)........................................................................ 76
S
Safety....................................................................................... 9
security policies .......................................................................4
Send Immediately option (Network Parameters) ................... 76
Multi-Tech Systems, Inc. MultiVOIP Gatekeeper User Guide 91
Z
zone management ....................................................................5
Zone Prefixes 1& 2 gatekeeper defined services ...................81
zone prefixes, example........................................................... 82
zones ........................................................................................ 5
zones, definition..................................................................... 27
 Loading...