

Page 1

MultiVOIP® GSM
SIP-to-Cellular Gateways
Model: MVPGSM-2
User Guide
Page 2

User Guide
S000450A
Wireless MultiVOIP GSM Unit (Model: MVPGSM-2)
This publication may not be reproduced, in whole or in part, without prior expressed written permission from
Multi-Tech Systems, Inc. All rights reserved.
Copyright © 2008, by Multi-Tech Systems, Inc.
Multi-Tech Systems, Inc. makes no representations or warranty with respect to the contents hereof and
specifically disclaims any implied warranties of merchantability or fitness for any particular purpose.
Furthermore, Multi-Tech Systems, Inc. reserves the right to revise this publication and to make changes from
time to time in the content hereof without obligation of Multi-Tech Systems, Inc. to notify any person or
organization of such revisions or changes. Check Multi-Tech’s Web site for current versions of our product
documentation.
Record of Revisions
Revision Date Description
A 10/27/08 Initial release.
Patents
This Product is covered by one or more of the following U.S. Patent Numbers: 6219708, 6151333, 5757801,
5682386, 5.301.274; 5.309.562; 5.355.365; 5.355.653; 5.452.289; 5.453.986. Other Patents Pending.
Trademark
Registered trademarks of Multi-Tech Systems, Inc. are MultiVOIP GSM, Multi-Tech, and the Multi-Tech logo.
Windows is a registered trademark of Microsoft.
World Headquarters
Multi-Tech Systems, Inc.
2205 Woodale Drive
Mounds View, Minnesota 55112
Phone: 763-785-3500 or 800-328-9717
Fax: 763-785-9874
http://www.multitech.com
Technical Support
Country By Email By Phone
Europe, Middle East, Africa: support@multitech.co.uk (44) 118 959 7774
U.S., Canada, all others: support@multitech.com
(800) 972-2439 or (763) 717-5863
Warranty
Warranty information for this product can be found on the Multi-Tech Systems website at: www.multitech.com
Multi-Tech Systems, Inc. MVPGSM 2
Page 3

CONTENTS
CHAPTER 1 – DESCRIPTION AND SPECIFICATIONS ..................................................................................................... 4
Introduction .......................................................................................................................................................... 4
Specifi
cations ........................................................................................................................................................ 5
C
HAPTER 2 – INSTALLATION AND ACTIVATION ......................................................................................................... 7
Introduction .......................................................................................................................................................... 7
Safety Warni
cking Your MultiVOIP GSM ........................................................................................................................... 7
Unpa
Mounting
Cabling Proce
GS
M Instructions ................................................................................................................................................. 10
HAPTER 3 – SOFTWARE INSTALLATION ............................................................................................................... 11
C
Introduction ........................................................................................................................................................ 11
Loading
Overview ................................................................................................................................................... 14
Setup
HAPTER 4 – CONFIGURING YOUR MULTIVOIP GSM ............................................................................................ 24
C
Introduction ........................................................................................................................................................ 24
Software Categories Covered in
How to Navig
Web Browser Interface
ngs .................................................................................................................................................... 7
Instructions ......................................................................................................... .................................. 8
dure ................................................................................................................................................. 9
MultiVOIP GSM Software onto the PC .................................................................................................. 11
This Chapter .................................................................................................... 24
ate Through the Software ............................................................................................................. 25
....................................................................................................................................... 25
C
HAPTER 5 – PHONE BOOK CONFIGURATION ........................................................................................................ 52
Introduction ........................................................................................................................................................ 52
Sample
Phone Book
HAPTER 6 – USING THE SOFTWARE ................................................................................................................... 64
C
Configurations ........................................................................................................................................ 53
Descriptions .................................................................................................................................... 56
Introduction ........................................................................................................................................................ 64
Software Categories Covered in
Statisti
Mul
FTP Server
Web Browser Interface
SysLog Server Fun
A
A
A
A
cs Section.................................................................................................................................................. 66
tiVOIP GSM Program Menu Items ................................................................................................................ 76
File Transfers (“Downloads”) ............................................................................................................ 81
....................................................................................................................................... 85
ctions ...................................................................................................................................... 88
PPENDIX A – CABLE PIN-OUTS & PORTS ............................................................................................................ 89
PPENDIX B – REGULATORY INFORMATION .......................................................................................................... 90
PPENDIX C – WASTE ELECTRICAL AND ELECTRONIC EQUIPMENT (WEEE) STATEMENT .................................................. 92
PPENDIX D – C-ROHS HT/TS SUBSTANCE CONCENTRATION .................................................................................. 93
This Chapter .................................................................................................... 64
INDEX ......................................................................................................................................................... 94
Multi-Tech Systems, Inc. MVPGSM 3
Page 4
Chapter 1 – Description and Specifications
Introduction
The MultiVOIP GSM provides wireless voice communications over the Internet or an Intranet. By integrating
wireless connectivity into your existing data network, you can realize substantial savings on inter-office long
distance toll charges. The MVPGSM has “phone books,” which are directories set up to simulate dialing and
connecting as though the call was in the local area.
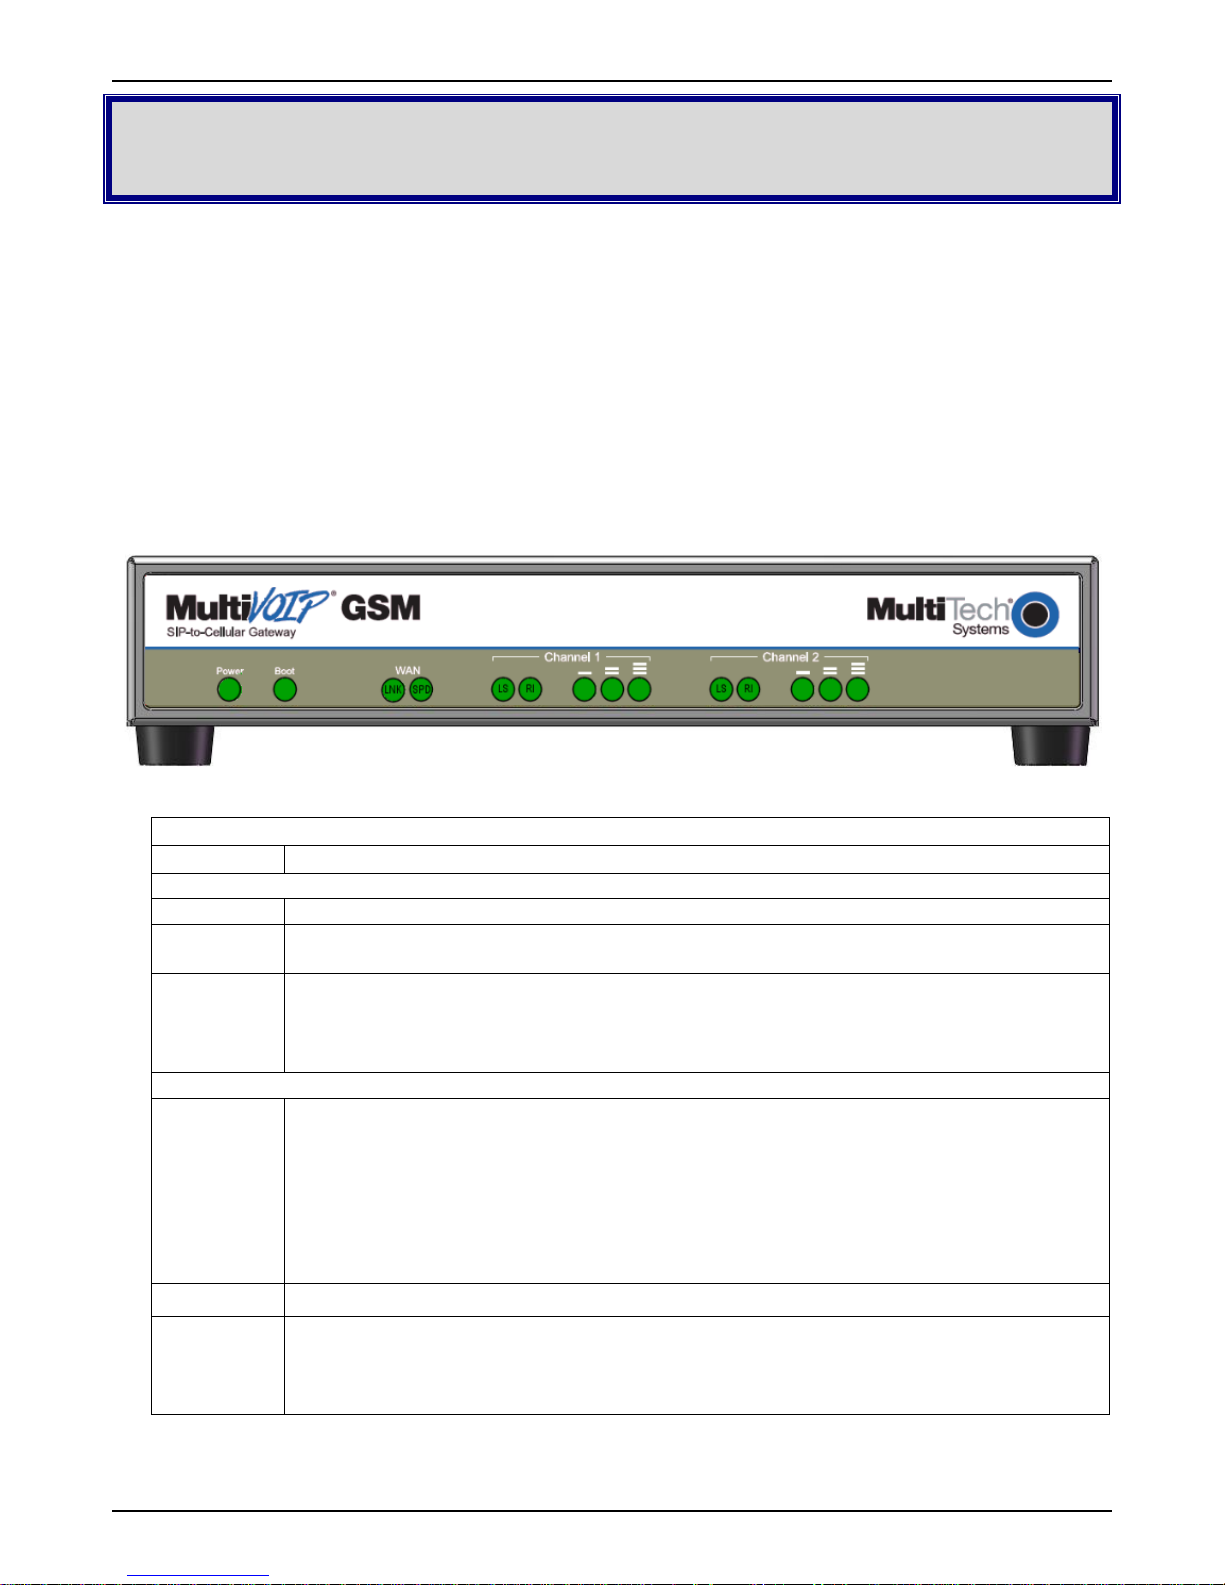
Front Panel LEDs
LED Types. The MVPGSM has two types of LEDs on the front panel:
(1) general operation LED indicators (for power, booting, and Ethernet functions), and
(2) channel operation LED indicators that describe the voice traffic and performance for each channel.
MVPGSM LEDs
Front Panel LED Definitions
LED Description
General Operation LEDs
Power Indicates presence of power
Boot
WAN
LS
RI
Signal
Strength
Bars (0-3)
After power up, the Boot LED will be on briefly while the MultiVOIP GSM is booting. It lights
whenever the MultiVOIP GSM is booting, saving a configuration or receiving a firmware upgrade.
LNK. Link/Activity LED. This LED is lit if Ethernet connection has been made. It is off when the link
is down (i.e., when no Ethernet connection exists). While the link is up, this LED will flash off to
indicate activity.
SPD. Speed indicator LED: this is lit when link speed is 100MB/s and off when it is 10MB/s.
Channel-Operation LEDs (one set for each channel)
Line Status.
• Continuous “on” state indicates that the channel is connected.
• Flashing states:
• 600 ms on / 600 ms off – searching for network, no SIM card or authentication in progress
• 75 ms on / 3000 ms off – IDLE mode; registered on network but no call in progress
• 75 ms on / 75 ms off / 75 ms on / 3000 ms off – GPRS PDP contexts activated
• Off state. Channel is off (not ready) or in sleep mode.
Ring Indicator. This LED will light when an incoming Ring Signal is detected.
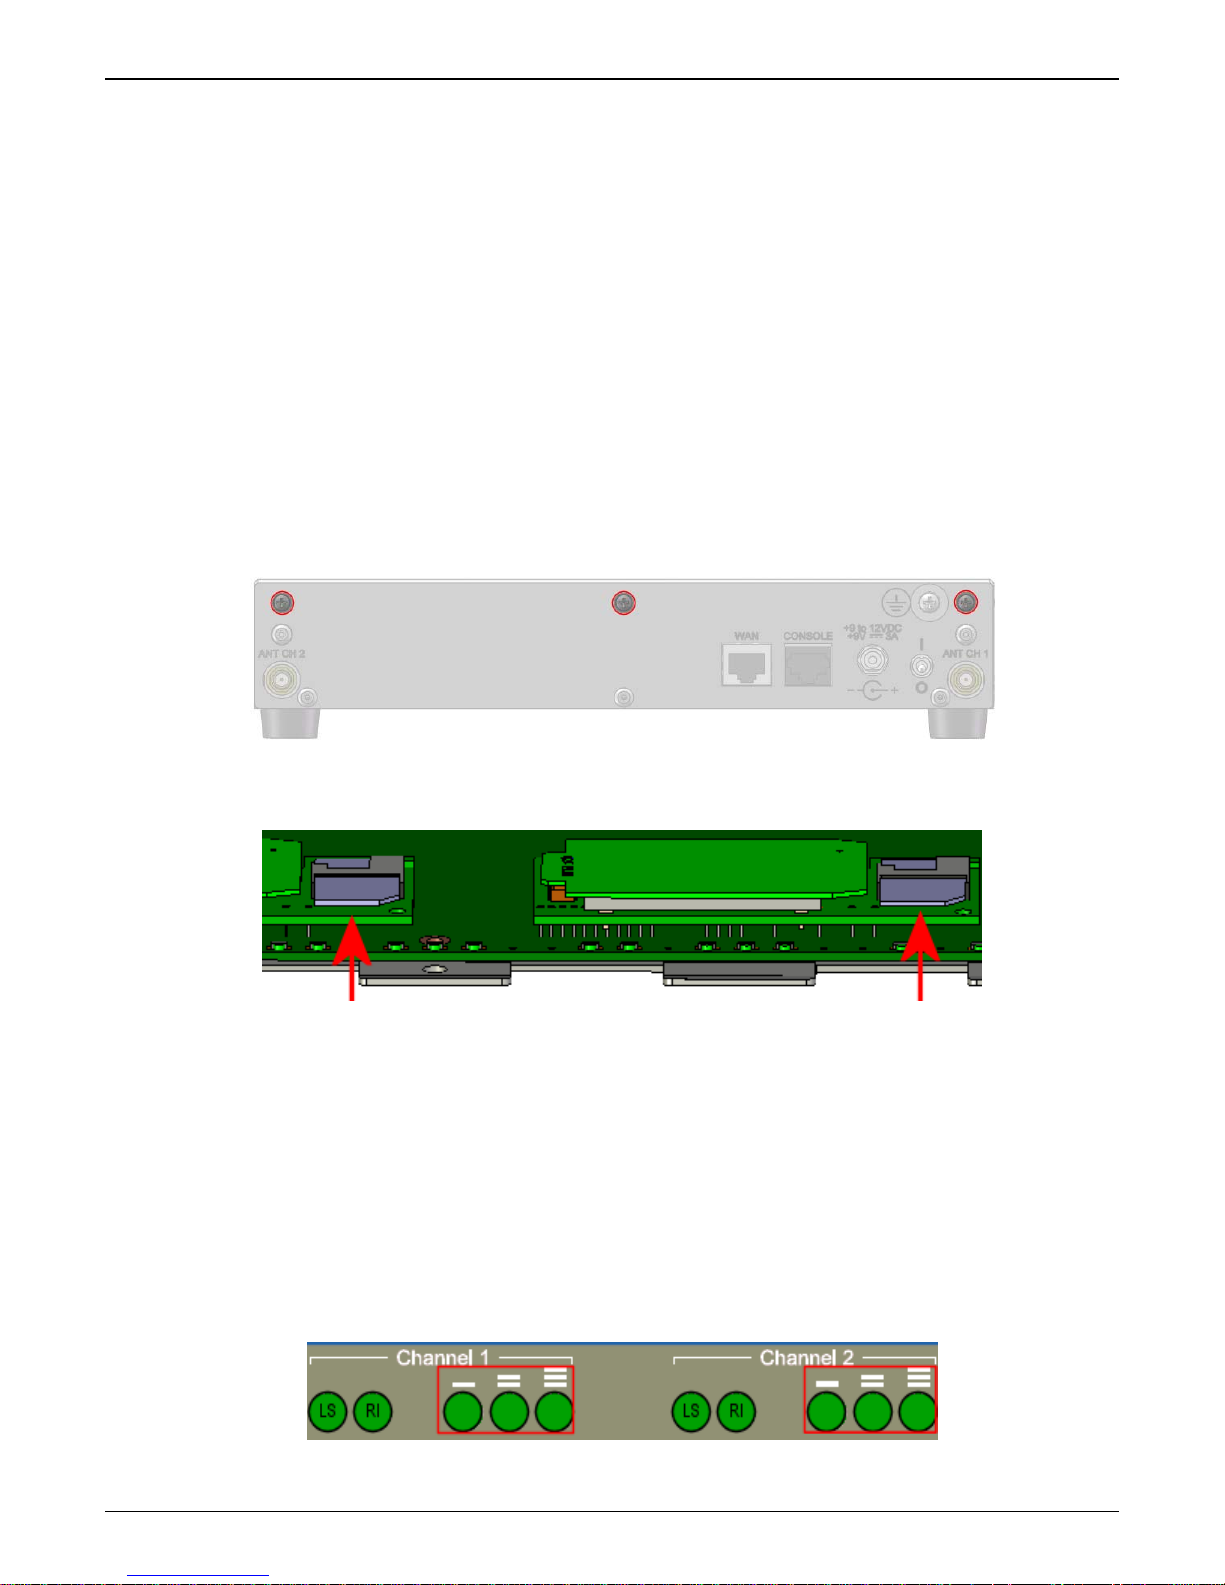
There are three LEDs for each channel. If no LEDs are lit, there is not enough signal strength to
maintain the wireless connection reliably. If at least one LED is lit, there is enough signal to
maintain connection with Low signal strength. If the left two LEDs are lit, a Medium signal strength
is present. If all three LEDs are lit, a High signal strength is present.
Multi-Tech Systems, Inc. MVPGSM 4
Page 5

Chapter 1: Description & Specifications
Computer Requirements
The computer on which the MVPGSM configuration program is installed must meet these requirements:
• must be IBM-compatible PC with MS Windows operating system;
• must have an available COM port for connection to the MultiVOIP GSM.
However, this PC does not need to be connected to the MultiVOIP GSM permanently. It only needs to be
connected when local configuration and monitoring are done. Nearly all configuration and monitoring
functions can be done remotely via the IP network using a web browser.
Specifications
MVPGSM-2
+9 to 12Vdc
Operating Voltage/Current
Mains Frequencies 50 - 60 Hz
Power Consumption 14 watts
Mechanical Dimensions
Weight 4.75 lbs (2.14 kg)
Operational Temperature
Certifications
(9Vdc @ 750mA)
(12Vdc @ 580mA)
1.71” H x (2.1” with feet attached)
9.792” W x
7.646” D
----------------
4.343 cm H x (5.334 cm with feet attached)
24.871 cm W x
19.42 cm D
-5° to +55° C (UL listed @ 40° C limited by power supply)
@ 20-90% non-condensing relative humidity.
CE
EMC:
FCC Parts 2/15/22/24, RSS 132/133, EN 310 489-7, EN 55022,
EN 55024
Safety:
UL 60950, cUL, EN 60950, AS/NZS 60950:2000
Antenna Specifications
GSM/EGSM Antenna Requirements/Specifications
Frequency Range: 824 – 960 MHz / 1710 – 1990 MHz
Impedance: 50 Ohms
VSWR: <2.0:1
Typical Radiated Gain: 3 dBi on azimuth plane
Radiation: Omni
Polarization: Vertical
Wave: Half Wave Dipole
Antennas available from Multi-Tech Systems, Inc.
Description Part Number
900/1800 MHz 1/2 Wave Antenna Mag Mount, 12.5", 1 Pack ANF1-1MMHW
850/1900 MHz 1/2 Wave Antenna Mag Mount, 12.5", 1 Pack ANF2-1MMHW
Multi-Tech Systems, Inc. MVPGSM 5
Page 6

Chapter 1: Description & Specifications
PTCRB Requirements Note
There cannot be any alteration to the authorized antenna system. The antenna system must be the same type
with similar in-band and out-of-ban radiation patterns and maintain the same specifications.
FCC Requirements Note
The antenna gain, including cable loss, must not exceed 3.0 dBi at 1900 MHz / 1.6 dBi at 850 MHz for mobile
operating configurations and 7.0 dBi at 1900 MHz / 2.3 dBi at 850 MHz for fixed mounted operations, as
defined in 2.1091 and 1.1307 of the rules for satisfying RF exposure compliance.
Load Balancing
The MVPGSM uses round robin load balancing to ensure that one or more SIMs are not used excessively while
others go largely ignored during times of light traffic. The channels are treated as a list and once a channel is
used, it goes to the bottom of the list and the next channel comes to the top of the list and is ready for use. In
the case of a MVPGSM-2, once channel 1 has been used, the next call will be routed through channel 2, then
back to channel 1, and so on. When Hunting is enabled, load balancing is done automatically.
Multi-Tech Systems, Inc. MVPGSM 6
Page 7

Chapter 2 – Installation and Activation
Introduction
The MultiVOIP GSM is equally usable as tabletop unit or mounted in a location with good reception. The initial
setup is best performed before any mounting is done.
Safety Warnings
Lithium Battery Caution
A lithium battery on the voice/fax channel board provides backup power for the timekeeping capability. The
battery has an estimated life expectancy of ten years. When the battery starts to weaken, the date and time
may be incorrect. If the battery fails, the board must be sent back to Multi-Tech Systems for replacement.
Warning: There is danger of explosion if the battery is incorrectly replaced.
General Safety
The MultiVOIP GSM is designed for, and intended to be used in fixed applications. “Fixed” means that the device
is physically secured at one location and is not able to be easily moved to another location.
Caution: A separation distance of at least 20 cm (8 inches) is normally maintained between the transmitter’s
antenna and the body of the user or nearby persons. The MVPGSM is not designed for or intended to
be used in portable applications within 20 cm. (8 inches) of the body of the user.
RF Interference Issues
It is important to follow any special regulations regarding the use of radio equipment due in particular to the
possibility of radio frequency (RF) interference. Please follow the safety advice given below carefully.
• Switch OFF your MVPGSM in hospitals and any other place where medical equipment may be in use.
• Respect restrictions on the use of radio equipment in fuel depots, chemical plants or where blasting
operations are in progress.
• There may be a hazard associated with the operation of your MVPGSM close to inadequately protected
personal medical devices such as hearing aids and pacemakers. Consult the manufacturers of the
medical device to determine if it is adequately protected.
Operation of your MVPGSM close to other electronic equipment may also cause interference if the equipment is
inadequately protected. Observe any warning signs and manufacturers’ recommendations.
Unpacking Your MultiVOIP GSM
When unpacking your MultiVOIP GSM, check to see that all of the items are included in the box. If any box
contents are missing, contact Multi-Tech Tech Support at 1-800-972-2439.
MVPGSM-2 model content list:
• MVPGSM-2
• DB9 to RJ45 cable
• Power transformer
• Power cord
• Printed Cabling Guide
• Product CD
• Antenna (2)
Multi-Tech Systems, Inc. MVPGSM 7
Page 8
Chapter 2: Installation & Activation
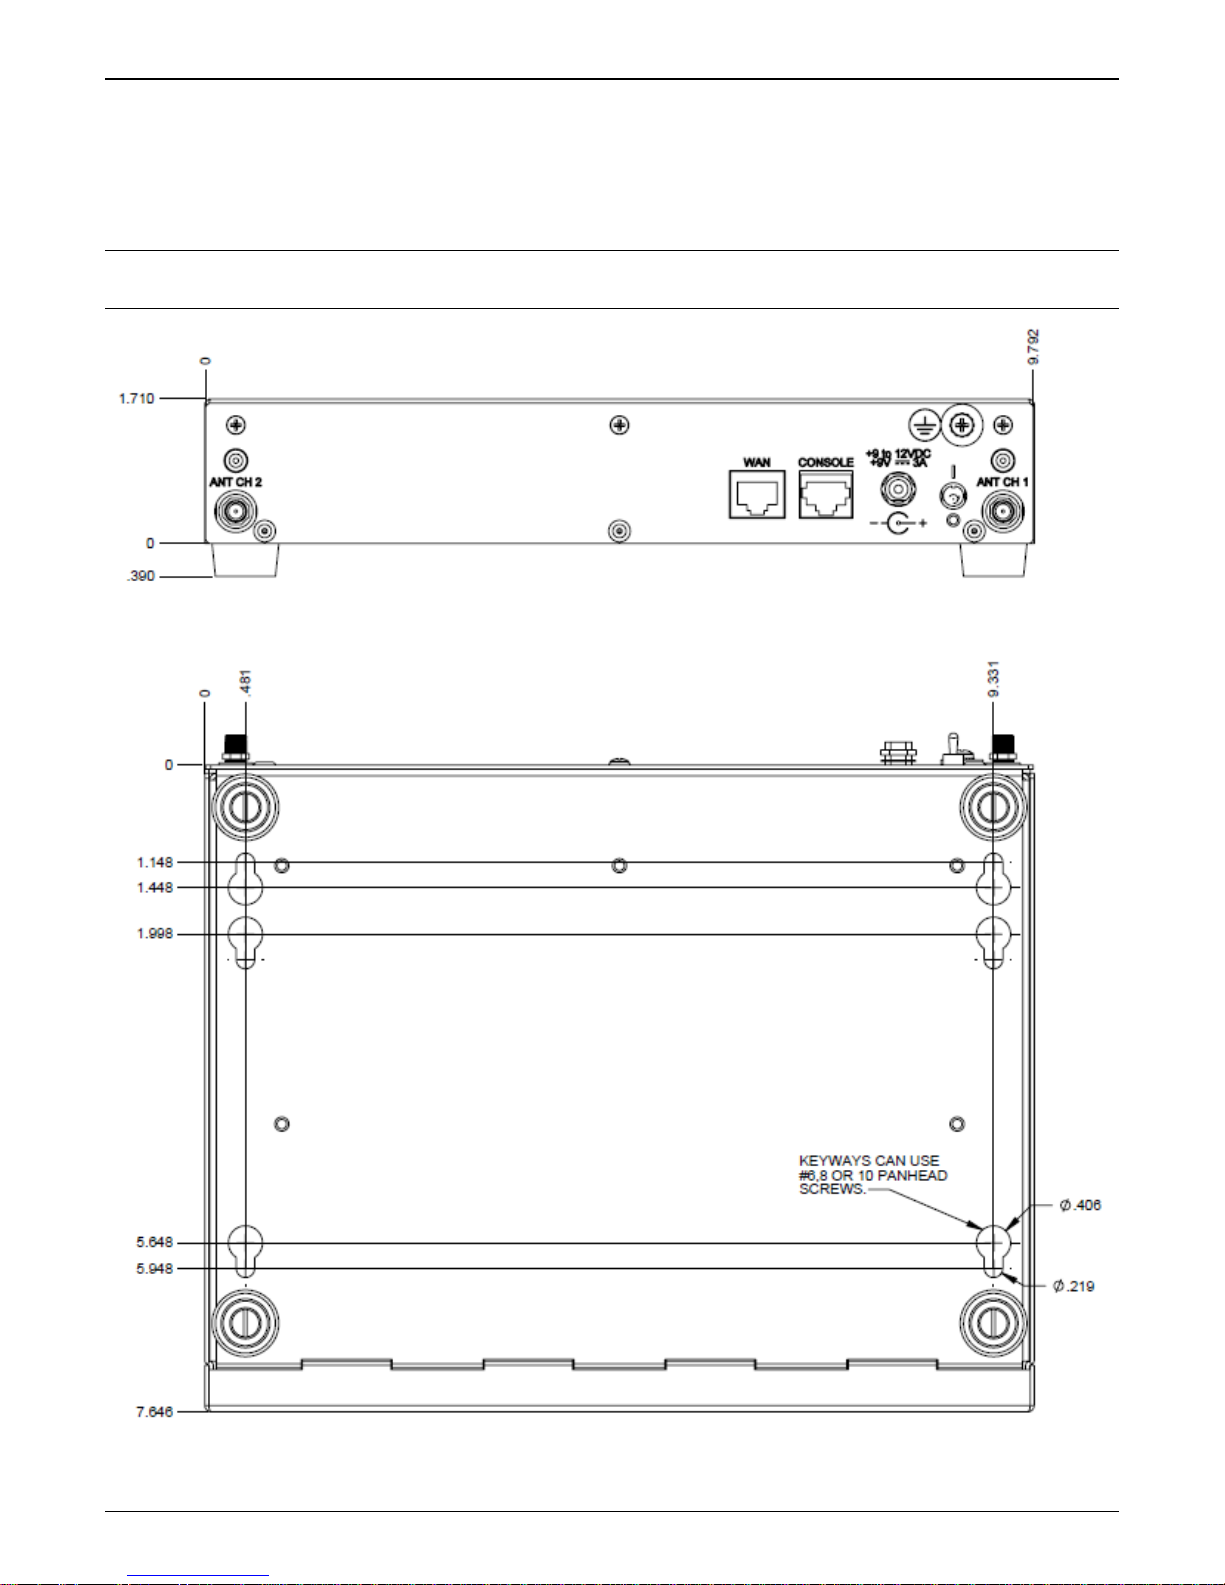
Mounting Instructions
When not used as a tabletop device, the bottom panel of the MVPGSM has six keyed slots for versatility of
mounting. The dimensions (in inches) provided below allow for placement nearly anywhere.
Caution: Please make sure your signal strength is adequate for the planned site of mounting before actually
finalizing placement. Verifying signal strength procedures can be found in the Setup Overview section.
Multi-Tech Systems, Inc. MVPGSM 8
Dimensions for Mounting
Page 9
Chapter 2: Installation & Activation
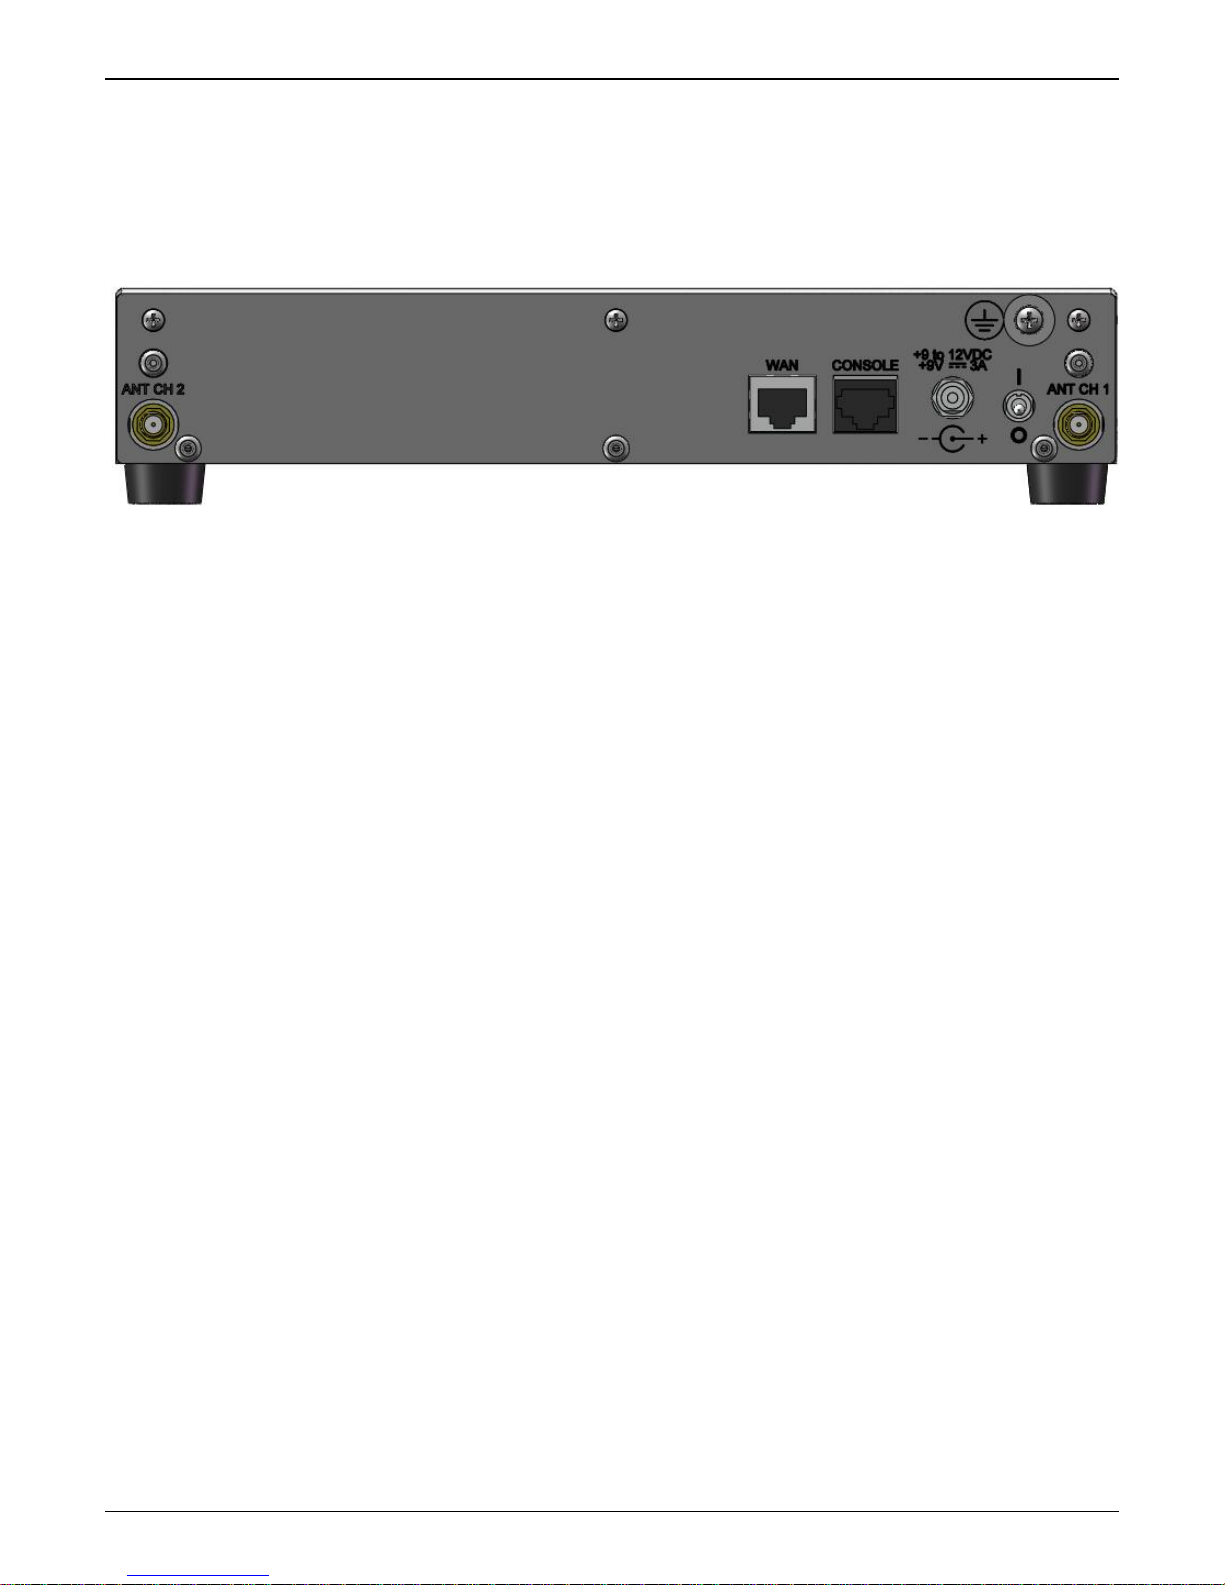
Cabling Procedure
Cabling involves connecting the MultiVOIP GSM to your LAN and telephone equipment.
1. Connect a power cord to the transformer and to a live AC outlet, and then attach the barrel connector
to the back of the MultiVOIP GSM as shown in the figure below.
Cabling for MVPGSM-2
2. Connect the MultiVOIP GSM to a PC by using a RJ-45 (male) to DB-9 (female) cable. Plug the RJ-45 end of
the cable into the CONSOLE port of the MultiVOIP GSM and the other end into the PC serial port.
3. Connect a network cable to the WAN connector on the back of the MultiVOIP GSM. Connect the other
end of the cable to your network.
4. Attach an antenna to both channel connectors on either side of the MultiVOIP GSM.
5. Turn on power to the MultiVOIP GSM by placing the ON/OFF switch on the back panel to the ON
position. Wait for the BOOT LED on the MultiVOIP GSM to go off before proceeding. This may take a few
moments.
6. Proceed to the Software Installation chapter to load the MultiVOIP GSM software.
Multi-Tech Systems, Inc. MVPGSM 9
Page 10
Chapter 2: Installation & Activation
GSM Instructions
Step 1 – Activate Your Wireless Account
Select a wireless network provider and follow their directions to activate your account and receive your SIM
cards.
Phone Numbers
Every channe
by your wireless service provider or it may be on the SIM card or both. Wireless provider
implementations may vary.
Step 2 – Installing the SIM Cards
The MVPGSM requires the power supply connection to begin operation. It also requires a SIM card (Subscriber
Identity Module) to operate on a GSM network. To install the modem, do the following:
1. Turn the unit off and disconnect the power cord. Remove the three highlighted screws from the back as
shown below.
l will have its own unique phone number. The phone number may simply be given to you
2. Slide the cover forward and up to remove it.
3. Insert the SIM cards into the units at the front of the MVPGSM.
4. Verify that the SIM cards fit into their holders properly and then replace the cover. Attach the power cord.
Step 3 – Check Signal Strength
Turn the unit on and verify that the Power LED is lit and that the Boot sequence is finished (Boot LED is no
longer active), then wait for the Link Status (LS) LED to show that the MVPGSM channel is registered on the
wireless network (flashing 75 ms on and 3 seconds off). Once registered, the Signal Strength LEDs should be
referenced for the strength of signal in its current location.
Caution: Before final placement or mounting, ensure that the wireless signal strength is strong enough for the
chosen area. If no LEDs are lit, there is insufficient signal strength for proper operation. If one or
more are lit, then there is good signal strength and operation will not be impaired. Finding a location
with the strongest signal strength is desirable.
Multi-Tech Systems, Inc. MVPGSM 10
Page 11
Chapter 3 – Software Installation
Introduction
Configuring software for your MultiVOIP GSM entails three tasks:
Loading the software onto the PC (this is “Software Installation” and is discussed in this chapter).
Setting values for telephony and IP parameters that will fit your system (details are in Chapter 4).
Establishing “phonebooks” that contain the various dialing patterns for VOIP calls made to different locations (a
detailed discussion of this is found in Chapter 5).
Loading MultiVOIP GSM Software onto the PC
The software loading procedure does not present every screen or option in the loading process. It is assumed
that someone with a thorough knowledge of Windows and the software loading process is performing the
installation.
1. Be sure that your MultiVOIP GSM has been properly cabled and that the power is turned on.
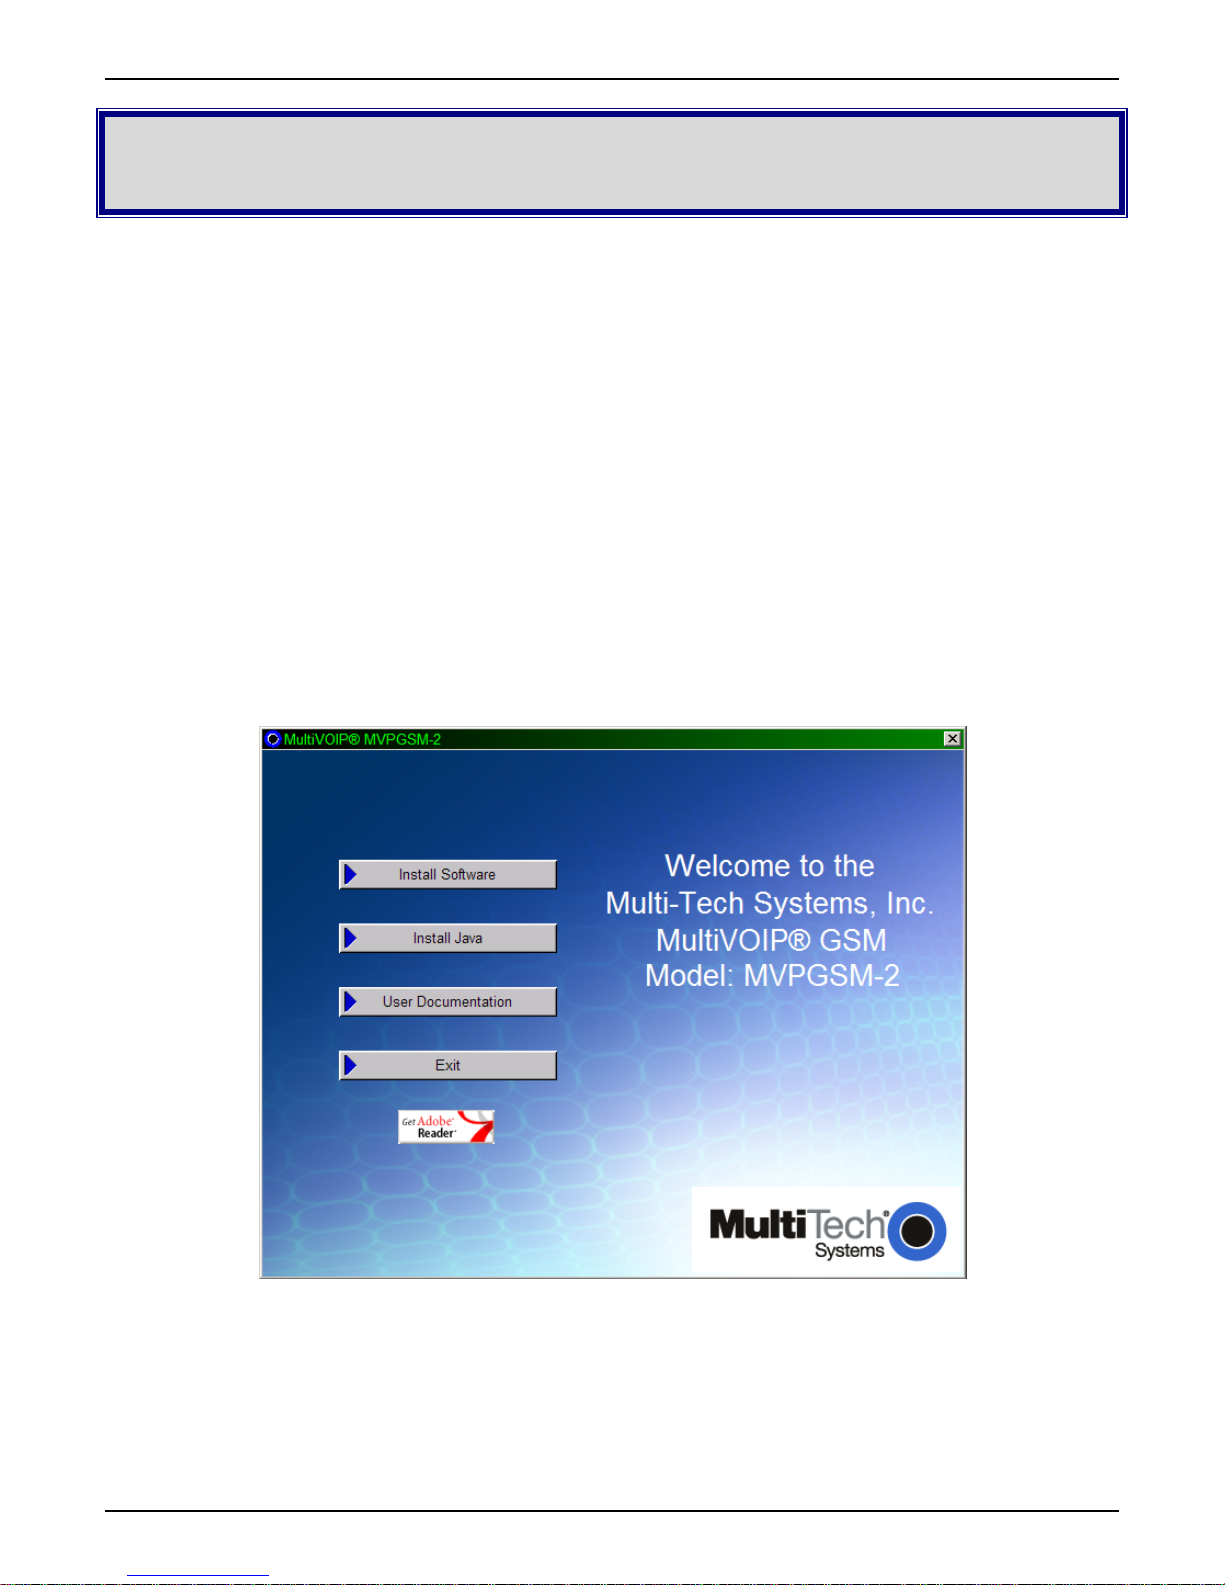
2. Insert the MultiVOIP GSM CD into your CD-ROM drive. The CD starts automatically. It may take a few
moments for the Multi-Tech CD installation window to display.
3. When the Multi-Tech Installation CD dialog box appears, click the Install Software icon.
Multi-Tech Systems, Inc. MVPGSM 11
MVPGSM splash screen
Page 12
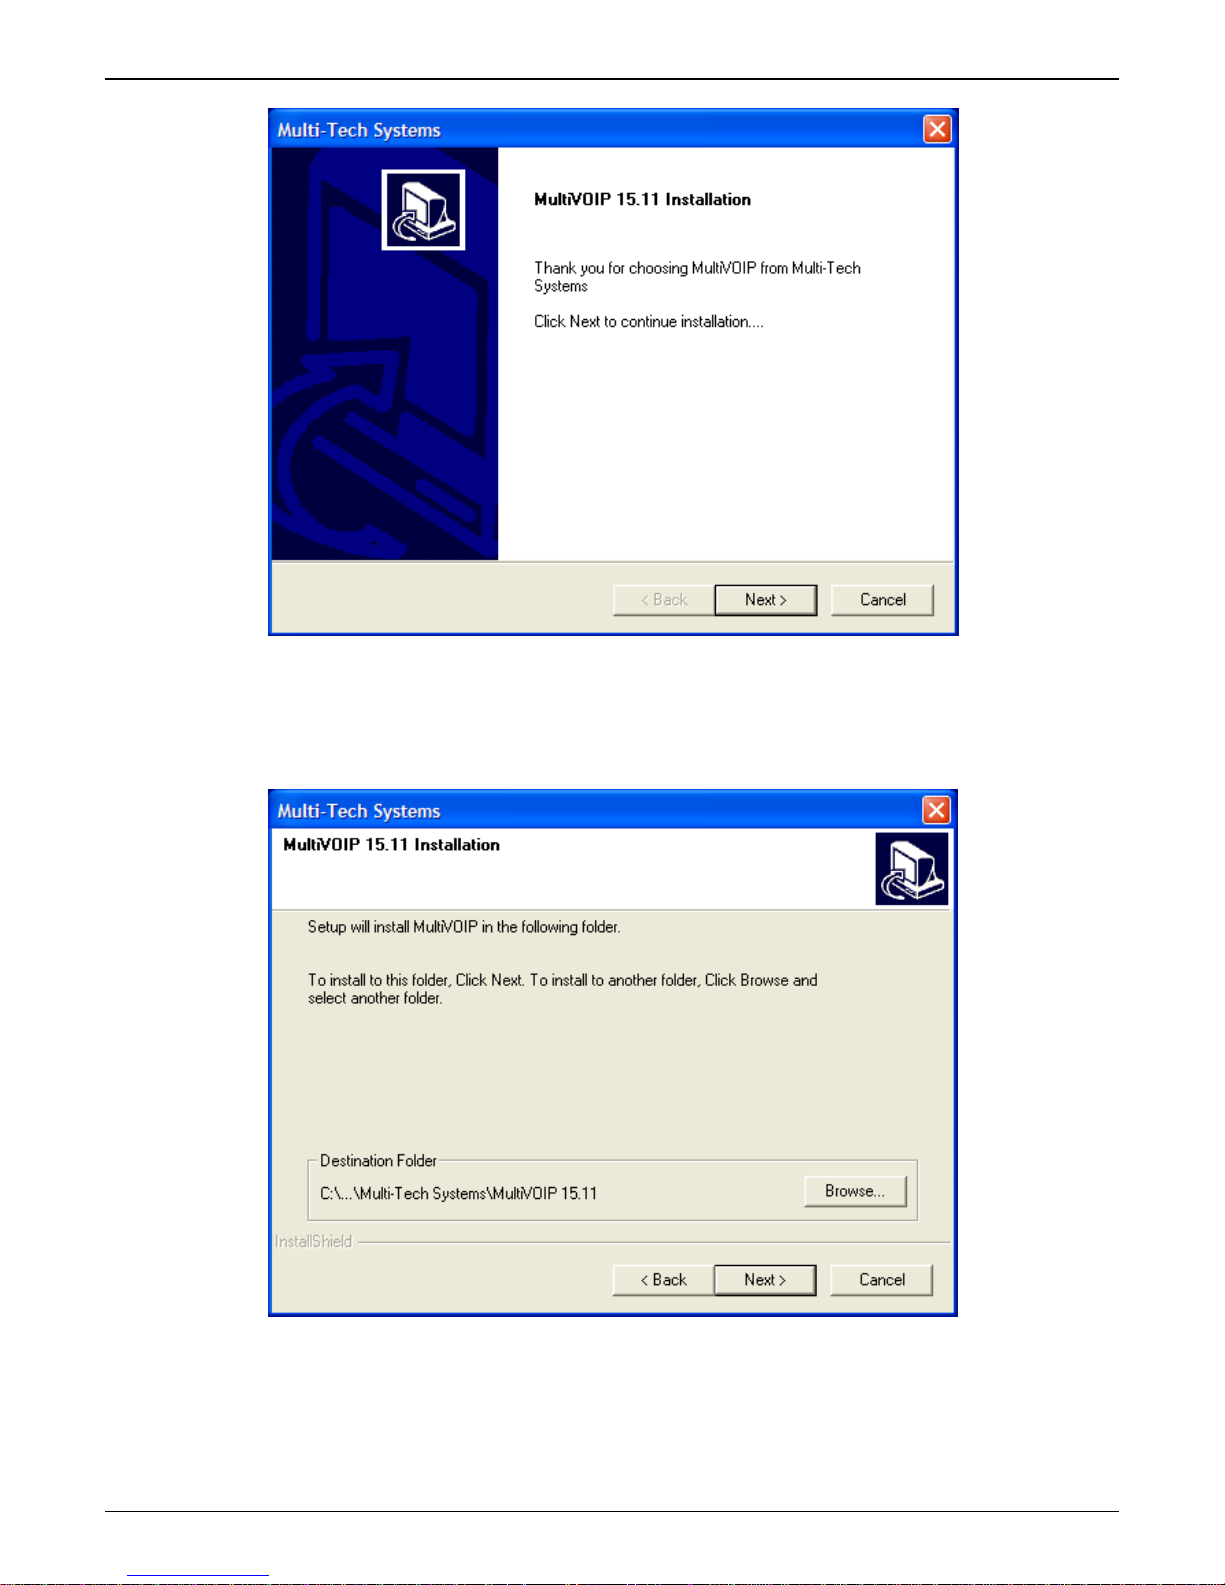
Installation wizard screen
Chapter 3: Software Installation
Press Enter or click Next to continue.
4. Follow the on-screen instructions to install your MultiVOIP GSM software. The first screen asks you to
choose the destination for the MultiVOIP GSM software.
Choose a location and click Next.
5. At the next screen, you must select a program folder location for the MultiVOIP GSM software program icon.
Click Next. Transient progress screens will appear while files are being copied.
Multi-Tech Systems, Inc. MVPGSM 12
Destination screen
Page 13

Chapter 3: Software Installation
6. On the next screen you can select the COM port that the command PC will use when communicating with
the MultiVOIP GSM unit. After software installation, the COM port can be re-set in the MultiVOIP GSM
Software (from the sidebar menu, select Connection | Settings to access the COM Port Setup screen or use
keyboard shortcut Ctrl + G).
Note: If the COM port setting made here conflicts with the actual COM port resources available in the
command PC, the “Error in Opencomm handle” message will appear when the MultiVOIP GSM program is
launched. If this occurs, you must reset the COM port.
7. A completion screen will appear.
Completion screen
Click Finish.
8. When setup of the MultiVOIP GSM software is complete, you will be prompted to run the MultiVOIP GSM
software to configure the VOIP.
Configuration screen
Software installation is now complete.
Multi-Tech Systems, Inc. MVPGSM 13
Page 14
Chapter 3: Software Installation
Setup Overview
With the software now installed, you are ready to get your MultiVOIP GSM set up and working. There are a few
necessary settings that need to be entered in the configuration software to achieve this and they are noted in
the action lists for the categories below. The following chapters will cover all aspects in detail, but here we will
cover the basic configuration needed to start VOIP communications. Below you will find the list of categories
requiring information to be set before VOIP communication will be ready.
⇒ Ethernet/IP
⇒ Voice/Fax
⇒ Wireless Interface
⇒ Call Signaling
⇒ Regional
⇒ Phone Book
This setup process must be followed by a Save & Reboot for the changes to take affect.
Multi-Tech Systems, Inc. MVPGSM 14
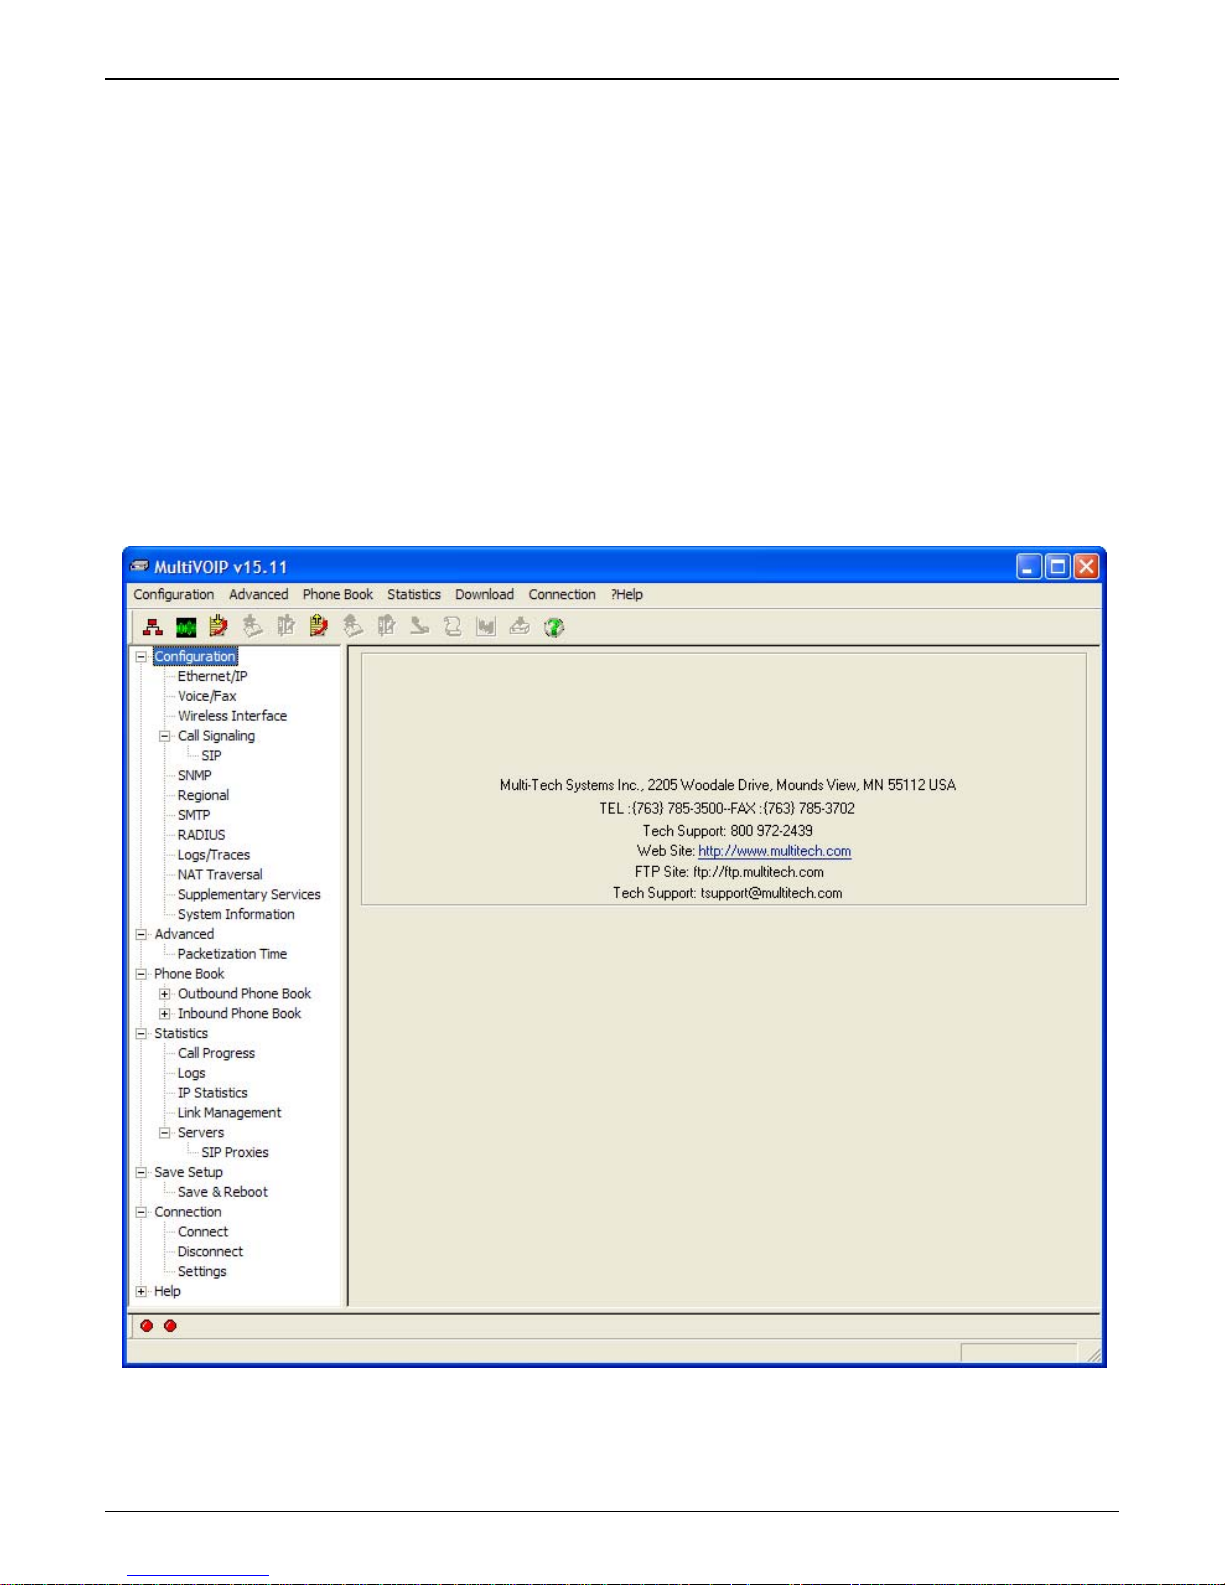
Main Screen
Page 15
Chapter 3: Software Installation
Ethernet/IP
A unique LAN IP address is required for the MultiVOIP GSM unit as well as a subnet mask and Gateway IP for
minimal functionality. Other settings in this category pertain to specific features and protocols that can be used,
but are not necessary for basic operation. Details for all settings are provided in chapter 4.
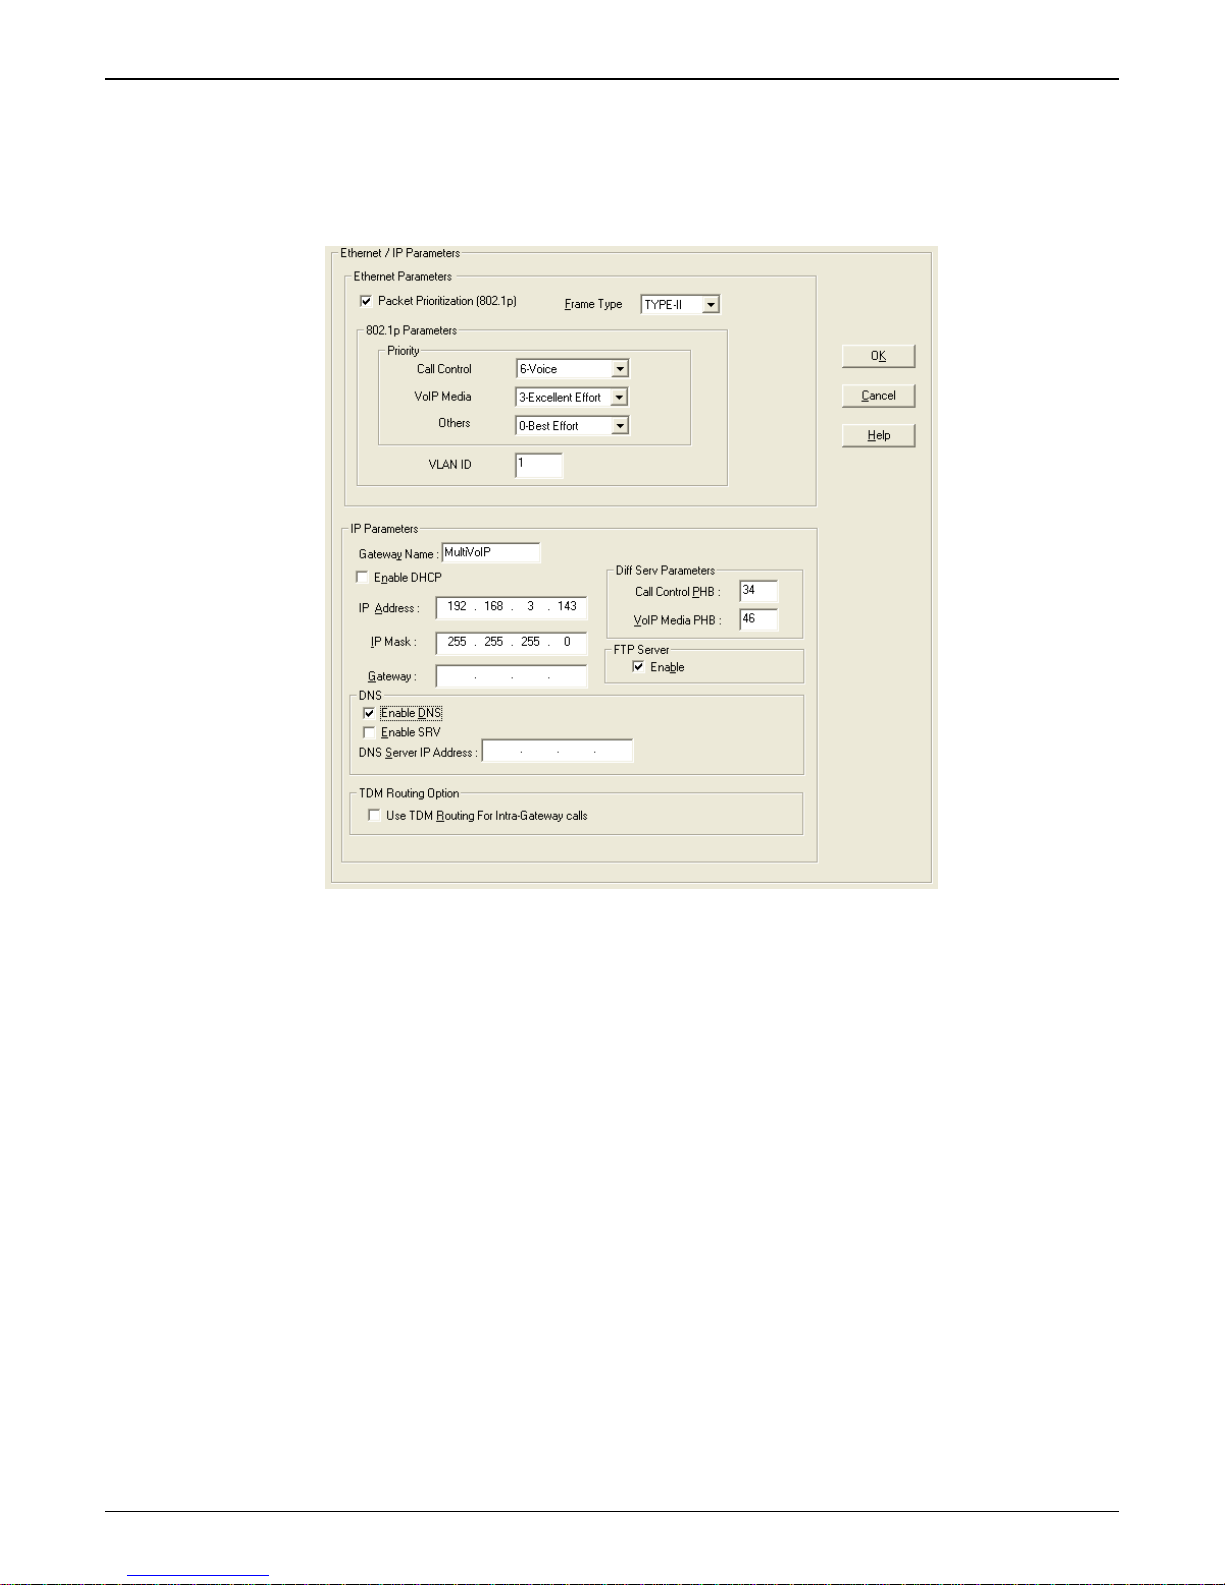
Actions:
• Select Packet Prioritization if used
o Set 802.1p Priority Parameters as needed
• Set the Frame Type to match the network that the MultiVOIP GSM is attached to
o TYPE II or SNAP
• Enter Gateway Name
o Check to enable DHCP if used
• Enter IP Address for the MultiVOIP GSM unit (default is 192.168.3.143)
• Enter Subnet IP Mask for the MultiVOIP GSM unit
• Enter Gateway IP
• Enable DNS if desired
o Enter DNS Server IP Address
• Enable SRV support if needed
• Diff Serv Parameters are for routers that are Diff Serv compatible
o Setting both values to 0 effectively disables Diff Serv
• FTP Server Enable is only needed for firmware and software updates to the MultiVOIP GSM
• TDM Routing can be used if necessary
IP settings
The Priority levels can be from 0 – 7, where 0 is lowest priority (details in Chapter 4)
VLAN ID identifies a virtual LAN by a number (1 to 4094)
Multi-Tech Systems, Inc. MVPGSM 15
Page 16
Chapter 3: Software Installation
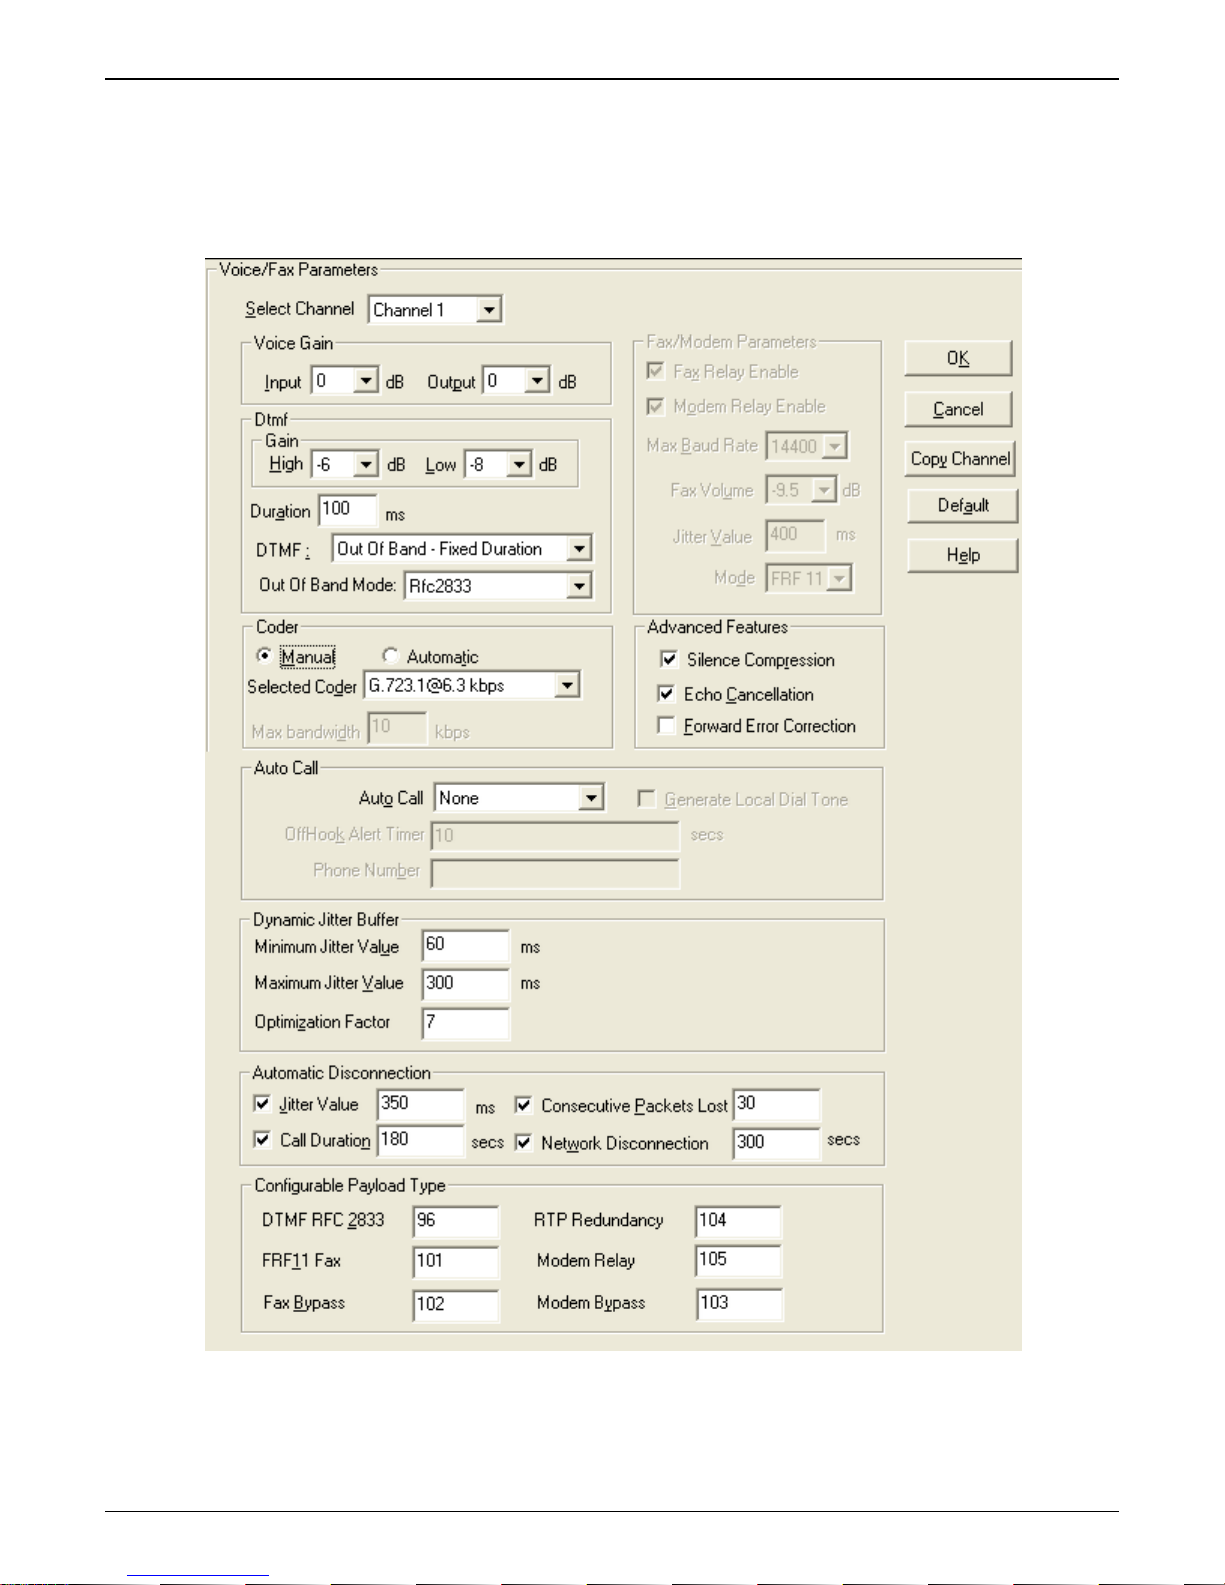
Voice
The individual channels must be set up before use. The Copy Channel button can save a lot of time during this
step if channels are to be set with the same parameters. Some options should be noted for future changes if
necessary, but the defaults are likely to work without adjustment.
Multi-Tech Systems, Inc. MVPGSM 16
Voice settings
Page 17

Actions:
• Select Channel
o Choose channel parameters:
Fax and modem parameters are not available at this time
Modem Relay Enable allows modem traffic through the VOIP system
Adjusting the Voice Gain and DTMF should not be done as it may adversely affect voice
and DTMF quality
Select a Coder or allow Automatic negotiation
Advanced Features
• Silence Compression, when enabled, will not send IP packets during times of
silence
• Echo Cancellation removes echo to improve voice quality
• Forward Error Correction allows some bad packets to be recovered
Choose Auto Call / OffHook Alert settings
• For automatically calling a remote VOIP without dialing (details in Chapter 4)
Change Dynamic Jitter values if necessary (details in Chapter 4)
Select any Automatic Disconnection options needed to ensure lines are not left “open”
Configurable Payload Types are best left at their defaults.
o The Copy Channel button is available for easily transferring these settings to the other channels
• Repeat for all channels to be used
Chapter 3: Software Installation
Multi-Tech Systems, Inc. MVPGSM 17
Page 18
Chapter 3: Software Installation
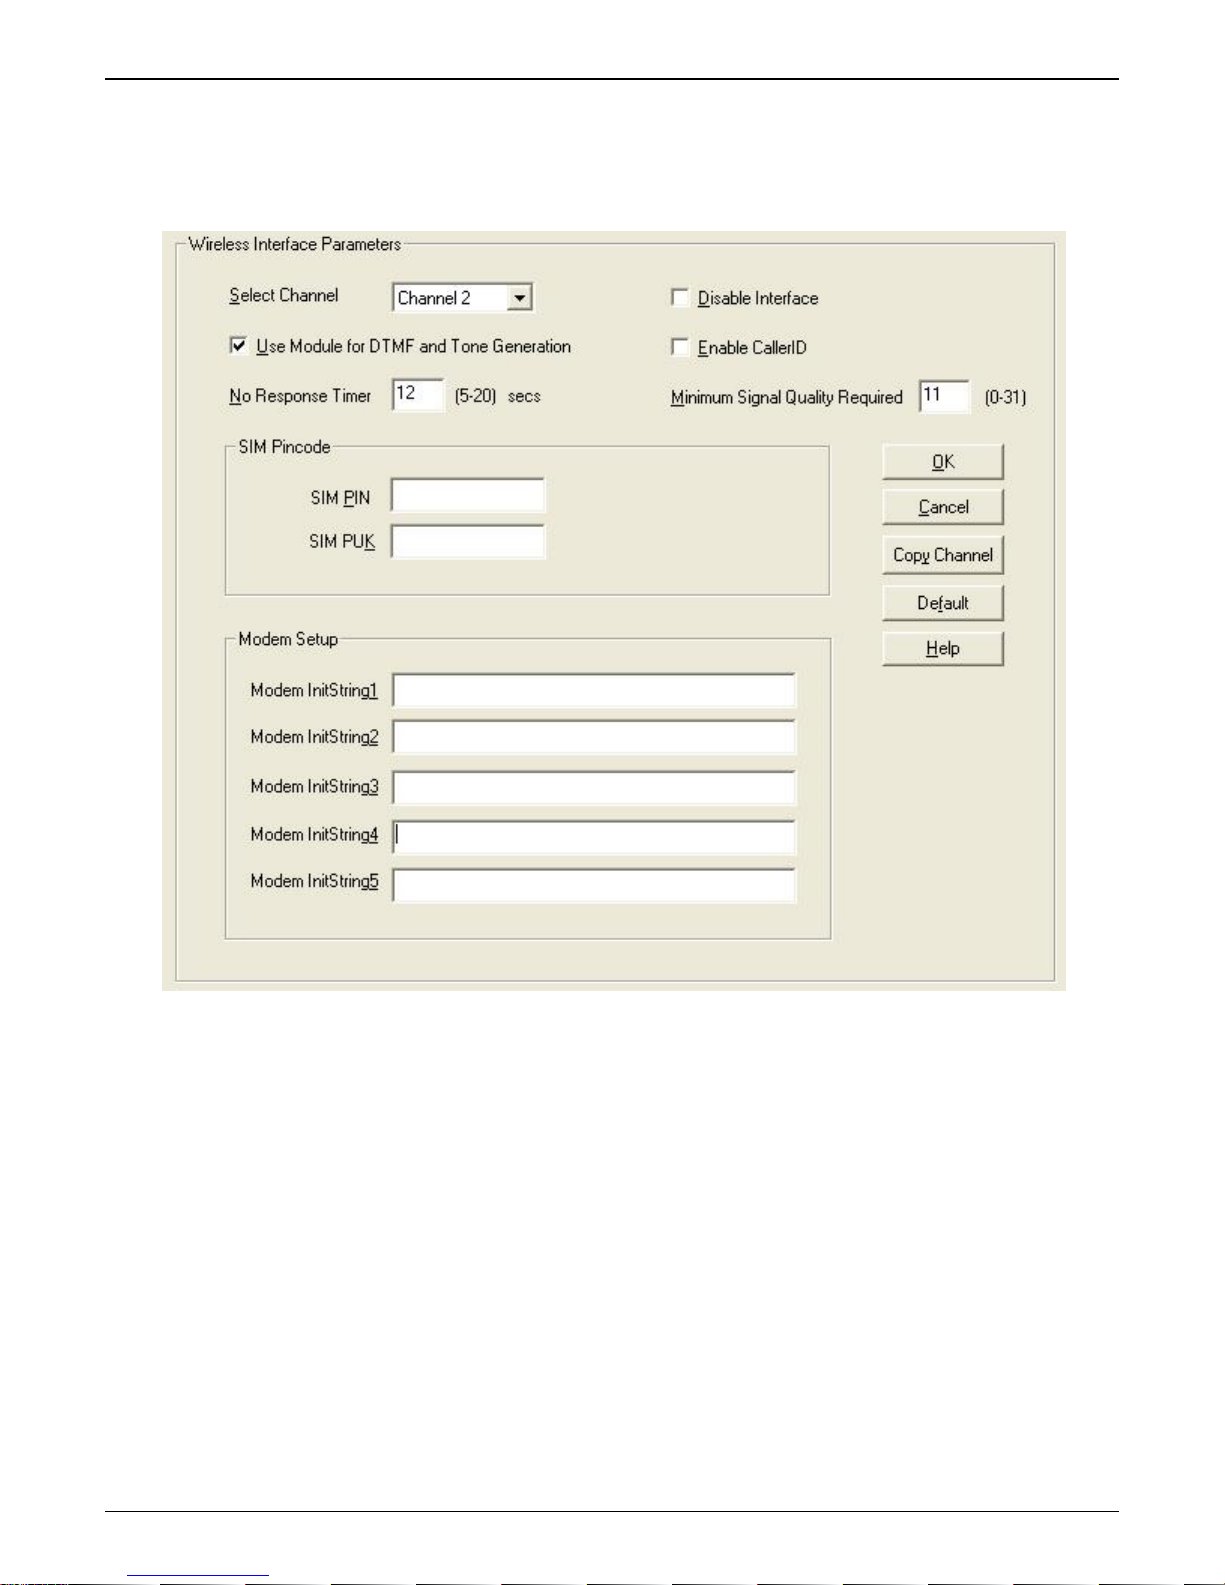
Wireless Interface
The Wireless Interface Parameters are the settings for the GSM connection. The Copy Channel button can save a
lot of time during this step if channels are to be set with the same parameters.
Wireless Interface Parameters
Multi-Tech Systems, Inc. MVPGSM 18
Page 19

Chapter 3: Software Installation
Actions:
• Select Channel
o Channel 1 or 2
• Disable Interface
o Check box: Enable or Disable Interface
• Use Module for DTMF and Tone Generation
o Check box: Enable or Disable DTMF and Tone generation (this is used in conjunction with out of
band DTMF)
• Enable Caller ID
o Check box: Enable or Disable Caller ID (this is for Caller ID information coming in from the
wireless network)
• No Response Timer
o Internal timer for command response time. Range 5-20 seconds
• Minimum Signal Quality Required
o Range 0-31
• SIM Pincode
o SIM PIN
Enter SIM PIN number (this is only necessary in cases where the PIN is required on
power-up)
o SIM PUK
Enter SIM PIN Unlock Key number (this would only be needed in conjunction with the
above PIN number where 3 incorrect attempts lock an account)
• Modem Setup
o Modem InitString1-5
Enter initialization strings (if necessary, internal modem commands can be added)
• Copy Channel (button)
o Copy settings to another channel
• Default (button)
o Reset unit to Factory Default Settings
Important: Verify Signal Strength
Before final placement or mounting, ensure that the wireless signal strength is strong enough for the chosen
area. Once the unit has established connection to the wireless network, the Link Status LED will blink (75 ms on
and 3 seconds off), then you can look to the signal indicators. To find your signal strength, look at the LED
indicators on the front panel. If the first indicator is lit (“one bar”), there is sufficient signal strength for proper
operation. If two or three are lit (two or three “bars”), then there is good signal strength and operation will not
be impaired.
Multi-Tech Systems, Inc. MVPGSM 19
Page 20

Chapter 3: Software Installation
Call Signaling
The MultiVOIP GSM utilizes the SIP protocol for communication with other VOIP units. Additional details for all
settings are found in Chapter 4.
SIP parameters
Actions:
• Configure the Call Signal type
o SIP
Signaling Port (default is 5060)
Use SIP Proxy (enable to work with a proxy server)
Allow Incoming Calls Through SIP Proxy Only
SIP Proxy Parameters
• Enter information for Primary and any Alternate Proxy servers
• Append SIP Proxy Domain Name in User ID
• Enter User Name and Password
• Re-Registration Time (in seconds)
• Proxy Polling Interval (time between proxy server connect attempts)
• TTL Value (in seconds)
Multi-Tech Systems, Inc. MVPGSM 20
Page 21
Chapter 3: Software Installation
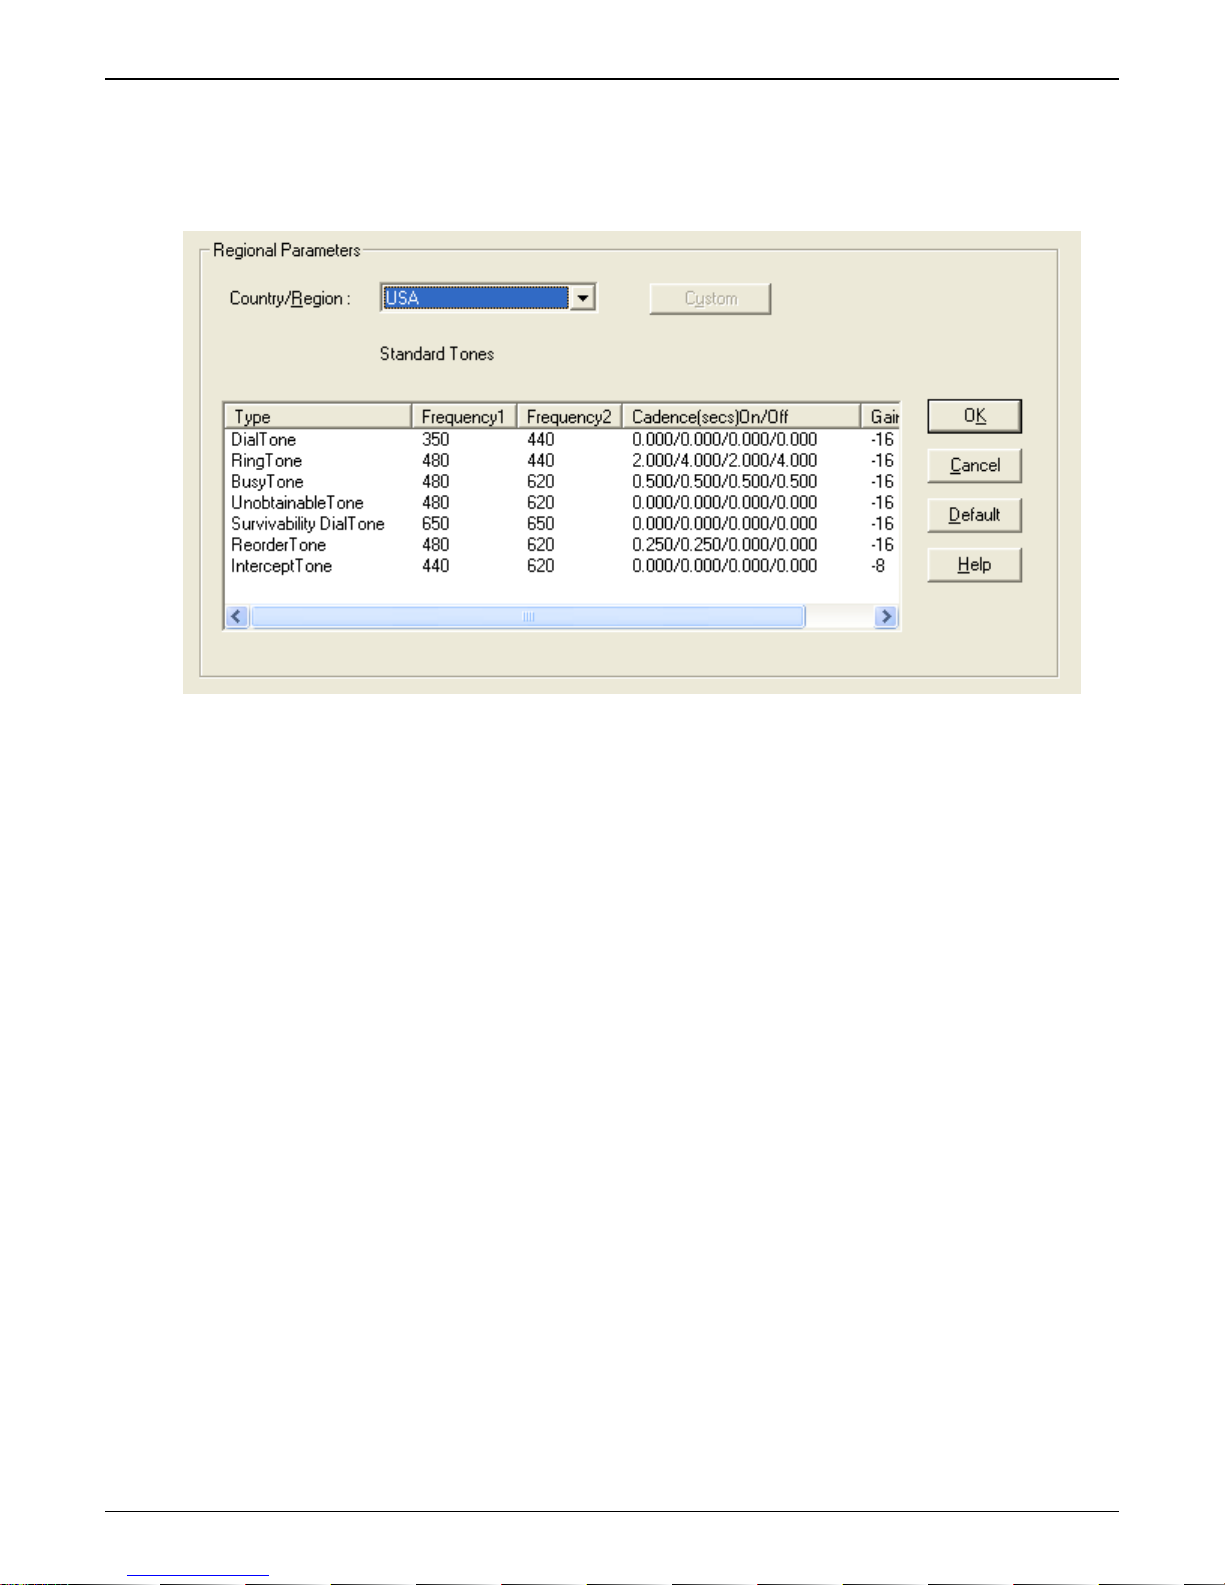
Regional
Select the country or region that the MultiVOIP GSM unit will operate in, or use the custom option if the
available settings are not adequate.
Regional Parameters
Actions:
• Select the choice that matches the location of the MultiVOIP GSM from the Country/Region field
o If there is not a selection to fit your needs, you may select Custom and set the tones manually
Multi-Tech Systems, Inc. MVPGSM 21
Page 22
Chapter 3: Software Installation
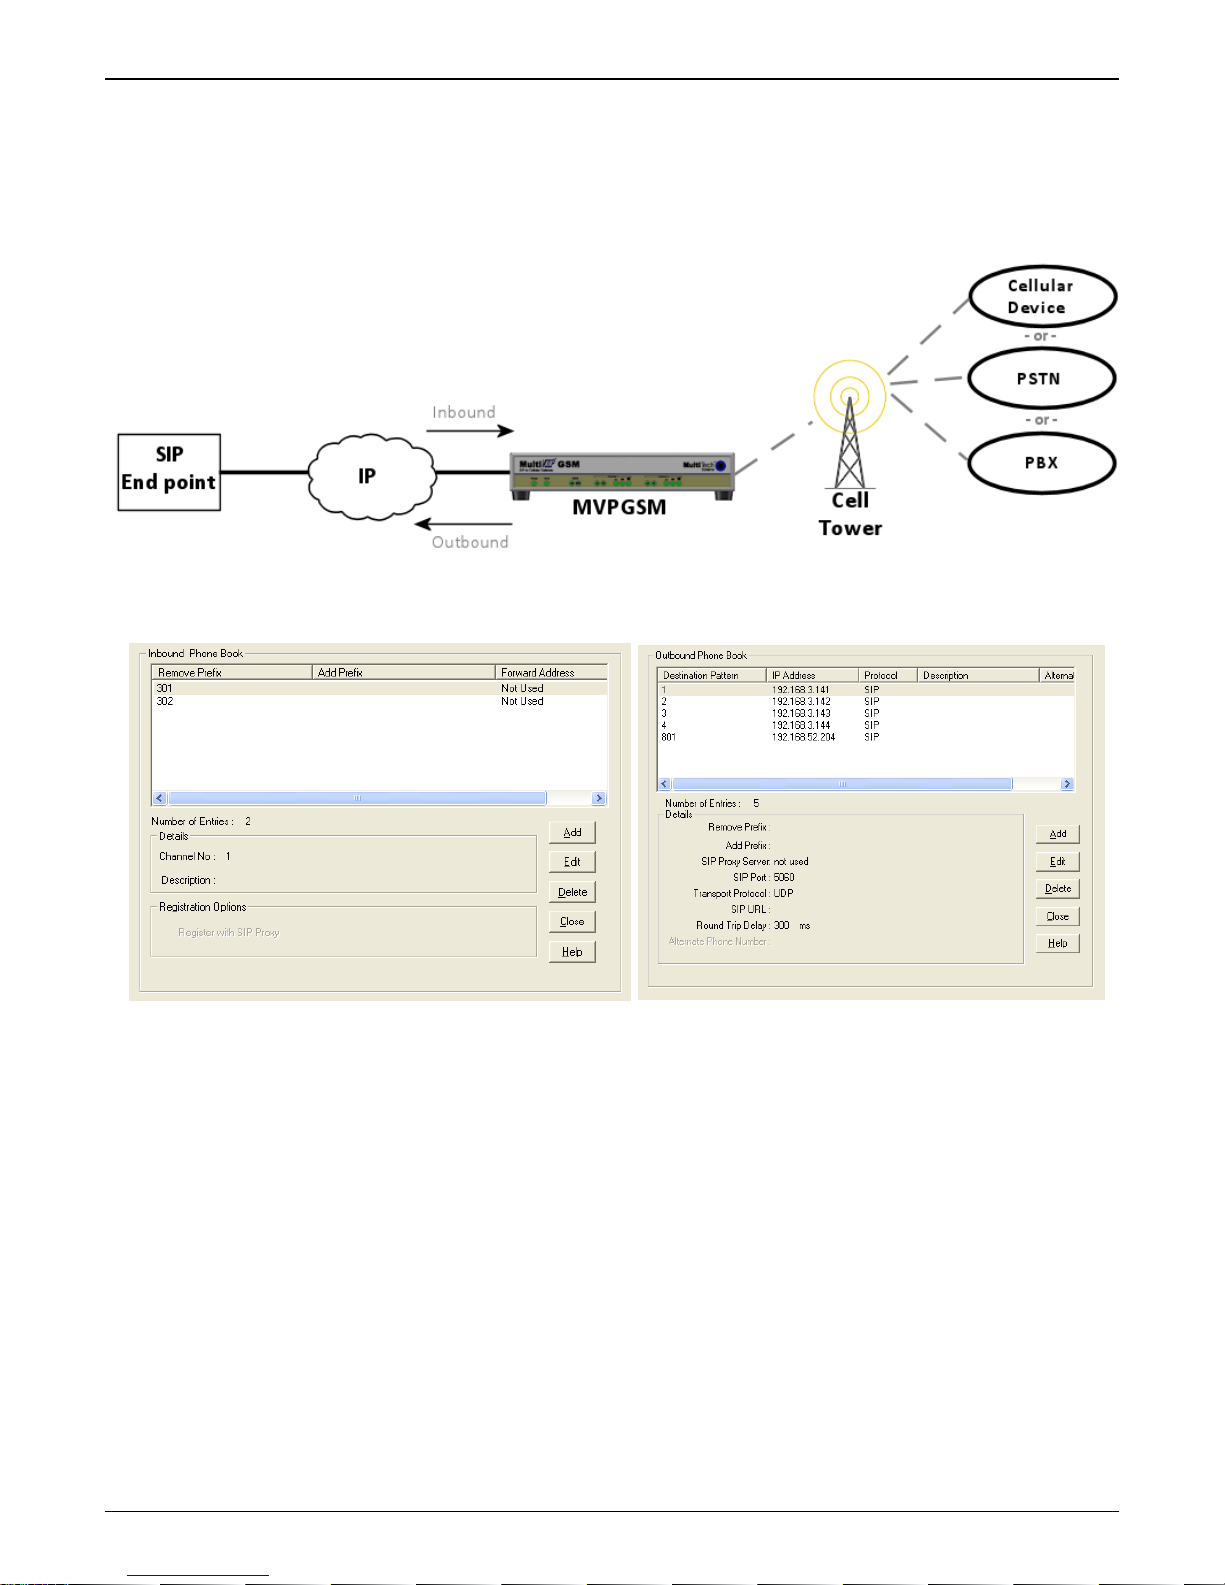
Phone Book
Without a populated phone book, the VOIP unit is unable to translate call traffic. You will need the information
for both a local and any remote sites that are to be used. Detailed descriptions and examples are available in
chapter 5. To better understand the meaning behind ‘Inbound’ and ‘Outbound’ please see the graphic below.
Inbound and Outbound directions
Multi-Tech Systems, Inc. MVPGSM 22
Phone Book screens
Page 23

Actions:
• Select Outbound Phone Book
o Select Add Entry
o Accept Any Number: may be selected to allow any phone number from the wireless network to
initiate a SIP call to the IP address of the SIP end point listed below
o Destination Pattern: When a call from the wireless network is received, the subsequent digits
received from the wireless side are used to match the destination pattern and route the call to
the SIP end point with the IP address listed below
o Remove Prefix: enter any access digits (e.g. a number to get out of a PBX system) or area codes
to be taken off in this field – this manipulates the number dialed by the wireless-side caller
before sending the digit string to the SIP end point of the IP address below
o Add Prefix: any digits that need to be added to make a call appear as local should be put in this
field – this manipulates the number dialed by the wireless-side caller before sending the digit
string to the SIP end point of the IP address below
o Enter the IP address of the SIP end point where the phone number is to be routed
o Protocol type
SIP:
• Select Transport Protocol, Proxy and URL if needed
o The Advanced Button will allow routing to an Alternate IP Address to be entered for times when
the primary does not respond within the allotted time
• Select Inbound Phone Book
o Select Add Entry
o Accept Any Number will allow any number received from a SIP end point to be routed to the
selected channel below
o Enter any access digits followed by the local calling code in the Remove Prefix field. Incoming SIP
calls that match these digits will be routed to the selected channel below and have those digits
removed from the incoming number
o Enter any digits needed to access an outside line in the Add Prefix field. These will be added to
the prefix of the SIP inbound call
o Select Hunting in the Channel Number field to have the VOIP use the next available channel (this
is necessary for load balancing), otherwise you can select a specific channel for the call to go out
on
o Add a description if you like
o Call Forward may be set up (details available in Chapter 5)
o Select Registration Option
• Repeat the Phone Book steps for any additional entries needed
Chapter 3: Software Installation
Save & Reboot
Any time that you change settings on the VOIP unit, you must choose the Save & Reboot option; otherwise all
changes made will not take affect and be lost completely when the MultiVOIP GSM is reset, shutdown or you
exit from the management screen.
Multi-Tech Systems, Inc. MVPGSM 23
Page 24

Chapter 4 – Configuring Your MultiVOIP GSM
Introduction
There are two methods of configuring your MultiVOIP GSM; one is through a web interface, and the other is
through the Windows software interface. There are several necessary parameters that must be set for the
MultiVOIP GSM unit to operate properly, with some additional settings that are optional. You must know the IP
address that will be used, the IP mask, the Gateway IP, and the Domain Name Server information. The
MultiVOIP GSM must be configured locally at first, but changes to this initial configuration can be done locally or
remotely. Local configuration is done through a connection between the “Console” port of the MultiVOIP GSM
and the COM port of the computer; the MultiVOIP GSM configuration software is used for this.
This chapter will explain the setup portion of the software pertaining to the list below, while Chapter 5 will cover
the Phone Book setup and Chapter 6 will discuss the Statistics options and overall maintenance of the MultiVOIP
GSM.
Software Categories Covered in This Chapter
¾ Ethernet/IP
¾ Voice/Fax
¾ Wireless Interface
¾ Call Signaling
o SIP
¾ Regional
¾ SMTP
¾ RADIUS
¾ Logs/Traces
¾ NAT Traversal
¾ Supplementary services
¾ Save Setup
¾ Connection
o Settings
Multi-Tech Systems, Inc. MVPGSM 24
Page 25

Chapter 4: Configuring your MVPGSM
How to Navigate Through the Software
The MultiVOIP GSM software is launched from the Start button and is found in the All Programs area under the
title of MultiVOIP GSM x.xx (where x represents version number). The top option is “Configuration” – choose
this.
Within the software, there are several ways to arrive at the parameter that you want to use: through the lefthand panel, from the drop-down menu, clicking a taskbar icon (if available) or a keyboard shortcut (if available).
Once the initial settings are entered, you may choose to configure the MultiVOIP GSM through a Web browser
instead.
Web Browser Interface
The MultiVOIP GSM web browser interface gives access to the same commands and configuration parameters as
are available in the MultiVOIP GSM Windows interface except for logging functions. When using the web
browser interface, logging can be done by email (the SMTP option).
Set up the Web Browser interface (Optional). After an IP address for the MultiVOIP GSM unit has been
established, you can choose to configure the unit by using the MultiVOIP GSM web browser interface. If you
want to do configuration work using the web browser interface, you must first set it up:
• Set IP address of MultiVOIP GSM unit using the MultiVOIP GSM Configuration program (the Windows
interface). The default IP address is 192.168.3.143.
• Save Setup in Windows interface.
• Close Windows interface.
• Install Java program from MultiVOIP GSM product CD (on first use only).
• Open web browser.
• Browse to IP address of MultiVOIP GSM unit.
• If a username and password have been set up, enter them when prompted.
• Set the browser to allow pop-ups. The MultiVOIP GSM Web interface makes use of pop-up windows.
• The configuration screens in the web browser will have the same content as their counterparts in the
software; only the presentation differs.
Multi-Tech Systems, Inc. MVPGSM 25
Page 26
Chapter 4: Configuring your MVPGSM
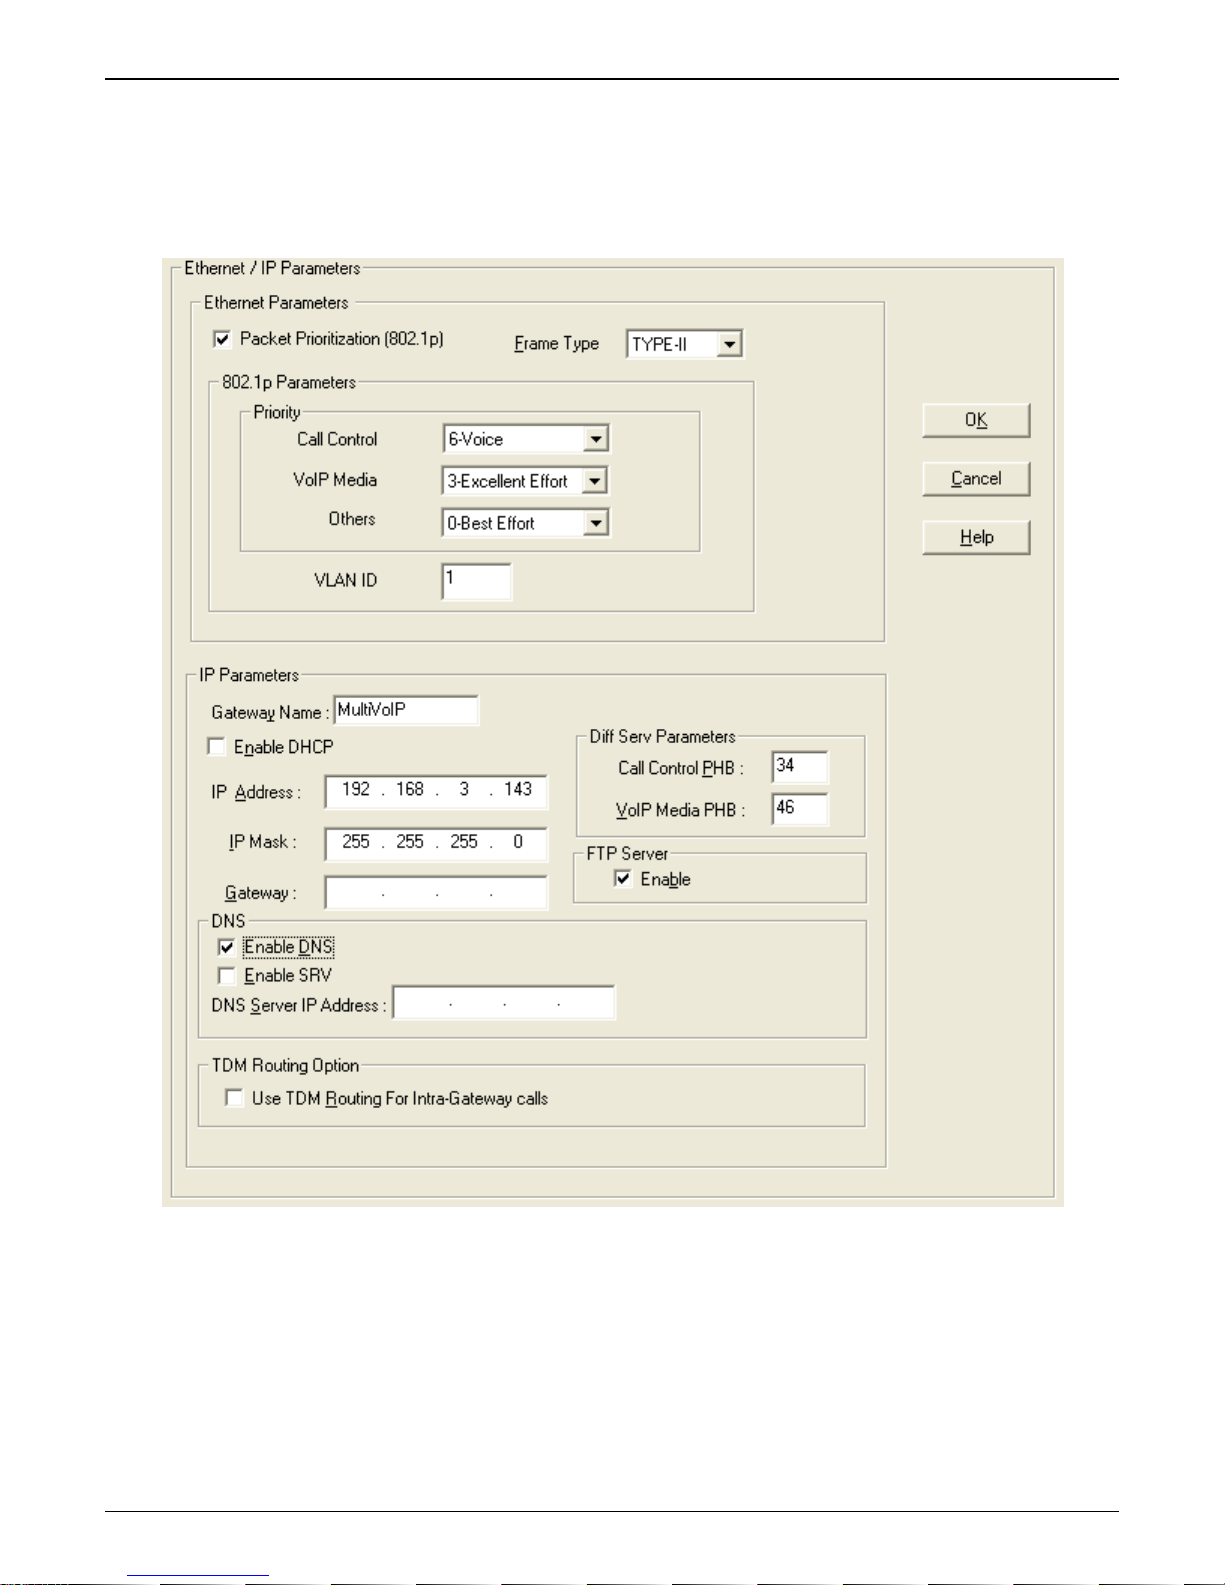
Ethernet/IP
This section covers the Ethernet settings needed for the MultiVOIP GSM unit. In each field, enter the values that
fit the network to which the MultiVOIP GSM will be connected to. For many of the settings, the default values
will work best – try these settings first unless you know you definitely need to change a parameter.
The Ethernet/IP Parameters fields are described in the tables and text passages below.
Multi-Tech Systems, Inc. MVPGSM 26
Network parameters
Page 27

Chapter 4: Configuring your MVPGSM
Ethernet/IP Parameter Definitions
Field Name Values Description
Ethernet Parameters
Packet Prioritization
(802.1p)
Frame Type Type II, SNAP Must be set to match network’s frame type. Default is Type II.
802.1p A draft standard of the IEEE about data traffic prioritization on Ethernet networks. The 802.1p
Call Control Priority 0-7 Sets the priority for signaling packets. 0 is lowest priority.
VOIP Media Priority 0-7 Sets the priority for media packets. 0 is lowest priority.
Others (Priorities) 0-7, where 0 is
VLAN ID 1 - 4094 The 802.1Q IEEE standard allows virtual LANs to be defined within a
IP Parameter fields
Gateway Name alphanumeric Descriptor of current VOIP unit to distinguish it from other units in system.
Enable DHCP Y/N
IP Address n.n.n.n The unique IP address assigned to the MultiVOIP GSM. Default is
IP Mask n.n.n.n Subnetwork address that allows for sharing of IP addresses within a LAN.
Gateway n.n.n.n The IP address of the device that connects your MultiVOIP GSM to the
Table is continued on next page…
Y/N Select to activate prioritization under 802.1p protocol (described below).
draft is an extension of the 802.1D bridging standard. 802.1D determines how prioritization
will operate within a MAC-layer bridge for any kind of media. The 802.1Q draft for virtual
local-area-networks (VLANs) addresses the issue of prioritization for Ethernet networks in
particular.
802.1p enacts this Quality-of-Service feature using 3 bits. This 3-bit code allows data switches
to reorder packets based on priority level. The descriptors for the 8 priority levels are given
below.
802.1p PRIORITY LEVELS
LOWEST PRIORITY
1 – Background: Bulk transfers and other activities permitted on the network, but should not
affect the use of network by other users and applications.
2 – Spare: An unused (spare) value of the user priority.
0 – Best Effort (default): Normal priority for ordinary LAN traffic.
3 – Excellent Effort: The best effort type of service that an information services organization
would deliver to its most important customers.
4 – Controlled Load: Important business applications subject to some form of “Admission
Control”, such as preplanning of Network requirement, characterized by bandwidth
reservation per flow.
5 – Video: Traffic characterized by delay < 100 ms.
6 – Voice: Traffic characterized by delay < 10 ms.
7 - Network Control: Traffic urgently needed to maintain and support network
infrastructure.
HIGHEST PRIORITY
lowest priority
disabled by
default
:
Sets the priority for SMTP, DNS, DHCP, and other packet types. 0 is lowest
priority.
network. This field identifies each virtual LAN by number.
Dynamic Host Configuration Protocol is a method for assigning IP address
and other IP parameters to computers on the IP network in a single message
with great flexibility. IP addresses can be static or temporary depending on
the needs of the computer.
192.168.3.143
Internet.
Multi-Tech Systems, Inc. MVPGSM 27
Page 28

Chapter 4: Configuring your MVPGSM
Ethernet/IP Parameter Definitions (continued)
Field Name Values Description
Diff Serv
Parameter
fields
Call Control
PHB
VOIP Media
PHB
FTP Parameter fields
FTP Server
Enable
DNS Parameter fields
Enable DNS Y/N
Enable SRV Y/N Enables ‘service record’ function. Service record is a category of data in the
DNS Server IP
Address
Diff Serv PHB (Per Hop Behavior) values pertain to a differential prioritizing system for IP packets as
handled by Diff Serv-compatible routers. There are 64 values, each with an elaborate technical
description. These descriptions are found in TCP/IP standards RFC2474, RFC2597, and, for present
purposes, in RFC3246, which describes the value 34 (34 decimal; 22 hex) for Assured Forwarding
behavior (default for Call Control PHB) and the value 46 (46 decimal; 2E hexadecimal) for Expedited
Forwarding behavior (default for VOIP Media PHB). Before using values other than these default
values of 34 and 46, consult these standards documents and/or a qualified IP telecommunications
engineer.
To disable Diff Serv, configure both fields to 0 decimal.
0 – 63
default = 34
0 – 63
default = 46
Y/N
Default =
disabled
See “FTP
Server File
Transfers” in
Chapter 6
Default =
disabled
n.n.n.n IP address of specific DNS server to be used to resolve Internet computer names.
Value is used to prioritize call setup IP packets.
Setting this parameter to 0, in conjunction with VOIP Media PHB below will disable
Diff Serv.
Value is used to prioritize the RTP/RTCP audio IP packets.
Setting this parameter to 0, in conjunction with Call Control PHB above will disable
Diff Serv.
MultiVOIP GSM unit has an FTP Server function so that firmware and other
important operating software files can be transferred to the VOIP via the network.
Enables Domain Name System function where computer names are resolved using
a worldwide distributed database.
Internet Domain Name System specifying information on available servers for a
specific protocol and domain, as defined in RFC 2782. Newer internet protocols like
SIP, STUN, H.323, POP3, and XMPP may require SRV support from clients. Client
implementations of older protocols, like LDAP and SMTP, may have been enhanced
in some settings to support SRV.
Multi-Tech Systems, Inc. MVPGSM 28
Page 29
Chapter 4: Configuring your MVPGSM
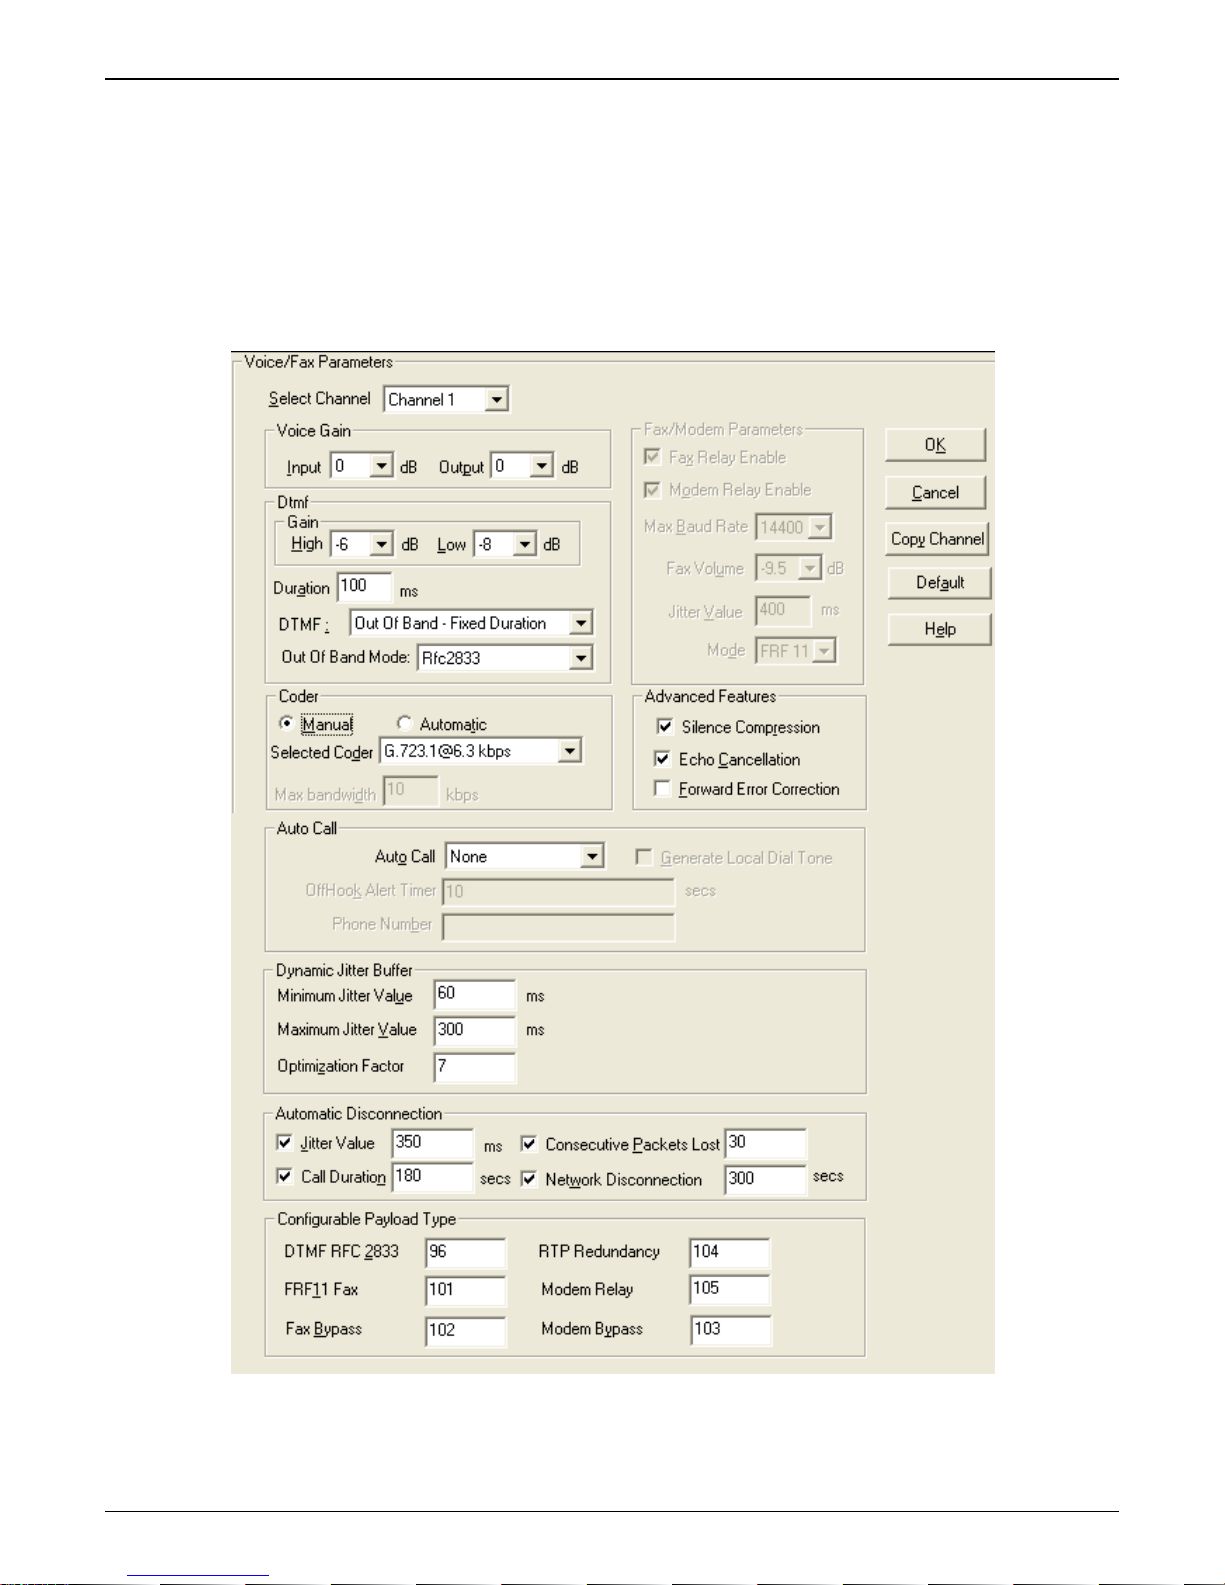
Voice/Fax
Setting the Voice Parameters. The Voice/Fax section needs to be set for each channel to be used. However, once
you have established a set of Voice parameters for a particular channel, you can apply this entire set of Voice
parameters to another channel by using the Copy Channel button and its dialog box. To copy a set of Voice
parameters to all channels, select “Copy to All” and click Copy.
The majority of the settings should be left at their default settings as changes may introduce problems with
audio quality. In each field, enter the values that fit your particular setup.
The Voice/FAX Parameters settings are described in the tables below.
Multi-Tech Systems, Inc. MVPGSM 29
Voice/Fax parameters
Page 30

Chapter 4: Configuring your MVPGSM
Voice/Fax Parameter Definitions
Field Name Values Description
Default -- When this button is clicked, all Voice/FAX parameters are set to their default
values.
Select Channel 1-2 Channel to be configured is selected here.
Copy Channel -- Copies the Voice/FAX attributes of one channel to another channel.
Voice Gain -- Signal amplification (or attenuation) in dB.
Input Gain +31dB to
–31dB
Output Gain +31dB to
–31dB
DTMF Gain -- The DTMF Gain (Dual Tone Multi-Frequency) controls the volume level of the DTMF
DTMF Gain,
High Tones
+3dB to
-31dB &
“mute”
DTMF Gain, Low
Tones
+3dB to
-31dB &
“mute”
DTMF Parameters
Duration (DTMF) 60 – 3000
ms
DTMF
In/Out of Band
Out of
Band, or
Inband
Out of Band
Mode
RFC 2833,
SIP Info
FAX Parameters – This section is grayed-out as Fax is not supported by the wireless channels
Fax Enable
Modem Relay
Enable
Max Baud Rate
(Fax)
Fax Volume
Jitter Value (Fax)
Mode (Fax)
Table is continued on next page…
Modifies audio level entering voice channel before it is sent over the IP network to
the remote SIP device. The default & recommended value is 0 dB.
Modifies audio level from IP to the voice channel. The default and recommended
value is 0 dB.
tones sent out for Touch-Tone dialing.
Default value: -4 dB. Not to be changed except under supervision of Multi-Tech
Technical Support.
Default value: -7 dB. Not to be changed except under supervision of Multi-Tech
Technical Support.
When DTMF: Out of Band is selected, this setting determines how long each DTMF
digit ‘sounds’ or is held. Default = 100 ms.
When DTMF Out of Band is selected, the MultiVOIP GSM detects and regenerates
DTMF tones. When DTMF Inband is selected, the DTMF digits are passed through
the MultiVOIP GSM unit as they are received.
RFC2833 method. Uses RTP mode defined in RFC 2833 to transmit the DTMF digits.
SIP Info method. Generates DTMF tones on the telephony call leg. The SIP INFO
message is sent along the signaling path of the call. You must set this parameter per
the capabilities of the remote endpoint with which the VOIP will communicate. The
RFC2833 method is the more common of the two methods.
Multi-Tech Systems, Inc. MVPGSM 30
Page 31

Voice/Fax Parameter Definitions (continued)
Coder Parameters
Coder Manual or
Automatic
Selected Coder G.711 a/u law 64 kbps;
G.726, @ 16/24/32/40 kbps;
G.727, @ nine bps rates;
G.723.1 @ 5.3 kbps, 6.3 kbps;
G.729, 8kbps;
Net Coder @
6.4, 7.2, 8, 8.8, 9.6 kbps
Selected Coder
additional
choices
Max bandwidth
(coder)
Silence
Compression
Echo
Cancellation
Forward Error
Correction
Table is continued on next page…
G.711, G.729
-or-
G.729, G.711
11 – 128 kbps
Advanced Features
Y/N Determines whether silence compression is enabled (checked)
Y/N Determines whether echo cancellation is enabled (checked) for
Y/N Determines whether forward error correction is enabled
Determines whether selection of coder is manual or automatic.
When Automatic is selected, the local and remote voice
channels will negotiate the voice coder to be used by selecting
the highest bandwidth coder supported by both sides without
exceeding the Max Bandwidth setting. G.723, G.729, or G.711
are negotiated.
Select from a range of coders with specific bandwidths. The
higher the bps rate, the more bandwidth is used. The channel
that you are calling must have the same voice coder selected.
Default = G.723.1 @ 6.3 kbps. Here 64K of digital voice is
compressed to 6.3K, allowing several simultaneous
conversations over the same bandwidth that would otherwise
carry only one.
To make selections from the Selected Coder drop-down list, the
Manual option must be enabled.
Coder Priority has two options (G.711,G.729 or G.729, G711) on
the Selected Coder listing of the Coder group on the Voice/Fax
screen. If G.711 is the higher priority, i.e., G.711 is preferred to
G729 on the sending side, then G.711, G.729 option is selected.
Similarly, if G.729 has the higher priority, then G.729, G.711
option is selected.
It is used whenever a user wants to advertise both G.711 and
G.729 coders with higher preference to a particular coder.
It is useful when the calls are made from a particular channel on
the VOIP to two different destinations where one supports
G.711 and the other supports G.729.
This drop-down list enables you to select the maximum
bandwidth allowed for this channel. The Max Bandwidth dropdown list is enabled only if the Coder is set to Automatic.
If coder is to be selected automatically (“Auto” setting), then
enter a value for maximum bandwidth.
for this voice channel.
With Silence Compression enabled, the MultiVOIP GSM will not
transmit voice packets when silence is detected, thereby
reducing the amount of network bandwidth that is being used
by the voice channel (default = on).
this voice channel.
Echo Cancellation removes echo and improves sound quality
(default = on).
(checked) for this voice channel.
Forward Error Correction enables some of the voice packets
that were corrupted or lost to be recovered. FEC doubles the
overhead to the total network bandwidth consumed by the
voice channel (default = Off).
Chapter 4: Configuring your MVPGSM
Multi-Tech Systems, Inc. MVPGSM 31
Page 32

Chapter 4: Configuring your MVPGSM
Voice/Fax Parameter Definitions (continued)
Field Name Values Description
AutoCall/Offhook Alert Parameters
Auto Call / Offhook
Alert
Generate Local Dial
Tone
Offhook Alert Timer This section is grayed-out as Offhook Alert is not used.
Phone Number -- Phone number used for Auto Call function. This phone number must
Dynamic Jitter
Dynamic Jitter Buffer Dynamic Jitter defines a minimum and a maximum jitter value for voice
Minimum Jitter Value 60 - 400ms The minimum dynamic jitter buffer of 60 milliseconds is the minimum delay
Maximum Jitter Value 60 - 400ms The maximum dynamic jitter buffer of 400 milliseconds is the maximum
Optimization Factor 0 - 12 The Optimization Factor determines how quickly the length of the Dynamic
Auto Disconnect
Automatic
Disconnection
Jitter Value 1-65535 The Jitter Value defines the average inter-arrival packet deviation before the
Call Duration 1-65535 Call Duration defines the maximum length of time (in seconds) that a call
Consecutive Packets
Lost
Network
Disconnection
AutoCall, The AutoCall option enables the local MultiVOIP GSM to call a remote SIP
endpoint without the user having to dial a Phone Directory Database
number. As soon as you access the local MultiVOIP GSM voice/fax channel,
the MultiVOIP GSM immediately connects to the SIP end point identified in
the Phone Number box of this option. This function requires an entry in the
Outgoing phonebook of the local MultiVOIP GSM.
Y/N If selected, dial tone will be generated locally while the call is connecting
between gateways. This would be useful if there is a long network delay.
correspond to an entry in the Outbound Phonebook of the local MVPGSM.
communications. When receiving voice packets from an SIP end point,
varying delays between packets may occur due to network traffic problems.
This is called Jitter. To compensate, the MVPGSM uses a Dynamic Jitter
Buffer. The Jitter Buffer enables the MVPGSM to wait for delayed voice
packets by automatically adjusting the length of the Jitter Buffer between
configurable minimum and maximum values. An Optimization Factor
adjustment controls how quickly the length of the Jitter Buffer is increased
when jitter increases on the network. The length of the jitter buffer directly
affects the voice delay between MultiVOIP GSM gateways.
that would be acceptable over a low jitter network. Default = 150 ms
delay tolerable over a high jitter network. Default = 300 ms
Jitter Buffer is changed based on actual jitter encountered on the network.
Selecting the minimum value of 0 means low voice delay is desired, but
increases the possibility of jitter-induced voice quality problems. Selecting
the maximum value of 12 means highest voice quality under jitter conditions
is desired at the cost of increased voice delay. Default = 7.
-- The Automatic Disconnection group provides four options which can be
used singly or in any combination.
call is automatically disconnected. The default is 300 milliseconds. A higher
value means voice transmission will be more accepting of jitter. A lower
value is less tolerant of jitter. Inactive by default. When active, default = 300
ms. However, value must equal or exceed Dynamic Minimum Jitter Value.
remains connected before the call is automatically disconnected.
Inactive by default. When active, default = 180 sec.
1-65535 Consecutive Packets Lost defines the number of consecutive packets that
are lost after which the call is automatically disconnected.
Inactive by default. When active, default = 30
1 to 65535 Specifies how long to wait before disconnecting the call when IP network
connectivity with the remote site has been lost. Default = 30 sec
Multi-Tech Systems, Inc. MVPGSM 32
Page 33

Chapter 4: Configuring your MVPGSM
Configurable Payload Type
The Configurable Payload Type is located on the bottom of the Voice/Fax screen. The Configurable Payload
Type is used when the remote side uses a different payload type for the associated features.
Wireless Interface
The Wireless Interface parameters are set individually for each channel. In each field, enter the values that fit
your particular setup. Once you have established a set of Interface parameters for a particular channel, you can
apply this entire set of parameters to another channel by using the Copy Channel button and its dialog box.
Multi-Tech Systems, Inc. MVPGSM 33
Wireless parameters
Page 34

Chapter 4: Configuring your MVPGSM
Wireless Interface parameter definitions
Field Name Values Description
Select Channel 1 – 2 Select which channel you want to set parameters for.
Disable Interface Check box Enable or Disable the interface.
Use Module for
DTMF Generation
Enable Caller ID Check box Enable or Disable Caller ID reporting. This allows Caller ID from the cell network
No Response Timer Range 5 - 20 Set the timeout in seconds, for the wireless module to wait for a valid response
Minimum Signal
Quality Required
SIM Pincode -
SIM PIN Numeric Should your SIM card get locked out, your provider can give you the PIN code
SIM PUK Numeric Should your SIM card get locked out, your provider can give you the PUK code
Modem Setup - Five areas are available for initialization strings to be sent to the internal
Copy Channel
(button)
Default (button) - Resets parameters back to their factory default settings.
Check box Enable or Disable DTMF generation. When checked, the wireless module will
generate DTMF tones to the cell network. If this is enabled, out of band DTMF
must be set in Voice/Fax and out of band DTMF must be set to the remote SIP
end point.
to be passed over IP.
from AT commands.
Range 0 - 31 Set the lowest allowed signal quality for the wireless channel to initiate a call.
for the SIM on this channel.
for the SIM on this channel.
wireless modules.
- Will copy all settings from the current channel to the other available channels.
Multi-Tech Systems, Inc. MVPGSM 34
Page 35

Call Signaling
The MultiVOIP GSM uses SIP call signaling.
SIP
Session Initiation Protocol
The fields are detailed in the table below.
is the only option available for application layer control of the MultiVOIP GSM.
Chapter 4: Configuring your MVPGSM
Multi-Tech Systems, Inc. MVPGSM 35
SIP call signaling
Page 36

Chapter 4: Configuring your MVPGSM
SIP Call Signaling Parameter Definitions
Field Name Values Description
SIP Parameters
Signaling Port port Port number on which the MultiVOIP GSM UserAgent software module will be
waiting for any incoming SIP requests. Default = 5060
Use SIP Proxy Y/N Allows the MultiVOIP GSM to work in conjunction with a proxy server.
Allow Incoming
Calls Through SIP
Proxy Only
Proxy Domain
Name / IP Address
Alternate Proxy 1
and 2
SIP Proxy
Parameters
Append SIP Proxy
Domain Name in
User ID
Port Number port Logical port number for proxy communications. Default = 5060
Default Subscriber This is used as the default end point register with a Proxy.
Default Username name If the Username is not populated in the Phone Book, this is the Username that
Password password Password for proxy server function. See “Default Username” description above.
Re-Registration
Time
Proxy Polling
Interval
TTL Value SIP proxy
Y/N When selected, incoming calls are accepted only if those calls come through the
proxy.
n.n.n.n Network address of the proxy server that the MultiVOIP GSM is using.
-- A first and a second alternate SIP proxy server can be specified for use by the
VOIP for situations where the Primary proxy server is otherwise unavailable.
This is the preferred SIP proxy server for controlling the traffic of the current
VOIP.
Y/N When checked, the domain name of the SIP Proxy serving the MultiVOIP GSM
gateway will be included as part of the User ID for that gateway. If unchecked,
the SIP Proxy’s IP address will be included as part of the User ID instead of the SIP
Proxy’s domain name.
will be used. This works the same for the password as well.
10–65535
seconds
60 - 300 The interval between the VOIP gateway’s successive attempts to connect to and
“Time to
Live”
value.
(in
seconds)
This is the timeout interval for registration of the MultiVOIP GSM with a SIP
proxy server. The time interval begins the moment the MultiVOIP GSM gateway
registers with the SIP proxy server and ends at the time specified by the user in
the Re-Registration Time field (this field). When/if registration lapses, call traffic
routed to/from the MultiVOIP GSM through the SIP proxy server will cease.
However, calls in progress will continue to function until they end.
be governed by a higher level SIP proxy server. The Primary Proxy is the highest
level gatekeeper. Alternate Proxy 1 is second; Alternate Proxy 2 is the lowest
order SIP proxy server.
As soon as a MultiVOIP GSM gateway registers with a SIP proxy server (allowing
the proxy server to control its call traffic) a countdown timer begins. The TTL
Value is the interval of the countdown timer. Before the TTL countdown expires,
the MultiVOIP GSM gateway needs to register with the gatekeeper in order to
maintain the connection. If the MultiVOIP GSM does not register before the TTL
interval expires, the MultiVOIP GSM gateway’s registration with the proxy server
will expire and the proxy server will no longer permit call traffic to or from that
gateway. Calls in progress will continue to function even if the gateway becomes
de-registered.
Multi-Tech Systems, Inc. MVPGSM 36
Page 37

Chapter 4: Configuring your MVPGSM
Regional
The Regional Parameters are used to set the phone signaling tones and cadences. For the country selected, the
standard set of frequency pairs will be listed for dial tone, busy tone, ‘unobtainable’ tone (fast busy or trunk
busy), ring tone, and other, more specialized tones. If you need settings that are not available, the Custom
selection will let you set the tones to what is necessary. The Regional Parameters fields are described in the
table below.
Regional parameters
Multi-Tech Systems, Inc. MVPGSM 37
Page 38

Chapter 4: Configuring your MVPGSM
“Regional Parameter” Definitions
Field Name Values Description
Country/Region USA,
Japan,
UK,
Custom
Advisory screen This message screen appears whenever the
Standard Tones fields
Type column dial tone,
ring tone,
busy tone,
unobtainable tone,
survivability tone,
re-order tone
Frequency 1 freq. in Hertz Lower frequency of pair.
Frequency 2 freq. in Hertz Higher frequency of pair.
Gain 1 gain in dB
+3dB to –31dB
and “mute” setting
Gain 2 gain in dB
+3dB to –31dB
and “mute” setting
Cadence
(ms) On/Off
Custom (button) Only available when
n/n/n/n
four integer time
values in
milliseconds; zero
value for dial-tone
indicates continuous
tone
Country/Region is
set to “Custom”
Name of a country or region that uses a certain set of tone pairs for dial tone, ring
tone, busy tone, unobtainable tone (fast busy tone), survivability tone (tone
heard briefly, 2 seconds, after going off hook denoting survivable mode of VOIP
unit), re-order tone (a tone pattern indicating the need for the user to hang up the
phone), and intercept tone (a tone that warns a party that has gone off hook but
has not begun dialing, within a prescribed time, that an automatic emergency or
attendant number will be called; the automatic call can be used to direct an
attendant’s attention to a disabled or distressed caller, allowing an appropriate
response to be made).
In some cases, the tone-pair scheme denoted by a country name may also be used
outside of that country. The “Custom” option (button) assures that any tonepairing scheme worldwide can be accommodated.
Note 1:
been chosen in the Interface screen and when the AutoCall / OffHook Alert field is
set to OffHook Alert in the Voice/Fax Parameters screen. The time allowed for
dialing before the automatic calling process begins is set in the OffHook Alert
Timer field of the Voice/Fax Parameters screen.
Intercept tone is applicable only when the FXS telephony interface has
Country field is changed. It informs the operator
that, upon change of the Country field value, all
User Defined Tones will be deleted.
Type of telephony tone-pair for which frequency, gain, and cadence
are being presented.
Amplification factor of lower frequency of pair.
This applies to the dial, ring, busy and ‘unobtainable’ tones that the
MultiVOIP GSM outputs as audio to the wireless port. Default: -16dB
Amplification factor of higher frequency of pair.
This applies to the dial, ring, busy, and ‘unobtainable’ (fast busy) tones
that the MultiVOIP GSM outputs as audio to the wireless port.
Default: -16dB
On/off pattern of tone durations used to denote phone ringing, phone
busy, connection unobtainable (fast busy), dial tone (“0” indicates
continuous tone), survivability, and re-order. Default values differ for
different countries/regions. Although most cadences have only two
parts (an “on” duration and an “off” duration), some telephony
cadences have four parts. Most cadences, then, are expressed as two
iterations of a two-part sequence. Although this is redundant, it is
necessary to allow for expression of 4-part cadences.
Click on the “Custom” button to bring up the Custom Tone Pair
Settings screen. This screen allows the user to specify tone pair
attributes that are not found in any of the standard national/regional
telephony toning schemes.
Multi-Tech Systems, Inc. MVPGSM 38
Page 39

Chapter 4: Configuring your MVPGSM
Setting Custom Tones and Cadences (optional). The Regional Parameters dialog box has a secondary dialog box
that allows you to customize DTMF tone pairs to create unique ring-tones, dial-tones, busy-tones or
“unobtainable” tones or “re-order” tones or “survivability” tones for your system. This screen allows the user to
specify tone-pair attributes that are not found in any of the standard national/regional telephony toning
schemes. To access this customization feature, click on the Custom button on the Regional Parameters screen.
The “Custom” button is active only when “Custom” is selected in the Country/Region field.
Custom Tone-Pair Settings Definitions
Field Name Values Description
Tone Pair dial tone, busy tone
ring tone,
‘unobtainable’ tone,
survivability tone,
re-order tone
Tone Pair Values About Defaults: US telephony values are used as defaults on this screen.
Frequency 1 Frequency in Hertz Lower frequency of pair.
Frequency 2 Frequency in Hertz Higher frequency of pair.
Gain 1 +3dB to –31dB
and “mute” setting
Gain 2 +3dB to –31dB
and “mute” setting
Cadence 1 integer time value in
milliseconds; zero value
for dial-tone indicates
continuous tone
Cadence 2 duration in milliseconds Cadence 2 is duration of first “off” period in signaling cadence.
Cadence 3 duration in milliseconds Cadence 3 is duration of second “on” period in signaling cadence.
Cadence 4 duration in milliseconds Cadence 4 is duration of second “off” period in the signaling cadence.
Identifies the type of telephony signaling tone for which frequencies are
being specified.
Amplification factor of lower frequency of pair. This figure describes
amplification that the MultiVOIP GSM applies to outbound tones entering
the MultiVOIP GSM at the input port. Default: -16dB
Amplification factor of higher frequency of pair. This figure describes
amplification that the MultiVOIP GSM applies to outbound tones entering
the MultiVOIP GSM at the input port. Default: -16dB
On/off pattern of tone durations used to denote phone ringing, phone
busy, dial tone (“0” indicates continuous tone) survivability and re-order.
Cadence 1 is duration of first period of tone being “on” in the cadence of
the telephony signal.
Multi-Tech Systems, Inc. MVPGSM 39
Page 40

Chapter 4: Configuring your MVPGSM
SMTP
Setting the SMTP Parameters (Log Reports by Email). The SMTP Parameters screen is applicable when the VOIP
administrator has chosen to receive log reports by email (this is done by selecting the “SMTP” checkbox in the
Others screen and selecting “Enable SMTP” in the SMTP Parameters screen.)
Email Address for VOIP (for email call log reporting)
This is needed only if log reports of VOIP call traffic are to be sent by email.
Ask Mail Server administrator to set up email account (with password) for the MultiVOIP GSM unit itself. Be
sure to give a unique identifier to each individual MultiVOIP GSM unit. Get the IP address of the mail server
computer, as well.
MultiVOIP GSM as Email Sender. When SMTP is used, the MultiVOIP GSM will actually be given its own email
account (with Login Name and Password) on some mail server connected to the IP network. Using this account,
the MultiVOIP GSM will then send out email messages containing log report information. The “Recipient” of the
log report email is ordinarily the VOIP administrator. Because the MultiVOIP GSM cannot receive email, a
“Reply-To” address must also be set up. Ordinarily, the “Reply-To” address is that of a technician who has
access to the mail server or MultiVOIP GSM or both, and the VOIP administrator might also be designated as the
“Reply-To” party. The main function of the Reply-To address is to receive error or failure messages regarding
the emailed reports.
The SMTP Parameters screen is shown below:
Multi-Tech Systems, Inc. MVPGSM 40
SMTP parameters
Page 41

Chapter 4: Configuring your MVPGSM
“SMTP Parameters” Definitions
Field Name Values Description
Enable SMTP Y/N In order to send log reports by email, this box must be checked. However,
to enable SMTP functionality, you must also select “SMTP” in the Logs
screen.
Requires
Authentication
Login Name alpha-numeric This is the User Name for the MultiVOIP GSM unit’s email account.
Password alpha-numeric Login password for MultiVOIP GSM unit’s email account.
Mail Server IP
Address
Port Number 25 25 is a standard port number for SMTP.
Mail Type text or html Mail type in which log reports will be sent.
Subject text User specified. Subject line that will appear for all emailed log reports for
Reply-To Address email address User specified. This email address functions as a source email identifier
Recipient Address email address Email address where log reports are sent.
Mail Criteria
Number of Records integer This is the number of log records that must accumulate to trigger the
Number of Days integer This is the number of days that must pass before triggering the sending of
Y/N If this checkbox is checked, the MultiVOIP GSM will send Authentication
information to the SMTP server. The authentication information indicates
whether or not the email sender has permission to use the SMTP server.
n.n.n.n This is the mail server’s IP address. This mail server must be accessible on
the IP network to which the MultiVOIP GSM is connected.
this MultiVOIP GSM unit.
for the MultiVOIP GSM, which, of course, cannot usefully receive email
messages. The Reply-To address provides a destination for returned
messages indicating the status of messages sent by the MultiVOIP GSM
(esp. to indicate when log report email was undeliverable or when an
error has occurred).
Criteria for sending log summary by email. The log summary email will be
sent out either when the user-specified number of log messages has
accumulated, or once every day or multiple days, whichever comes first.
sending of a log-summary email.
a log-summary email.
Multi-Tech Systems, Inc. MVPGSM 41
Page 42

Chapter 4: Configuring your MVPGSM
The SMTP Parameters dialog box has a secondary dialog box, accessed by the Select Fields button, that allows
you to customize email logging. The MultiVOIP GSM software logs data about many aspects of the call traffic
going through the MultiVOIP GSM. The Custom Fields screen lets you pick which aspects will be included in the
email log reports.
“Custom Fields” Definitions
Field Description Field Description
Select All Log report to
include all fields shown.
Channel
Number
Duration Length of call. Packets
Packets Sent Total packets sent in call. Bytes
Bytes Sent Total bytes sent in call. Coder Voice Coder /Compression Rate used
Packets Lost Packets lost in call. Prefix
Outbound
Digits
Received
Call Status Successful or unsuccessful. DTMF
Call Direction Indicates originating party.
Server
Details
Disconnect
Reason
Gateway
Name
IP Address IP address where call originated. IP Address IP address where call was completed
Description Identifier of site where call originated. Description Identifier of site where call was
Options When selected, log will record Silence
Channel carrying call. Call Mode Voice or fax.
The DTMF dialing digits received by this
gateway from the remote gateway
presuming that DTMF is set to "Out of
Band."
The IP address of the traffic control
server (if any) being used will be
displayed here if the call is handled
through that server.
Indicates whether the call was
disconnected simply because the
desired conversation was done or
some other irregular cause occasioned
disconnection (e.g., a technical error or
failure). Values are "Normal" and
"Local" disconnection.
From Details To Details
Originating gateway Gateway
Compression and Forward Error
Correction by call originator.
Start Date,
Time
Received
Received
Matched
Call Type Indicates the Call Signaling protocol
Capability
Outbound
Digits Sent
Name
Options When selected, log will record Silence
Date and time the phone call began.
Total packets received in call.
Total bytes received in call.
for call will be listed in log.
When selected, the phonebook prefix
matched in processing the call will be
listed in log.
used for the call.
Indicates whether the DTMF dialing
digits are carried "Inband" or "Out of
Band." It can display either "Out of
Band RFC2833" or "Out of Band SIP
INFO" to indicate the out-of-band
condition or "Inband" to indicate the
in-band condition.
The dialing digits sent by this gateway
to the remote gateway presuming
that DTMF is set to "Out of Band."
Completing or answering gateway
or answered.
completed or answered.
Compression and Forward Error
Correction by party answering call.
Multi-Tech Systems, Inc. MVPGSM 42
Page 43

Chapter 4: Configuring your MVPGSM
RADIUS
In general, RADIUS is concerned with authentication, authorization, and accounting. The MultiVOIP GSM
supports the accounting and authentication functions. The accounting function is well suited for billing of VOIP
telephony services. In the Select Attributes secondary screen (accessed by clicking on Select Attributes button),
the VOIP administrator can select the parameters to be tallied by the RADIUS server.
Multi-Tech Systems, Inc. MVPGSM 43
RADIUS settings
Page 44

Chapter 4: Configuring your MVPGSM
The fields of the RADIUS screen are described in the table below.
RADIUS Screen Field Definitions
Field Name Values Description
Enable Accounting Y/N When checked, the MultiVOIP GSM will access the accounting functionality
of the RADIUS server.
Server Address n.n.n.n IP address of the RADIUS server that handles accounting (billing) for the
current MultiVOIP GSM unit.
Accounting Port 1 - 65535 TDM time slot at which RADIUS accounting information will be transmitted
and received.
Retransmission
Interval
Number of
Retransmissions
Shared Secret alpha-numeric Client encryption key for the current VOIP unit.
Select Attributes
(button)
If the MultiVOIP GSM sends out a packet to the RADIUS server and doesn't
receive a response in the retransmit interval, it will retransmit that packet
0 - 255
-- Gives access to RADIUS Attributes screen. On Attributes screen, one can
again and wait the retransmit interval again for a response. How many
times it does this is determined by the setting in the Number of
Retransmissions field.
specify the parameters to be tallied by the RADIUS server for accounting
(usually billing) purposes.
The RADIUS dialog box has a secondary dialog box, RADIUS Attributes, that allows you to customize accounting
information sent to the RADIUS server by the MultiVOIP GSM. The MultiVOIP GSM software logs data about
many aspects of the call traffic going through the MultiVOIP GSM. The RADIUS Attributes screen lets you pick
which aspects will be included in the accounting reports sent to the RADIUS server.
“RADIUS Attributes” Definitions
Field Description Field Description
Select All Log report to include all fields
shown.
Channel
Number
Duration Length of call. Call Mode Voice or fax.
Packets Sent Total packets sent in call. Packets Received Total packets received in call.
Bytes Sent Total bytes sent in call. Bytes Received Total bytes received in call.
Packets Lost Packets lost in call. Coder Voice Coder /Compression Rate used for
Outbound
Digits Sent
Call Status Successful or unsuccessful.
Server Details The IP address of the traffic control server being used will be displayed here if the call is handled
Gateway
Name
IP Address IP address where call originated. IP Address IP address where call was completed/answered.
Description Identifier of where call originated. Description Identifier of where call was
Options When selected, log will record
Channel carrying call. Start Date, Time Date and time the phone call began.
call will be listed in log.
DTMF digits received by this
gateway from remote gateway
(if that DTMF set to "Out of
Band").
through that server. The Options field refers to server features that might be activated.
From Details To Details
Originating gateway Gateway
Silence Compression and Forward
Error Correction by call originator.
Prefix Matched When selected, the phonebook prefix
matched in processing the call will be
listed in log.
Completing or answering gateway
Name
completed/answered.
Options When selected, log will record Silence
Compression and Forward Error Correction by
party answering call.
Multi-Tech Systems, Inc. MVPGSM 44
Page 45

Chapter 4: Configuring your MVPGSM
Logs/Traces
The Logs/Traces screen lets you choose how the VOIP administrator will receive log reports about the MultiVOIP
GSM’s performance and the phone call traffic that is passing through it. Log reports can be received in one of
two ways:
• in the MultiVOIP GSM program (interface), or
• via email (SMTP)
Logs and Filters screens
Multi-Tech Systems, Inc. MVPGSM 45
Page 46

Chapter 4: Configuring your MVPGSM
If you enable console messages, you can customize the types of messages to be included/excluded in log reports
by clicking on the Filters button and using the Console Messages Filter Settings screen. If you use the logging
function, select the logging option that applies to your VOIP system design. If you intend to use a SysLog Server
program for logging, click in that Enable check box. The common SysLog logical port number is 514. If you
intend to use the MultiVOIP GSM web browser interface for configuration and control of MultiVOIP GSM units,
be aware that the web browser interface does not support logs directly. However, when the web browser
interface is used, log files can still be sent to the administrator via email (which requires using SMTP logging).
“Logs” Screen Definitions
Field Name Values Description
Enable Console
Messages
Filters (button) Click to access secondary screen on where console messages can be
Turn Off Logs Y/N Check to disable log-reporting function.
Logs Buttons Only one of these log reporting methods, GUI or SMTP, may be chosen.
GUI
SMTP
SysLog Server
Enable
IP Address n.n.n.n IP address of computer, in VOIP network, on which SysLog Server program is running.
Port 514 Logical port for SysLog Server. 514 is commonly used.
Online Statistics
Updation
Interval
Y/N Allows MultiVOIP GSM debugging messages to be read via a basic terminal program
like HyperTerminal ™ or equivalent. Normally, this should be disabled because it
uses MultiVOIP GSM processing resources. Console messages are meant for IT
support personnel.
included/excluded by category and on a per-channel basis.
User must view logs at the MultiVOIP GSM configuration program.
•
Log messages will be sent to user-specified email address.
•
Y/N This box must be checked if logging is to be done in conjunction with a SysLog Server
program.
integer Set the interval (in seconds) at which logging information will be updated.
Multi-Tech Systems, Inc. MVPGSM 46
Page 47

Chapter 4: Configuring your MVPGSM
NAT Traversal
Setting the NAT (Network Address Translation) Traversal parameters. STUN (Simple Traversal of UDP through
NATs) is a protocol for assisting devices behind a NAT firewall or router with their packet routing.
NAT Traversal
Descriptions for NAT Traversal screen fields are presented in the table below.
NAT Traversal Definitions
Field Name Values Description
Enable (STUN) Y/N Enables STUN client functionality in the MultiVOIP GSM.
STUN (Simple Traversal of UDP through NATs (Network Address Translation))
is a protocol that allows a server to assist client gateways behind a NAT
firewall or router with their packet routing.
Name/IP (Server) n.n.n.n IP address of the STUN server.
Port (Server;
NAT/STUN)
Keep Alive (Timers;
NAT/STUN)
port;
default=
3478
60 – 3600
(seconds)
The data port (TDM time slot) at which STUN info will be transmitted and
received.
The interval at which the STUN client sends indicator (“Keep Alive”) packets to
the STUN server to determine whether or not the STUN server is available.
Multi-Tech Systems, Inc. MVPGSM 47
Page 48

Chapter 4: Configuring your MVPGSM
Supplementary Services
Supplementary Services features derive from the H.450 standard, - even though the H.450 standard refers only
to H.323, Supplementary Services are still applicable to the SIP VOIP protocols.
Of the features implemented under Supplementary Services, three are very closely related: Call Transfer, Call
Hold, and Call Waiting.
Call Transfer. Call Transfer allows one party to re-connect the party with whom they have been speaking to a
third party. The first party is disconnected when the third party becomes connected. Feature is used by a
programmable phone keypad sequence (for example, #*1).
Call Hold. Call Hold allows one party to maintain an idle (non-talking) connection with another party while
receiving another call (Call Waiting), while initiating another call (Call Transfer), or while performing some other
call management function. Feature is used by a programmable phone keypad sequence (for example, #*2).
Call Waiting. Call Waiting notifies an engaged caller of an incoming call and allows them to receive a call from a
third party while the party with whom they have been speaking is put on hold. Feature is used by a
programmable phone keypad sequence (for example, #*3).
Note that Supplementary Services parameters are applied on a channel-by-channel basis. However, once you
have established a set of supplementary parameters for a particular channel, you can apply this entire set of
parameters to another channel by using the Copy Channel button and its dialog box - to copy a set of
Supplementary Services parameters to all channels, select “Copy to All” and click Copy.
The Supplementary Services fields are described in the tables below.
Multi-Tech Systems, Inc. MVPGSM 48
Supplementary Services
Page 49

Chapter 4: Configuring your MVPGSM
Supplementary Services Parameter Definitions
Field Name Values Description
Select Channel 1-2 The channel to be configured is selected here.
Call Transfer Enable Y/N Select to enable the Call Transfer function in the VOIP unit.
This is a “blind” transfer and the sequence of events is as follows:
Callers A and B are having a conversation.
Caller A wants to put B into contact with C.
Caller A dials call transfer sequence.
Caller A hears dial tone and dials number for caller C.
Caller A gets disconnected while Caller B gets connected to caller C.
A brief musical jingle is played for the caller on hold.
Transfer Sequence Any phone keypad
character
Call Hold Enable Y/N Select to enable Call Hold function in VOIP unit.
Hold Sequence phone keypad
characters
Call Waiting Enable Y/N Select to enable Call Waiting function in VOIP unit.
Retrieve Sequence Phone keypad
characters, two
characters in length
Default When this button is clicked, all Supplementary Service parameters are set to their default
values.
Copy Channel Copies the Supplementary Service attributes of one channel to another channel. Attributes
can be copied to multiple channels or all channels at once.
The numbers and/or symbols that the caller must press on the
phone keypad to initiate a call transfer.
The call-transfer sequence can be 1 to 4 characters in length using
any combination of digits or characters (* or #).
Call Hold allows one party to maintain an idle (non-talking)
connection with another party while receiving another call (Call
Waiting), while initiating another call (Call Transfer), or while
performing some other call management function.
The numbers and/or symbols that the caller must press on the
phone keypad to initiate a call hold.
The call-hold sequence can be 1 to 4 characters in length using any
combination of digits or characters (* or #).
The numbers and/or symbols that the caller must press on the
phone keypad to initiate retrieval of a waiting call.
The call-waiting retrieval sequence can be 1 to 4 characters in length
using any combination of digits or characters (* or #).
This is the phone keypad sequence that a user must press to
retrieve a waiting call. Customize-able. Sequence should be distinct
from sequence that might be used to retrieve a waiting call via the
PBX or PSTN.
Multi-Tech Systems, Inc. MVPGSM 49
Page 50

Save Settings
Save & Reboot
Saving the MultiVOIP GSM Configuration. When values have been set for all of the various operating
parameters, click on Save Setup in the sidebar, then Save & Reboot.
Creating a User Default Configuration. When a “Setup” (complete grouping of parameters) is being
saved, you will be prompted about designating that setup as a “User Default” setup. A User Default
setup may be useful as a baseline of site-specific values to which you can easily revert. Establishing a
User Default Setup is optional.
Connection
Settings
This is also accessible from the Start menu in the MultiVOIP GSM software folder.
Set Baud Rate. The Connection option in the sidebar menu has a “Settings” item that includes the baudrate setting for the COM port of the computer running the MultiVOIP GSM software.
First, it is important to note that the default COM port established by the MultiVOIP GSM program is
COM1. Do not accept the default value until you have checked the COM port allocation on your PC. To
do this, check for COM port assignments in the system resource manager of your Windows operating
system. If COM1 is not available, you must change the COM port setting to a COM port that you have
confirmed as being available on your PC.
Chapter 4: Configuring your MVPGSM
Multi-Tech Systems, Inc. MVPGSM 50
COM port setup
Page 51

Chapter 4: Configuring your MVPGSM
Troubleshooting Software Issues
In the lower left corner of the screen, the connection status of the MultiVOIP GSM will be displayed.
The messages in the lower left corner will change as detection occurs. The message “MultiVOIP GSM
Found” confirms that the MultiVOIP GSM is in contact with the MultiVOIP GSM configuration program. If
the message displayed is “MultiVOIP GSM Not Found!” please try the resolutions below.
Fixing a COM Port Problem
If the MultiVOIP GSM main screen appears but is grayed out and seems inaccessible, the COM port that
was specified for its communication with the PC is unavailable and must be changed. An error message
will appear.
Error pop-up
To change the COM port setting, use the COM Port Setup dialog box, by going to the Connection pulldown menu and choosing “Settings” or use the left side control panel. In the “Select Port” field, select a
COM port that is available on the PC (if no COM ports are currently available, re-allocate COM port
resources in the computer’s MS Windows operating system to make one available).
Fixing a Cabling Problem
If the MultiVOIP GSM cannot be located by the computer, three error messages will appear (saying
“Multi-VOIP Not Found”, “Phone Database Not Read” and “Password Phone Database Not Read).
Cabling errors
In this case, the MultiVOIP GSM is disconnected from the PC running the MultiVOIP software – the cause
of which may be a bad or unplugged cable, the VOIP is turned off or the COM port is wrong or bad. For
instructions on MultiVOIP GSM cable connections, see the Cabling section of Chapter 3.
Multi-Tech Systems, Inc. MVPGSM 51
Page 52

Chapter 5 – Phone Book Configuration
Introduction
The wireless connectivity of the MVPGSM provides the cost-savings of wireless-to-wireless connections and
inexpensive long distance to an existing location. By flagging calls that would connect to a remote site with
another MultiVOIP unit or calls that are to be long distance, the MVP GSM can save money by routing those calls
through the wireless connection instead of the standard PSTN. By configuring the phone books and setting up
these routes, you can ensure that the calls placed are using the least cost possible to connect. The phone books
also provide some security by limiting what numbers may be routed through them.
The “Inbound” phonebook is created with the dialing rules required for a call to be received on that VOIP. The
“Outbound” phonebook describes dialing rules used to send calls from this VOIP, over IP, to a SIP end point.
Briefly stated, the MVPGSM’s Outbound phone book lists the phone numbers it will call; its Inbound phone book
describes the dialing sequences that can be used to call in and how those calls will be directed. The phone
numbers are not literally “listed” individually, but are, instead, described by rule, such as an area code or
beginning digit.
Below you will find some basic configurations and the accompanying phone book setups to aid in the
understanding of how the phone books work. These are not necessarily the situations where your MVPGSM
would be used, but do serve to illustrate the functionality of the phone books.
Here is a basic setup example of how the MVPGSM can be put to use:
Multi-Tech Systems, Inc. MVPGSM 52
Page 53

Chapter 5: Phonebook Configuration
Sample Configurations
¾ MVPGSM-to-MVPGSM
¾ MVPGSM as a Stand Alone Unit
¾ Analog VOIP and MVPGSM
¾ Load Balancing
General Notes
Suppose you want to call a phone number outside of your building using a phone station that is an extension
from your PBX system (if present). What digits must you dial? Often a “9” must be dialed to “get an outside line”
through the PBX (i.e., to connect to the PSTN). Generally, “1 “or “11” or “0” must be dialed as a prefix for calls
outside of the calling code area (long-distance calls, national calls, or international calls). For PBX units that have
a trunk access code, it’s important to enter the trunk access code (often a “9”) in the “Remove Prefix” field in
the Outbound Phonebook.
MVPGSM-to-MVPGSM
The basic setup would consist simply of two VOIPs able to communicate via IP address, with preset phone
numbers entered into the Phone Book of each unit, with the Inbound Phone Book of one unit containing the
exact same information as the Outbound Phone Book of the other unit and vice-versa. This is the underlying
concept behind the Phone Books – they are the reverse of each other so that they match information to
accomplish the connections. This is more applicable to analog VOIP units than the wireless, but it helps with
understanding the purpose of the Phone Book sections.
Example 1:
Example 2:
The Local VOIP has channel 1 populated with a SIM using the phone number 612-555-1234 and the
Remote VOIP has 763-555-4321 as the phone number for the SIM on channel 1. By populating the
Phone Book of each unit with the information from the other, calls can be changed as to appear
local to the receiving unit. This is the most basic setup and illustrates the concept behind the Phone
Book entries and standard VOIP operation. This direct connection then takes advantage of the
wireless connection and the calls are not charged as long-distance.
Multi-Tech VOIP units can also be set to Auto Call, in which case, either or both sides can be set to
automatically dial the other VOIP (‘612-555-1234’ or ‘763-555-4321’) when a phone number
matches the entry set to Auto Call, the MVPGSM will automatically dial the corresponding phone
number of the other VOIP unit.
MVPGSM as a Standalone Unit
Operating as a standalone unit (that is, with no corresponding VOIP unit on the receiving end), the MVPGSM can
be used as a SIP gateway to handle all long distance calls and any other call that would be less expensive if the
connection is wireless. In this case, the phone system call control module (e.g. an IP PBX) would determine the
nature of the call being placed and route it to the proper gateway. Incoming calls would be automatically routed
to the voice mail system that would then provide options for the caller to select from, e.g. a voice menu system
that informs the caller to press “0” for the operator or simply enter the digits of the extension they wish to
reach.
Multi-Tech Systems, Inc. MVPGSM 53
Page 54

Chapter 5: Phonebook Configuration
Example 3: Your company has an IP PBX system with an analog VOIP unit for local calls and direct calls to the
office in another city and an MVPGSM that will handle all long distance calls. With this setup, a call
control module handles the call routing – when an extension requests an outside line (by dialing a
“9” first, for example) the call control module then watches what the first digit after the 9 is. If that
first digit is anything other than one of the local area codes, the call is routed through the MVPGSM
to take advantage of the cost savings provided by the wireless network. If the first digit is a local call,
it is sent through the standard PSTN. The analog VOIP could also be setup to connect with a remote
office VOIP as well. In this case then, there would be another access digit (an “8” for example) to
have an extension use the analog VOIP and connect to the remote location as if it were a local call.
Analog VOIP and MVPGSM
The Any Number setup entails determining a series of numbers that the VOIP unit will recognize as needing to
be routed to the remote VOIP.
Example 4:
Load Balancing
The MVPGSM uses round robin load balancing to ensure that one or more SIMs are not used excessively while
others go largely ignored during times of light traffic. When Hunting is enabled, load balancing is done
automatically.
Example 5:
An analog VOIP and an MVPGSM are connected to the same network. Calls that are local or on the
PBX are routed by the analog VOIP, while calls that are dialed out of the local area are sent to the
MVPGSM to use the wireless network and save money. In this case, the MVPGSM is the SIP gateway
to the wireless network. Incoming calls to the MVPGSM from an external source will receive the
auto attendant and from this, external calls can access the extensions attached to the analog VOIP.
Your MVPGSM has both channels populated with Pay-as-you-go SIM cards. You do not want the
Channel 1 SIM to carry the majority of the traffic while channel 2 sits idle waiting for channel 1 to be
busy so that it is used.
Example Inbound Phone Books
The basic purpose of the Inbound Phone Book is to create rules for routing incoming IP calls. Below you will find
the Inbound Phone Book settings for the examples that were detailed in the sample Phone Book Configurations
above.
Example 1:
Local VOIP has 763-555-4321 in the Inbound Phone Book while the Remote VOIP has 612-555-1234
in the Inbound Phone Book. A user at the Local VOIP can dial 612-555-1234 and it will ring the
Remote VOIP, a user at the Remote VOIP can dial 763-555-4321 and it will ring the Local VOIP. Both
calls are treated as local area code calls.
Example 2:
Example 3:
Example 4:
Example 5:
Multi-Tech Systems, Inc. MVPGSM 54
Local VOIP has 763-555-4321 in the Inbound Phone Book while the Remote VOIP has 612-555-1234
in the Inbound Phone Book. A user at the Local analog VOIP can pick up an attached phone and it
will ring the Remote GSM VOIP. The call is treated as a local area code call. The Auto-Call feature is
set in the Voice Parameters section.
The Inbound Phone Book for this setup will be set to Any Number for all channels, allowing all digits
and relying on the call control module to handle the routing.
The outbound number on the analog side matches the inbound number on the MVPGSM. The
Inbound Phone Book of the analog VOIP will list the phone number of the MVPGSM.
Your Inbound phone book will have one entry that has “Hunting” selected for the ‘Channel Number’
selection box. The other fields will be populated per your setup, but the ‘Any Number’ selection is
used in this example to allow any call, all other entries here must have ‘Hunting’ enabled as well to
use the load balancing feature.
Page 55

Chapter 5: Phonebook Configuration
Example Outbound Phone Books
The Outbound Phone Book is the director of where calls will be routed – whether that is to a specific phone
number (Any Number) or to the IP address of a remote VOIP unit for resending as a local call or out to the
wireless network to take advantage of wireless plan savings. Below you will find the Outbound Phone Book
settings for the examples that were detailed in the sample Phone Book Configurations above.
Example 1:
Example 2:
Example 3:
Example 4:
Example 5:
Local VOIP has 612-555-1234 in the Outbound Phone Book while the Remote VOIP has 763-555-4321
in the Outbound Phone Book a. A user at the Local VOIP can pick up an attached phone and dial 763555-4321 and it will ring the Remote VOIP, a user at the Remote VOIP can pick up an attached line
and dial 612-555-1234 and it will ring the Local VOIP. Both calls are treated as local area code calls.
Local VOIP has 612-555-1234 in the Outbound Phone Book while the Remote VOIP has 763-555-4321
in the Outbound Phone Book a. A user at the Local VOIP can pick up an attached phone and it will
ring the Remote VOIP, a user at the Remote VOIP can pick up an attached line and it will ring the
Local VOIP. Both calls are treated as local area code calls.
The Auto-Call feature is set in the Voice Parameters section.
The Outbound Phone Book is set to the destination pattern number of the auto attendant. In this
example the MVPGSM would also be setup to use a proxy (the call control module).
The Outbound Phone Book of the MVPGSM will have the phone number of the analog VOIP routed
to the IP address of the analog VOIP. The Outbound Phone Book of the analog VOIP will have the
phone number of the MVPGSM.
The Outbound phone book in this example is simply going to be set at ‘Any Number’ as well – the
purpose is to have load balancing occur between the channels and allow all traffic to pass through
the MVPGSM in a round robin manner to avoid the channel one SIM using more minutes than the
other channel SIMs.
Multi-Tech Systems, Inc. MVPGSM 55
Page 56

Chapter 5: Phonebook Configuration
Phone Book Descriptions
Outbound Phone Book/List Entries
Fields in the “Details” section that are grayed out are not used by the SIP protocol.
Outbound Phone Book
Multi-Tech Systems, Inc. MVPGSM 56
Page 57

Add/Edit Outbound Phone Book
Chapter 5: Phonebook Configuration
Add/Edit screen
Enter Outbound Phone Book data for your MultiVOIP GSM unit. Note that the Advanced button gives access to
the Alternate IP Routing feature, if needed. Alternate IP Routing can be implemented in a secondary screen (as
described after the primary screen field definitions below).
The fields of the Add/Edit Outbound Phone Book screen are described in the table below.
Multi-Tech Systems, Inc. MVPGSM 57
Page 58

Chapter 5: Phonebook Configuration
Add/Edit Outbound Phone Book: Field Definitions
Field Name Values Description
Accept Any
Number
Destination
Pattern
Total Digits as needed Number of digits the phone user must dial to reach specified destination.
Remove Prefix dialed digits Portion of dialed number to be removed before remaining digits are sent to
Add Prefix dialed digits Digits to be added before routing the call to the address below.
IP Address n.n.n.n The IP address to which the call above will be routed with the destination
Description alpha-numeric This description will be sent as Caller ID information.
Protocol Type SIP Indicates protocol to be used in outbound transmission.
Y/N When checked, “Any Number” appears as the value in the Destination
Pattern field.
The Any Number feature works differently depending on whether or not an
external routing device is used (Proxy for SIP protocol).
When no external routing device is used. If Any Number is selected, calls
to phone numbers not matching a listed Destination Pattern will be
directed to the IP Address in the Add/Edit Outbound Phone Book screen.
“Any Number” can be used in addition to one or more Destination Patterns.
When external routing device is used. If Any Number is selected, calls to
phone numbers not matching a listed Destination Pattern will be directed
to the external routing device used (Proxy for SIP protocol). The IP Address
of the external routing device must be set in the Phone Book Configuration
screen.
prefixes,
area codes,
exchanges,
line numbers,
extensions
Defines the beginning of dialing sequences for calls that will be routed to a
SIP end point on the IP network. This is the phone number or beginning
portion of the phone number for calls that are to be routed to the IP
address listed below.
This field not used in North America
their destination.
pattern given.
SIP Fields
Use Proxy Y/N Select if proxy server is used.
Transport
Protocol
SIP Port
Number
SIP URL sip.userphone@hostserver,
TCP or
UDP
5060 or other
*See RFC 3087 (“Control of
Service Context using SIP
Request-URI,” by the
Network Working Group).
where “userphone” is the
telephone number and
“hostserver” is the domain
name or an address on the
network
VOIP administrator must choose between UDP and TCP transmission
protocols. UDP is a high-speed, low-overhead connectionless
protocol where data is transmitted without acknowledgment,
guaranteed delivery, or guaranteed packet sequence integrity. TCP is
slower connection-oriented protocol with greater overhead, but
having acknowledgment and guarantees delivery and packet
sequence integrity.
The SIP Port Number is a UDP logical port number. The VOIP will
“listen” for SIP messages at this logical port. If SIP is used, 5060 is the
default, standard or “well known” port number to be used. If 5060 is
not used, then the port number used is that specified in the SIP
Request URI (Universal Resource Identifier).
Looking similar to an email address, a SIP URL identifies a user's
address.
In SIP communications, each caller or callee is identified by a SIP URL:
sip:user_name@host_name. The format of a sip URL is very similar
to an email address, except that the “sip:“ prefix is used.
Multi-Tech Systems, Inc. MVPGSM 58
Page 59

Chapter 5: Phonebook Configuration
Clicking on the Advanced button brings up the Alternate Routing secondary screen. This feature provides an
alternate path for calls if the primary IP network cannot or does not respond within the timeframe of the Round
Trip Delay. Often in cases of failure, call traffic is temporarily diverted into the PSTN. However, this feature could
also be used to divert traffic to a redundant (backup) unit in case one SIP end point fails. The user must specify
the IP address of the alternate route for each destination pattern entry in the Outbound Phonebook.
Advanced button
Alternate Routing Field Definitions
Field Name Values Description
Alternate IP
Address
Round Trip
Delay
n.n.n.n Alternate destination for call traffic in case of excessive network delay.
Default is
300
milliseconds
The Round Trip Delay is the criterion for judging when a data pathway is
considered blocked. When the delay exceeds the threshold specified here, the
data stream will be diverted to the alternate destination specified as the
Alternate IP Address.
The Alternate Routing function facilitates PSTN Failover protection, that is, it allows you to re-route VOIP calls
automatically if the VOIP system fails. The MultiVOIP GSM can be programmed to respond to excessive delays in
the transmission of voice packets, which the MultiVOIP GSM interprets as a failure of the IP network. Upon
detecting an excessive delay in transmission of voice packets (overly high “latency” in the network) the
MultiVOIP GSM diverts the call to another of its channels, allowing the call to go back out to the wireless
network to reach the remote end using a land line.
Multi-Tech Systems, Inc. MVPGSM 59
Page 60

Chapter 5: Phonebook Configuration
Inbound Phone Book/List Entries
The “Details” and “Registration Options” sections will display information based on the setup and protocols
chosen.
Inbound phonebook entries
Multi-Tech Systems, Inc. MVPGSM 60
Page 61

Add/Edit Inbound Phone Book
Chapter 5: Phonebook Configuration
Multi-Tech Systems, Inc. MVPGSM 61
Add/Edit Inbound Phone Book
Page 62

Chapter 5: Phonebook Configuration
Enter Inbound Phone Book data for your MultiVOIP GSM. The fields of the Add/Edit Inbound Phone Book screen
are described in the table below.
Add/Edit Inbound Phone Book: Field Definitions
Field Name Values Description
Accept Any
Number
Remove Prefix dialed digits Portion of digits to be removed from the incoming IP call before initiating a call
Add Prefix dialed digits Digits to be added to the incoming IP call after digits are removed (if any) but
Channel
Number
Description -- Optional description field.
Call Forward Parameters
Enable Y/N Click the check-box to enable the call-forwarding feature.
Forward
Condition
Forward
Destination
Ring Count integer When “No Response” is condition for forwarding calls, this determines how
Registration
Option
Parameters
Y/N When checked, “Any Number” appears as the value in the Remove Prefix field.
The Any Number feature of the Inbound Phone Book does not work when an
external routing device is used (Proxy for SIP protocol).
When no external routing device is used. If Any Number is selected, calls
received from phone numbers not matching a listed Prefix (shown in the
Remove Prefix column of the Inbound Phone Book) will be admitted into the
VOIP on the channel listed in the Channel Number field. “Any Number” can be
used in addition to one or more Prefixes.
on the wireless network using the remaining digits.
before initiating a call on the wireless network.
channel, or
“Hunting”
Unconditional,
Busy,
No Response
IP address,
phone
number, port
number, etc
In a SIP VOIP system, gateways can register with the SIP Proxy.
Wireless VOIP channel which the incoming IP call will be routed to. “Hunting”
directs the call to any available channel and enables load balancing to keep one
channel from being used more often than another.
Unconditional. When selected, all calls received will be forwarded.
Busy. When selected, calls will be forwarded when station is busy.
No Response. When selected, calls will be forwarded if called party does not
answer after a specified number of rings, as specified in Ring Count field.
Forwarding can be conditioned on both “Busy” and “No Response
Phone number or IP address to which calls will be directed.
For SIP calls, the Forward Destination can be one of the following:
(a) phone number,
(b) IP address,
(c) IP address: port number,
(d) phone number: IP address: port number,
(e) SIP URL, or
(f) phone #: IP address.
many unanswered rings are needed to trigger the forwarding.
Multi-Tech Systems, Inc. MVPGSM 62
Page 63

Chapter 5: Phonebook Configuration
Authorized User Name and Password for SIP
To enable the Registration Options on the Add/Edit Inbound Phone Book, you have to activate Use SIP
Proxy Option on the Call Signaling, SIP Parameters Screen. Then add the IP address for the Primary Proxy
in the SIP Proxy Parameters. This allows you to add a Username and Password to the Inbound Phone
Book entry.
This feature is used when the MultiVOIP GSM registers with the proxies that support authorization and
need the username, password and the endpoint name to be unique.
The VOIP sends Register request to Registrar for each entry with its configured Username and Password.
When Authentication is enabled for the endpoint, then the registrar/proxy sends “401
Unauthorized/407 Proxy Authentication Required” response when it receives a REGISTER/INVITE
request. Now, the endpoint has to send the authentication details in the Authorization header. In this
header one of the fields is “username”.
Generally proxies accept requests even if both Endpoint Name and Username are same. But some
proxies expect that the Endpoint Name and Username should be different.
To support these proxies, we have the username and password configuration for every inbound phone
book entry which gets registered with a proxy.
If the username and password are not configured in the inbound phone book, then the registration will
happen with the default username and password that are configured in the SIP Call Signaling Page.
Phone Book Save and Reboot
When your Outbound and Inbound Phonebook entries are completed, click on Save Setup in the sidebar menu
to save your configuration. You can change your configuration at any time as needed for your system.
Remember that the initial MultiVOIP GSM setup must be done locally using the MultiVOIP GSM program. After
the initial configuration is complete, all of the MultiVOIP GSM units in the VOIP system can be configured, reconfigured, and updated from one location using the MultiVOIP GSM web interface software program or the
MultiVOIP GSM program.
Multi-Tech Systems, Inc. MVPGSM 63
Page 64

Chapter 6 – Using the Software
Introduction
This chapter will primarily cover the day to day operation and maintenance sections of the MultiVOIP GSM
software. How to update the firmware and software are also covered here should either be needed. This section
will mainly focus on the Statistics section of the configuration software, but there are references to a few of the
other sections as they are used more in the daily operations than in a setup situation.
Software Categories Covered in This Chapter
¾ System Information
¾ Call Progress
¾ Logs
¾ IP Statistics
¾ Link Management
¾ Registered Gateway Details
¾ Servers
o SIP Proxies
¾ Advanced
o Packetization Time
Multi-Tech Systems, Inc. MVPGSM 64
Page 65

Chapter 6: Using the Software
System Information screen
This screen presents system information at a glance. It is found under the Configuration section and its primary
use is in troubleshooting. The information presented in the figure below is for reference only and is not meant
to be an exact match of your system.
System information screen
System Information Parameter Definitions
Field Name Values Description
Boot Version nn.nn
alphanumeric
Firmware Version nn.nn.nn
alphanumeric
Configuration
Version
Phone Book Version nn.nn
Module n Module
Mac Address numeric Denotes the number assigned as the VOIP unit’s unique MAC address.
Up Time days:
Hardware ID alpha-
nn.nn.
nn.nn
alphanumeric
alphanumeric
Info
hours:
mm:ss
numeric
Indicates the version of the boot code that is running on the VOIP. The boot
code version is independent of the software version.
Indicates the version of the MultiVOIP GSM firmware.
Indicates the version of the MultiVOIP GSM configuration software.
Indicates the version of the MultiVOIP GSM phone book being used.
This will display the model information of the internal wireless modems.
Indicates how long the VOIP has been running since its last booting.
Indicates version of the MultiVOIP GSM circuit board assembly being used.
The frequency with which the System Information screen is updated is determined by a setting in the
Logs/Traces screen (“Online Statistics Updation Interval”).
Multi-Tech Systems, Inc. MVPGSM 65
Page 66

Chapter 6: Using the Software
Statistics Section
Ongoing operation of the MVPGSM, whether it is in a MVPGSM/PBX setting or MVPGSM/telco-office setting,
can be monitored for performance using the Statistics functions of the MVPGSM software. The following screens
are examples of what can be shown and are followed by detailed descriptions of the categories involved. The
model and signaling used will affect what is available for display.
Call Progress
Multi-Tech Systems, Inc. MVPGSM 66
Call progress screen
Page 67

Chapter 6: Using the Software
Call Progress Details: Field Definitions
Field Name Values Description
Channel 1-n This is the channel for which call-progress details are being viewed.
Call Details
Duration H/M/S The length of the call in hours, minutes, and seconds (hh:mm:ss).
Mode Voice or FAX Indicates whether the call being described was a voice call or a FAX call.
Voice Coder G.723, G.729,
G.711, etc.
IP Call Type SIP Indicates the Call Signaling protocol used for the call (SIP).
IP Call Direction incoming,
outgoing
Packet Details
Packets Sent integer value Number of voice packets sent over IP network in the course of this call.
Packets Rcvd integer value Number of voice packets received over IP network during this call.
Bytes Sent integer value Number of bytes sent over IP network in the course of this call.
Bytes Rcvd integer value Number of bytes received over IP network in the course of this call.
Packets Lost integer value Number of voice packets lost in the course of this call.
From – To Details Description
Gateway Name
(from)
IP Address (from) n.n.n.n IP address for the SIP end point that originated the call.
Options SC, FEC Displays VOIP transmission options in use on the current call. These may
Gateway Name (to) alphanumeric Identifier for the VOIP gateway that received the call.
IP Address (to) n.n.n.n IP address for the VOIP gateway that received the call.
Options SC, FEC Displays VOIP transmission options in use on the current call
DTMF/Other Details
Prefix Matched specified
Outbound Digits Sent 0-9, #, * The digits transmitted by the MultiVOIP GSM for this call.
Outbound Digits
Received
Server Details n.n.n.n
DTMF Capability inband,
Table is continued on next page…
alphanumeric
string
dialing digits
0-9, #, * Of the digits transmitted by the MultiVOIP GSM for this call; these are the
and/or other
related
descriptions
out of band
Expressions
differ slightly
for different
Call Signaling
protocols.
The voice coder being used on this call.
Indicates whether the call in question is an incoming call or an outgoing
call.
Identifier for the SIP end point gateway that originated the call.
include Forward Error Correction or Silence Compression.
Displays the dialed digits that were matched to a phonebook entry.
digits that were confirmed as being received.
The IP address (etc.) of the traffic control server (if any) being used (SIP
proxy) will be displayed here if the call is handled through that server.
Indicates whether the DTMF dialing digits are carried "Inband" or "Out of
Band."
For SIP it can display either "Out of Band RFC2833" or "Out of Band SIP
INFO" to indicate the out-of-band condition or "Inband" to indicate the
in-band condition.
Multi-Tech Systems, Inc. MVPGSM 67
Page 68

Chapter 6: Using the Software
Call Progress Details: Field Definitions (continued)
Field Name Values Description
Supplementary Services Status
Call on Hold alphanumeric Describes held call by its IP address source, location/gateway identifier,
and hold duration. Location/gateway identifiers come from Gateway
Name field in Phone Book Configuration screen of remote VOIP.
Call Waiting alphanumeric Describes waiting call by its IP address source, location/gateway
identifier, and hold duration. Location/gateway identifiers come from
Gateway Name field in Phone Book Configuration screen of remote
VOIP.
Caller ID “Calling Party
+ identifier”;
“Alerting Party
+ identifier”;
“Busy Party
+ identifier”;
“Connected
Party +
identifier”
Call Status fields
Call Status hangup, active Shows condition of current call.
Wireless Module
Status
SIM Registration
Status
Signal Strength 0-99 0-3 is an insufficient signal for use.
Note section
(Options & Signal Strength Ranges)
Reset (button) - Clicking this button will reset the channel including the wireless module.
Disconnect (button)
ready,
registering
“registered
to…”, not
registered
-
This field shows the identifier and status of a remote VOIP (which has Call
Name Identification enabled) with which this VOIP unit is currently
engaged in some VOIP transmission. The status of the engagement
(Connected, Alerting, Busy, or Calling) is followed by the identifier of a
specific channel of a remote VOIP unit. This identifier comes from the
“Caller Id” field in the Supplementary Services screen of the remote VOIP
unit.
This displays the current status of the wireless module on this channel.
This shows the registration status of the module on this channel.
4-9 is a low strength signal that is usable.
10-19 is a medium strength and is a good connection.
20-31 is a high strength and is an excellent connection.
99 means there is no signal at all.
“SC” stands for Silence Compression. With Silence Compression enabled,
the MultiVOIP GSM will not transmit voice packets when silence is
detected, thereby reducing the amount of network bandwidth that is
being used by the voice channel.
“FEC” stands for Forward Error Correction. Forward Error Correction
enables some of the voice packets that were corrupted or lost to be
recovered. FEC adds an additional 50% overhead to the total network
bandwidth consumed by the voice channel.
Clicking this button will disconnect the current connection on this
channel.
Multi-Tech Systems, Inc. MVPGSM 68
Page 69

Logs
Chapter 6: Using the Software
Log statistics screen
The table below describes the fields of the Logs screen.
Multi-Tech Systems, Inc. MVPGSM 69
Page 70

Chapter 6: Using the Software
Logs Screen Details: Field Definitions
Field Name Values Description
Log # column 1 or higher All calls are assigned an event number in chronological order, with the
most recent call having the highest event number.
Start Date, Time
column
Duration column hh:mm:ss This describes how long the call lasted in hours, minutes, and seconds.
Type SIP Indicates the Call Signaling protocol used for the call (SIP).
Status column success or failure Displays the status of the call (whether the call was completed or not).
IP Direction Incoming,
Mode column voice or FAX Shows if the event being described was a voice call or a FAX call.
From column gateway name Displays the name of the voice gateway that originates the call.
To column gateway name Displays the name of the voice gateway that completes the call.
Special Buttons
Previous -- Displays log entry before currently selected one.
Next -- Displays log entry after currently selected one.
First -- Displays first log entry
Last -- Displays last log entry.
Delete File -- Deletes selected log file.
Call Details
Voice coder Coder protocol The voice coder being used on this call.
Disconnect Reason "Normal" or
DTMF Capability inband,
Outbound Digits
Received
Outbound Digits Sent 0-9, #, * These are the digits received from the wireless network and sent to the
Server Details n.n.n.n When the MultiVOIP GSM is operating in the non-direct mode (with
Packets sent integer value Number of voice packets sent over the IP network during this call.
Packets received integer value Number of voice packets received over the IP network in the course of
Packets lost integer value Number of voice packets from this call that were lost after being received
Bytes sent integer value
Bytes received integer value Number of bytes of voice received over the IP network during this call.
FROM Details
Gateway Name alphanumeric Identifier for the VOIP gateway that originated this call.
IP Address n.n.n.n IP address for the VOIP gateway that originated this call.
Options FEC, SC Displays transmission options used by the gateway originating the call.
TO Details
Gateway Name alphanumeric Identifier for the VOIP gateway that received this call.
IP Address n.n.n.n IP address for the VOIP gateway that received this call.
Options Displays transmission options used by VOIP gateway receiving the call.
Supplementary Services Info
Call Transferred To phone number Number of party called in transfer.
Call Forwarded To phone number Number of party called in forwarding.
dd:mm:yyyy
hh:mm:ss
outgoing
"Local"
out of band
0-9, #, * These are the digits received from the remote SIP end point that are used
The starting time of the call. The date is presented as a day and a month
of one or two digits, and a four-digit year, followed by a time-of-day.
Shows call "incoming" or "outgoing" with respect to the gateway.
Indicates whether the call was disconnected simply because the desired
conversation was done or some other irregular cause.
Indicates whether the DTMF dialing digits are carried "Inband" or "Out of
Band." The corresponding field values differ for the 3 different VOIP
protocols. For SIP it can display either "Out of Band RFC2833" or "Out of
Band SIP INFO" to indicate the out-of-band condition or "Inband" to
indicate the in-band condition.
to initiate a call out on the wireless network.
remote SIP end point to place a call.
proxy in SIP mode), this field shows the IP address of the server that is
directing IP phone traffic.
this call.
from the IP network.
Number of bytes of voice sent over the IP network during this call.
Multi-Tech Systems, Inc. MVPGSM 70
Page 71

IP Statistics
Chapter 6: Using the Software
IP statistics screen
UDP versus TCP. (User Datagram Protocol versus Transmission Control Protocol). UDP provides unguaranteed,
connectionless transmission of data across an IP network. By contrast, TCP provides reliable, connectionoriented transmission of data.
Both TCP and UDP split data into packets called “datagrams.” However, TCP includes extra headers in the
datagram to enable retransmission of lost packets and reassembly of packets into their correct order if they
arrive out of order. UDP does not provide this. Lost UDP packets are irretrievable; that is, out-of-order UDP
packets cannot be reconstituted in their proper order.
Despite these obvious disadvantages, UDP packets can be transmitted much faster than TCP packets -- as much
as three times faster. In certain applications, like audio and video data transmission, the need for high speed
outweighs the need for verified data integrity. Sound or pictures often remain intelligible despite a certain
amount of lost or disordered data packets (which comes through as static).
Multi-Tech Systems, Inc. MVPGSM 71
Page 72

Chapter 6: Using the Software
IP Statistics: Field Definitions
Field Name Values Description
IP Address n.n.n.n IP address of the MultiVOIP GSM. For an IP address to be displayed here, the MultiVOIP
GSM must have DHCP enabled. Its IP address, in such a case, is assigned by the DHCP
server.
“Clear” button -- Clears packet tallies from memory.
Total Packets Sum of packets of all types.
Transmitted integer
value
Received integer
value
Received with
Errors
integer
value
UDP Packets User Datagram Protocol packets.
Transmitted integer
value
Received integer
value
Received with
Errors
integer
value
TCP Packets Transmission Control Protocol packets.
Transmitted integer
value
Received integer
value
Received with
Errors
integer
value
RTP Packets
Transmitted integer
value
Received integer
value
Received with
Errors
integer
value
RTCP Packets
Transmitted integer
value
Received integer
value
Received with
Errors
integer
value
Total number of packets transmitted by this VOIP gateway since the last “clearing” or
resetting of the counter within the MultiVOIP GSM software.
Total number of packets received by this VOIP gateway since the last “clearing” or
resetting of the counter within the MultiVOIP GSM software.
Total number of error-laden packets received by this VOIP gateway since the last
“clearing” or resetting of the counter within the MultiVOIP GSM software.
Number of UDP packets transmitted by this VOIP gateway since the last “clearing” or
resetting of the counter within the MultiVOIP GSM software.
Number of UDP packets received by this VOIP gateway since the last “clearing” or
resetting of the counter within the MultiVOIP GSM software.
Number of error-laden UDP packets received by this VOIP gateway since the last
“clearing” or resetting of the counter within the MultiVOIP GSM software.
Number of TCP packets transmitted by this VOIP gateway since the last “clearing” or
resetting of the counter within the MultiVOIP GSM software.
Number of TCP packets received by this VOIP gateway since the last “clearing” or
resetting of the counter within the MultiVOIP GSM software.
Number of error-laden TCP packets received by this VOIP gateway since the last
“clearing” or resetting of the counter within the MultiVOIP GSM software.
Voice signals are transmitted in Realtime Transport Protocol packets. RTP packets are a
type or subset of UDP packets.
Number of RTP packets transmitted by this VOIP gateway since the last “clearing” or
resetting of the counter within the MultiVOIP GSM software.
Number of RTP packets received by this VOIP gateway since the last “clearing” or
resetting of the counter within the MultiVOIP GSM software.
Number of error-laden RTP packets received by this VOIP gateway since the last
“clearing” or resetting of the counter within the MultiVOIP GSM software.
Realtime Transport Control Protocol packets convey control information to assist in the
transmission of RTP (voice) packets. RTCP packets are a type or subset of UDP packets.
Number of RTCP packets transmitted by this VOIP gateway since the last “clearing” or
resetting of the counter within the MultiVOIP GSM software.
Number of RTCP packets received by this VOIP gateway since the last “clearing” or
resetting of the counter within the MultiVOIP GSM software.
Number of error-laden RTCP packets received by this VOIP gateway since the last
“clearing” or resetting of the counter within the MultiVOIP GSM software.
Multi-Tech Systems, Inc. MVPGSM 72
Page 73

Chapter 6: Using the Software
Link Management
The Link Management screen is essentially an automated utility for pinging endpoints on your VOIP network.
This utility generates pings of variable sizes at variable intervals and records the response to the pings.
Link management
Link Management screen Field Definitions
Field Name Values Description
Monitor Link fields
IP Address to Ping n.n.n.n This is the IP address of the target endpoint to be pinged.
Pings per Test 1-999 This field determines how many pings will be generated by the Start Now
command.
Response Timeout 500 – 5000
milliseconds
Ping Size in Bytes 32 – 128 bytes This field determines how long or large the ping will be.
Timer Interval
between Pings
Start Now button -- Initiates pinging.
Clear button -- Erases ping parameters in Monitor Link field group and restores default
Link Status Parameters These fields summarize the results of pinging.
IP Address column n.n.n.n Target of ping.
No. of Pings Sent as listed Number of pings sent to target endpoint.
No. of Pings Received as listed Number of pings received by target endpoint.
Round Trip Delay
(Min/Max/Avg)
Last Error as listed Indicates when last data error occurred.
0 or 30 – 6000
minutes
as listed,
in milliseconds
The duration after which a ping will be considered to have failed.
This field determines how long of a wait there is between one ping and
the next.
values.
Displays how long it took from time ping was sent to time ping response
was received.
Multi-Tech Systems, Inc. MVPGSM 73
Page 74

Chapter 6: Using the Software
Servers
SIP Proxies
This window lists all the SIP proxy servers configured and the active server with which the system is
registered.
SIP proxies
SIP Proxies (Statistics, Servers): Field Definitions
Field Name Values Description
Column Headings
IP Address n.n.n.n The IP address of the SIP proxy by which the MultiVOIP GSM is governed.
Port port SIP signaling port used for communication between MultiVOIP GSM unit and
the SIP Proxy that governs it.
Type Primary,
Alternate
Status registered,
not registered
This field describes the type of gateway the MultiVOIP GSM is defined as with
respect to the SIP proxy server.
The current status of the MultiVOIP GSM gateway with respect to the SIP
proxy either registered or unregistered.
Multi-Tech Systems, Inc. MVPGSM 74
Page 75

Advanced
Packetization Time
You can use the Packetization Time screen to specify definite packetization rates for coders selected in
the Voice/FAX Parameters screen (in the “Coder Options” group of fields). The Packetization Time
screen is accessible under the “Advanced” options entry in the sidebar list of the main VOIP software
screen. In dealing with RTP parameters, the Packetization Time screen is closely related to both
Voice/FAX Parameters and to IP Statistics. It is located in the “Advanced” group for ease of use.
Chapter 6: Using the Software
Packetization rates can be set separately for each channel.
The table below presents the ranges and increments for packetization rates. The final column represents
recommended settings (based on the most common found) when operating with third party devices.
Packetization Ranges and Increments Recommendations
Coder Types Range (in Kbps); {default} Increments (in Kbps) Setting (in ms)
G711, G726, G727 5-120 {5} 5 20
G723 30-120 {30} 30 30
G729 10-120 {10} 10 20
NetCoder 20-120 {20} 20 20
Once the packetization rate has been set for one channel, it can be copied into other channels by using
the Copy Channel button on the Packetization Time screen. Simply click the boxes next to the channels
you wish to copy the settings for.
Multi-Tech Systems, Inc. MVPGSM 75
Packetization time
Page 76

Chapter 6: Using the Software
MultiVOIP GSM Program Menu Items
After the MultiVOIP GSM program is installed on the PC, it can be launched from the Programs group of the
Windows Start menu ( Start | Programs | MultiVOIP GSM x.xx | … ). In this section, we describe the software
functions available on this menu.
Several basic software functions are accessible from the MultiVOIP GSM software menu, as shown below.
MultiVOIP GSM Program Menu
Menu Selection Description
Configuration Select this to enter the Configuration program where values for IP, telephony,
and other parameters are set.
Configuration Port Setup Select this to access the COM Port Setup screen of the MultiVOIP GSM
Configuration program.
Date and Time Setup Select this for access to set calendar/clock used for call logging.
Download ATTable Select this to download the current set of SIP protocols. This is generally only
needed in conjunction with a firmware update.
Download Factory Defaults Select this to return the configuration parameters to the original factory values.
Download User Defaults To be used after a full set of parameter values, values specified by the user,
have been saved (using Save Setup). This command loads the saved user
defaults into the MultiVOIP GSM.
Set Password Select this to create a password for access to the MultiVOIP GSM software
programs (Program group commands, Windows interface, web browser
interface, & FTP server). Only the FTP Server function requires a password for
access. The FTP Server function also requires that a username be set along with
the password.
Uninstall Select this to uninstall the MultiVOIP GSM software (most, but not all
components are removed from computer when this command is used).
Upgrade Software Loads firmware and settings from the controller PC to the MultiVOIP GSM unit.
User can choose whether to load Factory Default Settings or Current
Configuration settings.
“Downloading” here refers to transferring program files from the PC to the nonvolatile “flash” memory of the
MultiVOIP GSM. Such transfers are made via the PC’s serial port. This can be understood as a “download” from
the perspective of the MultiVOIP GSM unit.
When new versions of the MultiVOIP GSM software become available, they will be posted on Multi-Tech’s
website. Although transferring updated program files from the Multi-Tech website to the user’s PC can
generally be considered a download (from the perspective of the PC), this type of download cannot be initiated
from the MultiVOIP GSM software’s Program menu command set.
Multi-Tech Systems, Inc. MVPGSM 76
Page 77

Chapter 6: Using the Software
Setting and Downloading User Defaults
The Download User Defaults command allows you to maintain a known working configuration that is specific to
your VOIP system. You can then experiment with alterations or improvements to the configurations confident
that a working configuration can be restored if necessary.
1. Before you can use the Download User Defaults command, you must first save a set of configuration
parameters by using the Save Setup command in the sidebar menu of the MultiVOIP GSM software.
Save & Reboot
2. Before the setup configuration is saved, you will be prompted to save the setup as the User Default
Configuration. Select the checkbox and click OK.
A user default file will be created. The MultiVOIP GSM unit will reboot itself.
3. To download the user defaults, go to Start | Programs | MultiVOIP GSM x.xx | Download User Defaults.
4. A confirmation screen will appear indicating that this action will entail rebooting the MultiVOIP GSM.
Confirmation screen
Click OK.
5. Progress bars will appear during the file transfer process.
Progress bars
6. When the file transfer process is complete, the Dialog / IP Parameters screen will appear.
7. Set the IP values per your particular VOIP system. Click OK. Progress bars will appear as the MultiVOIP GSM
reboots itself.
Multi-Tech Systems, Inc. MVPGSM 77
Dialog screen
Page 78

Setting a Password
Windows Interface
After a user name has been designated and a password has been set, that password is required to gain
access to any functionality of the MultiVOIP GSM software. Only one user name and password can be
assigned to a VOIP unit. The user name will be required when communicating with the MultiVOIP GSM
via the web browser interface.
NOTE: Record your user name and password in a safe place. If the password is lost, forgotten, or
irretrievable, the user must contact Multi-Tech Tech Support in order to resume use of the MultiVOIP
GSM unit.
1. The MultiVOIP GSM configuration program must be off when invoking the Set Password command. If
it is on, the command will not work.
2. To use the Set Password command, go to Start | Programs | MultiVOIP GSM x.xx | Set Password.
3. You will be prompted to confirm that you want to establish a password, which will entail rebooting
the MultiVOIP GSM (which is done automatically).
Click OK to proceed with establishing a password.
4. The Password screen will appear. If you intend to use the FTP Server function that is built into the
MultiVOIP GSM, enter a user name. (A User Name is not needed to access the local Windows
interface, the web browser interface, or the commands in the Program group.) Type your password in
the Password field of the Password screen. Type this same password again in the Confirm Password
field to verify the password you have chosen.
NOTE: Be sure to write down your password in a convenient but secure place. If the password is
forgotten, contact Multi-Tech Technical Support for advice.
Chapter 6: Using the Software
Click OK.
5. A message will appear indicating that a password has been set successfully.
After the password has been set successfully, the MultiVOIP GSM will re-boot itself and, in so doing,
its BOOT LED will light up.
6. After the password has been set, the user will be required to enter the password to gain access to the
web browser interface and any part of the MultiVOIP GSM software listed in the Program group
menu. User Name and Password are both needed for access to the FTP Server residing in the
MultiVOIP GSM.
Multi-Tech Systems, Inc. MVPGSM 78
Password screen
Page 79

Chapter 6: Using the Software
Password verification
When the MVPGSM program asks for the password at launch of program, if CANCEL is selected, the
program will simply shut down.
The MVPGSM program will produce an error message if an invalid password is entered.
Invalid password
Web Browser Interface
Setting a password is optional when using the MultiVOIP GSM web browser interface. Only one
password can be assigned and it works for all MultiVOIP GSM software functions (Windows interface,
web browser interface, FTP server, and all Program menu commands, e.g., Upgrade Software – only the
FTP Server function requires a User Name in addition to the password). After a password has been set,
that password is required to access the MultiVOIP GSM web browser interface.
NOTE: Record your user name and password in a safe place. If the password is lost, forgotten, or
irretrievable, the user must contact Multi-Tech Tech Support in order to resume use of the MultiVOIP
GSM web browser interface.
Web interface password change
Multi-Tech Systems, Inc. MVPGSM 79
Page 80

Chapter 6: Using the Software
Upgrading Software
As noted earlier, the Upgrade Software command transfers from the controller PC to the MultiVOIP GSM unit.
The settings can be either Factory Default Settings or Current Configuration Settings.
Upgrade software path
Multi-Tech Systems, Inc. MVPGSM 80
Page 81

Chapter 6: Using the Software
FTP Server File Transfers (“Downloads”)
Multi-Tech has built an FTP server into the MultiVOIP GSM unit. Therefore, file transfers from the controller PC
to the VOIP unit can be done using an FTP client program or even using a browser (e.g., Internet Explorer,
Netscape, or Firefox, used in conjunction with Windows Explorer).
The terminology of “downloads” and “uploads” gets a bit confusing in this context. File transfers from a client to
a server are typically considered “uploads.” File transfers from a large repository of data to machines with less
data capacity are considered “downloads.” In this case, these metaphors are contradictory: the FTP server is
actually housed in the MultiVOIP GSM unit, and the controller PC, which is actually the repository of the info to
be transferred, uses an FTP client program. In this situation, we have chosen to call the transfer of files from the
PC to the VOIP “downloads.” (Be aware that some FTP client programs may use the opposite terminology, i.e.,
they may refer to the file transfer as an “upload “)
You can download firmware, default configuration parameters, and phonebook data for the MultiVOIP GSM unit
with this FTP functionality. These downloads are done over a network, not by a local serial port connection.
Consequently, VOIPs at distant locations can be updated from a central control point.
The phonebook downloading feature greatly reduces the data-entry required to establish inbound and
outbound phonebooks for the VOIP units within a system. Although each MultiVOIP GSM unit will require some
unique phonebook entries, most will be common to the entire VOIP system. After the phonebooks for the first
few VOIP units have been compiled, phonebooks for additional VOIPs become much simpler: you copy the
common material by downloading and then do data entry for the few phonebook items that are unique to that
particular VOIP unit or VOIP site.
To transfer files using the FTP server functionality in the MultiVOIP GSM, follow these directions.
1. Establish Network Connection and IP Addresses. Both the controller PC and the MultiVOIP GSM unit(s)
must be connected to the same IP network. An IP address must be assigned for each.
2. Establish User Name and Password. You must establish a user name and (optionally) a password for
contacting the VOIP over the IP network. (When connection is made via a local serial connection between
the PC and the VOIP unit, no user name is needed.)
As shown above, the user name and password can be set in the web interface as well as in the Windows
interface.
Multi-Tech Systems, Inc. MVPGSM 81
Change password
Page 82

Chapter 6: Using the Software
3. Install FTP Client Program or Use Substitute. You should install an FTP client program on the controller
PC. FTP file transfers can be done using a web browser (e.g., Firefox or Internet Explorer) in conjunction
with a local Windows browser a (e.g., Windows Explorer), but this approach is somewhat clumsy (it
requires use of two application programs rather than one) and it limits downloading to only one VOIP unit
at a time. With an FTP client program, multiple VOIPs can receive FTP file transmissions in response to a
single command (the transfers may occur serially however).
Although Multi-Tech does not provide an FTP client program with the MultiVOIP GSM software or endorse
any particular FTP client program, we remind our readers that adequate FTP programs are readily
available under retail, shareware and freeware licenses. (Read and observe any End-User License
Agreement carefully.) Two examples of this are the “WSFTP” client and the “SmartFTP” client, with the
former having an essentially text-based interface and the latter having a more graphically oriented
interface, as of this writing. User preferences will vary.
4. Enable FTP Functionality. Go to the IP Parameters screen and click on the “FTP Server: Enable” box.
5. Identify Files to be Updated. Determine which files you want to update. See table below.
File Type File Names Description
factory defaults fdefFtp.cnf This file contains factory default settings for user-changeable
inbound phonebook InPhBk.tmr This file updates the inbound phonebook in the MultiVOIP GSM unit.
outbound phonebook OutPhBk.tmr This file updates the outbound phonebook in the MultiVOIP GSM
Multi-Tech Systems, Inc. MVPGSM 82
Enable FTP server
configuration parameters. Only one file of this type will be in the
directory.
unit.
Page 83

Chapter 6: Using the Software
6. Contact MultiVOIP GSM FTP Server. You must make contact with the FTP Server in the VOIP using either
a web browser or FTP client program. Enter the IP address of the MultiVOIP GSM’s FTP Server. If you are
using a browser, the address must be preceded by “ftp://” (otherwise you’ll reach the web interface within
the MultiVOIP GSM unit).
FTP address
7. Log In. Use the User Name and password established in item #2 above. The login screens will differ
depending on whether the FTP file transfer is to be done with a web browser or with an FTP client
program (varies).
8. Use Download. Downloading can be done with a web browser or with an FTP client program.
Download with Web Browser:
• In the local Windows browser, locate the directory holding the MultiVOIP GSM program files. The
default location will be C:\Program Files \Multi-Tech Systems \MultiVOIP GSM xxxx yyyy (where x and y
represent MultiVOIP model and software version numbers).
• Right-click on the file and select Copy files from Windows Explorer.
• Change focus to the Web browser window (left-clicking on the title bar will accomplish this), then right-
click in the browser window showing the file and select Paste.
• You may be asked to confirm the overwriting of files on the MultiVOIP GSM. Do so.
• File transfer between PC and VOIP will look like a transfer within VOIP directories.
Multi-Tech Systems, Inc. MVPGSM 83
Page 84

Chapter 6: Using the Software
Download with FTP Client Program:
• In the local directory browser of the FTP client program, locate the directory holding the MultiVOIP GSM
program files. The default location will be C:\Program Files \Multi-Tech Systems \MultiVOIP GSM xxxx
yyyy (where x and y represent MultiVOIP GSM model numbers and software version numbers).
• In the FTP client program window, drag-and-drop files from the local browser pane to the pane for the
MultiVOIP GSM FTP server. FTP client interface operations vary. In some cases, you can choose
between immediate and queued transfer. In some cases, there may be automated capabilities to
transfer to multiple destinations with a single command.
9. Verify Transfer. The files transferred will appear in the directory of the MultiVOIP GSM. Check to insure
that the new file is in place by verifying the file size and date (this is easy if this is the first time you have
done this as it will change from a file size of ‘0’ and a date of 01/01/1980).
10. Log Out of FTP Session. Whether the file transfer was done with a web browser or with an FTP client
program, you must log out of the FTP session before opening the MultiVOIP GSM Windows interface.
Multi-Tech Systems, Inc. MVPGSM 84
Page 85

Web Browser Interface
Chapter 6: Using the Software
Web interface main page
You can control the MultiVOIP GSM unit with a graphic user interface (interface) based on the common web
browser platform. Qualifying browsers are Internet Explorer 6+, Netscape 6+, and Mozilla Firefox 1.0+.
MultiVOIP GSM Web Browser Interface Overview
Function Remote configuration and control of MultiVOIP GSM units.
Configuration Prerequisite Local Windows interface must be used to assign IP address to MultiVOIP GSM.
Browser Version Requirement Internet Explorer 6.0 or higher; or
Netscape 6.0 or higher; or
Mozilla Firefox 1.0 or higher.
Java Requirement Java Runtime Environment
version 1.4.0_01 or higher
(this application program is included with MultiVOIP GSM)
The initial configuration step of assigning the VOIP unit an IP address must still be done locally using the
Windows interface. However, all additional configurations can be done via the web interface.
The content and organization of the web interface is directly parallel to the Windows interface. For each screen
in the Windows interface, there is a corresponding screen in the web interface. The fields on each screen are
the same, as well.
Multi-Tech Systems, Inc. MVPGSM 85
Page 86

Chapter 6: Using the Software
The Windows interface gives access to commands via icons and pull-down menus whereas the web interface
does not. The web interface, however, cannot perform logging in the same direct mode done in the Windows
interface. However, when the web interface is used, logging can be done by email (SMTP).
The graphic layout of the web interface is also somewhat larger-scale than that of the Windows interface. For
that reason, it’s helpful to use as large of a video monitor as possible.
The primary advantage of the web interface is remote access for control and configuration. The controller PC
and the MultiVOIP GSM unit itself must both be connected to the same IP network and their IP addresses must
be known.
In order to use the web interface, you must also install a Java application program on the controller PC. This
Java program is included on the MultiVOIP GSM product CD. Java is needed to support drop-down menus and
multiple windows in the web interface.
To install the Java program, go to the Java directory on the MultiVOIP GSM product CD. Double-click on the .EXE
file to begin the installation. Follow the instructions on the Install Shield screens.
Java install screen
During the installation, you may be asked to specify which browser(s) you’ll use in the Select Browsers screen.
Multi-Tech Systems, Inc. MVPGSM 86
Page 87

Chapter 6: Using the Software
Browser choice
When installation is complete, the Java program runs automatically in the background as a plug-in supporting
the MultiVOIP GSM web interface. No user actions are required.
After the Java program has been installed, you can access the MultiVOIP GSM using the web browser interface.
Close the MultiVOIP GSM Windows interface. Start the web browser. Enter the IP address of the MultiVOIP
GSM unit. Enter a password when prompted. (A password is needed here only if password has been set for the
local Windows interface or for the MultiVOIP GSM’s FTP Server function. See “Setting a Password -- Web
Browser interface” earlier in this chapter.) The web browser interface offers essentially the same control over
the VOIP as can be achieved using the Windows interface. As noted earlier, logging functions cannot be handled
via the web interface. And, because network communications will be slower than direct communications over a
serial PC cable, command execution will be somewhat slower over the web browser interface than with the
Windows interface.
Multi-Tech Systems, Inc. MVPGSM 87
Page 88

Chapter 6: Using the Software
SysLog Server Functions
Multi-Tech has built SysLog server functionality into the software of the MultiVOIP GSM units. SysLog is a de
facto standard for logging events in network communication systems.
The SysLog Server resides in the MultiVOIP GSM unit itself. To implement this functionality, you will need a
SysLog client program (sometimes referred to as a “daemon”). SysLog client programs, both paid and freeware
can be obtained from Kiwi Enterprises (search the Internet for kiwi syslog daemon), among other firms. Read the
End-User License Agreement carefully and observe license requirements. SysLog client programs essentially give
you a means of structuring console messages for convenience and ease of use.
Multi-Tech Systems does not endorse any particular SysLog client program. SysLog client programs by qualified
providers should suffice for use with MultiVOIP GSM units.
Before a SysLog client program is used, the SysLog functionality must be enabled within the MultiVOIP GSM in
the Logs menu under Configuration.
Enable SysLog
The IP Address used will be that of the MultiVOIP GSM itself.
In the Port field, entered by default, is the standard (‘well-known’) logical port, 514.
Configuring the SysLog Client Program. Configure the SysLog client program for your own needs. In various
SysLog client programs, you can define where log messages will be saved/archived, opt for interaction with an
SNMP system, set the content and format of log messages, determine disk space allocation limits for log
messages, and establish a hierarchy for the seriousness of messages (normal, alert, critical, emergency, etc.).
Multi-Tech Systems, Inc. MVPGSM 88
Page 89

Appendix A – Cable Pin-outs & Ports
Command Cable
RJ-45 Connector End-to-End Pin Info
1 2 3 4 5 6 7 8
RJ-45 connector plugs into Command Port of MultiVOIP GSM.
DB-9 connector plugs into serial port of command PC (which runs MultiVOIP GSM configuration
software).
Ethernet Connector
The functions of the individual conductors of the MultiVOIP GSM’s Ethernet port are shown on a pin-by-pin basis
below.
RJ-45 Ethernet Connector Pin Circuit Signal Name
1 2 3 4 5 6 7 8
1 TD+ Data Transmit Positive
2 TD- Data Transmit Negative
3 RD+ Data Receive Positive
6 RD- Data Receive Negative
Well Known Port Numbers
The following description of port number assignments for Internet Protocol (IP) communication is taken from
the Internet Assigned Numbers Authority (IANA) web site (www.iana.org).
“The Well Known Ports are assigned by the IANA and on most systems can only be used by system (or root)
processes or by programs executed by privileged users. Ports are used in the TCP [RFC793] to name the ends
of logical connections which carry long term conversations. For the purpose of providing services to unknown
callers, a service contact port is defined. This list specifies the port used by the server process as its contact
port. The contact port is sometimes called the "well-known port". To the extent possible, these same port
assignments are used with the UDP [RFC768]. The range for assigned ports managed by the IANA is 0-1023.”
Well-known port numbers especially pertinent to MultiVOIP GSM operation are listed below.
Port Number Assignment List
Function Port Number
telnet 23
tftp 69
snmp 161
snmp tray 162
http 80
ftp (simple) 115
SIP 5060
SysLog 514
Multi-Tech Systems, Inc. MVPGSM 89
Page 90

Appendix B – Regulatory Information
EMC, Safety, and R&TTE Directive Compliance
The CE mark is affixed to this product to confirm compliance with the following European Community Directives:
Council Directive 2004/108/EC of 31 December, 2004 on the approximation of the laws of Member States
relating to electromagnetic compatibility,
and
Council Directive 2006/95/EC 12 December, 2006 on the harmonization of the laws of Member States relating to
electrical equipment designed for use within certain voltage limits,
and
Council Directive 1999/5/EC of 9 March 1999 on radio equipment and telecommunications terminal equipment
and the mutual recognition of their conformity.
FCC Part 15 Declaration
NOTE: This equipment has been tested and found to comply with the limits for a Class A digital device, pursuant
to Part 15 of the FCC Rules. These limits are designed to provide reasonable protection against harmful
interference when the equipment is operated in a commercial environment. This equipment generates, uses
and can radiate radio frequency energy, and if not installed and used in accordance with the instructions, may
cause harmful interference to radio communications. Operation of this equipment in a residential area is likely
to cause harmful interference in which case the user will be required to correct the interference at their own
expense.
This device complies with Part 15 of the FCC rules.
Operation is subject to the following two conditions:
(1) This device may not cause harmful interference.
(2) This device must accept any interference that may cause undesired operation.
Warning: Changes or modifications to this unit not expressly approved by the party responsible for compliance
could void the user’s authority to operate the equipment.
Multi-Tech Systems, Inc. MVPGSM 90
Page 91

Appendix C: Regulatory Information
Industry Canada
This Class A digital apparatus meets all requirements of the Canadian Interference-Causing Equipment
Regulations.
Cet appareil numérique de la classe A
respecte toutes les exigences du
Reglement Canadien sur le matériel brouilleur.
Canadian Limitations Notice
Notice: The Industry Canada label identifies certified equipment. This certification means that the equipment
meets certain telecommunications network protective, operational and safety requirements. The Department
does not guarantee the equipment will operate to the user’s satisfaction.
Before installing this equipment, users should ensure that it is permissible to be connected to the facilities of the
local telecommunications company. The equipment must also be installed using an acceptable method of
connection. The customer should be aware that compliance with the above conditions may not prevent
degradation of service in some situations.
Repairs to certified equipment should be made by an authorized Canadian maintenance facility designated by
the supplier. Any repairs or alterations made by the user to this equipment, or equipment malfunctions, may
give the telecommunications company cause to request the user to disconnect the equipment.
Users should ensure for their own protection that the electrical ground connections of the power utility,
telephone lines and internal metallic water pipe system, if present, are connected together. This precaution may
be particularly important in rural areas.
Caution: Users should not attempt to make such connections themselves, but should contact the appropriate
electric inspection authority, or electrician, as appropriate.
Multi-Tech Systems, Inc. MVPGSM 91
Page 92

Appendix C – Waste Electrical and Electronic
Equipment (WEEE) Statement
July, 2005
The WEEE directive places an obligation on EU-based manufacturers, distributors, retailers and importers to
take-back electronics products at the end of their useful life. A sister Directive, ROHS (Restriction of Hazardous
Substances) complements the WEEE Directive by banning the presence of specific hazardous substances in the
products at the design phase. The WEEE Directive covers all Multi-Tech products imported into the EU as of
August 13, 2005. EU-based manufacturers, distributors, retailers and importers are obliged to finance the costs
of recovery from municipal collection points, reuse, and recycling of specified percentages per the WEEE
requirements.
Instructions for Disposal of WEEE by Users in the European Union
The symbol shown below is on the product or on its packaging, which indicates that this product must not be
disposed of with other waste. Instead, it is the user’s responsibility to dispose of their waste equipment by
handing it over to a designated collection point for the recycling of waste electrical and electronic equipment.
The separate collection and recycling of your waste equipment at the time of disposal will help to conserve
natural resources and ensure that it is recycled in a manner that protects human health and the environment.
For more information about where you can drop off your waste equipment for recycling, please contact your
local city office, your household waste disposal service or where you purchased the product.
Multi-Tech Systems, Inc. MVPGSM 92
Page 93

Appendix D – C-ROHS HT/TS Substance
Concentration
依照中国标准的有毒有害物质信息
根据中华人民共和国信息产业部 (MII) 制定的电子信息产品 (EIP)
标准-中华人民共和国《电子信息产品污染控制管理办法》(第 39 号),也称作中国
RoHS,下表列出了 Multi-Tech Systems Inc. 产品中可能含有的有毒物质 (TS) 或有害物质 (HS)
的名称及含量水平方面的信息。
成分名称
印刷电路板
电阻器
电容器
铁氧体磁环
继电器/光学部件
IC
二极管/晶体管
振荡器和晶振
调节器
电压传感器
变压器
扬声器
连接器
LED
螺丝、螺母以及其它五金件
交流-直流电源
软件/文档 CD
手册和纸页
底盘
有害/有毒物质/元素
铅
(PB)
O O O O O O
X O O O O O
X O O O O O
O O O O O O
O O O O O O
O O O O O O
O O O O O O
X O O O O O
O O O O O O
O O O O O O
O O O O O O
O O O O O O
O O O O O O
O O O O O O
X O O O O O
O O O O O O
O O O O O O
O O O O O O
O O O O O O
X 表示所有使用类似材料的设备中有害/有毒物质的含量水平高于 SJ/Txxx-2006 限量要求。
O 表示不含该物质或者该物质的含量水平在上述限量要求之内。
汞
(Hg)
镉
(CD)
六价铬
(CR6+)
多溴联苯
(PBB)
多溴二苯醚
(PBDE)
Multi-Tech Systems, Inc. MVPGSM 93
Page 94

INDEX
Auto Disconnect ....................................................................... 32
AutoCall/Offhook ..................................................................... 32
Cabling ....................................................................................... 9
Call Hold .................................................................................. 48
Call Progress fields ................................................................... 67
Call Transfer ............................................................................. 48
Call Waiting .............................................................................. 48
Coder Parameters fields ............................................................ 31
Comm. Port Unavailable .......................................................... 51
Creating a User Default Configuration ..................................... 50
Custom Tones and Cadences .................................................... 39
Diff Serv PHB value ................................................................. 28
DTMF inband ........................................................................... 30
DTMF out of band .................................................................... 30
Dynamic Jitter .......................................................................... 32
Email log reports ...................................................................... 40
FTP Server function .................................................................. 81
FTP Server, logging out ............................................................ 84
IP Statistics fields ..................................................................... 72
LED descriptions ........................................................................ 4
Link Management fields ........................................................... 73
Logs (Statistics) field definitions .............................................. 70
MultiVOIP GSM Not Found .................................................... 51
NAT Traversal screen fields ..................................................... 47
Packet Prioritization 802.1p ..................................................... 27
Packetization rates .................................................................... 75
Phone Database not Read ......................................................... 51
RADIUS Screen field definitions ............................................. 44
Regional parameter definitions ................................................. 37
Saving the MultiVOIP GSM Configuration ............................. 50
Set Baud Rate ........................................................................... 50
Set Log Reporting Method ....................................................... 45
Setting Ethernet/IP parameters ................................................. 26
Setting password ...................................................................... 78
Setting user defaults ................................................................. 77
SIP Call Signaling parameter definitions ................................. 36
SMTP parameters definitions ................................................... 41
Specifications ............................................................................. 5
STUN clients and servers ......................................................... 47
Supplementary Services parameter definitions......................... 48
Voice/FAX parameter de
Wireless Interface parameters .................................................. 33
finitions ............................................ 29
Multi-Tech Systems, Inc. MVPGSM 94
 Loading...