

Multitech Multi-Tech FaxFinder FF120, FaxFinder FF220, FaxFinder FF420, FaxFinder FF820 Administrator User Manual
Page 1

FaxFinder®
V.34 Fax Servers
Models: FF120
FF220
FF420
FF820
Administrator User Guide
Page 2

FaxFinder® Administrator User Guide
S000405E, Version E
Models: FF120, FF220, FF420, and FF820
Copyright © 2008, by Multi-Tech Systems, Inc.
This publication may not be reproduced, in whole or in part, without prior expressed written permission
from Multi-Tech Systems, Inc. All rights reserved.
Multi-Tech Systems, Inc. makes no representations or warranties with respect to the contents hereof and
specifically disclaims any implied warranties of merchantability or fitness for any particular purpose.
Furthermore, Multi-Tech Systems, Inc. reserves the right to revise this publication and to make changes
from time to time in the content hereof without obligation of Multi-Tech Systems, Inc. to notify any person
or organization of such revisions or changes. Check Multi-Tech’s web site for current version s of our
product documentation.
Revisions
Level Date Description
A 05/05/06 Initial release of FF-420/820.
B 03/02/07 Initial release. Update of FF420/820 and addition of FF120/220.
C 04/04/07 Revise warranty statement and update tech support contact list.
D 11/20/07 Removed status LED references, updated tech support contact list, and
added slotted hole mounting drawing.
E 09/15/08 Update Server changes for software & firmware. Added status LED
references back in.
Patents
This device covered by the following patents:
6,031,867; 6,012,113; 6,009,082; 5,905,794; 5,864,560; 5,815,567; 5,815,503; 5,812,534; 5,809,068;
5,790,532; 5,764,628; 5,764,627; 5,754,589; D394,250; 5,724,356; 5,673,268; 5,673,257; 5,644,594;
5,628,030; 5,619,508; 5,617,423; 5,600,649; 5,592,586; 5,577,041; 5,574,725; D374,222; 5,559,793;
5,546,448; 5,546,395; 5,535,204; 5,500,859; 5,471,470; 5,463,616; 5,453,986; 5,452,289; 5,450,425;
D361,764; D355,658; D355,653; D353,598; D353,144; 5,355,365; 5,309,562; 5,301,274, 6,219,708 Other
patents pending.
Trademarks
Multi-Tech Registered Trademarks: FaxFinder, Multi-Tech, and the Multi-Tech logo.
All other products and technologies are the trademarks or registered trademarks of their respe ctive
holders.
World Headquarters
Multi-Tech Systems, Inc.
2205 Woodale Drive
Mounds View, Minnesota 55112
Phone: 763-785-3500 or 800-328-9717
Fax: 763-785-9874
Technical Support
Country By Email By Phone
Europe, Middle East, Africa: support@multitech.co.uk (44) 118 959 7774
U.S., Canada, all others: support@multitech.com (800) 972-2439 or (763) 717-5863
Internet Address: http://www.multitech.com
Page 3

CONTENTS
CHAPTER 1 – PRODUCT DESCRIPTION & SPECIFICATIONS ............................................................... 4
Product Description ................................................................................................................................... 4
Safety Warnings ........................................................................................................................................ 6
Technical Specifications ............................................................................................................................ 7
CHAPTER 2 – INSTALLATION ................................................................................................................... 9
Mechanical Mounting ............................................................................................................................... 10
Quick Hookup .......................................................................................................................................... 11
Installation Overview ............................................................................................................................... 14
CHAPTER 3 – FAXFINDER SERVER SOFTWARE SCREENS ............................................................... 42
Home Screen ........................................................................................................................................... 42
Login Screen ........................................................................................................................................... 43
Fax Log Screen ....................................................................................................................................... 44
Current Status Screen ............................................................................................................................. 47
Administration Screen ............................................................................................................................. 50
Phone Book Screen ................................................................................................................................. 54
Modem Configuration Screen .................................................................................................................. 56
Password Administration Screen ............................................................................................................ 60
Shared Resources Screen ...................................................................................................................... 61
CHAPTER 4 – FAXFINDER CLIENT SOFTWARE CONFIGURATION .................................................... 62
Establishing Client User’s ID in System .................................................................................................. 62
Associating Client with Specific FaxFinder Unit(s) .................................................................................. 63
Disassociating the Client from a Specific FaxFinder Unit ....................................................................... 65
Disabling and Re-Enabling a Client’s FaxFinder Service ........................................................................ 66
FaxFinder Fax Client Software Menu Command Definitions .................................................................. 67
CHAPTER 5 – FAXFINDER CLIENT SOFTWARE OPERATION ............................................................. 79
Sending a Fax ......................................................................................................................................... 80
Scheduling Fax Transmissions ............................................................................................................... 86
Putting Pending Faxes on Hold and Removing the Hold ........................................................................ 88
Canceling a Fax ....................................................................................................................................... 91
Setting Fax Retry Number and Interval ................................................................................................... 92
Sending One Fax Containing Multiple Documents ................................................................................. 93
Forwarding a Fax ..................................................................................................................................... 95
Receiving a Fax ....................................................................................................................................... 96
Using the Multi-Tech Tiff Viewer ............................................................................................................. 99
Setting up Your Address Book Manually ............................................................................................... 105
Setting up Your Address Book by Synchronizing with Outlook ............................................................. 108
Setting Up Address Books with CSV Files ............................................................................................ 111
Cover Pages .......................................................................................................................................... 125
CHAPTER 6 – SERVER OPERATION .................................................................................................... 147
Fax Log Email Messages ...................................................................................................................... 147
Dealing with Failed Fax Reports ........................................................................................................... 149
CHAPTER 7 – DEVICE MANAGER OPERATION .................................................................................. 150
Access to Commands ............................................................................................................................ 152
Firmware Updating Process .................................................................................................................. 175
APPENDIX A – TROUBLESHOOTING ................................................................................................... 183
APPENDIX B – REGULATORY INFORMATION .................................................................................... 188
APPENDIX C – WARRANTY, SERVICE, & REPAIR .............................................................................. 193
APPENDIX D – EXAMPLE SYSTEMS .................................................................................................... 195
Multi-Tech Systems, Inc. FaxFinder Admin User Guide 3
Page 4

Chapter 1 – Product Description &
Specifications
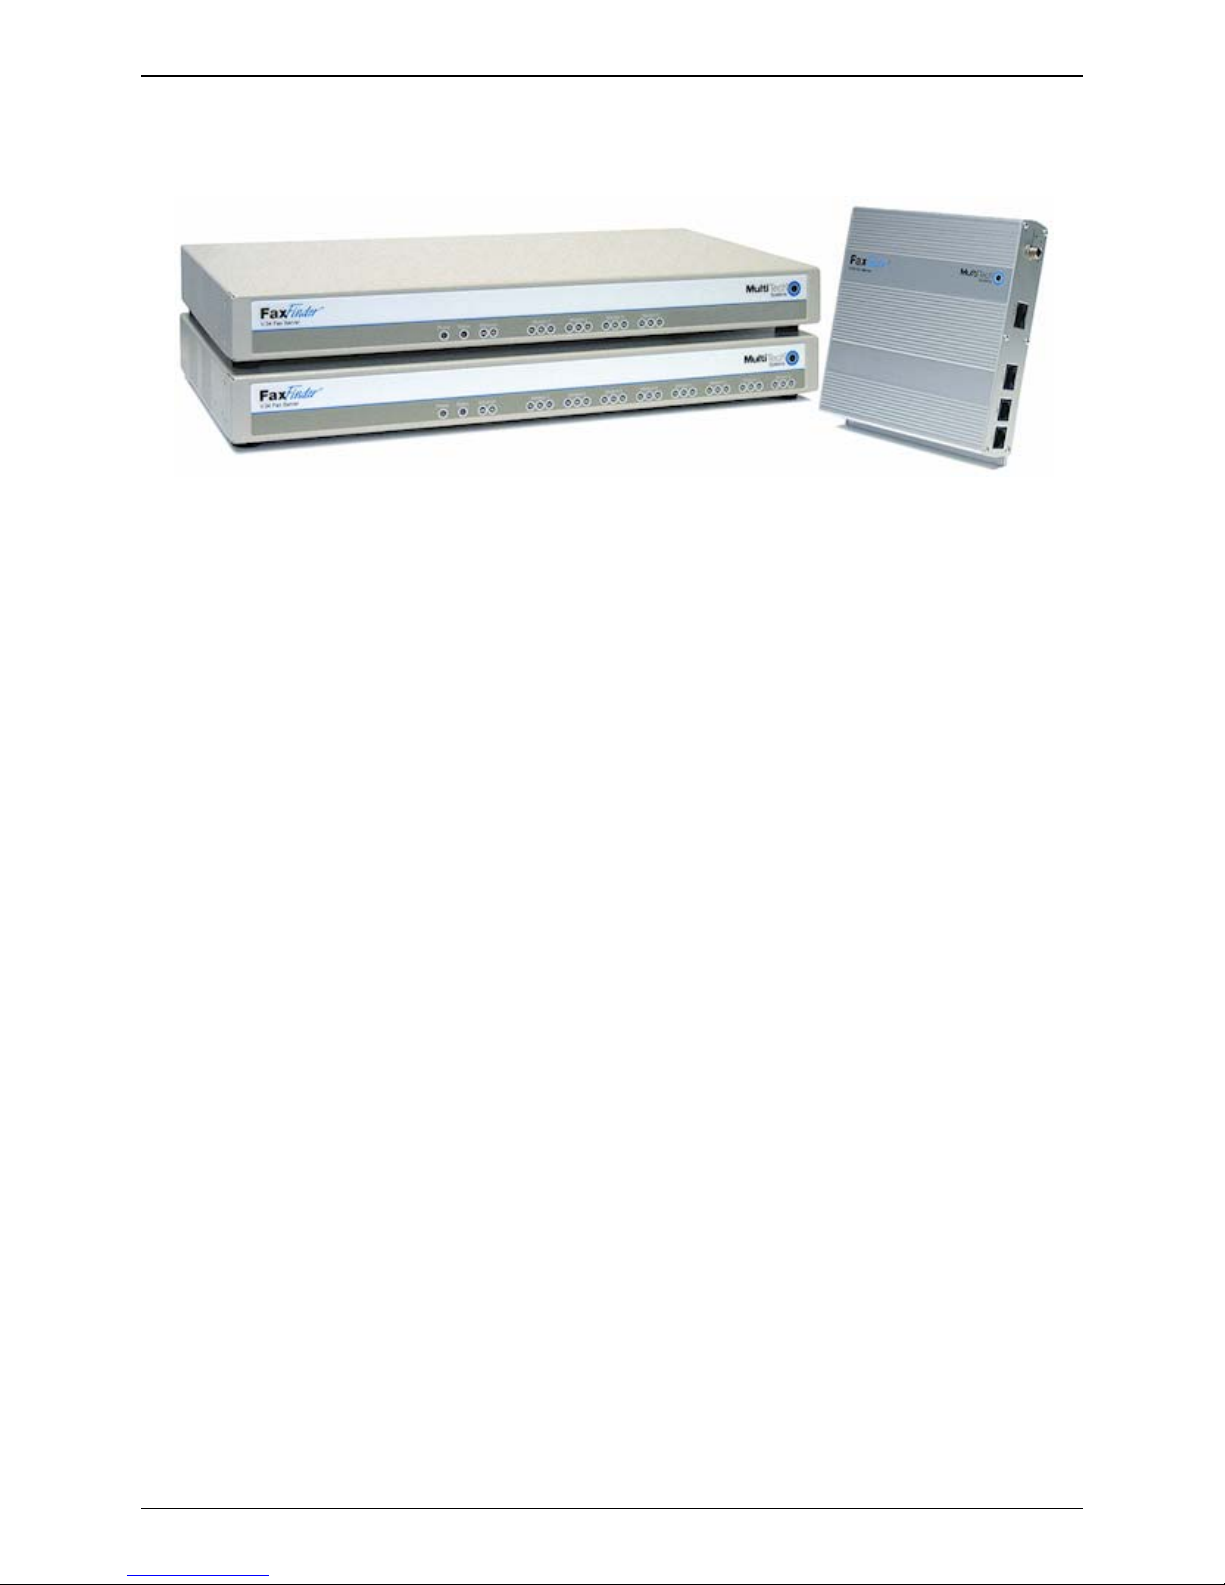
Product Description
This manual describes four Multi-Tech V.34 fax servers: the FF120 1-Port FaxFinder unit, the FF220 2Port FaxFinder unit, the FF420 4-Port FaxFinder unit, and the FF820 8-Port FaxFinder unit. All four of
these units are complete, economical, easy-to-use network fax servers. With any of these units, you can
receive faxes as emails and send faxes from any application that can print. The FF120/220/420/820
FaxFinder operates in two modes: Automated Routing Mode and Manual Routing Mode.
set in the Routing field of the Modem Configuration screen of the FaxFinder Server software.
Automated Routing Mode. When connected to a station port on a PBX, the FaxFinder functions as a
network fax server with two-way fax service. Multiple PBX extension numbers are dedicated to incoming
fax traffic which is routed to the FaxFinder. (Only one station port is needed. Faxes transmitted to any of
the PBX’s fax-dedicated extension numbers all go to the station port serving the FF120/220/420/820.)
The FaxFinder converts the incoming faxes into graphic files that are sent as email attachments to fax
recipients on or beyond the Ethernet network. (Because faxes are delivered in the form of email, the fax
recipient could be at any reach-able email address. So, for example, a sales person could receive faxes
while traveling by using a regular company fax number and picking up the email messages remotely.)
Each fax-dedicated PBX extension number is associated with a particular email address.
1
The mode is
Receiving. Fax clients receive faxes in the form of email attachments. From the remote fax sender’s
perspective, PBX extension phone numbers are functionally identical to ordinary fax phone lines.
Sending. Fax clients on the network can send faxes directly from their PCs using any application
program that can print. The application program must be set so that the FaxFinder itself is its printing
destination. In response to the ‘Print’ command, the FaxFinder turns the ‘print file’ image into a fax. The
FaxFinder transmits the fax to the public phone system (PSTN) or to another PBX extension.
Manual Routing Mode. When connected directly to a regular POTS line (or to a PBX without
‘convergent’ routing capability), the FF120/220/420/820 functions as an outgoing fax server with incoming
fax service going through one or more attendants. Each of the FaxFinder’s modems has a separate fax
number and each modem can have a separate attendant that receives the fax messages as emails and
then has the duty to direct them to their intended recipients. (Note that one attendant could serve more
than one of the FaxFinder’s modems – some or all of the modems.) For example, an FF820 FaxFinder
might be used in a company with several departments that regularly receive faxes but in differing
volumes. Suppose the sales department and the purchasing department receive many faxes a nd the
shipping and service departments receive much less fax traffic. In that case, three of the FF820’s
modems might direct faxes to a single attendant in the sales department, and an additional three modems
might direct faxes to the purchasing department; one modem might be directed to an attendant for the
shipping department and another to an attendant for the service department.
Outgoing faxes work the same in Manual Routing Mode as in Automated Routing Mode. That is, to send
a fax, the user prints to the FaxFinder from an application program. However, all incoming faxes go to a
single email recipient, the attendant, who then sends them on, as needed, to the intended recipient.
Being devices of multiple ports, the FF220/420/820 units can send and receive faxes simultaneously.
Mixed Mode. It is also possible to operate a FaxFinder unit in a mixed mode such that some of its
modems are connected to PBX extensions while other of its modems are connected to POTS lines.
1
For FF120/220/420/820 compatibility in Automated Routing Mode, the PBX must support ‘convergent routing,’
that is, the routing of multiple extension numbers to a single station port . PBXs lacking this functionality can still
be used with the FaxFinder in Manual Routing Mode.
Multi-Tech Systems, Inc. FaxFinder Admin User Guide 4
Page 5
Chapter 1: Product Description and Specifications
The FF420 and FF820 are both housed in chassis of the same size and shape. Similarly, the FF120 a nd
FF220 are both housed in a chassis of the same size and shape, a chassi s smaller and differently shaped
than that for the FF420/820.
The FaxFinder product consists of the hardware unit, server software pre-installed on the hardware unit,
server management software (the Device Manager program), and a suite of client software programs (th e
main fax-sending client program, a viewer for TIFF files, and a program for creating and modifying fax
cover pages).
Prerequisite: Determining PBX Compatibility &
Configuration
To operate the FF120/220/420/820 FaxFinder system in conjunction with a PBX (“Automated Routing
Mode”), that PBX must be able to route incoming calls to many PBX extension numbers to a single PBX
station port. This multiple-extension-to-single-port capacity allows multiple PBX users to have their own
unique directory numbers for receiving faxes.
If you are using the FF120/220/420/820 in conjunction with a PBX, be sure that the PBX has this multipleextension-to-single-port functionality and that it is activated. PBXs lacking this functionality can still be
used with the FaxFinder in Manual Routing Mode.
Multi-Tech Systems, Inc. FaxFinder Admin User Guide 5
Page 6

Chapter 1: Product Description and Specifications
Safety Warnings
Telecom
1. Never install telephone wiring during a lightning storm.
2. This product must be disconnected from power source and telephone network interface when
servicing.
3. This product is to be used with UL and cUL listed computers.
4. Never touch uninsulated telephone wires or terminals unless the telephone line has been
disconnected at the network interface.
5. Use caution when installing or modifying telephone lines.
6. Avoid using a telephone (other than a cordless type) during an electrical storm. There may be a
remote risk of electrical shock from lightning.
7. Do not use a telephone in the vicinity of a gas leak – not even to report a gas leak.
8. To reduce the risk of fire, use only 26 AWG or larger telecommunication line cord.
9. Never install a telephone jack in wet locations unless the jack is specifically designed for wet
locations.
Lithium Battery Caution
• A lithium battery located within product provides backup power for the timekeeping capability.
The battery has an estimated life expectancy of ten years.
• When the battery starts to weaken, the date and time may be incorrect. If the battery fails, the
board must be sent back to Multi-Tech Systems for battery replacement.
Warning! There is danger of explosion if the battery is incorrectly replaced!
Ethernet Ports Caution
Caution: The Ethernet ports and command ports are not designed to be connected to a Public
Telecommunication Network.
Multi-Tech Systems, Inc. FaxFinder Admin User Guide 6
Page 7

Technical Specifications
The FaxFinder models meet the following specifications:
Connectors
RJ11 Line Jacks (1 or 2), Console
Serial Port for RJ45-to-RS232
configuration/debug connection,
Ethernet RJ48 connector, and
Locking Screw on the Power Jack.
FF120/220 FF420/820
Chapter 1: Product Description and Specifications
RJ11-Line Jacks (4 or 8), RJ45 Ethernet Jack
Size
Weight
Power Consumption
Operating
Environment
Storage Temp.
EMC Approvals
Safety Approvals
Telecom Approvals
Data Modem Specs
Fax Modem Specs
6.4” W x 6.0” L x 1.2” H
16.3 cm x 15.2 cm x 3.0 cm
17.3” W x 1.7” H x 8.4” L
43.9 cm x 4.3 cm x 21.3 cm
20.5 oz. (750 g) 7.4 lbs. (3.4 kg)
Typical: 4.05 W (0.450A@ 9V)
Maximum: 5.31W (0.590A @9V)
Typical 3.75W (0.750A @5v DC)
Maximum 7.7W (1.4A @5.5v DC)
100 -240 VAC, 1.2 – 0.6A,
50/60Hz
32°-120° F (0°-50° C)
relative humidity 20 to 90%
noncondensing
32°-120° F (0°-50° C)
relative humidity 20 to 90%
noncondensing
-10° to +85° C -10° to +85° C
FCC Part 15 Class A, Canada
Class A, EN 55022:1998 Class A,
EN55024: 1998
cUL/UL60950-1, EN60950-1,
AS/NZS60950:2000
FCC Part 15 Class A, Canada
Class A, EN 55022:1998 Class A,
EN55024: 1998
cUL/UL60950-1, EN60950-1,
AS/NZS60950:2000
FCC Part 68, CS03 FCC Part 68, CS03
ITU-T V.92/V.90/56K (-92 build
option), V.34/
33.6K V.32bis/14.4K V.22bis/2400
baud
V.22, V.23, & V.21; Bell 212A & Bell
103
V.44 Error Correction
V.42 LAPM, MNP 2-4 Error Correction
V.42bis & MNP Class 5 data
compression
ITU-T V.34 (MT5634SMI)
ITU-T V.17, V.29, V.27 & V.21 Ch. 2
Telephony/TAM
V.253 commands
2-bit & 4-bit ADPCM, 8-bit linear PCM
& 4-bit IMA coding
8kHz sample rate
Concurrent DTMF, ring, & U.S. Caller
ID detection
Multi-Tech Systems, Inc. FaxFinder Admin User Guide 7
Page 8

Chapter 1: Product Description and Specifications
Related Manuals
Each FF-120/220/420/820 FaxFinder unit comes with 4 manuals that serve different purposes (see table
below). In addition, several FaxFinder Reference Guides are available on the Multi-Tech web site and
they describe use of a FaxFinder in conjunction with PBXs of various brands and models.
Title Format Purpose
Administrator User Guide
(this manual)
Client User Guide on CD Comprehensive user info for FaxFinder clients.
Client Operation Primer on CD Brief instructions for sending and receiving
Cabling Guide in print FaxFinder Administrator should use this
FaxFinder Reference Guides on MTS
Multi-Tech manuals and other resources are available on the Multi-Tech Web site at
http://www.multitech.com.
on CD Presents comprehensive info about FaxFinder
unit, server software, & client software.
Includes Quick Start Instructions chapter.
FaxFinder Administrator should use this
chapter to configure the FaxFinder unit, the
server software, and software for each client.
faxes via the FaxFinder system. Multi-Tech
recommends that you give a copy of this
document to each client user.
manual to make cabling connections for the
FaxFinder unit.
FaxFinder Administrator should use these
web site
manuals to configure the FaxFinder unit in
conjunction with the PBX specified in each
guide.
Distributing Documents to Client Users
The person acting as FaxFinder Administrator should see to it that client users get copies of the Client
Operation Primer (the file name is S000407E.PDF) and the Client User Guide (the file name is
S000406E.PDF). You could distribute this information either by printing out and/or photocopying hard
copies of these manuals for client users or else by supplying them with the electronic PDF files for these
documents either as email attachments or via some memory storage medium (CD, diskette, etc.). Client
users will need this information to take advantage of the capabilities of the FaxFinder system.
Multi-Tech Systems, Inc. FaxFinder Admin User Guide 8
Page 9

Chapter 2: Installation
Chapter 2 – Installation
Introduction
This chapter shows you how to set up your Multi-Tech Model FF120/220/420/820 FaxFinder.
The setup process includes both cabling of the FaxFinder unit and configuration of the FaxFinder server
software. The FaxFinder server software resides on the FaxFinder unit and does not need to be installed.
PBX Compatibility
Before proceeding with cabling or software installation, you should confirm that the telephony equipment
with which you intend to use the FaxFinder is compatible with it. Although the FaxFinder can simply be
connected to an ordinary phone subscriber line (a POTS line), it is often connected to a PBX. One of the
convenient features of the FaxFinder is its ability to deliver incoming faxes as email messages directly to
users on an Ethernet network. This direct service depends on the PBX’s ability to route multiple phone
extension numbers to a single station port. If the PBX lacks that ability, incoming faxes must be sent to
users through an attendant. If you will be connecting the FaxFinder to a PBX, it is important to
understand the PBX’s capabilities in this regard beforehand. The following section explains why the
capabilities of your PBX will determine how you set up the FaxFinder unit to work with it.
We Supply
FF120/220 FF420/820
• A FaxFinder (FF120 or FF220) with factory-
installed software
• One universal power supply with power
cord
• Common telephone cables (one for each
port; RJ-11 at both ends)
• A product CD that contains: (a) a software
package for client PCs, (b) a system
management software package for the
administrator’s PC, and (c) additional
documentation for both administrators and
client/users
• A printed Cabling Guide
• A FaxFinder (FF420 or FF820) with factory-
installed software
• One universal power supply with powe r
cord
• Common telephone cable s (one for each
port;
RJ-11 at both ends)
• A product CD that contains: (a) a software
package for client PCs, (b) a system
management software package for the
administrator’s PC, and (c) additional
documentation for both administrators and
client/users
• A set of four self-adhesive plastic feet
• Rack-mounting fasteners
• A printed Cabling Guide
You Supply
• A nearby AC power outlet and a connection to your Ethernet LAN
• A telephony connection:
either - a PBX station port
or - a common subscriber (POTS) phone line jack
• An admin PC (with web browser) to configure the FaxFinder
• Client PCs (Windows 2000/XP/2003/Vista) with email and printing applications. Network clients
receive faxes in their email inboxes. They will send faxes by printing to the FaxFinder server from
application programs.
Multi-Tech Systems, Inc. FaxFinder Admin User Guide 9
Page 10
Chapter 2: Installation
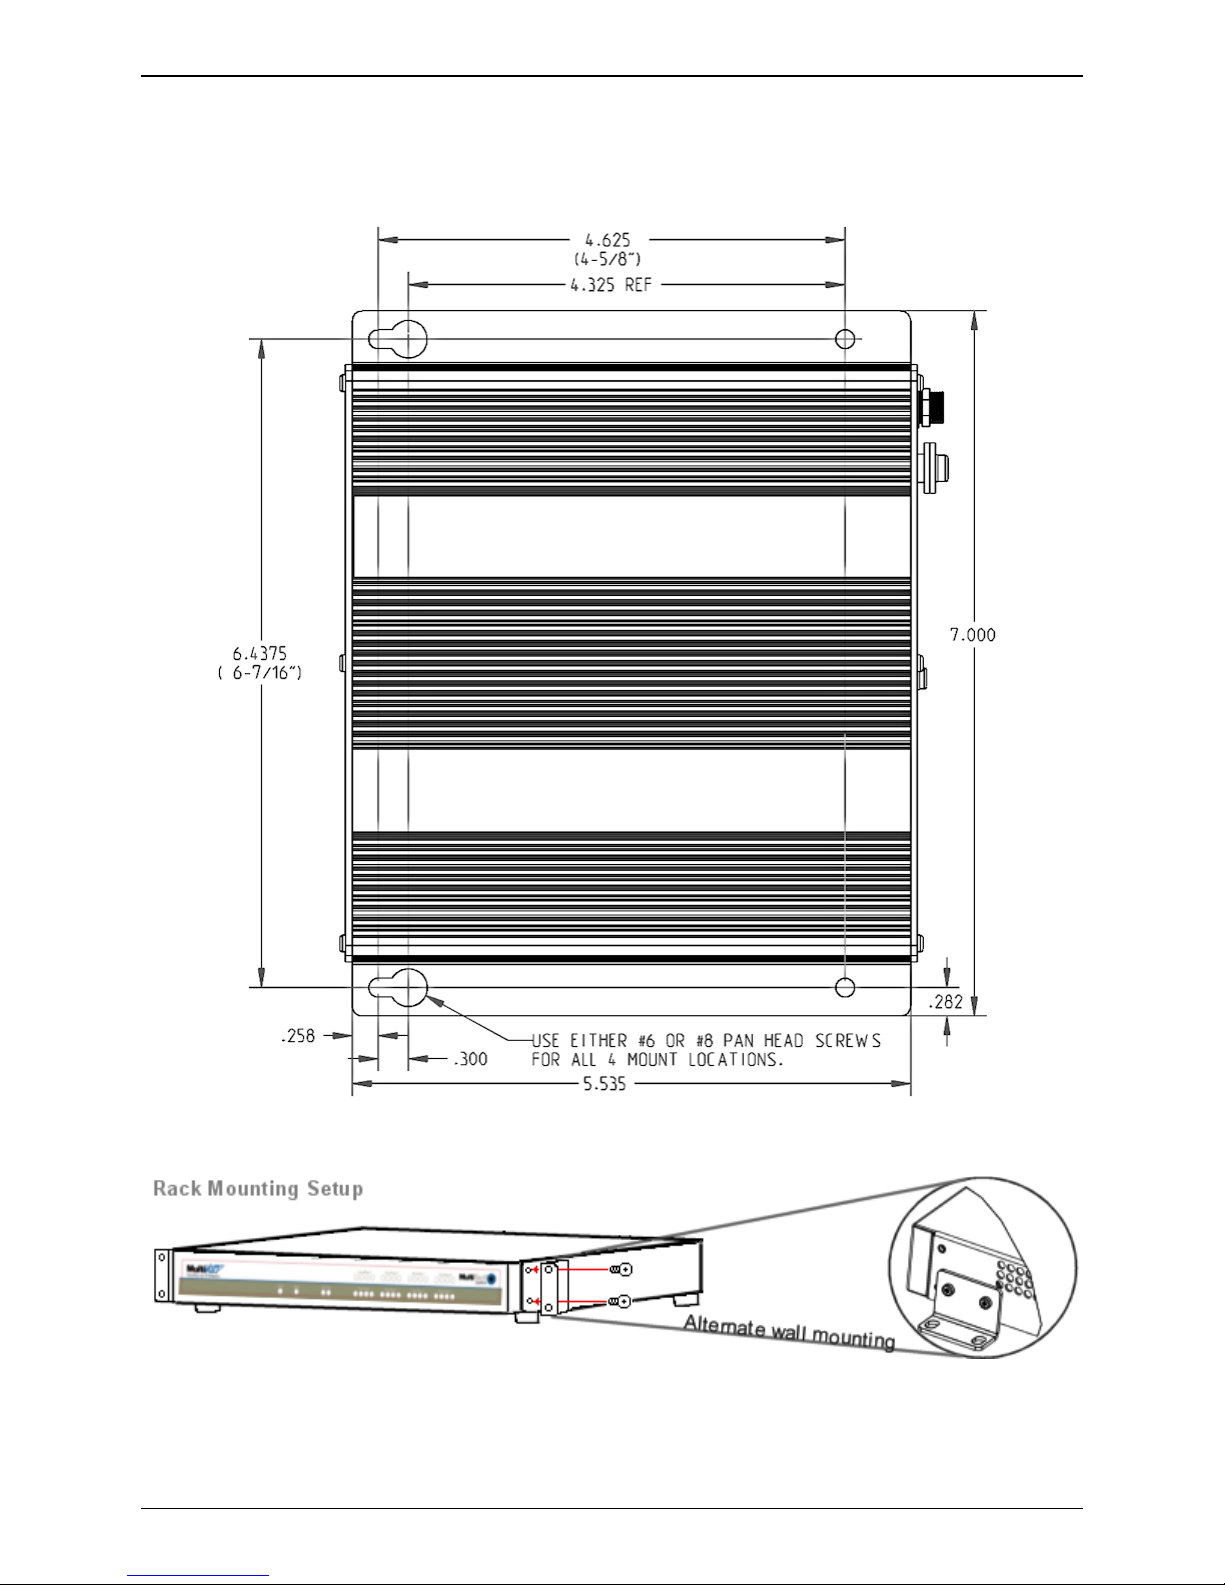
Mechanical Mounting
The FF120/220 FaxFinder comes with chassis screw holes to facilitate attaching it to a flat surface.
The FF420/820 are table-top units that can also be rack-mounted. Rack-mounting hardware is included.
Multi-Tech Systems, Inc. FaxFinder Admin User Guide 10
Page 11
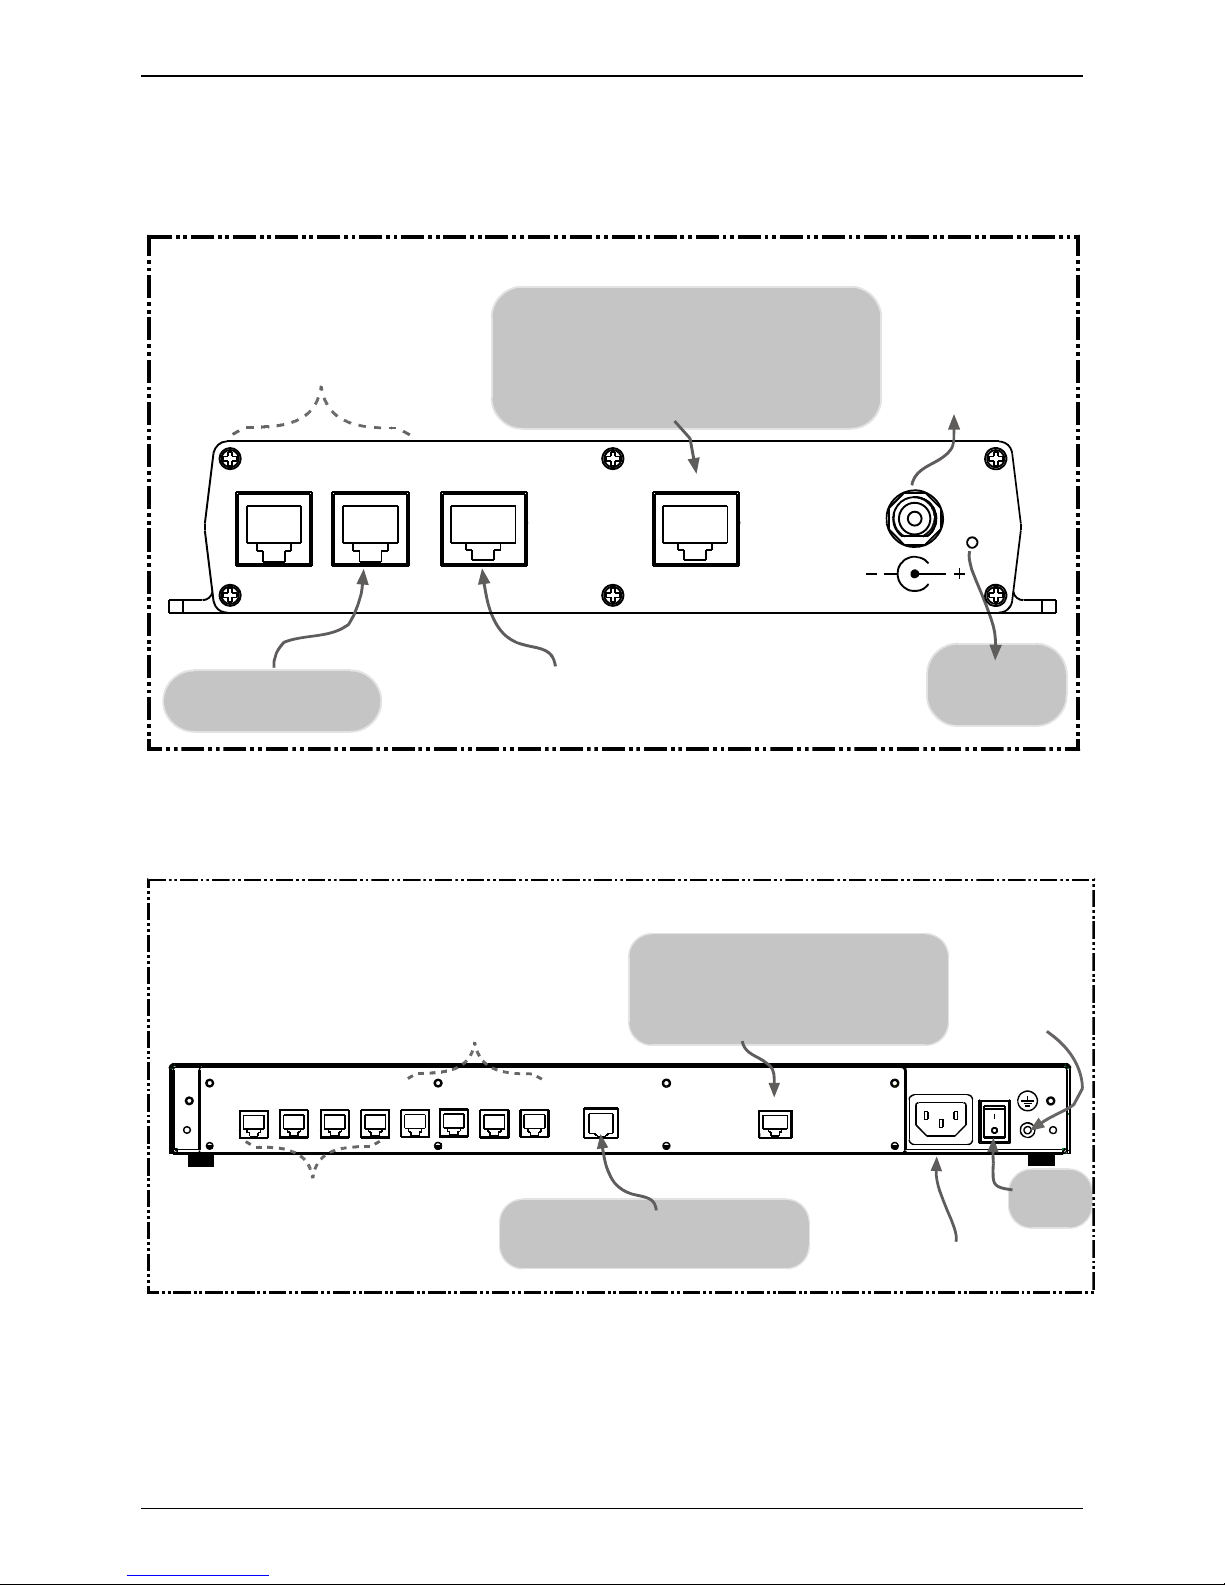
Quick Hookup
FF120/220
FaxFinder FF-120/220 Hookup
Cabling to telco POTS lines
or PBX station ports.
Cabling to computer running
terminal software.
For debugging purposes only.
Connector at FaxFinder: RJ-45.
Connector at computer: DB-9.
Chapter 2: Installation
Power Cable
Receptacle
LINE 1
Line 2 appears
on FF220 only.
FF420/820
LINE 2 LAN 1
CONSOLE
Cabling to your IP network.
RJ-45 connector.
FaxFinder Hookup: FF-420/820
Cabling to telco POTS lines
or PBX station ports.
Ports 5-8 appear on
FF820 only.
Cabling to computer running
terminal software.
For debugging purposes only.
Connector at FaxFinder: RJ-45.
Connector at computer: DB-9.
RESET
Reset
Switch
Grounding
Screw:
Connect to
Earth Ground
312 4
Cabling to telco POTS lines
or PBX station ports.
Ports 1-4.
RJ-11 Connectors.
Multi-Tech Systems, Inc. FaxFinder Admin User Guide 11
5
ETHERNET
6
87
Cabling to your IP network.
RJ-45 connector.
COMMAND
On/Off
Switch
Power Cable
Receptacle
Page 12
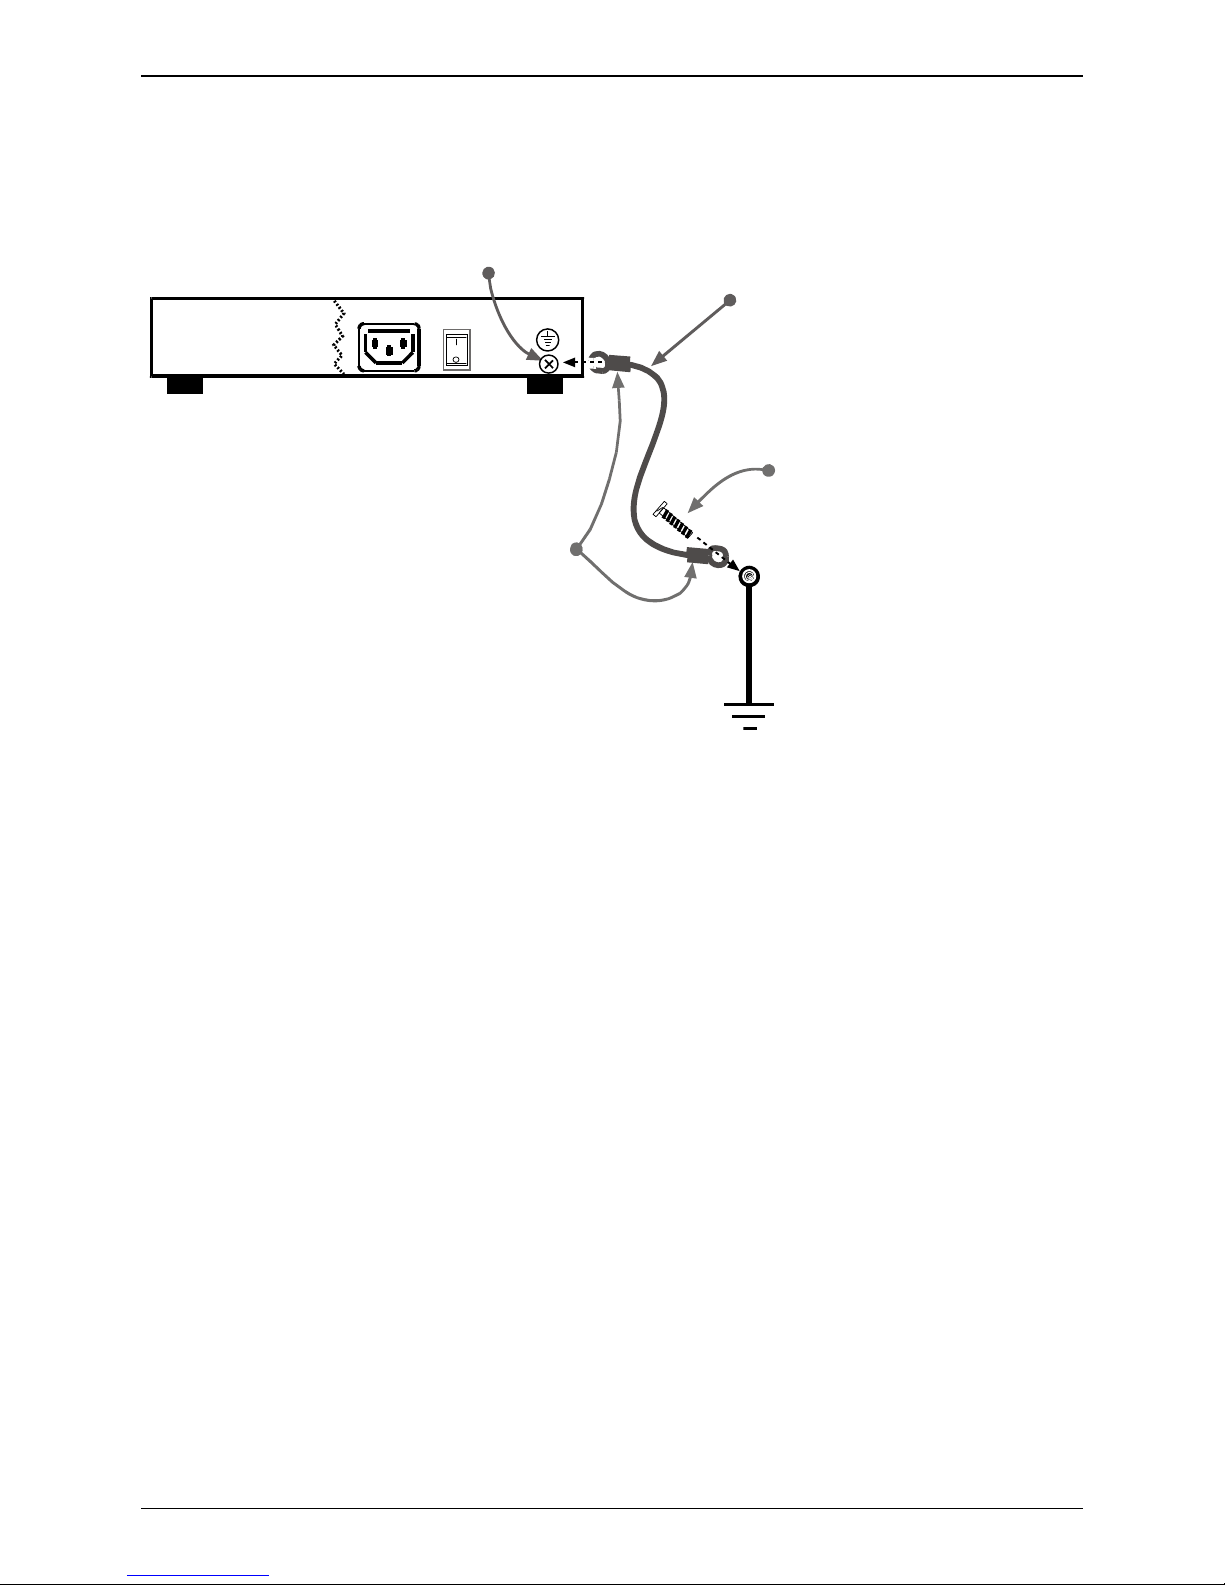
Earth Grounding for FF420/820
Product
Ground
Screw
FF-420/820
Unit
Grounding connectors
must be secured
permanently to
product ground screw
and earth ground screw.
Chapter 2: Installation
Ground Wire:
Size 18AWG
or thicker
Earth Ground Screw:
Connected to
Permanent Earth Ground
of Building’s
Electrical System
GND
Multi-Tech Systems, Inc. FaxFinder Admin User Guide 12
Page 13
Chapter 2: Installation
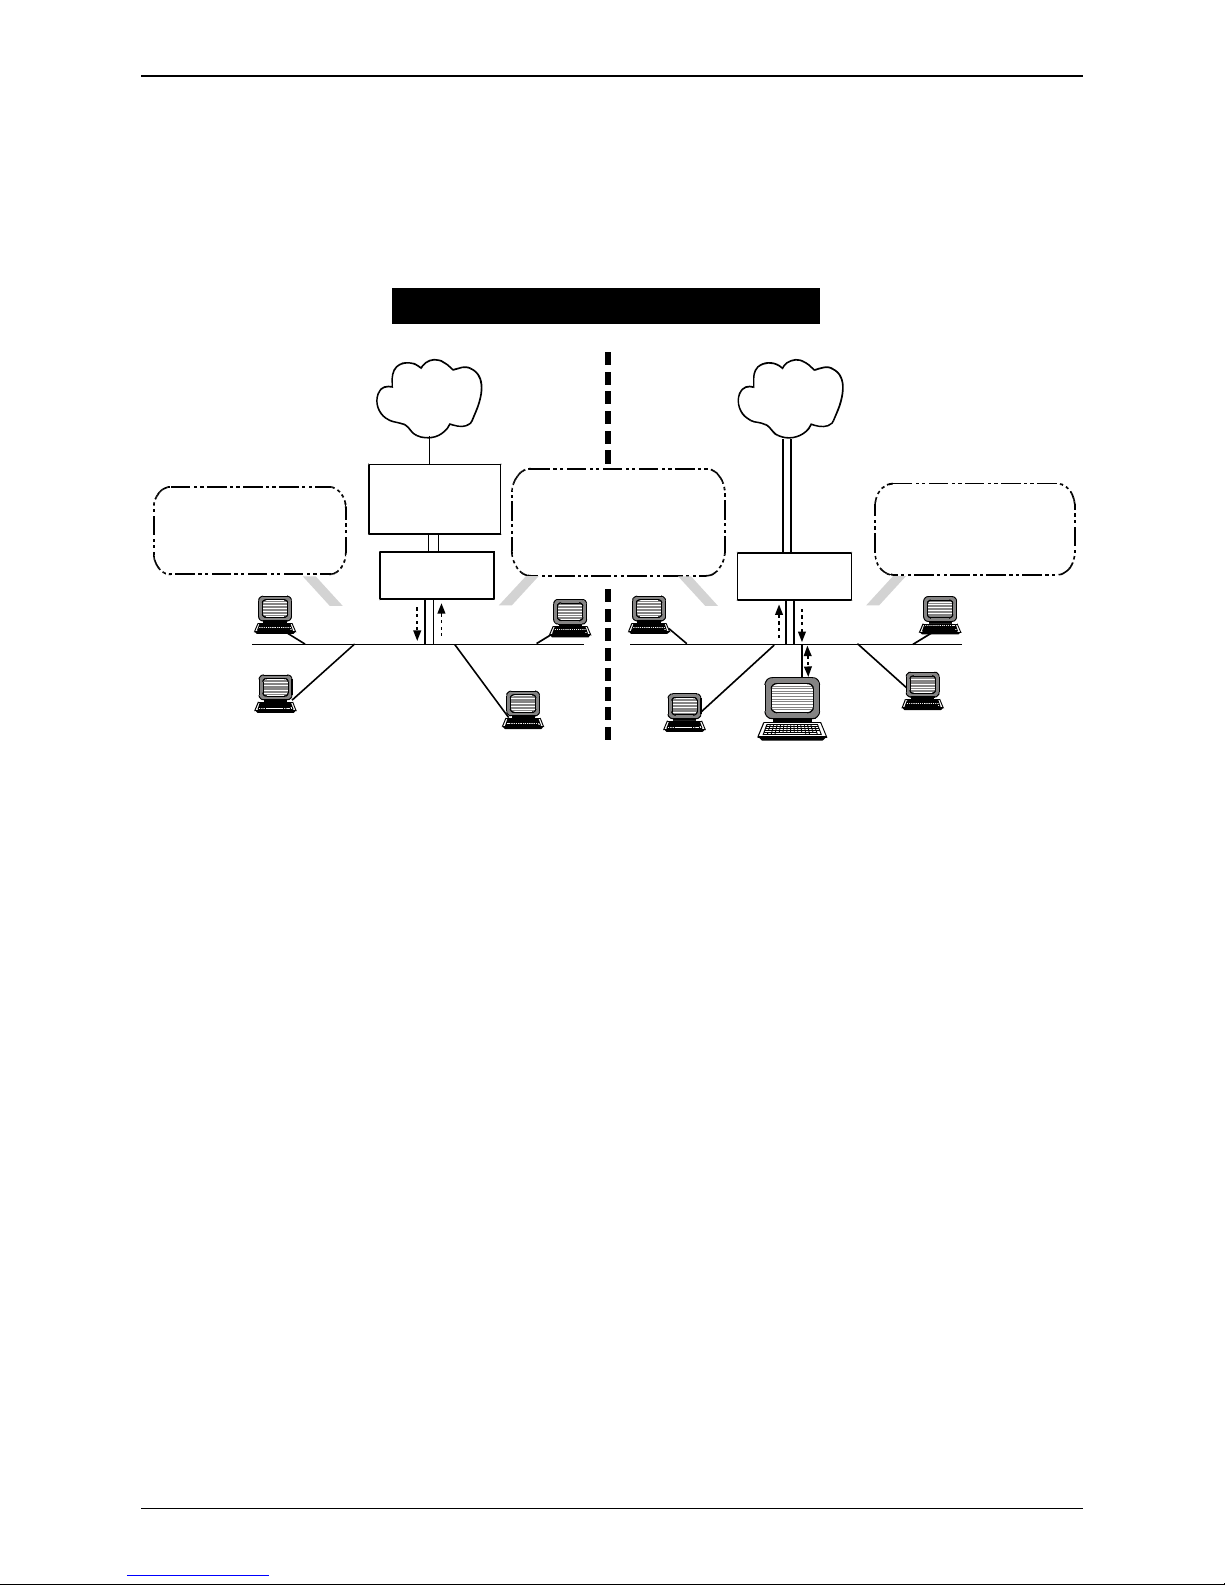
FaxFinder Operating Modes
The FaxFinder Fax Server provides two-way fax service to PC client users on an Ethernet network. For
outgoing service, users send faxes by using the Print command of any application program and selecting
the FaxFinder as the target Printer. For incoming fax service, the FaxFinder converts the incoming faxes
into graphic files that are sent as email attachments to fax recipients on the Ethernet network.
FaxFinder Operating Modes
Automated Routing Mode Manual Routing Mode
FaxFinder
Faxes
PSTN
POTS Lines
Inbound
Faxes
Attendant(s)
Inbound Faxing:
Email attachments are
sent to Attendant(s) and
forwarded to recipients.
. . .
PSTN
T1 Line
Outbound Faxing:
Users set FaxFinder
as printing destination
in application program.
Then ‘print-to-FaxFinder.’
Ethernet
LAN
Ethernet
LAN
Outbound
FaxFinder
Faxes
PBX
Station Ports
Outbound
Faxes
Inbound Faxing:
Email attachments
are sent di r e ctly
to recipients.
Inbound
. . .
If the FaxFinder is connected to a PBX station port and that PBX can route multiple phone extension
numbers to the FaxFinder, then each user can have his/her own incoming fax number and faxes will go
directly to each user’s email address. This is the FaxFinder’s Automated Routing Mode of operation.
Because there are several ways of implementing Automated Routing Mode (some generic and some
specific to certain PBXs) there are several different “Routing” settings in the FaxFinder software’s
“Modem Configuration” screen that will implement the Automated Routing Mode for these different
situations.
If the FaxFinder is connected directly to a POTS line or to the station port of a PBX that cannot route
multiple extension numbers to a single station port, then all incoming faxes must go to the email address
of a single recipient who acts as an attendant and forwards the faxes to the intended recipients.
This is the FaxFinder’s Manual Routing Mode of operation. In the FaxFinder software’s “Modem
Configuration” screen, you simply choose the “POTS Line” option to implement the Manual Routing Mode
of operation.
In order for each user to receive incoming faxes directly, the FaxFinder must be connected to a PBX that
can route multiple extensions to a single port (convergent routing). If your PBX does not support this
convergent routing, then incoming faxes must be sent to recipients through an attendant.
Multi-Tech Systems, Inc. FaxFinder Admin User Guide 13
Page 14
Chapter 2: Installation
Installation Overview
Part A: Cabling – Connecting the FaxFinder to Power,
Phone Lines, and Ethernet
Summary: Place the FaxFinder in a convenient location, and then connect it to your AC power outlet and
Ethernet.
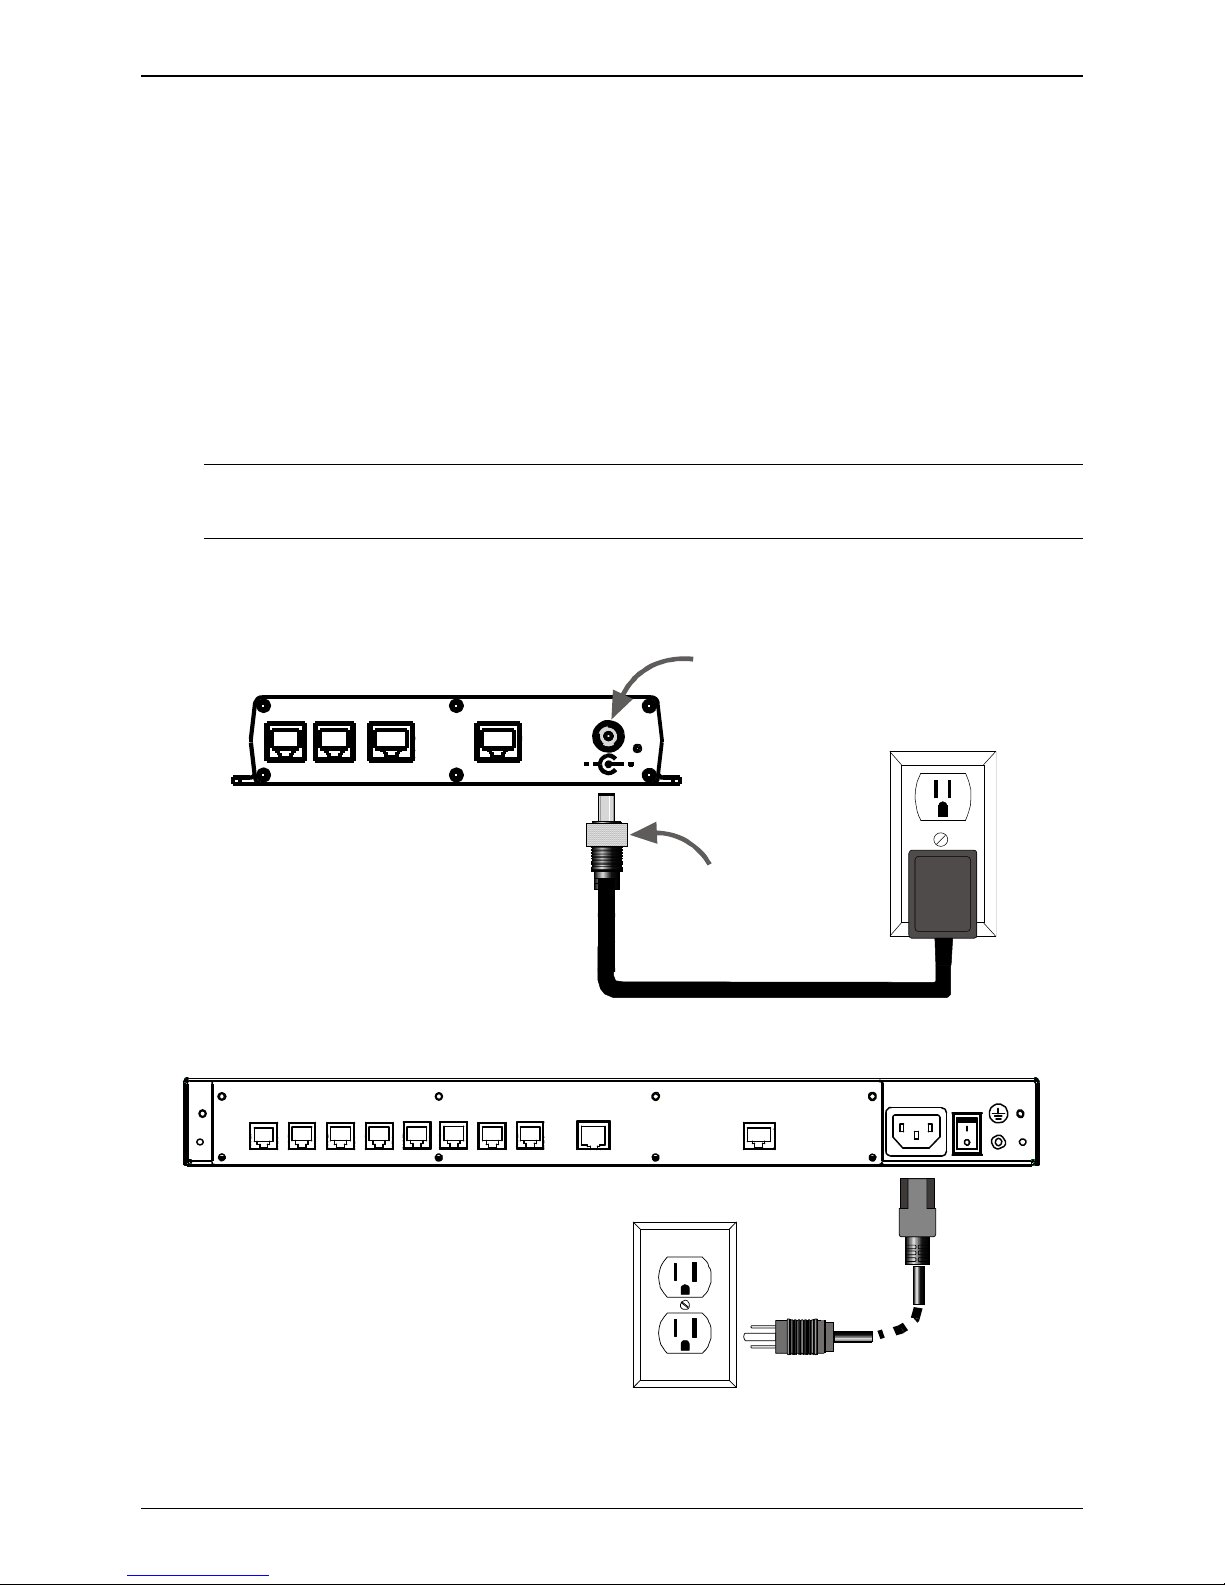
1. Connect FaxFinder to AC Outlet.
A. FF120/220 Power. Plug the DC power transformer into a power outlet or power strip. Secure the
other end to the Power Receptacle on your FF120/220 FaxFinder. Secure the power cord to the
connector with the lock nut. (Builds of FF120/220 for outside of North America have a 2-piece
power connection.)
Note: The FF120 & 220 have a reset switch in lieu of a power toggle switch. Using a straightened
paper clip to push the recessed button will perform a hardware reset. This is only necessary
if the unit becomes unresponsive.
Caution: Use only the DC power transformer supplied with the FaxFinder. Use of any other
transformer voids the warranty and can damage the FaxFinder.
PowerCable
Receptacle
6
CONSOLE
RESET
Lock Nut
ETHERN ET
87
COMMAND
LINE 2 LAN 1
LINE 1
FF-120/220
B. FF420/820 Power. Connect the power cable between the unit and a power outlet.
312 4
5
FF-420/820
Multi-Tech Systems, Inc. FaxFinder Admin User Guide 14
Page 15
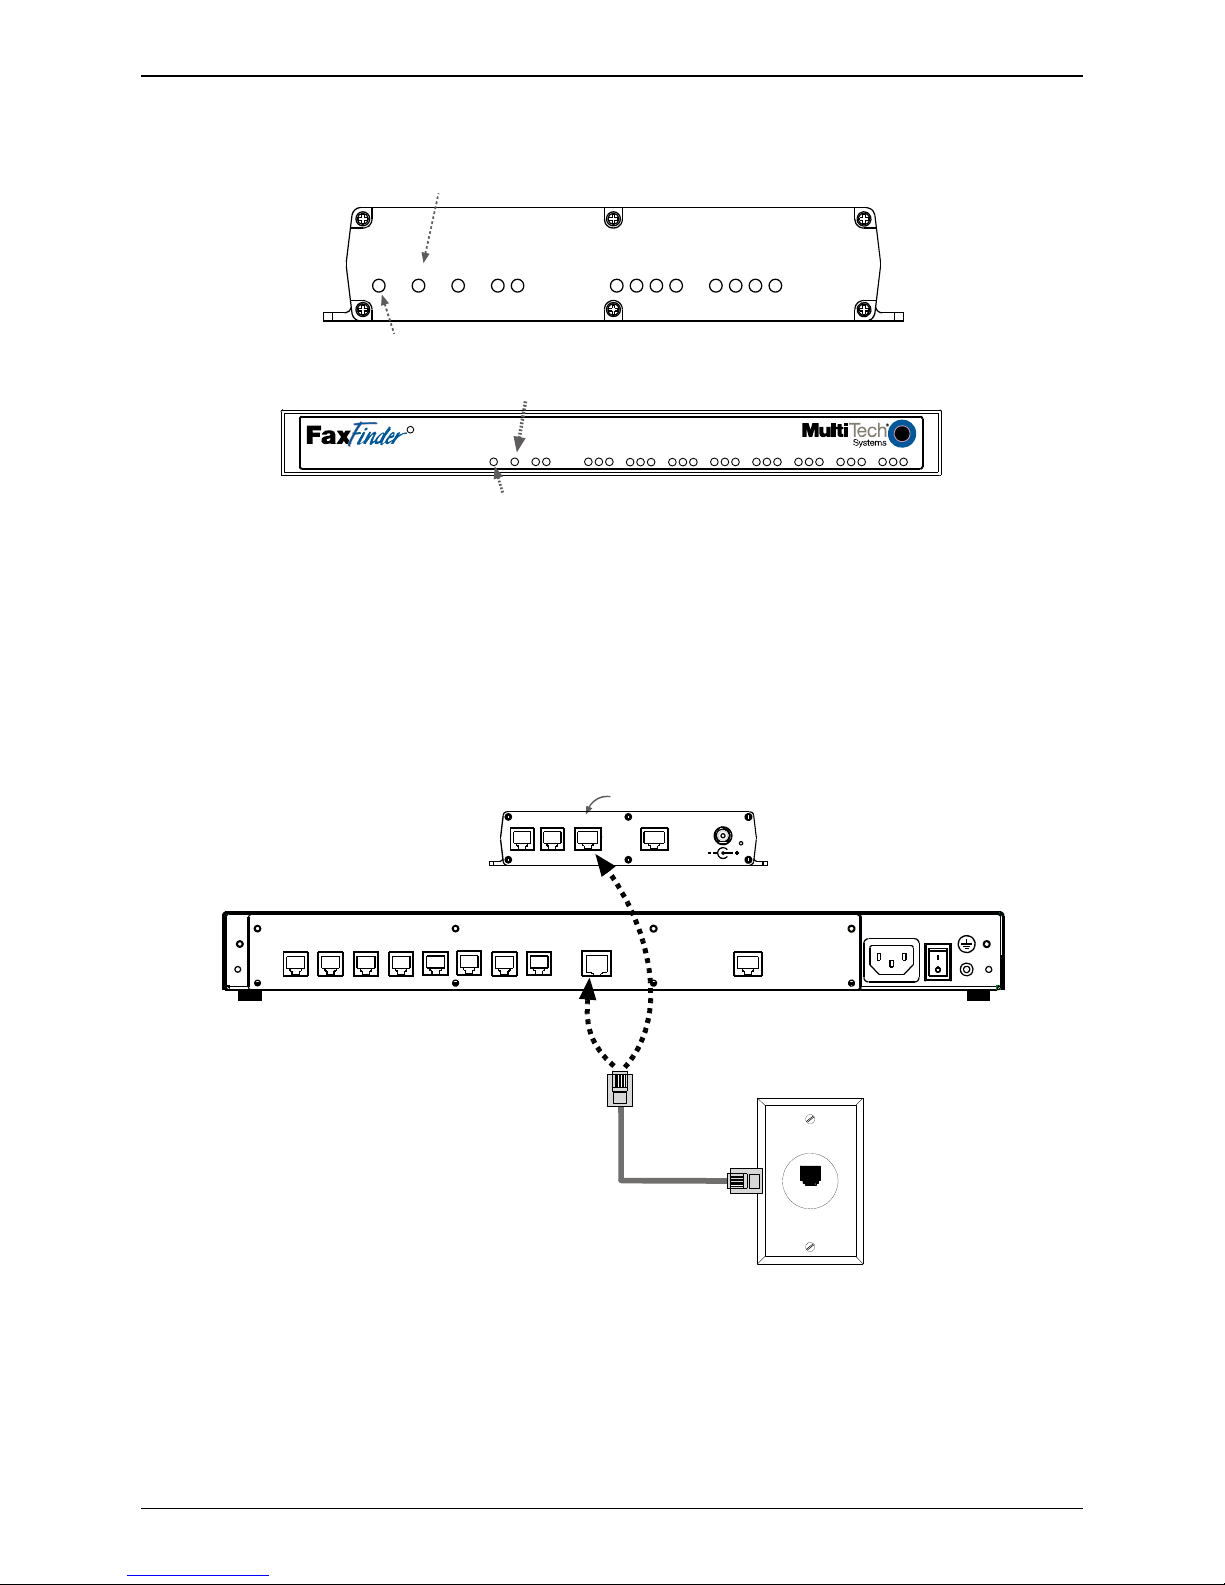
2. Verify Powering.
Chapter 2: Installation
Power
Power
LED
Status LED
CF
Status
LAN 1
LNK 100
Line 1
TDRDTR
FF-120/220
Line 2
TDRDTR
CD
CD
Status LED
R
Power
Status
Ethernet
LNK IOO
Power LED
Modem 1
TD
Modem 2
RD
CD
RD
CD
TD
Modem 3
TD
Modem 4
Modem 5
Modem 6
Modem 7
RD
RD
CD
TD
RD
CD
RD
CD
TD
CD
TD
FF-420/820
Modem 8
RD
RD
CD
TD
CD
TD
After power is applied, the Power LED comes on immediately but there is a 4-second delay before the
Status LED comes on. In normal operation, the Status LED will be flashing.
When you apply power, the FaxFinder performs a diagnostic self-test. The Status indicator flashes when
the test is complete and the unit is ready. If this does not happen, check that the power supply is solidly
connected and that the AC outlet is live.
3. Connect FaxFinder to Ethernet Network.
Plug one end of your RJ45 Ethernet cable into the FaxFinder’s Ethernet jack and the other end into your
network Ethernet hub. This Ethernet cable is not included with your FaxFinder unit.
Ethernet
Receptacle
CONSOLE
RESET
FF-120/220
LINE 1
LINE 2
LAN 1
312 4
ETHERNET
5
6
87
COMMAND
FF-420/820
Caution: Before connecting to the Ethernet Network, make sure that the network to which you are
connecting the FaxFinder is not a 192.168.2.x subnet. Because the FaxFinder’s factory default
IP address is 192.168.2.1, connecting it to a network that has a different device at that same IP
address would cause data interference.
If it is a 192.168.2.x subnet, connect from the Administrative PC to the FaxFinder using an RJ45
crossover cable until the FaxFinder’s IP address has been configured. Thereafter, connect the
FaxFinder into the network with an ordinary RJ45 cable.
Multi-Tech Systems, Inc. FaxFinder Admin User Guide 15
Page 16
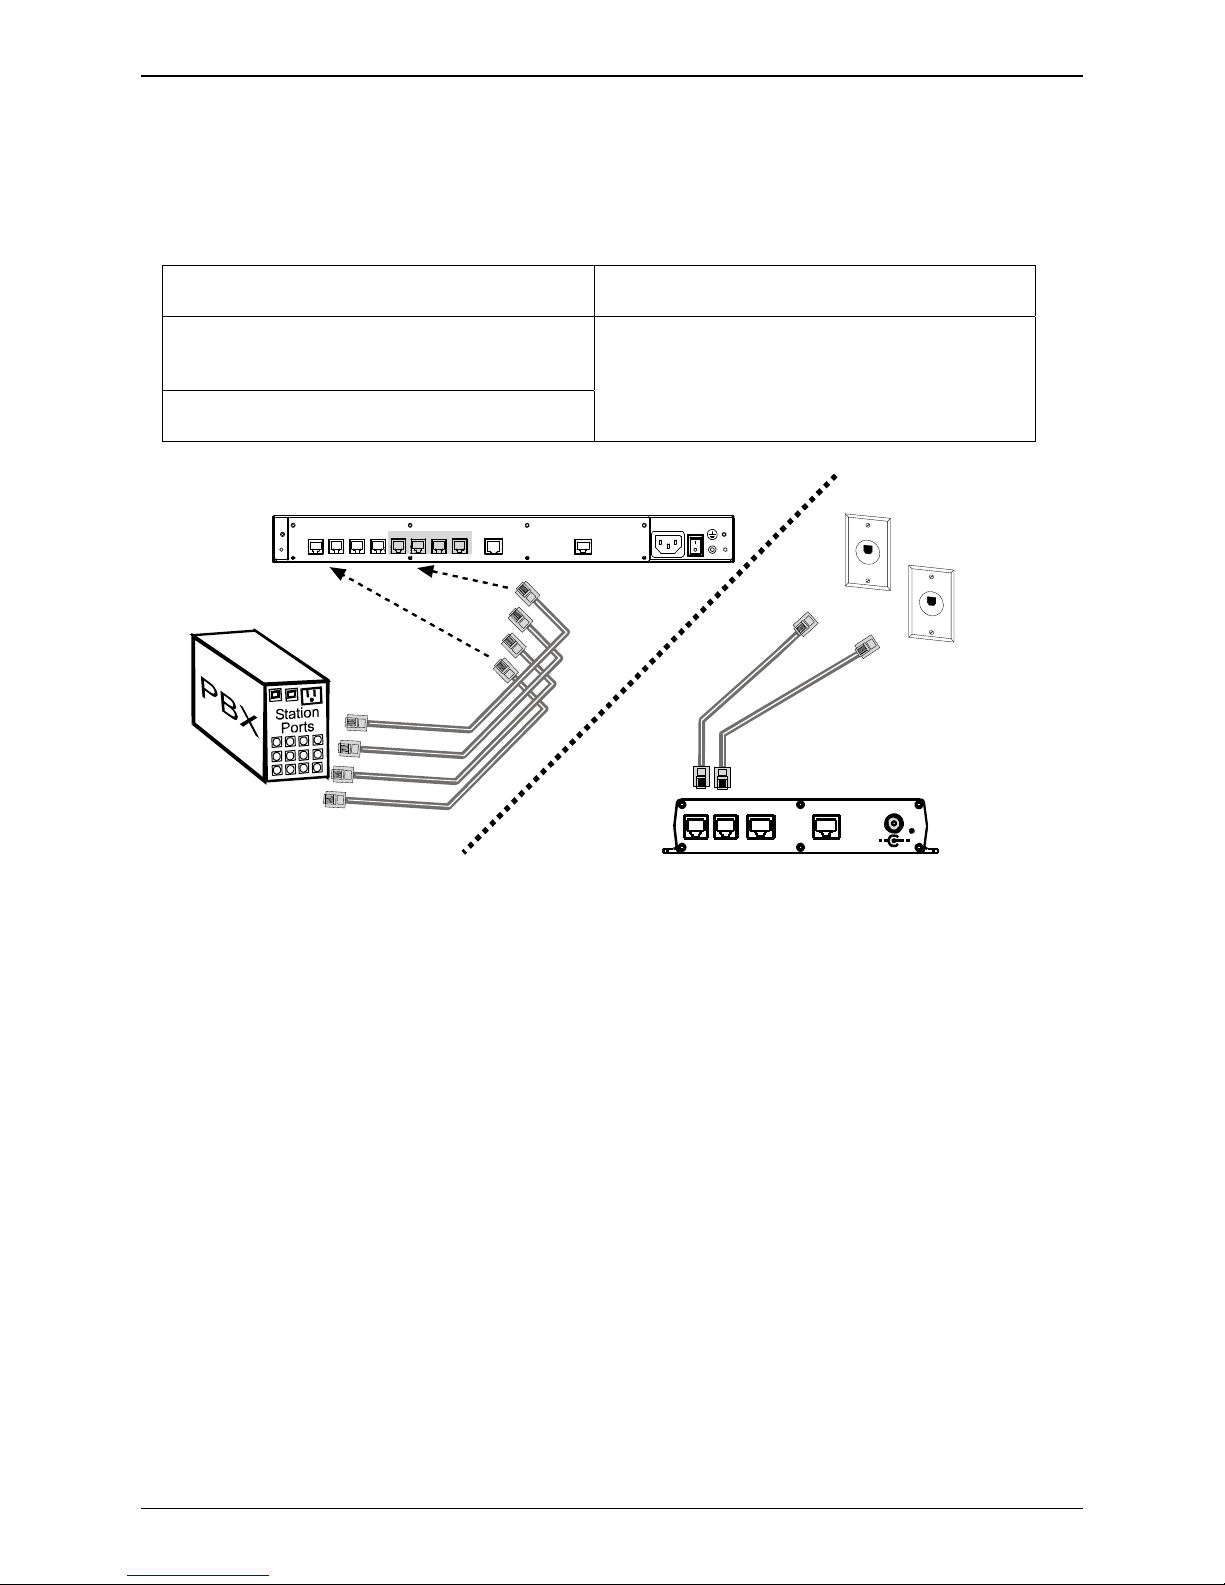
Part B: Connecting to Telephony Service
The FaxFinder can either be connected to a PBX
(for use in
(for use in
Automated Routing Mode) or to POTS lines
Manual Routing Mode).
Chapter 2: Installation
Connection for
Automated Routing Mode
Plug one end of the phone cable into the
FaxFinder’s LINE jack and the other into an
available Station Port on the PBX.
An RJ11-to-RJ11 cable is included with your
FaxFinder.
Automated Routing Mode
ETHERNET
312 4
5
87
6
Connection for
Manual Routing Mode
Plug one end of the phone cable into the
FaxFinder’s LINE jack and the other end into
your standard telephone receptacle.
COMMAND
Manual
Routing
Mode
LINE 1
LINE 2 LAN 1
CONSOLE
RESET
Multi-Tech Systems, Inc. FaxFinder Admin User Guide 16
Page 17

Chapter 2: Installation
Part C: Installing the Software
There are two programs to install for configuring and using the FaxFinder unit. The Device Manager
software is for the Administrator and primarily deals with the setup and logging functionality. The second
is the Client software that is for general use of the FaxFinder, but it needs to be associated with a
FaxFinder unit for proper operation.
Installing the Device Manager software
A. Insert the FaxFinder Product CD into the CD-ROM drive of the client PC. If the CD does not auto
start, use Windows Explorer to navigate to your CD drive and launch the installation program by
double-clicking on
button.
From the new screen presented, select the Manager Software button to install the Multi-Tech
Device Manager software used to configure the FaxFinder unit.
cd_start.exe file on the CD. From the menu presented, click the Software
B. The Welcome wizard appears. Click
Next.
Multi-Tech Systems, Inc. FaxFinder Admin User Guide 17
Page 18
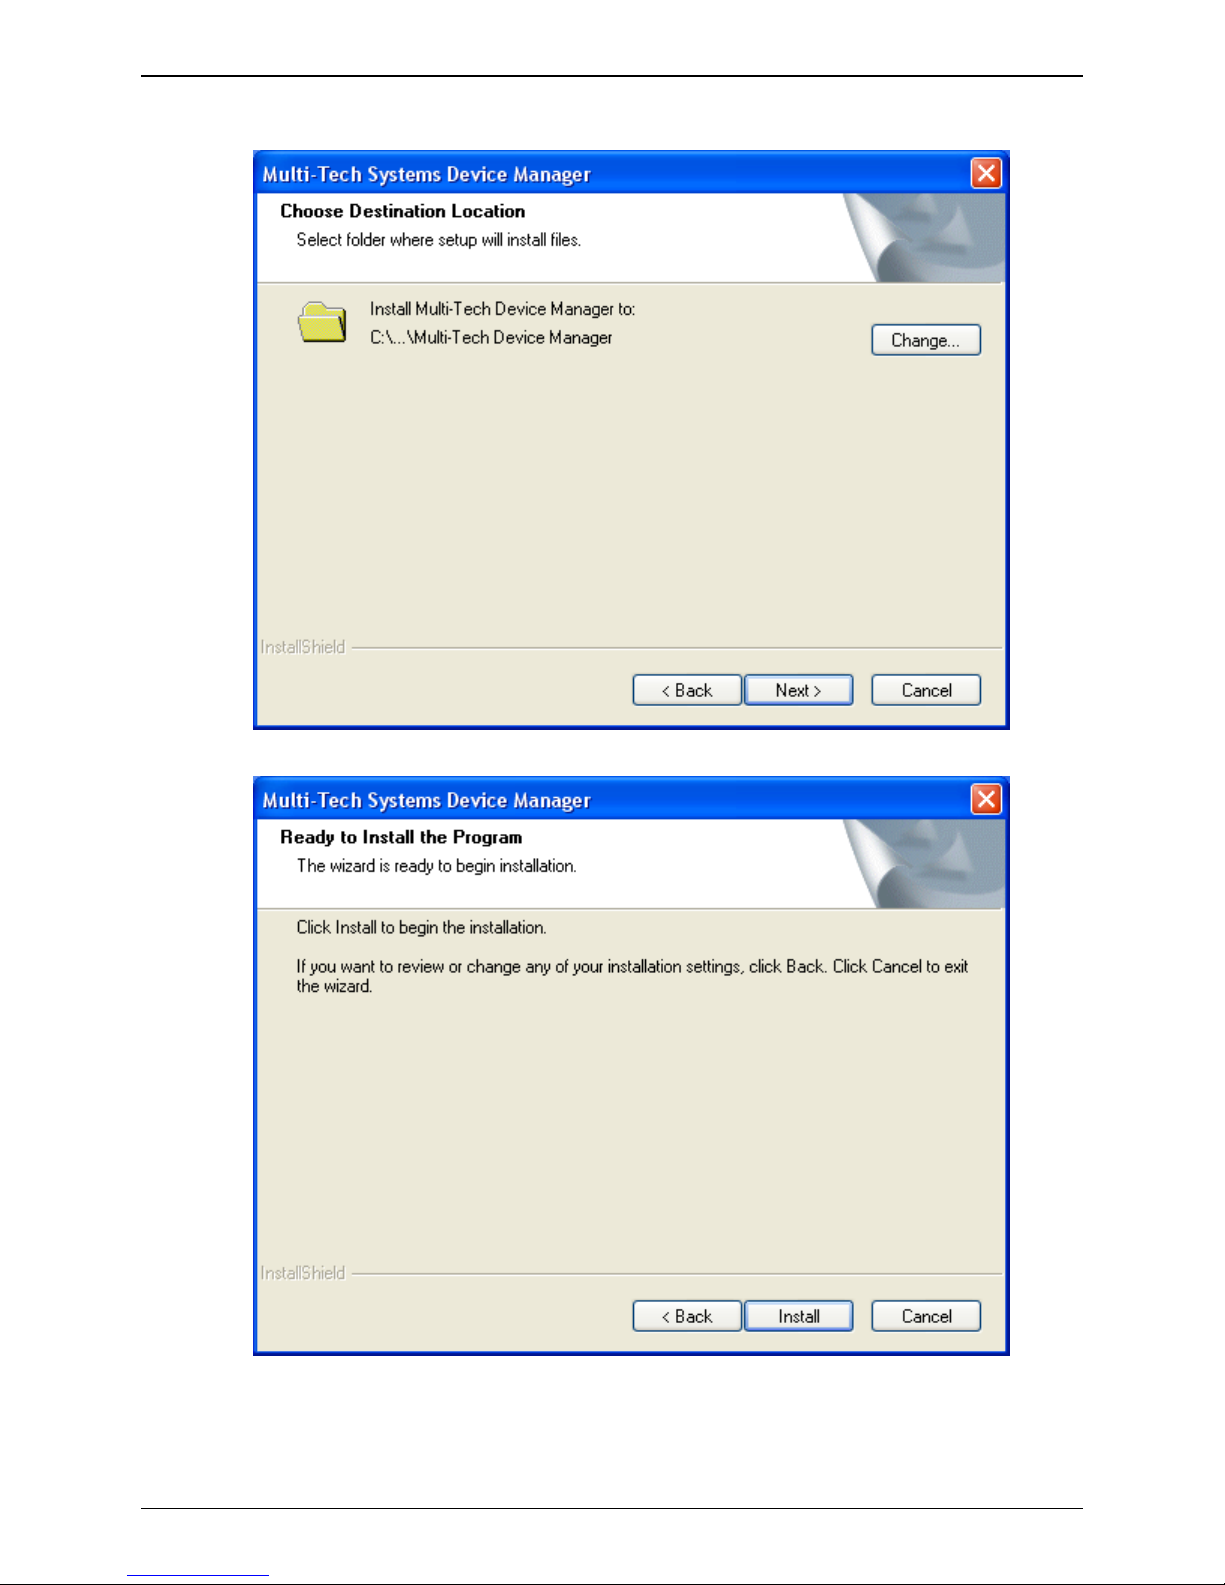
C. Select the location where you would like the software to install. Click Next.
Chapter 2: Installation
D. The soft ware is rea dy to be installed. Click
Install.
Multi-Tech Systems, Inc. FaxFinder Admin User Guide 18
Page 19
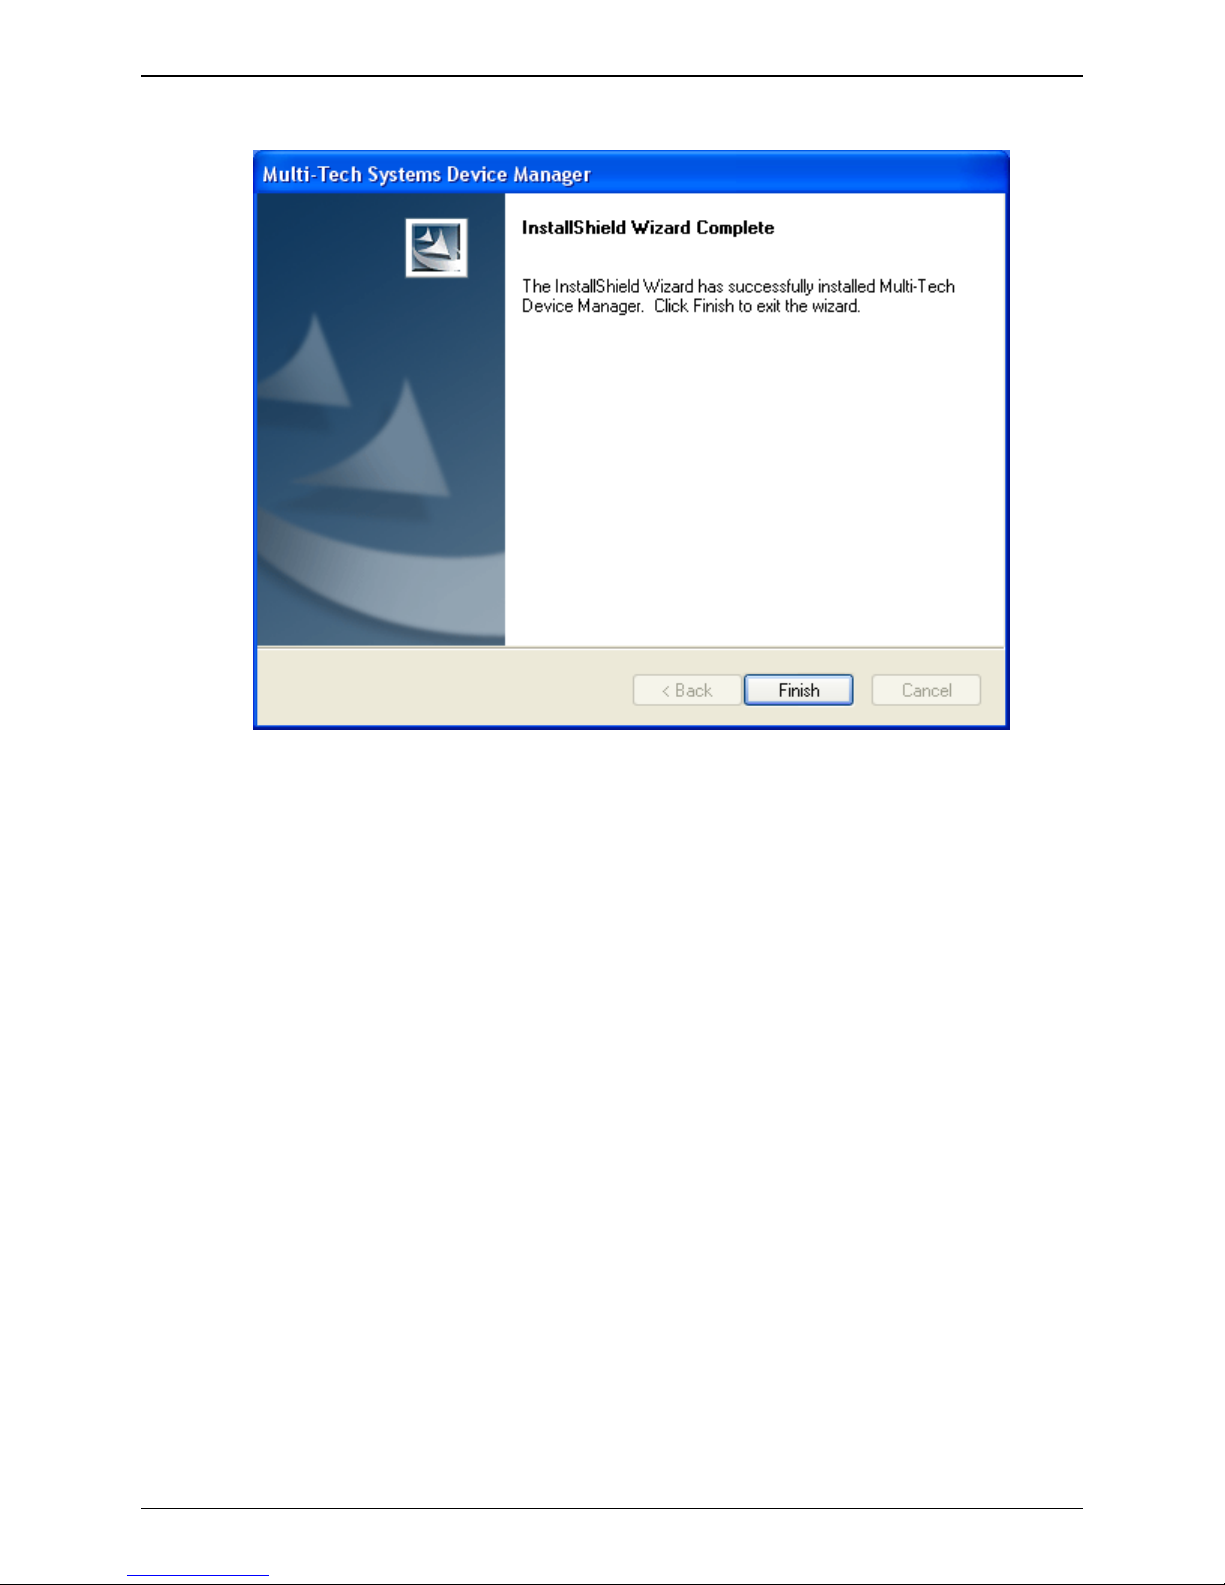
E. When the installation is completed, click Finish.
Chapter 2: Installation
Installation of the Device Manger software is complete. You may now move ahead and set up your
FaxFinder unit using the Device Manager software, or continue with the Client software installation
below.
Multi-Tech Systems, Inc. FaxFinder Admin User Guide 19
Page 20
Chapter 2: Installation
Installing the Client software
A. Insert the FaxFinder Product CD into the CD-ROM drive of the client PC. If the CD does not auto
start, use Windows Explorer to navigate to your CD drive and launch the installation program by
double-clicking on
button.
From the new screen presented, select the Client Software button to install the Multi-Tech
FaxFinder Client software for using the FaxFinder unit.
Important: If you have any old versions of the FaxFinder client software installed, please uninstall
that prior to installing the new version. For your convenience, there is a mass uninstaller available
for push uninstalls on the product CD. It is in the Software folder and is called
Remove_InstallShield_FFClient.msi’.
‘
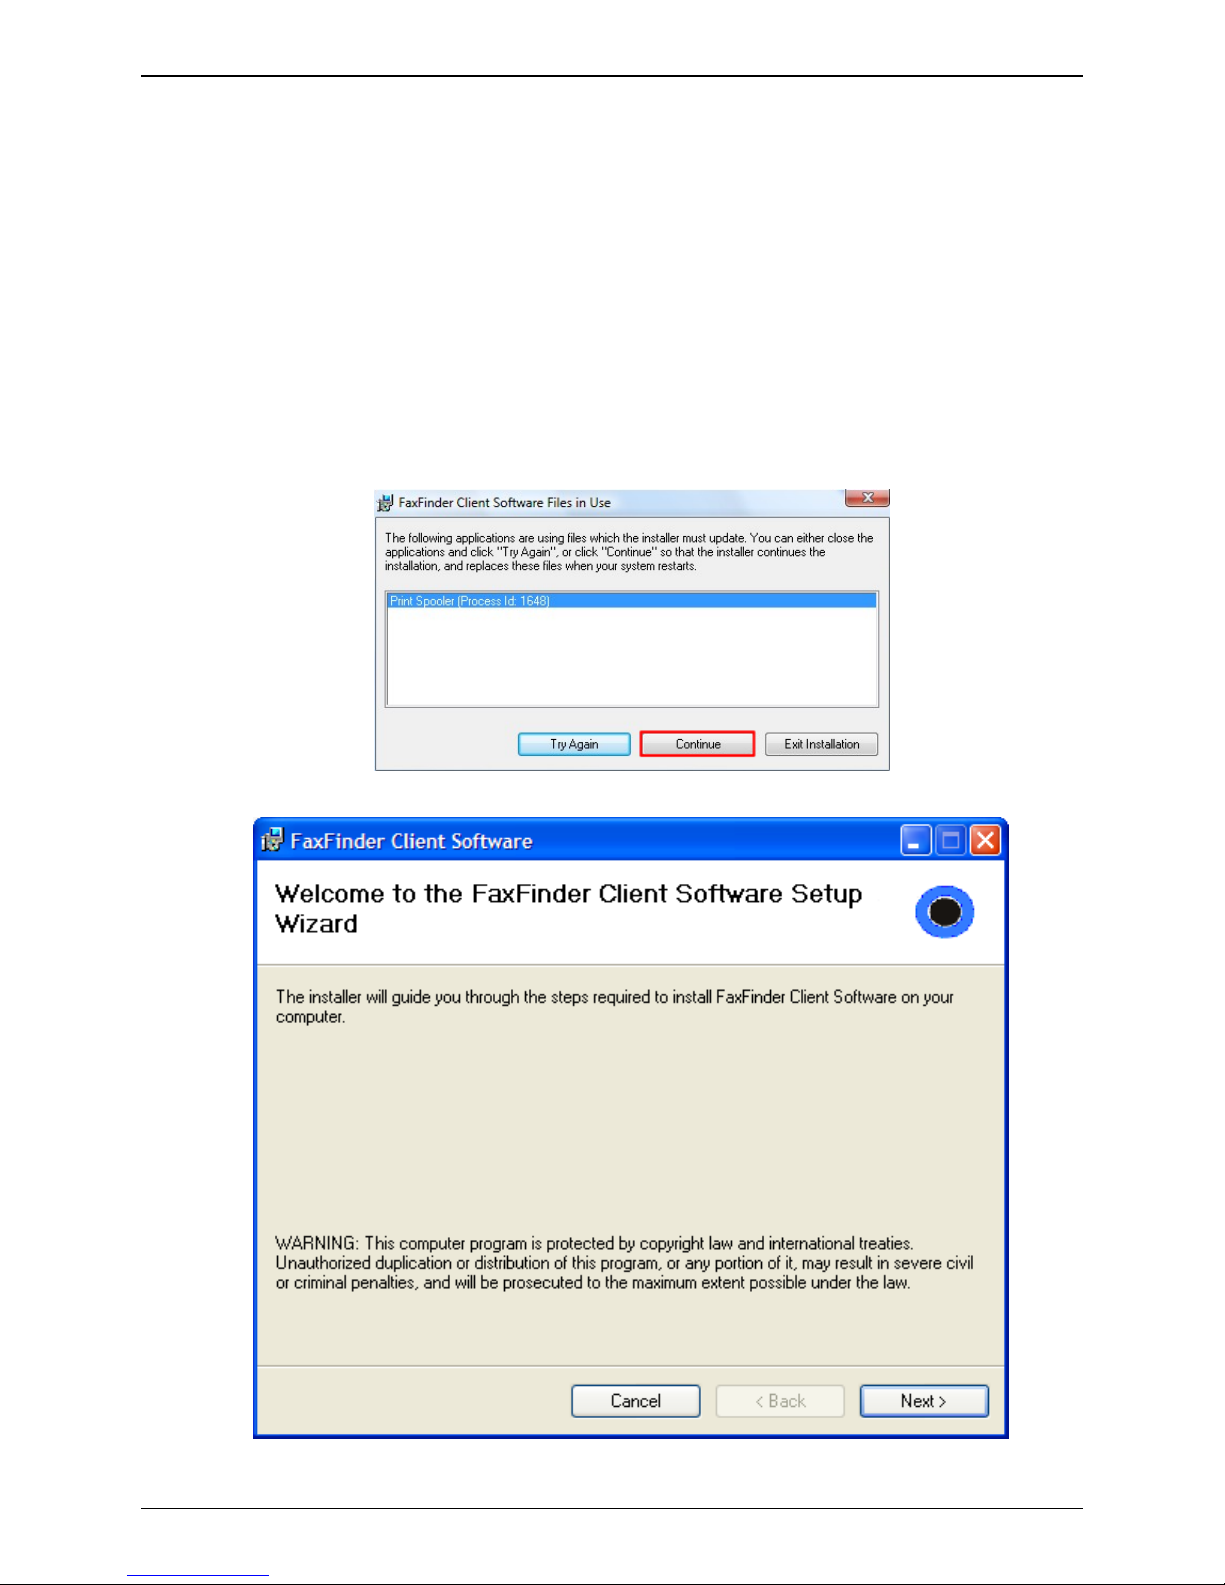
Vista Only: Should you install the client in Windows Vista, you may see a pop-up window informing
you of a printer spooling in use. Please select ‘Continue’ to finish the installation. This message
has no impact on the installation or functionality of the FaxFinder Client Software.
cd_start.exe file on the CD. From the menu presented, click the Software
Continue the installation.
Multi-Tech Systems, Inc. FaxFinder Admin User Guide 20
Page 21
B. At the
Chapter 2: Installation
Welcome screen, click Next.
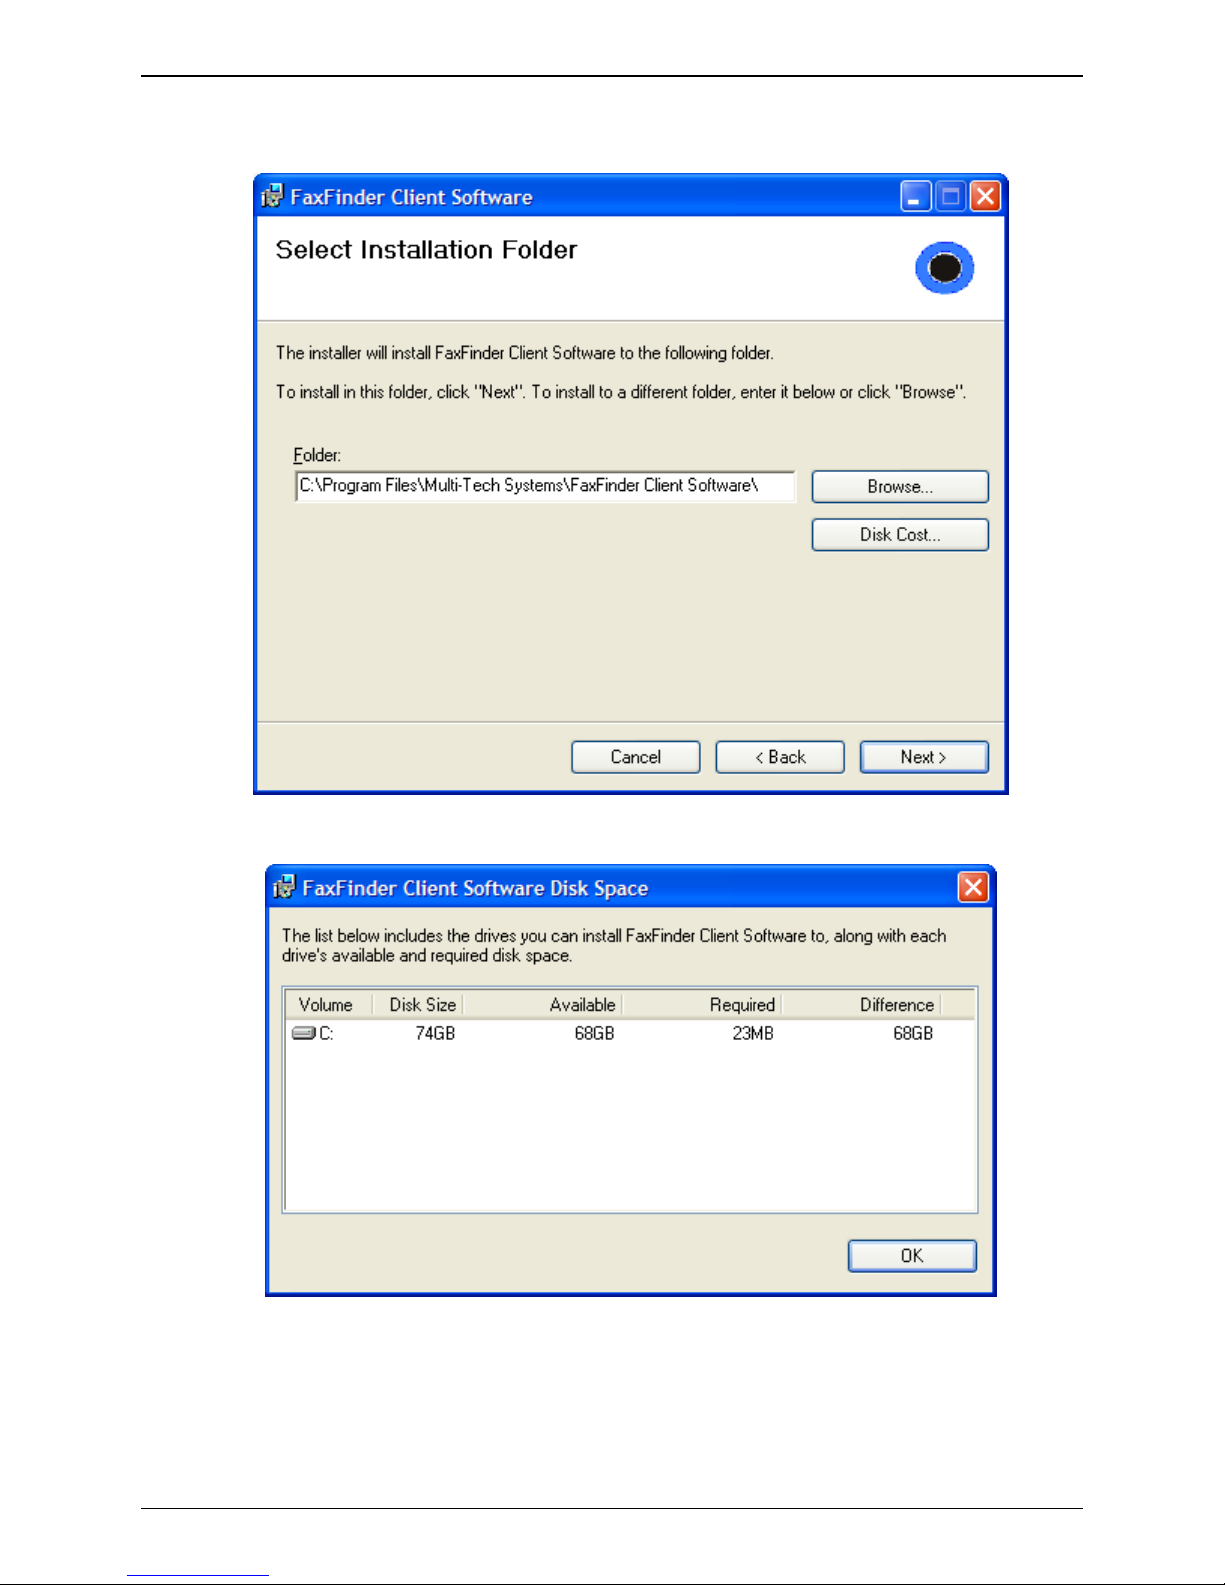
C. At the
Select Installation Folder screen, browse to the desired file location for the FaxFinder
client software. In most cases, the default file location is recommended.
Clicking on the
Disk Cost button will show you the size of the software being installed as well as the
available disk space of the target drive.
When the destination location is correct, click
Multi-Tech Systems, Inc. FaxFinder Admin User Guide 21
Next.
Page 22
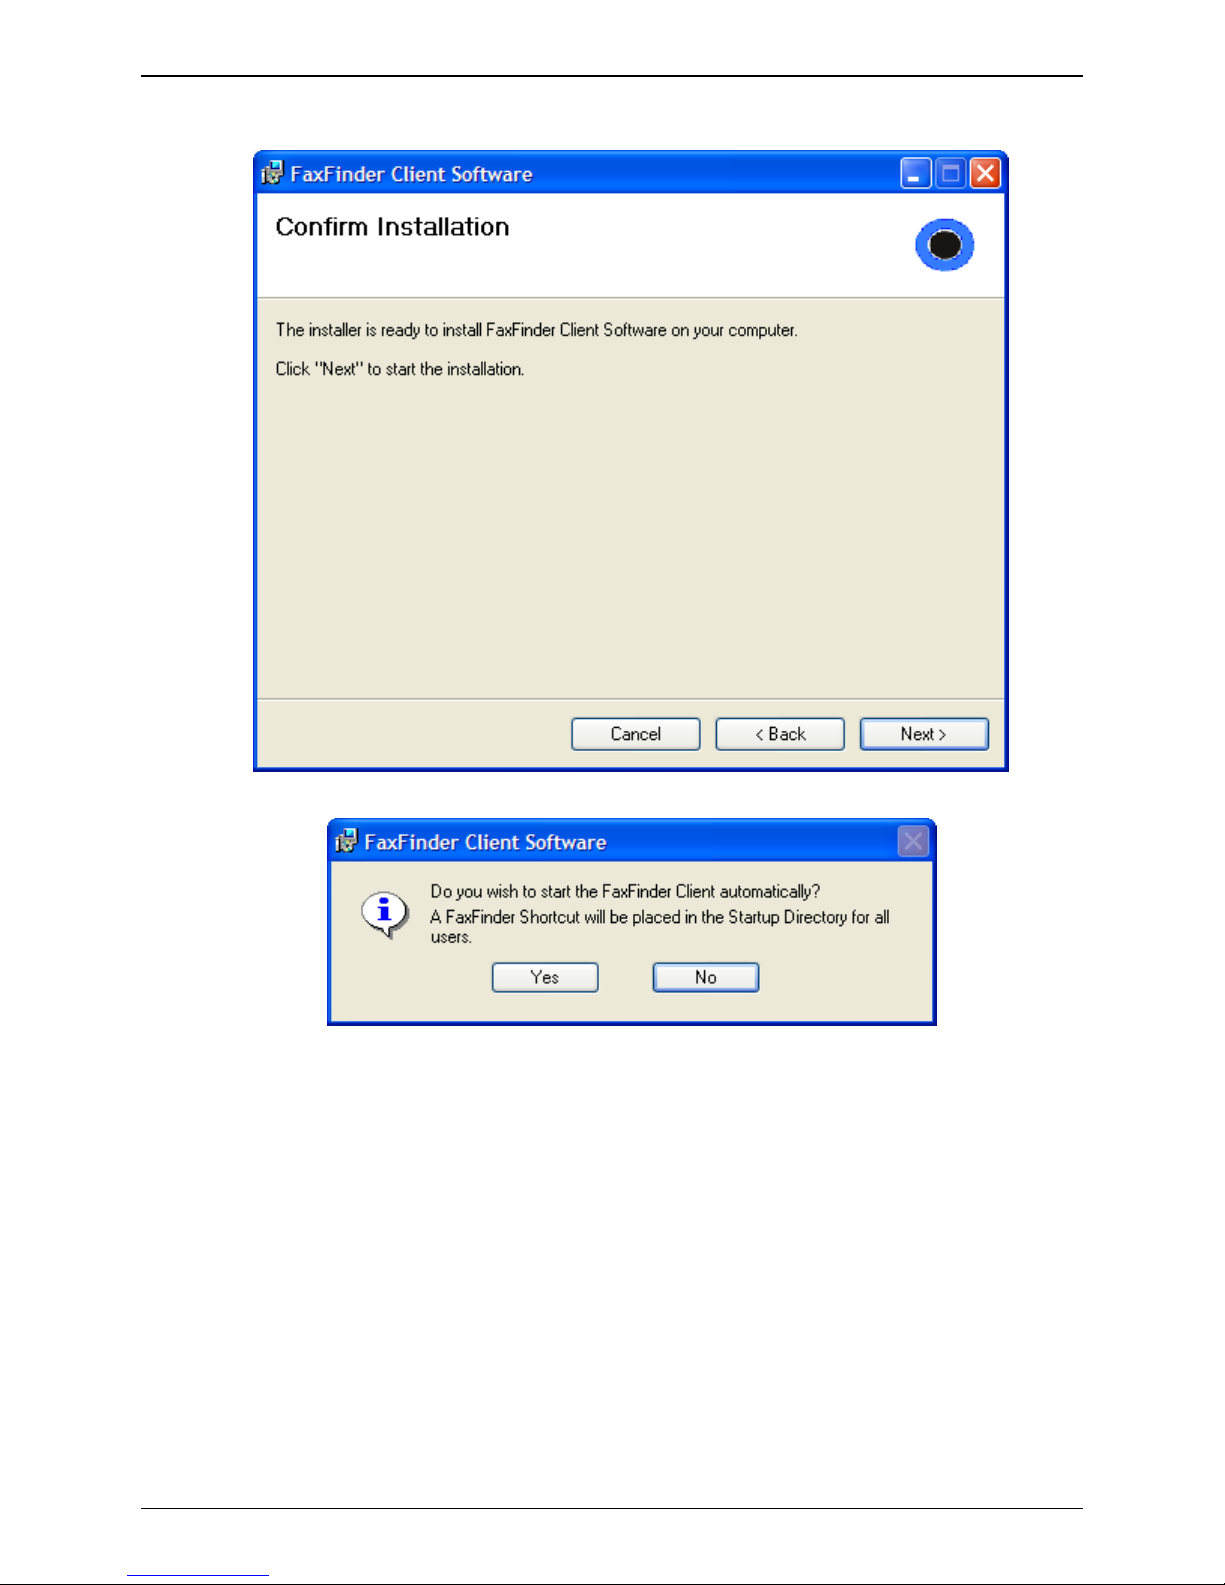
D. At the Confirm Installation screen, click Next to begin the installation..
Chapter 2: Installation
E. A transient screen will appear while files are being copied.
F. The FaxFinder Client software can place a shortcut in the Startup directory so that the client
software will start automatically when the PC is booted.
Multi-Tech Systems, Inc. FaxFinder Admin User Guide 22
Page 23
Chapter 2: Installation
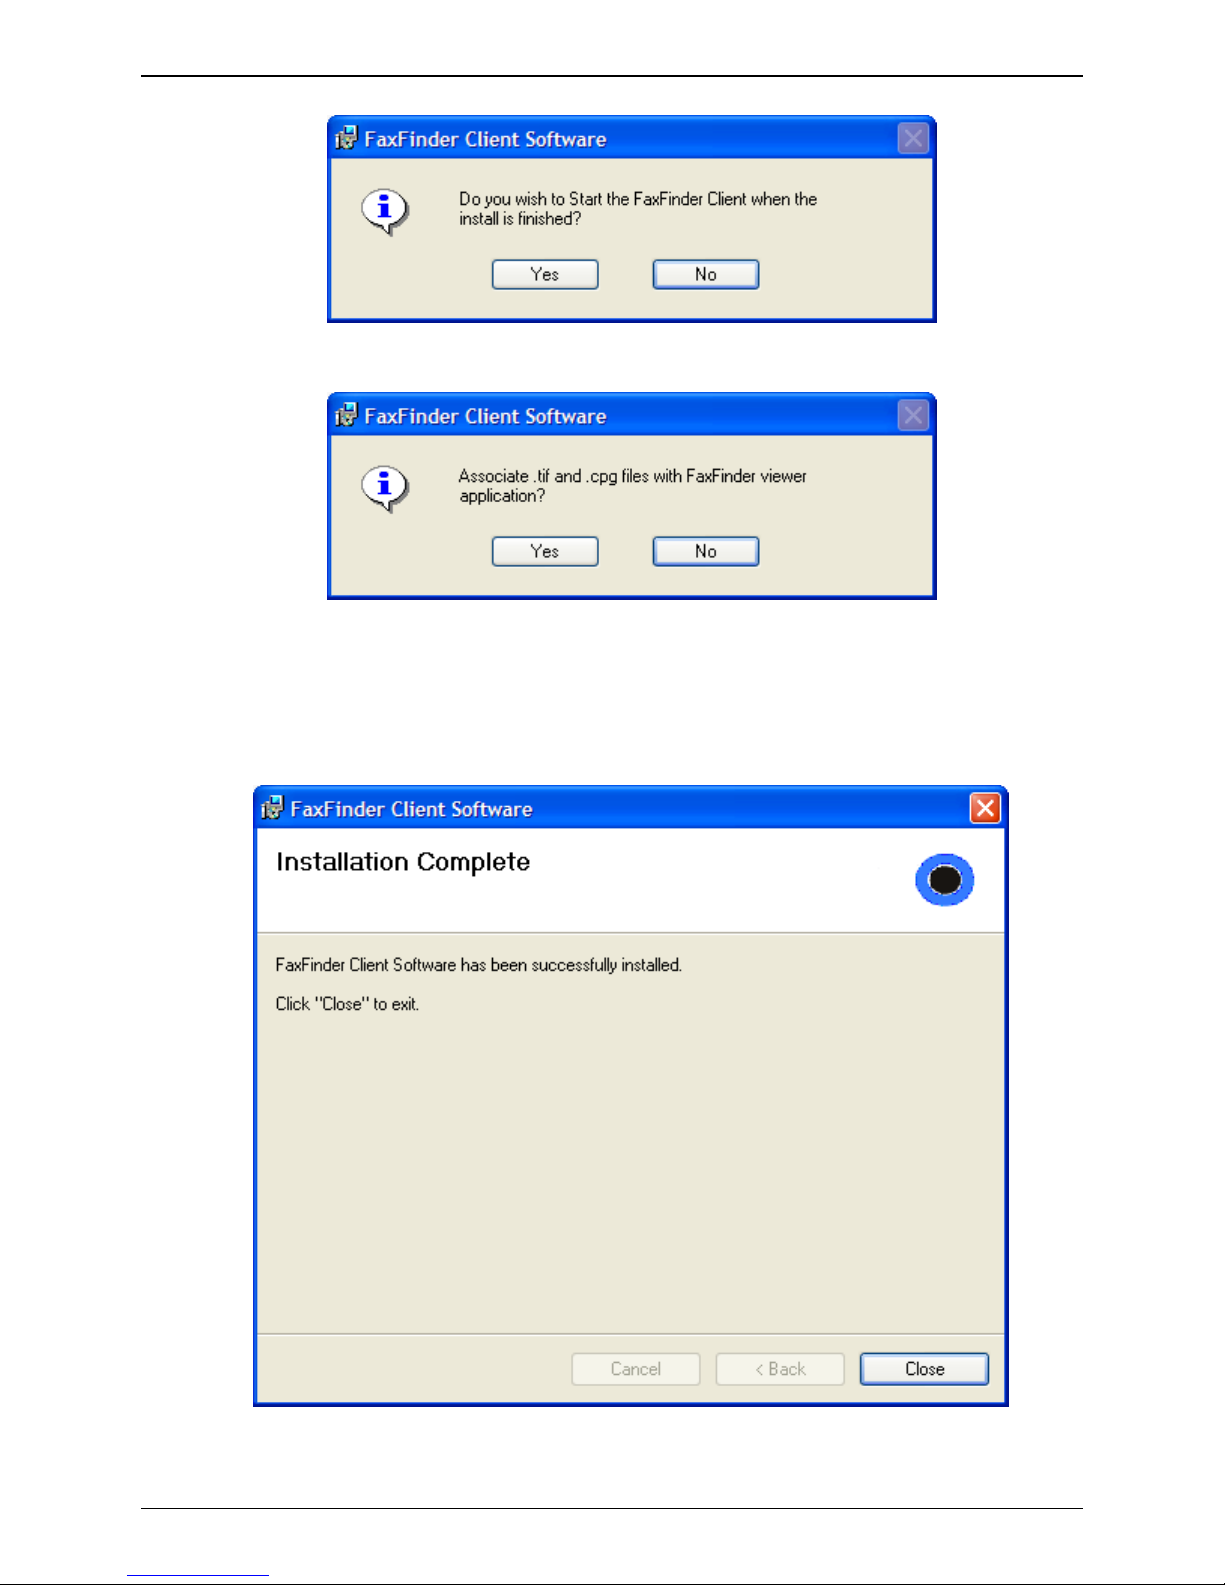
G. You will be asked if you want the Client software to automatically launch when the installation is
complete. Select your preference
H. You will be asked whether or not you want to associate
Viewer. Click
Yes (unless you prefer to use a different viewer program).
.tif and .cpg files with the Multi-Tech Tiff
If a Question screen appears asking "Warning - the extension
Overwrite?”; click
Software. Click
I. Then the
Installation Complete screen will appear.
Yes if you wish to use the TIFF viewer installed with the FaxFinder Client
No if you prefer to use a different software package for viewing .tif files.
.tif is already registered,
Click the
Close button.
Multi-Tech Systems, Inc. FaxFinder Admin User Guide 23
Page 24

Chapter 2: Installation
Client Install on Terminal Service
The process for installing the FaxFinder Client software in Terminal Services is as follows:
• Run the FaxFinder Client for Terminal Services install er as an administrator on the terminal
server.
• Once the installation is complete, a shortcut to the FaxFinder Client is created in the Startup
section of the start menu for All Users (C:\Documents and Settings\All Users\Start
Menu\Programs\Startup). This causes the FaxFinder Client to start up automatically when any
user logs into the terminal server. If this is not desired, the shortcut in the All Users start menu
may be deleted and placed in user-specific Startup folders as needed.
• Users running the FaxFinder Client must be granted full permissions to the "Multi-Tech
FaxFinder" printer or the client will error on start up.
• The users may be added to the Power Users group, which has full access by default, or can be
given permission individually by selecting Properties on the printer and navigating to the Security
tab.
Push Installs of the Client Software
The FaxFinder Client installer is now available as an MSI package. This provides the ability to perform
remote installation using Microsoft Group Policy, SMS, as well as other third party tools. The installer can
be run like any other Windows software installer and it can also be invoked from the command line usin g
the Windows Installer command ‘msiexec’.
older) must be uninstalled before upgrading.
Previous versions of the FaxFinder Client (1.08.06 and
The installer supports the following options when being used from the com m an d line or remote
installation:
• Set a different install directory:
o TARGETDIR=PATH (default is Program Files/Multi-Tech Systems/FaxFinder Client
Software)
• Add file associations for Multi-Tech TIFF Viewer a nd Cover Page Editor:
o ADDFILEEXT=1 (default is 0)
• Start the FaxFinder client after installation:
o LAUNCHPRODUCT=1 (default is 0)
• Automatically Start the FaxFinder Client
o LAUNCHPRODUCTONBOOT=1 (default is 0)
• Example command to install in silent mode with options:
o msiexec /i FFClient-x_x_x.msi /q TARGETDIR=”C:\FaxFinder Client” ADDFILEEXT=1
LAUNCHPRODUCT=1 LAUNCHPRODUCTONBO OT=1
• Example command to uninstall in silent mode:
o msiexec /x FFClient-x_x_x.msi /q
An example of how to perform a remote software installation using Microsoft Group Policy is available
from Microsoft’s website.
• Search for Knowledge Base article number 816102 at microsoft.com.
Multi-Tech Systems, Inc. FaxFinder Admin User Guide 24
Page 25

Chapter 2: Installation
FaxFinder Client Terminal Services MSI Installer
The FaxFinder Client Terminal Services Installer is also available as an MSI package.
• Run the FaxFinder Client for Terminal Services install er as an administrator on the terminal
server.
Once the installation is complete, a shortcut to the FaxFinder Client is created in the Startup section of
the start menu for All Users (C:\Documents and Settings\All Users\Start Menu\Programs\Startup). This
causes the FaxFinder Client to start up automatically when any user logs into the terminal server. If this is
not desired, the shortcut in the All Users start menu may be deleted and placed in user-specific Startup
folders as needed.
FaxFinder Client Install Shield Mass Uninstall
An MSI package is available on the web site, and the Installation CD, that can be used to mass un-install
the previous version of FaxFinder Client (versions before 1.08.08).
• Example command to uninstall the Install Shield FaxFinder Client in silent mode:
o msiexec /i remove_installshield_faxclient.msi /q
Multi-Tech Systems, Inc. FaxFinder Admin User Guide 25
Page 26

Chapter 2: Installation
V
r
Part D: Configuring the FaxFinder Server
Summary of Configuration Data
The table below lists the information you will need to fill in on the various FaxFinder Server screen.
Gathering this information in advance will expedite the FaxFinder configuration process.
Server Parameters (for Server Admin screen)
IP Address (of FaxFinder unit)
Subnet Mask
(Domain) Name Server
Secondary Name Server (optional)
Default Gateway
Time Server
SMTP (Mail) Server Address
SMTP Port
SMTP Server User ID
SMTP Password
Routing: Manual Routing Mode= “None”;
Automated Routing Mode = either “DTMF Digits” or a PBXspecific mode code)
alues for this FaxFinde
User Parameters
(for Server Phonebook, Client Options, & Client Add Fax Server screens)
Name User ID/
Email Address PBX Extension Password
Username
Multi-Tech Systems, Inc. FaxFinder Admin User Guide 26
Page 27

Chapter 2: Installation
r
Manual Routing Mode: Mapping of FF Ports to Phone Numbers
FaxFinder Port Phone Numbe
Port 1
Port 2
Port 3
Port 4
Port 5
Port 6
Port 7
Port 8
Automated Routing Mode: PBX Phone Number Ranges
Start of Range End of Range
Multi-Tech Systems, Inc. FaxFinder Admin User Guide 27
Page 28
1. Setting Admin PC to Startup IP Address
There are two ways that you can set the startup IP parameters.
You can either
Chapter 2: Installation
• do steps
1A and 1B, then do the steps for your operating system from the table, and then skip to
2A,
-or-
• do the “Alternative Method ...” using the
Device Manager software and then go on to step 2A.
A. Connect a pc to your network.
B. Set the pc IP address to 192.168.2.x subnet (using any address except 192.168.2.1).
Windows XP/2003
a. From the Windows desktop, right-click on “My
Network Places,” and select “Properties.”
b. In the Network Connection screen, right-click
on “Local Area Connection.”
c. In the Local Area Connection Properties
screen, on the “General” tab, scroll to the
“Internet Protocol (TCP/IP)” entry and select it.
Click “Properties.”
d. In the Internet Protocol (TCP/IP) Properties
screen, record the existing IP address. Then
reset the IP address to 192.168.2.2.
Windows Vista
a. Click on Start and go to Network.
b. In the left-hand ‘Folders’ pane, Right-click on Network and select Properties.
c. For the Local Area Connection , click on the View Status link.
d. In the Status window, click on Properties. Click Continue when the permission window pops-up.
e. In the Properties window, click once to highlight “Internet Protocol Version 4 (TCP/IPv4) and then click
Properties below.
f. Here you can select the “Use the following IP address:” radio button, and then set the “IP Address” to
192.168.2.2.
g. Click OK, then click Close and Close again.
Windows 2000
a. From the Windows desktop, right-click on “My
Network Places,” and select “Properties.”
b. In the Network and Dialup Connections
screen, right-click on “Local Area Connection”
and select “Properties.”
c. In the Local Area Connection Properties
screen, select the “Internet Protocol (TCP/IP)”
entry. Click “Properties.”
d. In the Internet Protocol (TCP/IP) Properties
screen, record the existing IP address. Then
reset the IP address to 192.168.2.2.
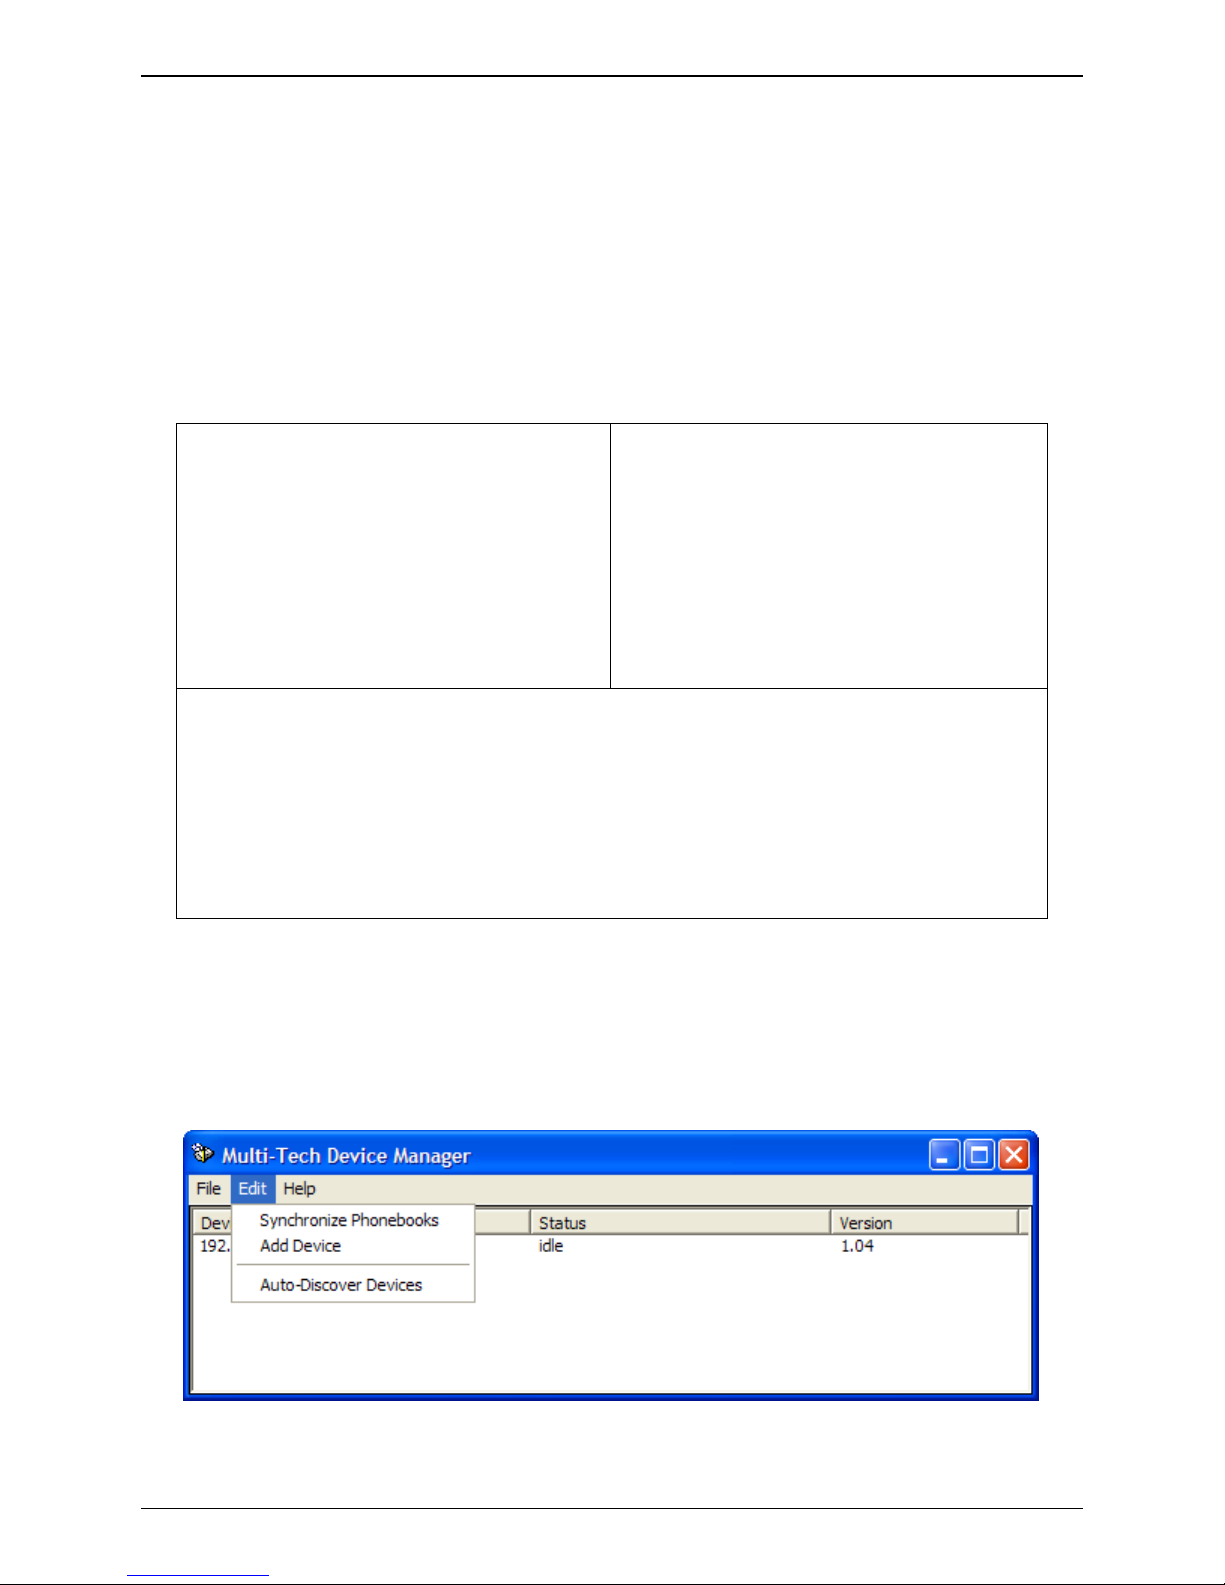
Alternative Method for Setting Desired IP Parameters on FaxFinder Server
If the FaxFinder Server is on the same subnet as the Administration PC, you can set its IP parameters
using the Multi-Tech Device Manager’s Auto-Discovery function (see
the Device Manager software).
In Device Manager, go to Edit | Auto-Discover Devices. The Auto Discovery Monitor dialog box will
appear.
Multi-Tech Systems, Inc. FaxFinder Admin User Guide 28
Chapter 8 concerning installation of
Page 29
Chapter 2: Installation
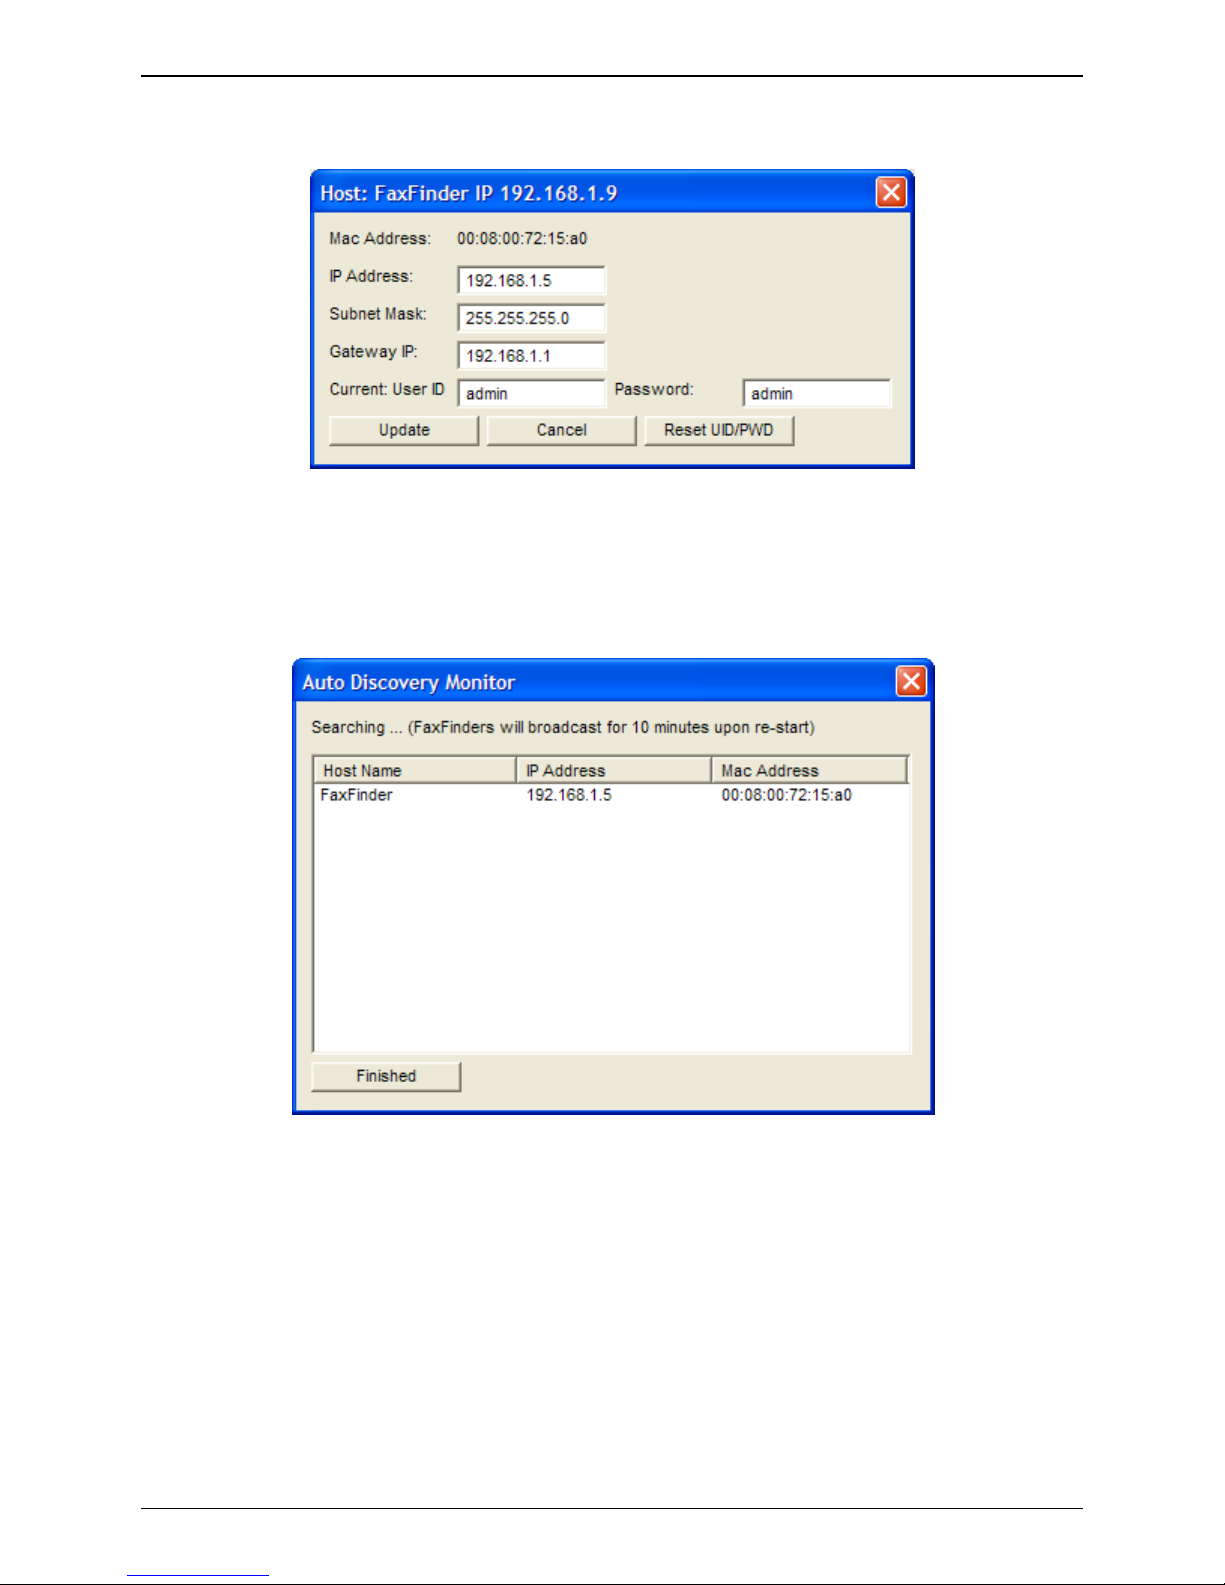
Double-click on the FaxFinder in the Auto Discovery Monitor dialog box and change the IP
Addresses.
If you know the correct User ID and Password, you can change the IP Address, Subnet Mask or
Gateway IP. Select the field you wish to change, enter the User ID and Password then click
Update.
If you click the Reset UID/PWD button, the telnet User ID and Password of the FaxFinder Server will
be reset to factory defaults (
admin/admin).
The Auto Discovery Monitor dialog box will be updated with the IP parameter information from the
Server. This can take up to 30 seconds.
The Host Name column will change to Waiting for update, and then back to FaxFinder once the
update is completed.
The FaxFinder server may need to be turned off and back on again for the IP address change to take
effect. If the IP address is being changed from a previously “discovered” FaxFinder, the old IP version
will need to be deleted from the Device Manager by right-clicking on the old IP and selecting Delete.
You may now Add Device or run the Auto-Discovery again.
Continue to step
2A.
Multi-Tech Systems, Inc. FaxFinder Admin User Guide 29
Page 30
Chapter 2: Installation
2. Logging In
A. Bring up a Web browser on your pc. At the browser’s address line,
type the IP address of the FaxFinder:
either type http://192.168.2.1 and press Enter,
or type the IP address you set using the Auto Discovery dialog box (the “Alternative Method...” above)
and press
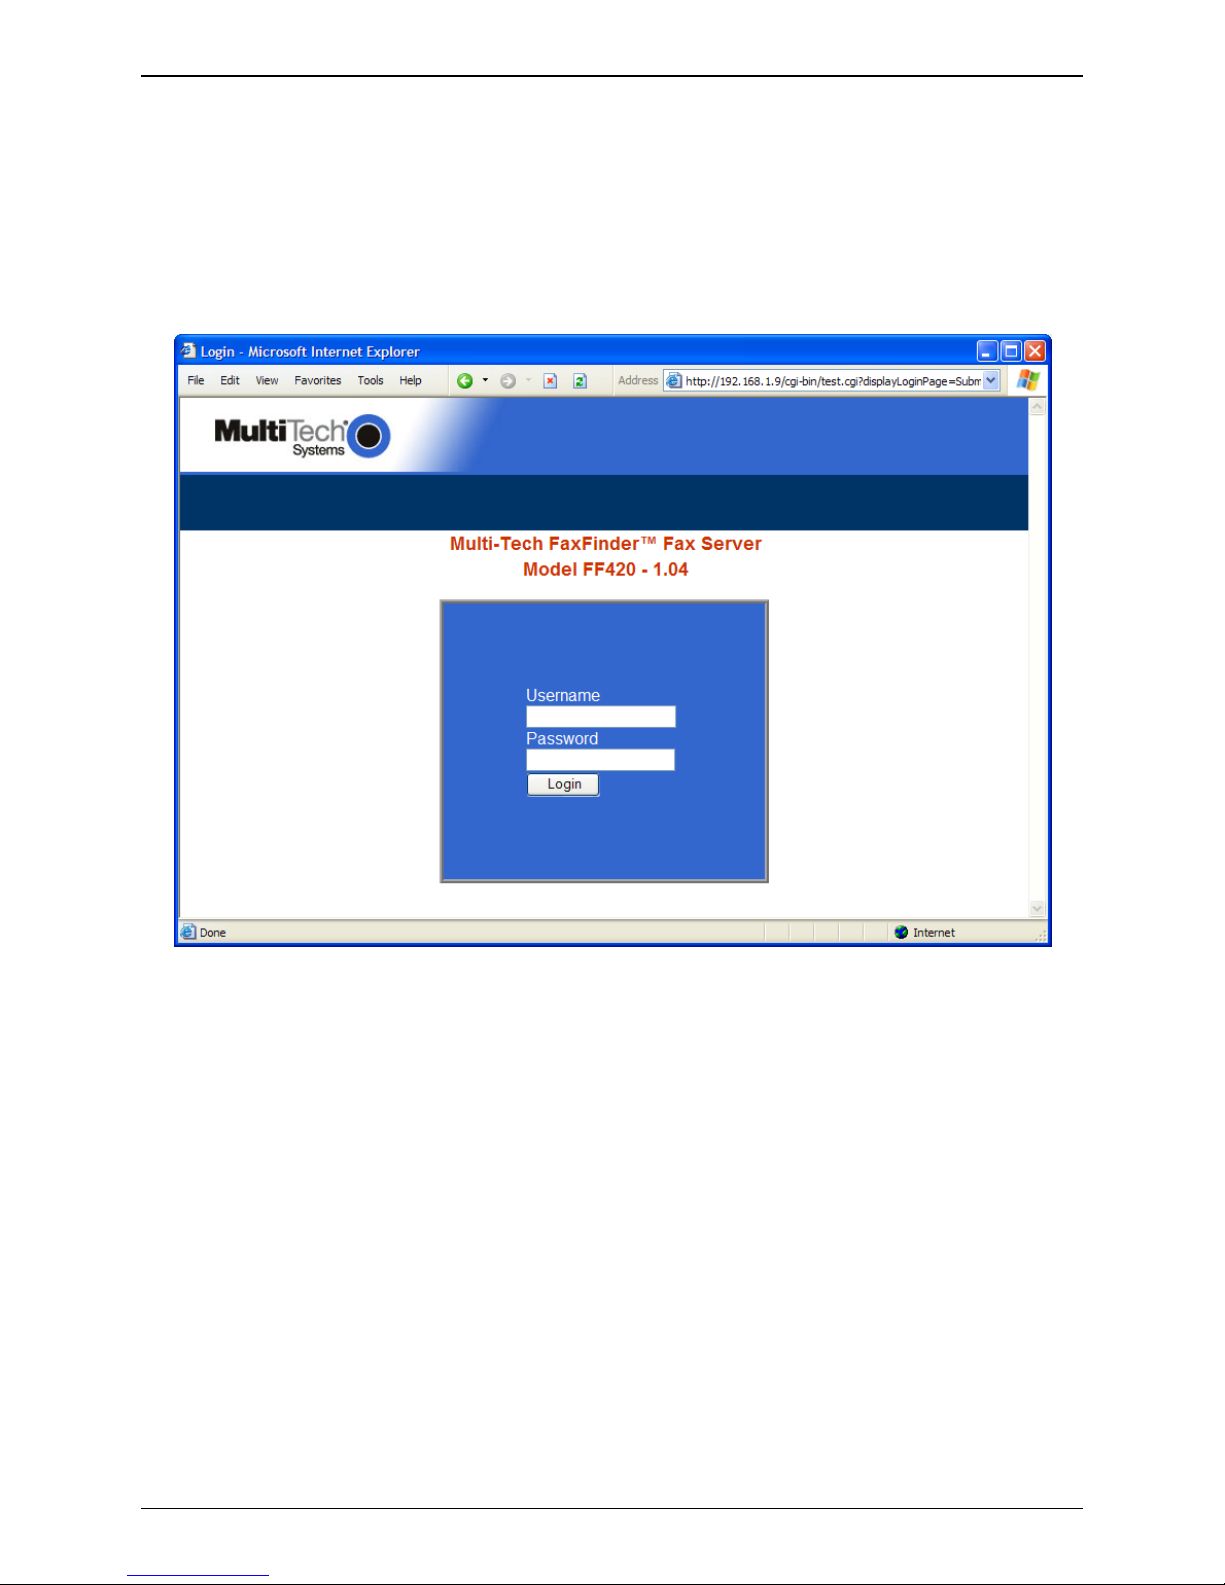
B. The Login screen will appear.
Enter.
At this point you can be assured that the FaxFinder is connected to the network.
Login screen does not appear, see “What if I can’t see the web page for my FaxFinder?” in the
If the
Troubleshooting appendix.
C. At the Login screen, enter admin (all lower case) in the Username field.
D. Enter admin (all lower case) in the Password field.
Multi-Tech Systems, Inc. FaxFinder Admin User Guide 30
Page 31

Chapter 2: Installation
E. Click the Login button. The Web Management Home screen will appear. From this screen, you can
access all of the FaxFinder Server software screens.
3. Setting FaxFinder IP Addresses
A. In the FaxFinder Administration screen, go to the IP Configuration fields.
B. Fill in the IP information that applies to your FF120/220/420/820 FaxFinder Server unit. The fields for
“IP Address,” “Subnet Mask,” “Default Gateway” and “Name Server” are required. The Hostname field
is used to supply a fully qualified domain name (fqdn) for the FaxFinder Server when it accesses an
email server to send email. A “Secondary Name Server” may be considere d opti onal, but, in any
case, do not leave any invalid value in this field.
C. Click Update. After the Update button has been clicked, it takes 5 seconds for the FaxFinder to
update the addresses.
4. Resetting Admin PC to Its Regular IP Address
In step #1 above, you recorded the original IP address of the administrator’s PC and then reset it to the IP
address required to allow communication with the FaxFinder unit. You may now set the IP address of the
administrator’s PC back to its original value or to any other value that will allow you to communicate with
the FaxFinder at its new IP address.
Multi-Tech Systems, Inc. FaxFinder Admin User Guide 31
Page 32

Chapter 2: Installation
5. Log In After Reset
Having reset the IP address of the administrator’s PC, you must log into the FaxFinder Server software
again. Go to the
Login screen, enter admin as User Name and admin as Password.
6. Setting Administrative Functions
Go to the FaxFinder Phone Book screen.
The first several rows of the Phone Book list are for special purposes. The first row is for the
“Administrator” function. No matter what values are used for the
fields, the first row will still apply to the person doing the Administrator function for the FaxFinder system.
The Administrator is the party privileged to configure the FaxFinder Server. The next group of phonebook
rows are for attendants (one attendant row for the FF120, two for the FF220, four for the FF420, and eight
rows for the FF820). These rows stand out as exceptional because they have no values in the
column. No matter what values are used in the Name and Email Address fields the attendant rows will
still do this special function. So, you will want to avoid putting regular fax users in these rows.
In Manual Routing Mode, each ‘attendant’ row is related to a separate POTS Line. The assigned
‘attendant’ will receive all emails that enter the FaxFinder system through that modem and the attendant
will have to distribute them to their final recipients. You can assign attendants for your convenience. You
could assign a separate attendant for each POTS line; or one attendant might be assigne d to handle
incoming fax traffic from multiple POTS lines. For example, suppose an 4-port FaxFinder (FF420) is used
by a company that has four separate departments. In that case, it might be convenient to have one
person in each of those departments serve as the attendant for that department.
Name, User ID and Email Address
User ID
In Automated Routing Mode, the email address for each of these ‘attendant’ rows will receive all emails
that are undeliverable to any end-user on the FaxFinder system. You could assign a separate email
recipient for such undeliverable faxes as they are received through each of the FaxFinder’s modems.
However, it’s more likely that you will want to have a single recipient to handle all undeliverable faxes
regardless of the modem through which they entered the FaxFinder system. So, for Automated Routing
Mode, we recommend that you enter the same email address for all of the ‘attendant’ rows, unless you
have a specific reason to do otherwise.
A. Administrator Row: Email Address
i. In the “Administrator” row of the Phone Book screen, enter the name and user ID to be used
for the FaxFinder administrator (it need not be literally “Administrator”). All incoming faxes will
be marked as coming from this administrator. Then enter the email address of the party who
will act as the FaxFinder administrator.
ii. Click on Update in the “Administrator” row. At this point, a Login screen will appear and you
will be asked to log in again. Log in using the administrator’s User ID (as listed in the “User ID”
column) and the administrator’s current password (at this point, it should be
admin).
Multi-Tech Systems, Inc. FaxFinder Admin User Guide 32
Page 33

Chapter 2: Installation
At this point, the FaxFinder ‘home’ page is displayed. Click on Phone Book to see the updated
values.
The next step (B1) will depend on the routing mode (automated or manual) used.
B1. “Pots Line n” Rows: Automated Routing Mode only
In the “Pots Line n” rows of the Phone Book screen (where n is 1 for the FF120, 1-2 for the FF220,
1-4 for the FF420, and 1-8 for the FF820), enter the email address of the person whom you wa nt to
receive all inbound faxes sent to unassigned PBX phone numbers. (For example, suppose extra PBX
extensions were allocated to incoming faxes but were not specifically assigned to any individual
employee. Faxes sent to those PBX extensions would go to the email address of the FaxFinder
modem on which it was received, which would correspond to one of the “Pots Line
n” rows of the
Phone Book.) In general, it would also be possible to direct unassigned faxes to a different email
address for each FaxFinder modem. This is a matter of convenience or preference.
B1. “Pots Line n” Rows: Manual Routing Mode only
In the “Pots Line n” rows of the Phone Book screen, enter the email address of the person(s) whom
you want to receive all faxes sent to each FaxFinder modem. This party becomes essentially the ‘fax
attendant’ for that particular FaxFinder modem. This is the person who forwards received faxes to
their intended recipients, typically by forwarding the email to which the fax message is attached.
A natural approach to fax attendant assignments would be to have one attendant for each department
of a company. For example, Art Jones might be the fax attendant for the accounting department, Sue
Thompson the attendant for the sales department, Dee Brooks for the customer service department,
and Ray Dodd for the repair department. If an FF420 FaxFinder were used, each of these fax
attendants could be assigned one of its modems.
Multi-Tech Systems, Inc. FaxFinder Admin User Guide 33
Page 34

Chapter 2: Installation
B2. “Pots Line n” Rows: Finishing
Click on Update in each of the “Pots Line n” rows after editing. The message “Success: POTS Line n
was updated” will appear above the Phone Book list.
C. Personal Email Address for Administrator (optional)
i
. Just below the last “Pots Line n” rows of the Phone Book screen, enter the name and user ID
that the FaxFinder Administrator can use to send and receive (Automated Routing Mode only)
personal faxes. In Automated Routing Mode, enter, in the
fax extension. In Manual Routing Mode, leave the
Ext field blank. (Generally, the
Ext field, the Administrator’s PBX
administrator should have an additional phonebook entry for receiving ordinary fax traffic for
his/her own use that is separate from the administrator function). Then enter the email
address at which the FaxFinder administrator will receive such fax traffic.
ii. Click on Update for this row. The message “Success: [name] was updated” will appear above
the Phone Book list.
Multi-Tech Systems, Inc. FaxFinder Admin User Guide 34
Page 35

7. Setting up the Mail Server
A. In the FaxFinder Administration screen, go to the SMTP Configuration fields.
Chapter 2: Installation
B. Fill in the network IP address of your mail server.
C. If needed, fill in SMTP Port values if different than 25 (which is the default value).
D. If needed by the SMTP Server, fill in the SMTP Server User ID and SMTP Password (which you will
need to retype to confirm).
E. Unless you have compelling reasons for changing them, we suggest that you accept default values
for the fields labeled “Email Size Limit,” “Send Fax Email Receipt,” “Include Fax Details,” and “Fax
Output Format” (set to PDF).
F. Click Update.
G. At this point the FaxFinder will send the Administrator an email saying that the mail server address
has been updated. If your Administrator does not receive such an email, see the
appendix, specifically item #2 “What if I don’t get an email when I set the mail server address?”
Troubleshooting
8. Configuring the FaxFinder’s Modems
Each of the FaxFinder’s modems can direct inbound faxes to client email add re sses.
A. In the FaxFinder Server software, go to the Modem Configuration screen and enter the modem
characteristics that your FaxFinder system needs this modem to have. The default values have been
designed to work well in many situations.
B. Click on the Modem down arrow to choose the modem you want to configure. You can choose one or
all the modems to configure.
C. Specify a Country Code that fits your location. The Country Code configures the modem to meet
telecom requirements in the specified country.
Multi-Tech Systems, Inc. FaxFinder Admin User Guide 35
Page 36

Chapter 2: Installation
D. Use the Routing field to set the FaxFinder’s operating mode.
For Manual Routing Mode, set the Routing field to “Pots Line.”
For Automated Routing Mode, set the Routing field to “DTMF Digits,” or, if a mode code for your
PBX is listed in the drop-down box, select that mode code.
E. Dial Prefix (or ‘access digit’). When the FaxFinder is attached to an extension of a PBX or key phone
system, an access digit is often required to ‘get an outside line’ (that is, to make a connection to the
PSTN). Often a “9” or an “8” is used for this purpose. You can also add a comma (“,”) to insert a
pause that may be required to receive dial tone for the outside line.
If needed, enter the access digit and optional comma in the “Dial prefix” field. Inform FaxFinder client
users that they should not insert any access digits when entering fax numbers in the
screen or in their FaxFinder Address Books. Instead, client users should enter fax num bers the
Fax
way they would dial the number from an ordinary residential phone line. Finally,
digit combination that might predispose client users to make fax calls accidentally to 911
FaxFinder Send
avoid any access
or any other
official/emergency phone number.
F. Fax Debugging. Leave this feature OFF. It is intended for use only by Multi-Tech Tech Support.
G. Init String. Set only if modem is in situation that requires an AT command to be inserted after each
use.
H. Set the Max DTMF Digits field per the requirements of the PBX with which the FaxFinder will
interface (if applicable).
I. Fax ID. The value entered in the “Fax ID” field will appear in the fax log printed by the sender’s fax
machine and, typically, will be printed at the top of each page of the transmitted fax.
In Automated Routing Mode (where the Routing field is set to “DTMF Digits” or a ‘mode code’
option for a particular PBX brand),
the Fax ID is typically the PBX fax extension number of the
FaxFinder Administrator or the number of the phone line to which the FaxFinder is connected.
In Manual Routing Mode (where the Routing field is set to “Pots Line”), the Fax ID is typically the
number of the phone line to which the FaxFinder is connected.
In either mode, an organizational identifier, like the company name, might be used as the Fax ID
instead of any fax number.
Multi-Tech Systems, Inc. FaxFinder Admin User Guide 36
Page 37

Chapter 2: Installation
J. Smart Dial. When Smart Dial mode is ON, the FaxFinder will look for a dial tone before dialing. If,
under normal circumstances, no dial tone is presented to the FaxFinder, then set Smart Dial to OFF.
When Smart Dial is OFF, the FaxFinder modem will seize the phone line and dial after a 3-second
pause whether a dial tone is present or not.
Hint: If ‘no dial tone’ messages appear consistently,
set Smart Dial to OFF.
K. Fax Direction. Set the direction of fax traffic flow for this modem (outbound, inbound, or both).
L. Other parameters. For the parameters Answer On, Max Baud Rate, and Tone Dial, use default
values unless characteristics of your system warrant otherwise.
M. Implement the Configuration Changes. Click Update. to apply the changes to Modem 1 only.
Update All Modems to apply this same configuration to all of the FaxFinder’s modems.
Click
N. Click on Current Status. Watch the Current Status: POTS Modem 1 portion of the screen. The
“State” of the POTS Modem should be “Waiting for Ring.”
O. Test Call - for Automated Routing Mode (where Routing field is set either to “DTMF Digits” or to the
mode code of a specified brand/model of PBX)
. From an ordinary POTS phone, dial one of the PBX
phone numbers used for incoming faxes in the FaxFinder system. Dial the PBX phone number as
you would from an outside line (it will not work to dial the number as if it were an ordinary 3- or 4-digit
extension).
P. Test Call - for Manual Routing Mode (where the Routing field is set to “Pots Line”). From a
different POTS phone, dial the number of the phone line to which the FaxFinder is attached.
Q. In the Current Status: POTS Modem 1 screen, the "State" field should change to "Waiting For Ring."
On the phone, you should hear modem dialup/negotiation tones.
R. If you both observe the "Waiting For Ring" state and hear the tones, then the FaxFinder's Modem has
been configured properly.
If either of these is absent, see “What if the FaxFinder doesn’t answer a fax call?” in the
Troubleshooting
section
S. Repeat steps 8B through 8R for each of the FaxFinder’s modems (twice for the FF220; four times for
the FF420; and eight times for the FF820).
you FaxFinder identically, you can select the
Shortcut: If you want to configure all of the modems in
Update All Modems option from the drop down menu.
Multi-Tech Systems, Inc. FaxFinder Admin User Guide 37
Page 38

Chapter 2: Installation
9. Changing Administrator Server Password
A. In the Password Administration screen, enter a new Password for the FaxFinder Administrator
(something other than “admin”). This password is to be used in that person’s capacity as
administrator. Then re-enter the password in the “Confirm Password” field. Passwords can be as
short as 1 character, as long as 40 characters, and are case-sensitive.
Notes: 1. Changes to any “User ID” must be done in the Phone Book screen.
2. As a default, the FaxFinder software automatically assigns as a password a string that is
identical to the ‘User ID’ string.
B. Click on Update for this row. The Login screen will appear.
10. Specifying Administrator’s Client Password
A. In the Password Administration screen, enter a new Password for the FaxFinder Administrator to
be used for sending in that person’s capacity as client/user of the FaxFinder system. Then re-enter
the password in the “Confirm Password” field. Passwords must be at least 1 char acter in length, can
be as long as 40 characters, and are case-sensitive.
Notes: 1. Changes to any “User ID” must be done in the Phone Book screen.
2. As a default, the FaxFinder software automatically assigns as a password a string that is
identical to the ‘User ID’ string.
B. Click on Update for this row.
Multi-Tech Systems, Inc. FaxFinder Admin User Guide 38
Page 39

Chapter 2: Installation
11. Sending Test Fax from Fax Machine to FaxFinder
A. Using a conventional fax machine, send a fax to the fax number established for the FaxFinder
Administrator.
B. Verify that the fax message sent reaches the email inbox of the administrator.
Watch the Current Status: System portion of the FaxFinder Server Administration screen to see
when or if the FaxFinder sends the email. If the email was sent successfully, the “Pending” field will
be “0” (zero) and the “Email Status” field will indicate “No Errors.”
If the email does not appear within 5 minutes, see “Chapter 9: Troubleshooting,” specifically “What if I
don’t get the email to me of the test fax that I sent?”
Multi-Tech Systems, Inc. FaxFinder Admin User Guide 39
Page 40

Chapter 2: Installation
C. Verify also that you can open the fax in a PDF viewer program on your computer. The PDF viewer
could be any commercial viewer or any open source PDF viewer. You can also choose to have your
fax messages delivered as TIF files. The TIFF viewer program you use could be either the MultiTech Tiff Viewer or a graphic file viewer included with or installed in your PC. (The Multi-Tech Tiff
viewer is included on the Product CD and installed with other client programs. During installation,
you can choose to associate all Tiff files with the Multi-Tech Tiff Viewer or with another program.) In
your email program, double-click on the file attached to the email message. The PDF or Tiff viewer
program will come up automatically displaying the fax file.
Multi-Tech Systems, Inc. FaxFinder Admin User Guide 40
Page 41

Chapter 2: Installation
12. Adding Client-Users to the Phone Book
A. In the Phone Book screen just below the entries for the FaxFinder administrator, make entries for the
other persons in your office who will send and receive faxes through the FaxFinder. For each such
FaxFinder client/user, enter the name, user ID, and email address in the appropriate fields.
In Automated Routing Mode, enter, in the Ext column, the PBX extension assigned to each client
user.
In Manual Routing Mode, leave the Ext field blank; all incoming faxes will go to the ‘Attendant’ (the
user specified in the Phone Book’s “Pots Mode
In Manual Routing Mode, even though received faxes are routed to client users by an attendant,
those client users must still be entered in the Phone Book in order to use the FaxFinder to
faxes.
B. Click on Add to create a new row and enter each client user. Ensure that you click on the Upd ate
button after each row before editing the next one. The message “Success: [name] was updated” will
appear above the Phone Book list.
Alternative (and quicker) methods for populating the Phone Book are:
• CVS importation using the Device Manager software
• Synchronization of the Phone Book with another FaxFinder u sin g the Device Man ager
software
n” field) who will distribute them by email.
send
• Restoration of an entire saved configurat ion file from the same model of FaxFinder
• Restoration of a user phone book from a different model of FaxFinder
Multi-Tech Systems, Inc. FaxFinder Admin User Guide 41
Page 42

Chapter 3 – FaxFinder Server
Software Screens
Introduction
In this chapter, we present the screens of the FaxFinder server software. We describe each field in each
screen and some of the command buttons. (We do not describe command buttons that have functions
that would be readily understood by users of Windows software. Examples of such self-evident functions
include buttons like “OK,” “Cancel,” “Next,” etc.)
Home Screen
The FaxFinder Home screen offers access to all other FaxFinder software screens.
Multi-Tech Systems, Inc. FaxFinder Admin User Guide 42
Page 43

Chapter 3: FaxFinder Server Software Screens
Login Screen
The FaxFinder Server Login screen is the primary security device for the Server software.
The FaxFinder has a default setting that allows use of “admin” as both the User Name and the Password
at initial startup. After you have begun configuring your FaxFinder fax server system, you should change
the password in the
Password Administration screen described later in this chapter.
Multi-Tech Systems, Inc. FaxFinder Admin User Guide 43
Page 44

Chapter 3: FaxFinder Server Software Screens
Fax Log Screen
Sorting Function. You can sort the entries of this screen by doing a mouse-over on the name/identifier
of any column that has variable entries. After you click on the column name, the entries will be re-sorted
by that column’s parameter in ascending alphabetical or numerical order.
Fax Log Screen Field Definitions
Log Parameters Values Description
Email Log
Threshold
Log History numeric The total number of fax transmissions (including faxes
Command Buttons -- Description
Save Changes If you change the values of the “Email Log Threshold” field
Send Log Now Clicking on this button will cause a fax log to be emailed
Delete Log Clicking on this button will remove all fax transmission
Time mm/dd/yyyy Time that fax was sent or received.
Name alphanumeric Client party sending or receiving fax.
Remote ID phone number Fax number of remote party in fax transmission.
Result pass/fail Indicates whether fax transmission passed or failed.
Send/Receive send, receive Indicates if FaxFinder client is the sender or receiver.
Pages numeric Indicates number of pages in fax transmission.
Details (button) -- Click to access the “Fax Details” screen.
numeric The total number of sent and received faxes required to
cause a log report to be sent to the FaxFinder
Administrator. Log reports are sent to the administrator by
email. If you do not want fax logs emailed to the
Administrator, set this threshold to 0.
sent and received) listed in a log report. The number of
fax transmissions described in the fax log can differ from
the number that triggers the sending of the log report.
and/or the “Log History” field, you must click on this button
to make those changes take effect.
immediately to the FaxFinder administrator (or other
designated recipient).
entries from the
Fax Log screen.
Multi-Tech Systems, Inc. FaxFinder Admin User Guide 44
Page 45

Chapter 3: FaxFinder Server Software Screens
Fax Details Screen
The Fax Details screen is a secondary screen accessible from the Fax Log screen. It presents detailed
technical information about a fax selected in the Fax Log screen.
Fax Details Screen Field Definitions
Field Values Description
Name alphanumeric Name of local client participating in fax
transmission (sending or receiving).
Fax Direction send or receive Indicates which side of fax transmission the client
is on (sending or receiving).
Fax Number nnnn Phone number at which client receives in fax
transmissions.
Init Time mm/dd/yyyy
hh:mm:ss
Time at which the FaxFinder modem was
initiated for this fax transmission (receive or
send).
Resolution standard, fine Coarseness or fineness of the fax image.
Standard = 92x204 dpi. Fine = 196x204 dpi.
Baud Rate 2400, 4800, 7200,
9600, 12000,
14400, 16800,
The data transmission speed in bits per second
at which the current fax transmission is
occurring.
19200, 21600,
24000, 26400,
28800, 31200,
33600 bps
Scan Line Time 0, 5, 10, 20, 40
milliseconds
The minimum duration of each line of the fax. For
non-error-corrected faxes, this prevents data loss
on the receiving fax machine by adding buffer
time at the end of lines.
0 means no extra data
Remote ID numeric (fax
number) or
alphanumeric
Typically, this is the fax number of remote party
involved in the fax transmission (this could be fax
sender or recipient). Remote ID could also
simply be an alphanumeric string.
Number of Pages alphanumeric Number of pages included in fax transmission.
Total Bytes numeric Number of bytes in fax transmission.
Multi-Tech Systems, Inc. FaxFinder Admin User Guide 45
Page 46

Chapter 3: FaxFinder Server Software Screens
Fax Details Screen Field Definitions
Field Values Description
Off-Hook Time mm/dd/yyyy
hh:mm:ss
The time at which the modem went off-hook for
the fax transmission.
Width numeric (in pixels) Width of fax. This is typically 1728 pixels.
Data Compression mh, mr, mmr Data Compression reduces the fax data stream
taking advantage of the fact that most documents
have commonly-used runs of black and white
horizontally and the fact that most documents
differ very little from one scanned line to the next.
MH is a one-dimensional compression along the
horizontal axis. MR is a combination of one-
dimensional compression and compression of
differences between lines (two-dimensional
compression). Error Correction is not re quired if
MH or MR compression is used. MMR is two-
dimensional compression only and requires error
correction.
MH = modified Huffman, MR = modified READ,
MMR = modified modified READ
Default = MH.
Modem Port 1 – 8 (FF820)
1 – 4 (FF420)
Indicates the modem on which the fax
transmission occurred.
1 – 2 (FF220)
1 (FF120)
Status pass/fail Indicate s whet her the curre nt fax has be en
transmitted successfully or not.
Elapsed time (in seconds) Indicates the duration of the current fax
transmission.
Email Attachments numeric Indicates the number of email attachments into
which an incoming fax was divided.
Connect Time mm/dd/yyyy
hh:mm:ss
Height: Letter, Legal,
Variable
Error Correction:
on, off Indicates whether the function to detect and right
Indicates the time at which the connection for the
current fax began.
Height of fax expressed in common page sizes
(Letter = 8.5” x 11”; Legal = 8.5” x 14”)
faulty data is on or off.
FaxFinder timeline with “Elapsed Time” marked.
ini t t im e
Multi-Tech Systems, Inc. FaxFinder Admin User Guide 46
off-hook time
connect time
elaps ed ti m e
h a ng- u p t i me
Page 47

Current Status Screen
Chapter 3: FaxFinder Server Software Screens
Current Status Screen Field Definitions
Field Name Values Description
System fields group
Current Time weekday, mo, dd
hh:mm:ss yyyy
Pending Msgs numeric Emails that have arrived in the FaxFinder Server
Email To: a@b.c Email recipient of latest fax message (either the
Subject: alphanumeric Subject line of email version of pending/last fax
Time Server Status Initializing,
No Errors,
SNTP Error:
type
The present time of day.
that have not yet been conveyed to clients.
These include faxes received from remote
senders and administrative emails of several
kinds: fax log messages, debug log messages,
send-fax error messages, mail server change
notification message (relating to the “SMTP
Server Address” field of
reboot message indicating that the FaxFinder is
online.
last message sent or, if a message is pending,
that pending message.
message.
The FaxFinder synchronizes its fax time stamps
to an Internet source, usually a government
standards site. It will attempt contact with the
standards web site 5 times in 20 seconds. If
contact fails, it will try 5 times again 5 minutes
later. If contact succeeds, the FaxFinder will
update its stamping time periodically per an
interval set in the
Administration screen),
Administration screen.
Multi-Tech Systems, Inc. FaxFinder Admin User Guide 47
Page 48

Chapter 3: FaxFinder Server Software Screens
Current Status Screen Field Definitions (cont’d)
Field Name Values Description
System fields group
Up Time x days yy hours:
Operation time since last reboot.
zz minutes
Email Status No Errors,
Bad MailServer
Address,
Indicates whether the FaxFinder’s email
transmissions, both faxes and administrative
messages, are proceeding with or without errors.
Mail Server
Connect Failed,
SMTP Invalid
Response, SMTP
Client Timeout
POTS Modem n fields group
State Waiting for Ring,
Initializing Modem,
Indicates the modem’s current operating
condition.
Waiting for Connect,
Negotiating, Receiving Page,
Postpage Processing,
Processing, Busied Out
Vertical Resolution standard, fine Horizontal resolution is 204 bpi. Vertical
resolution can be either 98 bpi (standard) or 196
bpi (fine).
Width
Connect Time mm/dd/yyyy,
Remote ID numeric (phone
numeric, in pixels
hh:mm:ss
number) or
alphanumeric
Width of received fax.
For the current fax, the date and time at which
the connection began.
The fax number or other identifier for the off-
premises fax machine (sender or receiver)
involved with this fax transmission.
Name alphanumeric Identifier or description for the off-premises fax
machine (sender or receiver) involved with this
fax transmission.
Version alphanumeric FaxFinder modem version in use.
Page numeric For the current fax, this indicates the page
number currently being received. “0” indicates
that no fax is currently being sent or received.
Baud Rate 2400, 4800, 7200, 9600,
12000, 14400, 16800, 19200,
21600, 24000, 26400, 28800,
The data transmission speed in bits per second
at which the current fax transmission is
occurring.
31200, 33600 bps
Length letter, legal, or
Length, in paper size, of the received fax.
variable
Elapsed Time numeric The duration of the current fax transmission in
seconds.
Phone Number numeric The fax number of the off-premises fax machine
(sender or receiver) involved with this fax
transmission.
Initialize Modem (button) Initializes the modem, clearing a busied-out
state. This can only be done by a user with
administrative rights.
Make Busy (button)
Imposes a busied state on the modem. This can only
be done by a user with administrative rights.
Multi-Tech Systems, Inc. FaxFinder Admin User Guide 48
Page 49

Chapter 3: FaxFinder Server Software Screens
The “Initialize Modem” and “Make Busy” button commands can be legitimately invoked only by a user with
administrative rights. If a non-administrator clicks on either of these buttons, that party will be logged out
of the FaxFinder Server program and the following error message will appear.
Logout Option
When you click on Logout in the FaxFinder Home screen, you will be logged out of the FaxFinder Server
software. The
Login screen will appear to allow access to re-enter the program.
Multi-Tech Systems, Inc. FaxFinder Admin User Guide 49
Page 50

Administration Screen
Chapter 3: FaxFinder Server Software Screens
Multi-Tech Systems, Inc. FaxFinder Admin User Guide 50
Page 51

Chapter 3: FaxFinder Server Software Screens
Administration Screen Field Definitions
Field Name Values Description
IP Configuration Fields
IP Address n.n.n.n
for n = 0-255
Subnet Mask n.n.n.n
for n = 0-255
Name Server n.n.n.n
for n = 0-255
Host name alphanumeric Supplies a fully qualified domain name (fqdn) for the
Default Gateway Name n.n.n.n
for n = 0-255
Secondary Name Server n.n.n.n
for n = 0-255
Update (button) Click on this button to make changes to IP
The IP address of the fax server.
This subnet mask is the subnet for the network to which
the fax server is connected. A subnet mask is used in
conjunction with the IP address to determine if a data
destination is on the same immediate network or not (in
the case of networks made of hubs and ethernet cards).
The default value, often used, is 255.255.255.0.
The IP address of a local DNS server.
FaxFinder Server when it accesses an email server to
send email. Some email servers require an fqdn on the
EHLO command at the beginning of the SMTP email
communication. The model name of the FaxFinder is
the default. Also see the SMTP Configuration section
on setting an email address for the FaxFInder.
Address used to route data out of the immediate
network.
The IP address of a backup DNS server, which is
typically at a separate location. A “Secondary Name
Server” may be considered optional, but, in any case,
do not leave any invalid value in this field.
Configuration fields take effect.
SMTP Configuration Fields
Active Email Server
FaxFinder Email Address n.n.n.n
SMTP Server Address n.n.n.n
SMTP Port 0 – 65535 (default:
Primary -or- Backup
SMTP Server
for n = 0-255
for n = 0-255
25)
The active server will be automatically switched to the
backup email server if an error occurs when an attempt
is made to send an email. The active server will toggle
between primary and backup servers depending on
errors during email transmissions.
This field is used to set the ‘From’ email address on
emails sent by the FaxFinder. If the field is left blank,
the email address of the administrator is used. This field
can also be set to a no_reply@yoursite.com
address to prevent recipients of an email from replying
directly to the administrator. This field along with the
hostname field in IP Configuration can be used to
identify emails as coming from the FaxFinder, instead of
the Administrator email account. See the IP
Configuration Hostname section for setting the
hostname along with this field for sending email from
the FaxFinder.
Domain name or IP address for mail server (SMTP
must be supported on mail server).
The IP port on which the SMTP server is listening.
email
Multi-Tech Systems, Inc. FaxFinder Admin User Guide 51
Page 52

Chapter 3: FaxFinder Server Software Screens
Administration Screen Field Definitions (continued)
Field Name Values Description
SMTP Configuration Fields
SMTP Server User ID alphanumeric Identifier used by FaxFinder when interfacing with mail
SMTP Password alphanumeric Password used by FaxFinder unit when accessing mail
Retype SMTP Password alphanumeric Reiteration of above password.
Backup SMTP Server n.n.n.n The Backup SMTP Server can be set up to send
Backup User ID
Backup SMTP Port
Backup SMTP Password
Retype Backup Password alphanumeric Reiteration of above password.
Email Size Limit 100 - 192000
Email Admin on Failed
Fax
Send Fax Email Receipt Y/N When selected, email confirmation n otice is sent
Include Fax Details Y/N Determines whether, for received faxes, the technical
Fax Output Format PDF (default)
Update (button) Click on this button to have changes to SMTP Configuration take effect.
alphanumeric Log in ID for the backu p server.
0 – 65535 (default: 24) IP port on which the backup SMTP server is listening.
alphanumeric Password for access to the backup server.
in kilobytes
Y/N Sends an emai l to Admin address for each failed fax.
or TIF
server. FaxFinder uses mail server to send call reports
to administrator. Some email servers require
authentication when accessed for this purpose. To
satisfy this authentication requirement (where needed), a
User ID must be specified for the FaxFinder unit. Leave
this field blank if authentication is not needed.
server. Leave this field blank if authentication is not
needed.
received faxes to users, if the primary email server is
interrupted. The Active Email Server drop down shows
the email server which will be used to send email. If an
email attempt fails, the FaxFinder re-queues the
message and automatically switches to the server that is
not currently active. This provides a way to ensure
received faxes are sent when the primary email service
is interrupted.
This is the maximum size limit that the FaxFinder will
accept for incoming fax messages.Set this to match any
limits that your email server may have on attachments.
attesting that the fax message sent by the FaxFinder
client user has been transmitted with no errors to the
remote fax machine.
characteristics of that particular fax are included in the
email message. (These details are those listed in the Fax
Details screen that is accessible as a secondary screen
from the Fax Log screen).
Determines whether the fax message becomes a PDF
attachment or TIF attachment. TIF attachments can be
forwarded or added to a list of multiple documents to be
faxed whereas PDF attachments cannot.
Multi-Tech Systems, Inc. FaxFinder Admin User Guide 52
Page 53

Chapter 3: FaxFinder Server Software Screens
Administration Screen Field Definitions (continued)
Field Name Values Description
Time Configuration Fields
Time Server URL A real time clock has been enabled on the FaxFinder
Add Time Server URL Used to add a user-supplied time server.
Request Interval This value (to be set by user) indicates how often the
Use Daylight Savings Time
(DST)
Time Zone alphanumeric Indicates the time zone in which the FaxFinder server is
Date Format
Time Format
Time (24hr) hh:mm:ss Display current time in 24-hour format. This can be
Update (button) Click on this button to make changes to Time Configuration settings take effect.
Reset Unit fields
Reset button Click on this button to re-boot the server.
Y/N
mm/dd/yyyy
-ordd/mm/yyyy
-oryyyy/mm/dd
12-hour or 24-hour Indicates whether time is presented in a 12-hour
Server which can eliminate the need to use an external
time server to get the Time of Day. To set the real time
clock: Set the current time in 24-hour format in the Time
(24 hr) hh:mm:ss field. Set the current date in the Date
mm/dd/yy field. Select none for the Time Server. Click
update and the real time clock will be set using this
information.
The time of day is preserved across power cycles of the
Server.
If you use an external time server, the real time clock
will be set in response to time retrieved from the
external time server.
FaxFinder will update its clock from the Time Server.
Adjust clock setting to coincide with Daylight Savings.
located.
The date can be set to one of three orders, where mm
is the month, dd is the day of the month, and yyyy is
the year.
scheme with an am/pm designation or in a 24-hour
scheme.
used to set the time for the real time clock.
Multi-Tech Systems, Inc. FaxFinder Admin User Guide 53
Page 54

Chapter 3: FaxFinder Server Software Screens
Phone Book Screen
The Phone Book screen maps the PBX extension phone numbers of clients to their respective email
inbox addresses at which they will receive incoming faxes as viewable drawing files.
Sorting Function. You can sort the entries of this screen by clicking on the column name; the entries will
be re-sorted by that column’s parameter in ascending alphabetical or num erical order.
Phone Book Screen Field Definitions
Field Name Values Description
Name alphanumeric For each client entry, this column shows the client’s name.
User ID alphanumeric For each client entry, this column lists an additional one-word identifier
for each client that is typically shorter than the client’s name. Often this
consists of initials, first name only, first initial plus last name, etc. The
“User ID” field of the FaxFinder Server Phone Book corresponds to the
“Username” field of the FaxFinder Fax Client Software (see “Add
FaxFinder Address” screen).
Email Address alphanumeric in
email name format
Ext # numeric For each client entry, this column shows the client’s PBX extension
Function Buttons for
Update, Delete,
and Add functions
Delete button -- Use to remove a client user from the Phone Book.
Admin row -- The party whose email address is entered here has extensive special
For each client entry, this column shows the client’s email address.
phone number. This is the directory number for incoming faxes only.
You can use this field to direct faxes to multiple client-users even though
the fax itself was originally directed to only one client-user.
By entering <extensionA> , <extensionF> in this field, the client-user of
extensionA will also receive all faxes sent to extensionF.
By entering <extensionA>-<extensionC> in this field, the client-users of
extensions A, B, and C will all receive faxes sent to any of them.
By entering <extensionA>, * in this field, the client-user of extensionA
will receive all faxes sent to all extensions in the Phone Book.
Also, you can assign the same extension number to two client-users.
Both will receive faxes sent to that extension number.
For each client entry, this column presents functions that can be invoked
upon the entry.
rights to configure the FaxFinder client and server software.
The faxes in email form received by FaxFinder client users will be sho wn
as coming from the party having the name and email address listed in
the Admin row. The FaxFinder administrator also receives fax logs
every n faxes (where n can be set as needed).
The first row is always for the “Administrator” function. No matter what
values are used for the Name, User ID and Email Address fields of this
row, it still applies to the person doing the Administrator function for the
FaxFinder system.
Multi-Tech Systems, Inc. FaxFinder Admin User Guide 54
Page 55

Chapter 3: FaxFinder Server Software Screens
Phone Book Screen Field Definitions (cont’d)
Field Name Values Description
Pots Line n rows Each row in a group of rows immediately following the
Administrator row corresponds to one of the FaxFinder’s
modems. There is one such row for the FF120. There
are two such rows for the FF220, four for the FF420,
and eight for the FF820. These rows function differently
in Manual Routing Mode than in Automated Routing
Mode.
Automated Routing Mode
the Modem Configuration screen is set to “DTMF Digits”
or set to a PBX-specific mode code).
‘attendant’ will receive all emails that are undeliverable
to any end-user on the FaxFinder system. In such
cases, it is probably adviseable to have the same
attendant for all
n of the POTS modems.
(where the Routing field of
The POTS Line n
Manual Routing Mode. Each row allows faxes to one
of the modems to be directed to an assigned email
address. The owner of that email address can then act
as an attendant for the faxes received through that
modem. This arrangement allows each of the
FaxFinder’s individual modems to serve a separate
department of a company (or any convenient grouping
of client users) through the assigned attendant.
These rows can be renamed and need not always
literally have
Line2,” etc. Still, no matter what values are used for the
Name and Email Address fields of these rows, they still
serve the purpose of receiving faxes to unassigned
numbers (for Automated Routing Mode) or they facilitate
the ‘fax attendant’ function (for Manual Routing Mode).
That is, you cannot enter the name and email address of
ordinary fax users in these rows. These rows always
serve a special purpose.
User Update button You must click this button after changing values on
Phone Book entries in order to update the Phone Book.
Name field values of “POTS Line1,” “POTS
Multi-Tech Systems, Inc. FaxFinder Admin User Guide 55
Page 56

Chapter 3: FaxFinder Server Software Screens
Modem Configuration Screen
Modem Configuration Screen Field Definitions
Field Name Values Description
Modem POTS Modem #,
All
Country Code country names Sets modem telephony parameters as required for the listed
Answer On number of rings This setting determines the number of rings after which an
Routing Pots Line,
DTMF Digits,
Alcatel Mode Code,
Siemens HiCom Mode Code,
Avaya Mode Code,
NEC Aspire Modem Code,
Samsung Modem Code,
User Defined
This field allows you to select one or all modems to change
configuration.
country.
incoming fax call to the POTS modem will be answered.
Default = 2.
The value chosen for this field determines whether the
FaxFinder is in Manual Routing Mode (the “Pots Line” option)
or Automated Routing Mode. If the FaxFinder is in Automated
Routing Mode, this field also determines whether it is in
generic Automated Routing Mode (the “DTMF Digits” option)
or if a specific mode-code is used (mode codes are available
for certain specific PBX models).
If the FaxFinder is working in conjunction with any other PBX
that supports convergent routing (that is, if the PBX allows
calls to multiple extensions to be directed to a single Station
Port), then select “DTMF Digits” for this field.
When the value of the Routing field is anything other than
“Pots Line,” then the FaxFinder is said to be in “Automated
Routing Mode.”
If the FaxFinder is either connected directly to a POTS phone
line or is working in conjunction with a PBX that does not
support convergent routing, then select “Pots Line” for this
field. When the value of the Routing field is “Pots Line,” the
FaxFinder is said to be in “Manual Routing Mode.”
The model-specific mode codes are as follows:
The "Avaya Mode Code" setting applies to Avaya PBXs in
which a centralized voice-mail system (like Merlin Messaging
or Intuity Audix) has been installed. FaxFinder supports such
Avaya PBXs as Magix, Definity, S8500, and other models.
The "Siemens HiCom Mode Code" setting applies to the
model 300H and other Siemens PBXs in which a centralized
voice-mail system has been installed.
The "Alcatel Mode Code" setting applies to the Alcatel
model Omni-PCX4400 PBX equipped with an inband DTMF
protocol for connecting to voice-mail.
Additional mode codes are available as listed.
User Defined mode codes (Custom) are defined in the Key
URL that displays the definitions of the special character
sequence that can be used to create a custom mode code
definition. The Key
Definition field when Routing is set to User Defined.
URL is displayed after the Routing
Multi-Tech Systems, Inc. FaxFinder Admin User Guide 56
Page 57

Modem Configuration Screen Field Definitions (cont’d)
Field Name Values Description
Routing Definition
Key link,
Description link
-and-
Hide Key,
Hide Description
Many PBXs send a series of DTMF Tones to the Server
when a call is being established. The Routing Definition
field defines where the Extentsion number is in the series
of tones. The Extension number is used by the FaxFinder
Server to route the received fax to the appropriate email
address.
Routing Definition allows a User Defined setting for PBXs
using DTMF routing that is not currently in the Routing
field.
The
character sequence that can be used to create a custom
mode code definition. The definition is used by the
FaxFinder Server to extract the extension number from
the DTFM tones sent to the PBX.
Chapter 3: FaxFinder Server Software Screens
Key URL will display the definition of the special
Description URL will display how the FaxServer will
The
interpret the custom definition.
In an example of the Routing set for Avaya Mode Code,
the Description in the Routing Definition is displayed as
follows:
In the Description above, the
# is used as a delimiter
between sections of the custom routing definition. There
are two calling type characters, followed by 4 calling
number characters, followed by 4 DTMF extension digits.
? tells the Server to use the definition of Max DTMF
The
Digits for the number of extension digits. All fields are
separated by a
# tone field separator.
Max Baud Rate 2400 – 33,600 bps The value in this field determines the maximum baud rate
used for fax calls on the POTS modem. Set at less than
33,600 bps only if there are problems with the phone line.
Tone Dial on, off Set this field to “on” if your POTS line supports tone
(DTMF) dialing. Set this field to “off” if the POTS line
supports rotary dialing only. Default = on.
Multi-Tech Systems, Inc. FaxFinder Admin User Guide 57
Page 58

Chapter 3: FaxFinder Server Software Screens
“Modem Configuration: POTS Modem” Screen Field Definitions (cont’d)
Field Name Values Description
Dial Prefix Numeric string,
5 characters, max.
Use of a comma is
optional. The comma
denotes a brief delay to
establish dial tone for an
outside line.
When the FaxFinder is used on a phone line in a
PBX or key system, this is the digit that must be
dialed to access an outside line (that is, a line on
the PSTN rather than extensions of the PBX or
key telephone system). The digit “9” is most
frequently used.
If “9” is specified in this field, clients will not need
to include the “9” in the individual entries in their
address books or when ‘Adding Recipients’ in the
FaxFinder Send Fax screen.
The FaxFinder administrator must inform clients
as to whether they must include or omit the “9”
when entering fax numbers.
Fax Debugging on, off This field allows you to turn on or off a fax
debugging feature. When Fax Debugging is on,
the FaxFinder produces detailed technical
reports on failed faxes. Generally, this feature is
for use by the user in conjunction with MultiTech
tech support personnel. This feature helps to
identify and clarify unusual or difficult problems
that may occur.
Init String in AT command format In this field, the administrator can enter AT
commands that the FaxFinder modem will
implement each time the modem is initialized
(between each fax call).
Update (button) Click on this button to implement configuration
changes on the FaxFinder modem. That is, after
Modem
Update All Modems
(button)
changing any fields in the
Configuration
Update button for those changes to be activated.
screen, you must click the
This button updates changes to all modems of
the FaxFinder.
Max DTMF Digits 1-15 Indicates the maximum number of dual-tone
multiple frequency phone-dialing digits that can
be received by the FaxFinder in this system.
Default = 4.
Fax ID alphanumeric;
20 characters, max.
The value in this field will be printed at the top of
each page of the transmitted fax. The value in
this field is usually the phone number of the line
to which the POTS modem is attached.
However, any alphanumeric string up to 20
characters is allowed. Sometimes company
names or abbreviations are included in this
string. Some governments may require that the
originating phone number be printed on each fax
page.
This field can be linked to the client software.
The client-user can choose the value of this field
for his/her Fax ID by going to
Identification | Fax Header Local ID
File | Options |
and
selecting the value “Default (modem Fax ID).”
Multi-Tech Systems, Inc. FaxFinder Admin User Guide 58
Page 59

Chapter 3: FaxFinder Server Software Screens
“Modem Configuration: POTS Modem” Screen Field Definitions (cont’d)
Field Name Values Description
Error Correction on, off By setting Error Correction to "on," you are
requesting that faxes be sent in an error-free
condition, which can be achieved only if the
remote fax machine with which you are
communicating also supports Error Correction
and has this feature enabled. The Error
Correction feature slows down fax transmissions.
If you are operating at speeds below 16,800 bps,
you can set Error Correction "off" to achieve
faster transmissions of faxes, although the
quality of the fax transmissions may be
compromised. However, if you have set the fax
baud rate to 16,800 bps or higher, then error
correction is automatically enabled.
Default = on.
Smart Dial on, off If set to “on,” the POTS modem will detect dial
tones and busy signals. If ‘no dial tone’
messages appear consistently, the Smart Dial
feature may be having difficulty detecting PBX
dial tone. In such cases, set Smart Dial to “off.”
Default = on.
Fax Direction both, inbound,
outbound,
In this field, you can set the FaxFinder to allow
only incoming faxes, only outgoing faxes, or to
allow both.
Modem Configuration Table
The Modem Configuration Table will display the settings for each modem as they were set. This is an
area that will let you know how each modem is set at a glance.
Columns displayed (in order, from left to right):
• Modem
• Country Code
• Answer On
• Max DTMF Digits
• Routing
• Routing Definition
• Fax ID
• Max Baud Rate
• Error Correction
• Tone Dial
• Smart Dial
• Dial Prefix
• Fax Direction
• Fax Debugging
• Init String
Multi-Tech Systems, Inc. FaxFinder Admin User Guide 59
Page 60

Chapter 3: FaxFinder Server Software Screens
Password Administration Screen
Use the Password Administration screen to assign password to client users in the FaxFinder system.
In this screen, you specify each client’s name, user ID, and password. You must click “Update” to make
changes for any client permanent. The User ID, Password, and Confirm Password fields are casesensitive. After making changes to a single line, make sure to click the update button as further changes
will be discarded.
Sorting Function. You can sort the entries of this screen by doing a mouse-over on the name/identifier
of any column that has variable entries. After you click on the column name, the entries will be re-sorted
by that column’s parameter in ascending alphabetical or numerical order.
“Password Administration” Screen Field Definitions
Column Name Values Description
Name alphanumeric Name of client user. This entry must match the
“Name” entry in the Phone Book.
User ID alphanumeric Identifier for client user. This entry must match
the “User ID” entry in the Phone Book.
Password alphanumeric Security code for user. This allows the user to
send faxes using this server. It gives the user
access to the FaxFinder Server software but
without administrative rights.
at least 1 character in length, can be as long as 40
characters, and are case-sensitive.
Confirm Password alphanumeric After a password is entered in the Password
column, an exactly matching entry must be made
here to validate that password.
Update Update (button) When you add or change a client password, you
must click on this button to make the change
permanent.
Passwords must be
Multi-Tech Systems, Inc. FaxFinder Admin User Guide 60
Page 61

Chapter 3: FaxFinder Server Software Screens
Shared Resources Screen
Inbound Fax Backup gives you the ability to add a Share location to copy received faxes. This feature
allows all incoming faxes to be copied to a share location before they are emailed.
The Domain field is set to the domain of the user, if the user ID and password are a domain user account.
Select
Put the location of the Share Server in the
Username, Password and Confirm Password are used if a user id and password are required to copy files
to the share folder.
Click Update to save the share information – an attempt to write a test file to the share directory is made
to ensure the FaxFinder has write privileges to the share drive. A message will indicate success (Inbound
Fax Backup updated successfully) or failure (Share Access Error).
Shared Resources from the Main Menu, to show the Inbound Fax Backup screen.
Share Location edit field.
Multi-Tech Systems, Inc. FaxFinder Admin User Guide 61
Page 62

Chapter 4 – FaxFinder Client
Software Configuration
Establishing Client User’s ID in System
When the FaxFinder Fax Client Software starts, you will be prompted to enter your own client user
information in the
client until this step has been done.
Options | Identification screen. You will not be able to access or use the FaxFinder
The default value for the
“Fax ID” field (from the FaxFinder Server
transmission.
Icons for the FaxFinder software applications will appear in the Windows
the Client Software starts up whenever the computer is booted. A FaxFinder icon appears in the tray area
at the lower-right corner of the screen. The FaxFinder Fax Client Software screen can be opened from
either the Start menu icon or the tray icon. If the Client Software is shut down, it can be re-opened from
the Start menu or by double-clicking on a file named FF110.EXE (or something very similar), which,
following a typical, default installation, the Client is located at C:\Program Files\Multi-Tech
Systems\FaxFinder Client Software\FF
Options | Identification “Fax Header Local ID” field is the value taken from the
Modem Configuration screen) for the modem used in the fax
Start menu. After installation,
xxxClient.exe (the x’s represent the version number).
Multi-Tech Systems, Inc. FaxFinder Admin User Guide 62
Page 63

Chapter 4: FaxFinder Client Software Configuration
Associating Client with Specific FaxFinder Unit(s)
Sometimes more than one FaxFinder unit is connected to an Ethernet network. In some ca ses, certain
client users might be assigned to some FaxFinder units and not assigned to others. After the FaxFinder
client software is installed, you must associate it with one or more FaxFinder units. This procedure shows
you how to make this association so that faxes may be sent from a particular FaxFinder unit to the email
inbox of your PC. To do this procedure, you will need to know the IP address of the FaxFinder unit. Be
aware that an individual FaxFinder client user can be associated with more than one FaxFinder unit. This
could easily be the case in an office that is large and/or an office that has a great deal of fax traffic.
1. At the main screen of the
2. At the Add Device Address screen, in the “Select Server” field, highlight “FaxFinder.”
In the “Enter Address” field, enter the IP address or domain name of the FaxFinder unit that the client
will use.
A client can be associated with more than one FaxFinder unit, but the associations must be
established one at a time.
FaxFinder Fax Client Software, click on Edit and select “Add Fax Server.”
3. Enter, in the appropriate fields, the Username and Password that the client will use when accessing
this FaxFinder unit. If the client is to be associated with multiple FaxFinder units, a different
Username and Password could be established for each. However, in most cases, it is advisable (for
the sake of simplicity and convenience) to use the same Username and Password for all FaxFinder
units.
Multi-Tech Systems, Inc. FaxFinder Admin User Guide 63
Page 64

Chapter 4: FaxFinder Client Software Configuration
NOTE: The Username entered here must match the entry used in the “User ID” field of the Phone
screen in the FaxFinder Server Software. The password entered here must match
Book
the password entered for this client in the
Password Administration screen in the
FaxFinder Server software.
Click
OK.
4. A new FaxFinder entry should appear on the “Device Status” tab of the
Software
screen.
FaxFinder Fax Client
The status of the newly registered FaxFinder unit should momentarily go from “Logging in” to “Idle.”
If it goes to Login Failure, then one of two things is wrong:
a. The IP address or domain name is wrong. If that is the case, delete that entry (by right-clicking
DELETE), and enter a new one; otherwise,
b. The Username/Password combination may be wrong. Verify that the client Username/Password
combination (accessible by right-clicking and selecting
Device Status tab of the client software) matches the
Properties on the FaxFinder listed in the
User ID/Password combination assigned to
the client-user by the FaxFinder Administrator.
Multi-Tech Systems, Inc. FaxFinder Admin User Guide 64
Page 65

Chapter 4: FaxFinder Client Software Configuration
Disassociating the Client from a Specific FaxFinder
Unit
In this procedure, you will un-do the procedure “Associating Client with a Specific FaxFinder Unit.” This
situation might occur when changes are being made in the network faxing system. In any event, this
procedure severs the tie between your PC and a specific FaxFinder unit so that you will no lo nger be
connected to it for sending fax messages. (Faxes can be received in email form from the FaxFinder
server, despite disassociating from the FaxFinder server, as long as the receiving party is entered in the
FaxFinder Phone Book.) In cases where the client is currently associated with more than on e FaxFinder
unit, you will need to know the IP address of the specific FaxFinder unit from which you want to
disconnect.
1. Open the FaxFinder Client Software program and go to the Device Status tab. Select the
FaxFinder unit from which you want to disconnect (you can identify the FaxFinder unit by its IP
address or domain name). Right-click on it and select
delete.
2. Your FaxFinder Client Software will no longer be able to send faxes through this particul ar
FaxFinder unit.
Multi-Tech Systems, Inc. FaxFinder Admin User Guide 65
Page 66

Chapter 4: FaxFinder Client Software Configuration
Disabling and Re-Enabling a Client’s FaxFinder Service
Disabling a FaxFinder’s service to a specific client is simply a temporary version of disassociating the
client from that FaxFinder. When a client has disabled the FaxFinder’s service to that client, the
client/user cannot send faxes through the FaxFinder. (Faxes can be received in email form fro m the
FaxFinder server, despite this disabling, as long as the receiving party is entered in the FaxFinder
Phone Book.) The client can easily re-establish FaxFinder service by toggling the
(now shown with a “
1. Open the FaxFinder Client Software program and go to the Device Status tab. Select the
FaxFinder unit from which you want to disconnect temporarily (you can identify the FaxFinder unit by
its IP address or domain name). Right-click on it and select
” beside it), thus enabling service once again.
disable.
Disable command
2. When disabled, a check mark will appear beside the disable command.
3. To re-enable the FaxFinder unit for your use, that is to avail your PC of its service once again,
open the FaxFinder Client Software program and go to the Device Status tab. Select the FaxFinder
unit to which you want to re-connect. Right-click on it and select
connected to service by this FaxFinder unit.
disable. You will now be re-
Sending Test Fax
To verify that the software installation has succeeded, you should use the FaxFinder client software to
send a fax to a regular fax machine (preferably a local fax machine). To do so, follow the instructions for
the “Sending a Fax” procedure in Chapter 5.
Multi-Tech Systems, Inc. FaxFinder Admin User Guide 66
Page 67

Chapter 4: FaxFinder Client Software Configuration
FaxFinder Fax Client Software Menu Command
Definitions
FaxFinder Fax Client Software Menu Command Definitions
Command Name Values Description
File menu commands
Send Fax -- Brings up the FaxFinder Send Fax screen, the
first step in transmitting a fax message via the
FaxFinder system.
Pause Scheduler -- When you invoke the Pause Scheduler
command, any faxes currently pending will not
be sent and any fax transmissions attempted
while this command is in force will not be sent.
When the scheduler has been paused, you must
Pause Scheduler to rescind the
select
command. That is to say, this command toggles
on and off when selected repeatedly.
If the computer is rebooted, the FaxFinder Fax
Client Software will cancel the Pause Scheduler
command at startup. Any faxes that had been
paused and left unsent when the computer was
turned off will be sent immediately when the
computer is turned on again.
Multi-Tech Systems, Inc. FaxFinder Admin User Guide 67
Page 68

The FaxFinder Send Fax Screen
Chapter 4: FaxFinder Client Software Configuration
FaxFinder Send Fax screen appears (a) when you ‘print to FaxFinder’ from any application program,
The
or (b) when you select the
Send Fax command from the File menu of the FaxFinder Fax Client Software
screen.
FaxFinder Send Fax Screen Definitions
Command/Field Name Values Description
Recipients pane
Name (column) alphanumeric Party to whom the fax will be sent. You cannot
type in this window. When a recipient is
specified either from the
Enter a Fax Recipient window, that
the
Address Book or from
recipient’s name will appear in this field.
Fax Number (column) numeric Fax number to which the fax will be sent. You
cannot type in this window. When a fax number
is specified either from the
from the
Enter a Fax Recipient window, that fax
Address Book or
number will appear in this field.
Multi-Tech Systems, Inc. FaxFinder Admin User Guide 68
Page 69

Chapter 4: FaxFinder Client Software Configuration
FaxFinder Send Fax Screen Definitions (cont’d)
Command/Field Name Values Description
Recipients pane
+ (button)
Brings up the
Enter a Fax Recipient window. At
this window, you enter the name and fax number of
the party to whom the fax will be sent. After you
OK in this window, the FaxFinder-Add
click
Recipient
window will appear and prompt you as to
whether or not you want to add this recipient to the
Address Book. If you check the Remember this
response
box, the response you select will be
remembered. In other words, if you check
Remember this response, and click the
No button,
recipients added using the + button on the Send Fax
Form will never be automatically added to the
Address book. If you check Remember this
response, and click the
Yes button, recipients
added using the + button on the Send Fax Form will
always be automatically added to the Address book.
- (button)
-- Removes a selected entry from the Recipients list.
You will be prompted (by the
FaxFinder – Delete?
screen) to confirm removal of the recipient from the
list of recipients.
Address Book (button) -- Brings up the Address Book screen from which a
fax recipient can be chosen.
Documents pane
Document (column)
Pages (column)
entries are
alphanumeric
with file-type
extensions
entries are
numeric
File name of document to be transmitted as a fax.
Length (number of pages) of the fax to be
transmitted.
+ (button) -- Click this button to add another document to the fax
transmission. Only TIFF files can be added with this.
- (button) -- Click this button to remove a document from the list
of items to be faxed. You will be prompted (by the
FaxFinder – Delete? screen) to confirm removal of
the item from the fax queue.
Λ (button)
-- Clicking this button moves a selected document
upward in the queue. For example, if the file
jonesbill.tif is third in the Document list, clicking will
cause it to be the second item faxed.
V (button) -- Clicking this button moves a selected document
downward in the queue. For example, if the file
jonesbill.tif is fourth in the Document list, clicking
will cause it to be the fifth item faxed.
Schedule pane
Send field “immediately”
-or-
at designated
later time
This field specifies when a fax will be sent. By
default, the fax will be sent immediately. If you click
the Schedule button and re-schedule the
transmission, the time and date of the forthcoming
transmission will be listed.
Schedule (button) -- Click here to schedule a fax for transmission at a
later time. This button brings up the
Scheduling
screen. See the procedure
Fax
“Scheduling Fax Transmissions” in Chapter 6.
Multi-Tech Systems, Inc. FaxFinder Admin User Guide 69
Page 70

Chapter 4: FaxFinder Client Software Configuration
FaxFinder Send Fax Screen Definitions (cont’d)
Command/Field Name Values Description
Cover Page pane
Use Cover Page Y/N Check this checkbox to include a cover page with
your fax.
Cover Page Style BoldComplete,
BoldComplete2,
FaxComplete,
LongComment,
PlainComplete,
PlainShort
If you have checked
select a cover page style for your fax from this
drop-down menu. Six standard cover page
styles are standard. You can revise any one of
these or create a new cover page style using the
Template Editor program.
Use Cover Page, you can
View/Edit (button) -- Brings up the cover page Template Editor
program where the chosen cover page template
can be seen and/or altered.
Subject alphanumeric Here you can type a brief description of the
contents of the fax. The placement of this
“Subject” description will depend on the cover
page style that you use.
Cover Page Notes alphanumeric Here you can type a lengthy comment about the
fax or related topics.
Send Fax (button) -- Click here to invoke the sending of the fax.
Preview Fax (button) -- Click here to see a preview of the fax, including
the cover page. This preview will appear in the
TIFF viewer.
Cancel (button) -- Click here to cancel the sending of the fax.
Multi-Tech Systems, Inc. FaxFinder Admin User Guide 70
Page 71

Chapter 4: FaxFinder Client Software Configuration
FaxFinder Fax Client Software Menu Command Definitions
Option tab Description
Identification tab.
to set the ID of the Sending Modem when Sending a Fax
using the FaxFinder Client. The Modem ID string is
displayed in the header information of a sent fax. For many
Fax machines, it is the phone number of the sending fax
machine. The default is the Modem Fax ID which is set via
Modem Configuration in the FaxFinder Server web
interface. Phone Number will use the Identification Tab's
Phone number field as the Modem ID string. Fax Number
will use the Identification Tab's Fax number field as the
Modem ID string.
Fax Retry tab.
that were not sent successfully on the first attempt, the
number of subsequent attempts to be made, the interval
between these attempts, when attempts should expire.
Date/Time tab.
for the fax header.
Server Priority tab.
a sent fax would first be directed: to a FaxFinder, to a
Hylafax, or to the first available. This applies only to
special multiple-modem server systems that use both
FaxFinder and Hylafax.
Advanced tab.
that will make the Send Fax window become minimized
and allow the enabling of the synchronization of the
FaxFinder Address Book with a Microsoft Outlook address
book. Trace Outlook Sync should only be selected when
directed by Multi-Tech Support as it generates a large
amount of logging information and should not be left on for
extended periods of time. It will generate a debug log that
can be be used to debug problems syncing address book
entries with Outlook.
Logging tab.
file exists after the application is closed.
A Trace Level of 9 is the highest trace setting. A Trace
Level of 1 is the lowest (least amount of trace) setting.
Select Custom Log File to create a log file other than the
default. You may Browse to an existing File Folder and
type in the name of the custom log file in the edit field.
Click Defaults to restore the Logging information to factory
defaults.
Click View Log to view the existing log file.
Click Explore to start an explorer window to find existing
log files.
Click Delete Log to erase the current log.
Click Delete All Logs to remove any previously existing
Log Files.
Click OK to save your changes.
Click Cancel to Cancel any changes made.
The Fax Header Local ID can be used
Here the client user can specify, for faxes
Here you enter the date and time formats
Here you choose to which fax server
Here you designate the circumstances
Select Save Log on Exit to ensure the Log
Multi-Tech Systems, Inc. FaxFinder Admin User Guide 71
Page 72

Chapter 4: FaxFinder Client Software Configuration
FaxFinder Fax Client Software Menu Command Definitions (cont’d)
Command Name Values Description
Edit menu commands
Add Fax Server -- Brings up the Add Device Address screen so
that a FaxFinder or HylaFax server on the
network can be associated with the client. A
client can be served by more than one FaxFinder
unit. See the procedure “Associating Client with
Specific FaxFinder Unit(s)” earlier in this chapter.
Add Contact -- Brings up the New Contact screen so that an
recipient can be added to the Address Book.
Once a recipient’s contact info has been entered
into the Address Book, faxes sent to that party
will have the destination fax number
automatically conveyed to the FaxFinder unit.
Info from recipient’s Address Book entry will also
be included in automated fields on fax cover
pages where applicable (for example, the voice
phone number, company name, and city of the
recipient might be two fields included on the
cover page). See the procedure “Setting Up Your
Address Book Manually” in Chapter 6.
Edit Cover Page
Template
-- Brings up the Cover Page Generator (or
Template Editor) program so that fax cover
pages can be created or modified. See the
procedure “Creating or Modifying Cover Page
Styles” in Chapter 6.
Help menu commands Online Help is not currently supported. See User
Guides for detailed instructions.
command brings up the
screen, which identifies the software’s
About
FaxFinder Fax Client
An “About”
version.
Multi-Tech Systems, Inc. FaxFinder Admin User Guide 72
Page 73

Chapter 4: FaxFinder Client Software Configuration
FaxFinder Fax Client Software Menu Command Definitions (cont’d)
Field Name Values Description
Device Status tab
Device (column) alphanumeric Shows status of FaxFinder or HylaFAX server
units with which the client is associated. Also
shows status of the “Print Capture” function and
the “Outlook Synchronizer” function.
Status (column) idle, negotiating,
preparing to
capture, capturing
n, sending
page
fax page
n,
Shows the status of the FaxFinder or HylaFAX
fax server unit pertaining to its fax sending and
receiving capabilities and to its print/image
capturing capabilities.
receiving fax page
n, success,
unsuccessful- user
aborted
,
unsuccessful-no
carrier,
unsuccessful- no
dial tone
,
unsuccessful-error
descriptor>
<
Recipient (column) alphanumeric Shows the name and fax number of recipient to
whom fax is currently being sent.
Print Capture (row) idle,
preparing to
Indicates status of the FaxFinder’s Print
Capturing software module.
capture,
capturing page
n
Multi-Tech Systems, Inc. FaxFinder Admin User Guide 73
Page 74

Chapter 4: FaxFinder Client Software Configuration
FaxFinder Fax Client Software Menu Command Definitions (cont’d)
Command Name Description
Device Status tab (cont’d)
Commands accessed by Right-Clicking on a selected FaxFinder
delete Dis-associates the client from the selected FaxFinder or HylaFAX unit so that
the client can no longer send faxes through that FaxFinder unit. (The
FaxFinder Server’s IP address is removed from the Device Status list of the
FaxFinder Client Software.)
disable Temporarily dis-associates the client from the selected FaxFinder or HylaFAX
unit so that the client can no longer send faxes through that unit.
To restore the connection to the FaxFinder/HylaFAX unit, select
Disable.
(Because the FaxFinder Server’s IP address remains in Device Status list of
the FaxFinder Client Software, service can be restored by toggling the
Disable
command, thus enabling the association once again.)
abort Discontinues a fax transmission in progress.
abort and Pause Discontinues a fax transmission in progress and puts all pendin g faxes on
hold. After this command has been invoked, no more faxes will be sent from
this client until
(a) the client PC is turned off and on again, or
(b) the command has been turned off by selecting
Pause Scheduler in the
File menu of the FaxFinder Fax Client Software.
properties Brings up the FaxFinder <IP address><domain name> screen. This screen
simply shows the IP address or domain name of the selected FaxFinder unit.
FaxFinder Fax Client Software Menu Command Definitions (cont’d)
Field/Command Name Values Description
Pending Faxes tab
Recipient (column) -- Identifies recipient of each fax for which transmission is
Scheduled Time/Date -- Identifies time at which a pending fax is set to be
Pages (column) -- Shows the number of pages of each fax.
Commands accessed by right-clicking on a selected pending fax message
delete Cancels the tran smission of the selected pending fax message.
reschedule Brings up the Fax Scheduling screen so that transmission of a pending
properties Brings up the Fax Details screen for the selected pending fax . The
Multi-Tech Systems, Inc. FaxFinder Admin User Guide 74
incomplete.
transmitted.
fax can be scheduled for a different time.
Fax Details screen presents information about the recipient,
transmission status, cover page, and original source file of the
selected pending fax.
Page 75

Chapter 4: FaxFinder Client Software Configuration
FaxFinder Fax Client Software Menu Command Definitions (cont’d)
Field Name Values Description
Fax Ports tab
Device (column) alphanumeric Shows FaxFinder units with which the client is
associated.
Port (column) ttys0 for FF120,
ttys0, ttys1
for FF220
0-3 for FF420
ttys_
0-7 for FF820
ttys_
Status (column) idle, negotiating,
preparing to
capture, capturing
n, sending
page
fax page
n,
The fax modem (within) the FaxFinder server
unit, the status of which is being tracked.
ttys0 denotes POTS Modem 1 of the listed
faxfinder unit;
ttys1 denotes POTS Modem 2 of the listed
faxfinder unit, etc., for all modems in the FF420/820 unit.
Shows the status of the FaxFinder fax server unit
pertaining to its fax sending and receiving
capabilities and to its print/image capturing
capabilities.
receiving fax page
n, success,
unsuccessful- user
aborted
,
unsuccessful-no
carrier,
unsuccessful- no
dial tone
,
unsuccessful-error
descriptor>
<
Recipient (column) alphanumeric Shows the name and fax number of recipient to
whom fax is currently being sent.
List All Fax Ports Y/N When selected, all fax ports are listed; when not
selected, only the active fax ports are listed.
Multi-Tech Systems, Inc. FaxFinder Admin User Guide 75
Page 76

Chapter 4: FaxFinder Client Software Configuration
FaxFinder Fax Client Software Menu Command Definitions (cont’d)
Field/Command Name Values Description
Fax Log tab
Recipient (column) Identifies recipient of each outgoing fax.
Time/Date Sent (column)
day, date, time, zone
in the form
ddd mmm nn
hh:mm:ss zzzzzz
Indicates when each outgoing fax was sent.
Pages (column) integer Shows the number of pages in each fax.
Status (column) success,
unsuccessful- user
aborted
,
Indicates whether each fax was sent successfully
or not and, if not, indicates reason for failure.
unsuccessful-no
carrier,
unsuccessful- no
dial tone
,
unsuccessful-error
descriptor>
<
Commands accessed by right-clicking on a selected fax log entry
delete Cancels the selecte d fax log entry.
resend Resends the selected fax. The Fax Scheduling screen will appear to
set a time for the resending to occur.
properties Brings up the Fax Details screen for the selected fax. The Fax Details
screen presents information about the recipient, transmission status,
cover page, and original source file of the selected pending fax.
Multi-Tech Systems, Inc. FaxFinder Admin User Guide 76
Page 77

Chapter 4: FaxFinder Client Software Configuration
FaxFinder Fax Client Software Menu Command Definitions (cont’d)
Field/Command Name Values Description
Address Book tab
Name (column) alphanumeric Shows the name of the the selected Address
Book entry.
Organization (column)
alphanumeric
Shows the organizational affiliation of the the
selected Address Book entry.
Fax Number (column) integers Shows the fax number of the selected Address
Book entry.
Commands accessed by right-clicking on a selected address book entry
delete Removes the selected entry from the Address Book. A confirmation
screen appears before the deletion is executed.
properties Brings up the Contact <name> screen screen for the selected
address book entry. The Contact screen shows user contact details
(name, company name, fax number, phone numbers, and street
address info).
Multi-Tech Systems, Inc. FaxFinder Admin User Guide 77
Page 78

Chapter 4: FaxFinder Client Software Configuration
Add Contact
Import
Export
FaxFinder Fax Client Software Menu Command Definitions
Command Name Values Description
Address Book menu commands
--
--
Brings up the New Contact screen for adding entries to
client-user’s personal address book. These entries are for
parties to whom the client-user may want to send faxes.
The contact info includes the party’s name, their
organizational affiliation, phone numbers, fax numbers,
and land address information.
The contact information goes into these specific fields:
Name, Organization, Home Number, Work Number, Fax
Number, Address, City, State/Province, and Postal Code.
The New Contact screen allows for manual entry of
contacts into the Address Book. It can also be accessed
from the FaxFinder Send Fax screen and from Edit |
Add Contact.
Brings up the Address Book Import screen. The Import
command allows you to import entries into your address
book from a delimited file (e.g., a MS Outlook address
book exported as a delimited file; the delimiter could be a
comma, semicolon, colon, or a tab). In most cases, a
template file is required to map the information from the
import file into the appropriate fields of the FaxFinder
Address Book (i.e., into the fields of the New Contact
screen)
The FaxFinder Client software includes a template that
allows entries from one FaxFinder client-user’s Address
Book to be imported into the Address Book of another
client user, and a template to import entries from an
Outlook CSV file. You may also create a custom template
to map a CSV file to address book entries.
Template files are accessible by clicking on the
“Browse” button in the “CSV import field mapping
template” area .
Allows you to create a delimited file from the FaxFinder
Address Book for use in applications that can import
delimited files. The delimiters could be comma,
semicolon, colon, or tab. The primary use of the Export
command is to allow an established FaxFinder Address
Book to be shared with other client users. Export files
have a .csv extension.
Multi-Tech Systems, Inc. FaxFinder Admin User Guide 78
Page 79

Chapter 5 – FaxFinder Client
Software Operation
Introduction
This chapter describes the things that a client user can do with the FaxFinder system. Three software
programs are involved: the FaxFinder Client Software, the Multi-Tech Tiff Viewer (or designate d PDF
viewer), and the Multi-Tech Cover Page Generator. The programs work together with the FaxFinder
Client Software acting as the hub of activity. The FaxFinder Client Software interfaces with the FaxFinder
Server, has a user interface, and calls upon the Cover Page Generator and viewer program fo r their
special functions. When sending faxes, the FaxFinder Client Software calls up the Multi-Tech Cover
Page generator if cover pages are requested. When previewing outgoing faxes, the PC’s operating
system calls up the designated TIFF viewer to display the outgoing fax. When viewing received faxes,
the PC’s operating system calls up the appropriate viewer (PDF or TIFF). The choice of file types (PDF
or TIFF) is made in the FaxFinder Server software. Note that client users can choose to display either on
the Multi-Tech TIFF viewer or on a different (non-Multi-Tech) TIFF viewing program. Likewise, if the
FaxFinder system distributes incoming faxes as PDF files, the client can design ate which PDF viewer to
use.
Multi-Tech Systems, Inc. FaxFinder Admin User Guide 79
Page 80

Chapter 5: FaxFinder Client Software Operation
Sending a Fax
To send a fax by printing from an application program on a client PC, follow the steps listed below.
1. The FaxFinder client software must be installed on the PC. (See the section “Installing FaxFinde r
Client Software” earlier in this manual.)
2. The client PC and the FaxFinder server must both be connected to the same Ethernet LAN system.
(See the section “Chapter 3, Part C: Configuring the FaxFinder Server” earlier in this manual.)
3. The association must be made between the client PC and the FaxFinder Server. (See the section
“Associating Client with Specific FaxFinder Unit(s)” earlier in this manual).
4. After installation, the
on. You can view the FaxFinder program's main window by clicking on the FaxFinder icon at the
lower right of the PC’s monitor screen in its Application Tray. Then select “Show FaxFinde r Client
Software.”
Note: The user can shut down the FaxFinder program by selecting "exit" either
FaxFinder Fax Client Software program will be running whenever the PC is
from the tray icon or from the main FaxFinder program screen. If the
program has been shut down, it can be restarted from the Windows
menu.)
Start
However, you can send faxes through the FaxFinder without bringing up the FaxFinder Client
Software
Multi-Tech Systems, Inc. FaxFinder Admin User Guide 80
screen.
Page 81

Chapter 5: FaxFinder Client Software Operation
5. At the application program (for example, a word processing program or drawing program), print to the
FaxFinder.
Setting the destination of the printing job varies from program to program. For the common
text editor program, for example, you must set the destination printer in the
most cases, however, the destination printer can be set in a
Print menu that appears when each
Page Setup screen. In
printing job is initiated.
Notepad
Multi-Tech Systems, Inc. FaxFinder Admin User Guide 81
Page 82

Chapter 5: FaxFinder Client Software Operation
After the FaxFinder has been chosen as the target printer, a ‘Properties/Preference s’ scre en can be
accessed by clicking on either “Properties” or “Preferences” on the Print dialog b ox (for most
application programs, it’s a “Properties” button; for a few, it’s a “Preferences” button). Then a screen
labeled either
MULTI-TECH FAXFINDER Properties or Printing Preferences screen will ap pear
and its “Device Settings” tab will be shown.
We strongly advise you not to change any parameters on the Device Settings tab. If you have
changed any parameters, click on the “Restore defaults” button to reset the parameters. Also, none
of the parameters on the Profile Manager tab should be altered.
DO NOT CHANGE ANY “Device Settings” or “Profile Manager” parameters.
Multi-Tech Systems, Inc. FaxFinder Admin User Guide 82
Page 83

Chapter 5: FaxFinder Client Software Operation
6. After the printing has been initiated by the application program, the FaxFinder Send Fax screen will
appear.
Click on Address Book. When the Address Book screen appears, click “New.” At the New
Contact
screen, enter the recipient’s name, fax number, and any other contact information you want
to retain.
The recipient’s fax number should be entered as you would dial it from a phone on the public phone
network (as from a residential phone). Click
recipient in the list and click “Select.” The party will appear in the “Recipients” list in the
Send Fax
screen.
Additional recipients can be added. The same fax message will be sent to all recipients.
Streamlined Approach. You can also add a recipient in the FaxFinder Send Fax screen by clicking +
to launch the
Enter a Fax Recipient screen where you can enter Name and Fax Number only. You
can then choose to send the fax with or without adding the recipient to your Address Book.
Multi-Tech Systems, Inc. FaxFinder Admin User Guide 83
OK. At the Address Book screen, highlight the
FaxFinder
Page 84

Chapter 5: FaxFinder Client Software Operation
You can also access the Address Book directly to add and edit entries. At the
Software
screen, go to Edit | Add Contact.
FaxFinder Fax Client
7. If you want to include a cover page with your fax, click in the “Use Cover Page” checkbox. Enter
information as needed in the “Subject” and “Cover Page Notes” fields.
Automated fields, like sender information (individual name, company name, street address, phone
number, fax number, etc.) should be entered in the Address Book. The Address Book is accessible
in the “Options” menu of the
FaxFinder Fax Client Software screen. For more information about
addresses and the automated fields used in cover pages, see the section “Setting Up Your Addre s s
Book” later in this chapter.
Multi-Tech Systems, Inc. FaxFinder Admin User Guide 84
Page 85

Chapter 5: FaxFinder Client Software Operation
The “Cover Page Style” chosen will determine how this information will appear on the fax cover page.
You can select a standard style from the “Cover Page Style” drop-down menu or create a style of
your own in the Template Editor. To access the Template Editor software, click on the “View/Edit”
button. (For more information, see the section “Creating or Modifying Cover Page Styles” later in this
chapter.)
Click on the “Preview Fax” button to check the fax before you send it. The Multi-Tech Tiff Viewer
program will appear.
In it, you can view both the cover page and the main fax page(s). (For more information on this, see
the section “Using the Multi-Tech Tiff Viewer” later in this chapter.) When satisfied with your fax,
close the viewer program and return to the
8. At the
FaxFinder Send Fax screen, click on the “Send Fax” button to send the fax.
9. Confirmation of having sent the fax(es) successfully will appear in the “Fax Log” tab of the
Fax Client Software
screen.
FaxFinder Send Fax screen.
FaxFinder
Multi-Tech Systems, Inc. FaxFinder Admin User Guide 85
Page 86

Chapter 5: FaxFinder Client Software Operation
Scheduling Fax Transmissions
The FaxFinder allows you to send a fax immediately or delay its transmission until a later time. Perhaps
the most common motivations for delayed faxing are to enjoy the lower phone rates that may apply at
night and on weekends or to broadcast faxes after business hours to avoid tying up fax transmission
resources during the busiest weekday hours. In any case, it is easy to schedule faxing for a later time.
1. Send the fax via FaxFinder in the normal way (see the procedure “Sending a Fax” earlier in this
chapter).
2. When the
Book
Recipient
3. In the FaxFinder Send Fax screen, the recipient’s name and fax number will appear in the “Recipi ents”
list and the “Schedule” pane will no longer be grayed out. Click
screen will appear.
FaxFinder Send Fax screen appears, enter a recipient for the fax either from the Address
or by entering Name and Phone Number (fax number) in the appropri ate fields a nd clicking Add
.
Schedule. The Fax Scheduling
4. Click to uncheck the “send immediately” checkbox.
5. Enter the date and time at which you want the fax to be sent.
6. Click
Multi-Tech Systems, Inc. FaxFinder Admin User Guide 86
OK in the Fax Scheduling screen and then click Send Fax in the FaxFinder Send Fax screen.
Page 87

Chapter 5: FaxFinder Client Software Operation
7. The fax will be sent at the scheduled time. You can view the event as it happens in the FaxFinder
client software
Device Status screen or after the fact in the Fax Log screen.
Re-Sending a Failed Fax
Locate the failed fax in the Fax Log tab of the FaxFinder Fax Client Software. Select the failed fax and
right-click on it. In the menu that appears, select
Resend.
Multi-Tech Systems, Inc. FaxFinder Admin User Guide 87
Page 88

Chapter 5: FaxFinder Client Software Operation
Putting Pending Faxes on Hold and Removing the
Hold
Suppose you have sent a fax to 10 recipients and, shortly after clicking on Send Fax, you realize that
there is something incorrect in the content of your fax (it may be something you want to add, delete, or
change). You can prevent any pending faxes from being sent by selecting “Pause Scheduler” in the
menu of the FaxFinder Fax Client screen. Suppose that 2 faxes have already been transmitted
completely and a third fax is in progress when you click “Pause Scheduler.” The FaxFinder will finish the
third fax but will not fax to recipients 4-10. The pausing function allows you to see details about the fax,
to view the fax again, and to delete the fax if you so desire.
As long as “Pause Scheduler” is selected, no fax message will advance beyond “Pending” status and, so,
none will be sent.
To rescind or call off the hold on pending faxes, open the FaxFinder Fax Client Software. From the File
menu, select
Consider this example.
1. A fax is sent by FaxFinder to three recipients.
Pause Scheduler. The scheduler will resume normal operation and faxes will be sent.
File
Multi-Tech Systems, Inc. FaxFinder Admin User Guide 88
Page 89

Chapter 5: FaxFinder Client Software Operation
2. While the fax is being sent to the second party, the client user realizes that there is something wrong
with the fax. She brings up the FaxFinder Fax Client Software screen, opens the File menu, and
selects “Pause Scheduler.”
At that point, the FaxFinder will complete the fax in progress that is being sent to the second recipient.
However, the fax to the third recipient is still listed as “Pending” in the
Pending Faxes tab of the
FaxFinder Fax Client Software.
The client user can take one of several actions.
She could click on “Pause Scheduler” again to cancel that command. In that case, the pen di ng fax would
become active and could not be stopped.
She could select the fax in the Pending Faxes screen and right-click on it to bring up a menu.
Multi-Tech Systems, Inc. FaxFinder Admin User Guide 89
Page 90

Chapter 5: FaxFinder Client Software Operation
She could view the details of the fax and, at her option, view the fax again.
She could re-schedule the fax for a later time.
Multi-Tech Systems, Inc. FaxFinder Admin User Guide 90
Page 91

Chapter 5: FaxFinder Client Software Operation
She could “delete” the fax, which means that that fax transmission would never be completed .
Pause is canceled on reboot. If she shuts down her computer for the day while leaving this fax in a
“pending” state, that fax will be sent shortly after booting up her computer again, that is shortly after the
FaxFinder client software is functioning again. So, any faxes put in the pending state by using the
‘Pause Scheduler’ command will be sent the next time the FaxFinder software is activated.
Canceling a Fax
If the fax is in progress … Open the FaxFinder Fax Client Software. On the Device Status tab, select
the FaxFinder unit that is in the process of sending your fax. In the list, right-click on that FaxFinder entry.
In the menu that appears, select
If the fax is pending … Open the FaxFinder Fax Client Software. On the Pending Faxes tab, select the
fax transmission that you want to cancel. In the list, right-click on that fax message entry (the recipient
will be shown). In the menu that appears, select
To cancel the current fax and simultaneously put a hold on sending any other faxes from your PC, select
Abort and Pause. To resume faxing, go to the File menu and cancel the pause by selecting Pause
Scheduler
pending with the FaxFinder Scheduler paused will be sent as soon as the FaxFinder cli ent program
opens when the PC is turned on again.
. Any pause applied to a pending fax is cancelled when the computer is rebooted. Any fax left
Abort.
Delete.
Multi-Tech Systems, Inc. FaxFinder Admin User Guide 91
Page 92

Chapter 5: FaxFinder Client Software Operation
Setting Fax Retry Number and Interval
You can set the FaxFinder client software to retry a fax transmission if it fails on the first attempt. You can
set both the number of additional attempts and the interval between each additional attempt. You can set
these parameters as follows.
1. In the FaxFinder Fax Client Software screen, open the
Options screen appears, click on the
2. Set the number of retries and the interval between these repeated attempts and click OK.
Fax Retry tab.
File menu and select “Options.” When the
Multi-Tech Systems, Inc. FaxFinder Admin User Guide 92
Page 93

Chapter 5: FaxFinder Client Software Operation
Sending One Fax Containing Multiple Documents
The FaxFinder allows you to include multiple documents in a single fax transmission. Those multiple
documents could come from the same or different application programs.
1. Consider the example below where a text file and a drawing file are included in the same fax with a
single cover letter. Here’s how this multiple-document fax was sent.
a. The user printed the text file to the FaxFinder from the
b. The FaxFinder Send Fax screen appeared. However rather than completing the fax
transmission, the user opened another application program.
c. The user printed the graphic file to the FaxFinder from the Macromedia
program.
d. When the user returned to the FaxFinder Send Fax screen, both documents appeared in the
“Documents” list.
Notepad text editor program.
FreeHand drawing
2. In the “Documents” pane of the FaxFinder Send Fax screen, you can add a cover page, re-arrange
the order of the files, or delete items from the list of files to be faxed.
Multi-Tech Systems, Inc. FaxFinder Admin User Guide 93
Page 94

Chapter 5: FaxFinder Client Software Operation
3. You can also add to the list of files to be faxed out by including items that you have stored. In the
“Documents” pane of the
FaxFinder Send Fax screen, click +. You could then browse to find, for
example, a fax that you had received earlier, had stored as a TIF file, and now want to forward to
another party. (Faxes received as PDF files cannot be added to the list.)
4. When all documents to be transmitted have been listed in the Documents list, click Send Fax. The
documents will be sent in the order listed.
Multi-Tech Systems, Inc. FaxFinder Admin User Guide 94
Page 95

Chapter 5: FaxFinder Client Software Operation
Forwarding a Fax
Suppose you receive a fax using the FaxFinder system. Suppose that fax message is something you
want to pass along to another party in fax form at a later date (for example, Rocky Mountain Construction
Company receives tax information about lots on which it intends to build houses). In this case, you
should note the name of the TIF file in question. You can then browse to that TIF file and re-send it as a
fax message.
Note: Forwarding of faxes applies only to TIF files; PDF files cannot be forwarded.
To forward a fax, follow these steps.
1. At the FaxFinder Fax Client Software screen, go to the File menu and select “Send Fax.” The
FaxFinder Send Fax screen will appear.
2. In the Documents pane, click “+.” Then browse to the TIF file to be sent as a fax.
Click Open.
3. The selected file will appear in the “Documents” list in the FaxFinder Send Fax screen.
Multi-Tech Systems, Inc. FaxFinder Admin User Guide 95
Page 96

Chapter 5: FaxFinder Client Software Operation
4. In the FaxFinder Send Fax screen, specify a recipient for the fax. The recipient could either come
from your
Name and Fax Number in the
Address Book or be entered by clicking “+” in the “Recipients” pane and then typing the
Enter a Fax Recipient dialog box. Then click OK.
Finally, you would click Send Fax. The TIF file will be reconverted into a fax message that can be
received by a fax machine.
Receiving a Fax
The FaxFinder Server delivers incoming faxes to client PCs in their email inboxes.
Since faxes received through the FaxFinder are transformed into email attachments, they can be directed
anywhere email goes. The final recipient can be inside the office or across the ocean.
Fax reception works differently when the FaxFinder is operating in
Manual Routing Mode. In Automated Routing Mode, faxes come directly to client/users; in Manual
Routing Mode, all faxes come to an attendant who forwards them to the intended recipient.
Receiving Faxes in Manual Routing Mode
In Manual Routing Mode, all faxes are emailed to an attendant using a single fax number.
1. The incoming fax arrives in the attendant’s email inbox as a message with an attachment.
2. The attendant uses email to forward the message to the appropriate recipient. Recipients could be on
the local Ethernet network or outside of it.
3. The recipient opens the email message. The incoming fax message takes the form of a graphic file
attachment. The FaxFinder Server has assigned the file an automatic file name.
Automated Routing Mode than in
Multi-Tech Systems, Inc. FaxFinder Admin User Guide 96
Page 97

Chapter 5: FaxFinder Client Software Operation
4. The incoming fax arrives in the client’s email inbox as a message with an attachment.
The email message is marked as being from the FaxFinder Administrator.
The sender’s “Remote ID” and the client’s name appear in the “Subject” line of th e email message.
(The Remote ID comes from the sending fax machine and is typically the sender’s fax number or
name.)
5. The FaxFinder client opens the email message. The incoming fax message takes the form of a
graphic file attachment. The FaxFinder Server has assigned the file an automatic file name.
6. The FaxFinder client can open the file or save the file.
a.
Opening the fax message graphic file. Incoming fax messages are PDF or TIFF files. These
graphics files are automatically associated with a PDF or TIFF viewer program that has alre ady been
chosen. The client can open the fax email attachment directly in the viewer program.
b.
Saving the fax message graphic file. In some viewer programs, the client can do a ‘Save As,’
renaming the graphic file attachment with a meaningful name for subsequent viewing or for
forwarding (applicable to TIFF files only).
7. The client views the fax message in the (PDF or TIFF) viewer program.
Multi-Tech Systems, Inc. FaxFinder Admin User Guide 97
Page 98

Chapter 5: FaxFinder Client Software Operation
Receiving Faxes in Automated Routing Mode
In Automated Routing Mode, the FaxFinder Server delivers incoming faxes to client PCs in their email
inboxes.
1. A PBX extension number must be assigned to the client PC at the FaxFinder Server.
2. For fax reception, the client PC and the FaxFinder server
need not both be connected to the same
Ethernet LAN system. (A sales representative, for example, could receive faxes sent to her home
office fax number even though she is traveling overseas, if she uses an Internet email account.)
3. A fax document is sent to the PBX extension number of a client/recipient on the FaxFinder system.
The fax call is routed to the FaxFinder server and there converted to a PDF or TIFF graphic file. The
graphic file is attached to an email message that is sent to the intended recipient’s email address (as
specified in the FaxFinder Phone Book).
4. The incoming fax arrives in the recipient’s email inbox as a message with an attachment.
The email message is marked as being from the FaxFinder Administrator.
The sender’s “Remote ID” and the recipient’s name appear in the “Subject” line of the email
message. (The Remote ID comes from the sending fax machine and is typically the sender’s fax
number or name.)
Multi-Tech Systems, Inc. FaxFinder Admin User Guide 98
Page 99

Chapter 5: FaxFinder Client Software Operation
5. The fax recipient (a client of the FaxFinder Server) opens the email message. The incoming fax
message takes the form of a graphic file attachment. The FaxFinder Server has assigned the file an
automatic file name.
6. The FaxFinder client can open the file or save the file.
a.
Opening the fax message graphic file. Incoming fax messages are PDF or TIFF files. These
graphics files are automatically associated with a PDF or TIFF viewer program that has alre ady been
chosen. The client can open the fax email attachment directly in the viewer program.
b.
Saving the fax message graphic file. In some viewer programs, the client can do a ‘Save As,’
renaming the graphic file attachment with a meaningful name for subsequent viewing or forwarding.
7. The client views the fax message in the (PDF or TIFF) viewer program.
Using the Multi-Tech Tiff Viewer
The Multi-Tech Tiff Viewer program has a variety of features that enhance the viewing of fax messages in
graphic file form (thumbnails, zooming, spot magnification, scrolling, rotating, etc.). The program can also
manipulate and permanently alter the graphic files.
Frequently Used Commands – Toolbar Icons
The most commonly used functions are available as icons on the toolbar. In the next three diagrams, we
label and describe the functions of these icons.
Multi-Tech Systems, Inc. FaxFinder Admin User Guide 99
Page 100

Chapter 5: FaxFinder Client Software Operation
Multi-Tech Systems, Inc. FaxFinder Admin User Guide 100
 Loading...