

Multitech MultiModem iSMS SF100-G, MultiModem SF400-G, MultiModem SF800-G Administrator's Manual
Page 1

MultiModem
®
iSMS
Intelligent SMS Server
Models: SF100-G
SF400-G
SF800-G
Administrator’s Guide
Page 2

MultiModem® iSMS
Administrator’s Guide
Models: SF100, SF400, SF800
Part Number S000461D
Copyright © 2012
This publication may not be reproduced, in whole or in part, without prior expressed written permission from Multi-Tech Systems, Inc.
All rights reserved.
Multi-Tech Systems, Inc. makes no representations or warranty with respect to the contents hereof and specifically disclaims any
implied warranties of merchantability or fitness for any particular purpose. Furthermore, Multi-Tech Systems, Inc. reserves the right to
revise this publication and to make changes from time to time in the content hereof without obligation of Multi-Tech Systems, Inc. to
notify any person or organization of such revisions or changes.
Revision Date Description
A 08/21/09 Initial release of SF400 and 800.
B 09/02/10 Release of 1.44 version.
C 01/30/2012 Removed references to product CD.
D 08/9/2012 Updated web interface.
Trademarks
MultiModem is a trademark of Multi-Tech Systems, Inc. The Multi-Tech logo is a registered trademark of Multi-Tech Systems, Inc.
World Headquarters
Multi-Tech Systems, Inc.
2205 Woodale Drive
Mounds View, Minnesota 55112
Phone: 763-785-3500 or 800-328-9717
Fax: 763-785-9874
Internet Address: http://www.multitech.com
Contacting Multi-Tech Support
Online Support Portal
support.multitech.com
In order to better serve our customers, manage support requests and shorten resolution times, we have created the online web portal
allowing you to submit questions regarding Multi-Tech products directly to our technical support team. Get answers to your most
complex questions, ranging from implementation, troubleshooting, product configuration, firmware upgrades and much more.
To create an account and submit a Support Case on the Portal, visit support.multitech.com
Knowledge Base and Support Services
www.multitech.com/en_US/SUPPORT
The Knowledge Base provides immediate answers to your questions and gives you access to support resolutions for all Multi-Tech
products. Visit our support area on the website for other support services.
Technical Support
Country By Email By Phone
Europe, Middle East, Africa: support@multitech.co.uk
U.S., Canada, all others: support@multitech.com
Warranty
Warranty and repair information for your product can be found at:
http://www.multitech.com/en_US/COMPANY/Policies/warranty/
(44) 118 959 7774
(800) 972-2439 or (763) 717-5863
MultiModem® iSMS Administrator’s Guide 2
Page 3

Contents
Chapter 1 – Product Overview and Safety Information ................................................................................... 7
Safety Warnings ..................................................................................................................................................... 7
Ethernet Port Caution ................................................................................................................................................ 7
Handling Precautions ................................................................................................................................................. 7
Packaging Contents ................................................................................................................................................ 7
MultiModem iSMS Documentation ......................................................................................................................... 8
User Guides ................................................................................................................... ............................................. 8
AT Commands ............................................................................................................................................................ 8
Front and Back Panels ............................................................................................................................................. 8
Front Panel of model SF100 ....................................................................................................................................... 8
Front Panel of Models SF400 and SF800 .................................................................................................................... 9
Installing a SIM Card for Model SF100 ....................................................................................................................... 9
Installing a SIM Card for Models SF400 and SF800 .................................................................................................. 10
Modem Numbering .................................................................................................................................................. 11
Back Panels .............................................................................................................................................................. 11
Back Panel Connectors ............................................................................................................................................. 11
Panel Mounting (SF100) ........................................................................................................................................... 12
Rack or Wall Mounting (SF400/800) ........................................................................................................................ 13
Technical Specifications ........................................................................................................................................ 14
Chapter 2 – Setting up and using the iSMS ................................................................................................... 16
Setting Up Your MultiModem iSMS ....................................................................................................................... 16
SF100 Cabling ........................................................................................................................................................... 17
SF400/800 Cabling ................................................................................................................................................... 18
Establishing TCP/IP Communication ...................................................................................................................... 19
Setting a Fixed IP Address ........................................................................................................................................ 19
Obtaining and Activating a Wireless Account ........................................................................................................ 22
Service Provider Fees ............................................................................................................................................... 22
Directly Communicating with the Cellular Modem .................................................................................................. 22
Signal Strength ......................................................................................................................................................... 23
Using AT Commands to Check Network Registration and Roaming Status ............................................................. 23
Chapter 3 – iSMS Basics and the Setup Wizard ............................................................................................. 24
Starting the iSMS .................................................................................................................................................. 24
Open a Web Browser ............................................................................................................................................... 24
Login ......................................................................................................................................................................... 24
3 MultiModem® iSMS Administrator’s Guide
Page 4

Contents
Web Interface Opens ............................................................................................................................................... 24
Navigating the Windows ....................................................................................................................................... 25
Menus ...................................................................................................................................................................... 25
Table of Menus and Sub-Menus .............................................................................................................................. 26
Saving System Configuration Changes ................................................................................................................... 27
Save & Restart Button under Menu Bar .................................................................................................................. 27
Using the Wizard Setup to Configure the MultiModem iSMS ................................................................................. 28
Opening the Wizard Setup Window ......................................................................................................................... 28
Saving System Settings ............................................................................................................................................. 29
Chapter 4 – Using the MultiModem iSMS Web Interface .............................................................................. 30
Administration ..................................................................................................................................................... 30
Administration > System Setup ................................................................................................................................ 30
Administration > SNTP Client ................................................................................................................................... 32
Administration > Administrative Access .................................................................................................................. 34
Administration > Admin Access > Allowed Networks .............................................................................................. 35
Administration > Remote Syslog .............................................................................................................................. 35
Administration > Tools ............................................................................................................................................. 36
Administration > Factory Defaults ........................................................................................................................... 37
Network Setup ..................................................................................................................................................... 38
Network Setup > IP Settings ..................................................................................................................................... 38
Network Setup > Cellular Modem ............................................................................................................................ 39
Save & Restart .......................................................................................................................................................... 41
SMS Services ........................................................................................................................................................ 42
SMS Services > Address Book ................................................................................................................................... 42
SMS Services > Groups ............................................................................................................................................. 44
SMS Services > International Number ..................................................................................................................... 45
SMS Services > Users ................................................................................................................................................ 45
SMS Services > SMS Settings .................................................................................................................................... 46
SMS Services > Send SMS ......................................................................................................................................... 47
SMS Services > SMS API ........................................................................................................................................... 50
SMS Services > Load Balancing ................................................................................................................................ 53
SMS Services > Inbox ................................................................................................................................................ 54
SMS Services > Outbox ............................................................................................................................................. 55
Triggers ................................................................................................................................................................ 56
Triggers > Authentic List ........................................................................................................................................... 56
Triggers > Broadcast Triggers ................................................................................................................................... 56
Triggers > Action Triggers ......................................................................................................................................... 58
Triggers > Pre-Configured SMS ................................................................................................................................ 60
MultiModem® iSMS Administrator’s Guide 4
Page 5

Contents
Save & Restart .......................................................................................................................................................... 60
Utilities ................................................................................................................................................................. 61
Utilities > Backup...................................................................................................................................................... 61
Utilities > Firmware Upgrade ................................................................................................................................... 62
Import & Export Address Book .............................................................................................................................. 63
Import & Export Address Book > Import .................................................................................................................. 63
Import & Export Address Book > Export .................................................................................................................. 65
Statistics & Logs .................................................................................................................................................... 66
Statistics & Logs > System Information .................................................................................................................... 66
Statistics & Logs > SMS Statistics ............................................................................................................................. 67
Statistics & Logs > Load Balancing Statistics ............................................................................................................ 68
Statistics & Logs > Log Traces ................................................................................................................................... 69
Chapter 5 – Using the Non-Administrative User Interface ............................................................................ 70
Web Interface Available to Non-Administrative Users ........................................................................................... 70
How Non-Administrative Users Login ...................................................................................................................... 70
Chapter 6 – SMS Examples ........................................................................................................................... 72
Verifying the SIM Card is Installed and Activated .................................................................................................. 72
Creating a Broadcast Message for Future Use ........................................................................................................ 74
Appendix A – Application Programming Interface (API) ............................................................................... 75
Acronyms and Definitions ........................................................................................................................................ 75
SMS API ................................................................................................................................................................ 76
HTTP API ................................................................................................................................................................... 76
TCP API ..................................................................................................................................................................... 92
Receive SMS API ................................................................................................................................................... 96
Non Polling Mode Receive SMS API ......................................................................................................................... 96
HTTP Receive API – Non-Polling Mode .................................................................................................................... 97
TCP Receive API – Non-Polling Mode ..................................................................................................................... 101
Polling Mode Receive SMS API ............................................................................................................................... 106
Receive API – Polling Mode .................................................................................................................................... 107
Appendix B – Table of Commonly Supported Subnet Addresses ................................................................. 114
Appendix C – Antennas for the
RF Specifications ................................................................................................................................................. 118
MultiModem iSMS .................................................................................... 118
Antenna Specifications ....................................................................................................................................... 118
GSM/EGSM Antenna Requirements/Specifications ............................................................................................... 118
Antennas Available from Multi-Tech Systems, Inc. ................................................................................................ 118
PTCRB Requirements Note..................................................................................................................................... 118
FCC Requirements Note ......................................................................................................................................... 118
Appendix D – Waste Electrical and Electronic Equipment Directive (WEEE) ................................................ 119
Waste Electrical and Electronic Equipment (WEEE) Directive ............................................................................... 119
5 MultiModem® iSMS Administrator’s Guide
Page 6

Contents
Appendix E – Time Zone Abbreviations ...................................................................................................... 120
Appendix F – End User License Agreement (EULA) ..................................................................................... 122
Appendix G – Regul
Restriction of the Use of Hazardous Substances (RoHS) ....................................................................................... 125
Information on HS/TS Substances According to Chinese Standards ...................................................................... 126
47 CFR Part 15 Regulation ................................................................................................................................... 127
atory Information ........................................................................................................ 125
Index ......................................................................................................................................................... 128
MultiModem® iSMS Administrator’s Guide 6
Page 7

Chapter 1 – Product Overview and
Safety Information
The Multi-Tech iSMS is an intelligent Short Message Services (SMS) server that gives businesses the ability to broadcast
and receive SMS text messages. The ready-to-use solution plugs into the Ethernet network and connects to the wireless
network through an integrated quad-band GSM modem. Now anyone on the network can broadcast messages, which
allows organizations to reach clients, subscribers, members and prospects in real-time through SMS.
Safety Warnings
Ethernet Port Caution
The Ethernet port is not designed to be connected to a Public Switched Telecommunication Network (PSTN).
Handling Precautions
All devices must be handled with certain precautions to avoid damage due to the accumulation of static charge. Although
input protection circuitry has been incorporated into the devices to minimize the effect of this static build up, proper
precautions should be taken to avoid exposure to electrostatic discharge during handling and mounting.
Before servicing any part of the MultiModem iSMS system, read the instructions and cautions in this section. This
information explains how to work safely when servicing product. Observe the following safety precautions when setting
up the equipment:
● Follow all cautions, warnings, and instructions.
● Ensure that the voltages and frequency rating of the power receptacle match the electrical rating label on the
equipment.
● Never push or attach objects of any kind through openings inside the equipment. Object may touch dangerous
voltage points or short components, resulting in fire or electric shock.
Caution: Maintain a separation distance of at least 20 cm (8 inches) between the transmitter’s antenna and the body of
the user or nearby persons. The modem is not designed for, nor intended to be, used in applications within 20 cm (8
inches) of the body of the user.
Packaging Contents
The following items are included in the package for the MultiModem iSMS product.
• One MultiModem iSMS
• For model SF100, a power supply (SF100) -or-
• For models SF400 and SF800, a power cord
• RJ-45 Ethernet cable
• Cellular antenna (not included with all models)
If any item is missing or damaged, contact Multi-Tech Systems, Inc.
7 MultiModem® iSMS Administrator’s Guide
Page 8
Chapter 1 – Product Overview and Safety Information
MultiModem iSMS Documentation
User Guides
All product documentation is available on the Multi-Tech website: http://www.multitech.com/man.go
AT Commands
The AT commands used to configure this product are described in a reference guide. You can find this guide, “GPRS AT
Commands Reference Guide” on the Multi-Tech website. Document part numbers include: S000463 and S000293.
Front and Back Panels
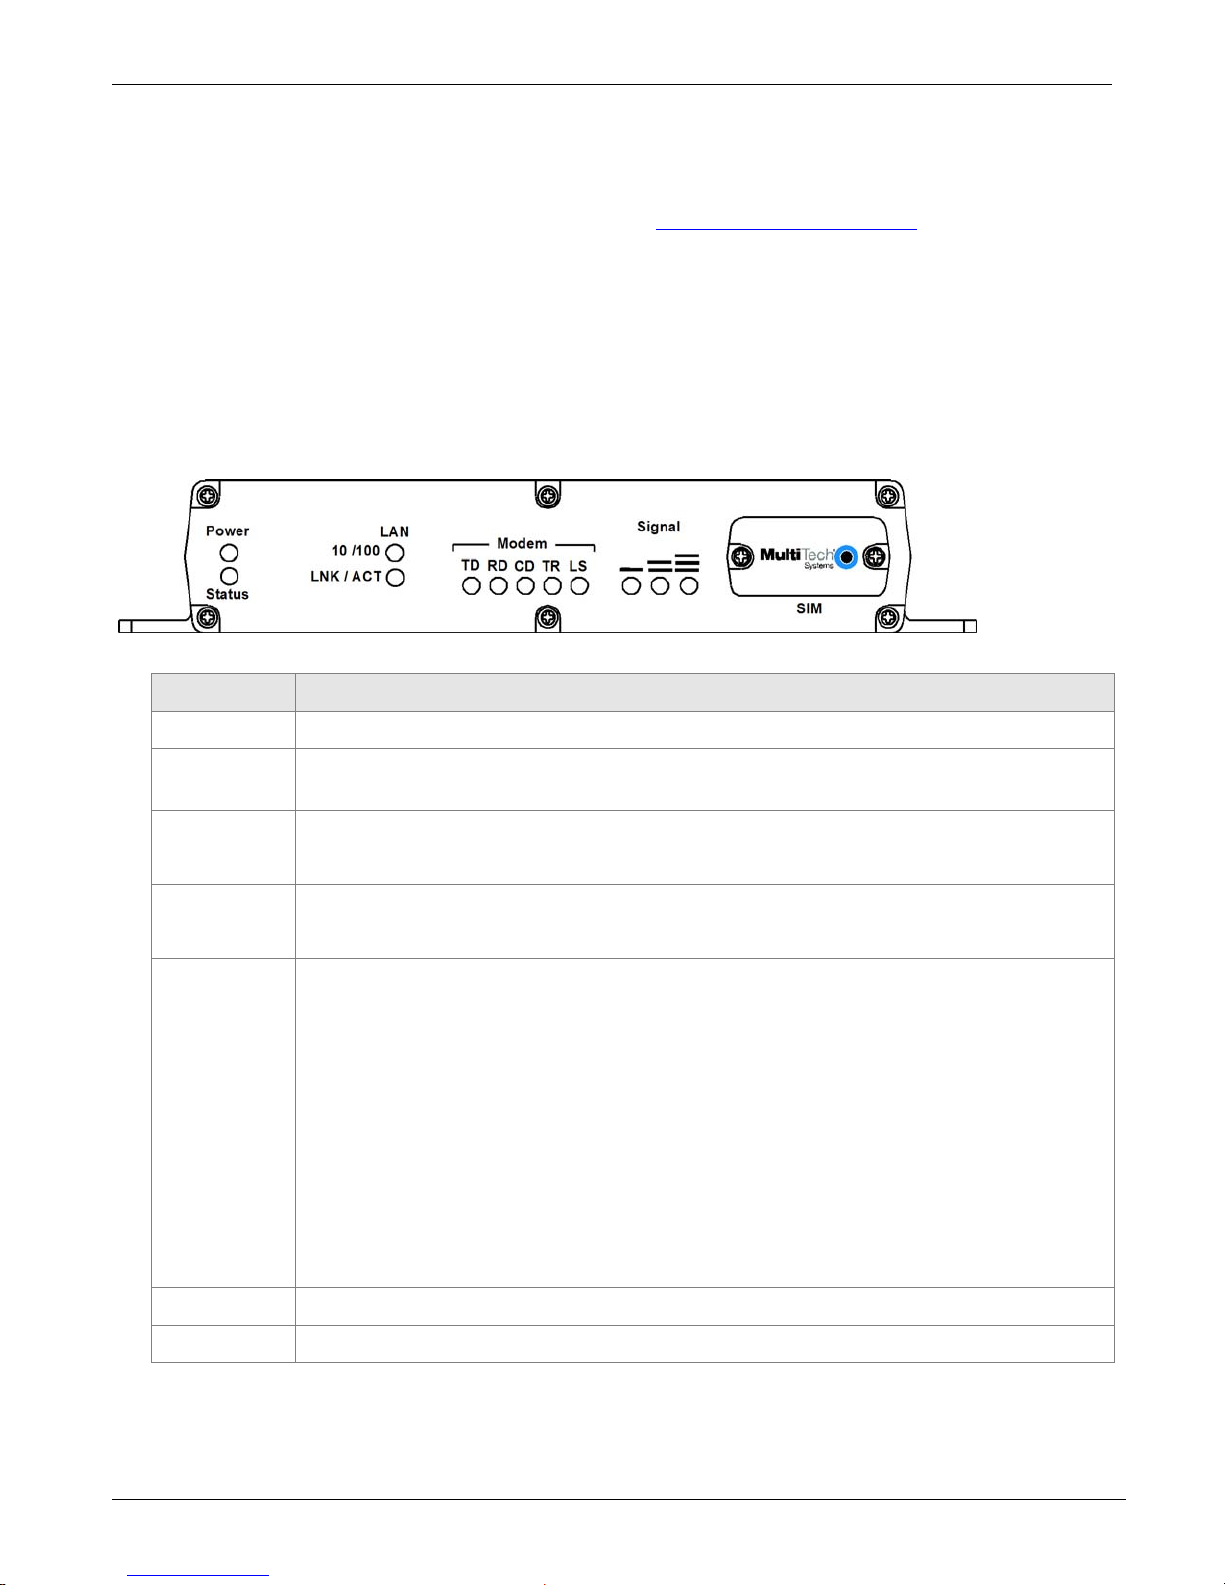
Front Panel of model SF100
Front Panel LEDs of Model SF100
LED Description
Power Lights when power is being supplied to the MultiModem iSMS.
Status When functioning normally, the LED blinks. The LED is a solid light when the unit is booting up,
saving the configuration, restarting, or updating the firmware.
LAN
10/100
LAN
LNK / ACT
Modem TD TRANSMIT DATA. This LED blinks when the modem is transmitting data to your wireless
Lights when a successful connection to the 100BaseT LAN is established. Off when connected at
10BaseT.
Lights when the LAN port has a valid Ethernet connection.
Blinks when it is receiving or transmitting data.
carrier.
RD RECEIVE DATA. This LED blinks when the modem is receiving data from your wireless
carrier.
CD CARRIER DETECT. This LED lights when the modem detects a valid carrier signal from a
wireless carrier.
TR (DATA) TERMINAL READY. This LED lights when the modem is trying to establish a
wireless connection.
LS LINK STATUS. This LED flashes once every 3 seconds when network registration is
successful. This LED is on constant if the network registration is invalid, if a network signal
is not detected or if a SIM card is not installed in the modem.
Signal Indicates the wireless signal strength. See the Signal Strength section in this chapter.
SIM Location of the SIM card.
MultiModem® iSMS Administrator’s Guide 8
Page 9
Chapter 1 – Product Overview and Safety Information
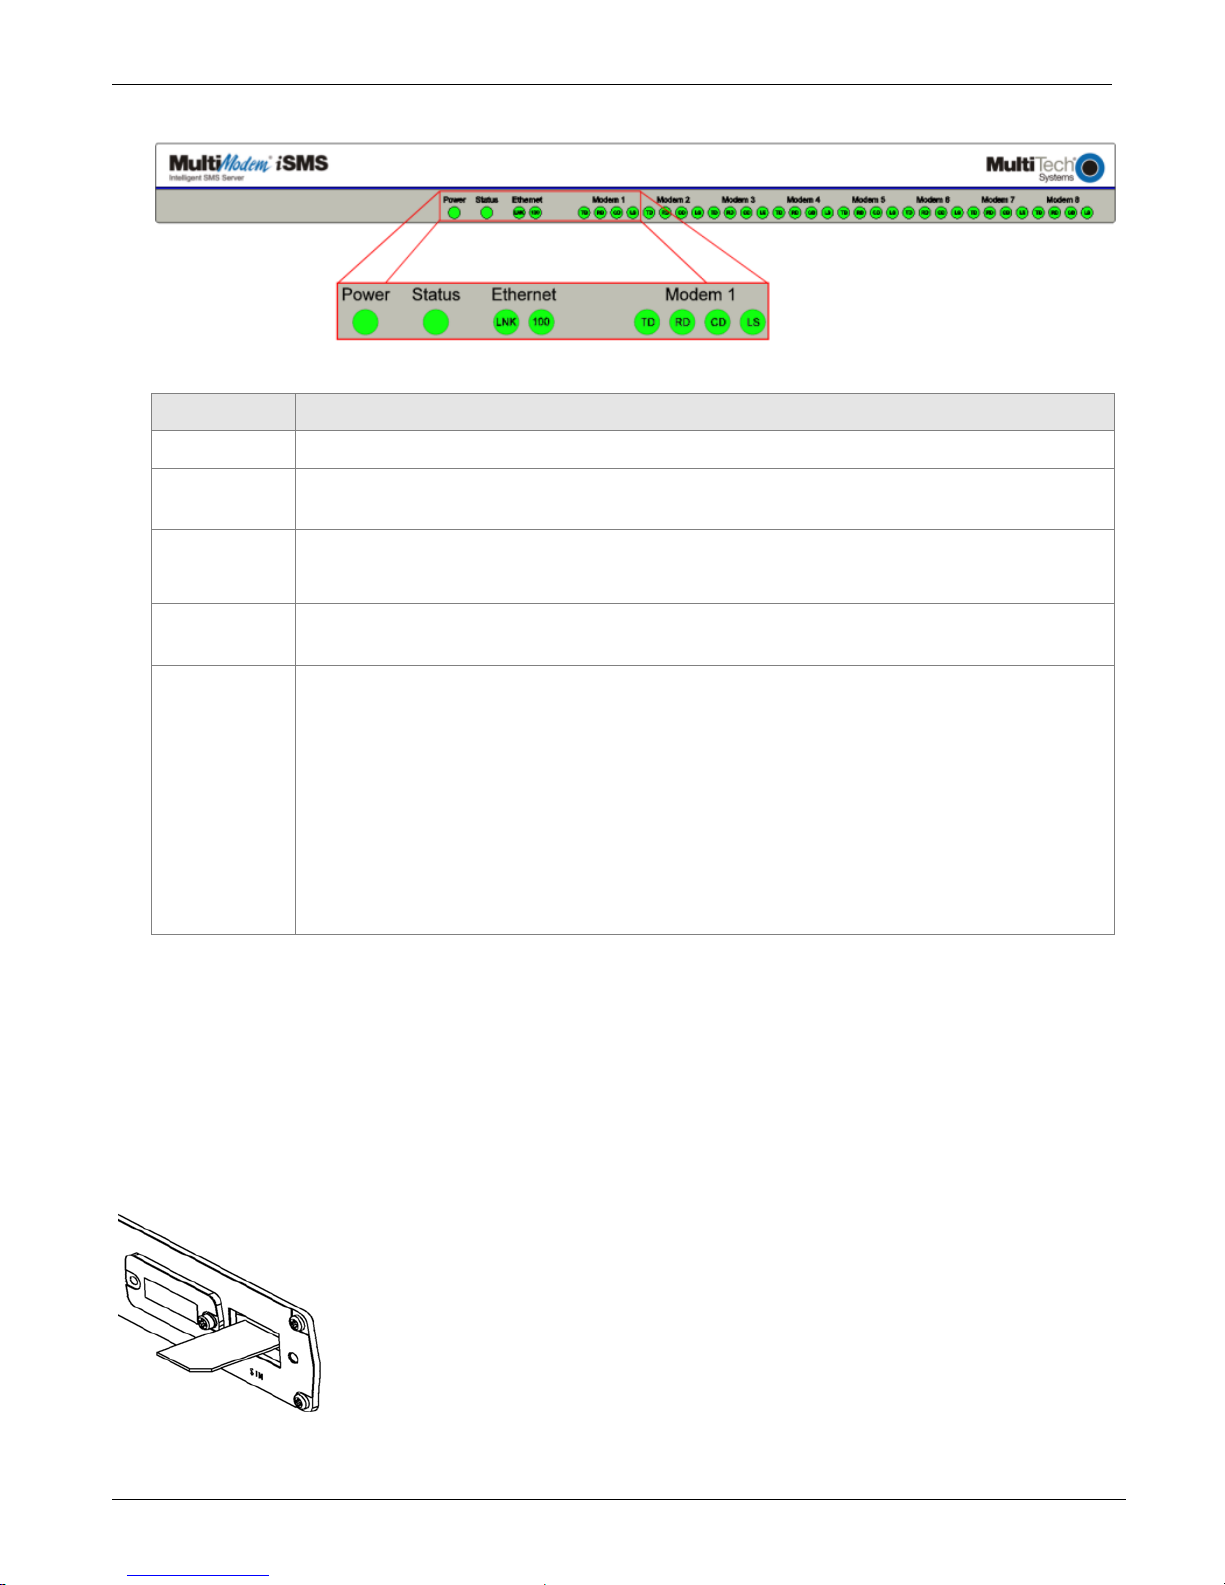
Front Panel of Models SF400 and SF800
Front Panel LEDs of Models SF400 and SF800
LED Description
Power Lights when power is being supplied to the MultiModem iSMS.
Status When functioning normally, the LED blinks. The LED is a solid light when the MultiModem iSMS is
booting up, saving the configuration, restarting, or updating the firmware.
Ethernet
100
Ethernet
LNK
Modem n TD TRANSMIT DATA. This LED blinks when the modem is transmitting data to your wireless
Lights when a successful connection to the 100BaseT LAN is established. Off when connected at
10BaseT.
Lights when the LAN port has a valid Ethernet connection.
Blinks when it is receiving or transmitting data.
carrier.
RD RECEIVE DATA. This LED blinks when the modem is receiving data from your wireless
carrier.
CD CARRIER DETECT. This LED lights when the modem detects a valid carrier signal from a
wireless carrier.
LS LINK STATUS. This LED flashes once every 3 seconds when network registration is
successful. This LED is on constant if the network registration is invalid, if a network signal
is not detected or if a SIM card is not installed in the modem.
Installing a SIM Card for Model SF100
A SIM (Subscriber Identity Module) card is required in order for the MultiModem iSMS to operate on a GPRS network. To
install the SIM card:
1. Remove power from the unit.
2. Use a small screwdriver to remove the screw closest to the outside edge of the MultiModem iSMS. Then swing the
SIM slot cover up and over to the left.
3. Insert the SIM card into the SIM card slot. The following graphic shows a partial front panel illustrating the correct
SIM card orientation.
4. Swing the cover back to its original placement and replace the screw.
5. Reattach the power supply.
9 MultiModem® iSMS Administrator’s Guide
Page 10
Chapter 1 – Product Overview and Safety Information
Installing a SIM Card for Models SF400 and SF800
SIM (Subscriber Identity Module) cards are required for the MultiModem iSMS to operate on a GPRS network. This
section describes how to install the SIM card.
Before You Begin
Perform the procedure that follows—removal of chassis cover—only at an ESD workstation using an antistatic wrist strap.
If such a station is not available, you can provide some ESD protection by wearing an antistatic wrist strap and attaching it
to a metal ground screw (lug) next to power switch of MultiModem iSMS chassis.
1. Power off the unit and unplug the power cord.
2. Do not remove protective power supply cover. Harmful voltages may be exposed if cover is removed, and can lead to
electrical shock and or death.
Electrostatic discharge (ESD) is the release of stored static electricity that can damage electrical circuitry or components
.
Static electricity is often stored in your body, and discharged when you contact an object of a different potential.
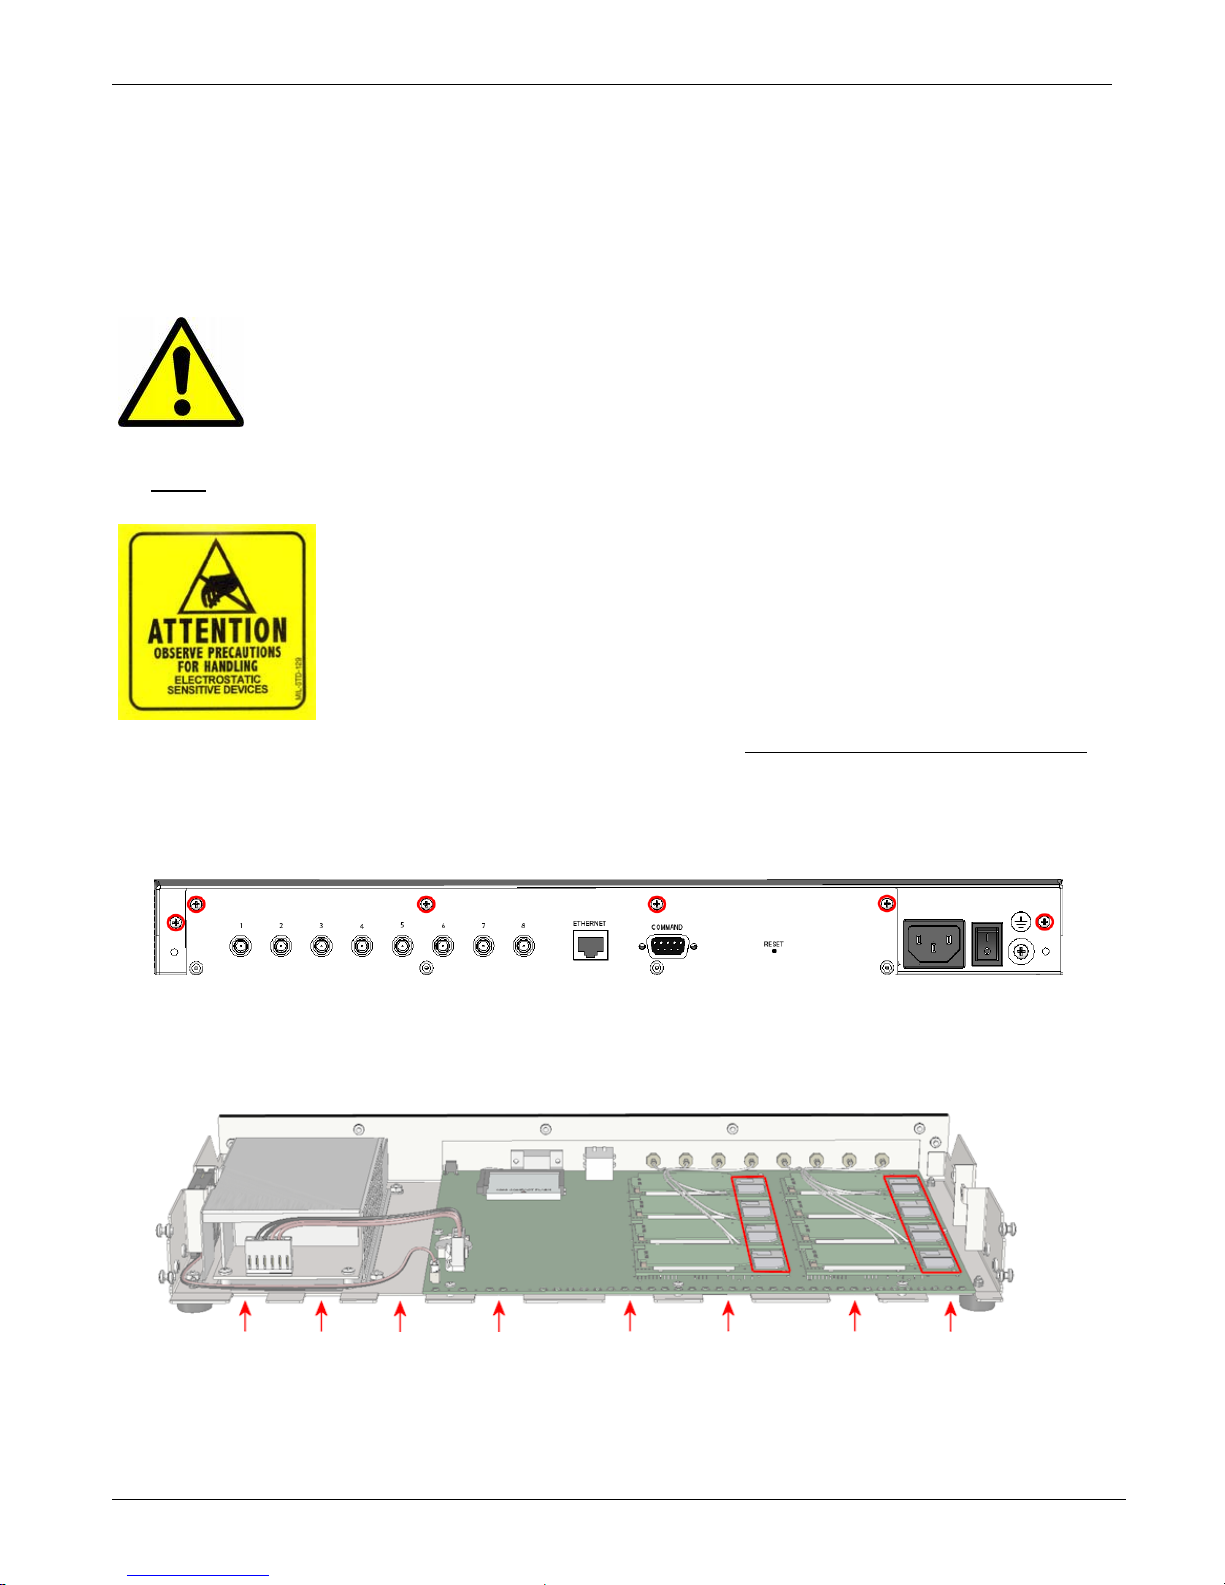
3. Use a small screwdriver to remove the six (6) screws on the back of the MultiModem iSMS. The figure that follows
uses red circles to indicate the location of these screws.
4. Lift the top cover from the back of the unit and then slide towards the front to remove.
5. Insert the SIM cards into the SIM card slots on the internal wireless modems. Each modem has a graphic line
depicting the correct SIM card orientation.
6. The figure that follows uses two red boxes to indicate the location of these receptacles. Note that the SF800 model is
used in the figure.
7. To re-attach the cover, tilt the cover up and align the “teeth” with the gaps between those on the bottom of the
chassis. The illustration uses red arrows to indicate the locations to align.
8. Rotate the cover down and push it toward the rear of the unit until it is flush.
9. Insert the six (6) screws back in to the unit and tighten.
MultiModem® iSMS Administrator’s Guide 10
Page 11
Chapter 1 – Product Overview and Safety Information
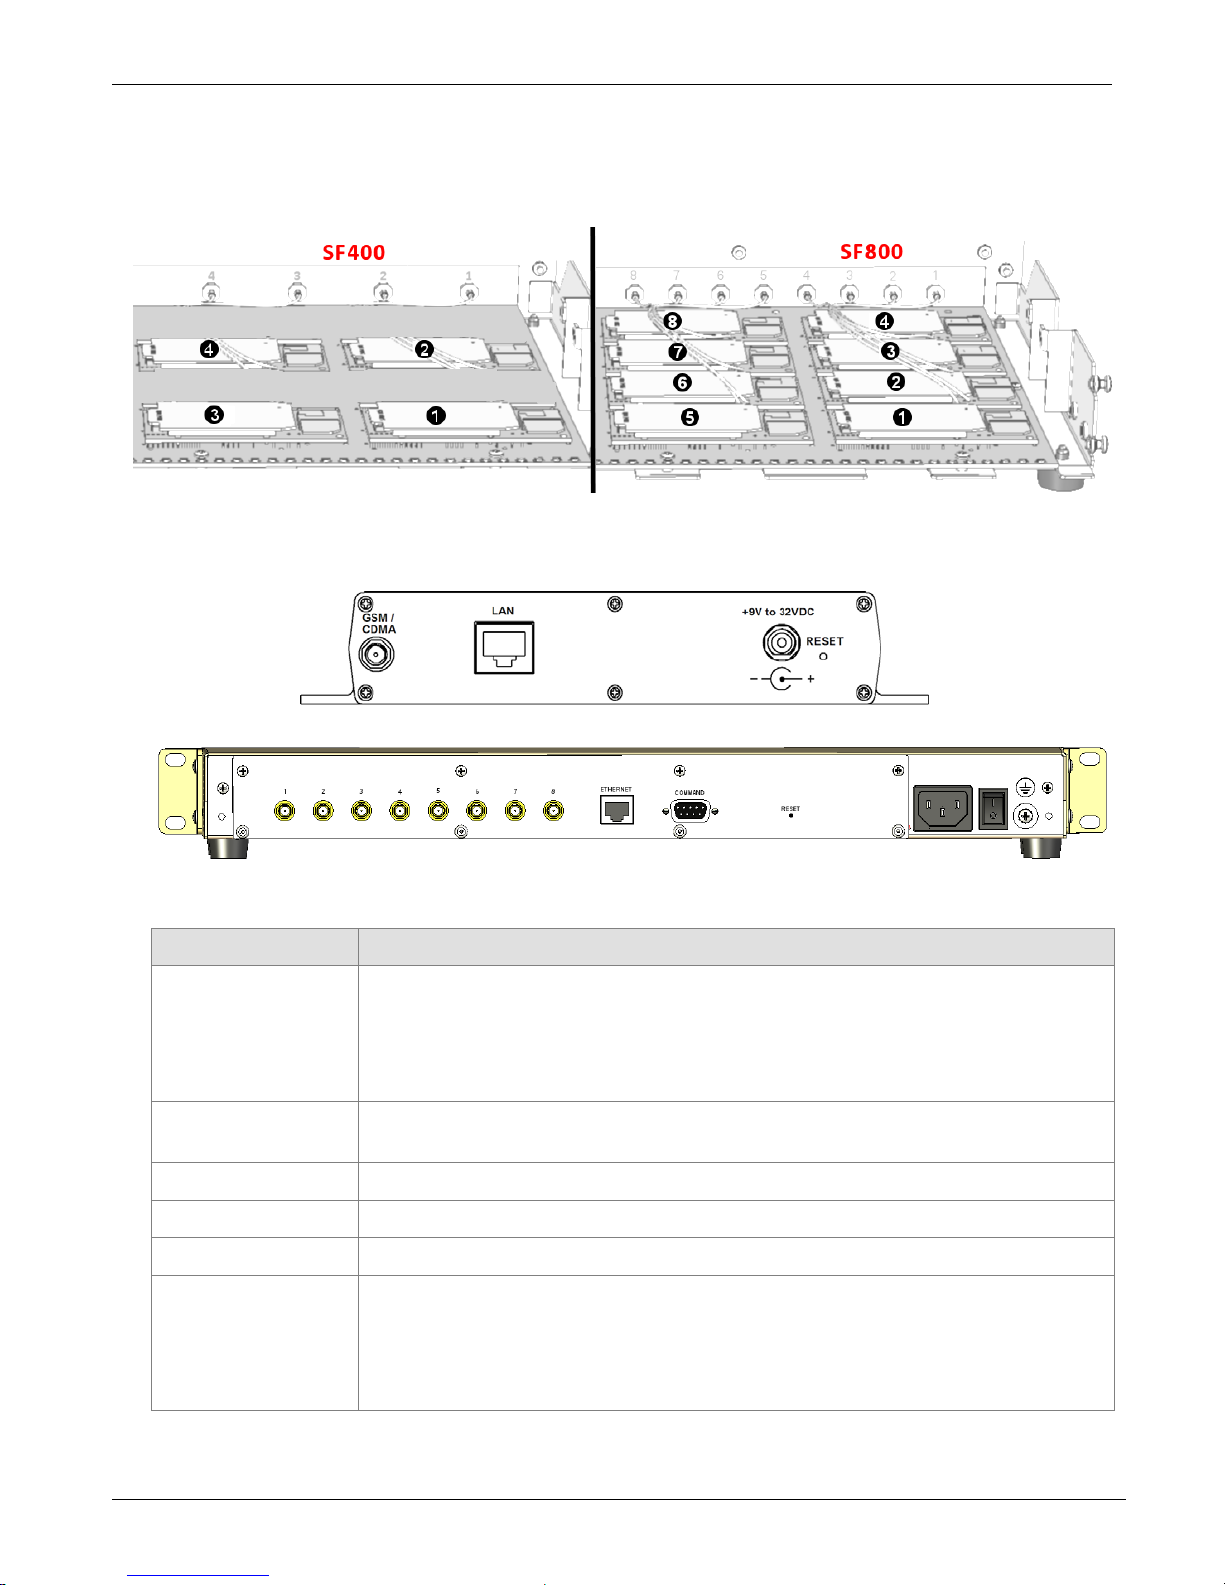
Modem Numbering
In the Web interface, the modem tabs correspond to internal modems and use the numbering scheme shown in the
illustration that follows. The row of LEDs shows where the front of the unit is. Disable unpopulated modems as described
in Network Setup.
Back Panels
SF100
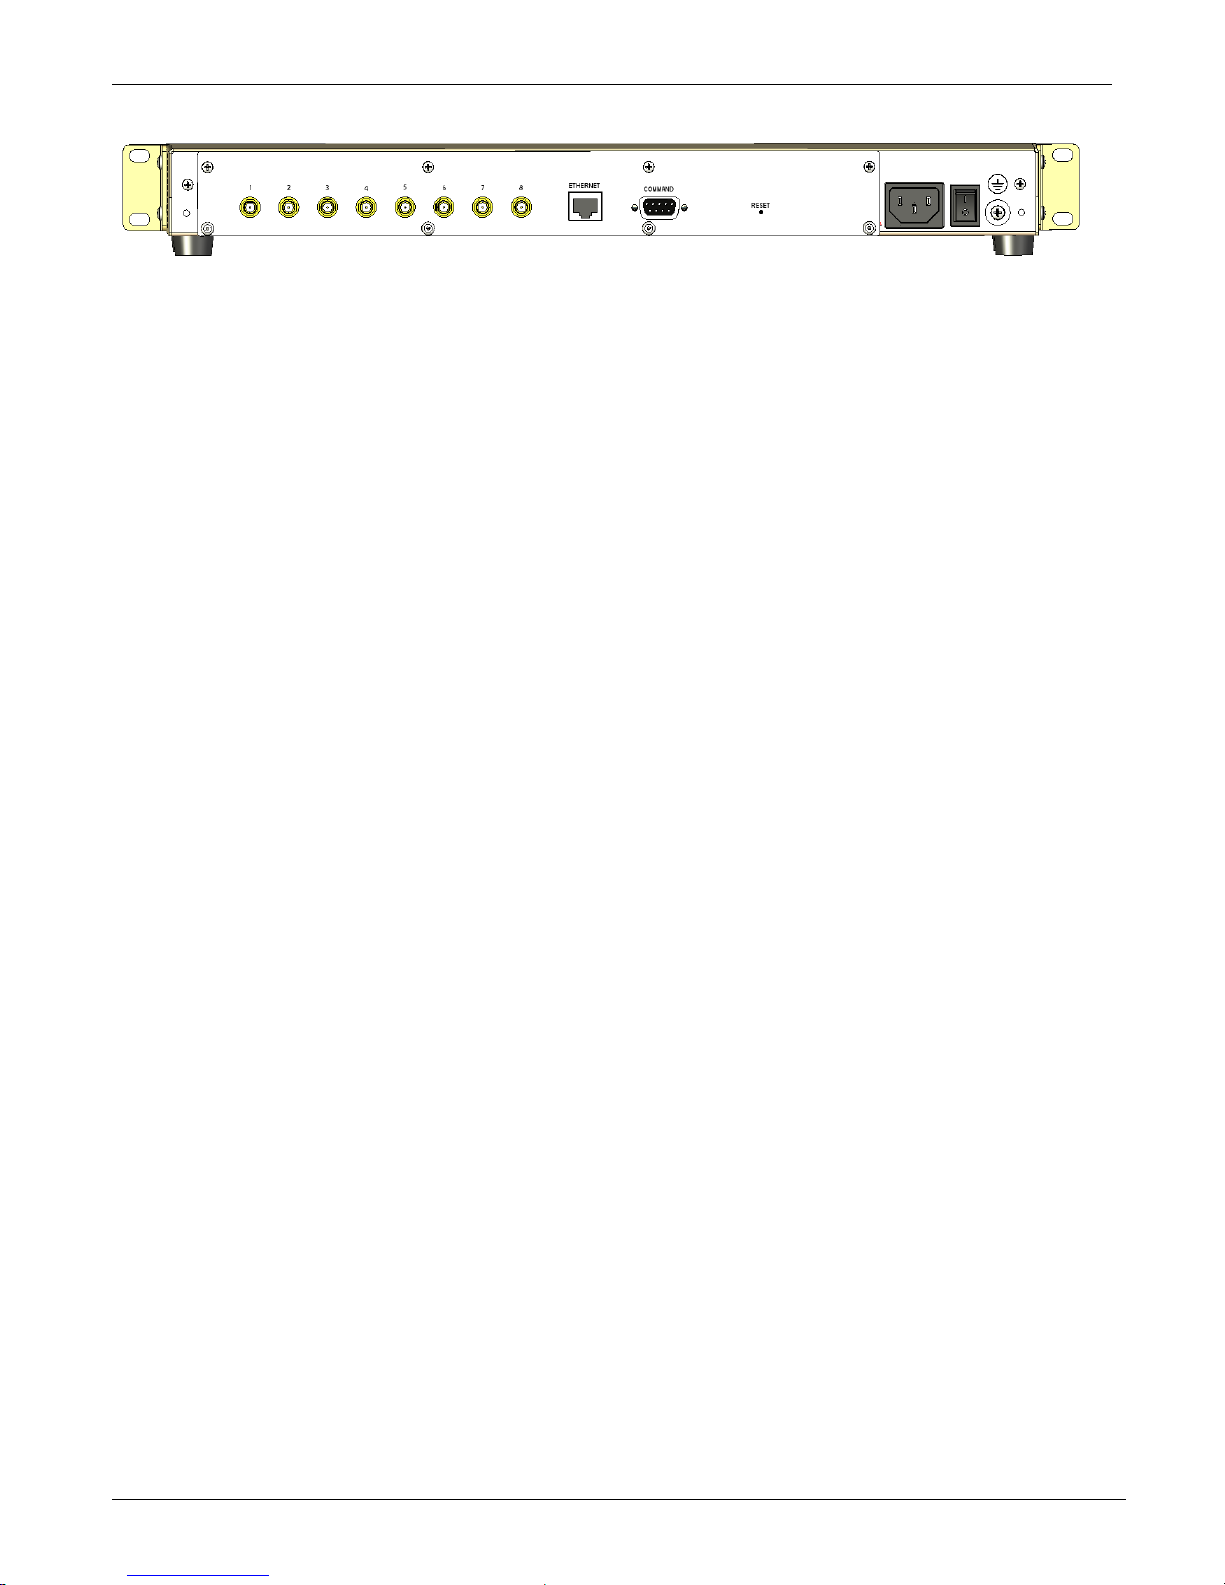
SF400/800
Back Panel Connectors
Connector Description
GSM Antenna
Connector (s):
1 for the SF100;
1 – 4 for the SF400;
1 – 8 for the SF800
Ethernet
(LAN for the SF100)
+9V to 32VDC [SF100 only] The SF100 power source can range from 9 volts to 32VDC.
Power Receptacle [SF400/800 only] Connection for standard power cord (provided).
COMMAND [SF400/800 only] A DE9 port for direct command access to the SF400/800.
SMA (female) antenna connector for a cellular antenna.
Note: One antenna must be attached for each internal modem in order for them to be
operational.
The LAN (SF100) / Ethernet (SF400/800) port connects the MultiModem iSMS to your
Ethernet network-connected PC.
Reset The Reset button resets the unit to factory settings, which includes deleting any existing
Address Book entries, SMS User account entries and any sent or received SMS history.
This Reset is the same as performing the MultiModem iSMS Factory Defaults option found
in the Administration menu. Press and hold the Reset button until the Status LED turns
off, and then release it. Do not press this button unless you want to restore all settings.
11 MultiModem® iSMS Administrator’s Guide
Page 12
Chapter 1 – Product Overview and Safety Information
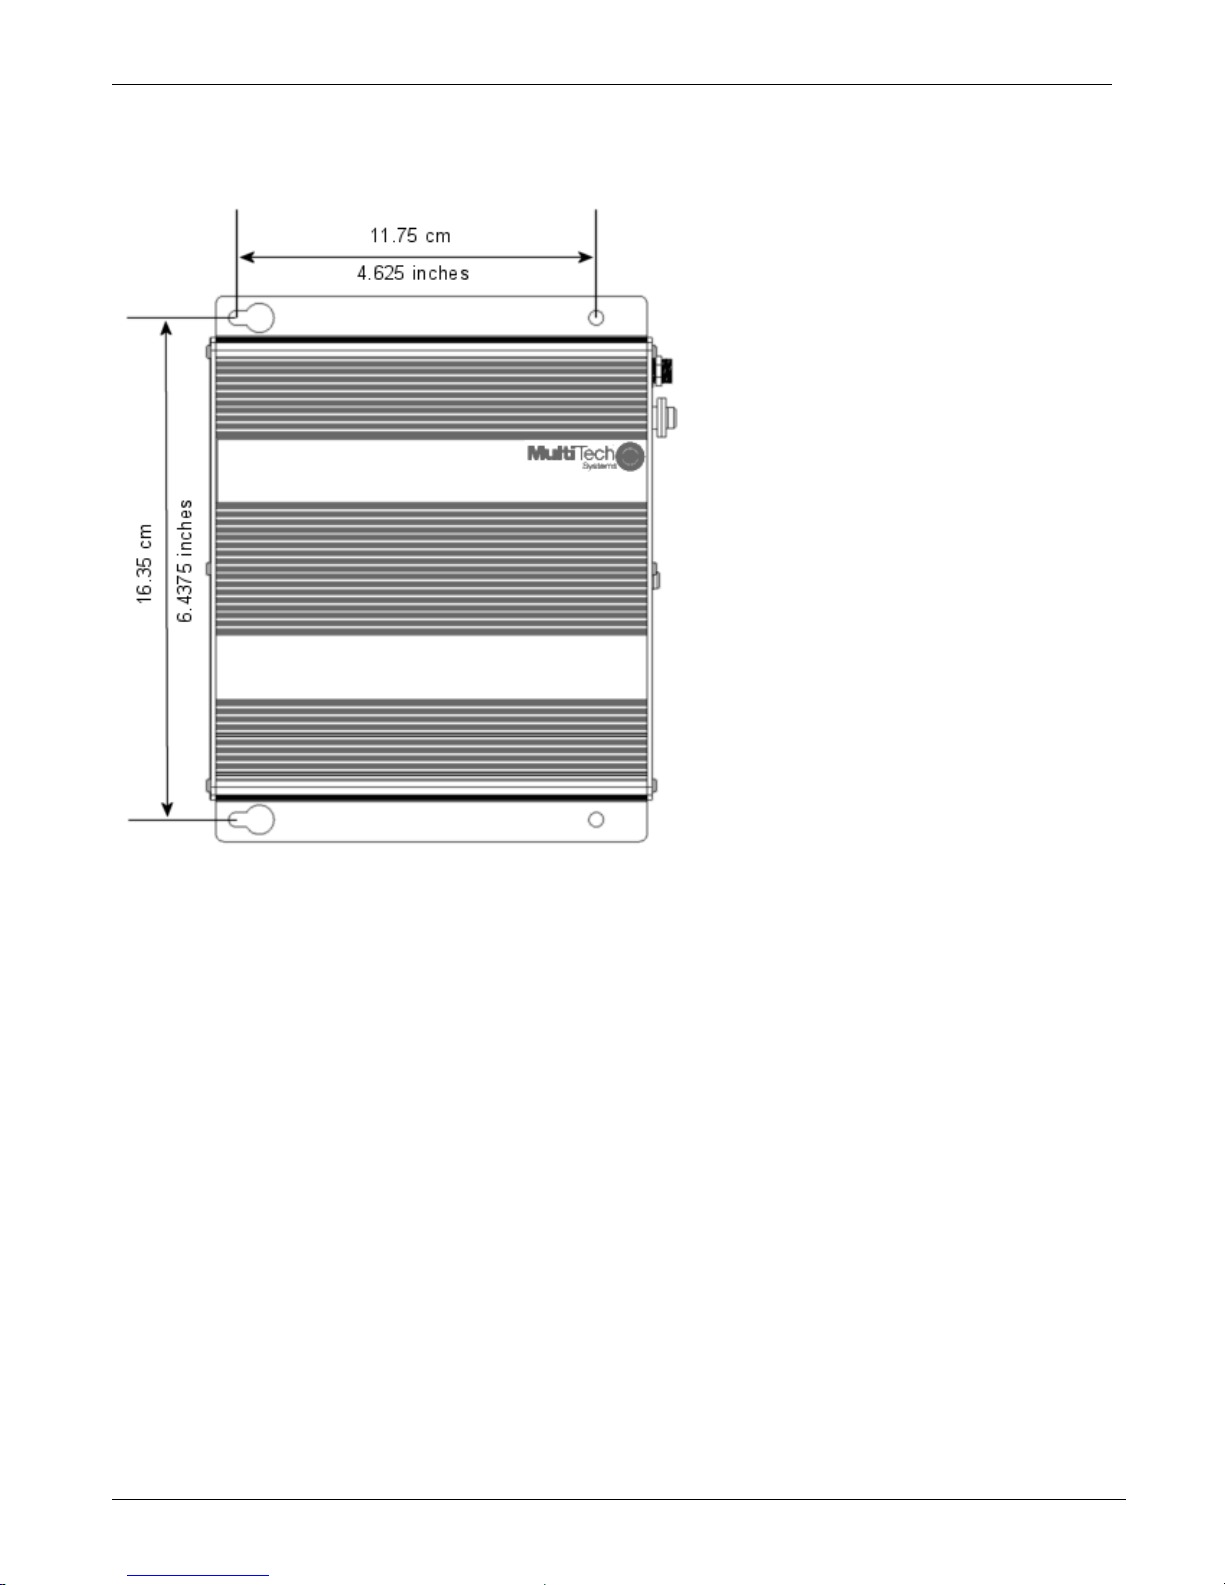
Panel Mounting (SF100)
You can mount the SF100 model using screws spaced according to the measurement shown in the illustration that
follows.
Note: Use either #6 or #8 pan head screws for all four mount locations.
MultiModem® iSMS Administrator’s Guide 12
Page 13
Chapter 1 – Product Overview and Safety Information
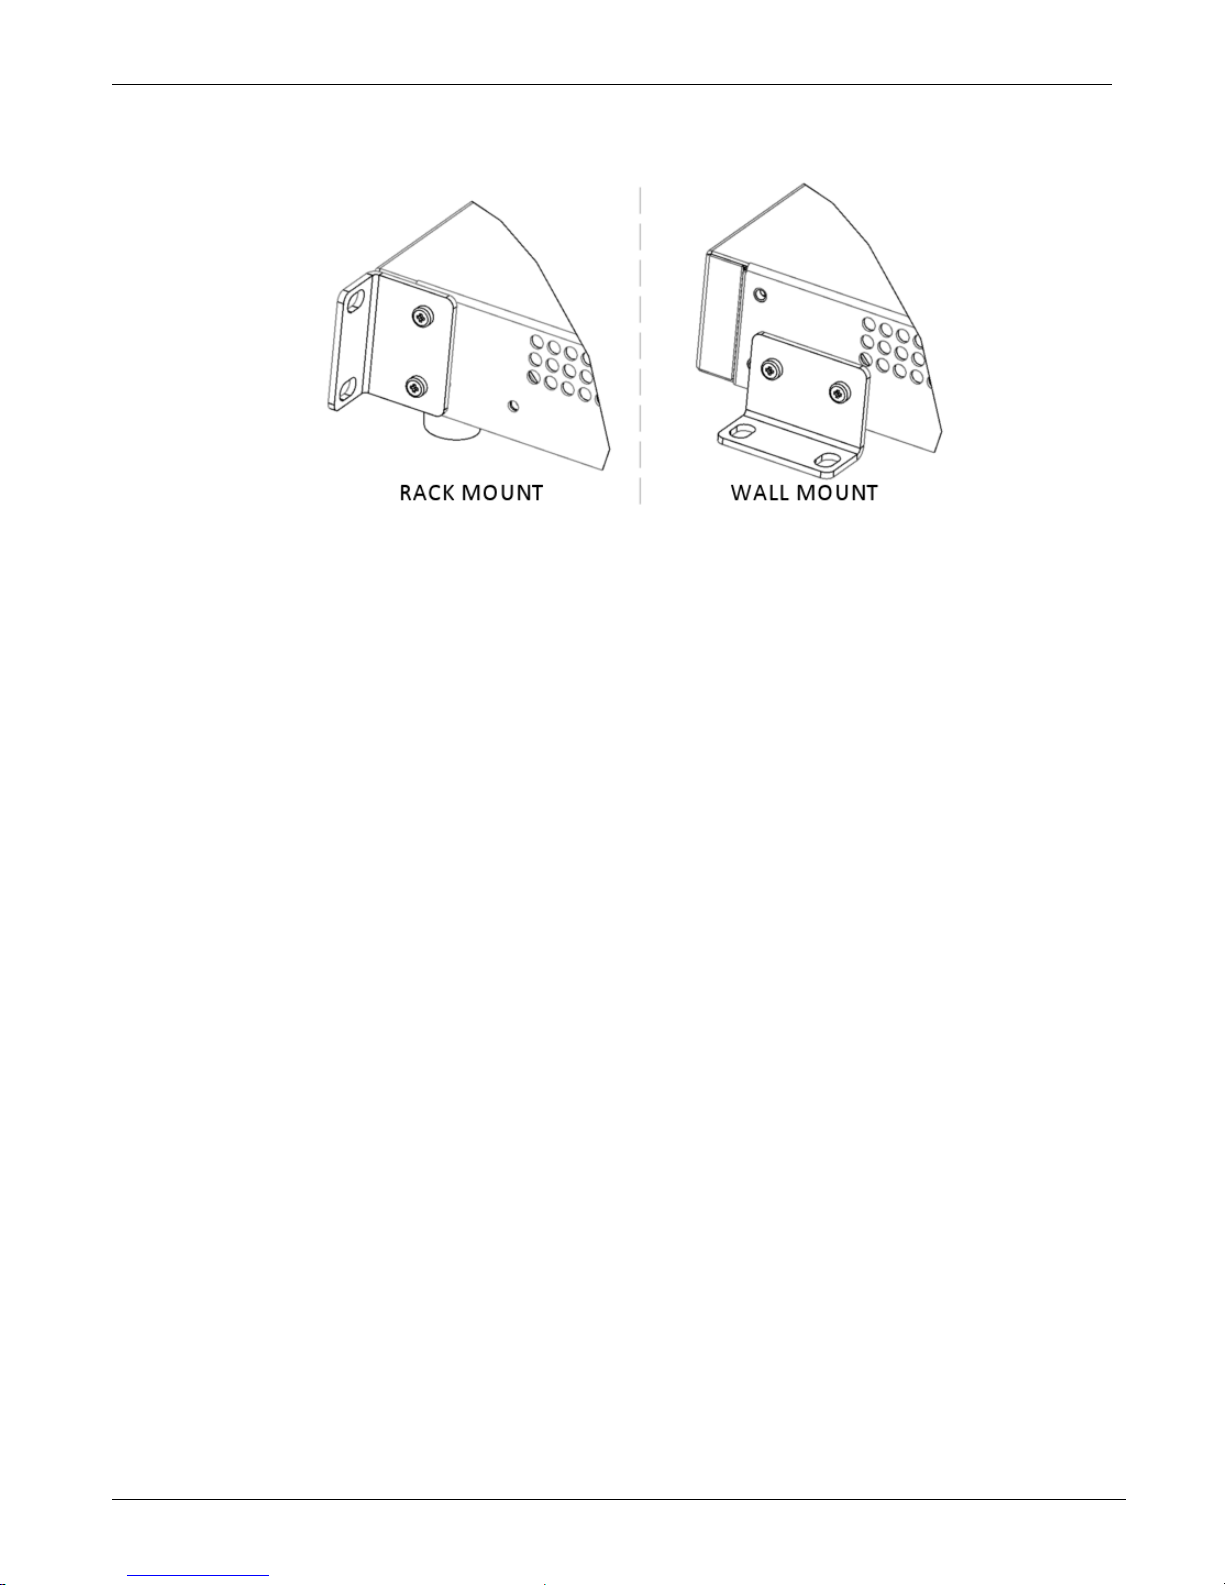
Rack or Wall Mounting (SF400/800)
The MultiModem SF400/800 units can be rack (or wall) mounted with screws using the mounting brackets.
Rack Mounting
Ensure proper installation of the unit in a closed or multi-unit enclosure by following the recommended installation as
defined by the enclosure manufacturer. Do not place the unit directly on top of other equipment or place other
equipment directly on top of the unit. If installing the unit in a closed or multi-unit enclosure, ensure adequate airflow
within the rack so that the maximum recommended ambient temperature (50° C) is not exceeded. Ensure that the unit is
properly connected to earth ground by verifying that it is reliably grounded when mounted within a rack. If a power strip
is used, ensure that the power strip provides adequate grounding of the attached apparatus.
When mounting the equipment in the rack, make sure mechanical loading is even to avoid a hazardous condition. The
rack used must safely support the combined weight of all the equipment it supports.
Ensure that the mains supply circuit is capable of handling the load of the equipment. See the power label on the
equipment for load requirements.
Ensure that only properly qualified service personnel install this equipment. Only connect like circuits - connect SELV
(Secondary Extra Low Voltage) circuits to SELV circuits and TN (Telecommunications Network) circuits to TN circuits.
Note: The ambient temperature of the rack interior must not exceed 50° Celsius.
19-Inch Rack Enclosure Mounting Procedure
Two people may need to work together to attach the MultiModem iSMS to the rail of an EIA 19-inch rack. These people
must attach the brackets to the MultiModem iSMS chassis with the screws provided, as shown in the figure above, and
then secure unit to rack rails by the brackets.
Because equipment racks vary, screws for rack-rail mounting are not provided. Follow the instructions of the rack
manufacturer and use screws that fit.
1. Position the right rack-mounting bracket on the MultiModem iSMS using the two vertical mounting screw holes.
2. Secure the bracket to the MultiModem iSMS using the two screws provided.
3. Position the left rack-mounting bracket on the MultiModem iSMS using the two vertical mounting screw holes.
4. Secure the bracket to the MultiModem iSMS using the two screws provided.
5. Remove feet (4) from the MultiModem iSMS unit.
6. Mount the MultiModem iSMS in the rack enclosure per the rack manufacture’s mounting procedure.
13 MultiModem® iSMS Administrator’s Guide
Page 14

Chapter 1 – Product Overview and Safety Information
Technical Specifications
Specifications SF100 SF400/800
Hardware Interfaces Network: 1 Ethernet 10/100BaseT
Network: 1 Ethernet 10/100BaseT
Wireless Modems 1 Quad Band GSM
850/900/1800/1900 MHz
Dimensions
Weight
Operating
Temperature
Humidity
Hardware
Connectors
Power* External power supply
6.4” w x 1.2” h x 6” d
(16.3 cm x 3.0 cm x 15.2 cm)
1.25 lbs.
(.56 kg)
+32o to +120o F (0o to +50oC)
Note: UL listed @ +40o C (limited by power supply)
20–90% non-condensing 20–90% non-condensing
SIM connector: Standard 3V
Antenna: RF 50 ohm SMA (female)
Network: RJ-45 (female)
Input: 100-240Vac, 0.5A 50-60 Hz
Output: 9VDC, 1.7A
Power consumption
Console: 1 serial RS-232
4 or 8 Quad Band GSM
850/900/1800/1900 MHz
17.4” w x 1.75” h x 8.5” d
(44.2 cm x 4.5 cm x 21.6 cm)
SF400: 7.75 lbs. (3.52 kg)
SF800: 8.00 lbs. (3.64 kg)
+32o to +120o F (0o to +50o C)
SIM connector: Standard 3V
Antenna: RF 50 ohm SMA (female)
Network: RJ-45 (female)
Console: DE9 (female)
Power supply – (universal input)
Input: 100-240Vac, 1.8 – 1.0 A 50/60 Hz
SF400 / SF800:
Input 120Vac Typical Maximum
Certifications and
Approvals
Maximum consumption is 0.95A at 9V
Input 9v Typical Maximum Peak
Current (A) 0.564 0.712 1.600
Watts 5.0 6.2
Input 20v Typical Maximum Peak
Current (A) 0.276 0.330 0.700
Watts 5.5 6.6
Input 32v Typical Maximum Peak
Current (A) 0.191 0.225 0.625
Watts 6.1 7.2
CE Mark; R&TTE
EMC compliance:
FCC Part 15 Class A; EN 55022 Class A;
EN 55024; ACIF S042.1; ACIF S042.3
Radio compliance:
FCC Part 22, 24
EN 301 489-1; EN 301489-7;
EN 301 511
Current (Amps) 0.078/0.126 0.105/0.150
Watts 9.20/15.04 12.44/17.94
Input 220Vac Typical Maximum
Current (Amps) 0.068/0.124 0.085/0.140
Watts 14.96/27.30 18.73/30.84
CE Mark; R&TTE
EMC compliance:
FCC Part 15 Class A; EN 55022 Class A;
EN 55024; ACIF S042.1; ACIF S042.3
Radio compliance:
FCC Part 22, 24
EN 301 489-1; EN 301489-7;
EN 301 511
RSS 132, 133, 102
MultiModem® iSMS Administrator’s Guide 14
RSS 132, 133, 102
Page 15

Chapter 1 – Product Overview and Safety Information
Specifications SF100 SF400/800
Safety:
Safety:
cUL 60950-1; UL 60950-1;
IEC 60950-1; AS/NZS 60950
Network compliance:
PTCRB, GCF
cUL 60950-1; UL 60950-1;
IEC 60950-1; AS/NZS 60950
Network compliance:
PTCRB, GCF
Warranty 2 years 2 years
* Multi-Tech Systems, Inc. recommends that you incorporate a 10% buffer into your power source when determining
product load.
15 MultiModem® iSMS Administrator’s Guide
Page 16

Chapter 2 – Setting up and using the
iSMS
Setting Up Your MultiModem iSMS
New MultiModem iSMS units are preconfigured with an IP address of 192.168.2.1 and a 24 bit subnet mask
(255.255.255.000).
Before connecting your new MultiModem iSMS to your network and powering it up, identify the existing IP network
numbering scheme of the target network. If the target network already implements a 192.168.2.xxx class C network, the
unit's host IP address of 192.168.2.1 may conflict with an existing computer or device on the network. Additionally,
advanced network configurations may block IP packets not of the current scheme. For example, if the current network
configuration is 10.1.x.x/16, any IP packets not of this subnet are blocked.
If either is the case, temporarily isolate a workstation and the new MultiModem iSMS from the target network. Connect
the Ethernet interface of the workstation directly to the Ethernet interface of the MultiModem iSMS. After configuring
the MultiModem iSMS with appropriate IP network parameters (IP address, subnet mask, default gateway and DNS), you
can connect the MultiModem iSMS to the target network.
Note: Be sure to perform a "Save to Flash" before powering off the unit, if you are physically moving the unit to a new
location.
The MultiModem iSMS LAN connection is a full duplex, auto negotiating 10/100 MHz, auto polarity sensing Ethernet
interface. You can use a traditional straight through RJ-45 Ethernet cable or a cross-over RJ-45 Ethernet cable when
connecting to an Ethernet port on a hub or switch or when connecting directly to the Ethernet interface of a workstation.
The LAN connection of the MultiModem iSMS does not
need to be disabled on the equipment/port that the MultiModem iSMS is connected to.
You must cable and then configure your device:
● Basic cabling and TCP/IP directions are included in this chapter.
● Chapter 3 describes basic configurations.
● Chapter 4 describes advanced configurations.
support POE (Power over Ethernet) or 1GHz. These features may
MultiModem® iSMS Administrator’s Guide 16
Page 17
Chapter 2 – Getting Started
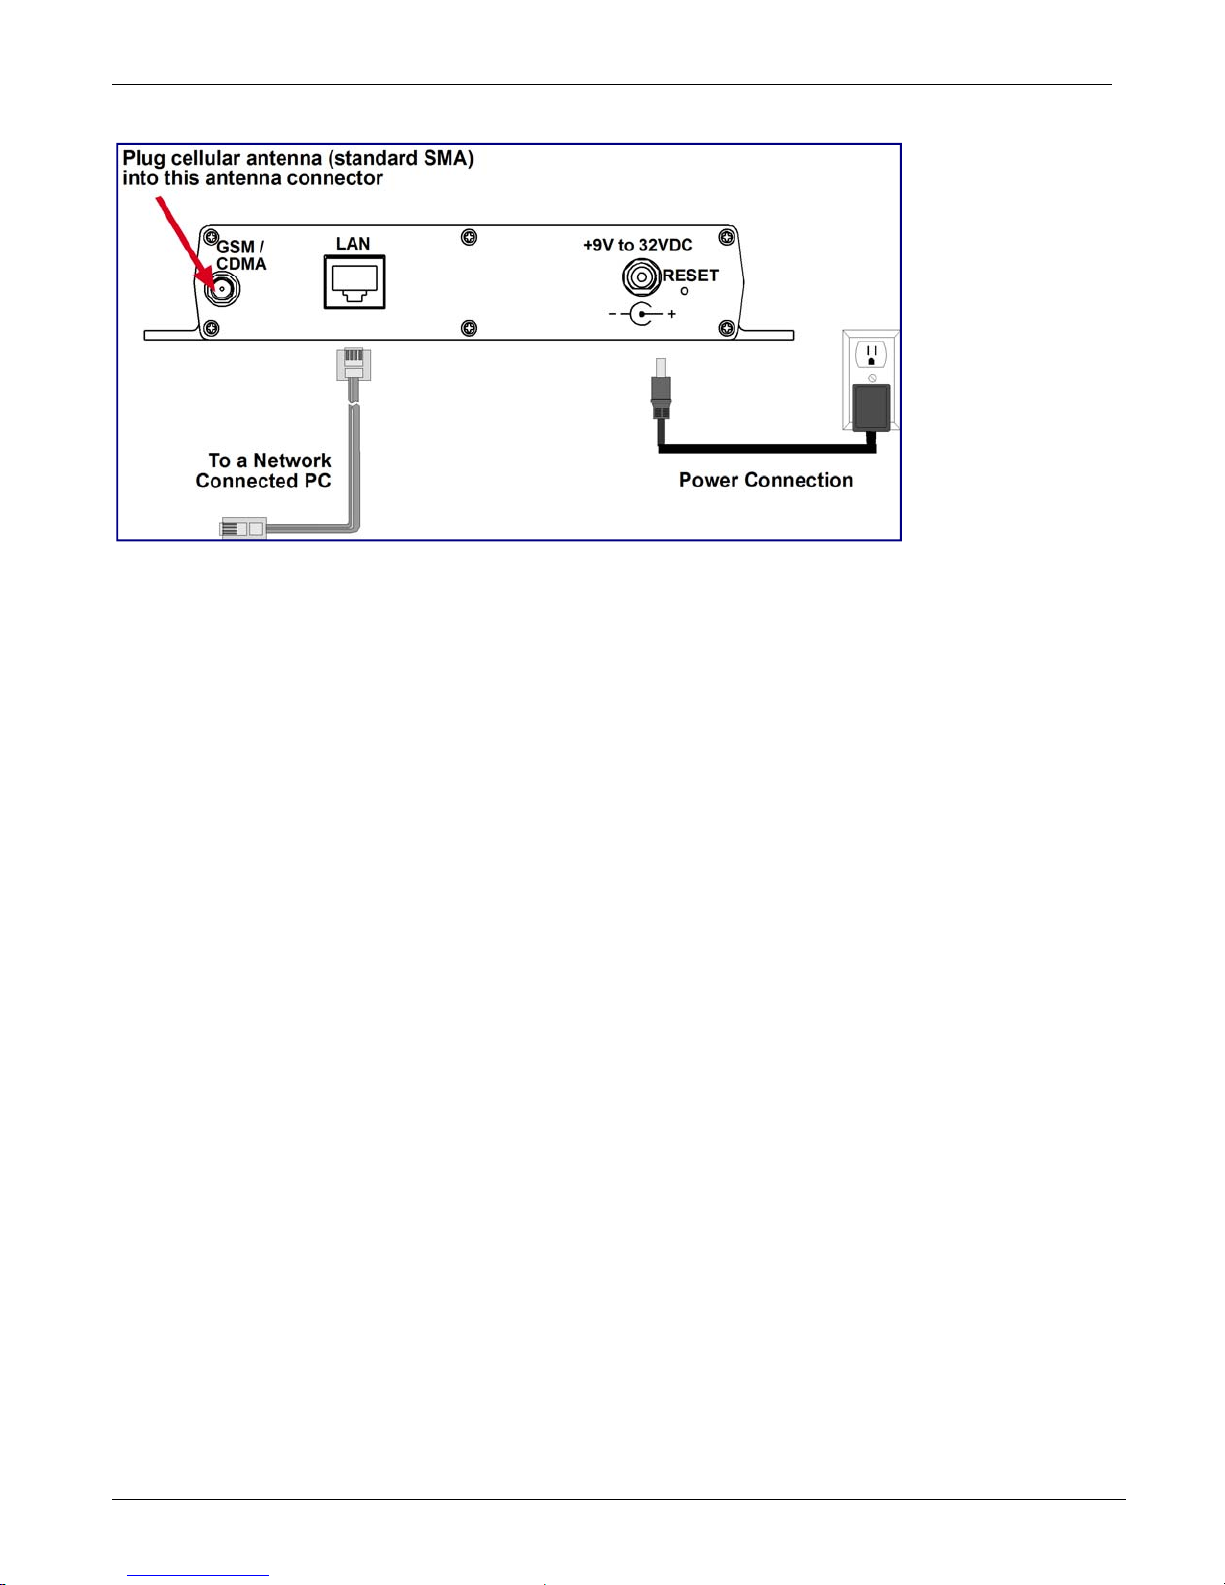
SF100 Cabling
1. Plug one end of a RJ-45 cable into the LAN port on the MultiModem iSMS and the other end into your network or
workstation interface.
2. Attach the cellular antenna.
3. Connect the provided power supply cable to the 9 volt power port on the back of the MultiModem iSMS, and plug
the other end into an AC power outlet.
About 30 seconds after you apply power, the unit’s front panel Status and LAN LEDs report normally. For more
information about the LEDs, see Chapter 1.
Antenna Notes:
● Be sure to locate this appliance where there is wireless coverage.
● The antenna must be attached for the MultiModem iSMS to operate.
● Maintain a separation distance of at least 20 cm (8 inches) between the transmitter’s antennas and the body of the
user or nearby persons. The product is not designed for, nor intended to be, used in applications within 20 cm (8
inches) of the body of the user.
17 MultiModem® iSMS Administrator’s Guide
Page 18
Chapter 2 – Getting Started
SF400/800 Cabling
1. Plug one end of a RJ-45 cable into the LAN port on the MultiModem iSMS and the other end into your network or
workstation interface.
2. Attach the cellular antennas.
3. Connect the provided power supply cable to the 9 volt power port on the back of the MultiModem iSMS, and plug
the other end into an AC power outlet. The unit’s front panel Status and LAN LEDs report normally approximately 30
seconds after power is applied. Refer to Chapter 1, Front Panel LEDs.
Antenna Notes:
● Be sure to locate this appliance where there is wireless coverage.
● The antenna must be attached in order for the MultiModem iSMS to be operational.
● Maintain a separation distance of at least 20 cm (8 inches) between the transmitter’s antennas and the body of the
user or nearby persons. The product is not designed for, nor intended to be, used in applications within 20 cm (8
inches) of the body of the user.
MultiModem® iSMS Administrator’s Guide 18
Page 19
Chapter 2 – Getting Started
Establishing TCP/IP Communication
Use an IP enabled workstation with an Internet browser to setup and manage the MultiModem iSMS.
Your workstation needs to be configured with a 192.168.2.x IP address and subnet mask of 255.255.255.000, to be able to
communicate with a new (or factory defaulted) MultiModem iSMS (where x is not the number 0, 1, or 255, nor any other
host number that may already be in use by another computer or device on the 192.168.2.x subnet).
Note: When configuring your workstation with a 192.168.2.x IP address (either as an alias address or as the primary fixed
address) and when the workstation is not separated by a router or firewall from the MultiModem iSMS (that is, the units
are on the same local network), the workstation does not need to be configured with a default gateway address (default
route).
This section describes how to setup a Windows XP workstation so it can communicate with the MultiModem iSMS.
Setting a Fixed IP Address
1. Make the MultiModem iSMS connections.
2. From the Start menu, select Settings then Control Panel.
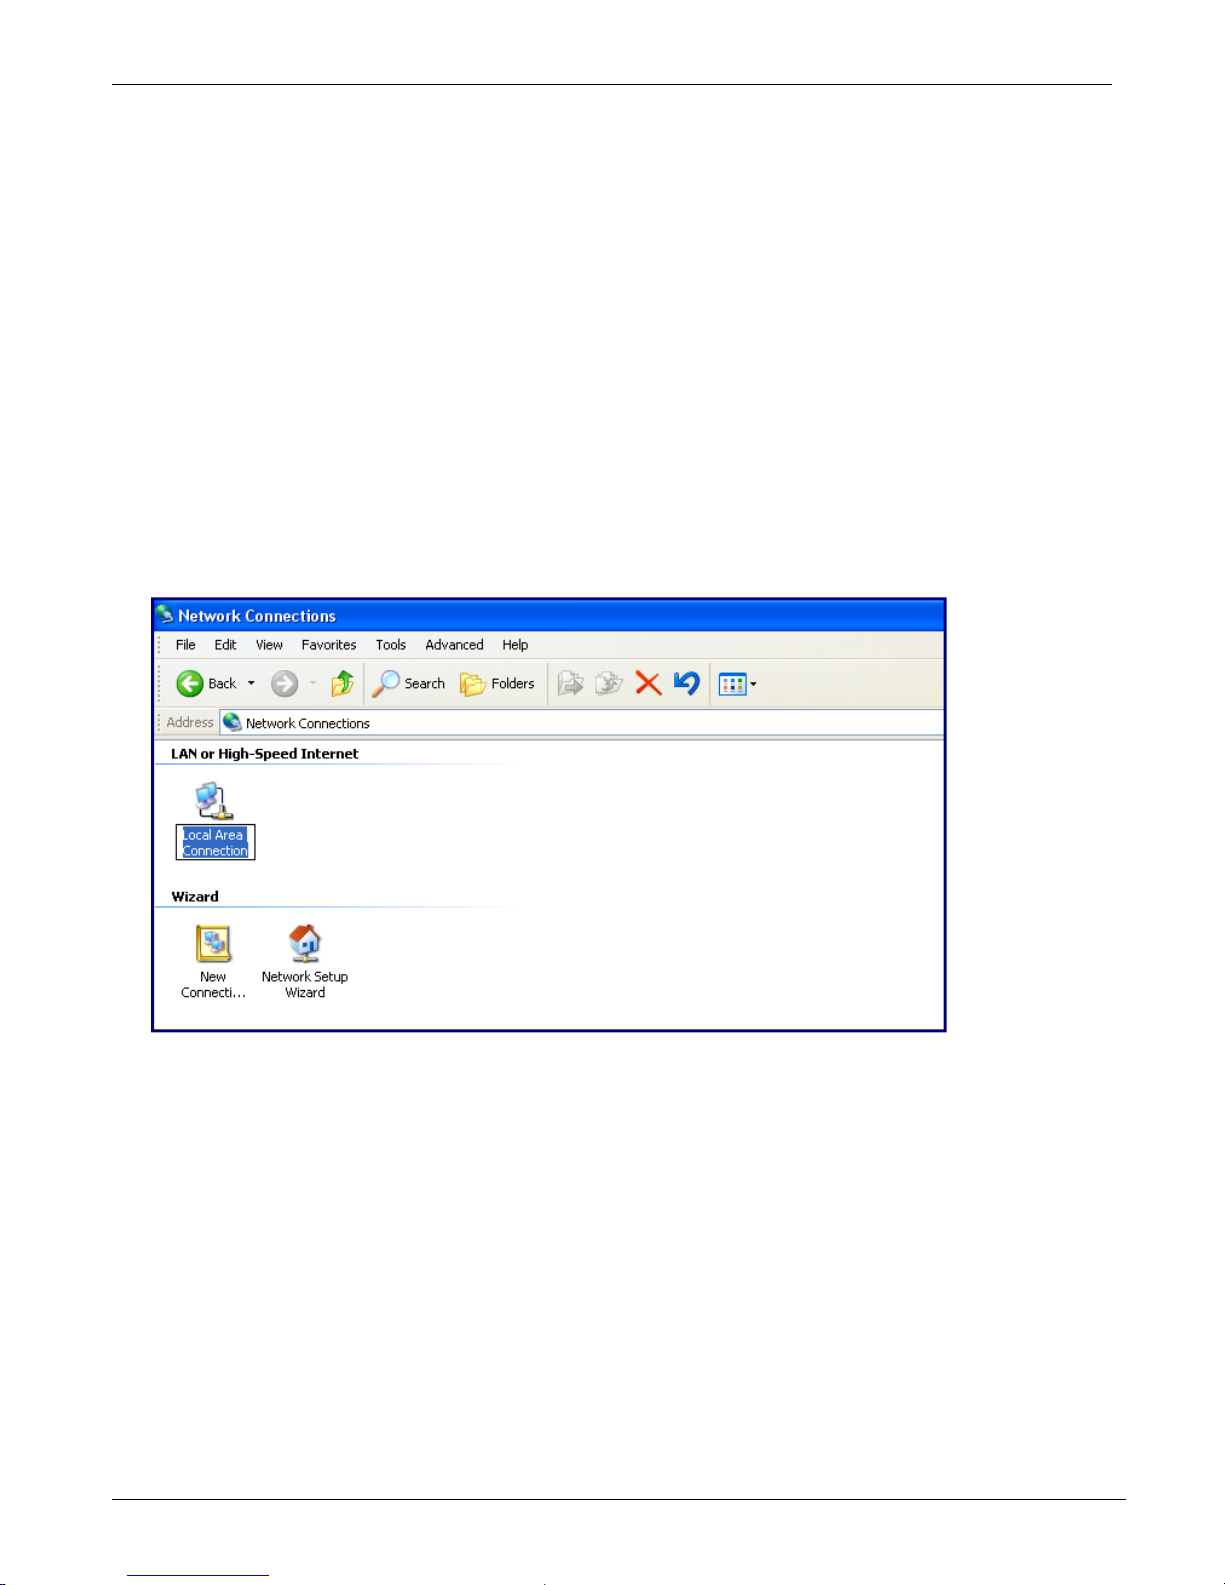
3. In the control panel, double-click Network Connections. The Network Connections window opens.
4. Right click the Local Area Connection icon and select Properties from the drop down list.
19 MultiModem® iSMS Administrator’s Guide
Page 20
Chapter 2 – Getting Started
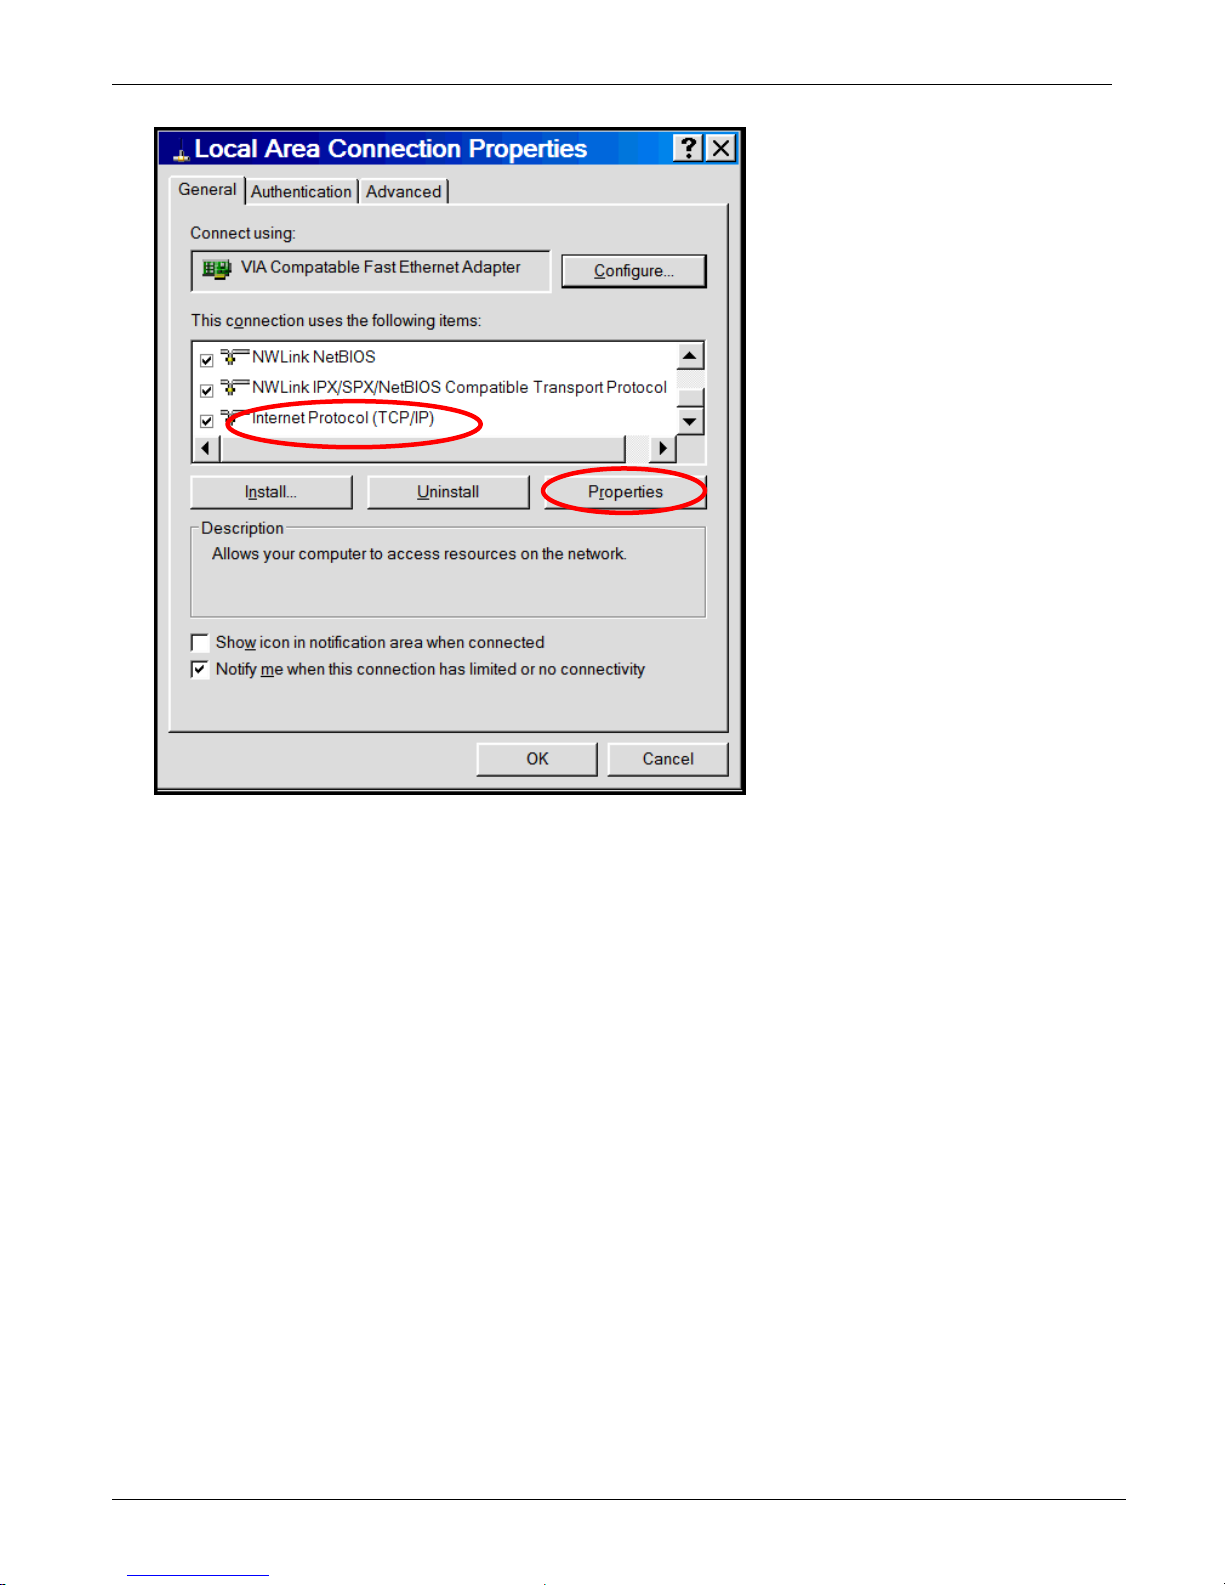
5. The Local Area Connection Properties dialog box opens.
6. Select Internet Protocol (TCP/IP).
7. Click Properties. The Internet Protocol (TCP/IP) Properties dialog box opens.
MultiModem® iSMS Administrator’s Guide 20
Page 21
Chapter 2 – Getting Started
Note: If this window opens and displays your current IP configuration, record this information. This information can help
you restore the workstation’s original settings after you finish configuring the MultiModem iSMS is configured.
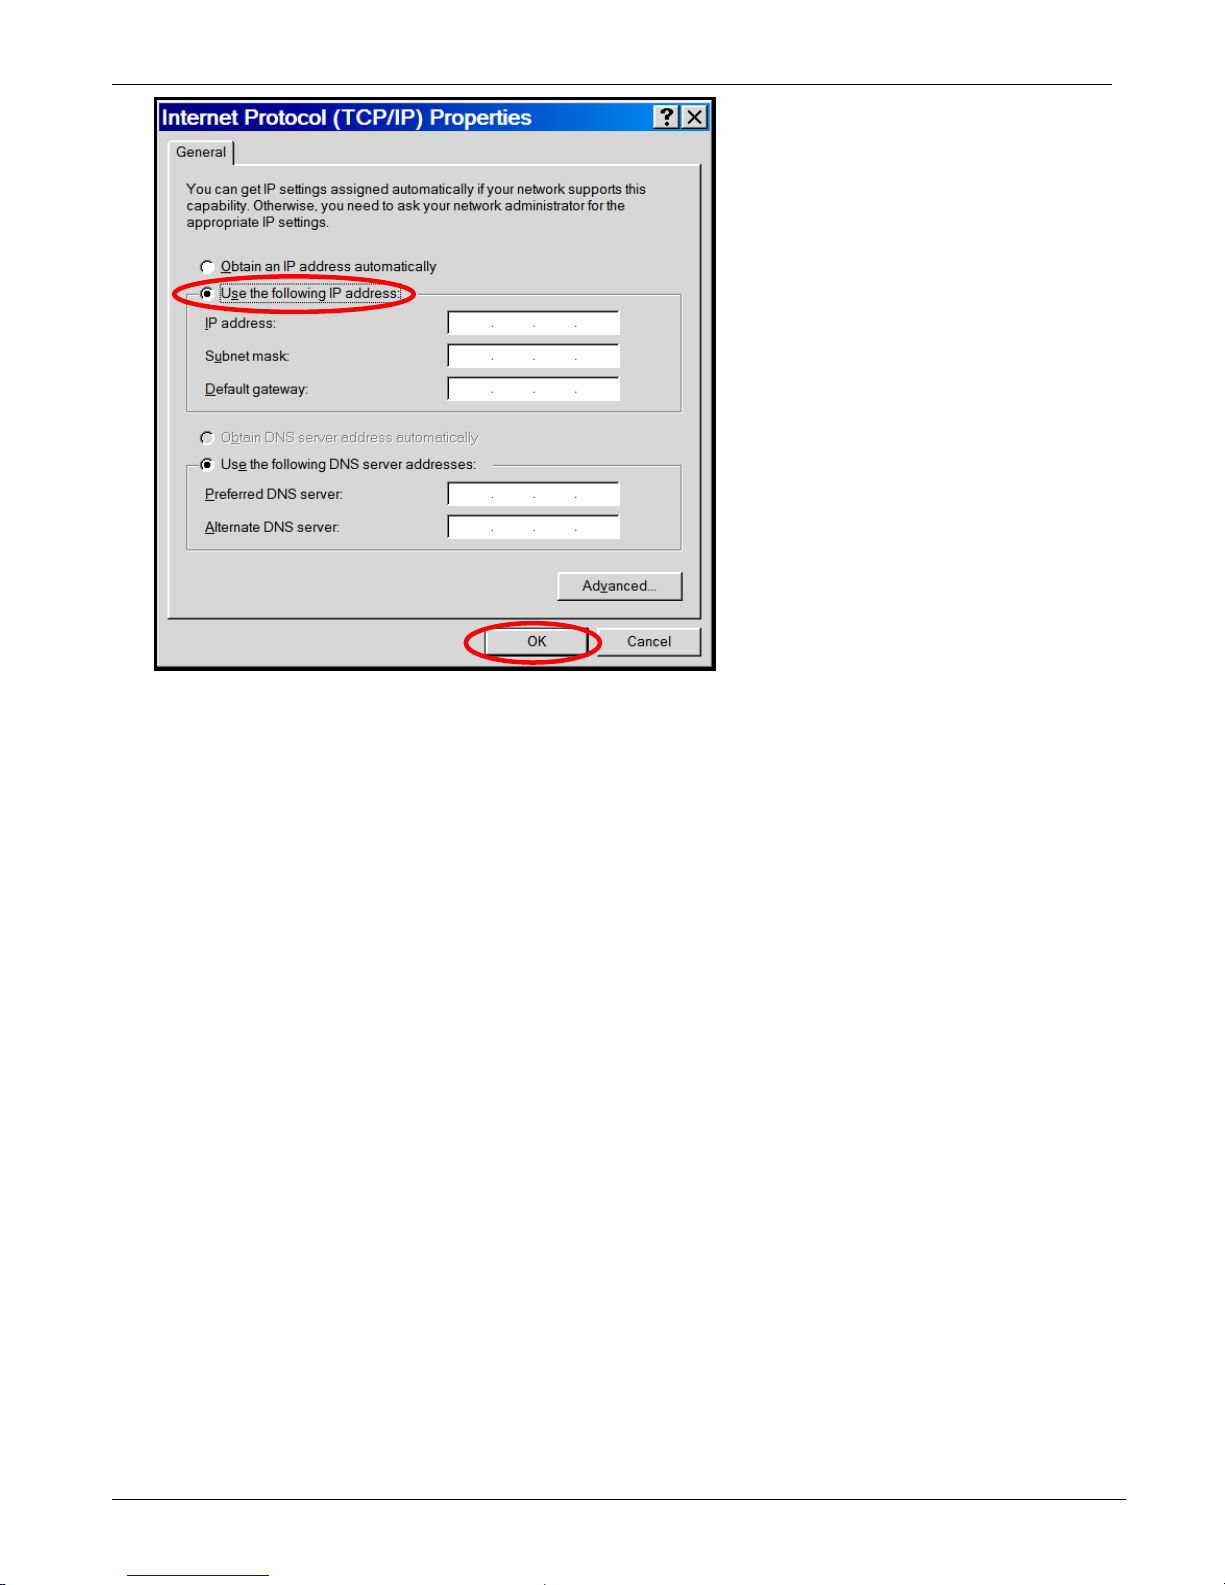
8. To set a Fixed IP Address for the workstation, use the following IP address.
a. Enter the workstation IP address. Example: 192.168.2.x.
Note: The x in the address cannot be the number 0, 1, 255 or any number already in use by a computer or device
on this network.
9. Enter the workstation Subnet mask 255.255.255.0
10. Enter the workstation Default gateway. This can be left blank when the MultiModem iSMS is on the same network
and subnet.
Note: The workstation settings must be in the same subnet range as the MultiModem iSMS.
The factory default settings for the MultiModem iSMS are:
IP Address: 192.168.2.1
Subnet Mask: 255.255.255.0
Default Gateway: 192.168.2.2
11. Use the following DNS server addresses.
a. For initial communication with the MultiModem iSMS, DNS information is not needed. These settings can be left
as is.
12. Click OK.
13. To close the Local Area Properties window, click OK.
14. Close the Control Panel.
21 MultiModem® iSMS Administrator’s Guide
Page 22

Chapter 2 – Getting Started
Obtaining and Activating a Wireless Account
Before you can use the cellular feature:
● Obtain a GSM wireless account with an activated SIM card capable of sending SMS text messages through your
service provider.
● Install the SIM into the MultiModem iSMS.
● Activate your account. For further information, find the wireless activation notice on the Multi-Tech website. Follow
the directions on the website to complete the activation of your account.
Service Provider Fees
Your service provider charges you for data usage. Your provider can tell you what these fees are.
You can use your MultiModem iSMS to send a large number of SMS messages very quickly. As such, have a contract that
accounts for the numbers of messages you are likely to send. Multi-Tech is not responsible for any charges relating to
your cellular bill.
Directly Communicating with the Cellular Modem
You may want to communicate directly to the cellular modem to verify network registration, and to troubleshoot your
connection. To do this, open a Telnet connection to the MultiModem iSMS, specifying port 5000.
This provides AT command line access to the first GPRS modem in the MultiModem iSMS.
To determine cellular connection status, use the AT commands. For more information about these commands, see the
GPRS AT Commands Reference Guide.
Note: If your SIM card is locked, you cannot send SMS messages.
MultiModem® iSMS Administrator’s Guide 22
Page 23
Chapter 2 – Getting Started
Signal Strength
Signal Strength Command
To View Strength
For the SF400/800 models without signal LEDs, signal strength can be determined by using the following AT command:
AT+CSQ. This command is the default setting on the Network Setup > Cellular Modem window. This works for the SF100
as well.
AT Command Response Example
+CSQ: xx (For xx, see the values chart below)
Signal Strength Reference Table
The following table lists the meaning of the xx values in the signal strength response and explains how they correspond to
the number of LEDs lit for signal strength.
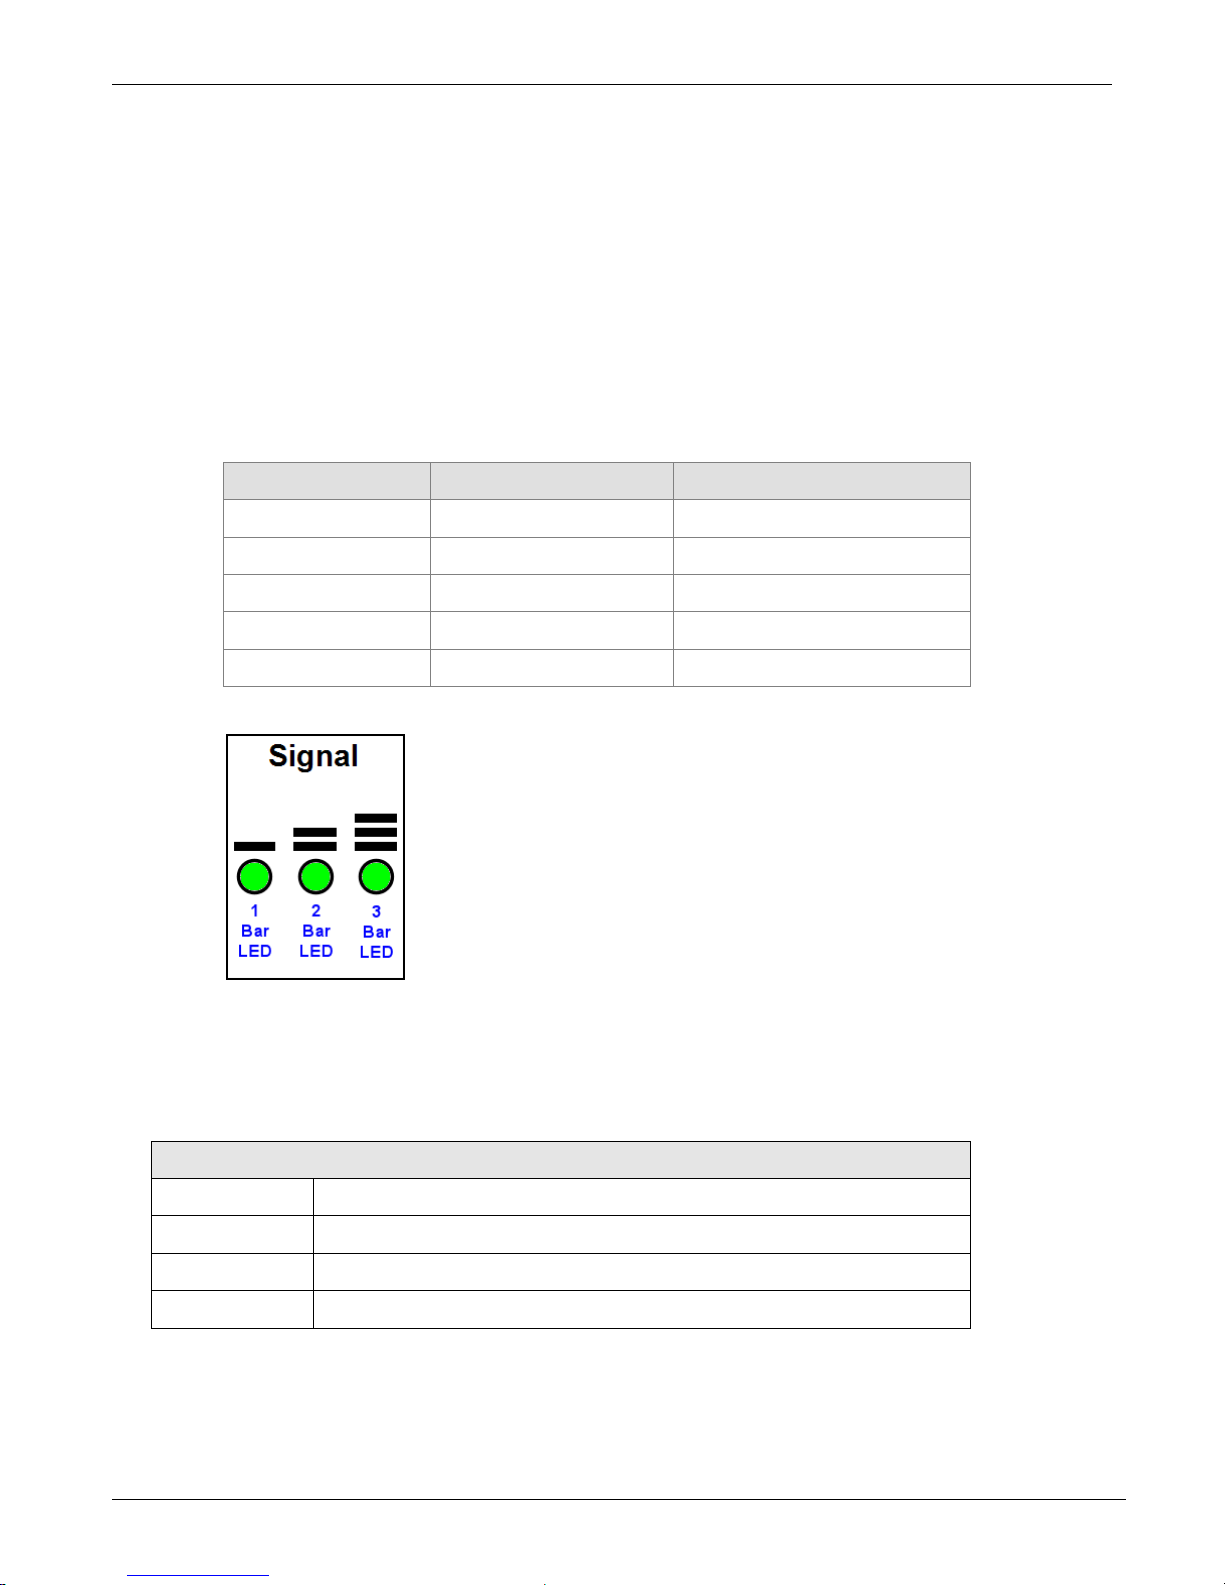
AT+CSQ Values Signal Strength SF100 Signal LED Bars
0 to 6 Very weak signal No LEDs lit
7 to 14 Weak signal 1 Bar LED is lit
15 to 23 Stronger signal 1 Bar and 2 Bar LEDs are lit
24 to 31 Strongest signal 1 Bar, 2 Bar, 3 Bar LEDs are lit
99 Signal not detectable No LEDs lit
SF100 Signal Strength LEDs
Using AT Commands to Check Network Registration and Roaming Status
Use this command to verify that the cellular modem has been registered on a wireless network.
1. In the command window, type AT+CREG?
2. The modem responds in one of the following ways:
Network Registration Verification
Value Network Registration Status
+CREG: 0,0 The modem is not registered on any network
+CREG: 0,1 The modem is registered on the home network
+CREG: 0,5 The modem is registered on a network and it is roaming
Note: If the modem indicates that it is not registered, verify the signal strength to determine if the problem is the
strength of the received signal.
23 MultiModem® iSMS Administrator’s Guide
Page 24
Chapter 3 – iSMS Basics and the Setup
Wizard
Starting the iSMS
Open a Web Browser
1. Be sure that the MultiModem iSMS is cabled and that the power is connected as shown in Chapter 2.
2. Then open a Web browser.
3. Type the IP address of your MultiModem iSMS in the address/location area of your browser: http://192.168.2.1
4. Press Enter.
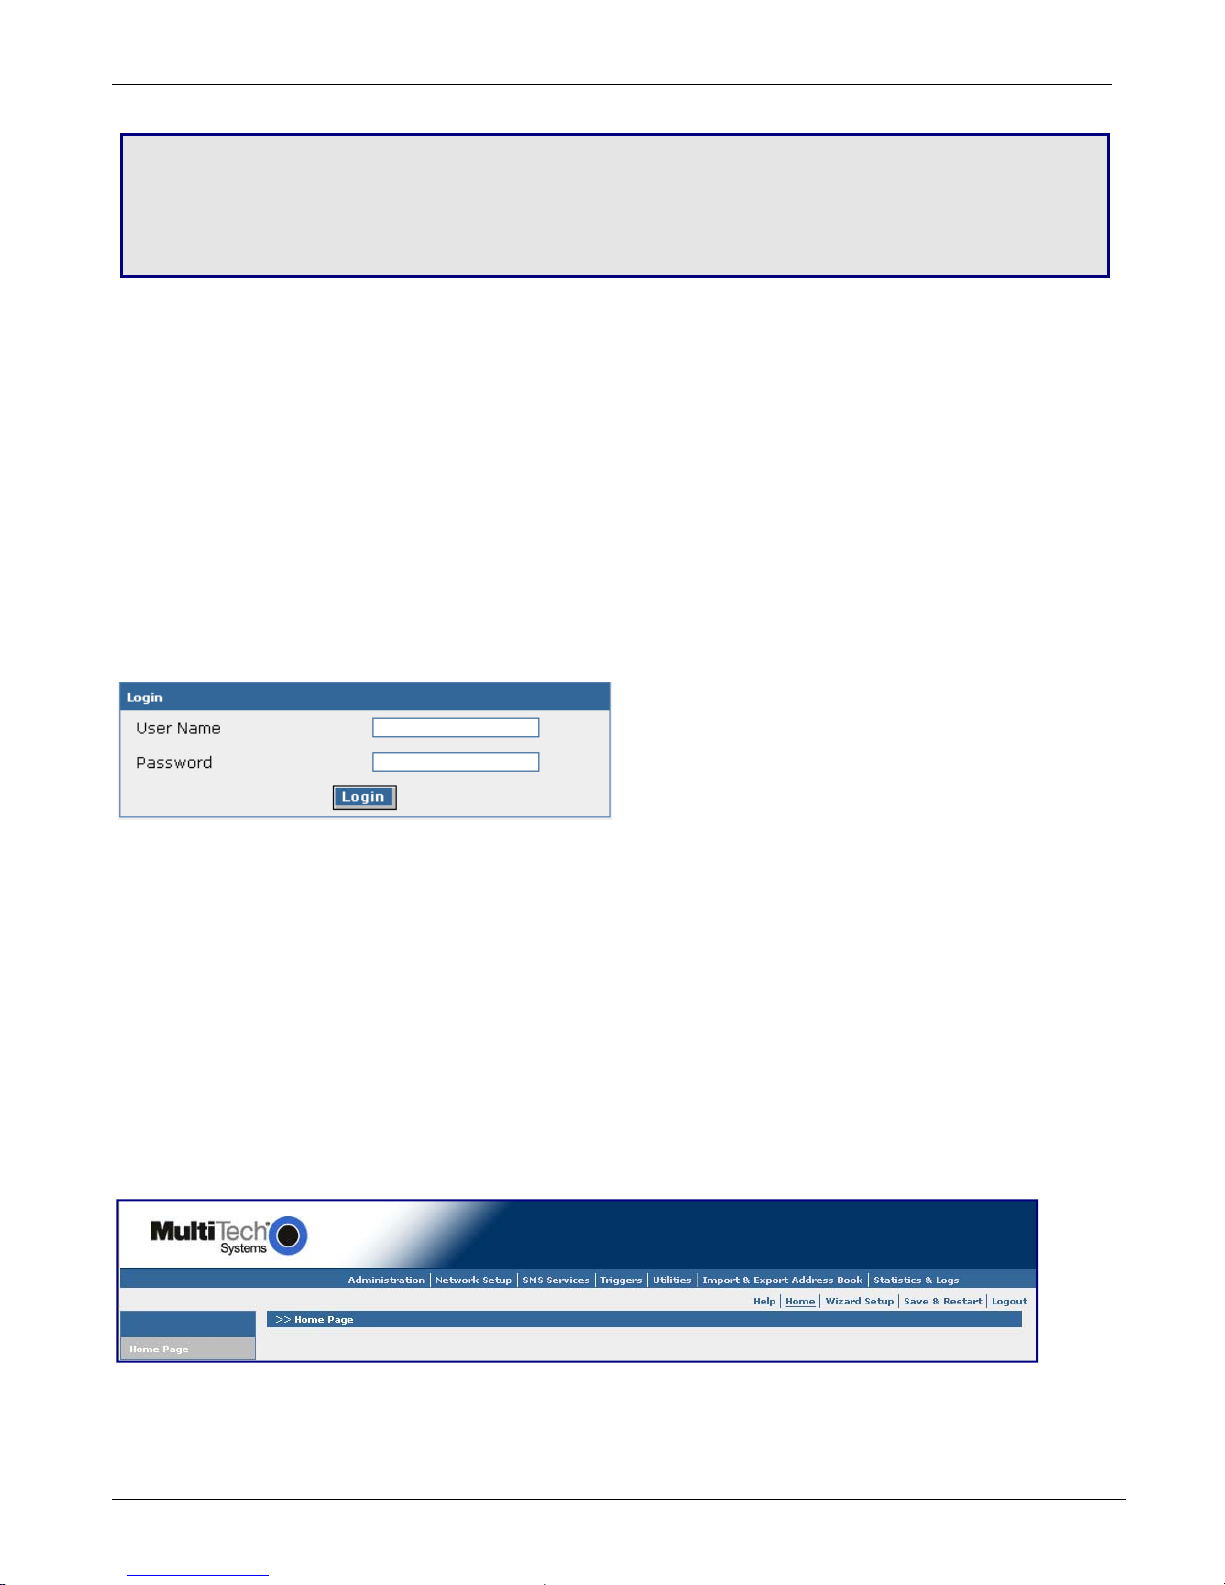
Login
The Login window for the MultiModem iSMS Web Interface displays. The appearance of the Login window proves that a
TCP/IP communication path (network connection) has been established between your workstation's browser and the
MultiModem iSMS SMS Server.
1. Type admin (admin is the default user name) in the user name box.
2. Type admin (admin is the default password) in the password box.
3. Click Login.
Note: The User Name and Password entries are case-sensitive (both must be typed in lower-case). The password can be
up to 12 characters. Later, you change the password from the default (admin) to something else. If Windows displays the
AutoComplete window, you may want to click No to tell the browser to not remember the password for security reasons.
Password Caution: Use a safe password. Your first name spelled backwards is not a sufficiently safe password; a password
such as xfT35$4 is better. It is recommended that you change the default password. Create your own password.
Web Interface Opens
This is the Home window of the Web management interface from which you can access all setup functions.
Note: Only the top portion of the Home window is shown here.
MultiModem® iSMS Administrator’s Guide 24
Page 25
Chapter 3 – iSMS Basics and Setup Wizard
w
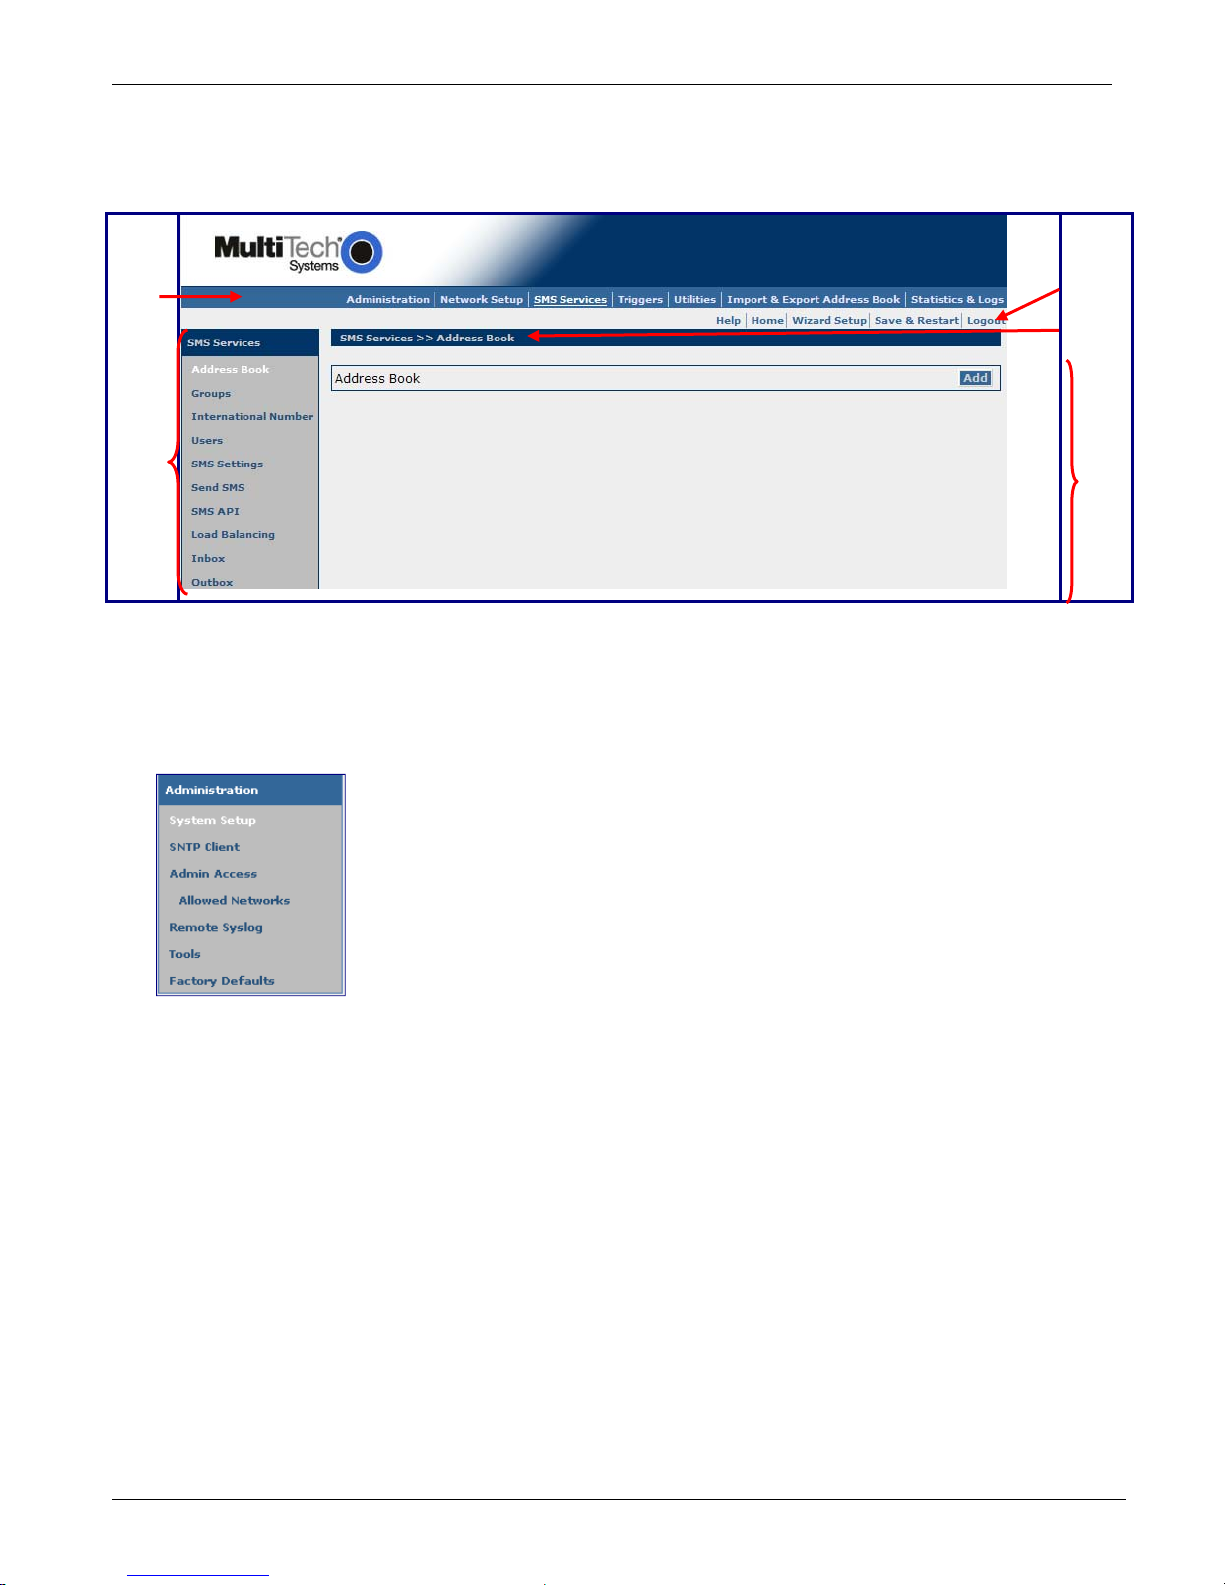
Navigating the Windows
Before using the Web interface, you may find the following information about navigating through the windows and the
structuring of the menus helpful.
Menu
Bar
Sub
Menu
Other
Options
Windo
Name
Input
Area
Menus
Each menu bar selection has its own sub-menu, which displays on the left side of the window.
When you click one of the main menu choices, the first window listed in the sub-menu displays. Choose other sub-menu
options/windows by clicking on its name. The following is an example of the Administration sub-menu.
25 MultiModem® iSMS Administrator’s Guide
Page 26

Chapter 3 – iSMS Basics and the Setup Wizard
Table of Menus and Sub-Menus
Administration
System Setup – Set up the SMTP server for e-mail notifications, the names of individuals who receive notifications, and
the email ID for the notifications FROM line.
SNTP Client – Set up the synchronization of the MultiModem iSMS clock to real time.
Admin Access – Set up the administrator's password and set an automatic inactivity disconnection interval.
Allowed Networks – Set the networks to be allowed access to the MultiModem iSMS unit.
Remote Syslog – Configure the Remote Syslog status and server's IP. The default is Disabled.
Tools – Reset the cellular modem, Cancel pending Send jobs.
Factory Defaults – Reset all parameters to the original factory defaults.
Network Setup
IP Settings – Specify your LAN settings.
Cellular Modem – Configure the cellular modem, and TCP access to the modem.
SMS Services
Address Book – Manually input names and phone numbers into the phone book.
Groups – Create groups of names with their phone numbers.
International Number – Enable or disable international numbers.
Users – Set up users and their passwords.
SMS Settings – Define default encoding type and periodic network re-registration.
Send SMS – Send SMS messages by manually entering the message or using a message from the Preconfigured SMS list.
SMS API – This page is divided into two sections: Send API and Receive API.
Load Balancing – Configure multiple units to share traffic load.
Inbox – View messages received.
Outbox – View messages sent.
Triggers
Authentic List – A list of cellular phone numbers (mobile endpoints), derived from the address book, that are allowed to
trigger a broadcast.
Broadcast Triggers – Configure trigger (codes or words) and broadcast messages.
Action Triggers – Create the triggers (codes or words) that dynamically configures (manages) certain databases via SMS.
Pre-Configured SMS – Write and save pre-configured messages.
Utilities
Backup – Save MultiModem iSMS settings to a backup file.
Firmware Upgrade – Get Web Management firmware upgrade files from Multi-Tech Systems, Inc.
Import & Export Address Book
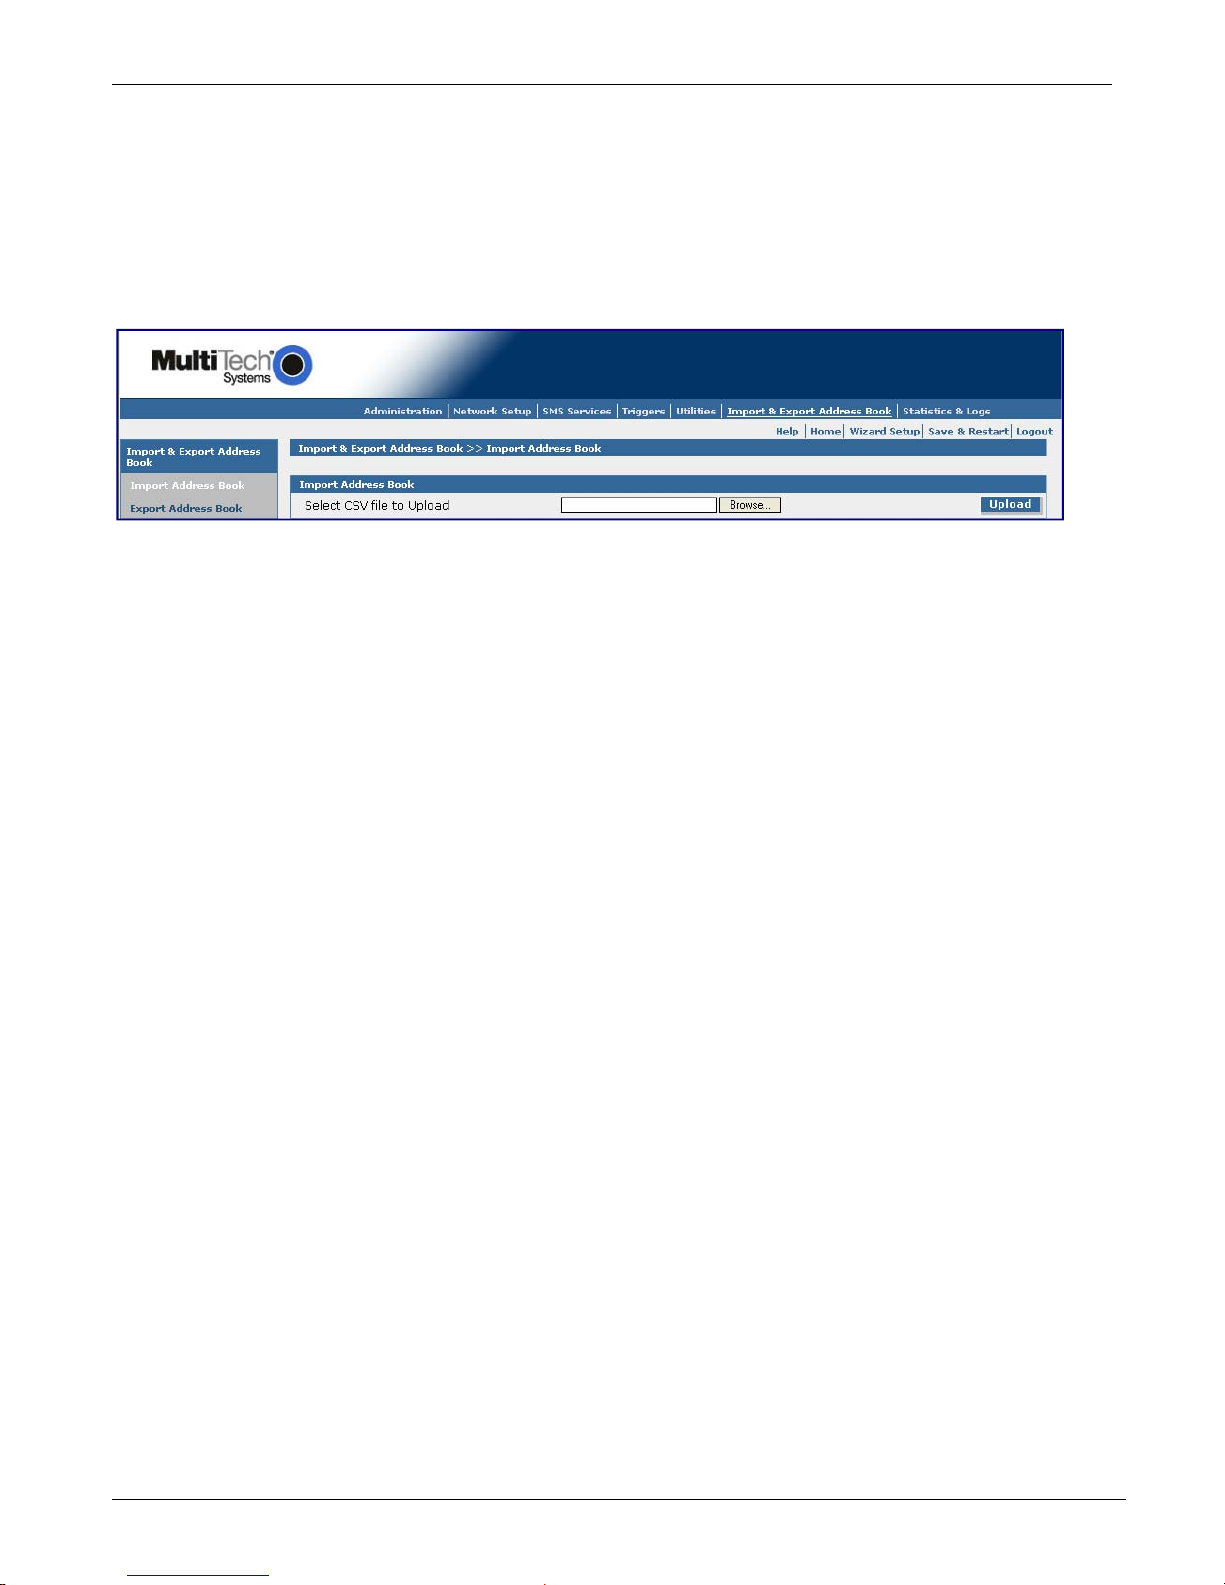
Import Address Book – Import a CSV formatted address book that you want to use to set up your MultiModem iSMS.
Export Address Book – Export the contents of the MultiModem iSMS Address Book into a CSV formatted file.
Statistics & Logs
System Information – View product model number, firmware version, MAC Address, number of Address Book entries
and live system details.
SMS Statistics
View SMS Statistics: Signal strength, number of messages in the inbox, number of message in the outbox, and number of
messages sent.
View Triggers Statistics: Number of broadcast triggers received, number of action triggers received, and number of
broadcast triggers configured.
Load Balancing Statistics – View statistics for the unit if load balancing is used.
Log Traces
View SMS Logs: SMS Sent Log, SMS Received Log, SMS Failure Log, SMS Live Log.
View Sent API Logs: Send API Status Log, Send API Failure Log, Send HTTP API Live Log, Send TCP API Live Log.
View Receive API Logs: Receive API Live Log and Receive API Failure Log.
View Load Balance Logs
View System Logs: A log of all Web access attempts.
MultiModem® iSMS Administrator’s Guide 26
Page 27
Chapter 3 – iSMS Basics and Setup Wizard
Saving System Configuration Changes
There are two types of save functions within the WEB Management menu system.
The first is a 'per feature' (per menu) save button. Most changes made per menu take effect immediately when you use
this save function. However, some changes require a system restart. These are found individually in the Sub Menu input
areas.
The second type is a system wide save function called "Save to Flash". Non-default parameters, that is, parameter
changes specific to your needs, are lost when the system restarts if you have not saved your changes to flash memory.
After you set up the MultiModem iSMS system, make sure your selections are permanently saved.
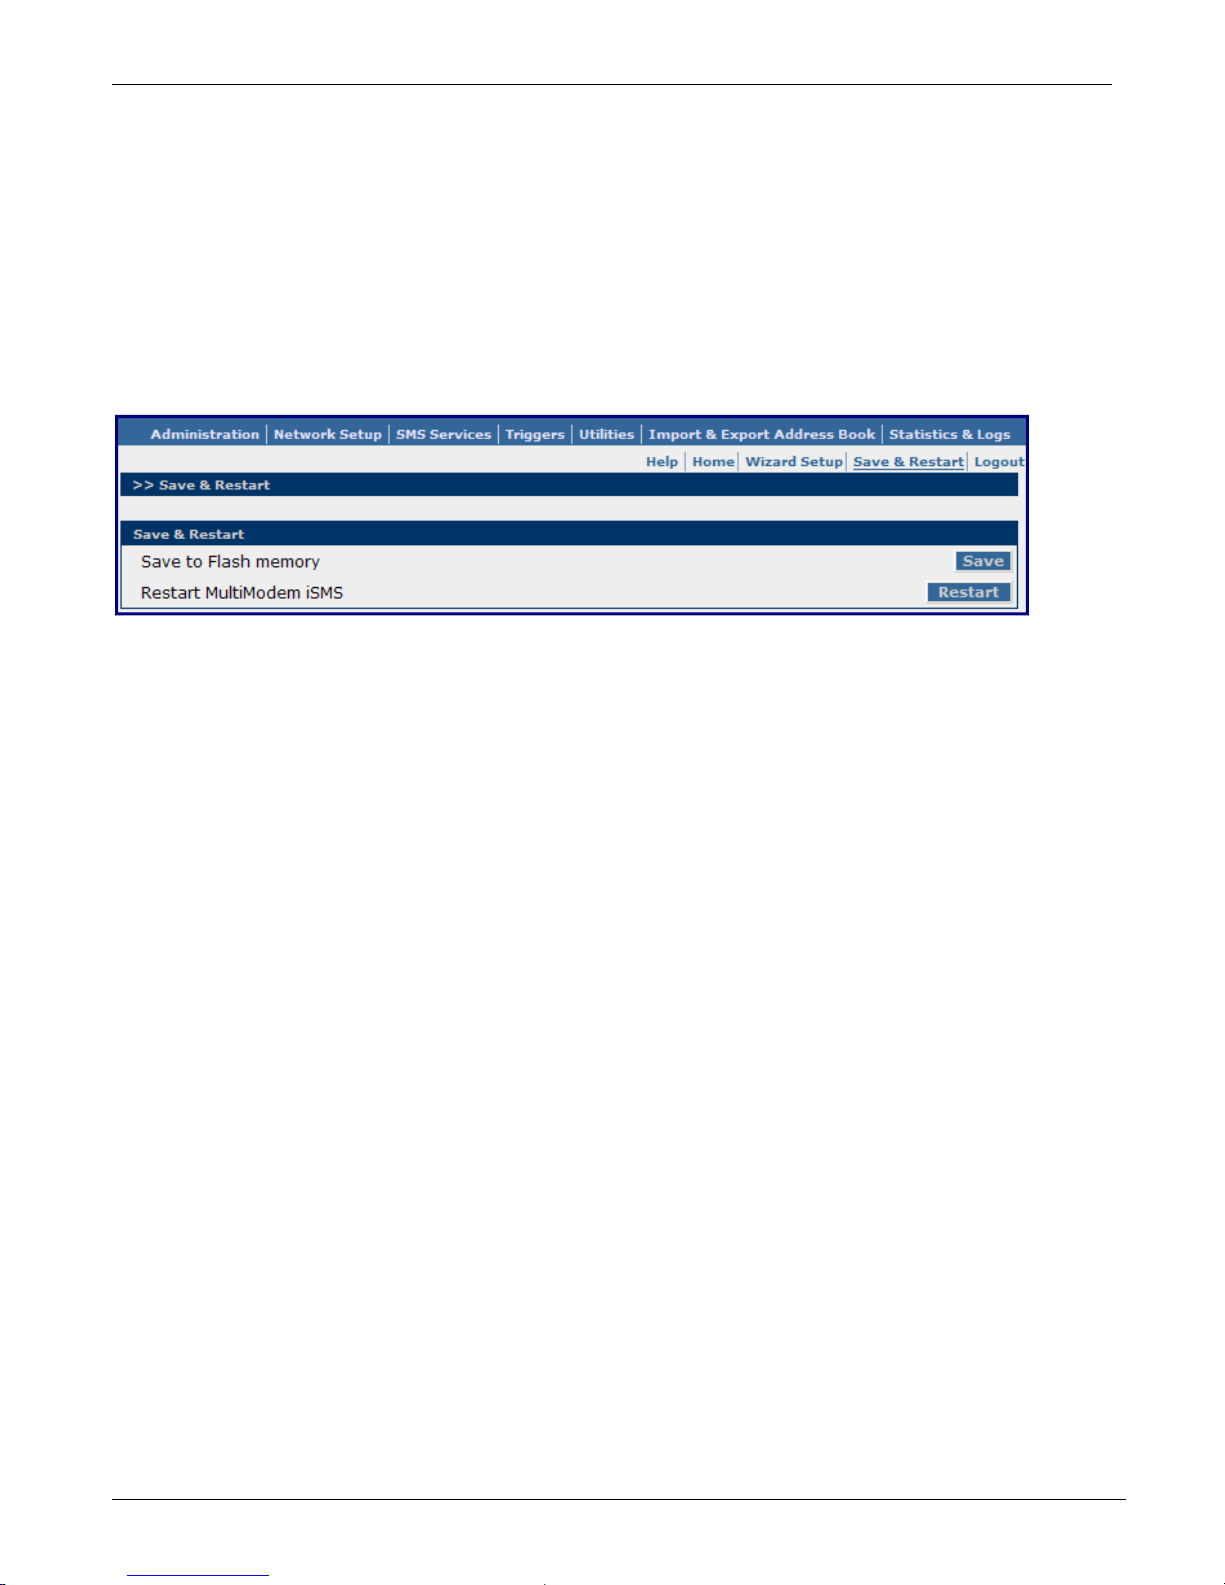
Save & Restart Button under Menu Bar
Save to Flash Memory
This is a system wide save function.
Upon system start up, system parameters are taken the unit's Flash Memory. After configuring the unit to meet your
needs, perform the "Save to Flash" function before you restart the unit.
Additionally, your changes to the Address Book, Groups, the User accounts, and Triggers (all living databases) take effect
immediately. However, the changes are lost when the system restarts if the Save to Flash is not performed before the
restart.
Save
Click Save to save your system settings to the flash memory.
Restart
This is optional. You do not have to restart the MultiModem iSMS after saving to the flash memory.
27 MultiModem® iSMS Administrator’s Guide
Page 28
Chapter 3 – iSMS Basics and the Setup Wizard
Using the Wizard Setup to Configure the MultiModem iSMS
The Wizard Setup lets you conveniently enter the minimal setup requirements for a user based (web browser) Send SMS
environment. The information you enter here carries over to other windows that require similar information.
Note: For new units (units defaulted to factory settings), Received SMS is handled by the Receive API Polling feature. You
can use the Web Management interface to set up additional features and functions.
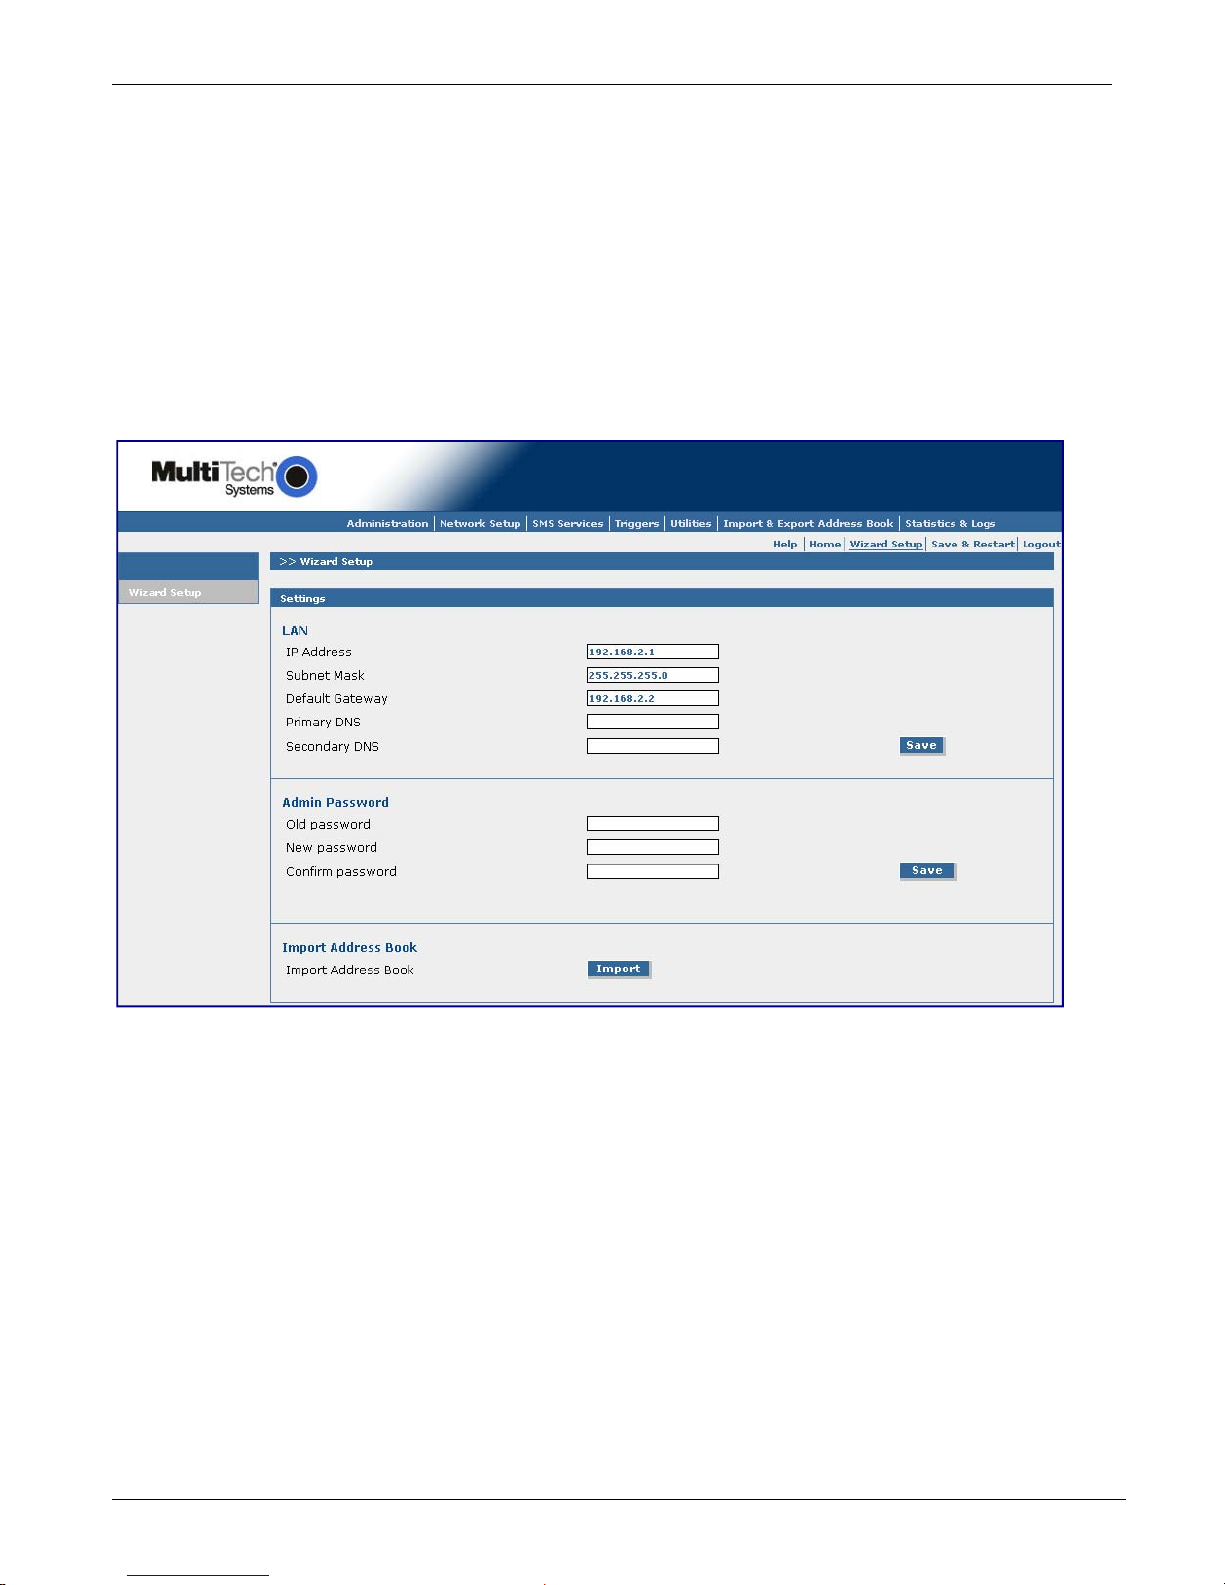
Opening the Wizard Setup Window
To open the Wizard Setup:
1. Log in.
2. Click Wizard Setup located under the menu bar.
3. In the LAN group, enter the desired LAN settings. Currently saved LAN settings are displayed.
● IP Address – Enter the new IP address the MultiModem iSMS needs to use.
● Subnet Mask – Enter the subnet mask value to be used.
● Default Gateway – Enter the IP address of your network's internet router or gateway.
● Primary DNS – Enter the IP address of your network’s primary DNS server.
● Secondary DNS – Enter a secondary DNS IP Address (if any).
● Save – Click Save.
MultiModem® iSMS Administrator’s Guide 28
Page 29
Chapter 3 – iSMS Basics and Setup Wizard
4. In the Admin Password group, change the password. Change the password immediately after initial installation and
also change it regularly thereafter for security purposes.
● Old Password – Enter the existing password (factory default is admin).
● New Password – Enter new password.
● Confirmation – Confirm your new password by re-entering it into this field.
Note: You might want to record the new password for future reference.
5. In the Import Address Book group, click Import. The Import Address Book window displays.
Use this window to upload a database of mobile endpoint contacts. Each contact entry in the CSV (comma separated
values) formatted file is to have 4 values in this order: firstname, lastname, description, phonenumber.
a. To browse for the address file you want to use, click Browse and navigate to the area where your file is located.
6. Click Upload.
Saving System Settings
When you finish entering MultiModem iSMS settings and configuration data, go to the Save & Restart menu and save the
settings to flash memory.
Doing so saves the new settings in the flash prom and prevents the settings from getting lost at the next power up.
To save:
1. Click Save to save your system settings to the flash memory.
2. To restart the MultiModem iSMS, click Restart. This step is optional.
29 MultiModem® iSMS Administrator’s Guide
Page 30

Chapter 4 – Using the MultiModem
iSMS Web Interface
You can use the Web-based configuration and management interface to set up SMS features and parameters. This
chapter describes the Web interface.
Note: The antenna must be attached so the MultiModem iSMS can operate.
IMPORTANT Note About Saving your Settings to Flash Memory
When you have completed your MultiModem iSMS settings, you must go to the Save & Restart menu located at the
top of the window under the menu bar. Then click the Save to Flash save button. This saves all your system settings
to flash memory and prevents them from being lost after a system restart.
Administration
Administration > System Setup
On the System Setup window, you can set up the e-mail address of the administrator to whom e-mails are sent for event
notification. You must enter the e-mail address in proper "user@domain" format.
Configuring E-Mail Notification
E-mail notification is delivered through the Ethernet network with an Internet connection, not through the wireless
cellular connection.
MultiModem® iSMS Administrator’s Guide 30
Page 31

Chapter 4 – Using the MultiModem iSMS Web Interface
SMTP Server
Enter the IP address or the resolvable name of your mail server; for example, smtp.yourdomain.com
Port
Enter the port number on which the mail server listens. Example: 25. Click Save.
SMTP Server Authentication
Some mail servers accept connection only after a user name and password are authenticated. If your server requires this,
check the SMTP Server Authentication box. Then enter the User Name and Password in the next fields.
User Name
If your mail server accepts connection only after a user name and password are authenticated, enter the user name.
Password
If your mail server accepts connection only after a user name and password are authenticated, enter the password. Click
Save.
E-Mail Address
Enter the e-mail addresses of the individuals who are sent notifications regarding the log file being full, an invalid Telnet
login, or an invalid Web login. The administrator may want use their office e-mail address, home e-mail address, and so
on. Enter the addresses in proper user@domain format. Click Save after each entry. You can change or delete an address
at any time.
You must enter at least one e-mail address.
Configure E-Mail Notification
Select the types of notifications that you want sent to individuals. Click Add. Each entry then moves to the Send E-Mail
Notification For box. To remove a notification, click Delete. The entry moves back to the Don't Send E-Mail Notification
For box.
Defaults for Don't Send E-Mail Notification are:
1. Log File Full
2. Invalid Telnet Login
3. Invalid Web Login
MultiModem iSMS E-Mail Address
Enter the administrator's e-mail identification. This is the name and address that appears in the FROM line of the
notification emails. This allows the recipients of the notifications to direct questions or comments to the administrator.
Enter the email ID in proper user@domain format.
Click Save.
You can delete or change the address as desired.
Auto Reboot Timer
The Auto Reboot feature automatically reboots the iSMS at a given hour interval. Enter the interval in hours that you want
the iSMS to reboot automatically or enter zero to disable this feature. Valid interval values are 0 to 999 hours. This feature
is disabled by default. When this feature reboots, it first saves to flash so no changes are lost.
31 MultiModem® iSMS System Administrator’s Guide
Page 32

Chapter 4 – Using the MultiModem iSMS Web Interface
Administration > SNTP Client
Clicking the SNTP Client check box enables the SNTP client within the MultiModem iSMS. SNTP (Simple Network Time
Protocol) is an internet protocol used to set up the synchronization of the unit’s clock to real time.
Configuring SNTP
General Configuration
SNTP Client Enable or disable the SNTP Client to contact the configured server on the UDP port 123 and set the local
time. Default is Enabled.
Server Enter the SNTP server name or IP address to which the SNTP Client must contact in order to update the
time. The default is time.nist.gov.
Polling Time Enter the polling time at which the SNTP client requests the server to update the time. Default is 30
minutes. Time must be entered in minutes.
Note:
So that messages in the outbox can have a valid date/time stamp, perform one of the following:
Enable SNTP Client and ensure the Ethernet connection is live to the Internet.
-or-
Enter the MultiModem iSMS phone number on the Network Setup > Cellular Modem window.
MultiModem® iSMS System Administrator’s Guide 32
Page 33

Chapter 4 – Using the MultiModem iSMS Web Interface
Time Zone Configuration
Time Zone Enter your time zone. Default is UTC (Universal Coordination).
The greenwichmeantime.com website has Time Zone information in detail or you can find a portion of
the Time Zone abbreviations in Appendix E of this manual.
Time Zone
Offset
Enter +/- hh:mm. Default is +06:00. Offset is the amount of time varying from the standard time of a
Time Zone.
Daylight Configuration
Daylight
Enables/disables Daylight Saving mode. Default is Enable.
Saving
Daylight
Saving Offset
Set the offset to use during Daylight Saving mode. Default is +60 minutes. Enter the time in + / - minutes.
Offset is the amount of time varying from the standard time of a Time Zone.
Daylight Saving Start Time
Start Ordinal
(Month, Day,
Time)
Set the start ordinal to use during Daylight Saving mode. Options are first/second/third/fourth/last.
Default is second.
Daylight Saving time usually starts at the same time on the same day of the week in the same month
every year. Each day of the week occurs four or five times a month. Therefore, you are selecting the
week in which daylight saving time starts: the first, second, third, fourth or the last of the month.
Start Month Set the start month to use during Daylight Saving mode. The default is March.
Start Day Set the start weekday to use during Daylight Saving mode. The default is Sunday.
Start Time Set the start time to use during Daylight Saving mode. The default is 02:00 (hh:mm).
Daylight Saving End Time
End Ordinal
(Month, Day,
Set the end ordinal to use during Daylight Saving mode. Select the week in which daylight saving time
ends. Options are first/second/third/fourth/last. The default is first.
Time)
End Month Set the end month to use during Daylight Saving mode. The default is November.
End Day Set the end weekday to use during Daylight Saving mode. The default is Sunday.
End Time Set the end time to use during Daylight Saving mode. The default is 02:00 (hh:mm).
Save Button
Click Save to save these settings.
33 MultiModem® iSMS System Administrator’s Guide
Page 34

Chapter 4 – Using the MultiModem iSMS Web Interface
Administration > Administrative Access
Use this window to set up the password that the administrator uses, to set an automatic inactivity disconnection interval
and to define the TCP port on which the Web Management interface listens.
Change Password
Old Password, New Password, Confirm Password
To change the password, enter the existing password in the Old Password field, enter the new password into the New
Password field, and confirm your new password by re-entering it into the Confirm Password field. Click Save.
Note: Change the password immediately after initial installation and configuration, and also change it regularly
thereafter.
Web Interface Inactivity Time Out
Time Before Automatic Disconnect
An automatic inactivity disconnection interval is part of this firmware for security purposes.
In the Time Before Automatic Disconnect field, type the desired time span (in seconds) after which are automatically
disconnected from the Web Interface if no operations take place.
● The default setting is 600 seconds, which usually allows enough time to download the CSV file.
● The smallest possible setting is 30 seconds.
● The maximum setting is 3600 seconds.
Click Save.
Administrative Access HTTP Port
Specify the HTTP port for administrative access. Port 80 is the default used for HTTP sessions. If you change the port
number, ensure it is between 1 and 65535. Port numbers currently in use by the MultiModem iSMS are not allowed.
Click Save.
MultiModem® iSMS System Administrator’s Guide 34
Page 35

Chapter 4 – Using the MultiModem iSMS Web Interface
Administration > Admin Access > Allowed Networks
Use this window to set the networks that can access the MultiModem iSMS. The administrator can then add, edit and
delete any network. By default, the LAN network is always allowed access to the MultiModem iSMS. In addition, the
administrator can configure the IP Address and Subnet Mask as 0.0.0.0 to allow access to any network.
Allowed Networks
IP Address – Enter the IP address of any network you want to allow access to the MultiModem iSMS.
Subnet Mask – Enter the Subnet Mask of any network you want to allow access to the MultiModem iSMS.
Add – Then click Add.
The allowed network displays at the bottom of the window.
Note: The first entry is the LAN Network, which defaults onto this window. Subsequent entries have Edit and Delete as
Command options.
Administration > Remote Syslog
Use this window to enable/disable the Syslog Client in the MultiModem iSMS and to define the IP address of the Syslog
Server. The default is Disabled.
Remote Syslog Configuration
Remote Syslog Status – Check the Remote Syslog Status box to enable this remote syslog.
Remote Syslog Host IP Address – Enter the IP address or resolvable name of your Syslog server.
Save – Then click Save.
Note: When Remote Syslog is enabled, the Trace Log windows (found in the Statistics and Logs menu) no longer display
data. The data is now being sent to your Syslog Server.
35 MultiModem® iSMS System Administrator’s Guide
Page 36

Chapter 4 – Using the MultiModem iSMS Web Interface
Administration > Tools
Use this window to reset the cellular modem. You may want to use Reset if you have lost your connection or if the
modems are not functioning properly but you don't want to recycle power through the MultiModem iSMS.
Reset Modem
After clicking on the modem tab for the modem you want reset, click Reset. The modem corresponding to the number
selected (1 – 4 for the SF400, 1 – 8 for the SF800) is reset.
Cancel Jobs
From here you can cancel "Pending" SMS messages that have been submitted for sending via either Send API or the Send
SMS menu. View the "Send API Status Log" window found in Statistics and Logs | Log Traces menu to determine message
status. Pending messages submitted by the Send SMS Web interface are cancelled.
Cancel All Jobs
Clicking this Cancel button stops and clears all jobs queued.
Cancel Low Priority Jobs
Clicking this Cancel button stops and clears all jobs flagged as Low Priority that are queued.
Cancel Normal Priority Jobs
Clicking this Cancel button stops and clears all jobs flagged as Normal Priority that are queued.
Cancel High Priority Jobs
Clicking this Cancel button stops and clears all jobs flagged as High Priority that are queued.
MultiModem® iSMS System Administrator’s Guide 36
Page 37

Chapter 4 – Using the MultiModem iSMS Web Interface
Administration > Factory Defaults
Reset to Factory Defaults
Click Factory Defaults to set all configuration parameters to the factory default settings. This includes setting the
administrator account password back to "admin" and deleting all User accounts
Performing this function does NOT delete entries out of the Address Book, Groups, Inbox or Outbox databases.
Invoke the Factory Defaults option when you want to set the default encoding type per the SMS Settings menu option.
Reset MultiModem iSMS Defaults
Click MultiModem iSMS Defaults to load all system configuration parameters to the original factory default settings,
including default encoding type AND it deletes all entries that may be in the Address Book, Groups, Inbox and Outbox
databases. Invoking the "MultiModem iSMS Defaults" is a full default.
.
Note: The back panel Reset button performs the same function as the "MultiModem iSMS Defaults" option.
37 MultiModem® iSMS System Administrator’s Guide
Page 38

Chapter 4 – Using the MultiModem iSMS Web Interface
Network Setup
Network Setup > IP Settings
Use this window to set up your network.
IP Settings – LAN
The MultiModem iSMS needs to be programmed with a static IP address. The MultiModem iSMS does not support DHCP
assigned IP addresses.
IP Address
Enter the IP Address of the LAN Interface. The factory default is 192.168.2.1.
Subnet Mask
Enter the Subnet Mask for the IP address configured. The factory default is 255.255.255.0.
Default Gateway
Enter the Default Gateway. The factory default is 192.168.2.2.
Primary DNS and Secondary DNS
Enter the address of the primary and secondary DNS (domain name system) IP Address. The order in which domain names
are entered is the order in which they are consulted.
Note:
Valid Gateway and DNS Addresses: For e-mail notifications and SNTP Time/Date accuracy, you must have a live
Ethernet connection, and this requires a valid gateway address and at least one DNS address.
Save
Click Save.
MultiModem® iSMS System Administrator’s Guide 38
Page 39

Chapter 4 – Using the MultiModem iSMS Web Interface
Network Setup > Cellular Modem
Use this window to configure the cellular modems. Click the Modem# tab at the top to work with that specific modem.
You configure each modem individually.
Status
Modem Status (SF400 and SF800 models only)
This box is checked by default. This means that this modem is considered for use. If you do not have or want a SIM card
for a particular modem, uncheck the box so that the modem is not used. Repeat this process for any modems that do not
have SIM cards. A graphic to show which internal modem is assigned to each number is in the SIM card installation
section of Chapter 2.
Save
After configuring a modem, click Save before you select the next modem to configure from the modem tabs.
Modem Initialization Strings
Initialization Strings 1 – 3
Initialization strings are composed of AT commands sent to the modem to initialize and prepare it for connection. The
contents of these 3 fields are sent in addition to and after the built in initialization commands are issued by the iSMS
server. The modems are initialized upon power up, modem status enable, modem port reset and upon termination of TCP
connections. See the GPRS AT Commands Reference Guide for additional information.
Save
After configuring a modem, click Save before you select the next modem to configure from the modem tabs.
39 MultiModem® iSMS System Administrator’s Guide
Page 40

Chapter 4 – Using the MultiModem iSMS Web Interface
Signal Strength
Command
The string entered here is sent to the cellular modem so that the signal strength LEDs can display the current signal
strength. Use the following command: AT+CSQ
The following table lists the meaning of the xx values in the signal strength response and explains how they correspond to
the number of LEDs lit for signal strength.
AT+CSQ xx Values SF100 Signal LED Bars Signal Strength
0 to 6 No light Very weak signal
7 to 14 1 Bar LED is lit Weak signal
15 to 23 1 Bar and 2 Bar LEDs are lit Stronger signal
24 to 31 1 Bar, 2 Bar, 3 Bar LEDs are lit Strongest signal
Save
Click Save.
SIM Number
Specify the cellular phone number that the wireless provider assigned to your account. Do not enter dashes. Example:
6125551234.
The MultiModem iSMS uses as an alternate means of synchronizing the system clock. If you are using SNTP for your time
stamp, you do not need to enter a SIM number.
Note: If your SIM card is locked, you cannot send SMS messages.
When a number is entered in this field, upon system start up (after the port is done being initialized and has registered on
the cellular network) the unit sends an SMS with the text "Time Setting Loopback Message" to the defined number. The
Cellular Network routes the SMS back to this port (assuming the account associated to the SIM in this port is setup
correctly, and the number you entered matches that of the SIM). The MultiModem iSMS then uses the time stamps found
within the header of this specific SMS to set its internal clock. This message (Time Setting Loopback) is counted in the SMS
Statistics, and Listed in the Trace Logs (Sent and Received categories). This message is logged in the SMS Inbox, however it
is not logged in the SMS Outbox.
Save
After configuring a modem, click Save before you select the next modem to configure from the modem tabs.
MultiModem® iSMS System Administrator’s Guide 40
Page 41

Chapter 4 – Using the MultiModem iSMS Web Interface
TCP Connection
The TCP Connection feature is a per modem port feature that provides direct AT command access to the modem's serial
interface for troubleshooting purposes only. When you open a TCP socket on the defined TCP port number (for example,
5000), the modem is no longer available to the unit's send and receive queues. Events that occur while the socket is open
to the modem do not get logged by the system (that is, SMS messages received by the modem are not logged in the
system nor delivered through the Receive API process). It is recommended that you disable this feature after you have
setup and tested the system.
TCP Connection
Enable or Disable the TCP Connection by clicking the appropriate radio button. Default: Enable
TCP Connection Port
The TCP port number on which the MultiModem iSMS is listening. Ensure each cellular modem port in the MultiModem
iSMS is listening on a different TCP port number.
Default is 5000 for an SF100; 5000 thru 5003 for ports 1 through 4 for an SF400 and 5000 through 5007 for ports 1 thru 8
of an SF800.
Save
Click Save.
Save & Restart
IMPORTANT Note About Saving System Settings
When you have completed entering your MultiModem iSMS settings and you are not going to enter any more
configuration data, you must go to the Save & Restart menu and perform a Save to Flash. Saving to the Flash
Memory saves the new settings in the flash prom and prevents the settings from getting lost at the next power
up.
Save
Click Save to save your system settings to the flash memory.
Restart is Optional
This is optional. You do not have to restart the MultiModem iSMS after saving to the flash memory.
41 MultiModem® iSMS System Administrator’s Guide
Page 42

Chapter 4 – Using the MultiModem iSMS Web Interface
SMS Services
Use the sub menus in SMS Services to define how the MultiModem iSMS SMS server handles incoming and outgoing SMS
messages.
You can also use the Send SMS menu to generate and send SMS (text) messages to other mobile devices, which are
specific numbers or entries in the Address Book.
SMS Services > Address Book
The Address Book contains a list of cellular recipients (mobile end points) to which the MultiModem iSMS can send SMS
messages. Address Book entries are available to the Groups, Send SMS and Broadcast Triggers menus and the Send API
feature.
There are 3 ways to create Address Book entries:
● Enter names and phone numbers manually. Use the following window to enter addresses in this way.
● Import an Address Book. See the details in the: Import & Export Address Book > Import section of this chapter.
Note: You must perform a Save to Flash to permanently save Address Book entries (to prevent the entries from being
lost upon a system restart).
● Remotely enter a name and phone number. See how to do this in the: Triggers > Action Triggers section of this
chapter.
Manually Adding Names and Phone Numbers to the Address Book:
Use this window to manually add the names and phone numbers of any person(s) you want to include in your address
book. If you imported an address book, you can use this window to add names not included in the imported Address
Book. All address book names display on this window, and each entry can be edited, deleted, and/or added to a group list.
MultiModem® iSMS System Administrator’s Guide 42
Page 43

Chapter 4 – Using the MultiModem iSMS Web Interface
Address Book
Click Add to display the Add a Phone Number window.
Add a Phone Number
Note that fields marked with an asterisk are required.
Name
Enter the name of the person you want to add to the SMS Phonebook. The maximum number of characters is 50 including
spaces and punctuation.
Phone Number
Enter the mobile phone number of person you are adding. The maximum number of characters is 50 including spaces and
punctuation.
Note: If you plan to implement the Broadcast Trigger feature with the Authenticate option enabled, you must enter the
phone number string exactly as the cellular network presents the sender's number on incoming SMS messages.
For example: +17632493555 instead of just 7632493555. To determine the exact format, use your cell phone and send a
simple text message to the phone number/SIM card in port 1 of your MultiModem iSMS, then go to the SMS Live Log
menu (in Trace Logs) for Port 1 and view the +CMT unsolicited response (SMS text message) received by the cellular
modem in port 1. The following is an example of a received SMS as shown in the SMS Live Log: +CMT:
"+17632346274",,"10/08/06,15:52:35-20",145,4,0,0,"+16363848827",145,26 simple message from your phone
Description
Enter any additional information about this phonebook entry that helps you contact or identify this person. The maximum
number of characters is 120 including spaces and punctuation.
Groups
If you want this person to be a member of a phonebook group, select the group name from this box.
Note: You must first enter Group names on the SMS Services > Groups window before they appear here.
Save or Cancel
Click Save to save the entries.
Click Cancel if you want to start over on this window or want to end the entries from the last Save.
43 MultiModem® iSMS System Administrator’s Guide
Page 44

Chapter 4 – Using the MultiModem iSMS Web Interface
SMS Services > Groups
Use this window to create groups of recipients (names and phone numbers of mobile end points). Groups allow you to
send SMS messages to many individuals using only a group name.
A group is made up of entries from the Address Book. You can create up to 50 groups.
You can establish a group based on a common function, a location, or an activity such as an Administrators group, an
Engineers group, a Building 201 group, a Basketball Team group, and so on.
After you create a group, you can use this feature to edit and delete the groups.
Creating Groups
1. To create a group, click Create.
The Create a Group window opens.
2. Enter information into fields marked with an asterisk, as described in the table that follows.
Group Name Enter a name for the group you want to create. Maximum number of characters is 10. You can later edit
Group names.
Group
Members
4. After assembling the group, click Create. You return to the Group page.
5. To abandon the changes, click Cancel.
To assemble a group:
1. To open a list of individuals in your Address Book, click Address Book. A pop up window appears,
displaying the contents of the Address Book
2. Highlight the name of the user you want to add to the group, then click Add. Close the pop up
window. The selected address book entries are listed as group members. You may also use the
Select the entire Address Book checkbox instead to all entries to this group.
3. To remove a user from the group, highlight that user’s name and click Delete
MultiModem® iSMS System Administrator’s Guide 44
Page 45

Chapter 4 – Using the MultiModem iSMS Web Interface
SMS Services > International Number
Use this window to enable SMS messaging to international numbers. International numbers are identified according to
the number of digits.
Disable
International
Number
If Disable International Number is checked (this is the default), SMS messages can be sent to phone
numbers limited by the maximum allowed digits, as entered in the Maximum Digits field.
If Disable International Number is NOT checked, SMS messages can be sent to any phone number.
Maximum
Digits
Save Click Save.
Enter the number of digits you want to be allowed when Disable International Number is checked. The
default is 11 digits.
SMS Services > Users
Use this window to create a list of users who can have limited access to the MultiModem iSMS to send SMS messages and
monitor their associated outbox. The figure below includes an example entry called "JoeSmith".
Adding Users
1. To add a user, click Add. The Add a New User window opens.
2. Enter information into fields marked with an asterisk, as described in the table that follows.
User Name Enter the user's name. Spaces are not allowed.
Password Enter a password for this user. Each user must have a unique password. You must enter a minimum of 5
characters.
3. After entering users, click Create. If you want to start over, click Cancel.
Deleting Users
After you add a user, the Delete checkbox is available.
To delete a user:
1. Click the Delete check box. A pop-up dialog box asks you to confirm the deleting of this user.
2. Click OK to permanently remove the selected user.
45 MultiModem® iSMS System Administrator’s Guide
Page 46

Chapter 4 – Using the MultiModem iSMS Web Interface
SMS Services > SMS Settings
Use this window to set general system settings related to SMS encoding format, time & date format and network
registration.
Extended
ASCII 8-bit
(ISO-8859-1)
Set as Factory
Default
Save Click Save to set each changed setting before navigating away from this page.
Unicode Enabling this mode allows the MultiModem iSMS to pass characters encoded using UTF16 (2 byte
Set as Factory
Default
Save Click Save to set each changed setting before navigating away from this page.
Enabling this mode allows the MultiModem iSMS to pass characters in the text message that are made
up of 8 bits instead of 7 bits (1 byte characters 0x80 through 0xFF). When enabled, the Extended ASCII
characters option becomes available on the following windows:
• Send SMS window
• Triggers window
• Preconfigured SMS window.
To set Extended ASCII 8-bit as the factory default, select this check box and click Save.
Use this option when you want to "Reset to Factory Defaults".
This option is ignored and overwritten when invoking the "Reset MultiModem iSMS Defaults" option.
characters 0x0001 through 0xFFFF). Select this check box and click Save to allow Unicode text in the SMS
messages
Select this check box and click Save to set Unicode as the factory default. This option is used when
performing a "Reset to Factory Defaults". This option is ignored and overwritten when invoking the
"Reset MultiModem iSMS Defaults" option.
Date Select a format for the date:
MultiModem® iSMS System Administrator’s Guide 46
Page 47

Configuration dd/mm/yyyy
mm/dd/yyyy
yyyy-mm-dd
Where dd represents the day as 2 digits, mm represents the month as 2 digits and yyyy represents the
year as 4 digits.
Save Click Save.
Chapter 4 – Using the MultiModem iSMS Web Interface
Periodic Reregistration
Save Click Save.
This feature causes all modems in the unit to re-register (un-register and then reconnect) with the
cellular network at the selected interval.
This feature can prevent the appearance of the MultiModem iSMS Server being 'camped' onto the
network. The MultiModem iSMS is a stationary, 24/7 device and some cellular networks implement rules
that limit the maximum duration a device can be continuously registered.
You can select the status of re-registration to one of several times (in hours) or Disabled. The default is
Disabled.
SMS Services > Send SMS
Use this menu to generate a message and then send it to specific phone numbers, Address Book contacts or Groups.
Note: The only windows available to non-administrative users include this window and a user’s Outbox window.
To
Enter Phone Numbers
Enter the mobile phone numbers to which a new message is sent. Click Add after each entry. The phone number displays
in the box. If you change your mind about a phone number, highlight the number and press Delete.
-and/or-
Select Names from the Address Book
Click Address Book to display all names. Select the names of the individuals to whom a new message is sent. Click Add
after each name. If you change your mind about a name, highlight the name and press Delete or check Select the entire
Address Book, press Delete and all the names are deleted.
-and/or-
Select Group
Click Groups to display all group names. Select the Groups to which a new message is sent. Click Add after each selection.
The group name displays in the box. If you change your mind about a group, highlight the group name and press Delete or
check the Select all the Groups, and press Delete and all groups are deleted.
47 MultiModem® iSMS System Administrator’s Guide
Page 48

Chapter 4 – Using the MultiModem iSMS Web Interface
SMS Text
Enter the text of the message you want to send.
-or-
You can choose a Pre-Configured Message that you set up on the Triggers > Pre-Configured SMS window. Click the Pre-
Configured Message text to access a list of pre-configured messages. After the pre-configured message appears in the
SMS Text field, you may continue to edit the contents of the message/SMS Text field.
Unicode options are also available, please see Unicode Use below.
The message entered automatically tracked by the Typed, Left and Spanned boxes below the entry field. Depending on
the Encoding Type, the maximum characters allowed can change.
Typed
This field tracks the actual number of characters entered into the SMS Text field.
Left
This counts down the number of characters left available in the SMS Text field.
Spanned
This shows the number of SMS messages that are needed to send the text as currently entered. Messages that need to be
spanned are sent concurrently. Each spanned message is prefixed with 6 characters indicating it is part of a spanned SMS.
The 6 characters are:
(#of8)
Where # is equal to 1 to 8.
Maximum Number of Characters Allowed with Spanning:
ASCII 1232
Extended ASCII 1072
Unicode 512
After upgrading from older firmware, the number of allowed spans can be increased up to 8 using one of the following
methods:
● Set the unit to factory defaults.
● To set number of spans allowed on sent SMS messages, run the setspans utility from telnet:
setspans utility
You can run this utility from a telnet session to port 2222.
After logging in, type "./sbin/setspans" (without the quotes). This shows you the syntax and current span setting. set
To set the span value and save it to flash, enter "./sbin/setspans #" where # is the number of desired spans (1-8).
Encoding Type
Select the encoding type that you want the SMS message to be sent as.
Options: ASCII (default), Extended ASCII, Unicode.
● When Extended ASCII is selected, an "Extended ASCII" link is added under the SMS Text box, providing a keyboard of
extended ASCII characters that can be added into the SMS Test message.
● When Unicode is selected, choose Hexadecimal, Decimal or Language for the Unicode type. If Language is selected,
an additional drop-down box appears with specific language selections.
When a language is selected, clicking on the link after the Pre-Configured Message link brings up a virtual keyboard that
allows you to enter the specified text in the SMS Text message box.
MultiModem® iSMS System Administrator’s Guide 48
Page 49

Chapter 4 – Using the MultiModem iSMS Web Interface
Modem
Select a specific modem from which to send the message, or use the default of Any.
Priority
Set the priority level for the message to be sent. When messages enter the queue to be sent, the priority levels are
compared and the messages flagged as High are sent first, followed by Normal and Low.
Options: Low, Normal (default), High.
Send button
When you are ready, click Send to send your message – click OK when the pop-up “in process” message appears. The
message is not sent unless you acknowledge this pop-up.
49 MultiModem® iSMS System Administrator’s Guide
Page 50

Chapter 4 – Using the MultiModem iSMS Web Interface
SMS Services > SMS API
This feature helps you use the MultiModem iSMS Application Programming Interface (API).
HTTP API and TCP API are Send SMS APIs (for sending SMS messages to mobile endpoints on the cellular network). Both
methods can be enabled and used simultaneously.
SMS Messages received from the cellular network are handled by the Receive API process.
Note: See Appendix A for specific information on API command structure, options, responses and XML data structure.
HTTP API Configuration
IP enabled applications external to the MultiModem iSMS can submit messages for sending by using HTTP protocol Get
and POST commands.
HTTP API Status
Check the box to enable the HTTP API service.
HTTP Port
Enter the port number on which the HTTP API service listens. It is recommended this port be different from what the WEB
Management Interface uses. The default is 81.
Save
Click Save.
TCP API Configuration
IP enabled applications external to the MultiModem iSMS can submit messages for sending by using this product specific
command protocol. See Appendix A for more details.
TCP API Status
Check the box to enable TCP API service. This is necessary for units participating in load balancing.
TCP Port
Enter the port number on which the TCP API service listens. The default is 2040.
Save
Click Save.
MultiModem® iSMS System Administrator’s Guide 50
Page 51

Chapter 4 – Using the MultiModem iSMS Web Interface
Non Polling Receive API Configuration
This group helps you select which method of Receive API is implemented by the MultiModem iSMS server (how SMS
Messages received from the cellular network are handled). There are two methods:
● Polling: the received SMS is left in the Receive SMS queue until your application queries for it using an HTTP GET.
● Non Polling: Upon reception, the MultiModem iSMS server POSTs the message to your WEB server (or TCP
application).
When the "Non Polling Receive API Status" checkbox is NOT checked, polling is enabled. When polling is enabled, perform
the query on the HTTP Port number defined in the HTTP API Configuration section/menu.
Non Polling Receive API Status
Check this box to enable non-polling API status when receiving messages. This changes the SMS API section as shown
below. When this is not checked, Receive API Polling is enabled. Receive API Polling is the default.
Protocol
Select the protocol to use: HTTP or TCP.
Server
Enter the resolvable name or IP address of the server to use.
Port
Enter the port number for accessing the server.
Server Default Page
Enter the default page for the server to use.
Server Authentication
Check this box if you want to authenticate to the server. Below you can enter the username and password that allows
access.
Username
Enter the username used for authentication.
Password
Enter the password associated with the above username.
51 MultiModem® iSMS System Administrator’s Guide
Page 52

Chapter 4 – Using the MultiModem iSMS Web Interface
Send Encoding Flag
Specify whether to include the encoding type (ASCII, Extended ASCII, or Unicode) of the messages in the data posted.
When using older Non-Polling Receive API programs and scripts, this should be disabled for backwards compatibility.
Post Interval
Enter the number of seconds that you want to elapse between Non-Polling posts to the HTTP or TCP server. The minimum
allowed post interval is 30 seconds. Note that all undelivered messages will be posted at this time. The messages will be
posted in groups, based on the Max Messages Per Post setting, until all have been delivered.
Max Messages Per Post
Specify the maximum number of messages that should be posted at one time. See post interval for more details on how
this is used. When using older Non-Polling Receive API programs and scripts, this should be set to 1 for backwards
compatibility.
Send Message Index
Specify whether to include the Message Index with each message in the post and include a total Message Count at the
beginning of the post. When enabled, this will make parsing multiple easier. When using older Non-Polling Receive API
programs and scripts, this should be disabled for backwards compatibility.
Save Buttons
Click Save for each section after making changes. Unsaved changes are not maintained when you navigate from this page.
MultiModem® iSMS System Administrator’s Guide 52
Page 53

Chapter 4 – Using the MultiModem iSMS Web Interface
SMS Services > Load Balancing
This feature provides a single interface to your Send SMS application when multiple units are needed for increased
throughput. When multiple iSMS units are available on a network, they can be set up to work together to share the
outgoing message load. This is achieved by designating one unit to be the Master and subsequent units (up to 4) to be
Slaves. Your Send SMS application does not need to make any changes when Load Balancing is enabled. The send SMS
application still uses either of the send APIs (HTTP or TCP) to submit SMS messages for sending.
When the amount of "pending" messages within the Master reaches a system threshold, the Slave units are polled by the
Master for availability, and if so available, pending messages are distributed dynamically to the slaves. Once initiated, the
Master unit uses the slaves until the send queue is reduced sufficiently below the threshold. Your Send SMS Application
can not specify the slave unit through which a particular message is sent.
The number of pending messages needed to surpass the threshold is a variable based on the length of each message
(character count per message) and the MultiModem iSMS model number. The threshold is increased as the model
number increases.
Load Balancing
Status
Check the Status box on every unit that is participating in Load Balancing and click Save.
Note: When using Load Balancing, each Slave unit must have the TCP API Status enabled. The Master unit communicates
to the slaves via TCP API access.
Slave Configuration
Slave Configuration information is only to be defined in the Master unit.
Slave#
The slave# tabs are used to identify which units are slave units and login information.
Status
This box is checked only on the Master unit. Uncheck this checkbox for all Slave units.
Username
Enter the valid administrator username needed to access the Slave unit.
Password
Enter the valid administrator password needed to access the Slave unit.
IP Address
Enter the IP Address of the Slave unit.
TCP API Port
Enter the open port used to access the Slave unit.
53 MultiModem® iSMS System Administrator’s Guide
Page 54

Chapter 4 – Using the MultiModem iSMS Web Interface
SMS Services > Inbox
This window displays a list of all messages received by the cellular modem port. There is an Inbox per modem port. Each
listing includes the sender's number, the message received, and a timestamp. Click on the individual modem number tabs
for a list of messages received by that modem.
SF100 Note: SF100 models require a "Save to Flash" be performed for the Inbox and Outbox records to be retained upon
system restart. SF400 and SF800 models do not have this requirement.
Clear Inbox
Click Clear to delete all the inbox entries.
From
Shows the phone number from which the SMS was received.
SMS
Displays the text message received.
Date
Shows the day that the MultiModem iSMS received the message.
Time
Displays the time the message was received by the MultiModem iSMS.
Note: The cellular service provider gives the inbox a time stamp.
MultiModem® iSMS System Administrator’s Guide 54
Page 55

Chapter 4 – Using the MultiModem iSMS Web Interface
SMS Services > Outbox
The Outbox is for the unit as a whole. This window chronologically lists sent messages and includes Message ID, Sending
unit, who submitted the message, receiver's number, the message sent, and the timestamp.
To determine the specific modem port on which the SMS was transmitted, note the exact time and date of the message
and then review the Sent SMS Log found in the Trace Logs menu.
SF100 Note: SF100 models require you to perform a "Save to Flash" for the Inbox and Outbox records to be retained upon
system restart. SF400 and SF800 models do not have this requirement.
Clear Outbox
Click Clear to delete all the outbox entries.
Msg ID
The message ID (Msg ID) is non-zero if the message has been sent using SEND API. A Msg ID of zero means it was
submitted using the Web Management Send SMS menu.
Handled By
Displays the MultiModem iSMS unit used to send the SMS. If Outbox of the unit you are viewing is the unit that sent the
SMS to the cellular network, it displays "Local" (regardless of Load Balancing configuration). If this Outbox is that of the
Load Balancing Master and the message was distributed to a Slave unit, it displays "Slave#" (where # is 1 thru 4).
User
Displays the user name of the account that sent the message.
To
Shows the numbers or groups to which the message is sent.
SMS
Display the text sent in the message.
Date
Shows the day the message was sent.
Time
Displays the time the message was sent.
Note: For messages in the Outbox to have a valid date/time stamp, be sure to set up one of the following options:
● SNTP Client must be enabled and the Ethernet connection must be live to the Internet.
-or-
● Enter the iSMS cellular phone number on the Network Setup > Cellular Modem window.
55 MultiModem® iSMS System Administrator’s Guide
Page 56

Chapter 4 – Using the MultiModem iSMS Web Interface
Triggers
Use the four Triggers windows to:
● Establish a list of users who are authorized to trigger a broadcast.
● Set up broadcast triggers.
● Set up action triggers.
● Compose and save pre-configured messages.
Triggers > Authentic List
Use this window to set up a list of users who are authorized to trigger a broadcast. This list is made up of entries found in
the Address Book. This list is used by the Broadcast Trigger setup menu when the Broadcast Trigger option "Authenticate"
is enabled.
Authentic List
Click Add to display the Address Book from which you can select users who are added to the Authentic List.
Note: Without a populated Address Book, no users can be added to the Authentic List.
Triggers > Broadcast Triggers
Use this window to set up Broadcast Triggers. A Broadcast Trigger is a function of the MultiModem iSMS server. When a
Trigger message (code or word) is received from a cellular phone or mobile end point, the MultiModem iSMS server
responds by sending a predefined Broadcast message (SMS) to a predefined group of recipients (Address Book entries and
Group). The Broadcast Message is also sent to the sender of the trigger, indicating the trigger was received and the
broadcast invoked.
Broadcast Triggers
Click Add to display the Add a Broadcast Trigger window.
MultiModem® iSMS System Administrator’s Guide 56
Page 57

Chapter 4 – Using the MultiModem iSMS Web Interface
Add a Broadcast Trigger
Note that the fields marked with an asterisk are required. This is a setup window; no messages are sent from this window.
Trigger Message
Enter a code or word that triggers the sending of the Broadcast Message.
Broadcast Message
Enter a message that is broadcast when the trigger code or word is received, or click Pre-Configured Message if you want
to use one of these messages as your broadcast message.
Encoding Type
Select the encoding type: ASCII, Extended ASCII or Unicode. This applies to both the Trigger Message and the Broadcast
Message. The received trigger message must be encoded in the same format as specified in the Broadcast Trigger,
otherwise the trigger does not match and the broadcast message is not sent. Default is ASCII.
To
Select the Groups who receive this broadcast message. Click Groups to display your list of group choices. If desired, you
can later highlight the name of a group and click Delete to remove a group from the list.
Authenticate
Check the Authenticate box if you want this trigger code or word and the broadcast message to be managed by the
authentication function. If this option is not enabled (unchecked), upon receipt of the Trigger Message the broadcast is
initiated.
When this option is enabled, the sender of the Trigger Message (phone number) is verified to be listed as an "Authentic
User" before the broadcast is initiated. If the Sender is not Authentic, the broadcast is not performed.
Authentic Users
Select the Authentic Users who are allowed to trigger a broadcast message.
Priority
Select a priority level from Low, Normal or High. Default is Normal.
Save or Cancel
Click Save, or if you change your mind and do not want the information saved, click Cancel.
57 MultiModem® iSMS System Administrator’s Guide
Page 58

Chapter 4 – Using the MultiModem iSMS Web Interface
Triggers > Action Triggers
Action Triggers are the codes or words sent from a remote cell phone and received by the MultiModem iSMS – the trigger
executes the action associated with it. This is a setup window; no messages are sent from this window.
The trigger codes or words along with the authentication function may be configured for each trigger action. If
authentication is enabled, only the trigger code or word received from an authenticated user can trigger the action.
Trigger Action – The action is executed when a properly formatted Trigger Message is received.
Trigger Message (Codes or Words) – The window shows the default Trigger Message for each Trigger Action. The code or
word (Trigger Message) used to invoke the specific action can be changed by clicking on the Edit option for each Trigger
Action. See the table on the next page for an explanation of how the trigger codes and their associated actions are used.
Authenticate – If the authenticate option is enabled, only the message received from the configured authenticated user
can trigger the action. The authenticated users are set up on the Triggers > Authentic List window.
Enable Authentication
To enable authentication click Edit. The Authenticate column then displays a check box, and the View/Edit column
displays the words Save and Cancel.
Click the check box to enable Authentication for this action and then click Save. If you want to disable Authentication for
this action, simply click Cancel.
MultiModem® iSMS System Administrator’s Guide 58
Page 59

Table of Trigger Codes and Trigger Actions
Chapter 4 – Using the MultiModem iSMS Web Interface
Trigger
Code/Word
ADD To add an entry in the
Objective Configuring the Trigger Code and Its
Associated Trigger Action
Configuration format:
address book
<act_tri_configured>;name;number
Example: ADD;joe smith;7635554174
Configuration format:
<act_tri_configured>;name
Example: ADD; joe smith
Configuration format:
<act_tri_configured>
Example: ADD
ADDG To add a group name
and an entry.
Note: The same action
Configuration format:
<act_tri_configured>;grp_name
Example: ADDG;Building_201
trigger message is
used for creating a
group name and
adding an entry to a
group. So, in the
interface there is one
configuration for both.
Configuration format:
<act_tri_configured>;grp_name;name;
number
Example:
ADDG;Building_201;joe smith;7635554174
Configuration format:
<act_tri_configured>;grp_name;name;
Example: ADDG;Building_201;joe smith
ADDSMS To add a pre-
configured SMS
Configuration format:
<act_tri_configured>;SMS
Example:
ADDSMS;Building 201 is closed until further
notice.
DEL To delete an entry
from the address book
Configuration format:
<act_tri_configured>;name;number
Example: DEL;joe smith;7635554174
Configuration format:
<act_tri_configured>;name
Example: DEL;joe smith
DELG To delete a group Configuration format:
<act_tri_configured>;grp_name
Example: DELG;Building_201;joe smith
Action
Adds name with number
to address book.
Adds name with sender's
number to address book.
Adds name and number of
sender to address book.
Creates a group with a
group name.
Adds name with number
to a group. Group must
already exist.
Adds name to a group.
Group must already exist.
Adds SMS to
preconfigured list.
Deletes name with number
from the address book.
Deletes all entries with this
name from the address
book.
Deletes the group with the
group name.
59 MultiModem® iSMS System Administrator’s Guide
Page 60

Chapter 4 – Using the MultiModem iSMS Web Interface
Triggers > Pre-Configured SMS
Use this window to compose and save pre-configured messages.
Pre-Configured SMS
Click Add to open the Add a Pre-Configured SMS window.
Add a Pre-Configured SMS
An asterisk indicates a required field.
Pre-Configured SMS
Enter the text for your Pre-Configured SMS Message.
Encoding Type
Select the encoding type to be used from ASCII, Extended ASCII or Unicode. Default is ASCII.
Pre-Configured Group
Select the groups to receive this pre-configured message. Click Groups and select the desired groups. If you change your
mind about a group, highlight the group and click Delete to remove it from the list. Note that a message can contain only
160 characters including spaces and punctuation.
Save or Cancel
Click Save, or if you change your mind and do not want the information saved, click Cancel.
Save & Restart
IMPORTANT Note About Saving System Settings
When you have completed entering your MultiModem iSMS settings and you are not going to enter any more
configuration data, you must go to the Save & Restart menu and perform a Save to Flash. Saving to the Flash
Memory saves the new settings in the flash prom and prevents the settings from getting lost at the next power
up.
Save
Click Save to save your system settings to the flash memory.
Restart is Optional
This is optional. You do not have to restart the MultiModem iSMS after saving to the flash memory.
MultiModem® iSMS System Administrator’s Guide 60
Page 61

Chapter 4 – Using the MultiModem iSMS Web Interface
Utilities
Utilities > Backup
The Backup window has two functions. First, it lets you save all MultiModem iSMS configuration files into one file for
storing externally (Export Backup). Second, it is used to import and apply a configuration backup file (Import Backup from
Remote Client). You may want to import a configuration backup for ease of configuring new units, or to restore a
previously known good configuration to a unit under test.
A backup file is a .tar file that includes the Address Book, Groups and /var/config/ folder (which includes the unit's IP
network settings).
Note: Only apply (import) a backup file to a MultiModem iSMS unit that is the same model number and firmware version
as the unit that created (exported) the backup file. Be careful not to create an IP address conflict on your LAN. Two or
more units cannot be on the same LAN with the same configuration applied.
Backup
Import Backup from Remote Client
Use this section of the window to import a previously exported configuration backup file. Click Browse to locate the file.
Then click Import to restore the MultiModem iSMS configuration from this backup file. The configuration file is uploaded
to the MultiModem iSMS and the saved configuration is restored.
Export Backup
Use this section of the window to create a backup file of the unit's current configuration. Click Export to save the
configuration file to a location of your choice. The file created is a .tar file with its name based on the model type and the
time and date of when the export was invoked.
61 MultiModem® iSMS System Administrator’s Guide
Page 62

Chapter 4 – Using the MultiModem iSMS Web Interface
Utilities > Firmware Upgrade
Use this feature to upgrade the firmware on the MultiModem iSMS to the latest version. You can download Multi-Tech
firmware upgrades from Multi-Tech website.
Before upgrading the unit's firmware:
● Save to Flash and then reboot the iSMS server.
● Back-up the unit's configuration.
● Stop using the iSMS Server while it is being upgraded. The upgrade process requires the Send API functions within the
iSMS server be disabled.
Caution: It is recommended that the firmware upgrade be done locally, invoked from a workstation on the same subnet
and LAN that the iSMS is on. It can be helpful to watch the unit's STATUS LED and Ethernet LEDs during the upgrade
process.
Firmware Upgrade
Select a File to Upgrade
1. Click Browse to locate the latest firmware version.
2. Click Upgrade to start the download.
Note for 1-Port
rename that portion of the file to “SMSFinder...” for the unit to recognize it as a viable upgrade file.
versions only: If the firmware upgrade .bin file you have downloaded begins with “SF100...” you need to
The MultiModem iSMS reboots automatically after the firmware upgrade.
MultiModem® iSMS System Administrator’s Guide 62
Page 63

Chapter 4 – Using the MultiModem iSMS Web Interface
Import & Export Address Book
Import & Export Address Book > Import
Use this window to import contact information from a CSV formatted file. The process allows you to select which fields
(values) in the CSV file to import. Duplicate records—where all values of the record are identical to the existing record
found in the unit's Address Book— are not imported. After performing an Import, be sure to perform a "Save to Flash",
otherwise the new Address Book entries are lost after a system restart.
Note: CSV stands for comma separated values, a term that applies to the format of an address book. The CSV file to be
imported cannot have more than 10 fields (values) per record (line).
Import Address Book
Select the CSV File
Browse for the address file you want to use, and then click Upload. The window displays 'Please Wait while the CSV "File"
is Uploaded'. This window appears quickly (this is the actual upload of the file to the MultiModem iSMS Server). When the
transfer is complete the next window displays 'Please Wait while "CSV" is Uploaded'. This is displayed while the structure
and contents of the CSV file are analyzed. When the analysis is complete the following window appears. The following
window helps you select which Field/Values in the CSV file to use (import).
Choose Your Address Book Column Headings
Address Book Field and Field in the CSV
The four items in the Address Book Field column make up one entry (record) in the unit's Address Book. The column on
the right (Field in the CSV) is used to select which fields (values) in the CSV file you want to associate with the Address
Book fields on the left. The options listed in the drop down boxes are derived from the column headings (1st row) in the
CSV file.
For each drop down box, select a Value that matches closest to the Address Book Field on the left. Each drop down box
must select a different value (column heading). Then click Import.
In the example that follows, the selected column headings are First Name, Last Name, Phone, and Description in this
order.
63 MultiModem® iSMS System Administrator’s Guide
Page 64

Chapter 4 – Using the MultiModem iSMS Web Interface
Example: Excerpt from a .CSV File
First Name,Last Name,phone,description
first1,last1,17633604174,Parent
first2,last2,17633604174,Parent
first3,last3,17633604174,Student
first4,last4,17633604174,Teacher
first5,last5,17633604174,Supplier
first6,last6,17633604174,Newspaper
first7,last7,17633604174,Photographer
Note: If you plan to use authentication on any entry in the address book, enter the phone numbers of these individuals
exactly as how the Cellular Network presents Sender Number information (usually that is with a + symbol followed by the
country code and then area code). Please see NOTE in the Address Book section of this guide. This allows authentication
to work properly by allowing the MultiModem iSMS box to successfully match the cell phone number of a received trigger
message with the phone number in the Authentic List.
Example of an Imported Address Book
Exception: The first entry was entered remotely with a trigger message. Note that remotely sent numbers have a "+" in
front of the number. The other entries were added by the import process. The Phone Number values in the CSV file did
not include a + symbol with the numbers.
Address Book
After the Address Book has been imported, you can add, edit, delete and search for entries.
Add
To add a new entry, click Add. The SMS Services > Add a Phone Number window displays on which you can enter the new
number.
Edit
To edit an entry, click the corresponding Edit in line with the entry you want to edit. The window turns to edit mode.
Delete
To delete an entry, place a check in the Delete box in line with the entry or entries you want to delete. Then click Delete.
Note that you can select all entries to be deleted at one time instead of checking each entry; simply check Select All and
then click Delete.
Search
To search for an entry, enter the beginning letters of a name. Then click Search.
You can enter a new starting point at anytime, if your search does not yield the results you wanted.
MultiModem® iSMS System Administrator’s Guide 64
Page 65

Chapter 4 – Using the MultiModem iSMS Web Interface
Import & Export Address Book > Export
Use this window to export the contents of the MultiModem iSMS Address Book. The export creates a CSV file with 4 fields
(values) per record: Firstname,Lastname,Description,Phone-Number.
This .csv file is then ‘tarred’ and zipped.
The created .csv file is ideal for importing it into a different MultiModem iSMS server. It can also be imported by any
other application that supports .csv formatted files (e-mail programs, business applications, etc.).
Note: Ensure the browser you are using to view the MultiModem iSMS has pop-ups enabled, so information windows can
appear when necessary.
Export Address Book
Export Address Book
Click Export to save the address book of this MultiModem iSMS to the workstation that is accessing the MultiModem
iSMS. The address list is saved in the following format (a zipped-up file):
.tar.gz
The CSV file is saved with four columns labeled First Name, Last Name, Description, and Phone.
Save & Restart
IMPORTANT Note About Saving System Settings
When you have completed entering your MultiModem iSMS settings and you are not going to enter any more
configuration data, you must go to the Save & Restart menu and perform a Save to Flash. Saving to the Flash
Memory saves the new settings in the flash prom and prevents the settings from getting lost at the next power
up.
Save
Click Save to save your system settings to the flash memory.
Restart is Optional
This is optional. You do not have to restart the MultiModem iSMS after saving to the flash memory.
65 MultiModem® iSMS System Administrator’s Guide
Page 66

Chapter 4 – Using the MultiModem iSMS Web Interface
Statistics & Logs
Statistics & Logs > System Information
The System Information window provides the following information:
System Information
● Product Model Number
● Firmware Version
● MAC Address
● Entries in the Address Book
Live Details
● Date and Time
● System Uptime
● Memory Utilization
MultiModem® iSMS System Administrator’s Guide 66
Page 67

Chapter 4 – Using the MultiModem iSMS Web Interface
Statistics & Logs > SMS Statistics
The SMS Statistics window provides the following information by individual modem:
SMS Statistics (SF400/800 can select modem number):
SIM Status - Indicates the presence of a SIM card and if the modem port is enabled or disabled.
Signal Strength - See Signal Strength section in Chapter 2.
Messages in Inbox - The number of messages received by the modem since the MultiModem iSMS server booted up.
Messages Sent - The number of messages sent by the modem since the MultiModem iSMS server booted up.
Rate of Sent Messages: This is the number of messages sent per minute. This counter reflects live activity. If the modem
has not sent a message in over 60 seconds, the value is zero. The average number of messages sent from the
MultiModem iSMS is about 7 a minute. These rates are affected by the size of each message and the amount of network
congestion.
Rate of Received Messages: This is the number of messages received per minute. This counter reflects live activity. If the
modem has not received a message in over 60 seconds, the value is zero. The average number of messages received by
the MultiModem iSMS is about 5 a minute. These rates are affected by the size of each message and the amount of
network congestion.
Note: The Triggers Statistics and Job Statistics windows provide system totals (not per port) for the listed events.
Trigger Statistics
Broadcast Triggers Configured
Broadcast Triggers Received
Action Triggers Received
Job Statistics
Entries in Outbox
Low Priority Jobs Queued
Normal Priority Jobs Queued
High Priority Jobs Queued
Jobs Distributed
Jobs Dispatched
67 MultiModem® iSMS System Administrator’s Guide
Page 68

Chapter 4 – Using the MultiModem iSMS Web Interface
Statistics & Logs > Load Balancing Statistics
When load balancing is set up with multiple units, this section is populated with statistics corresponding to the workload
shared.
Load Balancing Statistics
Slaves
List of possible slave units.
Load
Load for specific slave unit, or ‘Disabled’ for units not participating in load balancing.
Jobs Distributed
The number of jobs that have been given to the specific unit.
MultiModem® iSMS System Administrator’s Guide 68
Page 69

Chapter 4 – Using the MultiModem iSMS Web Interface
Statistics & Logs > Log Traces
The Log Traces window provides detailed information about SMS messages, API functions, and the SMS system per
modem:
SMS Logs (Sent, Received, Failure, Live)
Send API Logs (Status, Failure, HTTP API Live, TCP API Live)
Receive API Logs (Live, Failure)
Load Balance Logs
System Logs
The number of logged messages depends on the amount of memory. Typically, the log can store information for about
500+ messages.
To View Logs
Click Show to view the desired Log for the modem number selected from the tabs above.
69 MultiModem® iSMS System Administrator’s Guide
Page 70

Chapter 5 – Using the Non-
Administrative User Interface
This chapter covers the Web Interface available to non-administrative users. Non-administrative users have access to the
Send SMS menu and an Outbox tied to their account. Users browse to the address of the MultiModem iSMS, login using
the name and password created by the administrator and can then send messages from the SMS Services > Send SMS
window.
Note: The Administrator uses the SMS > Send SMS Users window to identify and set up users.
Web Interface Available to Non-Administrative Users
The only windows available to users are the following SMS Services windows:
● Send SMS
● Outbox
How Non-Administrative Users Login
Note: Be sure that the MultiModem iSMS is cabled and that the power is connected as shown in Chapter 2.
1. Open a Web browser on the PC.
2. Enter the address of the MultiModem iSMS (resolvable name or IP address):
http://192.168.2.1
3. The Login window for the MultiModem iSMS displays.
Users must type their names the way the administrator entered them on the SMS Services > Send SMS Users
window.
Users must type the passwords created for them by the administrator on the SMS Services > Send SMS Users.
4. Click Login. The SMS Services > Send SMS window displays.
70 MultiModem® iSMS System Administrator’s Guide
Page 71

Chapter 5 – Using the Non-Administrative User Interface
SMS Services > Send SMS
This is the window from which users send SMS text messages (original text or pre-configured messages). The window
options here are the same options available to the administrator.
SMS Services > Outbox
This window is also available to users. It lists the SMS text messages sent. The list includes the receiver's number, the
message sent, and a timestamp.
MultiModem® iSMS System Administrator’s Guide 71
Page 72

Chapter 6 – SMS Examples
Verifying the SIM Card is Installed and Activated
To verify that the SIM is installed correctly and that it is activated.
1. Power up the MultiModem iSMS. Wait until the Status LED and the LS LED are blinking before continuing. Make sure
all setup procedures and connections have been made. See Chapter 2.
2. Open the Web browser, enter the IP address, and login to the MultiModem iSMS. See Chapter 3.
3. Go to the Network Setup > Cellular Modem window.
a. Enter the phone number of your SIM card. Example: 6126361654.
4. Click Save.
5. Click Save & Restart under the Menu Bar. Select Save. Note: You do not have to restart the MultiModem iSMS.
6. Send a text message to yourself. Do this on the SMS Services > Send SMS window.
7. To – Enter Phone Numbers – Enter the SIM phone and click Add. The phone number displays in the box to the
right.
8. SMS Text – Enter an SMS Text message. The format add;SF100 is a trigger message word that tells the
MultiModem iSMS to add
this message.
9. Click Send. The following message displays: Your request is being processed.
10. Click OK.
72 MultiModem® iSMS System Administrator’s Guide
the phone number and name to the address book. Notice the use of the semicolon in
Page 73

Chapter 6 – SMS Examples
11. Check the Outbox and observe that the message was sent.
12. Check the Inbox and observe that the message was received. This verifies that the cellular modem is functioning.
Note: Sometimes you may have to refresh this window and wait several minutes for the cellular provider to deliver
the message.
13. Go to the SMS Services > Address Book. Observe that the trigger SMS text message was processed and the name and
phone number were added to the address book.
Note: The phone number is entered with a "+1" in front of it. This indicates the address phone number was entered into
the address book using a trigger message.
73 MultiModem® iSMS System Administrator’s Guide
Page 74

Chapter 6 – SMS Examples
Creating a Broadcast Message for Future Use
In this example a school wants to be prepared to send a message that school is closed for the day. The Administrator
creates a Trigger Message word Snow and the following Broadcast Message: School is closed today. This example
assumes that a Group called Parents has been created and that SF100 stands for the Administrator's cell phone number.
1. Go to the Triggers > Add a Broadcast Trigger window.
a. Enter Snow in the Trigger Message word box. Trigger message words or codes are not case-sensitive.
2. Enter the Broadcast Message. In this case the message is School is closed today.
3. Select the Group that receives this message. In this case the group is Parents.
4. Check the Authenticate box to indicate that this message can be sent by an authenticated user only.
5. The Authentic User selected to trigger this message is SF100, the Administrator's cell phone.
Note: If you plan to use authentication on any entry in the address book, enter the phone numbers of these individuals
exactly as how the Cellular Network presents Sender Number information (usually that is with a + symbol followed by the
country code and then area code). Please see NOTE in the Address Book section of this guide. This allows authentication
to work properly by allowing the MultiModem iSMS box to successfully match the cell phone number of a received trigger
message with the phone number in the Authentic List.
6. Select a Priority level (in this case, High was selected).
7. Click Save. The following window displays the Broadcast Message saved for future use.
8. To trigger the broadcasting of this message to the Parent group, the administrator sends the SMS text message word
Snow from his cell phone to the MultiModem iSMS. When the MultiModem iSMS receives this message, it compares
the Administrator's cell phone number with the Authentication List and if they match, it broadcasts the message to
everyone in the Parent group.
MultiModem® iSMS System Administrator’s Guide 74
Page 75

Appendix A – Application
Programming Interface (API)
This appendix defines the Application Programming Interface (API) provided for sending and receiving SMS through the
MultiModem iSMS. Use the API to integrate the MultiModem iSMS Send and Receive SMS capability into your custom
application.
APIs are defined to send and receive SMS using HTTP or TCP protocols. The packet formats and handshakes are provided
in the next section “Send SMS API”.
Acronyms and Definitions
Acronyms Definitions
API Application Programming Interface
HTTP Hypertext Transfer Protocol
SMS Short Message Service
TCP Transport Control Protocol
MultiModem® iSMS System Administrator’s Guide 75
Page 76

Appendix A – Application Programming Interface (API)
SMS API
HTTP API
This section describes how to configure the "HTTP Send API" by using the MultiModem iSMS web admin interface.
HTTP Send API Status:
Enable “HTTP Send API Status” to send SMS / query status using HTTP API.
By default, HTTP Send API is disabled.
HTTP Port:
Configure the port to service the HTTP Send API.
Default is 81.
MultiModem® iSMS System Administrator’s Guide 76
Page 77

Appendix A – Application Programming Interface (API)
HTTP Send API Format
Each "HTTP Send API Request" consists has four parts:
● The first part is the destination, that is, the MultiModem iSMS IP and HTTP port number.
● The second part is the API call which is the query; therefore, it has a '?' post-fixed to the call.
● The third part is for authentication, which is in the form of a username and password.
● The fourth part is the message parameters.
Where: portnumber is optional.
modem is optional
user1, puser1, 7634567765 and message are variables / configured parameters.
Note: The MultiModem iSMS can be accessed ONLY from the preconfigured allowed networks.
Example: To access the MultiModem iSMS 204.26.122.125 from 125.63.78.44, you MUST add the network 125.63.78.0 to
the following MultiModem iSMS window: Admin Access >> Allowed Networks
When HTTP Send API is enabled, it is also possible to send SMS from a non-browser with a TCP connection to the
configured HTTP Port by following the steps below:
● Initiate a raw TCP connection to the MultiModem iSMS IP address over the "HTTP Send API" port
● Example : telnet 192.168.2.1 81
● Issue GET command to send SMS.
● Issue GET command to query the status of send SMS.
Send API Format
GET
/sendmsg?user=admin&passwd=admin&cat=1[&enc=0][&priority=1][&modem=2]&to=56456
76543&ton=Graham&group=Engineering&text=This%20is%20a%20test%20message.^M^J
-or-
GET
/sendmsg?user=admin&passwd=admin&cat=1[&enc=1][&priority=2][&modem=0]&t
o=%225678976543%22&ton=%22Bob%22&group=%22Engineering%22&text=This%20is
%20a%20test%20message.^M^J
Query API Format
GET /querymsg?user=admin&passwd=admin&apimsgid=message id.^M^J
Note: All special characters must be given in URL encoded format with hex value. For example give space as %20; double
quotes as %22.
Example: If a name is Graham Bell, give it as Graham%20Bell
77 MultiModem® iSMS System Administrator’s Guide
Page 78

Appendix A – Application Programming Interface (API)
Authenticating API Requests
The system needs to authenticate any API request. As such, the authentication credentials are included in the "Send SMS
URL" or “Send SMS TCP” command.
user - The username of the account, which has a maximum of 50 bytes.
passwd - The password of the account, which has a maximum of 50 bytes.
This user is Admin or the configured Send Users.
Ensure that every "Send SMS URL" has the username and password, and every request is authenticated by the
MultiModem iSMS.
Sending to a Number
HTTP API format is:
http://192.168.2.1[:portnumber]/sendmsg?user=user1&passwd=puser1&cat=1[&enc=0]
[&priority=1][&modem=1]&to=”7657867765”&text=message
The parameters are:
Parameter Description
cat Category
1 - Send SMS
2 - Broadcast Trigger
3 - Action Trigger
enc Encoding type to send SMS(Optional field)
Range: 0 to 3
0 - SMS text is in ASCII form
1 - SMS text in Extended ASCII form
2 - SMS text in hexadecimal form. Each hexadecimal value length is maximum 4 and each hexadecimal
value is separated by a semi-colon. Example: 0645;41;646.
3 - SMS text is in decimal form. Each decimal Value length is maximum 5. Use a semi-colon to separate
each decimal value. Example: 1605;65;65300. The maximum decimal value allowed is 65535
If enc is not specified in the send API request, default enc is the configured settings in SMS settings
page.
Examples
enc=2, if Unicode is enabled.
enc=1, if Extended ASCII is enabled.
enc=0, if both Extended ASCII and Unicode are disabled.
priority Priority to send SMS (Optional field)
Range: 1 to 3
1 - Low Priority
2 - Normal Priority
3 - High Priority
If priority is not specified in the request, default priority is normal.
MultiModem® iSMS System Administrator’s Guide 78
Page 79

Modem Modem index to send SMS. SF400/800 models only.
Range : 1 to 4 for SF400
1 to 8 for SF800
0 for any modem (Send API job is distributed using all available modems)
If modem is not specified in the request, send API job is distributed using all the available modems.
to The mobile number where the SMS is delivered.
This number is given in double quotes. The maximum size of each recipient’s number is 50 bytes.
text The message text to be sent.
Enable Extended ASCII in the MultiModem iSMS to send both ASCII and extended ASCII characters. By
default, Extended ASCII is disabled and the message can have only ASCII characters.
Notes: If Extended ASCII and Unicode are disabled and spanned SMS value is 1, a maximum of 160
characters can be sent.
If Extended ASCII is enabled and spanned SMS value is 1, a maximum of 140 characters can be sent.
If Unicode is enabled and spanned SMS value is 1, a maximum of 70 characters can be sent.
If the spanned SMS value is more than 1, the maximum number of characters allowed for each
encoding scheme is defined as follows (where n represents the span value):
Appendix A – Application Programming Interface (API)
ASCII – n * 154 characters
Extended ASCII – n * 134 characters
Unicode – n * 64 characters
Any characters entered beyond the allowed limit are truncated.
In the HTTP API format example above: user1, puser1, 7657867765 and message are variables / configured parameters.
79 MultiModem® iSMS System Administrator’s Guide
Page 80

Appendix A – Application Programming Interface (API)
Sending to an Address Book Name
The API can be used to send the message to a name in the MultiModem iSMS address book. If the name does not exist in
the address book, the message is dropped.
HTTP API format is:
http://192.168.2.1[:portnumber]/sendmsg?user=user1&passwd=user1&cat=1
[&enc=0][priority=3][&modem=2]&ton=”bob”&text=message
-or-
http://192.168.2.1[:portnumber]/sendmsg?user=user1&passwd=user1&cat=1
[&enc=2][priority=3][&modem=2]&ton=”bob”&text=41;42;645;0645(hexadeci
mal form)
-or-
http://192.168.2.1[:portnumber]/sendmsg?user=user1&passwd=user1&cat=1
[&enc=3][priority=3][&modem=2]&ton=”bob”&text=65;66;67(decimal form)
The parameters are:
Parameter Description
cat 1
enc Encoding type to send SMS(Optional field)
Range: 0 to 3
0 - SMS text in ASCII form
1 - SMS text in Extended ASCII form
2 - SMS text in hexadecimal form. Each hexadecimal value length is maximum 4, and each hexadecimal
value is separated by a semi-colon. Example: 0645;41;646.
3 - SMS text is entered in decimal form. Each decimal Value length is maximum 5, and each decimal
value is separated by a semi-colon. Example: 1605;65;65300.
Note: Maximum decimal value allowed is 65535.
If enc is not specified in the send API request, default enc is the configured settings in SMS settings
page.
enc=2, if Unicode is enabled.
enc=1, if Extended ASCII is enabled.
enc=0, if both Extended ASCII and Unicode are disabled
priority Priority to send SMS(Optional field)
Range: 1 to 3
1 - Low Priority
2 - Normal Priority
3 - High Priority
If priority is not specified in the request, the default priority is normal.
modem Modem index to send SMS (this is only for the SF400/800 models)
Range : 1 to 4 for SF400
1 to 8 for SF800
0 for any modem (Send API job is distributed using all the available modems)
If modem is not specified in the request, send API job is distributed using all the available modems
MultiModem® iSMS System Administrator’s Guide 80
Page 81

Appendix A – Application Programming Interface (API)
Parameter Description
To The name in the address book where the SMS is to be delivered must be given within double quotes.
The maximum size of each recipient's name is 50 bytes.
Text
The message text to be sent.
Enable Extended ASCII in the MultiModem iSMS to send both ASCII and extended ASCII characters. By
default, Extended ASCII is disabled and the message can have only ASCII characters.
If Unicode is enabled(if enc is not specified in request), SMS text is only in Hexadecimal form.
If Extended ASCII and Unicode are disabled and spanned SMS value is 1, a maximum of 160 characters
can be sent.
If Extended ASCII is enabled and spanned SMS value is 1, a maximum of 140 characters can be sent.
If Unicode is enabled and spanned SMS value is 1, a maximum of 70 characters can be sent
If the spanned SMS value is more than 1, the maximum number of characters allowed for each encoding
scheme is defined as follows (where n represents the span value):
ASCII – n * 154 characters
Extended ASCII – n * 134 characters
Unicode – n * 64 characters
Characters entered beyond the allowed limit are truncated.
81 MultiModem® iSMS System Administrator’s Guide
Page 82

Appendix A – Application Programming Interface (API)
Sending to a Group
You can use the API to send SMS to a pre-defined group. The group must exist in the MultiModem iSMS. If the group does
not exist, the message is dropped.
HTTP API format is:
http://192.168.2.1[:portnumber]/sendmsg?user=user1&passwd=user1&cat=1
[enc=1][priority=1][&modem=4]&
-or-
http://192.168.2.1[:portnumber]/sendmsg?user=user1&passwd=user1&cat=1
[enc=2][priority=1][&modem=4]&
form)
-or-
http://192.168.2.1[:portnumber]/sendmsg?user=user1&passwd=user1&cat=1
[enc=3][priority=1][&modem=4]&
The parameters are:
Parameter Description
cat 1
group=”admin”&text=message
group=”admin”&text=41;42;645;0645(hexadecimal
group=”admin”&text=65;66;678(decimal form)
enc Encoding type to send SMS(Optional field)
Range: 0 to 3
0 - SMS text is in ASCII form
1 - SMS text is in Extended ASCII form
2 - SMS text is in hexadecimal form. Each hexadecimal value length is maximum 4, and each
hexadecimal value should be separated by a semi-colon. Example: 0645;41;646.
3 - SMS text is in decimal form. Each decimal Value length is maximum 5, and each decimal value should
be separated by a semi-colon Example: 1605;65;65300.
Note: Maximum decimal value allowed is 65535.
If enc is not specified in the send API request, default enc is the configured settings from the SMS
settings page.
enc=2, if Unicode is enabled.
enc=1, if Extended ASCII is enabled.
enc=0, if both Extended ASCII and Unicode are disabled.
priority Priority to send SMS(Optional field)
Range: 1 to 3
1 - Low Priority
2 - Normal Priority
3 - High Priority
If priority is not specified in the request, the default priority is normal.
modem Modem index to send SMS (this is only for the SF400/800 models)
Range : 1 to 4 for SF400
1 to 8 for SF800
0 for any modem (Send API job is distributed using all the available modems)
MultiModem® iSMS System Administrator’s Guide 82
Page 83

Appendix A – Application Programming Interface (API)
Parameter Description
If modem is not specified in the request, send API job is distributed using all the available modems.
Group The pre-defined group names must be in double quotes.
The maximum size of group name is 50 bytes
Text The message text to be sent.
Enable Extended ASCII in the MultiModem iSMS to send both ASCII and extended ASCII characters. By
default, Extended ASCII is disabled, and the message can have only ASCII characters.
If Unicode is enabled (and if enc is not specified in request), SMS text is only in Hexadecimal form.
If Extended ASCII and Unicode are disabled and spanned SMS value is 1, a maximum of 160 characters
can be sent.
If Extended ASCII is enabled and spanned SMS value is 1, a maximum of 140 characters can be sent.
If Unicode is enabled and spanned SMS value is 1, a maximum of 70 characters can be sent.
If the spanned SMS value is more than 1, the maximum number of characters allowed for each encoding
scheme is defined as follows (where n represents the span value):
ASCII – n * 154 characters
Extended ASCII – n * 134 characters
Unicode – n * 64 characters
Characters entered beyond the allowed limit are truncated.
83 MultiModem® iSMS System Administrator’s Guide
Page 84

Appendix A – Application Programming Interface (API)
Sending a Broadcast Trigger Message
You can use the API to send a broadcast trigger message to the MultiModem iSMS.
HTTP API format is:
http://192.168.2.1[:portnumber]/sendmsg?user=user2&passwd=user2&cat=2[&
enc=0][&modem=5]&text=message
-or-
http://192.168.2.1[:portnumber]/sendmsg?user=user2&passwd=user2&cat=2
[&enc=2][&modem=5]&
-or-
http://192.168.2.1[:portnumber]/sendmsg?user=user2&passwd=user2&cat=2[&enc=3][&modem=5]&text=message
should be decimal form
The parameters are:
Parameter Description
cat 2
enc Encoding type to send SMS (optional field)
Range: 0 to 3
0 - SMS text should be in ASCII form
text=message should be hexadecimal form
1 - SMS text should be in Extended ASCII form
2 - SMS text is in hexadecimal form. Each hexadecimal value length is maximum 4, and each
hexadecimal value is separated by a semi-colon. Example: 0645;41;646.
3 - SMS text is in decimal form. Each decimal Value length is maximum 5, and each decimal value is
separated by a semi-colon. Example: 1605;65;65300.
Note: Maximum decimal value allowed is 65535.
If enc is not specified in the send API request, default enc is configured to the settings of the SMS
settings page.
i.e. enc=2, if Unicode is enabled.
enc=1, if Extended ASCII is enabled.
enc=0, if both Extended ASCII and Unicode are disabled
modem Modem index to send broadcast message
Range : 1 to 4 for SF400
1 to 8 for SF800
0 for any modem (Broadcast API job is distributed using all the available modems)
If modem is not specified in the request, broadcast API job is distributed using all the available modems
If modem is specified, broadcast job is sent using the specified modem
text The trigger message text to be sent.
Enable Extended ASCII in the MultiModem iSMS to send both ASCII and extended ASCII characters.
By default, Extended ASCII is disabled, and the message can have only ASCII characters.
If Unicode is enabled (and if enc is not specified in request), SMS text is only in Hexadecimal form.
If Extended ASCII is disabled, a maximum of 160 characters can be sent.
If Extended ASCII is enabled, a maximum of 140 characters can be sent.
MultiModem® iSMS System Administrator’s Guide 84
Page 85

Appendix A – Application Programming Interface (API)
Parameter Description
If Unicode is enabled, a maximum of 70 characters can be sent.
Despite the spanned SMS value set, the maximum number of characters allowed in the text field is:
160 for ASCII
140 for Extended ASCII
70 for Unicode
Characters entered beyond the allowed limit are truncated.
Use the API to send a trigger message to the MultiModem iSMS. If the MultiModem iSMS has a
configured broadcast trigger, it sends the broadcast trigger message to the configured recipients.
85 MultiModem® iSMS System Administrator’s Guide
Page 86

Appendix A – Application Programming Interface (API)
Sending an Action Trigger Message
Use this API to perform a predefined action.
HTTP API format is:
http://192.168.2.1[:portnumber]/sendmsg?user=user1&passwd=user1&cat=3
[&enc=0]
-or-
http://192.168.2.1[:portnumber]/sendmsg?user=user1&passwd=user1&cat=3[&enc=2]&text=message should be
hexadecimal form
Example: Configured action trigger for adding preconfigured SMS as 41;42;43 (with enc=2).
Preconfigured SMS to add is 645;646;647;648 (in hexadecimal form).
In an API request, the text field is in the format:
Configured action trigger; Preconfigured SMS
text=41;42;43;;645;646;647;648 (not correct)
text=41;42;43;3a;645;646;647;648 (correct format)
Here 3a is equivalent hexadecimal value for a semi-colon. Use equivalent hexadecimal value for either semi-colon or
colon.
&text=message
-or-
http://192.168.2.1[:portnumber]/sendmsg?user=user1&passwd=user1&
cat=3[&enc=3]
Example: Configured action trigger for adding preconfigured SMS as 41;42;43(with enc=3).
Preconfigured SMS to add is 645;646;647;648 (in decimal form).
In an API request, the text field is in the format:
Configured action trigger;Preconfigured SMS
text=41;42;43;;645;646;647;648 (not correct)
text=41;42;43;58;645;646;647;648 (correct format)
Here 58 is decimal equivalent value for a semi-colon. Use equivalent decimal value for either semi-colon or colon.
Irrespective of the spanned SMS value set, the maximum number of characters allowed in the text field is:
160 for ASCII
140 for Extended ASCII
70 for Unicode
Any characters entered beyond the allowed limit are truncated.
&text=message should be decimal form.
MultiModem® iSMS System Administrator’s Guide 86
Page 87

Appendix A – Application Programming Interface (API)
Examples for action trigger with enc=2:
To Add an entry in the Address book:
Configured trigger: 41;42;43 (with enc=2)
Name: 61;62;63;64 (abcd)
Phone number: 39;38;38;36;30;39;38;38;36;30 (9886098860)
http://192.168.2.1[:portnumber]/sendmsg?user=user1&passwd=user1&
cat=3[&enc=2]
Here 3a is the equivalent hexadecimal for semi-colon. Instead of 3a, we can use 3b (equivalent hexadecimal value for
colon) also.
To Add a group name:
Configured trigger: 44;45;46 (with enc=2)
Group name: 65;66;67;68 (efgh)
&text=41;42;43;3a;61;62;63;64;3a;39;38;38;36;30;39;38;38;36;30
http://192.168.2.1[:portnumber]/sendmsg?user=user1&passwd=user1&
cat=3[&enc=2]
To Add a group name with a member and phone number:
&text=44;45;46;3b;65;66;67;68
Configured trigger: 44;45;46 (with enc=2)
Group name: 65;66;67;68 (efgh)
Name: 61;62;63;64 (abcd)
Phone number: 39;38;38;36;30;39;38;38;36;30 (9886098860)
http://192.168.2.1[:portnumber]/sendmsg?user=user1&passwd=user1&
cat=3[&enc=2]
9;38;38;36;30
To Add a group name with a member (should exist in Address book):
Configured trigger: 44;45;46(with enc=2)
Group name: 65;66;67;68 (efgh)
Name: 61;62;63;64 (abcd)
&text=44;45;46;3b;65;66;67;68;3b;61;62;63;64;3b;39;38;38;36;30;3
http://192.168.2.1[:portnumber]/sendmsg?user=user1&passwd=user1&
cat=3[&enc=2]
&text=44;45;46;3b;65;66;67;68;3b;61;62;63;64
87 MultiModem® iSMS System Administrator’s Guide
Page 88

Appendix A – Application Programming Interface (API)
To delete an entry in the Address Book:
Configured trigger: 47;48;49(with enc=2)
Name: 61;62;63;64 (abcd)
Phone number: 39;38;38;36;30;39;38;38;36;30 (9886098860)
With Name and Number:
http://192.168.2.1[:portnumber]/sendmsg?user=user1&passwd=user1&cat=3[&enc=2]
;64;3a;39;38;38;36;30;39;38;38;36;30
With Name only:
http://192.168.2.1[:portnumber]/sendmsg?user=user1&passwd=user1&cat=3[&enc=2]
;64
With Number only:
http://192.168.2.1[:portnumber]/sendmsg?user=user1&passwd=user1&cat=3[&enc=2]
;38;36;30;39;38;38;36;30
To Delete a Group:
Configured trigger: 4a;4b;4c (with enc=2)
Group name: 65;66;67;68 (efgh)
http://192.168.2.1[:portnumber]/sendmsg?user=user1&passwd=user1&cat=3[&enc=2]
;68
The parameters are:
Parameter Description
cat 3
enc Encoding type to send SMS(Optional field)
Range: 0 to 3
&text=47;48;49;3a;61;62;63
&text=47;48;49;3a;61;62;63
&text=47;48;49;3a;3a;39;38
&text=4a;4b;4c;3a;65;66;67
0 - SMS text is in ASCII form
1 - SMS text is in Extended ASCII form
2 - SMS text is in hexadecimal form. Each hexadecimal value length is maximum 4, and each
hexadecimal value is separated by a semi-colon. Example: 0645;41;646.
3 - SMS text is in decimal form. Each decimal Value length is maximum 5, and each decimal value is
separated by a semi-colon. Example: 1605;65;65300.
Note: Maximum decimal value allowed is 65535.
If enc is not specified in the send API request, default enc is the configured settings in SMS settings
page.
enc=2, if Unicode is enabled.
enc=1, if Extended ASCII is enabled.
enc=0, if both Extended ASCII and Unicode are disabled.
modem Modem index to send SMS
Range :
1 to 4 for SF400
1 to 8 for SF800
0 for any modem
MultiModem® iSMS System Administrator’s Guide 88
Page 89

Appendix A – Application Programming Interface (API)
Parameter Description
Specifying modem for a cat=3 job is not applicable. Action trigger is executed even if modem is
specified.
text The trigger message text to be sent.
Enable Extended ASCII in the MultiModem iSMS to send both ASCII and extended ASCII chars.
By default, Extended ASCII is disabled, and the message can have only ASCII characters.
If Unicode is enabled (if enc is not specified in request), ensure SMS text is only in hexadecimal form.
If Extended ASCII is disabled, a maximum of 160 characters can be sent.
If Extended ASCII is enabled, a maximum of 140 characters can be sent.
If Unicode is enabled, a maximum of 70 characters can be sent.
The API can be used to send an action trigger to the MultiModem iSMS. If the MultiModem iSMS has a
configured action trigger, it performs the configured action.
Sending to Multiple Numbers, Address Book Recipients or Groups
An SMS can be sent to multiple numbers, address book names and groups using a single API.
HTTP API format is:
http://192.168.2.1[:portnumber]/sendmsg?user=xxx&passwd=xxx&cat=1[&enc=0][&priority=1][&modem=8]&
to=”xxx1”,”xxx2”,”xxx3”&ton=”name1”,”name2”&group=”admin”,”rd”,”market”&text=message
xxx1, xxx2 and xxx3 are mobile numbers.
name1 and name2 are names in the Address Book.
admin, rd and market are groups present in the MultiModem iSMS.
Note: Enclose the to, ton and group parameters in quotes.
Response from the MultiModem iSMS after Submitting the Send SMS API
The MultiModem iSMS returns a unique identifier, that is, an API message ID for each "Send API request".
This ID can be used to track and monitor any given message.
ID: apimsgid
-or-
Err: error code
e.g.,
ID: 1
Err: 601
89 MultiModem® iSMS System Administrator’s Guide
Page 90

Appendix A – Application Programming Interface (API)
HTTP Query API Format
Processing the "Send API" and sending the message takes some time. So, only an apimsgid is returned as a response to
the "Send SMS API". Query API can be used to query the status of a Send. It returns the status of a message submitted
earlier.
HTTP API format is:
http://192.168.2.1[:portnumber]/querymsg?user=xxx&passwd=xxx&apimsgid
=id
Response values:
ID: apimsgid Status: status code
OR
ID: apimsgid Err: error code
OR
Err: error code
e.g.,
ID: 1 Status: Done
ID: 1 Err: 604
Err: 602
Note: The maximum supported size of the URL is 2048 bytes.
Status Codes
Status Code Status Description Description
Done The MultiModem iSMS has completed servicing the "Send"
0
1
2 In progress The MultiModem iSMS is processing the "Send" API.
3 Request Received The MultiModem iSMS has received the "Send" request.
4
5 Message ID Not Found An API Message ID does not exist.
6 Distributed to Slave1
7 Distribution resulted in
8 Distributed among many
Done with error The MultiModem iSMS has completed servicing the "Send"
Error Error occurred while sending the SMS from the
[10.10.10.101]
error
Slaves
job. The message has been successfully sent to the cellular
network for delivery to all intended recipients.
job, but the message is not sent to all the recipients
MultiModem iSMS.
The Master MultiModem iSMS has distributed the Job to a
given slave.
Master tried to send the job to the slaves and could not
send the job to any of the slaves as the slaves are not
available (loaded full or network unreachable)
The Master MultiModem iSMS has distributed the Job
Request among many slaves.
9 API is canceled Reflects that API job is dropped if the Send API job is
MultiModem® iSMS System Administrator’s Guide 90
canceled from the web interface
Page 91

Appendix A – Application Programming Interface (API)
–
Error Codes
Error Code Error Description Response to
601 Authentication failed Send API, Query API
602 Parse error Send API, Query API
603 Invalid category Send API
604 SMS message size is greater than 160 chars Send API
605 Recipient overflow Send API
606 Invalid recipient Query API
607 No recipient Send API
608 MultiModem iSMS is busy, can’t accept this request Send API, Query API
609 Timeout waiting for a TCP API request Send API
610 Unknown action trigger Send API
611 Error in broadcast trigger Send API
612 System error
Invalid modem index
613
In SF400, if modem index given is not within 0 to 4
memory allocation failure Send API, Query API
Send API
In SF800, if modem index given is not within 0 to 8
614
Invalid device model number
(model number is not detected properly to validate the
Send API
modem index)
615 Invalid encoding type Send API
616 Invalid time/date input Receive API
617 Invalid count input Receive API
618 Service not available (non-polling receive API is enabled so
Receive API
polling receive API service is not available)
619 Invalid addressee Receive API
620 Invalid priority value Send API
621 Invalid SMS text
Send API
This error code is given if the following is not true:
If enc = 2, SMS text must be in hexadecimal form. Each
hexadecimal value length is a maximum of 4 digits and
semi-colon is used as a delimiter between two
hexadecimal values.
If enc = 3, SMS text must be in decimal form. Each decimal
value length is maximum 5 digits and semi-colon is used as
delimiter between two decimal values.
Note: Decimal values allowed up to 65535 only.
91 MultiModem® iSMS System Administrator’s Guide
Page 92

Appendix A – Application Programming Interface (API)
TCP API
Configuration of the "TCP Send API" Using the MultiModem iSMS Web Admin Interface
TCP Send API Status:
Enable TCP Send API Status to send SMS / query status using TCP API. By default, TCP Send API is disabled.
TCP Port:
Configure the port to service the TCP Send API. Default is 2040.
Note: MultiModem iSMS can be accessed ONLY from the preconfigured allowed networks.
Example: To access the MultiModem iSMS 204.26.122.125 from 125.63.78.44, you must
the following MultiModem iSMS window: Admin Access >> Allowed Networks
● Initiate a raw TCP connection to the MultiModem iSMS IP address over the "TCP Send API" port.
● Issue send command to send SMS.
● Issue query command to query the status of send SMS.
add the network 125.63.78.0 to
TCP Send API Format
/sendmsg?user=admin&passwd=admin&cat=1&enc=0&priority=1&modem=1&to="+9198448956
91"&ton=”Bob”&group=”eng”&text=Here is the test message
Notes:
“enc” and “priority” parameters are optional.
MultiModem® iSMS System Administrator’s Guide 92
Page 93

Parameter Description
enc Encoding type to send SMS(Optional field)
Range: 0 to 3
0 - SMS text in ASCII form
1 - SMS text in Extended ASCII form
2 - SMS text in hexadecimal form. Each hexadecimal value length is maximum 4, and each hexadecimal
value is separated by a semi-colon. Example: 0645;41;646)
3 - SMS text is in decimal form. Each decimal Value length is maximum 5, and each decimal value is
separated by a semi-colon. Example: 1605;65;65300).
Note: Maximum decimal value allowed is 65535.
If enc is not specified in the send API request, default enc is the configured settings in SMS settings
page.
enc=2, if Unicode is enabled.
enc=1, if Extended ASCII is enabled.
enc=0, if both Extended ASCII and Unicode are disabled.
priority Priority to send SMS (optional field)
Appendix A – Application Programming Interface (API)
Range: 1 to 3
1 - Low Priority
2 - Normal Priority
3 - High Priority
If priority is not specified in the request, default priority is set to normal.
modem modem parameter is optional.
Modem index to send SMS
Range : 1 to 4 for SF400
1 to 8 for SF800
0 for any modem (Send API job is distributed through all the available modems)
If modem is not specified in the request, send API job is distributed through all the available modems
TCP Query API Format
/querymsg?user=admin&passwd=admin&apimsgid=id
Notes:
● The TCP buffer needs to contain only this data in the given format to be parsed properly by the TCP Server in the
MultiModem iSMS to send SMS / query status.
● SMS could be sent to different multiple recipients like name, number, group using the same format. Enumeration and
examples given in HTTP Send API section apply.
● Response to TCP Send API, response to TCP Query API, Status Codes and Error Codes are the same as given for HTTP
Send API.
93 MultiModem® iSMS System Administrator’s Guide
Page 94

Appendix A – Application Programming Interface (API)
Sending a Job to a Slave MultiModem iSMS From Master MultiModem iSMS
You can use the TCP API to distribute the Job Load from Master MultiModem iSMS unit to a slave unit when load
balancing is enabled in the master and with the slaves properly configured.
TCP API format is:
/sendmsg?user=admin&passwd=admin&cat=4&enc=0&priority=2&to="+919844895691",”+16
675674532”&text=Here is the test message
The parameters are:
Parameter Description
cat 4
enc Encoding type of the SMS(Range 0 to 3)
0 - SMS text is in ASCII form
1 - SMS text is in Extended ASCII form
2 - SMS text is in hexadecimal form, that is, each hexadecimal value is of 4 digits and each hexadecimal
value is separated by a semi-colon. Example: 0645;0041;0646).
3 - SMS text is in hexadecimal form. However, enc type is given as 3 to indicate to the slave to display in
decimal form as in the input send SMS job.
priority Priority of the SMS Job(Range 1 to 3)
1 - Low Priority
2 - Normal Priority
3 - High Priority
It indicates to the slave the priority of the job and to be handled accordingly.
to The mobile numbers where the SMS is to be delivered.
This number must be given in double quotes. The maximum size of each recipient’s number is 50 bytes
text The message text to be sent.
If enc is 0, SMS text is in ASCII.
If enc is 1, SMS text is in Extended ASCII.
If enc is 2 / 3 / 4, SMS text is in hexadecimal form.
Each hexadecimal value is of 4 digits and each hexadecimal value is separated by a semi-colon. Example:
0645;0041;0646)
Spanned SMS is sent as in the input Send SMS job.
Note:
An API request from master to slave contains only recipient’s numbers. Recipient names and groups are not
supported to make it independent of the Address Book in the slave.
MultiModem® iSMS System Administrator’s Guide 94
Page 95

Appendix A – Application Programming Interface (API)
Response from the Slave MultiModem iSMS After Receiving the Send SMS API from Master
MultiModem iSMS
The Slave MultiModem iSMS returns a unique identifier i.e., an API message ID for each "Send API request” and Load
Indicator, which tells the Job load on the slave.
This Load indicator is used to decide the least loaded slave while distributing to many slaves.
ID: apimsgid Load indicator
-or-
Err: error code Load indicator
e.g.,
ID: 1 1
Err 608 1000
95 MultiModem® iSMS System Administrator’s Guide
Page 96

Appendix A – Application Programming Interface (API)
Receive SMS API
The Receive API feature is implemented in two modes:
1. Non-Polling Mode
2. Polling Mode
Note: By Default, Polling mode is configured.
Non Polling Mode Receive SMS API
Process:
● Upon receipt of an SMS message and based on the configuration, the MultiModem iSMS sends the SMS to the HTTP
or TCP server.
● If the post interval is zero seconds, the MultiModem iSMS uploads the message immediately upon receipt of it. If the
post interval is non-zero, it waits for the configured post interval, queues up the messages, and then uploads the
messages accumulated for the configured post interval.
● The MultiModem iSMS waits for an OK response from the server after sending the SMS to the application through
HTTP or TCP. The response timeout at the MultiModem iSMS is 30 seconds.
MultiModem® iSMS System Administrator’s Guide 96
Page 97

Appendix A – Application Programming Interface (API)
HTTP Receive API – Non-Polling Mode
Configuration of the "Non-Polling Mode HTTP Receive API" Using the MultiModem iSMS Web Admin Interface
POST Packet Format with Authentication
POST /cgi-bin/postquery.cgi HTTP/1.1
HOST: 192.168.2.2:80
User-Agent: MultiModem iSMS/1.40
Accept: text/xml, application/xml,
application/xhtml+xml,text/html;q=0.9,text/plain;q=0.8,
application/msword, application/vnd.ms-powerpoint, image/png, */*
Accept-Language: en-us; en;q=0.50
Accept-Encoding: gzip, deflate
Accept-Charset: ISO-8859-1, utf-8;q=0.7, *;q=0.7
Keep-Alive: 300
Connection: keep-alive
Content-Type: application/x-www-form-urlencoded
Content-Length: 395
username=SMSFINDER&password=SMSFINDER&XMLDATA=%3C%3Fxml%20version%3D%221.0%22%20
encoding%3D%22ISO-88591%22%3F%3E%0D%0A%3CResponse%3E%0D%A0%3CMessageNotification%3E%0D%0A%3CModemNumber%3E%2
B2%3A19525945092%3C%2FModemNumber%3E%0D%0A%3CSenderNumber%3E%2B919844895692%3C%2FSende
rNumber%3E%0D%0A%3CDate%3E08%2F03%2F14%3C%2FDate%3E%0D%0A%3CTime%3E12%3A53%3A09%3C%2F
Time%3E%0D%0A%3CMessage%3ETest%0D%0A%0D%3C%2FMessage%3E%0D%0A%3C%2FMessageNotification%3
E%0D%0A%A0%3C%2FResponse%3E%0D%0A
97 MultiModem® iSMS System Administrator’s Guide
Page 98

Appendix A – Application Programming Interface (API)
POST Packet Format without Authentication
POST /ismsResponse_1.4x.rb HTTP/1.1
HOST: 172.17.20.1:80
User-Agent: MultiModem iSMS/1.41
Accept: text/xml, application/xml, application/xhtml+xml,text/html;q=0.9,text/plain;q=0.8,image/png, */*
Accept-Language: en-us; en;q=0.50
Accept-Encoding: gzip, deflate
Accept-Charset: ISO-8859-1, utf-8;q=0.7, *;q=0.7
Keep-Alive: 300
Connection: keep-alive
Content-Type: application/x-www-form-urlencoded
Content-Length: 439
XMLDATA=%3C%3Fxml%20version%3D%221.0%22%20encoding%3D%22ISO-88591%22%3F%3E%0D%0A%3CResponse%3E%0D%0A%3CMessageNotification%3E%0D%0A%3CModemNumber%3E1%
3A7632346274%3C%2FModemNumber%3E%0D%0A%3CSenderNumber%3E%2B16512706431%3C%2FSenderNumb
er%3E%0D%0A%3CDate%3E10%2F08%2F24%3C%2FDate%3E%0D%0A%3CTime%3E14%3A15%3A52%3C%2FTime%
3E%0D%0A%3CMessage%3ETest%20Message.%3C%2FMessage%3E%0D%0A%3C%2FMessageNotification%3E%0D%
0A%3C%2FResponse%3E%0D%0A
Notes:
● If authentication is disabled, POST DATA contains XMLDATA=[urlencoded(XML)]
● If authentication is enabled, POST DATA contains username=user&passwd=user& XMLDATA=[urlencoded(XML)]
MultiModem® iSMS System Administrator’s Guide 98
Page 99

Posting of 1 message
<?xml version="1.0" encoding="ISO-8859-1"?>\r\n
<Response>\r\n
<MessageNotification>\r\n
<ModemNumber>2:19525945092</ModemNumber>\r\n
<SenderNumber>6754535645</SenderNumber>\r\n
<Date>08/03/10</Date>\r\n
<Time>09:05:30</Time>\r\n
<Message>Here is a test message</Message>\r\n
</MessageNotification>\r\n
</Response>\r\n
Posting of 2 messages
<?xml version="1.0" encoding="ISO-8859-1"?>\r\n
<Response>\r\n
<MessageNotification>\r\n
<ModemNumber>2:19525945092</ModemNumber>\r\n
Appendix A – Application Programming Interface (API)
<SenderNumber>8767654534</SenderNumber>\r\n
<Date>08/03/07</Date>\r\n
<Time>08:07:20</Time>\r\n
<Message>Test message 1</Message>\r\n
</MessageNotification>\r\n
<MessageNotification>\r\n
<ModemNumber>3:</ModemNumber>\r\n
<SenderNumber>9876754534</SenderNumber>\r\n
<Date>08/03/13</Date>\r\n
<Time>10:10:36</Time>\r\n
<Message>Test message 2</Message>\r\n
</MessageNotification>\r\n
</Response>\r\n
99 MultiModem® iSMS System Administrator’s Guide
Page 100

Appendix A – Application Programming Interface (API)
Posting of 3 messages with ”Send Encoding Flag” and “Send Message Index” enabled
POST /ismsResponse_1.4x.rb HTTP/1.1
<?xml version="1.0" encoding="ISO-8859-1"?>
<Response>
<Msg_Count>3</Msg_Count>
<MessageNotification>
<Message_Index>1</Message_Index>
<ModemNumber>3:7637853500</ModemNumber>
<SenderNumber>+919742204905</SenderNumber>
<Date>11/07/14</Date>
<Time>12:25:20</Time>
<EncodingFlag>ASCII</EncodingFlag>
<Message>This messages was sent with the ASCII encoding</Message>
</MessageNotification>
<MessageNotification>
<Message_Index>2</Message_Index>
<ModemNumber>1:7637853500</ModemNumber>
<SenderNumber>+919742204905</SenderNumber>
<Date>11/07/14</Date>
<Time>12:26:24</Time>
<EncodingFlag>Extended ASCII</EncodingFlag>
<Message>This messages was sent with Extended ASCII encoding</Message>
</MessageNotification>
<MessageNotification>
<Message_Index>3</Message_Index>
<ModemNumber>3:7637853500</ModemNumber>
<SenderNumber>+919742204905</SenderNumber>
<Date>11/07/14</Date>
<Time>12:26:43</Time>
<EncodingFlag>Unicode</EncodingFlag>
<Message>00280031006F0066003300290041006C006C00200074006800650020006C006F0067
0073002000730068006F0075006C0064002000620065002000640069007070006C00610079006
50064002000700072006F007000650072006C007900200069006E00200074006</Message>
</MessageNotification>
</Response>
Notes:
● The MultiModem iSMS accommodates a maximum of 50 messages in one POST message.
● The MultiModem iSMS waits for an OK response from the HTTP server; it times out in 30 seconds.
● If receiving modem’s SIM number is configured then <ModemNumber> field has modem index:SIM number. If
receiving modem’s SIM number is not configured then <ModemNumber> field has modem index:
MultiModem® iSMS System Administrator’s Guide 100
 Loading...