

Multitech MultiMobile MT10ZLX/E, MultiMobile MT10ZLX/E-T/2 User Manual

Model MT10ZLX/E
& Model MT10ZLX/E-
T/2

Owners Manual
MultiMobile
TM
Model # MT10ZLX/E & MT10ZLX/E-T2
P/N 82071400
This publication may not be reproduced, in whole or in part,
without prior expressed written permission from Multi-Tech
Systems, Inc. All rights reserved.
Copyright © 1997 by Multi Tech Systems, Inc.
Multi-Tech Systems, Inc. makes no representations or warranties
with respect to the content hereof and specifically disclaims any
implied warranties of merchantability or fitness for any particular
purpose. Furthermore, Multi-Tech Systems, Inc. reserves the right
to revise this publication and to make changes from time to time
in the content hereof without obligation of Multi-Tech Systems,
Inc. to notify any person or organization of such revisions or
changes.
Record of Revisions
Revision Description
A Manual Release at Revision Level A.
(9/20/97)
TRADEMARKS
Trademarks of Multi-Tech Systems, Inc. are as follows:
MultiMobile, Multi-Tech, and the Multi-Tech logo. All other
trademarks are owned by their respective companies.
Multi-Tech Systems, Inc.
2205 Woodale Drive
Mounds View, Minnesota 55112 U.S.A.
(612) 785-3500 or (800) 328-9717
U. S. FAX 612-785-9874
Fax-Back Service 612-717-5888
Technical Support (800) 972-2439
BBS (612) 785-3702 or (800) 392-2432
Internet Address: http://www.multitech.com
Technical Writer: mark@ multitech.com

Contents
3-Contents
Contents
Chapter 1 - Introduction and Description ............5
About This Manual ................................................. 5
About This Product ................................................6
Network Interface Specifications .......................... 6
System Requirements .............................................7
Ship Kit Contents....................................................8
Chapter 2 - Installation .......................................... 9
Chapter 3 - Software Installation....................... 12
Novell NetWare ..................................................... 12
Menu Installation.................................................. 13
Manual Driver Installation ..................................14
Novell Client Installation ..................................... 14
MS LAN Manager ................................................16
Packet Driver ........................................................18
Windows for Workgroups 3.11 ...........................18
Windows NT 3.51.................................................. 22
Windows NT 4.0.................................................... 22
Windows 95 Installation....................................... 23
Artisoft Lantastic 6.0 Installation ....................... 23
IBM OS/2 Warp ....................................................24
Notes For NDIS Driver......................................... 27
Notes For Packet Driver....................................... 29
Notes For Windows For Workgroups Driver..... 29
Chapter 4 - Troubleshooting ................................ 30
Introduction ..........................................................30
Chapter 5 - Service ............................................... 36
Limited Warranty ................................................. 36
Software User License Agreement....................... 37
Tech Support ......................................................... 39
Service ....................................................................39
About the Multi-Tech BBS................................... 41

Contents
4-Contents
How to Use the Multi-Tech BBS ..........................41
About CompuServe/Internet ............................... 43
About the Multi-Tech Fax-Back System .............43
APPENDIX A - REGULATORY AGENCY INFORMATION .. 44
Index ......................................................................51

5-MultiMobile
Introduction/Description
Chapter 1 - Introduction and Description
About This Manual
This manual explains how to install and use your
Ethernet PC Card, model(s) MT10ZLX/E and
MT10ZLX/E-T/2 from Multi-Tech Systems. This
manual is divided into 5 chapters and one appendix.
The information contained in each chapter and appendix is as follows:
Chapter 1 - Introduction and Description
Chapter 1 begins with a short introduction and description; followed by a guide (which you are now reading)
to the use of this manual; and ends with a section on
technical specification information.
Chapter 2 - Hardware Installation
This chapter provides you with procedures for making
the physical connections attaching your PC Card to
portable computers, as well as LED descriptions which
verify proper operation and report operating status.
Chapter 3 - Software Installation
Chapter 3 contains information on PCMCIA setup,
manual installation of PCMCIA Software, and infor-
mation about supported drivers.
Chapter 4 - Troubleshooting Your PC Card
Chapter 4 provides tips and advice if you think your
Ethernet PC Card isnt working correctly.
Chapter 5 - Service/Warranty/Tech Support
Chapter 5 provides service and product warranty information.
Appendix
Appendix A - Regulatory Information

Introduction/Description
6-MultiMobile
About This Product
The MT10ZLX/E is a credit-card-sized Type II
PCMCIA card that complies with the PCMCIA 2.1 and
JEIDA 4.1 standards and works with computers incorporating a compatible interface.
Connectivity to your Local Area Network (LAN) is accomplished when using an RJ-45 network cable connection (model MT10ZLX/E), or when using an BNC
T-connector converting 10Base-T to 10Base2 (model
MT10ZLX/E-T/2); and installing software and drivers
respective to your LAN environment.
Network Interface Specifications
Operating Environment:
• Novell Netware 3.x, 4.x
• Microsoft LAN Manager
• Packet Driver Applications
• Microsoft Windows for Workgroups 3.11
• Microsoft Windows 3.1
• Microsoft Windows NT 3.51, NT 4.0
• Windows 95
• Lantastic 6.0
• IBM OS/2 Warp Version 3
Features:
• Compatible with most notebook, laptop and portable
computers
• Compatible with Card and Socket Services
• Easy to install and use
• Card is hot swappable
• NE2000 compatible
• 10Mbps Ethernet: IEEE 802.3 standard 10BaseT or
10Base2 baseband CSMA/CD local area network

7-MultiMobile
Introduction/Description
•PCMCIA 2.0/2.1 and PC Card Standard compliant
Type II PC Card
Dimensions:
•3.37 x 2.128 x 0.197 (86mm x 54mm x 5.0mm);
•30gw in weight
Power Requirements:
•Normal Operation: +5V DC, 250mA max
•Sleep Mode: +5V DC, 50mA max
Diagnostics:
•LEDs: Link Integrity, Power / Activity
Environment Ranges:
•Operating:32°F to 149°F (0°C to 65°C)
•Storage: -4°F to 158°F (0°C to 70°C)
•Humidity:10% - 90%, noncondensing
Certifications:
•FCC, Part 15, Class B
•CE Mark (EN55022,ClassB, EN50082-1)
System Requirements
• An IBM compatible notebook computer with
386SX or faster processor
• Drivers and utilities provided with this product
• PCMCIA release 2.1 compliant Card Services and
Socket Services
• an RJ45 jack for 10BaseT connection to your Ethernet
LAN (MT10ZLX/E)
• an RJ45 jack for 10BaseT connection, or an BNC T-
connector for 10Base2 connection to your Ethernet
LAN (MT10ZLX/E-T/2)

Introduction/Description
8-MultiMobile
Ship Kit Contents
Your MT10ZLX/E is shipped from the factory with
the following:
• Fast Ethernet PC Card Adapter
• Media coupler with a 15-pin detachable terminated
connector (to PC card); with the other end of the
cable terminated with one RJ-45 receptacle connector for 10BASE-T LAN connection
• 3.5 driver diskette
• Users Manual (this manual)
• Plastic protection case for base PC Card
Your MT10ZLX/E-T/2 is shipped from the factory
with the following:
• Ethernet PC Card Adapter
• Media coupler with a 15-pin detachable terminated
connector (to PC card); with the other end of the
cable terminated with one RJ-45 receptacle connector for 10BASE-T and one receptacle BNC Tconnector converting 10Base-T to 10Base2 for
LAN connection
• 3.5 driver diskette
• Users Manual (this manual)
• Plastic protection case for base PC Card
9-MultiMobile
Hardware Installation
CHAPTER 2 - INSTALLATION
This chapter describes how to install your Ethernet PC
Card into your notebook computer and connect it to
the network. The PC Card can connect at 10Mbps
Ethernet over unshielded twisted pair (UTP) cable, or
using a thin net cable.
Please refer to Software Installation in Chapter 3 for
installing network drivers using menu driven installation utilities.
*: hardware installation must occur before driver installation is attempted.
Installing The MT10ZLX/E or MT10ZLX/E-T/2
Card(s)
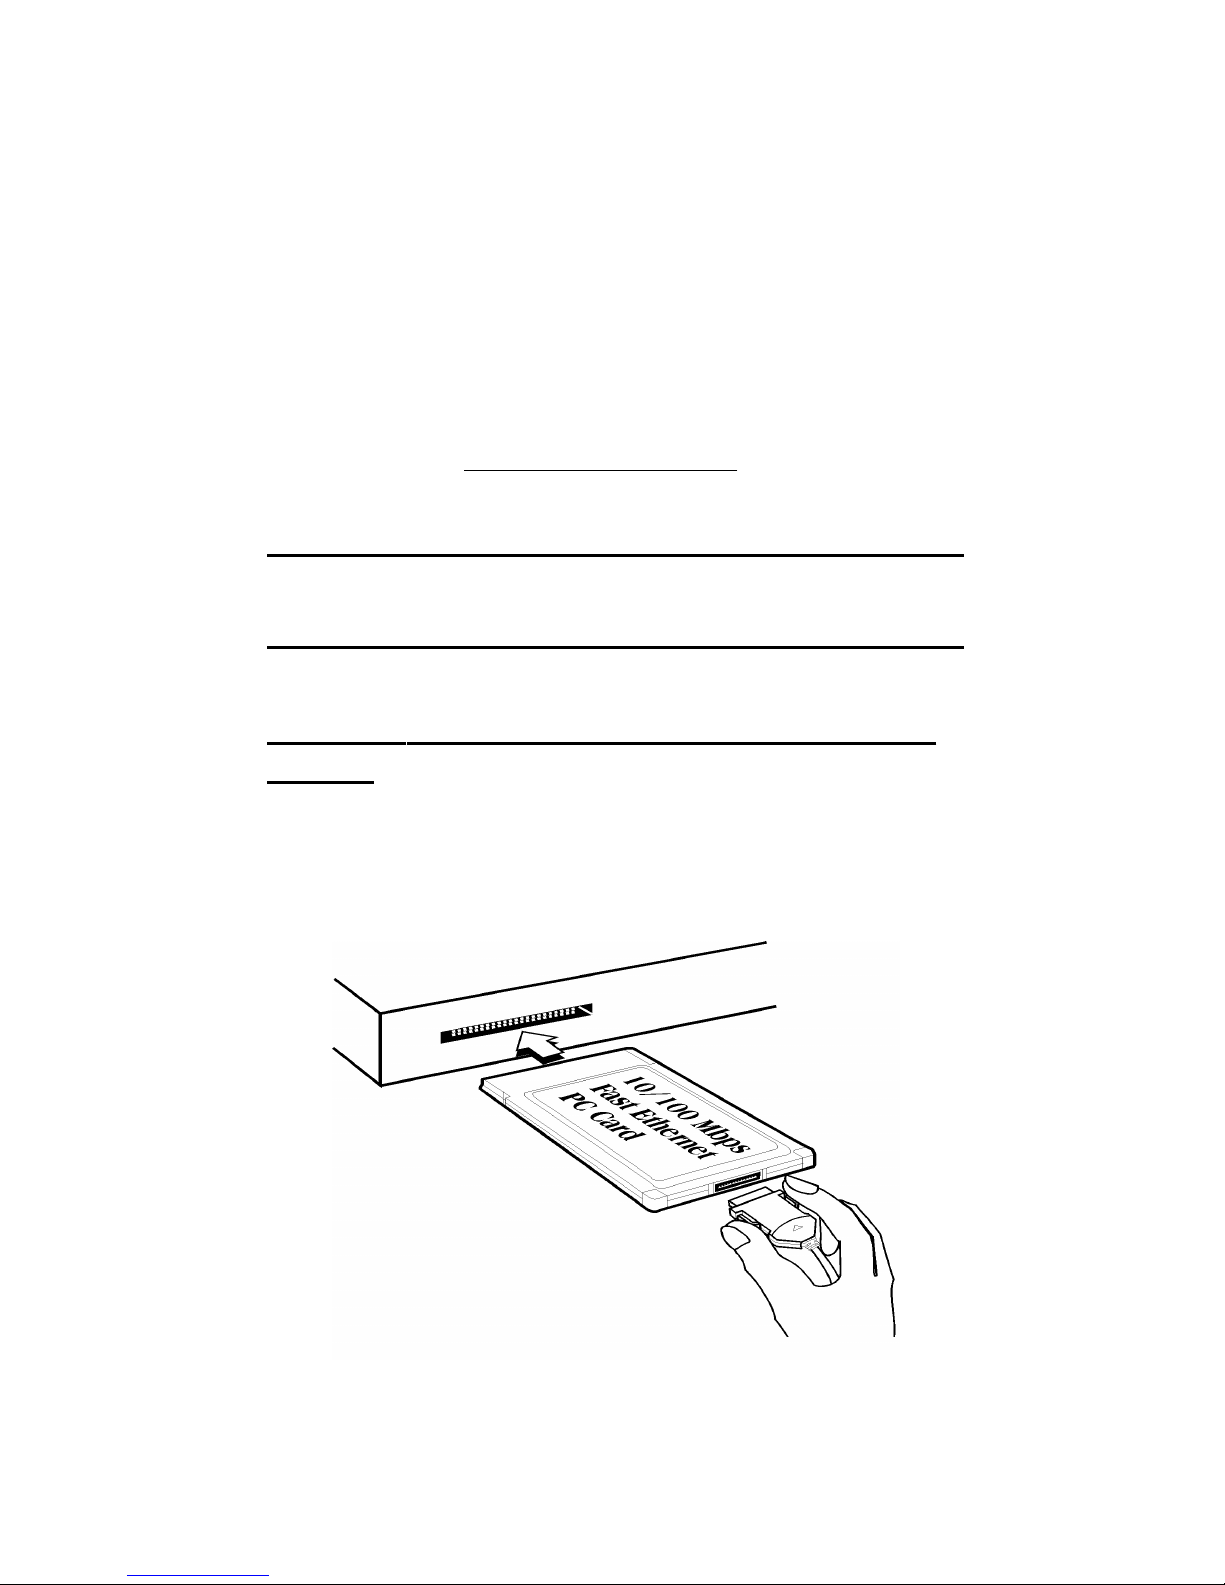
1. Insert the MT10ZLX/xxx into the computers
PCMCIA slot with the 68-pin connector facing the
PCMCIA slot and the label facing up.
Figure 2-1. PC Card Installation

Hardware Installation
10-MultiMobile
2. Plug the 15 pin connector into the 15 pin socket of
the PC card. On the other end of the 15-pin cable,
leave the RJ-45 network cable exposed until the
LAN connection is made; hardware installation is
now complete. The MT10ZLX/E is powered directly from the PC.
2a. Determine if your LAN connection is 10Base-T or
10Base2. Plug the 15 pin connector into the 15 pin
socket of the PC card. On the other end of the 15pin cable, leave RJ-45 cable (10Base-T), or BNC
T-cable receptacle (10Base2) exposed until LAN
connection is made; hardware installation is now
complete. The MT10ZLX/E-T/2 is powered di-
rectly from the PC.
3. Connect the MT10ZLX/E to the network (LAN)
using the bundled RJ-45 (8-pin) plug.
3a. If youve determined that your LAN connection
requires a 10Base2 connection, connect the
MT10ZLX/E-T/2 to the network (LAN) using the
media coupler thin net cable connection. Allign
the notches of the cable to that of the BNC T-connector, and twist clock wise approximately onequarter turn. Otherwise, follow step 3 for 10BaseT connection.
For operation in a 10Mbps (10Base-T) Ethernet network, a Category 3, 4 or 5 UTP cable could be used to
connect between the media coupler and a 10Mbps hub
or switch. Speak to your Network Administrator for
more details.
*: Removal of this PCMCIA card from a notebook computer is contingent upon notebook computer design.
Please refer to PC Card removal instruction specific to
your notebook computer.
11-MultiMobile
Hardware Installation
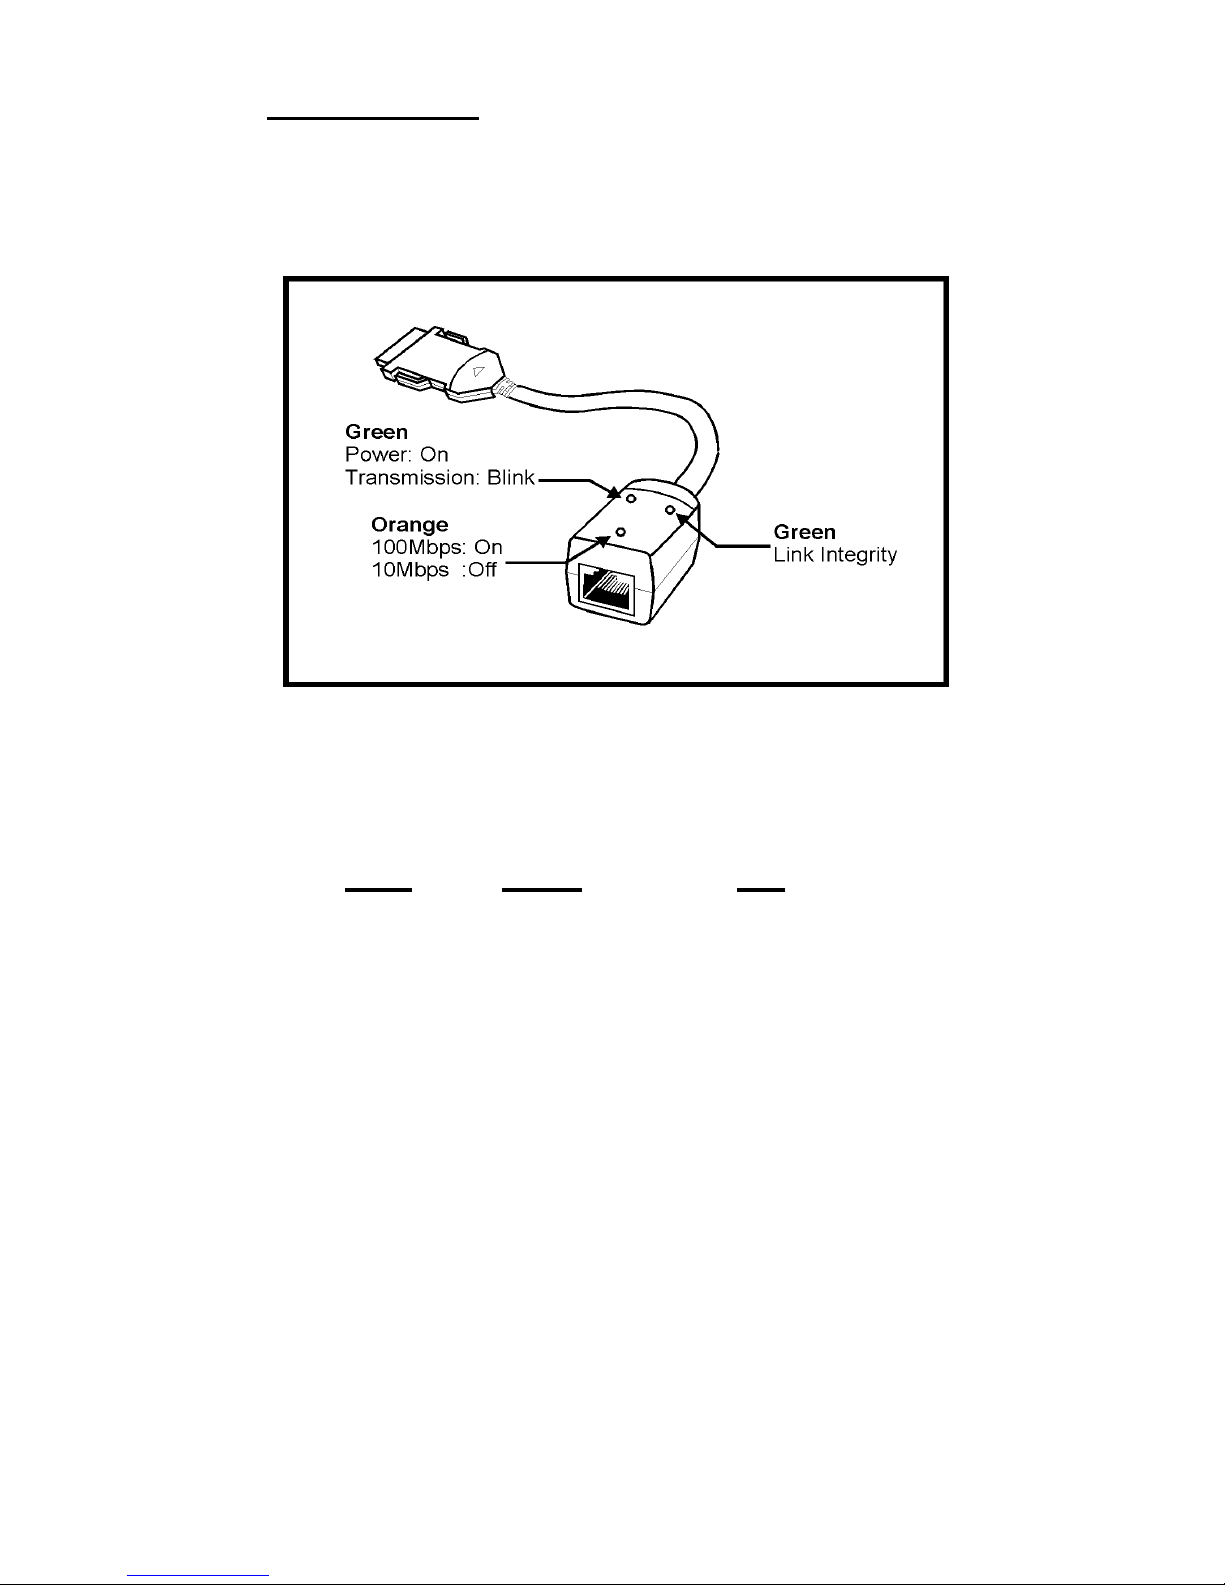
LED Functions
The MT10ZLX/xxx has two LEDs (Figure 2-2) that report Ethernet Link and Network status.
Figure 2-2. LED Functions
LED Color ON
POWER Green ON:Power is on
Blinking:
Transmission
Active
LINK Green ON:Link
Integrity
Established
OFF:Link
Integrity Failed
Software Installation
12-MultiMobile
CHAPTER 3 - SOFTWARE
INSTALLATION
1. Insert the Driver diskette into the floppy drive and
set the current drive to the floppy drive.
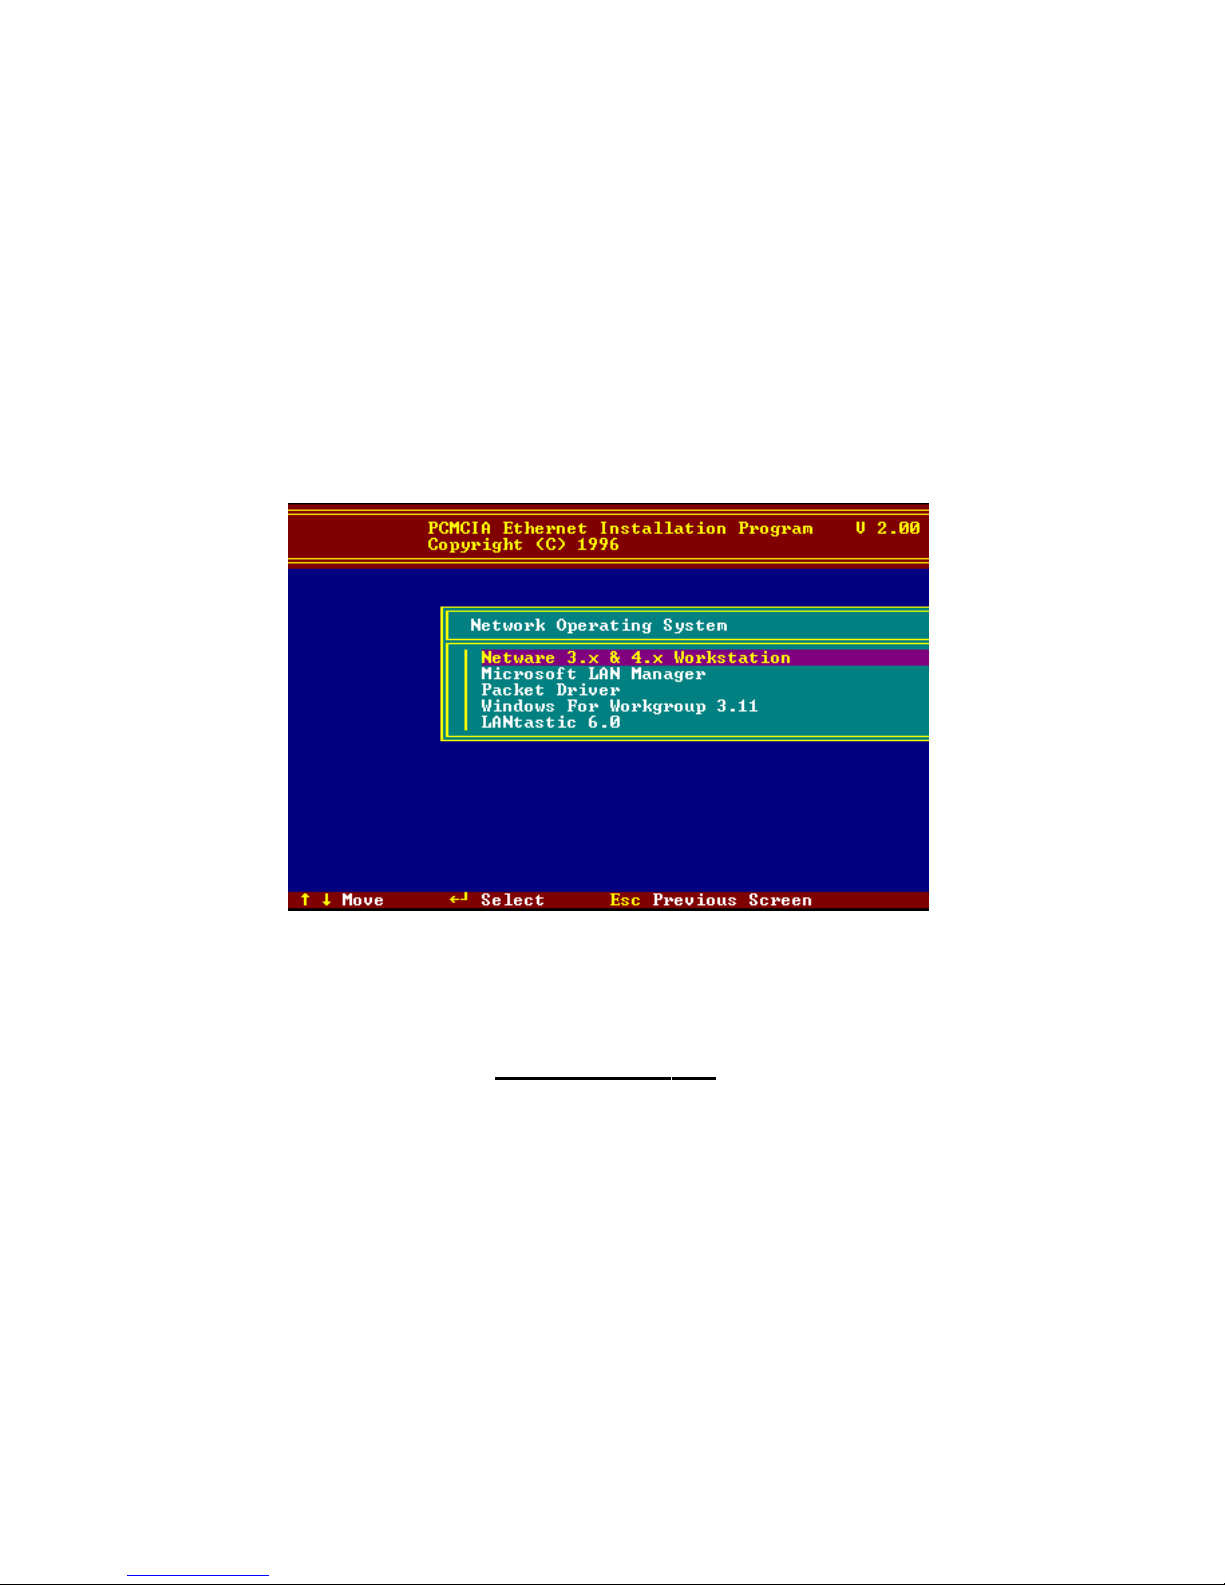
2. Run INSTALL to install the drivers (such as ODI
or NDIS 2.x or Packet Drivers) onto the target disk.
The NOS selection screen is displayed:
Figure 3-1. NOS Selection Screen
Novell NetWare
There are two methods to install the NetWare client
ODI driver: Menu Installation and NetWare 3.12 or
4.x Client Installation.
Software Installation
13-MultiMobile
Menu Installation
1.Run INSTALL.EXE from the root directory of driver
diskette.
2.Select NetWare 3.x and 4.x Workstation item from
the Installation menu.
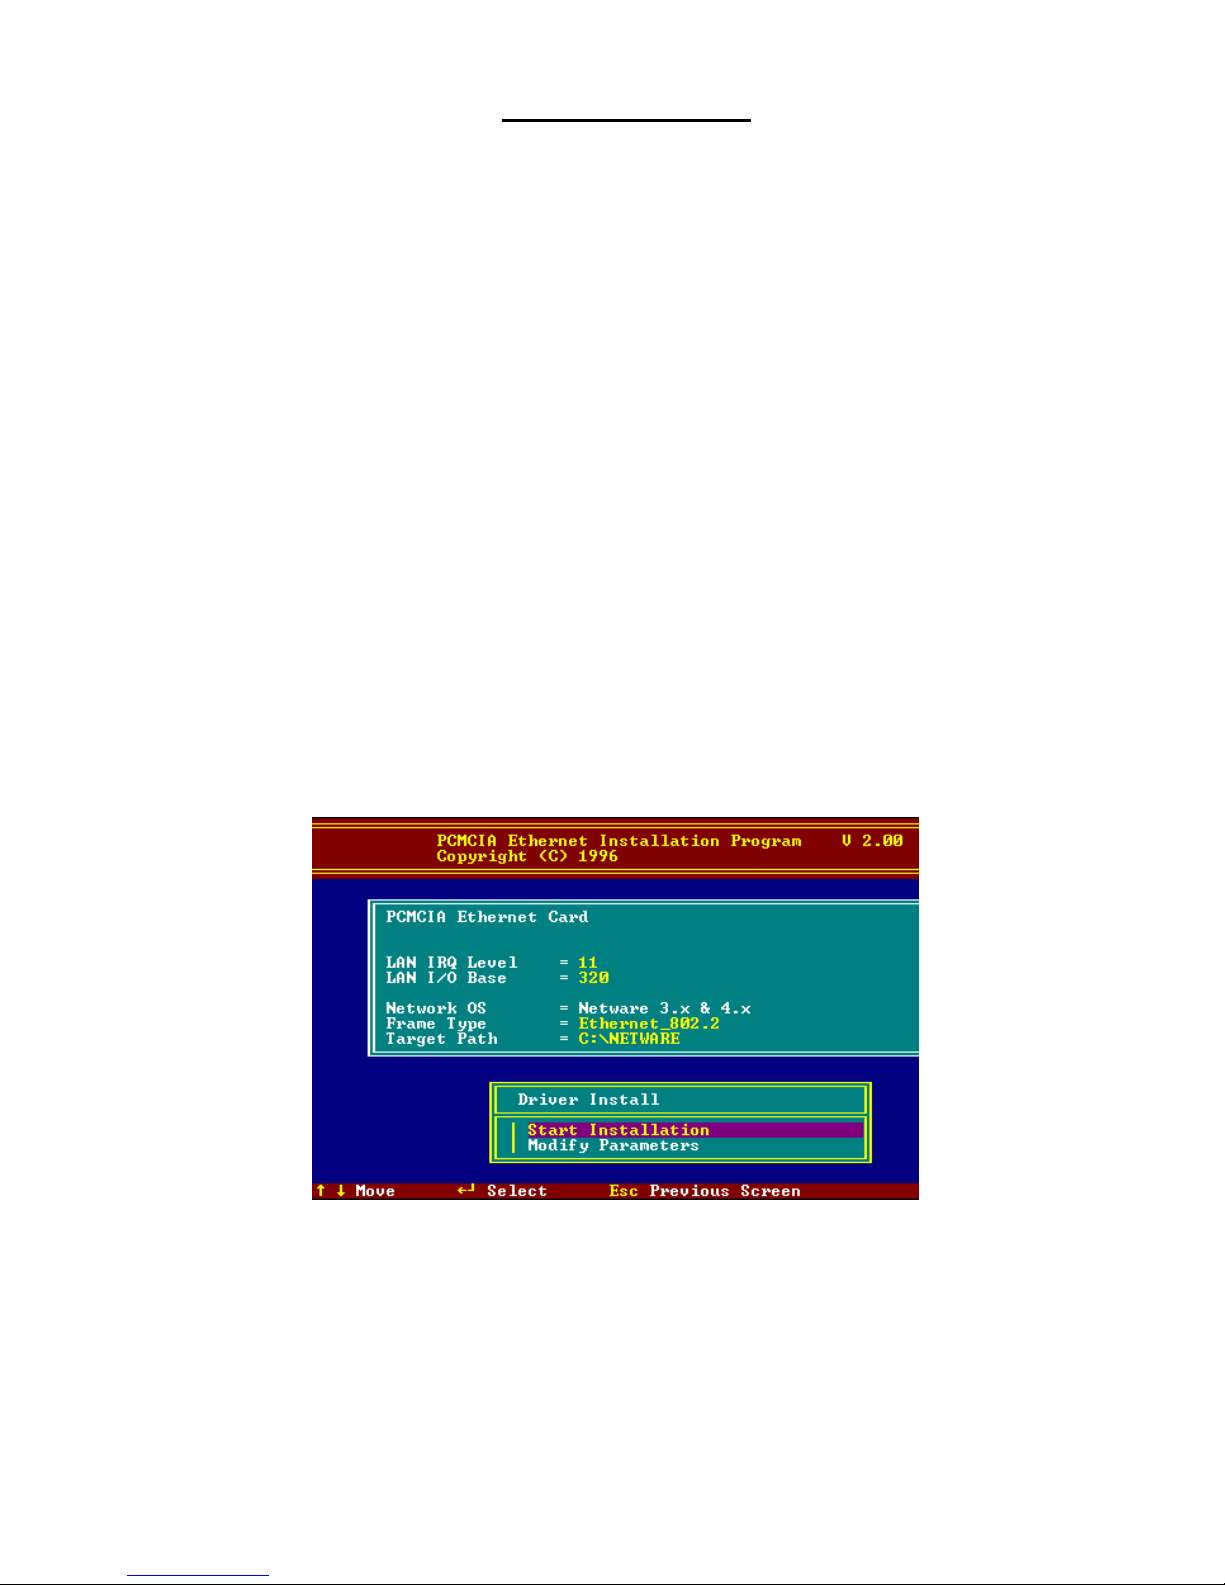
3.If current settings are acceptable, select Start Instal-
lation and go to step 5. Otherwise, select Modify
Parameters to make setting changes.
4. Move the cursor to highlight the settings you want
to change and press Enter to select an appropriate
value. When the configurations are set, press En-
ter on the OK field to exit the screen. The Installa-
tion program copies related files from the Drivers
diskette to the destination directory and modifies
the AUTOEXEC.BAT and NET.CFG files as
specified. The installation is complete.
5. Reboot the computer to make the NetWare connections. The Driver Installation screen is displayed:
Figure 3-2. Driver Installation Screen

Software Installation
14-MultiMobile
Manual Driver Installation
If you wish to install the ODI driver manually, perform
the following:
1.Copy the files LE100ODI.COM and NET.CFG from
the path \NETWARE and the file LANEN.EXE
from the path \ENABLER in the driver diskette into
the NetWare client directory containing Novells
LSL.COM, IPXODI.COM and NETx.COM files.
2.Use a text editor to edit the NET.CFG file for setting
the Frame Type. On the NetWare server, the Frame
Type default is 802.3 for NetWare 3.11, and 802.2
for NetWare 3.12 and 4.x. The Frame Type set in
NET.CFG must match Frame Type set at the
NetWare server, or the client will not attach to the
server.
3.Follow Novells instructions on using ODI programs.
You can substitute the LE100ODI.COM whenever
a reference is made to the Hardware Specific
Module.
4.A typical ODI workstation startup batch file includes:
>LANEN /IRQ=dd /IOP=xxx Card Enabler
>LSL ;Link Support Layer Module provided by
Novell
>LE100ODI ;Hardware Specific Module
>IPXODI ;IPX Protocol Stack Module provided by
Novell
>NETx ;Shell Support Module provided by Novell
>LOGIN
Novell Client Installation
1. Run the NetWare Client Install V1.21 software.
Either:
a. get the four Client disks from the network
administrator, or

Software Installation
15-MultiMobile
b. run the \NWCLIENT\INSTALL.EXE used in
a previous Installation.
2. Answer Ye s .
The program then modifies your AUTOEXEC.BAT
and CONFIG.SYS files accordingly and creates
backup copies. The following message appears:
Install support for MS Windows? (Y/N): .
3. Answer accordingly and provide a path if necessary.
The program displays the following:
Configure your workstation for backup by a
NetWare server running software such as
BACKUP? (Y/N): No
4. Answer accordingly and provide a path if necessary.
5. Select a driver for your network board.
6. From the driver list, select Other Drivers.
7. Go to the Insert the Driver Disk dialog box and
specify the path where the ODI driver and INS files
reside. For example: C:\ODI.DOS.
8. Press Enter and select the target ODI driver.
9. Specify the drivers optional settings.
10. Press F10 to save to new configuration.
11. Highlight Install press here and press Enter to
install. The program copies the necessary files for
NetWare Client.
12. Continue the installation procedure to completion.
On completion, a new NET.CFG file is created in
your DOS directory. Typically, this file contains
the following lines:
Link Driver LE100ODI
#FRAME Ethernet_802.3
FRAME Ethernet_802.2
13.Copy the file LANEN.EXE from the directory
\ENABLER in the driver diskette to NetWare Client directory.
14.Use a text editor to edit the STARTNET.BAT. Add
a running LANDEN command at the beginning of
the file. STARTNET.BAT for the ODI workstation
performs as the following

Software Installation
16-MultiMobile
LANEN /IOP=nnn /IRQ=n
Card Enabler
SET NWLANGUAGE=ENGLISH
Set NetWare 4.X to English
language
LSL Link Support Layer Module
provided by Novell
LE100ODI Hardware Specific Module
IPXODI IPX Protocol Stack Module provided by
Novell
VLM DOS Support Module provided by Novell
F: Change to connected device
LOGIN xxx Login to file server as user xxx
15.Run STARTNET to access the Novell
network.
MS LAN Manager
1.View the README.TXT on the installation diskette
in the \NDIS2 directory. Before installing the drivers, ensure that the Microsoft LAN Manager has
been installed in the target path. The installation
program will check and modify the
PROTOCOL.INI file for LAN Manager.
2.Run INSTALL.EXE from root directory of driver dis-
kette.
3.Select Microsoft LAN Manager item on the menu
screen.
4.If current settings are acceptable, select Start
Installation and go to step 6. Otherwise, select
Modify Parameters to make setting changes.
5.Move cursor to each field you wish to change and
press Enter to select an appropriate value. When
the selections are set, press Enter on the OK field
to exit the screen and go back to step 4.
6.The Installation program copies related files from the
 Loading...