

Page 1

Model MT10ZLX/E
& Model MT10ZLX/E-
T/2
Page 2

Owners Manual
MultiMobile
TM
Model # MT10ZLX/E & MT10ZLX/E-T2
P/N 82071400
This publication may not be reproduced, in whole or in part,
without prior expressed written permission from Multi-Tech
Systems, Inc. All rights reserved.
Copyright © 1997 by Multi Tech Systems, Inc.
Multi-Tech Systems, Inc. makes no representations or warranties
with respect to the content hereof and specifically disclaims any
implied warranties of merchantability or fitness for any particular
purpose. Furthermore, Multi-Tech Systems, Inc. reserves the right
to revise this publication and to make changes from time to time
in the content hereof without obligation of Multi-Tech Systems,
Inc. to notify any person or organization of such revisions or
changes.
Record of Revisions
Revision Description
A Manual Release at Revision Level A.
(9/20/97)
TRADEMARKS
Trademarks of Multi-Tech Systems, Inc. are as follows:
MultiMobile, Multi-Tech, and the Multi-Tech logo. All other
trademarks are owned by their respective companies.
Multi-Tech Systems, Inc.
2205 Woodale Drive
Mounds View, Minnesota 55112 U.S.A.
(612) 785-3500 or (800) 328-9717
U. S. FAX 612-785-9874
Fax-Back Service 612-717-5888
Technical Support (800) 972-2439
BBS (612) 785-3702 or (800) 392-2432
Internet Address: http://www.multitech.com
Technical Writer: mark@ multitech.com
Page 3

Contents
3-Contents
Contents
Chapter 1 - Introduction and Description ............5
About This Manual ................................................. 5
About This Product ................................................6
Network Interface Specifications .......................... 6
System Requirements .............................................7
Ship Kit Contents....................................................8
Chapter 2 - Installation .......................................... 9
Chapter 3 - Software Installation....................... 12
Novell NetWare ..................................................... 12
Menu Installation.................................................. 13
Manual Driver Installation ..................................14
Novell Client Installation ..................................... 14
MS LAN Manager ................................................16
Packet Driver ........................................................18
Windows for Workgroups 3.11 ...........................18
Windows NT 3.51.................................................. 22
Windows NT 4.0.................................................... 22
Windows 95 Installation....................................... 23
Artisoft Lantastic 6.0 Installation ....................... 23
IBM OS/2 Warp ....................................................24
Notes For NDIS Driver......................................... 27
Notes For Packet Driver....................................... 29
Notes For Windows For Workgroups Driver..... 29
Chapter 4 - Troubleshooting ................................ 30
Introduction ..........................................................30
Chapter 5 - Service ............................................... 36
Limited Warranty ................................................. 36
Software User License Agreement....................... 37
Tech Support ......................................................... 39
Service ....................................................................39
About the Multi-Tech BBS................................... 41
Page 4

Contents
4-Contents
How to Use the Multi-Tech BBS ..........................41
About CompuServe/Internet ............................... 43
About the Multi-Tech Fax-Back System .............43
APPENDIX A - REGULATORY AGENCY INFORMATION .. 44
Index ......................................................................51
Page 5

5-MultiMobile
Introduction/Description
Chapter 1 - Introduction and Description
About This Manual
This manual explains how to install and use your
Ethernet PC Card, model(s) MT10ZLX/E and
MT10ZLX/E-T/2 from Multi-Tech Systems. This
manual is divided into 5 chapters and one appendix.
The information contained in each chapter and appendix is as follows:
Chapter 1 - Introduction and Description
Chapter 1 begins with a short introduction and description; followed by a guide (which you are now reading)
to the use of this manual; and ends with a section on
technical specification information.
Chapter 2 - Hardware Installation
This chapter provides you with procedures for making
the physical connections attaching your PC Card to
portable computers, as well as LED descriptions which
verify proper operation and report operating status.
Chapter 3 - Software Installation
Chapter 3 contains information on PCMCIA setup,
manual installation of PCMCIA Software, and infor-
mation about supported drivers.
Chapter 4 - Troubleshooting Your PC Card
Chapter 4 provides tips and advice if you think your
Ethernet PC Card isnt working correctly.
Chapter 5 - Service/Warranty/Tech Support
Chapter 5 provides service and product warranty information.
Appendix
Appendix A - Regulatory Information
Page 6

Introduction/Description
6-MultiMobile
About This Product
The MT10ZLX/E is a credit-card-sized Type II
PCMCIA card that complies with the PCMCIA 2.1 and
JEIDA 4.1 standards and works with computers incorporating a compatible interface.
Connectivity to your Local Area Network (LAN) is accomplished when using an RJ-45 network cable connection (model MT10ZLX/E), or when using an BNC
T-connector converting 10Base-T to 10Base2 (model
MT10ZLX/E-T/2); and installing software and drivers
respective to your LAN environment.
Network Interface Specifications
Operating Environment:
• Novell Netware 3.x, 4.x
• Microsoft LAN Manager
• Packet Driver Applications
• Microsoft Windows for Workgroups 3.11
• Microsoft Windows 3.1
• Microsoft Windows NT 3.51, NT 4.0
• Windows 95
• Lantastic 6.0
• IBM OS/2 Warp Version 3
Features:
• Compatible with most notebook, laptop and portable
computers
• Compatible with Card and Socket Services
• Easy to install and use
• Card is hot swappable
• NE2000 compatible
• 10Mbps Ethernet: IEEE 802.3 standard 10BaseT or
10Base2 baseband CSMA/CD local area network
Page 7

7-MultiMobile
Introduction/Description
•PCMCIA 2.0/2.1 and PC Card Standard compliant
Type II PC Card
Dimensions:
•3.37 x 2.128 x 0.197 (86mm x 54mm x 5.0mm);
•30gw in weight
Power Requirements:
•Normal Operation: +5V DC, 250mA max
•Sleep Mode: +5V DC, 50mA max
Diagnostics:
•LEDs: Link Integrity, Power / Activity
Environment Ranges:
•Operating:32°F to 149°F (0°C to 65°C)
•Storage: -4°F to 158°F (0°C to 70°C)
•Humidity:10% - 90%, noncondensing
Certifications:
•FCC, Part 15, Class B
•CE Mark (EN55022,ClassB, EN50082-1)
System Requirements
• An IBM compatible notebook computer with
386SX or faster processor
• Drivers and utilities provided with this product
• PCMCIA release 2.1 compliant Card Services and
Socket Services
• an RJ45 jack for 10BaseT connection to your Ethernet
LAN (MT10ZLX/E)
• an RJ45 jack for 10BaseT connection, or an BNC T-
connector for 10Base2 connection to your Ethernet
LAN (MT10ZLX/E-T/2)
Page 8

Introduction/Description
8-MultiMobile
Ship Kit Contents
Your MT10ZLX/E is shipped from the factory with
the following:
• Fast Ethernet PC Card Adapter
• Media coupler with a 15-pin detachable terminated
connector (to PC card); with the other end of the
cable terminated with one RJ-45 receptacle connector for 10BASE-T LAN connection
• 3.5 driver diskette
• Users Manual (this manual)
• Plastic protection case for base PC Card
Your MT10ZLX/E-T/2 is shipped from the factory
with the following:
• Ethernet PC Card Adapter
• Media coupler with a 15-pin detachable terminated
connector (to PC card); with the other end of the
cable terminated with one RJ-45 receptacle connector for 10BASE-T and one receptacle BNC Tconnector converting 10Base-T to 10Base2 for
LAN connection
• 3.5 driver diskette
• Users Manual (this manual)
• Plastic protection case for base PC Card
Page 9
9-MultiMobile
Hardware Installation
CHAPTER 2 - INSTALLATION
This chapter describes how to install your Ethernet PC
Card into your notebook computer and connect it to
the network. The PC Card can connect at 10Mbps
Ethernet over unshielded twisted pair (UTP) cable, or
using a thin net cable.
Please refer to Software Installation in Chapter 3 for
installing network drivers using menu driven installation utilities.
*: hardware installation must occur before driver installation is attempted.
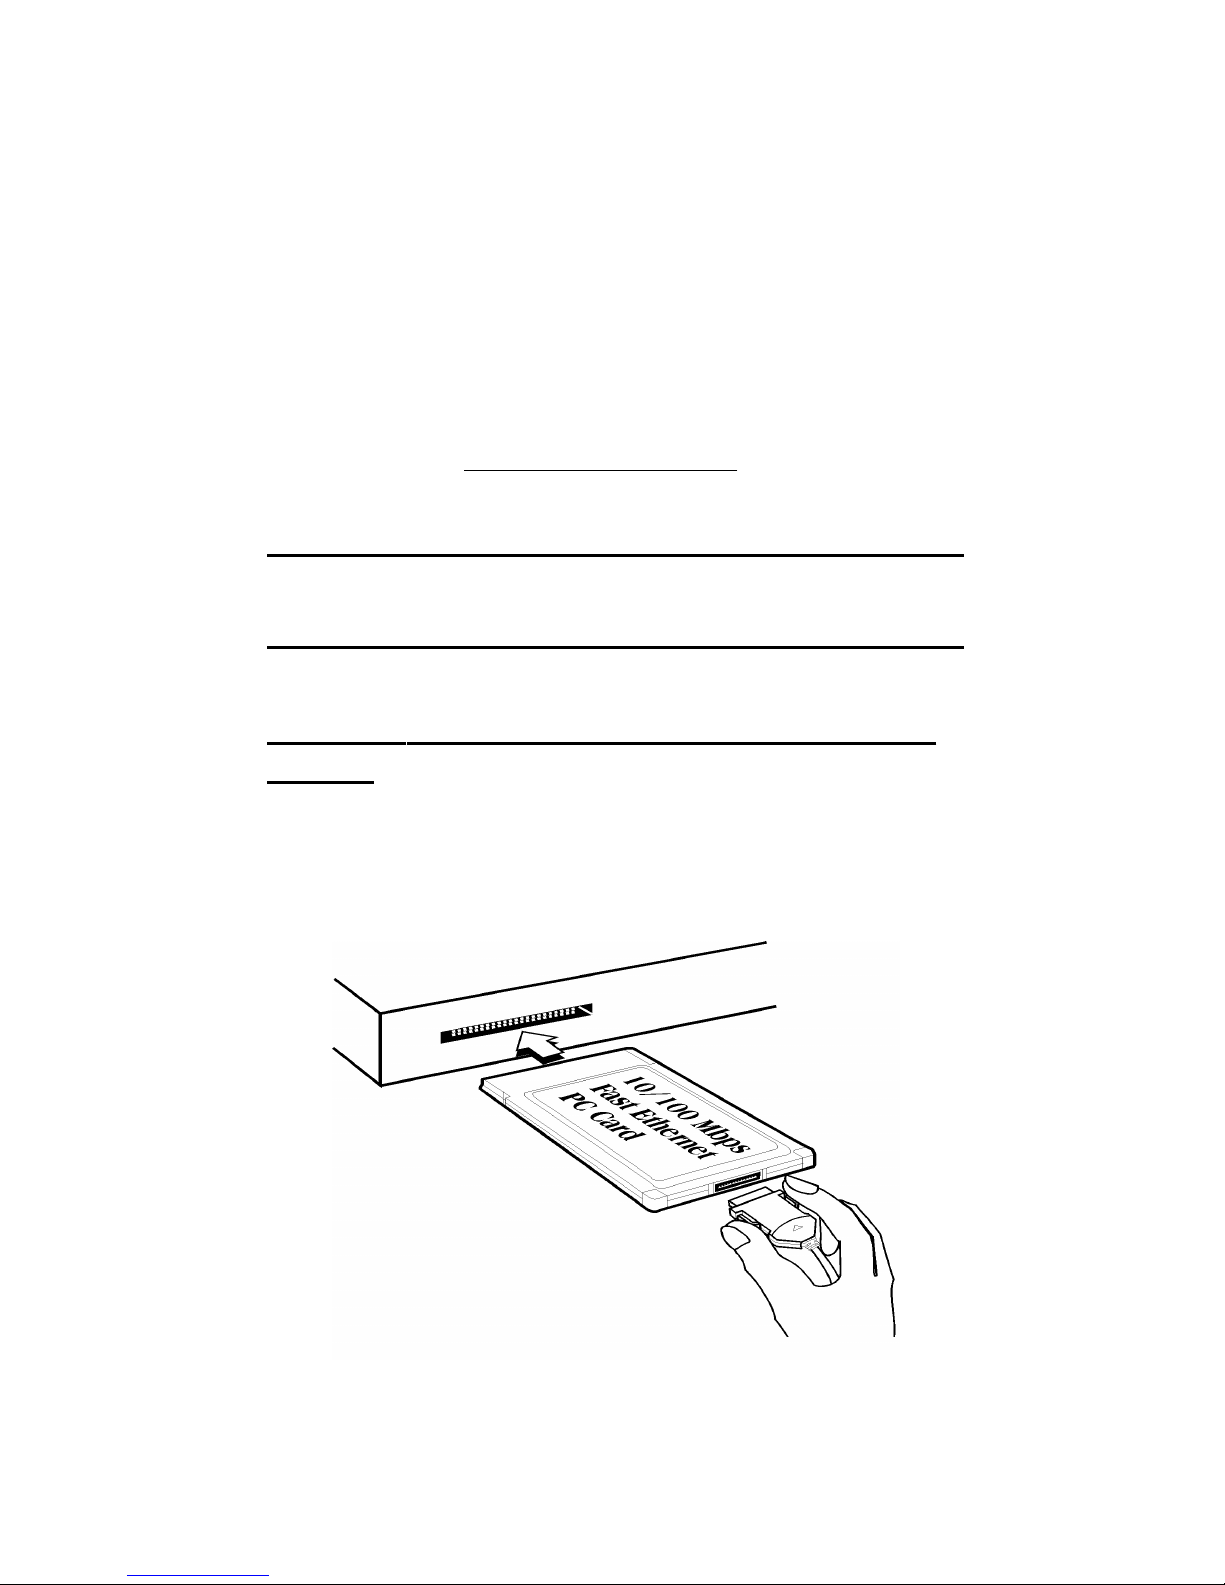
Installing The MT10ZLX/E or MT10ZLX/E-T/2
Card(s)
1. Insert the MT10ZLX/xxx into the computers
PCMCIA slot with the 68-pin connector facing the
PCMCIA slot and the label facing up.
Figure 2-1. PC Card Installation
Page 10

Hardware Installation
10-MultiMobile
2. Plug the 15 pin connector into the 15 pin socket of
the PC card. On the other end of the 15-pin cable,
leave the RJ-45 network cable exposed until the
LAN connection is made; hardware installation is
now complete. The MT10ZLX/E is powered directly from the PC.
2a. Determine if your LAN connection is 10Base-T or
10Base2. Plug the 15 pin connector into the 15 pin
socket of the PC card. On the other end of the 15pin cable, leave RJ-45 cable (10Base-T), or BNC
T-cable receptacle (10Base2) exposed until LAN
connection is made; hardware installation is now
complete. The MT10ZLX/E-T/2 is powered di-
rectly from the PC.
3. Connect the MT10ZLX/E to the network (LAN)
using the bundled RJ-45 (8-pin) plug.
3a. If youve determined that your LAN connection
requires a 10Base2 connection, connect the
MT10ZLX/E-T/2 to the network (LAN) using the
media coupler thin net cable connection. Allign
the notches of the cable to that of the BNC T-connector, and twist clock wise approximately onequarter turn. Otherwise, follow step 3 for 10BaseT connection.
For operation in a 10Mbps (10Base-T) Ethernet network, a Category 3, 4 or 5 UTP cable could be used to
connect between the media coupler and a 10Mbps hub
or switch. Speak to your Network Administrator for
more details.
*: Removal of this PCMCIA card from a notebook computer is contingent upon notebook computer design.
Please refer to PC Card removal instruction specific to
your notebook computer.
Page 11
11-MultiMobile
Hardware Installation
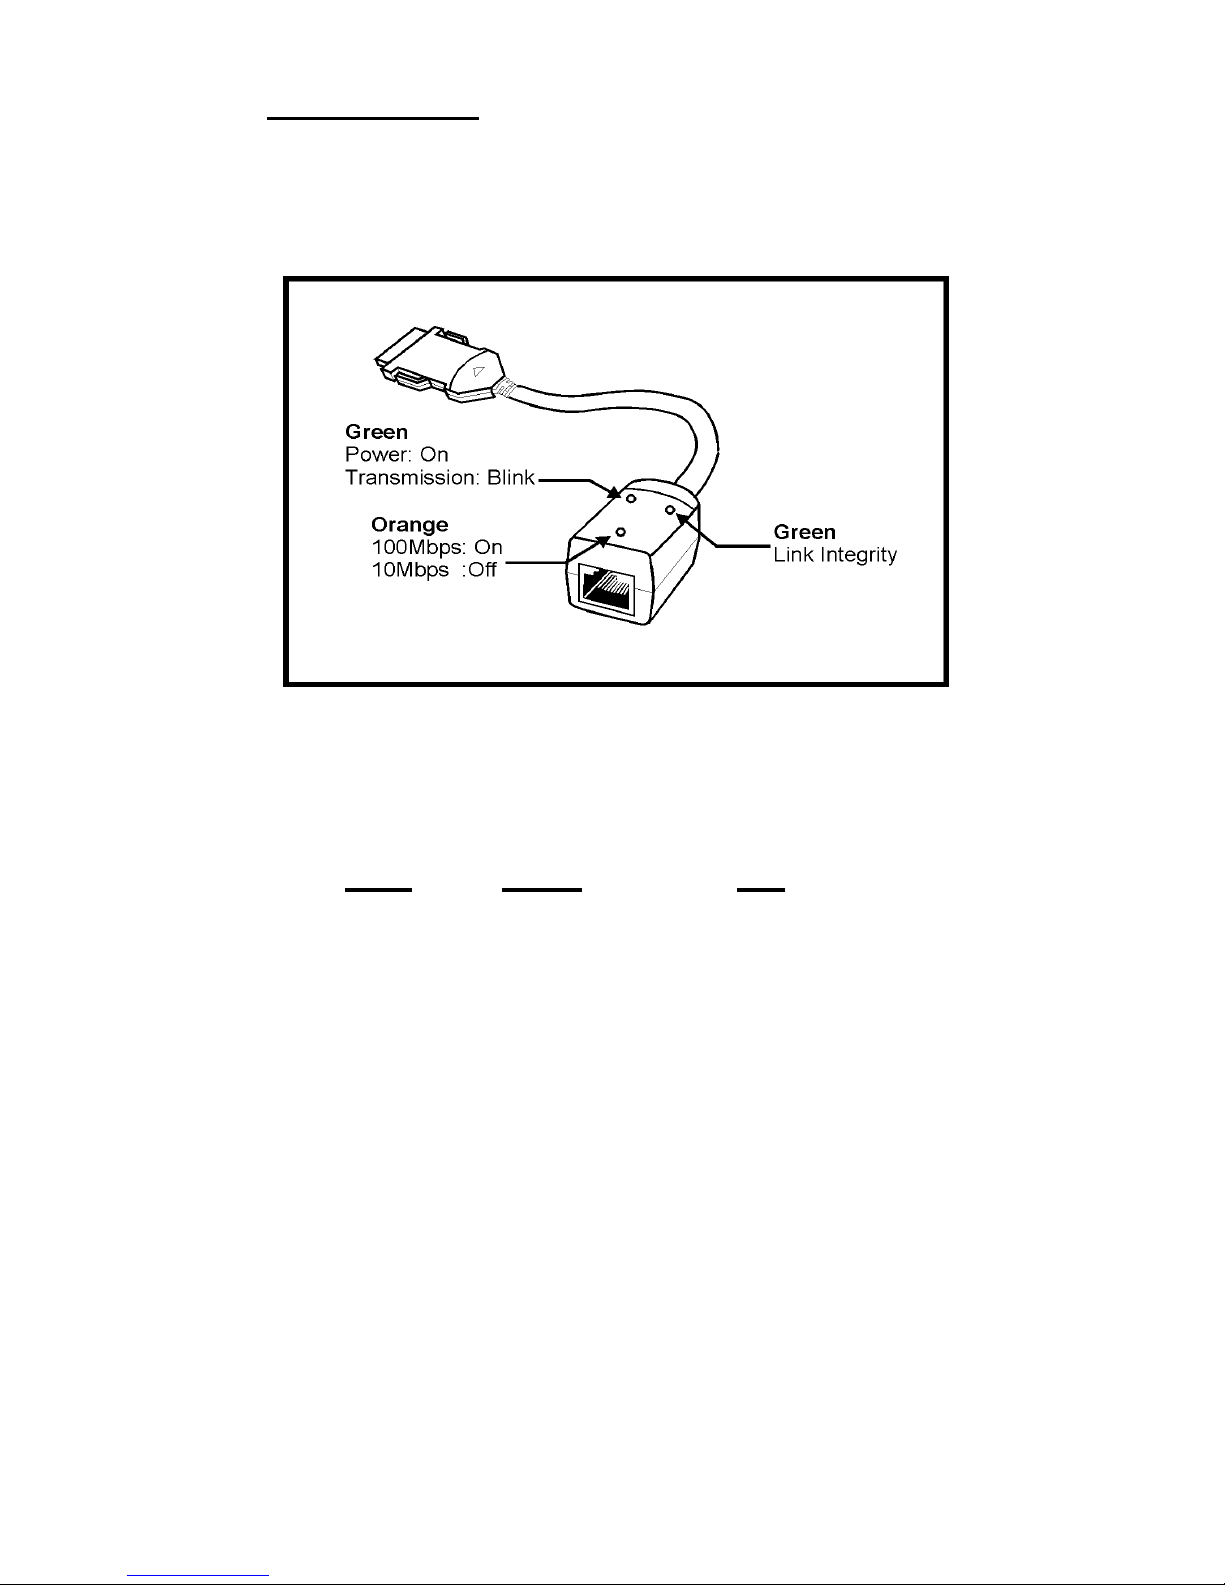
LED Functions
The MT10ZLX/xxx has two LEDs (Figure 2-2) that report Ethernet Link and Network status.
Figure 2-2. LED Functions
LED Color ON
POWER Green ON:Power is on
Blinking:
Transmission
Active
LINK Green ON:Link
Integrity
Established
OFF:Link
Integrity Failed
Page 12
Software Installation
12-MultiMobile
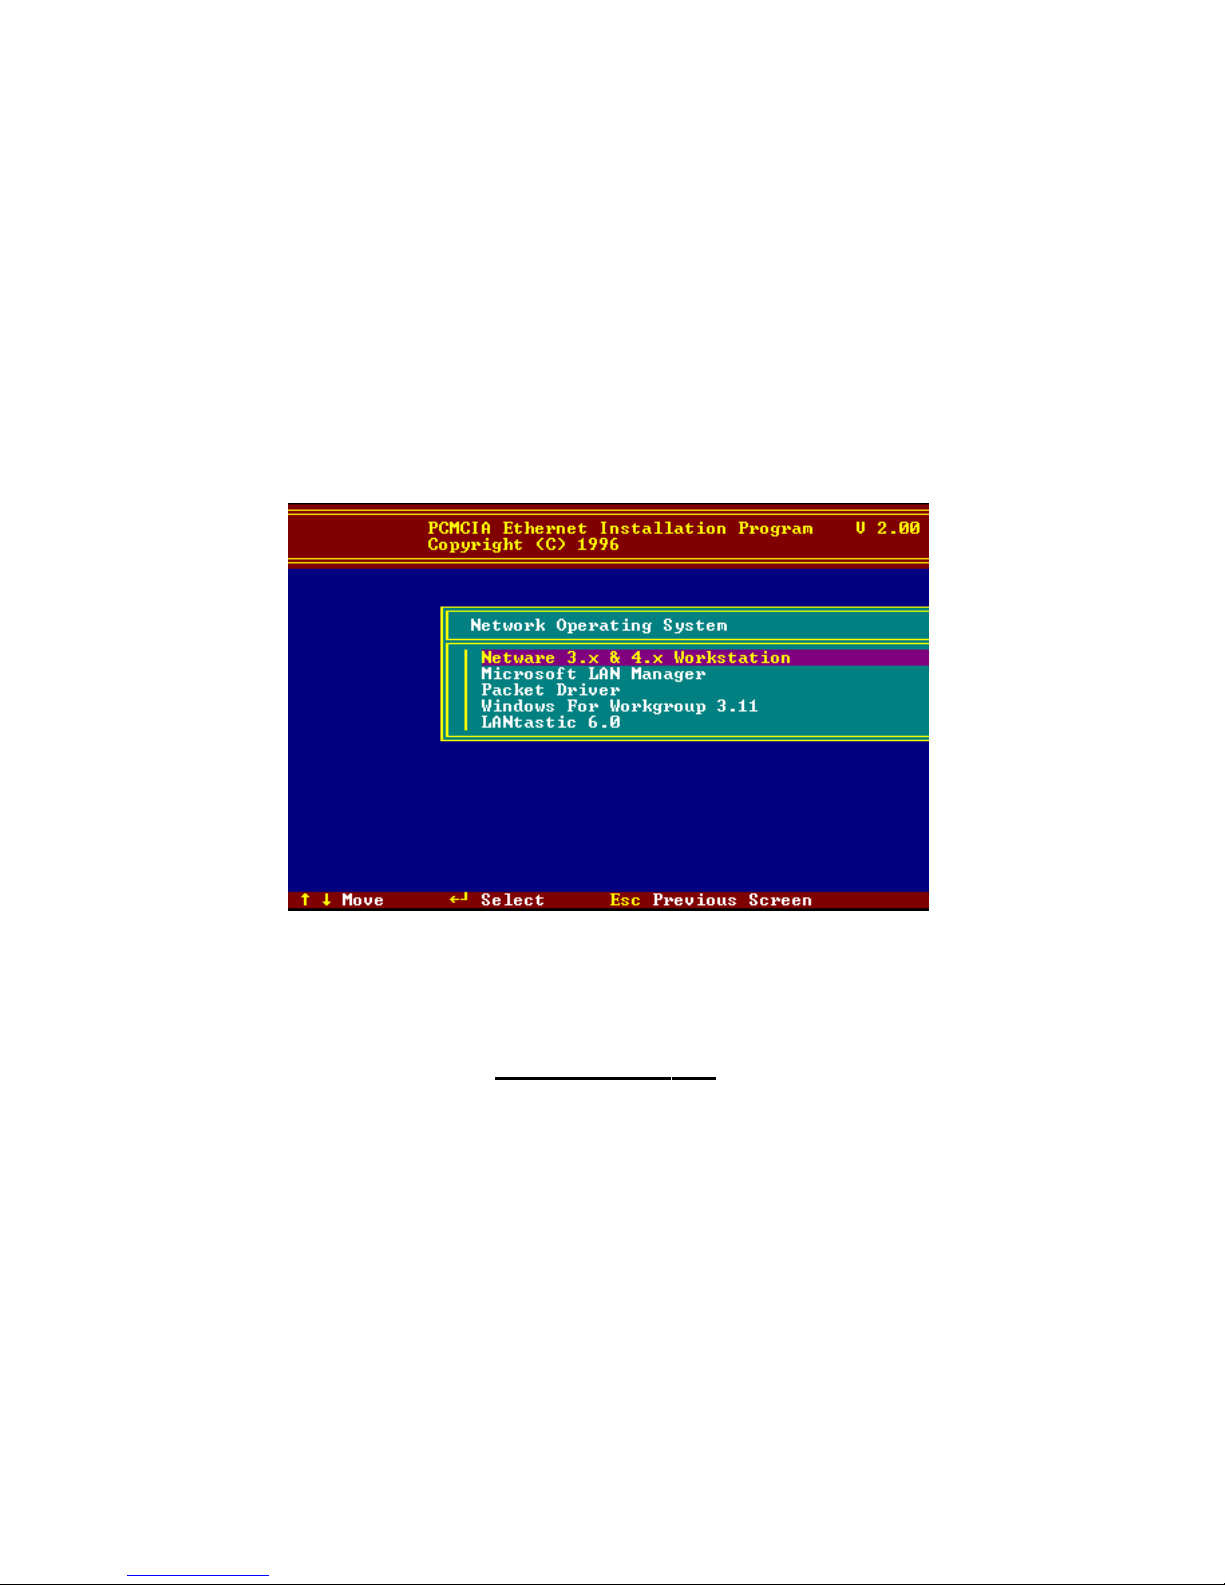
CHAPTER 3 - SOFTWARE
INSTALLATION
1. Insert the Driver diskette into the floppy drive and
set the current drive to the floppy drive.
2. Run INSTALL to install the drivers (such as ODI
or NDIS 2.x or Packet Drivers) onto the target disk.
The NOS selection screen is displayed:
Figure 3-1. NOS Selection Screen
Novell NetWare
There are two methods to install the NetWare client
ODI driver: Menu Installation and NetWare 3.12 or
4.x Client Installation.
Page 13
Software Installation
13-MultiMobile
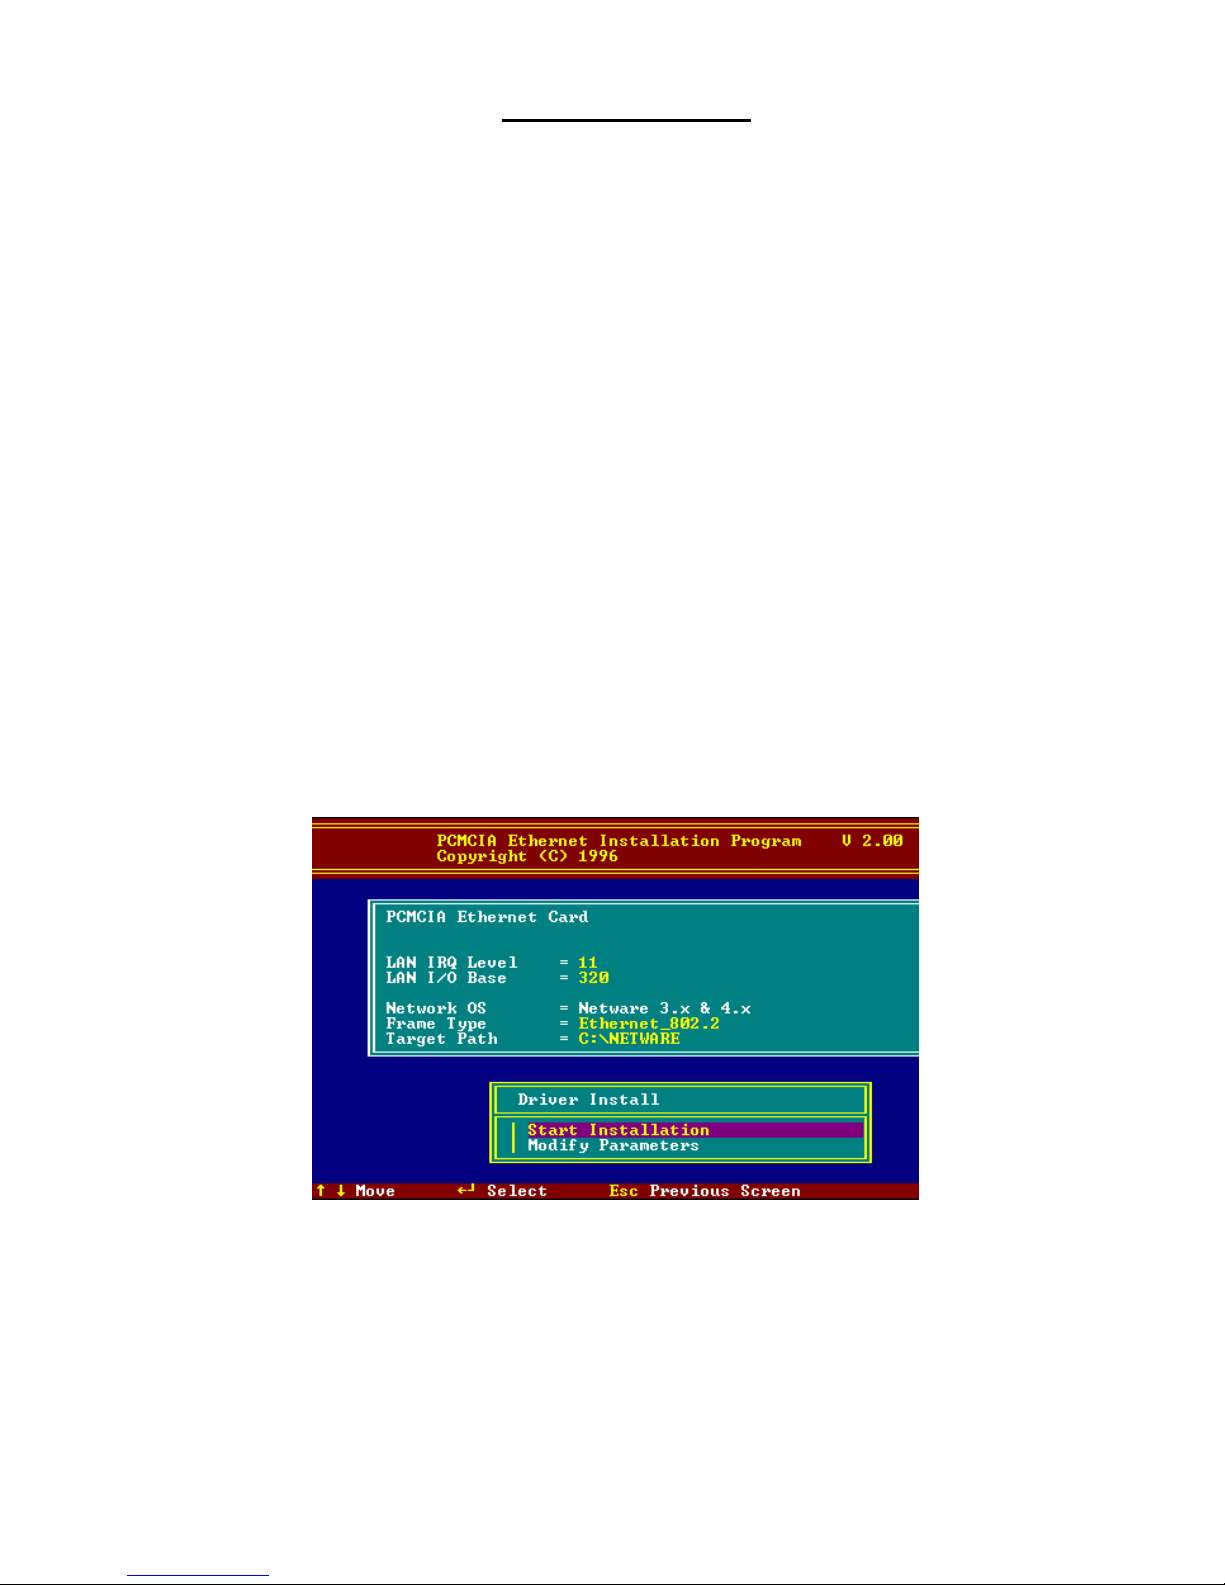
Menu Installation
1.Run INSTALL.EXE from the root directory of driver
diskette.
2.Select NetWare 3.x and 4.x Workstation item from
the Installation menu.
3.If current settings are acceptable, select Start Instal-
lation and go to step 5. Otherwise, select Modify
Parameters to make setting changes.
4. Move the cursor to highlight the settings you want
to change and press Enter to select an appropriate
value. When the configurations are set, press En-
ter on the OK field to exit the screen. The Installa-
tion program copies related files from the Drivers
diskette to the destination directory and modifies
the AUTOEXEC.BAT and NET.CFG files as
specified. The installation is complete.
5. Reboot the computer to make the NetWare connections. The Driver Installation screen is displayed:
Figure 3-2. Driver Installation Screen
Page 14

Software Installation
14-MultiMobile
Manual Driver Installation
If you wish to install the ODI driver manually, perform
the following:
1.Copy the files LE100ODI.COM and NET.CFG from
the path \NETWARE and the file LANEN.EXE
from the path \ENABLER in the driver diskette into
the NetWare client directory containing Novells
LSL.COM, IPXODI.COM and NETx.COM files.
2.Use a text editor to edit the NET.CFG file for setting
the Frame Type. On the NetWare server, the Frame
Type default is 802.3 for NetWare 3.11, and 802.2
for NetWare 3.12 and 4.x. The Frame Type set in
NET.CFG must match Frame Type set at the
NetWare server, or the client will not attach to the
server.
3.Follow Novells instructions on using ODI programs.
You can substitute the LE100ODI.COM whenever
a reference is made to the Hardware Specific
Module.
4.A typical ODI workstation startup batch file includes:
>LANEN /IRQ=dd /IOP=xxx Card Enabler
>LSL ;Link Support Layer Module provided by
Novell
>LE100ODI ;Hardware Specific Module
>IPXODI ;IPX Protocol Stack Module provided by
Novell
>NETx ;Shell Support Module provided by Novell
>LOGIN
Novell Client Installation
1. Run the NetWare Client Install V1.21 software.
Either:
a. get the four Client disks from the network
administrator, or
Page 15

Software Installation
15-MultiMobile
b. run the \NWCLIENT\INSTALL.EXE used in
a previous Installation.
2. Answer Ye s .
The program then modifies your AUTOEXEC.BAT
and CONFIG.SYS files accordingly and creates
backup copies. The following message appears:
Install support for MS Windows? (Y/N): .
3. Answer accordingly and provide a path if necessary.
The program displays the following:
Configure your workstation for backup by a
NetWare server running software such as
BACKUP? (Y/N): No
4. Answer accordingly and provide a path if necessary.
5. Select a driver for your network board.
6. From the driver list, select Other Drivers.
7. Go to the Insert the Driver Disk dialog box and
specify the path where the ODI driver and INS files
reside. For example: C:\ODI.DOS.
8. Press Enter and select the target ODI driver.
9. Specify the drivers optional settings.
10. Press F10 to save to new configuration.
11. Highlight Install press here and press Enter to
install. The program copies the necessary files for
NetWare Client.
12. Continue the installation procedure to completion.
On completion, a new NET.CFG file is created in
your DOS directory. Typically, this file contains
the following lines:
Link Driver LE100ODI
#FRAME Ethernet_802.3
FRAME Ethernet_802.2
13.Copy the file LANEN.EXE from the directory
\ENABLER in the driver diskette to NetWare Client directory.
14.Use a text editor to edit the STARTNET.BAT. Add
a running LANDEN command at the beginning of
the file. STARTNET.BAT for the ODI workstation
performs as the following
Page 16

Software Installation
16-MultiMobile
LANEN /IOP=nnn /IRQ=n
Card Enabler
SET NWLANGUAGE=ENGLISH
Set NetWare 4.X to English
language
LSL Link Support Layer Module
provided by Novell
LE100ODI Hardware Specific Module
IPXODI IPX Protocol Stack Module provided by
Novell
VLM DOS Support Module provided by Novell
F: Change to connected device
LOGIN xxx Login to file server as user xxx
15.Run STARTNET to access the Novell
network.
MS LAN Manager
1.View the README.TXT on the installation diskette
in the \NDIS2 directory. Before installing the drivers, ensure that the Microsoft LAN Manager has
been installed in the target path. The installation
program will check and modify the
PROTOCOL.INI file for LAN Manager.
2.Run INSTALL.EXE from root directory of driver dis-
kette.
3.Select Microsoft LAN Manager item on the menu
screen.
4.If current settings are acceptable, select Start
Installation and go to step 6. Otherwise, select
Modify Parameters to make setting changes.
5.Move cursor to each field you wish to change and
press Enter to select an appropriate value. When
the selections are set, press Enter on the OK field
to exit the screen and go back to step 4.
6.The Installation program copies related files from the
Page 17

Software Installation
17-MultiMobile
driver diskette to the destination directory and modifies CONFIG.SYS and PROTOCOL.INI under
users agreement.
7. Reboot the computer to load driver and start LAN
Manager in batch.
8. Highlight Start Installation and press Enter to start
the LAN Manager in batch mode.
Figure 3-3. Microsoft LAN Manager
Installation Screen
Example of PROTOCOL.INI: used by LAN
Manager
[PROTMAN]
DRIVERNAME = PROTMAN$
DYNAMIC = YES
PRIORITY = NETBEUI
[NETBEUI_XIF]
Drivername = netbeui$
SESSIONS = 6
NCBS = 12
BINDINGS = LE100NDS_NIF
LANABASE = 0
[LE100NDS_NIF]
; protocol.ini session for LAN driver.
Page 18

Software Installation
18-MultiMobile
IOADDRESS = 0x320
INTERRUPT = 11
DRIVERNAME = LE100NDS$
Packet Driver
1.Run INSTALL.EXE from root directory of driver diskette.
2.Select Packet Driver item on the Menu screen.
3.If current settings are acceptable, select Start
Installation and go to step 5. Otherwise, select
Modify Parameters to make setting changes.
4. Move the cursor to the field you want to change and
press Enter to select a new value. When the con-
figuration is set, press Enter on the OK field to
exit the screen and go back to step 3. The Installation program copies related files from the Drivers
diskette to the destination directory and modifies
the AUTOEXEC.BAT file as defined.
5. Reboot the computer to load the selected driver.
Windows for Workgroups 3.11
NDIS3 Driver for Workgroups
1.Run Windows for Workgroups and click the Network
Setup icon in the Network group.
2.In the Network Settings dialog box, click the Networks... button to select the network operating system.
3.In the Networks dialog box, check the radio button
before Install Microsoft Windows Network and No
Additional Network. Press OK to go back to the
Network Settings screen.
4.Click the Drivers... button to select network driver.
Page 19

Software Installation
19-MultiMobile
5.In the Network Drivers dialog box, press the Add
Adapter... button to enter Add Network Adapter
dialog box. Select Unlisted or Updated Network
Adapter and press OK.
6.Windows prompts a Install Driver dialog box. At this
time, place the driver diskette into floppy drive and
press OK.
7.Select the Enhanced mode NDIS3 for.... string and
press OK.
8.Follow Windows instructions to complete the installation and exit Windows
9.Run INSTALL.EXE from root directory of driver dis-
kette.
10.Select Windows for Workgroup in the Network
Operating System screen.
11.If current settings are acceptable, select Start In-
stallation and go to step 13. Otherwise, select
Modify Parameters to make setting changes.
12.Move cursor to focus on the setting(s) you want to
change and press Enter to select a new value. When
the configuration is accepted, press Enter on the
OK field to exit the screen and go back to step 11.
13.Select NDIS Server (LAN Manager,...) as the net-
work server you wish to attach and press the Enter
key. The Installation program starts to copy related
files to the destination directory and modifies
AUTOEXEC.BAT under users agreement.
14.Reboot the computer to have the selected driver take
effect.
NDIS2 Driver for Workgroups
1.Run Windows for Workgroups and click the Network
Setup icon in the Network group.
2.In the Network Settings dialog box, click the Networks... button to select the network operating system.
3.In the Networks dialog box, check the radio button
before Install Microsoft Windows Network and No
Page 20

Software Installation
20-MultiMobile
Additional Network. Press OK to go back the
Network Settings screen.
4.Click the Drivers... button to select network driver.
5.In the Network Drivers dialog box, press the Add
Adapter... button to enter Add Network Adapter
dialog box. Select Unlisted or Updated Network
Adapter and press OK.
6.Windows will prompt a Install Driver dialog box. In
this time, put the driver diskette into floppy drive
and press OK.
7.Select the Real mode NDIS2 for.... string and press
OK.
8.Follow Windows instructions to complete the installation and exit Windows.
9.Run INSTALL.EXE from root directory of driver dis-
kette.
10.Select Windows for Workgroups in Network Op-
erating System screen.
11.If current settings are acceptable, select Start
Installation and go to step 13. Otherwise, select
Modify Parameters to make setting changes.
12.Move cursor to focus on the setting you wish to
change and press Enter to select a new value. When
the configuration is set, press Enter on the OK field
to exit the screen and go back to step 11.
13.Select NDIS Server (LAN Manager,...) as the net-
work server you wish to attach and press Enter. The
Installation program starts to copy related files to
the destination directory and modifies
AUTOEXEC.BAT under users agreement.
14.Reboot the computer to have the selected driver take
effect.
ODI Driver for Workgroups
1.Run Windows for Workgroups and click the
Network Setup icon in the Network group.
2.In the Network Setup dialog box, click the
Networks... button to select the network operating
system.
Page 21

Software Installation
21-MultiMobile
3.In the Networks dialog box, check Install Microsoft
Windows Network and Others,
thereafer select Novell NetWare (Workstation Shell,
3.X) or Novell NetWare (Workstation 4.0 and
above) and press OK to enter the screen of
PXODI.COM and LSL.COM
4. Press OK to go back the Network Setup screen.
5.Click on the Drivers... button to select network
driver.
6.In the Network Drivers dialog box, press Add
Adapter... button to enter Add Network Adapter
dialog box. Select Unlisted or Updated Network
Adapter and press OK.
7.Windows will prompt a Install Driver dialog box. At
this time, put the driver diskette into floppy drive
and press OK.
8.Select the NetWare ODI Driver .... string and press
OK.
9.Follow Windows instructions to complete the installation and exit Windows.
10.Run INSTALL.EXE from the root directory of
driver diskette.
11.Select Windows for Workgroups in the Network
Operating System screen.
12.If current settings are acceptable, select Start
Installation and go to step 13. Otherwise, select
Modify Parameters to make setting changes.
13.Move cursor to the setting you wish to change and
press Enter to select a new value. When the con-
figuration is set, press Enter on the OK field to
exit the screen and go back to step 11.
14.Select Novell NetWare Server as the network server
you wish to attach and press Enter. Installation copies related files to the destination directory and
modifies AUTOEXEC.BAT and NET.CFG under
users agreement.
15.Reboot the computer to have the selected driver take
effect.
Page 22

Software Installation
22-MultiMobile
Windows NT 3.51
1.In the Main Group of NT 3.51, open Control Panel
and click on the Network icon.
2.In the Network Settings dialog box, push Add
Adapter... button. The Add Network Adapter dialog box will appear.
3.Choose Others requires disk from manufacturer from
the network adapter card list and press Continue..
4.When Windows NT prompts for manufacturer disk,
insert driver diskette and press OK until the Net-
work Setting Change dialog box appears.
5.Reboot the computer to have the card take effect.
Windows NT 4.0
1.Insert the Fast Ethernet PC Card into any one of the
available PC Card Slots in system.
2.Power up Windows NT 4.0.
3.Open My Computer.
4.Open Control Panel.
5.Run the Network.
6.Select Adapters page.
7.Press Add to add network adapter.
8.Press Have Disk button.
9.Insert the driver disk into drive A:.
10.Specify the path to A:\ and press OK.
11.A dialog box will appear to adjust the
drivers settings. The resources assignment to the
adapter must be unique in the system.
12.Press OK when all setting are completed.
13.Press Close to complete network setting.
Page 23

Software Installation
23-MultiMobile
Windows 95 Installation
1. We assume that the PCMCIA Chipset drivers are
loaded and functioning. The System Icon in the Control Panel can report on its functionality. Any questions on this layer must be taken up with the
computers manufacturer.
2.Insert the PC Card into the slot. In New Hardware
Found dialog box, select Driver from disk provided
by hardware manufacturer.
Figure 3-4. Windows 95 Driver
Installation Screen
3. Type the full path (e.g., A:\) and insert the Installation disk.
4.For first time installation, click the Network icon in
Control Panel to add Protocols, Client and Service
if needed.
5.Reboot the computer; the card is now fully functional.
Artisoft Lantastic 6.0 Installation
1.Install LANTASTIC 6.0 first.
2.Run INSTALL.EXE from root directory of driver dis-
kette.
Page 24

Software Installation
24-MultiMobile
3.Select LANTASTIC 6.0 in Network Operating Sys-
tem screen.
4.If current settings are acceptable, select Start Instal-
lation and go to step 6. Otherwise, select Modify
Parameters to change settings.
5.Move cursor to highlight each field you want to
change and press Enter to select a new value. When
the configuration is set, press Enter on the OK field
to exit the screen, and go back the step 4.
6.The Installation program starts to copy the related
files from the diskette to the destination directory
and modifies CONFIG.SYS, PROTOCOL.INI, and
STARTNET.BAT under users agreement.
7. Reboot the computer to have the selected driver
take effect.
IBM OS/2 Warp
NDIS2 Driver for OS2 Warp
Before driver installation, ensure that the PCMCIA is
installed and working properly. If the PCMCIA Service of OS/2 Warp has been enabled, go directly to
section B (Install NDIS2 driver for IBM LAN Server
4.0) for driver installation. If not, go to section A
(Enable PCMCIA Service of OS/2 Warp) to install the
PCMCIA Service.
Section A
Enable PCMCIA Service of OS/2 Warp
1.In the OS/2 Desktop group, double-click on the
OS/2 System icon.
2.Double-click on the System Setup icon.
3.Double-click on the Selective Install icon.
4.Select the PCMCIA Support button.
5.Select PCMCIA system.
Page 25

Software Installation
25-MultiMobile
For example : select IBM ThinkPad 750
6.Click OK.
7.Click Install
8.Select the source drive and directory
For Example D:\OS2IMAGE
9.Click Install
10.Click OK
Section B
Install NDIS2 driver for IBM LAN Server 4.0
1.In the OS/2 Desktop group, double-click on the
MPTS icon.
2.Click on the Configure button.
3.Select the LAN adapters and protocols option.
4.Click on the Configure button.
5.Select the Other adapters ... option.
6.Insert the driver diskette and type the driver
path:
A:\OS2\NDIS2
Click on the OK button.
7.Select PCMCIA Ethernet Adapter, and then click on
the Add button.
8.Select IBM OS/2 NETBIOS, and then click on the
Add button.
9.Click OK.
10.Click Close.
11.Click Exit.
12.Shutdown and restart your system.
ODI Driver for IBM OS/2 Warp
Before driver installation, ensure that the PCMCIA is
installed and working properly. If the PCMCIA Service of OS/2 Warp has been enabled, go directly to
section B (Install NetWare Request) for driver installation. If not, go to section A (Enable PCMCIA Service of OS/2 Warp) to install the PCMCIA Service.
Page 26

Software Installation
26-MultiMobile
A. Enable PCMCIA Service of OS/2 Warp
1.In the OS/2 Desktop group, double-click on the
OS/2 System icon.
2.Double-click on the System Setup icon.
3.Double-click on the Selective Install icon.
4.Select the PCMCIA Support button.
5.Select PCMCIA system.
For example: select IBM ThinkPad 750
6.Click OK.
7.Click Install
8.Select the source drive and directory
For Example D:\OS2IMAGE
9.Click Install
10.Click OK
B. Install NetWare Request
1.Insert diskette labeled WSOS2_1 to diskette drive
A:
2.Change current drive to A:
3.Run INSTALL.EXE
4.Select Installation
5.Select Requester on workstation...
6.Set Target Directory
Assume C:\NETWARE
7.Click OK
8.Select Edit CONFIG.SYS and Copy All Files...
9.Click OK
10.Insert diskette labeled WSDRV_1 and Click OK
11.Select NE2000.SYS driver
12.Click the Continue button
13.Insert diskette labeled WSOS2_1 and Click OK
14.Click the Continue button
15.Select the SPX Support for OS/2 Sessions
16.Click the Save button
17.Click OK
18.Click the Copy button
Page 27

Software Installation
27-MultiMobile
19.Insert diskette labeled WSOS2_2 and Click OK
20.Insert diskette labeled WSOS2_3 and Click OK
21.Insert diskette labeled OS2UTIL1 and Click OK
22.Insert diskette labeled WSDRV_1 and Click OK
23.Insert diskette labeled OS2DOC_1 and Click OK
24.Insert Fast Ethernet PC Card Ethernet Adapter driver
diskette
25.Close Installation window to exit install
26.Copy following driver to C:\NETWARE
directory
COPY A:\OS2\ODI\LE100ODI.SYS
C:\NETWARE
COPY A:\OS2\ODI\LANEN.OS2
C:\NETWARE
27.EDIT C:\CONFIG.SYS file
28.Delete DEVICE=C:\NETWARE\NE2000.SYS
For Example
REM ODI-Driver Files BEGIN
REM DEVICE=C:\NETWARE\NE2000.SYS
REM ODI-Driver Files END
29.Add
DEVICE=C:\NETWARE\LANEN.OS2
and DEVICE=C:\NETWARE\LE100ODI.SYS
For Example
REM ODI-Driver Files BEGIN
DEVICE=C:\NETWARE\LANEN.OS2
DEVICE=C:\NETWARE\LE100ODI.SYS
REM ODI-Driver Files END
30.Save C:\CONFIG.SYS
31.Shutdown and restart your system.
Notes For NDIS Driver
The following are examples of partial CONFIG.SYS
file and AUTOEXEC.BAT for loading SystemSoft
Card Services and NDIS2 driver:
Page 28

Software Installation
28-MultiMobile
Examples of partial CONFIG.SYS file:
DEVICE=C:\CARDSOFT\SS365SL.EXE
DEVICE=C:\CARDSOFT\CS.EXE
DEVICE=C:\CARDSOFT\CSALLOC.EXE
C:\CARDSOFT\CSALLOC.INI
DEVICE=C:\CARDSOFT\CARDID.EXE
device=c:\lanman.dos\drivers\ethernet\le100\lanen.exe
device=c:\lanman.dos\drivers\protman.dos /I:c:\lanman.dos
device=c:\lanman.dos\drivers\ethernet\le100\le100nds.dos
Examples of partial AUTOEXEC.BAT file:
SET PATH=C:\LANMAN.DOS\NETPROG;%PATH%
NET START WORKSTATION
LOAD NETBEUI
The Ethernet function configuration information for the
DOS NDIS driver is contained in the PROTOCOL.INI
file. The section of the PROTOCOL.INI file that contains configuration information for this card must begin with [LE100NDS2_NIF]. The valid entries in the
file are listed below:
[LE100NDS2_NIF]
DRIVERNAME - LE100NDS$
this line must always be present
IOADDRESS - value
where value is one of 32 bytes boundary from 0x200 to 0x3e0.
The leading 0x for the hex notation is required.
To have Card Services select the address base
from its pool of available address then use a
value of 0.
INTERRUPT - value
where values is one of the following interrupts:
3, 4, 5, 7, 9, 10, 11, 12, 15.
To have Card Services select an available
interrupt resource then place a value of 0 at this
location.
Page 29

Software Installation
29-MultiMobile
Notes For Packet Driver
The following are examples of partial CONFIG.SYS
file for loading SystemSoft Card Services and Packet
Driver:
Examples of partial CONFIG.SYS file:
DEVICE=C:\CARDSOFT\SS365SL.EXE
DEVICE=C:\CARDSOFT\CS.EXE
DEVICE=C:\CARDSOFT\CSALLOC.EXE
C:\CARDSOFT\CSALLOC.INI
DEVICE=C:\CARDSOFT\CARDID.EXE
device=c:\tcpip\lanen.exe
device=c:\tcpip\le100pd.sys
Notes For Windows For Workgroups
Driver
The following are examples of partial CONFIG.SYS
file and AUTOEXEC.BAT for loading SystemSoft
Card Services and drivers for Windows for
Workgroups:
Examples of partial CONFIG.SYS file:
DEVICE=C:\CARDSOFT\SS365SL.EXE
DEVICE=C:\CARDSOFT\CS.EXE
DEVICE=C:\CARDSOFT\CSALLOC.EXE
C:\CARDSOFT\CSALLOC.INI
DEVICE=C:\CARDSOFT\CARDID.EXE
device=c:\wfw311\lanen.exe
DEVICE=C:\WFW311\IFSHLP.SYS
Examples of partial AUTOEXEC.BAT file:
C:\WFW311\NET START
Page 30

Troubleshooting
30-MultiMobile
Chapter 4 - Troubleshooting
Introduction
This chapter provides a number of examples of Questions (Q:), Causes (C:), and Answers (A:). If your
Ethernet PC card is not working properly, look up the
solution here; if unsuccessful, call Tech Support (see
Chapter 5).
Q:The Card Service does not enable my card. When
I run LANEN, the error message displays Fail to
enable PC card. Why?
C:No memory space to map the attribute memory of
PCMCIA card.
A:If memory management software e.g. EMM386 has
been installed, you have to reserve some area in upper memory (C000:0 EFFF:F) for attribute
memory of PCMCIA card while enabling the card.
Example: Device=C:\DOS\EMM386.EXE RAM
X=D000-D3FF. Reserve D000 - D3FF for attribute
memory.
Q:How do I know the FAST Ethernet PC card is
enabled?
A:1.If the Card Service is installed, you will hear a beep
when card is inserted.
2.Run LANEN /CHK to check if the card is enabled. The resources allocated for the card are
shown at the last line of the display message.
IO=xxx IRQ=nn Slot=nn
Page 31

Troubleshooting
31-MultiMobile
Q:How do you enable the FAST Ethernet PC card?
A:1.The Fast Ethernet PC Card can be enabled by the
Card Service installed in the laptop directly. The
drivers associated with the card in the driver diskette can be run over Card Service directly.
2.In case the Card Service cannot enable the
PCMCIA card, you can run LANEN to enable it.
Q:How do you make the card work under
Systemsoft Card Service?
A:1.Copy across the LE100.CLB file.
Copy FROM
A:\PCMCIA\CARDSOFT\LE100.CLB
TO
C:\CARDSOFT\LE100.CLB
Contingent upon where the Cardsoft is saved.
2.Edit the CARDID.INI file and add the library
LE100.CLB.
Edit C:\CARDSOFT\CARDID.INI
Find the section which starts [Libraries], and
add the line
CardLib=le100.clb
before any other CardLib= lines.
When the card is inserted it will beep. Use
CARDINFO /V to check if the card has been configured correctly.
3.If the card cannot work properly, you may edit
CARDID.INI again to change the resources allocation.
In the [Common] section you may find the following strings:
Lan1Port=300
Lan1IRQ=5
Page 32

Troubleshooting
32-MultiMobile
Lan1MemoryBase1=D0
Lan1MemoryBase2=D4
Lan2Port=320
Lan2IRQ=11
Lan2MemoryBase1=D8
Lan2MemoryBase2=DC
You may change the Lan1Port or Lan1IRQ to another
value (e.g. Lan1Port=320, Lan1IRQ=11) to request
Cardsoft allocate the resources you wanted.
4.If the resources cannot allocate properly, you may
run \CARDSOFT\CONFIG
or edit \CARDSOFT\CSALLOC.INI directly to set
the system resources available for allocation. The file
content of CSALLOC.INI are listed as below:
# The available resources described by the MEM=,
IO=, and IRQ= lines
# It may have been altered by the xINCLUDE and/
or xEXCLUDE lines below!
# The MEM=, IO= and IRQ= lines are provided
for Read-Only purposes.
#
MEM=D000-DFFF
IO=100-3F7
IRQ=5,7,9-C,E-F
#
# *** Resource modifications should be made below
this line. ***
#
RIO=170-177,370-377
MEMEXCLUDE=C000-CFFF,E000-EFFF
IOEXCLUDE=3F8-3FF,2F8-2FF
IRQEXCLUDE=3-4,6,13-14
You may edit the file to guide the Cardsoft which
resources are available in your computer.
Page 33

Troubleshooting
33-MultiMobile
Q:How do you make the card work under Phoenix
Socket/Card Service?
A:Add a card to PCM. Once the card is added, you
may use PCM to modify the resources requested for
the card.
1.Insert the PC Card into the computers PCMCIA
slot with the 68-pin connector facing the PCMCIA
slot and the label facing up and slide the card into
the slot.
2.Execute PCM.EXE supported by Phoenix PCM.
3.Select the socket by the PageUp, Page Down
keys.
4.Choose Configure item by ALT-C.
5.Choose Add Card to List item and Enter for first
time or choose Edit Config Parameters for further edition.
6.Set the I/O range and IRQ for the card.
7.Press Enter key and then save the configuration.
8.Exit PCM.EXE by pressing Alt-V and selecting
Exit item.
9.Reboot
Q:How do you make the card work under Award
Socket/Card Service?
A:You need to run the PC Card Control for Windows
program under Windows. If you do not have Windows, edit the CARDWARE.INI file as indicated below. Before running PC Card Control for Windows,
make sure the PC Card is inserted into one of your
PCs sockets.
1.Run PC Card Control for Windowsfrom the
Cardware sub-directory.
Page 34

Troubleshooting
34-MultiMobile
2.Press OK until you get to the main menu.
3.Select the Cards option and choose Edit.
4.Select right Socket and press Enter
If you already have a device in the Defined box
called LE100, go to step (11).
5.Select New Device under the Defined devices
box.
6.Edit the new device to be named LE100.
7.Select IO range 1 Base (Hex) = 320, Length = 32
(16 bit).
8.Do not alter MEM range 1 or 2.
9.Select IRQ level 11. Select OK to make changes.
10.On the Edit card screen, highlight the LE100
device in the defined devices box.
11.Transfer the LE100 to the Associated box with
the Include command.
12.Select OK to complete editing and return to Main
screen.
13.If the LE100 card is not graphically depicted,
choose Card and Reconfigure the socket which
contains the LE100 card.
Page 35

Troubleshooting
35-MultiMobile
If you still have problems with CARDWARE software try to replace your CARDWARE.INI file with
the one supplied on the Ethernet Adapter Drivers
Disk.
In DOS mode, you may use PCCARD /D or
DOSCARD /D command to check the resources allocated for the card.
Q:How can the ODI driver run successfully but fail
to login to the Netware server?
C:Frame type incompatible with server or Interrupt
mismatch.
A:1.The default frame type for Netware 3.11 is 802.3
but changed to 802.2 in Netware 4.x and 3.12. You
may check the content of NET.CFG to see if the
frame type is acceptable to the server. If the frame
type is not acceptable, edit NET.CFG to change
the frame type at the client site or add the frame
type that can be accepted at server site.
Page 36

Service
36-MultiMobile
Chapter 5 - Service
This chapter begins with the terms of your PC Cards
warranty. Read carefully the next section, Tech Support, if you have questions or problems with your PC
Card. It includes telephone numbers and an explanation of how to send in your PC Card should you require service. The final sections explain how to use our
bulletin board service (BBS), and get support through
CompuServe, the Internet and the Multi-Tech Fax-Back
System.
Limited Warranty
Multi-Tech Systems, Inc. (MTS) warrants that its
products will be free from defects in material or workmanship for a period of five years from the date of purchase, or if proof of purchase is not provided, five years
from date of shipment. MTS MAKES NO OTHER
WARRANTY, EXPRESSED OR IMPLIED, AND ALL
IMPLIED WARRANTIES OF MERCHANTABILITY
AND FITNESS FOR A PARTICULAR PURPOSE
ARE HEREBY DISCLAIMED. This warranty does
not apply to any products which have been damaged
by lightning storms, water, or power surges or which
have been neglected, altered, abused, used for a purpose other than the one for which they were manufactured, repaired by the customer or any party without
MTSs written authorization, or used in any manner
inconsistent with MTSs instructions.
MTSs entire obligation under this warranty shall be
limited (at MTSs option) to repair or replacement of
any products which prove to be defective within the
warranty period, or, at MTSs option, issuance of a refund of the purchase price. Defective products must be
returned by Customer to MTSs factory transportation
prepaid.
Page 37

Service
37-MultiMobile
MTS WILL NOT BE LIABLE FOR CONSEQUENTIAL DAMAGES AND UNDER NO CIRCUMSTANCES WILL ITS LIABILITY EXCEED THE
PURCHASE PRICE FOR DEFECTIVE PRODUCTS.
Software User License Agreement
The PC Card software is licensed by Multi-Tech Systems, Inc. to the original end-user purchaser of the product, hereafter referred to as licensee. The License includes the distribution diskette, other accompanying
programs, and the documentation.
The PC Card software, hereafter referred to as software, consists of the computer program files included
on the original distribution diskette.
Licensee agrees that by purchase and/or use of the Software, he hereby accepts and agrees to the terms of this
License Agreement.
In consideration of mutual covenants contained herein,
and other good and valuable considerations, the receipt
and sufficiency of which is acknowledged, Multi-Tech
Systems, Inc. does hereby grant to the Licensee a nontransferable and non-exclusive license to use the Software and accompanying documentation, on the following conditions and terms:
The Software is furnished to the Licensee for execution and use on a single computer system only and may
be copied (with the inclusion of the Multi-Tech Systems, Inc. copyright notice) only for use on that computer system.
The Licensee hereby agrees not to provide or otherwise make available any portion of this software in any
form to any third party without the prior express written approval of Multi-Tech Systems, Inc.
Page 38

Service
38-MultiMobile
Licensee is hereby informed that this software contains
confidential, proprietary and valuable trade secrets developed by or licensed to Multi-Tech Systems, Inc. and
agrees that sole ownership shall remain with Multi-Tech
Systems, Inc.
The Software is copyrighted. Except as provided herein,
the Software and documentation supplied under this
agreement may not be copied, reproduced, published,
licensed, sub-licensed, distributed, transferred, or made
available in any form, in whole or in part, to others
without expressed written permission of Multi-Tech
Systems, Inc. Copies of the software may be made to
replace worn or deteriorated copy for archive or emergency back-up procedures.
Licensee agrees to implement sufficient security measures to protect Multi-Tech Systems, Inc. proprietary
interests and not to allow the use, copying or transfer
by any means, other than in accordance with this agreement.
Licensee agrees that any breach of this agreement will
be damaging to Multi-Tech Systems, Inc.
Page 39

Service
39-MultiMobile
Tech Support
Multi-Tech has an excellent staff of technical support
personnel available to help you get the most out of your
Multi-Tech product. If you have any questions about
the operation of your Multi-Tech PC Card, please call
1-800-972-2439. The software version numbers are
printed on the diskette labels. Before calling Tech Support, please check your cables to ensure they are connected properly; then note the status of your PC Card
including status indicators, screen messages, problems
with a specific application, etc..
On-line Warranty Registration
To register your Multi-Tech product on-line, click on the
following link:
http://www.multitech.com/support/register.htm
Page 40

Service
40-MultiMobile
Service
If your tech support specialist decides that service is
required, you may send your PC Card to our factory
(freight prepaid). Return shipping charges will be paid
by Multi-Tech Systems (with North America).
Include the following with your PC Card:
· A description of the problem.
· Return billing and return shipping addresses.
· Contact name and phone number.
· Check or purchase order number for payment
if the PC Card is out of warranty. (The standard repair
charge for this PC Card is $95. This price is valid at the
time of this publication, but could change in the future.
Check with your technical support specialist.)
· If possible, note the name of the technical support
specialist with whom you spoke.
If you need to inquire about the status of the returned
product, be prepared to provide the serial number of
the product sent.
Send PC Cards to the following address:
Multi-Tech Systems, Inc.
2205 Woodale Drive
Mounds View, MN 55112
Attn.: Service or Repairs
Page 41

Service
41-MultiMobile
About the Multi-Tech BBS
Multi-Tech Systems maintains a bulletin board system
(BBS) for its customers. The information available via
the BBS includes new product information, product
upgrade data, problem-solving tips, and a message service you can use to request additional information. The
phone number for the Multi-Tech BBS is (612) 7853702 or (800) 392-2432 (USA and Canada).
The BBS can be accessed by any asynchronous modem operating at speeds of 1200 bps to 33,600 bps at a
setting of 8 bits word length, no parity, and 1 stop bit
(8-N-1).
How to Use the Multi-Tech BBS
To use Multi-Techs BBS, perform the following steps.
1. Set your communications program to 8-N-1, and to
emulate ANSI (with MultiExpress software, press
ALT+Z and choose ANSI).
2. Dial our BBS at 1-800-392-2432 (USA and Canada)
or 612-785-3702 (international).
3. At the prompts, type your first name, last name, and
password; then press RETURN. If you are a firsttime caller, after you press RETURN, the BBS will
ask if your name is spelled correctly. If you answer
yes, our questionnaire will be displayed. You can
use our BBS on your first call.
4. There are four BBS areas: the Main Menu, the Files
Menu, Bulletins (from the Main Menu), and the
Message Menu. All bulletins are menu-driven. To
read the bulletins, enter the number of the bulletin
you wish to read.
5. Files Menu: From the Main Menu, type F to display the Files Menu. If you want a list of directories, type L (list directory) and then type L again
for a list of all directories. If you do not type the
Page 42

Service
42-MultiMobile
second L, you will list all of the files on the BBS.
At the list of directories, select the number of the
directory required. A list of files and a description
for each of the files will be displayed. Select a file
that you would like to download. If you already
know the file name, type D at the Files Menu to
download the selected file(s). Type V to view a text
file.
6. At the Message Menu, you can leave a message to
the sysop (you cannot read messages at this point).
The BBS will tell you if you have a personal message (mail). At the prompt Would you like to read it
now?, type R for read now. You must read your
message(s) when you first access the BBS.
About CompuServe/Internet
In addition to the BBS, Multi-Tech provides support
through CompuServes Modem Vendor Forum (GO
MODEMVEN) under GO MULTITECH. You can
download manuals, Help files, drivers, ARA and
Microsoft Mail scripts, and product descriptions from
Multi-Techs forum library. Please refer to your
CompuServe documentation for special operating procedures.
Multi-Tech is a commercial user on the Internet, and
we retrieve messages from our customers on a periodic basis. If you prefer to receive technical support
via the Internet, please address your message to
techsupport@multitech.com.
Multi-Tech also has a home page on the World Wide
Web. The address is:
http://www.multitech.com.
Page 43

Service
43-MultiMobile
About the Multi-Tech Fax-Back System
Multi-Techs fax-back system provides 24-hour access
to sales/marketing and technical literature.
Dial (612) 717-5888, follow the voice prompts, and
enter the document number for either the Sales and
Marketing catalog or the Technical Support catalog of available documents. For convenience, have your
fax number handy: _________________________.
From the Sales and Marketing catalog, you can request
to have newsletters, white papers, press releases, brochures, and other marketing literature faxed to you.
From the Technical Support catalog, you may request
basic modem operation information and troubleshooting guides. With either catalog, simply enter the applicable FB Doc. # of the literature you wish to receive
from the left column of the catalog.
Page 44

Regulations
44-MultiMobile
APPENDIX A - REGULATORY AGENCY INFORMA-
TION
FCC REGULATORY STATEMENTS
Consumer Instructions
1. This equipment complies with part 68 of the
Federal Communications Commission Rules. On the
outside surface of this equipment is a label that
contains, among other information, the FCC registration number and ringer equivalence number (REN).
If requested, this information must be provided to the
telephone company.
2. As indicated below, the suitable jack (Universal
Service Order Code connecting arrangement) for this
equipment is shown. If applicable, the facility
interface codes (FIC) and service order codes (SOC)
are shown.
3. An FCC-compliant telephone and modular plug is
provided with this equipment. This equipment is
designed to be connected to the telephone network or
premises wiring using a compatible modular jack
which is Part 68 compliant. See installation instructions for details.
4. The ringer equivalence number (REN) is used to
determine the quantity of devices not ringing in
response to an incoming call. In most, but not all
areas, the sum of the RENs should not exceed five
(5.0). To be certain of the number of devices tat may
be connected to the line, as determined by the total
RENs, contact the telephone company to determine
the maximum REN for the calling area.
Page 45

Regulations
45-MultiMobile
5. If this equipment causes harm to the telephone
network, the telephone company will notify you in
advance that temporary discontinuance of service
may be required. But if advance notice is not
practical, the telephone company will notify the
customer as soon as possible. Also, you will be
advised of your right to file a complaint with the FCC
if you believe it is necessary.
6. The telephone company may make changes in its
facilities, equipment, operations, or procedures that
could affect the operation of the equipment. If this
happens, the telephone company will provide
advance notice in order for you to make necessary
modifications in order to maintain uninterrupted
service.
7. If trouble is experienced with this equipment (the
model of which is indicated below) please contact
Multi-Tech Systems, Inc. at the address shown below
for details of how to have repairs made. If the
equipment is causing harm to the network, the
telephone company may request you to remove the
equipment from the network until the problem is
resolved.
8. No repairs are to be made by you. Repairs are to
be made only by Multi-Tech Systems or its licensees.
Unauthorized repairs void registration and warranty.
9. This equipment cannot be used on public coin
service provided by the telephone company. Connection to Party Line Service is subject to state tariffs.
(Contact the state public utility commission, public
service commission or corporation commission for
information.)
10. If so required, this equipment is hearing-aid
compatible.
11. The telephone Consumer Protection Act of 1991
makes it unlawful for any person to use a computer
or other electronic device, including fax machines, to
send any message unless such message clearly
Page 46

Regulations
46-MultiMobile
contains in a margin at the top or bottom of each
page or on the first page of the transmission, the date
and time is sent and an identification of the business
or other entity, or individual sending the message and
the telephone number of the sending machine or such
business, other entity, or individual. In order to
program this information into your fax machine
please refer to the installation instructions.
Manufacturer: Multi-Tech Systems, Inc.
Trade Name: MultiMobile
Model Number(s): MT10ZLX/E
MT10ZLX/E-T/2
FCC Registration #:
Modular Jack (USOC): RJ45
Service Center in USA: Multi-Tech Systems, Inc.
2205 Woodale Drive
Mounds View, MN 55112
Phone: (612) 785-3500
Fax: (612) 785-9874
NOTE: This equipment has been tested and found to be
comply with the limits for a Class B digital device,
pursuant to Part 15 of the FCC rules. These limits are
designed to provide reasonable protection against harmful
interference when the equipment is operated in a residential installation. This equipment generates, uses and can
radiate radio frequency energy, and if not installed and
used in accordance with the instruction manual, may cause
harmful interference to radio communications. However
there is no guarantee that interference will not occur in a
particular installation. If this equipment does cause
harmful interference to radio or television reception, which
can be determined by turning the equipment off and on, the
user is encouraged to try to correct the interference by one
or more of the following measures:
Page 47

Regulations
47-MultiMobile
Reorient or relocate the receiving antenna
Increase the separation between the equipment and
receiver.
Connect the equipment into an outlet on a circuit different
from that to which the receiver is connected.
Consult the dealer or an experienced radio/TV technician
for help.
Page 48

Regulations
48-MultiMobile
This device complies with Part 15 of the FCC rules.
Operation is subject to the following two conditions:
(1) This device may not cause harmful interference.
(2) This device must accept any interference that may
cause undesired operation.
Warning: Changes or modifications to this unit not
expressly approved by the party responsible for compliance could void the users authority to operate the
equipment.
Canadian Limitations Notice
Notice: The ringer equivalence number (REN)
assigned to each terminal device provides an
indication of the maximum number of terminals
allowed to be connected to a telephone interface.
The termination of a interface may consist of any
combination of devices subject only to the requirement that the sum of the ringer equivalence numbers
of all the devices does not exceed 5.
Notice: The Industry Canada label identifies certificated equipment. This certification means that the
equipment meets certain telecommunications
network protective, operational and safety requirements. The Industry Canada does not guarantee the
equipment will operate to the users satisfaction.
Before installing this equipment, users should ensure
that it is permissible to be connected to the facilities
of the local telecommunications company. The
equipment must also be installed using an acceptable
method of connection. The customer should be aware
that compliance with the above conditions may not
prevent degradation of service in some situations.
Repairs to certified equipment should be made by an
authorized Canadian maintenance facility designated
Page 49

Regulations
49-MultiMobile
by the supplier. Any repairs or alterations made by
the user to this equipment, or equipment malfunctions, may give the telecommunications company
cause to request the user to disconnect the equipment.
Users should ensure for their own protection that the
electrical ground connections of the power utility,
telephone lines and internal metallic water pipe
system, if present, are connected together. This
precaution may be particularly important in rural
areas.
Caution: Users should not attempt to make such
connections themselves, but should contact the
appropriate electric inspection authority, or electrician, as appropriate.
Page 50

Regulations
50-MultiMobile
EMC, Safety, and Terminal Directive
Compliance
The CE mark is affixed to this Multi-Tech product to
confirm compliance with the following European Community Directives:
Council Directive 89/336/EEC of 3 May 1989 on the
approximation of the laws of Member States relating
to electromagnetic compatibility;
and
Council Directive 73/23/EEC of 19 February 1973 on
the harmonization of the laws of Member States relating to electrical equipment designed for use within certain voltage limits;
and
Council Directive 91/263/EEC of 29 April 1991 on the
approximation of the laws of the Member States concerning telecommunications terminal equipment, including the mutual recognition of their conformity.
each amended by
Council Directive 93/68/EEC of 22 July 1993 on the
harmonization of CE marking requirements.
Page 51

Index
51-MultiMobile
Index
A
About This Manual ............................................... 5
About This Product............................................... 6
Artisoft Lantastic 6.0 Installation ........................ 23
Award Socket/Card Service ................................ 33
B
Bulletin board systems .......................................... 41
C
Canadian Limitations Notice .............................. 48
Certifications ........................................................ 7
Comprehensive Driver Notes ............................. 12
CompuServe/Internet ........................................... 42
Consumer Instructions ......................................... 44
D
Diagnostics ........................................................... 7
Dimensions ............................................................ 7
Driver Installation Screen ................................... 13
E
Enviroments Ranges .............................................. 7
F
FCC Regulatory Statements................................. 44
Features................................................................. 6
Page 52

Index
52-MultiMobile
I
IBM OS/2 Warp .................................................. 24
Installation ..................................................... 9, 12
Installing PC Card(s) ............................................. 9
Introduction and Description ......................... 5, 30
L
LED Functions .................................................... 11
M
Manual Driver Installation .................................. 14
Menu Installation ................................................ 13
Microsoft LAN Manager Installation Screen ..... 17
MS LAN Manager .............................................. 16
Multi-Tech BBS.................................................. 41
Multi-Tech Fax-Back System .............................. 43
Multi-Tech's BBS ............................................... 41
N
NDIS DRIVER ................................................... 27
NDIS2 driver for IBM LAN Server 4.0 ............. 25
NDIS2 Driver for OS2 Warp .............................. 24
NDIS2 Driver for Workgroups ............................ 19
NDIS3 Driver for Workgroups ........................... 18
NetWare Request ................................................ 26
Network Interface Specifications........................... 6
NOS Selection Screen .................................... 9, 12
Novell Client Installation .................................... 14
Novell NetWare .................................................. 12
Page 53

Index
53-MultiMobile
O
ODI Driver for IBM OS/2 Warp ......................... 25
ODI Driver for Workgroups ............................... 20
ODI Driver/Netware server ................................. 35
On-line Warranty Registration ............................. 39
Operating Environment.......................................... 6
P
Packet Driver ...................................................... 18
PC Card Installation............................................... 9
PCMCIA Service of OS/2 Warp .................. 24, 26
Phoenix Socket/Card Service ........................... 33
Power Requirements .............................................. 7
S
Service ................................................................ 36
Ship Kit Contents................................................... 8
SOFTWARE INSTALLATION ......................... 12
System Requirements ............................................ 7
Systemsoft Card Service ..................................... 31
T
Technical support ............................ 39, 40, 41, 42
Troubleshooting ................................................... 30
W
Warranty 36, 40
Windows 95 Driver Installation Screen .............. 23
Windows for Workgroups 3.11 .......................... 18
WINDOWS FOR WORKGROUPS DRIVER .... 29
Windows NT 3.51 ............................................... 22
Windows NT 4.0 .................................................. 22
 Loading...