

Page 1

MultiFRAD 200-Series
Models FR221 & FR221/V2
User Guide
Page 2

User Guide
8831 1950 Revision A
MultiFRAD (Models FR221 and FR221/V2)
This publication may not be reproduced, in whole or in part, without prior expressed written permission from
Multi-Tech Systems, Inc. All rights reserved.
Copyright © 1999, by Multi-Tech Systems, Inc.
Multi-Tech Systems, Inc. makes no representations or warranties with respect to the contents hereof and
specifically disclaims any implied warranties of merchantability or fitness for any particular purpose.
Furthermore, Multi-Tech Systems, Inc. reserves the right to revise this publication and to make changes from
time to time in the content hereof without obligation of Multi-Tech Systems, Inc. to notify any person or
organization of such revisions or changes.
Record of Revisions
Revision Description
A Manual released; covers software revision 3.00. All pages at revision A.
(6/16/99)
P ATENTS
This Product is covered by one or more of the following U.S. Patent Numbers:
5.355.365; 5.355.653; 5.452.289; 5.453.986
Trademark of Multi-Tech Systems, Inc. are MultiFRAD and the Multi-Tech logo.
Windows is a registered trademark of Microsoft.
. Other Patents Pending.
TRADEMARK
Multi-Tech Systems, Inc.
2205 Woodale Drive
Mounds View , Minnesota 55112
(612) 785-3500 or (800) 328-9717
Fax 612-785-9874
Tech Support (800) 972-2439
Internet: http://www.multitech.com
5.301.274; 5.309.562
;
Page 3

Contents
Chapter 1 - Introduction and Description
Introduction ................................................................................................................................................ 6
Preview of this Guide ................................................................................................................................. 7
Front Panel Description.............................................................................................................................. 8
Back Panel Description ............................................................................................................................ 10
Shunts .......................................................................................................................................................11
T echnical Specifications........................................................................................................................... 12
Chapter 2 - Installation
Introduction .............................................................................................................................................. 14
Safety Warning Telecom .......................................................................................................................... 14
Lithium Battery Caution ............................................................................................................................ 14
Unpacking your MultiFRAD ...................................................................................................................... 15
Cabling your MultiFRAD........................................................................................................................... 16
V.35 Shunt Procedure .............................................................................................................................. 18
E&M Jumper Block Positioning Procedure (FR221/V2 Only) ........................................................... 20
Chapter 3 - Software Loading and Configuration
Installing Y our Software............................................................................................................................ 22
Ethernet Setup................................................................................................................................... 25
WAN Port Setup ................................................................................................................................ 27
Data Ports Setup ............................................................................................................................... 28
DLCI Setup ........................................................................................................................................ 29
Voice/Fax Channel Setup .................................................................................................................. 30
Detect and Map Your DLCIs .............................................................................................................. 33
Build Your Phone Directory Database................................................................................................ 35
Chapter 4 - MultiFRAD Software
Introduction .............................................................................................................................................. 40
Before Y ou Begin............................................................................................................................... 40
MultiFRAD Configuration.......................................................................................................................... 41
Changing IP Parameters .......................................................................................................................... 42
Changing IPX Parameters ....................................................................................................................... 44
Spanning Tree Setup................................................................................................................................ 46
Filtering .............................................................................................................................................. 46
Statistics................................................................................................................................................... 47
IP Statistics ........................................................................................................................................ 48
IPX Port Statistics.............................................................................................................................. 49
STP (Spanning T ree) Port Statistics.................................................................................................. 49
SNMP Statistics ................................................................................................................................. 50
WAN Statistics................................................................................................................................... 50
Frame Relay Statistics....................................................................................................................... 51
WAN Port Setup....................................................................................................................................... 55
Frame Relay ...................................................................................................................................... 55
Point-To-Point .................................................................................................................................... 56
iii
Page 4

Point to Point Setup ................................................................................................................................. 57
Frame Relay Setup .................................................................................................................................. 58
Data Port Configuration............................................................................................................................ 63
Changing Channel Parameters (FR221/V2 only) .....................................................................................64
Interface............................................................................................................................................. 64
Voice/Fax (FR221/V2 only)................................................................................................................ 66
Regional (FR221/V2 only).................................................................................................................. 67
Changing the Phone Directory Database (FR221/V2 only)...................................................................... 68
Others Setup ............................................................................................................................................ 70
Chapter 5 - Remote Configuration and Management
Introduction .............................................................................................................................................. 74
Remote Configuration .............................................................................................................................. 74
Modem-Based ................................................................................................................................... 74
LAN-Based ....................................................................................................................................... 76
Remote Management............................................................................................................................... 77
T elnet ................................................................................................................................................. 77
Web Browser Management ............................................................................................................... 79
Chapter 6 - Warranty, Service and Tech Support
Introduction .............................................................................................................................................. 82
Limited Warranty ...................................................................................................................................... 82
On-line Warranty Registration............................................................................................................ 82
Tech Support ............................................................................................................................................ 83
Recording MultiFRAD Information ..................................................................................................... 83
Contacting Tech Support via E-mail................................................................................................... 83
Service ..................................................................................................................................................... 84
The Multi-Tech BBS ................................................................................................................................. 85
To log on to the Multi-Tech BBS......................................................................................................... 85
To Download a File ............................................................................................................................ 85
About the Internet..................................................................................................................................... 86
Appendixes
Appendix A - Cabling Diagrams................................................................................................................ 88
Voice/Fax Channel Connectors ......................................................................................................... 89
Trunk Cable ...................................................................................................................................... 90
Appendix B - Regulatory Information ....................................................................................................... 91
Class A Statement .............................................................................................................. ............... 91
Fax Branding Statement .................................................................................................................... 91
FCC Part 68 Telecom......................................................................................................................... 92
Canadian Limitations Notice .............................................................................................................. 93
EMC, Safety and Terminal Directive Compliance .............................................................................. 93
Appendix C - Network Overview .............................................................................................................. 94
Appendix D - Disabling the Internal DSU ................................................................................................. 98
Glossary
Index
iv
Page 5

Chapter 1 - Introduction and Description
Page 6
MultiFRAD User Guide
Introduction
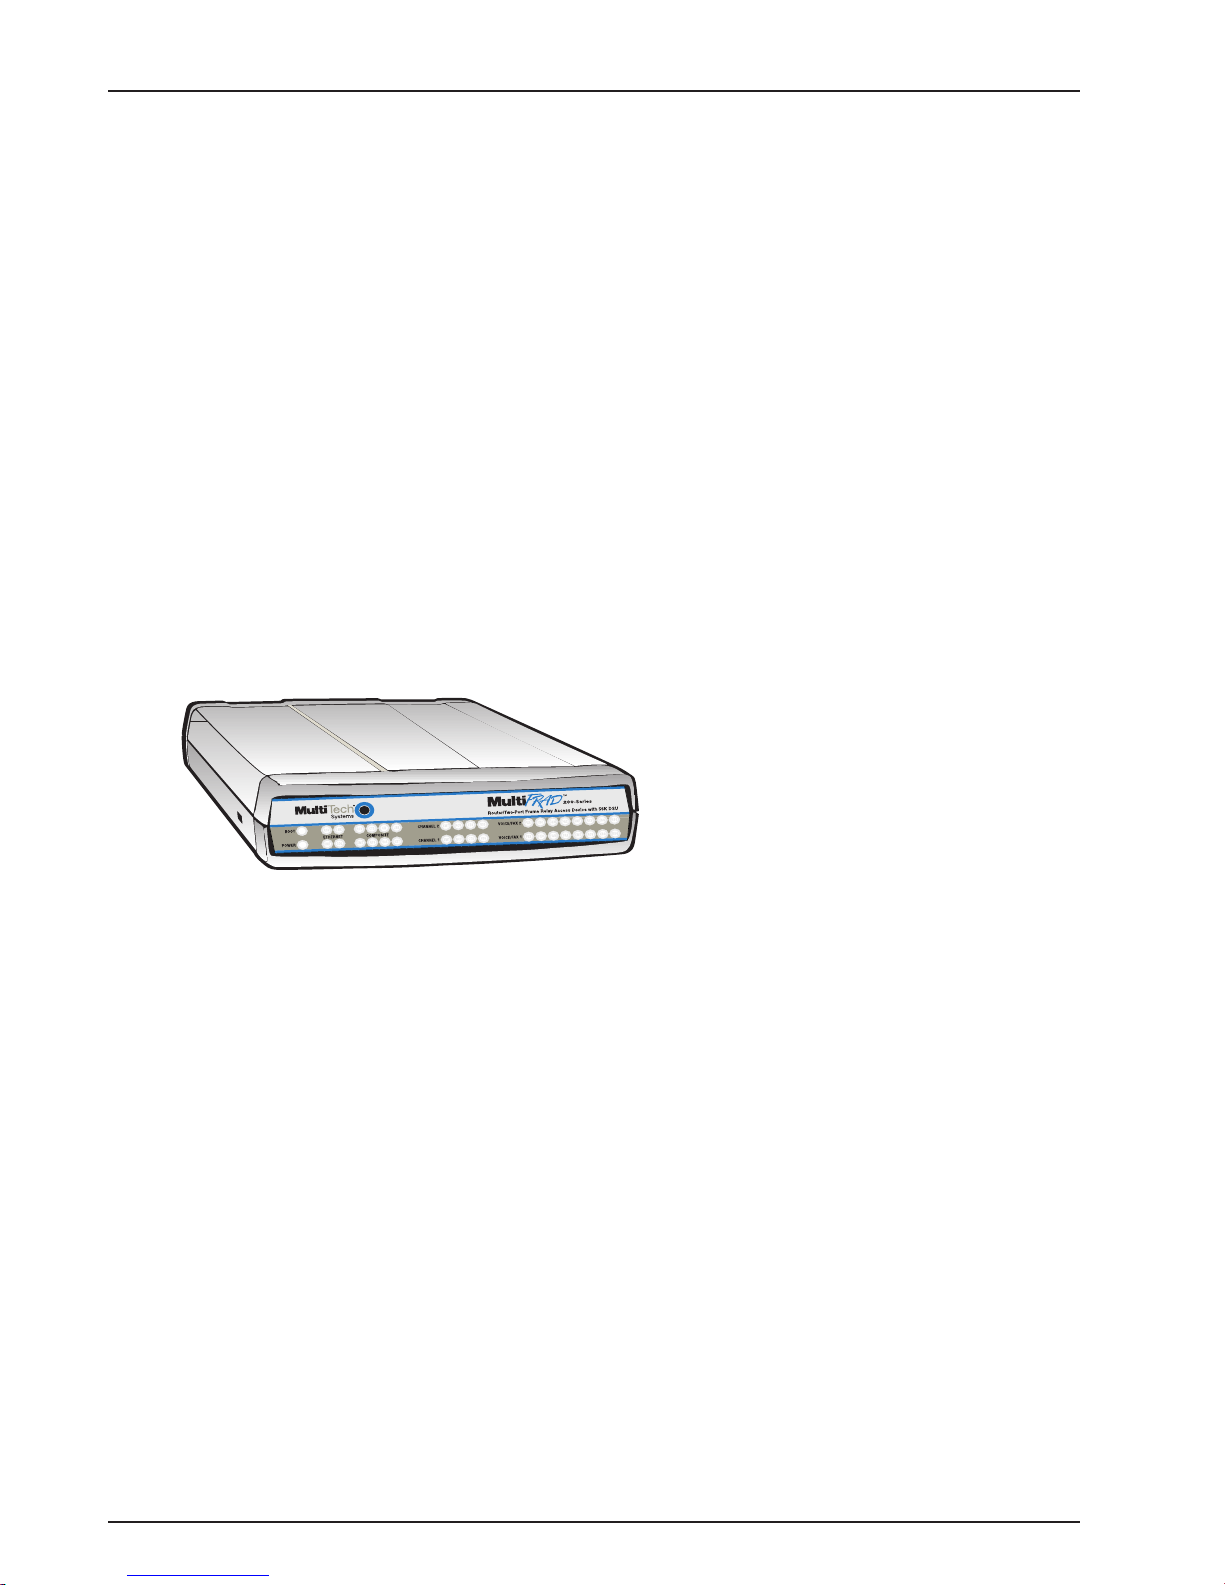
Welcome to Multi-Tech's new MultiFRAD™, Models FR221 and FR221/V2, Routers/ Two-Port Frame
Relay Access Devices (FRADs). The “/V2” version includes a “Voice option” with two voice/fax
channels (with three voice/fax interfaces on each voice channel). Both versions have a 10 Mbps
Ethernet LAN interface, an internal DSU for the WAN interface, and a command port for
configuration.
These MultiFRADs enable non-frame relay devices to connect to a common carrier frame relay
network service or a private frame relay network. Multi-Tech’s new voice/fax gateway technology
allows voice and fax communication to ride, with no additional expense, over your frame relay
network, which has traditionally been data-only . To access this free voice and fax communication, all
you have to do is connect the FR221/V2 to your telephone equipment and then to your frame relay
connection. Once configured, the FR221/V2 allows voice and fax to travel down the same path as
your traditional data communications.
Both of these MultiFRADs have two data ports for Data Terminal Equipment (DTE) devices that are
either asynchronous or HDLC synchronous. The Ethernet LAN connection is provided for IP or IPX
routing and Media Access Control (MAC) layer bridging for all other protocols on a 10Base-T port
connection. These MultiFRADs also have an internal 56K DSU that can be connected directly to a
frame relay network.
System management is provided through the command port using bundled Windows® based
software which provides easy-to-use configuration menus.
Figure 1-1. MultiFRAD 221/V2
6
Page 7

Preview of this Guide
This User Guide describes the MultiFRAD and details how to install and configure it. The information
contained in each chapter is as follows:
Chapter 1 - Introduction and Description
Chapter 1 describes the MultiFRAD and includes front panel descriptions, back panel connectors,
and relevant technical specifications.
Chapter 2 - Installation
This chapter provides information on unpacking and cabling your MultiFRAD. Safety Warnings are
detailed, followed by the installation procedure in which each cable is connected to the MultiFRAD
and the unit is powered on.
Chapter 3 - Software Loading and Configuration
Chapter 3 details the software loading and configuration procedures. The MultiFRAD software is
windows based; numerous configuration options are available and are described in this chapter.
Chapter 4 - MultiFRAD Software
Chapter 1 - Introduction and Description
Chapter 4 describes the MultiFRAD software package designed for the Windows® environment.
Chapter 5 - Remote Configuration and Management
Chapter 5 provides procedures for changing the configuration of a remote MultiFRAD. Remote
configuration enables you to change the configuration of a unit by simply connecting a PC with
communications software to a remote MultiFRAD that has communications software and a modem
connected to the command port. You can then configure the unit. Chapter 5 also describes a typical
Telnet Client configuration application and Web browser configuration.
Chapter 6 - Warranty, Service and Tech Support
Chapter 6 provides instructions on getting service for your MultiFRAD at the factory , a statement of
the limited warranty , information about our user bulletin board service, and space for recording
information about your MultiFRAD prior to calling Multi-Tech’s Technical Support personnel.
7
Page 8
MultiFRAD User Guide
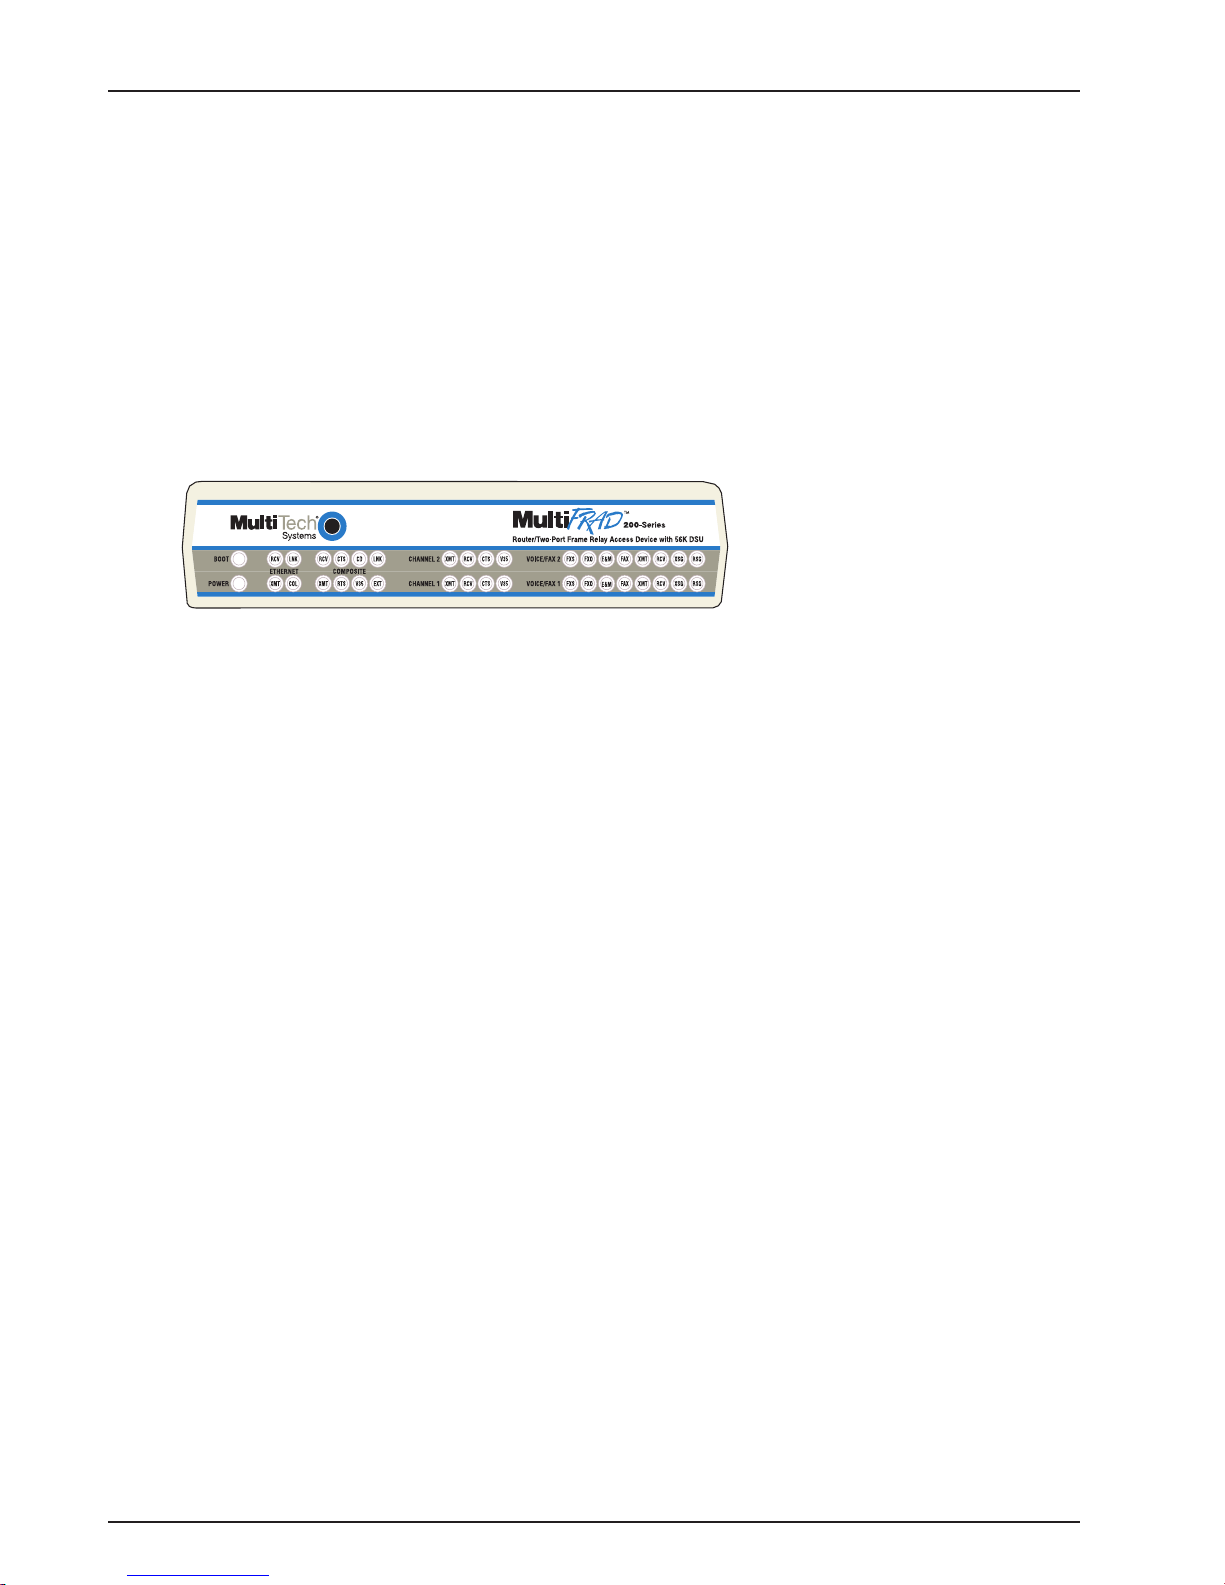
Front Panel Description
The front panel of the FR221 has four groups of LEDs that provide the status of the LAN connection
and the general status of the MultiFRAD. The FR221/V2 has an additional group of LEDs for its two
voice/fax channels. From left to right, the first group of LEDs indicates whether the self test passed or
failed and if the power On/Off switch on the back of the MultiFRAD is switched On. The Ethernet
LEDs display LAN activity; i.e., they show whether the MultiFRAD is connected to the LAN,
transmitting or receiving packets, and if a data collision is occurring. The Composite LEDs display the
trunk (i.e., DSU) status, show whether a trunk is ready to transmit or receive serial data, and indicate
if the trunk connection (i.e., the back panel TRUNK connector) is configured for a V.35 interface. The
data Channel 1 and data Channel 2 LEDs display the status of the two data Channels, including
whether the data Channel or the attached device is ready to transmit or receive data and if the data
Channel is configured for a V.35 serial interface. Finally (on the FR221/V2 only), the voice/fax LEDs
indicate the configuration and status of these two channels.
Figure 1-2. Front Panel
BOOT The BOOT indicator lights for 75 seconds (approx.) when power is applied to the MultiFRAD.
POWER The POWER indicator lights when the Power switch is set to the “1” (up, On) position.
ETHERNET
RCV Receive indicator blinks when packets are being received from the local area network.
LNK Link indicator lights indicating that the MultiFRAD is connected to the local area network.
XMT Transmit indicator blinks when packets are being transmitted to the local area network.
COL Collision indicator lights when a collision is in progress, that is, when two nodes are
transmitting packets at the same time.
COMPOSITE (DSU, TRUNK)
RCV Receive indicator blinks when the trunk is receiving data.
CTS Clear To Send indicator lights when the trunk is ready to transmit data.
CD Carrier Detect indicator lights when the MultiFRAD detects a carrier signal on the trunk line.
LNK The composite Link LED blinks slowly when it detects the frame relay management type.
Then, when at least one DLCI goes active, it blinks quickly. When all DLCIs are active, it
remains on. In PPP mode, it remains on all the time.
XMT Transmit indicator blinks when the trunk is transmitting data.
RTS Request to Send indicator lights then the trunk is ready to receive data.
V35 The V35 indicator lights whenever the trunk is configured for a V.35 interface; i.e., the shunt
for the trunk is in the V.35 position.
EXT External indicator lights when the MultiFRAD is configured for an external composite device.
DATA CHANNELS
XMT Transmit indicator blinks when the Channel is transmitting data to the composite link.
RCV Receive indicator blinks when the Channel is receiving data from the composite link.
CTS Clear To Send indicator lights when the Channel is ready to transmit data.
XMT Transmit indicator blinks when voice packets are being transmitted to the local area network.
RCV Receive indicator blinks when voice packets are being received from the local area network.
V35 The V35 indicator lights whenever the Channel is configured for a V.35 interface; i.e., the
Channel shunt is in the V.35 position.
8
Page 9

Chapter 1 - Introduction and Description
VOICE/FAX CHANNELS (FR221/V2 Only)
FXS Foreign Exchange Station indicator lights when the voice/fax Channel is configured for FXS
operation.
FXO Foreign Exchange Office indicator lights when the voice/fax Channel is configured for FXO
operation.
E&M Ear and Mouth indicator lights when the voice/fax Channel is configured for E&M operation.
FAX Fax indicator lights when there is fax traffic on the voice/fax Channel.
XMT Transmit indicator blinks when voice packets are being transmitted to the composite link.
RCV Receive indicator blinks when voice packets are being received from the composite link.
XSG Transmit Signal indicator lights when the FXS-configured Channel is of f-hook, the FXO-
configured Channel is receiving a ring from the PBX, or the M lead is active on the E&Mconfigured Channel (i.e., the MultiFRAD is receiving a ring from the PBX).
RSG Receive Signal indicator lights when the FXS-configured Channel is ringing, the FXO-
configured Channel has taken the line off-hook, or the E lead is active on the E&Mconfigured Channel.
9
Page 10

MultiFRAD User Guide
Back Panel Description
All the cable connections to the MultiFRAD are made at the back panel. Four categories of signal
cables are used on the MultiFRAD: Ethernet, Channels, Command Port, and Trunk (RS232/V.35).
The back panel connectors are shown in Figure 1-3 and described in the following groups.
COMMAND10BASE-T
VOICE/FAX CHANNEL 2
E&M FXO FXS
TRUNK (RS232C/V.35)
CHANNEL 2 (RS232C/V.35)
CHANNEL 1 (RS232C/V.35)
VOICE/FAX CHANNEL 1
E&M FXO FXS
DIGITAL
ETHERNET RS232
DSU
Figure 1-3. Back Panel (FR221/V2)
Voice/Fax Channel 1 and 2 (on FR221/V2 only)
The Voice/Fax Channel connectors include three options per Channel: E&M, FXO and FXS.
E&M - This connector is used if you are connecting VOICE/FAX CHANNEL 1 or 2 to the E&M trunk
on a PBX. This connector is an RJ-48 jack.
FXO - This connector is used if you are connecting VOICE/FAX CHANNEL 1 or 2 to the station side
of a PBX. This connector is an RJ-45 jack.
FXS - This connector is used if you are connecting VOICE/FAX CHANNEL 1 or 2 to a station device,
etc., an analog telephone, KTS telephone system, or fax machine. This connector is an RJ-45 jack.
Ethernet 10Base-T Connector
The Ethernet 10Base-T connector is used to connect the MultiFRAD to a LAN using unshielded
twisted pair (UTP) cable. This connector is an RJ-45 jack.
DSU Connector
The DSU connector is used to connect the MultiFRAD’s internal DSU to a trunk connection of a
frame relay network. The DSU connector is an RJ-45 jack.
GND
POWER
I
O
Command Connector
The Command connector is used to configure the MultiFRAD using a PC with a serial port or terminal
emulation. The Command connector has a DCE physical interface using an RJ-45 jack.
TRUNK Connector (Alternate)
The RS232/V.35 trunk connector can be used for diagnostic point-to-point testing of the MultiFRAD.
This connector is a DB25 female connector.
Channels 1 and 2 Connectors
The two Channel connectors are used to connect data devices to the MultiFRAD. A data device can
be a synchronous device such as a multiplexer or an asynchronous device such as a PC. The data
Channels can be either RS232C or V.35 . If a V.35 connection is desired, then the internal shunt for
that Channel must be physically moved from its default RS232 position to the V.35 position.
Power Connector
The Power connector is used to connect the external power supply to the MultiFRAD. The Power
connector is a 7-pin circular DIN connector. A separate power cord connects the power supply to a
live AC grounded outlet.
10
Page 11

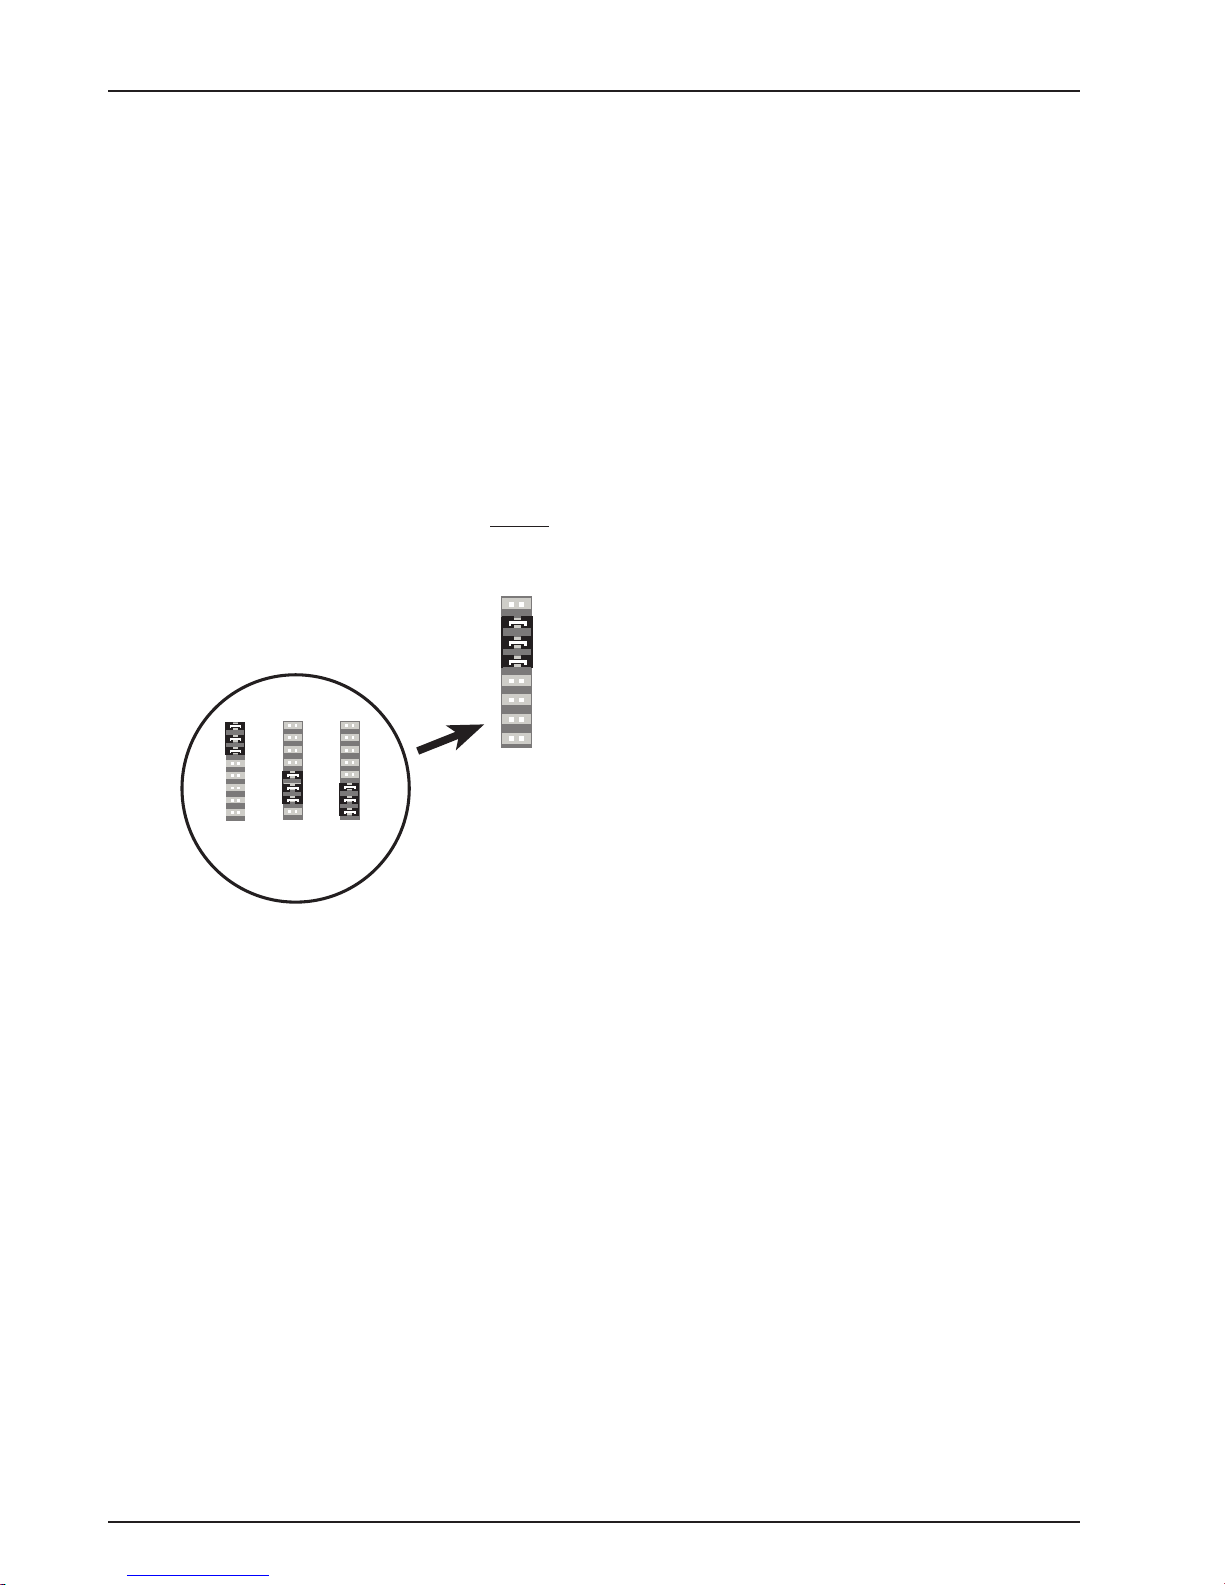
Shunts
There are three shunts (Figure 1-4) on the printed circuit board for the composite link trunk
connection and the two data Channels.
Trunk V.35
Shunt Position
Channel 1 V.35
Shunt Position
Figure 1-4. Shunts
Initially, all three shunts are installed in their default RS232 locations and the associated V.35 16-pin
DIP sockets are empty. Each of the DIP sockets is identified by markings on the main PCB assembly.
To change the position of a given shunt, refer to V.35 Shunt Procedure in Chapter 2.
Trunk RS232
Shunt Position
Channel 2 V.35
Shunt Position
Chapter 1 - Introduction and Description
11
Page 12

MultiFRAD User Guide
Technical Specifications
The MultiFRAD conforms to the following specifications:
• Provides access to Frame Relay Networks for IP, IPX, bridged LAN traffic, Async and HDLC
Sync devices
• DSU Port - 56 Kbps, synchronous
• Data ports can be configured as either EIA-232 or V.35
• Command Port - 19.2 Kbps, asynchronous
Data Ports
Supports 2 data ports with speeds of 300 bps to 1 15.2 Kbps asynchronous, and 4800 bps to
128 Kbps synchronous
• Asynchronous data format parameters: 5, 6, 7, 8 data bits; Even, Odd, None parity; 1,
1.5, 2 stop bits
• Async Data port options: local echo, hardware or software flow control, pacing, Xon passthru, ENQ/ACK spoofing
• Sync Channel parameters: internal/external clocking, flag or mark idle, NRZ/NRZI encoding,
interframe timer
• Special APSM mode enables muxing of data port and LAN traffic over a single PVC
Ethernet Port
• Routing Protocols - IP and IPX and bridging all others
• Ethernet Interface - 10Base-T (twisted pair) RJ-45 connector
• Special APSM mode enables muxing of LAN traffic and data port data over a single PVC
Command Port
• Single 19.2K bps asynchronous Command Port with DB25 female connector.
DSU Port
• Provides 56 Kbps synchronous communication over DDS line.
Trunk Port
• Can be used with a 25-pin back-to-back cable for point-to-point diagnostic testing.
Electrical/Physical
• Power Supply Input: 100 to 250V AC ~ 50 to 60 HZ, 0.9A
• Power Supply Output: +5V DC @ 3.0A, +12V DC @ 0.5A, -12V DC @ 0.2A
• Power Consumption: 10 Watts
• Dimensions - 2.25" high x 9" wide x 12.875" deep
• Weight - 4.5 pounds (1.7 kg)
Requirement
• PC with one serial COM port to connect to the Command Port of the MultiFRAD for
configuration
12
Page 13

Chapter 2 - Installation
Page 14

MultiFRAD User Guide
Introduction
This chapter will guide you through the unpacking and installation of your MultiFRAD. The installation
procedure, which is preceded by important safety warnings, provides step-by-step instructions on
cabling and powering-on the MultiFRAD. Chapter 3 provides instructions on installing and configuring
the MultiFRAD software.
Safety Warning Telecom
1. Never install phone wiring during a lightning storm.
2. Never install phone jacks in wet locations unless the jacks are specifically designed for wet
locations.
3. This product is to be used with UL and cUL listed computers.
4. Never touch uninsulated phone wires or terminals unless the phone line has been disconnected
at the network interface.
5. Use caution when installing or modifying phone lines.
6. Avoid using a phone (other than a cordless type) during an electrical storm. There may be a
remote risk of electrical shock from lightning.
7. Do not use the phone to report a gas leak in the vicinity of the leak.
8. To reduce the risk of fire, use only No. 26 AWG or larger Telecommunication line Cord.
Lithium Battery Caution
Caution: Danger of explosion if battery is incorrectly replaced.
A lithium battery on the voice/fax channel board provides backup power for the time keeping
capability. The battery has an estimated life expectancy of ten years.
When the battery starts to weaken, the date and time may be incorrect. If the battery fails, the voice/
fax board must be sent back to Multi-Tech Systems for battery replacement.
14
Page 15

Unpacking your MultiFRAD
Remove all items from the box. Your shipping box should contain the MultiFRAD, a power supply,
various cables, software and manual disks, and a MultiFRAD Quick Start Guide. Inspect all items
(Figure 2-1) before proceeding with the installation. If any item appears to be damaged, do not
power up the unit; contact Multi-Tech’s Technical Support personnel for advice (Refer to Chapter 6).
If no damage is observed, configure the MultiFRAD using the information in the rest of this chapter.
Chapter 2 - Installation
MADE IN U.S.A
MADE IN U.S.A
Figure 2-1. Unpacking the FR221/V2
15
Page 16

MultiFRAD User Guide
Cabling your MultiFRAD
Cabling your MultiFRAD involves making the proper Power, Command Port, Ethernet, and Channel
(and Voice/Fax, FR221/V2 Only) connections. Figure 2-2 shows the back panel connectors and the
associated cable connections. The MultiFRAD supports two data channels.
Note: Before starting to cable your MultiFRAD (FR221/V2 Only), perform the E&M Jumper Block
Positioning Procedure if either voice/fax channel (1 or 2) will be connected to an E&M trunk that is a
Type 1,3,4, or 5 rather than a Type 2 (the default position).
The following steps detail the procedures for connecting the cables to your MultiFRAD.
1 Connect one end of a DB25 cable to each of the data channel connectors on the back of your
MultiFRAD (labeled CHANNEL 1-2). See Figure 2-2. Connect the other end of each cable to a
channel device.
Note: Both data channels support the RS232/V .35 protocols, and either asynchronous or HDLC
synchronous RS232 data equipment such as multiplexers. Refer to V.35 Shunt procedure in Chapter
2 if it is necessary to switch from the default RS232 interface to V.35 interface.
Voice/Fax Channels
PBX
1 & 2 Connections
FXO
PSTN
From internal
56K DSU
E&M
VOICE/FAX CHANNEL 1
E&M FXO FXS
DIGITAL
ETHERNET RS232
DSU
COMMAND10BASE-T
FXS
VOICE/FAX CHANNEL 2
E&M FXO FXS
TRUNK (RS232C/V.35)
CHANNEL 2 (RS232C/V.35)
CHANNEL 1 (RS232C/V.35)
GND
I
O
POWER
Power Connection
Frame Relay Connection
Ethernet Connection
Cables to Channel Devices
Command Port Connection
Figure 2-2. Cable Connections
2 Connect an RJ-45 Link cable from the DSU jack to a Trunk connection of a frame relay network.
3 Connect a network cable to the 10 BASE-T Ethernet connector (shown in Figure 2-2). Connect the
other end of the cable to your LAN.
4 Connect the MultiFRAD to your PC using the short RJ-45 to DB9 (female) cable provided with your
unit. Plug the RJ-45 end of the cable into the Command Port jack (labeled COMMAND) of the
MultiFRAD and the other end into the serial port on the PC.
Note: The E&M, FXS, and Ethernet ports are not designed to be connected to a Public
T elecommunication Network.
16
Page 17

Chapter 2 - Installation
5 On the FR221/V2 only: if you are connecting your MultiFRAD to a station device; e.g., analog
telephone, fax machine, or Key Telephone System (KTS); connect one of the supplied RJ-11 cables
to the V oice/Fax Channel 1 FXS connector on the back of the MultiFRAD and the other end to the
station device.
If you are connecting your MultiFRAD to a PBX extension, connect one of the supplied RJ-1 1 cables
to the V oice/Fax Channel 1 FXO connector on the back of the MultiFRAD and the other end to the
PBX extension
If you are connecting your MultiFRAD to an E&M trunk from a telephone switch, connect one end of
an RJ-45 phone cord to the V oice/Fax Channel 1 E&M connector on the back of the MultiFRAD and
the other end to the trunk. Note: Appendix a has a pinout diagram for the E&M back panel connector
on the MultiFRAD.
6 Repeat the above step to connect the remaining telephone equipment to Voice/Fax Channel 2 on
your MultiFRAD.
7 Connect the power supply to a live AC outlet, then connect the power supply to the MultiFRAD as
shown in Figure 2-2. The Power connector is a 7-pin circular DIN connector .
At this time your MultiFRAD is completely cabled. Proceed to the section Loading Y our Software to
install your software.
17
Page 18
MultiFRAD User Guide
V.35 Shunt Procedure
If you are using an external link device on a data port (or the trunk port), and the connection will be a
V.35 connection, the corresponding internal shunt must be moved from its default RS232C position
prior to cabling and power-up. The following steps detail the procedures for switching the shunt.
Step Procedure
1 Ensure that the external power supply is disconnected from the MultiFRAD.
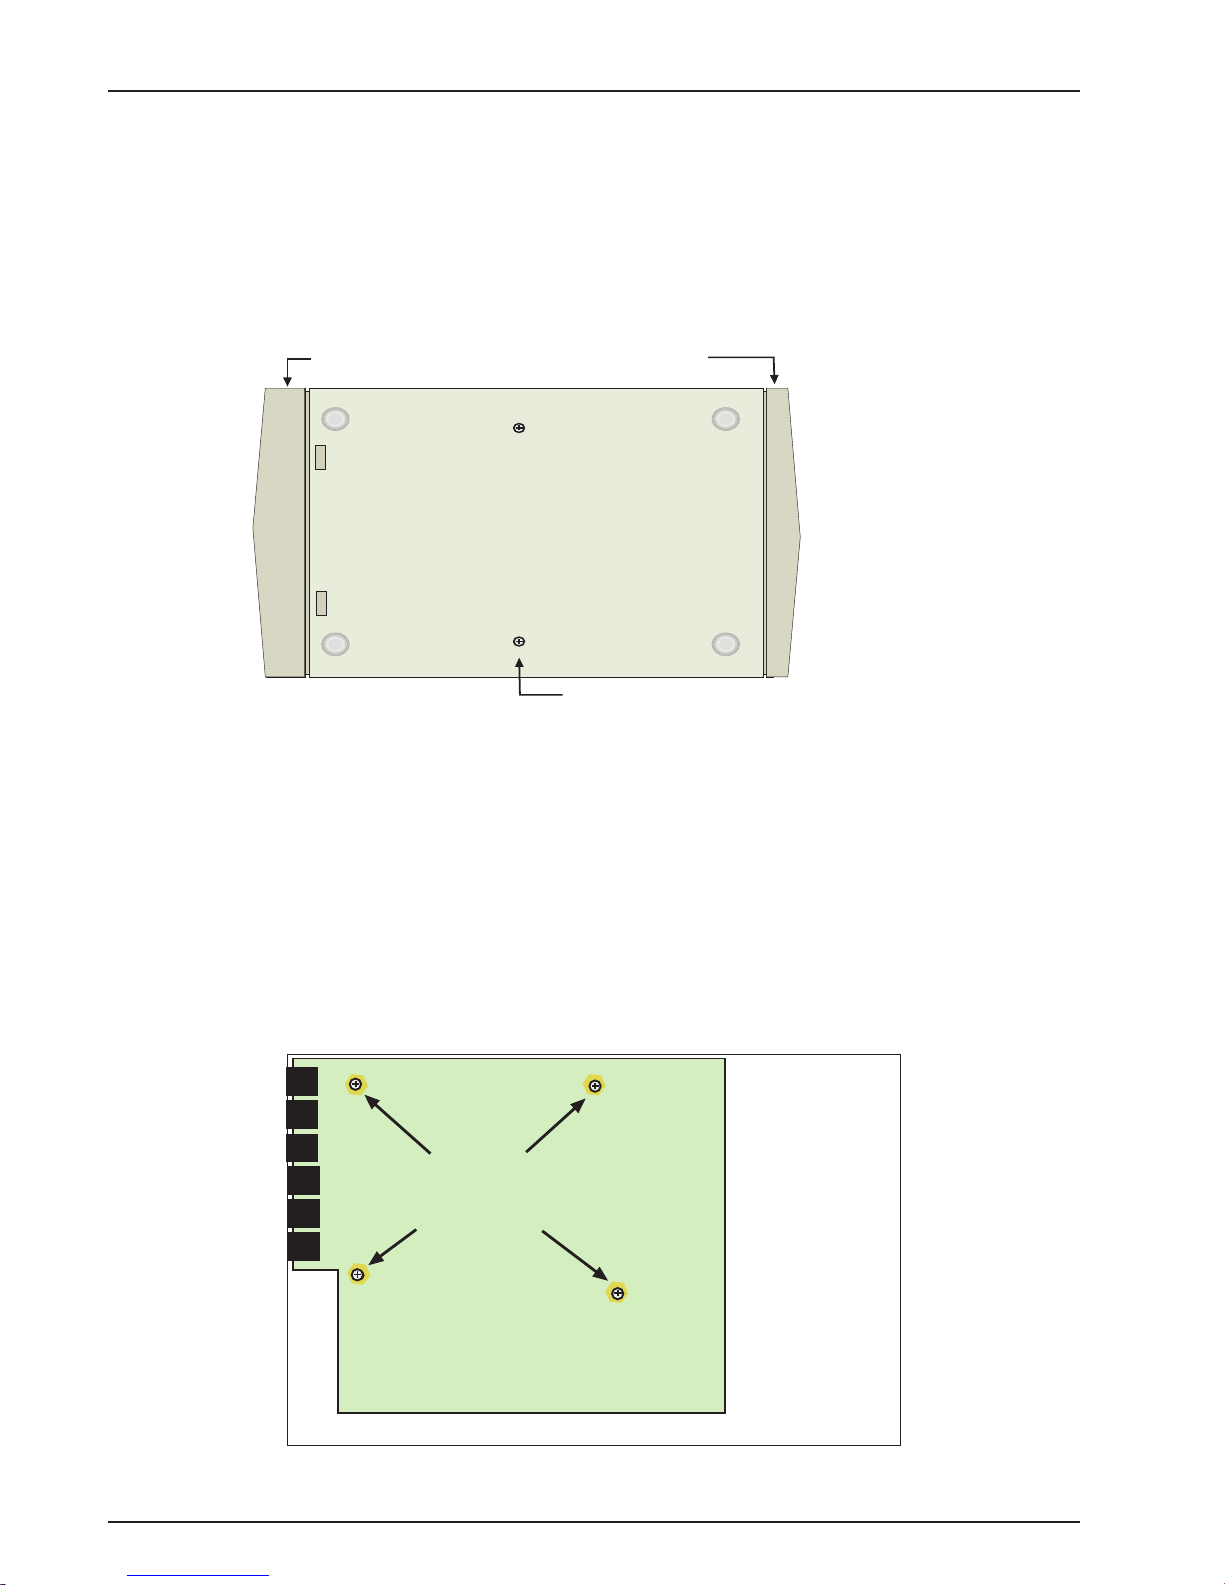
2 Turn the MultiFRAD upside down and remove the two cabinet mounting screws (Figure 2-3).
Front Panel
Back Panel
Cabinet Mounting Screws (2)
Figure 2-3. Cabinet Mounting Screw Locations
3 While supporting the back panel, turn the MultiFRAD right side up, then slide the PCB
assembly out the back of the chassis.
4 Place the PCB assembly on a flat, grounded surface.
Note: For the FR221/V2 only, you will have to remove the voice/fax daughterboard by
performing the following steps to gain access to the shunt locations on the main PCB
assembly.
a. Remove four screws (Figure 2-4) that secure the daughterboard to the standoffs.
b. Grasp the corners of the daughterboard, then gently lift the front edge of the
daughterboard upward, pivoting about the jacks at the back panel of the MultiFRAD,
until the long pins are free of the mating connector on the main PCB assembly .
Remove the daughterboard and set it temporarily aside.
Daughterboard
Mounting Screws
Daughterboard
Figure 2-4. Daughterboard Mounting Screw Locations
18
Main PCB Assembly
Page 19
Chapter 2 - Installation
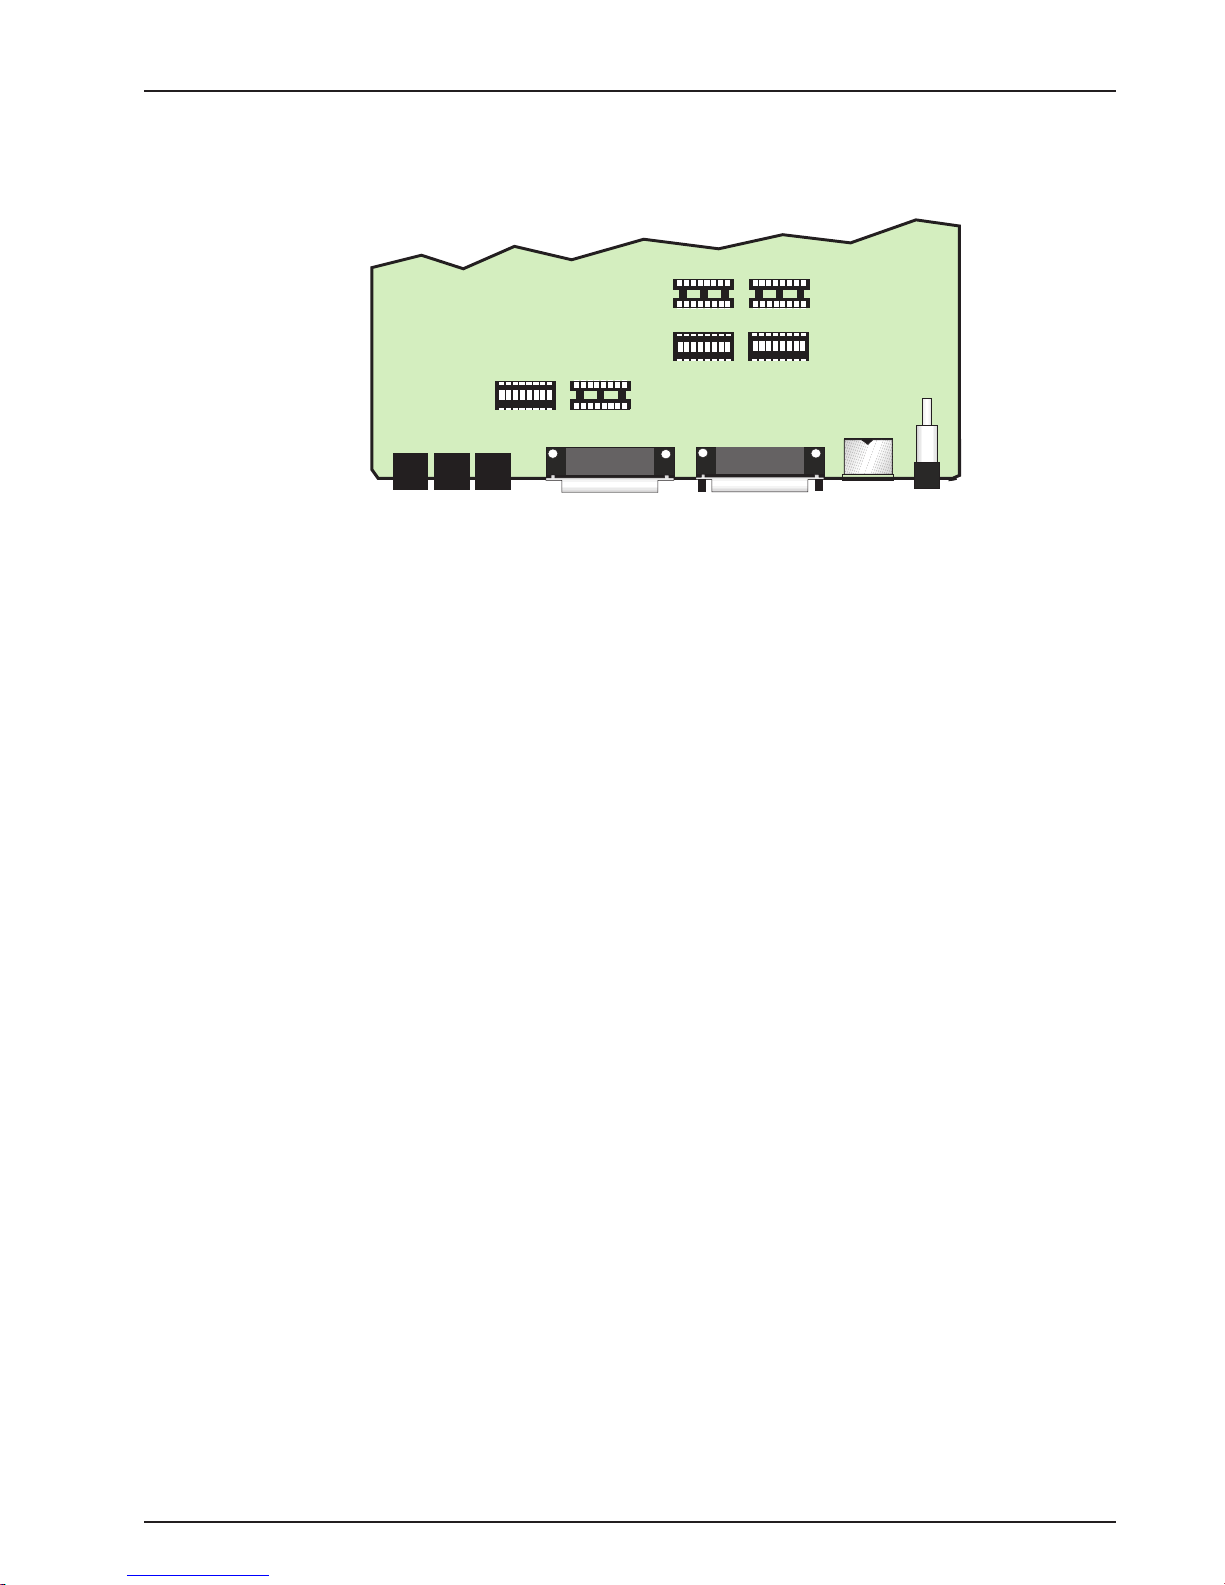
5 Pry the shunt (TRUNK, CHANNEL 1, or CHANNEL 2) out of its default RS232 position;
check that no pins are bent or missing, then insert the shunt in the corresponding V.35
position shown on Figure 2-5.
Note: Markings are on main PCB assembly; shunts
are shown in their default RS232 locations.
RS232
TRUNK
V.35
V.35
RS232
CHANNEL 2
V.35
RS232
CHANNEL 1
Back Panel Jacks, Connectors, and Switch
Figure 2-5. Shunt Positions
6 Repeat step 5 for any other shunt that needs to be moved.
Note: For the FR221/V2 only , reinstall the voice/fax daughterboard before replacing the PCB
assembly in the cabinet. Check that none of the long pins are bent or out of alignment.
a. Holding the front corners of the daughterboard, gently ease the RJ-45 jacks into
position at the back panel of the MultiFRAD, then carefully align all the long pins (on
the underside of the daughterboard) with the mating connector on the main PCB
assembly . When you are sure all the long pins are started in the mating connector,
press down on the front edge of the daughterboard until the long pins are secure in
the mating connector.
b. Reinstall the four screws (Figure 2-4) that secure the daughterboard to the standoffs.
7 Align the main PCB assembly with the guide slots on the inside of the chassis and carefully
slide the board back into the chassis.
8 While supporting the back panel, turn the MultiFRAD over again, and replace the two cabinet
mounting screws that were removed in step 2.
9 Turn the MultiFRAD right side up again, then return to Cabling Y our MultiFRAD.
19
Page 20
MultiFRAD User Guide
E&M Jumper Block Positioning Procedure (FR221/V2
Only)
Each voice/fax channel on the FR221/V2 has a separate E&M jumper block, located near the
channel jacks on the back panel of the MultiFRAD. Each jumper block has 8 pairs of pins with a
jumper plug on three adjacent pairs of pins. The E&M type numbers are labeled on the printed circuit
board, and the jumper plug needs to be centered on the E&M type number corresponding to type of
E&M connection used on that channel (1 or 2). Perform the following procedure if it is necessary to
move the E&M jumper block from its default (Type 2) position.
1 Ensure that the external power supply is disconnected from the MultiFRAD.
2 Turn the MultiFRAD upside down and remove the two cabinet mounting screws midway back
along both edges of the bottom of the cabinet.
3 Turn the MultiFRAD right side up, then slide the base out the rear of the cabinet.
Note: To change a jumper position, lift the jumper plug up off the jumper block, then move it to the
new position, ensuring that the middle jumper of the jumper block is centered on the E&M type
number (1,3; 4; or 5). See Figure 2-6.
2
Jumper Block
In Position 2
(Default)
1,3
4
Alternate Positions
Figure 2-6. E&M Jumper Block Positions
4 Change the jumper block position for any voice/fax channel to be connected to an E&M trunk that
is not a T ype 2 (the default position).
5 Slide the base all the way into the cabinet until it stops.
6 Turn the MultiFRAD upside down and replace the two cabinet mounting screws that were
removed in step 2.
7 Turn the MultiFRAD right side up, then return to Cabling Y our MultiFRAD (FR221/V2 Only).
5
20
Page 21

Chapter 3 - Software Loading and Configuration
Page 22
MultiFRAD User Guide
Installing Your Software
The following procedure does not provide every screen or option used in the process of installing the
MultiFRAD software. The assumption is that a technical person with a thorough knowledge of
Windows and the software loading process is doing the installation. Additional information on the
MultiFRAD software is provided in the User Guide supplied with your MultiFRAD.
1 Run Windows on the PC that is connected to the Command Port.
2 Insert the MultiFRAD Disk 1 into the disk drive on the PC that is connected to the Command Port.
3 Win3.1 users - in Program Manager, click File | Run. In the Run dialog box, type a:\setup.exe or
b:\setup.exe (depending on the location of your floppy disk drive) in the Command Line field and
then click OK.
Win95/98/NT users - click Start | Run. In the Run dialog box, type (or click the down arrow and
choose) a:\setup or b:\setup (depending on the letter of your floppy disk drive) and then click OK.
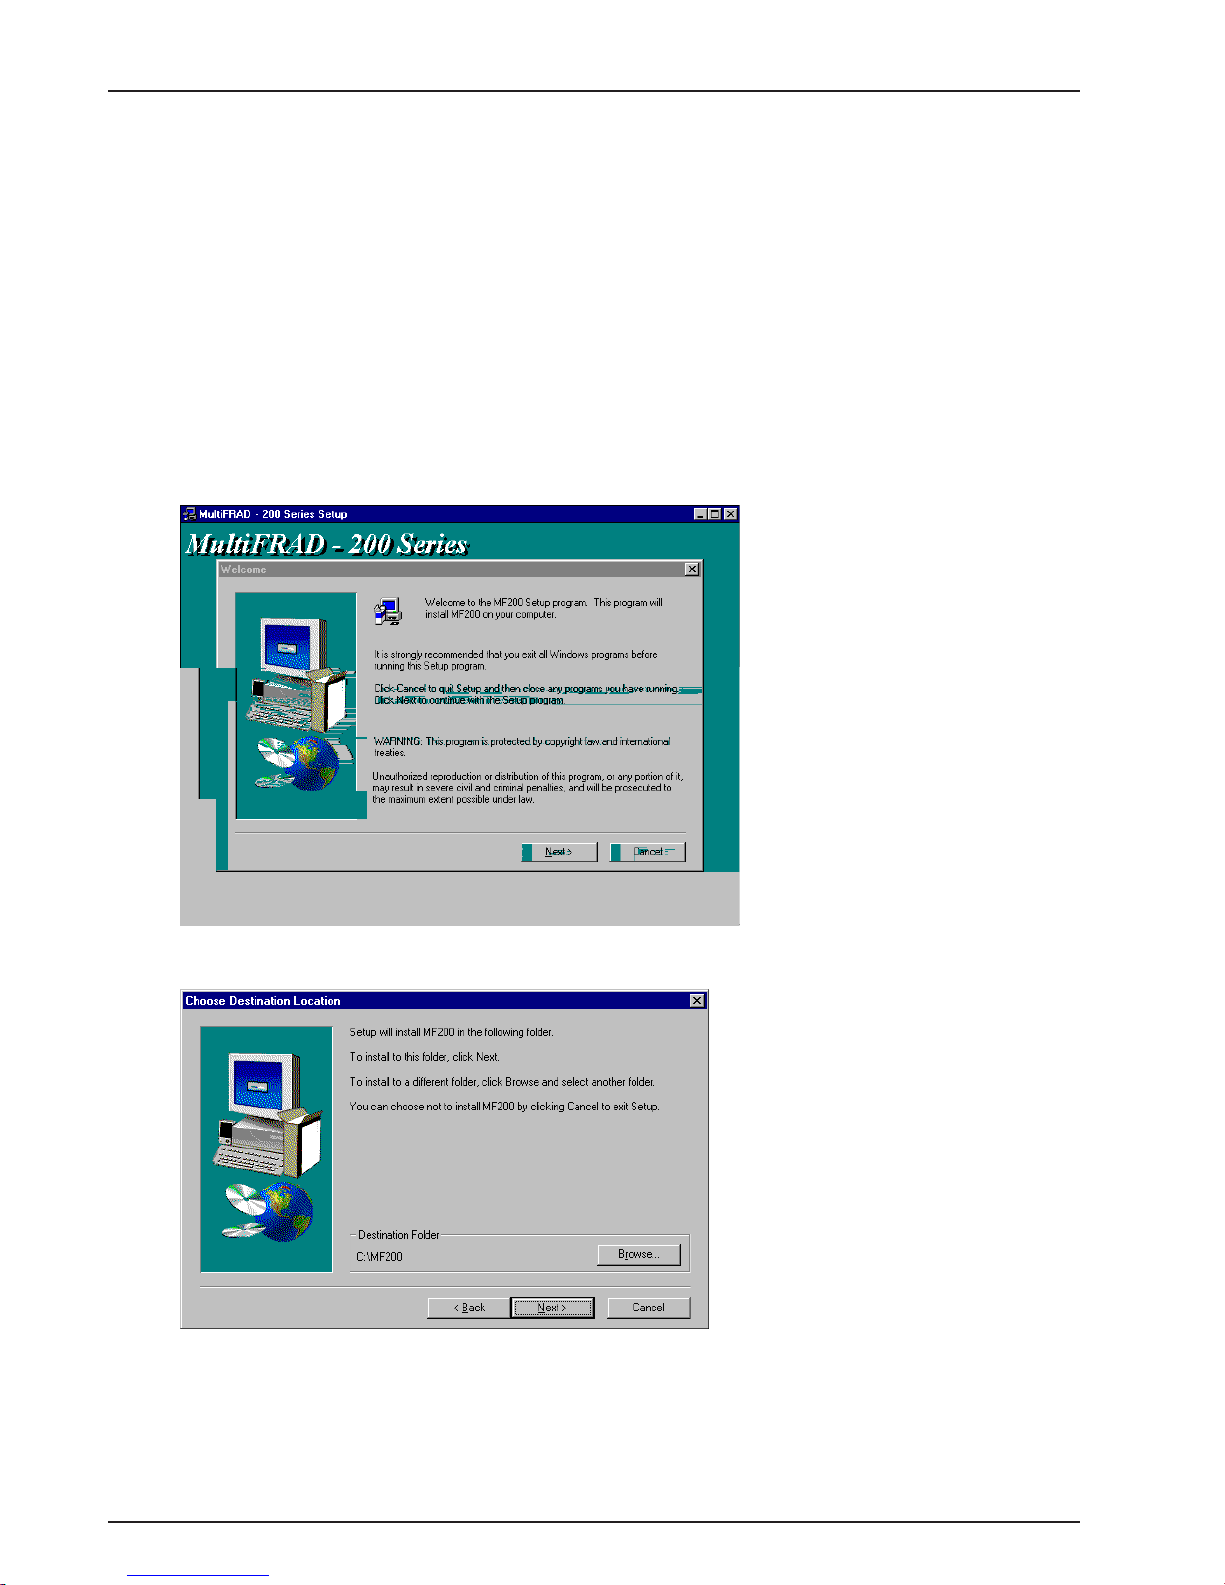
4 The MultiFRAD 200 Series Setup W elcome screen is displayed.
Click Next> to continue.
5 Follow the on-screen instructions to install your MultiFRAD software.
You can choose the Destination Location of your MF200 software or you can accept the default
destination by clicking Next>. If you click Browse, you can select a different folder for your
MultiFRAD software; however, it is recommended that you accept the default folder, MF200.
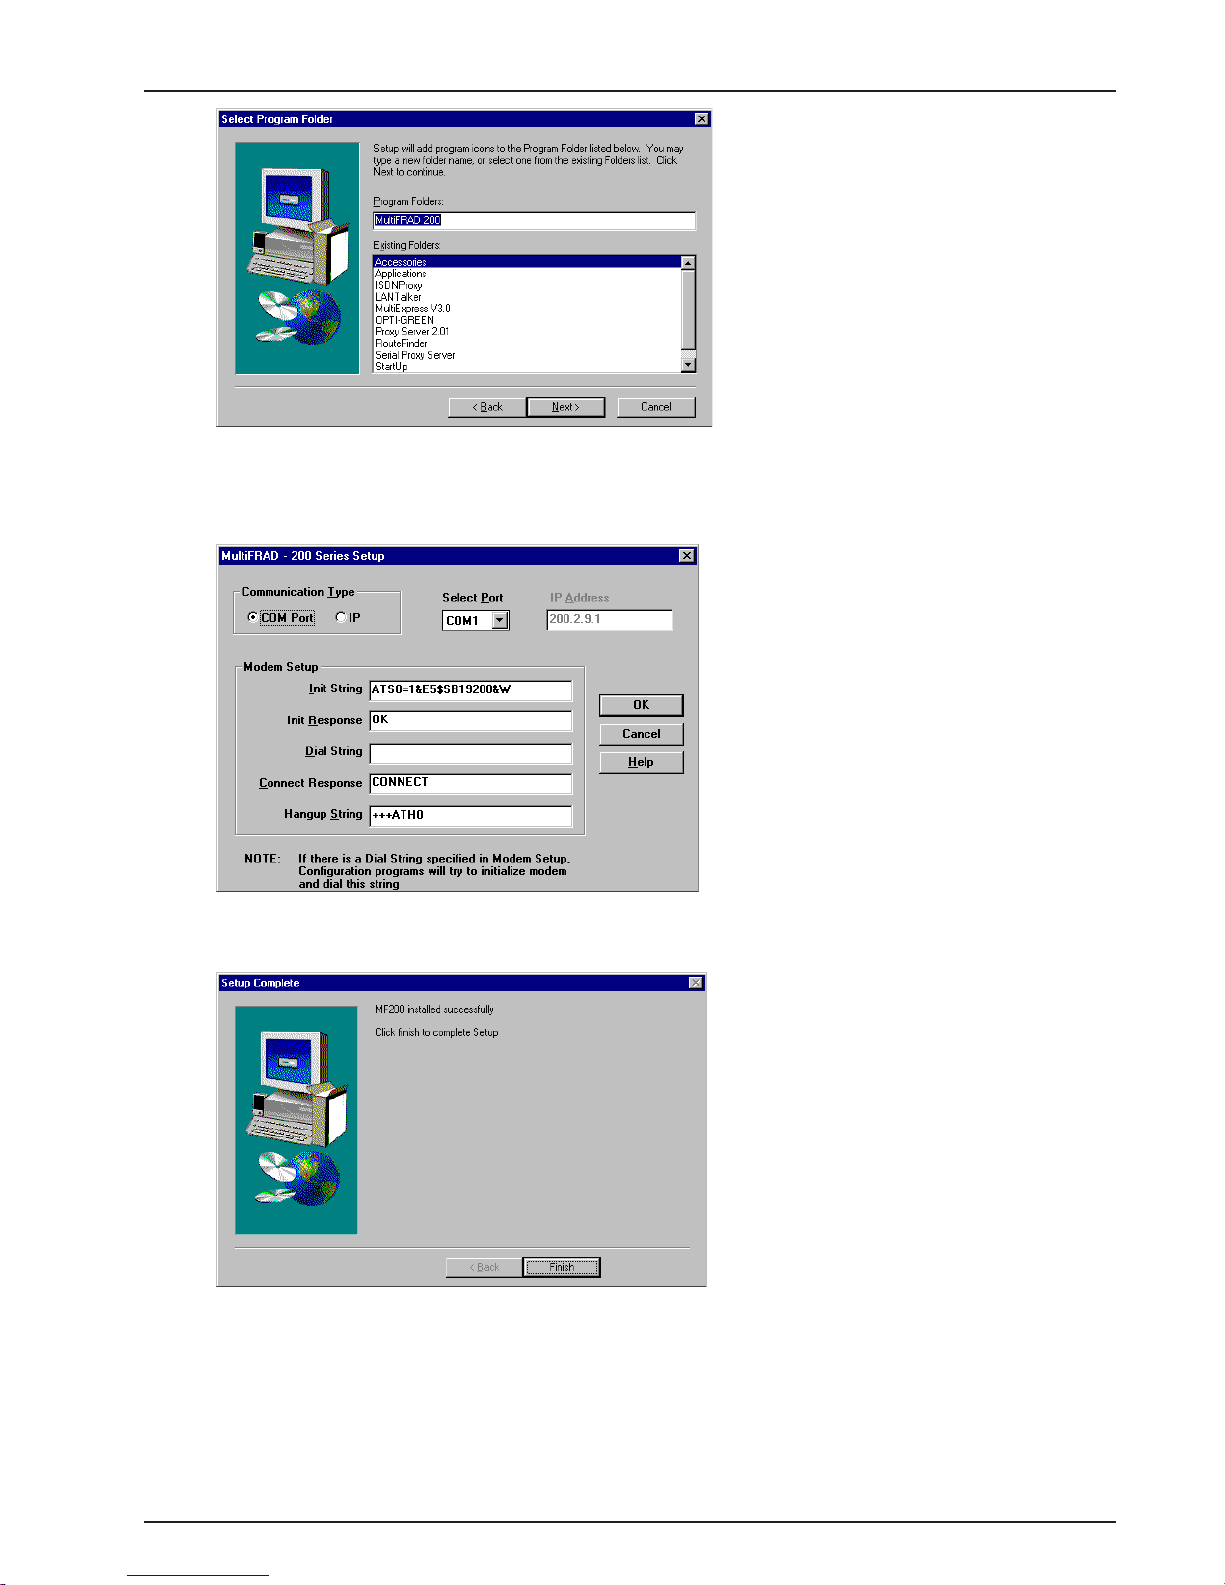
6 The next dialog box enables you to name the Program Folder for the MF200 files. You can select the
default name, MultiFRAD 200, or name it anything you like; when done, click Next> to continue.
22
Page 23
Chapter 3 - Software Loading and Configuration
7 After all the program files from both disks are loaded, the Setup dialog box is displayed, enabling you
to designate the COM port of the PC that is connected to your MultiFRAD. On the Select Port field,
click the down arrow and choose the COM port of your PC (COM1 -- COM4) that is connected to
your MultiFRAD.
Click OK to continue.
8 The Setup Complete screen is displayed. Click Finish to continue.
23
Page 24

MultiFRAD User Guide
9 The following message is displayed:
Click Yes to continue.
10 If your MultiFRAD is already turned on and fully booted, you may get the following message; if so,
click Yes to continue.
24
Page 25
Chapter 3 - Software Loading and Configuration
Ethernet Setup
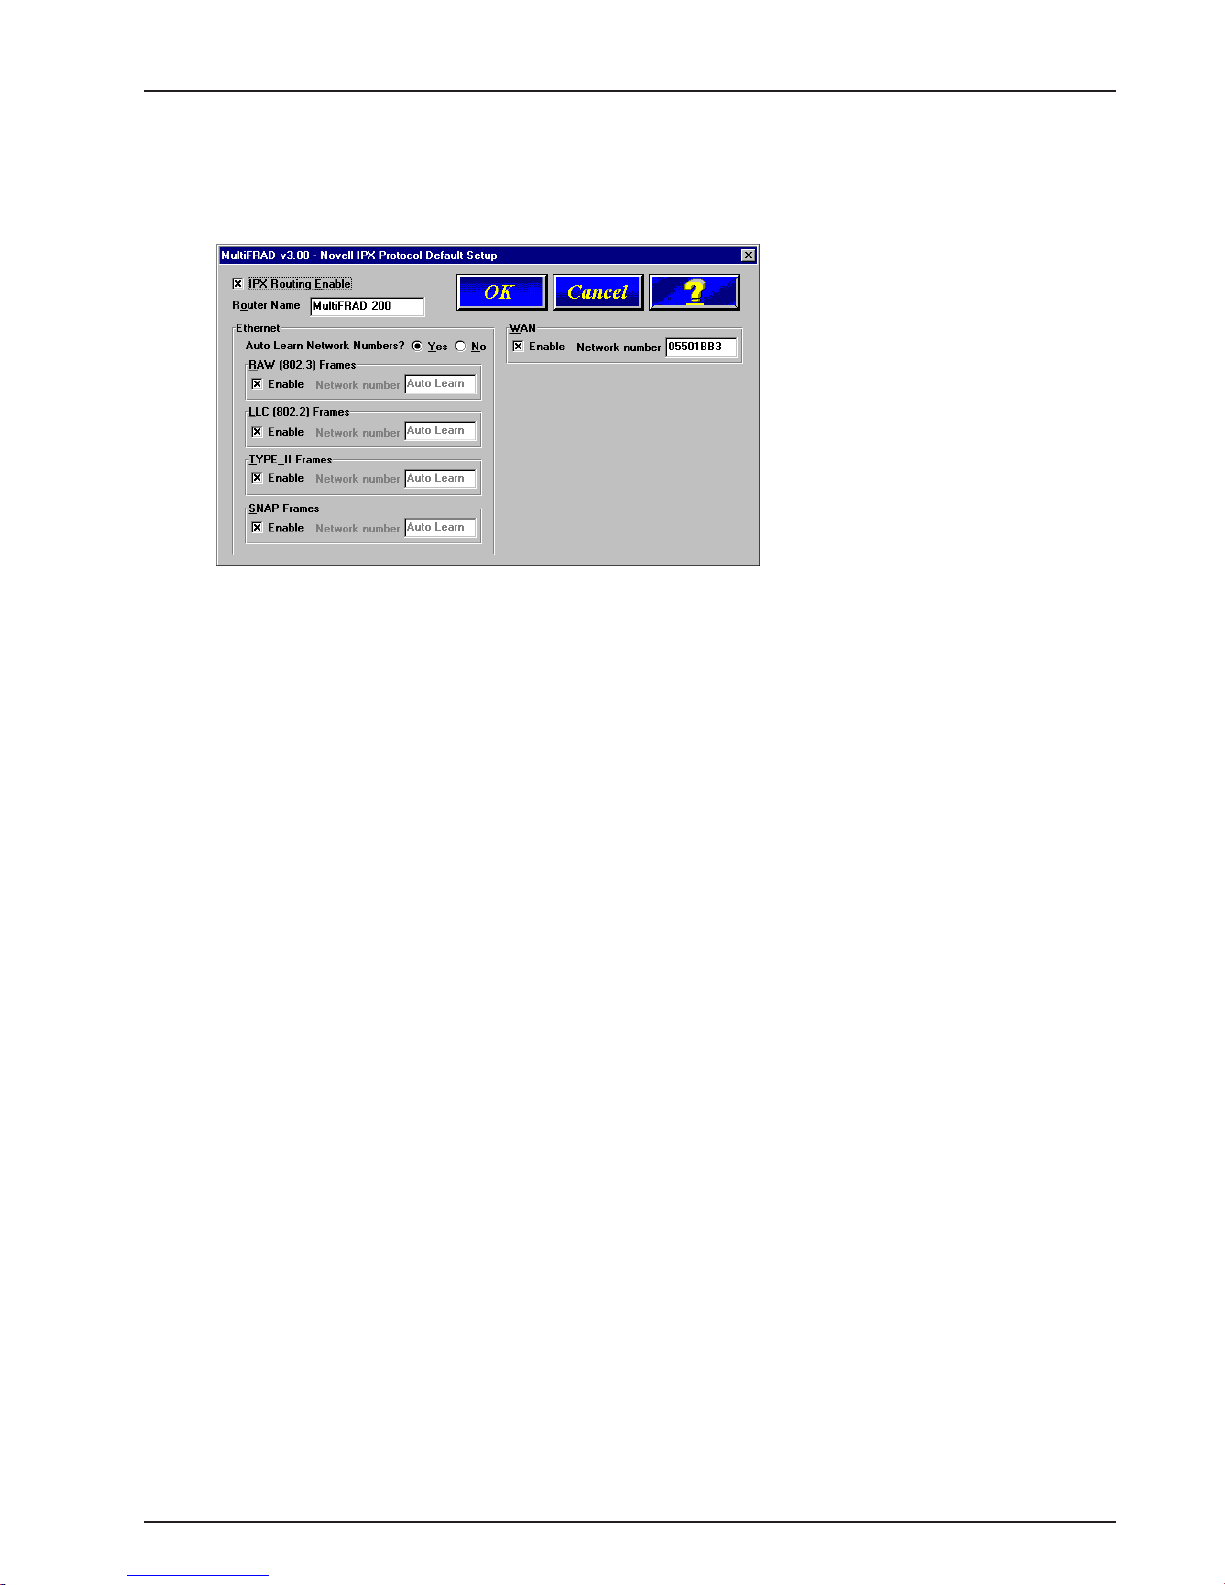
1 1 If your MultiFRAD is connected to an IPX network, continue with the following steps (12 thru 15).
If your MultiFRAD is NOT connected to a LAN, click the IPX Routing Enable check box to disable
IPX, then click OK and proceed to step 16 to disable IP protocol.
12 Router Name: You can either use the default Router Name (MultiFRAD 200) or assign a new Router
Name in this field. The Router Name must be a unique printable ASCII string of a maximum of 47
characters.
13 Ethernet: You can enable Auto Learn Network Numbers by leaving the default Yes or you can click
No (each Network number field will then become active) and manually assign the network numbers
here.
If no file server is connected to the Ethernet segment, then this field should be No.
If you enable Auto Learn (Yes), the MultiFRAD will learn the IPX network numbers from the file
server.
If you select No for Auto Learn, record the network numbers assigned by the network file server for
each of the four frame types [Raw (802.3), LLC (802.2), EthernetII (Type II), SNAP] in the spaces
provided below.
RAW (802.3) Frames Network Number _____________
LCC (802.2) Frames Network Number ______________
TYPE_II Frames Network Number _________________
SNAP Frames Network Number ___________________
WAN Network Number __________________________
When you manually assign network numbers, make sure they match the network numbers assigned
to your local file server (if any).
14 WAN: Enter the WAN network number for the Frame Relay WAN Port by clicking the Network
Number box, backspacing through the default number, and entering your new W AN Number. Make
sure the WAN network number is the same as the MultiFRAD on the other end of the link.
The WAN network number has to be assigned by the Network Administrator and must be unique
throughout the entire internetwork.
Note: The WAN port does not have the capability of learning the network number, unlike the LAN
port (i.e., the WAN port does not have a file server).
15 Click OK when you are satisfied with your selections.
16 If your MultiFRAD is connected to an IP network, continue with the following steps (17 thru 22).
If your MultiFRAD is NOT connected to a LAN or the network does not use IP, click the IP Routing
Enable check box to disable the IP protocol, then click OK and proceed to step 23.
25
Page 26
MultiFRAD User Guide
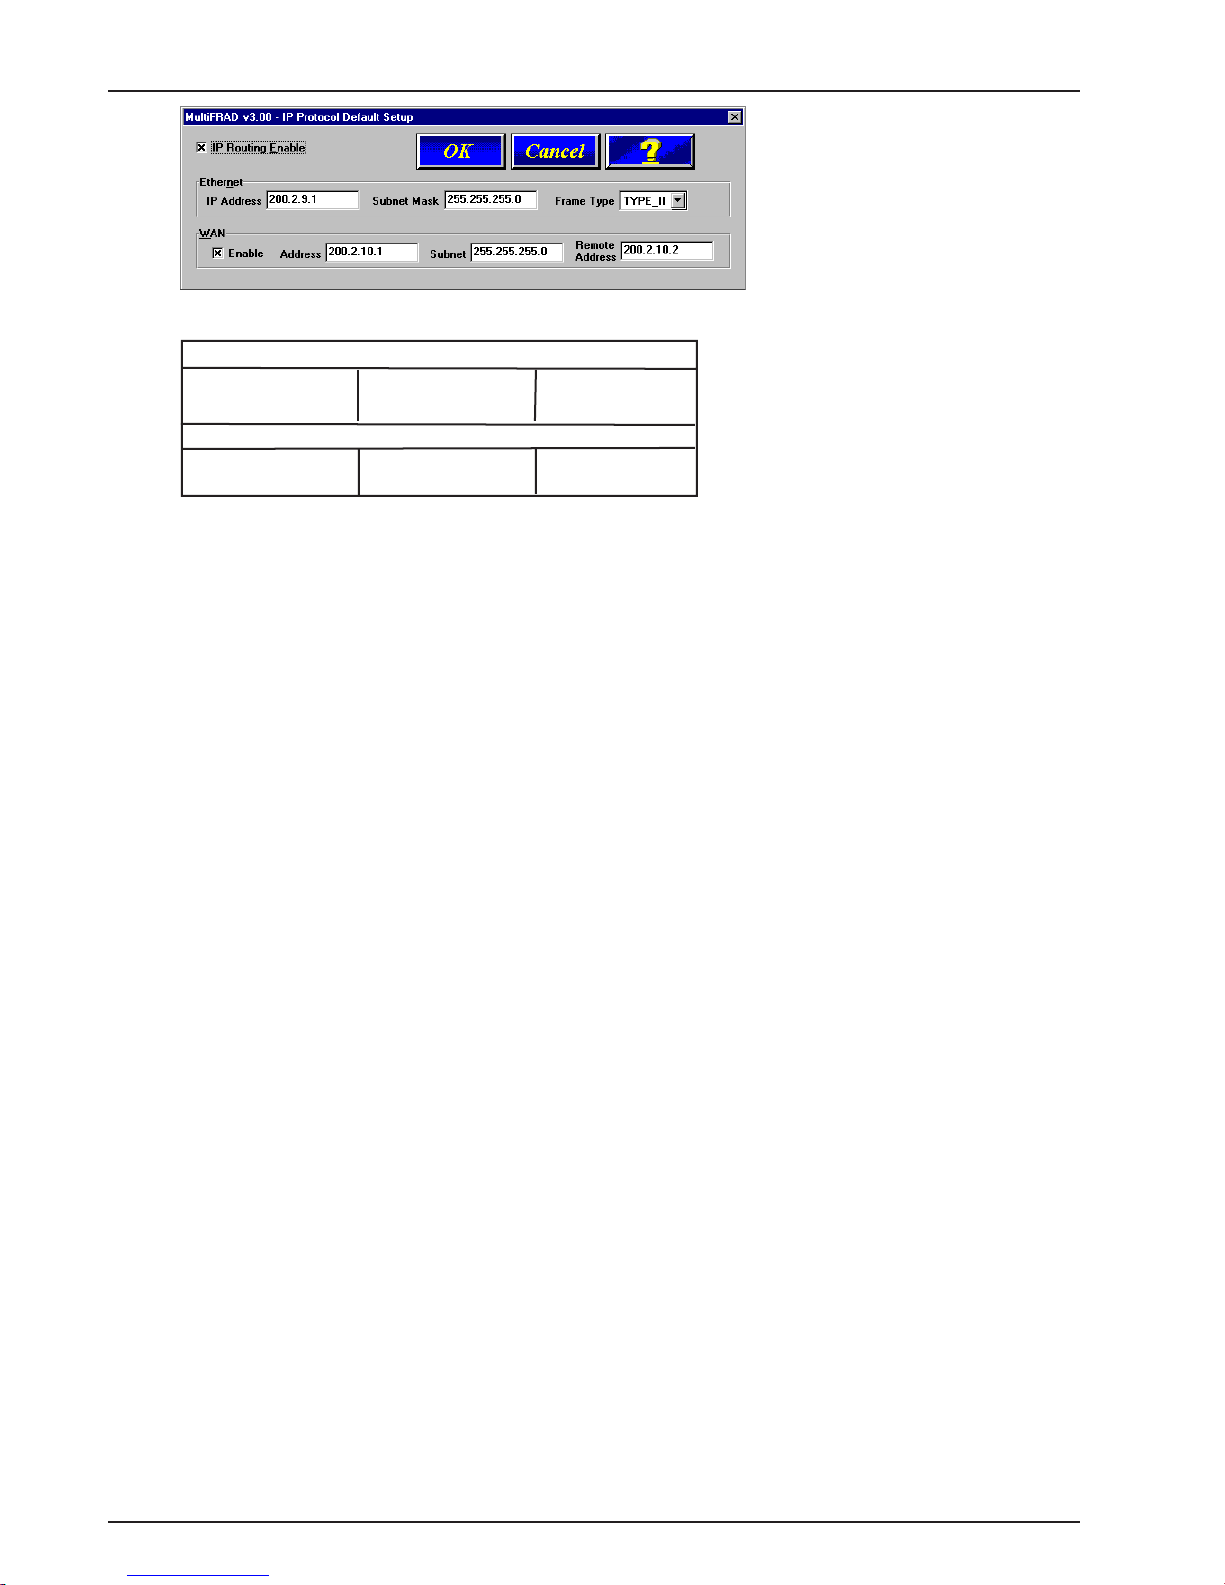
17 Record the IP address protocol information for your specific network in the space provided below:
Ethernet
IP Address
___.___.___.___
Mask
___.___.___.___
Frame Type
TYPE II/SNAP
WAN Port
IP Address
___.___.___.___
Mask
___.___.___.___
Remote Address
___.___.___.___
18 The default Ethernet IP Address has to be changed to your unique LAN address. Enter an
acceptable, unique IP address for the Ethernet port.
19 Change the default Subnet Mask and Frame T ype to the values you have assigned to your LAN
port.
20 The default WAN Address has to be changed to your unique WAN address. Assign an acceptable
unique WAN Address to the W AN port.
21 Change the default Subnet Mask and Remote Address for WAN to the values you have assigned to
your WAN.
22 Click OK when you are satisfied with your selections.
26
Page 27
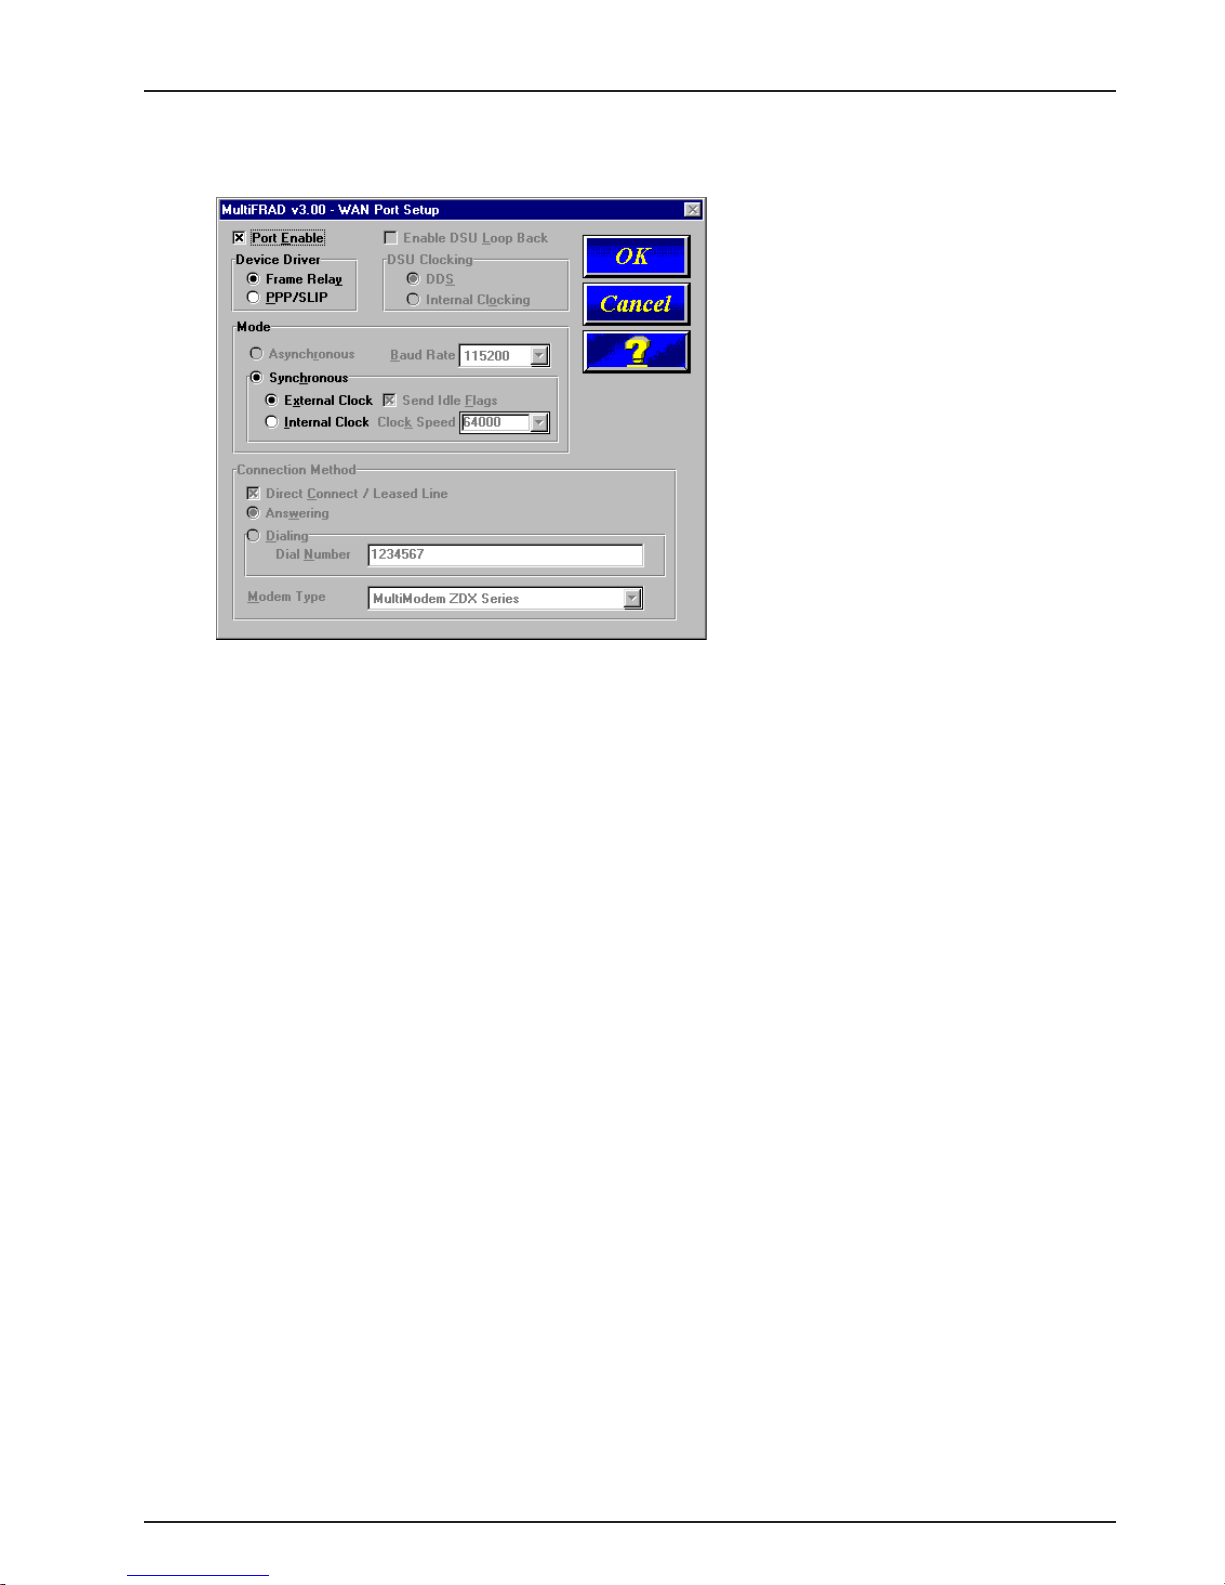
WAN Port Setup
23 The WAN Port Setup dialog box is displayed.
Chapter 3 - Software Loading and Configuration
The defaults are as shown above: Frame Relay connection, Synchronous mode, with external
clocking (DDS) from the phone system.
Since the DSU connector on your MultiFRAD is cabled to a trunk connection of a frame relay
network, click OK.
27
Page 28
MultiFRAD User Guide
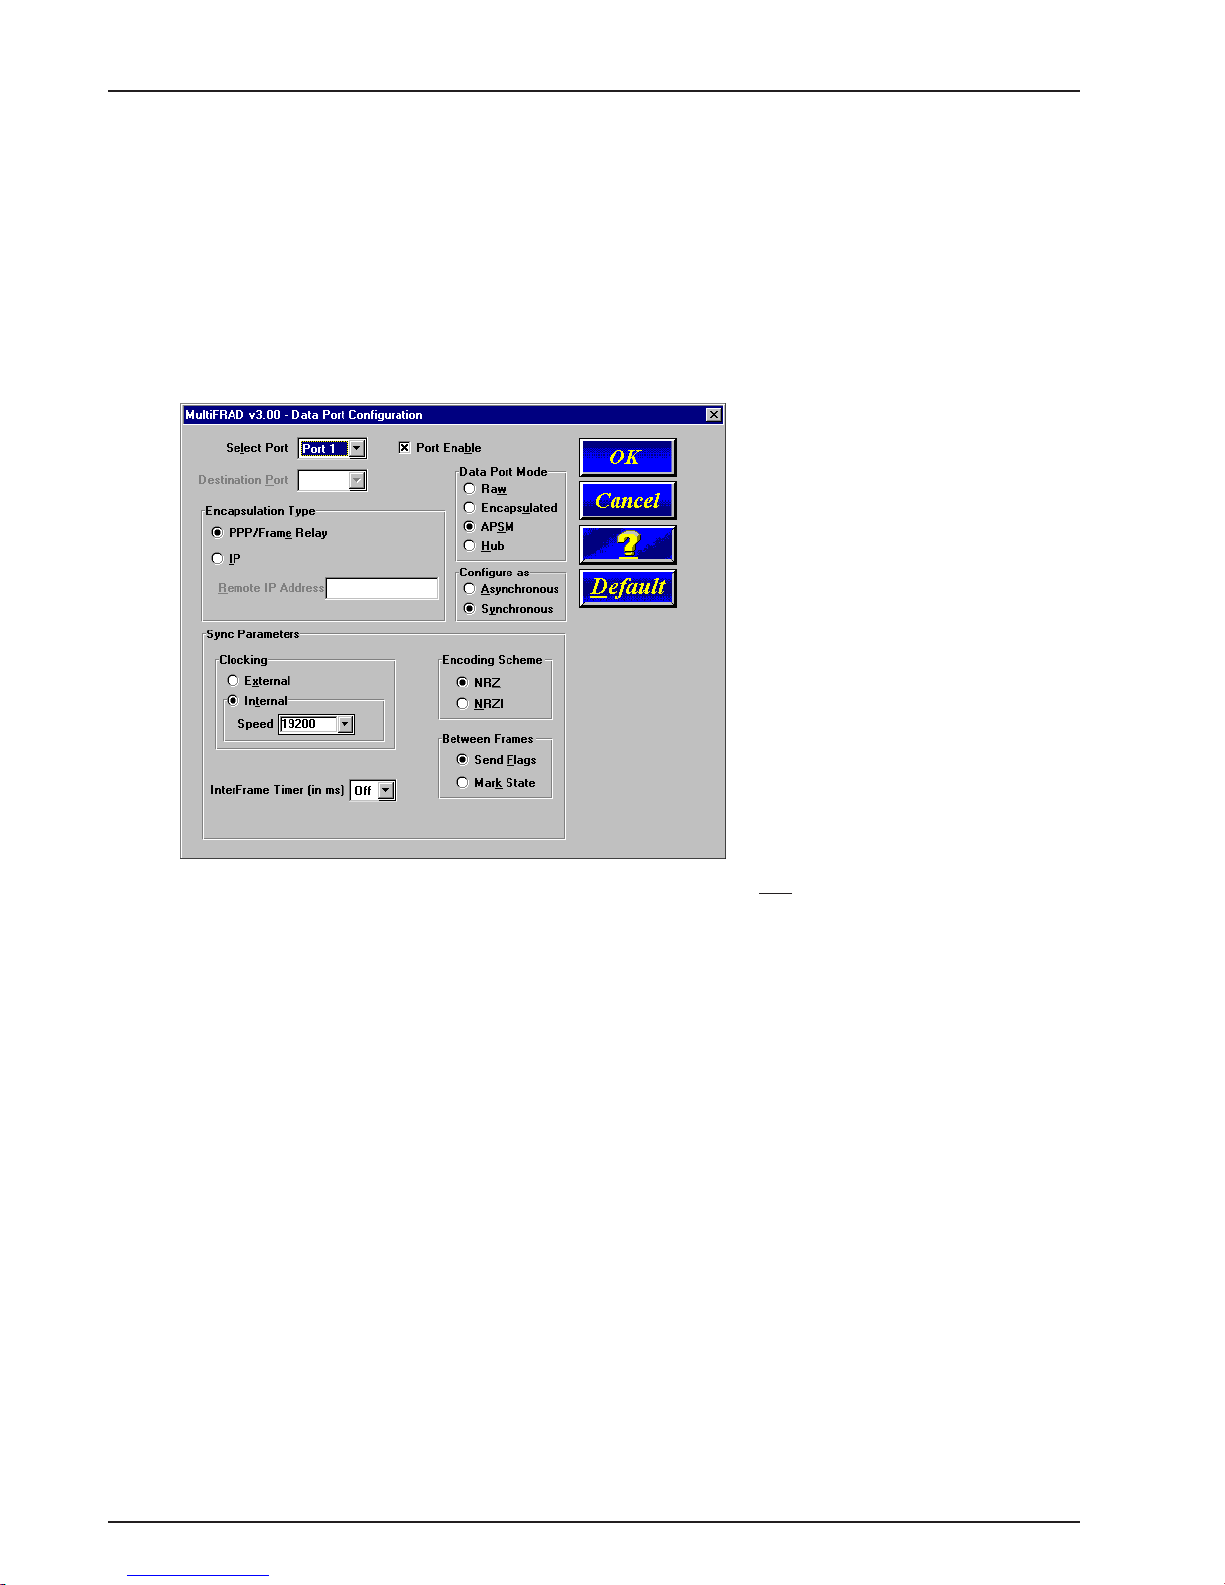
Data Ports Setup
24 The Data Port Configuration dialog box enables you to individually configure the two data channels
(Port 1 and Port 2) for PPP/Frame Relay, data over IP, or as a frame relay Hub. The Encapsulation
Type group determines how the data channel is configured.
If your MultiFRAD will be connected to a frame relay network or point-to-point, then accept the default
PPP/Frame Relay option in the Encapsulation Type group. However, if you are configuring your
MultiFRAD for data over IP, then select the IP option. The Remote IP Address field becomes active;
enter the IP address of the remote MultiFRAD.
The Point-to-Point Protocol (PPP) is used to connect a pair of MultiFRADs together without going
across a frame relay network.
25 If your Multifrad will be connected to a Frame Relay network (but not to an Ethernet LAN) and both
data channels are synchronous and are being mapped to individual DLCIs, use the Raw option.
Select the Encapsulated option when a synchronous data channel and LAN traffic are combined on
a single frame relay DLCI.
Use the Hub option to route DLCIs to other MultiFRADs that are connected to the Data Ports. The
Hub function can be used to add data channels or to set up an Internet connection through a router
connected to one of the data channel ports.
If your MultiFRAD is going to be connected in a Point-to-Point configuration, Data Port Mode
defaults to APSM and all other modes are disabled.
26 If your data device is a synchronous device, ensure that the clocking is correct, and set the Speed if
an internal clock is used. Also check that the Encoding Scheme, Between Frames, and InterFrame
Timer settings are correct for your channel device, per user documentation.
If your data device is an asynchronous device, click Asynchronous, then set the Speed in the dropdown list. Also select the W ord Length, Parity, Stop Bits, etc. for your device. Refer to the user
documentation for the parameters of the data device.
27 Click OK when you are satisfied with the configurations for both data ports. If you enabled PPP in the
WAN Ports Default Setup dialog box, proceed to step 30.
28
Page 29
Chapter 3 - Software Loading and Configuration
DLCI Setup
28 If you enabled Frame Relay in the WAN Ports Default Setup dialog box, the Frame Relay DLCI
Default Setup dialog box is displayed with all the groups inactive. Click OK to continue.
Note: When your MultiFRAD is connected to an active frame relay network service, it can detect
DLCIs and the frame relay management type. However, at this point your MultiFRAD is not yet
communicating with the frame relay network. We recommend that you finish loading the software and
then access the frame relay dialog box from the main menu.
29
Page 30
MultiFRAD User Guide
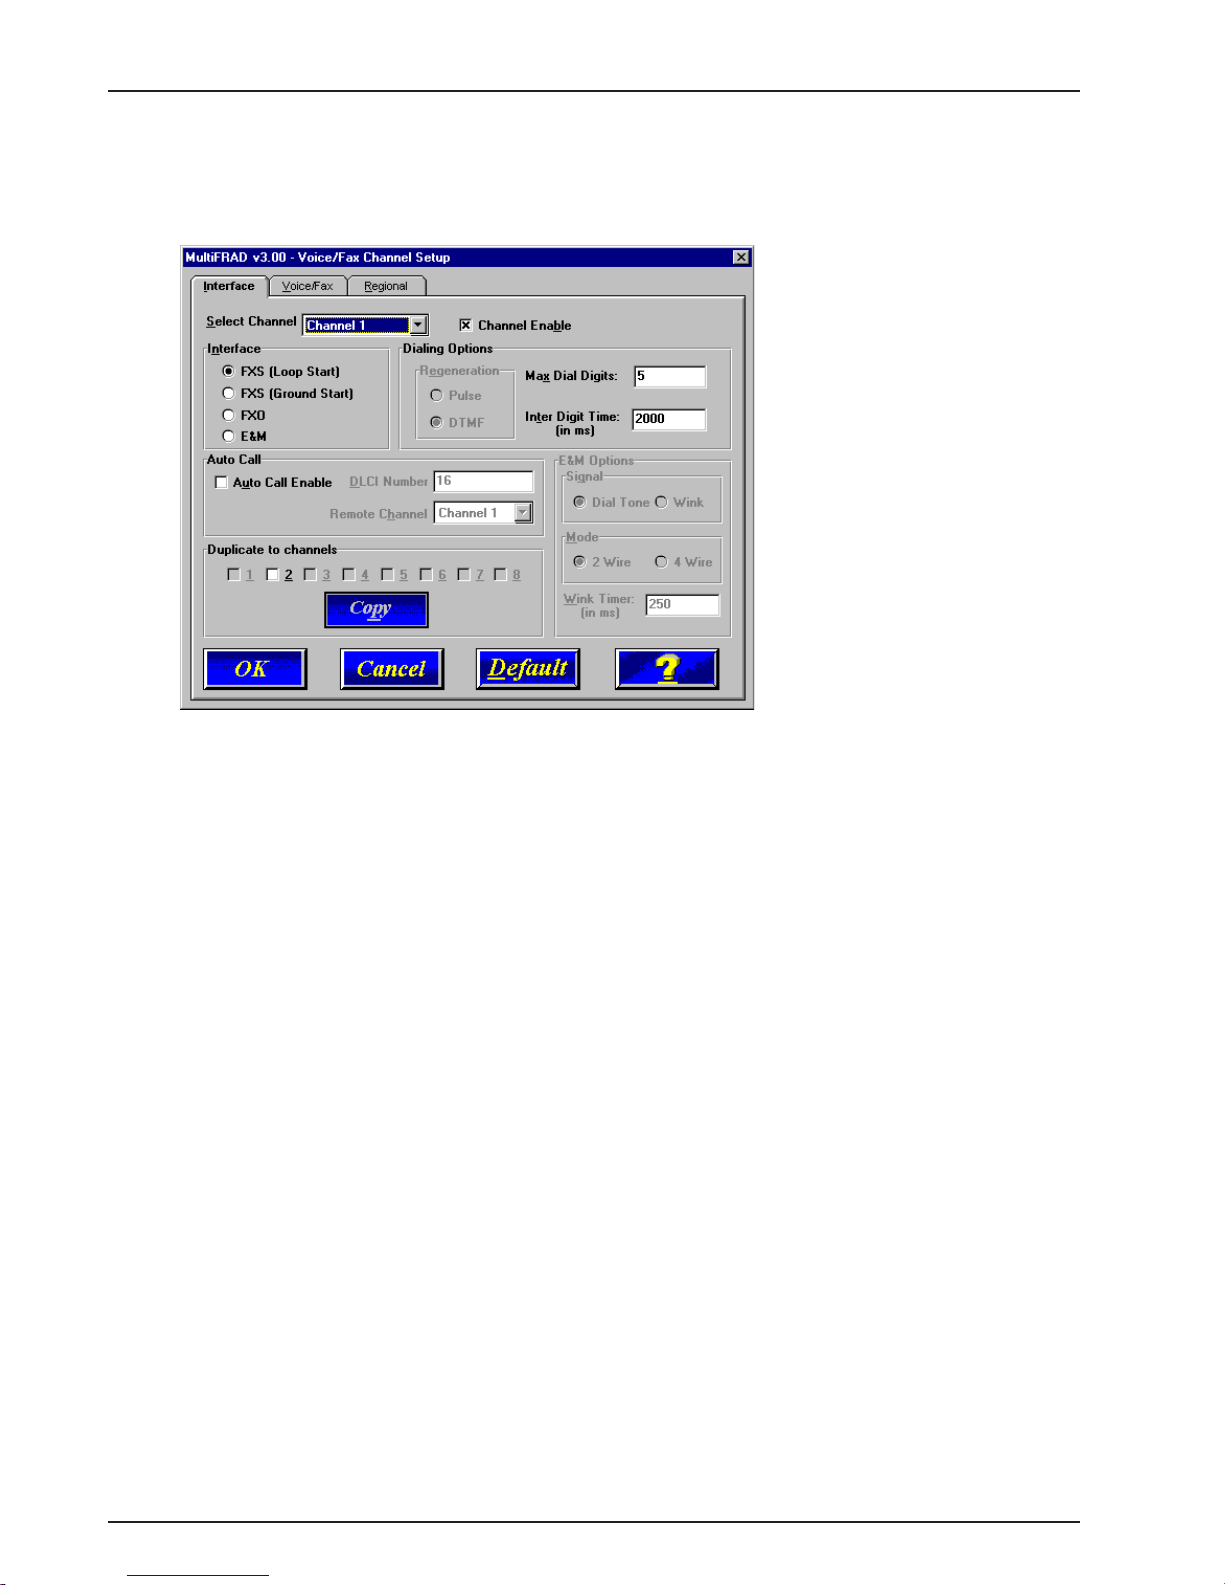
Voice/Fax Channel Setup
29 The Voice/Fax Channel setup dialog box is displayed. Its three tabs are used to define the voice/fax
channel interface, voice coder, fax parameters, and regional phone parameters (tone pairs) for each
channel.
Configure each channel for the type of interface you are connecting to. The Interface tab defaults to
Channel 1 in the Select Channel field.
30 The Interface group defaults to FXS (Loop Start). Select the interface option that corresponds to
the interface type being connected to the Voice/Fax connector on the back panel of the MultiFRAD.
If you are connecting a station device; e.g., an analog telephone, fax machine, or KTS telephone
system to the Voice/Fax connector on the back of the unit, FXS (Loop Start) will likely be the correct
Interface option.
If the station device uses ground start, then choose the FXS (Ground Start) option. Refer to the
device’s user documentation.
If you are using an analog extension from your PBX, then choose the FXO option. Check with your
in-house phone personnel to verify connection type.
If you are connecting to an analog trunk on your PBX, then choose the E&M option.
If you choose the FXO interface, the Dialing Options Regeneration group is enabled. Check with your
local in-house phone personnel to verify whether your local PBX dial signaling is Pulse or tone
(DTMF). Then, set the Regeneration option accordingly .
If you choose the E&M interface, then the E&M Options group is enabled. Check with your local inhouse phone personnel to determine if the signaling is Dial T one or Wink and if the connection is 2wire or 4-wire. If Wink signaling is used, then the Wink Timer is enabled with a default of 250
milliseconds. The range of the Wink T imer is from 100 to 350 milliseconds. Consult with your local inhouse phone personnel for this timer setting.
If you want to dedicate a local voice/fax channel to a remote voice/fax channel (so you will not have
to dial the remote channel), click the Auto Call Enable option in the Auto Call group. Then enter the
appropriate DLCI in the DLCI Number field. Change the Channel number to the channel of the
remote MultiFRAD you want to call.
If you enable the Auto Call feature, this channel will not have to be entered in the Phone Directory
Database; you will have a direct line whenever you pick up the receiver.
Note: After configuring a given channel (1 or 2), you can copy that channel’s configuration to the
other channel by selecting the other channel in the “Duplicate To” group and clicking the Copy
button. Everything on the Interface tab will be copied to the other channel.
30
Page 31

Chapter 3 - Software Loading and Configuration
31 Repeat the above step to configure the interface type for voice/fax channel 2. To change the channel
number, click the down arrow and highlight Channel 2.
32 When you are satisfied with your interface choices, and if the default voice coder is acceptable and
your country/region is the default USA, then you can click OK and continue building your phone
directory database.
If you need to change the voice coder, click the Voice/Fax tab and proceed to step 34.
If your country/region is not the default USA, then click on the Regional tab and proceed to step 35.
33 To change the voice coder, first select the channel by clicking the Select Channel down arrow and
highlighting the channel number, then click the Voice Coder down arrow and highlight your new voice
coder entry .
If you change the voice coder, ensure that the same voice coder is used on the voice/fax channel you
are calling; otherwise, you will always get a busy signal.
Note: After configuring a given channel (1, or 2), you can copy that channel’ s configuration to the
other channel by selecting the other channel in the “Duplicate To” group and clicking the Copy
button. Everything on the V oice/Fax tab will be copied to the other channel.
34 To change the Tone Pairs, click the Regional tab and then click the Country/Region down arrow
and highlight your specific country or region.
The Tone Pairs parameters change per your choice. Click OK when finished.
35 The Checking MultiFRAD dialog box will appear .
31
Page 32

MultiFRAD User Guide
Click OK to continue.
36 The Writing Setup dialog box is displayed as the setup configuration is written to the MultiFRAD.
37 After the setup is written to the MultiFRAD, the unit reboots.
38 Check that the BOOT LED on the MultiFRAD is Off after the download is complete. This may take
several minutes as the MultiFRAD reboots.
39 Win3.1 users - you are returned to your Program Manager where the MultiFRAD 200 Program
Group and Program Item (Windows icons) have been created.
Win95/98/NT users - you are returned to your MultiFRAD 200 folder which will be visible on your
desktop.
32
Page 33

Chapter 3 - Software Loading and Configuration
Detect and Map Your DLCIs
40 To detect DLCIs and map your data ports and protocols to the detected DLCIs, perform the following
steps:
Win3.1 users - from the Program Manager, click the MultiFRAD Configuration icon in the
MultiFRAD 200 Program Group. The main menu is displayed.
Win95/98/NT users - from your desktop, click Programs | MultiFRAD 200 | MultiFRAD
Configuration. The main menu is displayed.
Click Frame Relay.
41 A Frame Relay dialog box is displayed, stating “MultiFRAD has detected Management Type to be
Annex D. Hence it has set Management type to Annex D from Annex A.” The Management Types are
Annex A, Annex D, or LMI. Any one of them could appear in this dialog box.
Click OK.
42 A second Frame Relay dialog box stating “MultiFRAD has detected and added the following DLCIs.”
is displayed.
Click OK and the Frame Relay Setup dialog box is displayed.
33
Page 34

MultiFRAD User Guide
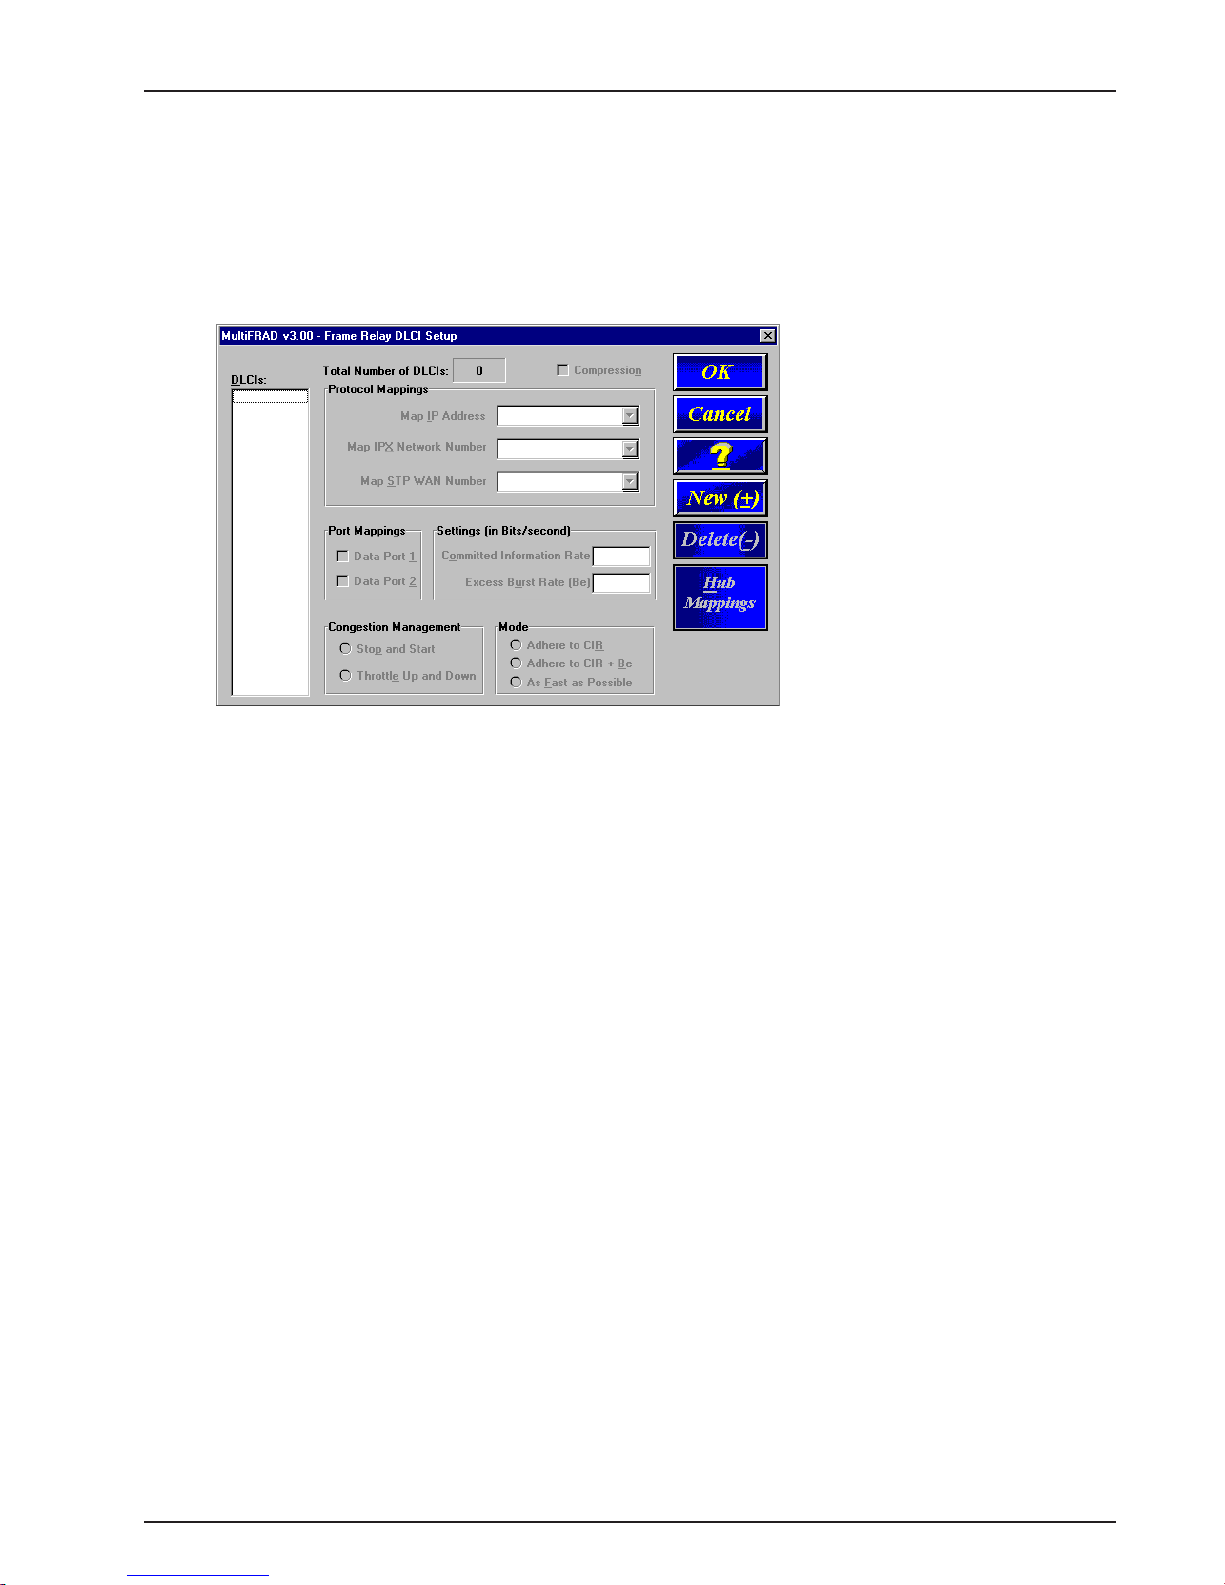
43 Click DLCI and the Frame Relay DLCI Setup dialog box is displayed.
The Compression option may be useful at low link speeds (i.e., below 56K); however, do not use
this feature with a high speed link (i.e., 56K or higher). Click to enable this option for each DLCI on
which you want to use the compression function.
44 Click the DLCI you want to map. The Protocol Mappings, Port Mappings, and all the other groups
become active. To map the network protocol to the selected DLCI, click the down arrow for the active
protocol (Map IP Address, Map IPX Network Number, or Map STP W AN Number) and select the
IP address, IPX network number , or STP WAN number you want to use.
45 To map a data port to this DLCI, click (to enable) the Data Port (Data Port 1 or Data Port 2 in the Port
Mappings group) that you want to associate with this DLCI.
46 Click the Committed Information Rate text box in the Settings (in Bits/second) group and enter
the CIR value your service provider supplied for this DLCI.
47 Click the Excess Burst Rate (Be) text box in the Settings (in Bits/second) group and enter the Be
value your service provider supplied for this DLCI.
48 Ensure that Throttle Up and Down is selected in the Congestion Management group.
49 Ensure that Adhere to CIR + Be is selected in the Mode group. Multi-Tech recommends using this
setting initially .
50 Repeat steps 44 through 49 for each new DLCI.
51 Click OK when you are satisfied with all your selections.
52 The Frame Relay Setup dialog box is displayed.
34
Page 35

Chapter 3 - Software Loading and Configuration
Click OK.
53 The main menu is displayed.
Build Your Phone Directory Database
Perform the following steps to construct your phone directory database.
54 Click Phone Book on the main menu. The Phone Directory Database dialog box is displayed. You
will build your personalized MultiFRAD Phone Directory in the following steps.
The completed database will contain the phone numbers, associated descriptions, DLCI numbers,
and channels for all the MultiFRADs available for communication on the internetwork.
The Add (+) button is active, enabling you to start building the phone directory database that will
control the calls.
55 Click Add (+) to begin building your phone directory database. The Add/Edit Phone Entry dialog
box is displayed.
35
Page 36

MultiFRAD User Guide
In the Station Information group, enter a unique phone number for the destination voice/fax channel
in the Phone Number field. For example, phone number 101. (This number does not have to be a
standard number with 7 or more digits.)
The Description field for the phone number is optional. In the following example, we describe this
phone number as, “Jerry’s Desk.”
The V oice Channel field defaults to Channel 1. To change the channel number, click the down arrow
and highlight the desired channel.
The DLCI field defaults to the number 16, which can be changed by selecting it and typing the
desired number. (We are using DLCI number 20 in this example.)
The Permit Hunting option enables your call to connect to any open channel on the remote unit if
the first channel is busy . Click to enable Permit Hunting if you want this function to be active.
If there is no direct PVC between the local MultiFRAD and the MultiFRAD that this phone number
dials, you will need to click to check Enable Routing to assure that such calls will be routed through
the central site’s voice/fax MultiFRAD to the appropriate remote MultiFRAD.
56 Click OK and you are returned to the Phone Directory Database dialog box, which now displays the
phone number 101 in the Station Phone Number list and your other information in the Station
Information group.
36
Page 37

Chapter 3 - Software Loading and Configuration
57 Repeat steps 55 and 56 for each additional phone number. Y ou should enter one phone number for
each remote channel that you want to call. When you are finished, click OK.
58 You are returned to the main menu.
Click Download Setup.
59 The “Save Current Setup” dialog box is displayed.
Click the check box to retain the current setup as the User Default Configuration, then click OK.
60 The Writing Setup dialog box is displayed as the setup configuration is written to the MultiFRAD.
61 After the setup is written to the MultiFRAD, the unit reboots.
62 Check that the BOOT LED on the MultiFRAD is Off after the download is complete. This may take
several minutes as the MultiFRAD reboots.
63 You are returned to the main menu.
Your MultiFRAD is operational at this time.
37
Page 38

MultiFRAD User Guide
38
Page 39

Chapter 4 - MultiFRAD Software
Page 40

MultiFRAD User Guide
Introduction
This chapter describes various features of the MultiFRAD software that enable you to change
(update) the configuration of your MultiFRAD. The basic configuration parameters were established
during the loading of the software (Chapter 3). The MultiFRAD software and configuration utilities
described in this chapter enable you to change that initial configuration as necessary.
The primary interface to the MultiFRAD software is a main menu (with MultiFRAD v3.00 in the title
bar) with individual buttons that enable you to quickly and easily select a desired function. These
features are discussed in detail in the MultiFRAD Configuration section later in this chapter.
The other seven configuration utilities in the MultiFRAD 200 software provide additional functionality .
Download User Defaults
configuration with any necessary changes.
configuration to the original factory settings.
these software items to the MultiFRAD after repair or upgrade.
download new versions of firmware as enhancements become available. The
setup
utility enables you to change the method by which you access the MultiFRAD (i.e., through a
direct connection of a PC to the Command Port on the MultiFRAD, or via your Internet or LAN
connection to the LAN port on the MultiFRAD). The
prepare a database of information concerning your remote users; you can add and remove users
from the database or edit information already in the database. The
Configuration
enables you to download user defaults and update the MultiFRAD
Download Factory Defaults
Download Voice Coders
Download Firmware
Remote User Data Base
utility removes the MF200 software from your PC.
enables you to return the
enables you to download
enables you to
Configuration port
utility enables you to
Uninstall MultiFRAD
The MultiFRAD software includes a context-sensitive Help system. Clicking a Help [ ? ] button
anywhere in the graphical user interface (GUI) will display definitions and recommended values for
the buttons, options, and fields on that dialog box or menu. Clicking the green underlined text in the
Helps displays a popup box of related supplementary information for that topic. Clicking the Search
button (just below the menu bar) displays an Index tab with a list of numerous topics. Click a given
topic, then click the Display button to display the text associated with that topic.
Before You Begin
The MultiFRAD software operates in a Microsoft Windows® environment. The MultiFRAD 200
program group contains icons for all the utilities described above. In Windows 95/98/NT, you can
access the individual utility programs either by clicking Start | Programs | MultiFRAD 200 |
or by double-clicking the utility icon in the MultiFRAD 200 program group shown here:
(utility)
,
40
Page 41

MultiFRAD Configuration
To view or change your MultiFRAD configuration in Windows 95/NT, click Start | Programs |
MultiFRAD 200 | MultiFRAD Configuration, or double-click the MultiFRAD Configuration icon in
the MultiFRAD 200 program group. After loading, the MultiFRAD main menu will appear.
The MultiFRAD main menu consists of 12 buttons in which you can point and click, an Events
window, and a status bar. The 12 buttons enable you to display and change the protocol stacks,
statistics, WAN port setup, Frame Relay parameters, data port configuration, enable applications
such as SNMP Agent, Telnet Server, Web Server, and assign a MultiFRAD password.
Chapter 4 - MultiFRAD Software
The Events window can be a useful troubleshooting tool. Its purpose is to provide timely
information about the boot process and ongoing information regarding the status of “events” such
as the type of frame relay management selected and which PVCs are active.
The status bar, located at the bottom of the main menu, displays MultiFRAD status (e.g.;
Running), the date that the unit was configured, the type of connection on the command port;
e.g., if the PC connected to the command port is using its serial port to communicate with the
MultiFRAD or if the PC is communicating with the MultiFRAD via an Ethernet connection. The
last field on the status bar is the Rights field which displays either Read/Write or Read only rights.
The first user to connect with the MultiFRAD has Read/Write rights and can change the
configuration of the MultiFRAD. The second user has read-only rights and can only
configuration of the MultiFRAD.
If your WAN port (connected to the DCE device) is configured for frame relay, the button
immediately to the right of the WAN button is entitled, “Frame Relay.” However, if your WAN port
is configured for Point-to-Point operation, the marking on the button switches from “Frame Relay”
to “PPP.”
display
the
41
Page 42

MultiFRAD User Guide
Changing IP Parameters
The IP Setup dialog box enables you change the IP routing capabilities, add or delete logical
WANs, enable the DHCP relay agent, assign DNS server addresses, and define static routes and
a default route. The initial routing capabilities were established during the software installation.
You can change IP routing parameters by clicking on the Advanced tab and changing, for
example, the RIP Response T ime or RIP Route Aging Time. The WAN tab enables you to change
the WAN port IP address, the remote address, and if logical WAN ports need to be added for
frame relay , you can add them here by merely clicking the Add button.
The Ethernet IP Setup dialog box displays the parameters for your Ethernet port with the IP
Address that was established during software installation.
From the Ethernet IP Setup dialog box you can switch to the to either the WAN IP Setup dialog
box or the Advanced IP Setup dialog box by clicking the respective tab.
The WAN IP Setup dialog box enables you to disable or enable IP routing on the WAN port,
change the port IP Address, mask, or remote IP address. If the WAN port is configured for frame
relay , this dialog box enables you to add logical WANs. General setup for the logical IP WAN
ports is configured on the WAN Port Setup dialog box that opens when you click the W AN button
on the main menu.
To add logical WAN in a frame relay configuration, click the Add(+) button and the next WAN
number is displayed in the List of Logical WANs window in the lower left corner of the W AN IP
Setup dialog box. To delete the last logical WAN assigned, click the Delete (-) button.
42
Page 43

Chapter 4 - MultiFRAD Software
The Advanced tab on the IP Setup dialog box controls the timers, Dynamic Host Configuration
Protocol (DHCP) and Domain Name System (DNS) options, the default route, filters, and Static
Routes. In most cases, you should not have to change the value of any timer (default TTL,
reassembly time-out, RIP response time, or RIP route aging time).
If you are using Default Routing, disable RIP based routing, then enter the IP host address of the
“next hop.” The MultiFRAD will automatically use the IP route table to resolve the host address to a
port number.
43
Page 44

MultiFRAD User Guide
Changing IPX Parameters
The IPX Setup dialog box controls the four frame types and the WAN ports. The Advanced tab
enables IPX routing, enables auto learn of Ethernet network numbers, and specifies the distributed
name of the MultiFRAD.
The RIP and SAP default timers should not have to be changed for most applications. Disabling IPX
and SPX Watchdog Spoofing in the Bandwidth Optimization group has proven effective under certain
circumstances with Citrix clients.
The WAN tab on the IPX Setup dialog box lets you to enable or disable IPX routing on the W AN port,
change the network number for the WAN port, enable or disable NetBIOS, change the default RIP
and SAP timers, and optimize the bandwidth. If the WAN port is configured for frame relay, this
dialog box lets you to add logical WANs. How the W AN port is configured is controlled by the WAN
Port Setup dialog box that you access by clicking the WAN button on the main menu.
44
Page 45

Chapter 4 - MultiFRAD Software
The IPX WAN network number has to be the same on both ends of the link and must be unique
throughout the internetwork. If the WAN port is configured in a point-to-point operation, both W AN
network numbers have to be the same and unique. If the WAN port is configured for frame relay,
both logical WAN network numbers have to be the same and unique. In a frame relay configuration,
the logical WAN network number has to be the same and unique at both ends of the Permanent
Virtual Circuit (PVC).
The Advanced tab on the IPX Setup dialog box controls the routing of the protocol, enables or
disables auto learn of Ethernet network numbers, specifies the broadcast name of the MultiFRAD,
and defines any IPX filtering by filter type, port number, and IPX address.
If bridging of IPX packets is desired, IPX routing must be disabled and frame type support for the
frame type must be enabled.
If there is a server on the local segment, IPX network number auto learn should be enabled. If there
is no server, or if for some reason the router comes up before the server, the router will default to
some random network numbers after a short interval of time.
45
Page 46

MultiFRAD User Guide
Spanning Tree Setup
When the Bridging Enable option is enabled, the Spanning Tree Setup dialog box controls
transparent bridging; however, if there are any loops or redundant links in the internetwork, the
Spanning Tree Algorithm Enable option must also be enabled. Spanning Tree is a method of
transparent bridging, as opposed to source route bridging which the MultiFRAD does not support.
The MultiFRAD defaults with one logical WAN port mapped to a DLCI. It is not necessary to map this
port to a DLCI; however, care should be taken if an additional logical W AN is created. An additional
WAN will default to a disabled state, and it must be mapped to a DLCI before it can be used. In most
applications, the forwarding state should be enabled on the first logical WAN, and blocking should be
set up on any additional WANs. While in operation, the MultiFRAD will automatically transition from
blocking to forwarding, and vice versa, as necessary .
Filtering
Clicking the Filters button on the Spanning T ree Setup dialog box displays the Spanning Tree
Filtering screen. Here, you can toggle the packet Default Action from forward to filter.
Clicking the
designate the source or destination Ethernet Address, the Physical Port (LAN, or WAN 1), and the
type of action desired; i.e., Forward Destination Address (default), Filter Destination Address,
Forward Destination Address, or Forward Source Address. Clicking OK displays your selections on
the Spanning Tree Filtering dialog box; however, note that to save changes permanently you will
need to click OK on the Spanning T ree Filtering dialog box and then also click OK on the Spanning
Tree Setup screen. (If you forget, you will be queried...)
46
Add (+)
button displays the Add Spanning Tree Filter dialog box, which enables you to
Page 47

Statistics
The Statistics dialog box enables you to view statistics on the major events of the MultiFRAD. The
Statistics dialog box changes depending on the way the WAN port is configured. If the MultiFRAD is
configured for point-to-point operation, the button to the right of the WAN button changes from
“Frame Relay” to “PPP” and the DLCI button will no longer be active. If the WAN port is configured for
frame relay , then the button to the right of the WAN reads “Frame Relay” and the DLCI button is
active.
Chapter 4 - MultiFRAD Software
Statistics can be a useful troubleshooting tool. For example, the WAN Statistics show whether the
MultiFRAD is sending or receiving on its composite link or WAN port. When the MultiFRAD is
configured in a frame relay mode, it will transmit management frames approximately every ten
seconds, trying to establish communication with the provider’s switch. If the unit is sending frames
but not receiving any , this may be an indication of a problem with the link device or the frame relay
network. Statistics in the frame relay dialog box show the actual number of management frames sent
and received, and can also indicate a link or frame relay network problem. (One way to determine if a
problem is local would be to set your DSU to internal clocking and put it in loopback mode using an
RJ-45 DSU loopback cable. If the MultiFRAD, cable, and DSU are all functioning properly , the WAN
statistics will reflect that fact by showing the same number of bytes received as transmitted.)
Another useful screen is DLCI Statistics, which shows the status of the PVC; e.g., it indicates
whether the selected DLCI is “active” or “inactive” and shows if the MultiFRAD is experiencing
network congestion (reflected by FECNs or BECNs received).
47
Page 48

MultiFRAD User Guide
IP Statistics
IP is a connection-less network protocol that resides in the network layer of a conventional OSI
layered model (for more information on this model, refer to Appendix C). Depending on what is going
on at the application layer, IP will typically use one of two transport layer protocols. User Datagram
Protocol (UDP), is a connection-less transport layer protocol used with TFTP or SNMP; and
Transport Control Protocol (TCP) is a connection-oriented transport layer protocol used with FTP,
Telnet, and SMTP .
UDP makes use of the port concept and has no measures for flow control, reliability, or error
recovery. It is used when the full services of TCP are not required, and the reliability measures must
be assumed by another layer.
TCP works well in environments where the reliability measures are not assumed by other layers. It is
connection-oriented and has a full range of services.
These statistics are primarily informational, and their use as a troubleshooting tool will be contingent
on the applications running in the upper layers. For instance, if you were having problems connecting
to MultiFRAD’s Web server, you would look under the TCP section to make sure connections are
being established. If not, perhaps the Web server is not enabled. Or , if you were having problems
establishing a remote connection through TFTP, you could look in the UDP section to see if any
packets are being received. If not, you may need to review your network addressing.
The Port Tab enables you to view generic IP statistics for a given Ethernet IP Port. The statistics for
either the Ethernet (LAN) port or any logical IP WAN port can be viewed in this window. The
practicality of statistical use in troubleshooting will depend on the application running in the upper
layers.
48
Page 49

Chapter 4 - MultiFRAD Software
IPX Port Statistics
The IPX Port Statistics dialog box displays information pertaining to the IPX Port; for example, the
frame type used or the number of packets transmitted/received.
IPX is a network layer protocol usually associated with Novell NetwareTM networks. It allows for
encapsulation of four different frame types over a single physical LAN connection (provided each
frame type has a unique network address): RAW (802.3), LLC (802.2), Ethernet II, and SNAP.
These statistics are mostly informational but could be useful for troubleshooting. For instance, if there
was a question as to which frame type your workstation was using, you could view the statistics for
each frame type and determine which one is being used by the amount of packets transmitted and
received.
STP (Spanning Tree) Port Statistics
The STP (Spanning T ree) Port Statistics dialog box displays information regarding the selected STP
port, for example, the number of frames discarded or forwarded.
Spanning Tree transParent (STP) bridging is the method of bridging used by the MultiFRAD as
specified in an IEEE 802.1D telecommunications standard. Enabling the spanning tree algorithm in
addition to spanning tree bridging provides for a loop-free environment with redundant paths (if
present) that will transition automatically from blocking to forwarding any time a root bridge failure
occurs.
The STP Port statistics are mostly informational but can also be useful for troubleshooting. For
example, you can check the number of forward transitions to ensure that the port has been active (in
which case forward transitions will be greater than zero).
49
Page 50

MultiFRAD User Guide
SNMP Statistics
The SNMP Statistics dialog box provides statistical information on Simple Network Management
Protocol (SNMP).
SNMP is an application layer protocol that facilitates the exchange of management information
between network devices. There are three key components in SNMP: the devices that are to be
managed, agents, and the network management systems. The managed device is the network
device, such as a router. The agent is the network management software module residing in the
managed device. The network management system runs the SNMP application that controls the
managed devices and monitors their status. Four primary operations (Set, Get, Get Next, and Trap)
are performed using SNMP and monitored for display on this screen of statistics.
You can use these statistics as a troubleshooting aid should you have a problem communicating with
the MultiFRAD from your SNMP manager .
WAN Statistics
The WAN Port Statistics dialog box provides statistical information regarding the MultiFRAD’s
Composite Link port, including the number of packets transmitted/received, and to transmit, and the
number of bytes transmitted/received.
This dialog box monitors the traffic on the MultiFRAD’s composite link (W AN) port. The Statistics that
fall into the “Others” category relate to the physical layer between the MultiFRAD and the link device;
i.e., the CSU/DSU. These statistics can be helpful in troubleshooting suspected problems in the
physical layer; e.g., the WAN port itself, the link device (CSU/DSU), and any associated cabling.
50
Page 51

Chapter 4 - MultiFRAD Software
Frame Relay Statistics
The Frame Relay Management Statistics dialog box can be a useful tool for troubleshooting
MultiFRAD installations and monitoring the performance of active links, and checking that the
MultiFRAD is talking to the provider’s switch.
The Polling Details section lists the various management frames sent and received. For every
Status Enquiry Sent, a Status Response should be received from the network. Likewise, for every
Full Status Enquiry Sent, there should be one Full Status Response received. The two status enquiry
types are used by the FRAD to verify that the frame relay network is operational, and to determine
which DLCIs are active. Under default settings a status enquiry is sent every ten seconds, and every
sixth enquiry will be a Full Status Enquiry .
The Enquiries Sent and the Responses Received should increment together, and should be equal
under normal circumstances. Any gap between them reflects a breakdown in communication with the
provider’s switch, and will be reflected as Missed Status Responses.
The Status Errors section lists the number of errors that have occurred. A Missed Status Response
means the frame relay network did not respond to a status enquiry from the MultiFRAD before the
next status enquiry was sent (by default there are 10 seconds between status enquiries).
A Sequence Number Error means the sequence numbers in a received status response did not
match what the MultiFRAD expected based on its Status Enquiry . Basically, the Status Enquiry has
two numbers (or counts), and one should be incremented by the network and then both numbers
should be returned to the FRAD in the Status Response. Sequence Number Errors also reflect
missing packets between the MultiFRAD and the switch, but are not a cause for alarm unless they
are incrementing rapidly and steadily .
The Link Details section records the number of times the frame relay link between the MultiFRAD
and the network has gone up (become active) or gone down (become inactive). The Link Details
provide a more general picture of the status of communication between the MultiFRAD and the frame
relay network.
DLCI Statistics
The DLCI Statistics dialog box shows the individual DLCI status and statistics. This information can
be helpful in determining if the DLCI is active, if it is going up and down, and if the MultiFRAD is
experiencing frame relay network congestion (FECNs/BECNs). It also gives an indication of the
momentary throughput on individual DLCIs.
51
Page 52

MultiFRAD User Guide
When troubleshooting a frame relay circuit, once it has been established that management frames
are being sent and received, the next step is to determine whether the DLCIs are becoming active.
This dialog box will provide that information. A FRAD needs to be present at both ends for the DLCI
to be active. Keep in mind that the frame relay network tells the FRAD the status of the PVC with one
of its status responses. But the network will not say the PVC is active until it has established
management communication at both ends of the PVC. If the FRADs at both ends of the PVC show
that they are communicating with the frame relay network and the DLCI still shows active, and there
is a communication problem over that PVC, there may be a problem with your service provider. If all
DLCIs show active at both (or all) locations and there is still an end-to-end communication problem, it
is likely that it is in the configuration of the MultiFRAD. At that point, review your protocol stack/data
port parameters and DLCI mappings.
Data Port Statistics
The Data Port Statistics dialog box displays statistical information, such as bytes or blocks received/
transmitted, for the two data ports.
This window shows the statistics for both data channels. If you highlight and double-click Port 1 or
Port 2 on this screen, you will display another screen of channel statistics and various hardware
signals (RTS, CTS, DSR, DCD, DTR) and Xon/Xoff status. This second screen also displays buf fer
utilization percentage and receive flow control time.
52
Page 53

Chapter 4 - MultiFRAD Software
These statistics may indicate that either the data channels, or more likely the devices attached to
them, are being driven harder than they should be. Excessive buffer utilization and/or receive flow
control time can usually be reduced or eliminated by slowing the speed at which the channel is
operating.
Voice Channel Statistics (FR221/V2 Only)
The Voice Channel Statistics dialog box displays statistical information, such as the total connected
time, number of calls attempted and completed (both incoming and outgoing) for each voice channel.
Also displayed are the duration, percentage and average usage, number of packets and bytes
received/transmitted. Percentage refers to the ratio of voice/fax activity to total connected time.
Clicking the Clear button will clear all the statistics on this dialog box.
53
Page 54

MultiFRAD User Guide
Call Progress Statistics (FR221/V2 Only)
The Call Progress Statistics dialog box displays statistical information for the current activity, such
as a call in progress. A drop-down list enables you to select which channel you want to monitor. After
a channel is selected, all the relevant data for the current activity on that channel will be displayed in
the fields provided. Note: the Packets Sent and Bytes Sent are for the local side of the current call.
Packets Lost are those sent from the remote side that failed to reach the local side of the call.
54
Page 55

WAN Port Setup
The WAN Port Setup dialog box selects whether the DSU port is enabled or not and controls how this
port is configured (i.e., for frame relay or for point-to-point operation). For Frame Relay operation, you
can ignore everything in the Mode and Connection Method groups on this dialog box. For point-topoint operation, the FR221/V2 voice/fax channels are not operational.
Note: Refer to Appendix D if in the future your WAN network is upgraded to T1/E1 and you then want
to
disable
rates of up to 2.048 Mbps.
the MultiFRAD’s internal DSU and use the back panel T runk connection to obtain data
Frame Relay
When the WAN port is configured for frame relay (the default), then the mode is Synchronous and
DSU Clocking is set for external (DDS) clocking from the network. For Frame Relay operation, the
DSU encapsulates data for transmission over a frame relay network. Additional frame relay
configuration is necessary by clicking Frame Relay on the MultiFRAD main menu.
Note: The FR221 and FR221/V2 MultiFRADs use the DSU functions (Loop Back and Clocking) on
this screen.
Chapter 4 - MultiFRAD Software
55
Page 56

MultiFRAD User Guide
Point-To-Point
You can check communication between two MultiFRADs by cabling their DSU ports together with an
RJ-45 cable, selecting point-to-point operation (PPP/SLIP), enabling DSU Loop Back, and setting
one MultiFRAD to Internal Clocking and the other one to DDS. Data applied to the DSUs will be
reflected both ways. Further configuration for point-to-point operation can be set up by clicking the
PPP button on the main menu.
As an alternative (for diagnostic purposes), you can connect the TRUNK ports of two MultiFRADs
together with a 25-pin back-to-back cable and transmit packets between the units.
56
Page 57

Point to Point Setup
The Point to Point Setup dialog box controls the WAN port protocol, dial on demand, and remote port
setup. The WAN port protocol can be either Point to Point Protocol (PPP) or Serial Line Internet
Protocol (SLIP). PPP is the more robust of the two protocols in that it enables the endpoints to
negotiate use of the link and protocol parameters in a standardized way and also provides for
standardized encapsulation of the packets. SLIP is an older protocol that requires manual
authentication using a script.
In order to display the PPP dialog box, the WAN Port Setup dialog box has to first be configured for
PPP/SLIP.
Chapter 4 - MultiFRAD Software
PPP is the default protocol. If SLIP is being used, click the PPP Enable option to disable PPP. Click
on the SLIP Enable option. Determine if the TCP header is going to be compressed using VJC
compression. If VJC compression is used, click the CSLIP (Van Jacobson Compression) option.
Two types of password authentication (PAP and CHAP) are supported for remote access clients and
can be enabled here on the WAN tab. When either (or both) authentication protocols are enabled, the
MultiFRAD expects the client at the other side of the link to be configured with a User Name and
Password combination that is listed in its database. (Note: if there are no entries in the User
database, any User Name and Password combination from a peer will be authenticated. For
MultiFRAD-to-MultiFRAD connections, authentication normally is not used and the User Name and
User Password fields are left empty .)
Enable SLIP if you are using this older protocol for communication on a dial-out WAN port. Either
PPP or SLIP can be used on a dial-out port; however, on answering ports the MultiFRAD detects
automatically the type of connection. If you enable CSLIP, the MultiFRAD will transmit and receive
CSLIP packets. Packet size is limited by the Maximum T ransmit Unit (MTU) value, for which the
maximum setting (also the recommended setting) is 1006.
57
Page 58

MultiFRAD User Guide
Frame Relay Setup
The Frame Relay dialog box displays the CIR Measurement Interval in milliseconds, the
Management T ype and details of that management type, and the number of DLCI’ s that are active.
The MultiFRAD can detect DLCIs and the Management T ype when you are connected to an active
frame relay service. So it is important that if you change any frame relay parameters, that the new
parameters agree with the way your frame relay service is provisioned.
In the Frame Relay Setup dialog box, you can change the Management T ype by choosing one of the
three options, then the detail parameters for that option are displayed to the right of the Management
Type. For example, in the above dialog box, Annex D is the chosen management type with the Full
Status Enquiry Interval [N391] set to 6 down thru Polling Verification Timer [T392] set to 15.
Usually , you will have no need to change the management type because the MultiFRAD will
automatically detect the network’s management type at power-up, or when the network becomes
active. This feature takes about 1 to 2 minutes to detect the management type and get a list of the
DLCI’s.
Occasionally the Management T ype parameters can be changed to correct a problem. In these
cases, making the following changes could alleviate the problem:
1. Change the Link Integrity Verification T imer. This feature sets how often the MultiFRAD verifies
that the link is good. Reducing the setting from the default value of 10 seconds to a lower value; e.g.,
5 seconds, will increase the frequency of those verifications.
2. Change the Full Status Enquiry Interval to affect how often DCLI Status is updated. This
parameter defines how often the MultiFRAD will send a request for DLCI status information along
with the Link Integrity Verification request. The default value is to include such a request every sixth
time the link integrity is checked. A value less than every sixth request will enable faster detection of
active/inactive DLCIs, but will also produce a slight increase in management overhead.
3. Change the Monitored Events Count and the Error Threshold to affect the MultiFRAD’s
sensitivity to errors on the link. Every management frame received by the MultiFRAD is considered
an event, and if the link integrity sequence numbers are wrong, for example, it is considered an
“errored” event. With the default settings, if Error Threshold is 3 and Monitored Events Count is 4,
and 3 out of 4 events are “errored”, then the link is considered to be bad, and the FRAD stops
sending on all DLCIs and restarts the initial procedures to activate the link.
4. Change the CIR Measurement Interval to change the time frame in which the FRAD calculates
throughput for each DLCI. By default, every 1000 milliseconds (1 second), the MultiFRAD calculates
how much information has been sent on each DLCI, and depending on the congestion management
option for a DLCI the MultiFRAD may stop sending on that DLCI because it has exceeded its CIR or
CIR+Be rating. By changing the CIR Measurement interval, the throughput calculations can be made
more or less often.
Note: performance could be compromised if the MultiFRAD is set to calculate throughput too often.
If you click the DLCI button on the right side of the dialog box, the Frame Relay DLCI dialog box is
displayed.
58
Page 59

Chapter 4 - MultiFRAD Software
If you are connected to a frame relay service, this dialog box should display your current DLCI
numbers automatically . It also shows the protocol mapping of the highlighted DLCI, which data ports
are mapped to it, and how you set up your Congestion Management, Mode, CIR, and Be values. To
change the mapping of a DLCI, highlight the DLCI number in the list on the left side of the dialog box.
The dialog box will then change to the mapping of that DLCI. To add a new DLCI that has not been
auto detected, click the New (+) button and the Frame Relay New DLCI dialog box is displayed.
To add a new DLCI Number, enter the number in the Enter DLCI Number window. You do not have to
enter the leading zeros.
When you click the OK button, the new DLCI appears in the DLCI’s window in the Frame Relay DLCI
dialog box.
When a DLCI has just been detected, or if you have just created a new DLCI, then no protocols or
data ports are yet mapped to it. The default Congestion Management, mode, CIR, and Be are
displayed. You should verify these default settings with the way your new DLCI is provisioned by your
service provider.
59
Page 60

MultiFRAD User Guide
Congestion Management, Mode, and CIR/Be settings are used to avoid congestion and possible loss
of data. The Committed Information Rate (CIR) and Excess Burst rate (Be) settings are throughput
amounts determined by the network and user when each DLCI is ordered. The CIR is the basic
throughput which the network will try to set aside for that DLCI. It will always be equal to or less than
the actual access rate of the physical line (i.e., if the frame relay physical link is a 56K DDS line, the
sum of the CIRs of all DLCIs on that link should not exceed 56K bps). The Be is the excess burst
throughput rate (added to CIR) that the network should accept for that DLCI before significant loss of
data occurs due to the discarding of frames during times of congestion. Note, however, that in frame
relay there is no absolute guarantee of a congestion-free link, regardless of CIR and Be settings. The
CIR and Be settings on the MultiFRAD should match the settings that the network has provisioned.
The Congestion Management and Mode settings determine how the MultiFRAD handles congestion.
The Mode selects whether the MultiFRAD should use its own throughput calculations to avoid
congestion, or simply send data to the network as fast as possible. The MultiFRAD calculates
throughput after every CIR Measurement Interval, and can limit throughput to either the CIR (Adhere
to CIR) or the CIR plus the Be (Adhere to CIR+Be). The Congestion Management setting selects
whether the MultiFRAD should stop sending data when congestion is indicated (Stop and Start), or
gradually reduce throughput during times of congestion (Throttle Up and Down).
Compression can be enabled on a per-DLCI basis by clicking on the Others-Compression box. If
compression is required, it must be enabled on both the local and remote ends of the PVC.
To map a protocol to a DLCI (e.g., 17), return to the MF200 main menu and then click the protocol
stack that you are using. In the lower left part of the protocol stack dialog box a list of Logical WANs
is displayed. To add a new logical WAN, click the Add (+) button and the next logical WAN number
will appear in the list on the left hand side of the dialog box.
For example let’s map our new DLCI 17 to the IP protocol as a WAN 2 with an IP Port Address of
192.168.2.1, an IP Mask of 255.255.255.0, and a remote IP Address of 192.168.2.2. From the MF200
main menu, click the IP button. The IP Setup dialog box is displayed. Click the WAN tab at the top of
the dialog box. The WAN parameters are displayed. Click the Add (+) button and WAN 2 is added to
the List of Logical WANs. Default IP addresses will be displayed for the Port Address and Remote
Address and a default IP Mask will appear in its window . If either address or mask needs to be
changed, click the appropriate window and the change the numbers.
60
Page 61

Chapter 4 - MultiFRAD Software
When you click the OK button in the IP WAN dialog box, you now have an IP address for a second
logical WAN. Now we have to tie that IP address to a DLCI, which in our example is DLCI 17. Now,
return to the Frame Relay DLCI dialog box and highlight DLCI 17. Click the Protocol Mappings Map
IP Address down arrow and the IP address 192.168.2.1 appears. Click this address and now IP
address 192.168.2.1 is mapped to DLCI 17.
We now have WAN IP address 192.168.2.1 from the IP protocol stack mapped to DLCI 17. Let’s say
we also want to map a data channel to DLCI 17. The data ports that are already mapped to other
DLCIs are grayed out. In our example, let's map data port 2 to DLCI 17. Simply click Port 2 in the
Port Mappings group and an X appears in the box at the left of Port 2. Now we have both data port 2
and IP WAN address 192.168.2.1 mapped to DLCI 17. The MultiFRAD enables multiple sources of
data to be mapped to the same DLCI because the MultiFRAD multiplexes all the data onto the DLCI.
In other words, bandwidth for that DLCI is shared by all the data sources mapped to the DLCI. Of
course this means that all the data sources must go to the same remote site, since the frame relay
network will send all data on DLCI 17 to the same place.
61
Page 62

MultiFRAD User Guide
Packet Priority
Three levels of priority (High, Medium, and Low) are supported for data packets (i.e., IP packets,
IPX packets, and STP packets), whether in frame relay or point-to-point mode. When priority
levels are in use, the packets are processed based on their priority setup. To apply a priority level
to a given DLCI, click the Priority button on the Frame Relay Setup dialog box, then select that
DLCI on the Priority Setup dialog box and select the desired Priority Level from the drop-down
list and click OK. After that, for frame relay operation the software checks for priority and then
processes the packets on that DLCI accordingly .
Packet priority can be disabled by selecting None on the Priority Setup dialog box.
The Priority Setup dialog box for PPP has an option for Port Based priority replacing the DLCI
Based option shown on the following screen; for PPP, select the Port (Port 1 or Port 2) where
you want the priority applied, then select the desired Priority Level from the drop-down list.
62
Page 63

Data Port Configuration
This dialog box lets you leave both data ports enabled for normal data transfer operations or disable
a given port if you do not want to transmit or receive data over it. The Destination Port parameter will
be active only if both data ports have been mapped to the same DLCI.
For point-to-point operation, only APSM mode will be enabled. For frame relay operation, APSM
mode allows both data ports and any protocol stacks to be mapped to a single DLCI. Encapsulated
mode allows data from only one port with any other protocol mapping through a given DLCI. Raw
mode allows the data of only one port to be transmitted, and the other port will not be able to transfer
data on that DLCI.
For an asynchronous device, select Configure Asynchronous and configure the MultiFRAD to match
your device. For a synchronous device, select Configure Synchronous, then configure the MultiFRAD
to match your synchronous device. The Data Port Configuration dialog box also enables you to
configure both data channels independently .
Chapter 4 - MultiFRAD Software
For example, Port 1 could be connected to a Multi-Tech MultiMux MMH904 and configured with the
following options:
´ Data Port Mode set to APSM (Advanced Priority Statistical Multiplexer),
´ Synchronous Configuration,
´ Internal Clocking with Speed set to 19200,
´ Encoding Scheme set to NRZ for all Multi-Tech Muxes,
´ Between Frames set to Send Flags, and
´ InterFrame Timer (in ms) has to be Off.
The MMH904 would have to be configured for an external composite link device. This means that the
8-position DIP Switch on the MMH904 would have to be toggled to the closed position and an
external composite link cable connected between the MMH904 and the MultiFRAD Channel 1
connector.
In most applications, the encoding scheme, interframe timer, and between frames will be used at their
default settings. If you are unsure of your device’s configuration, start with the defaults or refer to
your device’s documentation.
63
Page 64

MultiFRAD User Guide
Changing Channel Parameters (FR221/V2 only)
Click the V oice Channels button on the main menu to display the Voice/Fax Channel Setup dialog
box. The Interface tab is the default tab that appears whenever this dialog box is opened. The other
two tabs contain voice and fax settings and the voice communications Tone Pairs for the MultiFRAD.
Interface
The Interface tab defines the interface type used on each voice/fax channel. The interface group
contains three interfaces with the FXS divided into Ground Start and Loop Start (Loop Start is
common). Use FXS when a telephone or fax machine is connected directly to the back panel of the
MultiFRAD. Use the FXO interface for a station side connection to a telephone switch (PBX). Use
the E&M interface for a trunk connection to a PBX.
Dialing Options and Auto Call options have to be considered for each interface; also, Pulse or DTMF
dialing has to be selected for the FXO interface, and signal, mode, and wink timer (if wink signaling is
used) also have to be considered for the E&M interface. To change a voice channel, you have to
select Channel 1 or Channel 2. If the default interface (FXS) is used, you have to consider the
signaling method (either loop start or ground start) and the Maximum Dial Digits (with a range of 1 to
16 and a default of 5). The value for Max Dial Digits can be increased without affecting the existing
phone directory database. If you increase the value in this field, it merely means that any new phone
numbers that are added to the database can have more than five digits.
FXO Interface
To use an FXO interface, you have to select (in the Regeneration group) the dialing type (pulse or
DTMF; i.e., tone) used by your PBX. To determine the dialing type, contact the person in charge of
your in-house telephone switch (PBX).
E&M Options
To use an E&M interface, you have to consider the dialing options, Auto Call option, signaling, mode,
and if wink signaling is used, the wink timer. The E&M signal options of Dial Tone or Wink are based
on how the E&M trunk on the PBX is configured. The dial tone is the sound you hear when you pick
up the telephone. Wink signaling is part of the handshaking protocol between telecommunications
devices which is a momentary interruption in signal indicating that a distant device is ready to receive
the digits that have just been dialed. To determine which type of signaling to use, contact your inhouse switch personnel. If wink signaling is used, the Wink Timer option becomes active which
specifies in milliseconds the delay in sending address information to the remote MultiFRAD. The wink
timer range is from 100 to 350 milliseconds with a default of 250 ms.
64
Page 65

Chapter 4 - MultiFRAD Software
The Max Dial Digits field in the Dialing Options group indicates the longest phone number you can
enter in the phone directory database. The value shown in this field is the maximum number of digits
permitted in any phone number entered into the database. It does
number. The range for the Maximum Dial Digits is 1 to 16 digits, and the default is 5 digits. As soon
as you have entered the specified number of digits (when making a call), the MultiFRAD searches
the Phone Directory Database for a DLCI that matches the phone number you entered.
The Inter Digit Time option in the Dialing Options group defines (in milliseconds) the amount of time
that the MultiFRAD waits between digits before searching its Phone Directory Database for that
phone number. The range for the value of this option is 200 to 10,000 with a default of 2,000
milliseconds (i.e., two seconds), which is adequate for most applications.
not
represent an actual phone
Auto Call
The Auto Call option enables you to eliminate the dialing feature and as soon as you access the
channel, the MultiFRAD connects to the frame relay circuit you identified with your DLCI number. The
Auto Call group can be changed if a site is changed; e.g., a new site was added or a site was
removed from your calling network. If a new site had been added and you wanted channel 2 of your
local MultiFRAD to have a direct connection to this new site, you could enable the Auto Call option for
channel 2 and then add in the DLCI number and remote channel number. If a site is removed from
your calling network and you had Auto Call enabled, you can merely select the local channel and
disable the Auto Call option here on the Interface tab.
65
Page 66

MultiFRAD User Guide
Voice/Fax (FR221/V2 only)
The Voice/Fax tab controls the voice coder, Fax settings, DTMF gain, and some miscellaneous
options.
The MultiFRAD supports numerous state-of-the art ITU (International Telecommunications Union)
voice coders. The Voice Coder drop-down menu enables you to select from a range of coders with
specific bandwidths. The higher the bps rate, the more bandwidth is used. The channel you are
calling has to be using the
The Fax group enables a fax machine to transmit and receive faxes through the MultiFRAD. If a fax
machine is connected to one of the voice/fax channels, the Max Baud Rate should be set to match
the baud rate of the fax machine (e.g., 9600 or 14400); refer to user documentation. The Fax V olume
setting controls the output level of the fax tones. These settings should be changed only under the
direction of Multi-Tech’s Technical Support personnel (see Chapter 6 - Warranty, Service and T ech
Support).
same
voice coder; otherwise, you will always get a busy signal.
66
Page 67

Chapter 5 - Remote Configuration and Management
Regional (FR221/V2 only)
The Regional tab controls the voice communications for the country or region in which the Multi-
FRAD is being used.
From the Country/Region drop-down list you can select the country or region for which you are
configuring the MultiFRAD. The Tone Pairs group always displays the tones used in the country or
region currently selected. In addition to Australia, Central America, Chile, Europe, France, Japan, UK,
and USA, there is a Custom selection (with defaults identical to USA) that will make the Custom
button active. Clicking the Custom button enables you to edit the T one Pairs and establish custom
sets of tone pairs for Dial Tone, Ring, and Busy on a Custom Tone Pair Settings dialog box.
The Pulse Generation Ratio group contains two ratios: the 60/40 ratio is for the USA, and the 67/33
ratio is for international applications.
67
Page 68

MultiFRAD User Guide
Changing the Phone Directory Database (FR221/V2 only)
Clicking the
box, which displays the phone numbers of all the MultiFRADs in your network. The Station Phone
Number field on this dialog box lists the phone numbers in numerical order. The Station Information
group displays all the details (including the optional description, DLCI number, channel assignment,
and shows whether routing is enabled or disabled) for whichever phone number (in the Station Phone
Number list) is highlighted. When this dialog box displays, the first phone number is highlighted;
however, you can click on any other number in the list to display its associated information.
Phone Book
button on the main menu displays the Phone Directory Database dialog
The
Add(+)
number to the database. (The phone number you enter does
phone number; for example, it does not have to be 717-5565. This number can be a single digit or
several digits except it cannot be longer than the entry in the Max Dial Digits field in the Dialing
Options group on the Channel Setup dialog box.) Clicking the Add(+) button displays the Add
Phone Entry dialog box where you can assign a new Phone Number, add an optional Description,
select the Voice Channel number and type the DLCI number in the fields provided. Permit Hunting
enables a call to roll over to Channel 2 if Channel 1 is busy . Click Enable Routing if the packets are
to be routed to another MultiFRAD rather than to the local phone interface. When done, click OK and
the Phone Directory Database dialog box is displayed and includes the information you just added.
To change or delete an existing phone number, highlight the number on the Station Phone Number
list on the Phone Directory Database dialog box, then click either the Edit or Delete(-) button. If you
are editing an existing phone number, the Edit Phone Entry dialog box is displayed.
button on the Phone Directory Database dialog box enables you to add a new phone
not
have to be a conventional 7-digit
68
Page 69

Chapter 4 - MultiFRAD Software
The
Edit
button on the Phone Directory Database dialog box enables you to edit any existing phone
number in the database. Clicking the selected number, then clicking the
Edit
button displays the Edit
Phone Entry dialog box where you can change the information in any field(s), permit hunting, or
enable routing. Clicking OK displays the Phone Directory Database dialog box; the updated
information will be displayed in the Station Information group when the edited phone number entry
is highlighted.
The
Delete(-)
button on the Phone Directory Database dialog box enables you to remove any
existing phone number and its related information from the database. Clicking the selected number,
then clicking the
Delete(-)
button displays the following dialog box for confirming the deletion.
Clicking Yes displays the Phone Directory Database dialog box, where the deleted information will
be gone. However, a mistake can be overriden by clicking the
Cancel
button at the bottom of the
Phone Directory Database dialog box, providing an opportunity to return to this dialog box later to
make the desired change(s).
69
Page 70

MultiFRAD User Guide
Others Setup
Clicking the Others button on the main menu displays the Others Setup dialog box. This dialog box
lets you to enable SNMP Agent (the default is
enable or disable various remote configuration methods such as TFTP (T rivial File Transfer Protocol)
Server, W eb Server, Dumb Terminal, and Telnet Server; and assign a Password to the MultiFRAD for
Internet security. These applications enable remote viewing and changing of the MultiFRAD
configuration, or updating firmware, from anywhere on the connected internetwork.
Verify that the desired applications are enabled (checked). The default condition is all applications are
checked. To disable a given application, click to uncheck the check box and disable support.
SNMP related operations can be performed only when the SNMP Agent is enabled (checked) on this
dialog box. The IP address of the system (i.e., SNMP Manager) that will receive the Traps from the
Multifrad should be entered in the IP Address field in the Trap Manager group. The Community
Name of the SNMP Manager receiving the T raps can be a maximum of 19 characters and is case
sensitive. The default Port Number of the SNMP Manager receiving the Traps is 162. The MultiFRAD
currently supports a maximum of two community users at a time, and they can be assigned either
Read/Write or Read Only rights.
For more information on using these applications, click the on-line Help button or refer to Chapter 5,
Remote Configuration and Management.
disabled
) and set up all the necessary parameters;
The Print Console that displays when you click the Print Console button presents a more detailed
version of the Events list that appears at the bottom of the main menu.
70
Page 71

Enable Logging of Statistics
Chapter 4 - MultiFRAD Software
Clicking the
box which lets you Enable/Disable Logging, set the time interval (in minutes) between logging, and
either Log all Statistics or only those statistics that you enable (check) on this dialog box. You can
also select specific port data or DLCI data for logging by clicking the appropriate button(s).
Log Setup
button on the Others Setup dialog box displays the Log Statistics dialog
71
Page 72

MultiFRAD User Guide
Enable Analysis of Statistics
Clicking the
dialog box. This dialog box lets you set the Start/Stop parameters (the start date/time and end date/
time) for statistics logging, and enable Analyze All or analyze only certain statistics that you enable
(check) on this dialog box. Here, too, you can designate the output file name, select specific port data
or DLCI data for analysis (by clicking the appropriate buttons and making your selections), and then
start the analysis process by clicking the
Analysis Setup
button on the Others Setup dialog box displays the Log Statistics
Analyze
button.
72
Page 73

Chapter 5 - Remote Configuration and Management
Page 74

MultiFRAD User Guide
Introduction
This chapter provides procedures for viewing or changing the configuration of a remote unit. T wo
methods are provided to access a remote unit; the first method is modem based and the second
method is using IP. Within the IP method, three applications can be used: 1) LAN-Based using TFTP
(Trivial lFile Transfer Protocol), 2) Telnet as a client application, or 3) a standard Web browser on the
Internet.
Remote Configuration
Remote configuration requires that the MultiFRAD software already be loaded on the local PC. The
local PC then controls the remote MultiFRAD either via the modem connection or over the LAN.
Modem-Based
To remotely configure a MultiFRAD, a local PC needs to be connected to a dial-up line and the
MultiFRAD software configured to call the remote MultiFRAD. The remote MultiFRAD needs to have
a modem connected to a dial-up line and the Command Port. Once the connection to the remote unit
is made, you can change the configuration as you see fit. Once the configuration is changed, you can
download the new configuration to the remote MultiFRAD. Refer to the Modem-Based Remote
Configuration Procedure in this chapter to remotely configure a MultiFRAD.
1 At the remote site, remove the serial cable from the PC to the Command Port connector on the
back panel of the MultiFRAD.
2 At the remote site, connect a special cable (Remote Configuration Cable) from the Command
Port connector on the back panel of the MultiFRAD to the RS232 connector on the modem. The
special cable is a serial cable with male connectors on both ends. Refer to Appendix B for cable
details.
Connect the modem to your local telephone line.
Provide your telephone number to the person verifying your configuration.
Configure the remote modem for 19200 baud and turn on Force DTR.
3 At the main site, connect your local PC to a modem that is connected to a dial-up line.
4 Install the MultiFRAD software on the local PC. When installed, click Start | Programs |
MultiFRAD 200 | Configuration Port Setup, or double click on the Configuration Port icon in
the MultiFRAD 200 program group.
5 The MultiFRAD - 200 Series Setup dialog box is displayed.
74
Page 75

Chapter 5 - Remote Configuration and Management
Verify that the Communication Type is set for COM Port and the Select Port field is set for the
COM port of your local PC.
In the Dial String field, enter the AT command for dialing (ATDT) plus the phone number of the
remote MultiFRAD.
If your Modem Initialization String, Initialization Response, or Connect Response values are
different from the defaults in the dialog box, refer to your modem user documentation and change
the default values to match your modem.
Click OK when you are satisfied with your selections.
6 Run the MultiFRAD Configuration program. Click Start | Programs | MultiFRAD 200 |
MultiFRAD Configuration, or double-click the MultiFRAD Configuration icon in the MultiFRAD
200 program group.
7 The Dialing dialog box is displayed while software is dialing the remote MultiFRAD.
8 The Reading Setup dialog box is displayed.
9 The MultiFRAD main menu is displayed. This is the main menu for the remote MultiFRAD.
10 After you have changed the configuration of the remote MultiFRAD, click Download Setup to
update the configuration. The remote MultiFRAD will be brought down, the new configuration
written to the unit, and the unit will reboot.
1 1 Click Exit when the downloading is complete.
12 The Hangup connection? dialog box is displayed
Click Y es to disconnect the phone connection to the remote site.
13 If the same telephone number is not going to be used again in the immediate future, you may
want to remove it from the Port Setup dialog box.
14 At the remote site, reconnect the MultiFRAD to the serial port of the PC and from the MultiFRAD
200 program group double click on the MultiFRAD Configuration icon to verify that the
MultiFRAD is running.
75
Page 76

MultiFRAD User Guide
LAN-Based
The LAN-based remote configuration requires a Windows Sockets compliant TCP/IP stack. TCP/IP
protocol software must be installed and functional before the configuration program can be used.
1 You must assign an Internet (IP) address for the PC and for each node that will be managed by
the configuration program. Refer to the protocol software documentation for instructions on how
to set the IP addresses.
Once you have completed this step, you should be able to use the protocol Ping command for
the PC host name. You should also test the network interface configuration by Pinging another
TCP/IP device that is connected to the network.
2 Install the MultiFRAD software on the local PC. When installed click Start | Programs |
MultiFRAD 200 | Configuration Port Setup, or double-click the Configuration Port Setup icon
in the MultiFRAD 200 program group.
3 The MultiFRAD - 200 Series Setup dialog box is displayed.
Verify that the Communication Type field is set IP.
In the MultiFRAD IP Address field, enter the IP Address of the remote MultiFRAD.
4 Click OK when you are satisfied with your selections.
5 Run the MultiFRAD Configuration program. Click Start | Programs | MultiFRAD 200 |
MultiFRAD Configuration, or double-click the MultiFRAD Configuration icon in the
MultiFRAD 200 program group.
The TFTP (Reading Configuration.) dialog box is displayed.
6 The MultiFRAD main menu is displayed. This is the main menu of the remote MultiFRAD. Refer
to the online Help provided with your MultiFRAD for the definition of each dialog box and field
within the main menu or any related dialog box.
7 After you have changed the configuration of the remote MultiFRAD, click Download Setup to
update the configuration. The remote MultiFRAD will be brought down, the new configuration
written to the unit, and the unit will reboot.
8 Click Exit when the downloading is complete.
9 Double-click the MultiFRAD Configuration icon in the MultiFRAD 200 program group to verify
that the MultiFRAD is running by again displaying the MultiFRAD main menu .
76
Page 77

Remote Management
This section describes typical client applications that can be used to configure the MultiFRAD
remotely. It is important to note that although any subsequent changes to configuration can be made
using these applications, the initial setup and configuration of the MultiFRAD must be done using a
local PC and the MultiFRAD software provided with your unit.
Although establishing access to the MultiFRAD varies between applications, the configuration
functions mirror those of the MultiFRAD software. For more information on MultiFRAD software, refer
to Chapter 4 - MultiFRAD Software.
Telnet
A typical Telnet client application is described next. The MultiFRAD has a built-in Telnet Server that
enables Telnet client PCs to access and configure the MultiFRAD. In addition, the MultiFRAD can be
remotely accessed and configured from any where on the Internet through its Web interface.
The TCP/IP stack has to be loaded before the Telnet client (a Windows application) will run. Also, the
T elnet Server option has to be enabled on the Others Setup dialog box. Double-click the Telnet
icon (or shortcut) and a blank Telnet screen is displayed. Click Connect | Remote System and the
Connect dialog box is displayed. Select (or enter) a Host Name (the IP address of the MultiFRAD).In
this example, the Host Name is 192.168.2.14.
Chapter 5 - Remote Configuration and Management
When you enter a valid Host Name (IP address) and click Connect, you are immediately connected
to the target MultiFRAD and the MultiFRAD Telnet Server screen is displayed.
MultiFRAD Telnet Server Menu
The MultiFRAD Telnet Server menu provides two basic options: MultiFRAD Configuration and
Remote User Database. Note: the Database option is
(EXIT) enables you to close the Telnet session.
If you have entered a password requirement in the Applications Setup dialog box in the MultiFRAD
software, once you choose the MultiFRAD Configuration option (1) on the MultiFRAD Telnet Server
menu, you must enter your password to display the Main Menu.
not used
in this application. A third option
77
Page 78

MultiFRAD User Guide
MultiFRAD Configuration (Main Menu)
Selecting Option 1 displays the MultiFRAD Configuration Main Menu, which enables you to view and
change parameters on the protocol stacks, high and low level device drivers, enable or disable the
supported servers, configure MUX data ports, set up filtering and priority , or view system information.
Also, for the “/V2” version only , you can configure voice/fax channels 1 and 2, set up ‘Regional
parameters, and build or edit the Phone Book Database.
78
Page 79

Chapter 5 - Remote Configuration and Management
Web Browser Management
The MultiFRAD can be accessed, via a standard Web browser, from anywhere on the connected
Internet. In order to provide this support, the WEB Server option has to be enabled from the Others
button on the main menu which displays the Others Setup dialog box (see Chapter 4 - MultiFRAD
Software). Depending on the rights of the user (read/write, or read only), it is possible to view the
current parameters and statistics of the MultiFRAD as well as configure and download setup changes
to the MultiFRAD.
You can access MultiFRAD Configuration by entering the IP address of the unit in the Address line of
your Web browser . In this example, the IP address is 192.168.2.14. The following screen appears.
Click the word Login to gain access to the MultiFRAD; the following screen appears:
Enter the User Name “supervisor” (no Password is required), then click OK. The MultiFRAD - 200
Configuration menu is displayed.
Note: the first user to access the MultiFRAD will have
users will have
(i.e., will not be linked).
From the MultiFRAD - 200 Configuration menu, you can access current settings, view statistics, or
configure and download a new setup to the MultiFRAD.
read only
read/write
rights, and some of the options in the Web interface will be inactive to them
rights over the unit. All subsequent
79
Page 80

MultiFRAD User Guide
80
Page 81

Chapter 6 - Warranty, Service and Tech Support
Page 82

MultiFRAD User Guide
Introduction
This chapter will provide you the resources for receiving service or support for your MultiFRAD. The
chapter starts with a description of the warranty, and continues with instructions for contacting the
Service department, Technical Support group, and various Multi-T ech Internet resources.
Limited Warranty
Multi-Tech Systems, Inc. (“MTS”) warrants that its products will be free from defects in material or
workmanship for a period of two years from the date of purchase, or if proof of purchase is not
provided, two years from date of shipment. MTS MAKES NO OTHER WARRANTY, EXPRESSED
OR IMPLIED, AND ALL IMPLIED WARRANTIES OF MERCHANTABILITY AND FITNESS FOR A
PARTICULAR PURPOSE ARE HEREBY DISCLAIMED. This warranty does not apply to any
products which have been damaged by lightning storms, water, or power surges or which have been
neglected, altered, abused, used for a purpose other than the one for which they were manufactured,
repaired by the customer or any party without MTS’s written authorization, or used in any manner
inconsistent with MTS’s instructions.
MTS’s entire obligation under this warranty shall be limited (at MTS’s option) to repair or replacement
of any products which prove to be defective within the warranty period, or, at MTS’ s option, issuance
of a refund of the purchase price. Defective products must be returned by Customer to MTS’s factory
transportation prepaid.
MTS WILL NOT BE LIABLE FOR CONSEQUENTIAL DAMAGES AND UNDER NO
CIRCUMSTANCES WILL ITS LIABILITY EXCEED THE PURCHASE PRICE FOR DEFECTIVE
PRODUCTS.
On-line Warranty Registration
If you would like to register your MultiFRAD electronically, you can do so at the following address:
http://www.multitech.com/support/register.htm
82
Page 83

Tech Support
Multi-Tech has an excellent staff of technical support personnel available to help you get the most out
of your Multi-Tech product. If you have any questions about the operation of this unit, call 1-800-972-
2439. Please fill out the MultiFRAD information (below), and have it available when you call. If your
MultiFRAD requires service, the tech support specialist will guide you on how to send in your
equipment (refer to the next section).
Recording MultiFRAD Information
Please fill in the following information on your MultiFRAD. This will help tech support in answering
your questions. (The same information is requested on the Warranty Registration Card.)
Model No.: _________________________
Serial No.: _________________________
Software Version: ____________________
The model and serial numbers are on the bottom of your MultiFRAD.
Please note the type of external link device that is connected to your MultiFRAD before calling tech
support. Also, note the status of your MultiFRAD including LED indicators, screen messages,
diagnostic test results, DIP-Switch settings, problems with a specific application, etc. Use the space
below to note the status:
Chapter 6 - Warranty, Service and Tech Support
________________________________________________________________________________________________________
________________________________________________________________________________________________________
________________________________________________________________________________________________________
________________________________________________________________________________________________________
______________________________________________________________________________________________________________
______________________________________________________________________________________________________
______________________________________________________________________________________________________________
______________________________________________________________________________________________________
Contacting Tech Support via E-mail
If you prefer to receive service on-line, via the Internet, you can contact Tech Support via e-mail at
the following address:
http://www.multitech.com/_forms/email_tech_support.htm
83
Page 84

MultiFRAD User Guide
Service
If your tech support specialist decides that service is required, your MultiFRAD may be sent (freight
prepaid) to our factory . Return shipping charges will be paid by Multi-Tech Systems.
Include the following with your MultiFRAD:
• a description of the problem.
• return billing and return shipping addresses.
• contact name and phone number .
• check or purchase order number for payment if the MultiFRAD is out of warranty. (Check with
your technical support specialist for the standard repair charge for your MultiFRAD).
• if possible, note the name of the technical support specialist with whom you spoke.
If you need to inquire about the status of the returned product, be prepared to provide the serial
number of the product sent.
Send your MultiFRAD to this address:
MULTI-TECH SYSTEMS, INC.
2205 WOODALE DRIVE
MOUNDS VIEW, MINNESOTA 55112
ATTN: SERVICE OR REPAIRS
You should also check with the supplier of your MultiFRAD on the availability of local service and/or
loaner units in your area.
84
Page 85

The Multi-Tech BBS
For customers who do not have Internet access, Multi-Tech maintains a bulletin board system (BBS)
that mirrors its FTP site. Information available from the BBS includes new product information,
product upgrade files, and problem-solving tips. The phone number for the Multi-Tech BBS is (800)
392-2432 (USA and Canada) or (612) 785-3702 (international and local).
The BBS can be accessed by any asynchronous modem operating at 1200 bps to 33,600 bps at a
setting of 8 bits, no parity , and 1 stop bit (8-N-1).
To log on to the Multi-Tech BBS
1. Set your communications program to 8-N-1.
2. Dial our BBS at (800) 392-2432 (USA and Canada) or (612) 785-3702 (international and
local).
3. At the prompts, type your first name, last name, and password; then press ENTER. If you are
a first time caller, the BBS asks if your name is spelled correctly. If you answer yes, a
questionnaire appears. You must complete the questionnaire to use the BBS on your first
call.
4. Press ENTER until the Main Menu appears. From the Main Menu you have access to two
areas: the Files Menu and News. For help on menu commands, type ?.
Chapter 6 - Warranty, Service and Tech Support
To Download a File
If you know the file name
1. From the Main Menu, type F to access the Files Menu, then type D.
2. Enter the name of the file you wish to download from the BBS.
3. If a password is required, enter the password.
4. Answer Y or N to the automatic logoff question.
5. Select a file transfer protocol by typing the indicated letter, such as Z for Zmodem (the
recommended protocol).
6. If you select Zmodem, the transfer will begin automatically . If you select another protocol, you
may have to initiate the transfer yourself. (In most datacomm programs, the P AGE DOWN
key initiates the download.)
7. When the download is complete, press ENTER to return to the File Menu.
8. To exit the BBS, type G and press ENTER.
If you don’t know the file name
1. From the Main Menu, type F to access the Files Menu. For a list of file areas, type L, press
ENTER, then type L and press ENTER again. (If you do not type the second L, you will list all
of the files on the BBS.)
2. Mark each file area you would like to examine by typing its list number and pressing ENTER.
3. Enter L to list all the files in the selected file areas. Enter C to go forward in the file list and P
to go back.
4. To mark one or more files for download, type M, press ENTER, type the list numbers of the
files, and press ENTER again.
5. Enter D. You will see a list of the files you have marked. Enter E if you would like to edit the
list; otherwise enter D again to start the download process.
6. Select a file transfer protocol by typing the indicated letter, such as Z for Zmodem (the
recommended protocol).
7. If you select Zmodem, the file will transfer automatically . If you select another protocol, you
may have to initiate the transfer yourself. (In most data communications programs, the P AGE
DOWN key initiates the download.)
8. When the download is complete, press ENTER to return to the File Menu.
9. To exit the BBS, type G and press ENTER.
85
Page 86

MultiFRAD User Guide
About the Internet
If you prefer to receive technical support via the Internet, you can contact Tech Support via e-mail at
the following address:
http://www.multitech.com/_forms/email_tech_support.htm
Multi-Tech’s presence includes a Web site at:
http://www.multitech.com
and an ftp site at:
ftp://ftp.multitech.com
The ftp server mirrors the Multi-Tech BBS.
86
Page 87

Appendixes
Page 88

MultiFRAD User Guide
Appendix A - Cabling Diagrams
Command Port Cable
RS232
1 2 3 4 5 6 7 8
COMMAND
PIN NO.
1
2
To COMMAND
PORT Connector
3
4
5
6
7
8
LAN Cable
10Base-T (RJ-45)
Pin Circuit Signal Name
1 TD+ Data Transmit Positive
2 TD- Data Transmit Negative
DB9FRJ-45
PIN NO.
4
7
8
3
2
6
1
5
ETHERNET
1 2 3 4 5 6 7 8
10Base-T
TRANSMIT DATA
RECEIVE DATA
SIGNAL GROUND
To DTE
Device
(e.g., PC)
3 RD+ Data Receive Positive
4 RD- Data Receive Negative
DSU Cable
DIGITAL
1 2 3 4 5 6 7 8
DSU (RJ-45)
Pins Signal Name
1, 2 Transmit pair
7, 8 Receive pair
88
DSU
Page 89

Voice/Fax Channel Connectors
Appendix A - Cabling Diagrams
1 2 3 4 5 6 7 8
2 3 4 5 2 3 4 5
Pin Connections
E&M Description FXO Description FXS Description
1M
2 E 2 N/C 2 N/C
3 T1 3 Ring 3 Tip
4 R 4 T ip 4 Ring
5 T 5 N/C 5 N/C
89
Page 90

MultiFRAD User Guide
Trunk Cable
13 12 11 10 9 8 7 6 5 4 3 2 1
25 24 23 22 21 20 19 18 17 16 15 14
TRUNK (RS232/V.35)
RS232C/V.24 * Link Cable
To External
Synchronous
Modem/DSU
Connector
PIN NO.
1
2
3
4
5
7
8
15
17
20
25
PIN NO.
1
2
3
4
5
7
8
15
17
20
25
CHASSIS GROUND (AA)
TRANSMIT DATA (BA)
RECEIVE DATA (BB)
REQUEST TO SEND (CA)
CLEAR TO SEND (CB)
SIGNAL GROUND (AB)
CARRIER DETECT (CF)
TRANSMIT CLOCK (DB)
RECEIVE CLOCK (DD)
DATA TERMINAL READY (CD)
V.35 Adapter Cable Configured on a RS232C/V.35**
Link Cable
V.35 34-PIN CONNECTOR
Chassis Ground
Request To Send
Data Set Ready
Data Terminal Ready
Send Data (A)
Send Data (B)
Terminal Timing (A)
Terminal Timing (B)
Send Timing (A)
Send Timing (B)
A
D
C
E
H
J
K
M
N
P
T
S
U
X
W
Y
BB
AA
CC
FF
EE
HH
KK
LL
MM
As viewed from the connector side
B
F
L
R
V
Z
DD
JJ
NN
Signal Ground
Clear To Send
Data Carrier Detect
Receive Data (A)
Receive Data (B)
Receive Timing (A)
Receive Timing (B)
To MultiFRAD
TRUNK
(RS232C/V.35)
Connector
V.35 34-PIN
CONNECTOR (MALE)
A
B
C
D
E
F
H
P
R
S
T
U
V
W
X
Y
a
* The MultiFRAD RS232C interface circuits have been designed to meet the
electrical specificaitons given in EIA (Electronic Industries Association) RS232C
and CCITT (Consultative Committee International Telegraph and Telephone) V.24
Standards.
** When configured for V.35 interface operation on the link, the V.35 adapter
cable should be used. This cable uses a 25-pin female connector at one end and
a 34-pin winchester male connector at the other end.
90
25-PIN
CONNECTOR (FEMALE)
1
PROTECTIVE GROUND
7
SIGNAL GROUND
4
REQUEST TO SEND
5
CLEAR TO SEND
6
DATA SET READY
8
DATA CARRIER DETECT
20
DAT A TERMINAL READY
2
TRANSMIT DATA A
3
RECEIVE DATA A
12
TRANSMIT DATA B
22
RECEIVE DATA B
23
EXTERNAL TX CLOCK A
17
RECEIVE CLOCK A
25
EXTERNAL TX CLOCK B
18
RECEIVE CLOCK B
15
TRANSMIT CLOCK A
21
TRANSMIT CLOCK B
Page 91

Appendix B - Regulatory Information
Appendix B - Regulatory Information
Class A Statement
FCC Part 15
NOTE: This equipment has been tested and found to comply with the limits for a Class A digital device,
pursuant to Part 15 of the FCC Rules. These limits are designed to provide reasonable protection against
harmful interference when the equipment is operated in a commercial environment. This equipment
generates, uses and can radiate radio frequency energy and, if not installed and used in accordance with the
instruction manual, may cause harmful interference to radio communications. Operation of this equipment in
a residential area is likely to cause harmful interference, in which case the user will be required to correct the
interference at his own expense.
This device complies with Part 15 of the FCC rules.
Operation is subject to the following two conditions:
(1) This device may not cause harmful interference.
(2) This device must accept any interference that may cause undesired operation.
Warning: Changes or modifications to this unit not expressly approved by the party responsible for
compliance could void the user’s authority to operate the equipment.
Industry Canada
This Class A digital apparatus meets all requirements of the Canadian Interference-Causing Equipment
Regulations.
Cet appareil numerique de la classe A respecte toutes les exigences du Reglement sur le materiel brouilleur
du Canada.
Fax Branding Statement
The Telephone Consumer Protection Act of 1991 makes it unlawful for any person to use a computer or other
electronic device, including fax machines, to send any message unless such message clearly contains the
following information:
• Date and time the message is sent
• Identification of the business or other entity, or other individual sending the message
• Phone number of the sending machine or such business, other entity, or individual
This information is to appear in a margin at the top or bottom of each transmitted page or on the first page of
the transmission. (Adding this information in the margin is referred to as
Since any number of Fax software packages can be used with this product, the user must refer to the Fax
software manual for setup details. T ypically, the Fax branding information must be entered via the
configuration menu of the software.
fax branding
.)
91
Page 92

MultiFRAD User Guide
FCC Part 68 Telecom
1. This equipment complies with Part 68 of the Federal Communications Commission (FCC) rules. On the
outside surface of this equipment is a label that contains, among other information, the FCC registration
number. This information must be provided to the telephone company.
2. As indicated below, the suitable jack (Universal Service Order Code connecting arrangement) for this
equipment is shown. If applicable, the facility interface codes (FIC) and service order codes (SOC) are
shown.
3. An FCC-compliant telephone cord with modular plug is provided with this equipment. This equipment is
designed to be connected to the phone network or premises wiring using a compatible modular jack which is
Part 68 compliant. See installation instructions for details.
4. If this equipment causes harm to the phone network, the phone company will notify you in advance that
temporary discontinuance of service may be required. But if advance notice is not practical, the phone
company will notify the customer as soon as possible. Also, you will be advised of your right to file a
complaint with the FCC if you believe it is necessary .
5. The phone company may make changes in its facilities, equipment, operations, or procedures that could
affect the operation of the equipment. If this happens, the phone company will provide advance notice in
order for you to make necessary modifications in order to maintain uninterrupted service.
6. If trouble is experienced with this equipment (the model of which is indicated below) please contact MultiTech Systems, Inc., at the address shown below for details of how to have repairs made. If the equipment is
causing harm to the network, the phone company may request that you remove the equipment from the
network until the problem is resolved.
7. No repairs are to be made by you. Repairs are to be made only by Multi-Tech Systems or its licensees.
Unauthorized repairs void registration and warranty .
8. Manufacturer: Multi-Tech Systems, Inc.
Trade name: MultiFRAD 200
Model Numbers: FR221, FR221/V2
FCC Registration Number: AU7USA-25715-DF-N
Modular Jack (USOC): RJ-11C or RJ-11W
Service Center in U.S.A.: Multi-Tech Systems Inc.
2205 Woodale Drive
Mounds View , MN 55112
(612) 785-3500 Fax (612) 785-9874
92
Page 93

Appendix C - Network Overview
Canadian Limitations Notice
Ringer Equivalence Number
Notice: The ringer equivalence number (REN) assigned to each terminal device provides an indication of the
maximum number of terminals allowed to be connected to a phone interface. The termination on an interface
may consist of any combination of devices subject only to the requirement that the sum of the ringer
equivalence numbers of all the devices does not exceed 5.
Notice: The Industry Canada label identifies certified equipment. This certification means that the equipment
meets certain telecommunications network protective, operational and safety requirements. The Department
does not guarantee the equipment will operate to the user’s satisfaction.
Before installing this equipment, users should ensure that it is permissible to be connected to the facilities of
the local telecommunications company . The equipment must also be installed using an acceptable method of
connection. The customer should be aware that compliance with the above conditions may not prevent
degradation of service in some situations. Repairs to certified equipment should be made by an authorized
Canadian maintenance facility designated by the supplier. Any repairs or alterations made by the user to this
equipment, or equipment malfunctions, may give the telecommunications company cause to request the user
to disconnect the equipment.
Users should ensure for their own protection that the electrical ground connections of the power utility , phone
lines and internal metallic water pipe system, if present, are connected together. This precaution may be
particularly important in rural areas.
Caution: Users should not attempt to make such connections themselves, but should contact the appropriate
electric inspection authority , or electrician, as appropriate.
EMC, Safety and Terminal Directive Compliance
The CE mark is affixed to this product to confirm compliance with the following European Community
Directives:
Council Directive 89/336/EEC of 3 May 1989 on the approximation of the laws of Member States relating to
electromagnetic compatibility .
and
Council Directive 73/23/EEC of 19 February 1973 on the harmonization of the laws of Member States relating
to electrical equipment designed for use within certain voltage limits:
and
Council Directive 98/13/EC of 12 March 1998 on the approximation of the laws of Member States concerning
telecommunications terminal and Satellite earth station equipment.
93
Page 94

MultiFRAD User Guide
Appendix C - Network Overview
Network architecture defines how computer equipment and other devices are linked together to form
a communications system that enables users to share information and resources. There are
proprietary network architectures and open architectures like the Open Systems Interconnection
(OSI) model defined by the International Organization for Standardization (IOS). The OSI model
defines a layered model for an open systems environment in which a process running in one
computer communicates with a similar process on another computer if they implement the same OSI
layer communications protocol. The OSI protocol stack shown in Figure B-1 is commonly used as a
reference. During a communications session, processes running in each layer on each computer
communicate with one another. The bottom layer defines the actual physical components such as
connectors and cable and the electrical transmission of data bits between systems. The layers
immediately above define data packaging and addressing methods. Still further up are methods for
keeping communication sessions alive. Finally , the uppermost layers describe how applications use
the underlying communication systems to interact with applications on other systems.
Application Layer 7
Presentation Layer 6
Session Layer 5
Transport Layer 4
Network Layer 3
Data-Link Layer 2
Physical Layer 1
Figure B-1. OSI Protocol Stack
Protocols are loaded into a computer as software drivers. Each layer of the protocol stack defines a
specific set of functions. An application at the uppermost layer interacts with the layer below when it
needs to send information to another system on the network. The request is packaged in one layer
and passed down to the next layer, which adds information related to functions handled at that layer,
creating a new packet within a packet. This package is then passed down to the next layer and the
process continues. Each layer adds information to the message packet and this information is read
by the corresponding layer in the receiving system's protocol stack. In this way , each protocol layer
communicates with its corresponding protocol layer to facilitate communication.
The physical layer defines the physical characteristics of the interface, such as mechanical
components and connectors, electrical aspects such as voltage levels representing binary values,
and functional aspects such as setting up, maintaining, and taking down the physical link. Well known
physical layer interfaces for data communication include RS-232 and RS-449, the successor to RS-
232.
The data-link layer defines the rules for sending and receiving information across the physical
connection between two systems. This layer encodes and frames data for transmission, in addition to
providing error detection and control. Because the data-link layer can provide error control, higher
layers may not need to handle such services. However, when reliable media is used, there is a
performance advantage by not handling error control in this layer, but in higher layers.
The Network layer defines protocols for opening and maintaining a path on the network between
systems. It is concerned with data transmission and switching procedures, and hides such
procedures from upper layers. The network layer can look at packet addresses to determine routing
methods. If a packet is addressed to a workstation on the local network, it is sent directly there. If it's
addressed to a network on another segment, the packet is sent to a routing device, which forwards it
on the network. Some common protocols occupying the network layer are Internet Protocol (IP),
X.25, Novell's Internetwork Packet Exchange (IPX), Banyan's VINES Internet Protocol (VIP).
The transport layer provides a high level of control for moving information between systems,
94
Page 95

Appendix C - Network Overview
including more sophisticated error handling, prioritization, and security features. It provides quality
service and accurate delivery by providing connection-oriented services between two end systems.
The transport layer controls the sequence of packets, regulates traffic flow , and recognizes duplicate
packets. It assigns packetized information which is a tracking number that is checked at the
destination. If data is missing from the packet, the transport layer at the receiving end arranges with
the transport layer of the sending system to have packets retransmitted. This layer ensures that all
data is received and in the proper order.
The session layer coordinates the exchange of information between systems by using conversational
techniques, or dialogues. Dialogues are not always required, but some applications may require a
way of knowing where to restart the transmission of data if a connection is temporarily lost, or may
require a periodic dialog to indicate the end of one data set and the start of a new one.
Presentation layer protocols are part of the operating system and the application the user runs on a
workstation. Information is formatted for display or printing in this layer. Codes within the data, such
as tabs or special graphics sequences, are interpreted. Data encryption and translation of other
character sets are also handled in this layer.
Applications access the underlying network services using defined procedures in this layer. The
application layer is used to define a range of applications that handle file transfers, terminal sessions,
and message exchanges. Data starts at the application and presentation layers, where a user works
with a network application, such as an electronic mail program. Requests for services are passed
through the presentation layer to the session layer which begins the process of packetizing the
information. A connection-oriented communication session may be opened between the two systems
to provide reliable transmissions. Once the session is established, protocol layers begin exchanging
information as appropriate.
Packet
A packet is a package of data that is exchanged between devices over a data communications link.
Data exchanged between devices may include messages and commands, control codes for
managing the session, and data. Information is placed in packets by various communications
subsystems of the transmitting system, then framed into a serial bit-stream and sent across the
communications link. One of the main reasons for packetizing and framing information is that errors
on the communication link only affect a small, discernible part of the transmission, which is easily
retransmitted.
The process starts at the application layer. An application in one computer has some information to
send to another computer. The information is sent down through the protocol stack, across the wire,
and up through the protocol stack of the other computer. This information takes the form of a protocol
data unit (PDU). As the PDU moves through the layers of the sending computer, each layer attaches
specific information to the PDU that is relevant to the protocols in that layer. This attached information
is destined for the peer layer in the receiving computer. For example, the transport layer in the
sending computer adds a sequence number to the PDU. This sequence number is read by the
transport layer in the receiving computer to resequence the packets.
The communication protocol defines the packet structure and the networking system in use and
defines the frame structure for bit-stream transmission. Each protocol layer attaches information
destined for its peer layer in the other computer. When the PDU reaches the physical layer, it is
transmitted as a stream of bits. On copper wire, the bit-streams take the form of voltage level
changes that represent binary ones and zeros. The data-link layer places the PDU in one or more
frames and uses a media access method (such as CSMA/CD or token) to gain access to the
transmission media. The PDU might be subdivided into a number of separately addressed frames.
The frame format is defined by the network in use. For example, Ethernet defines frames that can
hold up to 1,500 bytes of packet data.
In general, a packet is a collection of information that contains data (payload) and headers (pilot).
Headers include the source and destination address as well as control information to handle errors
and keep packets flowing properly . Each packet is a separate block of information that can have a
95
Page 96

MultiFRAD User Guide
different destination address, and in some cases, different sizes. A typical packet holds 512 bytes of
information, so it takes many packets to transfer a large file over a network.
As packets traverse a network, the addressing information contained in them is used by bridges and
routers to direct packets to their destination, or keep them off of networks where they don't belong.
Routers direct packets along a specific path that has been predetermined as the best route to the
packets' destination. Routers use algorithms to determine efficient paths in conjunction with other
routers on the network. Administrators can also manually configure routers, based on the cost or
speed of routes. Information can be transmitted to another system using either connection-oriented
or connection-less methods. A connection-less session is more efficient for short, bursty
transmissions since a session setup is not required, but the end system may need to perform more
work to resequence packets that arrive out of order and check for lost packets.
Network Address
Every node on a network has an assigned address that other nodes use when communicating with it.
For Ethernet and token ring network adapters, unique addresses are assigned at the factory .
ARCNET networks have user-definable addresses. For example, the address of an Ethernet and
token ring network adapter consists of a 6-byte address, half of which is a special number identifying
the board's manufacturer. The last half of the address is a unique number for the board assigned at
the factory . This strategy virtually guarantees that no two Ethernet or token ring network interface
cards will ever have the same address and prevents conflicts.
When separate networks are connected into an internetwork, a new addressing scheme is required.
On interconnected NetWare networks, each network segment has its own address, which is used for
routing purposes and differentiate each segment from the others.
In TCP/IP networks such as the Internet, every node has a numeric address that identifies both a
network and a local host or node on the network. This address is written as four numbers separated
by dots, for example 148.1.9.1. The assignment of addresses is arbitrary within a company or
organization, but if the company plans to connect with the Internet, it is important to obtain registered
addresses from an outside agency to conform with international addressing standards. Applications
running in computers also have addresses that other applications, either local or remote, use to
communicate with the application. On TCP/IP networks, a socket is a combination of an Internet
address plus an application address.
Internet Protocol (IP)
Internet Protocol is a connection-less communication protocol that by itself provides a datagram
service. Datagrams are self-contained packets of information that are forwarded by routers based on
their address and the routing table information contained in the routers. Datagrams can be addressed
to a single node or to multiple nodes. There is no flow control, acknowledgment of receipt, error
checking, and sequencing. Datagrams may traverse different paths to the destination and thus arrive
out of sequence. The receiving station is responsible for re-sequencing and determining if packets
are lost. IP handles congestion by simple discarding packets. Re-sequencing and error handling are
taken care of by upper layer protocols.
IP works on a number of local and wide area networks. When IP runs in the LAN environment on an
Ethernet network, for example, the data field in the Ethernet frame holds the IP packet and a specific
field in the frame indicates that IP information is enclosed. IP uses an addressing scheme that works
independently of the network addressing scheme. For example, every Ethernet adapter has a
factory-assigned address for each node.
96
Page 97

Appendix C - Network Overview
IP Addressing
Every node on an IP network requires a 4-byte numeric address that identifies both a network and a
local host or node on the network. This address is written as four numbers separated by dots, for
example, 148.1.9.1. In most cases, the network administrator sets up these addresses when
installing a device.
The assignment of addresses is arbitrary within a company or organization, but if a company plans to
connect with the Internet any time in the near future, a registered addresses should be obtained from
the Defense Data Network (DDN) Network Information Center (NIC), which is managed by Network
Solutions in Chantilly , V irginia. With the growing popularity of the Internet, it is recommended that all
organizations obtain registered addresses to avoid address conflicts in the future.
There are three classes of Internet addresses; Class A, B and C. Class A networks use the first byte
of the IP address for the network number and the remaining three bytes for the host number. The first
byte may have any value from one to 127.
Class B networks use the first two bytes of the IP address for the network number and the last two
bytes for the host number. The first byte must have a value from 128 to 191.
Class C networks use the first three bytes of the IP address for the network number and the last byte
for the host number. This scheme provides for a very large number of dif ferent networks, each with
up to 255 addressable devices. The first byte must have a value from 192 to 223.
The part of the IP address that refers to the network is called the network address. A network mask is
the bit pattern which yields the network address in a Boolean AND operation with the IP address. For
example, in Class C networks, network addresses take the form X.X.X.0. The network mask for
Class C networks is 255.255.255.0. In all of the IP addresses on a given network, the network
address will remain the same while the host portion will be different for each host or workstation.
97
Page 98

MultiFRAD User Guide
Appendix D - Disabling the Internal DSU
Perform the following procedure if your WAN network has been upgraded to T1/E1 and you now want
to
disable
rates of up to 2.048 Mbps.
1 Turn off the MultiFRAD using the back panel Power switch.
2 Locate the access window (side slot opening) near the left front corner of the MultiFRAD.
3 Using a small flat blade screwdriver or similar tool, press
the MultiFRAD’s internal DSU and use the back panel T runk connection to obtain data
down
(Figure D-1) until it is even with all the other DIP switches; the internal DSU is now disabled.
DIP switch 2 UP; internal DSU is enabled.
OPEN
12345678
DIP switch 2 DOWN; internal DSU is disabled.
on DIP Switch 2
OPEN
12345678
Figure D-1. DIP Switch 2 Location and Functions
4 If your trunk connection is V.35 rather than the default RS232C, refer to V.35 Shunt
Procedure in Chapter 2 - Installation and move the Trunk shunt to the V.35 socket.
5 Disconnect the RJ-45 cable from the DSU jack and connect a trunk cable (Appendix A) to the
DB25 female TRUNK connector on the back panel of the MultiFRAD.
6 Reapply power to the MultiFRAD, then configure the Trunk port as the WAN connection.
98
Page 99

Glossary
Page 100

MultiFRAD User Guide
A
Access: The T1 line element made up of two pairs of wire that the telephone company brings to the customer premises. The Access
portion ends with a connection at the local telco (LEC or RBOC).
Accunet Spectrum of Digital Services (ASDS): The AT&T 56K bps leased (private) line service. Similar to services of MCI and
Sprint. ASDS is available in nx56/64K bps, where n=1, 2, 4, 6, 8, 12.
ACK (ACKnowledgement code) (pronounced "ack"): A communications code sent from a receiving modem to a transmitting modem
to indicate that it is ready to accept data. It is also used to acknowledge the error-free receipt of transmitted data. Contrast with NAK.
Adaptive Differential Pulse Code Modulation (ADPCM): In multimedia applications, a technique in which pulse code modulation
samples are compressed before they are stored on a disk. ADCPM, an extension of the PCM format, is a standard encoding format for
storing audio information in a digital format. It reduced storage requirements by storing differences between successive digital samples
rather than full values.
Address: A numbered location inside a computer. It's how the computer accesses its resources, like a video card, serial ports,
memory, etc.
AMI line coding: One of two common methods of T1 line coding (with B8ZS). AMI line coding places restrictions on user data (B8ZS
does not).
Analog signal: A waveform which has amplitude, frequency and phase, and which takes on a range of values between its maximum
and minimum points.
Analog Transmission: One of two types of telecommunications which uses an analog signal as a carrier of voice, data, video, etc. An
analog signal becomes a carrier when it is modulated by altering its phase, amplitude and frequency to correspond with the source
signal. Compare with digital transmission.
Application Program Interface (API): A software module created to enable dissimilar, or incompatible applications programs to
transfer information over a communications link. APIs may be simple or complex; they are commonly required to link PC applications
with mainframe programs.
ASCII (American Standard Code for Information Interchange) (pronounced "askey"): A binary code for data that is used in
communications and in many computers and terminals. The code is used to represent numbers, letters, punctuation and control
characters. The basic ASCII code is a 7-bit character set which defines 128 possible characters. The extended ASCII file provides 255
characters.
Asynchronous Transfer Mode (ATM): A very high-speed method of transmission that uses fixed-size cells of 53 bytes to transfer
information over fiber; also known as cell relay.
AT Commands: A standard set of commands used to configure various modem parameters, establish connections and disconnect. The
"AT" is used to get the "attention" of the modem before the actual command is issued.
Availability: The measure of the time during which a circuit is ready for use; the complement of circuit "outage" (100% minus %
outage = % available).
B
B7ZS (Bipolar 7 Zero Suppression) line coding: One method of T1 line coding (see also "B8ZS" and "AMI"). B7ZS line coding does
not place restrictions on user data (AMI does).
B8ZS (Bipolar 8 Zero Suppression) line coding: One of two common methods of T1 line coding (with AMI). B8ZS line coding does
not place restrictions on user data (AMI does). A coding method used to produce 64K bps "clear" transmission. (See also "B7ZS" and
"AMI" line coding)
Backbone: 1. A set of nodes and their interconnecting links providing the primary data path across a network. 2. In a local area network
multiple-bridge ring configuration, a high-speed link to which the rings are connected by means of bridges. A backbone may be configured as a bus or as a ring. 3. In a wide area network, a high-speed link to which nodes or data switching exchanges (DSEs) are
connected. 4. A common distribution core that provides all electrical power, gases, chemicals, and other services to the sectors of an
automated wager processing system.
Background: An activity that takes place in the PC while you are running another application. In other words, the active user interface
does not correspond to the 'background' task.
Bandwidth: The transmission capacity of a computer channel, communications line or bus. It is expressed in cycles per second (hertz),
the bandwidth being the difference between the lowest and highest frequencies transmitted. The range of usable frequencies that a
transmission medium will pass without unacceptable attenuation or distortion. Bandwidth is a factor in determining the amount of
information and the speed at which a medium can transmit data or other information.
Backward Explicit Congestion Notification (BECN): A bit that tells you that a certain frame on a particular logical connection has
encountered heavy traffic. The bit provides notification that congestion-avoidance procedures should be initiated in the opposite direction
of the received frame. See also FECN (Forward Explicit Congestion Notification).
100
 Loading...