

Page 1
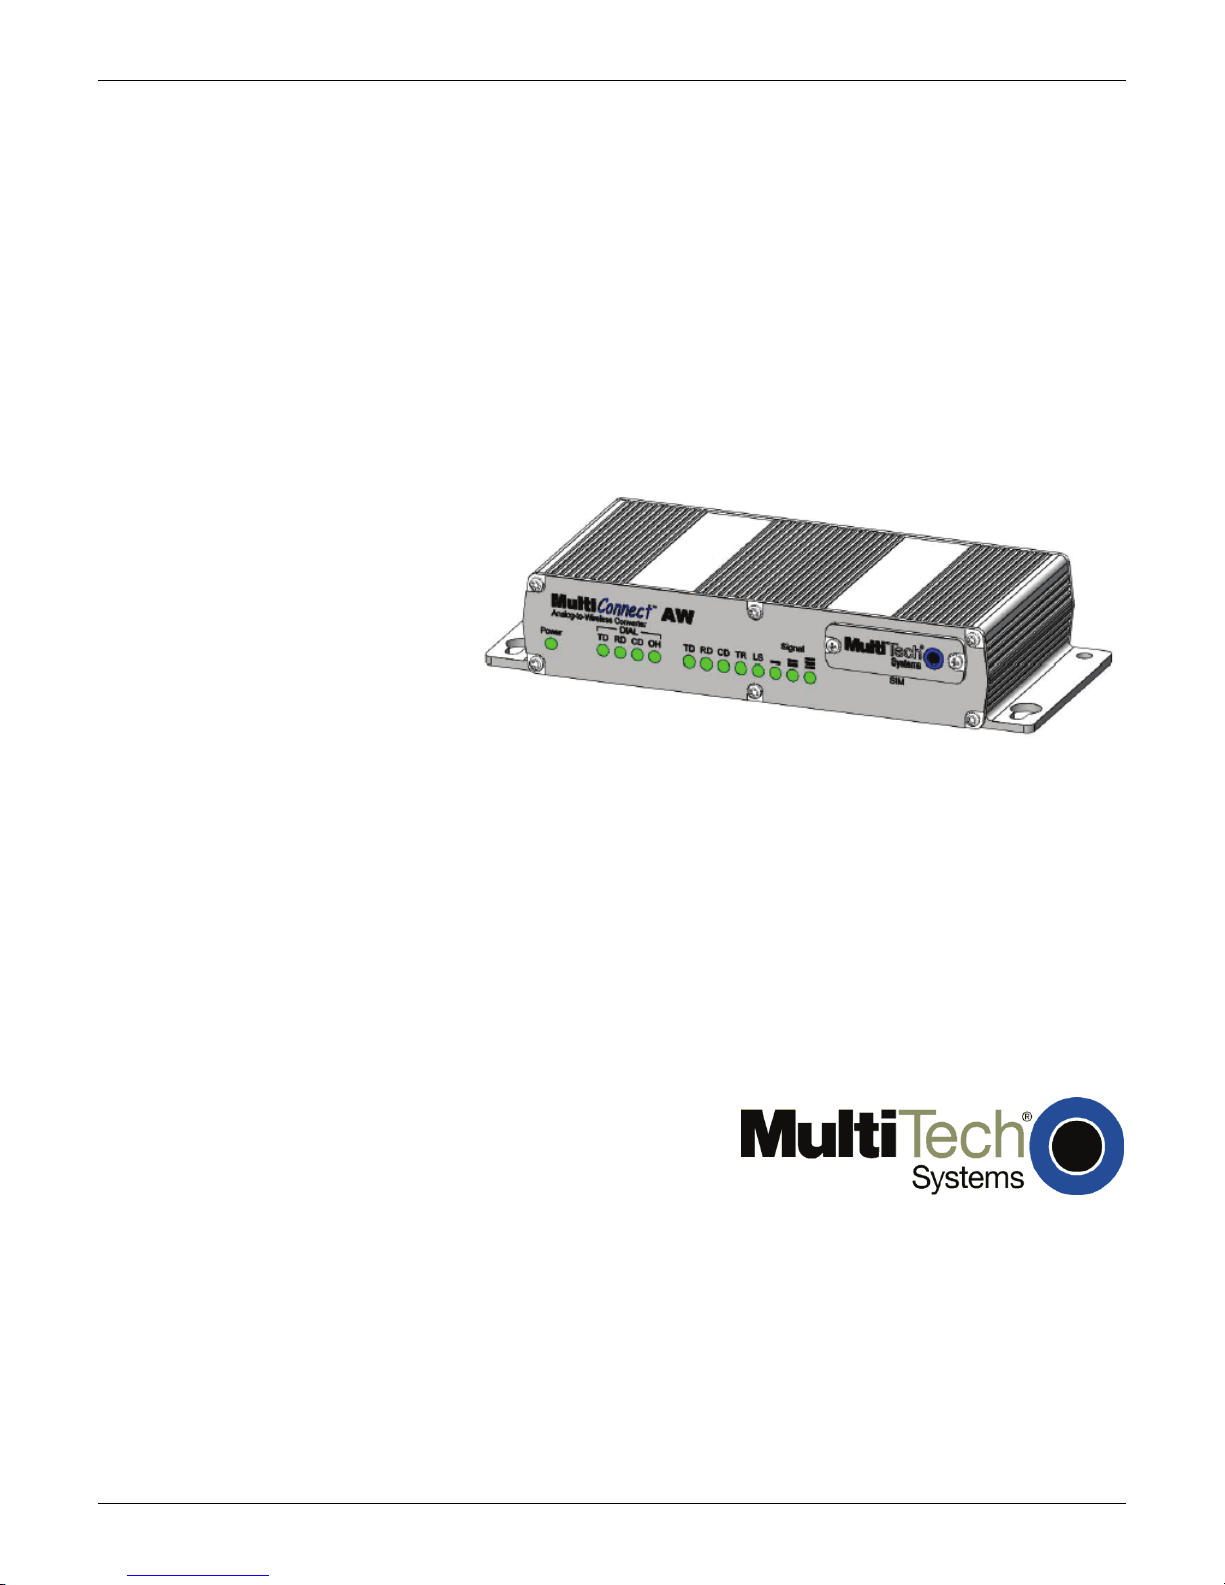
MultiConnect™ AW
Analog-to-Wireless Converter
User Guide
Page 2

Copyright and Technical Support
MultiConnect™ AW User Guide
Analog-to-Wireless Converter
MT100A2W & MT100A2W-G
S000467A, Revision A
Copyright
This publication may not be reproduced, in whole or in part, without prior expressed written permission from MultiTech Systems, Inc. All rights reserved.
Copyright © 2009 by Multi-Tech Systems, Inc.
Multi-Tech Systems, Inc. makes no representation or warranties with respect to the contents hereof and specifically
disclaims any implied warranties of merchantability or fitness for any particular purpose.
Furthermore, Multi-Tech Systems, Inc. reserves the right to revise this publication and to make changes from time to
time in the content hereof without obligation of Multi-Tech Systems, Inc., to notify any person or organization of such
revisions or changes. Check Multi-Tech’s Web site for current versions of our product documentation.
Revision History
Revision Date Description
A 07/20/09 Initial Release
Trademarks and Logos
Multi-Tech and the Multi-Tech logo are registered trademarks of Multi-Tech Systems, Inc. MultiConnect is a
trademark of Multi-Tech Systems, Inc.
Windows is a registered trademark of Microsoft in the U.S. and other countries. Other trademarks and trade names
mentioned in this publication belong to their respective owners.
Warranty
Warranty information can be found at: http://www.multitech.com/COMPANY/Policies/warranty/
World Headquarters
Multi-Tech Systems, Inc.
2205 Woodale Drive
Mounds View, Minnesota 55112
Phone: 763-785-3500 or 800-328-9717
Fax: 763-785-9874
Internet Address: http://www.multitech.com
Technical Support
Country By Email By Phone
Europe, Middle East, Africa: support@multitech.co.uk +(44) 118 959 7774
U.S., Canada, all others: support@multitech.com 800-972-2439 or 763-717-5863
2 Multi-Tech Systems, Inc. MultiConnect AW User Guide
Page 3

Table of Contents
Contents
CHAPTER 1 – PRODUCT DESCRIPTION AND SPECIFICATIONS .......................................................... 4
Product Description .................................................................................................................................. 4
Features ................................................................................................................................................... 4
AT Command Information ........................................................................................................................ 4
Safety ....................................................................................................................................................... 5
Front Panel .............................................................................................................................................. 6
Package Contents .................................................................................................................................... 6
Interfaces ................................................................................................................................................. 6
Specifications ........................................................................................................................................... 7
RF Specifications ..................................................................................................................................... 9
Antenna Specifications ............................................................................................................................ 9
Modem Connector ................................................................................................................................... 9
CHAPTER 2 – ACTIVATION AND INSTALLATION ................................................................................. 10
Activate Your Wireless Account ............................................................................................................. 10
Insert the SIM Card into Holder, if Required .......................................................................................... 10
Connect the Antenna, Serial Cable, Modem Cable, and Power............................................................ 11
Optional – Attach the Modem to a Flat Surface ..................................................................................... 12
CHAPTER 3 - CONFIGURATION OF YOUR MULTICONNECT ............................................................... 13
Login ...................................................................................................................................................... 14
Device Configuration .............................................................................................................................. 15
Cellular Port Configuration ..................................................................................................................... 16
CHAPTER 4 – DEVICE CONFIGURATION ............................................................................................... 19
GPRS Cellular Port Configuration ......................................................................................................... 20
GSM Cellular Port Configuration ........................................................................................................... 23
CDMA Cellular Port Configuration ......................................................................................................... 24
Analog (PSTN) Port Configuration ......................................................................................................... 27
System Login ......................................................................................................................................... 29
Timers .................................................................................................................................................... 30
Setup Email ............................................................................................................................................ 31
Reset Parameters to Default ................................................................................................................. 32
System Reboot ...................................................................................................................................... 33
APPENDIX A – REGULATORY COMPLIANCE........................................................................................ 34
EMC, Safety, and R&TTE Directive Compliance ................................................................................... 34
International Modem Restrictions .......................................................................................................... 34
FCC Part 15 Class B Statement ............................................................................................................ 34
Industry Canada ..................................................................................................................................... 34
APPENDIX B - WASTE ELECTRICAL AND ELECTRONIC EQUIPMENT (WEEE) STATEMENT ......... 35
APPENDIX C – ROHS HT/TS SUBSTANCE CONCENTRATION ............................................................ 36
Multi-Tech Systems, Inc. MultiConnect AW User Guide 3
Page 4
Chapter 1 – Product Description and Specifications
Chapter 1 – Product Description and
Specificat ions
Product Description
The MultiConnect™ AW analog-to-Wireless converter is a convenient turnkey solution that allows legacy
equipment with built-in analog modems to connect to a cellular network. By emulating the traditional dial-up PSTN
network and using a cellular modem, the affordable MultiConnect AW converter gives new life to devices currently
using traditional analog dial-up communications. The MultiConnect AW model (MT100A2W-G) with its internal GPRS
or GSM cellular modem allows connection to the cellular packet data network (GPRS) or the circuit switched data
network (GSM). The MultiConnect AW model (MT100A2W) requires a Multi-Tech CDMA, RS232 based external
modem for the cellular connection. Both models are housed in a rugged metal chassis. The MultiConnect AW
converter operates on standards based communication networks and can be desktop or panel mounted.
Model MT100A2W-G
Model MT100A2W
Features
● Turnkey solution with integrated quad-band GSM/GPRS modem, V.34/33.6K analog modem and SLIC for
PSTN emulation
● Supports GPRS packet data and circuit switched data modes
● RJ-11 port provides dial tone, ring, busy and DTMF detection
● Supports analog modem connections from 300 baud to 33.6K bps with error correction and data
compression
● Serial port configuration
● Rugged metal chassis
● LED’s for visual monitoring of power, signal strength, RS-232 and phone line status
● SMA antenna connector and SIM socket
● FCC, PTCRB and R&TTE certified
● Desktop or panel mounting
● Two-year warranty
60 .....
AT Command Information
AT commands for the MultiConnect AW are published in separate Reference Guides included on the
MultiConnect CD and posted on the Multi-Tech web site.
Multi-Tech Systems, Inc. MultiConnect AW User Guide 4
Page 5

Chapter 1 – Product Description and Specifications
Safety
Dial Port Caution
The dial port is not designed to be connected to a Public Telecommunications Network (PSTN/phone line) or used
outside the building.
General Safety
The modem is designed for and intended to be used in fixed and mobile applications. “Fixed” means that the device
is physically secured at one location and is not able to be easily moved to another location. “Mobile” means that the
device is designed to be used in other than fixed locations.
Caution: Maintain a separation distance of at least 20 cm (8 inches) is normally maintained
between the transmitter’s antenna and the body of the user or nearby persons. The Modem
is not designed for or intended to be used in portable applications within 20 cm. (8 inches) of
the body of the user.
RF Interference Issues
It is important to follow any special regulations regarding the use of radio equipment due in particular to the possibility
of radio frequency, RF, interference. Please follow the safety advice given below carefully.
• Switch OFF your MultiConnect when in an aircraft. The use of cellular telephones in an aircraft may endanger
the operation of the aircraft, disrupt the cellular network and is illegal. Failure to observe this instruction may
lead to suspension or denial of cellular telephone services to the offender, or legal action or both.
• Switch OFF your MultiConnect when around gasoline or diesel-fuel pumps and before filling your vehicle with
fuel.
• Switch OFF your MultiConnect in hospitals and any other place where medical equipment may be in use.
• Respect restrictions on the use of radio equipment in fuel depots, chemical plants or where blasting operations
are in progress.
• There may be a hazard associated with the operation of your MultiConnect close to inadequately protected
personal medical devices such as hearing aids and pacemakers. Consult the manufacturers of the medical
device to determine if it is adequately protected.
• Operation of your MultiConnect close to other electronic equipment may also cause interference if the
equipment is inadequately protected. Observe any warning signs and manufacturers’ recommendations.
Maintenance of the Wireless MultiConnect
Your wireless MultiConnect is the product of advanced engineering, design, and craftsmanship and should be treated
with care. The suggestions below will help you to enjoy this product for many years.
● Do not expose the MultiConnect to any extreme environment where the temperature or humidity is high.
● Do not attempt to disassemble the MultiConnect. There are no user serviceable parts inside.
● Do not expose the MultiConnect to water, rain, or spilled beverages. It is not waterproof.
● Do not abuse your MultiConnect by dropping, knocking, or violently shaking it. Rough handling can damage it.
● Do not place the MultiConnect alongside computer discs, credit or travel cards, or other magnetic media. The
information contained on discs or cards may be affected by the phone.
● The use of accessories not authorized by Multi-Tech or not compliant with Multi-Tech’s accessory
specifications may invalidate the warranty of the MultiConnect.
● In the unlikely event of a fault in the MultiConnect, contact Multi-Tech Technical Support.
Handling Precautions
All devices must be handled with certain precautions to avoid damage due to the accumulation of static charge.
Although input protection circuitry has been incorporated into the devices to minimize the effect of this static build up,
proper precautions should be taken to avoid exposure to electrostatic discharge during handling and mounting.
Multi-Tech Systems, Inc. MultiConnect AW User Guide 5
Page 6
Chapter 1 – Product Description and Specifications
Front Panel
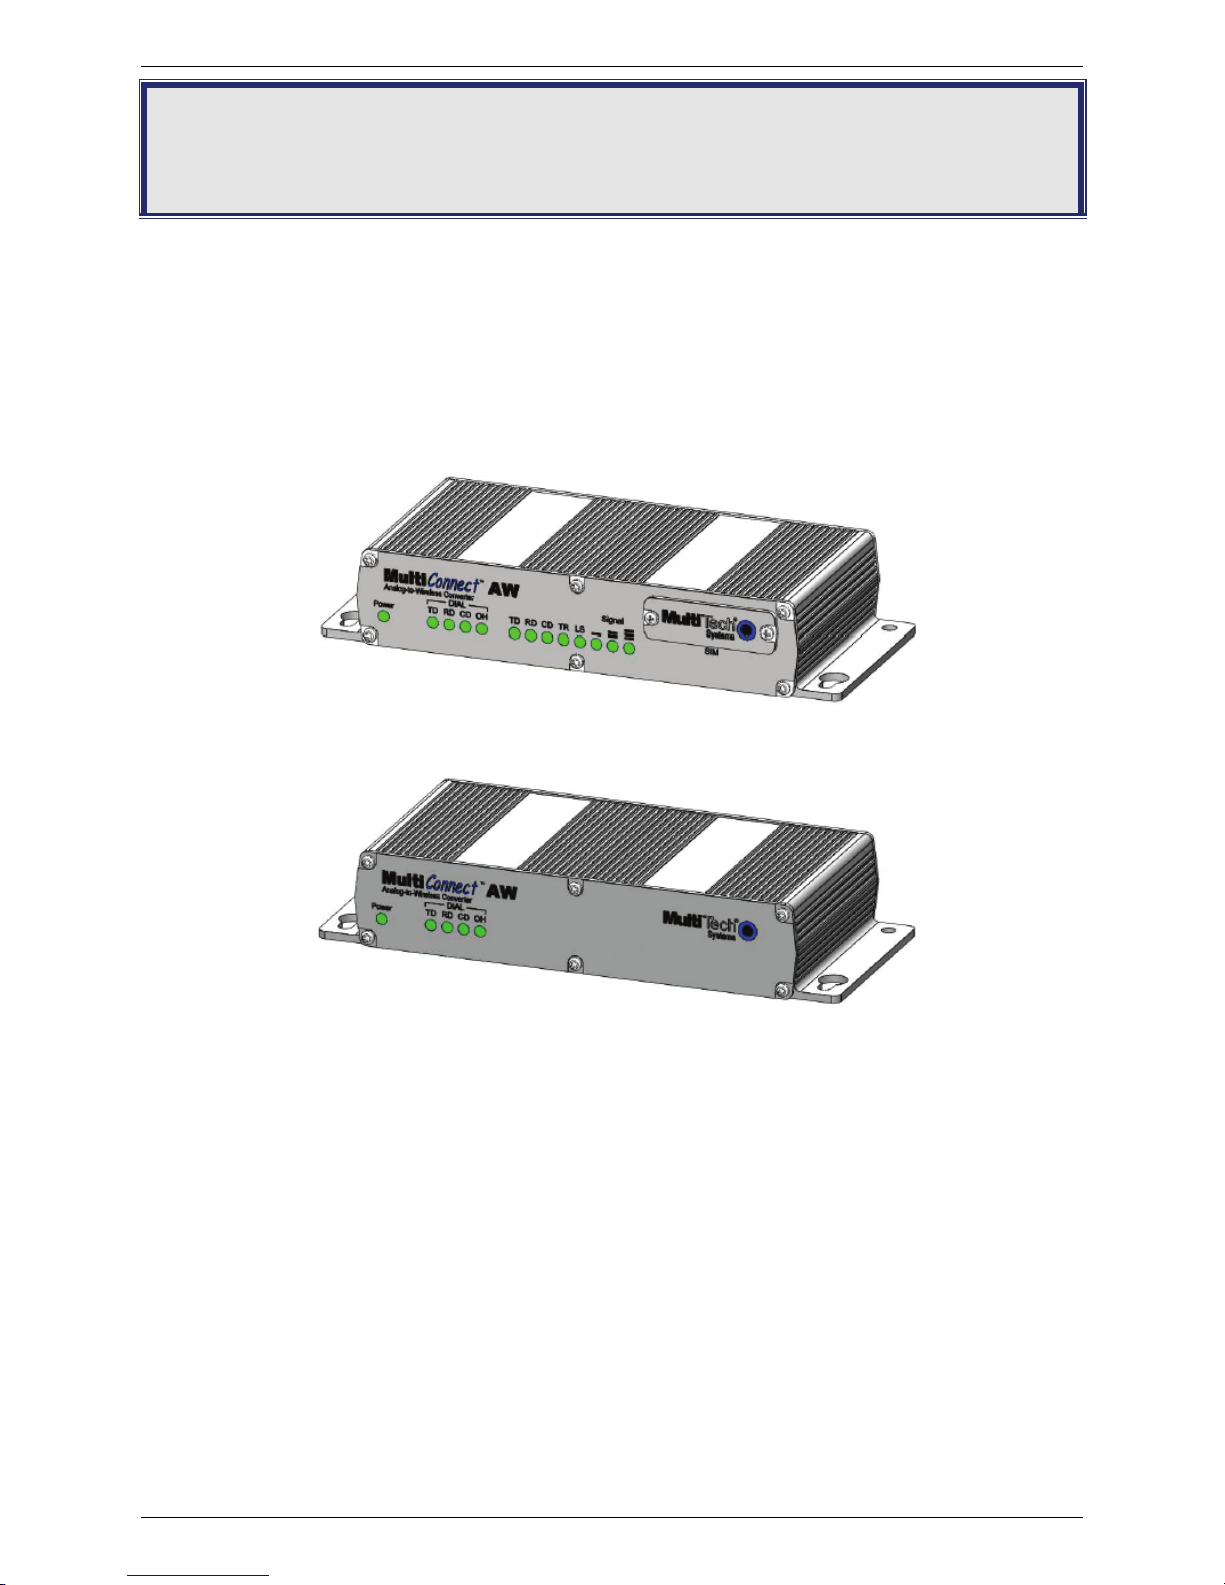
The front panel is designed with a Power indicator and four Dial indicators on both models. The MT100A2W-G model
also has five wireless modem LEDs, three Signal strength LEDs, and a SIM door. The Power LED lights when power
is applied to the unit. The four analog signal LEDs (Dial) display the activity of the analog modem port. The five
wireless modem LEDs display the activity of the internal wireless modem and the three Signal strength LEDs display
the signal strength level of the internal wireless connection on the MT100A2W-G model. The SIM door on the right
side provides access to the SIM card holder for the MT100A2W-G model.
LEDs
Power
Analog
Modem
Port
Internal
Wireless
Modem
Signal
MT100A2W-G
MT100A2W
LED Indicators
Indicates presence of DC power when lit.
TD – Transmit Data – Flashes when the analog modem port is transmitting data.
RD – Receive Data – Flashes when the analog modem port is receiving data.
CD -Carrier Detect. Lit when the data connection from the analog modem port is established.
OH – Off-hook – Lit when the analog modem port goes off-hook
TD – Transmit Data – Flashes when the wireless modem is transmitting data.
RD – Receive Data – Flashes when wireless modem is receiving data.
TR - Terminal Ready – Lit indicates the communication channel between the internal processor
and the internal wireless modem is ready.
LS - Link Status.
Off - Unit is off or not registered on network.
Continuous “ON” - Indicates that the wireless modem is not registered on the network.
Slow Flash * - Indicates registration on network.
Quick Flash ** – Indicates registration on the network and communication is in progress.
ALL OFF - Unit is off, not registered on network, or extremely week signal (RSSI <7).
1 Bar “ON” – Very weak signal (7 < = RSSI <12)
1 Bar and 2 Bar “ON” – Week signal (12 < = RSSI <12)
1 Bar, 2 Bar, and 3 Bar “ON” – Good signal ( RSSI > = 15)
Package Contents
● 1 MultiConnect Converter
● 1 antenna
● 1 RS232 cable
● 1 power supply
● 1 Quick Start Guide
● 1 MultiConnect CD
Note: You must supply mounting screws.
Your wireless provider will supply the SIM card.
Note:
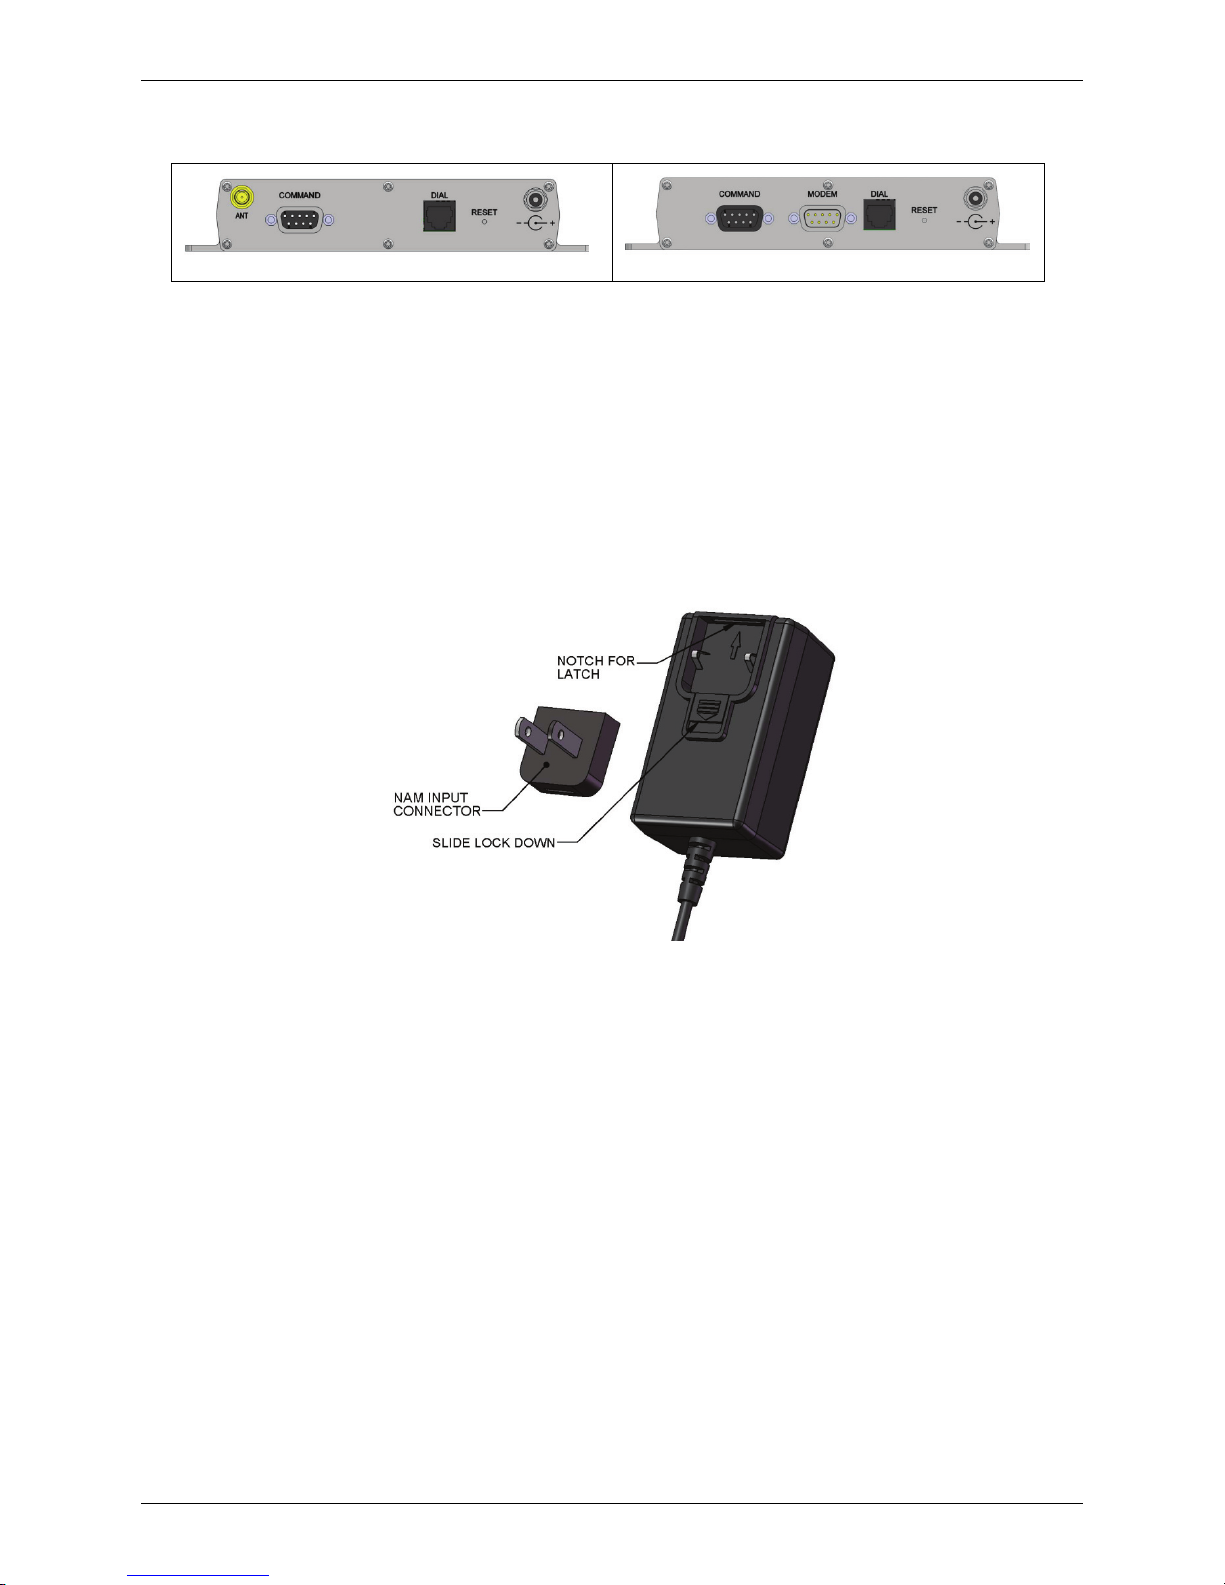
Interfaces
The MultiConnect has several interfaces:
• LED function indicating operating status
• External antenna (via SMA connector)
• Serial port (Command) for configuration (via 9-pin DE9 female)
• Dial port (via RJ11)
• Modem port (via 9-pin DE9 male) (MT100A2W model only)
• Power supply (via 2.5mm miniature power jack)
• SIM card holder (MT100A2W-G model only)
Multi-Tech Systems, Inc. MultiConnect AW User Guide 6
Page 7

Chapter 1 – Product Description and Specifications
Specifications
MT100A2W-G
Category Description
Performance
Band, Frequency
Packet Data
Circuit-Switched Data
Data Format
Flow Control
SIM Connector
Command Connector
Dial Connector
Antenna Connector
Power Connector
Voltage Range
Power Requirements*
Dimensions 7” W x 1.24”H x 2.79”D .78lbs 17.78cmW x 3.15cmH x 7.07cmD 0.320Kg
Operating Temperature** -40° C to +60° C UL listed @ +40° C
Storage Temperature -40° C to +85° C
Humidity Relative humidity 20% to 90% noncondensing
Compliance EMC Compliance
Multi-Tech Systems, Inc recommends that the customer incorporate a 10% buffer into their power source when
*
determining product load.
** UL Listed @ 40°C. Limited by power supply. UL Certification does not apply or extend to an ambient above 40°C
and has not been evaluated by UL for ambient greater than 40°C
** “UL has evaluated this device for use in ordinary locations only. Installation in a vehicle or other outdoor locations
has not been evaluated by UL. UL Certification does not apply or extend to use in vehicles or outdoor applications or
in ambients above 40° C.”
** Optional power must be UL Listed ITE power supply marked LPS or Class 2 rated 9-32Vdc, 1.44 – 0.4A
GPRS; Class 10
Quad-band, GSM/GPRS, 850/900/1800/1900M Hz
Class 10, full PBCCH Support, coding schemes CS1-4, Mobile station Class B
Asynchronous, non-transparent up to 14.4Kbps (V.110)
For Serial Interface - Asynchronous, 8-N-1, Fixed 115K bps
Hardware flow control
Standard 1.8V/3V SIM receptacle
DE9 (female connector)
RJ11
RF Antenna: SMA (female connector). Refer to Antenna Specifications.
2.5mm miniature screw-on
9V to 32VDC @ 400mA
Typical: 0.23A @ 9V @ 2.04W Max: 0.34A @ 9V @ 2.97W
0.12A @ 20V @ 2.31W 0.16A @ 20V @ 3.17W
0.08A @ 32V @ 2.48W 0.11A @ 32V @ 3.34W
9V Peak 1.43A
20V Peak 0.75A
32V Peak 0.50A
FCC Part 15
EN55022
EN55024
Radio Compliance
FCC Part 22, 24
RSS 132,133
EN301 489-1
EN301 489-7
EN301 511
AS/ACIF S042.1, S042.3
Safety: UL60950-1
cUL60950-1
EN60950-1
Network Compliance: PTCRB, GCF
Multi-Tech Systems, Inc. MultiConnect AW User Guide 7
Page 8

Chapter 1 – Product Description and Specifications
MT100A2W
Category Description
Command Connector
Modem Connector
Dial Connector
Power Connector
Voltage Range
Power Requirements*
Dimensions 7” W x 1.24”H x 2.79”D .70lbs 17.78cmW x 3.15cmH x 7.07cmD 0.318Kg
Operating Temperature** -40° C to +60° C UL listed @ +40° C
Storage Temperature -40° C to +85° C
Humidity Relative humidity 20% to 90% noncondensing
Compliance EMC Compliance
* Multi-Tech Systems, Inc recommends that the customer incorporate a 10% buffer into their power
source when determining product load.
** UL Listed @ 40°C. Limited by power supply. UL Certification does not apply or extend to an ambient above 40°C
and has not been evaluated by UL for ambient greater than 40°C
** “UL has evaluated this device for use in ordinary locations only. Installation in a vehicle or other outdoor locations
has not been evaluated by UL. UL Certification does not apply or extend to use in vehicles or outdoor applications or
in ambients above 40° C.”
** Optional power must be UL Listed ITE power supply marked LPS or Class 2 rated 9-32Vdc, 1.44 – 0.4A
DE9 (female connector)
DE9
RJ11
2.5mm miniature screw-on
9V to 32VDC @ 400mA
Typical: 0.156A @ 9V @ 1.404W Max: 0.233A @ 9V @ 2.097W
0.078A @ 20V @ 1.560W 0.113A @ 20V @ 2.260W
0.053A @ 32V @ 1.696W 0.076A @ 32V @ 2.432W
FCC Part 15
EN55022
EN55024
Safety: UL60950-1
cUL60950-1
EN60950-1
Multi-Tech Systems, Inc. MultiConnect AW User Guide 8
Page 9

RF Specifications
r
Chapter 1 – Product Description and Specifications
Frequency RX
Frequency TX
RF Power Stand 2W at 12.5% duty
GSM 850 GSM 900 GSM 1800 GSM 1900
869 to 894 MHz 925 to 960 MHz 1805 to 1800 MHz 1930 to 1990 MHz
824 to 849 MHz 880 to 915 MHz 1710 to 1785 MHz 1850 to 1910 MHz
cycle
2W at 12.5% duty
cycle
1W at 12.5% duty
cycle
1W at 12.5% duty
cycle
Antenna Specifications
GPRS/GSM Antenna Requirements/Specifications
Frequency Range: 824 – 960 MHz / 1710 – 1990 MHz
Impedance: 50 Ohms
VSWR: <2.0:1
Typical Radiated Gain: 3 dBi on azimuth plane
Radiation: Omni
Polarization: Vertical
Wave: Half Wave Dipole
Antennas Available from Multi-Tech Systems, Inc.
Description Part Number
Hinged Right Angle 900/1800 MHz Cellular Modem Antenna ANF1-1HRA
Hinged Right Angle 800/1900 MHz Cellular Modem Antenna ANF21HRA
Hinged Right Angle 850/900/1800/1900 MHz Cellular Modem Antenna ANQB-1HRA
PTCRB Requirements Note
There cannot be any alteration to the authorized antenna system. The antenna system must be the same type
with similar in-band and out-of-ban radiation patterns and maintain the same specifications.
FCC Requirements Note
The antenna gain, including cable loss, must not exceed 3.0 dBi at 1900 MHz / 1.4 dBi at 850 MHz for mobile
operating configurations and 7.0 dBi at 1900 MHz / 1.4 dBi at 850 MHz for fixed mounted operations, as defined
in 2.1091 and 1.1307 of the rules for satisfying RF exposure compliance.
Modem Connector
The following table explains the pin functions.
External Power
Signal IN/OUT
Pin 1 CD O
Pin 2 RX O
Pin 3 TX I
Pin 4 DTR I
Pin 5 GND -Pin 6 DSR O
Pin 7 RTS I
Pin 8 CTS O
Pin 9 RI O
Modem Connecto
(DE-9)
Multi-Tech Systems, Inc. MultiConnect AW User Guide 9
Page 10
Chapter 2 – Activation and Installation
Chapter 2 – Activation and
Installat ion
Account Activation for Wireless Products
Please refer to the wireless account activation notice included with your unit and located on the MultiConnect CD.
Choose the one for your wireless network provider and follow the directions to activate your account.
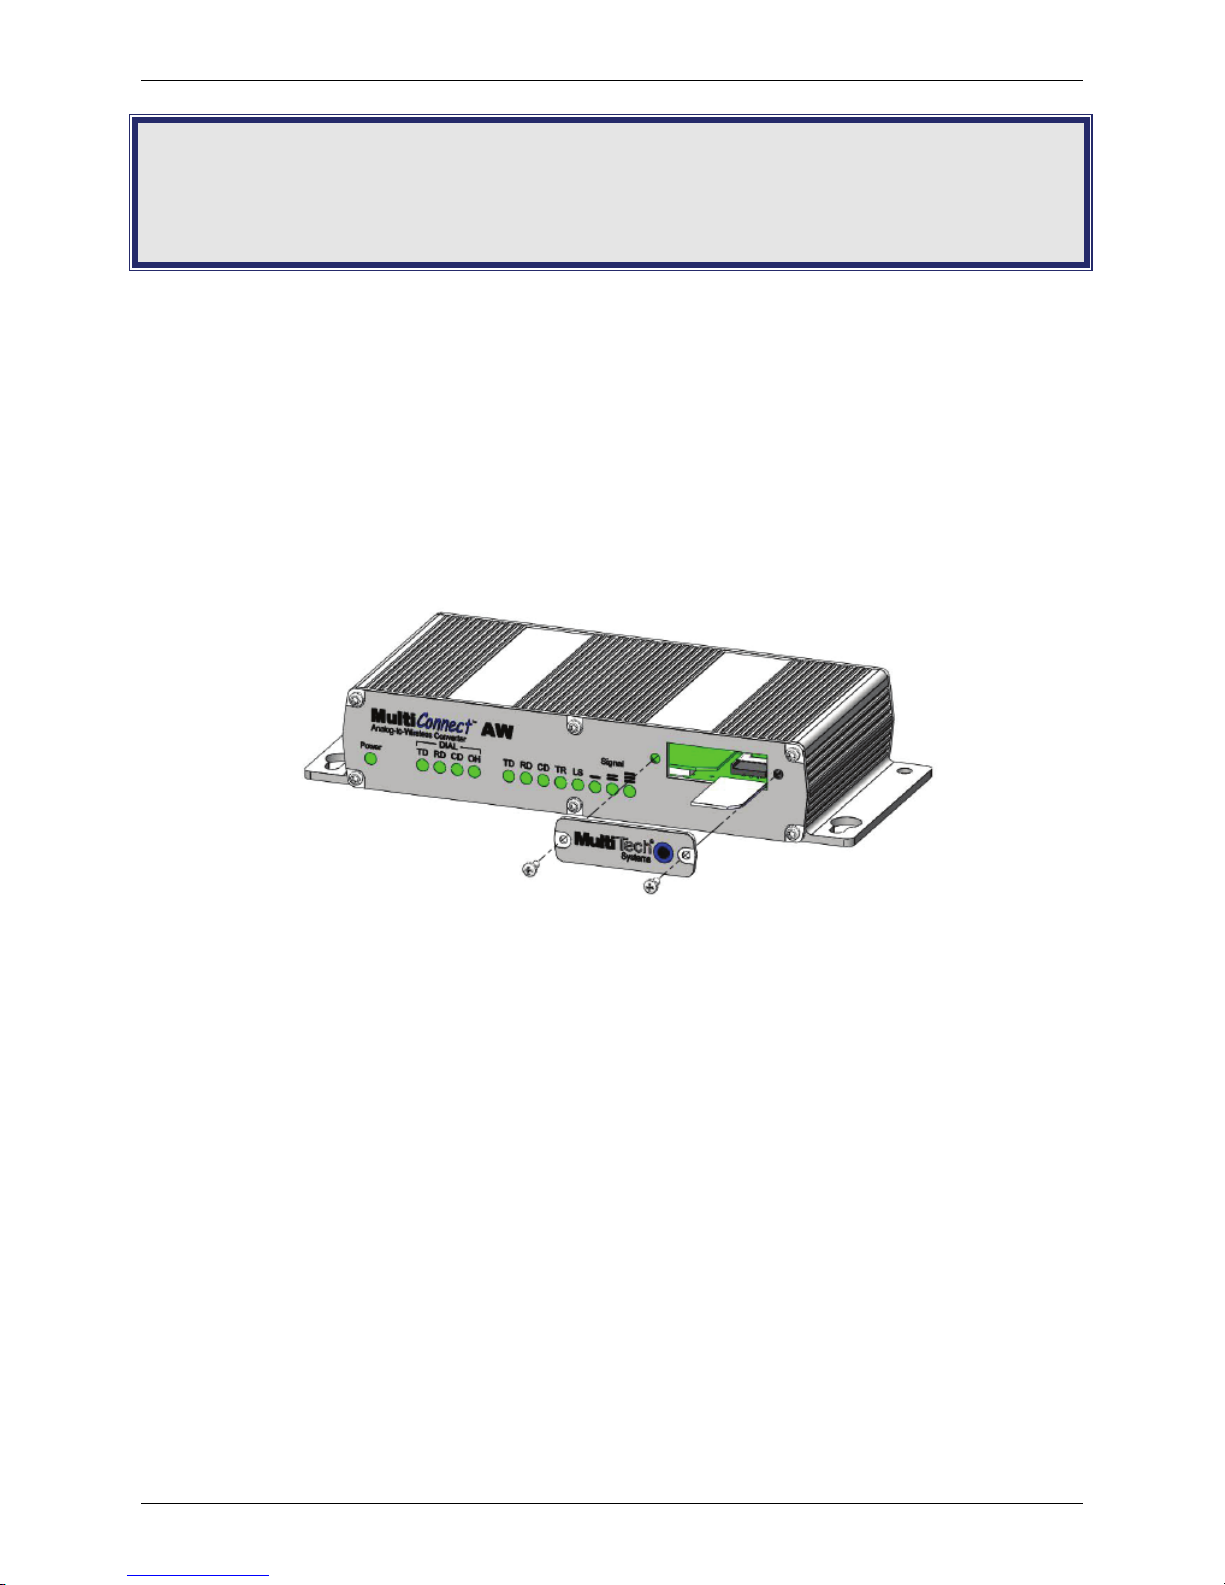
Insert the SIM Card into Holder, if Required
The MultiConnect requires the power supply connection to begin operation. It also requires a SIM card (Subscriber
Identity Module) in the MT100A2W-G unit to operate on a GPRS/GSM network. To install the SIM, do the following:
1. Using a small Phillips screwdriver, remove the two SIM door screws and remove the SIM door.
Note: When changing a SIM, ensure that power is removed from the unit.
2. Insert the SIM card into the card holder. The above graphic illustrates the correct SIM card orientation.
3. Verify that the SIM card fits into the holder properly and then replace the cover.
Multi-Tech Systems, Inc. MultiConnect AW User Guide 10
Page 11
Chapter 2 – Activation and Installation
Connect the Antenna, Serial Cable, Modem Cable, and
Power
MT100A2W-G
1. Connect a suitable antenna to the ANT connector on the MT100A2W-G model, (see antenna specifications
in Chapter 1).
2. Connect the DE9 connector (9-pin) of the RS232 cable to the COMMAND connector on the unit and connect
the other end to serial port on your PC.
3. For the MT100A2W model, connect an RS232 cable, male connector, to the MODEM connector on the back
of the unit. Connect the other end of the cable to your external wireless modem.
4. Connect the RJ 11 phone cable to the DIAL connector on the unit and connect the other end of the phone
cable to the customer’ s analog modem.
5. Remove the protective shipping cover. Attach the appropriate input connector to the power supply module
by holding down on the slide lock and tipping the input connector to fit into the notch on top of the module
and then lowering it into the slide lock. Then release the slide lock.
MT100A2W
6. Screw-on the power lead from the power supply module to the power connection on the unit. Now, plug the
power supply into your power source.
Multi-Tech Systems, Inc. MultiConnect AW User Guide 11
Page 12

Chapter 2 – Activation and Installation
Optional – Attach the Modem to a Flat Surface
The modem can be panel mounted with screws spaced according to the measurement shown.
Note: Use either #4 or #6 pan head screws for all four mount locations.
Multi-Tech Systems, Inc. MultiConnect AW User Guide 12
Page 13

Chapter 3 – Configuration of your MultiConnect
Chapter 3 - Config uration of your
MultiConnect
The configuration of the MultiConnect varies slightly depending on which unit you are configuring, MT100A2W-G
which has the internal GPRS/GSM wireless modem. The MT100A2W requires a Multi-Tech CDMA, RS232 based
external modem for its cellular connection. The Cellular Port configuration for the MT100A2W-G has more
configuration options than the MT100A2W unit. The differences are detailed in the Cellular Port Configuration.
The following configuration procedures are based on the Windows XP Operating System. Other Windows operating
systems have similar paths to HyperTerminal. See your system’s online Help if you cannot find it.
HyperTerminal
1. Go to Start I All Programs I Accessories I Communications and then click on HyperTerminal.
2. The New Connection screen is displayed. In the Name: window, enter an applicable name for your
MultiConnect connection.
Click OK.
3. The Connect To screen is displayed with the Country/region, Area code, and phone number windows
blanked out.
Change the Connect using: window to the COM port for the MultiConnect. Click on the down arrow and
select your COM port.
Multi-Tech Systems, Inc. MultiConnect AW User Guide 13
Page 14

Chapter 3 – Configuration of your MultiConnect
4. The COM Properties screen is displayed.
Change the default Bits per second: window from 2400 to 115200. Click the Apply button and then OK.
Login
1. The Login screen is displayed.
Enter the default password of admin
Multi-Tech Systems, Inc. MultiConnect AW User Guide 14
Page 15

Chapter 3 – Configuration of your MultiConnect
2. What would you like this port to do? Screen is displayed.
Enter Selection => _ Enter A and press OK
Device Configuration
Initial configuration of the MultiConnect AW could involve just the Cellular Port menu which is dependent on cellular
network that you are connecting to. The Device Configuration main menu changes depending on the cellular network.
The cellular network change is in Option 1 which in the Current Settings displays the cellular network type; GPRS or
GSM for the MT100A2W-G unit or CDMA for the MT100A2W unit. The GPRS cellular network is for packet switched
data. GSM uses circuit switch data.
The Analog (PSTN) Port menu is defaulted to a typical configuration. The System Login option thru the System
Reboot options refine the use of your MultiConnect AW.
1. The Device Configuration main menu is displayed.
In the Enter option to modify => _ Enter 1 and press OK for both versions. The Cellular Port configuration
menu is displayed.
Multi-Tech Systems, Inc. MultiConnect AW User Guide 15
Page 16

Chapter 3 – Configuration of your MultiConnect
Cellular Port Configuration
The Cellular Port configuration is dependent on the cellular network, a GPRS Cellular network is the default cellular
network for MT100A2W-G units and contains the most options to configure. When the Cellular Port is set to GSM on
the MT100A2W-G units, the number of configuration options are reduced. When a MT100A2W unit determines that
there is no internal wireless modem, the Device Configuration menu changes to a CDMA network.
The GPRS Cellular network configuration is detailed in the following section. The GSM Cellular Network
configuration is detailed in the next section, and finally the CDMA Cellular network configuration is detailed in the last
section of the Cellular Port Configuration.
GPRS Cellular Network Configuration
1. The GPRS Cellular Port menu is displayed.
2. Configure options A thru D for your GPRS cellular network.
GPRS Network Dependent
Option Default Description
A) GPRS or GSM
B) Protocol
C) Inbound or
Outbound
D) Wireless
Connection
3. When you change the Remote Port or Remote IP, they become the new default without pressing the + key
to save the configuration.
Option Default Description
E) Local Port
F) Remote Port
G) Remote IP
GPRS Select GPRS
TCPClient
Outbound
OnDemand Select either OnDemand or Always On.
23
0
None
Select either TCPClient, Telnet, UDP, or
Pass Thru
Select either
0) Auto Detect which automatically
detects between inbound and outbound,
1) PPP Client (Outbound),
2) PPP Client (Listening) for inbound.
ATTENTION: If Always On is desired,
wait until you have made all your other
configuration changes before selecting
this option.
Port Dependent
The Local Port is for inbound
communications
TCP/IP port that remote device is
listening on.
IP address of remote device on the
network you are connecting to.
Multi-Tech Systems, Inc. MultiConnect AW User Guide 16
Page 17

Chapter 3 – Configuration of your MultiConnect
4. The Wireless Band is set depending on the region of the world the unit is set up for, e.g., 850/1900MHz for
NAM.
Wireless Band
Option Default Selection
K) Wireless Band
5. Configure options L thru N dependent on your Access Point Name (APN) Server requirements.
Option Default Selection
L) APN User Name
M) APN Password
N) APN Server
6. Save your configuration by pressing the + key. Then return to the Main Device Configuration menu and wait
for the cellular wireless network and the analog modem to change to a READY state. The Current Settings
will change to: (State WIRELESS_READY) (State ANALOG_READY).
Initial configuration of the GPRS version is complete.
The APN assigned by your cellular network provider.
This option is default depending on the region of the
world the unit is set up for, e.g., 900/1800MHz for
Europe.
0) dual-band 850/1900 MHz
1) dual-band 900/1800 MHz
APN Dependent
The user name may not be required by all network
providers.
The password may not be required by all network
providers.
GSM Cellular Network Configuration
1. The GSM Cellular Port menu is displayed.
2. Configure options A thru D for your GSM cellular network.
GSM network Dependent
Option Default Selection
A) GPRS or GSM
B) Protocol
K) Wireless Band
GPRS Select GSM
PassThru No selection
This option is default depending on the region of the world
the unit is set up for, e.g., 850/1900MHz for NAM.
0) dual-band 850/1900 MHz
1) dual-band 900/1800 MHz
3. You need to save your configuration by pressing the + key. Then return to the Main Device Configuration
menu and wait for the cellular wireless network and the analog modem to change to a READY state. The
Current Settings will change to: (State WIRELESS_READY) (State ANALOG_READY).
Initial configuration of the GSM version is complete.
Multi-Tech Systems, Inc. MultiConnect AW User Guide 17
Page 18

Chapter 3 – Configuration of your MultiConnect
CDMA Cellular Network Configuration
When an external Multi-Tech CDMA modem is connected to the MODEM port of a MT100A2W unit and the unit is
powered up, the Device Configuration menus will default to a CDMA Cellular Network.
1. The CDMA Cellular Port menu is displayed.
2. Configure options A thru D depending on your CDMA cellular network.
CDMA Network Dependent
Option Default Description
A) CDMA
B) Protocol
C) Inbound or
Outbound
D) Wireless
Connection
3. When you change the Remote Port or Remote IP, they become the new default without pressing the + key
to save the configuration.
Option Default Description
E) Local Port
F) Remote Port
G) Remote IP
CDMA No selection
TCPClient
Outbound
OnDemand Select either OnDemand or Always On
Port Dependent
23
0
None
Select either TCPClient, Telnet, UDP,
or Pass Thru
Select either
0) Auto Detect which automatically
detects between inbound and outbound,
1) PPP Client (Outbound),
2) PPP Client Inbound (Listening).
ATTENTION: If Always On is desired,
wait until you have made all your other
configuration changes before selecting
this option.
The Local Port is for inbound
communications
TCP/IP port that remote device is
listening on.
IP address of remote device on the
network you are connecting to.
4. You need to save your configuration by pressing the + key. Then return to the Main Device Configuration
menu and wait for the cellular wireless network and the analog modem to change to a READY state. The
Current Settings will change to: (State WIRELESS_READY) (State ANALOG_READY).
Initial configuration of the CDMA Version is complete.
Multi-Tech Systems, Inc. MultiConnect AW User Guide 18
Page 19

Chapter 4 – Device Configuration
Chapter 4 – Device Conf iguration
The Device Configuration menu displays seven main menu options and navigational selections such as Main Menu,
Save & Exit, etc. The numbered options are the configurable options and the alphabetical options are the navigational
selections. The Enter option to modify => at the bottom of the menu is your selection field.
Each numbered option in the Device Configuration menu has its own sub-menu with the individual settings for that
option. You can select option 1) Cellular Port and press ENTER. The Cellular Port menu is displayed. You can now
select a setting, modify it, and then save and exit.
1) Cellular Port
GPRS Cellular Port * GSM Cellular Port * CDMA Cellular Port **
A) GPRS B) Protocol
C) Inbound/Outbound D) Wireless Connection
E) Local Port F) Remote Port
G) Remote IP
J) View or change Phone Number/IP Conversion
Table K) Wireless Band
L) APN User Name M) APN Password
N) APN Server O) Phy TimeOut (Min)
P) DLE Mode Q) TCP TxDelay
R) HandShake TimeOut (sec)
Z) Enter Wireless Modem Command Mode
A) GSM B) Protocol
K) Wireless Band
R) HandShake TimeOut (sec)
Z) Enter Wireless Modem Command
Mode
2) Analog (PSTN) Port 3) System Login
A) Modem Initilazition String
B) Modem Settings
A) No Login
B) Login Required
C) Change Password
5) Set Email 6) Reset Parameters to
A) CDMA B) Protocol
C) Inbound/Outbound
D) Wireless Connection
E) Local Port F) Remote Port
G) Remote IP
J) View or change Phone
Number/IP Conversion Table
Z) Enter Wireless Modem
Command Mode
4) Timers
A) Menu Inactivity Timer
B) No Signal Reset Timer (Not
applicable to CDMA)
7)System Reboot
Default
A) SMTP UN B) SMTP PW
C) SMTP PORT D) SMTP Authentication
E) SMTP Server F) Domain
G) Sender’s Name H) Sender’s Address
I) Recipient’s Address
Note: * MT100A2W-G only.
** MT100A2W only.
Are you sure you want to reset ALL
parameters back to Defaults?
yes/no
Are you sure you want to reboot the
unit?
Yes/no
Multi-Tech Systems, Inc. MultiConnect AW User Guide 19
Page 20

GPRS Cellular Port Configuration
Chapter 4 – Device Configuration
Network Dependent
Option Default Description
A) GPRS or GSM
B) Protocol
C) Inbound/Outbound
GPRS The GPRS or GSM option is based on the SIM
installed in the unit.
1) GPRS option requires a packet switched cellular
network.
TCP Client
Outbound
1) TCP Client option is an internet protocol intended
to get data from one network device to another.
2) Telnet option is a client communication.
3) UDP option is a connectionless protocol in that
UDP makes no provision for acknowledgement of
packets received.
4) PassThru option allows for data to be transferred
from a legacy device to a remote destination without
being modified.
0) Auto Detect automatically detects between
inbound and outbound.
1) PPP Client (Outbound) option is for outbound
traffic from the MultiConnect AW to the wireless
network.
2) PPP Client Inbound (Listening) option is for
inbound traffic to the MultiConnect AW
D) Wireless Connection
Multi-Tech Systems, Inc. MultiConnect AW User Guide 20
OnDemand
1) On-Demand option initiates the wireless
connection when a request made.
2) Always On option is always connected to the
cellular network.
ATTENTION: If Always On is desired, wait until you
have made all your other configuration changes
before selecting this option.
Page 21

Port Dependent
Option Default Description
E) Local Port
23
Local Port is the port that the MultiConnect AW
listens on for inbound traffic.
F) Remote Port
0
Remote Port is the IP port that the remote device
listens on. When you change the Remote Port, it
becomes the new default port.
G) Remote IP
none
Remote IP is the IP address of the device you are
connecting to for outbound. When you change the
Remote IP, it becomes the new default IP.
Phone Number/IP Conversion Table
Option Default Selection
J) View or change
Phone Number/IP
Conversion Table
This option allows for additional connections to be
added to the Phone Number/ IP Conversion Table.
When a dialed number matches one of those in this
table, the default Remote Port and IP options are
overridden during the call. If the entry does not
match, the default is used. For detail instructions on
entering data in this table, refer to View or Change
Phone Number/IP Conversion Table in this chapter.
Wireless Band
Option Default Selection
K) Wireless Band
This option is default depending on the region of the
world the unit is set up for, e.g., 900/1800MHz for
Europe.
0) dual-band 850/1900 MHz
1) dual-band 900/1800 MHz
APN* Dependent
Option Default Selection
L) APN User Name
The APN User Name is assigned by your cellular
network provider for security and authentication
purposes. The user name may not be required by all
network providers.
M) APN Password
The APN Password is assigned by your cellular
network provider for security and authentication
purposes. The password may not be required by all
network providers.
N) APN Server
The APN assigned by your cellular network provider.
Chapter 4 – Device Configuration
GPRS Cellular Port Configuration
* The Access Point Name (APN) is a server name that your account is setup on with your provider. Your
APN will be provided to you by your provider. Here are some well known APNs:
● AT&T; PROXY, INTERNET, or PUBLIC
● T-Mobile; INTERNET2, VOICESSTREAM.COM, INTERNET2, or WAP.VOICESTREAM.COM
● Rogers Wireless of Canada; INTERNET.COM
Multi-Tech Systems, Inc. MultiConnect AW User Guide 21
Page 22

MultiConnect AW Security
Option Default Selection
O) PhyTimeout (Min)
P) DLE Mode
Q) TCP TxDelay 100
R) Handshake TimeOut
(sec)
Option Default Selection
Z) Enter Wireless
Modem Command
Mode
15 Min
1
milliseconds
90 seconds
MultiConnect AW Security
The Physical Time out option is a time limit in which
the MultiConnect AW will drop the connection to the
cellular network if no activity is sensed on the
network. The range is zero to 255 minutes, with 0
disabling the time out. The default is 15 minutes.
Normally, this option should be left in the default
value.
DLE Mode 0 is enabled, no specific process is
needed on [ETX] characters. This means that is not
possible for a host to request an end of connection
or to receive a clear indication of the end of a
connection from the TCP/IP stack.
DLE Mode 1 is enabled, the [EXT] characters
means a request or an indication of end of
correction. As a consequence, [EXT] characters that
belong to the payload must be sent by the host on
the serial port preceded by a DLE character.
Similarly, EXT characters received by the TCP/IP
stack from the Internet are sent to the host through
the serial port preceded by a DLE character.
This option determines the time delay introduced
before sending a TCP frame that has not been
entirely filled with user data. The time is entered in
milliseconds, and it should be noted that a value of 0
initiates the sending of a TCP frame as soon as
possible after the reception of a single character
value from the host.
The handshake timeout is a wireless modem
timeout of between 1 and 255 seconds. Default is 90
seconds.
This option opens the command port on the wireless
modem to enter AT commands.
Chapter 4 – Device Configuration
GPRS Cellular Port Configuration
Multi-Tech Systems, Inc. MultiConnect AW User Guide 22
Page 23

GSM Cellular Port Configuration
Chapter 4 – Device Configuration
Option Default Description
A) GPRS or GSM
B) Protocol
Option Default Selection
K) Wireless Band
Option Default Selection
R) Handshake TimeOut
(sec)
Z) Enter Wireless
Modem Command
Mode
Network Dependent
GPRS The GPRS or GSM option is based on the SIM
installed in the unit.
GSM option requires a circuit switched cellular
network.
PassThru
MultiConnect AW Security
90 seconds
This option defaults to PassThru and there are no
additional selections.
Wireless Band
This option is default depending on the region of the
world the unit is set up for, e.g., 850/1900MHz for
NAM.
0) dual-band 850/1900 MHz
1) dual-band 900/1800 MHz
The handshake timeout is a wireless modem
timeout of between 1 and 255 seconds.
This option opens the command port on the wireless
modem to enter AT commands.
Multi-Tech Systems, Inc. MultiConnect AW User Guide 23
Page 24

Chapter 4 – Device Configuration
CDMA Cellular Port Configuration
When an external Multi-Tech CDMA modem is connected to the MODEM port of a MT100A2W unit and the unit is
powered up, the Device Configuration menus will default to a CDMA Cellular Network.
Network Dependent
Option Default Description
A) CDMA
B) Protocol
C) Inbound/Outbound
D) Wireless Connection
CDMA No selection
TCPClient
Outbound
OnDemand
1) TCPClient option is an internet protocol
intended to get data from one network device
to another.
2) Telnet option is a client communication.
3) UDP option is a connectionless protocol in
that UDP makes no provision for
acknowledgement of packets received.
4) PassThru option allows for data to be
transferred from a legacy device to a remote
destination without being modified.
0) Auto Detect automatically detects
between inbound and outbound.
1) PPP Client (Outbound) option is for
outbound traffic from the MultiConnect AW to
the wireless network.
2) PPP Client Inbound (Listening) option is
for inbound traffic to the MultiConnect AW
1) On-Demand option initiates the wireless
connection when a request made.
2) Always On option is always connected to
the cellular network.
ATTENTION: If Always On is desired, wait
until you have made all your other
configuration changes before selecting this
option.
Multi-Tech Systems, Inc. MultiConnect AW User Guide 24
Page 25

Option Default Description
E) Local Port
F) Remote Port
G) Remote IP
Option Default Selection
J) View or change
Phone Number/IP
Conversion Table
Option Default Selection
Z) Enter Wireless
Modem Command
Mode
Port Dependent
23
Local Port is the port that the MultiConnect AW
listens on for inbound traffic.
0
Remote Port is the IP port that the remote device
listens on. When you change the Remote Port, it
becomes the new default port.
none
Remote IP is the IP address of the device you are
connecting to for outbound. When you change the
Remote IP, it becomes the new default IP.
Phone Number/IP Conversion Table
This option allows for additional connections to be
added to the Phone Number/ IP Conversion Table.
When a dialed number matches one of those in this
table, the default Remote Port and IP options are
overridden during the call. If the entry does not
match, the default is used. For detail instructions on
entering data in this table, refer to View or Change
Phone Number/IP Conversion Table in this chapter.
MultiConnect AW Security
This option opens the command port on the wireless
modem to enter AT commands.
Chapter 4 – Device Configuration
CDMA Cellular Port Configuration
Multi-Tech Systems, Inc. MultiConnect AW User Guide 25
Page 26

Chapter 4 – Device Configuration
Cellular Port Configuration
View or Change Phone Number/IP Conversion Table
The Phone Number/IP Conversion Table allows you to look up an IP address using an analog (PSTN) phone
number. The Phone Number/IP Conversion Table allows for 5 entries. When a dialed number matches one of
those in the table, the default Remote Port and Remote IP options in the Cellular Port menu are overridden
during this call.
To set up the Conversion Table, you have to:
Entries Description
Enter option to modify => _
Enter Server Port Number (ESC to abort) :
Enter Server Phone Number (ESC to abort) :
Enter Server IP (ESC to abort):
When you select the option to modify and press ENTER, the response is for you to add the server port number
and press ENTER, then, the phone number is requested, and finally the server IP address is requested. Once
you enter the server IP address and press ENTER, the complete entry is saved to the Phone Number/IP
Conversion Table. You do not have the press the + key to save your entries.
Enter a number for the entry you want to
change and press ENTER.
Enter a numerical port number and press
ENTER.
Enter the telephone number without the dashes
between the area code, exchange, and
extension number.
Enter the IP address of the server on your
cellular network.
Multi-Tech Systems, Inc. MultiConnect AW User Guide 26
Page 27

Analog (PSTN) Port Configuration
Chapter 4 – Device Configuration
Option Default Selection
A) Modem Initialization
String
B) Modem Settings
“ “ The Modem Initialization String allows
you to enter initialization commands into
the internal analog modem.
V34,33600 The Modem Settings option allows you to
reconfigure the internal analog modem.
By selecting option B, a submenu is
displayed allowing you change the baud
rate, flow control, etc.
Refer to the PSTN Modem Settings menu
below.
Multi-Tech Systems, Inc. MultiConnect AW User Guide 27
Page 28

Chapter 4 – Device Configuration
Analog (PSTN) Modem Settings
PSTN Modem Settings
The PSTN Modem Settings menu allow you to reconfigure the customer’s analog modem. The seven options are
described in the table below.
PSTN Modem Settings
Option Default Selection
A) Rate
B) Modulation
C) Error Correction
D) Data Compression
E) Flow Control
F) Auto Modulation
Negotiation
G) Handshake TimeOut
Timer (sec)
33600
V34
V.42/MNP
V.42bis/MNPS Data Compression options are:
RTS/CTS
ON
90
The Rate is the maximum speed of the customer’s
analog modem. The options are: A) 56000
B) 33600 C) 28800 D) 14400 E) 12000 F) 9600
G) 4800 H) 2400 I) 2200 J) 1200 K)300.
The customer’s analog modem modulation options
are: A) V92 B) V90 C) V34 D) V32bis E) V32
F) V22bis G) V22 H) BELL212A I) BELL103
Error Correction options are: A) V.42/MNP B) V.42
Only C) MNP Only D) Direct Mode E) NoECM
A) Enable V.42bis/MNP5 Data Compression or
B) Disable Data Compression.
Flow Control options are: A) RTS/CTS
B) XON/XOFF C) Disable
The Auto Modulation Negotiation options are: A) ON
or B) OFF
The Handshake Time Out Timer is a range from 1 to
255 seconds. Zero disables the timer.
Multi-Tech Systems, Inc. MultiConnect AW User Guide 28
Page 29

System Login
Chapter 4 – Device Configuration
Option Description
A) No Login The No Login option allows you to gain access to
B) Login Required Login Required option requires that you login to
C) Change PassWord The Change PassWord option allows you to
the MultiConnect AW without logging into the
device.
the MultiConnect AW before gaining access to the
device.
change the pass word of the MultiConnect AW
device. The default password is admin. All lower
case letters.
Multi-Tech Systems, Inc. MultiConnect AW User Guide 29
Page 30

Timers
Chapter 4 – Device Configuration
Option Default Selection
A) Menu Inactivity Timer
B) No Signal Reset Timer *
Note: * MT100A2W-G only.
30 (sec)
300 (sec)
The Menu Inactivity Timer is a time limit
on how long a menu is displayed with
no activity. This inactivity time is
displayed in seconds. Zero seconds
disables the timer.
The MultiConnect AW resets itself if it
can not find a signal strong enough to
establish a wireless connection. This
timer is displayed in seconds. Zero
seconds disables timer.
Multi-Tech Systems, Inc. MultiConnect AW User Guide 30
Page 31

Chapter 4 – Device Configuration
Setup Email
The email function is to send the network assigned public IP address and user assigned local port number to the
recipient email address. This email is used for inbound only. The IP address and port number sent in this email are
displayed after the last option in the Cellular Settings menu and above the @ Main Menu option. The assigned public
IP address and port number are displayed in
“MY PUBLIC IP:
Option Default Selection
A) SMTP UN The SMTP User Name, UN, option is the user name of
the email server.
B) SMTP PW The SMTP Pass Word, PW, option is the pass word of
the email server.
C) SMTP PORT The SMTP Port is the port that the email server listens
on. The default port number is 25.
D) SMTP Authentication If your email account requires authentication, the
MultiConnect AW will send the user name and pass word
to the mail server. The default is to have authentication
on.
E) SMTP Server
F) Domain The Domain option is the domain that the mail server is
G) Sender’s Name
H) Sender’s Address The Sender’s Address is the address of where the email
I) Recipient’s Address This is the IP address of where the email is being sent
SMTP Server is the IP address/name of the mail server.
on.
The Sender’s Name is who sent the email.
came from.
to. If no recipient address, the email service is disabled.
Multi-Tech Systems, Inc. MultiConnect AW User Guide 31
Page 32

Reset Parameters to Default
Chapter 4 – Device Configuration
Option Description
Are you sure you want to reset ALL
parameters back to Defaults?
This option requires either a yes or no.
You have to enter the word, not just a
letter y/n
Multi-Tech Systems, Inc. MultiConnect AW User Guide 32
Page 33

System Reboot
Chapter 4 – Device Configuration
Option Description
Are you sure you want to
reboot the unit?
This option requires either a yes/no or y/n.
Multi-Tech Systems, Inc. MultiConnect AW User Guide 33
Page 34

Appendix A – Regulatory Compliance
Appendix A – Regulatory
Compliance
EMC, Safety, and R&TTE Directive Compliance
The CE mark is affixed to this product to confirm compliance with the following European Community Directives:
Council Directive 2004/108/EC of 31 December 2004 on the approximation of the laws of Member States
relating to electromagnetic compatibility;
and
Council Directive 2006/95/EC of 12 December 2006 on the harmonization of the laws of Member States
relating to electrical equipment designed for use within certain voltage limits;
and
Council Directive 1999/5/EC of 9 March 1999 on radio equipment and telecommunications terminal
equipment and the mutual recognition of their conformity.
International Modem Restrictions
Some dialing and answering defaults and restrictions may vary for international modems. Changing settings may
cause a modem to become non-compliant with national telecom requirements in specific countries. Also note that
some software packages may have features or lack restrictions that may cause the modem to become noncompliant.
FCC Part 15 Class B Statement
This equipment has been tested and found to comply with the limits for a Class B digital device, pursuant to 47 CFR
Part 15 regulations. The stated limits in this regulation are designed to provide reasonable protection against harmful
interference in a residential installation. This equipment generates, uses, and can radiate radio frequency energy, and
if not installed and used in accordance with the instructions, may cause harmful interference to radio
communications. However, there is no guarantee that interference will not occur in a particular installation. If this
equipment does cause harmful interference to radio or television reception, which can be determined by turning the
equipment off and on, the user is encouraged to try to correct the interference by one or more of the following
measures:
• Reorient or relocate the receiving antenna.
• Increase the separation between the equipment and receiver.
• Plug the equipment into an outlet on a circuit different from that to which the receiver is connected.
• Consult the dealer or an experienced radio/TV technician for help.
This device complies with Part 15 of the 47 CFR rules. Operation of this device is subject to the following conditions:
(1) This device may not cause harmful interference, and (2) this device must accept any interference that may cause
undesired operation.
Warning: Changes or modifications to this unit not expressly approved by the party responsible
for compliance could void the user’s authority to operate the equipment.
Industry Canada
This Class B digital apparatus meets all requirements of the Canadian Interference-Causing Equipment Regulations.
Cet appareil numérique de la classe B respecte toutes les exigences du Reglement Canadien sur le matériel
brouilleur
Multi-Tech Systems, Inc. MultiConnect AW User Guide 34
Page 35

Appendix B – WEEE Statement
Appendix B - Waste Electrical and
Electronic Equipment (WEEE)
Statement
July, 2005
The WEEE directive places an obligation on EU-based manufacturers, distributors, retailers and importers to takeback electronics products at the end of their useful life. A sister Directive, ROHS (Restriction of Hazardous
Substances) complements the WEEE Directive by banning the presence of specific hazardous substances in the
products at the design phase. The WEEE Directive covers all Multi-Tech products imported into the EU as of August
13, 2005. EU-based manufacturers, distributors, retailers and importers are obliged to finance the costs of recovery
from municipal collection points, reuse, and recycling of specified percentages per the WEEE requirements.
Instructions for Disposal of WEEE by Users in the European Union
The symbol shown below is on the product or on its packaging, which indicates that this product must not be
disposed of with other waste. Instead, it is the user’s responsibility to dispose of their waste equipment by handing it
over to a designated collection point for the recycling of waste electrical and electronic equipment. The separate
collection and recycling of your waste equipment at the time of disposal will help to conserve natural resources and
ensure that it is recycled in a manner that protects human health and the environment. For more information about
where you can drop off your waste equipment for recycling, please contact your local city office, your household
waste disposal service or where you purchased the product.
Multi-Tech Systems, Inc. MultiConnect AW User Guide 35
Page 36

Appendix C – ROHS HT/TS Substance
Concentration
依照中国标准的有毒有害物质信息
根据中华人民共和国信息产业部 (MII) 制定的电子信息产品 (EIP)
标准-中华人民共和国《电子信息产品污染控制管理办法》(第 39 号),也称作中国
RoHS,下表列出了 Multi-Tech Systems Inc. 产品中可能含有的有毒物质 (TS) 或有害物质 (HS)
的名称及含量水平方面的信息。
Appendix C – China ROHS
成分名称
印刷电路板
电阻器
电容器
铁氧体磁环
继电器/光学部件
IC
二极管/晶体管
振荡器和晶振
调节器
电压传感器
变压器
扬声器
连接器
LED
螺丝、螺母以及
其它五金件
交流-直流电源
软件/文档 CD
手册和纸页
底盘
有害/有毒物质/元素
铅
(PB)
O O O O O O
X O O O O O
X O O O O O
O O O O O O
O O O O O O
O O O O O O
O O O O O O
X O O O O O
O O O O O O
O O O O O O
O O O O O O
O O O O O O
O O O O O O
O O O O O O
X O O O O O
O O O O O O
O O O O O O
O O O O O O
O O O O O O
X 表示所有使用类似材料的设备中有害/有毒物质的含量水平高于 SJ/Txxx-2006
限量要求。
O 表示不含该物质或者该物质的含量水平在上述限量要求之内。
汞
(Hg)
镉
(CD)
六价铬
(CR6+)
多溴联苯
(PBB)
多溴二苯醚
(PBDE)
Multi-Tech Systems, Inc. MultiConnect AW User Guide 36
 Loading...