

Page 1

Multi
Analog Communications Server
Access
®
ACS
MA100-1M
User Guide
Page 2

MultiAccess ACS User Guide
MA100-1M
PN S000351D, Version D
Copyright
This publication may not be reproduced, in whole or in part, without prior expressed written permission
from Multi-Tech Systems, Inc. All rights reserved.
Copyright © 2007, by Multi-Tech Systems, Inc.
Multi-Tech Systems, Inc. makes no representations or wa rranties with respect to the contents hereof and
specifically discla ims any implied warranti es of mercha ntability or fitness for any particular purpose.
Furthermore, Multi-Tech Systems, Inc. reserves the right to revise this publication and to make changes
from time to time in the content hereof without obligation of Mul ti-Tech Systems, Inc. to notify any person
or organization of such revisions or changes. Check Multi-tech’s Web site for current versions of our
product documentation.
Revisions
Revision Level Date Description
A 07/22/05 Initial release.
B 04/13/06 Added modem sharing and call-back security.
C 07/14/06 Change to single moun ting bracket and chang ed mounting dimension.
D 06/22/07 Manual revised to inclu d e so ftware version 1.03.
Trademarks
MultiAccess, Multi-Tech, Multi-Tec h Systems, Inc., and the Multi-Tech logo are trademarks of Multi-Tech
Systems, Inc.. All other products or technologies are the trademarks or registered trademarks of their
respective holders.
World Headquarters
Multi-Tech Systems, Inc.
2205 Woodale Drive
Mounds View, Minnesota 55112
Phone: 763-785-3500 or 800-328-9717
Fax: 763-785-9874
Technical Support
Country By Email By Phone
France: support@multitech.fr
Europe, Asia, Africa
U.S., Canada, all others:
support@multitech.co.uk
support@multitech.com
+(33) 1-64 61 0981
+(44) 118 959 7774
(800) 972-2439 or (763) 785-3500
Internet Address: http://www.multitech.com
Multi-Tech Systems, Inc. MultiAccess ACS User Guide 2
Page 3

Table of Contents
Table of Contents
Chapter 1 – Product Description & Specifications................................................................ ................5
Product Description ................................................................................................................................5
Features ................................................................................................................................................. 5
Package Contents ..................................................................................................................................6
Handling Precautions..................................................................................... ......................................... 6
LED Indicators............................................................................................... ......................................... 6
Product Specifications.................................... ... ... .. ... ...... .. ... ... ... ..... ... ... ... .. ... ...... .. ... ... ... .. ......................6
Chapter 2 – Installation............................................................................................................................ 7
Attaching the MultiAccess ACS to a Fixed Location................................................................................7
MultiAccess ACS Connections................................................................................................................ 8
Chapter 3 – Configuring Your MultiAccess ACS ...................................................................................9
Setting Admin PC to Startup IP Address................................................................................................. 9
Logging In ...............................................................................................................................................9
Setting MA100-1M IP Addresses..........................................................................................................10
Resetting Admin PC to Its Original IP Address.....................................................................................10
Logging In Again.......................................... .........................................................................................10
Time Configuration ...............................................................................................................................10
Setting Up the Mail Server.................................................................................................................... 11
Modem Setup.......................................................................................... .............................................11
Setting Authentication.............................................................. ............................................................. 13
Setting Up Local Users....................................................................... ..................................................14
Chapter 4 – Software..............................................................................................................................15
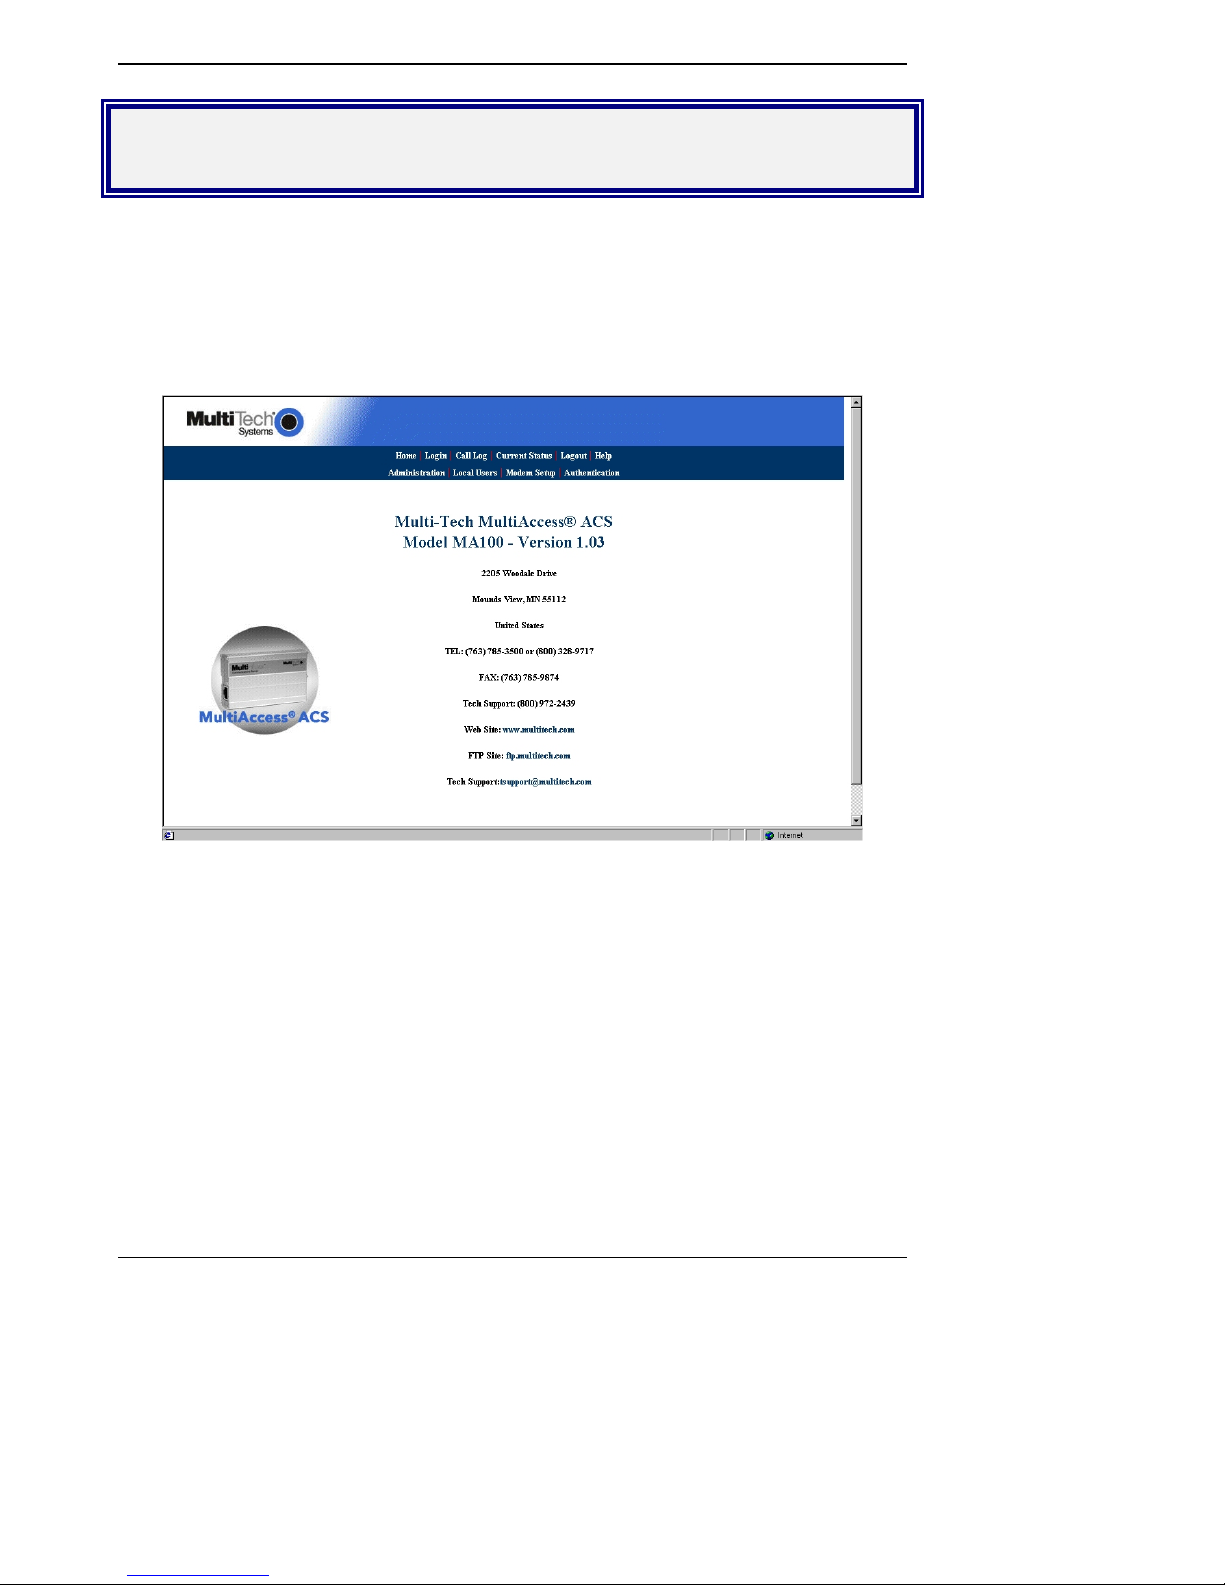
Home Screen....................................................................................................................................15
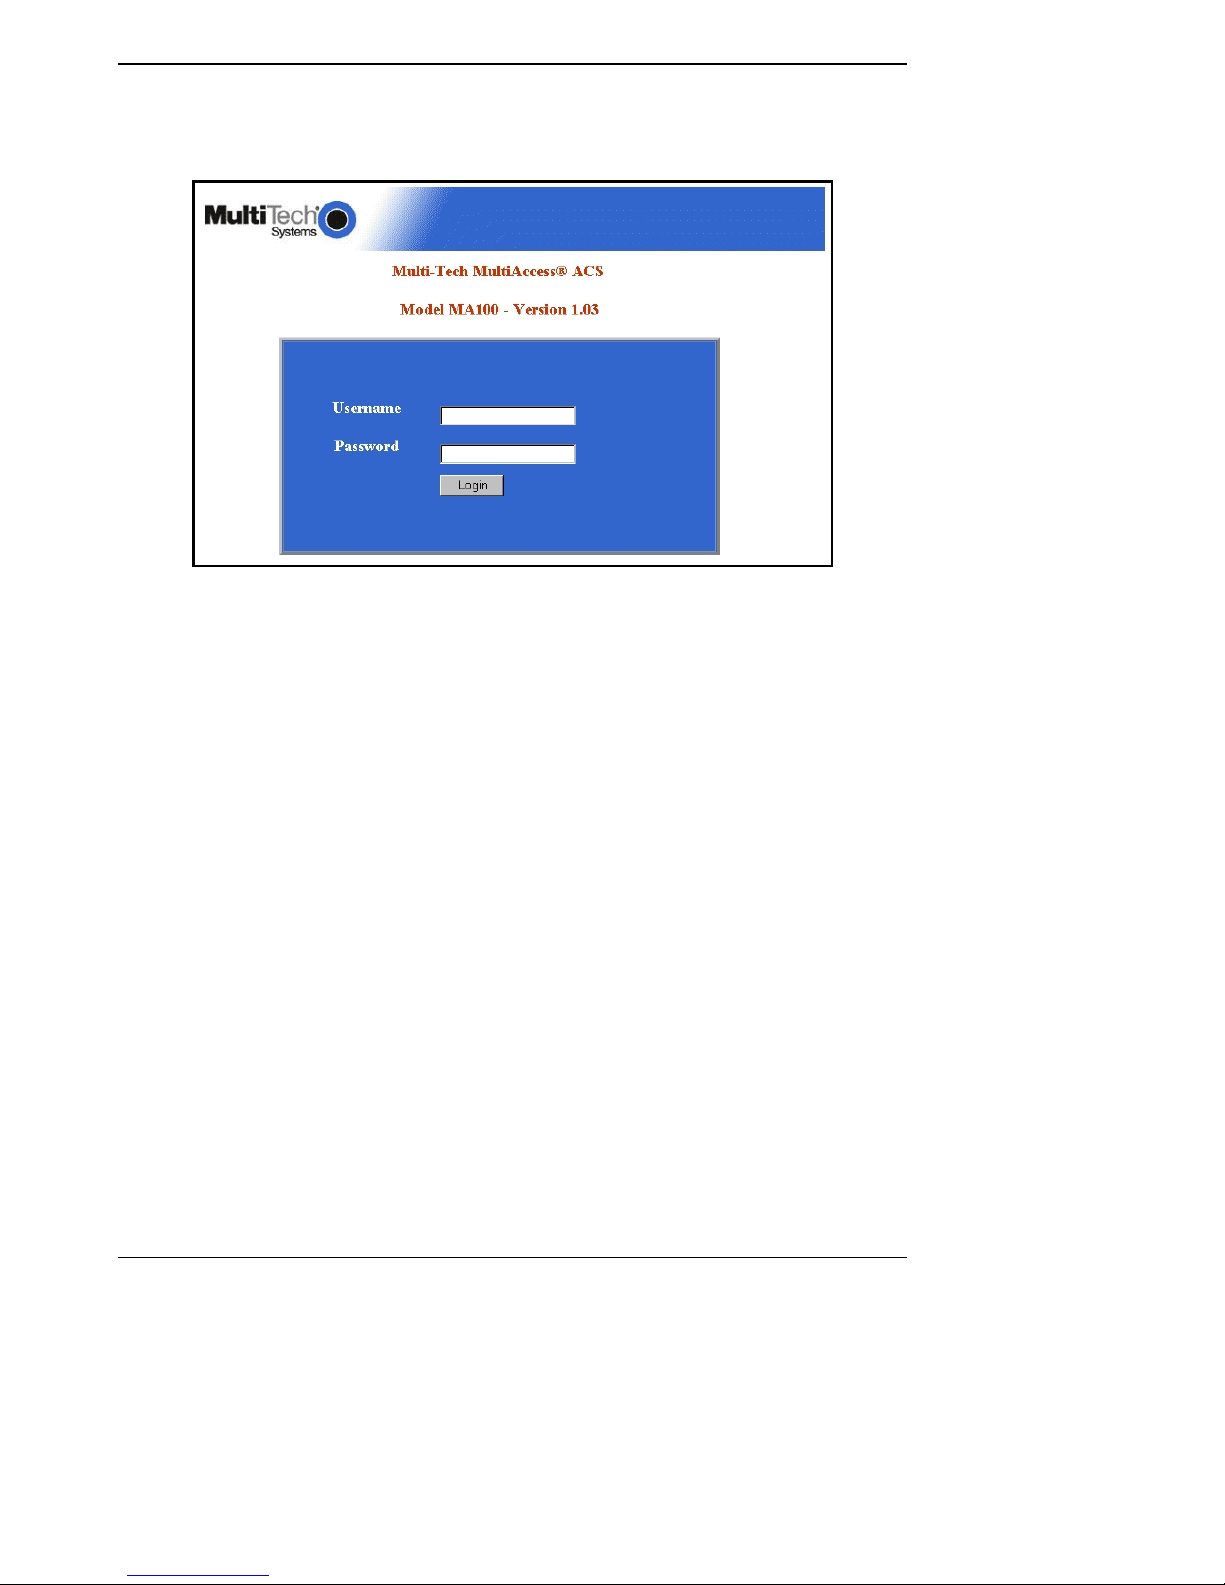
Login Screen.................................................. ...................................................................................16
Call Log Screen........................................................................................................................ .........17
Call Log ... .. ... ... ..... ... ... ... .. ... ...... ... .. ... ... ... ..... ... ... .. ... ... ..... ... ... ... .. ...... ... .. ... ... ... ..... ... ... .. .......................18
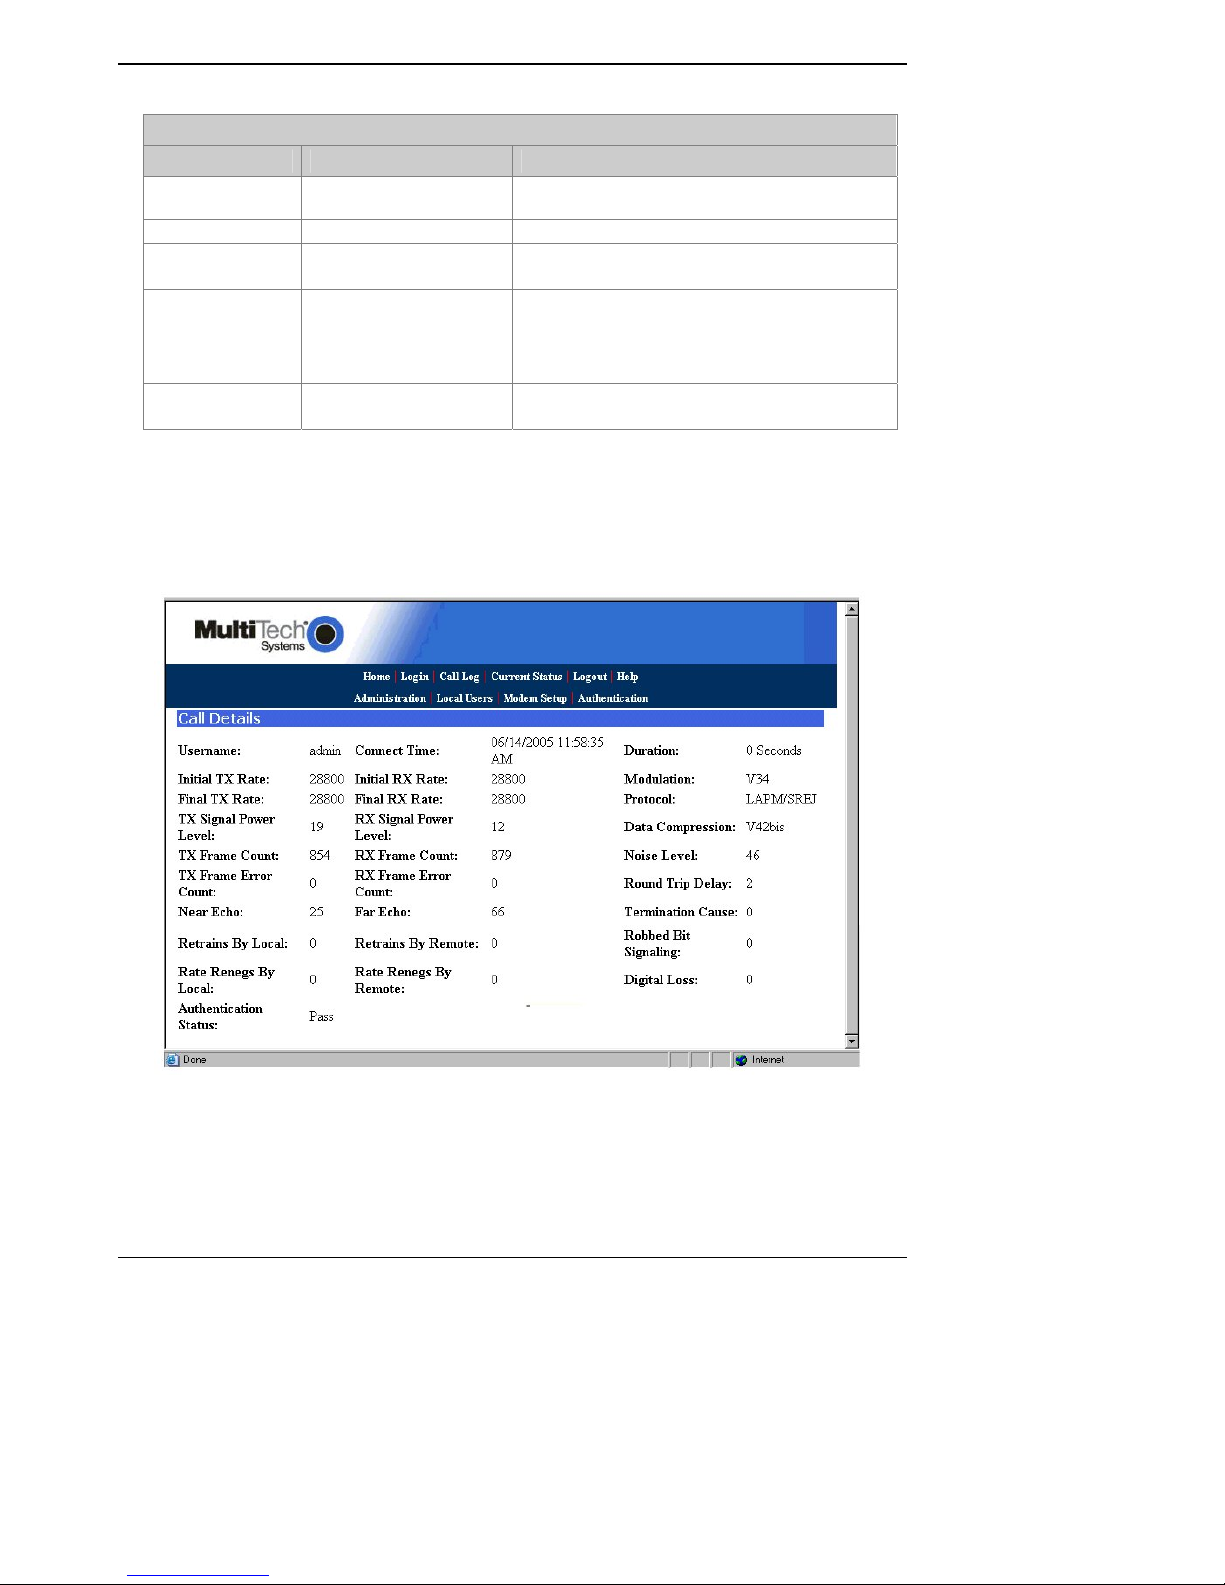
Call Details.................... ....................................................................................................................18
Current Status Screen..................................................................................... ..................................19
Logout Option....................................................................................................................................20
Help Screen........................................................................................................................ ..............20
Administration Screen........................................................................ ...............................................21
Local Users Data Base Screen.............................. ...........................................................................23
Modem Setup....................................................................... .............................................................24
Authentication Screen...................................................................................................... .................25
Chapter 5 – Troubleshooting................................................................................................................. 26
Chapter 6: Warranty, Service, & Repair................................................................................................28
Appendix A – Device Manager Utility.................................................................................................... 30
Adding a Device to the Manager...........................................................................................................31
Set Local User Sharing..... ..... ... ... ... .. ... ...... .. ... ... ... .. ...... ... .. ... ... ..... ... ... ... .. ... ...... ... .. ... ... .. ...... .................32
Synchronize Phonebooks/Local Users..................................................................................................33
Updating Firmware ...............................................................................................................................34
MultiAccess ACS Modem Firmware Update......................................................................................34
MultiAccess ACS Firmware Update...................................................................................................37
Appendix B – Regulatory Information.................................................................................................. 40
47 CFR Part 68 Telecom......................................................................................................................40
Multi-Tech Systems, Inc. MultiAccess ACS User Guide 3
Page 4

Table of Contents
47 CFR Part 15 Regulation.......... .........................................................................................................41
Fax Branding Statement.......................................................................................................................41
Canadian Limitations Notice................................................................................................................. 42
Industry Canada ..................................................... ..............................................................................42
Safety and EMC Product Approvals...................... .. ... ... ... .. ...... ... .. ... ... ..... ... ... ... ... .. ...... ... .. ... ... ... ...........42
Appendix C – Waste Electrical and Electronic Equipment (WEEE) Statement ................................. 43
Appendix D – C-ROHS HT/TS Substance Concentration....................................................................44
依照中国标准的有毒有害物质信息
Appendix E – MCSI2000 Parameters ....................................................................................................45
Setting Up MCSI2000 Com Port Redirector....................................................................................... ... 45
Appendix F – Modem AT Commands ...................................................................................................46
AT Commands............... ... ... ..... ... ... .. ... ...... .. ... ... ... .. ...... ... .. ... ... ... ..... ... ... .. ... ... ...... .. ... ... ... .. ....................46
Escape AT Commands......................................................................................................................... 59
V.92 Commands.................... ... ... ... ..... ... ... .. ... ... ..... ... ... ... .. ... ...... .. ... ... ... .. ...... ... .. ... ... ... ..... ... ... ..............60
S-Registers........................................................... ................................................................................65
Result Codes........................................................................................................................................ 68
Index........................................................................................................................................................70
.............................................................. ..........................................44
Multi-Tech Systems, Inc. MultiAccess ACS User Guide 4
Page 5
Chapter 1 – Product Description and Specifications
Chapter 1 – Product Description &
Specifications
Product Description
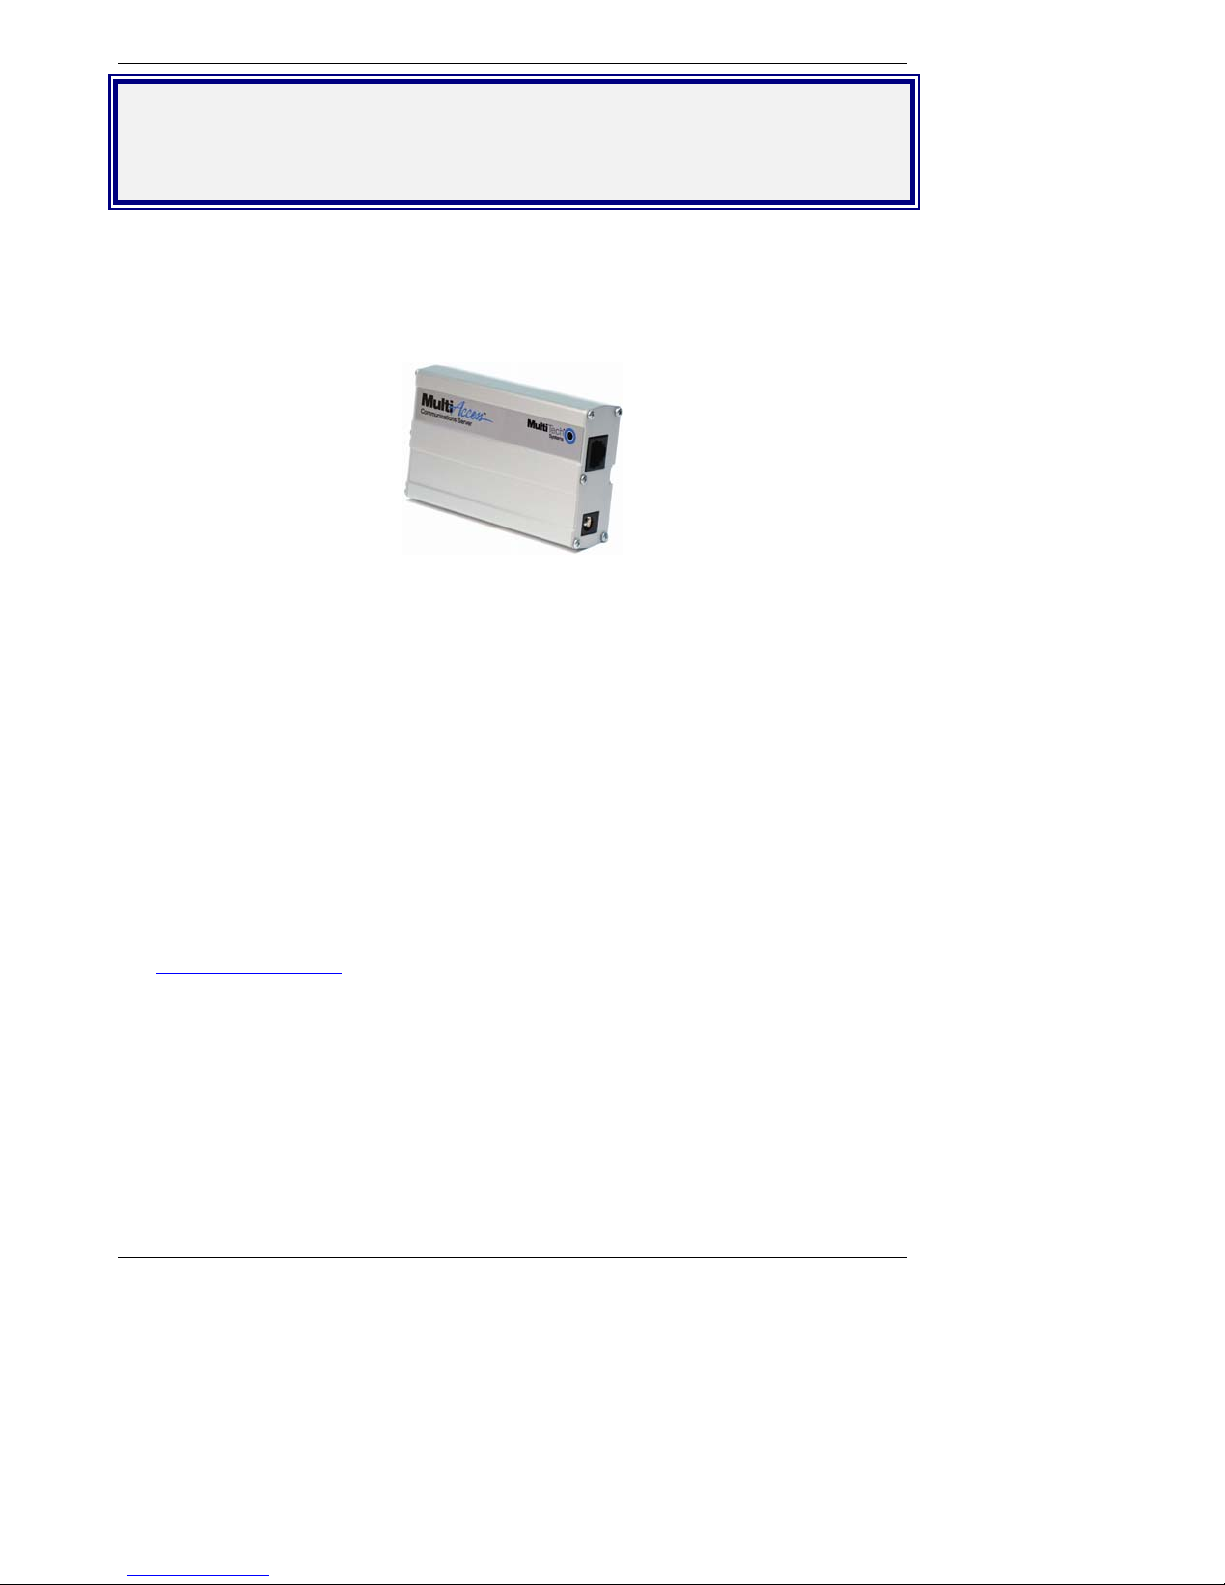
The MultiAcces ACS single-port communications server provides connectivity to the corporate LAN for
telecommuters and mobile users, or to remotely installed equipment, via one integrated V.92/56K
modem. MultiAccess’ small size makes it ideal for users who need remote access on a limited basis, but
don’t have room for a larger system or where remote access is needed on a temporary basis for remote
diagnostics.
The MultiAccess ACS has two roles (usage), RAS and Modem Sharing.
RAS Solution: The MultiAccess can be used as a dial-in PPP Remote Acce ss Server in a LAN to Client
environment. The purpose is to give a remote node (i.e., Microsoft Dail-up Networking clients) IP access
to the same subnet and LAN the ACS is installed on. Masquerading (NAT) and LAN to LAN routing
(assignment of an entire subnet) are IP networking techniques not supported by the ACS. The supported
PPP security protocol (means of communicating user credentials between PPP end points) is PAP only.
Modem Sharing Solution: The modem in the ACS can be a shared resource on your network. Comput ers
with network asscess to the ACS can use Telnet on port 7000 and get direct AT command access to the
modem in the ACS, for either outbound or inbound calls. A common way to take advantage of this role is
by installing Com Port Redirector Software (i.e., Multi-Tech’s MCSI2000 for Windows) on your
workstation(s). The redirector adds a vir tual com port to the workstation and uses Telnet to map, redirect,
the com port to the modem. The redirector and Telnet session replaces the UART based hardware of a
PC and serial cable connection normally found in traditional modem installations. A communication
program using this virtual com port has its data redirected to and from the modem within the ACS, making
the modem appear as if it is directly attached to a communication port on the workstation.
MCSI2000 Utility is provided on the MultiAccess CD and a summary of the pa rameters are presented in
Appendix E.
Modem AT Commands are presented in Appendix F.
For the latest revision of the MultiAccess User Documentation, refer to the Multi-Tech Systems, Inc. Web
site: http://www.multitech.com
Features
• One integrated V.92/56K modem
• Supports dial-out for clients on IP networks
• Modem supports V.92/56K dial-out and V.34/33.6K dial-in connections
• Client authentication provided through RADIUS or local database
• Callback security using local database
• Connects to 10/100BaseT Ethernet
• Industry-standard PPP client support
• Web server interface for system configuration and management
• Flash memory on modem and server for easy updates
• Two-year warranty
Multi-Tech Systems, Inc. MultiAccess ACS User Guide 5
Page 6
Chapter 1 – Product Description and Specifications
Package Contents
The MultiAccess package contains:
• One MultiAccess ACS
• One universal power supply with power cord
• One mounting bracket
• Four adhesive-backed rubber feet for table-top mounting
• One Quick Start Guide
• One product CD
Handling Precautions
All Devices must be handled with certain precautions to avoid damage due to the accumulation of static
charge. Although input protection circuitry has been incorporated into the Devices to minimize the effect
of this static buildup, proper precautions should be taken to avoid exposure to electrostatic discharge
during handling and mounting.
LED Indicators
Name Description
TD Transmit Data – Lit when transmitting data
RD Receive Data – Lit when receiving data
CD Carrier Detect – Lit when a valid carrier signal is detected
LNK Link – Lit when network data connection has been established.
ACT Activity – Lit when network data is being transmitted or received.
PWR
Power – Flashes as a heart beat when unit is functioning normally. If
the processor is locked up, this LED is on all the time.
Product Specifications
Category Description
LAN Port 10/100Baset Ethernet
WAN Port V.92/56K modem
Data Rates
Standards Data: V.92, V.90, enhanced V.34 & below
Error Correction: V.42
Data Compression: V.44, MNP® Class 5; V.42bis
System Management Web based - HTTP
Security Local database or RADIUS su pport
Power Usage Typical – 1.6W (175mA @ 9VDC)
Power Supply 100-240VAC; 50/60Hz universal input or 120VAC; 60Hz
Operating Temperature
Storage Temperature
Physical Dimensions
Certifications CE Mark
Multi-Tech Systems, Inc. MultiAccess ACS User Guide 6
V.92/56K downloads and 48K uploads speeds from V.92 servers;
V.90/56K downloads from V.90/K56flex servers; 33.6K bps transfers
with other servers.
Maximum – 2.2W (225mA @ 9.9VDC)
32° to +120°F (0° to 50°C); humidity range 20-90% (non-condensing)
-40°C to +85°C
4.3” w x 2.4” h x 0.94” d; 4.5 oz.
11 cm x 6.1 cm x 2.4 cm; .14K g
EMC: FCC Part 15 Class B, EN55022, EN55024
Safety: UL 60950, En60950
Telecom: 47CFR Part 68, CS03, TBR21
Other countries also included
Deleted: 
Page 7
Chapter 2 – Installation
Chapter 2 – Installation
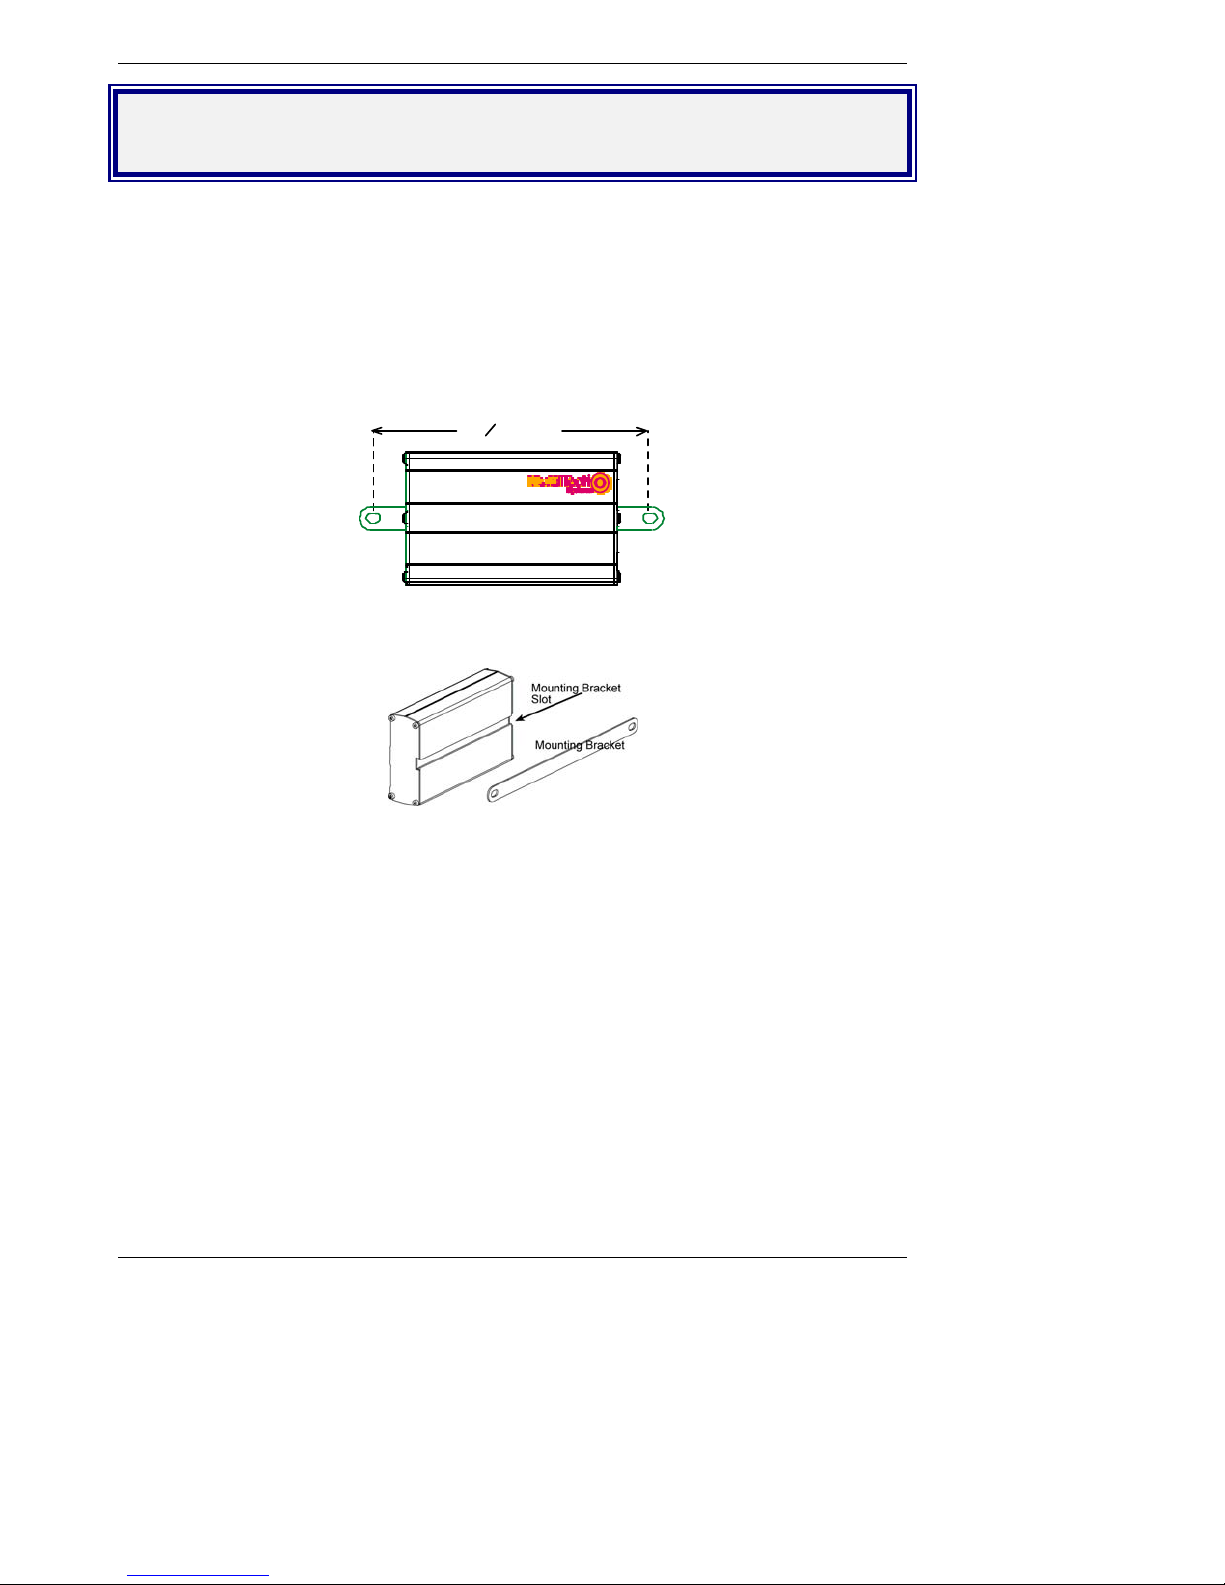
Attaching the MultiAccess ACS to a Fixed
Location
The MultiAccess is design to be used on the desktop or to be panel-mounted. To attach the br acket for
panel-mounting, following these steps:
1. Typically, the MultiAccess is mounted against a flat surface with two mounting screws. Drill the
mounting holes at the desired location. The mounting holes must separated by 4
to-center.
Screw Separat ion
15
inches4
16
2. To attach the bracket to the MultiAccess, slide the mounting bracket into the corresponding slots on
the back of the MultiAccess chassis.
15
/16 inches center-
3. Attach the adapter to the surface with two screws.
Multi-Tech Systems, Inc. MultiAccess ACS User Guide 7
Page 8
Chapter 2 – Installation
MultiAccess ACS Connections
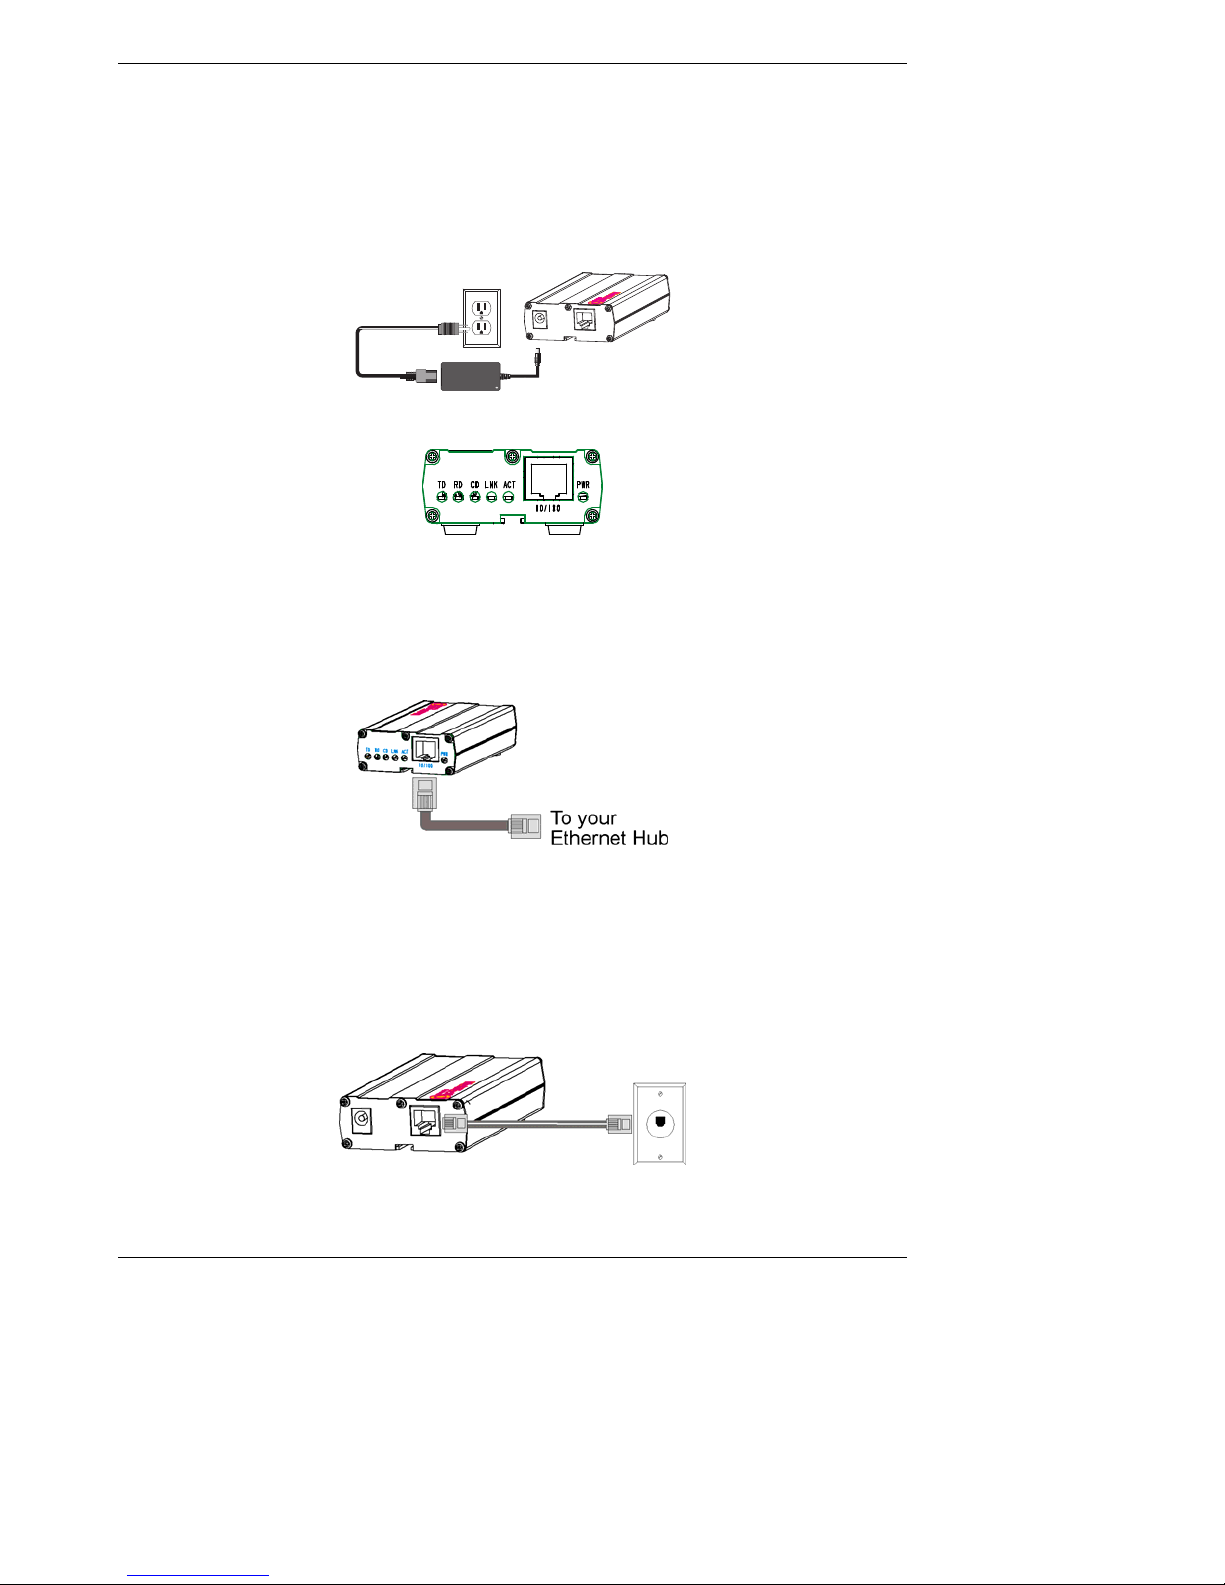
The MT100-1M is supplied power through an external power supply.
1. Plug the DC power transformer into the power outlet or power strip. Secure the other end to the PWR
on your MultiAccess. The DC power transformer is included with your MultiAccess.
Caution: Use only the DC power transform supplied with the MA100-1M. Use of any other
transformer voids the warranty and can damage the unit.
2. After power is applied, there is a 4-second delay before the PWR LED comes on. In normal
operation, the PWR LED will be flashing.
When you apply power, the MA100-1M performs a diagnostic self-test. The PWR indicator flashes as
a heart beat indicating that the processor is functioning correctly. If the PWR indicator does not come
on, check that the power supply is solidly connected and that the AC outlet is live. If the PWR
indicator flashes as a heart beat, then comes on solid, this indicates a malfunction within the unit.
3. Plug one end of your RJ45 Ethernet cable into the MA100-1M’s Ethernet jack and the other end into your
network Ethernet hub. This Ethernet cable is not included with your MA100-1M unit.
Caution: Before connecting to the Ethernet Network, make sure that the network to which you
are connecting the MA100-1M is not a 192.1 68.2.x subnet. Because the MA100-1M’s factory
default IP address is 192.168.2.1, connecting it to a network that has a different Device at that
same IP address would cause data interference.
If it is a 192.168.2.x subnet, connect from the Administrative PC to the MA100-1M using an
RJ45 crossover cable until the MA100-1M’s IP address has been configured. Thereafter,
connect the MA100-1M into the network with an ordinary RJ45 cable.
4. Plug one end of a phone cable into the telephone wall jack and the other end into the LINE jack on
the MA100-1M.
Multi-Tech Systems, Inc. MultiAccess ACS User Guide 8
Page 9

Chapter 3: Configuring your MultiAccess ACS
Chapter 3 – Config uring Your
MultiAccess ACS
Setting Admin PC to Startup IP Address
1. Connect a PC to your network. Record the original PC’s IP address before you change it.
2. Set the PC IP address to 192.168.2.x subnet (using any address excluding 192.168.2.1).
Logging In
1. Bring up a Web browser on your PC. At the browser’s address line, type the default address of
the MA100-1M: http://192.168.2.1
2. The Login screen will appear.
and press Enter.
At this point you can be assured that the MA100-1M is connected to the network.
If the Login screen does not appear, see item #1, “What if I can’t see the web page for my MA100-1M?”
in Chapter 5: Troubleshooting.
3. At the Login screen, enter admin (all lower case) in the Username field.
4. Enter admin (all lower case) in the Password field.
5. Click the Login button. The Home screen will appear. From this screen, you can access all of
the MA100-1M software screens.
Multi-Tech Systems, Inc. MultiAccess ACS User Guide 9
Page 10
Chapter 3: Configuring your MultiAccess ACS
Setting MA100-1M IP Addresses
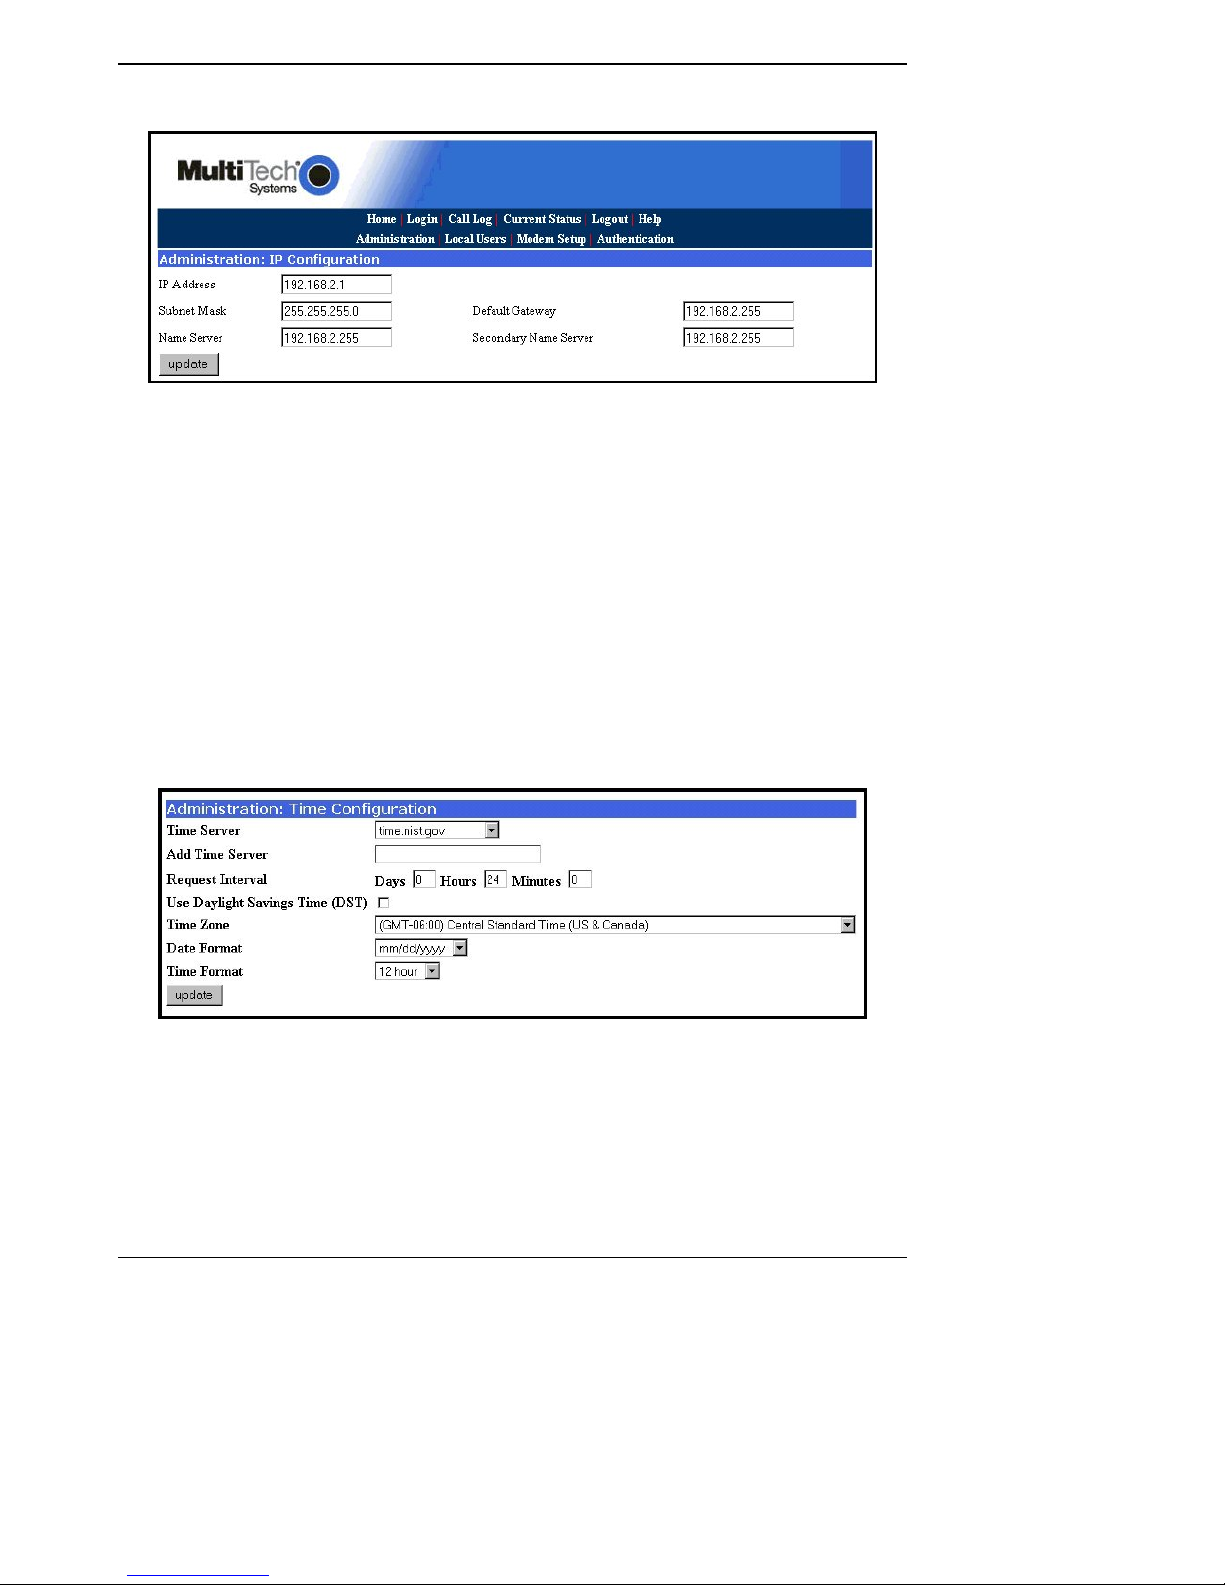
1. In the MA100-1M Administration screen, go to the IP Configuration fields.
2. Fill in the IP information that applies to your MA100-1M unit. The fields for “IP Address,” “Subnet
Mask,” “Default Gateway” and “Name Server” are required. A “Secondary Name Server” is
optional.
3. Click Update. After the Update button has been clicked, it takes 5 seconds for the MA100-1M
to update the addresses.
Resetting Admin PC to Its Original IP Address
In Setting the Admin PC to the network number of the MultiAccess, you recorded the original IP address
of the administrator’s PC and then reset it to the IP address required to allow communication with the
MA100-1M unit. You may now set the IP address of the administrator’s PC back to its original value or to
any other value that will allow you to communicate with the MA100-1M at its new IP address.
Logging In Again
Having reset the IP address of the administrator’s PC, you must log into the MA100-1M software again
with the MA100-1M’s new IP address. Go to the Login screen, enter admin as User Name and admin
as Password.
Time Conf ig uration
1. In the MultiAccess Administration screen, go to the Time Configuration fields.
2. In the Time Server window, select from the three time server URLs. The default is time.nist.gov.
The Time Server is a substitute for a real-time clock in the MultiAccess.
If you would like to add your own time server, you can enter the URL or IP address of your time
server in the Add Time Server window.
3. In the Request Interval window, select the Days, Hours, and Minutes that the MultiAccess will
update its clock from the time server.
4. If you are in daylight savings time, check the Use Daylight Savings Time (DST) box.
5. In the Time Zone, Date Format, and Time Format windows, choose the options for your time
zone.
6. Click the update button to change to your new parameters.
Multi-Tech Systems, Inc. MultiAccess ACS User Guide 10
Page 11
Chapter 3: Configuring your MultiAccess ACS
Setting Up the Mail Ser ver
1. From the Administration screen, go to the SMTP Configuration fields.
2. Enter the mail server address in the SMTP Server Address window (e.g., mail.multitech.com or
IP address).
3. Enter the SMTP Port (usually 25) that is used as the SMTP Server.
4. Enter the E-mail address of the administrator in the Administrator E-mai l window.
5. If the SMTP Server requires a User ID, enter the ID in the SMTP Serv er User ID window.
6. If th e SM TP Serve r requ i res a pass wor d , e nt er the pas sword in the SMTP Password window.
7. If you enter a password, retype the identical password in the Retype SMTP Password window.
8. Click on Update. At this point the MA100-1M will send the Administrator an email saying that
the mail server address has been updated.
Modem Setup
The Modem Setup menu gro up defines the Modem Sharing behavior and the General Modem Setup
Group defines the Country Code and number of rings before auto answ e r.
If you are using your MultiAccess for dial-in PPP access (RAS solution), you do not have to modify
Modem sharing, but, you have to select the Country Code. If you are using your MultiAccess for dial-out,
you will have to select one of the Modem Sharing options and select the Country Code.
With any of the Modem Sharing options, the TCP port number used to access the modem is 7000.
Modem Sharing with authentication means a login prompt will be issued to the socket when it is opened.
Who (what) ever opened the socket must provide appropriate credentials before access is given to the
modem. If RAW is also selected – support for RFC 2217 (com port control vial Telnet) will be disabled.
1. If you are using your MultiAccess for dial-in PPP access (RAS), click on the Country Code down
arrow and choose your country/region. Click on the update button to save your selection.
If you are using your MultiAccess for dial-out, you will have to click on the Modem Sharing down
arrow and choose one of the Modem Sharing options.
Caution: Modem sharing is accomplished by implementing a Telnet interface to the MultiAccess
modem. Secure the acce ss to the port via a firewall or IP filter settings to prevent unauthorized
use of your modem resource.
No Authentication. Immediate access is given to the modem.
Multi-Tech Systems, Inc. MultiAccess ACS User Guide 11
Page 12

Chapter 3: Configuring your MultiAccess ACS
Local Authentication. A valid set of credentials, defined in the Local User data base, is required
before access is granted.
Radius Authentication. A valid set of credentials, defined in the Radius User data base, is
required before access is granted.
Raw Mode with No Authentication. User data is treated “as is”, without interpretation, and no
authentication is required.
Raw Mode with Local Authentication. User data is treated “as is”, without interpretation, and a
valid set of credentials, defined in the Local User data base, is required before access is granted.
Raw Mode with Radius Authentication. User data is tr e ated “as is”, w ithout interpretation, and
a set of credentials, defined in the Radius User data base, is required before access is granted.
2. Select your Country Code by clicking on the down arrow and choose your country/region.
3. If the modem is being used for in-bound calls, select the number of ring(s) for auto answer.
4. Click Update
Multi-Tech Systems, Inc. MultiAccess ACS User Guide 12
Page 13
Chapter 3: Configuring your MultiAccess ACS
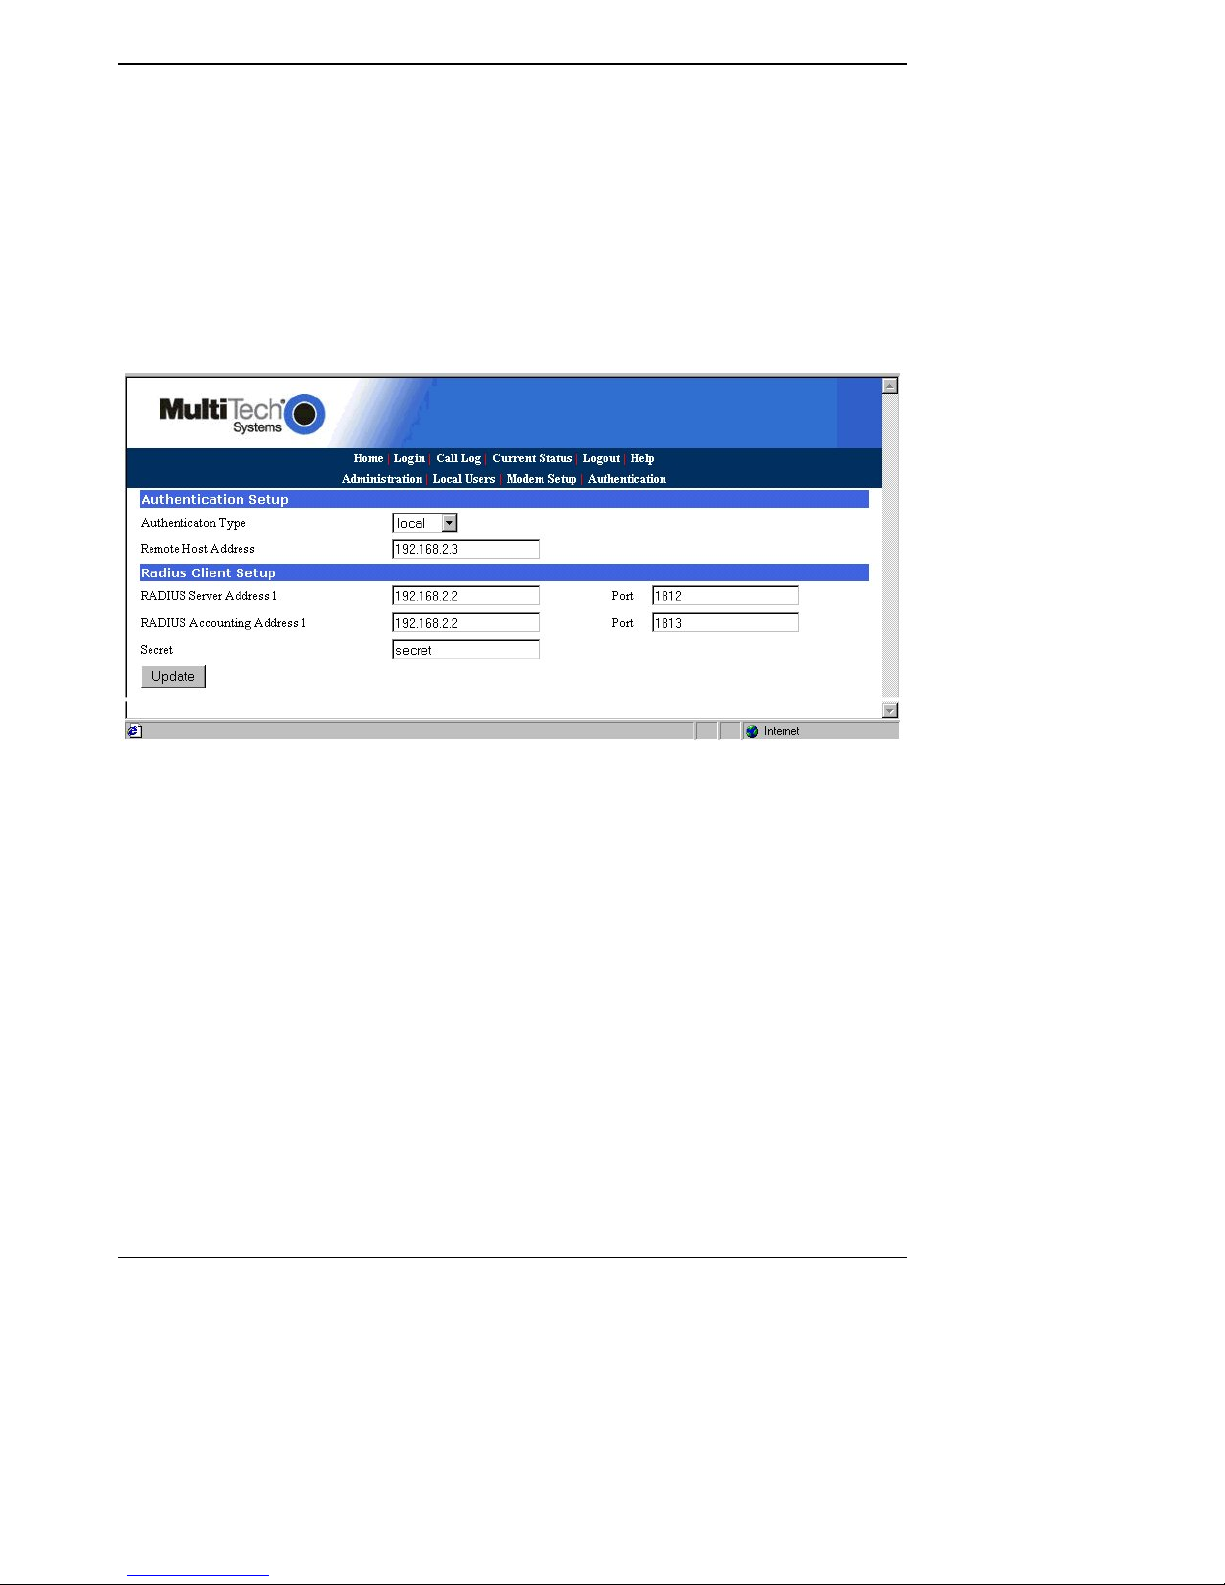
Setting Au thenticatio n
Authentication Type option defines where the database of user credentials reside. Loca l Authentication
refers to the Local User Database on the MultiAccess. Radius Authentication refers to a user database
controlled by a Radius Server outside the MultiAccess.
If a Radius Server is used for authentication, then the server has to be configured to receive requests
from the MA100-1M.
For RAS calls, dial-in PPP, a second static IP address is needed in the Remote Host Address field. This
address is for the dial-in user, PPP server. This address needs to be on the same subnet, network
number as that of the MultiAcces s.
Remote Host Address is not used if the modem sharing is set for authentication..
Radius Client Setup points to the Radius Server when the Authentication is Radius.
Authentication
1. In the Authentication Type, if your database for user credentials reside in the Local User
Database on the MultiAccess, then accept the default – local.
If your user database r esides on a Radius Server outside the MultiAccess, then click on the
down arrow and choose radius.
2. For RAS calls, enter a static IP Address in the Remote Host Address window which will be
assigned to the dial-in user. This Remote Host Address has to match the network number of the
MultiAccess.
RADIUS
1. If you are setting up MultiAccess to use Radius authentication, then enter the IP address of the
primary RADIUS Server in the RADIUS Server Address 1 window.
2. Enter the port number (usually port 1812) for the RADIUS Server in the top Port window.
3. Enter the IP address of the Radius Accounting server in the RADIUS Accounting Address 1
window.
4. Enter the port number (usually port 1813) for the Radius Accounting Server in the bottom Port
window.
5. Enter the Secret of the Radius Server that you are communicating with. The Secret has to be
identical to the one used by your Radius Server and is limited to 14 alphanumeric characters.
6. Click on the Update but ton to save your port configuration.
Multi-Tech Systems, Inc. MultiAccess ACS User Guide 13
Page 14
Chapter 3: Configuring your MultiAccess ACS
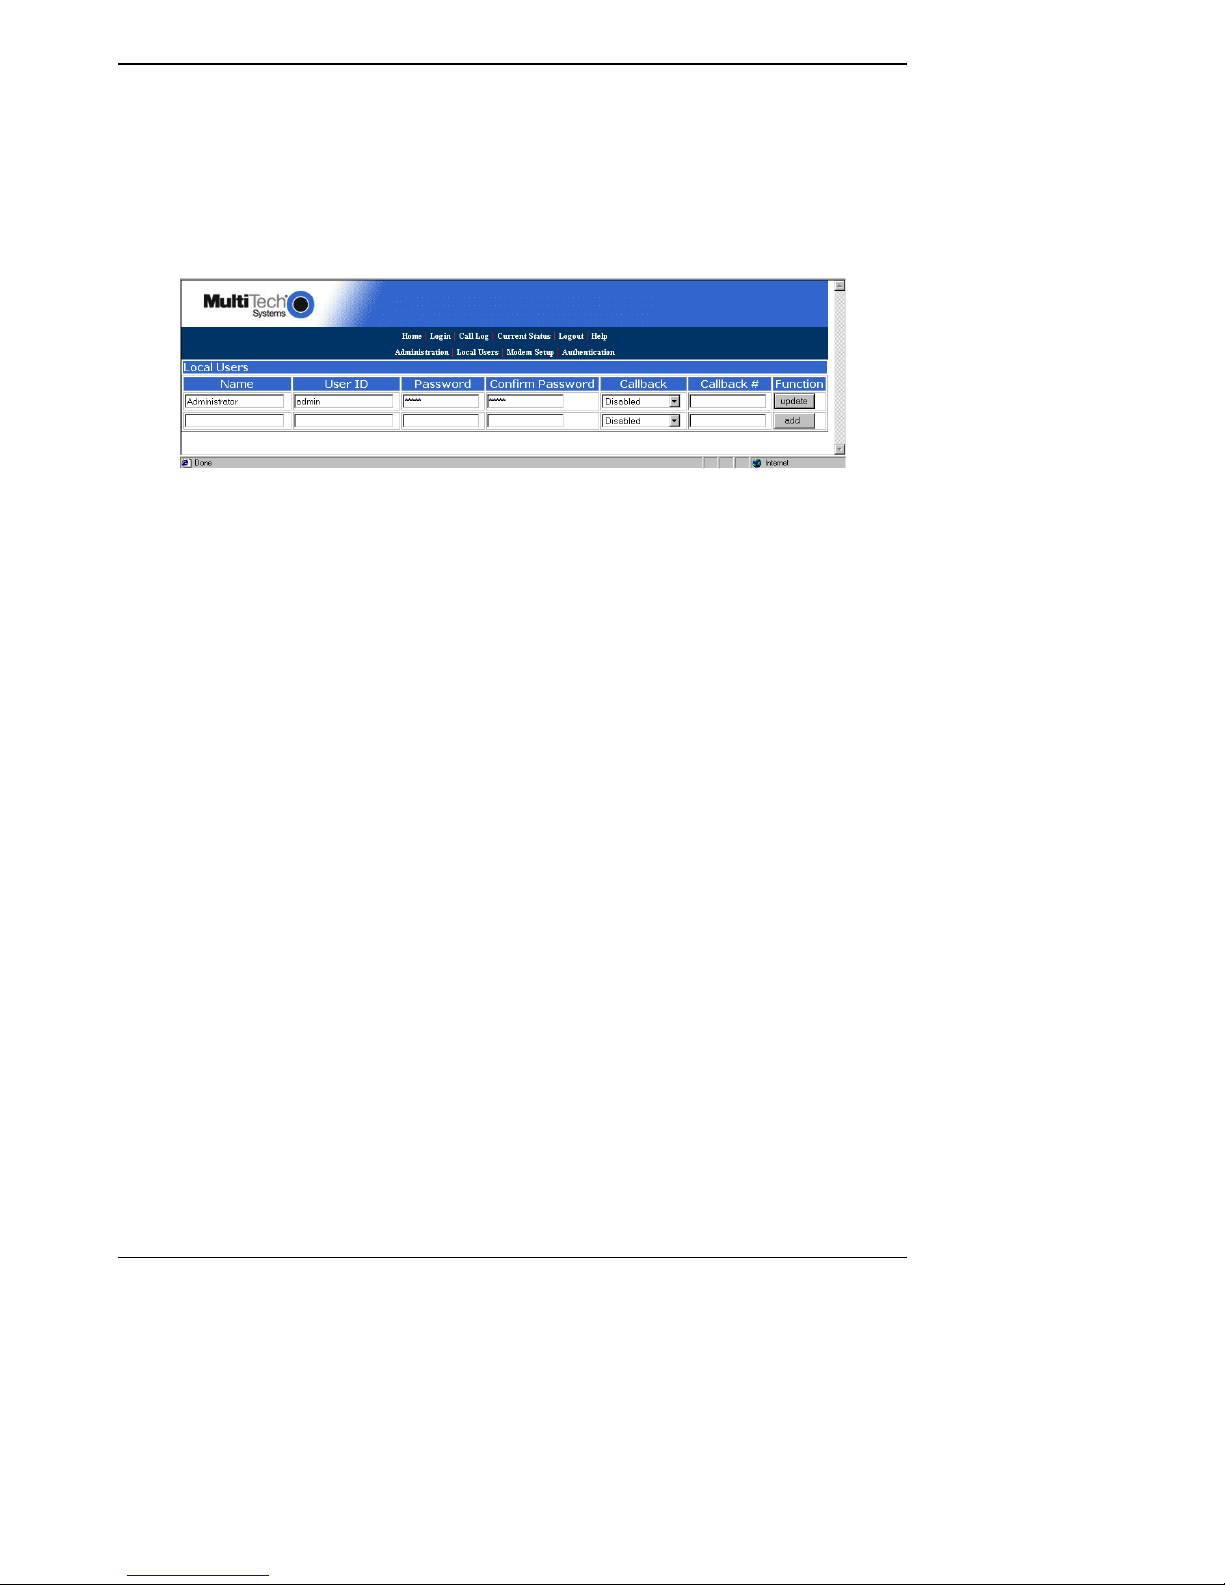
Setting Up Local Users
The administrator builds the Local Users data base defining the Name field, recording the User ID,
Password entries, and callback method. The administrator accou nt has both administration of the MA1001M and dial-in rights. The user accounts only have rights to use the modem. The remote user enters
their user ID and password during the dial-in session.
For Local Authentication, go to the Local Users screen.
Note: The first row is for the “Administrator” function. No matter what values are used for the Name,
User ID and Password fields, the first row will still apply to the person doing the Administrator
function for the MA100-1M. The Administrator is the party privileged to configure the MA100-1M.
Note: C
Admin specified in the Callback window. 2) A variable telephone number by choosing User specified
in the Callback window.
Administrator Row:
1. In the “Administrator” row of the Local Users screen, enter the Name and User ID to be used for
2. In the Password window, enter an alphanumeric password. Passwords can be as long as 21
3. In the Confirm Password window, enter the identical alphanumeric password.
4. If th e adm i n ist r a tor is goi n g to enab l e th e Ca ll b ack Secu ri ty option, click on the Callback down
If the Callback Security option is enabled and Admin specified is selected, then enter your fixed
5. Click on Update in the “ Administrator” row. At this point, a Login screen will appear and you will
Users Row:
1. In the first blank row, enter the Name and User ID of your local user.
2. In the Password window, enter an alphanumeric password. Passwords can be as long as 21
3. In the Confirm Password window, enter the identical alphanumeric password.
4. If you are going to enable the Callback Security option for a remote user, click on the Callback
If the Callback Security option is enabled and Admin specified is selected, then enter their
If the Callback Security option is enabled and User specified is selected, you do not enter a
5. Click the add button to include this local user in the data base.
6. Repeat the User Row steps for each user you want to add to your local user data base.
Multi-Tech Systems, Inc. MultiAccess ACS User Guide 14
allback Security can be implemented in two ways: 1) a fixed telephone number by choosing
the MA100-1M administrator (it need not be literally “Administrator”).
characters, and are case-sensitive.
arrow and choose the callback method. A fixed phone number is Admin specified or variable
phone number is User specified.
callback telephone number in the Callback # window.
If the Callback Security option is enabled and User Specified is selected, you do not enter a
telephone number in the Callback # window. You enter the callback telephone number during the
dial-in process.
be asked to log in again. Log in using the administrator’s User ID (as listed in the “User ID”
column) and the administrator’s current password.
Caution: If you change the admin password, you must be sure you remember you new
password.
characters, and are case-sensitive.
down arrow and choose the callback method. A fixed phone number is Admin specified or a
variable phone number is User specified. For example, if a traveling sales person needs to be
called back at their current location, they will provide the callback telephone number during the
dial-in process.
fixed callback telephone number in the Callback # window.
telephone in the callback # window. The remote user enters the callback number during the dial-
in process.
Page 15
Chapter 4: Software
Chapter 4 – Software
In this chapter, we present the screens of the MultiAccess ACS software. We describe each field in each
screen and some of the command buttons. (We do not describe command but tons that have functions
that would be readily understood by users of Windows software. Examples of such self-evident functions
include buttons like “OK,” “C a nc el , ” “Ne xt ,” et c. )
Home Screen
The MultiAccess Home screen offers access to all other MultiAccess software screens.
Multi-Tech Systems, Inc. MultiAccess ACS User Guide 15
Page 16
Chapter 4: Software
Login Screen
The MultiAccess Login screen is the primary security Device for the Server software.
The MultiAccess has a default setting that allows use of “admin” as both the User Name and the
Password at initial startup. After you have begun configuring your MultiAccess, you should change the
password in the Local Users screen for the administra tor ac c ou nt described later in this chapter.
Multi-Tech Systems, Inc. MultiAccess ACS User Guide 16
Page 17
Chapter 4: Software
Call Log Screen
The Call Log screen displays the parameters you can set for the Call Log entries and displays a call log
entry for each call. The Log Parameters define the threshold number of entries and the number of entries
retained in the log history. The Call Log summarizes each call and the Details button displays an in-depth
look at the call from the individual initiating the call, when the call was connected, duration of the call,
transmit and receive baud rates, to authentication status.
Log Parameters Field Definitions
Column Values Description
Auto Log Threshold
Log History Numeric
Numeric
1 to 20 entries
1 to 20 entries
The Auto Log Threshold is limited to 20 logs. The
threshold is limited by the memory in the
MultiAccess.
The Log History Entries defines how many Call
Log entries are stored. The maximum number of
Log History entries is limited by the memory in
the MultiAccess and that limit is 20 entries.
Save Changes (button) Click the Save Changes button save the
threshold and history entries.
Send Log Now (button) Click the Send Log Now bu tton to
Delete Log (button) Cl ick the Delete Log button to remove Call Log
entries
Multi-Tech Systems, Inc. MultiAccess ACS User Guide 17
Page 18
Chapter 4: Software
Call Log
Call Log Field Definitions
Column Values Description
Call Type Data
Time mm/dd/yyyy Time that call was sent or received.
Username
Rate
Details
alphanumeric The name of the user generating or receiving the call.
33,600; 31,200; 28,800;
26,400; 24,000; 21,600;
19,200; 16,800; 14,400;
12,000; 9600; 7200; 4800;
2400; 1200; 0-300 bps
The Details button displays the details of that call.
Data call is the only type of call supported by
MultiAccess.
The data call transmission speed in bits per second at
which the current call occurred.
Call Details
The Call Details scr een displays the details of the call when the Details button was cl icked for the call
displayed in the Call Log. The Call Details present an in-depth view of the call from the individual initiating
the call to the time it was connected, duration of the call, transmit and receive baud rates, authentication
status, and much more.
Multi-Tech Systems, Inc. MultiAccess ACS User Guide 18
Page 19
Chapter 4: Software
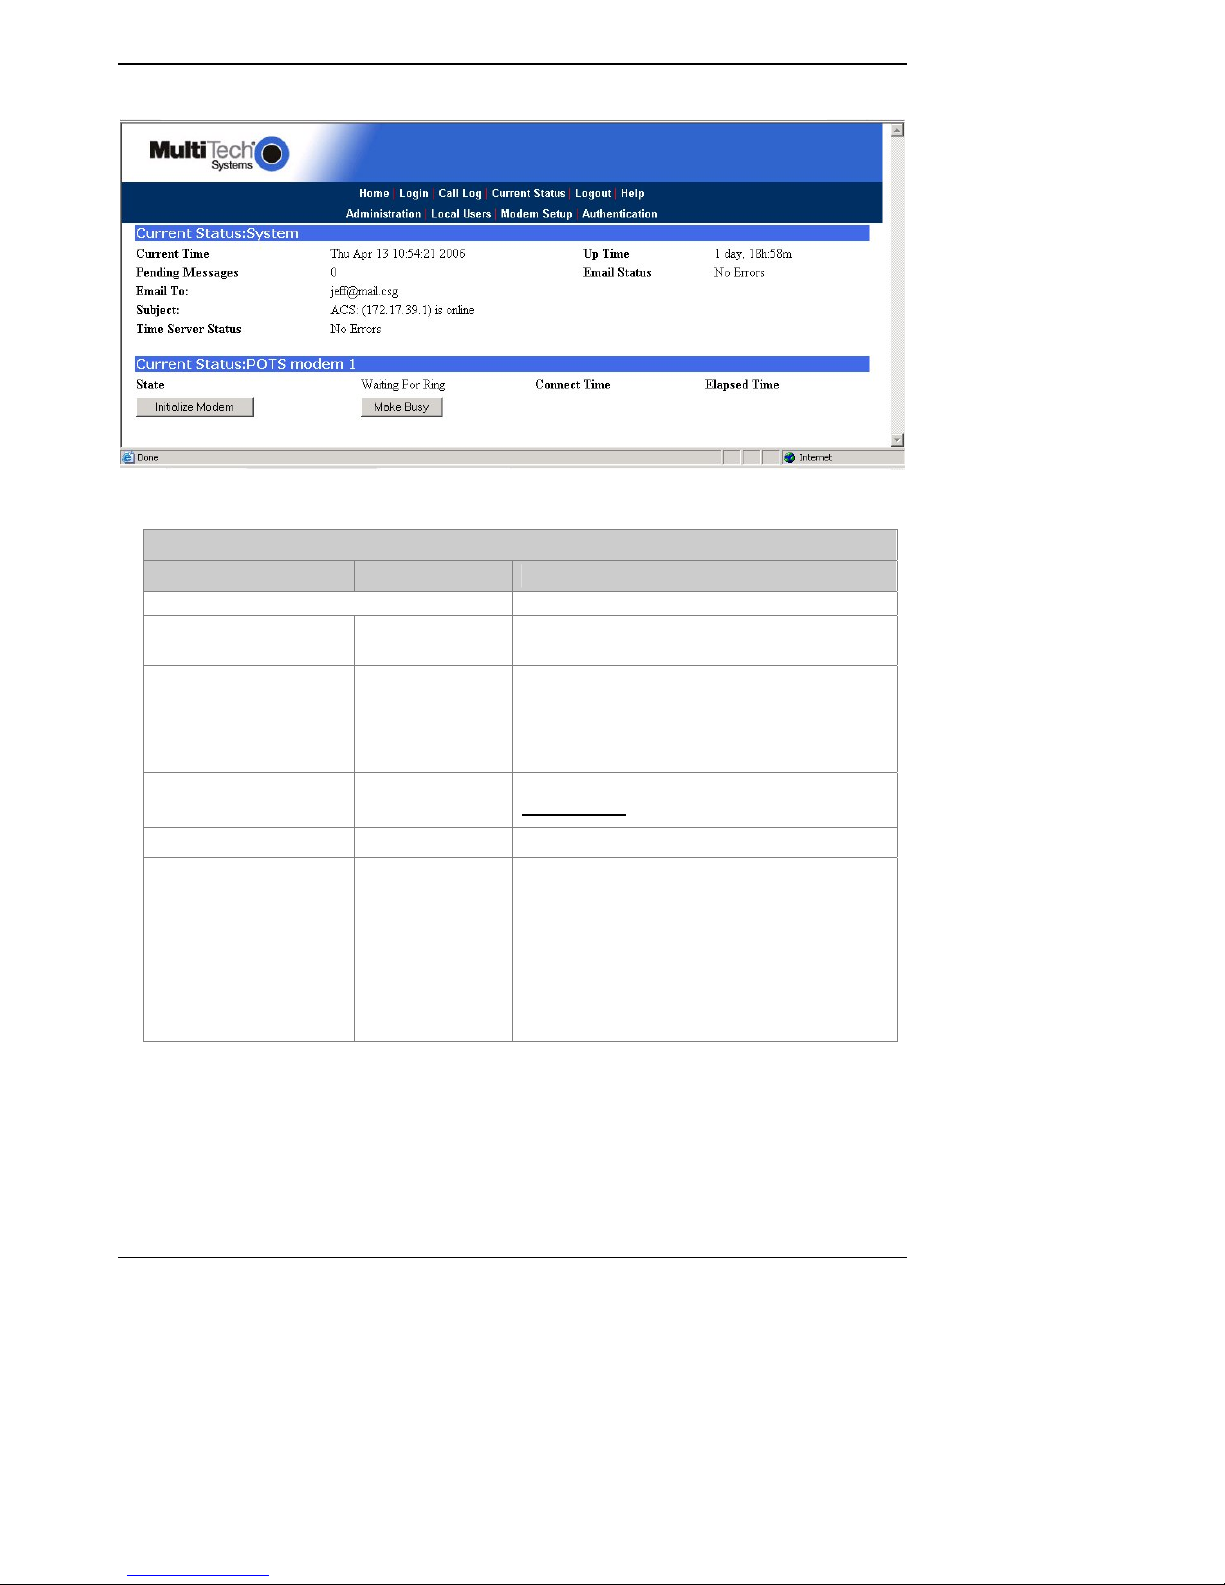
Current Status Screen
Current Status Field Definitions
Field Name Values Description
System group
Current Time weekday, mo, dd
Pending Messages numeric Emails sent to the administra tor that have not
Email To:
Subject: Alphanumeric Title of the last pending or sent email.
Time Server Status Initializing,
hh:mm:ss yyyy
Alphanumeric in
email name format
No Errors,
SNTP Error: type
The present time of day.
been opened. These can i nclude debug log
messages, mail server change notifiction
message (relating to the “SMTP Server Address”
field of Administration screen).
The email address has to be entered in proper
user@domain
The MultiAccess synchronizes its call time
stamps to an Internet source, us u a l ly a
government standards site. It will attempt
contact with the standards web site 5 times in 20
seconds. If contact fails, it will try 5 times again 5
minutes later. If contact succeeds, the
MultiAccess will update its stamping time
periodically per an interval set in the
Administration screen.
format.
Multi-Tech Systems, Inc. MultiAccess ACS User Guide 19
Page 20

Chapter 4: Software
Current Status Field Definitions (cont’d)
Field Name Values Description
System group
Up Time
Email Status
POTS Modem1 group
State
Connect Time
Elapsed Time numeric The duration of the curre nt ca ll in sec ond s.
Initialize Modem (button) Initializes the modem, clearing a busied-out
Make Busy (button)
Reset (button) Click on this button to reset the unit to factory
x days yy hours:
zz minutes
No Errors,
Bad MailServer
Address,
Mail Server
Connect Failed,
SMTP Invalid
Response, SMTP
Client Timeout
Waiting for Ring,
Initializing Modem,
Waiting for
Connect,
User login getting
Call info
mm/dd/yyyy,
hh:mm:ss
Operation time since last reboot.
Indicates whether the MultiAccess’s email
transmissions, both calls and administrative
messages, are proce eding with or without errors.
Indicates the modem’s current operating
condition.
For the current call, the date and time at which
the connection began.
state. This can only be done by a user with
administrative rights.
Imposes a busied state on the modem. This can
only be done by a user with administrative rights.
defaults.
Logout Option
When you click on Logout in the Home screen, you will be logged out of the MultiAccess software. The
Login screen will appear to allow access to re-enter the program.
Help Screen
Online Help has not yet been implemented.
Multi-Tech Systems, Inc. MultiAccess ACS User Guide 20
Page 21
Chapter 4: Software
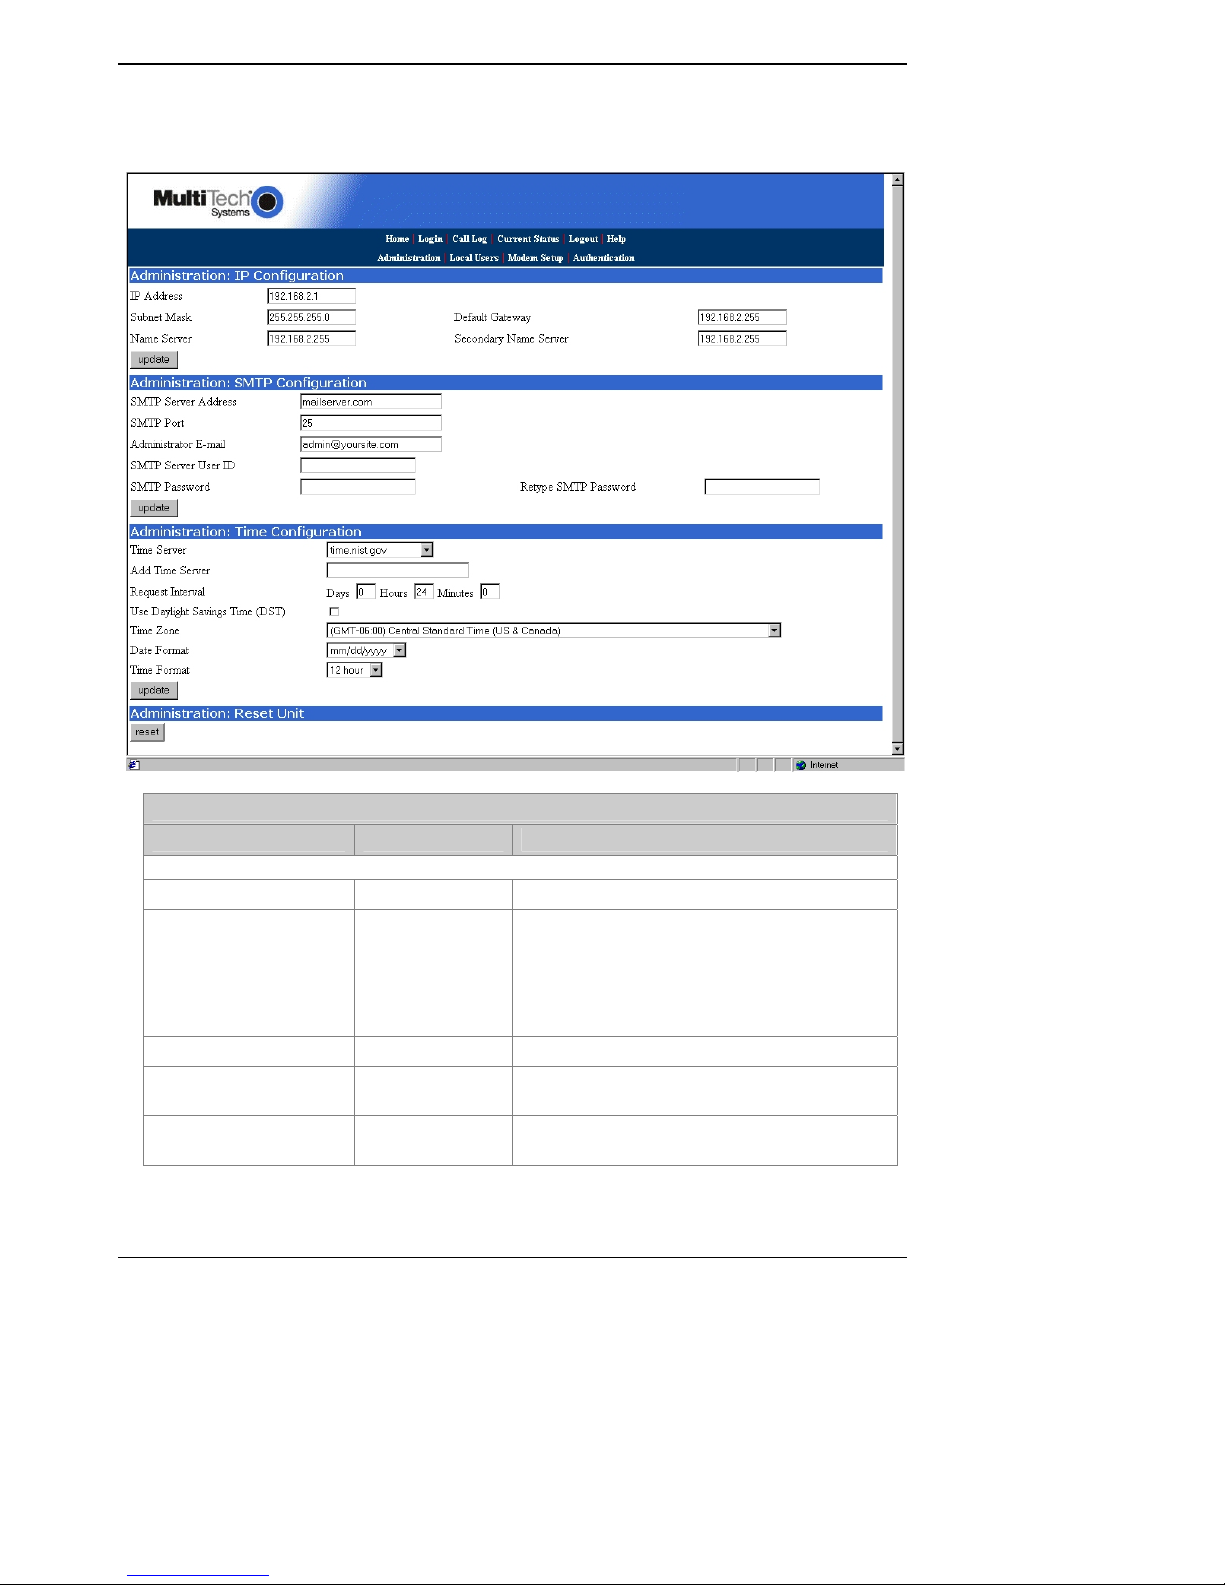
Administration Screen
The Administration Screen sets up the network addressing of the MultiAccess, communication with the
SMTP name server, and defines the time stamp for the MultiAccess.
Administration Screen Field Definitions
Field Name Values Description
IP Configuration Fields
IP Address n.n.n.n The IP address of the MultiAccess.
Subnet Mask n.n.n.n
Name Server The IP address of a local DNS server.
Default Gateway n.n.n.n
Secondary Name Server n.n.n.n
Multi-Tech Systems, Inc. MultiAccess ACS User Guide 21
This subnet mask is the subnet for the network to
which the MultiAccess is connected. A subnet
mask is used in conjunction with the IP address
to determine if a data destination is on the same
immediate network or not. The default value,
often used, is 255.255.255.0.
Address used to route ca lls out of the immediate
network.
The IP address of a backup DNS server, which is
typically at a separate location.
Page 22

Chapter 4: Software
Administration Screen Field Definitions
Field Name Values Description
IP Configuration Fields
Update (button) Click on this button to make changes to IP
Configuration fields take effect.
SMTP Configuration Fields
SMTP Server Address Domain name or IP address for mail server
(SMTP must be supported on mail server).
SMTP Port Numeric The default SMTP Port number is 25.
Administrator E-mail Alphanumeric in
email name format
The administrator’s email address. This address
has to be entered in proper user@domain
format
SMTP Server User ID Alphanumeric An additional security identifier for the mail
server, that if required by the mail server is
typically a short uni que name or location of the
server.
SMTP Password Alphanumeric Securit y code for the SMTP Server.
Retype SMTP Password Alphanumeric After the SMTP Password is entered above, an
exactly matching entr y must be made her e to
validate that password
Update (button) Click on this button after changes have been
made to the SMTP Server’s configuration before
the change take effect.
Time Configuration Fields
Time Server URL Location of time-tracking computer that supports
SMTP. This se rver is the functional su bstitute for
a real-time clock in the MultiAccess.
Add Time Server URL Used to add a user-supplied time server.
Request Interval This value (to be set by user) indicates how often
the MultiAccess will update its clock from the
Time Server.
Use Daylight Savings
Time
Check box New 2007 dates. Start DST second Sunday in
April. End 1
st
Sunday in Nov.
Time Zone alphanumeric Indicates the time zone in which the MultiAccess
is located.
Date Format Numeric Click on the down arrow to select the date
format.
Time Format Alphanumeric Click on the down arrow to select the time
format.
Update (button) Click on this button to make changes to Time
Configuration settings take effect.
Reset (button) Soft reset of the software.
Multi-Tech Systems, Inc. MultiAccess ACS User Guide 22
Page 23

Chapter 4: Software
Local Users Data Base Screen
The administrator builds the Local Users data base defining the Name field, recording the User ID,
Password entries, and callback method. The administrator accou nt has both administration of the MA1001M and dial-in and dial-out rights. The user accounts have dial-in and dial-out rights to use the modem.
The remote user enters their user ID and password at the beginning of the dial- in ses sion.
Local Users Field Definitions
Field Name Values Description
Name 21 Alphanumeric
User ID 21 Alphanumeric
Password
Confirm Password
Callback Disabled,
Callback #
Function – Update (button)
Function – Delete (button)
Function – Add (button)
characters max
Characters max
21 Alphanumeric
characters max
Alphanumeric The confirm password is the identical password that
User specified,
Admin specified
Any printable
character
The Name field is an unique identifier that is used for
ease of administration and is not used for
authentication. For each user entry, this column shows
the user’s name as you entered it.
The administrator enters the credentials, user ID, that
the remote user is going to enter at his/her login
prompt.
The administrator enters the credentials, password,
that the remote user is going to enter at his/her login
prompt.
you just entered in the Password window.
User specified allows a remote user to enter a callback
telephone number during a dial-in session and be able
to change this number at any time.
Admin specified allows a fixed telephone number to be
entered that is associated with a remote location.
This is the telephone number that the MultiAccess
uses to call the remote user. This telephone number
can be up to 39 digits.
Click the Update button to after you have changed a
user’s record.
Click the Delete button to remove a user record. Be
aware that the removal of the user record is not
confirmed.
Click the Add button when you have entered a new
user into the Local Users data base.
Multi-Tech Systems, Inc. MultiAccess ACS User Guide 23
Page 24

Chapter 4: Software
Modem Setup
The Modem Setup screen defines the Modem Sharing behavior and general modem parameters, Country
Code and number of rings before auto answer.
Prior to software release 1.03, the ports were configured for either R AS or modem sharing, for which they
were then dedicated to just that role. Now, with software release 1.03, the ports can be configured for
both roles, alleviating the need for administrator intervention when either role is desired.
The TCP port number to access the modem is 7000. The Modem Sharing method can be with or without
an authentication process. Modem Sharing with authentication means a login prompt will be issued into
the socket, to the user, when it is opened. Who, what, opens the socket must provide the appropriate
credentials before access is given to the modem. The data base of us er’s names and password s the
MultiAccess will check against can be one of two choices. A local data base, defined within the
MultiAccess, or a Radius data base, defined in a Radius server, external to the MultiAccess.
The type of Telnet connection, mode, can be “Raw” or not Raw. A Raw Telnet connection is one that
does not respond to or use Telnet and RFC 2217 escape sequences, flags. When Raw is not used,
packets of FF will not be interpreted as escape flags. The excape routine includes a process of removing
and replacing escape flags and subsequent characters normally intended for command and control
function between Telnet hosts, RFC 2217 com port control via Telnet.
Modem Setup Screen Field Definitions
Field Name Values Description
Modem Sharing
Country Code Alphabetical The Country Code configures the modem for the country
Answer On Numeric The number of rings before the maodem answers is
Update (button) Click this button to update the configuration.
Modem Sharing with
no, local, or radius
Authentication,and
Modem Sharing- Raw
Mode with no, local or
radius Authenticati on
The type of PPP session is standard PAP authentication
with IP as the network protocol.
No Authentication – Immediate access is granted to the
modem.
Local Authentication – A valid set of credentials, defined
in the Local User data base, is required before access is
granted.
Radius Authentication – A valid set of credentials,
defined in the Radius User data base, is required before
access is granted.
Raw is the type of telnet socket used to access the
shared modem.
that it is operating in.
defaulted to two rings. You can change the number of
rings from zero to 255 rings.
Multi-Tech Systems, Inc. MultiAccess ACS User Guide 24
Page 25

Chapter 4: Software
Authentication Screen
If the authentication method is Radius, then the IP address of the Radius server and Radius Accounting
Server have to be entered and the user credentials are handled by the Radius server.
If the authentication method is local, the Local User Database defines the user credentials.
For RAS calls, dial-in PPP, a second static IP address is needed in the Remote Host Address field. This
address is for the dial-in user, PPP peer. This address needs to be on the same subnet, network number,
as that of the MultiAccess.
Authentication Screen Field Definitions
Field Name Values Description
Authentication Setup Fields
Authentication
Type
Remote Host
Address
RADIUS Server
Address 1
Port numeric The UDP port number (ususally 1812) is used to communicate with the
RADIUS
Accounting
Address 1
Port Numeric
Secret Alpha-
local or
radius
n.n.n.n
Local Authentication refers to the Local User database on the MultiAccess.
Radius is a network specific protocol used to communicate authentication
requests between the authentication server and Radius client. User
credentials are stored within the Radius server. The MultiAccess is a Radius
client.
This is the IP address the MultiAccess will assign to the remote node, PPP
client, if one is not dictated by the Radius server which is included in the
authentication accept packet issued by the Radius server. This address
should be on the same network number as that of the MultiAccess.
Radius Client Setup Fields
n.n.n.n
n.n.n.n
numeric
IP address of the Radius Server providing remote user verification.
Radius Server. The Radius server has to listen on the same set of UDP ports
that the Radius client, MultiAccess is using.
IP address of the Radius Accounting host. Radius accounting is a process
that starts after successful Radius authentication. The MultiAccess sends an
accounting start packet to the accounting server. When the user disconnects,
the MultiAccess sends an accounting stop packet to the accounting server.
Radius accounting summaries the time and date, duration, POTS port
connected and IP address given to the user for that call. Radius accounting
does not track the amount or type of data or places the user has been.
The UDP port number (usually 1813) is used to communicate with the Radius
Accounting host. The host has to listen on the same set of UDP ports that the
Radius client, MultiAccess, is using.
The secret is used by the Radius Server to encrypt and by the Radius Client
to unencrypt user passwords during exchanges of Radius authentication
packets. The client secret has to be identical to the one used by the Radius
server. MultiAccess implements MD5 encryption.
Multi-Tech Systems, Inc. MultiAccess ACS User Guide 25
Page 26

Chapter 5: Troubleshoot i ng
Chapter 5 – Troubleshooting
What if I can’t see the web page for my MultiAccess?
REMEDY: Is the PWR LED on the MultiAccess unit b linking? If not, then the unit is either
What if I don’t get an email when I set the mail server address?
This pertains to the procedure “Setting Up the Mail Server.”
The email may have failed due to one of three causes:
CAUSE A: During transmission, the name server’s address could not be resolved (that is, the
RESPONSE A: Contact the MultiAcc ess unit using telnet and try to ping the name server.
CAUSE B: The mail server is not running or cannot be contacted from the MultiAccess unit.
RESPONSE B: Verify that the mail server is running by sending an email to yourself using your email
malfunctioning or not turned on. If the PWR LED is flashing as a heart beat, then verify that
the Admin PC is actually on the same subnet as the MultiAccess and that it can be “pinged.”
Launch a Command Prompt.
(In WinNT, go to Start | Programs | Comman d Pr omp t.
In WinXP, go to Start | All Programs | Accessories | Command Prompt.
In Win2000, go to Start | Programs | Accessories | Command Prompt.)
Type iPConfig to verify that the Admin PC’s IP address is in the same network as the
MultiAccess’s IP address.
Then type ping 192.168.2.1 and press Return.
If the MultiAccess unit does reply to the ping and you are still unable to view the MultiAccess
web page, then call Multi-Tech Tech Support for more assistance (1-800-972-2439).
(A) the name server is irresolvable,
(B) the mail server cannot be contacted; or
© the client PC running the mail software cannot connect to the mail server.
MultiAccess unit could not contact your name server).
telnet 192.168.x.x
user: admin
password: admin
# ping 192.168.y.y (where this is the address of the name server)
If the name server ping fails, you must determine why it failed.
The name server may not be contact-able because it is on a different subnet. The name
server ping could also fail because the default gateway has been set incorrectly.
If the name server ping succeeds, then try to ping the mail server using its domain name.
# ping mail.ourcompany.com
If pinging the mail server by its domain name fails, then try pinging it by using its IP
address (if this can be determined). If you succeed in pinging the mail server by its IP
address but yet it cannot be pinged via its domain name, then the name server is not
functioning correctly.
If the mail server can be pinged neither by its domain name nor by its IP address, then
consider item B below.
software.
If you cannot send an email to yourself using your email software, then the mail server is
not running and you should find out why.
If you can send an email to yourself using the email software, then there is a problem
between your mail server and the MultiAccess unit. Call Multi-Tech Tech Support (1800-972-2439).
Multi-Tech Systems, Inc. MultiAccess ACS User Guide 26
Page 27

Chapter 5: Troubleshoot i ng
CAUSE C: The client PC running the mail software cannot connect to the mail server.
RESPONSE C: If you, as a client, cannot send yourself an email, then contact your administrator; there
may be a problem with your mail server.
If the Radius server shows the auth request was rejected?
CAUSE: The shared secret is wrong (case sensitive), the user is giving the wrong password, or the user
doesn’t have appropriate rights.
If the Radius server doesn’t see the auth request?
CAUSE: The MultiAccess was n o t added to the clients file within the Radius server,
the Radius client is not set to the same set of UDP ports as the Radius server,
the Radius client is pointing to the wrong Radius server/IP address, or
there is a network problem blocking or dropping the request, Radius Protocol uses UDP to
communicate.
RESPONSE: When the auth request is not seen by the Radius server, eventually the Radius client will
report a “Radius Timeout” error, no response from the Radius server, and disconnect the user.
The MultiAccess can not tell which application, on the workstation, is opening the
TCP port/socket.
Redirectors, telnet clients, and proprietary programs all appear the same to the MultiAccess because they
all need to use/follow TCP/IP to get to the modem in the MultiAccess.
RESPONSE: Telnet to the modem in the MultiAccess and issue at commands, try to dial out. If it works,
then the redirector is configured wrong, or the user application is configured wrong.
When the MultiAccess is configured for Modem Sharin g with Radius
Authentication, the user rights defined in the Radius server are not set correctly.
CAUSE: The Service Type Attribute in the Radius server configuration is not set to “Outbound”.
Multi-Tech Systems, Inc. MultiAccess ACS User Guide 27
Page 28

Chapter 6: Warranty, Service, & Repair
Chapter 6: War ranty, Serv ice, &
Repair
Multi-Tech Warranty Statement
Multi-Tech Systems, Inc., (hereafter “MTS”) warrants that its products will be free from defects in material
or workmanship for a period of two, five, or ten years (depending on model) from date of purchase, or if
proof of purchase is not provided, two, five, or ten years (depending on model) from date of shipment.
MTS MAKES NO OTHER WARRANTY, EXPRESS OR IMPLIED, AND ALL IMPLIED WARRANTIES OF
MERCHANTABILITY AND FITNESS FOR A PARTICULAR PURPOSE ARE HEREBY DISCLAIMED.
This warranty does not apply to any products which have been damaged by lightning storms, water, or
power surges or which have been neglected, altered, abused, used for a purpose other than the one for
which they were manufactured, repaired by Customer or any party without MTS’s written authorization, or
used in any manner inconsistent with MTS’s instructions.
MTS’s entire obligation under this warranty shall be limited (at MTS’s option) to repair or replacement of
any products which prove to be defective within the warranty period or, at MTS’s option, issuance of a
refund of the purchase price. Defective products must be returned by Customer to MTS’s factory —
transportation prepaid.
MTS WILL NOT BE LIABLE FOR CONSEQUENTIAL DAMAGES, AND UNDER NO CIRCUMSTANCES
WILL ITS LIABILITY EXCEED THE PRICE FOR DEFECTIVE PRODUCTS.
In the event that service is required, products may be shipped, freight prepaid, to our Mounds View,
Minnesota factory:
Multi-Tech Systems, Inc.
2205 Woodale Drive
Mounds View, MN 55112 U.S.A.
Attn: Repairs, Serial # ____________
A Returned Materials Authorization (RMA) is not required. Return shipping charges (surface) will be paid
by MTS to destinations in U.S. and Canada.
Please include, inside the shipping box, a description of the prob lem, a return shipping address (must
have street address, not P.O. Box), and your telephone number. If the product is out of warranty, a
payment in advance is required. Acceptable means of payment include credit card, wire transfer or a
check in U.S. dollars drawn on a U.S. Bank.
For out of warranty repair charges, go to COMPANY/Policies/warranty/
Extended two-year overni gh t re placement service agreements are av a i lab l e fo r selec t ed pr odu c t s. Pl ea se
call MTS customer service at (888) 288-5470 or visit our web site at
/PARTNERS/Programs/overnight_replacement/
Please direct your questions regarding technical matters, product configuration, verification that the
product is defective, etc., to our
for details on rates and coverages.
Repair Procedures for U.S. and Canadian Customers
Technical Support department at (800) 972-2439 or email support@multitech.com. Please direct your
questions regarding repair expediting, receiving, shipping, billing, etc., to our Repair Accounting
department at (800) 328-9717 or (763) 717-5631, or email mtsrepair@multitech.com.
Repairs for damages caused by lightning storms, water, power surges, incorrect installation, physical
abuse, or user-caused damages are billed on a time-plus-materials basis.
Multi-Tech Systems, Inc. MultiAccess ACS User Guide 28
Page 29

Chapter 6: Warranty, Service, & Repair
Repair Procedures for International Customers
(Outside U.S.A. and Canada)
Your original point-of-purchase Reseller may offer the qui cke st and mo st ec ono mi cal repai r op tion for
your Multi-Tech product. You may also contact any Multi-Tech sales office for information about the
nearest distributor or other repair service for your Multi-Tech product. The Multi-Tech sales office
directory is available at www.multitech.com/PARTNERS/Channels/offices/
In the event that factory service is required, products may be shipped, freight prepaid to our Mounds
View, Minnesota factory. Recommended internatio nal shipment methods are via Federal Express, UPS or
DHL courier services, or by airmail parcel post; shipments made by any other method will be refused.
Please include, inside the shipping box, a description of the prob lem, a return shipping address (must
have street address, not P.O. Box), and your telephone number. If the product is out of warranty, a
payment in advance is required. Acceptable means of payment include credit card, wire transfer or a
check in U.S. dollars drawn on a U.S. Bank. Repaired units shall be shipped freight collect, unless other
arrangements are made in advance.
Please direct your questions regarding technical matters, product configuration, verification that the
product is defective, etc., to our Technical Support department nearest you or email
support@multitech.com
receiving, shipping, billing, etc., to our Repair Accounting department at +(763) 717-5631 in the U.S.A., or
email mtsrepair@multitech.com
Repairs for damages caused by lightning storms, water, power surges, incorrect installation, physical
abuse, or user-caused damages are billed on a time-plus-materials basis.
. When calling the U.S., please direct your questions regarding repair expediting,
.
Repair Procedures for International Distributors
International distributors should contact their MTS International sales representative for information about
the repair of Multi-Tech product( s).
Please direct your questions regarding technical matters, product configuration, verification that the
product is defective, etc., to our International Technical Support department at +(763)717-5863. When
calling the U.S., please direct your questions regarding repair expediting, receiving, shipping, billing, etc.,
to our Repair Accounting department at +(763) 717-5631 in the U.S.A. or email mtsrepair@multitech.com
Repairs for damages caused by lightning storms, water, power surges, incorrect installation, physical
abuse, or user-caused damages are billed on a time-plus-materials basis.
.
Multi-Tech Systems, Inc. MultiAccess ACS User Guide 29
Page 30

Appendix A – Device Manager Utility
Appendix A – Device Manager Utility
The Device Manger utility is used to synchronize phonebooks/local user data bases, backup and restore
a configuration, and update firmware in a MultiAccess ACS unit and its accom panying POTS modem.
The Device Manager utility can manage multiple MultiAccess ACS units on the same network and on
other networks as long as the manager has access to that network.
The process of installing the Device Manager utility is explained in the illustration below.
Multi-Tech Systems, Inc. MultiAccess ACS User Guide 30
Page 31

Appendix A – Device Manager Utility
Adding a Device to the Manager
In order for the Device Manager to recognize a MultiAccess ACS unit, the MA100-1M must be added to
the manager. The Device Manager can manage multiple MA100-1M as long as the Device Manager has
access to that network.
1. To launch the Device Manager program from the Windows desktop, go to Start | Programs |
Multi-Tech Device Manager I Multi-Tech Device Manager. The Device Manager main screen
will appear.
2. To add a MultiAccess ACS to the Manager, click Edit menu and select Add Device. When the
Add Device Address screen appears, click on the Select Server down arrow and select
MultiAccess ACS.
3. In the Enter Address window, enter the IP address for the unit you are adding.
4. In the Username and Password windows, enter the administrator’s username and password for
the unit you are adding.
5. Click OK when you are finished.
6. The Device Manager screen appears with the added Device.
Multi-Tech Systems, Inc. MultiAccess ACS User Guide 31
Page 32

Appendix A – Device Manager Utility
Set Local User Sharing
Local user sharing must be set up per unit before local user data bases can be synchronized. When
MultiAccess ACS local user s ar e synch ro n ized, all data bases contain the sam e user cre ntials except for
the administrator acco unts. One MultiAccess ACS unit (th e Primary unit) holds the master list that is
transmitted (using the Synchronize Phonebooks/Local Users command) to other MultiAccess ACS
units on the network (Copy units). MultiAccess ACS units can operate on the same network, but have
independent local user data bases, in which case they are designated Independent.
Designating one Mult iA cc es s ACS as the master local user data base. In the main Device Manager
screen, right-click on the unit to be designated as master, scroll to set local user sharing, and select
Primary.
Designating all other MultiAccess ACS units participating in local user sharing as Copy units. In the
main Device Manager screen, right-click on each unit to share the master local user data base, and
select Copy.
Designating a MultiAcc ess ACS as in depen d en t. In the main Device Manager screen, right-click on
the unit to be designated as master, scroll to set local user sharing, and select Independent.
Multi-Tech Systems, Inc. MultiAccess ACS User Guide 32
Page 33

Appendix A – Device Manager Utility
Synchronize Phonebooks/Local Users
When MultiAccess ACS Local Users data bases are synchronized, all non-administrative listings match.
One MultiAccess ACS unit (primary unit) holds the master data base that is transmitted to other remote
units on the network (copy units). MultiAccess ACS units can operate on the network, but have
independent Local Users, in which case they are designated as Independent. Independent units are
ignored during synchronization.
1. Invoking synchronization. Click on the Edit menu and select Synchronize Phoneboo ks / loca l
users.
2. The Synchronize Phone Books screen will appear along with a series of transient screens
(denoting tftp data transfers) and confirmation screens.
3. After the master local users data is transferred to the first Copy MultiAccess ACS unit and that
unit has been rebooted, the Device Mana ger will automatically begin synchronizing the additional
Copy MultiAccess ACS unit on the network (if any) until all have been synchronized.
Multi-Tech Systems, Inc. MultiAccess ACS User Guide 33
Page 34

Appendix A – Device Manager Utility
Updating Firmware
Over time, new versions of MultiAccess ACS firmware will be issued. When these newer versions
become available, you will want to secure the firmware files (typically by downloading them from the
MultiTech web site) and install them on the MultiAccess ACS.
There are two parts to a full firmware update:
(a) Updating POTS Modem 1 firmware (with file name of the form dwqg<x><y>.hex; where x is a
number and y is a letter),
(b) Updating MultiAccess ACS firmware (with file name of the form MA100-<x>-<yz>.bin).
NOTE: You must have the update files on your computer before beginning this procedure. The
NOTE: Updating the MultiAccess ACS unit will take it out of operation for a few minutes (allow 10
To update firmware, follow the steps shown below.
MultiAccess ACS Modem Firmware Update
1. Bring up the Device Manager Software main screen. In the Device column, identify the
MultiAccess ACS unit on which the update is to be done. Be sure that the Status of that
MultiAccess ACS unit is idle before continuning. (You cannot update the MultiAccess ACS while
it is handling a call). Select that MultiAccess ACS unit and right-click on it. In the menu that
appears, select Update.
latest version of these files will be available on the MultiTech web site. Put them in a
directory on a computer connected to the network on which the MultiAccess ACS unit is
running.
minutes for each update if you already have the new firmware in a directory on the host
computer). Do the update at a time that is not critical to your organization’s usage of the
MultiAccess ACS service.
2. The Update MultiAccess ACS N.N.N.N screen will appear. The current firmware versions for
the MultiAccess ACS’s POTS Modem 1 will be listed in the main window.
Multi-Tech Systems, Inc. MultiAccess ACS User Guide 34
Page 35

In the bottom (and largest) pane of the Update MultiAccess ACS n.n.n.n window, read the list and
write down the version of firmware currently in use for the POTS modem. Compare the version with
the update file that you plan to use. Make sure that the file to be installed really does supersede the
one currently installed.
3. In the MultiAccess ACS Update Select field, select the POTS Modem 1 to update.
4. Browse to the location of the most recent firmware file.
Appendix A – Device Manager Utility
5. Click Start Update.
6. The MultiAccess ACS – Confirm Update screen will appear. Click OK.
Multi-Tech Systems, Inc. MultiAccess ACS User Guide 35
Page 36

Appendix A – Device Manager Utility
7. The updating process will take as long as a minute. During this time, several messages will
appear in the Update MultiAccess ACS N.N.N.N window. A transient TFTP screen may
appear briefly. If the updating process has been successful, the final message line will say
“Finished – The MultiAccess ACS is ready.”
8. The updating process is now complete. Click the “X” in the upper-right corner to return to the
main Device Manager screen.
Multi-Tech Systems, Inc. MultiAccess ACS User Guide 36
Page 37

Appendix A – Device Manager Utility
MultiAccess ACS Firmware Update
1. In the Device column of the Device Manager screen, identify the MultiAccess ACS unit on which
the update is to be done. Be sure that the Status of that MultiAccess ACS unit is idle before
continuing. (You cannot update the MultiAccess ACS while it is handling a call.) Select that
MultiAccess ACS unit and right-click on it. In the menu that appears, select Update.
2. The Update MultiAccess ACS N.N.N.N screen will appear. The current firmware versions for
the MultiAccess ACS firmware and for POTS Modem 1 will be listed in the main window.
In the bottom (and largest) pane of the Update MultiAccess ACS N.N.N.N window, read the list
and write down the ve rsion of firmware currently in use for the MultiAccess ACS. Compare the
version with the update file that you plan to use. Make sure that the file to be installed really does
supersede the one currently installed on the MultiAccess ACS.
3. In the MultiAccess ACS Update Select field, select “MultiAccess ACS firmware.”
Multi-Tech Systems, Inc. MultiAccess ACS User Guide 37
Page 38

Appendix A – Device Manager Utility
4. Browse to the location of the most recent firmware file.
5. Click Start Update.
6. The MultiAccess ACS – Confirm Update screen will appear. Click OK.
Multi-Tech Systems, Inc. MultiAccess ACS User Guide 38
Page 39

Appendix A – Device Manager Utility
7. The updating process will take as long as a minute. During this time, several messages will
appear in the Update MultiAccess ACS N.N.N.N window. A transient TFTP screen may
appear briefly. If the updating process has been successful, the final message line will say
“Finished – The MultiAccess ACS is ready.”
8. Close the Update MultiAccess ACS N.N.N.N window. In the main Device Manager window,
the updated version will be listed.
9. Repeat steps 1-8 for each MultiAccess ACS unit in the system.
NOTE: For proper operation of t he MultiAccess ACS system, including the sharing of the Local
Users data base data, the firmware version for all MultiAccess ACS units must be the same.
10. The updating process is now complete.
Multi-Tech Systems, Inc. MultiAccess ACS User Guide 39
Page 40

Appendix B – Regulatory Information
Appendix B – Regulator y
Informat ion
47 CF R Pa rt 68 Tele c om
1. This equipment complies with Part 68 of the 47 CFR rules and the requirements adopted by the
ACTA. Located on this equipment is a label that contains, among other information, the registration
number and ringer equivalence number (REN) for this equipment or a product identifier in the format:
For current products is US:AAAEQ##Txxxx.
For legacy products is AU7USA-xxxxx-xx-x.
If requested, this number must be provided to the telephone company.
2. A plug and jack used to connect this equipment to the premises wiring and telephone network must
comply with the applicable 47 CFR Part 68 rules and requirements adopted by the ACTA. It’s
designed to be connected to a compatible modular jack that is also compliant.
3. The ringer equivalence number (REN) is used to determine the number of Devices that may be
connected to a telephone line. Excessive RENs on a telephone line may result in the Devices not
ringing in response to an incoming call. In most but not all areas, the sum of RENs should not exceed
five (5.0). To be certain of the number of Devices that may be connected to a line, as determined by
the total RENs, contact the local telephone company. For products approved after July 23, 2001, the
REN for this product is part of the product identifier that has the format US:AAAEQ##Txxxx. The
digits represented by ## are the REN without a decimal point (e.g., 03 is a REN of 0.3). For earlier
products, the REN is separately shown on the label.
4. If this equipment causes harm to the telephone network, the telephone company will notify you in
advance that temporary discontinuance of service may be required. But if advance notice isn’t
practical, the telephone company will notify the customer as soon as possible. Also, you will be
advised of your right to file a complaint with the FCC if you believe it is necessary.
5. The telephone company may make changes in its facilities, equipment, operations or procedures that
could affect the operation of the equipment. If this happens, the telephone company will provide
advance notice in order for you to make necessary modifications to maintain uninterrupted service.
6. If trouble is experienced with this equipment, please contact Multi-Tech Systems, Inc. at the address
shown below for details of how to have the repairs made. If the equipment is causing harm to the
telephone network, the telephone company may request that you disconnect the equipment until the
problem is resolved.
7. Connection to party line service is subject to state tariffs. Contact the state public utility commission,
public service commission or corporation commission for information.
8. No repairs are to be made by you. Repairs are to be made only by Multi-Tech Systems or its
licensees. Unauthorized repairs void registration and warranty.
9. If your home has specially wired alarm equipment connected to the telephone line, ensure the
installation of this equipment does not disable your alarm equipment.
If you have questions about what will disable alarm equipment, consult your telephone company or a
qualified installer.
10. Connection to party line service is subject to state tariffs. Contact the state public utility commission,
public service commission or corporation commission for information.
11. This equipment is hearing aid compatible.
Multi-Tech Systems, Inc. MultiAccess ACS User Guide 40
Page 41

Appendix B – Regulatory Information
12. Manufacturing Information:
Manufacturer: Multi-Tech Systems, Inc.
Trade Name: MultiAccess ACS
Model Number: MA100-1M
Registration No: AU7USA-25814-M5-E
Ringer Equivalence: 0.3B
Modular Jack (USOC): RJ11C or RJ11W (single line)
Service Center in USA: Multi-Tech Systems, Inc.
2205 Woodale Drive
Mounds View, MN 55112 U.S.A.
(763) 785-3500
(763) 785-9874 Fax
47 CFR Part 15 Regulation
This equipment has been tested and found to comply with the limits for a Class B digital De vice, pursu an t
to 47 CFR Part 15 regulations. The stated limits in this regulation are designed to provide reasonable
protection agains t harmful interference in a residential installation. This equipment generates, uses, and
can radiate radio frequency energy, and if not installed and used in accordance with the instructions, may
cause harmful interference to radio communications. However, there is no guarantee that interference will
not occur in a particular installation. If this equipment does cause harmful interference to radio or
television reception, which can be determined by turning the equipment off and on, the user is
encouraged to try to correct the interference by one or more of the following measures:
Reorient or relocate the receiving antenna.
Increase the separation between the equipment and receiver.
Plug the equipment into an outlet on a circuit different from that to which the receiver is connected.
Consult the dealer or an experienced radio/TV technician for help.
This Device complies with Part 15 of the CFR 47 rules. Operation of this Device is subject to the following
conditions:
(1) This Device may not cause harmful interference, and (2) this Device must accept any interference that
may cause undesired o peration.
Warning: Changes or modifications to this unit not expressly approved by the party responsible for
compliance could void the user’s authority to operate the equipment.
Fax Branding Statement
The Telephone Consumer Protection Act of 1991 makes it unlawful for any person to use a computer or
other electronic Device, including fax machines, to send any message unless such message clearly
contains the follo wing information:
• Date and time the message is sent
• Identification of the business or other entity, or other individual sending the message
• Telephone number of the sending machine or such business, other entity, or individual
This information is to appear in a margin at the top or bottom of each transmitted page or on the first page
of the transmission. (Adding this information in the margin is referred to as fax branding).
Any number of fax software packages can be used with this product. Refer to the fax software manual for
setup details. Typica lly, the fax branding information must be entered via the configuration menu of the
software.
Multi-Tech Systems, Inc. MultiAccess ACS User Guide 41
Page 42

Appendix B – Regulatory Information
Canadian Limitations Not ice
Notice: The ringer equivalence number (REN) assigned to each terminal Device provides an indication of
the maximum number of terminals allowed to be connected to a telephone interface. The termination on
an interface may consist of any combination of Devices subject only to the requirement that the sum of
the ringer equivalence numbers of all the Devices does not exceed 5.
Notice: The Industry Canada label identifies certified equipment. This certification means that the
equipment meets certain telecommunications network protective, operational, and safety requirements.
The Industry Canada label does not guarantee the equipment will operate to the user’s satisfaction.
Before installing this equipment, users should ensure that it is permissible to be connected to the facilities
of the local telecommunications company. The equipment must also be installed using an acceptable
method of connection. The customer should be aware that compliance with the above conditions may not
prevent degradation of service in some situations. Repairs to certified equipment should be made by an
authorized Canadian maintenance facility designated by the supplier. Any repairs or alterations made by
the user to this equipment or equipment malfunctions may give the telecommunications company cause
to request the user to disconnect the equipment.
Users should ensure for their own protection that the electrical ground connections of the power utility,
telephone lines and internal metallic water pipe system, if present, are connected together. This
precaution may be particularly important in rural areas.
Caution: Users should not attempt to make such connections themselves, but should contact the
appropriate electric inspection authority, or electrician, as appropriate.
Industry Canada
This Class B digital apparatus meets all requirements of the Canadian Interference-Causing Equipment
Regulations.
Cet appareil numérique de la classe B respecte toutes les exigences du Reglement Canadien sur le
matériel brouilleur.
Safety and EMC Product Approvals
Safety EMC Product Approvals
EN60950 EN 55022
UL60950 FCC Part 15 Class A
cUL EN 55024
EMC, Safety, and Directi ve Compliance
The CE mark is affixed to this product to co nfi rm comp li a nc e wit h the fol lo win g Euro pe a n Commu n ity
Directives:
Council Directive 89/336/EEC of 3 May 1989 on the approximation of the laws of Member States relating
to electromagnetic compatibility;
and
Council Directive 73/23/EEC of 19 February 1973 on the harmonization of the laws of Member States
relating to electrical equipment designed for use within certain voltage limit;
And
Council Directive 1999/5/EC of 9 March 1999 on radio equipment and telecommunications terminal
equipment and the mutual recognition of their conformity .
Multi-Tech Systems, Inc. MultiAccess ACS User Guide 42
Page 43

Appendix C – WEEE Statement
Appendix C – Waste E lectrical and
Electronic Equipment (WEEE) Statement
July, 2005
The WEEE directive places an obligation on EU-based manufacturers, distributors, retailers and importers
to take-back electronics products at the end of their useful life. A sister Directive, ROHS (Restriction of
Hazardous Substances) complements the WEEE Directive by banning the presence of specific
hazardous substances in the products at the design phase. The WEEE Directive covers all Multi-Tech
products imported into the EU as of August 13, 2005. EU-based manufacturers, distributors, retailers and
importers are obliged to finance the costs of recovery from municipal collection points, reuse, and
recycling of specified percentages per the WEEE requirements.
Instructions for Disposal of WEEE by Users in the European Union
The symbol shown below i s on the product or on its packaging, which indicates that this product must not
be disposed of with other waste. Instead, it is the user’s responsibility to dispose of their waste equipment
by handing it over to a designated collection point for the recycling of waste electrical and electronic
equipment. The separate collection and recycling of your waste equipment at the time of disposal will help
to conserve natural resources and ensure that it is recycled in a manner that protects human health and
the environment. For more information about where you can drop off your waste equipment for recycling,
please contact your local city office, your household waste disposal service or where you purchased the
product.
Multi-Tech Systems, Inc. MultiAccess ACS User Guide 43
Page 44

Appendix D – C-ROHS HT/ST Substance Concentration
Appendix D – C-ROHS HT/TS Substance
Concentration
依照中国标准的有毒有害物质信息
根据中华人民共和国信息产业部 (MII) 制定的电子信息产品 (EIP)
标准-中华人民共和国《电子信息产品污染控制管理办法》(第 39 号),也称作中国 RoHS,下表列出了
Multi-Tech Systems Inc. 产品中可能含有的有毒物质 (TS) 或有害物质 (HS)
的名称及含量水平方面的信息。
成分名称
印刷电路板
电阻器
电容器
铁氧体磁环
继电器/光学部件
IC
二极管/晶体管
振荡器和晶振
调节器
电压传感器
变压器
扬声器
连接器
LED O O O O O O
螺丝、螺母以及
其它五金件
交流-直流电源
软件/文档 CD
手册和纸页
底盘
有害/有毒物质/元素
铅
(PB)
O O O O O O
X O O O O O
X O O O O O
O O O O O O
O O O O O O
O O O O O O
O O O O O O
X O O O O O
O O O O O O
O O O O O O
O O O O O O
O O O O O O
O O O O O O
X O O O O O
O O O O O O
O O O O O O
O O O O O O
O O O O O O
X 表示所有使用类似材料的设备中有害/有毒物质的含量水平高于 SJ/Txxx-2006
汞
(Hg)
限量要求。
镉
(CD)
六价铬
(CR6+)
多溴联苯
(PBB)
多溴二苯醚
(PBDE)
O 表示不含该物质或者该物质的含量水平在上述限量要求之内。
Multi-Tech Systems, Inc. MultiAccess ACS User Guide 44
Page 45

Appendix E – MCSI2000 Parameters
Appendix E – MCSI2000 Parameters
Setting Up MCSI2000 Com Port Redirector
Add one MCSI2000 com port to your workstation. Reboot the workstation. The properties of the
MCSI2000 com port should be:
• Connect Time = 0
• Direct (Not MAG)
• Use Line Defaults Yes
• Server IP address is tha t of the MultiAccess
• Protocol Telnet
• Port Number 7000
• Authentication No.
For further details on how install and operate MCSI200, refer to the MCSI For Windows 2000 and XP
Software Installation Guide on your product CD.
Multi-Tech Systems, Inc. MultiAccess ACS User Guide 45
Page 46

Appendix F – Modem AT Commands
Appendix F – Modem AT Commands
AT Co mm an ds
Command: AT Attention Code
Values: N/A
Description: The attention code precedes all command lines except A/, A: and escape sequences.
Command: ENTER Key
Values: N/A
Description: Press the E
Command: A Answer
Values: N/A
Description: Answer call before final ring.
Command: A/ Repeat Last Command
Values: N/A
Description: Repeat the last command string. Do not precede this command with AT. Do not press E
to execute.
Command: Bn Communication Standard Setting
Values: n = 0–3, 15, 16
Default: 0 and 15
Description: B0 Select ITU-T V.22 mode when modem is at 1200 bps.
B1 Select Bell 212A when modem is at 1200 bps.
B2 Deselect V.23 reverse channel (same as B3).
B3 Deselect V.23 reverse channel (same as B2).
B15 Select V.21 when the modem is at 300 bps.
B16 Select Bell 103J when the modem is at 300 bps.
NTER (RETURN) key to execute most commands.
NTER
Multi-Tech Systems, Inc. MultiAccess ACS User Guide 46
Page 47

Appendix F – Modem AT Commands
Command: Ds Dial
Values: s = dial string (phone number and dial modifiers)
Default: none
Description: Dial telephone number s, where s may up to 40 characters long and include the 0–9, *, #, ,
Dial string modifiers:
L Redial last number. (Must be placed immediately after ATD.)
P Pulse-dial following numbers in command.
T Tone-dial following numbers in command (default).
V Switch to speakerphone mode and dial the following number. Use ATH command to
W Wait for a new dial tone before continuing to dial. (X2, X4, X5, X6, or X7 must be
, Pause during dialing for time set in register S8.
; Return to command mode after dialing. (Place at end of dial string.)
! Hook flash. Causes the modem to go on-hook for one-half second, then off-hook
@ Wait for quiet answer. Causes modem to wait for a ringback, then 5 seconds of
^ Disable data calling tone transmission.
$ Detect AT&T call card “bong” tone. The character should follow the phone number and
Command: DS=y Dial Stored Telephone Number
Values: n = 0–2 (0–1 for SMI-Parallel {internal})
Default: none
Description: Dial a number previously stored in directory number y by the &Zy=x command. Example:
Command: En Echo Command Mode Characters
Values: n = 0 or 1
Default: 1
Description: E0 Do not echo keyboard input to the terminal.
E1 Do echo keyboard input to the terminal.
Command: Fn Echo Online Data Characters
Values: n = 1
Default: 1
F0 Enable online data character echo. (Not supported.)
F1 Disable online data character echo (included for backward compatibility with some
Command: Hn Hook Control
Values: n = 0 or 1
Default: 0
Description: H0 Go on-hook (hang up).
H1 Go off-hook (make the phone line busy).
B, C, and D characters, and the L, P, T, V, W, S, comma (,), semicolon (;), !, @, ^ and $ dial
string modifiers.
hang up.
selected.)
again.
silence, before processing next part of command. If silence is not detected, the modem
returns a NO ANSWER code.
precede the user’s call card number: ATDT1028806127853500$
ATDS=2
software).
123456789
Multi-Tech Systems, Inc. MultiAccess ACS User Guide 47
Page 48

Appendix F – Modem AT Commands
Command: In Information Request
Values: n = 0–5, 9, 11
Default: None
Description: I0 Display default speed and controller firmware version.
I1 Calculate and display ROM checksum (e.g., 12AB).
I2 Check ROM and verify the checksum, displaying OK or ERROR.
I3 Display default speed and controller firmware version.
I4 Display firmware version for data pump (e.g., 94).
I5 Display the board ID: software version, hardware version, and country/region ID
I9 Display the country/regional code (e.g., NA Ver. 1).
I11 Display diagnostic information for the last modem connection, such as DSP and
Command: Mn Monitor Speaker Mode
Values: n = 0, 1, 2, or 3
Default: 1
Description: M0 Speaker always off.
M1 Speaker on until carrier signal detected.
M2 Speaker always on when modem is off-hook.
M3 Speaker on until carrier is detected, except while dialing.
Command: Nn Modulation Handshake
Values: n = 0 or 1
Default: 1
Description: N0 Modem performs handshake only at communication standard specified by S37 and the
N1 Modem begins handshake at communication standard specified by S37 and the B
Command: On Return Online to Data Mode
Values: 0, 1, 3
Default: None
Description: O0 Exit online command mode and return to data mode (see +++AT<CR> escape
O1 Issue a retrain and return to online data mode.
O3 Issue a rate renegotiations and return to data mode.
Command: P Pulse Dialing
Values: P, T
Default: T
Description: Configures the modem for pulse (non-touch-tone) dialing. Dialed digits are pulsed until a T
Command: Qn Result Codes Enable/Disable
Values: n = 0 or 1
Default: 0
De
scription: Q0 Enable result codes.
Q1 Disable result codes.
Q2 Returns an OK for backward compatibility with some software.
firmware version, link type, line speed, serial speed, type of error correction/data
compression, number of past retrains, etc.
B command.
command. During handshake, fallback to a lower speed can occur.
sequence).
command or dial modifier is received.
Multi-Tech Systems, Inc. MultiAccess ACS User Guide 48
Page 49

Appendix F – Modem AT Commands
Command: Sr=n Set Register Value
Values: r = S-register number; n varies
Default: None
Description: Set value of register Sr to value of n, where n is entered in decimal format (e.g., S0=1).
Command: Sr? Read Register Value
Values: r = S-register number
Default: None
Description: Read value of register Sr and display it in 3-digit decimal form (e.g., S2? gives the response
Command: T Tone Dialing
Values: P, T
Default: T
Description: Configures the modem for DTMF (touch-tone) dialing. Dialed digits are tone dialed until a P
Command: Vn Result Code Format
Values: n = 0 or 1
Default: 1
Description: V0 Displays result codes as digits (terse response).
V1 Displays result codes as words (verbose response).
Command: Wn Result Code Options
Values: n = 0, 1, or 2
Default: 2
Description: W0 CONNECT result code reports serial port speed, disables protocol result codes.
W1 CONNECT result code reports serial port speed, enables protocol result codes.
W2 CONNECT result code reports line speed, enables protocol result codes.
Command: Xn Result Code Selection
Values: n = 0–7
Default: 4
Description: X0 Basic result codes (CONNECT); does not look for dial tone or busy signal.
X1 Extended result codes (CONNECT 46000 V42bis); does not look for dial tone or busy
X2 Extended result codes with NO DIALTONE; does not look for busy signal.
X3 Extended result codes with BUSY; does not look for dial tone.
X5 Extended result codes with NO DIALTONE and BUSY.
X6 Extended result codes with NO DIALTONE and BUSY.
X7 Basic result codes with NO DIALTONE and BUSY.
Command: Zn Modem Reset
Values: n = 0 or 1
Default: None
Description: Z0 Reset modem to profile saved by the last &W command.
Z1 Same as Z0.
043).
command or dial modifier is received.
signal.
X4 Extended result codes with NO DIALTONE and BUSY.
Multi-Tech Systems, Inc. MultiAccess ACS User Guide 49
Page 50

Appendix F – Modem AT Commands
Command: &Cn Data Carrier Detect (DCD) Control
Values: n = 0, 1, 2
Default: 1
Description: &C0 Forces the DCD circuit to be always ON.
&C1 DCD goes ON when the remote modem’s carrier signal is detected, and goes OFF
&C2 DCD turns OFF upon disconnect for time set by S18. It then goes high again (for some
Command: &Dn Data Terminal Ready (DTR) Control
Values: n = 0, 1, 2, or 3
Default: 2
Description: &D0 Modem ignores true status of DTR signal and responds as if it is always on.
&D1 If DTR drops while in online data mode, the modem enters command mode, issues
&D2 If DTR drops while in online data mode, the modem hangs up. If the signal is not
&D3 If DTR drops, modem hangs up and resets as if ATZ command were issued.
Command: &En XON/XOFF Pacing Control
Values: n = 12 or 13
Default: 12
Description: &E12 Disables XON/XOFF pacing.
&E13 Enables XON/XOFF pacing.
Command: &Fn Load Factory Settings
Values: n = 0
Default: None
Description: &F0 Load factory settings as active configuration.
Note: See also the Z command.
Command: &Gn V.22bis Guard Tone Control
Values: n = 0, 1, or 2
Default: 0
Description: &G0 Disable guard tone.
&G1 Set guard tone to 550 Hz.
&G2 Set guard tone to 1800 Hz.
Note: The &G command is not used in North America.
Command: &Kn Flow Control Selection
Values: n = 0, 3, or 4
Defaults: 3
Description: &K0 Disable flow control.
&K4 Enable XON/XOFF software flow control.
&K3 En able CTS/RTS hardwar e f low control.
when the carrier signal is not detected.
PBX phone systems).
an OK, and remains connected.
present, the modem will not answer or dial.
Multi-Tech Systems, Inc. MultiAccess ACS User Guide 50
Page 51

Appendix F – Modem AT Commands
Command: &Ln Leased Line Operation
Values: n = 0, 1, or 2
Defaults: 0
Description: &L0 The modem is set for standard dial-up operation.
&L1 The modem is set for leased line operation in originate mode.
&L2 The modem is set for leased line operation in answer mode.
Note: For &L1 and &L2, there is a 30-second window between power up and the starting of
Command: &Pn Pulse Dial Make-to-Break Ratio Selection
Values: n = 0, 1, or 2
Default: 0
Description: &P0 60/40 make-to-break ratio
&P1 67/33 make-to-break ratio
&P2 20 pulses per second
Note: The &P2 command is available only if the country/regional code is set to Japan.
Command: &Qn Asynchronous Communications Mode
Values: n = 0, 5, 6, 8, or 9
Default: 5
Description: &Q0 Asynchronous with data buffering. Same as \N0.
&Q5 Error control with data buffering. Same as \N3.
&Q6 Asynchronous with data buffering. Same as \N0.
&Q8 MNP error control mode. If MNP error control is not established, the modem falls back
&Q9 V.42 or MNP error control mode. If neither error control is established, the modem
Command: &Sn Data Set Ready (DSR) Control
Values: n = 0 or 1
Default: 0
Description: &S0 DSR is always ON.
&S1 DSR goes ON only during a connection.
Command: &Tn Loopback Test (V.54 Test) Commands
Values: n = 0, 1, 3, 6
Default: None
Description: The modem can perform selected test and diagnostic functions. A test can be run only when
&T0 Stops any test in progress.
&T1 Starts a local analog loopback, V.54 Loop 3, test. If a connection exists when this
&T3 Starts local digital loopback, V.54 Loop 2, test. If no connection exists, ERROR is
&T6 Initiates a remote digital loopback, V.54 Loop 2, test without self-test. If no connection
Command: &V Display Current Settings
Values: N/A
Description: Displays the active modem settings.
the leased line handshake. During this time, you can turn off the command, if desired.
according to the setting in S36.
falls back according to the setting in S36.
the modem is operating in non-error-correction mode (normal or direct mode). For tests 3
and 6, a connection between the two modems must be established. To terminate a test in
progress, the escape sequence (+++AT) must be entered.
command is issued, the modem hangs up. When the test starts, a CONN E CT
message is displayed.
ret
urned.
exists, ERROR is returned.
Multi-Tech Systems, Inc. MultiAccess ACS User Guide 51
Page 52

Appendix F – Modem AT Commands
Command: &Wn Store Curr en t Configuration
Values: n = 0 or 1
Default: 1
Description: &W0 Stores current modem settings in non-volatile memory and causes them to be
&W1 Clears user default settings from non-volatile memory and causes the factory
Command: &Zy=x Store Dialing Command
Values: y = 0–2 (0–1SMI-Parallel {internal})
x = Dialing command
Default: None
Description: Stores dialing command x in memory location y. Dial the stored number using the command
ATDS=y. See Also the #CBS command, a callback security command.
Command: \An Select Maximum MNP Block Size
Values: n = 0, 1, 2, or 3
Default: 3
Description: \A0 64-character maximum
\A1 128-character maximum
\A2 192-character maximum
\A3 256-character maximum
Command: \Bn Transmit Break
Values: n = 0–9 in 100 ms units
Default: 3
Description: In non-error-correction mode only, sends a break signal of the specified length to a remote
modem. Works in conjunction with the \K command.
loaded at power-on or following the ATZ command instead of the factory defaults.
See &F command.
defaults to be loaded at power-on or following the ATZ command.
Multi-Tech Systems, Inc. MultiAccess ACS User Guide 52
Page 53

Appendix F – Modem AT Commands
Command: \Kn Break Control
Values: n = 0–5
Default: 5
Description: Controls the modem's response to a break received from: computer, remote modem, or \B
Data mode. Modem receives the break from the computer:
\K0 Enter online command mode, no break sent to the remote modem.
\K1 Clear data buffers and send break to the remote modem.
\K2 Same as \K0.
\K3 Send break immediately to the remote modem.
\K4 Same as \K0.
\K5 Send break to the remote modem in sequence with the transmitted data.
Data mode. Modem receives the break from the remote modem:
\K0 Clear data buffers and send break to the computer.
\K1 Same as \K0.
\K2 Send break immediately to the computer.
\K3 Same as \K2.
\K4 Send break to the computer in sequence with the received data.
\K5 Same as \K4.
Online command mode. Modem receives a \Bn command from the computer:
\K0 Clear data buffers and send break to the remote modem.
\K1 Same as \K0.
\K2 Send break immediately to the remote modem.
\K3 Same as \K2.
\K4 Send break to the remote modem in sequence with the transmitted data.
\K5 Same as \K4.
Command: \Nn Error Correction Mode Selection
Values: n = 0–5, or 7
Default: 3
Description: \N0 Non-error correction mode with data buffering (buffer mode; same as &Q6).
\N1 Same as N0.
\N2 MNP reliable mode. If the modem cannot make an MNP connection, it disconnects.
\N3 V.42/MNP auto-reliable mode. The modem attempts first to connect in V.42 error
\N4 V.42 reliable mode. If the modem cannot make a V.42 connection, it disconnects.
\N5 V.42, MNP, or non-error correction (same as \ N3).
\N7 V.42, MNP, or non-error correction (same as \ N3).
Command: \Qn Flow Control Selection
Values: n = 0, 1, or 3
Default: 3
Description: \Q0 Disable flow control (same as &K0).
\Q1 XON/XOFF software flow control (same as &K4).
\Q2 CTS-only flow control. Not supported.
\Q3 RTS/CTS hardware flow control (same as &K3).
Command: \Tn Inactivity Timer
Values: n = 0, 1–255
Default: 0
De
scription: Sets the time (in minutes) after the last character is sent or received that the modem waits
Command: \Vn Protocol Result Code
Values: n = 0, 1, or 2
Default: 1
Description: \V0 Disables the appending of the protocol result code to the DCE speed.
\V1 Enables the appending of the protocol result code to the DCE speed.
\V2 Same as \V1.
command. Response is different for each of three different states.
correction mode, then in MNP mode, and finally in non-error correction (buffer) mode
with continued operation.
before disconnecting. A value of zero disables the timer. Applies only in buffer mode.
Note: You can also set the inactivity timer by changing the value of S30.
Multi-Tech Systems, Inc. MultiAccess ACS User Guide 53
Page 54

Appendix F – Modem AT Commands
Command: \Xn XON/XOFF Pass-Through
Values: n = 0 or 1
Default: 0
Description: \X0 Modem responds to and discards XON/XOFF characters.
\X1 Modem responds to and passes XON/XOFF characters.
Note: This is also controlled via &E6 and &E7.
Command: -Cn Data Calling Tone
Values: n = 0 or 1
Defaults: 1
Description: -C0 Disable V.25 data calling tone to deny remote data/fax/voice discrimination.
-C1 Enable V.25 data calling tone to allow remote data/fax/voice discrimination.
Command: %A Adaptive Answer Result Code Enable
Values: n = 0 or 1
Default: 0
Description: The %A command controls whether the DATA or FAX result codes will be sent by the
%A0 Disables adaptive answer result codes.
%A1 Enables adaptive answer result codes.
Command: %B View Numbers in Blacklist
Values: N/A
Description: If blacklisting is in effect, AT%B displays the numbers for which the last call attempted in the
Command: %Cn Data Compression Control
Values: n = 0 or 1
Default: 1
Description: %C0 Disable V.42bis /MNP 5 data compression.
%C1 Enable V.42bis/MNP 5 data compression.
Command: %DCn AT Command Control
Values: n = 0 or 1
Default: 0
Description: %DC0 The modem responds to AT commands.
%DC1 The modem ignores AT commands.
Note: The modem will respond to AT%DC for 10 seconds after power-up.
Command: %En Fallback and Fall Forward Control
Values: n = 0, 1, or 2
Default: 2
De
scription: %E0 Disable fallback and fall forward.
%E1 Enable fallback, disable fall forward.
%E2 Enable fallback and fall forward.
Command: %Hn Direct Connect Enable
Values: n = 0, 1
Default: 0
Description: %H0 Sets callback security to normal operation.
%H1 All callback security calls will be direct connect regardless of whether the password
modem. The modem must be in fax mode for this command to work. Also, the modem must
be set to +FAA=1, which enables the modem to distinguish between a fax and a data call.
When these commands are enabled, the modem sends DATA to the computer when it
detects data tones and FAX when it detects fax tones. These strings are used by some
servers to select the appropriate communication program.
previous two hours failed. In countries that do not require blacklisting, the ERROR result
code appears.
or phone number has the - character.
Multi-Tech Systems, Inc. MultiAccess ACS User Guide 54
Page 55

Command: %Rn Cisco Configuration
Values: n = 0, 1
Default: 0
Description: %R0 Disables Cisco configuration.
%R1 Sets E0, Q1, &D0, \N0, $SB9600, and %S1 for operation with a Cisco router.
Command: %Sn Command Speed Response
Values: n = 0, 1
Default: 0
Description: %S0 Sets modem to respond to AT commands at all normal speeds.
%S1 AT commands accepted at 115200 bps only. Commands at other speeds are
Command: $Dn DTR Dialing
Values: n = 0 or 1
Default: 0
Description: $D0 Disables DTR dialing.
$D1 Dials the number in memory location 0 when DTR goes high.
Command: $EBn Asynchronous Word Length
Values: n = 0 or 1
Default: 0
Description: $EB0 Enables 10-bit mode.
$EB1 Enables 11-bit mode.
Command: $MBn Online BPS Speed
Values: n = speed in bits per second
Default: 28,800
Description: $MB75 Selects CCITT V.23 mode
$MB300 Selects 300 bps on-line
$MB1200 Selects 1200 bps on-line
$MB2400 Selects 2400 bps on-line
$MB4800 Selects 4800 bps on-line
$MB9600 Selects 9600 bps on-line
$MB14400 Selects 14400 bps on-line
$MB19200 Selects 19200 bps on-line
$MB28800 Selects 28800 bps on-line
$MB33600 Selects 33600 bps on-line
Command: $RPn Ring Priority vs. AT Command Priority
Values: n = 0 or 1
Default: 1
Description: $RP0 The AT command will have priority over the ring. S1 will be reset to 0 if an AT
$RP1 The ring will have priority over the AT command. S1 will increment even if an AT
Note: SocketModems do not detect ring cadence of TelTone telephone line simulators as a
Command: $SBn Serial Port Baud Rate
Values: n= s
Default: 57600
Description: $SB300 Sets serial port to 300 bps
$SB1200 Sets serial port to 1200 bps
$SB2400 Sets serial port to 2400 bps
$SB4800 Sets serial port to 4800 bps
$SB9600 Sets serial port to 9600 bps
$SB19200 Sets serial port to 19200 bps
$SB38400 Sets serial port to 38400 bps
$SB57600 Sets serial port to 57600 bps
$SB115200 Sets serial port to 115200 bps
$SB230400 Sets serial port to 230400 bps
Multi-Tech Systems, Inc. MultiAccess ACS User Guide 55
ignored.
command is received. This command is storable to memory.
command and ring are received together and the incoming call will be answered when S1 is
equal to S0.
valid ring.
peed in bits per second
Appendix F – Modem AT Commands
Page 56

Appendix F – Modem AT Commands
Command: +VDR=x, y Distinctive Ring Report
Values: x = 0, 1 Distinctive Ring report control. See description.
y = 0–255 Minimum ring interval in 100 ms units. See description.
Default: 0, 0
Description: Enables reporting of ring cadence information to the DTE and specifies the minimum
The report format is one line per silence period and one line per ring period. The
+VDR=0, N/A Disables Distinctive Ring cadence reporting.
+VDR=1, 0 Enables Distinctive Ring cadence reporting. Other call progress
+VDR=1, >0 Enables Distinctive Ring cadence reporting. The RING result code
+VDR=? Displays the allowed values.
+VDR? Displays the current value.
ring cadence that will be reported.
length of the silence period is in the form DROF=number in units of 100
ms<CR><LF>, and the length of the ring is in the form DRON=number in units of 100
ms<CR> <LF>. The modem may produce a Ring event code after the DRON
message if enabled by the y parameter. The y parameter must be set to a value equal
to or smaller than the expected ring cadence in order to pass the report to the DTE.
result codes (including RING) are reported as normal.
is reported after the falling edge of the ring pulse (i.e., after the
DRON report).
Multi-Tech Systems, Inc. MultiAccess ACS User Guide 56
Page 57

Appendix F – Modem AT Commands
Command: #CBAn Callback Attempts
Values: n = 1–255
Default: 4
Description: Sets the number of callback attempts that are allowed after passwords have been
Command: #CBDn Callback Delay
Values: n = 0–255
Default: 15
Description: Sets the length of time (in seconds) that the modem waits before calling back the
Command: #CBF? Callback Failed Attempts Display
Values: N/A
Default: N/A
Description: Requests the number of failed callback passwords since reset or power-up. This
exchanged between modems.
remote modem.
number can be stored to nonvolatile memory using the &W command.
Command: #CBFR Callback Failed Attempts Reset
Values: N/A
Default: N/A
Description: Resets the number of failed callback passwords to 0. This does not reset the number
Command: #CBIn Local Callback Inactivity Timer
Values: n = 1–255
Default: 20
Description: Sets the time (in minutes) that the modem waits for a command before forcing the
stored in nonvolatile memory.
user to enter the setup password again.
Command: #CBNy=x Store Callback Password
Values: y = 0–29
Defaults: None
Description: Sets the callback security password for the y memory location. The password must
Command: #CBPn Callback Parity
Values: n = 0, 1, or 2
Default: 0
Description: Sets parity for the callback security messages.
#CBP0 No parity.
#CBP1 Odd parity.
#CBP2 Even parity.
x = password
have 6 to 10 characters, and cannot include the + or - characters.
Multi-Tech Systems, Inc. MultiAccess ACS User Guide 57
Page 58

Appendix F – Modem AT Commands
Command: #CBRy Callback Security Reset
Values: y = 0–29
Default: None
Description: Clears the password and phone number in the y memory location.
Command: #CBSn Callback Enable/Disable
Values: n = 0, 1, 2, or 3
Default: 0
Description: #CBS0 Disables callback security.
#CBS1 Enables local and remote callback security.
#CBS2 Enables remote callback security only.
#CBS3 Disables callback security until local hang-up or reset.
Command: #Pn Set 11-bit Parity
Values: n = 0 or 1
Default: 2
Description: #P0 No parity.
#P1 Odd parity.
#P2 Even parity.
Command: #Sx Enter Setup Password
Values: x= password (1–8 characters, case sensitive)
Default: MTSMODEM
Description: Enters the remote configuration setup password.
Command: #S=x Store Setup Password
Values: x= password (1–8 characters, case sensitive)
Default: MTSMODEM
Description: Stores a new remote configuration setup password.
Multi-Tech Systems, Inc. MultiAccess ACS User Guide 58
Page 59

Appendix F – Modem AT Commands
Escape AT Commands
Command: +++AT<CR> Escape Sequence
Values: N/A
Description: Puts the modem in command mode (and optionally issues a command) while
Command: %%%ATMTSMODEM<CR> Remote Configuration Escape Sequence
Values: N/A
Description: Initiates remote configuration mode while online with remote modem. The remote
remaining online. Type +++AT and up to six optional command characters; then
press ENTER. Used mostly to issue the hang-up command: +++ATH<CR>.
configuration escape character (%) is defined in register S13.
Multi-Tech Systems, Inc. MultiAccess ACS User Guide 59
Page 60

Appendix F – Modem AT Commands
V.9 2 C omma nd s
Command: +MS= Modulation Selection
Values: See description.
Defaults: See description.
Description: This extended-format command selects modulation, enables or disables automode, and
The command syntax is
+MS=? Reports supported options in the format (list of supported mod values),(list of supported
+MS? Reports current options in the format mod, automode, 0, max_rate, 0, max_rx_rate.
mod Specifies the preferred modulation (automode enabled) or the modulation to use in
automode An optional numeric value that enables or disables automatic modulation negotiation using
0 Disable automode
specifies the highest downstream and upstream connection rates using one to four
subparameters.
+MS=[mod][,[automode][,[0][,[max_rate][,[0][,[max_rx_rate]]]]]]<CR>
Subparameters that are not entered retain their current value. Commas separate optional
subparameters, and must be inserted to skip a subparameter. Example: +MS=,0<CR>
disables automode and keeps all other settings at their current values.
automode values),(0),(list of supported max_rate values),(0),(list of supported max_rx_rate
values). Example: +MS: (BELL103, V21, BELL212A, V22, V22B, V23C, V32, V32B, V34,
V90, V92), (0, 1), (0), (0-33600), (0), (0-56000)
Example: +MS: V92, 1, 0, 31200, 0, 56000.
Subparameters
originating or answering a connection (automode disabled). The default is V92.
mod Modulation Possible rates (bps)1
V922 V92 56000, 54666, 53333, 52000, 50666, 49333,
V903 V.90 56000, 54666, 53333, 52000, 50666, 49333,
V34 V.34 33600, 31200, 28800, 26400, 24000,
V32B V.32bis 14400, 12000, 9600, 7200, or 4800
V32 V.32 9600 or 4800
V22B V.22bis 2400 or 1200
V22 V.22 1200
V23C V.23 1200
V21 V.21 300
Bell212A Bell 212A 1200
Bell103 Bell 103 300
Notes:
1. See optional <automode>, <max_rate>, and <max_RX_rate>
subparameters.
2. Selects V.92 modulation as first priority. If a V.92 connection
cannot be established, the modem attempts V.90, V.34, V.32bis, etc.
3. Selects V.90 modulation as first priority. If a V.90 connection
cannot be established, the modem attempts V.34, V.32bis, etc.
V.8 bis/V.8 or V.32 bis Annex A. Automode is disabled if values are specified for the
max_rate and max_rx_rate parameters. The options are:
48000, 46666, 45333, 44000, 42666, 41333.
40000, 38666, 37333, 36000, 34666, 33333,
32000, 30666, 29333, or 28000
48000, 46666, 45333, 44000, 42666, 41333.
40000, 38666, 37333, 36000, 34666, 33333,
32000, 30666, 29333, or 28000
21600,19200, 16800, 14400, 12000, 9600, 7200,
4800, or 2400
1 Enable automode (default)
Multi-Tech Systems, Inc. MultiAccess ACS User Guide 60
Page 61

Appendix F – Modem AT Commands
max_rate An optional number that specifies the highest rate at which the modem may
establish an upstream (transmit) connection. The value is decimal coded in units of
bps, for example, 33600 specifies the highest rate to be 33600 bps.
0 Maximum rate determined by the modulation selected in mod (default).
300–33600 Maximum rate value limited by the modulation selected in mod. For valid max_rate
values for each mod value, see the following table.
mod value Valid max_rate values (bps)
V92, V90, V34 31200, 28800, 26400, 24000, 21600,19200, 16800,
V32B 19200, 16800, 14400, 12000, 9600, 7200, 4800
V32 14400, 12000, 9600, 7200, 4800
V22B 2400
V22, V23C, Bell212A 1200
V21, Bell103 300
14400, 12000, 9600, 7200, 4800, 2400
max_rx_rate An optional number that specifies the highest rate at which the modem may
establish a downstream (receive) connection. The value is decimal coded in units
of bps, e.g., 28800 specifies the highest rate to be 28800 bps.
0 Maximum rate determined by the modu lation selected in mod (default).
300–56000 Maximum rate value limited by the modulation selected in mod. See “Possible rates” in the
Command: +PCW=n Call Waiting Enable
Values: n = 0, 1, or 2
Default: 2
Description: Controls the action to be taken upon detection of a call waiting tone in V.92 mode.
+PCW=0 Toggles V.24 Circuit 125 and collects Caller ID if enabled by +VCID
+PCW=1 Hangs up
+PCW=2 Ignores V.92 call waiting
+PCW=? Displays the allowed values
+PCW? Displays the current value
Command: +PIG=n PCM Upstream Ignore
Values: n = 0 or 1
Default: 1
Description: Controls the use of PCM upstream during V.92 operation. PCM upstream allows
+PIG=0 Disables PCM upstream
+PIG=1 Enables PCM upstream
+PIG=? Displays the allowed values
+PIG? Displays the current value
Command: +PMH=n Modem on Hold Enable
Values: n = 0 or 1
Default: 1
Description: Controls if modem on hold procedures are enabled during V.92 operation. Normally
+PMH=0 Enables V.92 modem on hold
+PMH=1 Disables V.92 modem on hold
+PMH=? Displays the allowed values
+PMH? Displays the current value
mod table.
Values specified by this command are not modified when an AT&F command is
issued.
faster upload speeds to a V.92 server.
controlled by a modem on hold program. Values specified by this command are not
modified when an AT&F command is issued.
Multi-Tech Systems, Inc. MultiAccess ACS User Guide 61
Page 62

Appendix F – Modem AT Commands
Command: +PMHF V.92 Modem Hook Flash
Values: N/A
Default: N/A
Description: Causes the DCE to go on-hook for a specified period of time, and then return off-hook
for at least a specified period of time. The specified period of time is normally one-half
second, but may be governed by national regulations.
Command: +PQC=n Quick Connect Control
Values: n = 0, 1, 2, or 3
Default: 3
Description: Controls V.92 shortened Phase 1 and Phase 2 startup procedures (Quick Connect).
When line conditions are stable, quick connect results in shortened connect times;
however, significant fluctuation in line conditions from call to call can cause longer
connect times; thus, it may be advisable to disable quick connect.
+PQC=0 Enables Short Phase 1 and Short Phase 2 (Quick Connect)
+PQC=1 Enables Short Phase 1
+PQC=2 Enables Short Phase 2
+PQC=3 Disables Short Phase 1 and Short Phase 2
+PQC=? Displays the allowed values
+PQC? Displays the current value
Command: +VCID=n Caller ID Selection
Values: n = 0, 1, or 2
Default: 0
Description: Enables Caller ID detection and configures the reporting and presentation of the
Caller ID data that is detected after the first ring. The reported data includes the date
and time of the call, the caller's name and number, and a message. Set S0=2.
+VCID=0 Disables Caller ID
+VCID=1 Enables Caller ID with formatted data
+VCID=2 Enables Caller ID with unformatted data
+VCID=? Displays the allowed values
+VCID? Displays the current value
Command: +VDR=x, y Distinctive Ring Report
Values: x = 0, 1 Distinctive Ring report control. See description.
y = 0–255 Minimum ring interval in 100 ms units. See description.
Default: 0, 0
Description: Enables reporting of ring cadence information to the DTE and specifies the minimum
Report format is one line per silence period and one line per ring period. The length of
ring cadence that will be reported.
the silence period is in the form DROF=number in units of 100 ms<CR><LF>, and the
length of the ring is in the form DRON=number in units of 100 ms<CR> <LF>. The
modem may produce a Ring event code after the DRON message if enabled by the y
parameter. The y parameter must be set to a value equal to or smaller than the
expected ring cadence in order to pass the report to the DTE.
+VDR=0, N/A Disables Distinctive Ri ng cade nc e rep orting.
+VDR=1, 0 Enables Distinctive Ring cadence reporting. Other call
progress result cod es (including RING) are reported as
normal.
+VDR=1, >0 Enables Distinctive Ring cadence reporting. RING result
code is reported after falling edge of the ring pulse (after
the DRON report).
+VDR=? Displays the allowed values.
+VDR? Displays the current value.
Multi-Tech Systems, Inc. MultiAccess ACS User Guide 62
Page 63

Appendix F – Modem AT Commands
Command: #CBAn Callback Attempts
Values: n = 1–255
Default: 4
Description: Sets the number of callback attempts that are allowed after passwords have been
exchanged between modems.
Command: #CBDn Callback Delay
Values: n = 0–255
Default: 15
Description: Sets the length of time (in seconds) that the modem waits before calling back the
Command: #CBF? Callback Failed Attempts Display
Values: N/A
Default: N/A
Description: Requests the number of failed callback passwords since reset or power-up. This
Command: #CBFR Callback Failed Attempts Reset
Values: N/A
Default: N/A
Description: Resets the number of failed callback passwords to 0. This does not reset the number
Command: #CBIn Local Callback Inactivity Timer
Values: n = 1–255
Default: 20
Description: Sets the time (in minutes) that the modem waits for a command before forcing the
Command: #CBNy=x Store Callback Password
Values: y = 0–29
Defaults: None
Description: Sets the callback security password for the y memory location. The password must
remote modem.
number can be stored to nonvolatile memory using the &W command.
stored in nonvolatile memory.
user to enter the setup password again.
x = password
have 6 to 10 characters, and cannot include the + or - characters.
Command: #CBPn Callback Parity
Values: n = 0, 1, or 2
Default: 0
Description: Sets parity for the callback security messages.
#CBP0 No parity.
#CBP1 Odd parity.
#CBP2 Even parity.
Command: #CBRy Callback Security Reset
Values: y = 0–29
Default: None
Description: Clears the password and phone number in the y memory location.
Multi-Tech Systems, Inc. MultiAccess ACS User Guide 63
Page 64

Appendix F – Modem AT Commands
Command: #CBSn Callback Enable/Disable
Values: n = 0, 1, 2, or 3
Default: 0
Description: #CBS0 Disables callback security.
#CBS1 Enables local and remote callback security.
#CBS2 Enables remote callback security only.
#CBS3 Disables callback security until local hang-up or reset.
Command: #Pn Set 11-bit Parity
Values: n = 0 or 1
Default: 2
Description: #P0 No parity.
#P1 Odd parity.
#P2 Even parity.
Command: #Sx Enter Setup Password
Values: x= password (1–8 characters, case sensitive)
Default: MTSMODEM
Description: Enters the callback security setup password.
Command: #S=x Store Setup Password
Values: x= password (1–8 characters, case sensitive)
Default: MTSMODEM
Description: Stores a new callback security and remote configuration setup password.
Multi-Tech Systems, Inc. MultiAccess ACS User Guide 64
Page 65

Appendix F – Modem AT Commands
S-Registers
Certain modem values, or parameters, are stored in memory locations called S-Registe rs. Use the S
command to read or to alter the contents of S-Registers (see previous section).
Register Unit Range Default Description
S0 1 ring 0, 1–255 1 Sets the number of rings until the modem answers. ATS0=0
S1 1 ring 0–255 0 Counts the rings th at hav e oc cu rr e d.
S2 decimal 0–127 43 (+) Sets ASCII code for the escape sequence character.
128–255 Values greater than 127 disable escape.
S3 decimal 0–127 13 (^M) Sets the ASCII code for the carriage return character.
S4 decimal 0–127 10 (^J) Sets the ASCII code for the line feed character.
S5 decimal 0–32 8 (^H) Sets the ASCII code for the backspace character.
33–127 Values greater than 32 disable backspace.
S6 seconds 2–65* 2* Sets the time the modem waits after it goes off-hook before it
S7 seconds 35-65* 50* Sets the time the modem waits for a carrier signal before
S8 seconds 0–65 2 Sets the length of a pause caused by a comma character in a
S9 decimal 0, 1–127 37 (%) Sets ASCII code for remote configuration escape character.
S10 100 ms 1–254 20 Sets how long a carrier signal must be lost before the modem
S11 1 ms 50–150* 95* Sets spacing and duration of dialing tones.
S28 decimal 0, 1–255 1 0 disables, 1–255 enables V.34 modulation.
S30 1 minute 0, 1–255 0 Sets the length of time that the modem waits before
S35 decimal 0–1 1 0 disables, 1 enables the V.25 calling tone, which allows
S36 decimal 0–7 7 Specifies the action to take in the event of a negotiation failure
disables auto answer completely.
begins to dial the telephone number.
aborting a call. Also sets the wait for silence time for the @ dial
modifier.
dialing command.
S9=0 disables remote configuration.
disconnects.
disconnecting when no data is sent or received. A value of
zero disables the timer. See als o the \T command
remote data/fax/voice discrimination.
when error control is selected. (See S48.)
Multi-Tech Systems, Inc. MultiAccess ACS User Guide 65
Page 66

Appendix F – Modem AT Commands
S37 decimal 0–19 0 Sets the maximum V.34 “upstream” speed at which the
modem attempts to connect.
0 = maximum speed
1 = reserved
2 = 1200/75 bps
3 = 300 bps
4 = reserved
5 = 1200 bps
6 = 2400 bps
7 = 4800 bps
8 = 7200 bps
9 = 9600 bps
10 = 12000 bps
11 = 14400 bps
12 = 16800 bps
13 = 19200 bps
14 = 21600 bps
15 = 24000 bps
16 = 26400 bps
17 = 28800 bps
18 = 31200 bps
19 = 33600 bps
S38 decimal 0–23 1 Sets “downstream” data rate where V.90 provides rates of
28,000 to 56,000 bps in increments of 1,333 bps.
0 = V.90 disabled
1 = V.90 auto rate
2 = 28,000 bps
3 = 29,333 bps
4 = 30,666 bps
5 = 32,000 bps
6 = 33,333 bps
7 = 34,666 bps
8 = 36,000 bps
9 = 37,333 bps
10 = 38,666 bps
11 = 40,000 bps
12 = 41,333 bps
13 = 42,666 bps
14 = 44,000 bps
15 = 45,333 bps
16 = 46,666 bps
17 = 48,000 bps
18 = 49,333 bps
19 = 50,666 bps
20 = 52,000 bps
21 = 53,333 bps
22 = 54,666 bps
23 = 56,000 bps
Upstream data rates: Upstream V.90 data rates are 4800 to
33,600 bps in 2400 bps increments.
S43 decimal 0–1 1 For testing and debugging only. Enables/disables V.32bis
start-up auto mode operation. 0 = disable; 1 = enable.
Multi-Tech Systems, Inc. MultiAccess ACS User Guide 66
Page 67

Appendix F – Modem AT Commands
S48 decimal 7 or 128 7 Enables (7) or disables (128) LAPM negotiation. The following
table lists the S36 and S48 configuration settings for certain
types of connections.
S36=0, 2 LAPM or hang up Do not use
S36=1, 3 LAPM or async Async
S36=4, 6 LAPM, MNP, or hang up MNP or hang up
S36=5, 7 LAPM, MNP, or async MNP or async
S48=7 S48=128
S89 seconds 0, 5–255 10 Sets the length of time in the off-line command mode before
the modem goes into standby mode or “sleep mode”. A value
of zero prevents standby mode; a value of 1–4 sets the value
to 5. Standby mode (sleep mode or low power mode) is
controlled by S89. It programs the number of seconds of
inactivity before the modem will go to sleep. The default value
is 0. A value of 0 disables standby mode. The modem will
wake on an incoming r ing or an AT command.
S108 decimal 0–3, 6, 7 6 Selects the 56K digital loss if using the modem through a PBX
line. The default value is -6 dB loss, the value used when
calling from a typical POTS line long distance.
0 = -0 dB digital loss, no robbed-bit signaling
1 = -3 dB PBX digital loss
2 = -2 dB digital loss
3 = -3 dB digital loss
6 = -6 dB digital loss
7 = -0 dB digital loss with robbed-bit signaling
Multi-Tech Systems, Inc. MultiAccess ACS User Guide 67
Page 68

Appendix F – Modem AT Commands
Result Codes
In command mode your modem can send responses called Result Codes to your computer. Result
codes are used by communications programs and can also appear on your monitor.
Terse Verbose Description
0 OK Command executed
1 CONNECT Modem connected to line
2 RING Ring signal detected
3 NO CARRIER Carrier signal lost or not detected
4 ERROR Invalid command
5 * CONNECT 1200 Connected at 1200 bps
6 NO DIALTONE No dial tone detected
7 BUSY Busy signal detected
8 NO ANSWER No answer at remote end
9 CONNECT 75 Connected at 75 bps
10* CONNECT 2400 Connected at 2400 bps
11* CONNECT 4800 Connected at 4800 bps
12* CONNECT 9600 Connected at 9600 bps
13* CONNECT 14400 Connected at 14400 bps
14* CONNECT 19200 Connected at 19200 bps
18 CONNECT 57600 Connected at 57600 bps
24* CONNECT 7200 Connected at 7200 bps
25* CONNECT 12000 Connected at 12000 bps
28 CONNECT 38400 Connected at 38400 bps
40* CONNECT 300 Connected at 300 bps
55* CONNECT 21600 Connected at 21600 bps
56* CONNECT 24000 Connected at 24000 bps
57* CONNECT 26400 Connected at 26400 bps
58* CONNECT 28800 Connected at 28800 bps
59* CONNECT 31200 Connected at 31200 bps
60* CONNECT 33600 Connected at 33600 bps
70 CONNECT 32000 Connected at 32000 bps
71 CONNECT 34000 Connected at 34000 bps
72 CONNECT 36000 Connected at 36000 bps
73 CONNECT 38000 Connected at 38000 bps
74 CONNECT 40000 Connected at 40000 bps
75 CONNECT 42000 Connected at 42000 bps
76 CONNECT 44000 Connected at 44000 bps
77 CONNECT 46000 Connected at 46000 bps
78 CONNECT 48000 Connected at 48000 bps
79 CONNECT 50000 Connected at 50000 bps
80 CONNECT 52000 Connected at 52000 bps
81 CONNECT 54000 Connected at 54000 bps
82 CONNECT 56000 Connected at 56000 bps
83 CONNECT 58000 Connected at 58000 bps
84 CONNECT 60000 Connected at 60000 bps
86 CONNECT 16800 Connected at 16800 bps
87 CONNECT 115200 Connected at 115200 bps
88 DELAYED Delay is in effect for the dialed number
89 BLACKLISTED Dialed number is blacklisted
90 BLACKLIST FULL Blacklist is full
91 CONNECT 230400 Connected at 230400 bps
100 CONNECT 28000 Connected at 28000 bps
101 CONNECT 29333 Connected at 29333 bps
102 CONNECT 30666 Connected at 30666 bps
103 CONNECT 33333 Connected at 33333 bps
104 CONNECT 34666 Connected at 34666 bps
105 CONNECT 37333 Connected at 37333 bps
106 CONNECT 38666 Connected at 38666 bps
107 CONNECT 41333 Connected at 41333 bps
108 CONNECT 42666 Connected at 42666 bps
109 CONNECT 45333 Connected at 45333 bps
110 CONNECT 46666 Connected at 46666 bps
111 CONNECT 49333 Connected at 49333 bps
112 CONNECT 50666 Connected at 50666 bps
113 CONNECT 53333 Connected at 53333 bps
Multi-Tech Systems, Inc. MultiAccess ACS User Guide 68
Page 69

Appendix F – Modem AT Commands
114 CONNECT 54666 Connected at 54666 bps
115 CONNECT 25333 Connected at 25333 bps
116 CONNECT 26666 Connected at 26666 bps
* EC is added to these result codes when the extended result codes configuration option is enabled. EC is
replaced by one of the following codes, depending on the type of error control connection:
V42bis – V.42 error control (LAP-M) and V.42bis data compression
V42 – V.42 error control (LAP-M) only
MNP5 – MNP 4 error control and MNP 5 data compression
MNP4 – MNP 4 error control only
NoEC – No error control protocol).
Multi-Tech Systems, Inc. MultiAccess ACS User Guide 69
Page 70

Index
Index
integrated V.92/56K modem..............................................5
1
10/100Baset Ethernet..........................................................6
4
47 CFR Part 15 regulations...............................................42
A
Add Time Server............................................................23
Administration Screen......................................................22
Administrator....................................................................12
Administrator E-mail......................................................23
Authentication ..................................................................11
Authentication Type.......................................................26
Auto Log Threshold .......................................................17
C
Call Details.......................................................................18
Call Log entries.................................................................17
Call Log screen.................................................................17
Call Type .........................................................................18
Compact Turnkey Solution.................................................5
Confirm Password..........................................................24
Connect Time.................................................................20
Country Code..................................................................25
Current Time...................................................................19
D
Data: V.92, V.90, enhanced V.34 & below.........................6
Default Gateway .........................................................10, 23
Details..............................................................................18
E
Elapsed Time..................................................................20
Email Status....................................................................20
Email To ..........................................................................19
EMC, Safety, and R&TTE Directive Compliance............43
F
Fax Branding Statement....................................................42
FCC Regulations...............................................................42
H
Handling Precautions..........................................................6
Help Screen.......................................................................21
Home Screen.....................................................................15
I
Industry Canada regulatory statement...............................43
Initialize Modem...............................................................21
Multi-Tech Systems, Inc. MultiAccess ACS User Guide 70
IP Address......................................................................22
L
LED Indicators...................................................................6
Log History .....................................................................17
Log Parameters.................................................................17
Login Screen ....................................................................16
Logout..............................................................................21
M
MA100-1M ........................................................................8
Make Busy.......................................................................21
MNP® Class 5...................................................................6
mounting brackets..............................................................7
MultiAccess .......................................................................5
MultiAccess™ ACS...........................................................5
N
Name...............................................................................24
Name Server..................................................................22
P
Package Contents...............................................................6
Part 68 of the 47 CFR rules..............................................41
Password........................................................................24
Pending Messages........................................................19
Port..................................................................................26
Product Specifications........................................................6
R
RADIUS Accounting......................................................26
RADIUS Server..............................................................26
Rate.................................................................................18
Reduced Development Time..............................................5
Remote Host Address...................................................26
Request Interval.............................................................23
S
Secondary Name Server............................................. 10, 23
Secret..............................................................................26
single-port communications...............................................5
SMTP Configuration........................................................13
SMTP Password......................................................... 13, 23
SMTP Server Address................................................13, 23
SMTP Server User ID................................................13, 23
State................................................................................20
Subject............................................................................19
Subnet Mask..................................................................22
T
Time.................................................................................18
Page 71

Time Server....................................................................23
Time Server Status........................................................19
Time Zone.......................................................................23
U
Up Tim.............................................................................20
User ID.............................................................................24
Username........................................................................18
Index
V
V.42....................................................................................6
V.42bis...............................................................................6
V.44....................................................................................6
V.92/56K modem...............................................................6
Multi-Tech Systems, Inc. MultiAccess ACS User Guide 71
 Loading...