

Page 1

QuickCarrier™ USB-D
MTD-H5 and MTD-EV3 Best Practices
Page 2

2
QuickCarrier USB-D MTD-H5 and MTD-EV3
QuickCarrier USB-D MTD-H5 and MTD-EV3 Best Practices
Country
By Email
By Phone
Europe, Middle East, Africa:
support@multitech.co.uk
+(44) 118 959 7774
U.S., Canada, all others:
support@multitech.com
(800) 972-2439 or (763) 717-5863
S000600, Version 1.1
Copyright
This publication may not be reproduced, in whole or in part, without prior expressed written permission from Multi-Tech Systems, Inc. All rights reserved.
Copyright © 2014 by Multi-Tech Systems, Inc.
Multi-Tech Systems, Inc. makes no representations or warranties, whether express, implied or by estoppels, with respect to the content, information,
material and recommendations herein and specifically disclaims any implied warranties of merchantability, fitness for any particular purpose and noninfringement.
Multi-Tech Systems, Inc. reserves the right to revise this publication and to make changes from time to time in the content hereof without obligation of
Multi-Tech Systems, Inc. to notify any person or organization of such revisions or changes.
Trademarks
QuickCarrier is a trademark. The Multi-Tech logo are registered trademarks of Multi-Tech Systems, Inc. All other brand and product names are trademarks
or registered trademarks of their respective companies.
Contacting Multi-Tech
Knowledge Base
The Knowledge Base provides immediate access to support information and resolutions for all Multi-Tech products. Visit
http://www.multitech.com/kb.go.
Support Portal
To create an account and submit a support case directly to our technical support team, visit: https://support.multitech.com
Technical Support
Business Hours: M-F, 9am to 5pm CT
World Headquarters
Multi-Tech Systems, Inc.
2205 Woodale Drive
Mounds View, Minnesota 55112
Phone: 763-785-3500 or 800-328-9717
Fax: 763-785-9874
Page 3

3
QuickCarrier USB-D MTD-H5 and MTD-EV3
Contents
Overview ...................................................................................................................................................................4
Related Documentation ...................................................................................................................................................... 4
For MTD-H5 Devices ....................................................................................................................................................... 4
For MTD-EV3 Devices ...................................................................................................................................................... 4
Installing and Removing SIM Cards in an MTD-H5 .......................................................................................................5
Installing a SIM Card ............................................................................................................................................................ 5
Removing a SIM Card .......................................................................................................................................................... 6
SIM cards that require a PIN to unlock SIM before use ...................................................................................................... 6
Powering Devices On and Off .....................................................................................................................................7
Powering On the Device ...................................................................................................................................................... 7
Powering Off or Rebooting a Device ................................................................................................................................... 7
Basic Operations ........................................................................................................................................................8
Preparing the Modem for a Data Connection .................................................................................................................... 8
Using the Radio IP Stack to Make a Data Connection ......................................................................................................... 8
Using the Host System IP Stack to Make a Data Connection .............................................................................................. 8
Using the Internal IP Stack to Disconnect a Data Connection ............................................................................................ 8
Using the Host IP Stack Disconnect a Data Connection ...................................................................................................... 8
Responding to Failed Connections ..............................................................................................................................9
When your device fails to connect ...................................................................................................................................... 9
When a call drops ................................................................................................................................................................ 9
Carrier Issues MTD-H5 ........................................................................................................................................................ 9
Customer Contact Information ......................................................................................... Error! Bookmark not defined.
Carrier Information for MTD-EV3 .............................................................................................................................. 11
Verizon Activation ............................................................................................................................................................. 11
Sprint Activations .............................................................................................................................................................. 11
#9XX OMA Unsolicited Indications ............................................................................................................................... 12
PRL Updates ...................................................................................................................................................................... 15
For Sprint....................................................................................................................................................................... 15
For Verizon .................................................................................................................................................................... 15
Other Carrier Notes ........................................................................................................................................................... 15
Page 4

4
QuickCarrier USB-D MTD-H5 and MTD-EV3
Overview
Document
Description
QuickCarrier USB-D MTD-H5 User Guide
Provides an overview, specification, safety and regulatory
information, and SIM cards and basic operations. (Part: S000551)
USB Driver Installation Guide for H5 and
G3 Devices
Instructions for installing USB drivers on Linux and Windows
Systems (Part: S000553)
HSPA+ AT Commands Reference Guide
Provides AT Command for configuring your device. (Part: S000574)
Document
Description
QuickCarrier USB-D MTD-EV3 User Guide
Provides an overview, specification, safety and regulatory
information, and basic operations. (Part: S000570)
USB Driver Installation Guide for EV3 and
C2 Devices
Instructions for installing USB drivers on Linux and Windows
Systems. (Part: S000569)
EV-DO and CDMA AT Commands
Reference Guide
Provides AT Commands for configuring your device. (Part: S000546)
The MTD is a complex computer system that contains a radio, a processor, flash memory and RAM. The system is interacting
with a cellular network while trying to talk to the host system it is connected to.
Following these guidelines will help preserve the system in the best possible way.
Related Documentation
For more information re following documentation is available on the Multi-Tech Installation Resources website at
www.multitech.com/setup/product.go.
For MTD-H5 Devices
For MTD-EV3 Devices
Page 5
5
QuickCarrier USB-D MTD-H5 and MTD-EV3
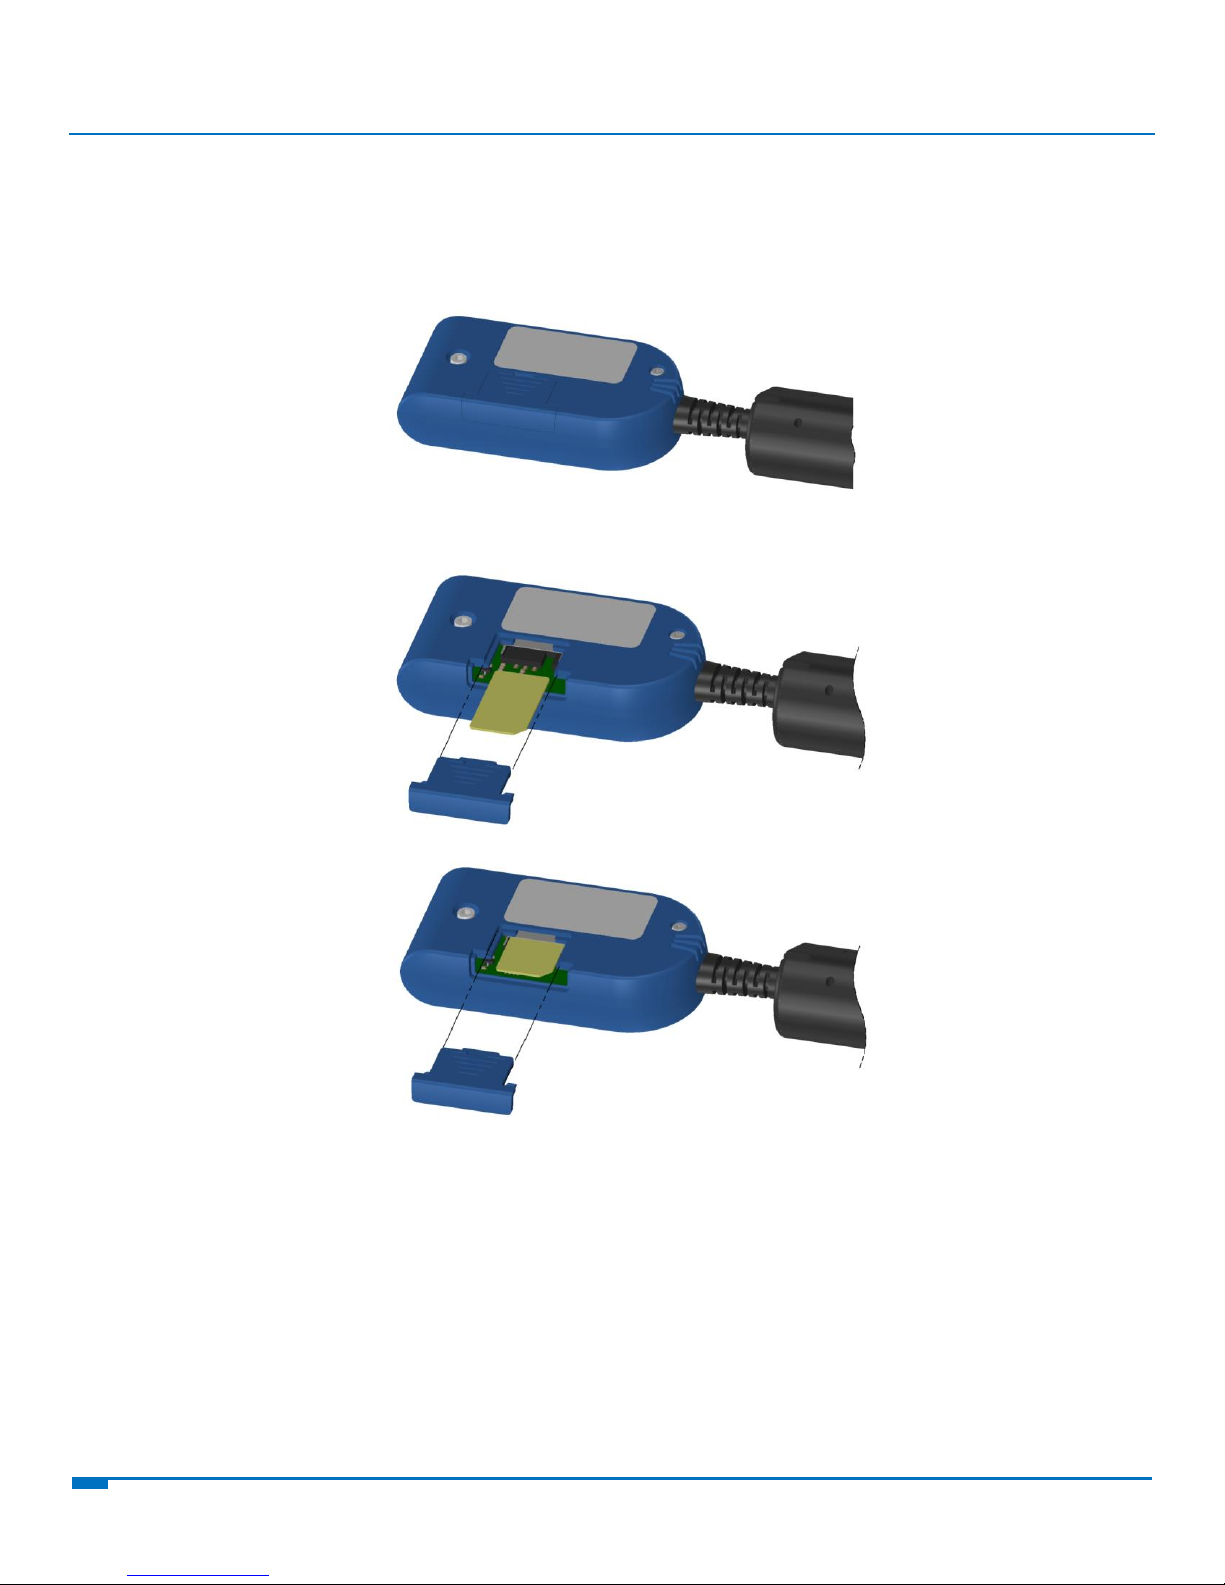
Installing and Removing SIM Cards in an MTD-H5
Installing a SIM Card
Only MTD-H5 models have a SIM card.
Warning: If the device is connected to a computer or power supply, disconnect it. Inserting or removing a SIM
card with the device powered may harm the SIM card and the device.
1. Remove the SIM cover from the back of the device. If you have trouble sliding the SIM cover, use a flat-blade
screwdriver in the slot on the SIM cover to slide it out.
2. Insert the SIM card into the card holder with the gold contact side facing down as shown.
3. Verify that the SIM card fits into the holder properly and replace the cover.
Page 6

6
QuickCarrier USB-D MTD-H5 and MTD-EV3
Removing a SIM Card
To remove a SIM card:
Warning: If the device is connected to a computer or power supply, disconnect it. Inserting or removing a SIM
card with the device powered may harm the SIM card and the device.
Remove the SIM cover from the back of the device. If you have trouble sliding the SIM cover, use a flat-blade
screwdriver in the slot on the SIM cover to slide it out.
Slide the SIM card out.
Replace the SIM cover.
SIM cards that require a PIN to unlock SIM before use
AT+CPIN=XXXXX is the command to set and read the PIN used for the SIM card. Entering an invalid PIN or entering
a PIN for a SIM that doesn’t require one could cause the SIM to become locked. Typically XXXX failures while trying
to enter the SIM PIN may lock the SIM.
Page 7

7
QuickCarrier USB-D MTD-H5 and MTD-EV3
Powering Devices On and Off
Powering On the Device
These devices are USB powered and do not have a power button.
Note: Make sure the USB hub, whether external or internal, can provide adequate power. Max Peak current is in
the range of 700mA for EV3 and 1.2A for H5. Refer to the device’s User Guide for more information.
If the host system can’t provide enough power, then the 5V rail bounces, which causes the modem to lose
power prematurely and could damage to the modem. Each port on the USB hub should support 500mA at
5V. If the system has inadequate power, voltage droops when additional devices are plugged into the hub
(for example, when a modem is plugged into first port, plugging a USB flash drive into the second port,
causes the modem to reset).
To power on the device:
1. Plug the device into the USB port and give it time to initialize.
2. Wait 10 seconds after plugging the device into the USB port before giving the modem any commands. The
10 seconds allows the modem to reach the activation state.
Disconnecting it or shutting off the computer, turns it off.
Note: When reconnecting the device, use the same USB port that you used when installing drivers. Otherwise, you
may need to re-install the driver.
Powering Off or Rebooting a Device
To power off your device:
1. Suspend dial-up networking to disconnect the data connection and keep the application from attempting
to redial.
2. Suspend any other modem queries. (Sometimes separate apps are talking to the modem, initializing, or
accessing modem status information.)
3. Wait for Steps 1-2 to complete so the modem is disconnected.
4. Issue AT#SHDN and wait for OK.
You can issue this command through a power down app that sends this command before removing
power.
Some terminal communication scripts send AT commands to the modem.
5. Wait 30 seconds after the OK to allow the radio to disconnect from the carrier and close out file systems.
It is now safe to remove power or unplug the MTD.
Page 8

8
QuickCarrier USB-D MTD-H5 and MTD-EV3
Basic Operations
Preparing the Modem for a Data Connection
Set the APN by issuing the following command where <APN Name> is the APN assigned by the carrier:
AT+CGDCONT=1,”IP”,”<APN Name>”
Check for registration by issuing AT+CREG?<cr> and wait for the response. If the second value of the response (for
example, +CREG: x,y) is 1, then the modem is registered on the home network. If y=5, then the modem is
registered but roaming. See the AT command reference guide for other possible responses. If the second value is
not 1 or 5, then do not attempt to dial. Wait ~5 seconds for the modem to finish registration and check +CREG
again.
Using the Radio IP Stack to Make a Data Connection
Connect by issuing the command: AT#SGACT=1,1 (using PDP context #1)
Using the Host System IP Stack to Make a Data Connection
This device only supports packet data connections, such as dial-up networking. To make a data connection, you
must use a PPP dialer. If your carrier requires a username and password for the Internet connection, be sure to
enter that information into the PPP dialer. Dial up using ATD*99***1# (using PDP context #1).
Using the Internal IP Stack to Disconnect a Data Connection
Issue the following command to disconnect: AT#SGACT=1,0
Using the Host IP Stack Disconnect a Data Connection
The method to disconnect depends on the type of PPP dialer that was used to establish the data connection.
Page 9

9
QuickCarrier USB-D MTD-H5 and MTD-EV3
Responding to Failed Connections
When your device fails to connect
Verizon recommends working through the steps below until your device connects:
Wait 30 seconds and try again.
Wait 1 minute and try again.
Wait 2 minutes and try again.
Wait 8 minutes and try again.
Make one attempt every 15 minutes for an hour.
Make one attempt every 90 minutes.
When a call drops
If a connected call drops for any reason:
Wait 30 seconds and restart the sequence again.
Carrier Issues MTD-H5
Congested cellular towers may bump data devices since voice calls take priority. Idle data devices may also
experience dropped connections.
Page 10

10
QuickCarrier USB-D MTD-H5 and MTD-EV3
Getting Help
Several things can affect cellular modem service. Who you contact for help depends on what issue you are having:
Contact the Cellular Carrier (SIM card provide for MTD-H5 models) for the following:
Issues with account configuration.
SIM card does not appear to be working.
Cannot activate the radio.
Radio appears to be activated, but you cannot get a data connection. (Verify that your account is configured
for packet data.)
Questions about data usage.
Contact MultiTech
Any other questions – Contact Multi-Tech at our Online Support Portal http://support.multitech.com.
Page 11

11
QuickCarrier USB-D MTD-H5 and MTD-EV3
Carrier Information for MTD-EV3
#904
HFA Started
#905
PRL - Session started
#906
DC - Session started
#907
FUMO -Session started
Verizon Activation
1. Send ATD*22899;<cr>
2. Wait for response OK
3. Wait for response #OTASP:0
4. Wait for response #OTASP:1
5. Wait for response #OTASP:2
6. Modem will reset when done with the activation.
7. Close terminal program
8. Unplug and replug the USB cable
9. Check registry with AT_REG?
Check the Multi-Tech web site for the latest information regarding activations.
Sprint Activations
Sprint performs OTA activations automatically. Watch for their OMA messages for various Sprint updates. Do not
power off or reset the unit if the device is in the middle of an OTA update.
Applications should look for the following unsolicited OMA indications at all times:
If application sees one of these indications it should not attempt to issue commands, attempt data connection, or
reset device until the OMA process is complete as indicated by additional #9XX OMA success or failure indications
below.
If the device is in a data connection when a Network Initiated PRL, DC, or FUMO update alert message is received
from Sprint the radio will wait for a point where data is not being transmitted, then “gracefully” close the data
connection, and then start OMA-DM process with #9xx indication. When this occurs the application should not
attempt to issue AT commands, attempt to start data connection again, or reset device in an attempt to regain
control. Application should wait for a #9xx indication the process has completed before proceeding.
Be aware after the HFA process is successfully completed the radio will be reset. The radio may also reset after
other OMA functions.
Page 12

12
QuickCarrier USB-D MTD-H5 and MTD-EV3
#9XX OMA Unsolicited Indications
#900
DM Client Ready
#901
HFA Attempt #
#902
HFA Countdown Timer (seconds)
#904
HFA Started
#911
HFA Error - credential error
#912
HFA Error - unreachable server
#913
HFA Error - network error
#914
HFA Done - HFA success
#922
HFA Done - No profile received
#923
HFA Error – ETC
#924
HFA Cancelled
#DREL
Data session release
#906
DC - Session started
#911
DC - Error - credential error
#912
DC - Error - unreachable server
#913
DC - Error - network error
#915
DC - Error - update fails for other reasons
#918
DC - Done - success
#924
DC - Cancelled - no profile received
#DREL
Data session release
#905
PRL - Session started
#909
PRL - Done - PRL success
#910
PRL - Done - No PRL update
#911
PRL - Error - credential error
#912
PRL - Error - unreachable server
#913
PRL - Error - network error
#915
PRL - Error - update failed for other reasons
#DREL
Data session release
Hands Free Activation HFA Notifications
Network Initiated Device Configuration (NIDC) or Client Initiated Device Configuration (CIDC)
Network Initiated or Client Initiated Preferred Roaming List (NIPRL or CIPRL) Download
Page 13

13
QuickCarrier USB-D MTD-H5 and MTD-EV3
Network Initiated (NI) or Client Initiated (CI) Firmware Update Management Object (FUMO)
#907
FUMO - Firmware DM session started or started again until no more updates
are available
#911
FUMO - credential error
#912
FUMO - unreachable server
#913
FUMO - network error
#915
FUMO – update fails with other reasons
#916
FUMO - Firmware done, no firmware update
#919
FUMO - Firmware downloaded successfully
#920
FUMO - Firmware download progress (percent)
#921
FUMO - Firmware download start
#921
FUMO - Firmware size get from the OMA-DM server (byte)
#929: 200
FUMO - Firmware Update Success
#929: 402
FUMO - Firmware corrupted , CRC error
#929: 403
FUMO - Firmware package mismatch
#929: 404
FUMO - Firmware signature failed
#929: 406
FUMO - Firmware update authentication failed
#929: 410
FUMO - Firmware update General Error #930 FUMO - Firmware Reporting
Firmware Update result to server
#DREL
Data session release
#926
NIA - NIA retry start
#927
NIA - Notification done with no NIFA information
#928
NIA - NIA digest mismatch error
AT#OMADMSVADDR=<URL>
Set OMA-DM server address (default
https://oma.ssprov.sprint.com/oma)
AT#OMADMSVADDR?
Read OMA-DM server address
AT#OMADMSVPORT=<port#>
Set OMA-DM server (default 443)
AT#OMADMSVPORT?
Read OMA-DM server
AT#OMADMPROXY=<port#>,<URL>
Set OMA-DM proxy server port/URL (default
http://oma.ssprov.sprint.com:80)
AT#OMADLPROXY=<port#>,<URL>
Set OMA-DL Proxy DL Server Port URL (default
http://oma.ssprov.sprint.com:80)
Notifications
Additional Network Initiated Alert Indications (NIA Retry)
OMA-DM Commands
These commands are available after the unsolicited indication #900 appears, which means DM client is ready.
Page 14

14
QuickCarrier USB-D MTD-H5 and MTD-EV3
AT+OMADMCEN=<onoff>
Set OMA-DM Client feature Disable=0, Enable=1
AT#OMADMCEN?
Query the current OMA-DM client status
AT+OMADMCEN=?
Query OMA-DM available values
AT+OMADM=(onoff)
Set OMA-DM Client Initiated Device Configuration
Disable=0, Enable=1, Initiate=2
(Many OMA commands will result in error if
OMADMCEN=0 is set)
AT+OMADM=?
Query OMA-DM Client Initiated Device setting
AT+PRL=<onoff>
Set OMA-DM CIPRL Session
Disable=0, Enable=1, Initiate=2
AT+PRL=?
Query OMA-DM CIPRL Session setting
AT+FUMO=
Set OMA-DM FUMO enable parameter
Disable=0, Enable=1, Initiate=2
AT+FUMO=?
Query OMA-DM FUMO parameter
AT#HFA
Initiate Sprint Hands Free Activation (HFA)
AT#HFACANCEL
Cancel Sprint Hands Free Activation (HFA) DM
Session
AT#SPRTN=xxxxxx
HFA Reset (after device reboot HFA will occur)
xxxxxx= SPC or MSL (currently last 6 digits MEID)
AT#DCCANCEL
Cancel Device Configuration (DC) Session
AT#PRLCANCEL
Cancel Preferred Roaming List (PRL) Session
AT$PRL?
Query Preferred Roaming List (PRL) ID #
AT#FUMOCANCEL
Cancel Firmware Update Management Object
(FUMO) session.
Page 15

15
QuickCarrier USB-D MTD-H5 and MTD-EV3
PRL Updates
The Preferred Roaming List (PRL) is a database file that includes cell tower IDs and capabilities, a prioritized list of
towers the device is allowed to connect to, and the preferred connection order. Consider updating your PRL if you
have connection problems or if your carrier is updating cell towers in your area.
PRL updates for Sprint and Verizon are over the air updates. To update your PRL, issue the following commands.
For Sprint
AT+PRL=2
For Verizon
AT+CDV*22899
Other Carrier Notes
Congested cell towers may bump data devices.
 Loading...