

Page 1
Models MTA128ST & MTA128NT
External ISDN Terminal Adapter
Quick Start Guide
Page 2

Quick Start Guide
IWay ISDN Terminal Adapter
MTA128ST, MTA128NT
82050151 Rev. B
Copyright
This publication may not be reproduced, in whole or in part, without
prior expressed written permission from Multi-Tech Systems, Inc. All
rights reserved.
Copyrig ht © 2003 - 07 Multi- Tech Systems, Inc.
Multi-Tech Systems, Inc. makes no representations or warranties with
respect to the contents hereof and specifically disclaims any implied
warranties of merchantability or fitness for any particular purpose.
Furthermore, Multi-Tech Systems, Inc. reserves the right to revise this
publication and to make chan ges from tim e to ti me in t he conte nt
hereof without obligation of Multi-Tech Systems, Inc. to notify any person
or organization of such revisions or changes.
Revision Date Description
A 7/15/03 InitialRelease
B 8/28/07 UpdateTechnical support contact list.
Trademarks
IWay, Multi-Tech, and the Multi-Tech logo are trademarks of Multi-Tech
Systems, Inc. All ot her bran d and p roduct na mes menti oned in this
publication are trademarks or registered trademarks of their respective
companies.
Technical Support
Country By Email By Phone
Europe,Middle East,
Africa: support@multitech.co.uk
+(44) 118 959 7774
US,Canada,all others support@multitech.com
+(763) 717-5863
(763) 717-5863
World Headquarters
Multi-Tech Systems, Inc.
2205 Woodale Drive
Mounds View, Minnesota 5511 2 U.S.A.
(763) 785-3500 or (800) 328-9717 - Fax (763) 785-9874
Page 3

MTA128NT/ST Quick Start Guide
3
Getting Started
This Quick Start will help you install and configure your
Terminal Adapter (TA). Before you begin, verify you switch
type and TEI with your local ISDN provider and record that
information in Before You Start in Chapter 3 of the User
Guide.
Before You Start
Safety Warnings
• Never install telephone wiring during a lightning storm.
• Never install a telephone jack in a wet location unless
the jack is specifically designed for wet locations.
• Never touch uninsulated tele phone wires or
terminals unless the telephone line has been
disconnected at the network interface.
• Use caution when installing or modifying telephone lines.
• Avoid using a telephone (other than a cordless type)
duri ng an electrical storm. There may be a remote risk of
electrical shock from lightning.
• Do not use the telephone to report a gas leak in the
vicinity of the leak.
• Ports that connect to other apparatus are defined as
SELV. To ensure conformity with EN 41003, ensure
that these ports connect only to the same type of port on
t h e ot h e r apparatus.
Page 4

MTA128NT/ST Quick Start Guide
4
Network Configuration
The following describes network configuration. Other types of
configuration are included in the User G uide.
Network Switch Type
Select the network switch type your ISDN service provider uses at
its local central office. You can set the MTA128ST/NT to NET3
(DSS1), VN4, INS64, U.S. NI-1, AT&T 5ESS, or DMS-100. If you
don’t know the switch ty pe, get the informati on from your ISDN
service provider.
AT command: !C0=
Data TEI
Data TEI is the TEI assigned t o the data channel. You can select
Auto TEI, a fixed TEI, or Disable. A TEI (terminal endpoint
identifier) is a number used by the central office switch to
uniquely identify each device connected to the network. When it
uses dynamic TEI assignme nts (Auto TEI), the cent ral office
switch assigns a TEI each time the TA conne cts to the network.
However, the ISDN service provider may assign a fixed TEI at
subscription time, in which case you must configure the TA with
the fixed TEI number. You also can disable the channel, which
may be useful when multiple TA s are attached to a network
terminator bus.
AT command: !D3=
Voice TEI
Voice TEI is the TEI assigned to the voice channel. Choices are:
Auto TEI, a fixed TEI number, or Disable.
AT command: *!D3=.
Page 5

MTA128NT/ST Quick Start Guide
5
Data MSN
The Data MSN (multiple subscriber number) allows a caller to
specify an individual TA when more than one TA is connected to
you network terminator. If you don’t assign a value to the MSN,
the TA accepts all incoming calls. If you only assign a base
address to the MSN, the TA accepts any incoming call with the
same base address, regardless of whether a subaddress is
included. If you assign a base address and a
subaddress to the
MSN, the TA only accepts calls that match both the base
address and the subaddress. The following examples show the
syntax for setting the MSN with and without a subaddress.
AT command: !N1=
MSN with subaddress: 5551000:001 (base address is
5551000; subaddress is 001)
MSN without subaddress: (base address is 5551000)
Voice MSN
Selects calls on the voi ce channel in the same way the Data
MSN selects calls on the data cha nnel.
AT command: *!N1=
SPIDs and DNs
The TA must be configured with the Service Profile Identifier
(SPID). The SPID is assigned by the local phone company and is
for the specific BRI line where the TA is attached. The SPID field
is empty prior to configuration.
AT commands: AT!C6= and AT*!C6=
Directory Number (DN) is the phone number another user calls
to contact this TA once it is attached to the ISDN.
AT commands: AT!N1= and AT*!N1=
Note:
SPIDs and DNs are used only by the U.S. NI-1, AT&T
5ESS, and DMS-100 switch types.
Page 6
MTA128NT/ST Quick Start Guide
6
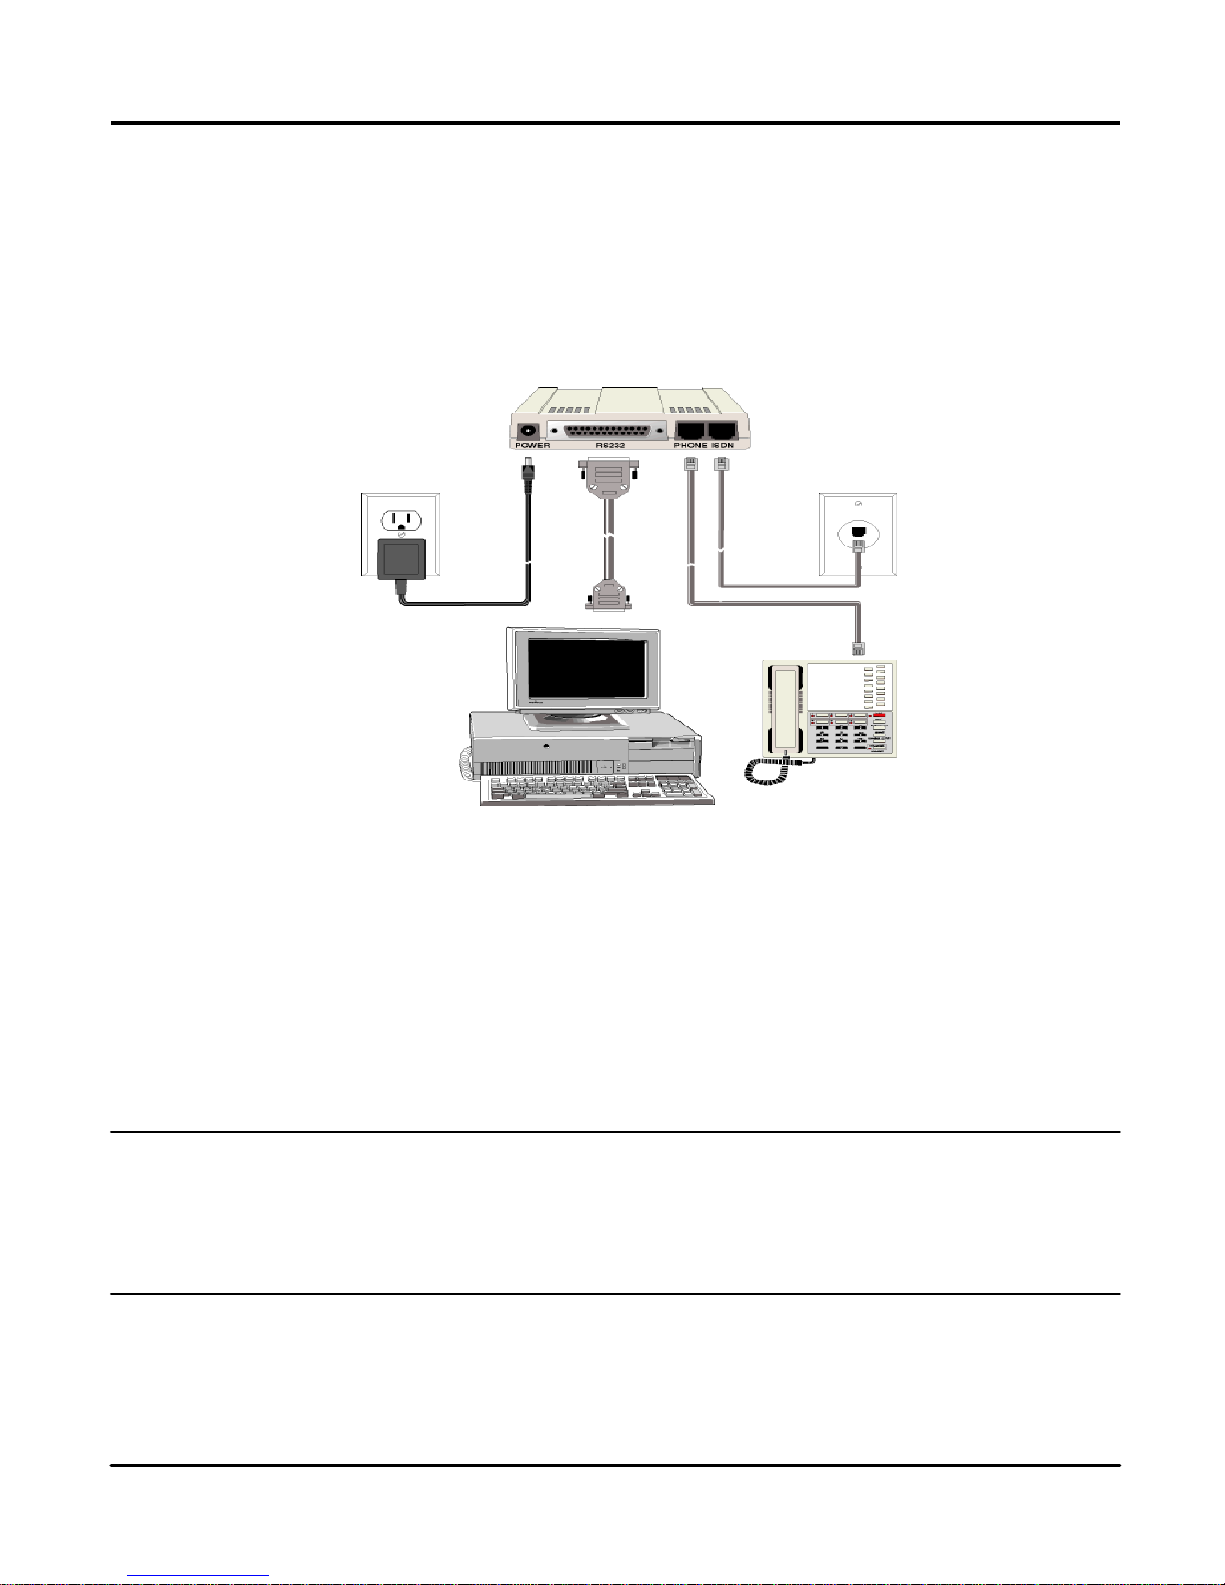
Connecting Your TA
Turn off your computer. Place the modem in a convenient
location, connect it to your computer’s serial port, to the phone
line, to AC power, and to your phone.
Connect the TA to the AC Power Outlet
Plug the DC power transfo rmer in to an AC pow er outle t or pow er
strip. Plug the DC power transformer into the POW ER jack on
the TA.
Note: Use only the DC power transformer supplied with the TA.
Use of any ot her transf ormer voids the warra nty and can
damage the TA.
Page 7

MTA128NT/ST Quick Start Guide
7
Turn on the TA by sliding the power switch to ON and verify
operation by observing the LEDs on the front panel. The LEDs
first flash in a self-test pattern. Then the LS LED remains on. If
the TA does not appear to be working, Refer to Chapter 5 for
troubleshooting help.
Connect the TA to Your PC (RS-232 Connection)
Plug one end of the RS-2 32 serial cable into the RS -232
connector on the modem, and plug the other end into a serial
port connector on your computer, such as COM1 or COM2. You
supply the RS-232 cable.
Connecting to your ISDN Network Terminator
If you need a longer cable than the one provi ded with your TA,
select a cable that is wired straight through (pin 1 to pin 1; pin 2
to pin 2, etc) with at least the middle four pins connected (pins 3,
4, 5, and 6).
Plug one end of the cable into the ISDN jack on the TA and the
other end into the jack on your network terminator (MTA128ST)
or U-interface (MTA128NT).
Note: The PHONE jack and ISDN jack are not interchangeable.
(Optional) Connecting to Analog Equipment
You can connect an analog device such as an analog
telephone, modem or fax machine to the TA. Simply put the
device’s module telephone cable into the PHONE Jack (RJ11)
on the TA.
Note: The PHONE jack and the IDSN jack o n the TA are not
interchangeable.
Page 8
MTA128NT/ST Quick Start Guide
8
Configuring your TA
If you use Windows 98/ME/NT, perform the following procedure
using the Configuration Utility provided on your system CD. If
you are using another operating sy stem, you can configure the
TA using the firmware-based configuration utility or AT
commands. Procedures for both are described in the User
Guide.
Before you begin, verify your switch type and TEI with your local
ISDN provider and have that information readily available
1. When installing from CD, insert the MTA1 28ST/NT System
CD into your CD ROM drive. When the MTA128ST/NT
Terminal Adapter AutoRun screen is displayed, click on the
Config Utility icon. Follow the on screen directions to load
the Configuration Utility onto your PC.
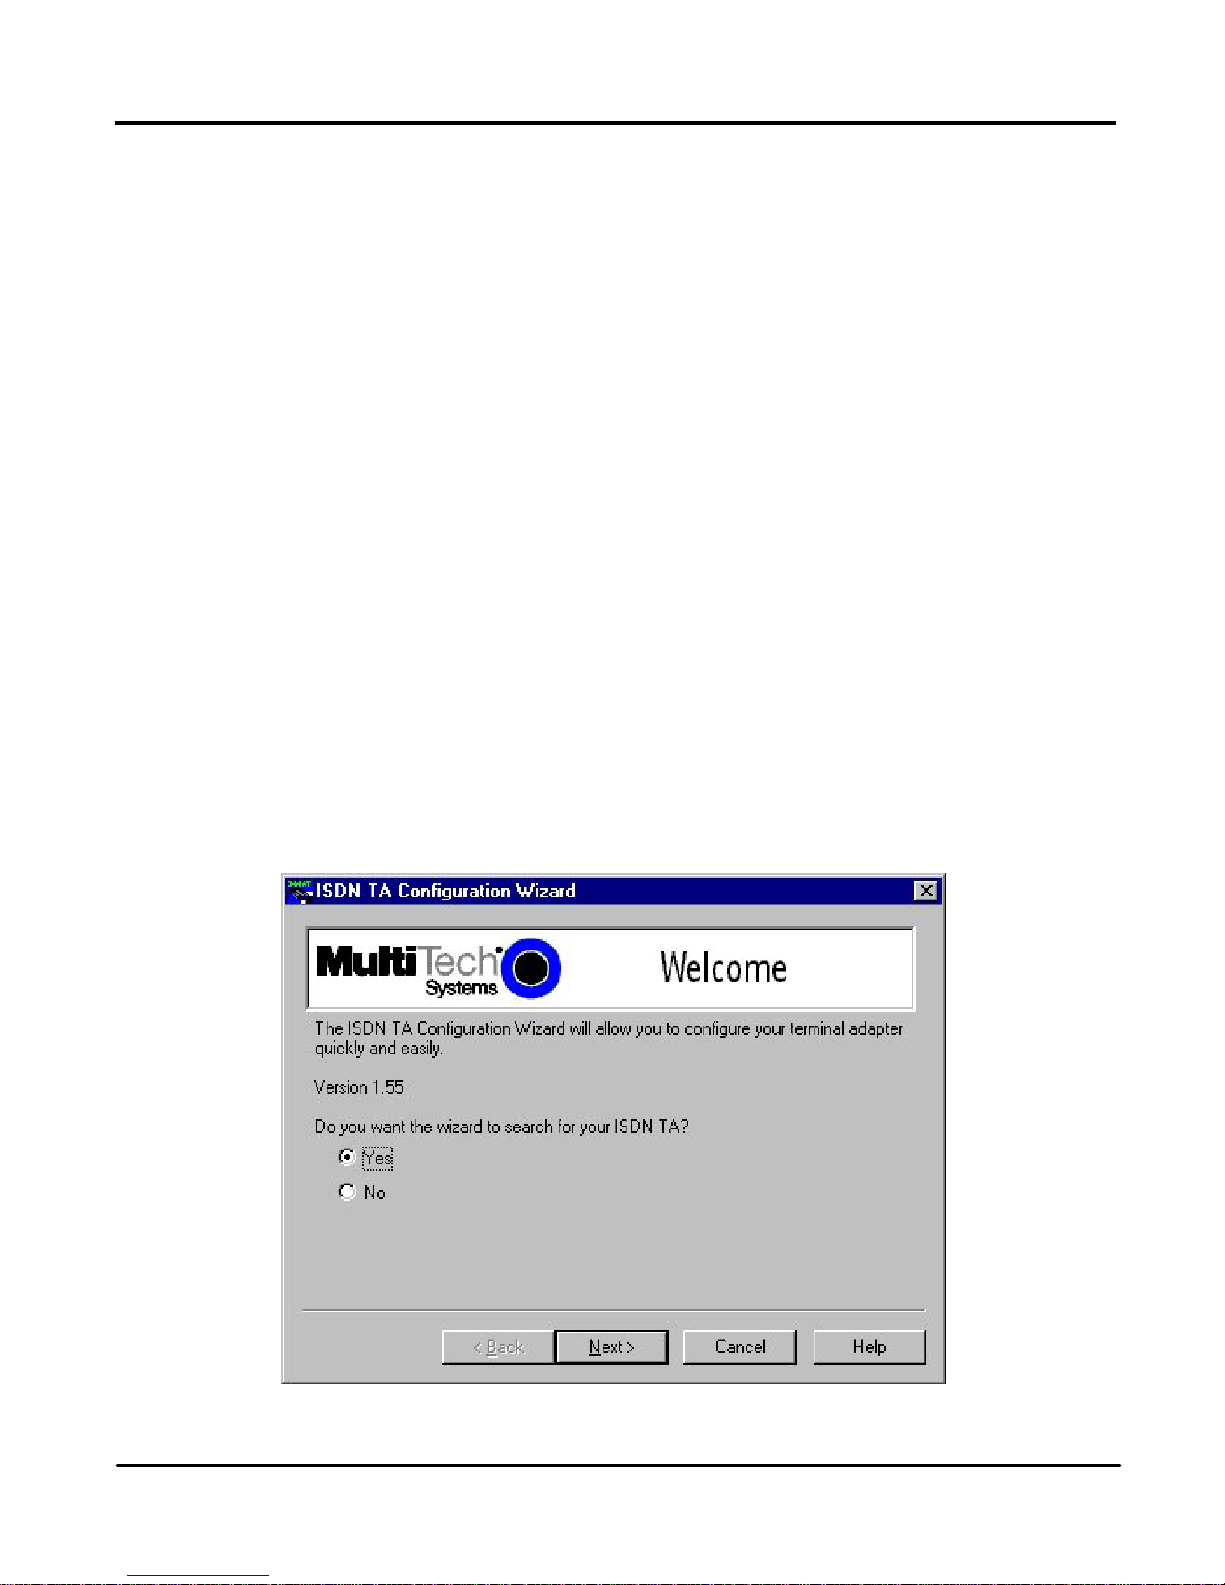
2. When the Configuration Utility is loaded onto your pc, click
Start>Programs>ISDNTA Config Utility. The Welcom e
screen is displayed.
Do you want the wizard to search for your ISDN TA? with the
Yes option enabled. Click Next to continue.
Page 9

MTA128NT/ST Quick Start Guide
9
3. Searching for TA screen is displayed with please wait while
the configuration utility searches for your ISDN TA(s). This
may take up t o 20 seco nds. T hen the S earch ing for T A
screen with Devices have been identified. Please select a
device to configure
Click Next to continue.
Page 10

MTA128NT/ST Quick Start Guide
10
4. The Configuration screen is displayed with Select the type of
setup, custom building a new configuration, custom with an
existing configuration, or express with an existing
configuration.
From the Setup pull down window you can choose Express
(Existing), Custom (Existing), or Custom (New). The Express
(Existing) opens an existing configuration, allowing you to modify
some elements of the configuration. Custom (Existing) opens
an existing configuration, allowing you to modify all elements of
the configuration. Cust om (New) allows you to customize a
new configuration.
I have chosen Custom (New) for this example.
Page 11

MTA128NT/ST Quick Start Guide
11
5. The Network Switch Type screen is displayed with
Please select the settings for the Network Switch
Type.
Select the network switch type you listed in the Before
You Start section of this chapter.
Page 12

MTA128NT/ST Quick Start Guide
12
6. Please select the settings for dy namic bandwi dth allocation,
high and low sampling pe riod and throughput, a nd call
bumping.
Click Next to continue.
Page 13

MTA128NT/ST Quick Start Guide
13
7. The TEI (Terminal Endpoint Identifier) screen is displayed
with Please select the settings you would like for Data TEI
and Voice TEI.
The TEI is a unique number assigned to the TA at
subscription time. The TEI is used by the telephone central
office (GO) to identify the various TAs connected to the
ISDN network. The TEI number can be fixed (range 0 - 63) or
dynamic and is assigned automatically at the GO each time the
TA connects to the ISDN interface and powers up. Glick Next
when you are finished.
Page 14

MTA128NT/ST Quick Start Guide
14
8. The SPID (Service Profile Identifier) North America only, is
displayed with Please enter the data SPID, voice SPID, data
directory numbers, and voice directory number of your
network.
SPID is only used in North America. A SPID is the ISDN
network paramet er for lo cal termin al ident ification and
tracking. A SPID is assigned by your local ISDN provider when
you subscribe, th ey are in the form of a string of up to 20
characters. A SPID points to a specific location in the provider’s
central office memory where service and feature parameters
are stored.
Click Next when you have entered your SPID information.
Page 15

MTA128NT/ST Quick Start Guide
15
9. The Call Control Setup screen is displayed with Please
select the settings for call control.
Call Control Setup allows you to set up your terminal
adapter and customize how it dials and answers. You can
configure persistent DTR dialing, calling line identification,
auto answer data calls, and number of ring s. You can also
set the online inactivity timer as well as the dialing metho d.
Click Next when you are done.
Page 16

MTA128NT/ST Quick Start Guide
16
10. The Data Protocol Setup screen is displayed with Please
select the setting you desire for the Data Protocol.
If you would like the TA to detect the data protocol of an
incoming data call and automatically change the TA’s protocol
to match the incoming call, click auto protocol detection
check box. Click
Next to continue.
Page 17

MTA128NT/ST Quick Start Guide
17
11.The Stored Numbers screen is displayed with Please enter
the numbers you would like to store.
You can store up to ten phone numbers with up to 25
characters per number. Stored number zero is used if
Persistent DTR Dialing is enabled in Call Control Setup
screen.
Page 18

MTA128NT/ST Quick Start Guide
18
12 .The Port Control Setup 1 screen is displayed with Please
select the settings you would like for the DTR detect time,
DCD drop time, DTR, DSR, CTS, and DCD signals.
Click Next when you have finished entering your settings.
Page 19

MTA128NT/ST Quick Start Guide
19
13.The Port Control Setup II screen is displayed with Please
select the setting s you wo uld like for t he Default Parity,
Default Bit Rate, number of Data Bits, number of Stop Bits,
Flow Control, and synchronous mode.
Click Next when you are finished.
Page 20

MTA128NT/ST Quick Start Guide
20
14.The POTS Port screen is displayed with Please select the
settings for the PORTS port.
When your selections are complete, click Next.
Page 21

21
MTA128NT/ST Quick Start Guide
15.The Save Configuratio n screen is displ ayed with Please
enter the name to store the configuration as in the .ini file.
You can enter any name up to 35 characters or less in
the Store Configuration as: window. Click Next after
y o u h av e selected a name.
Page 22

MTA128NT/ST Quick Start Guide
22
16.The Load Configuration screen is displayed with To load the
configuration now, click Next.
Page 23

23
MTA128NT/ST Quick Start Guide
17.Your ISDN TA is currently being configured.
When the Finish button becomes active, click Finish.
18.The Configured screen is displayed. Click Finish to exit the
Configuration Utility.
Page 24

MTA128NT/ST Quick Start Guide
82050151
Patents
This device is covered by one or more of the following patents: 6,031,867;
6,012,113; 6,009,082; 5,905,794; 5,864,560; 5,815,567; 5,815,503; 5,812,534;
5,809,068; 5,790,532; 5,764,628; 5,764,627; 5,754,589; 5,724,356; 5,673,268;
5,673,257; 5,644,594; 5,628,030; 5,619,508; 5,617,423; 5,600,649; 5,592,586;
5,577,041; 5,574,725; 5,559,793; 5,546,448; 5,546,395; 5,535,204; 5,500,859;
5,471,470; 5,463,616; 5,453,986; 5,452,289; 5,450,425; D353,598; 5,355,365;
5,309,562; 5,301,274. Other pat ents pen di ng .
 Loading...