

Page 1
MultiModem® ZBA
MT9234ZBA-USB
User Guide
Page 2

MultiModem ZBA
MULTIMODEM PRODUCT User Guide
S000419B Revision B
Copyright
All rights reserved. This publication may not be reproduced, in whole or in part, without prior expressed
written permission from Multi-Tech Systems, Inc.
Copyright © 2007-08 by Multi-Tech Systems, Inc.
Multi-Tech Systems, Inc. makes no representations or warranties with respect to the contents hereof and
specifically disclaims any implied warranties of merchantability or fitness for any particular purpose.
Furthermore, Multi-Tech Systems, Inc. reserves the right to revise this publication and to make changes in
the content hereof without obligation of Multi-Tech Systems, Inc. to notify any person or organization of such
revisions or changes. Check Multi-Tech’s Web site for current versions of our produ ct documentation.
Record of Revisions
Revision Date Description
A 11/05/07 Initial release
B 04/24/08 Add Vista Operating System support and removed support for Windows 2000.
Trademarks
MultiModem, Multi-Tech, and the Multi-Tech logo are registered trademarks of Multi-Tech Systems, Inc.
Microsoft Windows 2003, XP, and Vista Operating Systems are registered trademarks or trademarks of
Microsoft Corporation in the United States and/or other countries.
Patents
This device is covered by one or more of the following patents: 6,031,867; 6,012,113; 6,009,082; 5,905,794;
5,864,560; 5,815,567; 5,815,503; 5,812,534; 5,809,068; 5,790,532; 5,764,628; 5,764,627; 5,754,589;
D394,250; 5,724,356; 5,673,268; 5,673,257; 5,644,594; 5,628,030; 5,619,508; 5,617,423; 5,600,649;
5,592,586; 5,577,041; 5,574,725; D374,222; 5,559,793; 5,546,448; 5,546,395; 5,535,204; 5,500,859;
5,471,470; 5,463,616; 5,453,986; 5,452,289; 5,450,425; D361,764; D355,658; D355,653; D353,598;
D353,144; 5,355,365; 5,309,562; 5,301,274;7082106;7082141;7092406 . Othe r patents pending.
Technical Support
Country By Email By Phone
Europe, Middle East, Africa: support@multitech.co.uk
U.S., Canada. all others:
World Headquarters
Multi-Tech Systems, Inc.
2205 Woodale Drive
Mounds View, MN 55112 U.S.A
Telephone (763) 785-3500 or (800) 328-9717
Fax (763) 785-9874
Internet http://www.multitech.com
support@multitech.com (800) 972-2439 or +763-717-5863
+(44) 118 959 7774
2
Multi-Tech Systems, Inc. MT9234ZBA-USB User Guide (S000419B)
Page 3

Chapter 1 – Description and Specification
CONTENTS
CHAPTER 1 – DESCRIPTION AND SPECIFICATION ......................................................4
Features include:............................................................................................................................................................. 4
Universal Serial Bus (USB)............................................................................................................................................ 4
Package Contents........................................................................................................................................................... 4
AT Commands Info.......................................................................................................................................................... 4
Technical Specifications................................................................................................................................................. 5
CHAPTER 2 – INSTALLATION..........................................................................................6
Safety Warning Telecom................................................................................................................................................ 6
Connect the Modem to Your PC.................................................................................................................................... 6
Install the Modem Driver ................................................................................................................................................... 7
Country Configuration with Global Wizard..................................................................................................................... 22
CHAPTER 3 - OPERATION............................................................................................ 24
Front Panel..................................................................................................................................................................... 24
Connecting to the Internet............................................................................................................................................ 24
Internet Connection....................................................................................................................................................... 25
CHAPTER 4 - REMOTE CONFIGURATION .................................................................... 26
Basic Procedure............................................................................................................................................................. 26
Setup ............................................................................................................................................................................... 26
CHAPTER 5- TROUBLESHOOTING................................................................................27
None of the Indicators Light......................................................................................................................................... 27
The Modem Does Not Respond to Commands........................................................................................................ 27
The Modem Dials But Cannot Connect...................................................................................................................... 27
The Modem Disconnects While Online...................................................................................................................... 28
The Modem Cannot Connect When Answering........................................................................................................ 28
The Modem Doesn’t Work with Caller ID................................................................................................................... 29
Fax and Data Software Can’t Run at the Same Time.............................................................................................. 29
APPENDIX A – REGULATORY COMPLIANCE .............................................................. 30
FCC Part 68 Telecom ................................................................................................................................................... 30
FCC Part 15.................................................................................................................................................................... 31
Canadian Limitations Notice........................................................................................................................................ 31
Industry Canada............................................................................................................................................................. 31
International Modem Restrictions................................................................................................................................ 32
EMC, Safety, and R&TTE Directive............................................................................................................................ 32
South African Notice...................................................................................................................................................... 32
APPENDIX B – WARRANTY & REPAIR POLICIES....................................................... 33
APPENDIX C – WASTE ELECTRICAL AND ELECTRONIC EQUIPMENT.....................35
APPENDIX D - C-ROHS HT/TS SUBSTANCE CONCENTRATION ................................ 36
APPENDIX E - LINUX INSTALLATIONS
Introduction...................................................................................................................................................................... 37
Installation in Computers Using the Linux 2.4 Kernel..................................................................................................... 37
Installation in Computers Using the Linux 2.6 Kernel..................................................................................................... 43
Installation in Computers Using the Linux 2.6.20 Kernel................................................................................................ 48
.........................................................................37
APPENDIX F – ASCII CONVERSION .............................................................................. 50
Multi-Tech Systems, Inc. MT9234ZBA-USB User Guide (S000419B) 3
Page 4

Chapter 1 – Description and Specification
Chapter 1 – Description and Specification
Congratulations on your purchase of the MultiModem ZBA-USB modem. Your MultiModem productdata/fax
modem supports remote configuration and dial-up connections. It offers V.34/33.6K fax and Error Correction
Mode, that reduces fax transmission time by more than half when compared to traditional fax modems. In
addition, they are globally approved for use in many countries around the world. This means one model ca n
ship virtually anywhere.
This User Guide will help you install, configure, test, and use your modem.
Check the Multi-Tech’s Web site for current versions of our product documentation.
Features include:
• V.92/56K download speeds and 48K upload speeds when connecting with V.92 servers
• V.44 compression improves data throughput rates
• Class 1.0 and Class 2.1 faxing at speeds to V.34/33.6K bps (Super G3)
• Error Correction Mode (ECM) provides fast and reliable fax transmissi ons
• Windows Plug-and-Play operation
• Linux compatible
• U.S. Caller ID reporting
• Remote configuration for centralized setup and control
• Globally approved models for use in many countries worldwide
• Small footprint and stackable design
• Self-resetting lightning protection
• Flash memory for easy updates
• USB cable included
• Ten-year warranty
Universal Serial Bus (USB)
Universal Serial Bus (USB), defined by a consortium of industry leaders, permits connection of multiple lowspeed and medium speed computer peripheral devices such as telephones, modems, printers, keyboards,
mice, and scanners; all from a single personal computer port. The specification, based on an open
architecture is quickly becoming a standard feature in new desktop and notebook computers.
Package Contents
The MultiModemUSB package contains:
An MultiModem productdata/fax modem
•
A set of four self-adhesive plastic feet
•
A printed Quick Start Guide
•
One Product CD
•
One USB cable
•
One modular telephone cable
•
AT Commands Info
The AT Commands for the MultiModem are published in a separate Reference Guide in cluded on your
product CD and posted on the Multi-Tech web site.
4
Multi-Tech Systems, Inc. MT9234ZBA-USB User Guide (S000419B)
Page 5

Chapter 1 – Description and Specification
Technical Specifications
Your MultiModemZBA-USB modem meets the following specifications:
®
Trade Name
Model Number
MULTIMODEM PRODUCT
Server-to-Client Data Rates
MultiModem
V.90 speeds when accessing a V.90 or V.92 server (actual speed
depends on server capabilities and line conditions)
Client-to-Server Data Rates
Up to 50Kbps when accessing a V.92 server (actual speed depends
on server capabilities and line conditions); otherwise, the same as
client-to client data lines.
Client-to-Client Data Rates
33600, 31200, 28800, 26400, 24000, 21600, 19200, 16800, 14400,
12000, 9600, 7200, 4800, 2400, 1200, 0-300 bps
Fax Data Rates
33600, 31200, 28800, 26400, 24000, 21600, 19200, 16800, 14400,
12000, 9600, 7200, 4800, 2400, 1200, 0-300 bps
Data Format
Modem Compatibility
Serial, binary, asynchronous
ITU-T V.92, V.90, V.34 enhanced, V.34, V.34bis, V.32, V.32bis,
V.22; Bell 212A and 103; ITU-T V.21, V.42, V.42bis, V.44
Fax Compatibility
ITU-T “Super” Group 3, Class 1.0, 2.0, 2.1, T.4, T.30, V.21, V.27ter,
V.29, V.34, V.17; TIA/EIA 578 Class 1, 2, TR29.2
Error Correction
Data Compression
ITU-T V.42
ITU-T V.44 (4:1 throughput), V.42bis (4:1 throughtput), MNP 5 (2:1
throughput)
Flow Control
Intelligent Features
XON/XOFF (software), RTS/CTS (hardware)
Plug and play; fully AT command compatible; autodial, redial, repeat
dial; pulse or tone dial; dial pauses; auto answer; caller ID; EIA
extended automode; adaptive line probing; automatic symbol and
carrier frequency during start-up, retrain, and rate ren egotiation;
DTMF detection; call status display, auto-parity and data rate
selections; keyboard-controlled modem options; non-volatile
memory; on-screen displays for modem option parameters;
command lines of up to 40 characters each; remote configuration
Command Buffer
Transmit Level
Lightning Protection
Frequency Stability
Receiver Sensitivity
AGC Dynamic Range
Connectors
Cables
40 characters
-12dBm )Euro/NAM) – varies by country/region setting
FCC Part 68 A/B surge
±0.01%
-43 dBm under worst-case conditions
43 dB
USB connector; two RJ-11 phone jacks
One RJ11 phone cable
One USB cable
Note:
Any cables connected to the computer should be shielded to
reduce interference.
Diagnostics
Power-on self test, local analog loop, local digital loop, remote digital
loop.
Environmental
Temperature range -40°– 60°C (-40°–140°F); humidity range 20–
90% (non-condensing)
Dimensions
Weight
Limited Warranty
10.9 cm wide x 14.5 cm long x 2.5 cm high (4.3” x 5.7” x 1.10”)
227 g (8 oz)
10 year
ZBA
Multi-Tech Systems, Inc. MT9234ZBA-USB User Guide (S000419B) 5
Page 6
Chapter 2 - Installation
Chapter 2 – Installation
This chapter shows you step-by-step how to set up your Multi-Tech MultiMode m productmodem.
Safety Warning Telecom
Use this product only with UL and cUL listed computers.
•
To reduce the risk of fire, use only 26 AWG (.41mm) or larger telephone wiring.
•
Never install telephone wiring during a lightning storm.
•
Never install a telephone jack in wet locations unless the jack is specifically designed for wet
•
locations.
Never touch uninsulated telephone wires or terminals unless the telephone line has been
•
disconnected at the network interface.
Use caution when installing or modifying telephone lines.
•
Avoid using a telephone during an electrical storm. There is a risk of electrical shock from lightning.
•
Do not use a telephone in the vicinity of a gas leak.
•
This product must be disconnected from the telephone network interface when servicing.
•
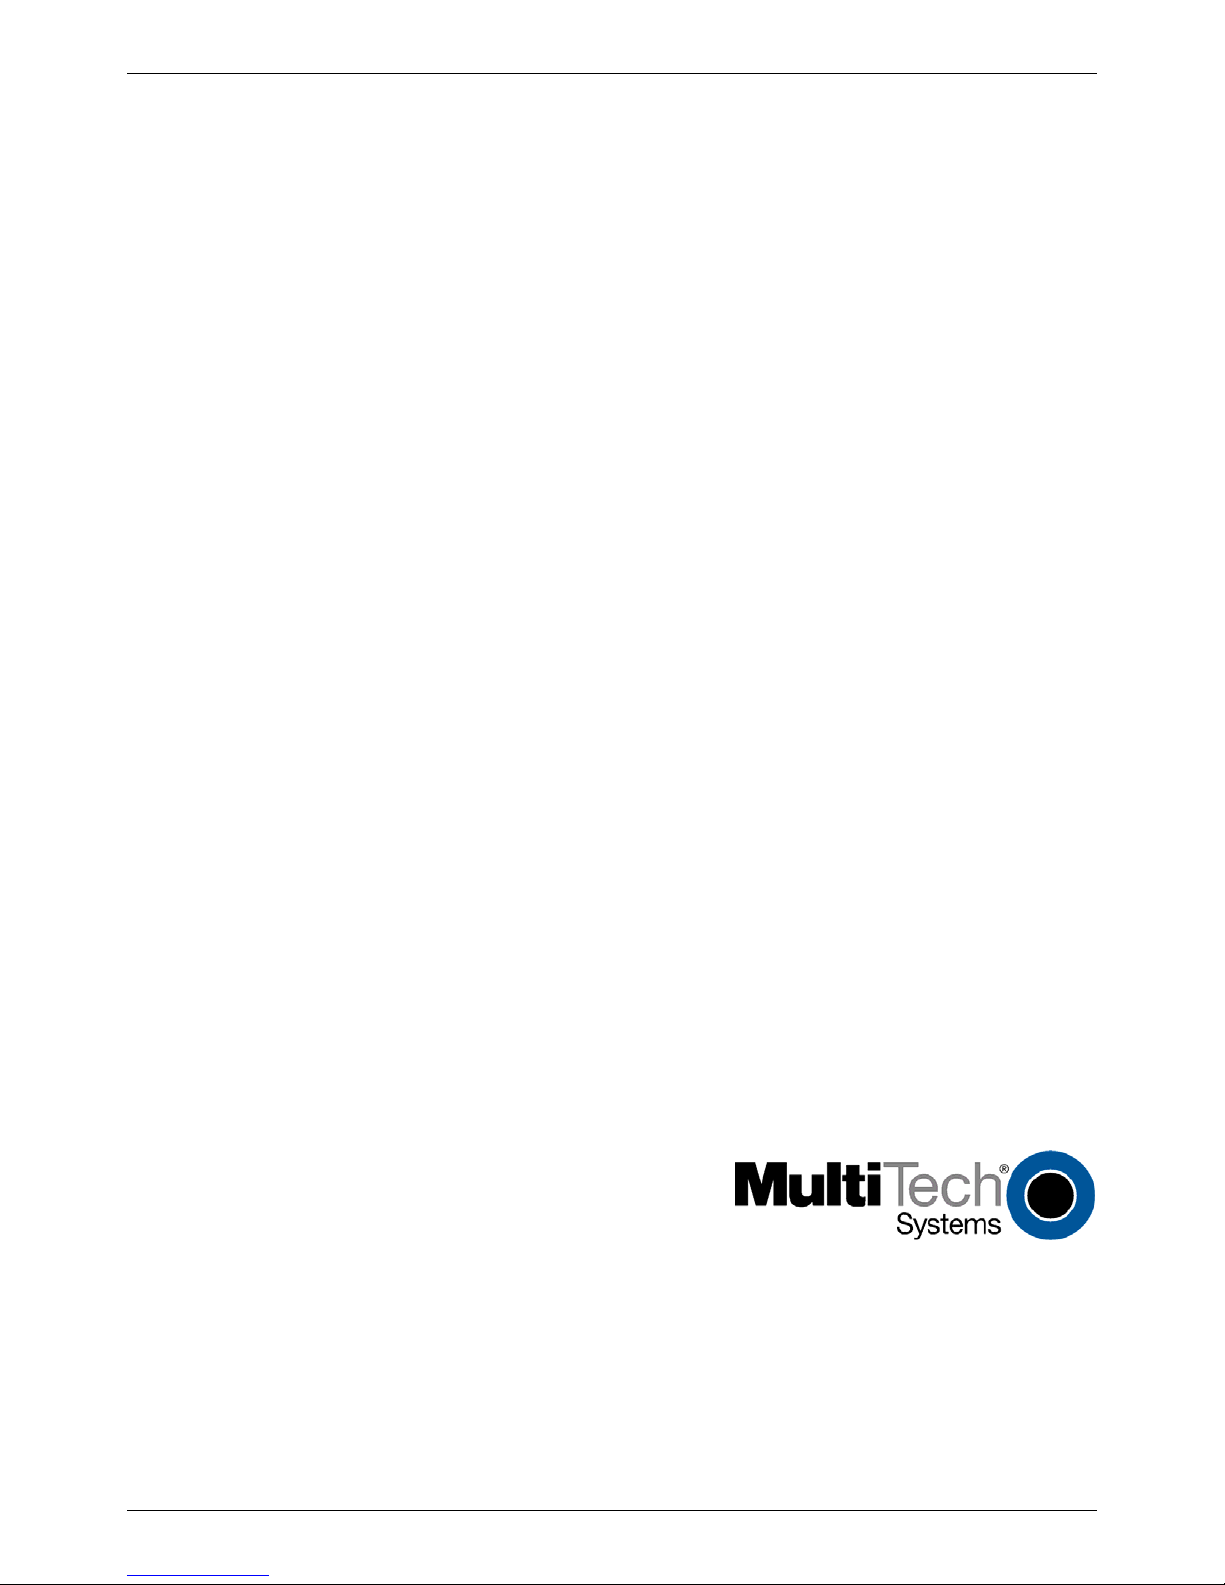
Connect the Modem to Your PC
Placing the modem in a convenient location, connect it to your computer’s USB port, to the telephone line,
and, optionally, to your telephone.
USB Connection
Plug one end of the USB cable into the USB connector on the modem, and the other end into a USB port
connector on your computer.
Line Connection
Plug one end of the phone cable into the modem’s LINE jack and the other end into a phone line wall jack.
The LINE jack is not interchangeable with the PHONE jack. Do not plug the phone into the LINE jack
Note:
or the line cable into the PHONE jack.
The Federal Communications Commission (FCC), and Industry Canada impose certain restrictions on
Note:
equipment connected to public telephone systems. See Appendix A for more information.
Phone Connection
For voice-only calls, you can optionally plug a telephone into the modem’s PHONE jack.
6
Multi-Tech Systems, Inc. MT9234ZBA-USB User Guide (S000419B)
Page 7

Chapter 2 - Installation
Install the Modem Driver
Introduction
Compatibility: This MultiModem is compatible with Windows Operating Systems Vista/XP/2003/2000
and Linux.
Windows Drivers: The MultiModem productdriver must be installed in your computer’s progra m
directory. The Windows drivers are located on the MultiModem productCD in the Drivers I Windows
Drivers folder. A complete set of drivers for each operating system is organized into Vista and XP with
either 32-bit or 64-bit processor. Most users will select either the 32-bit Vista or 32-bit XP drivers
(Windows 2003 also use the XP drivers). Windows 2000 users must select the drivers from the Drivers I
Windows_2000 directory. Server users can select either 32-bit or 64-bit depending on their application.
For server users to determine whether they have a 32-bit or 64-bit operating system, go to Start I All
Programs I Accessories I System Tools I Computer and click on the System Properties button.
Under System you will see System Type: 64-bit Operating System.
When installing the 64-bit version of the Vista driver, a person will have to disable the “signed” driver
check in order to install it. Two methods are available, choose one:
• First Method
Boot your PC, press F8 and choose “Disable driver signature enforcement option”.
• Second Method
• Create a shortcut on the desktop to cmd.exe using the following steps:
• Right click on an empty space on the desktop to open the context menu
• Select New
• Select Shortcut with a left-click
• In the Location box type cmd /k
• Right-click on the shortcut and select Run as administrator
• When the command window opens, type or paste the following and press ENTER:
• Reboot your PC and install the driver
Linux Drivers: Linux Operating System drivers are also located on the CD in the Drivers I Linux
Folder. Refer to the Readme file (also in the Linux directory) for the correct driver file and installation
guide for your distribution/version of Linux.
Overview of Windows Driver Installation: Three install wizards guide you through the software
Installation in this order:
Part A installs the USB Driver.
Part B associates the PC port with the USB Driver, and finally
Part C installs the modem driver.
Multi-Tech Systems, Inc. MT9234ZBA-USB User Guide (S000419B) 7
Page 8
Chapter 2 - Installation
Installing the Modem Driver in Windows Vista
Preliminaries
1. Power up your computer.
2. If you have not already done so, connect the modem’s USB cable to a USB port on the
computer and connect the phone line between the modem and a telephone wall jack.
3. Windows will detect that the new modem is present.
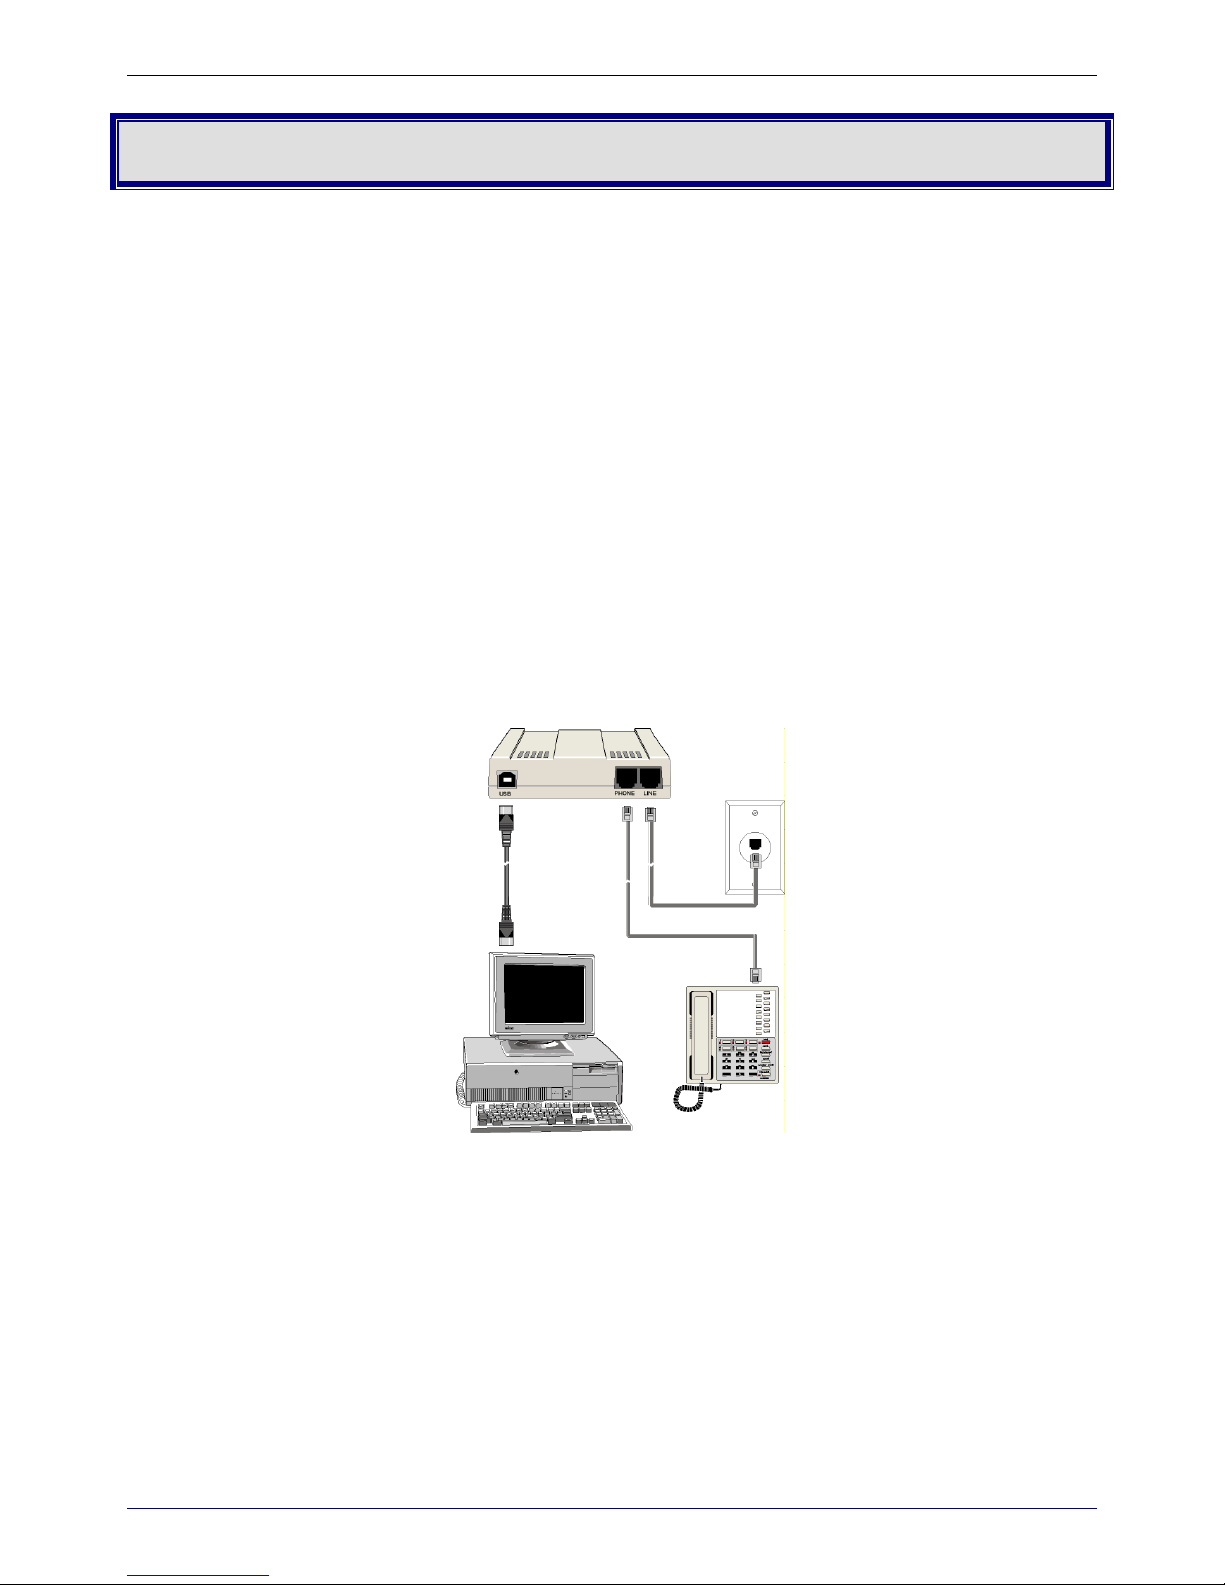
Driver Installation of your TUSB3410 Serial Port
4. The Found New Hardware screen appears with Windows needs to install driver software for
your TUSB3410 Serial Port.
Click on Locate and install driver software (recommended). Windows will guide you through the
process of installing driver software for your device.
5. The next screen prompts you to insert the disc that came with your MultiModem product. If you
have the disc that came with your device, insert it now. Then, click on I don’t have the disc.
Show me other options. Windows may prompt you to search online, but this is not necessary.
8
Multi-Tech Systems, Inc. MT9234ZBA-USB User Guide (S000419B)
Page 9
Chapter 2 - Installation
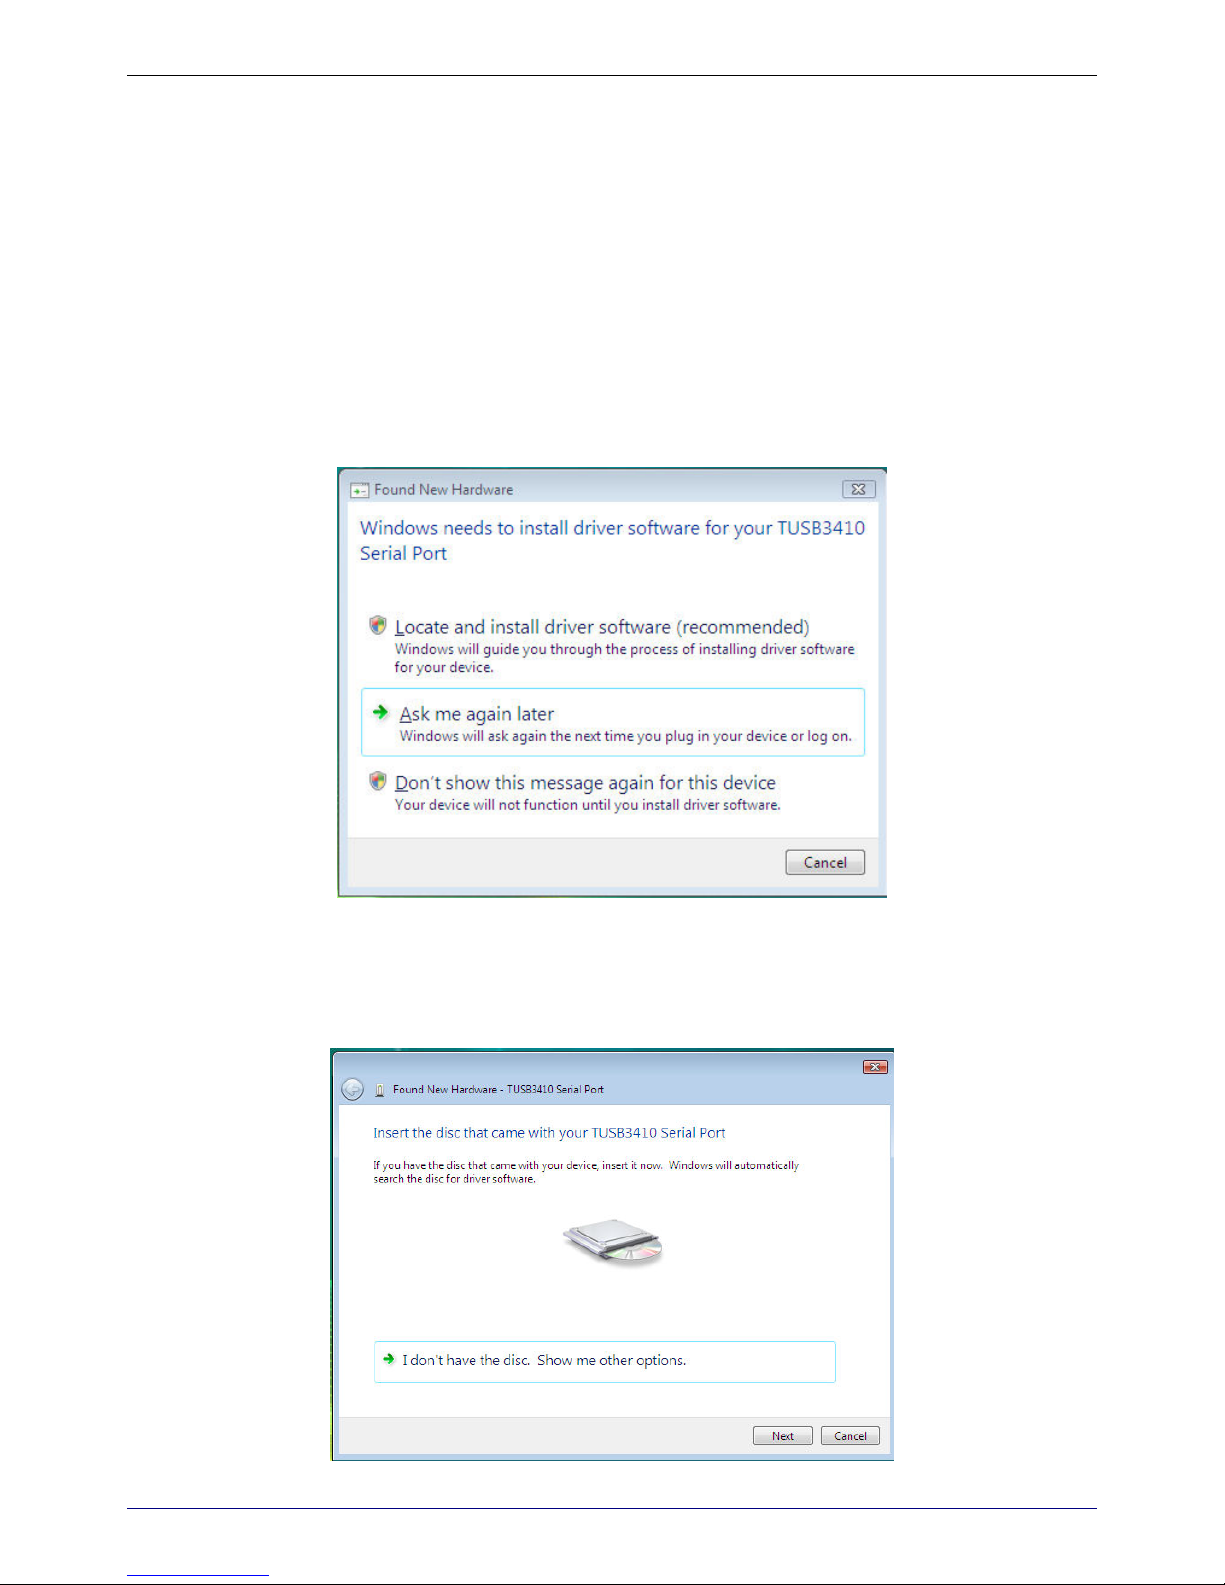
6. Choose Browse my computer for driver software (advanced).
7. At the Browse for driver software on your computer screen, click the Browse button.
8. Browse to the Drivers folder on your MultiModem productCD , then select the Windows_Drivers
folder and then the Vista32 folder. If you were installing drivers on a Vista 64-bit Operating
System, you would browse to the Vista64 folder. Click OK, then Click Next.
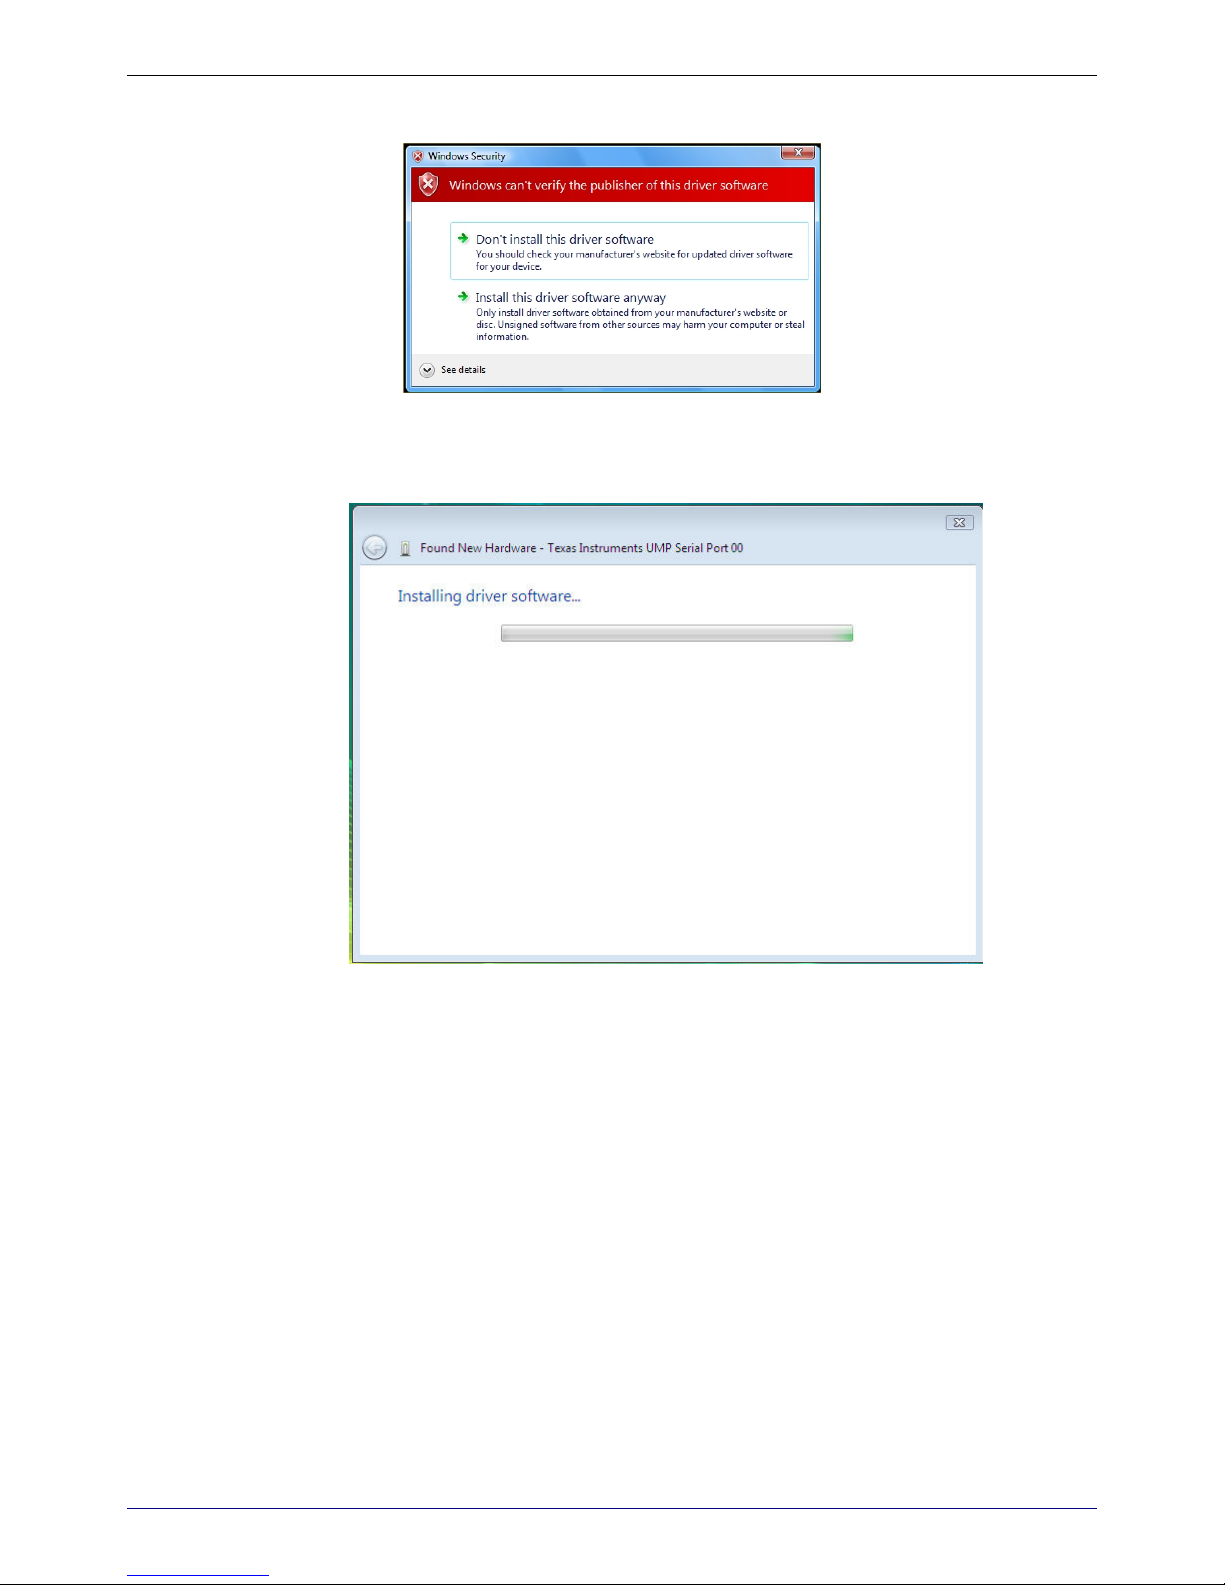
9. Windows can’t verify the publisher of this driver software screen appears.
Select Install this driver software anyway.
Multi-Tech Systems, Inc. MT9234ZBA-USB User Guide (S000419B) 9
Page 10
Chapter 2 - Installation
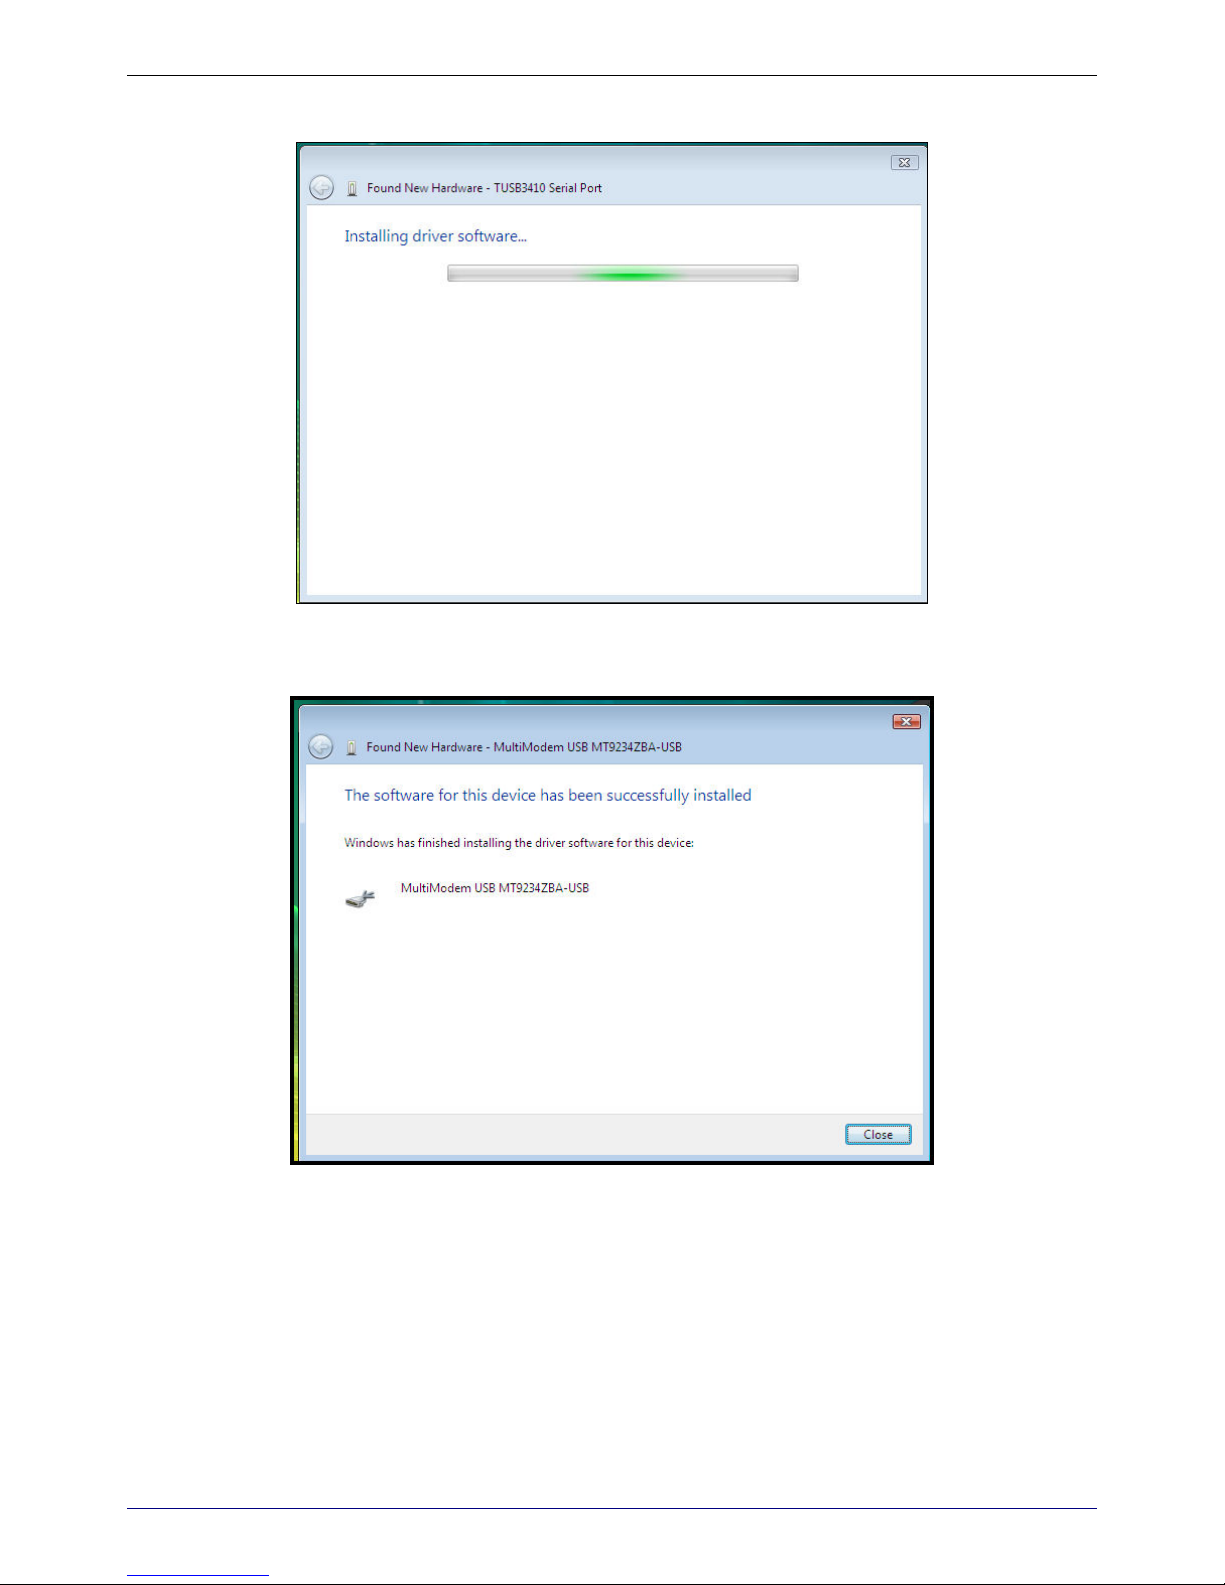
10. Installing driver software… screen appears.
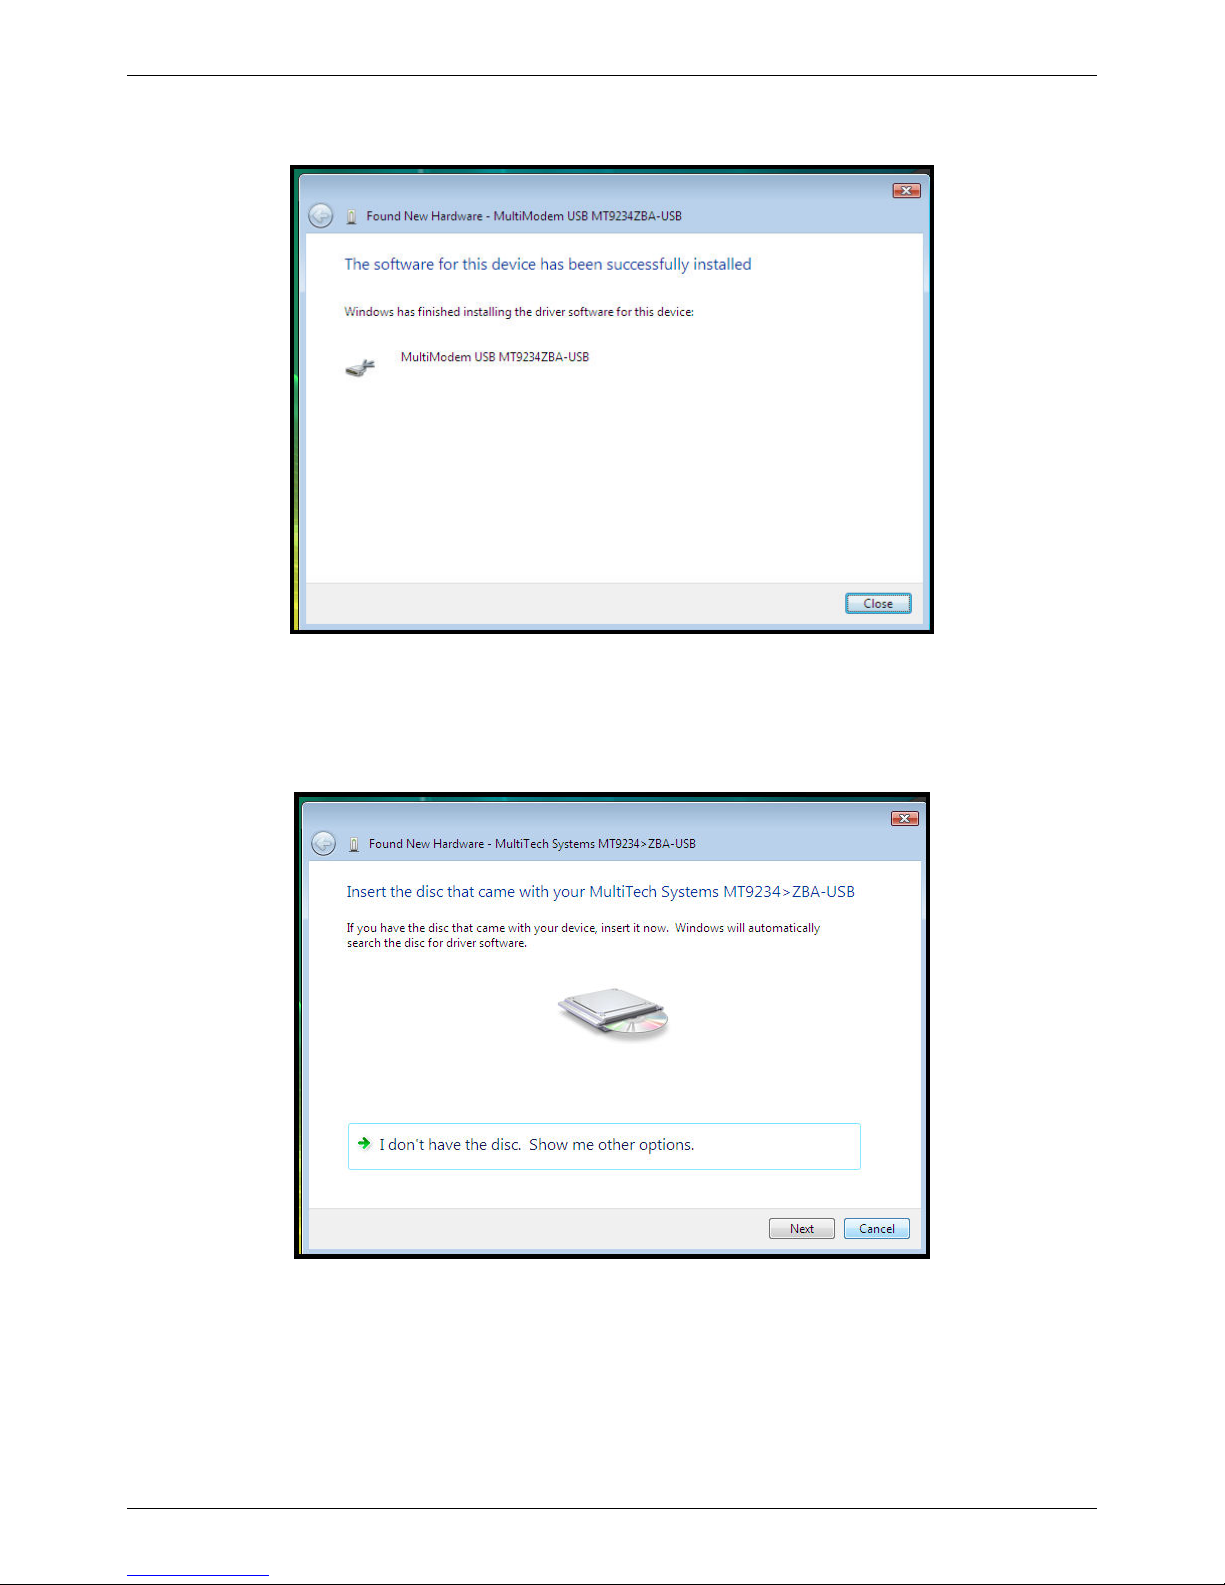
11. When the software for this device has been successfully installed screen appears with
Windows has finished installing the driver software for this device: MultiModem USB
MT9234ZBA-USB.
Click Close.
10
Multi-Tech Systems, Inc. MT9234ZBA-USB User Guide (S000419B)
Page 11

Installation of the Communications Port
12. The Found New Hardware – Texas Instrument UMP Serial Port 00 screen appears. If you have
the disc that came with your device, insert it now.
Chapter 2 - Installation
The MultiModem product Modem product CD is still in the CD ROM drive. Click Next.
13. Searching disc for software screen appears.
Multi-Tech Systems, Inc. MT9234ZBA-USB User Guide (S000419B) 11
Page 12
Chapter 2 - Installation
14. Windows can’t verify the publisher of this driver software screen appears.
Select Install this driver software anyway.
15. Installing driver software progress screen appears.
12
Multi-Tech Systems, Inc. MT9234ZBA-USB User Guide (S000419B)
Page 13
Chapter 2 - Installation
16. The software for this device has been successfully installed screen appears with Windows has
finished installing the driver software for this device: MultiModem USB MT9234ZBA-USB.
Click Close.
Installation of the Modem
17. The Found New Hardware – MultiTech Systems MultiModem product screen appears. If you
have the disc that came with your device, insert it now.
The MultiModem product product CD is still in the CD ROM drive. Click Next.
Multi-Tech Systems, Inc. MT9234ZBA-USB User Guide (S000419B) 13
Page 14
Chapter 2 - Installation
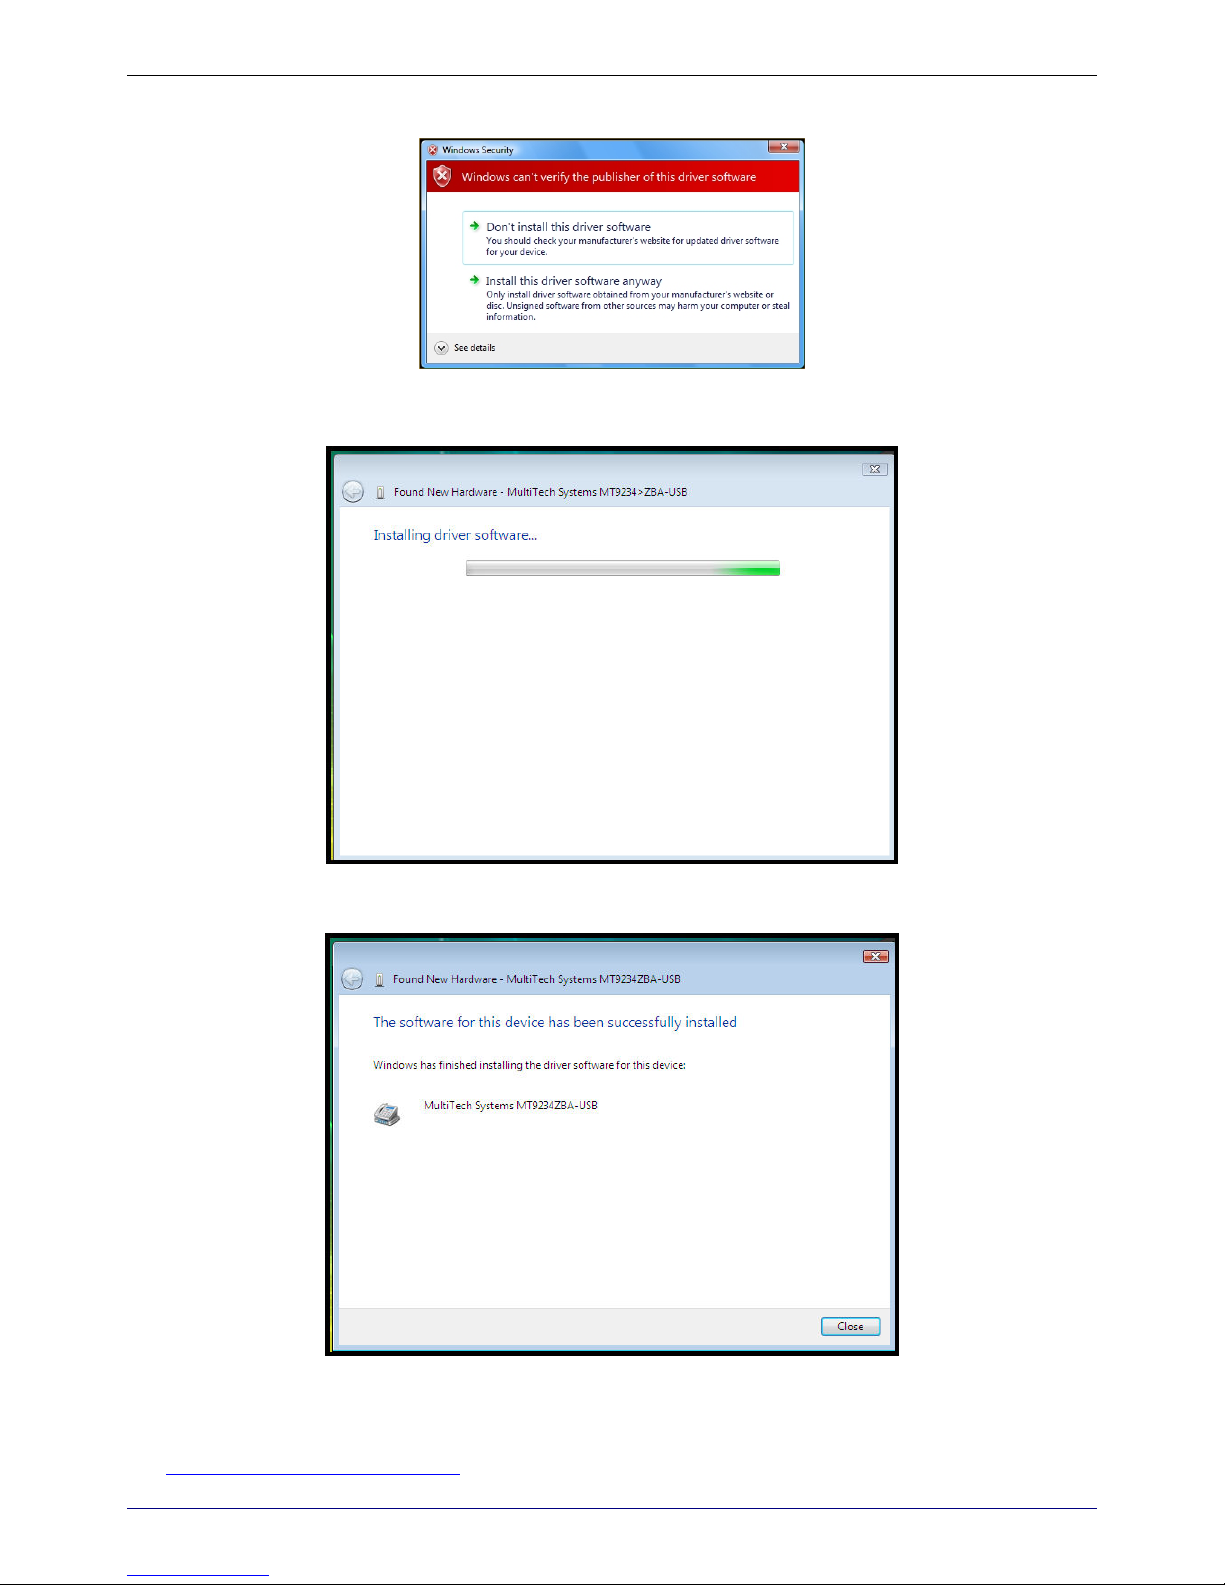
18. Windows can’t verify the publisher of this driver software screen appears.
Select Install this driver software anyway.
19. Installing driver software progress screen appears.
20. The software for this device has been successfully installed screen appears. Windows has
finished installing the driver software for this device: MultTech Systems MT9234ZBA-USB.
21. Click Close. The installation of drivers is now complete.
After installation has been completed, you should test the operation of your new MultiModem product by
registering it. Key in the URL given below and follow the on-line instructions:
http://www.multitech.com/register
14
Multi-Tech Systems, Inc. MT9234ZBA-USB User Guide (S000419B)
Page 15

Chapter 2 - Installation
Installing the Modem Driver in Windows XP/2003
This installation assumes a Windows XP or Windows 2003 operating system. Windows XP/2003 are identical in the
methods they use for installing modem drivers.
Part A for Windows XP/2003: Installing the USB Driver
1. Connect the USB cable between the MultiModem and the PC.
2. Insert the MultiModem productCD into your CD-ROM drive. The CD uses the Autorun feature,
and after a brief delay, the MULTIMODEM PRODUCT Setup – Welcome screen appears. Close
the Welcome screen.
In some situations the operating system will display a Found New Hardware Wizard screen and
asks you: Can Windows connect to Windows Update to search for software?
Select No, not this time. Then click Next.
3. The Found New Hardware Wizard screen now displays the MultiModem product. This is the
first of three New Hardware Wizards that will appear.
4. Click on Install from a list or specific location (Advanced), and then click Next..
Multi-Tech Systems, Inc. MT9234ZBA-USB User Guide (S000419B) 15
Page 16
Chapter 2 - Installation
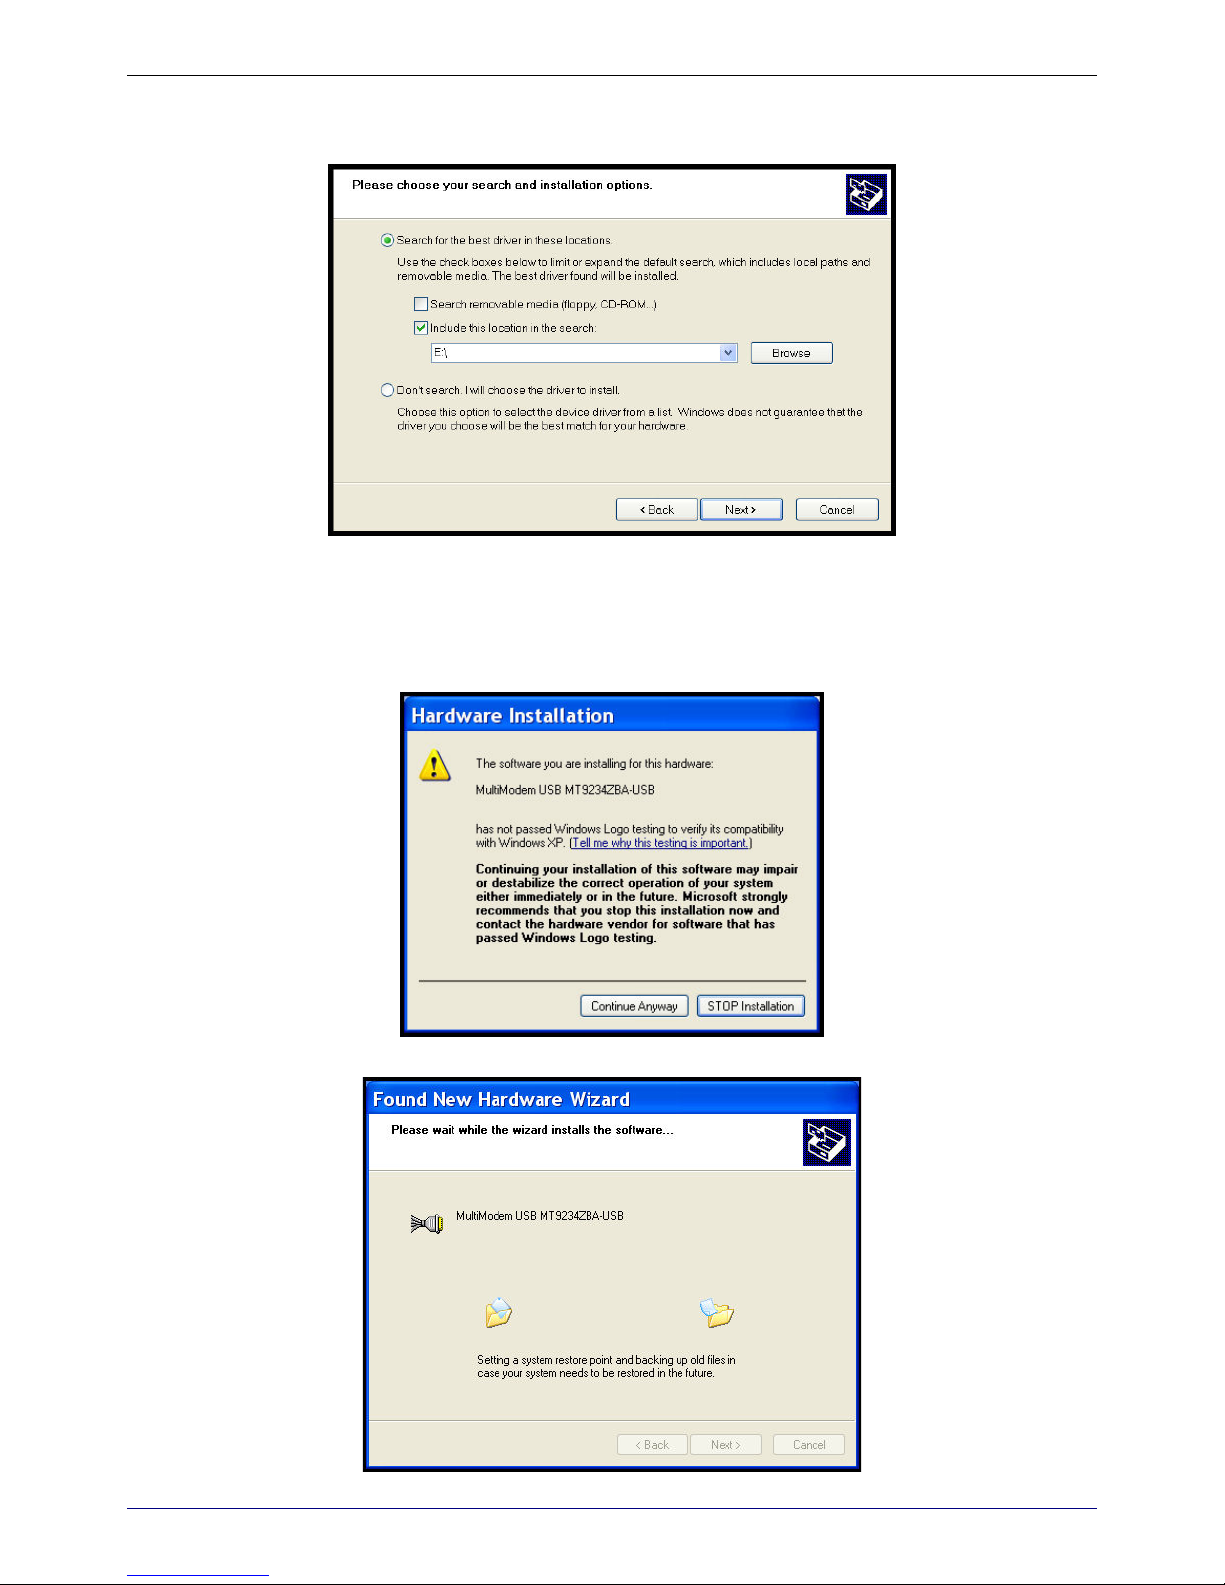
5. The next screen is the Please choose your search and installation options.
Ensure that only Include this location in the search is selected.
Click the Browse button
6. Browse to the Drivers folder on your MultiModem productCD, then select the Windows_Drivers
folder and then the XP32 folder. If you are installing drivers on an XP 64-bit Operating System,
you would browse to the XP64 folder. Click Next.
7. A Windows Logo Testing screen appears. Click Continue Any way.
8. Please wait while the wizard installs the software.
16
Multi-Tech Systems, Inc. MT9234ZBA-USB User Guide (S000419B)
Page 17

Chapter 2 - Installation
9. At the Completing the Found New Hardware Wizard for the MultiModem USB MT9234ZBA-
USB screen, click Finish. Installation of the USB driver is now complete.
The second Found New Hardware wizard will start automatically to associate the PC port with
the USB driver.
Part B for Windows XP/2003: Associating PC Port with USB Driver
10. If the Welcome to the Found New Hardware Wizard screen – Can Windows connect to
Windows update to search for software? appeared when you were installing the driver, it will
come up here also.
Select No, not this time. Then click Next.
11. The Welcome to the Found New Hardware Wizard screen will appear with the Texas
Instruments UMP Serial Port 00 as the device to be installed. This is the beginning of the
Found New Hardware sequence for the port.
Multi-Tech Systems, Inc. MT9234ZBA-USB User Guide (S000419B) 17
Page 18

Chapter 2 - Installation
12. Click Install from a list or specific location (Advanced).
13. Click Next.
14. Please choose your search and installation options screen appears.
Select Include this location in the search:. Click Browse. This may already be populated
with the correct path from the first wizard; in that case simply click Next and skip step16.
15. Browse to the Drivers folder on your MultiModem productCD , then select the
Windows_Drivers folder and then the XP32 folder. If you are installing drivers on an XP 64-bit
Operating System, you would browse to the XP64 folder. Click Next.
16. A second Windows Logo Testing screen may appear depending on operating system settings.
This screen pertains to the USB – Serial Port.
Click Continue Anyway.
18
Multi-Tech Systems, Inc. MT9234ZBA-USB User Guide (S000419B)
Page 19

Chapter 2 - Installation
17. The Completing the Found New Hardware Wizard screen appears.
The association between the serial port and the USB driver has been made.
Click Finish.
The third Found New Hardware wizard will start automatically to install the modem inf file.
Part C for Windows XP/2003: Installing the Modem
18. If the Welcome to the Found New Hardware Wizard screen asking – Can Windows connect to
Windows update to search for software? appears again, select No, not this time. Then click
Next.
Multi-Tech Systems, Inc. MT9234ZBA-USB User Guide (S000419B) 19
Page 20

Chapter 2 - Installation
19. This wizard helps you install software for MultiTech Systems MT9234ZBA-USB product.
20. Click on Install from a list or specific location (Advanced). Then click Next.
21. The Please choose your search and installation options screen appears.
Select Include this location in the search is selected. Click the Browse button.
22. If necessary, Browse to the Drivers folder on your MultiModem productCD , then select the
Windows_Drivers folder and then the XP32 folder. If you are installing drivers on an XP 64-bit
Operating System, you would browse to the XP64 folder. Click Next.
23. The final Windows Logo Testing screen may appear depending on operating system settings.
This screen pertains to the creation of a modem entity in the operating system that
accommodates the MultiModem product.
Click Continue Anyway.
20
Multi-Tech Systems, Inc. MT9234ZBA-USB User Guide (S000419B)
Page 21

24. Please wait while the wizard installs the software.
25. The Completing the Found New Hardware Wizard screen appears.
Chapter 2 - Installation
Click Finish.
With the modem .inf file successfully installed, the entire software installation procedure for the
MultiModem productis complete.
After installation has been completed, you should test the operation of your new MultiModem productby
registering it. Key in the URL given below and follow the on-line instructions:
http://www.multitech.com/register
Multi-Tech Systems, Inc. MT9234ZBA-USB User Guide (S000419B) 21
Page 22

Chapter 2 - Installation
Country Configuration with Global Wizard
Different countries have different requirements for how modems must function. Therefore, before you use
your modem, you must configure it to match the defaults of the country in which you are using it. You can
use one of two configuration methods:
Using the Global Wizard to Configure Your Modem
•
Using AT Commands to Configure Your Modem
•
Using the Global Wizard to Configure Your Modem
The Global Wizard configuration utility is recommended for computers running Windows Vista, XP, and
2003. The Global Wizard can configure your modem for a specific country with just a few mouse clicks.
Insert the MultiModemUSB CD into the CD-ROM drive. The
1.
Click
2.
3.
4.
5.
6.
7.
8.
Initial Setup and Country Selection
Choose either:
Run Global Wizard from CD.
•
Install Global Wizard on the HD
•
The
Global Wizard
The Global Wizard searches for your modem and identifies it. Click
Select the country in which the modem will be used, and then click
Review your choice of country. If it is correct, click
When Global Wizard announces that the parameters have been set, click
dialog box appears. Click
This will not load the wizard onto your hard drive, or
.
. This will install the wizard onto your hard drive for future use.
.
Next
Next
Autorun
to configure the modem.
dialog box appears.
.
Next
.
Next
Finish
to exit.
22
Multi-Tech Systems, Inc. MT9234ZBA-USB User Guide (S000419B)
Page 23

Chapter 2 - Installation
Using AT Commands to Configure Your Modem
Non-Windows users can configure the modem using AT commands. You must enter these commands in
your communication program’s terminal window.
Run your favorite communication program and open the program’s terminal window.
1.
To configure the modem for a specific country, type
2.
hexadecimal format, and then press E
To verify the change, type
3.
, and then press E
ATI9
The country/region code displays:
Example Country/Region AT command Country code
(hexadecimal) (decimal)
Euro/NAM AT%T19,0,34 (default) 52
The complete list of country/region codes can be found on the Multi-Tech Web site at
http://www.multitech.com/PRODUCTS/Categories/Modems/global/configuration.asp#chart
Then click on global modems. The Global Modem Country Approvals page displays. On this page you can
view approvals, configuration strings and responses by country and product.
AT%T19,0,
NTER
. The message OK displays.
NTER
.
, where nn is the country code in
nn
Multi-Tech Systems, Inc. MT9234ZBA-USB User Guide (S000419B) 23
Page 24

Chapter 3 - Operation
Chapter 3 - Operation
Front Panel
The MultiModem producthas 6 LED indicators on the front panel that indicate status, configuration, and
activity.
Figure 3-1. Front panel
TR
RD
CD
OH
TR
Power.
Transmit Data.
Receive Data.
Carrier Detect.
modem. It is on when the modem is communicating with the other modem and off when the link is
broken.
Off-Hook.
dialing, online, or answering a call. The LED flashes when the modem pulse-dials.
Terminal Ready.
means the modem is ready for an outgoing or incoming call. It goes off when the communications
program disconnects. When it goes off, a connected modem will also disconnect.
The PWR led lights when the system is applying power to the modem.
The TD LED flashes when the modem is transmitting data to another modem.
The RD LED flashes when the modem is receiving data from another moem.
The CD LED lights when the modem detects a valid carrier signal from another
The OH LED lights when the modem is off-hook, which occurs when the modem is
The TR LED lights when a communications program is using the modem. It
Connecting to the Internet
Your Multi-Tech modem is your gateway to the Internet and the World Wide Web. To access the Internet and
Web via your modem, you must establish a dial-up account with an Internet service provider (ISP). To locate
an ISP near you, look in a local directory or computer publication. Your ISP should provide you with the
following information:
User name (also called user ID)
•
Password
•
Access number (the number you call to connect to the server)
•
Host name and/or domain name
•
Domain Name Server (DNS) server address
•
If, besides the Web, you use the Internet for e-mail and newsgroups, your ISP should also provide you with
the following information:
E-mail or POP mail address
•
POP server address
•
Mail or SMTP address
•
News or NNT server address
•
24
Multi-Tech Systems, Inc. MT9234ZBA-USB User Guide (S000419B)
Page 25

Chapter 3 - Operation
Internet Connection
Before you can connect to the Internet, you must set up a remote-node client program on your computer.
Windows XP uses HyperTerminal to establish your connection to the ISP’s server, which is the shared
computer that manages calls from clients (your computer) to the Internet. Most, if not all, Windows browsers
can automatically open this connection. For instructions on how to set up this connection, consult your ISP or
your operating system’s online help or printed documentation. Many ISPs include with their service a
program that will install and configure this connection automatically for you.
Multi-Tech Systems, Inc. MT9234ZBA-USB User Guide (S000419B) 25
Page 26

Chapter 4 – Remote Configuration
Chapter 4 - Remote Configuration
Remote configuration is a network management tool that allows you to configure modems anywhere in you r
network from one location. With password protected remote configuration, you can issue AT commands to a
remote MultiModem productmodem for maintenance or troubleshooting as if you were on site.
Basic Procedure
The following steps are valid regardless of whether the connection is established by the local or the re mote
Multi-Tech modem.
Establish a data connection with a remote MultiModem productmodem.
1.
Send three remote configuration escape characters followed by AT and the setup password, and
2.
press ENTER. Example:
before being disconnected. If the password is correct, the remote modem responds with OK.
You can now send AT commands to configure the remote modem.
3.
When you have finished configuring the remote modem, save the new configuration by typing
4.
AT&W0
Type
5.
normal way.
CAUTION:
%%%ATMTSMODEM
, and pressing
and press
ATO
If you hang up while you are in remote configuration mode, it may lock up the remote modem.
Enter
.
Enter
to exit remote configuration. You can then break the connection in the
. You have four tries to enter the correct password
Setup
Multi-Tech modems are shipped with a default setup password (MTSMODEM). Because anyone who has an
owner’s manual knows the default setup password, for security you should change the password and
possibly also the remote configuration escape character.
Changing the Setup Password
Open a data communications program such as Phone Tools or HyperTerminal.
1.
To change the password, type
2.
press ENTER. The password can include any keyboard character, and must be one to eight
characters long. The modem responds with OK.
The new password is saved automatically. You can now either enter more AT commands or exit
3.
the data communications program. The next time you remotely configure the modem you must
use the new setup password.
You can only change the setup password locally; you cannot do it remotely. Also, passwords are case
Note:
sensitive. The next time you enter the password, it must be in the same case as you set it up.
AT#S=xxxxxxxx
, where xxxxxxxx stands for the password, and
Changing the Remote Escape Character
To increase security, you can change a remote modem’s remote configuration escape character. The remote
configuration escape character is stored in register S9. The factory default is 37, which is the ASCII code for
the percent character (%). For ASCII code characters, refer to Appendix E. Setting S9 to 0 (zero) disables
remote configuration entirely—but if you do this remotely, you won’t be able to change it back remotely!
Establish a remote configuration link with the remote modem as described in “Basic Procedure.”
1.
Type
2.
3.
4.
ATS9=
then press ENTER.
Save the new value by typing
Type
ATO<CR>
, where n is the ASCII code for the new remote configuration escape character,
n
and pressing ENTER.
AT&W
to exit remote configuration.
26
Multi-Tech Systems, Inc. MT9234ZBA-USB User Guide (S000419B)
Page 27

Chapter 5 – Troubleshooting
Chapter 5- Troubleshooting
Your modem was thoroughly tested at the factory before it was shipped. If you are unable to make a
successful connection, or if you experience data loss or garbled characters during your connection, it is
possible that the modem is defective. However, it is more likely that the source of your problem lies
elsewhere. The following symptoms are typical of problems you might encounter:
None of the LEDs light when the modem is on.
•
The modem does not respond to commands.
•
The modem dials but is unable to make a connection.
•
The modem disconnects while online.
•
The modem cannot connect when answering.
•
Data is being lost.
•
There are garbage characters on the monitor.
•
The modem doesn’t work with Caller ID.
•
Fax and data software can’t run at the same time.
•
None of the Indicators Light
When you plug in the modem, the operating system detects and configures the modem, and the TR LED
should come on.
If the TR LED does not come on, check to see that the driver from the product CD has been installed, refer to
Chapter 2, step 2 – Install the Modem Driver.
The Modem Does Not Respond to Commands
Make sure you are issuing the modem commands from data communication software, either
•
manually in terminal mode or automatically by configuring the software. (You cannot send
commands to the modem from the DOS prompt.)
Make sure you are in terminal mode in your data communication program, then type AT and press
•
NTER
. If you get an OK response from your modem, your connections are good and the problem
E
likely is in the connection setup in your communication software.
Try resetting your modem by unplugging the USB cable from the modem, and then plugging it back
•
in.
Try rebooting the computer.
•
• The modem might have a problem beyond the scope of this user guide. If you have another Multi-
Tech modem, try swapping modems. If the problem goes away, the first modem is possibly
defective. Call Technical Support for assistance.
The Modem Dials But Cannot Connect
There can be several reasons the ZBA fails to make a connection. Possibilities include:
lack of a physical connection to the telephone line.
•
a wrong dial tone.
•
a busy signal.
•
a wrong number.
•
no modem at the other end.
•
a faulty modem, computer, or software at the other end.
•
incompatibility between modems.
•
You can narrow the list of possibilities by using extended result codes. Extended result codes are enabled by
default. If they have been disabled, enter
in the modem’s initialization string. When you dial again, the modem will report the call’s progress.
V1X4
If the modem reports NO DIALTONE, check that the modem’s telephone line cable is connected to
•
both the modem’s LINE jack (not the PHONE jack) and the telephone wall jack. If the cable looks
ATV1X4
and press ENTER while in terminal mode, or include
Multi-Tech Systems, Inc. MT9234ZBA-USB User Guide (S000419B) 27
Page 28

Chapter 5 - Troubleshooting
secure, try replacing it. If that doesn’t work, the problem might be in your building’s telephone
installation. To test the building installation, plug a telephone into your modem’s telephone wall jack
and listen for a dial tone. If you hear a dial tone, your modem might be installed behind a company
phone system (PBX) with an internal dial tone that sounds different from the normal dial tone. In that
case, the modem might not recognize the dial tone and might treat it as an error. Check your PBX
manual to see if you can change the internal dial tone; if you can’t, change your modem’s
initialization string to replace
however, that X3 is not allowed in some countries, such as France and Spain).
If the modem reports BUSY, the other number might be busy, in which case you should try again
•
later, or it might indicate that you have failed to add a 9, prefix to the phone number if you must dial
9 for an outside line.
If you must dial 9 to get an outside line, the easiest way to dial it automatically is to include it in the
•
modem’s dial prefix, e.g.,
dialed. By inserting 9, into the dial prefix, you do not have to include it in each directory entry.
To change the dial prefix in Windows 98 HyperTerminal, select
•
Dialing Properties
location
If the modem reports NO ANSWER, the other system has failed to go off-hook, or you might have
•
dialed a wrong number. Check the number.
If the modem reports NO CARRIER, the phone was answered at the other end, but no connection
•
was made. You might have dialed a wrong number, and a person answered in stead of a computer,
or you might have dialed the correct number, but the other computer or software was turned off or
faulty. Check the number and try again, or try calling another system to make sure your modem is
working. Also, try calling the number on your telephone. If you hear harsh sounds, then another
modem is answering the call, and the modems might be having problems negotiating because of
modem incompatibilities or line noise. Try connecting at a lower speed.
.
, and type 9 in the local and long distance boxes in
with X3, which will cause the modem to ignore dial tones (note,
X4
ATDT9,
. Note the comma, which inserts a pause before the number is
from the
Call
Call
How I dial from this
menu, click
The Modem Disconnects While Online
If you have Call Waiting on the same phone line as your modem, it can interrupt your connection
•
when someone tries to call you. If you have Call Waiting, disable it before each call. In most
telephone areas in North America, you can disable Call Waiting by preceding the telephone number
with
You can automatically disable Call Waiting by including the disabling code in the modem’s dial prefix
•
(e.g.,
the dial prefix in Windows 98 HyperTerminal, select
Properties
service.
If you have extension phones on the same line as your modem, you or someone else can interrupt
•
the connection by picking up another phone. If this is a frequent problem, disconnect the extension
phones before using the modem, or install another phone line especially for the modem.
Check for loose connections between the modem and the computer and the telephone jack.
•
You might have had a poor connection because of line conditions or the problem might have
•
originated on the other end of the line. Try again.
If you were online with an online service, it might have hung up on you because of lack of activity on
•
your part or because you exceeded your time limit for the day. Try again.
(check with your local telephone company).
*70
ATDT*70,
—note the comma, which inserts a pause before the number is dialed). To change
, check
This location has Call Waiting
from the
Call
, and select the correct code for your phone
menu, click
Call
Dialing
The Modem Cannot Connect When Answering
Autoanswer might be disabled. Turn on autoanswer in your data communications program or send
•
the command
mode.
ATS0=1 (ATS0=2
if you have Caller ID service) to make sure your modem in terminal
28
Multi-Tech Systems, Inc. MT9234ZBA-USB User Guide (S000419B)
Page 29

Chapter 5 – Troubleshooting
The Modem Doesn’t Work with Caller ID
Caller ID information is transmitted between the first and second rings, so if autoanswer is turned off
•
(
) or if the modem is set to answer after only one ring (
S0=0
ID information. Check your initialization string, and if necessary change it to set the modem to
answer after the second ring (
Make sure that you have Caller ID service from your telephone company.
•
S0=2
).
), the modem will not receive Caller
S0=1
Fax and Data Software Can’t Run at the Same Time
Communications devices can be accessed by only one application at a time. In Windows 2000 and
•
higher, you can have data and fax communication applications open at the same time, but they
cannot use the same modem at the same time.
Multi-Tech Systems, Inc. MT9234ZBA-USB User Guide (S000419B) 29
Page 30

Appendix A – Regulatory Compliance
Appendix A – Regulatory Compliance
FCC Part 68 Telecom
1. This equipment complies with part 68 of the Federal Communications Commission Rules. On the
outside surface of this equipment is a label that contains, among other information, the FCC
registration number. This information must be provided to the telephone company.
2. The suitable USOC jack (Universal Service Order Code connecting arrangement) for this equipment
is shown below. If applicable, the facility interface codes (FIC) and service order codes (SOC) are
shown.
3. An FCC-compliant telephone cord and modular plug is provided with this equipment. This equipment
is designed to be connected to the telephone network or premises wiring using a compatible modular
jack that is Part 68 compliant. See installation instructions for details.
4. The ringer equivalence number (REN) is used to determine the number of devices that may be
connected to the telephone line. Excessive RENs on the telephone line may result in the device not
ringing in response to an incoming call. In most, but not all, areas the sum of the RENs should not
exceed 5.0. To be certain of the nuber of devices that may be connected to the line, as determined
by the total RENs, contact the local telephone company.
5. If this equipment causes harm to the telephone network, the telephone company will notify you in
advance that temporary discontinuance of service may be required. But if advance notice is not
practical, the telephone company will notify you as soon as possible. Also, you will be advised of
your right to file a complaint with the FCC if you believe it is necessary.
6. The telephone company may make changes in its facilities, equipment, operations, or procedures
that could affect the operation of the equipment. If this happens, the telephone company will provide
advance notice in order for you to make necessary modifications in order to maintain uninterrupted
service.
7. If trouble is experienced with this equipment (the model of which is indicated below) please contact
Multi-Tech Systems, Inc. at the address shown below for details of how to have repairs made. If the
trouble is causing harm to the telephone network, the telephone company may request you remove
the equipment from the network until the problem is resolved.
8. No repairs are to be made by you. Repairs are to be made only by Multi-Tech Systems or its
licensees. Unauthorized repairs void registration and warranty.
9. This equipment should not be used on party lines or coin lines.
10. If so required, this equipment is hearing aid compatible.
11. This product is labeled with the following information:
Manufacturer: MultiTech Systems, Inc.
Trade Name: MultiModem
Model Number: MULTIMODEM PRODUCT
FCC Registration Number: AU7USA-24713-M5-E
Ren: 0.3B
Modular Jack (USOC): RJ11
Service Center in USA: MultiTech Systems, Inc.
2205 Woodale Drive
Mounds View, MN 55112
(763) 785-3500 Fax (763) 785-9874
®
ZBA
30
Multi-Tech Systems, Inc. MT9234ZBA-USB User Guide (S000419B)
Page 31

FCC Part 15
Appendix A – Regulatory Compliance
This equipment has been tested and found to comply with the limits for a
Part 15 of the FCC Rules. These limits are designed to provide reasonable protection against harmful
interference in a residential installation. This equipment generates, uses, and can radiate radio frequency
energy, and if not installed and used in accordance with the instructions, may cause harmful interference to
radio communications. However, there is no guarantee that interference will not occur in a particular
installation. If this equipment does cause harmful interference to radio or television reception, which can be
determined by turning the equipment off and on, the user is encouraged to try to correct the interference by
one or more of the following measures:
Reorient or relocate the receiving antenna.
•
Increase the separation between the equipment and receiver.
•
Plug the equipment into an outlet on a circuit different from that to which the receiver is connected.
•
Consult the dealer or an experienced radio/TV technician for help.
•
This device complies with Part 15 of the FCC rules. Operation of this device is subject to the following
conditions: (1) This device may not cause harmful interference, and (2) this device must accept any
interference that may cause undesired operation.
WARNING:
compliance could void the user’s authority to operate the equipment.
Changes or modifications to this unit not expressly approved by the party responsible for
Class B
digital device, pursuant to
Canadian Limitations Notice
Notice:
maximum number of terminals allowed to be connected to a telephone interface. The termination on an
interface may consist of any combination of devices subject only to the requirement that the sum of the ringer
equivalence numbers of all the devices does not exceed 5.
Notice:
equipment meets certain telecommunications network protective, operational and safety requirements. The
Industry Canada label does not guarantee the equipment will operate to the user’s satisfacti on.
Before installing this equipment, users should ensure that it is permissible to be connected to the facilities of
the local telecommunications company. The equipment must also be installed using an acceptable method of
connection. The customer should be aware that compliance with the above conditions may not prevent
degradation of service in some situations. Repairs to certified equipment should be made by an authorized
Canadian maintenance facility designated by the supplier. Any repairs or alterations made by the user to this
equipment or equipment malfunctions may give the telecommunications company cause to request the user
to disconnect the equipment.
Users should ensure for their own protection that the electrical ground connections of the power utility,
telephone lines and internal metallic water pipe system, if present, are connected together. This precaution
may be particularly important in rural areas.
Caution
appropriate electric inspection authority, or electrician, as appropriate.
The ringer equivalence number (REN) assigned to each terminal device provides an indication of the
The Industry Canada label identifies certificated equipment. This certification means that the
: Users should not attempt to make such connections themselves, but should contact the
Industry Canada
This Class B digital apparatus meets all requirements of the Canadian Interference-Causing Equipment
Regulations.
Cet appareil numérique de la classe B respecte toutes les exigences du -Reglement Canadien sur le matériel brouilleur.
Multi-Tech Systems, Inc. MT9234ZBA-USB User Guide (S000419B) 31
Page 32

Appendix A – Regulatory Compliance
International Modem Restrictions
Some dialing and answering defaults and restrictions may vary for international modems. Ch anging settings
may cause a modem to become non-compliant with -national telecom requirements in specific countries.
Also note that some software packages may have features or lack restrictions that may cause the modem to
become non-compliant.
EMC, Safety, and R&TTE Directive
The CE mark is affixed to this product to confirm compliance with the following -European Community
Directives:
Council Directive 89/336/EEC of 3 May 1989 on the approximation of the laws of Member States
•
relating to electromagnetic compatibility;
and
Council Directive 73/23/EEC of 19 February 1973 on the harmonization of the laws of Member
•
States relating to electrical equipment designed for use within certain voltage limits;
and
Council Directive 1999/5/EC of 9 March 1999 on radio equipment and telecommunications terminal
•
equipment and the mutual recognition of their conformity.
South African Notice
This modem must be used in conjunction with an approved surge protection device.
32
Multi-Tech Systems, Inc. MT9234ZBA-USB User Guide (S000419B)
Page 33

Appendix B – Warranty and Service
Appendix B – Warranty & Repair Policies
Multi-Tech Warranty Statement
Multi-Tech Systems, Inc., (hereafter “MTS”) warrants that its products will be free from defects in material or
workmanship for a period of two, five, or ten years (depending on model) from date of purchase, or if proof of
purchase is not provided, two, five, or ten years (depending on model) from date of shipment.
MTS MAKES NO OTHER WARRANTY, EXPRESS OR IMPLIED, AND ALL IMPLIED WARRANTIES OF
MERCHANTABILITY AND FITNESS FOR A PARTICULAR PURPOSE ARE HEREBY DISCLAIMED.
This warranty does not apply to any products which have been damaged by lightning storms, water, or power
surges or which have been neglected, altered, abused, used for a purpose other than the one for which they
were manufactured, repaired by Customer or any party without MTS’s written authorization, or used in any
manner inconsistent with MTS’s instructions.
MTS’s entire obligation under this warranty shall be limited (at MTS’s option) to repair or replacement of any
products which prove to be defective within the warranty period or, at MTS’s option, issuance of a refund of
the purchase price. Defective products must be returned by Customer to MTS’s factory — transportation
prepaid.
MTS WILL NOT BE LIABLE FOR CONSEQUENTIAL DAMAGES, AND UNDER NO CIRCUMSTANCES
WILL ITS LIABILITY EXCEED THE PRICE FOR DEFECTIVE PRODUCTS.
Repair Procedures for U.S. and Canadian Customers
In the event that service is required, products may be shipped, freight prepaid, to our Mounds View,
Minnesota factory:
Multi-Tech Systems, Inc.
2205 Woodale Drive
Mounds View, MN 55112
Attn: Repairs, Serial # ____________
A Returned Materials Authorization (RMA) is not required. Return shipping charges (surface) will be paid by
MTS to destinations in U.S. and Canada.
Please include, inside the shipping box, a description of the problem, a return shipping address (must have
street address, not P.O. Box), and your telephone number. If the product is out of warranty, a payment in
advance is required. Acceptable means of payment include credit card, wire transfer or a check in U.S.
dollars drawn on a U.S. Bank.
For out of warranty repair charges, go to COMPANY/Policies/warranty/
Extended two-year overnight replacement service agreements are available for selected products. Please
call MTS at (888) 288-5470, extension 5308 or visit our web site at
PARTNERS/Programs/overnight_replacement
Please direct your questions regarding technical matters, product configuration, verification that the product
is defective, etc., to our Technical Support department at (800) 972-2439 or email support@multitech.com
Please direct your questions regarding repair expediting, receiving, shipping, billing, etc., to our Repair
Accounting department at (800) 328-9717 or (763) 717-5631, o r e m ail mtsrepair@multitech.com
Repairs for damages caused by lightning storms, water, power surges, incorrect installation, physical abuse,
or user-caused damages are billed on a time-plus-materials ba sis.
for details on rates and coverages.
.
.
Multi-Tech Systems, Inc. MT9234ZBA-USB User Guide (S000419B) 33
Page 34

Appendix B – Warranty and Service
Repair Procedures for International Customers
(Outside U.S.A. and Canada)
Your original point of purchase Reseller may offer the quickest and most economical repai r option for your
Multi-Tech product. You may also contact any Multi-Tech sales office for information about the nearest
distributor or other repair service for your Multi-Tech product. The Multi-Tech sales office directory is
available at http://www.multitech.com/ PARTNERS/Channels/offices/
In the event that factory service is required, products may be shipped, freight prepaid to our Mounds View,
Minnesota factory. Recommended international shipment methods are via Federal Express, UPS or DHL
courier services, or by airmail parcel post; shipments made by any other method will be refused. Please
include, inside the shipping box, a description of the problem, a return shipping address (must have street
address, not P.O. Box), your telephone number, and if the product is out of warranty, a payment in advance
is required. Acceptable means of payment include credit card, wire transfer or a check in U.S. dollars drawn
on a U.S. bank. Repaired units shall be shipped freight collect, unless other arrangements are made in
advance.
Please direct your questions regarding technical matters, product configuration, verification that the product
is defective, etc., to our Technical Support department nearest you or email support@multitech.com
calling the U.S., please direct your questions regarding repair expediting, receiving, shipping, billing, etc., to
our Repair Accounting department at +(763) 717-5631 in the U.S.A., or email mtsrepair@multitech.com
. When
.
Repairs for damages caused by lightning storms, water, power surges, incorrect installation, physical abuse,
or user-caused damages are billed on a time-plus-materials ba sis.
Repair Procedures for International Distributors
International distributors should contact their MTS International sales representative for information about the
repair of the Multi-Tech product(s).
Please direct your questions regarding technical matters, product configuration, verification that the product
is defective, etc., to our International Technical Support department at +(763)717-5863. When calling the
U.S., please direct your questions regarding repair expediting, receiving, shipping, billing, etc., to our Rep air
Accounting department at +(763) 717-5631 in the U.S.A. or email mtsrepair@multitech.com
Repairs for damages caused by lightning storms, water, power surges, incorrect installation, physical abuse,
or user-caused damages are billed on a time-plus-materials ba sis.
.
Replacement Parts
SupplyNet, Inc., can supply you with replacement power supplies, cables and connectors for selected MultiTech products. You can place an order with SupplyNet via mail, phone, fax or the Internet at the following
addresses:
Mail: SupplyNet, Inc.
614 Corporate Way
Valley Cottage, NY 10989
Phone: 800 826-0279
Fax: 914 267-2420
Email: info@thesupplynet.com
Internet: http://www.thesupplynet.com
34
Multi-Tech Systems, Inc. MT9234ZBA-USB User Guide (S000419B)
Page 35

Appendix C – WEEE Statement
Appendix C – Waste Electrical and Electronic Equipment
July, 2005
The WEEE directive places an obligation on EU-based manufacturers, distributors, retailers and importers to
take-back electronics products at the end of their useful life. A sister Directive, ROHS (Restriction of
Hazardous Substances) complements the WEEE Directive by banning the presence of specific hazardous
substances in the products at the design phase. The WEEE Directive covers all Multi-Tech products
imported into the EU as of August 13, 2005. EU-based manufacturers, distributors, retailers and importers
are obliged to finance the costs of recovery from municipal collection points, reuse, and recycling of specified
percentages per the WEEE requirements.
Instructions for Disposal of WEEE by Users in the European Union
The symbol shown below is on the product or on its packaging, which indicates that this product must not be
disposed of with other waste. Instead, it is the user’s responsibility to dispose of their waste equipment by
handing it over to a designated collection point for the recycling of waste electrical and electronic equipment.
The separate collection and recycling of your waste equipment at the time of disposal will help to conserve
natural resources and ensure that it is recycled in a manner that protects human health and the environment.
For more information about where you can drop off your waste equipment for recycling, please contact your
local city office, your household waste disposal service or the seller from whom you purchased the product.
Multi-Tech Systems, Inc. MT9234ZBA-USB User Guide (S000419B) 35
Page 36

Appendix D – C-ROHS HT/ST Substance Concentration
Appendix D - C-ROHS HT/TS Substance Concentration
依照中国标准的有毒有害物质信息
根据中华人民共和国信息产业部 (MII) 制定的电子信息产品 (EIP)
标准-中华人民共和国《电子信息产品污染控制管理办法》(第 39 号),也称作中国
RoHS,下表列出了 Multi-Tech Systems Inc. 产品中可能含有的有毒物质 (TS) 或有害物质 (HS)
的名称及含量水平方面的信息。
成分名称
印刷电路板
电阻器
电容器
铁氧体磁环
继电器/光学部件
IC
二极管/晶体管
振荡器和晶振
调节器
电压传感器
变压器
扬声器
连接器
LED
螺丝、螺母以及其
它五金件
交流-直流电源
软件/文档 CD
手册和纸页
底盘
有害
/有毒物质/元素
铅
(PB)
O
X
X
O
O
O
O
X
O
O
O
O
O
O
X
O
O
O
O
汞
(Hg)
O O
O O
O O
O O
O O
O O
O O
O O
O O
O O
O O
O O
O O
O O
O O
O O
O O
O O
O O
镉
(CD)
(CR6+)
六价铬
O O O
O O O
O O O
O O O
O O O
O O O
O O O
O O O
O O O
O O O
O O O
O O O
O O O
O O O
O O O
O O O
O O O
O O O
O O O
多溴联苯
(PBB)
X 表示所有使用类似材料的设备中有害/有毒物质的含量水平高于 SJ/Txxx-
多溴二苯醚
(PBDE)
2006 限量要求。
O 表示不含该物质或者该物质的含量水平在上述限量要求之内。
36 Multi-Tech Systems, Inc. MT9234ZBA-USB User Guide (S000419B)
Page 37

Appendix E – Linux Installations
Appendix E - Linux Installations
Introduction
The MULTIMODEM PRODUCT supports Linux 2.4 kernel versions (2.4.28 and above), 2.6 kernel versi ons 2.6.8 through
2.6.10, and, with a special patch, Linux kernel versions 2.6.11 through 2.6.20.4. There are three separate installation
procedures for these ranges of kernel versions. When installation is complete, you must use AT commands to configure
the modem for the country in which it is operating.
Installation in Computers Using the Linux 2.4 Kernel
1. Introduction
This procedure applies to Linux 2.4 kernel versions 2.4.28 and above.
These tgz and source RPM packages (ti_usb-1.2.tgz and ti_usb-1.2-1.src.rpm) contain a device driver for the
MULTIMODEM PRODUCT ’s TI USB 3410 processor in the Linux 2.4 kernels.
This package is designed for these hardware platforms: a standard PC with i486, Pentium, or compatible CPUs (32 bit
x86).
This package has been tested on these Linux distributions:
- Red Hat 8.0
- Red Hat 9.0
- SUSE Linux Standard Server 8.0
Most likely this package will work on many other Linux distributions based on the 2.4 kernels, but this has not yet been
tested. Note that different distributions can make custom changes to the Linux kernel, and there is a small chance that
these changes might be incompatible with this package.
This package will not work in the Linux 2.6 kernels. Separate packages of the TI USB 3410/5052 driver are ava ilable for
the Linux 2.6 kernels.
These packages are available from http://www.brimson.com/downloads
The tgz package will be named ti_usb-X.Y.tgz, and the source RPM package will be named ti_usb- X.Y-Z .src.rpm, where
X.Y-Z is the version number. See www.brimson.com/downloads/README for a description of the packages avail ab le.
If you have questions or problems with this package please contact Texas Instruments technical support or Brimson
technical support.
Multi-Tech Systems, Inc. MT9234ZBA-USB User Guide (S000419B) 37
Page 38

Appendix E – Linux Installations
2. Installation Steps
Install the Kernel Sources
To build the TI USB driver you must have the matching kernel sources for your kernel.
To verify that you have matching kernel sources, run "uname -r" to get the version of the running kernel. Then check for
the directory /usr/src/linux-<version>, /lib/modules/<version>/source, /lib/modules/<version>/build, or /usr/src/linux<stripped_version>, where stripped_version has the extra version information removed. In these directories look for the
files include/linux/autoconf.h and .config.
If you do not find the correct kernel source directory, you must find and install the kernel sources from your distribution
CDs or other media.
Prepare the Kernel Sources
This step may or may not be necessary, depending on how your Linux distribution installs the kernel sources.
Log in as root and do the following:
Command Explanation
1. cd /usr/src/linux-<version> Change to the source directory.
2. make mrproper Clean up any old files.
3. Use either of these commands:
make oldconfig
-ORmake cloneconfig
4. make dep Create the dependency and version files.
If you have built your own kernel, the kernel sources will already be install ed and prepared. If you are using a kernel that
came with a Linux distribution, it can sometimes be difficult to get the kernel sources correctly installed and prepared,
since each Linux distribution handles kernel sources slightly differently.
For example, if you get errors about the wrong kernel version, you may have installed the wrong kernel sources, or you
may need to edit the kernel version in the top level Makefile of the kernel sources. If you get compilation errors, perhaps
you forgot to run "make oldconfig" and "make dep".
If you have difficulties, look carefully at the error messages when installing the TGZ or RPM packages--those messages
should give you an indication of just what the error is.
Make a configuration file to match your running
kernel.
for Red Hat
for SUSE
For other distributions these same commands
might work, or you might need to find a config
file in /boot or in a configs directory, copy it to
.config, and run "make oldconfig".
38 Multi-Tech Systems, Inc. MT9234ZBA-USB User Guide (S000419B)
Page 39

Appendix E – Linux Installations
Build and Install the TI USB Driver from the Source RPM Package
Follow this step if your distribution supports RPM packages; otherwise, follow the next step on installing from a TGZ
package.
You will need the TI USB source RPM package for this step. The Introduction section above describes where to find the
latest TI USB source RPM.
Log in as root and do the following:
Command Explanation
1.
rpmbuild --rebuild ti_usb-X.Y-Z.src.rpm
-- OR -rpm --rebuild ti_usb-X.Y-Z.src.rpm
2.
cd /usr/src/redhat/RPMS/i386
-- OR -cd /usr/src/packages/RPMS/i386
3. rpm -Uvh ti_usb-X.Y-Z.i386.rpm This command installs the driver package.
If there are problems in this process, you may need to go back to install and prepare the kernel sources as described
above. You may need to remove the RPM package with "rpm -e ti_usb-X.Y-Z" or remove RPM temporary files. Re d Hat
stores RPM temporary files in /var/tmp and /usr/src/redhat/BUILD; other distributions may store them in other places.
This command builds the driver package for
your kernel.
For Red Hat.
For SUSE.
For Red Hat.
For SUSE.
Or use the appropriate path for your Linux
distribution.
Multi-Tech Systems, Inc. MT9234ZBA-USB User Guide (S000419B) 39
Page 40

Appendix E – Linux Installations
Build and Install the TI USB Driver from the TGZ Package
You will need the TI USB tgz package for this step. The Introduction section above describes where to find the latest TI
USB tgz package.
Log in as root and do the following:
Command Explanation
1. tar xvzf ti_usb-X.Y.tgz Un-package the files.
2. cd ti_usb-X.Y
3. ./configure Configure the package for your distribution and
kernel.
4. make Build the driver.
5. make install Install the ti_usb driver.
If there are problems in this process, you may need to go back to install and prepare the kernel sources as described
above.
Load the TI USB Driver
The ti_usb driver should be automatically loaded when you plug in the TI USB 3410 device, provided your device uses
the default vendor and product ids. If it does not, see the section entitled "VENDOR and PRODUCT IDS" in the Release
Notes file for Linux 2.4 kernel installations (on the product CD as file name ti_usb_release_notes- 1 2.txt).
The first TI USB 3410 device plugged in will appear as /dev/ttyTIUSB0, the next as /dev/ttyTIUSB1, and so on.
Note that these device names are different from the device names used by the Linux usbserial driver. See the section
below entitled "DEVICE FILES" for more information.
If TI USB devices had been in use before installing the new TI USB driver, old versions of the drivers will still be loaded.
These old versions must be unloaded before the newly installed driver will be used.
The simplest way to unload the old drivers and load the new is to reboot.
Alternatively, you can close all open TI USB serial ports, disconnect the TI USB serial devices, and then unload the old TI
USB serial driver with the command
rmmod ti_usb
Completion. Then reconnect the TI USB serial devices and the new driver will be loaded.
40 Multi-Tech Systems, Inc. MT9234ZBA-USB User Guide (S000419B)
Page 41

Appendix E – Linux Installations
Device Files
Because the TI USB driver does not use usbserial (to avoid known problems with usbserial) it uses its own device file
names, /dev/ttyTIUSB0, /dev/ttyTIUSB1, and so on.
The device files are created automatically when the ti_usb driver is loaded. This is done by the module post-install
command in /etc/modules.conf, which runs the script /etc/ti_usb/make_devices.
You can change the device names that ti_usb uses. First you should remove the old device files by running
/etc/ti_usb/make_devices remove
Then edit /etc/ti_usb/make_devices. At the top of this file you will find the parameters DEVICE_NAME which determines
the basename of the TI USB device files, DEVICE_COUNT which determines the number of device files created,
DEVICE_GROUP which determines the group owner of the device files, and DEVICE_PERMISSIONS which determines
the device file permissions.
For example, to create 8 TI USB device files named /dev/ttyusb0 through /dev/ttyusb7, owned by the uucp group, and
having permissions 0660, change the parameters like this
DEVICE_NAME=/dev/ttyusb
DEVICE_COUNT=8
DEVICE_GROUP=uucp
DEVICE_PERMISSIONS=0660
After editing make_devices, run the script to create the new device files, like this
/etc/ti_usb/make_devices
If you use devfs, the ti_usb devices will be /dev/usb/ti/0, /dev/usb/ti/1, and so on in the order they are plugged in. The
ti_usb driver has not been tested with devfs.
Multi-Tech Systems, Inc. MT9234ZBA-USB User Guide (S000419B) 41
Page 42

Appendix E – Linux Installations
Uninstalling the TI USB Driver (for 2.4 kernel versions)
If you installed the TI USB RPM package, you can uninstall it by logging in as root and running the command
rpm -e ti_usb-X.Y-Z
If you installed the TI USB TGZ package, you can uninstall it by logging in as root and running the following commands:
Command Explanation
cd ti_usb-X.Y You will need to give a full or relative path to
the unpacked source file directory.
make uninstall
42 Multi-Tech Systems, Inc. MT9234ZBA-USB User Guide (S000419B)
Page 43

Appendix E – Linux Installations
Installation in Computers Using the Linux 2.6 Kernel
1. Introduction
This procedure applies to Linux 2.6 kernel versions 2.6.8 through 2.6.10.
These tgz and source RPM packages (ti_usb_2.6-1.2.tgz and ti_usb_2.6-1.2-1.src.rpm) contain a device driver for the
MULTIMODEM PRODUCT ’s TI USB 3410 processor in the Linux 2.6 kernels.
These packages have been tested on the Fedora Core 2 Linux distribution.
Most likely these packages will work on many other Linux distributions based on the 2.6 kernels, but this has not yet
been tested. Note that different distributions can make custom changes to the Linux kernel, and there is a small chance
that these changes might be incompatible with this package.
The TI USB 3410/5052 driver has been tested in the kernel.org kernels 2.6.5 through a pre-release version of 2.6.10, and
in the Fedora Core 2 kernels 2.6.5-1.358 and 2.6.9-1.6. There are limitations in kernels before 2.6.8; see the section on
Known Limitations in the Release Notes file for kernel 2.6 (the file name is ti_usb_2 6_release_notes-1 2.txt and it is on
the product CD).
These packages will not work in the Linux 2.4 kernels (however, installation in the 2.4 kernels is covered earlier in this
chapter).
These packages are available from http://www.brimson.com/downloads
The tgz package will be named ti_usb_2.6-X.Y.tgz, and the source RPM package will be named ti_usb_2.6-X.Y-
Z.src.rpm, where X.Y-Z is the version number. See www.brimson.com/downloads/README for a description of the
packages available.
If you have questions or problems with this package, please contact Texas Instruments technical support or Brimson
technical support.
2. Installation Steps
Install the Kernel Sources
To build the TI USB driver you must have the matching kernel sources for your kernel.
In particular, you must have the file usb-serial.h for your kernel sources. Sometimes Linux distributions will include the
kernel headers but not the complete kernel sources, and usb-serial.h will be missing. However, the complete kernel
sources should still be available as a separate add-on package.
To verify that you have matching kernel sources, run "uname -r" to get the version of the running kernel. Then check for
the directory /usr/src/linux-<version>, /lib/modules/<version>/source, /lib/modules/<version>/build, or /usr/src/linux<stripped_version>, where stripped_version has the extra version information removed. In these directories look for the
files include/linux/autoconf.h, .config, and drivers/usb/serial/usb-serial.h.
If you do not find the correct kernel source directory, you must find and install the kernel sources from your distribution
CDs or other media.
Multi-Tech Systems, Inc. MT9234ZBA-USB User Guide (S000419B) 43
Page 44

Appendix E – Linux Installations
Prepare the Kernel Sources
This step may or may not be necessary, depending on how your Linux distribution installs the kernel sources.
Log in as root and do the following:
Command Explanation
1. cd /usr/src/linux-<version> Change to the source directory.
2. make mrproper Clean up any old files.
3. Use either of these commands:
make oldconfig
-ORmake cloneconfig
4. make prepare To prepare the kernel sources for your
If you have built your own kernel, the kernel sources will already be install ed and prepared. If you are using a kernel that
came with a Linux distribution, it can sometimes be difficult to get the kernel sources correctly installed and prepared,
since each Linux distribution handles kernel sources slightly differently.
For example, if you get errors about the wrong kernel version, you may have installed the wrong kernel sources, or you
may need to edit the kernel version in the top level Makefile of the kernel sources. If you get errors about a missing usbserial.h, you may only have the kernel headers installed. If you have trouble getting the full kernel sources installed and
prepared, you can copy the correct version of usb-serial.h to drivers/usb/serial in the kernel headers directory and then
the other kernel sources are not needed.
Make a configuration file to match your running
kernel.
for Red Hat
for SUSE
For other distributions these same commands
might work, or you might need to find a config
file in /boot or in a configs directory, copy it to
.config, and run "make oldconfig".
machine.
If you have difficulties, look carefully at the error messages when installing the TGZ or RPM packages. Those messages
should give you an indication of just what the error is.
44 Multi-Tech Systems, Inc. MT9234ZBA-USB User Guide (S000419B)
Page 45

Appendix E – Linux Installations
Build and Install the TI USB Driver from the Source RPM Package
Follow this step if your distribution supports RPM packages; otherwise, follow the next step on installing from a TGZ
package.
You will need the TI USB 3410/5052 source RPM package for this step. The Introduction section ab ove describes where
to find the latest TI USB 3410/5052 source RPM.
Log in as root and do the following:
Command Explanation
1.
rpmbuild --rebuild ti_usb_2.6-X.Y-Z.src.rpm
-- OR --
rpm --rebuild ti_usb_2.6-X.Y-Z.src.rpm
2.
cd /usr/src/redhat/RPMS/i386
-- OR --
cd /usr/src/packages/RPMS/i386
3. rpm -Uvh ti_usb_2.6-X.Y-Z.i386.rpm This command installs the driver package.
If there are problems in this process, you may need to go back to install and prepare the kernel sources as described
above. You man need to remove the RPM package with "rpm -e ti_usb_2.6-X.Y-Z" or remove RPM temporary files. Red
Hat stores RPM temporary files in /var/tmp and /usr/src/redhat/BUILD; other distributions may store them in other places.
This command builds the driver package for
your kernel.
For Red Hat.
For SUSE.
For Red Hat.
For SUSE.
Or use the appropriate path for your Linux
distribution.
Multi-Tech Systems, Inc. MT9234ZBA-USB User Guide (S000419B) 45
Page 46

Appendix E – Linux Installations
Build and Install the TI USB Driver from the TGZ Package
Follow this step if your distribution does not support RPM packages; otherwise, follow the previous step on installing from
an RPM package.
You will need the TI USB 3410/5052 tgz package for this step. The Introduction section above describes where to find
the latest TI USB 3410/5052 tgz package.
Log in as root and do the following:
Command Explanation
1. tar xvzf ti_usb_2.6-X.Y.tgz Un-package the files.
2. cd ti_usb_2.6-X.Y
3. ./configure Configure the package for your distribution and
kernel.
4. make install Build and install the ti_usb_3410_5052 driver.
If there are problems in this process, you may need to go back to install and prepare the kernel sources as described
above.
Load the TI USB 3410/5052 Driver
The ti_usb_3410_5052 driver should be automatically loaded when you plug in the TI USB 3410/5052 devices, provided
your device uses the default vendor and product ids. If it does not, see the section of the Release Notes file "VENDOR
and PRODUCT IDS" (on the product CD as file name ti_usb_2.6_release_notes-1.2.txt ).
The first TI USB 3410/5052 device plugged in will appear as /dev/ttyUSB0, then next as /dev/ttyUSB1, and so on. These
device names are shared with other USB serial devices.
If TI USB devices had been in use before installing the new TI USB driver, old versions of the drivers will still be loaded.
These old versions must be unloaded before the newly installed driver will be used.
The simplest way to unload the old drivers and load the new is to reboot.
Alternatively, you can close all open TI USB serial ports, disconnect the TI USB serial devices, and then unload the old TI
USB serial driver with the command
rmmod ti_usb_3410_5052
Completion. Then reconnect the TI USB serial devices and the new driver will be loade d.
46 Multi-Tech Systems, Inc. MT9234ZBA-USB User Guide (S000419B)
Page 47

Appendix E – Linux Installations
Uninstalling the TI USB Driver (for 2.6 kernel versions)
If you installed the TI USB RPM package, you can uninstall it by logging in as root and running the command
rpm -e ti_usb_2.6-X.Y-Z
If you installed the TI USB TGZ package, you can uninstall it by logging in as root and running the following commands:
Command Explanation
cd ti_usb_2.6-X.Y You will need to give a full or relative path to
the unpacked source file directory.
make uninstall
Multi-Tech Systems, Inc. MT9234ZBA-USB User Guide (S000419B) 47
Page 48

Appendix E – Linux Installations
Installation in Computers Using the Linux 2.6.20 Kernel
1. Introduction
This procedure applies to Linux 2.6 kernel versions 2.6.11 through 2.6.20 and higher.
This tgz package contains a patch for the Linux kernel version 2.6.20 and later to add support for MultiTech modems.
The patch was generated from the 2.6.20.4 kernel source. Additional support files like hotplug scripts, udev rules and
firmware images are also included.
The TI USB 3410/5052 driver should be included in the official Linux kernel in version 2.6.20 or later. The official Linux
kernel does not yet have support for the Multitech modems, however; to add that support you need this package.
This package has been tested on these Linux distributions: (a) Fedora Core 6, and (b) CentOS 5.
Most likely this package will work on many other Linux distributions based on the 2.6 kernels, but this has not yet been
tested. Note that different distributions can make custom changes to the Linux kernel, and there is a small chance that
these changes might be incompatible with this package.
These packages are available from http://www.brimson.com/downloads
If you have questions or problems with this package, please contact Texas Instruments technical support or Brimson
technical support.
2. Installation Steps
Patching and Rebuilding the Kernel
Apply the patch ti_usb_multitech_2.6.20.4.patch. This patch should apply to 2.6.20.4 and later kernels. Then rebuild
and reinstall your kernel and/or kernel modules. Be sure the TI USB driver is configured on.
Detailed instructions on patching and building a kernel can be found elsewhere.
Installing the Hotplug Scripts
The ti_usb_3410_5052 driver needs a hotplug script to work correctly. This hotplu g script is used to change the device
configuration.
Copy ti_usb_3410_5052 to /etc/hotplug/usb/ti_usb_3410_5052. Be sure t he script is owned by root:root and has
permissions r-xr-xr-x.
If the device configuration is not being set properly, you might need a slightly different hotplu g script, depending on your
Linux distribution. If this does not work, remove /etc/hotplug/usb/ti_usb_3410_5052 and instead copy
/etc/ti_usb/ti_usb_3410_5052.hotplug into /etc/hotplug.d/usb.
Some distribution have deprecated hotplug scripts. If this is the case, you will most likely need a udev rule to perform this
function.
Installing udev Rules
The ti_usb_3410_5052 driver needs a udev rule to work correctly. This udev rule is used to change the device
configuration.
Copy 25_ti_usb_3410_5052.rule to /etc/udev/rules.d. Be sure the rule is owned by root:root and has permissions r-xr-xrx.
If the device configuration is not being set properly, you might need a slightly different udev rule, depending on your
Linux distribution.
48 Multi-Tech Systems, Inc. MT9234ZBA-USB User Guide (S000419B)
Page 49

Appendix E – Linux Installations
Note: This is only needed if firmware is not built into the driver.
Installing the Firmware Images
Copy ti_mts_fw_cdma, ti_mts_fw_edge, ti_mts_fw_gsm, ti_mts_fw_MULTIMODEM PRODUCT and
ti_mts_fw_mt9234zbausb to /usr/lib/hotplug/firmware/ or /lib/firmware depending on your distribution.
Be sure the files are owned by root:root and have permissions r--r--r--.
Load the TI USB 3410/5052 Driver
The ti_usb_3410_5052 driver should be automatically loaded when you plug in the TI USB 3410/5052 devices, provided
your device uses the default vendor and product ids. If it does not, see the section below titled "VENDOR and
PRODUCT IDS".
The first TI USB 3410/5052 device plugged in will appear as /dev/ttyUSB0, then next as /dev/ttyUSB1, and so on. These
device names are shared with other USB serial devices.
If TI USB devices had been in use before installing the new TI USB driver, old versions of the drivers will still be loaded.
These old versions must be unloaded before the newly installed driver will be used.
The simplest way to unload the old drivers and load the new is to reboot.
Alternatively, you can close all open TI USB serial ports, disconnect the TI USB serial devices, and then unload the old TI
USB serial driver with the command
rmmod ti_usb_3410_5052
Then reconnect the TI USB serial devices and the new driver will be loaded.
Uninstalling the TI USB Driver (for 2.6 kernel versions)
If you installed the TI USB RPM package, you can uninstall it by logging in as root and running the command
rpm -e ti_usb_2.6-X.Y-Z
If you installed the TI USB TGZ package, you can uninstall it by logging in as root and running the following commands:
Command Explanation
cd ti_usb_2.6-X.Y You will need to give a full or relative path to
the unpacked source file directory.
make uninstall
Multi-Tech Systems, Inc. MT9234ZBA-USB User Guide (S000419B) 49
Page 50

Appendix F – ASCII Conversion
Appendix F – ASCII Conversion
ASCII Conversion Chart
CTRL CODE HEX DEC CODE HEX DEC CODE HEX DEC CODE HEX DEC
@ NUL 00 0 SP 20 32 @ 40 64 ` 60 96
A SOH 01 1 ! 21 33 A 41 65 a 61 97
B STX 02 2 " 22 34 B 42 66 b 62 98
C ETX 03 3 # 23 35 C 43 67 c 63 99
D EOT 04 4 $ 24 36 D 44 68 d 64 100
E ENQ 05 5 % 25 37 E 45 69 e 65 101
F ACK 06 6 & 26 38 F 46 70 f 66 102
G BEL 07 7 ' 27 39 G 47 71 g 67 103
H BS 08 8 ( 28 40 H 48 72 h 68 104
I HT 09 9 ) 29 41 I 49 73 i 69 105
J LF 0A 10 * 2A 42 J 4A 74 j 6A 106
K VT 0B 11 + 2B 43 K 4B 75 k 6B 107
L FF 0C 12 , 2C 44 L 4C 76 l 6C 108
M CR 0D 13 - 2D 45 M 4D 77 m 6D 109
N SO 0E 14 . 2E 46 N 4E 78 n 6E 110
O SI 0F 15 / 2F 47 O 4F 79 o 6F 111
P DLE 10 16 0 30 48 P 50 80 p 70 112
Q DC1 11 17 1 31 49 Q 51 81 q 71 113
R DC2 12 18 2 32 50 R 52 82 r 72 114
S DC3 13 19 3 33 51 S 53 83 s 73 115
T DC4 14 20 4 34 52 T 54 84 t 74 116
U NAK 15 21 5 35 53 U 55 85 u 75 117
V SYN 16 22 6 36 54 V 56 86 v 76 118
W ETB 17 23 7 37 55 W 57 87 w 77 119
X CAN 18 24 8 38 56 X 58 88 x 78 120
Y EM 19 25 9 39 57 Y 59 89 y 79 121
Z SUB 1A 26 : 3A 58 Z 5A 90 z 7A 122
[ ESC 1B 27 ; 3B 59 [ 5B 91 { 7B 123
\ FS 1C 28 < 3C 60 \ 5C 92 | 7C 124
] GS 1D 29 = 3D 61 ] 5D 93 } 7D 125
^ RS 1E 30 > 3E 62 ^ 5E 94 ~ 7E 126
_ US 1F 31 ? 3F 63 _ 5F 95 DEL 7F 127
NUL Null, or all zeros VT Vertical Tab SYN Sync.
SOH Start of Header FF Form Feed ETB End Transmission Block
STX Start of Text CR Carriage Return CAN Cancel
ETX End of Text SO Shift Out EM End of Medium
EOT End of Transmission SI Shift In SUB Substitute
ENQ Enquiry DLE Data Link Escape ESC Escape
ACK Acknowledge DC1 Device Control 1 FS File Separator
BEL Bell or Alarm DC2 Device Control 2 GS Group Separator
BS Backspace DC3 Device Control 3 RS Record Separator
HT Horizontal Tab DC4 Device Control 4 US Unit Separator
LF Line Feed NAK Negative Acknowledge DEL Delete
50 Multi-Tech Systems, Inc. MT9234ZBA-USB User Guide (S000419B)
Page 51

Index
Index
A
AT Commands .......................................................................5
autoanswer...........................................................................29
C
Call Waiting.........................................................................29
Caller ID ..............................................................................29
Canadian regulations........................................................32
connecting the modem...........................................................7
D
DOC regulations................................................................32
F
FCC regulations.................................................................31
front panel ............................................................................25
G
Global Wizard ....................................................................23
I
Installing the 64-bit version in Vista...................................... 8
indicators..............................................................................25
initialization strings..............................................................28
O
Ordering Replacement Parts................................................ 35
P
phone connection .................................................................. 7
R
remote configuration........................................................... 27
escape character .............................................................. 27
remote node operation......................................................... 26
Replacement Parts............................................................... 35
result codes.......................................................................... 28
S
Safety Warning Telecom....................................................... 7
solving problems................................................................. 28
specifications, technical ........................................................ 6
S-registers
S9 .................................................................................... 27
T
technical specifications .........................................................6
telephone line...................................................................... 28
telephone, connecting a......................................................... 7
testing the modem............................................................... 29
troubleshooting.................................................................... 28
L
LED indicators.....................................................................25
LED Indicators.....................................................................28
line connection.......................................................................7
Linux 2.4 installation
2.4.28 and above..............................................................38
Linux 2.6 installation
2.6.11 through 2.6.20 and higher .....................................49
2.6.8 through 2.6.10.........................................................44
Linux Drivers.........................................................................8
V
Vista Operating System and Driver Installation.................... 9
W
warranty .............................................................................. 31
Waste Electrical and Electronic Equipment WEEE Statement
........................................................................................ 36
WEEE directive................................................................... 36
Windows XP & 2003 and the Modem Driver..................... 22
Multi-Tech Systems, Inc. MT9234ZBA-USB User Guide (S000419B) 51
 Loading...