

Page 1
r
o
s
s
e
c
o
r
P
le
g
in
S
x
a
F
d
n
a
a
t
a
D
r
e
v
r
e
S
s
n
io
t
a
ic
n
u
m
m
o
C
Model MA6
Single Processor
Data and Fax
Communications Server
Quick Start Guide
Page 2

MiniArray III Model MA6 Communications Server
Quick Start Guide
82067052, Revision C
This publication may not be reproduced, in whole or in part, without prior expressed written
permission from Multi-Tech Systems, Inc. All rights reserved.
Copyright © 2000, by Multi-Tech Systems, Inc.
Multi-Tech Systems, Inc. makes no representations or warranties with respect to the contents hereof
and specifically disclaims any implied warranties of merchantability or fitness for any particular
purpose. Furthermore, Multi-Tech Systems, Inc. reserves the right to revise this publication and to
make changes from time to time in the content hereof without obligation of Multi-Tech Systems, Inc.
to notify any person or organization of such revisions or changes.
Record of Revisions
RevisionDescription
A Manual released. All pages at revision A.
(10/30/98)
B Add appendices on Workstation Redirectors and RADIUS. Revise RASExpress
info (1/14/2000)
C Update phone info; remove info on BBS and FAX-back (11/06/00).
Patents
This product is covered by one or more of the following U.S. Patent Numbers: 5.301.274; 5.309.562;
5.355.365; 5.355.653; 5.452.289; 5.453.986. Other Patents Pending.
TrademarksTrademarks of Multi-Tech Systems, Inc. are as follows: MiniArray, RASExpress,
MultiExpressFax, and the Multi-Tech logo. CompuServe is a trademark of CompuServe, Inc.
Multi-Tech Systems, Inc.
2205 Woodale Drive
Mounds View, Minnesota 55112
(763) 785-3500 or (800) 328-9717
Fax (763) 785-9874
Tech Support (800) 972-2439
Internet Address: http://www.multitech.com
2 MA6
Page 3

Contents
1 System Overview
Introduction .................................................................................................................................................6
Product Overview........................................................................................................................................ 6
RASExpress & Auxiliary Software ........................................................................................................6
Documentation Set Overview......................................................................................................................8
Configurations ............................................................................................................................................. 8
T echnical Specifications..............................................................................................................................9
2 Installing Your MiniArray III Model MA6
Introduction ...............................................................................................................................................12
Unpacking ................................................................................................................................................. 12
Safety Warnings: AC Power, Lithium Battery, Laser Caution,....................................................................12
Telecom Warnings ..............................................................................................................................13
Rack Mounting ..........................................................................................................................................13
Cable Connections....................................................................................................................................13
Powering Up ............................................................................................................................................. 16
3 Getting Started with RASExpress
Quick Start with RASExpress.................................................................................................................... 18
4 Hardware Removal and Replacement
Introduction ...............................................................................................................................................24
Disconnecting Cables & Removing from Enclosure ..................................................................................24
Card Cage Removal/Replacement............................................................................................................25
Board Removal/Replacement ................................................................................................................... 27
Hard Disk Removal/Replacement .............................................................................................................29
Floppy Disk Removal/Replacement ..........................................................................................................29
CDROM Removal/Replacement ............................................................................................................... 30
Power Supply Removal/Replacement .......................................................................................................30
5 T roubleshooting 34
6 Service, Warranty, and Technical Support
Introduction ...............................................................................................................................................38
Limited Warranty....................................................................................................................................... 38
Warranty Addendum for Service on North American Products..................................................................38
Warranty Addendum for Service on International Products .......................................................................39
Out of Warranty Repair Costs ...................................................................................................................39
Tech Support.............................................................................................................................................39
About the Internet...................................................................................................................................... 40
Appendices
Appendix A—Back Panel Connector Pinouts............................................................................................42
Appendix B—Regulatory Information ........................................................................................................48
Appendix C—Workstation Redirectors -- MCSIWSN & WINMCSI ............................................................55
Appendix D—RADIUS Authentication & User Profile Software .................................................................63
Appendix E—MultiManager Software........................................................................................................ 67
MA6
3
Page 4

4 MA6
Page 5

1 System Overview
MA6
5
Page 6
Introduction
The MiniArray
III
dedicated turnkey operation as a LAN-based communications, remote access, or fax server.
The MiniArray
III
is a general purpose, turnkey communications server that easily interfaces to
any existing Novell, Windows NT or IP network.
Product Overview
The MiniArray
includes a built-in hard drive, 3.5" floppy drive, and also contains a slot for a CD-ROM drive.
The heart of the MA6 is MultiTech's high-powered Pentium-based single-board computer
(SBC) with up to 200 MHz of processing power. The MA6 has five expansion slots, four that
meet the ISA standard, and one that accommodates either ISA or PCI devices. A user
configurable card cage allows for up to 32 enhanced V.34 (33.6 bps) internal modems or up
to 32 high speed serial ports.
The MiniArray
software installed. Two MiniArray
RASExpress software and internal modems, and the other has RASExpress software and
serial ports for external communications devices. Both have a default configuration that
allows them to boot up as remote-access servers (RAS).
III
Model MA6 is a ruggedized, highly expandable 19" rack mount device that
III
is shipped with RASExpress remote access server and MultiManager
™ is a single-segment rack mountable solution that's customized for
r
o
s
s
e
c
ro
P
le
g
in
S
x
a
F
d
n
a
ta
a
D
r
e
v
r
e
S
s
n
tio
a
ic
n
u
m
m
o
C
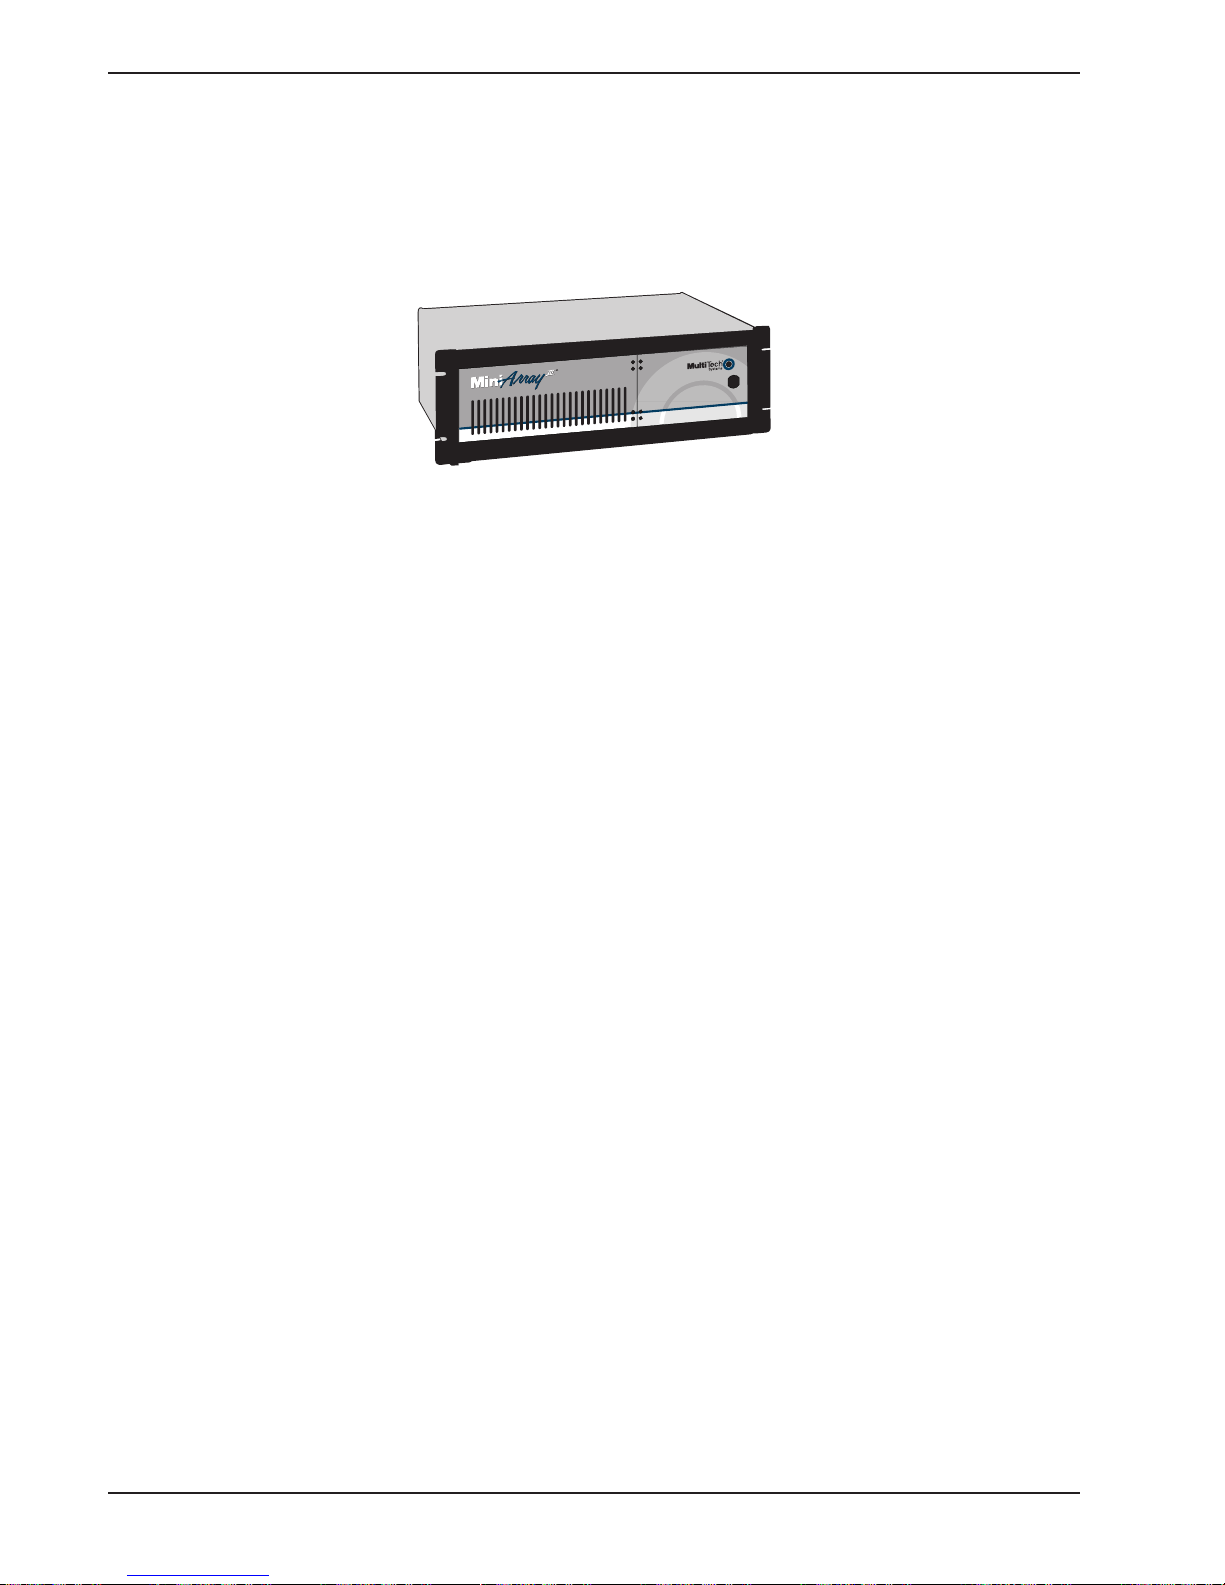
Figure 1-1. MiniArray
III
Model 6 versions are shipped; one is equipped with
III
RASExpress and Auxiliary Software
The MiniArray
package that enables network managers to configure and manage remote servers via web browsers,
through Telnet over an IP network, and via a GUI manager over both IP and IPX networks. Through a
special software package bundled with the MiniArray
standard RADIUS authentication functionality (which resides on a separate PC).
RADIUS authentication software (Remote Authentication Dial-In User Service) handles
authentication and profile information about network users and ensures security against unauthorized
server access. Built-in R log protocol support permits remote log-in to all hosts on the network.
RASExpress can facilitate remote software upgrades via standard TFTP protocol.
The MiniArray
assignments on the network.
III
's factory-installed RASExpress software is an advanced remote-access software
III
s workstation re-director programs (WINMCSI and MCSIWSN) control modem port
III
, RASExpress can also be interfaced to
6 MA6
Page 7
et
Terminals
Ethernet Concentrator
Ethernet 10BASET Concentrator
Model EN516TP/CA Active Hub for UTP Networks
12345678 910111213141516
Printer
Print
Server
File
Server
MultiExpresFAX
Server
SBC
NIC
Network
Interface
Card
Single Processor Data and Fax
Communications Server
rocessor
gle P
in
S
ax
F
nd
Data a
s Server
ication
un
m
om
C
ISIHI cards
ISIHI
ISIHI
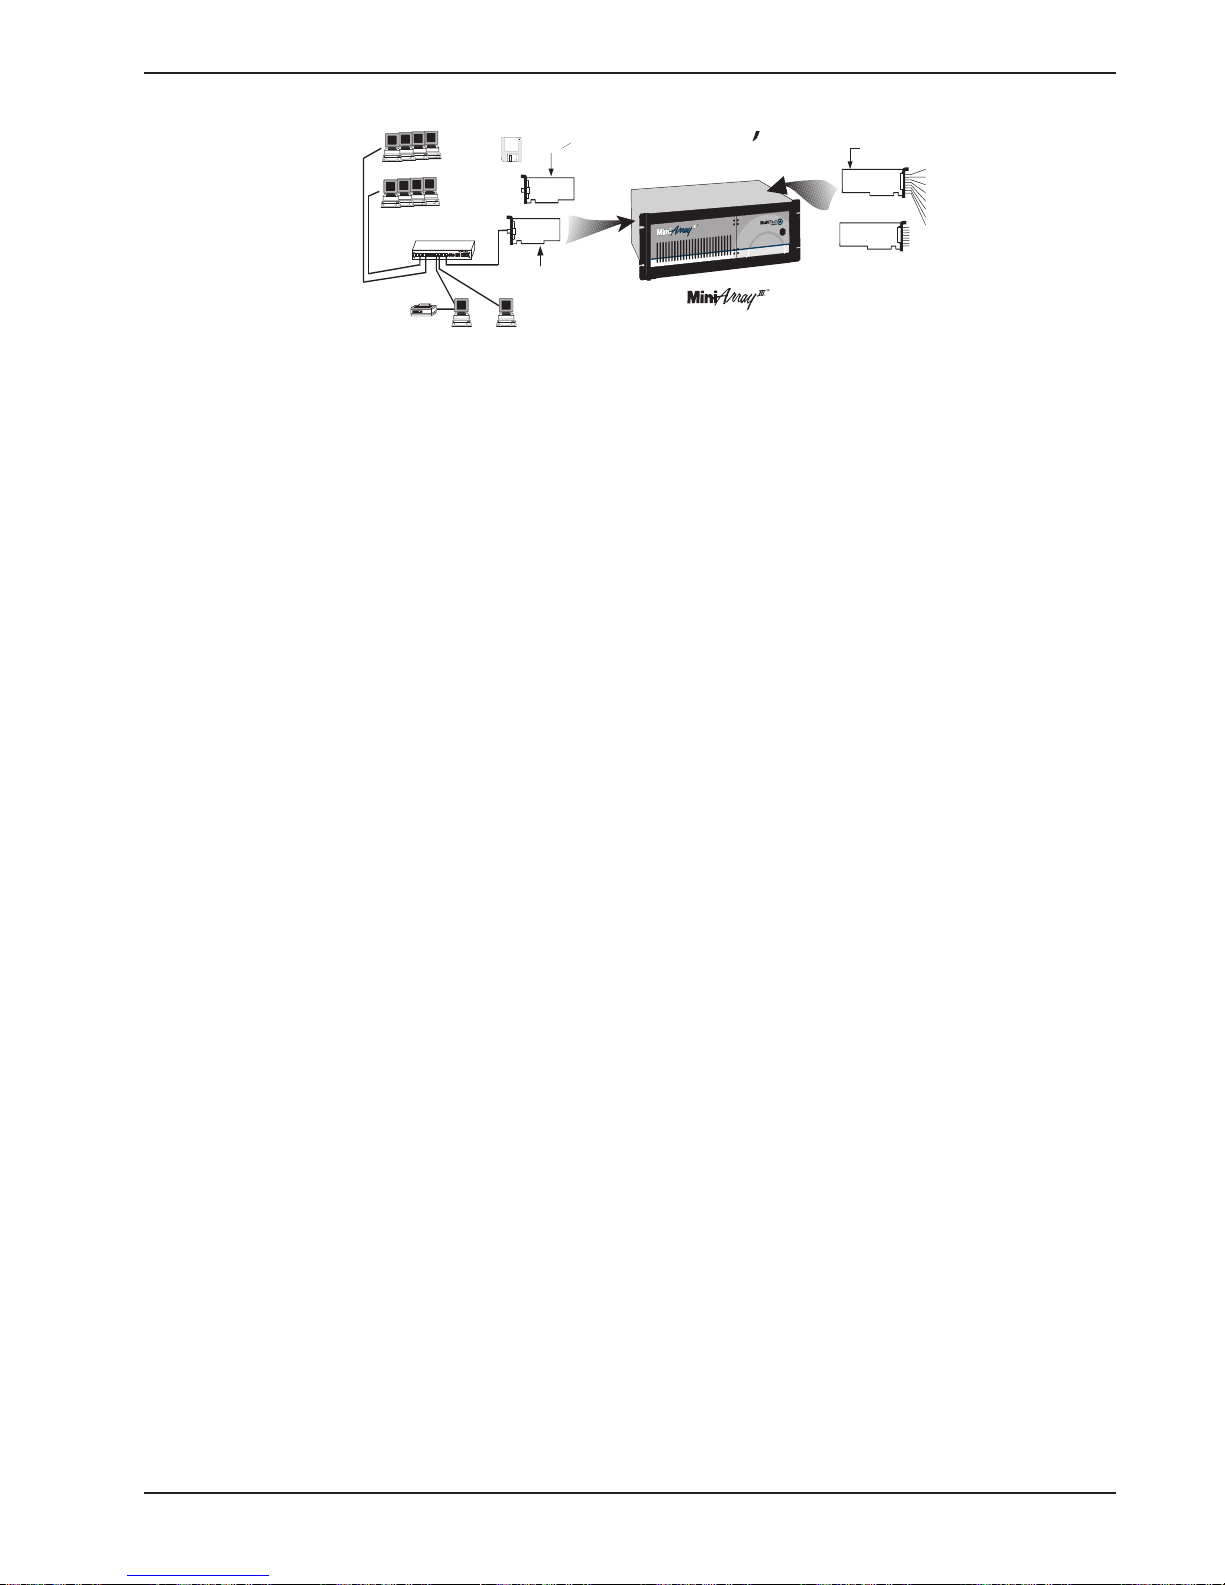
Figure 1-2. Typical RASExpress Application
Additional noteworthy features of RASExpress include include:
• Support for DHCP, a time saving feature that dynamically allocates IP addresses instead of requiring
network managers to allocate them manually
• Built-in SNMP agent enables third-party SNMP manager to administer the box
• Support of IP and IPX header compression and IP VJC header compression for increased performance
• Call back support for Windows 95 client
• Remote Access Security on a per use basis for accessing IP only, IPX only, or both IP and IPX
• Keyboard or mouse operation
• Standard or User-defineable cover page
• Built-in web, telnet, and FTP access
Other noteworthy features include:
• A DOS client that supports one local phone book with 500 groups and 4,000 recipients.
• A WindowsTM client that supports unlimited phone books with 1,000 groups and 1,000 recipients.
• DOS user interface with Pop-up menus, context-sensitive Help, and hot-key TSR activation.
MA6
7
Page 8

Documentation Set Overview
The MiniArray
hardware and software manuals on CD-ROM. Updates are available from the Multi-Tech
web site and FTP site.
Manual Set
Please refer to the list below for the individual titles included in your MiniArray
documentation set.
System Overview
Single Board Computer - Models MSB133Px, MSB166Px, and MSB200Px
PCI Ethernet Network Interface Card (10/100 Mb)
Intelligent Serial Interface Card with Integrated Data/Fax Modems - Model ISI3334
Intelligent Serial Interface (ISI) - Model ISI4608PC
RASExpress User Guide
Configurations
The Multi-Tech MiniArray
option of installing additional upgrades that can offer up to 32 modems in each MiniArray
as well as a number of application software packages.
III
documentation set consists of this Quick Start Guide and a complete set of
III
III
can be configured in a number of ways. Your reseller has the
III
,
Technical Specifications
The MiniArray
Chassis
• 6-slot PCI/ISA backplane
• SBC
• PCI Ethernet Network Interface Card (10/100 Mb)
• One half-height 1.44Mb 3½-inch floppy disk drive
• One half-height 500 plus megabyte hard disk drive
• One power supply
• Power on/off switch on front panel with built in Power LED.
• Full security locking
• Intelligent Serial Interface (ISI3334 or ISI4608) optional
Power Supply
AC Input
• Power Requirement: 100-120/220-240V; 3A
• Frequency: 50-60 Hz
• Efficiency:>65% @ full load, nominal line
III
conforms to the following technical specifications.
8 MA6
Page 9

DC Output
• Output: +5 @ 18A
• Inrush Current<50A peak @ 115VAC, cold start at 25o C
• Line Regulation:+/- 5% at full load for +/-5V, +/-12V, +/-10% for -12V
• Hold Time:20ms at full load @ 115VAC
Dimensions
• Height:5.25 inches
• Width: 19 inches
• Depth: 17 inches
• Weight: 31 lbs. (14kg)
Environmental
• Temperature:0-40o C
• Humidity: 10-90% RH Non Condensing
• Fan Rating: 25 cfm
+12 @ 6A
-5 @ 0.3A
-12 @ 0.8A
MA6
9
Page 10

10 MA6
Page 11

2 Installing Your MiniArray III
Model MA6
MA6
11
Page 12

Introduction
This chapter explains how to set up and cable the MiniArray
This product, as received by the end-user, is ready to be connected to the end-user's
Ethernet concentrator and is preconfigured to operate as a communication server once your
modem connections are made, VGA monitor and keyboard are linked up, the system booted,
and some basic information entered. To connect the cables to the SBC, NIC, or ISI board,
refer to the "Cable Connections" section of this chapter.
Unpacking
Check the items on the MiniArray
options and accessories. Unpack and inspect the cabinet for visible shipping damage. If
damage is observed, do not power-on the unit; contact Multi-Tech's Tech Support for advice.
If no damage is observed, place the MiniArray
Safety Warning AC Power
Locate the AC outlet near the communication equipment. The AC power cord is your main
AC disconnecting device and must be easily accessible at all times. For your safety, the
power cord provided with your system has a grounded plug. Always use the power cord with
a properly grounded wall outlet, to avoid the risk of electrical shock.
Lithium Battery Caution
III
.
III
shipping list to ensure that you have received the correct
III
in its final location.
A lithium battery on the product provides backup power for the devices timekeeping
capability. The battery has an estimated life expectancy of ten years.
When the battery starts to weaken, the date and time may be incorrect. If the battery fails,
the unit must be sent back to Multi-Tech systems for battery replacement.
Warning: There is danger of explosion if the battery is incorrectly replaced.
Laser Safety Caution
Class 1 LED Product.
The CD-ROM drive contains a laser system and is classified as a “ Class 1 Laser Product”
under a U.S. Department of Health and Human Services (DHHS) Radiation Performance
standard according to the Radiation Control for Health and Safety Act of 1968.
Should the unit ever require maintenance, contact an authorized repair location.
12 MA6
Page 13

Safety Warnings Telecom
1. Never install telephone wiring during a lighting storm.
2. Never install telephone jacks in wet locations unless the jack is specifically designed
for wet locations.
3. This product is to be used with UL and cUL listed computers.
4. Never touch uninsulated telephone wires or terminals unless the telephone line has
been disconnected at the network interface.
5. Use caution when installing or modifying telephone lines.
6. Avoid using a telephone (other than a cordless type) during an electrical storm.
There may be a remote risk of electrical shock from lightning.
7. Do not use the telephone to report a gas leak in the vicinity of the leak.
8. To reduce the risk of fire, use only No. 26 AWG or larger Telecommunication line
Cord.
Rack Mounting
In order to prevent injury or damage to the unit, it is recommended that
The MiniArray
III
is designed to mount in a standard 19-inch rack enclosure. Four (4) rack
enclosure mounting screws are provided in your MiniArray
the unit securely to the rack enclosure.
In order to maintain proper operating temperatures, there is a one-inch clearance requirement for
the back of the unit. If mounted in a rack enclosure or as a desktop unit, there
must be a minimum of one inch between the back of the MiniArray
Cable Connections
The cabling required for the MiniArray
or in the case of integrated multiport ISI/Modem, plugging the RJ11 cables into the multiport
ISI/Modem modular receptacles; and a NIC connection to the network. The SBC board has
cable connectors for adding a monitor and keyboard. Cable connectors and boards are
shown in Figure 2-1.
Caution
two people mount the MiniArray
III
in the rack enclosure
III
kit. Use these screws to mount
Note
any wall or barrier, and the front of the MiniArray
and any wall or barrier.
III
involves connecting the ISI board(s) to the modems;
III
III
and
MA6
13
Page 14
Cover Mounting
Screws
ISI Boards
Cover
Power Supply
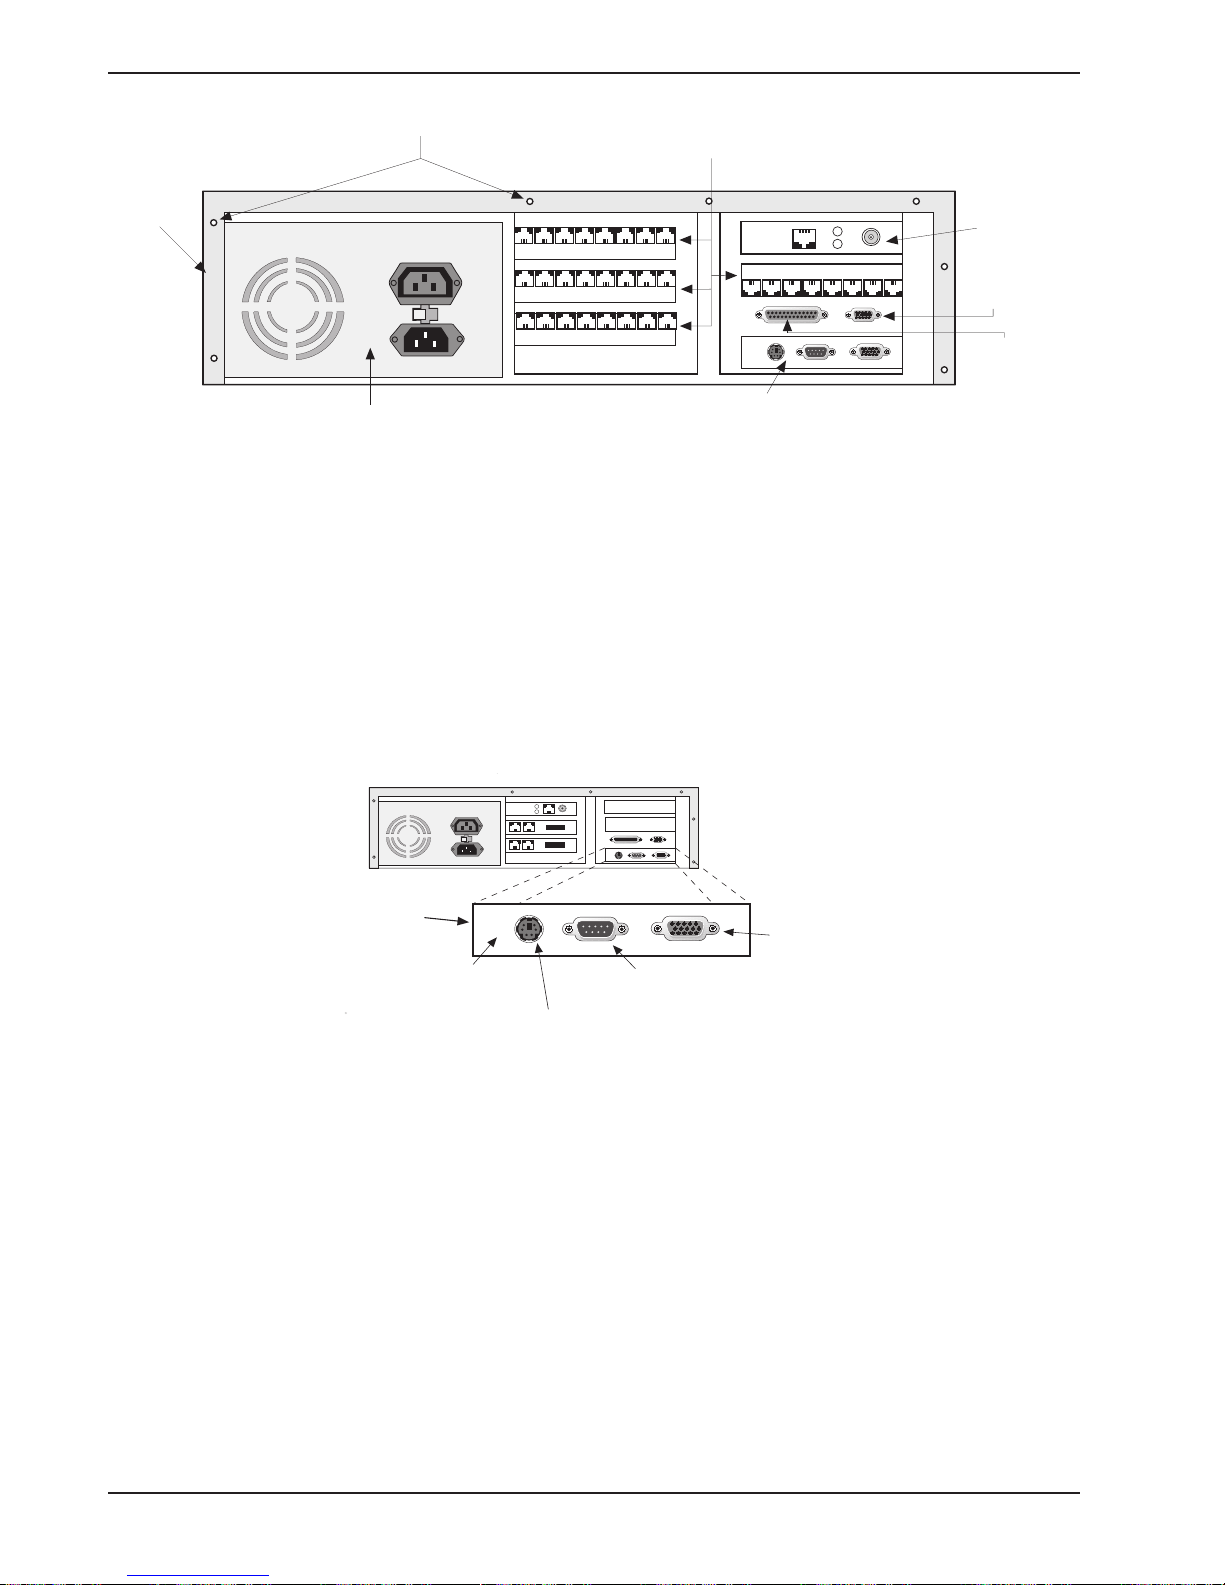
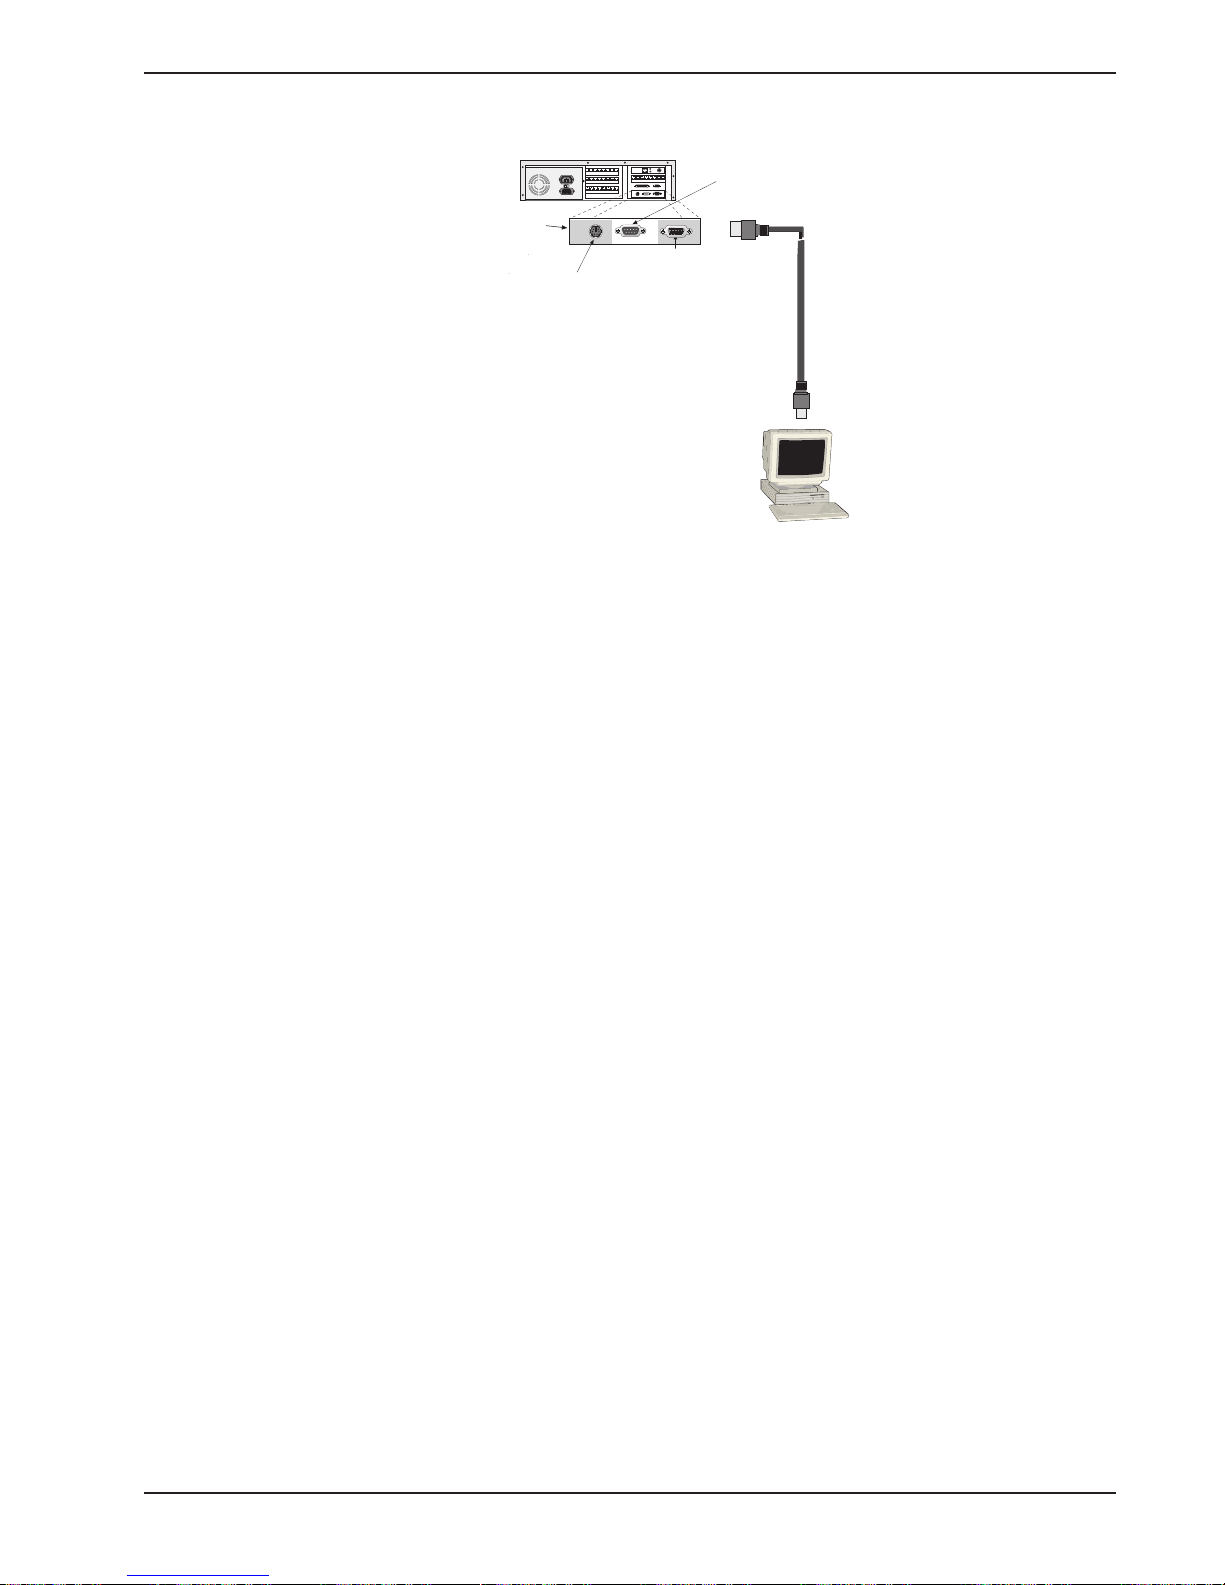
SBC Board Cabling
The SBC board is located in the MiniArray
may involve connection to three back panel connectors (see Figure 2-2). The back panel
connectors are:
• Video connector
• COM 1 connector
• Keyboard connector
120
SBC Board
Figure 2-1. Back Panel Connectors
III
as shown in Figure 2-1. The SBC board cabling
NIC Board
COM 2
(DB15)
•
[( )]
Printer Port
(DB25)
SBC Board
120
Hardware
Reset Switch
WPDT SW1
•
[( )]
6-Pin Circular Jack
(To External Keyboard)
•
[( )]
DB9 (male) Connector
(to COM 1 Serial Port)
15-Pin Video
Connector
(to External
Display Monitor)
Fig. 2-2. SBC Board Connections
The right connector on the SBC board connects the video cable to a monitor. The left round
connector is for the keyboard. The middle connector is COM 1. The SBC connector pinouts
are shown and defined in Appendix A.
Note
Any cables connected to the MiniArray
be shielded to reduce interference
III
should
14 MA6
Page 15
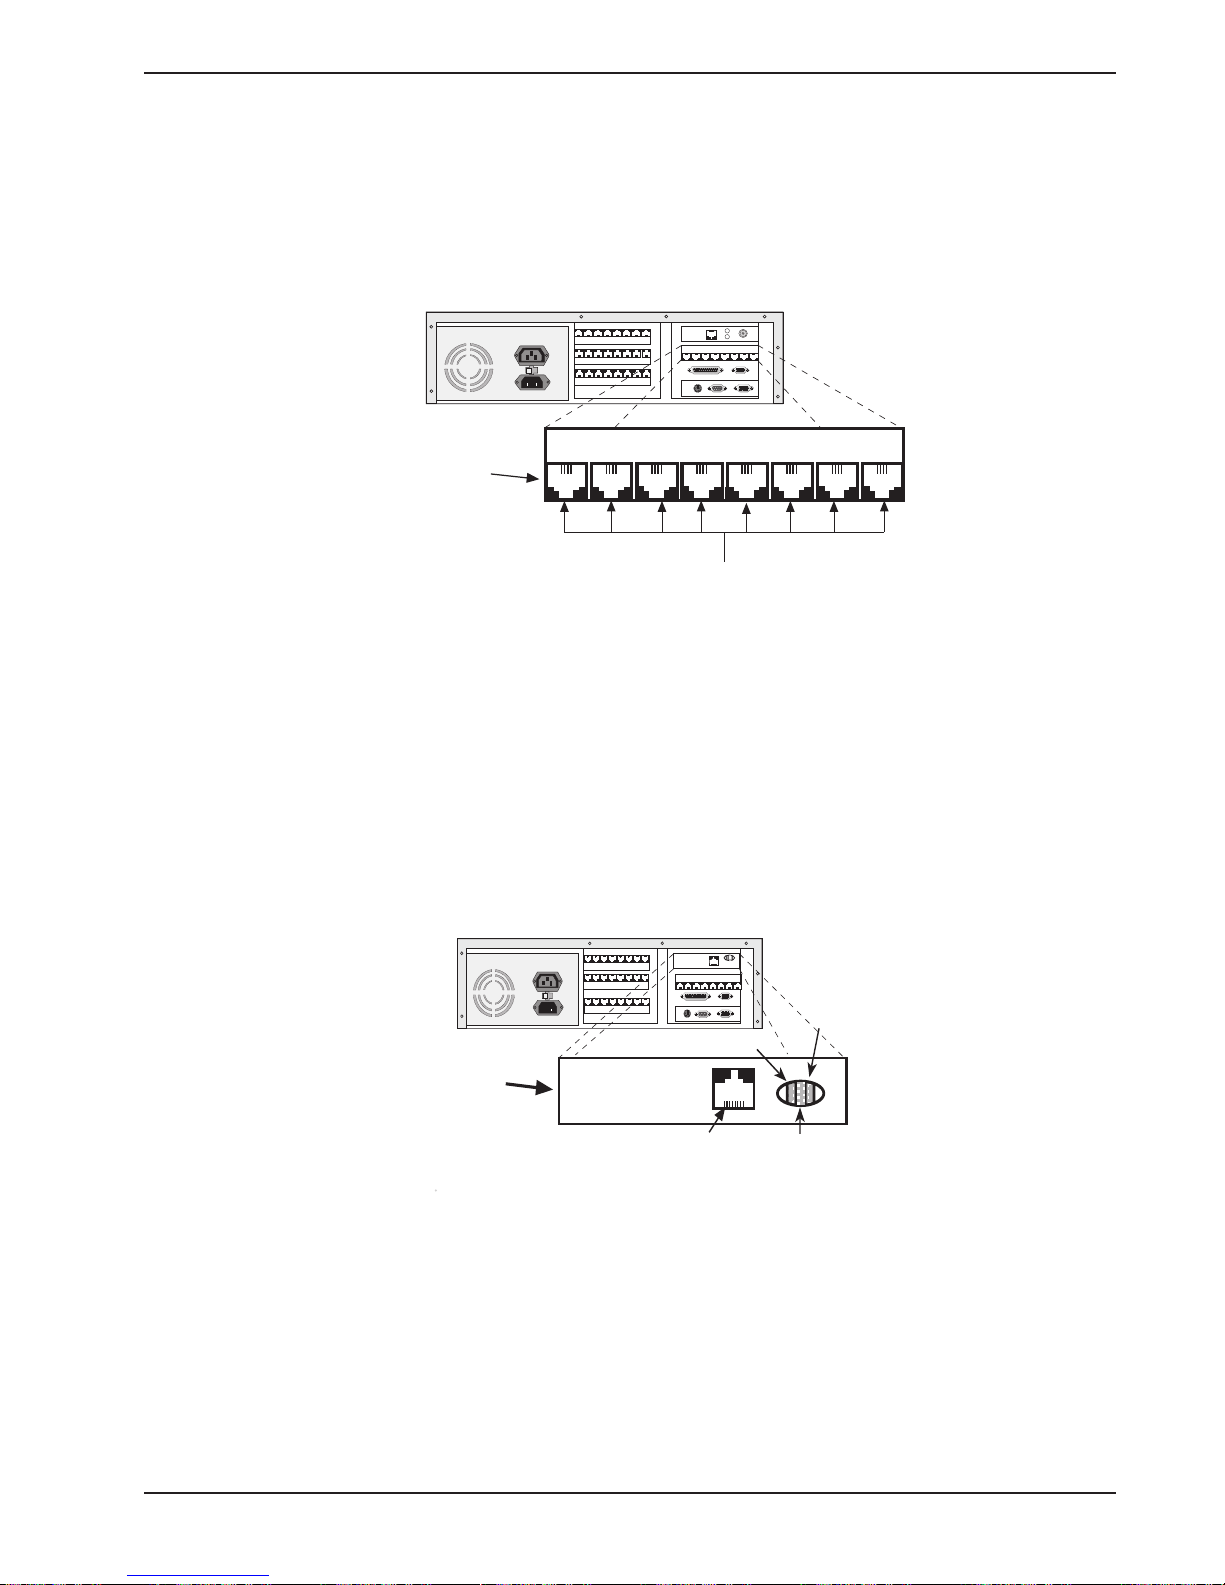
ISI Board Cabling
Each ISI3334/8 board takes up one physical slot in the MiniArray
III
. Depending on your
configuration, you may have a total of up to four (4) cards (see figure 2-1). Attach the RJ11
line cords to the RJ11 line connectors on the ISI card(s) at the back of your MiniArray
III
, as
shown in Figure 2-3.
120
•
[( )]
ISI3334/8 Board
RJ11 Line Jacks
Fig. 2-3. ISI Board Connectors
Note
Any cables connected to the MiniArray
be shielded to reduce interference.
III
should
NIC Cabling
The EN-series EtherNet NIC is located as shown in Figure 2-4. The NIC connectors are of
theUTP (RJ45 connector) type.
100M
LINK
ACT
120
100M
ACT
Network
Interface
Card
RJ-45 UTP
Connector
Fig. 2-4. NIC Board Connector
Connect the appropriate network cable to the NIC in the MiniArray
connectors are shown and defined in Appendix A.
LINK
III
. The various NIC
MA6
Note
Any cables connected to the MiniArray
be shielded to reduce interference.
III
should
15
Page 16
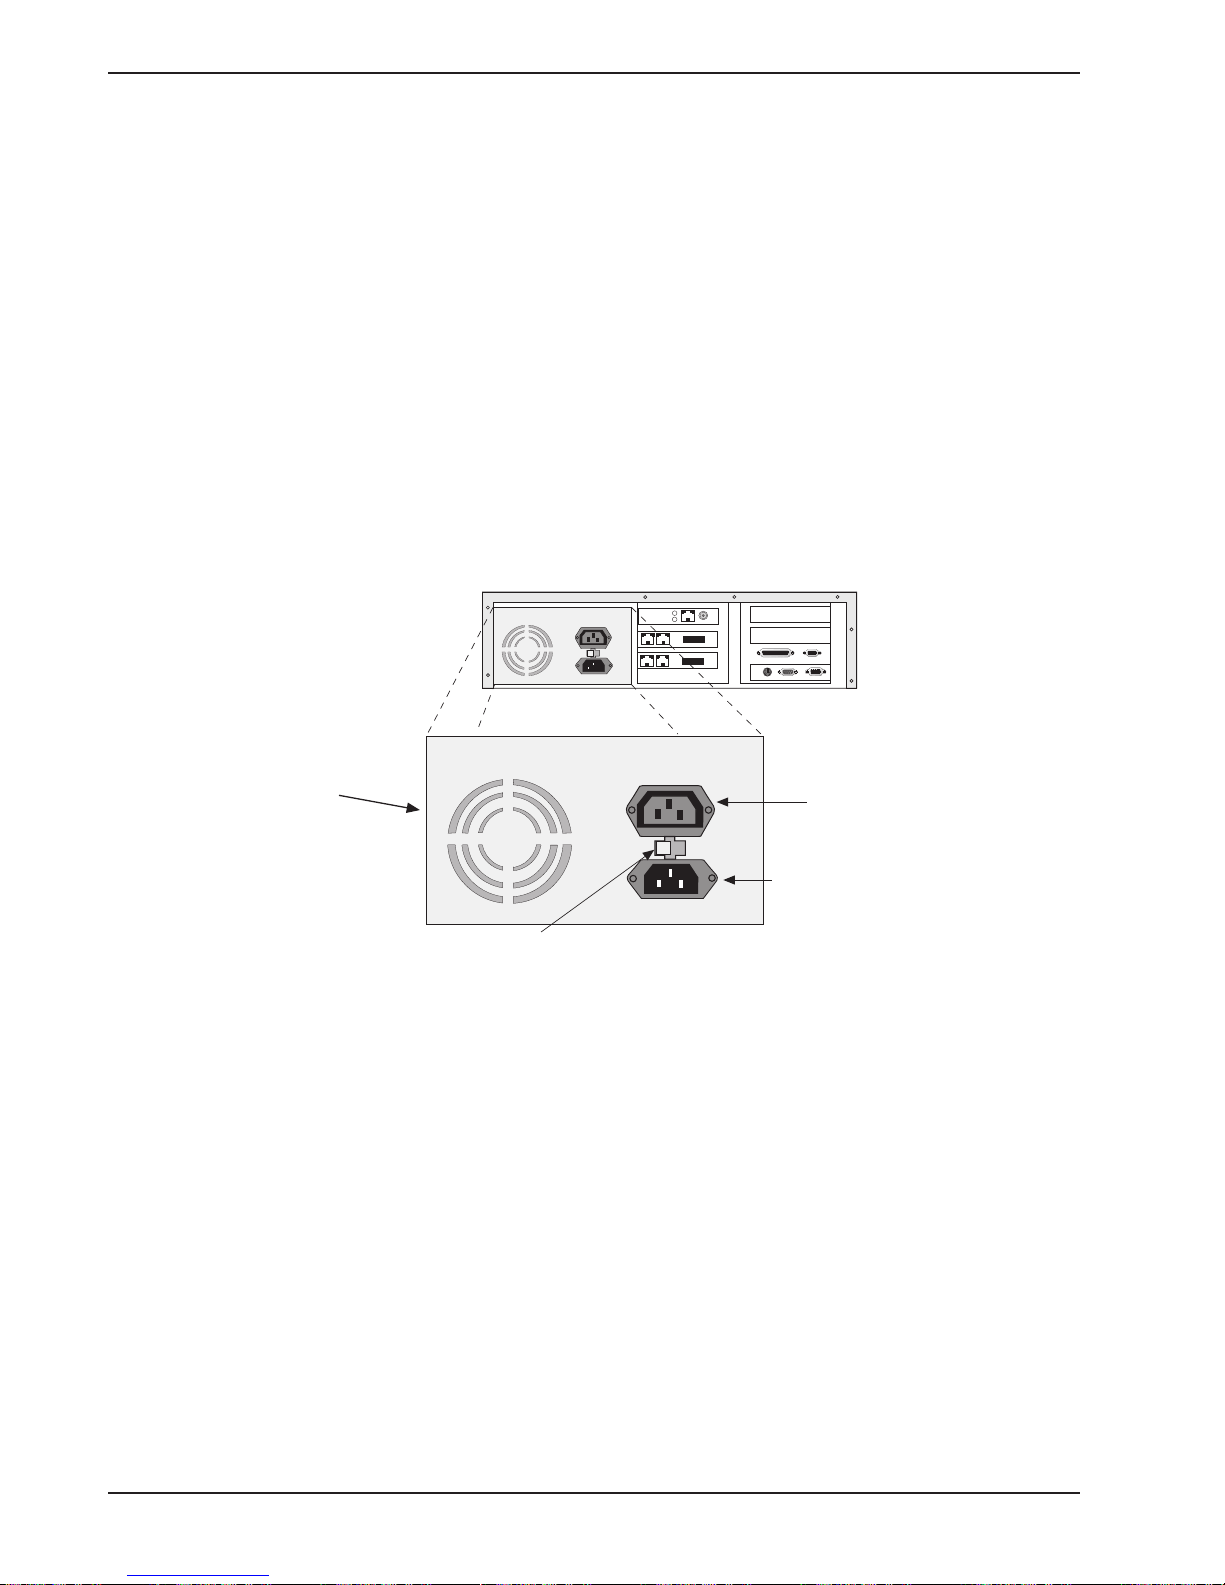
Powering Up
Note: This is plugable equipment; the socket outlet must be installed near the equipment and
must be easily accessible.
Make sure that the voltage selector on the power supply is set to the proper voltage prior to
connecting this equipment to the main power. If the voltage selector needs to be changed,
an ordinary pencil can be used to change the switch to the position which best correlates with
the known input voltage. If the voltage selector is in the "115" position, input voltages from
100-120VAC may be applied to the equipment. If the voltage selector is in the "230" position,
input voltages from 200-240 VAC may be applied to the equipment.
Connect the power cord supplied with the MiniArray
III
to the power cord connector on the
back of the cabinet and to an AC outlet. Press the power switch on the front of the cabinet to
the ON position. The power switch contains an LED which should light when power is
applied.
120
•
[( )]
Power Supply
Monitor Power
Outlet
120
Power Cord
Input
Voltage Selector
16 MA6
Fig. 2-5. Power Supply Connectors
Page 17

3 Getting Started with
RASExpress
MA6
17
Page 18

Quick Start with RASExpress
MultiTech Systems has pre-installed RAS Server software on your MiniArray
configuration as simple as possible. For your convenience, a copy of the RASExpress Installation disk
is on the CD-ROM shipped with the MiniArray
into operation as a RAS Server.
What you need to start
• The MiniArray
• A dumb terminal or an auxiliary PC (other than the MiniArray
terminal mode
• A shielded RS-232C serial cable with a female DB-9 connector on one end and a
connector to match the serial port of the terminal or auxiliary PC on the other end.
• An IP Address assigned to the MiniArray
• An IP Subnet Mask assigned to the MiniArray
• Optional: a client PC connected to the MiniArray
a browser, or MultiManager
Accessing RASExpress
To configure the MiniArray
PC to the MiniArray
IP Address and IP Subnet Mask into the MiniArray
have been entered into the MiniArray
III
to make
III
. Complete this procedure to put your MiniArray
III
Server
III
itself) that can operate in
III
server
III
server
III
’s network and equipped with Telnet,
III
III
as a RASExpress server, you must first connect a terminal or auxiliary
s serial port. Then you must enable IP Remote Access and then program the
III
III
, you can either:
. After the IP Address and IP Subnet Mask
III
(a) continue using the terminal or auxiliary PC to program other network settings into
the MiniArray
(b) re-boot the MiniArray
III
, or
III
and then continue programming the MiniArray
settings from a client PC connected to the LAN in which the MiniArray
server.
Do this using Telnet, or a browser, or MultiManager.
The steps for both methods are presented below.
Method A. Do All Configuration using Terminal or Auxiliary PC
A1. Be sure that the MiniArray
A2. Using the provided RS-232C serial cable, connect a terminal (or an auxiliary PC) to the
MiniArray
III
s serial port.
III
is connected to the LAN. Turn off the power for the MiniArray
III
’s network
III
is the RAS
III
.
18 MA6
Page 19

SBC
Backplane
120
6-Pin Circular Jack
(To External Keyboard)
COM 1
DB9 male
15-Pin Video
Connector
(to External
Display Monitor)
Connect RS-232C
Serial Cable (female end)
here
RS-
232C
Cable
Dumb Terminal
or
Auxiliary PC
Figure 3-1: Serial port on the MiniArray
A3. Power up the MiniArray
III
. The RASExpress Server Screen will appear.
III
Note: The server takes a few moments to load the RASExpress software and to
initialize the modems after it is turned on. Observe RAS software processing and
displaying .
A4. Turn on the terminal (or auxiliary PC) and press Enter.
A5. Select Quick Configuration of Server.
A6. Enable IP Remote Access.
Note: Error messages will appear and will indicate that the remote addresses of the
WAN ports are not on the same subnet. This is normal for the initial setup. Ignore
these messages.
A7. Type the IP Address for the CommPlete RASExpress server.
A8. Type the IP Subnet Mask.
A9. In the IP Default Route field, enter the router address for the LANs file server.
A10. If you want the RASExpress server to use IP Routing Information Protocol (RIP-2) for for IP
routing, enable IP RIP.
A11. If you have enabled IP-RIP, you may enable IP Auto Learn Default Gateway. When
enabled, the RASExpress server will learn the correct default gateway if it was configured
incorrectly or if the configured gateway goes down and a different router starts acting as a default
router.
A12. In the Primary Name Server field and the Secondary Name Server fields,
type 000.000.000.000
unless you have made other arrangements.
A13. In the IP Frame Type field, select the frame type that fits your LAN, either TYPE_II
(the default value), or SNAP (Sub-Network Access Protocol).
MA6
19
Page 20

A14. If you set the Remote Client IP Address field to the value Configure Per
Port, follow these steps when this this present Quick Configuration procedure is done:
i. From the terminal main menu, select Configuration of server
ii. Select Communication Setup.
iii. Select ISI Setup.
iv. Delete all ISI cards before saving and rebooting the server.
These steps correct the initial subnet error the next time the server loads.
If you set the Remote Client IP Address to any of these values (Use DHCP, or Use
Address, Use Radius), go to step A15.
A15. When the above steps are complete, press Esc and save the changes to disk. You will be asked
to re-boot the server.
A16. Type Y and press Enter. The connection closes while the RASExpress server re-boots. A new
menu appears after the MiniArray
III
has re-booted.
A17. To complete the configuration of the RASExpress server, select Configuration of server from
the main menu. For detailed information about the menu options, see Chapter 3 of the
RASExpress manual.
Method B. Start Configuration with Terminal, Finish Configuration on Client PC
To enable remote configuration of the RASExpress server, you must first configure the servers IP
settings, including the servers IP address. To do this, you must connect a terminal (or auxiliary PC)
to the servers serial port. After IP is configured and working, you can complete the server
configuration remotely through Telnet, through a browser, or through MultiManager on a client PC
connected to the LAN.
B1. Be sure that the MiniArray
B2. Using the provided RS-232C serial cable, connect a terminal to the RASExpress servers
configuration port.
III
is connected to the LAN. Turn off the power for the MiniArray
III
.
20 MA6
Page 21
SBC
Backplane
6-Pin Circular Jack
(To External Keyboard)
120
COM 1
DB9 male
15-Pin Video
Connector
(to External
Display Monitor)
Connect RS-232C
Serial Cable (female end)
here
RS-
232C
Cable
Dumb Terminal
or
Auxiliary PC
Figure 3-2: Serial port on the MiniArray
B3. Power up the MiniArray
III
. The RASExpress Server Screen will appear.
III
Note: The server takes a few moments to load the RASExpress software and to
initialize the modems after it si turned on.Observe RAS software processing and
displaying .
B4. Turn on the terminal (or auxiliary PC) and press Enter.
B5. Select Quick Configuration of Server.
B6. Enable IP Remote Access.
Note: Error messages will appear and will indicate that the remote addresses of the
WAN ports are not on the same subnet. This is normal for the initial setup. Ignore
these messages.
B7. Type the IP Address for the MiniArray
III
RASExpress server.
B8. Type the IP Subnet Mask.
B9. Re-boot the MiniArray
III
.
B10. Using Telnet for access requires that a TCP/IP protocol stack be loaded on the client PC. Telnet
access is possible both by dialing in through the RASExpress server and, more commonly ,
through the LAN or Internet.
MA6
21
Page 22

Client PC
running Telnet session,
web, or Windows
MultiManager
MiniArray III
RASExpress Server
Figure 3-3. Setup for completing RASExpress configuration from client PC
At a client PC connected to the LAN in which the MiniArray
III
is the RAS server, start a Telnet
session using either dial-in access or TCP/IP access.
Using Dial-In Access
• Dial in to the RASExpress server using a terminal program. A login prompt appears.
• Enter a user name and password. A menu appears.
• Select Telnet Session from the menu.
• Enter the IP address of the RASExpress server.
• The RASExpress main menu appears.
Using TCP/IP Access
• Run your Telnet software and connect to the IP address of the RASExpress server.
• The RASExpress main menu appears.
B11. At the Telnet main menu, select Configuration of server.
B12. Set network parameters as described in items A9 through A17 as described in Method A Above.
22 MA6
Page 23

4 Hardware Removal and
Replacement
MA6
23
Page 24

Introduction
This chapter provides procedures for removing and replacing the key hardware components
of the MiniArray
III
. Before removing or replacing any component, be sure to perform the
procedures in Table 4.1 which describes the process for disconnecting cables from the back
of the MiniArray
III
, and removing the MiniArray
III
from the rack enclosure. Your MiniArray
has been designed to make this process as efficient as possible, but if you experience
problems, contact Multi-Tech Technical Support, refer to chapter 6 of this section.
Disconnecting Cables and Removal from Enclosure
The following table describes the procedures for removing the MiniArray
enclosure. These steps must be followed before any internal component can be removed or
replaced.
Warning
Anytime power has to be removed, turn off the Master Power
switch inside the front door.
Note
In order to make re-connection easier, be sure to note or label all cable connections
before disconnecting any cables from the MiniArray
Table 4.1 Cable Disconnection and Rack Enclosure Removal Procedure
III
from its rack
III
.
III
Step Procedure
1 Remove the power cord from the back of the MiniArray
III
.
2 If connected, disconnect the video, COM 2, and keyboard cables from the back of
the SBC.
Cover Mounting
Screws
Cover
120
Power Supply
ISI Boards
•
[( )]
SBC Board
NIC Board
COM 2
(DB15)
Printer Port
(DB25)
Fig.4-1. Back Panel Connectors
24 MA6
Page 25

3 If LAN is connected to the MiniArray
III
, disconnect the 10BaseT cable at the NIC.
4 Disconnect the telephone cords (RJ11) from the ISI board(s).
Note
You may have ISI boards located in the left and
right halves of the card cage
Table 4.1 Cable Disconnection and Rack Enclosure Removal Procedure (cont'd.)
Caution
It is recommended that two people remove the MiniArray
III
from its rack enclosure
5 Remove the four rack enclosure mounting screws from the front of MiniArray
remove the MiniArray
Enclosure
Mounting Holes
Handle
III
from the rack enclosure. See Figure 4-2.
Rack Enclosure
Mounting Screws
Single Processor
Data and Fax
Communications Server
Fan Intake Vents
Fig. 4-2. Rack Enclosure Mounting Screws
6 To re-attach cables and re-mount the MiniArray
III
, follow steps 1-5 in reverse.
III
and
Card Cage Removal/Replacement
The following table describes the process for removing the card cage. Note that card cage
removal is not always necessary to remove or replace some components. If change will
only be made to the SBC side of the card cage, the card cage does not need to be removed.
Table 4.2 Card Cage Removal Procedure
Step Procedure
1 Remove the MiniArray
2 Remove the top cover from the MiniArray
screws located in the back of the MiniArray
chassis.
III
from rack enclosure following the procedures in Table 4.1.
III
by removing the seven cover mounting
III
. The cover slides off the back of the
MA6
25
Page 26

Cover
Cover Mounting
Screws (7)
120
•
[( )]
Fig. 4-3. Cover Mounting Screws
Table 4.2 Card Cage Removal Procedure (cont'd.)
Step Procedure
3 Remove the chassis mounting screw from the card cage. See Figure 4-4.
Chasis Mounting Screw
7
SOCKET
K
LOC
M1
2
M
M3
4
M
BANK 1
BANK 1
Fig. 4-4. Chassis Mounting Screw
4 Finish pulling the card cage (including fan enclosure) straight up and out of the
chassis. See Figure 4-5. Set next to chassis.
Note
Before placing card cage back into chassis, verify that power connectors from the power
supply to backplane are fully attached
26 MA6
Page 27

Ethercard
SBC Board
T 7
KE
OC
S
1
M
M2
M3
BANK 1
4
M
BANK 1
Fan Enclosure
M1
2
M
3
M
M4
Fig. 4-5. Card Cage Removal
Board Removal/Replacement
Table 4.3 Board Removal/Replacement Procedure
Step Procedure
ISI (3)
LOCK
7
ET
K
OC
S
LOCK
K 1
BAN
BANK 1
Removing SBC Board
Memory
III
from rack enclosure following the procedures in Table 4.1.
III
by removing the seven cover mounting
III
. (See Figure 4-3.)
BANK 2
BANK 1
M4
M3
M2
M1
J2 133/166M Hz
LOCK
SOCKET 7
J20 Heatsink Fan
Power
J8 Speaker
Hard Drive
Connector
J19 HHD LED
COM 2
Connector
Printer Port
Connector
Floppy Drive
Connector
15-pin Video Connector
(to VGA Monitor)
DB9 Male Connector
(to COM1 Serial Port)
1 Remove the MiniArray
2 Remove the top cover from the MiniArray
screws located in the back of the MiniArray
3 Disconnect the four ribbon cables from the SBC. (See Figure 4-6.) Depending on
your configuration, you may not have all four ports in use.
External
Cache
Memory
Socket
J10 DCD
Reset
J21 Video
Enable
Hardware
Reset Switch
6-pin Circular
Jack (to Keyboard)
MA6
Fig. 4-6. SBC Board and Ribbon Cable Connectors
27
Page 28

4 Remove the screw that secures the SBC board to the chassis at the back of the
MiniArray
III
.
5 Remove the SBC board from the midplane.
6 To replace the SBC board, verify SBC board configuration; refer to the Hardware
Configuration and Installation instructions in the SBC manual.
7 Install the new SBC board by following steps 1-5 in reverse.
8 If other boards are being installed, perform those procedures below now, and then
remount the MiniArray
III
in the enclosure. See Step 6 of Table 4.1.
Table 4.3Board Removal/Replacement Procedure (cont'd.)
Step Procedure
Removing NIC Board
1 Remove the MiniArray
2 Remove the top cover from the MiniArray
screws located in the back of the MiniArray
3 Remove the screw that secures the NIC board to the chassis at the back of the
MiniArray
III
.
4 Remove the NIC board from the midplane.
5 To replace the NIC board, verify NIC configuration; refer to the Installation
Instructions in the appropriate NIC section of this manual.
6 Install the new NIC board by following steps 1-4 in reverse.
III
from rack enclosure following the procedures in Table 4.1.
III
by removing the seven cover mounting
III
. See figure 4-3.
7 If other cards are being installed, perform those procedures below now, and then
remount the MiniArray
Removing ISI Boards
left side (looking from the front) of the midplane, no card cage removal is
1 Remove the MiniArray
2 Remove the top cover from the MiniArray
screws located in the back of the MiniArray
3 Remove the chasis mounting screw from the card cage. See figure 4-4.
28 MA6
III
in the enclosure. See Step 6 of Table 4.1.
Note
If removing or replacing the single ISI board on the
necessary. Ignore steps 3 through 5.
III
from rack enclosure following the procedures in Table 4.1.
III
by removing the seven cover mounting
III
. See figure 4-3.
Page 29

4 Being careful to maintain slack in the power cables, lift the card cage up and over so
that it can rest along side the chassis.
5 Remove the screw(s) that secures the ISI board(s) to the chasis at the back of the
MiniArray
III
.
6 Remove the ISI board(s) from the midplane.
7 To replace the ISI board(s), verify ISI board configuration; refer to the Installation
Instructions in the ISI section of this manual.
8 Install the new ISI card(s) by following steps 1-6 in reverse.
Hard Disk Drive Removal/Replacement
Table 4.4 Hard Drive Removal/Replacement Procedure
Step Procedure
1 Remove the MiniArray
2 Remove the top cover from the MiniArray
screws located in the back of the MiniArray
If you are simply adding a hard drive and not replacing the
III
from rack enclosure following the procedures in Table 4.1.
III
by removing the seven cover mounting
III
. See figure 4-3.
Note
existing hard drive, proceed to step 6.
3 Disconnect the power and data cables from the back of the hard disk drive.
4 Remove the two screws securing the hard drive to the drive chassis.
5 Remove hard drive by sliding it off of the drive chassis, towards the back of the unit.
6 To install a new hard drive, follow steps 1-5 in reverse.
Floppy Disk Drive Removal/Replacement
Table 4.5 Floppy Drive Removal/Replacement Procedure
Step Procedure
1 Remove the MiniArray
2 Remove the top cover from the MiniArray
screws located in the back of the MiniArray
3 Remove the chassis mounting screw from the card cage. See figure 4-4.
III
from rack enclosure following the steps in Table 4.1.
III
by removing the seven cover mounting
III
. See figure 4-3.
4 Being careful to maintain slack in the power cables, lift the card cage, including fan
housing, up and over so that it can rest along side the chassis.
MA6
29
Page 30

5 Disconnect the power and data cables from the back of the floppy disk drive.
6 Remove the four screws securing the floppy drive to the drive chassis.
7 Open the front door, remove floppy drive by sliding it out the front of the drive
chassis.
8 To install a new floppy drive, follow steps 1-7 in reverse.
Before installing card cage, make sure power connectors from
power supply to midplane are fully connected.
CDROM Removal/Replacement
Table 4.6 CD ROM Removal/Replacement Procedure
Step Procedure
Note
1 Remove the MiniArray
2 Remove the top cover from the MiniArray
screws located in the back of the MiniArray
III
from rack enclosure following the steps in Table 4.1.
III
by removing the seven cover mounting
III
. See figure 4-3.
3 Remove the chassis mounting screw from the card cage. See figure 4-4.
4 Being careful to maintain slack in the power cables, lift the card cage, including fan
housing, up and over so that it can rest along side the chassis.
5 Disconnect the power and data cables from the back of the CDROM drive.
6 Remove the four screws securing the CDROM drive to the drive chassis.
7 Open the front door and remove CDROM drive by sliding it out the front of the drive
chassis.
8 To install a new CDROM drive, follow steps 1-7 in reverse.
Note
Before installing card cage, make sure power connectors
from power supply to midplane are fully connected.
Power Supply Removal/Replacement
The card cage has to be removed in order to disconnect the power wiring before the power
supply can be removed.
Table 4.7 Power Supply Removal/Replacement Procedure
Step Procedure
1 Remove the MiniArray
30 MA6
III
from rack enclosure following the steps in Table 4.1.
Page 31

2 Remove the top cover from the MiniArray
screws located in the back of the MiniArray
III
by removing the seven cover mounting
III
. See figure 4-3.
3 Remove the chassis mounting screw from the card cage. See figure 4-4.
4 Partially remove the card cage and remove power cabling at midplane.
5 Remove power cables from the back of hard drive, floppy drive, and CD ROM drive.
6 Remove the three power supply mounting screws from the back of the MiniArray
7 Remove the power supply from the chassis.
8 To install a new power supply, follow steps 1-7 in reverse.
III
.
MA6
31
Page 32

32 MA6
Page 33

5 Troubleshooting
MA6
33
Page 34

Introduction
This chapter provides steps for solving problems if the MiniArray
thoroughly tested at the factory before it was shipped. If you are unable to make a successful
connection, it is possible that the MiniArray
source of your problem lies elsewhere. As with any microcomputer product, start with simple
hardware and software problems, and then work toward more complex problems (i.e.,
operating system and/or applications).
Troubleshooting
The following troubleshooting process addresses some of the typical problems and with
some basic solutions. If a problem arises while you are in an application, refer to the
software documentation.
• No Video
• Verify that power is ON, and LED in power switch is lit.
• Verify that SBC and any other adapter boards are connected properly.
NOTE: Make sure to turn power OFF to reconnect boards.
• Verify that monitor is turned ON, and verify that power is connected to
monitor and video cable is connected to video connector on SBC.
III
fails. Your MiniArray
III
is defective. However, it is more likely that the
III
was
• Verify that two or four 72-pin, memory SIMMs are connected properly on the
SBC. The SIMMs they must be the same brand, size and speed.
• If some device other than a modem is connected to COM 1, verify that the
DCD jumper is not installed.
• Remove all connectors from the SBC and adapter boards, except the video
connector, and then power ON the MiniArray
III
. If MiniArray
then there is a problem with one of the cables or one of the peripherals. Try
each cable, one at a time, to isolate the bad cable or peripheral.
• Verify that fan in front of card cage is running. If power is on and fan is
stopped, check to be sure power connectors from power supply to midplane
are fully connected.
• If problem persists, contact MultiTech's Technical Support Department, refer
to Chapter 6 of this manual.
• SBC does not boot correctly or hangs after video appears
• Run BIOS Setup Utility to verify correct configuration for system and drives
(press <DEL> as system boots).
III
now has video,
• If boot PROM is used, verify that network and adapter card are configured
properly to see the network.
34 MA6
Page 35

• Verify that SBC and adapter boards are seated properly in ISA slot. NOTE:
Make sure to turn power off to reconnect boards.
• Hard drive or floppy drive cables are not connected properly or parameters
are not set properly in setup.
• Verify that enough memory is installed to load the intended applications.
• Verify that two or four 72-pin SIMMs are seated properly on the SBC. The
SIMMs must be the same brand, size and speed.
• If some device other than a modem is connected to COM1, verify that the
DCD jumper is not installed.
• Remove all adapter cards. If system boots there is a conflict with an adapter
card.
• If problem persists, contact MultiTech's Technical Support Department, refer
to Chapter 6 of this manual.
• COM1, COM2 or LPT1 port does not respond correctly
• If some device other than a modem is connected to COM1, verify that the
DCD jumper is not installed.
• Try COM2, if it also fails, check Setup configuration and verify that the ports
are enabled.
• Check if any adapter boards are conflicting with ports. If ports are used by
an expansion card, then on board ports must be turned off in Setup.
• Check that cables are connected properly and peripherals are powered ON
and configured properly.
• If problem persists, contact MultiTech's Technical Support Department, refer
to Chapter 6 of this manual.
• Keyboard does not respond to key strokes
• Connect keyboard cable to the left round connector on SBC.
• If cable converter is used to connect a large 5-pin DIN to a small 6-PIN PS/2
DIN, this converter could be bad or of the wrong type.
• Verify that the keyboard works on a different system.
• If problem persists, contact MultiTech's Technical Support Department, refer
to Chapter 6 of this manual.
• Invalid Time, Date or Setup
• Battery is failing.
• Last system boot was incomplete. Verify in Setup that configuration is
correct and reboot system.
• If problem persists, contact MultiTech's Technical Support Department, refer
to Chapter 6 of this manual.
MA6
35
Page 36

Diagnostic Tests
The MiniArray
diagnostic program. These programs are available at any software re-seller and can quickly
help isolate component failures.
III
operates like any stand-alone PC, and can run almost any off-the-shelf
Calling Technical Support
For immediate help in finding and fixing MiniArray
call Multi-Tech's Technical Support department at 1-800-972-2439.
III
problems, record the error condition and
36 MA6
Page 37

6 Service, Warranty, and
Technical Support
MA6
37
Page 38

Introduction
This chapter starts out with statements about your MiniArray
section, Tech Support, should be read carefully if you have questions or problems with your
MiniArray
MiniArray
require service.
III
. It includes the technical support telephone numbers, space for recording your
III
information, and an explanation of how to send in your MiniArray
Limited Warranty
Multi-Tech Systems, Inc. (“MTS”) warrants that its products will be free from defects in
material or workmanship for a period of two years from the date of purchase, or if proof of
purchase is not provided, two years from date of shipment. MTS MAKES NO OTHER
WARRANTY, EXPRESSED OR IMPLIED, AND ALL IMPLIED WARRANTIES OF
MERCHANTABILITY AND FITNESS FOR A PARTICULAR PURPOSE ARE HEREBY
DISCLAIMED. This warranty does not apply to any products which have been damaged by
lightning storms, water, or power surges or which have been neglected, altered, abused,
used for a purpose other than the one for which they were manufactured, repaired by the
customer or any party without MTS’s written authorization, or used in any manner
inconsistent with MTS’s instructions.
MTS’s entire obligation under this warranty shall be limited (at MTS’s option) to repair or
replacement of any products which prove to be defective within the warranty period, or, at
MTS’s option, issuance of a refund of the purchase price. Defective products must be
returned by Customer to MTS’s factory transportation prepaid.
III
's 2-year warranty. The next
III
should you
MTS WILL NOT BE LIABLE FOR CONSEQUENTIAL DAMAGES AND UNDER NO
CIRCUMSTANCES WILL ITS LIABILITY EXCEED THE PURCHASE PRICE FOR
DEFECTIVE PRODUCTS.
W arranty Addendum on Service for North American
Products
In the event that service is required, products may be shipped, freight prepaid, to our Mounds
View, Minnesota, factory (Multi-Tech Systems, Inc., 2205 Woodale Drive, Mounds View, MN
55112, Attn: Repairs, Serial #_____). A Returned Materials Authorization (RMA) is not
required. Return shipping charges (surface) will be paid by MTS. Please include, inside the
shipping box, a description of the problem, a return shipping address (must have street
address, not P.O. Box), a telephone number, and if the product is out of warranty, a check or
purchase order for repair charges.
Extended two-year overnight replacement agreements are available for selected products.
Please refer to our Overnight Replacement Agreement for details on rates and coverages.
Please direct your questions regarding technical matters, product configuration, verification
that the product is defective, etc., to our Technical Support department at 1-800-972-2439.
Please direct your questions regarding repair expediting, receiving, shipping, billing, etc., to
our Repair Accounting department at (800) 328-9717 or (763) 717-5631.
Repairs for damages caused by lightning storms, water, power surges, incorrect installation,
physical abuse, or user-caused damages are billed on a time-plus-materials basis.
38 MA6
Page 39

Warranty Addendum on Service for International
Products
Distributors should contact Amex, Inc., for information about the repairs for your Multi-Tech
product.
Amex, Inc.
2724 Summer Street NE
Minneapolis, MN 55413 U.S.A.
Tel: +(612) 331-3251
Fax: +(612) 331-3180
Please direct your questions regarding technical matters, product configuration, verification
that the product is defective, etc., to our Technical Support department nearest you. When
calling the U.S., please direct your questions regarding repair expediting, receiving, shipping,
billing, etc., to our Repair Accounting department at +(763) 717-5631 in the U.S.A., or a
nearby Multi-Tech office which is listed on the “Multi-Tech Corporate Offices” sheet in this
International Distributor Resource Kit.
Repairs for damages caused by lightning storms, water, power surges, incorrect installation,
physical abuse, or user-caused damages are billed on a time-plus-materials basis.
Out of W arranty Repair Costs
Current out-of-warranty repair costs are listed by category on the Multi-Tech web site
(www.multitech.com).
Tech Support
Multi-Tech has an excellent staff of technical support personnel available to help you get the
most out of your Multi-Tech product. If you have any questions about the operation of this
unit, call 1-800-972-2439. Please fill out the information (below), and have it available when
you call. If your MiniArray
to send in your MiniArray
Recording MiniArray
Please fill in the following information on your Multi-Tech MiniArray
support in answering your questions.
MiniArray
MiniArray
Application Software Type and Version (e.g., RASExpress, Radius Server):
Please note the status of your MiniArray
screen messages, diagnostic test results, problems with a specific application, etc.
III
Model No.:____________________
III
Serial No.: ____________________
III
requires service, the tech support specialist will guide you on how
III
.
III
Information
III
. This will help tech
III
before calling tech support. This status can include
MA6
39
Page 40

About the Internet
Multi-Tech is a commercial user on the Internet, and we retrieve e-mail messages from on a periodic
basis. If you prefer to receive e-mail technical support via the Internet, you can contact Tech Support
at the following address:
http://www.multitech.com/_forms/email_tech_support.htm
Multi-Tech's presence includes a Web site at:
http://www.multitech.com
and an ftp site at:
ftp://ftp.multitech.com
40 MA6
Page 41

Appendices
Appendix A: Back Panel Connector Pinouts
Appendix B: Regulatory Information
Appendix C: Workstation Redirectors --
MCSIWSN and MINMCSI
Appendix D: RADIUS Authentication &
User Profile Software
Appendix E: MultiManager Software
MA6
41
Page 42

Appendix A: Back Panel Connector Pinouts
Introduction
This appendix provides specifications for the various connectors on the back panel of the
MiniArray.
VGA 15-Pin Connector
This connector provides video analog data, and horizontal and vertical synchronization
signals for VGA monitors.
1
6
11
Figure A-1. 15-Pin VGA Connector
5
10
15
Pin Identification
Pin Description Pin Description
1 Analog Red 2 Analog Green
3 Analog Blue 4 VESA Monitor Status Bit 2
5 Digital Ground 6 Digital Ground
7 Digital Ground 8 Digital Ground
9 NC 10 Digital Ground
11 VESA Monitor 12 VESA Monitor
Status Bit 0 Status Bit 1
13 Horizontal Sync 14 Vertical Sync
15 NC
42 MA6
Page 43

9-Pin DB9 (COM 1) Connector
This connector attaches the SBC board to the COM 1 serial port.
Pin Identification
Pin Description Pin Description
1 DCD 2 RX Data
3 TX Data 4 DTR
5 Ground 6 DSR
7 RTS 8 CTS
9RI
6-Pin Circular Jack
1
6
Figure A-2. 9-Pin DB9 COM 1 Connector
5
9
This connector connects the keyboard to the SBC board.
6
4
2
Figure A-3. 6-Pin Mini-DIN Keyboard Connector
5
3
1
Pin Identification
Pin Description Pin Description
1 +Keyboard Data 2 NC
3 GND 4 +5V DC
5 +Keyboard Clock 6 NC
MA6
43
Page 44

Ethernet NIC Card Connector
RJ-45 Connector
This connector ties the EN-Series Ethernet board to a 10BASET network.
Pin Identification
Pin Description Pin Description
1 + Transmit Data 2 - Transmit Data
3 + Receive Data 4 No Connect
5 No Connect 6 -Receive Data
7 No Connect 8 No Connect
ISI Board Connector
DB78S Connector
This connector provides the serial, control and handshaking signals for all modems
connected to the MiniArray.
2
1
Figure A-5. RJ-45 Connector (viewed from connector side)
10
9
2
Figure A-6. DB78S Connector (female)
40
Pin Identification
Pin Description Pin Description Pin Description Pin Description
1 DTR8 2 -SOUT6 3 DTR6 4 CTS6
5 DSR5 6 DCB8 7 RI8 8 -SIN6
9 CTS7 10 -SOUT4 11 -SOUT3 12 RTS3
13 DTR3 14 RTS4 15 RI2 16 CTS1
17 -SIN2 1 8 DCD4 19 RI4 20 RI3
21 RTS5 22 DTR5 23 DCD6 24 RI6
25 CTS5 26 DSR8 27 -SIN8 28 -SIN5
29 DSR7 30 -SOUT1 31 RTS2 32 DTR2
33 DCD2 34 DSR6 35 DCD1 36 RI1
37 -SIN3 3 8 DSR4 39 DCD3 40 -SOUT5
44 MA6
Page 45

41 RTS6 42 DSR6 43 DCD5 44 RI5
45 CTS6 46 -SIN7 47 RI7 48 DCD7
49 DTR1 50 -SOUT2 51 RTS1 5 2 DTR4
53 CTS2 54 DSR1 55 -SIN1 56 -SIN4
57 CTS4 58 DSR3 59 CTS3 60 RTS8
61 DTR7 62 RTS7 63 -SOUT7 64 -SOUT8
65 +12v 66 +12v 67 +12v 68 GND1
69 GND2 70 GND3 71 GND4 72 GND5
73 GND6 74 GND7 75 GND8 76 -12v
77 -12v 78 -12v
Pin-out assignments for the 10Base-T connector are as follows:
10-pin Signal 8-pin
1 NC NA
2 Tx+ 1
3 Tx- 2
4 Rx+ 3
5 NC 4
6 NC 5
7 Rx- 6
8 NC 7
9 NC 8
10 NC NA
Multi-Tech's products use a 10-pin 10Base-T connector. Some manufacturers use an 8-pin
format. This format is compatible with the EN301CT16d, and will plug in and work without
modification. If an 8-pin RJ-45 is used with the EN301CT16c, use the pin assignments
shown in the 8-pin column.
34-Pin Floppy Disk Drive Connector
This connector provides signal and data connection between the floppy drive and the SBC board.
2
1
Figure A-4. Floppy Disk Connector
Pin Description Pin Description
1 Ground 18 Direction (Stepper Motor)
2 RPM/RWC 19 Ground
3 Ground 20 Step Pulse
4 Not Used 21 Ground
5 Ground 22 Write Data
6 Not Used 23 Ground
7 Ground 24 Write Enable
8 Index 25 Ground
9 Ground 26 Track 0
10 Motor Enable 1 27 Ground
11 Ground 28 Write Protect
12 Drive Select 2 2 9 Ground
13 Ground 30 Read Data
14 Drive Select 1 3 1 Ground
34
33
MA6
45
Page 46

15 Ground 32 Select Head
16 Motor Enable 2 33 Ground
17 Ground 34 /DCHNG
Printer Port Connector
This 25-pin connector provides parallel printer data and control signals to and from the SBC board.
2
1
Figure A-5. Printer Port Connector
Pin Description Pin Description
1 -Strobe 10 -Acknowledge
2 +Data Bit 0 11 +Busy
3 +Data Bit 1 12 +Paper End
4 +Data Bit 2 13 +Select
5 +Data Bit 3 14 -Auto Feed
6 +Data Bit 4 15 -Error
7 +Data Bit 5 16 -Initialize Printer
8 +Data Bit 6 17 -Select Input
9 +Data Bit 7 18-25 Ground
COM 2 Port Connector
This 10-pin connector transfers serial data to and from the COM 2 port.
2
1
26
25
10
9
Figure A-6. COM 2 Port Connector
PinSignal Name (Direction)
1 Carrier Detect (Input)
2 Data Set Ready (Input)
3 Receive Data (Input)
4 Request To Send (Output)
5 Transmit Data (Output)
6 Clear To Send (Input)
7 Data Terminal Ready (Output)
8 Ring Indicator
9 Signal Ground
10 Unused
Hard Disk Connector
This connector supplies hard disk drive signals which interface with the software I/O drivers to provide the read/write
functions.
46 MA6
Page 47

2
1
40
39
Figure A-7. Hard Disk Connector
Pin Description Pin Description
1 /Reset 21 NC
2 Ground (GND) 22 Ground (GND)
3 Data Bit 7 (SD7) 23 -I/O Write (-IOW)
4 Data Bit 8 (SD8) 24 Ground (GND)
5 Data Bit 6 (SD6) 25 -I/O Read (-IOR)
6 Data Bit 9 (SD9) 26 Ground (GND)
7 Data Bit 5 (SD5) 27 IOCHRDY
8 Data Bit 10 (SD10) 28 ALE\
9 Data Bit 4 (SD4) 29 NC
10 Data Bit 11 (SD11) 30 Ground (GND)
11 Data Bit 3 (SD3) 31 IRQ14
12 Data Bit 12 (SD12) 32 /IOCS16
13 Data Bit 2 (SD2) 33 Address Bit 1 (SA1)
14 Data Bit 13 (SD13) 34 NC
15 Data Bit 1 (SD1) 35 Address Bit 0 (SA0)
16 Data Bit 14 (SD14) 36 Address Bit 2 (SA2)
17 Data Bit 0 (SD0) 37 Chip Select 0 (-CS0)
18 Data Bit 15 (SD15) 38 Chip Select 1 (-CS1)
19 Ground (GND) 3 9 /HDLED
20 NC 40 Ground (GND)
MA6
47
Page 48

Appendix B
Regulatory Information
FCC Regulations for Telephone Line Interconnection
1.This equipment complies with Part 68 of the Federal Communications Commission (FCC)
rules. On the outside surface of this equipment is a label that contains, among other
information, the FCC registration number and ringer equivalence number (REN). If
requested, this information must be provided to the telephone company.
2.As indicated below, the suitable jack (Universal Service Order Code connecting
arrangement) for this equipment is shown. If applicable, the facility interface codes (FIC)
and service order codes (SOC) are shown.
An FCC-compliant telephone cord and modular plug is provided with this equipment. This
equipment is designed to be connected to the telephone network or premises wiring using
a compatible modular jack which is Part 68 compliant. See installation instructions for
details.
3.The ringer equivalence number (REN) is used to determine the quantity of devices which
may be connected to the telephone line. Excessive REN’s on the telephone line may result
in the devices not ringing in response to an incoming call. In most, but not all areas, the
sum of the REN’s should not exceed five (5.0). To be certain of the number of devices that
may be connected to the line, as determined by the total REN’s, contact the telephone
company to determine the maximum REN for the calling area.
4.If this equipment causes harm to the telephone network, the telephone company will notify
you in advance that temporary discontinuance of service may be required. But if advance
notice isn’t practical, the telephone company will notify the customer as soon as possible.
Also, you will be advised of your right to file a complaint with the FCC if you believe it is
necessary.
5.The telephone company may make changes in its facilities, equipment, operations, or
procedures that could affect the operation of the equipment. If this happens, the telephone
company will provide advance notice in order for you to make necessary modifications in
order to maintain uninterrupted service.
6.If trouble is experienced with this equipment (the model of which is indicated below) please
contact Multi-Tech Systems, Inc. at the address shown below for details of how to have
repairs made. If the equipment is causing harm to the telephone network, the telephone
company may request you remove the equipment from the network until the problem is
resolved.
7.No repairs are to be made by you. Repairs are to be made only by Multi-Tech Systems or
its licensees. Unauthorized repairs void registration and warranty.
8.This equipment cannot be used on public coin service provided by the telephone company.
Connection to Party Line Service is subject to state tariffs. (Contact the state public utility
commission, public service commission or corporation commission for information.)
9. If do required, this equipment is hearing-aid compatable.
48 MA6
Page 49

Manufacturer: Multi-Tech Systems, Inc.
Model Number: ISI3334/4, ISI3334/EC and ISI3334/8
FCC registration number: AU7USA-23834-MM-E
Ringer Equivalence No: 0.3B
Service Center in USA: Multi-Tech Systems Inc.
Canadian Limitations Notice
Notice: The ringer equivalence number (REN) assigned to each terminal device provides an
indication of the maximum number of terminals allowed to be connected to a telephone
interface. The termination of a interface may consist of any combination of devices subject
only to the requirement that the sum of the ringer equivalence numbers of all the devices
does not exceed 5.
Notice: The Industry Canada label identifies certificated equipment. This certification means
that the equipment meets certain telecommunications network protective, operational and
safety requirements. The Industry Canada does not guarantee the equipment will operate to
the user’s satisfaction.
Modular Jack (USOC)
RJ11C or RJ11W (single line)
2205 Woodale Drive
Mounds View, MN 55112
Voice (763) 785-3500/
FAX (763) 785-9874
Before installing this equipment, users should ensure that it is permissible to be connected to
the facilities of the local telecommunications company. The equipment must also be installed
using an acceptable method of connection. The customer should be aware that compliance
with the above conditions may not prevent degradation of service in some situations.
Repairs to certified equipment should be made by an authorized Canadian maintenance
facility designated by the supplier. Any repairs or alterations made by the user to this
equipment, or equipment malfunctions, may give the telecommunications company cause to
request the user to disconnect the equipment.
Users should ensure for their own protection that the electrical ground connections of the
power utility, telephone lines and internal metallic water pipe system, if present, are
connected together. This precaution may be particularly important in rural areas.
Caution: Users should not attempt to make such connections themselves, but should
contact the appropriate electric inspection authority, or electrician, as appropriate.
Compliance with BABT Requirements
Approved for connection to telecommunications system specified in the instructions for use subject to
the conditions set out in them.
Warning: Interconnection directly, or by way of other apparatus, of ports marked "SAFETY
WARNING see instructions for use" with ports marked or not so marked may produce hazardous
conditions on the network. Advice should be obtained from a competent engineer before such a
connection is made.
MA6
49
Page 50

It is a condition of approval that the power required by the host and the total of all adapter cards
installed within the host environment, together with any auxiliary apparatus, does not exceed the
power specification as stated in the Technical Reference Material of the host apparatus.
The power requirements for the MULTIMODEMISI are:
Modem operating voltages: +12V D.C., -12V D. C., +5V D.C.
Modem Power Consumption: 8 Watts
In order to maintain the independent approval of this card, it is essential that when other option cards
are introduced which use or generate a hazardous voltage, the minimum creepages and clearances
specified in the following table are maintained. A hazardous voltage is one which exceeds 42.4V
peak a.c or 50V d.c. If you have any doubt, seek advice from a competent engineer before installing
other adapters into the host equipment.
The equipment must be installed such that with the exception of connection to the host, clearance
and creepage distances shown in the following table are maintained between the card and any other
assemblies which use or generate a voltage shown in that table. The larger the distance shown in
brackets applies where the local environment within the host is subject to conductive pollution or dry
nonconductive pollution which could become conductive due to condensation. Failure to maintain
these minimum distances would invalidate approval.
Clearance (mm)
2.0
2.6
4.0
4.0
Communication Module
Power Supply Unit
or other source of
excessive voltage
Creepage (mm)
2.4 (3.8)
3.0 (4.8)
5.0 (8.0)
6.4 (10.0) Up to 300 Vms or Vdc
X
Y
Example Diagram Showing Creepage
Voltage used or
Generated by Host or
other Cards
Up to 50 Vms or Vdc
Up to 125 Vms or Vdc
Up to 250 Vms or Vdc
Carrier Card
Expansion Card
X
Y
Fig. B-1. Example Diagram Showing Creepage and Clearance Distances
Except at the edge connector which plugs into the host's expansion slot, clearance distance (Xmm)
and creepage distance (Ymm) as given in the table above, must be maintained between the
communication card and any assemblies which use or generate hazardous voltage.
This apparatus has been approved for the use of the following facilities:
• Auto-calling
• Loop disconnect and MF dialing
• Phone number storage and retrieval by a predetermined code
50 MA6
Page 51

• Operation in the absence of proceed indication
• Automatic storage of last number dialed
• Tone detection-busy
• Auto clear from the originating end
• DTR dialing
• Modem
• PBX timed break register recall
European Low Voltage Directive
When correctly installed and maintained, the modem will present no hazard to the user. When
correctly installed the modem will be connected to the PSTN or a PW and to a Data Terminal
Equipment (DTE), whose modem connections comply with CCITT recommendation V28. The DTE
connections are therefore taken to be safe voltages (less than ± 30 volts).
Ports which are capable of connecting to other apparatus are defined as SELV. To ensure conformity
with EN41003, ensure that these ports are only connected to ports of the same type on other
apparatus.
Compliance with BS6305 Clause 6.2, BS6320 Clause 7.2, and BABT/
SITS/82/005S/D
a. The modem is suitable for connection to the Public Switched Telephone Network
(PSTN) provided by British Telecommunications plc or Kingston Communications
(Hull) plc. Circuit supply by British Communications, Mercury Communication, or Hull
City Council. Only direct exchange lines may be used, not shared service.
b. The modem is suitable for household, office, and similar general indoor use. It is not
suitable for use as an extension to a payphone.
c. BT lines supplied must support either loop disconnect or multifrequency tone
signalling.
d. REN (Ringer Equivalence Number).
The REN value of a unit is calculated from 3/n where n is the total number of units which
can be connected in parallel which will still cause the standard bell (as defined in BS6305
Appendix D) to ring.
REN values of less than 0.3 cannot be assigned.
REN = 1
If a telephone or other device is connected in parallel with the modem, the combined REN
must not exceed 4. A BT supplied telephone may be assumed to have REN of 1.0 unless
otherwise noted.
The approval of this modem for connection to the British Telecom public switched telephone
network is INVALIDATED if the apparatus is subject to any modification in any material way
not authorized by BABT or if it is used with or connected to:
i. internal software that has not been formally accepted BABT.
MA6
51
Page 52

ii. external control software or external control apparatus which cause the operation of
the modem associated call set-up equipment to contravene the requirements of the
standard set out in BABT/SITS/82/005S/D.
All other apparatus connected to this modem and thereby connected directly or indirectly to
the British Telecom public switched telephone network must be approved apparatus as
defined in Section 22 of the British Telecommunications Act 1984.
Compliance with BS6789: Section 3.1 and Part 2
a. The modem is not capable of allowing Auto Call using '999' or other PABX
emergency numbers.
b. Modes other than modes 1, 2, or 3 should not be used on the BT PSTN. This modem
is a mode 1 device.
c. Users are advised to check the numbers entered during the Auto Call set up phase
prior to dialing.
d. The user should not issue any sequence of commands to the modem which would
cause the modem to exceed the maximum allowable pause of 8 seconds from the
time the modem goes off hook until dialing begins.
e. For correct operation of the call progress monitor, the power has to be properly
connected and switched on.
Compliance with BS6328 Part 1
a. The modem is not suitable for use on circuits with British Telecommunications
signaling at a normal frequency of 2280 Hz.
b. The modem does not require signaling or otherwise employ the frequency range dc
to 200 Hz.
c. The modem does not require dc from the Private Circuit for correct operation. The
modem may be damaged if connected, in a private circuit mode, to a circuit
supplying dc current (the maximum permissible direct current is zero amps).
52 MA6
Page 53

Modem CE Mark, EMC, and Safety Compliance
The CE mark is affixed to the enclosed Multi-Tech product to confirm compliance with the
following European Community Directives:
Council Directive 89/336/EEC of 3 May 1989 on the approximation of laws of Member States
relating to electromagnetic compatibility;
and
Council Directive 73/23/EEC of 19 February 1973 on the harmonization of the laws of
Member States relating to electrical equipment designed for use within certain voltage limits;
both amended by
Council Directive 93/68/EEC of 22 July 1993 on the harmonization of CE marking
requirements.
MA6
53
Page 54

Appendix C: Workstation Redirectors --
MCSIWSN and WINMCSI
Introduction
Note: This material is for IP or IPX network users only.
This section describes how a client PC can use MCSI (pronounced miksee) software redirectors to
access theRASExpress servers modems when using standard communications software.
MCSIWSN.EXE is a DOS application for use with IPX networks only. WINMCSI.EXE is a Windows
application for use with either IPX or IP networks. COMMAP.EXE can be used with either IPX or IP
networks.
To install MCSIWSN for DOS, see Installing MCSIWSN for DOS below. To install WINMCSI for
Windows, see Installing and Configuring the WINMCSI Redirector below.
Installing MCSIWSN for DOS
This procedure allows you to establish a connection between a client PC and the RASExpress server,
after which you can run any communications software that has a MCSI/NASI/NCSI compatible
interface.
1. Turn on your client PC and log in to your LAN.
2. Insert the workstation diskette into your floppy disk drive. Change to your floppy disk drive, e.g.,
A:\, and type install.
3. The Installation Options menu appears.
Make sure only Software Redirector for DOS (MCSI) is checked, then press ESC to continue.
4. The Enter Pathname for MCSI files window appears. Press ENTER to accept the default
(C:\MCSI), or type a different path and press ENTER.
5. MCSI is installed in the designated directory. When the installation is complete, the message
AsyncGateway MCSI Installation Complete appears. Press any key to continue. The message:
Installation of client is completed appears. Press any key to return to the DOS prompt.
Using the MCSIWSN Redirector
6. Change to the subdirectory containing the MCSIWSN files, e.g., C:\MCSI.
7. Type mcsiwsn (the program name for the redirector software) and press ENTER.
Note: Use the -P parameter (e.g., mcsiwsn -p) to display the Inbound /Outbound Modem
Type window. For more information on MCSIWSNs command line parameter options, see
MCSIWSN Command Line Operation above.
The redirector software loads, and the following message appears:
Initializing, please wait...
8. Type logon and press ENTER. The following message appears:
54 MA6
MCSI Program is resident
Enter your user name:
Page 55

You can use a preferred communications server name if more than one communications server is
on the network, e.g., logon server_1/user1.
9. Type user1 (or your RASExpress user name) and press E
the user name, the following message appears. (If a password was not assigned, then the message
in step 5 appears.)
10. Type user1 (or your RASExpress password) and press E
sensitive. The following message appears:
11. You are now connected to the RASExpress server, and can run any MCSI-compatible
communications software to use one of the servers modems.
To unload MCSIWSN from memory, change to the directory where MCSIWSN is located, type
mcsiwsn -u, and press ENTER. MCSIWSN will unload from memory, provided that other memory-
resident programs have not been loaded after MCSIWSN was loaded. If other memory-resident
programs were loaded after MCSIWSN, then you must unload them in reverse order before you can
unload MCSIWSN.
MCSIWSN Command Line Operation
MCSIWSN command line parameters allow you to operate MCSIWSN as an INT14 software
redirector, make MCSIWSN Novell NASI-compatible, turn on the popup Inbound Outbound menu,
select Inbound as default connection type, unload MCSIWSN from memory, and enable the
command interpreter option for applications that make use of this option.
NTER. If a password has been assigned to
Enter your password:
NTER. Note that the password is case-
Login Completed.
12. Log into your network. This automatically establishes a communications link between your client
PC and the RASExpress server.
13. Change to the subdirectory containing the MCSIWSN files.
14. Type mcsiwsn ? at the DOS prompt and press ENTER. The following help screen appears:
Usage is:
-U For uninstalling this program.
-F If you want to search for active modem servers.
-C Turns on Command Interpreter option.
-I Connection Manager will connect as inbound.
-P Display Connection Manager popup.
-N<1 to 9> Number of multiple connections operational
-A Load TSR as an INT14.
-X Novell NASI compatible.
-C<1 to 9> Number of Servers to wait when it is inbound.
You can type MCSIWSN parameters in any order, but there must be a space before each one
(e.g., MCSIWSN -I -P -N5).
-U Unloads MCSIWSN.
-F Searches for active modem servers.
MA6
55
Page 56

-C Enables the command interpreter. An additional 5 KB of memory is used by
MCSIWSN when the command interpreter is enabled. It allows applications
programs that provide a command interpreter interface to issue the following
commands:
CONNECT, DISCONNECT, HELP, LIST, RESUME, SET, SHOW, SWITCH
-I Connection Manager connects as inbound. When setting up for inbound-only
connections, adding this parameter string to the command removes the need
for operator intervention to select INBOUND on the Connection Manager
screen.
-P Adding this parameter to the command line turns on the Connection Manager
OUTBOUND/INBOUND screen.
-Nx This option sets the maximum number of connections that can be operational at one
time. X represents a number from 1 through 9 (default = 1). Increasing the number
of multiple connections expands the MCSIWSN memory requirement by up to 10
KB.
-A This parameter enables MCSIWSN to become an INT14-compatible
interface when the COMS14.EXE program is run. See “Using MCSIWSN as
an INT14 Redirector” in the RASExpress User Guide.
-X This parameter makes MCSIWSN compatible with Novell NASI-based
software
-M This parameter allows you to wait on a specific line when it is in inbound
mode
-Sx This option allows a user to wait on multiple servers on the same network
when it is in inbound mode. X is the number of servers available, in the
range 1–9 (default = 1).
15. Select the command line options needed for the client PC on which MCSIWSN will be run. Then
type mcsiwsn followed by the selected parameter string.
16. When the MCSI is Resident message appears, type logon and press E
message appears:
17. Type user1 or another valid user name and press ENTER. If a password is assigned to the user
name, the following message appears. (If a password is not assigned, go to step 8.)
18. Type user1 or the valid password for the user name you entered, and press ENTER. Note that the
password is case-sensitive. The following message appears:
19. You are now connected to the RASExpress server, and can use the RASExpress servers modems
by running any MCSI-compatible software.
Using MCSIWSN as an INT14 Redirector
NTER. The following
Enter your user name:
Enter your password:
Login Completed.
Running MCSIWSN on a workstation as an INT14 redirector enables the workstation to use
communications software that provides a network INT14 interface.
This section is for users whose LAN PCs will be running a LAN network version of INT14compatible communications software. Before you can begin:
56 MA6
Page 57

· You must have your RASExpress user name and password, which was assigned by the
LAN system administrator when the RASExpress server was installed.
· The RASExpress server and the client PC must be properly connected to a LAN with IPX
capability, and you must have access to a network version copy of a dial-in or dial-out
communications program with a MCSI-compatible interface.
Note: The INT14 that is used in Windows is not the same as a network INT14, and does not
connect to the gateway.
20. Turn on your client PC and log into your LAN.
21. Change to the subdirectory containing the MCSIWSN files, i.e., C:\MCSI.
22. Type mcsiwsn -a and press ENTER. This loads MCSIWSN and allows it to operate as an INT14
redirector. A message similar to the following appears:
Initializing, please wait...
INT14 Program is Resident.
23. Type logon and press ENTER. The following message appears:
Enter your user name.
Note: If you have more than one RASExpress server on your network and you are not listed
as a user on every RASExpress server, then you must type the following command: logon
ServerName\UserName.. E.g., logon server_1\user1.
24. Type user1 (or your valid RASExpress user name) and press ENTER. If a password has been
assigned, the following message appears. (If a password was not assigned, go to step 7.)
25. Type user1 (or your valid RASExpress password) and press ENTER. Note that the password is
case-sensitive. The following message appears:
26. If the RASExpress server is the only remote access server on your LAN, then type coms14 -c
comn Inbound * * * (n is replaced by the number 1, 2, 3, or 4, which selects one of the COMS14
COM ports) or coms14 -c comn Outbound * * * and press ENTER (Inbound or Outbound must
be specified). This connects you to a line on the RASExpress server.
Note: If you have more than one remote access server on your network, see COMS14
Command Line Parameters on this page.
27. You are now connected to the RASExpress server and can run any INT14-compatible software.
Follow the softwares instructions to establish the softwares INT14 connection to the
RASExpress servers modem.
COMS14 Command Line Parameters
To list the COMS14 command line parameters, type coms14 ?. The following information appears.
Usage : coms14 -l [Server Name]
(for listing services)
Enter your password.
Login Completed.
<GeneralName> <ServerName>
(for establishing a connection)
(to disconnect)
MA6
: coms14 -c COM<n> <LineType> <SpecificName>
: coms14 -d COM<n>
57
Page 58

: coms14 -m
ports)
(to list mapping of local COM ports to Network
COMS14 -L [ServerName]
Type coms14 -L for a list of available communications servers.
Type coms14 -L [ServerName], e.g., coms14 -L server_1, for a list of services at an
individual server similar to that shown below:
List of services at the server SERVER_1
GENERAL NAME SPECIFICNAME STATUS
MODEM LINE1 FREE
COMS14 -C COMn LineType SpecificName GeneralName ServerName
Type coms14 -c comn (n = 1, 2, 3, or 4), followed by its argument string, to connect to one of the four
COM ports (COM1, COM2, COM3, COM4) allowed by INT14 software.
LineType Identifies whether the session will be inbound or outbound. The
LineType position must be filled by inbound, outbound, or an asterisk.
The latter indicates that the line type last selected by the user is to be
used.
SpecificName Identifies the specific name assigned to the port on the RASExpress
server. This position must contain either the specific name assigned to
the RASExpress port (the default specific name for port one is
B1_LINE1) or it must contain an asterisk, which indicates that the first
available specific name is to be used. The specific name is used when
a specific modem is to be used on a communications server.
GeneralName Identifies the general name assigned to the port on the RASExpress
server. This position must contain either the general name assigned to
the RASExpress port (e.g., MODEM) or it must contain an asterisk. The
latter indicates that the first available specific name is to be used. The
general name is used when more than one style of modem is used on a
communications server, e.g., an MT2834BA and an MT2834ZDX.
ServerName Identifies the server name assigned to the RASExpress server. This
position must contain either the server name (e.g., SERVER_1), or it
must contain an asterisk. The latter indicates that the first available
server is to be used. The server name is used when more than one
RASExpress server is on a network.
COMS14 -D COMn
Type coms14 -d comn (n = 1, 2, 3, or 4) to disconnect from the COM port to which you were
connected, i.e., COM1, COM2, COM3, or COM4. The following message appears.
Port is disconnected.
58 MA6
Page 59

COMS14 -M
Type coms14 -m to see which of the four COM ports are mapped to network ports by INT14
software. A message similar to the following appears.
Mapping of logical COM ports to network ports
LOCAL PORT STATUS GEN’L NAME SPECIFIC NAME SERVER NAME
COM1 BUSY MODEM LINE1 SERVER_1
COM2 FREE
COM3 FREE
COM4 FREE
Installing and Configuring the WINMCSI Redirector
The WINMCSI modem-sharing program manages access to a modem for inbound and outbound calls.
It allows Windows communications software packages that do not support INT6B or INT14 to
connect to Multi-Tech gateways such as RASExpress. It also detects other compatible
communications servers on your network and displays the resources they provide to eligible LAN
users.
WINMCSI Installation
Windows 3.1, Windows for Workgroups 3.11, Windows95/98, or Windows NT:
1. Turn on your client PC and log in to your LAN.
2. Start Windows.
3. Insert the Workstation Redirectors diskette into your floppy disk drive.
Windows 3.1 or Windows for Workgroups 3.11:
4a. In Program Manager, click File, Run.
4b. In the Command Line box, type a:\install. Click OK.
4c. Go to step 5.
Windows95/98/NT:
4a. Click Start.
4b. Point to Settings.
4c. Click the Control Panel icon.
4d. Double-click the Add/Remove Programs icon.
4e. The Install/Uninstall Program menu appears. Click Install.
4f. Click Next. If you want to install WINMCSI as a 32-bit program, let Windows locate
the proper Install.exe file on the client disk in your floppy drive. If you want to install
WINMCSI as a 16-bit program, type a:\winmcsi\install.exe.
4g. Click Finish.
5. The WINMCSI Installation Program window appears.
MA6
59
Page 60

WinMCSI Installation Program
WinMCSI COM Port Redirector
Welcome to WinMCSI. This Program allows
Windows Communications applications that
talk only to the local COM ports to access the
ports of a MultiTech Asynchronous
Communications Server which may be running
anywhere on the LAN.
This install program will install WinMCSI
for Windows.
Continue
Abort
6. To continue with the WINMCSI installation, click Continue and go to step 7.
If you do not want to install WINMCSI, click the Abort button .
7. The WINMCSI Install Configuration window appears.
In the Destination Directory box, type the name of the directory where you want to install
WINMCSI, if you do not want to accept the default, C:\COMMCSI. Under Network Type, select
the appropriate network type (IPX, NetBIOS, or IP).
Note: If you choose IP in the Network Type box, you must have a TCP/IP protocol active
with the default IP router matched with the local IP address of the RASExpress server.
8. Click Continue.
9. When the Installing Multi-Tech WINMCSI dialog box appears, click Install.
10. When installation is complete, the WINMCSI Installation dialog box appears.
WinMCSI Installation
60 MA6
Your SYSTEM.INI and WIN.INI files need to be modified.
You can let Install make the changes now or save the
changes to a file.
The following changes are to be made to the
SYSTEM.INI [Boot]
Current: COMM= C:\COMMCSI\commsci.drv
New: COMM= COMMSCI.DRV
The following change is to be made to the WIN.INI
[Windows]
Current: Load= nwpopup.exe netdex.exe
New: Load=
Save changes to file
xe netddex.exe c:\commcsi\commap.exe
AbortModify INI files now
Page 61

11. Click Modify INI Files Now to have WINMCSI make changes to your SYSTEM.INI and
WIN.INI files.
Click Save Changes to File to have WINMCSI make a copy of the changes to be made and store
them in a file. You must make the changes yourself before you can run WINMCSI.
A screen appears later that tells you your installation is complete, and where your WIN.INI and
SYSTEM.INI files are backed up. If IP was selected in the WINMCSI Install Configuration
dialog box, the screen also asks if you want to set up the IP server list. Answer appropriately.
12. The following message appears:
Do you want to login to Multi-Tech Asynchronous Communication
server when WINDOWS comes up?
Answer appropriately.
13. The following message appears:
Do you want to Map now?
Click Yes if you want to map your COM Ports now, and go to step 14.
Click No if you want to map your COM Ports when you start WINMCSI, then go to step 15.
14.The COM Port to MCSI Mapping window appears.
· If you want the first available line, click Map, then click Close, and go to
the next section.
· If you want a specific line, select a COM port in the Local Port list, then
select the line to which you want to map the COM port. The status
message Mapped to MCSI should appear above the Local Port list.
Note: If a serial mouse is connected to COM1, you must select a different local port.
· Click Unmap if you want to unmap a line.
· Click Search to search for lines on a server.
· Click Close when finished.
15. The following message appears:
WINMCSI Successfully installed. Click OK.
16. A message appears that tells you where your old SYSTEM.INI and WIN.INI files have been
backed up. It also tells you to restart Windows. Click Restart Windows.
Running the WINMCSI Workstation Software
Before running data communications software, LAN users should use WINMCSI to log on to the
communications server.
To log on to the communications server from a workstation
17. ComMap should start automatically if the WIN.INI file was modified during installation. To start
ComMap manually, double-click the ComMap icon in the MultiTech MCSI program group
(Windows 3.1x) or Start menu (Windows 95/98/NT).
18. If you have not previously done so, select the Setup menu to configure ComMap.
Network Type. The Network Type dialog box shows your current network type (IP, IPX, or
NetBIOS). To change the network type, click the appropriate type for your network. Click OK
when finished. You must restart Windows if you change this setting.
Note: Do not change the network type unless the network has changed. Also,
make sure that your SYSTEM.INI file contains device drivers specific to the
MA6
61
Page 62

selected network type.
Connect Timer. The MCSI Connect Timer dialog box shows the default value of the connect
timer in the Enter Connect Timer Value box. This value sets the time in seconds, in the range 0
through 60, that the MCSI emulator waits for a MCSI device to become available. To change the
value of the connect timer, type a different value in the box. Click OK when finished.
Baud Change. A check mark appears next to the Baud Change command to indicate that an
application can change the baud rate or other port parameters. If Baud Change is unchecked,
then an application cannot change the baud rate or other port parameters. To change this setting,
click Baud Change.
Default Login. Use the Default Login Parameters dialog box to automatically log into a
specific server whenever Windows runs. Select a server from the Available Servers box, then
type a user name and optional password. Click OK when finished. ComMap saves these login
parameters in your COMMCSI.INI file.
Note: You can use a text editor to edit the COMMMCSI.INI file, however you cannot change
the password because the password field is encrypted. Editing the password will corrupt the
file.
If there are no servers listed in the Available Servers box, type a server name in the Server
Name box, then click the Search button to search for a match. You can use * and ? as wild card
characters.
Port Type. Use this command to designate your mapped ports as outbound (available only for
calling out) or inbound (available only for calling in A port cannot be both outbound and
inbound. In Windows 3.1x, all mapped ports have the same port type. In Windows 95/98/NT,
however, you can designate one port as outbound and another as inbound.
62 MA6
Page 63

Appendix D: RADIUS Authentication &
User Profile Software
Requirements
Radius Server requires a 486-66 MHz or faster computer, preferably running Microsoft Windows NT
Server. Although Radius Server can also run on Windows 95, Windows 98, and Windows NT 4.0
Client, on those operating systems it is not possible to use the NT Server user database. The computer
should have a hard disk, a CD-ROM drive, and LAN or WAN access.
Radius Server requires approximately 420 kB on the hard disk and space for the user database.
Installing Radius Login Authentication Software
MultiTechs Radius software allows the MiniArray
general LAN server using Windows 95, 98, or NT4.
1. On the Radius Server computer, exit all Windows programs except Windows Explorer.
2. Insert the compact disc supplied with your Multi-Tech Systems communications server into the
computer's CD-ROM drive.
3. If Autorun does not display the installation menu, find Autorun.exe in the root folder of the
compact disc, and double-click it. The installation menu appears.
4. In the Install Software option, select Radius Server. The Multi-Tech Radius Server Setup wizard
appears.
5. Follow the instructions in the Setup wizard to install Radius Server.
6. When the Settings dialog box appears, click OK. The default values are appropriate in most cases.
You can change these settings any time when Radius Server is running.
7. Click Finish.
III
RAS Server to operate in conjunction with a
MA6
63
Page 64

8. Re-boot the computer. By default, Multi-Tech Radius Service runs automatically on startup. If for
any reason the Radius program was shut down, you can launch the program manually from the
Windows Start menu.
14. To shut down the Radius program, click on the Radius icon at the lower left of the PC screen.
64 MA6
Page 65

Radius Software: “Clients” and “Users” Files
After installing the Radius software, the administrator must customize the Clients file and the
Users file for use in their specific network system. These files can be found in C:\Program
Files\MultiTech Systems\Radius Server. The Clients file and the Users file can both be opened in
Notepad or Wordpad text-processor application programs.
In the Clients file, the administrator specifies the IP address of the RAS Server and the shared
secret known to both the CommPlete 4000 RAS server and to the password authentication server.
Entries in the Clients file must be in this form:
<IP address of client> <blank or tab(s)> <shared secret> <new line>
The IP addresses should be in dotted notation only. Names are not permitted.
For Windows NT only. In the Users file, the administrator lists network users by name and specifies
authentication/password parameters. The "users" file can include another file which contains a list of
users. The syntax is as follows:
$include <full path to the users file>.
When this command is employed under Windows NT, the authentication server can use the same user
database as the host server.
The first line in each user entry contains the following information:
<User name> <Tab> <Check List>
The <User name> field must start from the first column. The <Check List> field can have the
following info :
(i). Auth-Type. This field specifies whether the authentication is done locally or by the
system (for WindowsNT only). Values: Local or System.
(ii). Password = <The password of the particular user>
Indicates that PAP is the authentication protocol.
(iii). CHAP-Password = <The password of the particular user>
MA6
65
Page 66

Indicates that CHAP protocol is the authentication protocol.
(iv). Prefix and Suffix.
The "users" file can also have DEFAULT entries which have the user name as DEFAULT. These
entries match on all users.
Concerning the notation, Fall-Through = 1 in the reply list,
=> the user entries which follow this user entry are also examined.
For NT Domain Authentication, the check list in the user entries can contain the attribute "Domainname," to indicate the domain in which the user is authenticated. For NT Domain Auth to work
properly, the person who has logged on should be given the rights "Act as part of the operating
System" and "Log On as Batch Job".
66 MA6
Page 67

Appendix E: MultiManager
Introduction
Multi-Tech MultiManager is a password-protected Windows 95/98/NT program for SNMPbased administration of RASExpress servers. It can be run from a network client PC or from
a dial-in remote-node or remote-control PC. Using MultiManager you can:
• maintain a map of your servers.
• monitor your servers.
• configure your servers.
• manage your communication lines and servers.
• display numeric statistics.
• graph online and offline statistics.
• display selected traps.
Installation
We recommend that you install MultiManager on a workstation that is on the same network
as a RASExpress server; however MultiManager can be run from any PC that has Internet
access. The workstation must be running Windows 95 or above, or Windows NT 4.0 or
above. To install MultiManager:
1. Insert MultiManager Disk 1 into drive A of the management PC. Do not use the
RASExpress server computer.
2. In Windows Explorer, open drive A and double-click on Setup.exe.
3. Follow the directions in the MultiManager Setup wizard.
Starting MultiManager
1. To start MultiManager, click Start, point to Programs, point to MultiManager, and then
click MultiManager. Alternately, create a shortcut on the desktop and then double-click it.
2. When MultiManager opens, log in using a valid user name and password. Initially no
password is required, but if you opt to use one, you can set it by clicking Change Password
in the Edit menu. Note that the password is case-sensitive.
To configure a server, you must log in as supervisor.
3. If you are starting MultiManager for the first time, click Edit, then click Auto Detect to
map the servers on your network. Valid servers appear in the Auto Detect dialog box, the
device tree, and the network map.
4. Select a server by clicking it in either the device tree or the network map. When you select a
server, the toolbar buttons become active.
MA6
67
Page 68

Main Window
The main window is the control center for configuring and managing your RASExpress
servers.
Title Bar
The title bar shows the IP address of the management workstation and the name and path of
the active map file.
Menu Bar
The menu bar contains menus for controlling MultiManager itself, for configuring and
managing your servers, for displaying statistics both numerically and graphically, and for
editing network maps. Most menu commands can be accessed through the toolbars; except
for those selecting the online and offline statistical graphs.
Toolbars
Below the title bar and menu bar are four toolbars, which can be resized, turned on and off,
and dragged and docked anywhere. From top to bottom:
• The Configuration toolbar is used to configure a RASExpress server.
• The Statistics toolbar is used to display throughput and other statistics collected since
the last reboot of the server.
• The Management toolbar is used to save configuration changes, reboot the server,
monitor connections, reset lines, set and display traps, and otherwise manage an
active server.
• The Draw toolbar is used to create and edit network maps of your servers.
Device Tree
The device tree, in the pane on the left, displays RASExpress servers and groups in an
Explorer-like tree. The manager is at the root of the tree. As in Explorer, you can expand or
contract branches by clicking + and – boxes. Just click any server in the tree to select it for
configuration or management. If no servers appear in the device tree when you open
MultiManager, you can cause MultiManager to look for them by selecting Auto Detect from
the Edit menu.
Network Map
The network map is in the pane on the right. Here you can define and select RASExpress
servers, and edit their device attributes by double-clicking their icons. Using the Draw
toolbar, you can show relationships among your servers, groups, and LAN and WAN links in
a graphic map of your network, which can then be saved to disk.
Status Bar
The status bar displays messages about the status of MultiManager and your SCROLL LOCK,
NUM LOCK, and CAPS LOCK keys, and displays the date and time.
68 MA6
PN 82067052, Rev. C
11/06/2000
 Loading...