

Multitech ISI4604-PCI, ISI4608-PCI Quick Start Manual
ISI4608-PCI & ISI4604-PCI
Quick Start Guide

Quick Start Guide
P/N 82084806, Revision C
Models: ISI4608-PCI & ISI4604-PCI
This publication may not be reproduced, in whole or in part, without prior
expressed written permission from Multi-Tech Systems, Inc. All rights reserved.
Copyright © 2001 by Multi-Tech Systems, Inc.
Multi-Tech Systems, Inc. makes no representation or warranties with respect to the
contents hereof and specifically disclaims any implied warranties of merchantability
or fitness for any particular purpose. Furthermore, Multi-Tech Systems, Inc.
reserves the right to revise this publication and to make changes from time to time in
the content hereof without obligation of Multi-Tech Systems, Inc. to notify any
person or organization of such revisions or changes.
Record of Revision
Revision Description
A Manual released. All pages at Revision A.
(8/25/00)
B Info added on Win 2000 & MTS Patents.
(11/20/00)
C Info added on Win Me, Novell, Linux, & regulatory matters.
(5/8/01)
TRADEMARKS
The Multi-Tech logo is a registered trademark of Multi-Tech Systems, Inc.
Windows 2000, Windows NT, Windows 95, Windows 98, and Windows Me are
registered trademarks of Microsoft.
Pentium is a registered trademark of Intel Corporation.
ofnItcatnoCofnItnetaP
.cnI,smetsyShceT-itluM
.rDeladooW5022
atosenniM,weiVsdnuoM
.A.S.U,21155
0053-587)367(
7179-823)008(
4789-587)367(:xaF.S.U
:troppuShceT
9342-279)008(
moc.hcetitlum.www:tenretnI
gniwollofehtfoeromroenoybderevocsiecivedsihT
;497,509,5;280,900,6;311,210,6;768,130,6:stnetap
;435,218,5;305,518,5;765,518,5;065,468,5
;726,467,5;826,467,5;235,097,5;860,908,5
;862,376,5;653,427,5;052,493D;985,457,5
;805,916,5;030,826,5;495,446,5;752,376,5
;140,775,5;685,295,5;946,006,5;324,716,5
;844,645,5;397,955,5;222,473D;527,475,5
;074,174,5;958,005,5;402,535,5;593,645,5
;524,054,5;982,254,5;689,354,5;616,364,5
;895,353D;356,553D;856,553D;467,163D
rehtO.472,103,5;265,903,5;563,553,5;441,353D
gnidnePstnetaP

Contents
Chapter 1Introduction and Description .............................. 5
Introduction to the IntelligentSerialInterface..........................................6
Product Description ................................................................................ 6
How to Use This Manual ........................................................................ 7
Technical Specifications ......................................................................... 8
Computer Requirements .................................................................. 8
Physical/Electrical/Environmental ................................................... 8
Chapter 2Hardware Installation ......................................... 9
Introduction .......................................................................................... 10
Safety Warnings Telecom ..................................................................... 10
Hardware Installation Procedures ......................................................... 10
Chapter 3Driver Installation ............................................. 13
Introduction .......................................................................................... 14
Install ISI460x-PCI Software for Windows 2000 .................................... 14
ISI460x-PCI for Win 2000: Install ISI Management Software ................. 16
Remove ISI460x-PCI Driver (Win 2000) ................................................. 17
ISI460x-PCI Software Install for Win NT 3.51/4.0 .................................. 17
Removing ISI460x-PCI Card and Driver in Win NT 3.51/4.0 .................. 19
I/O Addresses and IRQ Codes.............................................................. 19
ISI460x-PCI Software Install for Win 95/98/Me ..................................... 20
Remove the ISI460x-PCI Driver (Win 95/98/Me) ................................... 21
NetWare Driver Installation .................................................................. 22
Configuring Ports for NetWare Connect ....................................... 23
Removing the Driver (Novell) ........................................................ 23
SCO Open Server 5 Driver Installation .................................................. 24
To install from CD-ROM: ............................................................... 24
To format a floppy disk for SCO5: .................................................. 24
To untar the driver file and copy files onto floppy disk: ................ 24
To install driver from floppy disk ................................................... 26
MultiTech Installation Script ......................................................... 27
Activating Ports in SCO Open Server 5 ......................................... 30
Removing the Driver (SCO Open Server 5) .................................... 31

Linux Driver for Multi-Tech ISI460x-PCI Server Cards .......................... 32
LINUX: Pre-Installation Issues ...................................................... 32
LINUX: Copying the driver from the media ................................... 32
LINUX: Copying and untarring the driver from CD-ROM ............. 32
LINUX: Copying and untarring the driver from a floppy ............... 33
LINUX: Driver installation and loading ......................................... 33
LINUX: Setting the baud rate ........................................................ 34
LINUX: Verifying the ports ............................................................ 35
LINUX: TTY Devices Created by the Drivers: ............................... 35
LINUX -- Dial-in configuration: .................................................... 36
LINUX -- PPP setup: ...................................................................... 36
Removing the ISI Driver (Linux) .................................................... 37
Chap 4: Warranty, Service, & Tech Support ........................ 39
Limited Warranty .................................................................................. 40
Addendum for North American Products ............................................. 40
Addendum for International Products .................................................. 41
Out of Warranty Repair Cost Charts ..................................................... 42
Upgrades and Product Support via Internet ......................................... 42
Technical Support ................................................................................. 42
Recording ISI460x-PCI Information ....................................................... 43
Software User License Agreement ........................................................ 43
On-Line Warranty Registration ............................................................. 45
About the Internet ................................................................................ 45
Index ....................................................................................... 48

Chapter 1—Introduction and Description

6
ISI460x-PCI Quick Start Guide
Introduction to the Intelligent
Serial
Interface
The Intelligent Serial Interface cards, model ISI4608-PCI and ISI4604-
PCI, are hardware solutions for adding fast serial ports to
communication servers and async hosts that have 32-bit PCI bus
architecture.
Serial ports are essential to
Communication servers that pool modems and other
communication devices for users on a LAN and to
Asynchronous hosts that provide user access through serial
ports.
Each ISI4604-PCI card adds four serial ports to the computer; each
ISI4608-PCI card adds eight serial ports to the computer. (From now on
in this manual we will use ISI460x-PCI when referring to both
models.) The ISI460x-PCI ships with drivers for the following multiuser
operating systems: Windows® 2000 Server and Advanced Server,
Windows NT, versions 3.51 and 4.0; Windows 95, Windows 98, and
Windows Me.
The IntelligentSerialInterface card can be combined to support
asynchronous serial devices (local or dial-up). The ports can be used
to connect basic terminals with or without multiple pages of memory to
multiplexer channels and asynchronous modems. Each ISI460x-PCI port
can support as many screens as there are physical pages of memory on
the terminal. In Windows 95/98/Me, a built-in autodetect utility enables
detection of Multi-Tech modems and sets the proper initialization
strings.
This manual contains product specifications, installation instructions,
and technical support information to assist you in the installation
process. It is assumed you have basic PC skills. Therefore, we have not
included step-by-step instructions for basic operations such as
logging in and file editing, etc.
Product Description
The ISI460x-PCI is a multiport serial port expansion card that adds data
buffering on each port for enhanced serial port performance. The
ISI460x-PCI features an on-board microprocessor to coordinate the

7
Chapter 1—Introduction and Description
communications activity of your local and remote terminals. Using the
ISI460x-PCI to provide additional serial connections enables your
systems processor to perform more efficiently since the ISI460x-PCI
handles all byte-by-byte interrupts generated by asynchronous
terminals and stores the data in buffers.
The processor, along with 256K bytes of RAM, work to allocate
resources dynamically to the most active port. The ISI then generates
one interrupt for an entire block of information and transfers the block
to the systems microprocessor.
The ISI4608-PCI has one 78-pin (DB78S) connector that interfaces with
an eight-port fan-out, or octopus, cable (supplied with the card), that
provides eight additional serial ports. The ISI4604-PCI has a four-port
fan-out cable (supplied with the card), that provides four additional
ports. Both are 3/4 size add-on cards that support a high-speed
interface up to 460 Kbps.
MultiTechs ISI Management Software is shipped with the ISI460x-PCI
server card. It is designed to monitor data traffic and control the
modems attached to the ISI460x-PCI card in a computer using
Windows 2000 Server or Windows 2000 Advanced Server as its
operating system.
How to Use This Manual
This manual presents installation procedures for the ISI460x-PCI card
and for its software drivers. It also contains information about
technical support and warranty coverage. A User Guide, containing
more detailed information can be found on the Multi-Tech CD shipped
with the ISI460x-PCI card.

8
ISI460x-PCI Quick Start Guide
T echnical Specifications
Computer Requirements
386, 486, or Pentium®- based PC or compatible with PCI bus
architecture
Microsoft Windows 2000 Server and Advanced Server; Windows
NT v. 3.51 and v. 4.0; Windows 95, Windows 98, and Windows
Me; Linux (kernels 2.0 and 2.2); SCO Open Server 5; Novell
Netware.
a CD-ROM drive (or, if software/drivers have been downloaded, a
floppy drive)
100K bytes of hard disk space
Physical/Electrical/Environmental
Dimensions: 6.875" x 4.2"
17.46 cm x 10.67 cm
Baud Rates: 300 bps to 460 Kbps per port
Bus Type: PCI
Connectors: DB78S
Cables: The ISI4608-PCI has an eight-port fan-out cable. DB78M
(male) interface goes to card; eight DB25 (male) connectors are
available for serial devices. The IS I4604-PCI has an four-port fanout cable. DB78M (male) interface goes to card; four DB25 (male)
connectors are available for serial devices.
Serial Interface: For ISI4608-PCI, eight RS232C or RS232D ports
for ISI4604-PCI, four RS232C or RS232D ports.
Temperature: 32° to 120°F (0° to 50°C)
Power: 0.1 amp @ +12v DC
0.1 amp @ -12v DC
1 amp @ +5v DC
Base I/O Address: One 16-byte address space per card
Interrupt Request (IRQ): One IRQ per card (can be shared)
Warranty: Two years
Manufactured in Mounds View, MN, U.S.A.

Chapter 2—Hardware Installation

10
ISI460x-PCI Quick Start Guide
Introduction
This chapter describes installation of the Multi-Tech ISI4608-PCI as an
expansion card in your PCI bus computer.
Safety Warnings Telecom
1. Never install telephone wiring during a lightning storm.
2. Never install telephone jacks in wet locations unless the jack is
specifically designed for wet locations.
3. This product is to be used with UL and CUL listed computers.
4. Never touch uninsulated telephone wires or terminals unless the
telephone line has been disconnected at the network interface.
5. Use caution when installing or modifying telephone lines.
6. Avoid using a telephone (other than a cordless type) during an
electrical storm. There may be a remote risk of electrical shock from
lightning.
7. Do not use the telephone to report a gas leak in the vicinity of that
leak.
8. To reduce the risk of fire, use only No 26 AWG or larger
Telecommunication line Cord.
Hardware Installation Procedures
To install the ISI460x-PCI card into your PC-PCI bus computer:
1. Before handling the ISI460x-PCI, discharge any static in your body
by touching a piece of grounded metal such as the computer
chassis.
2. Carefully remove the ISI460x-PCI from its antistatic bag, handling it
only by the mounting bracket and edges. Do not touch the goldplated connectors along the bottom edge. (You may want to save
packaging for possible future use.)
3. Visually inspect the ISI460x-PCI. If you have any concerns about
its condition, call Technical Support at (800) 972-2439.

11
Chapter 2—Hardware Installation
4. To avoid damaging the ISI460x-PCI card and your PC, make sure
your computer and any peripheral equipment connected to it are
turned off. The ISI460x-PCI can be installed in a PC-AT, 386, 486,
or Pentium equivalent PCI bus computer.
5. Remove the cover of your computer as instructed in your
computers documentation.
6. Locate the unused PCI slot you will be using for your ISI460x-PCI
card and remove the slot cover according to instructions in your
computers documentation.
7. Install the ISI460x-PCI card into the selected expansion slot in the
same manner as any other add-on card, as instructed in your
computers documentation.
8. Fasten the retaining bracket to computer chassis and replace
cover.
12
ISI460x-PCI Quick Start Guide
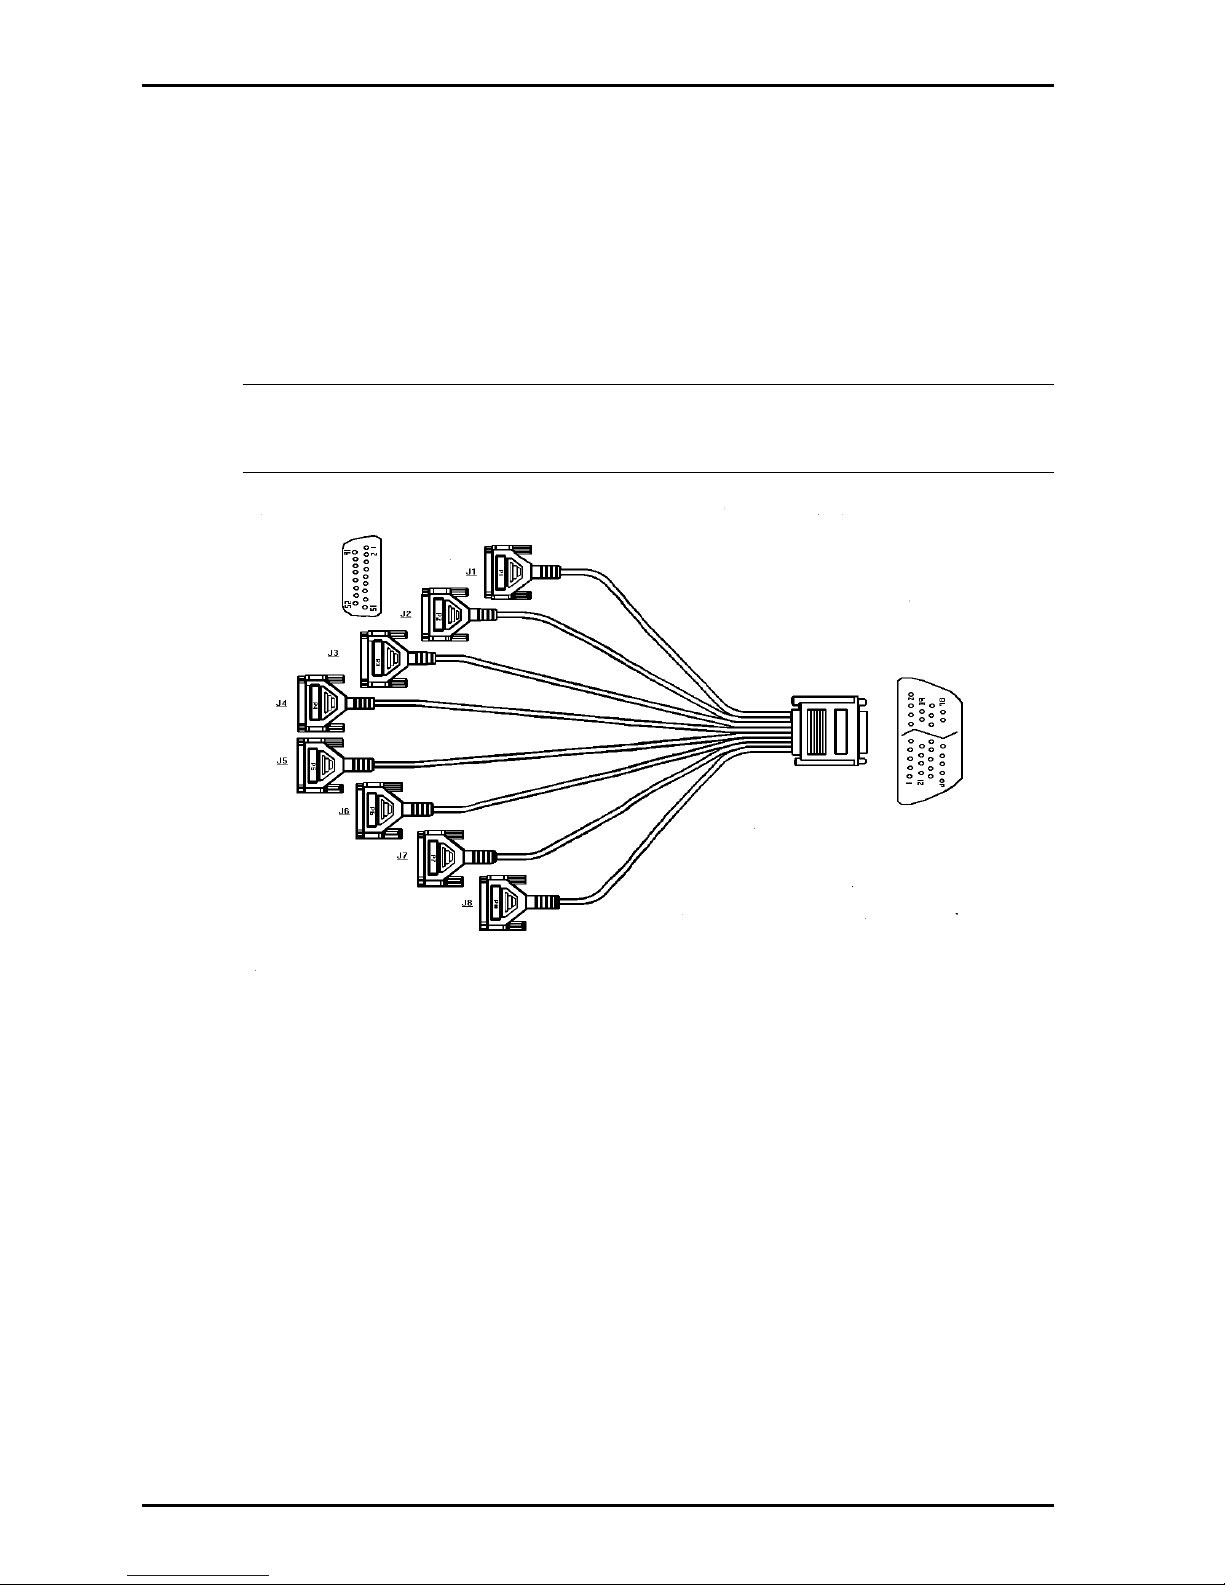
9. Attach the octopus cable to the DB78S female connector on the
ISI460x-PCI card at the back of your computer. The RS232 ports on
the octopus cable are for connecting to modems, multiplexers or
other devices. If the other device is a local terminal port, a
crossover cable (not included) is required between the octopus
cable and the terminal port. See Appendix A of the User Guide for
schematic of a crossover cable.
Note: Any cables connected to the computer must be shielded to
reduce interference.
Figure 2-2. Octopus Cable (ISI4608-PCI)
10. Turn on the power to the computer. You now are ready to install
the software/drivers.

Chapter 3—Driver Installation

14
ISI460x-PCI Quick Start Guide
Introduction
The ISI460x-PCI ships with drivers for each of the following operating
systems: Windows® 2000 Server and Advanced Server, Windows NT,
Windows 95, Windows 98, Windows Me, Novell Netware, SCO Open
Server, and Linux. This chapter describes the installation of these
drivers. We also describe installation of MultiTechs Management
Software for use with ISI cards under Windows 2000.
Installing a device driver modifies your system. For this reason, only
the super user (system administrator) is allowed to perform the
installation. If you cannot login as administrator, find the person in
your organization with this authorization (i.e., password). To begin
driver installation, login as administrator. Then proceed with the
appropriate installation section in this chapter.
Installing ISI460x-PCI Software for Windows 2000
NOTE: A series of installation wizard screens will appear
repeatedly during this procedure (step 12). This is not an error.
Do not discontinue the procedure when the installation wizard
screens repeatedly appear.
1. Shut down Windows 2000 and turn off the PC.
2. Install the ISI460x-PCI card in an available PCI expansion slot in
the computer. Follow the computer manufacturer's instructions
concerning installation of expansion cards. Observe standard
precautions regarding electro-static discharge (ESD) when
handling the ISI460x-PCI board (the board should be kept in its
shipping bag until used). During installation, handle the ISI460xPCI circuit card by its edges and keep one hand in contact with the
PC chassis.
3. Turn on the PC and start Windows 2000.
4. Insert the ISI driver CD-ROM into the CD-ROM drive (if drivers
have been downloaded from the MultiTech web site, they will
typically be on diskette; in that case, insert diskette into floppy
drive).

15
Chapter 3—Software/Driver Installation
5. Windows 2000 will detect the ISI460x-PCI card. The Found New
Hardware Wizard- Welcome screen will appear. Click Next.
6. The Install Hardware Device Drivers screen appears. Select
"Search for a suitable driver ..." and click Next.
7. The Locate Driver Files screen appears (Windows 2000 is seeking
the driver for the ISI460x-PCI card). Select CD-ROM drives and
click Next.
8. The Driver File Search Results screen appears. Click Next.
9. A progress screen will appear briefly while files are being copied.
10. A completion screen will appear. Click Finish.
11. Immediately after the ISI driver installation has been completed,
another Found New Hardware screen will appear briefly indicating
that the MultiTech ISI Port has been detected.
A second sequence of installation wizard screens appears. This
sequence of screens deals with the setting up of ISI ports. The
first screen in this sequence is the Found New Hardware Wizard --
Welcome screen.
The Found New Hardware -- MultiTech ISI Port screen will appear
four times for the ISI4604-PCI and eight times for the ISI4608-PCI.
12. The Install Hardware Device Drivers screen appears.
Select Search for a suitable driver ... and click Next.
13. The Locate Driver Files screen appears (Windows 2000 is
seeking the ISI Port device driver). Select CD-ROM drives and
click Next.
14. The Driver Files Search Results screen will indicate that the
isiport.inf file has been found on the CD-ROM. Click Next.
15. A completion screen will appear. It will indicate that the first
MultiTech ISI Port has been set up successfully. Click Finish.

16
ISI460x-PCI Quick Start Guide
Notice that the auto-detection facility of Windows 2000 will repeat
the ISI Port installation sequence 7 more times for the ISI4608PCI, or 3 more times for the ISI4604-PCI. That is, the Found New
Hardware -- MultiTech ISI Port screen will appear many times
after the ISI driver has been located. On this screen, the messages
Found New Hardware and Installing ... will appear alternately.
Please understand that the repetition of these screen sequences is
normal and is not an error. It does not indicate any problem with
your PC, or with the MultiTech ISI card, or its driver software.
16. Driver installation for the ISI460x-PCI card is complete.
ISI460x-PCI for Win 2000: Installing ISI Management
Software (server OSs only)
If you are using a Windows 2000 Server operating system ("Server" or
"Advanced Server"), you must decide whether you want to use the
MultiTech ISI Management Software in conjunction with your ISI460xPCI card. The ISI Management Software is shipped with the ISI card.
1. Turn on your computer and start Windows 2000.
2. Insert the CD-ROM containing the ISI Management Software into
your CD-ROM drive. (If ISI Management Software has been
downloaded from the MultiTech web site, it will typically be on a
diskette. In that case, insert diskette into floppy drive).
3. Go to Start | Run. In the Run window, enter the file path of the ISI
Management software. Typically, this would be
E:\SERVCARD\UTILITY\MGMT\SETUP.EXE.
Click OK.
4. The ISI Management setup screen appears. At the Welcome
screen, click Next.
5. A progress screen appears while files are copied. If the Error
Creating WWW Server message appears, it may indicate that
there was an attempt to install the ISI Management Software on a
 Loading...