

Page 1
MultiTech Model IPC-551
Single Board Computer
for CommPlete 4000 Server
User Guide
Page 2

COMMPlete 4000 Single Board Computer (IPC-551)
User Guide
82098951 Revision B
All rights reserved. This publication may not be reproduced, in whole or in part,
without prior expressed written permission from Multi-Tech Systems, Inc. All
rights reserved.
Copyright © 2000 by Multi-Tech Systems, Inc.
Multi-Tech Systems, Inc. makes no representation or warranties with respect to the
contents hereof and specifically disclaims any implied warranties of merchantability
or fitness for any particular purpose. Furthermore, Multi-Tech Systems, Inc.
reserves the right to revise this publication and to make changes from time to time in
the content hereof without obligation of Multi-Tech Systems, Inc., to notify any
person or organization of such revisions or changes.
Record of Revisions
Revision Description
A Manual released (11/10/99).
B Phone numbers updated.
Patents
This product is covered by one or more of the following U.S. Patent Numbers:
5.301.274, 5.309.562, 5.355.365, 5.355.653, 5.452.289, 5.453.986. Other patents
Pending.
Trademarks
The Multi-Tech logo is a registered trademark of Multi-Tech Systems, Inc.
NetWare is a registered trademark of Novell, Inc.
Pentium is a registered trademark of Intel Corporation.
SCO is a registered trademark of Santa Cruz Operation, Inc.
UNIX is a registered trademark of X/Open Company, Ltd.
Windows 95 and Windows NT are registered trademarks of Microsoft.
Multi-Tech Systems, Inc.
2205 Woodale Drive
Mounds View, Minnesota 55112
(763) 785-3500 or (800) 328-9717
Fax (763) 785-9874
Tech Support (800) 972-2439
Internet Address: http://www.multitech.com
Page 3

Table of Contents
Contents
Chapter 1: Introduction
Introduction ....................................................................................... 5
About This Manual ............................................................................ 5
System Specifications ....................................................................... 6
Safety Precautions .......................................................................... 10
Chapter 2: Installation -Hardware Configuration
List of Jumpers and Connectors ...................................................... 11
Component Locations ..................................................................... 12
How to Set Jumpers ........................................................................ 12
CPU Type and Clock Selection ....................................................... 14
RS-232/422/485 (COM2) Selection .................................................. 16
AT Keyboard / PS2 Mouse Selection .............................................. 18
Memory Map for Solid State Disk .................................................... 18
COM1 Connector ............................................................................ 20
COM2 Connector ............................................................................ 20
Keyboard Connector ........................................................................ 21
External Keyboard Connector.......................................................... 21
Reset Connector ............................................................................. 22
Floppy Disk Drive Connector ........................................................... 22
Hard Disk Drive Connector .............................................................. 23
Hard Disk Drive LED Connector ....................................................... 24
Power LED and Keylock Connector ................................................ 25
VGA CRT Connector ....................................................................... 25
Power Connector ............................................................................. 26
Printer Connector ............................................................................ 26
External Speaker Connector............................................................ 27
Solid State Disk Socket .................................................................. 28
Memory Installation ......................................................................... 28
Chapter 3: Software Configuration
VGA Drive Utilities ........................................................................... 31
Flash BIOS Update ......................................................................... 36
Watchdog Timer Configuration ......................................................... 36
CommPlete 4000 Server SBC, Model IPC-551 3
Page 4

Table of Contents
Chapter 4: Green PC Function
Power Saving Block Diagram .......................................................... 39
CPU Doze Mode ............................................................................. 40
System Standby Mode .................................................................... 40
System Suspend Mode ................................................................... 40
Chapter 5: Award BIOS Setup
Introduction ..................................................................................... 41
Entering Setup ................................................................................ 42
Standard CMOS Setup Menu .......................................................... 44
BIOS Features Setup Menu ............................................................ 50
Chipset Features Setup .................................................................. 56
Power Management Setup .............................................................. 59
PnP/PCI Configuration ..................................................................... 62
Load BIOS Defaults ......................................................................... 63
Load Setup Defaults ........................................................................ 63
Integrated Peripherals ..................................................................... 64
Password Setting ............................................................................ 64
IDE HDD Auto Detection ................................................................. 65
HDD Low-Level Format .................................................................... 69
Save and Exit Setup ........................................................................ 70
Appendix A: Expansion Slots
PC-104 Pin Assignments ............................................................... 73
ISA Pin Assignments ...................................................................... 74
PCI Pin Assignments ...................................................................... 75
Appendix B: Technical Summary
....................................................................................................... 77
Appendix C: Troubleshooting
Introduction ................................................................................... 81
Troubleshooting with Error Codes............................................... 81
4 CommPlete 4000 Server SBC, Model IPC-551
Page 5

Introduction
Chapter 1
Introduction
This chapter introduces the IPC-551 single-board computer and
outlines the system specifications. Sections include:
About This Manual
System Specifications
Safety Precautions
1-1. About This Manual
Thank you for purchasing the IPC-551 embedded CPU card This
single-board computer is PC/AT compatible and produces VGA video.
The IPC-551 features CPU speeds as high as 366 MHz, up to 256
MBytes of DRAM working memory, and supports a disk-on-chip
memory device (in an SSD flash socket, a Solid State Disk). This
manual will assist you in installing and setting up the system. The
manual contains five chapters and three appendices.
Chapter 1 Introduction
Presents an overview of this manual and presents system
specifications and cautionary information to protect both the product
and personnel.
Chapter 2 Hardware Configuration
Outlines the components locations and their functions. Describes
how to set jumpers and how to configure this PC card to meet your
own needs.
CommPlete 4000 Server SBC, Model IPC-551 5
Page 6

Introduction
Chapter 3 Software Utilities
Describes proper installation of the VGA , Flash BIOS, and the
watchdog-timer function.
Chapter 4 Green PC Function
Describes Green PC functions, which allow the computer to work at
a decreased power level after a period of idleness.
Chapter 5 Award BIOS Setup
Shows how to set up BIOS configurations.
Appendix A Expansion Bus
Describes the expansion bus with slots for PCI and ISA cards and an
on-board PC-104 receptacle (an ISA-type connection typically used for
testing).
Appendix B Technical Summary
Describes mapping of interrupts, RAM, hard-drive memory and other
parameters.
Appendix C Troubleshooting
Outlines error messages and presents solutions for associated
problems.
1-2. System Specifications
CPU:
Intel 54C/55C; AMD K5/K6; Cyrix M1/M2.
320/321 pin PGA socket.
75 - 366MHz clock generator.
2.8V - 3.5V voltage regulator.
Memory:
Up to 256MB, EDO/FPM DRAM
Four 72-pin SIMM sockets on board.
6 CommPlete 4000 Server SBC, Model IPC-551
Page 7

Introduction
Cache:
L1 Cache: (depends on CPU type).
L2 Cache on board:512K.
Real-Time Clock/Calendar:
CMOS data back up from BIOS setting or BIOS default.
Dallas DS 12887 Real Time Clock.
BIOS:
Award Flash BIOS with plug & play functionality.
Easily updated 128/256KB flash EEPROM.
Supports Green power-saving function .
Supports System IO Setup.
Keyboard Connector:
PC/AT type miniature DIN connector.
Supports PC/AT, PS/2 Keyboard or PS/2 Mouse; determined by jumper
selection.
Bus Support and Speed:
External ISA bus at 8 MHz.
External PCI bus at 33 MHz.
Internal PCI bus, for VGA & IDE at 33 MHz.
PC-104 bus at 8 MHz.
Display:
Supports SVGA for CRT.
Supports 32-bit PCI Local Bus.
VGA BIOS combines 128/256KB flash ROM with system BIOS.
Supports 15 pin connector 1024 x 768 resolution (256 colors) on SVGA
CommPlete 4000 Server SBC, Model IPC-551 7
Page 8

Introduction
Monitor.
Supports 2 MB video memory.
Watchdog Timer:
The watchdog timer is controlled by software. Once enabled, the
system will reboot, unless the timer is re-enabled before the specified
timeout duration expires. Timeout durations range from zero to 30
seconds in two-second increments (+/- 25%).
To enable watchdog: use I / O port 0443H
To disable watchdog: use I / O port 0441H
IDE Interface:
Two IDE ports. Supports up to four Enhanced IDE devices.
Floppy Disk Driver Interface:
Supports up to two floppy disk drives: 3.5" and 5.25" (360K / 720K /
1.2M / 1.44M / 2.88M).
Disk-on-Chips Socket:
Supports up to 72MB.
Serial Port:
Two high-speed 16550-compatible UARTs with Send / Receive
16-byte FIFOs.
MIDI Compatible.
Programmable Band Rate Generator.
Parallel Port:
SPP, ECP, EPP Function.
Bi-directional parallel port.
Green Power-Saving Function:
Software support determined by BIOS setup.
8 CommPlete 4000 Server SBC, Model IPC-551
Page 9

LED Indicators
System power (at jumper KBL1 on board).
Hard Disk access (at jumper HDL1 on board).
DMA Controller:
82C37 x 2
DMA Channels:
7
Interrupt Controllers:
82C59 x 2
15 levels
Operating Temperature:
0 to 60°C;
32 to 140°F.
System Power Requirements :
DC Voltage: +5V; minimum +4.75V, maximum 5.25V.
DC Ampere: 15A.
Introduction
Board Dimensions:
338.5mm x 122mm (13.33in. x 4.80in.)
Board Net Weight:
0.4 Kg.
14.1 oz.
CommPlete 4000 Server SBC, Model IPC-551 9
Page 10

Introduction
1-3. Safety Precautions
Follow the practices below to prevent electrical damage to personnel
and to the computer:
1. Employ standard ESD precautions when working with this product
and its components. Static electricity can damage semiconductor
devices.
2. Take precautions against electric shock. Do not touch any
components of this card when the card is on. Disconnect the power
cord when the system is not in use.
3. Disconnect the power cord when you change any hardware devices.
For instance, when you connect a jumper or install any cards, a surge
of power may damage electronic components that affect the whole
system.
10 CommPlete 4000 Server SBC, Model IPC-551
Page 11

Hardware Configuration
Chapter 2
Installation: Hardware Configuration
2-1 List of Jumpers and Connectors
CPU Type & Clock Selection ................................JP2, JP4
CPU Voltage Selection ..........................................JP8, JP9
RS232/422/485 (COM2) Selection .....................JP7
AT Keyboard / PS/2 Mouse Selection ..................JP6
SSD Memory Map ................................................ JP12
COM1 Connector ................................................. COM1
COM2 Connector ...................................................COM2
Keyboard Connector ............................................. .DIN
External Keyboard Connector ............................. ..EXKB
Reset Connector ................................................... JP10
Floppy Disk Drive Connector ................................FDD
Hard Disk Drive Connector ................................... IDE1, IDE2
Hard Disk Drive LED Connector .......................... HDL
Power LED & KeyLock Connector ....................... KBL
LCD Panel Connector ............................................ LCD
VGA CRT Connector ............................................ VGA
Power Connector ................................................... PWR
Printer Connector .................................................. PRT
External Speaker Connector .................................. SPK
Memory Installation: S IMM1,SIMM2, SIMM3, SIMM4
Disk-on-chip Socket .............................................. SSD
CommPlete 4000 Server SBC, Model IPC-551 11
Page 12
Hardware Configuration
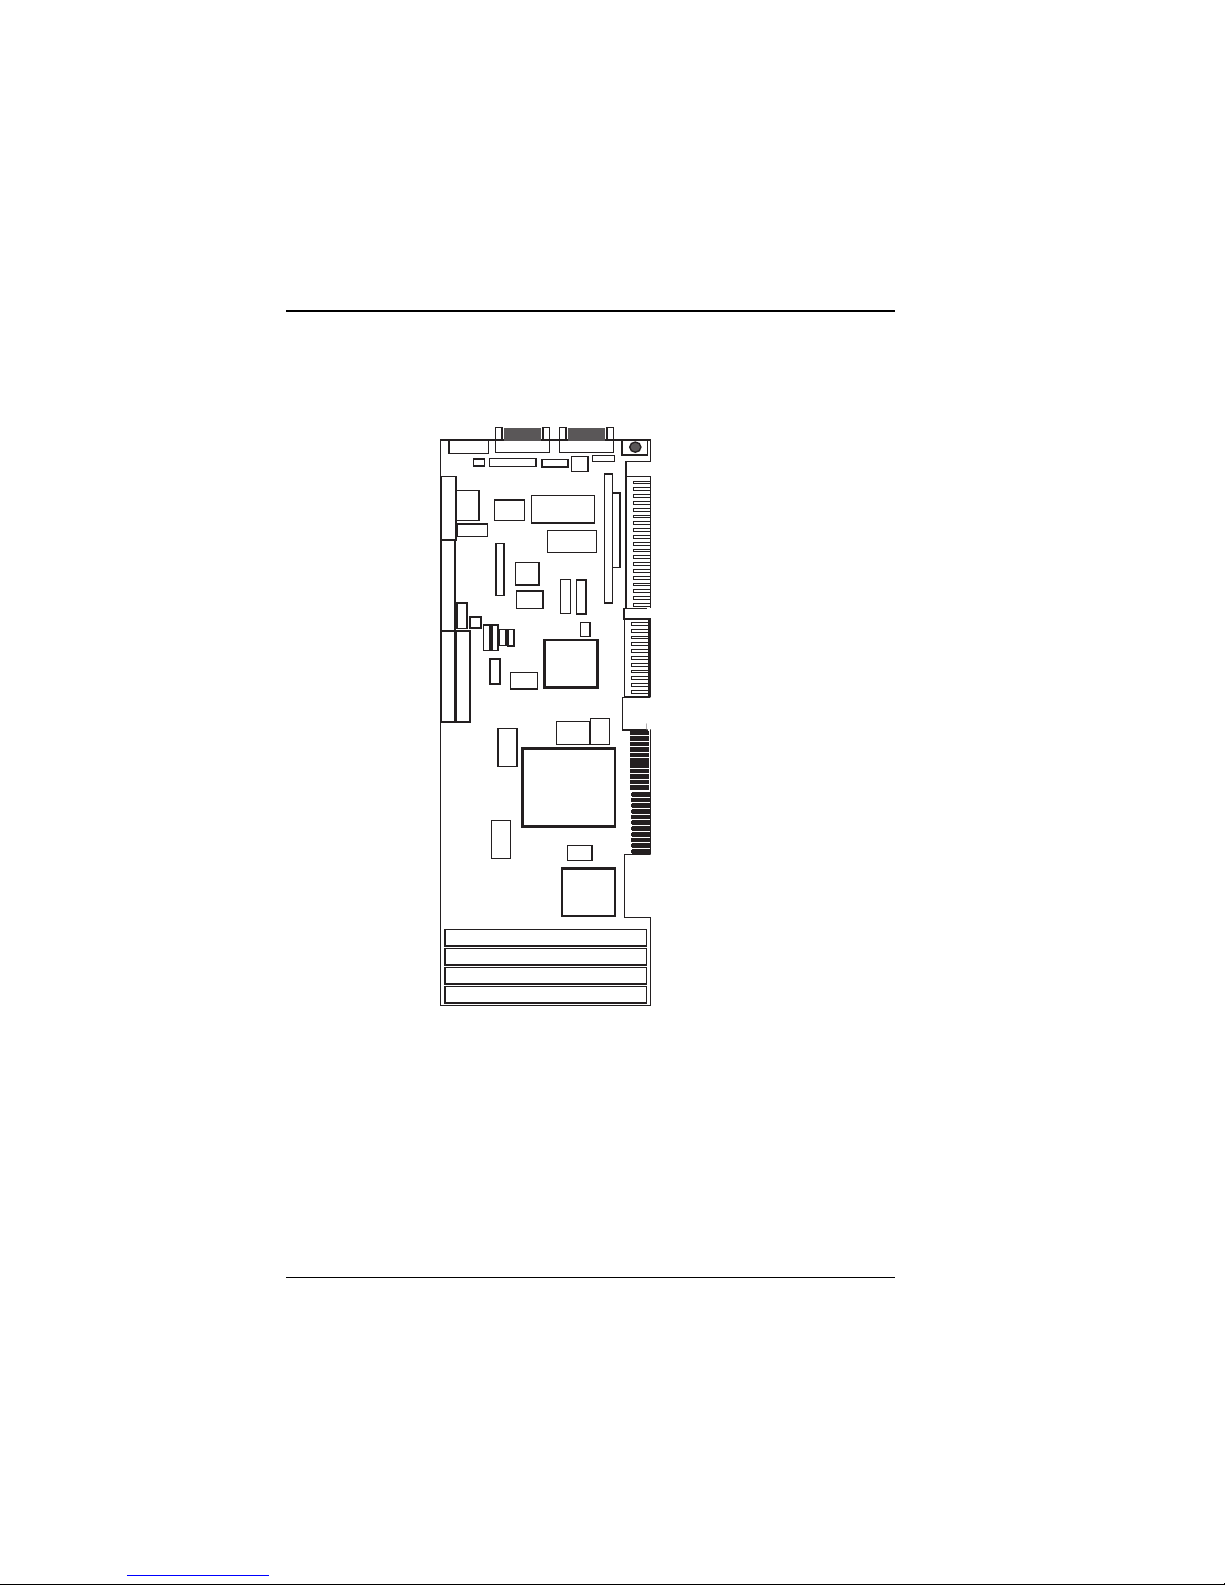
2-2 Component Locations
Figure 2-1 displays component locations.
BIOS
JP13
KB
Flash
BIOS
KBL
Flash
Disk
Real Time
Clock
Chipset
VGA
JP6
VRAM
EXKB
VRAM
GND
Mouse
PC-104
RST
PRT
FDD
PWR
JP11
2
COM
JP12
JP14
IDE 2
HDL
COM 1
JP7
SIO
Panel
SPK
USB
JP10
JP4
KB/
IDE 1
JP
9
JP2
JP
3
6xx86
CPU
JP
8
JP1
Chipset
SIMM 1
SIMM 2
SIMM 3
SIMM 4
Figure 2-1: Connector, Jumper and Component Locations
on the Single-Board Computer
2-3 How to Set Jumpers
Jumpers and Caps. Your PC is configured by the positions of jumpers
on the circuit board. A jumper consists of two or more metal pins with
a plastic base mounted on the card. A small plastic cap(with a metal
contact inside) is used to connect the pins. For two-pin jumpers, the
12 CommPlete 4000 Server SBC, Model IPC-551
Page 13

Hardware Configuration
active value for user-changeable parameters depends on jumper pins
being closed (electrically connected by a cap) or open (not electrically
connected). For parameters having more than two values, groups of
jumpers (or jumper blocks) are used to determine the active value.
For example, if a jumper has three pins labeled PIN1, PIN2, and PIN3,
you can use a jumper cap to connect PIN1 & PIN2 to activate one
value for the parameter. Connecting PIN2 and PIN3 would activate
another value.
This manual contains many illustrations of jumper configurations.
Jumper caps are depicted as shaded boxes connecting pairs of pins on
jumper blocks
Jumper Settings
The IPC-551 comes equipped with one of five CPUs of differing
operating speeds: 233 MHz, 266 MHz, 300 MHz, 333 MHz, or 366 MHz.
UPC
epyT
DMA
DMA
DMA
DMA
XMM
eroC
UPC
662-2-6K
V2.2zHM66
)zHM662(
003-2-6K
V2.2zHM66
)zHM003(
333-2-6K
V2.2zHM66
)zHM333(
663-2-6K
V2.2zHM66
)zHM663(
muitnePletnI
V8.2zHM66
zHM332
UPC
kcolC
egatloV
repmuJ
2PJ
3-1
6-4
5-3
6-4
3-1
4-2
3-1
4-2
3-1
4-2
repmuJ
4PJ
4-2
5-3
4-2
5-3
4-2
5-34-3
4-2
5-3
4-2
5-3
4-3
4-3
4-3
8-7
repmuJrepmuJ
9J8PJ
erocUPCtesot(
)egatlov
6-5
8-7
6-5
8-7
6-5
8-7
6-5
8-7
6-5
8-7
CommPlete 4000 Server SBC, Model IPC-551 13
Page 14
Hardware Configuration
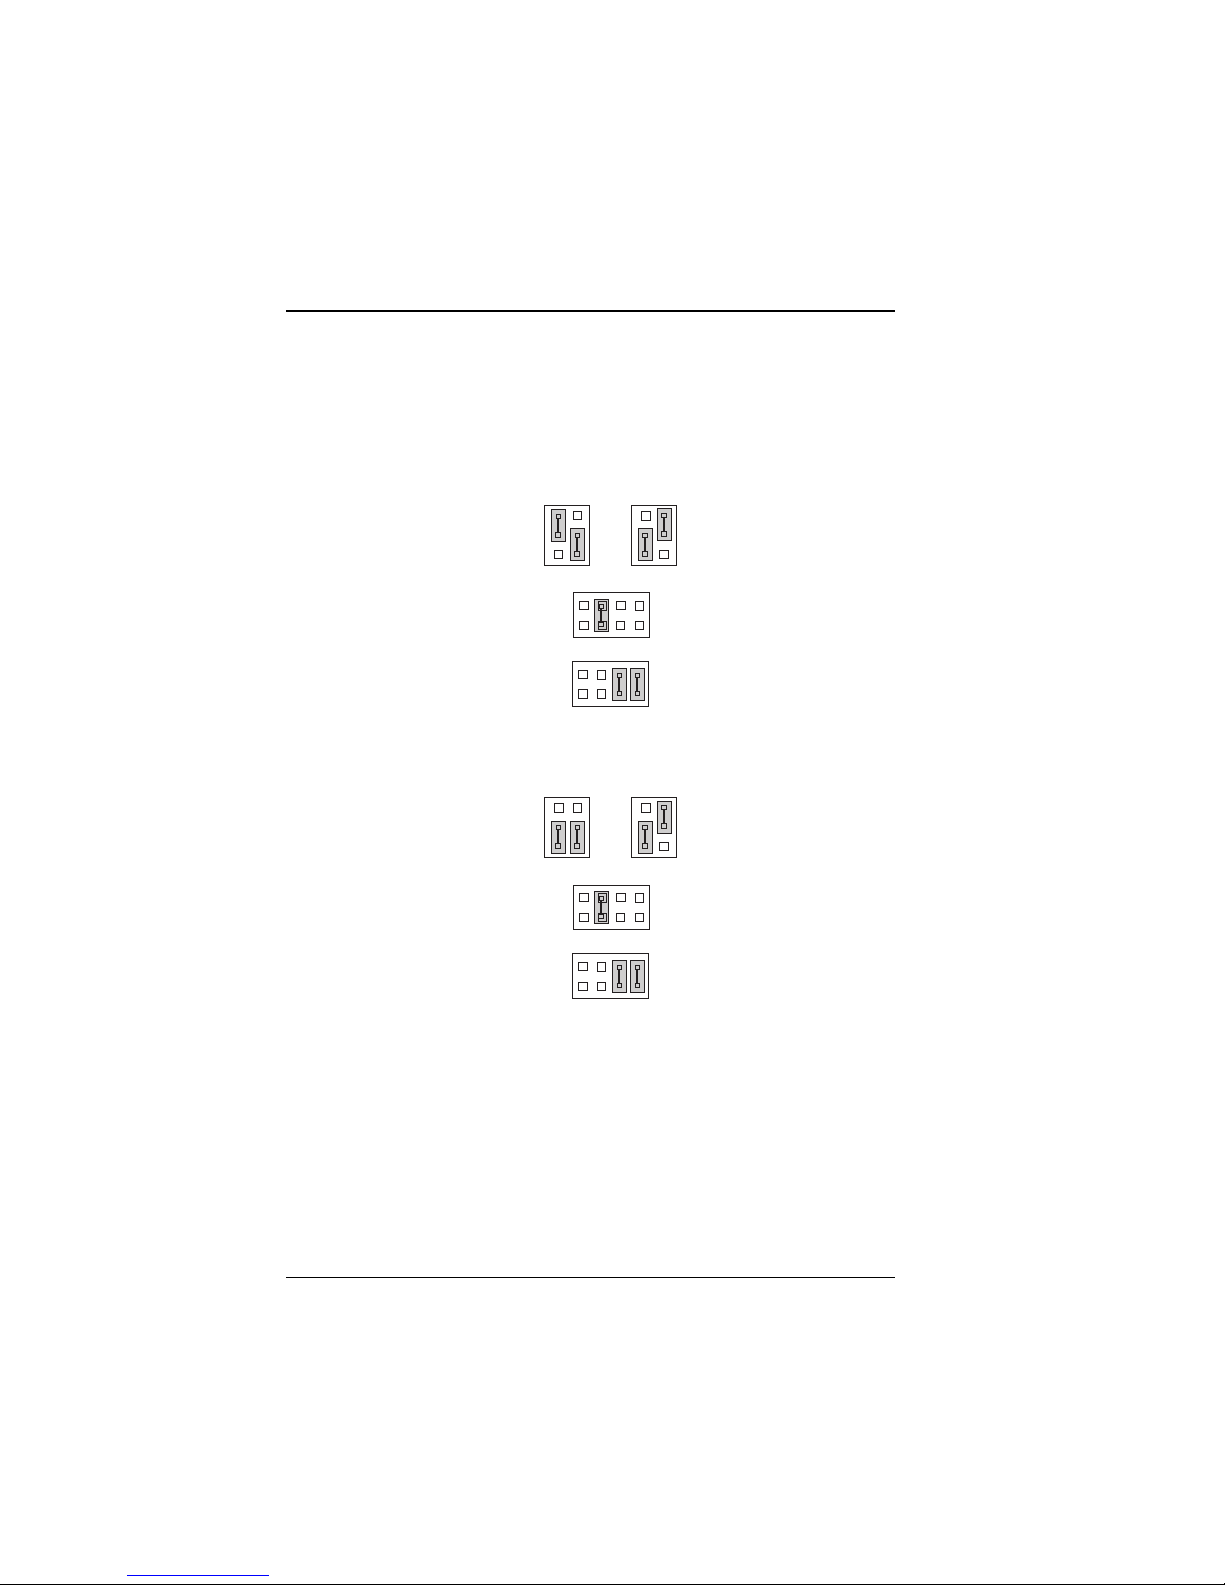
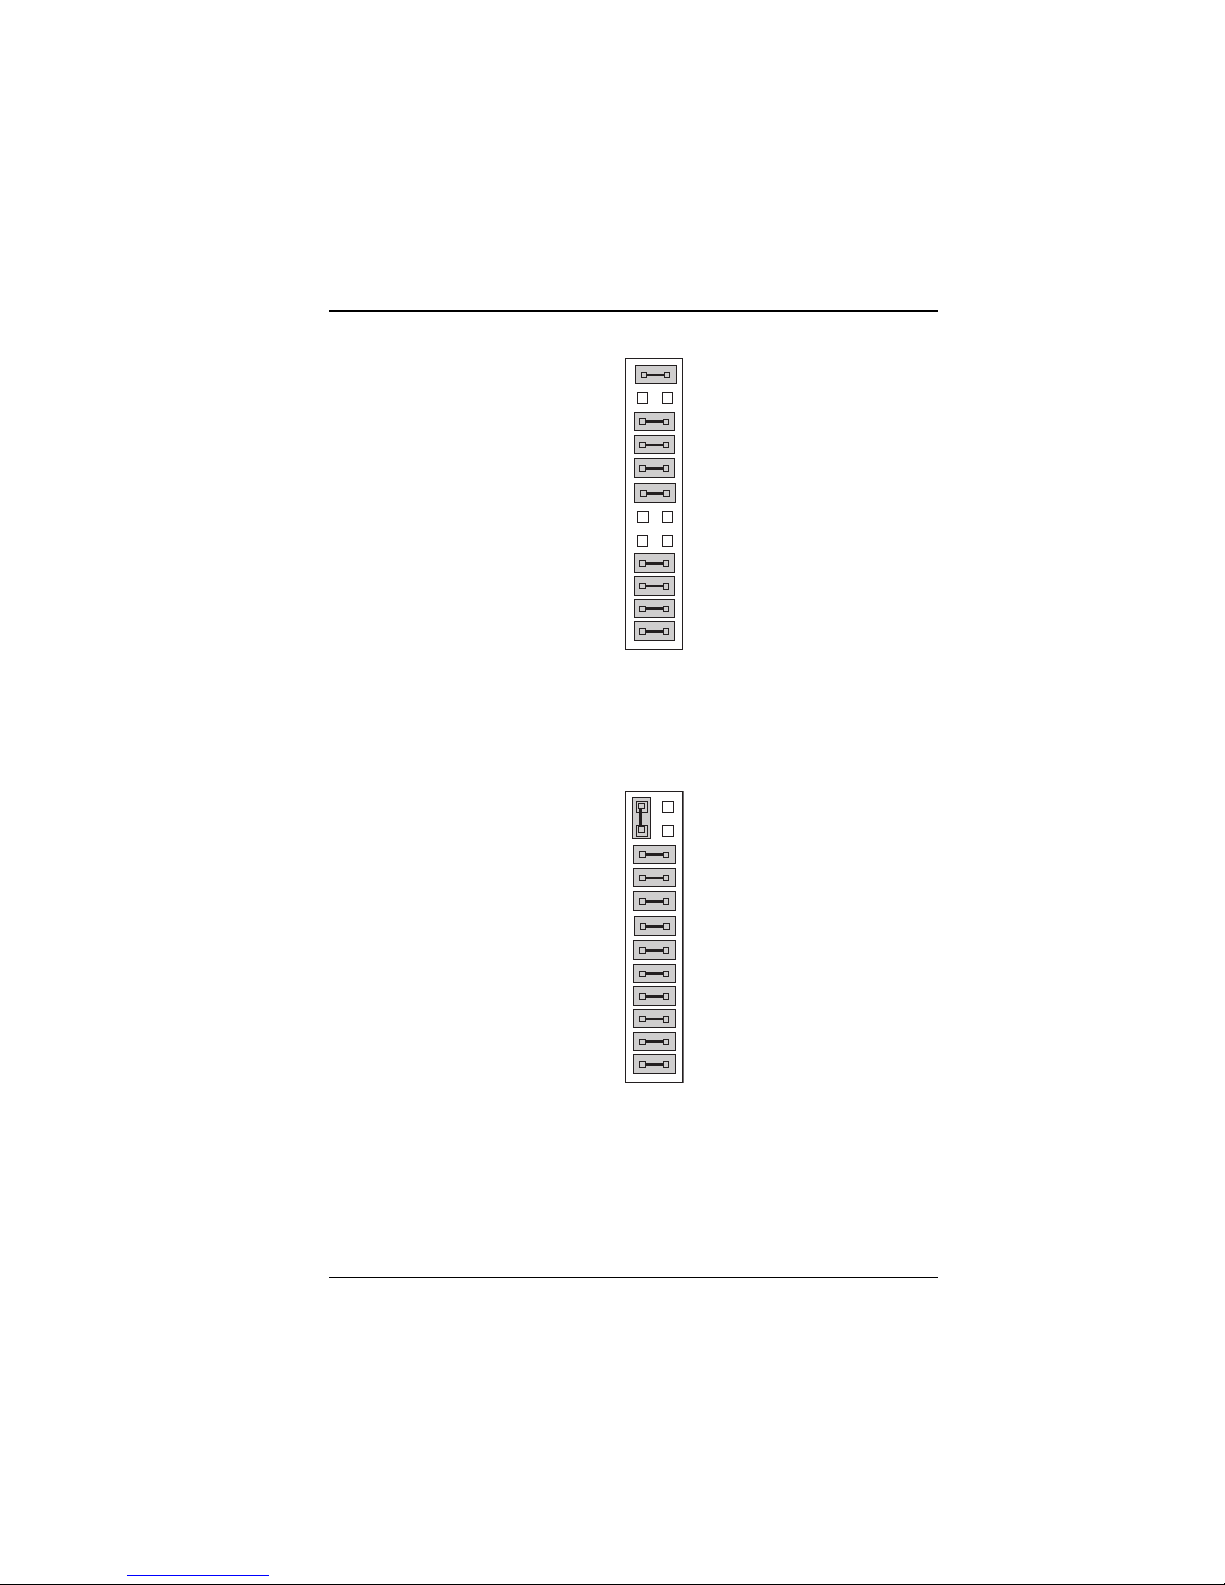
2-4 CPU TYPE & CLOCK SELECTION
JP2 : Bus Frequency Ratio Selection
JP4 : CPU Clock Selection
JP8, JP9 : CPU Voltage Selection
The jumper settings for each of the five CPU types are shown in a
separate figure below :
12
12
56
JP2
2
1
2
1
56
JP4
8
7
JP8
8
7
JP9
Figure 2-2: CPU & Clock Jumpers for AMD K6-2-266
12
56
JP2
2
1
2
1
12
56
JP4
8
7
JP8
8
7
JP9
Figure 2-3: CPU & Clock Jumpers for AMD K6-2-300
14 CommPlete 4000 Server SBC, Model IPC-551
Page 15
Hardware Configuration
12
56
JP2
2
1
12
56
JP4
8
7
JP8
2
1
8
7
JP9
Figure 2-4: CPU & Clock Jumpers for AMD K6-2-333
12
56
JP2
2
1
2
1
12
56
JP4
8
7
JP8
8
7
JP9
Figure 2-5: CPU & Clock Jumpers for AMD K6-2-366
12
56
JP2
2
1
12
56
JP4
8
7
JP8
2
1
8
7
JP9
Figure 2-6: CPU & Clock Jumpers for Intel Pentium MMX 233 MHz
CommPlete 4000 Server SBC, Model IPC-551 15
Page 16

Hardware Configuration
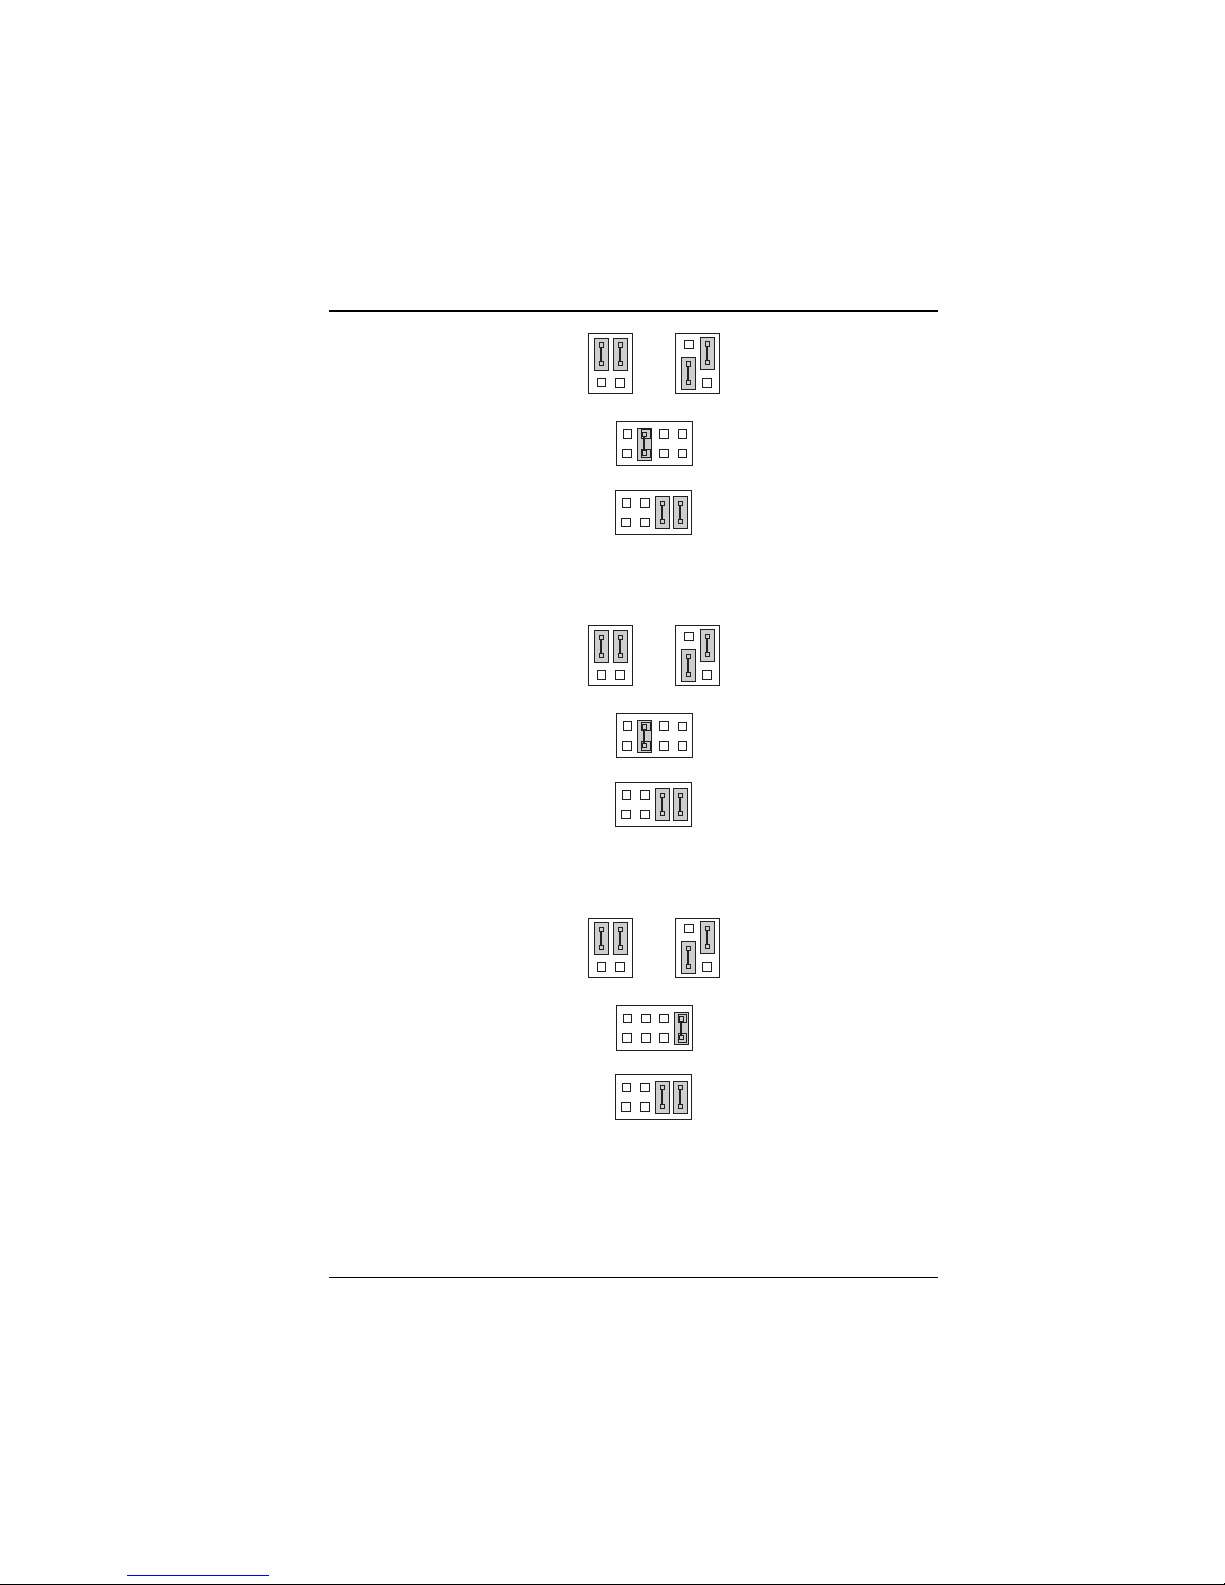
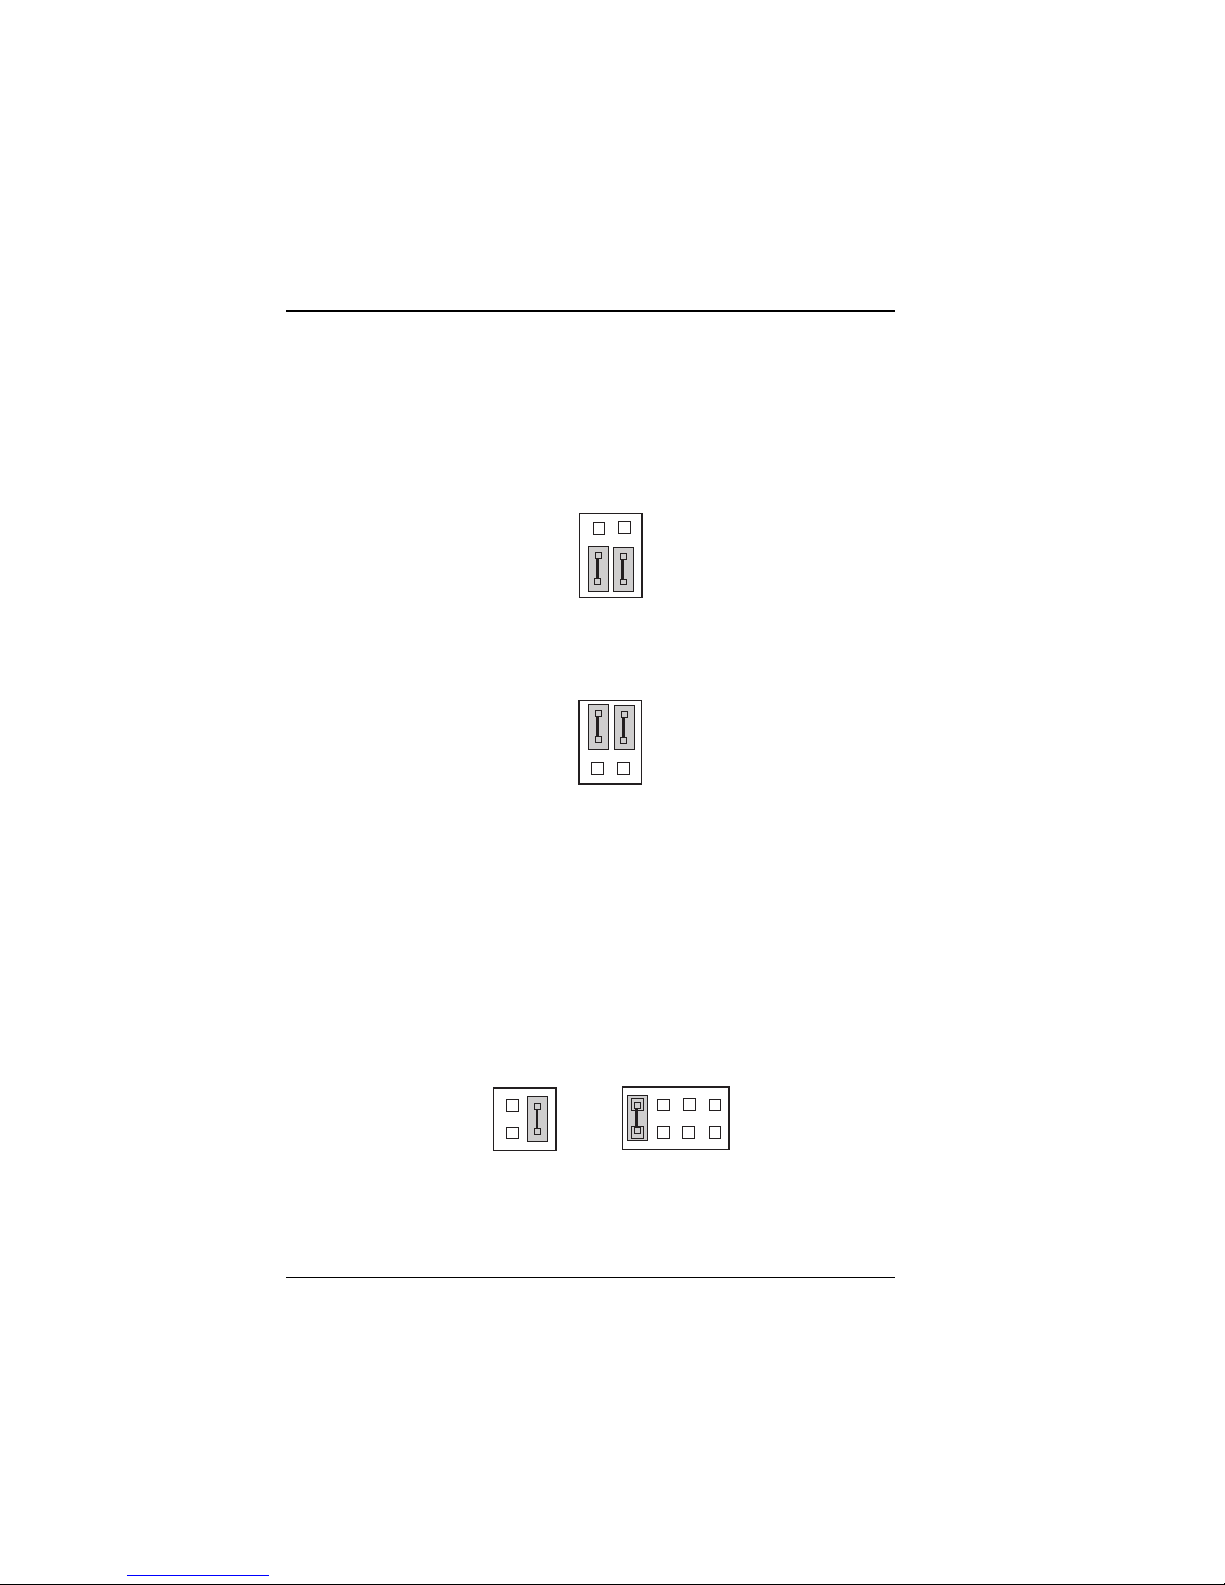
2-5 RS232/422/485 (COM2) Selection
JP7 : RS-232/422/485 selection
COM1 supports RS-232 functionality only. (The COM1 port has a
receptacle at the edge of the IPC-551 board.)
COM2 is selectable forRS-232, RS-422,or RS- 485 functionality. (A
COM2 connector is available on the IPC-551 board. To use COM2,
you must attach a cable to this connector. This attached cable must
terminate to a receptacle that can be mounted on the backplane of the
CommPlete 4000 chassis.)
The jumper settings are as follows:
12
16 CommPlete 4000 Server SBC, Model IPC-551
23
24
JP7
Figure 2-7: RS-232 at COM2
Page 17
Hardware Configuration
12
23
JP7
24
12
23
JP7
24
Figure 2-8: RS-422 at COM2
*** Factory default RS-232.
CommPlete 4000 Server SBC, Model IPC-551 17
Figure 2-9: RS-485 at COM2
Page 18
Hardware Configuration
2-6 AT Keyboard / PS2 Mouse Selection
JP6 : AT keyboard / PS2 mouse selection
The jumper settings are as follows:
12
56
JP6
Figure 2-10: AT Keyboard Jumper (Default)
12
56
JP6
Figure 2-11: PS2 Mouse Jumper
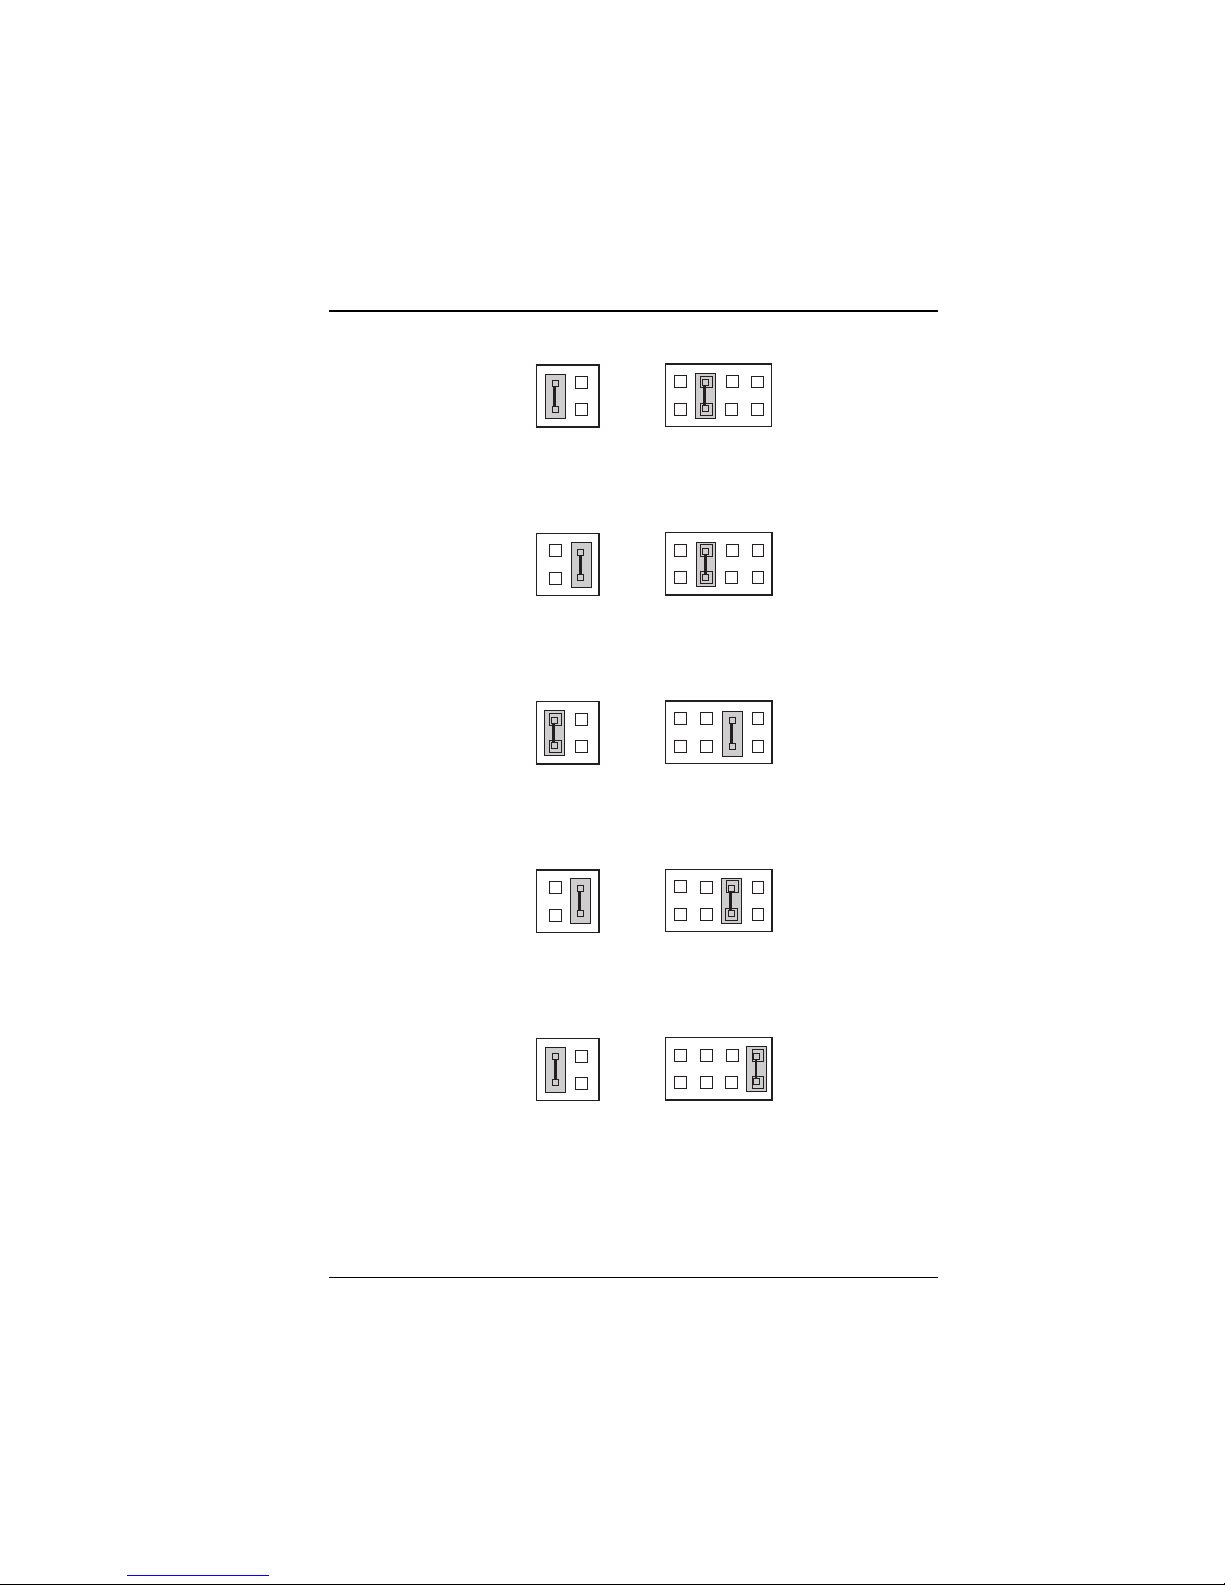
2-7 Memory Map for SSD (Solid State Disk)
JP12, JP14 : SSD Memory Mapping Selection.
This 32-pin disk-on-chip socket supports an SSD up to 72MB. This
plug-and-play flash ROM SSD can be installed as though it were a
hard disk. If mapped as Drive C, it can be used to boot up the
computer with MS-DOS installed.
JP14
2
1
4
3
Figure 2-12: SSD Memory Map -- CC000h-CDFFFh
18 CommPlete 4000 Server SBC, Model IPC-551
JP12
2
1
8
7
Page 19
Hardware Configuration
JP12
2
1
8
7
2
1
JP14
4
3
Figure 2-13: SSD Memory Map -- D0000h-D1FFFh
JP12
2
1
8
7
2
1
JP14
4
3
Figure 2-14: SSD Memory Map -- D4000h-D5FFFh
JP12
2
1
8
7
2
1
JP14
4
3
Figure 2-15: SSD Memory Map -- D8000h-D9FFFh
JP12
2
1
8
7
2
1
JP14
4
3
Figure 2-16: SSD Memory Map -- DC000h-DDFFFh
JP12
2
1
8
7
2
1
JP14
4
3
Figure 2-17: SSD Memory Map -- E0000h-E1FFFh
***Factory default CC000h-CDFFFh
CommPlete 4000 Server SBC, Model IPC-551 19
Page 20

Hardware Configuration
2-8 COM1 Connector
COM1 : connector type is DB9 male and has pinout as follows:
15
6
9
COM1
Figure 2-18: COM1 Connector
PIN SIGNAL FUNCTION
1 DCD
2RX
3TX
4DTR
5 GND
6 DSR
7RTS
8 CTS
9RI
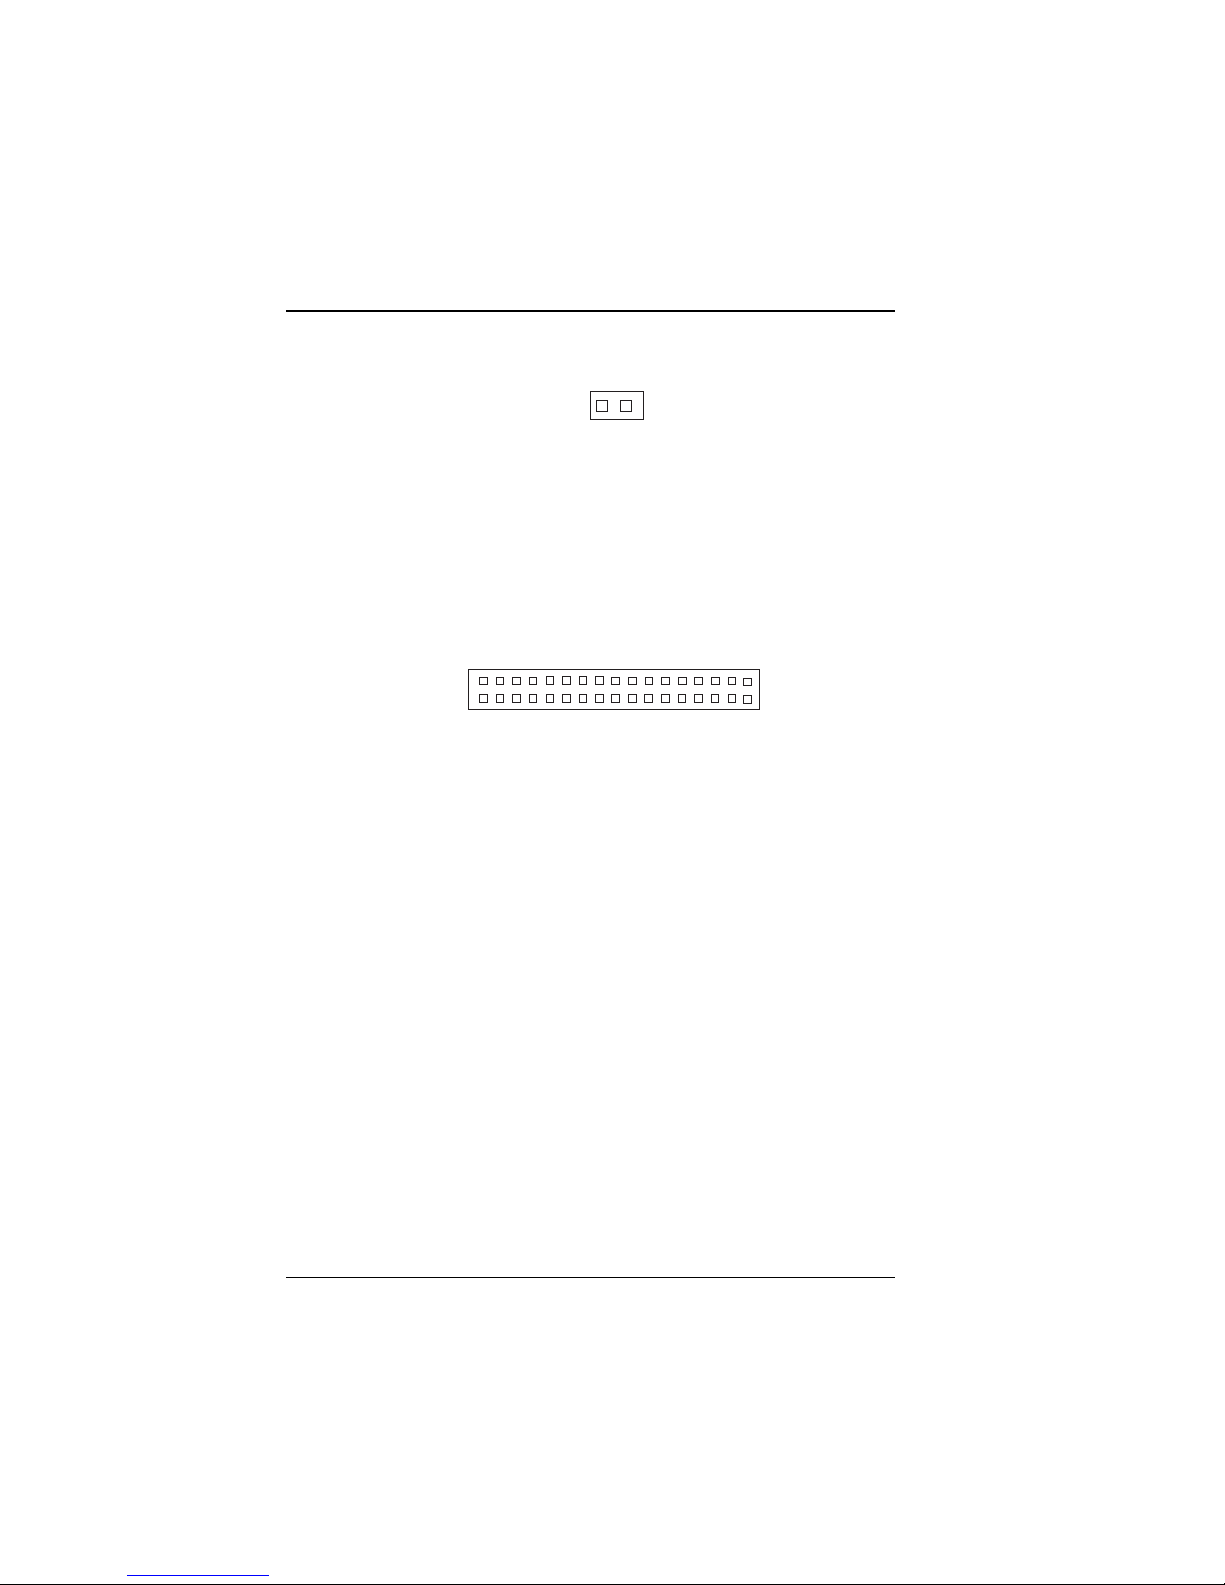
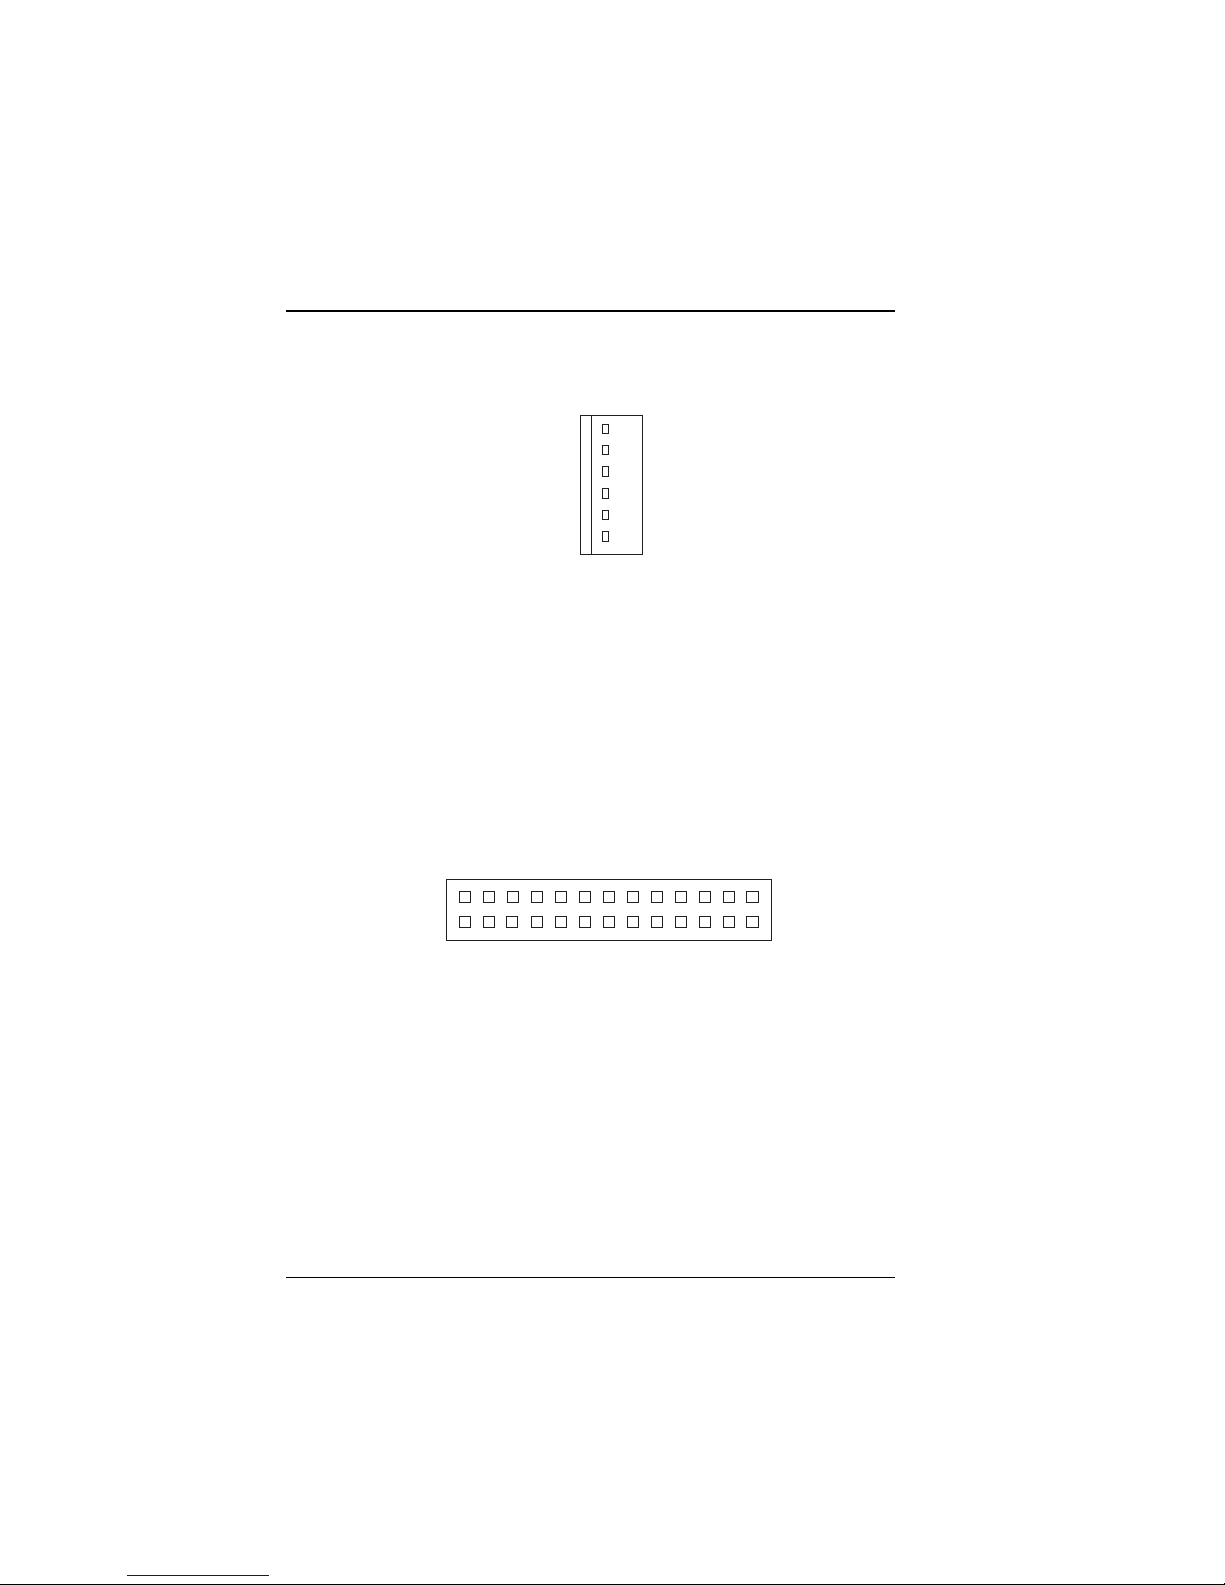
2-9 COM2 Connector
COM2 : COM2 Connector
COM2
5
1
10
6
Figure 2-19: COM2 Connector
The COM2 Connector assignments are as follows:
PIN SIGNAL FUNCTION
1 DCD TX- DATA2 RX TX+ DATA+
3 T X RX+ NC
4 DTR RX- NC
5 GND GND GND
6 DSR RTS - NC
7RTS RTS+NC
8 CTS CTS+ NC
9 RI CTS- NC
10 NC NC NC
20 CommPlete 4000 Server SBC, Model IPC-551
RS-232 RS-422 RS-485
Page 21

Hardware Configuration
2-10 Keyboard Connector
Connector Type: DIN
5
6
4
3
1
2
DIN
Figure 2-20: Keyboard DIN Connector
Supports PC/AT keyboard. Pin assignments are as follows:
PIN SIGNAL FUNCTION
1 KBDATA
2NC
3 GND
4Vcc
5 KBCLK
6NC
2-11 External Keyboard Connector
EXKB : external keyboard connector
EXKB
1
The pin assignments are as follows:
CommPlete 4000 Server SBC, Model IPC-551 21
Figure 2-21: External Keyboard Connector
PIN SIGNAL FUNCTION
1 KBCLK
2 KBDATA
3NC
4 GND
5Vcc
Page 22
Hardware Configuration
2-12 Reset Connector
1
JP10
Figure 2-22: Reset Connector
JP10 : Reset Connector.
The pin assignments are as follows:
PIN SIGNAL FUNCTION
1 Reset
2 Ground
2-13 Floppy Disk Drive Connector
33
34
Figure 2-23: Floppy Disk Drive Connector
FDD : Floppy Disk Drive Connector
The pin assignments are as follows:
PIN SIGNAL FN PIN SIGNAL FUNCTION
1 GND 2 RPM
3 GND 4 NC
5 GND 6 RATE0
7 GND 8 INDEX
9 GND 1 0 MT R 0
11 GND 12 DRV1
13 GND 14 DRV0
15 GND 16 MTR1
17 GND 18 DIR
19 GND 20 STEP
21 GND 22 WDATA
23 GND 24 WGATE
25 GND 26 TRK0
27 GND 28 WRPRT
29 GND 30 RDATA
31 GND 32 SEL
33 GND 34 DSKCHG
1
2
FDD
22 CommPlete 4000 Server SBC, Model IPC-551
Page 23

Hardware Configuration
2-14 Hard Disk Drive Connector
39
40
1
2
IDE1
Figure 2-24: Hard Disk Drive Connector for IDE1
IDE1: Hard Disk Drive Connector
The CommPlete 4000 has two HDD connectors, IDE1 and IDE2. The
pin assignments are as follows:
PIN SIGNAL FUNCTION PIN SIGNAL FUNCTION
1 IDERST 21 IDEREQ0
2 GND 22 GND
3 IDED7 23 IDEIOW
4 IDED8 24 GND
5 IDED6 25 IDEIOR
6 IDED9 26 GND
7 IDED5 27 IDERDY
8 IDED10 2 8 PULL HI
9 IDED4 29 IDEACK0
10 IDED11 30 GND
11 IDED3 31 IRQ14
12 IDED12 32 IOCS16
13 IDED2 33 IDEA1
14 IDED13 34 GND
15 IDED1 35 IDEA0
16 IDED14 36 IDEA2
17 IDED0 37 IDECS1P
18 IDED15 38 IDECS3P
19 GND 39 IDELEDP
20 N.C. 40 GND
39
40
1
2
IDE2
CommPlete 4000 Server SBC, Model IPC-551 23
Figure 2-25: Hard Disk Drive Connector for IDE2
Page 24

Hardware Configuration
IDE2: Hard Disk Drive Connector
The pin assignments are as follows:
PIN SIGNAL FN PIN SIGNAL FUNCTION
1 IDERST 2 1 IDEREQ1
2 GND 2 2 GND
3 IDED7 23 IDEIOW
4 IDED8 24 GND
5 IDED6 25 IDEIOR
6 IDED9 26 GND
7 IDED5 27 IDERDY
8 IDED10 28 PULL HI
9 IDED4 29 IDEACK1
10 IDED11 3 0 GND
11 IDED3 31 IDESIRQ
12 IDED12 3 2 IOCS16
13 IDED2 33 IDEA1
14 IDED13 3 4 GND
15 IDED1 35 IDEA0
16 IDED14 3 6 IDEA2
17 IDED0 37 IDECS1S
18 IDED15 3 8 IDECS3S
19 GND 39 IDELEDS
20 N.C. 4 0 GND
2-15 Hard Disk Drive LED Connector
1
HDL
Figure 2-26: Hard Drive LED Connector
HDL : Hard Disk Driver LED Connector
The pin assignments are as follows:
PIN SIGNAL FUNCTION
1Vcc
2 HDD Active Signal
3 HDD Active Signal
4Vcc
24 CommPlete 4000 Server SBC, Model IPC-551
Page 25

Hardware Configuration
2-16 Power LED & Keylock Connector
1
KBL
Figure 2-27: Power LED and Keylock Connector
KBL : Power LED & keylock Connector
The pin assignments are as follows:
PIN SIGNAL FUNCTION
1 Power LED
2NC
3 Ground
4 Keyboard INT
5 Ground
2-17 VGA CRT Connector
1
10
15
5
6
11
VGA
Figure 2-29: VGA Connector for CRT
VGA : VGA CRT Connector
The pin assignments are as follows:
PIN SIGNAL FN PIN SIGNAL FUNCTION
1 RED 9 NC
2 GREEN 1 0 GND
3 BLUE 11 NC
4NC 12NC
5 GND 1 3 HSYNC
6 GN D 1 4 VSYNC
7 GND 1 5 NC
CommPlete 4000 Server SBC, Model IPC-551 25
Page 26
Hardware Configuration
8 GND
2-18 Power Connector
Figure 2-30: Power Connector
PWR : Power Connector
The pin assignments are as follow :
PIN SIGNAL FUNCTION
1NC
2 +5V
3 +12V
4 -12V
5 GND
6 GND
2-19 Printer Connector
1
6
PWR
13
26
1
14
PRT
Figure 2-31: Printer Connector
PRT : Printer Connector
As to link the Printer to the card, you need a cable to connect both
DB25 connector and parallel port. The pin assignments are as follows:
PIN SIGNAL FN PIN SIGNAL FUNCTION
1 STB 14 AUTFE
2 P 0 15 ERROR
3P1 16INIT
4 P2 17 SLCTIN
5 P 3 18 GND
6 P 4 19 GND
26 CommPlete 4000 Server SBC, Model IPC-551
Page 27

Hardware Configuration
7 P 5 20 GND
8 P 6 21 GND
9 P 7 22 GND
10 ACK 23 GND
1 1 BUSY 2 4 GND
12 PE 25 GND
13 SLCT 26 NC
2-20 External Speaker Connector
1
SPK
Figure 2-32: External Speaker Connector
SPK : External Speaker Connector
The pin assignments are as follows:
PIN SIGNAL FUNCTION
1Vcc
2 Ground
3NC
4 Speaker Signal
CommPlete 4000 Server SBC, Model IPC-551 27
Page 28

Hardware Configuration
2-21. Solid-State Disk Socket
SSD
Figure 2-36: Solid-State Disk Socket
SSD: The 32pin Disk-on-Chip Socket has pin assignments as follows:
PIN FUNCTION PIN FUNCTION
1 NC 17 SD3
2 NC 18 SD4
3 NC 19 SD5
4 SA12 20 SD6
5 SA7 21 SD7
6 SA6 22 CE
7 SA5 23 SA10
8 SA4 24 O E
9 SA3 25 SA11
10 SA2 26 SA9
11 SA1 27 SA8
12 SA0 28 NC
13 SD0 29 NC
14 SD1 30 VCC
15 SD2 31 WR
16 GND 32 VCC
2-22. Memory Installation
The IPC-551 Pentium Embedded Computer will support two double
DRAM banks , bank 0 and bank 1, each consisting of two 72-pin
SIMM sockets.
28 CommPlete 4000 Server SBC, Model IPC-551
Page 29

Hardware Configuration
Note: SIMM 1,2,3,4 for double-bank DRAM module (72pin x 32bit x 4).
DRAM BANK CONFIGURATION
SIMM 1 SIMM 2 SIMM 3 SIMM 4 TOTAL
BANK 0 BANK 1 MEMORY
4M 4M 8M
4M 4M 4M 4M 16M
8M 8M 16M
8M 8M 4M 4M 24M
8M 8M 8M 8M 32M
16M 16M 32M
16M 16M 4M 4M 40M
16M 16M 8M 8M 48M
16M 16M 16M 16M 64M
32M 32M 64M
32M 32M 4M 4M 72M
32M 32M 8M 8M 80M
32M 32M 16M 16M 96M
32M 32M 32M 32M 128M
64M 64M 128M
64M 64M 4M 4M 136M
64M 64M 8M 8M 144M
64M 64M 16M 16M 160M
64M 64M 32M 32M 192M
64M 64M 64M 64M 256M
128M 128M 256M
CommPlete 4000 Server SBC, Model IPC-551 29
Page 30

Hardware Configuration
30 CommPlete 4000 Server SBC, Model IPC-551
Page 31

Software Configuration
Chapter 3
Software Configuration
This chapter presents detailed information on VGA video mode and
on the Watchdog function. It also describes how to install
configurations.
Sections include:
VGA Drivers Utilities
Flash BIOS Update
Watchdog Timer Configuration
3-1. VGA Driver Utilities
3.1.1. VGA Drivers
The VGA interface for IPC-551 supports a great range of display
modes, such as SVGA, STN, TFT, EL,.etc.
This single-board computer is shipped with two utility diskettes
containing two files, VGA.EXE and AWDFLASH.EXE, for VGA driver
setup and Flash BIOS update.
<
Utility Disk#1
......... 1. Awdflash 5.35A program update for Awardflash BIOS
......... 2. Win3.1 program for Win3.1 system
......... 3. Win95 program for Win95 system
......... 4. WinNT 3.5x program f or WinNT3.5x
CommPlete 4000 Server SBC, Model IPC-551 31
Page 32

Software Configuration
......... 5. WinNT 4.0 program for WinNT4.0
<<
Utility Disk#2
............ OS/2 Video Device Driver for OS/2 3.0 system
Before you change any setup for VGA or system BIOS, you must first
install your utility diskette. Then the file will automatically be
decompressed (unzipped) and a sub-directory will be created on your
hard drive.
32 CommPlete 4000 Server SBC, Model IPC-551
Page 33

Software Configuration
3-1-2. Installing the VGA Driver for PCI
Each procedure below explains how to install the VGA driver into a
particular operating system (Windows 3.1, Windows 95, Windows NT,
or OS/2 Warp).
1. Installing the VGA driver into Windows 3.1
(A) To install the VGA driver into Windows 3.1, insert Utility Disk#1
into the floppy disk drive (drive A or B). Using File Manager, go to
the win31directory where the VGA driver files are located.
(B) Click on the Setup.exe file to launch installation of the VGA
driver.
(C) Follow the instructions presented on the screen and complete the
installation.
(D) After the installation is complete, you must shut down and restart
the system in order for the changes to take effect.
2. Installing the VGA driver into Windows 95
(A) Click on Start | Settings | Control Panel.
(B) On the Control Panel, click the Display icon and enter the
Settings tab of the Display Properties window.
(C) Click on Change Display Type.
(D) In the Change Display Type dialog box, select Adapter
Type, and click on Change. The PC will compile a list of devices
that it supports.
(E) When the Select Device dialog box appears, click on Have
Disk.
(F) Click on Browse and select the Win95 file on the diskette.
(G) Select Chips & Tech 65550 PCI Video Driver.
(G) Follow screen instructions to completion.
3. Installing the VGA driver into Windows NT 3.5
(A) From the Main group, select Control Panel and click on the
Display icon.
CommPlete 4000 Server SBC, Model IPC-551 33
Page 34

Software Configuration
(B ) Select Change Display Type...(Alt-C)
(C) From the Adapter Type window, select Change... .
(D ) From th e Select Device window, choose Other.
(E) Insert the CHIPS WinNT driver disk into the appropriate floppy
drive and click OK.
(F) Click on Install. Then, follow the prompts on the screen.
4. Installing the VGA driver into Windows NT 4.0
(A) Click on Start | Settings | Control Panel.
(B) On the Control Panel, click on Display| Settings |
Display Type.
(C) Click on Change and enter the Change Display area tab
of the Display Properties window.
(D) In the Change Display Type window, click on the Have
Disk button under Display Type. This will bring up the
Install from Disk window.
(E) Place the diskette containing the video driver into floppy drive A.
(F) In the Select Device window, click on the Other
button. Enter the source directory where the Windows NT driver
files are located (usually a:\winnt40). Press <ENTER>.
(G) The name of the Chips and Technologies Video Accelerator driver
will appear in the Display list box. Double-click on the driver.
Once the installation is complete, the system must be shut down
and restarted.
(H) Upon restart, select the desired display settings from the
Display Properties dialog box. Click on Test to test the
newly selected graphics mode.
(I) A color test screen should appear, followed by the Testing
Mode window. Click Yes to continue.
(J) The Display Properties window will appear. Click on OK
for the new settings to take effect.
34 CommPlete 4000 Server SBC, Model IPC-551
Page 35

Software Configuration
5. Installing the VGA driver into OS/2 Warp Operating System
(A) Preliminary Steps:
OS/2 DOS Support must be installed.
If you previously installed SVGA support, you must reset
the system to VGA mode. VGA is the default video mode.
Enable VGA when OS/2 is to be installed.
To restore VGA mode, use SELECTIVE INSTALL. Specify
VGA as the PRIMARY DISPLAY. For more information on this
procedure, see the section on Changing Display Adapter
Support in the OS/2 Users Guide.
(B) Start Driver installation from Utility Disk#2
(B1) Open an OS/2 full screen or windowed session.
(B2) Insert Utility Disk#2 into the floppy disk drive. Utility
Disk#2 contains the 65550 Display Driver.
(B3) At the OS/2 command prompt , type the following
commands to copy the files to the OS/2 drive:
Type A: and press ENTER to make this the default drive.
Type Setup A: C: and press ENTER.
When the setup program has finished running, you must
shut down and then restart the computer in order for the
change to take effect.
(B4) After restarting the system, open the OS/2 System folder.
(B5) Open the System Setup folder.
(B6) Open the Display Driver Install Object.
(B7) When the Display Driver Install window appears, select
PRIMARY DISPLAY, and click OK.
(B8) When the Primary Display Driver List window appears,
select Chips and Technologies 65550/554 from the list of
Adapter Types.
CommPlete 4000 Server SBC, Model IPC-551 35
Page 36

Software Configuration
(B9) Select OK to install the video driver.
(B10) When installation is complete, you must shut down and
restart the system for the changes to take effect. And also
make sure to remove the install Disk#2 before restarting the
system.
3-2. Flash BIOS Update
3-2-1. System BIOS Update:
BIOS updates are revised versions of the BIOS that have been
modified to remedy known bugs. Use the program Awdflash.exe on
Utility Disk#1 to update the system BIOS and the VGA BIOS. Users
should check periodically with MultiTech to see if a new flash BIOS
update is available.
3-3. Watchdog Timer Configuration
The watchdog timer does not run constantly. It must be started in
DOS Debug mode or from another application program, customized for
this purpose, that runs on the system. The watchdog timer is
especially useful for remote rebooting of the PC.
The watchdog timer is defined at I/O port 0443H. To enable the
watchdog timer, write I/O port 0443H, then the system will reset itself.
To disable the function, write I/O port 0441H and the system will stop
the Watchdog timer.
Since the timers intervals have a tolerance of 25%, you should specify
that the timer be refreshed about once every second. To program
your watch timer, follow these steps:
Watchdog enable program:
36 CommPlete 4000 Server SBC, Model IPC-551
Page 37

Software Configuration
MOV AX, 000FH
(choose the values you need; start from 0)
MOV DX, 0443H
OUT DX , AX
Watchdog disable program:
MOV AX, 000FH
(this value can be ignored)
MOV DX, 0441H
OUT DX , AX
The Watchdog Timer control table is as follows:
Level Value Time/sec Level Value Time/sec
1 F09716
2E210618
3D411520
4C612422
5B813324
6 A 10 14 2 26
7 9 12 15 1 28
8 8 14 16 0 30
CommPlete 4000 Server SBC, Model IPC-551 37
Page 38

Software Configuration
38 CommPlete 4000 Server SBC, Model IPC-551
Page 39

Green PC Function
Chapter 4
Green PC Function
The CommPlete 4000 is equipped with a green function that allows it
to operate using reduced electrical power when the machine is
inactive. When in green mode, the CommPlete 4000 slows down and
shuts down certain computer functions in order to reduce power
consumption. There are three reduced-power operating modes
(presented in order of increasing power savings):
(1) CPU Doze Mode,
(2) System Standby Mode,
(3) System Suspend Mode .
By default, however, the green function is turned off.
4-1. Power Saving Block Diagram
Keyboard/Mouse Wake-Up
Timer Control into Doze
Keyboard/Mouse
Wake-Up
Timer Control into Standby
DozeSuspend
External Switch &
Timer Control into Suspend
Keyboard/Mouse Wake-Up
Timer Control
Timer Control into Suspend
into Standby
On
Standby
Timer Control into Suspend
Figure 4-1: Power On & Three Reduced-Power States
CommPlete 4000 Server SBC, Model IPC-551 39
Page 40

Green PC Function
4-2. CPU Doze Mode
1. After a pre-determined period of inactivity has elapsed, the CPU will
slow down to 8 MHz.
2. The computer will emit one beep sound.
3. The green function will monitor PC activity according to settings in
the Power Management Setup screen.
4. If any activity occurs, the system will switch from Doze Mode to
On Mode.
4-3. System Standby Mode
1. After a pre-determined period of inactivity has elapsed, the CPU will
slow down to 8 MHz.
2. The computer will emit two beeps.
3. The Level 1 cache will be disabled.
4. The VGA monitor will display a blank screen.
5. The hard drive will be powered down.
6. If any activity occurs, the system will switch from Doze Mode to
On Mode.
4-4 System Suspend Mode
1. After a pre-determined period of inactivity has elapsed, the CPU will
slow down to 8 MHz.
2. The computer will emit three beeps.
3. The Level 2 cache will be disabled.
4. The VGA monitor will display a blank screen.
5. The hard drive will be powered down.
6. The green function will monitor PC activity according to settings in
the Power Management Setup screen.
7. When the system is in Suspend Mode, input from the keyboard, or
the mouse, or alarm is required to wake up the PC.
40 CommPlete 4000 Server SBC, Model IPC-551
Page 41

Award BIOS Setup
Chapter 5
Award BIOS Setup
5.1 Introduction
This chapter describes the function of the BIOS in managing the
features of your system and how to configure the BIOS in its Setup
Menu. The IPC-551 single-board computer is equipped with a system
BIOS chipset from Award Software Inc.
Your application programs (such as word processing, spreadsheets,
and games) rely on an operating system such as DOS or OS/2 to
manage such things as keyboard, monitor, disk drives, and memory.
The operating system, in turn, relies on a BIOS (Basic Input and
Output system), a program stored on a ROM (Read-only Memory)
chip, to initialize and configure your computers hardware. As the
interface between the hardware and the operating system, the BIOS
enables you to make basic changes to your systems hardware without
having to write a new operating system.
The following diagram illustrates the interlocking relationships
between the system hardware, BIOS, operating system, and an
application program:
Application Program
Operating System
BIOS
System Hardware
Figure 5-1: PC Subsystem Relationships
CommPlete Series 4000 Server SBC, Model IPC-551 41
Page 42

Award BIOS Setup
The Setup program built into the Award BIOS lets users modify the
basic system configuration. This special configuration information is
then stored in battery-backed RAM so that the PC retains the Setup
information when the power is turned off.
The Award BIOS is a custom version of an industry standard BIOS. It
supports Intel/Cyrix/AMD processors in a standard IBM-AT
compatible input/output system. The BIOS provides critical low-level
support for standard devices such as disk drives and serial and
parallel ports.
The Award BIOS has been customized by adding important, but nonstandard, features such as virus and password protection as well as
special support for detailed fine-tuning of the chipset that controls the
entire PC system.
Descriptions in this chapter will help you configure your system using
the BIOS Setup screens.
Note: MultiTech has pre-set the BIOS before shipping the CommPlete
4000. In most cases, the user will not need to change any BIOS settings.
However, if any hardware within the CommPlete 4000 has been changed,
or if the boot sequence has been changed, the user will need to revise the
BIOS accordingly.
5-2 Entering Setup
To enter the BIOS Setup screen, power on the computer and then
press the Delete key immediately. The other way to enter Setup is to
power on the computer and then, when the below message appears
briefly at Phe bottom of the screen during the POST (Power On Self
Test), press the Delete key or simultaneously press <Ctrl>, < Alt >,
and < Esc > keys (Control, Alternate, & Escape).
TO ENTER SETUP BEFORE BOOT PRESS <CTRL-ALT-ESC> OR
<DEL> KEY
As long as the above message is present on the screen you may press
the <Del> key (the one that shares the decimal point at bottom of the
number keypad) to access the Setup program. After a moment, the
main menu of the Award SETUP program will appear on the screen:
42 CommPlete Series 4000 Server SBC, Model IPC-551
Page 43

Award BIOS Setup
ROM / PCI / ISA BIOS (2A59FP6C)
CMOS SETUP UTILITY
AWARD SOFTWARE, INC.
STANDARD CMOS SETUP
BIOS FEATURES SETUP
CHIPSET FEATURES SETUP
POWER MANAGEMT SETUP
PNP/PCI CONFIGURATION
LOAD BIOS DEFAULTS
LOAD SETUP DEFAULTS
Esc: Quit
F10: Save & Exit Setup
Time, Date, Hard Disk Type .........
INTERGRATED PERIPHERALS
PASSWORD SETTING
IDE HDD AUTO DETECTION
HDD LOW LEVEL FORMAT
SAVE & EXIT SETUP
EXIT WITHOUT SAVING
:SELECT ITEM
(Shift) F2: Change Color
Figure 5-2: Setup Program Initial Screen
5.2.1 Setup Keyboard Commands
A common set of keyboard commands is used for all BIOS-related screens.
For example, you may use the cursor up/down keys to highlight the
individual menu items. As you highlight each item, a brief description of
that items function will appear in the lower window. If you have a color
monitor you can use the Shift F2 keys to scroll through the various color
combinations available.
In general, you use the arrow keys to highlight items and then press
Enter to select. Use the PageUp and PageDown keys to change
entries. Press F1 for help. Press Esc to quit. The following table
provides more detail about how to navigate in the Setup program using the
keyboard.
CommPlete Series 4000 Server SBC, Model IPC-551 43
Up arrow Move to previous item
Down arrow Move to next item
Left arrow Move to the item in the left hand
Right arrow Move to the item in the right hand
Esc key Main Menu Quit but do not save
changes into CMOS
Page 44

Award BIOS Setup
Submenu Exit current page and return to Main
PgUp key Increase the numeric value or make
PgDn key Decrease the numeric value or make
+ key Increase the numeric value or make
- key Decrease the numeric value or make
F1 key General help
(Shift)F2 Change color from total 16 colors.
F4 key Reserved
F5 key Restore the previous CMOS value
F6 key Load the default CMOS value from
Menu
changes
changes
changes
changes
F2 selects key color forward,
Shift-F2 selects color backwards.
from CMOS
BIOS default table
F7 key Load the default value of the parameter
F8 key Reserved
F9 key Reserved
F10 key Save all the CMOS changes, only for
Main Menu
5-3 Standard CMOS Setup Menu
Highlight STANDARD CMOS SETUP and press < ENTER > . The
following screen display will appear:
44 CommPlete Series 4000 Server SBC, Model IPC-551
Page 45

Award BIOS Setup
ROM PCI / ISA BIOS (2A59FP6C)
STANDARD CMOS SETUP
AWARD SOFTWARE, INC.
Date (mm:dd:yy) : Fri, Sep 5 1997
Time (hh:mm:ss) : 10 : 17 : 37
Primary Master
Primary Slave
Secondary Master
Secondary Slave
Drive A: 1.44M, 3.5in.
Drive B: None
Video: EGA/VGA
Halt On: All Errors
Esc: Quit
F1:Help
Type
:Auto
:Auto
:Auto
:Auto
(Shift) F2: Change Color
Size
Heads
Cyls.
0
0
0
0
0
0
:SELECT ITEM
0
0
0
0
0
0
Base Memory: 640K
Extended Memory: 31744K
Other Memory: 384K
__________________________
Total Memory: 32768K
PreComp
Figure 5-3: Standard CMOS Setup Screen
In the above table the base memory size and the extended memory size
are displayed. This is automatically read from your system. You do not
need to set these parameters. The screen displays the date and time,
which the operator must set correctly after powering up the computer.
The format of the date/time display is as follows:
Land-
zone
0
0
0
0
Sectors
0
0
0
0
Pu/Pd/+/-: Modify
Mode
:Auto
0
:Auto
0
:Auto
0
:Auto
0
Date:
< Month >, < Date > and <Year >. Ranges for each value are in the
CMOS Setup Screen, and the week-day will be skipped skip
automatically.
Time:
< Hour >, < Minute >, and < Second >. Use 24 hour clock format, i.e.,
for p.m. numbers, add 12 to the hour. For example, 4: 30 p.m. should
be expressed as 16:30:00.
Drives: Primary Master/Slave & Secondary Master/Slave
In general, the IPC-551 can handle four disk drives: a primary master, a
primary slave, a secondary master, and a secondary slave. The hard
drive shipped with the CommPlete 4000 will be a Primary Master
drive designated as Drive C. An IDE CDROM may optionally function
CommPlete Series 4000 Server SBC, Model IPC-551 45
Page 46

Award BIOS Setup
as a Primary Slave drive and be designated as Drive D. The type
and mode settings for the primary master and the primary slave
drives should, in most cases, be AUTO. The default configuration
state for the secondary master/slave is DISABLED.
When this field of the Standard CMOS Setup screen is set to AUTO,
the IPC-551 will automatically detect the hard drive(s) in the system.
The IPC-551 can auto-detect 45 specific drive types ( designated 1-45
in this field).
The drive type can also be entered manually. If entered manually, the
drive in use must match the type entered in this field. If the drive being
used is not of the type specified in this field, it will not work properly
in the CommPlete 4000. For drives not on the list of 45 types, a userdefined drive can also be specified in this field (as type User).
When User is selected for this field, the operator must specify the
parameters of the hard drive (number of cylinders, heads, etc.). This
information should be provided in the documentation for the hard
drive unit (this information is often specified on the exterior of the hard
drive unit, as well).
Note: If your IPC-551 has trouble detecting your hard drive when the
Type field in the Standard CMOS Setup screen is set to AUTO, then you
should enable the IDE HDD Auto Detection function in the CMOS Setup
Utility screen. If the hard drive is still not detected, designate the Type as
User and enter the hard-drive values into the Standard CMOS Setup
screen
If the controller of the hard-disk drive interface is ESDI, the selection
shall be
Type 1.
If the controller of the hard-disk drive interface is SCSI, the selection
shall be None
If the controller of the hard-disk drive interface is CD-ROM, the
selection shall be None
46 CommPlete Series 4000 Server SBC, Model IPC-551
Page 47

Award BIOS Setup
Type:
Describes the hard drive. Default value is AUTO. Other values: 1-45,
user, and none.
CYLS.:
Denotes the number of cylinders in the specified drive type.
HEADS:
Denotes the number of heads in the specified drive type.
PRECOM:
Precom is the read delay circuitry which takes into account the timing
differences between the inner and outer edges of the surface of the
disk platter. The number designates the starting cylinder of the signal.
LZONE:
Lzone is the landing zone of the heads. This number determines the
cylinder location where the heads will normally park when the system
is shut down.
SECTORS:
Denotes the number of sectors in the specified drive type.
Size (Capacity):
Denotes the formatted capacity of the drive based on the following
formula: (# of heads) X (# of cylinders) X (# of sets) X ( 512bytes/
sects)
Drive A and Drive B:
The option are 360KB 5.25in, 1.2KB 5.25in, 720KB 3.5in, 1.44MB 3.5in,
2.88MB 3.5in and None. Not Installed could be used as an option for
workstations without disk drives.
CommPlete Series 4000 Server SBC, Model IPC-551 47
Page 48

Award BIOS Setup
Video:
Options are Monochrome, Color 40, VGA/EGA (default), Color 80.
Halt On:
Options are No Errors, All but Keyboard, All but Diskette, All but
Diskette/Keyboard, All Errors. Default is No Errors.
48 CommPlete Series 4000 Server SBC, Model IPC-551
Page 49

Hard Disk Attributes:
Award BIOS Setup
Type
10
11
12
13
14
15
16
17
18
19
20
21
22
23
24
25
26
27
28
29
30
31
32
33
34
35
36
37
38
39
40
41
42
43
44
45
47
1
2
3
4
5
6
7
8
9
Cylinders
306
615
615
940
940
615
642
733
900
820
855
855
306
733
000
612
977
977
1024
733
733
733
306
977
1024
1224
1224
1224
1024
1024
918
925
1024
1024
1024
1024
1024
1024
918
820
1024
1024
809
809
776
Heads
4
4
6
8
6
4
8
5
15
3
5
7
8
7
0
4
5
7
7
5
7
5
4
5
9
7
11
15
8
11
11
9
10
12
13
14
2
16
15
6
5
5
6
6
8
V-P comp
128
300
300
512
512
65535
256
65535
65535
65535
65535
65535
128
65535
0000
0000
300
65535
512
300
300
300
0000
65535
65535
65535
65535
65535
65535
65535
65535
65535
65535
65535
65535
65535
65535
65535
65535
65535
65535
65535
65535
65535
65535
AUTO
LZone
305
615
615
940
940
615
511
733
901
820
855
855
319
733
000
663
977
977
1023
732
732
733
336
976
1023
1223
1223
1223
1023
1023
1023
926
1023
1023
1023
1023
1023
1023
1023
820
1023
1023
852
852
775
Sect
17
17
17
17
17
17
17
17
17
17
17
17
17
17
00
17
17
17
17
17
17
17
17
17
17
17
17
17
17
17
17
17
17
17
17
17
17
17
17
17
17
26
17
26
33
Capacity
10
20
30
62
46
20
30
30
112
20
35
49
20
42
00
20
40
56
59
30
42
30
10
40
76
71
111
152
68
93
83
69
85
102
110
119
17
136
114
40
42
65
40
61
100
CommPlete Series 4000 Server SBC, Model IPC-551 49
Figure 5-4: Award Hard Disk Type Table
Page 50

Award BIOS Setup
5-4 BIOS Features Setup Menu
The BIOS FEATURES SETUP menu presents configuration options
for the support chipset and the shadowing of RAM. When you select
BIOS FEATURES SETUP in the CMOS Setup Utility menu, this
screen appears:
ROM / PCI / ISA BIOS (2A59FP6C)
BIOS FEATURES SETUP
Virus Warning :Disabled
CPU Internal Cache :Enabled
External Cache :Enabled
Quick Power-On Self-Test :Disabled
Boot Sequence :A, C, SCSI
Swap Floppy Drive :Disabled
Boot-Up Floppy Seek :Enabled
Boot-Up Numlock Status :ON
Boot-Up System Speed :High
Gate A20 Option :Fast
Typematic Rate Setting :Disabled
Typematic Rate (char/sec) :6
Typematic Delay (msec) :250
Security Option :Setup
PCI/VGA prelatal snoop :Disabled
OS Select for DRAM>64Mb :Non-OS2
AWARD SOFTWARE, INC.
Video BIOS Shadow :Enabled
C8000-CBFFF Shadow :Disabled
CC000-CFFF Shadow :Disabled
D000-D3FFF Shadow :Disabled
D4000-D7FFF Shadow :Disabled
D8000-DBFFF Shadow :Disabled
DC000-DFFFF Shadow :Disabled
Esc: Quit
F1: Help
F5: Old Values
F6: Load BIOS Defaults
F7: Load Setup Defaults
:SELECT ITEM
Pu/Pd/+/-: Modify
(Shift) F2: Color
Figure 5-5: BIOS Features Setup
The parameters accessible on this screen govern the systems default
speed, boot-up sequence, keyboard operation, shadowing and
security.
Note: MultiTech presets all BIOS features before shipping the
CommPlete 4000. BIOS features should not be changed except by expert
operators.
Virus Warning
When this item is enabled, the Award BIOS will monitor the boot
sector and partition table of the hard disk drive for any attempt at
50 CommPlete Series 4000 Server SBC, Model IPC-551
Page 51

Award BIOS Setup
modification. If an attempt is made, the BIOS will halt the system and
the following error message will appear.
! WARNING !
Disk boot sector is to be modified
Type Y to accept write or N to abort write
Award Software, Inc.
Afterwards, if necessary, you will be able to run an anti-virus program
to locate and remove the problem before any damage is done.
Enabled Activates automatically when the system boots
up. Causes a warning message to appear when
anything attempts to access the boot sector or
hard disk partition table.
Disabled No warning message will appear when anything
attempts to access the boot sector or hard disk
partition table. (Default.)
NOTE: Many disk diagnostic programs which attempt to access the boot
sector table can cause the above warning message. If you will be running
such a program, we recommend that you disable Virus Protection beforehand. When enabled, this feature can cause problems
when installing Windows 95.
CPU Internal Cache/External Cache
These two settings affect memory access speed, generally increasing
access speed when enabled. The default value is Enabled.
Enabled Enable cache
Disabled Disable cache
Quick Power On Self Test
This setting affects the duration of the Power On Self Test (POST),
which occurs after you power up the computer. If enabled, the BIOS
will shorten or skip some check items during the POST.
Enabled Enable quick POST (Default)
Disabled Normal POST
CommPlete Series 4000 Server SBC, Model IPC-551 51
Page 52

Award BIOS Setup
Boot Sequence
This setting determines which drive to search first for booting files at
startup. The default value is C, A.
C, A System will first search for hard disk drive then floppy disk
drive.
A, C System will first search for floppy disk drive then hard disk
drive.
Boot Up Floppy Seek
During POST, BIOS will determine if the floppy disk drive installed has
40 or 80 tracks. 360K type has 40 tracks while 760K, 1.2M and 1.44M
are all 80 tracks.
Enabled BIOS searches for floppy disk drive to determine
if it is 40 or 80 tracks. Note that BIOS can not
tell from 720K, 1.2M or 1.44M drive type as they
are all 80 tracks (Default).
Disabled BIOS will not search for the type of floppy disk
drive by track number. Note that there will not
be any warning message if the drive installed is
360K.
Boot Up NumLock Status
This allows you to determine the default state of the numeric keypad.
By default, the system boots up with NumLock on.
On Keypads number keys are active.
Off Keypads arrow keys are active.
Boot Up System Speed
Selects the default system speed the normal operating speed at
power up.
High Sets the speed to high (default)
Low Sets the speed to low
52 CommPlete Series 4000 Server SBC, Model IPC-551
Page 53

Award BIOS Setup
Regardless of which setting is chosen, the operator can still use the
turbo switch to toggle between High and Low modes during operation.
Gate A20 Option
This entry allows you to select how gate A20 is handled. Gate A20 is a
device used to address memory above 1 Mbyte. Initially, Gate A20 was
handled by a pin on the keyboard. Today, while keyboards still
provide this support, it is more common, and much faster, for the
system chipset to provide support for gate A20.
No rmal keyboard (default)
Fast chipset
Typematic Rate Setting
Enable the typematic function if you want to be able to configure
the key-repetition characteristics of your keyboard. When typematic is
disabled, continually holding down a key on your keyboard will
generate only one instance. In other words, the BIOS will only report
that the key is down. When the typematic rate is enabled, the BIOS
will report as before, but it will then wait a moment, and, if the key is
still down, it will begin the report that the key has been depressed
repeatedly. For example, you would use such a feature to accelerate
cursor movements with the arrow keys.
Enabled Enable typematic rate
Disabled Disable typematic rate (default)
CommPlete Series 4000 Server SBC, Model IPC-551 53
Page 54

Award BIOS Setup
Typematic Rate (Chars/Sec)
When the typematic rate is enabled, the typematic rate selection
allows you select the rate at which a held-down key will produce
acceleration. Acceleration refers to multiple instances of a character
(letter, number, or symbol) or other multiple keyboard effects (like
cursor movement with arrow keys and character removal with the
Delete keys).
6 6 characters per second (default)
8 8 characters per second
10 10 characters per second
12 12 characters per second
15 15 characters per second
20 20 characters per second
24 24 characters per second
30 30 characters per second
Typematic Delay (Msec)
When the typematic rate is enabled, this selection allows you to select
the delay between when the key is first depressed and when the
acceleration begins.
250 250 msec (default)
500 500 msec
750 750 msec
1000 1000 msec
Security Option
Allows you to limit access to the computer system or to the BIOS
Setup menus. When System security is enabled, the system will not
boot and access to Setup will be denied if the correct password is not
entered at the prompt. When Setup security is enabled, the system will
boot, but access to Setup will be denied if the correct password is not
entered at the prompt.
54 CommPlete Series 4000 Server SBC, Model IPC-551
Page 55

Award BIOS Setup
System security boot & BIOS access require password
Setup security BIOS access requires password (default)
Note: To disable security, select PASSWORD SETTING at the CMOS Setup
Utility menu. You will be asked to enter a password. Do not type anything; just press Enter, and security will be disabled. Once its disabled,
the system will boot and you can enter Setup freely.
Video BIOS Shadow
Determines whether the video BIOS will be copied to RAM. However,
it is optional depending on chipset design. Video Shadow will increase
the video speed.
Enabled Video shadow is enabled (default)
Disabled Video shadow is disabled
C8000 - CFFFF Shadow/DC000 - DFFFF Shadow
Determines whether option ROMs will be copied to RAM or not. An
example of such option ROM would be support of on-board SCSI hard-drive
functionality.
Enabled Optional shadow is enabled
Disabled Optional shadow is disabled (Default)
CommPlete Series 4000 Server SBC, Model IPC-551 55
Page 56

Award BIOS Setup
5-5 Chipset Features Setup
This menu lets you configure the system based on the specific
features of the installed chipset. This chipset manages bus speeds and
access to system memory resources, such as DRAM and the external
cache. It also coordinates communications between the conventional
ISA bus and the PCI bus. However, these parameters should never
need to be altered. The default settings have been chosen because
they provide the best operating conditions for your system. The only
time you might consider making any changes would be if you
discovered that data was being lost while using your system.
If you choose CHIPSET FEATURES SETUP from the CMOS
Setup Utilities menu, the following screen appears.
ROM / PCI / ISA BIOS (2A59FP6C)
BIOS FEATURES SETUP
AWARD SOFTWARE, INC.
Auto Configuration :Enable
DRAM Timing : 70 ns
DRAM RAS# Precharge Time :4
DRAM R/W Leadoff Timing :7/6
Fast RAS# to CAS# Delay :3
DRAM Read BUrst (EDO/FPM) :x333/x444
DRAM Write Burst Timing :x333
Turbo Read Leadoff :Disabled
DRAM Speculative Leadoff :Disabled
Turn-Around Insertion :Disabled
ISA Clock :PCICLK/4
System BIOS Cacheable :Disabled
Video BIOS Cacheable :Disabled
8-Bit I/O Recovery Time :1
16-Bit I/O Recovery Time :1
Memory Hole at 15M-16M :Disabled
Peer Concurrency :Enabled
Chipset Special Features :Enabled
DRAM ECC/Parity Select :Parity
Memory Parity / ECC Check :Auto
Single Bit Error Report :Enabled
L2 Cache Cacheable Size :64MB
Chipset NA# Asserted :Enabled
Pipeline Cache Timing :Faster
Passive Release :Enabled
Delayed Transaction :Disabled
Esc: Quit
F1: Help
F5: Old Values
F6: Load BIOS Defaults
F7: Load Setup Defaults
:SELECT ITEM
Pu/Pd/+/-: Modify
(Shift) F2: Color
By moving cursor to the desired field and pressing < F1 > key, all
values for that field will be displayed.
56 CommPlete Series 4000 Server SBC, Model IPC-551
Figure 5-6: Chipset Features Setup
Page 57

Award BIOS Setup
Auto Configuration Function:
When this option is Enabled, the BIOS automatically configures cache
and clock settings based on detection of the CPU clock speed. The
user cannot change the other parameters. Set this option to
Disabled to do manual setting of DRAM , cache, and I/O bus
clock operating parameters. Enabled is default.
DRAM Settings
The first chipset settings deal with CPU access to dynamic random
access memory (DRAM). The default timings have been carefully
chosen and should only be altered if data is being lost. One data-loss
scenario that relates to DRAM timing values occurs when the
computer contains mixed-speed DRAM chips; greater delays may be
required to preserve the integrity of the data held in the slower
memory chips and, consequently, data may be lost.
ISA Clock:
Defines the clock value for the ISA bus. Usually, the ISA bus clock
should be programmed to 8Mhz. For example, when the PCI clock is
33MHz, choose PCICLK/4. PCICLK/4 is the default value.
Cache Features
System BIOS Cacheable
When enabled, accesses to the system BIOS ROM addressed at F0000HFFFFFH are cached.
Enabled BIOS access cached
Disabled BIOS access not cached
Disabled is the default.
CommPlete Series 4000 Server SBC, Model IPC-551 57
Page 58

Award BIOS Setup
Video BIOS Cacheable
As with caching the System BIOS above, enabling the Video BIOS cache
will cause access to video BIOS addressed at C0000H to C7FFFH to be
cached.
Enabled Video BIOS access cached
Disabled Video BIOS access not cached
Disabled is the default.
PCI and IDE Configuration
8 Bit I/O Recovery Time
The recovery time is the length of time, measured in CPU clock periods, that
the system will delay after completing an input/output request. This delay
occurs because the CPU operates much faster than the input/output bus
and, therefore, the CPU must be delayed to allow for the completion of the I/
O.
This setting determines the recovery time allowed for 8 bit I/O. Choices are
from 1 to 8 CPU clock periods.
3 clock periods is the default setting.
16 Bit I/O Recovery Time
This setting determines the recovery time allowed for 16 bit I/O. Choices are
from 1 to 4 CPU clock periods.
2 clock periods is the default setting.
Memory Hole At 15M-16M
In order to improve performance, certain space in memory can be
reserved for ISA cards. This memory must be mapped into the memory
space below 16 MB.
Enabled memory hole supported
Disabled memory hole not supported (default)
58 CommPlete Series 4000 Server SBC, Model IPC-551
Page 59

Award BIOS Setup
5-6 Power Management Setup
The Power Management Setup allows you to configure your system to
save energy most effectively while still meeting your computing
needs. When you specify Max Saving, all power-saving timeouts
are set to their minimum value and power saving is implemented at the
lowest possible threshold.
ROM / PCI / ISA BIOS (2A59FP6C)
POWER MANAGEMENT SETUP
AWARD SOFTWARE, INC.
Power Management :Disable
PM Control by APM :Yes
Video Off Method :V/H SYNC + Blank
MODEM Use IRQ :3
Doze Mode :Disable
Standby Mode :Disable
Suspend Mode :Disable
HDD Power-Down :Disable
**Wake Up Events in Doze & Standby **
** Power-Down & Resume Events **
IRQ3 (COM 2) :ON
IRQ4 (COM 1) :ON
IRQ5 (LPT 2) :ON
IRQ6 (Floppy Disk) :OFF
IRQ7 (LPT1) :ON
IRQ8 (RTC Alarm) :OFF
IRQ9 (IRQ2 Redir) :ON
IRQ10 (Reserved) :ON
IRQ11 (Reserved) :ON
IRQ12 (PS/2 Mouse) :ON
IRQ13 (Co-Processor) :ON
IRQ14 (Hard Disk) :ON
IRQ15 (Reserved) :ON
IRQ3 (Wake-Up Event) :ON
IRQ4 (Wake-Up Event) :ON
IRQ8 (Wake-Up Event) :ON
IRQ12 (Wake-Up Event) :ON
Esc: Quit
F1: Help
F5: Old Values
F6: Load BIOS Defaults
F7: Load Setup Defaults
:SELECT ITEM
Pu/Pd/+/-: Modify
(Shift) F2: Color
Figure 5-7: Power Management Setup
Power Management
This field lets you select the type (or degree) of power saving used.
There are four modes of power management:
1. Doze Mode
2. Standby Mode
3. Suspend Mode
4. HDD Power Down
There are four selections for Power Management, three of which have
fixed mode settings.
Disable (default) No power management. Disables all four
modes
CommPlete Series 4000 Server SBC, Model IPC-551 59
Page 60

Award BIOS Setup
Min. Power Saving Minimum power management.
Doze Mode = 1hr.,
Standby Mode = 1 hr.,
Suspend Mode = 1hr., and
HDD Power Down = 15 min.
Max. Power Saving Maximum power management ONLY
AVAILABLE FOR SL CPUs.
Doze Mode = 1 min.,
Standby Mode = 1 min.,
Suspend Mode = 1 min., and
HDD Power Down = 1 min.
User Defined. Allows you to set each mode individually. When not
disabled, each of the ranges are from 1 min. to 1 hr. except for HDD
Power Down which ranges from 1 min. to 15 min. (HDD can also be
disabled).
PM Control APM
When enabled ( YES ), an Advanced Power Management device will
be activated to enhance the Maximum Power Saving mode and to
stop the CPU internal clock. The Advanced Power Management
function operates only if Maximum Power Saving is enabled. When
enabled ( YES ), the system BIOS will wait for APMs prompt before
it enters any PM mode (Doze, Standby or Suspend). If APM is
installed, and if a task is running and the timer has timed out, APM will
not prompt the BIOS to employ any power saving mode.
Video Off Method
This determines how the monitor is blanked (V/H SYNC+Blank).
This selection will cause the system to turn off the vertical and
horizontal synchronization ports and write blanks to the video buffer
(Blank Screen). This option only writes blanks to the video buffer.
Note: Doze, Standby, and Suspend are configurable only when
User Defined power management has been selected.
60 CommPlete Series 4000 Server SBC, Model IPC-551
Page 61

Award BIOS Setup
Doze Mode
This timeout setting determines how long the PC must be idle before
entering Doze mode. Values range from 10 seconds to 2 hours. Doze
mode can also be disabled. In Doze mode, the CPU clock runs at a
slower speed while all other devices continue operating at full speed.
Standby Mode
This timeout setting determines how long the PC must be idle before
entering Standby mode. Values range from 30 seconds to 2 hours.
Standby can also be disabled. When Standby mode is engaged, the
PCs hard drive and its video are turned off while all other devices
continue operating at full speed.
Suspend Mode
This timeout setting determines how long the PC must be idle before
entering Suspend mode. Values range from 30 seconds to 2 hours.
Suspend can also be disabled. In Suspend mode, all devices except
the CPU are shut off.
HDD Power Down
This timeout setting determines how long the PC must be idle before
entering HDD Power Down mode. In HDD Power Down mode, the
hard disk drive will be shut off but all other devices remain active.
CommPlete Series 4000 Server SBC, Model IPC-551 61
Page 62

Award BIOS Setup
5-7 PnP/PCI Configuration
If you choose PNP/PCI CONFIGURATION from the CMOS Setup
Utility menu, the following screen will appear:
ROM / PCI / ISA BIOS (2A59FP6C)
PNP/PCI CONFIGURATION
AWARD SOFTWARE, INC.
Resources Controlled by :Manual
Reset Configuration Data :Disabled
IRQ3 assigned to :Legacy ISA
IRQ4 assigned to :Legacy ISA
IRQ5 assigned to :PCI/ISA PnP
IRQ6 assigned to :Legacy ISA
IRQ7assigned to :PCI/ISA PnP
IRQ8 assigned to :PCI/ISA PnP
IRQ9 assigned to :PCI/ISA PnP
IRQ10 assigned to :PCI/ISA PnP
IRQ11 assigned to :PCI/ISA PnP
IRQ12 assigned to :PCI/ISA PnP
IRQ13 assigned to :PCI/ISA PnP
IRQ14 assigned to :PCI/ISA PnP
IRQ15 assigned to :PCI/ISA PnP
DMA-1 assigned to :PCI/ISA PnP
DMA-3 assigned to :PCI/ISA PnP
DMA-5 assigned to :PCI/ISA PnP
DMA-6 assigned to :PCI/ISA PnP
DMA-7 assigned to :PCI/ISA PnP
Figure 5-7: PNP/PCI Configuration
You can manually configure the Plug-and-Play/PCI Devices IRQ. The
default setting is Auto.
PCI IRQ Active by :Level
PCI IDE IRQ Map to :PCI-Auto
Primary IDE INT# :A
Secondary IDE INT# :B
Onboard PCI SCSI Chip :Enabled
Used MEM base addr :N/A
Esc: Quit
F1: Help
F5: Old Values
F6: Load BIOS Defaults
F7: Load Setup Defaults
:SELECT ITEM
Pu/Pd/+/-: Modify
(Shift) F2: Color
PCI IRQ Activated by
This sets the method by which the PCI bus recognizes that an IRQ
service is being requested by a device. Under all circumstances, you
should retain the default configuration unless advised otherwise by
your systems manufacturer.
Choices are Level (default) and Edge.
PCI IDE IRQ Map to
This allows you to configure your system to the type of IDE disk
controller in use, ISA or PCI (default value is PCI Auto). PCI Auto
allows the system to determine automatically how your IDE disk
system is configured. Remember that this setting refers to the hard
disk drive itself, rather than individual partitions. Since each IDE
62 CommPlete Series 4000 Server SBC, Model IPC-551
Page 63

Award BIOS Setup
controller supports two separate hard drives, you can select the
interrupt number (the INT#; the possible values are A, B, C, or D)
for each. Note that the primary drive always has a lower interrupt than
the secondary drive.
Onboard PCI SCSI Chip
Default is Disabled. The IPC-551 SBC does not support SCSI.
5-8 Load BIOS Defaults
Auto Configuration with BIOS Defaults
Choosing LOAD BIOS DEFAULTS from the CMOS Setup Utility menu
will restore default BIOS values to the PC. Invoking LOAD BIOS
DEFAULTS will bring up this dialog box:
Load BIOS Default ( Y ? N ) ? Y
To use the BIOS defaults, change the prompt to Y and press
Enter ; the default BIOS values will be loaded into CMOS
automatically the next time you power up the IPC-551. Load BIOS
Defaults are the same as Load Setup Defaults.
5-9 Load Setup Defaults
Auto Configuration with Setup Defaults
Choosing LOAD SETUP DEFAULTS from the CMOS Setup Utility
menu will restore default SETUP values to the PC. Invoking LOAD
SETUP DEFAULTS brings up this dialog box:
Load SETUP Default ( Y ? N ) ? Y
To use the SETUP defaults, change the prompt to Y and press
<Enter>; the default SETUP values will be loaded into the CMOS
automatically the next time you power up the IPC-551. Load Setup
Defaults are the same as Load BIOS Defaults.
CommPlete Series 4000 Server SBC, Model IPC-551 63
Page 64

Award BIOS Setup
5-10 Integrated Peripherals
If you choose INTEGRATED PERIPHERALS from the CMOS Setup
Utility menu, this screen will appear:
ROM / PCI / ISA BIOS (2A59FP6C)
INTEGRATED PERIPHERALS
AWARD SOFTWARE, INC.
IDE HDD Block Mode :Enabled
PCI Slot IDE 2nd Channel :Enabled
On-Chip Primary PCI IDE :Enabled
On-Chip Secondary PCI IDE :Enabled
IDE Primary Master PIO :Auto
IDE Primary Slave PIO :Auto
IDE Secondary Master PIO :Auto
IDE Secondary Slave PIO :Auto
USB Controller :Enabled
USE Keyboard Support :Disabled
Onboard FDC Controller :Enabled
Onboard UART 1 :Auto
UART 1 operation mode :Standard
Onboard UART 2 :Auto
UART 2 operation mode :Standard
Onboard Parallel Port 378/IRQ7
Parallel Port Mode :Normal
Esc: Quit
F1: Help
F5: Old Values
F6: Load BIOS Defaults
F7: Load Setup Defaults
Pu/Pd/+/-: Modify
(Shift) F2: Color
Figure 5-8: Integrated Peripherals
5-11 Password Setting
:SELECT ITEM
Access to the computer system in general or to the BIOS settings in
particular can be put under password protection using this function.
When you select PASSWORD SETTING on the CMOS Setup Utility
menu, the following dialog box will appear at the center of the screen
to assist you in creating a password.
Enter Password
Type the password, up to eight characters in length, and press
Enter. The password typed now will clear any previously entered
password from CMOS memory. You will be asked to confirm the
password. Type the password again and press Enter. You may also
press Esc to abort the selection and not enter a password.
64 CommPlete Series 4000 Server SBC, Model IPC-551
Page 65

Award BIOS Setup
Caution: Losing or forgetting your system password will render your
computer unusable. Assign a password only if it is necessary for security
purposes. Restoring access after loss of a password is nontrivial and
requires the clearing and re-loading of BIOS settings. If a password is
forgotten or lost, contact MultiTech Technical Support to establish a new
password.
To disable a password, just press Enter when you are prompted to
enter the password. A message will confirm that the password is to be
disabled. Once the password has been disabled, the system will boot
and you can enter Setup freely.
Password Disabled
When a password has been enabled, you will be prompted to enter it
every time you try to enter Setup. This prevents an unauthorized
person from changing any part of your system configuration.
Additionally, when a password is enabled, you can also require the
BIOS to request a password every time your system is rebooted. This
would prevent unauthorized use of your computer.
You determine when the password is required within the BIOS
Features Setup menu and its Security option (presented earlier). If the
Security option is set to System, the password will be required both
at boot and at entry to Setup. If set to Setup, prompting only occurs
when trying to enter Setup.
5-12 IDE HDD Auto Detection
The parameters presented on this menu are pre-set at the factory. They
should be altered only by expert users.
This feature automatically detects and configures hard disk drive
parameters. If you are uncertain of your hard disk drives parameters,
this features will display them. Generally, the IDE HDD Auto
Detection function is needed only if you change your hard disk drive.
When you select IDE HDD AUTO DETECTION from the CMOS Setup
Utility menu, this screen will appear:
CommPlete Series 4000 Server SBC, Model IPC-551 65
Page 66

Award BIOS Setup
Primary Master :( Mb)
Primary Slave :
Secondary Master :
Secondary Slave
Option
2(Y)
1
3
ROM / PCI / ISA BIOS (2A59FP6C)
STANDARD CMOS SETUP
AWARD SOFTWARE, INC.
CYLS.
0
:
Select Secondary Slave Option (N=Skip) :N
Size
Cyls
540
524
541
1049
540
524
HEADS
Heads
32
16
32
0
PRECOMP
0
Precomp
0
65535
65535
Landzone
LANDZONE
1048
1048
1048
0
SECTORS
Sectors
63
63
63
0
Mode
LBA
Normal
LARGE
MODE
--------
Note: Some OSes (like SCO-UNIX) must use Normal for installation
Esc: Skip
Figure 5-9: IDE HDD Auto Detection Screen
Generally speaking, hard disk drives are categorized by size as follows:
Normal: HDD Size < 528MB
LBA: 528MB< HDD Size < 8.4 GB
Large: HDD Size > 8.4GB
If you specify a sub-standard mode for a hard disk drive when
formatting, part of the drive will remain unformatted and therefore
inaccessible. For example, if you format a 4GB hard disk drive as a
Normal drive, only 528MB would be formatted and nearly 3.5GB would
be unusable.
Auto Detection
The BIOS Setup will display all the possible modes that are supported
by the HDD including NORMAL, LBA, & LARGE. The user can select
the appropriate mode.
HDD Mode
The Award BIOS supports 3 HDD mode: NORMAL, LBA, & LARGE
NORMAL mode:
66 CommPlete Series 4000 Server SBC, Model IPC-551
Page 67

Award BIOS Setup
Generic access mode in which neither the BIOS nor the IDE controller
will make any transformations during accessing.
The maximum number of cylinders, heads & sectors for NORMAL
mode are 1024, 16, and 63.
no. Cylinder (1024)
x no. Head ( 16)
x no. Sector ( 63)
x no. Bytes per Sector ( 512)
-
Total: 528 megabytes
If the user sets the HDD to NORMAL mode, the maximum accessible
HDD size will be 528 Megabytes even though its physical size may be
greater than that.
LBA (Logical Block Addressing) mode:
This new HDD accessing method overcomes the 528 megabyte
bottleneck. The number of cylinders, heads and sectors shown in
Setup may not be the number physically contained in the HDD.
During HDD accessing, the IDE controller will transform the logical
address described by the sector, head, and cylinder numbers into its
own physical address inside the HDD.
The maximum HDD size supported by LBA mode is 8.4 gigabytes,
which is obtained by the following formula:
no. Cylinder (1024)
x no. Head ( 255)
x no. Sector ( 63)
CommPlete Series 4000 Server SBC, Model IPC-551 67
Page 68

Award BIOS Setup
x no. of Bytes per Sector ( 512)
-
Total: 8.4 gigabytes
LARGE mode:
Some IDE HDDs contain more than 1024 cylinder without LBA support
(in some cases, users do not want LBA). The BIOS provides another
alternative to support these kinds of HDD.
CYLS HEADS SECTOR MODE
1120 16 59 NORMAL
560 32 59 LARGE
The BIOS tricks DOS (or other OS) that the number of cylinders is less
than 1024 by dividing it by 2. At the same time, the number of heads is
multiplied by 2. A reverse transformation process will be made inside
INT 13h in order to access the right HDD address.
Maximum HDD size in Large Mode:
no. Cylinder (1024)
x no. Head ( 32)
x no. Sector ( 63)
x no. Per sector ( 512)
-
Total: 1 gigabyte
Note: Support of the LBA or LARGE mode of HDDs, requires some special
software. All such software packages are located in the Award HDD
Service Routine (INT 13h). If the PC is running under a Operating System
that replaces the whole INT 13h, that PC may fail to access a HDD set to
LBA or LARGE mode.
68 CommPlete Series 4000 Server SBC, Model IPC-551
Page 69

Award BIOS Setup
5-13 HDD Low Level Format
If you choose HDD LOW LEVEL FORMAT from the CMOS Setup
Utility menu, the following screen will appear:
Hard Disk Low Level Format Utility NO. CYLS HEAD
- - - - -- SELECT DRIVE - - - - - -
- - -- - - BAD TRACK LIST - - - - -
- - - - - PREFORMAT - - - - - Current Select drive is : C
DRIVE : C CYLINDER : 0 HEAD : 0
Primary Master
Primary Slave
Secondary Master
Secondary Slave
Up/Down - Select item Enter - Accept ESC - Exit / Abort
Copyright (C) Award Software, Inc. 1992-94 All Rights Reserved
Figure 5-10: HDD Low Level Format
Low-level formatting will sometimes remedy corrupt disk sectors.
Unlike DOS formatting which can format disk parititions separately,
Low-level formatting formats the entire physical hard disk drive. To
invoke low-level formatting, select PREFORMAT and press Enter.
SIZE
541
0
0
0
HEAD
16
0
0
0
PRECOMP
65535
0
0
0
LANDZ
1048
0
0
0
SECTOR
63
0
0
0
MODE
AUTO
AUTO
AUTO
AUTO
Caution: Low-level formatting will destroy all data on the hard disk drive.
If you really want to reformat a hard disk drive, back up your data first.
5-14 Save & Exit Setup
When all required adjustments are complete, you must save these
settings into the CMOS RAM. Select SAVE & EXIT SETUP and
press Enter.
CommPlete Series 4000 Server SBC, Model IPC-551 69
Page 70

Award BIOS Setup
ROM / PCI / ISA BIOS (2A59FP6C)
CMOS SETUP UTILITY
STANDARD CMOS SETUP
BIOS FEATURES SETUP
CHIPSET FEATURES SETUP
POWER MANAGEMT SETUP
PNP/PCI CONFIGURATION
LOAD BIOS DEFAULTS
LOAD SETUP DEFAULTS
AWARD SOFTWARE, INC.
SAVE to CMOS and EXIT (Y/N)? N
Esc: Quit
F10: Save & Exit Setup
Save Data to CMOS & Exit SETUP
INTERGRATED PERIPHERALS
PASSWORD SETTING
IDE HDD AUTO DETECTION
HDD LOW LEVEL FORMAT
SAVE & EXIT SETUP
EXIT WITHOUT SAVING
:SELECT ITEM
(Shift) F2: Change Color
Figure 5-11: Saving a CMOS Setup Configuration
When you confirm that you want to save the settings, your machine
will automatically reboot and the changes you have made will be
implemented. You can call up the setup program at any time to adjust
any of the individual items by pressing the <Del> key during boot up.
To cancel any changes you have made, select QUIT WITHOUT
SAVING (see figure below) and the original settings stored in CMOS
will be retained.
ROM / PCI / ISA BIOS (2A59FP6C)
CMOS SETUP UTILITY
STANDARD CMOS SETUP
BIOS FEATURES SETUP
CHIPSET FEATURES SETUP
POWER MANAGEMT SETUP
PNP/PCI CONFIGURATION
LOAD BIOS DEFAULTS
LOAD SETUP DEFAULTS
Esc: Quit
F10: Save & Exit Setup
AWARD SOFTWARE, INC.
INTERGRATED PERIPHERALS
PASSWORD SETTING
IDE HDD AUTO DETECTION
HDD LOW LEVEL FORMAT
QUIT Without Saving (Y/N)? Y
Abandon All Data and Exit SETUP
SAVE & EXIT SETUP
EXIT WITHOUT SAVING
:SELECT ITEM
(Shift) F2: Change Color
Figure 5-12: Exiting Setup Mode without Saving
70 CommPlete Series 4000 Server SBC, Model IPC-551
Page 71

Appendix A: ExpansionBus
Appendix A:
Expansion Slots
This appendix presents the pin assignments for the PC-104 connector,
the ISA bus, and the PCI bus.
PC-104 Connector Pin Assignment
104AB, 104CD : PC-104 Connector
B1
A1
104AB
C1
D1
Figure A-1: PC104 Connector
The PC-104 can support multiple PC-104 modules. This card has two
connectors : one (104AB) consists of 64 pins; the other one (104CD)
consists of 40 pins, both are dual-in-line headers.
The pin assignments for connectors 104AB & 104CD are as follows:
B32
A32
C32
D32
104AB
IOCHK
D7
D6
D5
D4
D3
D2
D1
D0
AEN
A19
A18
A17
A16
A15
A14
A13
A12
A11
A10
A9
A8
A7
A6
A5
A4
A3
A2
A1
A0
GND
Pin
Assignment
B1
B2
B3
B4
B5
B6
B7
B8
B9
B10
B11
B12
B13
B14
B15
B16
B17
B18
B19
B20
B21
B22
B23
B24
B25
B26
B27
B28
B29
B30
B31
B32
GND
RESET
VCC
IRQ9
-5V
DRQ2
-12V
OWS
+12V
GND
SMEMW
SMEMR
IOW
IOR
DACK3
DRQ3
DACK1
DRQ1
REFRESH
CLK
IRQ7
IRQ6
IRQ5
IRQ4
IRQ3
DACK2
T/C
BALE
VCC
OSC
GND
GND
Pin
C1
C2
C3
C4
C5
C6
C7
C8
C9
C10
C11
C12
C13
C14
C15
C16
C17
C18
C19
C20
Assignment
KEY PIN
Pin
A1
A2
A3
A4
A5
A6
A7
A8
A9
A10
A11
A12
A13
A14
A15
A16
A17
A18
A19
A20
A21
A22
A23
A24
A25
A26
A27
A28
A29
A30
A31
A32
Assignment
iOCHRDY
Figure A-2: PC-104 Pin Assignments
CommPlete 4000 Server SBC, Model IPC-551
GND
SBHE
LA23
LA22
LA21
LA20
LA19
LA18
LA17
MEMR
MEMW
D8
D9
D10
D11
D12
D13
D14
D15
104CD
D10
D11
D12
D13
D14
D15
D16
D17
D18
D19
D20
Assignment
Pin
D1
D2
D3
D4
D5
D6
D7
D8
D9
GND
MEMCS16
IOCS16
IRQ10
IRQ11
IRQ12
IRQ15
IRQ14
DACK0
DRQ0
DACK5
DRQ5
DACK6
DRQ6
DACK7
DRQ7
+5V
MASTER
GND
GND
Page 72

Appendix A: Expansion Bus
ISA Bus Pin Assignments
There are two edge connectors on this CPU Card. The one closest to
the edge bracket is the ISA bus connector; the other is the PCI bus
connector. The ISA-bus connector is divided into two sets : one
consists of 62 pins; the other consists of 36 pins.
A31
B31
C18
D18
COMPONENT SIDE
Figure A-3: ISA Bus Connector
The pin assignments are as follows:
Assignment
-5V
T/C
+5V
Pin
A1
A2
A3
A4
A5
A6
A7
A8
A9
A10
A11
A12
A13
A14
A15
A16
A17
A18
A19
A20
A21
A22
A23
A24
A25
A26
A27
A28
A29
A30
A31
-IOCHK
SD07
SD06
SD05
SD04
SD03
SD02
SD01
SD00
-IOCHRDY
AEN
SA19
SA18
SA17
SA16
SA15
SA14
SA13
SA12
SA11
SA10
SA09
SA08
SA07
SA06
SA05
SA04
SA03
SA02
SA01
SA00
Pin
B1
B2
B3
B4
B5
B6
B7
B8
B9
B10
B11
B12
B13
B14
B15
B16
B17
B18
B19
B20
B21
B22
B23
B24
B25
B26
B27
B28
B29
B30
B31
Assignment
GND
RESET
VCC
IRQ9
DRQ2
-12V
OWS
+12V
GND
-SMEMW
-SMEMR
-IOW
-IOR
-DACK3
-DRQ3
-DACK1
-DRQ1
-REFRESH
BCLK
IRQ7
IRQ6
IRQ5
IRQ4
IRQ3
-DACK2
BALE
OSC
GND
C1
D1
Assignment
Pin
D1
D2
D3
D4
D5
D6
D7
D8
D9
D10
D11
D12
D13
D14
D15
D16
D17
D18
-MEMCS16
-IOCS16
IRQ10
IRQ11
IRQ12
IRQ15
IRQ14
-DACK0
DRQ0
-DACK5
DRQ5
-DACK6
DRQ6
-DACK7
DRQ7
+5V
-MASTER
GND
Pin
Assignment
C1
C2
C3
C4
C5
C6
C7
C8
C9
C10
C11
C12
C13
C14
C15
C16
C17
C18
A1
B1
SBHE
LA23
LA22
LA21
LA20
LA19
LA18
LA17
MEMR
MEMW
SD08
SD09
SD10
SD11
SD12
SD13
SD14
SD15
72 CommPlete 4000 Server SBC, Model IPC-551
Figure A-4: ISA Bus Pin Assignments
Page 73

Appendix A: ExpansionBus
PCI Bus Pin Assignments
Like the ISA-BUS connector, the PCI-BUS edge connector is also
divided into two parts: one consists of 98 pins; the other consists of
22 pins. The standard of PCI-MG 32-bit PCI-ISA connector contains
218 pins in total.
F49
F62
E62
F52
E52
E49
Figure A-5: PCI Bus Connector
The pin assignments are as follows:
Pin
F1
F2
F3
F4
F5
F6
F7
F8
F9
F10
F11
F12
F13
F14
F15
F16
F17
F18
F19
F20
F21
F22
F23
F24
F25
F26
F27
F28
F29
F30
F
Assignment
-12V
TCK
GND
TDO
+5V
+5V
INTB#
INTD#
REQ3#
REQ1#
GNT3#
GND
GND
CLKA
GND
CLKB
GND
REQ0#
+5V(I/O)
AD31
AD29
GND
AD27
AD25
+3.3V
C/BE3#
AD23
GND
AD21
AD19
Pin
E1
E2
E3
E4
E5
E6
E7
E8
E9
E10
E11
E12
E13
E14
E15
E16
E17
E18
E19
E20
E21
E22
E23
E24
E25
E26
E27
E28
E29
E30
E
Assignment
TRST#
+12V
TMS
TDI
+5V
INTA#
INTC#
+5V
CLKC
+5V(I/O)
CLKD
GND
GND
GNT1#
RST#
+5V(I/O)
GNT0#
GND
REQ2#
AD30
+3.3V
AD28
AD26
GND
AD24
GNT2#
+3.3V
AD22
AD20
GND
Pin
F31
F32
F33
F34
F35
F36
F37
F38
F39
F40
F41
F42
F43
F44
F45
F46
F47
F48
F49
F52
F53
F54
F55
F56
F57
F58
F59
F60
F61
F62
COMPONENT SIDE
F
Assignment
+3.3V
AD17
C/BE2#
GND
IRDY#
+3.3V
DEVSEL#
GND
LOCK#
PERR#
+3.3V
SERR#
+3.3V
C/BE1#
AD14
GND
AD12
AD10
GND
AD08
AD07
+3.3V
AD05
AD03
GND
AD01
+5V(I/O)
ACK64#
+5V
+5V
Pin
E31
E32
E33
E34
E35
E36
E37
E38
E39
E40
E41
E42
E43
E44
E45
E46
E47
E48
E49
E52
E53
E54
E55
E56
E57
E58
E59
E60
E61
E62
Assignment
AD18
AD16
+3.3V
FRAME#
GND
TRDY#
GND
STOP#
+3.3V
SDONE
SB0#
GND
PAR
AD15
+3.3V
AD13
AD11
GND
AD09
C/BE0#
+3.3V
AD06
AD04
GND
AD02
AD00
+5V(I/O)
REQ64#
+5V
+5V
F1
E1
E
CommPlete 4000 Server SBC, Model IPC-551
Figure A-6: PCI Pin Assignments
Page 74

Appendix A: Expansion Bus
74 CommPlete 4000 Server SBC, Model IPC-551
Page 75

Appendix B: Technical Summary
Appendix B:
Technical Summary
This appendix presents mappings of six parameter sets:
Interrupts
RTC & CMOS RAM Assignments
Timer Channels
DMA Channels
Memory Functions
Input/Output Functions
Table B-1: Interrupt Map
QRItnemngissA
00-remiTmorftpurretniREMITmetsyS
1llufreffubtuptuodraobyeK
251-8QRIrofedacsaC
32troPlaireS
41troPlaireS
52troPlellaraP
6retpadAksiDyppolF
71troPlellaraP
8kcolCCTR
9elbaliavA
01elbaliavA
11elbaliavA
21elbaliavA
31rossecorP-oChtaM
41retpadAksiDdraH
51elbaliavA
CommPlete 4000 Server SBC, Model IPC-551 75
Table B-2: RTC & CMOS Map
Page 76

Appendix B: Technical Summary
edoCtnemngissA
00sdnoceS
10mralAdnoceS
20setuniM
30mralAetuniM
40sruoH
50mralAsruoH
60keeWfoyaD
70htnoMfoyaD
80htnoM
90raeY
A0AretsigeRsutatS
B0BretsigeRsutatS
C0CretsigeRsutatS
D0DretsigeRsutatS
E0etyBsutatScitsongaiD
F0etyBnwodtuhS
01etyBepyTevirDksiDyppolF
11devreseR
21etyBepyTevirDksiDdraH
31devreseR
41etyBtnempiuqE
51etyBwoLyromeMesaB
61etyBhgiHyromeMesaB
71etyBwoLyromeMnoisnetxE
81etyBhgiHyromeMnoisnetxE
03etyBwoLyromeMnoisnetxErofdevreseR
13etyBhgiHyromeMnoisnetxErofdevreseR
23etyByrutneCetaD
33galFnoitamrofnI
F3-43devreseR
F7-04ataDgnitteStespihCrofdevreseR
76 CommPlete 4000 Server SBC, Model IPC-551
Page 77

Appendix B: Technical Summary
Table B-3: Timer Channels Map
remiT
lennahC
0tpurretnIremiTmetsyS
1tseuqeRhserfeRMARD
2rotareneGenoTrekaepS
tnemngissA
Table B-4: DMA Channels Map
lennahCAMDtnemngissA
0elbaliavA
1CLDSMBI
2retpadAksiDyppolF
3elbaliava;3lennahC
41rellortnoCAMDrofedacsaC
5elbaliavA
6elbaliavA
7elbaliavA
Table B-5: Memory Map
CommPlete 4000 Server SBC, Model IPC-551 77
Page 78

Appendix B: Technical Summary
paMyromeMtnemngissA
FFFF900-0000000
FFFFB00-0000A00
FFFFE00-0000E00MORecivedICProfdevreseR
FFFFF00-0000F00MORSOIBmetsyS
FFFFFFF-0000010yromemnoisnetxemetsyS
Table B-6: I/O Map
paMO/ItnemngissA
F10-000)retsaM(rellortnoCAMD
120-020)retsaM(rellortnoCtpurretnI
320-220stroPO/I,sretsigeR:rellortnoCtespihC
F50-040sretsigeRlortnoCremiT
F60-060)2408(rellortnoCecafretnIdraobyeK
F70-070stroPO/ISOMC&stroPCTR
F90-080retsigeRAMD
FB0-0A0)evals(rellortnoCtpurretnI
FD0-0C0)evals(rellortnoCAMD
FF0-0F0rossecorP-oChtaM
8F1-0F1rellortnoCksiDdraH
F72-8722troPlellaraP
FD2-0B2rellortnoCretpadAscihparG
FF2-8F22troPlaireS
F63-063stroPkrowteN
F73-8731troPlellaraP
FB3-0B3retpadAretnirP&emorhconoM
FC3-0C3retpadAAGE
FD3-0D3retpadAAGC
7F3-0F3rellortnoCksiDyppolF
FF3-8F31troPlaireS
.noitacilppa
dnaSODybdesuyromemmetsyS
rofyromemreffubyalpsiD
.retpadaemorhconom/AGC/AGE/AGV
78 CommPlete 4000 Server SBC, Model IPC-551
Page 79

Appendix C: Troubleshooting
Appendix C:
Troubleshooting
C-1 Introduction
This appendix outlines errors that may occur during system operation
and likely remedies for these problems.
C-2 Troubleshooting with Error Messages
This section describes error messages and their use in
troubleshooting. Since many errors can be caused by poor cable
connections, you should verify that all cables have been connected
firmly to their proper receptacles. If error messages persist after the
recommended adjustments have been made, contact MultiTech
Systems for maintenance.
Post Beep: The BIOS generates two beeping (audible) error codes.
(1) A single long beep followed by three short beeps indicates
that a video error has occurred and the BIOS cannot initialize
the video screen to display any additional information.
(2) A single long beep sounded repeatedly indicates that a
DRAM error has occurred.
CMOS Battery Failure: If the CMOS battery is low or dead, it should
be replaced. The battery is located inside the real-time clock chip.
Replacement requires soldering. The user should return the IPC-551 to
MultiTech Systems for repair if the clock fails.
CMOS Checksum Error: This error indicates that the CMOS has
been corrupted. Corruption may be caused by a weak battery.
Display Switch Is Set Incorrectly: The display switch on the
motherboard can be set to either monochrome or color. This error
CommPlete 4000 Server SBC, Model IPC-551 79
Page 80

Appendix B: Technical Summary
message indicates that the switch setting does not match the video
display mode specified in the Setup screen. Determine which setting is
correct. Then either turn off the system and change the jumper, or
enter Setup and change the entry in the Video field.
Disk Boot Failure: When you cant find the boot device, insert a
system disk into Drive A and press < Enter >. Make sure that the
controller and the cables are in their proper positions and that the hard
disk drive has been formatted correctly. Then reboot the system.
Diskette Drives Or Types Mismatch Error: When the diskette drive
type is different from the settings specified in CMOS (BIOS Setup),
run Setup and re-configure the drive.
Error Encountered Initializing Hard Drive: If you cannot initialize
the hard drive, check that the adapter has been installed correctly and
that all cables are correctly and firmly attached. Also be sure the
correct hard-drive type has been selected in the BIOS Setup.
Error Initializing Hard Disk Controller: When this error occurs,
check to see that the cable connecting the hard drive to the
motherboard is seated properly in its receptacle. Make sure the
correct hard-drive type has been selected in the BIOS Setup. Also,
check to see that all of the jumpers in the hard disk drive unit have
been set correctly.
Floppy Disk Controller Error or No Controller Present: When you
cannot find or initialize the floppy drive controller, please check that
the controller settings in the BIOS Setup screen match the actual
controller being used. If no floppy drives are installed in your PC, be
sure the Diskette Drive field of the Setup screen is set to NONE.
Keyboard Error Or No Keyboard Present: When this error message
appears, check to see that your keyboard is attached properly to its
receptacle. Make sure JP6 is jumpered for keyboard. Also, be sure
that no keys are being pressed during the booting process. If you are
purposely configuring the system without a keyboard, set the error
halt condition in Setup to HALT ON ALL, BUT KEYBOARD. This will
cause the BIOS to ignore the missing keyboard and continue the boot.
80 CommPlete 4000 Server SBC, Model IPC-551
Page 81

Appendix C: Troubleshooting
Memory Address Error: If the memory address indicates an error, use
the specified location and the memory map for your system to find and
replace the bad memory chips.
Memory Size Has Changed: Memory has been added or removed
since the last boot. In EISA mode, use the Configuration Utility to reconfigure memory. In ISA mode, enter the BIOS Setup screen and type
the new memory size in the memory field.
Memory Verifying Error : It indicates an error verifying a value
already written to memory. Use the specified memory location and
your systems memory map to locate the bad chip.
Offending Address Missing: This message is used in connection
with the I/O CHANNEL CHECK and RAM PARITY ERROR messages
when the segment that has caused the problem cannot be isolated.
Reboot Error: When this error occurs, you must re-boot. Press any
key and the system will re-boot.
System Halted: Indicates that the present boot attempt has been
aborted and the system must be re-booted. Press and hold down the
CTRL and ALT keys and press DEL.
CommPlete 4000 Server SBC, Model IPC-551 81
Page 82

Appendix C: Troubleshooting
82 CommPlete 4000 Server SBC, Model IPC-551
Page 83

Appendix C: Troubleshooting
CommPlete 4000 Server SBC, Model IPC-551 83
Page 84

Appendix C: Troubleshooting
84 CommPlete 4000 Server SBC, Model IPC-551
 Loading...