

Page 1
Multi-Tech Model
IAC-F696
Single Board Computer for
CommPlete 4000 Server
USER'S MANUAL
Page 2

Copyright and Technical Support
CommPlete 400 Single Board Computer (IAC-F696)
User Guide
PN S000349A
Copyright
This publication may not be reproduced, in whole or in part, without prior expressed written permission from
Multi-Tech Systems, Inc. All rights reserved.
Copyright © 2002-2004, by Multi-Tech Systems, Inc.
Multi-Tech Systems, Inc. makes no representations or warranties with respect to the contents hereof and
specifically disclaim any implied warranties of merchantability or fitness for any particular purpose. Furthermore,
Multi-Tech Systems, Inc. reserves the right to revise this publication and to make changes from time to time in
the content hereof without obligation of Multi-Tech Systems, Inc. to notify any person or organization of such
revisions or changes.
Revisions
Revision Level Date Description
A 05/21/04 Initial release.
Patents
This device covered by one or more of the following patents: 5.301.274, 5.309.562, 5.355.365, 5.452.289, and
5.453.986.
Other Patents Pending.
Trademarks
The Multi-Tech logo is a Trademark of Multi-Tech Systems, Inc.
Microsoft and Windows are registered trademarks or trademarks of Microsoft Corporation in the United States
and/or other countries. All other trademarks are owned by their respective companies.
The following are trademarks or registered trademarks of their respective companies and companies.
IBM, AMD, V1A C3, Award, AMI, PC/104, PICMG, ALI, DMC, SMC, Winbond
Pentium®, CeleronTM are registered trademark of Intel Corporation.
NetWare is a registered trademark of Novell, Inc.
SCO is a registered trademark of Santa Cruz Operation, Inc.
UNIX is a registered trademark of X/Open Company, Ltd.
World Headquarters
Multi-Tech Systems, Inc.
2205 Woodale Drive
Mounds View, Minnesota 55112
Phone: 763-785-3500 or 800-328-9717
Fax: 763-785-9874
Technical Support
Country By Email By Phone
France: support@multitech.fr (33) 1-64 61 09 81
India: support@multitechindia.com 91 (124) 6340778
U.K.: support@multitech.co.uk (44) 118 959 7774
U.S. and Canada: oemsales@multitech.com (800) 972-2439
Rest of the World: oemsales@multitech.com (763) 717-5863
Internet Address: http://www.multitech.com
Multi-Tech Systems, Inc. Single Board Computer IAC-F696 User’s Guide (S000349A) 2
Page 3

Table of Contents
TABLE OF CONTENTS
Chapter 1 – General Information ..................................................................................................................................4
Introduction ................................................................................................................................................................4
Features.....................................................................................................................................................................4
Technical Specification ..............................................................................................................................................5
IAC-F696 Series .....................................................................................................................................................5
Chapter 2 – Installation .................................................................................................................................................6
Hardware Setup and Installation ................................................................................................................................6
System Memory Installation....................................................................................................................................6
Compact Flash Installation...................................................................................................................................... 6
Jumper Settings and Connectors...............................................................................................................................7
Board Outline..........................................................................................................................................................7
I/O Connector Summary .......................................................................................................................................12
Chapter 3 – BIOS Setup...............................................................................................................................................26
Running Phoenix AWARD BIOS..............................................................................................................................26
Entering Setup ...................................................................................................................................................... 26
CMOS Setup Utility ..................................................................................................................................................27
Main Program Screen ...........................................................................................................................................27
Standard CMOS Setup ............................................................................................................................................28
Standard CMOS Setup Screen .............................................................................................................................28
Primary Master/Primary Slave ..............................................................................................................................28
BIOS Features Setup...............................................................................................................................................30
BIOS Features Setup Screen................................................................................................................................30
Chipset Features Setup ...........................................................................................................................................32
Chipset Features Setup Screen............................................................................................................................32
Integrated Peripherals..............................................................................................................................................34
Integrated Peripherals Setup Screen ....................................................................................................................34
Power Management Setup.......................................................................................................................................36
Power Management Setup Screen .......................................................................................................................36
PnP/PCI Configuration .............................................................................................................................................37
PnP/PCI Configuration Setup Screen ...................................................................................................................37
PC Health Status (Optional).....................................................................................................................................39
Load Optimized Defaults..........................................................................................................................................39
Set Supervisor / User Password ..............................................................................................................................40
Save & Exit Setup .................................................................................................................................................... 40
Exit Without Saving..................................................................................................................................................41
Chapter 4 – Drivers Support .......................................................................................................................................42
Use Your Driver CD-ROM........................................................................................................................................42
File Directory............................................................................................................................................................42
Appendix A – Watchdog Timer...................................................................................................................................43
Appendix B – Warranty ...............................................................................................................................................44
Multi-Tech Warranty Statement ............................................................................................................................44
Repair Procedures for U.S. and Canadian Customers .........................................................................................44
Repair Procedures for International Customers (Outside U.S.A. and Canada).....................................................44
Repair Procedures for International Distributors ................................................................................................... 45
Replacement Parts ...............................................................................................................................................45
Index .............................................................................................................................................................................46
Multi-Tech Systems, Inc. Single Board Computer IAC-F696 User’s Guide (S000349A) 3
Page 4

Chapter 1 – General Information
Chapter 1 – GENERAL INFORMATION
Introduction
IAC-F696 With its rich AGP V1.0 Compliant 2X integrated graphics capabilities, flexible FSB settings,
and support for PC133 DRAM, delivers excellent levels of scalability and performance on a costeffective, High integrated platform designed for the specific needs of the Automation, DVR, Information
PC, and Internet Appliance market segments.
Low power VIA CPU + VIA Apollo PLE133P = Ultimate Value Combination
IAC-F696 optimizes the performance of the VIA Low power Processor while its integrated AGP 2X
graphics engine delivers rich graphics capabilities for running 2D/3D software and Internet applications.
Its highly scaleable asynchronous bus design also makes it the ideal solution for VIA low power
processors running at 100/133MHz FSB speeds. With an advanced memory controller architecture, the
IAC-F696 supports up to 1.5GB of high-speed PC133 SDRAM. These advanced memory technologies
provide the bandwidth and performance necessary for even the most demanding Internet and 3D
graphics applications. Further integrated CPU & multimedia & connectivity features that help minimize
the cost of building automation and Internet Appliances without sacrificing features and performance
include two Fast Ethernet controllers, integrated AGP 2X graphics, AC’97 audio, Super I/O, and
advanced power management.
In addition, IAC-F696 features two IDE, one FDD port, two COM ports and one multi-mode parallel port
allows for more devices support and more flexibility. Other standard features include one socket for
Compact Flash, four USB headers and one IrDA header. IAC-F696 has also incorporated Watchdog
Timer that allows for monitoring ability to ensure system stability.
Features
• VIA EBGA 1GHz CPU
• VIA VT8601T North Bridge and VT82C686B South Bridge
• Award BIOS
• Integrated AGP 2X Graphics Engine
• Dual Realtek RTL 8100C 10/100 Base-T Fast Ethernet
• 2 x EIDE, 1 x FDD, 2 x COM, 1 x LPT, Keyboard & Mouse, 4 x USB, 1 x IrDA and 1 x VGA
• Watchdog Timer
• ISA & PCI expansion bus (PICMG)
Multi-Tech Systems, Inc. Single Board Computer IAC-F696 User’s Guide (S000349A) 4
Page 5

Technical Specification
IAC-F696 Series
Chapter 1 – General Information
Processor
System
Bus
Memory
Graphic
Ethernet
EIDE
I/O Interface
Flash Memory
Disk
Health Monitoring
Expansion Bus
I/O Bracket
RTC
Watchdog Timer
Power
Requirements
Temperature
Dimensions
EMI/EMS
CPU
Max. Speed
L2 Cache
Chipset
BIOS
FSB
PCI
Technology
Max.
Capacity
Socket
Controller On-board integrated VGA controller
VRAM Share memory up to 8 MB
Connector One DB15 (VGA)/VT1631 LVDS connector
Controller Dual Realtek 8100C X 2
Interface 10/100 Base-T (FE)
Connector RJ-45
Mode ATA 100/66/33
Channel Two 20x2 Box header, support up to four devices
FDD
Serial port
Parallel port
PS/2
USB
IrDA
CF Type-II at solder side
System Temperature Alarm Sensor
PCI & ISA (PICMG)
COM1 (DB9) + LAN1 (RJ-45) + VGA(DB15) + PS/2(mini DIN)
Internal RTC with Li battery
16-level time-out intervals
Standard ATX/AT Power
Operating
Storage
338 x 122 (13.3” x 4.8”)
EN 50081-1/1994>EN 55022/1997>
EN 61000-3-2/1995>EN 61000-3-3/1995,
EN 50082-1/1994>IEC 1000-4-2/1995,
IEC 1000-4-3/1995, IEC 1000-4-4/1995
VIA C3 EBGA 1GHz s
1GHz
Integrated 192KB Cache (two 64KB L1 Cache and 64KB L2)
VIA VT8601T (NB)+VT82C686B (SB)
Award licensed BIOS (2M bit Flash ROM)
100/133MHz
32-bit/33 MHz
PC-100/133
1.5 GB
Three 168-pin DIMM
One 17x2 Box header, support up to two devices
One DB9 (COM1: RS-232) and one 5 x 2 Box header (COM2: RS-232)
One 13 x 2 Box header (SPP/EPP/ECP)
One mini-DIN6 PS/2 keyboard/mouse connector and one 5-pin
keyboard wafer
Header for 4 ports (USB 1.1 compliant)
One IrDA compliant Infrared interface
0 °C~60 °C
-20 °C~70 °C
Multi-Tech Systems, Inc. Single Board Computer IAC-F696 User’s Guide (S000349A) 5
Page 6

CHAPTER 2 – INSTALLATION
Hardware Setup and Installation
System Memory Installation
Step1: Open latches of DIMM socket.
Step2: Insert the RAM module into the DIMM socket.
Step3: Press the latches into the notches of the RAM module.
Chapter 2 - Installation
Compact Flash Installation
Multi-Tech Systems, Inc. Single Board Computer IAC-F696 User’s Guide (S000349A) 6
Page 7

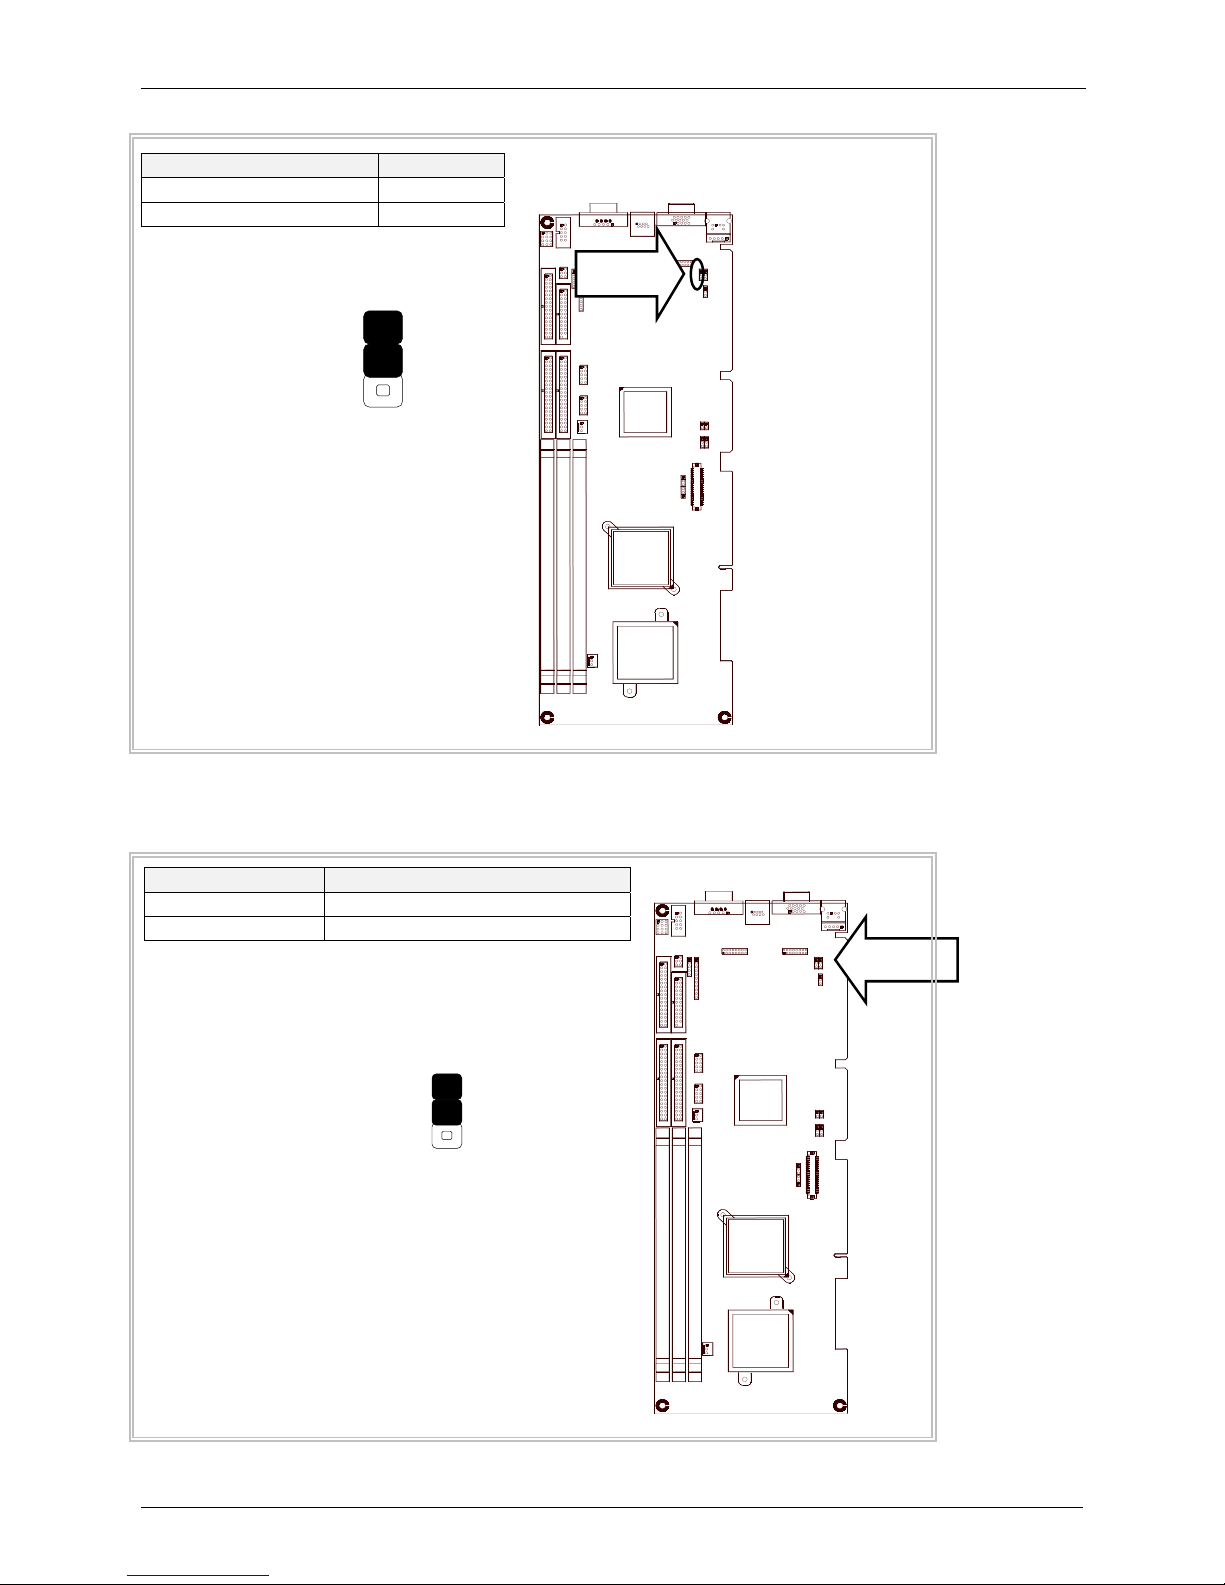
Jumper Settings and Connectors
1
Board Outline
Chapter 2 - Installation
SC2T2
FDCA1
IDEB1
COMB1
SC2T1 IRDA1
LPTA1
IDEB2
USBF2
FAN1
COMA1
PLRS1
USBF1
LNB1
LANB1
SM1
South
Bridge
PKM1
VGAA1
KCN1
SBVB1
KBPW1
ATXD1
SCF1
LVDSE
CMOS
VLCD1
DIMMA1
Multi-Tech Systems, Inc. Single Board Computer IAC-F696 User’s Guide (S000349A) 7
DIMMA3
DIMMA2
FAN2 CPU
North
Bridge
Page 8
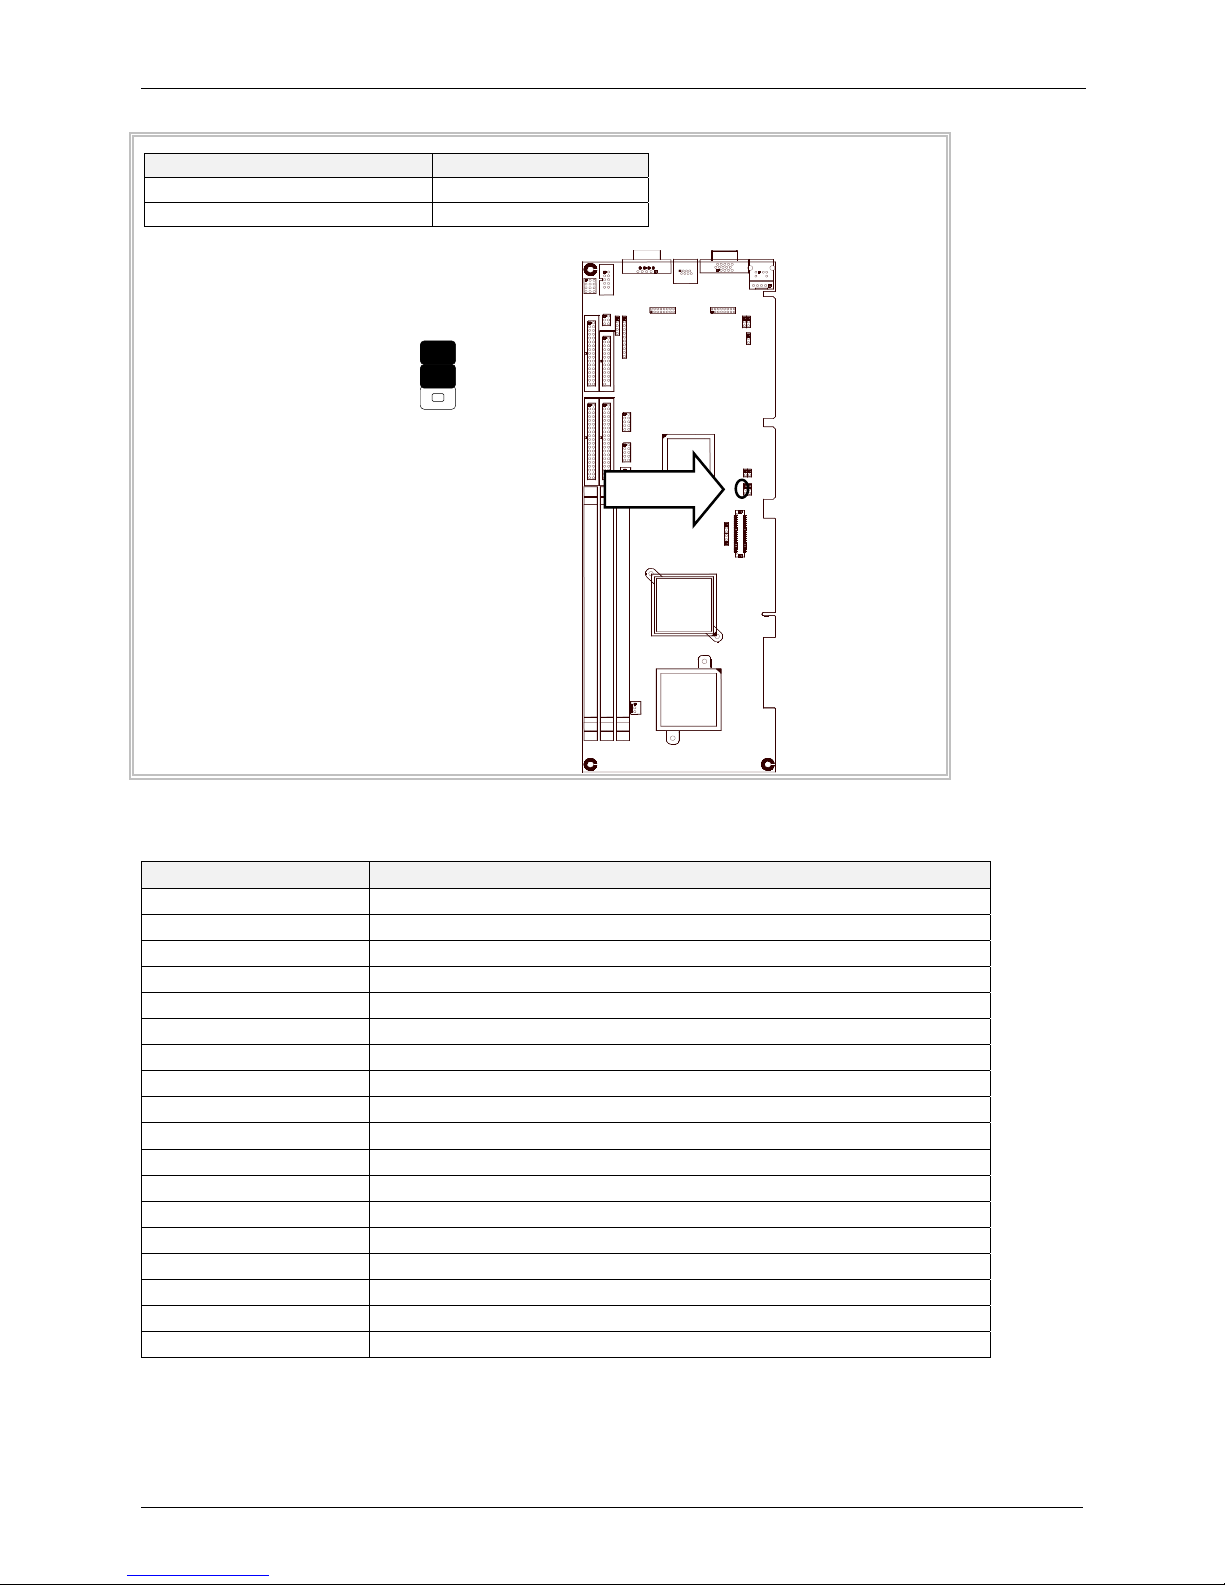
Jumper Settings Summary
Jumper
Function
SC2T1/SC2T2 Select COM2 Type
VLCD1 Select Panel Voltage
CMOS1 Clear CMOS Data
PLRS1 Power LED, HD LED, Reset, Speaker Connector
SCF1 Master/Slave Select
KBPW1 PS/2 Keyboard/Mouse
SBVB1 Select power mode
SLVA1 12/24 Bit Input Mode Select
SC2T1/SC2T2: Select COM2 Type
COM2 TYPE SC2T1 SC2T2
RS-232 (Default) 1-2 1-5,2-6,3-7,4-8
RS-422 3-4 5-9,6-10,7-11,8-12
RS-485 5-6 5-9,6-10,7-11,8-12
Chapter 2 - Installation
Default:
RS-232
RS-422
RS-485
SC2T1
1
3
5
SC2T1
1
3
5
SC2T2
1
2
2
4
3
6
4
10
11
9
SC2T2
SC2T1
SC2T2
1
2
2
4
3
6
4
9
10
11
12
Multi-Tech Systems, Inc. Single Board Computer IAC-F696 User’s Guide (S000349A) 8
Page 9
VLCD1: Select Panel Voltage
V
V
V
Panel Voltage VLCD1
+3.3 V (Default) 1-2
+5 V 2-3
Chapter 2 - Installation
Default:
LCD1
LCD1
3.3V (Default)
5V
3
2
1
3
2
1
CMOS1: Clear CMOS Data
3
2
VLCD1
LCD1
3
2
1
Description CMOS1
Normal (Default) 1-2
Clear CMOS 2-3
CMOS1
Normal (Default)
Clear CMOS1
1
2
3
1
2
3
CMOS1
1
2
3
CMOS1
Multi-Tech Systems, Inc. Single Board Computer IAC-F696 User’s Guide (S000349A) 9
Page 10
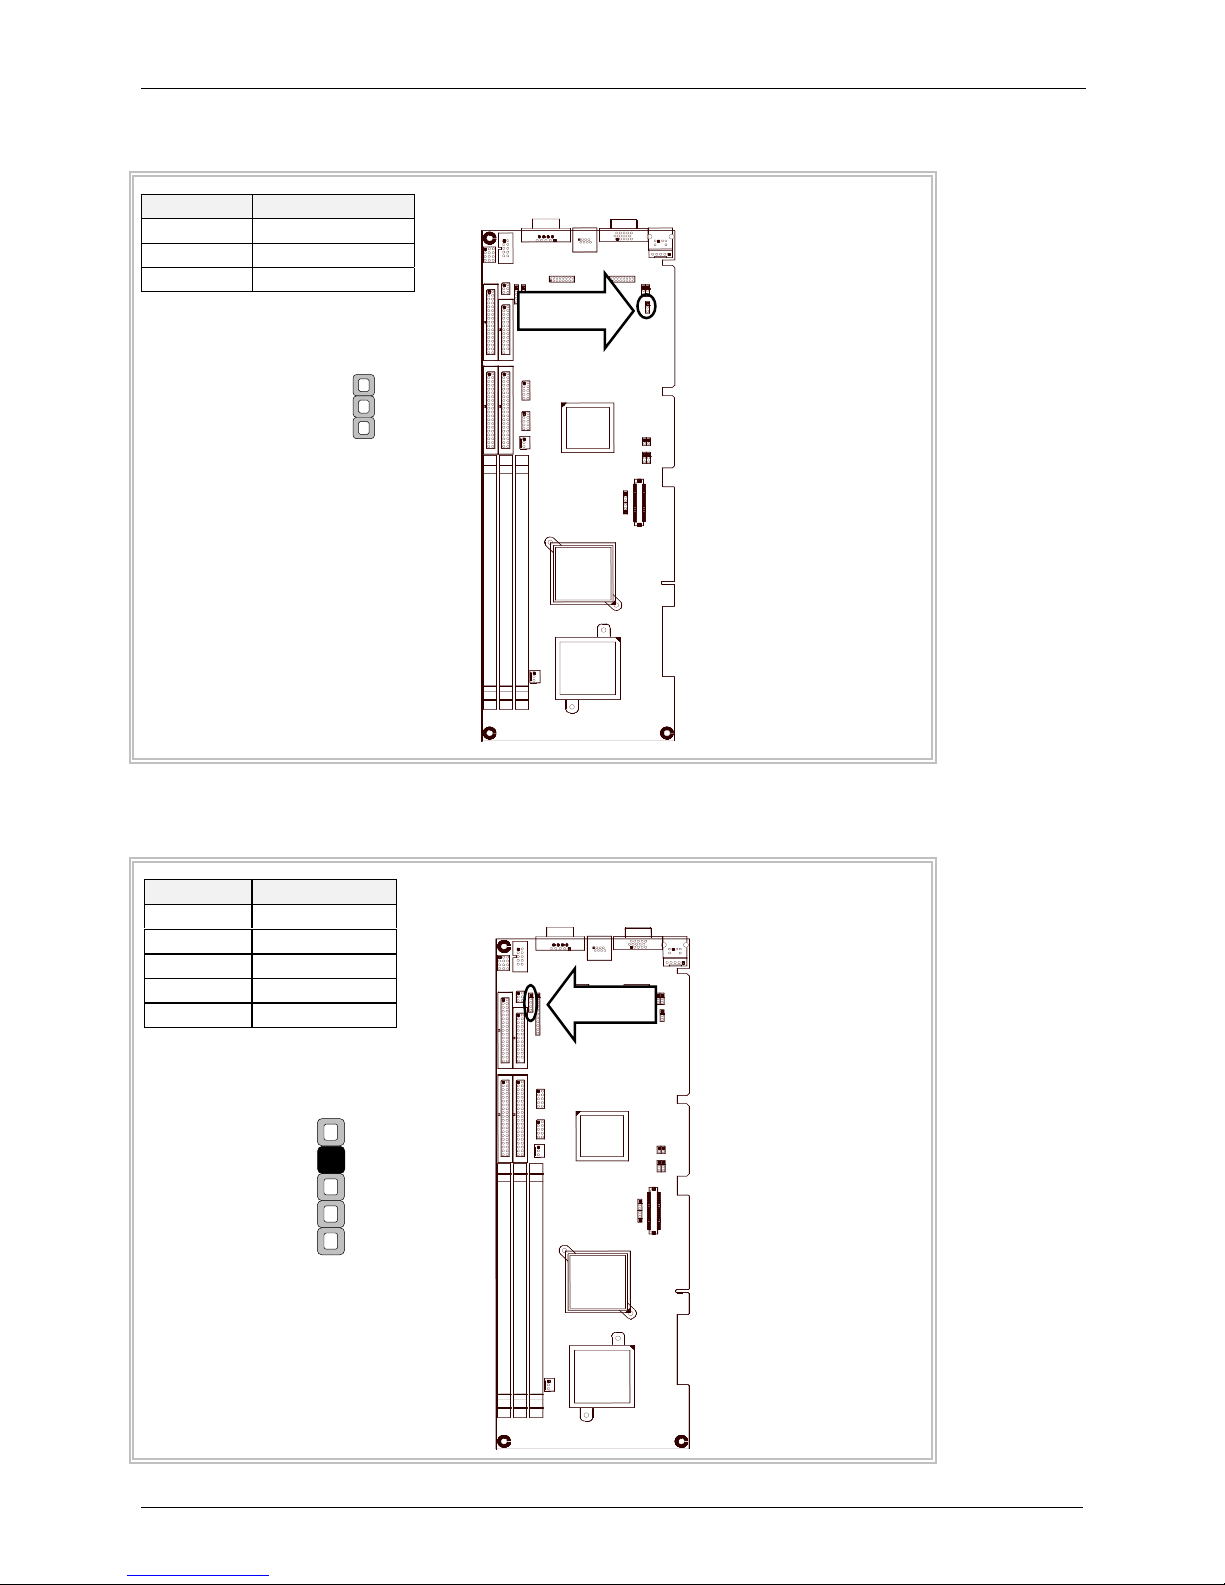
PLRS1: Power LED, HD LED, Reset, Speaker Connector (11 Pin 2.54mm)
Pin No. Description
1 Power LED +
2 Power LED +
3 GND
4 HDD LED +
PLRS1
5 HDD LED 6 RESET SW +
7 RESET SW – (GND)
8 External Speaker 9 Internal Buzzer 10 NC
11 External Speaker +
Default : 8-9 (ON) Internal Buzzer
1
PLRS1
Chapter 2 - Installation
11
SCF1: Master/Slave Select
Compact
Flash Card
ATA Disk
Chip
SCF1
Master Slave 1-2
Slave Master 2-3 (Default)
SCF1
1
3
SCF1
Multi-Tech Systems, Inc. Single Board Computer IAC-F696 User’s Guide (S000349A) 10
Page 11
KBPW1: 1x3 Pin 2.54mm
1
PS/2 Keyboard/Mouse KBPW1
+5V (Default) 1-2
+5V STANDBY 2-3
KBPW1
1
3
Chapter 2 - Installation
KBPW
SBVB1: Select power mode
MODE SBVB1
AT 1-2
ATX 2-3
SBVB1
SBVB1
1
3
Multi-Tech Systems, Inc. Single Board Computer IAC-F696 User’s Guide (S000349A) 11
Page 12
SLVA1: 12/24 Bit Input Mode Select
Bit Input Mode Select SLVA1
24 bits Mode 1-2 (Default)
12 bits Mode 2-3
SLVA1
1
3
Chapter 2 - Installation
SLVA1
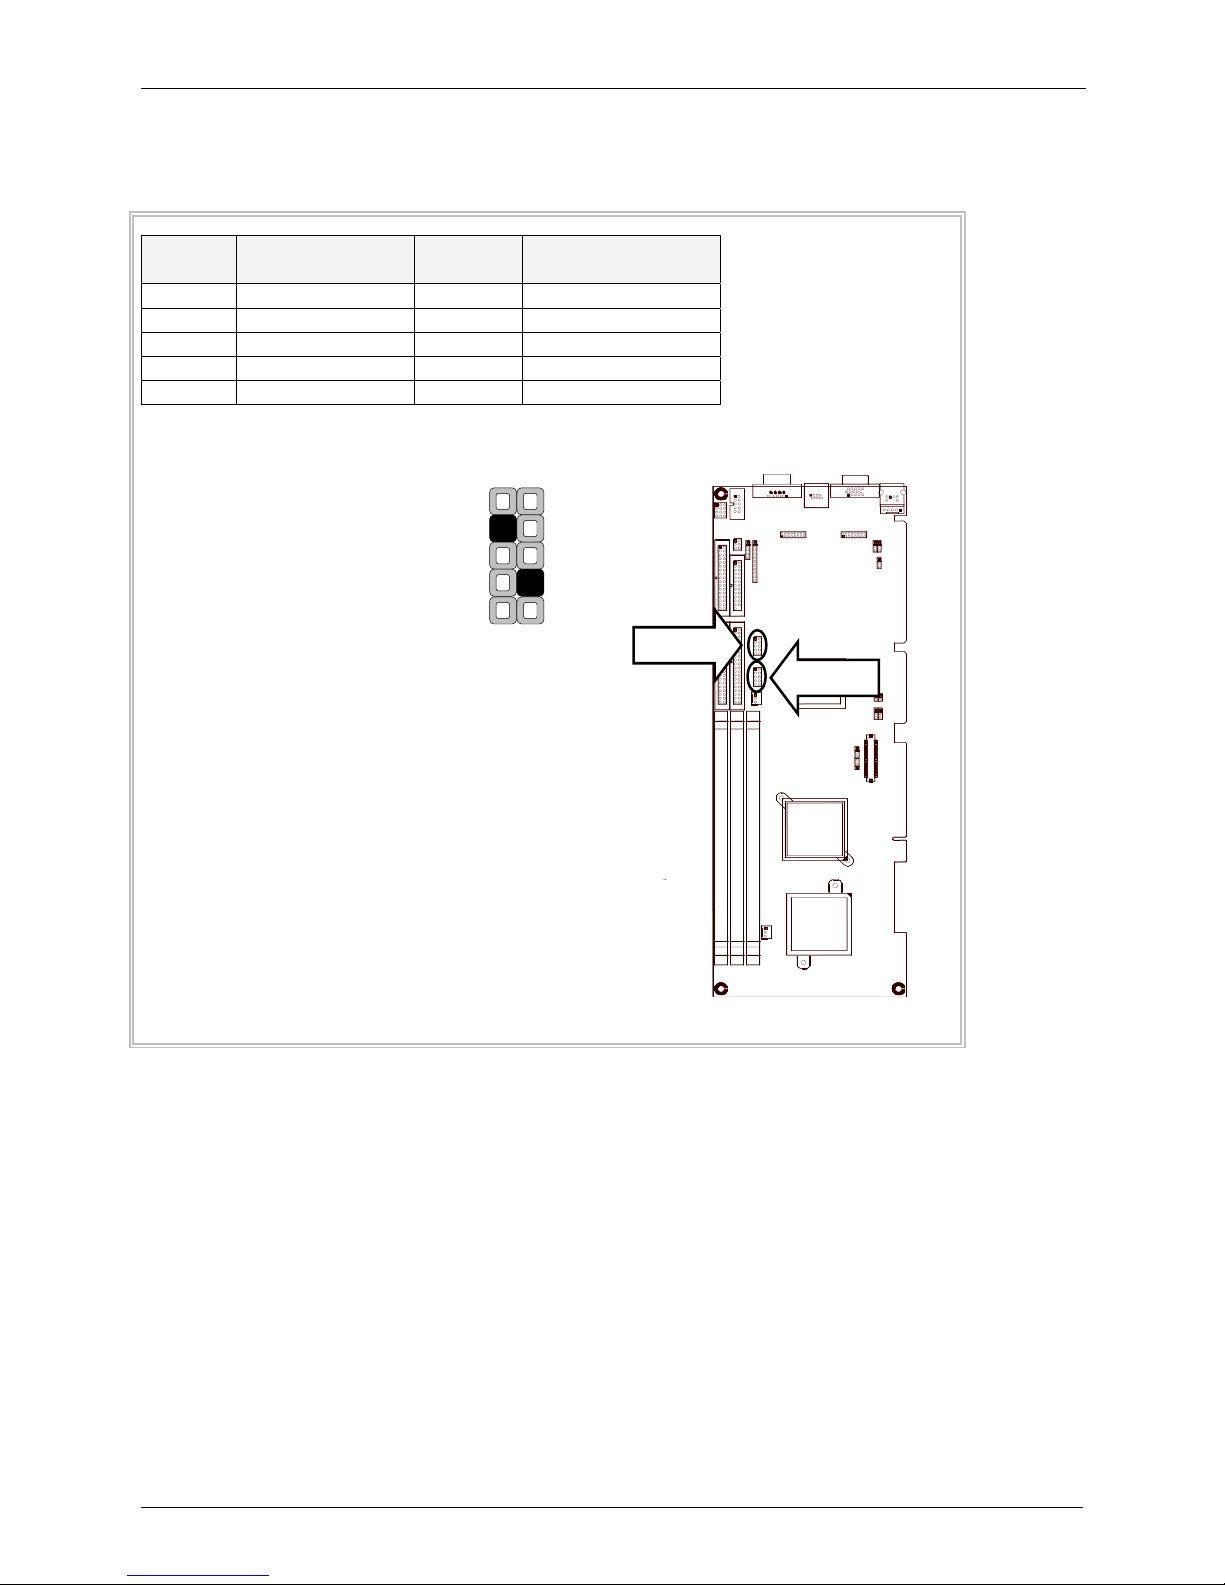
I/O Connector Summary
CONNECTOR FUNCTION
ATXD1
IRDA1 IRDA1 Connector
USBF1/ USBF2 USB Port #1 & #2 Connector (2¯5 Pin 2.54mm)
FAN1/ FAN2 3 Pin FAN Connector
PSW1 ATX Power Button
IDEB1 / IDEB2 IDE Interface Connector (40Pin 2.54mm Pitch Header)
FDCA1 Floppy Interface Connector (34 Pin Header)
LPTA1 Parallel Connector (26 Pin 2.54mm Pitch Header)
COMA1 RS-232 Serial Port #1 Connector (D-Sub)
COMB1 Serial Port #2 Connector (Header)
LANB1 Type 2 (RJ-45 with LED)
VGAA1 External VGA Connector (15 Pin D-Sub)
PKM1 PS/2 Keyboard & Mouse Connector (6P Mini Din)
KCN1 5 Pin Keyboard Cable Connector
LNB1 LAN 2¯8 Pin 2.0mm (Female/ Male)
SM1 Sound/ Mouse (2¯8 Pin 2.0mm Female/ Male)
DIMMA1/2/3 168 Pin DIMM Connector
LVDSE1 LVDS Panel Connector 2¯20P 1.25mm SMT
For ATX Function
Multi-Tech Systems, Inc. Single Board Computer IAC-F696 User’s Guide (S000349A) 12
Page 13
ATXD1: For ATX Function
Pin No. Description
1 PSON
2 GND
3 +5V STANDBY
ATXD1
Chapter 2 - Installation
ATXD1
1
3
IRDA1: IRDA1 Connector
Pin No. Description
1 VCC
2 NC
3 IRRX
4 GND
5 IRTX
IRDA1
1
5
IRDA1
Multi-Tech Systems, Inc. Single Board Computer IAC-F696 User’s Guide (S000349A) 13
Page 14
USBF1/USBF2: USB Port #1 & #2 Connector 2x5 Pin 2.54mm
Chapter 2 - Installation
Pin
No.
Description
Pin
No.
Description
1 USB_VCC 2 Ground
3 Key 4 USBD1+/3+
5 USBD0-/2- 6 USBD1-/37 USBD0+/2+ 8 Key
9 Ground 10 USB_VCC
USBF1
1
9
2
10
USBF2
USBF1
Multi-Tech Systems, Inc. Single Board Computer IAC-F696 User’s Guide (S000349A) 14
Page 15

FAN1/FAN2: 3 Pin FAN Connector
/
Pin No. Description
1 Ground
2 +12V
3 FAN Status
FAN1
2
1
Chapter 2 - Installation
2
3
PSW1: For ATX Power Button
Pin No. Description
1 PANSW
2 GND
PSW1
FAN1
FAN2
1
2
Multi-Tech Systems, Inc. Single Board Computer IAC-F696 User’s Guide (S000349A) 15
1
2
PSW1
Page 16

IDEB1/IDEB2: IDE Interface Connector (40Pin 2.54mm Pitch Header)
Pin No. Description Pin No. Description
1 Reset # 2 Ground
3 Data 7 4 Data 8
5 Data 6 6 Data 9
7 Data 5 8 Data 10
9 Data 4 10 Data 11
11 Data 3 12 Data 12
13 Data 2 14 Data 13
15 Data 1 16 Data 14
17 Data 0 18 Data 15
19 Ground 20 KEY
21 DMA REQ# 22 Ground
23 IOW # 24 Ground
25 IOR # 26 Ground
27 IOCHRDY 28 Ground
29 DMA ACK # 30 Ground
31 Interrupt 32 NC
33 SA1 34 PD80P / SD80P
35 SA0 36 SA2
37 HDC CS0 # 38 HDC CS1 #
39 HDD Active LED # 40 Ground
Chapter 2 - Installation
1
39
IDEB1/2
2
IDEB1
40
IDEB2
Multi-Tech Systems, Inc. Single Board Computer IAC-F696 User’s Guide (S000349A) 16
Page 17

FDCA1: Floppy Interface Connector (34 Pin Header)
Pin No. Description Pin No. Description
1 Ground 2 Density Select
3 Ground 4 KEY
5 Ground 6 DS1
7 Ground 8 Index #
9 Ground 10 Motor Enable A #
11 Ground 12 Drive Select B #
13 Ground 14 Drive Select A #
15 Ground 16 Motor Enable B #
17 Ground 18 Direction #
19 Ground 20 Step #
21 Ground 22 Write Data #
23 Ground 24 Write Gate #
25 Ground 26 Track 0 #
27 Ground 28 Write Protect #
29 NC 30 Read Data #
31 Ground 32 Head Side Select #
33 NC 34 Disk Change #
Chapter 2 - Installation
1
33
FDCA1
2
FDCA1
34
Multi-Tech Systems, Inc. Single Board Computer IAC-F696 User’s Guide (S000349A) 17
Page 18

LPTA1: Parallel Connector (26 Pin 2.54mm Pitch Header)
Pin No. Description Pin No. Description
1 Strobe # 2 Auto Form Feed
3 Data0 4 Error #
5 Data1 6 Initialize #
7 Data2 8 Printer Select IN #
9 Data3 10 Ground
11 Data4 12 Ground
13 Data5 14 Ground
15 Data6 16 Ground
17 Data7 18 Ground
19 Acknowledge # 20 Ground
21 Busy 22 Ground
23 Paper Empty 24 Ground
25 Printer Select 26 KEY
LPTA1
1
2
LPTA1
Chapter 2 - Installation
25
26
Multi-Tech Systems, Inc. Single Board Computer IAC-F696 User’s Guide (S000349A) 18
Page 19

COMA1: RS-232 Serial Port #1 Connector (D-Sub)
Pin No. Description
1 Data Carrier Detect (DCDA #)
2 Receive Data (RXDA)
3 Transmit Data (TXDA)
4 Data Terminal Ready (DTRA #)
5 Ground (GND)
6 Data Set Ready (DSRA #)
7 Request To Send (RTSA #)
8 Clear To Send (CTSA #)
9 Ring Indicator (RIA #)
COMA1
15
96
Chapter 2 - Installation
COMA1
Multi-Tech Systems, Inc. Single Board Computer IAC-F696 User’s Guide (S000349A) 19
Page 20

COMB1: Serial Port #2 Connector (Header)
Chapter 2 - Installation
Pin No.
Description
RS-232
1 Data Carrier Detect (DCDB #)
2 Data Set Ready (DSRB #)
3 Receive Data (RXDB)
4 Request To Send (RTSB #)
5 Transmit Data (TXDB)
6 Clear To Send (CTSB #)
7 Data Terminal Ready (DTRB #)
8 Ring Indicator (RIB #)
9 Ground
10 KEY
COMB1
1
9
COMB1
2
10
Multi-Tech Systems, Inc. Single Board Computer IAC-F696 User’s Guide (S000349A) 20
Page 21

LANB1: Type 2 (RJ-45 with LED)
Chapter 2 - Installation
Pin No.
Description
Fast E-Net Giga Net
1 TX+ MD0+
2 TX- MD03 RX+ MD1+
4 T45 MD2+
5 T45 MD26 RX- MD17 T78 MD3+
8 T78 MD39 10-/100-/1000+
10 10+/100+/100011 Link+/ACT12 Link-/ACT+
¼ Pin9 to pin12 are on the solder side.
LANB1
LANB1
8 1
Multi-Tech Systems, Inc. Single Board Computer IAC-F696 User’s Guide (S000349A) 21
Page 22

VGAA1: External VGA Connector (15 Pin D-Sub)
Pin No. Description
1 Red Color Signal
2 Green Color Signal
3 Blue Color Signal
4 NC
5 Ground
6 Ground
5
10
15
VGAA1
7 Ground
8 Ground
9 NC
10 Ground
11 NC
12 DDC-DATA
13 H-Sync.
14 V-Sync.
15 DDC-CLK
Chapter 2 - Installation
VGAA1
1
6
11
PKM1: PS/2 Keyboard & Mouse Connector (6P Mini Din)
Pin No. Description
1 PS/2 Keyboard Data
2 PS/2 Mouse Data
3 Ground
4 +5 V
5 PS/2 Keyboard Clock
6 PS/2 Mouse Clock
6
4
PKM1
1 2
PKM1
5
3
Multi-Tech Systems, Inc. Single Board Computer IAC-F696 User’s Guide (S000349A) 22
Page 23

KCN1: 5 Pin Keyboard Cable Connector
Pin No. Description
1 Keyboard Clock
2 Keyboard Data
3 NC
4 Ground
5 +5V
Chapter 2 - Installation
KCN1
KCN1
5 1
LNB1: LAN 2x8 Pin 2.0mm Female/Male
Pin
No.
Descriptio
n
Pin
No.
Description
1 AMDI0+ 2 ACTLD
3 AMDI0- 4 Vcc2_5
5 GND 6 3VSB
7 AMDI1+ 8 GND
9 AMDI1- 10 LNKLD
11 AMDI2+ 12 AMDI3+
13 AMDI2- 14 AMDI315 LNK1G 16 LNK100
LNB1
2
1
LNB1
16
15
Multi-Tech Systems, Inc. Single Board Computer IAC-F696 User’s Guide (S000349A) 23
Page 24

SM1: Sound/Mouse 2x8 Pin 2.0mm Female/Male
Pin No. Description Pin No. Description
1 ICH_SPKR 2 AC97
3 AC_RST- 4 VCC
5 SYNC 6 GND
7 SDINO 8 +3.3V
9 NC 10 GND
11 BITCLK 12 +5V STANDBY
13 SDOUT
14
NC
15 MSDAT 16 MSCLK
SM1
2
1
16
15
Chapter 2 - Installation
SM1
DIMMA1/2/3: 168 Pin DIMM Connector
DIMMA1/2/3
DIMMA1/2/3
Multi-Tech Systems, Inc. Single Board Computer IAC-F696 User’s Guide (S000349A) 24
Page 25

LVDSE1: LVDS Panel Connector 2x20P 1.25mm SMT
Pin No. Description Pin No. Description
1 PVDD 2 A4M
3 PVDD 4 A4P
5 GND 6 GND
7
GND
8
A5M
9 A0M 10 A5P
11 A0P 12 GND
13 GND 14 A6M
15 A1M 16 A6P
17 A1P 18 GND
19 GND 20 CLK2M
21 A2M 22 CLK2P
23 A2P 24 GND
25 GND 26 A7M
27 CLK1M 28 A7P
29 CLK1P 30 GND
31 GND 32 NC
33 A3M 34 NC
35 A3P 36 ENPBLT
37 GND 38 ENPVEE
39 NC 40 ENPVDD
Chapter 2 - Installation
LVDSE1
39
1
40
LVDSE1
2
Multi-Tech Systems, Inc. Single Board Computer IAC-F696 User’s Guide (S000349A) 25
Page 26

Chapter 3- BIOS Setup
CHAPTER 3 – BIOS SETUP
Phoenix Award‘s ROM BIOS provides a built-in Setup program that allows users to modify the basic system
configuration and settings. The modified data will be stored in a battery-backed CMOS RAM so that this
data will be retained even when the power is turned off. In general, the information saved in the CMOS
RAM remains unchanged unless there is a configuration change in the system, such as hard drive
replacement or new equipment installment.
Running Phoenix AWARD BIOS
The Setup Utility is stored in the BIOS ROM. When the power of the computer system is turned on, a
screen message will appear to give you an opportunity to call up the Setup Utility while the BIOS will enter
the Power On Self Test (POST) routines. The POST routines perform various diagnostic checks while
initializing the board hardware. If the routines encounter an error during the tests, the error will be reported
in one of two ways, a series of short beeps or an error message on the screen. There are two kinds of
errors, fatal and non-fatal. The system can usually continue the boot up sequence with non-fatal errors.
Non-fatal error messages usually appear on the screen along with the following instructions:
Press <F1> to RESUME
Write down the message and press the F1 key to continue the boot up sequence. After the POST routines
are completed, the following message appears:
Press DEL to enter SETUP
Entering Setup
Turn on the power of the computer system and press <Del> immediately. If you don’t have the chance to
respond, reset the system by simultaneously pressing the <Ctrl>, <Alt> and <Delete> keys, or by pushing
the Reset button on the system cabinet. You can also restart by turning the system OFF then ON.
Multi-Tech Systems, Inc. Single Board Computer IAC-F696 User’s Guide (S000349A) 26
Page 27

Chapter 3- BIOS Setup
CMOS Setup Utility
To access the AWARD BIOS SETUP program, press the <DEL> key. The screen display will
appears as shown below:
Main Program Screen
Phoenix - Award BIOS CMOS Setup Utility
Standard CMOS Features PC Health Status
Advanced BIOS Features Load Optimized Defaults
Advanced Chipset Features Set Supervisor Password
Integrated Peripherals Set User Password
Power Management Setup Save & Exit Setup
PnP/PCI Configurations Exit Without Saving
Esc : Quit
F10 : Save & Exit Setup
Time, Date, Hard Disk Type...
This screen provides access to the utility‘s various functions.
Listed below is explanation of the keys displayed at the bottom of the screen:
<ESC> : Exit the utility.
<Ç È Æ Å>: Use arrow keys Ç È Æ Å to move cursor to your desired selection.
<F1> : General Help
<F10> : Saves all changes made to Setup and exits program.
The following explains the options for each of the features as listed in the above menu:
Standard CMOS Features: Use this menu for basic system configurations.
Advanced BIOS Features: Use this menu to set the Advanced Features available on your system.
Advanced Chipset Features: Use this menu to change the values in the chipset registers and
optimize your system’s performance.
Integrated Peripherals: Use this menu to specify your settings for integrated peripherals.
Power Management Setup: Use this Menu to specify your settings for power management.
Ç È
Æ ³
: Select Item
PnP/PCI Configurations: This entry appears if your system supports PnP/PCI.
PC Health Status: This entry shows your PC health status, if Hardware Monitor Chipset is installed.
Load Optimized Defaults: Use this menu to load the BIOS default values that are factory settings
for optimal performance system operations.
Set Supervisor Password: Use this menu to set Supervisor Passwords.
Set User Password: Use this menu to set User Passwords.
Save & Exit Setup: Save CMOS value changes to CMOS and exit setup.
Exit Without Saving: Abandon all CMOS value changes and exit setup
Multi-Tech Systems, Inc. Single Board Computer IAC-F696 User’s Guide (S000349A) 27
Page 28

Chapter 3- BIOS Setup
Standard CMOS Setup
When you select the STANDARD CMOS SETUP on the main program, the screen display will appears as:
Standard CMOS Setup Screen
Phoenix - Award BIOS CMOS Setup Utility
Standard CMOS Features
Date (mm:dd:yy) Fri, Oct 24, 2003 Item Help
Time (hh:mm:ss) 13 : 29 : 45 Menu Level f
f IDE Primary Master [None]
f IDE Primary Slave [None]
f IDE Secondary Master [None]
f IDE Secondary Slave [None]
Drive A [1.44M, 3.5 in.]
Drive B [None]
Change the day,
month, year and
century
Halt On [All, But Disk/Key]
Base Memory 640K
Extended Memory 63488K
Total Memory 64512K
Ç È Æ ³ Move Enter: Select +/-/PU/PD: Value F10: Save ESC: Exit F1: General Help
F5: Previous Values F6: Fail-Safe Defaults F7:Optimized Defaults
The Standard CMOS Setup utility is used to configure the following components such as date, time, hard disk
drive, floppy drive, display and memory. Once a field is highlighted, on-line help information is displayed in
the left bottom of the Menu screen.
Set Date: Month, Date, Year
Set Time: Hour, Minute and Second. Use 24-hour clock format (for p.m. time, add 12 to the hour number,
e.g. you would enter 4:30 p.m. as 16:30) Primary Master / Primary Slave.
Primary Master/Primary Slave
Secondary Master / Secondary Slave: Press PgUp / <+> or PgDn / <-> to select Manual, None, Auto
type. Note that the specifications of your drive must match with the drive table. The hard disk will not
work properly if you enter improper information for this category. If your hard disk drive type is not
matched or listed, you can use Manual to define your own drive type manually.
If you select Manual, related information is asked to be entered to the following items. Enter the
information directly from the keyboard. This information should be provided in the documentation from
your hard disk vendor or the system manufacturer.
If the controller of HDD interface is SCSI, the selection shall be
[None]
If the controller of HDD interface is CD-ROM, the selection shall be
[None]
Multi-Tech Systems, Inc. Single Board Computer IAC-F696 User’s Guide (S000349A) 28
Page 29

Chapter 3- BIOS Setup
Here is a brief explanation of drive specifications:
• Access Mode: The settings are Auto, CHS, Large, LBA.
• Cylinder: Number of cylinders
• Head: Number of heads
• Precomp: Write precom
• Landing Zone: Landing Zone
• Sector: Number of sectors
Drive A and Drive B: Select the correct specifications for the diskette drive(s) installed in the
computer.
None No diskette drive installed
360K, 5.25 in 5-1/4 inch PC-type standard drive; 360 kilobyte capacity
1.2M, 5.25 in 5-1/4 inch AT-type high-density drive; 1.2 megabyte capacity
720K, 3.5 in 3-1/2 inch double-sided drive; 720 kilobyte capacity
1.44M, 3.5 in 3-1/2 inch double-sided drive; 1.44 megabyte capacity
2.88M, 3.5 in 3-1/2 inch double-sided drive; 2.88 megabyte capacity
Note: 1. Not Installed could be used as an option for diskless workstations.
2. Highlight the listing after each drive name and select the appropriate entry.
Halt On: During the power-on-self-test (POST), the computer stops if the BIOS detect a hardware error.
You can tell the BIOS to ignore certain errors POST and continue the boot-up process. These are the
selections:
No errors Whenever the BIOS detects a non-fatal error the system will not be stopped
and you will be prompted
All errors The system boot will be stopped for any error that may be detected.
All, But Keyboard The system boot will not stop for a keyboard error; it will stop for all other
errors.
All, But Diskette The system boot will not stop for a disk error; it will stop for all other errors.
All, But Disk/Key The system boot will not stop for a keyboard or disk error; it will stop for all
other errors.
Multi-Tech Systems, Inc. Single Board Computer IAC-F696 User’s Guide (S000349A) 29
Page 30

Chapter 3- BIOS Setup
BIOS Features Setup
When you select the BIOS FEATURES SETUP on the main program, the screen display will appear
as:
BIOS Features Setup Screen
Phoenix - Award BIOS CMOS Setup Utility
Advanced BIOS Features
Virus Warning
Quick Power On Self Test
First Boot Device
Second Boot Device
Third Boot Device
Boot Other Device
Swap Floppy Drive
Boot Up NumLock Status
Security Option
PS2 Mouse Function Control
HDD S.M.A.R.T Capability
Video BIOS Shadow
C8000 – CBFFF Shadow
CC000 – CFFFF Shadow
D0000 – D3FFF Shadow
D4000 – D7FFF Shadow
D8000 – DBFFF Shadow
DC000 – DFFFF Shadow
Full Screen LOGO Show
Ç È Æ ³ Move Enter: Select +/-/PU/PD: Value F10: Save Esc: Exit F1: General Help
[Disabled]
[Enabled]
[Floppy]
[HDD-0]
[CDROM]
[Enabled]
[Disabled]
[On]
[Setup]
[Enabled]
[Enabled]
[Enabled]
[Disabled]
[Disabled]
[Disabled]
[Disabled]
[Disabled]
[Disabled]
[Disabled]
Item Help
Menu Level f
Allows you to
choose the VIRUS
warning feature
for IDE Hard Disk
boot sector
protection. If this
function is
enabled and
someone attempt
to write data into
this area, BIOS
will show a
warning message
on screen and
alarm beep
F5: Previous Values F6: Fail-Safe Defaults F7:Optimized Defaults
The following explains the options for each of the features as listed in the above menu:
Virus Warning: The default setting of Virus Warning is Disabled. When it is enabled, any attempt to write
the boot sector and partition table will halt the system and cause a warning message to appear. If this
happens, you can use an anti-virus utility on a virus free, bootable floppy diskette to reboot, to clean and
to investigate your system.
Quick Power on Self-Test: The default setting is Enabled. This speeds up the Power On Self Test
(POST) by skipping some items that are normally checked during the full POST. If your system is
functioning normally, you can choose this feature to speed up the booting process.
First / Second / Third / Other Boot Device: The BIOS attempts to load the operating system from the
devices in the sequence selected in these items. The settings are Floppy, LS/ZIP, HDD-0/ HDD-1/ HDD2/ HDD-3, SCSI, CDROM, LAN, and Disabled.
Swap Floppy Drive: The default setting is Disabled. This setting gives you an option to swap A and B
floppy disks. Normally, the floppy drive A is the one at the end of the cable and drive B is at the other
end. If you set this option to Enabled, the Drive A will function as Drive B, and vice-versa under the DOS.
Multi-Tech Systems, Inc. Single Board Computer IAC-F696 User’s Guide (S000349A) 30
Page 31

Chapter 3- BIOS Setup
Boot Up NumLock Status: The default setting is On. If it set Off, the cursor controls will function on the
numeric keypad.
Security Option: This setting controls the password in the main screen. The options are Setup and
System. Select Setup and it will protect the Setup Utility settings from being tampered with. Select
System if you want to use password feature every time the system boots up. The default setting is
Setup. You can create your password by using the SUPERVISOR/USER PASSWORD utility on the
main program screen.
PS/2 Mouse Function Control: The default setting is Enabled. If your system has a PS/2 mouse port
and you install a serial pointing device, select Disabled.
HDD S.M.A.R.T Capability: SMART (Self-Monitoring, Analysis, and Reporting Technology) is a
technology developed to manage disk drive reliability by predicting device failures. Award BIOS can warn
of possible device failure, allowing time for backups or drive replacement.
Video BIOS Shadow: The default setting is Enabled which will copy the VGA display card BIOS into
system DRAM to improve performance.
C8000-CBFFF Shadow to DC000-DFFFF Shadow: The default setting for the shadow feature is
Disabled. When enabled, the ROM with the specific address is copied into system DRAM. It will also
reduce the size of memory available to the system. After you have made your selection in the BIOS
FEATURES SETUP, press the <ESC> key to go back to the main program screen.
Multi-Tech Systems, Inc. Single Board Computer IAC-F696 User’s Guide (S000349A) 31
Page 32

Chapter 3- BIOS Setup
Chipset Features Setup
When you select the CHIPSET FEATURES SETUP on the main program, the screen display will
appears as:
Chipset Features Setup Screen
Phoenix - Award BIOS CMOS Setup Utility
Advanced Chipset Features
DRAM Clock
DRAM Timing By SPD
SDRAM Cycle Length
Bank Interleave
Memory Hole
P2C/C2P Concurrency
Fast R-W Turn Around
System BIOS Cacheable
Video RAM Cacheable
Frame Butter Size
AGP Aperture Size
CPU to PCI Write Buffer
PCI Dynamic Bursting
PCI Master 0 WS Write
PCI Delay Transaction
PCI#2 Access #1 Retry
AGP Master 1 WS Write
AGP Master 1 WS Read
Select Display Device
Panel Type
Ç È Æ ³ Move Enter: Select +/-/PU/PD: Value F10: Save Esc: Exit F1: General Help
[By Auto]
[Enabled]
3
Disabled
[Disabled]
[Enabled]
[Enabled]
[Enabled]
[Enabled]
[8M]
[64M]
[Enabled]
[Enabled]
[Enabled]
[Disabled]
[Disabled]
[Disabled]
[Disabled]
[CRT]
[1024¯768]
Item Help
Menu Level f
F5: Previous Values F6: Fail-Safe Defaults F7: Optimized Defaults
The following explains the options for each of the features as listed in the above menu:
DRAM Clock: Set the clock frequency of the DRAMs. The default is HOST CLOCK. You can select
HCLK+33M if your DRAM modules are faster than CPU (eg. a 66Mhz FSB CPU with a PC100 SDRAM or a
100Mhz FSB CPU with PC-133 SDRAM) or select HCLK-33M for a faster CPU with slower SDRAMs. This
selection is indeed important if you're thinking of overclocking a Pentium III to run beyond 133Mhz but only
have PC-100 SDRAM
DRAM Timing By SPD: This item allows you to select the value in this field, depending on whether the
board has paged DRAMs or EDO (extended data output) DRAMs.
SDRAM Cycle Length: This item allows you to select the SDRAM cycle length. The settings are 2 or 3.
Bank Interleave: Select the bank interleave. The default setting is Disabled.
Memory Hole: In order to improve performance, certain space in memory can be reserved for ISA cards.
This memory must be mapped into the memory space below 16MB.
P2C / C2P Concurrency: This item allows you to Enable or Disable the PCI to CPU, CPU to PCI
concurrency. The default setting is Enabled.
Multi-Tech Systems, Inc. Single Board Computer IAC-F696 User’s Guide (S000349A) 32
Page 33

Chapter 3- BIOS Setup
Fast R-W Turn Around: This setting activates or deactivates a timing rapid of the cycles of lettura-
scrittura. If memories of low quality are used or a system bus specifies outside deactivating this mode,
not to have problems of instability of the system is advisable. Activating it with memories to high
performance is possible. It is not possible to pretend resulted convincing from desks of memory of low
quality.
System BIOS Cacheable: Selecting Enabled allows caching of the system BIOS ROM at F0000h -
FFFFFh, resulting in better system performance. However, if any program writes to this memory area, a
system error may result. The settings are Enabled and Disabled.
Video RAM Cacheable: The choices: Enabled (Default) and Disabled.
Frame Butter Size: The choices: 2M, 4M, and 8M(Default).
AGP Aperture Size: Select the size of the Accelerated Graphics Port (AGP) aperture. The aperture is a
portion of the PCI memory address range dedicated for graphics memory address space. Host cycles
that hit the aperture range are forwarded to the AGP without any translation. The choices: 128M, 64M,
32M, 16M, 8M, and 4M.
CPU to PCI Write Buffer: When this field is Enabled, writes from the CPU to the PCI bus is buffered, to
compensate for the differences between the CPU and the PCI bus. When disabled, the writes are not
buffered and the CPU must wait until the write is complete before starting another cycle. The default
setting is Enabled.
PCI Dynamic Bursting: This item allows you to enable or disable the PCI dynamic bursting function. The
settings are Enabled or Disabled.
PCI Master 0 WS Write: When enabled, writes to the PCI bus and are executed with zero wait states.
The settings are Enabled or Disabled.
PCI Delay Transaction: The chipset has an embedded 32-bit posted write buffer to support delay
transactions cycles. Select Enabled to support compliance with PCI specification version 2.1. The
settings are Enabled or Disabled.
PCI#2 Access #1 Retry: When disabled, PCI#2 will not be disconnected until access finishes. When
enabled, PCI#2 will be disconnected if max retries are attempted without success. The default setting is
Enabled.
AGP Master 1 WS Write: Implements a single delay when writing from the AGP Bus. Normally, two wait
states are used, allowing for greater stability, but check with your motherboard manufacturer to see if
they have already implemented a Master latency of zero, in which case the lowest writing here of 1 will
reduce performance.
AGP Master 1 WS Read: Implements a single delay when reading from the AGP Bus. Normally, two wait
states are used, allowing for greater stability, but check with your motherboard manufacturer to see if
they have already implemented a Master latency of zero, in which case the lowest reading here of 1 will
reduce performance.
Select Display Device: Select Display for CRT LCD Model.
Panel Type: Please select the type of panel you are incorporating with our single board computer.
Consult your panel manual for detail information.
Multi-Tech Systems, Inc. Single Board Computer IAC-F696 User’s Guide (S000349A) 33
Page 34

Chapter 3- BIOS Setup
Integrated Peripherals
When you select the INTEGRATED PERIPHERIALS on the main program, the screen display will
appears as:
Integrated Peripherals Setup Screen
Phoenix - Award BIOS CMOS Setup Utility
Integrated Peripherals
On-Chip Primary PCI IDE
On-Chip Secondary PCI
IDE
Init Display First
USB Controller
USB Keyboard Support
USB Mouse Support
AC97 Audio
Onboard Lan Boot ROM
Onboard FDD Controller
Onboard Serial Port 1
Onboard Serial Port 2
UART 2 Mode Select
UART 2 Duplex Mode
Onboard Parallel Port 1
Onboard Parallel Mode
ECP Mode Use DMA
Parallel Port EPP Type
Ç È Æ ³ Move Enter: Select +/-/PU/PD: Value F10: Save Esc: Exit F1: General Help
[Enabled]
[Enabled]
[Add-On Card]
[Enabled]
[Disabled]
[Disabled]
[Auto]
[Disabled]
[Enabled]
[3F8/IRQ4]
[2F8/IRQ3]
[Normal]
Half
[378/IRQ7]
[SPP]
[3]
[Epp1.9]
Item Help
Menu Level f
F5: Previous Values F6: Fail-Safe Defaults F7: Optimized Defaults
The following explains the options for each of the features as listed in the above menu:
On-Chip Primary PCI IDE: The chipset contains a PCI IDE interface with support for two IDE channels.
Select Enabled to activate the primary IDE interface. Select Disabled to deactivate this interface. The settings
are Enabled and Disabled.
On-Chip Secondary PCI IDE: The chipset contains a PCI IDE interface with support for two IDE channels.
Select Enabled to activate the secondary IDE interface. Select Disabled to deactivate this interface. The
settings are Enabled and Disabled.
Init Display First: This item allows you to decide to active whether PCI Slot of VGA card or AGP first. The
settings are Add-On Card and Onboard AGP.
USB Controller: Select Enabled if your system contains a Universal Serial Bus (USB) controller and you
have USB peripherals
USB Keyboard Support: Set this option to Enabled or Disabled the USB keyboard support. The default
setting is Disabled.
USB Mouse Support: Set this option to Enabled or Disabled the USB mouse support. The default setting is
Disabled.
AC97 Audio: This option sets the AC97 Audio. The settings are Auto and Disabled.
Onboard Lan Boot ROM: Unless you intend to boot using PXE Enabled/Disabled.
Multi-Tech Systems, Inc. Single Board Computer IAC-F696 User’s Guide (S000349A) 34
Page 35

Chapter 3- BIOS Setup
Onboard FDD Controller: Select Enabled if your system has a floppy disk controller (FDD) installed on
the system board and you want to use it. If you install add-in FDD or the system has no floppy drive,
select Disabled in this field. The settings are Enabled and Disabled.
Onboard Serial Port 1 / Port 2: Select an address and corresponding interrupt for the first and
second serial ports. The settings are 3F8/IRQ4, 2F8/IRQ3, 3E8/IRQ4, 2E8/IRQ3, Disabled, Auto.
UART 2 Mode Select: This item allows you to select which mode for the Onboard Serial Port 2. The
settings are Normal, HPSIR, and ASKIR.
UART 2 Duplex Mode: This item allows you to select the is half/full duplex function. The default
setting is Half
Onboard Parallel Port 1: This item allows you to determine onboard parallel port controller I/O
address setting. The settings are Disabled, 3BC/IRD7, 378/IRQ7, and 278/IRQ5.
Onboard Parallel Mode: There are four options SPP (default), EPP, ECP and ECP/EPP. Change
the mode from Normal to the enhanced mode only if your peripheral device can support it. When it is
set to ECP mode, the printer port always uses DMA3.
ECP Mode Use DMA: Select a DMA channel for the parallel port for use during ECP mode. The
settings are 3 and 1.
Parallel Port EPP Type: Select EPP port type 1.7 or 1.9.
Multi-Tech Systems, Inc. Single Board Computer IAC-F696 User’s Guide (S000349A) 35
Page 36

Chapter 3- BIOS Setup
Power Management Setup
The Power Management Setup controls the CPU card’s Green features. When you select the
POWER MANAGEMENT SETUP on the main program, the screen display will appears as:
Power Management Setup Screen
Phoenix - Award BIOS CMOS Setup Utility
Power Management Setup
ACPI function [Disabled] Item Help
Power Management [Press Enter] Menu Level f
Video Off In Suspend [Suspend -> Off]
Video Off Method [DPMS]
Soft-Off by PWRBTN [Instant-Off]
********** Power On Events *********
Power On by LAN/Ring [Disabled]
Power On by RTC Alarm [Disabled]
Date (of Month) 0
Resume Time (hh:mm:ss) 0:0:2
PwrOn After AC Power
Lose
[On]
Ç È Æ ³ Move Enter: Select +/-/PU/PD: Value F10: Save Esc: Exit F1: General Help
F5: Previous Values F7: Optimized Defaults
The following explains the options for each of the features as listed in the above menu:
ACPI Function: This item allows you to enable or disable the Advanced Configuration and Power
Management (ACPI). The settings are Enabled and Disabled.
Power Management:
Min. Power Saving Minimum power management. Doze Mode=1hr. Standby Mode =1hr.,
Suspend Mode=1hr., and HDD Power Down=15min.
Max. Power Saving Maximum power management. –Only available for SL CPU’s. Doze
Mode=1min., Standby Mode=1min., Suspend Mode=1min., and HDD
Power Down=1min.
User Defined Allows you to set each mode individually. When not disabled, each of
the ranges is from 1 min. to 1 hr. except for HDD Power Down which
ranges from 1 min. to 15 min. and disabled.
Video Off In Suspend: This determines the manner in which the monitor in which the monitor is blacked.
The setting are YES and NO.
Video Off Method: This determines the manner in which the monitor is blanked. The default setting is
V/H SYNC+Blank.
V/H SYNC+Blank This selection will cause the system to turn off the vertical and
horizontal synchronization ports and write blank to the video buffer.
Blank Screen This option only writes blanks to the video buffer.
DPMS Initial display power management signaling.
Soft-Off by PWRBTN: Pressing the power button for more than 4 seconds forces the system to enter the
Soft-Off state. The settings are: Delay 4 Sec., and Instant-Off.
Power On by LAN/Ring: When Enabled, an input signal on the serial LAN/Ring Indicator (RI) line (in
other words, an incoming call on the modem) awakens the system from a soft off state.
Power On by RTC Alarm: Power-on interval by RTC setting.
PwrOn After AC Power Lose: This option specifies the Power ON/OFF Status after AC power loss.
Multi-Tech Systems, Inc. Single Board Computer IAC-F696 User’s Guide (S000349A) 36
Page 37

Chapter 3- BIOS Setup
PnP/PCI Configuration
Both the ISA and PCI buses on the CPU card use system IRQs & DMAs. You must set up the IRQ and
DMA assignments correctly through the PnP/PCI Configuration Setup utility; otherwise the motherboard
will not work properly.
PnP/PCI Configuration Setup Screen
Phoenix - Award BIOS CMOS Setup Utility
PnP/PCI Configurations
PNP OS Installed [No] Item Help
Reset Configuration Data [Disabled] Menu Level f
Select Yes if you
Resources Controlled By [Manual]
f IRQ Resources [Press Enter]
f DMA Resources [Press Enter]
PCI/VGA Palette Snoop [Disabled]
Assign IRQ For VGA [Enabled]
Assign IRQ For USB [Enabled]
INT Pin 1 Assignment [Auto]
INT Pin 2 Assignment [Auto]
INT Pin 3 Assignment [Auto]
INT Pin 4 Assignment [Auto]
Ç È Æ ³ Move Enter: Select +/-/PU/PD: Value F10: Save Esc: Exit F1: General Help
are using a Plug
and Play capable
operating system.
Select No if you
need the BIOS to
configure non-boot
devices.
F5: Previous Values F6: Fail-safe Defaults F7: Optimized Defaults
The following explains the options for each of the features as listed in the above menu:
PNP OS Installed: When set to Yes, BIOS will only initialize the PnP cards used for booting (VGA, IDE,
SCSI). The rest of the cards will be initialized by the PnP operating system like Windows® 95 or 98.
When set to No, BIOS will initialize all the PnP cards. So, for non-PnP operating system (DOS,
Netware®), this option must set to Yes.
Reset Configuration Data: Normally, you leave this field Disabled, Select Enabled to reset Extended
System Configuration Data (ESCD) when you exit Setup if you have installed a new add-on and the
system reconfiguration has caused such a serious conflict that the operating system cannot boot.
The settings are: Enabled and Disabled.
Resource Controlled By: The Award Plug and Play BIOS has the capacity to automatically configure all
of the boot and Plug and Play compatible devices. However, this capability means absolutely nothing
unless you are using a Plug and Play operating system such as Windows98. If you set this field to
Manual choose specific resources by going into each of the sub menu that follows this field (a sub menu
is proceeded by a f). The settings are Auto (ESCD), Manual.
Multi-Tech Systems, Inc. Single Board Computer IAC-F696 User’s Guide (S000349A) 37
Page 38

Chapter 3- BIOS Setup
IRQ Resources: When resources are controlled manually, assign each system interrupt as one of the
following types, depending on the type of device using the interrupt.
IRQ-3 assigned to
IRQ-4 assigned to
IRQ-5 assigned to
IRQ-7 assigned to
IRQ-9 assigned to
IRQ-10 assigned to
IRQ-11 assigned to
IRQ-12 assigned to
IRQ-14 assigned to
IRQ-15 assigned to
[ Legacy ISA ]
[ Legacy ISA ]
[ PCI /ISA PNP]
[ Legacy ISA ]
[ PCI /ISA PNP]
[ PCI /ISA PNP]
[ PCI /ISA PNP]
[ PCI /ISA PNP]
[ PCI /ISA PNP]
[ PCI /ISA PNP]
Item Help
Menu Level fff
Legacy ISA for devices compliant
with the original PC AT bus
specification, PCI/ISA PnP for
devices compliant with the Plug
and Play standard whether
designed for PCI or ISA bus
architecture.
DMA Resources: The sub menu can let you control the DMA resource.
DMA-0 assigned to
DMA-1 assigned to
DMA-3 assigned to
DMA-5 assigned to
DMA-6 assigned to
DMA-7 assigned to
[ PCI /ISA PnP]
[ PCI /ISA PnP]
[ PCI /ISA PnP]
[ PCI /ISA PnP]
[ PCI /ISA PnP]
[ PCI /ISA PnP]
Item Help
Menu Level fff
Legacy ISA for devices compliant
with the original PC AT bus
specification, PCI/ISA PnP for
devices compliant with the Plug
and Play standard whether
designed for PCI or ISA bus
architecture.
PCI/VGA Palette Snoop: Leave this field at Disabled. The settings are Enabled, Disabled.
Assign IRQ for VGA: Enable/Disable to assign IRQ for VGA. The settings are Enabled and
Disabled.
Assign IRQ for USB: Enable/Disable to assign IRQ for USB. The settings are Enabled and
Disabled.
INT Pin 1/2/3/4 Assignment: These options specify the IRQ priority for PCI devices installed in the
PCI expansion slots.
Multi-Tech Systems, Inc. Single Board Computer IAC-F696 User’s Guide (S000349A) 38
Page 39

Chapter 3- BIOS Setup
PC Health Status (Optional)
This section helps you to get more information about your system including CPU temperature, FAN speed
and voltages. It is recommended that you contact your motherboard supplier to get proper value about
your setting of the CPU temperature.
Phoenix - Award BIOS CMOS Setup Utility
PC Health Status
CPU Temperature 36º C/ 96º F Item Help
System Temperature 29º C/ 80º F Menu Level f
FAN1
FAN2 0 RPM
Vcore +0.95 V
+2.5V +2.56 V
+3.3V +3.46 V
+5V +5.20 V
+12V +12.30 V
Ç È Æ ³ Move Enter: Select +/-/PU/PD: Value F10: Save Esc: Exit F1: General Help
F5: Previous ValuesF6: Fail-Safe Defaults F7: Optimized Defaults
The following explains the options for each of the features as listed in the above menu:
CPU Temperature: This item shows the CPU temperature.
System Temperature: This item displays the value of system temperature.
FAN1: This item displays the value of FAN1 speed.
FAN2: This item displays the value of FAN2 speed.
Vcore: This item shows the current system voltage.
Load Optimized Defaults
When you press Enter on this item, you get a confirmation dialog box with a message similar to:
Load Optimized Defaults (Y/N)? N
Pressing Y loads the default values that are factory settings for optimal performance system
operations.
Phoenix - Award BIOS CMOS Setup Utility
fStandard CMOS Features
fAdvanced BIOS Features
fAdvanced Chipset Features
fIntegrated Peripherals
fPower Management
fPnP / PCI Configuration
Load Optimized Defaults (Y/N)?
fPC Health Status
Load Optimized Defaults
Set Supervisor Password
Set User Password
Setup
Saving
ESC : Quit Ç È Æ ³ : Select Item
F10 : Save & Exit Setup
Load Optimized Defaults
Multi-Tech Systems, Inc. Single Board Computer IAC-F696 User’s Guide (S000349A) 39
Page 40

Chapter 3- BIOS Setup
Set Supervisor / User Password
The SUPERVISOR/USER PASSWORD utility sets the password. The SBC is shipped with the password
disabled. If you want to change the password, you must first enter the current password, then at the
prompt -- enter your new password. The password is case sensitive, and can be up to 8 alphanumeric
characters. Press <Enter> after you have finished typing in the password. At the next prompt, confirm the
new password by re-typing it and pressing <Enter> again. When you are done, the screen automatically
reverts to the main screen. Remember that when you use this feature, the Security Option line in BIOS
FEATURES SETUP will determine when entering the password will be required.
Phoenix - Award BIOS CMOS Setup Utility
fStandard CMOS Features
fAdvanced BIOS Features
fAdvanced Chipset Features
fIntegrated Peripherals
fPower Management
fPnP / PCI Configuration
ESC : Quit Ç È Æ : Select Item
F10 : Save & Exit Setup
Change/Set/Disable Password
Enter Password:
fPC Health Status
Load Optimized Defaults
Set Supervisor Password
Set User Password
Setup
Saving
To disable the password, press the <Enter> key instead of entering a new password when the Enter
Password in the dialog box appears. A message will appear confirming that the password is disabled.
If you have set both supervisor and user password, only the supervisor password allows you to enter the
BIOS SETUP PROGRAM.
Note: If you forget your password, the only way to solve this problem is to discharge the CMOS
memory.
Save & Exit Setup
Select this option and press the <Enter> key to save the new setting information in the CMOS memory
and continue with the booting process.
Phoenix - Award BIOS CMOS Setup Utility
fStandard CMOS Features
fAdvanced BIOS Features
fAdvanced Chipset Features
fIntegrated Peripherals
fPower Management
fPnP / PCI Configuration
ESC : Quit Ç È Æ : Select Item
F10 : Save & Exit Setup
SAVE to CMOS and EXIT (Y/N)? Y
fPC Health Status
Load Optimized Defaults
Set Supervisor Password
Set User Password
Setup
Saving
Save Data to CMOS
Multi-Tech Systems, Inc. Single Board Computer IAC-F696 User’s Guide (S000349A) 40
Page 41

Chapter 3- BIOS Setup
Exit Without Saving
Select this option and press the <Enter > key to exit the Setup Utility without recording any new values or
changing old ones.
Phoenix - Award BIOS CMOS Setup Utility
fStandard CMOS Features
fAdvanced BIOS Features
fAdvanced Chipset Features
fIntegrated Peripherals
fPower Management
fPnP / PCI Configuration
ESC : Quit Ç È Æ : Select Item
F10 : Save & Exit Setup
Abandon all Data
Quit Without Saving (Y/N)? N
fPC Health Status
Load Optimized Defaults
Set Supervisor Password
Set User Password
Setup
Saving
Multi-Tech Systems, Inc. Single Board Computer IAC-F696 User’s Guide (S000349A) 41
Page 42

Chapter 4 – Drivers Support
CHAPTER 4 – DRIVERS SUPPORT
Use Your Driver CD-ROM
This chapter provides information on how to install the drivers in generally and related directory that come
with the CD-ROM in the package. Please follow the instructions set forth on the screen carefully.
1. Find the directory for your O/S accordingly.
2. Always read the README.TXT before installation
3. Run the *.EXE and follow the installation prompt step by step.
File Directory
Multi-Tech Systems, Inc. Single Board Computer IAC-F696 User’s Guide (S000349A) 42
Page 43

Appendix A – Watchdog Timer
APPENDIX A – WATCHDOG TIMER
You can enable the watchdog when your application software monitors an unexpected or not respond, then
the timer generates a reset to reboot your system. During the period of enable to reset, you could still
cancel reset by disabling the watchdog. Decide the way you want to set the period for reset by selecting
hardware or software watchdog (if both of them are available). For hardware setting period, select period by
jumper. For software setting period, normally setting hardware watchdog timer period to 2 sec.
Software watchdog using example.
EX.1: For DOS
Enable Disable
C:\DOS> DEBUG C:\DOS>DEBUG
-o443 D -o441 F
EX.2: For assemble Language
Enable: Disable:
MOV DX, 443H MOV DX, 441H
MOV AL, 0FH MOV AL, 0FH
OUT DX, AL OUT DX, AL
Note: F is the period of software watchdog timer (normally F indicated 0 sec.). 0 to 9 and A to F
are used for represent different period. Normally, the step is 2 sec. That means E is 2, D is
4, 2 is 26, 1 is 28 and 0 is 30 seconds.
Multi-Tech Systems, Inc. Single Board Computer IAC-F696 User’s Guide (S000349A) 43
Page 44

Appendix B - Warranty
APPENDIX B – WARRANTY
Multi-Tech Warranty Statement
Multi-Tech Systems, Inc., (hereafter “MTS”) warrants that its products will be free from defects in material or
workmanship for a period of two, five, or ten years (depending on model) from date of purchase, or if proof of
purchase is not provided, two, five, or ten years (depending on model) from date of shipment.
MTS MAKES NO OTHER WARRANTY, EXPRESS OR IMPLIED, AND ALL IMPLIED WARRANTIES OF
MERCHANTABILITY AND FITNESS FOR A PARTICULAR PURPOSE ARE HEREBY DISCLAIMED.
This warranty does not apply to any products which have been damaged by lightning storms, water, or power
surges or which have been neglected, altered, abused, used for a purpose other than the one for which they
were manufactured, repaired by Customer or any party without MTS’s written authorization, or used in any
manner inconsistent with MTS’s instructions.
MTS’s entire obligation under this warranty shall be limited (at MTS’s option) to repair or replacement of any
products which prove to be defective within the warranty period or, at MTS’s option, issuance of a refund of the
purchase price. Defective products must be returned by Customer to MTS’s factory — transportation prepaid.
MTS WILL NOT BE LIABLE FOR CONSEQUENTIAL DAMAGES, AND UNDER NO CIRCUMSTANCES
WILL ITS LIABILITY EXCEED THE PRICE FOR DEFECTIVE PRODUCTS.
Repair Procedures for U.S. and Canadian Customers
In the event that service is required, products may be shipped, freight prepaid, to our Mounds View, Minnesota
factory:
Multi-Tech Systems, Inc.
2205 Woodale Drive
Mounds View, MN 55112
Attn: Repairs, Serial # ____________
A Returned Materials Authorization (RMA) is not required. Return shipping charges (surface) will be paid by
MTS to destinations in U.S. and Canada.
Please include, inside the shipping box, a description of the problem, a return shipping address (must have
street address, not P.O. Box), your telephone number, and if the product is out of warranty, a check or purchase
order for repair charges.
For out of warranty repair charges, go to www.multitech.com/DOCUMENTS/Company/warranty/
Extended two-year overnight replacement service agreements are available for selected products. Please call
MTS customer service at (888) 288-5470 or visit our web site at www.multitech.com/PARTNERS/Programs/orc/
for details on rates and coverage’s.
Please direct your questions regarding technical matters, product configuration, verification that the product is
defective, etc., to our Technical Support department at (800) 972-2439 or email support@multitech.com. Please
direct your questions regarding repair expediting, receiving, shipping, billing, etc., to our Repair Accounting
department at (800) 328-9717 or (763) 717-5631, or email mtsrepair@multitech.com.
Repairs for damages caused by lightning storms, water, power surges, incorrect installation, physical abuse, or
user-caused damages are billed on a time-plus-materials basis.
Repair Procedures for International Customers (Outside U.S.A. and Canada)
Your original point of purchase Reseller may offer the quickest and most economical repair option for your MultiTech product. You may also contact any Multi-Tech sales office for information about the nearest distributor or
other repair service for your Multi-Tech product. The Multi-Tech sales office directory is available at
www.multitech.com/PARTNERS/Channels/offices/
In the event that factory service is required, products may be shipped, freight prepaid to our Mounds View,
Minnesota factory. Recommended international shipment methods are via Federal Express, UPS or DHL
courier services, or by airmail parcel post; shipments made by any other method will be refused. A Returned
Materials Authorization (RMA) is required for products shipped from outside the U.S.A. and Canada. Please
contact us for return authorization and shipping instructions on any International shipments to the U.S.A. Please
include, inside the shipping box, a description of the problem, a return shipping address (must have street
address, not P.O. Box), your telephone number, and if the product is out of warranty, a check drawn on a U.S.
Multi-Tech Systems, Inc. Single Board Computer IAC-F696 User’s Guide (S000349A) 44
Page 45

Appendix B - Warranty
bank or your company’s purchase order for repair charges. Repaired units shall be shipped freight collect,
unless other arrangements are made in advance.
Please direct your questions regarding technical matters, product configuration, verification that the product is
defective, etc., to our Technical Support department nearest you or email support@multitech.com. When calling
the U.S., please direct your questions regarding repair expediting, receiving, shipping, billing, etc., to our Repair
Accounting department at +(763) 717-5631 in the U.S.A., or email mtsrepair@multitech.com.
Repairs for damages caused by lightning storms, water, power surges, incorrect installation, physical abuse, or
user-caused damages are billed on a time-plus-materials basis.
Repair Procedures for International Distributors
International distributors should contact their MTS International sales representative for information about the
repairs for their Multi-Tech product.
Please direct your questions regarding technical matters, product configuration, verification that the product is
defective, etc., to our International Technical Support department at +(763)717-5863. When calling the U.S.,
please direct your questions regarding repair expediting, receiving, shipping, billing, etc., to our Repair
Accounting department at +(763) 717-5631 in the U.S.A. or email mtsrepair@multitech.com.
Repairs for damages caused by lightning storms, water, power surges, incorrect installation, physical abuse, or
user-caused damages are billed on a time-plus-materials basis.
Replacement Parts
SupplyNet, Inc., can supply you with replacement power supplies, cables and connectors for selected MultiTech products. You can place an order with SupplyNet via mail, phone, fax or the Internet at the following
addresses:
Mail: SupplyNet, Inc.
614 Corporate Way
Valley Cottage, NY 10989
Phone: 800 826-0279
Fax: 914 267-2420
Email: info@thesupplynet.com
Internet: http://www.thesupplynet.com
Multi-Tech Systems, Inc. Single Board Computer IAC-F696 User’s Guide (S000349A) 45
Page 46

A
AC97 Audio......................................................................34
Accelerated Graphics Port ................................................33
ACPI Function..................................................................36
AGP Aperture Size ...........................................................33
AGP Master 1 WS Read ...................................................33
AGP Master 1 WS Write ..................................................33
Assign IRQ for USB.........................................................38
Assign IRQ for VGA ........................................................38
Index
INDEX
Integrated Peripherals .................................................. 27
Load Optimized Default .............................................. 27
PC Health Status .......................................................... 27
PnP/PCI Configurations............................................... 27
Power Management ..................................................... 27
Save & Exit Setup........................................................ 27
Supervisor Passwords ..................................................27
User Passwords............................................................ 27
CMOS Setup Utility Standard CMOS Features.............. 27
Copyright ........................................................................... 2
CPU to PCI Write Buffer ................................................. 33
B
Bank Interleave.................................................................32
BIOS Features Setup
Virus Warning ..............................................................30
BIOS Features Setup
C8000 CBFFF Shadow ................................................31
NumLock Status...........................................................31
Other Boot Device........................................................30
Power On Self Test ......................................................30
Security Options...........................................................31
SMART Capability ......................................................31
Swap Floppy Drive.......................................................30
Video BIOS Shadow ....................................................31
BIOS Features Setup Screen.............................................30
BIOS Setup.......................................................................26
BIOS Shadow ...................................................................31
C
Chipset Features Setup......................................................32
AGP Aperture Size.......................................................33
AGP Master 1 WS Read...............................................33
AGP Master 1 WS Write..............................................33
Bank Interleave ............................................................32
CPU to PCI Write Buffer .............................................33
DRAM Clock ...............................................................32
DRAM Timing by SPD ................................................32
Fast R-W Turn Around.................................................33
Memory ........................................................................32
P2C/C2P Concurrency .................................................32
Panel Type....................................................................33
PCI Delay Transaction .................................................33
PCI Dynamic Bursting .................................................33
PCI Maser 0 WS Write.................................................33
PCI#2 Access ...............................................................33
SDRAM Cycle Length .................................................32
Select Display...............................................................33
System BIOS Cacheable ..............................................33
Video RAM Cacheable ................................................33
CMOS Setup Utility .........................................................27
Advanced BIOS Features .............................................27
Advanced Chipset Features ..........................................27
Drive Specifications .....................................................29
Exit Without Saving .....................................................27
Halt On.........................................................................29
DMA Resource................................................................. 38
DRAM Clock ................................................................... 32
DRAM Timing by SPD.................................................... 32
Drive Specifications......................................................... 29
ECP Mode ........................................................................ 35
EPP Port Type .................................................................. 35
Exit without Saving.......................................................... 41
Fast R-W Turn Around .................................................... 33
FDD Controller ................................................................ 35
Features .............................................................................. 4
Frame Butter Size............................................................. 33
General Information ........................................................... 4
Halt On............................................................................. 29
Hardware Setup and Installation ........................................ 6
I/O Connect Summary...................................................... 12
I/O Connector
ATXD1 - ATX Function.............................................. 13
COMA1 - RS-232 Serial Port ...................................... 19
COMB1 - Serial Port #2 (Header) ............................... 20
DIMMA1/2/3 - 168 Pin DIMM ...................................24
FAN1/FAN2 - 3-pin FAN Connector ..........................15
FDCA1 - Floppy Interface Connector.......................... 17
IDEB1/IDEB2 - Interface Connector........................... 16
IRDA1 - IRDA1 Connector ......................................... 13
KCN1 - 5-Pin Keyboard Cable .................................... 23
LANB1 - Type 2 (RJ-45 with LED) ............................ 21
LNB1 - LAN 2x8 Pin................................................... 23
LPTA1 - Parallel Connector ........................................ 18
D
E
F
G
H
I
Multi-Tech Systems, Inc. Single Board Computer IAC-F696 User’s Guide (S000349A) 46
Page 47

Index
LVDSE1 - Panel Connector .........................................25
PKM1 - PS/2 Keyboard & Mouse................................22
SM1 - Sound/Mouse.....................................................24
USBF1/USBF2 - USB Port ..........................................14
VGAA1 - External VGA Connector.............................22
I/O ConnectorPSW1 - ATX Power Button.......................15
Initial Display First...........................................................34
Installing Drivers ..............................................................42
INT Pin 1/2/3/4 Assignment .............................................38
Integrated Peripherals .......................................................34
ECP Mode ....................................................................35
EPP Port Type ..............................................................35
Onboard Parallel Mode ................................................35
Onboard Parallel Port 1 ................................................35
On-Chip Primary PCI IDE ...........................................34
UART 2 Duplex Mode .................................................35
UART 2 Mode Select ...................................................35
Integrated Peripherals AC97 Audio..................................34
Integrated Peripherals FDD Controller .............................35
Integrated Peripherals Initial Display First .......................34
Integrated Peripherals LAN Boot ROM ...........................34
Integrated Peripherals On-Chip Secondary PCI IDE........34
Integrated Peripherals Serial Ports....................................35
Integrated Peripherals USB Controller .............................34
Integrated Peripherals USB Keyboard Support ................34
Integrated Peripherals USB Mouse Support .....................34
IRQ Resources..................................................................38
J
Jumper Select
KBPW1 - 1x3 Pin 2.45mm...........................................11
SBVB1 - Select Power Mode .......................................11
SLVA1 - Bit Input Mode Select...................................12
Jumper Settings
CMOS1 - Clear CMOS Data..........................................9
PLRS1 - Power LED, HD LED, Reset, Speaker
Connector.................................................................10
SC2T1/SC2T2 – Select COM2 Type .............................8
SCF1 - Master/slave Select ..........................................10
VLCD1 - Select Panel Voltage.......................................9
Jumper Settings Summary ..................................................8
P
P2C/C2P Concurrency ..................................................... 32
Panel Type........................................................................ 33
PC Health Status .............................................................. 39
PCI Delay Transaction ..................................................... 33
PCI Dynamic Bursting .....................................................33
PCI Maser 0 WS Write..................................................... 33
PCI#2 Access ................................................................... 33
PCI/VGA Palette Snoop................................................... 38
PnP OS Installed .............................................................. 37
PnP/PCI Configuration
Assign IRQ for USB .................................................... 38
Assign IRQ for VGA ................................................... 38
DMA Resource ............................................................ 38
INT Pin 1/2/3/4 Assignment ........................................ 38
IRQ Resources ............................................................. 38
PCI/VGA Palette Snoop .............................................. 38
PnP OS Installed .......................................................... 37
Reset Configuration Data............................................. 37
Resource Controlled by ............................................... 37
PnP/PCI Configuration Setup........................................... 37
Power Management Setup................................................ 36
ACPI Function ............................................................. 36
Power on by Lan.......................................................... 36
Power On by RTC Alarm ............................................ 36
Power ON/OFF Status after AC Power Loss ............... 36
Soft-Off State............................................................... 36
Video Off In Suspend .................................................. 36
Video Off Method........................................................ 36
Power on by Lan .............................................................. 36
Power On by RTC Alarm................................................. 36
Power On Self Test .......................................................... 30
Power ON/OFF Status after AC Power Loss ................... 36
Primary Master/Primary Slave......................................... 28
PS/2 Mouse Control ......................................................... 31
R
Replacement Parts........................................................ 45
Reset Configuration Data ................................................. 37
Resource Controlled by.................................................... 37
L
LAN Boot ROM ...............................................................34
Load Optimized Defaults..................................................39
M
Memory ............................................................................32
Mouse Control ..................................................................31
N
NumLock Status ...............................................................31
O
Onboard Parallel Mode.....................................................35
Onboard Parallel Port 1.....................................................35
On-Chip Primary PCI IDE................................................34
On-Chip Secondary PCI IDE............................................34
Ordering Replacement Parts ........................................45
Other Boot Device ............................................................30
Multi-Tech Systems, Inc. Single Board Computer IAC-F696 User’s Guide (S000349A) 47
S
Save & Exit Setup ............................................................40
SDRAM Cycle Length ..................................................... 32
Security Option ................................................................31
Select Display .................................................................. 33
Serial Ports ....................................................................... 35
Set Date............................................................................ 28
Set Supervisor/User Password.......................................... 40
Set Time ........................................................................... 28
SMART Capability .......................................................... 31
Soft-Off State ................................................................... 36
Standard CMOS Setup Screen ......................................... 28
Swap Floppy Drive .......................................................... 30
System BIOS Cacheable ..................................................33
T
Technical Specifications .................................................... 5
U
UART 2 Duplex Mode..................................................... 35
Page 48

Index
UART 2 Mode Select .......................................................35
USB Controller .................................................................34
USB Keyboard Support ....................................................34
USB Mouse Support .........................................................34
V
VGA Card.........................................................................34
Video Off In Suspend .......................................................36
Video Off Method ............................................................ 36
Video RAM Cacheable ....................................................33
Virus Warning.................................................................. 30
W
Warranty .......................................................................... 44
Watchdog Timer............................................................... 43
Write Buffer ..................................................................... 33
Multi-Tech Systems, Inc. Single Board Computer IAC-F696 User’s Guide (S000349A) 48
 Loading...