

Page 1
Operating instructions
1777.8/7-10 G3
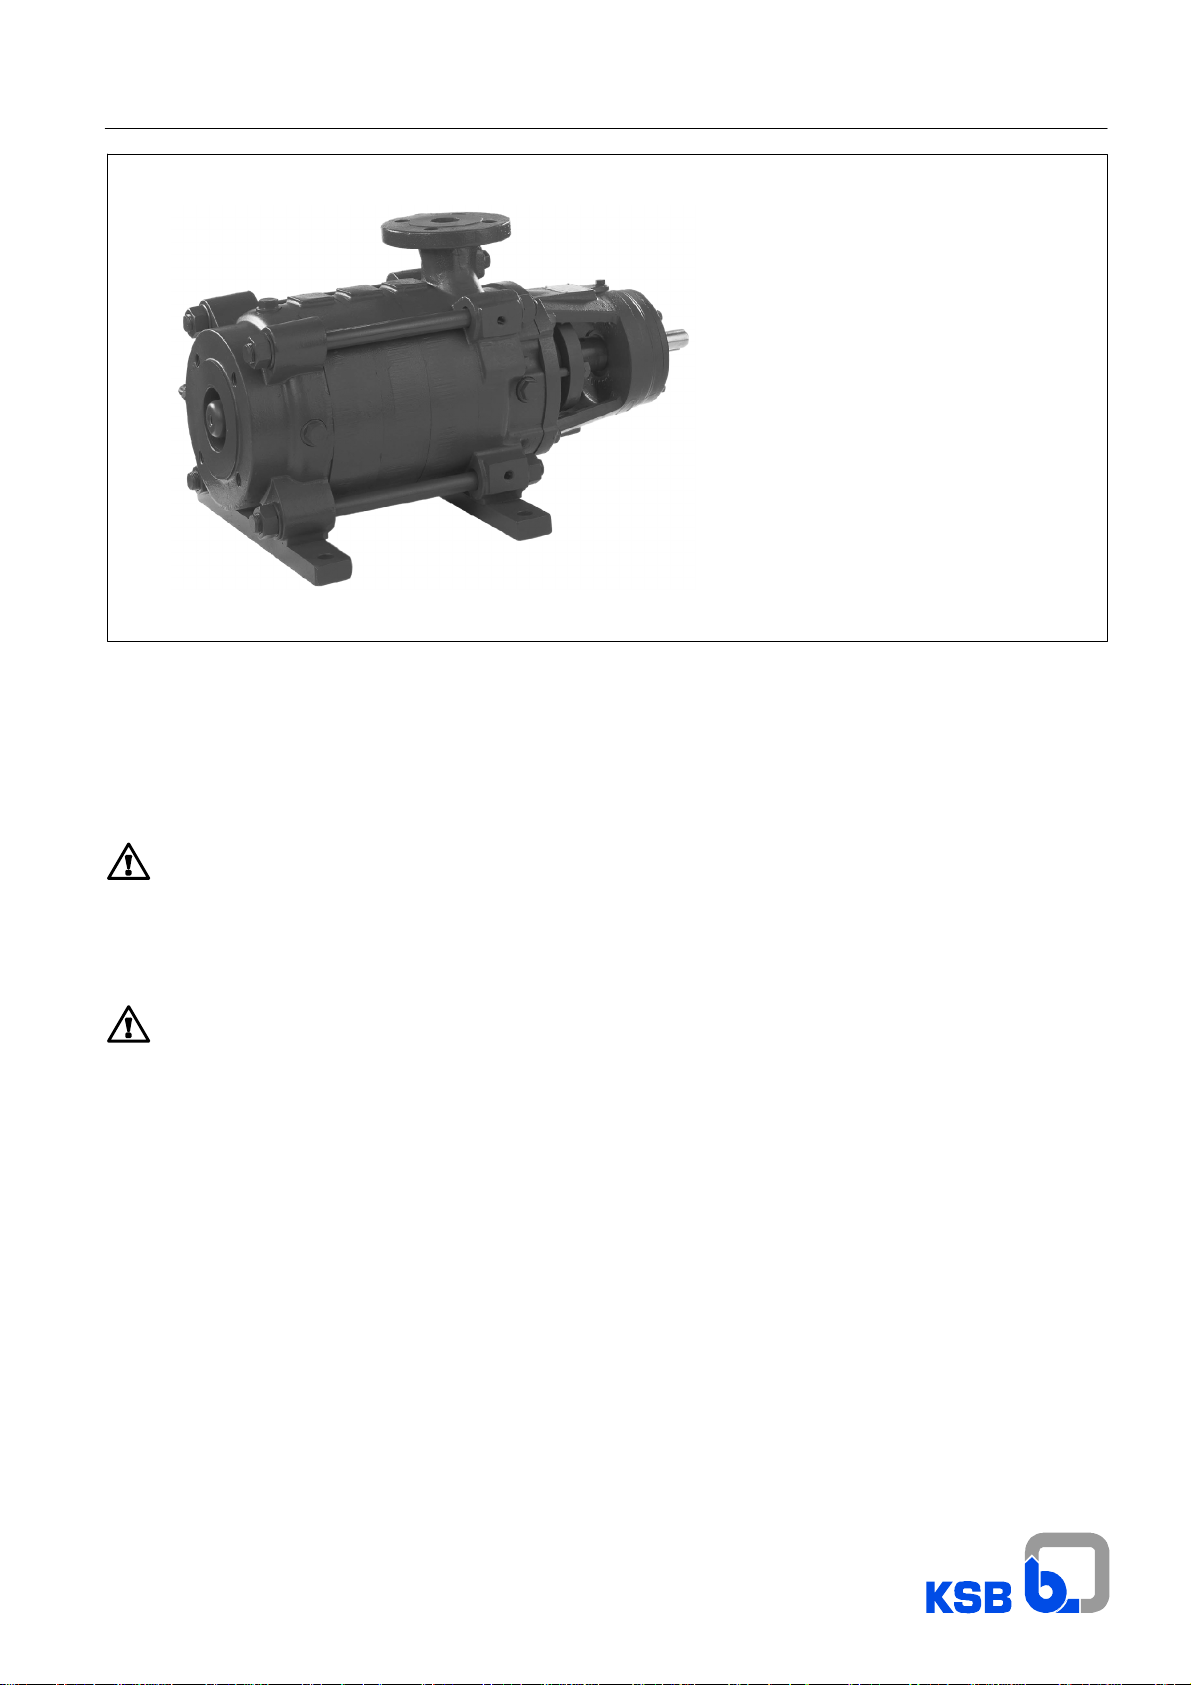
Multitec
High-pressure pumps in
ring-section design
Works No.: __________________________________
Type series: __________________________________
These operating instructions contain fundamental
information and precautionary notes. Please read
the manual thoroughly prior to installation of unit,
connection to the power supply and commissioning. It is
imperative to comply with all other operating instructions
referring to components of this unit.
This manual shall always be kept close to the unit’s
location of operation or directly on the pump set.
Page 2

Contents
Page
1 General 4
2 Safety 4
2.1 Marking of instructions in the manual 4
2.2 Personnel qualification and training 4
2.3 Non-compliance with safety instructions 4
2.4 Safety awareness 4
2.5 Safety instructions for the operator / user 5
2.6 Safety instructions for maintenance,
inspection and installation work 5
2.7 Modification and manufacture of spare parts
by customer 5
2.8 Unauthorized modes of operation 5
3 Transport / Storage 5
3.1 Transport / Handling 5
3.2 Storage / Preservation 5
4 Description of the product and
accessories
4.1 Technical specification 6
4.2 Designation 6
4.3 Design details 6
4.4 Applications 6
5 Installation at site 7
5.1 Safety regulations / Special instructions 7
5.2 Foundation / Checks to be carried out prior to
installation 7
5.3 Installing the pump/unit 7
5.3.1 Aligning the pump / drive 8
5.4 Connecting the piping 9
5.4.1 Vacuum balance line 10
5.5 Connection to power supply 10
5.5.1 Connecting the motor 10
5.5.2 Setting the time relay 10
5.5.3 Checking the direction of rotation 10
6 Commissioning, start-up / shutdown 11
6.1 Commissioning 11
6.1.1 Lubricants 11
6.1.2 Priming the pump and checks to be carried
out
6.1.3 Contact guard 12
6.1.4 Connection to power supply 12
6.1.5 Start-up 12
6.1.6 Shutdown 12
6.1.7 Final check 12
6.2 Operating limits 12
6.2.1 Temperature of fluid pumped 12
6.2.2 Switching frequency 13
6.2.3 Minimum flows 13
6.2.4 Density of fluid pumped 13
6.3 Shutdown / storage / preservation 13
6.3.1 The unit / pump remains installed; periodic
check of operation 13
6.3.2 The pump is removed from the pipe and
stored
6.4 Returning to service after storage 13
7 Servicing / maintenance 14
7.1 General instructions 14
7.2 Servicing / inspection 14
7.2.1 Supervision of operation 14
7.2.2 Bearings and lubrication 14
7.2.3 Shaft seal 15
7.2.4 Coupling 15
7.3 Dismantling 15
7.3.1 General instructions 15
7.3.2 Preparations for dismantling 15
7.3.3 Dismantling the bearings 16
7.3.4 Dismantling and replacement of shaft seals 18
6
7.3.5 Dismantling the mechanical seal 18
7.3.6 Dismantling the hydraulic system 20
7.3.7 Recommended spare parts stock for 2 years’
continuous operation 20
7.4 Reassembly 20
7.4.1 Tightening torques - Tie bolts (part No. 905) 21
7.4.2 Reassembly of hydraulic system 21
7.4.3 Shaft seals 21
7.4.4 Bearings 22
7.5 Re-adjusting the clearance gaps 25
7.5.1 Max. clearance gaps 25
7.5.2 Repairs 25
8 Trouble-shooting 26
9 General assembly drawings 27-29
9.1 List of components 30
Tightening of shaft nuts on Multitec pumps 23
Adjusting dimensions for coupling alignment,
pump sizes 32 to 65, versions E, Ex, F, Fx, V, Vx 31
11
Multitec
Page
13
2
Page 3

Index
Section Page
Adjusting dimensions for coupling
alignment, pump sizes 32 to 65, versions
E, Ex, F, Fx, V, Vx 31
Aligning the pump / drive 5.3.1 8
Applications 4.4 6
Bearings 7.4.4 22
Bearings and lubrication 7.2.2 14
Checking the direction of rotation 5.5.3 10
Commissioning 6.1 11
Commissioning, start-up / shutdown 6 11
Connecting the motor 5.5.1 10
Connecting the piping 5.4 9
Connection to power supply 5.5/6.1.4 10/12
Contact guard 6.1.3 12
Coupling 7.2.4 15
Density of fluid pumped 6.2.4 13
Description of the product and
accessories
Design details 4.3 6
Designation 4.2 6
Dismantling 7.3 15
Dismantling and replacement of shaft
seals
Dismantling the bearings 7.3.3 16
Dismantling the hydraulic systems 7.3.6 20
Dismantling the mechanical seal 7.3.5 18
Final check 6.1.7 12
Foundation / Checks to be carried out
prior to installation
General 1 4
General assembly drawings 9 27-29
General instructions 7.1 14
General instructions (dismantling) 7.3.1 15
Installation at site 5 7
Installing the pump/unit 5.3 7
List of components 9.1 30
Lubricants 6.1.1 11
Marking of instructions in the manual 2.1 4
Max. clearance gaps 7.5.1 25
Minimum flows 6.2.3 13
Modification and manufacture of spare
parts by customer
Non-compliance with safety instructions 2.3 4
Operating limits 6.2 12
Personnel qualification and training 2.2 4
Preparations for dismantling 7.3.2 15
Priming the pump and checks to be
carried out
Re-adjusting the clearance gaps 7.5 25
Reassembly 7.4 20
46
7.3.4 18
5.2
2.7
6.1.2 11
Section Page
Reassembly of hydraulic system 7.4.2 21
Recommended spare parts stock for 2
years’ continuous operation
Repairs 7.5.2 25
Returning to service after storage 6.4 13
Safety 2 4
Safety awareness 2.4 4
Safety instructions for maintenance,
inspection and installation work
Safety instructions for the operator / user 2.5 5
Safety regulations / Special instructions 5.1 7
Servicing / inspection 7.2 14
Servicing / maintenance 7 14
Setting the time relay 5.5.2 10
Shaft seal 7.2.3/7.4.3 15/21
Shutdown 6.1.6 12
Shutdown / storage / preservation 6.3 13
Start-up 6.1.5 12
Storage / Preservation 3.2 5
Supervision of operation 7.2.1 14
Switching frequency 6.2.2 13
Technical specification 4.1 6
Temperature of fluid pumped 6.2.1 12
The pump is removed from the pipe and
stored
The unit / pump remains installed; periodic
check of operation
Tightening of shaft nuts on Multitec pumps 23
Tightening torques - Tie bolts (part No.
7
905)
Transport / Handling 3.1 5
Transport / Storage 3 5
Trouble-shooting 8 26
Unauthorized modes of operation 2.8 5
Vacuum balance line 5.4.1 10
5
7.3.7
2.6
6.3.2 13
6.3.1
7.4.1 21
Multitec
20
5
13
3
Page 4
Multitec
1 General
The Multitec pump has been developed in accordance with
state-of-the-art technology;it is manufactured with utmost care
and subject to continuous quality control.
These operating instructionsare intendedto facilitate operation
of the pump and help in commissioning and maintenance.
The manual also contains important recommendations for
reliable, proper and efficient operation.
These operating instructions do not take into account local
regulations;the operatormust ensure thatsuch regulations are
strictly observed by all, including the personnel called in for
installation.
Multitec pumps must not be operated beyond the limit values
specified in the technical documentation for the fluid handled,
capacity, speed, density, pressure, temperature and motor
rating. Make sure that operation is in accordance with the
instructions laid down in this manual or in the contract
documentation.
The name plate indicates the type series / size and the main
operating data; please quote this information in all
correspondence and particularly when ordering spare parts.
If you need any additional informationor instructions exceeding
the scope of this manual or in case of damage please contact
KSB’s after-sales service.
2 Safety
These operating instructions contain fundamental information
which must be complied with during installation, operation and
maintenance. Therefore this operating manual must be read
and understood both by the installing personnel and the
responsible trained personnel / operators prior to installation
and commissioning, and it must always be kept close to the
location of operation of the machine / unit for easy access.
Not only must the general safety instructions laid down in this
chapter on ”Safety” be complied with, but also the safety
instructions outlined under specific headings, plus:
- the general safety rules forworking materials and protective
devices,
- the applicable organizational guidelines for the
commissioning of working materials and tools
(work guidelines R233-1 to R233 - 10 and decree No. 93-41
dd. 11/1/93, or country-specific guidelines).
is used to introduce s afety instructions whose non-observance
may lead to damage to the equipment and its functions.
Instructions attached directly to the machine, e.g.
- arrow indicating the direction of rotation
- markings for auxiliary connections
must always be complied with and be kept in a perfectly legible
condition at all times. Non-compliance with these safety
instructions will lead to forfeiture of manufacturer’s warranties.
2.2 Personnel qualification and training
All personnel involved in the operation, maintenance,
inspection and installation of the unit must be fully qualified to
carry out the work involved.
Personnel responsibilities, competence and supervision must
be clearlydefined bythe operator. Ifthe personnel in question is
not already in possession of the requisite know-how,
appropriate training and instruction must be provided. If
required, the operator may commission the manufacturer /
supplierto take care of such training.In addition,the operatoris
responsible for ensuring that the c ontents of the operating
instructions are fully understood by the responsible personnel.
2.3 Non-compliance with safety instructions
Non-compliance with safety instructions can jeopardize the
safety of personnel, the environment and the machine / unit
itself. Non-compliance with these safety instructions will also
lead to forfeiture of any and all rights to claims for damages.
In particular, non-compliance can, for example, result in:
- failure of important machine/system functions,
- failure of prescribed maintenanceand servicingpractices,
- hazard to persons by electrical, mechanical, thermal and
chemical effects,
- hazard to the environment due to leakage of hazardous
substances.
2.4 Safety awareness
It is imperative to comply with the safety instructionscontained
in this manual, the relevant national health and safety
regulationsand the operator’s own internalwork, operation and
safety regulations.
2.1 Marking of instructions in the manual
The safety instructions contained in this manual whose
non-observance mightcause hazards to persons are specially
marked with the general hazard sign, namely:
(safety sign as per ISO 7000 - 0434)
The electrical danger warning sign is
(safety sign as per IEC 417 - 5036).
The word
Caution
4
Page 5
2.5 Safety instructions for the operator / user
- Any hot or cold components that could pose a hazard must
be equipped with a guard by the operator.
- Guards which are fitted to prevent accidental contact with
moving parts (e.g.coupling) must not be removed whilst the
unit is operating.
- Leakages (e.g.at theshaft s eal) ofhazardous fluidshandled
(e.g. explosive, toxic, hot) mustbe contained so as to avoid
any danger to persons or the environment. Allrelevant laws
must be heeded.
- Electrical hazards must be eliminated. (In this respect refer
to the relevant safety regulations applicable to different
countries and/or the local energy supply companies.)
2.6 Safety instructions for maintenance, inspection and
installation work
The operator is responsible for ensuring that all maintenance,
inspection and installation work be performed by authorized,
qualified specialist personnel who are thoroughly familiar with
the manual.
Work on the machine / unit must be carried out only during
standstill. The shutdown procedure described in the manual for
taking the unit out of service must be adhered to without fail
(section 6.3).
Pumps or pump units handlingfluids injurious to health must be
decontaminated.
Immediately following completion of the work, all
safety-relevantand protective devicesmust be re-installed and
/ or re-activated.
Please observe all instructions set out in the chapter on
”Commissioning” (6.1) before returning the unit to service.
2.7 Modification and manufacture of spare parts by
customer
Modifications or alterations of the equipment supplied are only
permitted with KSB’s prior approval. Original spare parts and
accessories authorized by KSB ensuresafety.The use of other
parts will invalidate any liability of the manufacturer for
consequential damage.
2.8 Unauthorized modes of operation
The warranty relatingto theoperatingreliability andsafety of the
pump is only valid if the machine is used in accordance with its
designateduse, i.e.withthe technicaldataspecified. For further
details please refer to the information in section 4 of this
operating manual. The limits stated in the data sheet must not
be exceeded under any circumstances.
3 Transport, storage
3.1 Transport / Handling
Transportof the unit requires proper preparation and handling.
Never use the motor eyebolt for lifting the unit.
If the pump / unit slips out of the suspension
arrangement, it may cause personal injury and damage
to property!
Do notuse liftinggear whichmay damage the pump(e.g.
no chains).
Fig. 1 Transport of pump only
Multitec
Fig. 2 Transport of pump unit
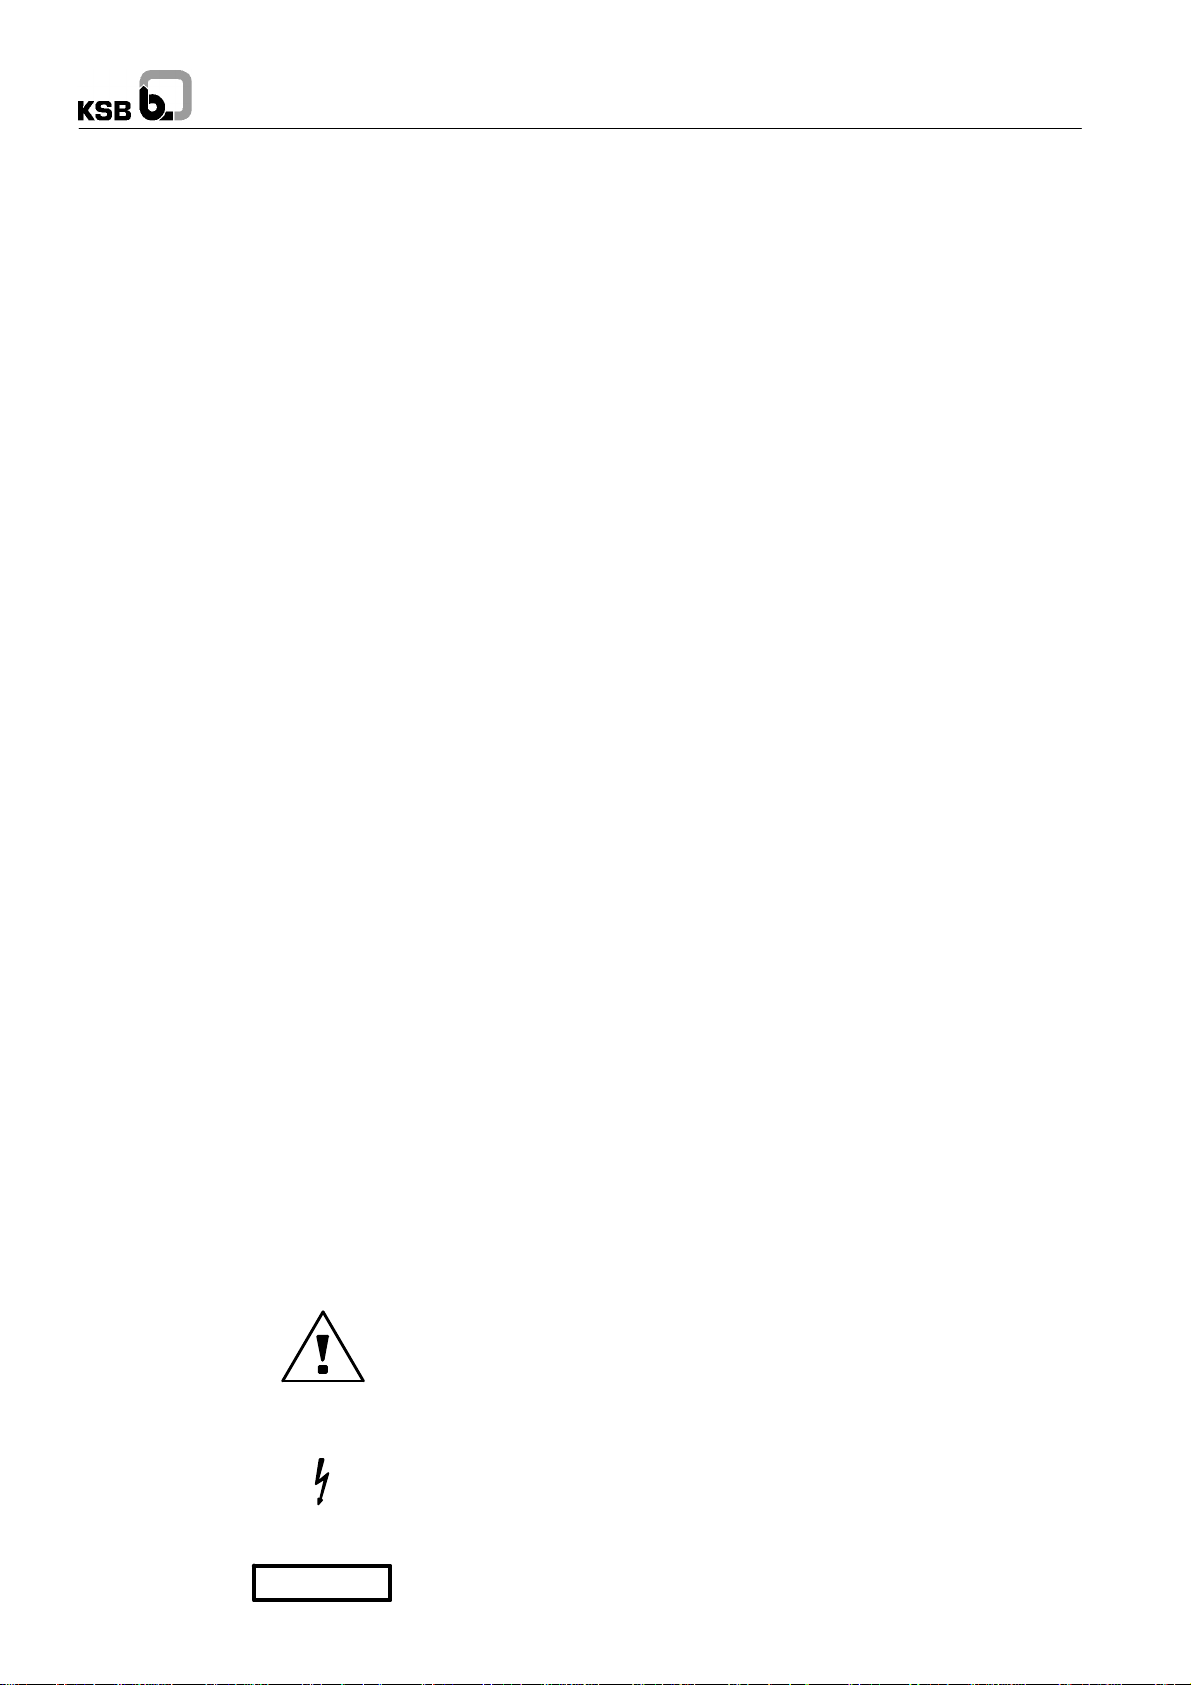
For transporting the unit, lifting ropes shall be attached to the
pump and the motor as shown above. Never use the motor
eyebolt for lifting the unit!
Fig. 3 Transport of close-coupled pumps and vertical pumps
3.2 Storage / Preservation
Unless otherwise stated in the purchase order and order
confirmation, the pumps are supplied by our factory duly
preserved for a storage period of 3 months from delivery. We
recommend to take the following additional measures if the
pump is stored for a prolonged period of time prior to
commissioning:
Indoor storage of new pumps:
New pumps are preserved for indoor storage in a dry, closed
room in their original, unopened packaging for a maximum
period of 3 months.
Caution
the assembled unit components are closed and must only be
opened when required during installation.
Outdoor storage with the packaging unopened:
Protect the pump/unit against moisture, dirt, vermin and
unauthorized access.
It is imperative to remove the preservative prior to normal
commissioning by flushing through the system.
If the pump is to be stored for more than 3 months
(optional, specified in the purchase order):
New pump/unit:
New pumps/units arespecially preservedin themanufacturer’s
factory.
It is imperative to remove the preservative prior to normal
commissioning by flushing through the system.
Caution
completelyby dismantling and subsequent cleaning of all parts
of the pump coming into contact with the fluid handled, if
required. For further information please refer to the order
confirmation.
The unit/pump is installed some time before the system is
commissioned:
Special measures have to be taken for prolonged shutdown
periods, to make s ure that the pump is always ready for instant
start-up and to prevent the formation of deposits within the
pump’s hydraulic system and intake area (see section 6.3.1).
Protect all stored goods against moisture, dirt,
vermin and unauthorized access! All openings of
The product used for this purpose is not suitable
for potable water systems and must be removed
5
Page 6

Multitec
4 Description of the product and
accessories
4.1 Technical specification
Multistage centrifugal pumpsin ring-section design withsuction
impeller for low NPSH value (exception: MTC 32).
Horizontal design, baseplate
mounted
1 casing entry, drive end
A
1 rolling element bearing, drive end
1 plain bearing, suction end
axial suction nozzle
for the entire H/Q range
same as installation type A, but
radial suction nozzle
B
Horizontal design, baseplate
mounted,
2 casing entries, drive and suction
C
end
2 rolling element bearings
drive on discharge side
for the entire H/Q range
same as installation type C, but
drive on suction side
D
Horizontal close-coupled pump,
common bearing for pump and mo-
E
Ex
F Fx
V
Vx
tor,
rigid coupling,
radial suction nozzle
H/Q range: up to 100 m
same as installation type E, but
axial suction nozzle
Vertical close-coupled pump
H/Q range: up to 204 m
up to 100 m
3
/h, 25 bar
3
/h 25 bar
3
/h 40 bar
4.2 Designation
Multitec A 32 / 8E - 2.1 12 . 65 (SP)
Type series
Installation type / pump version
Discharge nozzle DN
No. of stages / impeller combination
Hydraulic system
Material variant
Shaft seal code
Code for special variants (optional)
4.3 Design details
Pump type
High-pressure centrifugal pump in long-coupled (baseplate
mounted) or close-coupled design, horizontal or vertical
version, axial or radial suction nozzle. Radial suction and
discharge nozzles can be turned by 90°.
Bearings:
Radial bearings are s ilicon carbide plain bearings (not on
versions C and D), self-aligning. Plain bearings lubricated by
fluid handled. Fixed bearings are rolling element bearings,
grease- or oil-lubricated.
Shaft seals:
Uncooled gland packing; with or without barrier fluid.
Standardizedmechanical seal (uncooled,cooled)to EN12756.
Double-acting mechanical seal with standardized mechanical
seals to EN 12756 (back-to-back or tandem).
Cartridge seals, special designs.
Drive:
Electric/ hydraulicdrives, Dieselengines or turbinesup tomax.
4000 1/min.
4.4 Applications
Municipal water supply: pumping stations, water treatment
and pressure boosting systems.
Water treatment: filtration, reverse osmosis.
Pumps in industrial applications: general water supply, cold
water, washing systems, recycling, cooling circuits, boiler feed
systems, hot water, superheated water, condensate handling,
process, organic and inorganic liquids, degreasing agents,
washing or alkaline solutions, lubricants, cooling, surface
treatment.
Air-conditioning: large-scale air-conditioning systems,
high-rise buildings
Irrigation: centre-pivot sprinkling systems, trickle irrigation
systems, square sprinkling systems, flood irrigation systems.
6
Page 7
Multitec
5 Installation at site
5.1 Safety regulations / Special instructions
Electrical equipment operated in potentially
explosive atmospheres must comply with the
relevant explosion protection regulations. This is
indicated on the motor rating plate. If the equipment is
installed in potentially explosive atmospheres, the
applicable local explosion protection regulations and the
regulations of the test certificate supplied with the
equipment and issued by the responsible approval
authorities must be observed and complied with. The test
certificate supplied must be kept close to the location of
operation for easy access (e.g. foreman’s office).
Centrifugal pumps will only give trouble-free
operationif carefully installed and properly serviced.
Note: The pump’s name plate shows the type series, pump
size, version, main operating data and the works number (see
also section 4.2).
Please quote the type series / version in all queries, repeat
orders and particularly when ordering spare parts .
5.3 Installing the pump/unit
Before placing the baseplate onthe foundation, make surethat
the concrete foundation is clean and smooth. The complete
pump unit must be aligned horizontally with the help of a
precision spirit level.
It is imperative that the factory-aligned unit mounted on the
baseplate be re-aligned after it has been fastened on the
foundation and after the piping has been connected(precision
alignment).
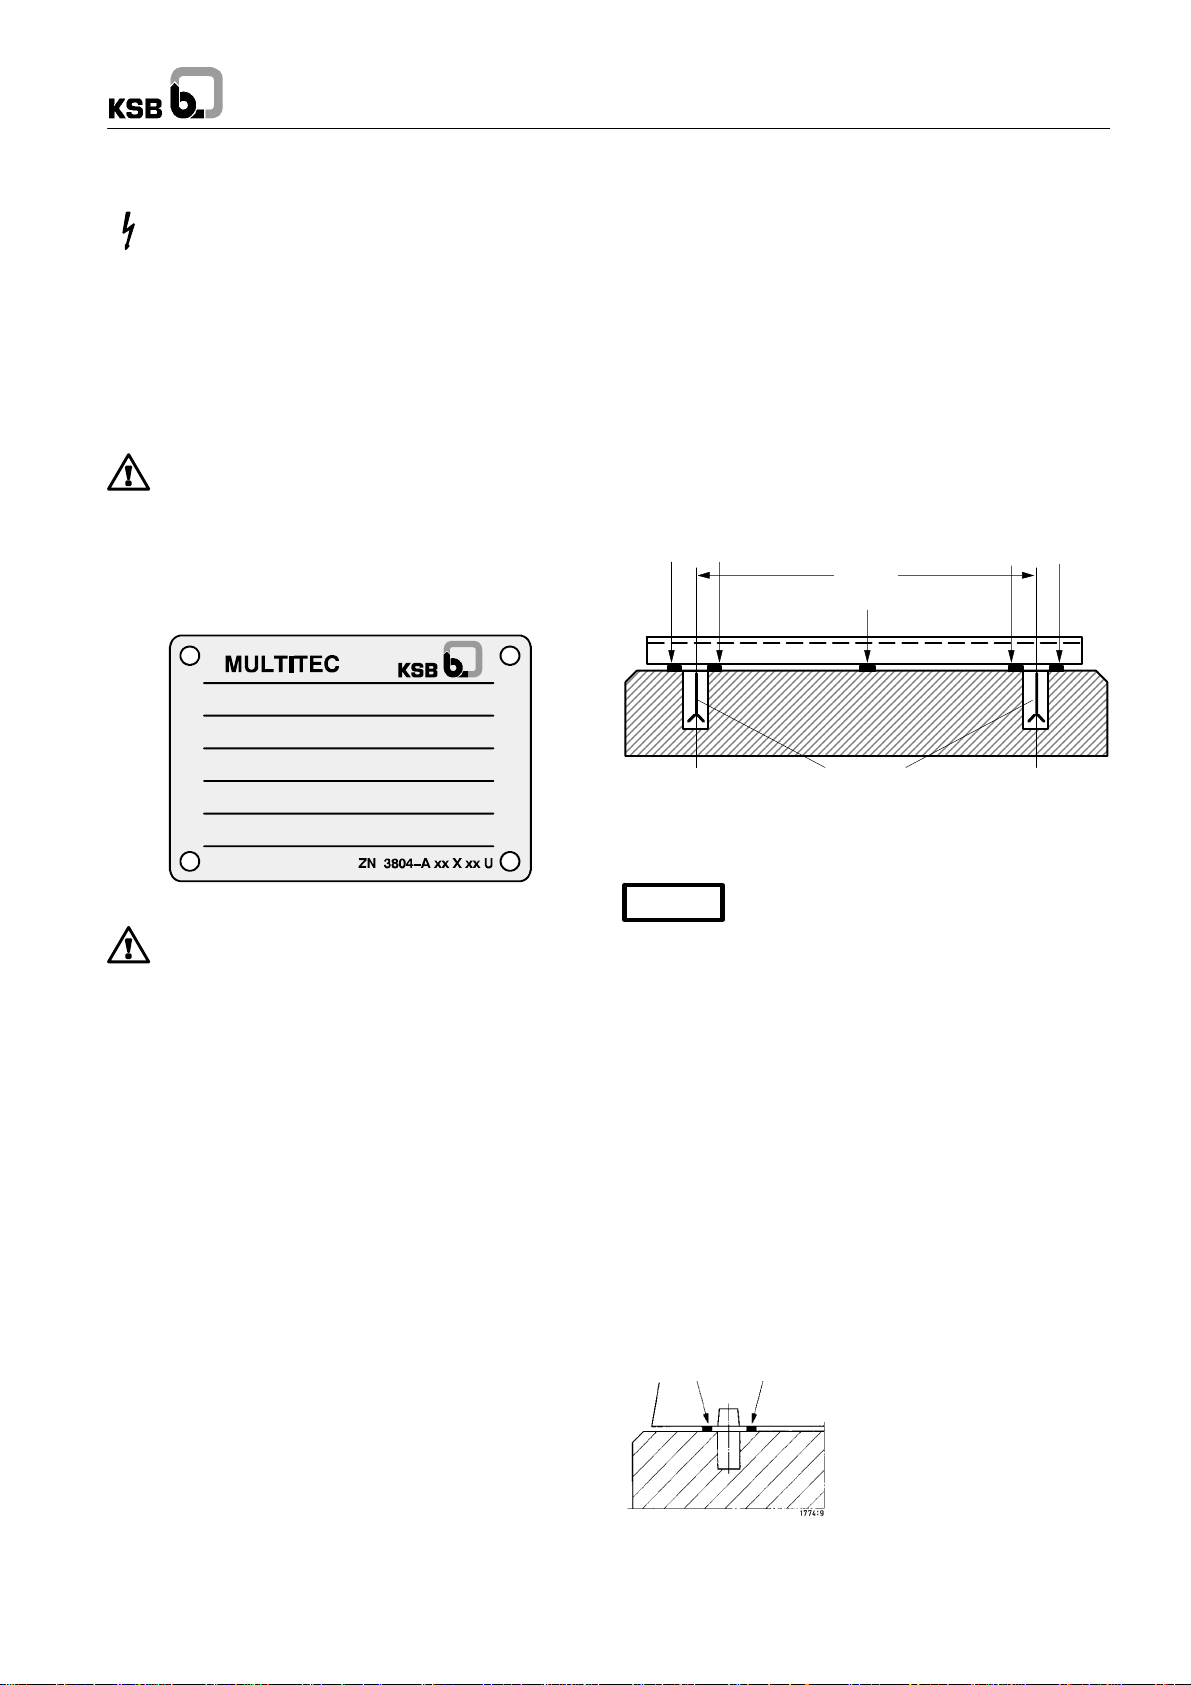
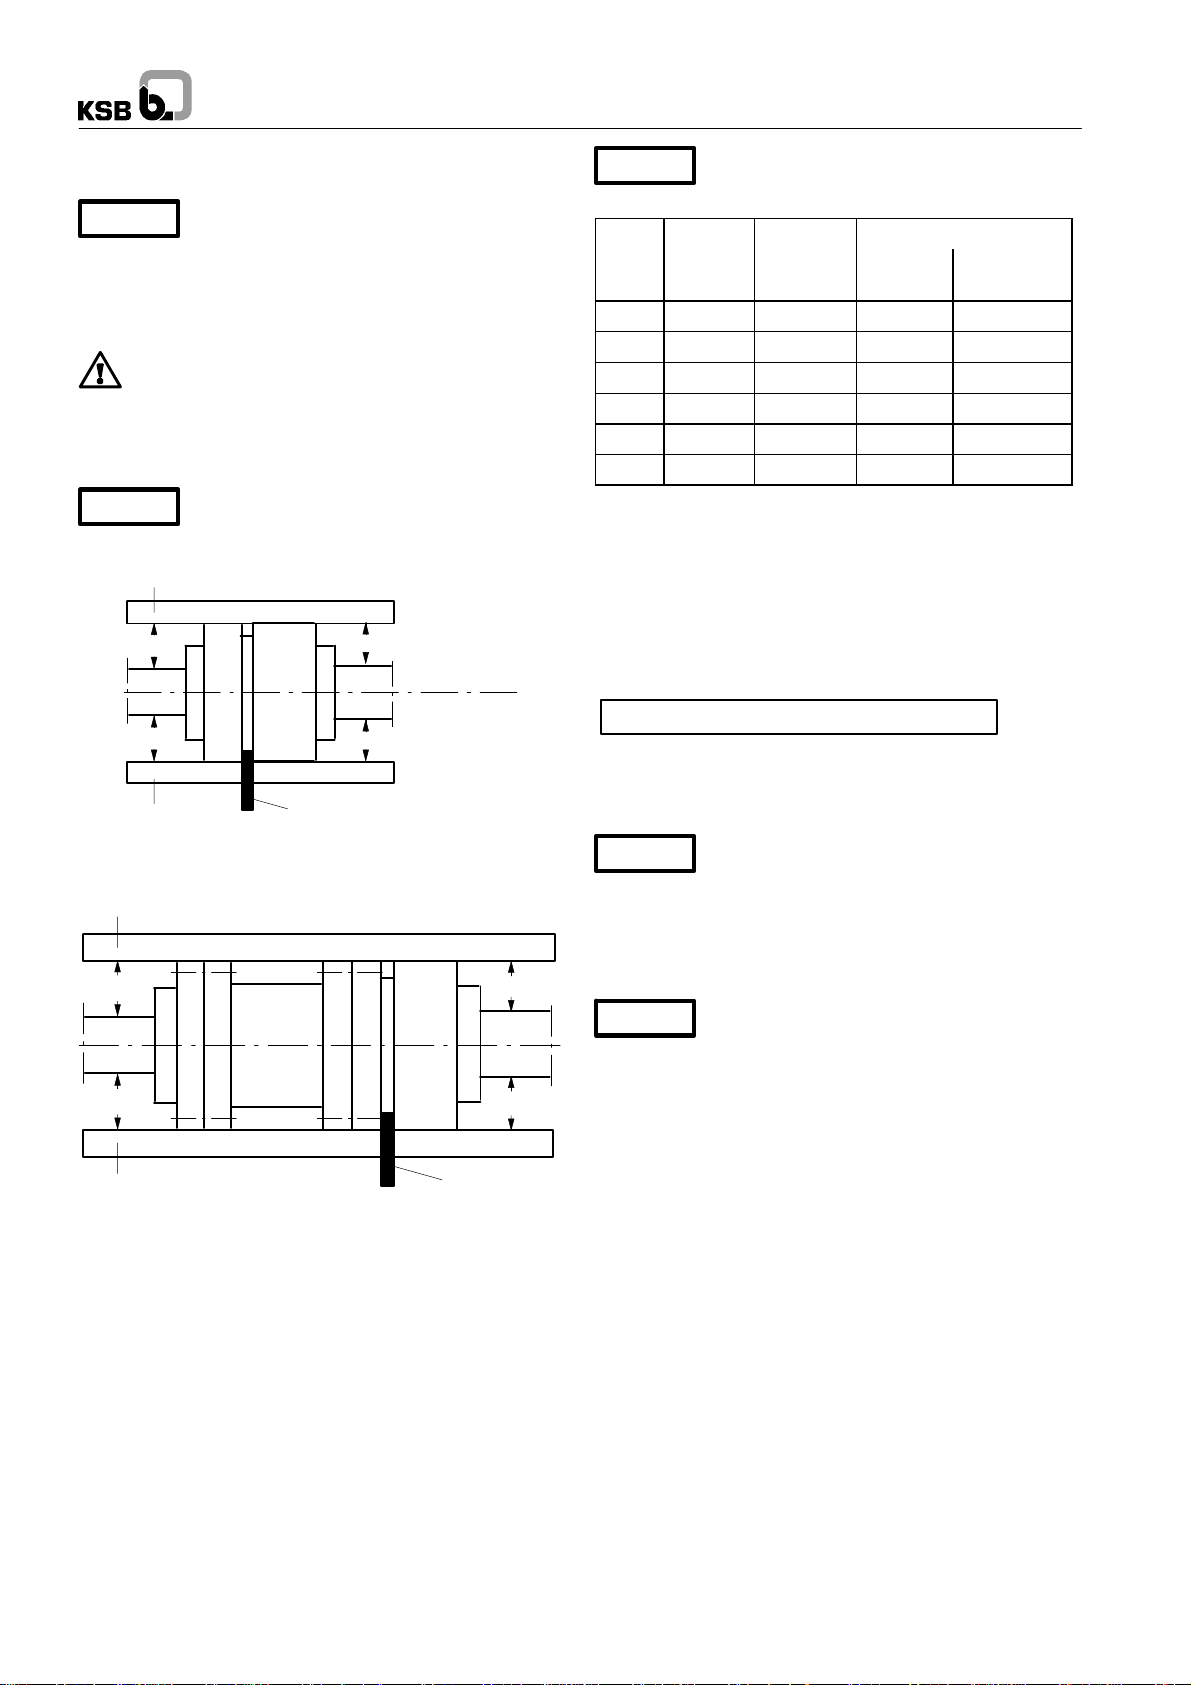
After placing the pump unit on the foundation, align it with the
help of a spirit level placed on the shaft/discharge nozzle. The
correct distance between the coupling halves as specified in
the general arrangement drawing must be observed. Shims
shall be fitted between the baseplate/foundation frame and the
foundation itself; they shall always be inserted to the left and
rightof thefoundationbolts andin closeproximityto thesebolts.
For a bolt-to-boltclearance > 800mm, additional shims shall be
used. All shims must lie perfectly flush.
Shim
Shim
³ 800
Shim
Fig. 4 Name plate
This unit must not be operated beyond the limit
values for capacity, speed and temperature
specified on the name plate. Make sure that operation is in
accordance with the instructions laid down in this manual
or in the contract documentation. All values stipulated for
electrical connection of the unit as well as instructions
given for installation and maintenance must be adhered to
without fail. Operation of the unit outside the
above-mentioned conditions may result in overloads the
unit cannot withstand.
Skilled, properly trained personnel is essential to ensure
trouble-free operation of the unit.
KSB shall not accept any liability if the instructions set
forth in this manual are not complied with.
In case of damage or if you need further information please
contact our nearest customer service centre.
5.2 Foundation / Checks to be carried out prior to
installation
All structural work required must have been prepared in
accordance with thedimensions stated in thedimension table /
general arrangement drawing.
The concrete foundations shall have sufficient strength (min.
class X0) to ensure safe and functional installation in
accordance with DIN 1045 or equivalent standards.
Make sure that the concrete foundation has set firmly before
placing the unit on it. Its surface shall be truly horizontal and
even.
Foundation bolts
Fig. 5 Fitting required shims
Tighten the foundation bolts evenly and firmly after after the
concrete has set.
Caution
Proceed with utmost care when aligning the unit, as the pump
unit will only give trouble-free operationwhen correctly aligned.
Non-compliance with these instructions will lead to forfeiture of
all warranty claims.
Channel section baseplates (up to 400 mm wide) are
torsion-resistant in their own right; they need not be grouted.
After fastening, baseplates more than 400 mm wide shall be
grouted up to the upper frame edge using low shrinkage
concrete, making sure that no cavities remain.
Close-coupled pumps
It is essentialto make sure that the pump is not warped in axial
or radial direction.
Ifpump and motorare suppliedseparately, place thepump onto
the foundation without the motor, align with the help of a
precision spirit level (on the upper flange of the drive lantern),
then fasten.
To align the pump, shims shall be fitted between the pump foot
and thefoundationitself;they shall alwaysbe insertedto theleft
and right of the foundation bolts and in close proximity to these
bolts. All shims must lie perfectly flush. Tighten the foundation
bolts evenly and firmly.
It is essential to make sure that the baseplate is
not warped in axial or radial direction.
Shim
Fig. 6 Fitting required shims
7
Page 8
Multitec
5.3.1 Aligning the pump / drive
Coupling guard
Caution
without a coupling guard / a guard on the drive lantern. If the
customer specifically requests not to include a coupling guard /
lanternguard inour delivery,then theoperator mustsupply one.
Baseplate-mounted units
set be re-aligned (at the motor), if required.
Prior to checking the alignment/realignment, loosen the pump
feet and re-tighten without transmitting any stresses or strains.
Caution
completely assembled and aligned on a common baseplate.
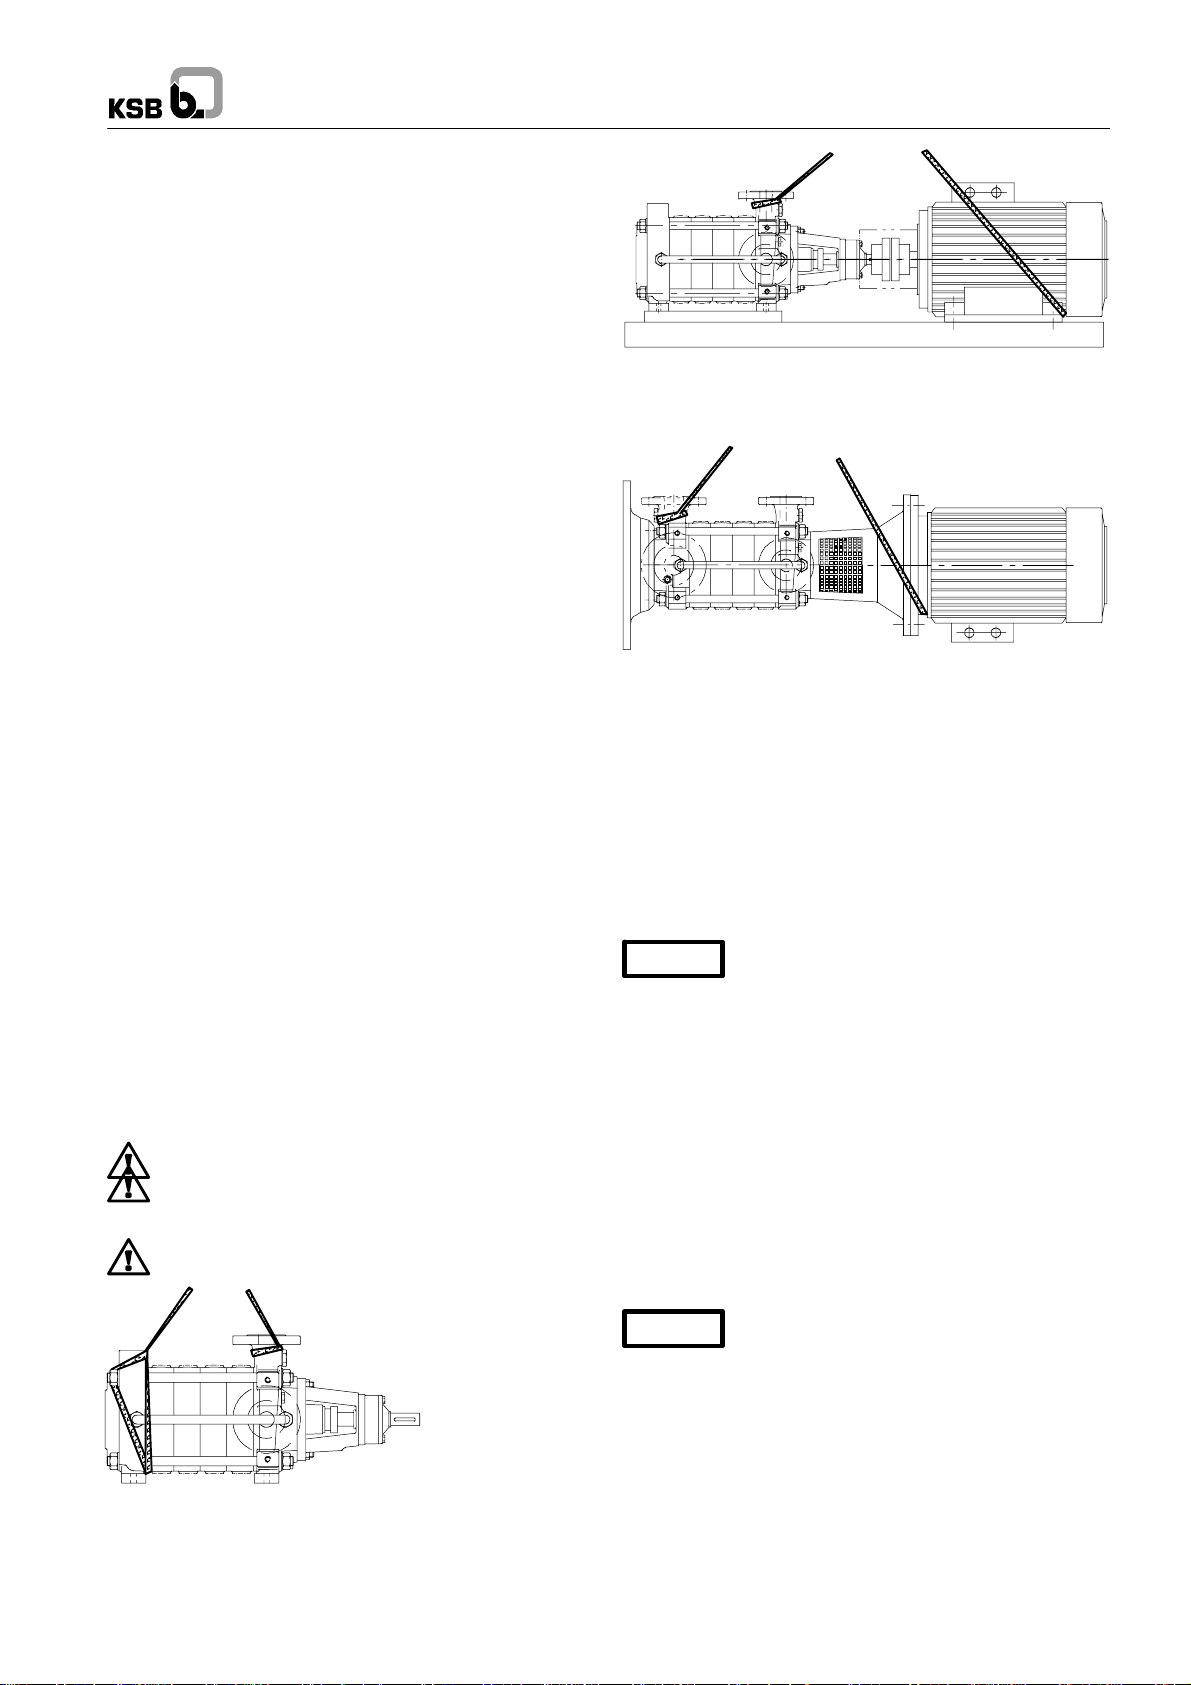
Fig. 7 Aligning the coupling with the help of a gauge and a
straight-edge
Straight-edge
a
a
In compliance with health and safety
regulations the pump must not be operated
After fastening the baseplate on the foundation, the
coupling must be thoroughly checked and the pump
Coupling check and realignment must be
effected even if pump and motor are supplied
Straight-edge
a
a
Straight-edge Gauge
b
b
b
b
Caution
be tightened to the following torques:
MTC Thread Strength
32
50 M12 4.6 30 Nm 15 Nm
65 M16 4.6 60 Nm 30 Nm
100 M20 4.6 120 Nm 60 Nm
125 M20 4.6 120 Nm 60 Nm
150 M30 4.6 450 Nm 200 Nm
This will avoid that any increase in pump length due to
thermal expansion will lead to warping and deformation.
The increase in height of pump and drive due to thermal
expansion may differ; this has to be considered when
aligning the coupling of pump units handling temperatures of
100°C and higher.
The following equation can serve as a guide to estimate by
how much the motor has to be elevated in relation to the
pump:
DH [mm] = 1/100000 * (DTp * Hp - DTm * Hm)
DTp = Temperature difference pump - ambient (°C)
Hp = Height of pump axis [mm]
DTp = Temperature difference motor - ambient (°C)
Hp = Height of motor axis [mm]
Caution
reached operating temperature.
Close-coupled pumps and vertical pumps
Alignment between the motor and the pump is ensured by the
centering effect between the motor flange and the drive lantern
flange. It must be easy to rotate the shaft.
Caution
Final check
Re-check the alignment as described in the sections above. It
must be easy to rotatethe couplingby hand. Check the integrity
and proper functioning of all connections.
For fluid temperatures of 120°C and higher, the
footbolts holdingthe pumpon thebaseplatemust
Tightening torque
Drive
end
M12 4.6 30 Nm 15 Nm
In any case, also when using this correction, the
coupling has to be re-aligned when the unit has
For MTC V 32-65 please observe the adjusting
dimensionsfor couplingalignment(see page31).
Non-drive
end
Straight-edge
Fig. 8 Aligning a spacer-type coupling
The radial and axial deviation between thetwo coupling halves
must not exceed 0.1 mm.
8
Gauge
Page 9
Multitec
5.4 Connecting the piping
Suction lift lines shall be laid with a rising slope towards the
pump and suction head lines with a downward slope towards
the pump, to prevent the formation of air pockets.
With short pipelines, the nominal diameters should be at least
equal to the nominal diameters of the pump nozzles. For long
pipelines, the most economical nominal diameter has to be
determined from case to case.
Adapters to larger diameters should have a diffuser angle of
approx. 8° in order to avoid any pressure losses caused by the
formation of air pockets or gas.
It is recommended to install check and shut-off elements in the
system, depending on the type of plant and pump.
Caution
Never use the pump itself as an anchorage point
for the piping. The piping-induced forces and
moments acting on the pump flanges (e.g. due to warped
pipelines or thermal expansion) must not exceed the
permissible forces and moments.
The pipelines shall be anchored in close proximity to the pump
and connected without transmitting any stresses or strains.
Their weight must not be carried by the pump.
Caution
If welding work must be performed on the piping
when the pump is already installed, the electric
welding equipment must not be earthed on the pump or
baseplate,to prevent current flowing through the rolling element
bearings,which could cause theirpremature destruction (pitting
effect).
Thermal expansions of the pipelines must be
compensated by appropriate measures so as not to
impose any extra loads on the pump.
Expansion joints may have to be used. An excessive,
impermissible increase in the pipeline forces may cause leaks
on the pump where the fluid handled can escape into the
atmosphere.
Danger to life when hot fluids are handled!
Max. permissible pipeline forces
(material codes 10, 11, 12, 13)
Nom. nozzle diameter (DN)
32 50 65 80 100 125 150 200 250
Vertical nozzle, at a right angle to the shaft (N )
Fx 245 510 640 700 1015 1470 1780 2700 Fy 410 635 800 970 1270 1850 2220 3490 -
Fz 265 415 520 625 830 1220 1465 2220 -
Horizontal nozzle, at a right angle to the shaft (N )
Fx 245 510 640 800 1015 1470 1780 2700 Fy 265 415 520 625 830 1220 1465 2220 Fz 410 635 800 970 1270 1850 2220 3490 -
Axial nozzle, parallel to the shaft (N )
Fx - - 800 - 1270 1850 2220 3490 4760
Fy - - 520 - 830 1220 1465 2220 3180
Fz - - 640 - 1015 1470 1780 2700 3810
Moments for all nozzles (Nm )
Mx 260 330 460 680 950 1235 1640 2520 3580
My 160 250 350 520 715 930 1260 1840 2710
Mz 190 170 240 340 490 660 840 1260 1740
Example:
Multitec 50 with radial suction nozzle
- for thesuction nozzle, thevalues givenin tablecolumnDN80
apply
- for the discharge nozzle, the values given in table column
DN50 apply
Max. permissible pipeline forces
(material codes 20 to 30)
The values given for material codes 10, 11, 12,13 shall be
multiplied by the factor 1.4.
Protection against foreign matter
Before commissioning new installations thoroughly clean,flush
and blow through all vessels, pipelines and connections. Often
welding beads, scale and other impurities only come off after a
certain period of operation. Fit a strainer in the suction line to
preventthem from entering thepump. The total cross-section of
the holesin the strainershall bethree timesthe cross-sectionof
the pipeline in order to avoid excessive pressure loss across
the strainer due to clogging. Conical strainers with laid in wire
mesh having a mesh width of 0.5 mm and a wire diameter of
0.25 mm, of corrosion-resistant material, shall be used.
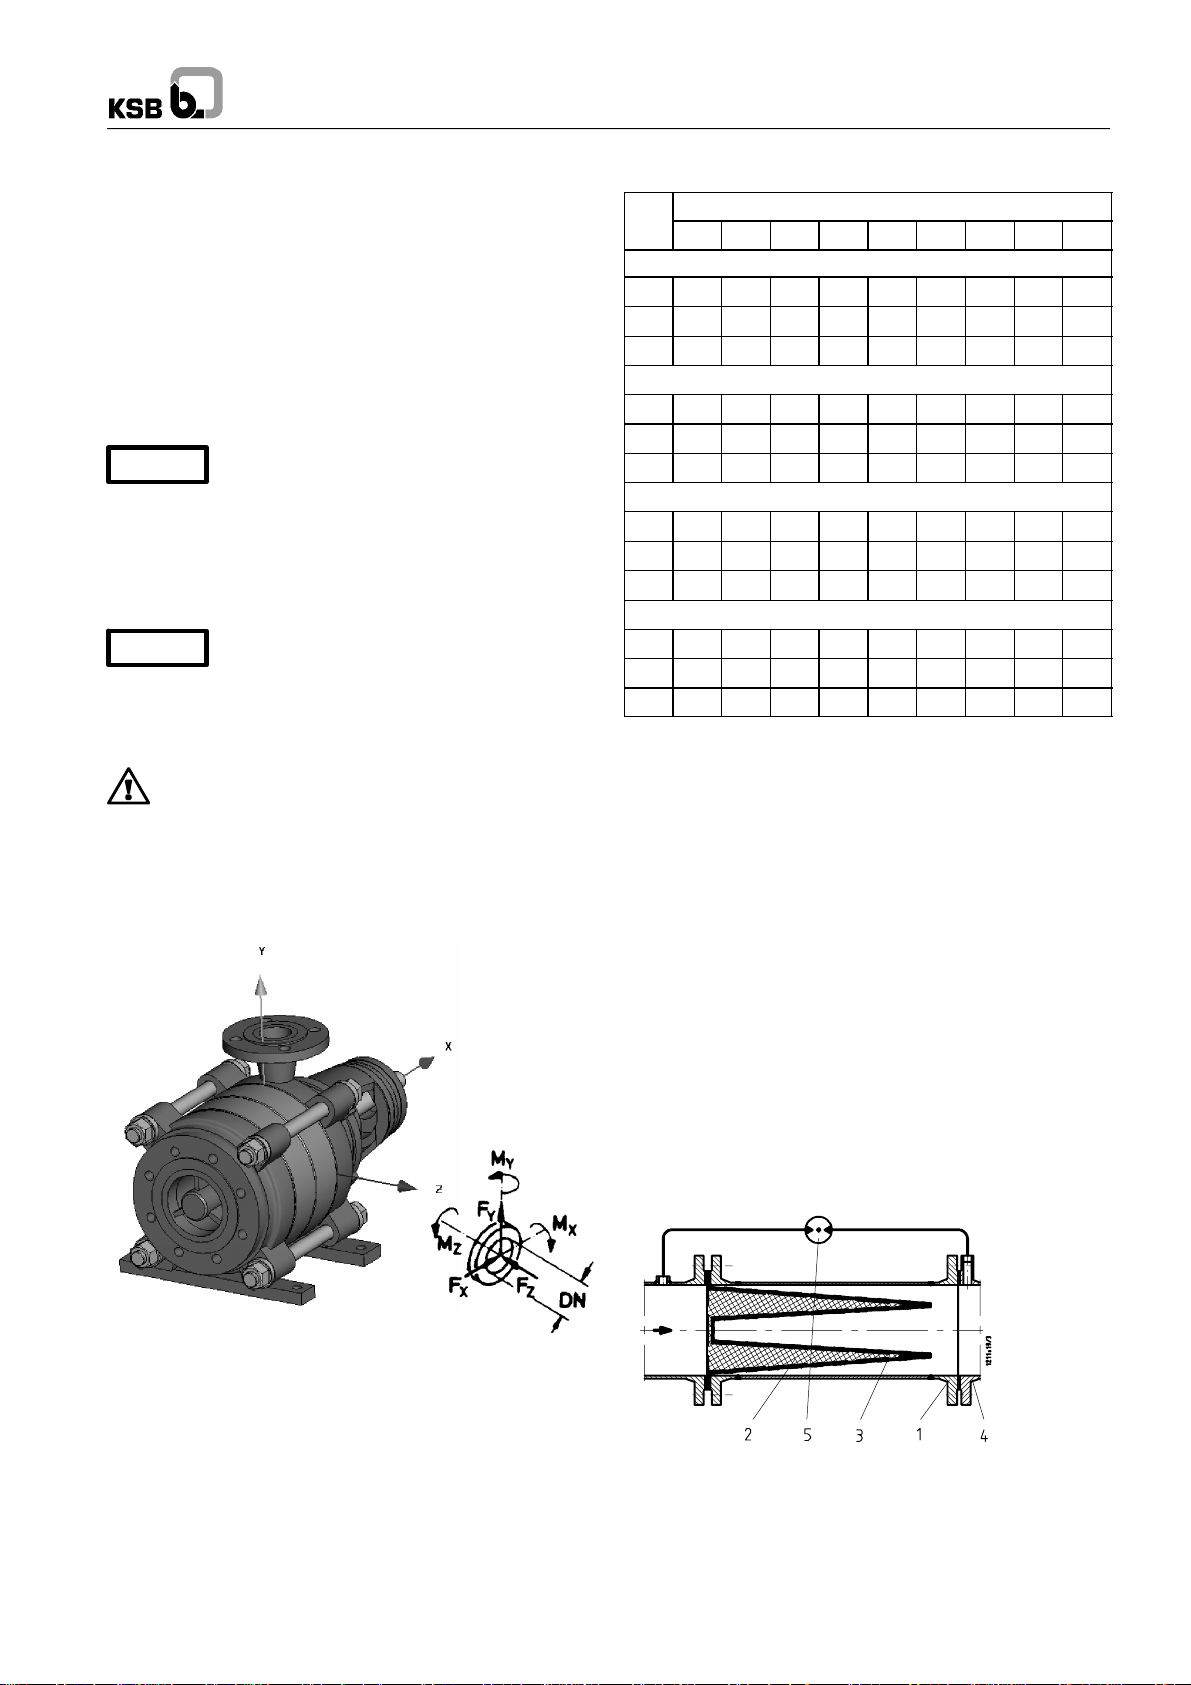
Fig. 9 Max. nozzle forces and moments
Direction of forces:
X = horizontal, parallel to the pump axis
Y = vertical to the pump axis
X = horizontal, at a right angle to the pump axis
Direction of moments:
X = around the horizontal axis, parallel to the pump axis
MY = around the vertical nozzle axis
X = around the horizontal axis, at a right angle to the
pump axis
Suction and discharge nozzle are regarded separately.
1 Strainer housing
2 Fine screen
3 Perforated plate
4 Pump suction nozzle
5 Differential pressure gauge
Fig. 10 Conical strainer for the suction line
9
Page 10

Multitec
5.4.1 Vacuum balance line
Where liquid has to be pumped out ofa vessel undervacuum, it
is advisable toinstalla vacuum balance line. Thislineshall have
a minimum nom. diameter of25 mm andmust extend abovethe
highest permissible liquid level of the vessel.
An additional pipeline fitted with a shut-off valve – from the
pump discharge nozzle to the balance line – facilitates venting
of the pump before start-up.
A Main shut-off valve
1212:5
B Vacuum balance line
C Shut-off valve
E Vacuum-tight shut-off valve
R Swing check valve
V Vessel under vacuum
Z Intermediate flange
Fig. 11 Suction line and vacuum balance line
5.5 Connection to power supply
Connection to the power supply must be effected by a
trained electrician only (see 5.1)!
The applicable DIN VDE regulations or country-specific
guidelines must be complied with.
Y configuration (high voltage)
1145:32/2
Fig. 13 Connection diagram for three-phase motors,
Y configuration
5.5.2 Setting the time relay
Make surethatin thecase of three-phase motors with star-delta
starting method switching over from starto delta will beeffected
at very short intervals. Prolonged switchover intervals may
result in pump damage.
Recommended time relay setting for star-delta starting: 3 to 5
seconds, depending on motor rating.
EN 50014 (DIN VDE 0170/0171 Part 1) stipulates that
explosion-proof motors, type of protection IP 54, increased
safety (Ex)e, thermalclass T3, mustalways be connected via a
motor protection switch.
5.5.3 Checking the direction of rotation
Caution
On pumps fitted with uni-directional mechanical
seals (seal codes 62 and 63) the direction of
rotation must never be checked with the pump coupled to the
motor. Ifthe pump/motorcoupling doesnot haveto beremoved,
make sure that the pump has been primed before checking the
direction of rotation.
The motor’s direction of rotation must correspond to the
direction indicated by the arrow on the pump or motor
(clockwise when seen from the motor end; on version D
anti-clockwise). Verify by switching the motor on and then off
again immediately.
If the pump runs in the wrong direction of rotation, interchange
any two phases L1, L2 or L3 of the power cable in the motor
terminal box.
Check available mains voltage against the data on the motor
rating plate and select appropriate start-up method.
All connections shall be effected in accordance with the
technical specifications issued by the local energy supply
company.
We strongly recommend to use a motor protection switch.
5.5.1 Connecting the motor
Connect themotor in accordance withthe circuit diagram in the
terminal box or as illustrated in fig. 12 or fig. 13.
Caution
Priorto starting the motor,check whetherthe wires
are firmly connected at the terminals and
re-tighten any loose wires.
n configuration (low voltage)
1145:31/2
Fig. 12 Connection diagram for three-phase motors,
n configuration
10
Page 11

Multitec
6 Commissioning, start-up / Shutdown
Instructions for boiler feed applications
Limit values for boiler feed water and condensate when using
cast iron pump parts: pH value ³ 9.0 (target: ³ 9.3)
content ≤0.02 ppm.
O
2
These values must be ensured under all operating conditions
before entry into the pump. Max. percentage of fresh water:
25%.
Watertreatment shall be in accordancewith VdTÜV guidelines
for feed and boiler water in steam plants of up to 64 bar.
The penetration of air into the system must be avoided by all
means.
6.1 Commissioning
Caution
- The quality of the concrete foundation is in compliance with
the applicable regulations.
- The tolerances stipulated for mounting the unit on the
foundation, for shims and alignment have been complied
with.
- The pipelines have been connected without warping the
pump nozzles.
- Electrical connection and relay settings correspond to the
motor rating and comply with the applicable regulations.
- All hydraulic, electrical and mechanical protection devices
have been set.
- The pump has been fully primed with the fluid to be pumped.
- The unit’s direction of rotation corresponds to the rotation
arrows.
- All connections are leak-free.
Caution
of the pump unit can be compensated, e.g. by fittingexpansion
joints in the discharge and suction lines.
6.1.1 Lubricants
Grease-lubricated bearings
The grease-lubricated bearings are packed with grease at the
factory (see section 7.2.2).
Before starting up the pump make sure that the
following requirements have been met:
For installation withoutfoundation (e.g. on spring
elements)care must be taken that all movements
Special notes regarding cooled mechanical seals
(seal code 64)
- If the pump is equipped with a cooled mechanical seal, vent
the seal chamber by opening the screwed plug 903.11 by a
quarter turn, then re-tighten.
Pump sizes
32 to 100
Fig. 14
Pump sizes
125 and 150
Oil lubricated bearings
Fill oil of ISO VG 46 quality into the bearing cover (see section
7.2.2).
6.1.2 Priming the pump and checks to be carried out
Before each start-up, the pump and the suction line must be
completely vented and primed with the fluid tobe pumped. The
pump has several plugged holes for venting; adequate venting
devices can be used in the pipelines. The shut-off valve in the
suction or feed line must be fully open.
Fully open all auxiliary connections provided and check the
throughflow.
Open shut-off valve ”C”in the vacuum balance line(if any), and
close the vacuum-tight shut-off valve ”E” (see 5.4.1).
Caution
If the discharge line is equippedwith an automatic check valve,
open the minimum flow valve and secure against inadvertent
closing.
Exceptions:
- If there is not enough back pressure in the line prior to
start-up, the shut-off element must be closed before pump
start-up.
- On pumps fitted with a mechanicalseal, themechanical seal
will leak only slightly, i.e. practically invisibly (vapour) during
operation. It is maintenance-free.
- If the pumpis equipped witha glandpacking, leakage during
operation is normal (see 6.1.6).
Dryrunning willlead to increased wear onthe unit
and may eventually damage the pump !
Fig. 15
Caution
venting in hot condition, steam will escape at the v ent plug
during the venting process (risk of scalding!) Should it not be
possible to avoid opening the seal chamber in hot condition,
due tothe situationin theplant, apipe withvalve (notincluded in
KSB’s scope of supply) must be installed at the vent hole, in
order to lead the steam escaping during venting to another
place where there is no dangerof scalding. Make sure that this
valve cannot be opened during operation.
The seal chamber has to be vented when the
pump is in cold condition before start-up. When
11
Page 12

Multitec
6.1.3 Contact guard
In compliance with health and safety regulations the
pump must not be operated without a coupling guard. If
the customer specifically requests not to include a coupling
guard in our delivery, then the operator must supply one.
6.1.4 Connection to power supply
If the pump is equipped with an electric motor, connectionto the
power supply must be effected by a trained electrician only.
Check available mains voltage against the data on the motor
rating plate and select appropriate start-up method.
Make surethatin thecase of three-phase motors with star-delta
starting method switching over from starto delta will beeffected
at very short intervals. Prolonged switch-over intervals will
result in pump damage.
Time relay setting for star-delta starting
Motor rating Ytimetobeset
≦ 30 kW
>30kW
3sec. ± 30 %
5sec. ± 30 %
6.1.5 Start-up
Start-up procedure
- The discharge-side shut-off valve must be closed.
- Start-up must proceed without abnormal vibrations or
noises.
- An automatic check valve installedmust open steadilywhen
the operating speed has been reached, without abnormal
noise, vibrations or increased power consumption of the
unit.
- Open the discharge-side shut-off valve.
- After the duty point has been reached, check motor input
power and bearing temperature.
After the operating temperature has been reached, switch off
the pump and re-tighten the bolts at the connecting flanges.
Caution
In the event of abnormal noise, vibrations,
temperatures or leakage, switch off the unit
immediately and re-start it only after the cause for the problem
has been eliminated.
Increased temperatures at the rolling element bearings after
commissioningare caused by the running-in process. The final
bearing temperature will be reached only after a certain
operating period (up to 48 h, depending on operating
conditions).
6.1.6 Shutdown
Close the shut-off valve in the discharge line.
If the discharge line is equipped with a non-return or check
valve, the shut-offelementmay remain open if thereis sufficient
backpressure.
- Switch off the motor, making sure that the unit runs down
smoothly to a standstill.
- For prolonged shutdown, close the shut-off valve in the
suction line. Also close the auxiliary feed lines.
- The shaft seal in pumps where the liquid is fed in under
vacuum must also be supplied with barrier liquid during
standstill.
- In the event of frost and/or prolonged shutdowns, the pump
must be drained or otherwise protected against freezing.
If the pump has to remain operationalduring shutdown periods,
it must be started up regularly for at least 5 minutes (see also
6.3):
- fire-fighting pumps at least once a month
- drinking water pumps at least once in 48 hours
- stand-by pumps at least once a week
(It is better to operate the pumps by alternating daily.)
During these periodic check runs also check the integrity and
proper functioning of the auxiliary feed lines.
6.1.7 Final check
After the pump has been primed, it must be easy to rotate the
coupling/ shaft by hand.
There must be no impermissible leakage at the shaft seal
during pump operation.
Gland packing
The gland packing has been fitted in the factory. Its permanent
compression can only be set after several hours of pump
operation. During this running-in period, gland leakage will be
higher than during normal pump operation. Check the
temperature of the leakage.
Final adjustment of the gland packing is made gradually after
havingallowed fora sufficientrunning-inperiod,so thatleakage
is reduced to individual drops (approx. 20 drops per minute).
Tightening thegland covertoo early ortoo hardwithoutallowing
for a sufficient running-in period would cause a local
temperature rise and insufficient lubrication, resulting in the
destruction of the gland packing, premature wear on the shaft
protecting sleeve and higher, uncontrollable leakage.
For speed controlled pumps or fluctuating inlet pressure, no
gland packingshould be used, ifpossible. Changing pressures
make it diffic ult to set an even and controlled leakage rate.
Caution
Should such conditions occur, leakage of the
gland packing must not be prevented under any
operating conditions. At increased inlet pressure and/or
increased speed, the inevitably higher leakage of the gland
packing must not be reduced by re-tightening the gland bolts.
The minimum leakage rate mustonly be setat the lowests peed
and/or lowest inlet pressure.
Mechanical seal
The mechanicals eal assemblyhas been adjusted and installed
in thefactory. Itis maintenance-free.Check the seal for leakage
occasionally.
During commissioning, increased leakage may occur for a
short period of time. If leakage remains high, immediately
switch off the pump and investigate the leakage cause, e.g.
contaminated fluid handled or previous dry running due to
inadequate venting of the pump unit.
Cooled mechanical seal (seal code 64)
If the pump is fitted with a cooled mechanical seal (seal code
64), vent the seal chamber as described in 6.1.1.
6.2 Operating limits
The hydraulic system is designed for pure or slightly
contaminated liquids (max. solids c ontent: 20 ppm). Make sure
that the operating limits indicated in the order confirmation are
complied with.
6.2.1 Temperature of the fluid pumped
The pump must not be operated at temperatures exceeding
thosespecified onthe nameplate orin thetechnicaldata sheet.
12
Page 13

Multitec
6.2.2 Switching frequency
The permissible number of start-ups in a given period of time
depends on the circumstances prevailing in the plant and the
operating conditions. Overloading of the motor may generally
result in:
- an abnormal increase in motor temperature exceeding the
temperature limit of the winding or bearing grease
- premature coupling wear
- reduced service life of the pump components
- irregularities or malfunctions in the plant
To prevent abnormal temperature increases in the motor and
excessive loads on the motor, coupling, pump, seals and
bearings, the switching frequency must not exceed the
following number of start-ups per hour (h):
Motor rating
upto3kW
from4to11kW
from 11 to 45 kW
45 kW and higher
6.2.3 Minimum flows
The pump must not be operated against a closed gate valve.
The minimum flows required are defined as follows.
For MTC 32, MTC 50 and MTC 65, the required minimum flow
for continuous operation is:
t -10 to + 100 °C 15 % of Qopt
t > 100 to + 140 °C 20 % of Qopt
t > 140 to + 200 °C 25 % of Qopt
For MTC 100, MTC 125 and MTC 150, the minimum flow
required for continuous operation, independent of the
temperature, is:
0.35 x Qopt.
For MTC100, MTC 125 and MTC 150an additional,short--term
minimum flow of 0.25 x Qopt. has been defined, which is
permitted forup to 1 hour’s uninterrupted operationand approx.
200 h/year.
The minimum flows indicated for MTC 32 to 150 above are for
single pump operation andwill prevent thermal and mechanical
overloading of the pump. In case of parallel operation with
pumps of identical or different design higher flow rates may be
required in some cases, to guarantee a stable operating
behaviour.
6.2.4 Density of fluid pumped
The pump input power willincrease in proportion to the density
of the fluid handled. To avoid overloading of the motor and
pump, the density of the fluid must comply with the data
specified on the purchase order.
6.3 Shutdown / Storage / Preservation
6.3.1 The unit / pump remains installed; periodic check of
operation
In order to make sure that the pump is always ready for instant
start-up and to prevent the formation of deposits within the
pump and thepump intake area,start up thepump setregularly
once amonth oronce every 3months fora short time (approx. 5
minutes) during prolonged shutdown periods. Follow the
instructions for commissioning (see 6.1).
Max. start-ups/h
20
15
10
5
Prolonged shutdown periods should be avoided in the case of
pumps in material variants 10, 13, 20 and 21 (cast-iron
variants), particularly if the pumps are handling aggressive
water qualities (high oxygen content). In such cases, the pump
should remain filled, and the operation check run should be
performed at least every other day, instead of once a month or
once every 3 months (see also 6.1.5).
In the event of frost and/or prolonged shutdowns, the pump
must be drained and protected against freezing and corrosion.
To drain the pump, open drain plug 6B.
Caution
installedconditioncan onlybe ensured by openingthe plugson
the stage casings (optional). If this is not possible, it is
recommended to remove the pump from the system and
proceed according to section 6.3.2.
6.3.2 The pump is removed from the pipe and stored
Before putting the pump into storage, carry out all checks and
maintenance work specified in section 7.1. Then preserve as
follows:
Drain the pump as completely as possible. On vertical pumps,
this can be done by opening the drain plugs on the suction
casing.
Horizontal pumps with drain holes in the stage casings
(optional) can be drained almost completely by opening the
drain plugs. The pump can also be drained by bringing it into a
verticalposition -suction nozzle pointing downwards - by crane
(see 3.1). Turn the rotor by hand. However, the s eal housing
must still be drained separatelyby opening the respectivedrain
plug.
components.
Afterwards fillthe pumpwith awater-repellentpreservative,e.g.
RUSTELO DEWATERING 924 (producer CASTROL)
OSYRIS DW (producer TOTAL) or equivalent.
Turn the pump rotor by hand several times, to ensure even
distribution of the preservative. Then drain the pump and close
the suction and discharge nozzle.
Exposed blank metal parts must be treated with a suitable
anti-corrosive agent.
Caution
glycol-basepreservative, the preservativemust notbe drained.
In this case, the pump must be completely filled with
preservative for storage. The preservative must be drained
beforethe pumpis returnedto service.It can be re-used. Before
re-use, make sure that the water content in the preservative
does not exceed 20%.
6.4 Returning to service after storage
Before returning the pump to service, carry out all instructions
laid down in the sections on ”Commissioning” (6.1) and
”Operating limits” (6.2).
Immediately following completion of the work, all
safety-relevant and protective devices must be re-installed
and/or re-activated.
In the case of horizontal pumps, virtually
complete drainage of the stage casings in
If the pump cannot be drained completely, we
recommend to dismantle it and dry the individual
If the pump is preserved for a prolonged storage
period with KLÜBERTOP K 01-601 or another
13
Page 14

Multitec
7 Servicing / maintenance
7.1 General instructions
The operator is responsible for ensuring that all maintenance,
inspection and installation work be performed by authorized,
qualified personnel who are thoroughly familiar with the
manual.
A regular maintenance schedule will help avoid expensive
repairs and contribute to trouble-free, reliable operation of the
pump with a minimum of maintenance expenditure and work.
Before commencing any work on the unit, always
make sure that the drive unit (electric motor, turbine,
I.C. engine, ...) cannot be started up.
Pumps handling liquids posing health hazards must
be decontaminated. When draining the fluid pumped
see to it that there is no risk to persons or the environment.
All relevant laws must be heeded.
7.2 Servicing / Inspection
7.2.1 Supervision of operation
Caution
The pump must never be allowed to run dry.
Max. permissible room temperature 40 °C.
The bearing temperature may exceed room temperature by up
to 50 °C, but must never rise above 90 °C (measured on the
outside of the bearing bracket), see also section 7.4.4.1.
fluid pumped.
Caution: For required minimum flows please refer to section
6.2.3.
The mechanical seal shows only slight or invisible (vapour)
leakage during operation. It is maintenance-free.
Gland packings must leak slightly (individual drops).
Any stand-by pumps installed shall be switched on and then
immediately off again once a week to keep them operational.
Attentionshall be paid to the correct functioning of the auxiliary
connections.
The pump must run quietly and free from
vibrations at all times.
Do not run the pump against a closed shut-off valve for
prolongedperiods oftime soas to avoidheating up ofthe
During pump operation the shut-off valve in the suction
line must not be closed.
7.2.2 Bearings and lubrication
On grease-lubricated units, the rolling element bearings of the
MTC32 and the non-drive end rolling element bearings of the
MTC50 and MTC65in design C and Dare lubricatedfor lifeand
do not requirere-lubrication.For this reason,no lubricating nipples are provided on the bearing brackets.
Pump
Depending on the pump version, the rolling element bearings
are either grease-lubricated or oil-lubricated.
Grease quality / Grease change
The bearingsare packed with high-quality lithium-soap grease.
Dependingon the sizeand the operating hours ofthe pump,the
rolling element bearings must be re-lubricated or the grease in
the rolling element bearings must be replaced.
Speed (1/min)
Size MTC < 1800 » 2950 » 3550
32-50-65 10000h 7200h 5700h
100-125 9000h 5700h 3900h
150 8300h 4000h 3100h
If re-lubrication intervals are short, we recommend to
completely replace the grease once a year. If this is not the
case, the grease fill must be replaced completelyat least every
two years. For this purpose, the rolling element bearings must
be removed, cleaned and packed with new grease.
Under unfavourable operating conditions, e.g. high ambient
temperature, high atmospheric humidity, dust-laden air,
aggressive industrial atmosphere etc., the bearings shall be
checked earlier and cleaned and packed with new grease, if
required.
Use a high-quality lithium-soap grease, free of resin and acid,
not liable to crumble and with good rust-preventive
characteristics. The grease should have a penetration number
(NLGI class) between 2 and 3, corresponding to a worked
penetration between 220 and 295 mm/10. Its drop point must
not be below 175°C. The bearing cavities must only be
half-filled with grease.
Ifrequired,the bearingsmay be lubricated withgreases ofother
soap bases. Since greasesof differing soap bases must notbe
mixed, the bearings must be thoroughly cleaned beforehand.
The re-lubrication intervals required must then be adjusted to
the greases used.
14
Page 15

Multitec
P
P
Oil quality / Oil change
Quality: ISO VG 46.
The first oil change shall be carried out after 300 operating
hours, the following ones every 3000 operating hours.
Unscrewthe screwedplug inthe re-fill holeand inthe drain hole.
Allow the bearing housing to drain completely, then plug the
drain hole again.
Fig. 16 Oil fill
Hinge down the constant-level oiler 638.
Pour in the oil through the hole after having hinged down the
reservoir of the constant-level oiler until oil appears in the
vertical portion of the connection elbow (Fig. 16). Then fill the
reservoirof the constant-level oiler with oil and snap it back into
operatingposition. After a short time check whether the oil level
in the reservoir has dropped.
It is important to keep the reservoir two thirds full at all times!
Lubricant quantities
Grease quantities
ump size
Quantity per bearing unit in g
Drive end Non-drive end
32 - -
50 / 65 15 -
100 / 125 25 15
150 40 30
Note: On some pump designs the rolling element bearings are
lubricated for life. These pumps are not provided with a
lubricating nipple on the bearing bracket.
Oil quantities
)
ump size
Oil quantity in ml *
Drive end Non-drive end
32 330 330
50 500 330
65 490 510
100 / 125 880 920
150 1000 1040
*) oil quantity without oil fill in the reservoir of the constant-level oiler
Motor
Motors without lubricating nipple: The rolling element bearings
have been lubricated in the supplier’s factory for an operating
period of 15,000 h or 2 years under normal operating
conditions.
Motors with lubricating nipple: The rolling element bearings
must be re-lubricated at the intervals indicated on the motor
name plate (approx. 500 h).
7.2.3 Shaft seal
Mechanical seal:
The mechanical seal is maintenance-free.
Gland packing:
The nuts atthe gland cover must only be tightened slightly. The
gland cover must be at rightangles to the shaft. After the pump
has been primed and prior to start-up, make sure the gland
packing is set to allow a larger amount of leakage. After
approximately 1 operating hour, tighten the nuts at the gland
cover gradually until leakage has been reduced to individual
drops (approx. 7 l/H).
7.2.4 Coupling
If the flexible coupling elements begin to show signs of wear,
they must be replaced in due time and pump/motor alignment
must be checked.
7.3 Dismantling
If you need additional information or instructions please
contact KSB’s customer service !
7.3.1 General instructions
Drainage / Cleaning
If the pump was used for handling liquids posing health
hazards, see to it that there is no risk to persons or the
environment when draining the fluid. All relevant laws must be
heeded. If required, wear safetyclothingand aprotectivemask!
The flushing liquid used and any liquid residues in the pump
must be properly collected and disposed ofwithout posing any
risk to persons or the environment.
7.3.2 Preparations for dismantling
Caution
Make sure to switch off the pump unit before
starting any dismantling activities. Secure the
pump soas tomake sure it cannotbe switchedon accidentally!
The shut-off valves in the inlet / suction and discharge pipes
must be closed and secured against inadvertent opening.
The pump must have cooled down to ambient temperature.
Pump pressure must have been released and the pump must
have been drained.
Noxious, explosive, hot or other hazardous fluids shall be
drained without posing any risk to persons or the environment.
We strongly recommend to flush the pump after drainage.
Flushingand cleaningthe pumpis anabsolute necessity before
sending the pump to the workshop. In addition, the pump must
be supplied with a cleaning certificate.
Aftera prolongedperiod of operation the individualcomponents
may be hard to pull off. We recommend to use a brand name
penetrating agent or a suitable puller.
Under no circumstances use force.
Dismantling must only be carried out in accordance with the
sectional drawings at the end of these operating instructions.
(see section 9 ”General assembly drawings”)
Heavy components must be sufficiently supported during
dismantling. The components shall be marked with their
sequence of dismantling, to make sure they will be
re-assembled in the correct sequence.
Thoroughly clean all dismantled components and check their
condition. Careful examination may help to find the cause for
pump failure, ifany. If in doubt,replace the components. Always
replace parts which are subject to wear (gaskets, O-rings,
casing wear rings, rolling element bearings).
15
Page 16

7.3.3 Dismantling the bearings
The sections below describe partial dismantling (bearings,
seals, etc.) and complete dismantling of the pump unit.
7.3.3.1 Dismantling the non-drive-end bearings
Plain bearing
The plain bearing is removedwithout dismantling the hydraulic
section of the pump.
Axial suction nozzle:
Fig. 17
- Pull off bearing cover 160.2 using forcing screw.
- Remove circlip 932.1 (shaft in C45) or bolt 901.2 and disc
550.7 (shaft in 1.4021 / 1.4462).
- Take out bearing sleeve 529.
- Pull out bearing cartridge 381 with its two O-rings 412.2.
N.B.: Anti-rotation pin 561.1 remains in position.
Radial suction nozzle:
Multitec
Shaft in 1.4021 / 1.4462
Fig. 19
Rolling element bearings:
If the pump is oil-lubricated, drain the oil before dismantling.
- Unscrew bolts 901.4 or 914.5 and remove non-drive-end
bearing cover 361.1 or 361.2.
- Unscrew nut 920.7 with lockwasher 931 or the nut with
castellated nut 920.6.
- Pull out sleeve 520.2 with ro lling element bearing 320.2.
Grease lubrication with lip seal
Multitec 32 - 125
Multitec 150
Fig. 18
- Undo bolts 901.3 and remove cover 160.1with O-ring 412.3
and bearing cartridge 381 with O-rings 412.2.
- Remove circlip 932.1 (shaft in C45) or bolt 901.2 and disc
550.7 (shaft in 1.4021 / 1.4462).
- Pull out bearing sleeve 529.
- Remove disc 550.6.
N.B.: Anti-rotation pin 561.1 remains in position.
Fig. 20 Fig. 21
Oil lubrication with lip seal
Multitec 32 - 125
Fig. 22 Fig. 23
Oil lubrication with labyrinth seal
Multitec 32 - 125
Multitec 150
Multitec 150
16
Fig. 24 Fig. 25
Page 17

Multitec
7.3.3.2 Dismantling the drive-end rolling element bearings
N.B.: The ceramic bearing installed at the non-drive end need
not be dismantled in order to remove the drive-end rolling
element bearings. If the pump is oil-lubricated, the oil must be
drained before dismantling.
- After loosening the grub screw in the coupling hub pull out
coupling half with key 940.3.
Grease lubrication (figs. 26 and 27)
- Remove joint ring (V-ring) 411.7.
- Undo bolts 901.1.
- Remove bearing cover 360.1.
Oil lubrication with lip seal (fig. 28)
- Undo screws914.4 and pull out togetherwith washer 550.10
and O-ring 412.12.
- Remove bearing cover 360.2.
- Pull off sleeve 520.4 with ring 500.1 (tolerance ring) and
O-ring 412.11.
Oil lubrication with labyrinth seal (fig. 29)
- Pull out labyrinth ring 423.2.
- Undo screws914.4 and pull out togetherwith washer 550.10
and O-ring 412.12.
- Remove bearing cover 360.2.
Grease lubrication Pump version V, MTC 100/125/150
Caution
after partial dismantling (bearing or seal replacement), the
same spacerdiscs 551.1 must be mounted on the bearing side
to reproduce the original rotor adjustment.
When dismantling keywayed nut 920.6, all relevant positions
such as sequence and orientation of the contact face must be
marked accordingly, to ensure identical reassembly (see also
section 7.4.4).
- Undo nut 920.2 with lockwasher 931 or nut with locknut
920.6, depending on the pump size. To undo the nut, hold
onto shaft with key 940.3.
- Pull off sleeve 520.1 with rolling element bearing(s) 320.1.
(The shaft is centered in the sleeve without locking device.)
- Remove spacers 551.1, see text above.
The rotating unit is adjusted axially by means of
spacers 551.1. When reassembling the pump
Note: Pump versions V, Vx, E, Ex, F, Fx of sizes 32, 50,65 do
not have a fixed bearing as this function is taken over by the
motor bearings.
On pumpversions Multitec V100,125 and 150the fixedbearing
is located in the support lantern 342. Dismantling and
installation shall be performed in analogy with the horizontal
versions.
(grease lubrication only)
Fig. 26
Fig. 27
Oil lubrication with labyrinth sealOil lubrication with lip seal
Fig. 28 Fig. 29
17
Page 18

Multitec
7.3.4 Dismantling and replacement of shaft seal
Gland packings
7.3.4.1 Replacing the packing rings
Access to packing rings without removing the bearing or the
lantern:
- Undo both nuts 920.3 and pull gland cover 452 out of seal
housing 441.1.
- Remove packing rings 461.
7.3.4.1 Replacing the shaft protecting sleeve
- Remove the bearing as described in sections 7.3.3.1 and
7.3.3.2.
- Remove packing rings as described in section 7.3.4.1.
- On grease-lubricated pumps, pull V-ring 411.6 off spacer
sleeve 525.1.
- Remove O-ring 412.10.
- Pull off spacer sleeve 525.1.
- Remove bearing housing 350.1.
- Remove seal housing 441.1 with gland cover 452.
- Remove key 940.2.
- Take off sleeve 524 with a puller,
using the groove provided in the sleeve.
- Remove O-ring 412.4.
N.B.: If sleeve 524 is hard to remove, the balance drum can be
used for leverage.
- Remove balance drum59-4, disc550.3 and sleeve524 with
a puller engaged in the threaded holes on the drum.
This is not possible on pumps without balance drum.
7.3.5 Dismantling the mechanical seal
7.3.5.1 Dismantling the mechanical seal
- Remove the bearing as described in sections 7.3.3.1 and
7.3.3.2.
- On grease-lubricated pumps, pull V-ring 411.6 off spacer
sleeve 525.1.
- Remove O-ring 412.10.
- Pull off spacer sleeve 525.1.
- Remove any auxiliary pipework (circulation, etc.),
depending on the pump version.
- Loosen thenuts 920.3 on the mechanicalseal coveruntilthe
spring is relaxed.
- Remove bearing housing 350.1.
- Take off mechanical seal cover 471.1 with the seat ring and
gasket 400.1, remove spring-loaded ring (not in case of
bellows-type seals).
- Remove key 940.2.
- Pull off sleeve 523.1 with the rotating assembly of the
mechanical seal. (Two holes are provided in the s leeve for
engaging a puller.)
- Take off seal housing 441.1.
- Remove O-ring 412.4.
Fig. 30
Pump design without balance drum
Fig. 31
18
Fig. 32
Page 19

Multitec
7.3.5.2 Removing an air-cooled mechanical seal
(seal code 64)
Fig. 33
N.B.: This mechanical seal design is used for application
temperatures from 140 to 200°C and Multitec sizes 32 to 100.
The pumpshall onlybe coupledto amotorwith enclosureIP 55.
- Remove the bearing as described in sections 7.3.3.1 and
7.3.3.2.
- Remove O-ring 412.10.
- Pull off spacer sleeve 525.1.
- Loosen bolts 901.11.
- Remove bearing housing 350.1.
- Remove mechanical sealcover 471.1 withthe seat ringand
gasket 400.1.
- Remove key 940.5.
- Pull off sleeve 523.1 with the rotating assembly of
mechanical seal 433.7. (Two holes are provided in the
sleeve for engaging a puller.)
- Take off seal housing 441.4.
- Remove O-ring 412.4.
On between-bearings pumps (pump version C or D) the
mechanical seal shall be removed as follows:
- Remove screws 900.2 and hood 683.1.
- Undo axis 87-5 with fan impeller 831.1.
- The threaded insert 915 must remain in the shaft 210.
Caution
fitted using Loctite 222.
Caution
Loctite 222.
- Remove support 59-7.
- Remove the bearing as described in section 7.3.3.1 as well
as spacer sleeve 525.1 and bearing housing 350.1.
Remove the mechanical seal as described above.
On previous versions (prior to 03/2002) and if
assembled in the factory, the fan shaft 87-5 was
On previous versions and when re-assembling,
secure fan shaft 87-5 and fan impeller 831.1 with
7.3.5.3 Removing a water-cooled mechanical seal (seal
code 64)
Fig. 35
Note: This mechanical seal design is used for temperatures
from 140 to 200°C and sizes 125 and 150 (optional for sizes
32 to 100).
- Drain the pump and remove the circulation line at the
pipe union 731.15.
- Remove the rolling element bearing as described in sec-
tions 7.3.3.1 and 7.3.3.2.
- Remove O-ring 412.10.
- Pull off spacer sleeve 525.1.
- Undo nuts 920.3.
- Remove bearing housing 350.1.
- Remove mechanical seal cover 471.1 with the seat ring
and gasket 400.1.
- Remove key 940.5.
- Pull off sleeve 523.1 with the rotating assembly of mech-
anical seal 433.7. (Two holes are provided in the sleeve
for engaging a puller.)
- Remove cooling jacket 66-2.
- Take off seal housing 441.4.
- Remove O-ring 412.4.
7.3.5.4 Removing a double-acting mechanical seal
Mechanicalseals intandem andback-to-backarrangementare
fitted as per customer specifications. There is a wide variety of
variants, types and brands. Please refer to the general
assembly drawing and the documentation supplied with the
pump for orientation.
Fig. 34
19
Page 20

Multitec
7.3.6 Dismantling the hydraulic system
- Remove the bearings as described in sections 7.3.3.1 and
7.3.3.2 and the shaft seals as described in sections 7.3.4
and 7.3.5.
If possible, place the hydraulic system in vertical position and
start dismantling it from the discharge end.
- Undo the four tie bolts 905.
- Remove dischargecasing 107,then dismantle the hydraulic
elements.
Note: Pump versions A/B/C/D in material variants 22/23/30
have an intermediate bearing in the middle stage as of the
number of stages given in the table (see fig. 36).
Pump size
32 50 65 100 125 150
No. of stages 8 7 6 6 5 6
Fig. 36
171.5
540.3
230.1
540.3 Intermediate bearing - bush
171.5 Intermediate bearing - diffuser
7.3.7 Recommended spare parts stock for 2 years’
continuous operation
Caution
We recommend to replace various wear parts,
e.g. rolling element bearings, sealing elements,
circlips, etc.) whenever the hydraulic system has been
completely dismantled.
Part No. Description Number of pumps
For shaft seal codes 65 and 66 (gland packing)
210
Shaft with small parts
230
Impeller (set = S)
231
Suction stage impeller
320.1
Fixed bearing (set)
320.2
Radial bearing
381
Bearing cartridge
411
V-ring (set)
412
O-ring (set = S)
461
Gland packing (set)
1)
502
Casing wear ring (set)
520
Sleeve
524
Shaft protecting sleeve
525
Spacer sleeve
529
Bearing sleeve
540
Bush
2)
550.1
Disc
59-4
Balance drum
For shaft seal codes 61, 62, 63 and 64 (with mechanical seal)
433
Mechanical seal (compl.)
Shaft sleeve (set)
523
For oil lubrication
4214)Lip seal 4 8 8 8 9 12 150 %
4234)Labyrinth ring 2 3 4 5 6 7 90 %
1) pump sizes 125 and 150 only
2) pump sizes 32 to 100 only
3) parts 461 and 524 are not fitted
4) depending on pump version
(including stand-by pumps)
2 3 4 5 6+7 8+9 10 and
1
1
2
2
1
1
1
1
1
1
4
4
4
2
1
2
2
1
1
2
1
3)
22324253637490 %
1
1
1
1
2
1
2
1
2
8
8
8
8
6
8
2
2
1
2
2
2
2
2
1
2
1
1
2
2
1
1
2
2
2
2
2
2
3
2
3
2
3
8
9
8
9
8
9
3
3
2
3
3
3
3
3
2
3
2
2
3
3
2
2
more
3
30 %
3
30 %
3
30 %
4
50 %
4
50 %
4
50 %
12
150 %
12
150 %
12
150 %
4
50 %
4
50 %
4
50 %
4
50 %
4
50 %
3
30 %
4
50 %
3
30 %
50 %
Note: Please always indicate the works number stamped onto
the pump name plate when ordering spare parts.
7.4 Reassembly
Caution
The pump shall be reassembled in accordance
with the rules of sound engineering practice.
- Under no circumstances use force.
- Due to their weight, some pump components must be
supported during reassembly.
- Before reassembly, the locating surfaces of the individual
components must be coated with a mounting aid in
compliance with hygienic and safety regulations.
- The properties of new pump components must not be
altered without prior consultation with our technical
departments.
- The parts must be clean and free from shavings or dust.
- Reassembly is effected in reverse order to dismantling.
- The tightening torques indicated must be complied with.
Avoid the use of mounting aids as far as possible. Should a
mounting aid be required after all, use a commercially
available contact adhesive, e.g. Pattex, Hylomar or Epple
33, after prior consultation with our technical departments.
The adhesive shall only be applied at selected points and in
thin layers. Do not use cyanoacrylate adhesives
(quick-setting adhesives).
20
Page 21

Multitec
All
Multi
Dimensionsi
n
7.4.1 Tightening torques - Tie bolts, part No. 905
Material codes 10, 11, 12, 13 (casing: cast iron)
Pump size
Tightening torque Nm
Multitec 32 85
Multitec 50 140
Multitec 65 250
Multitec 100 395
Multitec 125 600
Multitec 150 700
Material code 20 to 30
(Casing: steel or stainless steel)
Pump size
Operating pressure
(bar)
Tightening torque
Nm
Multitec 32 150
Multitec 50 240
Multitec 65
Multitec 100
All
430
680
Multitec 125 1370
tec 150
≤ 40
> 40 2000
1500
7.4.2 Reassembly of hydraulic system
Reassembly of the hydraulic system starts at the suction end
and proceeds towards the discharge end. It is advisable to
place the pump in vertical position for reassembly. The
sequence of reassembly does not pose any special problems
and shall be realized in accordance with the detailed sectional
drawing and list of components. The components shall be
re-installed in the same place as before dismantling.
A clearance of 0.7 to 1.2 mm shall be set between the last
impeller 230.1 or 230.3 and the balance drum 59-4 (or spacer
sleeve 525.4).
When tightening the tie bolts, proceed as follows:
- Tighten the nuts of tie bolts 905 gently, with the pump in
vertical position.
- Set thepump horizontallyonto itsfeet on theassembly table.
- Tightenthe nutsof tiebolts 905in twosteps (first step: 50% of
nominal torque, second step: nominal torque) in the sequence
1.4.2.3.
12
34
Tighten the gland cover by hand at first. Use a feeler gauge to
check the level position of the gland cover. It must be easy to
turn the rotor by hand.
Leakage isnormalduring pump commissioning. Afterapprox. 5
minutes’ operating period, the amount of leakage can be
reducedby steadilytighteningthe nuts ofthe glandcover by 1/6
of a turn. Keep an eye on the amount of leakage and the water
temperature. It takes several hours of pump operation for the
gland to be adjusted completely. There must be a high leakage
rate during the running-in period.
Repeat thisprocedure every 5 minutes untila minimumvalue is
reached.
Dimensions in
mm
Packing
cross-section
Length of
packing cord
Number of
packing rings
32 - 50 - 65
10 j 12,5 j 16 j
≈181 ≈223 ≈254 ≈306
Pump size
100 125 150
5 6
Stuffing box housing
d
a
d
i
l
Pump size
d
i
d
a
l
32 - 50 - 65 45 65 50
100 56 80 60
125 66 90 72
150 78 110 96
Fig. 38 Gland chamber dimensions
Fig. 37
7.4.3 Seals
Gland packing
Before re-packing, thoroughly clean the packing chamber and
the gland cover.
Caution
Packing rings must be inserted so that the cut
edge of each ring is displaced by approx. 90° to
120° in relation to the previous one.
Slip the pre-stressed packing rings onto the shaft protecting
sleeve, press home the first packing ring with the help of the
gland cover. Each packing ring must be pressed into the
packing chamber individually, using the gland cover.
On gland packings with lantern ring (for vacuum operation), the
lantern ring is mounted instead of the next to last packing ring
(thelast packingring is locatedin theseal chamberon thepump
side).
21
Page 22

Multitec
Mechanical seals
Caution
Mechanicalseals areprecision components. The
seat ring and the spring-loaded ring must always
be replaced together, i.e. always replacethe entire mechanical
seal.
To ensure trouble-free operation of the mechanical seal, the
seal faces and the tools must be absolutely clean. Mechanical
seals must be installed with utmost care.
The contact faces shall only be cleaned immediately before
assembly takes place. They must not be greasy (grease,
smudges ...) or damaged.
Individual seal components such as O-rings made of EPDM
must never come into contact with oil or grease.
Mechanical seal reassembly is effected in reverse order to
dismantling.
When mounting the spring-loaded ring, we recommend to wet
the shaft protecting sleeve with clean fluid handled.
The seat ring and the spring-loaded ring shall always be
mounted by hand resp. fingers, making sure that pressure is
applied evenly, without tilting.
Horizontal baseplate-mounted pump units
Caution
On pump versions C and D, the correct direction
of rotation must be observed for mechanical
seals with uni-directional springs.
Left--hand spring
Right--hand spring
7.4.3.1 Leakage at the mechanical seal
- Check axial alignment of the seal.
- Inspect gasket 400.1.
- Remove sealcover 471.1(471.2 forbellows-typeseals) and
check position of seat ring in the seal cover.
- Check the O-ring on sleeve 523.1.
- Check O-ring 412.4.
7.4.4 Bearings
Plain bearing
ininstallationtypes A- B -E /Ex - F/ Fx -V / Vxare re-installedin
reverse order to dismantling.
Rolling element bearings
The rolling element bearings are generally mounted on the
bearing sleeve and tightened with shaft nut 920.2 / 920.6 /
920.7.
They are re-installed in reverse order to dismantling. The
position of the keywayed nuts 920.6 (contact surface = plane
surface with recess) marked during dismantling (7.3.3.2) must
be complied with.
Check theconcentricityand facerun-outof ring500.1 witha dial
gauge for variants with oil lubrications.
Shaft
rotation:
anti-clock-
wise
View
towards
the springloaded ring
Shaft
rotation:
clockwise
Fig. 39
Sealing elements
Caution
Sealing elements made of EPDM must never
come into contact with oil or grease.
Defective O-rings (which have sustained mechanical damage
such as cuts, cracks and deformation as well as changes in
properties from deposits or embrittlement) must be replaced.
Gaskets shall always be replaced by new ones.
If possible, the gasket shall be mounted without the use of
mounting aids like grease or adhesives, unless authorized
mounting aids are used.
22
Page 23

Multitec
(2x)
(2x)
(2x
)
(2x
)
(2x)
(2x)
(2x
)
(2x
)
(2x)
(2x)
(2x
)
(2x
)
(2x
)
(2x
)
Caution
When tightening the shaft nuts, please observe the following:
The shaft nuts must be tightened to the torques indicated in the table ”Tightening torques for shaft nuts”.
Tightening the shaft nuts on Multitec pumps
Shaft nuts without lockwasher
Caution
Not applicable to drive end on MTC 32/50/65 with self-locking shaft nut
Tightening torques for shaft nuts
Drive end Non-drive end
Pump size A, B, C, D E,F,V A,B,E,F,V C,D
Nut Nm Nut Nm Nut Nm Nut Nm
80
MTC 32 M 25x1,5
MTC 50 M 30x1,5
MTC 65 M 35x1,5
MTC 100
MTC 125
MTC 150
1) loosen after first tightening
(*) block first nut when tightening
(**) self-locking nut
(***) bend over lockwasher
M 42x1,5
M 52x1,5
M 62x1,5
40 (***)
80
40 (***)
100
50 (***)
1501)
50
150 (*)
2001)
60
200 (*)
2501)
80
250 (*)
1)
M 25x1,5
1)
M 25x1,5
1)
M 30x1,5
M 42x1,5
M 52x1,5
M 62x1,5
1)
80
40 (***)
80
40 (***)
80
40 (***)
1501) 1501)
50
150 (*) 150(*)
2001) 2001)
60
200 (*) 200 (*)
2501)
80
250 (*) 250 (*)
M 25x1,5
1)
M 30x1,5
1)
M 35x1,5
M 42x1,5
M 50x1,5
M 60x1,5
40
100 (*)
40
120 (*)
50
150 (*)
50
60
80
M 25x1,5
M 30x1,5
M 35x1,5
M 42x1,5
M 52x1,5
M 62x1,5
801)
40
801)
40
100
50
50 (***)
60 (***)
2501)
80
250 (*)
Tightening the shaft nuts on Multitec pumps
Nut with lockwasher - (drive end and non-drive end on versions C and D)
M1
M2
Nut with locknut - drive end (and non-drive end on versions C and D)
M1
M2
M3
Nut with locknut - non-drive end (except versions C and D)
M1
M2
Self-locking nut - old version MTC E/F/V 32/50/65 (drive end)
1.) Tighten nut to torque M1, then loosen again
2.) Tighten to torque M2 and bend over lockwasher
1.) Tighten first nut to torque M1, then loosen again
2.) Tighten first nut to torque M2
3.) Tighten second nut to torque M3, at the same time blocking first nut
1.) Tighten first nut to torque M1
2.) Tighten second nut to torque M2, at the same time blocking first nut
No torques given
23
Page 24

Multitec
If there is no s uitable torque wrench available for tightening the
shaft nuts, proceed asfollows, depending on the pumpversion:
Self-locking nut on drive end(or non-drive end on versions
C und D)
G Tighten the shaft nut firmly
G Loosen the shaft nut again
G Apply thread-locking agent to the thread (e.g. LOCTITE)
G Moderately tighten the shaft nut
Nut with lockwasher on drive end (or non-drive end on
versions C und D)
G Tighten the shaft nut firmly
G Loosen the shaft nut again
G Moderately tighten the shaft nut
G Bend over lockwasher
Nut with locknuton driveend (ornon-driveend on versions
C und D)
G Tighten the first shaft nut firmly
G Loosen the first shaft nut again
G Moderately tighten the first shaft nut
G Block the firstshaft nut with asuitable tool and tightenthe
locknut firmly against the first shaft nut
Nut with locknut on non-drive end (all versions except C
and D)
G Moderately tighten the first shaft nut
G Block the firstshaft nut with asuitable tool and tightenthe
locknut firmly against the first shaft nut
Fixed bearing
The fixed bearing is the coupling-side bearing at the coupling
end. Pump size 32 is equipped withdeep-groove ball bearings.
The other pump sizes are fitted with angular contact ball
bearings in X arrangement (see sectional drawing).
The spacer discs 551.1 serve to position the rotor in axial
direction.
Axial adjustment of the rotor is not required. The correct axial
position of the rotor is achievedby inserting spacer discs551.1
toa totalthickness of1.6 mm (1x 1 mm+ 3 x 0.2mm) in bearing
housing350.1 on theside of thebearing (or angular contactball
bearings).
Caution
On the old versions, the rotor is axially positioned
by inserting spacer discs 551.1 on both sides of
the bearing (or angular contact ball bearings) to a total
thickness of 1.6 mm each.
Cover bolts 901.1 (or 901.8 for oil-lubricated bearings) must
be tightened in diagonally opposite sequence to the following
torques:
MTC 32/50/65 : 30 Nm
MTC 100/125/150 : 40 Nm
After installation of the bearings, the following checks shall be
made:
- Grease-lubricated bearings: Check the clearance
between cover 360.1 and bearing housing 350.1 after
having tightened bolts 901.1. There should be a clearance
between 0.2 mm and 0.8 mm. Cover 360.1 mustnot rest on
the bearing housing 350.1.
- Oil lubricated bearings: Check the clearance between
cover 360.2 and bearing housing 350.1 by verifying the
dimensions prior to re-assembly (if bearings or cover have
to be replaced).
Rolling element bearing sizes
Grease-lubricated bearings
0.2 ...0.8 mm
Fig. 40
Pump size Fixed bearing 320.1 Radial bearing 320.2
32 6309 ZZ C3-HT 6309 ZZ C3-HT
50 2 x 7309 BUA 6309 ZZ C3-HT
65 2 x 7309 BUA 6309 ZZ C3-HT
100 2 x 7312 BUA 6312 C3
125 2 x 7312 BUA 6312 C3
150 2 x 7315 BUA 6315 C3
Oil lubricated bearings
0.2... 0.8 mm
24
Fig. 41
The same rolling element bearings are installed for oil
lubrication as for grease lubrication.
Exception: Instead of bearing type 6309 ZZ C3-HT, rolling
element bearing type 6309C3 is used for oil lubrication.
Page 25

Multitec
Radial bearing
Versions Cand D are equipped with adeep-groove ballbearing
as radial bearing. (The other versions are fitted with a plain
bearing in the suction casing). The outer race of the
deep-groove ball bearing must have axial play. The bearing is
installed without spacer discs 551.1.
Fig. 42
7.4.4.1 Temperature of the rolling element bearings
Caution
The temperature of the rolling element bearings,
which run at 3000 1/min and more, can be 90°C.
Manual temperature checks are not sufficient !
- The bearings only reach theirnormal operating temperature
after several hours of operation.
- When a new pump is started up, the bearing temperature
may exceed 95°C. After 2 or 3 operating hours it will sink
slowly andlevel out toa constantvalue afterapprox. 1 week.
- A temperature rise may occur after service activities
comprisingreplacementof thebearings ordismantling ofthe
hydraulic system.
Should the temperature exceed 100°C during start-up, switch
off the pump and perform the following checks:
- Check whether the unit is correctly aligned.
- Remove the bearings, check grease quantity.
Excessive amounts of grease will cause increased
temperatures.
- Verify bearing type and arrangement (see 7.4.4.4)
- Re-startthe pump.Ensure tight press fitbetween outerraces
and cover (fixed bearing).
7.5 Re-adjusting the clearance gaps
7.5.1 Maximum clearance gaps
The following max. clearances on the gap diameter apply:
D
Impellers 230 and 231
Suction side clearance gap 0.8 mm
Clearance gap at the hub 0.8 mm
Balance drum 59-4 0.8 mm
Suction casing 106.1 and
spacer sleeve 525.2 (C and D
versions only)
1.0 mm if the fluid is pumped
from a vessel under vacuum
conditions
2.5 mm for all other operating
conditions
Should wider clearances be found, the parts subject to wear
must be replaced.
Note: Pump performance is adversely affected by excessive
clearances.Losses in efficiencyand discharge head willoccur.
7.5.2 Repairs
Clearance between impeller 231 and suction casing:
Sizes 32 to 65 for material codes 10,11, 12, 13:
Re-working the suction casing and mounting a spare casing
wear ring as per ZN 1095 and re-working the impeller.
For other pump sizes and material codes:
Replacing the casing wear ring 502.1 with a spare ring as per
ZN 1095 and re-working the impeller.
Clearance between impeller 230 and disc 550.1 or casing
wear ring 502.2
(Sizes 125 and 150):
Replacing the casing wear ring 502.2 with a spare ring as per
ZN 1095 and re-working the impeller.
(Sizes 32 to 100):
Two repair methods are possible:
a) Replacing the impellers 230 and discs 550.1 by new ones.
Quick repair method, no re-work of parts required.
b) Re-working the impellers 230 at the impeller eye by deposit
welding and subsequently machining to the original diameter.
This repair methodis used forimpellersmade of stainless steel.
Clearance gaps between impeller 230 and diffuser:
a) Re-working the impellers at the sealing gaps of the hubs.
Re-working the diffusers and installing an interstage bush as
per ZN 140.
b)Should hub thickness beinsufficientafter re-working,replace
the impeller or fit a spacer sleeve (see drawing below). The
spacer sleeve must be driven by the impeller key. Make sure
that the load-carrying key length in the impeller is at least 2/3 of
the total (load-carrying) key length.
Fig. 43
Installation and returning to service
Please refer to the appropriate sections of these operating
instructions.
25
Page 26

8 Trouble-shooting
Multitec
Pump delivers insufficient flow rate
Motor is overloaded
Pump is running, but does not deli ver
Excessive bearing temperature
Leakage at the pump
Excessive leakage at the shaft seal
Vibrations during pump operation
Excessive rise of temperature inside the pump
Cause Remedy
* * *
* * * *
* *
* *
* * * * *
* *
* * *
*
* * * *
* *
* *
* * *
*
*
*
*
*
* * *
* * *
*
*
* *
*
* *
* * *
* * *
* * *
*
* * * *
*
* * *
* * *
1) Pump pressure must be released before attempting to remedy faults on parts which are subjected to pressure.
2) Contact KSB
3) Pump version with barrier liquid supply on request only
Pump delivers against an excessively high disc harge pressure. Re-adjust to duty point.
Pump or piping are not completely v ented or primed. Vent and/or prime.
Supply line or impeller clogged. Remove deposits in the pump and/or piping.
Formation of air pockets in the piping. Alter piping layout.
Suction headis toohigh /NPSH
Air intake at the shaft seal. Cl ean barrier liquid duct, supply external barrier liquid, if necessary
Wrong direction of rotation. Interchange two of the phases of the power supply cable.
Speed is too low.
Wear of internal pump parts. Replace worn components by new ones.
Pump back pressure is lower than s pecified in the purchase order. Adjust duty point accurately.
Density or visc osity of the fluid pumped is higher than stated in the pur-
chase order.
Gland cover too tight or askew. Correct. Increase leakage slightly.
Speed is too high. Reduce speed.
Tie bolts / gaskets Tighten the bolts.
Worn shaft seal. Fit new shaft seal.
Score marks or roughness on shaft protecting sleeve / shaft sleeve. Replace shaft protecting sleeve / shaft sleeve.
Vibrations during pump operation Improve suction conditions.
The unit is misaligned. Re-align.
Pump is warped or sympathetic vibrations in the piping. Check pipeline connections and secure fixing of pump; if required, reduce
Outer bearing races of fixed bearing are loose. Clamp outer bearing races axially.
Increased axial thrust.
Insufficient or excessive quantity of lubricant or unsuitable lubricant. Top up, reduce or c hange lubric ant.
Non-compliance with specified coupling distance. Correct distance according to the general arrangement drawing.
Motor is running on two phases only. Replace the defective fuse.
Rotor is out of balance. Clean the impellers.
Defective bearing(s). Fit new bearing(s).
Insufficient rate of flow. Increase the minimum rate of flow.
Incorrect inflow of circulation liquid. Increase the free cross-section.
In case of parallel operation, check valve defective or missing. Check.
Incorrect installation of gland packing,
unsuitable packing material
Inadequate cooling of shaft seal chamber Check the free cross-section of the cooling liquid feed line.
Change in the free cross-section of the return line of the balancing liquid
Wear in balancing device
2)
2)
(positive suction head) is too low. Check/alter liquid level.
available
1)
Check plant for impurities.
Fit one or several larger impellers.
Increase the speed (turbine, I.C. engine).
Fit a vent valve.
Fully open shut-off valve in the suction line.
Change suction line, if the friction losses in the suction line are too hi gh.
Check suction strainer/foot valve and suction line for clogging.
increase its pressure.
Fit new shaft seal.
Increase speed.
2)
2)
Fit new gaskets.
Check barrier liquid pressure
Fit new shaft seal.
Re-align the pump.
Re-balance the impeller.
Increase pressure at the pump suction nozzle.
the distances between the pipe clamps.
Fix the pipelines using anti-vibration material.
Check rotor clearances, axial adjustment and clearance on throttling bush
/ balance drum.
Check the electric cable connections.
Re-balance the impeller.
Check.
Check the balancing line.
Check throttling bush / balance drum clearances.
2) 3)
2) 3)
,or
26
Page 27

9 General assembly drawing
Pump sizes 32 to 100
Radial suction nozzle
Multitec
Version without balance drum
Axial suction nozzle
up to pump size 50
with mechanical seal
Axial suction nozzle
pump size 65 and above
1) for pump models with mechanical seal only
2) pump size 65 and above
3) pump size 100 and above
4) except pump size 32
5) pump sizes 32 and 50 only
6) hydraulics 9.2/10.2/1 1.1 and 12.1 only
7) for variant with balance drum only
27
Page 28

Close-coupled pump up to pump size 65
Radial suction nozzle
Multitec
Vertical design
Pump sizes 32, 50 and 65
Vertical design
Pump sizes 100, 125 and 150
28
1) for pump models with mechanical seal only
2) pump size 65 and above
3) pump size 100 and above
4) except pump size 32
5) pump sizes 32 and 50 only
6) hydraulics 9.2/10.2/1 1.1 and 12.1 only
7) for variant with balance drum only
Page 29

Pump sizes 125 and 150
V
ersion B
Multitec
Version C
1) for pump models with mechanical seal only
2) pump size 65 and above
3) pump size 100 and above
4) except pump size 32
5) pump sizes 32 and 50 only
6) hydraulics 9.2/10.2/1 1.1 and 12.1 only
7) for variant with balance drum only
Material codes 20, 21, 22, 23 and 30
Return of balancing line MTC 150, 2-pole
29
Page 30

9.1 List of components
This list includes all components mentioned in this document
Part No. Description
106.1/2 Suction casing
107 Discharge casing
108.1 Stage casing
160.1/2 Cover
171.1 Diffuser
181 Pump stool
182 Foot
210 Shaft
230.1/3 Impeller
231 Suction stage impeller
1)
320.1/2 Rolling element
bearing
1)
1)
1)
341 Drive lantern
342 Thrust bearing lantern
350.1 Bearing housing
360.1/2 Bearing cover
361.1/2 Non-drive end bearing
cover
381 Bearing cartridge
1)
400.1 Gasket
411.1/2/3/4/5/6/7/8/13 Joint ring
412. 1/2/3/4/5/10/11/12 O-ring
1)
1)
421.1/2/3 Lip seal
423.1/2 Labyrinth ring
433.1/7/10 Mech. seal
441.1/4 Shaft seal housing
452 Gland cover
461 Gland packing
1)
471.1/2 Seal cover
500.1 Ring
502.1/2 Casing wear ring
520.1/2/3/4 Sleeve
1)
1)
523.1 Shaft sleeve
524 Shaft protecting sleeve
1)
Multitec
525.1/2/4 Spacer sleeve
Part No. Description
529 Bearing sleeve SiC
540.1/3 Bush
550. 1/2/3/4/6/8/9/10/11 Disc
1)
1)
551.1/2 Spacer disc
561.1 Grooved pin
565 Rivet
59-4 Balance drum
59-7 Support
636 Lubricating nipple
638 Constant level oiler
681.2 Coupling guard
683.1 Hood
710.1/2 Pipe
723.1 Flange
731. 1/2/3/4/16/17/18 Pipe union
800 Motor
831.1 Fan impeller
861.1/2/3/4 Coupling half
87-5 Axle
89-8 Foundation rail
900.2 Screw
901.1/2/3/4/5/6/7/8/9/10/11/12 Hex. head bolt
902.1/2 Stud
903.1/2/3/4/5/9/10/11/14 Screwed plug
905 Tie bolt
914.1 Hex. socket head cap
screw
920.1/2/3/4/5/6/7/9/10/11 Nut
931 Lockwasher
932.1/2 Circlip
940.1/2/3/4/5 Key
950.2/3 Spring
971.1 Plate
1)
1)
1)
1) recommended spare parts (see 7.3.7 on page 20)
30
Page 31

Adjusting Dimensions for Coupling Alignment, Pump sizes 32 to 65, Pump versions E, Ex, F, Fx, V, Vx
Cotes de réglage pour alignement de l’accouplement tailles 32 jusqu’à 65, Exécutions E, Ex, F, Fx, V, Vx
Einstellmaße für Kupplungsausrichtung Baugrößen 32 bis 65 Ausführung E, Ex, F, Fx, V, Vx
Multitec
Bild 44
Fig. 44
Achtung
Attenzion
Caution
Beiden Motoren für die VersionEx, Fx und Vx handelt essich um Sondermotoren mit verstärkter Lagerung, dienicht
durch Standard-Motoren ersetzt werden können!
Les moteurs pour les versions Ex, Fx et Vx sont des moteurs spéciaux à paliers renforcés qui ne peuvent pas être
remplacés par des moteurs standard!
The motors of versions Ex, Fx and Vx are special motors with reinforced bearing which cannot be replaced by
standard motors!
31
Page 32

Multitec
Subject to technical modification without prior notice.
1777.8/7-10 01.06.2006
KSB Aktiengesellschaft
P.O. Box 1361, 91253 Pegnitz · Bahnhofplatz 1, 91257 Pegnitz (Germany)
Tel. +49 9241 71-0 · Fax +49 9241 71-1791 · www.ksb.com
 Loading...