

Multitech FaxFinder FF440, FaxFinder FF240, FaxFinder FF840 Administrator's Manual
FaxFinder® V.34 Fax Servers
FF240, FF440, FF840
Administrator Guide

Copyright and Technical Support
Revision
Date
Description
A
05/04/12
Initial Release
B
12/17/12
RoHS update.
Contacting Multi-Tech
Knowledge Base
The Knowledge Base provides immediate access to support information and resolutions for all Multi-Tech products. Visit
http://www.multitech.com/kb.go.
Installation Resources
To download manuals, firmware, and software, visit http://www.multitech.com/setup/product.go.
Support Portal
To create an account and submit a support case directly to our technical support team, visit: https://support.multitech.com
Technical Support
Business Hours: M-F, 9am to 5pm CT
Country
By Email
By Phone
Europe, Middle East, Africa:
support@multitech.co.uk
+(44) 118 959 7774
U.S., Canada, all others:
support@multitech.com
(800) 972-2439 or (763) 717-5863
World Headquarters
Multi-Tech Systems, Inc.
2205 Woodale Drive
Mounds View, Minnesota 55112
Phone: 763-785-3500 or 800-328-9717
Fax: 763-785-9874
Warranty
To read the warranty statement for your product, please visit: http://www.multitech.com/warranty.go
FaxFinder Administrator Guide
FF240, FF440, and FF840
S000522B, Version B
Copyright
This publication may not be reproduced, in whole or in part, without prior expressed written permission from Multi-Tech Systems, Inc.
All rights reserved.
Copyright © 2012, by Multi-Tech Systems, Inc.
Multi-Tech Systems, Inc. makes no representations or warranties with respect to the contents hereof and specifically disclaims any
implied warranties of merchantability or fitness for any particular purpose. Furthermore, Multi-Tech Systems, Inc. reserves the right to
revise this publication and to make changes from time to time in the content hereof without obligation of Multi-Tech Systems, Inc. to
notify any person or organization of such revisions or changes. Check Multi-Tech’s web site for current versions of our product
documentation.
Revision History
Patents
This device covered by the following patents: 6,031,867; 6,012,113; 6,009,082; 5,905,794; 5,864,560; 5,815,567; 5,815,503; 5,812,534;
5,809,068; 5,790,532; 5,764,628; 5,764,627; 5,754,589; D394,250; 5,724,356; 5,673,268; 5,673,257; 5,644,594; 5,628,030; 5,619,508;
5,617,423; 5,600,649; 5,592,586; 5,577,041; 5,574,725; D374,222; 5,559,793; 5,546,448; 5,546,395; 5,535,204; 5,500,859; 5,471,470;
5,463,616; 5,453,986; 5,452,289; 5,450,425; D361,764; D355,658; D355,653; D353,598; D353,144; 5,355,365; 5,309,562; 5,301,274,
6,219,708. Other patents pending.
Trademarks
Multi-Tech Registered Trademarks: FaxFinder, Multi-Tech, and the Multi-Tech logo.
All other products and technologies are the trademarks or registered trademarks of their respective holders.
2 FaxFinder x40 Administrator Guide

Contents
Chapter 1 – Product Description .................................................................................................................. 8
Package Contents ................................................................................................................................. 8
Safety Warnings ................................................................................................................................... 8
Telecom Safety Warning ............................................................................................................................ 8
Internal Lithium Battery ............................................................................................................................. 9
Ethernet Ports ............................................................................................................................................ 9
Technical Specifications ........................................................................................................................ 9
Fax File Types ..................................................................................................................................... 10
Requirements ..................................................................................................................................... 10
Fax Routing Overview ......................................................................................................................... 11
Inbound Routing ....................................................................................................................................... 11
Outbound Routing .................................................................................................................................... 11
Static or Dynamic Delivery .................................................................................................................. 12
PBX Call Routing ....................................................................................................................................... 12
Chapter 2 – Hardware and Installation ...................................................................................................... 13
Connectors and LEDs by Model ........................................................................................................... 13
FaxFinder 240 ........................................................................................................................................... 13
FaxFinder 440 ........................................................................................................................................... 13
FaxFinder 840 ........................................................................................................................................... 14
FaxFinder Connector Descriptions ........................................................................................................... 14
LED Descriptions ....................................................................................................................................... 14
Before You Begin ................................................................................................................................ 15
Mounting FaxFinder (Optional) ........................................................................................................... 15
Wall Mounting.......................................................................................................................................... 15
Rack Mounting ......................................................................................................................................... 16
Cabling FaxFinder ............................................................................................................................... 17
Chapter 3 – Basic FaxFinder Configuration ................................................................................................. 18
Configuring FaxFinder’s IP address and Network Settings ..................................................................... 18
Network Configuration Fields .................................................................................................................. 20
Updating the Admin Account .............................................................................................................. 20
Setting Time ....................................................................................................................................... 20
Time Fields ............................................................................................................................................... 21
FaxFinder x40 Administrator Guide 3

Contents
Configuring SMTP ............................................................................................................................... 21
SMTP Parameters ..................................................................................................................................... 22
Sending a Test Fax from Fax Machine to FaxFinder .............................................................................. 22
Adding a Printer (Optional) ................................................................................................................. 22
Printer Parameters ................................................................................................................................... 23
Adding a Network Share (Optional) ..................................................................................................... 23
Network Share Fields ............................................................................................................................... 23
Generating a Server Certificate ........................................................................................................... 23
Server Certificate Parameters .................................................................................................................. 24
Adding Users Individually .................................................................................................................... 24
User Fields ................................................................................................................................................ 24
Adding Global Contacts Individually .................................................................................................... 25
Configuring Modems .......................................................................................................................... 25
Modem Fields ........................................................................................................................................... 26
Routing Inbound Faxes........................................................................................................................ 28
General Setup Fields ................................................................................................................................ 29
Inbound Routing Destinations ................................................................................................................. 29
Creating a Restore File ........................................................................................................................ 29
Chapter 4 – Fax Management .................................................................................................................... 30
Logging into the Web Management Interface ...................................................................................... 30
Requesting a Password ............................................................................................................................ 30
Navigating the Web Management Interface ........................................................................................ 30
Checking System, Printer, and Share Status ......................................................................................... 31
Checking Modem and Fax Status ......................................................................................................... 31
Canceling Outbound Faxes .................................................................................................................. 33
Resetting a Busy Modem .................................................................................................................... 33
Blocking a Modem’s Inbound and Outbound Faxes .............................................................................. 33
Checking the Mail Queue .................................................................................................................... 33
Resending Queued Mails..................................................................................................................... 33
Viewing Logs....................................................................................................................................... 34
Log Fields .................................................................................................................................................. 34
Rebooting FaxFinder ........................................................................................................................... 35
Restoring Configuration ...................................................................................................................... 35
Restoring Factory Defaults .................................................................................................................. 35
Chapter 5 – Managing Users, Contacts, and Recipients .............................................................................. 36
Importing Users .................................................................................................................................. 36
4 FaxFinder x40 Administrator Guide

Contents
User Page CSV Import Formats ................................................................................................................ 36
Creating a CSV File.................................................................................................................................... 37
Importing a CSV File ................................................................................................................................. 38
Exporting a User List ........................................................................................................................... 38
Deleting Users .................................................................................................................................... 38
Editing Users ...................................................................................................................................... 38
Adding Global and Personal Contacts .................................................................................................. 39
Allowing Users to Add Global Contacts .................................................................................................... 39
Importing Global or Personal Contacts .................................................................................................... 39
Adding Personal Contacts Individually ..................................................................................................... 40
Exporting a Contact List ...................................................................................................................... 41
Deleting Global or Personal Contacts ................................................................................................... 41
Using Groups to Organize Contacts ...................................................................................................... 41
Adding a Global or Personal Group .......................................................................................................... 41
Deleting Groups ....................................................................................................................................... 42
Using the Recipients Table .................................................................................................................. 42
Importing Recipient Lists ..................................................................................................................... 42
Example Recipient CSV Format ................................................................................................................ 42
Recipient Record Fields ............................................................................................................................ 43
Creating a Recipient CSV File ................................................................................................................... 43
Importing a Recipient List ........................................................................................................................ 44
Exporting a Recipient List .................................................................................................................... 44
Deleting Recipients ............................................................................................................................. 44
Chapter 6 – Advanced Configuration ......................................................................................................... 45
Configuring Fax Log Purging ................................................................................................................ 45
Fax Log Purge Parameters ........................................................................................................................ 45
Using the Common UNIX Printing System ............................................................................................ 46
Updating Software .............................................................................................................................. 46
Updating FaxFinder Software................................................................................................................... 46
Updating Modem Software ...................................................................................................................... 46
Setting the Debug Level ...................................................................................................................... 47
Downloading System Logs ....................................................................................................................... 47
Faxing to the Same Number Simultaneously ........................................................................................ 48
Archiving Outbound Faxes .................................................................................................................. 48
Enabling Outbound Fax Approval ........................................................................................................ 48
Enabling the Outbound Approval Report................................................................................................. 49
FaxFinder x40 Administrator Guide 5

Contents
Configuring Store & Forward Fax (T.37) ............................................................................................... 49
Store & Forward Fax (T.37) Parameters ................................................................................................... 50
Adding Additional Hosts ........................................................................................................................... 50
Chapter 7 –Cover Pages ............................................................................................................................ 51
Custom Cover Pages ........................................................................................................................... 51
Tips ........................................................................................................................................................... 51
Text Field Names and Descriptions .......................................................................................................... 51
Adding Cover Pages to FaxFinder......................................................................................................... 52
Providing Default Opt-Out Information for Cover Pages ....................................................................... 52
Chapter 8 – Installing FaxFinder Fax Client Software .................................................................................. 53
Using FaxFinder Client Mass Uninstall ................................................................................................. 53
Pushing Installation to Client Computers ............................................................................................. 53
Installing the Software on a Single Computer ...................................................................................... 54
Setting Usage Rights for the FaxFinder Printer ..................................................................................... 56
Associating the Software and a User with a FaxFinder ......................................................................... 57
Disassociating a FaxFinder Unit from the Client ................................................................................... 59
Appendix A – Troubleshooting .................................................................................................................. 60
What if I can't see my FaxFinder’s web page? ...................................................................................... 60
What if I don't get an email when I click Send Test Email? .................................................................... 60
What if FaxFinder doesn't answer a fax call? ....................................................................................... 62
Where can I Find the SMTP Error Code List?......................................................................................... 62
Dealing with Failed Fax Reports .......................................................................................................... 62
Appendix B – Customization ...................................................................................................................... 63
T.37 Advanced Usage .......................................................................................................................... 63
Options ..................................................................................................................................................... 63
Appendix C – Regulatory Compliance ........................................................................................................ 65
47 CFR Part 68 Telecom ....................................................................................................................... 65
47 CFR Part 15 Regulation ................................................................................................................... 66
Fax Branding Statement ...................................................................................................................... 67
Canadian Limitations Notice ................................................................................................................ 67
Industry Canada.................................................................................................................................. 67
EMC, Safety, and R&TTE Directive Compliance..................................................................................... 68
Waste Electrical and Electronic Equipment Statement ......................................................................... 68
WEEE Directive ......................................................................................................................................... 68
Instructions for Disposal of WEEE by Users in the European Union ........................................................ 68
REACH Statement ............................................................................................................................... 69
6 FaxFinder x40 Administrator Guide

Contents
Registration of Substances ....................................................................................................................... 69
Substances of Very High Concern (SVHC) ................................................................................................ 69
Restriction of the Use of Hazardous Substances (RoHS)........................................................................ 70
Information on HS/TS Substances According to Chinese Standards ...................................................... 71
Information on HS/TS Substances According to Chinese Standards (in Chinese) .................................... 72
Index ........................................................................................................................................................ 73
FaxFinder x40 Administrator Guide 7

FaxFinder is an all-in-one fax server that provides faxing capabilities over a WAN from a corporate office to
remote offices as well as to field sales people. FaxFinder converts inbound faxes to PDF or TIFF files and
delivers them to a recipient’s inbox, a network folder, or a network printer. Users can to send outbound faxes
through a fax client, web browser, or the print function of other applications.
The FaxFinder x40 includes the following models:
● FF240 2-modems
● FF440 4-modems
● FF840 8-modems
Multi-Tech provides three manuals for use with FaxFinder x40 models:
● Administrator Guide provides details on installing, configuring, and managing FaxFinder.
● User Guide provides details on sending faxes and using the client software.
● Developer Guide provides information and examples for the FaxFinder Web Services API.
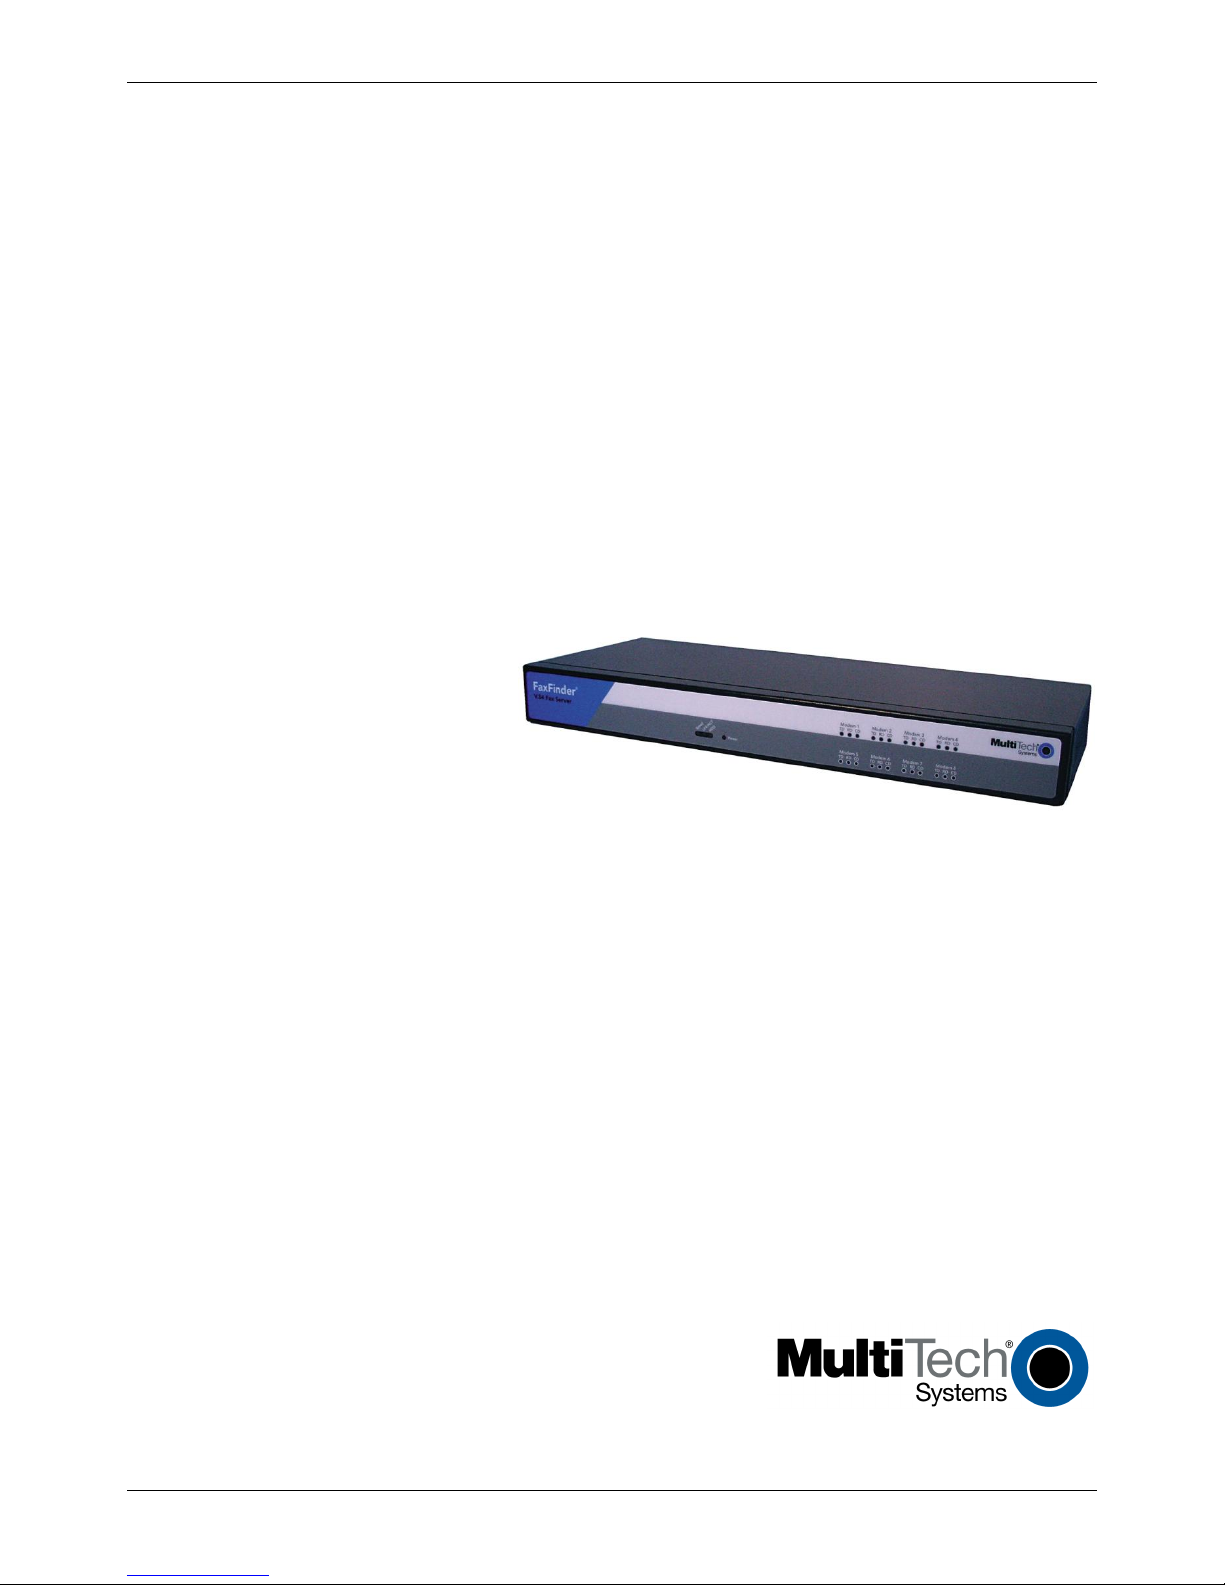
Package Contents
● FaxFinder with factory installed software
● Universal power supply with power cord
● One phone cable for each port with RJ-11 at both ends
● One Ethernet cable, one serial cable, one serial debug cable
● Adhesive plastic feet
● Two mounting brackets and screws; the same bracket is used for wall and rack mounting
● Class A users notice
Safety Warnings
Telecom Safety Warning
● Never install telephone wiring during a lightning storm.
● Never install a telephone jack in wet locations unless the jack is specifically designed for wet locations.
● Use this product with UL and cUL listed computers only.
● Never touch uninsulated telephone wires or terminals unless the telephone line has been disconnected at
the network interface.
● Use caution when installing or modifying telephone lines.
● Avoid using a telephone during an electrical storm. There may be a remote risk of electrical shock from
lightning.
● Do not use a telephone in the vicinity of a gas leak.
● To reduce the risk of fire, use only 26 AWG or larger telecommunication line cord.
● Before servicing, disconnect this product from its power source and telephone network.
8 FaxFinder x40 Administrator Guide
Chapter 1 – Product Description
Category
Description
Connectors
1 RJ-45 console serial port
1 RJ-45 Ethernet port
2 USB ports (inactive)
RJ-11 line jacks
Size
W 15.4” x H 1.9” x D 6.1” (W 39.0 cm x H 4.7 cm x D 15.5 cm)
Note that adding the plastic feet increases the height to 1.877”
Weight
FF240
FF440
FF840
4.1 lbs (1.9 kg)
4.2 lbs (2.0 kg)
4.5 lbs (2.1 kg)
Input Voltage
12 Volts
Power Draw1
Typical2
Maximum3
Peak4
FF240
Current (AMPS)
0.910
1.080
1.300
Watts
11.06
13.05
FF440
Current (AMPS)
1.140
1.200
1.450
Watts
13.77
14.47
FF840
Current (AMPS)
1.350
1.450
1.700
Watts
16.21
17.40
Operating Environment
-40° to 167° F (-40° to +75° C) 5UL Listed at 40 C
relative humidity 20 to 90% noncondensing
Storage Temperature
-40° to 185° F (-40° to +85° C)
EMC Approvals
FCC Part 15 Class A, EN 55022 Class A, EN 55024
Safety Approvals
UL\cUL 60950-1 ed.2, IEC 60950-1 ed.2 & EN (2006 +am.11)
Telecom Approvals
47CFR Part 68, CS03, TBR21; Other countries also included
Fax Specs
(MT5634SMI modem) Group 3 Fax (T.30 and T.4)
Modulations: ITU V.34, ITU V.17, V.29, V.27 and V.21
Web Connections
50
File Upload Size6
48MB max for the Send Fax Web page
36MB max for T.37, Client software and API
Warranty
2 years
Internal Lithium Battery
● A lithium battery located within the product provides backup power for the timekeeping. This battery has
an estimated life expectancy of ten years.
● When this battery starts to weaken, the date and time may be incorrect. If the battery fails, the board
must be sent back to Multi-Tech Systems for battery replacement.
● Lithium cells and batteries are subject to the Provisions for International Transportation. Multi-Tech
Systems, Inc. confirms that the Lithium batteries used in the Multi-Tech product(s) referenced in this
manual comply with Special Provision 188 of the UN Model Regulations, Special Provision A45 of the ICAOTI/IATA-DGR (Air), Special Provision 310 of the IMDG Code, and Special Provision 188 of the ADR and RID
(Road and Rail Europe).
Warning: There is danger of explosion if the battery is incorrectly replaced.
Ethernet Ports
Caution: Ethernet ports and command ports are not designed to be connected to a public telecommunication
network.
Technical Specifications
FaxFinder x40 Administrator Guide 9

Chapter 1 – Product Description
1
Multi-Tech Systems, Inc. recommends that the customer incorporate a 10% buffer into their power source
when determining product load.
2
Typical is the current while the unit is powered up, but not sending or receiving faxes.
3
Maximum is the current while sending or receiving faxes.
4
Peak is the current while sending or receiving faxes.
5
UL Listed @ 40°C. Limited by power supply. UL Certification does not apply or extend to an ambient above
40°C and has not been evaluated by UL for ambient greater than 40°C
6
The difference in maximum size allowed is due to the data encoding for T.37, the client software, and API
attachments.
Fax File Types
Users can fax the following document types:
● PDF
● PS
● TIF or TIFF
● TXT
Note: When printing from another application, FaxFinder sends the file as TIF images.
Requirements
The FaxFinder Fax Server is an IP enabled fax server that works with other devices and services on your
communication network to send and receive faxes and to perform administrative functions. FaxFinder
requires:
● SMTP server access
Used to distribute FaxFinder emails that contain faxes, administrative notices, and log files.
● Multi-Tech recommends that you create a DNS A record for FaxFinder.
● Depending on the location of email recipients and IP resources, FaxFinder may also WAN require
access through your network’s Internet gateway.
● Analog phone lines that provide dial tone and ring voltage at traditional levels and cadence
To fully use FaxFinder’s inbound fax routing, communication lines (PBX ports) need to pass direct inward
dial (DID) information in DTMF format to FaxFinder when the FaxFinder port goes off hook to answer a call.
● A workstation for initial FaxFinder configuration
Depending on your network, you may need to connect FaxFinder directly to the workstation to complete
initial network setup. You will need to identify and possibly change the workstation’s current IP. If using a
laptop, note that an active WiFi connection may interfere with the Ethernet connection to FaxFinder.
Static IP address
FaxFinder does not support automatically assigned IP addresses via DHCP. FaxFinder is set from the factory
with an IP address of 192.168.2.1 (netmask 255.255.255.000).
● Ethernet
You need to know if your Ethernet equipment has a simple traditional switch or hub, a managed V-LAN
switch that is IP address aware (and will block traffic that is not from its configured subnet), or a port on a
network enabled device (such as a PBX or router) with controls that are similar to a managed switch.
10 FaxFinder x40 Administrator Guide
Chapter 1 – Product Description
Network Share
Mail Server
Network Printer
Incoming fax
FaxFinder
555-1234
555-1235
555-1236
Fax Recipient
FaxFinder
Store &
Forward
T.37 Email
Fax Client
Software
Web
Interface
or API
Software
Print Option
Mail Server
● FaxFinder's Ethernet interface is full duplex, auto negotiating 10/100/1000 Mb and auto polarity
sensing. Auto polarity allows you to use a traditional straight through or cross-over, Ethernet RJ-45
cable.
● FaxFinder does not support POE (Power over Ethernet). You may need to disable POE features on the
Ethernet port that you connect to the FaxFinder.
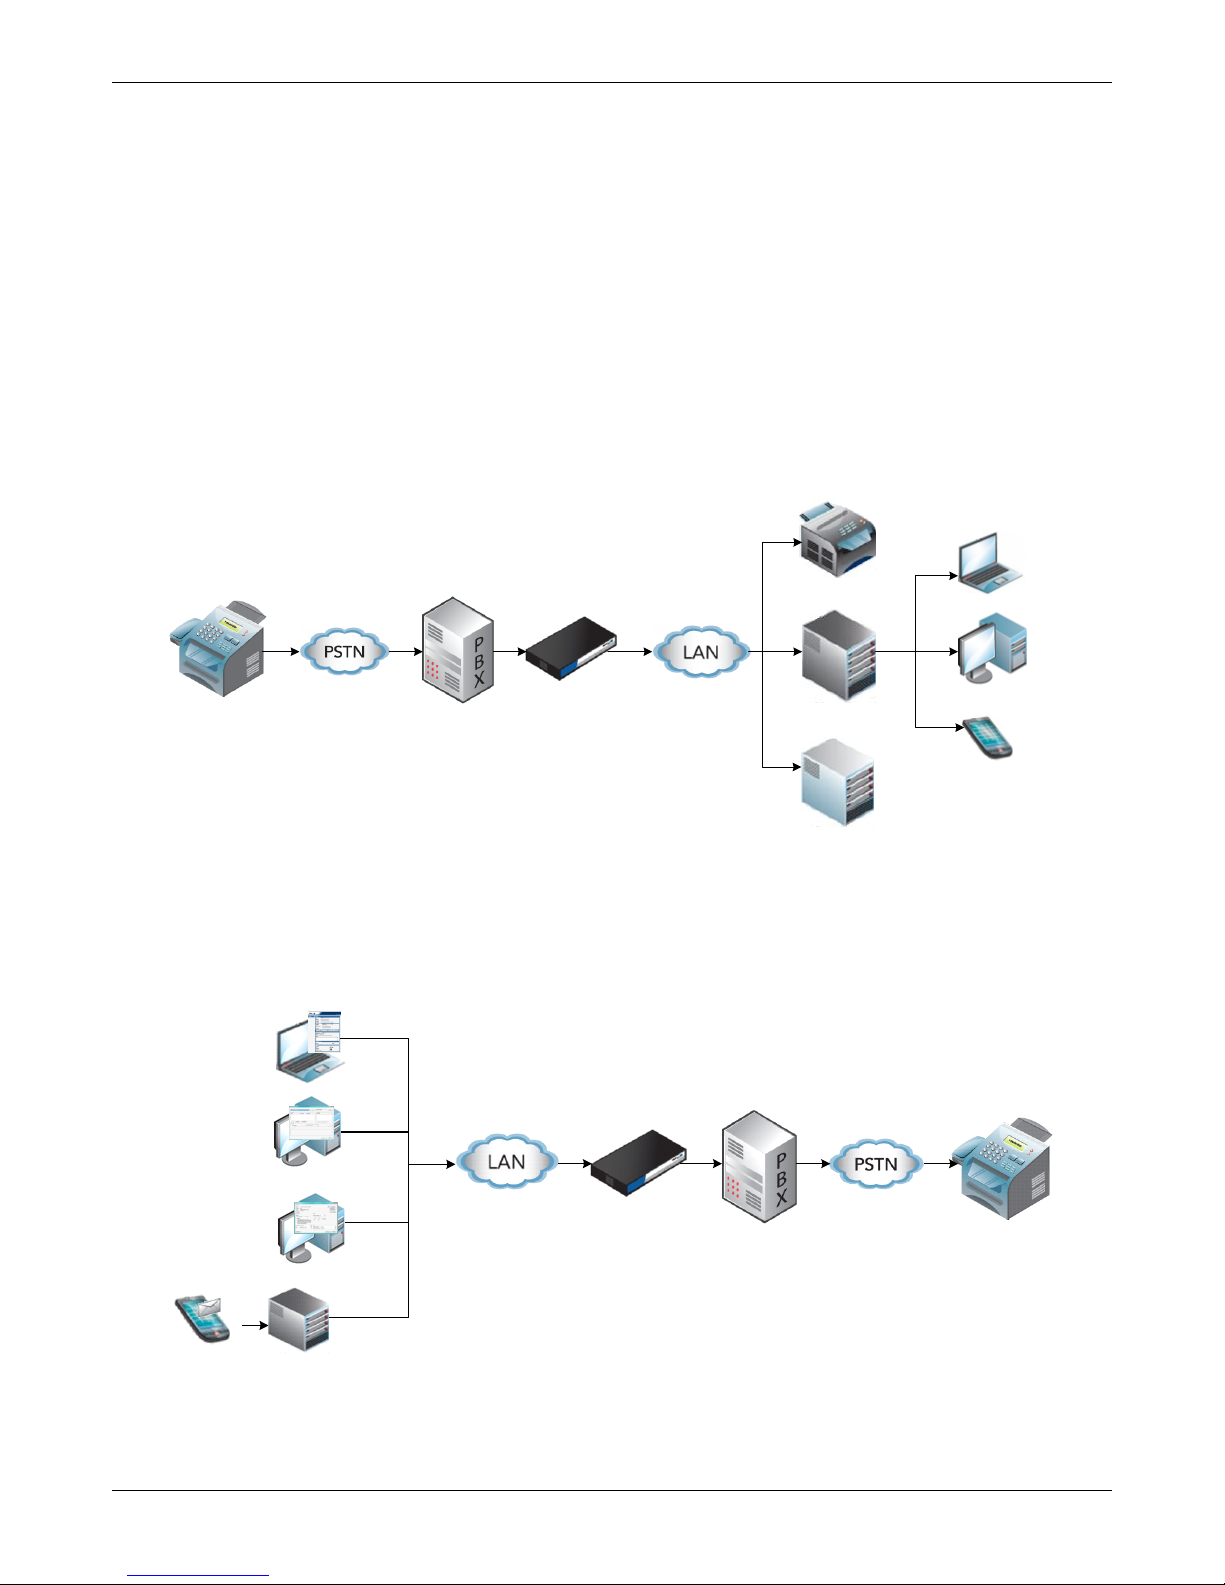
Fax Routing Overview
Inbound Routing
Depending on your network configuration, FaxFinder can route incoming faxes to a network printer, network
share, and through your mail server to any individual user. FaxFinder can deliver incoming faxes as email
attachments to any user on your mail system, whether local, remote, or mobile.
Outbound Routing
You can configure FaxFinder so that users can send faxes through a T.37 email, the FaxFinder Fax Client, a web
browser, or a Web API. Fax Client Software, installed on a user’s Windows computer, also allows the user to
send faxes through the print function of any software.
FaxFinder x40 Administrator Guide 11

Chapter 1 – Product Description
Static or Dynamic Delivery
The source and type of communication lines that connect to FaxFinder dictate if the inbound fax routing
method is set for dynamic or static delivery. Dynamic delivery is based on the number dialed by the party
sending the fax. Static delivery is based on which communication line/FaxFinder port the inbound fax uses.
Although FaxFinder ports can be connected to an ordinary phone line (POTS line), they are often connected to
a PBX extension/station port. FaxFinder can deliver incoming faxes as email messages to any user on your
network. Use this feature when your PBX can route multiple receiving numbers to a single station port. A PBX
may determine which number was dialed by the originator, for example, through an IP enabled PBX
communicating directly with an IP based PSTN service or other IP enabled communication equipment.
PBX Call Routing
1. PBX sends a call to the FaxFinder by ringing the extension connected to the FaxFinder port.
2. FaxFinder picks up (goes off hook).
3. The PBX transmits a string of DTMF digits to the extension. Usually this is the last x number of digits dialed
by the calling side.
4. FaxFinder port answers as a fax machine and receives the incoming fax.
5. When the fax transmission completes, FaxFinder uses the DID information to determine delivery options.
FaxFinder does this by reading the recipient inbound routing table in the FaxFinder.
When the PBX provides call routing information, it does not matter which FaxFinder port (line) receives the
call. The fax will be routed to all the delivery options associated with the DID number (recipient extension)
defined in the Recipient routing table.
If the PBX/analog line cannot provide DID call routing, incoming faxes will be routed solely on the delivery
options associated with specific FaxFinder port (line) that the call was received on. You can define multiple
delivery options for each physical line/port.
12 FaxFinder x40 Administrator Guide
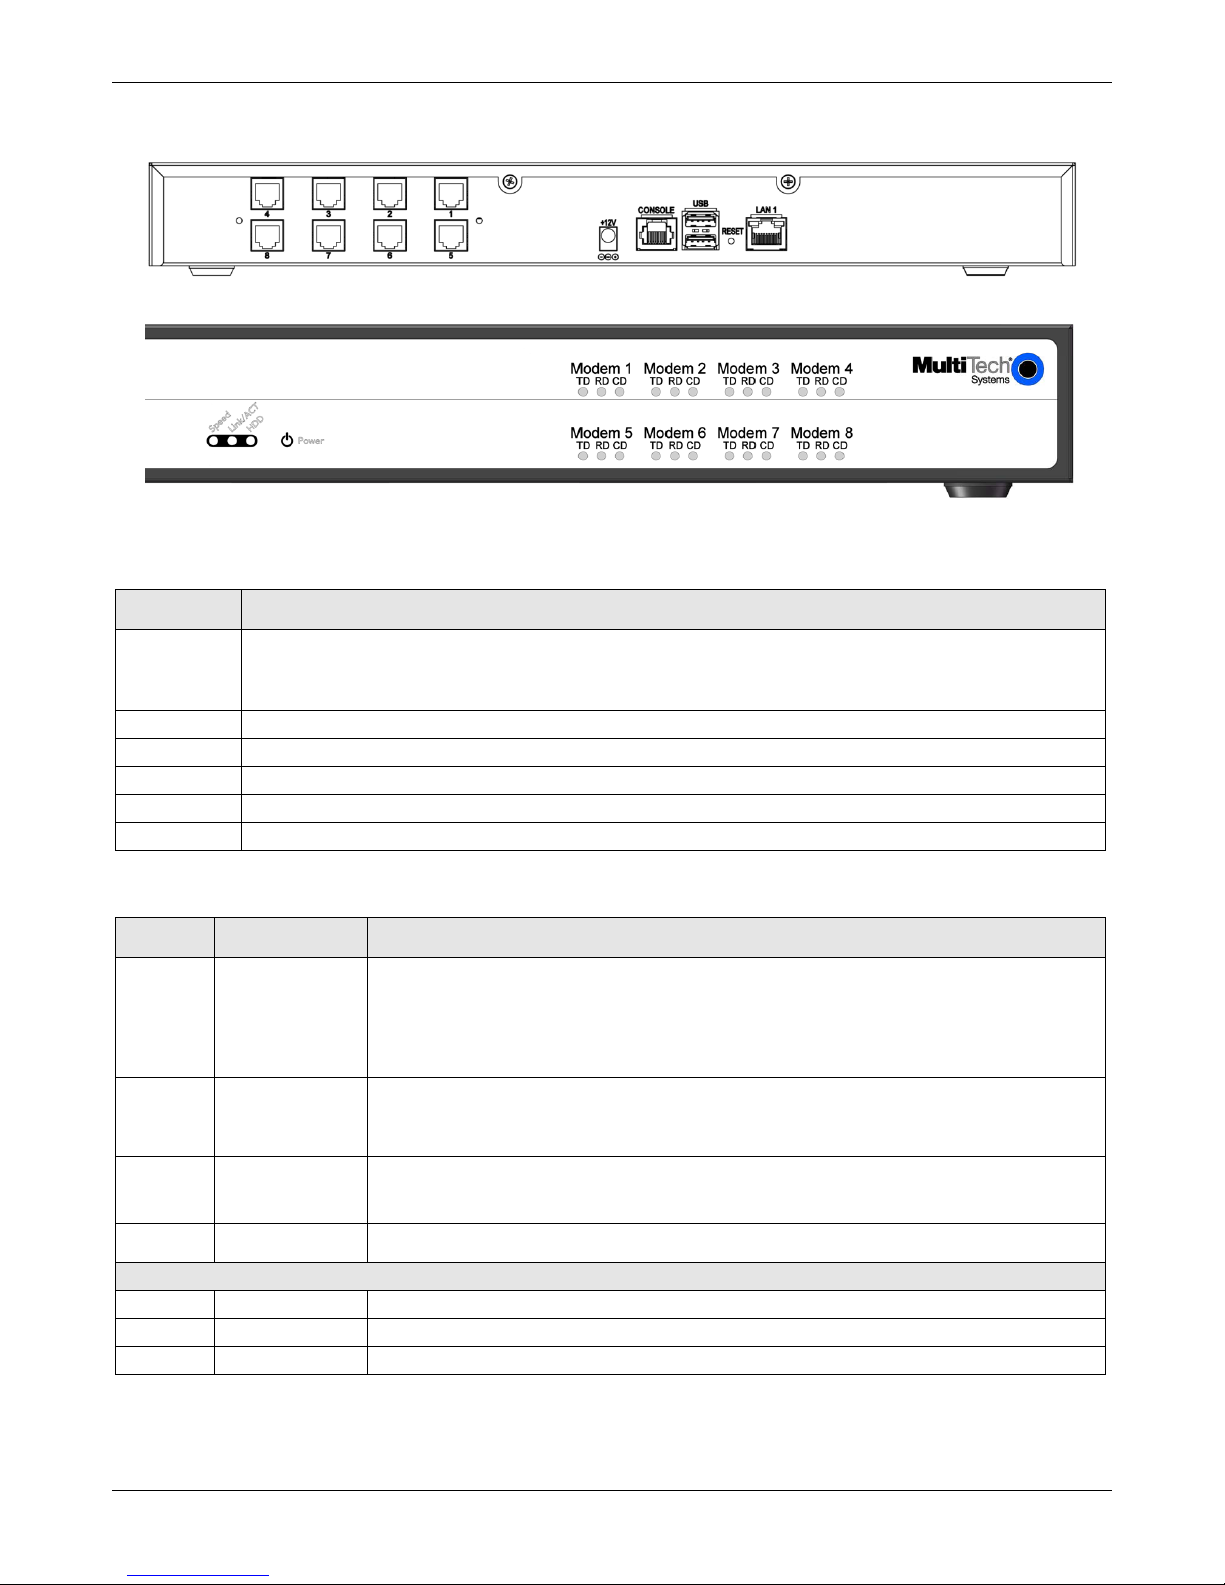
This chapter identifies FaxFinder connectors and LEDs by model. It also explains how to connect the FaxFinder
to your network and complete basic configuration.
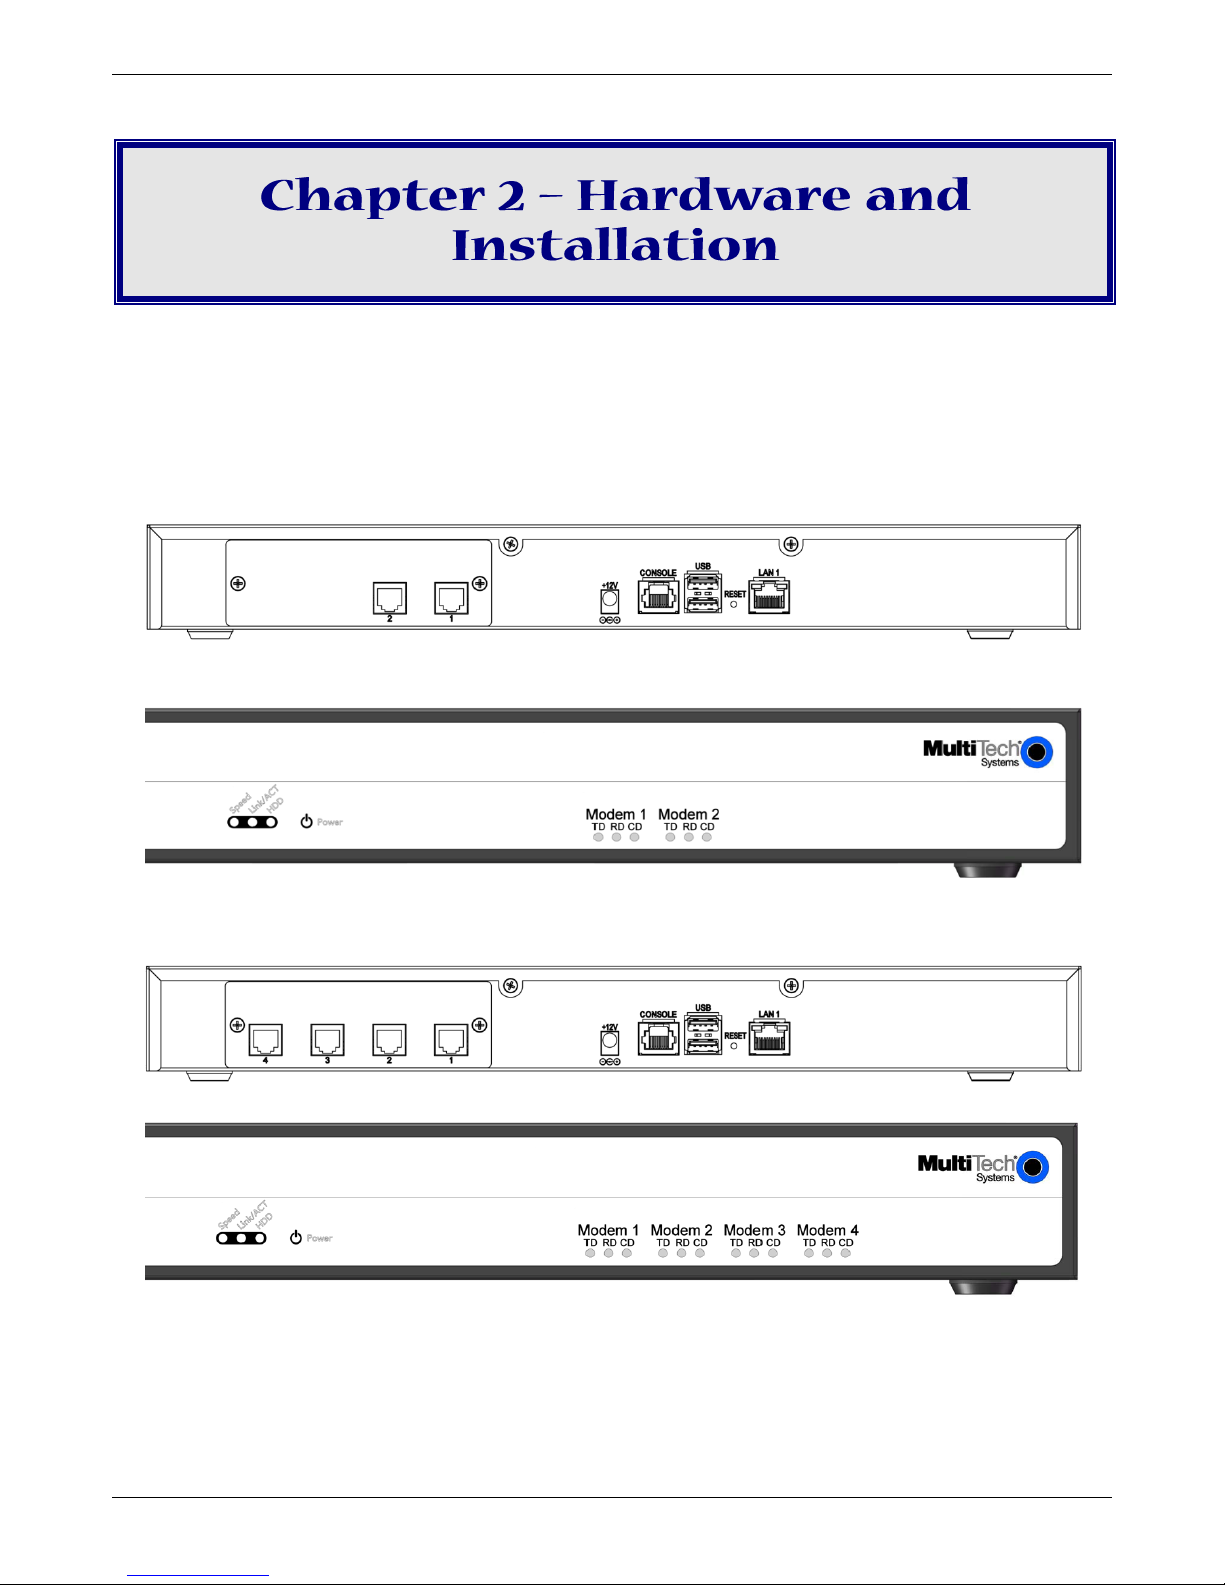
Connectors and LEDs by Model
FaxFinder 240
FaxFinder 440
FaxFinder 240 Connectors
FaxFinder 240 LEDs
FaxFinder 440 Connectors
FaxFinder x40 Administrator Guide 13
FaxFinder 440 LEDs
Chapter 2 – Hardware and Installation
Label
Description
1-8
PSTN/POTS RJ 11 phone line ports. The FaxFinder 240 has ports 1-2, the FaxFinder 440 has
ports 1-4, and the FaxFinder 840 has ports 1-8. Ports on the back line up with the modem
LEDs on the front.
+12V
Power receptacle for provided power cord.
CONSOLE
DE-9 connection for serial access and control of the FaxFinder.
USB
Not used at this time.
RESET
Use to reboot the FaxFinder.
LAN 1
RJ 45 receptacle for network connection.
Label
Name
Description
Speed
Speed
When lit, if the color is:
Green: Ethernet rate is 1000 Mbps
Yellow: Ethernet rate is 100 Mbps
Unlit: Ethernet rate is 10 Mbps
Link/Act
Link / Activity
Lit when a physical link has been established with the Ethernet network.
Blinking when there is activity.
HDD
High Density
Drive
When the internal hard drive is accessed, this LED will light yellow. When unlit,
HDD is not being accessed.
Power
Power
Solid (constant) green if unit is on.
One set of the following for each modem/port:
TD
Transmit Data
The TD LED flashes when the modem is transmitting data to another modem.
RD
Receive Data
The RD LED flashes when the modem is receiving data from another modem.
CD
Carrier Detect
Carrier of remote modem is detected.
FaxFinder 840
FaxFinder 840 Connectors
FaxFinder 840 LEDs
FaxFinder Connector Descriptions
LED Descriptions
14 FaxFinder x40 Administrator Guide
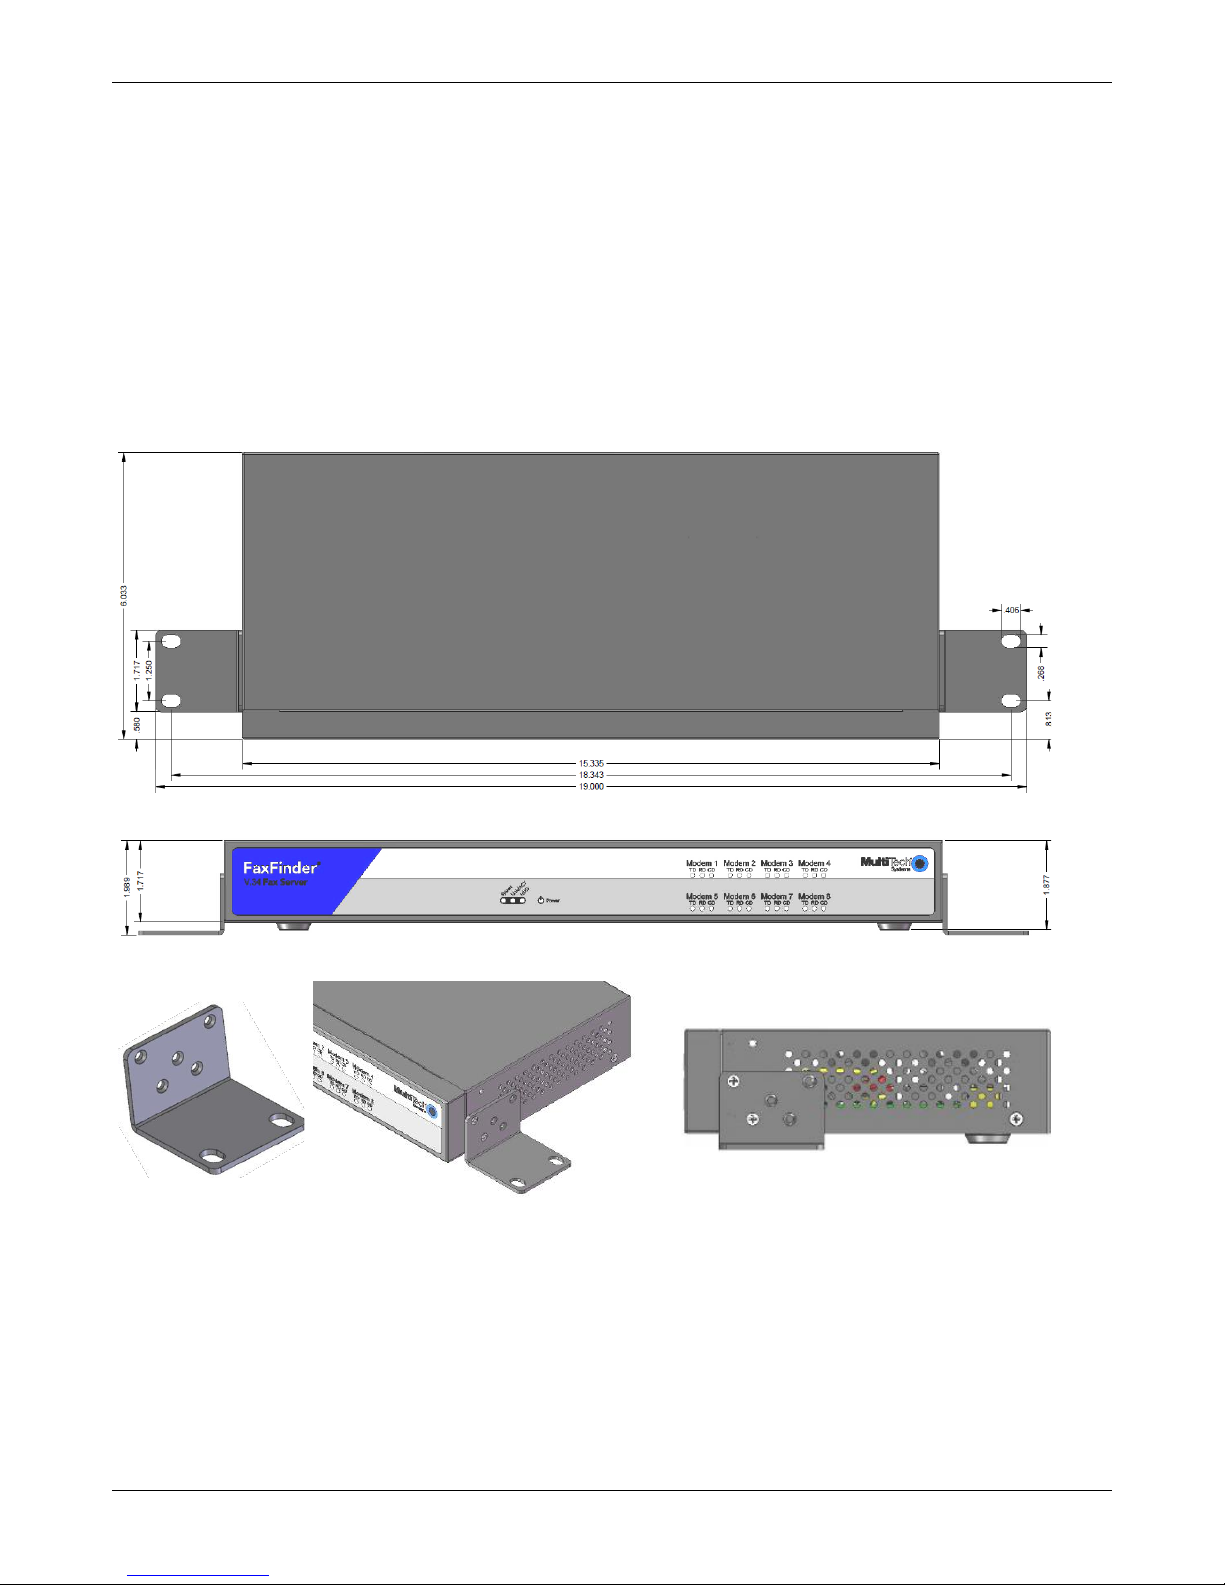
Chapter 2 – Hardware and Installation
Figure 1
Figure 2
Figure 3
Figure 4
Figure 5
Front
Before You Begin
● Disable Caller ID and Call Waiting on lines or PBX ports to be used with FaxFinder.
FaxFinder does not support the use of either Caller ID or Call Waiting. Caller ID delivers information
between rings before the call is answered. The Call Waiting beep causes fax communication errors.
Mounting FaxFinder (Optional)
FFx40 units are table-top units that can be wall- or rack-mounted. Mounting hardware is included.
Wall Mounting
shown in Figure 4.
1. P
osit
ion
a
mo
unti
ng
bra
cke
t
(Fig
ure
3)
on
Fax
Fin
der’
s
righ
t
side
usin
g
two
mo
unti
ng
scre
w
hol
es
as
2. Secure the bracket to the FaxFinder using two provided screws as shown in Figure 5.
3. Position a mounting bracket on the FaxFinder’s left side using two mounting screw holes.
4. Secure the bracket to the FaxFinder using two provided screws.
FaxFinder x40 Administrator Guide 15
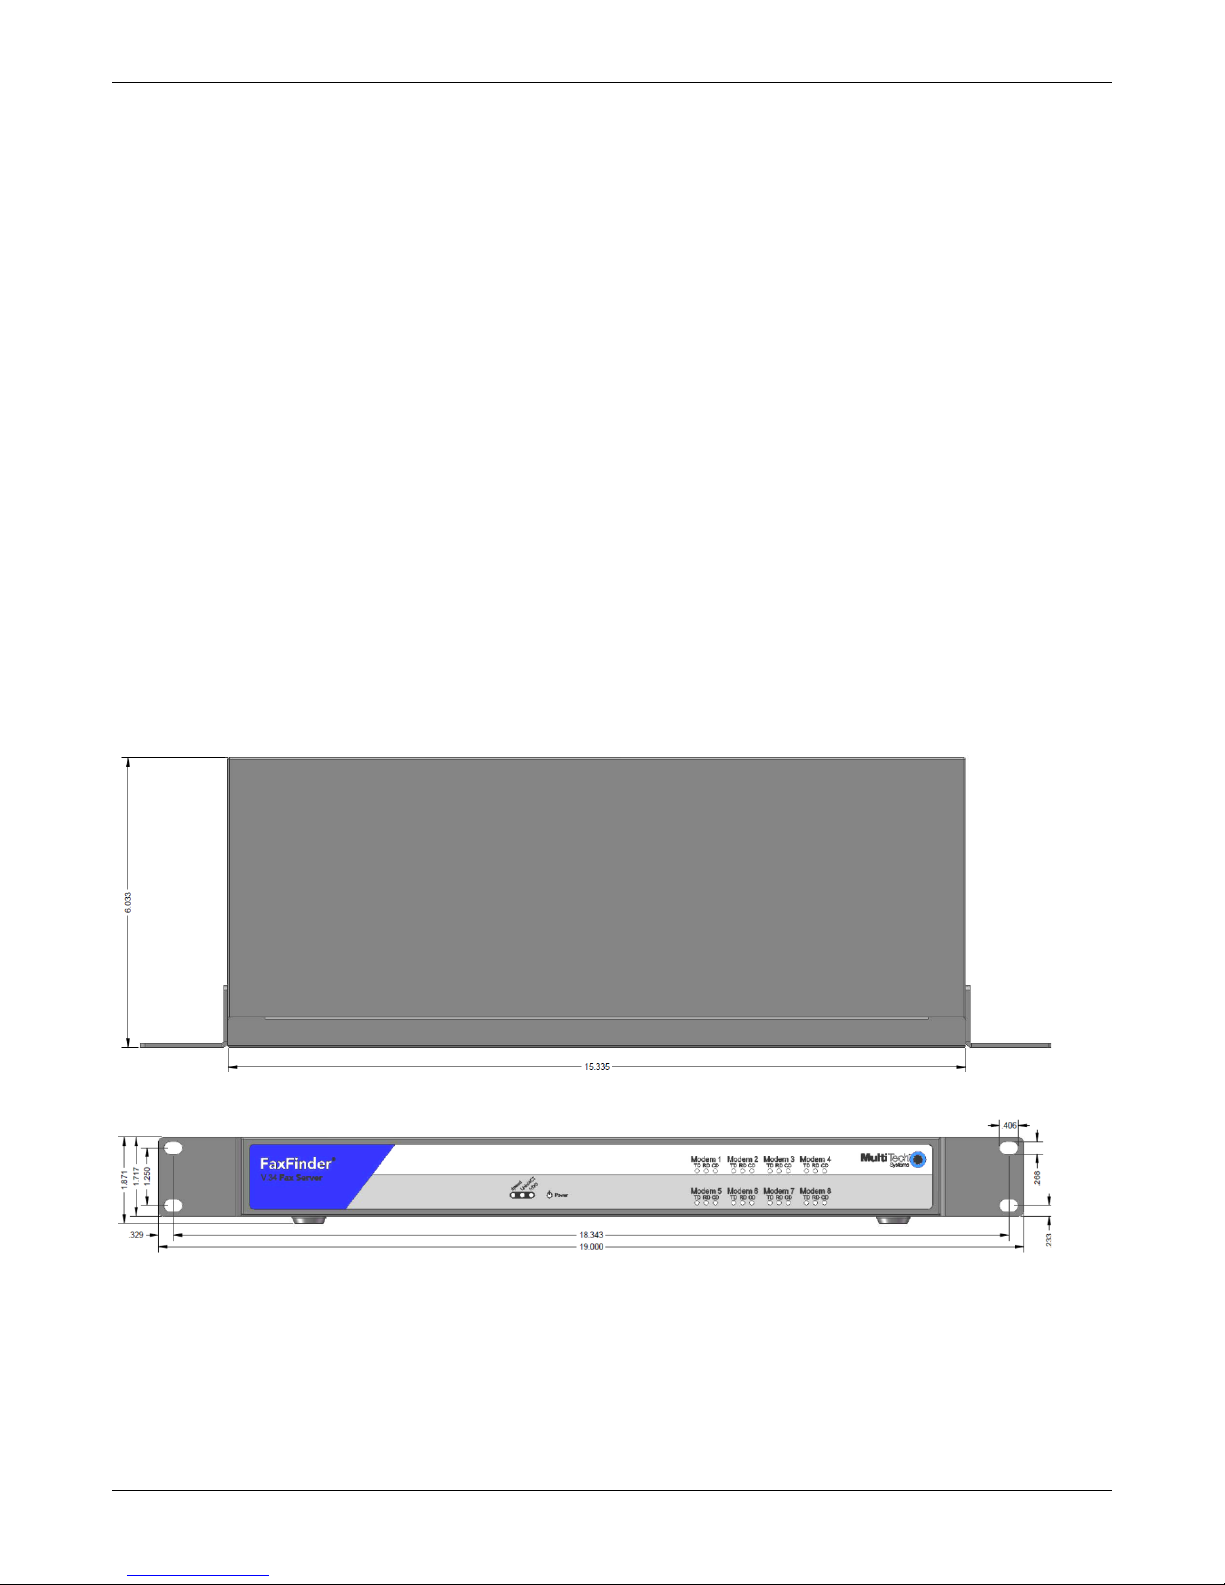
Chapter 2 – Hardware and Installation
Figure 6
Figure 7
Rack Mounting
When installing the unit in a closed or multi-unit enclosure, follow the recommended installation defined by
the enclosure manufacturer.
Note: The ambient temperature of the rack interior must not exceed 40° Celsius.
● Do not place the unit directly on top of other equipment or place other equipment directly on top of the
unit.
● If installing the unit in a closed or multi-unit enclosure, ensure adequate airflow within the rack so that the
maximum recommended ambient temperature (40° C) is not exceeded.
● Ensure that the unit is properly connected to earth ground by verifying that it is reliably grounded when
mounted within a rack.
● If a power strip is used, ensure that the power strip provides adequate grounding of the attached
apparatus.
● When mounting the equipment in the rack, make sure mechanical loading is even to avoid a hazardous
condition. The rack should safely support the combined weight of all the equipment it supports.
● Ensure that the main supply circuit is capable of handling the load of the equipment. See the power label
on the equipment for load requirements.
● This equipment should only be installed by properly qualified service personnel. Only connect like circuits -
connect SELV (Secondary Extra Low Voltage) circuits to SELV circuits and TN (Telecommunications
Network) circuits to TN circuits.
19-Inch Rack Enclosure Mounting Procedure
16 FaxFinder x40 Administrator Guide
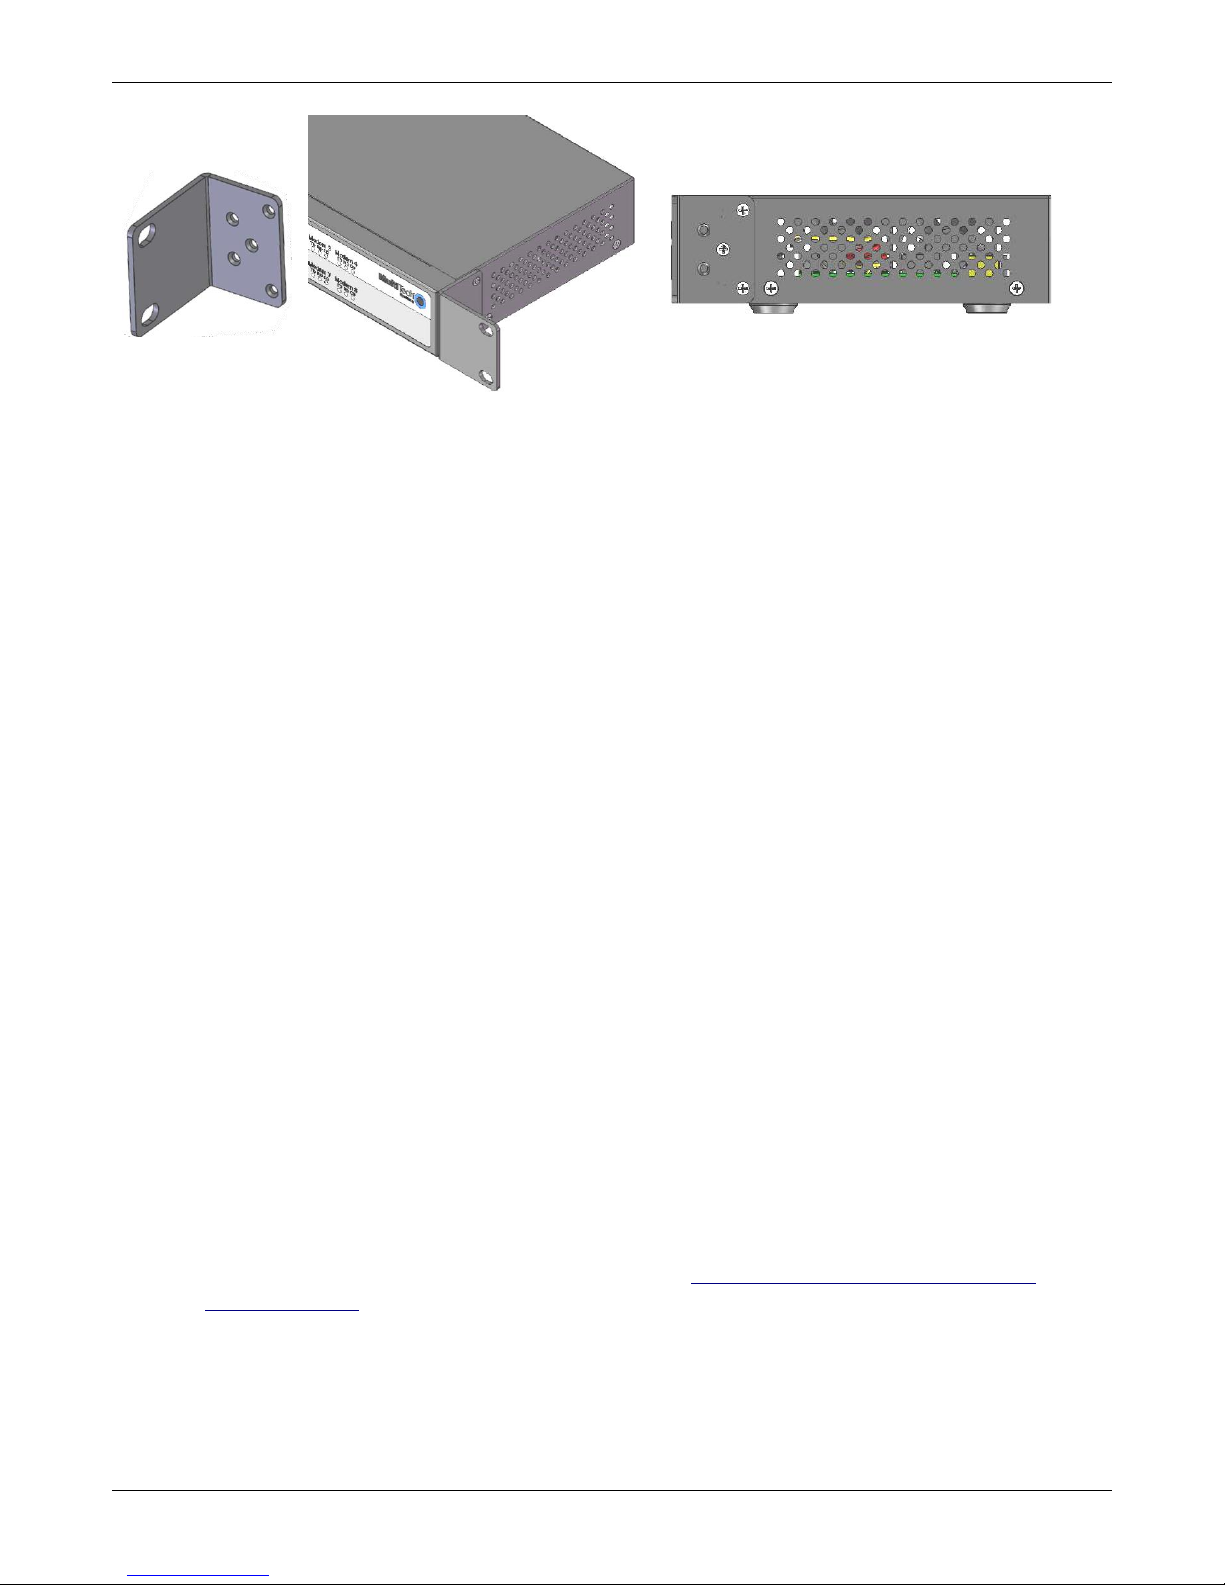
Chapter 2 – Hardware and Installation
Figure 8
Figure 9
Figure 10
Front
19-inch rack enclosure will likely require two people.
1. Position a mounting bracket (Figure 8) on FaxFinder’s right side as shown in Figure 9.
2. Secure the bracket to FaxFinder’s right side using three provided screws as shown in Figure 10.
3. Position a mounting bracket on the FaxFinder’s left side.
4. Secure the bracket to FaxFinder’s left side using three provided screws.
Att
achi
ng
the
Fax
Fin
der
to
the
rail
of
an
EIA
5. Remove feet (4) from the FaxFinder unit.
6. Secure the unit to rack rails by the brackets and mount the FaxFinder in the rack enclosure per the rack
manufacture’s mounting procedure. Because equipment racks vary, screws for rack-rail mounting are not
provided. Follow the instructions of the rack manufacturer and use screws that fit.
Cabling FaxFinder
1. Connect the power cord to an outlet or power strip and to the 12V connector on the FaxFinder.
Caution: Use only the power supply provided with the FaxFinder. Using any other power supply voids the
warranty and can damage the FaxFinder.
2. Verify power.
● The Power LED comes on immediately after power is applied.
● FaxFinder takes a short time to boot up when you apply power.
3. Connect FaxFinder to Ethernet Network.
Caution: Before connecting to the Ethernet Network, determine if the network is a 192.168.2.x subnet.
FaxFinder’s factory default IP address is 192.168.2.1. Connecting the FaxFinder to a network that has
a different device at the same IP address will cause data interference.
If your existing Ethernet network uses a 192.168.2.x subnet, connect from the Administrative PC to
the FaxFinder using an RJ-45 Ethernet cable and configure the FaxFinder’s IP address to an IP address
currently available on the Ethernet network. (Refer to Configuring FaxFinder’s IP address and
Network Settings.)When the FaxFinder’s IP address has been configured, you can connect the
FaxFinder into the network.
Plug one end of your RJ-45 Ethernet cable into the FaxFinder’s Ethernet port (labeled LAN1) and the other
end into your network Ethernet hub. This Ethernet cable is not included with your FaxFinder unit.
4. Use the RJ-11 cables to connect individual ports to either a PBX or POTS lines.
FaxFinder x40 Administrator Guide 17

Configuring FaxFinder’s IP address and Network
Settings
1. Set the admin PC to startup IP address.
If FaxFinder is already connected to a network, the client software can auto-discover the IP address. You
can also use the console port and a terminal program to learn its IP address; enter “ifconfig eth0” in the
terminal program.
Connect the FaxFinder directly to a compatible computer so you can change the FaxFinder’s IP address to
one that will operate on your network. To connect a FaxFinder directly to a compatible computer:
a. Use an RJ-45 network cable to connect a PC directly to your FaxFinder (this may require you to
disconnect the PC from its current network).
b. Set the PC connected to the FaxFinder to IP address http://192.168.2.x, where x can be from 2 to 254
(use any address except 192.168.2.1). Record the original IP address so you may re-enter it when
finished.
In Windows 7
i. Right-click the Network icon on the desktop and select Properties.
ii. Right-click the link for the Local Area Connection.
iii. Click Properties.
iv. Click to highlight Internet Protocol Version 4 (TCP/IPv4) and then click Properties.
v. Record the existing IP address.
vi. Select Use the following IP address and set the IP Address to 192.168.2.2.
vii. Click OK twice and then click Close.
In Windows Vista:
i. Click Start and go to Network.
ii. Right-click on Network in the Folders pane and select Properties.
iii. Click on View Status for the Local Area Connection.
iv. Click Properties. Click Continue when the Permission window appears.
v. Click once to highlight Internet Protocol Version 4 (TCP/IPv4) and then click Properties.
vi. Record the existing IP address.
vii. Select Use the following IP address and set the IP Address to 192.168.2.2.
viii. Click OK and then click Close twice.
18 FaxFinder x40 Administrator Guide

Chapter 3 – Basic FaxFinder Configuration
In Windows XP/2003:
i. Right-click on My Network Places and select Properties.
ii. Right-click on Local Area Connection and select Properties.
iii. Select Internet Protocol (TCP/IP) on the General tab and click Properties.
iv. Record the existing IP address. Then, set the IP address to 192.168.2.2.
v. Click OK twice.
2. Login to FaxFinder Web Management.
a. Open a web browser and enter the FaxFinder IP address, 192.168.2.1. The Login screen appears,
showing that the FaxFinder is connected to the network.
Note: FaxFinder uses a Secure WEB interface via TLS (HTTPS browsing) with a self-signed certificate.
Your browser will display a warning message about expired or invalid certificates. Ignore the
warning or add an exception. Refer to Generating a Server Certificate for details.
b. Enter admin (all lower case) in both the Username and Password fields.
c. Click Login. The Web Management home page appears. Use this page to access all the FaxFinder
Server software screens.
3. Set FaxFinder’s IP Addresses.
a. Click System Configuration. The Network Configuration page appears.
b. Enter the IP Address and other network information for your FaxFinder. Refer to Network
Configuration Fields for field details.
c. Click Save.
● If you have not changed a DNS setting, changes take effect within a few seconds.
● If you have changed a DNS setting, the system prompts you to reboot the unit and changes take
effect when the reboot completes. Change will not take effect if you cancel the reboot.
Note: At this stage, your computer and the FaxFinder will no longer communicate with each other.
4. Reset the Admin computer’s IP Address.
a. Reset the computer’s IP address to the original value that you recorded in Step 1 or any other IP
address that allows you to communicate with the FaxFinder at its new IP address.
b. Disconnect the computer from the FaxFinder.
c. Connect the FaxFinder to the network it is to be installed on.
d. Re-connect your computer to its normal LAN connection.
5. Log in after reset
After resetting admin computer’s IP address, you must log into the FaxFinder Server software again.
a. Enter the new IP address of the FaxFinder into your browser
b. Enter admin as username and admin as password to log in again.
Again, your browser may show a warning about the certificate. Ignore it and continue. When you finish
configuring FaxFinder, you can generate a new certificate.
FaxFinder x40 Administrator Guide 19

Chapter 3 – Basic FaxFinder Configuration
Field
Description
Hostname
Required. Enter an alphanumeric hostname to associate with this FaxFinder. Hostnames
can contain periods (.) and dashes (-).
Multi-Tech recommends that the hostname be resolvable by DNS or otherwise.
FaxFinder uses this hostname to identify itself when connecting to an SMTP server. This
hostname is also used in the recipient’s address for T.37 emails.
Description
Enter a description of up to 64 characters. This appears on the Web Management Home
page.
IP Address
Required. Enter a static IP address for the FaxFinder to use. FaxFinder does not support
automatic assignment (DHCP). If you are setting up this FaxFinder for the first time, once
you change the IP address, you will need to be on the same network to make changes.
Subnet Mask
Required. Enter the subnet mask to be used by this FaxFinder. A typical subnet mask is
255.255.255.0, but your network may be different.
Default Gateway
Required. Enter the network’s default gateway IP address. This allows FaxFinder to
contact network addresses outside the local network, such as an internet time server or
SMTP server.
Primary DNS
Enter the primary domain name server, if any, that this FaxFinder will use for IP address
name resolution. If you change this value, reboot the system when you save your
changes.
Secondary DNS
Enter the secondary domain name server, if any, for this FaxFinder. If you change this
value, reboot the system when you save your changes.
Network Configuration Fields
FaxFinder’s factory default IP address is 192.168.2.1 and 24 bit network mask is 255.255.255.0.
Updating the Admin Account
By default, FaxFinder includes an admin user account. Update the factory-default settings with a secure
password and an email address.
1. Click Users.
2. Click Edit in the Action column for administrator.
3. Enter an email address for the administrator account.
4. Change the password from the default to something secure. Enter a new password and confirm the
password.
5. Click Update to save changes to the administrator account.
Setting Time
Correct time settings are important for logging and verification purposes. Use Time Configuration to select a
time server, time zone, and date and time formats.
1. Click System Configuration | Time.
2. Enter time parameters.
3. Click Save.
20 FaxFinder x40 Administrator Guide

Time Fields
Field
Description
Time Server
Select time.nist.gov, clock.via.net, pool.ntp.org, Custom, or None from the dropdown list.
● Select Custom to enter a custom time server in field below.
● If you select None, the Time and Date fields at the bottom are no longer
grayed-out so you can enter the current time and date.
Custom Time Server
If you do not want to use time.nist.gov, clock.via.net, or pool.ntp.org, set the Time
Server to Customer and use this field to enter the address of another time server.
Synchronize Every
Enter a time interval for how often you want FaxFinder to synchronize with the
time server. This is only valid if you select a time server.
Time Zone
Select the time zone for the FaxFinder’s location. After a time zone change, you
will be prompted to reboot the FaxFinder. Cancel if you do not want to reboot at
this time. The time zone change will not be saved unless you click OK and reboot
the FaxFinder.
Date Format
Select a date format from the drop-down list.
Time format
Select a time format of either 12 or 24 hours.
Time (24hr) hh:mm:ss
If you set Time Server to None, enter the current time in an hour:minutes:seconds
format.
Date MM/DD/YYYY
If you set Time Server to None, enter the current date in a month/day/year format.
Chapter 3 – Basic FaxFinder Configuration
Configuring SMTP
Enter SMTP information for your mail server so that FaxFinder can work with your company’s email.
Note: Incoming faxes that are to be routed by email to fax recipients will not be delivered unless this
section and your email server are configured correctly.
1. Click System Configuration | SMTP.
2. Enter SMTP parameters as required by your email system. Refer to SMTP Parameters for field details.
3. Click Save.
4. Enter an email address to receive a test email. Then, click Send Test Email. Check to see it was delivered.
● If it was delivered successfully, your SMTP server is relaying emails generated by the FaxFinder to local
email recipients.
● If it was not delivered, check your settings and refer to Troubleshooting.
FaxFinder x40 Administrator Guide 21

Chapter 3 – Basic FaxFinder Configuration
Field
Description
SMTP Server Address
Enter the IP address or hostname of the SMTP server where FaxFinder will send
emails. If you enter a hostname, configure FaxFinder with an appropriate DNS
server address.
SMTP Port
Enter the SMTP port to be used. The default value for SMTP is 25.
SMTP Username
If necessary for authentication, enter the username that FaxFinder will use for
validation on the email server.
SMTP Password
If necessary for authentication, enter the password associated with the above
username.
Confirm SMTP Password
Re-enter the password to verify the password.
FaxFinder Email Address
Enter an email address to define the FaxFinder’s Sender Envelope address. If left
blank, the Sender Envelope will be ffmailer-noreply@theFaxFinder’shostname.
Depending on whether the FaxFinder email is administrative or fax delivery, the
From address displayed with the email will be either the address defined here or
a combination of it and the FaxID provided by the remote fax machine.
SMTP Parameters
Sending a Test Fax from Fax Machine to
FaxFinder
1. If you are using a PBX, confirm the modem settings. Click Fax Configuration | Modem to view or edit
Modem Configuration settings.
2. Click Inbound Routing and confirm where the fax will be routed. If you do not change the default settings,
the admin email address will receive any incoming faxes.
3. Use a conventional fax machine to send a fax to the FaxFinder’s fax number.
4. Verify that the FaxFinder received the fax message and then check the administrator’s email inbox to see if
it was delivered. To verify that FaxFinder received the fax, click Status & Logs and then click:
● Fax Status to see faxes currently in progress.
● Inbound Fax Log to see Faxes that have been delivered. Click the Details link to view a pop-up window
showing Delivery and Modem Details.
If the email is not delivered within five minutes, refer to Troubleshooting.
Verify the fax opens in a PDF viewer, such as Adobe Reader. If you configured FaxFinder to deliver faxes as TIFF
files, use the Multi-Tech TIFF viewer or a graphic file viewer to view the fax. In your email program, doubleclick the file attached to the email to open it in either a PDF or TIFF viewer.
Adding a Printer (Optional)
Add a network printer to FaxFinder if you want to route faxes directly to a printer. Using a printer is not
required.
1. Click System Configuration | Printer.
2. Click Add and enter your printer information. Refer to Printer Parameters for details.
3. Click Save.
4. Click Print Test Page to verify that the printer was setup correctly.
22 FaxFinder x40 Administrator Guide

Chapter 3 – Basic FaxFinder Configuration
Field
Description
Printer Make
Select your printer’s manufacturer from the drop-down list. If the manufacturer is not
listed, select Generic.
Printer Model
Select your printer model from the drop-down list. If your printer make is Generic, the
options here will be generic.
Printer Name
Enter a name for this printer that users will understand. Printer names can contain upperand lowercase letters, numbers, hyphens, and underscores. They cannot have spaces.
Description
Enter a description that will help users select the correct printer, for example, 2nd floor copy
room.
Device URI
Enter this printer’s Uniform Resource Identifier. The URI identifies a printer’s location on
the network. To find a valid syntax for your printer, click the Help link next to this field.
Field
Description
UNC/Location
Enter the Universal Naming Convention identifier or network location, for example,
//server/service or \\server\service.
Username
Enter a username that has write access to the shared location. This can be a general
account or one specific to the shared folder.
Password
Enter the password associated with the above username.
Confirm Password
Re-enter the password in order to avoid possible errors.
Printer Parameters
Adding a Network Share (Optional)
If you want FaxFinder to send faxes to a network folder, set up a network share. Anyone with network rights to
the shared folder can view the faxes sent there. Creating a shared location can help ensure that faxes are
responded to in a timely manner and provides a location for archiving faxes.
Note: When using a Microsoft Windows network, you may need to enable Simple File Sharing.
Network shares are not required.
1. Click System Configuration | Shares.
2. Enter the Domain/Workgroup where the FaxFinder will operate and click Save. The default value is
Workgroup.
3. Enter your network folder information.
4. Click Save. Network Share updated appears at the top of the page.
Network Share Fields
Generating a Server Certificate
Because FaxFinder uses a self-signed website certificate, your browser will show a certificate error and
warning. FaxFinder does not support importing digitally signed certificates from a certificate body. Ignore the
warning or, depending on your browser, add an exception or add your FaxFinder IP address to your trusted
sites.
To generate a certificate:
1. Click System Configuration |Certificates.
FaxFinder x40 Administrator Guide 23
 Loading...