

Multitech MT5634ZLX, E, E-T, 2, MultiMobile MT5634ZLX/E Owner's Manual
...
Models MT5634ZLX/E
and MT5634ZLX/E-T/2
Owner’ s Manual

Owner’s Manual
MultiMobile
TM
Model # MT5634ZLX/E & MT5634ZLX/E-T/2
P/N 82067101
This publication may not be reproduced, in whole or in
part, without prior expressed written permission from Multi-
Tech Systems, Inc. All rights reserved.
Copyright © 1998 by Multi Tech Systems, Inc.
Multi-Tech Systems, Inc. makes no representations or
warranties with respect to the content hereof and
specifically disclaims any implied warranties of
merchantability or fitness for any particular purpose.
Furthermore, Multi-Tech Systems, Inc. reserves the right to
revise this publication and to make changes from time to
time in the content hereof without obligation of Multi-Tech
Systems, Inc. to notify any person or organization of such
revisions or changes.
Record of Revisions
Revision Description
B General editorial and technical
(8/1/97) changes.
TRADEMARKS
Trademarks of Multi-Tech Systems, Inc. are as follows:
MultiMobile, Multi-Tech, and the Multi-Tech logo. All other
trademarks are owned by their respective companies.
Multi-Tech Systems, Inc.
2205 Woodale Drive
Mounds View, Minnesota 55112 U.S.A.
(612) 785-3500 or (800) 328-9717
U. S. FAX 612-785-9874
Fax-Back Service 612-717-5888
Technical Support (800) 972-2439
BBS (612) 785-3702 or (800) 392-2432
Internet Address: http://www.multitech.com
Technical Writer: mark@ multitech.com

Contents
Chapter 1 - Introduction and Description
About This Manual....................................................7
About This Product ...................................................7
Specifications ...........................................................9
PC Card Interface..............................................9
Dimensions........................................................9
Weight................................................................9
Powe r.................................................................9
Power Consumption ..........................................9
Cable and Connector ........................................9
Network .............................................................9
Modem Characteristics ...................................10
Fax ...................................................................10
Features..................................................................11
System Requirements ............................................12
Ship Kit Contents....................................................13
Chapter 2 - Installation
Safety Warnings .....................................................1 4
Installing The MT5634ZLX/E or
MT5634ZLX/E-T/2 Card(s)...................................14
Driver Software Installation ....................................16
Novell NetWare Installation....................................16
Menu Installation .............................................16
Manual Driver Installation.......................................18
Novell Client Installation.........................................19
Microsoft LAN Manager Installation.......................21
Packet Driver Installation .......................................23
Windows for Workgroups Installation (NDIS3
Driver for Workgroup)...........................................23
NDIS2 Driver for Workgroup ..................................25
ODI Driver for Workgroups.....................................26
Windows NT 3.51 / NT 4.0 Installation ..................28
Windows 95 Installation .........................................2 9
Artisoft Lantastic 6.0 Installation ............................30
iii

Chapter 3 - Comprehensive Driver Notes
Introduction.............................................................31
Factory Default Settings.........................................31
Quick Start ..............................................................31
PC Card Software - Manual Installation .........31
Getting Started .......................................................33
Using DOS Extended Memory Managers..............33
Driver Directory Structure......................................34
Driver Upgrades .....................................................3 5
Notes for NDIS Driver.............................................36
Notes for Packet Driver ..........................................37
Notes for Windows For Workgroups ......................38
Chapter 4 - Troubleshooting
Introduction.............................................................39
No response to AT commands ........................39
The modem does not execute the command
line .................................................................39
The modem does not give a response after
an A T command was executed .....................40
The modem gives an ‘ERROR’ response
after an AT command was executed ............40
The modem goes off-hook and disables the
telephone line................................................ 4 0
The modem does not auto-answer the phone 40
The software does not control the modem
properly or can not detect the modem..........41
The characters on the screen are doubled.....41
No text appears on the screen in Data mode.41
No text appears on the screen when in
Command mode............................................41
The modem does not dial a phone number
after Execution of AT dial command .............42
Communications software dials, but Fails ......42
The modem Connects with some modems,
but not with others.........................................42
When dialing another modem, You r eceive a
‘CONNECT’ response, but nothing else .......42
iv

The modem speaker does not make any
sound when Connecting to another
modem ..........................................................42
The modem loses the connection when in
use.................................................................4 3
The modem does not connect with another
modem ..........................................................43
Occasionally, the modem gives a burst of
errors. ............................................................43
The modem gets random errors in
transmitted data. ...........................................43
After Downloading a file, the File does not
store on your disk drive.................................44
The text on the screen is not legible...............4 4
When using V.42bis or MNP5, some features
are disabled...................................................44
When connecting to another modem, the
modem reports a higher Connect baud rate
than it is really using .....................................45
When I run CARDEN, “PC-Card is not
enabled successfully” is displayed ...............45
Enabling the MT5634ZLX ...............................46
Installing the Win 95 Driver over SystemSoft
CardWorks ....................................................46
The NetWare driver runs successfully but fails
to login to the Netware server.......................47
COM Port and IRQ Conflicts ..................................47
Windows 3.1x ..................................................47
Windows 95 .....................................................4 8
Chapter 5 - Service
Limited Warranty ....................................................49
On-line Warranty Registration................................50
Software User License Agreement ........................50
Tech Support ..........................................................52
Recording Modem Information...............................52
Service ....................................................................53
About the Multi-Tech BBS ......................................54
How to Use the Multi-Tech BBS......................54
v

About CompuServe/Internet...................................55
About the Multi-Tech Fax-Back System .................56
Appendix A - Specifications
Appendix B - AT Commands,
S-Registers & Result Codes
Introduction.............................................................58
How To Use AT Commands....................................58
Basic A T Commands ..............................................60
AT& (Ampersand) Commands ...............................64
AT% (Percent) Commands.....................................67
AT\ (Back Slash) Commands ................................67
AT- (Dash) Commands ...........................................71
S-Registers (ATSn=x).............................................72
Result Codes ..........................................................76
Basic Result Codes .........................................7 7
Extended Result Codes ..................................78
Appendix C - Regulatory Agency
Information
FCC Regulatory Statements ..................................79
Consumer Instructions ....................................79
FCC Fax Update .............................................82
Canadian Limitations Notice ...........................83
Index
vi

7
1 - Introduction and Description
Chapter 1 - Introduction and Description
About This Manual
This manual explains how to install and use your
MT5634ZLX/E or MT5634ZLX/E-T/2 PCMCIA
Ethernet/Fax/Modem card.
About This Product
The MT5634ZLX is a multifunction communication
device that lets you perform multiple communication
tasks at the same time:
• K56flexTM compatible for data transmission
speeds up to 56Kbps, while maintaining
compatibility with lower-speed modems. The
K56flex standard asymmetrically transfers data-
-client downloads at speeds up to 56K bps,
client uploads at speeds up to 33.6K bps;
• send and receive faxes from computers or fax
machines;
• connect to an Ethernet 10BaseT LAN; and it
uses only one PCMCIA slot while performing
these functions.
The MT5634ZLX is a credit-card-size Type II
PCMCIA card that complies with the PCMCIA 2.1
and JEIDA 4.1 standards and works with computers
that incorporate a compatible interface.
It is Bell, ITU-T and AT command compatible,
allowing it to be used worldwide with today’s popular
communication software programs. You can send
and receive faxes with any Group 3 fax machine.

MT5634ZLX Owner’s Manual
8
Using standard phone lines and 10BaseT Ethernet,
the MT5634ZLX permits you to access servers on a
LAN and connect to the Internet or on-line computer
networks such as CompuServe and America Online;
and permits you to transmit E-Mail, send and
receive information and communicate with other
PCs.

9
1 - Introduction and Description
Specifications
PC Card Interface
PCMCIA Type II
Dimensions
3.37” X 2.128” X 0.197”
(85.6 mm X 54 mm X 5 mm)
Weight
1.225 oz. (35 g)
Power
+5V ±5%, @220mA
Power Consumption
0.86 W (Concurrent mode)
Cable and Connector
Model MT5634ZLX/E:
one cable with a 15-pin detachable
connector (to PC card) terminated on one
end; with the other end of the cable
splitting into one RJ-11 plug for PSTN
connection and one RJ-45 plug for LAN
connection.
Model MT5634ZLX/E-T/2:
one cable with a 15-pin detachable
terminated connector (to PC card); with the
other end of the cable terminated with one
RJ-11 receptacle connector for PSTN and
one receptacle BNC T-connector
converting 10Base-T to 10Base2 for LAN.
Network
IEEE 802.3 10BaseT (MT5634ZLX),
10Base2 (MT5634ZLX/E)--10M bps
NE2000 compatible

MT5634ZLX Owner’s Manual
10
Modem Characteristics
Client-to-Server
Data Rates
*K56flex speeds when accessing an ISPtype K56flex server (actual speed depend
on server capabilities and line conditions)
Client-to-Client
Data Rates
33,600, 31,200, 28,800, 26,400, 24,000,
21,600, 19,200, 16,800, 14,400, 12,000,
9600, 7200, 4800, 2400, 1200, 0-300 bps
V.42 bis & MNP 2-5 data compression and
error correction, AT Command Set
Enhanced Throughput Cellular (ETC)
protocol for mobile cellular connections
Fax
Group 3, V.17 14400bps and V.29 9600bps
Fax Service Class 1 and Class 2 compliant
* Although K56flex technology is capable of
downloads of up to 56K bps, FCC regulations
currently restrict ISP modems to downloads of
53K bps.

11
1 - Introduction and Description
Features
• Compatible with most notebook, laptop and
portable computers
• Compatible with Card and Socket Services
• Easy to install and use
• Card is hot swappable
• Supports popular Network OSs (e.g., LANtastic,
NetWare, LAN Manager, Windows 3.x,
Windows for Workgroups, Windows NT, and
Windows 95
• Supports popular Fax/Modem communication
programs
• Multifunction capability provides concurrent
LAN and Modem operation
• Multifunction CIS
• NE2000 compatible
• Concurrent, Low Power, and Sleep modes
• Auto-Sync protocol support
• POST and Loopback Tests
• Pulse/Tone and Adaptive Dialing

MT5634ZLX Owner’s Manual
12
System Requirements
• An IBM compatible PC or notebook computer
with 386SX or faster processor
• At least one type II PCMCIA socket
• PCMCIA release 2.1 compliant Card Services
and Socket Services
• Drivers and utilities (provided with this product)
• an RJ11 jack for connecting to a phone
receptacle
• an RJ45 jack for 10BaseT connection to your
Ethernet LAN (MT5634ZLX)
• an BNC T-connector for 10Base2 connection to
your Ethernet LAN (MT5634ZLX/E)
• Driver software loaded on your PC
• Data and/or Fax communications software

13
1 - Introduction and Description
Ship Kit Contents
Your MT5634ZLX/E is shipped from the factory with
the following:
• an MT5634ZLX/E PCMCIA LAN/Fax/Modem
Card
• one cable with a 15-pin detachable connector
(to PC card) terminated on one end; with the
other end of the cable splitting into one RJ-11
plug for PSTN connection and one RJ-45 plug
for LAN connection.
• one 3-1/2” Software Drivers diskette
• User ’s Manual (this manual)
• Two Fax/Modem communications software
diskettes
Your MT5634ZLX/E-T/2 is shipped from the factory
with the following:
• an MT5634ZLX/E-T2 PCMCIA LAN/Fax/Modem
Card
• Phone cord with RJ-11 plug
• one 3-1/2” Software Drivers diskette
• User ’s Manual (this manual)
• Two Fax/Modem communications software
diskettes
• one cable with a 15-pin detachable terminated
connector (to PC card); with the other end of
the cable terminated with one RJ-11 receptacle
connector for PSTN and one receptacle BNC Tconnector converting 10Base-T to 10Base2 for
LAN.

MT5634ZLX Owner’s Manual
14
Chapter 2 - Installation
Safety Warnings
1. Never install telephone wiring during a lightning
storm.
2. Never install telephone jacks in wet locations
unless the jack is specifically designed for wet
locations.
3. This product is to be used with UL and
CUL
listed computers.
4. Never touch uninsulated telephone wires or
terminals unless the telephone line has been
disconnected at the network interface.
5. Use caution when installing or modifying
telephone lines.
6. Avoid using a telephone (other than a cordless
type) during an electrical storm. There may be
a remote risk of electrical shock from lightning.
7. Do not use the telephone to report a gas leak in
the vicinity of the leak.
Installing The MT5634ZLX/E or
MT5634ZLX/E-T/2 Card(s)
1. Insert the MT5634ZLX into the computer’s
PCMCIA slot with the 68-pin connector facing
the PCMCIA slot and the label facing up and
slide the card into the slot.
2. Plug the 15 pin connector into the 15 pin socket
of the PC card. On the other end of the 15-pin
cable, leave both RJ-11 telephone and RJ-45
network cables exposed until PSTN and LAN
connections are made; hardware installation is
now complete. The MT5634ZLX/E is powered
directly from the PC.

15
2 - Installation
2a
. Plug the 15 pin connector into the 15 pin socket
of the PC card. On the other end of the 15-pin
cable, leave both RJ-11 telephone cable and
BNC T-cable receptacles exposed until PSTN
and LAN connections are made; hardware
installation is now complete. The MT5634ZLX/
E-T/2 is powered directly from the PC.
3. Connect the MT5634ZLX/E to the network
(LAN) using the RJ-45 (8-pin) plug.
3a
. Connect the MT5634ZLX/E-T/2 to the network
(LAN) using a “thin coax” cable. Allign the
notches of the cable to that of the BNC Tconnector, and twist clock wise approximately
one-quarter turn.
4. Connect the MT5634ZLX/E to the telephone
system using the RJ-11 (6-pin) plug into an
available PSTN connection.
4a
. Connect the MT5634ZLX/E-T/2 to the
telephone system by plugging an RJ-11 into the
cables’s RJ11 receptacle (6-pin), and with the
other end of that RJ11 into an available PSTN
receptacle.
MT5634ZLX Owner’s Manual
16
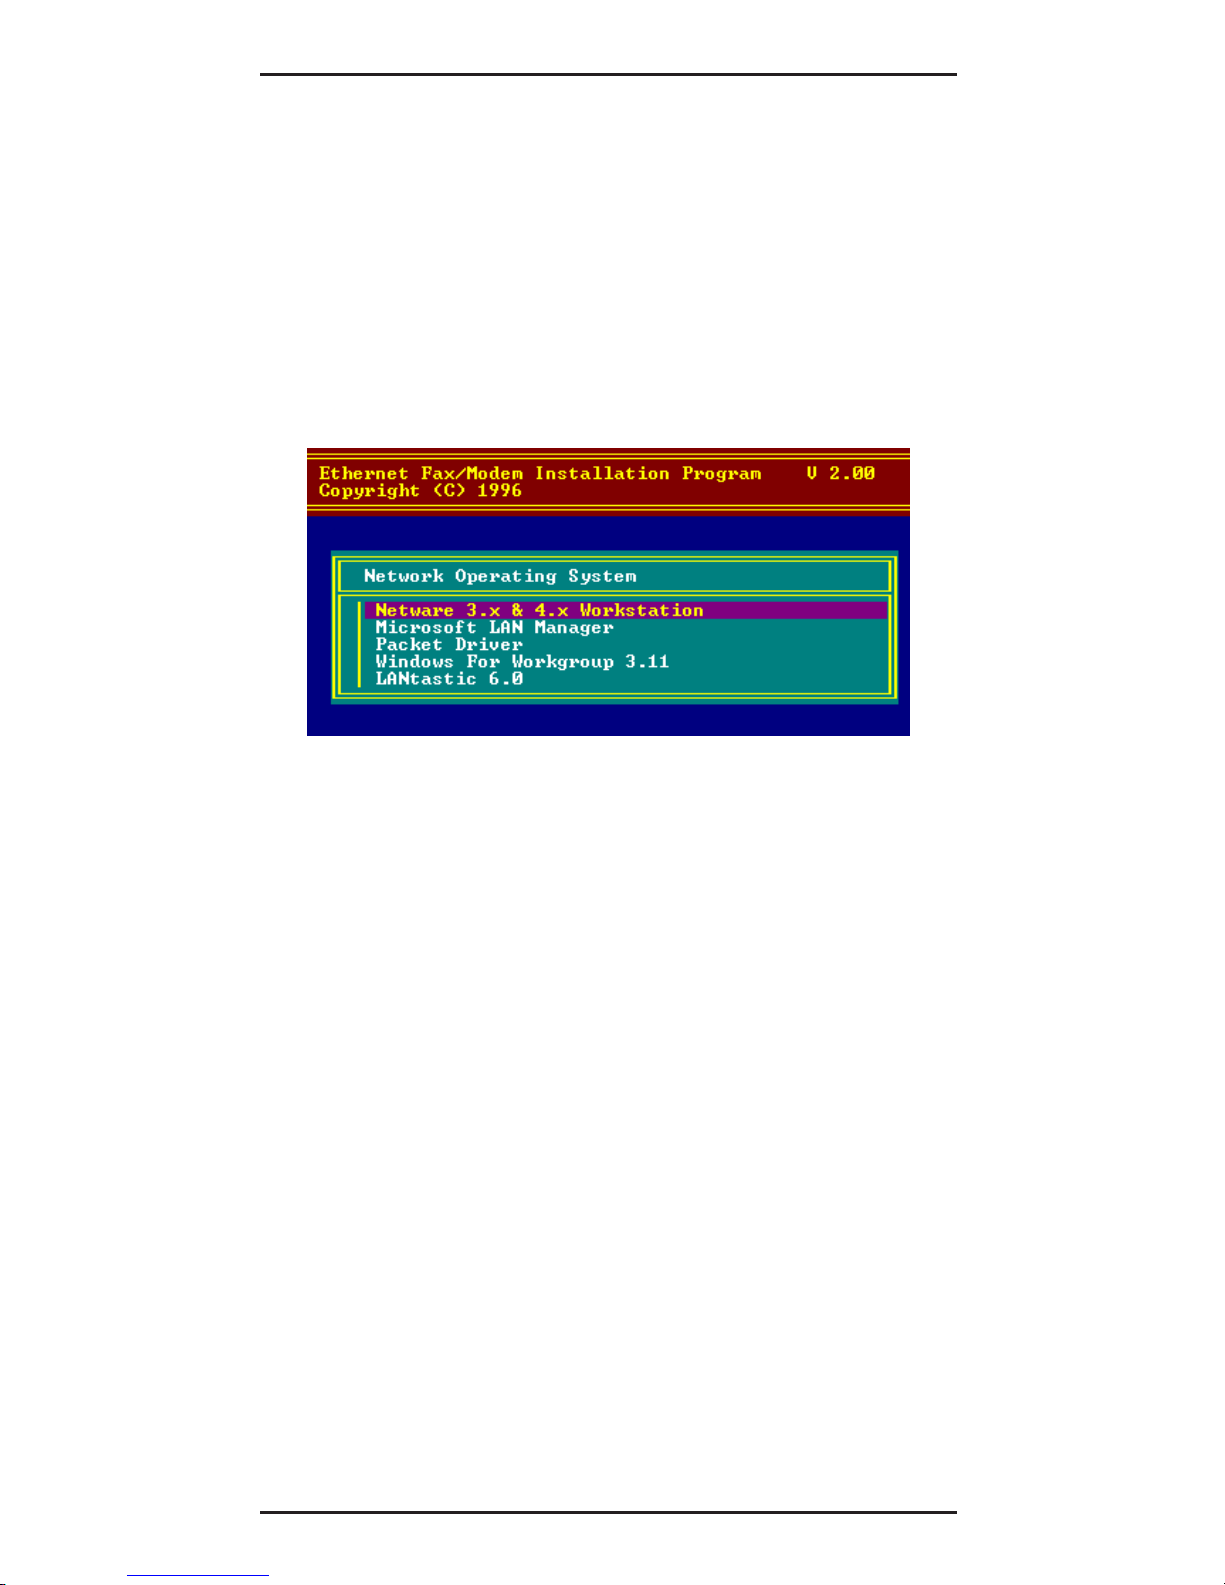
Driver Software Installation
1. Insert the Driver diskette into the floppy drive
and set the current drive to the floppy drive.
2. Run INSTALL to install the drivers (such as ODI
or NDIS 2.x or Packet Drivers) onto the target
disk. The NOS selection screen is displayed:
Figure 2-1. NOS Selection Screen
Novell NetWare Installation
There are two methods to install the MT5634ZLX
under NetWare: Menu Installation and Novell Client
Installation (for NetWare versions 3.12 and 4.x).
Menu Installation
1. Run INSTALL.EXE from Driver diskette‘s root
directory.
2. Select the NetWare 3.x and 4.x Workstation
item from the Installation menu.
3. If the current settings are acceptable, select
Start Installation and go to step 5. Otherwise,
select Modify Parameters to make setting
changes.
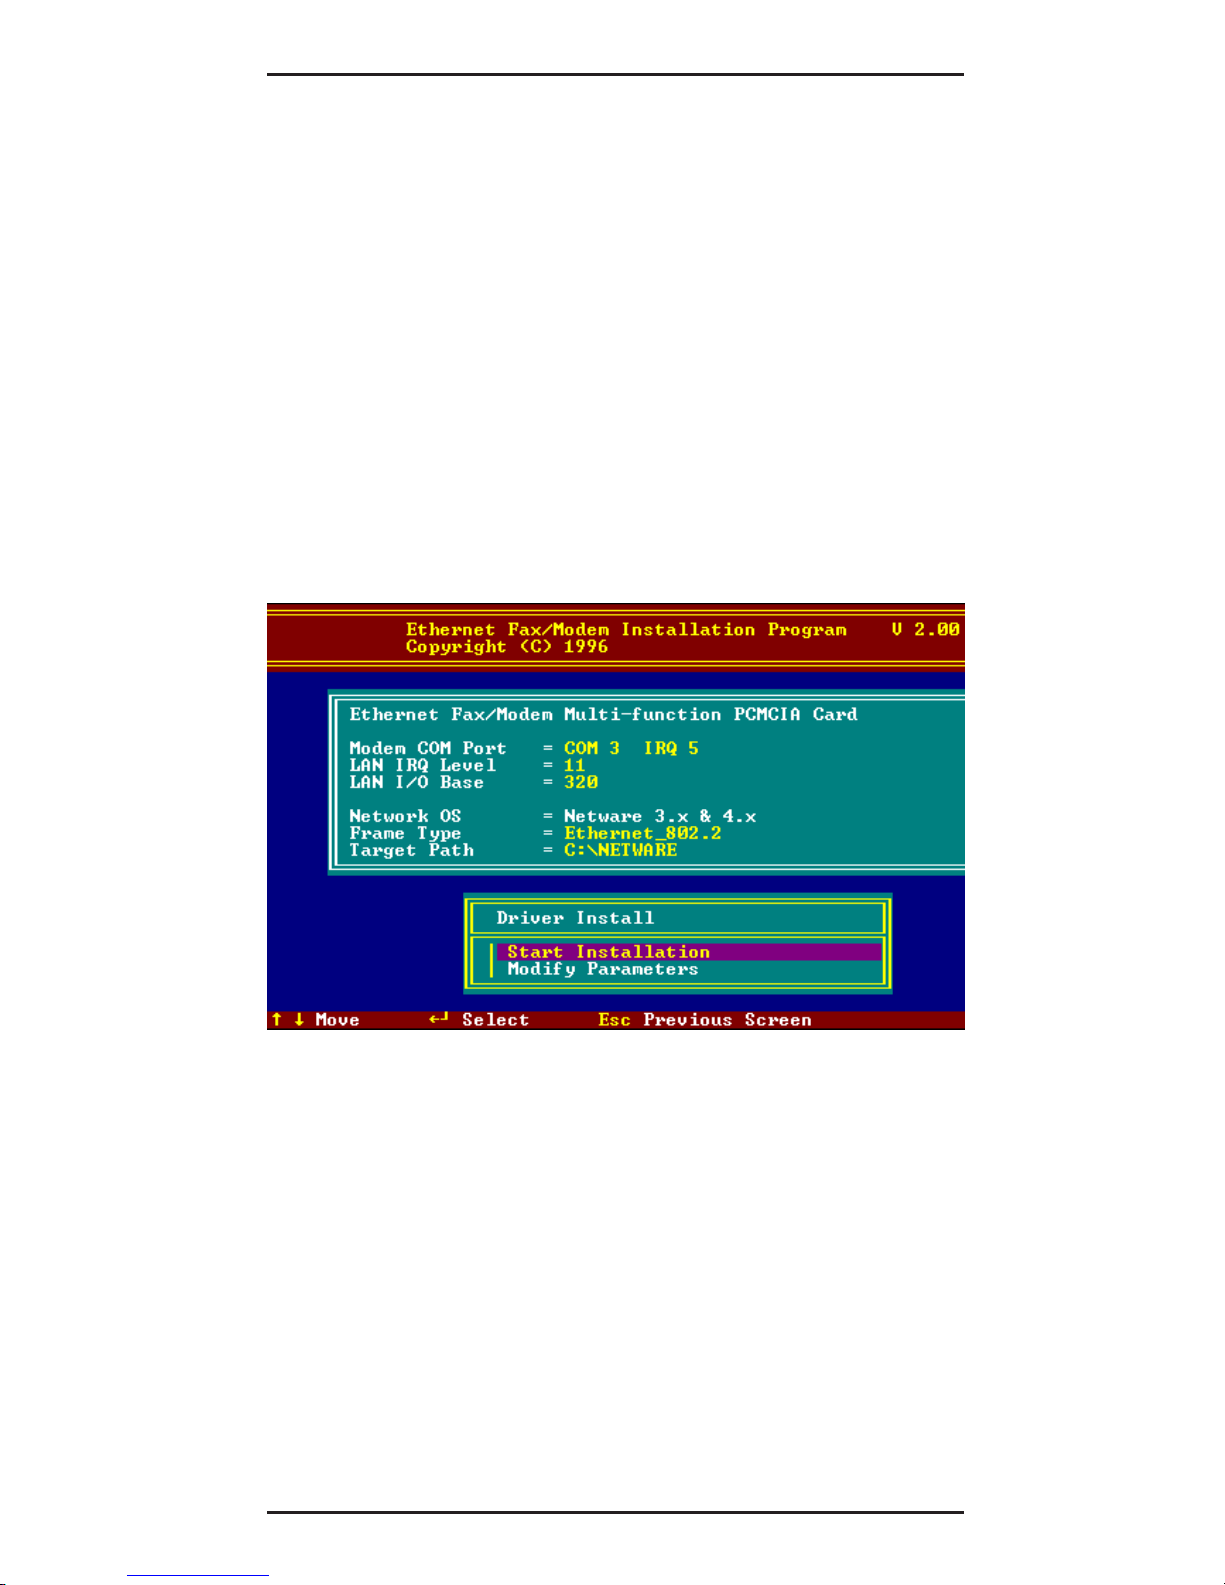
17
2 - Installation
4. Move the cursor to highlight the settings you
want to change and press Enter to select an
appropriate value. When the configurations
are set completely, press Enter on the OK field
to exit the screen. The Installation program
copies related files from the Drivers diskette to
the destination directory and modifies the
AUTOEXEC.BAT and NET.CFG files as
specified. The installation is complete.
5. Reboot the computer to make the NetWare
connections. The Driver Install screen is
displayed:
Figure 2-2. Driver Installation Screen

MT5634ZLX Owner’s Manual
18
Manual Driver Installation
If you wanted to install the ODI driver manually,
perform the following instructions:
1. Copy the files LM28ODI.COM and NET.CFG
from the directory \NETWARE and the file
CARDEN.EXE and LMVXD.386 from the
directory \ENABLER on the Driver diskette.
2. Use a text editor to edit the NET.CFG file for
setting the Frame Type. On the NetWare
server, the Frame Type default is 802.3 for
NetWare 3.11, and 802.2 for NetWare 3.12 and
4.x. The Frame Type set in NET.CFG must
match Frame Type set at the NetWare server,
or the client will not attach to the server.
3. Follow Novell’s instructions on using ODI
programs. You can substitute the
LM28ODI.COM whenever a reference is made
to the Hardware Specific Module.
4. A typical ODI workstation startup batch file
includes:
>CARDEN /IOP=nnn /IRQ=nnn /COM=n /
MIR=n
>LSL; Link Support Layer Module provided by
Novell
>LM28ODI ; Hardware Specific Module
>IPXODI ; IPX Protocol Stack Module provided
by Novell
>NETx ; Shell Support Module provided by
Novell
>LOGIN

19
2 - Installation
Novell Client Installation
1. Run the NetWare Client Install V1.21 software.
Either:
a. get the four Client disks from the network
administrator, or
b. run the \NWCLIENT\INSTALL.EXE used in
a previous Installation.
A message appears on the screen asking if you
want the program to perform modifications on
your AUTOEXEC.BAT and CONFIG.SYS files.
2. Answer Yes.
The program then modifies your
AUTOEXEC.BAT and CONFIG.SYS files
accordingly and creates backup copies. The
following message appears: “
Install support
for MS Windows? (Y/N):
”.
3. Answer accordingly and provide a path if
necessary. The program displays the following:
Configure your workstation for backup by a
NetWare server running software such as
BACKUP? (Y/N): No
4. Answer accordingly and provide a path if
necessary.
5. Select a driver for your MT5634ZLX.
6. From the driver list, select Other Drivers.
7. Go to the Insert the Driver Disk dialog box and
specify the path where the ODI driver and INS
files reside. For example: C:\ODI.DOS.
8. Press Enter and select the target ODI driver.

MT5634ZLX Owner’s Manual
20
9. Specify the driver’s optional settings.
10. Press F10 to save to new configuration.
11. Highlight Install press here and press <Enter>
to install. The program copies the necessary
files for NetWare Client.
12. Continue the installation procedure to
completion. On completion, a new NET.CFG file
is created in your DOS directory. Typically, this
file contains the following lines:
Link Driver LM28ODI
FRAME Ethernet_802.3
#FRAME Ethernet_802.2
13. Copy the file CARDEN.EXE and LMVXD.386
from the directory \ENABLER on the Driver
diskette to the NetWare Client directory.
14. Use a text editor to edit the STARTNET.BAT for
adding a running CARDEN command at the
beginning of the file. A sample STARTNET.BAT
for the ODI workstation is shown next:
CARDEN /IOP=nnn /IRQ=n /COM=n /MIR=n
SET NWLANGUAGE=ENGLISH
--(sets NetWare 4.X to English
language)
LSL
--Link Support Layer Module provided
by Novell
LM28ODI
--Hardware Specific Module
IPXODI
--IPX Protocol Stack Module provided
by Novell
VLM
--DOS Support Module provided by
Novell
F:
--Change to connected device
LOGIN .ADMIN
--Login to file server as user ADMIN
15. Run STARTNET to access the Novell network.

21
2 - Installation
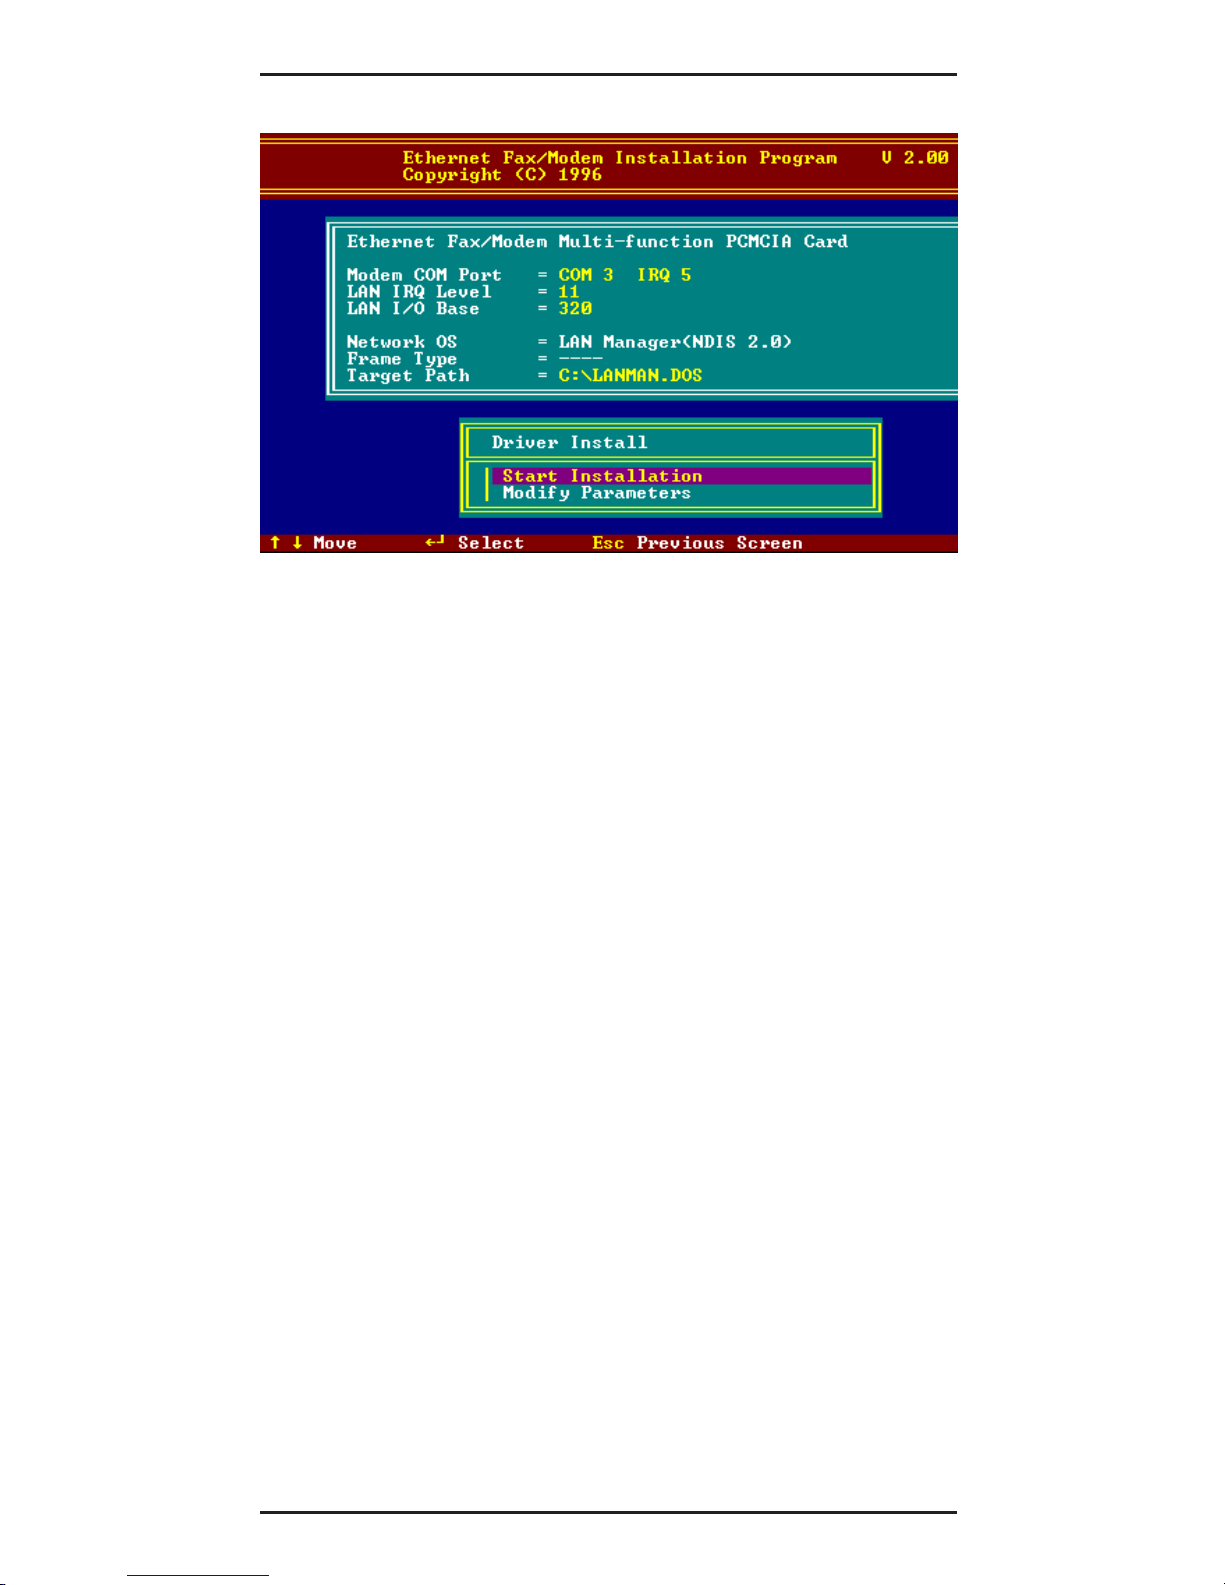
Microsoft LAN Manager Installation
1. View the README.TXT on the installation
diskette in the \NDIS2 directory. Before
installing the drivers, ensure that the Microsoft
LAN Manager has been installed in the target
path. The installation program will check and
modify the PROTOCOL.INI file for LAN
Manager.
2. Run INSTALL.EXE from root directory of driver
diskette.
3. Select the Microsoft LAN Manager item on the
menu screen.
4. If the current settings are acceptable, select
Start Installation and go to step 6. Otherwise,
select Modify Parameters to make setting
changed.
5. Move the cursor to each field you want to
change and press Enter to select a new value.
When the selections are set completely, press
Enter on the OK field to exit the screen and go
back to step 4.
6. The Installation program copies related files
from the Drivers diskette to the destination
directory and modifies the CONFIG.SYS and
PROTOCOL.INI files as specified.
7. Reboot the computer to load the selected
Driver.
8. Highlight “Start Installation” and press Enter to
start the LAN Manager in batch mode.
MT5634ZLX Owner’s Manual
22
Figure 2-3. Microsoft LAN Manager Installation
Screen
A sample LAN Manager PROTOCOL.INI file:
[PROTMAN]
DRIVERNAME = PROTMAN$
DYNAMIC = YES
PRIORITY = NETBEUI
[NETBEUI_XIF]
Drivername = netbeui$
SESSIONS = 6
NCBS = 12
BINDINGS = “LM28NDS2_NIF”
LANABASE = 0
[LM28NDS2_NIF]
; protocol.ini session for multifunction
LAN/MODEM driver.
IOADDRESS = 0x320
INTERRUPT = 11
DRIVERNAME = LM28NDS$

23
2 - Installation
Packet Driver Installation
1. Run INSTALL.EXE from the root directory of the
Drivers diskette.
2. Select the Packet Driver item on the Menu
screen.
3. If the current settings are acceptable, select
Start Installation and go to step 4. Otherwise,
select Modify Parameters to make setting
changed.
4. Move the cursor to the field you want to change
and press Enter to select a new value. When
the configuration is set completely, press Enter
on the OK field to exit the screen and go back
to step 3. The Installation program copies
related files from the Drivers diskette to the
destination directory and modifies the
AUTOEXEC.BAT file as defined.
5. Reboot the computer to load the selected
driver.
Windows for Workgroups Installation
(NDIS3 Driver for Workgroup)
1. Run Windows for Workgroups and click the
Network Setup icon in the Network group.
2. In Network Settings dialog box, click
Networks... button to select the network
operating system.
3. In Networks dialog box, check the radio button
before Install Microsoft Windows Network
and No Additional Network. Press OK to go
back the Network Settings screen.
4. Click the Drivers... button to select network
driver.

MT5634ZLX Owner’s Manual
24
5. In the Network Drivers dialog box, press Add
Adapter... button to enter Add Network
Adapter dialog box. Select Unlisted or
Updated Network Adapter and press OK.
Windows will prompt a Install Driver dialog
box.
6. Place the Drivers diskette into the floppy drive
and press OK.
7. Select the Enhanced mode NDIS3 for.... string
and press OK.
8. Follow Windows instructions to complete the
installation and exit Windows
9. Select Windows for Workgroup in the Network
Operating System screen.
10. If the current settings are acceptable, select
Start Installation and go to step 13. Otherwise,
select Modify Parameters to make settings
changed.
11. Move the cursor to the setting you want to
change and press Enter to select a new value.
When the configuration is accepted, press
Enter on the OK field to exit the screen and go
back to step 10.
12. Select NDIS Server (LAN Manager,...) as the
network server that you will attach to and press
the Enter key. The Installation program copies
the related files to the destination directory and
modifies the AUTOEXEC.BAT and
PROTOCOL.INI files as specified.
13. Reboot the computer to have the selected
driver take effect.

25
2 - Installation
NDIS2 Driver for Workgroup
1. Run Windows for Workgroups and click the
Network Setup icon in the Network group.
2. In the Network Settings dialog box, click the
Networks... button to select the network
operating system.
3. In the Networks dialog box, check the radio
button before Install Microsoft Windows
Network and No Additional Network. Press
OK to go back the Network Settings screen.
4. Click the Drivers... button to select network
driver.
5. In the Network Drivers dialog box, press the
Add Adapter ... button to enter the Add
Network Adapter dialog box. Select Unlisted
or Updated Network Adapter and press OK.
Windows displays a Install Driver dialog box.
6. Place the Drivers diskette in the floppy drive
and press OK.
7. Select the Real mode NDIS2 for... string and
press OK.
8. Follow the Windows instructions to complete
the installation, then exit Windows.
9. Run INSTALL.EXE from root directory of the
Drivers diskette.
10. Select Windows for Workgroup in Network
Operating System screen.
11. If the current settings are acceptable, select
Start Installation and go to step 13.
Otherwise, select Modify Parameters to
change settings.

MT5634ZLX Owner’s Manual
26
12. Move the cursor to the setting(s) you want to
change and press Enter to select a new value.
When the configuration is set completely, press
Enter on the OK field to exit the screen and go
back to step 11.
13. Select NDIS Server (LAN Manager,...) as the
network server to which you will attach and
press the Enter key. The Installation program
copies the related files to the destination
directory and modifies the AUTOEXEC.BAT file
as specified.
14. Reboot the computer to have the selected
driver take effect.
ODI Driver for Workgroups
1. Run Windows for workgroups and click
Network Setup icon in Network group.
2. In the Network Settings dialog box, click the
Networks... button to select the network
operating system.
3. In the Networks dialog box, check the radio
button before Install Microsoft Windows
Network and Others:. Select Netware Shell,
3.X or 4.0 and above, and press OK to go back
the Network Settings screen.
4. Click on the Drivers... button to select network
driver.
5. In the Network Drivers dialog box, press the
Add Adapter... button to enter the Add
Network Adapter dialog box. Select Unlisted
or Updated Network Adapter and press OK.
Windows will prompt a Install Driver dialog
box.

27
2 - Installation
6. Place the driver diskette in the floppy drive and
press OK.
7. Select the Netware ODI Driver ... string and
press OK.
8. Follow the on-screen Windows’ instructions to
complete the installation, then exit Windows.
9. Run INSTALL.EXE from the root directory of the
Drivers diskette.
10. Select Windows for Workgroup on the
Network Operating System screen.
11. If the current settings are acceptable, select
Start Installation and go to step 13. Otherwise,
select Modify Parameters to make settings
changed.
12. Move the cursor to the setting you want to
change and press Enter to select a new value.
When the configuration is set completely, press
Enter on the OK field to exit the screen.
13. Select Novell Netware Server as the network
server to which you will attach and press the
Enter key. The Installation program copies
related files to the destination directory and
modifies the AUTOEXEC.BAT and NET.CFG
files under user‘s agreement.
14. Reboot the computer to have the selected
driver take effect.
 Loading...