

Page 1

MR9600-100 Controller
User Guide
Page 2

MR9600-100 Controller User Guide
P/N 82067502, Revision C
Copyright © 1998 by Multi-Tech Systems, Inc.
All rights reserved. This publication may not be reproduced, in whole or in part, without prior expressed
written permission from Multi-Tech Systems, Inc.
Multi-Tech Systems, Inc. makes no representation or warranties with respect to the contents hereof and
specifically disclaims any implied warranties of merchantability or fitness for any particular purpose.
Furthermore, Multi-Tech Systems, Inc. reserves the right to revise this publication and to make changes
from time to time in the content hereof without obligation of Multi-Tech Systems, Inc., to notify any
person or organization of such revisions or changes.
Revision Date Description
A
B
C
7/25/97
5/11/98
12/23/98
Manual released.
Manual revised to include new controller commands.
Manual revised to reflect product changes.
Multi-Tech, CommPlete, RASExpress, MultiModem, MultiModemManager, and the Multi-Tech logo are
trademarks of Multi-Tech Systems, Inc. Other trademarks and trade names mentioned in this publication
belong to their respective owners.
Multi-Tech Systems, Inc.
2205 Woodale Drive
Mounds View, Minnesota 55112
(612) 785-3500 or (800) 328-9717
U.S. Fax (612) 785-9874
Technical Support (800) 972-2439
BBS (612) 785-3702 or (800) 392-2432
Fax Back (612) 717-5888
Internet Address: http://www.multitech.com
Page 3

Federal Communications Commission Statement
This equipment has been tested and found to comply with the limits for a Class A digital device, pursuant
to Part 15 of the FCC Rules. These limits are designed to provide reasonable protection against harmful
interference when the equipment is operated in a commercial environment. This equipment generates,
uses, and can radiate radio frequency energy, and if not installed and used in accordance with the
instruction manual, may cause harmful interference to radio communications. Operation of this
equipment in a residential area is likely to cause harmful interference, in which case the user will be
required to correct the interference at his own expense.
Warning: Changes or modifications to this unit not expressly approved by the party responsible for
compliance could void the user’s authority to operate the equipment.
Important Safety Instructions
Caution: Danger of explosion if battery is incorrectly replaced. Replace only with the same or equivalent
type recommended by the manufacturer. Dispose of used batteries according to the manufacturer’s
instructions.
The MR9600-100 Controller circuit board includes a battery that maintains the MR9600-100’s setup
information when it is turned off or disconnected from power. The battery can maintain the setup
information for approximately 10 years with no external power, and longer when the MR9600-100 is
turned on and operating normally. This battery is soldered onto the circuit board and cannot be replaced
by the user.
If, for some reason, the MR9600-100’s battery should fail, please contact Multi-Tech Technical Support at
(800) 972-2439 for replacement instructions.
CommPlete Communications Server iii
Page 4

iv CommPlete Communications Server
Page 5

v
Table of Contents
1 Introduction
Introduction ...................................................................................................................................................... 2
Product Description .......................................................................................................................................... 2
LED Indicators................................................................................................................................................... 2
Card Status LEDs .......................................................................................................................................... 3
MR9600-100 Ethernet Status LEDs .............................................................................................................. 3
Ethernet Switch LEDs ................................................................................................................................... 4
Connectors......................................................................................................................................................... 4
Duplex Mode Jumpers .................................................................................................................................. 5
MR9600-100 Controller Specifications ............................................................................................................. 5
Ethernet Switch Specifications ..................................................................................................................... 5
100BASE-TX Technology Overview .................................................................................................................. 6
Cables and Connectors.................................................................................................................................. 6
Topology ....................................................................................................................................................... 6
Network......................................................................................................................................................... 7
Hubs .............................................................................................................................................................. 7
Connectivity Rules ........................................................................................................................................ 7
Switching Technology ....................................................................................................................................... 7
Benefits of Switching .................................................................................................................................... 8
10/100 Switching Technology ....................................................................................................................... 8
2 Installation
Introduction .....................................................................................................................................................12
Installation Procedure......................................................................................................................................12
Ethernet Cabling ...............................................................................................................................................12
Serial Cabling ....................................................................................................................................................13
Network Connections.......................................................................................................................................13
10M bps Ports ..............................................................................................................................................13
100M bps Ports ............................................................................................................................................13
Cable Types ..................................................................................................................................................13
Setting the Duplex Mode (JP1-JP5)..................................................................................................................14
3 Operation
Introduction .....................................................................................................................................................18
Security .............................................................................................................................................................18
File System........................................................................................................................................................18
Event Files.........................................................................................................................................................18
SNMP Interface.................................................................................................................................................19
Command Line Interface .................................................................................................................................19
Telnet Interface.................................................................................................................................................20
Web Browser Interface .....................................................................................................................................20
Logging In ....................................................................................................................................................21
Getting Modem Information .......................................................................................................................21
Controlling Modems ....................................................................................................................................21
Web Interface Limitations...........................................................................................................................21
FTP Interface ....................................................................................................................................................21
CommPlete Communications Server
Page 6

4 Commands
Parameter Types ..............................................................................................................................................24
Commands Listed by Function........................................................................................................................26
Commands Listed by Security Level................................................................................................................30
Command Reference........................................................................................................................................33
Error Messages.................................................................................................................................................77
5 Solving Problems
Introduction .....................................................................................................................................................82
MR9600-100 Diagnostic Tests .........................................................................................................................82
Appendix A - Connector Pinouts...................................................... 85
RJ-45 Connectors .............................................................................................................................................85
Index....................................................................................................................... 89
vi CommPlete Communications Server
Page 7

1 Introduction
82067502
Page 8
MR9600-100 User Guide
Introduction
This manual describes the field installation of a Multi-Tech MR9600-100 Controller (henceforth, MR9600-
100) into a CommPlete Communications Server chassis. This manual also contains a reference guide to the
commands that are used to configure and control the MR9600-100. For configuration instructions, refer to
the System Installation and Quick Start section of you CommPlete documentation set.
Product Description
The MR9600-100 is the system controller module for the CommPlete Communications Server. The
MR9600-100 contains a built-in Web, FTP, and Telnet server, an embedded SNMP agent, and an
unmanaged Ethernet switch module. Its complete management capabilities allow the CommPlete
Communications Server and its segments to be managed remotely across any TCP/IP network.
LED Indicators
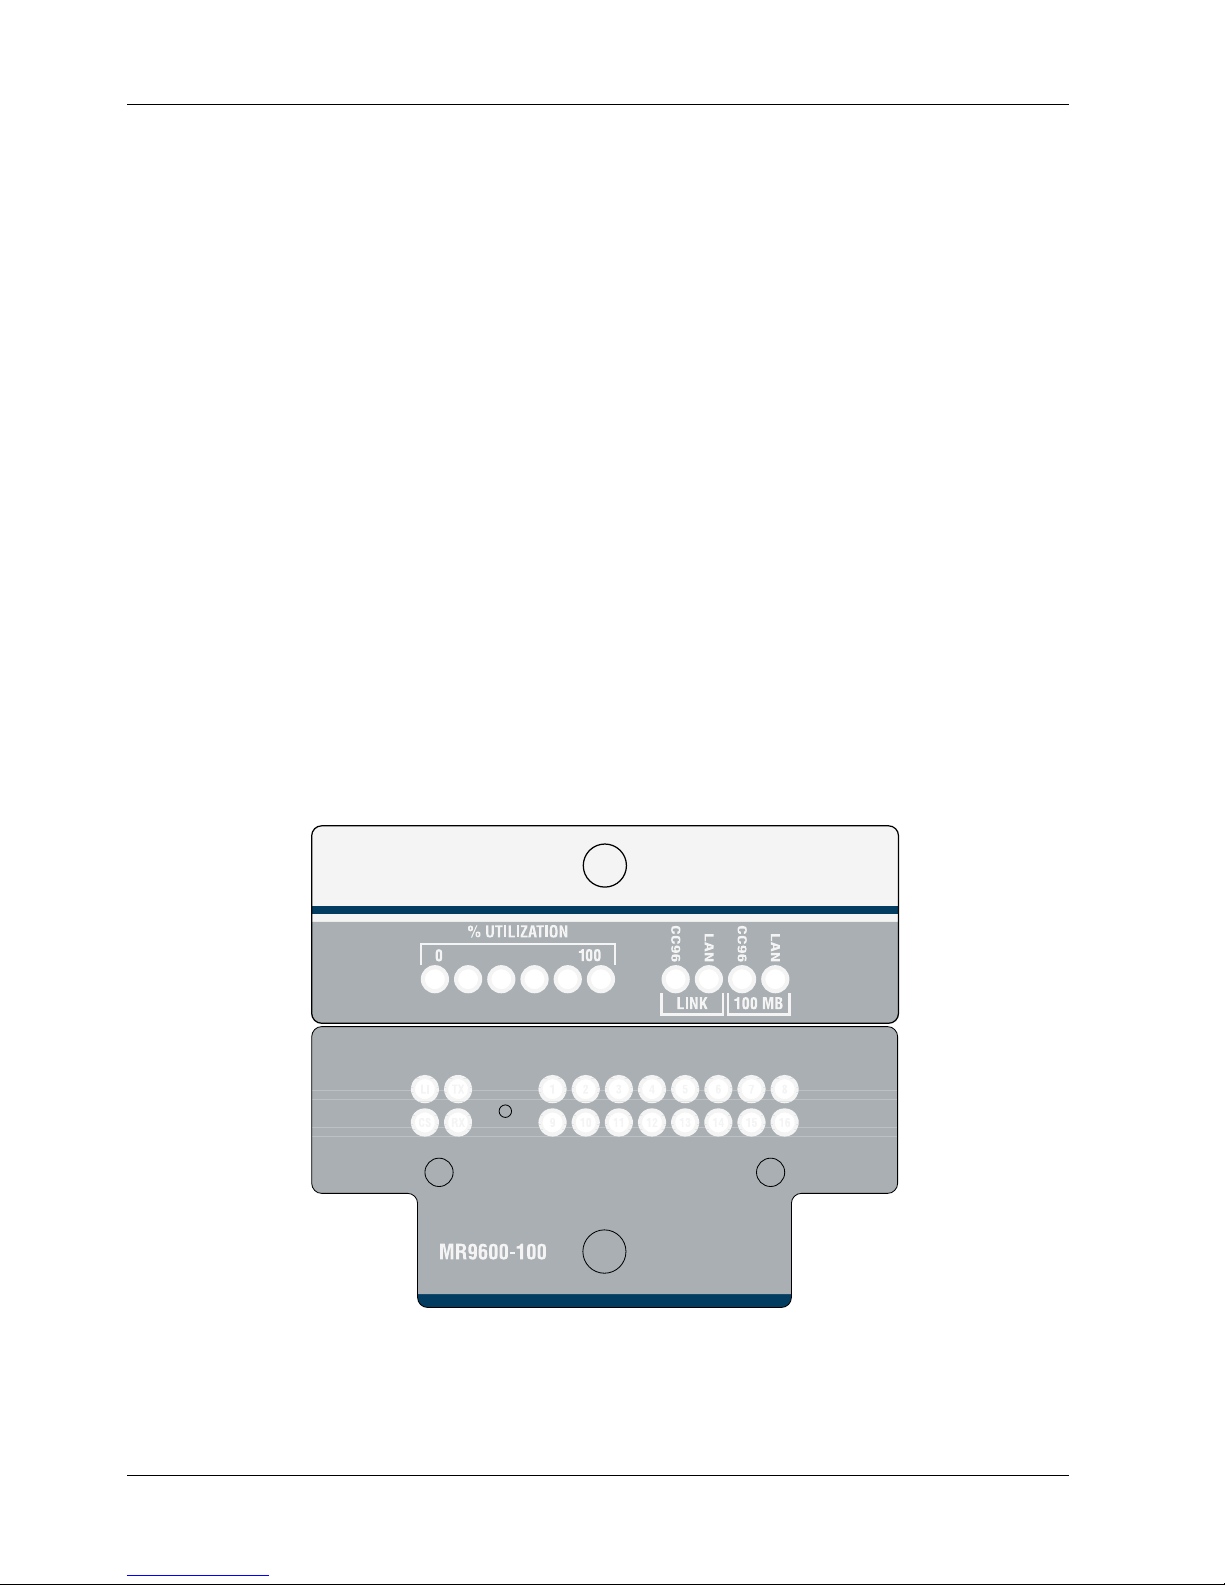
The MR9600-100 front panel contains the following LED indicators.
• Card status LEDs 1–16
• MR9600-100 Controller Ethernet status LEDs 1–4
• Ethernet switch LEDs
Figure 1. MR9600-100 Controller front panel.
2 CommPlete Communications Server
Page 9

Card Status LEDs
The lower part of the MR9600-100’s front panel contains 16 two-color LED indicators, one for each card
slot in the CC9600 chassis. The slots are numbered 1 through 16 from left to right. The LEDs indicate the
state of the device cards installed in the CC9600 chassis. When the MR9600-100 is turned on, the lights go
through the following sequence before they act as status indicators for the device cards.
1. The LEDs on the right side turn red and then turn green when the right SIMM passes its memory
2. The LEDs on the left side turn red and then turn green when the left SIMM passes its memory test.
3. The LEDs stay green for about five seconds while the flash boot code waits for a handshake sequence
4. If none is detected (this is normal unless the firmware is being updated through the diagnostic port)
5. The LEDs are turned on and off, one at a time, red and green.
6. All LEDs turn green while the system starts up.
7. After the system has started, the LEDs reflect the status of the device cards. Each LED will be in one
1 Introduction
test.
on the diagnostic serial port.
the main controller code starts running and the LEDs are turned off.
of the following states, depending on the device card.
LED Color Device Card Status
Off Card not installed.
Green Card installed and all devices are communicating with the MR9600-100.
Red Card installed and none of the devices are communicating with the
MR9600-100.
Flashing
Red/Green
Card installed and one or two devices are not communicating with the
MR9600-100.
MR9600-100 Ethernet Status LEDs
The lower part of the MR9600-100 front panel contains four indicators that show the status of the
MR9600-100 Controller’s Ethernet port.
LED Indicator Color Indication
LI Link Integrity Yellow On during a good link
CS Collision Sense Red On when there is a collision on the Ethernet port
TX Transmit Green On during Ethernet transmit
RX Receive Green On during Ethernet receive
CommPlete Communications Server 3
Page 10
MR9600-100 User Guide
Ethernet Switch LEDs
The upper part of the MR9600-100 front panel contains 10 status indicators for the Ethernet switch.
LED Indicator Indication
UTILIZATION Percentage of bandwidth in use. Each LED that is on represents a
CC9600 (LINK) On during a valid Ethernet link on a 10 Mbps port.
16.7% increment in use. The lower 4 LEDs are green, and the two
LEDs indicating highest activity are yellow.
LAN (LINK)
CC9600 (100 MB)
LAN (100 MB)
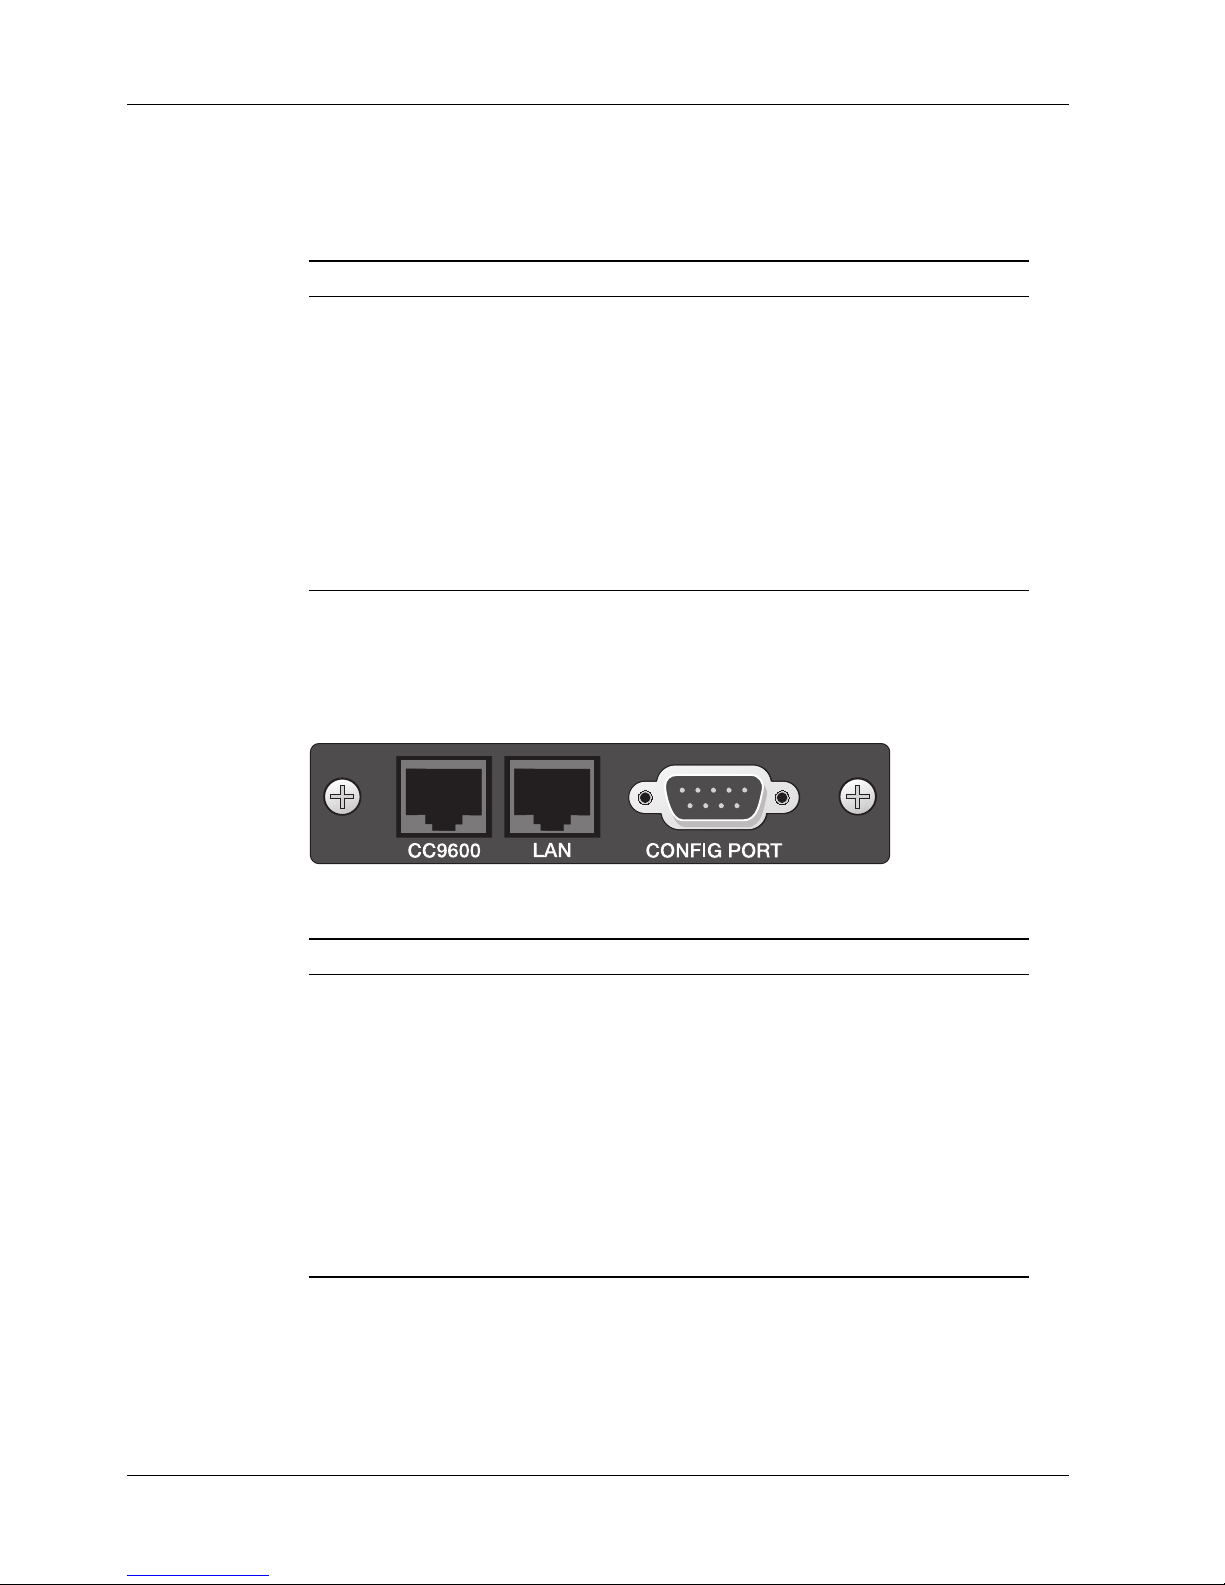
Connectors
The MR9600-100 has three connectors that are accessible from the rear of the CC9600 chassis.
Figure 2. MR9600-100 connectors.
Connector Type Function
CC9600 RJ-45 Crossover 10/100M bps network connector. The transmit
On during a valid Ethernet link on a 10 Mbps LAN port.
On during a valid Ethernet link on a 100 Mbps port. Off during a 10M
bps connection.
On during a valid Ethernet link on a 100 Mbps LAN port. Off during a
10M bps connection.
and receive pairs of wires are swapped so the connector
can be used with a straight-through cable to connect the
CommPlete Communications Server to an external switch or
to the LAN connector on another CommPlete
Communications Server.
LAN RJ-45 Straight-through 10Base-T network connector. Use with a
CONFIG PORT Male DB-9 RS-232C configuration port for MR9600-100 Controller.
4 CommPlete Communications Server
straight-through cable to connect the CommPlete
Communications Server to a network card in a server, to a
network wall connector, or to the CC9600 connector on
another CommPlete Communications Server.
Page 11

1 Introduction
Duplex Mode Jumpers
The MR9600-100 must be set to the proper duplex mode for all ports. To set the duplex mode, change the
Duplex Mode jumpers on the back of the MR9600-100. Note that it is not necessary to turn off the device
when changing the duplex mode setting.
Note: Full-duplex mode can only be used for connections to other switches or to
network stations. Connections to hubs must use half-duplex mode only.
MR9600-100 Controller Specifications
• Motorola MC68360 25 MHz microprocessor
• 8 MB of RAM for volatile storage
• 2 MB of flash memory: 1 MB for program space and 1 MB for nonvolatile file system space
• Recessed reset button
• Sixteen two-color LEDs for quick view of device card status
• Four Ethernet status LEDs
• Dimensions: 7.3 × 8.9 ×33.0 cm (H × W × D)
× 3.5 × 13 inches (H × W × D)
2.87
• Weight: 0.45 kg (1.0 lb.)
• Operating temperature: 0°–40° C
• Operating humidity: 0–95%, non-condensing (0-95%, storage)
• Operating altitude: 10,000 ft (3048 m)
• Power input: 100 ~ 240 VAC, 50/60Hz
• Power: 4.8 A @ 5 V
• Power Consumption: 15 watt (max.)
• Fuse: 7 A on 5 V supply
• Limited Warranty: Two years
Ethernet Switch Specifications
• Two high-speed uplink ports for connecting to a higher-tier switch or other device. The two RJ-45
100Base-T/10Base-TX connectors provide connection to a TCP/IP Ethernet network
(32°–104° F)
• Full- and half-duplex capability on all ports; the five 10BaseT ports are user-configurable via the
Duplex Mode jumpers on the printed circuit board (PCB).
• One male DB-9 RS-232C diagnostic and configuration connector
• Six Ethernet utilization LEDs
CommPlete Communications Server 5
Page 12

MR9600-100 User Guide
• Two Ethernet link indicator LEDs
• Two Ethernet 100M bps indicator LEDs
• 10BASE-T, IEEE 802.3, 100BASE-TX, and IEEE 802.3u compliance
• 100Mbps (100BASE-TX) mode via RJ-45 (Cat 5);
Full or Half Duplex – 100/200Mbps
• 10Mbps (100BASE-TX) via RJ-45 (Cat 3), Full or Half Duplex – 10/20Mbps
• Filtering Rates: 14880 pps for 10Mbps ports and 148800 pps for 100Mbps ports
• Forwarding Rates: 14880 pps for 10Mbps ports and 148800 pps for 100Mbps ports
• Shared memory architecture
• Dynamic buffer allocation allows network load balancing and prevents packet loss due to congestion
• 8K active MAC address entry table per device, with self-learning and table aging
• auto-polarity correction for all twisted-pair ports
• Weight: 500 g (1.1 lbs)
100BASE-TX Technology Overview
100M bps Fast Ethernet is a relatively new standard specified by the IEEE 802.3 LAN committee. It is an
extension of the 10Mbps Ethernet standard with the ability to transmit and receive data at 100Mbps, while
maintaining the CSMA/CD Ethernet protocol. Since 100Mbps Fast Ethernet is compatible with all 10Mbps
Ethernet environments, it provides a straight-forward upgrade without wasting your investment in
hardware, software, and personnel training.
The MR9600-100 provides an easy, affordable, high-performance, seamless, and standards-based
migration path to a 100BASE-TX LAN while preserving your initial investment and use of 10Mbps
Ethernet LANs.
The MR9600-100 complies with IEEE802.3u, 100BASE-TX, IEEE 802.3 and 10BASE-T standards. The
MR9600-100 has five 10Mbps twisted-pair ports and two 100Mbps twisted-pair ports. The MR9600-100
provides a store-and-forward token passing scheme. Filtering and forwarding rates for the MR9600-100
run at wire-speed, reducing latency within and across segments.
Cables and Connectors
The MR9600-100 supports Category 5 unshielded twisted-pair (UTP) cables. Cat 5 UTP cable uses the
same RJ-45 connector used with 10BASE-T, wired in the same configuration. Please note that the punchdown blocks in the wiring closet must also be Category 5 certified. Where these blocks do not meet the
standard, an upgrade is necessary.
Topology
A Fast Ethernet workgroup is configured in a star topology and is built around a maximum of two
repeaters. Each workgroup forms a separate LAN (also known as a “segment” or “collision domain”), and
these workgroups can be easily interconnected through switches, bridges, or routers to form one LAN
large enough to encompass a high-rise building or campus environment. Recent innovations in LAN hub
6 CommPlete Communications Server
Page 13

Network
Hubs
1 Introduction
technology such as stackable hubs, coupled with the decreasing cost of switches, bridges, and routers,
allow the design of low-cost, efficient Fast Ethernet workgroups and enterprise LANs.
The following factors strongly influence the architecture of Fast Ethernet networks:
• The EIA/TIA 568 Wiring Standard imposes a 100 meter limit on horizontal runs of twisted-pair cables;
that is, connections from the wiring closet to the end-station.
• Fast Ethernet’s increased operational speed reduces the maximum distance between all elements of the
LAN (see below).
• The EIA/TIA 568 Wiring Standard does not support the use of coaxial cables for horizontal wiring.
The network diameter, which is the distance between two end-stations in the same collision domain, is the
primary difference between traditional Ethernet and Fast Ethernet. Due to the increased speed in Fast
Ethernet and adherence to the EIA/TIA 568 wiring rules, the network diameter of a Fast Ethernet collision
domain is limited to 205 meters; in contrast, the maximum 10BASE-T Ethernet collision domain diameter
can be up to 2500 meters.
While 10BASE-T hubs are all functionally identical, Fast Ethernet hubs are divided into two distinct types:
Class I and Class II. A Class I hub repeats all incoming signals on one port to the other ports by first
translating them to digital signals and then retranslating them back to line signals. These translations are
necessary when connecting various network media to the same collision domain, such as when combining
two wire-pair 100BASE-TX media with four wire-pair 100BASE-T4 media. Only one Class I hub can exist
within the same collision domain, thus this type of hub cannot be cascaded. A Class II Hub (or
“repeater”), on the other hand, immediately repeats all incoming line signals on one port to the other
ports; no translations are performed. This type of hub connects identical media to the same collision
domain; for example, TX to TX. At most, two Class II hubs can exist within the same collision domain.
The cable used to cascade these hubs is called an inter-repeater link (IRL).
As mentioned earlier, stackable hubs can be used to increase the number of available nodes in a collision
domain. An entire hub stack counts as a single hub (repeater).
Connectivity Rules
• The maximum length of a twisted-pair segment (that is, distance between a port in the hub to a single-
address network device such as a PC, server, or LAN switch) is 100 meters.
• The maximum diameter in a collision domain is about 205 meters using two Class II hubs (or hub
stacks) and 200 meters using one Class I hub.
• Between any two end-stations in a collision domain, there may be up to three segments and two Class
II hubs or two segments and one Class I hub.
Switching Technology
Switching is fast becoming the industry standard for pushing the limits of existing Ethernet networks. A
switch bridges Ethernet packets between Ethernet and Fast Ethernet LAN segments at the MAC address
level of the Ethernet protocol.
CommPlete Communications Server 7
Page 14

MR9600-100 User Guide
The difference between switched Ethernet (10Mbps, 100Mbps, or both) and traditional Ethernet is
analogous to the difference between a private phone line and a party line. With switched Ethernet, each
workgroup has a “private line” so that transmitted packets don’t have to wait as long to gain access to the
network. When connected to a switched port, each Ethernet segment has full “wire-speed” access, so a
switch effectively divides a single Ethernet LAN into bridged multiple LAN segments. Each segment can
support a workgroup or even provide a dedicated connection for a key workstation or server. The result of
dividing an Ethernet LAN into multiple segments is a multiplication of internal bandwidth available to all
stations on the LAN and a reduction in latency rates during peak-use periods.
Benefits of Switching
Ethernet switching technology drastically increases the total bandwidth of a LAN. It also provides
configuration flexibility to local workgroups which allows the network administrator to better control how
network resources are distributed against network load. Switching helps reduce the congestion problems
inherent in the contention-oriented CSMA/CD protocol, thereby improving network response during high
utilization periods.
Also, currently popular distributed client/server applications often require higher bandwidth and tighter
client-to-server integration. Legacy 10Mbps Ethernet often is unable to provide a sufficiently
sophisticated platform for users to be able to take full advantage of such client/server applications.
Fast Ethernet switching not only satisfies both technical and business needs, it also preserves the current
investment in the huge 10BASE-T Ethernet installed base. Compatibility with 10Mbps Ethernet ensures
that users will be able to migrate to Fast Ethernet at a pace appropriate to their installation and needs.
10/100 Switching Technology
An integral extension of Fast Ethernet, 10/100 switching provides not only a 100Mbps high-speed
connection for carrying aggregated 10Mbps traffic, it also handles the necessary conversion of the MAC
layer between 10BASE-T and 100BASE-TX. Combining Fast Ethernet and switching technologies provides
both bandwidth for local workgroups and a high-speed link to carry local traffic elsewhere in the network.
8 CommPlete Communications Server
Page 15

1 Introduction
CommPlete Communications Server 9
Page 16

Page 17

2 Installation
82067502
Page 18
MR9600-100 User Guide
p
g
g
p
Introduction
This chapter describes how to install the MR9600-100 Controller into a CommPlete Communication Server
CC9600 chassis. This equipment should only be installed by properly qualified service personnel.
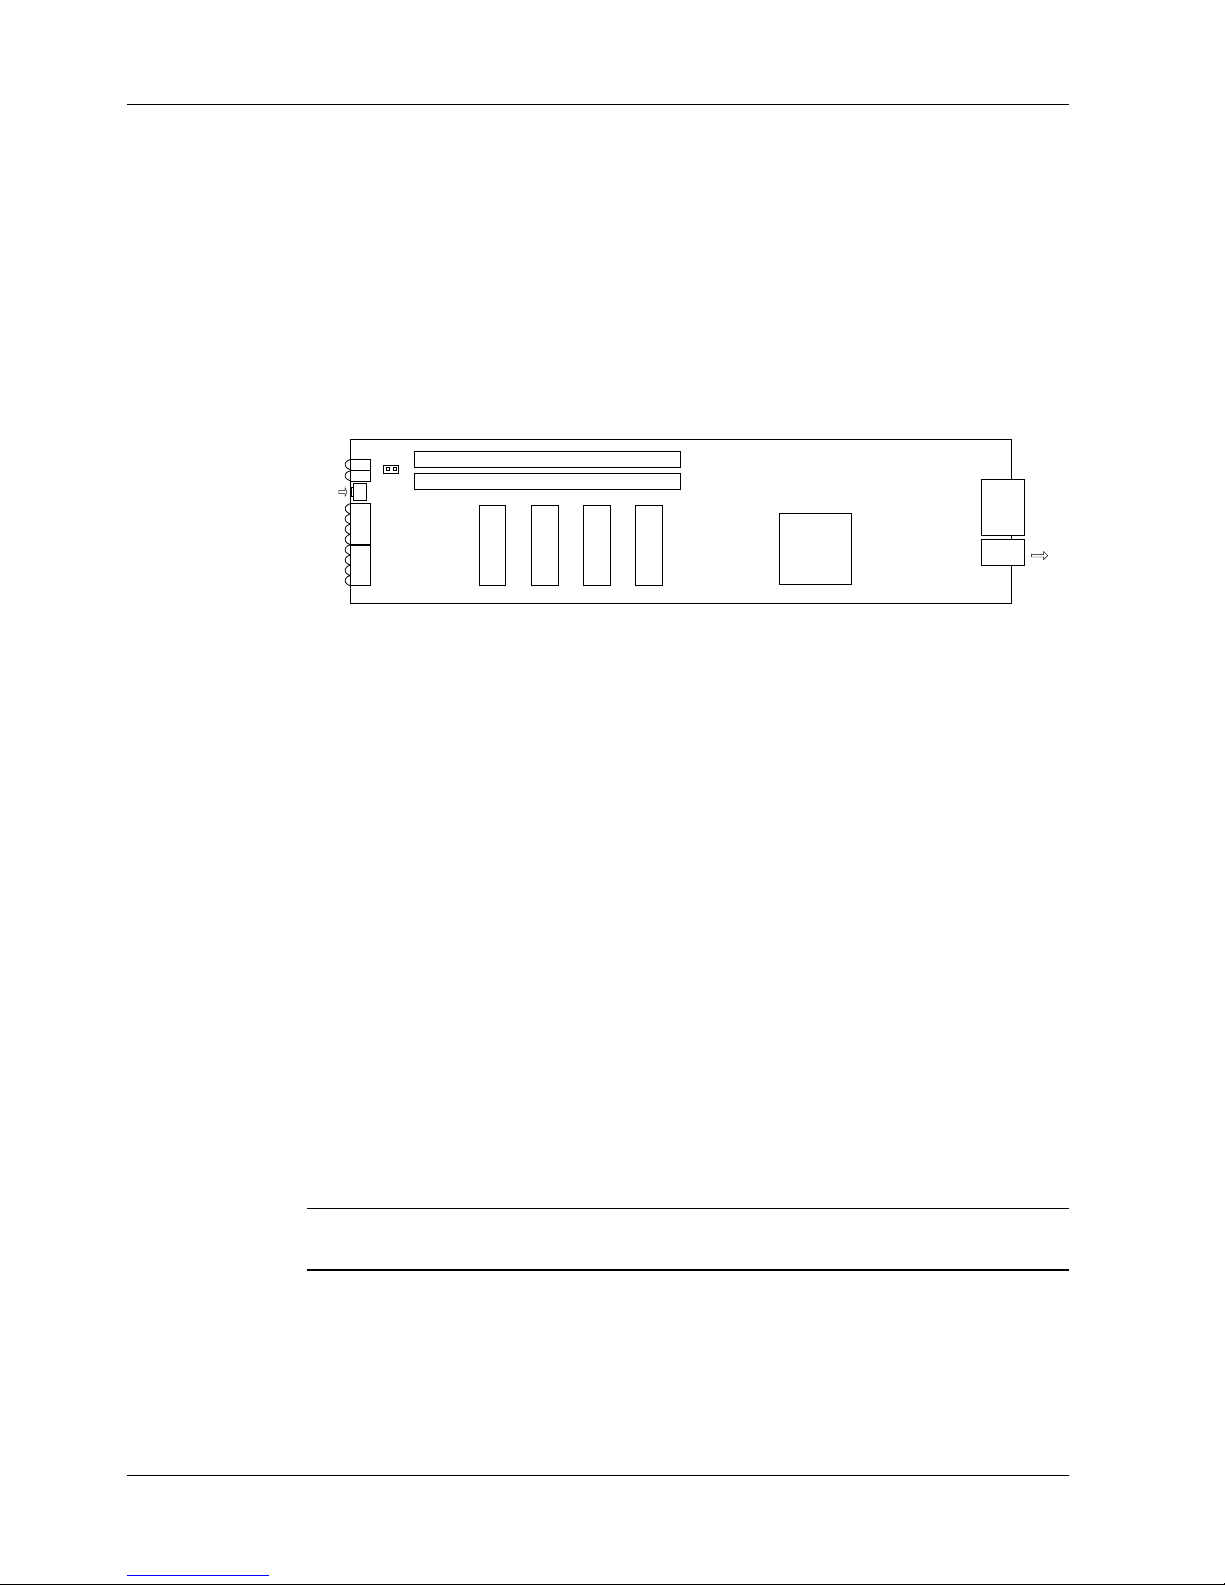
The MR9600-100 Controller assembly consists of the MR9600-100 Controller card, an integrated Ethernet
switch card, and a common front panel. Figure 3 shows the layout of the MR9600-100 card without the
switch. The MR9600-100 assembly plugs into bus connectors on the inside of the CC9600 chassis. Three
communications connectors on the switch module are accessible from the back of the CC9600 chassis: a
DB-9 serial connector for MR9600-100 diagnostics and configuration, and two 10/100M bps connectors for
network access.
Test
Reset
LEDs
Figure 3. MR9600-100 Controller card. Ethernet switch module not shown.
Installation Procedure
1. Unpack the MR9600-100 assembly from its packaging, and save the packaging for possible future
use. Perform a visual inspection of the MR9600-100. If you are concerned about the condition of the
MR9600-100, call Technical Support for instructions.
2. Remove the blank controller panel or previous MR9600-100 controller from the CC9600 chassis. The
MR9600-100 is hot-swappable.
3. Holding the MR9600-100 by its handle and the edges of the bottom panel, place the MR9600-100
into the open controller slot of the CC9600. Make sure the edges of the MR9600-100 card mate
properly with the plastic guides in the CC9600.
4. Slide the MR9600-100 into the CC9600 chassis until you feel the MR9600-100’s connectors fit into
the bus connectors at the back of the CC9600.
RAM
RAM
Flash Memory
To
back
Connectors
CPU
U4U5U7U6
anel
confi
debu
ort
/
5. Tighten the MR9600-100's retaining screws.
6. Turn on the PS9600 power supplies, if they are off.
7. Note the PS9600 LED indicators. If they are not lit, see Chapter 6. If they are lit, proceed with
MultiModemManager operation (Chapter 4 of the MultiModemManager
Note: A self-test runs each time the CommPlete Communications Server is turned on. Refer to Chapter 5
of the MultiModemManager
Ethernet Cabling
Two female 10/100M bps connectors are accessible from the back of the CC9600 chassis. Connect one of
these connectors to the TCP/IP network that the supervisor console is attached to. The supervisor console
12 CommPlete Communications Server
User Guide
User Guide
manual for more details on the power-on self-test.
manual).
Page 19

is the PC that runs the MultiModemManager software or, optionally, a third-party SNMP manager. Note
that for 10M bps connection, you can use Category 3 (Cat 3) or Cat 5 cable; for 100M bps connection you
must use Category 5 (Cat 5) cable.
Serial Cabling
Use the 9-pin RS-232 connector on the back of the CC9600 chassis for diagnostics and configuration.
Network Connections
If any port on the MR9600-100 is set for full duplex operation, the device (or LAN) connected to that port
must also be set for full duplex operation. Refer to the following sections on 10M bps and 100M bps ports
for specific requirements.
10M bps Ports
The five 10M bps ports are used internally for the four CommPlete segments and the Controller. The 10M
bps ports operate at a user-selectable effective speed of 10M bps in half-duplex mode, or at 20M bps in
full-duplex mode. In either mode, the twisted-pair connector can operate over 100 meters of Category 3, 4,
or 5 UTP/STP cable. Note that the MR9600-100 back panel has two RJ-45 connectors. Refer to Figure 2 for
the proper connector type (cross-over or straight through).
2 Hardware Installation
100M bps Ports
The two 100M bps ports use standard RJ45 twisted-pair connectors with unshielded or shielded twistedpair (UTP/STP) wiring. The 100M bps ports operate at an auto-negotiable neffective speed of 100M bps
(in half-duplex mode) or 200M bps (in full-duplex mode). In either mode, the twisted-pair connector can
operate over 100 meters of Category 5 UTP/STP cable. (Cat 3 cable can be used if the 100M bps port is
running at 10M bps.)
The two 100M bps ports can auto-negotiate for 10/20/100/200M bps operation. Note that the MR9600-100
back panel has two RJ-45 connectors. Refer to Figure 2 for the proper connector type (cross-over or
straight through).
Cable Types
Under most conditions, the ports on the MR9600-100 may use normal straight-through cables. Some
circumstances, however, may require cross-over cables (i.e., cables in which the twisted-pair outputs have
been crossed). See Appendix B for more information on cable pinouts.
Half-/Full-Duplex
Port Connector Effective Speed CableLength/Type
10M bps (internal) 10/20M bps 100m/Cat. 3/4/5
UTP/STP
100M bps RJ-45 10/20M bps 100m/Cat. 3/4/5 UTP/STP
100/200M bps 100m/Cat. 5 UTP/STP
CommPlete Communications Server 13
Page 20
MR9600-100 User Guide
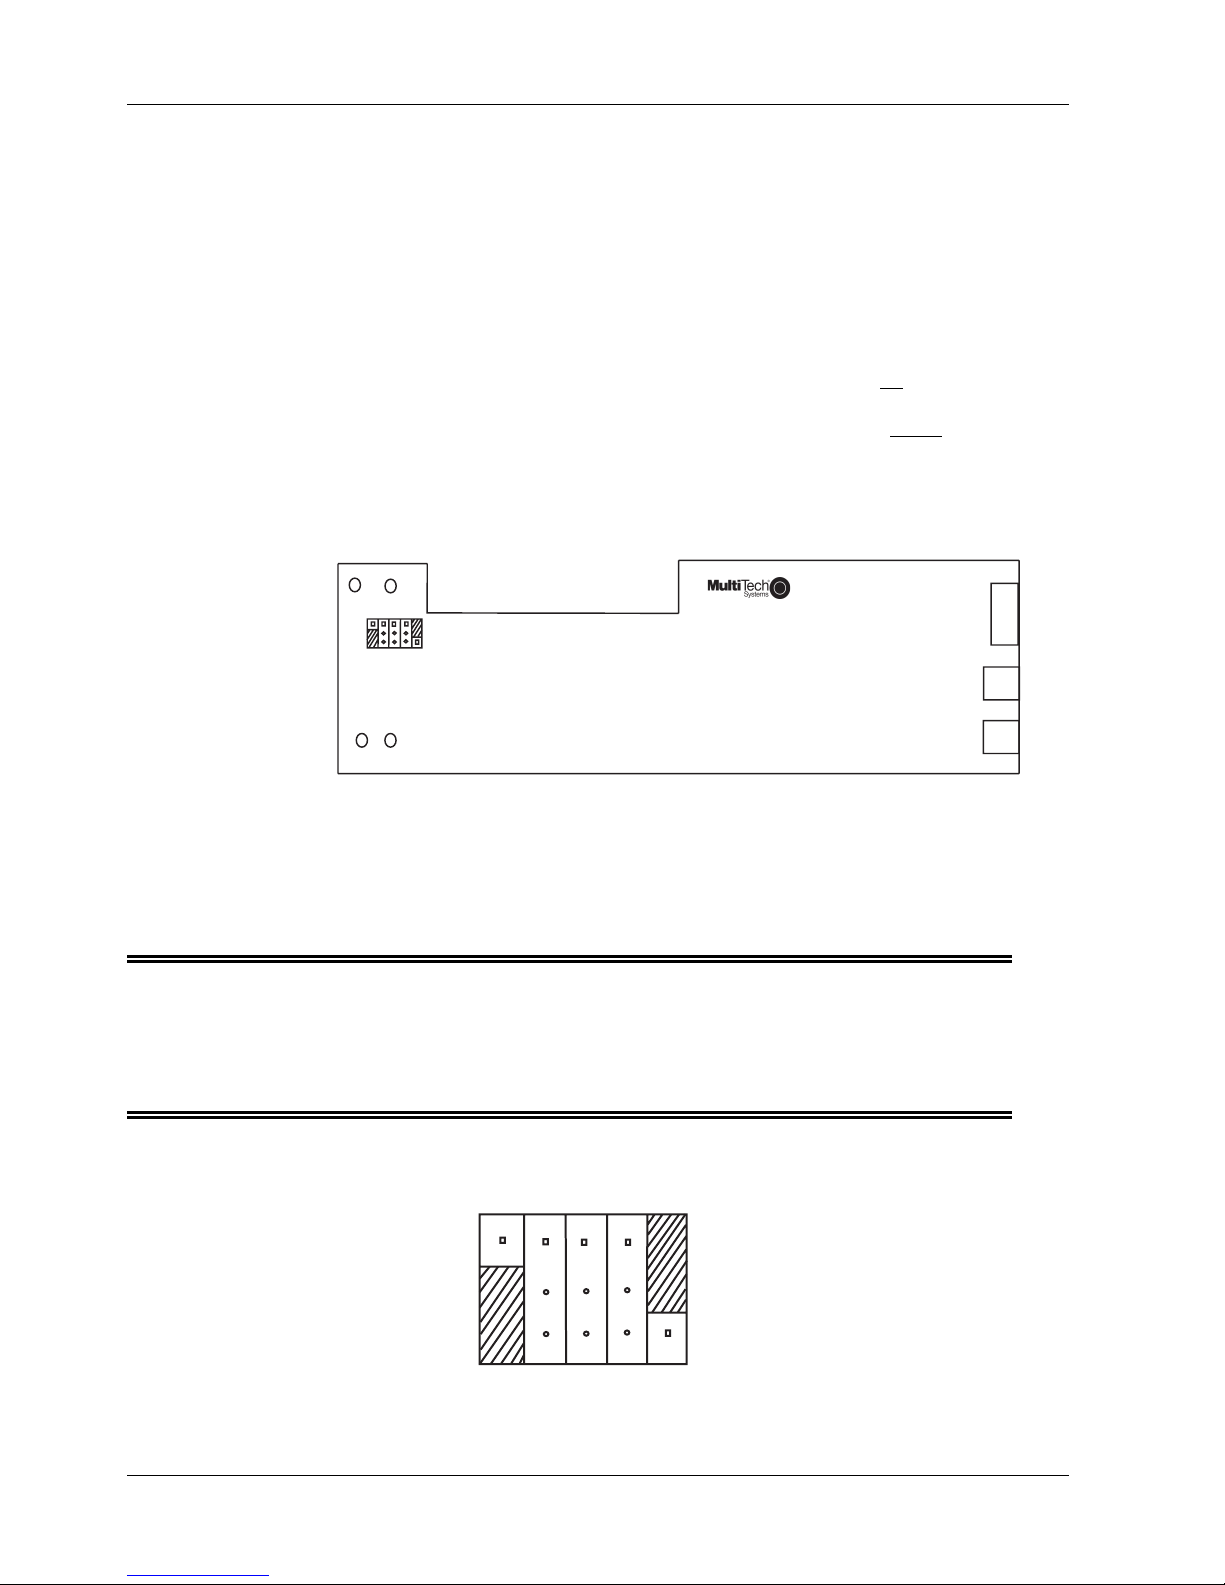
Setting the Duplex Mode (JP1-JP5)
Each 10M bps port can be set for half-duplex or full-duplex operation. At half-duplex operation, packet
transmission and reception do not occur simultaneously, thus communication speed is limited to 10Mbps
in 10BASE-T mode. At full-duplex operation, packet transmission and reception occur simultaneously,
thus communication speed is doubled to 20Mbps using 10BASE-T mode. Full-duplex operation can be
used on links between the MR9600-100 and any device (or station) that supports full-duplex operation.
Set the 10M bps duplex mode using jumpers JP1-JP5 on the top PCB located behind the front panel.
To set a port (e.g., “P1” in the figure below) to full-duplex operation, jumper the top two pins together for
that port.
To set a port (e.g., “P5” in the figure below) for half-duplex operation, jumper the bottom two pins
together for that port.
Refer to the figures below for 10M bps Half-duplex/Full-duplex mode jumper locations and settings. Note
that it is not necessary to turn off power to the MR9600-100 when changing the duplex mode setting.
P5 P4 P3 P2 P1
JP1 JP2 JP3 JP4 JP5
CC9600HB-100 Rev. xx
Figure 4. 10M bps Half-duplex/Full-duplex mode jumper locations.
Note: Full-duplex mode can only be used for connections to other switches, network
servers, or network stations. Connections to hubs must use half-duplex mode
Jumpers are not necessary for 10/100M bps ports (which can auto-negotiate for
only.
10/20/100/200M bps operation).
P5 P4 P3 P2
JP1 JP2 JP3 JP4
Figure 5. 10M bps Half-duplex/Full-duplex mode jumper settings.
14 CommPlete Communications Server
Page 21

2 Hardware Installation
In the figure above, port #1 (“P1”) is set to full-duplex operation by placing the shorting plug over the top
two pins of jumper JP5.
Port #5 (“P1”) is set to full-duplex operation by placing the shorting plug over the bottom two pins of JP1.
CommPlete Communications Server 15
Page 22

MR9600-100 User Guide
16 CommPlete Communications Server
Page 23

3 Operation
82067502
Page 24

MR9600-100 User Guide
Introduction
You can operate the MR9600-100 by using the front panel indicators for information (see Chapter 6). But if
you install the optional MultiModemManager software, you can operate the MR9600-100 by running
windows-based menu and command functions from a dedicated management console (refer to the
MultiModemManager User Guide).
Security
The MR9600-100 has a security system to prevent unauthorized system modification by Telnet, Web
browser, or FTP users who access the system via the TCP/IP network or the diagnostic serial port on the
back of the CC9600 chassis. SNMP and MultiModemManager software security is accomplished by
selecting SNMP read and write community strings. Note: SNMP issues relate to the SNMP-managed
MR9600-100 chassis, but not to the unmanaged CC9600HB-100 Ethernet switch.
There are three levels of security:
passwords for each level (see following table).
Security Level Can perform all
Default User ID supervisor operator guest
Default Password supervisor operator guest
Once you are logged in, you can change your user ID and password by using the commands userid to
change your user ID, and passwd to change your password (see Chapter 5).
File System
The MR9600-100 stores configuration, security, and event information in files. There are two drives on the
system: A and B. The A drive is used for nonvolatile information such as configuration and security
database files, and is about 1 MB in size. The B drive is for volatile information such as event files, and is
about 6.5 MB in size. Each drive has an MMM directory on it. A:\MMM stores all configuration
information for the system. B:\MMM\MR.LOG contains all of the event files for the system. The file system
can be accessed either through the command line interface or by using FTP.
guest, operator
Supervisor Operator Guest
management
commands
, and
supervisor
Can perform nondestructive
management
commands
. There are default user IDs and
Can only view information
Event Files
One event file is created for each hour in the format MMDDHHYY.HR, where MM is the month, DD is the
day, HH is the hour, and YY is the last two digits of the year. When the drive fills up, the oldest .HR file is
deleted. The number of events your MR9600-100 will hold depends on the number of calls you receive in a
day. Event files can be FTPed from the MR9600-100 and analyzed using the Statistical Analyzer, which is
part of the MultiModemManager software.
18 CommPlete Communications Server
Page 25

SNMP Interface
The MR9600-100 can be monitored and controlled by using SNMP through the MultiModemManager or a
third party SNMP manager.
Note that SNMP issues relate to the SNMP-managed MR9600-100 controller, but not to the unmanaged
CC9600HB-100 Ethernet switch.
To receive traps from the MR9600-100, the SNMP manager should log in using the entry in the system
table. In that entry, do a set of “login PUBLIC.” When you are done monitoring the MR9600-100, do a set
of the same variable with “logout.” This will stop traps being sent to your station. MultiModemManager
does this automatically.
Command Line Interface
The MR9600-100 provides a complete command line interface that enables you to do most of your
management functions through either the MR9600-100’s diagnostic serial connector or, more likely, by
using Telnet. When first setting up your MR9600-100, you must use the MR9600-100 diagnostic serial
connector to set up the system’s TCP/IP information, such as its IP address, default gateway IP address,
etc., as described in the MR9600-100 Quick Start in Chapter 3.
3 Operation
When you first connect with the MR9600-100, either in Telnet or by using the serial port, you will be
prompted for a user ID and password. Enter the correct user ID and password for the desired security level
(see “Security” on page 18). Once you are logged in, the screen should show the following information.
Welcome to MultiModemManager MR9600-100
version 2.20 (APR 24 1998 18:06:37) 4/29/1998 3:14pm
Press any key to start system
manually...starting............done
Username: supervisor
Password *********
[0] A:\ #
#
The command line prompt is the current directory followed by a
MR9600-100’s two drives, A and B, by using the cd command or by typing A: or B:. A standard set of DOS
and UNIX file system commands are available, though in limited fashion (no wildcards are supported,
etc.). See Chapter 5 for command functions and limitations.
Some commands allow you to monitor activity on the CommPlete’s modems. The commands
getmodems, getcalls, and getfaults allow you to see the current state of the modems, the connection
history of the modems, and the history of faults on the modems, respectively.
Information that does not fit on the screen is displayed one page at a time by using a --MORE--
prompt. When you see this prompt, you have the option of quitting the list by typing Q or continuing the
list by typing anything else.
Some commands allow you to change the current state of the modems. With the commands oosset,
oosclear, reset, and config, you can set modems in or out of service; reset them, or configure them,
respectively.
character. You can switch between the
Use the logout command when you are done using the command line interface, in order to leave the
MR9600-100 in a secure state.
For a complete list of the MR9600-100’s commands, see Chapter 5.
CommPlete Communications Server 19
Page 26

MR9600-100 User Guide
Telnet Interface
Telnet is a standard Internet protocol that allows a remote connection between two systems connected to a
TCP/IP network such as the Internet. The MR9600-100 can be managed remotely by using Telnet. Telnet
can give the user access to all management functions through the command line interface.
There is an inactivity timer associated with the Telnet session. If there is no activity for 10 minutes, then
the Telnet session will close.
Web Browser Interface
The MR9600-100 can be monitored and controlled from a World Wide Web browser such as Netscape
Navigator version 2.0 or later, or Microsoft Internet Explorer version 3.0 or later.
Two interfaces are available: an HTML framed interface (in which the browser screen is split into separate
frames) and a non-framed interface. To use the framed interface, type the following URL in your browser’s
URL entry line and press E
http://111.222.333.444/mmm/main.html
For the non-framed interface, use the following URL:
NTER:
http://111.222.333.444/mmm/standard.html
In both examples, 111.222.333.444 represents your card’s IP address.
20 CommPlete Communications Server
Page 27

Logging In
Whenever you access the MR9600-100 for the first time during a browser session, you will be prompted for
a user ID and password. You must log in as someone of security level operator or higher to get access to the
Web interface.
Both the framed and the non-framed interfaces present logged-in users with a list of available views
(Framed or Standard), a list of operations, and a list of information views. These are all available via
hypertext links.
Getting Modem Information
In each interface the same information is available in table format. There are tables of information about
modems, calls on modems, modem and system faults, and system version. In the framed version these
tables appear in frames on a single HTML page; in the non-framed version each table appears on a
separate HTML page.
Controlling Modems
3 Operation
In either interface, the user can reset modems, set modems in or out of service, and configure modems.
When the user selects the hot link for an operation, a form appears in which the user can enter in list
format (e.g., 1A:3C,15B) the modems that are to have the desired operation performed on them. The
operation is performed when the user selects the action button (e.g., Config if the user is configuring
modems).
Web Interface Limitations
The Web interface does not provide a full management interface. Full management is provided by our
MultiModemManager software, or through the use of a third party SNMP manager. However, once the
system is set up, most management can be done using the Web browser interface.
FTP Interface
FTP (File Transfer Protocol) is a standard Internet protocol that allows the transfer of files between two
systems connected to a TCP/IP network, such as the Internet. The MR9600-100 acts as an FTP server so
that FTP clients can send and receive files to and from it.
You need FTP to transfer configuration files (*.cfg) to and from your system. If you plan to use
MultiModemManager security, you need FTP to transfer security files (*.db) to and from your system. If
you wish to analyze event information, you also need FTP to transfer event files (*.hr) from the MR9600100 to a management computer where you can run the Statistical Analyzer on them.
Note: When logging in, you must use the Supervisor user name and password.
CommPlete Communications Server 21
Page 28

Page 29

4 Commands
82067502
Page 30

MR9600-100 User Guide
Parameter Types
Many MR9600-100 commands require a parameter to complete the command. Most of the required
parameters fall into one of the four following types.
Pathname
Description: A DOS-style path and/or file name. A partial path assumes the current directory.
Full
pathname
Partial
pathname
The preceding partial pathname gives the same result as a:\mmm\MR9600-100.ini if the current working
directory is a:\mmm.
Device
Description: A list of modems or T1 devices separated by commas. No spaces are allowed. A colon selects
a range of devices from the device preceding the colon through the device following the colon.
The device identifier includes the device’s slot number and device letter. A CommPlete Communications
Server has 16 slots, numbered from left to right, with the RASCards occupying slots 1, 5, 9, and 13. Each
modem card contains 8 modems, represented by the
fourth modem in slot 7.
example: a:\mmm\MR9600-100.ini
example: MR9600-100.ini
letters A, B, C, D, E, F, G,
and H. Thus, 7D is the
Examples:
The following two strings each select modems 1A, 2A, 2B, 2C, 2D, 2E, 2F, 2G, 2H, 3A, 3B, and 4C:
1A,2A:3B,4C
1A,2A,2B,2C,2D,2E,2F,2G,2H,3A,3B,4C.
Note: T1 devices can exist only at 1b, 1c, 5b, 5c, 9b, 9c, 13b, and 13c.
IP Address
Description: An IP address string consisting of four decimal numbers separated by periods. Each number
may have up to three digits.
Example: 192.168.4.25
24 CommPlete Communications Server
Page 31

4 Commands
IP Address Mask
Description: An IP address string consisting of four decimal numbers separated by periods, in which only
the decimal numbers 255 and 0 are permitted. It is used to select a set or range of IP addresses. The
standard Class A mask is 255.0.0.0, the standard Class B mask is 255.255.0.0, and the standard Class C
mask is 255.255.255.0.
Example: 255.255.255.0
CommPlete Communications Server 25
Page 32

MR9600-100 User Guide
Commands Listed by Function
This section lists the MR9600’s commands alphabetically by the following functions: Display,
Environment, File, Modem Control, and Security.
For an expanded description of each command, see “Command Reference” on page 33.
Display
Command Name Parameter Description
getcalls Device Displays call traffic for the device
getfaults Device Displays faults for the device
getmodems Device Displays the current status for the device
getpowerstatus, getps None Displays the main power supply/supplies status and
which segments are powered up
getrack Device Displays the chassis type
getslots None Displays hardwrae type and location in rack
gettemp None Displays the internal ambient temperature of the rack
in degrees Fahrenheit and Celcius.
Environment
Command Name Parameters Description
bpstatus None Displays the rack’s back plane polling activity
between the controller and each powered device
cl, clock None Displays current date and time
date None Prompts you for current date
getgateway None Display the configured gateway address
getip None Display the configured IP address
Getprichannels Device Retrieve the current status of each B-channel and
modem channel under the control of the PRI card.
getreadcommunity None Displays the Read community settings
getsendtrap None Displays whether traps are being sent or not.
getsubnet None Display the configured subnet mask
gettrap None Display the configured trap address
getwritecommunity None Displays the Write community settings
more Pathname Displays the contents of a file, one apge at a time
priocbchannel Device Set the specified channel in service
priosbchannel Device Set the specified channel out of service
pristatus Specifier Retrieve the current status of the specified PRI card
prisetup Specifier Set configuration parameters for a PRI card.
se, setenviron None Conteoller configuration utility (a menu drivin system
26 CommPlete Communications Server
used to set global defaults and configure system
devices)
Page 33

4 Commands
setgateway IP Address Configure the gateway address
setip IP Address Configure the IP address
setpollingoff Device Disables the controller generated polling to specified
device
setpollingon Device Re-enables polling between controller and specified
device
setrasostype Device Lets the controller know what operating system is
loaded on each segment
setreadcommunity None Change the Read community settings
setsendtrap On/Off Changes the status of sending traps.
setsubnet IP Address Mask Configure the subnet mask
settrap IP Address Configured the trap address
setwritecommunity None Change the Write community settings
t1cfg Device Sends stored configuration data to a T1 device
t1debug Device Displays status of AB Signalling bits for both the
transmit and receive directions of each DSO channel
for the specified T1 device within the CommPlete
t1setup Device Configures a T1 device
t1status Device Displays the status of a T1 device
time None Prompts you for current time
update Pathname
Device
uptime None Displays date and time since the last boot
version, ver None Displays the version number and release date of the
Updates firmware of the controller, T1 cards, or
modems.
CC9600 Controller’s Operating System
File
Command Name Parameters Description
cat Pathname Display the contents of an ASCII text file
cd, chdir Pathname Change to the specified directory
copy, cp Pathname1
Pathname2
del, delete Pathname Delete a file
dir Pathname Display the contents of a directory
Copy a file from Pathname1 to Pathname2
download Pathname Download a file from the MR9600 controller
ls Pathname Display the contents of a directory
md, mkdir Pathname Make directory
online Device Allows the user to perform AT commands with the
CommPlete Communications Server 27
selected device
Page 34

MR9600-100 User Guide
rd, remdir Pathname Remove directory
ren, rename Pathname Rename a file
rendir Pathname Rename a directory
rm Pathname Delete a file
sync None Writes outstanding events to the Log directory
type Pathname Display the contents of an ASCII text file
upload Pathname Upload a file to the MR9600.
Modem Control
Command Name Parameters Description
cfg, configure Device Configure the specified device with the configuration
getfkey1–getfkey4 None Displays the current value for the function keys used
oc, oosclear Device Set the device at specified device In Service
online Device Go online with a device to check or set configuration
file associated (via SNMP) with that device
when online with a device
information
oosset, os Device Set the specified device Out Of Service
reset, rs Device Reset the specified device
setconfig Pathname
Device
setfkey1–setfkey4 Command String Configures the current function key values for use
test Device Performs a specific diagnostic test to an indivisual or
usage Specifier Displays how many modems: received or made calls,
Associates a configuration file with a device
when online with a device
range of modems
were OOS, were not responding, or were free
Security
Command Name Parameters Description
lo, logout None Logs you off of the system so next user has to login
to get access
passwd, password None Will prompt you for old, new, and new password
security None Allows the modification of a subordinate security
levels user name and password
userid None Will prompt you for old, new, and new user ID
whoami None Tells you what user is currently logged in
28 CommPlete Communications Server
Page 35

4 Commands
System
Command Name Parameters Description
A: None Changes the drive the user is to work with
B: None Changes the drive the user is to work with
abort None Cancels update procedure of modem and T1 cards
boot None Reboot MR9600
bye None Logs the user off the system
exit None Logs the user off the system
format Specifier Initialize the specified drive to empty
history None Display command history buffer
quit None Logs the user off the system
mount Specifier Make the specified drive available to the operating
system
readme None Display information about most recent changes to
firmware
unmount Specifier Remove the drive from the operating system
CommPlete Communications Server 29
Page 36

MR9600-100 User Guide
Commands Listed by Security Level
This section lists the MR9600’s commands by security level. The security levels are Guest, Operator, and
Supervisor.
For an expanded description of each command, see “Command Reference” on page 33.
Guest
Command Name Parameters Description
A: None Changes the drive the user is to work with
B: None Changes the drive the user is to work with
bye None Logs the user off the system
cat Pathname Display the contents of an ASCII text file
cd, chdir Pathname Change to the specified directory
cl, clock None Displays current date and time
dir Pathname Display the contents of a directory
exit None Logs the user off the system
getgateway None Display the configured gateway address
getip None Display the configured IP address
getpowerstatus, getps None Displays the main power supply/supplies status and
which segments are powered up
getsendtrap None Displays whether traps are being sent or not.
getsubnet None Display the configured subnet mask
gettemp None Displays the internal ambient temperature of the rack
in degrees Fahrenheit and Celcius.
gettrap None Display the configured trap address
history None Display command history buffer
logout, lo None Logs you off of the system so next user has to login
to get access.
ls Pathname Display the contents of a directory
more Pathname Displays the contents of a file, one apge at a time
passwd, password None Will prompt you for old, new, and new password
quit None Logs the user off the system
security None Allows the modification of a subordinate security
levels username and password
t1status Device Displays the status of a T1 device
type Pathname Displays the contents of an ASCII text file
userid None Prompts you for old,and new user id
version, ver None Displays the version number and release date of the
whoami None Tells you what user is currently logged in
30 CommPlete Communications Server
CC9600 Controller’s Operating System
Page 37

4 Commands
Operator
Command Name Parameters Description
abort None Cancels update procedure of modem and T1 cards
cfg, configure Device Configures the specified device with the configuration
file associated (via SNMP) with that device
copy, cp Pathname1
Pathname2
date, d None Prompts you for current date
getcalls Device Displays call traffic for the device
getfaults Device Displays faults for the device
getfkey1–getfkey4 None Displays the current value for the function keys used
getmodems Device Displays the current status for the device
getrack None Displays the model number and basic description of
getslots None Displays hardware type and location in rack
oc, oosclear Device Sets the device at specified device In Service
online Device Allows the user to perform AT commands with the
oosset, os Device Sets the specified device Out Of Service
pristatus Specifier Retrieve the current status of the specified PRI card
prisetup Specifier Set configuration parameters for a PRI card.
readme None Displays information about most recent changes to
Copies a file from Pathname1 to Pathname2
when online with a device
the chassis
selected device
firmware
reset, rs Device Resets the specified device
se, setenviron None Conteoller configuration utility (a menu drivin system
used to set global defaults and configure system
devices)
setconfig Pathname
Device
setfkey1–setfkey4 Command String Configures the current function key values for use
setrasostype Device Lets the controller know what operating system is
sync None Writes outstanding events to the Log directory
t1cfg Device Sends stored configuration data to T1 device
test Device Performs a specific diagnostic test to an indivisual or
time None Prompts you for current time
update Pathname
Device
uptime None Displays date and time since the last boot
Associates a configuration file with a device
when online with a device
loaded on each segment
range of modems
Updates the firmware of the controller, a T1 device,
or a modem
CommPlete Communications Server 31
Page 38

MR9600-100 User Guide
usage Specifier Displays how many modems: received or made calls,
Supervisor
Command Name Parameters Description
boot None Reboots MR9600
bpstatus None Displays the rack’s back plane polling activity
del, delete Pathname Deletes a file
download Pathname Downloads a file from the MR9600 controller
format Specifier Initialize the specified drive to empty
getreadcommunity None Displays the Read community settings
getwritecommunity None Displays the Write community settings
md, mkdir Pathname Makes a directory
mount Specifier Make the specified drive available to the operating
were OOS, were not responding, or were free
between the controller and each powered device
system
rd, remdir Pathname Removes directory
ren, rename Pathname Renames a file
rendir Pathname Renames a directory
rm Pathname Deletes a file
setgateway IP Address Configures the gateway address
setip IP Address Configures the IP address
setpollingoff Device Disables the controller generated polling to specified
device
setpollingon Device Re-enables polling between controller and specified
device
setreadcommunity None Changes the Read community settings
setsendtrap On/Off Changes the status of sending traps
setsubnet IP Address Mask Configures the subnet mask
settrap IP Address Configures the trap address
setwritecommunity None Changes the Write community settings
t1debug Device Displays status of AB Signalling bits for both the
transmit and receive directions of each DSO channel
for the specified T1 device within the CommPlete
t1setup Device Configures a T1 device
unmount Specifier Remove the drive from the operating system
upload Pathname Uploads a file to the MR9600.
userid None Changes the login username of the Supervisor
32 CommPlete Communications Server
Page 39

Command Reference
This section describes the MR9600’s commands in alphabetic order. For a description of the parameters,
see “Parameter Types” on page 24.
?
4 Commands
Parameter:
Description: Displays an alphabetic list of the available commands.
Security: Guest
None
A:
Parameter:
Description: Changes the drive the user is to work with.
Security: Guest
Example:
[01] B:\# A:
[02] A:\#
None
!!
Parameter:
Description: Repeats the last command that has been saved in the history buffer. The command that is
executed is then placed into the history buffer at the current command index. A list of previously executed
commands can be printed by using the history command. See
None
history
.
Security: Guest
Example:
[0] A:\ # clock
10/29/1996 1:20pm
[1] A:\ # !!
10/29/1996 1:20pm
CommPlete Communications Server 33
Page 40

MR9600-100 User Guide
!n
Parameter:
Command history index.
Description: Repeats the command whose index is indicated by the parameter. The command index is the
number shown in the prompt when the command is executed. The command that is executed is then
placed into the history buffer at the current command index. A list of previously executed commands can
history
be printed by using the history command. See
.
Security: Guest
Example:
[0] A:\ # clock
10/29/1996 1:20pm
[1] A:\ # ver
Version E-1.02 (Oct 24 1996 18:06:37)
[2] A:\ # !0
10/29/1996 1:20pm
!a
Parameter: The initial characters of the command to search for
Description: Repeats the command whose initial characters are indicated by the parameter. The
command that is executed is then placed into the history at the current command index. A list of
history
previously executed commands can be printed by using the history command. See
.
Security: Guest
Example:
[0] A:\ # clock
10/29/1996 1:20pm
[1] A:\ # ver
Version E-1.02 (Oct 24 1996 18:06:37)
[2] A:\ # !cl
10/29/1996 1:20pm
34 CommPlete Communications Server
Page 41

abort
4 Commands
Parameter:
Description: Cancels update procedure of modem and T1 cards
Security: Operator
Example:
[03] B:\MMM # Update hd8-100d.hex 3a
Update started
[04] B:\MMM # Abort
Are you sure you wish to abort the update? (y/n) y
Aborting ...
[05]B:\MMM #
None
B:
Parameter:
Description: Changes the drive that the user is to work with
Security: Guest
Example:
[01] A:\# B:
none
[02] B:\#
boot
Parameter:
Description: Reboots the system by performing a reset of the MR9600 controller card. A prompt asks you
to confirm your choice. If you wish to reboot the system, enter y. Any other key will halt the reboot
operation.
Security: Supervisor
Example:
[0] A:\ # boot
Are you sure you wish to reboot the controller card?
(y/n)
None
CommPlete Communications Server 35
Page 42

MR9600-100 User Guide
bpstatus
Parameter:
None
Description: Displays the rack’s back plane polling activity between the controller and each powered
device. Each correctly operating device responds to three specific polls; “Busy”, “No Response”, and “No
Acknowledgement”. If the device does not respond the counter/s will increment. The example below
shows all devices in a fully loaded CC9600 are responding correctly.
Security: Supervisor
Example:
[1] A:\# bpstatus
Backplane Status: Busy:NoResp:NoAck
-:no polling 0:count of 0 1-9: tens digit plus 1 *:>=ninety
Slot ABCDEFGHIJKLMNOP
1: 000 000
2: 000 000 000 000 000 000 000 000
3: 000 000 000 000 000 000 000 000
4: 000 000 000 000 000 000 000 000
5: 000 000
6: 000 000 000 000 000 000 000 000
7: 000 000 000 000 000 000 000 000
8: 000 000 000 000 000 000 000 000
9: 000 000
10: 000 000 000 000 000 000 000 000
11: 000 000 000 000 000 000 000 000
12: 000 000 000 000 000 000 000 000
13: 000 000
14: 000 000 000 000 000 000 000 000
15: 000 000 000 000 000 000 000 000
16: 000 000 000 000 000 000 000 000
[2] A:\ #
bye
Parameter:
Description: Logs the User off of the system
Security: Guest
Example:
[03] B:\# Bye
Bye
Username:
None
36 CommPlete Communications Server
Page 43

cat
4 Commands
Parameter:
Description: Displays the contents of the ASCII text file referred to by
Security: Guest
Limitations: The cat command is more similar to the DOS type command than it is to the UNIX cat
command.
Example:
[0] A:\MMM # cat mr9600.ini
[SecurityFile]
NumberOfFile = 1
1 = mr9600.db
[SecurityConfig]
UseridPrompt = ^m^jUserid:
PasswordPrompt = ^m^jPassword:
WelcomeMsg = ^m^jConnected to MultiCommManager System:^m^j
...
Pathname
Pathname
.
cd, chdir
Parameter:
Description: Change directory. The cd command sets the current working directory to
Security: Guest
Pathname
Pathname
.
Example:
[0] A:\ # cd mmm
[1] A:\MMM #
cfg, configure
Parameter:
Description: Configure the specified device with the configuration file associated via SNMP with that
device. The cfg command causes the configuration file associated with the modems specified by
be sent to them. If the modem is connected, the cfg commands will be ignored.
Security: Guest
Example:
[0] A:\MMM # cfg 1a,2a:2c
[1] A:\MMM #
Device
Device
chdir
See
cd.
to
CommPlete Communications Server 37
Page 44

MR9600-100 User Guide
cl, clock
Parameter:
Description: Displays current date and time (24 hour clock).
Security: Guest
Limitations: The time does not change automatically with daylight savings time.
Example:
[0] A:\MMM # cl
4/15/97 1:20pm
[1] A:\MMM #
None
configure
See
cfg.
copy, cp
Parameter:
Description: Copy the file
Security: Operator
Pathname1 Pathname2
Pathname1
to
Pathname2
. If
Pathname2
exists, it is destroyed.
Example:
[0] A:\MMM # copy mr9600.ini mr9600.old
[1] A:\MMM #
d, date
Parameter:
Description: Displays the MR9600’s current date and prompts you for a new date.
Security: Operator
Example:
[0] A:\MMM # d
The current date is: 5/15/1996
Enter the new date: mm/dd/yyyy 10/29/96
[1] A:\MMM # cl
10/29/96 1:37pm
None
del, delete, rm
Parameter:
Pathname
38 CommPlete Communications Server
Page 45

4 Commands
Description: Deletes the file specified by
Pathname
. The file is permanently destroyed, and cannot be
recovered.
Security: Supervisor
Example:
[0] A:\MMM # del mr9600.old
[1] A:\MMM #
dir, ls
Parameter:
Description: The dir and ls commands display the contents of the current directory by file name, file size,
and date; they also show the available space on the drive. If no parameter is used, the dir and ls commands
list only the files of the current directory.
Security: Guest
Limitations: The output of the ls command is more similar to that of the DOS dir command than it is to
that of the UNIX ls command.
Example:
[0] A:\MMM # dir
The current directory is 'A:\MMM'
Pathname or none
.. <DIR>
... <DIR>
MR9600.INI 965 12/19/1996 2:53pm
MR9600.GP 4155 12/18/1996 4:54pm
MR9600.CNF 12221 12/19/1996 11:22am
MR9600.INV 3812 12/19/1996 2:54pm
MR9600.DB 792 12/19/1996 2:56pm
DEFAULT.CFG 0 12/18/1996 1:56pm
MR9600.SAV 192 12/18/1996 11:56am
MR.LOG <DIR> 11/25/1996 3:50pm
7 file(s) 22137 bytes
3 dirs(s) 1015296 bytes free
[1] A:\MMM #
CommPlete Communications Server 39
Page 46

MR9600-100 User Guide
download
Parameter:
Description: Downloads the file specified by
Pathname
pathname
from the MR9600 to a computer connected to the
MR9600 controller’s serial port connector on the back of the CC9600 chassis. The files are downloaded as
hexadecimal values in ASCII text format.
Note: For debugging use only under the direction of technical support personnel. Files will normally be
transferred using FTP.
Security: Supervisor
Limitations: The file transfer does not respond to flow control.
Example:
[0] A:\MMM # download mr9600.old
[5b][46][61][75][6c][74][41][6c][61][72][6d][73][5d][0d][0a][43]
[61][72][64][20][49][6e][73][74][61][6c][6c][65][64][20][3d][20]
[4f][4e][2c][30][2c][4e][4f][4e][45][0d][0a][43][61][72][64][20]
[52][65][6d][6f][76][65][64][20][3d][20][4f][4e][2c][30][2c][4e]
[4f][4e][45][0d][0a][50][6f][77][65][72][20][53][75][70][70][6c]
[79][20][46][61][69][6c][75][72][65][20][3d][20][4f][4e][2c][30]
[2c][4e][4f][4e][45][0d][0a][44][69][73][63][6f][6e][6e][65][63]
[74][3a][20][50][6f][77][65][72][4f][6e][20][6f][72][20][57][61]
[74][63][68][44][6f][67][20][3d][20][4f][4e][2c][30][2c][4f][4f]
...
[1] A:\MMM #
exit
Parameter:
Description: Logs the User off of the system.
Security: Guest
Example:
[01] A:\# exit
Bye.
Username:
None
format
Parameter:
Description: Initialize the specified drive to empty. All data is erased.
Security: Supervisor
Example:
[01] A:\# format b:
[02] B:\#
Specifier
40 CommPlete Communications Server
Page 47

getcalls
4 Commands
Parameter:
Description: Displays call traffic for the modems listed in
Device or none
device
. If there is no parameter, call traffic is
listed for every installed modem.
Security: Supervisor
Example:
[0] A:\ #
[1] A:\ # getcalls
Modem DateTime Connect Info. Call Duration User ID Phone Number
1A No Calls
1B No Calls
1C 05-21 08:15:02 A-33600-V.42bis 000-00:00:08
1C 05-21 08:15:41 A-33600-V.42bis 000-00:00:08
1C 05-21 08:32:58 A-33600-V.42bis 000-00:00:09
2A 05-21 08:13:48 O-33600-V.42bis 000-00:00:08 DT13
2A 05-21 08:14:26 O-33600-V.42bis 000-00:00:09 DT13
2A 05-21 08:15:02 O-33600-V.42bis 000-00:00:08 DT13
2A 05-21 08:16:20 O-33600-V.42bis 000-00:00:08 DT13
2A 05-21 08:33:02 Originate Open Call DT13
2B 05-21 08:13:47 O-33600-V.42bis 000-00:00:08 DT16
...
[2] A:\ #
getfaults
Parameter:
Description: Displays faults for the modems listed in
Device or none
device
. If there is no parameter, faults are listed for
every installed modem.
Security: Operator
Example:
[0] A:\ # getfaults
Modem Date Time Fault Description
1 06-05 10:18:51 Rack Online
06-05 10:19:17 Remote management session initiated
11 06-05 10:19:26 Modem card Removed
7 06-05 10:19:31 Modem card Removed
8 06-05 10:19:46 Modem card Installed
[1] A:\ #
[2] A:\ # getfaults 3a:3c
3A No fault/status found
3B 05-21 08:27:1 Modem reset by rack controller card
3C No fault/status found
[3] A:\ #
CommPlete Communications Server 41
Page 48

MR9600-100 User Guide
getfkey1, getfkey2, getfkey3, getfkey4
Parameter:
None
Description: Displays the current configuration for the specified online function key. These function keys
can be used when one is online with a modem.
See online
.
Security: Operator
Example:
[0] A:\ # getfkey1
Function Key 1: 'ATL5'
[1] A:\ # getfkey2
Function Key 2: 'ATL6'
[2] A:\ # getfkey3
Function Key 3: 'ATL5L6L7'
[3] A:\ # getfkey4
Function Key 4: 'ATI1I2I3I4'
getgateway
Parameter:
Description: Displays the default gateway IP address for the MR9600, if one is set.
None
Security: Guest
Example:
[0] A:\MMM # getgateway
Gateway IP Address = 199.199.99.1
[1] A:\MMM #
getip
Parameter:
Description: Displays the MR9600’s IP address.
Security: Guest
Example:
[0] A:\MMM # getip
IP Address = 199.199.99.9
[1] A:\MMM #
None
42 CommPlete Communications Server
Page 49

getmodems
4 Commands
Parameter:
Description: Displays the current status for the modems specified by
Device or none
device
. If there is no parameter,
current status is displayed for every installed modem.
Security: Operator
Example:
[0] A:\ # getmodems
Modem Current State Config Filename Modem Group Name Modem
Inventory
1A Idle default.cfg Group1 Dial Up No Security
1B Idle default.cfg Group1 Dial Up No Security
1C Idle default.cfg Group1 Dial Up No Security
2A Idle default.cfg Group1 Dial Up Call In Security
2B Dial default.cfg Group1 Dial Up Call In Security
2C Ring default.cfg Group1 Dial Up Call In Security
3A Dial default.cfg Group1 Dial Up Callback Security
3B Ring default.cfg Group1 Dial Up Callback Security
3C Idle default.cfg Unassigned Dial Up Callback Security
4A Idle default.cfg Group1 Dial Up No Security
4B Idle default.cfg Unassigned Dial Up No Security
4C Idle default.cfg Group1 Dial Up No Security
[1] A:\ #
[2] A:\ # getmodems 4a:5c
4A Idle default.cfg Group1 Dial Up No Security
4B Idle default.cfg Unassigned Dial Up No Security
4C Idle default.cfg Group1 Dial Up No Security
5A Not Present default.cfg Unassigned Dial Up No Security
5B Not Present default.cfg Unassigned Dial Up No Security
5C Not Present default.cfg Unassigned Dial Up No Security
[3] A:\ #
getprichannels
Parameter:
Description: Displays the current status of each of the B-channels and modem channels under the control
of the PRI card.
Security: Supervisor
Example:
getprichannels 2a
getting PRI Info
Bchannels
Chan 01: Ready Chan 02: Ready
Chan 03: Ready Chan 04: Ready
Chan 05: Ready Chan 06: Ready
Chan 07: Ready Chan 08: Ready
Chan 09: Ready Chan 10: Ready
Chan 11: Ready Chan 12: Ready
Chan 13: Ready Chan 14: Ready
Chan 15: Ready Chan 16: Ready
Chan 17: Ready Chan 18: Ready
Chan 19: Ready Chan 20: Ready
Device
CommPlete Communications Server 43
Page 50

MR9600-100 User Guide
Chan 21: Ready Chan 22: Ready
Chan 23: Ready Chan 24: Ready
Chan 25: Ready Chan 26: Ready
Chan 27: Ready Chan 28: Ready
Chan 29: Ready Chan 30: Ready
Modem Channels (card 1)
Chan 01 (3A): Idle Chan 02 (3B): Idle
Chan 03 (3C): Idle Chan 04 (3D): Idle
Chan 05 (3E): Idle Chan 06 (3F): Idle
Chan 07 (3G): Idle Chan 08 (3H): Idle
Chan 09 (3I): Idle Chan 10 (3J): Idle
Chan 11 (3K): Idle Chan 12 (3L): Idle
Chan 13 (3M): Idle Chan 14 (3N): Idle
Chan 15 (3O): Idle Chan 16 (3P): Idle
Modem Channels (card 2)
Chan 01 (4A): Idle Chan 02 (4B): Idle
Chan 03 (4C): Idle Chan 04 (4D): Idle
Chan 05 (4E): Idle Chan 06 (4F): Idle
Chan 07 (4G): Idle Chan 08 (4H): Idle
Chan 09 (4I): Idle Chan 10 (4J): Idle
Chan 11 (4K): Idle Chan 12 (4L): Idle
Chan 13 (4M): Idle Chan 14 (4N): Idle
Chan 15 (4O): Idle Chan 16 (4P): Idle
getps, getpowerstatus
Parameter:
None
Description: Displays the main power supply (or supplies) status and which segments are powered up.
Security: Guest
Example:
[02] A:\ # getpowerstatus
Left Power Supply: Installed, All outputs good
Right Power Supply: Installed, All outputs good
First Segment: Powered
Second Segment: Not Powered
Third Segment: Not Powered
Fourth Segment: Not Powered
[03] A:\ #
gettemp
Parameter:
Description: Displays the internal ambient temperature of the rack in Fahrenheit and Celsius.
Security: Guest
Limitations: CC9600 Only
None
Example:
[03] A:\ # gettemp
76.4 degrees Fahrenheit
24.7 degrees Celsius
44 CommPlete Communications Server
Page 51

getrack
4 Commands
Parameter:
Description: Displays the current Rack Type.
Security: Supervisor
Example:
getrack
Chassis Type: CC2400 single segment chassis
[2] A:\ #
None
getreadcommunity
Parameter:
Description: Displays the Read community settings.
Security: Supervisor
Example:
[0] A:\MMM # getreadcommunity
Read community = public
Enter SETREADCOMMUNITY <community-string> to change it.
[1] A:\ #
None
getsendtrap
Parameter:
Description: Displays whether or not traps are being sent from the MR9600. See
Security: Guest
Example:
[0] A:\ # getsendtrap
The sending of traps is enabled.
[1] A:\ # setsendtrap off
The sending of traps has been successfully disabled.
[2] A:\ # getsendtrap
The sending of traps is disabled.
None
setsendtrap
.
CommPlete Communications Server 45
Page 52

MR9600-100 User Guide
getslots
Parameter:
Description: Displays hardware type and location within the rack. This command also displays the
number of devices in each slot.
Security: Operator
Example:
[0] A:\ # getslots
1 MTRAS96-T1A 2
2 MT5634HD8 8
3 MT5634HD8 8
4 MT5634HD8 8
None
getsubnet
Parameter:
Description: Displays the subnet mask for the MR9600.
Security: Guest
Example:
[0] A:\MMM # getsubnet
Subnet mask = 255.255.255.0
None
[1] A:\MMM #
gettrap
Parameter:
Description: Displays the default trap IP address for the MR9600, if one is set. This is the address to which
MR9600-generated traps, such as fault and status traps, are sent.
Security: Guest
Example:
[0] A:\MMM # gettrap
Trap IP Address = 199.199.99.91
[1] A:\MMM #
None
getwritecommunity
Parameter:
Description: Displays the Write community settings.
Security: Supervisor
None
Example:
46 CommPlete Communications Server
Page 53

[0] A:\MMM # getwritecommunity
Write community = public
Enter SETWRITECOMMUNITY <community-string> to change it.
[1] A:\MMM #
history
4 Commands
Parameter:
None
Description: Displays the command history buffer.
Security: Guest
Example:
[4] A:\ # history
0 VER
1 CLOCK
2 VER
3 CLOCK
4 HISTORY
[5] A:\ #
lo, logout
Parameter:
Description: The logout command ends the session for the current user, and displays the userid
prompt on the monitor.
None
Security: Guest
Example:
[0] A:\MMM # lo
Bye.
UserName:
ls
See
dir.
CommPlete Communications Server 47
Page 54

MR9600-100 User Guide
md, mkdir
Parameter:
Pathname
Description: Make directory. The md command creates a directory with the path and file name assigned
by the
pathname
parameter.
Security: Supervisor
Example:
[0] A:\MMM # md mr.log
[1] A:\MMM # cd mr.log
[2] A:\MMM\MR.LOG #
more
Parameter:
Description: Displays the contents of a file, one page at a time. The user may press any key to continue, or
type the letter Q to quit.
Security: Guest
Example:
[04] A:\MMM # more mr4800.ini
[SecurityConfig]
UseridPrompt = ^m^jUserid:
PasswordPrompt = ^m^jPassword:
.
.
.
[SecurityFile]
NumberOfFile=0
[NetWorkDefaults]
Default Gateway = 192.168.10.151
--More--
Filename or Path
mount
Parameter:
Description: Make the specified drive available to the operating system.
Security: Supervisor
Example:
[01] [No Drive Mounted] # mount a:
[02] A:\ #
48 CommPlete Communications Server
Specifier
Page 55

oc, oosclear, oosclr
4 Commands
Parameter:
Device
Description: Puts the specified devices in service by clearing the Out Of Service flag.
Security: Operator
Limitations: There is no effect if the Out Of Service flag is not set for the modems.
Example:
[0] A:\MMM # oc 1a
[1] A:\MMM #
online
Parameter:
Description: Goes online in command mode with a device to check configuration information and
firmware version information. This does not create a fully functional terminal, but is available to set and
check configuration information.
Security: Operator
Example:
[0] A:\ # online 6a:6c
==== Online with device: Slot 06 Device A ====
Device
==== type “<esc> and ?” to display help information ====
<esc>?
+--------------------------------------+
! <esc> again to exit terminal mode !
! b to move back in device list !
! c to clear the screen !
! n to move forward in device list !
! 1 send stored command 1 to device !
! 2 send stored command 2 to device !
! 3 send stored command 3 to device !
! 4 send stored command 4 to device !
! ? to display this help menu !
+--------------------------------------+
atl5
B1 E1 M1 Q0 R0 V1 X4 &E1 &E4 &E6 &E8 &E10 &E13 &E15 %C0 #C1 *C0
&C1 *H0
$MB33600 $SB115200 $BA0 &W1
CommPlete Communications Server 49
Page 56

MR9600-100 User Guide
OK
<esc>n
==== Current device is: Slot 6 Device B ====
atl5
B1 E1 M1 Q0 R0 V1 X4 &E1 &E4 &E6 &E8 &E10 &E13 &E15 %C0 #C1 *C0
&C1 *H0
$MB28800 $SB57600 $BA0 &W1
OK
<esc>n
==== At end of list: Slot 6 Device C ====
atl5
B1 E1 M1 Q0 R0 V1 X4 &E1 &E4 &E6 &E8 &E10 &E13 &E15 %C0 #C1 *C0
&C1 *H0
$MB28800 $SB57600 $BA0 &W1
OK
<esc>b
==== Current device is: Slot 6 Device B ====
<esc><esc>
Goodbye!
[1] A:\ #
oosset, os
Parameter:
Description: Sets the Out Of Service flag for the modems specified by
Security: Operator
Limitations: If the modems are connected when the command is issued, they will remain off hook when
the call is completed.
Example:
[0] A:\MMM # os 1a
[1] A:\MMM #
Device
device
.
50 CommPlete Communications Server
Page 57

passwd, password
4 Commands
Parameter:
None
Description: The passwd command allows you to change your password by prompting you for the
current password and a new password.
Security: Guest
Example:
[0] A:\MMM # passwd
Current password: *****
New password: *****
Repeat new password: *****
Security information updated
[1] A:\MMM #
priosbchannels
Parameter: <
Description: Sets the specified channel out of service
Security: Supervisior
Example:
[03] A:\# priosbchannel 2a.1
device>.<channel>
[04] A:\# getprichannels 2a
getting PRI Info
Bchannels
Chan 01: OOS Chan 02: Ready
Chan 03: Ready Chan 04: Ready
Chan 05: Ready Chan 06: Ready
Chan 07: Ready Chan 08: Ready
Chan 09: Ready Chan 10: Ready
Chan 11: Ready Chan 12: Ready
Chan 13: Ready Chan 14: Ready
Chan 15: Ready Chan 16: Ready
Chan 17: Ready Chan 18: Ready
Chan 19: Ready Chan 20: Ready
Chan 21: Ready Chan 22: Ready
Chan 23: Ready Chan 24: Ready
Chan 25: Ready Chan 26: Ready
Chan 27: Ready Chan 28: Ready
Chan 29: Ready Chan 30: Ready
Modem Channels (card 1)
Chan 01 (3A): Idle Chan 02 (3B): Idle
Chan 03 (3C): Idle Chan 04 (3D): Idle
Chan 05 (3E): Idle Chan 06 (3F): Idle
Chan 07 (3G): Idle Chan 08 (3H): Idle
Chan 09 (3I): Idle Chan 10 (3J): Idle
Chan 11 (3K): Idle Chan 12 (3L): Idle
Chan 13 (3M): Idle Chan 14 (3N): Idle
Chan 15 (3O): Idle Chan 16 (3P): Idle
Modem Channels (card 2)
Chan 01 (4A): Idle Chan 02 (4B): Idle
Chan 03 (4C): Idle Chan 04 (4D): Idle
CommPlete Communications Server 51
Page 58

MR9600-100 User Guide
Chan 05 (4E): Idle Chan 06 (4F): Idle
Chan 07 (4G): Idle Chan 08 (4H): Idle
Chan 09 (4I): Idle Chan 10 (4J): Idle
Chan 11 (4K): Idle Chan 12 (4L): Idle
Chan 13 (4M): Idle Chan 14 (4N): Idle
Chan 15 (4O): Idle Chan 16 (4P): Idle
[05] A:\#
priocbchannels
Parameter: <
device>.<channel>
Description: Sets the specified channel in service
Security: Supervisior
Example:
[03] A:\# priocbchannel 2a.1
[04] A:\# getprichannels 2a
getting PRI Info
Bchannels
Chan 01: Ready Chan 02: Ready
Chan 03: Ready Chan 04: Ready
Chan 05: Ready Chan 06: Ready
Chan 07: Ready Chan 08: Ready
Chan 09: Ready Chan 10: Ready
Chan 11: Ready Chan 12: Ready
Chan 13: Ready Chan 14: Ready
Chan 15: Ready Chan 16: Ready
Chan 17: Ready Chan 18: Ready
Chan 19: Ready Chan 20: Ready
Chan 21: Ready Chan 22: Ready
Chan 23: Ready Chan 24: Ready
Chan 25: Ready Chan 26: Ready
Chan 27: Ready Chan 28: Ready
Chan 29: Ready Chan 30: Ready
Modem Channels (card 1)
Chan 01 (3A): Idle Chan 02 (3B): Idle
Chan 03 (3C): Idle Chan 04 (3D): Idle
Chan 05 (3E): Idle Chan 06 (3F): Idle
Chan 07 (3G): Idle Chan 08 (3H): Idle
Chan 09 (3I): Idle Chan 10 (3J): Idle
Chan 11 (3K): Idle Chan 12 (3L): Idle
Chan 13 (3M): Idle Chan 14 (3N): Idle
Chan 15 (3O): Idle Chan 16 (3P): Idle
Modem Channels (card 2)
Chan 01 (4A): Idle Chan 02 (4B): Idle
Chan 03 (4C): Idle Chan 04 (4D): Idle
Chan 05 (4E): Idle Chan 06 (4F): Idle
Chan 07 (4G): Idle Chan 08 (4H): Idle
Chan 09 (4I): Idle Chan 10 (4J): Idle
Chan 11 (4K): Idle Chan 12 (4L): Idle
Chan 13 (4M): Idle Chan 14 (4N): Idle
Chan 15 (4O): Idle Chan 16 (4P): Idle
[05] A:\#
52 CommPlete Communications Server
Page 59

prisetup
4 Commands
Parameter:
Description: Set Configuration parameters for a PRI card.
Security: Operator
Example:
[01] A:\# prisetup 2a
Specifier
pristatus
Parameter:
Description: Retrieve the current status of the specified PRI card
Security: Operator
Example:
[01] A:\# pristatus 2a
Specifier
quit
Parameter:
Description: Logs the User off of the system.
None
Security: Guest
Example:
[05] A:\ # quit
Bye.
Username:
readme
Parameter:
Description: Displays a summary of the most recent modifications made to the firmware for the MR9600.
Security: Operator
Example:
[0] A:\ # readme
MR9600 version 1.02 release information
-- 1. Web Server functionality -------...
-- 2. MR9600 MIB -------...
-- 3. Known Limitations -------...
[1] A:\ #
None
CommPlete Communications Server 53
Page 60

MR9600-100 User Guide
rd, remdir
Parameter:
Description: Remove directory. The rd command deletes the directory specified by
Security: Supervisor
Limitations: The directory must be empty before rd can delete it. The rd command cannot delete a
directory’s subdirectories.
Example:
[0] A:\MMM # rd mr.log
[1] A:\MMM #
Pathname
pathname
.
ren, rename
Parameter:
Description: Renames the file
Security: Supervisor
Example:
[0] A:\ # ren temp.txt temp1.txt
[1] A:\ #
Pathname1 Pathname2
Pathname1
to
Pathname2
.
rendir
Parameter:
Description: Renames the directory
Security: Supervisor
Example:
[0] A:\ # rendir MMM MMM1
[1] A:\ #
Pathname1 Pathname2
Pathname1
to
Pathname2
.
reset, rs
Parameter:
Description: Resets the specified modems by cycling their power. Any modems that are connected will
disconnect.
Security: Operator
Example:
[0] A:\ # reset 1a
[1] A:\ #
Device
54 CommPlete Communications Server
Page 61

rm
See del.
rs
See reset.
4 Commands
CommPlete Communications Server 55
Page 62

MR9600-100 User Guide
se, setenviron
Parameter:
None
Description: Allows you to check or change the environment values for the MR9600. The IP address,
default trap IP, gateway IP, subnet mask, and community strings may all be changed.
Security: Supervisor
Example:
Username: supervisor
Password: **********
Welcome to the MultiCommManager
1.99 Beta
[0] A:\ # se
Getting System Defaults
MultiCommManager Environment Setup
1. System Defaults Setup
2. Device Specific Setup
Enter Selection (<1>,2, q, -):
System Defaults Setup
1. Network Defaults
2. Ras Defaults
3. Ras Security Defaults
4. T1 Defaults
Enter Selection (<1>,2,3,4, q, -): 1
Default Gateway:0.0.0.0
Primary DNS Server:0.0.0.0
Backup DNS Server:0.0.0.0
Default Gateway (<0.0.0.0>, q, -):
Subnet Mask (<0.0.0.0>, q, -):
Primary DNS Server (<0.0.0.0>, q, -):
Backup DNS Server (<0.0.0.0>, q, -):
System Defaults Setup
1. Network Defaults
2. Ras Defaults
3. Ras Security Defaults
4. T1 Defaults
Enter Selection (1,<2>,3,4, q, -): 2
Operating System
1. Ras Express pre(5.2)
2. SCO Unix
3. Windows NT
4. Novell Netware
5. Ras Express 5.2 (or later)
6. Other
Subnet Mask:0.0.0.0
Operating System:Ras Express pre(5.2)
Frame Type:TYPE_II
Address Method:Per port config
Wan Port IPCP:Disabled
56 CommPlete Communications Server
Page 63

Enter Selection (<1>,2,3,4,5,6, q, -): 5
Frame Type
1. TYPE_II
2. SNAP
Enter Selection (<1>,2, q, -):
Address Method
1. via DHCP server
2. Address pool
3. Per port config
4. RADIUS
Enter Selection (1,2,<3>,4, q, -):
Wan Port IPCP
1. Disabled
2. Enabled
Enter Selection (<1>,2, q, -):
System Defaults Setup
1. Network Defaults
2. Ras Defaults
3. Ras Security Defaults
4. T1 Defaults
Enter Selection (1,<2>,3,4, q, -): 3
4 Commands
Administrator Password:********
Primary Server:0.0.0.0
Secondary Server:0.0.0.0
Shared Secret Password:********
Administrator Password (<********>, q, -):
Protocol
1. Local
2. RADIUS
3. TACACS+
Enter Selection (<1>,2,3, q, -):
Primary Server (<0.0.0.0>, q, -):
Secondary Server (<0.0.0.0>, q, -):
Shared Secret Password (<********>, q, -):
System Defaults Setup
1. Network Defaults
2. Ras Defaults
3. Ras Security Defaults
4. T1 Defaults
Enter Selection (1,2,3,<4>, q, -): 4
Framing Format:DS1 AT&T Extended Super Frame (ESF)
FXS Signaling Options:E&M Wink Start
Transmit Level:- 0.0dB
Framing Format
Protocol:Local
Line Coding:Binary 8 Zero Substitution (B8ZS)
1. DS1 AT&T Extended Super Frame (ESF)
2. AT&T D4 Super Frame (SF)
3. ANSI Extended Super Frame
4. G.704.ITU-T section 2.1.3.2
5. G.704.ITU-T section 2.1.3.1
Enter Selection (<1>,2,3,4,5, q, -):
Line Coding
CommPlete Communications Server 57
Page 64

MR9600-100 User Guide
Enter Selection (<1>,2,3, q, -):
FXS Signaling Options
Enter Selection (<1>,2,3,4, q, -):
Transmit Level
Enter Selection (<1>,2,3,4, q, -):
MultiCommManager Environment Setup
Enter Selection (1,<2>, q, -): 2
Device Specific Setup
1. Binary 8 Zero Substitution (B8ZS)
2. Alternate Mark Inversion (AMI)
3. ZBTSI
1. E&M Wink Start
2. E&M Immediate Start
3. Ground Start
4. Loop Start
1. - 0.0dB
2. - 7.5dB
3. -15.0dB
4. -22.5dB
1. System Defaults Setup
2. Device Specific Setup
1. Controller Setup
2. Ras Setup
3. T1 Setup
Enter Selection (<1>,2,3, q, -): 1
IP Address:192.168.90.3
Default Trap IP:192.168.90.5
Default Gateway:192.168.90.1
Subnet Mask:255.255.255.0
Read Community:********
Write Community:********
IP Address (<192.168.90.3>, q, -):
Date (<11/10/1997>, q, -):
Time (<4:31am>, q, -): 4:31pm
Default Trap IP (<192.168.90.5>, q, -):
Default Gateway (<192.168.90.1>, q, -):
Subnet Mask (<255.255.255.0>, q, -):
Read Community (<********>, q, -):
Write Community (<********>, q, -):
IP Address:192.168.90.3
Default Trap IP:192.168.90.5
Default Gateway:192.168.90.1
Subnet Mask:255.255.255.0
Read Community:********
Write Community:********
Config CONTROLLER? (<y>, n): y
Date:11/10/1997
Time:4:31am
Date:11/10/1997
Time:4:31pm
IP Address 192.168.90.3 stored
Trap IP Address 192.168.90.5 stored
Gateway IP Address 192.168.90.1 stored
Subnet mask 255.255.255.0 stored
Read Community public stored
Write Community public stored
Device Specific Setup
58 CommPlete Communications Server
Page 65

1. Controller Setup
2. Ras Setup
3. T1 Setup
Enter Selection (1,<2>,3, q, -): 2
Configure a Ras Card (1A, <->): 1a
Operating System:Ras Express 5.2 (or later)
Operating System
1. Ras Express pre(5.2)
2. SCO Unix
3. Windows NT
4. Novell Netware
5. Ras Express 5.2 (or later)
6. Other
Enter Selection (1,2,3,4,<5>,6, q, -):
Getting Ras Info ..
IP Address:192.168.90.4
Subnet Mask:255.255.255.0
Default Gateway:192.168.90.1
Primary DNS Server:0.0.0.0
Backup DNS Server:0.0.0.0
Frame Type:TYPE_II
Address Method:Address pool
4 Commands
IP Address (<192.168.90.4>, q, -):
Subnet Mask (<255.255.255.0>, q, -):
Default Gateway (<192.168.90.1>, q, -):
Primary DNS Server (<0.0.0.0>, q, -):
Backup DNS Server (<0.0.0.0>, q, -):
Frame Type
1. TYPE_II
2. SNAP
Enter Selection (<1>,2, q, -):
Address Method
1. via DHCP server
2. Address pool
3. Per port config
4. RADIUS
Enter Selection (1,<2>,3,4, q, -):
Administrator Password:********
Primary Server:0.0.0.0
Secondary Server:0.0.0.0
Shared Secret Password:********
Administrator Password (<********>, q, -):
Protocol
1. Local
2. RADIUS
3. TACACS+
Protocol:Local
Enter Selection (<1>,2,3, q, -):
Primary Server (<0.0.0.0>, q, -):
Secondary Server (<0.0.0.0>, q, -):
Shared Secret Password (<********>, q, -):
Start 1st Exclusion:0.0.0.0
CommPlete Communications Server 59
Address Pool Start:192.168.90.10
Address Pool End:192.168.90.33
End 1st Exclusion:0.0.0.0
Page 66

MR9600-100 User Guide
Address Pool Start (<192.168.90.10>, q, -):
Address Pool End (<192.168.90.33>, q, -):
Start 1st Exclusion (<0.0.0.0>, q, -):
End 1st Exclusion (<0.0.0.0>, q, -):
Start 2nd Exclusion (<0.0.0.0>, q, -):
End 2nd Exclusion (<0.0.0.0>, q, -):
Start 2nd Exclusion:0.0.0.0
End 2nd Exclusion:0.0.0.0
IP Address:192.168.90.4
Subnet Mask:255.255.255.0
Default Gateway:192.168.90.1
Primary DNS Server:0.0.0.0
Backup DNS Server:0.0.0.0
Frame Type:TYPE_II
Address Method:Address pool
Address Pool Start:192.168.90.10
Address Pool End:192.168.90.33
Start 1st Exclusion:0.0.0.0
End 1st Exclusion:0.0.0.0
Start 2nd Exclusion:0.0.0.0
End 2nd Exclusion:0.0.0.0
Administrator Password:********
Primary Server:0.0.0.0
Secondary Server:0.0.0.0
Shared Secret Password:********
Config Ras? (<y>, n): n
Settings have not been changed
Configure a Ras Card (1A, <->):
Device Specific Setup
1. Controller Setup
2. Ras Setup
3. T1 Setup
Enter Selection (1,2,<3>, q, -): 3
Configure a T1 Card (1B, <->): 1b
Framing Format:DS1 AT&T Extended Super Frame (ESF)
FXS Signaling Options:E&M Wink Start
Transmit Level:- 0.0dB
Framing Format
1. DS1 AT&T Extended Super Frame (ESF)
2. AT&T D4 Super Frame (SF)
3. ANSI Extended Super Frame
4. G.704.ITU-T section 2.1.3.2
5. G.704.ITU-T section 2.1.3.1
Protocol:Local
Line Coding:Binary 8 Zero Substitution (B8ZS)
Enter Selection (<1>,2,3,4,5, q, -):
Line Coding
1. Binary 8 Zero Substitution (B8ZS)
2. Alternate Mark Inversion (AMI)
3. ZBTSI
Enter Selection (<1>,2,3, q, -):
FXS Signaling Options
1. E&M Wink Start
2. E&M Immediate Start
3. Ground Start
4. Loop Start
60 CommPlete Communications Server
Page 67

Enter Selection (<1>,2,3,4, q, -):
Transmit Level
1. - 0.0dB
2. - 7.5dB
3. -15.0dB
4. -22.5dB
4 Commands
Enter Selection (<1>,2,3,4, q, -):
FXS Signaling Options:E&M Wink Start
Save changes and config the T1? (<y>, n): n
Settings have not been changed
Configure a T1 Card (1B, <->):
[1] A:\ #
Framing Format:DS1 AT&T Extended Super Frame (ESF)
Line Coding:Binary 8 Zero Substitution (B8ZS)
Transmit Level:- 0.0dB
security
Parameter:
Description: Prompts you to change the user ID and password for any security levels lower than your
own.
Security: Supervisor
Example:
[0] A:\MMM # security
Modify security information for which security level:
None
1. Guest level
2. Operator level
3. Supervisor level
Which one? 1
Enter User ID : guest
Enter new password : *****
Repeat new password : *****
Security information updated
[1] A:\MMM #
CommPlete Communications Server 61
Page 68

MR9600-100 User Guide
setconfig
Parameter:
Pathname Device
Description: Associates a configuration file with a particular modem or modems .
Security: Operator
Example:
[0] A:\ # getmodems
2A Idle default.cfg Unassigned Dial Up No Security
2B Idle default.cfg Unassigned Dial Up No Security
2C Idle default.cfg Unassigned Dial Up No Security
4A Idle default.cfg Unassigned Dial Up No Security
4B Idle default.cfg Unassigned Dial Up No Security
4C Idle default.cfg Unassigned Dial Up No Security
[1] A:\ # setconfig unix.cfg 2a:2c
[2] A:\ # setconfig rsa.cfg 4a:4c
[3] A:\ # getmodems
2A Idle unix.cfg Unassigned Dial Up No Security
2B Idle unix.cfg Unassigned Dial Up No Security
2C Idle unix.cfg Unassigned Dial Up No Security
4A Idle rsa.cfg Unassigned Dial Up No Security
4B Idle rsa.cfg Unassigned Dial Up No Security
4C Idle rsa.cfg Unassigned Dial Up No Security
62 CommPlete Communications Server
Page 69

setfkey1, setfkey2, setfkey3, setfkey4
4 Commands
Parameter:
Description: Creates command macros for the online function keys. These function keys are available for
use when one is online with a modem. See
Security: Operator
Example:
[0] A:\ # getfkey1
Function Key 1: “ATL5”
[1] A:\ # setfkey1 ATL5L6L7
Function Key 1: “ATL5L6L7”
[2] A:\ # getfkey1
Function Key 1: “ATL5L6L7”
Command String
online
.
setgateway
Parameter:
Description: Changes the default gateway address to the one specified by the
se.
Security: Supervisor
IP Address
IP Address
parameter.
See
Example:
[0] A:\ # setgateway 199.199.199.191
Gateway IP Address 199.199.199.191 stored
[1] A:\ #
setip
Parameter:
Description: Changes the MR9600’s IP address to the one specified by the
Security: Supervisor
Example:
[0] A:\ # setip 199.199.199.44
IP Address 199.199.199.44 stored
[1] A:\ #
IP Address
setpollingoff
Parameter:
Device
IP Address
parameter.
See se.
CommPlete Communications Server 63
Page 70

MR9600-100 User Guide
Description: Disables controller generated polling to specified device. The example below starts with
displaying the status of the back plane by using the
Security: Supervisor
Example:
[1] A:\ # bpstatus
Backplane Status: Busy:NoResp:NoAck
-:no polling 0:count of 0 1-9: tens digit plus 1 *:>=ninety
Slot ABCDEFGHIJKLMNOP
5: 000 000
6: 000 000 000 000 000 000 000 000
7: 000 000 000 000 000 000 000 000
8: 000 000 000 000 000 000 000 000
9: 000 000
10: 000 000 000 000 000 000 000 000
11: 000 000 000 000 000 000 000 000
12: 000 000 000 000 000 000 000 000
[2] A:\# setpollingoff 5a
[3] A:\# bpstatus
Backplane Status: Busy:NoResp:NoAck
-:no polling 0:count of 0 1-9: tens digit plus 1 *:>=ninety
Slot ABCDEFGHIJKLMNOP
5: --- 000
6: 000 000 000 000 000 000 000 000
7: 000 000 000 000 000 000 000 000
8: 000 000 000 000 000 000 000 000
9: 000 000
10: 000 000 000 000 000 000 000 000
11: 000 000 000 000 000 000 000 000
12: 000 000 000 000 000 000 000 000
bpstatus
command.
64 CommPlete Communications Server
Page 71

setpollingon
4 Commands
Parameter:
Device
Description: Re-enables polling bewtween controller and specified device. The example below starts with
displaying the status of the back plane by using the
bpstatus
command.
Security: Supervisor
Example:
[4] A:\ # bpstatus
Backplane Status: Busy:NoResp:NoAck
-:no polling 0:count of 0 1-9: tens digit plus 1 *:>=ninety
Slot ABCDEFGHIJKLMNOP
5: --- 000
6: 000 000 000 000 000 000 000 000
7: 000 000 000 000 000 000 000 000
8: 000 000 000 000 000 000 000 000
9: 000 000
10: 000 000 000 000 000 000 000 000
11: 000 000 000 000 000 000 000 000
12: 000 000 000 000 000 000 000 000
[5] A:\# setpollingon 5a
[6] A:\# bpstatus
Backplane Status: Busy:NoResp:NoAck
-:no polling 0:count of 0 1-9: tens digit plus 1 *:>=ninety
Slot ABCDEFGHIJKLMNOP
5: 000 000
6: 000 000 000 000 000 000 000 000
7: 000 000 000 000 000 000 000 000
8: 000 000 000 000 000 000 000 000
9: 000 000
10: 000 000 000 000 000 000 000 000
11: 000 000 000 000 000 000 000 000
12: 000 000 000 000 000 000 000 000
[7] A:\ #
CommPlete Communications Server 65
Page 72

MR9600-100 User Guide
setrasostype
Parameter:
Device
Description: Lets the controller know what operating system is loaded on each segment.
Security: Operator
Limitations: CC9600 Only
Example:
[01] A:\ # setrasostype 1a
Operating System:Ras Express 5.2 (or later)
Operating System
1. Ras Express pre(5.2)
2. SCO Unix
3. Windows NT
4. Novell Netware
5. Ras Express 5.2 (or later)
6. Other
Enter Selection (1,2,3,4,<5>,6, -(previous), q(quit)):
setreadcommunity
Parameter:
Description: Changes the Read community settings.
None
Security: Supervisor
Example:
[0] A:\ # setreadcommunity public
Read Community public stored
[1] A:\ #
setsendtrap
Parameter:
Description: Configures the MR9600 controller whether or not to send traps to an SNMP manager or
MultiCommManager console.
Security: Supervisor
Example:
[0] A:\ # getsendtrap
The sending of traps is enabled.
[1] A:\ # setsendtrap off
The sending of traps has been successfully disabled.
[2] A:\ # getsendtrap
The sending of traps is disabled.
On, off
66 CommPlete Communications Server
Page 73

setsubnet
4 Commands
Parameter:
Description: Changes the subnet mask to the mask specified in the parameter.
Security: Supervisor
Example:
[0] A:\ # setsubnet 255.255.255.0
Subnet mask 255.255.255.0 stored
[1] A:\ #
IP Address Mask
See se
.
settrap
Parameter:
Description: Changes the default trap IP address to the one specified in the parameter. This IP address is
where fault and status traps are sent. See
Security: Supervisor
Limitations: Only one default trap address may be set at a time.
Example:
[0] A:\ # settrap 199.199.199.6
Trap IP Address 199.199.199.6 stored
IP Address
se.
[1] A:\ #
setwritecommunity
Parameter:
Description: Changes the Write community settings.
Security: Supervisor
Example:
[0] A:\ # setwritecommunity public
Write Community public stored
[1] A:\ #
None
CommPlete Communications Server 67
Page 74

MR9600-100 User Guide
sync
Parameter:
None
Description: Writes oustanding events (events that normally get written every hour) to the
B:\#MMM\MR.log directory. The file will be named the current date and hour with an hour extension.
Security: Operator
Example:
[01] A:\ # sync
[02] A:\ #
t, time
Parameter:
Description: Prompts you to change the time on the MR9600.
Security: Operator
Limitations: The time is not corrected for daylight savings time.
Example:
[0] A:\MMM # t
The current time is: 4:59pm
Enter the new time: hh:mm 17:10
None
[1] A:\MMM # cl
10/30/1996 5:10pm
[2] A:\MMM # t
The current time is: 5:10pm
Enter the new time: hh:mm 5:12pm
[3] A:\MMM # cl
10/30/1996 5:12pm
t1cfg
Parameter:
Description: Sends T1 configuration information stored in nonvolatile memory to the specified device.
The specified device must be a T1 device. T1 devices can exist only at 1b, 1c, 5b, 5c, 9b, 9c, 13b, and 13c.
Security: Operator
Example:
[0] A:\MMM # t1cfg 1b,5b,9b,13b
Device
68 CommPlete Communications Server
Page 75

t1debug
4 Commands
Parameter:
Device
Description: Displays the status of AB Signalling bits for both the transmit and receive directions of each
DSO channel for the specified T1 device within the CommPlete. TX = from CommPlete T1 card to central
office. RX = from central office to CommPlete T1 card.
Security: Supervisor
Limitation: CC9600 only
Example:
[31] A:\ # t1debug 1b
1. Enable Signal Bit monitoring
2. Turn Off signal bit monitoring
3. Signal Poll interval (4)
=> 1
Completed enabling all selected devices!
[32] A:\ #
01B 01B
Tx/Rx Tx/Rx
AB/AB AB/AB
01 00/00 02 00/00
03 00/00 04 00/00
05 00/00 06 00/00
07 00/00 08 00/00
09 00/00 10 00/00
11 00/00 12 00/00
13 00/00 14 00/00
15 00/00 16 00/00
17 00/00 18 00/00
19 00/00 20 00/00
21 00/00 22 00/00
23 00/00 24 00/00
E&M Immediate Start Protocol Tx(AB) Rx(AB)
OFF HOOK 11 11
ON HOOK 00 00
RINGING NA NA
[33] A:\ # t1debug 1 b
1. Enable Signal Bit monitoring
2. Turn Off signal bit monitoring
3. Signal Poll interval (4)
=> 2
CommPlete Communications Server 69
Page 76

MR9600-100 User Guide
t1setup
Parameter:
Device
Description: Sets the T1 configuration information associated with a T1 device. This information is stored
in a nonvolatile area of memory so that the device can be properly reconfigured on power-up or reset. The
specified device must be a T1 device. T1 devices can exist only at 1b, 1c, 5b, 5c, 9b, 9c, 13b, and 13c.
Security: Supervisor
Example:
[0] A:\MMM # t1setup 5b
T1 Card Status:
LED Information: None
FXS Signaling Options: E&M Immediate Start
Dial-in Address: DNIS
Acknowledgement Wink: Disabled
Transmit Level: - 7.5dB
Receive Level: - 0.0dB
Firmware Version: N/A
Framing Format
1. DS1 AT&T Extended Super Frame (ESF)
2. DS1 AT&T D4 Super Frame (SF)
3. DS1 ANSI Estended Super Frame
4. G.704.ITU-T section 2.1.3.2
5. G.704.ITU-T section 2.1.3.1
Framing: AT&T D4 Super Frame (SF)
Line Coding: Alternate Mark Inversion (AMI)
Enter Selection (1,<2>,3,4,5, q, -):
Line Coding
1. B8ZS
2. AMI
3. ZBTSI
Enter Selection (1,<2>,3, q, -):
Transmit Level
1. 0.0 dB
2. -7.5 dB
3. -15.0 dB
4. -22.5 dB
Enter Selection (1,<2>,3,4, q, -):
FXS Signaling Options
1. E&M Wink Start Conversion
2. E&M Immediate Start Conversion
3. Ground Start Standard
4. Loop Start Standard
Enter Selection (1,<2>,3,4, q, -):
Dial-in Address
1. No Address
2. DNIS
3. ANI-DNIS
4. ANI
70 CommPlete Communications Server
Page 77

Enter Selection (1,<2>,3,4, q, -):
Acknowledgement Wink
1. Disabled
2. Enabled
Enter Selection (<1>,2, q, -):
T1 Card Status:
4 Commands
LED Information: None
FXS Signaling Options: E&M Immediate Start
Dial-in Address: DNIS
Acknowledgement Wink: Disabled
Transmit Level: - 7.5dB
Receive Level: - 0.0dB
Firmware Version: N/A
Save Changes? (<y>, n): n
T1 Settings have not been changed
[1] A:\MMM #
Framing: AT&T D4 Super Frame (SF)
Line Coding: Alternate Mark Inversion (AMI)
CommPlete Communications Server 71
Page 78

MR9600-100 User Guide
t1status
Parameter:
Device
Description: Interrogates the status of the specified T1 device. The specified device must a T1 device. T1
devices can exist only at 1b, 1c, 5b, 5c, 9b, 9c, 13b, and 13c.
Security: Guest
Example:
[0] A:\MMM # t1status 5b
T1 Card Status:
LED Information: Red Alarm, Sync Loss
FXS Signaling Options: E&M Wink Start
Dial-in Address: No Address
Acknowledgement Wink: Disabled
Transmit Level: - 0.0dB
Receive Level: - 3.0dB
Firmware Version: 1.00C
[1] A:\MMM #
Framing: DS1 AT&T Extended Super Frame (ESF)
Line Coding: Binary 8 Zero Substitution (B8ZS)
type
See cat.
unmount
Parameter:
Description: Remove the drive from the operating system. This is commonly done before formatting the
drive.
Security: Supervisor
Example:
[01] A:\# unmount b:
[02] A:\ # format b:
[03] B:\ #
Specifier
72 CommPlete Communications Server
Page 79

update
4 Commands
Parameter:
Description: Updates the firmware of the controller, of a T1 device, or of up to eight modems.
Pathname Device
Pathname
is the path of the file used to update the firmware. The file name extension determines which device is
updated: .HXC updates the controller; .HXT updates the T1 card; and .HEX updates modems.
Security: Operator
Limitations: Only eight modems can be updated at one time, and only one update can be performed at
one time.
Example:
update hd8803t.hex 2b:2h
Update started.
[11] A:\MMM # update
Percent Done = 03%
2B Updating
2C Updating
2D Updating
2E Updating
2F Updating
2G Updating
2H Updating
[12] A:\ # abort 2b
Are you sure you wish to abort the update? (y/n) y
Aborting...
CommPlete Communications Server 73
Page 80

MR9600-100 User Guide
upload
Parameter:
Pathname
Description: Uploads from a computer connected to the MR9600 controller’s serial port connector the file
specified by
pathname
. Before uploading, binary files must be converted to ASCII data on the source
computer using a utility supplied by Multi-Tech. The format for the data is one or more lines of
hexadecimal data up to 80 characters in length, where each hexadecimal value is bracketed by square
brackets (e.g., [2b][3c]...[1c]). When the file has been uploaded, press E
SC or CTRL+D to complete the
upload.
Note: For debugging use only under the direction of Technical Support personnel. Files will normally be
transferred using FTP.
Security: Supervisor
Limitations: Only ASCII files can be uploaded. This command does not support flow control, so the files
should be uploaded using an ASCII file transfer protocol with a 1 millisecond delay between lines.
Example:
[0] A:\MMM # upload mr9600.db
...data uploaded here...
2192 byte(s) written to ‘mr9600.db’
[1] A:\MMM #
uptime
Parameter:
Description: Displays the date and time since the last boot. Displays in Days, hours, minutes and seconds
how long the system has been running.
Security: Operator
Example:
[05] A:\ # uptime
System up since – 12/18/1997 12:57pm - 0 Days 2 Hours 47 Minutes 15
Seconds
[06] A:\ #
None
74 CommPlete Communications Server
Page 81

usage
4 Commands
Parameter:
Specifier
Description: Displays how many modems fit the following parameters: received inbound calls, made
outbound calls, were Out Of Service (OOS), were not respnding and were free per specified time intervals
since the controller was last started (24 clock and specifier is in minutes). The example below shows the
controller came up at 1:00 PM, has been running for 20 minutes and has taken 4 inbound calls.
Security: Operator
Example:
[01] A:\ # Usage 10
Time Inbound Outbound OOS NotResp Free Total
13:00 0 0 0 0 23 24
13:10 0 0 0 0 24 24
13:20 4 0 0 0 20 24
[02] A:\ #
userid
Parameter:
Description: Changes your user ID by prompting you for your current user ID and new user ID.
Security: Guest
None
Example:
[0] A:\MMM # userid
Current user id: super
New user id: supervisor
Security information updated
[1] A:\MMM #
CommPlete Communications Server 75
Page 82

MR9600-100 User Guide
ver, version
Parameter:
Description: Displays the current version of the MR9600’s firmware.
Security: Guest
Example:
[0] A:\ # ver
Version 2.10 (Jan 09 1998 18:06:37)
[1] A:\ #
None
whoami
Parameter:
Description: Displays the user ID of the user who is logged on, and the user’s security level.
Security: Guest
Example:
[0] A:\MMM # whoami
supervisor with < supervisor> access rights
[1] A:\MMM #
None
76 CommPlete Communications Server
Page 83

Error Messages
This section lists the MR9600-100’s error messages and their possible causes. Many error messages are
caused by human error. When you receive an error message when executing a command, ask the following
questions first:
• Did you spell the command correctly?
• Do you have access rights to the command?
• Do you have the correct number of parameters in the correct format?
ERROR: Illegal command
The command is spelled wrong, or you have the wrong number or incorrect parameters.
ERROR: Invalid IP address, format ###.###.###.###
The IP address is not 4 groups of up to 3 digits separated by a period. The IP address has no components
with a value greater than 255.
4 Commands
ERROR: Invalid user id — user id not changed
The user ID contains an invalid character.
ERROR: Unable to perform command
User does not have the security access to execute the command.
ERROR: Make directory ‘DIRNAME’ failed.
The subdirectory ‘DIRNAME’ already exists.
ERROR: Unable to rename ‘DIR1’ to ‘DIR2’
DIR1 does not exist, or you are attempting to rename the current working directory.
ERROR: Online session already exists
The online command is active by either a Telnet session or a terminal attached to the CC9600.
CommPlete Communications Server 77
Page 84

MR9600-100 User Guide
ERROR: No history is being maintained
The command history buffer is empty or not being maintained by the command line interface.
ERROR: Password not changed
The old password does not match the stored password; the new password is invalid; or the new password
and the repeated new password do not match.
ERROR: Unknown error
An error of unknown origin occurred while the MR9600-100 was attempting to parse a command line.
ERROR: Bad or missing configuration file
The specified configuration file is not present on the system. It is possible that the file name is incorrectly
spelled.
ERROR: Invalid number
The specified number is not a valid hex number starting with $ or a valid decimal number starting with a
digit.
ERROR: Invalid device specifier
The device specifier is invalid since it is not of the format 1a, where 1 represents the slot number for the
a
device and
represents the device number. See “Parameter Types” on page 24.
ERROR: Invalid drive specifier
The specified drive letter does not belong to a drive that is available to the system.
ERROR: Security information not changed
The new user ID is invalid. The new password is invalid; or the new password and the repeated new
password do not match.
ERROR: Unable to update security information
The CMOS write error failed when updating the security information.
78 CommPlete Communications Server
Page 85

4 Commands
CommPlete Communications Server 79
Page 86

Page 87

5 Solving Problems
82067502
Page 88

MR9600-100 User Guide
Introduction
This chapter provides information needed to identify and fix problems with the MR9600-100. Problems
can be diagnosed by observing the LED indicators on the MR9600-100’s front panel, or through the
dedicated management console’s screen. Also, problems can be found by performing the diagnostic tests
documented in Chapter 8 of the MultiModemManager
User Guide
Manual.
For specific MultiModem troubleshooting information, refer to the MultiModem
with your MultiModem. For basic Windows messages, refer to your Windows manual or Help screens. For
a description of the MR9600-100’s LED indicators, see Chapter 1.
MR9600-100 Diagnostic Tests
If you suspect that your MR9600-100 is not functioning properly, you can run the following diagnostic
tests to test the MR9600-100’s hardware capabilities.
1. Refer to Figure 3 on page 12 to locate the test jumper on the MR9600-100 Controller card. Put the
test jumper into the loopback position, so the two pins are shorted together. Reinstall the MR9600100 assembly into the CC9600 chassis. Plug the 10Base-T loopback jumper into the Ethernet
connector labeled “LAN” on the rear of the CC9600 chassis.
2. Run MultiExpress or another datacomm program on a PC at
Connect the COM port used by the datacomm program to the MR9600-100’s RS-232 port on the rear
of the CC9600 chassis.
3. Reset the MR9600-100 by pressing the reset button on the front with a paper clip, or turn the CC9600
chassis off and on.
4. When prompted to start manually, press a key.
5. When prompted to enter a user name and password, log in as supervisor.
6. Type the command HDTEST and press ENTER.
115,200 bps
Owner’s Manual
with
no flow control
shipped
.
7. You will see a menu. Proceed with testing in the following order:
WARNING: Running options out of order or ones not specified may cause unpredictable results.
Test 2 Red LEDs on.
Test 3 Green LEDs on.
Test 4 All LEDs off.
Test 5 Flash memory test.
Test 7 Ethernet loopback test.
Watch for the green Ethernet LED on the left side of the front panel; it should be on solid.
Numbers stopped and packets received will match.
Test 1 Start backplane. LEDs on the front panel of the MR9600-100 should reflect the number of
cards installed.
Test a Sets segment 1 modems to 9600 bps.
Test b Sets segment 1 modems OOS.
82 CommPlete Communications Server
Page 89

Test c Clears segment 1 modems OOS.
Test d Resets segment 1 modems.
5 Solving Problems
CommPlete Communications Server 83
Page 90

MR9600-100 User Guide
84 CommPlete Communications Server
Page 91

Appendix A - Connector Pinouts
This appendix describes the RJ-45 connector pinouts, and discusses categories of Ethernet cabling..
RJ-45 Connectors
Figure A-1 RJ-45 Connector
The above figure shows the arrangements of the pins, while Table A-1 lists the pinouts.
Table BA-1: RJ-45 Connector Pinouts
Appendixes
Pin Signal
1TD+
2TD3RD+
4
5
6RD7
8
A schematic for crossover cables is shown in the following figure.
Figure B-2 Crossover Cable
NC
NC
NC
NC
CommPlete Communications Server 85
Page 92

MR9600-100 User Guide
Appendix B - Categories of Ethernet Performance
The telecommunications industry has defined cable and cable component standards in terms of
performance “categories”. The standards cover cable thickness, outer jacket material and thickness, etc.
The categories specify the tests which the cable and components must pass to meet the standards. The two
categories of test standards currently in use are Category 3 and Category 5.
Category 3 (“Cat 3”) cabling is used for voice and data at speeds up to 10M bps (e.g., 10BaseT Ethernet).
Category 5 (“Cat 5”) cabling is used for 100M bps transmissions (e.g., 100BaseT), but is also fully capable
of 10M bps transmission. Both categories use 24 gauge wire.
The self-certifying tests for cabling and components involve a swept-frequency test. Cat 3 must pass all
signals from 1-16M Hz; Cat 5 must pass all signals from 1-100M Hz. All forms of modulation of any carrier
waves within those frequencies, as well as all forms of digital pulses must be supported for any and all
applications. Since handling digital pulses is more difficult than simple modulation, digital pulsing
requires a broader range of frequencies to provide square pulse edges (as compared to AM or FM
modulation).
Category 3 (Cat 3)
Cat 3 cabling and components are designed and tested for 16M Hz of communications bandwidth for 10M
bps voice and data/LAN traffic transmissions. Cat 3 is very common in voice telephone cabling. The Cat 3
technical specifications are defined by FCC Part 68, ANSI/EIA/TIA-568, TIA TSB-36, and TIA TSB-40.
Safety specifications for Cat 3 cabling are covered by UL 1459 (telephone), UL 1863 (wire and jacks), and
NEC 1993 (article 800-4).
Category 5 (Cat 5)
Cat 5 cabling and components are designed and tested for 100M Hz of communications bandwidth for
100M bps voice and data/LAN traffic transmissions. The Cat 3 technical specifications are defined by FCC
Part 68, EIA/TIA-568, TIA TSB-36, and TIA TSB-40. Safety specifications for Cat 3 cabling are covered by
UL 1459 (telephone), UL 1863 (wire and jacks), and NEC 1993 (article 800-4). Cat 5 cabling is required for
use with Ethernet 100BaseTX (Fast Ethernet over Category 5 wiring) networks.
Cat 5 wiring has advantages over Cat 3 in its operation (full-duplex) wire-twist structure (tighter),
insulation (better), and connecting hardware (more versatile). Another advantage with using Cat 5 is that
it works for legacy 10M bps as well as newer 100M bps equipment.
86 CommPlete Communications Server
Page 93

Appendixes
However, Cat 5 has some installation requirements that must be met:
• Never use staples to mount or fix Cat 5 wiring.
• Velcro is recommended in place of tie wraps. Wrap cable in bundles very loosely if you use tie wraps.
• Never untwist the wire at the punch-down block or jack termination; the twists should remain right up
to the termination.
• Never strip off more jacket insulation than is required to make the termination.
• Do not pull too hard on the cable (especially around corners).
• Do not pull on a cable to straighten out a loop or kink. Instead, always untwist the cable at the location
of the loop or kink.
• Do not stuff too many cables into too small of a conduit.
• Refer to the applicable Commercial Building Telecom Wiring Standard for specific information.
The Ethernet 100BaseT standard is implemented for three cabling environments: copper wire
(100BaseT2), UTP (100BaseTX), and fiber (100BaseFX). Since the 100BaseT spec is built on the 10BaseT
spec, it is an easy upgrade from 10M to 100M bps, without impact on users, existing operating systems, or
network management applications. 100BaseT provides increased throughput compared to 10BaseT by
decreasing the latency period between bits, effectively increasing packet speed by a factor of 10.
100BaseTX uses two pairs of 24 gauge wire, one pair for transmitting and one pair for receiving.
Upgrading a network from 10M bps to 100M bps Ethernet requires 100BaseTX NICs and Hubs as well as
the Cat 5 wiring to connect them. It is strongly recommended that end-to-end testing be performed to
verify proper installation of Cat 5 connection to the Cat 5-compliant wall jacks and patch panels.
100BaseTX Connectivity Rules:
• the max. length of a twisted-pair segment (e.g., the distance from a Hub port to a PC/NIC) is 100
meters.
• the max. diameter in a collision domain is approx. 205 meters (672.5 feet) using two Class II Hubs and
200 meters (656 feet) using one Class I Hub.
• up to three segments and two Class II Hubs (or two segments and one Class I Hub) may exist between
any two end stations in a collision domain.
CommPlete Communications Server 87
Page 94

MR9600-100 User Guide
88 CommPlete Communications Server
Page 95

Index
82067502
Page 96

MR9600-100 User Guide
#
#
character, 19
1
10Base-T connector, 5
A
ASCII text files, 37
C
CC9600 chassis, 2, 3, 12, 13, 18, 40, 82
changing directories, 37
chassis, 13
device
colon in
commands
!!, 33
!a, 34
!n, 34
?, 33
boot, 35
cat, 33, 35, 37, 40, 51, 52, 53, 72
cd, 19, 37
cfg, 37
chdir, 37
cl, 38
clock, 38
config, 20
configure, 37
copy, 38
cp, 38
d, 38
date, 38
del, 39
delete, 39
dir, 39
download, 40
getcalls, 20, 41
getfaults, 20, 41, 43, 44, 46, 48, 51, 52, 64, 65, 66, 68, 74,
75
getfkey, 42
getgateway, 42
getip, 42
getmodems, 20, 43, 62
getreadcommunity, 45
getsendtrap, 45
getsubnet, 46
gettrap, 46
parameter, 24
getwritecommunity, 46, 47
history, 33, 34, 47
lo, 47
logout, 20, 47
ls, 39
md, 48
mkdir, 48
oc, 49
online, 49, 77
oosclear, 20, 49
oosclr, 49
oosset, 20, 50
os, 50
passwd, 18, 51
password, 51
rd, 54
readme, 53
remdir, 54
ren, 54
rename, 54
rendir, 54
reset, 20, 54
rm, 39
rs, 54
se, 56
security, 61
setconfig, 62
setenviron, 56
setfkey, 63
setgateway, 63
setip, 63
setreadcommunity, 66
setsendtrap, 45, 66
setsubnet, 67
setwritecommunity, 67
t, 68
t1cfg, 68
t1setup, 69, 70
t1status, 72
time, 68
update, 73
upload, 74
userid, 18, 47, 75
ver, 76
version, 76
whoami, 76
community settings, 45, 46, 66, 67
community strings, 18
concentrator, 4
configuration
MR9600, 13
T1 devices, 68, 70
90 CommPlete Communications Server
Page 97

Index
configuration files, 18, 21
connectors, 4, 13
D
date and time, 38, 68
deleting a file, 39
device identifier, 24
device parameter, 24
diagnostics, 13
directories, creating, 48
directories, deleting, 54
directories, renaming, 54
display commands, 26
downloading a file from the MR9600, 40
E
environment commands, 26
environment values, 56
error messages, 77
Ethernet
10Base-T connectors, 5, 12
concentrator module, 2, 12
event files, 18, 19, 21
trap address, 67
IP address mask parameter, 25
IP address parameter, 24
L
LED indicators, 3, 4, 5, 82
M
mask, IP address, 25
memory, 5
microprocessor, 5
MMM directories, 18
modem control commands, 28
modems
configuring, 37
managing, 20, 21, 49, 50, 54, 62
monitoring, 20, 41, 43
MultiExpress, 82
MultiModemManager, 12, 13, 18, 19, 21, 37, 66, 82
O
Operator security level, 30
F
file commands, 27
file system, 18
firmware version, 76
firmware, updating, 73
front panel, 3, 12
FTP (File Transfer Protocol), 2, 18, 19, 21, 40, 74
function keys, 42, 63
fuse, 5
G
Guest security level, 30
H
HTML interfaces, 20
I
inactivity timer, 20
See
indicators.
installation, 12
Internet, 2, 20, 21
IP address, 19, 20, 24, 25, 46, 63, 77
gateway address, 42, 63
MR9600 address, 42
LED indicators
P
parameter types, 24
password, 18, 19, 21, 51, 61, 78, 82
passwords
default, 18
pathname parameter, 24
power supplies, 12
processor, 5
prompt, command line, 19
PS9600 power supplies, 12
R
remote management, 20
renaming a file, 54
repeating a command, 33, 34
reset button, 82
resetting the MR9600 controller, 35
S
security, 18, 19, 21, 30, 61, 76, 77, 79
commands, 28
files, 18, 21
guest level, 18
Guest level, 30
operator level, 18
CommPlete Communications Server 91
Page 98

MR9600-100 User Guide
Operator level, 31
supervisor level, 18
Supervisor level, 30, 32
self-test, 12
serial connector, 19
SNMP, 2, 13, 18, 19, 21, 37, 66
specifications, 5
Statistical Analyzer, 19, 21
subnet mask, 46, 67
supervisor console, 13
Supervisor security level, 30, 32
system commands, 29
T
T1 device, 68, 70, 72, 73
TCP/IP, 2, 5, 13, 18, 19, 20, 21
Telnet, 2, 18, 19, 20, 77
traps, 19, 45, 46, 66, 67
U
updating firmware, 73
uploading a file to the MR9600, 74
user ID, 18, 19, 21, 61, 75, 76, 77, 78
default, 18
V
viewing ASCII text files, 37
W
Web browsers, 20
Web management, 21
92 CommPlete Communications Server
Page 99

Index
CommPlete Communications Server 93
Page 100

MR9600-100 User Guide
94 CommPlete Communications Server
 Loading...