

Page 1
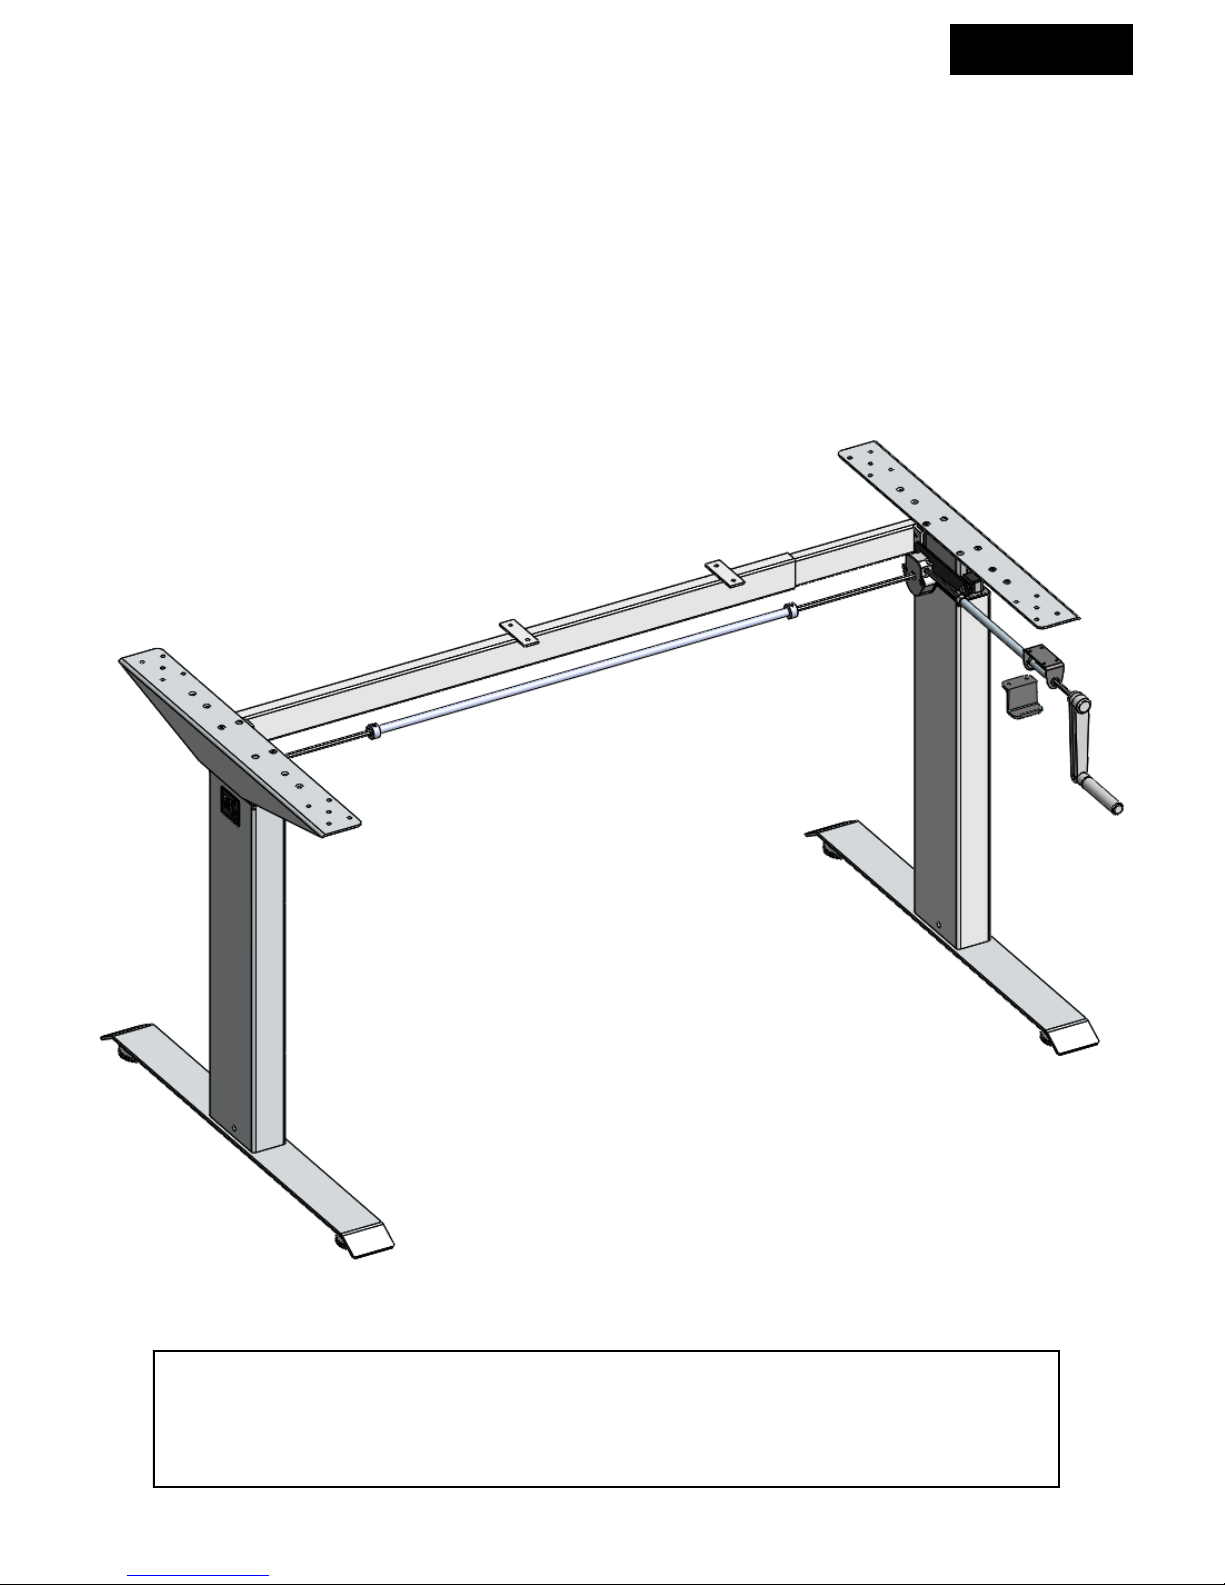
MultiTable
Manual FlexTable
Read this manual thoroughly and store in a safe place.
Assembly Manual
English
Page 2

2
Content
1 GENERAL .................................................................................................................................................. 3
1.1 Content box ................................................................................................................................... 3
1.2 Local value of the assembly/operating manual......................................................................... 4
1.3 Intended use ................................................................................................................................. 4
1.4 Improper use ................................................................................................................................. 4
2 SAFETY INFORMATION ............................................................................................................................ 4
2.1 Symbols/warnings ......................................................................................................................... 4
2.2 Symbols used on the FlexTable frame ........................................................................................ 4
2.3 Organizational measures ............................................................................................................. 4
2.4 Informal safety measures ............................................................................................................. 4
2.5 Note for those assembling the FlexTable .................................................................................... 5
2.6 Transport and assembly ............................................................................................................... 5
2.7 Use of the FlexTable frame ........................................................................................................... 5
2.8 Specific dangers ........................................................................................................................... 6
2.9 In an emergency .......................................................................................................................... 6
2.10 Maintenance and cleaning ......................................................................................................... 6
3 ASSEMBLY ................................................................................................................................................ 7
3.1 Checking the items supplied ....................................................................................................... 7
3.2 Packaging ..................................................................................................................................... 7
3.3 Tightening torques for screws used ............................................................................................. 7
3.4 Assembly of the FlexTable ........................................................................................................... 7
3.4.1 Pre-assembly of the Crossbar ...................................................................................................... 7
3.4.2 Mounting the Crossbar ............................................................................................................... 8-9
3.4.3 Mounting the Feet .................................................................................................................. 10-11
3.4.4 Mounting the Hexagon Shaft............................................................................................... 12-14
3.4.5 Mounting the Top Supports ........................................................................................................ 15
3.4.6 Mounting the Hand Crank .................................................................................................... 16-17
3.4.7 Adjustment of the frame width.................................................................................................. 18
3.4.8 Frame test without table top ...................................................................................................... 19
3.4.9 Note: Mounting the table top .................................................................................................... 19
4 TECHNICAL SPECIFICATIONS ........................................................................................................... 20-21
5 OPERATION AND INDICATORS ............................................................................................................. 22
5.1 Indicators ..................................................................................................................................... 22
6 CUSTOMER SERVICE .............................................................................................................................. 23
7 RECYCLING ............................................................................................................................................ 23
7.1 Taking the workstation out of active duty ................................................................................ 23
7.2 Taking the workstation apart ..................................................................................................... 23
7.3 Recycling ..................................................................................................................................... 23
Page 3

3
04
1 General
1.1 Content box
05
03
01 06
10
07
# Part name Qty
01 Leg 2
02 Top support 2
03 Foot 2
04 Hexagon shaft 2
05 Axle Drive 1
06 Crossbar 1
07 L-Bracket 1
08 Foot adjusters 4
09a Allen key M3 1
09b Allen Key M5 1
09c Spanner M10 1
09d Spanner M8 1
09e Pipe Key M10 1
10 Mounting hardware kit 1
11 Axle drive tube 1
12 Handle 1
13 Gearbox 1
14 Hexagon Shaft 200mm 1
15 Hexagon Shaft 280mm 1
16 Handle holder 1
08
02
11
12
13
10.1 2x Set Screw M6x6
10.2 4x Set Screw M6x20
10.3 5x Flange Nut M6
10.4 8x Cap Screw M6x25
10.5 1x Washer M6
10.6 1x Hex Bolt M6x16
10.7 9x CSK M5x25
10.8 30x Wood Screws
4.5x16
15
16
14
09a
09c
09b
09e
09d
Page 4

4
1.1 Local value of the assembly/operating manual
Your new FlexTable frame and its components are low maintenance items, but still
require regular maintenance. We recommend checking and tightening the bolts
and set screws every 6 months to ensure your table raises and lowers correctly.
1.2 Intended use
The FlexTable frame is designed to be used only as a manually adjusted workstation
for sitting/standing use in office environments or other enclosed areas. The frame
must be used for this purpose only. Please observe the provisions of Section 2, Safety
Information. Children may be unaware of the dangers presented by the FlexTable
frame if unsupervised. Any other use than the above shall be deemed improper.
MultiTable can in no way be held liable for damage or injury arising from improper
use.
Intended use shall also include:
• Observation of all information from the assembly/operating manual.
• Prohibition of any sort of alteration of the FlexTable not approved by MultiTable.
1.3 Improper use
• Never use the FlexTable frame to lift people or loads.
• Do not exceed the maximum load of the FlexTable frame (see Section 4, Tech-
nical Specifications).
WARNING: Any changes or modifications not expressly approved by MultiTable
could void the user’s warranty.
2 Safety Information
2.1 Symbols/warnings
The Assembly/Operating Manual uses the following terms and signs to indicate dangers:
2.2 Symbols used on the FlexTable frame:
2.3 Organizational measures
• The FlexTable frame can best be assembled by two people. Turning the frame, once
the work surface has been assembled, is a task which requires two people.
2.4 Informal safety measures
• Keep the assembly/operating manual in the place where the FlexTable frame is used
at all times.
• Make sure that all safety information on the table (see Section 2.2, Symbols used on
the workstation frame, page 5) is legible, replacing the same if necessary.
This symbol indicates an immediate threatening situation for any person’s
life or health. Failure to adhere to such information may have serious consequences for health, or could even result in life-threatening injury or death.
This symbol indicates important information. Failure to adhere to such information could lead to damage to the workstation.
Do not place objects or parts of the body under the workstation frame or
between the cross members. This could cause serious injury.
Do not exceed the maximum permitted weight capacity of 140 lbs. on the
FlexTable frame. Overloading could lead to damage and serious injury as a
result.
MAX
60 KG
(140lbs)
Page 5

5
2.5 Note for those assembling the FlexTable
• The FlexTable must be assembled/worked on by persons over the age of 16.
• The persons referred to above must have read and understood the assembly/
operating manual.
2.6 Transport and assembly
• The FlexTable frame must be moved by two persons only, and in such cases must be
retracted.
• Do not drag or pull the FlexTable frame over the floor.
• Assemble the FlexTable frame with the supplied tools only.
2.7 Use of the FlexTable frame
• Do not allow children to use the FlexTable frame unsupervised. Children may be una-
ware of the dangers presented by the FlexTable frame. They would be in serious danger of injuring themselves, possibly even with fatal consequences. Further adjustment
must then be impossible as a safeguard against use by children.
• The FlexTable frame must only be used in appropriate areas (see Section 4, Technical
Specifications).
• Do not use the FlexTable frame on an uneven surface. In such conditions, it will not be
stable.
• Never exceed the maximum load on the workstation frame (see Section 4, Technical
Specifications).
2.8 Specific dangers
• When adjusting the height of the frame, there may be risk of injury. Make persons and
body parts are not near moving parts as the frame is being adjusted up and down.
• When assembling and using the FlexTable frame, make sure there is ample space to
avoid collisions (i.e. filing cabinets, trash cans, etc.) in all directions.
• Make sure there is clearance of at least 1 in from all other furniture, all around the
FlexTable frame.
• This FlexTable frame has been built by professionals and complies with safety regula-
tions. Nonetheless, its use may constitute a risk to the health and safety of users or third
parties, damage to the FlexTable frame or to other items. The FlexTable frame must be
used only:
• for the purpose for which it was intended.
• if it is completely safe to do so.
2.9 In an emergency
• Stop using the FlexTable frame at once if you notice anything out of the ordinary
(unusual noises, resistance in the handle, etc.).
• Should your frame or other components require repairs, please contact us. Any repairs
or alterations should only completed using approved replacement parts from MultiTa-
ble.
• Refrain from using the FlexTable frame until it has been successfully repaired.
• Replacement parts are available for both in and outside of the warranty time frame.
2.10 Maintenance and cleaning
• Your new FlexTable frame and its components are low maintenance items, but still re-
quire regular maintenance. We recommend checking and tightening the bolts and
set screws every 6 months to ensure your table raises and lowers correctly.
• Do not alter the construction of the FlexTable frame. Any such alterations made to the
FlexTable frame outside of what is recommended by MultiTable may result in voiding
the warranty.
• To clean your FlexTable frame and table top, use a clean damp cloth and a mild
household cleaning solution.
Page 6
6
3 Assembly
3.1 Checking the items supplied
• Carefully open the cardboard packaging.
• In doing so, do not use any long knife blades. They may damage the components in-
side.
• Check the parts supplied against the list in Section 1.1, Items supplied.
• Check the contents for visible transit damage, paying particular attention to the electri-
cal wiring. In the event of any damage or incorrect components, contact customer services (see Section 6).
• Do not attempt to assemble the FlexTable frame if there is any damage or if there are
any incorrect components.
3.2 Packaging
• Remove the packaging. Treat as household waste/paper.
• Observe national legislation.
3.3 Tightening torques for screws used
• Assemble the FlexTable frame with the tools supplied only.
3.4 Assembly of the FlexTable
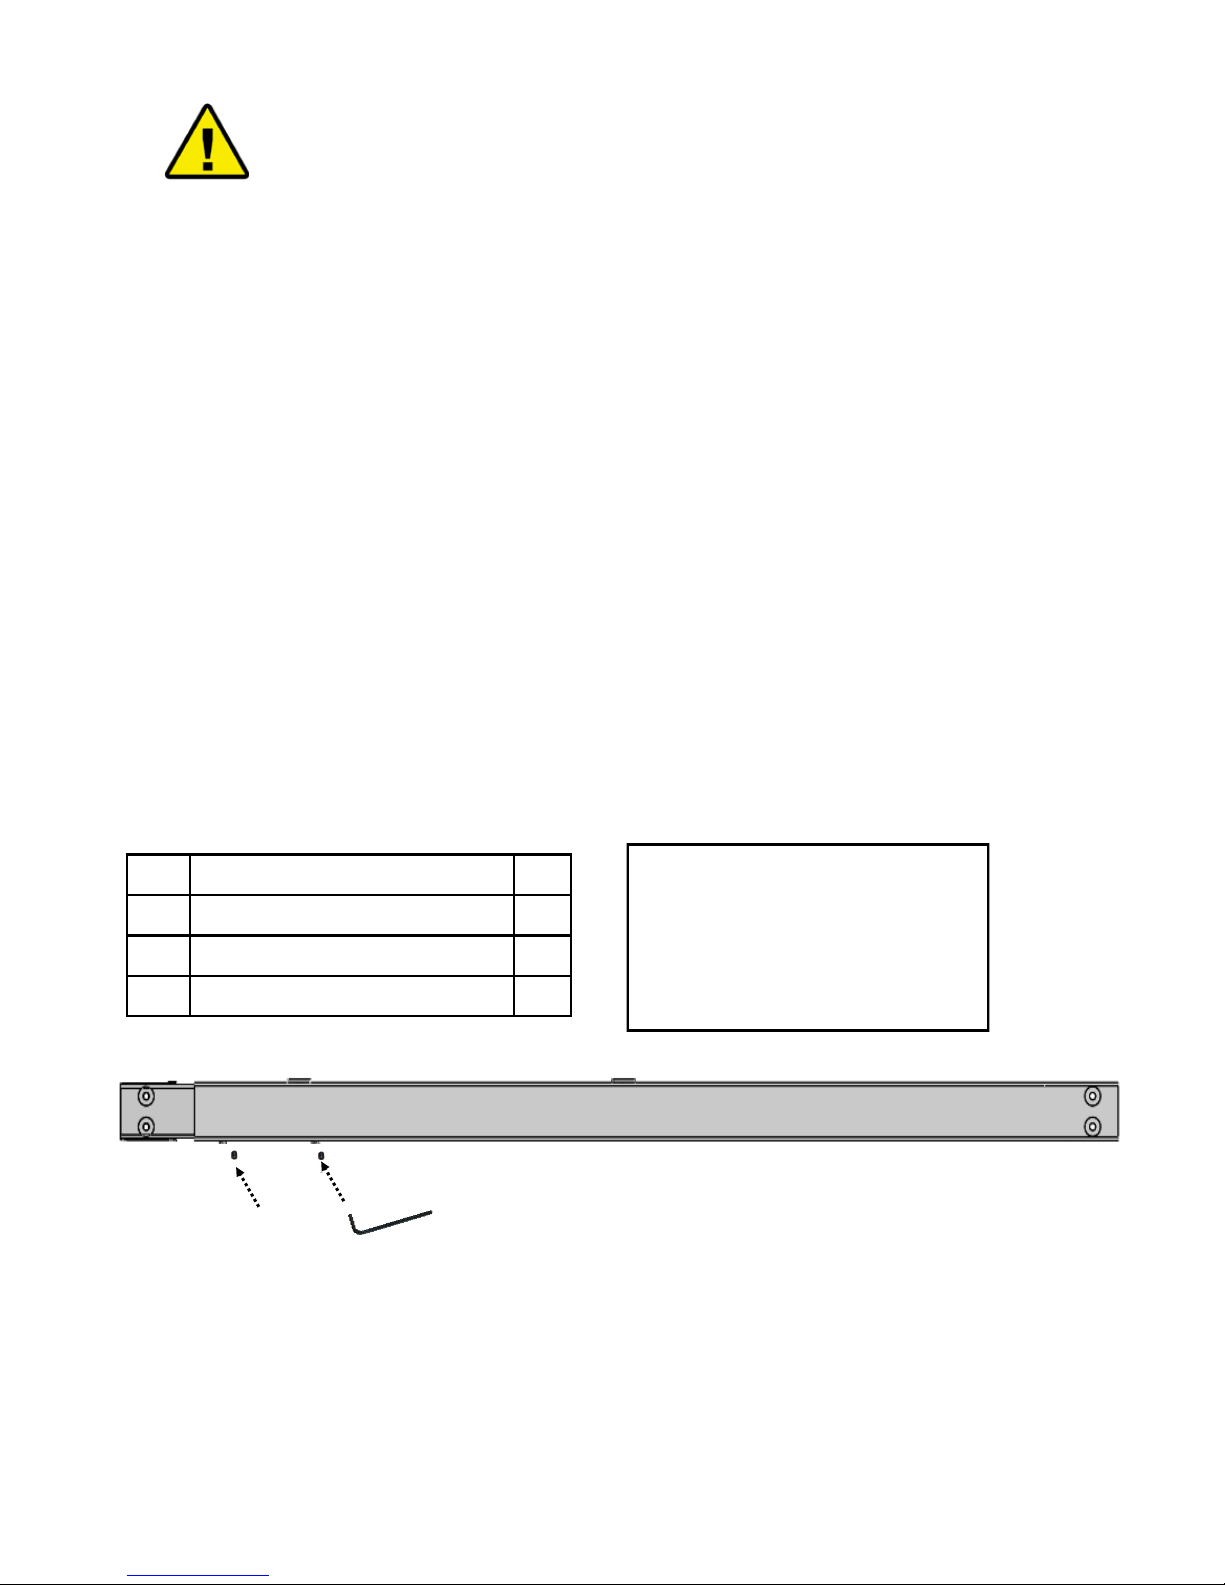
3.4.1 Pre-assembly of the Crossbar
Assemble the following components:
Before attempting assembly, read the Safety Information in Section 2.
• Assemble the 2 set screws in the tapped holes.
Do not yet tighten the socket screws!
• Tighten the socket screws only after assembling the components in step 3.4.7 Adjust-
ment of the frame width, page 18.
Recommneded Widths
Frame set-up Table Top Width
1,1 m 44 in
1.3 m 57 in
1.5 m 72 in
# Part name Qty
06 Crossbar 1
09a Allen key M3 1
10.1 Set Screw M6x6 2
Set screw M6x6
Page 7
7
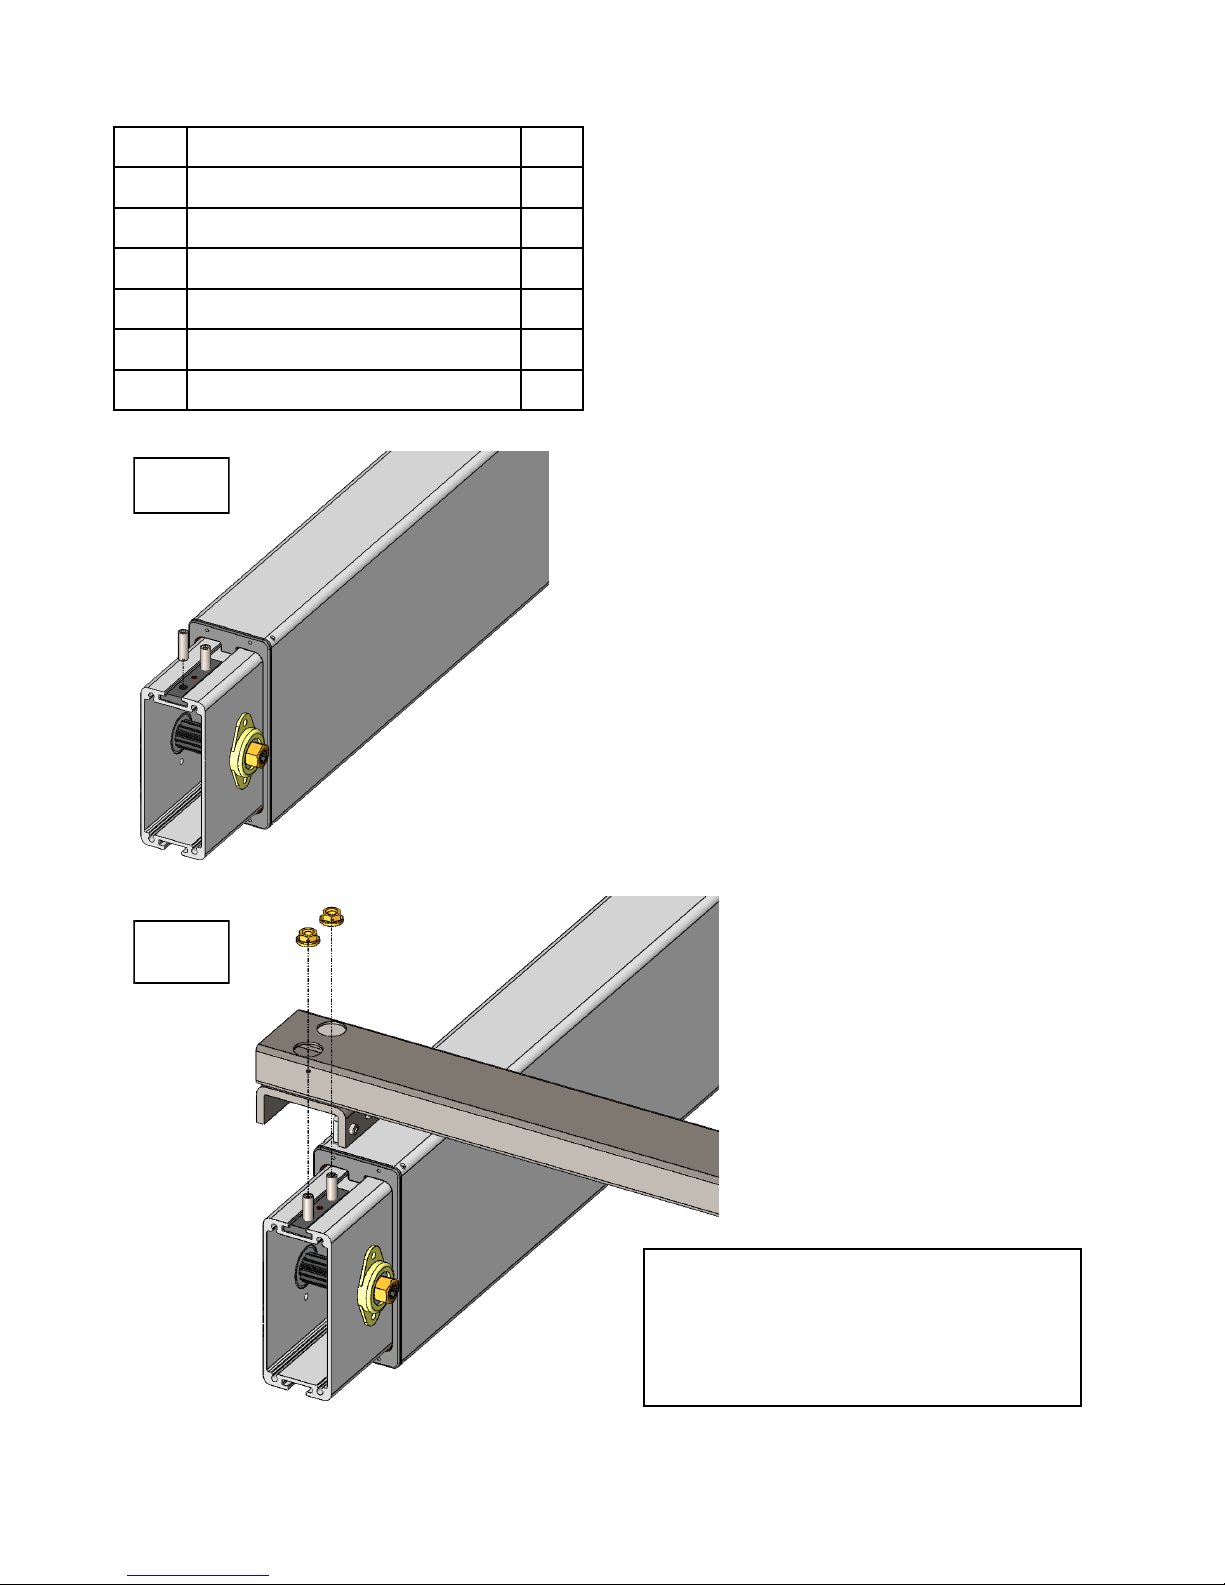
3.4.2 Mounting the Crossbar
Assemble the following components:
# Part name Qty
01 Leg 2
06 Pre-assembled Crossbar 1
09e Pipe Key M10 1
09a Allen key M3 1
10.2 Set Screw M6x20 4
10.3 Flange Nut M6 4
Photo 1
• Place both legs flat on the floor, parallel to each
other.
Be aware that both slide nuts point upwards.
• Twist in 2 set screws into the slide nut of each leg.
• Gently tighten the set screws with the Allen key M3.
1
Photo 2
• Place the pre-assembled crossbar over the set screws.
• Place the 4 flange nuts on the set screws.
• Hand tighten the 4 flange nuts with the Pipe Key M10.
Important !!!
• Do not fully tighten the flange nut.
• Prevent the plate in crossbar
bracket from falling off!
2
Page 8

8
4
Important !!!
• Please ensure that the “MultiTable” Tag
on both legs are facing outwards.
3
3.4.3 Mounting the Feet
Assemble the following components:
# Part name Qty
03 Foot 2
08 Foot adjusters 4
09b Allen Key M5 1
10.4 Cap Screw M6x25 8
Photo 4
• Turn the pre-assembled legs and crossbars up-side-down (with 2 persons). The
crossbars are now closest to the floor.
Secure the pre-assembled legs against falling over.
Page 9

9
Photo 5
• Place 2 foot adjusters on the bottom of each foot.
• Connect each foot to a leg with 4 cap screws.
• Tighten the 8 screws with the Allen Key M5.
6
Photo 6
• Remove the transparent cellulose tape on the crossbar bracket before
mount to the leg unit.
Cellulose
Tape
5
Page 10

10
Photo 7
• Turn the frame back on its foot (with 2 persons).
• Now only :-
- FIRMLY tighten the 4 set screws on the crossbar bracket with Allen Key M3.
- FIRMLY tighten the 4 flange nuts on the crossbar with Pipe key M10.
7
Tighten the set screws.
Tighten the flange nuts
# Part name Qty
01 Leg 2
06 Pre-assembled Crossbar 1
09e Pipe Key M10 1
09a Allen key M3 1
Page 11

11
3.4.4 Mounting the Hexagon Shaft
Assemble the following components:
8
Photo 8
• Slide both hexagon shafts through the hexagon holes in the legs.
• Slide the gearbox over the hexagon shaft, at the side where the handle needs to be
placed.
Be aware that both legs are completely in the lowest position.
Be aware that all components are originally packed.
# Part name Qty
04 Hexagon shaft 2
05 Axle Drive 1
09c Spanner M10 1
13 Gearbox 1
Page 12

12
9
Photo 9
• Slide the axle drive over both hexagon shafts.
10
Photo 10
• Slide both hexagon shafts inward, until they are flush with the outside surface of
the leg.
Page 13

13
11
Photo 11
• Tighten the 4 hex nuts on the leg unit with the Spanner M10 now.
# Part name Qty
09c Spanner M10 1
Page 14

14
3.4.5 Mounting the Top Support
Assemble the following components:
# Part name Qty
02 Top support 2
09a Allen Key M3 1
10.7 CSK M5x25 8
Photo 12 & 13
• Position the top support, like photo 12, in relation to the crossbars.
• Connect each top support to a leg with 4 CSK head screws.
• Tighten the 8 screws with the Allen Key M3.
12
13
Page 15

15
14
15
3.4.6 Mounting the Hand Crank
Assemble the following components:
# Part name Qty
07 L-Bracket 1
10.7 CSK M5x25 1
09c Spanner M10 1
10.6 Hex Bolt M6x16 1
10.5 Washer M6 1
10.3 Flange nut M6 1
11 Axle drive tube 1
12 Handle 1
14 Hexagon Shaft 200mm 1
15 Hexagon Shaft 280mm 1
The slotted hexagon shaft is exchangeable
based on the table top depth.
• For table top depth 24”~28”, hexagon
shaft used is 200mm (#14).
• For table top depth 29”~36”, hexagon
shaft used is 280mm (#15)
Photo 14
• Slide the hex bolt M6x16mm with a washer through the specific hole in the gearbox.
• Slide the L-bracket over the already placed bolt (between the gearbox and the top
support).
• Screw the flange nut, as showed on the photo, over the bolt.
Photo 15
• Adjust the gearbox towards the top support until L-Bracket’s hole align with hole on
top support.
• Screw the L-Bracket with CSK screw M5x25mm.
Page 16

16
Photo 16
• Slide the handle into the axle drive
tube.
17
16
Photo 17
• Slide the handle assembly over the shaft attached with the hand crank gearbox.
Page 17

17
3.4.7 Adjustment of the frame width
• Pull the frame outward to the required wide (see chapter 3.4.1, Pre-assembly of the
Crossbar).
• Tighten the set screws in the bottom crossbar and axle drive with the Allen Key M3
only now.
18
Tighten the set screws
Page 18

18
3.4.8 Frame test without table top
Make sure that the FlexTable frame can move correctly and freely at
all times. Should this no longer be the case, contact customer service
immediately (see Section 6).
3.4.9 Note: Mounting the table top and handle holder
Center top over base, align with predrilled holes, and attach with 24 wood screws. Align
handle holder with predrilled holes and attach with 2 wood screws
19
Tighten the Nut
20
(#15) Handle Holder
Page 19

19
4 Technical Specifications
Frame for manually adjustable FlexTable
Assembly Manual version 10.1
Material Aluminium, steel and plastic
Stroke (max.) 18.11 in
Frame load (max.) 140 lbs.
Frame weight ± 49 lbs.
Speed .236 inches/full rotation
Environmental temperature Use 59 - 86°F
Environmental temperature Storing 50 - 122°F
Humidity Use <85%
Humidity Storing <50%
Page 20

20
Minimum frame height 27.625 in
Maximum frame height 45.875 in
Maximum stroke 18 in
Frame Width 43—67 in
Frame Depth 29.5 in
Minimum Table Top Depth 24 in
Maximum load 140 lbs
4 Technical Specifications
(* General Tolerance = ± 1/8 in)
23.625”
29.5”
27.875” - 45.875”
45.875”
27.625”
Page 21

21
Observe the provisions of Section 2 Safety Information on page
5, in particular:
Do not leave children unsupervised with the FlexTable frame.
Children may be unaware of the dangers presented by the
FlexTable frame. They would be in serious danger of injuring
themselves, possibly even with fatal consequences.
Do not exceed the maximum time lag of the FlexTable frame.
Make sure there is ample space to avoid collisions if there are
objects on the work surface such as computers or computer
components.
5.1 Indicators
Stop using the workstation frame at once if you notice
anything unusual (strange sounds, etc.).
Have the FlexTable frame repaired by specialists. Refrain from
using the FlexTable frame until it has been successfully
repaired.
5 Operation and Indicators
Page 22

22
6 Customer Service
Please make sure you have your order number on hand when contacting cus-
tomer service:
7 Recycling
7.1 Taking the FlexTable out of active duty
• Pull the power plug out of the electricity socket.
7.2 Taking the FlexTable apart
• In case of de-assembling please follow the manual backwards or contact
customer service.
7.3 Recycling
• Please split all parts to their type of material. Keep notice of National
restrictions!
Manual FlexTable
By MultiTable, LLC
2255 W Desert Cove Ave Suite E
Phoenix, AZ 85029
Local: 602.773.6911
Toll Free: 855-469-6858
customerservice@multitable.com
www.MultiTable.com
 Loading...