


1info@multisound.it
ITIT
s.n.c.
MAX - T 100
MANUALE UTENTE
INSTRUCTION MANUAL

2 www.multisound.it
ITIT
Contenuto della confezione:
Riproduttore Mod. Max -T100
Memory Card
Manuale Istruzioni

3info@multisound.it
ITIT
Denizioni Simboli Display
Denizioni Tasti
Inserimento Memory Card
Accensione / Spegnimento
Selezione Canti
Regolazione Volume
Play / Pausa
MIX - Miscelazione Canti
Funzione Balance
Indicazione livello batteria
MENU SET:
Impostazione Lingua
Impostazione illuminazione Display
Impostazione Timeout Luce
Impostazione Data/Ora
Impostazione Timer Ciclici
Selezione Altoparlanti
Ripristino impostazioni iniziali
MENU LIST:
Crea Nuova Playlist
Carica Playlist
Modica Playlist
Elimina Playlist
Lista completa
MENU TIMER:
Impostazione Timer
Crea Programma
Elimina/Modica Programma
Attiva Timer
Disattiva Timer
Speciche Tecniche
Garanzia
pag. 4
pag. 5
pag. 6
pag. 6
pag. 7
pag. 7
pag. 7
pag. 7
pag. 8
pag. 8
pag. 9
pag. 9
pag. 10
pag. 10
pag. 11
pag. 12
pag. 12
pag. 13
pag. 14
pag. 15
pag. 15
pag. 16
pag. 16
pag. 16
pag. 18
pag. 19
pag. 19
pag. 20
pag. 20
INDICE

4 www.multisound.it
ITIT
ICONA DESCRIZIONE ICONA DESCIZIONE
VOLUME
LIST
MENU LIST
LIVELLO BATTERIA
TIMER
MENU TIMER
10:20
OROLOGIO
SET
MENU SET
CANTO IN RIPRODUZIONE
46-
NUMERO TRACCIA
L
PLAY LIST IN RIPRODUZIONE Regola BALANCE
B
Fig. 1
DEFINIZIONE SIMBOLI DISPLAY

5info@multisound.it
ITIT
TASTO DESCRIZIONE TASTO DESCIZIONE
Passaggio precedente /
Spostamento a sinistra
Passaggio successivo /
Spostamento a destra
Spostamento
verso il basso
Spostamento
verso l’alto
Aumento livello di volume Diminuzione livello di volume
Funzione miscelazione canti Conferma
Per uscire /
Attivare Balance
On / Off
Avvia/
Sospende la riproduzione
Led lampeggiante e
timer attivo
BACK
NEXT
MIX
ENTER
ESC
BALANCE
PLAY
PAUSE
Fig. 2
DEFINIZIONE TASTI

6 www.multisound.it
ITIT
INSERIMENTO MEMORY CARD
Nel momento in cui riceverete il vostro T-100 la Memory card sarà già installata e
pronta all’ uso.
Nel caso in cui debba essere sostituita procedere come segue:
1 - Spegnere il riproduttore.
2 - Per rimuovere la Memory card premete no a quando non sentite lo scatto di
sgancio, a questo punto rilasciare la memoria che verrà espulsa da sola.
3 - Inserite la Memory card con i contatti dorati rivolti verso il basso e premete no
a quando sentirete lo scatto di aggancio. (Fig. 3 )
Se la Memory card non viene inserita correttamente, viene visualizzato un messaggio d’errore sul display, “SD CARD ERROR” dopodiché l’apparecchio si spegne.
Per prevenire danni e/o perdita di dati dalla memoria si raccomanda di non rimuo-
vere mai la scheda con il riproduttore in funzione
ACCENSIONE / SPEGNIMENTO
Collegare i morsetti alla batteria esterna (non in dotazione) che deve avere
una tensione pari a 12 Volts rispettando la polarità corretta (Rosso=Positivo Nero=Negativo).
Per accendere il riproduttore T-100 premere il tasto ON/OFF no a quando il di-
splay si illumina ed inizia la riproduzione.
Per spegnere il riproduttore premere il tasto OFF. Nel caso sia impostato un programma Timer, l’apparecchio chiede di disabilitarlo prima di effettuare lo spegni-
mento.
Alla riaccensione, viene riprodotto l’ultimo canto selezionato al volume precedentemente impostato.

7info@multisound.it
ITIT
L’apparecchio T-100 è protetto contro l’inversione di polartà.
Per prevenire danni e/o perdita di dati dalla memoria si raccomanda di spegnere prima il riproduttore come sopra descritto poi scollegare i morsetti
dalla batteria.
SELEZIONE CANTI
Il riproduttore T-100 è in grado di riprodurre no a cento canti presenti sulla stessa
Memory card. La selezione del canto da riprodurre (Visualizzata sul display in
negativo) avviene tramite l’uso dei tasti freccia
( ) + il tasto (ENTER) per confermare. Per scorrere più velocemente la lista
dei canti si possono tenere premuti i tasti freccia ( ) a lungo. Questo con-
sentirà di scorrere la lista di 10 canti alla volta. Sul display il primo canto visualizzato in alto con il simbolo del play > alla sua sinistra è quello attualmente in
riproduzione.(Fig. 2 )
REGOLAZIONE VOLUME
La regolazione del volume avviene tramite i tasti + / -. Premere il tasto + per aumentare il volume, premere il tasto - per diminuire il volume. (Fig. 2)
PLAY / PAUSA
Nel caso in cui si voglia interrompere momentaneamente la riproduzione del canto
premere il tasto (Play/Pause) (Fig. 2).
Premendo nuovamente il tasto (Play/Pause) la riproduzione riprende dal punto in
cui è stata interrotta.
Se ci troviamo nella condizione di Pausa e vogliamo riprodurre un canto
diverso da quello attualmente in riproduzione, sarà sufciente selezionarlo
con i tasti ( ) + tasto (ENTER)
MIX - MISCELAZIONE CANTI
La funzione MIX permette di poter riprodurre simultaneamente due canti. Ad ogni
attivazione, la funzione MIX, riproduce i due canti allo stesso livello di volume.
Per afnare la riproduzione dei due canti e dare la prevalenza a uno o all’altro è
necessario effettuare la regolazione del BALANCE.
FUNZIONE MIX
1 - Selezionare il primo canto (canto base) al quale abbinare il successivo per
la miscelazione.
2 - Premere il tasto (MIX), il nome della pista base ora lampeggia.

8 www.multisound.it
ITIT
3 - Selezionare con le frecce ( ) il secondo canto da miscelare e premere
il tasto (ENTER). Per sostituire il secondo canto, selezionarne un altro con le
frecce ( ) e premere il tasto (ENTER).
4 - Per uscire dalla funzione di miscelazione, premere nuovamente il tasto (MIX),
verrà riprodotta l’ultima traccia selezionata e la pista base verrà eliminata.
FUNZIONE BALANCE
1 - Durante la riproduzione di due canti miscelati, premere il tasto (BALANCE),
verrà visualizzato un cursore nella parte alta del display.
2 - Premere il tasto (-) per attenuare il canto base, oppure il tasto (+) per atte-
nuare il secondo canto.
INDICATORE LIVELLO BATTERIA
Nella parte superiore del display è visualizzato l’indicatore di carica della batteria.
Quando l’indicatore segnala batteria scarica, si consiglia di ricaricare la batteria o
cambiare fonte di alimentazione.
Per evitare malfunzionamenti, in caso di batteria molto scarica, viene visualizzato
a tutto schermo, il simbolo di una batteria scarica lampeggiante, dopodiché l’apparecchio si spegne automaticamente.

9info@multisound.it
ITIT
MENU SET
IMPOSTAZIONE LINGUA
Il menu Lingua consente di modicare la lingua del dispositivo. La lingua predenita è l’Inglese.
MODIFICA LINGUA:
1 - Nella schermata principale premere il tasto ( ) e selezionare SET, premere
il tasto (ENTER) per confermare,
scorrere i menù con i tasti ( ) no alla selezione del menù Lingua e premere
(ENTER).
2 - Utilizare i tasti freccia ( ) per evidenziare la lingua desiderata.
3 - Premere il tasto (ENTER) o attendere l’uscita automatica dal menù per con-
fermare la scelta, oppure il tasto (ESC) per uscire senza apportare nessuna
modica.
IMPOSTAZIONE ILLUMINAZIONE DISPLAY
La schermata Backlight consente di modicare l’illuminazione del display, dal livello 0 (spento) no al livello 10 (max).
MODIFICA LUMINOSITA’:
1 - Nella schermata principale premere il tasto ( ) e selezionare SET, premere
il tasto (ENTER) per confermare,
scorrere i menù con i tasti ( ) no alla selezione del menù Backlight e premere
(ENTER).
2 - Utilizzare i tasti freccia ( ) per evidenziare il livello di luminosità desiderato.
3 - Premere il tasto (ENTER) o attendere l’uscita automatica dal menù per con-
fermare la scelta, oppure il tasto (ESC) per uscire senza apportare nessuna
modica.

10 www.multisound.it
ITIT
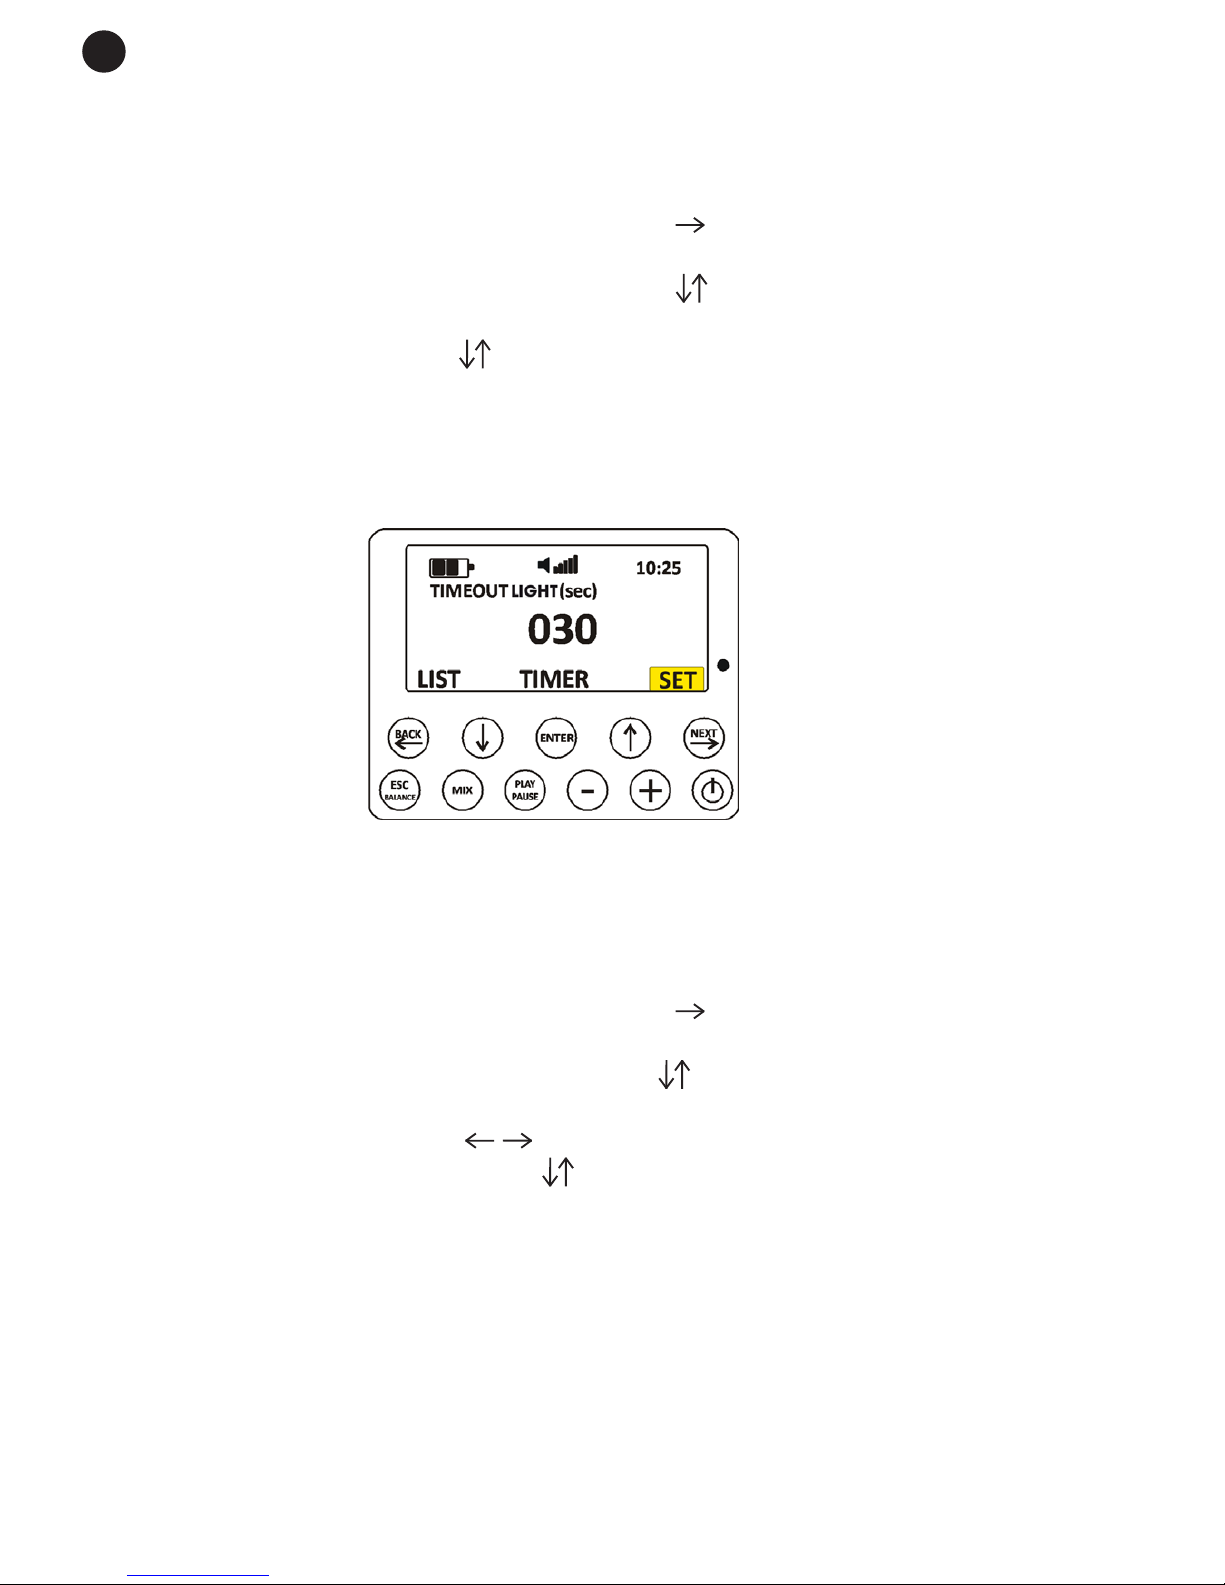
IMPOSTAZIONE TIMEOUT LUCE
Il menu Timeout luce consente di impostare il tempo di illuminazione del display. Il
tempo, espresso in secondi, è modicabile da 0 a 180.
MODIFICA TEMPO ILLUMINAZIONE DISPLAY:
1 - Nella schermata principale premere il tasto ( ) e selezionare SET, premere
il tasto (ENTER) per confermare,
scorrere i menù con i tasti ( ) no alla selezione del menù Timeout luce e
premere (ENTER).
2 - Utilizare i tasti freccia ( ) per evidenziare il tempo della luminosità deside-
rato.
3 - Premere il tasto (ENTER) o attendere l’uscita automatica dal menù per con-
fermare la scelta, oppure il tasto (ESC) per uscire senza apportare nessuna
modica.
IMPOSTAZIONE DATA - ORA
Il menu Imposta data-ora consente di impostare la data e l’ora del sistema
MODIFICA DATA - ORA
1 - Nella schermata principale premere il tasto ( ) e selezionare SET, premere
il tasto (ENTER) per confermare, scorrere i menù con i tasti ( ) no alla sele-

11info@multisound.it
ITIT
zione del menù Imposta data-ora e premere (ENTER).
2 - Utilizare i tasti freccia ( ) per evidenziare ore e minuti da modicare ed i
tasti ( ) per incrementare o diminuire i valori.
3 - Premere il tasto (ENTER) o attendere l’uscita automatica dal menù per con-
fermare la scelta, oppure il tasto (ESC) per uscire senza apportare nessuna
modica.
IMPOSTAZIONE TIMER CICLICI
Attivando l’opzione Timer ciclici il riproduttore ripeterà nei giorni successivi, no a
quando resterà alimentato, lo stesso ciclo di accensioni e spegnimenti program-
mati.
IMPOSTAZIONE TIMER CICLICI
1 - Nella schermata principale premere il tasto ( ) e selezionare SET, premere
il tasto (ENTER) per confermare, scorrere i menù con i tasti ( ) no alla selezione del menù Timer ciclici e premere (ENTER).
2 - Utilizare i tasti freccia ( ) per selezionare “SI” oppure “NO”.
3 - Premere il tasto (ENTER) o attendere l’uscita automatica dal menù per confermare la scelta, oppure il tasto (ESC) per uscire senza apportare nessuna
modica.

12 www.multisound.it
ITIT
SELEZIONE ALTOPARLANTI
Mediante il menù Selezione speaker si potrà impostare quale altoparlante deve
riprodurre il suono.
Le opzioni sono tre:
“INT” riproduce il suono con l’altoparlante interno.
“EST” abilita l’uscita audio sulla presa per l’altoparlante esterno disabilitando quel-
lo interno.
“EXT+INT” il suono viene riprodotto sia con l’altoparlante interno che quello collegato esternamente.
IMPOSTAZIONE ALTOPARLANTE:
1 - Nella schermata principale premere il tasto ( ) e selezionare SET, premere
il tasto (ENTER) per confermare, scorrere i menù con i tasti
( ) no alla selezione del menù Selezione speaker e premere il
tasto (ENTER).
2 - Utilizzare i tasti freccia ( ) per selezionare una delle tre opzioni.
3 - Premere il tasto (ENTER) o attendere l’uscita automatica dal menù
per confermare la scelta, oppure il tasto (ESC) per uscire senza apportare nessuna modica.
RIPRISTINO IMPOSTAZIONI INIZIALI
Mediante il menù Ripristino impostazioni si potranno ripristinare le impostazioni
di fabbrica.
RIPRISTINO IMPOSTAZIONI INIZIALI
1 - Nella schermata principale premere il tasto ( ) e selezionare SET, premere
il tasto (ENTER) per confermare, scorrere i menù con
i tasti ( ) no alla selezione del menù Ripristino impostazioni e
premere il tasto (ENTER).
2 - Utilizzare i tasti freccia ( )per selezionare “SI” oppure “NO”.
3 - Premere il tasto (ENTER) per confermare la scelta.

13info@multisound.it
ITIT
Se si procede con il ripristino, verranno riattivate le impostazioni della prima accensione, ed il riproduttore si spegnerà automaticamente.
MENU LIST
CREAZIONE PLAYLIST PERSONALIZZATE
Il riproduttore MAX T-100 è in grado di riprodurre memorie ad alta capacità no a
cento canti. Con un numero così elevato di canti da gestire si rende necessario
creare delle liste di canti personalizzate dette Playlist, per avere una gestione più
rapida e funzionale dei brani. Potrete creare no a 9 playlist, nelle quali inserire i
canti maggiormente usati.
CREA NUOVA PLAY LIST
1 - Nella schermata principale premere i tasti freccia ( ) e selezionare LIST,
premere il tasto (ENTER) per confermare.
2 - Scorrere i menù con i tasti ( ) no alla selezione del menù
Crea nuova playlist e premere il tasto (ENTER).
Il riproduttore torna automaticamente alla schermata principale e la voce di
menu LIST lampeggia.
3 - Con i tasti freccia ( ) selezionare il canto da inserire nella nuova Playlist e
premere il tasto (ENTER).
Ogni canto selezionato da inserire nella Playlist viene contrassegnato con
la lettera “P”.

14 www.multisound.it
ITIT
4 - Terminata la selezione dei canti desiderati, premere il tasto (NEXT) per pas-
sare al menu “ASSEGNA PLAYLIST”
5 - Selezionare con i tasti ( ) la playlist alla quale si vuole assegnare i canti e
premere il tasto (ENTER).
La Play-list appena creata verrà caricata automaticamente ed inizierà subito a
suonare. La riproduzione di una playlist, viene segnalata sulla parte alta del di-
splay con una lettera “L” in reverso. (Fig. 17)
Di anco al nome della playlist, è indicato il numero dei canti contenuti, la lettera
“R” indica quella in riproduzione. (Fig. 17)
CARICA PLAYLIST
Permette di riprodurre la Playlist desiderata:
FUNZIONE CARICA PLAYLIST
1 - Nella schermata principale premere i tasti freccia ( ) e selezionare LIST,
premere il tasto (ENTER) per confermare.
2 - Scorrere i menù con i tasti ( ) no alla selezione del menù Carica playlist
e premere il tasto (ENTER). Verrà visualizzato l’elenco delle playlist create. Di
anco al nome della playlist, è indicato il numero dei canti contenuti. (Fig. 16)
3 - Selezionare con i tasti freccia ( ) la playlist desiderata e premere il tasto
(ENTER).

15info@multisound.it
ITIT
La riproduzione di una playlist, viene segnalata sulla parte alta del display con una
lettera “L” in reverso
MODIFICA PLAY-LIST
Permette di modicare i canti all’interno di una Play-List:
FUNZIONE MODIFICA PLAYLIST
1 - Nella schermata principale premere i tasti freccia ( ) e selezionare LIST,
premere il tasto (ENTER) per confermare.
2 - Scorrere i menù con i tasti ( ) no alla selezione del menù Modica playlist e
premere il tasto (ENTER). Verrà visualizzato l’elenco delle playlist create.
Ogni canto selezionato da inserire nella Playlist viene contrassegnato con
la lettera “P”.
Per eliminare un canto non desiderato già scelto per la playlist, selezionarlo con
i tasti ( ) e premere il tasto (ENTER).
3 - Selezionare con i tasti freccia ( ) la playlist desiderata e premere il tasto
(ENTER), verranno visualizzati i canti contenuti.
I canti all’interno della playlist sono contrassegnati con la lettera “P”. Se-
lezionare con i tasti freccia ( ) il canto da eliminare o da aggiungere e premere
il tasto (ENTER).
4 - Premere il tasto (>NEXT) per confermare la scelta, oppure il tasto (< BACK)
per uscire senza apportare nessuna modica. (Fig. 17)
Fig. 17
ELIMINA PLAY-LIST
Permette di cancellare tutti i canti all’interno di una Play-List:
FUNZIONE ELIMINA PLAYLIST:

16 www.multisound.it
ITIT
1 - Nella schermata principale premere i tasti freccia ( ) e selezionare LIST,
premere il tasto (ENTER) per confermare.
2 - Scorrere i menù con i tasti ( ) no alla selezione del menù Elimina playlist e
premere il tasto (ENTER). Verrà visualizzato l’elenco delle playlist create.
3 - Selezionare con i tasti freccia ( ) la playlist da eliminare e premere il tasto
(ENTER). (Fig. 18)
Fig. 18
LISTA COMPLETA
Selezionare questa opzione per tornare alla riproduzione di tutti i canti presenti
sulla memoria.
1 - Nella schermata principale premere i tasti freccia ( ) e selezionare LIST,
premere il tasto (ENTER) per confermare.
2 - Scorrere i menù con i tasti ( ) no alla selezione del menù Lista completa e
premere il tasto (ENTER).
MENU TIMER
IMPOSTAZIONE TIMER
L’apparecchio T-100 è dotato di un timer programmabile che permette di programmare no a 20 programmi di accensione e spegnimenti nell’arco delle 24 ore.
Inoltre attivando nel menu SET la funzione “Timer ciclici” i programmi verranno
ripetuti anche nei giorni successivi. Vedi Timer ciclici a pag. 10.
CREA PROGRAMMA TIMER
Selezionare questa voce di menu per creare un nuovo programma di accensione
e spegnimento a ore prestabilite:
1 - Nella schermata principale, selezionare con i tasti freccia ( ) TIMER e
premere il tasto (ENTER) per confermare.
2 - Dopo aver vericato la data e l’ora corrente, selezionare con i tasti freccia (
) Crea Programma e premere il tasto (ENTER).
3 - Impostare l’orario di accensione e premere il tasto (NEXT). (FIG. 19)

17info@multisound.it
ITIT
Fig. 19
4 - Impostare l’orario di spegnimento (Fig.20) e premere il tasto (NEXT). Usare
le frecce ( ) per spostarsi tra ore e minuti e le frecce ( ) per incrementare
o diminuire il valori.
E’ possibile inserire i programmi con inizio dall’ora corrente per
un max di 24 ore.
Fig. 20
5 - Selezionare il canto da riprodurre per questo evento e il volume di riproduzione desiderato e premere il tasto (NEXT).
Verrà visualizzato sul display il riepilogo del ciclo timer appena impostato.
Fig. 21
6 - Per aggiungere nuovi cicli di accensione e spegnimento premere il tasto
(NEXT) e ripetere la procedura dal punto 3 al punto 5. Per salvare il programma,
premere il tasto (ENTER).
7 - Verrà richiesto se attivare subito il timer o successivamente. Premere i tasti
freccia ( ) per selezionare la scelta e premere il tasto (ENTER) per con-
fermare.

18 www.multisound.it
ITIT
Fig. 22
ATTENZIONE: una volta attivato il timer, per poter spegnere l’apparecchio è
necessario prima disattivarlo.
Durante il funzionamento del TIMER, in caso di interruzione dell’alimentazione, l’apparecchio si spegne. Una volta ripristinata l’alimentazione sarà necessario riaccendere l’apparecchio, il quale chiederà se disabilitare il TIMER
o se continuare il programma impostato.
Fig. 23
ELIMINA / MODIFICA PROGRAMMA
Consente di vericare, modicare o eliminare un programma. E’ possibile modicare l’orario di accensione o spegnimento, il numero della traccia e livello volume.
1 - Nella schermata principale, selezionare con i tasti freccia ( ) TIMER e
premere il tasto (ENTER) per confermare.
2 - Selezionare con i tasti freccia ( ) Modica programma e premere il tasto
(ENTER).
Fig. 24
3 - Viene visualizzato sul display l’elenco dei programmi creati, scorrerli con i
tasti freccia ( ) no a visualizzare il programma da modicare. (Fig. 21 )
4 - Premere i tasti freccia ( ) per selezionare i valori di ON / OFF / TRACK
che si desidera modicare e premere il tasto (ENTER).

19info@multisound.it
ITIT
Effettuare le modiche con la stesse procedure del menu Crea Programma
(vedi pag. 16)
Fare molta attenzione a non impostare orari di accensioni o spegnimenti che
possano andare in conitto con altri programmi.
5 - Per eliminare un programma intero, premere il tasto ( ) no a quando sul
display compare la frase ” – ERASE”, premere il tasto (-) per confermare la
cancellazione.
6 - Per uscire e salvare le modiche, premere il tasto freccia ( ) no a quando
compare SAVE, premere il tasto (ENTER) per confermare. Si consiglia di veri-
care l’esatta sequenza dei programmi scorrendoli con i tasti freccia ( ) prima
di salvare le modiche. Per uscire senza apportare modiche premere a lungo
il tasto (ESC).
ATTIVA TIMER
Serve per abilitare i programmi creati:
1 - Nella schermata principale, selezionare con i tasti freccia ( ) TIMER e
premere il tasto (ENTER) per confermare.
2 - Selezionare con i tasti freccia ( ) Attiva Timer e premere il tasto (ENTER)
per confermare (Fig. 22), Il riproduttore passerà in modalità TIMER (led verde
lampeggiante) eseguendo la programmazione impostata.
Durante la modalità Timer, viene indicato sul display il tempo mancante alla
funzione successiva.
ATTENZIONE: una volta attivato il timer, per poter spegnere l’apparecchio è
necessario prima disattivarlo.
Durante il funzionamento del TIMER, in caso di interruzione dell’alimentazione, l’apparecchio si spegne. Una volta ripristinata l’alimentazione sarà necessario riaccendere l’apparecchio, il quale chiederà se disabilitare il TIMER
o se continuare il programma impostato.
DISATTIVA TIMER
Il TIMER può essere disattivato in qualsiasi momento.
Premendo il tasto (ON/OFF), verrà chiesto se disattivare il timer.
Selezionare “SI” e premere il tasto (ENTER) per disattivare il TIMER e riprendere
la normale riproduzione.
Selezionare “NO” e premere il tasto (ENTER) per continuare la programmazione
TIMER . (Fig. 23)

20 www.multisound.it
ITIT
SPECIFICHE TECNICHE
Riproduttore Max-T100
• ALTOPARLANTE INTERNO 30 Watts
• PRESA JACK PER ALTOPARLANTE ESTERNO (30 Watts)
• CAPACITA’ MEMORY CARD: 100 CANTI
• FUNZIONE MISCELAZIONE CANTI
• FUNZIONE BALANCE
• FUNZIONE CREAZIONE PLAY-LIST
• TIMER ACCENSIONI MULTIPLE
• ALIMENTAZIONE ESTERNA 12 VOLTS
• INDICAZIONE DELLO STATO DI CARICA DELLA BATTERIA.
• DIMENSIONI DISPLAY: mm. 45 x 28
• RISOLUZIONE DISPLAY: 128 x 64 pixel
• DIMENSIONI CORPO: mm. 74.5 x 74.5 x 50
• PESO: 570 gr.
GARANZIA
I prodotti sono assistiti da garanzia a norma di legge. Multisound applicherà il
Decreto Legislativo num.24 del 2 febbraio 2002, artt. 1519-bis e seguenti c.c. (due
anni dalla consegna alle condizioni di legge). Restano in ogni caso valide eventuali
garanzie contrattuali rilasciate direttamente dal produttore. La garanzia copre il
prodotto contro difetti di fabbricazione, escludendo pertanto i danni provocati da
cause accidentali, da negligenze o da cattivo utilizzo dei prodotti stessi.

21info@multisound.it
GB
Display Symbols
Device Buttons
Inserting Memory Card
Turning Device On/Off
Selecting Songs
Adjusting Sound Volume
Play/Pause
Mix Function: Mixing Songs
Mix Function: Adjusting Balance
Battery Level Indicator
SET MENU:
Set Language
Set Backlight
Set Display Timeout
Set Date/Time
Set Repeat Timer
Set Speakers
Reset Default Settings
LIST MENU:
Create New Playlist
Load Playlist
Modify Playlist
Delete Playlist
All Songs
TIMER MENU:
Create Programme
Delete/Change Programme
Enable Timer
Disable Timer
Technical Specications
Warranty
pag. 22
pag. 23
pag. 24
pag. 24
pag. 25
pag. 25
pag. 25
pag. 25
pag. 26
pag. 26
pag. 26
pag. 27
pag. 28
pag. 28
pag. 29
pag. 29
pag. 30
pag. 31
pag. 32
pag. 33
pag. 33
pag. 34
pag. 34
pag. 36
pag. 37
pag. 37
pag. 38
pag. 38
INDICE
Contents of box:
Model MAX-T100 Player
Memory Card
Instruction Manual

22 www.multisound.it
GB
ICON DESCRIPTION ICON DESCRIPTION
VOLUME
LIST
LIST MENU
BATTERY LEVEL
TIMER
TIMER MENU
10:20
CLOCK
SET
SET MENU
CURRENT SONG PLAYING
46-
TRACK NUMBER
L
CURRENT PLAYLIST PLAYING BALANCE
B
DISPLAY SYMBOLS

23info@multisound.it
GB
BUTTON DESCRIPTION BUTTON DESCRIPTION
Previous step / move left Following step / move right
Move down Move up
Increase volume Decrease volume
Song mix function Conrm
Exit / enable balance On / Off
Start / suspend playing
Flashing led and timer on
BACK
NEXT
MIX
ENTER
ESC
BALANCE
PLAY
PAUSE
Fig. 2
DEVICE BUTTONS

24 www.multisound.it
GB
INSERTING MEMORY CARD
Your MAX-T100 comes with a memory card already installed and ready to use.
Should you need to replace it, proceed as follows:
1 - Turn off the device.
2 - To remove the memory card, press inwards on the card until you hear a click,
then release the card and it will pop out on its own.
3 - Insert the new memory card with the gold-coloured contacts facing downwards
and press inwards until you hear a click. (Fig. 3 )
If the memory card is not inserted correctly, the display will show this error message, “SD CARD ERROR”, then the device will turn off automatically.
To avoid damages and/or memory data loss, never remove the card while
the device is on.
TURNING DEVICE ON/OFF
Connect the clips to an external 12 Volt battery (not provided) respecting the correct polarity (Red=Positive - Black=Negative).
1 - To turn on the device, press the ON/OFF button until the display lights up and
it starts to play.
2 - To turn off the device, press the ON/OFF button again.
3 - If a timer programme has been set, the device will request that it be disabled
before turning off.
When the device is turned back on, the last song selected will play at the pre-
viously set volume.

25info@multisound.it
GB
The T-100 device is protected against polarity inversion.
To avoid damages and/or memory data loss, turn off the player as described
above, then disconnect the clips from the battery.
SELECTING SONGS
1 - Use the up/down arrow ( ) buttons to select a song to play (the title will be
displayed in white text on a dark background), then press the ENTER button to
conrm.
2 - To scroll through the song list more quickly, press and hold the up/down arrow
( ) buttons. This will scroll through ten songs at a time. On the display, the rst
song at the top with the play symbol > to its left is the current song playing. (Fig. 2 )
ADJUSTING SOUND VOLUME
1 - Use the plus/minus (+/-) buttons to adjust the volume.
2 - Press the plus (+) button to increase the volume, press the minus (-) button to
decrease volume. (Fig. 2)
PLAY / PAUSE
1 - To pause a song that is playing, press the PLAY/PAUSE button. (Fig. 2)
2 -To continue playing the same song from the same place, press the PLAY/PAUSE button again.
If a particular song is on PAUSE and you want to play to a different song, just select
it with the up/down arrow ( ) buttons, then press the ENTER button to conrm.
MIX FUNCTION
The MIX function allows the device to play two songs simultaneously.
1 - Whenever it is enabled, the MIX function plays two songs at the same volume.
2 - To have one song play louder than the other, press the BALANCE button to
adjust the volumes.
MIXING SONGS
1 - Select the rst song (base song) to which you wish to add another.
2 - Press the MIX button and the title of the base track will now ash.
3 - Select the second song with the up/down arrow ( ) buttons, then press the
ENTER button to conrm.
4 - To change the second song, select a different song with the up/down arrow (
) buttons, then press the ENTER button to conrm.
5 - To exit from the mixing function, press the MIX button again. The last selected
track will play and the base track will be deleted.

26 www.multisound.it
GB
Fig. 4
ADJUSTING BALANCE
1 - While two mixed songs are playing at the same time, press the BALANCE
button and a cursor will appear at the top of the display.
2 - Press the minus (-) button to lower the volume of the base song or the plus (+)
button to lower the volume of the second song.
BATTERY LEVEL INDICATOR
The battery level indicator appears at the top of the display. When the indicator
shows that the battery is getting low, recharge the battery or change the power
source.
When the battery is extremely low, to avoid malfunctioning, a ashing low battery
symbol will appear across the entire screen and then the device will turn off au-
tomatically.
Fig. 5
SET MENU
SET LANGUAGE
The default language of the device is English. Use this function to set a different
language.
1 - On the main screen, press the right arrow ( ) button to select SET, then press
the ENTER button to conrm.
2 - Scroll the menu with the up/down arrow ( ) buttons to select the LANGUAGE
function, then press the ENTER button to conrm.

27info@multisound.it
GB
3 - Use the up/down arrow ( ) buttons to select the desired language.
4 - To conrm your choice, press the ENTER button or wait for the automatic exit
from the menu.
5 - To exit without making any changes, press the ESC button.
Fig. 6
SET BACKLIGHT
Use this function to change the light level of the display. The intensity ranges from
a level of 0 (off) to a level of 10 (maximum).
1 - On the main screen, press the right arrow ( ) button to select SET, then press
the ENTER button to conrm.
2 - Scroll the menu with the up/down arrow ( ) buttons to select the BACKLIGHT
function, then press the ENTER button to conrm.
3 - Use the up/down arrow ( ) buttons to select the desired light level.
4 - To conrm your choice, press the ENTER button or wait for the automatic exit
from the menu.
5 - To exit without making any changes, press the ESC button.
Fig. 7
28 www.multisound.it
GB
SET DISPLAY TIMEOUT
Use this function to set the duration of the display light. The time is indicated in
seconds and has a range from 0 to 180 seconds.
1 - On the main screen, press the right arrow ( ) button to select SET, then press
the ENTER button to conrm
2 - Scroll the menu with the up/down arrow ( ) buttons to select the DISPLAY
TIMEOUT function, then press the ENTER button to conrm.
3 - Use the up/down arrow ( ) buttons to select the desired display light duration.
4 - To conrm your choice, press the ENTER button or wait for the automatic exit
from the menu.
5 - To exit without making any changes, press the ESC button.
Fig. 8
SET DATE-TIME
Use this function to set the date and time of the system.
1 - On the main screen, press the right arrow ( ) button to select SET, then press
the ENTER button to conrm
2 - Scroll the menu with the up/down arrow ( ) buttons to select the SET DATETIME function, then press the ENTER button to conrm.
3 - Use the left/right arrow ( ) buttons to select the hours and minutes to be
changed and the up/down arrow ( ) buttons to increase or decrease the numbers.
4 - To conrm your choice, press the ENTER button or wait for the automatic exit
from the menu.
5 - To exit without making any changes, press the ESC button.

29info@multisound.it
GB
Fig. 9
• SET REPEAT TIMER
If you want the player to repeat the programmed turn-on/turn-off cycle everyday,
enable the REPEAT TIMER function. The programme will be repeated until the
battery charge runs out.
1 - On the main screen, press the right arrow ( ) button to select SET, then press
the ENTER button to conrm.
2 - Scroll the menu with the up/down arrow ( ) buttons to select the REPEAT
TIMER function, then press the ENTER button to conrm.
3 - Use the up/down arrow ( ) buttons to select YES or NO.
4 - To conrm your choice, press the ENTER button or wait for the automatic exit
from the menu.
5 - To exit without making any changes, press the ESC button.
Fig. 10
SET SPEAKERS
Use this function to select which speakers will emit sound.
There are three options:
1 - the INT setting will emit sound from the internal speaker;
2 - the EXT setting enables sound to be emitted from the external speaker jack and
disables the internal speaker;

30 www.multisound.it
GB
3 - the EXT+INT setting enables sound to be emitted from both the internal speaker and a connected external speaker.
To set the speakers:
1 - On the main screen, press the right arrow( ) button to select SET, then press
the ENTER button to conrm.
2 - Scroll the menu with the up/down arrow ( ) buttons to select the SET SPEAKERS function, then press the ENTER button to conrm.
3 - Use the up/down arrow ( ) buttons to select one of the three options.
4 - To conrm your choice, press the ENTER button or wait for the automatic exit
from the menu.
5 - To exit without making any changes, press the ESC button.
Fig. 11
RESET DEFAULT SETTINGS
Use this function to restore the device to its default settings.
1 - On the main screen, press the right arrow ( ) button to select SET, then press
the ENTER button to conrm.
2 - Scroll the menu with the up/down arrow ( ) buttons to select the RESET SETTINGS function, then press the ENTER button to conrm.
3 - Use the left/right arrow ( ) buttons to select YES or NO, then press the ENTER button to conrm your choice.
When you do a reset, the device will delete all the settings that you have made so
far, then turn off automatically.

31info@multisound.it
GB
Fig. 12
LIST MENU
The MAX-T100 Player comes with 100 tracks in its memory. If you require quicker
and easier management of your songs, use the functions in this menu to create
and manage personalised playlists. You can create up to nine playlists of the songs
you use the most.
CREATE NEW PLAYLIST
Use this function to create a new playlist.
1 - On the main screen, press the left/right arrow ( ) buttons to select LIST,
then press the ENTER button to conrm.
Fig. 13
2 - Scroll the menu with the up/down arrow ( ) buttons to select the CREATE
NEW PLAYLIST function, then press the ENTER button to conrm. The player will
return automatically to the main screen and the word LIST will ash.
3 - Use the up/down arrow ( ) buttons to select each song to be added to the new
playlist, then press the ENTER button to conrm.
Each song selected for addition to the new playlist will be marked with a letter “P”.

32 www.multisound.it
GB
Fig. 14
4 - After selecting all the desired songs, press the NEXT button to move to the
ASSIGN PLAYLIST function.
5 - Use the up/down arrow ( ) buttons to select the playlist to which the songs will
be added, then press the ENTER button to conrm.
Fig. 15
The newly created playlist will be loaded automatically and start to play immediately. When a playlist is playing, a white letter “L” on a dark background will appear
at the top of the display.
The number of songs contained in each playlist will be indicated beside its title.
The current song playing will be marked with a letter “R”. (Fig. 17)
LOAD PLAYLIST
Use this function to load a desired playlist.
1 - On the main screen, press the left/right arrow ( ) buttons to select LIST,
then press the ENTER button to conrm.
2 - Scroll the menu with the up/down arrow ( ) buttons to select the LOAD PLAYLIST function, then press the ENTER button to conrm.
3 - A list of all created playlists will be shown. The number of songs contained in
each playlist will be indicated beside its title. (Fig. 16)
4 - Select the desired playlist with the up/down arrow ( ) buttons, then press the
ENTER button to conrm.
When a playlist is playing, a white letter “L” on a dark background will appear at
the top of the display.

33info@multisound.it
GB
Fig. 16
MODIFY PLAYLIST
Use this function to change songs within a playlist.
1 - On the main screen, press the left/right arrow ( ) buttons to select LIST,
then press the ENTER button to conrm.
2 - Scroll the menu with the up/down arrow ( ) buttons to select the MODIFY
PLAYLIST function, then press the ENTER button to conrm. A list of all created
playlists will be shown. Every song selected to be added to the playlist will be
marked with a letter “P”.
3 - To remove an unwanted song from those selected to be in a playlist, select it
with the up/down arrow ( ) buttons, then press the ENTER button to conrm.
4 - Select the desired playlist with the up/down arrow ( ) buttons, then press the
ENTER button to conrm. A list of all created playlists will be shown. The songs in
the playlist are marked with a letter “P”.
5 - To delete or add a song, select it with the up/down arrow ( ) buttons, then
press the ENTER button to conrm.
6 - To conrm your choice, press the NEXT button.
7 - To exit without making any changes, press the BACK button. (Fig. 17)
Fig. 17
DELETE PLAYLIST
Use this function to delete an entire playlist.
1 - On the main screen, press the left/right arrow ( ) buttons to select LIST,
then press the ENTER button to conrm.
2 - Scroll the menu with the up/down arrow ( ) buttons to select the DELETE
PLAYLIST function, then press the ENTER button to conrm. A list of all created

34 www.multisound.it
GB
playlists will be shown.
3 - Select the playlist to be deleted with the up/down arrow ( ) buttons, then press
the ENTER button to conrm.
Fig. 18
ALL SONGS
Use this function to remove all playlists and be able to play all 100 songs stored
in the memory.
1 - On the main screen, press the left/right arrow ( ) buttons to select LIST,
then press the ENTER button to conrm.
2 - Scroll the menu with the up/down arrow ( ) buttons to select the ALL SONGS
function, then press the ENTER button to conrm.
TIMER MENU
The MAX-T100 comes with a programmable timer that can hold up to 20 turnon/turn-off programmes within a 24-hour period. Moreover, enabling the REPEAT
TIMER function in the SET menu will repeat the set programmes every day. See
REPEAT TIMER on page XX.
CREATE TIMER PROGRAMME
Use this function to create and set a new turn-on/turn-off programme.
1 - On the main screen, press the left/right arrow ( ) buttons to select TIMER,
then press the ENTER button to conrm.
2 - After checking the current date and time, scroll the menu with the up/down
arrow ( ) buttons to select the CREATE PROGRAMME function, then press the
ENTER button to conrm.
3 - Set the turn-on time and press the NEXT button.
Fig. 19

35info@multisound.it
GB
4 - Set the turn-off time (Fig. 20) and press the NEXT button. Use the left/right
arrow( ) buttons to move between the hours and the minutes. Use the up/down
arrow ( ) buttons to increase or decrease the numbers.
Programmes can have a start time from the current time to a maximum of 24
hours.
Fig. 20
5 - Select the song to be played for this event and the desired volume (Fig. 16),
then press the NEXT button. A summary of the timer cycle you have just set will
be shown on the display.
Fig. 21
6 - To add more turn-on/turn-off cycles, press the NEXT button and repeat procedures 3 to 5, then press the ENTER button to save the programme.
7 - The device will ask if you want to enable the timer now or later. Use the left/
right arrow ( ) buttons to select your choice, then press the ENTER button to
conrm.
Fig. 22
ATTENTION: if the timer has been enabled, it must be disabled in order to

36 www.multisound.it
GB
turn off the device.
When the TIMER is running, if the power is cut off, the device will turn off
automatically.
Once the device has power and you turn it back on, it will ask you if you want
to disable the timer or continue setting a programme.
Fig. 23
DELETE/CHANGE PROGRAMME
Use this function to check, change or delete a programme. You can change the
turn-on time, the turn-off time, the track number or the volume level.
1 - On the main screen, press the left/right arrow ( ) buttons to select TIMER,
then press the ENTER button to conrm.
2 - Scroll the menu with the up/down arrow ( ) buttons to select the CHANGE
PROGRAMME function, then press the ENTER button to conrm.
Fig. 24
3 - A list of the created programmes will be shown on the display, scroll through
them with the up/down arrow ( ) buttons to select the programme to be changed. (Fig. 21 ).
4 - Press the left/right arrow ( ) buttons to select the ON / OFF / TRACK options
that you wish to change, then press the ENTER button to conrm.
5 - Use the same procedures as in the CREATE PROGRAMME function to make
any changes (see page XX). Be careful not to set any turn-on or turn-off times that
might conict with other programmes.
6 - To delete an entire programme, press the left arrow ( ) button until you see
the “– ERASE” option appear on the display, then press the minus (-) button to

37info@multisound.it
GB
conrm the deletion.
7 - To exit and save changes, press the right arrow ( ) button until the SAVE
option appears, then press the ENTER button to conrm.
8 - Use the up/down arrow ( ) buttons to scroll through and check the exact
sequence of the programmes before saving any changes.
9 - To exit without making any changes, press and hold the ESC button.
ENABLE TIMER
Use this function to enable created timer programmes.
1 - On the main screen, press the left/right arrow ( ) buttons to select TIMER,
then press the ENTER button to conrm.
2 - Scroll the menu with the up/down arrow ( ) buttons to select the ENABLE
TIMER function, then press the ENTER button to conrm. (Fig. 22)
3 - The player will enter timer mode (ashing green LED) and execute the set
programme.
While the device is in timer mode, the time to the next event will be shown
on the display.
ATTENTION: if the timer has been enabled, it must be disabled in order to
turn off the device.
When the TIMER is running, if the power is cut off, the device will turn off
automatically. Once the device has power and you turn it back on, it will ask
you if you want to disable the timer or continue setting a programme.
DISABLE TIMER
Use this function when you want to disable the timer.
1 - Press the ON/OFF button, the device will ask if you want to disable the timer.
2 - Select YES and press the ENTER button to disable the timer and go back to
playing songs.
3 - Select NO and press the ENTER button to continue programming the timer.
(Fig. 23)

38 www.multisound.it
GB
TECHNICAL SPECIFICATIONS
MAX-T100 Player
• INTERNAL 30 Watt SPEAKER
• JACK FOR EXTERNAL 30 Watt SPEAKER
• MEMORY CARD WITH 100 SONGS
• SONG MIXING FUNCTION
• BALANCE FUNCTION
• PLAYLIST CREATION FUNCTION
• MULTIPLE TIMER SETTINGS
• EXTERNAL 12 VOLT POWER SOURCE
• BATTERY CHARGE STATUS INDICATOR
• DISPLAY DIMENSIONS: 45 x 28 mm
• DISPLAY RESOLUTION: 128 x 64 pixels
• BODY DIMENSIONS: 74.5 x 74.5 x 50 mm
• WEIGHT: 570 g
WARRANTY
Products are covered by warranty for two years as provided for by law. MultiSound
operates under article 1519-bis and any subsequent articles of Italian Legislative
Decree 24 dated 2 February 2002. In any case, all guarantees offered directly by
the manufacturer remain valid. The warranty only covers the product for factory
defects and excludes any damages caused by accident, negligence or improper
device use.

1info@multisound.it
ITIT
P.le Resistenza 8 – 42015 Correggio (RE) – ITALY
Tel/Fax +39 0522 694929
e-mail: ass.tecnica@multisound.it
http://www.multisound.it
 Loading...