

Page 1

OPERATOR’S MANUAL
www.multiscreen.biz
info@multiscreen.biz
Page 2
MultiScree
TRADEMARKS
"MultiScreen" and the MultiScreen logo are registered trademarks of MultiScreen Pty. Ltd.. All other trademarked
names used herein are used for the purposes of identification and for the benefit of the trademark holder. No infringement of trademarks is intended. Trademarks remain the property of the trademark holder.
COPYRIGHT
The MultiScreen hardware, software & documentation are copyrighted ©2002-2010 by MultiScreen Pty. Ltd.. All
rights reserved.
LICENSE
You have purchased the right to use the MultiScreen software registered in your name on MultiScreen hardware (also
registered in your name) only and not on any other computer. No part of this documentation nor the hardware or software described within may be reproduced, transmitted, transcribed, scanned, stored mechanically or electronically, or
translated into any language without the prior written permission of MultiScreen Pty. Ltd.. You may not transfer or
duplicate the software from the media that it was provided on for anything other than your own back-up purposes, and
copyright and registered user information must be transferred to each back-up copy made. You may not distribute copies of the software or accompanying documentation to others. You may not decompile, disassemble, reverse engineer
or modify the hardware or software, nor attempt to unlock, decode or bypass any copy protection methods that have
been utilised.
MultiScreen Pty. Ltd. reserves the right to make improvements and modifications at any time to the products described
in this manual, and to the contents of this manual and other related documentation. While every effort is made to ensure
the correctness of the manual‟s content, MultiScreen Pty. Ltd. cannot guarantee its accuracy after publication and disclaims liability for any changes, errors and omissions, or damages resulting there from.
Portions of this product were created using LEADTOOLS ©1991-2008, LEAD Technologies, Inc.. ALL RIGHTS RESERVED.
XXX
WARRANTY
The MultiScreen system is fully guaranteed against any manufacturing defects or faulty workmanship for one full year
from the date of purchase. MultiScreen Pty. Ltd. warrants that it will repair (or at its option replace) any part of a MultiScreen system which in the opinion of MultiScreen Pty. Ltd. or its authorised service agent, is defective by reason of
faulty workmanship or materials during this period for parts and/or labour providing the MultiScreen unit has been installed and used in accordance with the MultiScreen Operator‟s Manual. Please take note of the following conditions :
(a) This warranty is issued only at the time of original purchase; it is non-transferable. (b) MultiScreen Pty. Ltd. will
not accept freight charges or insurance responsibility for any MultiScreen units returned unless prior approval has been
granted by MultiScreen Pty. Ltd.. (c) This warranty will be void if in the opinion of MultiScreen Pty. Ltd. the cause of
the defect is, or includes, misuse, accident, service or repair by any unauthorised person or company, or alterations
made or damage occurring in any other way. (d) This warranty will be rendered void if any third party software not
authorised by MultiScreen Pty. Ltd. is loaded onto the MultiScreen system. (e) A service fee will be charged for service
only where the fault is found not to be in the MultiScreen unit.
MultiScreen Pty. Ltd. shall not in any case be liable for damages or loss of anticipated profits or benefits or other incidental or consequential expenses or damages, including without limitation any data or information which may be lost or
rendered inaccurate, arising from the use or misuse of its products, even if MultiScreen has been advised of the possibility of such damages.
2
Page 3

MultiScree
Contents
Dear Customer 9
Specifications 10
Setting Up the Production Unit 11
Unpacking Your Production Unit.................................... 11
Where to put the Production Unit ................................... 12
Connections ........................................................................ 13
Front Panel 13
Rear Panel 13
Connecting the Power Cable 14
Connecting an Operating Monitor 14
Connection to a Television Monitor 14
Connecting the Keyboard and Mouse 15
Connection to Public Display TV‟s 15
Connection to Network (Internet) 15
Other Connections 15
Caring for Your Production Unit .................................... 16
Care of the Production Unit 16
Shock Precautions 17
Transporting the System 18
Cleaning the System 18
General Operation 19
Using the Keyboard and Mouse ....................................... 21
Using On-Screen Controls ................................................ 23
Using the Sequence Editor ................................................ 24
Sequence Preview Mode and Display Mode 27
Preview Mode 27
Display Mode 28
Keyboard Lock 28
Inserting a New Screen 29
Moving a Screen 30
Cloning a Screen 31
Deleting a Screen 32
Copy, Cut and Paste 33
Using the Screen Editor .................................................... 34
Adding a Graphic to a Screen 36
Selecting a Transition for a Screen 39
Setting the Display Times for a Screen 40
Adding Text to a Screen 43
Text Appearance 44
Alignment 45
3
Page 4

MultiScree
Tab Stops 46
Adding Tab Stops 46
Deleting Tab Stops 48
Cut, Copy and Paste 49
Undo 49
Save & Exit 49
Text Appearance 50
Adding a Scroller to a Screen 52
Adding a News Feed to a Scroller 55
Configuring News Feeds 57
Subscribe to a Recommended News Feed 58
Manually Add a News Feed 59
Modify a Subscribed News Feed 62
Test a Subscribed News Feed 62
Delete a Subscribed News Feed 64
More Information About News Feeds 64
Adding a Clock to a Screen 67
Adding a Sound to a Screen 71
Changing an Element on a Standard Screen 72
Removing an Element from a Standard Screen 73
Creating Multiple Screens 74
Inserting a DVD Title into a Sequence 76
Inserting a Video into a Sequence 79
Linking Sequences 83
Deleting a Linked Sequence Screen, PlayVideo
Screen or Play DVD Screen 86
Freezing a Sequence on the Screen 87
Print Screen 88
Installation of the MCS_PrintScreen Application 88
Paper Orientation 90
Using the PrintScreen feature 91
Advanced Options 93
Selecting a Screen 93
Deleting a Screen 93
Deleting All Screens 93
Using the Sequence Scheduler .......................................... 94
The Master Sequence 95
Scheduling a Sequence 96
Using the DVD Scheduler ................................................. 98
Scheduling a DVD 98
Scheduling Multiple DVD Titles 101
DVD Format 101
Shutting down the Production Unit ............................... 103
4
Page 5

MultiScree
Advanced Operation 104
Setting Defaults ................................................................ 105
Setting the Time and Date .............................................. 107
Changing the System Settings ........................................ 109
Positioning the Screen 109
Setting the Output Frequency 111
Automatic System Reboot 112
Network Folders 113
Adding Network Folders 113
Changing Network Folders 118
Removing Network Folders 119
Backup and Restore ........................................................ 120
The USB Flash Disk 120
Automatic Backup 120
Scheduled Backups 122
StartUp Backups 123
Manual Backup 124
Manual Restore 126
Save Sequences 128
Load Sequences 133
The Graphic Manager .................................................... 136
Graphic Categories 137
Loading a Graphic 138
Renaming a Graphic 140
Moving a Graphic 141
Deleting a Graphic 142
Digital Camera Initialisation 143
The Sound Manager ........................................................ 145
Loading a Sound 146
Renaming a Sound 148
Deleting a Sound 149
The Video Manager ......................................................... 150
Video Categories 151
Loading a Video 152
About Video Codecs 154
Renaming a Video 155
Moving a Video 156
Deleting a Video 157
Transfer Sequences ......................................................... 158
Transfer Sequences Set-up 158
Transferring Sequences 161
Displaying External Video .............................................. 164
Creating Your Own Graphics ........................................ 165
Creating Your Own Videos ............................................ 166
5
Page 6

MultiScree
Network & Internet Configuration ................................ 168
Additional Options 172
Random Number Generator ........................................... 173
The External Keypad 173
Overview of Operation 174
Setting the Random Number Generator Options 175
Setting the Random Number Limits in Display Mode 180
Drawing a Random Number 181
The Summary Screen 184
The Countdown Timer 186
Resuming a Draw 187
Viewing the RNG Draw History 188
Playing a Bingo! Draw 189
Configuring the Bingo Draw 190
Meal Number Control ..................................................... 193
The External Keypad 193
Keypad Operation 194
Adding a Meal Number 194
Deleting a Meal Number 195
Meal Number Display Screens 196
New Meal Number Display Screen 196
Meal Number Reminder Screens 196
Configuration 198
Setting the Meal Number Control Options 198
Meal Number Display Screen Settings 201
Meal Number Appearance Settings 203
Meal Number Size & Position 205
Advanced Settings 206
Instant Message Activator .............................................. 208
The External Keypad 208
Overview of Operation 209
Activating an Instant Message 210
Cancelling an Instant Message 211
Setting up Instant Messages 213
Setting up a Sequence as an Instant Message 214
Setting up a Sound as an Instant Message 216
Instant Message Configuration 218
Portrait Orientation ......................................................... 220
Monitor & TV Orientation 221
Editing Mode 222
Graphic Dimensions 222
Display of Videos 223
Sequence Compatibility 223
6
Page 7

MultiScree
Key Command Summary 224
Display Mode 224
Preview Mode 224
Sequence Editor 224
Screen Editor 225
Graphic Selector 225
Text Editor 225
Text Appearance Selector 226
Glossary 227
Warranty 229
Index 230
7
Page 8

MultiScree
8
Page 9

MultiScree
Dear Customer
Welcome,
The MultiScreen In House TV Production Unit has been designed to
satisfy the growing demand for effective information display equipment.
After many years of research and development we have manufactured
this unit to maximise your point-of-sale advertising and/or information
distribution. Incorporated into this machine is the latest technology
that will ensure simple, trouble-free operation. Various optional features are available to help customise the TV Production Unit to suit
your particular installation.
Should you have any further enquiries regarding this machine, whether it be for service or maximising its potential for your business,
please contact us.
We wish you every success.
9
Page 10
MultiScree
Specifications
The MultiScreen In House TV Production Unit has the capacity to
generate any number of information screens comprising any combination of graphics, text, sound and other elements.
Can output to any television or group of televisions via AV output
or RF output. Can also connect to a computer monitor via VGA
output.
A choice of 16 background and text colours, and a wide range of
fonts that may be expanded.
The ability to display the current time on screen using a virtual ana-
logue or digital clock.
Can generate scrolling text messages over any standard information
screen in a range of colours, speeds and styles.
Animated transitions between standard information screens.
Video content can be played from a wide range of video file for-
mats or directly from a DVD video disc.
Scheduling software allows individual screens or whole sequences
to be displayed at specific times.
Optional Random Number Generator and Bingo function.
10
Optional Meal Number Control.
Optional Instant Message Activator.
The Production Unit comes complete with a 12-month warranty.
Page 11

MultiScree
Setting Up the Production Unit
Unpacking Your Production Unit
When unpacking your MultiScreen In House TV Communication System, you should find the following items included in the container:
MultiScreen TV Production Unit
MultiScreen Keyboard
MultiScreen Mouse
MultiScreen Operator‟s Manual (this book)
2 USB Flash Disks
Powerboard
Cables and Connectors
11
Page 12

MultiScree
Where to put the Production Unit
A cleared-off desk or table is a perfect location. Look out for the proximity of a
power outlet and a local area network Ethernet cable or wall socket.
You should try to avoid dirt, dust and smoke, since these might cause system
failure. Also, keep your Production Unit away from strong magnetic fields. This
includes fans, air conditioners, radios, large speaker systems, and other electric
motors.
Do not set up your system in a room with extreme conditions of temperature and
humidity. Temperatures in a room too hot or too cold could cause your Production Unit to misbehave. Dampness causes oxidation, and dryness causes static
electricity.
Heat is probably the single most damaging environmental element to the Production Unit. Because of this, never push the rear of the unit against a bookcase,
wall, or anything that restricts the air from circulating freely around the entire
case. Do not place a TV or monitor directly on top of the unit. If the fan outlet on
the back of the Production Unit or any of the ventilation holes are blocked, heat
builds up inside the computer. A marginal heat problem can be exacerbated by
accumulated filth from dirt, dust and smoke.
Do not place the Production Unit in direct sunlight, near a radiator, lamp, or a
heat vent. Remember that heat causes electronic circuitry to behave in strange
ways. When electronic components heat up, they tend to fail. If this happens, it
may not be a permanent failure, but could lead to one.
12
Page 13

MultiScree
1 2 3 5 4 6 23 7 8 9 10
11
13
14 1716
18
19
20
21
12
22
15
Note: Due to continual improvements, some features
may be in different locations than as depicted.
Connections
Front Panel
1. CD/DVD ROM Drive
2. POWER SWITCH Used to switch the unit on. (Note:
Always shut down the Production Unit as described on
page 103 of this manual rather than using this switch to
turn it off.)
3. USB PORTS
4. POWER LED Indicates that the unit is switched on.
5. HDD LED Indicates Hard Disk Drive activity.
6. RESET SWITCH Used to restart the unit without turn-
ing it off. (Note: Do NOT reset the unit unless instructed
to by MultiScreen staff.)
Rear Panel
7. POWER [IEC] 100-240V 50-60Hz AC Input.
8. MOUSE [USB] Connection for the USB mouse. (Any
available USB port may be used.)
9. KEYBOARD [USB] Connection for the USB key-
board. (Any available USB port may be used.)
10. BACKUP FLASH DISK [USB] Connection of USB
Flash Disk for automatic backups. (Any available USB
port may be used.)
11. AUDIO OUT (PC) [Green 3.5mm STEREO] Raw
audio output from PC mainboard for Local Monitor.
12. VGA OUT [D15HD] Connect to Local VGA Monitor.
13. UHF OUT [PAL MALE] Modulated RF output for
connection via TV Antenna Distribution System. Nominal output level 70dBmV (3mV), adjustable over range
470-859 MHz. 5.5MHz Audio carrier (PAL B/G). Set at
factory to channel 25, 506 MHz.
14. VIDEO OUT (MAIN) [Yellow RCA] Main Video
output. PAL, 1V p-p into 75Ω.
15. AUDIO OUT (MAIN) [White RCA] Main Audio out-
put. Nominal output 0.7V RMS, impedance 1 kΩ.
16. KEYPAD [RJ45 x 2] Power and data communication
for accessory keypads. Can connect to multiple devices.
17. VIDEO IN [Yellow RCA] External Video input.
18. AUDIO IN [White RCA] External Audio input.
19. VIDEO OUT (MONITOR) [Yellow RCA] Secondary
Video output for Local TV Monitor. PAL, 1V p-p into
75Ω.
20. AUDIO OUT (MONITOR) [White RCA] Secondary
Audio output for Local TV Monitor. Nominal output
0.7V RMS, impedance 1k Ω.
21. NETWORK [RJ45] 10/100/1000 Mbps Ethernet
connection to computer network and for internet access.
22. S-VIDEO & COMPONENT VIDEO OUT [9 Pin
Mini Din] S-Video (Y/C) and Component Video
(YCrCb) output. Special adapter cable required.
23. DVI OUT Digital Video output to local DVI Monitor.
13
Page 14

MultiScree
Connecting the Power Cable
Plug the smaller end of the power cable into the power socket (7) on the rear of
the Production Unit, and ensure that the switch next to the socket is set to 1.
Next, plug the larger power connector into any mains power point, firstly ensuring that the power point is switched off prior to plugging in. Only turn the mains
power switch on after all of the other rear panel connections have been also been
plugged in.
Connecting an Operating Monitor
You can use a standard VGA computer display, or a TV set (or both) as your operating monitor.
If using a VGA computer monitor, connect the monitor‟s video lead to the blue
VGA OUT socket (12). There may be a second VGA socket on the mainboard
near the bottom centre of the back panel – do not connect to this socket. If the
monitor includes speakers, connect the monitor‟s audio input lead to the green
mainboard audio out socket (11). If the system has been started up previously
without a monitor connected, you ma y need to activate the monitor output by
pressing Ctrl + Alt + F2 after the system has finished starting up.
If using a TV monitor, connect the A/V OUT MONITOR sockets to the A/V inputs of the TV, using a twin RCA Male-Male lead. The lowest socket is the Audio output, with the Video output just above it. Select the A/V input on the TV.
Connection to a Television Monitor
If you have a monitor style television equipped with VIDEO IN and AUDIO IN
sockets, then connect these sockets to the MONITOR VIDEO OUT (19) and
MONITOR AUDIO OUT (20) sockets respectively on the rear of the Production
Unit using an audio/video cable with a pair of male RCA connectors on each end.
Ensure that your television is set to receive the external video signal in order to
display the Production Unit‟s output. Refer to your television‟s manual if you are
unsure about how to do this.
14
Page 15

MultiScree
Connecting the Keyboard and Mouse
The MultiScreen unit is operated by using a keyboard and a mouse. Connect each
of the USB plugs from the mouse & keyboard cables into any two of the available USB sockets on the MultiScreen unit‟s rear panel.
Connection to Public Display TV’s
There are two sets of outputs for connecting to public displays, UHF OUT (14)
and A/V OUT MAIN (15 & 16). The UHF OUT allows simple connection to an
MATV (Master Antenna TV) distribution system. The MultiScreen signal will
appear as one more (analogue) TV channel, and may be combined with free-toair channels and modulated Pay-TV decoders etc. The UHF channel frequency
can be set by the installation technician, to ensure it does not clash with any existing stations.
The A/V OUT MAIN sockets provide a standard composite video and line level
audio signal for connection to devices which require A/V inputs, such as external RF
modulators, video matrix switchers, video distribution amplifiers, & PA systems.
Both of these outputs will display an “Updating system, please wait” message
whenever the system is not running in Display mode, during editing for example.
The audio signal is muted.
The S-VIDEO output (22) may also be used. This output will not mask the editing process however. An adapter may be required if the connector is not the
standard S-Video type (4 pin Mini-DIN).
Connection to Network (Internet)
Using a CAT-5 Ethernet cable, plug one end into the NETWORK socket (21) on
the rear of the MultiScreen unit and the other end into a spare socket on a network switch or router connected to your local area network. Also see page 168
for further information regarding configuration of network & internet connectivity.
Other Connections
Some of the other sockets on the back panel are for options described elsewhere
in the manual, while others are provided for future functionality.
15
Page 16

MultiScree
Caring for Your Production Unit
Follow the suggestions below to keep your valuable system in good condition.
Care of the Production Unit
Never turn the power button off or move the system while the hard disk drive
is reading or writing, as indicated by the hard disk activity light. Doing so
may cause damage to the information stored on the hard disk. The system
should always be properly shut down as described on page 103 before being
switched off.
Whenever you turn off the Production Unit, always wait at least ten seconds
before turning it back on again. If you don‟t observe this precaution, you may
damage the Production Unit‟s circuitry.
Avoid dropping or jarring your Production Unit. This loosens memory chips
and expansion cards, and can severely damage the hard disk drive. Always
shut down the Production Unit prior to moving it, even if it‟s only to the other
side of the desk.
Do not set up your system in a room with extreme conditions of temperature
and/or humidity.
Do not allow heat to build up inside of the system unit. Ensure that the vents
on the top, sides and rear of the Production Unit are never blocked.
Do not spray any kind of cleaning liquid directly on the case or keyboard. In-
stead apply it onto a soft cloth. Always turn the power off and unplug each
power cable from its power source before cleaning.
Use the Production Unit in as clean & dust-free an environment as possible.
Do not eat or drink while operating the Production Unit.
16
Page 17

MultiScree
Shock Precautions
Electrical surges and spikes can cause serious damage to your s ystem. Use a
power filter/surge protector on the system unit and everything connected to it
(Televisions, for example). If just one device is not protected, damaging surges
can enter the system through unprotected peripherals and damage everything
connected to it.
A power strip/surge protector provides protection against many types of voltage
spikes that can travel on the power line and damage your system, but it isn‟t
much help against lightning. If severe weather or an electrical storm threatens,
it‟s a good idea to unplug the entire system from the power outlets before the
storm starts.
This list is important to protect yourself from electrical shock and your system
from damage.
Be sure all cables are free from table or desk legs resting on them. Arrange
cables out of traffic areas.
Unplug all power cords from their power sources if severe weather threatens.
When you disconnect a cable, always pull on the plug or connector, not on
the cable itself.
Know the static electricity precautions.
Do not open the Production Unit case. The components inside the Production
Unit can easily be damaged if the case is open. If it is ever necessary to open
the case, then this work should be performed by a technician. Note that unauthorised opening of the Production Unit‟s case will void your warranty.
Plug all three-prong cables into properly grounded power sources. The Pro-
duction Unit works better with steady and reliable electricity. Use a power filter/surge protector for protection against electrical surges. Do not use adapter
plugs or remove the grounding prong. Try to connect everything without the
use an extension cord. If you must use one, use a three-wire cable with
grounded plugs.
17
Page 18

MultiScree
Transporting the System
Dropping or jarring the system can damage the hard disk drive, particularly if the
drive is reading or writing when it is dropped. Hard disk drives are less vulnerable to shock when they are shut off. Consequently, you should always power
down the system unit as described on page 103 before moving it.
During transport, pack the system unit in its original packing boxes and cushioning materials.
Cleaning the System
Use a damp, lint-free cloth to clean the Production Unit and monitor (if present).
Avoid abrasives or solvents, as they can permanently damage the finish. Use a
soft cloth and window cleaner to clean the monitor. Turn off the monitor, then
squirt a little cleaner on the cloth and apply it to the screen.
Subjecting a system to a dusty or smoky environment significantly shortens its
life and increases the probability of failure.
If you spill liquid inside the keyboard, unplug the keyboard immediately and turn
it upside down to allow the liquid to drain out. Let the keyboard dry overnight
before attempting to use it again.
18
Page 19
MultiScree
+
General Operation
To switch on the Production Unit, first ensure that the unit is plugged
in and switched on at the power outlet. Next, press the Power On button located on the front of the unit.
The Production Unit has two main modes of operation: Display Mode
and Editing Mode. When the Production Unit is first switched on, it
will be running in Display Mode. This is the mode of operation the
Production Unit will normally be left in when unattended. Whilst in
Display Mode, the Production Unit will cycle through a sequence of
different screens. This sequence can be displayed on any in-house televisions the Production Unit is hooked up to. Screens can contain
graphics, static or scrolling text entered by the operator, sounds,
clocks showing the current time, or a combination of these things.
Once the Production Unit is up and running it will be operating in its
Display Mode, where it will continually cycle through a sequence of
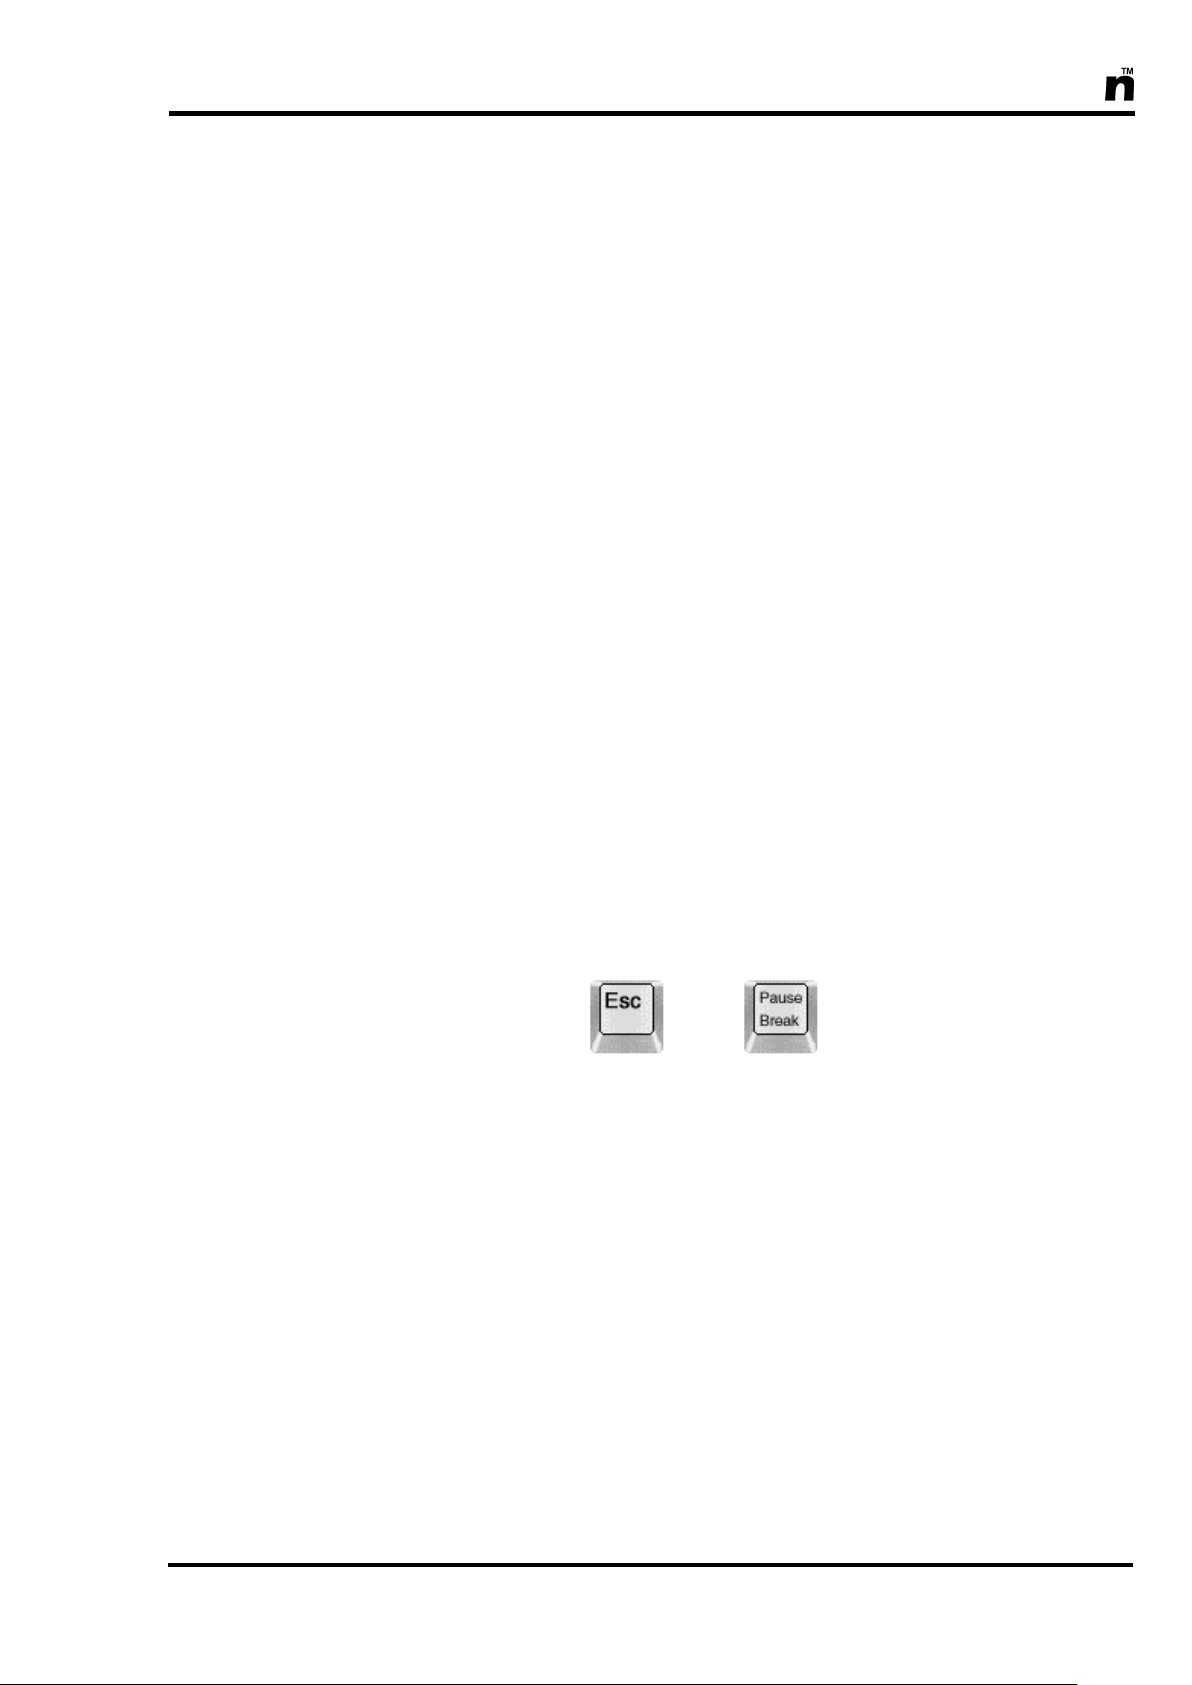
information screens. To switch from Display Mode to Editing Mode,
press Esc + Pause/Break or alternately click both mouse buttons simultaneously.
Editing Mode is used to create and alter screens and sequences,
schedule sequences, adjust the time and date, and change the Production Unit‟s settings. Whilst the system is in Editing Mode, your local
monitor is used to edit the system, and the message “UPDATING
SYSTEM, PLEASE WAIT” is displayed over the main TV output. (Note:
This message does not appear on MultiScreen Mini systems.)
Each sequence consists of a series of screens displayed in a defined
order. Each screen is shown for a specified amount of time before the
next is displayed. Every time the whole sequence has been shown, it
will start again from the beginning.
19
Page 20

MultiScree
Each standard screen in the sequence can contain any of the following
elements :-
A graphic, a static picture that may be chosen from the graphics
library.
Text, information that may be typed in by the user.
A scroller, text that scrolls across the screen at a speed specified by
the user.
A sound, a single sound effect that will play when the graphic ap-
pears. This is chosen from the sound library.
A clock, either analogue or digital, showing the current time. A
clock cannot be used on a screen that contains text or a scroller.
In addition a sequence may contain special screens which are used to
either link to another sequence, or to display a video title from the
video library or from a DVD video disc.
Screens may be created, altered or deleted as necessary, and you can
individually set the amount of time for each screen to be displayed.
You may also scan through the sequence for a particular screen, arrange the screens into a specific order, or hide a screen (ie. prevent it
from being displayed without deleting it). Each of these functions will
be described in detail in the pages to follow.
20
Page 21
MultiScree
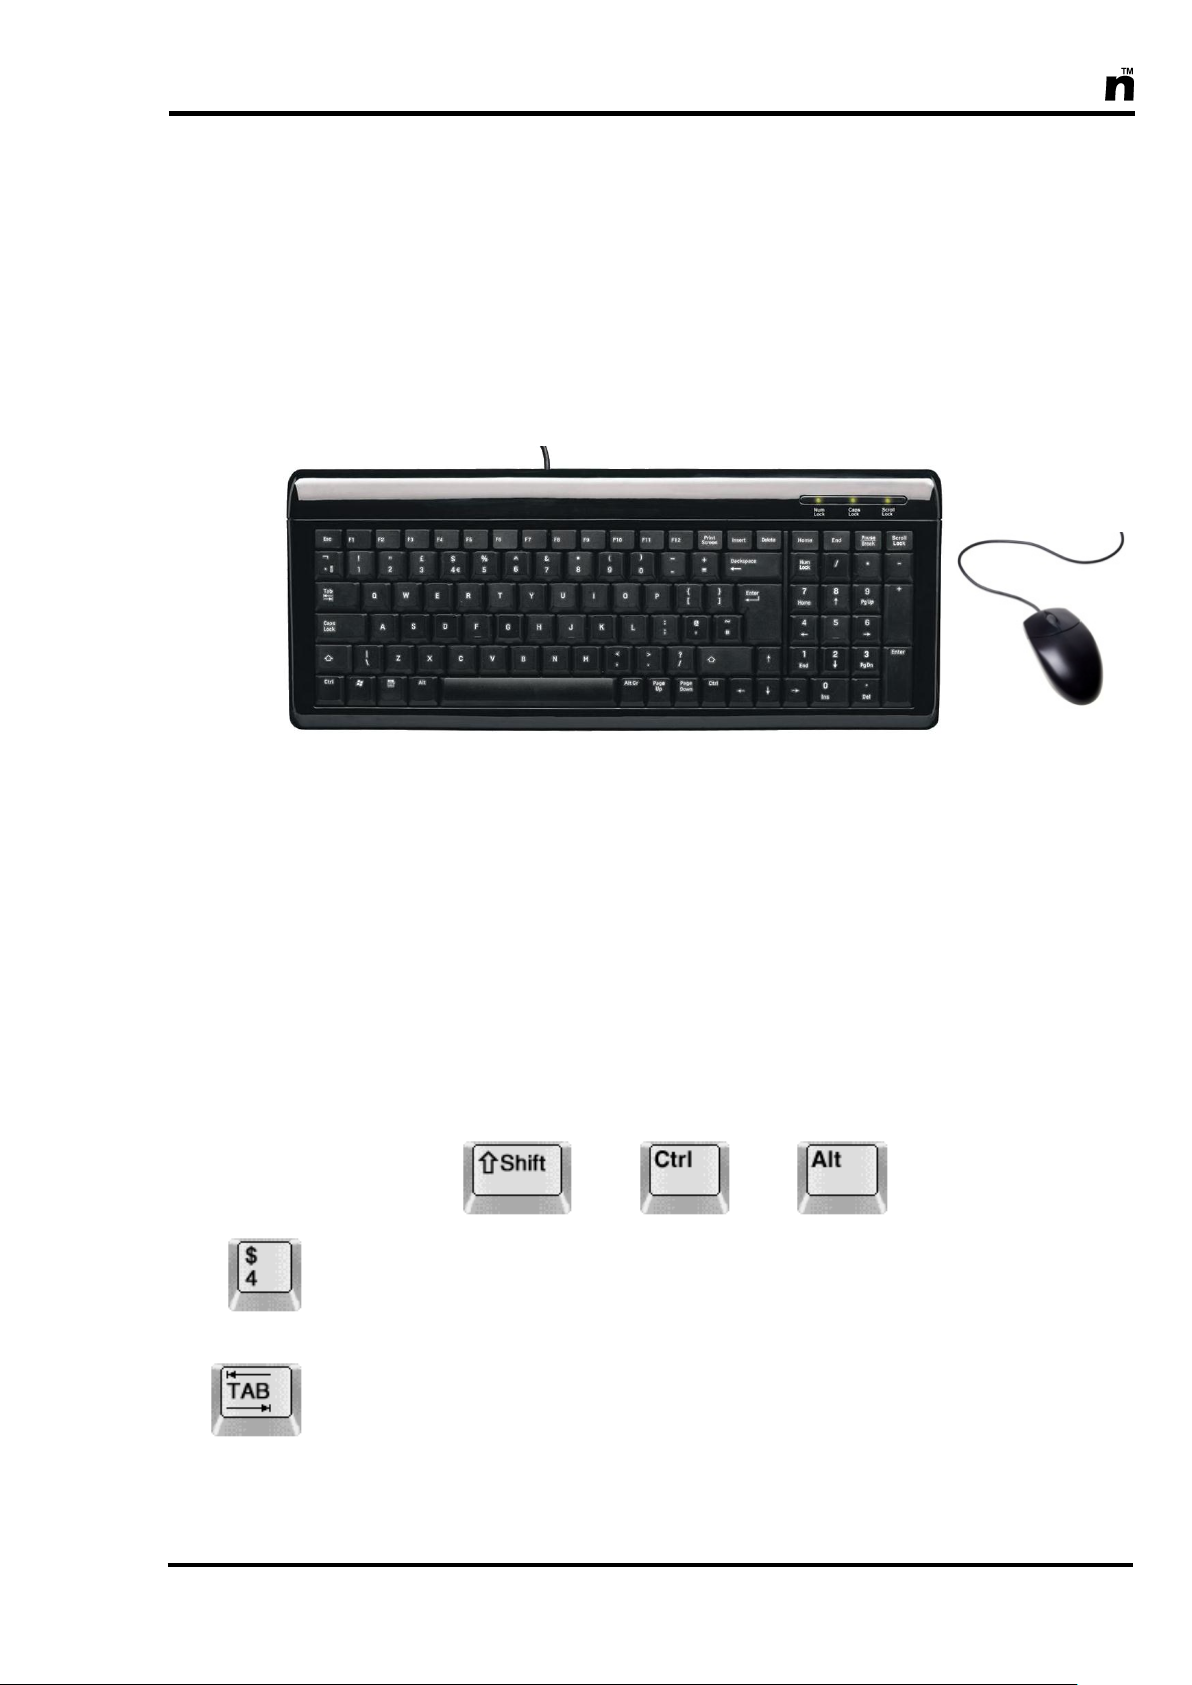
Using the Keyboard and Mouse
A keyboard and mouse are used to operate the MultiScreen TV Production Unit. Basic operation of the keyboard and mouse is described
below. For a full listing of all commands available on the Production
Unit, see Key Command Summary, page 224.
(Note: The supplied keyboard and mouse may differ slightly from those pictured here.)
XXXX
The main section of the keyboard contains all the letters of the alphabet,
plus the numbers 0-9, various characters required for punctuation and several other keys with specific functions. Most of these keys are used when
editing text, and will insert a character similar to that displayed on the key
itself.
The Shift, Ctrl (Control) and Alt keys are different from the other keys on
the keyboard. They change the functions of other keys. In this manual, it
may say to press, for example, Ctrl + C. In this case, you would press and
hold down the Ctrl key and then press the C key.
You will notice several keys have two symbols on them - for example, the
key with the number 4 also has the dollar symbol $. To access the higher
character, hold down the Shift key in the manner described above.
The Tab key has two purposes. When editing text, it inserts a large space
about 8 regular spaces wide. When not editing text, the Tab key allows you
to move between buttons on the screen without using the mouse. Pressing
Tab will move forward to the next button, whilst Shift + Tab will move
backward to the previous button.
21
Page 22
MultiScree
Cursor Keys
The Backspace key is used when editing text to erase one character at a
time. You can use it to correct mistakes.
The Numeric Keypad can be used to enter numbers instead of the row of
numbers along the top of the main section. This will only work if the Num
Lock light is on - press the Num Lock key to toggle the light on or off.
The Cursor Keys are used to move around the screen. Pressing any one of
the keys will move the cursor in the direction indicated. These keys also
have additional functions, which are described as necessary.
The special row of keys along the top denoted F1 to F12 are referred to as
Function Keys, and are used to perform the operations shown on the labels
above them. See page 224, Key Command Summary, for details.
The Esc key (or Escape key) is used to exit from screens or abort the cur-
rent operation. For example, pressing Esc in Preview Mode will return you
to the Sequence Editor.
The mouse is used to move a pointer around the monitor screen. There are
two buttons on the mouse. The mouse is used as follows:
To move the pointer, simply put your hand over the mouse and move.
The pointer will move around on the screen in the same direction that
you move your hand.
Pressing the left-hand button once is referred to as a "Left Click", or
simply a "Click". Pressing the right hand button is referred to as a
"Right Click".
Pressing the left button twice in quick succession is referred to as a
"Double Click".
22
In some cases, you can also use the mouse to "Drag and Drop" items,
such as screens in the Sequence Editor. To drag and drop an item, first
use the mouse to move the pointer over the item you wish to drag. Next,
press and hold down the left mouse button. With the left mouse button
still held down, move the mouse. When the item has reached its new
location, release the left mouse button.
Page 23
MultiScree
Pointer
Button
Up
Down
Handle
On
Off
Handle
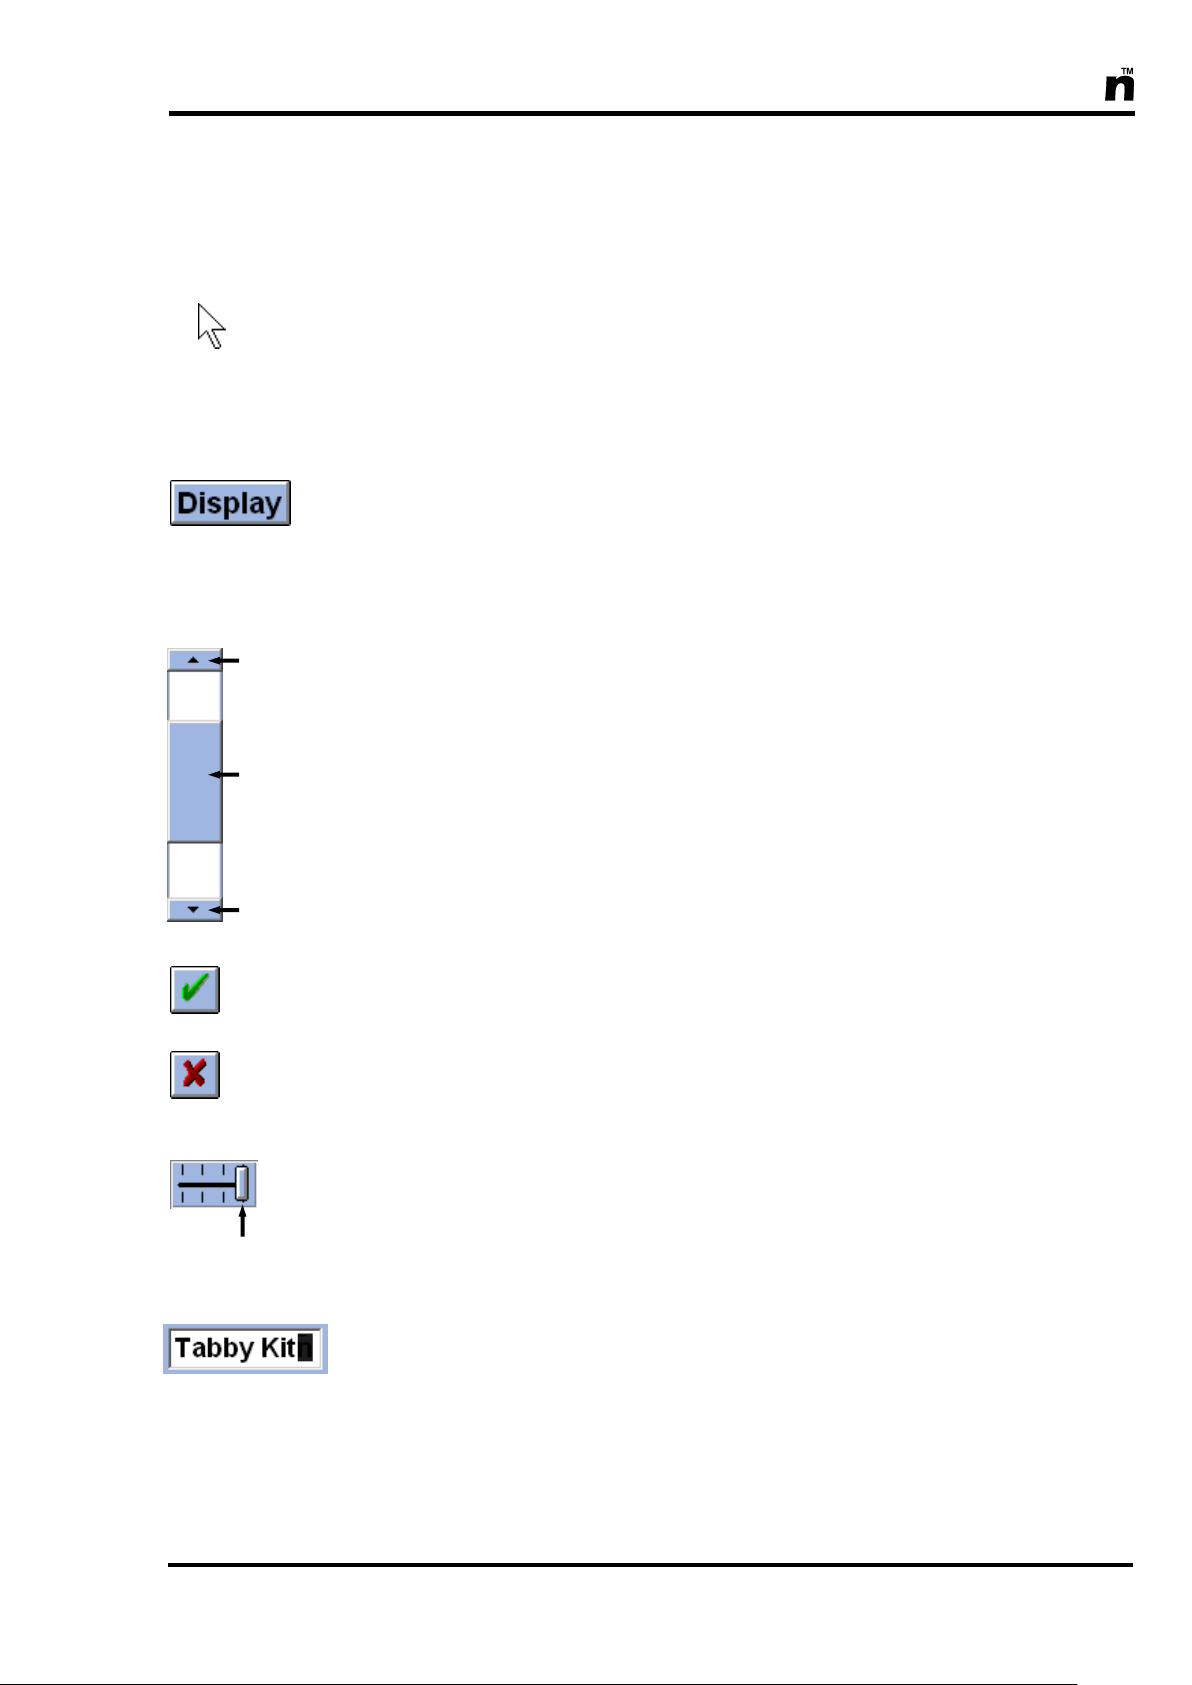
Using On-Screen Controls
The Production Unit uses a variety of on-screen buttons, scrollbars, checkboxes and other controls. These on-screen controls are
generally operated by moving the pointer (shown left) over them,
and left clicking. A summary of the different controls is provided
below:
The simplest on-screen control is a button (example shown left). A button
will be marked with a label, describing what it does. For example, the button shown here is labelled Display. Clicking it would put the Production
Unit into Display Mode. To operate a button, use the mouse to move the
pointer so that it is over the button, then left click.
A scrollbar (shown left) is used to move up and down within a list of
items. To use the scrollbar, click in the white area either above or below the
handle to move up or down by one page of items at a time.
Alternately, to move up or down one row of items, left click on the up or
down buttons on the scrollbar.
A checkbox (shown left) is used to turn certain options on and off. For ex-
ample, checkboxes are used to set screens to display or not display on particular days. If the option is turned on, the checkbox will appear as a green
tick. If the option is turned off, the checkbox will appear as a red cross. To
change the checkbox, point to it and click.
A slider (shown left) is similar to a scrollbar. It is used to adjust settings
like volume of sounds, or the speed of a scroller. To adjust it, click and drag
the handle. Left is lower volume/speed, right is higher.
A text box (example shown left) is used to enter information into the Pro-
duction Unit. This includes names of sequences or screens, etc. Click on the
text box, then enter your text using the keyboard. A flashing cursor marks
where the next letter pressed will appear. Use the cursor keys to move the
cursor around within a text box.
23
Page 24
MultiScree
Selected
Screen
Scroll
Bar
Shutdown
System
Configuration
Editor
Sequence
Scheduler
Preview
Mode
Display
Mode
Sequence
Selector
Sequence
Menu
Clipboard
Information
Screen In-
formation
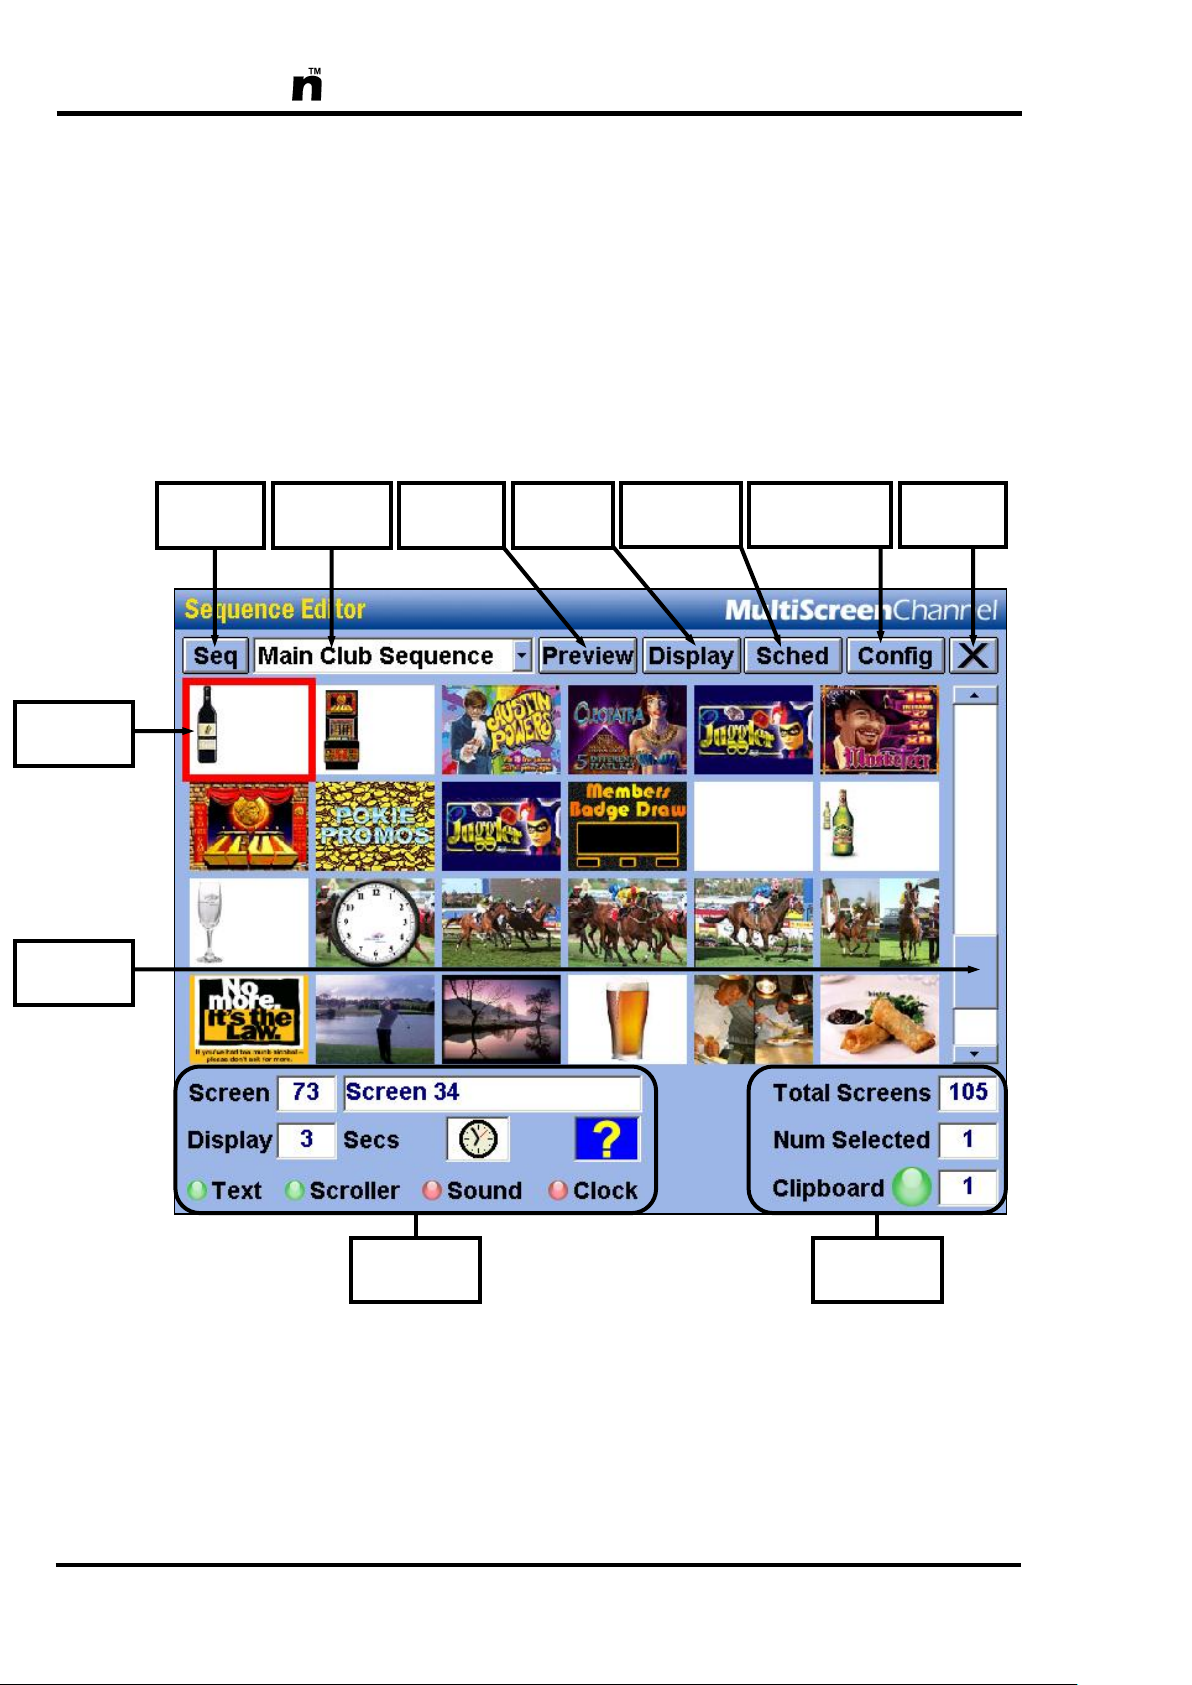
Using the Sequence Editor
The Sequence Editor is the TV Production Unit‟s main hub of operation. From
here you can create and alter sequences and their constituent screens. You can also perform other functions such as previewing sequences or shutting down the
Production Unit. To access the Sequence Editor when the Production Unit is running in Display Mode, either press Esc+Pause/Break, or both mouse buttons.
A Screen can contain a graphic, text, scroller, clock, sound, or a combination of
these elements, which are displayed together at the same time. Screens are
grouped together in a sequential list to form a Sequence. When a sequence is
displayed it will show each screen in order from the first screen to the last. When
the sequence is finished, it will restart from the beginning, continuously looping.
24
Page 25
MultiScree
You can create numerous sequences with varying content to display at different
times. To select a particular sequence to work with, click the Sequence Selector.
All the names of the existing sequences will appear in a drop-down list in alphabetical order. Click on the name of the sequence that you want to select.
You will see a group of small images known as Thumbnails. These are small
representations of what the selected sequence‟s screens look like. Up to 24
thumbnails can be displayed on the monitor at once, but a sequence can actually
contain any number of screens. To view the thumbnails beyond the 24 that are
displayed, click in the white area below or above the Scrollbar handle.
The Sequence Editor can be used to create screens, move screens around within a
sequence, and also to copy, modify & delete sequence screens. See pages 29-33
for more information.
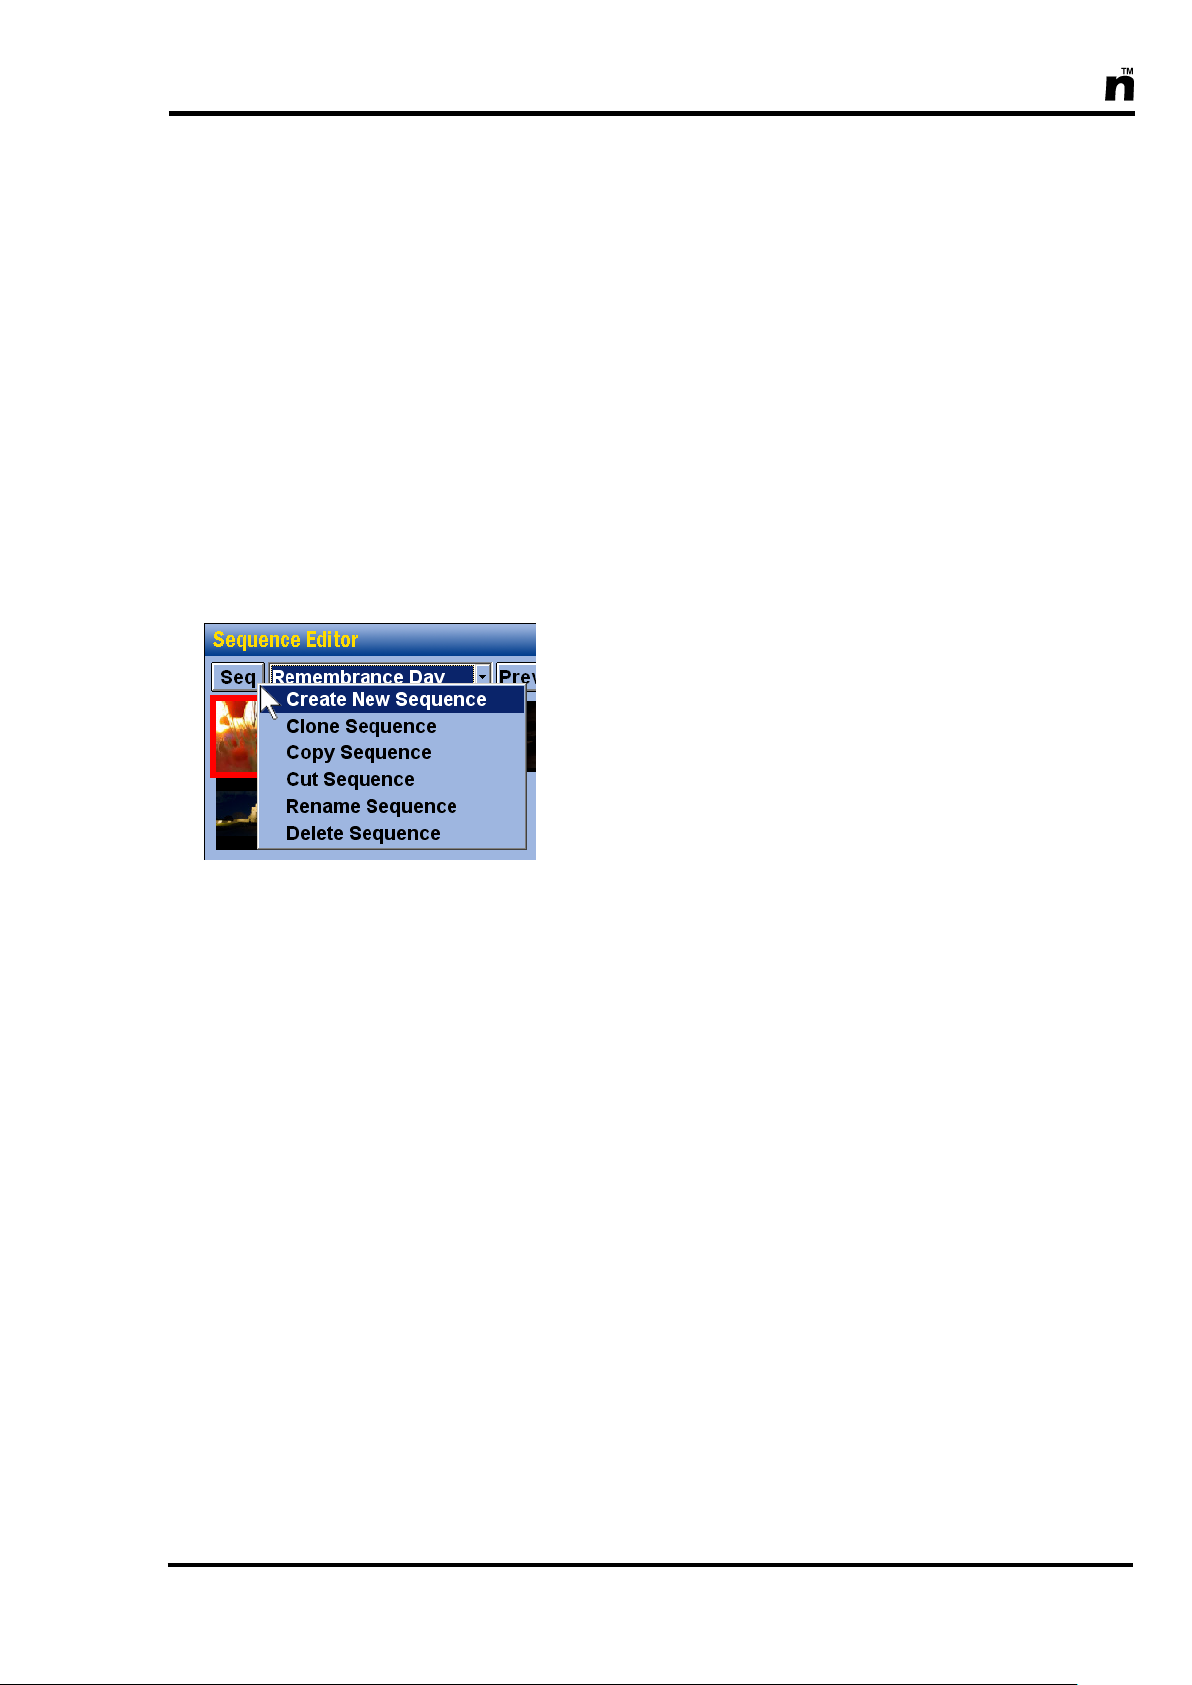
In addition, the Sequence Editor provides a number of
functions to allow you to manage entire sequences.
Click the button labelled Seq to bring up the Sequence
Menu (as shown to the left). Click on the option you
want to select. Otherwise, to exit the menu without selecting an option, press Esc. The various options are
explained below:-
Create New Sequence Creates a brand new sequence. Type the name for the
new sequence into the box provided, and click OK. If
you decide you don‟t want to create a sequence, click
Cancel. The new sequence is initially empty and will
only contain a single blank screen known as the Endmarker. This non-displaying screen will always mark
the end of the sequence, and may be used to add new
screens to the sequence. See page 29, Inserting a
New Screen, for details.
Clone Sequence Creates a duplicate copy of the current sequence with a
different name. Type a name for the cloned sequence
into the box provided, then click OK. If you decide you
don‟t want to copy the sequence, click Cancel. You
may want to clone a sequence to create a slightly altered version of the sequence, for example, a version
that contains additional Christmas graphics inserted into the regular sequence for use around the festive season. Cloning a sequence could also just be used to cre-
25
Page 26

MultiScree
Copy Sequence Copies all screens in the current sequence onto the
Cut Sequence This is similar to the Copy Sequence function, as it
Rename Sequence Renames the current sequence to a name that you spec-
Delete Sequence Permanently deletes the current sequence and all of its
ate a back-up copy of the sequence, in case the original
is accidentally deleted.
clipboard, leaving all of the existing screens in place.
This then allows you to use the Paste Screens function (see page 33) to paste a copy of this entire sequence into another sequence.
also copies all screens in the current sequence onto the
clipboard, but then it removes all those screens from
the sequence, leaving it empty with just an end-marker
screen. Once all of the sequence‟s screens have been
cut onto the clipboard, then you may use the Paste
Screens function (see page 33) to paste them all into
another sequence.
ify. Type the new name into the box provided and click
OK. If you decide you don‟t want to rename the se-
quence, click Cancel.
constituent screens from the Production Unit‟s hard
disk. Once deleted, a sequence and its screens cannot
be restored - therefore, only delete the sequence if you
are absolutely sure you won‟t need it again. If you just
want to stop the sequence from displaying, then you
should use the Sequence Scheduler (page 94) instead. It should be noted that when a sequence is deleted, any graphics, sounds or videos that were used in
that sequence will NOT be deleted. Instead they remain
available in the graphics, sound & video libraries ready
for reuse at a later stage.
26
Page 27
MultiScree
Sequence Preview Mode and Display Mode
Preview Mode
Preview Mode displays a preview of the current sequence only on your local
monitor & not on the public TVs. You would use this mode while you are adding
or modifying screens within a sequence to preview how the changes will look. It
displays the sequence exactly as it would in Display Mode, complete with transitions, scrollers & sounds, however the Sequence Scheduler & DVD Scheduler
will be disabled. In Preview Mode, display will start from the currently selected
screen, whereas Display Mode would always start from the first screen in a sequence. To enter Preview Mode, ensure the Sequence Editor screen is showing,
then click on the button labelled Preview. Alternately, press the PREVIEW (F12)
key on the keyboard.
While in Preview Mode you can freeze a sequence on the screen by pressing the
Ctrl + Alt + Scroll Lock keys all together. To unfreeze the screen and continue
running the current sequence, press Ctrl + Alt + Scroll Lock again. (For more information see page 87).
In Preview Mode, you can quickly skip forwards or backwards through the
screens by pressing NEXT (F2) or PREV (F1). This will abort the current screen
and immediately cut to the next (or previous) screen with no transition.
To exit Preview Mode, press Enter or Spacebar, or left click. This will return
you to the Sequence Editor. The selected screen in the Sequence Editor will be
the screen most recently displayed in Preview Mode.
Alternately, press Esc or right click to exit Preview Mode. This will return to
the Sequence Editor without changing the selected screen. ie. The screen selected
will be whatever screen was previously selected before entering Preview Mode.
Preview Mode is intended for use only while editing sequences, as the previewed screens
are not seen on the public TVs. Preview Mode should not be left running for extended
periods of time while the Production Unit is unattended, as it may be exited accidentally.
Also, Preview Mode has no Sequence Scheduling or DVD Scheduling functionality.
To display a sequence for long periods of time on the public TVs, use Display Mode
instead. The Production Unit has been designed to run primarily in Display Mode.
Note: On systems using the optional Random Number Generator, the RNG key-
pads are disabled during Preview Mode.
27
Page 28

MultiScree
+
+
+
+
Display Mode
Display Mode is the Production Unit‟s primary mode of operation, used when
the Production Unit is left running unattended. In this mode, your sequences will
display on both the public TVs as well as your operating monitor. To enter Display Mode, ensure that the Sequence Editor screen is showing, then click on the
button labelled Display. Alternately, press Shift + DISPLAY (F12) on the keyboard.
When running in Display Mode, the Sequence Scheduler controls which sequence is shown at any given time. By default, the Production Unit will display
the sequence that has been assigned as the Master Sequence. However if sequence scheduling is active, and there are entries in the Sequence Scheduler, then
at the times and dates specified in the scheduler‟s entries, other sequences will be
shown instead the Master Sequence. At all other times, the Master Sequence will
be shown. See page 94, Using the Sequence Scheduler, for more details.
To leave Display Mode, press Esc + Pause/Break, or alternately click both
mouse buttons together at the same time. This will return you to the Sequence
Editor.
Note: On systems using the optional Random Number Generator, Display Mode
must be running in order for the RNG keypads to be operational.
Keyboard Lock
Your MultiScreen unit‟s keyboard can be disabled, or “locked” out of operation
by pressing the Shift + Ctrl + Alt + L keys together at the same time while the
unit is running in Display Mode. The MultiScreen unit will not respond to
any other key presses or mouse clicks until the Shift + Ctrl + Alt + L key combination is pressed once again. When the keyboard lock is in place, a small
“locked” icon will appear briefly in the bottom right hand corner of the
screen. When the lock is removed, an “unlocked” icon will appear instead. This
function may be useful in situations where management wants to control who
has access to the MultiScreen unit, or to prevent Display Mode from being accidentally disrupted.
28
Page 29
MultiScree
+
Inserting a New Screen
A screen is a collection of elements that are displayed together on the television,
as part of a sequence. A new screen can be inserted into a sequence by using the
Sequence Editor. The Screen Editor is then used to add elements to the screen,
such as graphics, text, sounds, scrolling messages, and clocks.
Whilst the Production Unit is running in Display Mode, press Esc +
Pause/Break to open the Sequence Editor.
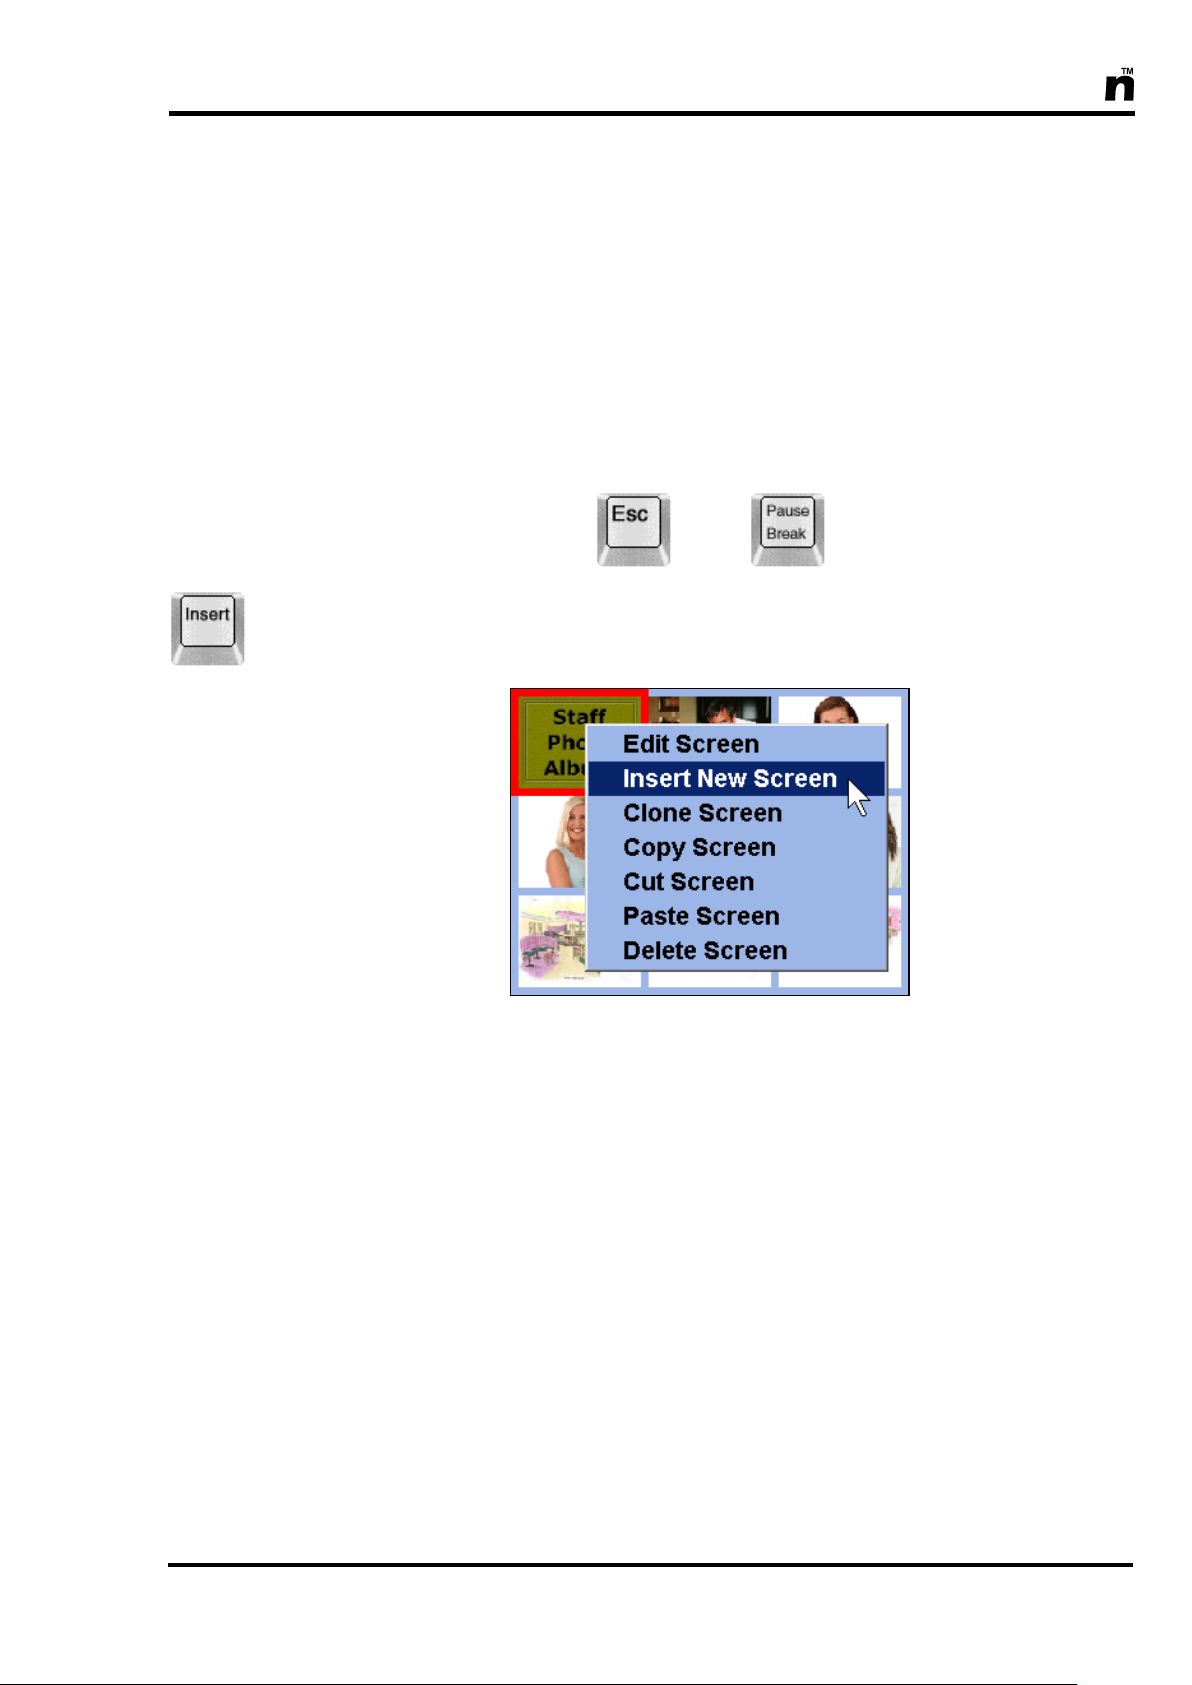
Select a screen by left clicking on it. Press Insert on the keyboard. Alternately,
right click and a menu of options will appear :-
Select Insert New Screen. The newly created screen will be inserted immediately before the previously selected screen.
To add graphics, text, or other elements to the new screen, please refer to page
34, Using the Screen Editor.
Another way to insert a new screen is to double click the End-marker screen.
This will insert a new screen at the end of the sequence, and will also open the
Screen Editor automatically.
A new screen can also be inserted by using the Screen Editor. See page 35 for
more details.
29
Page 30
MultiScree
+
Moving a Screen
A sequence contains a number of screens that will be displayed in a specific order. The Sequence Editor is used to alter the order in which screens appear. To
move a screen, the Production Unit must be operating in Editing Mode. If the
Production Unit is running in Display Mode, press Esc + Pause/Break to open
the Sequence Editor.
You can move screens around within a sequence, changing the order in which
they are displayed. Point to the thumbnail of the screen you want to move, hold
down the left mouse button and while keeping it held down, drag the screen to
the new position. Move the pointer over the top of the thumbnail of the screen
you want to drop it onto, then release the mouse button. The screen will be
moved to the position immediately prior to the screen it is dropped onto. Refer to
page 21, Using the Keyboard and Mouse, for more information on using
Drag and Drop.
You can also move screens within a sequence and between sequences by using
the Cut Screen & Paste Screen functions. These are described on page 33.
30
Page 31

MultiScree
+
Cloning a Screen
The Sequence Editor can be used to duplicate a screen. A cloned screen will be
identical to the original, but can be altered to produce multiple versions of a
screen. For example, one screen could have a graphic with text over it, whilst another could have the same graphic with a clock. Cloning a screen can also be
used if you want to make a particular screen appear multiple times during a sequence. If the Production Unit is running in Display Mode, press Esc +
Pause/Break to open the Sequence Editor.
Right click on the screen you wish to clone. A menu of options will appear :-
Select Clone Screen. The new screen created will be identical, and can be altered in any way independently of the original screen. The cloned screen is inserted immediately after the original screen, but may be moved to a different location in the sequence as described on page 30, Moving a Screen.
31
Page 32

MultiScree
+
Deleting a Screen
The Sequence Editor can be used to delete a screen. A deleted screen is permanently removed and cannot be brought back. If you think you may need the
screen again in the future, you may want to hide the screen instead. (See page
40, Setting the Display Times for a Screen for more details.) If the Production
Unit is running in Display Mode, press Esc + Pause/Break to open the Sequence Editor.
Select the screen/s you want to delete. Press the Delete key. Alternately, right
click on the screen. A menu of options will appear:
Select Delete Screen. You will be asked if you really want to delete the screen.
If you are sure you want to delete the screen, click Yes. Otherwise, click No.
A screen can also be deleted by using the Screen Editor. (See page 35.)
When a screen is deleted, any text, scroller or clock attached to the graphic is deleted and cannot be brought back without manually re-entering it. The graphic
will remain in the graphic library, and can still be attached to other screens. Similarly, if a sound is attached to the graphic it will remain in the sound library.
32
Page 33

MultiScree
+
Copy, Cut and Paste
The Sequence Editor can be used to Copy, Cut and Paste one or more screens
from one location to another within the same sequence, or between different sequences. If the unit is running in Display Mode, press Esc + Pause/Break to access the Sequence Editor.
To copy a screen, first select the screen or screens you wish to copy. To select
more than one screen, hold down the Ctrl key as you click each screen. Then
press the Copy (F7) key. Alternately, right click the screen and a menu of options will appear :-
Select Copy Screen.
Alternately, you may select Cut Screen. This is not generally recommended, as
it will remove the original screen/s after it copies them onto the clipboard.
The screens that are copied (or cut) will be placed on the clipboard. The number
of screens in the clipboard is displayed at the bottom right hand corner of the Sequence Editor.
Now that you have copied (or cut) the screen/s, you can paste them into a different part of the same sequence, or into a difference sequence altogether.
Right click on the thumbnail where you want to paste the screen/s in front of, and
then select Paste Screen, or alternately press the Paste (F8) key. A copy of all
of the screens currently on the clipboard will be inserted into the current sequence immediately prior to the selected screen.
33
Page 34
MultiScree
Screen
Usage
Scroller
Settings
Graphic
Settings
Sequence
Name
Screen
Name
Next
Screen
Previous
Screen
Screen
Number
Sound
Settings
Using the Screen Editor
The Screen Editor is used to add elements to a screen, such as
Graphics, Clocks, Text, Sounds and Scrollers. The Screen Editor is also used to alter a screen‟s background colour & display time, and to
schedule a screen. To open the Screen Editor, double left click on the
screen you wish to edit in the Sequence Editor.
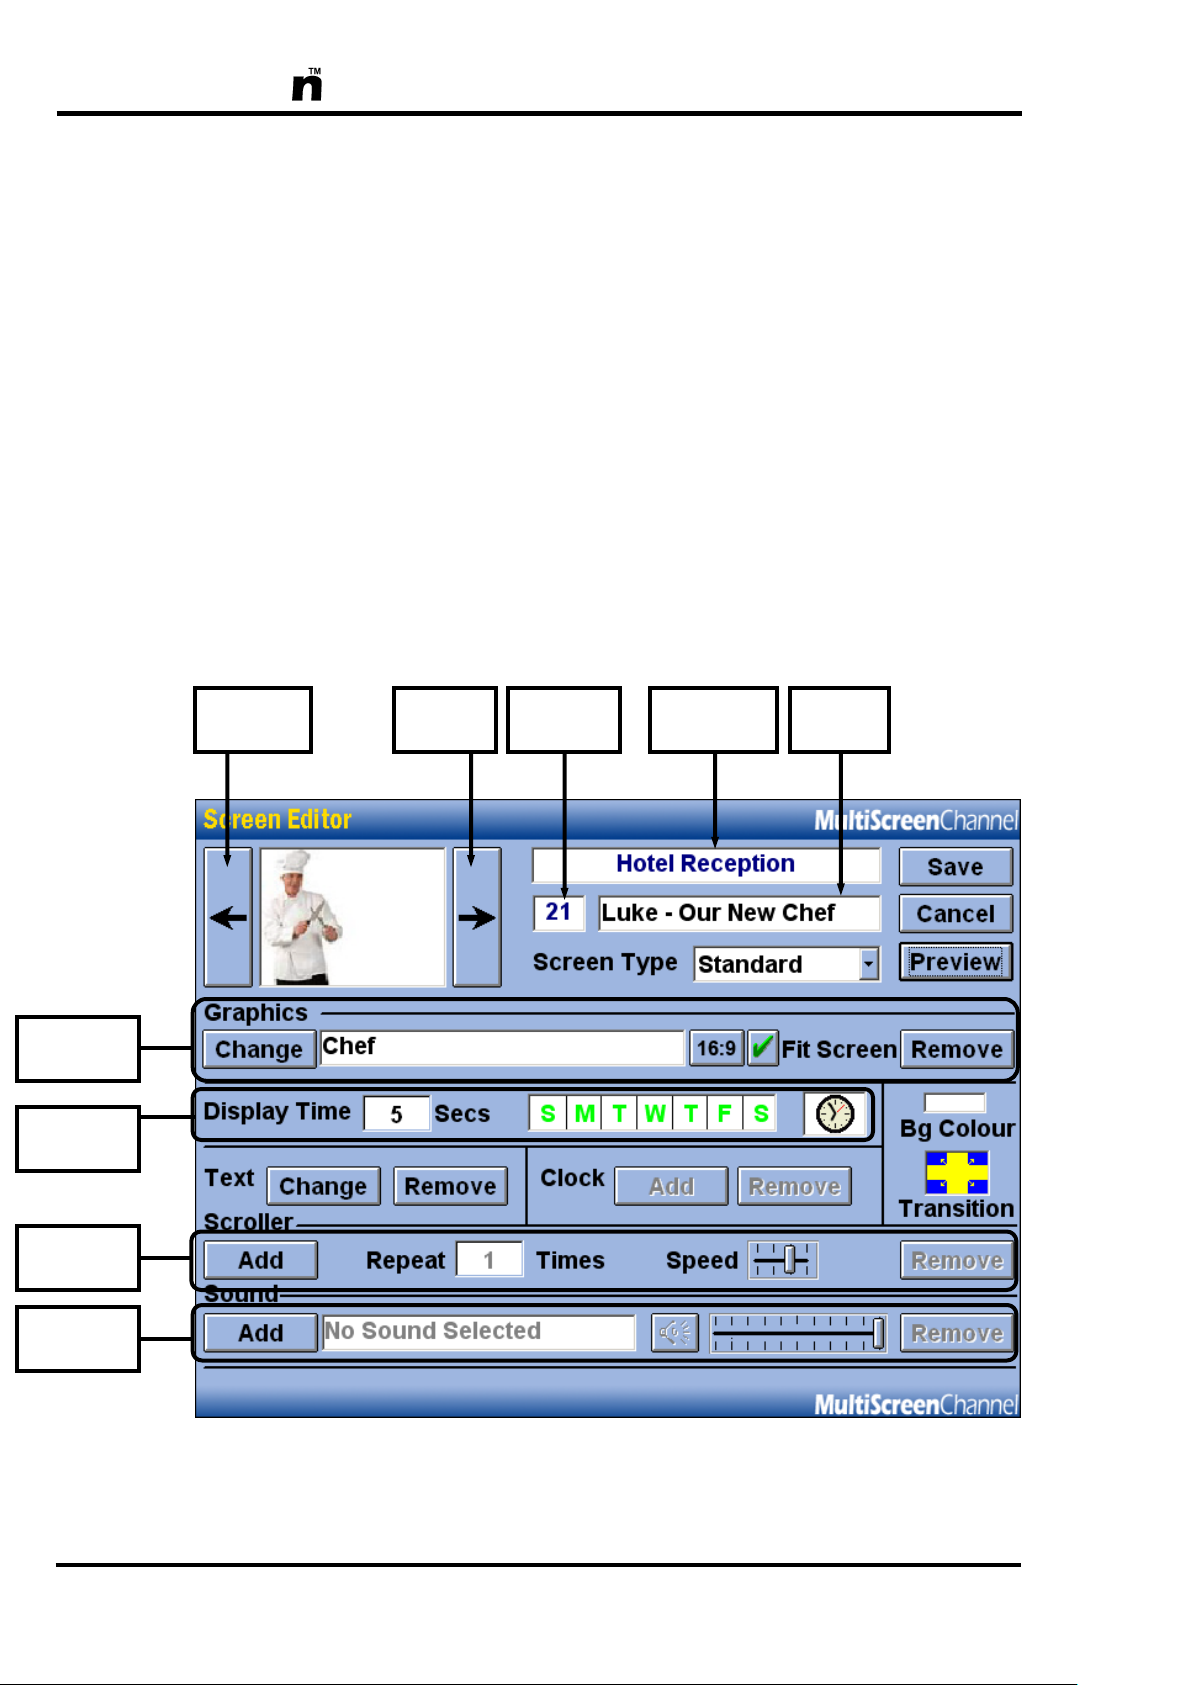
The current screen is shown in the top left-hand corner. You can name the screen
by clicking in the Screen Name box and typing the name you want on the keyboard. When you are satisfied with the name, press Enter. Alternately if the
screen has a graphic attached, then right-clicking on the screen name box will
make the screen‟s name the same as the graphic‟s name.
34
Page 35

MultiScree
+
To select the background colour of the screen, either click the coloured rectangle
labelled Bg Colour or press B on the keyboard. You will be given a selection of
16 colours to choose from. Click the colour you want to use as the background.
This colour will be displayed if you do not select a graphic, or if the graphic does
not fill the entire screen.
Elements can now be added to the screen, or modified, as described over the following pages.
Click Preview or press PREVIEW (F12) to see what the screen will look like
when displayed as part of a sequence. Press the Spacebar or Esc to exit from
Preview Mode.
When you are satisfied with the screen‟s settings, click Save or press SAVE (F6)
to save the screen to hard disk and return to the Master Sequence. Otherwise,
click Cancel or press Esc to quit without saving changes.
Additional functions can be carried out from the Screen Editor. You can move
backward and forward through screens in the sequence by clicking the Previous
Screen and Next Screen buttons. Alternately, press PREV (F1) for the previous
screen, or NEXT (F2) for the next screen.
Pressing CREATE (F3) will insert a new screen before the current screen. Shift +
CLONE (F3) will create a clone of the current screen. Pressing Delete will delete
the current screen.
Pressing Home will skip backward to the first screen in the sequence, whilst
pressing End will skip forward to the end-marker screen.
More functions are explained on the following pages.
35
Page 36

MultiScree
Selected
Graphic
Graphic Category
Selector
Scrollbar
Graphic
Name
Graphic
Width
Graphic
Height
Adding a Graphic to a Screen
All the graphics stored on your Production Unit‟s hard disk drive are kept in a
Graphic Library. Any graphic may be selected from the Graphic Library and
used on a screen as part of a sequence. Each graphic may be used on multiple
screens. The procedure to add a graphic to a screen is as follows:
[a] In Sequence Editor view, first double-click the screen you wish to add the
graphic to. Next, click Add (or Change) under the header Graphics. Alternately, press G on the keyboard. This will bring up the Graphic Selector.
[b] Clicking the Graphic Category selector will bring up a list of categories.
Each category contains a number of graphics. For example, the category
“Animals” would contain pictures of cats, dogs, rabbits etc. Choose the appropriate category by clicking it.
36
Page 37

MultiScree
Cursor Keys
Spacebar
[c] You should now see a screen of thumbnails. Thumbnails are small versions
of the graphics that they represent. To view a graphic full screen, right click
on its thumbnail. Alternately, you can use the cursor keys to move through
the thumbnails, and press the Spacebar to preview the graphic full screen.
Press the Esc key or right click to exit from the preview.
[d] If the graphic category contains more than 24 images, then they will not all
be visible. You can click and drag the scroll bar at the right side of the
screen up or down to reveal more thumbnails.
[e] You can use the keyboard to search through the list. For example, pressing
C will skip to the first graphic in the current library that has a filename be-
ginning with the letter C (such as cat.bmp). The Graphic Selector displays
the name of the selected graphic just below all the thumbnails.
[f] Once you find the graphic you want, you can select it by either double
clicking it, or left clicking it and then clicking on the Select button, or by
pressing Enter. Once you select the graphic you will return to the Screen
Editor.
[g] If you decide you don‟t wish to change the graphic, click Close.
While the Graphic Selector screen is showing, it also displays the dimensions of
the selected graphic (labelled W & H) at the bottom of the screen. The Width and
Height of a graphic are given in pixels. The Production Unit‟s display area on a
landscape system is 1067 pixels wide and 600 pixels high in a widescreen 16:9
aspect ratio. (On a portrait system the display area is 768 pixels wide by 1366
pixels high in a 9:16 aspect ratio). If the selected graphic‟s dimensions do not exactly match this, then it may need to be resized to fill the screen area. To resize a
graphic, simply click the words Fit Screen in the Screen Editor and the image
will be resized so as to best fit the full screen area without distorting the aspect
ratio of the picture. If the graphic is too tall or wide (ie. not in the 16:9 aspect ratio) then it may leave "bars" of blank colour at the sides or top and bottom. The
colour of these bars is determined by the background colour.
37
Page 38

MultiScree
When working on a landscape MultiScreen unit, if the selected graphic was originally designed in a 4:3 aspect ratio (suited to older non-widescreen CRT televisions) then you may stretch that image widthways to fill the 16:9 display area by
clicking on the 16:9 button in the Screen Editor to make it change to 4:3. When
the image is stretched like this, you may notice that circular objects will look more
ovular & people in the image may look fatter than usual! Clicking the 4:3 button to
change it back to 16:9 will return the image to its original unstretched proportions.
(Note that this button is not available on portrait MultiScreen systems.)
From the Screen Editor, you can also remove the graphic from the screen by
clicking the Remove button. This will leave a blank background in the selected
background colour - any text, scroller, clock or sound attached to the screen will
remain.
38
Page 39
MultiScree
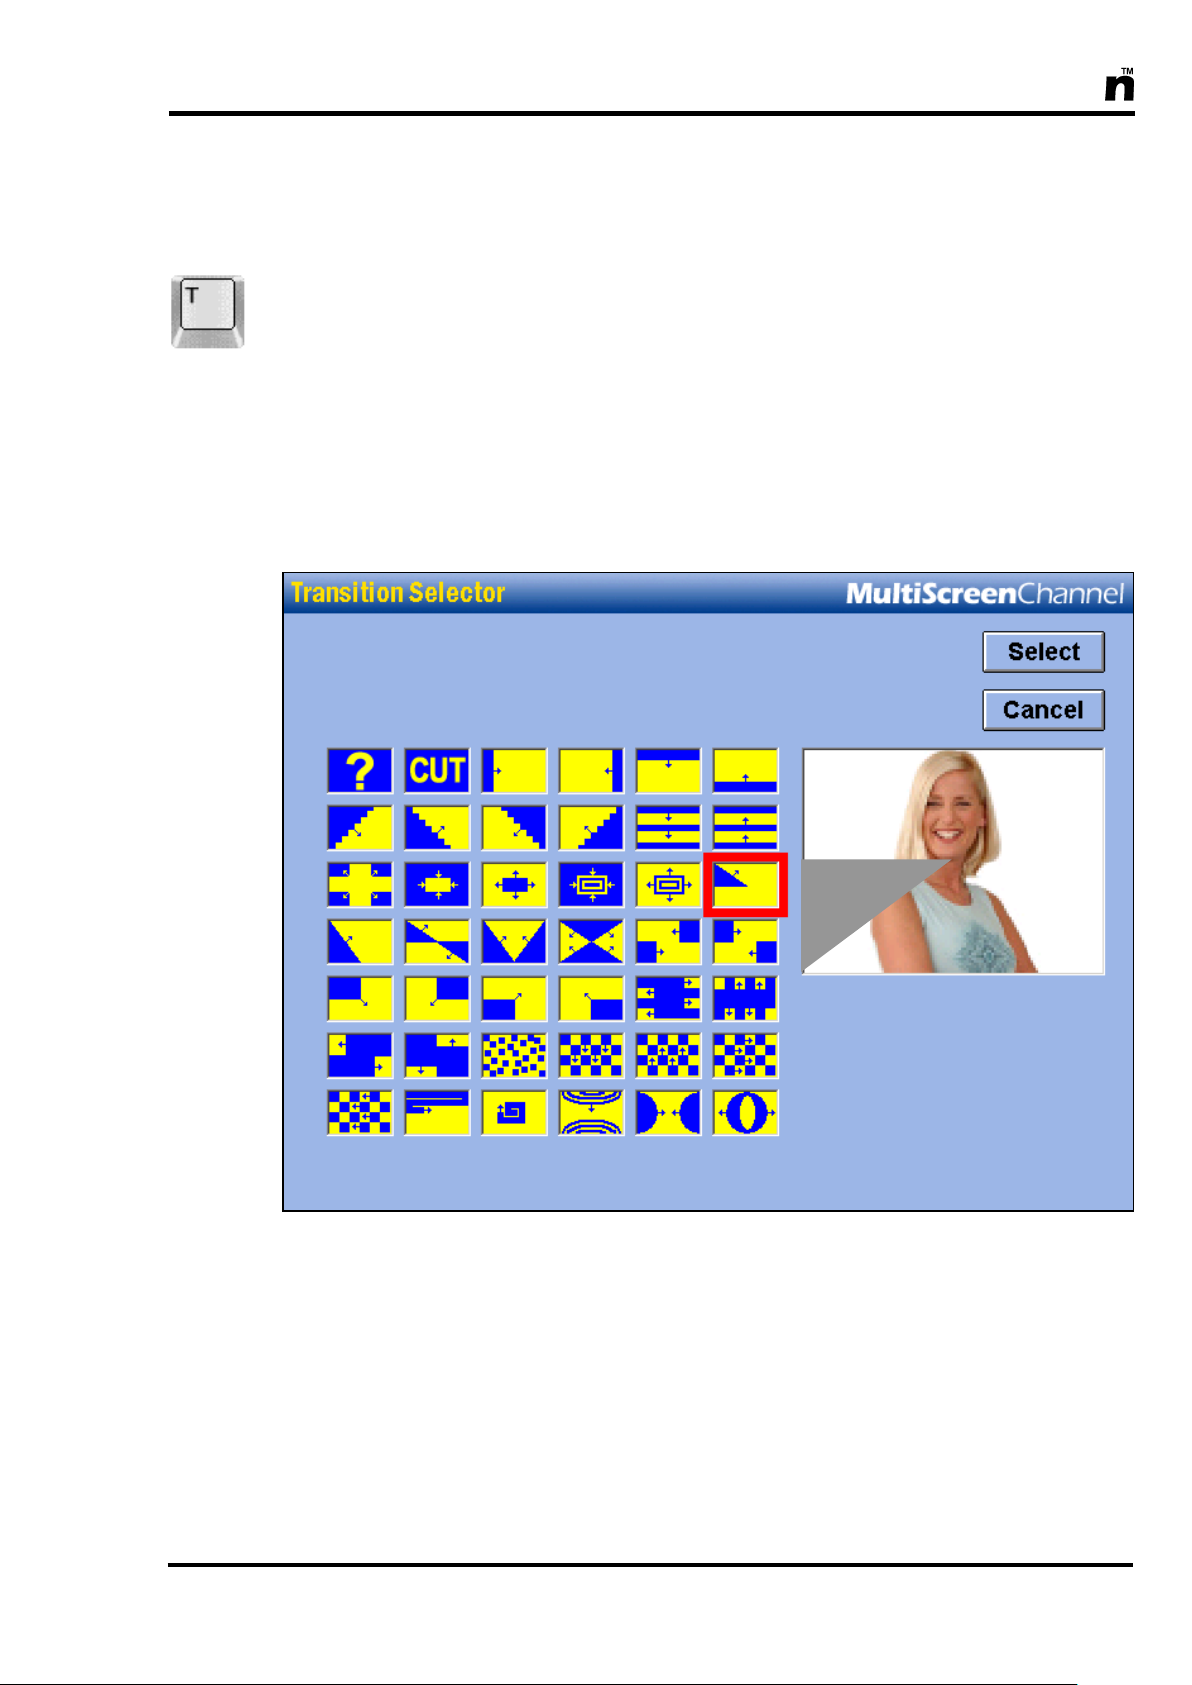
Selecting a Transition for a Screen
A transition defines the visual method by which a screen appears on the TV. A
screen‟s transition is selected from the Screen Editor. To open the Screen Editor,
first double click the screen in the Sequence Editor. Next, click the box labelled
Transition to bring up the Transition Selector (pictured below). Alternately,
press T on the keyboard. Choose a transition by clicking on its icon. The transition will be previewed in the top right corner of the screen. If you are not satisfied with the transition, try choosing another. Once you are satisfied with the
chosen transition, click Select. If you decide you don‟t want to change the transition, click Cancel.
Selecting the question mark ? will result in a random transition being used each
time the screen is displayed. The transition will change every time the screen is
used.
The CUT transition cuts straight from one screen to the next without any special
effects.
39
Page 40

MultiScree
Time
Range
Setting the Display Times for a Screen
A screen can be set to display for a specific number of seconds during each cycle. It can also be set so that it will only be used on certain times of the day, days
of the week, or parts of the year. To alter for how long and/or when a screen will
display, double click the screen to bring up the Screen Editor. You should see a
section of the screen that looks similar to that shown below :-
To set the display time, click the Display Time text box. Press BACKSPACE or
DELETE to erase the number there, then enter the number of seconds you wish
the screen to display. This is the number of seconds the screen will display each
time it appears in a sequence. If you want the screen to display for several
minutes, remember that 60 seconds = one minute. Therefore, to display a screen
for two minutes, you could enter 120 seconds.
The boxes containing the letters SMTWTFS are used to display the screen on certain days of the week. Clicking a weekday box will toggle it from green to red
and vice versa. A screen will only display on a day that is shown in green and not
on days shown in red.
Holding down Shift whilst clicking any weekday box will select or deselect all
weekday boxes. In this way, a screen can be hidden. Whilst hidden, a screen will
not display at all. To bring back a hidden screen, hold down Shift and click any
weekday box again.
40
Page 41

MultiScree
Clicking the clock icon (shown left) will bring up the Schedule dialog. This can
be used to set up a time and date range over which the screen should be used.
The top control is used to set a range of hours during the day over which the
screen should be used. If the checkbox has a red cross, the screen will display at
all times. If a time range is set up, the screen will only display when it is part of
the active sequence, and the time is within the hour range. Outside these hours,
the screen will not display. To adjust the time range, use the following procedure :-
[a] First click the checkbox so that it changes from a red cross to a green tick.
The grey boxes will turn white, allowing the times to be edited.
[b] Click on the hours, minutes or seconds value that you wish to change. There
are several ways to change the value. You can type a new number on the
keypad. You can also increase or decrease the number by one by pressing +
or - on the keyboard, or pressing the up and down arrows at the right side of
the entry box.
[c] Continue changing numbers until the start time and finish time are set as
you want them. The screen will only display between these times.
The bottom control can be used to set a range of dates. This is similar to setting a
time range. To change the date ranges, use the following procedure:
[a] First click the checkbox next to the date so that it changes from a red cross
to a green tick. The grey boxes will turn white, allowing the dates to be edited.
[b] Click on the day, month or year value that you wish to change. There are
several ways to change the value. You can type a new number on the keypad. You can also increase or decrease the number by one by pressing + or on the keyboard, or pressing the up and down arrows at the right side of the
entry box.
41
Page 42

MultiScree
Alternately, you may prefer to use a calendar to change the date. The calendar is
useful if you need to see which day of the week a particular date falls on.
[a] To select a start or stop time using the calendar, double click the start or
stop date. The calendar below will appear:
[b] The current date is circled in red, and the currently selected date is high-
lighted in light blue.
[c] The month and year are shown at the top of the calendar. You can click the
small buttons to the left and right of the month and year to cycle forward or
backward one month.
[d] To select a specific month, click the current month and select the month
you want from the drop down list.
[e] To select a specific year, click the current year. Two buttons will appear to
the left of the date. Click the top button to increase the year by one, and the
bottom button to decrease the year by one.
[f] Finally, select the date from the list available.
[g] Repeat steps [b] to [f] for the finishing date.
[h] The screen will only display between these dates. Ensure that the end date
is actually later than the start date.
42
Page 43

MultiScree
Adding Text to a Screen
Text can be added to a screen either over a background colour, or over a graphic.
You can type in text on the keyboard, which will be displayed whenever the
screen comes up in the sequence in Display Mode. Note that Text cannot be used
on the same screen as a clock, but can be combined with a scroller and/or sound.
To add text to a screen, first select the screen by double-clicking it in the Se-
quence Editor. Next, click the button labelled Add Text in the Screen Editor.
Alternately, press X. This will bring up the Text Editor.
Use the keyboard to type in the text as you want it to appear. You can use the
Backspace or Delete key to help correct mistakes. A flashing cursor will be
displayed on screen. The cursor marks the position that any new text will appear.
If there is text on the screen, you may move the cursor around. Left click the position where you wish to enter text. Alternately, use the arrow keys on the keyboard to move the cursor.
You may need to select text, in order to alter its appearance, or move it around.
To select the text, you can either use the mouse, or the keyboard. To use the
mouse, first move the pointer to the start of the text you want to select, and click
and hold down the left mouse button. Then, move the pointer to the end of the
text you want to select and release the left button. The background colour of text
will change to highlight the text when it is selected.
Alternately, to select text using the keyboard, use the arrow keys to move the
cursor to the start of the text you wish to select. Hold down the Shift key, and
move the cursor to the end of the text. Again, the selected text will be highlighted.
The Text Editor menu is used when editing text to perform a number of functions, including changing the appearance of the text, cutting and pasting text, and
saving changes.
43
Page 44

MultiScree
Whilst editing text, click the right mouse button. The following menu will appear:
Text Appearance
The text‟s appearance includes its colour, size, font, and possibly a shadow or
highlight. A small window in the corner of the screen will display the current
Text Appearance. This is what newly entered text will look like. To change the
current text appearance press TEXT (F9). Alternately, right click to bring up the
Text Editor Menu, then select the option Text Appearance. This will open the
Text Appearance Editor. For information on using the Text Appearance menu,
see page 50.
Do not move the cursor immediately after changing the Text Appearance. If you
move the cursor, then the new text‟s appearance will match that of the text
around it, rather than using the new text appearance that you have just selected.
You may also alter the appearance of existing text. First select the text as described previously, then open the Text Appearance Editor as above.
44
Page 45

MultiScree
Preview
Window
Alignment
The text‟s alignment defines where a line of text appears on the screen. Left
alignment makes the left edge of the line of text appear at the left side of the
screen, right alignment makes the right edge of the text appear at the right, and
centre alignment makes the line of text appear centred on the screen. Justified
alignment makes the line of text line up with both the left and right side of the
screen; for example, this paragraph of text has justified alignment.
To change the position of a line of text on the screen, position the cursor on that
line, then right click and select Alignment. Alternately, press Shift + ALIGN
(F8) to cycle through alignments. Examples of the four different alignments are
shown below. You may also change the alignment of multiple lines of text at
once, by highlighting those lines, then right clicking on the highlighted area and
choosing the desired alignment option.
45
Page 46

MultiScree
Tab Cursor
Positioning
Arrows
Tab Stop
Selectors
Tab Cursor
Tab Stops
Tab stops can be used to format text into columns for the purpose of menus or
timetables. To add tab stops to a screen use the following procedure :-
Adding Tab Stops
[a] In the Text Editor, make sure that the text alignment is set to Left Aligned.
[b] Right-click and select Tab Stops or else press Ctrl + Tab. The following
bar will appear :-
[c] The bar can be moved up and down the screen by dragging with the left
mouse button to enable tab stop points to be set using other items on the
screen as reference points.
[d] In the picture above the first tab stop point would need to be to the right of
the cherry stick at the top.
[e] To move the bar, left click on the blue area around the buttons then, without
letting go of the mouse button, drag the bar up (or down) the screen until it
is positioned below (or above) the reference point.
46
Page 47

MultiScree
[f] To add a tab stop, first position the white tab cursor by either using the left
and right cursor keys on the keyboard or clicking on the left and right arrow
buttons on the tab bar.
[g] When the tab cursor is in the correct position click on Add Tab. The tab
cursor will now appear yellow as below. This indicates that the tab stop has
been set.
[h] In this example we will type a heading on the first line and then add further
tab stops on the second. Left click on the screen anywhere outside of the tab
bar. This will exit out of the tab stop mode and enable addition of text.
[i] Press the Tab key which will move the cursor to the previously set tab stop
and type a heading.
[j] Press Enter to start a new line and then bring up the tab bar by right-
clicking and selecting Tab Stops or pressing Ctrl + Tab.
[k] The previously set tab stop will now appear in black, indicating that it is an
existing tab stop.
47
Page 48

MultiScree
[l] Add in additional tab stops as needed following the procedure outlined in
steps [f] and [g]. As tab stops are added they will appear in yellow then
change to black.
[m] When the necessary amount of tab stops have been added click outside of
the tab stop bar to continue adding text.
[n] To move the text cursor to the following tab stop, press the Tab button on
the keyboard.
[o] To start a new line, press Enter.
Deleting Tab Stops
To delete tab stops use the following procedure :-
[a] In the Screen Editor, click on the Change Text button.
[b] Right-click and select Tab Stops or press Ctrl + Tab.
[c] The tab stops that have already been set will appear in black. To delete all
set tab stops, click on the button Delete All Tabs. Deleting all tab stops will
left align all text.
[d] To delete one tab stop, click on the left or right Tab Stop Selectors (as
shown on page 46), or press Tab to move to the right or Shift + Tab to
move to the left and select the tab stop that you wish to delete.
[e] Once you have selected the desired tab stop, click on Delete Tab.
[f] After deleting a tab stop, all the text positioned at that tab stop will move to
the following tab stop.
48
Page 49

MultiScree
Cut, Copy and Paste
You can use the Cut, Copy and Paste functions to move text around on the
screen. Copying text will leave the selected text in place, but allow you to place a
copy of that text elsewhere. Cutting text will remove the selected text, but still allow you to paste it elsewhere.
[a] Select the text you want to cut or copy, using the procedure described pre-
viously.
[b] Press COPY (F7) or Shift + CUT (F7). Alternately, right click and select
Copy or Cut.
[c] To paste, position the cursor where you want the text to appear, and press
PASTE (F8). Alternately, right click and select Paste.
Undo
If you make a mistake, you may be able to use the Undo function to correct it.
Undo will reverse the most recent change you have made. To Undo, right click
and select Undo.
Save & Exit
When you are satisfied with the text, press SAVE (F6). Alternately, right click
and select Save. If you decide you don‟t want to save your changes to the text,
select Exit instead, or press Esc. Either way you will be returned to the Screen
Editor.
49
Page 50

MultiScree
Colour
Palette
Increase
Highlight
Decrease
Shadow
Decrease
Highlight
Increase
Shadow
Text Appearance
The Text Appearance screen is used to alter the appearance of text in a text
message. For details on how to invoke the Text Appearance menu, see page
43, Adding Text to a Screen.
[a] Select a font style from the font list by clicking on its name. A sample of
the text style is shown to the right of the font list. You can also move up
and down the list with the up and down cursor keys.
[b] Click the appropriate checkboxes to make the text Bold or Italic. Alter-
nately, press B to toggle Bold text and I to toggle Italic.
50
Page 51
MultiScree
[c] Select the text size you want by clicking the box of the desired size. The se-
lected box will be highlighted. Note that a small text size will not display
well on some televisions, whilst a large text size will not allow you to type
as much text. You can also use the left and right cursor keys to increase or
decrease the text size.
[d] Click the checkbox labelled Colour, or alternately press C. Next, select the
colour you want by clicking the corresponding colour on the palette.
[e] Click the Highlight checkbox (or press H) to choose what colour the top
left edge of the text should be using the procedure above, and similarly
chose the colour for the Shadow, S, the bottom right edge of the text. Using
the highlight and shadow colours allows you to create drop shadows or the
appearance of raised text.
[f] To create a drop shadow, select any colour for the text colour, then select
black as the text shadow colour. Click the right hand arrow on the text
shadow selection box to increase the size of the shadow until it is an appropriate size. Note that a black shadow won‟t show up on a black background.
[g] To create a raised text effect, select a colour a shade lighter than the text
colour for the highlight colour. For example, if you have bright green text,
you might select bright yellow for the highlight. Click the right hand arrow
on the text highlight colour box to increase the size of the highlight slightly.
Next select a shade slightly darker for the text shadow - dark green, for example - and increase the shadow size slightly.
[h] When you are satisfied with the font, the size and the colour effect, click
Select. If you decide you don‟t want to change the font, the size or the col-
our effect, then click Cancel instead.
51
Page 52

MultiScree
Adding a Scroller to a Screen
A scrolling text message may be placed on any screen. Known as a scroller, this
will appear as a single line of text moving along from the right side of the screen
towards the left. The text in a scroller may either be manually typed in, or else it
can automatically come from an internet news feed. To add a scroller to a screen,
follow these steps:
[a] In the Sequence Editor, first double-click the screen you wish to add the
scroller to. Next, click on Add under the header Scroller. This will bring up
the Scroller Editor, pictured below.
[b] If you want to manually type in the scroller‟s text then click the text entry
box in the top right part of the screen & use the keyboard to enter the text
you wish to appear on the scroller. Otherwise if you want the scroller‟s text
to automatically come from an internet news feed then perform the steps in
the following section Adding a News Feed to a Scroller on page 55,
then continue on here from step [c].
52
Page 53

MultiScree
[c] You can choose the font that you would like the scrolling text to be dis-
played in from the list of fonts in the top left-hand corner of the screen.
Simply click the name of the font you wish to use. Click and drag the scroll
bar to move up and down the list of fonts.
[d] You can choose to make the text Bold and/or Italic by clicking the appro-
priate boxes at the top of the screen. A green arrow indicates the effect has
been selected, whilst a red cross indicates the effect is turned off.
[e] Select the size of the scrolling text you want by clicking on the letters "Aa"
in the size required.
[f] The scroller background colour and text colour can be changed. To change
the text colour, Click Text Colour and select the colour you want at the
bottom right of the screen. Similarly, to change the Background Colour,
click Bg Colour and select the desired colour. If you do not wish the
scroller to be displayed with a coloured background, turn off the Bg Colour
checkbox (click it so that it displays a red cross). If the Bg Colour is turned
off, the text will scroll directly over the graphic.
[g] The text can be displayed in one of three styles: It can be plain, flat text
(Plain Text); it can drop a shadow (Shadowed); or it can have a highlight
at the top left corner (Raised Text). Simply click the name of the display
style you want. Though the text in the text entry box will not show the selected style, you may click the "Preview" button to see how the scroller
looks in the chosen style.
[h] The scroller can be set to scroll across the screen multiple times. Click the
Repeat Times box, then enter the new number of repeat times. You can al-
so press + to increase the number by 1, or - to decrease it.
[i] To change the scroller‟s speed, adjust the Speed Slider by clicking and
dragging the slider. The further to the right the slider is, the faster the
scroller will be.
[j] If you have chosen to use a background colour behind your scroller, then
the transition defines how the scroller‟s background appears on the screen,
and how it disappears once it has finished. Click the box labelled Transi-
tion to bring up the Transition Selector. Choose a transition by clicking on
it. The transition will be previewed in the top right corner of the screen. If
you are not satisfied with the transition, try choosing another. When you are
satisfied with the chosen transition, click Select. If you decide you don‟t
want to select a different transition, click Cancel instead.
53
Page 54

MultiScree
[k] The scroller‟s position on the screen is altered by clicking the Scroller Po-
sition button. This will bring up a preview of the screen background and
scroller. Use the mouse to move the scroller up and down the screen. Note
that while the Scroller Position function is in use, the scroller’s background
will be always be shown in a solid colour even if the scroller has been set to
use a transparent background.
[l] You can also adjust the width of the scroller. Move the cursor to either the
left or right edge of the scroller. The edge of the scroller will be highlighted. Click and drag the highlighted edge of the scroller to change the width
of the scroller. Once you are satisfied with the position and width, press En-
ter or left click within the scroller.
[m] Click Preview to see what the scroller will look like on the screen. If you
are satisfied with it, click Save. Otherwise, you can change the text or other
settings by following the previous steps. If you decide you don‟t want a
scroller at all, click Cancel.
54
Page 55

MultiScree
Adding a News Feed to a Scroller
The text from an internet news feed can be automatically added to a scroller on
any standard screen. In the Sequence Editor, first double-click the screen you
wish to add the news feed scroller to. Next, click on Add under the header
Scroller. This will bring up the Scroller Editor, pictured below.
[a] In the Scroller Editor, click on the checkmark immediately to the left of
the News Feed button so that it becomes a green tick. The text entry area
will change (similar to that shown below) to allow you to select & configure a news feed.
[b] From the drop-down list, select the subscribed news feed that you would
like to be shown on this scroller.
If the list of subscribed news feeds is either empty or does not include the
one that you wish to select, perform the steps in the following section
Configuring News Feeds on page 57, then return and continue on
here from step [b].
[c] Immediately below the drop down list some of the current content from the
selected new feed will be shown, to assist you in ensuring that the correct
news feed has been selected.
55
Page 56

MultiScree
[d] Set the number of news items from the selected feed that you would like to
be displayed on this scroller.
An average news feed may contain anything from about 10 to 40 news
items in total, and it is not usually a good idea to display them all at once
on a single scroller as this would take a considerable amount of time.
Thus we would recommend you display about 2 to 5 news items at a time
(depending on the amount of text in each news feed) per scroller.
[e] If you like, you can click the Preview button to view how long the selected
number of news items will take to be displayed. Either click the left mouse
button or press the Esc key to exit from the preview.
[f] Once you are satisfied with your selections, click the Font button to show
the font size & colour sample that the scroller will be displayed with.
If you need to return to change the news feed selection or settings, then
click on the News Feed button.
[g] Continue from step [c] in the previous section (Adding a Scroller to a
Screen on page 53) to modify the font size, colour and position attributes
that the news feed scroller will be displayed with.
56
Page 57
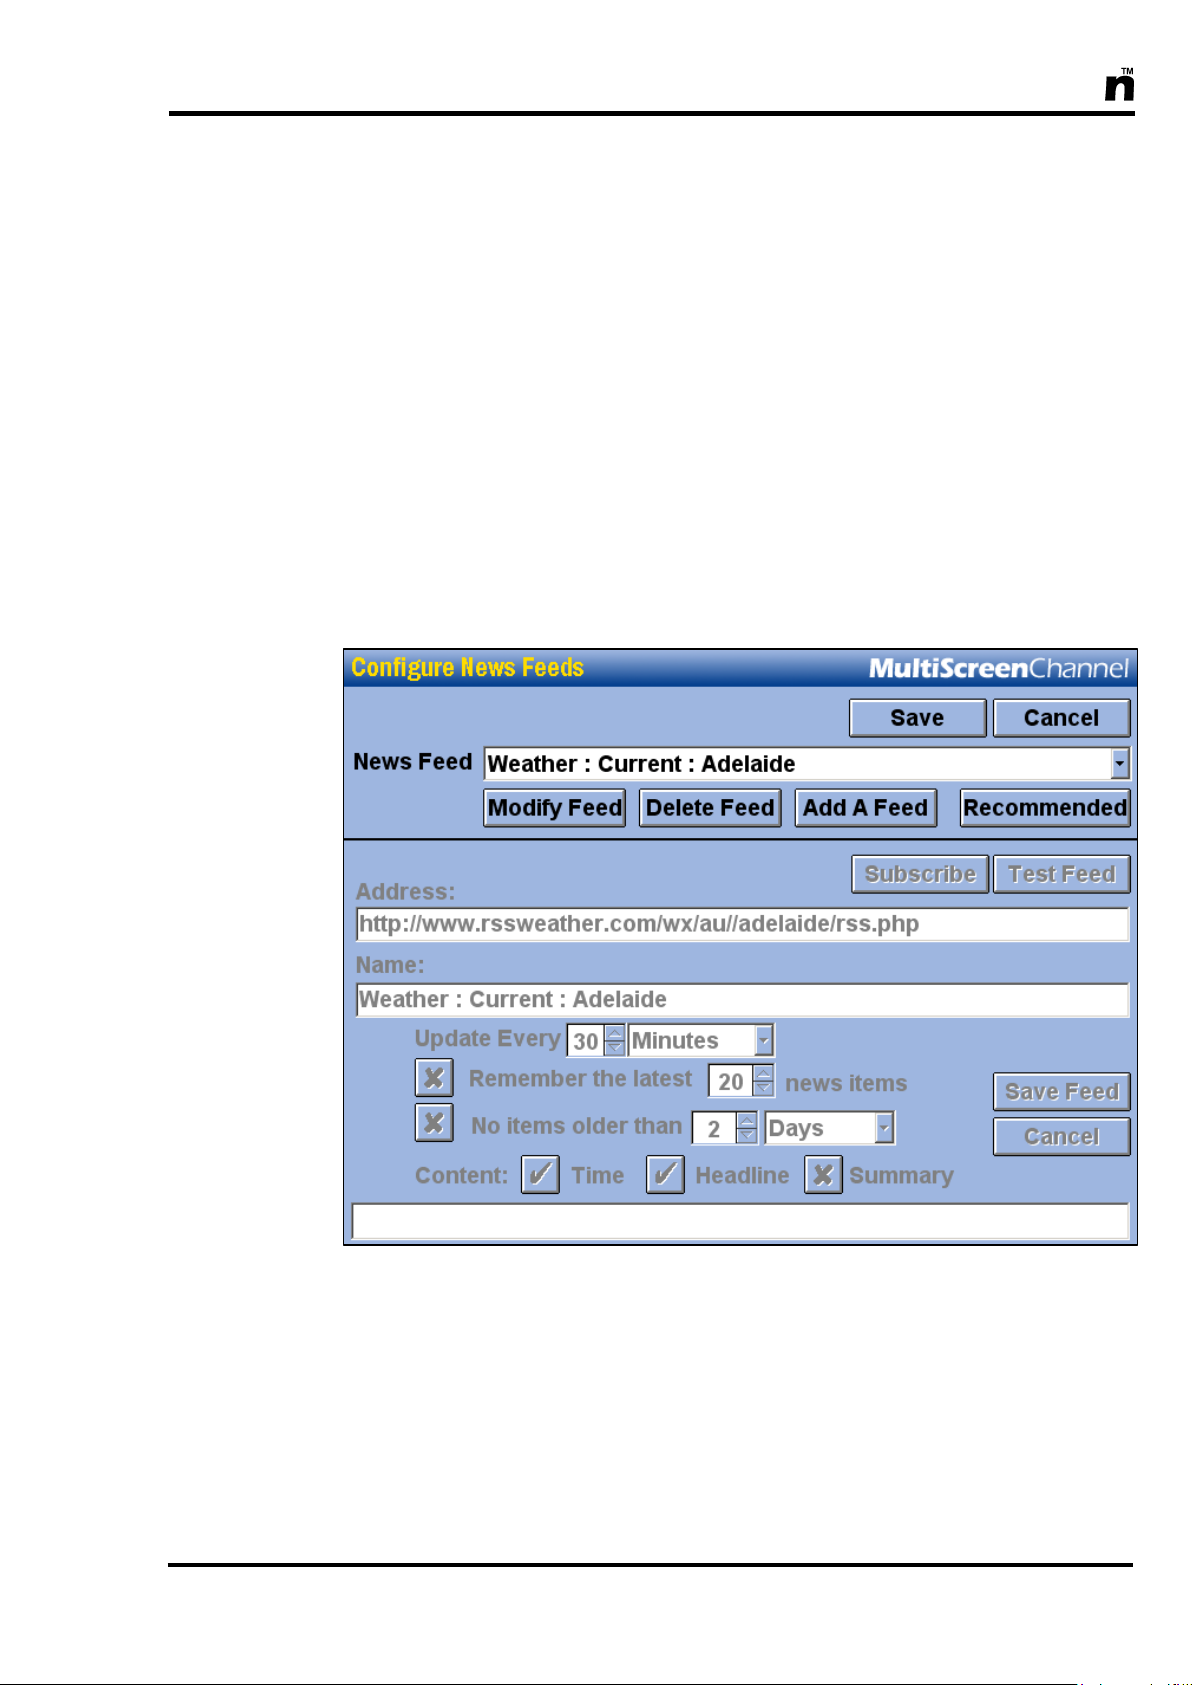
MultiScree
Configuring News Feeds
Before a news feed can be selected for inclusion on a scroller, it firstly needs to
be „subscribed‟ to and have certain options configured regarding the way content
from the news feed will be displayed. MultiScreen provides a list of recommended news feeds which have been preconfigured with the optimal display options, and this list can be updated from time to time online. You can choose to
subscribe to any of these recommended news feeds, or else you can set up any
suitable text based news feed that you know the internet address for. The options
to configure news feeds can be accessed in either of two ways :-
[a] In the Scroller Editor, ensure the checkmark to the left of the News Feed
button is ticked then click on the Config button. Or else, from the Sequence
Editor click on the Config button then the News Feeds button. This will
display the Configure News Feeds screen, similar to that shown below :-
[b] The Configure News Feeds screen allows you to manage the subscribed
news feeds. When a news feed has been “subscribed” to then it becomes
available for you to use on a scroller and its content is updated from the internet on a regular basis. The News Feed drop-down list will display all of
the news feeds that you are currently subscribed to. It is recommended that
you only subscribe to the number of news feeds that you will be actually be
using in your sequences, to minimise the amount of information being accessed from the internet. The Configure News Feeds screen allows you to :-
57
Page 58

MultiScree
(1) subscribe to a news feed by selecting one from the Recommended list
of news feeds,
(2) subscribe to a news feed by manually adding the news feed internet ad-
dress and configuration settings,
(3) modify the configuration settings for any news feed that has already
been subscribed to,
(4) test whether a subscribed news feed is still available online (or has be-
come defunct), &
(5) delete a subscribed news feed that is no longer required.
Each of these functions will be described below.
Subscribe to a Recommended News Feed
The easiest way to subscribe to a news feed is to choose from a list of preconfigured news feeds recommended by MultiScreen. From time to time, this list of
news feeds is updated and made available via the internet, and you can download
the latest version of the list to keep up to date.
[a] On the Configure News Feeds screen, click on the Recommended button.
The list of recommended news feeds which have been preconfigured will
appear, similar to the following :-
58
Page 59

MultiScree
[b] From time to time, the list of recommended news feeds is updated by Mul-
tiScreen. If you want to ensure you have the latest version of the list loaded,
click on the Update List button. You will be informed whether you already
have the most recent list or not. Click on the Yes button to download the
latest updated list from the internet.
[c] From the list, click on the name of the news feed that you would like to
subscribe to, then click on the Subscribe button. You will be returned to
the Configure News Feeds page and the selected news feed will now be
available in the drop-down list of subscribed news feeds.
[d] To exit from the Recommended News Feeds page without subscribing to a
news feed, then click on the Cancel button instead. You will be returned to
the Configure News Feeds page.
Manually Add a News Feed
If the news feed that you would like to subscribe to is not included in the Recommended list, then so long as you know internet address (or URL) of the news
feed (and that news feed is supplied in either RSS 2.0 or Atom 1.0 format) then it
can be manually configured & subscribed to so that its content can then be displayed on scrollers. (The section further below titled More Information About
News Feeds on page 64 describes how to go about determining the URL of a
news feed.) To manually add a news feed, do the following :-
[a] On the Configure News Feeds screen, click on the Add A Feed button.
[b] In the Address: box, type the internet address (URL) of the news feed that
you‟d like to subscribe to. Then click on the Subscribe button.
[c] If you receive a message saying “The data at this address is in an incompat-
ible format. Unable to subscribe to this news feed” then this could mean a
number of things : If the URL has been typed correctly, then the news feed content may
not be in the RSS 2.0 or Atom 1.0 format, and so is not compatible for
use on your MultiScreen unit. Try to find a similar feed that is in the
correct format.
Maybe a typing error was made when entering the internet address. Re-
check your spelling and try again.
Maybe the website hosting the news feed is temporarily unavailable.
Try subscribing to it again later.
If you receive a message titled “No Internet Connection” then this could
mean a number of things :-
59
Page 60

MultiScree
The network cable has become unattached from your MultiScreen unit.
Check the connection on the rear panel. If it is attached, try removing it
and reattaching it, then try subscribing again.
Maybe there is a problem at the other end of the network cable. Check
that it is correctly attached to the wall socket, router or network switch,
then try subscribing again.
If the cabling is correct then maybe your internet service is temporarily
unavailable. Check with your network administrator or internet service
provider to see if a problem exists. Try subscribing again when the internet service is back online.
[d] If all goes well, you will receive a message saying “Successfully subscribed
to this news feed.” Click on the OK button. The screen should appear similar to the following :-
[e] The Name: box will display the default name of the news feed. Feel free to
modify this if you wish. This is the name that will appear in the list of subscribed news feeds to describe this feed.
[f] By default, a newly added news feed is set to have its content automatically
updated from the internet every 30 minutes. This update interval can be
changed to any number of minutes or hours (depending on how often you
expect the content in the news feed to be updated by its publisher) by
changing the values following the words Update Every.
60
Page 61

MultiScree
[g] By default, all news items available in a news feed at the time it was last
updated are remembered. The number of articles provided in any given
news feed can vary greatly depending on what the publisher of the news
feed deems is suitable. If instead you would prefer that a fixed number of
news items are to be remembered, then ensure that the checkmark labelled
Remember the latest X news items is ticked, then set the number of
news items as desired.
If the number that you choose is less than the number of articles avail-
able in the news feed, then only the selected number of most recent
news items will be remembered, with the remainder discarded.
If the number that you choose is greater than the number of articles
available in the news feed, then all of the most current updated news
items are remembered with the remainder made up of the most recent
news items left over from the previous updates.
[h] By default, all remembered news items from a news feed are stored regard-
less of when those items were each first published. If you would prefer that
any news items older than a certain time period be discarded, then ensure
that the checkmark labelled No items older than … is ticked. Then set the
number of minutes, hours or days after which you would like news items of
that age to expire. This option can be used to ensure that only the most current news feed content be displayed.
If this option is used at the same time that the Remember the latest X
news items option us used, then the No items older than … option
will override the Remember the latest X news items option. eg. If set
to remember 30 news items, with no items older than 1 hour, and if 5 of
those 30 items were published more than an hour ago, then only the 25
most recent of the news items will be stored.
[i] In general, each news item can consist of (a) a timestamp of when it was
first published, (b) a brief headline succinctly describing the item, & (c) a
more comprehensive summary providing more specific details. By default,
a newly added news feed will display the Time & Headline only of each
news item. You can choose your own combination of Time, Headline &
Summary information as appropriate to the selected news feed by enabling
or disabling the checkmarks next to each option. The only proviso is that at
least one of the Headline or Summary options must be enabled.
Immediately below these options will be a scrolling preview of the con-
tent of news items from the current news feed, shown with the currently
selected options. This should help you decide which combination of
Time, Headline & Summary would best suit the news feed.
[j] When you are satisfied with your settings, then click on the Save Feed but-
ton to complete the subscription of the news feed. The newly added news
61
Page 62

MultiScree
feed will now be saved & available in the drop-down list of subscribed
news feeds. After completing the configuration of your news feeds click on
the Save button which will then exit this screen, saving all changes you
have made.
[k] Alternately, if you need to discard the changes you have made to the added
news feed, then click Cancel instead. In this case, the new news feed will
no longer be subscribed to and thus will not be added to the list of subscribed news feeds.
Modify a Subscribed News Feed
On occasion you may find it necessary to modify the settings governing how the
content of a subscribed news feed is displayed, or how often its content is updated, or how many or how old the news items are that are stored.
[a] On the Configure News Feeds screen, select the news feed you wish to
modify from the drop-down list then click on the Modify Feed button.
[b] In the lower half of the screen all the settings for the currently selected
news feed will be shown and are available for editing.
[c] Make any changes that are required to the news feed‟s settings. You might
want to refer to items [e] to [i] in the previous section (Manually Add A
News Feed on page 60) for more information about what each setting is
used for.
[d] When you are satisfied with your settings, click on the Save Feed button to
store those modified settings. Any scrollers displaying this news feed will
automatically have these changes applied. After completing the configuration of your news feeds click on the Save button which will then exit this
screen, saving all changes you have made.
[e] Alternately, if you need to discard the changes you have made to the news
feed‟s settings, then click Cancel instead. In this case, the original settings
of the news feed will be restored.
Test a Subscribed News Feed
On rare occasions, you may find that a news feed stops functioning. This may be
because the publisher of the feed has changed the internet address that it can be
accessed from, or it may have become defunct with the publisher no longer
providing content for it. Sometimes, there may simply be a temporary disruption
62
Page 63

MultiScree
to your internet access. In these situations when no content for a news feed can
be downloaded from the internet, a scroller will display the text “You are watching MultiScreen” instead. If you notice this message appear on a particular news
feed scroller, you might want to test that news feed to see what the problem is.
Do this as follows :-
[a] On the Configure News Feeds screen, select the news feed you want to test
from the drop-down list then click on the Modify Feed button.
[b] Click on the Test Feed button.
[c] If there is nothing wrong with the selected news feed, then you will receive
a message saying “This news feed is still available and its content has been
updated”. Click on OK. The scrolling preview at the bottom of the screen
will be showing the latest news items downloaded from the internet for this
feed. Click Cancel to end the test.
[d] Otherwise if you receive a message saying “Unable to locate this news feed.
This news feed may not be available” then this could mean a number of
things :-
Maybe the website hosting the news feed is temporarily unavailable.
Try subscribing to it again later.
Maybe the website that hosted the news feed has changed its web ad-
dress or has deleted the news feed altogether. Go to the publisher‟s
website or contact the publisher of the news feed to try to determine the
status of that particular news feed.
[e] If you receive a message titled “No Internet Connection” then this could
mean a number of things : The network cable may have become unattached from your Multi-
Screen unit. Check the connection on the rear panel. If it is attached, try
removing it and reattaching it, then try testing again.
Maybe there is a problem at the other end of the network cable. Check
that it is correctly attached to the wall socket, router or network switch,
then try testing again.
If the cabling is correct then maybe your internet service is temporarily
unavailable. Check with your network administrator or internet service
provider to see if a problem exists. Try testing again when the internet
service is back online.
[f] If you receive a message saying “The data at this address is in an incompat-
ible format. Testing failed.” then this may mean then the news feed content
may no longer be in the RSS 2.0 or Atom 1.0 format, and so is not compatible for use on your MultiScreen unit. Try to find a similar feed that is in the
correct format.
[g] After receiving any error messages, click the OK button then Cancel to end
the test.
63
Page 64

MultiScree
Delete a Subscribed News Feed
If you find you no longer use a particular news feed on any of your screens (or a
news feed has become defunct), then it is wise to delete that news feed so that the
subscribed list only contains news feeds that are actually in use in your sequences. This helps minimise the amount of unnecessary data being downloaded from
the internet.
[a] On the Configure News Feeds screen, select from the drop-down list of sub-
scribed news feeds the name of the news feed that is no longer being used.
[b] Click on the Delete Feed button. When asked whether you are sure you
want to delete the news feed, click on the Yes button.
The selected news feed will now be deleted from the subscribed news feed list. If this
was a news feed selected from the Recommended list, then it will still be available
for selection from that list should you choose to subscribe to it again at a later date.
More Information About News Feeds
News feeds (sometimes also known as Web feeds or RSS feeds) are documents
accessible on the internet which are used for providing frequently updated content to users. The type of content provided in news feeds can vary greatly, ranging from the latest news, weather reports, sports results or even lists of updated
webpages or blog entries. Many types of websites or “publishers” can provide
news feeds containing information on a wide range of subject matter. Examples
of some well-known publishers of news related news feeds are the BBC in the
UK and the ABC in Australia. Also most major newspaper websites such as The
Times, The Daily Telegraph or The Sun in the UK, or The Australian, The Sydney Morning Herald or The Age in Australia provide their news content as news
feeds.
News feed documents are provided in a number of different data formats, however the two most widely used formats are known as RSS 2.0 & Atom 1.0, and
both of these are compatible with your MultiScreen system. A news feed is composed of a number of news items. The amount of news items contained in a news
feed and the rate at which the news items in a news feed are updated can vary
considerably, depending on what the publisher deems suitable for the type of
content being published. Although news feeds can sometimes contain images and
other media in addition to text, your MultiScreen unit is only concerned about
displaying the textual content of the news feeds.
64
Page 65

MultiScree
News feed URL
So long as your MultiScreen system is connected to the internet, text based news
feeds in either the RSS 2.0 or Atom 1.0 formats can be configured so that
scrollers can display current up-to-date news items on them. A list of recommended news feeds covering a range of news topics have been preconfigured for
you to select from. However if the news feed you would like to subscribe to is
not available in that recommended list, then so long as you know the internet address (URL) of that news feed, you can manually configure the MultiScreen to
access it (as per the section called Manually Add A News Feed on page 59
above).
To determine the internet address of the news feed you require, you should use
an internet browser such as Internet Explorer on your regular computer. Browse
to the website which hosts the news feed then search for the links to news feeds
which are normally next to orange icons that usually look something like these :-
or
Once you find the news feed link you are after (eg. like the weather forecast
link shown below), then either (a) hover your pointer over it and the news feed
address (or URL) will appear in the status bar at the bottom left corner of the
browser window (as shown below), or else (b) click on the link and then the
65
Page 66

MultiScree
news feed will be displayed in the browser, with its internet address (URL)
shown in the Address box at the top of the browser (as shown below, where the
mouse pointer is).
Be sure to carefully write down this URL, as you will need to type it in to your
MultiScreen unit in order to subscribe to that feed. (This is done at step [b] in the
Manually Add a News Feed instructions on page 59 above.)
Handy tip: If the news feed URL begins with feed:// then when typing it into the
MultiScreen replace the feed:// with http:// instead.
66
Page 67

MultiScree
Clock
Preview
Analog Clock
Checkbox
Adding a Clock to a Screen
A clock can be added to any standard screen in a sequence, provided that the
screen does not contain text. A number of graphics designed specifically for use
with clocks are included in the MultiScreen Graphics Library. The Production
Unit can display both analogue and digital clocks. To add a clock to a screen,
first open the Screen Editor by double-clicking the screen in the Sequence Editor.
Then, click Add Clock. This will open the Clock Editor. You will not be able to
add a clock if the screen already contains text.
The current time is shown at the top of the screen. If this time is incorrect, click it
to adjust it. The full procedure to change the clock is given on page 107, Set-
ting the Time and Date.
67
Page 68

MultiScree
To add an analogue clock to a screen :[a] Click the Analogue Clock Checkbox.
[b] The colours of the clock hands can be altered. Click the box labelled
Hour/Min Hands Colour. A colour selection palette will appear. Click the
colour you wish to use, then click OK.
[c] The colour of the seconds hand can also be changed. Click the box labelled
Seconds Hand Colour, and select the colour you wish to use.
[d] There are twelve hour marks around the clock. The colour of these marks is
changed by clicking the box labelled Marks Colour. The clock is not numbered - if you need a clock with numbers, there are graphics available on
the Production Unit with numbers or roman numerals in the correct positions.
[e] If you decide you don‟t want to use the marks at all, click the Use Clock
Marks checkbox. If the box contains a green tick, marks will be used; if it
contains a red cross, the marks will not be used. You should deselect this
option if using a graphic that already contains marks.
[f] The current date can be displayed in the bottom right corner of the screen. If
you wish to display the date, click the Display Date checkbox.
[g] The colour of the date displayed can be changed. Click the box labelled
Date Colour to change it.
[h] A small preview is displayed in the lower right part of the screen. For a full
screen preview, click the Preview button.
68
Page 69

MultiScree
Digital Clock
Checkbox
Clock
Preview
To add a digital clock to a screen :-
[a] Click the Digital Clock checkbox. The screen will change to show the op-
tions for digital clocks.
[b] The three buttons to the right of the Text Appearance button will allow you
to change the clock format. HH:MM will only display the hours and minutes
of the current time. HH:MM:SS will also display seconds. HH:MM:SS DD-
MM-YY will display the current time including seconds, as well as the cur-
rent date below.
[c] Clicking on the Text Appearance button will open a new window that con-
tains various ways to change the text appearance.
69
Page 70

MultiScree
[d] Choose a font from the list of fonts in the top left-hand corner of the screen.
Click the name of the font you wish to use. Click and drag the scroll bar to
move up and down the list of fonts.
[e] You can choose to make the text Bold and/or Italic by clicking the appro-
priate boxes at the top of the screen. A green arrow indicates the effect has
been selected, whilst a red cross indicates the effect is turned off.
[f] Select the Text Size you want by clicking on the letters "Aa" in the size re-
quired.
[g] The clock text colour can be changed. To change the colour, Click Text
Colour and select the colour you want at the bottom right of the screen.
[h] The text can be displayed three styles: It can be plain, flat text; it can drop a
shadow; or it can have a highlight along the top and left. Simply click the
name of the display style you want. You can preview what the style will
look like in the box in the top right hand corner of the screen.
Once you are satisfied with the clock settings, click the button marked Save at
the bottom of the screen. If you do not wish to save the clock, click Cancel.
70
Page 71

MultiScree
Adding a Sound to a Screen
A sound can be added to a screen in addition to graphics, text, scrollers etc. The
sound will play when the screen is displayed, after the transition has finished. To
add a sound to screen, follow these steps:
[a] In the Sequence Editor, first double-click the screen you wish to add the sound
to. Next, click Add under the header Sound. This will bring up the Sound Selector.
[b] To select the sound you wish to add to the screen, left click on its name from
amongst the list of available sounds. Click the Preview button to listen to the
sound. If you wish to select a different sound, simply click on its name. You
can preview any number of sounds before making your selection.
[c] To adjust the sound‟s volume, click and drag the volume control slider to the
right of the sound list. The higher the scroller, the louder the sound.
[d] Once you are satisfied with the sound and volume, click Select. If you decide
you no longer want a sound, click Cancel.
71
Page 72

MultiScree
Changing an Element on a Standard Screen
Graphics, Text, Clocks, Scrollers and Sounds are referred to as elements of a
screen. Any elements can be changed at any time after the screen‟s initial crea-
tion. In most cases, the process used to alter an element is identical to the procedure used to create it. To change a screen, first select it from the Sequence Editor
(See page 24, Using the Sequence Editor). This will invoke the Screen Editor.
A Graphic can be swapped for any other graphic in the Graphic Library. Click
Change under the header Graphic to alter the graphic. Refer to page 36, Adding a Graphic to a Screen for more details. The screen‟s background colour
and transition can also be changed, by clicking the appropriate box and making
your choice.
Text can be edited at any time by clicking Change Text. The process to edit text
is described on page 43, Adding Text to a Screen.
A Clock can be changed by clicking Change Clock. If you alter the time of day,
it will affect all clocks, not just the one you are changing. See Adding a Clock
to a Screen, page 67.
If a Scroller is present, it can be altered by clicking Change under the Scroller
heading. See page 52, Adding a Scroller to a Screen. In addition, the
scroller‟s repeat times and speed can be altered without invoking the Scroller Ed-
itor. Simply enter a new number of repeat times into the Repeat Times box, or
adjust the Speed Slider by clicking and dragging the slider. The further to the
right the slider is, the faster the slider will be. To Hide a scroller, set the repeat
times to zero.
A Sound can be changed by clicking the button labelled Change at the bottom
left corner of the screen. See page 71, Adding a Sound to a Screen. In addition, the sound‟s volume can be changed without invoking the Sound Selector.
Use the slider next to the speaker button. The further right the slider is, the louder
the sound will be. Click the speaker button to hear the sound at the selected volume. To mute a sound, drag the slider to the far left. Once muted, a sound will
not play.
72
Page 73

MultiScree
Removing an Element from a Standard Screen
When an element is no longer needed, it can be permanently removed or deleted
from a screen. Once removed, some elements such as text cannot be recovered,
so make sure you really don‟t need the element any more before removing it.
To remove a Graphic, click the button labelled Remove under the Graphic
header. Once removed, a graphic can be added again by reselecting it from the
Graphic Library. Removing a graphic from a screen does not delete it from the
Graphic Library.
Text can be removed by clicking Remove Text. Removing text deletes all text
from the screen; if you need the text at a later date, you will have to re-type it all
by hand.
A Clock can be removed by clicking Remove Clock. Once removed, all settings
for the clock will be forgotten. If you add a clock at a later date, it will revert to
the default settings.
A Scroller can be removed by clicking the Remove button located under the
Scroller section at the right hand side of the screen. Once removed, all settings
for the scroller are forgotten; if you need to use it again, you will have to re-type
it by hand. To Hide the scroller instead, see page 72, Changing an Element
on a Standard Screen.
A Sound can be removed by clicking the Remove button at the bottom right
corner of the screen. Once removed, a sound can be added again by using the
Sound Selector. Removing a sound from a screen does not delete it from the
Sound Library. If you wish to remove a sound temporarily, you can Mute it instead. A muted sound will not play until the volume is again increased. See
page 72, Changing an Element on a Standard Screen.
73
Page 74

MultiScree
Creating Multiple Screens
It is possible to create many standard screens at once by choosing a number of
different graphics at once in the Graphic Selector. For example, you may have
loaded many graphics from a digital camera, and wish to add them all to a sequence at one time.
To create multiple screens, first create one screen as described on page 29, In-
serting a New Screen. This screen will be used as the basis for all the new
screens. Select the background colour, transition and other attributes that you want
to use for all the new screens, according to the procedure given in the previous section. Any text, scroller, sound or clock set at this point will be used on all screens.
Next, open the Graphic Selector as described on page 36, Adding a Graphic
to a Screen. Select the category you want the graphics to come from. You may
only add graphics from one category at a time.
Rather than selecting only one graphic, select all the graphics you wish to add.
To select multiple graphics, press and hold down Ctrl on the keyboard whilst you
click each graphic you wish to add. All selected graphics should be highlighted
with a red border.
You may also use the Shift key to select a contiguous range of graphics. This is
useful if all the graphics you wish to add have similar names, and are therefore
next to each other in the graphic selector. Click the first graphic in the range.
Then, holding down the Shift key, click the last graphic in the range. All selected
graphics should be highlighted with a red border.
When you have selected all the graphics you wish to use, click Select. The following dialog will be displayed :-
74
Page 75

MultiScree
If you want each new screen to use the same attributes of the screen you just created, click Current Screen.
If you click Defaults, each new screen will use the system‟s default attributes (as
described on page 105) instead.
If you do not want to create the new screens after all, click Cancel.
Once the screens have been created, you can alter them individually as described
on page 72, Changing an Element on a Standard Screen.
75
Page 76
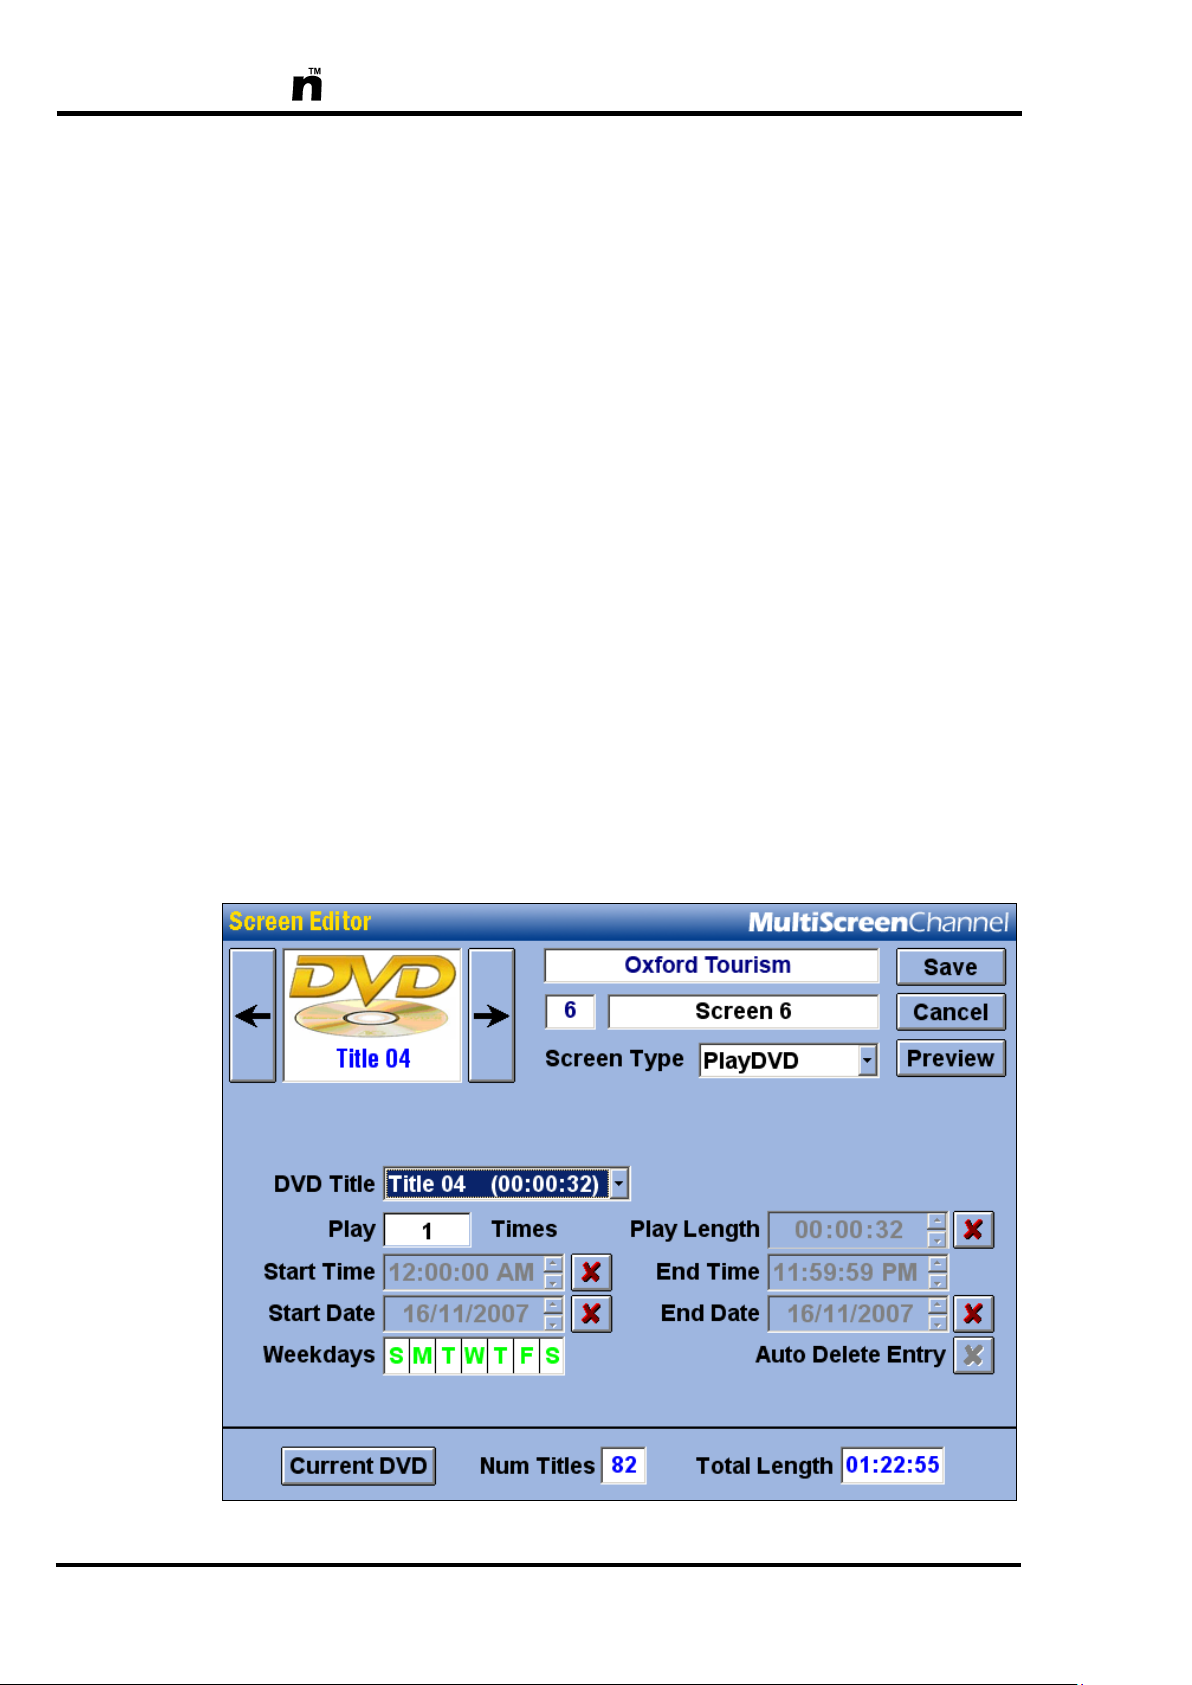
MultiScree
Inserting a DVD Title into a Sequence
The MultiScreen unit provides the ability to play a DVD title from within a sequence. This
is achieved by inserting a special “PlayDVD” screen into the sequence, and the Screen Editor is then used to specify which DVD title is to be played, together with when, how long &
how often it is played. Thus when such a PlayDVD sequence screen is due to be displayed,
the specified DVD title will be invoked and played according to the criteria specified on that
screen, after which the sequence will continue on from the following screen.
To insert a DVD title into sequence, perform the following procedure :[a] Firstly ensure that the DVD disc containing the title that you want to pro-
gram is loaded in the unit‟s DVD drive, shiny side down.
[b] In the Sequence Editor, select the thumbnail of the screen which you want
the DVD title to appear before.
[c] Right click on that thumbnail and select Insert New Screen.
[d] Open the new screen in the Screen Editor by double clicking on it.
[e] From the Screen Type drop-down menu, select the PlayDVD option. The
Screen Editor will now appear similar to that shown below.
76
Page 77

MultiScree
[f] The number of titles on the disc, as well as the entire program length of the
disc, is displayed at the bottom of the screen. Whenever you insert a new
DVD disc into the drive, you must click on the Current DVD button to update this information.
[g] From the DVD Title drop-down list select the desired DVD title number
that you want to attach to this screen. You can preview the chosen title by
clicking the Preview button. Either left clicking or pressing the Esc key
will exit from the preview.
[h] If you want the DVD title to play more than one time before continuing on
with the sequence, then enter the required number of repeats into the Play
Times box.
[i] If you want the DVD title to play for a shorter amount of time than its full
play length, then click on the checkmark to the right of the Play Length
box (so it changes to a green tick), and then enter the new play length into
that box.
[j] If you only want the DVD title to be played during a certain daily time
range then do the following :-
1. First click the checkbox to the right of the Start Time box so that it
changes to a green tick. The grey time boxes will turn white, allowing
the times to be edited.
2. Set the Start Time and End Time for the daily time range you require.
To do this, click on the hours, minutes or seconds value that you wish
to change. Then there are several ways to change the value. You can
type a new number on the keyboard. Or you can increase or decrease
the current value by one by either pressing the up or down arrow keys
on the keyboard or by clicking on the up and down arrow icons at the
right side of the entry box.
3. The DVD title will now only be started between these specified times
each day.
[k] If you only want the DVD title to be played during a specified range of
dates then do the following :-
1. First click the checkbox next to the Start Date or the Stop Date so that
it changes to a green tick. The grey date box will turn white, allowing
the dates to be edited.
2. Dates can be changed in a number of ways. You can double click on the
date which brings up a calendar to allow you to select the appropriate
date. Alternatively you can click on the day, month or year value you
want to alter, then there are several ways to change that value. You can
type a new number on the keyboard. Or you can increase or decrease
the current value by one by either pressing the up or down arrow keys
77
Page 78

MultiScree
on the keyboard or by clicking on the up and down arrow icons at the
right side of the entry box.
3. The Start Date & Stop Date can be set independently. If you only
specify a Start Date, then the date range is valid for all dates after & including the Start Date. If you only specify an End Date, then the date
range is valid for all dates prior to & including the End Date. Otherwise if both a Start & End Date are specified, then the date range is valid for all dates between & including the Start & End Dates.
4. If you specify an End Date, then you also have the option for the screen
to be automatically deleted after this date has passed. By default this
option (Auto Delete Screen) is turned off. To enable the Auto Delete
Screen feature then click on the red cross next to it so it changes to a
green tick.
[l] The boxes containing the letters SMTWTFS are used to display the DVD ti-
tle on certain days of the week. Clicking on a weekday box will toggle it
from green to red and vice versa. The DVD title will be shown on a weekday that is displayed in green and not on days shown in red.
[m] Holding down the Shift key whilst clicking any weekday box will either se-
lect or deselect all weekday boxes at once. In this way, the PlayDVD screen
can be hidden if all weekdays are deselected. Whilst hidden, the DVD title
specified on this screen will not display at all. To restore this screen once
hidden, hold down Shift and click any weekday box again.
[n] Once all settings have been made on this screen to your satisfaction, click
on the Save button. Otherwise, to abort without saving any changes click
on the Cancel button.
78
Page 79

MultiScree
Inserting a Video into a Sequence
The MultiScreen unit provides the ability to play video files from within a sequence. This is
achieved by inserting a special “PlayVideo” screen into the sequence, and the Screen Editor
is then used to specify which video from the video library is to be shown, together with
when, how long & how often it is to be played. Thus when such a PlayVideo sequence
screen is due to be displayed, the selected video will be invoked and played according to the
criteria specified on th at screen, after which the sequence will continue on from the following screen.
To insert a video into sequence, perform the following procedure :[a] In the Sequence Editor, select the thumbnail of the screen which you want
the video to appear before.
[b] Right click on that thumbnail and select Insert New Screen.
[c] Open the new screen in the Screen Editor by double clicking on it.
[d] From the Screen Type drop-down menu, select the PlayVideo option. The
Screen Editor will now appear similar to that shown below.
79
Page 80

MultiScree
Scrollbar
Video Category
Selector
Selected
Video
Video
List
Video
File Format
Video
Duration
[e] Click on the Add button to display the Video Selector, which will look sim-
ilar to that pictured here.
[f] Using the Video Category Selector, click on the name of the category from
the drop-down list that contains the video that you want to attach to the
screen. A list of the names of all the videos available in this category will
appear underneath.
[g] Select the desired video that you want to attach to this screen. You can pre-
view the chosen video by clicking the Preview button. Either left clicking
or pressing the Esc key will exit from the preview. Once your chosen video
is highlighted then click on the Select button.
[h] If you want the video to play more than one time before continuing on with
the sequence, then enter the required number of repeats into the Play Times
box.
80
Page 81

MultiScree
[i] If you want the video to play for a shorter amount of time than its full play
length, then click on the checkmark to the right of the Play Length box (so
it changes to a green tick), and then enter the new play length into that box.
[j] If you only want the video to be played during a certain daily time range
then do the following :-
1. First click the checkbox to the right of the Start Time box so that it
changes to a green tick. The grey time boxes will turn white, allowing
the times to be edited.
2. Set the Start Time and End Time for the daily time range you require.
To do this, click on the hours, minutes or seconds value that you wish
to change. Then there are several ways to change the value. You can
type a new number on the keyboard. Or you can increase or decrease
the current value by one by either pressing the up or down arrow keys
on the keyboard or by clicking on the up and down arrow icons at the
right side of the entry box.
3. The video will now only be started between these specified times each
day.
[k] If you only want the video to be played during a specified range of dates
then do the following :-
1. First click the checkbox next to the Start Date or the Stop Date so that
it changes to a green tick. The grey date box will turn white, allowing
the dates to be edited.
2. Dates can be changed in a number of ways. You can double click on the
date which brings up a calendar to allow you to select the appropriate
date. Alternatively you can click on the day, month or year value you
want to alter, then there are several ways to change that value. You can
type a new number on the keyboard. Or you can increase or decrease
the current value by one by either pressing the up or down arrow keys
on the keyboard or by clicking on the up and down arrow icons at the
right side of the entry box.
3. The Start Date & Stop Date can be set independently. If you only
specify a Start Date, then the date range is valid for all dates after & including the Start Date. If you only specify an End Date, then the date
range is valid for all dates prior to & including the End Date. Otherwise if both a Start & End Date are specified, then the date range is valid for all dates between & including the Start & End Dates.
4. If you specify an End Date, then you also have the option for the screen
to be automatically deleted after this date has passed. By default this
option (Auto Delete Screen) is turned off. To enable the Auto Delete
Screen feature then click on the red cross next to it so it changes to a
green tick.
81
Page 82

MultiScree
[l] The boxes containing the letters SMTWTFS are used to display the video on
certain days of the week. Clicking on a weekday box will toggle it from
green to red and vice versa. The video will be shown on a weekday that is
displayed in green and not on days shown in red.
[m] Holding down the Shift key whilst clicking any weekday box will either se-
lect or deselect all weekday boxes at once. In this way, the PlayVideo
screen can be hidden if all weekdays are deselected. Whilst hidden, the
video specified on this screen will not display at all. To restore this screen
once hidden, hold down Shift and click any weekday box again.
[n] The volume level of the video can be set using the Volume slider. You can
click on the Preview button to preview the video and its volume level. Either left click or press the Esc key to exit the preview.
[o] Once all settings have been made on this screen to your satisfaction, click
on the Save button. Otherwise, to abort without saving any changes click
on the Cancel button. Either way, you will be returned to the Sequence
Editor.
82
Page 83
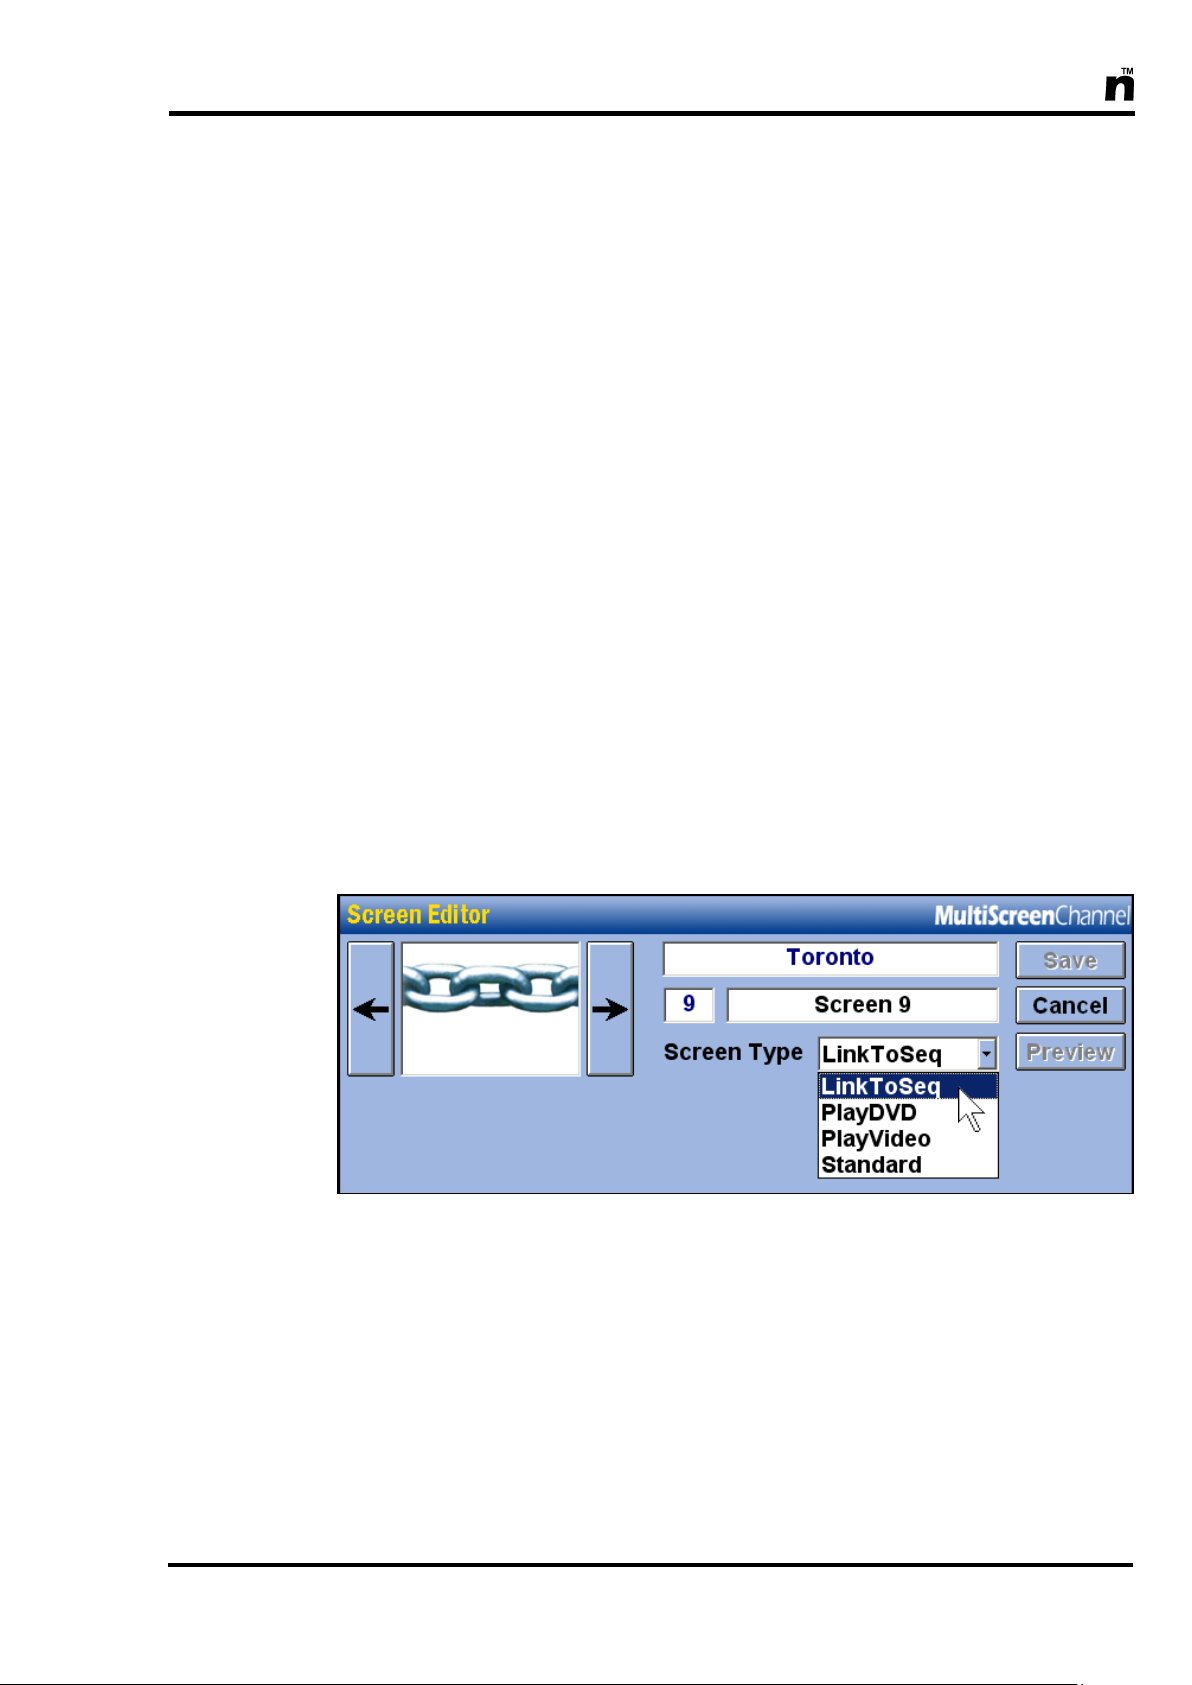
MultiScree
Linking Sequences
The MultiScreen unit provides the ability to create a link to another sequence
from within the current sequence. This is achieved by inserting a special “Link
To Sequence” screen into the sequence, and the Screen Editor is then used to
specify which other sequence is to be linked to, and when & how often it is
played. Thus when a sequence containing such a linked sequence screen is displayed, as it comes time to “play” the link screen, the specified sequence will be
invoked and displayed for the specified number of times during the specified
hours, on the specified days between the specified dates (if applicable) before returning to the main sequence and then continuing on from where it left off.
To create a link to a sequence, perform the following procedure :[a] In the Sequence Editor, select the thumbnail of the screen which you want
the linked sequence to appear before.
[b] Right click on that screen and select Insert New Screen.
[c] Open the new screen in the Screen Editor by double clicking on it.
[d] From the Screen Type drop-down menu, select the Link To Seq option as
shown here.
[e] The Screen Editor screen will now appear similar to below :-
83
Page 84

MultiScree
Sequence
Selector
Indicates that the
screen is a link
to a sequence
[f] Select the name of the sequence that you want to link to from the Sequence
Selector. Note that you will be unable to link to any sequence which already
contains a link back to the current sequence.
[g] If you want the sequence to play more than one time before returning to the
initial sequence, enter the required number of repeats into the Play Times
box.
[h] If you only want the linked sequence to be activated during a certain daily
time range then do the following :-
1. First click the checkbox to the right of the Start Time box so that it
changes to a green tick. The grey time boxes will turn white, allowing
the times to be edited.
2. Set the Start Time and End Time for the daily time range you require.
To do this, click on the hours, minutes or seconds value that you wish
to change. Then there are several ways to change the value. You can
type a new number on the keyboard. Or you can increase or decrease
the current value by one by either pressing the up or down arrow keys
on the keyboard or by clicking on the up and down arrow icons at the
right side of the entry box.
3. The linked sequence will now only be started between these specified
times each day.
[i] If you only want the linked sequence to be activated during a specified
range of dates then do the following :-
1. First click the checkbox next to the Start Date or the Stop Date so that
it changes to a green tick. The grey date box will turn white, allowing
the dates to be edited.
84
Page 85

MultiScree
2. Dates can be changed in a number of ways. You can double click on the
date which brings up a calendar to allow you to select the appropriate
date. Alternatively you can click on the day, month or year value you
want to alter, then there are several ways to change that value. You can
type a new number on the keyboard. Or you can increase or decrease
the current value by one by either pressing the up or down arrow keys
on the keyboard or by clicking on the up and down arrow icons at the
right side of the entry box.
3. The Start Date & Stop Date can be set independently. If you only
specify a Start Date, then the date range is valid for all dates after & including the Start Date. If you only specify an End Date, then the date
range is valid for all dates prior to & including the End Date. Otherwise if both a Start & End Date are specified, then the date range is valid for all dates between & including the Start & End Dates.
4. If you specify an End Date, then you also have the option for the screen
to be automatically deleted after this date has passed. By default this
option (Auto Delete Screen) is turned off. To enable the Auto Delete
Screen feature then click on the red cross next to it so it changes to a
green tick.
[j] The boxes containing the letters SMTWTFS are used to display the linked
sequence on certain days of the week. Clicking on a weekday box will toggle it from green to red and vice versa. The linked sequence will only display on a weekday that is shown in green and not on days shown in red.
[k] Holding down the Shift key whilst clicking any weekday box will either se-
lect or deselect all weekday boxes. In this way, the linked sequence screen
can be hidden if all weekdays are deselected. Whilst hidden, the linked sequence specified on this screen will not display at all. To restore this screen
once hidden, hold down Shift and click any weekday box again.
[l] Once all settings have been made on this screen to your satisfaction, click
on the Save button. Otherwise, to abort without saving any changes click
on the Cancel button.
85
Page 86

MultiScree
Deleting a Linked Sequence Screen, PlayVideo Screen
or Play DVD Screen
A linked sequence screen, PlayVideo screen or a PlayDVD screen can be removed in one of two ways. In the Screen Editor, the Screen Type can be
changed back to a Standard screen & then it can be reused for a different purpose. Alternatively the screen can be deleted from the Sequence Editor just like
any standard screen, as follows :-
[a] To delete a screen from the Sequence Editor, right click on the screen‟s
thumbnail and select Delete.
[b] A prompt will appear that says “Are you sure you want to delete the
screen?”
[c] If you are sure, click Yes, if not, or you have changed your mind, click No.
86
Page 87

MultiScree
+
+
Freezing a Sequence on the Screen
It is possible to “freeze” a sequence when the Production Unit is running in Preview Mode. When frozen, the currently displayed screen will remain on the television indefinitely. The sequence will not continue until it is unfrozen.
To freeze a sequence, ensure it is running in Preview Mode, then press the Ctrl +
Alt + Scroll Lock keys all together. To unfreeze the screen and continue running
the current sequence, press Ctrl + Alt + Scroll Lock again.
Whilst the sequence is frozen, you may use the Previous (F1) and Next (F2) buttons to skip to the previous or next screen in the sequence.
Note that if the frozen screen contains a clock, sound or scroller, the element will
continue running while the screen is frozen.
87
Page 88

MultiScree
Print Screen
When the MultiScreen unit is networked with a companion computer that has a
printer available, it has the ability to send images of individual screens from sequences to that computer so that they can then be printed. Before you can use this
feature though you will need to complete the Adding Network Folders section
in this manual and then install and set-up a companion application (MCS_PrintScreen) on the network accessible computer.
Installation of the MCS_PrintScreen Application
[a] On your companion computer (that is connected via a network to your Mul-
tiScreen unit) insert the CD disc titled “Install CD – PrintScreen Installer”
into its CD drive. (This disc is located in a plastic pocket at the back of this
manual.) Double click on the My Computer icon on the desktop. When the
My Computer window appears, double click on the name of the CD (usually located on the D: Drive) to display its contents. Once the contents are
displayed, double click on the installation file called MCS_Print-
Screen_SetUp.exe. The following window will appear :-
[b] This is a setup program that will install the companion application onto
your computer. The default settings do not need to be altered so continue to
click on the “Next >” button until you reach this screen :-
88
Page 89

MultiScree
1. Screens
panel
3. Location
Folder
5. Screen
Printing
Options
2. Printer
6. Printer
Options
4. Screen
Name
Then click on the “Finish >” button.
[c] On the desktop of your computer a new icon will appear that looks similar
to this :-
Double-click on this icon & a window similar to the following will appear :-
[d] Next you will specify the folder where the screen images sent from your
MultiScreen unit will be located. Click on the folder icon, labelled above as
Location Folder (3). Navigate through the tree menu to the PrintScreen
folder created in the Adding Networks Folder section of this manual as
shown below.
89
Page 90

MultiScree
Paper
Orientation
[e] Select the PrintScreen folder then click on OK.
[f] The printer can be changed by clicking on the adjacent drop down arrow (2)
and selecting the desired printer.
Paper Orientation
[a] To change whether the screen will print on the paper in landscape or por-
trait orientation, then click on the Printer Options (6) button. By default, it
is set-up to print in landscape layout as this best suits the dimensions of the
screen.
[b] To change to Portrait view, click on the round button next to Portrait. It
should be noted that when the Portrait page orientation is selected, the image will be printed at full width exactly in the centre of the page, leaving
large blank areas both above and below the image.
[c] Click on OK.
90
Page 91

MultiScree
7. Destinations
8. Refresh
Using the PrintScreen feature
[a] On the MultiScreen unit enter the Sequence Editor and select the sequence
containing the screen that you want to print.
[b] Double left click on the thumbnail of the screen that you want to print to
load it into the Screen Editor. Click on the Preview button.
[c] On the keyboard there is a key labelled PrtSc (short for Print Screen).
Press this key and a window similar to the following will appear :-
[d] Click on the drop-down arrow (7) to view the available destinations to save
the screen. If there are no options available press the Refresh (8) button.
Select the NET: PrintScreens option as shown below.
[e] Click on Save. This has now sent a copy of the screen image via the net-
work across to the “PrintScreens” folder located on the companion computer.
[f] On the keyboard, press the Esc key twice to return you to the Sequence Edi-
tor.
[g] Then on the network accessible computer, open the MCS_PrintScreen ap-
plication by double clicking on its icon on the desktop. It should now look
similar to the following window :-
91
Page 92
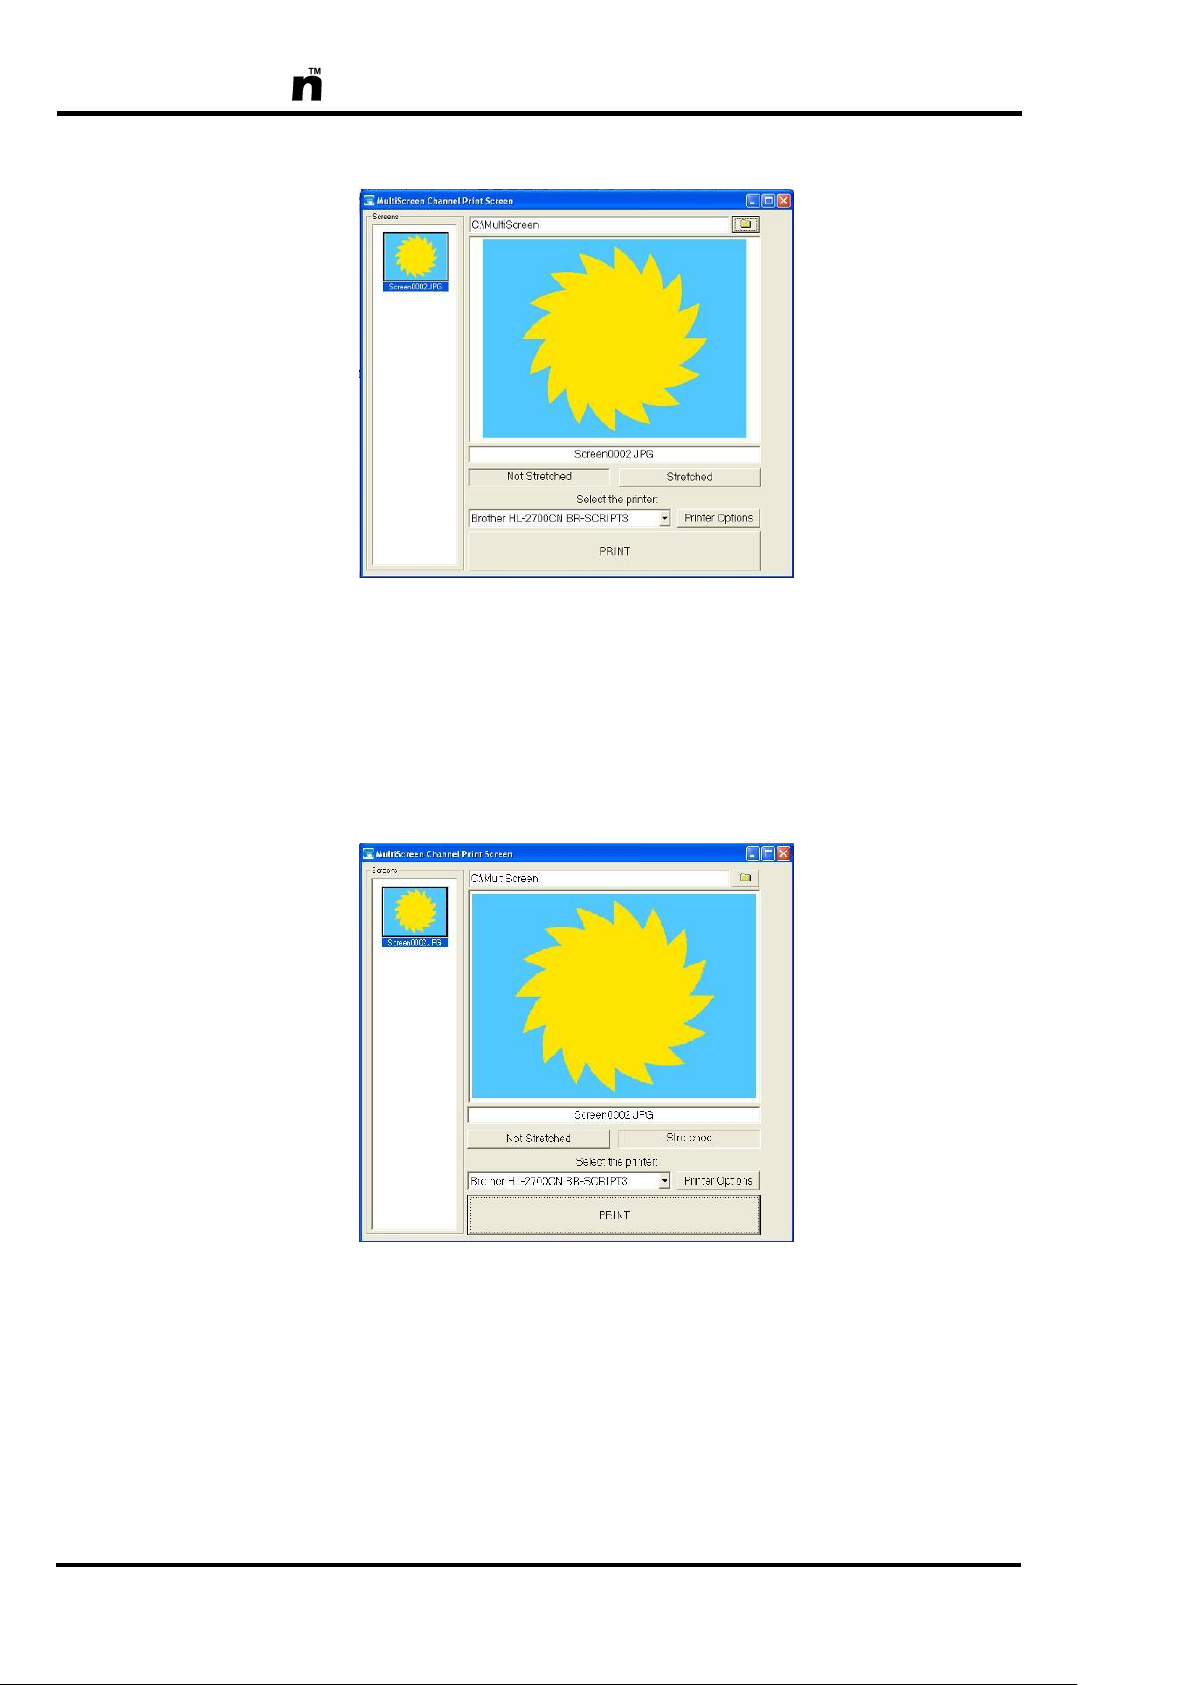
MultiScree
[h] The width to height proportions of the screen size are 4:3, which is not quite
as wide as a landscape A4 page. If the Not Stretched (5) option is selected,
as above, then there will be a thin white margin at the left & right sides of
the image when printed.
[i] To make the image fill an entire landscape A4 page, click on the Stretched
(5) button.
As this stretches the image so that it becomes slightly wider, there will be
some distortion which will be more noticeable on some screens than others.
[j] To print the screen, ensure that your printer is turned on and then click on
the Print button.
92
Page 93

MultiScree
Advanced Options
More advanced options can be used by right-clicking on images in the left Screens
panel (1).
Selecting a Screen
When there is more than one screen available in the Screens panel there are two
ways to select which screen you want to print.
[a] Left click on the desired image in the Screens panel.
OR
[a] Right click on the image.
[b] Left click on Select Image from the drop down menu.
Deleting a Screen
[a] Right click on the image in the Screens panel.
[b] Select Delete Image from the drop down menu.
Deleting All Screens
[a] Right click on any of the images in the Screens panel.
[b] Select Delete All Images from the drop down menu.
93
Page 94

MultiScree
Using the Sequence Scheduler
The MultiScreen TV Production Unit is capable of managing multiple
independent sequences of screens. Only one sequence can be active at
any time, within a schedule maintained by the Sequence Scheduler. If
no scheduled sequences are active, then the Master Sequence will be
displayed.
From the Sequence Editor, left click the button labelled Sched (pictured at left).
This will bring up a screen similar to the following :-
94
Each sequence in the scheduler has a priority; if two sequences are scheduled to
be displayed at the same time, the sequence with the highest priority will be displayed. The sequence at the top of the list has highest priority; number two has
second priority, and so on. To change the priority of a sequence, first select it by
clicking it. Then use the two arrow buttons on screen to move the sequence up or
down the list.
Page 95

MultiScree
There are three ranges that can be set up. The date range specifies a range of
dates during which the sequence will be displayed. For example, "Christmas Sequence" will only be displayed between the 1st of November and the 25th of December, 2010. Outside these times it will not be displayed. If the Date Range is
set to N/A, the sequence will display at all times of the year when it meets the
other conditions.
The daily time range can be used to display a sequence for a few hours of each
day. For example, "Midday Madness" will display between midday and 1 PM
every day. A single scheduling entry cannot be used to run a sequence overnight
(ie. beyond midnight), as the finishing time must be later than the starting time.
To run a sequence overnight, you would have to create two scheduling entries for
the sequence you wish to run, and run it from the starting time until 11:59:59PM,
then also run it from midnight until the finishing time the following day.
The weekday range (SMTWTFS) can be used to display the sequence on certain
days of the week. The sequence will display only on the days enabled in green.
For example, the sequence “Sunday Specials” will only display on Sundays. This
is indicated with a green S for Sunday, and red letters for the other days of the
week.
You can combine these conditions; for example, a sequence could be set to only
display between 6 PM and midnight every Tuesday & Thursday in July.
The Master Sequence
When the Production Unit is operating in Display Mode, the sequence assigned
as the Master Sequence is displayed when no other sequence is scheduled, or if
sequence scheduling is inactive. To set the Master Sequence, first open the Sequence Scheduler as described on the previous page.
Next, click the dropdown list labelled Master Sequence. Select the name of the
sequence you wish to use as the Master Sequence.
The Master Sequence should be considered the default sequence. That is, when
no other sequence is currently scheduled to appear, or if sequence scheduling is
not active, then the Master Sequence is the one that will be shown when Display
Mode is in operation.
95
Page 96

MultiScree
Scheduling a Sequence
[a] Invoke the Sequence Scheduler as described on page 94.
[b] Turn on sequence scheduling by clicking the box labelled Scheduling Ac-
tive ensuring it has a green tick. If this box is not checked (ie. if it is
marked with a red cross) then the Master Sequence will display all the time.
Next, from the drop-down list immediately below, select the name of the
sequence that you want to schedule.
[c] Set up the range of weekdays you want the sequence to display on by click-
ing the corresponding weekday initials. The sequence will only display on
days marked in green, and not on days shown in red. Holding Shift whilst
clicking on a weekday letter allows you to enable or disable all the weekdays. If you want it to display on all days of the week, leave all the boxes
marked green.
[d] If a time range is set up, the sequence will only display between the start
and end times set. This is very similar to setting up a time range for a
screen. To set a time range, use the following procedure :-
1) Click the time range checkbox. If you want the sequence to display at
all times of the day, leave this box with a red cross. If you want the
screen scheduled for a specific time, click the box so that it turns into
a green tick. The grey boxes will turn white, allowing the times to be
edited.
2) Click the number you wish to change. There are several ways to
change the number. You can type a new number on the keypad. You
can also increase or decrease the current number by 1 by pressing the
cursor up or down keys on the keyboard, or by clicking on the up and
down arrow icons at the right side of the entry box.
3) Continue changing numbers until the start time and finish time are set
as you want them. The sequence will only display between these
times.
[e] The bottom control can be used to set a range of dates. This is similar to set-
ting a time range. To change the date ranges, use the following procedure:
1) First click the checkbox next to the date so that it changes from a red
cross to a green tick. The grey boxes will turn white, allowing the
dates to be edited.
96
Page 97

MultiScree
2) Double click on the start date to bring up a calendar. The current date
is circled in red, and the currently selected date is highlighted in grey.
3) The month and year are shown at the top of the calendar. You can
click the small grey buttons to the left and right of the month and year
to cycle forward or backward one month.
4) To select a specific month, click the current month and select the
month you want from the drop down list.
5) To select a specific year, click the current year. Two buttons will ap-
pear to the left of the date. Click the top button to increase the year by
one, and the bottom button to decrease the year by one.
6) Finally, select the date from the list available by clicking on it.
7) Repeat these steps for the finishing date.
8) The sequence will only display between these dates. Ensure that the
end date is actually later than the start date.
[f] Click Add Entry to add the sequence to the schedule.
[g] Move the sequence entry up or down the list using the on-screen arrow but-
tons until it is at the correct priority position. Number 1 (at the top of the
list) is the entry with the highest priority.
[h] You can add another sequence to the schedule by repeating the above steps.
Otherwise, click Save to save the changes you have made and return to the
Sequence Editor.
97
Page 98

MultiScree
Using the DVD Scheduler
A MultiScreen TV Production Unit is able to play DVD video footage
interspersed with your standard sequences. Details on the types of acceptable DVD formats are on page 102, DVD Format. Note that
commercially available DVD titles are not suitable for use with the
system, due to copyright, legal & security issues.
Scheduling a DVD
Scheduling video titles from a DVD is similar to scheduling sequences to play
throughout the day.
[a] To start with, insert your DVD disc into the Production Unit‟s DVD-ROM
Drive. To access the DVD Scheduler, first open the Configuration Editor
then click on the DVD Scheduler button. A screen similar to the following
will be displayed :-
98
Page 99

MultiScree
[b] The number of titles on the disc, as well as the entire program length of the
disc, is displayed at the top of the screen. Whenever you insert a new DVD
disc into the drive, you must click on the Current DVD button to update
this information.
[c] Click the Title drop-down menu to select which video title from the DVD
that you want to schedule. If you want to play the entire DVD, select Entire
DVD.
[d] Click Preview to preview the title you have selected. The video will play
full screen, for a maximum of 30 seconds. Press Esc to stop the preview
early.
[e] You may set a title to play only once, or you may set it to play repeatedly
throughout the day. Either way, set the Start Time to the first time you
want the footage to appear.
[f] If you do not want to play the entire title, click the checkbox next to Play
Length, so that it turns into a green tick. Enter the amount of time you want
the title to play for.
[g] If you want the DVD title to repeat, click the checkbox marked Repeat
Every. You can then set the length between activations of the DVD. This is
the time between successive starts of the DVD title. Eg. If a 5 minute video
is set to play every 15 minutes, the title will start once every 15 minutes,
with a 10 minute gap in between.
[h] If you have set a repeat time, you must also set the time you want the title to
stop repeating. By default, this is set at 11:59:59 PM, in which case the title
will play until midnight.
[i] You can schedule the title to only play between a certain range of dates. To
do this, click the checkmark next to the Start Date or End Date to set the
date range. The title will not be played before the Start Date or after the End
Date. This is useful if, say, you only want to run a promotional title over
one week.
[j] When an End Date has been specified, the Auto Delete Entry option be-
comes available. If this option is ticked, then once the End Date has passed,
the schedule entry will automatically be deleted. This is useful to prevent
your schedule from clogging up. Note that this only deletes the entry from
the schedule, not the video itself.
99
Page 100

MultiScree
[k] The letters SMTWTFS are used to display the screen on certain days of the
week. Clicking a letter will toggle it from green to red and vice versa. A title will only display on a day that has a green letter.
[l] Holding down Shift whilst clicking any weekday‟s letter will select or dese-
lect all days. In this way, a title can be disabled. Whilst disabled, a title will
not display at all. This is useful if you want to deschedule an entry temporarily.
[m] Once the settings are correct, click on the Add Entry button. Note that the
new entry had been added to the bottom of the schedule.
[n] To modify any settings of an existing entry, left click on that entry in the
schedule, make the necessary changes to the settings as above, then click on
the Update Entry button.
[o] You can remove an entry you no longer need by left clicking on that entry
in the schedule, then clicking the Remove Entry button. This will remove
that selected entry from your schedule but will not delete the title from the
DVD.
[p] Click on the Clear button to clear the entire schedule. All entries will be
removed. You should use this if you change DVD discs and want to create a
schedule for the new disc.
[q] The up and down arrows are used to change the priority of each entry in the
schedule. The higher up in the list an entry is, the higher its priority. Click
the entry you want to move, then click up or down to move it up or down
the list. For example, if you have one title scheduled to play every fifteen
minutes, and one scheduled to play every twenty minutes, then they will
both be scheduled to play at the same time every hour. In the case of a clash
such as this, the title with higher priority will play.
[r] When you are satisfied with all the DVD scheduler settings, click on the
Save button to exit and keep all the new settings. Alternately you may click
on the Cancel button if you wish to exit without saving any changes.
100
 Loading...