

Page 1

OPERATION AND PARTS MANUAL
J-SERIES (CHINA)
WALK-BEHIND TROWEL
Revision #3 (07/07/10)
To find the latest revision of this
publication, visit our website at:
www.multiquip.com
THIS MANUAL MUST ACCOMPANY THE EQUIPMENT AT ALL TIMES.
P/N 20840
Page 2

HERE'S HOW TO GET HELP
PLEASE HAVE THE MODEL AND SERIAL NUMBER
ON-HAND WHEN CALLING
PARTS DEPARTMENT
800-427-1244 or 310-537-3700
FAX: 800-672-7877 or 310-637-3284
SERVICE DEPARTMENT/TECHNICAL ASSISTANCE
800-478-1244 or 310-537-3700
FAX: 310- 537-4259
WARRANTY DEPARTMENT
888-661-4279, or 310-661-4279
FAX: 310- 537-1173
MAIN
800-421-1244 or 310-537-3700
FAX: 310-537-3927
PAGE 2 — J-SERIES TROWEL — OPERATION AND PARTS MANUAL — REV. #3 (07/07/10)
Page 3

CONGRATULATIONS ON YOUR PURCHASE OF
YOUR POWER TROWEL!
Since inventing the power trowel over 50 years ago, Multiquip
has pioneered almost every innovation in trowel technology.
Each and every walk-behind trowel is designed-without
compromise-to produce the finest possible finishes.
J-Series Trowel
Here's How To Get Help .......................................... 2
Table Of Contents ................................................... 3
General Safety Guidelines ...................................... 4
Explanation Of Codes In Remarks Column ............ 5
Safety Information ................................................... 6
TABLE OF CONTENTS
INSTRUCTIONS
Fuel ......................................................................... 7
Instructions ......................................................... 8-14
Troubleshooting .................................................... 15
Operator Training .................................................. 16
Optional Equipment .............................................. 17
Technical Specifications ........................................ 18
Handle .............................................................. 20-21
Quick Pitch Handle ........................................... 22-23
Spider and Blades ............................................ 24-25
Gear Box and Engine Mounts .......................... 26-27
Engine .............................................................. 28-29
NOTE: Specification and part number
are subject to change without notice.
J-SERIES TROWEL — OPERATION AND PARTS MANUAL — REV. #3 (07/07/10) — PAGE 3
Page 4

GENERAL SAFETY GUIDELINES
Failure to follow instructions in this manual
may lead to serious injury or even death! This
equipment is to be used by qualified and
trained personnel only. This equipment should
not be operated by persons under 18 years of
age.
Always use proper heavy lifting techniques when moving
equipment.
Always make sure that machine is kept in proper operating
condition.
Always have throttle position at idle while starting engine.
Always check to make sure that operating area is clear
before starting engine.
Always test safety equipment including the safety engine
kill mechanisms before operating equipment.
Never place feet on or inside the guard ring while starting
the engine.
Never operate this equipment without proper protective
clothing including footwear.
Always keep clear of rotating parts when operating.
Never operate with belt guard or any other guards removed.
Never leave machine unattended while running.
Never refuel while engine is running or while engine is hot.
Always refuel in a well ventilated area, away from sparks
and open flames.
Never smoke while refueling.
Exhaust fumes are lethal! Operate machine in a well
ventilated area, away from places where fumes can
accumulate.
PAGE 4 — J-SERIES TROWEL — OPERATION AND PARTS MANUAL — REV. #3 (07/07/10)
Page 5

EXPLANATION OF CODE IN REMARK COLUMN
The following section explains the different symbols and
remarks used in the Parts section of this manual. Use the
help numbers found on the back page of the manual if there
are any questions.
NOTICE
The contents and part numbers listed in the parts
section are subject to change without notice. Multiquip
does not guarantee the availability of the parts listed.
SAMPLE PARTS LIST
NO. PART NO. PART NAME QTY. REMARKS
1 12345 BOLT ......................1 .....INCLUDES ITEMS W/%
2% WASHER, 1/4 IN. ...........NOT SOLD SEPARATELY
2% 12347 WASHER, 3/8 IN. ...1 .....MQ-45T ONLY
3 12348 HOSE ..................A/R ...MAKE LOCALLY
4 12349 BEARING ..............1 .....S/N 2345B AND ABOVE
NO. Column
Unique Symbols — All items with same unique
symbol
QTY. Column
Numbers Used — Item quantity can be indicated by a
number, a blank entry, or A/R.
A/R (As Required) is generally used for hoses or other
parts that are sold in bulk and cut to length.
A blank entry generally indicates that the item is not sold
separately. Other entries will be clarified in the “Remarks”
Column.
REMARKS Column
Some of the most common notes found in the “Remarks”
Column are listed below. Other additional notes needed
to describe the item can also be shown.
Assembly/Kit — All items on the parts list with the
same unique symbol will be included when this item is
purchased.
Indicated by:
“INCLUDES ITEMS W/(unique symbol)”
(@, #, +, %, or >) in the number column belong to the
same assembly or kit, which is indicated by a note in the
“Remarks” column.
Duplicate Item Numbers — Duplicate numbers indicate
multiple part numbers, which are in effect for the same
general item, such as different size saw blade guards in
use or a part that has been updated on newer versions
of the same machine.
NOTICE
When ordering a part that has more than one item
number listed, check the remarks column for help in
determining the proper part to order.
PART NO. Column
Numbers Used — Part numbers can be indicated by a
number, a blank entry, or TBD.
TBD (To Be Determined) is generally used to show a
part that has not been assigned a formal part number
at the time of publication.
A blank entry generally indicates that the item is not sold
separately or is not sold by Multiquip. Other entries will
be clarified in the “Remarks” Column.
Serial Number Break — Used to list an effective serial
number range where a particular part is used.
Indicated by:
“S/N XXXXX AND BELOW”
“S/N XXXX AND ABOVE”
“S/N XXXX TO S/N XXX”
Specific Model Number Use — Indicates that the part
is used only with the specific model number or model
number variant listed. It can also be used to show a
part is NOT used on a specific model or model number
variant.
Indicated by:
“XXXXX ONLY”
“NOT USED ON XXXX”
“Make/Obtain Locally” — Indicates that the part can
be purchased at any hardware shop or made out of
available items. Examples include battery cables, shims,
and certain washers and nuts.
“Not Sold Separately” — Indicates that an item cannot
be purchased as a separate item and is either part of an
assembly/kit that can be purchased, or is not available
for sale through Multiquip.
J-SERIES TROWEL — OPERATION AND PARTS MANUAL — REV. #3 (07/07/10) — PAGE 5
Page 6

SAFETY INFORMATION
RECOGNIZE SAFETY INFORMATION,
SYMBOLS AND TERMINOLOGY
This is the caution symbol. Wherever you see
this symbol in this manual or on the machine
be aware that there is potential for personal
injury or damage to equipment. Always follow
instructions for safe operation and use.
This is the symbol for gear drive.
This is the symbol for belt drive.
This is the symbol for lubrication.
FOLLOW ALL SAFETY INSTRUCTIONS
Note: If there are ANY questions regarding this manual (i.e.
something is unclear) please contact Multiquip for clarifications.
Read ALL safety instructions carefully. Safety instructions will be
found throughout this manual and on the machine. Keep all
safety information in good, readable condition. If needed,
replacement safety information is available. Contact the nearest
Multiquip distributor for replacement items and parts.
Proper machine operation includes training for operators.
Operators should be versed on machine safety and operation.
Never allow a person who is not properly trained to operate this
equipment.
Keep this machine in proper working condition. This includes
keeping all safety decals on the machine clean and visible. If
decals become unreadable, please call nearest Multiquip dealer
for replacements.
Do not modify this machine. Doing so may cause improper
operation and may not be safe. This may also reduce machine
life. Modifying this machine in any way will void the warranty.
OPERATE MACHINE SAFELY
Always be aware of the operational area of your machine.
This is the symbol for radiating heat. Know
that where you see this symbol on the machine
parts may be hot.
This is the symbol for examine or check. Know
that where you see this symbol on the machine
there will be something that may need to be
checked for maintenance.
This is the symbol for lift point. Know that this
symbol on the machine will point out possible
lifting points.
This is the symbol for continuous rotation.
The direction, clockwise or counter clockwise
will be indicated by this symbol.
Operators need to be careful to keep bystanders and nearby
objects at a safe distance from the machine. Never let someone
who is untrained operate this machine.
Study the operational area carefully. Remove all dangerous
objects from the finishing area. (i.e. protruding rebar or wood). Do
not attempt to use the machine where operation appears to be
dangerous.
Keep the machine properly maintained and in good working
order. This mainly entails keeping the machine clean and serviced.
This will allow the finisher to perform to it’s fullest potential and
provide the longest operational lifetime. Check the safety kill
switch before and after every operation. It is good practice to stop
the machine with the safety kill switch, to ensure it is operating
properly.
Always try to do most work during daylight hours or with sufficient
artificial lighting. Visibility must be good for this machine to be
used effectively.
Never operate machinery when tired or ill. Operators must be
alert and always looking for possible signs of danger or misuse
of machinery. Do not operate the machine in dangerous
surroundings.
PAGE 6 — J-SERIES TROWEL — OPERATION AND PARTS MANUAL — REV. #3 (07/07/10)
Page 7

FUEL
FUEL
Handle fuel safely. Motor fuels are highly flammable and can be
dangerous if mishandled. Do not smoke while refueling. Do not
refuel if the engine is hot or running.
Always shut off fuel flow with the fuel line valve after every
machine use. Never store the machine with fuel in the tank for any
extended period of time.
Clean up spilled fuel immediately!
Dispose of potentially hazardous waste properly. Examples of
potentially hazardous waste are: motor oil, fuel and filters. Use
rigid containers for trapping these items. Do not use old food or
beverage containers, someone may be mislead. Do not pour
waste oil or fuel directly onto the ground, down a drain or into any
water source.
Inquire what the proper disposal procedures are for waste fuel
and oil in your local area.
MACHINE SAFETY DECALS
PERSONAL PROTECTIVE EQUIPMENT
Always wear proper clothing while operating this equipment.
Protective clothing includes (but is not limited to): boots, long
sleeve shirt, long pants, gloves, hearing protection and safety
eyeglasses. Consult with the construction site foreman to
determine what protective clothing is required on the construction
site.
HAZARDOUS MATERIALS
Exposure and mishandling of hazardous material can cause
personal injury or damage the environment. Potentially hazardous
material used on this machine may include the following:
lubricants, fuel, paints and adhesives.
Take care to handle hazardous materials properly. MSDS
information sheets are available upon request.
Gear Drive — Located on the gearbox.
Belt Drive — Located on the belt guard.
Lubrication — Located near the fill hole for
gearbox lubricant.
BE PREPARED FOR EMERGENCIES
Always know the location of the nearest fire extinguisher and first
aid kit. Know the location of the nearest telephone. Also know the
phone numbers of the nearest ambulance, doctor and fire
department. This information will be invaluable in an emergency.
MAINTENANCE SAFETY
Caution! Disconnect spark plug wires before
attempting service.
Before attempting maintenance on this
machinery, know the procedure and have the
correct tools. Always make sure that the machine is stopped and
the spark plug wires are disconnected before attempting service.
Securely support any machine components that must be raised
for service (i.e. trowel arms). Never lubricate the machine or
attempt service on a running machine. Always allow the machine
proper time to cool before servicing.
Keep machinery in proper running condition. Make sure that
there is no buildup of concrete, grease, oil or debris. Keep all
parts properly installed. Fix damage immediately and always
replace worn or broken parts.
Hot! — Located on the muffler shield.
Check — Located near the oil level check for
the gearbox.
Lifting point — Located on the lift bale.
J-SERIES TROWEL — OPERATION AND PARTS MANUAL — REV. #3 (07/07/10) — PAGE 7
Page 8
J-SERIES TROWEL — INSTRUCTIONS
Putting Into Service
Before packing and shipping, this Power Trowel was run and
tested at the factory. If there are any problems, please let us know.
Fill out and send the warranty-registration card supplied with the
machine. All warranties are void unless this card is on file with
us.
Before putting your new finisher into service, read all manuals
and instructions carefully. Improper setup, use or maintenance
of your equipment could result in personal injury or damage to
equipment.
The purpose of this section of the manual is to explain the
intended setup, use and maintenance of this equipment.
Assembly
Note: READ THESE INSTRUCTIONS CAREFULLY BEFORE
ATTEMPTING TO ASSEMBLE ANY COMPONENTS.
HANDLE ASSEMBLY — QUICK PITCH™
The QUICK PITCH handle is spring loaded, personal injury or
damage could result from improper handling or installation.
Attach the handle tube as shown (Step 1). Bolts are to be inserted
from the bottom side of the handle. Note that the bolt on the engine
side must have a washer between the gearbox and the nut. The
Remove one brass nut from the cable end. Thread the second
brass nut towards the cable as far as possible (Step 3). Insert the
cable end into the yoke as shown. Replace the brass set nut on
the cable end. Tighten the set nut by hand as far as possible to
remove slack from the cable (Step 4). Using a wrench, tighten the
locking nut on the other side of the boss to lock the cable in place
(Step 5).
STEP 2STEP 2
STEP 2
STEP 2STEP 2
second bolt carries the auxiliary lift handle bracket in the place
of a washer.
After the handle is connected to the trowel, grasp the QUICK
PITCH control from operator’s position. Pull the adjustment
trigger on the QUICK PITCH handle and push the entire handle
towards the engine as far as possible (Step 2). This will compress
the spring inside the handle. Considerable force may be required
to do this! Release the trigger to lock the spring in this compressed
position.
PAGE 8 — J-SERIES TROWEL — OPERATION AND PARTS MANUAL — REV. #3 (07/07/10)
STEP 1STEP 1
STEP 1
STEP 1STEP 1
STEP 3STEP 3
STEP 3
STEP 3STEP 3
STEP 4STEP 4
STEP 4
STEP 4STEP 4
Page 9

STEP 5STEP 5
STEP 5
STEP 5STEP 5
J-SERIES TROWEL — INSTRUCTIONS
Preload adjustment for QUICK PITCH
After the handle is installed on the machine, spring preload
adjustment will be required. Locate the adjustment screw on the
underside of the handle. A decal has been placed there to assist
in the adjustment. Turn the screw to adjust until it lines up with the
arrow on the decal matching your setup. Test pitch control operation.
Adjust if necessary.
If you want to be able to increase the blade pitch using less arm
force, adjust the block away from the gearbox. Be aware, this will
also require more force to decrease the blade pitch. If you want
to be able to decrease the blade pitch using less arm force, adjust
the block toward the gearbox.
HANDLE ASSEMBLY — STANDARD HANDLE
Turn the pitch adjustment knob (located on the operator end of the
handle) counter-clockwise until resistance is felt.
Attach the handle tube to gearbox as shown in the QUICK PITCH
handle installation. Bolts are to be inserted from the bottom side
of the handle. Note that the bolt on the engine side must have a
washer between the gearbox and the nut. The second bolt carries
the auxiliary lift handle bracket in the place of a washer.
Remove one brass nut from the cable end. Thread the second
brass nut towards the cable as far as possible. Insert the cable end
into yoke as shown in the QUICK PITCH installation. Replace the
brass set nut on the cable end. Tighten the set nut by finger as far
as possible to remove slack from the cable. Using a wrench,
tighten the locking nut on the other side of the boss to lock the cable
in place.
SAFETY KILL WIRE
Locate the red wire protruding from the handle tube and connect
it to the red wire tail on the engine. Test to insure proper operation!
HANDLE HEIGHT ADJUSTMENT
If handle height adjustment is desired, a handle wedge kit can be
purchased for your machine by ordering Part Number 2576 from
your Multiquip dealer. These wedges are placed between the
handle and the gearbox to adjust the operating height of the
handle. This kit comes complete with wedges, new bolts and
installation instructions. This will move your operating handle
position up or down approximately 3” (76mm).
THROTTLE CABLE INSTALLATION
Note: A red wire piece has been placed on the engine
throttle assembly to show where the throttle cable from
your handle should be placed.
J-SERIES TROWEL — OPERATION AND PARTS MANUAL — REV. #3 (07/07/10) — PAGE 9
Page 10

J-SERIES TROWEL — INSTRUCTIONS
General Instructions
Set the throttle lever to the idle position by pushing it away from
the operator’s position towards the engine (counter clockwise
from the top- Step 1). Loosen the screw that crimps the throttle
cable to allow free movement of throttle cable (Step 2).
Connect the throttle cable to the engine. Keep in mind there
should be a piece of wire installed on the machine to show you
where to route the throttle cable. When connecting the cable
housing, make sure that no more than 1/4" (6.4mm) of the cable
STEP 1STEP 1
STEP 1
STEP 1STEP 1
housing protrudes past the housing clamp on the engine (Step 4).
After the cable has been installed on the engine, tighten the clamp
on the throttle control, operator position of the handle to lock the
throttle cable at the proper length.
These are general instructions. Installation of the throttle cable
may vary for different engine configurations. Please look for more
detailed instructions inside the box containing the handle. These
more detailed instructions should provide adequate guidance for
installing.
STEP 4STEP 4
STEP 4
STEP 4STEP 4
STEP 3STEP 3
STEP 3
STEP 3STEP 3
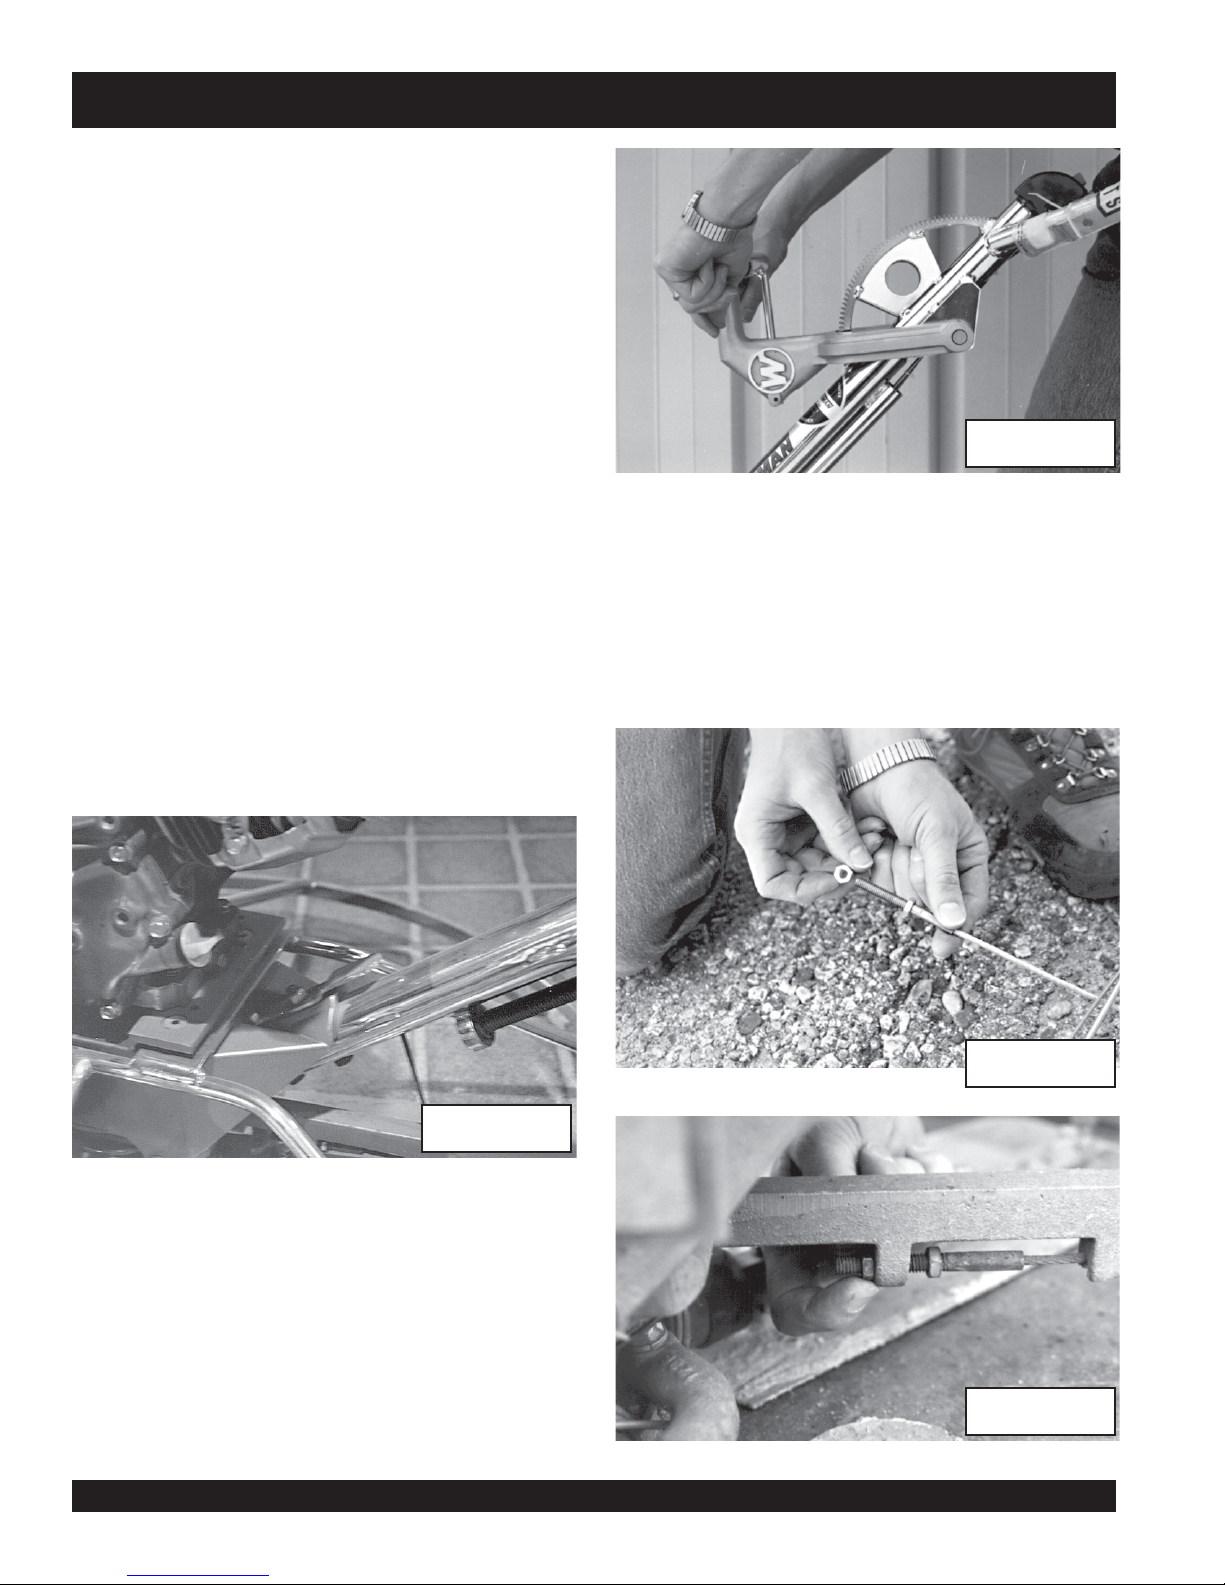
On Robin engines, the hook on the engine end of the throttle wire
must be removed. Make the cut as shown (Step 3). The rest of the
engine will not require this modification to the throttle cable.
PAGE 10 — J-SERIES TROWEL — OPERATION AND PARTS MANUAL — REV. #3 (07/07/10)
STEP 2STEP 2
STEP 2
STEP 2STEP 2
Page 11

J-SERIES TROWEL — INSTRUCTIONS
Handling
Machine is heavy and awkward to move around.
Use proper heavy lifting procedures and DO
NOT LIFT THE MACHINE BY GUARD RINGS.
Moving the Machine
Auxiliary Lifting Tube
Remove the auxiliary lifting tube located on top of the main handle.
Insert the tube into the socket located on the opposite side of the
gearbox from the handle. Make sure that the hole in the tube
engages with the pin in the socket. With one person lifting from the
main handle, and another lifting from the auxiliary lifting tube pick
up the machine to move it, as shown in the following diagram.
Machine Operations
CONTROLS
Safety Kill Switches
Your Whiteman finisher has been equipped with a safety kill
switch or a hand operated clutch. Safety kill switches should be
tested every time the engine is started.
Note: NEVER disable or disconnect the kill switch. It is provided
for operator safety. Injury may result if it is disable, disconnected
or improperly maintained.
Centrifugal Type
This is a red switch located on the main handle tube. The switching
mechanism should operate freely and should be kept in this
condition. With the switch in the OFF position, the engine should
not start or run. The purpose of this switch is to stop the engine in
a runaway situation, (i.e.-the operator releasing the handle during
operation).
Caution! The machine must be stabilized by the
person carrying the operator’s handle. If it is not
stabilized properly by this person it will rotate
upside down.
Lift Bale
The lift bale is optional on new machines. It provides an optimal
lift point for moving the finisher. Lift bales can be used to lift a
machine up onto a building with a crane. They can also be used
to lift a machine up onto a slab with a forklift machine. Using a crane
to move a machine with a lift bale is highly recommended, and is
perfectly safe for the machine. Extra care should be taken when
lifting the machine off the ground, though. Serious damage to the
machine or personal injury could be caused by dropping a
finisher. See “Optional Equipment” in this manual for ordering
information.
Hand Clutch
Some finisher models are equipped with a hand operated clutch.
These units are not equipped with a safety kill switch since the unit
automatically stops rotating when the clutch lever is released.
Clutch operation should be tested each time the machine is
started.
Do not let the machine sit unused with the engine at high speed
for an extended period of time. It will cause premature belt wear
or may destroy the belt. Always set the engine speed to idle when
the hand clutch is disengaged.
J-SERIES TROWEL — OPERATION AND PARTS MANUAL — REV. #3 (07/07/10) — PAGE 11
Page 12

J-SERIES TROWEL — INSTRUCTIONS
Blade Pitch — Standard Handle
The pitch control on machines equipped with the standard handle
is a big star-wheel knob located at the operator end of the main
handle tube. Pitch is controlled by turning the knob. Clockwise for
increased blade pitch, counter-clockwise for decreased blade
pitch.
Blade Pitch — QUICK PITCH™ handle
Pitch is controlled on machines with this option by a T-shaped
lever located on the top of the main handle tube. To change the
blade pitch, pull the locking control up to the T-handle. Pulling the
handle towards the operator will increase blade pitch. Pushing
the handle away from the operator will decrease the blade pitch.
See page 8 for adjustment.
Electric Control Switch (electric motors only)
Located on the control handle, this switch transfers power to the
electric motor when grasped.
Electric On-Off Switch (electric motors only)
Located on the handle, it is the main power control switch.
Engine Operation
Gearbox Oil Level
on the gearbox, there are two of them. Removal of the bottom-most
plug (DRAIN PLUG) will drain the oil. The level should be up to
the bottom of the fill plug hole, located approximately half way up
the side of the gear box. If needed, refill with specifically formulated
Whiteman gearbox lubricant (P>N> 10139) or ISO 680 oil.
Operation
The following steps are intended as a basic guide to machine
operation, and are not to be considered a complete guide to
concrete finishing. We suggest that all operators (experienced
and novice) read “Slabs on Grade” published by the American
Concrete Institute, Detroit, Michigan. Read the “Training” section
of this manual for more information.
1. Check oil levels in the engine and gearbox.
Check the oil level before starting the engine.
Because of the number of engine options, please
refer to engine owner’s manual for specific
instructions regarding engine operation.
Check the gearbox oil level daily.
Check the gearbox oil level by removing the plug
located on the side of the gearbox. It will be
clearly marked by the “check” decal (see Machine
Decals section). Take care when removing plugs
PAGE 12 — J-SERIES TROWEL — OPERATION AND PARTS MANUAL — REV. #3 (07/07/10)
2. Check to make sure that the fuel control valve is on and fuel
is in the tank.
3. Set safety kill switch (if equipped with centrifugal type clutch)
to ON position.
4. Set throttle to idle position.
Page 13

J-SERIES TROWEL — INSTRUCTIONS
NEVER start the engine with the throttle
above the idle position.
5. Grasp the control handle with left hand. Pull
slowly on starter rope until resistance is felt, then
pull briskly to start the engine. If the engine fails
to start after several tries, consult the engine owner’s manual.
6. After the engine starts, let it warm up by idling for a few minutes.
7. Test the safety kill switch. If you have the centrifugal type clutch,
try momentarily switching the kill switch to the OFF position. If your
safety kill switch is working properly, the engine on your finisher
should stop.
8. Get into the operator’s position behind the handle. With a secure
foothold and a firm grasp on the handles slowly increase the
engine speed until the desired blades speed is obtained. If your
finisher has a hand clutch, set your engine speed with the throttle,
then pull on the hand clutch lever to start the blades. Adjust the
blade speed after the hand clutch is fully engaged.
9. To maneuver the machine, gently lift up on or press down on the
main trowel handle. To move the machine to the operator’s left-lift
up on the handle, to move machine to the right-push down on the
handle.
10. The best method for finishing concrete is to slowly walk
backwards with the machine, guiding the machine from side to
side as you do so. See the diagram in the “Whiteman Suggested
Training Checklist” at the end of this manual.
Always look behind you to avoid hazards
before moving backwards.
Cleanup
NEVER allow concrete to harden on the power trowel.
Immediately after use, wash any concrete off your trowel with
water. Be careful not to spray water on the engine. An old
paintbrush or broom may help loosen any concrete that has
started to harden.
Coat the blades and blade arms with diesel fuel after cleaning.
This should help prevent rusting and allow for easier cleanup in
the future.
Maintenance (Service, Adjustment and Repair)
Note: See the engine manual supplied with your machine
for appropriate engine maintenance schedule.
There is a “Daily Preoperation Check List” at the end of this
manual . Please feel free to make copies of it and use it on a daily
basis.
Maintenance Schedule
Daily (8-10 Hours)
Check the fluid levels in the engine and gearbox.
Weekly (50-60 Hours)
Relube arms, thrust collar and clutch.
Replace the blades if necessary.
Check and clean or replace the engine air filter as necessary.
Monthly (200-300 Hours)
Remove, clean, reinstall and relube the arms, thrust collar and
clutch.
Adjust the blade arms.
Yearly (2000-2500 Hours)
Check and replace if necessary the arm bushings, thrust collar
bushings, shaft seals and belts.
Check pitch control cable for wear.
SERVICE PROCEDURES
Checking Belt Tension
The first indication of belt wear is a reduced blade speed despite
the engine running at full speed. Inspect belts often for signs of
damage or excessive wear.
There is no method for manual adjustment of belt tension.
Excessively worn belts must be replaced.
Blade Pitch Adjustment Procedure
The maintenance adjustment of blade pitch is an adjustment that
is made by a bolt on the arm of the trowel blade finger. This bolt
is the contact point of the trowel arm to the lower wear plate on the
spider. The goal of adjustment is to promote consistent blade
pitch.
There are some things to look for when checking to see if
adjustment is necessary. Is the machine wearing out blades
unevenly (i.e. one blade is completely worn out while the others
look new)? Does the machine have a perceptible rolling motion?
Look at the machine while it is running, do the guard rings “rock
up and down” relative to the ground? These are some indications
that the blade pitch needs to be adjusted.
J-SERIES TROWEL — OPERATION AND PARTS MANUAL — REV. #3 (07/07/10) — PAGE 13
Page 14

J-SERIES TROWEL — INSTRUCTIONS
The easiest way to make this adjustment is to use the Trowel Arm
Adjustment Fixture, Part Number 1817 (pictured below) that is
manufactured by Whiteman. This fixture will allow consistent
adjustment of the trowel arm fingers. It comes with all the hardware
necessary to properly accomplish this maintenance and
instructions on how to properly utilize this tool. Adjusting the trowel
arm fingers without a fixture requires a special talent.
If a trowel arm adjustment fixture is not available and immediate
adjustment is necessary , we suggest the following procedure. If
you can see or feel which blade is pulling harder, adjust the bolt
that corresponds to that blade. Another way to determine which
blades need adjusting is to place the machine on a flat surface and
pitch the blades as flat as possible. Now, look at the adjustment
bolts. They should all barely make contact with the lower wear
plate on the spider. If you can see that one os them is not making
contact, some adjustment will be necessary.
It is possible to either adjust the “high” bolts down to the level of
the one that is not touching, or adjust the “low” bolt up to the level
of the higher ones. Verify that after adjustment, the blades will pitch
correctly. Often times, if the blades are incorrectly adjusted, they
will not be able to pitch flat. This is due to the adjusting bolts being
raised too high. Conversely, some times the adjusting bolts are too
low and the blades cannot be pitched enough.
Changing a Blade
Whiteman recommends that all the blades be changed at the
same time. The machine may wobble or bounce if only some of
the blades are changed at one time.
1. Place the machine on a flat, level surface. Adjust the blade pitch
control to make the blades as flat as possible. Note the blade
orientation on the trowel arm.
2. Remove the bolts and lock washers on the trowel arm, then
remove the blade.
3. Scrape all concrete particles from the trowel arm.
4. Install the new blade, maintaining the proper orientation for
direction of rotation.
5. Affix the bolts and lock washers.
6. Repeat steps 2-6 for all of the remaining blades.
Hand Clutch Adjustment
Some Whiteman finishers are equipped with a hand-operated
clutch instead of an automatic centrifugal clutch. Two types of
hand clutches have been installed. Both are belt-tightener type
clutches. They operate by removing slack in the V-belt which then
transmits power from the engine to the gearbox.
There are two reasons to adjust the hand clutch: 1) operator
comfort; 2) initial belt stretch and break-in.
The easiest and most simple adjustment is to adjust the clutch
cable housing using the adjusting nut located on the clutch lever.
Rotating the nut provides either more or less (depending upon the
direction of rotation) clutch engagement.
about 1/4 to 1/3 of full speed. Grip the trowel handle firmly and
carefully engage the clutch by squeezing the clutch lever toward
the handle with your left hand. After the trowel is stabilized and you
feel comfortable with its operation, use your right hand to adjust
the housing adjustment nut. Rotating the nut so that it backs out
of the lever housing increases the engagement and also the
squeezing force required to keep it engaged. Too much squeezing
force may cause premature hand fatigue. Too little squeezing
force may cause belt slippage and premature belt wear. Each
operator should experiment with the adjustment to get the optimum
combination of squeeze force and belt grip.
After initial break-in (approximately 8 hours) the above procedure
should be repeated to attain optimum operator comfort and belt
wear.
After considerable belt wear, the adjustments mentioned above
may have a little or no effect on clutch engagement. If this is the
case, the belt should be replaced.
Always check to verify that the clutch will
properly disengage!
For operator comfort: start the trowel following
the instruction given earlier in this manual. Move
the throttle lever so that the engine is running
PAGE 14 — J-SERIES TROWEL — OPERATION AND PARTS MANUAL — REV. #3 (07/07/10)
Page 15

J-SERIES TROWEL — TROUBLESHOOTING
TROUBLESHOOTING
SYMPTOM POSSIBLE PROBLEM SOLUTION
Engine running rough or not at all.
Kill switch off or malfunctioning? Make sure that the kill switch is on or replace switch if necessary.
Other problems? Consult engine manufacture’s manual.
Safety kill switch not functioning.
Loose wire connections? Check wiring. Replace switch if necessary.
Bad contacts? Replace switch.
Clutch slipping or sluggish response to engine speed change.
Worn belts? Replace.
Dirty centrifugal clutch? Disassemble and clean the clutch.
Worn out centrifugal clutch? Replace entire clutch.
Hand clutch out of adjustment? Adjust as per instructions in Maintenance section.
Worn hand clutch parts? Replace parts as necessary.
Worn bearings in gearbox? Rotate input shaft by hand. If it rotates with difficulty check the input and output shaft bearings. Replace
if necessary.
Worn or broken gears in gearbox? Check in particular to verify that the gearbox output shaft rotates when the input shaft is rotated.
Replace both worm and worm gear as a set.
If trowel “bounces, rolls concrete, or makes uneven swirls in concrete”.
Blades? Make certain blades are in good condition, not excessively worn. Finish blades should measure no less than 2" (50 mm) from
the blade bar to the trailing edge, combo blades should measure no less than 3-1/2" (89mm). Trailing edge of blade should be straight
and parallel to the blade bar.
Spider? Check that all blades are set at the same pitch angle as measured at the spider. A field adjustment tool is available for height
adjustment of the trowel arms (see Optional Equipment section).
Bent trowel arms? Check the spider assembly for bent trowel arms. If one of the arms is even slightly bent, replace immediately.
Trowel arm bushings? Check the trowel arm bushing for tightness. This can be done by moving the trowel arms up and down. If there
is more than 1/8" (3.2mm) of travel at the tip of the arm, the bushings should be replaced. All bushings should be replaced at the same
time.
Thrust collar? Check the flatness of the thrust collar by rotating it on the spider. If it varies by more than 0.02" (0.5mm) replace the thrust
collar.
Thrust collar bushings? Check the thrust collar by rocking it on the spider. If it tilts more than 1/16" (1.6mm) (as measured at the thrust
collar O.D.), the bushing in the thrust collar should be replaced.
Thrust bearing worn? Check the thrust bearing to see that it is spinning free and has not worn into the thrust cap. Replace if necessary.
Machine has a perceptible rolling motion while running.
Main shaft? The main output shaft of the gearbox assembly should be checked for straightness. The main shaft must run straight and
cannot be more than 0.003" (0.08mm) out of round at the spider attachment point.
Blade pitch? Check blades for consistent pitch. Adjust per Maintenance section instructions if necessary.
J-SERIES TROWEL — OPERATION AND PARTS MANUAL — REV. #3 (07/07/10) — PAGE 15
Page 16

J-SERIES TROWEL — OPERATOR TRAINING
Operator Training
SUGGESTED TRAINING
Note: ONLY QUALIFIED AND EXPERIENCED PERSONNEL
SHOULD OPERATE THIS EQUIPMENT
Before taking your new equipment to the job site for it’s first
use, there are a few things that should be considered before
operation.
Handling
Know how to transport your trowel properly. Keep in mind that
you will need to place your trowel on a slab of concrete in the
middle of construction area. How will you accomplish this? Do
you need any special equipment for lifting or transport? These
are questions that you should be able to answer.
Operation
Perhaps it would be wise to familiarize yourself with machine
operation before placing your machine on a slab. It would of use
to understand how your trowel will behave and how it is
controlled. The best way to do this is to test run your machine.
To test run your machine, place it on a flat piece of existing
finished concrete. Before starting the machine, make sure that
the area around the machine is clear of any obstructions and
people. Test running your machine will give a good idea as to
how the machine will operate under normal conditions. Keep in
mind that running a machine on dry concrete could wear your
blades at an accelerated rate.
Training Checklist
For proper operator training please use the attached sheet
OPERATOR TRAINING CHECKLIST. It is located at the end of
this manual. This sheet will list some of the minimums for basic
operation of the machine. Please feel free to detach it and
make copies. This sheet is a checklist by which an experienced
operator can provide training to a new operator. This sheet
should help to familiarize the new operator with the machine.
It covers basic machine controls and use, but it is not to be
considered a complete training exercise. Nor is it to be
considered a complete guide to concrete finishing.
PAGE 16 — J-SERIES TROWEL — OPERATION AND PARTS MANUAL — REV. #3 (07/07/10)
Page 17

J-SERIES TROWEL — OPTIONAL EQUIPMENT
BLADES
Note: BLADES SHOULD BE CHANGED WHEN THEY FAIL TO
FINISH CONCRETE IN A SATISFACTORY MANNER.
Blades are a vital part of finishing concrete. This Whiteman
finisher has been designed to finish concrete with Whiteman and
are built to stringent quality standards out of the finest trowel steel.
If you need replacement blades, consult your parts list in this
manual for part numbers and order them from your Multiquip parts
dealer or importer.
Combo Blades
This trowel was equipped with combination FLOAT/FINISH
blades as original equipment. These blades have been designed
for optimum performance in both the floating and finishing
operations. These blades are versatile and should take care of
most troweling needs.
Finish Blades
These blades have been specifically designed for finish operations
with this trowel. They will provide a premium surface finishing
capability from your trowel. They should only be used after the
concrete has set to the point where the machine does not sink into
the concrete when placed on it .
Clip-On Float Blades
These blades will clip on to an existing installed blade, allowing
your finisher to float on “wet” concrete so that the troweling
operation can begin as early as possible. They are easily
removable, so that after the floating operation, when the concrete
is sufficiently cured, they can be removed to expose the finish
blades for continued troweling.
Float Discs
These round discs attach to the spiders and allow the machine
to “float” on “wet” concrete. The disc design allows early floating
and easy movement from wet to dry areas. They are also quite
effective in embedding large aggregates and surface hardeners.
FIELD TROWEL ARM ADJUSTMENT TOOL
If blades show uneven wear patterns or some tend to wear out
faster than others, the trowel arms may need to be adjusted.
Whiteman makes a special tool that will adjust all of the trowel
arms consistently, Part Number 1817-Trowel Arm Fixture.
Shown here is the adjustment fixture with an arm. As each arm is
locked into the fixture, the arm bolt is adjusted to where it contacts
a stop on the fixture. This will consistently adjust all of the trowel
arms, keeping the finisher as flat and evenly pitched as possible.
See Blade Pitch Adjustment Procedure in the Maintenance
section of this manual for more information.
LIFT BALE
There is a heavy duty, center balance type lifting bale made
specifically for your trowel. These bales are ideal for lifting and
transporting your trowel. They are designed to lift the finisher and
balance it on it’s center of gravity, providing great stability while
lifting.
GRINDING ATTACHMENTS
Available grinding attachments are used for grinding surface
imperfections or joints. These attachments allow greater utilization
of your trowel.
J-SERIES TROWEL — OPERATION AND PARTS MANUAL — REV. #3 (07/07/10) — PAGE 17
Page 18

J-SERIES TROWEL — TECHNICAL SPECIFICATIONS
TECHNICAL SPECIFICATIONS
MODEL J B
A 36.7 in. 931.6mm 34.5 in. 876.2mm
B 41.4 in. 1044.2mm 41.1 in. 1044.2mm
C 36.5 in. 927.1mm 46 1168.4mm
D 70.5 in. 1789.4mm 75.2 in. 1910.1mm
Weight 150 lb. 330 Kg 240 lb. 528 Kg
Sound Pressure* 94 dB 94 dB 97 dB 97 dB
Vibration** 2.0g 19.6m/s2 2.5g 24.5 m/s2
Blade Speed (max.) 129 rpm @ 4000 129 rpm @ 4000 129 rpm
@ 4000 129 pm @ 4000
engine rpm engine rpm engine rpm engine rpm
Blade Tip Speed (max.) 1182pm 6.0 m/s 1478 fpm 7.5m/s
*Sound pressure is A weighted. Measured at the operator’s ear
position while running the machine on curing concrete in a
manner most often experienced in “normal” circumstances.
Sound pressure may vary depending upon the condition of the
concrete. Hearing protection is always recommended.
**Vibration level indicated is the maximum RMS value obtained
at the handle grip while operating the machine on curing
concrete in a manner most often experienced in “normal”
circumstances. Values were obtained from all three axes of
motion. The values shown here represent the maximum RMS
value from these measurements.
PAGE 18 — J-SERIES TROWEL — OPERATION AND PARTS MANUAL — REV. #3 (07/07/10)
Page 19

NOTE PAGE
J-SERIES TROWEL — OPERATION AND PARTS MANUAL — REV. #3 (07/07/10) — PAGE 19
Page 20

HANDLES ASSY.
J-SERIES TROWEL — HANDLE
PAGE 20 — J-SERIES TROWEL — OPERATION AND PARTS MANUAL — REV. #3 (07/07/10)
Page 21

J-SERIES TROWEL — HANDLE
HANDLES ASSY.
NO. PART NO. PART NAME QTY. REMARKS
1 0189 HANDLE GRIP 2
1 4634 HANDLE GRIP ...................................................... 2 .......... ELECT.
2 1102 PLUG 1
3 0304 RHMS 10- 24 X 1/4’’ 4
4 1103 SAFETY SWITCH ASM 1
5 1101 HANDLE ONLY ...................................................... 1 .......... STANDARD
5 1907 HANDLE ONLY ...................................................... 1 .......... ELECT.
5 9100 HANDLE ONLY ...................................................... 1 .......... EXPORT
6 1100 HANDLE ASM. ...................................................... 1 .......... SALES ITEM
6 1921 HANDLE ASM ....................................................... 1 .......... ELECT.
7 10133 LOCK NUT 3/8- 16 2
8 10136 FLAT WASHER 3/8’’ 4
9 1117 SUPPORT BLOCK ASM (PULLEY & PIN) 1
10 0190A HOLDER 1
11 1121 HHCS 3/8- 16 X 2.3/4 2
13 1492 2.1/2” CHROME DECAL 1
14 0302 THROTTLE CONTROL ASM. 1
15 0185 SHSS 3/8- 16 X 3/8” 1
16 0280B HAND WHEEL 1
17 1478 TROWEL CONTROL SHAFT 1
18 0281 BEARING 1
19 1111 BEARING 1
20 3615 SET COLLAR (WITH SET SCREW) 1
21 1113 SLIDE BLOCK & CABLE ASM. 1
22 1115 CONTROL CABLE ASM. ...................................... 1 .......... STANDARD
22 9175 CONTROL CABLE ASM. ...................................... 1 .......... EXPORT
23 0786 BHCS 1/4- 20 X 3/8” NY- LOC 2
24 0786A SPACER 1
25 1114 ROLL PIN 5/32 X 1.3/8” 1
26 1116 BRASS JAM NUT 5/16- 18 2
27 1150 YOKE ARM 1
28 1151 YOKE PIN 1
29 0683 COTTER PIN 3/32 X 3/4” 2
30 2505 PIGTAIL ASM. ....................................................... 1 .......... ELECT.
31 0175-1 SWITCH BOX ........................................................ 1 .......... ELECT.
32 5044A FHMS 10- 32 X 3/4” .............................................. 3 .......... ELECT.
33 1268 MICRO SWITCH ................................................... 1 .......... ELECT.
34 1189 SWITCH CONDUIT KIT ........................................ 1 .......... ELECT.
35 LIFT HANDLE ASM. .............................................. 1 .......... NO LONGER AVAILABLE
36 1110 TROWEL CINTROL ASM. 1
J-SERIES TROWEL — OPERATION AND PARTS MANUAL — REV. #3 (07/07/10) — PAGE 21
Page 22

QUICK PITCH HANDLE ASSY.
J-SERIES TROWEL — QUICK PITCH HANDLE™
PAGE 22 — J-SERIES TROWEL — OPERATION AND PARTS MANUAL — REV. #3 (07/07/10)
Page 23

J-SERIES TROWEL — QUICK PITCH HANDLE™
QUICK PITCH HANDLE ASSY.
NO. PART NO. PART NAME QTY. REMARKS
1 1746 QUICK PITCH TRIGGER 1
2 1724 CONTROL HANDLE GRIP 2
3 1707 CONTROL HANDLE .............................................. 1 .......... INCLUDES 1739
1739 NYLINER BUSHINGS 2
1734 WARNING DECAL
4 1729 ROLL PIN 3/16 X 1.1/4” 3
5 1706 LATCH RETURN SPRING 1
6 1745 LATCHING SHAFT 1
7 1700 HANDLE ASM. COMPLETE ................................. 1 .......... SALES ITEM
8 1758 FINISHER HANDLE PATENT DECAL 1
10 1701 HANDLE ONLY 1
10 1721 HANDLE ONLY 1
11 1735 PRE- LOAD DECAL 1
12 10133 LOCK NUT 3/8- 16 2
13 10136 FLAT WASHER 3/8” 4
14 0190A HOLDER 1
15 1121 HHCS 3/8- 16 X 2.3/4” 2
16 1117 SUPPORT BLOCK ASM. 1
17 1737 SNAP RING 1
18 1733 HARDENED WASHER 1/2” X 1/32” 2
19 1718 PRE- LOAD ADJUSTMENT NUT 1
20 1732 PRE- LOAD ADJUSTMENT PIN 1
21 1717 PRE- LOAD ADJUSTMENT SCREW 1
22 1719 PIVOT PLATE BUSHING 2
23 1711 CONTROL SHAFT 1
24 4568 ROLL PIN 3/16” X 1” 1
25 1731 ROLL PIN 1/4” X 3/4” ............................................ 1 ..........SEE ITEM 47
26 1708 SLIDE CONTROL ARM ......................................... 1 .......... SEE ITEM 47
27 1743 PHSTS 1/4 X 1/2” 1
28 1727 SAFETY SWITCH ASM. 1
29 1730 HANDLE PAD & COVER 1
30 0304 RHMS 10- 24 X 1/4” 2
31 0302 THROTTLE CABLE ASM. 1
32 0189 HANDLE GRIP 2
33 1116 BRASS JAM NUT 5/16- 18 2
34 1150 YOKE ARM 1
35 1151 YOKE PIN 1
36 0683 COTTER PIN 3/32” X 3/4” 2
37 1716 PRE- LOAD ADJUSTMENT BLOCK 1
37 1741 PRE- LOAD ADJUSTMENT BLOCK 1
38 1715 CONTROL BALANCE SPRING 1
39 1714 CONTROL CABLE ASM. 1
39 9174 CONTROL CABLE ASM. 1
40 1757 ROLL PIN 3/16” X 1.3/8” 1
41 1726 ROLL PIN 1/4” X 1.3/8” 1
42 1712 CONTROL CABLE SLIDE BLOCK 1
43 1709 CONTROL ARM CONNECTOR ............................ 1 .......... SEE ITEM 47
44 LIFT HANDLE ASM. .............................................. 1 .......... NO LONGER AVAILABLE
45 1749 TOOL ASM.FOR UNLOADING SPRING ............... 1 .......... SALES ITEM
46 1754 T-HANDLE ASSY. 1
J-SERIES TROWEL — OPERATION AND PARTS MANUAL — REV. #3 (07/07/10) — PAGE 23
Page 24

SPIDER & BLADES ASSY.
J-SERIES TROWEL — SPIDER AND BLADES
PAGE 24 — J-SERIES TROWEL — OPERATION AND PARTS MANUAL — REV. #3 (07/07/10)
Page 25

J-SERIES TROWEL — SPIDER AND BLADES
SPIDER & BLADES ASSY.
NO. PART NO. PART NAME QTY. REMARKS
1
*
2
*
3
*
4
*
5 1157A BEARING INSERT 3,4
6 0164B RADIUS HEAD 3/8- 16 X 1.1/4” ..................................... 3,4 ........... FULL THREAD
7 1875 INT. SHKP. WASHER 3/8” 3,4
8 1876 JAM NUT 3/8- 16 ........................................................... 3,4 ........... CLASS 2B
9 0105 HHCS 5/16- 18 X 1.1/2” 6,8
10 0161C LOCK WASHER 5/16” 6,8
11 1156 SPIDER PLATE ONLY 1
12 2826 TROWEL ARM 3,4
13 1163 TROWEL ARM LEVER 3,4
14 4164 ROLL PIN 5/16 X 1.3/4” 3,4
15 1316 SPRING (RIGHT HAND) 3,4
16 1161 SPIDER PLATE ONLY 1
17 1322 RETAINING SCREW ASM. 3,4
18 1456 HEX NUT 3/8- 16 1
19 1167A SHSS 3/8- 16 X 1.1/2” CONE POINT 1
20 10844 COMBINATION FLOAT & FINISH BLADE ..................... 3,4 ........... SALES ITEM
21 0954F FLOAT BLADE ............................................................... 3,4 ........... SALES ITEM
22 0900 FINISH BLADE .............................................................. 3,4 ........... SALES ITEM
22 10900 ENDURO FINISH BLADE .............................................. 3,4 ........... SALES ITEM
23 0166A LOCK WASHER 3/8” 3,4
24 1210 SPIDER PLATE ASM. (3 BLADE)
24 1215 SPIDER PLATE ASM. (4 BLADE)
25 2274 GUARD RING 1
26 1434 TROWEL PLUG (FINISH BLADE ONL) 3,4
27 1162A LUBRA- CAP 3,4
28 1869 SNAP PIN 1/4 X 1.3/4” .................................................. 6,8 ........... SALES ITEM
29 1940 GUARD RING DECAL 1
30 1817 FIELD TROWEL ARM ADJUSTER ASM. 1
31 0987 GRINDING ATTACHMENT HOLDER 1
32 0988 LOCKING PLATE 2
33 S- 986 GRINDING ATTACHMENT STONE ................................... 1 ........... SALES ITEM
34 0414 SHSS 5/16- 18 X 3/4” 4
35 0106 JAM NUT 5/16- 18
36 0985 GRINDING ATTACHMENT ASM. ...................................... 1 ........... SALES ITEM
37 10968 THRUST BEARING KIT .................................................... 1 ........... INCLUDES ITEMS W/
38*# 1471 THRUST COLLAR BUSHING 1
39 1871 UNIVERSAL FIT COMBINATION BLADE ...................... 3,4 ........... SALES ITEM
39 101871 ENDURO UNIVERSAL FIT COMBINATION BLADE ..... 3,4 ........... SALES ITEM
40 1872 UNIVERSAL FIT FINISH BLADE .................................. 3,4 ........... SALES ITEM
40 101872 ENDURO UNIVERSAL FIT FINISH BLADE .................. 3,4 ........... SALES ITEM
41 1857 UNIVERSAL FIT MOUNTING BAR ............................... 3,4 ........... SALES ITEM
42 2878 FLOAT DISK ..................................................................... 1 ........... SALES ITEM
43 2935 FLOAT DISK LATCH PIN .................................................. 4 ........... SALES ITEM
12208 WEAR RING 1
12778 FLANGE BEARING 1
10793 THRUST COLLAR ............................................................. 1 ........... INCLUDES ITEMS W/#
1154A WEAR PLATE 1
*
J-SERIES TROWEL — OPERATION AND PARTS MANUAL — REV. #3 (07/07/10) — PAGE 25
Page 26

J-SERIES TROWEL — GEARBOX AND ENGINE MOUNTS
GEAR BOX & ENGINE MOUNTS ASSY.
PAGE 26 — J-SERIES TROWEL — OPERATION AND PARTS MANUAL — REV. #3 (07/07/10)
Page 27

J-SERIES TROWEL — GEARBOX AND ENGINE MOUNTS
GEAR BOX & ENGINE MOUNTS ASSY.
NO. PART NO. PART NAME QTY. REMARKS
1 1131 GEAR CASE 1
2 0131A HHCS 1/4- 20 X 3/4” 8
3 1136 END CAP 1
4 2614 GASKET/ SEAL KIT ........................................................................ ITEMS 9,11,22,& 25
5 0735A BEARING CUP 2
6 1132 AIR VENT 1
7 0735 BEARING CONE 2
8 1828 WORM & COUNTER SHAFT 1
9 2308 O- RING 2
10 0627 SQUARE KEY 3/16 X 3/16 X 1.1/4” .................................. 1 ........... NOT IN ASM.
11 0753 OIL SEAL 1
12 1133 FLANGE 1
13 0655 HHCS 5/16- 18 X 3/4” ....................................................... 1 ........... NOT IN ASM.
14 0300B FLAT WASHER 5/16’ ......................................................... 2 ........... NOT IN ASM.
15 0232A BEARING CUP 2
16 0232 BEARING CONE 2
17 1138 RETAINING RING 1
18 1202 BRONZE GEAR 1
19 2440 MAINSHAFT 1
20 1200 GEAR BOX ASM. 1
21 1145 COVER PLATE 1
22 0254 OIL SEAL 1
23 1146 FHSCS 5/16- 18 X 1” 4
24 10235 EXT. SHKP. LOCK WASHER 5/16” 4
25 1143 SEAL RING 1
26 1238 WOODRUFF KEY #25 ...................................................... 1 ........... NOT IN ASM.
27 1139 WOODRUFF KEY # 21 1
28 0121A SQUARE HEAD PIPE PLUG 3/8” 1
29 1481 FHSCS 3/8- 16 X 1.2/4” .................................................... 4 ........... ELECTRIC
30 1480 C’ SUNK SHKP. WASHER 3/8” 4
30 0166A LOCK WASHER 3/8” ......................................................... 4 ........... ELECTRIC
31 1245 SPACER 4
32 1247 GROMMET ....................................................................... 4 ........... STATIONARY RING ONLY
33 1251 STATIONARY GUARD RING 1
33 2274 STATIONARY GUARD RING ............................................. 1 ........... EXPORT
34 1816 PLATE 2
35 1955 FRONT ENGINE MOUNT ................................................. 1 ......... ELECTRIC
35 1954 FRONT ENGINE MOUNT ................................................. 1 ......... GAS
36 1943 REAR ENGINE MOUNT ................................................... 1 ......... ELECTRIC
36 1942 REAR ENGINE MOUNT ................................................... 1 ......... GAS
10139 GEARBOX OIL REPLACEMENT, AS REQ. .................................. 22 OZ. BOTTLE
2616 BEARING REPLACEMENT KIT .................................................... ITEMS 3,5,7,15, & 16
J-SERIES TROWEL — OPERATION AND PARTS MANUAL — REV. #3 (07/07/10) — PAGE 27
Page 28

J-SERIES TROWEL — ENGINES, 5 HP B&S, 6.0 HP ROBIN, 5.5 HP HONDA
ENGINES, 5 H.P. B&S, 6.0 H.P. ROBIN, 5.5 H.P. HONDA ASSY.
PAGE 28 — J-SERIES TROWEL — OPERATION AND PARTS MANUAL — REV. #3 (07/07/10)
Page 29

J-SERIES TROWEL — ENGINES, 5 HP B&S, 6.0 HP ROBIN, 5.5 HP HONDA
ENGINES, 5 H.P. B&S, 6.0 H.P. ROBIN, 5.5 H.P. HONDA ASSY.
NO. PART NO. PART NAME QTY. REMARKS
1 ENGINE 5 HP. B&S 1
2 0627 SQUARE KEY 3/16 X 3/16 X 1.1/4” 1
3 0255 AUTOMATIC CLUTCH ASM. 3/4” BORE .......................... 1............. INCLUDES ITEMS W/@
4@ 21307 SPINDLE 3/4” BORE ....................................................... 1 ............. REPLACES P/N 0256
5@ 0251 CLUTCH HOUSING DRUM .............................................. 1 ............. INCLUDES ITEM 6
6@ 0458 CLUTCH HOUSING DRUM BUSHING 1
7@ B1766 WEIGHT, CLUTCH ........................................................... 1............. REPLACES P/N 0454
8@ 0855 SPRING 1
9@ 0253 CLUTCH EXPANSION PLATE 1
10@ 1868 SHSS 3/8- 24 X 3/4” 1
11@ 0456 BELT RUNNER (BEARING) 1
12 1390 BELT (A26) ....................................................................... 1 ............. HONDA, ROBIN
12 1243 BELT (A27) ....................................................................... 1 ............. B&S
13 1335 BELT GUARD 1
14 0181B LOCK WASHER 1/4” 2
15 2577 T- BOLT 1/4- 20 2
16 0740 PULLEY (4.95” O.D.) 1
17 10181 HHCS 5/16- 24 X 11.1/4” 2,4
18 0161C LOCK WASHER 5/16” 4
19 0300B FLAT WASHER 5/16” 4
20 1406 RETAINER 1
21 1403 FHSCS 5/16- 24 X 1.1/4” 1
22 1846 LIFTING BALE ASM. ....................................................... 1............. SALES ITEM
23 1847 FHSCS 5/16- 24 X 3/4” .................................................... 4............. OPTIONAL
24 1391 HHCS 5/16- 24 X 1.1/2” 2
25 2742 THROTTLE MOUNT 1
26 ENGINE 6.0 HP. ROBIN 1
27 1393 FHSCS 3/8- 24 X 1.1/2” ................................................... 1............. ROBIN
28 0939 SPACER (LIFTING BALE OPTION) 3
29 ENGINE 5.5 HP. HONDA 1
J-SERIES TROWEL — OPERATION AND PARTS MANUAL — REV. #3 (07/07/10) — PAGE 29
Page 30

OPERATION AND PARTS MANUAL
©
HERE’S HOW TO GET HELP
PLEASE HAVE THE MODEL AND SERIAL
NUMBER ON-HAND WHEN CALLING
UNITED STATES
Multiquip Corporate Office MQ Parts Department
18910 Wilmington Ave.
Carson, CA 90746
Contact: mq@multiquip.com
Mayco Parts Warranty Department
Tel. (800) 421-1244
Fax (800) 537-3927
800-427-1244
310-537-3700
Fax: 800-672-7877
Fax: 310-637-3284
800-306-2926
310-537-3700
Service Department Technical Assistance
800-421-1244
310-537-3700
Fax: 800-672-7877
Fax: 310-637-3284
Fax: 310-537-4259 800-478-1244 Fax: 310-631-5032
800-421-1244, Ext. 279
310-537-3700, Ext. 279
Fax: 310-537-1173
MEXICO UNITED KINGDOM
MQ Cipsa Multiquip (UK) Limited Head Office
Carr. Fed. Mexico-Puebla KM 126.5
Momoxpan, Cholula, Puebla 72760 Mexico
Contact: pmastretta@cipsa.com.mx
Tel: (52) 222-225-9900
Fax: (52) 222-285-0420
Unit 2, Northpoint Industrial Estate,
Global Lane,
Dukinfield, Cheshire SK16 4UJ
Contact: sales@multiquip.co.uk
Tel: 0161 339 2223
Fax: 0161 339 3226
CANADA
Multiquip
4110 Industriel Boul.
Laval, Quebec, Canada H7L 6V3
Contact: jmartin@multiquip.com
COPYRIGHT 2010, MULTIQUIP INC.
Multiquip Inc and the MQ logo are registered trademarks of Multiquip Inc. and may not be used, reproduced, or altered without written permission. All other trademarks are the property
of their respective owners and used with permission.
This manual
The information and specifications included in this publication were in effect at the time of approval for printing. Illustrations, descriptions, references and technical data contained in
this manual are for guidance only and may not be considered as binding. Multiquip Inc. reserves the right to discontinue or change specifications, design or the information published
in this publication at any time without notice and without incurring any obligations.
MUST accompany the equipment at all times. This manual is considered a permanent part of the equipment and should remain with the unit if resold.
Tel: (450) 625-2244
Tel: (877) 963-4411
Fax: (450) 625-8664
Your Local Dealer is:
 Loading...