

Page 1
©2011 MultiQ are registered trademarks or trademark applications of MultiQ International AB in various jurisdictions. All
other company names and products are trademarks or registered trademarks of their respective companies. We reserve
the right to change the specifications without prior notice.
MultiQ DSMS 3.6 User Guide
Media players 4 & 5 operated in standalone mode
Page 2

©2011 MultiQ are registered trademarks or trademark applications of MultiQ International AB in various jurisdictions. All
other company names and products are trademarks or registered trademarks of their respective companies. We reserve
the right to change the specifications without prior notice.
MultiQ DSMS 3.6 User Guide, Media players operated in standalone mode, Version 2, 18/08/2011 2
Table of Contents
Table of Contents ...................................................................................................................... 2
1 Revision history .................................................................................................................. 4
2 Introduction ......................................................................................................................... 5
3 Introduction to the MultiQ range of products ............................................................. 6
4 Getting to know media player 4 & 5 ............................................................................. 9
4.1 Unpacking ..................................................................................................................................... 9
4.2 Mounting ....................................................................................................................................... 9
4.3 Connections ............................................................................................................................... 10
4.4 Hardware Installation ................................................................................................................ 10
4.4.1 Front panel LEDs ................................................................................................................................ 10
4.5 Adding interactivity (optional) ................................................................................................. 11
5 Initial setup ....................................................................................................................... 12
5.1 Media player installation .......................................................................................................... 12
5.1.1 Basic configuration ............................................................................................................................ 12
5.1.2 Flash installation ................................................................................................................................. 17
5.1.3 Making your first settings in the management system .......................................................... 19
5.1.4 Use the correct video settings ....................................................................................................... 20
5.2 Login and management ........................................................................................................... 21
6 Handling content ............................................................................................................ 23
6.1 What is content? ....................................................................................................................... 23
6.2 How to obtain content? ........................................................................................................... 23
6.3 Preparing content ...................................................................................................................... 23
6.3.1 Preparing images ................................................................................................................................ 23
6.3.2 Preparing video clips ......................................................................................................................... 24
6.3.3 Converting PDFs into images before use ................................................................................. 24
6.3.4 Converting Flash animations into MPEG-4 (h.264) files .................................................... 24
6.3.5 Converting Power Point presentations into images or video clips ................................... 24
6.4 Getting smooth transitions when playing video ................................................................. 25
6.4.1 Add fade-inns and fade-outs .......................................................................................................... 25
6.4.2 To combine several video clips into one clip with the desired transitions ..................... 25
6.5 Media spots ................................................................................................................................ 26
6.6 Playlists ........................................................................................................................................ 26
6.7 Channels ..................................................................................................................................... 27
6.8 Areas ............................................................................................................................................ 28
7 Getting an overview of the digital signage management system ........................ 30
8 Uploading content and the "Import" tab ................................................................... 31
8.1 The "Media" icon ....................................................................................................................... 31
Page 3

©2011 MultiQ are registered trademarks or trademark applications of MultiQ International AB in various jurisdictions. All
other company names and products are trademarks or registered trademarks of their respective companies. We reserve
the right to change the specifications without prior notice.
MultiQ DSMS 3.6 User Guide, Media players operated in standalone mode, Version 2, 18/08/2011 3
8.2 Uploading video clips ............................................................................................................... 33
8.3 Uploading images ..................................................................................................................... 35
8.4 Uploading several files simultaneously ................................................................................. 37
9 Creating your first playlist ............................................................................................. 41
9.1 Connecting the playlist to the media player ........................................................................ 43
9.1.1 Use the proper aspect ratio ............................................................................................................ 45
9.2 Create your second playlist, now with video clips ............................................................ 46
9.3 Playing playlists in sequence .................................................................................................. 52
10 Scheduling ....................................................................................................................... 54
10.1 Additional scheduling features ............................................................................................... 59
11 Streaming sources as media spots ............................................................................ 60
11.1 Adding Live TV ........................................................................................................................... 60
11.2 Adding security cameras ......................................................................................................... 64
12 Splitting the screen into several areas ...................................................................... 67
12.1 In store audio and using the “Audio” area ........................................................................... 67
12.2 Splitting the screen into several visual areas ...................................................................... 71
12.3 Adding an image slideshow to “Area2” ............................................................................... 78
13 Adding a ticker ................................................................................................................ 84
13.1 Getting tickers from RSS feeds............................................................................................. 85
14 Adding an online weather and time channel into “Area1” .................................... 91
14.1 Adding more links to the locally stored website ................................................................ 97
15 The unit settings menu ............................................................................................... 102
16 Appendix 1: Media player troubleshooting ............................................................ 103
17 Appendix 2: Firmware maintenance ........................................................................ 104
17.1 Firmware upgrade in standalone mode ............................................................................. 104
17.2 To create a USB rescue stick ............................................................................................. 105
17.3 To reset to factory state using the rescue USB stick .................................................... 107
17.4 Using a rescue USB stick with a media player in standalone mode .......................... 108
Page 4
©2011 MultiQ are registered trademarks or trademark applications of MultiQ International AB in various jurisdictions. All
other company names and products are trademarks or registered trademarks of their respective companies. We reserve
the right to change the specifications without prior notice.
MultiQ DSMS 3.6 User Guide, Media players operated in standalone mode, Version 2, 18/08/2011 4
1 Revision history
A description of changes with revision number will be noted in the revision log below:
Version Date Comments
1.00 2011-08-03 Initial version
software ver. 3.4
2.0 2011
-08-18
Software v
ersion 3.6
Page 5
©2011 MultiQ are registered trademarks or trademark applications of MultiQ International AB in various jurisdictions. All
other company names and products are trademarks or registered trademarks of their respective companies. We reserve
the right to change the specifications without prior notice.
MultiQ DSMS 3.6 User Guide, Media players operated in standalone mode, Version 2, 18/08/2011 5
2 Introduction
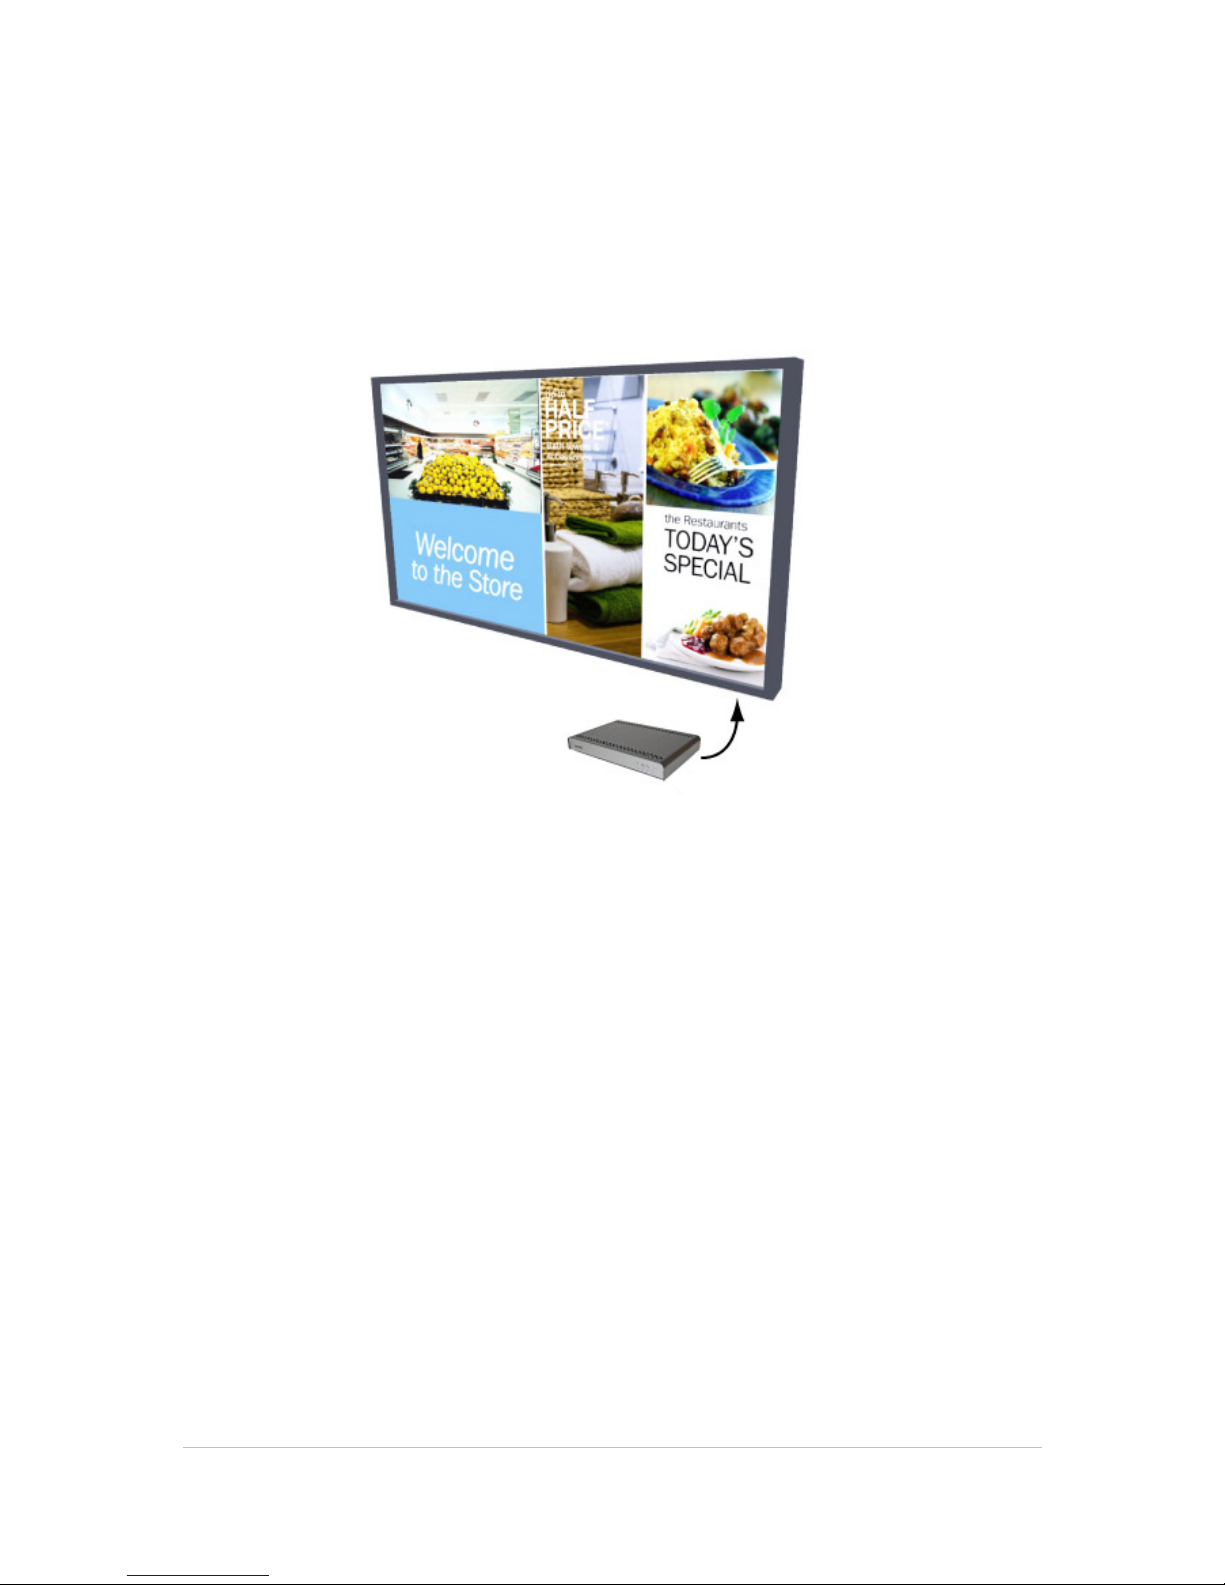
This document describes two simple ways of getting a quick start with MultiQ digital signage using
a Media player 4 or Media player 5 combined with a 16:9 widescreen monitor such as the MultiQ
42DS monitor especially designed for digital signage.
Figure 1. MultiQ Media player 4 or 5 combined with the MultiQ 42DS monitor.
In addition to a media player and a monitor you need a computer with a web browser along with
some images to be used as content. You may use images that you have shot using your own digital
camera or pictures that you have created using your favorite drawing software. Also you may want
to add video clips that you have shot using your own camera or that have been downloaded from
YouTube or similar sites. Do not forget that content that you have not created on your own may be
copyright protected.
Page 6
©2011 MultiQ are registered trademarks or trademark applications of MultiQ International AB in various jurisdictions. All
other company names and products are trademarks or registered trademarks of their respective companies. We reserve
the right to change the specifications without prior notice.
MultiQ DSMS 3.6 User Guide, Media players operated in standalone mode, Version 2, 18/08/2011 6
3 Introduction to the MultiQ range of products
The MultiQ digital signage- and kiosk system combines traditional digital signage with interactive
cutting edge kiosk technology. The products are designed for long lifetime, high reliability and low
power consumption. Also the system has designed for scalability allowing for easy operation of
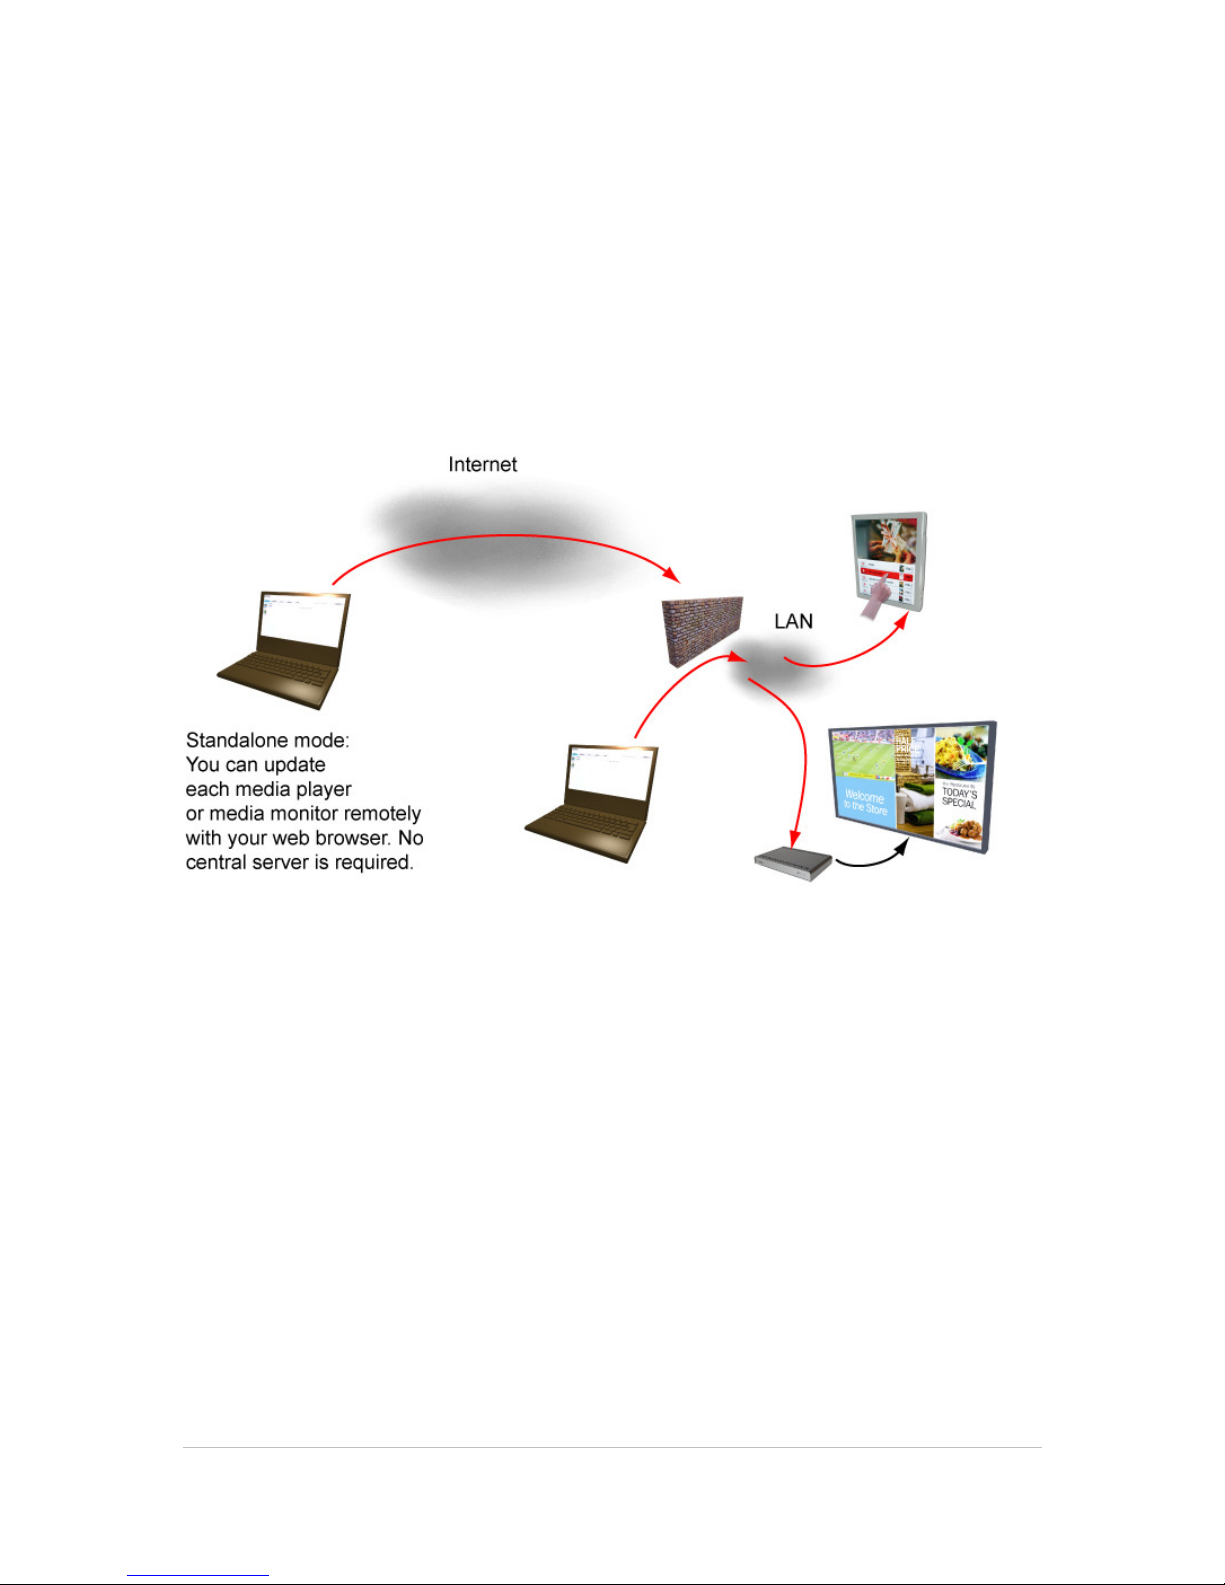
single media players or media monitors in standalone mode as well as large systems including
thousands of media players or media monitors located at hundreds of sites.
Figure 2. In standalone mode no central server is required. Each media player or media monitor contains
its own management system.
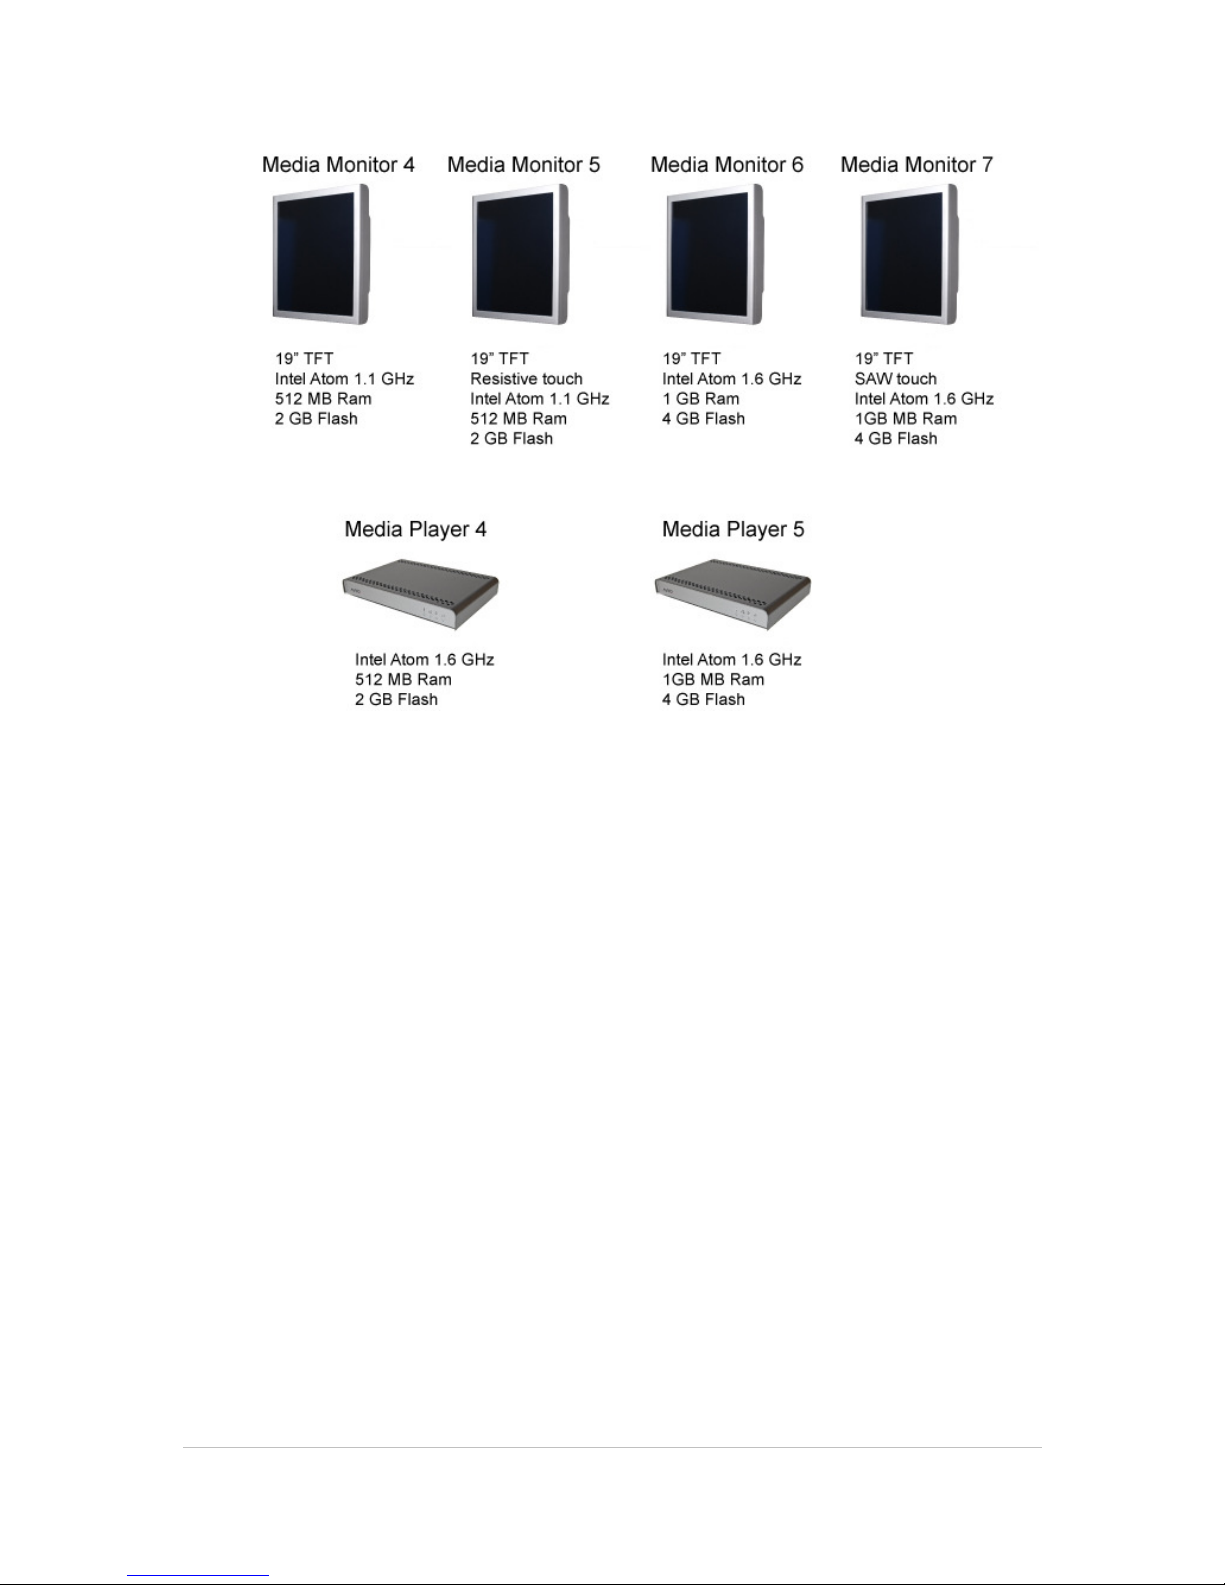
The MultiQ digital signage and kiosk system consists of 6 versions of media players and media
monitors.
Page 7
©2011 MultiQ are registered trademarks or trademark applications of MultiQ International AB in various jurisdictions. All
other company names and products are trademarks or registered trademarks of their respective companies. We reserve
the right to change the specifications without prior notice.
MultiQ DSMS 3.6 User Guide, Media players operated in standalone mode, Version 2, 18/08/2011 7
Figure 3. In the MultiQ digital signage and kiosk product range there are four versions of media monitors
with integrated media players and two versions of media players that are to be connected to separate
monitors.
The MultiQ product range includes media player and media monitors are designed for long lifetime
expectancy. The units do not include any moving mechanical parts such as fans or hard drives.
Instead the low power consumption, less than 10 watts for the standalone media players and 40
watts for the media monitors with integrated media players allow for passive cooling with no fans.
Since there are no fans there will be very little accumulation of dust in the units. The power supply
is a separate unit allowing for easy replacement.
Instead of hard drives, flash memories used for storing the content.
Linux is used as operating system in the units. This eliminates license costs and the need for
forced security updates. Finally it makes it possible to use a distribution of Linux that is especially
adapted to digital signage. The Linux system does only occupy about 1 GB of the flash memory.
The internal flash memory is 2 GB in media player 4 and media monitors 4 and 5. In media player 5
and media monitors 6 and 7 the memory size is 4 GB (allowing for 3 GB to be used for content).
However if necessary, it is possible to connect a separate standard USB stick to extend the
memory.
Page 8

©2011 MultiQ are registered trademarks or trademark applications of MultiQ International AB in various jurisdictions. All
other company names and products are trademarks or registered trademarks of their respective companies. We reserve
the right to change the specifications without prior notice.
MultiQ DSMS 3.6 User Guide, Media players operated in standalone mode, Version 2, 18/08/2011 8
Media players 4 and 5 are intended as separate units to be connected to any monitor having a DVI
or HDMI input. There is a special version of the separate media player that supports VGA as an
alternative to DVI and HDMI.
Other differences between the products are processor capability, internal memory size and flash
memory size.
This user manual focus on how to set up stand alone media players, media monitors 4 & 5.
The media monitors and media players can also be operated in a centrally managed mode with a
central management server. This is also described in separate manuals.
“MultiQ DSMS 3.6 User Guide Media players operated in centrally managed mode”
“MultiQ DSMS 3.6 User Guide Media monitors operated in centrally managed mode”
That can be downloaded from the MultiQ website.
Page 9
©2011 MultiQ are registered trademarks or trademark applications of MultiQ International AB in various jurisdictions. All
other company names and products are trademarks or registered trademarks of their respective companies. We reserve
the right to change the specifications without prior notice.
MultiQ DSMS 3.6 User Guide, Media players operated in standalone mode, Version 2, 18/08/2011 9
4 Getting to know media player 4 & 5
Media players 4 & 5 are to be connected to an external monitor. In the sections below the controls
and indications of the media players 4 and 5 are described.
4.1 Unpacking
Please make sure that the following items are included in the package and in good condition. If you
find that any items damaged or missing, please contact your retailer immediately.
• One media player
• AC/DC adapter with 12V DC output
• AC power cord
• A quick start guide
4.2 Mounting
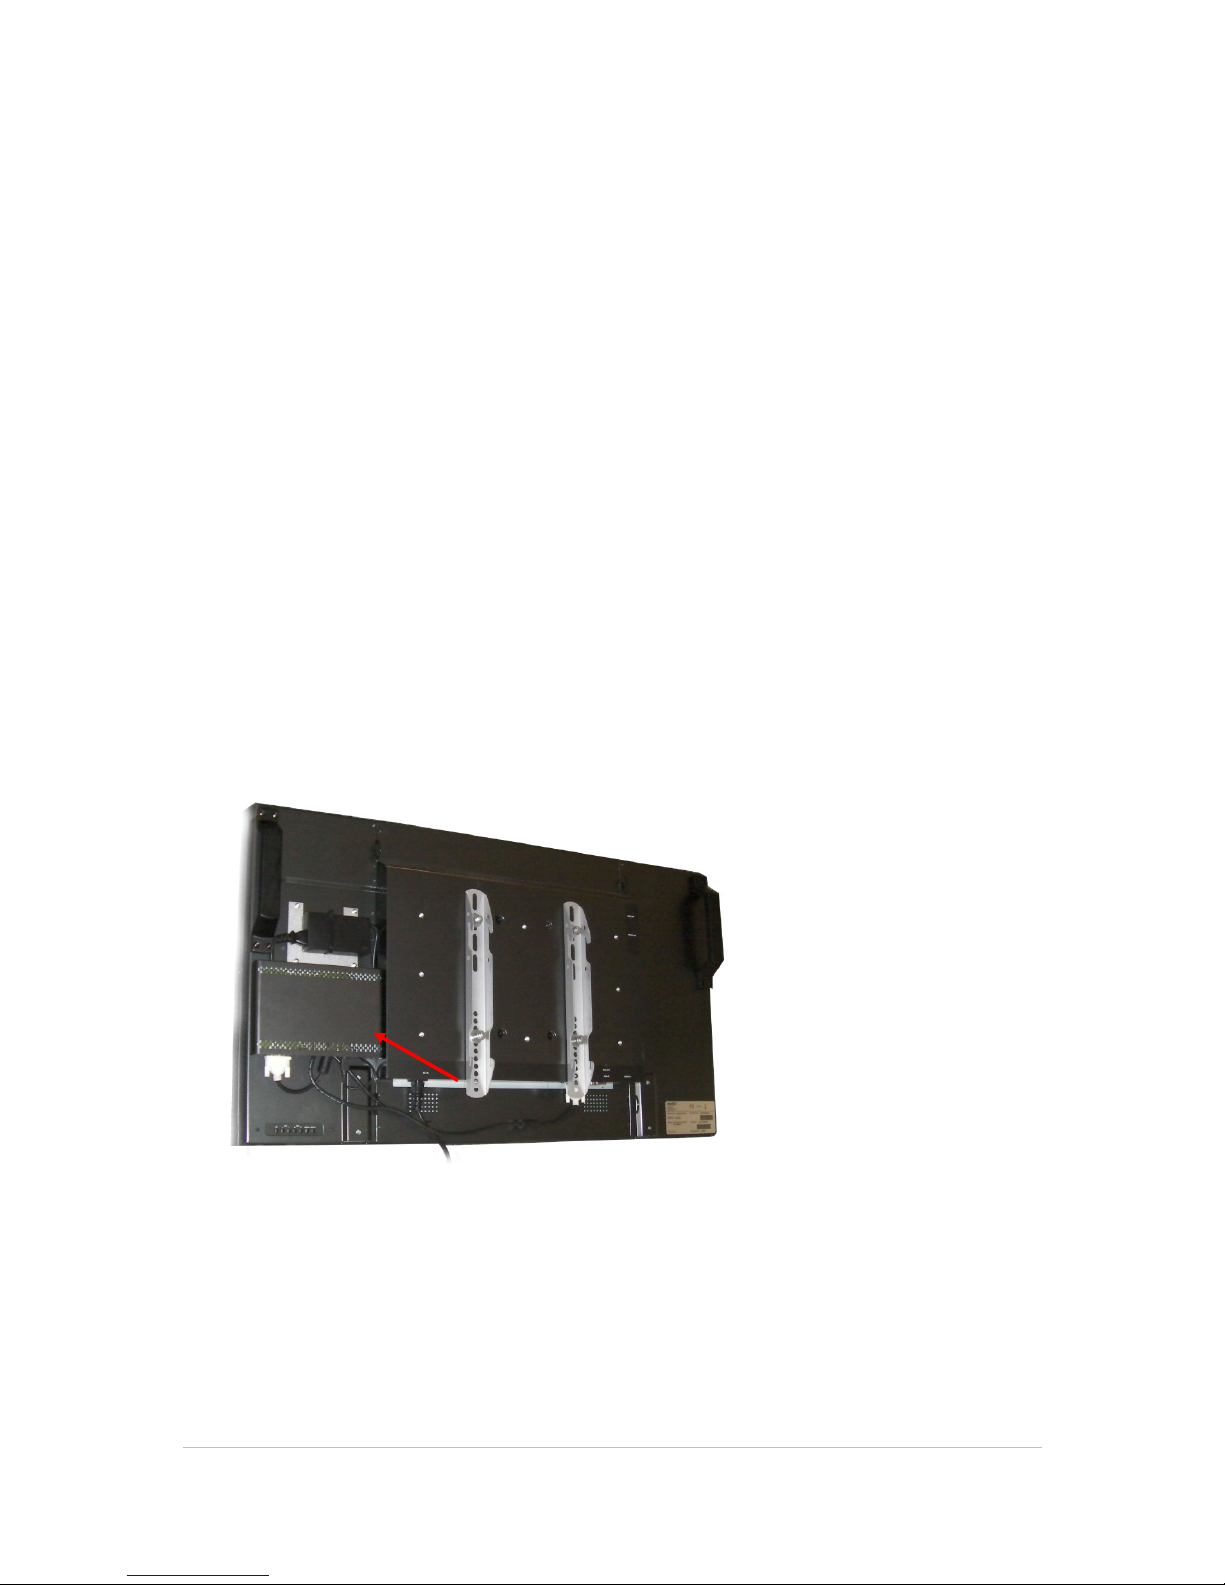
Mounting and attachment hardware is not included. The media player has a VESA 75 x 75 mm
interface. The media player can be mounted on the back of the MultiQ DS 42 monitors using a
separate bracket.
Figure 4. The media player can be mounted on the back of the MultiQ monitors using a VESA 75x75 mm
bracket.
Page 10
©2011 MultiQ are registered trademarks or trademark applications of MultiQ International AB in various jurisdictions. All
other company names and products are trademarks or registered trademarks of their respective companies. We reserve
the right to change the specifications without prior notice.
MultiQ DSMS 3.6 User Guide, Media players operated in standalone mode, Version 2, 18/08/2011 10
4.3 Connections
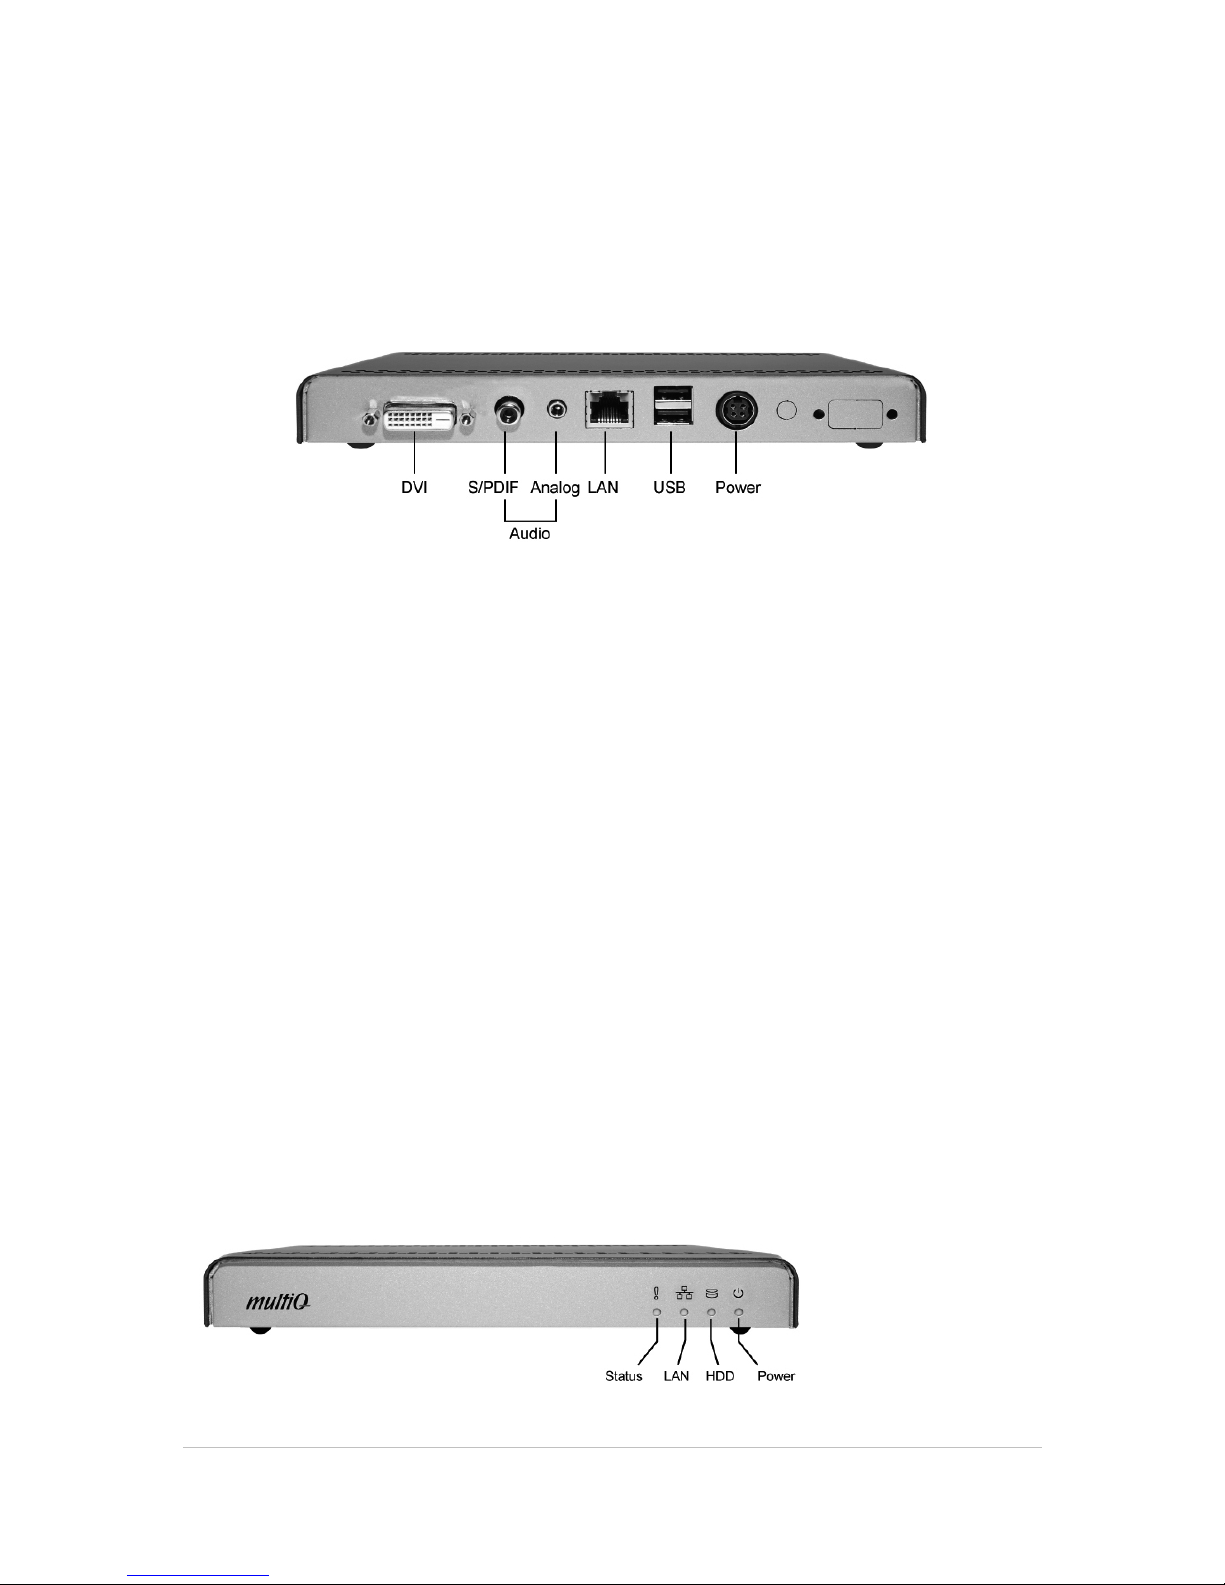
The media player has connections for DVI-D (digital only), Audio (digital and analogue), LAN and
USB I/O.
Figure 5. Figure 1.4. Media player back panel connections.
4.4 Hardware Installation
Connect the DVI-D output to the monitor to be used. If the monitor has an HDMI input a conversion
cable should be used. A monitor must be used when configuring the media player.
The audio outputs may be connected to analogue or digital inputs on external audio systems.
The LAN port must be connected to a LAN with Internet access. If you have no touch panel you
need a separate mouse to be connected to the second USB port.
If a separate touch panel monitor is to be used, one of the USB ports should be connected to the
touch panel interface of the monitor.
During setup a USB keyboard should be connected to one of the USB ports. Do all connections
before powering up by connecting the external power supply.
4.4.1 Front panel LEDs
On the front of the media player there are 4 LEDs.
Figure 6. Front panel with indication LEDs.
Page 11

©2011 MultiQ are registered trademarks or trademark applications of MultiQ International AB in various jurisdictions. All
other company names and products are trademarks or registered trademarks of their respective companies. We reserve
the right to change the specifications without prior notice.
MultiQ DSMS 3.6 User Guide, Media players operated in standalone mode, Version 2, 18/08/2011 11
Power – This led will be lit when the media player is on (Blue).
Status – This led indicates activities and result of activities
• Flashing between red and green: ongoing activity as starting up, shutting down or download in progress.
• Green: download succeeded
• Red: communication with the digital signage management server failed or download failed
HDD – This LED indicates hard drive activity (Yellow).
LAN – Flashes when there is activity on the LAN port.
• Not lit: no network access
• Constantly lit in green: Link up at 100 Mb/s or 1000 Mb/s
• Flashing in green: Network activity at 100 Mb/s or 1000 Mb/s
• Constantly lit in red: Link up at 10 Mb/s
• Flashing in red: Network activity at 10 Mb/s
4.5 Adding interactivity (optional)
To include interactivity you will need to use a monitor with a touch panel. The touch panel needs to
have a USB interface that is connected to one of the media player USB ports. More information on
adding interactivity is available in the “MultiQ DSMS 3.4 User Guide, Media monitors operated in
centrally managed mode”.
Page 12
©2011 MultiQ are registered trademarks or trademark applications of MultiQ International AB in various jurisdictions. All
other company names and products are trademarks or registered trademarks of their respective companies. We reserve
the right to change the specifications without prior notice.
MultiQ DSMS 3.6 User Guide, Media players operated in standalone mode, Version 2, 18/08/2011 12
5 Initial setup
5.1 Media player installation
The following section contains what is required when configuring the media player.
5.1.1 Basic configuration
To configure the media player you will need a USB keyboard and a USB mouse. The media player
should be connected to a monitor.
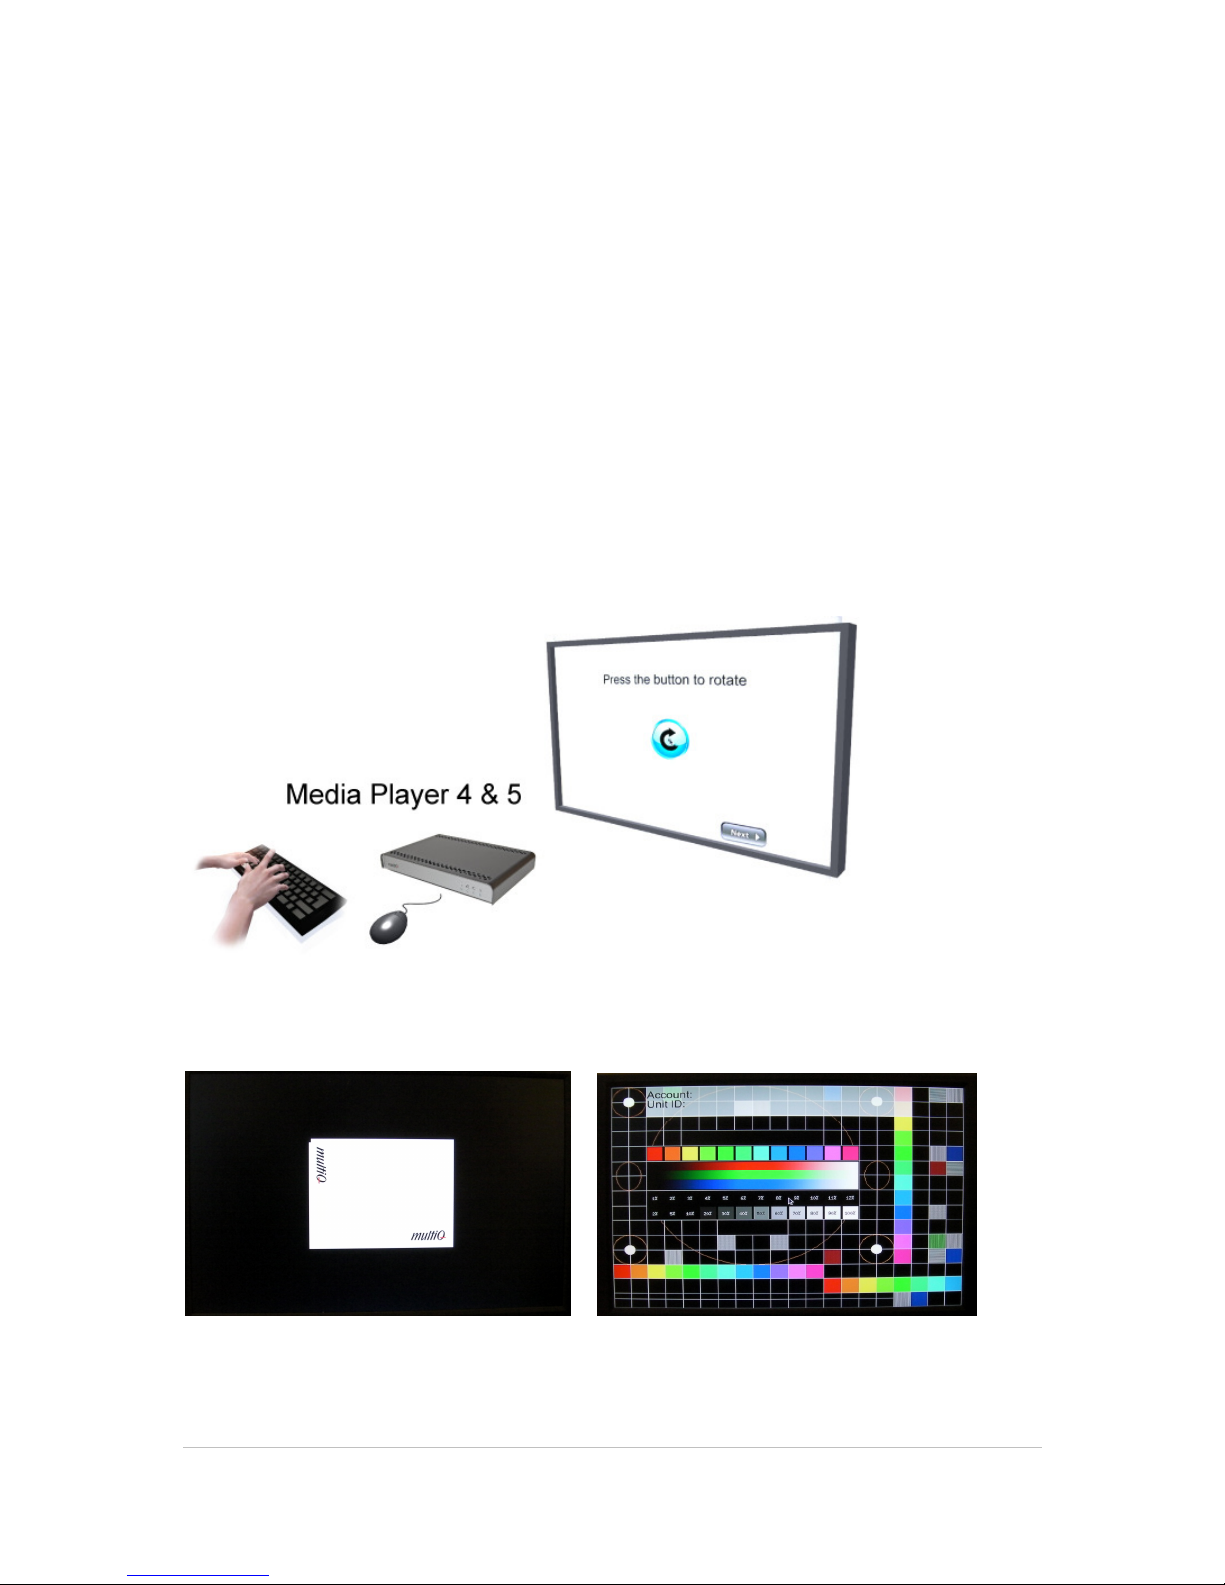
At first start up (factory state) the media player will go directly to the setup menu system after
showing the test pattern (without requiring any password).
However as soon as the unit has been configured, a USB keyboard will be needed to initiate setup
again. To initiate the menu system you press “Ctrl+Alt+c”.
Figure 7. Attach the USB keyboard and the USB mouse before you power up the media player.
Figure 8. When starting up the unit you will see a MultiQ sign and then a test card.
Page 13
©2011 MultiQ are registered trademarks or trademark applications of MultiQ International AB in various jurisdictions. All
other company names and products are trademarks or registered trademarks of their respective companies. We reserve
the right to change the specifications without prior notice.
MultiQ DSMS 3.6 User Guide, Media players operated in standalone mode, Version 2, 18/08/2011 13
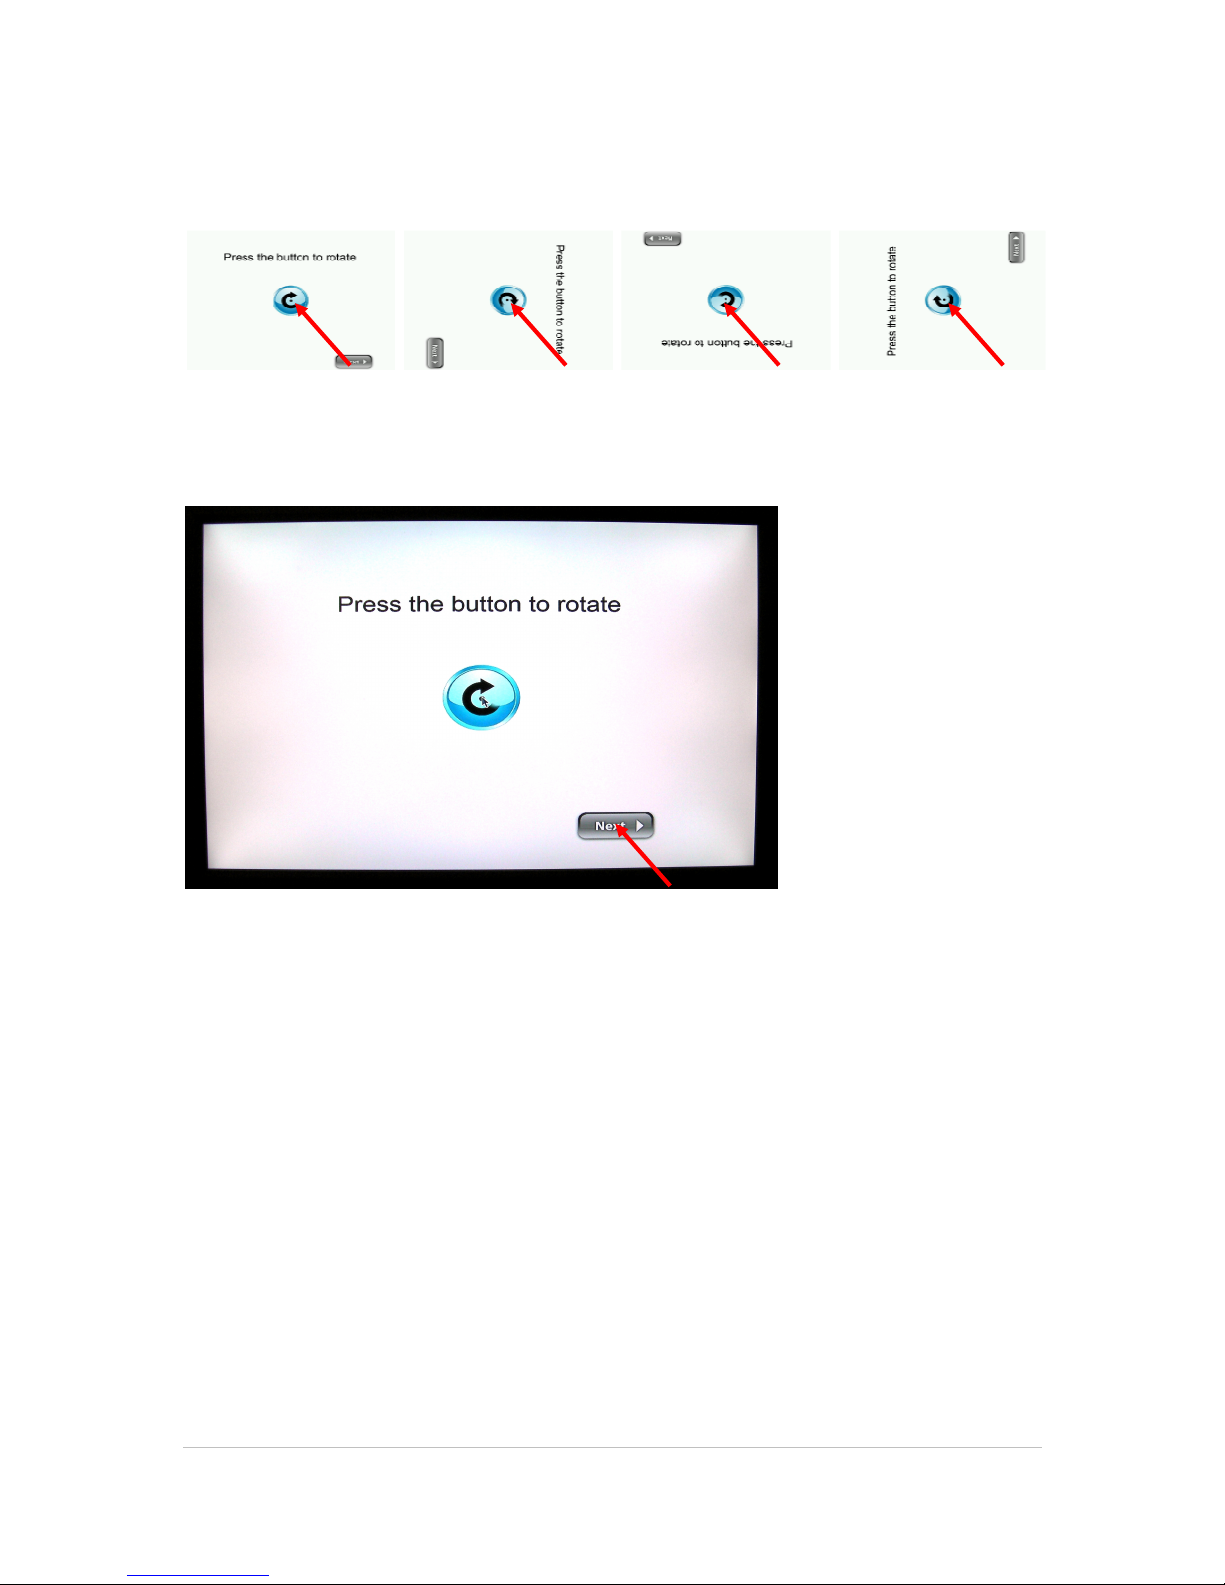
The first setup menu is the monitor orientation. By pressing the centre button you can rotate the
menu system to fit the orientation of the monitor.
Figure 9. By pressing the centre button the configuration menu can be rotated. When the menu is
correctly oriented, press the “Next” button.
Figure 10. After having selected the correct orientation of the screen, continue by clicking the “Next”
button.
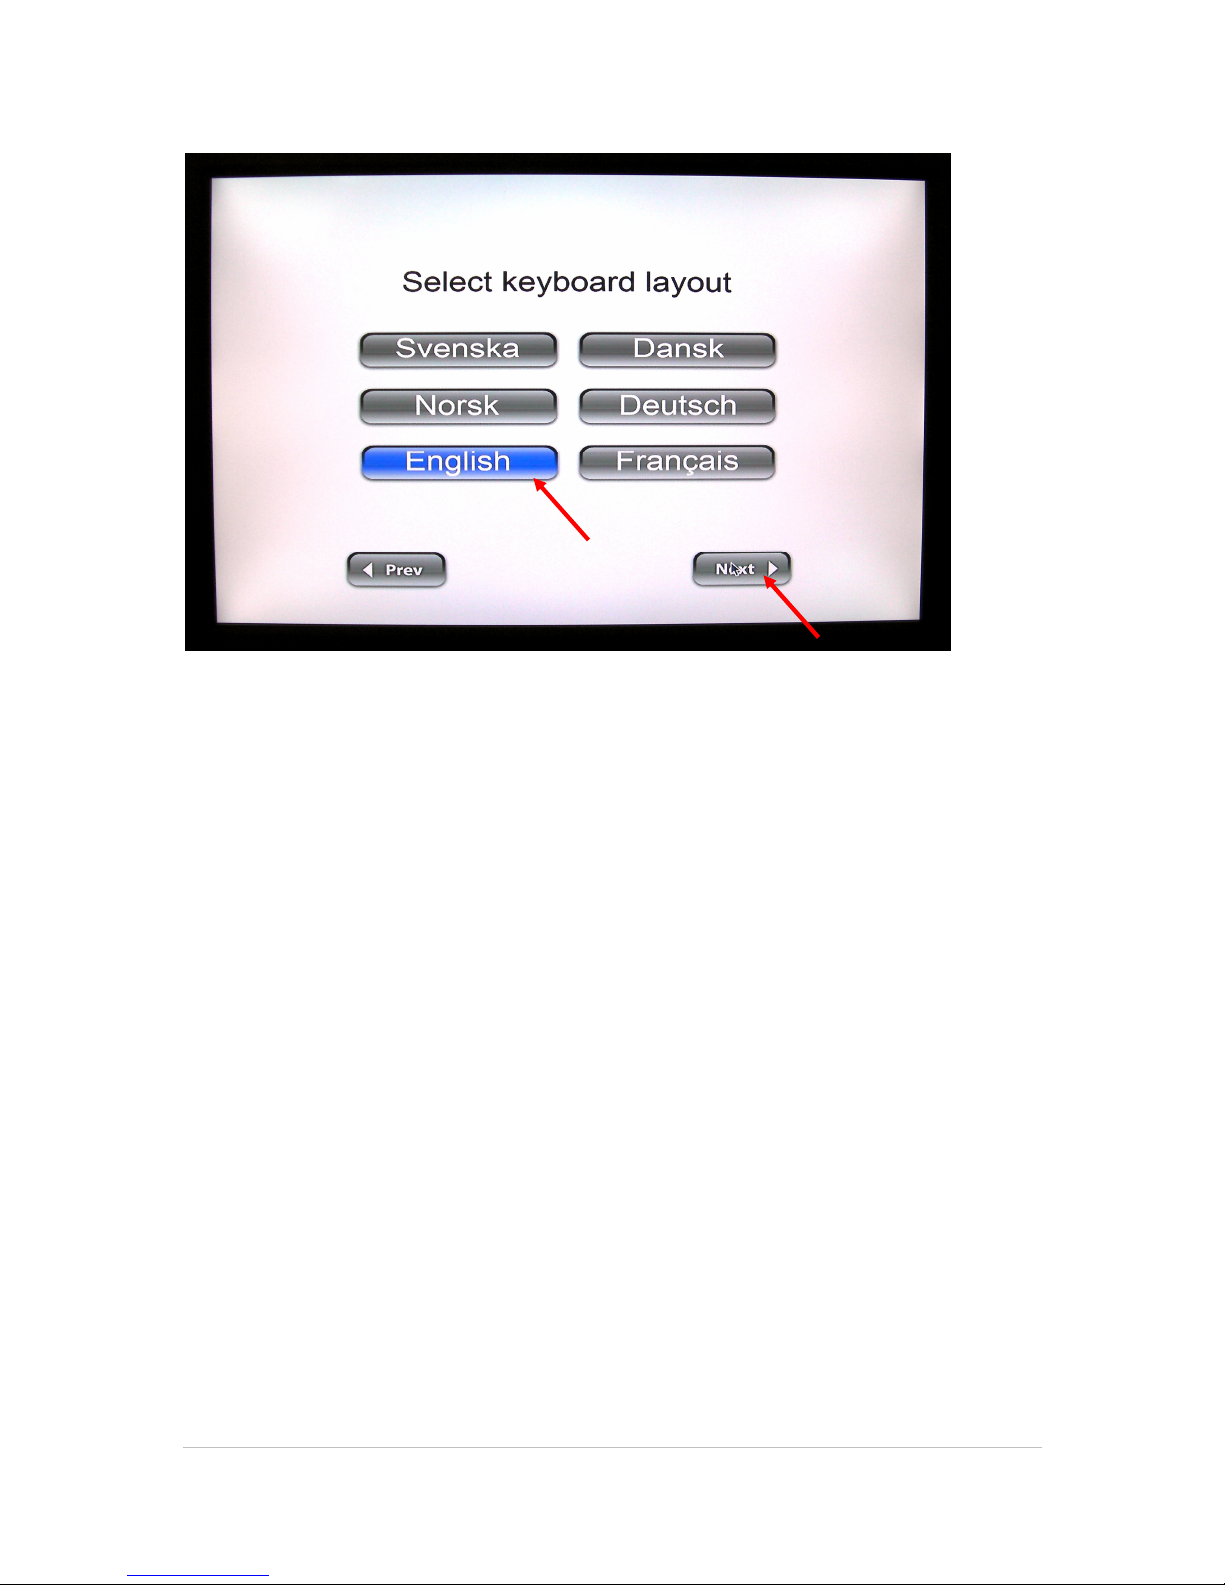
When the proper orientation of the menu system has been chosen the language setting menu will
appear. By choosing the language, also the keyboard language setting is selected.
Note.
Note.Note.
Note. The setting of the orientation only affects how the setup menu is presented. The orientation
of the content displayed on the screen is decided by the application in the management system.
Page 14
©2011 MultiQ are registered trademarks or trademark applications of MultiQ International AB in various jurisdictions. All
other company names and products are trademarks or registered trademarks of their respective companies. We reserve
the right to change the specifications without prior notice.
MultiQ DSMS 3.6 User Guide, Media players operated in standalone mode, Version 2, 18/08/2011 14
Figure 11. Select the keyboard language and then press “Next”.
Press the preferred language then press “Next”.
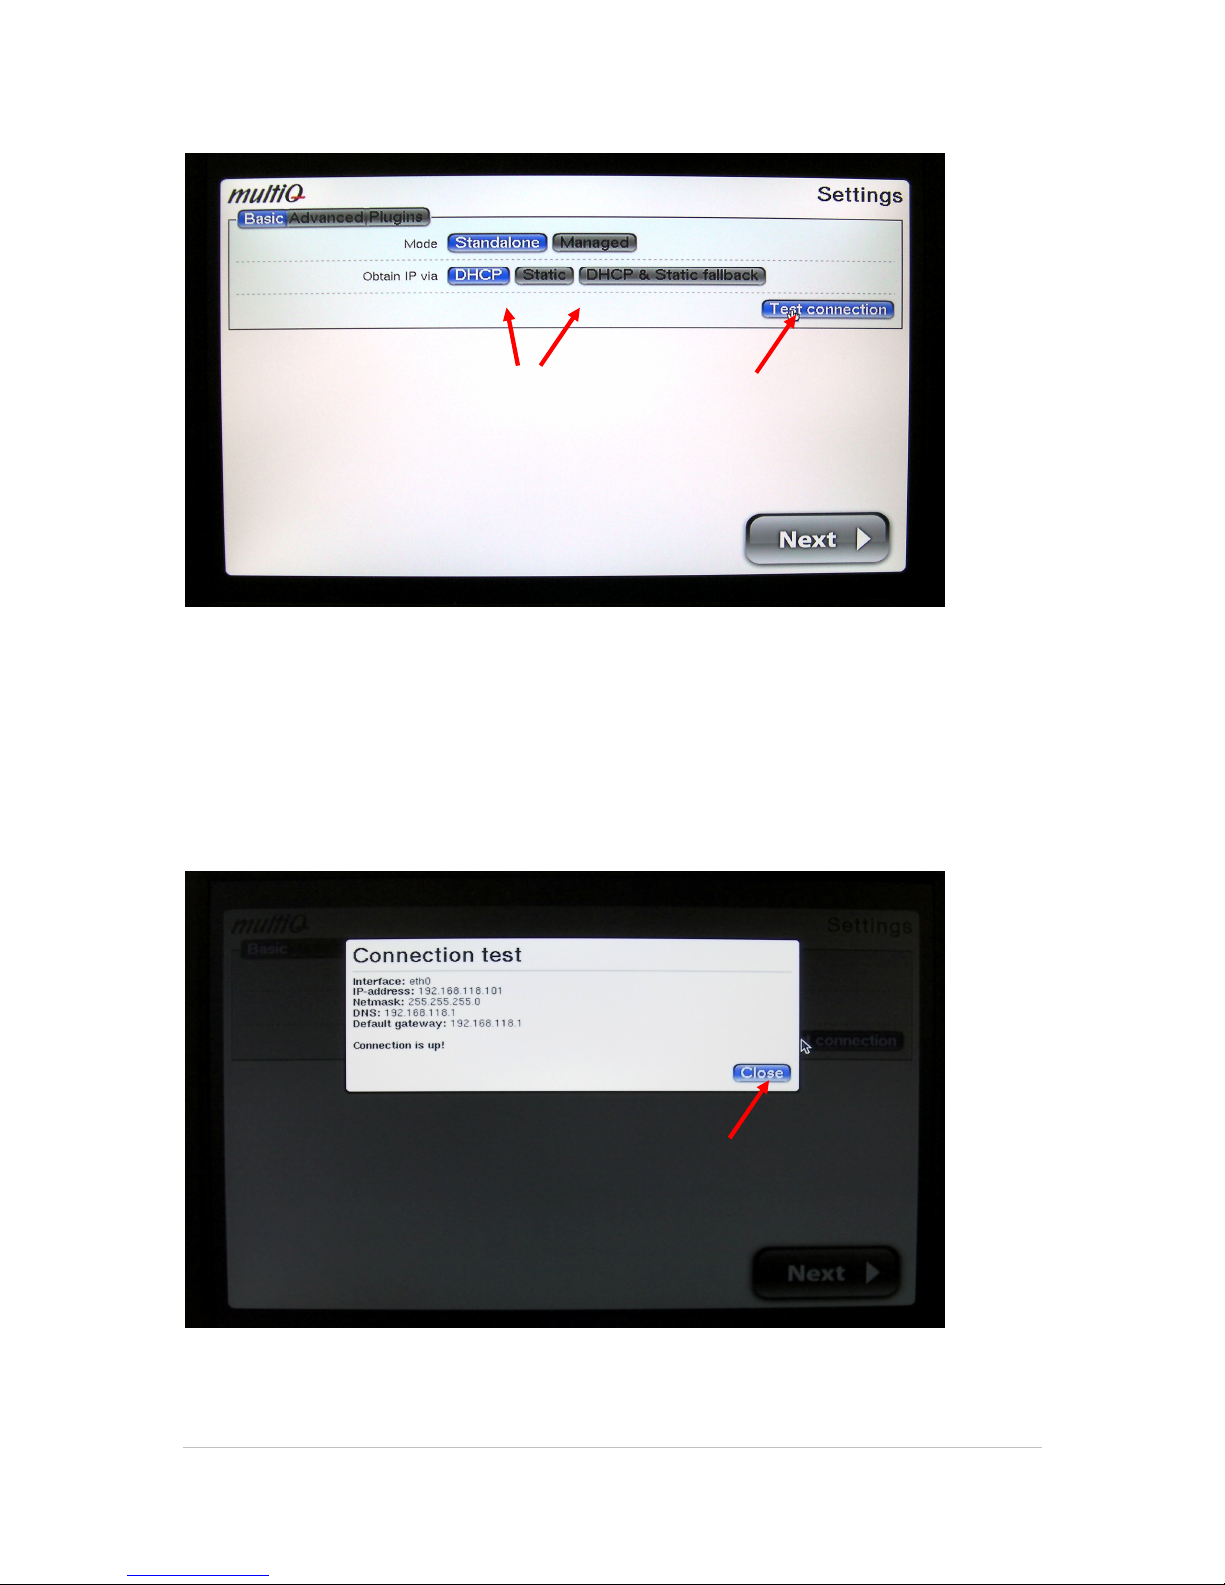
If the media player has not been previously been configured (in factory default state) it will directly
display the “Settings” menu (Figure 11). You will now find that “Managed” (meaning “centrally
managed”) is selected by default.
Note
NoteNote
Note If the media player is already set up in standalone mode you will need the password that was
set at the initial set up of the unit to get to the “Settings” menu. If prompted for a user name and
password you will find see the virtual keyboard at the bottom of the page. By default the username
is “admin”.
If the password has been lost you need to restore the factory state of the media monitor. See
Appendix 2.
Note
NoteNote
Note If you intend to set up a media monitor that has previously been configured to operate with a
central server; you will need a user name and a password before displaying the “Settings” menu.
The default user name is “installer
installerinstaller
installer” and the default password is “pass
passpass
pass”. This can be changed in the
central server, if so you need to get the password from the system administrator before changing
the media monitor to standalone mode.
Page 15
©2011 MultiQ are registered trademarks or trademark applications of MultiQ International AB in various jurisdictions. All
other company names and products are trademarks or registered trademarks of their respective companies. We reserve
the right to change the specifications without prior notice.
MultiQ DSMS 3.6 User Guide, Media players operated in standalone mode, Version 2, 18/08/2011 15
Figure 12. Select “Standalone” mode. DHCP is selected as default and will make the media player to
automatically obtain an IP address from a local DHCP server. Press the “Test connection” button and you
will get to know the IP address of the media player. As an alternative you can press the “Static” button to
set a fixed IP address. If so, you need to obtain IP addressing parameters from your network administrator.
DHCP operation is the most common. However in some networks static IP addresses are required.
If so, contact the local network administrator to obtain the fixed IP address parameters.
Figure 13. The connection test indicates that you are connected to a LAN and also give you the IP
address of the media player or media monitor. The IP address is needed in order to login to and to
manage the unit.
Choose between DHCP mode and setting
a fixed IP address
Page 16
©2011 MultiQ are registered trademarks or trademark applications of MultiQ International AB in various jurisdictions. All
other company names and products are trademarks or registered trademarks of their respective companies. We reserve
the right to change the specifications without prior notice.
MultiQ DSMS 3.6 User Guide, Media players operated in standalone mode, Version 2, 18/08/2011 16
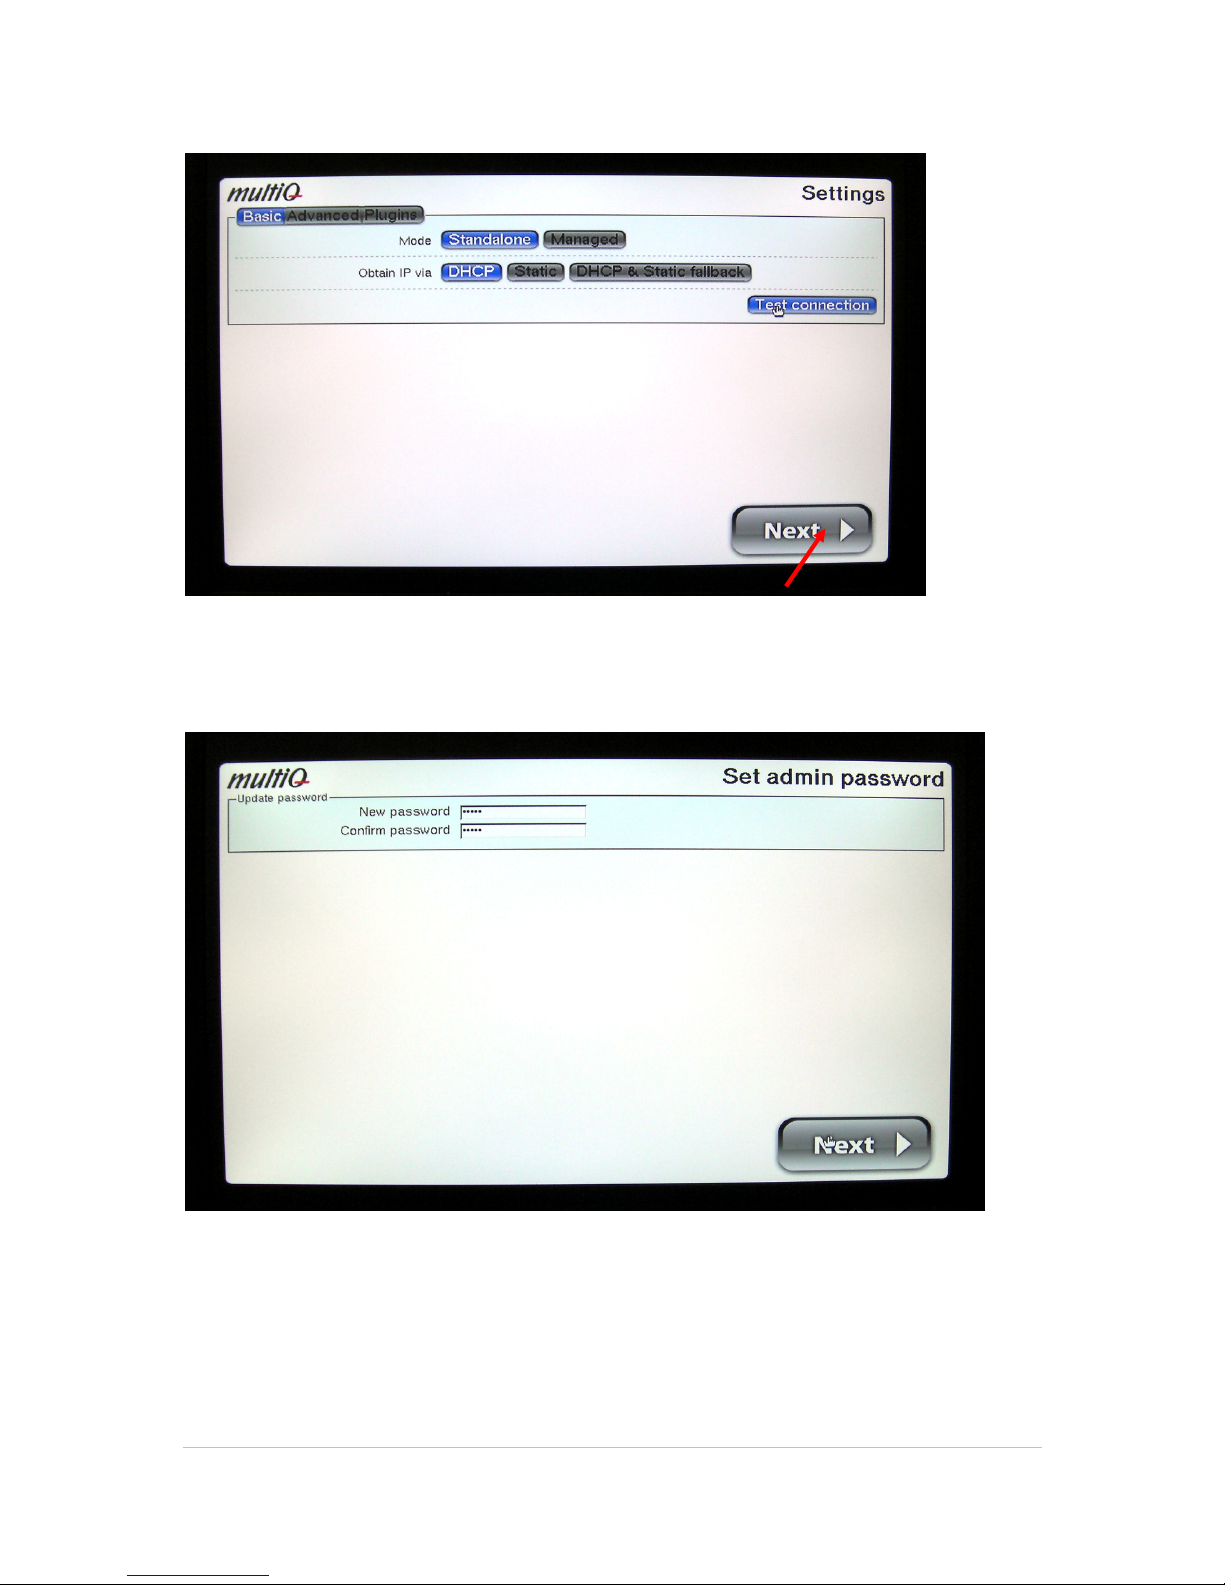
Figure 14. To leave the “Settings” menu, click the “Next” button. Note that if you intend to use Flash files,
a Flash plugin should be installed before leaving the setup menu (See next section).
Figure 15. Select the password of your choice. The administrator user name is “admin”. You can alter the
password and add more users later on.
After pressing the “Next” button you will get to the management system (see section 5.1.3).
Page 17
©2011 MultiQ are registered trademarks or trademark applications of MultiQ International AB in various jurisdictions. All
other company names and products are trademarks or registered trademarks of their respective companies. We reserve
the right to change the specifications without prior notice.
MultiQ DSMS 3.6 User Guide, Media players operated in standalone mode, Version 2, 18/08/2011 17
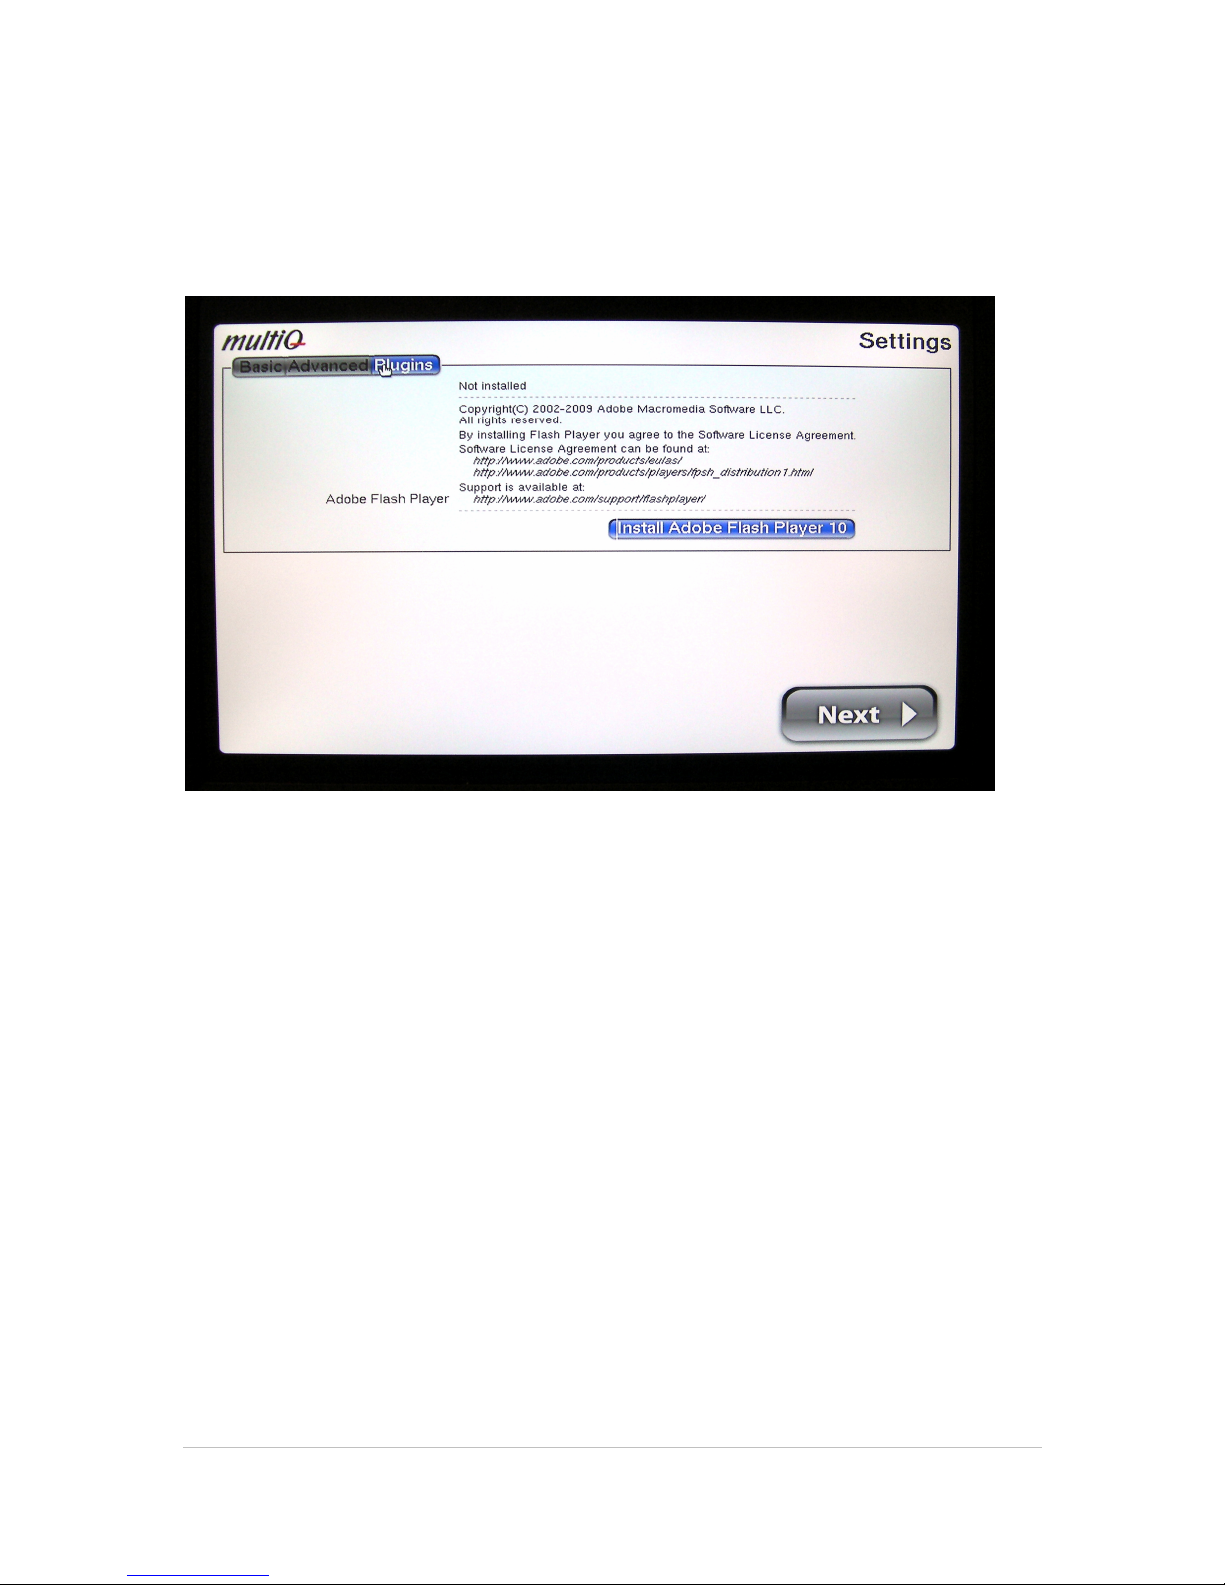
5.1.2 Flash installation
If the media player is to use Flash files a Flash plug in has to be installed. This is done by pressing
the “Plugins” button in the configuration menu. Follow the instructions to install Flash. Also other
plugins will become available in this menu.
Figure 16. If you intend to use Flash in your applications you need to install the Flash player by pressing
the “Plugins” button and then follow the onscreen instructions.
Page 18
©2011 MultiQ are registered trademarks or trademark applications of MultiQ International AB in various jurisdictions. All
other company names and products are trademarks or registered trademarks of their respective companies. We reserve
the right to change the specifications without prior notice.
MultiQ DSMS 3.6 User Guide, Media players operated in standalone mode, Version 2, 18/08/2011 18
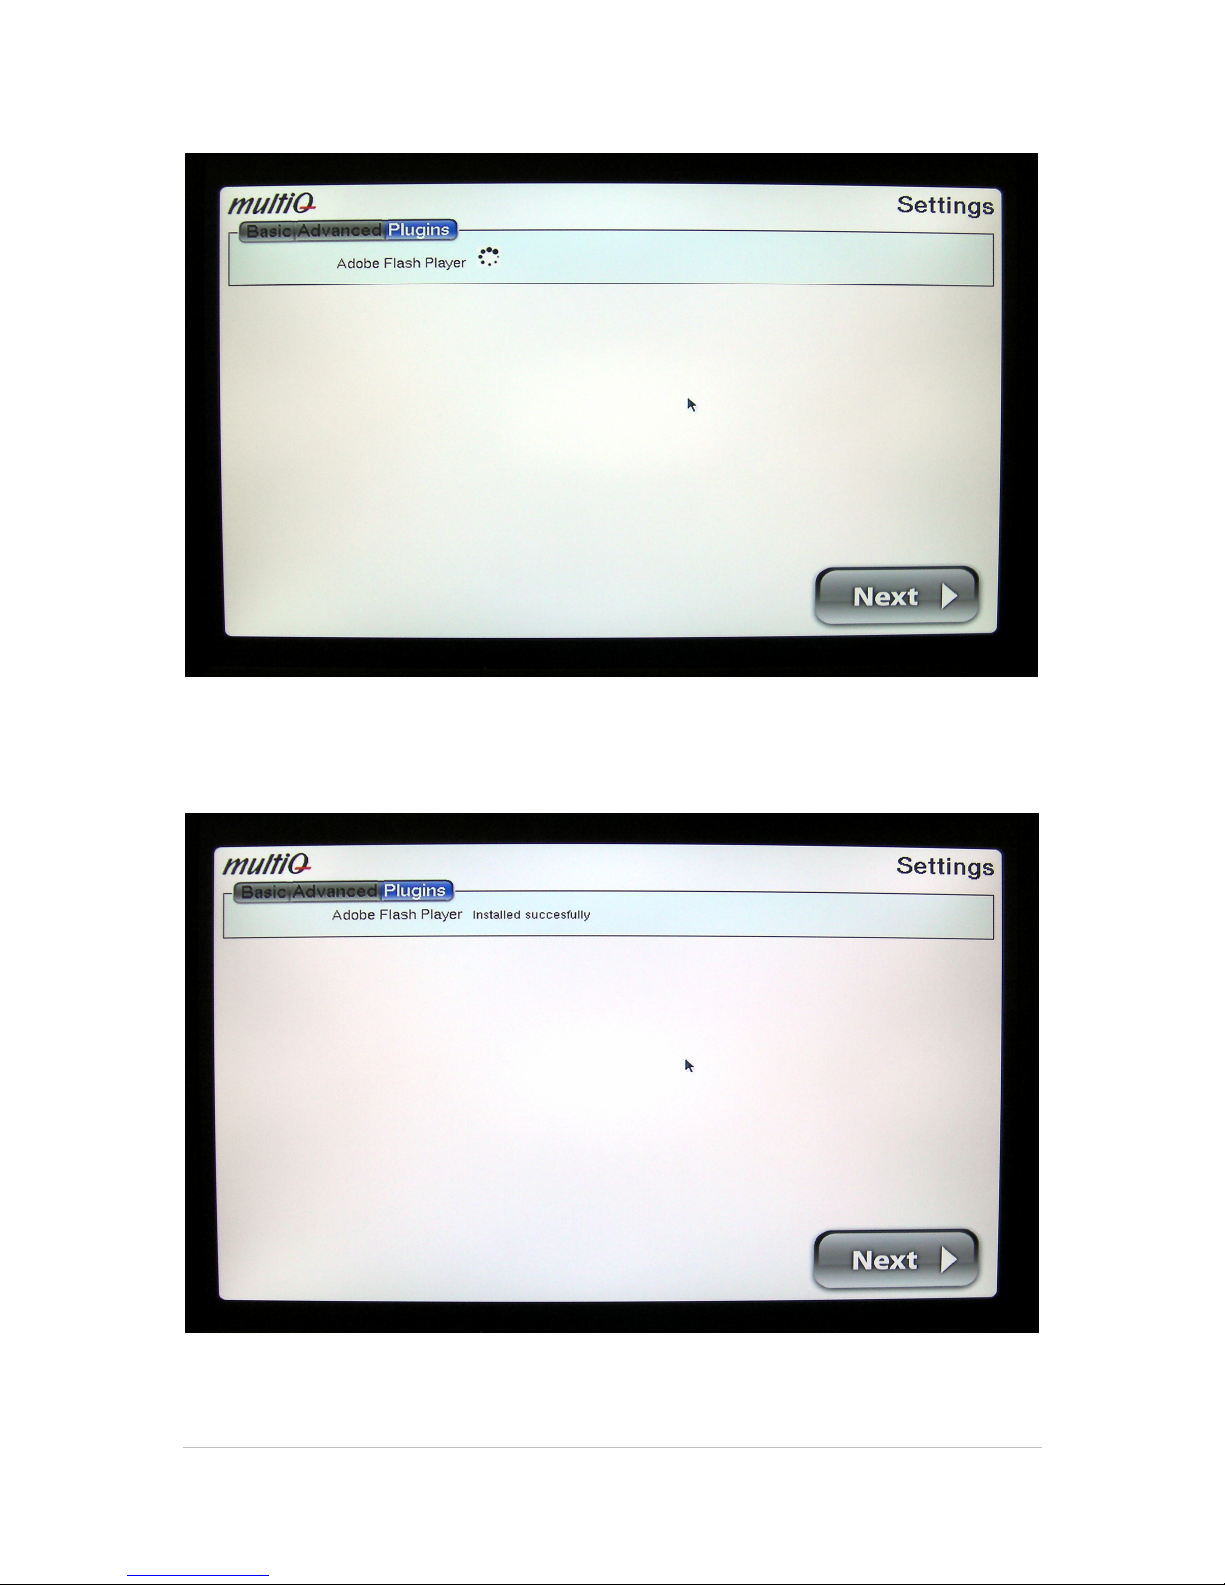
Figure 17. Once Flash has been installed it will stay in the media player as long as you do not perform a
factory reset of the unit.
Figure 18. Once the Flash player has been installed you can press “Next” to proceed.
Page 19
©2011 MultiQ are registered trademarks or trademark applications of MultiQ International AB in various jurisdictions. All
other company names and products are trademarks or registered trademarks of their respective companies. We reserve
the right to change the specifications without prior notice.
MultiQ DSMS 3.6 User Guide, Media players operated in standalone mode, Version 2, 18/08/2011 19
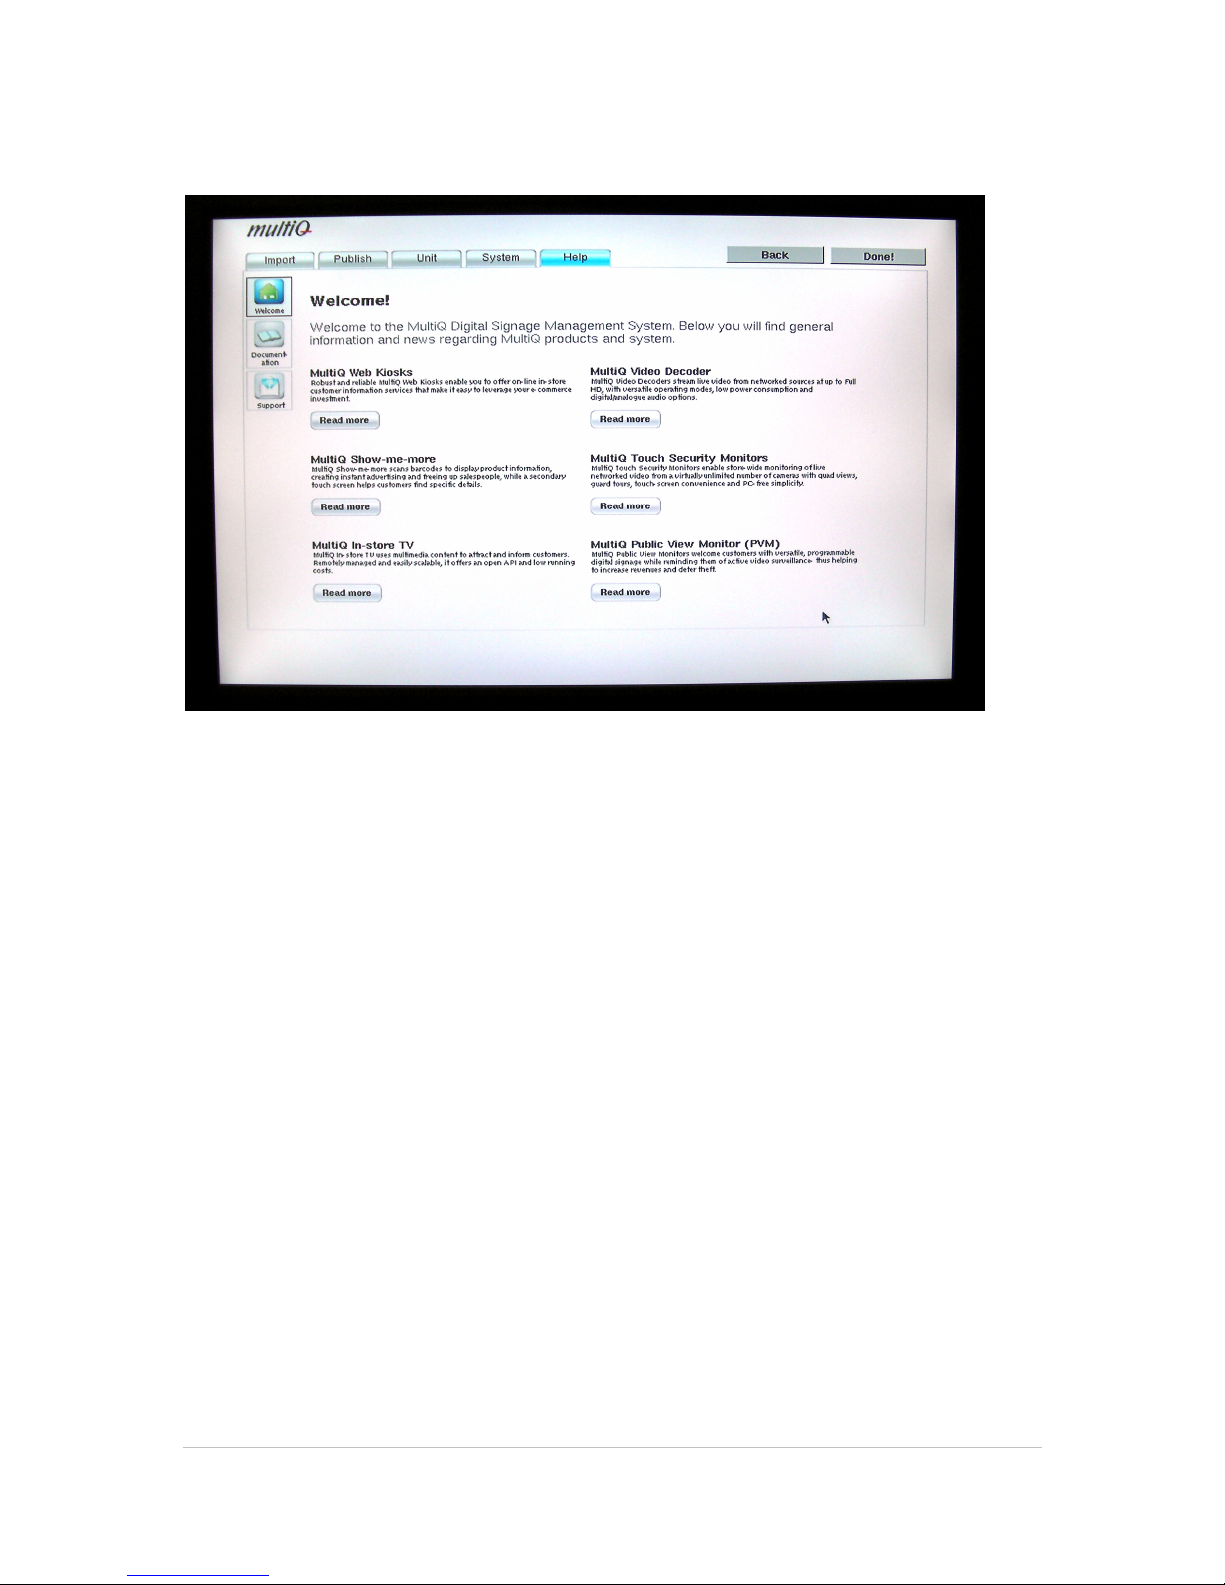
5.1.3 Making your first settings in the management system
Figure 19. After pressing “Next” you will get to the “Help” tab of the management system. The media
player contains a complete digital signage content management system.
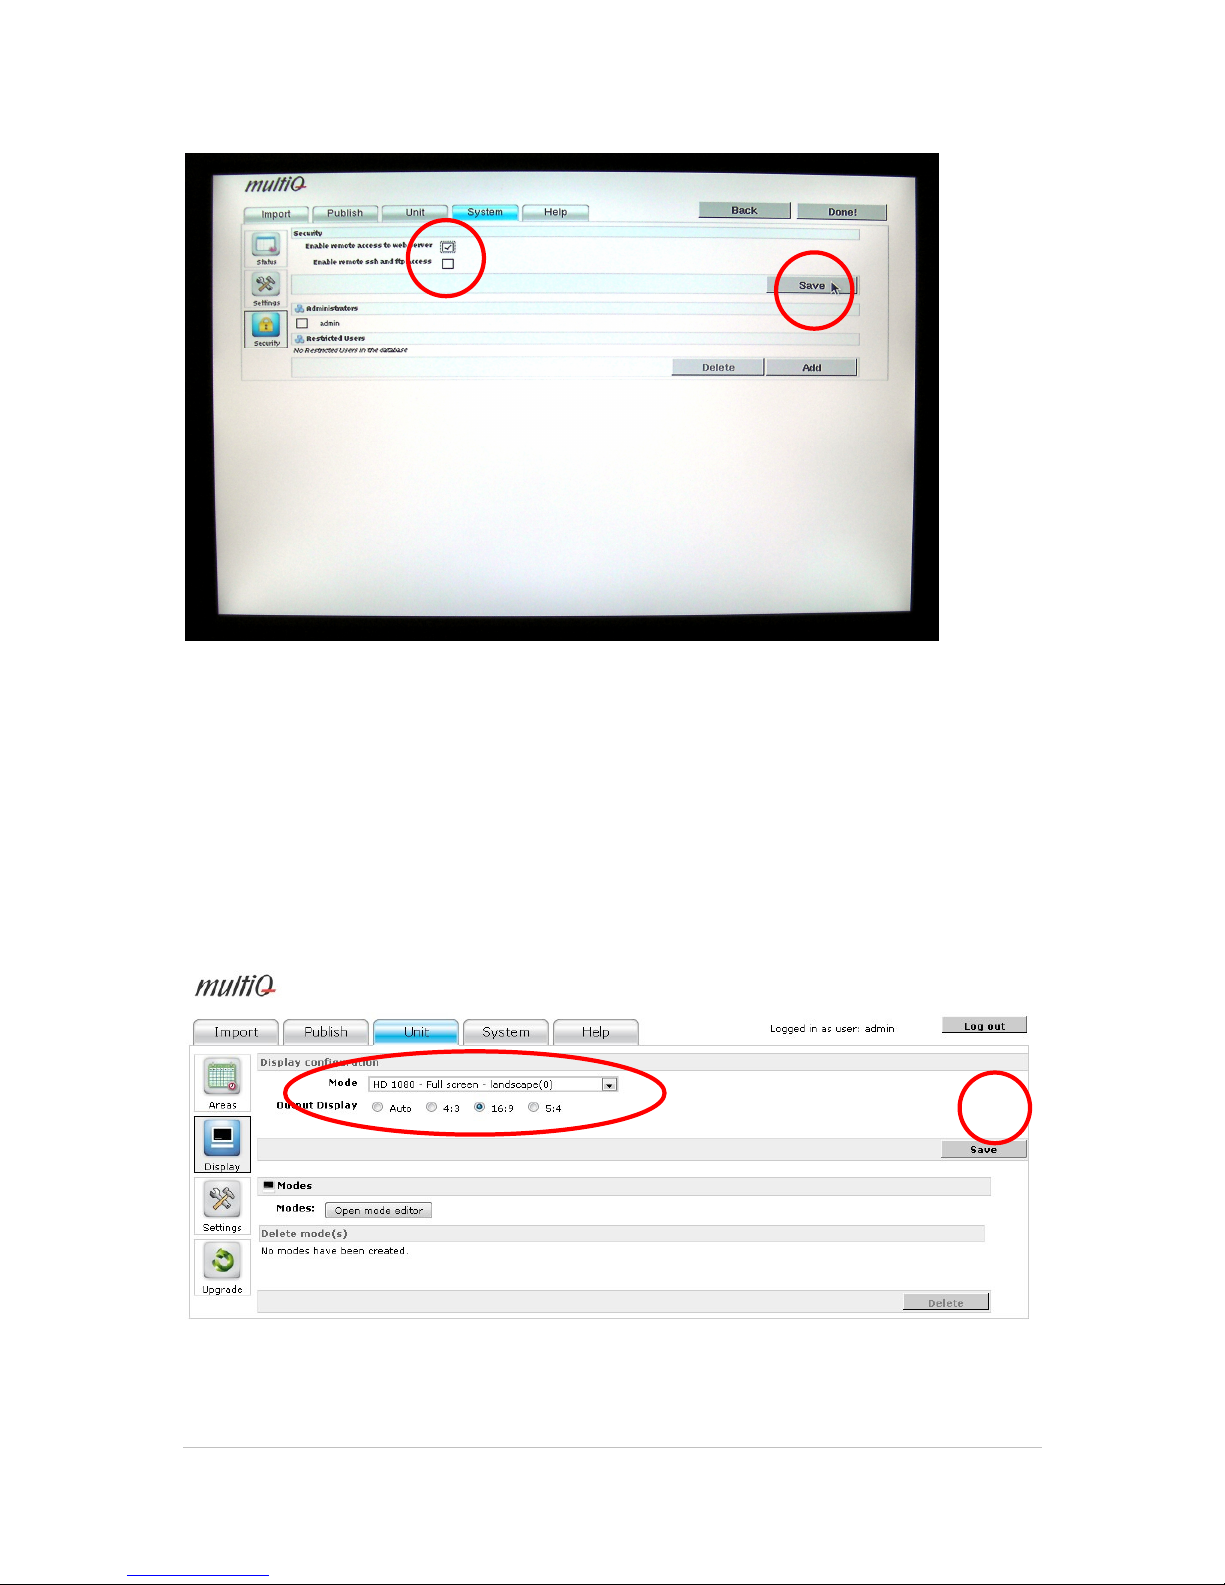
To be able to log in to the unit you also need to remove the web server lock. For security the web
server is by default locked from inbound requests. To remove the web server lock you need to click
the “Users” icon to the left. The “Disable remote access to web server” check box should be
unchecked. Then click “Save”. After a while the media monitor will be available for inbound
requests.
Page 20
©2011 MultiQ are registered trademarks or trademark applications of MultiQ International AB in various jurisdictions. All
other company names and products are trademarks or registered trademarks of their respective companies. We reserve
the right to change the specifications without prior notice.
MultiQ DSMS 3.6 User Guide, Media players operated in standalone mode, Version 2, 18/08/2011 20
Figure 20. Select the “System” tab and then the “Security” icon. Check that the “Enable access to web
server” box is checked and then click “Save”. If desired, the password can be changed while in the
“Security” menu. Finally press “Done” to proceed to normal operation of the media player.
5.1.4 Use the correct video settings
At this stage you can also set the video settings of the media player to fit the monitor that you
intend to use. Select the “Unit” tab and then the correct resolution (here 1080p) and the aspect
ratio (16:9). You can also choose to make these settings at a later stage after having logged in to
the media player.
Figure 21. Go to the “Unit” tab and click the Display icon and set the video mode to use the media player
with a 16:9 monitor, select “HD 1080 –Full screen –landscape(0). There is also an automatic mode that
Page 21

©2011 MultiQ are registered trademarks or trademark applications of MultiQ International AB in various jurisdictions. All
other company names and products are trademarks or registered trademarks of their respective companies. We reserve
the right to change the specifications without prior notice.
MultiQ DSMS 3.6 User Guide, Media players operated in standalone mode, Version 2, 18/08/2011 21
sees to that the aspect ratio is correct. This can be used as an alternative to setting the aspect ratio
manually.
Figure 22. Since the media player does not yet contain any content there is an “IDLE” sign presented on
the screen.
Next step is to login to the media player from the web browser in your computer.
5.2 Login and management
Connect your computer to the same LAN as the media player. Enter the IP address of your media
player in the address field of your web browser.
Note.
Note.Note.
Note. It is possible to login to the media player from any location on the Internet provided that the
external IP address of the media player is known (can be found by using www.myipaddress.com )
and that the firewall in the local network is configured to accept inbound requests on a specific port
that is assigned to the media player.
Page 22
©2011 MultiQ are registered trademarks or trademark applications of MultiQ International AB in various jurisdictions. All
other company names and products are trademarks or registered trademarks of their respective companies. We reserve
the right to change the specifications without prior notice.
MultiQ DSMS 3.6 User Guide, Media players operated in standalone mode, Version 2, 18/08/2011 22
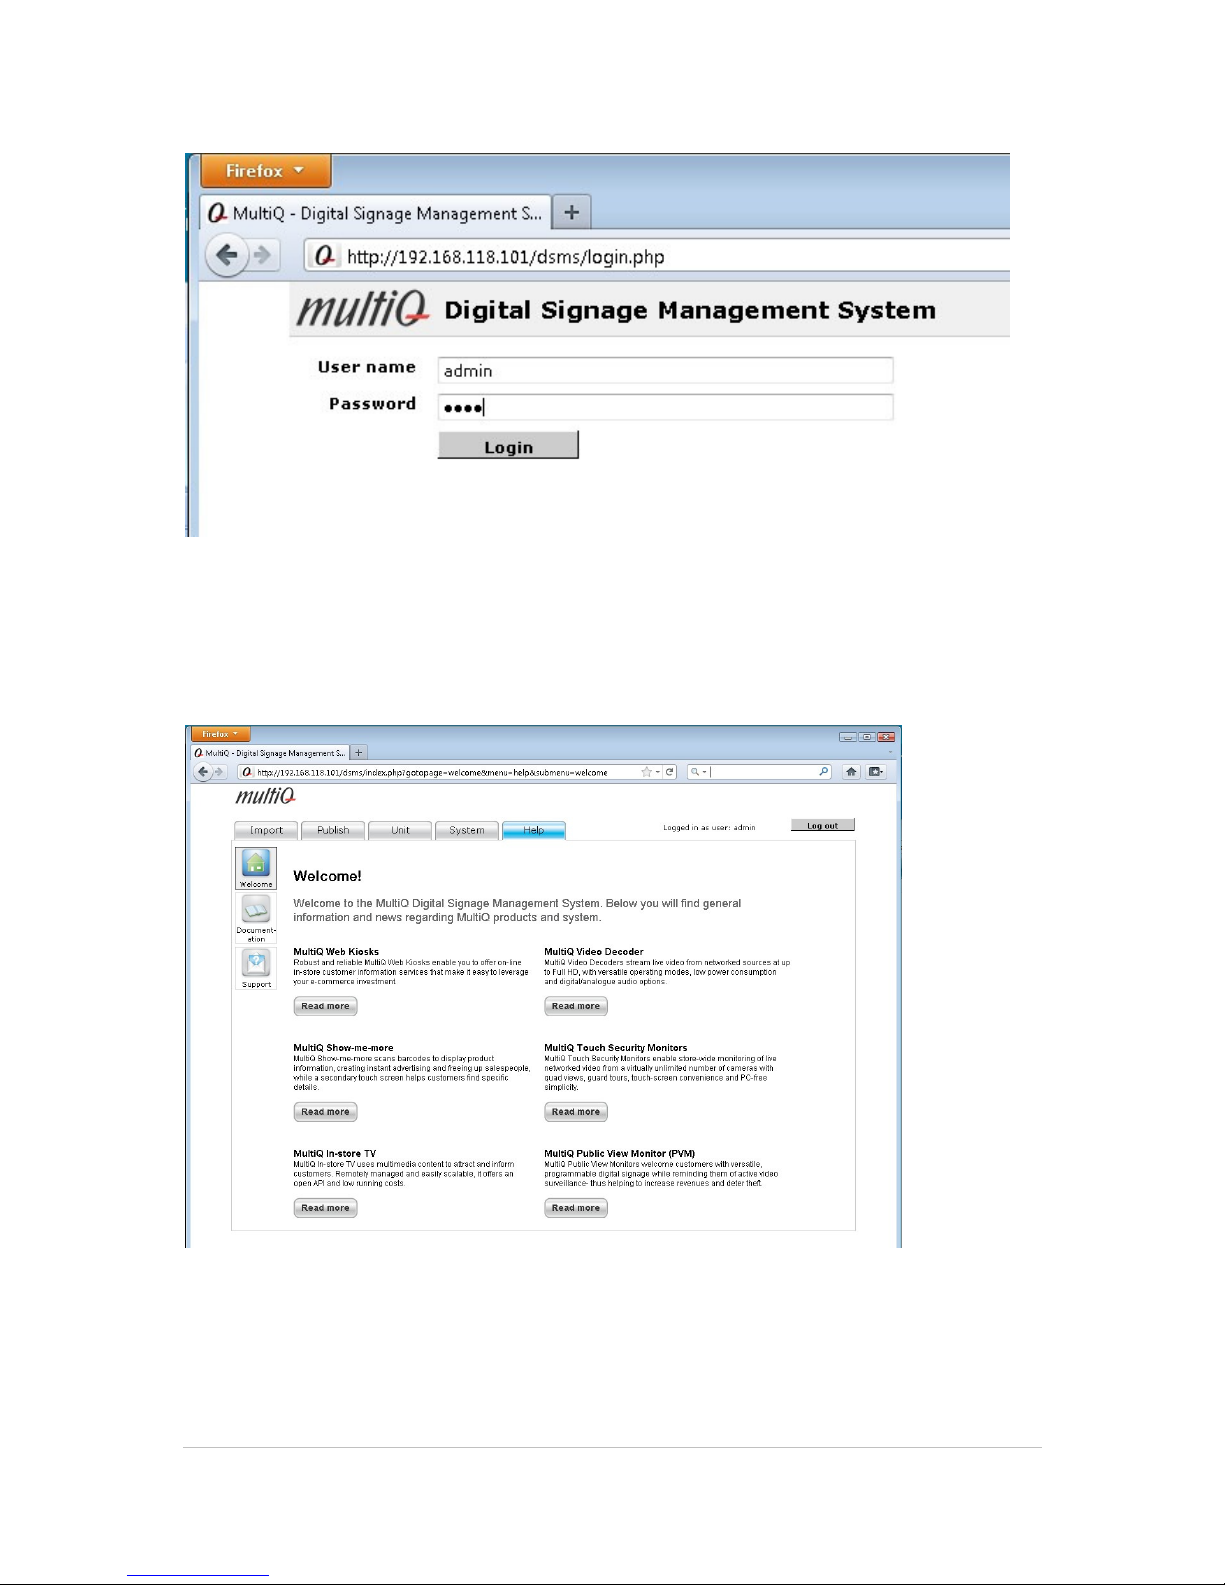
Figure 23. Enter the IP address of your media player into the address field of your web browser. User
name is admin and enter the password decided in the previous section.
Next you will find yourself in the “Help” tab.
Figure 24. After login you are in the “Help” tab.
The media player is now ready to operate with content that is added to the management system.
We will now start to upload and organize content in the media player. If you want to upgrade the
media monitor or if you need to do factory reset, there is more information on this in Appendix 2.
Page 23

©2011 MultiQ are registered trademarks or trademark applications of MultiQ International AB in various jurisdictions. All
other company names and products are trademarks or registered trademarks of their respective companies. We reserve
the right to change the specifications without prior notice.
MultiQ DSMS 3.6 User Guide, Media players operated in standalone mode, Version 2, 18/08/2011 23
6 Handling content
Content management in digital signage is very much based on repetition of messages. This is due
to the simple fact that there are new people coming to the location of the signs all the time. Digital
signage and kiosks share the challenge of providing the right information to the right person at the
right time. To achieve this we need to arrange our messages in a suitable way.
6.1 What is content?
Content can be many different things. The most common kinds of content are video clips and
images. However content comprise several other things such as web pages or entire websites,
signals from video streamers containing live TV and streams from surveillance cameras. Other
media formats such as Flash animation files and PDF documents can also be used as content in
this kind of systems. The basic component in any digital signage application is a media spot.
6.2 How to obtain content?
Media content once used to be quite hard and expensive to produce. However in today’s world of
modern media it is quite easy for anyone to produce media content at a low cost. Most companies
already produce a large amount of media content that can be reused for digital signage and kiosks.
And if adapted properly, existing media files can be converted into successful digital signage and
kiosk applications.
There are of course lots of sources for content. Video clips originate from video cameras that today
support HD formats up to 1080p at a very low cost. Video editing can be done using inexpensive
software available for less than 100 pounds and up. Images are produced using digital cameras
available at low prices and still providing excellent quality far exceeding the demands of digital
signage. Animations and drawings are created using inexpensive software that is easy to use.
By exploring what kind of media is already available in the company media archive you will probably
find lots of content that can be adapted and used in a digital signage or kiosk system after some
simple conversion. Digital signage and kiosks can soon be an additional publishing channel within
your company or organization.
6.3 Preparing content
The MultiQ system supports a wide range of media formats. However in order to get optimum
performance we strongly recommend the following choice of formats.
6.3.1 Preparing images
Images should be JPG or PNG. PNG give better performance. Image size must not exceed
1920x1080 pixels. Preparing images is easily done in Photoshop or other image processing
software. For batch conversion of image files into desired resolution you can try the free version of
“Fotosizer” (http://www.fotosizer.com).
If you need text to be put on top of your images (that is very much what digital signage is about),
you can do so in software as Photoshop or any other image editing software.
Page 24

©2011 MultiQ are registered trademarks or trademark applications of MultiQ International AB in various jurisdictions. All
other company names and products are trademarks or registered trademarks of their respective companies. We reserve
the right to change the specifications without prior notice.
MultiQ DSMS 3.6 User Guide, Media players operated in standalone mode, Version 2, 18/08/2011 24
6.3.2 Preparing video clips
Today video cameras produce Full HD video clips in the MPEG-4 (h.264) format directly. This is
more or less the industry standard for HD. Therefore video clips from modern HD video cameras
can be directly uploaded to the system.
Video clips in other formats are recommended to be converted into MPEG-4 (h.264) before use.
There are lots of freeware available that do the conversion with no visible loss of quality. Video
editing software such as “Pinnacle Studio” and others have all export filters for MPEG-4 (h.264) up
to 1080p Full HD. It is recommended to produce content in the same resolution as the resolution
of the area to be used on the screen. Adapting to the native resolution of the screen always give
superior results. Conversion to MPEG-4 (h.264) can be done using the “Super” freeware from
eRightsoft (http://www.erightsoft.com/SUPER.html) .
YouTube video clips can be downloaded from YouTube in full HD MPEG-4 (h.264) using the
YouTube download part of DVD VideoSoft Free Studio (http://dvdvideosoft.com/).
All video editing software allows for adding text with your own choice of fonts and colours on top of
your video clips.
6.3.3 Converting PDFs into images before use
It is recommended to convert PDFs (often multi page PDFs) to separate images and to put them
into one playlist per PDF. It is possible to use single page PDFs directly as media spots in the
system but converting the files to images before uploading to the system can improve performance.
Always use PDFs with better resolution than is to be used on the screen (which most PDFs are
since they are intended for print). Then convert the PDFs into single image files having the same
resolution as the area to be used on the screen. Conversion can be done with Photoshop or by
specialized software for PDF conversion such as Office Convert PDF
(http://www.officeconvert.com/).
6.3.4 Converting Flash animations into MPEG-4 (h.264) files
The system can use Flash animation, SWF files as media spots in playlists. However it is
recommended to convert the SWFs to MPEG-4 (h.264) files before use. The reason for this is that
the media players and media monitors have video hardware acceleration and the performance is
much better when using video than SWF files. This also relieves the processor from handling the
animation. By converting to MPEG-4 (h.264) you can run any Flash animation in 1080p Full HD.
6.3.5 Converting Power Point presentations into images or video clips
Power Points are by default produced in the 4:3 aspect ratio. This does not work well with modern
16:9 aspect ratio monitors. Therefore the Power Point files need to be redesigned to the 16:9
format before being used for digital signage in widescreen monitors. An alternative is to keep the
4:3 format and to only use a part of the screen for the presentation. Then the Power Point
presentation can be converted into either a sequence of JPG or PNG images or to a video clip.
Converting into images is easy. Just export your Power Point presentation into images by choosing
JPG or PNG as output formats. Power Point will batch convert the images into a folder. The images
can then be uploaded to the MultiQ system and presented as a sequence of images in a playlist.
Page 25
©2011 MultiQ are registered trademarks or trademark applications of MultiQ International AB in various jurisdictions. All
other company names and products are trademarks or registered trademarks of their respective companies. We reserve
the right to change the specifications without prior notice.
MultiQ DSMS 3.6 User Guide, Media players operated in standalone mode, Version 2, 18/08/2011 25
If you convert the Power Point presentation into a video clip you can keep all transitions and other
effects that are defined in the original presentation. There are several software alternatives
available to do this. One software that can be recommended is Moyea PPT to Video converter
(http://www.moyeasoft.com).
6.4 Getting smooth transitions when playing video
In digital signage things are played in loops and from separate files. When starting a new video file
or when looping a playlist the video decoder needs to be re-initiated. The restart of the video
decoder will cause a black screen. This may get annoying.
However by clever use of content, these effects can be avoided.
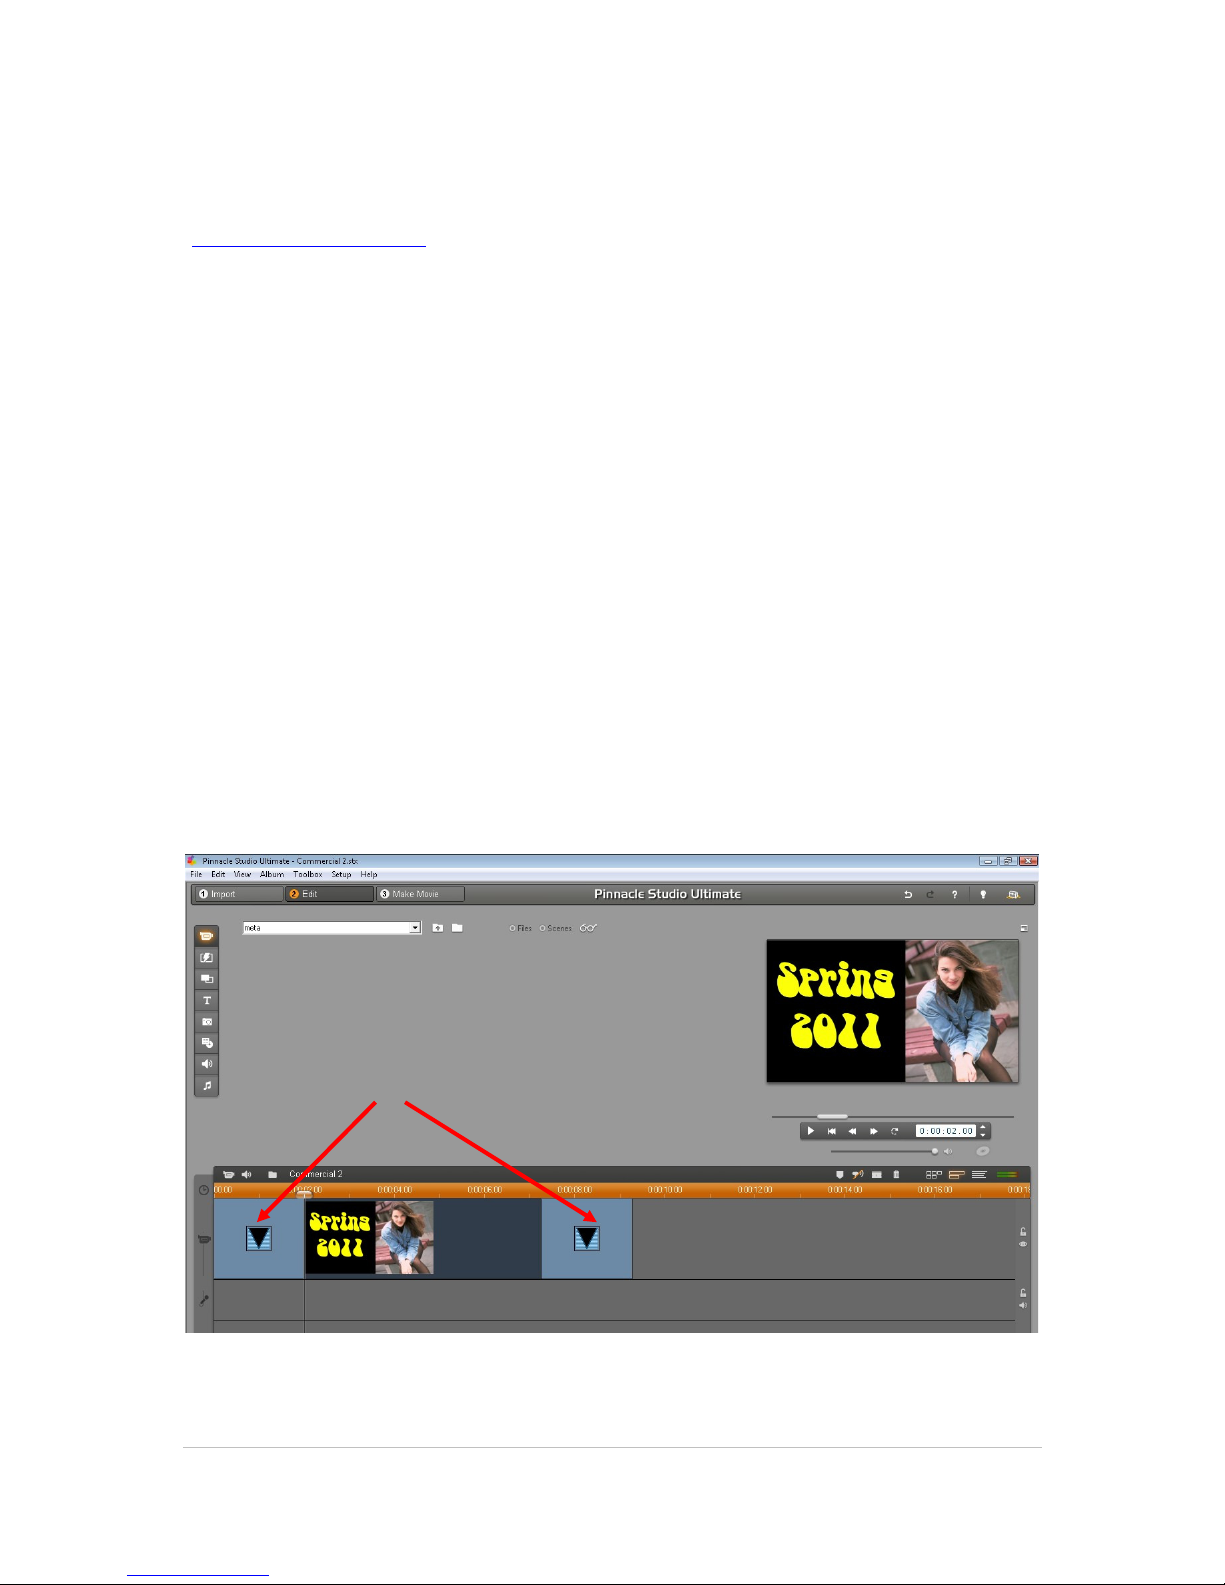
6.4.1 Add fade-inns and fade-outs
A way to avoid ugly transitions is to edit each video clip so that it fades in from black at the start
and fades out to black at the end. This can be done easily with video editing software such as
Pinnacle Studio.
6.4.2 To combine several video clips into one clip with the desired transitions
Video editing software is loaded with transition and if you want to have fade-over effects or other
more complex transitions it is easy to do so. By combining several video clips into one single clip
you also avoid restarting the video decoder. You can also combine video clips with still images in
any combination with all transitions that are supported by the video editing software.
Figure 25. In video editing software such as Pinnacle Studio you can easily add fade in and fade out to
black effects to avoid ugly transitions. Also, you can combine several video clips in to a sequence of clips
with any selection of transitions you want.
Video editing software such as Pinnacle
Studio lets you add fade inns and fade outs
along with any transition you like
Page 26
©2011 MultiQ are registered trademarks or trademark applications of MultiQ International AB in various jurisdictions. All
other company names and products are trademarks or registered trademarks of their respective companies. We reserve
the right to change the specifications without prior notice.
MultiQ DSMS 3.6 User Guide, Media players operated in standalone mode, Version 2, 18/08/2011 26
6.5 Media spots
The MultiQ digital signage management system use a number of icons used for easy navigation
through the process of building your applications. In the following sections you will learn the basic
elements of creating your own application.
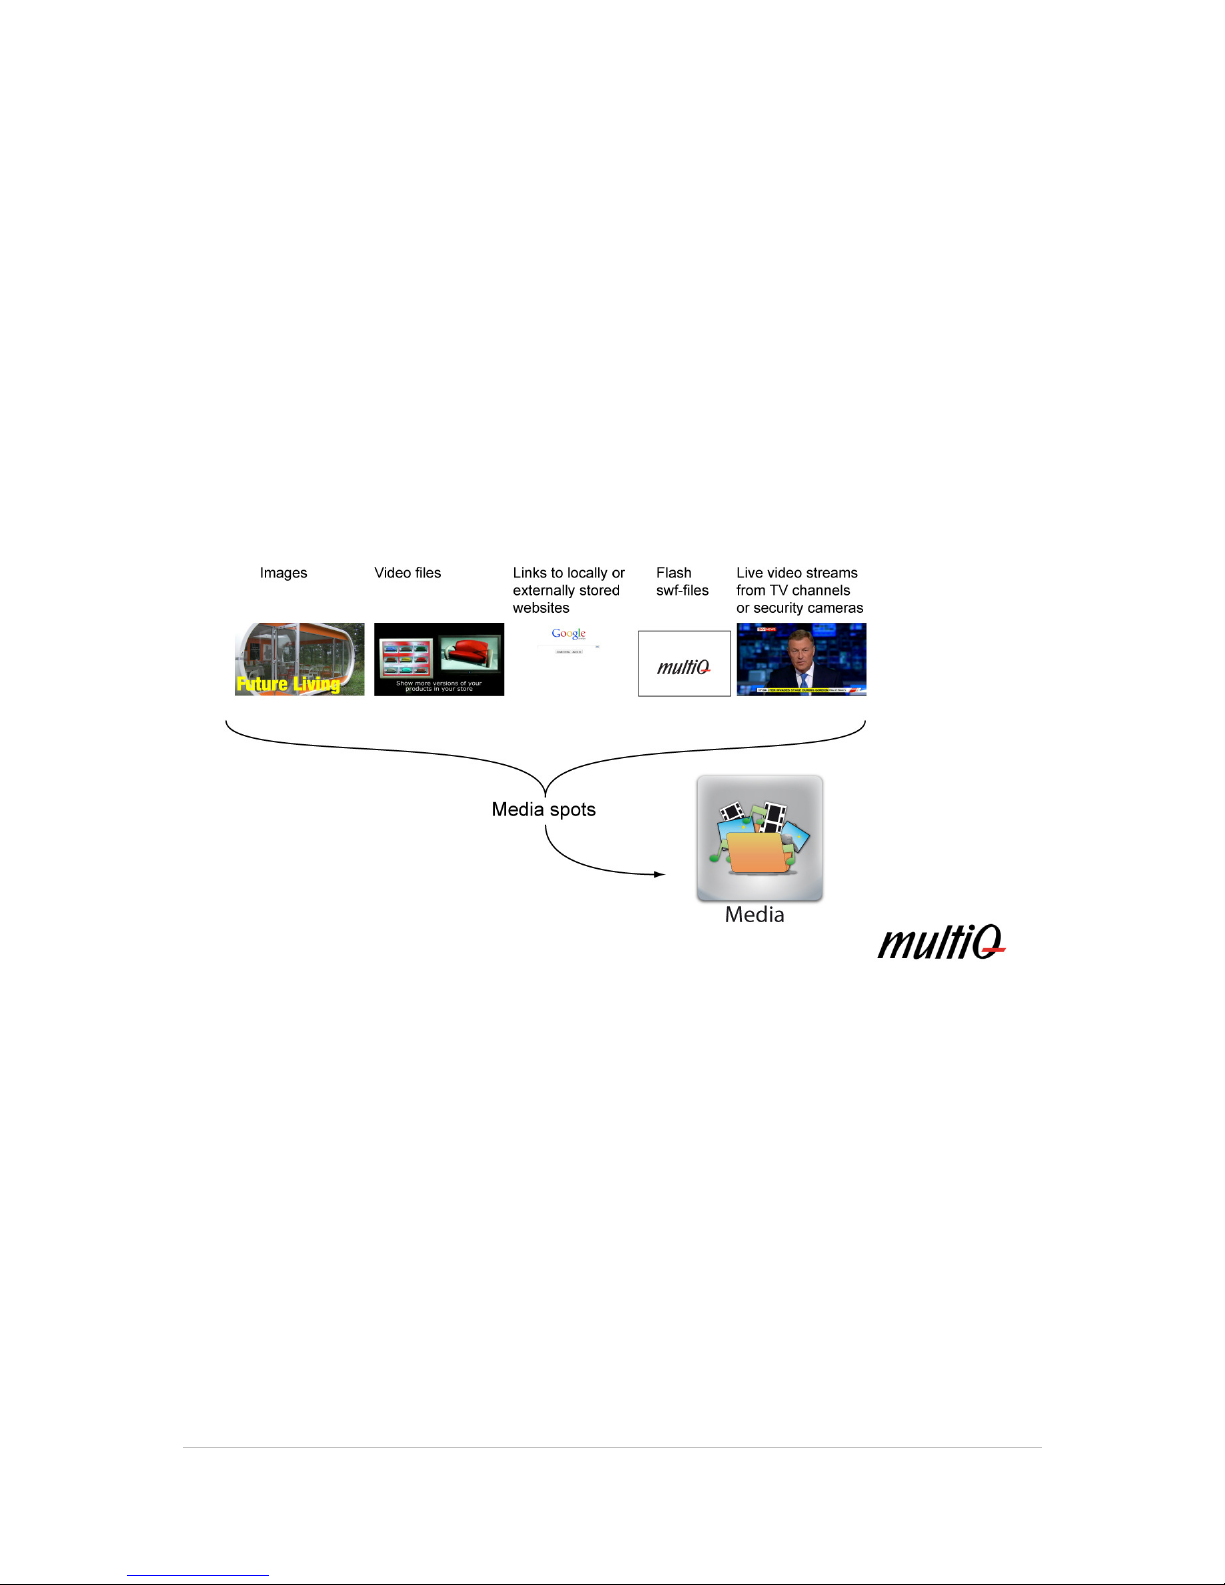
A media spot may be an image, a video clip, or a link to a web page that may be available on the
Internet or stored inside the media player or media monitor. Even an IP video stream from a security
camera or a live broadcasting IP stream may be regarded as a media spot.
All media spots used in the digital signage system are stored in the media archive. By clicking the
Media icon you get into the media archive where you can upload and define new media spots. In
the media archive you can organize the spots into folders that are adapted to your projects.
Figure 26. Media spots may be image and video files, local or external web hyperlinks or live IP video- or
audio streams
6.6 Playlists
To use the media spots in our media players we need to organize them and to decide how they are
going to be presented. In digital signage we use playlists. Playlists are looped sequences media
spots.
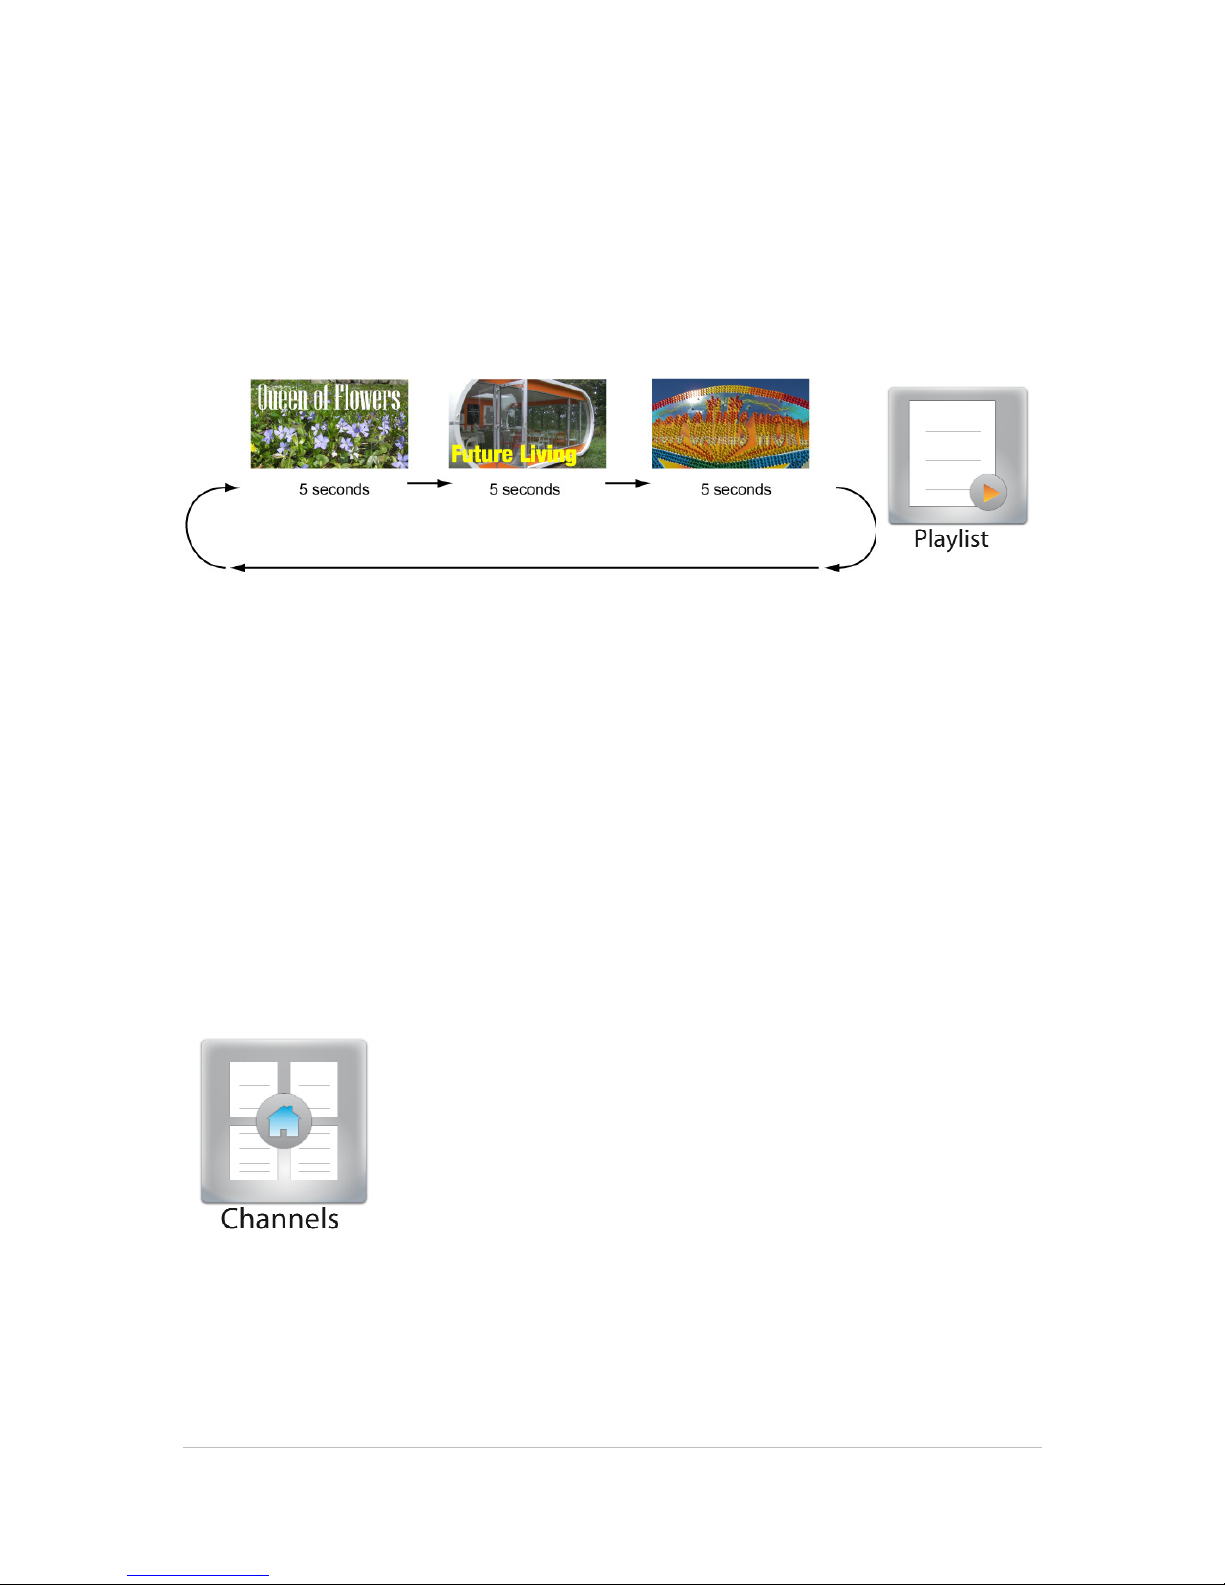
Media spots are organized into playlists. A playlist is a sequence of images, web pages and video
clips or even web links or streams that are repeated continuously. Therefore a playlist can be
regarded as a repeated (looped) sequence of spots.
Page 27
©2011 MultiQ are registered trademarks or trademark applications of MultiQ International AB in various jurisdictions. All
other company names and products are trademarks or registered trademarks of their respective companies. We reserve
the right to change the specifications without prior notice.
MultiQ DSMS 3.6 User Guide, Media players operated in standalone mode, Version 2, 18/08/2011 27
The reason why playlists are used in digital signage is that each customer stays only for a short
while in the proximity of the screen. This means that there are always new people to watch the
message and this result in a need for repetition. The length of a playlist may vary depending on
where the monitor is located and the application. In a store people may not stay in front of a
monitor for more than a few minutes while in an airport lounge they may stay for half an hour or
more. These circumstances have a large impact on the choice of length of playlists.
Playlists may consist of one or more media spots that are played in a loop.
Figure 27. A playlist is a sequence of media spots that in most cases are played in a loop.
The playlists are stored in the “Playlist” menu where you can create and edit the playlists as you
like.
6.7 Channels
In the Channel archive you can create channels and add playlists. However in standalone mode
channels are seldom used since the main objective of using channels is to be able to change the
content of several media monitors simultaneously. Instead, in standalone mode, the playlists can be
associated directly with the areas on the screen.
Additional information on channels is also to be found in the “MultiQ DSMS 3.4 User Guide Media
players operated in centrally managed mode”.
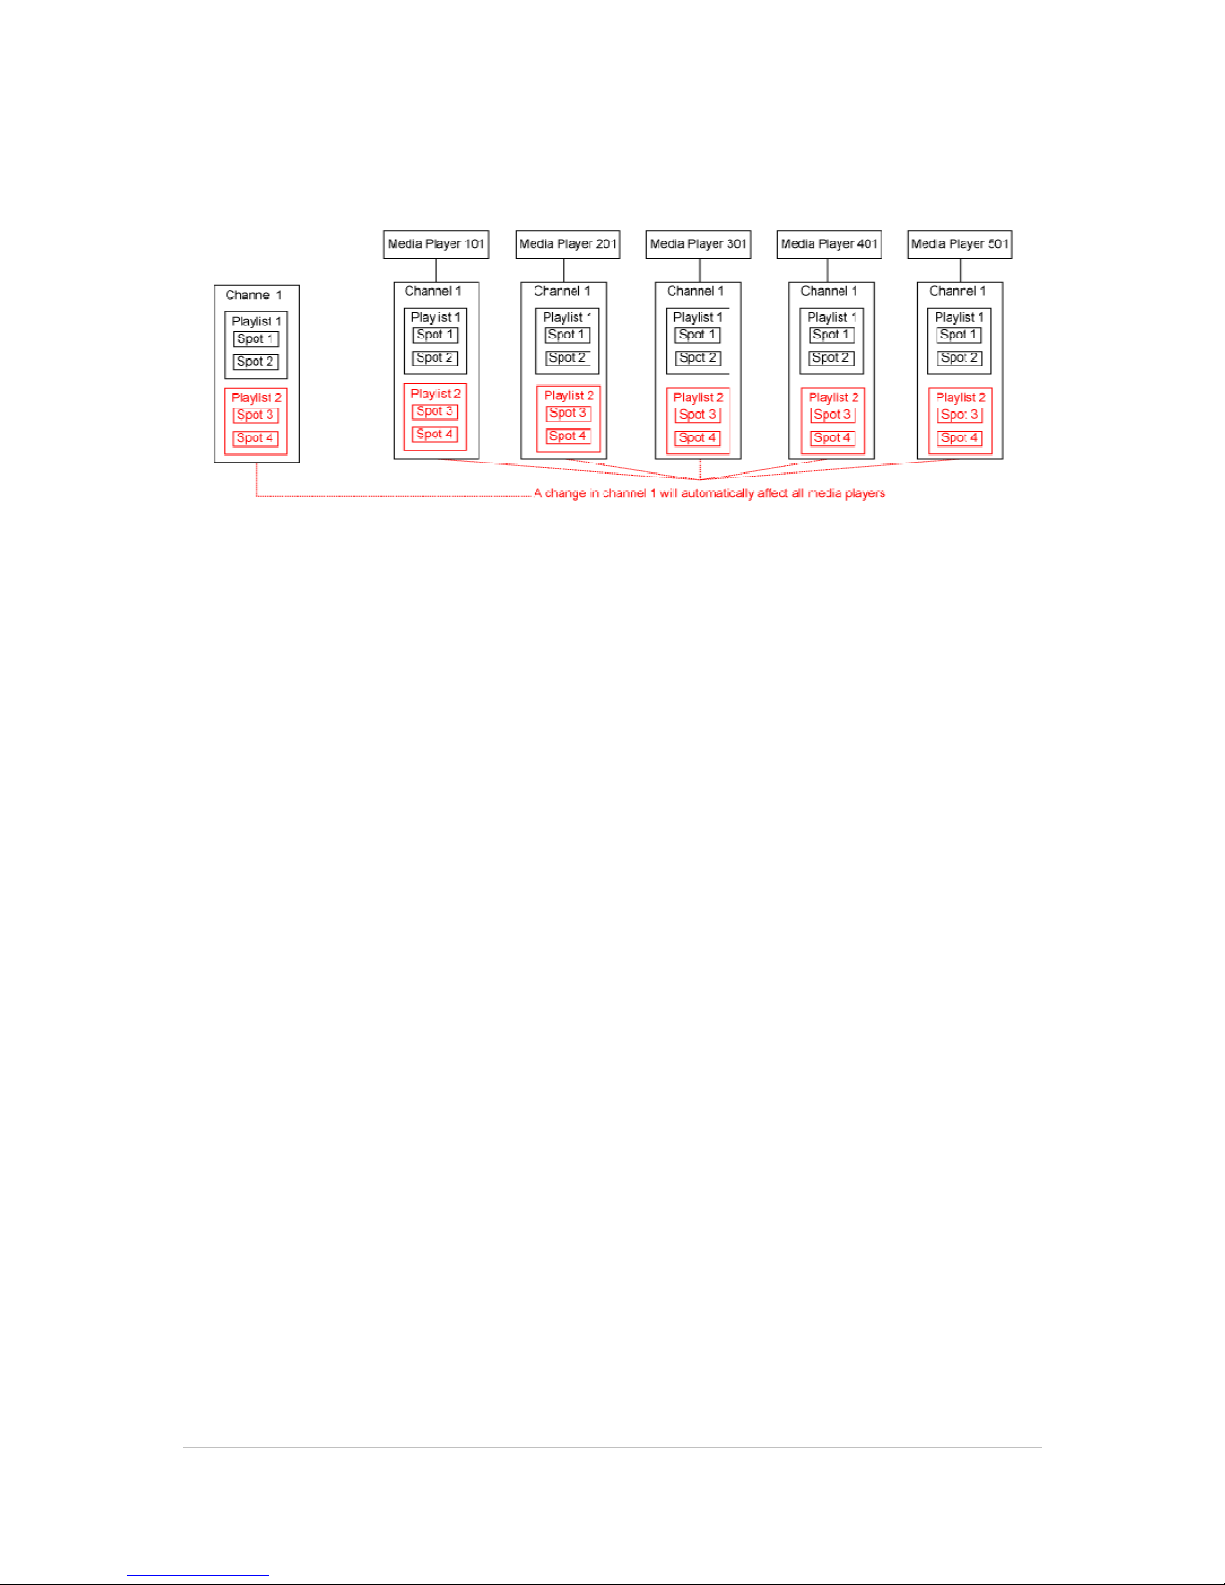
Figure 28. The channels can be created and edited in the Channel Bank by clicking the “Channels” icon.
Page 28
©2011 MultiQ are registered trademarks or trademark applications of MultiQ International AB in various jurisdictions. All
other company names and products are trademarks or registered trademarks of their respective companies. We reserve
the right to change the specifications without prior notice.
MultiQ DSMS 3.6 User Guide, Media players operated in standalone mode, Version 2, 18/08/2011 28
Figure 29. A channel is a number of playlists that are associated with an area on a monitor.
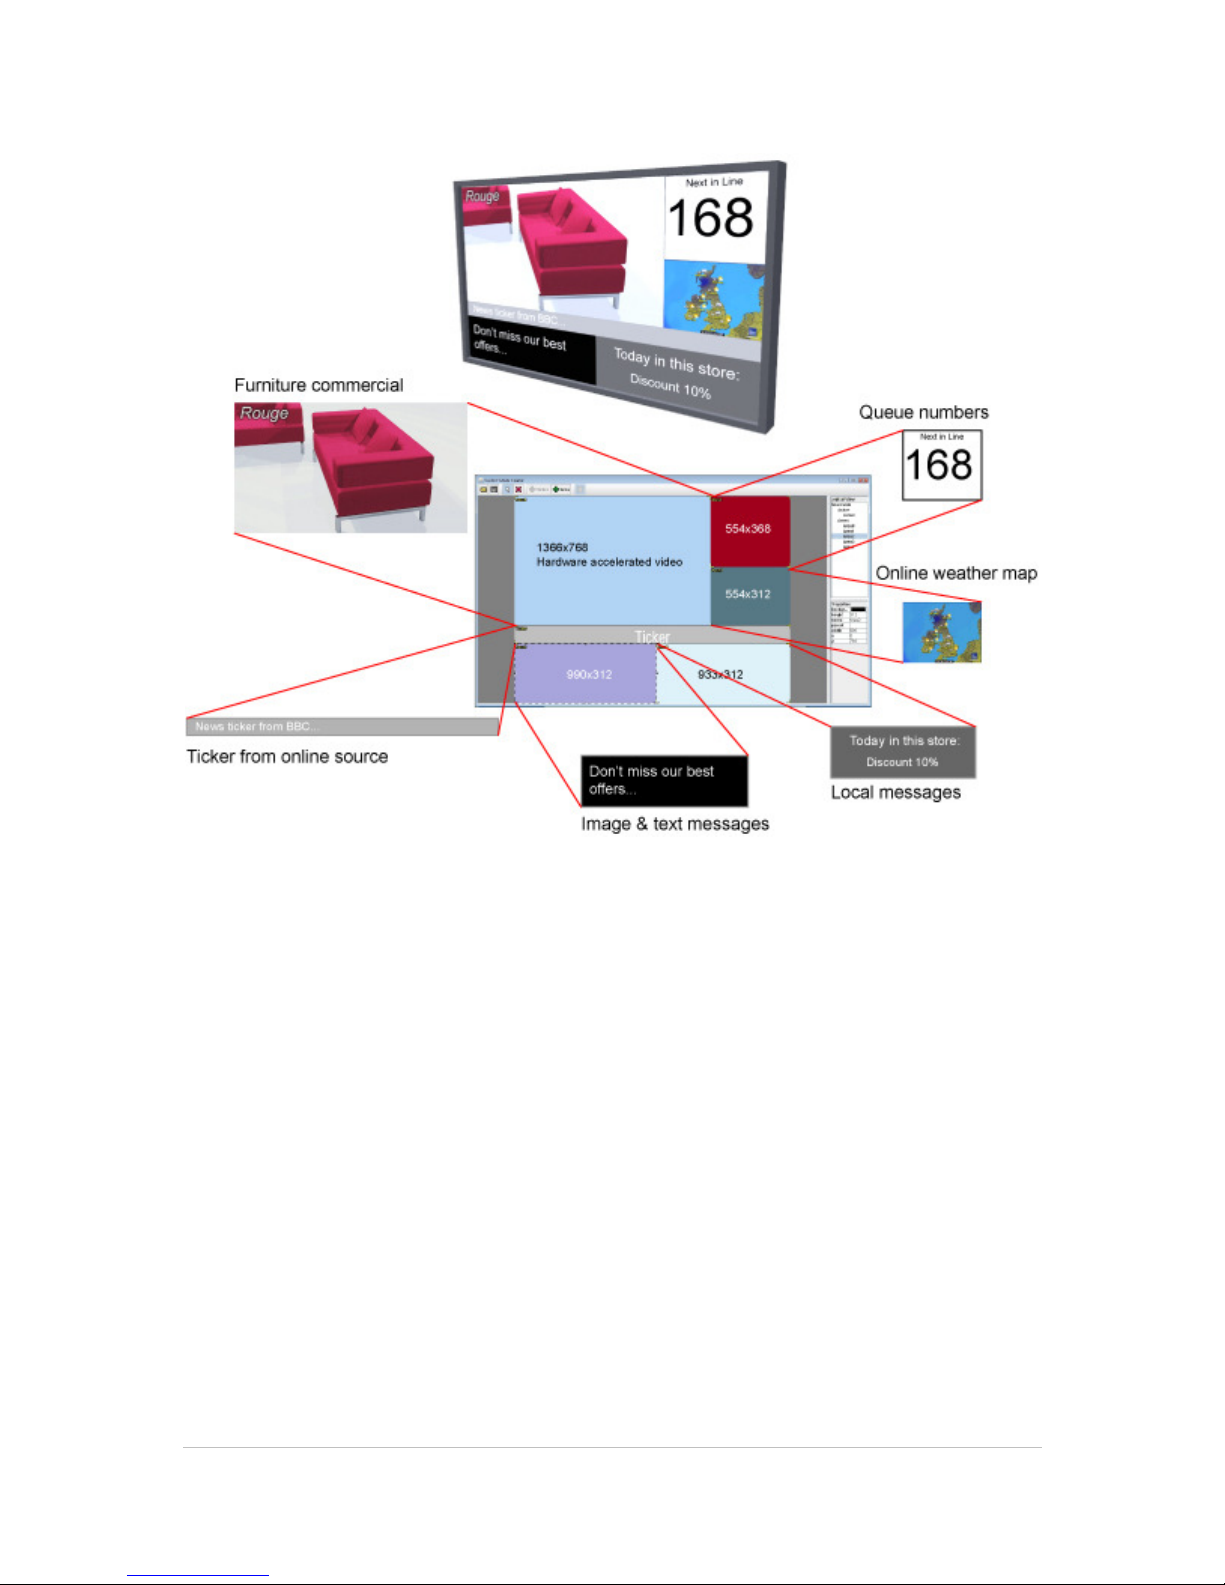
6.8 Areas
A channel may be presented as a full screen application on a monitor. However in digital signage
and kiosk systems the screen is often split into areas. Then each region may present a specific
channel. A screen used in split-screen mode may be regarded as a number of individual monitors
each showing their own channel.
Page 29
©2011 MultiQ are registered trademarks or trademark applications of MultiQ International AB in various jurisdictions. All
other company names and products are trademarks or registered trademarks of their respective companies. We reserve
the right to change the specifications without prior notice.
MultiQ DSMS 3.6 User Guide, Media players operated in standalone mode, Version 2, 18/08/2011 29
Figure 30. An area on a monitor that is used to display the content of a channel. In this example there are
four channels each associated with an area on the screen.
Page 30
©2011 MultiQ are registered trademarks or trademark applications of MultiQ International AB in various jurisdictions. All
other company names and products are trademarks or registered trademarks of their respective companies. We reserve
the right to change the specifications without prior notice.
MultiQ DSMS 3.6 User Guide, Media players operated in standalone mode, Version 2, 18/08/2011 30
7 Getting an overview of the digital signage management
system
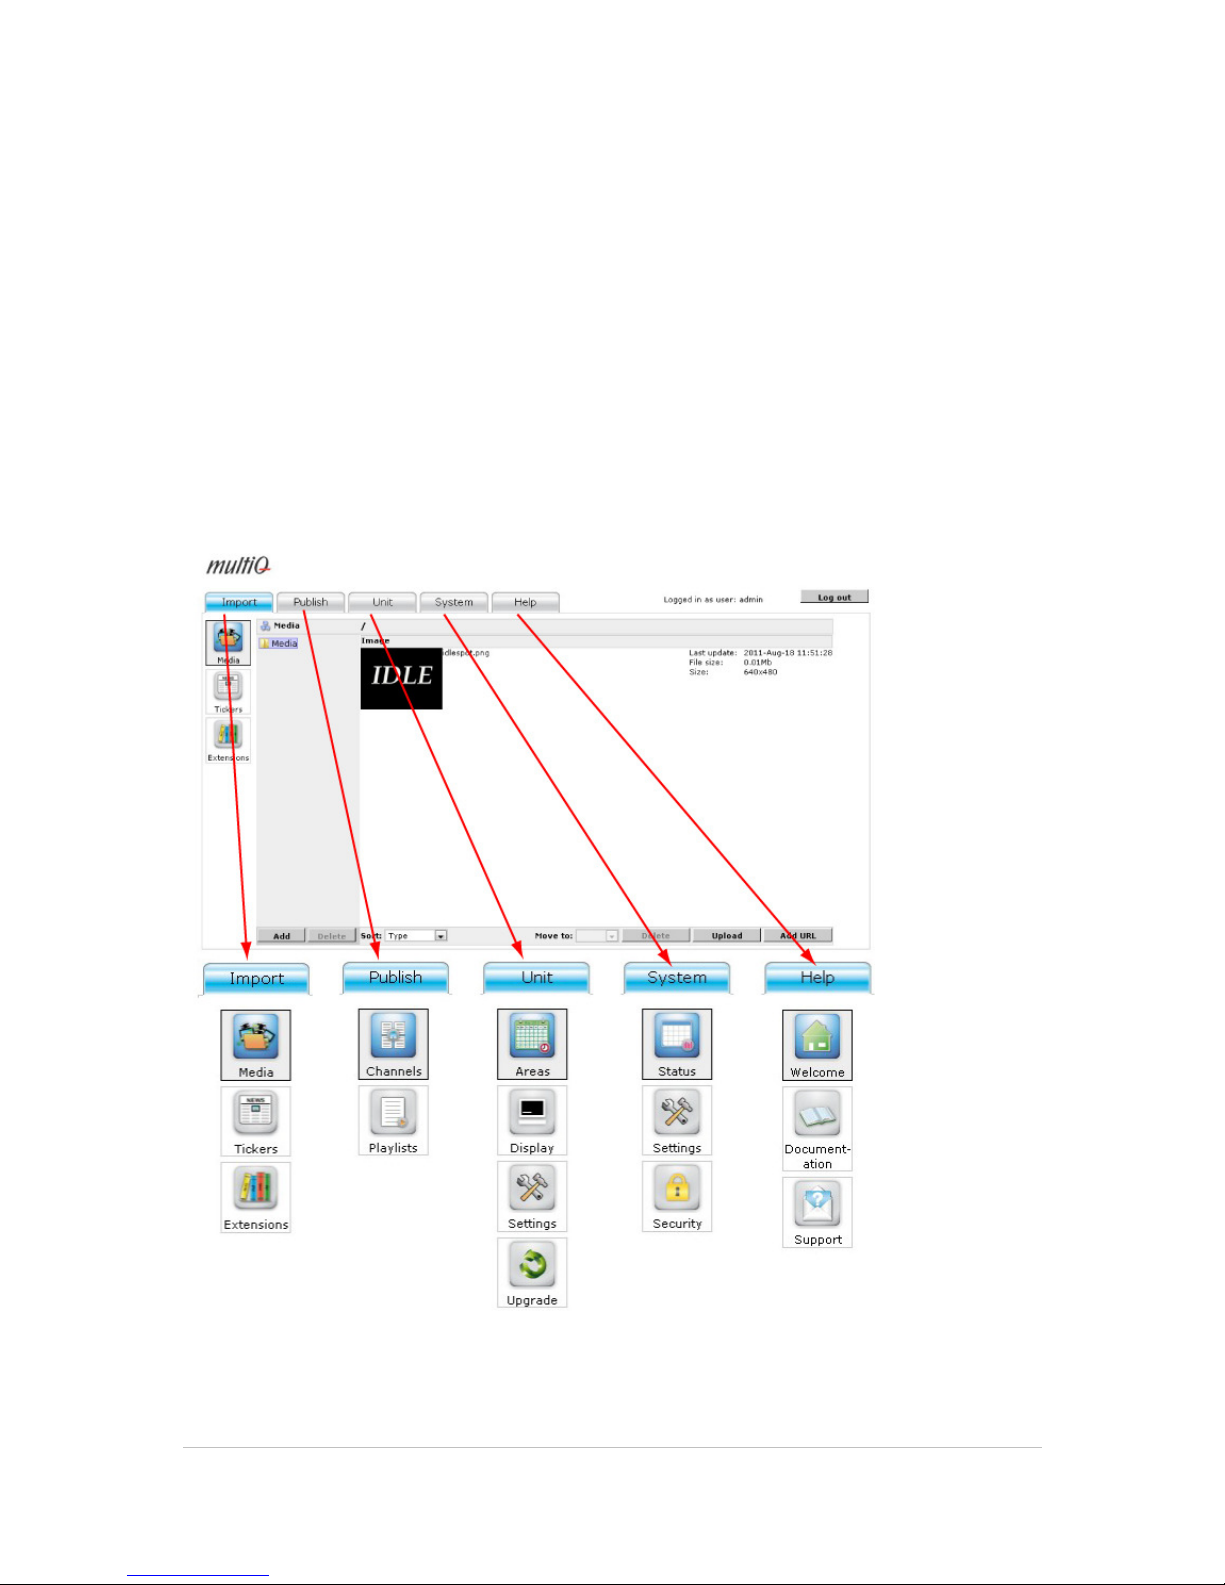
The management system is divided into five tabs.
The first two tabs “Import” and “Publish” are used to upload media to the system and to arrange the
media into playlists and channels. It is here that the media is updated. In the “Publish” tab you also
find the tools to create the video modes that may be used to present one or more channels on the
same screen.
The third tab “Sites” is used to handle the media players. Here the media players are associated
with the channels. The “System” tab includes some common settings for the system. The “Help” tab
includes links to various resources, such as manuals, technical notes, video training and to the
support page on the MultiQ website (see chapter 15).
Figure 31. The management system is divided into tabs. The “Import” and Publish” tabs are used for
everyday content management. The “Sites” tab is used to manage the media player infrastructure.
Page 31
©2011 MultiQ are registered trademarks or trademark applications of MultiQ International AB in various jurisdictions. All
other company names and products are trademarks or registered trademarks of their respective companies. We reserve
the right to change the specifications without prior notice.
MultiQ DSMS 3.6 User Guide, Media players operated in standalone mode, Version 2, 18/08/2011 31
8 Uploading content and the "Import" tab
The "Import tab contains all tools required to import content to the system. In the "Import tab has
four sub menus:
8.1 The "Media" icon
The "Media" menu contains an archive where most of the media files and links to web pages and
streams are added and stored. A common name for media files and links to web pages and
streams is "media spots".
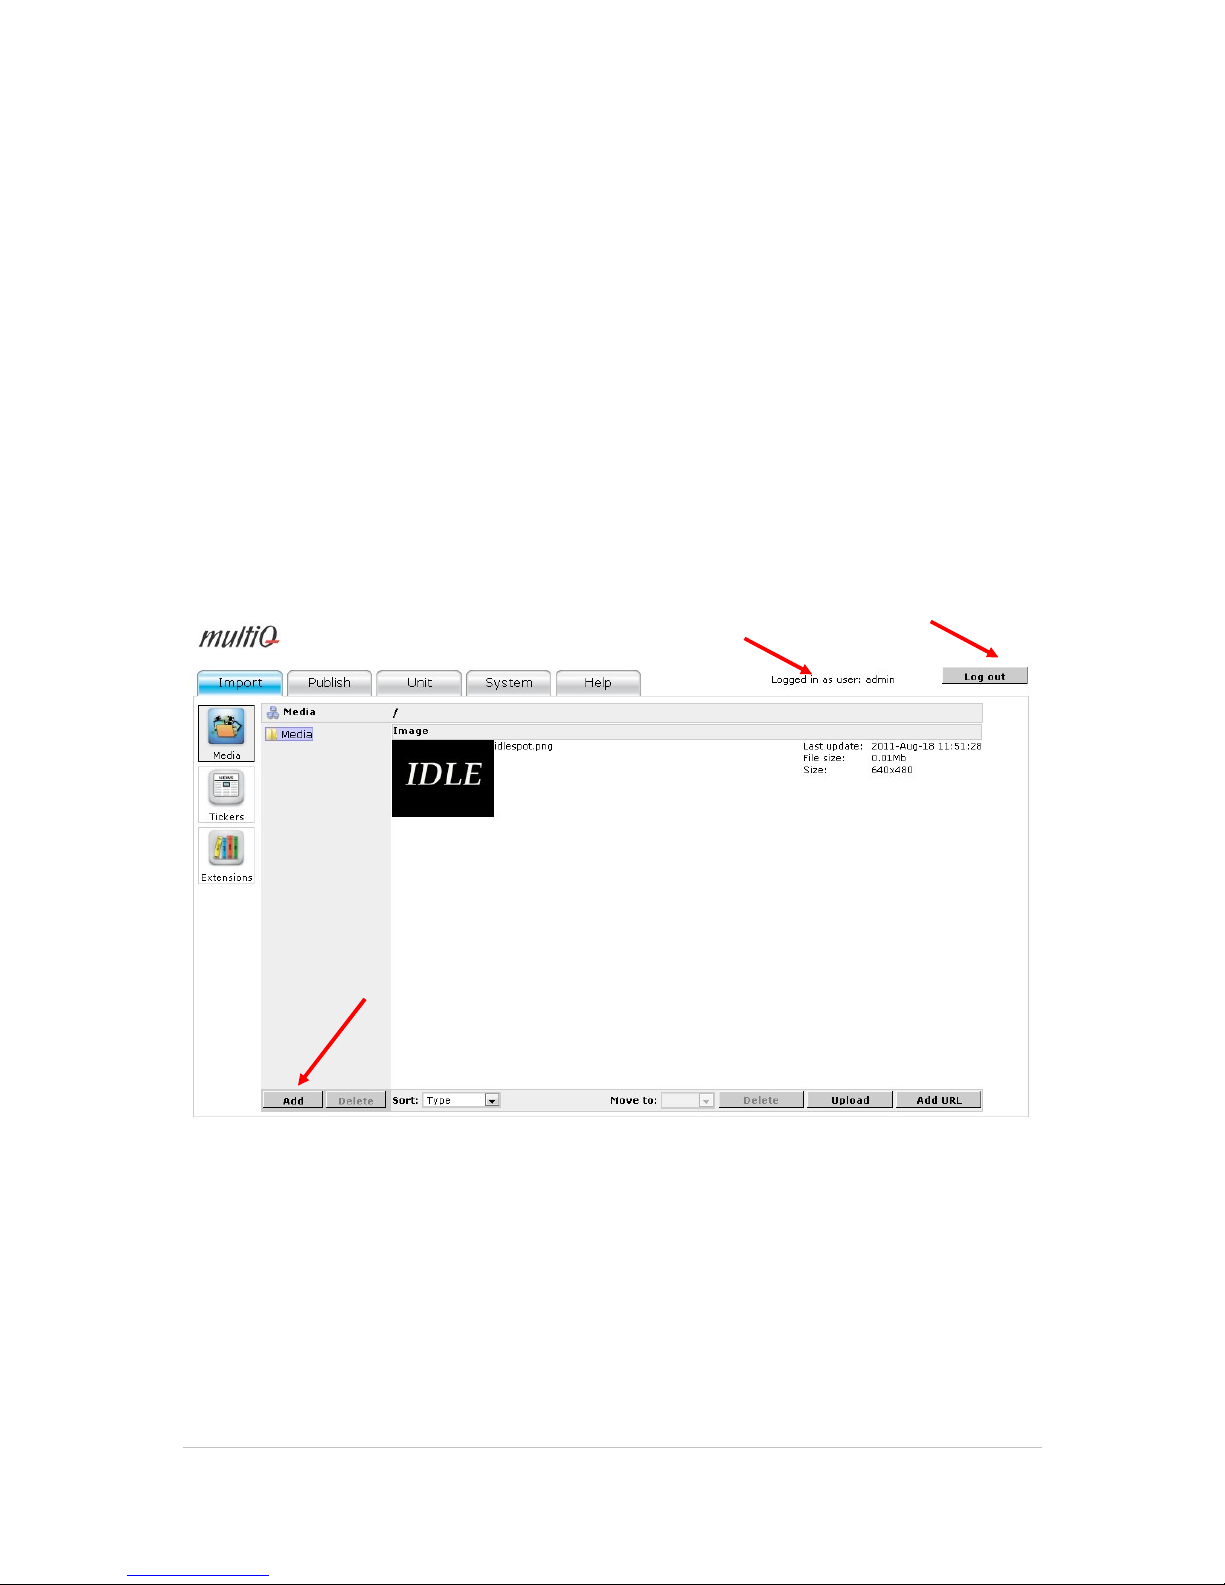
Figure 32. From the start there is a folder named "Media" where you can store your media spots. However
it is recommended to organize the files into sub folders. By pressing the "Add" button you can create a
tree structure of subfolders that you name as you like. In the “Media” folder you also have the
“idlespot.png” image that is shown if no content is assigned to an area of a media monitor. This image
cannot be removed.
Click to add sub folders
User information
"Logout" button
Page 32
©2011 MultiQ are registered trademarks or trademark applications of MultiQ International AB in various jurisdictions. All
other company names and products are trademarks or registered trademarks of their respective companies. We reserve
the right to change the specifications without prior notice.
MultiQ DSMS 3.6 User Guide, Media players operated in standalone mode, Version 2, 18/08/2011 32
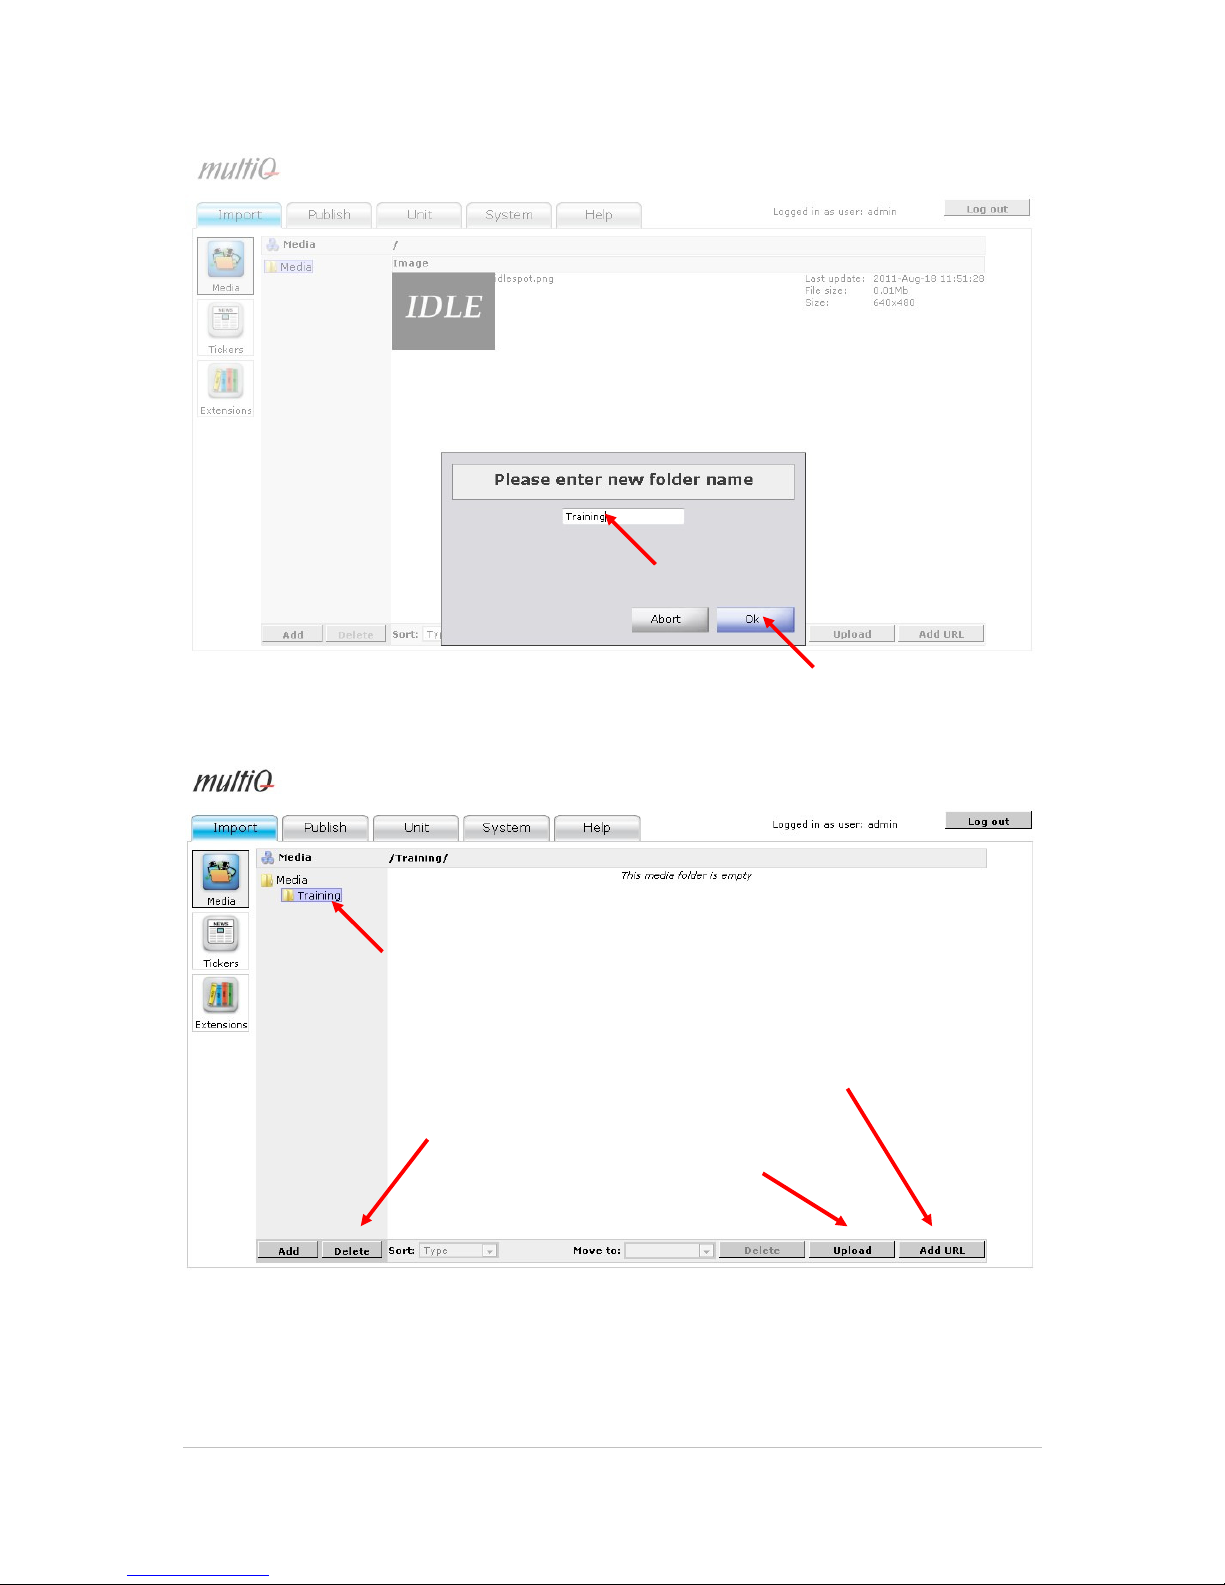
Figure 33. Name the new folder “Training” then clock “OK”.
Figure 34. The next step is to upload files and to define hyperlinks as media spots. Here is an overview of
the media archive controls.
Click to upload media files
Click to define links to web pages and streams
"Delete" folder button
Selected folder
Page 33
©2011 MultiQ are registered trademarks or trademark applications of MultiQ International AB in various jurisdictions. All
other company names and products are trademarks or registered trademarks of their respective companies. We reserve
the right to change the specifications without prior notice.
MultiQ DSMS 3.6 User Guide, Media players operated in standalone mode, Version 2, 18/08/2011 33
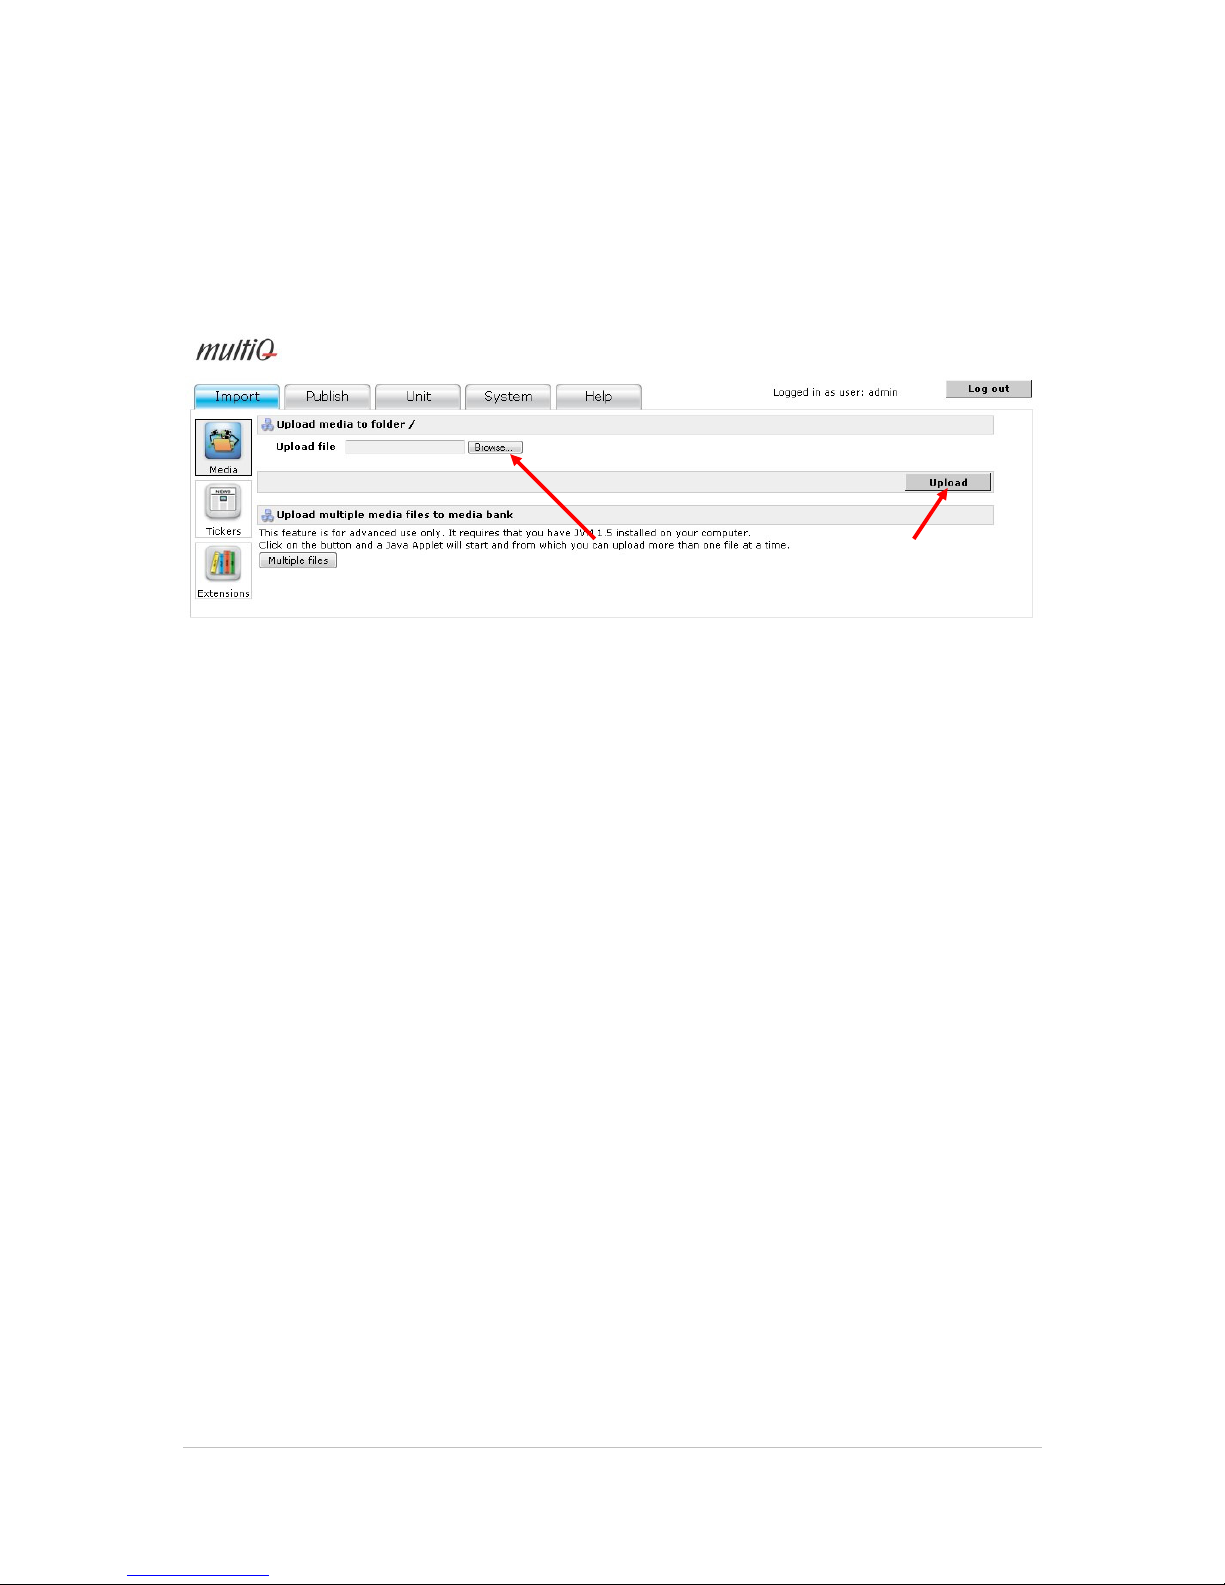
Media spots are added by pressing the "Upload" button for media files or the "Add URL" button to
add links to web pages or streams. The media spots will be placed in the selected folder.
You can move media spots between folders but a media spot can only exist in one of the folders.
To upload a file to the system, click the “Upload” button.
Figure 35. In the upload menu you can click the “Upload” button and then browse to the file on your
computer that you wish to upload and use in the system.
8.2 Uploading video clips
It is recommended to always use the mp4 (h.264) video format. The system supports other formats
as MPEG-2 etc as well but using the mp4 format is the best choice from a capacity- as well as a
quality point of view.
When uploading is done there is a dialogue where you can get some information about the video
clip (resolution, duration etc.) as well as defining how the video clip is to be displayed on the screen.
Setting the parameter "Stretch to fit area" to "yes" makes the video clip to fill out the entire area
regardless of the aspect ratio of the area.
Click the "Browse" button to select a single file to
be uploaded to the archive. Then click the
"Upload" button.
Page 34
©2011 MultiQ are registered trademarks or trademark applications of MultiQ International AB in various jurisdictions. All
other company names and products are trademarks or registered trademarks of their respective companies. We reserve
the right to change the specifications without prior notice.
MultiQ DSMS 3.6 User Guide, Media players operated in standalone mode, Version 2, 18/08/2011 34
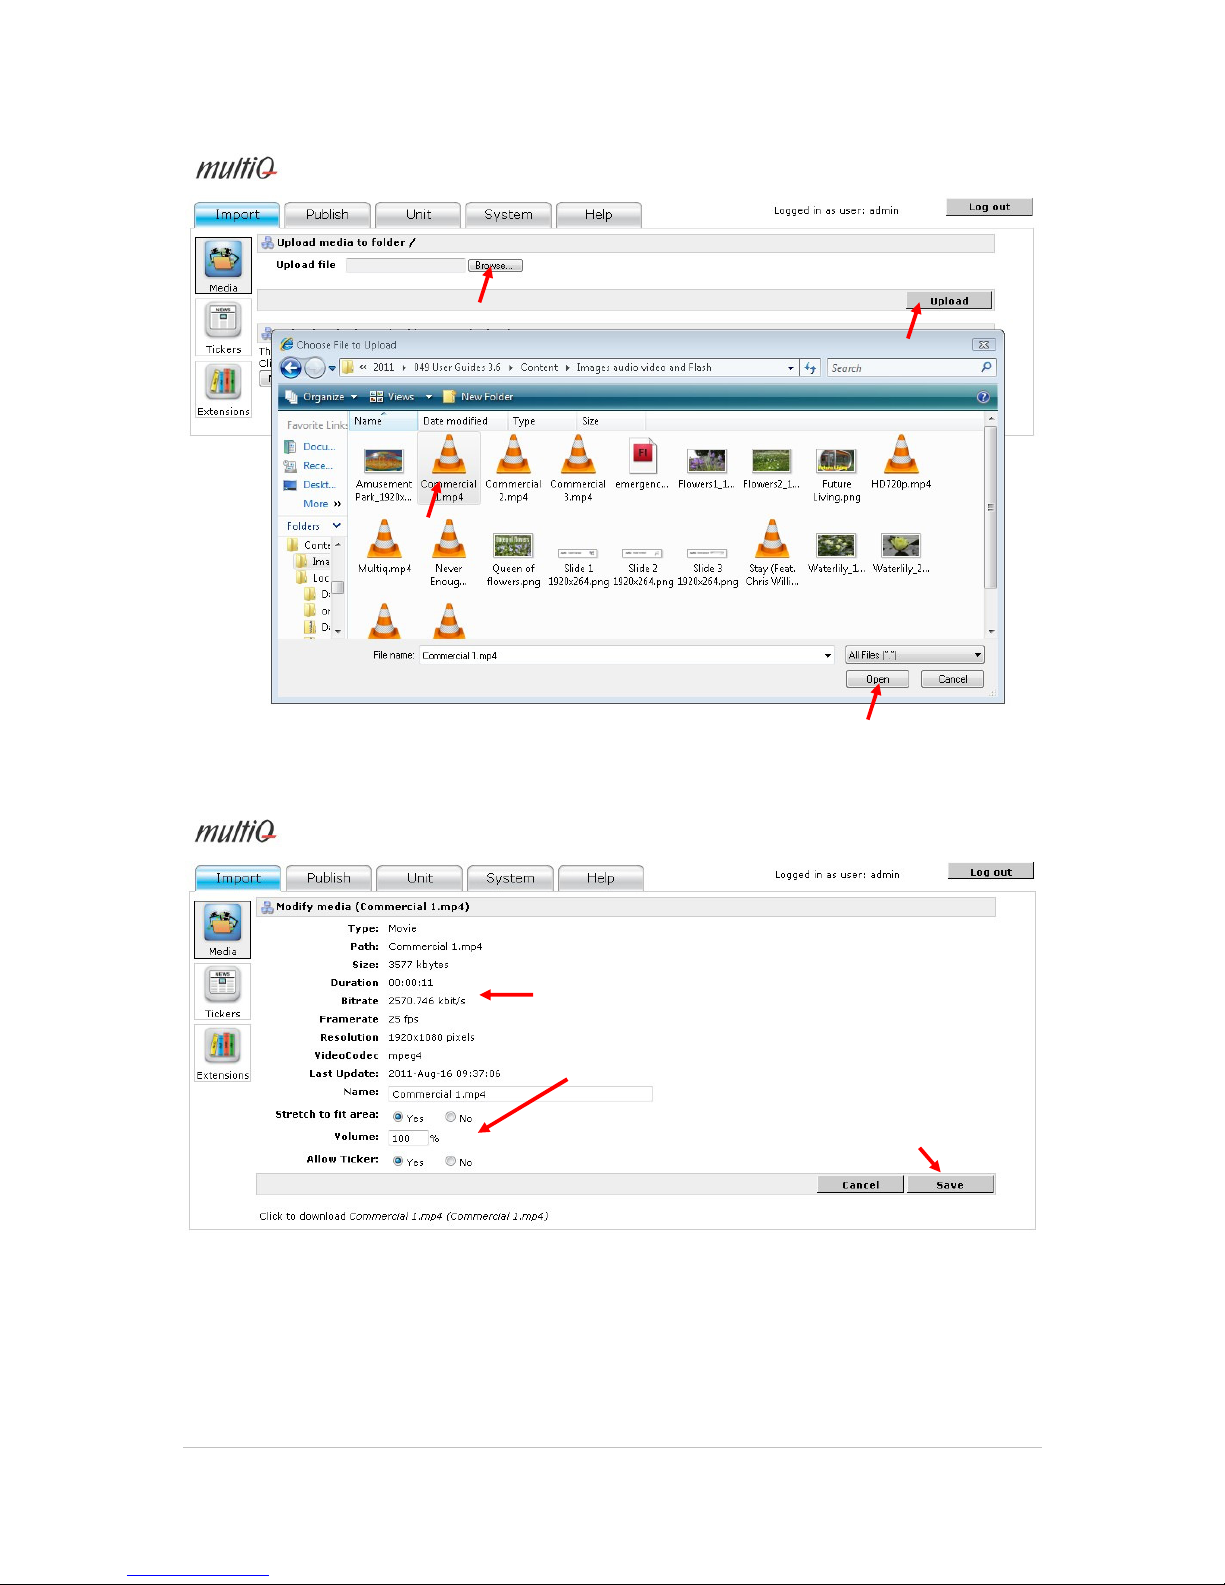
Figure 36. Browse to the video clip that you want and the click “Open”
Figure 37. In the “Upload” dialog you can set certain parameters such as the audio volume of the video
clip or stretch the video clip to cover the entire area. Also you can decide whether to display the ticker or
not. This is a way to control when to show or hide the ticker.
As an alternative you can specify the aspect ratio in order to use areas on the screen that does not
comply with the aspect ratio of the video clip.
Specify how to display the video clip and if to
show the ticker or not
Click "Save" when you are done
File information
1.
2.
3.
4.
Page 35
©2011 MultiQ are registered trademarks or trademark applications of MultiQ International AB in various jurisdictions. All
other company names and products are trademarks or registered trademarks of their respective companies. We reserve
the right to change the specifications without prior notice.
MultiQ DSMS 3.6 User Guide, Media players operated in standalone mode, Version 2, 18/08/2011 35
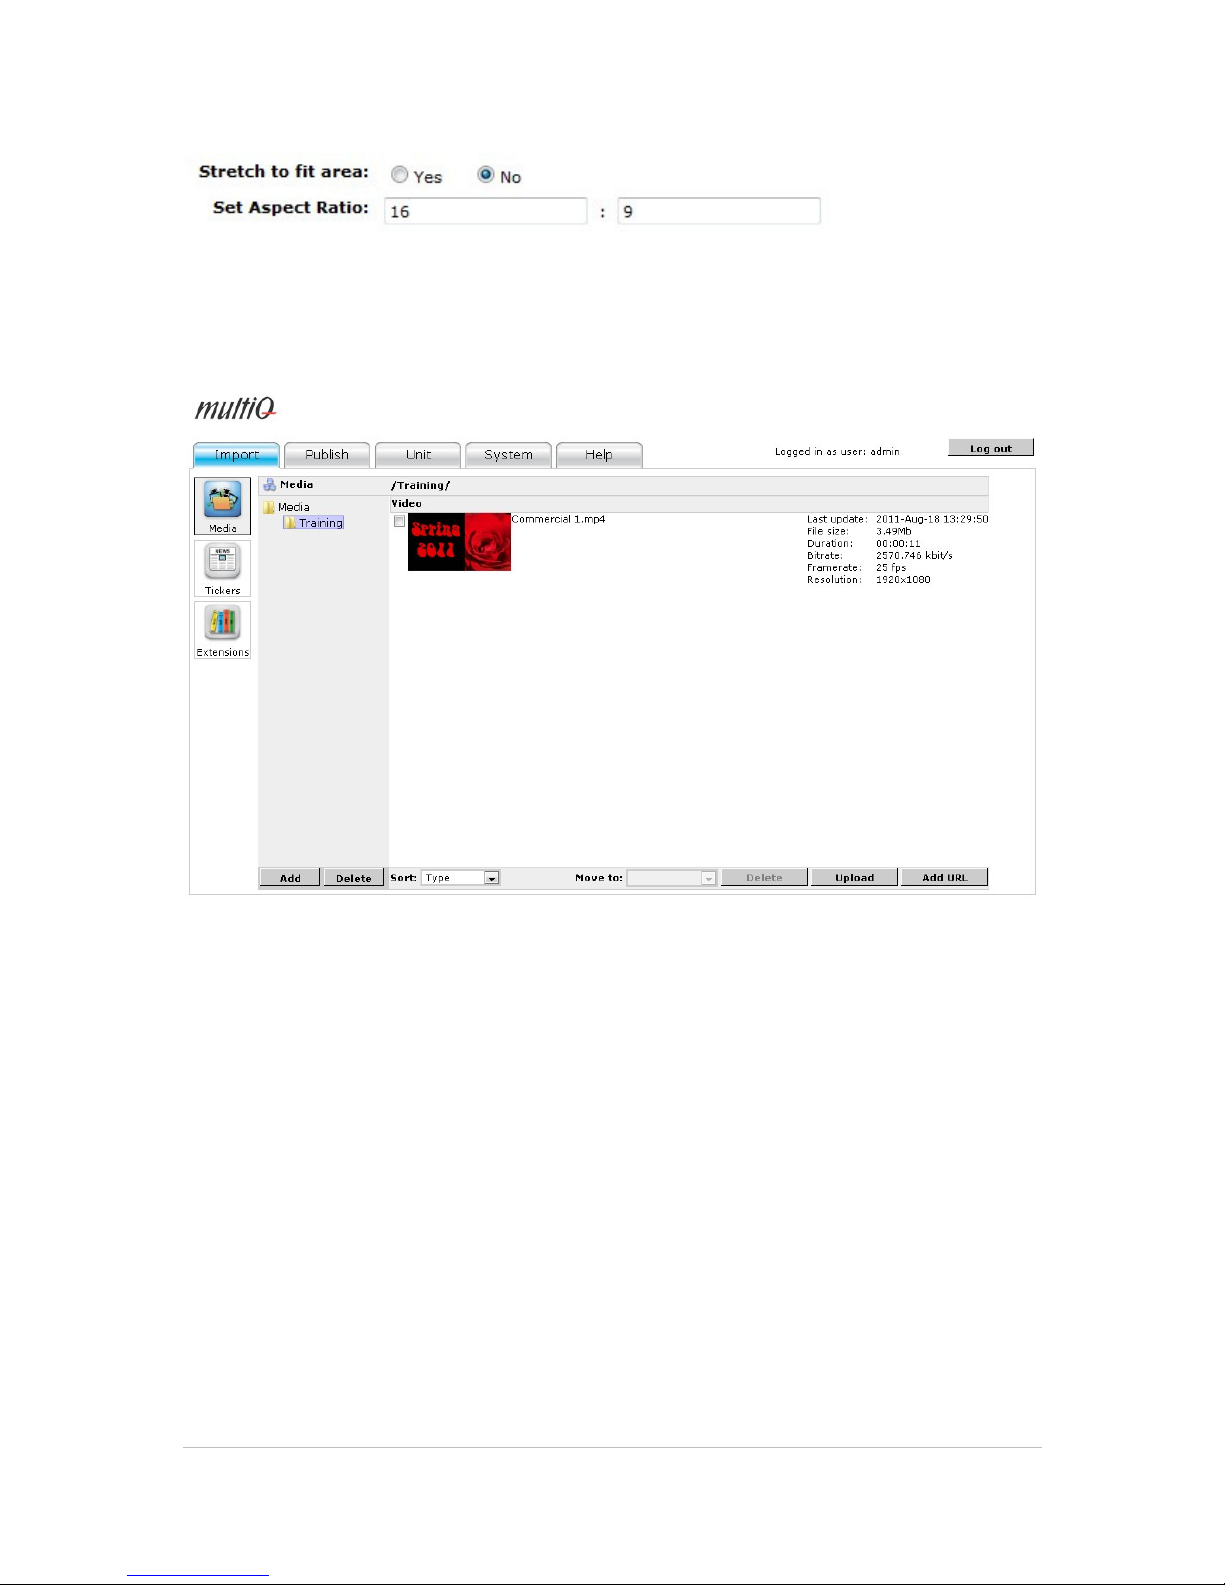
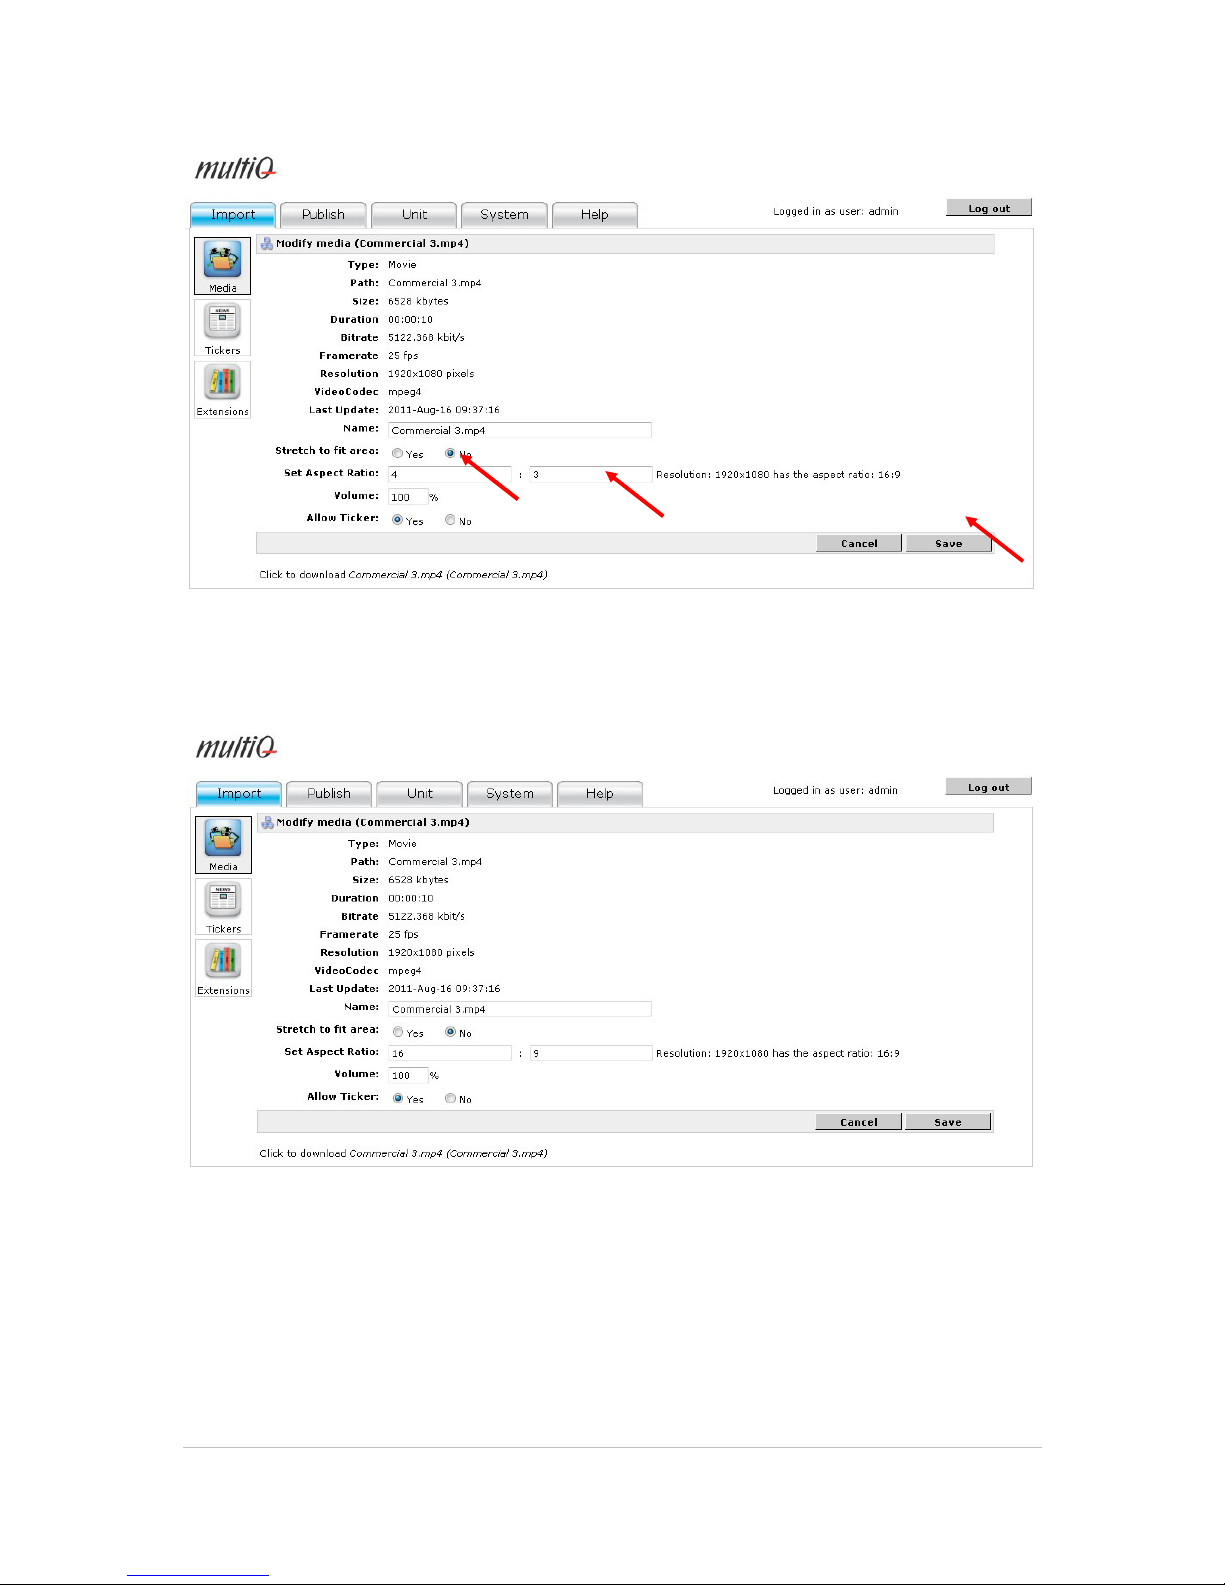
Figure 38. If you select not to stretch the video clip you can select the aspect ratio of the video clip
manually. Note that it is essential that the media player or media monitor to be used is set for the correct
aspect ratio to get this feature to work properly.
Figure 39. After being uploaded, a preview of the first image of the video clip is visible in the media
archive along with information on duration, file size and other parameters.
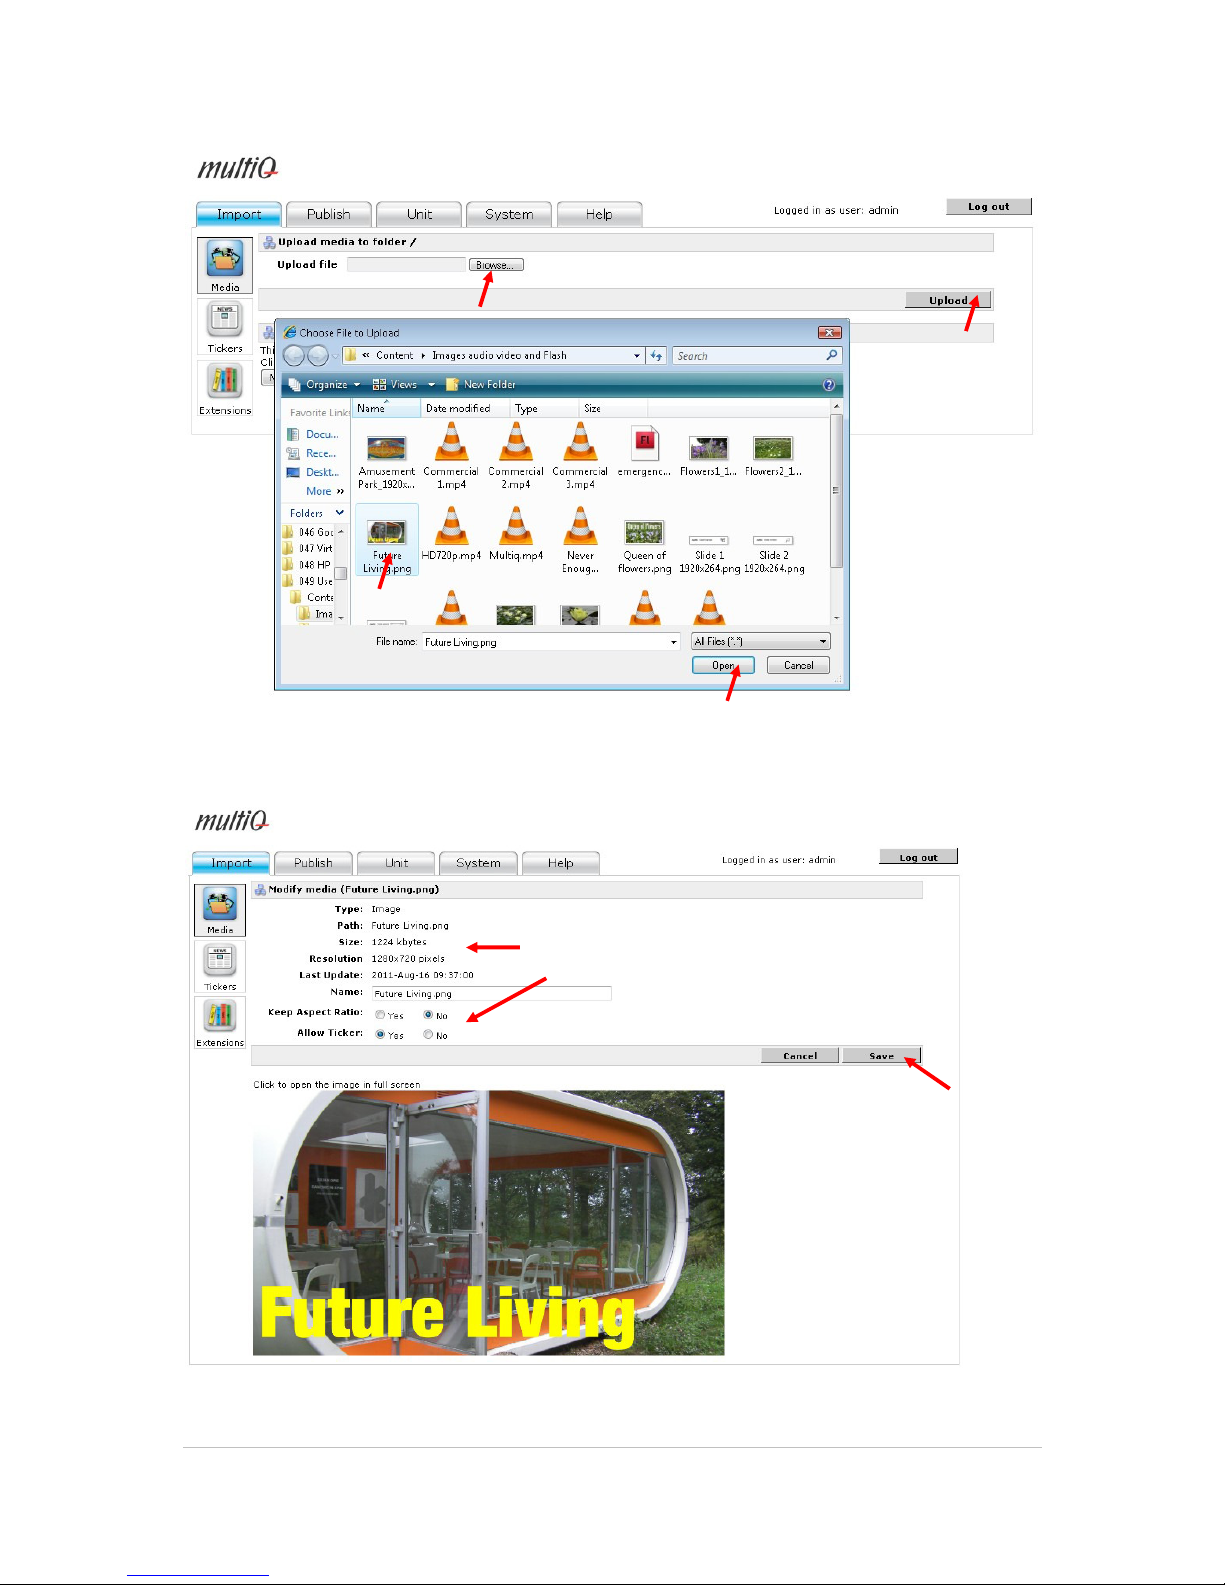
8.3 Uploading images
Uploading images is very much the same as uploading video clips. After selecting a file and
pressing the "Upload" button you get to a dialog box containing file information and a few settings.
Here you can decide if to preserve the aspect ratio of the image or to stretch to fit area. Supported
image formats are JPG, PNG, GIF and BMP. Recommended formats are JPG and PNG where
PNG give better performance in critical applications.
Page 36
©2011 MultiQ are registered trademarks or trademark applications of MultiQ International AB in various jurisdictions. All
other company names and products are trademarks or registered trademarks of their respective companies. We reserve
the right to change the specifications without prior notice.
MultiQ DSMS 3.6 User Guide, Media players operated in standalone mode, Version 2, 18/08/2011 36
Figure 40. Browse to the desired image, select open, and the click the “Upload” button.
Figure 41. When uploading an image you can set if to maintain the aspect ratio. You also get some
information on image size.
Specify how to display the image and if to
display the ticker
File information
1.
2.
4.
Click "Save" when you are done
3.
Page 37
©2011 MultiQ are registered trademarks or trademark applications of MultiQ International AB in various jurisdictions. All
other company names and products are trademarks or registered trademarks of their respective companies. We reserve
the right to change the specifications without prior notice.
MultiQ DSMS 3.6 User Guide, Media players operated in standalone mode, Version 2, 18/08/2011 37
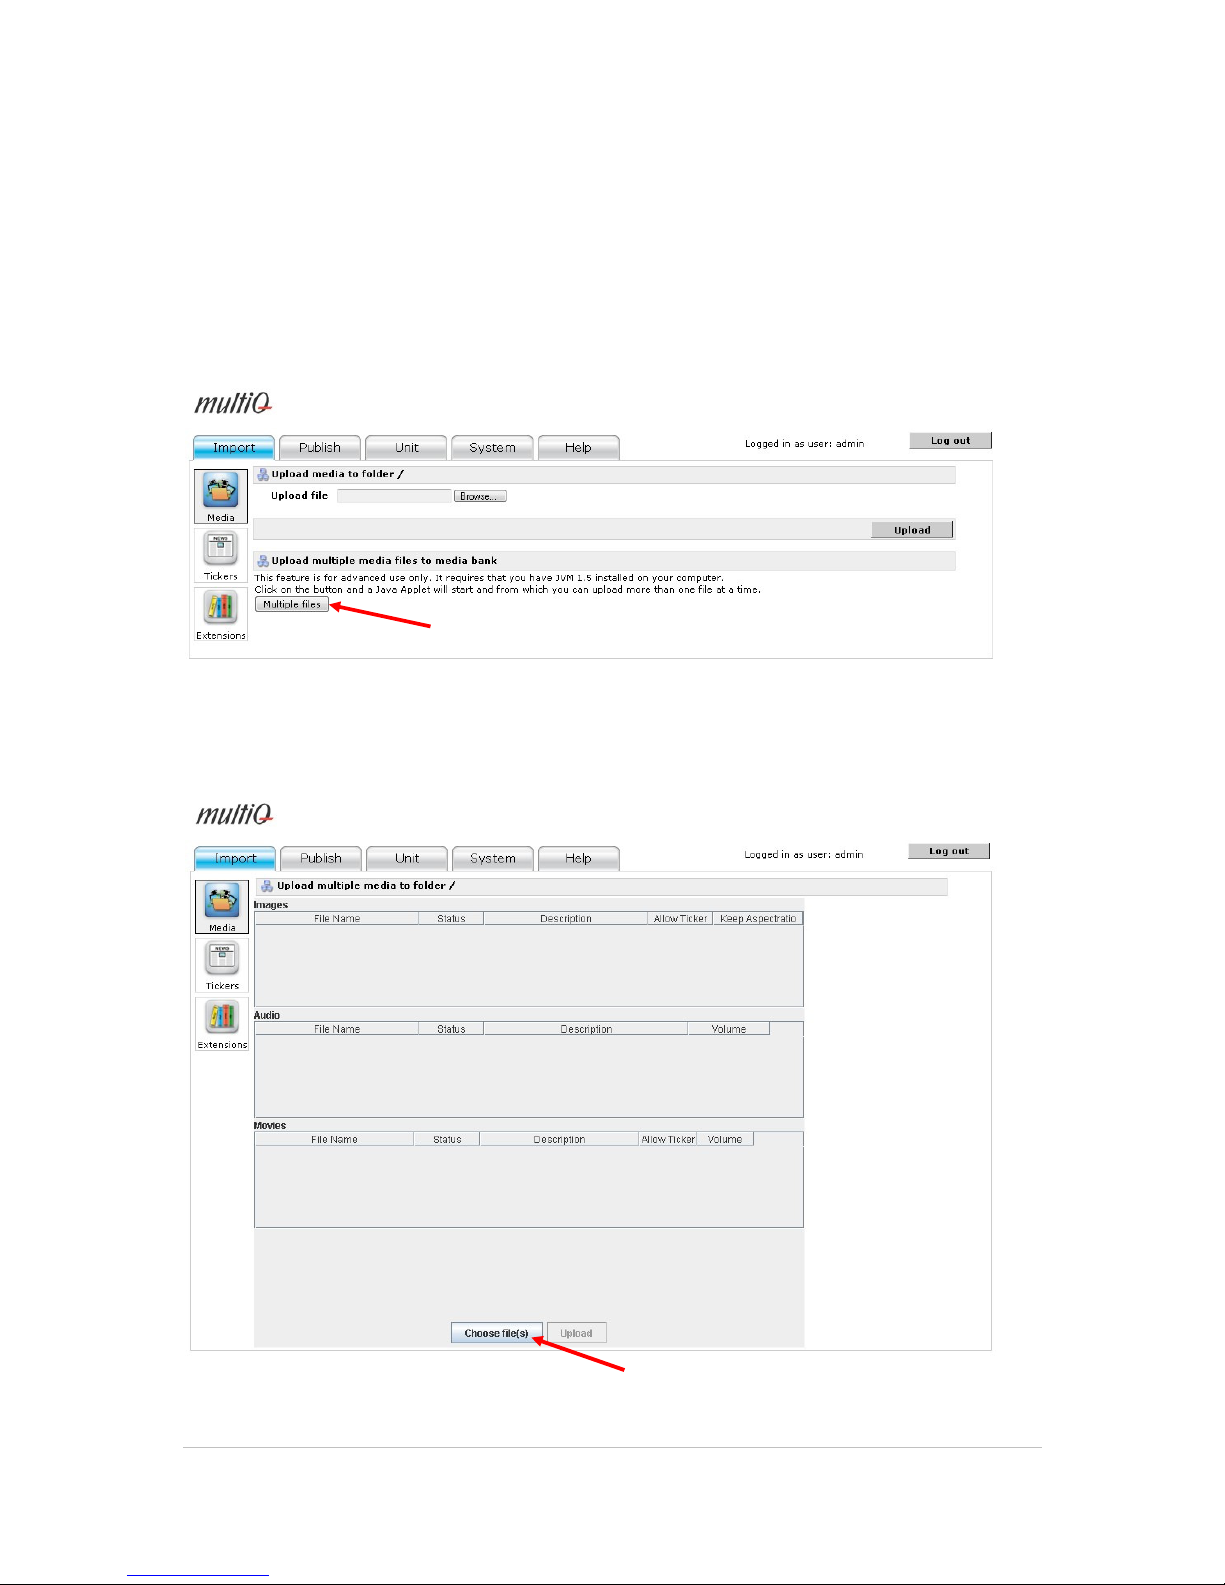
8.4 Uploading several files simultaneously
If you need to add several files to the media archive it is practical to do this as a batch job.
To use the multiple file upload tool you need to have Java installed on your computer. If you don’t,
installation will start automatically as you try to start the tool.
Figure 42. Click the “Upload” button in the Media menu and then click the "Multiple files" button in the
“Upload media to folder” menu.
Figure 43. The first step in using the multiple file upload tool is to select files for upload.
Click "Multiple files" to add several files simultaneously
Click to browse for file to be selected
Page 38
©2011 MultiQ are registered trademarks or trademark applications of MultiQ International AB in various jurisdictions. All
other company names and products are trademarks or registered trademarks of their respective companies. We reserve
the right to change the specifications without prior notice.
MultiQ DSMS 3.6 User Guide, Media players operated in standalone mode, Version 2, 18/08/2011 38
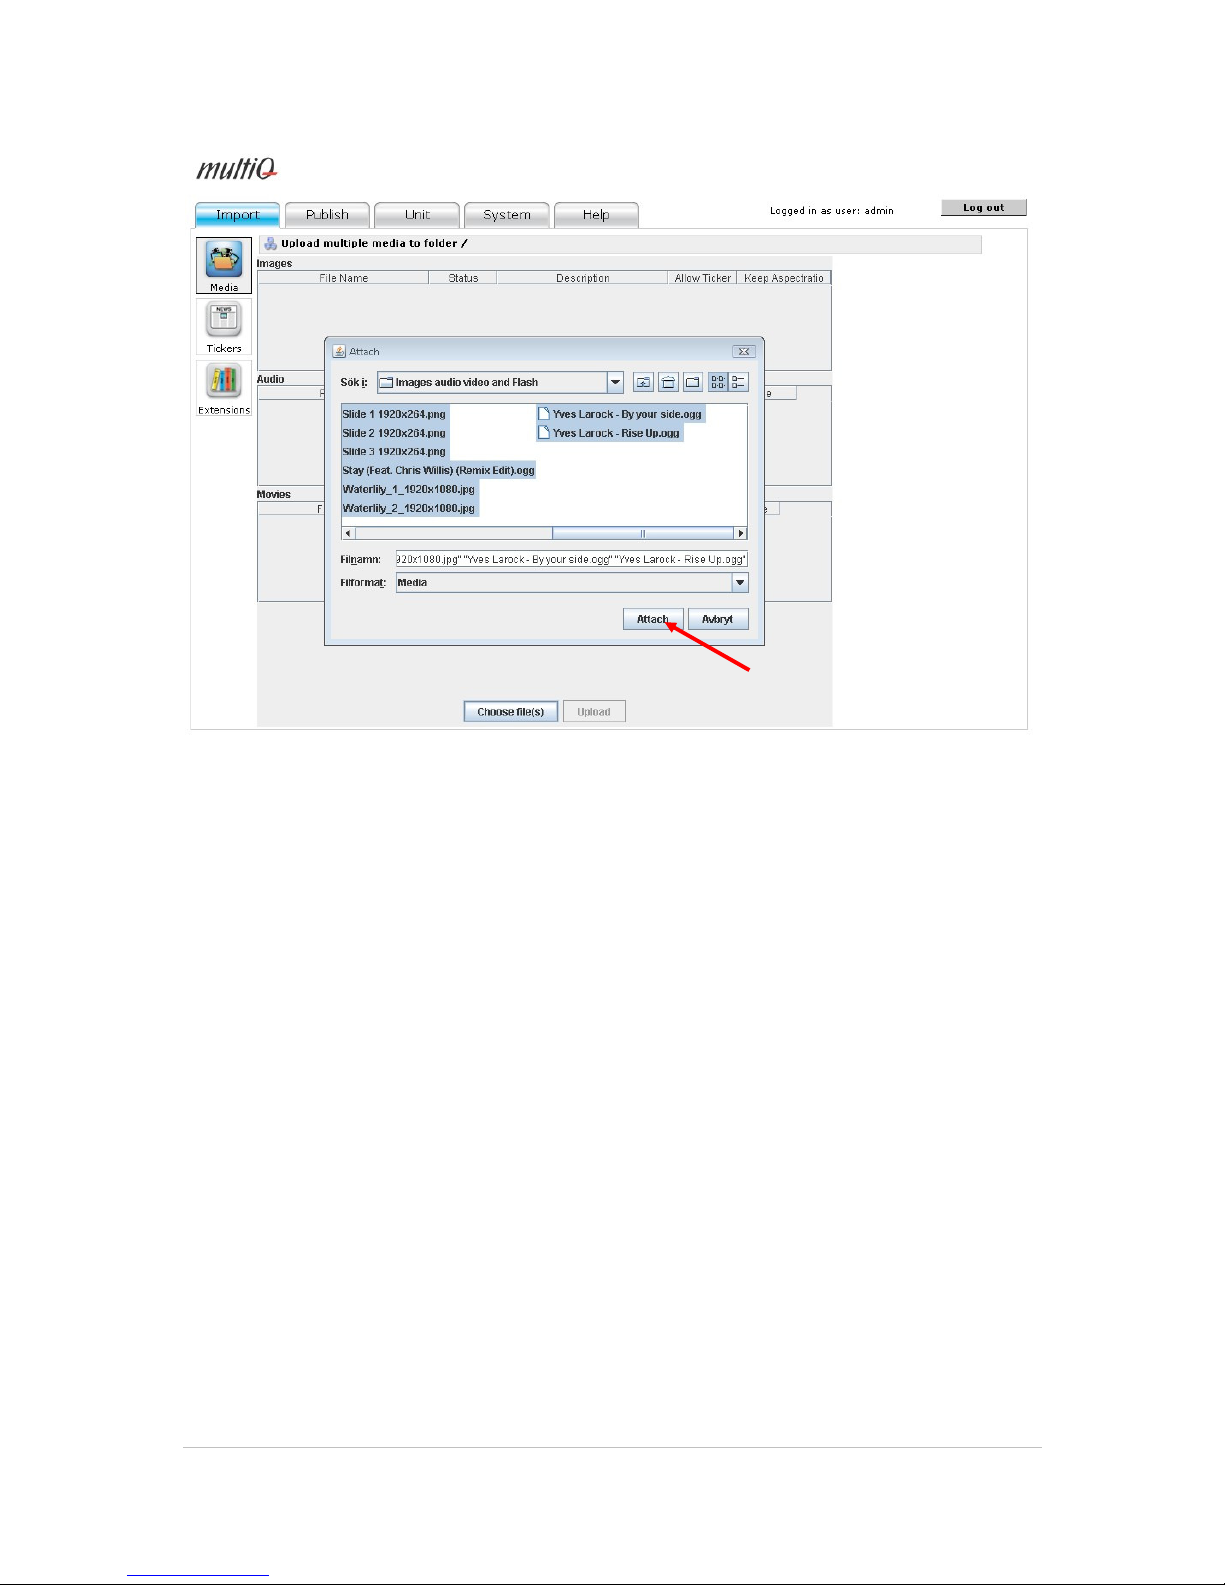
Figure 44. Choose all files by “Shift+Click” and the click the “Attach” button.
Select all video, audio and image files that you need to use in your applications. See to that the
right parameters are set.
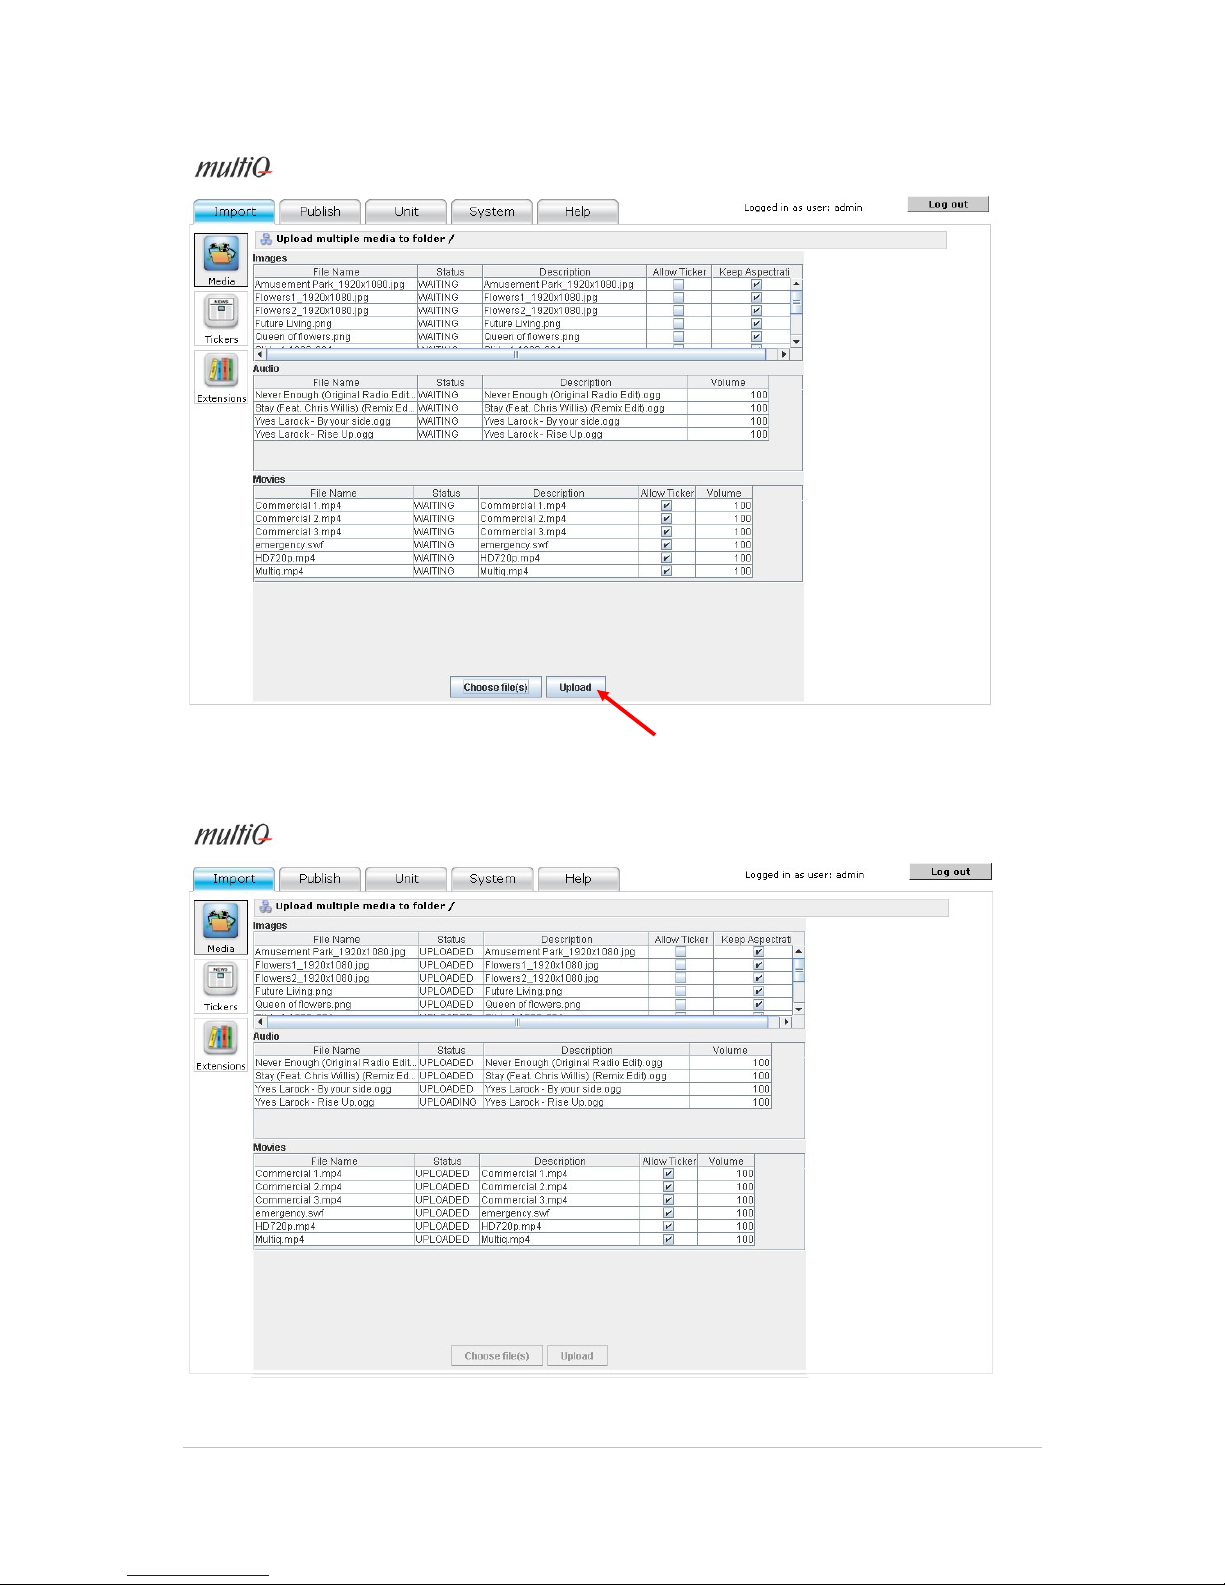
Finally click the “Upload” button to start the upload process. Remember not to click any other icon
or tab during the upload. Doing so will cause the upload to stop. If you need to work on the system
during upload, you should start another session of your web browser and login again. You can have
several sessions running with the server simultaneously.
Page 39
©2011 MultiQ are registered trademarks or trademark applications of MultiQ International AB in various jurisdictions. All
other company names and products are trademarks or registered trademarks of their respective companies. We reserve
the right to change the specifications without prior notice.
MultiQ DSMS 3.6 User Guide, Media players operated in standalone mode, Version 2, 18/08/2011 39
Figure 45. Once all files have been selected, you start uploading the files by clicking the “Upload” button.
Figure 46. Finally you can see the files being uploaded.
Page 40
©2011 MultiQ are registered trademarks or trademark applications of MultiQ International AB in various jurisdictions. All
other company names and products are trademarks or registered trademarks of their respective companies. We reserve
the right to change the specifications without prior notice.
MultiQ DSMS 3.6 User Guide, Media players operated in standalone mode, Version 2, 18/08/2011 40
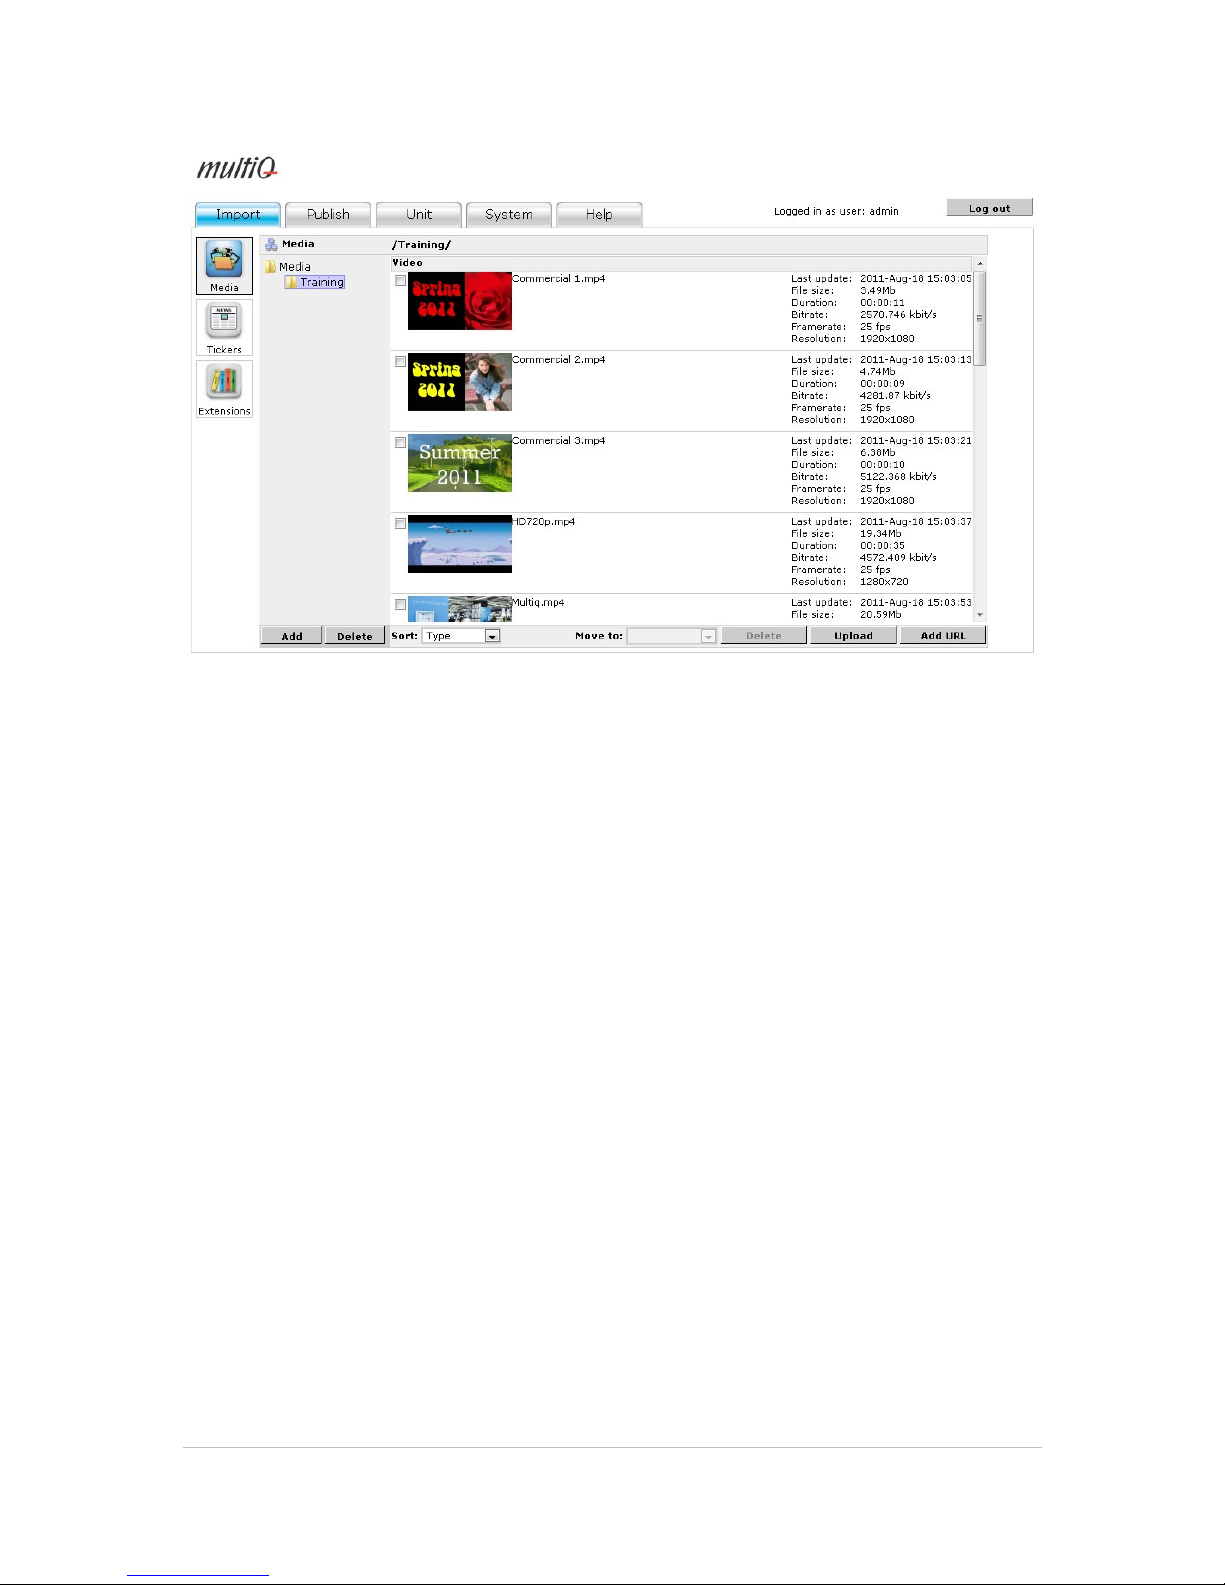
Figure 47. The files are now available in the “Training” folder of the media archive. Next to the previews
you can find interesting information on duration of video clips, format, file sizes, bitrates and resolution.
Now we have a number of images and video clips to choose from when building our fist digital
signage application.
Page 41
©2011 MultiQ are registered trademarks or trademark applications of MultiQ International AB in various jurisdictions. All
other company names and products are trademarks or registered trademarks of their respective companies. We reserve
the right to change the specifications without prior notice.
MultiQ DSMS 3.6 User Guide, Media players operated in standalone mode, Version 2, 18/08/2011 41
9 Creating your first playlist
A playlist is a sequence of media spots (images or video clips so far) that are played in a looped
sequence.
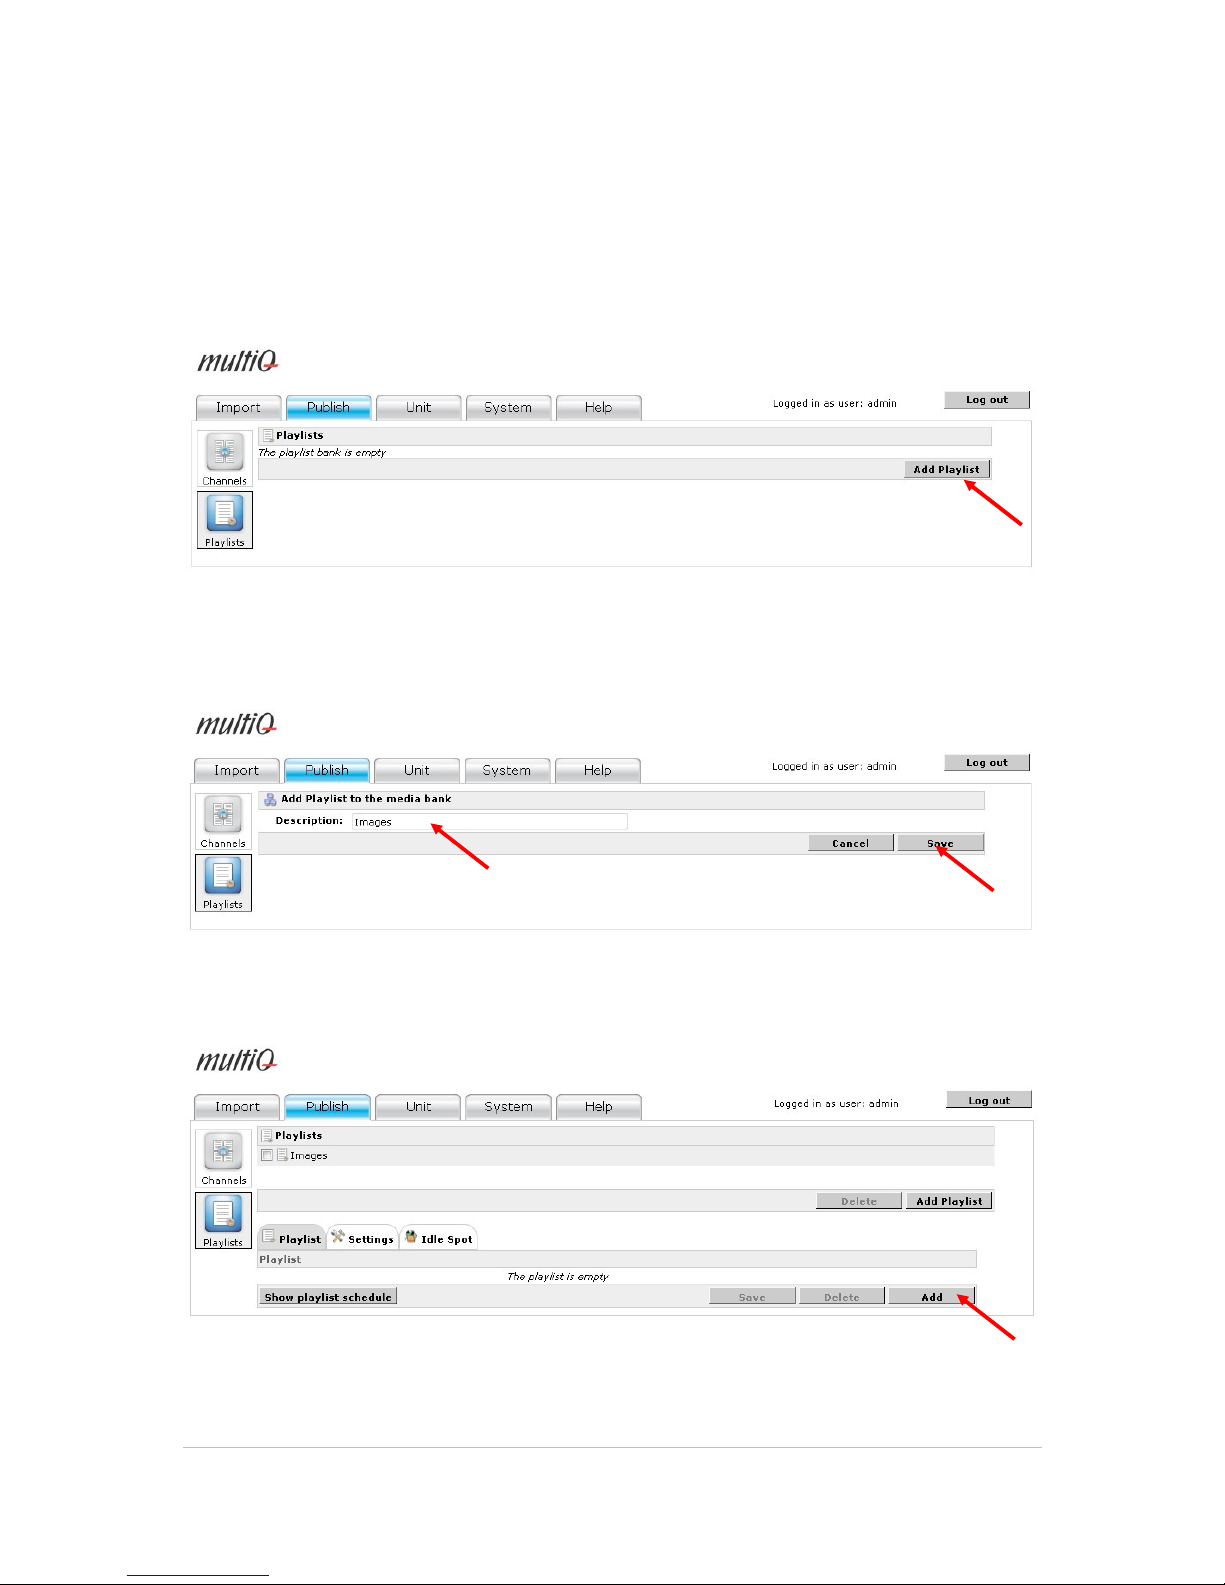
We will start by creating a playlist named “Images”.
Figure 48. First select the “Publish” tab and then click the “Playlist” button. Next click the “Add playlist”
button.
Figure 49. Name the playlist “Images” and then click the “Save” button.
Figure 50. We now have an empty playlist named “Images”. Click the “Add” button to add some media
spots.
Page 42
©2011 MultiQ are registered trademarks or trademark applications of MultiQ International AB in various jurisdictions. All
other company names and products are trademarks or registered trademarks of their respective companies. We reserve
the right to change the specifications without prior notice.
MultiQ DSMS 3.6 User Guide, Media players operated in standalone mode, Version 2, 18/08/2011 42
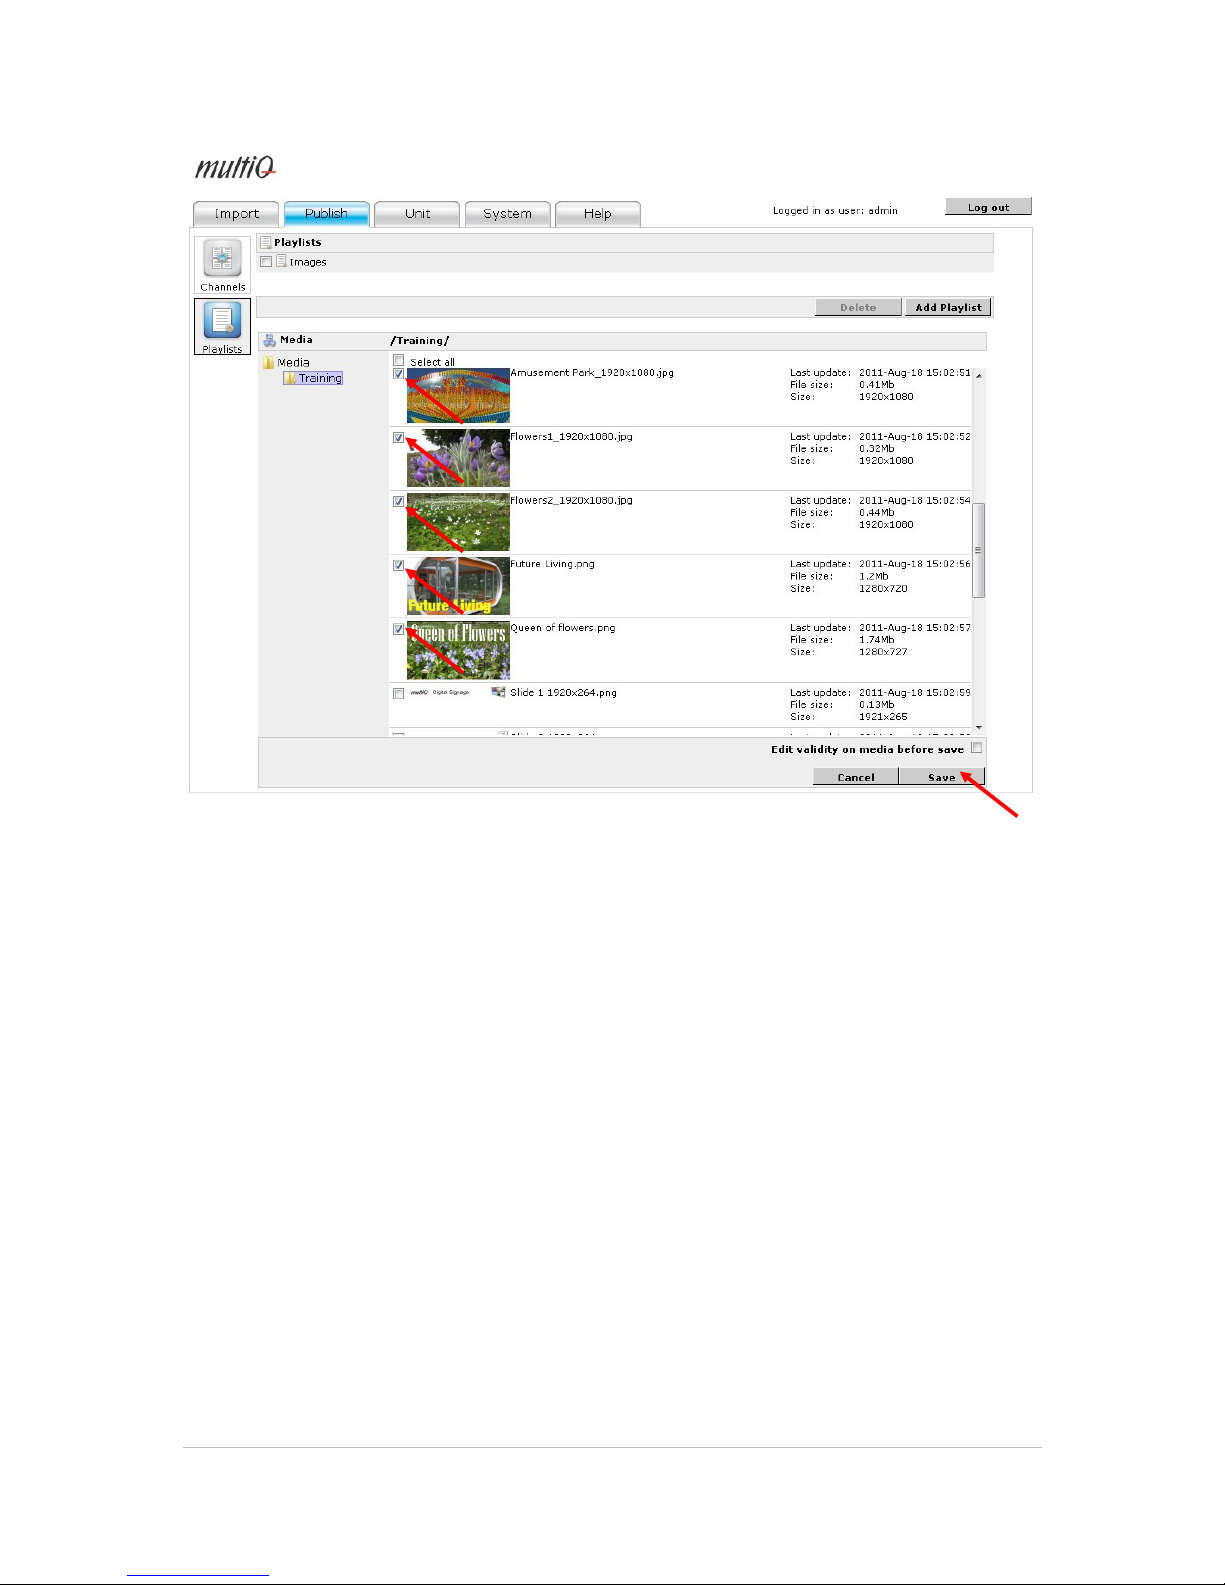
Figure 51. Now tick the boxes to the left of the previews of the images. Then click the “Save” button.
Page 43
©2011 MultiQ are registered trademarks or trademark applications of MultiQ International AB in various jurisdictions. All
other company names and products are trademarks or registered trademarks of their respective companies. We reserve
the right to change the specifications without prior notice.
MultiQ DSMS 3.6 User Guide, Media players operated in standalone mode, Version 2, 18/08/2011 43
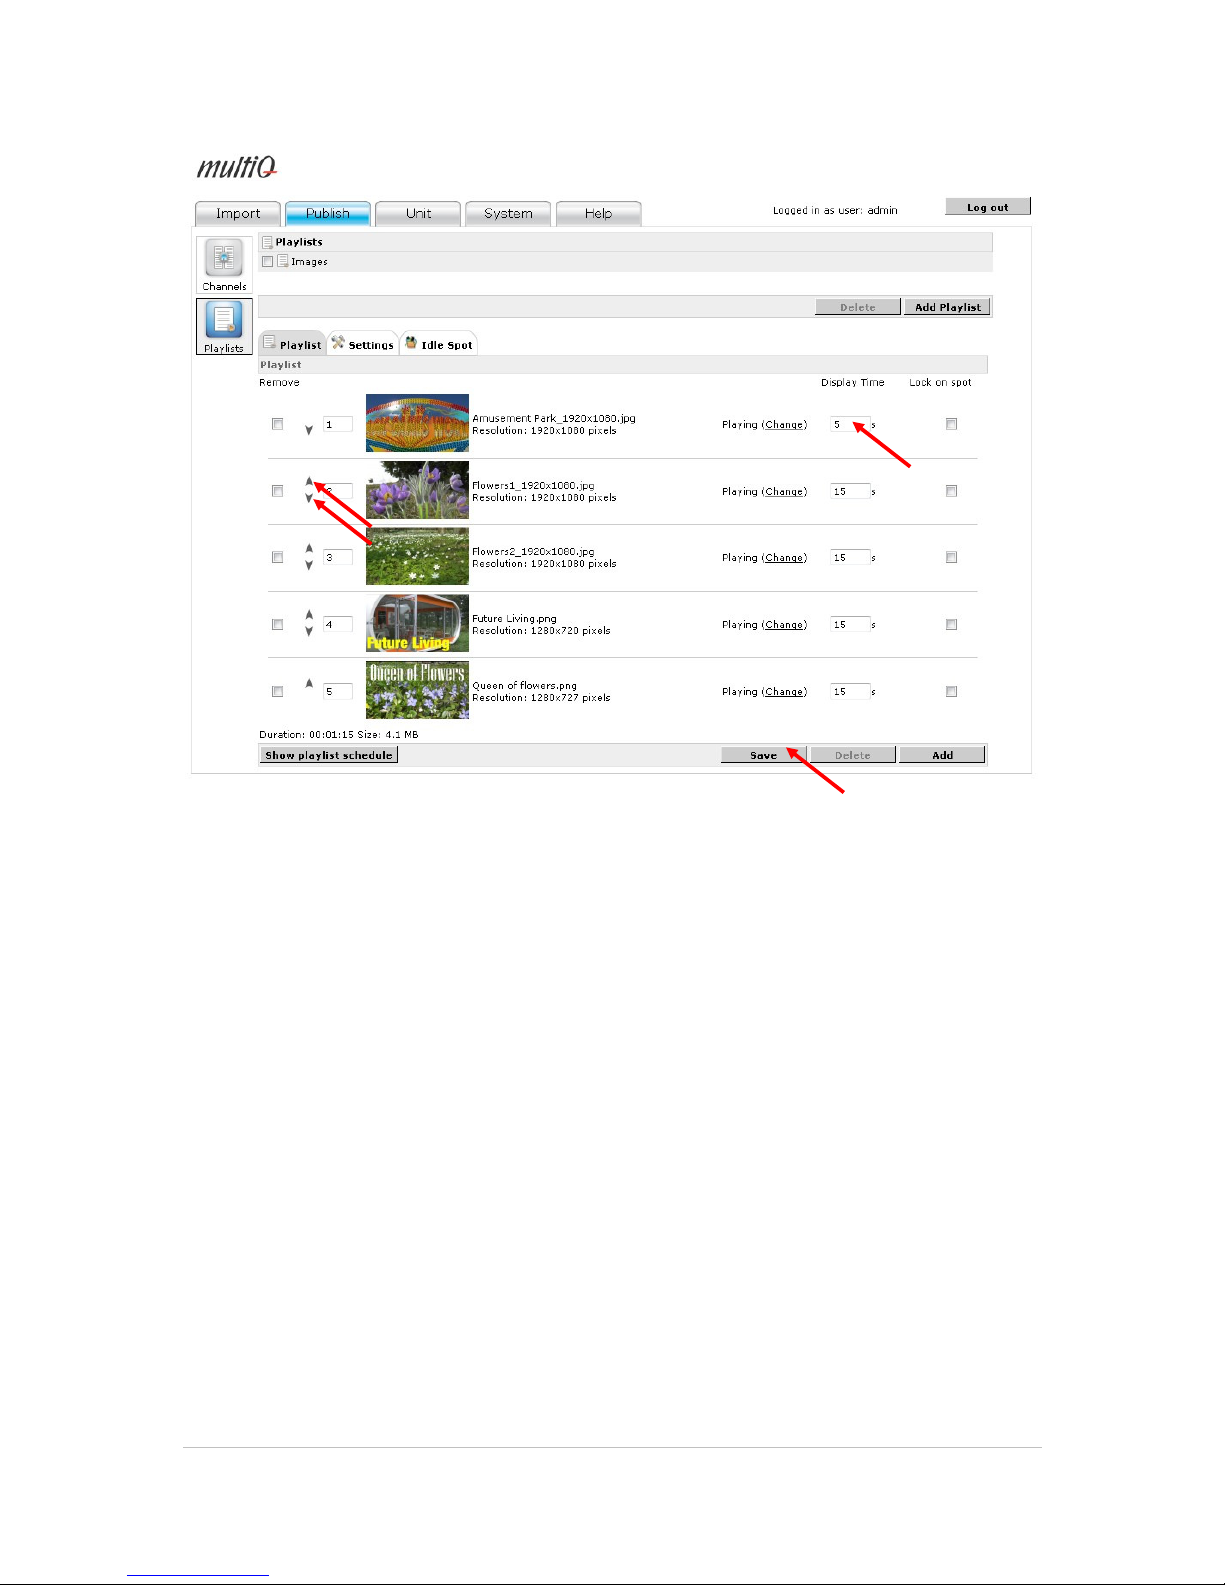
Figure 52. You now have your first playlist. The order between images can be changed by clicking the tiny
arrows to the left (or by changing the number) and the duration of each image can be changed by
changing the seconds in the boxes to the right. Finally you click the “Save” button to start using the new
settings.
9.1 Connecting the playlist to the media player
To be able to see the playlist playing on the screen the final step is to add the playlist to the full
screen area on the media monitor.
Page 44
©2011 MultiQ are registered trademarks or trademark applications of MultiQ International AB in various jurisdictions. All
other company names and products are trademarks or registered trademarks of their respective companies. We reserve
the right to change the specifications without prior notice.
MultiQ DSMS 3.6 User Guide, Media players operated in standalone mode, Version 2, 18/08/2011 44
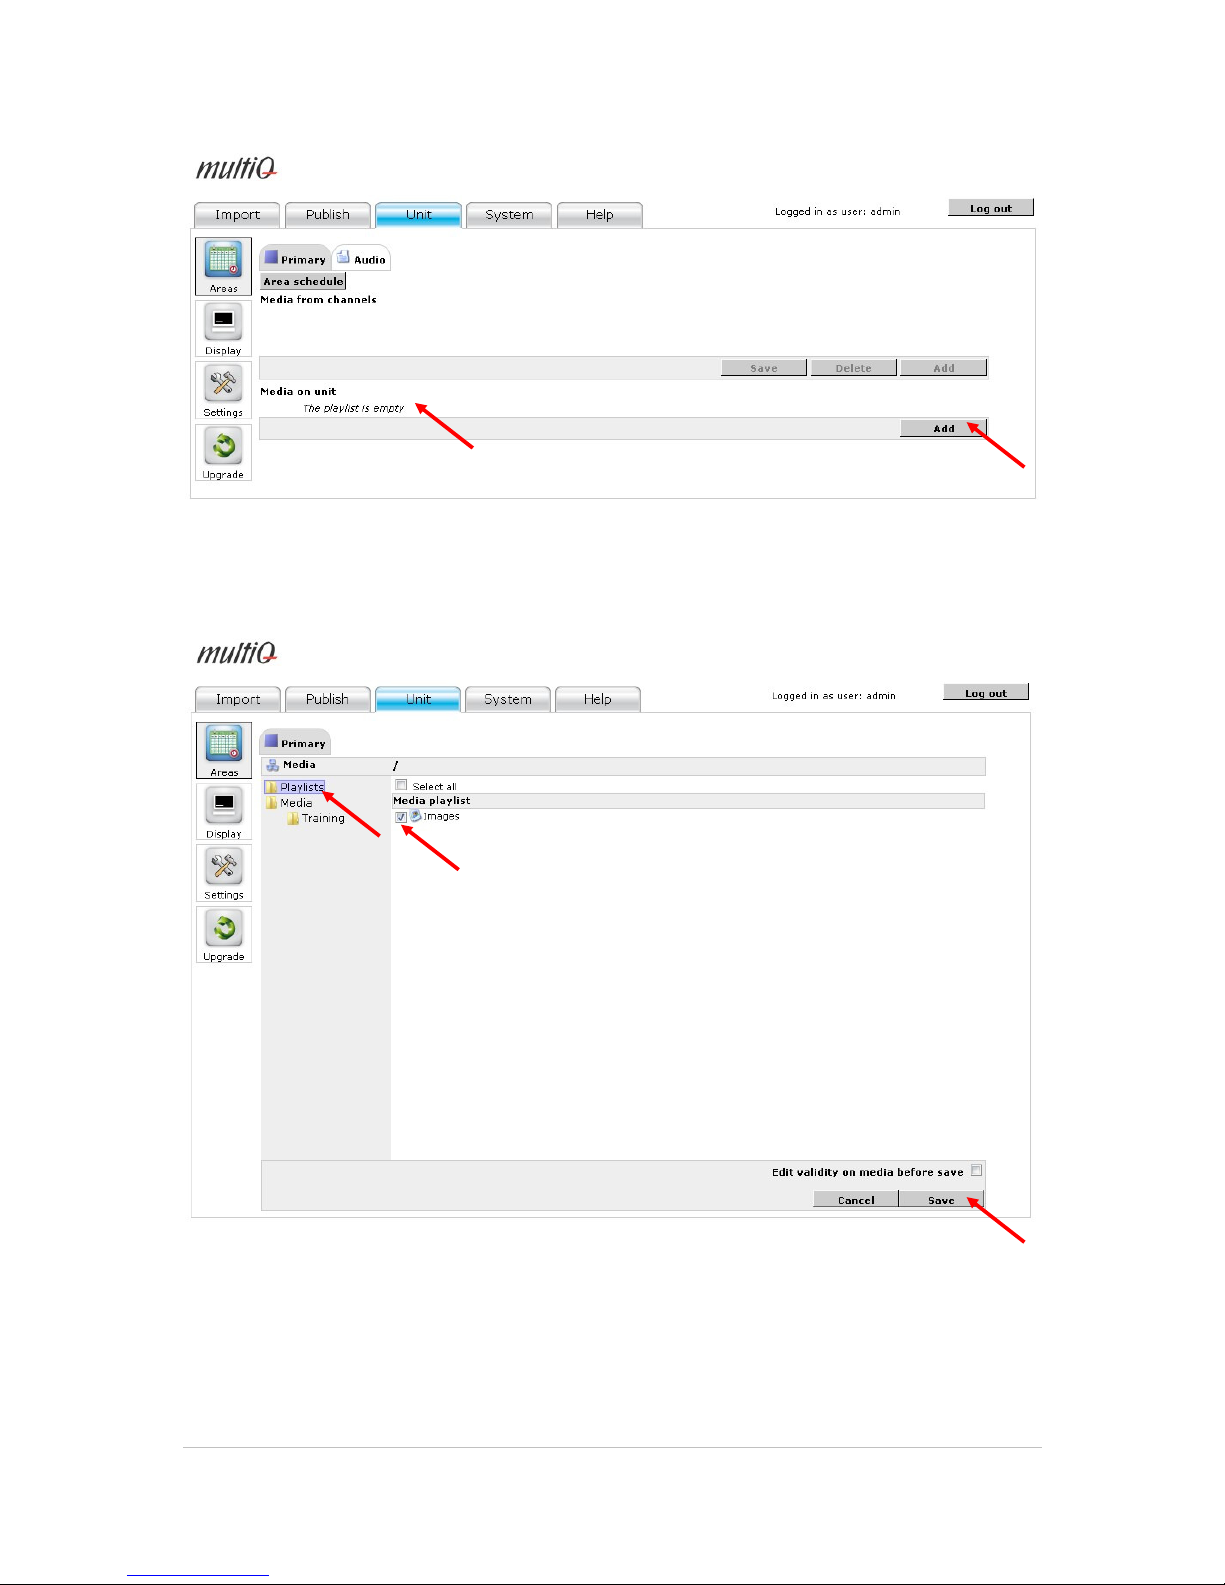
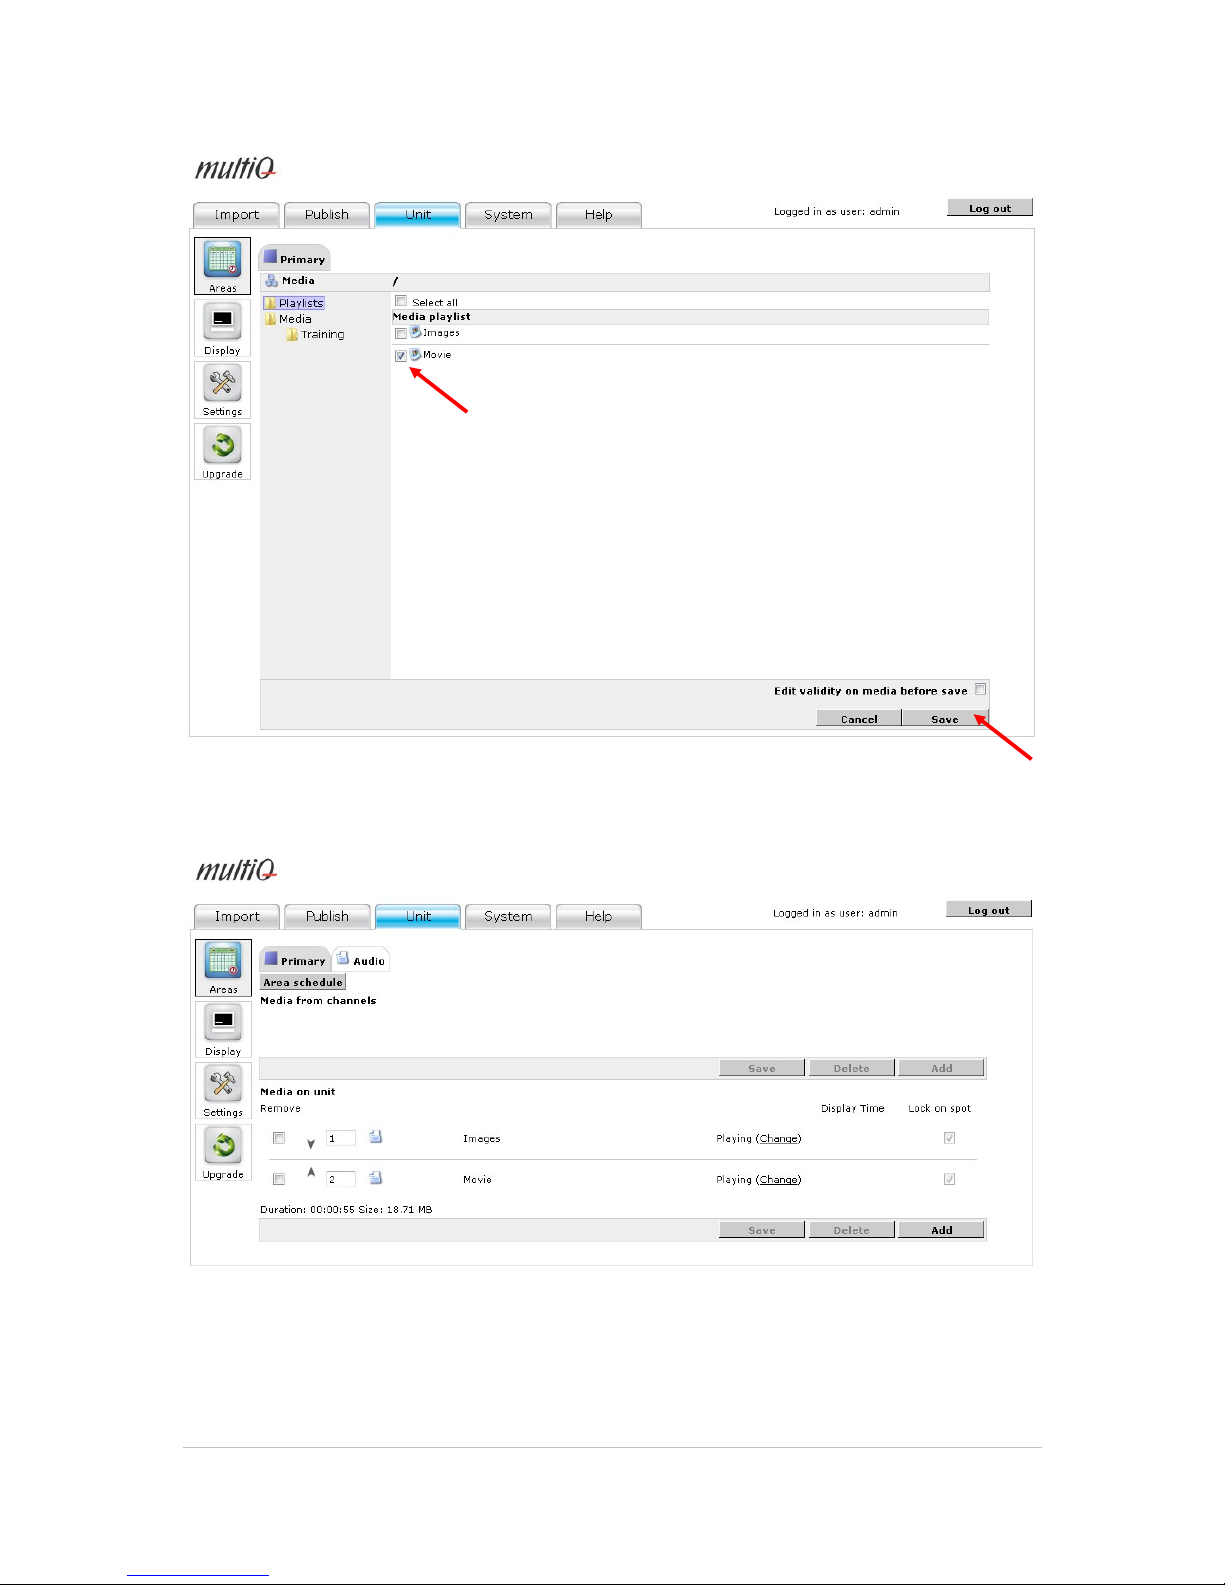
Figure 53. Click the “Areas” icon in the “Unit” tab and then click the “Add” button in the ”Media on unit”
section.
Figure 54. Tick the box for the “Images” playlist and then click the “Save” button. See to that you are in
the “Playlists” folder. The other folders contain media spots.
Page 45
©2011 MultiQ are registered trademarks or trademark applications of MultiQ International AB in various jurisdictions. All
other company names and products are trademarks or registered trademarks of their respective companies. We reserve
the right to change the specifications without prior notice.
MultiQ DSMS 3.6 User Guide, Media players operated in standalone mode, Version 2, 18/08/2011 45
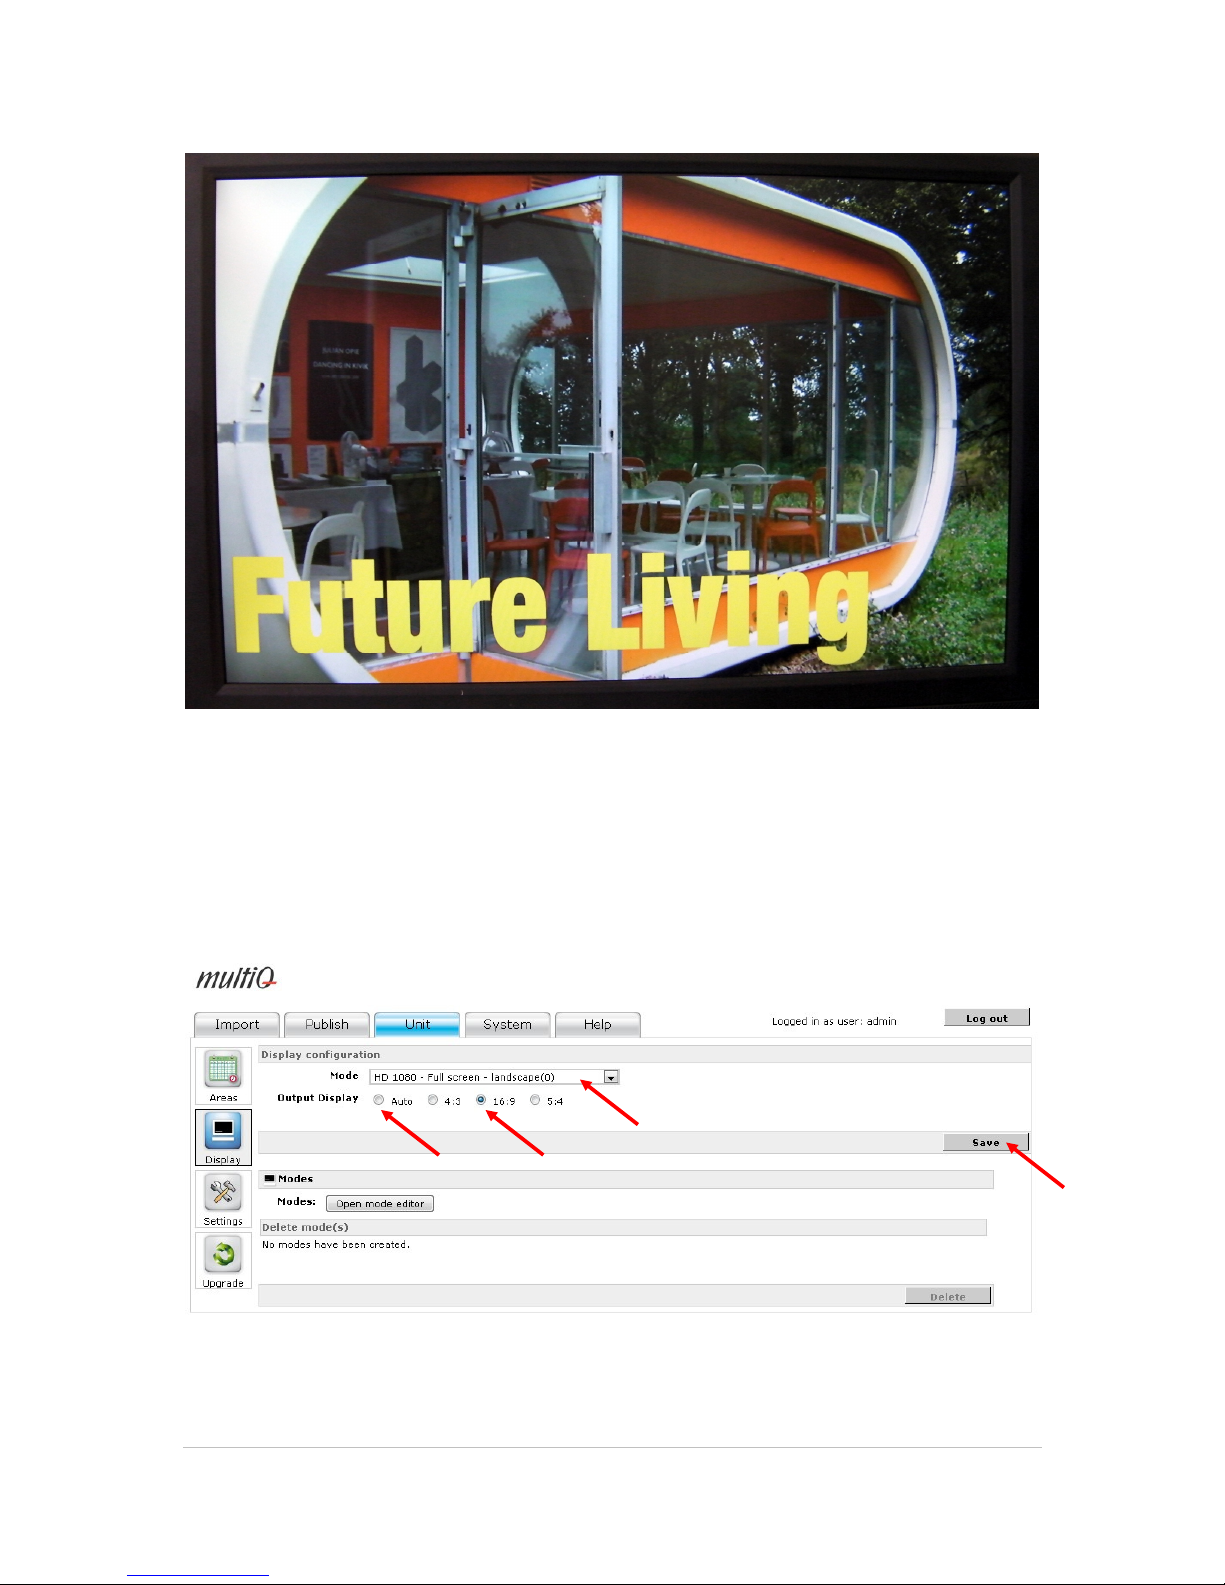
Figure 55. The playlist with images is now a part of the “Primary” area of your media player screen. You
will soon be able to see the images on the screen.
9.1.1 Use the proper aspect ratio
If you do not get the images displayed correctly as above you need to check the aspect ratio. The
aspect ratio can be set in the unit “Settings” menu.
Figure 56. The aspect ratio should be set to 16:9 when using widescreen monitors. Also check that you
use the correct resolution (video mode). There is an “Auto” mode that automatically detects the aspect
ratio of the video mode, but you can also use the manual setting.
Page 46
©2011 MultiQ are registered trademarks or trademark applications of MultiQ International AB in various jurisdictions. All
other company names and products are trademarks or registered trademarks of their respective companies. We reserve
the right to change the specifications without prior notice.
MultiQ DSMS 3.6 User Guide, Media players operated in standalone mode, Version 2, 18/08/2011 46
9.2 Create your second playlist, now with video clips
To be able to change in between playlists we will need a second playlist with other content.
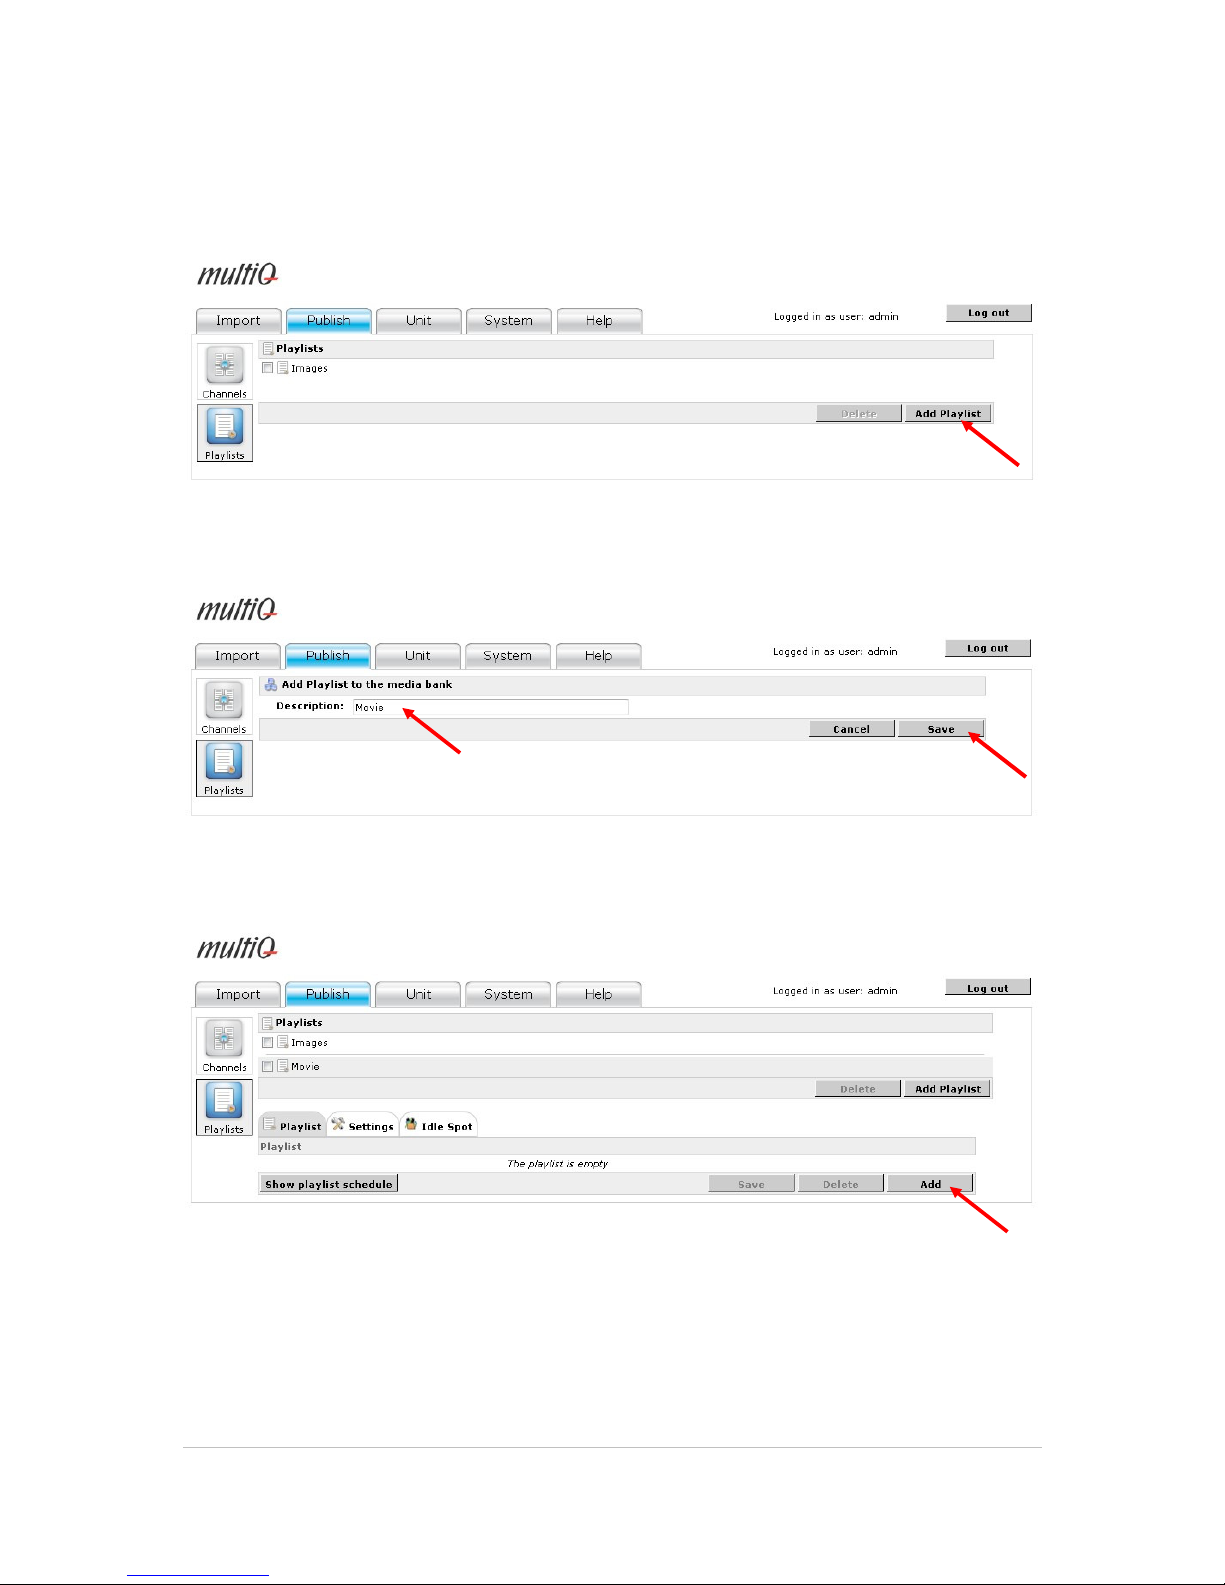
Figure 57. Select the “Publish” tab and then click the “Playlist” icon. Next click the “Add Playlist” button.
Figure 58. Name the next playlist “Movie” then click “Save”.
Figure 59. Click the “Add” button” of the empty playlist.
Page 47
©2011 MultiQ are registered trademarks or trademark applications of MultiQ International AB in various jurisdictions. All
other company names and products are trademarks or registered trademarks of their respective companies. We reserve
the right to change the specifications without prior notice.
MultiQ DSMS 3.6 User Guide, Media players operated in standalone mode, Version 2, 18/08/2011 47
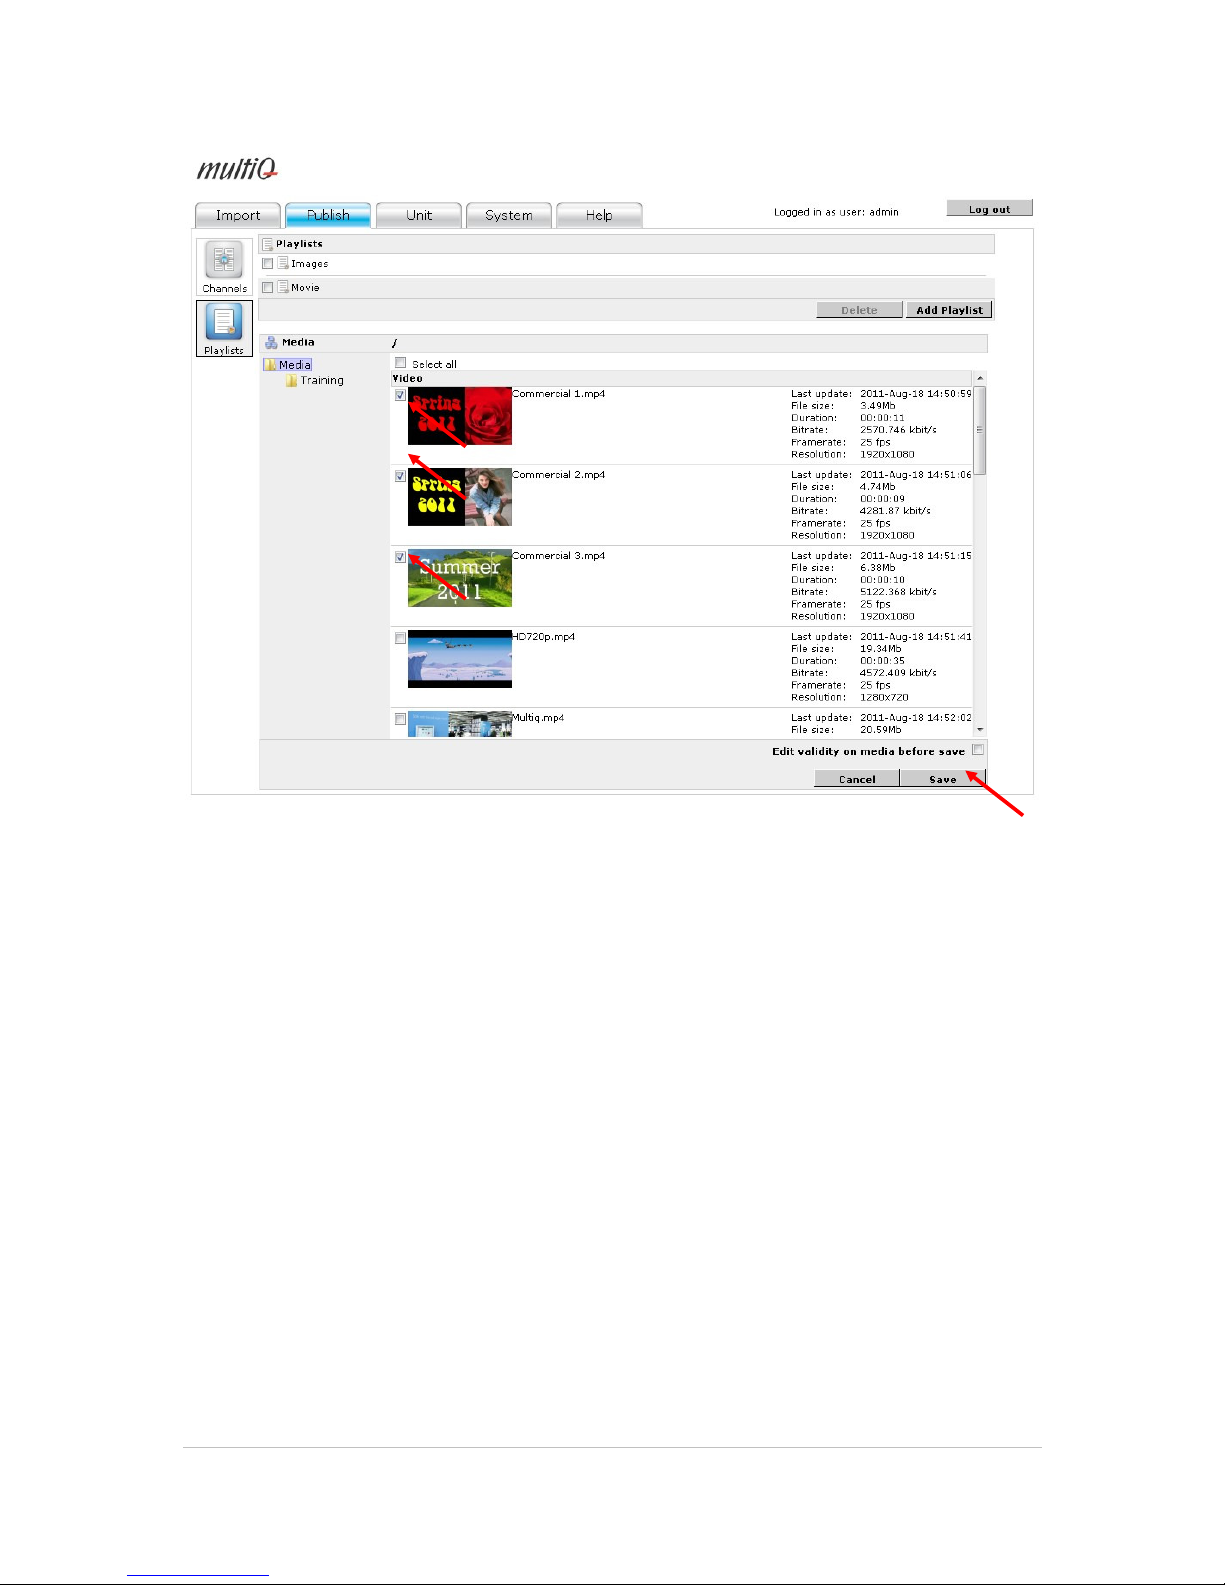
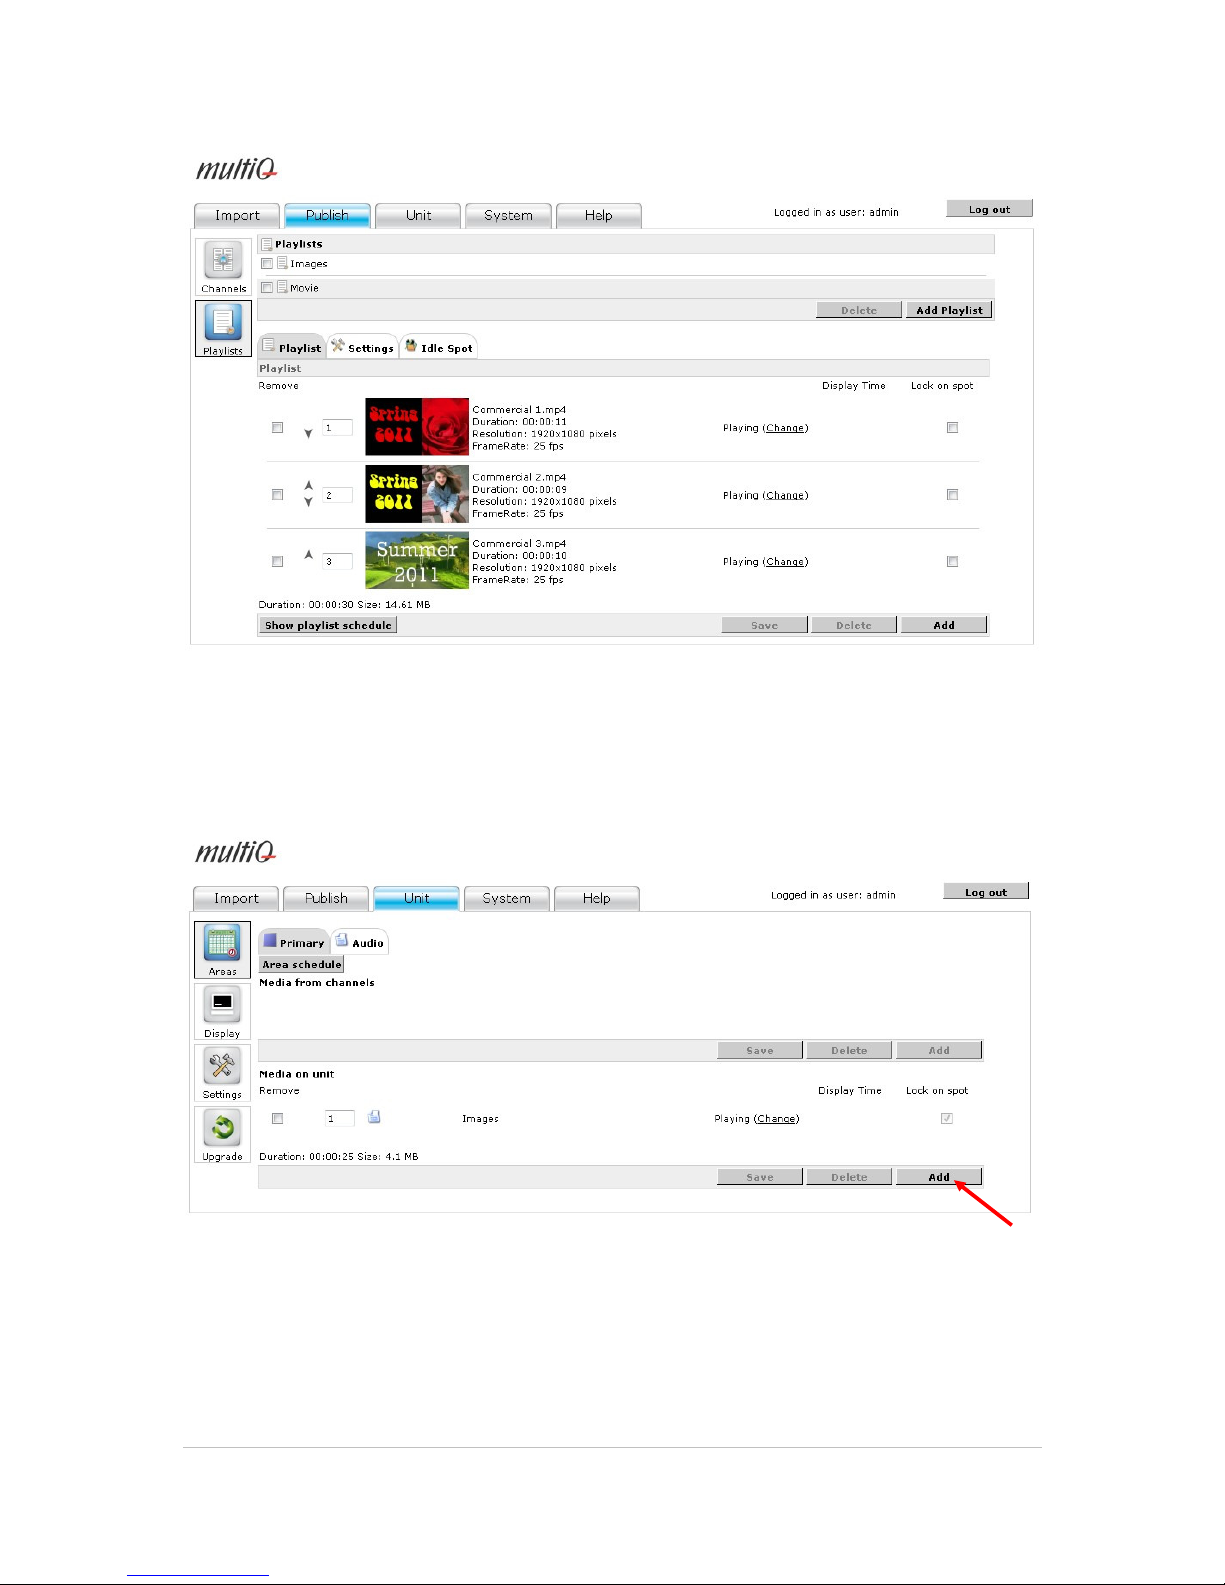
Figure 60. Tick the boxes for the “Commercial 1.mp4”, “Commercial 2.mp4” and the “Commercial
3.mp4” files and then click “Save”.
Page 48
©2011 MultiQ are registered trademarks or trademark applications of MultiQ International AB in various jurisdictions. All
other company names and products are trademarks or registered trademarks of their respective companies. We reserve
the right to change the specifications without prior notice.
MultiQ DSMS 3.6 User Guide, Media players operated in standalone mode, Version 2, 18/08/2011 48
Figure 61. The “Movie” playlist now include 3 short video clips that are played in a loop .
The next step is to include the “Movie” playlist in the “Media on unit” section of the full screen
“Primary” area of the media player.
Figure 62. Go to the “Unit” tab and click the “Areas” icon and then click the “Add” button in the “Media on
unit” section.
Page 49
©2011 MultiQ are registered trademarks or trademark applications of MultiQ International AB in various jurisdictions. All
other company names and products are trademarks or registered trademarks of their respective companies. We reserve
the right to change the specifications without prior notice.
MultiQ DSMS 3.6 User Guide, Media players operated in standalone mode, Version 2, 18/08/2011 49
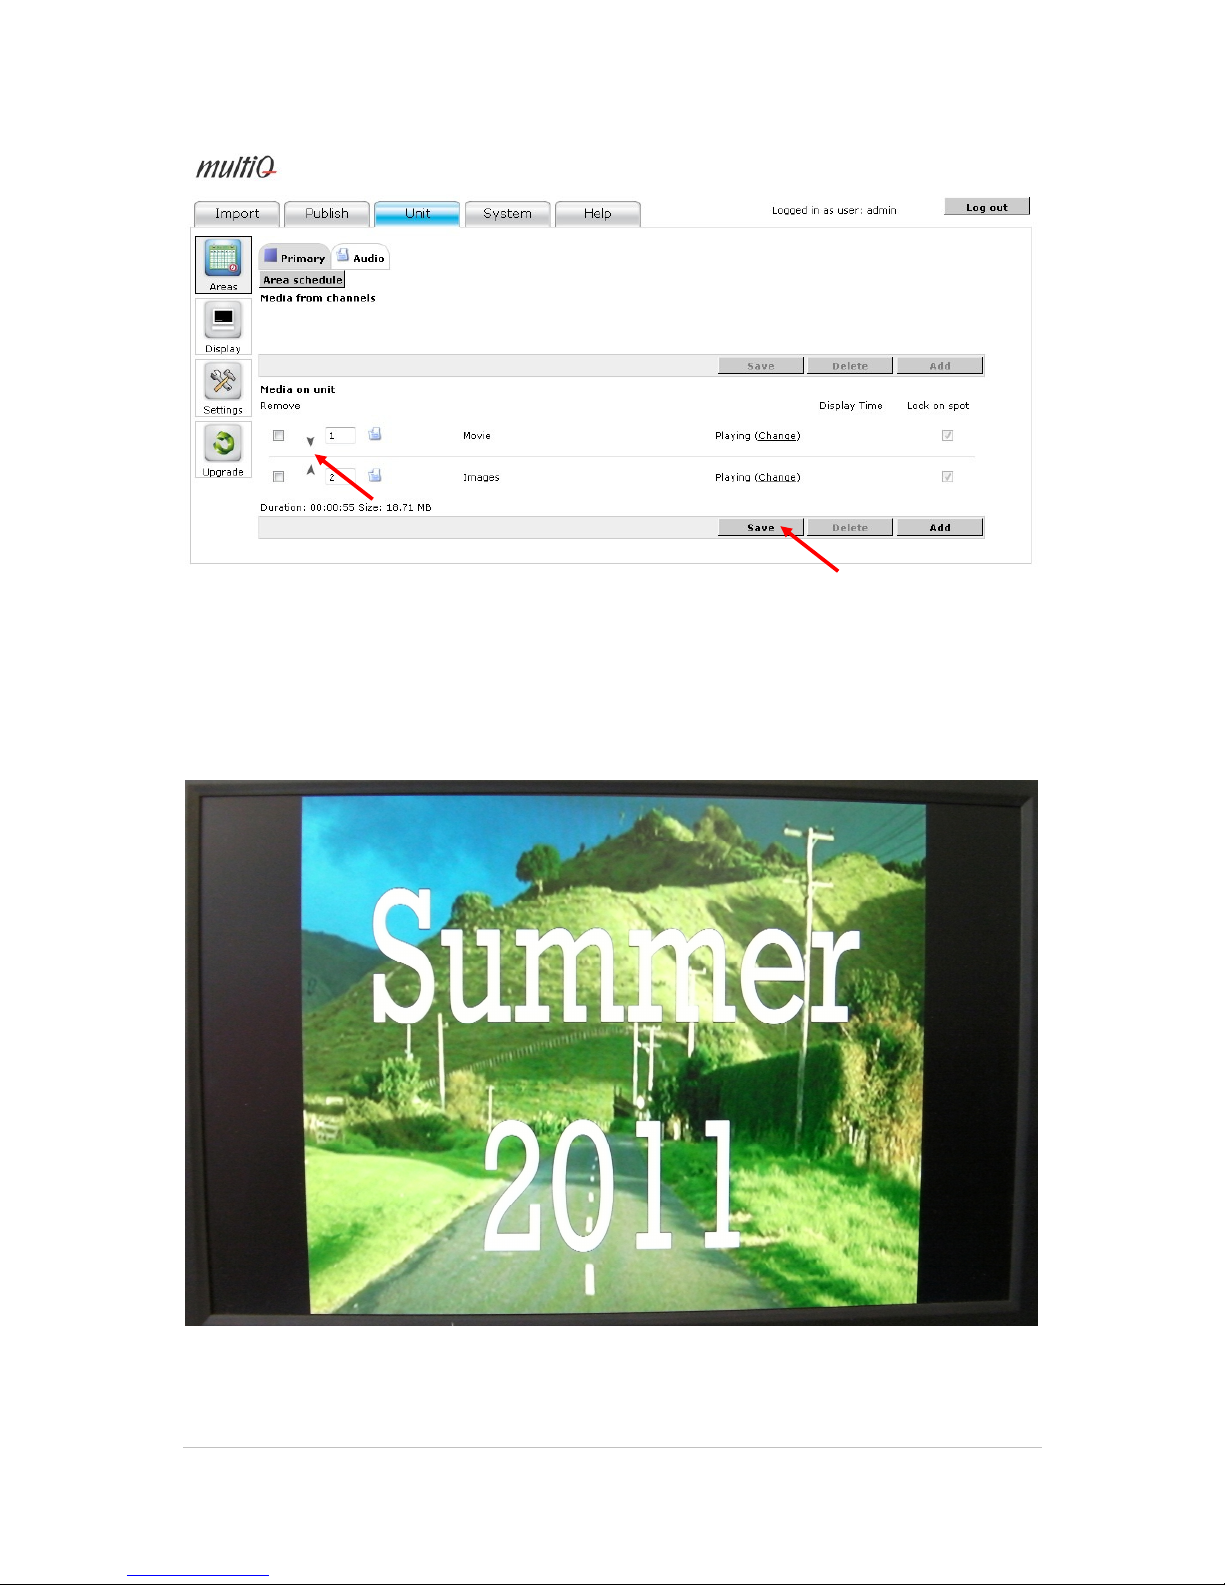
Figure 63. Tick the box to the left of “Movie” and then click “Save”
Figure 64. The “Primary” area now has two playlists. However it is only the playlist that is on top that is
played.
Page 50
©2011 MultiQ are registered trademarks or trademark applications of MultiQ International AB in various jurisdictions. All
other company names and products are trademarks or registered trademarks of their respective companies. We reserve
the right to change the specifications without prior notice.
MultiQ DSMS 3.6 User Guide, Media players operated in standalone mode, Version 2, 18/08/2011 50
Figure 65. To change playlist to be played you can move the “Movie” playlist to the top using the tiny
arrows to the right and then click “Save”.
The video clips are now played in sequence with smooth transitions since the video clips fade in to
black and fade out from black before changing to the next clip or looping the playlist.
Figure 66. The video clip is shot in the 16:9 format but presented in the 4:3 format.
Page 51
©2011 MultiQ are registered trademarks or trademark applications of MultiQ International AB in various jurisdictions. All
other company names and products are trademarks or registered trademarks of their respective companies. We reserve
the right to change the specifications without prior notice.
MultiQ DSMS 3.6 User Guide, Media players operated in standalone mode, Version 2, 18/08/2011 51
Figure 67. If playing the 16:9 aspect ratio video clips on a 5:4 media monitor it can be suitable to change
the parameters of the video clips to 16:9 to make the aspect ratio right on the screen.
Figure 68. Change the settings to either “Stretch to fit area” or to the 16:9 format.
Page 52
©2011 MultiQ are registered trademarks or trademark applications of MultiQ International AB in various jurisdictions. All
other company names and products are trademarks or registered trademarks of their respective companies. We reserve
the right to change the specifications without prior notice.
MultiQ DSMS 3.6 User Guide, Media players operated in standalone mode, Version 2, 18/08/2011 52
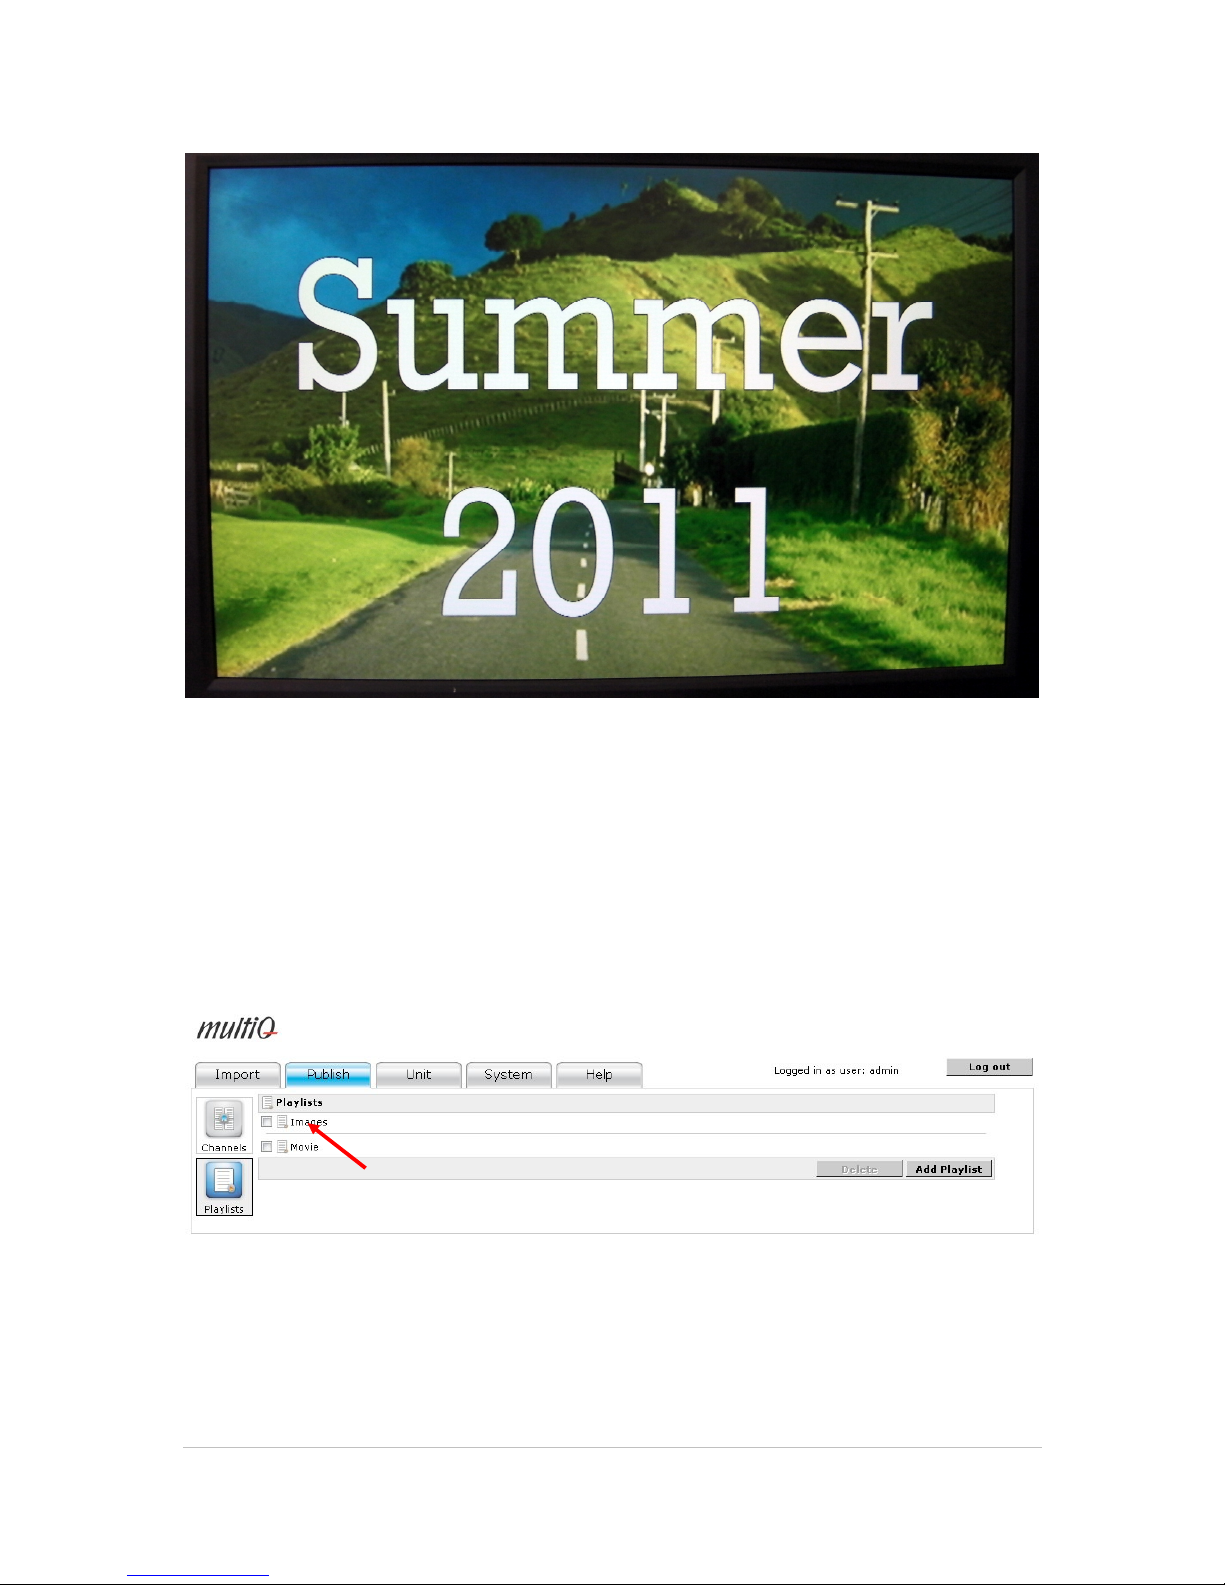
Figure 69. The image is now correctly displayed on the screen.
9.3 Playing playlists in sequence
A common request is to be able to play playlists in sequence. This is often used when mixing local
content contained in one playlist with national content contained in another playlist.
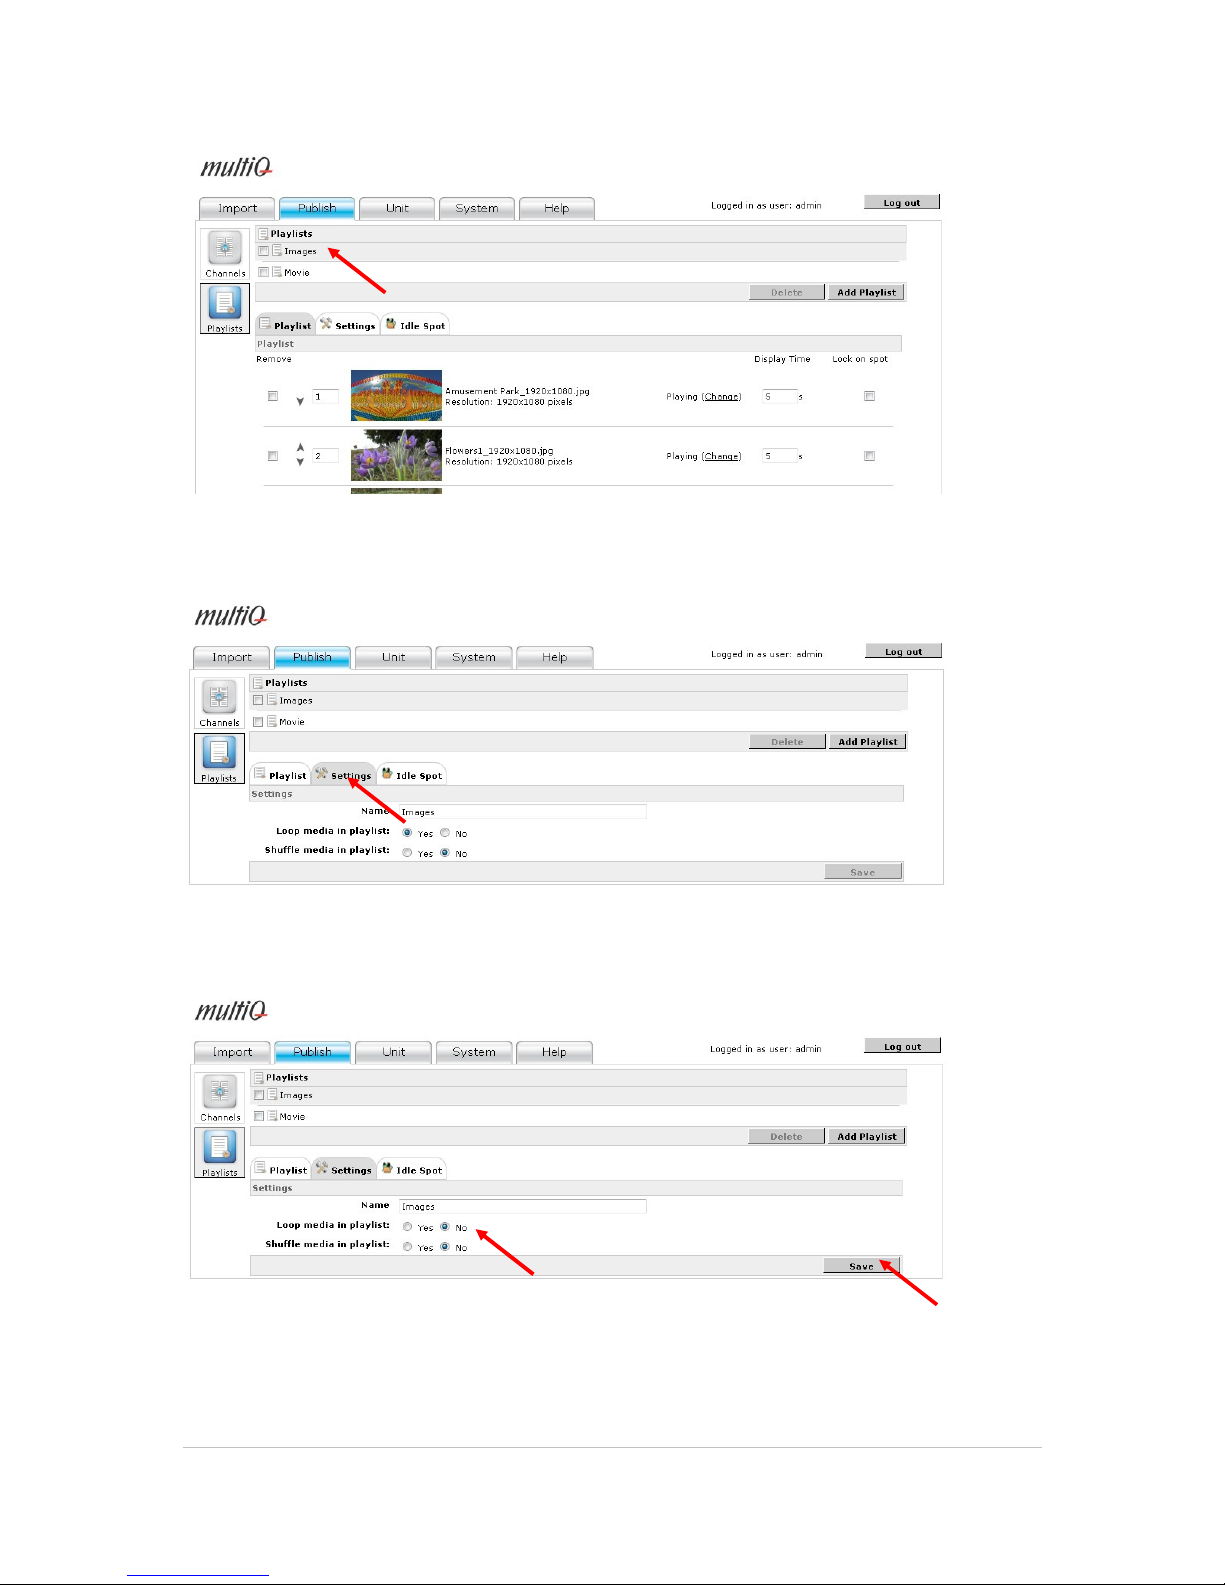
To make both playlists to play in sequence you must go to the “Settings” menu of each playlist and
set the “Loop media in playlist” to “No”.
Figure 70. Go to the playlists by selecting the “Publish” tab and click the “Playlists” icon. Then click the
name of the playlist to play in sequence.
Page 53
©2011 MultiQ are registered trademarks or trademark applications of MultiQ International AB in various jurisdictions. All
other company names and products are trademarks or registered trademarks of their respective companies. We reserve
the right to change the specifications without prior notice.
MultiQ DSMS 3.6 User Guide, Media players operated in standalone mode, Version 2, 18/08/2011 53
Figure 71. Click the “Settings” tab in the edit playlist menu.
Figure 72. Select the “Settings” tab for the playlist.
Figure 73. Set “Loop media in playlist” to “No”.
Do the same thing for both playlists and you will see them playing in sequence.
Page 54
©2011 MultiQ are registered trademarks or trademark applications of MultiQ International AB in various jurisdictions. All
other company names and products are trademarks or registered trademarks of their respective companies. We reserve
the right to change the specifications without prior notice.
MultiQ DSMS 3.6 User Guide, Media players operated in standalone mode, Version 2, 18/08/2011 54
10 Scheduling
Before proceeding with scheduling you should reset both playlists to “Loop media in playlist” to
“Yes”.
Our next task is to be able to play the playlists at different times. This is done by scheduling.
Scheduling is done by selecting the channel and then setting the times when each of the playlists
are allowed to be played.
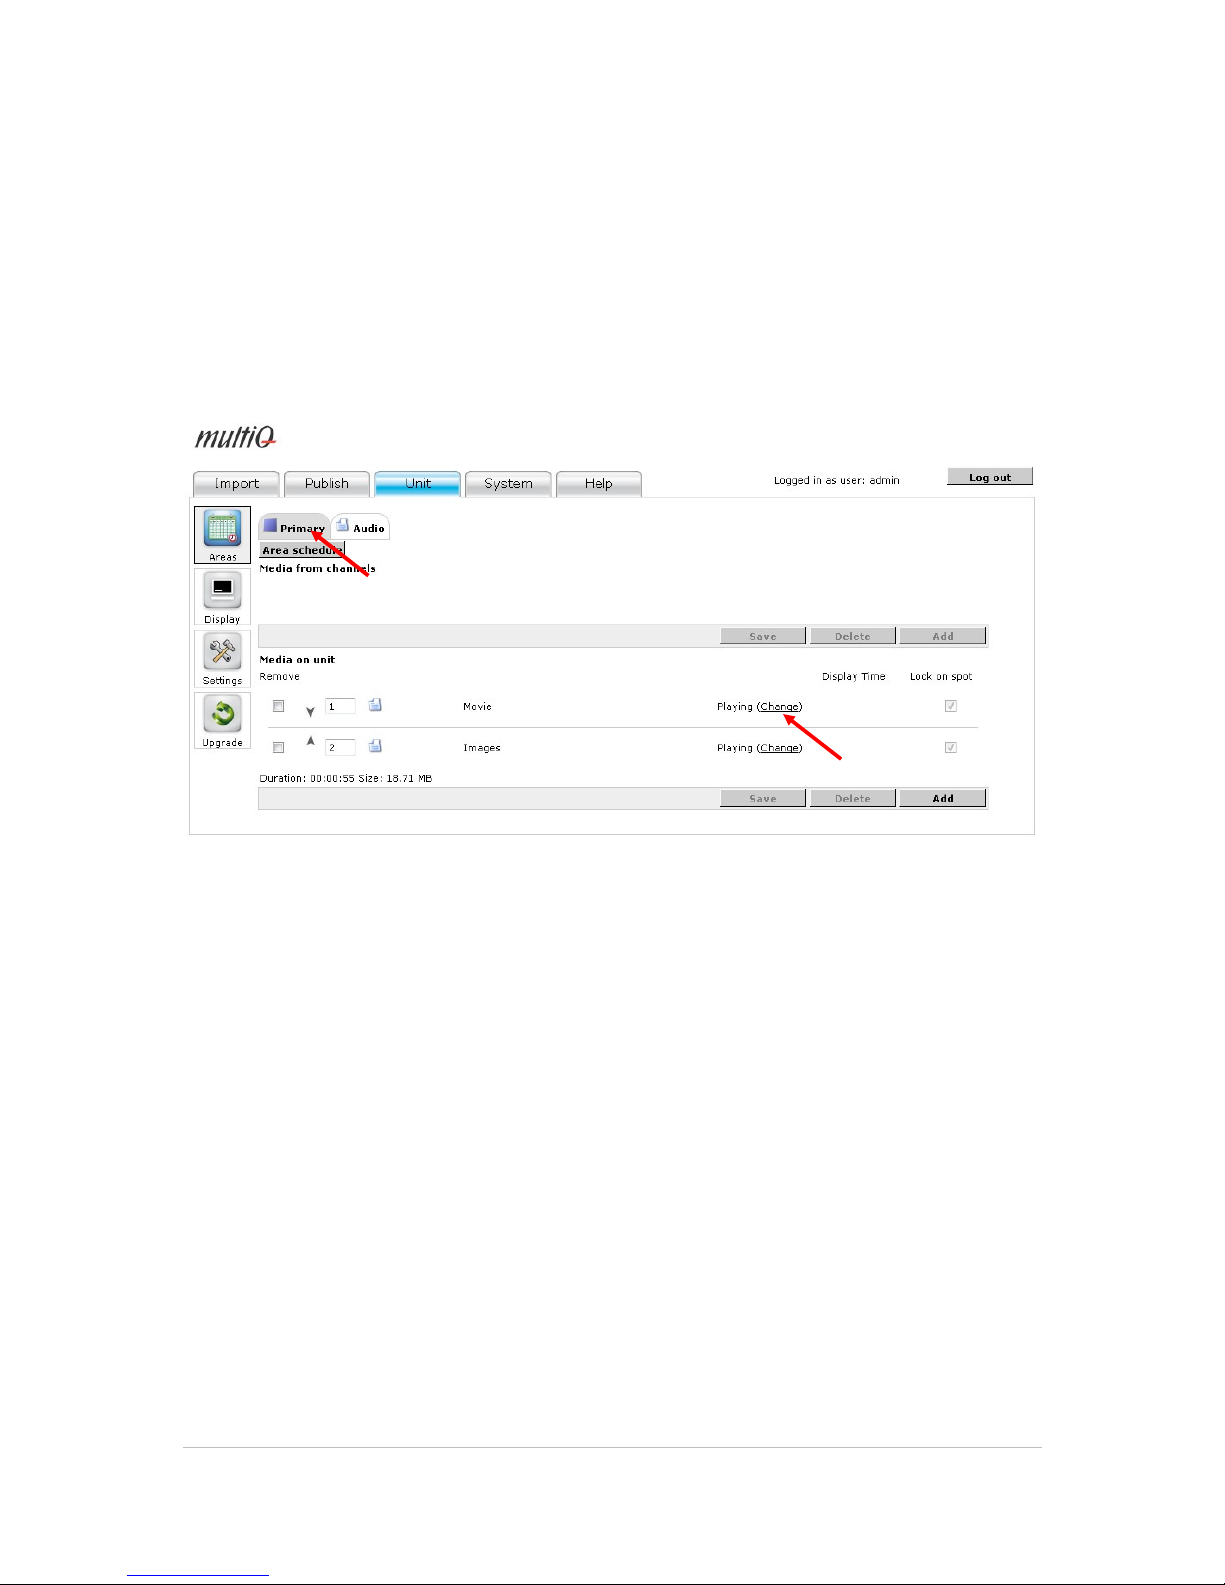
Figure 74. First select the “Unit” tab and then click on the “Primary” tab. Both playlists are said to be
“Playing” meaning that it is the one of top, “Movie”, (provided that both playlists are looping” that is
currently played. Click on the text “Change” of the playlist on top.
Page 55
©2011 MultiQ are registered trademarks or trademark applications of MultiQ International AB in various jurisdictions. All
other company names and products are trademarks or registered trademarks of their respective companies. We reserve
the right to change the specifications without prior notice.
MultiQ DSMS 3.6 User Guide, Media players operated in standalone mode, Version 2, 18/08/2011 55
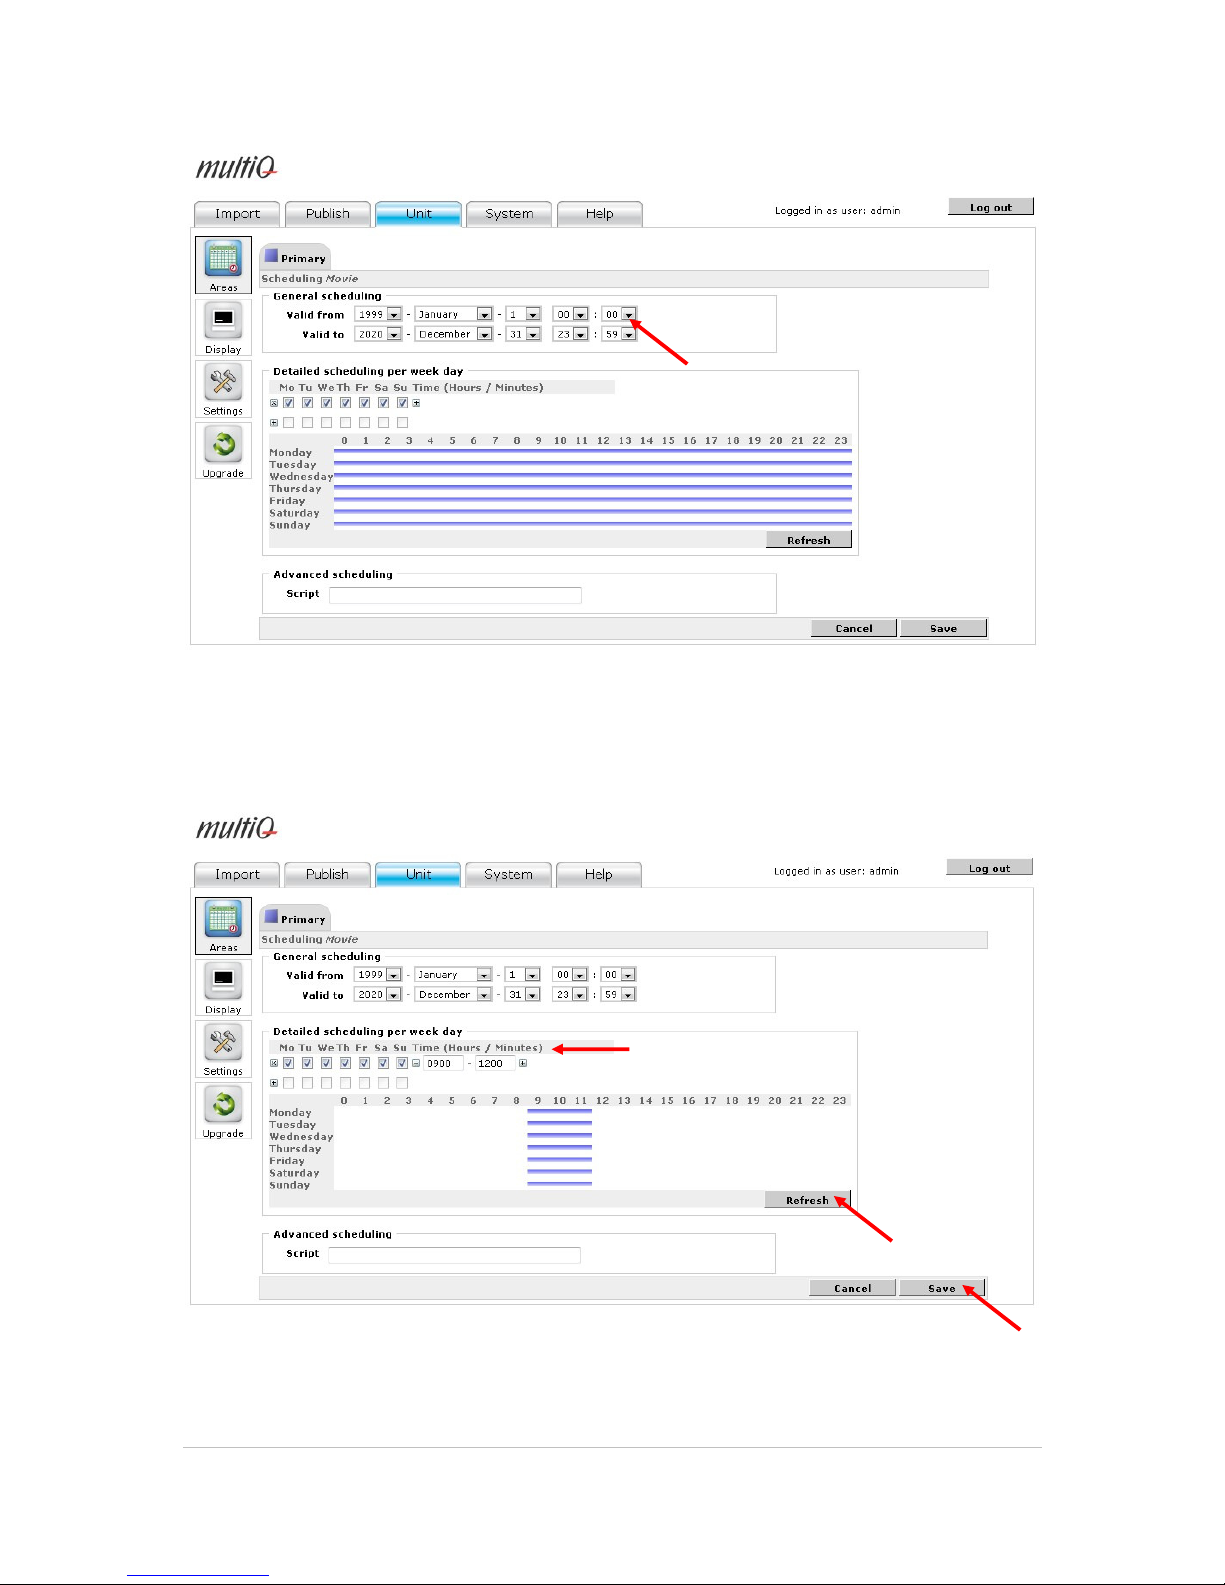
Figure 75. Next you get to the scheduling menu. First there is a start and stop date between which the
playlist is valid. This means that campaigns can be scheduled. In the preview you can see that the playlist
is to be played always between January 1999 and January 2020.
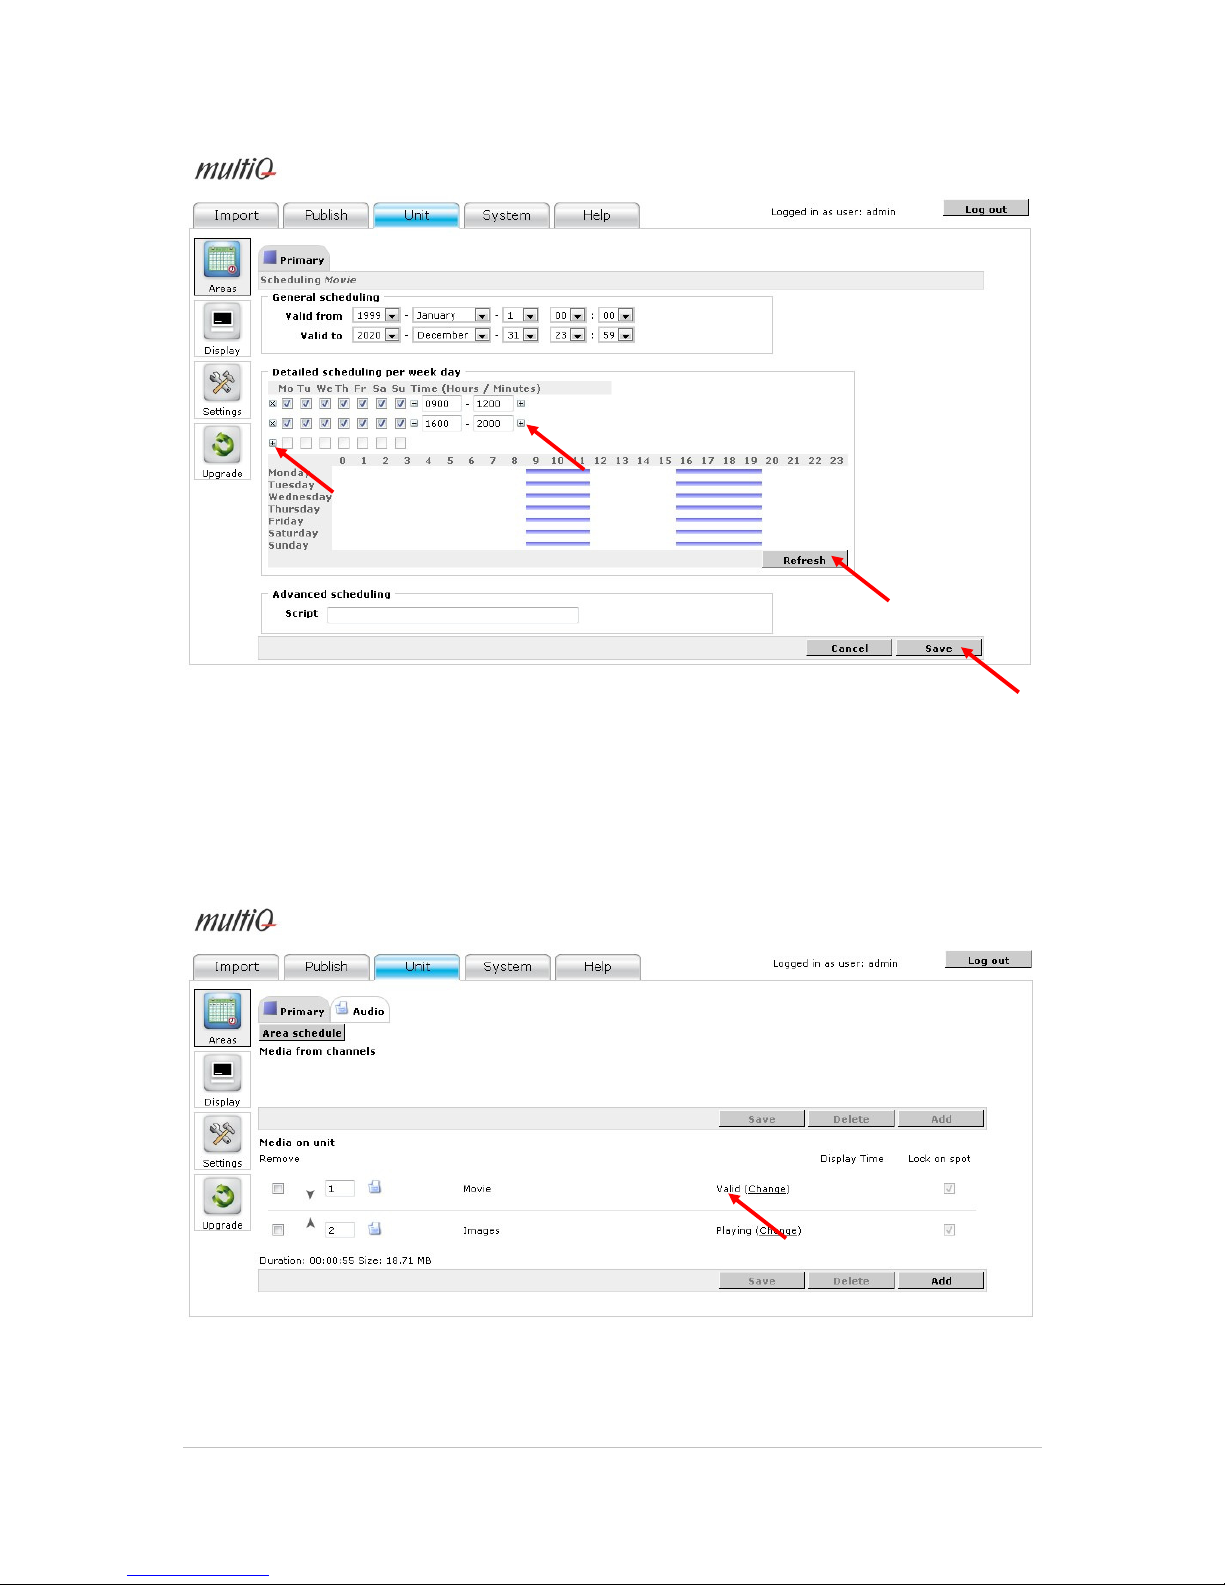
Figure 76. The “Movie” playlist is now set to play between 0900 and 1200 every day of the week. Click
the “+” sign to the right of the check boxes and then enter the time you want to start and stop playing. By
clicking the “Refresh” button you get a visual impression of the current scheduling. Click “Save” to
activate the new scheduling interval.
Page 56
©2011 MultiQ are registered trademarks or trademark applications of MultiQ International AB in various jurisdictions. All
other company names and products are trademarks or registered trademarks of their respective companies. We reserve
the right to change the specifications without prior notice.
MultiQ DSMS 3.6 User Guide, Media players operated in standalone mode, Version 2, 18/08/2011 56
Figure 77. Here a second scheduling interval has been added by clicking the tiny “+” button.
When the “movie” playlist is not allowed to play the media monitor will move to the next playlist and
check whether this is allowed to play or not. If it should prove that there is no playlist allowed to play
or if there is no content at all assigned to the media player there will be and “IDLE” sign shown on
the screen.
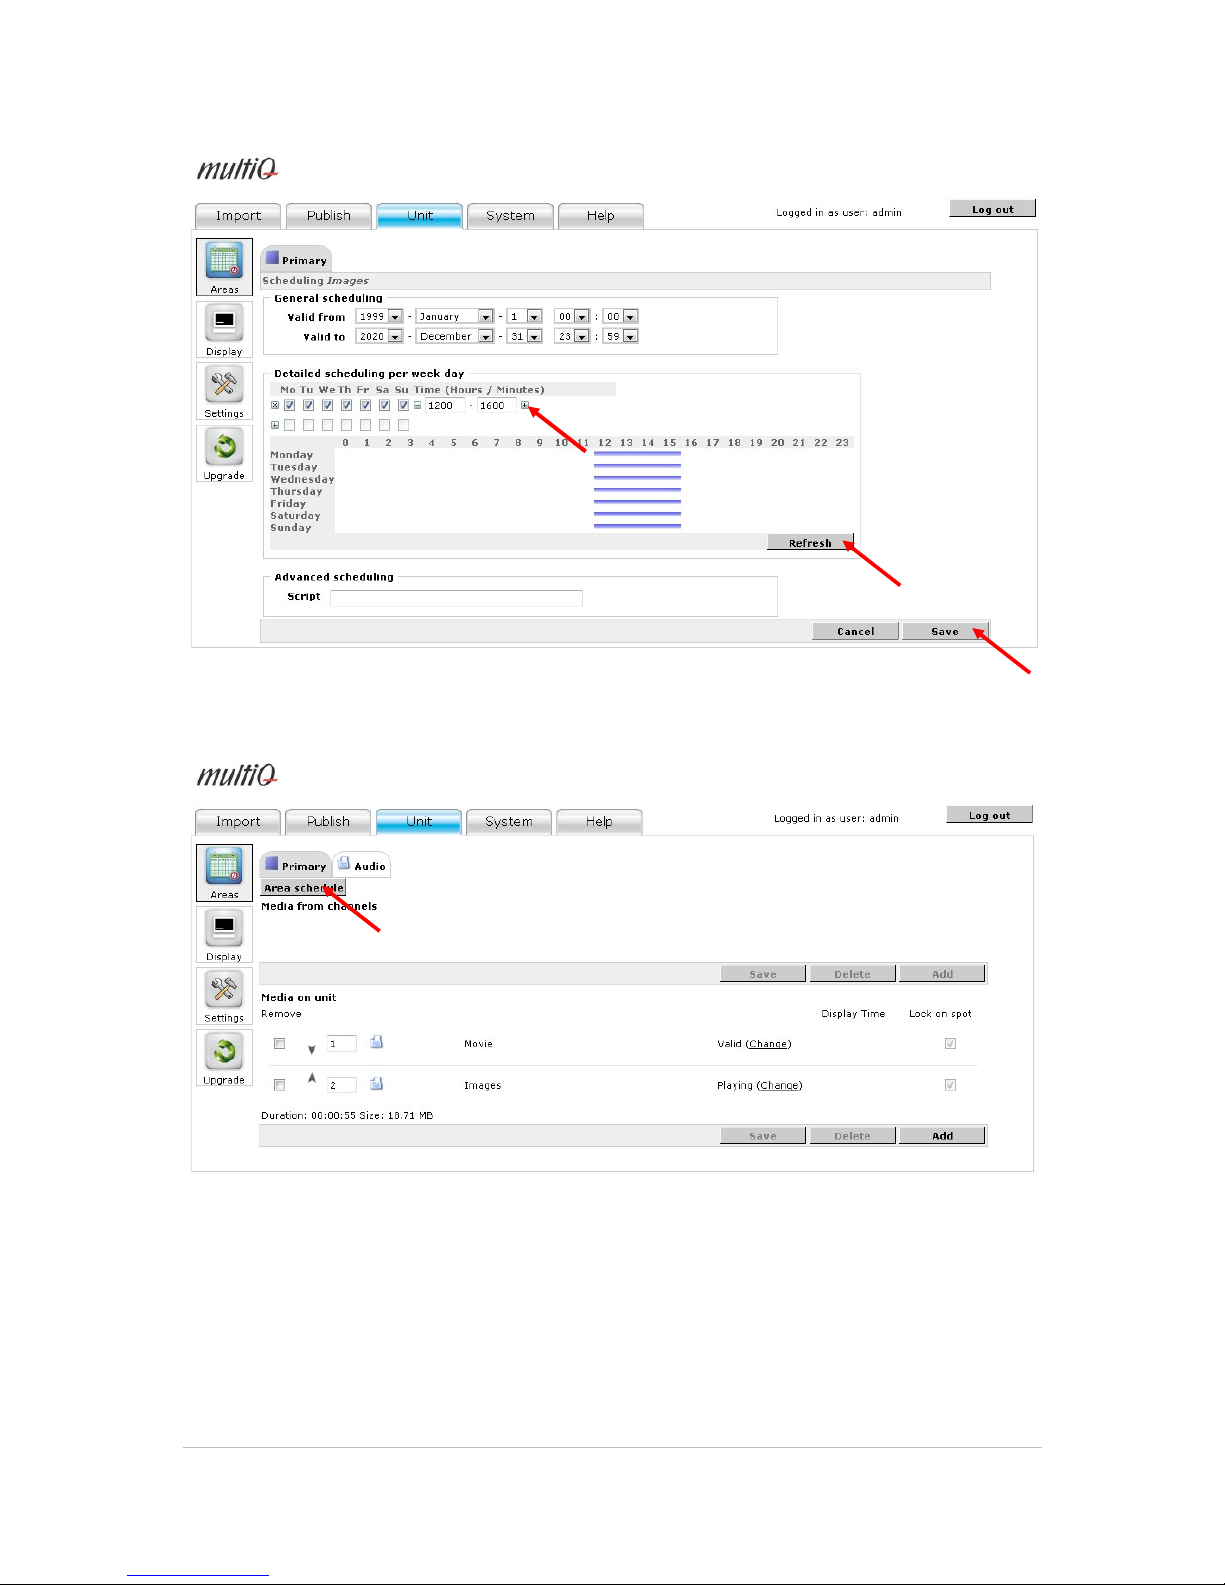
Figure 78. Returning to the channel playlists menu we can now see that the “Movie” playlist is still “Valid”
however it is not “Playing” as is the case for the “Images” playlist.
Page 57
©2011 MultiQ are registered trademarks or trademark applications of MultiQ International AB in various jurisdictions. All
other company names and products are trademarks or registered trademarks of their respective companies. We reserve
the right to change the specifications without prior notice.
MultiQ DSMS 3.6 User Guide, Media players operated in standalone mode, Version 2, 18/08/2011 57
Figure 79. Here the “Images” playlist is scheduled to play every day between1200-1600.
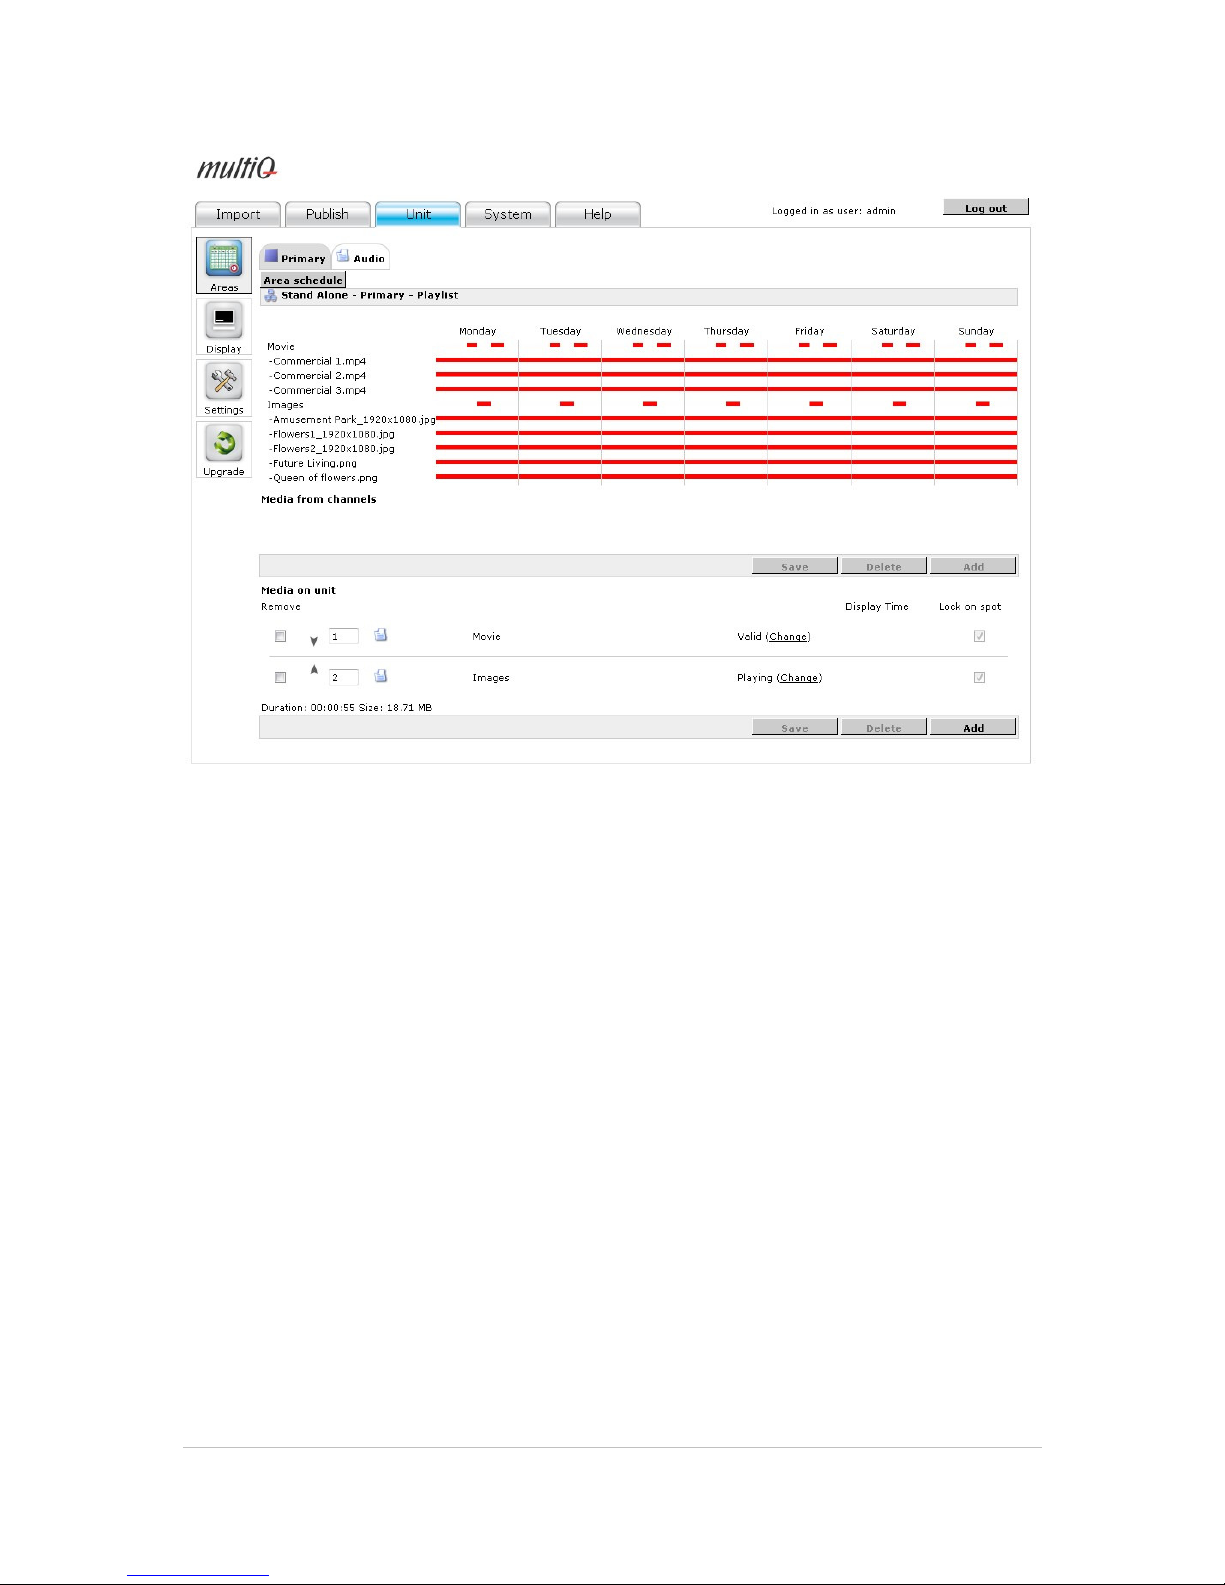
Figure 80. By clicking the “Area schedule” button you can get an overview of how the playlists and their
content are scheduled.
Page 58
©2011 MultiQ are registered trademarks or trademark applications of MultiQ International AB in various jurisdictions. All
other company names and products are trademarks or registered trademarks of their respective companies. We reserve
the right to change the specifications without prior notice.
MultiQ DSMS 3.6 User Guide, Media players operated in standalone mode, Version 2, 18/08/2011 58
Figure 81. Scheduling overview.
Page 59
©2011 MultiQ are registered trademarks or trademark applications of MultiQ International AB in various jurisdictions. All
other company names and products are trademarks or registered trademarks of their respective companies. We reserve
the right to change the specifications without prior notice.
MultiQ DSMS 3.6 User Guide, Media players operated in standalone mode, Version 2, 18/08/2011 59
10.1 Additional scheduling features
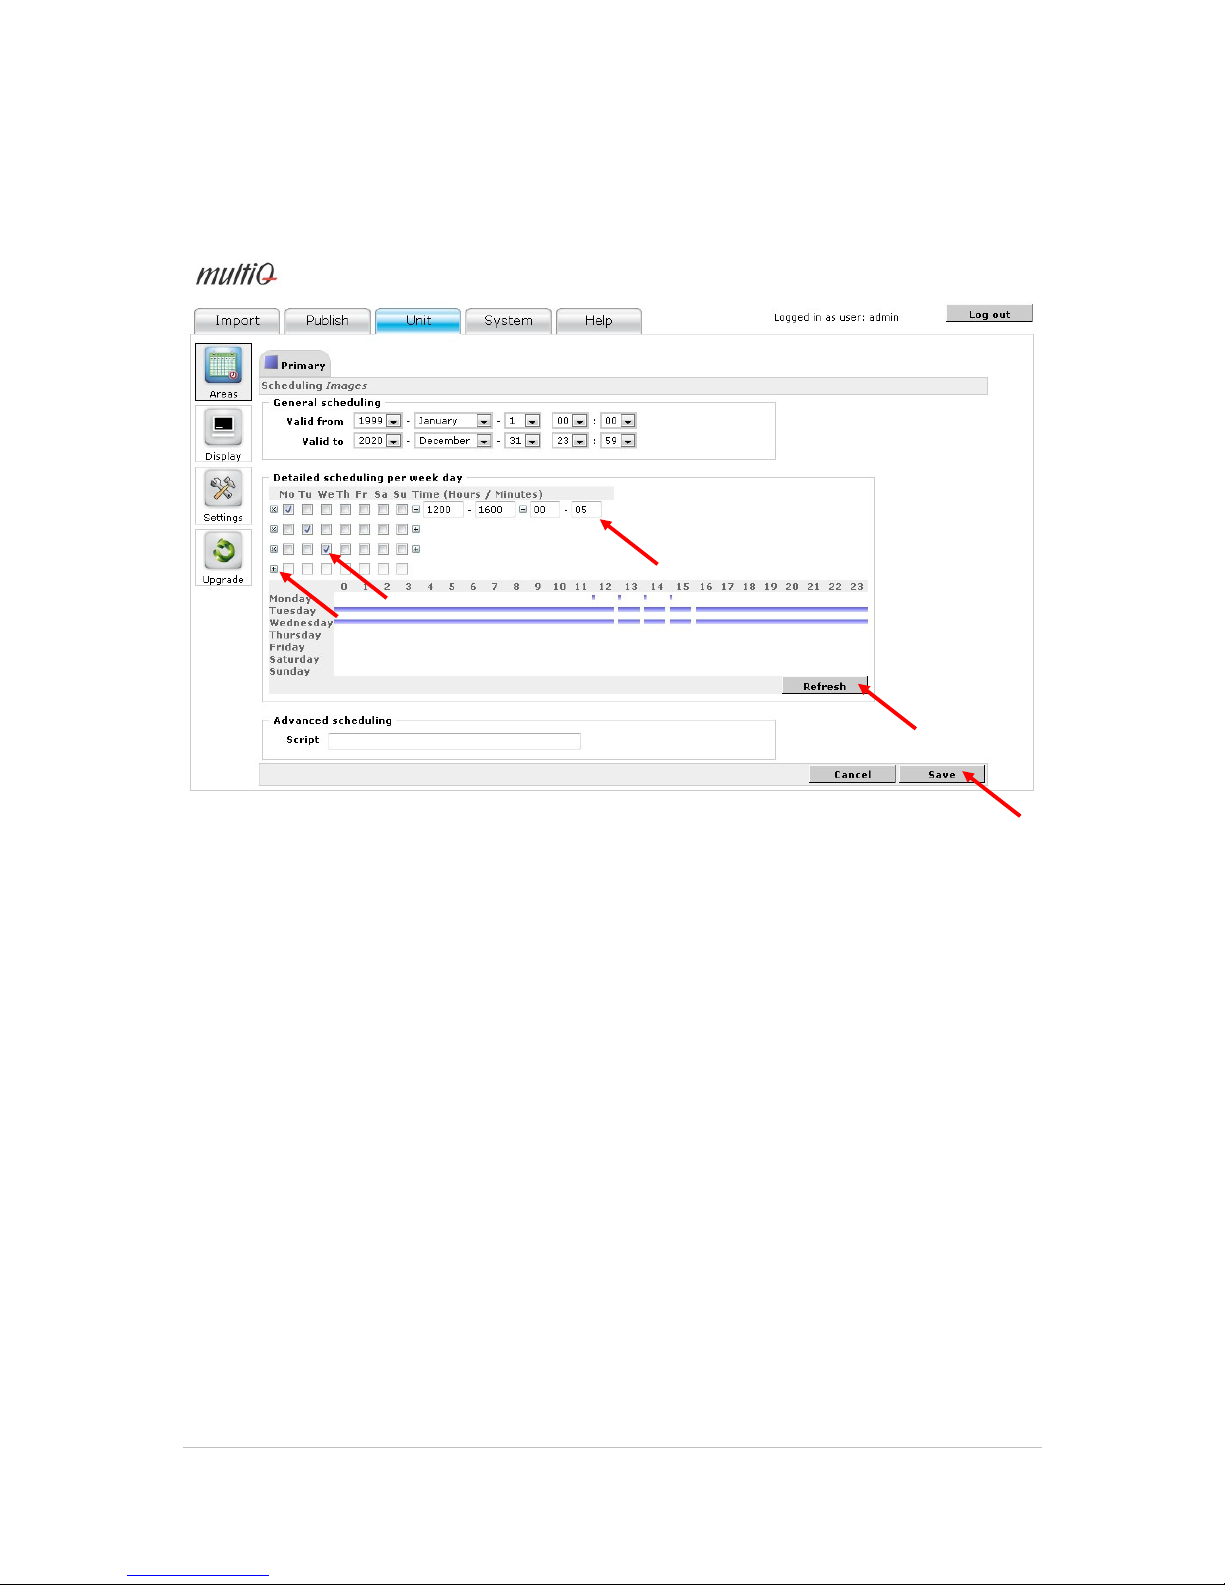
Figure 82. In this case the playlist is scheduled to play the first five minutes of every hour between 1200
and 1600 on Mondays. Specific scheduling can be added for different days of the week by adding new
conditions by clicking the “+” button.
Scheduling entries can be removed by clicking the “X” button to the left of the entry.
Before proceeding with the exercises below you should remove all scheduling making both playlists
play at all times.
Page 60
©2011 MultiQ are registered trademarks or trademark applications of MultiQ International AB in various jurisdictions. All
other company names and products are trademarks or registered trademarks of their respective companies. We reserve
the right to change the specifications without prior notice.
MultiQ DSMS 3.6 User Guide, Media players operated in standalone mode, Version 2, 18/08/2011 60
11 Streaming sources as media spots
11.1 Adding Live TV
In many digital signage applications there is a need to add Live TV. In the MultiQ system, streaming
is added by using an IP streamer streaming into the local area network. IP streamers are devices
with analogue or digital inputs that provide an IP stream including the input audio and video signals.
Input can be obtained from any audio or video source. Normally a digital set top box receiving
terrestrial, cable TV or satellite signals can be used. By inserting the live feed into the system
makes it possible to display live TV feeds in full screen format during some parts of the time. This
means that you can define live events to be mixed with digital signage. Also, you can use the live
feed in a selected are on the screen making it possible to mix the live feed with your own
messages. The MultiQ media players support streaming up to 1080p Full HD signals.
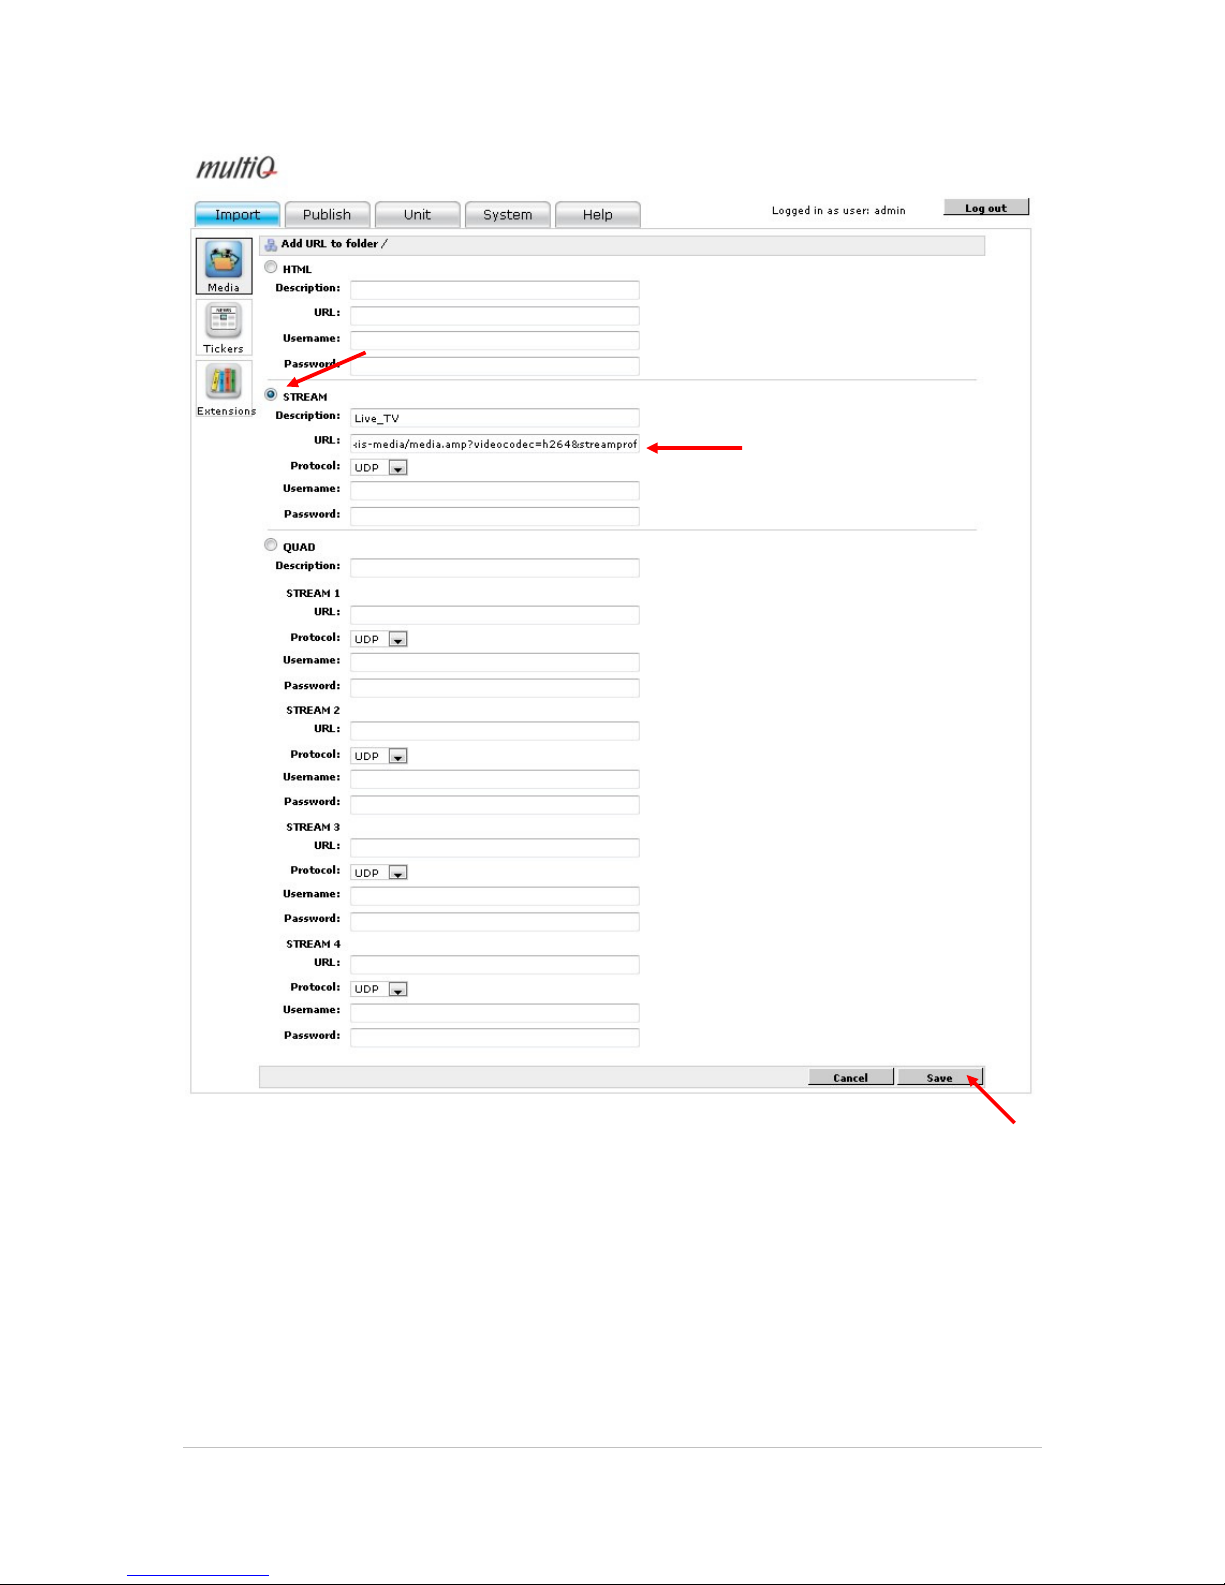
To be able to use the stream the media player or media monitor needs to know the IP address of
the streamer and to send the right request to the streamer. The later can be obtained from the
manufacturer of the streamer.
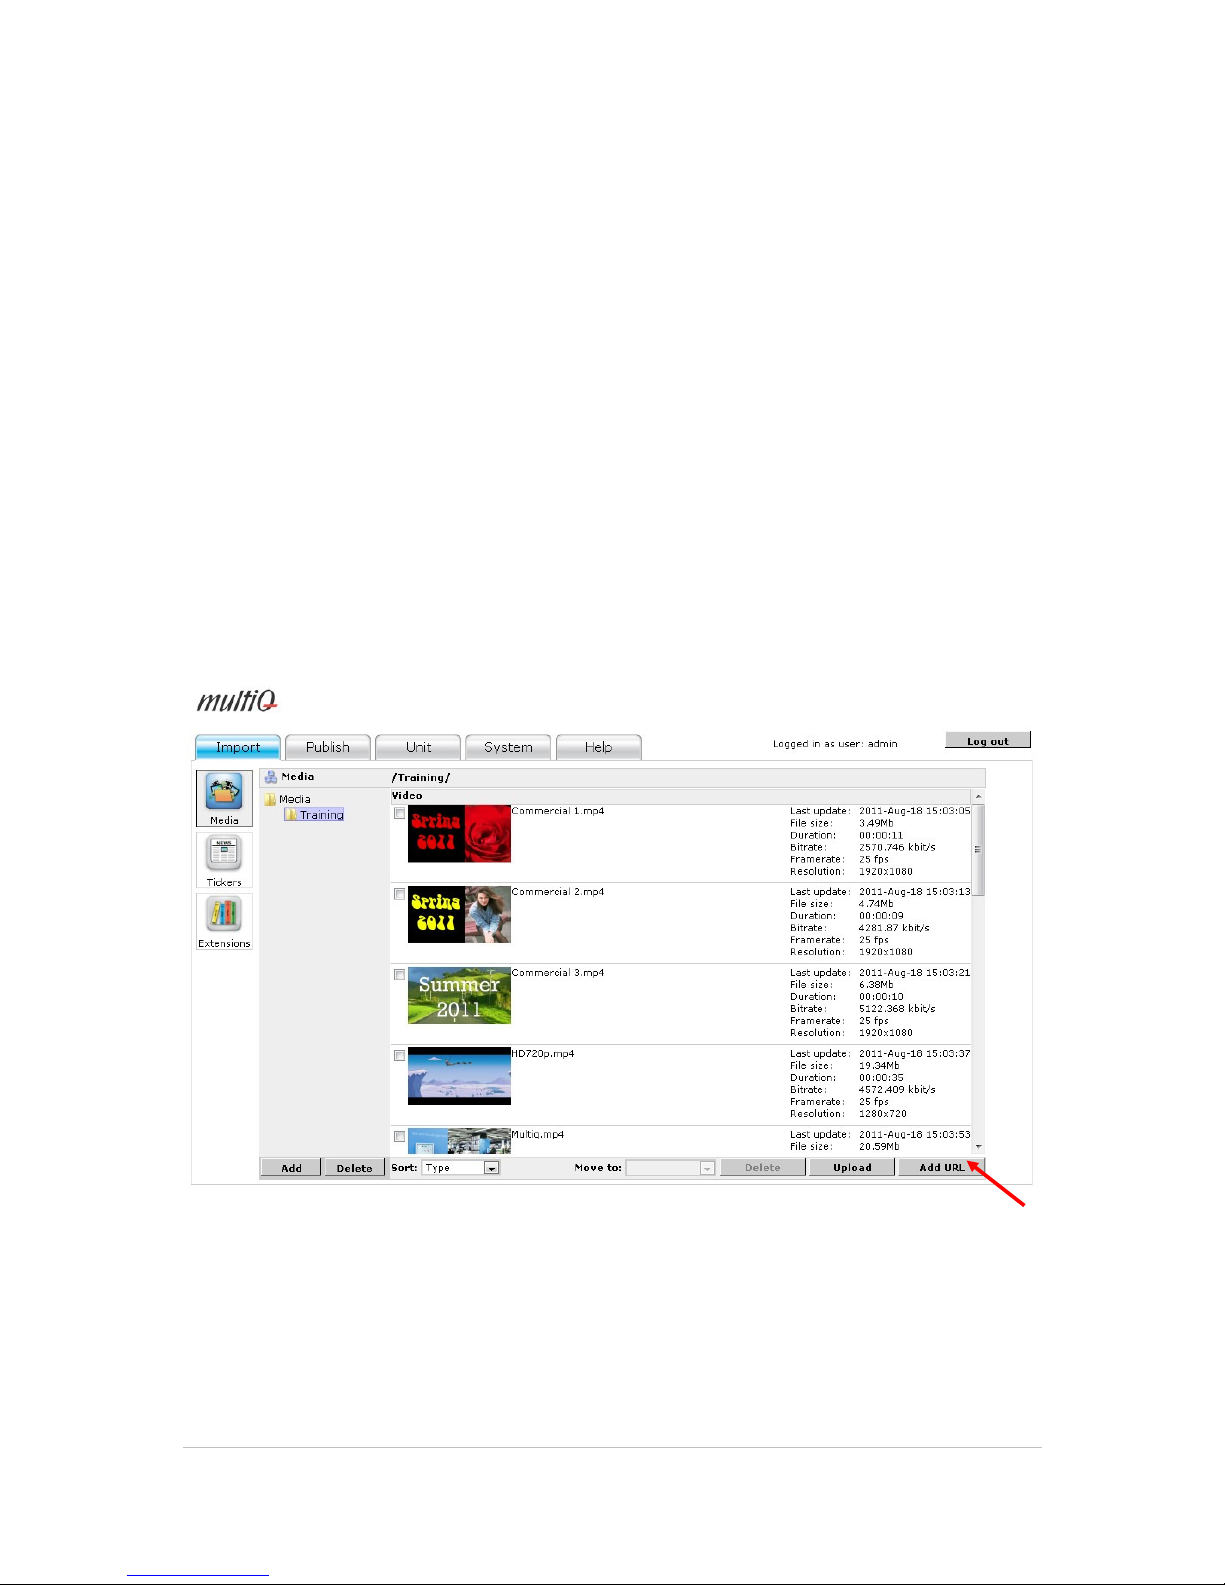
To add a stream we will use the “Add URL” button in the “Media menu”
Figure 83. By pressing the “Add URL” button in the “Media” archive you can add hyperlinks to streams
and websites.
Page 61
©2011 MultiQ are registered trademarks or trademark applications of MultiQ International AB in various jurisdictions. All
other company names and products are trademarks or registered trademarks of their respective companies. We reserve
the right to change the specifications without prior notice.
MultiQ DSMS 3.6 User Guide, Media players operated in standalone mode, Version 2, 18/08/2011 61
Figure 84. Add the link to the streamer in the URL box in the Stream section. If the streamer requires user
name and password, this can be added as well. Click “Save” to confirm.
Page 62
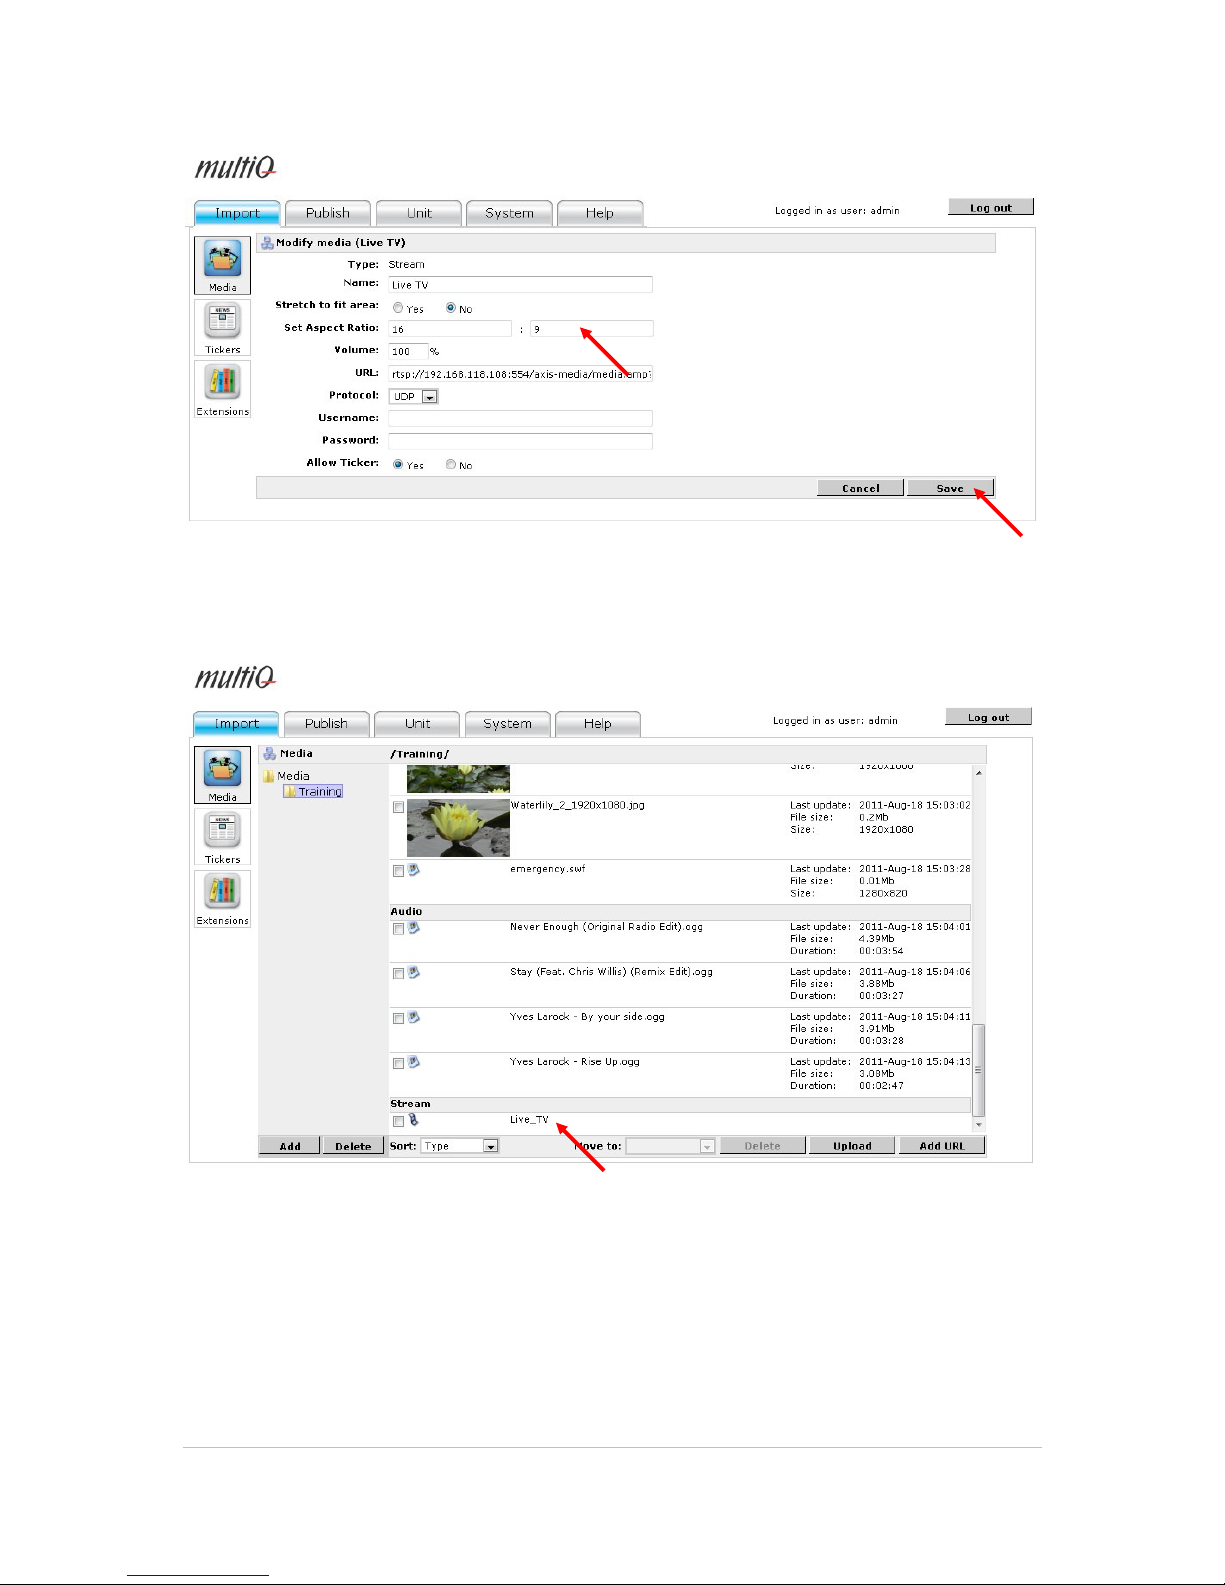
©2011 MultiQ are registered trademarks or trademark applications of MultiQ International AB in various jurisdictions. All
other company names and products are trademarks or registered trademarks of their respective companies. We reserve
the right to change the specifications without prior notice.
MultiQ DSMS 3.6 User Guide, Media players operated in standalone mode, Version 2, 18/08/2011 62
Figure 85. In the next dialog box you can set the correct aspect ratio to be used. You can return to this
(and other media spot menus) at any time by clicking the name of the media spot in the media archive.
Figure 86. The streamer media spot is now visible in the media archive (Stream section) like any other
media spot.
Page 63
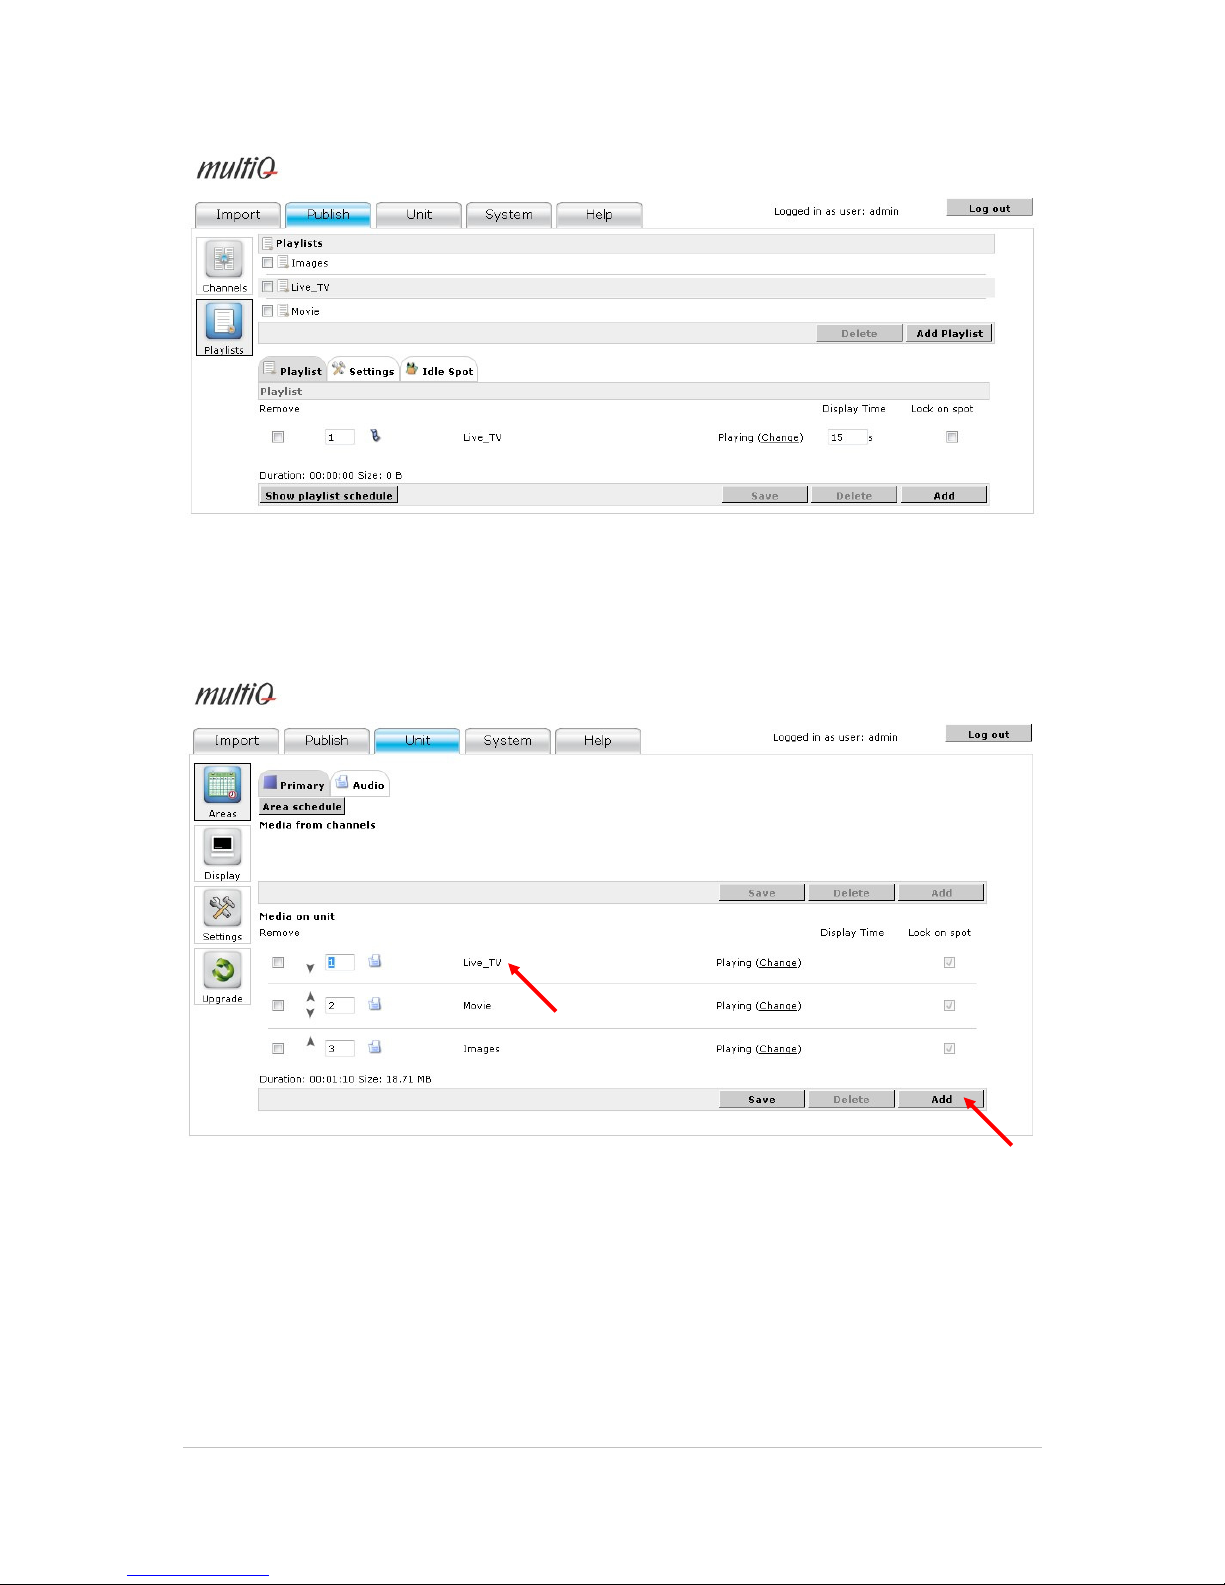
©2011 MultiQ are registered trademarks or trademark applications of MultiQ International AB in various jurisdictions. All
other company names and products are trademarks or registered trademarks of their respective companies. We reserve
the right to change the specifications without prior notice.
MultiQ DSMS 3.6 User Guide, Media players operated in standalone mode, Version 2, 18/08/2011 63
Figure 87. Now create a playlist (same way as before) named “Live_TV” and add the “Live TV” media spot
to this playlist. Note that the stream will be re-initiated at the time interval set by the “Display Time”. It is
advisable to select a long time interval here to avoid disturbing reloading of the stream.
Figure 88. Finally add the “Live_TV” playlist to “Media on unit” section of the “Primary” area and move it to
the top position in the list to make it play.
Page 64
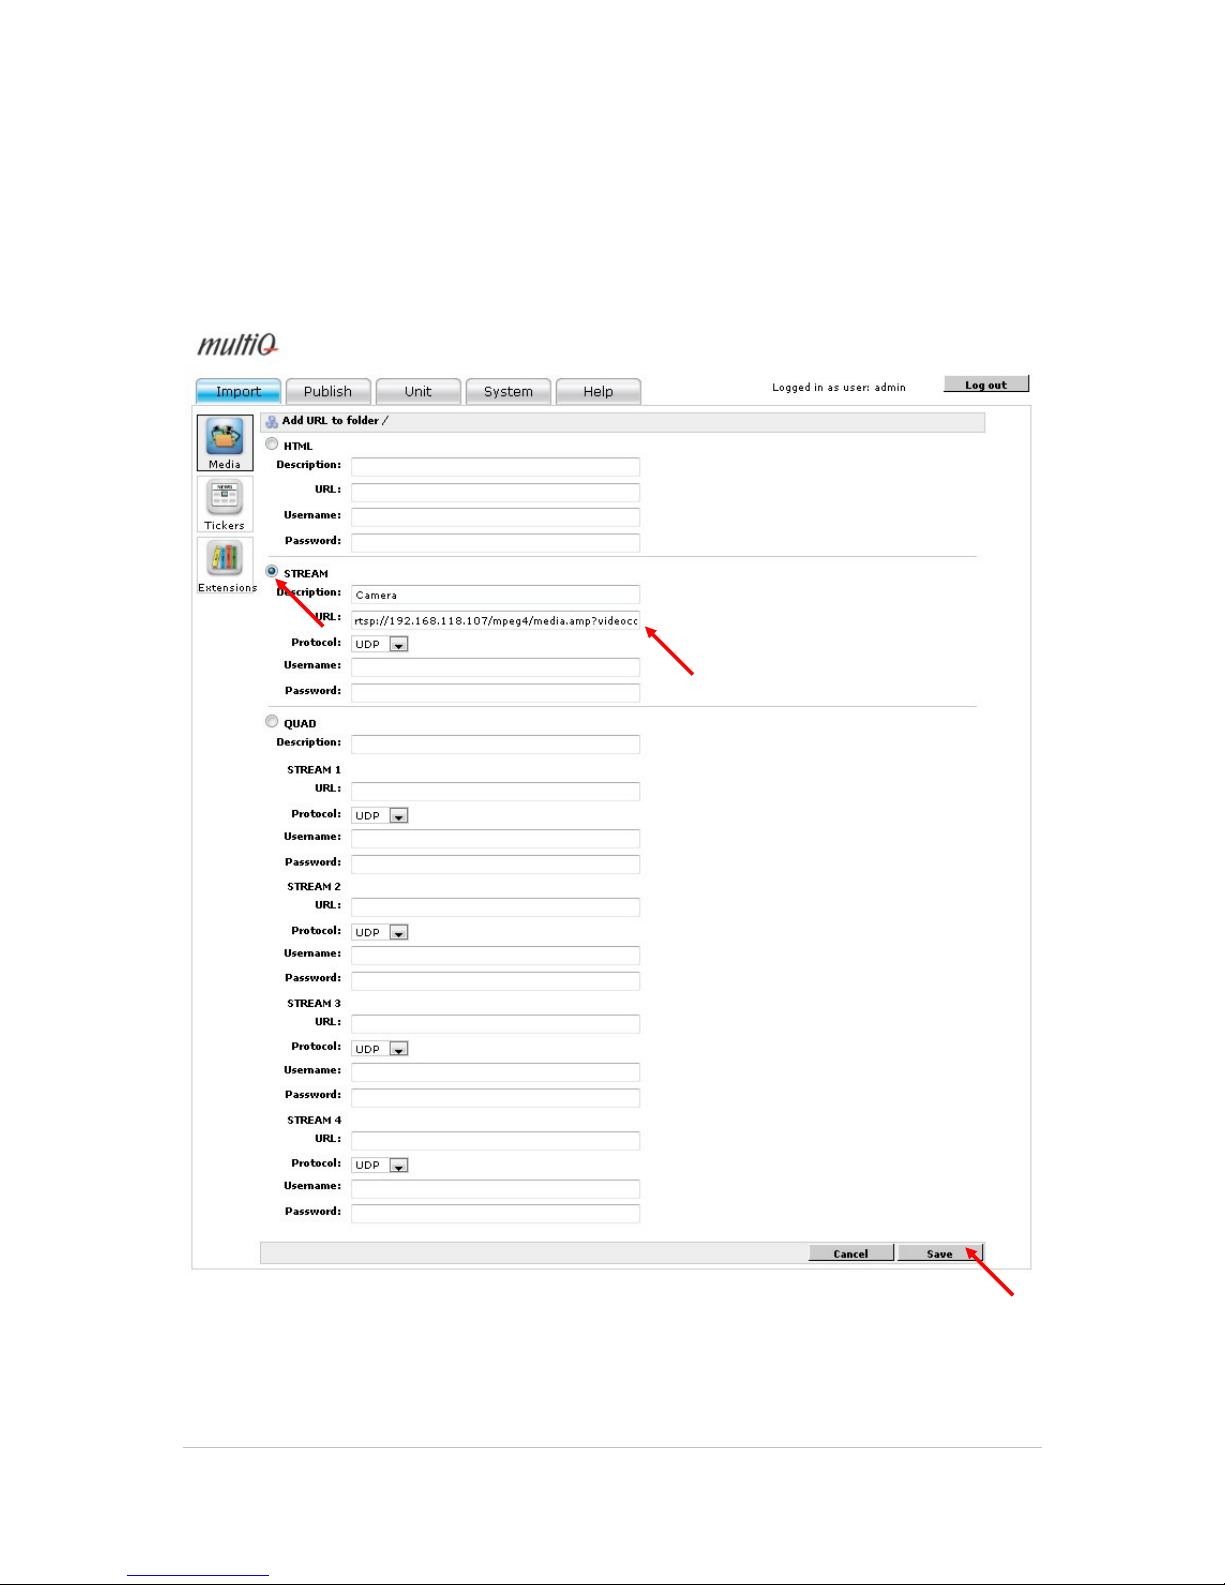
©2011 MultiQ are registered trademarks or trademark applications of MultiQ International AB in various jurisdictions. All
other company names and products are trademarks or registered trademarks of their respective companies. We reserve
the right to change the specifications without prior notice.
MultiQ DSMS 3.6 User Guide, Media players operated in standalone mode, Version 2, 18/08/2011 64
11.2 Adding security cameras
A similar application to live TV is adding security cameras. Security cameras stream video (and
audio) the same way separate streamers do. Therefore the procedure is very much the same when
adding a security camera as a media spot. The MultiQ media players support security cameras
streaming up to 1080p Full HD.
Figure 89. A security camera is added to the “Stream” section of the “Add URL” menu very much the
same as a streamer. At the bottom of the menu there is even a possibility to add a “Quad” which is a
mosaic of four streaming sources. This is very often used in PVM (Public View Monitor) applications.
Page 65
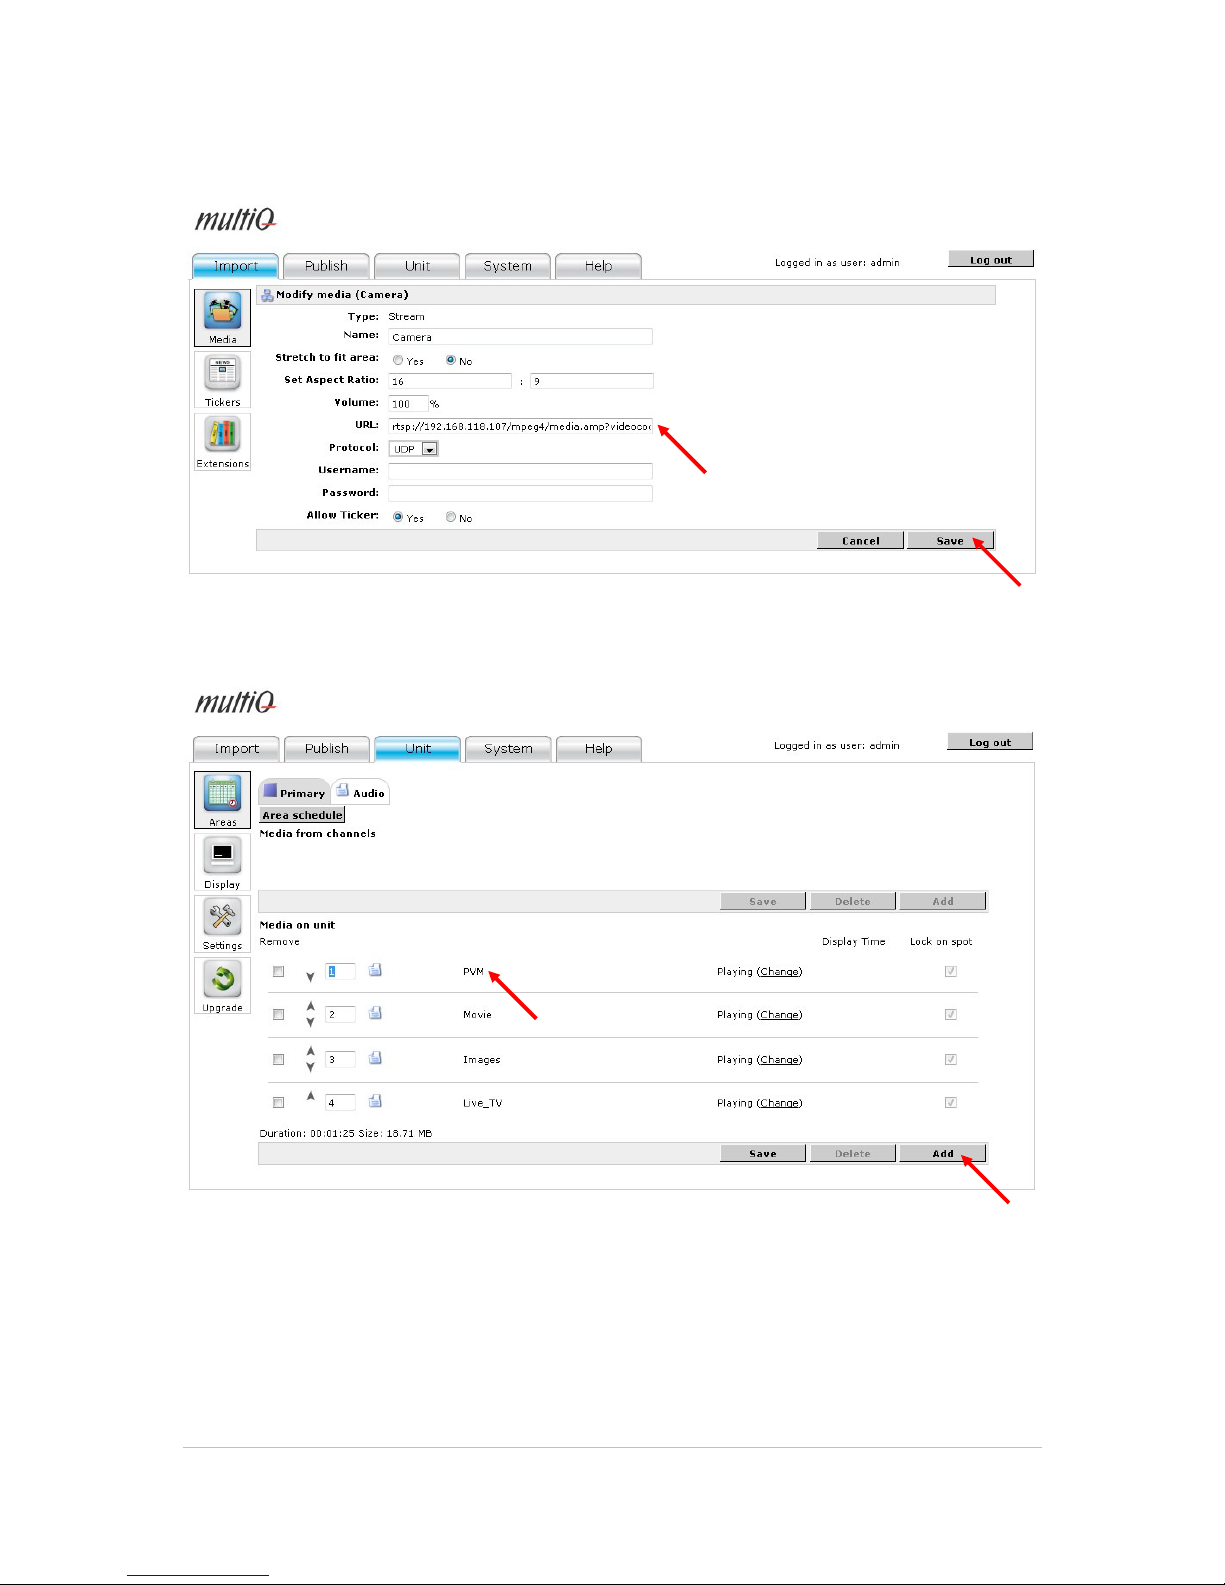
©2011 MultiQ are registered trademarks or trademark applications of MultiQ International AB in various jurisdictions. All
other company names and products are trademarks or registered trademarks of their respective companies. We reserve
the right to change the specifications without prior notice.
MultiQ DSMS 3.6 User Guide, Media players operated in standalone mode, Version 2, 18/08/2011 65
Figure 90. Parameters are set the same way as for a streamer.
Figure 91. Finally the “Camera” media spot is put into a playlist named “PVM” which is added to the top of
the list in the “Media on unit” section of the “Primary” area of the media player.
By scheduling or by moving the playlists to the top position in the “Primary” area we can display
images and video clips that are downloaded to the media player. Also, we can display live TV
streams and signals from security cameras. It is also possible (although not shown here) to
combine any of these media spots in a common playlist.
Page 66
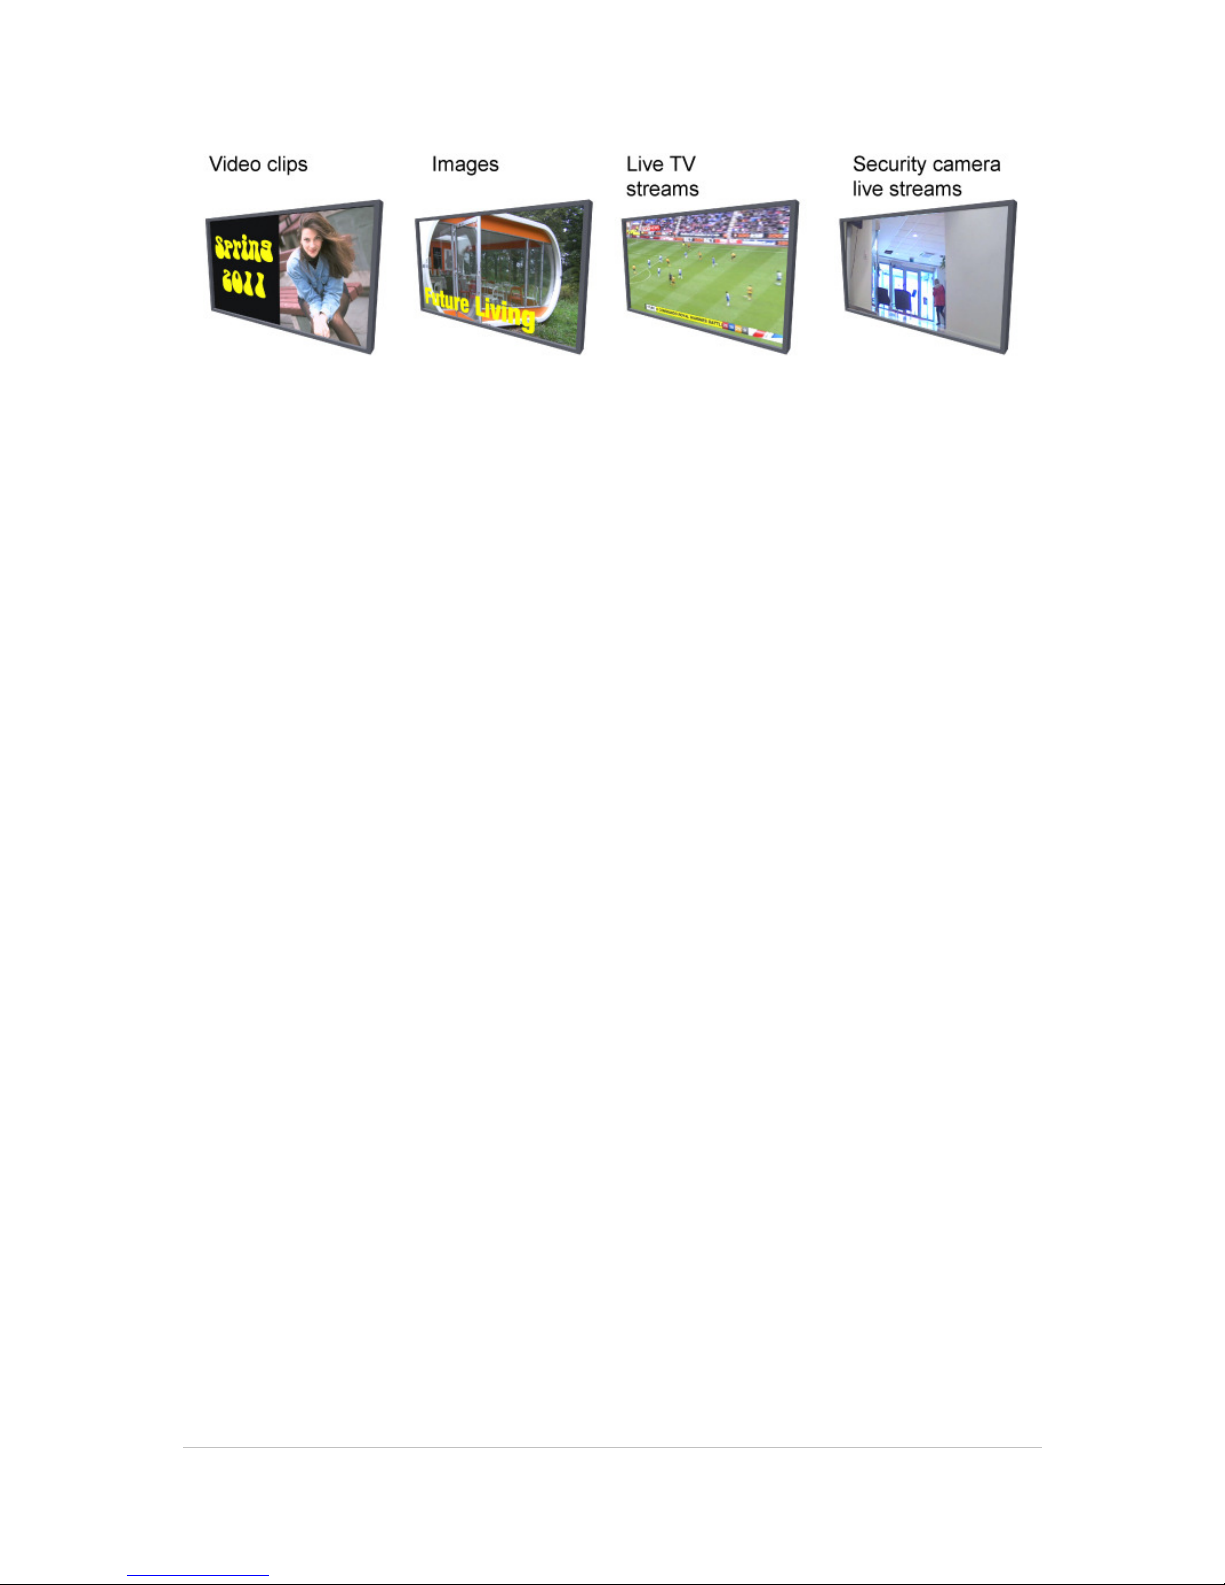
©2011 MultiQ are registered trademarks or trademark applications of MultiQ International AB in various jurisdictions. All
other company names and products are trademarks or registered trademarks of their respective companies. We reserve
the right to change the specifications without prior notice.
MultiQ DSMS 3.6 User Guide, Media players operated in standalone mode, Version 2, 18/08/2011 66
Figure 92. Video clips, images, Live TV streams and security camera live streams can be joined together
in a full screen in-store TV channel.
Even online web elements can be used in the playlists. In most cases web pages are not suitable to
be displayed on widescreen monitors. However certain web elements can be very useful such as
weather maps etc. We will return to this subject later. In kiosks however it is very common to use
web pages. More information on this is to be found in the Media monitor user guide.
Page 67
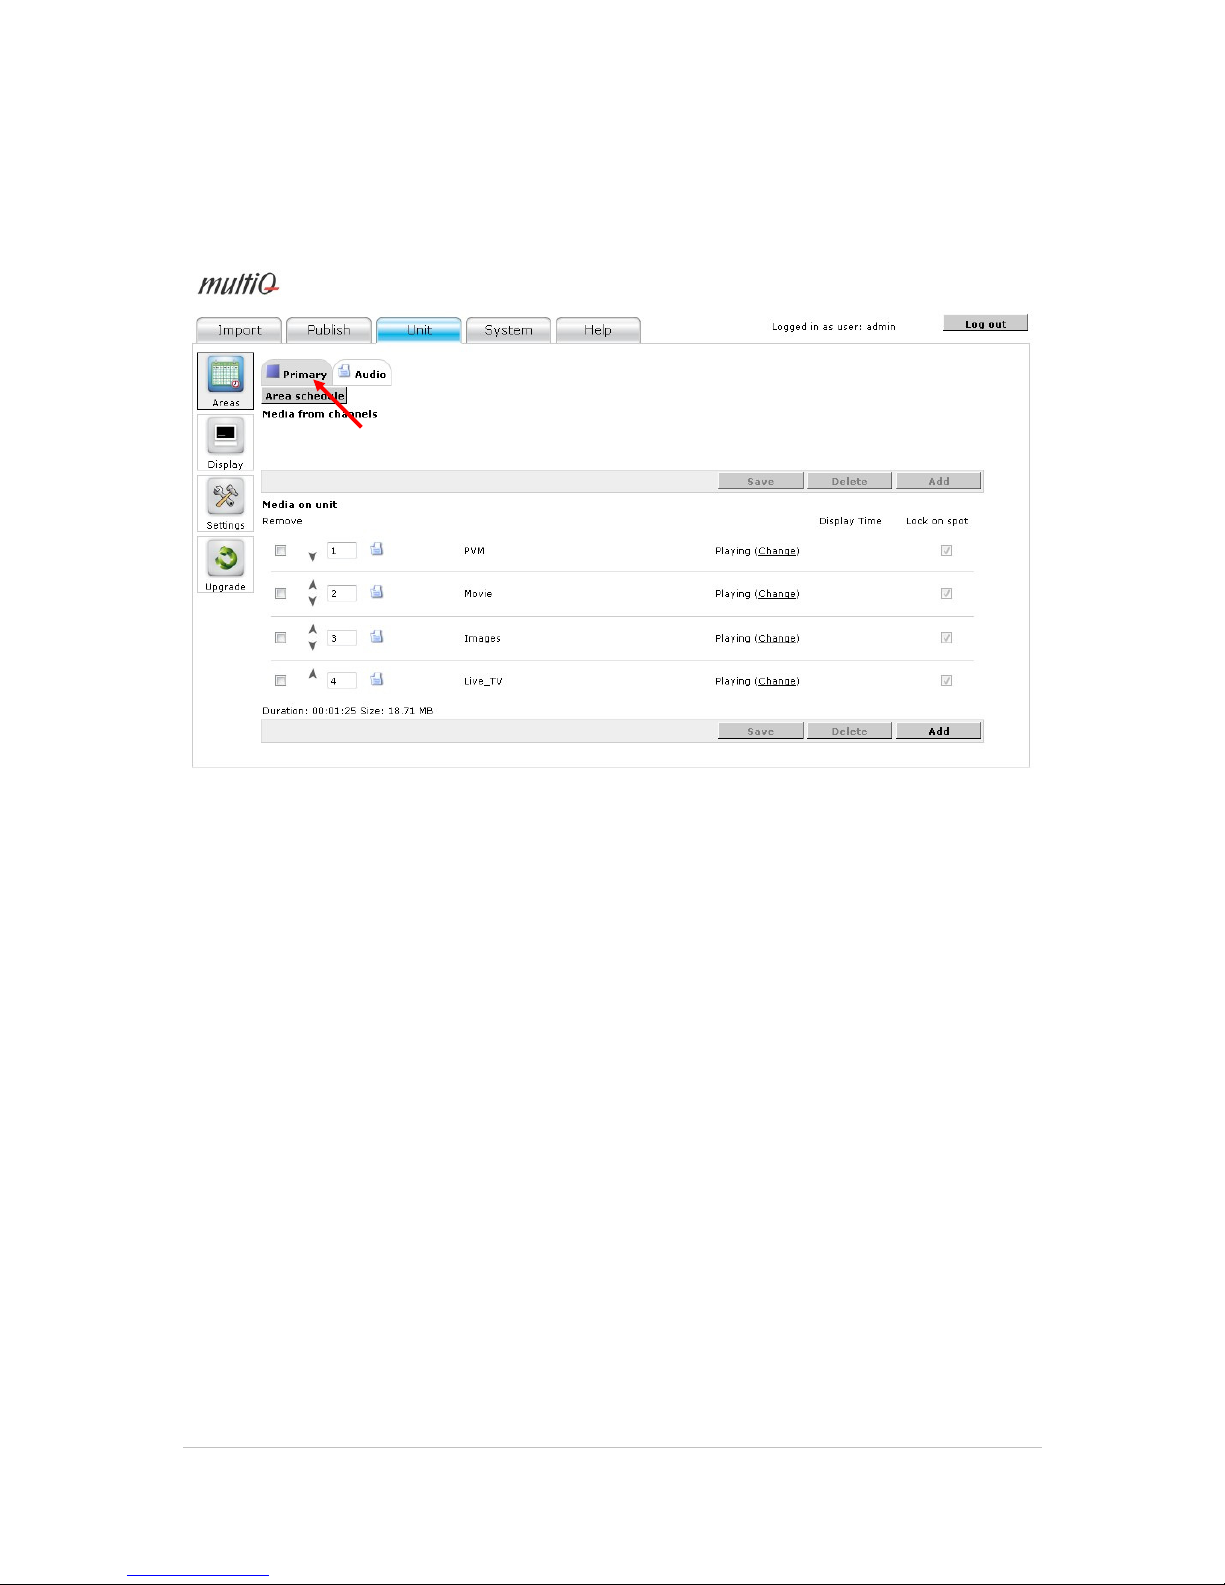
©2011 MultiQ are registered trademarks or trademark applications of MultiQ International AB in various jurisdictions. All
other company names and products are trademarks or registered trademarks of their respective companies. We reserve
the right to change the specifications without prior notice.
MultiQ DSMS 3.6 User Guide, Media players operated in standalone mode, Version 2, 18/08/2011 67
12 Splitting the screen into several areas
So far we have only been dealing with one area on the screen, the “Primary” area.
Figure 93. If looking closer at the media player (unit) menu we see that there is only one visual area and
that is the “Primary” area. There is also an “Audio” area that can be used for in-store audio. This is a
separate, invisible “area” that can play audio files independently from the Primary area.
12.1 In store audio and using the “Audio” area
Before splitting the visual parts of the screen we will introduce in store audio.
If you do not use the audio for other purposes you can let the media player produce an in store
audio channel.
The first step is to upload a number of songs into the system.
Page 68
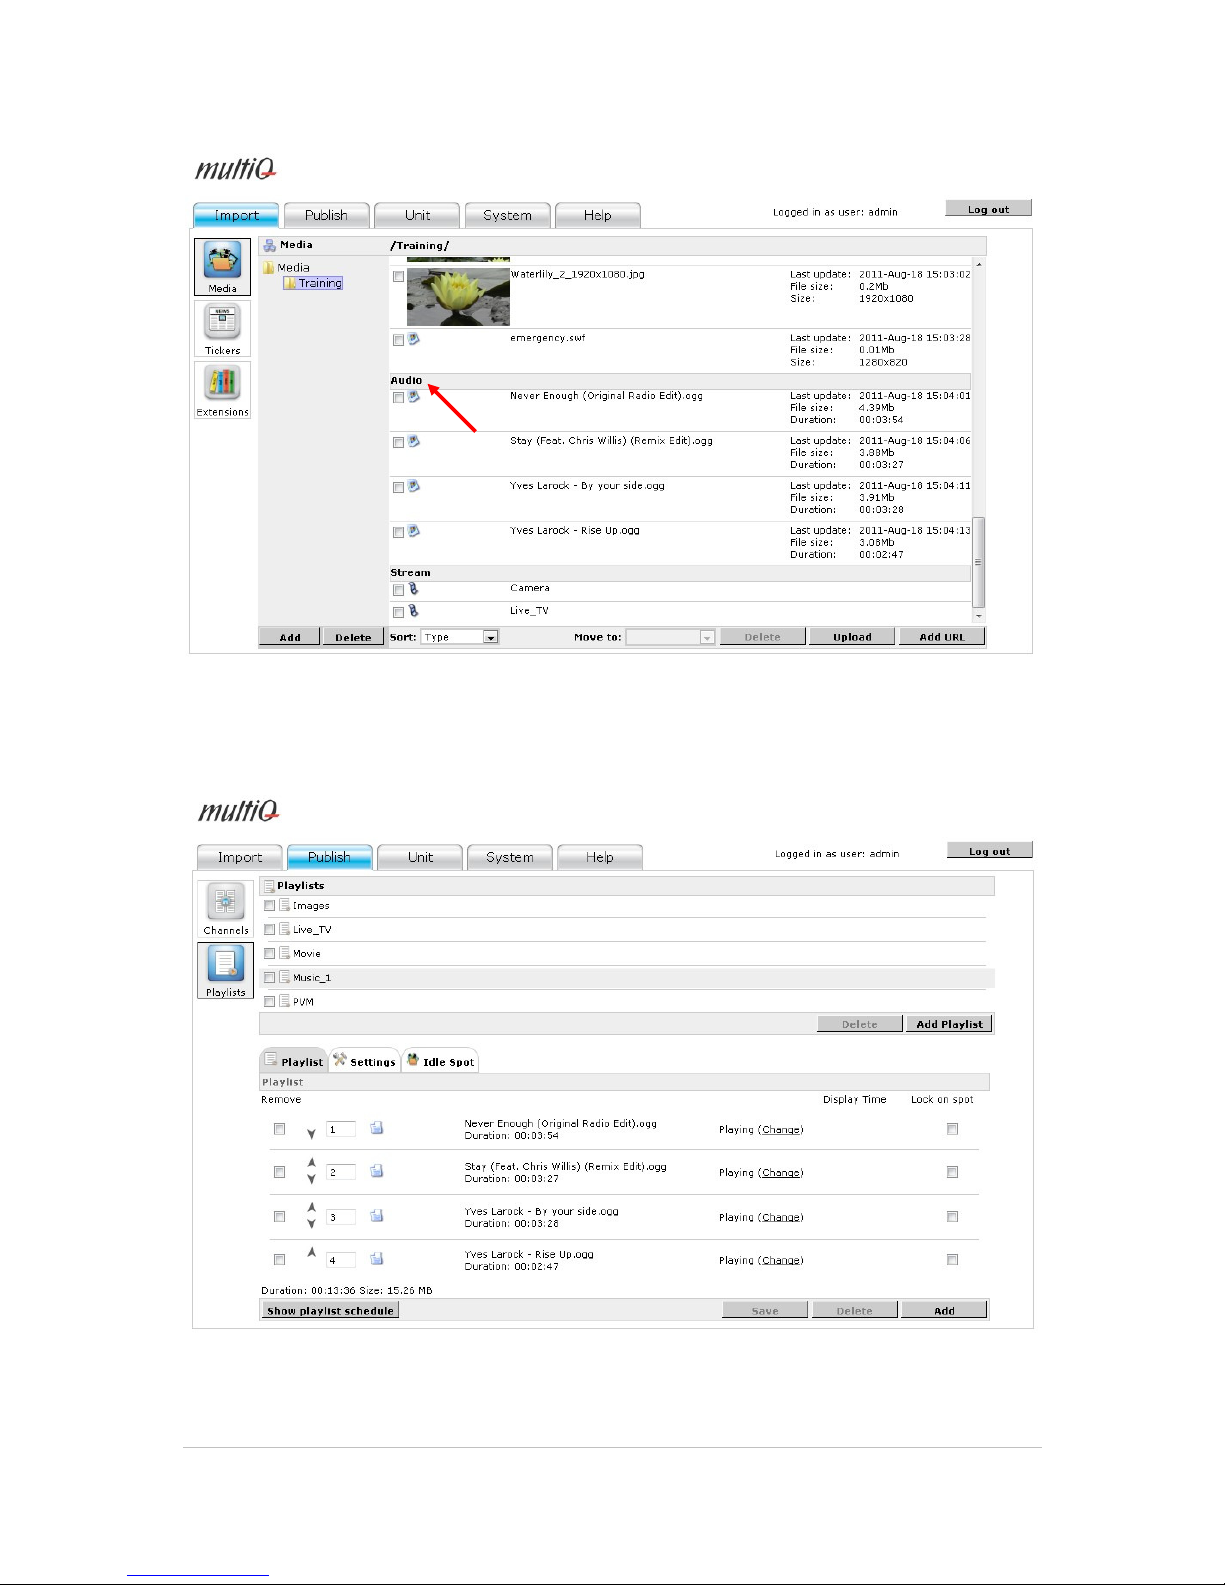
©2011 MultiQ are registered trademarks or trademark applications of MultiQ International AB in various jurisdictions. All
other company names and products are trademarks or registered trademarks of their respective companies. We reserve
the right to change the specifications without prior notice.
MultiQ DSMS 3.6 User Guide, Media players operated in standalone mode, Version 2, 18/08/2011 68
Figure 94. The uploaded songs are now to be found in the “Audio” section of the “Training” folder.
However it would be practical to use a separate folder for the songs.
Figure 95. The next step is to create a playlist that is named “Music1”.
Page 69
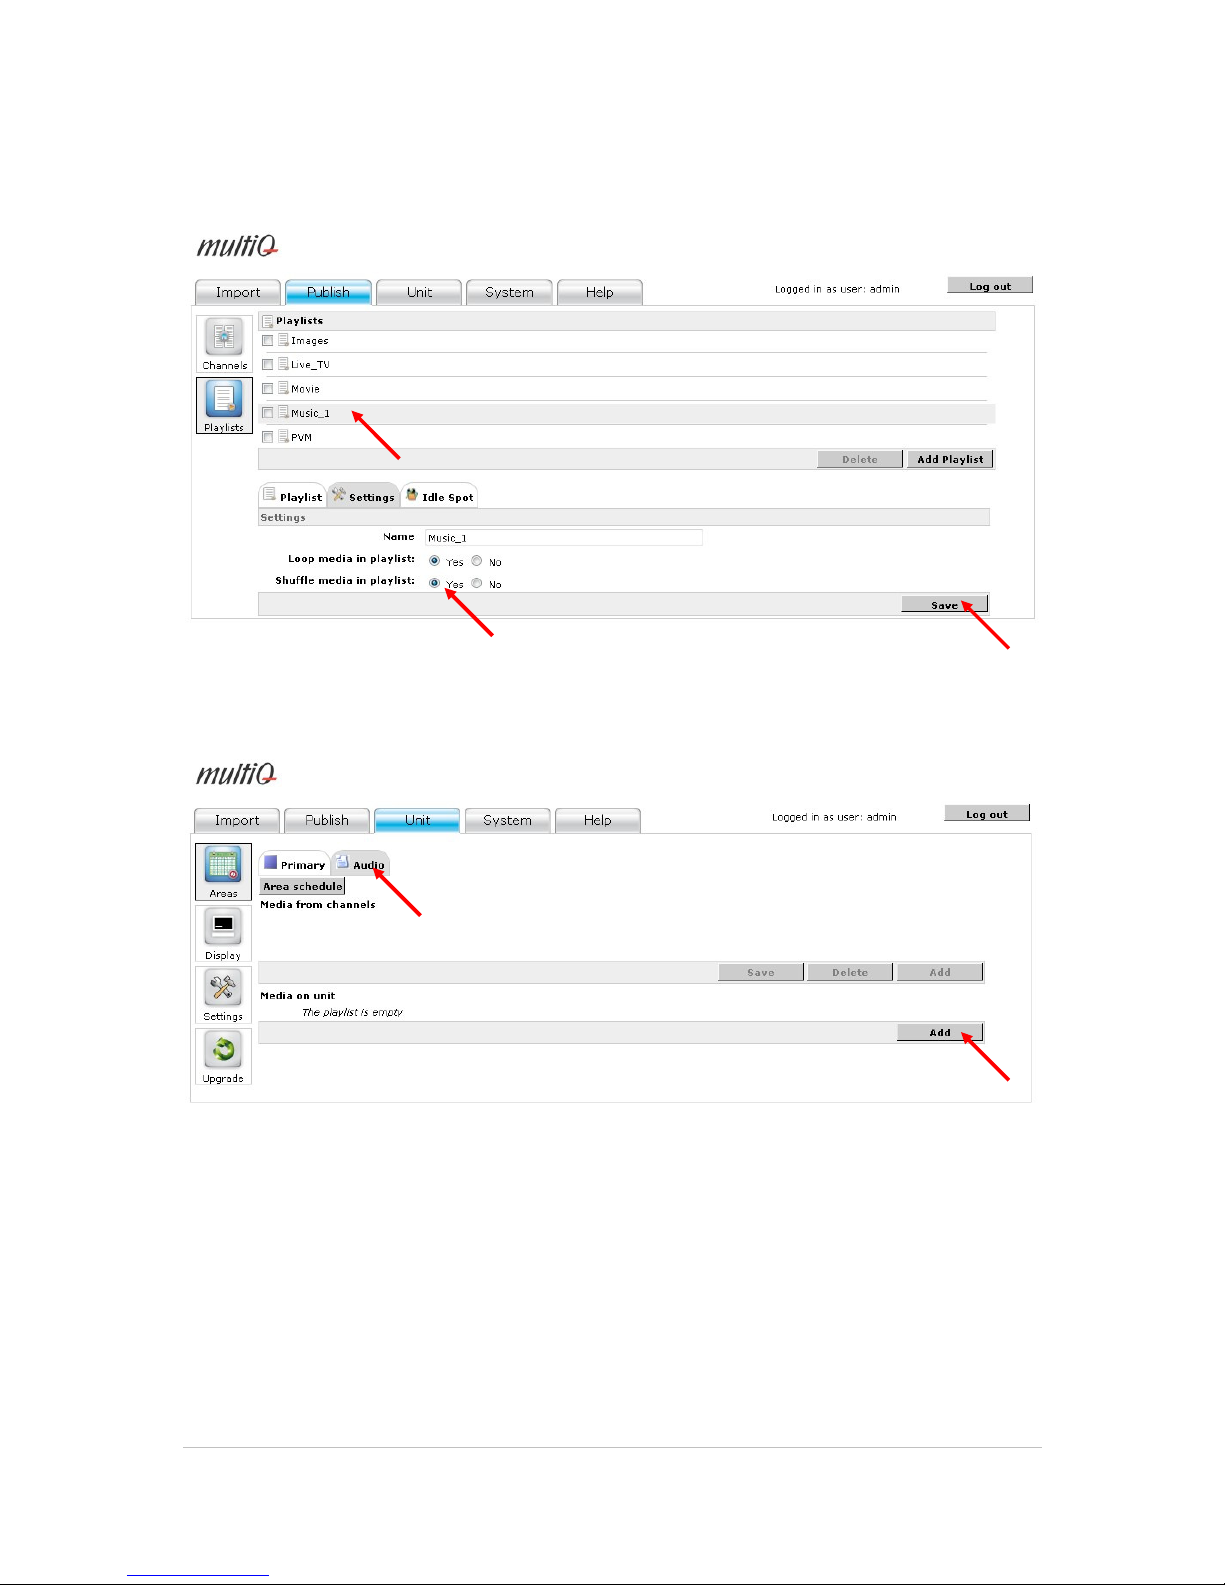
©2011 MultiQ are registered trademarks or trademark applications of MultiQ International AB in various jurisdictions. All
other company names and products are trademarks or registered trademarks of their respective companies. We reserve
the right to change the specifications without prior notice.
MultiQ DSMS 3.6 User Guide, Media players operated in standalone mode, Version 2, 18/08/2011 69
To create a useful in-store audio service we need to be able to shuffle the songs to make more
variation.
Figure 96. To create a useful in-store audio service we need to be able to shuffle the songs to make more
variation. In the “Settings” tab of the playlist you can set the “Shuffle media in playlist” to “Yes”.
Figure 97. To use the playlist we need to add the playlist to the “Audio” area.
Page 70
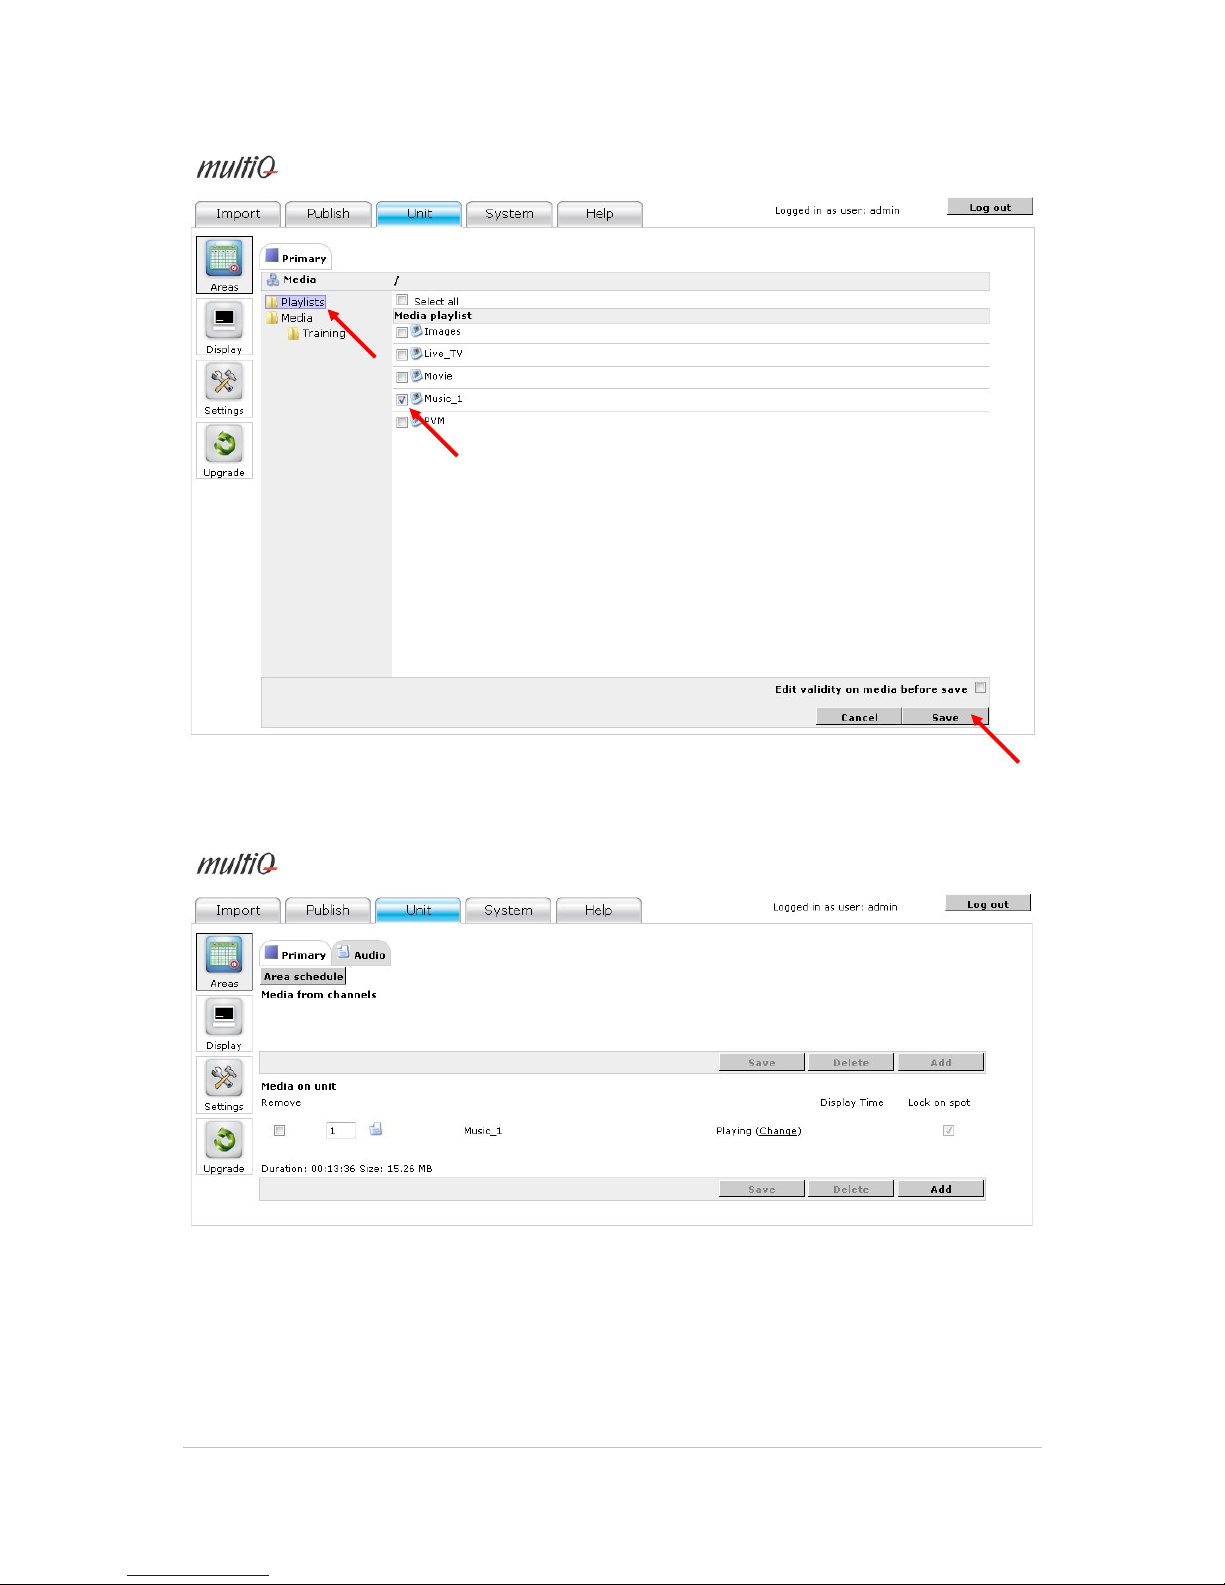
©2011 MultiQ are registered trademarks or trademark applications of MultiQ International AB in various jurisdictions. All
other company names and products are trademarks or registered trademarks of their respective companies. We reserve
the right to change the specifications without prior notice.
MultiQ DSMS 3.6 User Guide, Media players operated in standalone mode, Version 2, 18/08/2011 70
Figure 98. Add the “In Store Audio” channel to the “Audio” area of the media player.
Figure 99. The “Music_1” playlist is now added to the “Audio” area.
You will now have an in-store audio service added to the media player. You can schedule different
playlists to be used at different times just as for video clips. Note that if you are playing video clips
containing audio at the same time as content in the audio area, the audio channels will get mixed to
one common audio. Therefore you should avoid video clips with audio when using the audio area.
Page 71
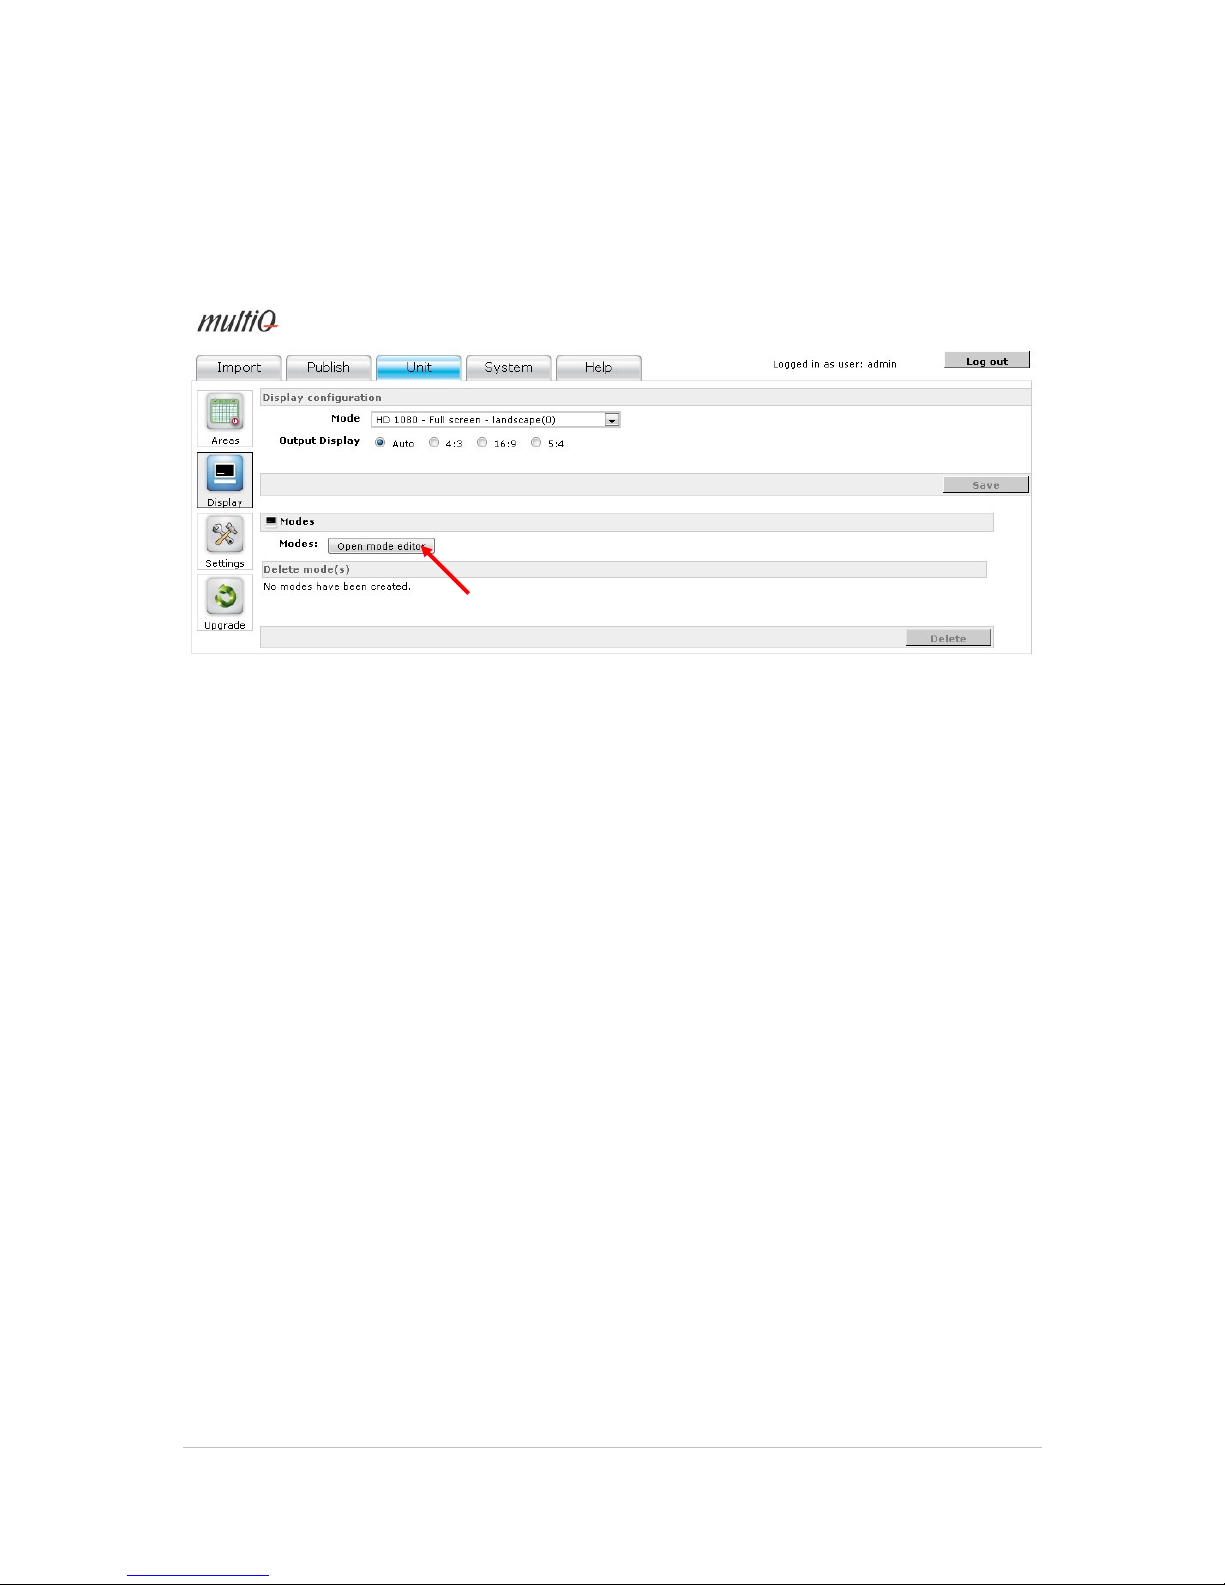
©2011 MultiQ are registered trademarks or trademark applications of MultiQ International AB in various jurisdictions. All
other company names and products are trademarks or registered trademarks of their respective companies. We reserve
the right to change the specifications without prior notice.
MultiQ DSMS 3.6 User Guide, Media players operated in standalone mode, Version 2, 18/08/2011 71
12.2 Splitting the screen into several visual areas
The audio area can to some extent seem to be a bit abstract. However more evident is the split of
the visual screen into areas that can be measured in pixels. To split the screen we need to create a
custom video mode for the media player.
Figure 100. Select the “Unit” tab and then click the “Display” icon. Click the “Open mode editor” button.
Java needs to be installed on your computer to run the mode editor.
Page 72
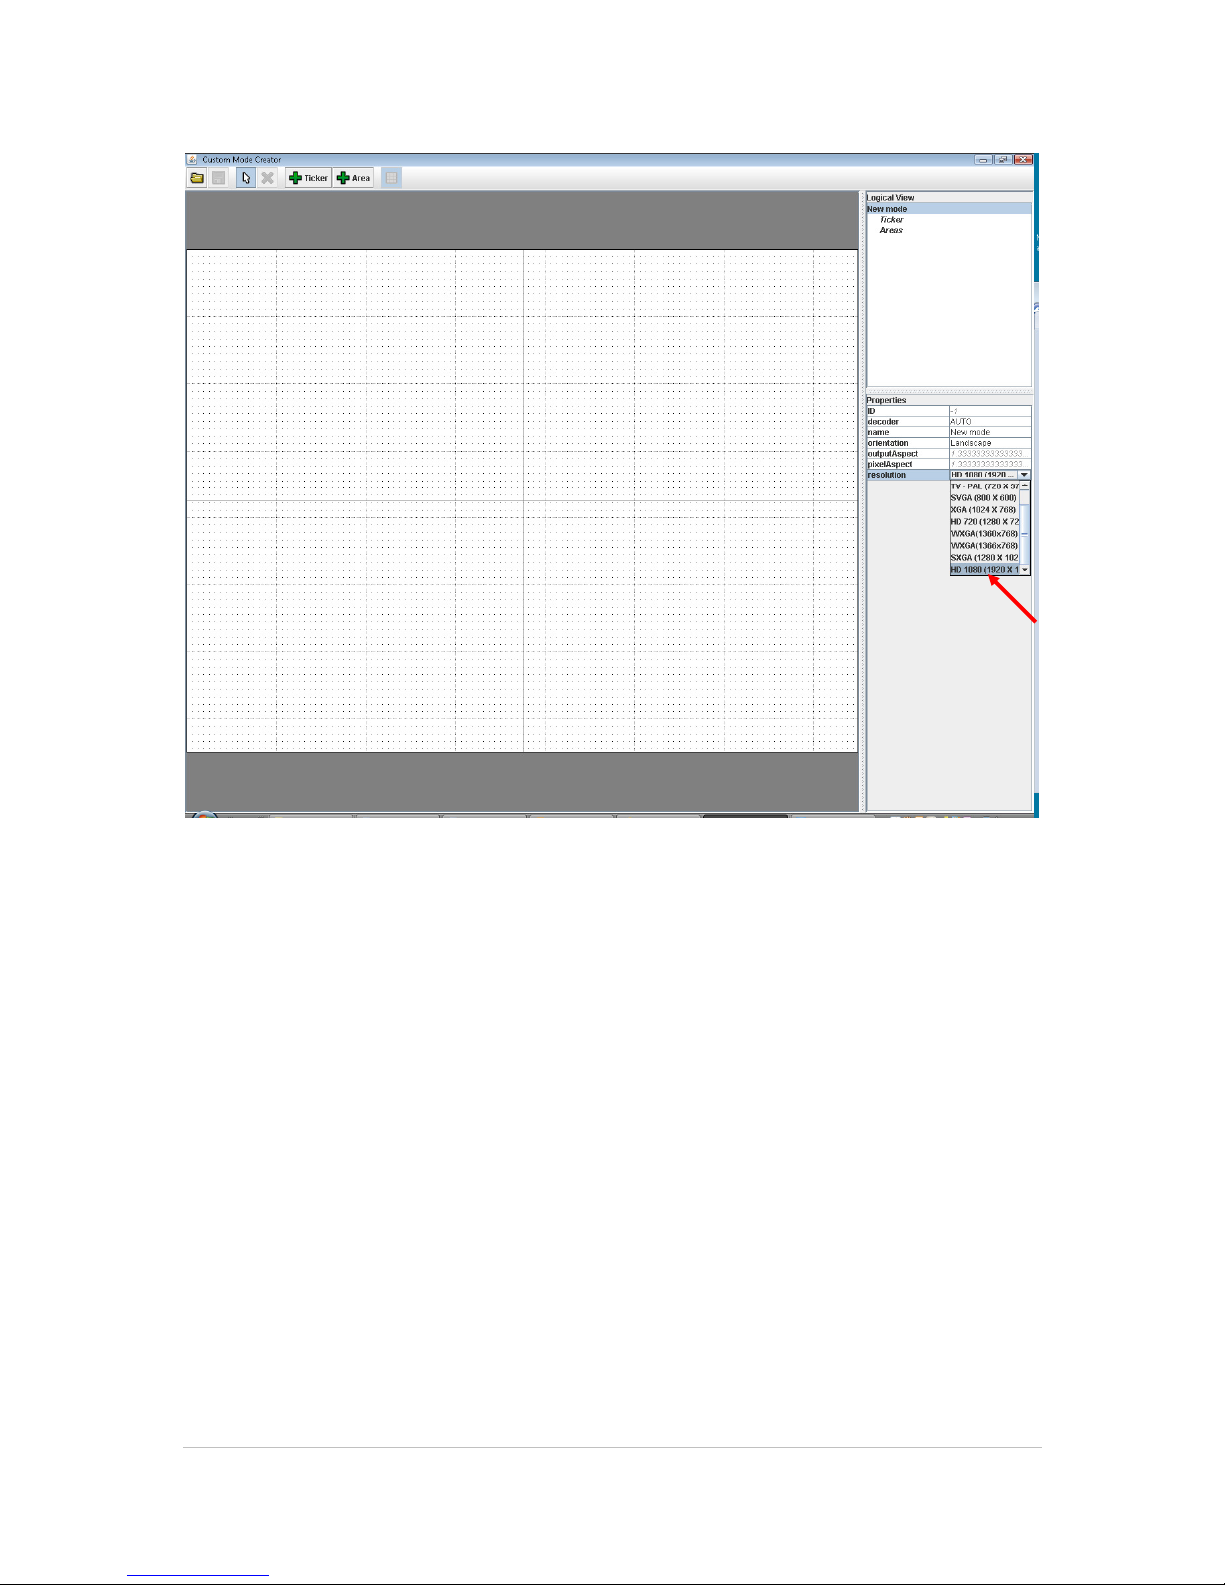
©2011 MultiQ are registered trademarks or trademark applications of MultiQ International AB in various jurisdictions. All
other company names and products are trademarks or registered trademarks of their respective companies. We reserve
the right to change the specifications without prior notice.
MultiQ DSMS 3.6 User Guide, Media players operated in standalone mode, Version 2, 18/08/2011 72
Figure 101. In the mode editor, select the correct resolution of the screen (in this case HD 1080 (1920x
1080 pixels). In this example we will use the “landscape” orientation of the screen.
Page 73
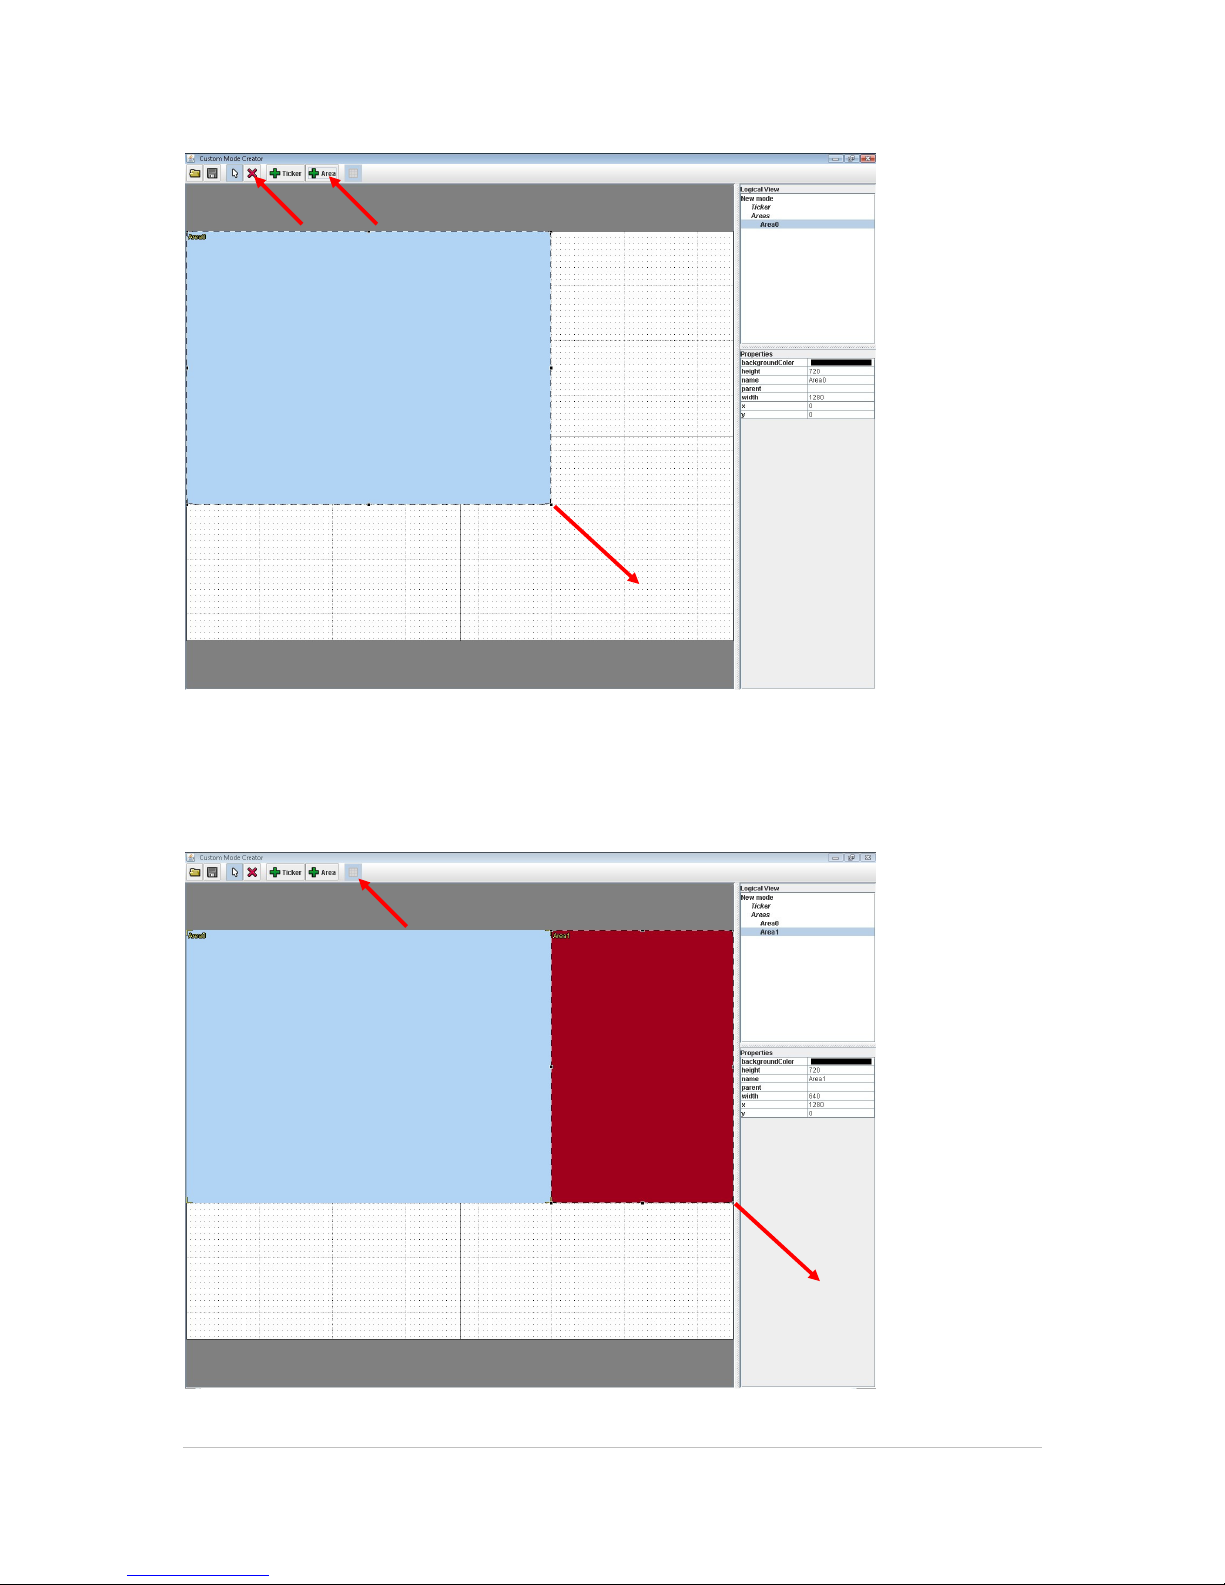
©2011 MultiQ are registered trademarks or trademark applications of MultiQ International AB in various jurisdictions. All
other company names and products are trademarks or registered trademarks of their respective companies. We reserve
the right to change the specifications without prior notice.
MultiQ DSMS 3.6 User Guide, Media players operated in standalone mode, Version 2, 18/08/2011 73
Figure 102. Click the “+ Area” button and then drag the area across the screen to get an area (Area0)
with 1280x720 pixels in the upper left part of the screen. (you can always remove areas by selecting
them and then press the “X” button.
Page 74
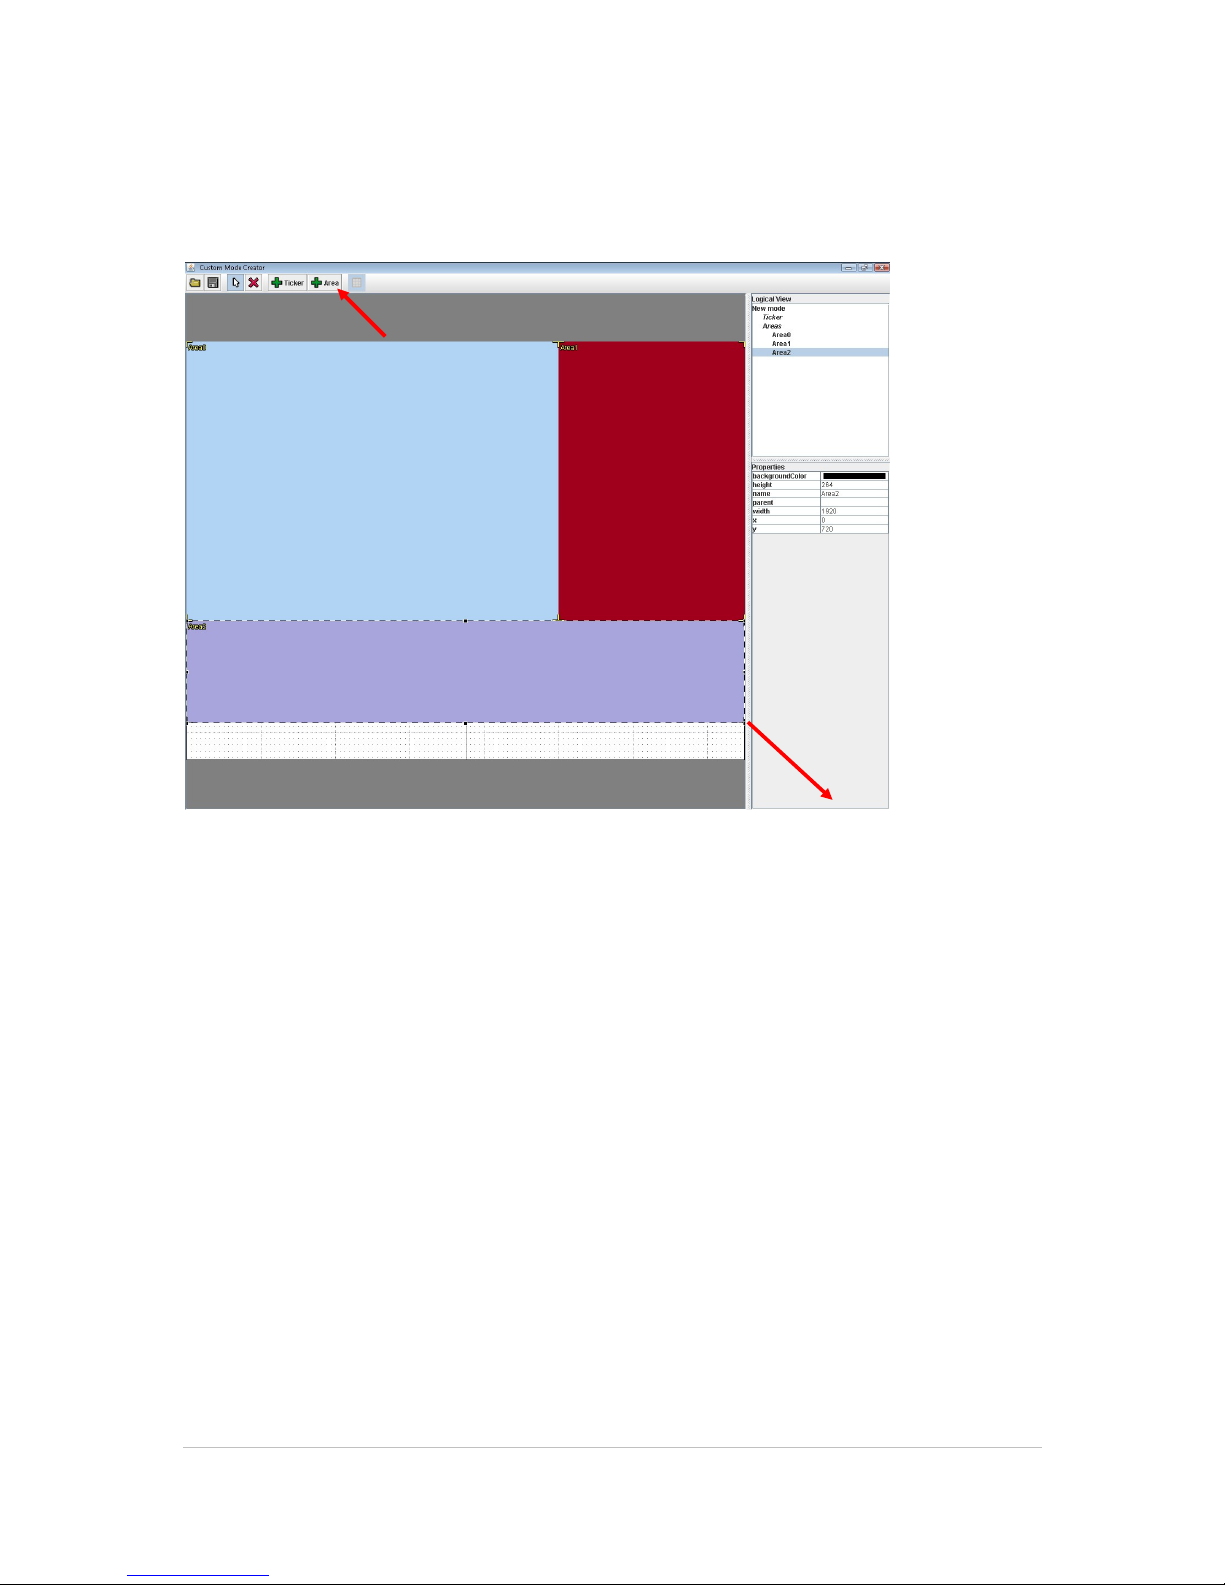
©2011 MultiQ are registered trademarks or trademark applications of MultiQ International AB in various jurisdictions. All
other company names and products are trademarks or registered trademarks of their respective companies. We reserve
the right to change the specifications without prior notice.
MultiQ DSMS 3.6 User Guide, Media players operated in standalone mode, Version 2, 18/08/2011 74
Figure 103. Click the “Area” button once more and drag a second area (Area1) having the size 640x720
pixels in the upper right corner of the screen.
Figure 104. Drag a third area (Area 2) below the first two areas having the size 1920x264 pixels.
Page 75
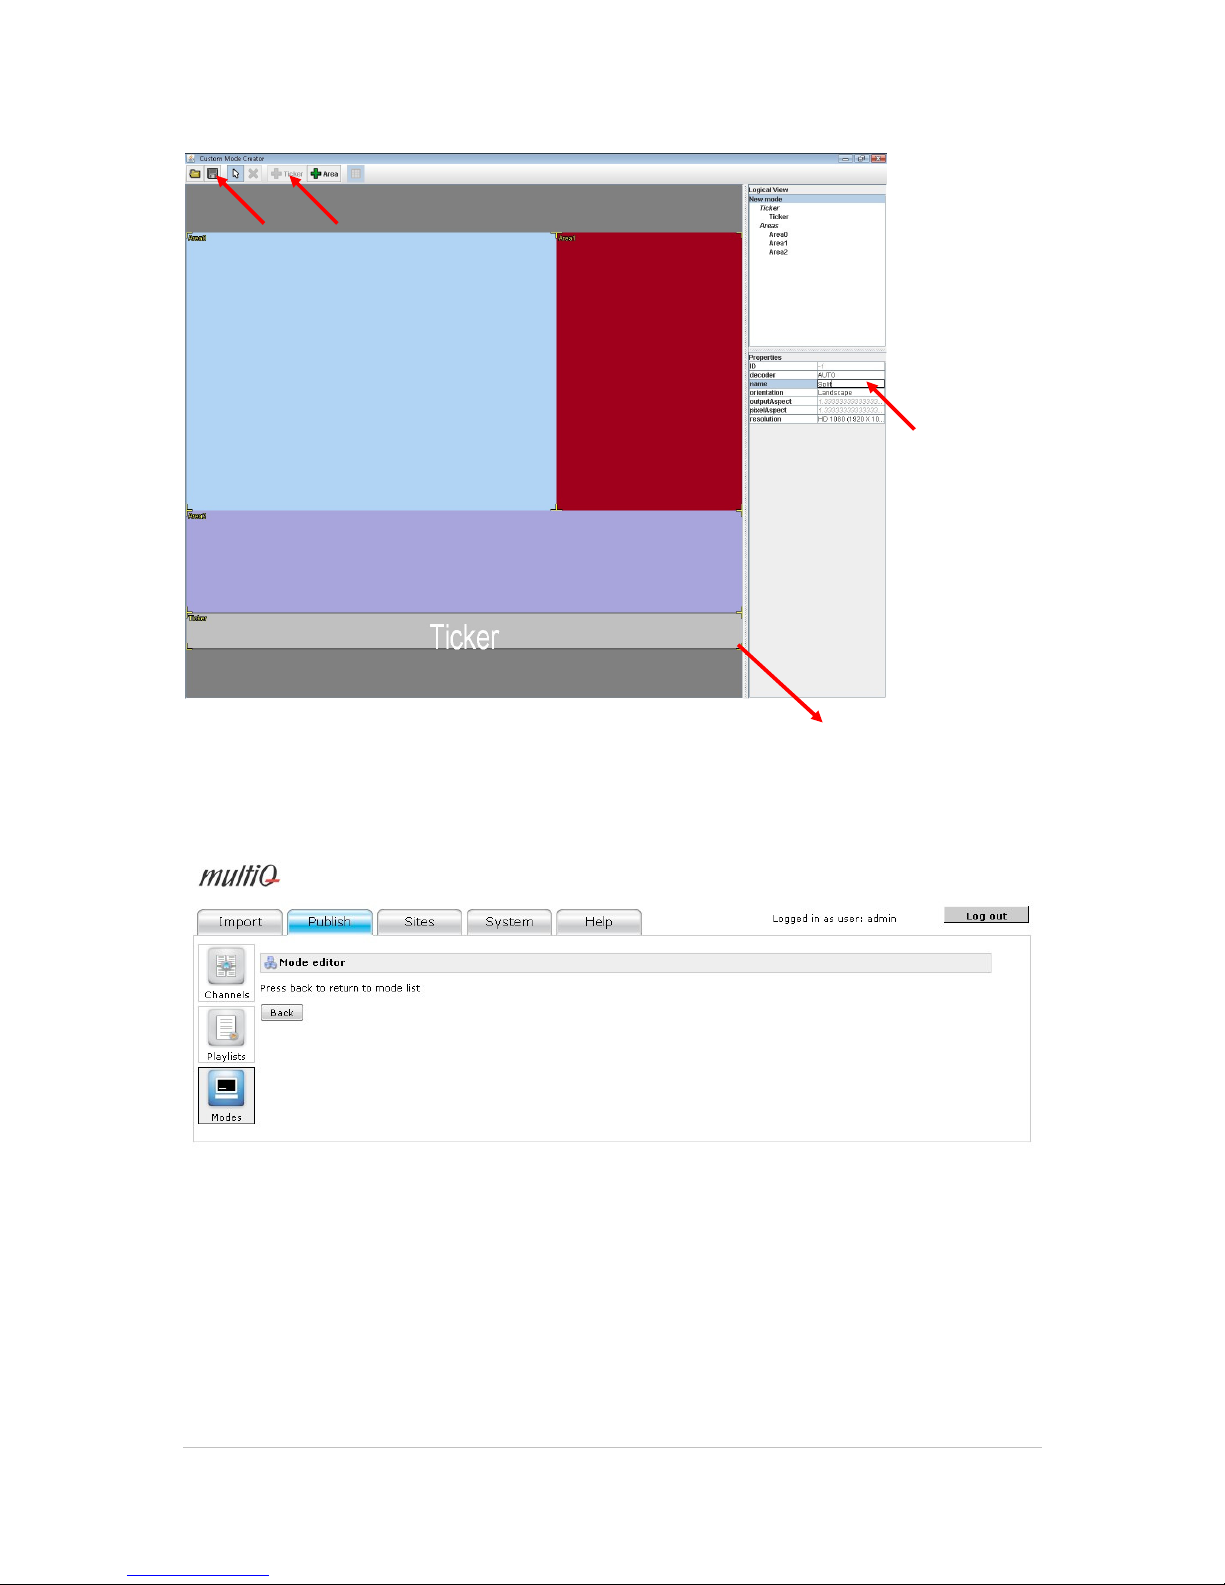
©2011 MultiQ are registered trademarks or trademark applications of MultiQ International AB in various jurisdictions. All
other company names and products are trademarks or registered trademarks of their respective companies. We reserve
the right to change the specifications without prior notice.
MultiQ DSMS 3.6 User Guide, Media players operated in standalone mode, Version 2, 18/08/2011 75
Figure 105. Finally click the “+Ticker” button and drag a ticker across the remaining bottom part of the
screen (height 96 pixels). Next, name the video mode “Split” and then click the “Save” icon in the upper
left corner.
Figure 106. Click the “Back” button to leave the mode editor.
Page 76
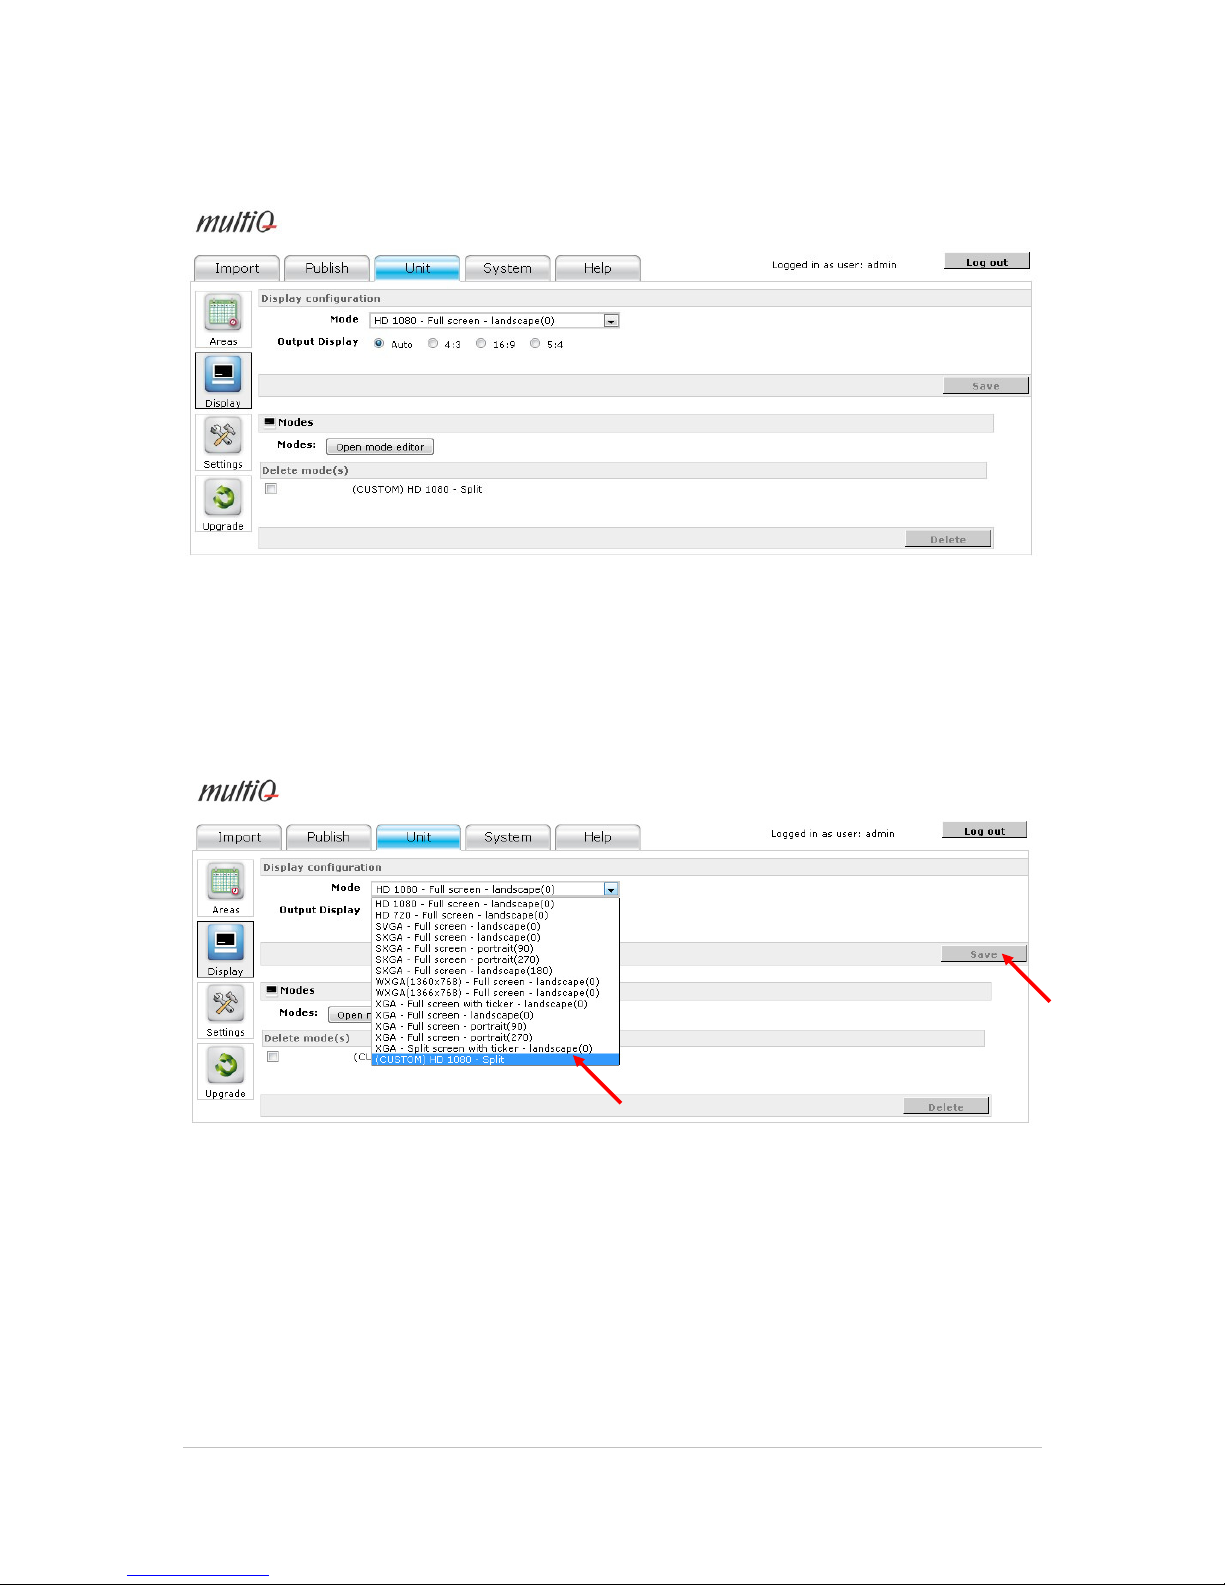
©2011 MultiQ are registered trademarks or trademark applications of MultiQ International AB in various jurisdictions. All
other company names and products are trademarks or registered trademarks of their respective companies. We reserve
the right to change the specifications without prior notice.
MultiQ DSMS 3.6 User Guide, Media players operated in standalone mode, Version 2, 18/08/2011 76
Figure 107. After you have closed the mode editor you will find the new custom video mode.
Next step is to change your media player into the custom “Split” video mode. To do this select the
“Split” video mode from the drop down menu and click the “Save” button. The media player will now
reboot.
Figure 108. Select the new video mode and then click the “Save” button.
Page 77
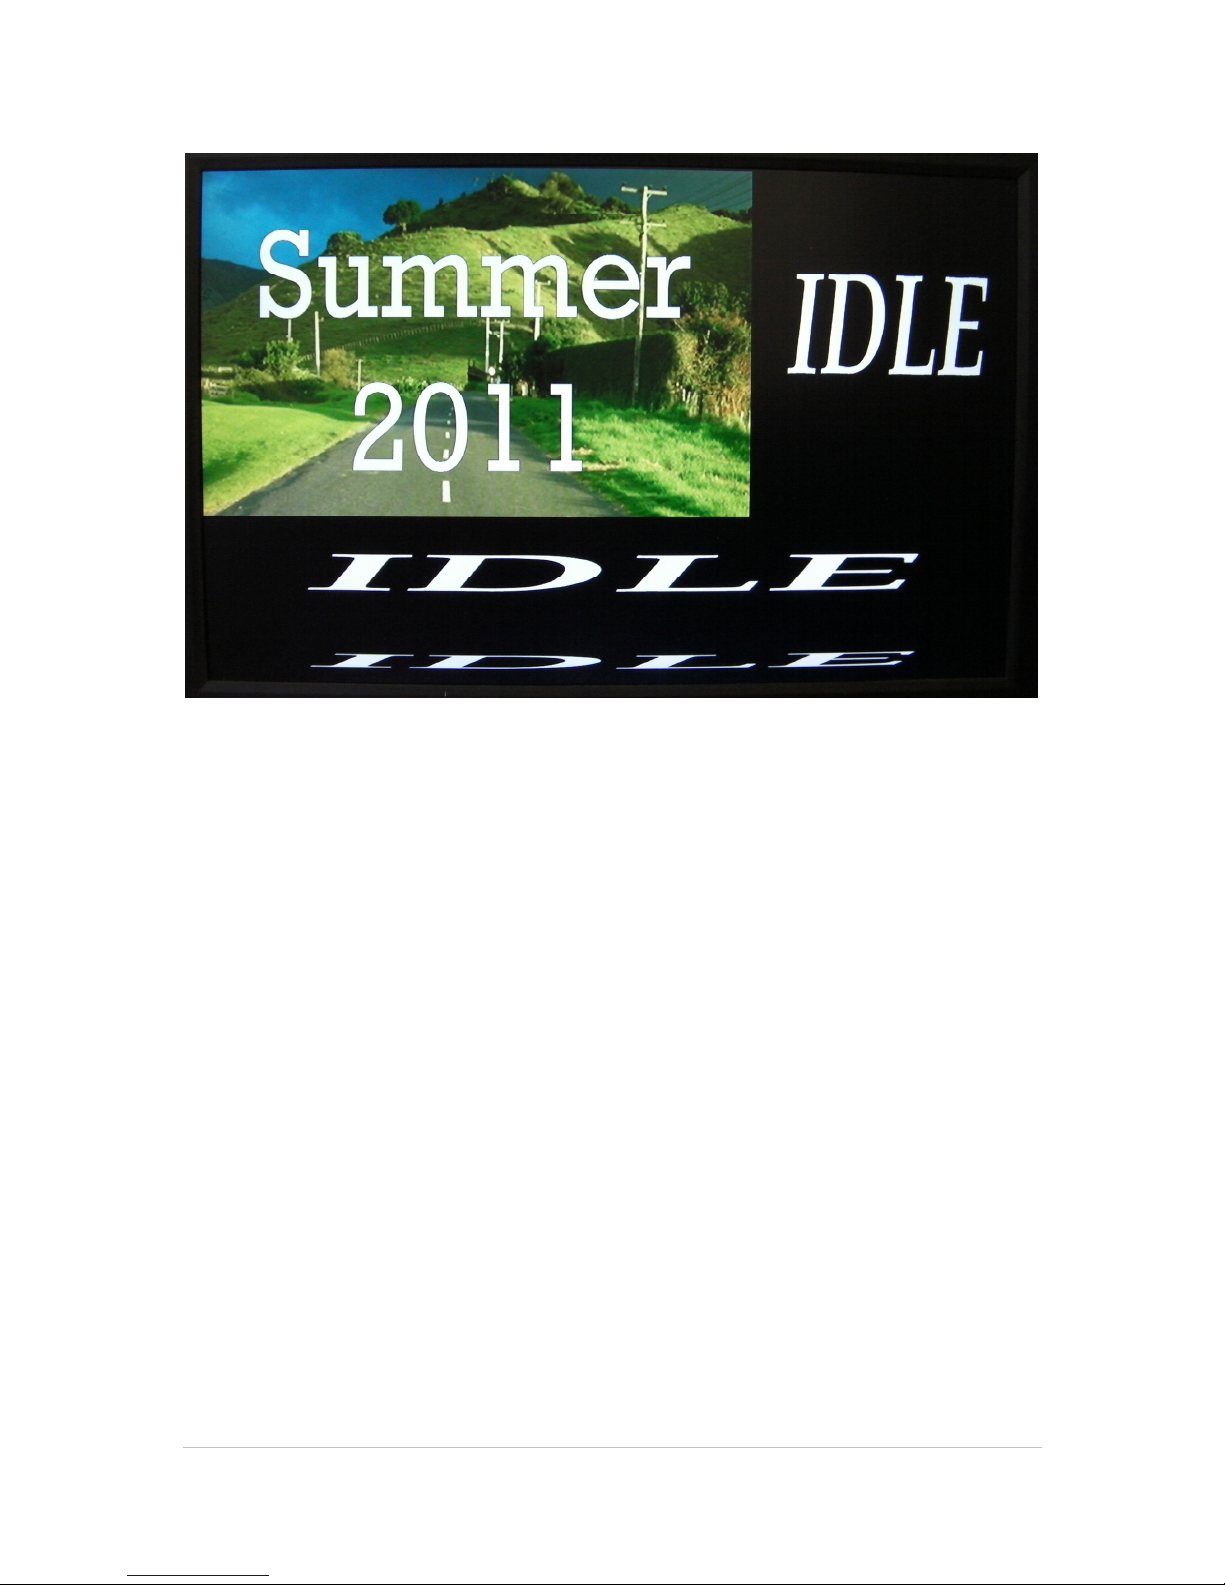
©2011 MultiQ are registered trademarks or trademark applications of MultiQ International AB in various jurisdictions. All
other company names and products are trademarks or registered trademarks of their respective companies. We reserve
the right to change the specifications without prior notice.
MultiQ DSMS 3.6 User Guide, Media players operated in standalone mode, Version 2, 18/08/2011 77
Figure 109. After rebooting the screen will be split into three areas. The playlists that previously belonged
to the “Primary” area are now in “Area0”. The other two areas that do not yet have any content assigned
to them show “IDLE” signs.
Page 78
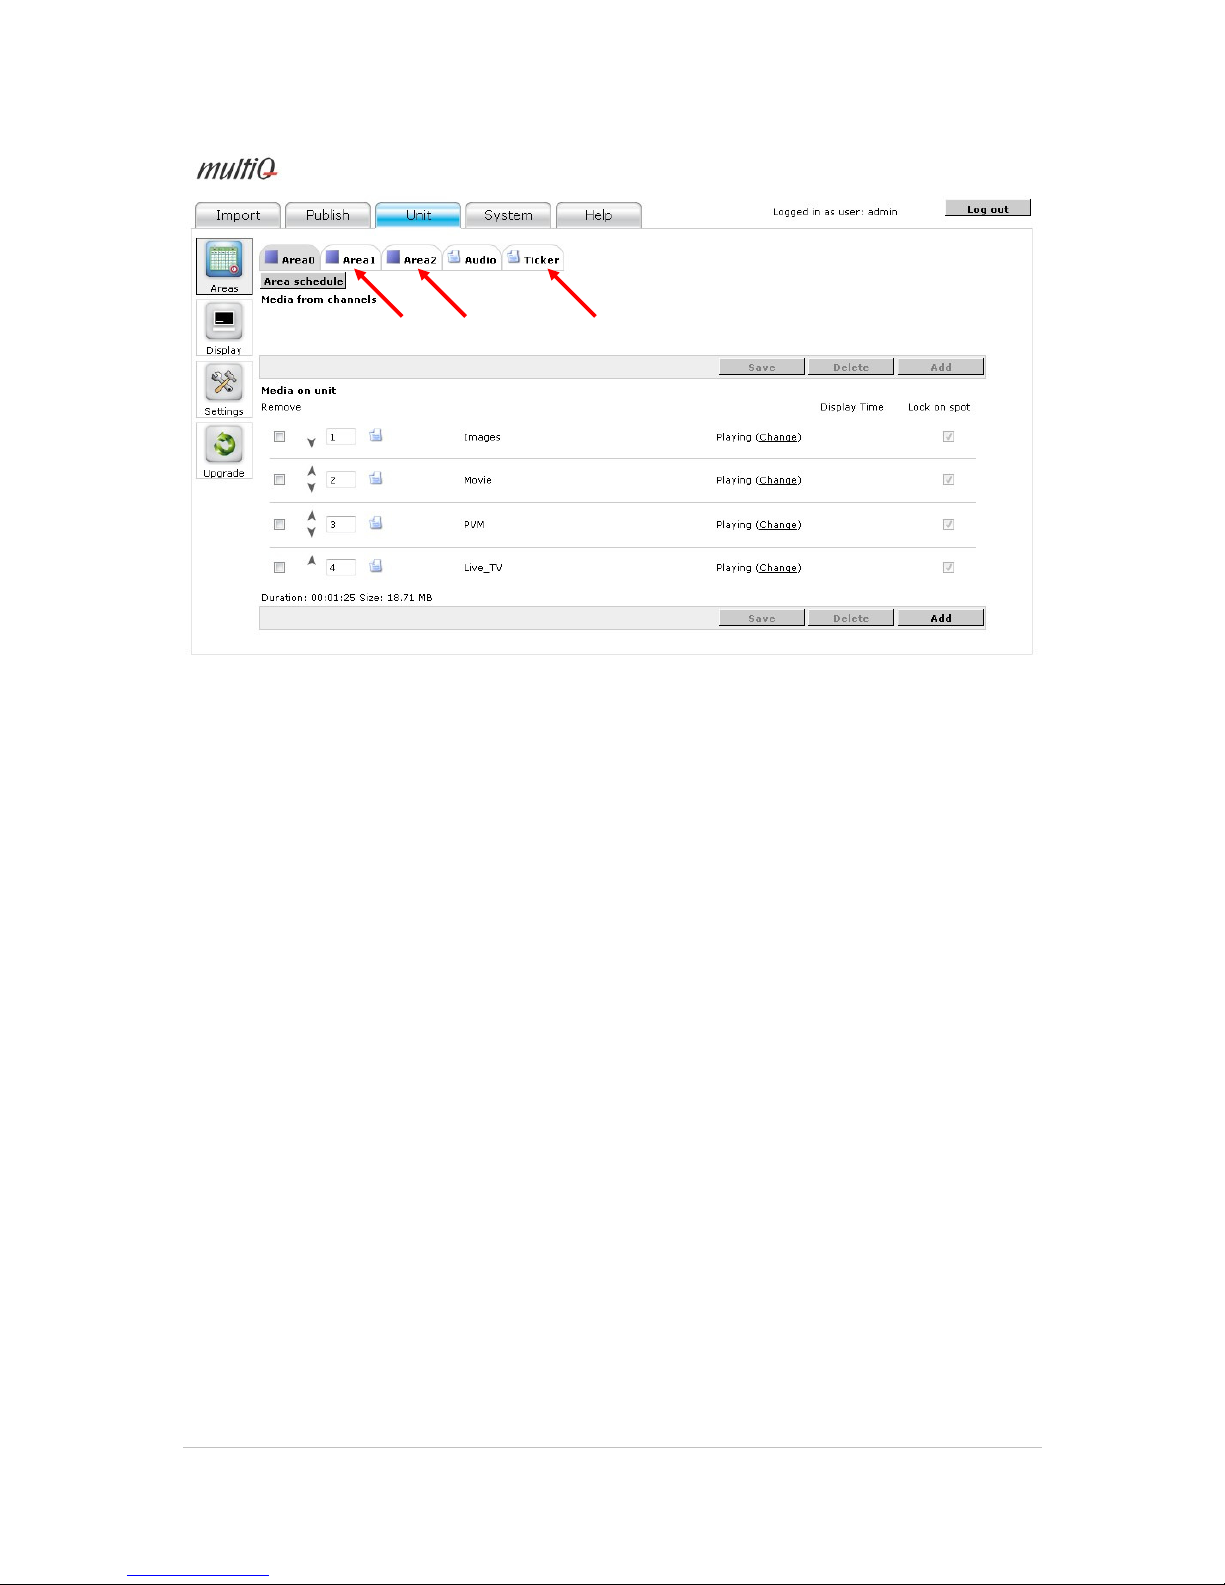
©2011 MultiQ are registered trademarks or trademark applications of MultiQ International AB in various jurisdictions. All
other company names and products are trademarks or registered trademarks of their respective companies. We reserve
the right to change the specifications without prior notice.
MultiQ DSMS 3.6 User Guide, Media players operated in standalone mode, Version 2, 18/08/2011 78
Figure 110. In the unit “Areas” menu you can see that the previous “Primary” tab has been renamed
“Area0” and contains content that previously covered the entire screen. The two new areas, “Area1” and
“Area2” have been added. Also, we still have the “Audio” area.
12.3 Adding an image slideshow to “Area2”
The area below Area0 where the “Training channel” runs is to be used to display a slideshow of
images. The size of the area is 1920x264 pixels. So, we need some images to put there. Using any
drawing or image editing software we can create the images needed. JPG or PNG images are
recommended.
We have already uploaded the three slideshow images that are made to fit into the 1920x264
pixels area. The files are to be found in the “Training” folder of the media archive.
Page 79
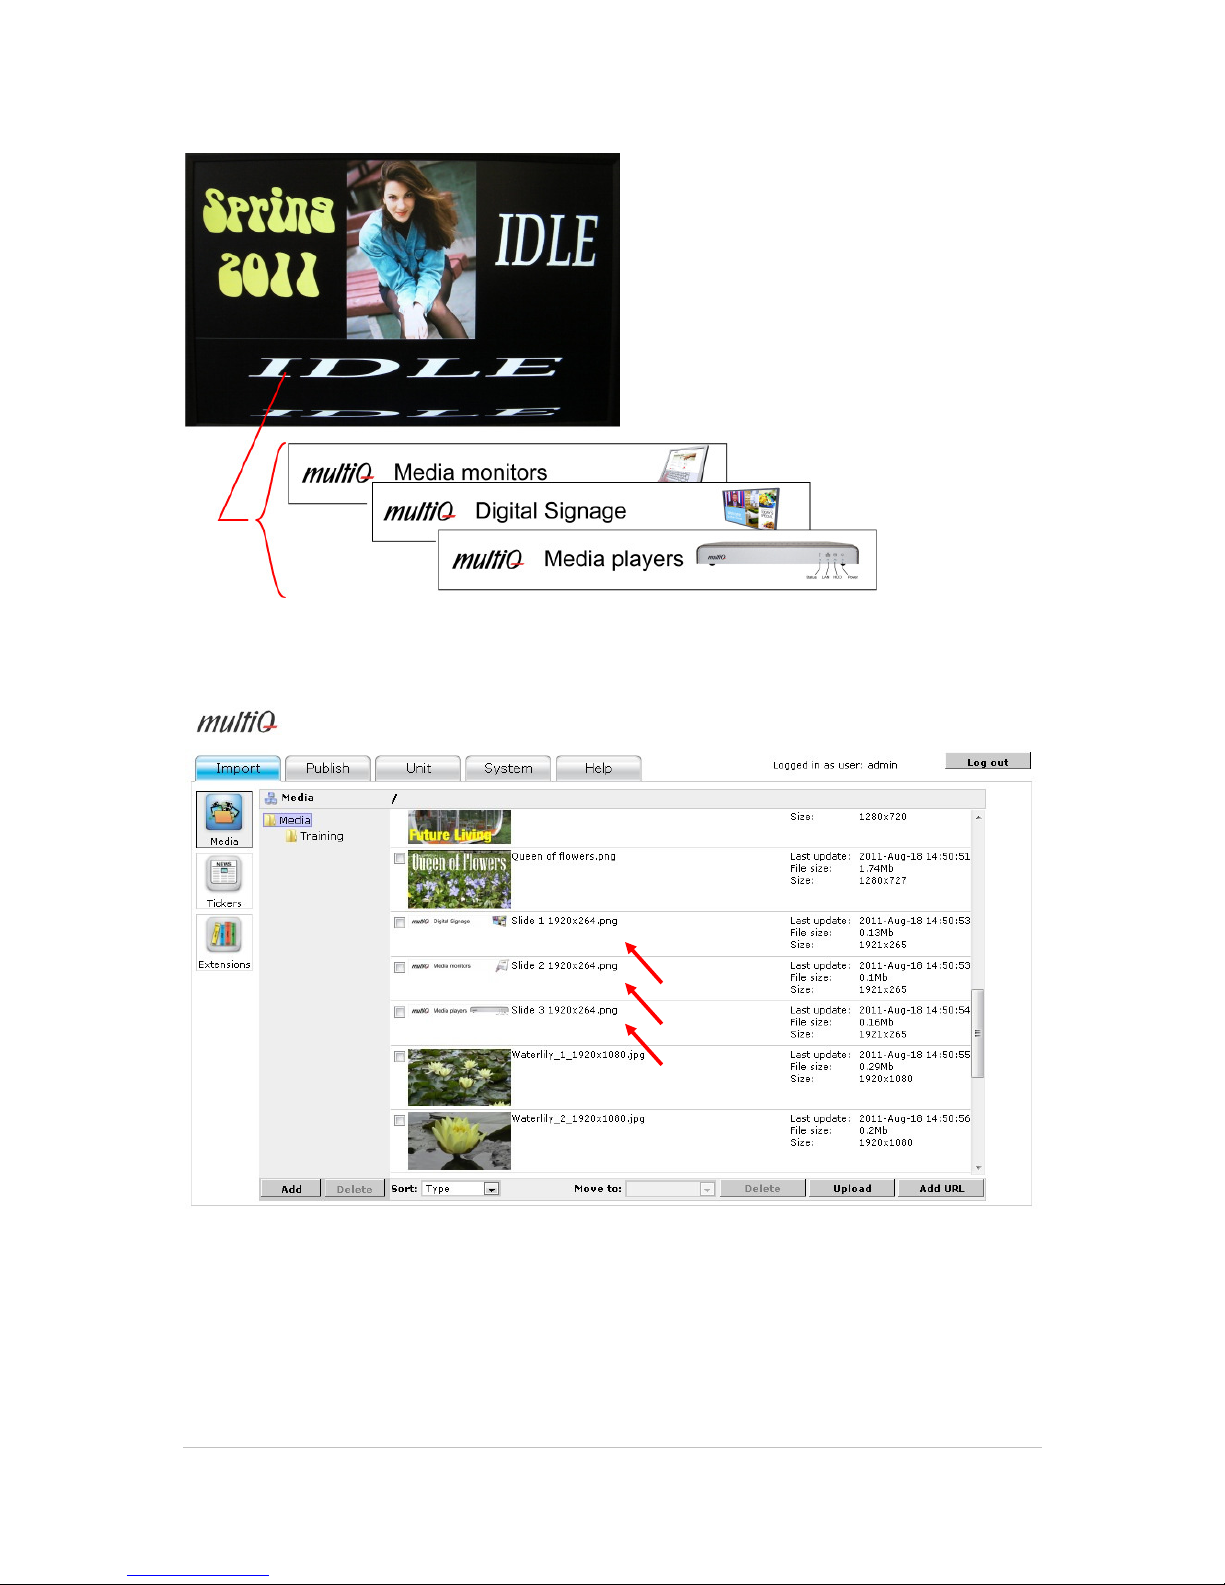
©2011 MultiQ are registered trademarks or trademark applications of MultiQ International AB in various jurisdictions. All
other company names and products are trademarks or registered trademarks of their respective companies. We reserve
the right to change the specifications without prior notice.
MultiQ DSMS 3.6 User Guide, Media players operated in standalone mode, Version 2, 18/08/2011 79
Figure 111. Three images (1920x264 pixels) are to be added to “Area 2”.
Figure 112. The three (previously uploaded) images are to be found in the “Training” folder of the media
archive.
The next step is to create a playlist named Slideshow1 and to organize the three images into the
playlist.
Page 80
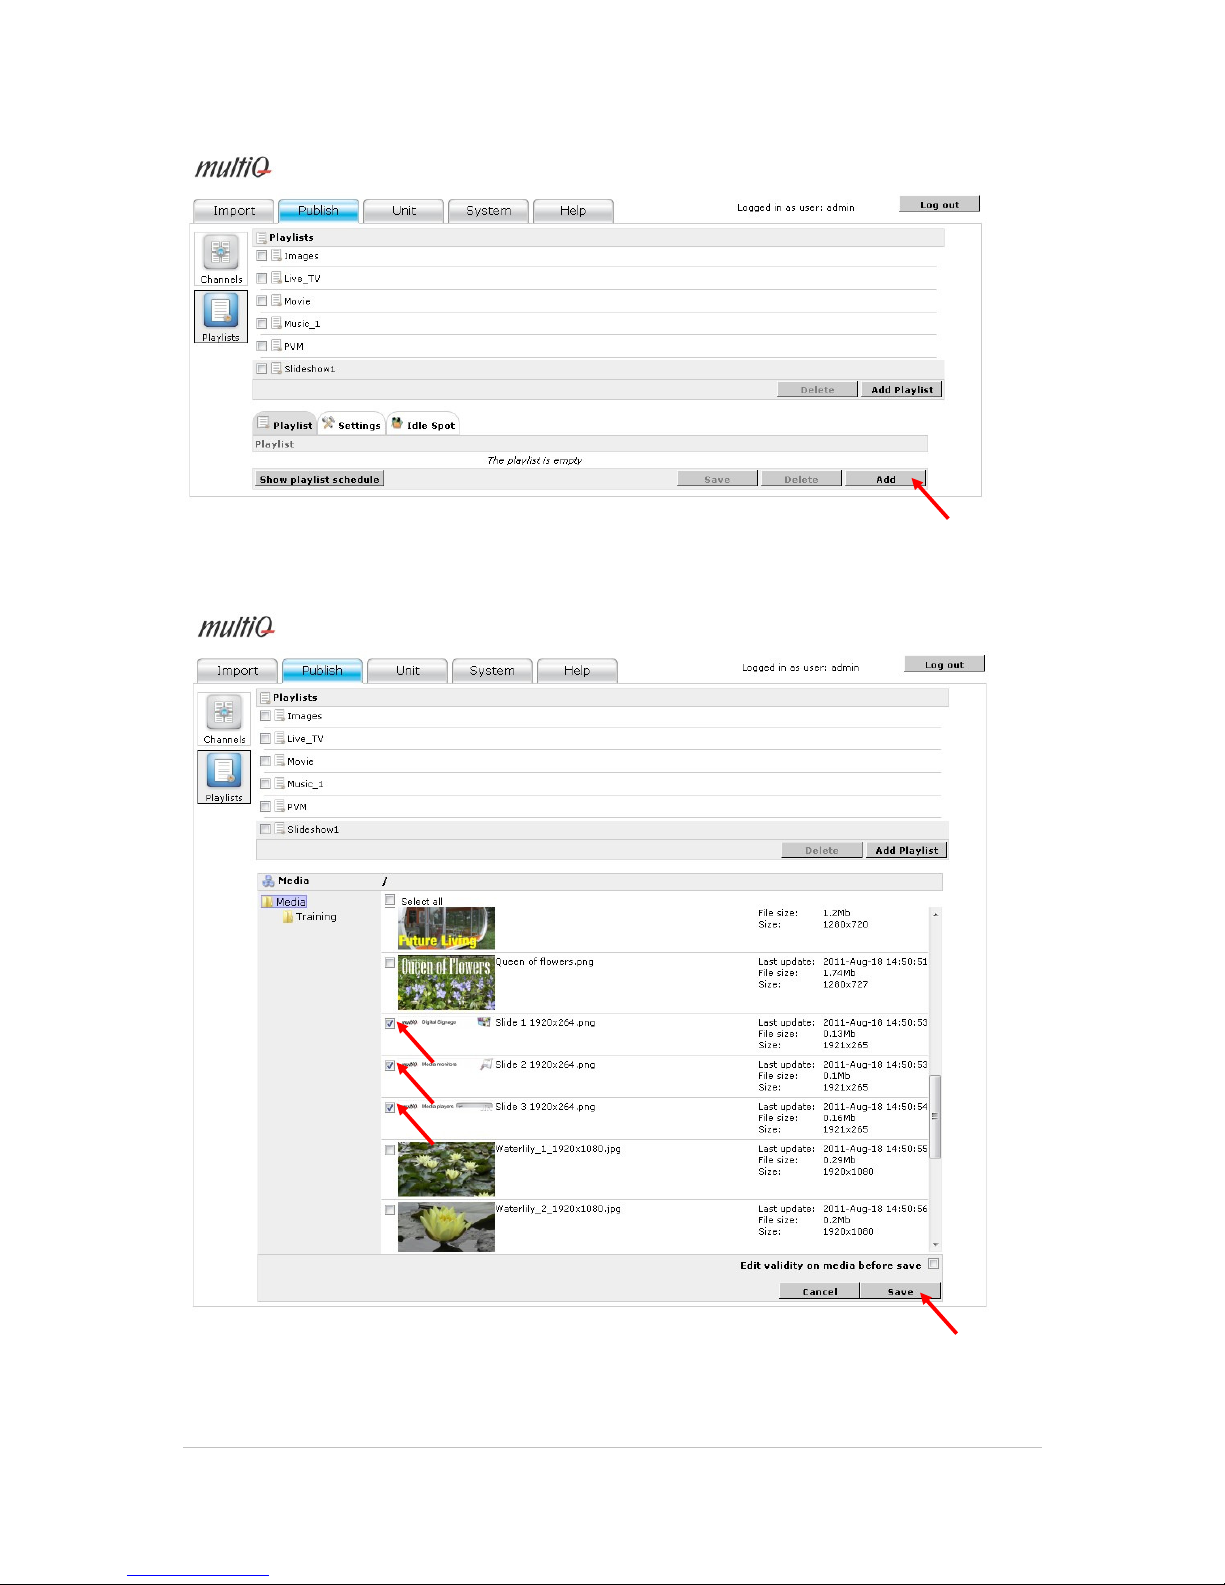
©2011 MultiQ are registered trademarks or trademark applications of MultiQ International AB in various jurisdictions. All
other company names and products are trademarks or registered trademarks of their respective companies. We reserve
the right to change the specifications without prior notice.
MultiQ DSMS 3.6 User Guide, Media players operated in standalone mode, Version 2, 18/08/2011 80
Figure 113. Create a playlist named “Slideshow1” to house the three images for “Area2”.
Figure 114. Select the “Publish” tab and the “Playlists” menu. Then create a new playlist named
“Slideshow1” and finally add the three images by ticking the boxes to the left and click the “Save” button
at the bottom of the page.
Page 81
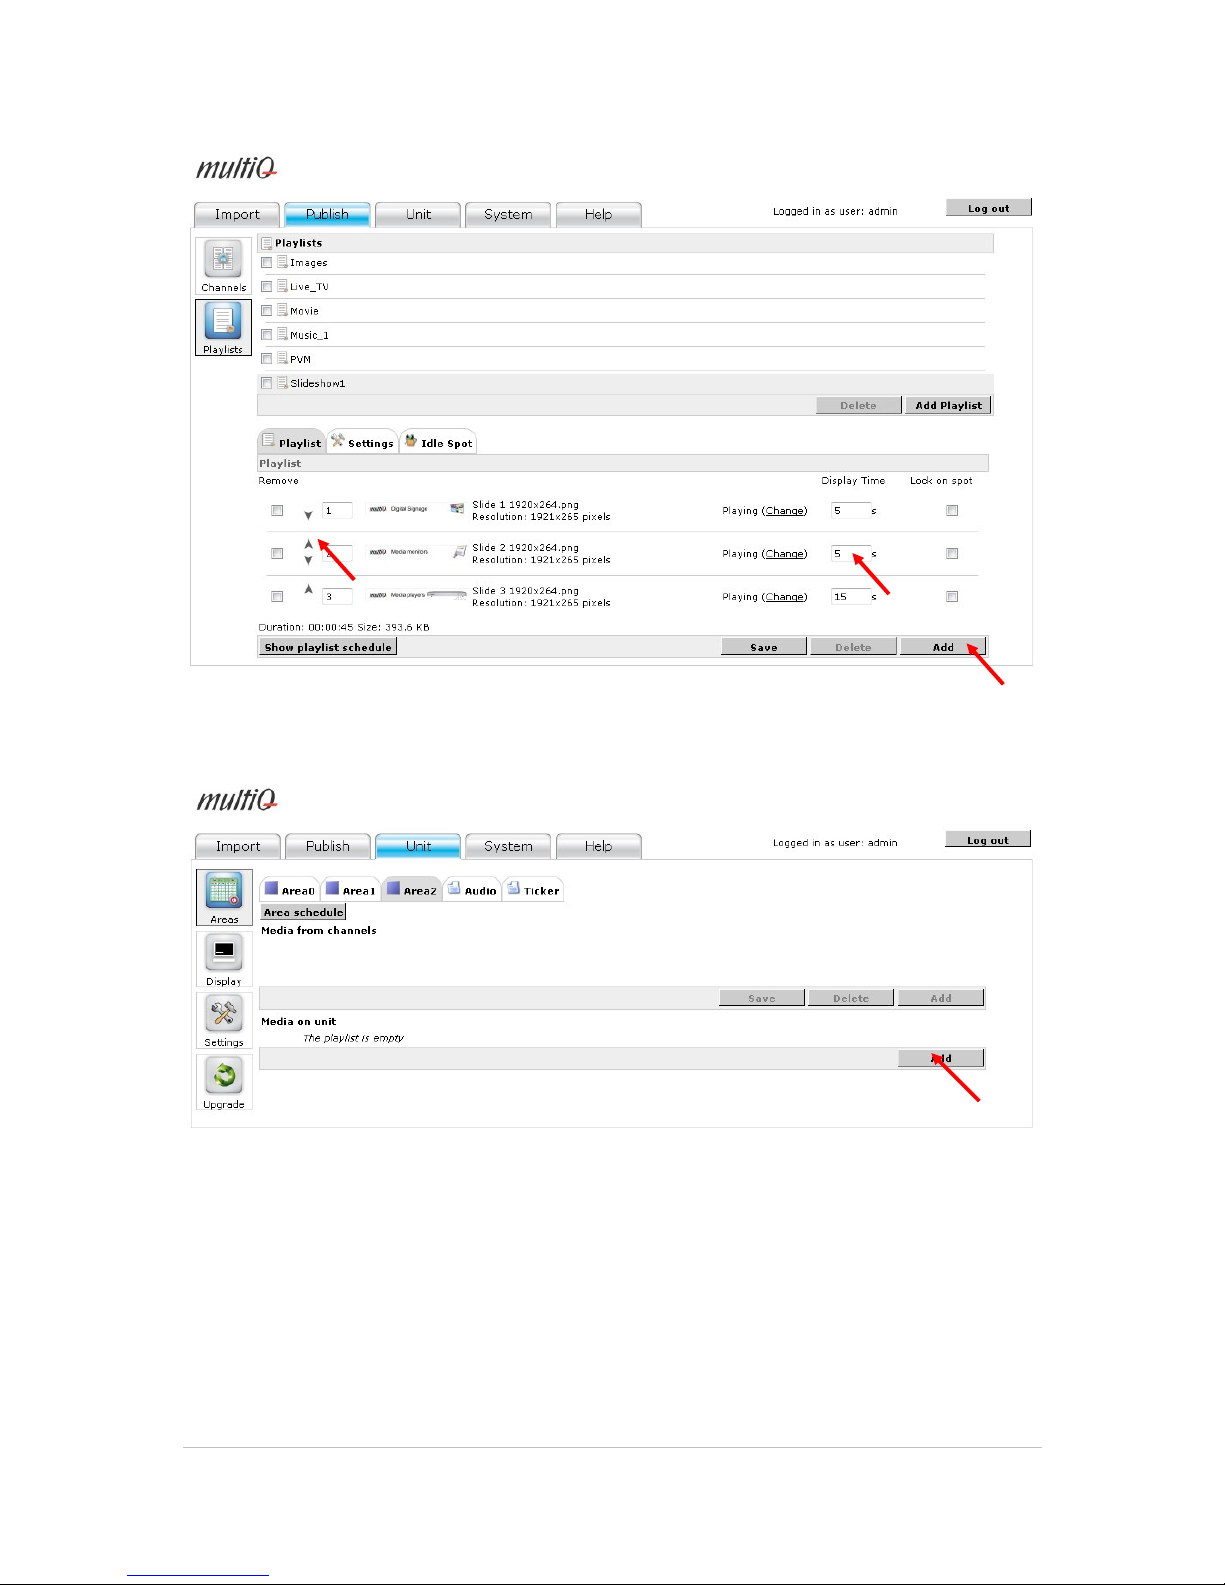
©2011 MultiQ are registered trademarks or trademark applications of MultiQ International AB in various jurisdictions. All
other company names and products are trademarks or registered trademarks of their respective companies. We reserve
the right to change the specifications without prior notice.
MultiQ DSMS 3.6 User Guide, Media players operated in standalone mode, Version 2, 18/08/2011 81
Figure 115. Select the order between the spots and the display time of each spot, then click “Save”.
Figure 116. Next, add the “Slideshow” playlist to “Area2”.
Page 82
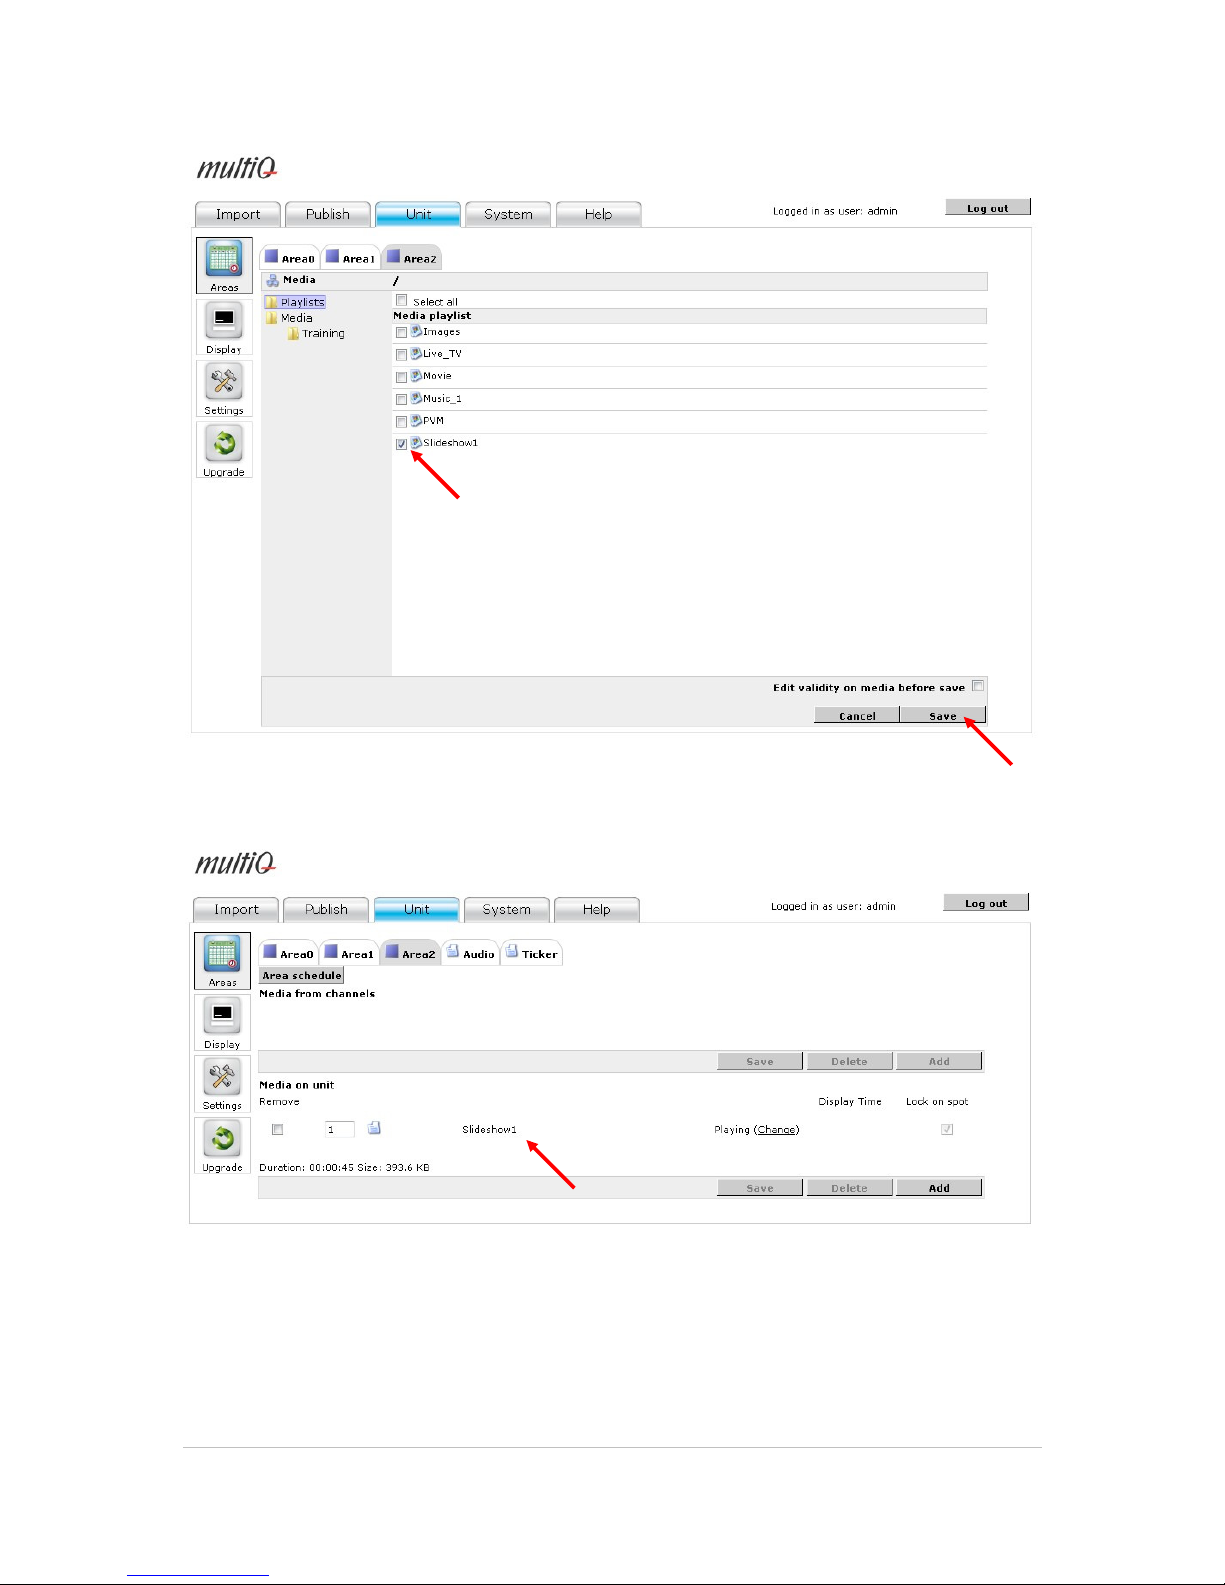
©2011 MultiQ are registered trademarks or trademark applications of MultiQ International AB in various jurisdictions. All
other company names and products are trademarks or registered trademarks of their respective companies. We reserve
the right to change the specifications without prior notice.
MultiQ DSMS 3.6 User Guide, Media players operated in standalone mode, Version 2, 18/08/2011 82
Figure 117. Select and add the “Slideshow” playlist.
Figure 118. “Slideshow1” is now connected to Area2.
Page 83
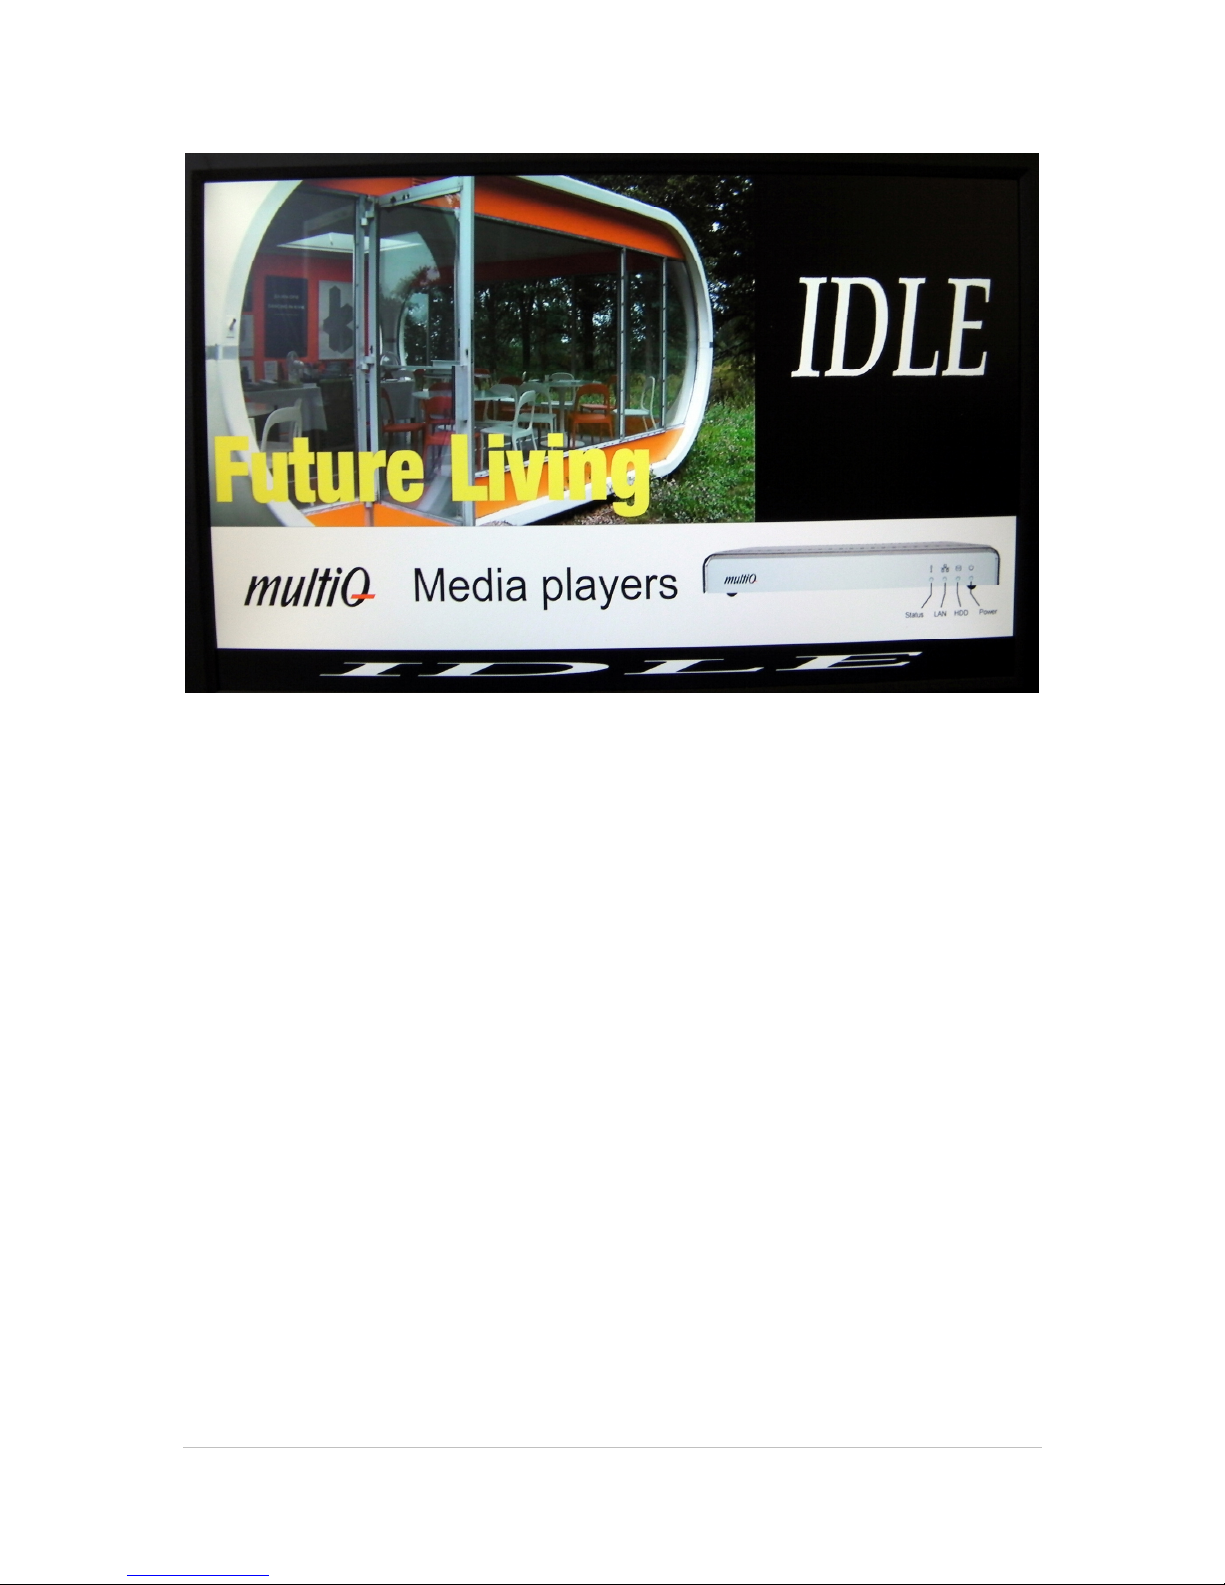
©2011 MultiQ are registered trademarks or trademark applications of MultiQ International AB in various jurisdictions. All
other company names and products are trademarks or registered trademarks of their respective companies. We reserve
the right to change the specifications without prior notice.
MultiQ DSMS 3.6 User Guide, Media players operated in standalone mode, Version 2, 18/08/2011 83
Figure 119. The “Slideshow1” playlist now runs in “Area2” at the bottom of the screen.
Page 84
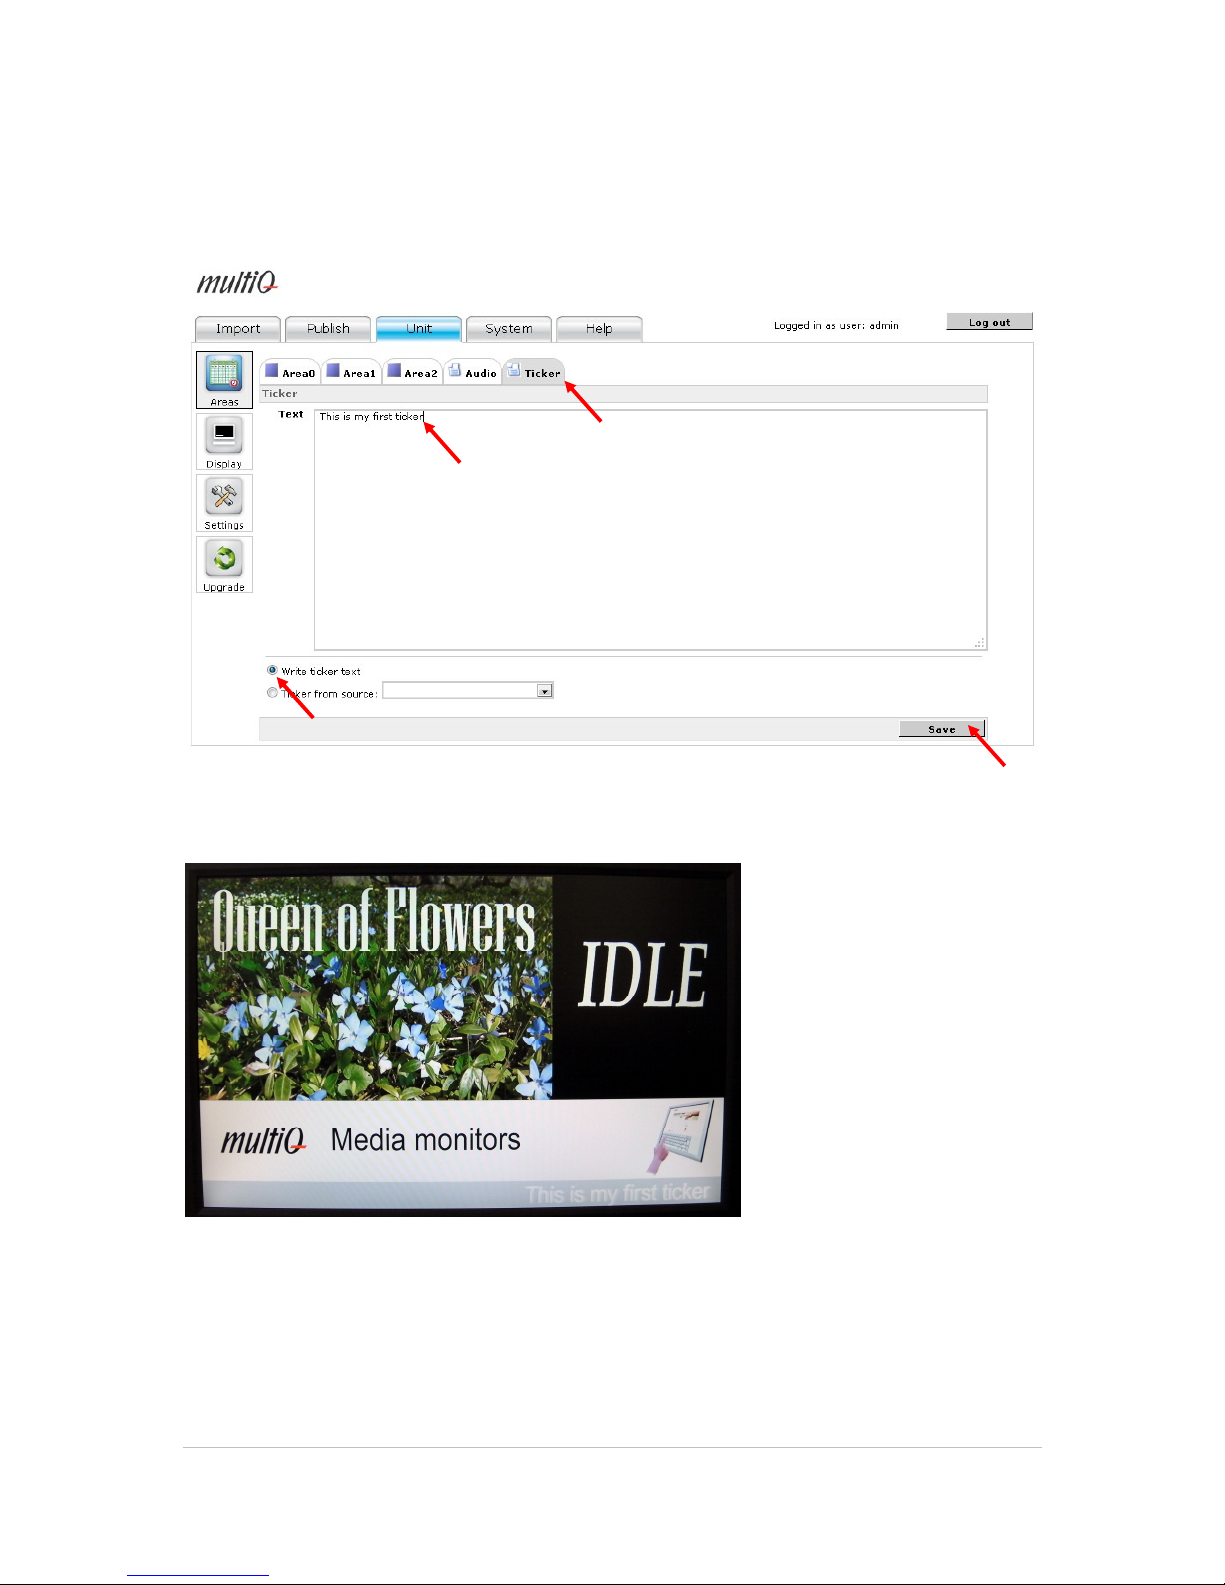
©2011 MultiQ are registered trademarks or trademark applications of MultiQ International AB in various jurisdictions. All
other company names and products are trademarks or registered trademarks of their respective companies. We reserve
the right to change the specifications without prior notice.
MultiQ DSMS 3.6 User Guide, Media players operated in standalone mode, Version 2, 18/08/2011 84
13 Adding a ticker
To add a ticker is simple.
Figure 120. The easiest way is to directly input a text that is to be displayed as a ticker.
Figure 121. The ticker quickly becomes visible at the bottom of the screen.
Page 85
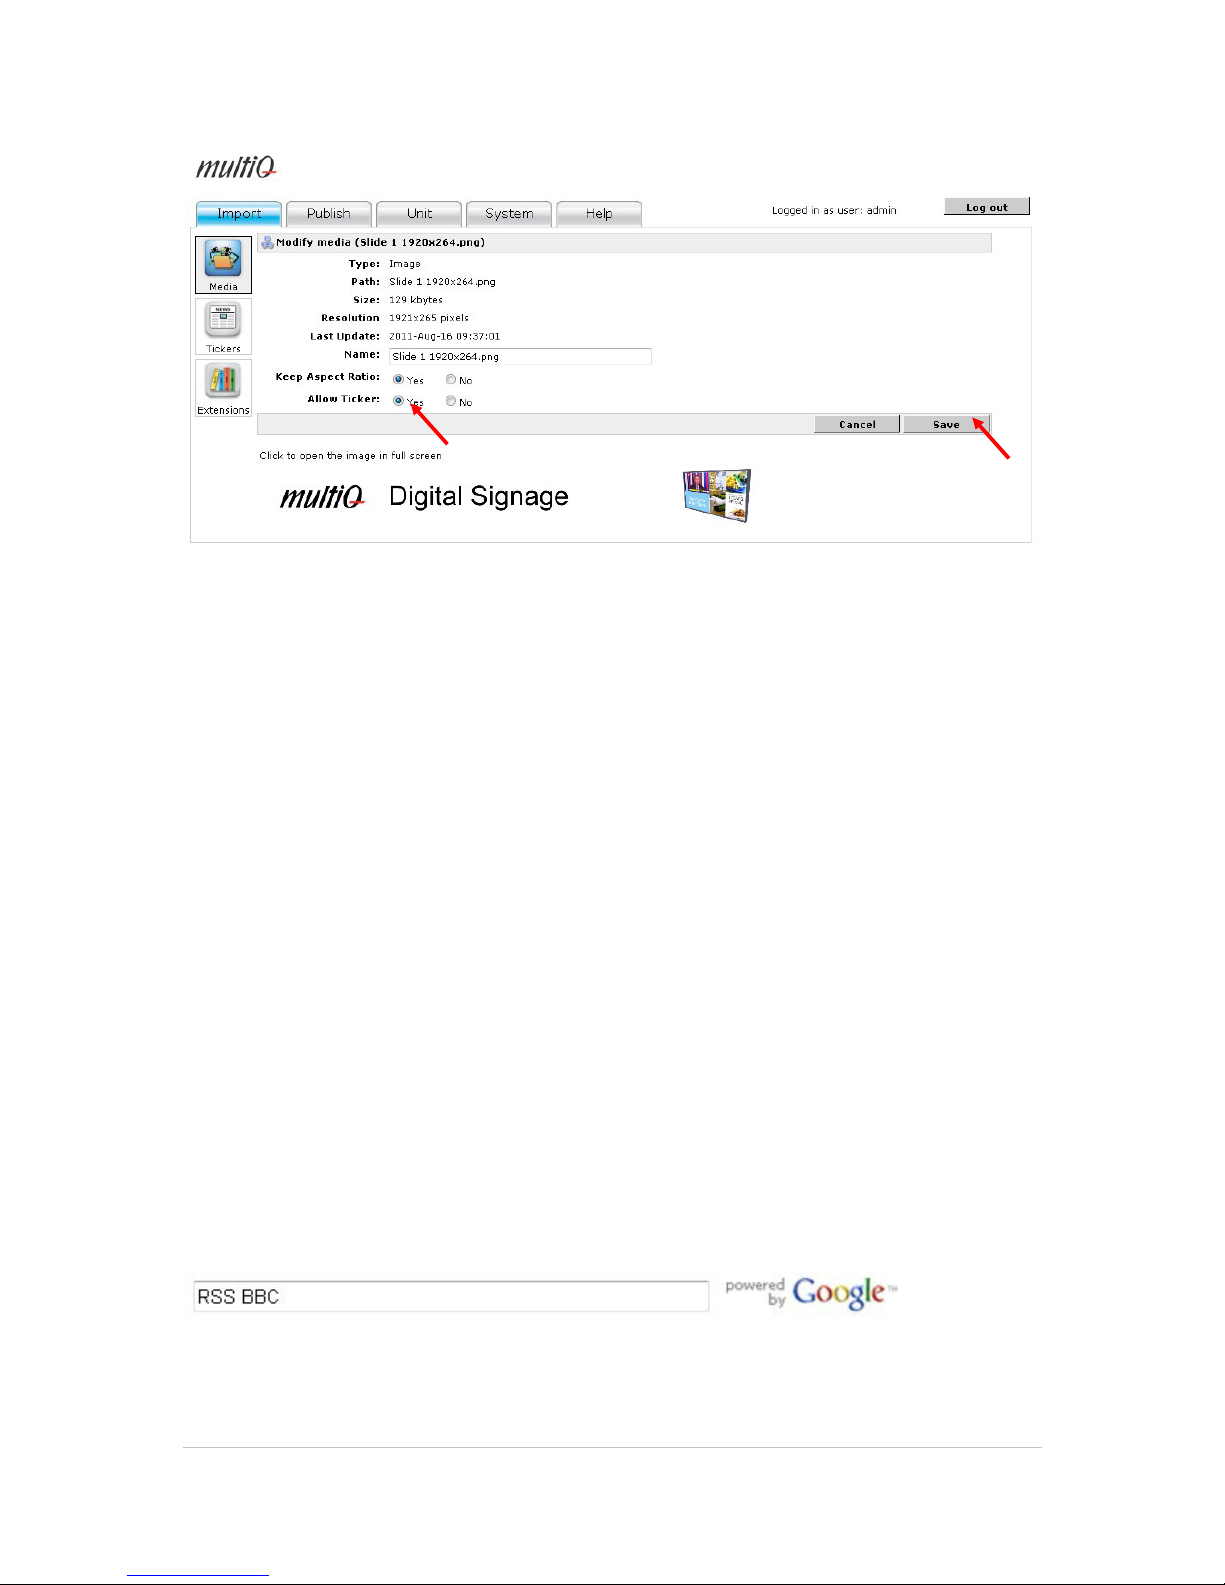
©2011 MultiQ are registered trademarks or trademark applications of MultiQ International AB in various jurisdictions. All
other company names and products are trademarks or registered trademarks of their respective companies. We reserve
the right to change the specifications without prior notice.
MultiQ DSMS 3.6 User Guide, Media players operated in standalone mode, Version 2, 18/08/2011 85
Figure 122. If the ticker does still not work, check that the “Allow Ticker” parameter is set for all media
spots. If any of them (regardless of what area is used) does not allow the ticker there will just be a black
area at the position of the ticker. By using the “Allow ticker” parameter it is possible to have the ticker
switched off at times when you do not want it.
The more advanced way is to either store a ticker in the “Ticker archive” or to define a link to an
RSS feed in the archive.
13.1 Getting tickers from RSS feeds
A popular way of getting ticker content is to use RSS feeds.
RSS feeds are widely available on the Internet and cover most areas of interest when it comes to
dynamically updated content.
Start by searching for suitable RSS feeds using Google. Just enter RSS and a name of a
newspaper, a broadcaster or any other organization and you will soon get to the right pages to find
RSS feeds.
Figure 123. Print “RSS” plus some associated broadcaster or area of interest into Google and make a
search.
Page 86
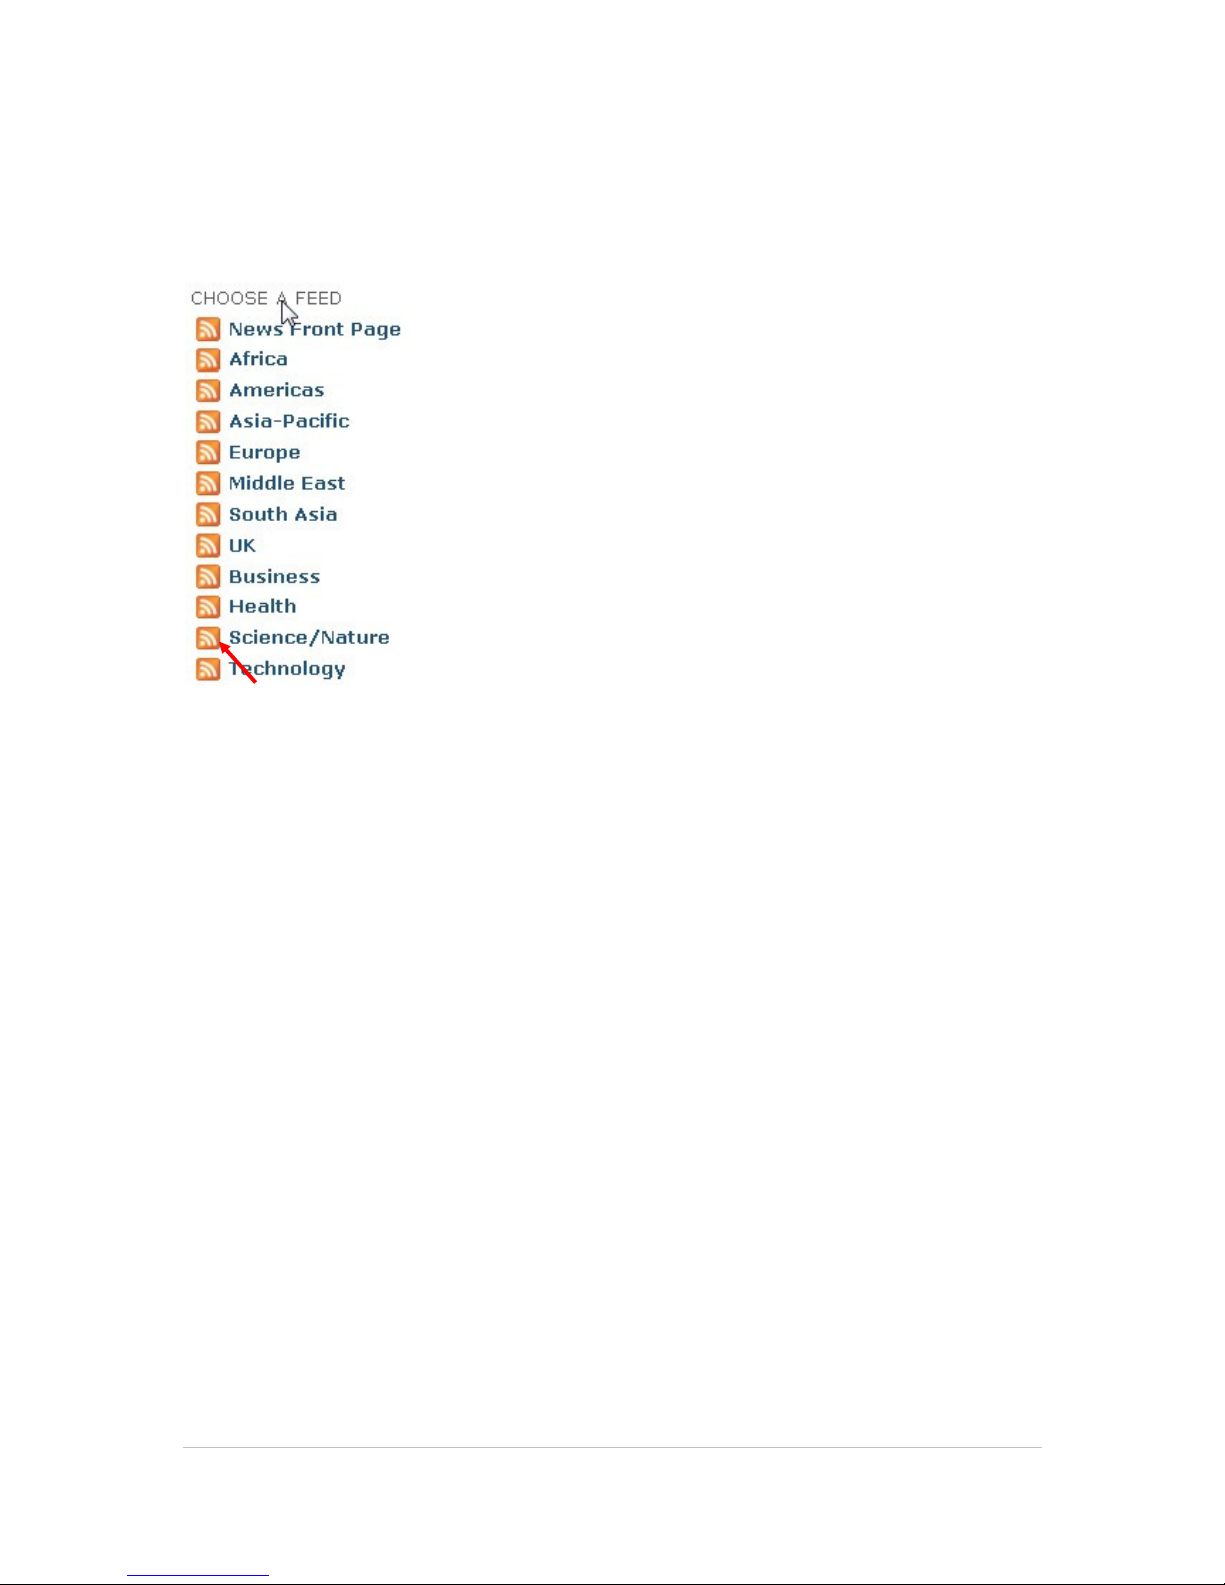
©2011 MultiQ are registered trademarks or trademark applications of MultiQ International AB in various jurisdictions. All
other company names and products are trademarks or registered trademarks of their respective companies. We reserve
the right to change the specifications without prior notice.
MultiQ DSMS 3.6 User Guide, Media players operated in standalone mode, Version 2, 18/08/2011 86
When you have found a list of interesting RSS feeds, click one of preference and you will get to a
page that looks like the one in figure 12.4.
Figure 124. Choose a feed of interest.
Copy the link in the address field. This link can be used in the digital signage system as a source of
information for the RSS feed.
The next few pages show how to use an RSS feed as a source of information for a ticker.
Page 87
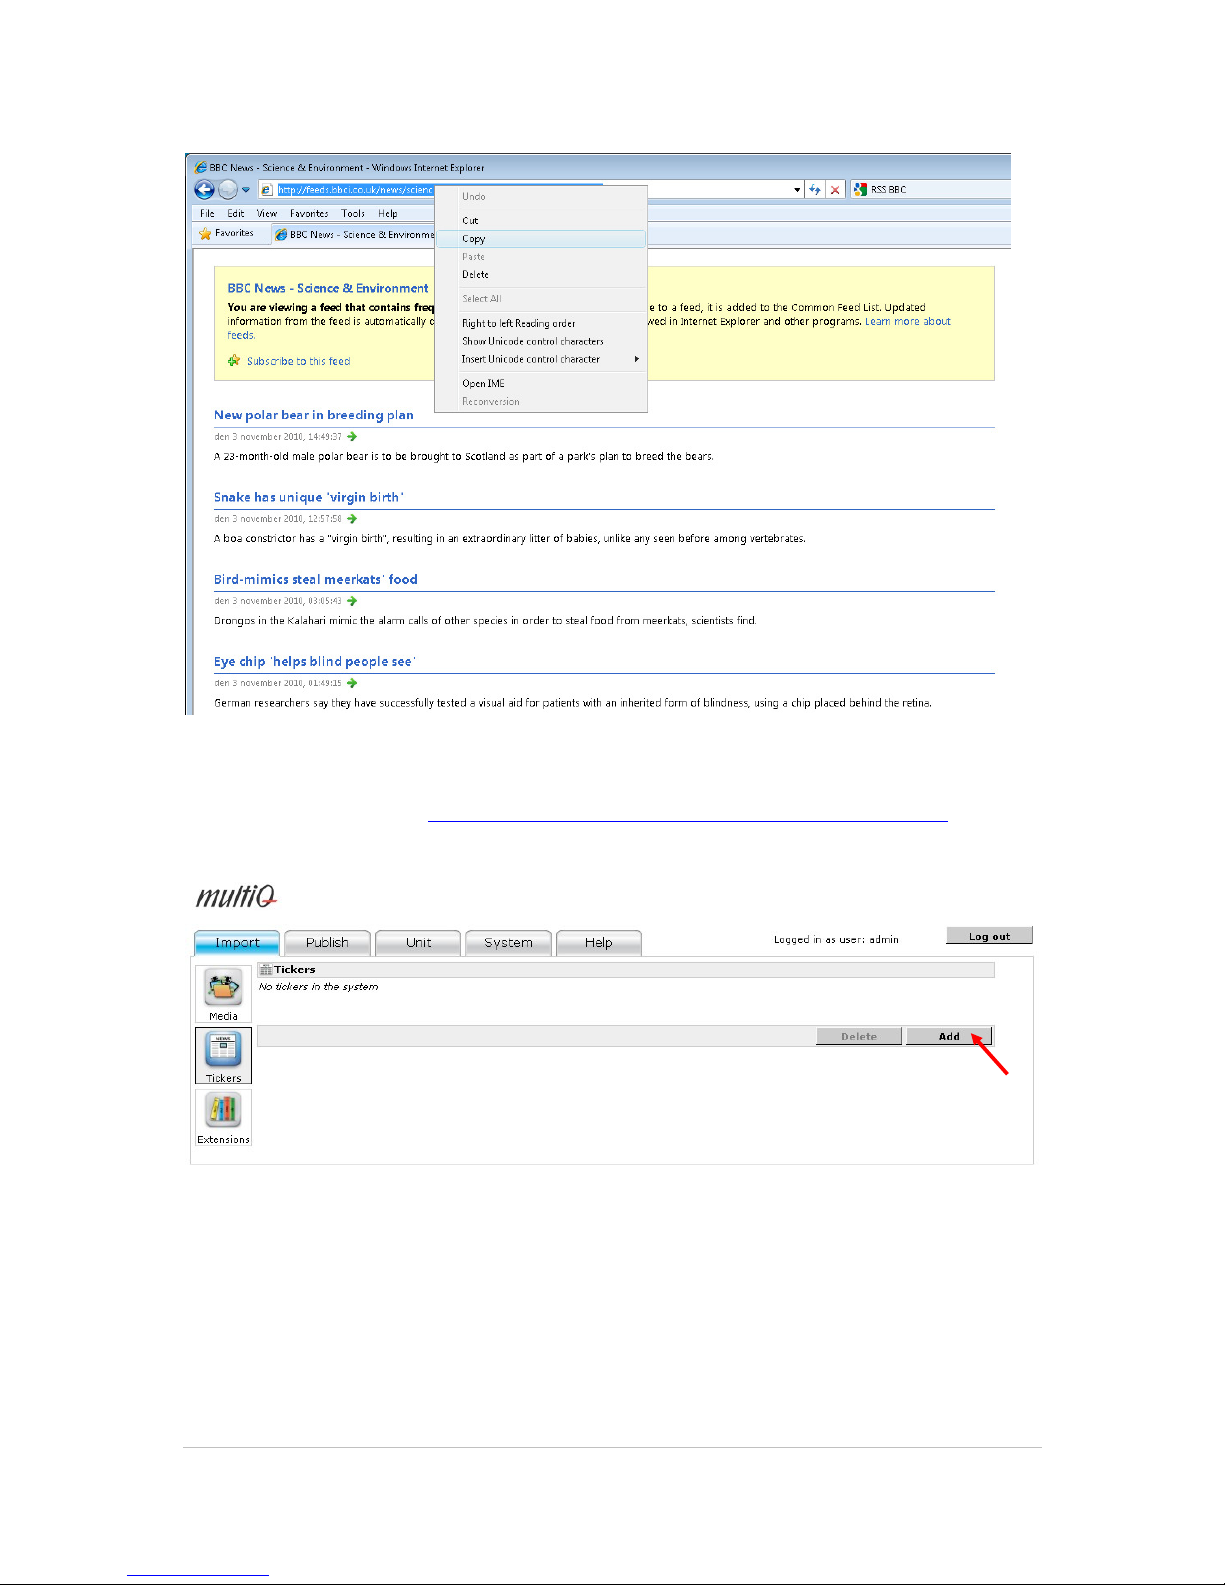
©2011 MultiQ are registered trademarks or trademark applications of MultiQ International AB in various jurisdictions. All
other company names and products are trademarks or registered trademarks of their respective companies. We reserve
the right to change the specifications without prior notice.
MultiQ DSMS 3.6 User Guide, Media players operated in standalone mode, Version 2, 18/08/2011 87
Figure 125. The link to the RSS feed can be used as an external link for ticker in the digital signage
system. The link used here is: http://feeds.bbci.co.uk/news/science_and_environment/rss.xml.
Figure 126. In the Ticker Bank you can store a number of links to RSS feeds. Click “Add” to store more
feeds.
Page 88
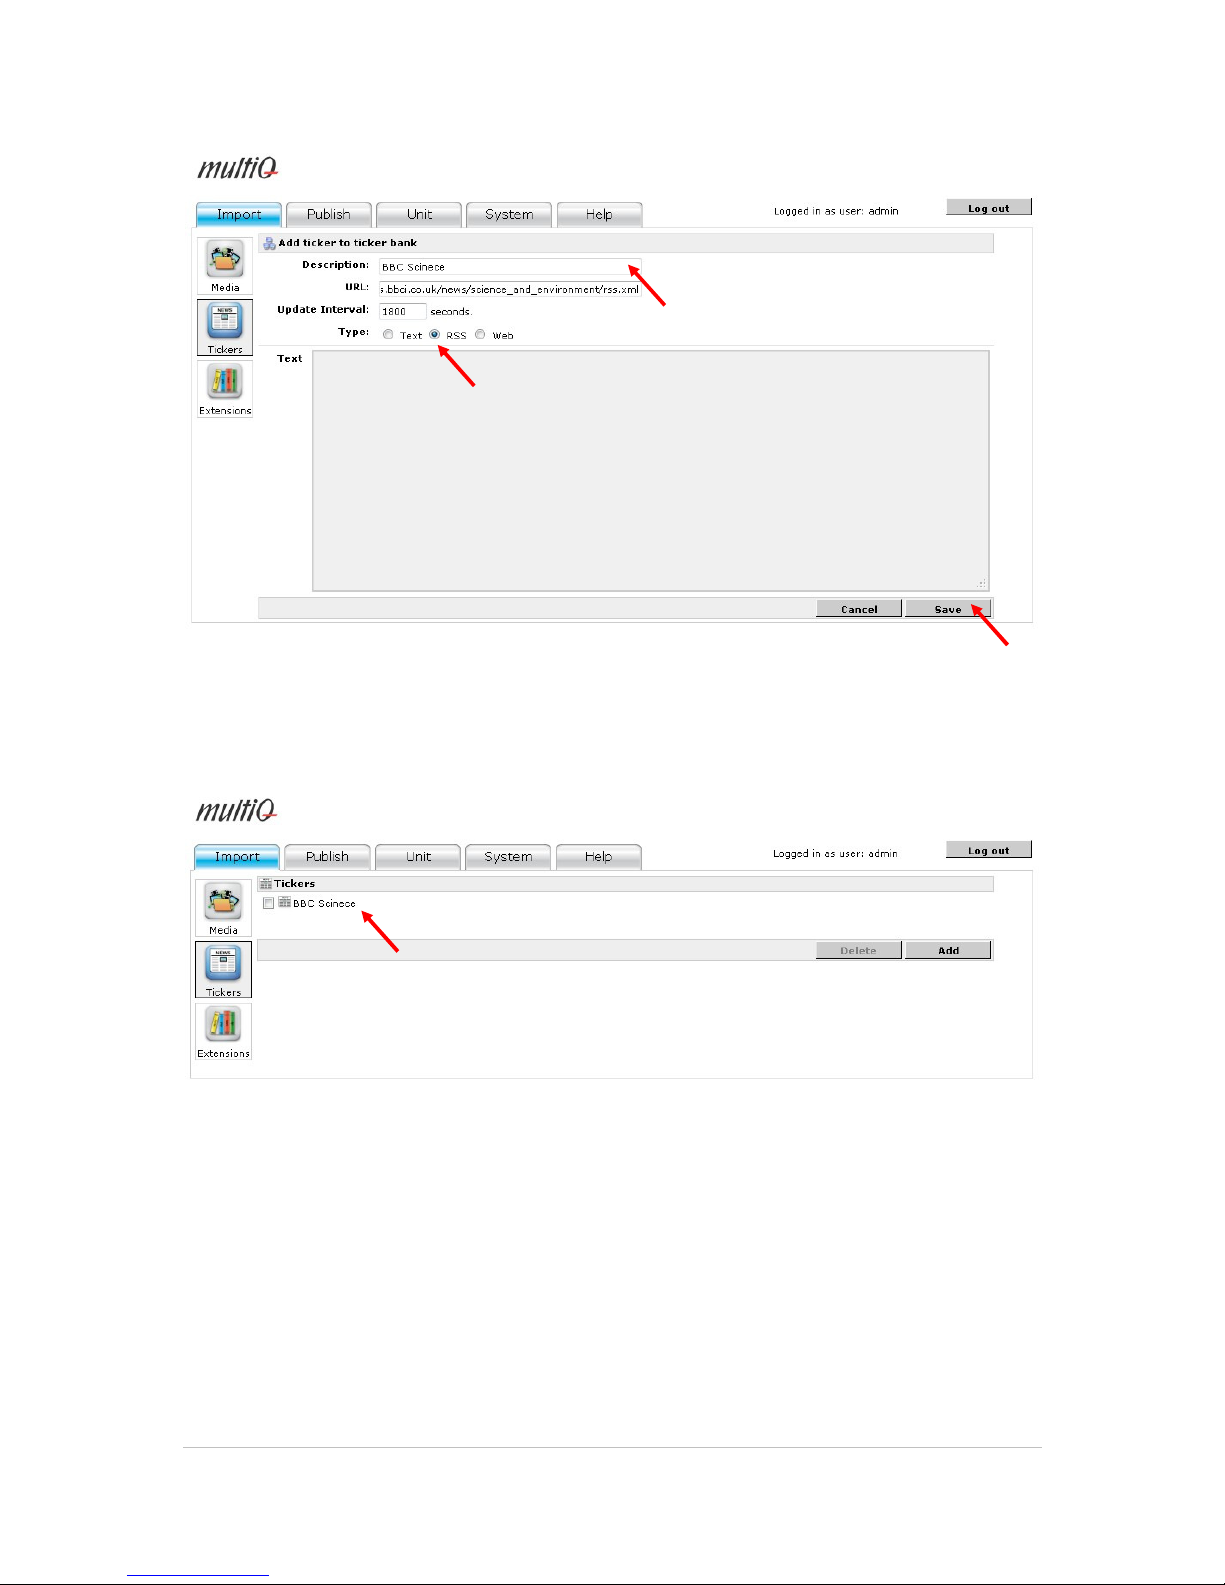
©2011 MultiQ are registered trademarks or trademark applications of MultiQ International AB in various jurisdictions. All
other company names and products are trademarks or registered trademarks of their respective companies. We reserve
the right to change the specifications without prior notice.
MultiQ DSMS 3.6 User Guide, Media players operated in standalone mode, Version 2, 18/08/2011 88
Figure 127. In the Ticker Bank “Add ticker to ticker bank” menu you add a description along with the link
that you copied from your web browser.
Figure 128. The “BBC Science” RSS feed is now available in the ticker archive.
Page 89
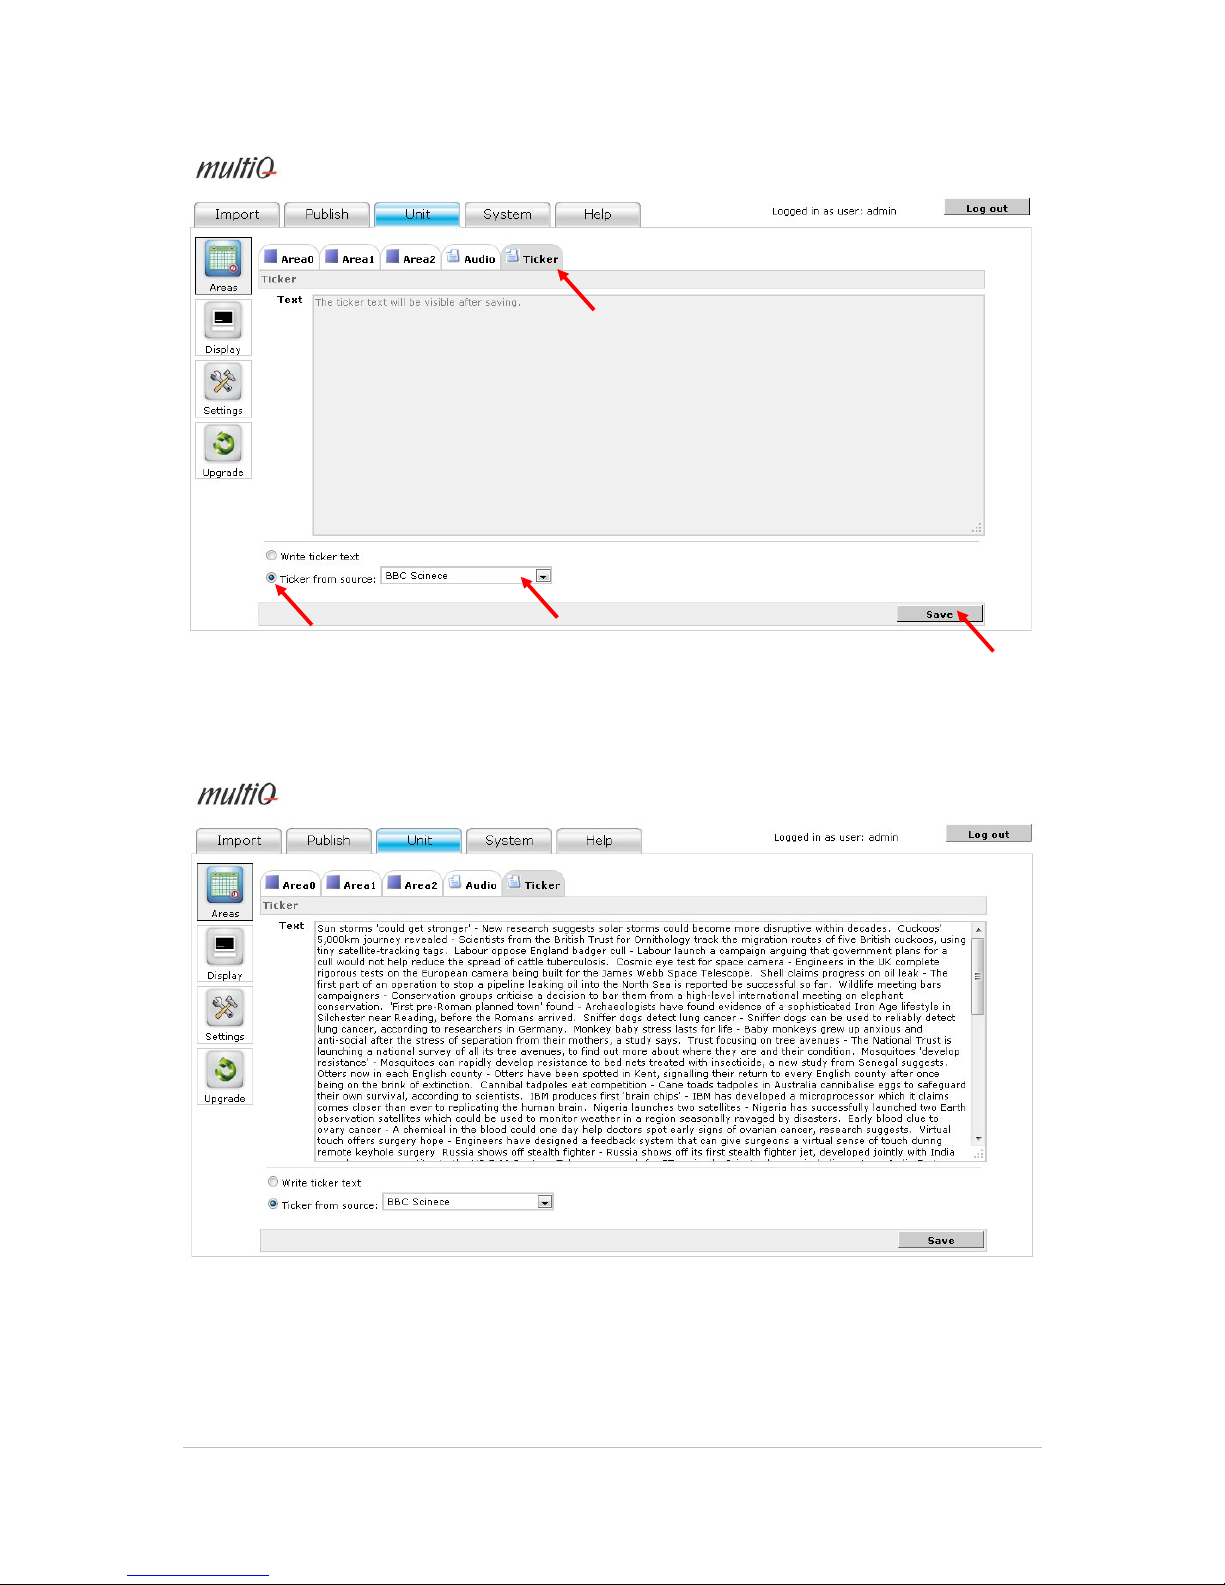
©2011 MultiQ are registered trademarks or trademark applications of MultiQ International AB in various jurisdictions. All
other company names and products are trademarks or registered trademarks of their respective companies. We reserve
the right to change the specifications without prior notice.
MultiQ DSMS 3.6 User Guide, Media players operated in standalone mode, Version 2, 18/08/2011 89
Figure 129. Tick “Ticker from source” and select the ticker source you want.
Figure 130. After a few minutes the text will be available in the Ticker Bank, and on the screen.
Page 90
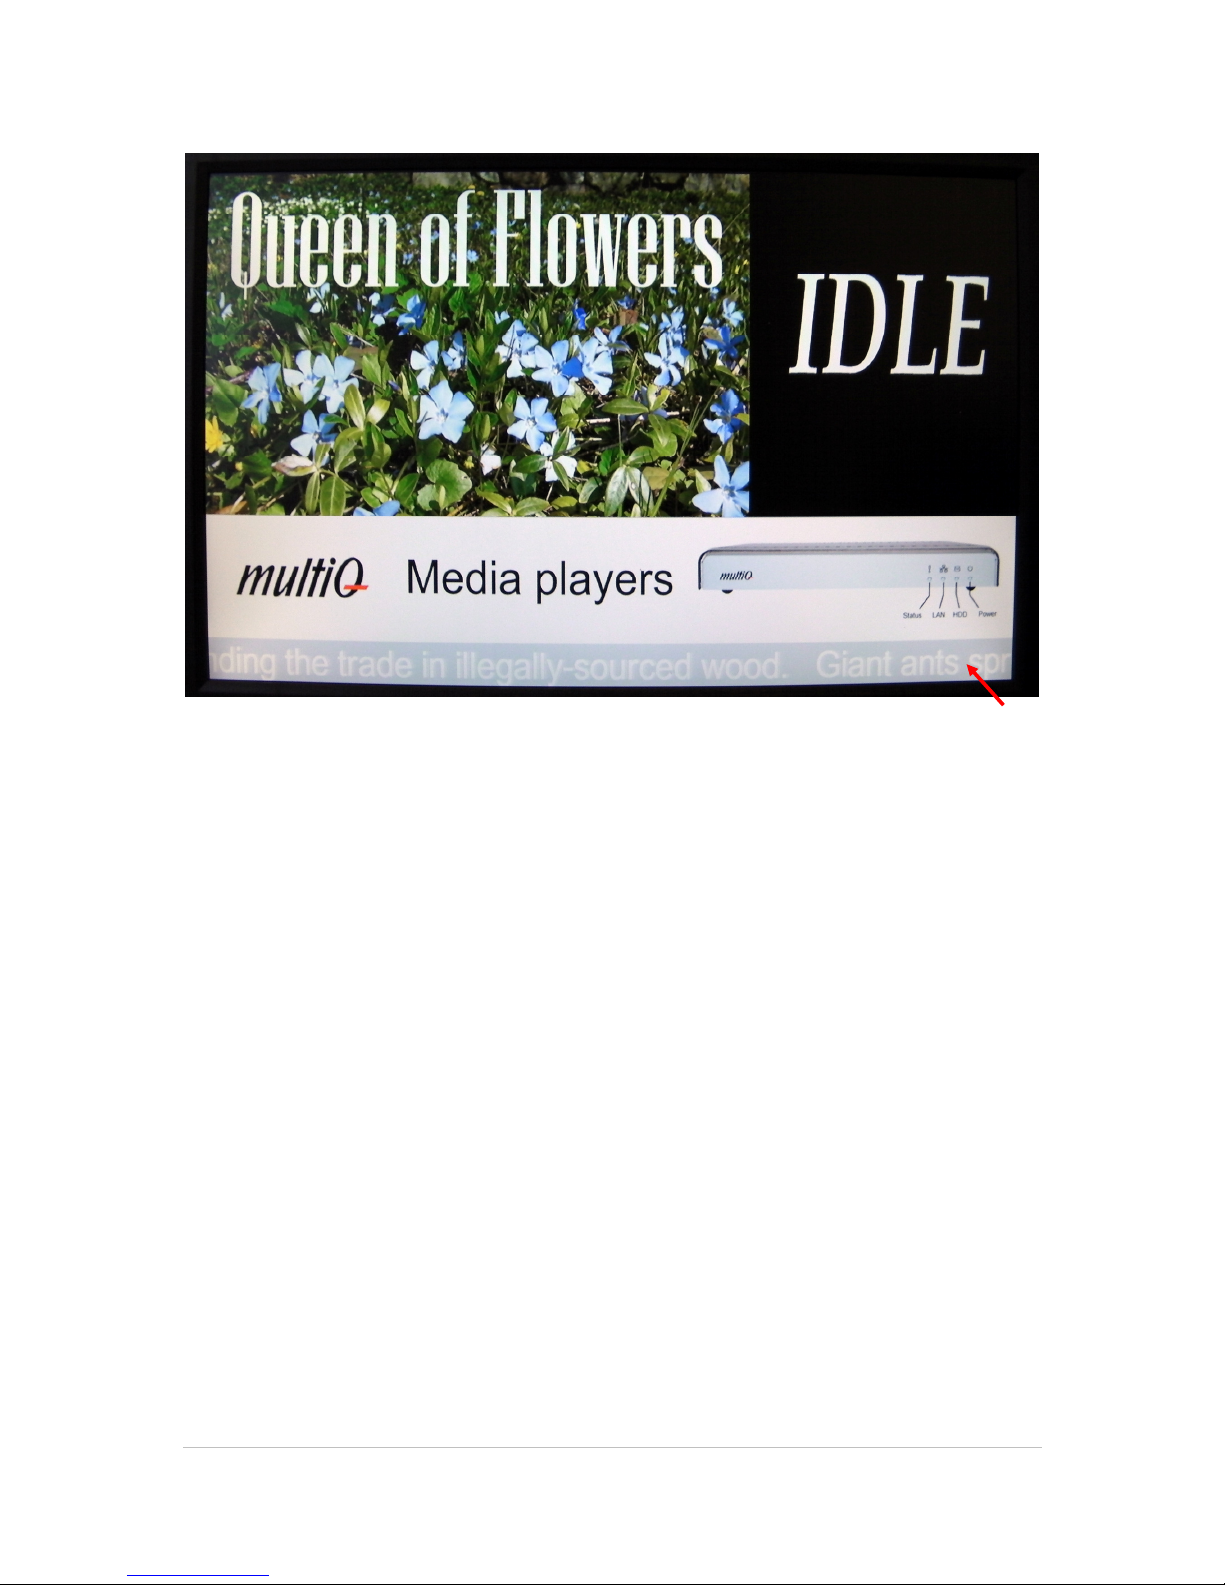
©2011 MultiQ are registered trademarks or trademark applications of MultiQ International AB in various jurisdictions. All
other company names and products are trademarks or registered trademarks of their respective companies. We reserve
the right to change the specifications without prior notice.
MultiQ DSMS 3.6 User Guide, Media players operated in standalone mode, Version 2, 18/08/2011 90
Figure 131. The RSS feed ticker is now online and will get updated automatically.
Page 91
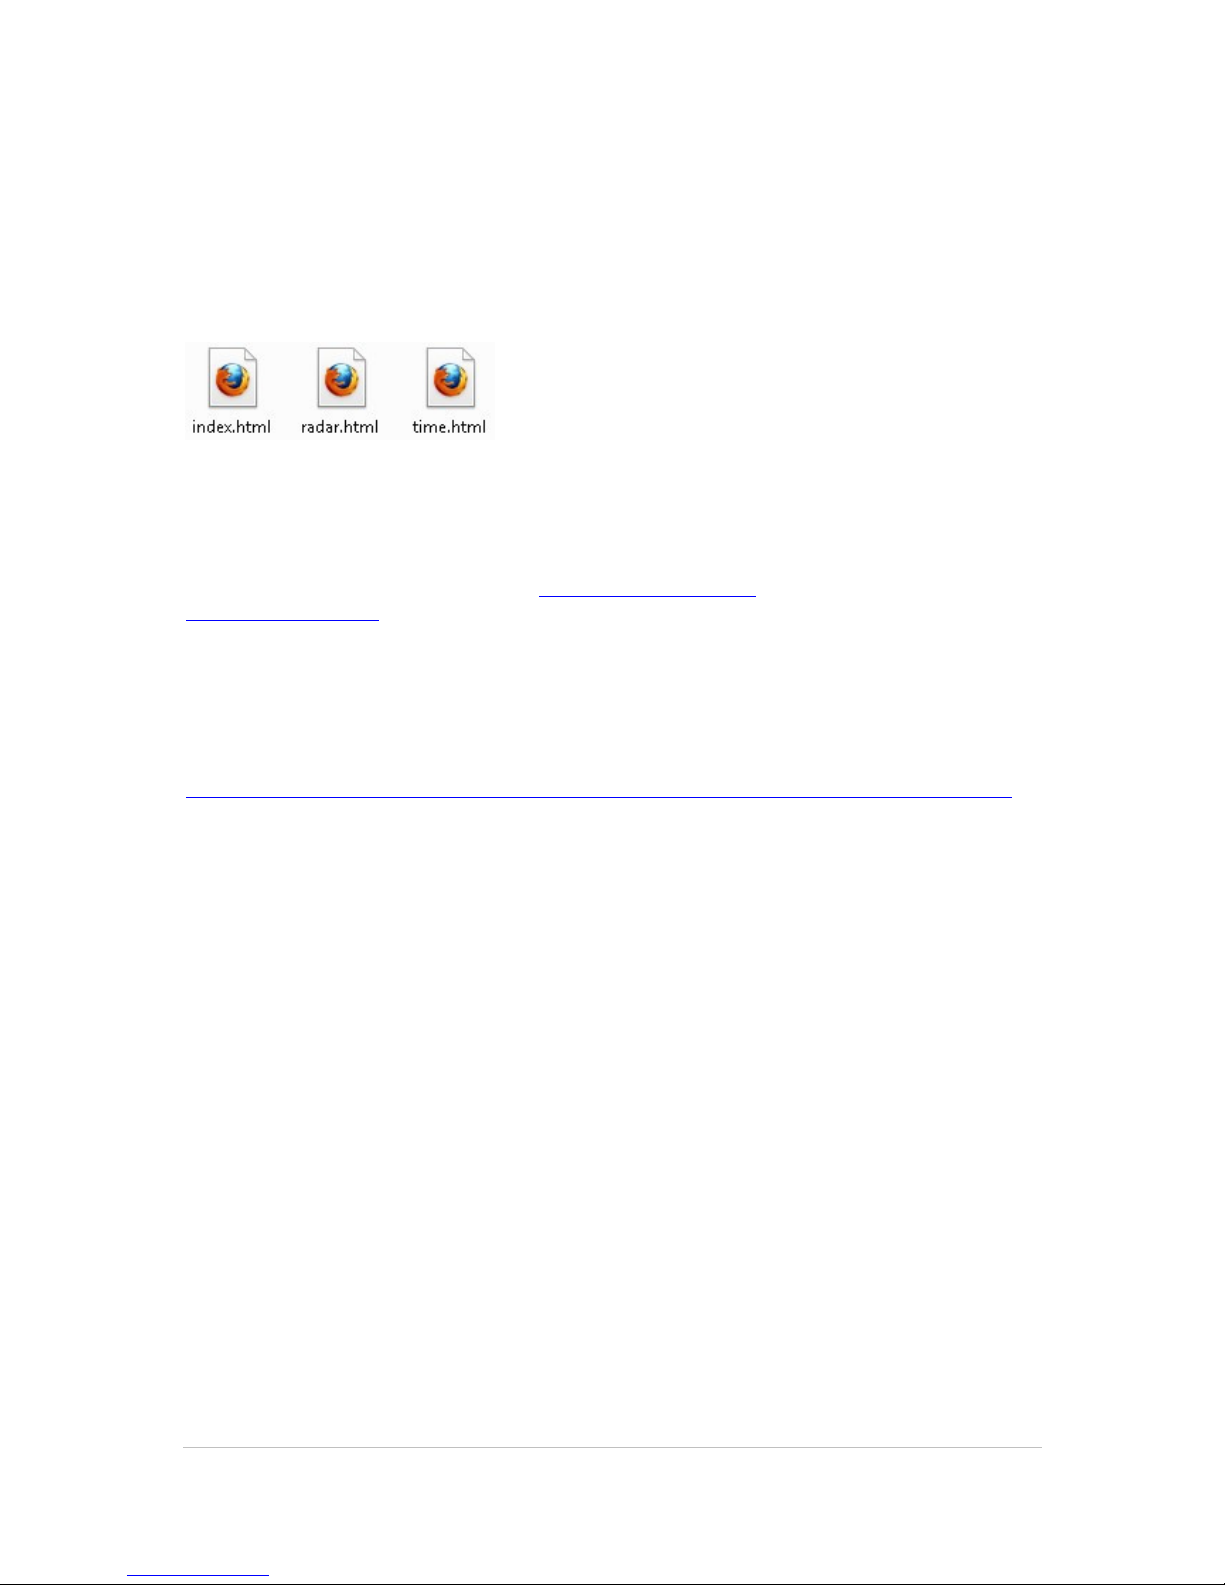
©2011 MultiQ are registered trademarks or trademark applications of MultiQ International AB in various jurisdictions. All
other company names and products are trademarks or registered trademarks of their respective companies. We reserve
the right to change the specifications without prior notice.
MultiQ DSMS 3.6 User Guide, Media players operated in standalone mode, Version 2, 18/08/2011 91
14 Adding an online weather and time channel into “Area1”
The remaining area “Area1” (640x720 pixels) is to be used for an online weather channel using an
online weather site and a time site. This is a more advanced exercise that shows the versatility of
the MultiQ system when it comes to storing web content on the internal web server and using
online content as a part of an in-store TV channel.
Figure 132. The “index.html” page contains a weather forecast map while the “radar.html” map contains a
radar rain intensity animation map and the “time.html” file contains online local time.
The weather maps are obtained from www.weatheronline.co.uk and the time service is from
www.timeanddate.com .
In general it would have been possible to use the hyperlinks to the weather maps directly as media
spots. However in order to be able to fit the maps and the time service into the 640x720 pixel area
it is necessary to have the web elements embedded into web pages. As an example the weather
map is available online using the link
http://www.weatheronline.co.uk/main/includes/operational/graphics/ukuk_0.gif?1258603200
However to use the zoom feature in the digital signage system to zoom the map to fill up the major
portion of the 640x720 pixel area we need to use html “body” tags as is shown below.
<body>
<img
src="http://www.weatheronline.co.uk/main/includes/operational/graphics/ukuk_0.gif?125860320
0" />
<body>
Also the radar map and the time service are embedded into web pages.
However these web pages are not available on the Internet (only the content is available). To solve
this problem we will put the web pages on the media player itself, stored in the lsf (local storage
files) library. The local storage web pages can be used as web media spots in a playlist.
Note that these web pages are stored locally on the media player but they are addressing external
content on the Internet.
The first step to take is to place the web pages in a folder named “onlineinfo”.
Page 92
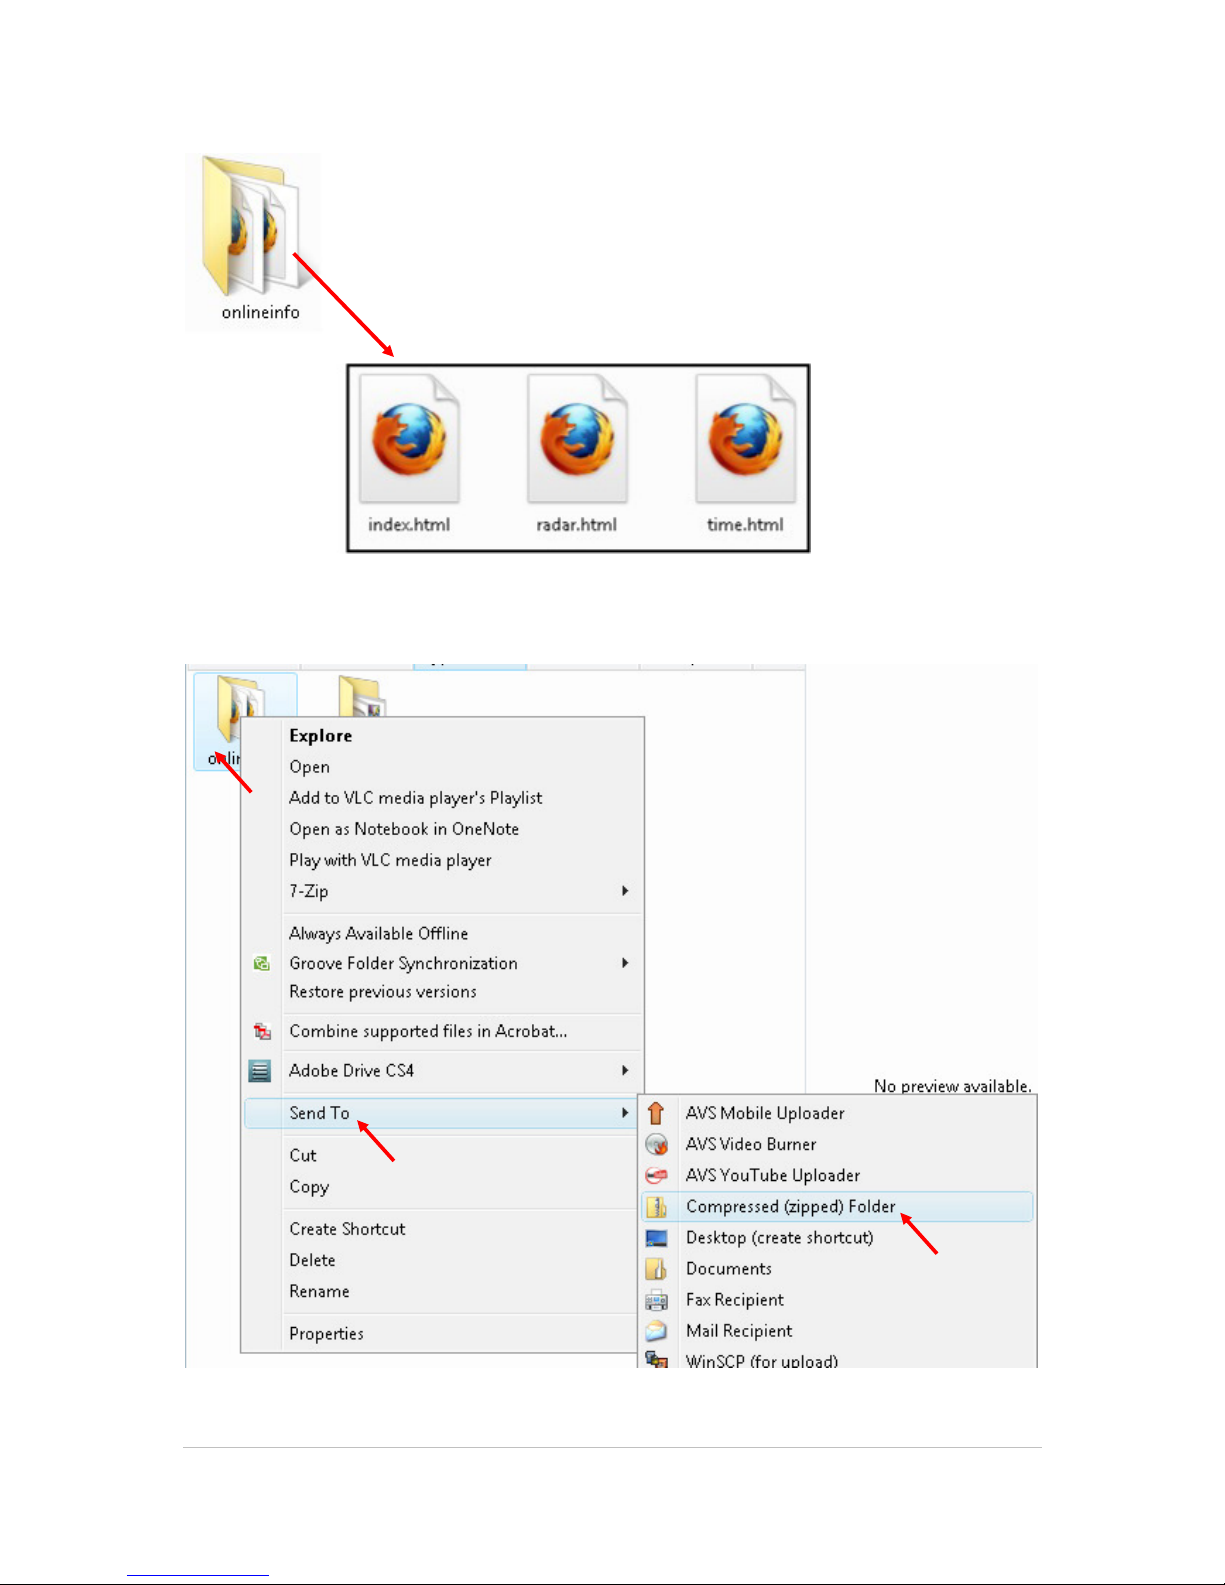
©2011 MultiQ are registered trademarks or trademark applications of MultiQ International AB in various jurisdictions. All
other company names and products are trademarks or registered trademarks of their respective companies. We reserve
the right to change the specifications without prior notice.
MultiQ DSMS 3.6 User Guide, Media players operated in standalone mode, Version 2, 18/08/2011 92
Figure 133. The web pages should be put inside a folder named “onlineinfo”.
Figure 134. Right click on the “onlineinfo” folder and then select “Send To” “Compressed(zipped) Folder”.
A zipped folder is now created.
Page 93
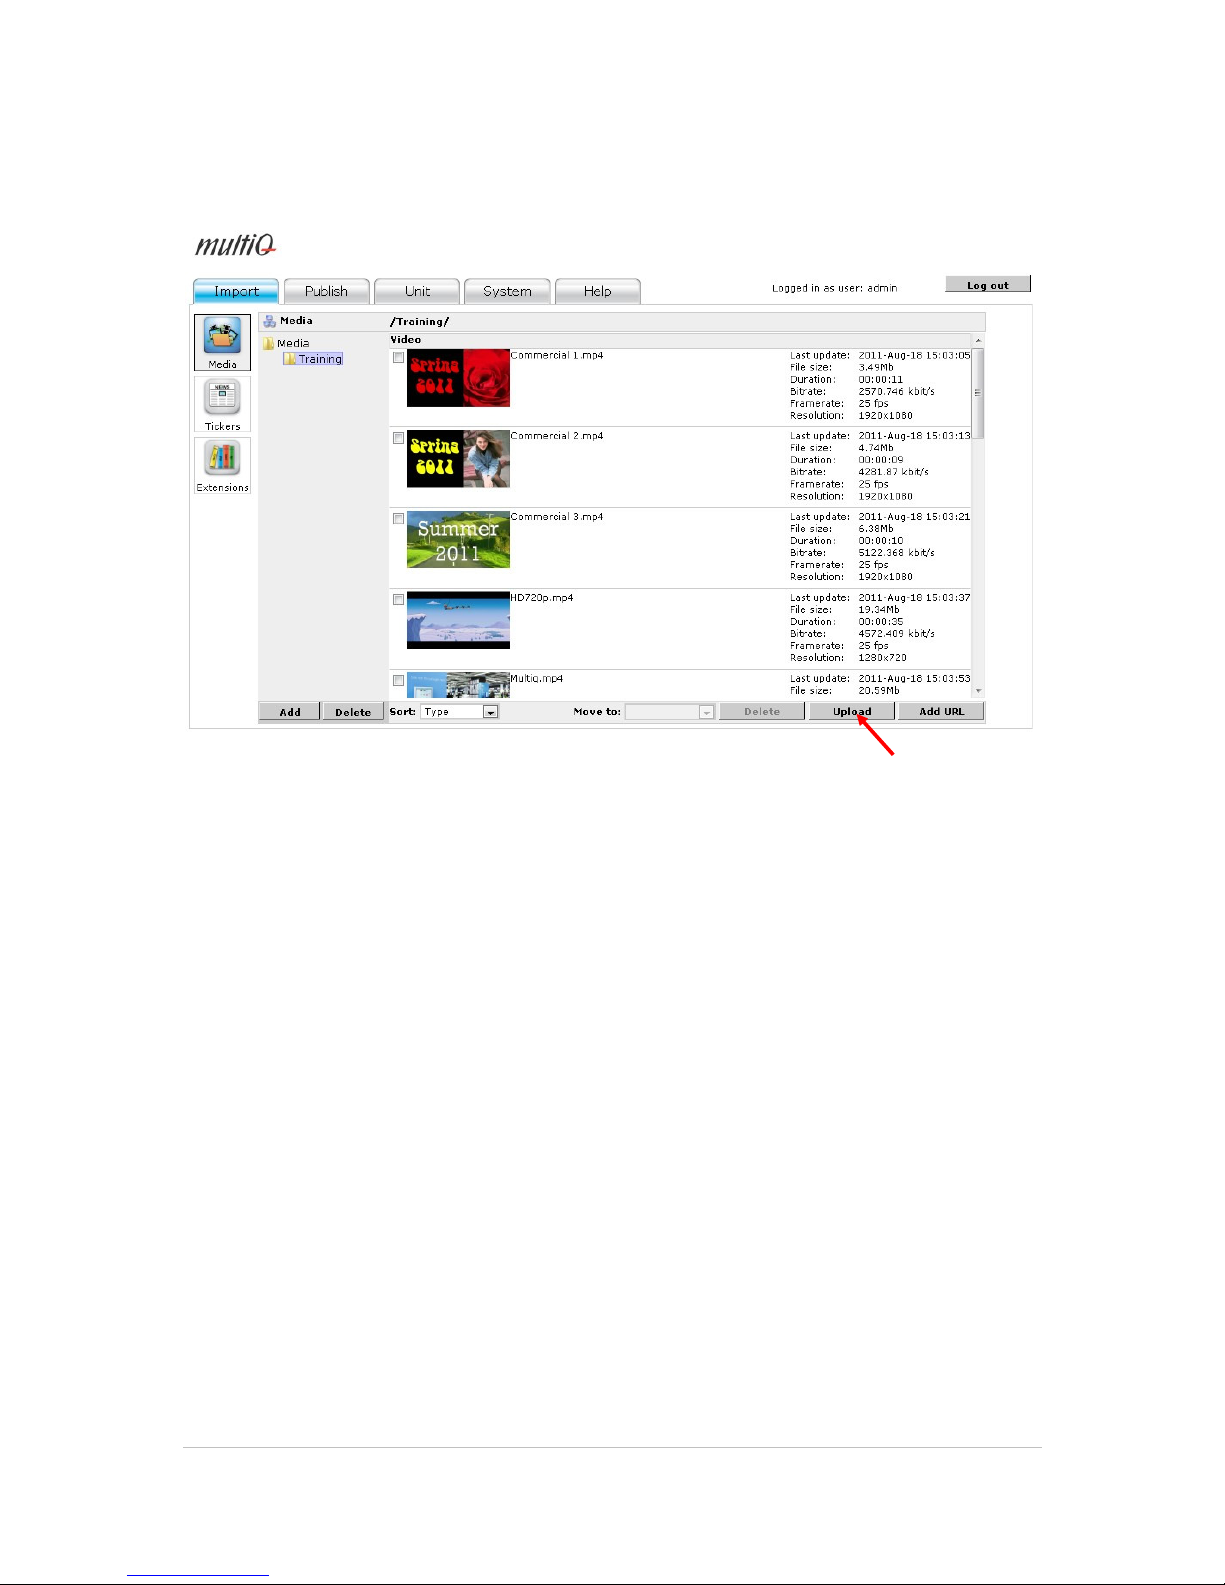
©2011 MultiQ are registered trademarks or trademark applications of MultiQ International AB in various jurisdictions. All
other company names and products are trademarks or registered trademarks of their respective companies. We reserve
the right to change the specifications without prior notice.
MultiQ DSMS 3.6 User Guide, Media players operated in standalone mode, Version 2, 18/08/2011 93
Next the zipped file holding the web pages can be used as a media spot in the digital signage
system.
Figure 135. Upload the zipped local website to the “Training” folder of the system by pressing the
“Upload” button in the media archive.
Page 94
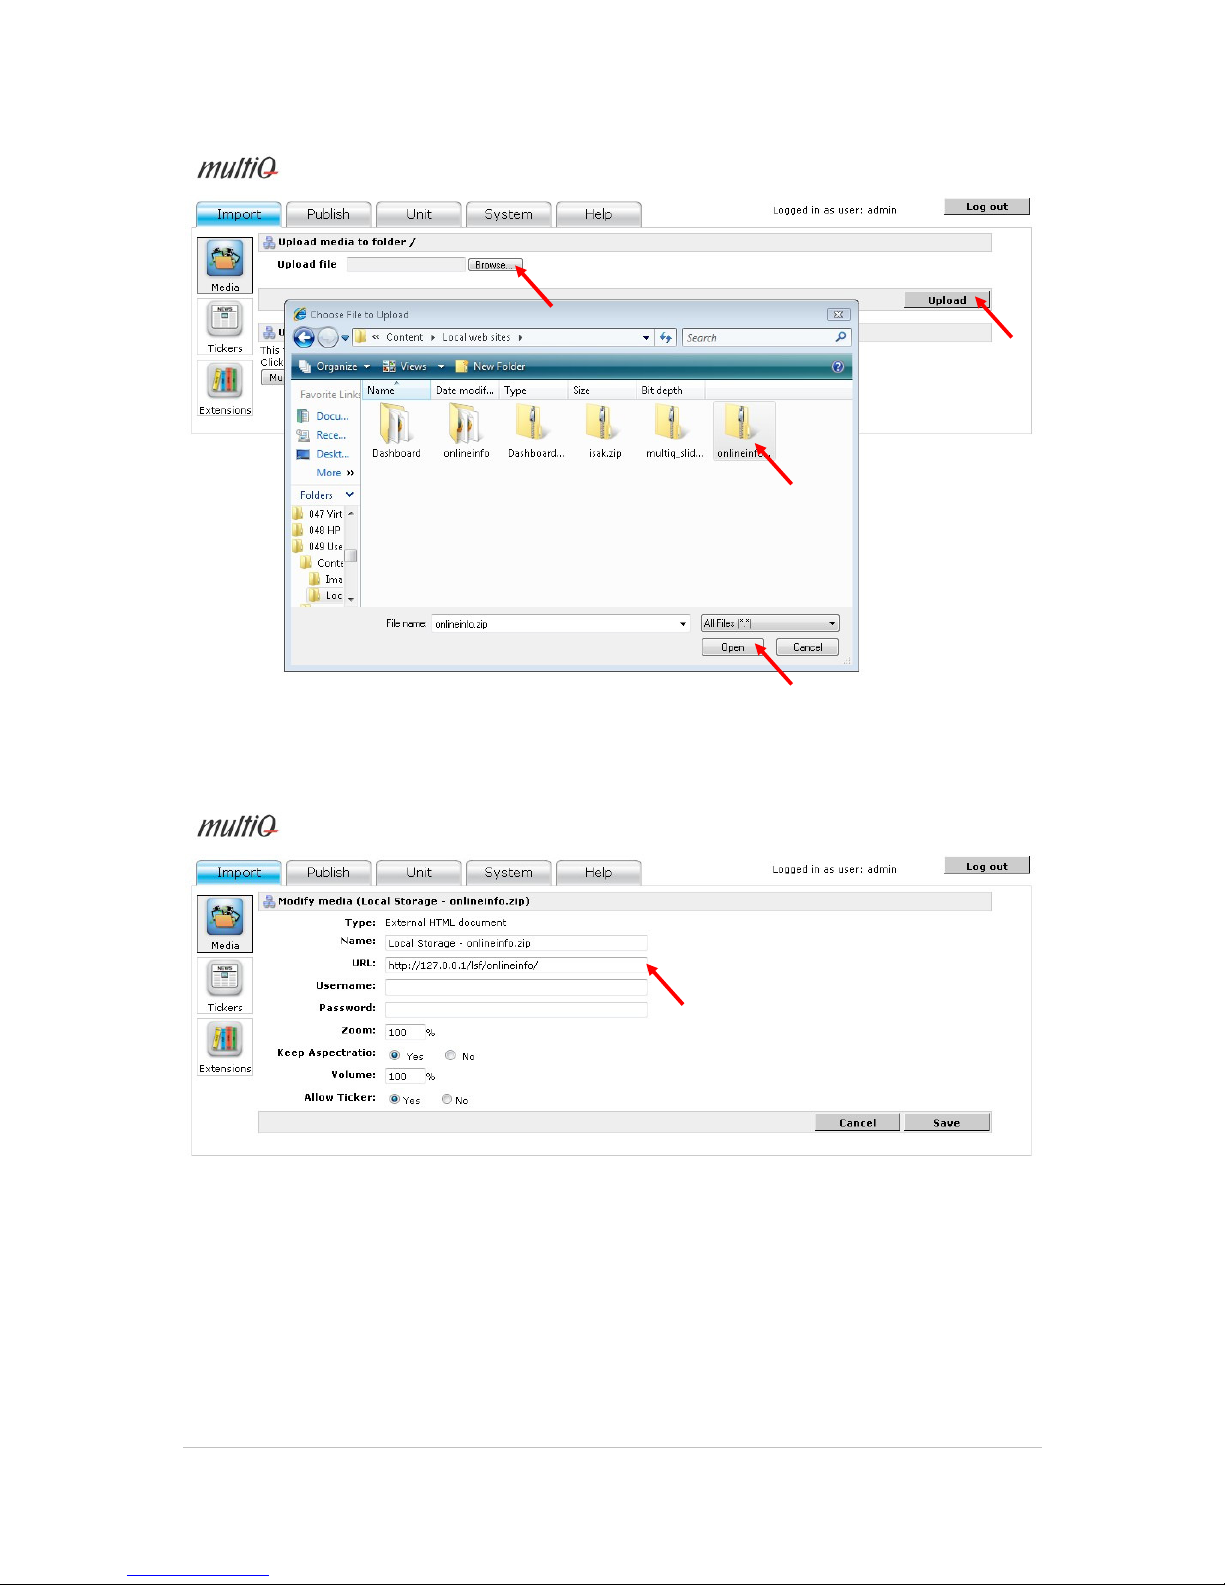
©2011 MultiQ are registered trademarks or trademark applications of MultiQ International AB in various jurisdictions. All
other company names and products are trademarks or registered trademarks of their respective companies. We reserve
the right to change the specifications without prior notice.
MultiQ DSMS 3.6 User Guide, Media players operated in standalone mode, Version 2, 18/08/2011 94
Figure 136. Browse to the zipped “onlineinfo” folder on your computer and upload the file the same way
as for a video clip or an image.
Figure 137. The parameters for the “onlineinfo” local storage website can now be set as for any other
media spot.
If you check the URL in figure 141 you will find that there is no specific address assigned to the
media spot, just the folder. This will make the media player automatically look for the “index” file of
the website and automatically present that page on the screen. In this case the index.html file
contains the online weather forecast map.
1.
2.
3.
4.
Page 95
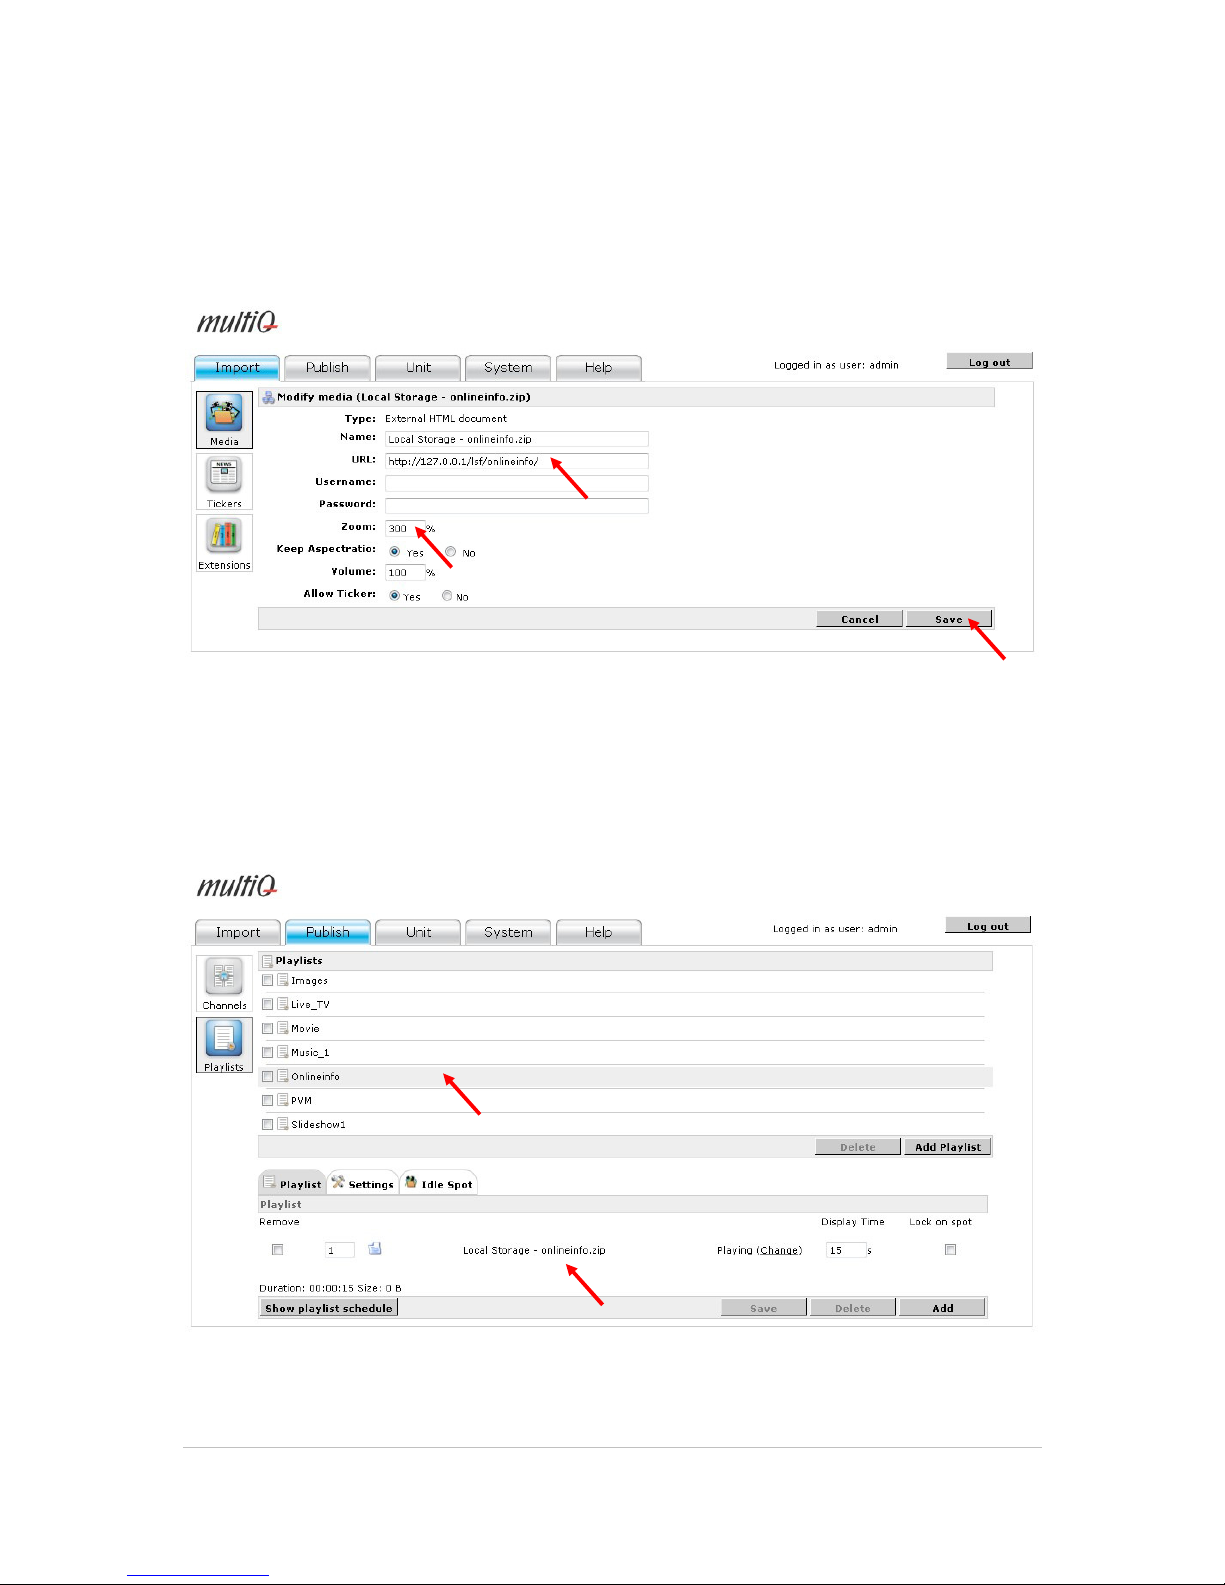
©2011 MultiQ are registered trademarks or trademark applications of MultiQ International AB in various jurisdictions. All
other company names and products are trademarks or registered trademarks of their respective companies. We reserve
the right to change the specifications without prior notice.
MultiQ DSMS 3.6 User Guide, Media players operated in standalone mode, Version 2, 18/08/2011 95
To get the map large enough to fill out the area on the screen we also increase the “zoom” factor to
300%
Note
NoteNote
Note. Using the IP address “127.0.0.1” means that the media player is addressing itself (Local
Host) which in this case is a file stored in the media player itself.
Figure 138. Set the “Zoom” factor to 300% (the maximum allowed value” and press “Save”. The “Zoom”
feature is used to increase the size of the weather map to fit the size of Area1 as good as possible
(640x720 pixels). To make things easier we also change the name of the media spot to “Weather map
zip”. Click “Save” to add the media spot to the media archive. The reason for adding “zip” to the name of
the media spot is to know that the media spot holds the local website.
Figure 139. Next, create a playlist named “Onlineinfo” and add the “Local Storage – Onlineinfo.zip” media
spot.
Page 96
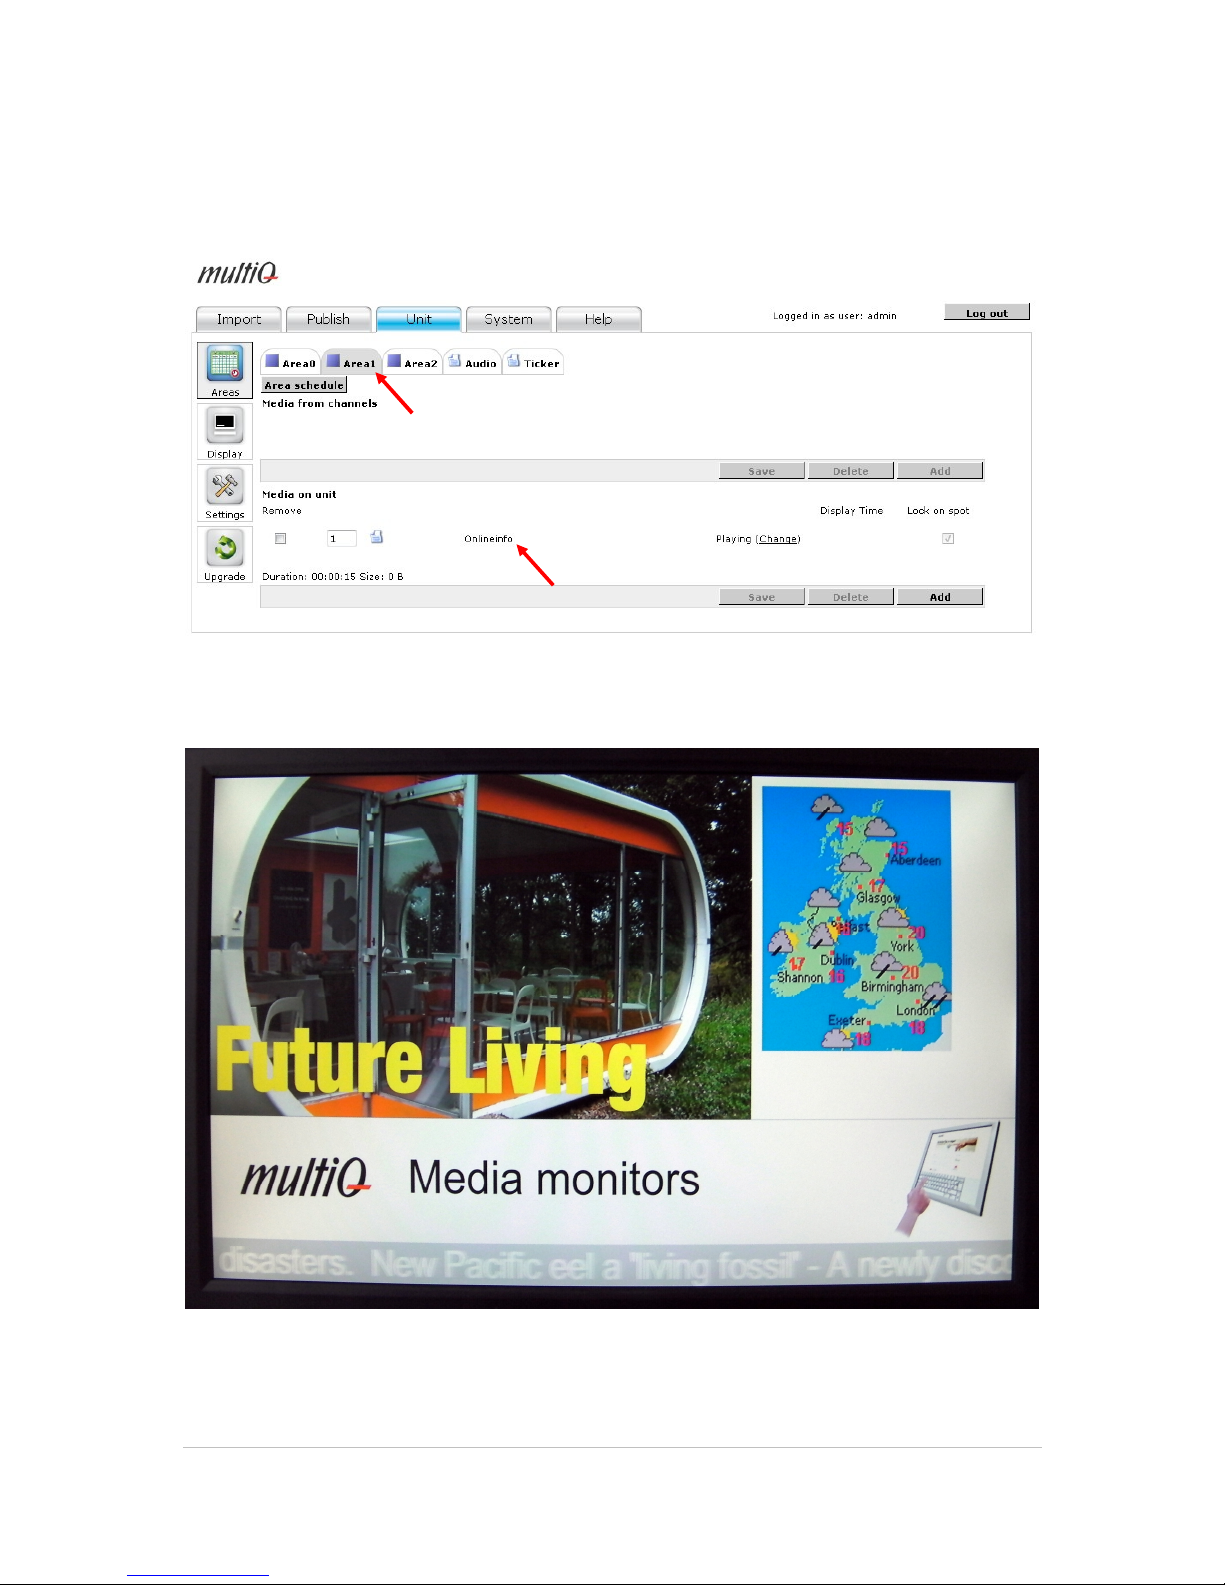
©2011 MultiQ are registered trademarks or trademark applications of MultiQ International AB in various jurisdictions. All
other company names and products are trademarks or registered trademarks of their respective companies. We reserve
the right to change the specifications without prior notice.
MultiQ DSMS 3.6 User Guide, Media players operated in standalone mode, Version 2, 18/08/2011 96
Figure 140. Finally add the “Onlineinfo” playlist to “Area1” of the media player.
Figure 141. The online weather forecast map is now displayed in “Area1”.
Page 97
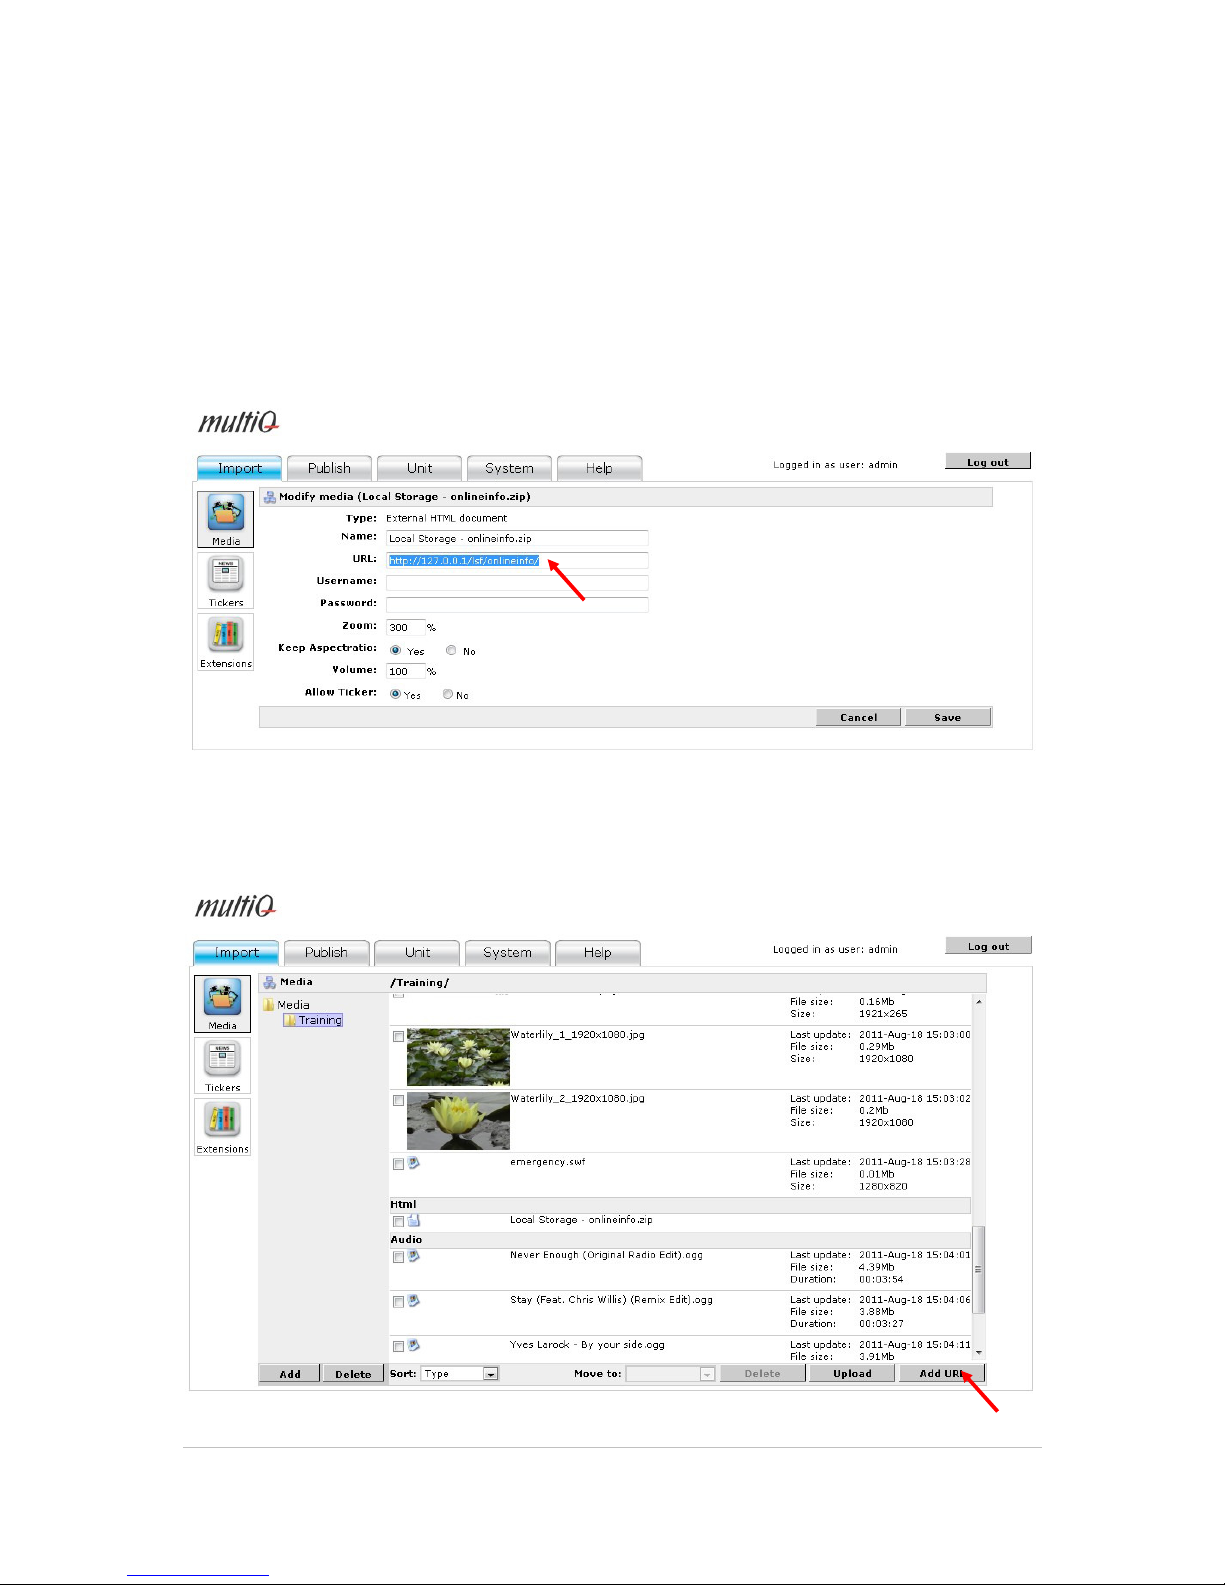
©2011 MultiQ are registered trademarks or trademark applications of MultiQ International AB in various jurisdictions. All
other company names and products are trademarks or registered trademarks of their respective companies. We reserve
the right to change the specifications without prior notice.
MultiQ DSMS 3.6 User Guide, Media players operated in standalone mode, Version 2, 18/08/2011 97
14.1 Adding more links to the locally stored website
However the locally stored website includes two more web pages, one holding a rain radar map and
the other local time. Just by uploading the website to the system and using it in an area makes the
media player to automatically look for the index file.
To be able to find the two other web pages we need to define links in the media archive. This is
done by using the “Add URL” menu. However first it may be a good idea to copy the address to the
local storage file from the configuration menu of the “onlineinfo.zip” media spot:
Figure 142. Click the “Local Storage – Onlineinfo.zip” media spot in the media archive and copy the URL
from the media spot configuration menu.
Figure 143. To add the new media spots, click the “Add URL” button in the media archive.
Page 98
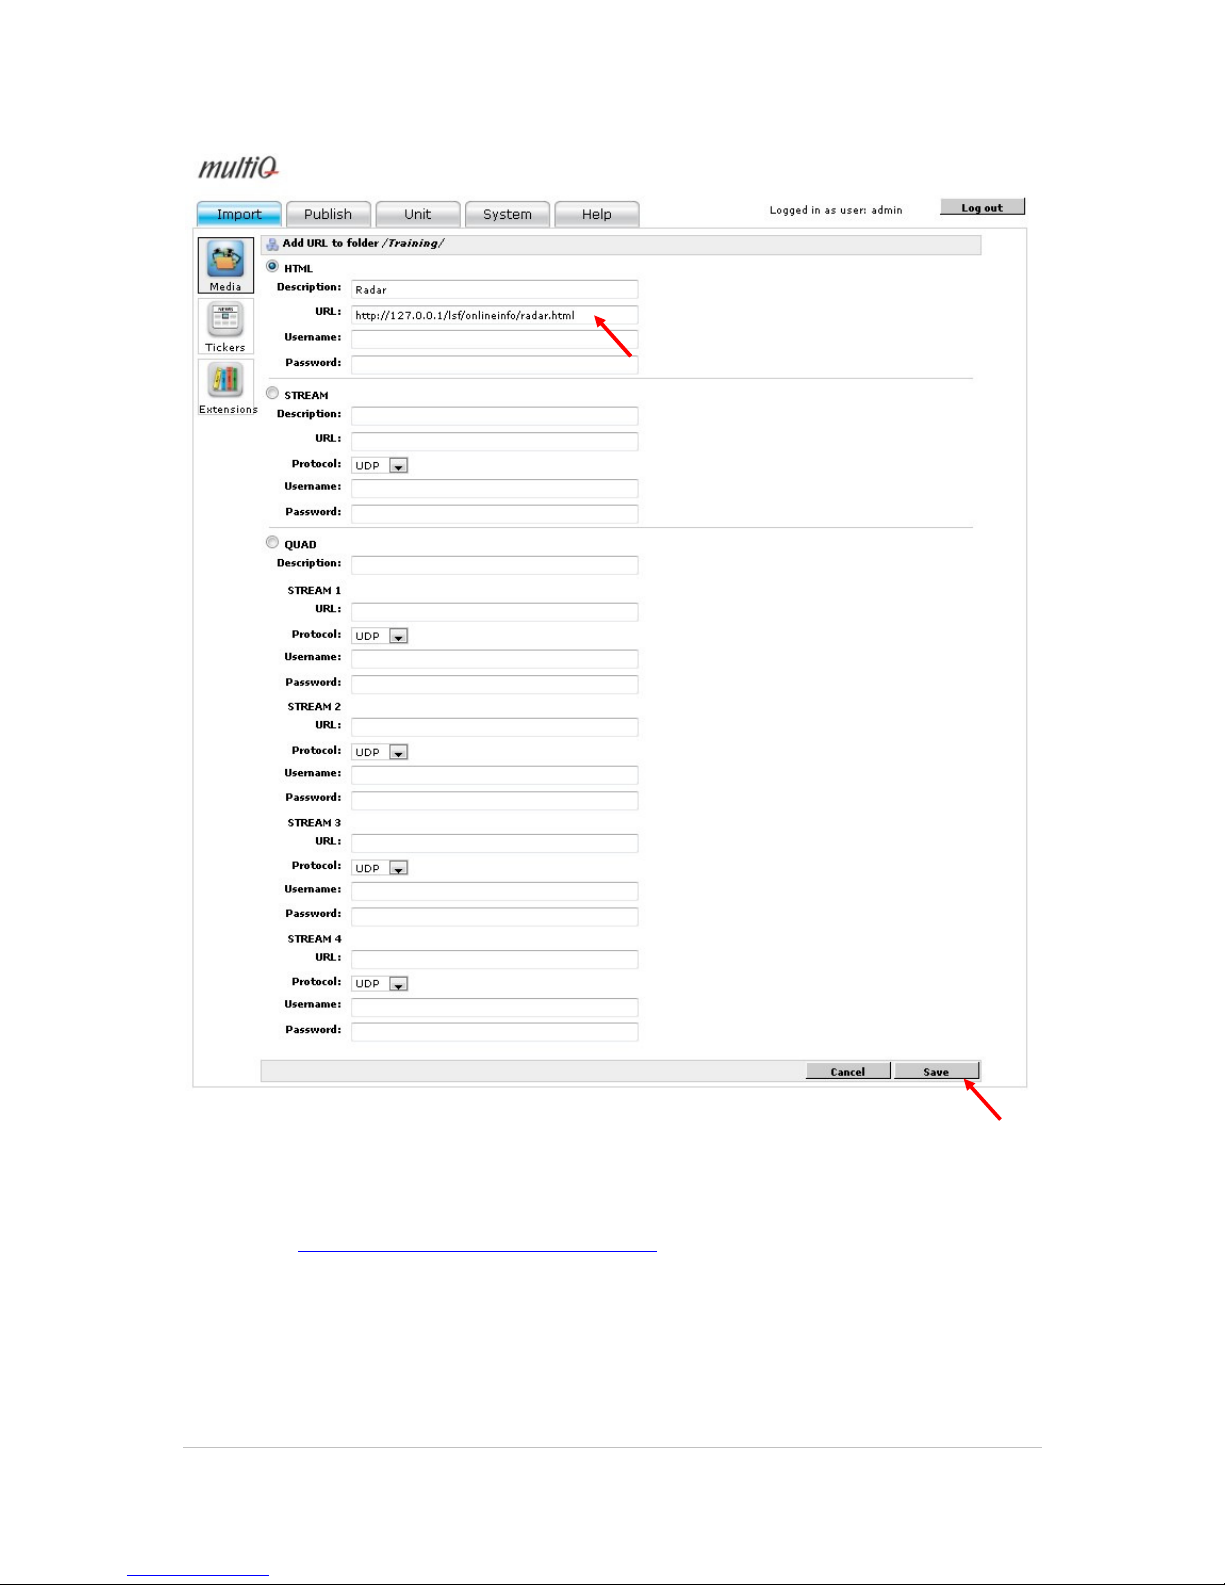
©2011 MultiQ are registered trademarks or trademark applications of MultiQ International AB in various jurisdictions. All
other company names and products are trademarks or registered trademarks of their respective companies. We reserve
the right to change the specifications without prior notice.
MultiQ DSMS 3.6 User Guide, Media players operated in standalone mode, Version 2, 18/08/2011 98
Figure 144. Add “radar.html” to the address that was used for the weather map. This will make the media
player address that specific file.
The address http://127.0.0.1/lsf/onlineinfo/radar.html makes the media player to address itself (IP
address 127.0.0.1 which is the local host address) and the “lsf” library (Local Storage Files library)
which holds a folder named “onlineinfo” where the “radar.html” file is to be found.
Page 99
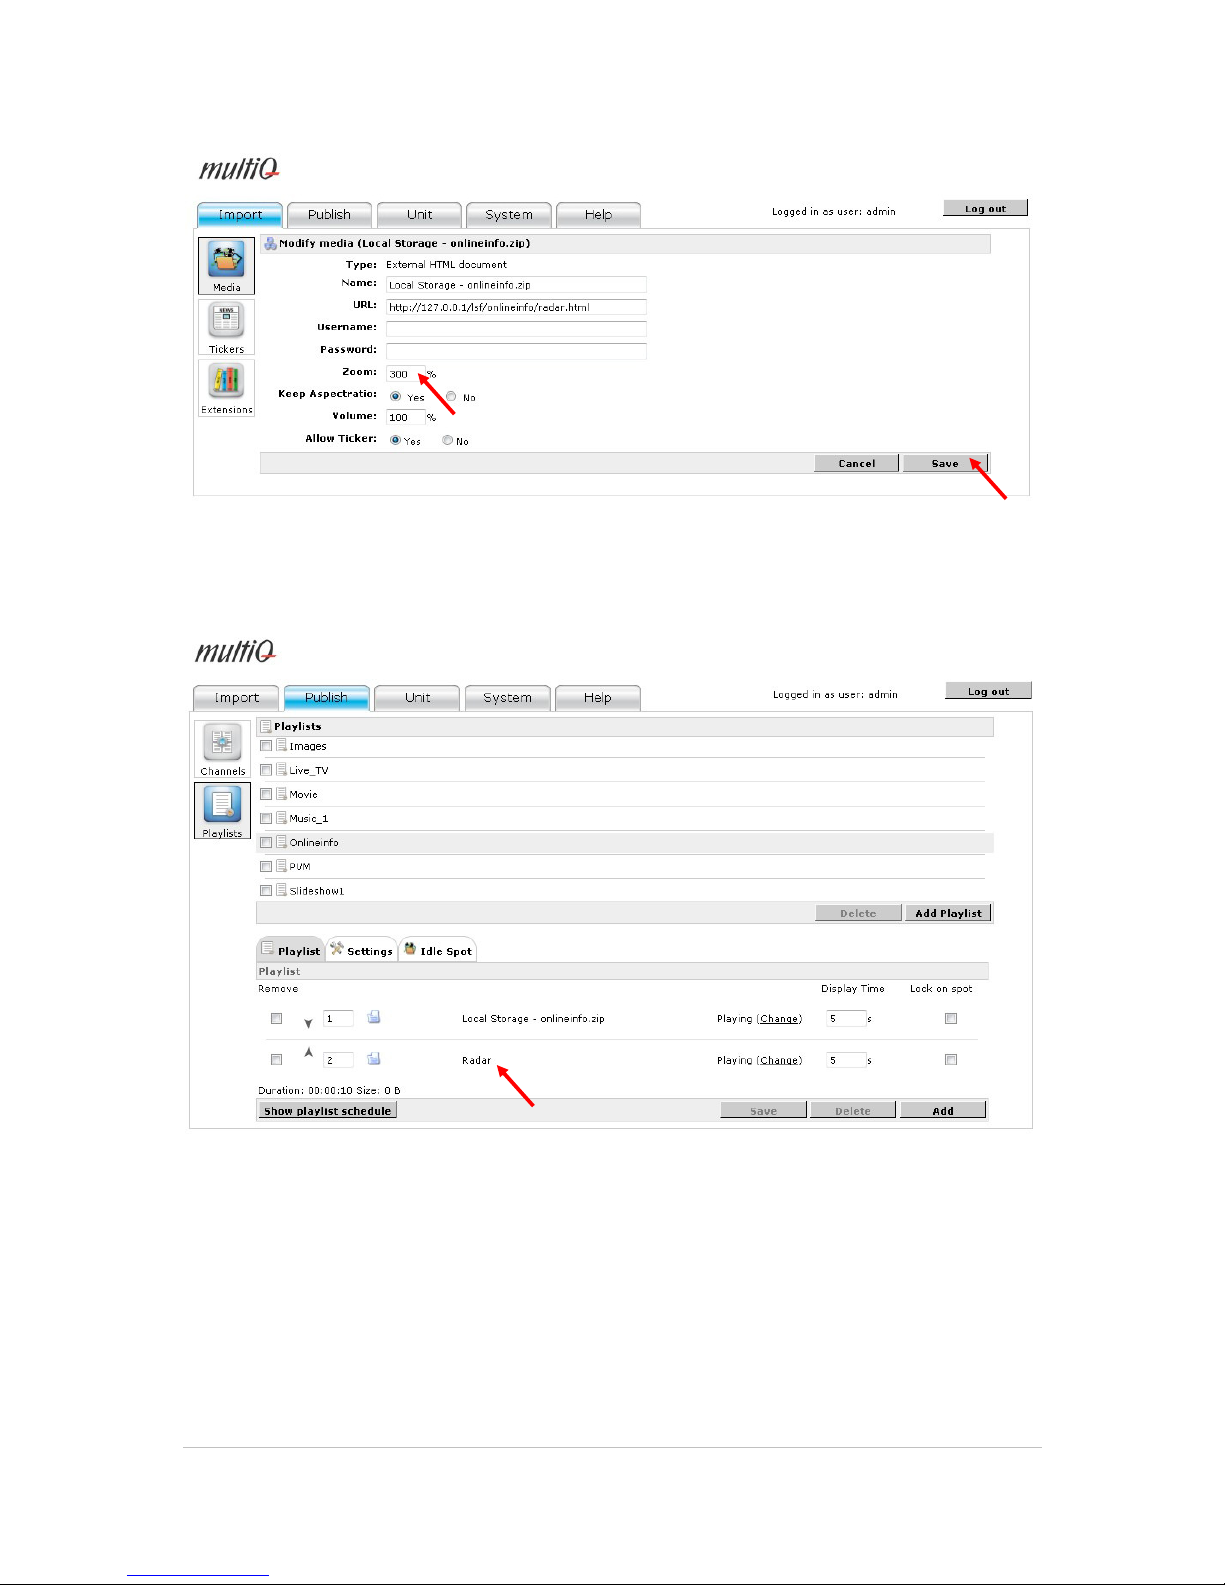
©2011 MultiQ are registered trademarks or trademark applications of MultiQ International AB in various jurisdictions. All
other company names and products are trademarks or registered trademarks of their respective companies. We reserve
the right to change the specifications without prior notice.
MultiQ DSMS 3.6 User Guide, Media players operated in standalone mode, Version 2, 18/08/2011 99
Figure 145. In the configuration menu, set the “Zoom” factor to 300% to get the proper size of the radar
map on the screen.
Figure 146. Add the “Radar” media spot to the “Onlineinfo” playlist and it will be played in sequence with
the weather forecast map.
Page 100
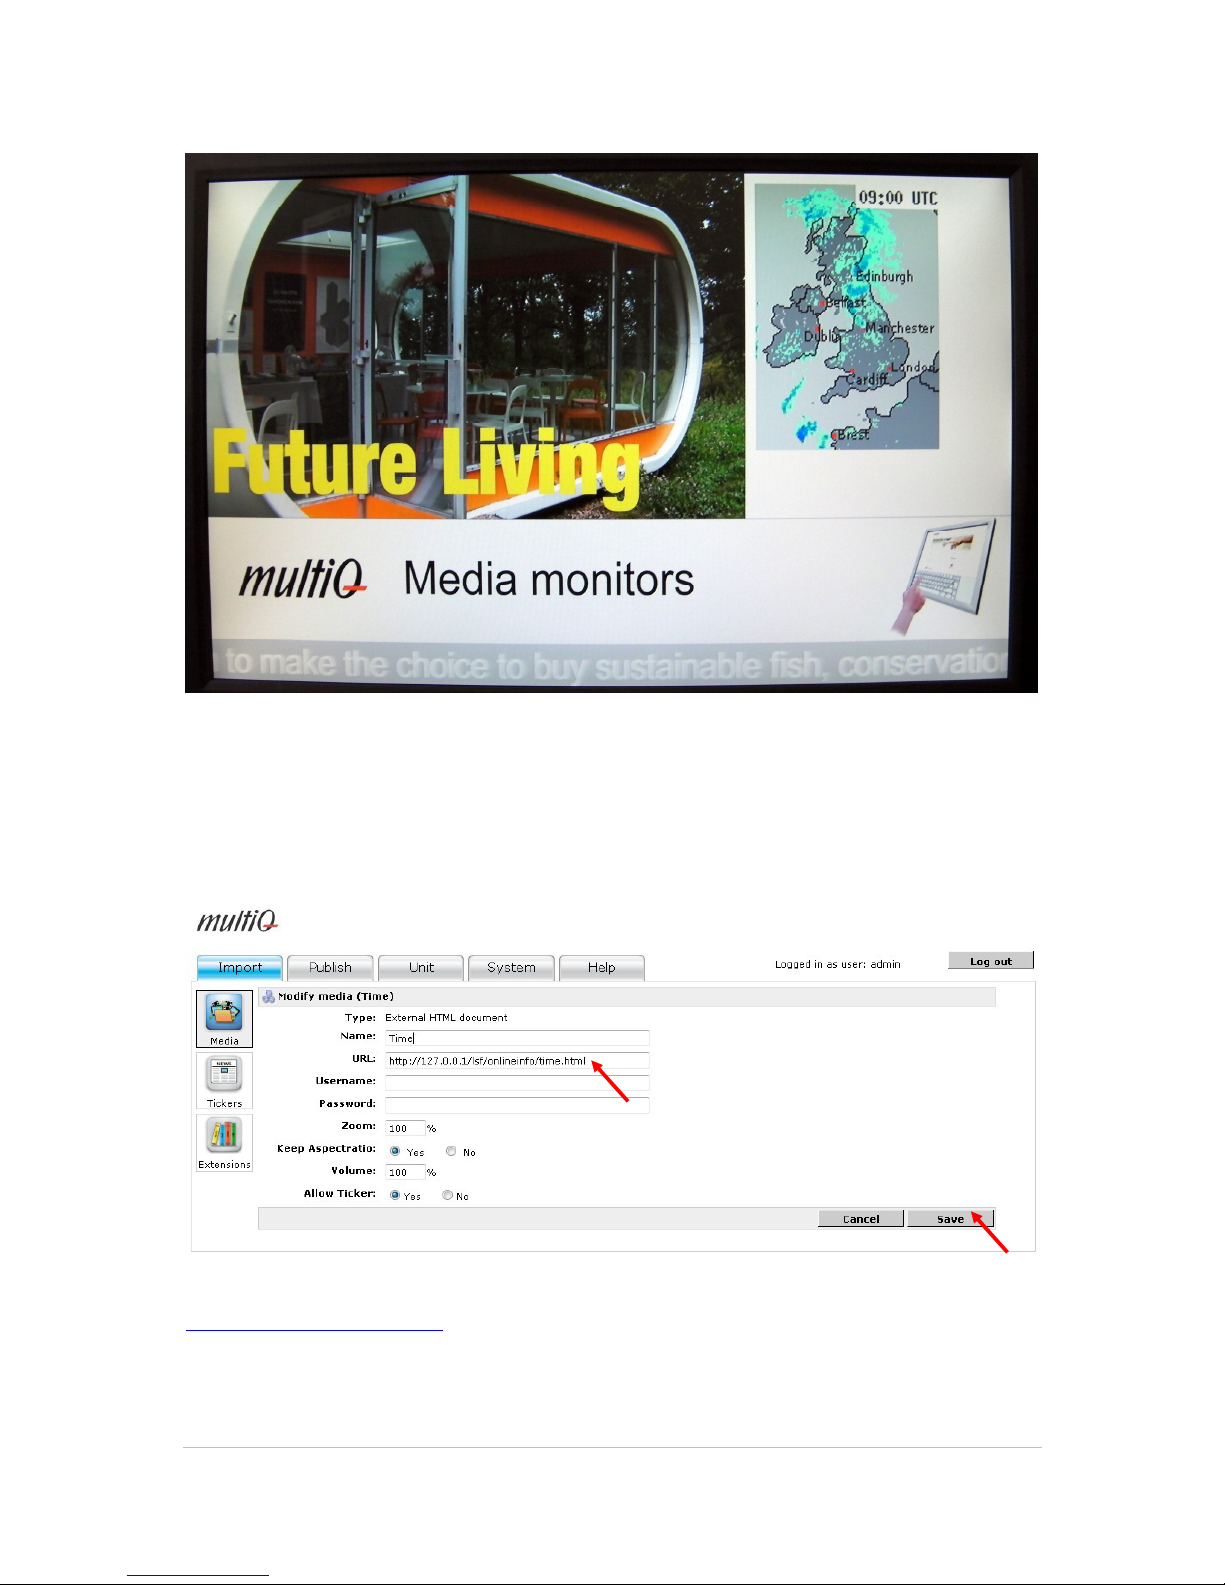
©2011 MultiQ are registered trademarks or trademark applications of MultiQ International AB in various jurisdictions. All
other company names and products are trademarks or registered trademarks of their respective companies. We reserve
the right to change the specifications without prior notice.
MultiQ DSMS 3.6 User Guide, Media players operated in standalone mode, Version 2, 18/08/2011 100
Figure 147. You will now have the online information playing in “Area1” in the upper right corner of the
screen.
Finally add the time web spot by using “time.html” at the end of the address line and it will be
played in sequence with the two other spots.
Figure 148. Add the “Time” web spot the same way as above by adding “time.html” to
http://127.0.0.1/lsf/onlineinfo/. In this case the “Zoom” factor can be left at 100%.
 Loading...