

Page 1

MULTIPLEX
2100 FUTURE, SELLERSBURG, IN 47172
WWW.MANITOWOCBEVERAGE.COM/US
800-367-4233
Instruction Sheet
Important
Read the following warnings before beginning an
installation. Failure to do so may result in possible death
or serious injury.
Warning
n
To Avoid Serious Injury
DO Adhere to all National and Local Plumbing and
Electrical Safety Codes.
DO Turn “off” incoming electrical service switches when
servicing, installing, or repairing equipment.
DO Check that all flare fittings on the carbonation
tank(s) are tight. This check should be performed with a
wrench to ensure a quality seal.
DO Inspect pressure on regulators before starting up
equipment.
DO Protect eyes when working around refrigerants.
DO Use caution when handling metal surface edges of
all equipment.
DO Handle CO2 cylinders and gauges with care. Secure
cylinders properly against abrasion.
DO Store CO2 cylinder(s) in well ventilated areas.
DO NOT Throw or drop a CO2 cylinder. Secure the
cylinder(s) in an upright position with a chain.
DO NOT Connect the CO2 cylinder(s) directly to the
product container. Doing so will result in an explosion
causing possible death or injury. It is best to connect the
CO2 cylinder(s) to a regulator(s).
DO NOT Store CO2 cylinders in temperature above 125°F
(51.7°C) near furnaces, radiator or sources of heat.
DO NOT Release CO2 gas from old cylinder.
DO NOT Touch refrigeration lines inside units. Some
may exceed temperatures of 200°F (93.3°C).
Subject: Installations Instructions
Air Compressor Kits
Important
Water pipe connections and fixtures directly connected
to a potable water supply shall be sized, installed and
maintained in accordance with Federal, State, and Local
codes.
Warning
n
Danger of Electric Shock
Disconnect and lock out all electrical power sources
before performing service or maintenance on this
machine — except when electrical tests are being
performed by qualified service personnel.
1 of 9
Part Number 020006402 12/2014
Page 2
Air Compressor Kits
Air Compressor Kit with Change-over Valve and Dump Valve — P.N. 00212135 (120 VAC),
P.N. 00214969 (120 VAC), P.N. 00217555 (230 VAC)
These instructions cover the installation and initial start-up
of the Multiplex Air Compressor Kit. An appropriate 3-wire,
15 amp power receptacle must be provided within 5 ft
(152.4 cm) of the left end of the refrigeration unit. This kit
is for use with either the Model 44 or Model 50 Fountain
Refrigeration Units and any of the Beermaster Units. Refer
to appropriate section for instructions.
GROUNDING INSTRUCTIONS
This product should be grounded. In the event of an
electrical short circuit, grounding reduces the risk of electric
shock by providing an escape wire for the electric current.
This product is equipped with a cord having a grounding
wire with an appropriate grounding plug. The plug
must be plugged into an outlet that is properly installed
and grounded in accordance with all local codes and
ordinances.
DANGER
Improper installation of the grounding plug can result
in a risk of electric shock. If repair or replacement of the
cord or plug is necessary, do not connect the grounding
wire to a flat blade terminal. The wire with insulation
having an outer surface that is green with or without
yellow stripes is the grounding wire.
Check with a qualified electrician or serviceman if the
grounding instructions are not completely understood, or
if in doubt as to whether the product is properly grounded.
Do not modify the plug provided; if it will not fit the outlet,
have the proper outlet installed by a qualified electrician.
Do not use an extension cord or an adapter plug with this
equipment.
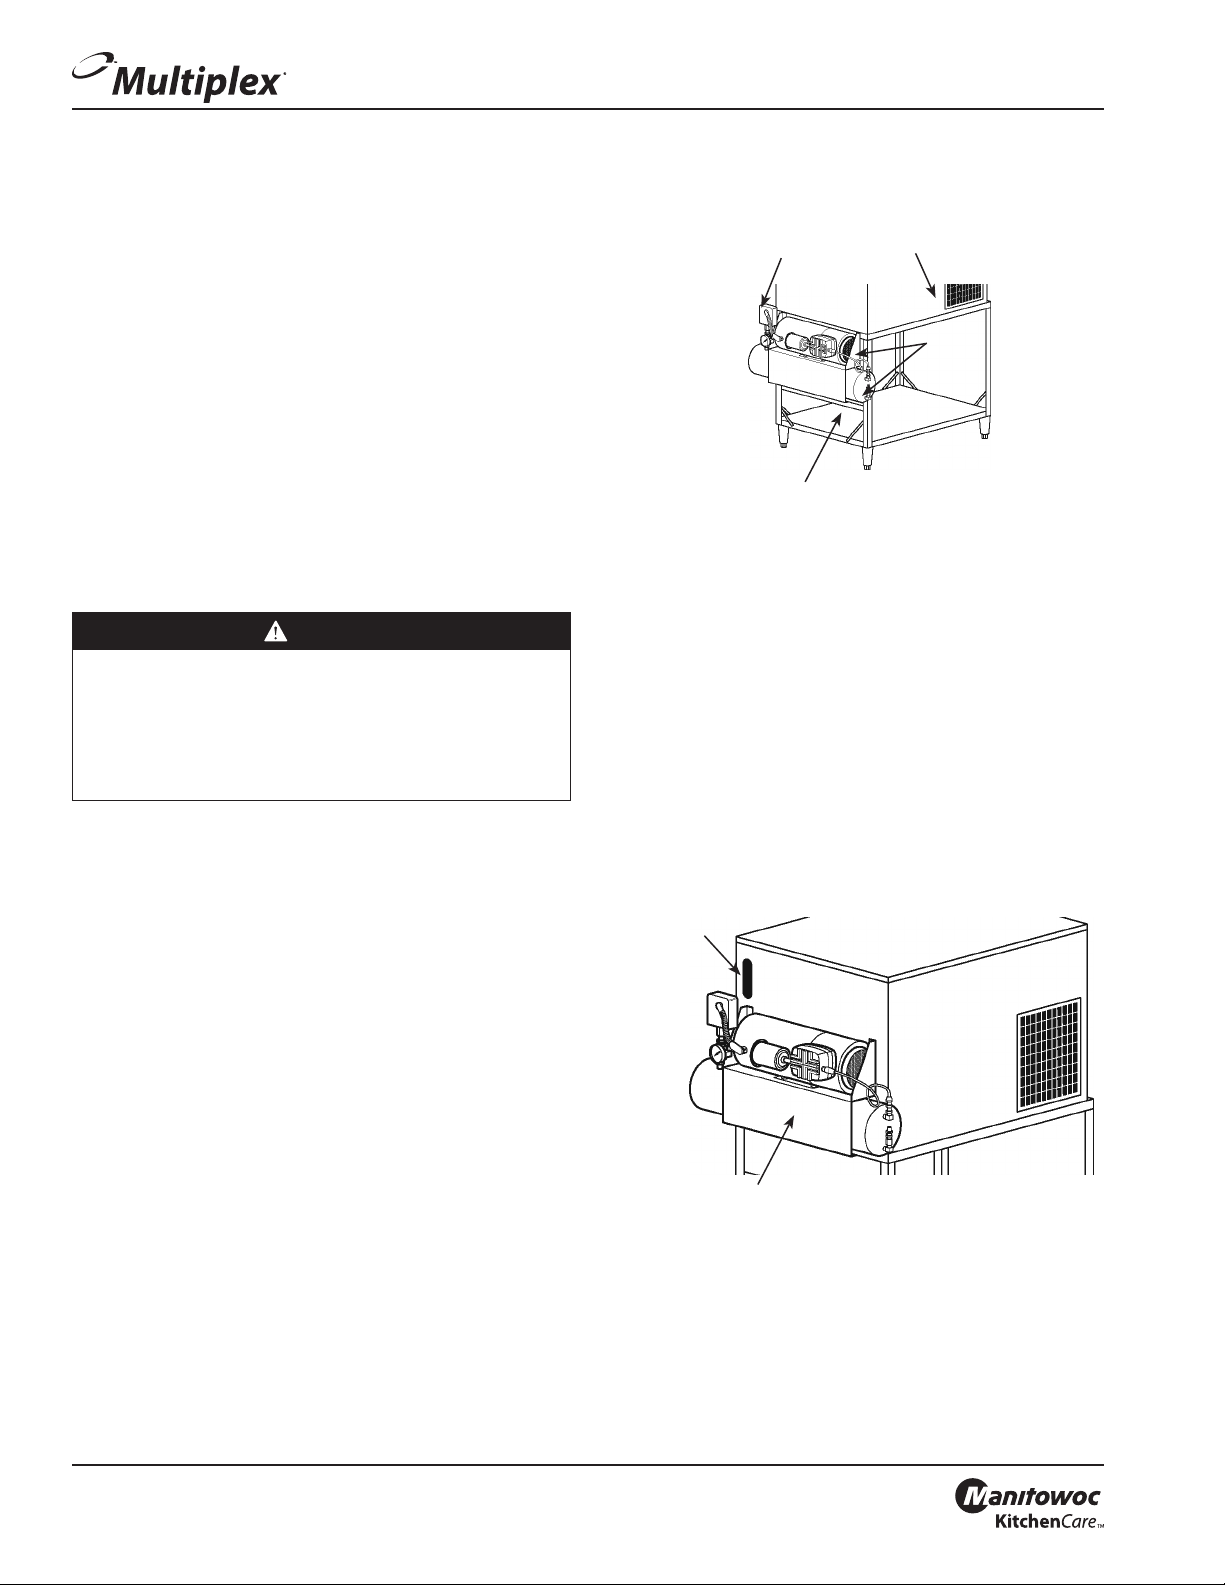
FOUNTAIN SYSTEMS APPLICATIONS
Air Compressor
Mounting Channel
Stand
Refrigeration Unit
Pump
Assembly
Mounting the Air Compressor onto a
Multiplex Support Stand
Installing the air compressor onto the support stand
1. Mount the air compressor mounting channel to left
end of the Multiplex Support Stand with two (2) 1/4"20 nuts and screws provided with kit (refer to figure
above).
NOTE: Compressor may be mounted to the end of the
refrigeration unit.
2. Install the air compressor assembly to the support
stand and mounting channel with four (4) 1/4"-20 nuts
and screws provided with kit (refer to figure above).
NOTE: Do not plug in pump assembly at this time. Shut “off”
the main CO2 supply to refrigeration unit.
Refrigeration
Unit
2 of 9
Part Number 020006402 12/2014
Pump Assembly
Mounting the Air Compressor onto a
Multiplex Refrigeration Unit
Page 3
Air Compressor Kits
Installing the air compressor onto a refrigeration unit
1. Align the air compressor assembly over the four (4)
holes on left end of the Multiplex Refrigeration Unit.
Secure to unit using the four (4) 1/4" screws provided in
kit (refer to figure above).
NOTE: Do not plug in pump assembly at this time. Shut “off”
main CO2 supply to refrigeration unit.
2. Locate the Air/CO2 Change-over Valve Assembly
supplied with kit (P.N. 00212506). Align the mounting
bracket of the change-over valve over the mounting
holes on the control panel (location for change-over
valve will be marked “Air/CO2 Change-over Valve”).
Mount the air/co2 change-over valve to the panel
with the #10-32 screws provided in kit (refer to figure
below).
Air/CO2 Change-over
Valve
To Outlet Fitting
of Air Pump
To Syrup Tank
Supply Manifold
To C O
Manifold
Supply
2
CO2 Control Panel
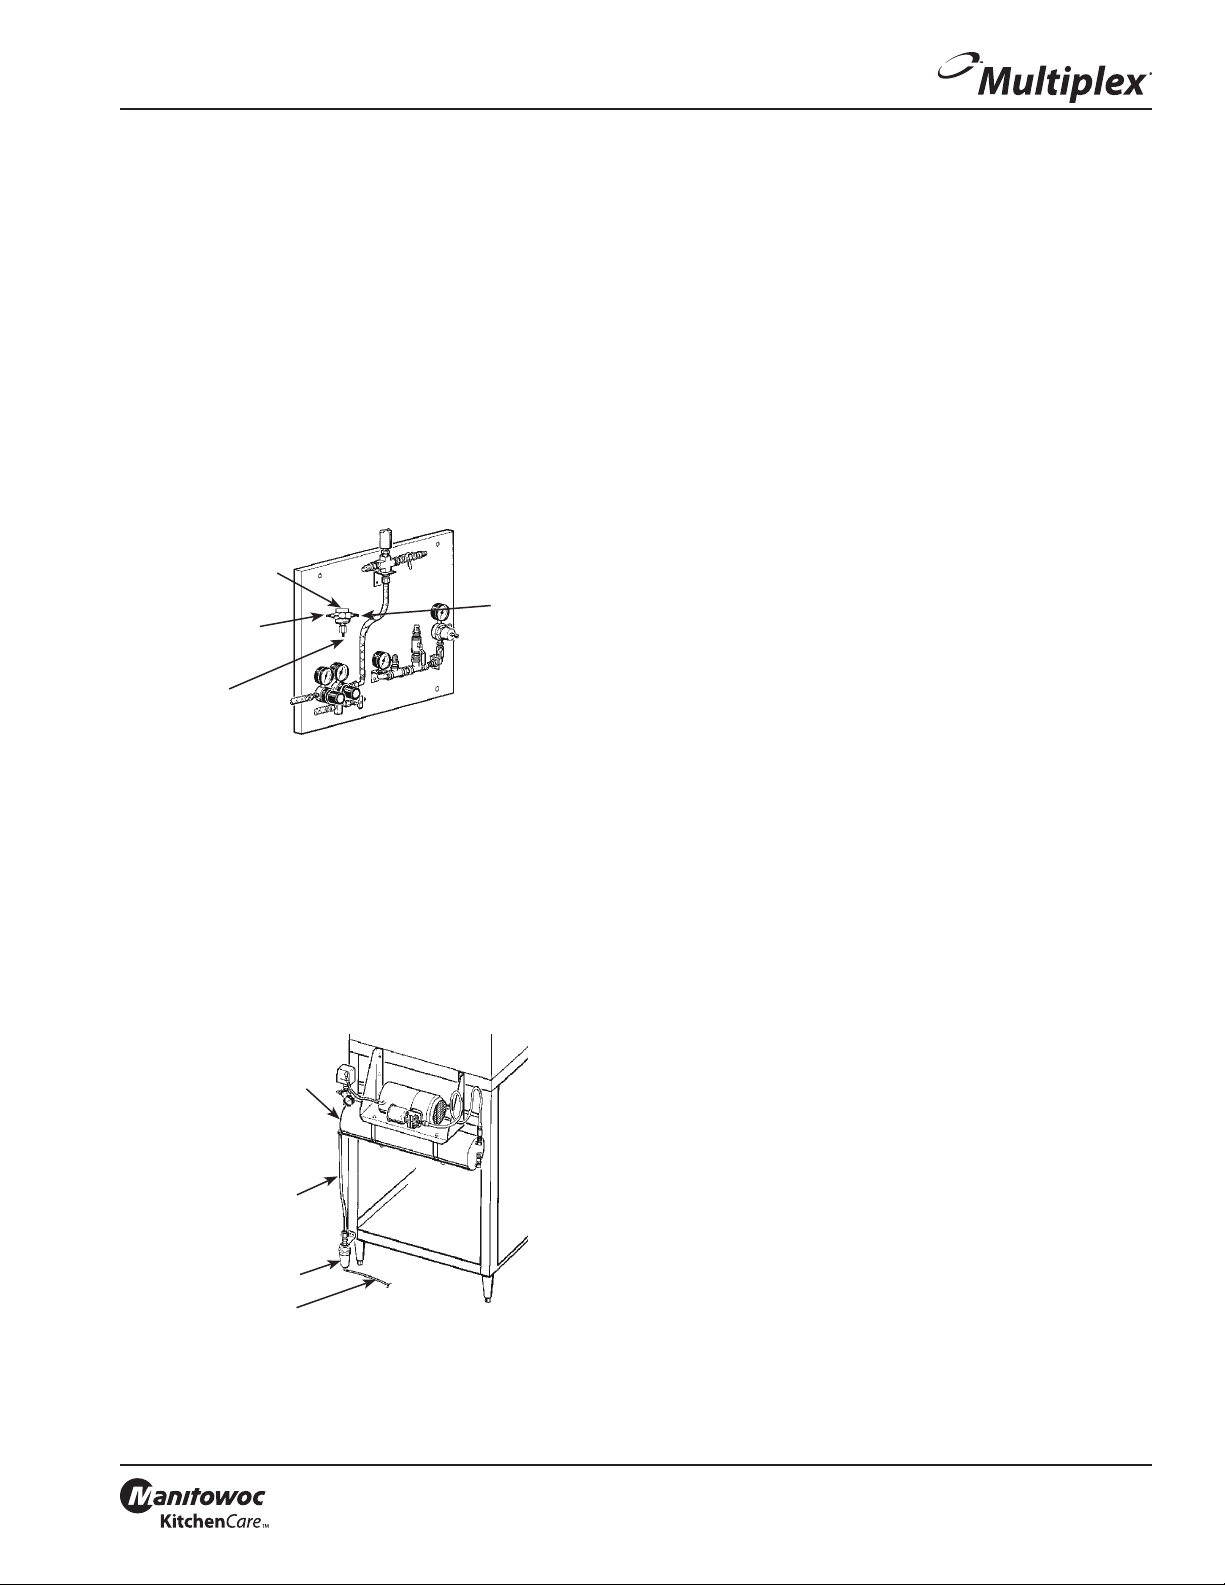
Installing the optional dump valve onto the Multiplex
refrigeration unit
1. Connect the 1/4" line assembly provided in kit (P.N.
00212506) to the flare fitting on right side of air/CO2
change-over valve. Route the other end of tubing
to the CO2 supply manifold. Trim excess line and
connect swivel nut adapter to the remaining end of
line assembly. Secure with tab clamp. Connect the line
assembly to the CO2 supply manifold (refer to figure
below).
2. Locate the 4-1/2" section of 1/4" tubing connected at
bottom side of change-over valve. Route and connect
the remaining end of tubing to the syrup tank supply
manifold (refer to figure above).
3. Locate the 12 ft x 1/4" EVA line assembly provided in
air compressor kit. Attach the end of this line assembly,
with the swivel nut, to the outlet fitting of the air
compressor tank. Use 1/4" flare washers at swivel nut
connectors. Neatly route tubing under the stand top
and to the left side of the control panel. Connect the
line assembly with 1/4" elbow x barb (provided in kit
P.N. 00212506) to the 1/4" male flare fitting of the air/
CO2 change-over valve (refer to figure above).
4. Locate the dump valve supplied with kit. Mount the
dump valve with #10-32 self-tapping screws provided
with kit to lower left cross channel of support stand.
5. Locate the 3 ft length of tubing supplied with kit.
Neatly route and attach this line from the air tank
compression elbow to the shut-off valve compression
fitting located on top of the dump valve. Trim tubing to
correct length. Tighten compression nuts.
6. Locate the 8 ft length of tubing supplied with kit. Route
and connect this line from the 1/4" barb elbow of the
dump valve to a floor drain. Place the shut-off valve
handle in the “open” position (refer to figure above).
7. Plug the air pump power supply cord into the power
receptacle provided on wall. Pump will begin to run
immediately and shut “off” when tank pressure reaches
approximately 90 psi (6.2 bar). Pump will turn “on” when
tank pressure drops to 70 psi (4.8 bar). If not, adjust
pressure switch according to instructions located on
the inside of pressure switch cover.
8. Turn the air/CO2 change-over valve to the “Air” position.
Check for leaks.
Air Tank
Compression
Elbow
3 ft Length
of Tubing
Dump Valve
8 ft Length of Tubing
to Floor Drain
Mounting the Dump Valve onto the
Multiplex Refrigeration Unit
3 of 9
Part Number 020006402 12/2014
Page 4

Air Compressor Kits
BEER SYSTEMS APPLICATIONS
Air Compressor
Mounting Channel
Stand
Beermaster Unit
Pump
Assembly
Mounting the Air Compressor onto
the Beermaster™ Unit
Procedure for installing the air compressor onto a
Beermaster™ unit
1. Determine location where the air pump will be
installed.
NOTE: Install the air compressor wall mount bracket (if
applicable).
2. Install the air compressor in its final location with
proper hardware.
3. Mount the low pressure regulator (packed separately)
to a convenient location. Attach the 10 ft x 1/4" ID air
line (provided with air compressor) to the air pump
outlet fitting. Route and connect the remaining end of
the air line to the inlet and onto the outlet of the low
pressure regulator. Route and connect the remaining
end of the tubing to the inlet side of the air filter
assembly.
4. Connect one (1) end of the remaining section of the air
line to the outlet side of the air filter assembly. Route
and connect the opposite end of the air line to the
incoming air connection on the left side of the blender.
5. Attach the 10 ft x 3/8" ID drain line to the tank drain
fitting and route opposite end to floor drain.
6. Close tank outlet valve and plug air compressor into a
120 VAC outlet (domestic).
NOTE: Allow tank to fill completely and shut “off”.
Compressor should shut “off” at approximately 70 psi
(4.8 bar). Compressor will start up when tank pressure drops
to approximately 50 psi (3.1 bar).
7. Open tank outlet valve and adjust air compressor
regulator to 40 psi (2.8 bar).
4 of 9
Part Number 020006402 12/2014
Page 5

Air Compressor Kits
Air Pump & Tank with Change-over Valve & Dump Valve Kit — P.N. 00212145 (220V),
P.N. 00214971 (220V)
These instructions cover the installation of the 220V/50Hz
Multiplex Air Pump kit. This kit is designed to be used
with Model 37KX and Model 44KX. The air pump must be
mounted to the support stand with a minimum of a 6-inch
clearance.
1. Mount air compressor mounting channel to left side of
stand in the third hole down with two 1/4-20 nuts and
screws provided with kit. (See figure below)
2. Install pump/tank assembly to stand and mounting
channel with four 1/4-20 nuts and screws provided
with kit. (See figure below)
Air Compressor
Air Pump Tank
Compression
Elbow
1/4" ID Tube
(Use 3 Ft.)
Shutoff
Valve
Dump Valve
8 ft. (2.44 m) Length" of
Tubing to Floor Drain
Mounting
Channel
Pump Tank
Assembly
Stand
Installation
INSTALLATION OF MODEL 37KX REFRIGERATION UNIT
1. Shut off main CO2 supply to refrigeration unit.
2. Open the CO2 control panel door on the refrigeration
unit and locate the 3/8" O.D. (9.5 mm) white
polyethylene tubing that is routed between the
carbonator tank CO2 supply manifold and the syrup
tank CO2 supply manifold (see figure below). Remove
and discard this section of tubing.
12' x 114"
(3.86 m x 6.35 mm)
Eva Tubing
To Outlet
Fitting of Air
Pump Tank
Model 37KX Manifolds
3. Locate the air/CO2 change-over valve supplied with
the air pump installation kit (P.N. 212508 Provided with
Stand). Remove the change-over valve handle, screw,
and retainer ring. Install the change-over valve in the
hole provided in the control panel marked “Air/CO2
Change-over Valve”. Replace the retainer ring, valve
handle, and screw. (See figure above)
4. Attach the upper 3/8" O.D. (9.5 mm) white polyethylene
tubing of the CO2 change-over valve to the carbonator
tank CO2 supply manifold. Attach the lower 3/8" O.D.
(9.5 mm) white polyethylene tubing of the CO2 changeover valve to the syrup tank CO2 supply manifold. Use
compression nuts supplied with kit. (See figure above)
NOTE: Tum air/CO2 change-over valve handle to the “CO2”
position.
5. Locate the 12' x 1/4" EVA (3.66 meters x 6.35 mm)
tubing supplied with air compressor. Attach the end
of this line assembly with the swivel nut to the outlet
fitting of the air compressor tank. Neatly route tubing
under the stand top, up through the opening in lower
right end of control panel and attach the opposite end
of this line assembly to the 1/4" (6.35 mm) barb elbow
of the air/CO2 change-over valve previously installed in
the control panel. Trim excess line as necessary. Use two
tab clamps to hold tube on stem. (See figure above)
6. Locate the dump valve supplied with air compressor.
Mount the dump valve with #10-32 self-tapping screws
provided with kit to lower left cross channel of support
stand. Use holes provided in channel. (See Installation
figure)
Carbonator
Supply
Tank CO
2
Manifold
Remove and
Discard
Retaining Ring,
Handle, and Screw
Air/CO
Syrup Tank
Supply
CO
2
Manifold
2
Change-over Valve
5 of 9
Part Number 020006402 12/2014
Page 6

Air Compressor Kits
7. Locate the three foot (0.91 m) length of tubing supplied
with air compressor. Neatly route and attach this line
from the air compressor tank compression elbow to the
shutoff valve compression fitting located on top of the
dump valve. Trim tubing to correct length.
8. Locate the eight foot (2.44 m) length of tubing supplied
with air compressor. Route and connect this line from
the 1/4" (6.35 mm) barb elbow of the dump valve to a
floor drain. Place the shut-off valve handle in the open
position. (See Installation figure)
9. Connect the air pump to the outlet box, following the
electrical instructions below.
INSTALLATION OF MODEL 44KX REFRIGERATION UNIT
1. Shut off main CO2 supply to refrigeration unit.
2. Locate the air/CO2 change-over valve assembly
supplied with kit P.N. 212506. Align the mounting
bracket of the change-over valve over the mounting
holes on control panel (Location for changeover valve
will be marked “Air/CO2 Change-over Valve”). Mount the
air/CO2 change-over valve to the panel with the #10-32
screws provided in kit. (See figure below)
To C O2 Supply
Manifold
Air/ CO2
Changeover
Valve
To Outlet Fitting
of Air Pump
To Syrup
Tank Supply
Manifold
Model 44KX Manifolds
3. Locate the 1/4" (6.35 mm) EVA line connected at the
CO2 supply manifold and syrup tank manifold. Remove
and discard the line.
4. Connect the 1/4" (6.35 mm) line assembly provided in
kit P.N. 212506 to the flair fitting on the right side of
the air/CO2 change-over valve. Route the other end of
the tubing to the CO2 supply manifold. Trim excess line
and connect swivel nut adapter to the remaining end
of line assembly. Secure with tab clamps. Connect this
line assembly to the CO2 supply manifold. (See figure
above)
5. Locate the 4-1/2" (11.4 cm) section of 1/4" (6.35 mm)
tubing and connect to the bottom side of the air/CO2
change-over valve. Route and connect the remaining
end of tubing to the syrup tank supply manifold. (See
figure above)
6. Locate the 12' x 1/4" (3.66 m x 6.35 mm) EVA line
assembly provided in kit P.N. 212506. Attach the end
of this line assembly, with the swivel nut, to the outlet
fitting of the air compressor tank. Neatly route tubing
under the stand top and to the left side of the control
panel. Connect the line assembly with 1/4" (6.35 mm)
elbow x barb (provided in kit P.N. 212506) to the 1/4"
(6.35 mm) male flare fitting of the air/CO2 change-over
valve. (See figure above)
7. Locate the dump valve supplied with kit. Mount the
dump valve with #10-32 self-tapping screws provided
with kit to lower left cross channel of support stand.
Use holes provided in channel. (See Installation figure)
8. Locate the six foot (1.83 m) length of tubing supplied
with kit. Neatly route and attach this line from the air
compressor tank compression elbow to the shutoff
valve compression fitting located at top of the dump
valve. Trim tubing to correct length. (See Installation
figure)
9. Locate the eight foot (2.44 m) length of tubing supplied
with kit. Route and connect this line from the 1/4"
(6.35 mm) barb elbow of the dump valve to a floor
drain. Place the shutoff valve handle in the open
position. (See Installation figure)
10. Connect the cord to the stand outlet box or the wall
outlet, following the appropriate steps listed below.
ELECTRICAL CONNECTIONS FOR BOTH MODELS 37KX
AND 44KX
This air pump kit is designed to easily connect to the high
stand that supports the refrigeration unit Model 44KX
or 37KX. The stand comes with an electrical outlet box
mounted to it. However, should the pump be used with
another type of stand, the power cord must be modified by
adding a plug that is accepted by the local electric outlet.
6 of 9
Part Number 020006402 12/2014
Page 7

Air Compressor Kits
CONNECTING THE AIR PUMP TO THE STAND OUTLET
BOX
Warning
n
Before proceeding with this installation, make sure the
power to this box is disconnected.
1. Locate the outlet box under the stand. Open the cover
of the outlet box.
2. Remove one of the 1/2" dia. knock-outs on the side or
bottom of the box.
3. Route the loose end of pump cord and terminals
through the Romex connector, the box wall opening,
and then the Romex connector lock-nut. Tighten the
connector and lock-nut securely against the box wall.
4. Connect the brown wire to the open terminal available
on the switch labeled “Air compressor” as shown on the
wiring diagram below. Connect the blue wire to the
other two blue wires inside the box that are already
connected with wire-nut terminal.
5. “Ground” the pump to the unit using the ground screw
available on box and the green wire.
6. Replace the box cover and tighten the holding screws
securely.
4. Check cord and plug connection for any loose or bare
wires.
Electrical Conduit
11.5" (29.2 cm) Line
Dump Valve
Air Pump
220V 220V
220V to Air
Compressor
220V to Water
Booster
Wiring Diagram
for Junction Box
CONNECTING THE AIR PUMP TO THE WALL OUTLET
An appropriate 3-wire power receptacle must be available
within 6 feet from the intended operating location of the air
pump kit. A locally furnished plug must be attached to the
power cord in order to be accepted by the local electrical
receptacle.
1. Locate a 3-wire plug. This plug (not furnished with kit)
must have a ground-wire connecting terminal.
2. Locate the loose end of the power cord attached to the
kit. All three wires are stripped to 1/2" length from the
end.
3. Connect all three wires to plug using the 1/2" stripped
ends or any other terminal requirements. Different
plugs and terminals may require different stripped
lengths.
Warning
n
To avoid the risk of electrical shock, the installer must
check the following:
This pump kit must be grounded. In the event of an
electrical short circuit, grounding reduces the risk of
electrical shock by providing an escape wire for the
electrical current. This product is equipped with a
grounding-type cord. To reduce the risk of electrical
shock, be certain that the plug and cord are securely
assembled and that they are used only with a properly
grounded receptacle. Check with a qualified electrician
or serviceman if the grounding instructions are not
completely understood.
Do not use an extension cord or an adapter plug with
this equipment. Do not splice the furnished power cord
to a locally supplied cord. If another power cord must
be used, completely replace the existing cord with the
new one. Proceed with the electric connection of the
stand outlet box to the refrigeration unit electrical box
using the stand installation instructions packed with the
stand.
7 of 9
Part Number 020006402 12/2014
Page 8

Air Compressor Kits
Air Tank Retro-fit Kit — P.N. 00212053
Bolts
Well Nuts
Air
Compressor
Tank
New
Well Nuts
Mounting
Brackets
Air Tank Relief
Valve
New Well
Nuts
Bolts and
Washers
REMOVING OLD TANK
1. Push the switch labeled “Air Compressor” to the “off”
position.
2. Open the air tank relief valve. Allow all air pressure to
bleed from tank.
3. Remove the four (4) bolts holding the air compressor
and motor assembly to the air compressor tank. Save
for future step in these instructions.
4. Remove all lines and/or fittings from the old tank. Note
the relative position of all fittings removed from the old
tank, as they will be re-installed into the new tank in
approximately the same position.
5. Remove the four (4) bolts and washers holding the air
compressor tank legs to the compressor mounting
brackets. Save these for a future step in these
instructions.
INSTALLING THE NEW AIR COMPRESSOR TANK
1. Remove and discard the four (4) old well nuts from the
stand’s air compressor mounting brackets and replace
with four (4) new well nuts, provided in kit (refer to
figure).
2. Position the new air compressor tank on the mounting
bracket. Fasten the tank to the mounting bracket with
the four (4) bolts and washers previously removed from
the old tank (refer to figure).
3. Install four (4) well nuts, provided in kit, into the holes
on top of the air compressor tank’s mounting bracket.
Fasten the air compressor and motor assembly to the
tank bracket with the four (4) bolts previously removed
(refer to figure).
4. Attach all lines and fittings to the new stainless steel
tank.
NOTE: Use Teflon tape on all fittings. Failure to use Teflon
tape on all fittings will cause tank to leak.
STARTUP
1. Push the switch labeled “Air Compressor” to the on
position. The compressor motor should begin to run
and will cycle “off” when the tank pressure reaches
85 psi (5.9 bar). If not, use instructions inside lid of
pressure switch to adjust to proper settings.
2. When compressor cycles “off”, check all connections for
leaks.
8 of 9
Part Number 020006402 12/2014
Page 9

Air Compressor Kits
Attaching Air Pump to Mounting Bracket — P.N. 00202676
OPENING THE CARTONS
Contents of Mounting Bracket carton:
• Mounting bracket
• Bag containing four (4) bolts, four (4) nuts, four (4)
washers, four (4) 5-1/6 masonry lead anchors
Contents of the Multiplex Air Pump carton:
• Air pump
• Four (4) rubber mounting pads, four (4) bolts, and four
(4) washers
INSTALLING THE MOUNTING BRACKET
1. Determine the most convenient location. Keep in mind
the air pump will require periodic service.
2. To mount to a wall, four (4) lead anchors are provided
to attach the bracket to a masonry wall. Any other
means of attachment will have to be secured locally.
HOW TO ATTACH THE AIR PUMP TO THE MOUNTING
BRACKET
1. Four (4) rubber mounting pads, bolts, and washers are
provided for this purpose.
2. Insert the rubber pads into the holes in the bracket that
match the holes in the air pump.
3. Position the air pump on the pads and screw in the
bolts with washers. Tighten the bolts only enough to
expand the rubber pads. This will secure the pump.
Make sure you have taken into consideration servicing
the air pump, the air tank, and the air filter.
4. Connect the air line from the control panel or manifold
to 1/4" male flare fitting on the tank.
5. Make sure all connections are tight and that the air to
the CO2 Gas Change-over Valve is turned to “CO2 G a s.”
6. Plug the pump service cord into a 120V outlet. The
pump should run and cycle “off” when the pressure
gauge reaches 90 psi (6.2 bar). The pump should cycle
“on” when the pressure drops to 70 psi (4.8 bar). If
adjustments are necessary, remove the cover of the
pressure control and follow instructions.
Air Line
Pressure
Control Switch
110 Volt
Electrical Outlet
Condensate
Drain Hose
Rubber Pads
9 of 9
Part Number 020006402 12/2014
 Loading...