

Page 1
1
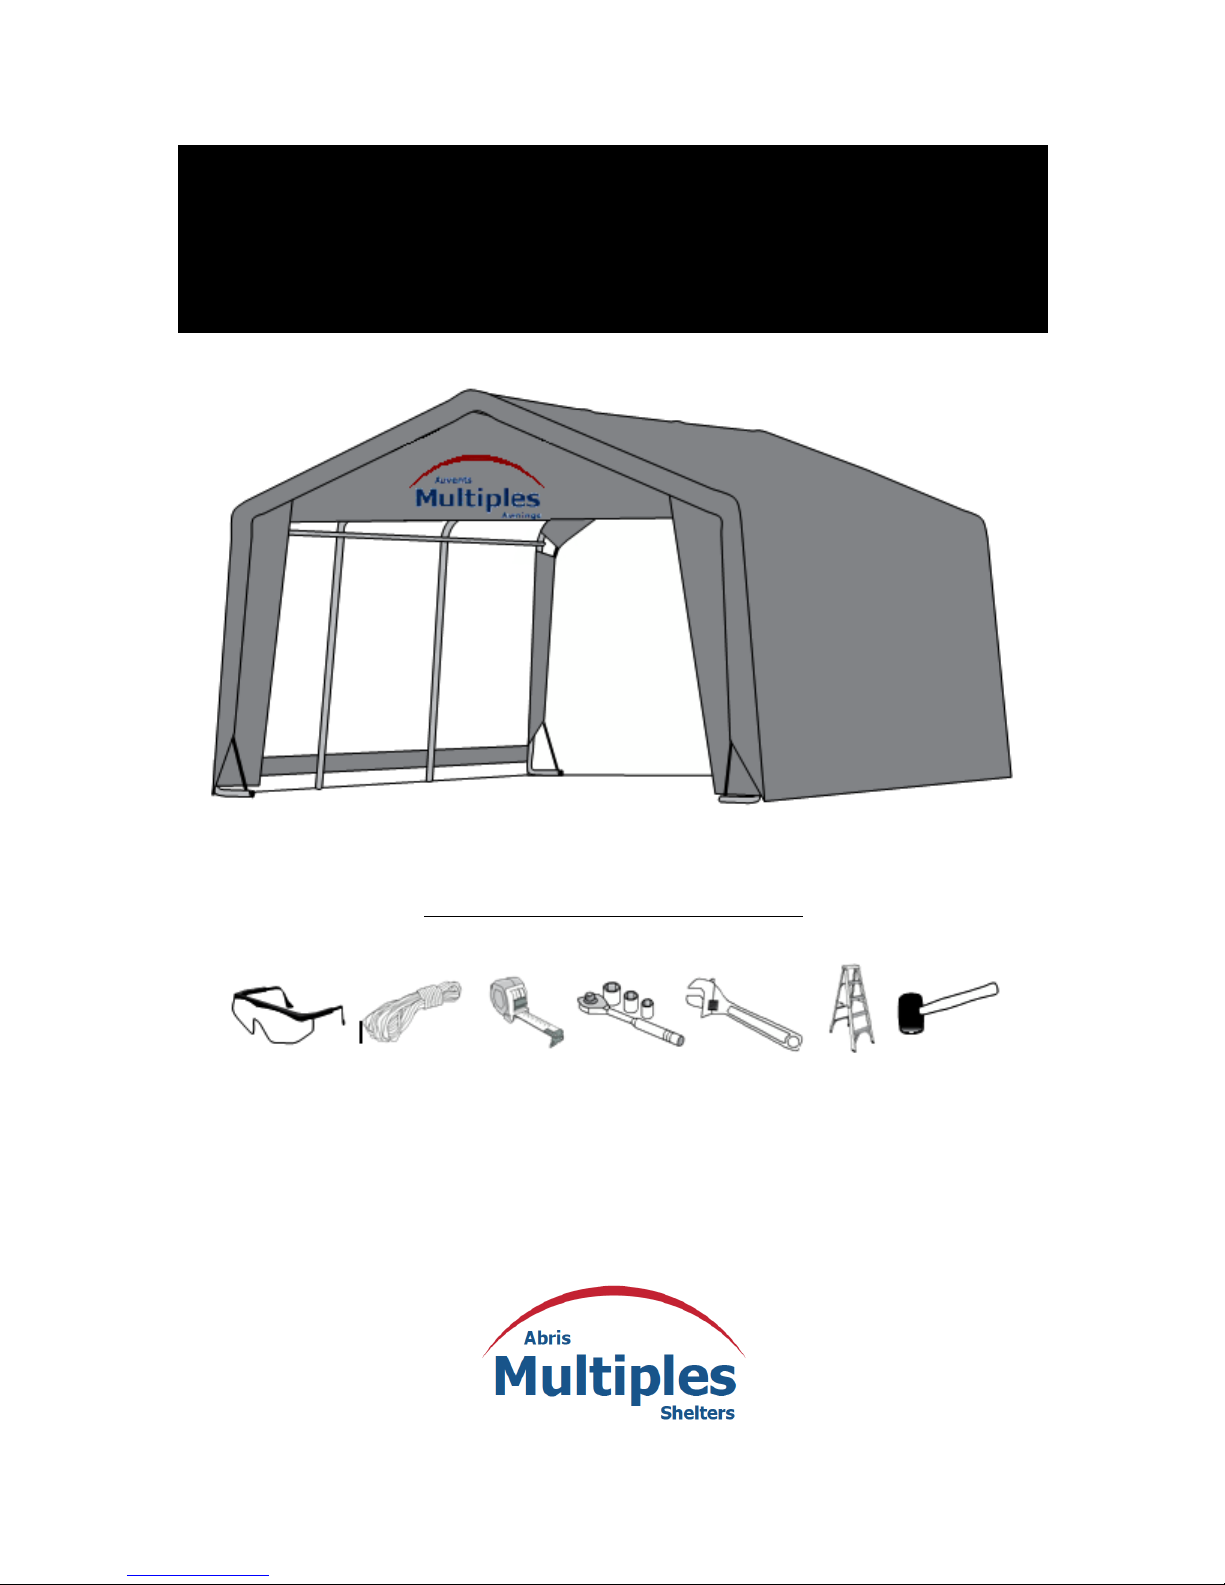
Winter Shelter
11’ X 12’/11’ X 16’ /11’ X 20 / 11’ X 24’
11’ X 28’ / 11’ X 32’
Recommended Tools
Please read instructions COMPLETELY before assembly. This shelter MUST be securely anchored.
This is a temporary structure and not recommended as a permanent structure.
It is recommended to be at least 2 people to assembly this shelter.
Estimated installation time: 2 hours
1 (866) 446-4182
Page 2
2
Product information
Description
The shelter comes with a galvanized frame and roof including 1 door and 2 or 4 windows. The width is 11’’ at the bottom of the
door. Available lengths are 12’, 16’, 20’ and 32’. The roof is U.V. protected. The frame is rust resistant.
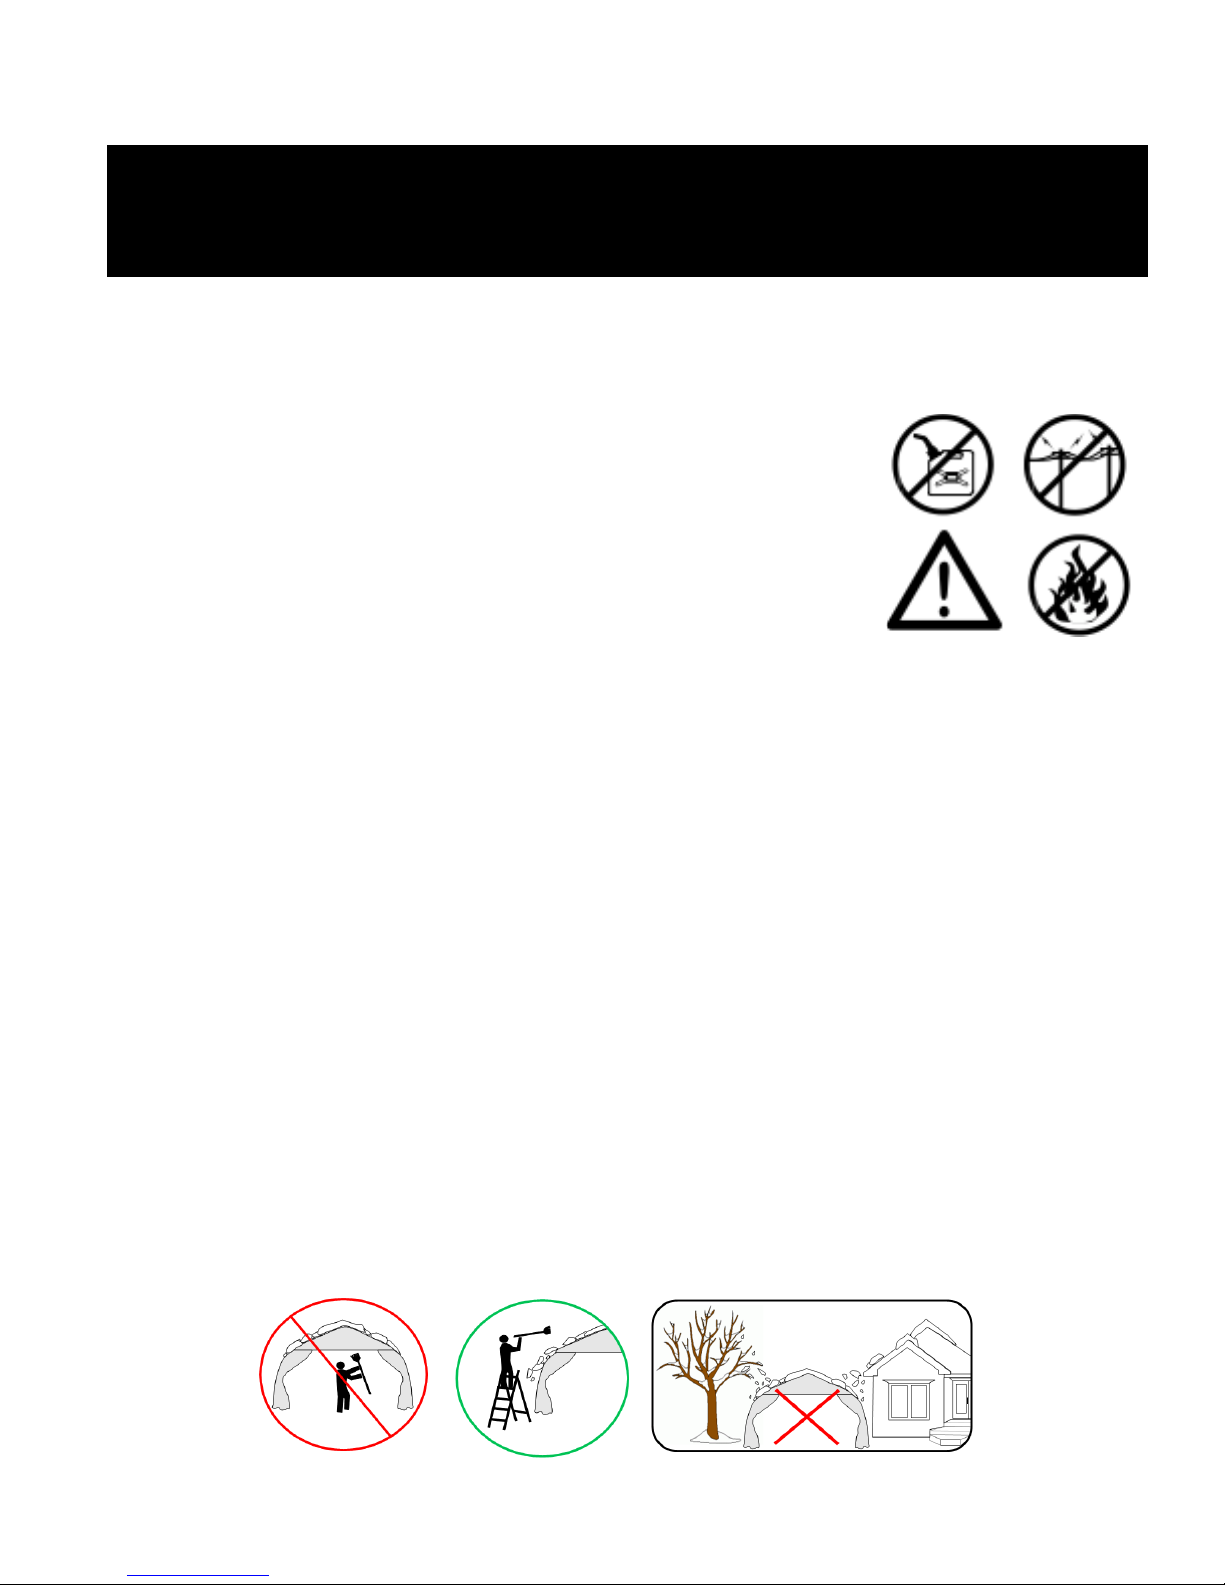
Danger
Risk of fire. DO NOT smoke or use open flame devices (including grills, fire pits, deep
fryers, smokers or lanterns) in or around the shelter. DO NOT store flammable liquids
(gasoline, kerosene, propane, etc.) in or around your shelter. Do not expose top or sides of
the shelter to open fire or other flame source.
Prior to installation, consult with all local municipal codes regarding installation of
temporary shelters. Choose the location of your shelter carefully. DANGER: Keep away
from electrical wires. Check for overhead utility lines, tree branches or other structures.
Check for underground pipes or wires before you dig. DO NOT install near roof lines or
other structures that could shed snow, ice or excessive run off onto your shelter. DO NOT
hang objects from the roof or support cables.
Improper Anchoring, Strong Winds, Rain, Snow, or Ice
Multiple Awning does not guarantee these canopies under strong weather conditions. The canopies are designed to protect
against damages caused by sun, rain, tree sap, birds, etc. They are not designed to hold roof loads that accompany snow, ice or
heavy rains. If your canopy is not anchored securely, it can be lifted but the wind and will fly away. If your canopy takes flight, we
are not responsible for any replacement. If you know strong weather is predicted, remove the cover or take down the canopy unit
completely. The cover is designed to by quickly and easily removed.
Caution
Use CAUTION when erecting the frame. Use safety goggles during installation. Secure and bolt together overhead poles during
assembly. Beware of pole ends.
Defective Parts
We try our best to eliminate any defective parts that are shipped with our products. If, however, you should find a defective part,
we will replace –free of charge- any part which is defective. You will need to provide proof of purchase showing date of purchase
and provide us with detailed description of the defective component. Your replacement will be shipped by ground shipping,
freight prepaid. Next day or express shipping will require freight collect and paid for by you, the consumer. Damages from
improper anchoring, strong winds, snow, ice or rain are not considered defects.
Installation
Note: Please verify all the pieces before installation
Installation parts come in 3 boxes.
For the roof, just unfold it and spread it on the frame.
Please do not force not to tear it.
Maintenance
Please remove the snow accumulation. Please read the instruction attached to the roof.
Page 3
3
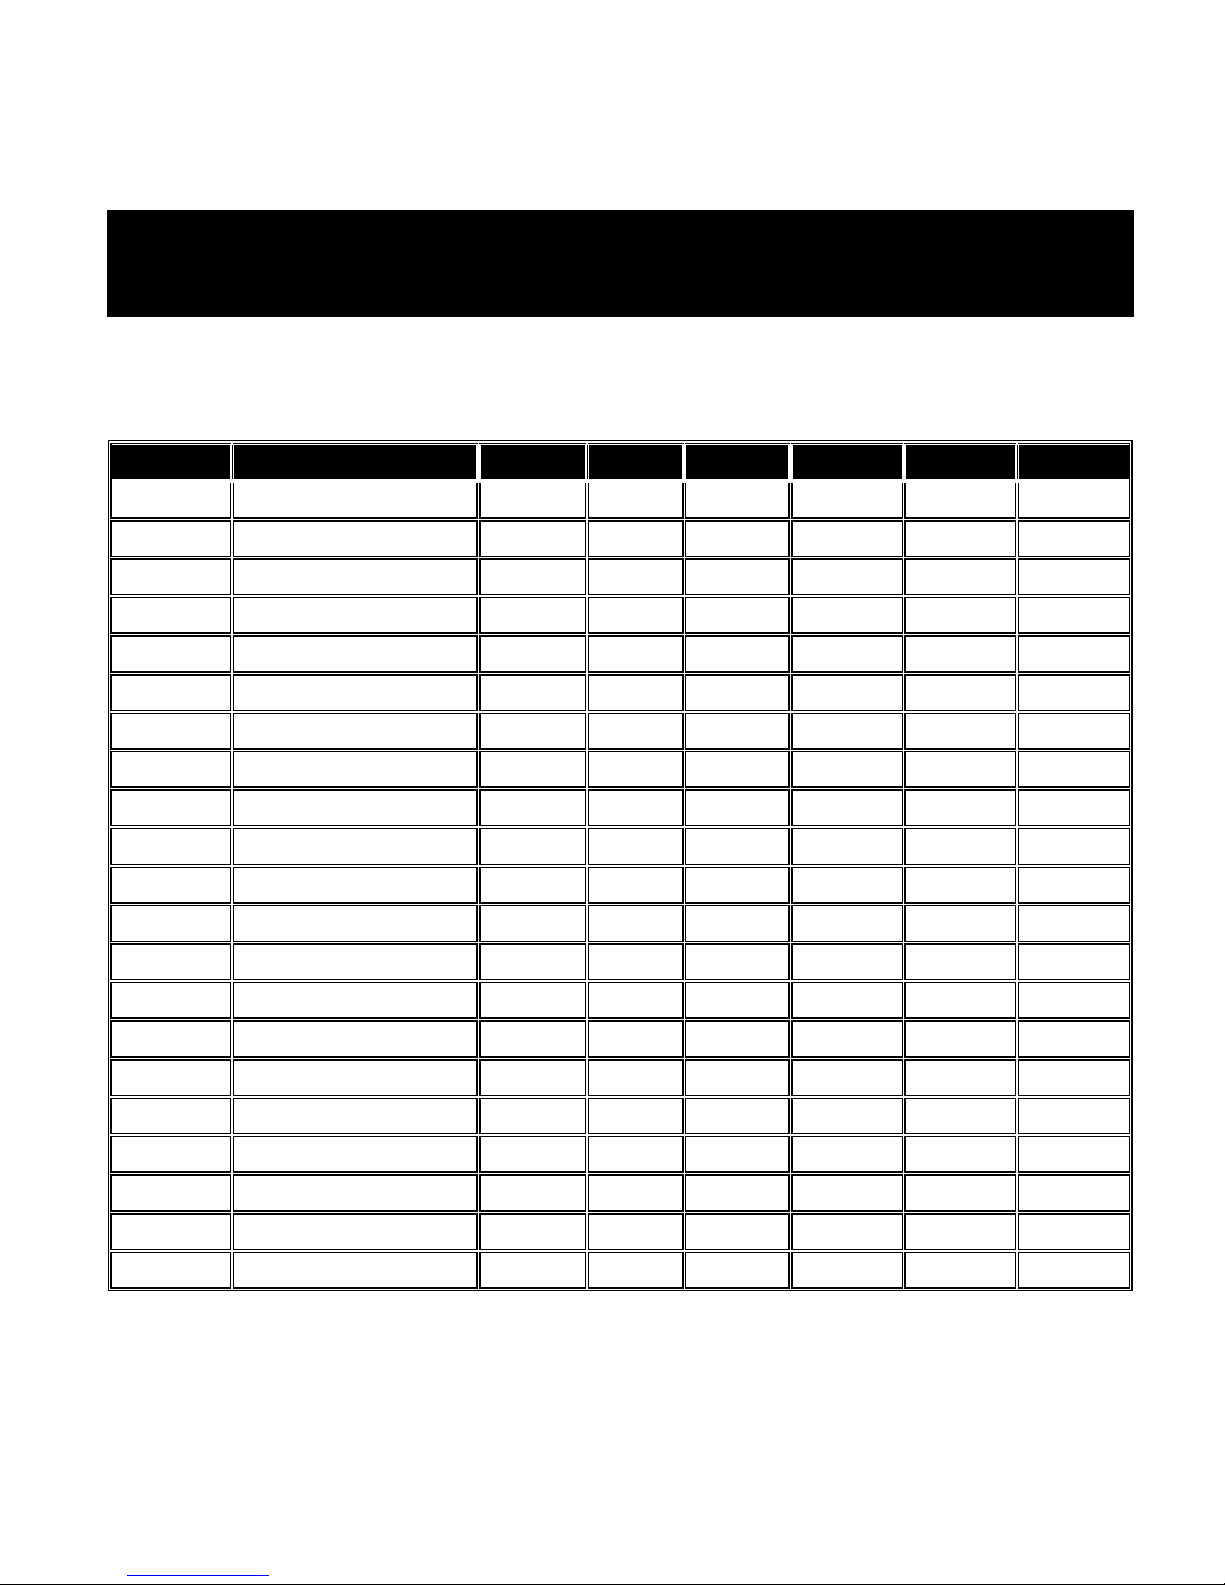
Parts list
CODE
DESCRIPTION
11’X12’
11’X16’
11’X20’
11’X24’
11’X28’
11’X32’
A10001
Leg 58 ¼’’ 1 hole
6 8 10
12
14
14
A10001-1
Leg 58 ¼’’ 2 holes
2 2 2 2 2 4 A10002
Side arch 52 ¾’’ 2 holes
4 6 8
10
12
14
A10002-1
Side arch 52 ¾’’ 3 holes
4 4 4 4 4 4 A10003
Center Arch 52 ¾’’
4 5 6 7 8 9 A10004
Crossbar 48’’
4 5 6 7 8 9 A10005
Door rail male 50 ½’’
2 2 2 2 2 2 A10006
Door rail female 43’’
2 2 2 2 2 2 A10007
Crossbar 60’’
2 2 2 2 2 4 A10008
Female eextension 48’’
5 5 5 5 5 5 A10009
Male extension 50 ½’’
10
15
20
25
30
35
B10001
Bolts 1 ¾’’
16
18
20
22
24
28
B10002
Bolts 2 ½’’
22
27
32
37
42
47
B10003
S Hooks
12
12
12
12
12
12
B10004
Rail Hooks
12
12
12
12
12
12
B10005
Elastics
12
12
12
12
12
12
B10006
Floor brackets
4 4 4 4 4 6 B10007
Nails
8 8 8 8 8
12
B10008
Rope
1 1 1 1 1 1 B10010
Wing nut
36
43
50
57
64
73 Roof
1 1 1 1 1
1
Page 4

4
Installation
1. ARCHES FRAME LAY OUT
a. Place all structure components on the ground as per the drawing
below.
Front and rear arches
Middle arches
Page 5

5
2. ARCHES ASSEMBLY ON THE GROUND
a. Start by assembling the arches to the horizontal frame.
*While assembling the arches parts, it is not necessary to tighten all screws and
nuts. Later, you will be required to add a few parts to the arches assembly.
Page 6

6
3. VERTICAL ASSEMBLY OF THE ARCHES
* Start installing the first two arches of the front or the back.
a. Raise the first arches from the ground and place them vertically.
b. Install the support base to the first two arches.
c. Join the arches with a diagonal bar as per the drawing.
d. Install the two top supports between the arches.
e. Repeat the same pattern for all the other arches.
** At the end of the installation process, there should be four diagonal bars
installed (two on each end)
*** Once all the arches are linked together as per the drawing, you can start to
tighten the screws and nuts.
Page 7

7
4. ANCHORAGE INSTALLATION TO THE GROUND
* Please make sure the anchorages are installed before the canvas is set-up on
the structure.
** Attach your canvas to the structure to avoid any flapping due to the wind. If the
shelter is installed in a wide-open area, additional anchorages may be required.
5. INSTALLATION OF THE CANVAS
a. Please unwind the canvas on the ground. It is not necessarily rolled
up lengthwise.
b. Set-up the canvas on the structure.
c. Attach the canvas to the structure.
* For your safety, avoid making the installation when it is windy.
Page 8

8
Warranty
The warranty covers installation for a period of three months. This warranty does not cover fabric replacement without an installation by our
technicians.
This warranty encloses the structure against any fabrication defect for a period of one year. Any change or modification of the structure or
addition of a product, which is not recommended by Multiple Awnings, will automatically cancel the warranty.
This warranty does not cover Acts of God (Great wind, storms, major accumulations of rain, or ice, or snow)
The owner HAS TO REMOVE ICE/SNOW/OR ANY OTHER MATERIAL from the structure.
This warranty will be void if:
1. There is use of concrete blocks as anchors (it may harm the product);
2. There is use of a cable tie-wrap on the eyelets to retain the cloth.
Join us
Multiple Awnings / Customer Service
1701, boul de l'Industrie
Beloeil (Quebec)
J3G 4S5
Tel: (450) 446-4182 / 1 (866) 446-4182
Fax: (450) 446-9364
Email: info@multipleawnings.com
The whole team of Multiple Awnings thanks you to trust them.
 Loading...