

Page 1
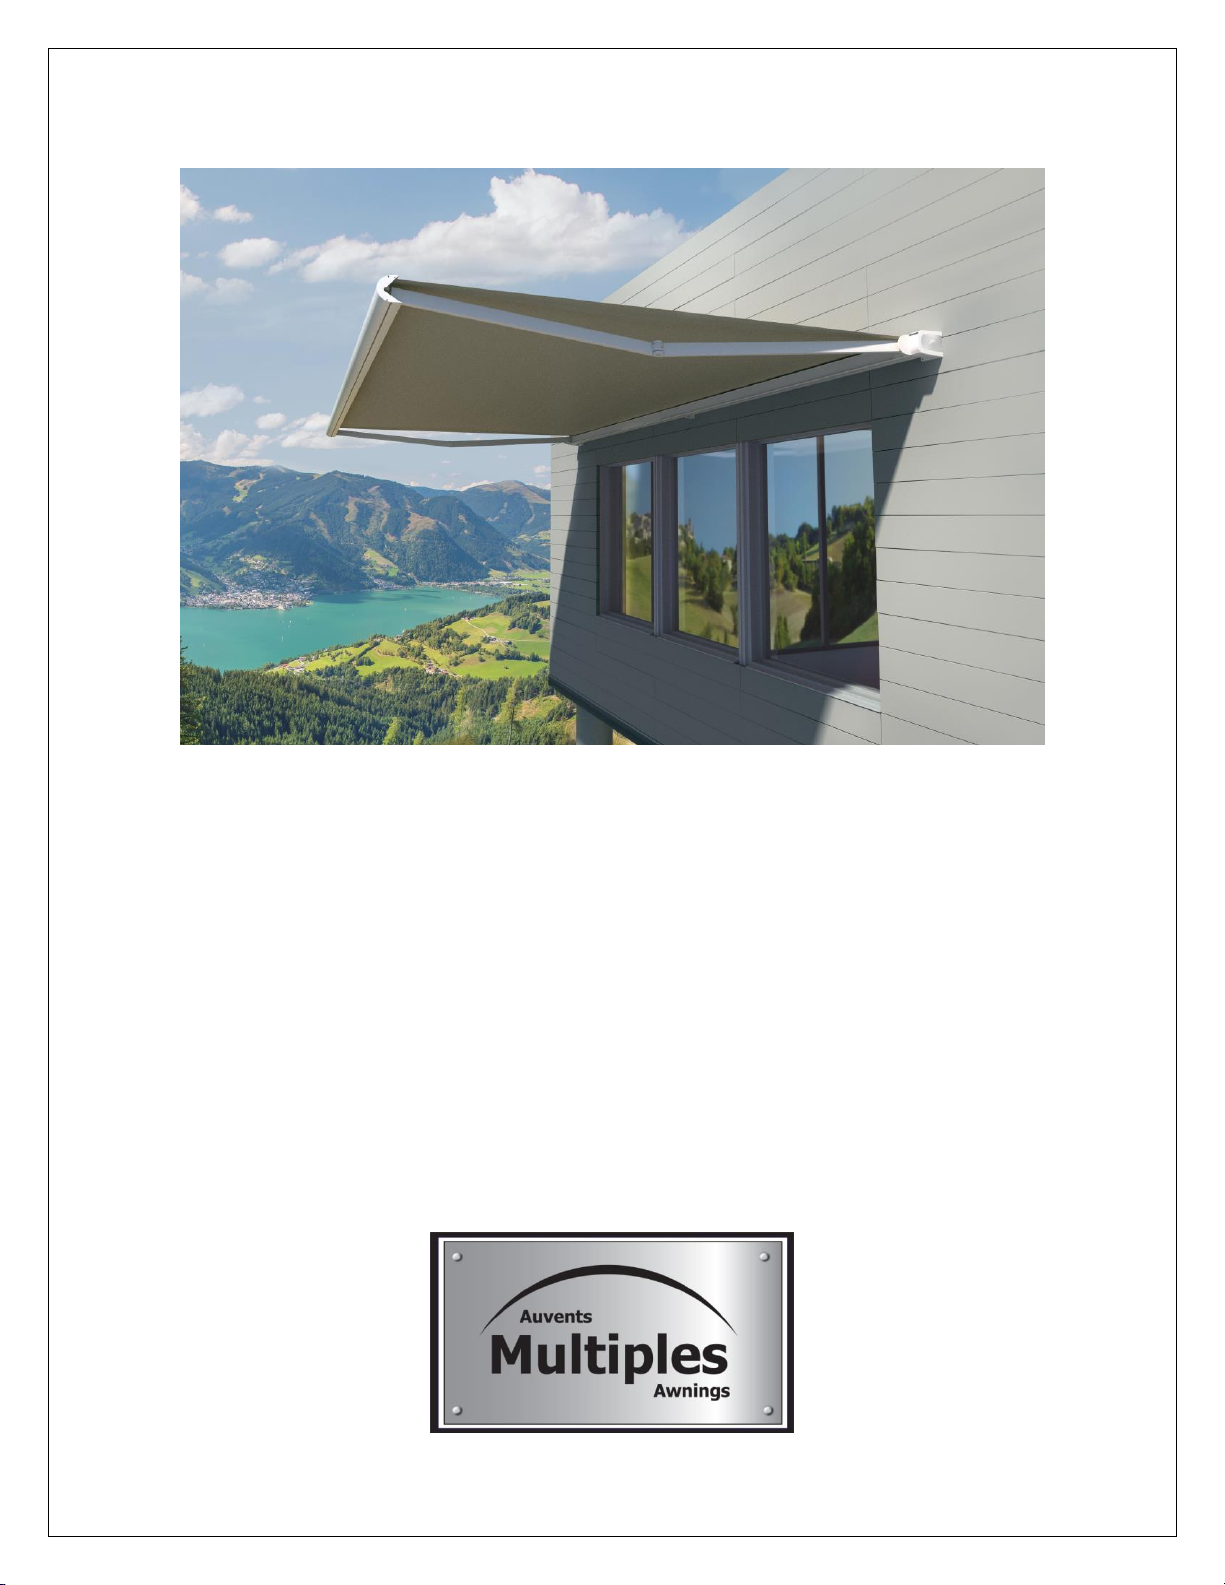
Brasilia Slim Awning
User and Installation Manual
March 2022
Page 2

Brasilia Slim EN March 2022 v4 2
Table of Content
Read me!
1. Getting ready
1.1. Tools and help needed
1.2. Revision of installation
requirements
1.3. Unpacking your awning
1.4. List and identification of parts
2. Wall installation on siding walls made
of wood, vinyl or aluminum
2.1. Where to install
2.2. Finding the studs, joists or headers
2.3. Shims and solidity
2.4. Installation of the brackets
3. Installation on masonry
3.1 Where to install
3.2 Location on the bricks
3.3 Installation of the brackets
4. Installation under soffit or eaves
4.1 Where to install
4.2 Finding trusses
4.3 Shims and solidity
4.4 Installation of the brackets
5. Installing the awning
5.1. Mounting the awning on the
Installation plates
5.2. Using the blocking blocking stoppers
5.3. Testing your installation
5.4. Operating your awning
5.5 The remote control and it’s support
5.6 Last details
6. Safety and advice
6.1. Acrylic fabric maintenance
6.2. Electric motor and remote control
maintenance
7. Appendix
7.A. Pitch inclination adjustment
7.B. Resetting motor and remotes
7.B.1. Putting the motor in
‘’programming mode’’ if you no
longer have the original remote
control
7.B.2. Erasing the motor’s memory
7.B.3. Programming the first remote
control
7.B.4.Memorizing an additional
remote control
7.C. Ajusting the limits of your awning
7.C.1. Ajusting the limits
7.C.2 Using the emergency override
7.D. Wind sensor
7.D.1. Wind sensor installation
7.D.2. Pair the wind sensor with the
motor
7.D.3. Calibrating the sensor
7.D.4. Timeout after a wind alarm
7.D.5 Detection of low battery
7.E.Removing the awning from the
bracket
8. Troubleshooting guide
Contact us
Page 3

Brasilia Slim EN March 2022 v4 3
READ ME!
This section contains important warnings concerning your safety and the integrity of your
awning and its installation.
1. CAUTION! The wind sensor is not a security device to prevent damages caused by
high winds and rainwater accumulation. Accumulated water, snow or ice, can
severely damage your awning. A simple power outage makes the automatic
closing of the awning impossible.
2. NEVER LEAVE YOUR AWNING IN THE OPEN POSITION WITHOUT PROPER
SURVEILLANCE.
3. WARNING! Your awning is not meant to cope with high winds, water, snow or ice
accumulations. It can cause the awning’s arms to break or even to collaspse
causing severe injuries and material damage.
4. WARNING! A correct and proper installation of the installation plates as well as
the integrity of the wall or eaves onto which they will be fixed is the sole
responsibility of the customer/user. All houses are different and the installation
placets supplied with the awning might not be suited for your
situation/installation. WHEN IN DOUBT, consult a certified contractor.
Page 4
Brasilia Slim EN March 2022 v4 4
1. Getting ready
1.1. Tools and help you will need
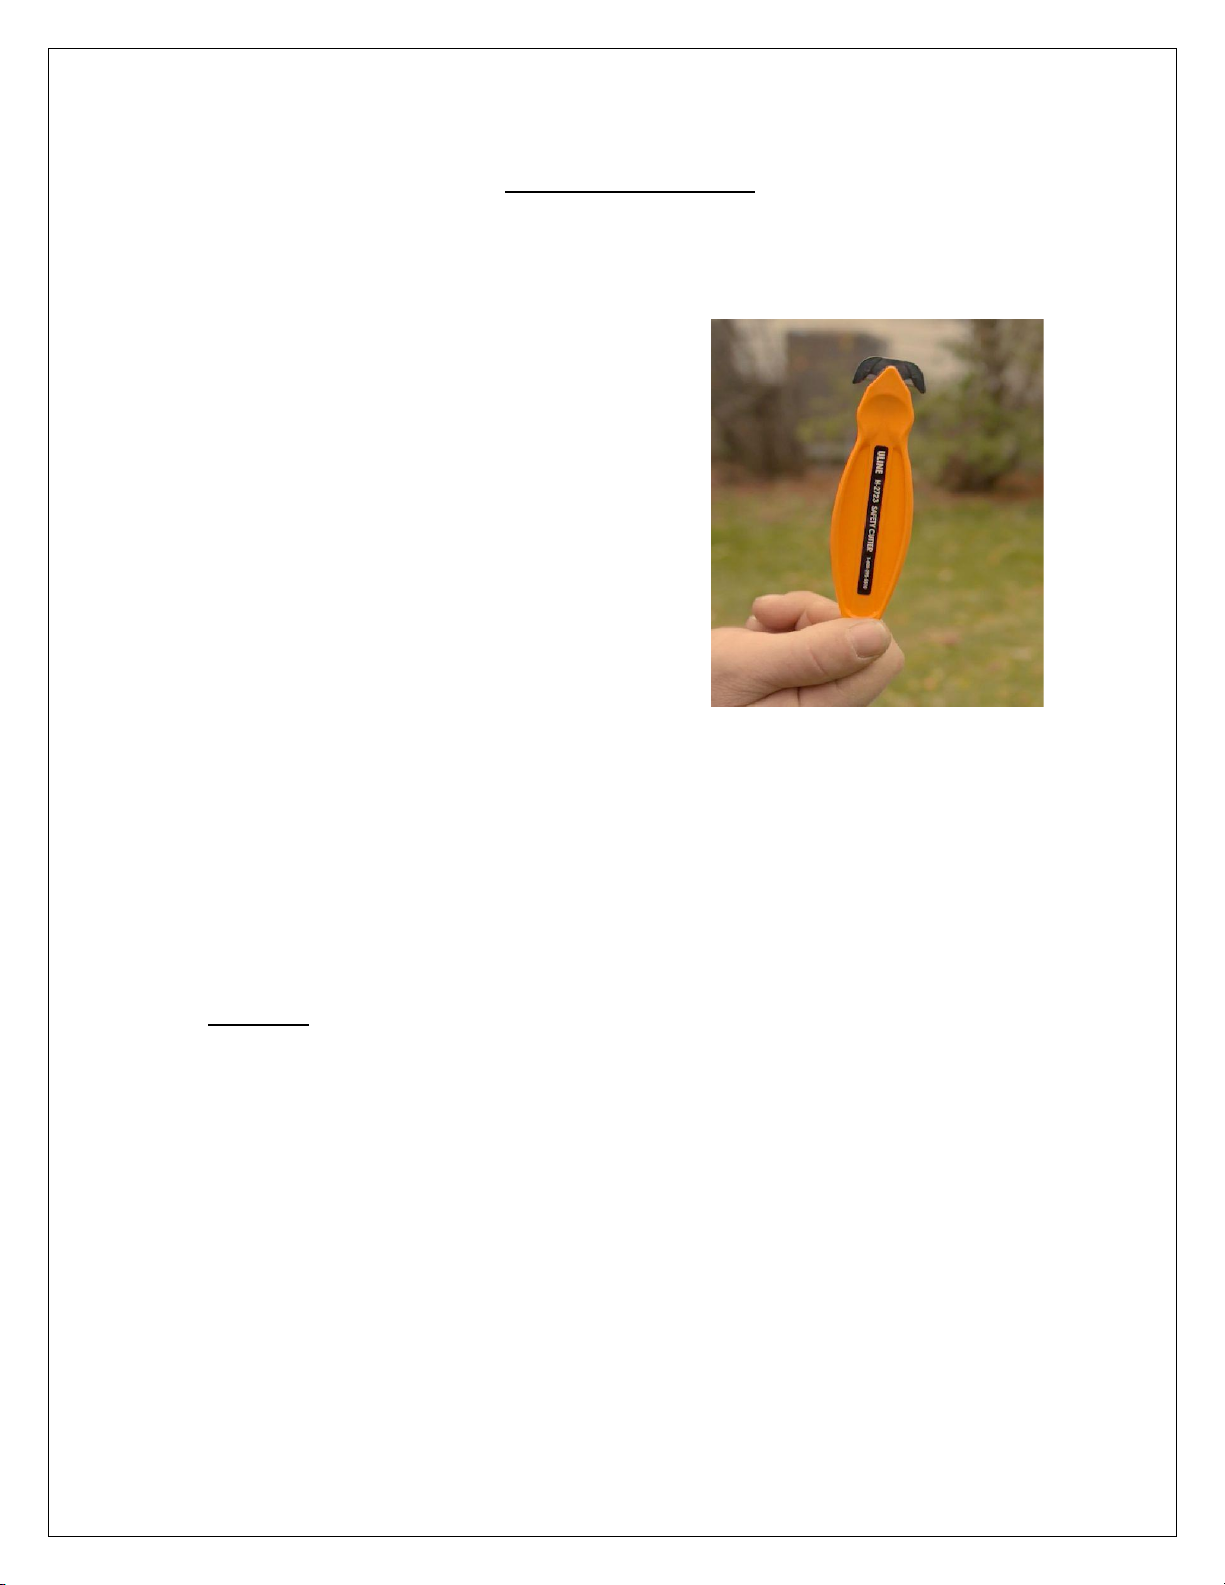
Security knife for unpacking (see
picture)
2 ladders or step ladders
Measuring tape
Carpenter’s pencil
Ratchet and socket (9/16’’)
Philips screwdriver to open the tube
6 mm Allen button to adjust the pitch
Drill
Level
To install in wooden structures : 3/16’’
bit
To install in masonry structures :
Masonry bit 3/8’’
Optional :
Stud finder
Masking tape
Nylon, aluminum, copper or other (not metal), shims
Zip tool (to remove siding)
Caulking
CAUTION! You will need help to install the installation plates. It takes two (2) persons
to safely install an awning on the plates, but we strongly recommend to work with
three (3) persons. You can also rent a manual lift.
1.2. Revision of installation requirements
Please adequately revise the space required to install the awning; follow steps 1.2.1 to
1.2.3 inclusively. This will help you to determine the type of required installation.
NOTE : If you have two (2) Brasilia Slims side by side or if the awning is close to an
inside corner, note that you will need at least three inches (3’’) to install the decorative
end caps on the motor side and two inches (2’’) on the other side.
Page 5

Brasilia Slim EN March 2022 v4 5
1.2.1. Wall installation
NOTE: No situation is perfect. Some installations (e.g. when there is a gap between
the siding and the stud) require a wooden (plank) or metal support plate to solidify
and facilitate the installation of the wall supports. This type of installation requires
the consultation of an experienced installer.
Required height
Your awning has an adjustable pitch and will be set to a minimum of eigtheen
inches (18”) when opened, for a ten feet (10’) projection awning. You may need
to give it more slope if your installation or surface is not perfectly level. The pitch
range is from five (5) degrees down to seventy (70) degrees. Take this into
consideration when selecting the height of installation.
We recommend a mounting height of one hundred and eigth inches (108”); the
minimum required height is at least ninty-six inches (96”). Your wall needs to be
free of any obstructions (doors, windows, vents, light fixtures) by an area of 6,5”
inches high on top of the total width of the awning’s structure.
If your awning is motorized, you will need an AC outlet to plug it in. A regular GFI
ou GFCI outlet will work. The power cable is twenty-four feet (24’) long (7,3m).
The motor’s amperage requirement is less than two amps (2A).
Required width
The installation plates on a ten to fifteen feet (10’-15’) wide Brasilia Slim are
installed at the two (2) extremeties of the awning and the weight is not supported
by any other parts of the awning then the plates. Consequently, studs or other
structural parts of the house are mandatory.
NOTES : Awnings of sixteen feet (16’) or more require an additional support to
prevent torsion of the aluminum casing under the weight of the arms.
WARNING! The exterior corners of the walls have a few inches without any
structural members, regardless of the type of exterior cladding. This absence
should be considered if you have limited space to install the installation plates or
if your installation is on a narrow wall or window near the corner.
Many recent constructions have composite "i" joists or open joists instead of solid
wood joists. These types of joists cannot be used to anchor the awning.
Page 6
Brasilia Slim EN March 2022 v4 6
1.2.2. Masonry
Masonry walls are weaker near the top, you will need a minimum of twenty inches
(20'') or four (4) to six (6) rows of bricks above the installation for a safe support
The weight of the rows above prevents the awning from pulling the bricks loose.
WARNING! Some brick walls might not be strong enough to safely support an
awning. The supplied bolts are not designed to attach the awning to veneer brick
walls or to « soft bricks». WHEN IN DOUBT, consult a certified contractor.
1.2.3. Under eaves or soffit installation
You need to open your soffit to see inside your eaves and plan before you can even
consider installing an under soffit awning. You need to see if your joists or rafters
are leveled or slanted and if they are strong enough to support the awning.
If your trusses are slanted, you will need to use rafter adapters or and wood
structurally on the horizontal, level, and well anchored in order to support the
weight of the Slim. WHEN IN DOUBT, consult a certified contractor.
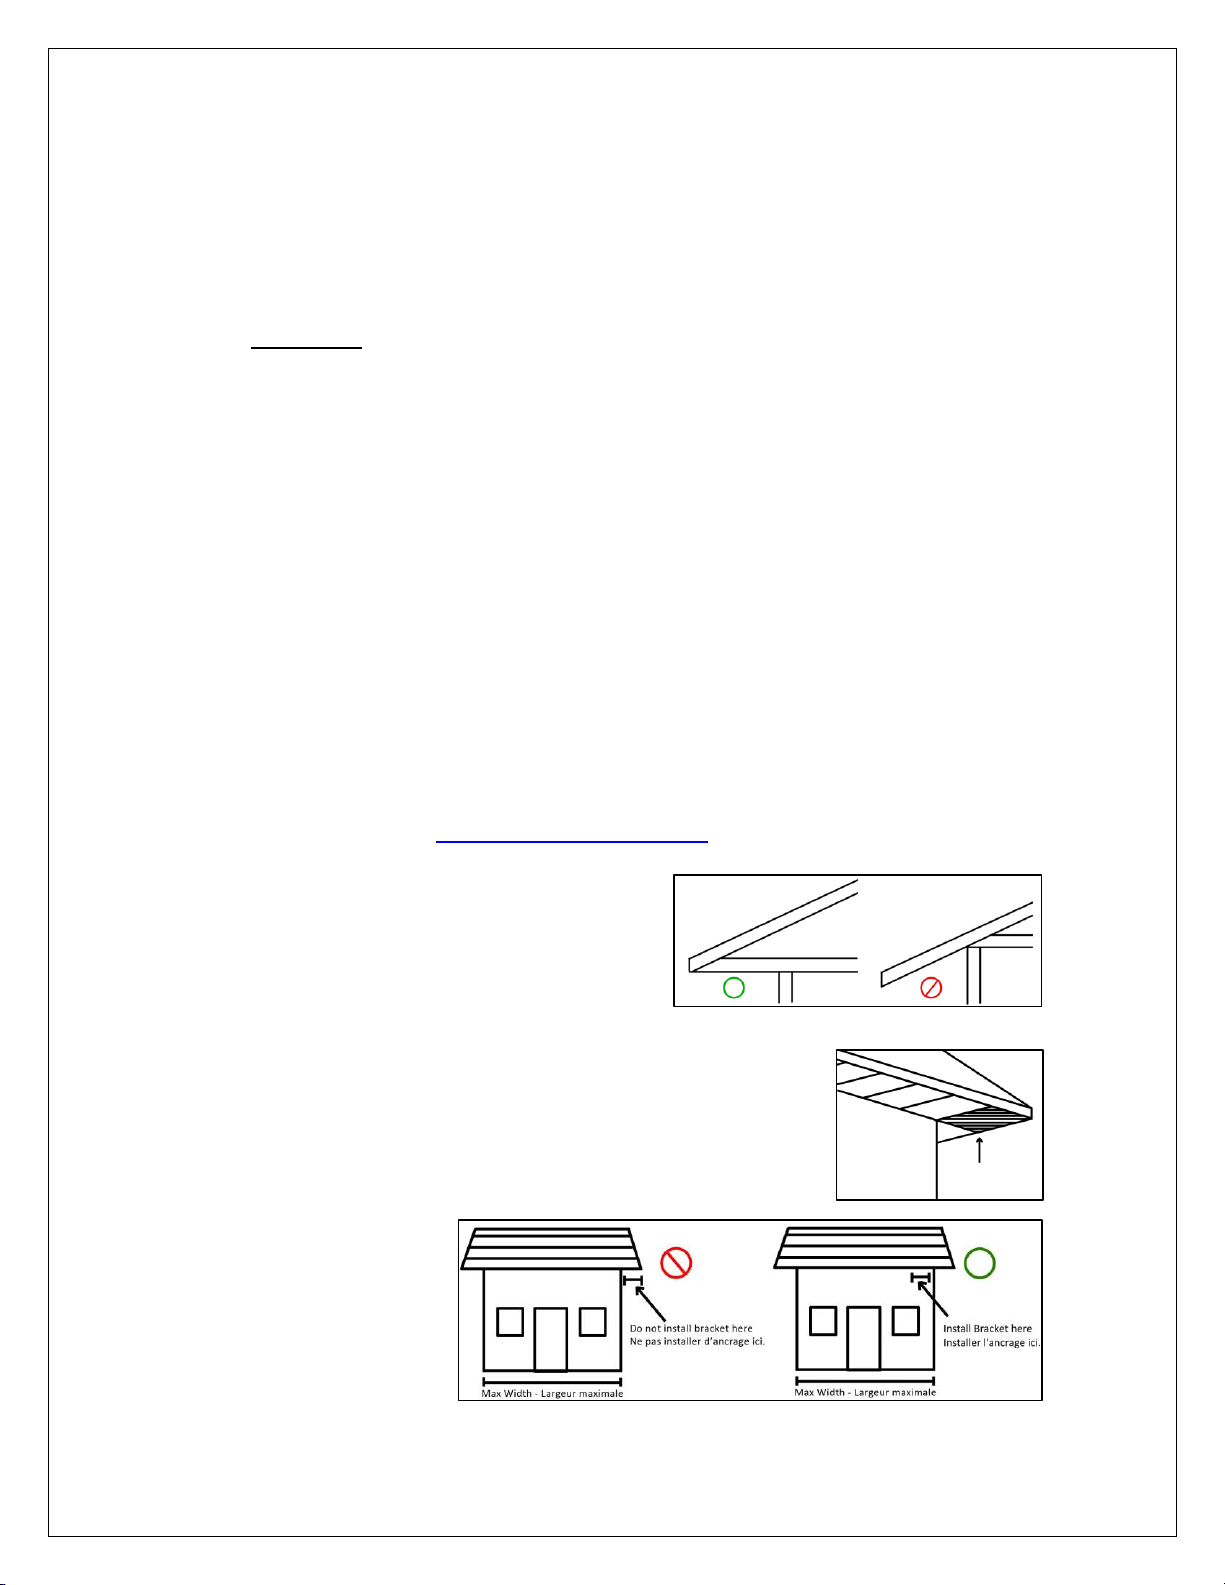
If you need to purchase rafter adapters contact us: 1-866-441-4182 (CA), 1-800736-0906 (USA) or [email protected]
NOTE : Levelled beams and rafters
adaptors are not included in the price of
your awning.
If your eaves are cantilevered in both (2) directions, the
corner of the eaves are not strong enough to support an
awning.
In this specific case, your awning can never be wider than
your wall even if
the eaves are
wider than the
wall.
Page 7

Brasilia Slim EN March 2022 v4 7
1.3. Unpacking your awning
1. Make sure that the weight of the awning is towards the ground. Gravity
will help this process.
2. Unscrew and completely remove all twelve (12) screws; four (4) at each
end of the tube and also four (4) screws of the hardware compartment.
Put them aside for storage. Make sure that all screws are removed or they
could caused damage to the awning.
3. Once the screws are removed, remove the end caps and the accessory
compartment cover. Cut and remove the two (2) green straps, located
under the duct tape. CAUTION! The straps are hidden by duct tape and will
not necessarily be visible.
4. Pull the awning out of the tube. A second (2
nd
) person will be needed to
safely perform this operation.
5. Rest the awning on a blanket or on easels with the brackets and the hand
crank upwards.
6. Remove the accessories packed on the awning.
7. Carefully remove the plastic wrapping. There is a groove behind the
awning, this is the place to insert the security knife. Do not use a regular
knife or an auto-retracting knife as this can damage the awning, see picture
in the section 1.1 Tools and help you will need.
WARNING! The Brasilia Slim arms are spring loaded and could open
without warning. They were closed at the factory, but if damaged
during transportation or manipulation, they could abruptly open while
being unwrapped and cause severe injury and material damage.
Page 8
Brasilia Slim EN March 2022 v4 8
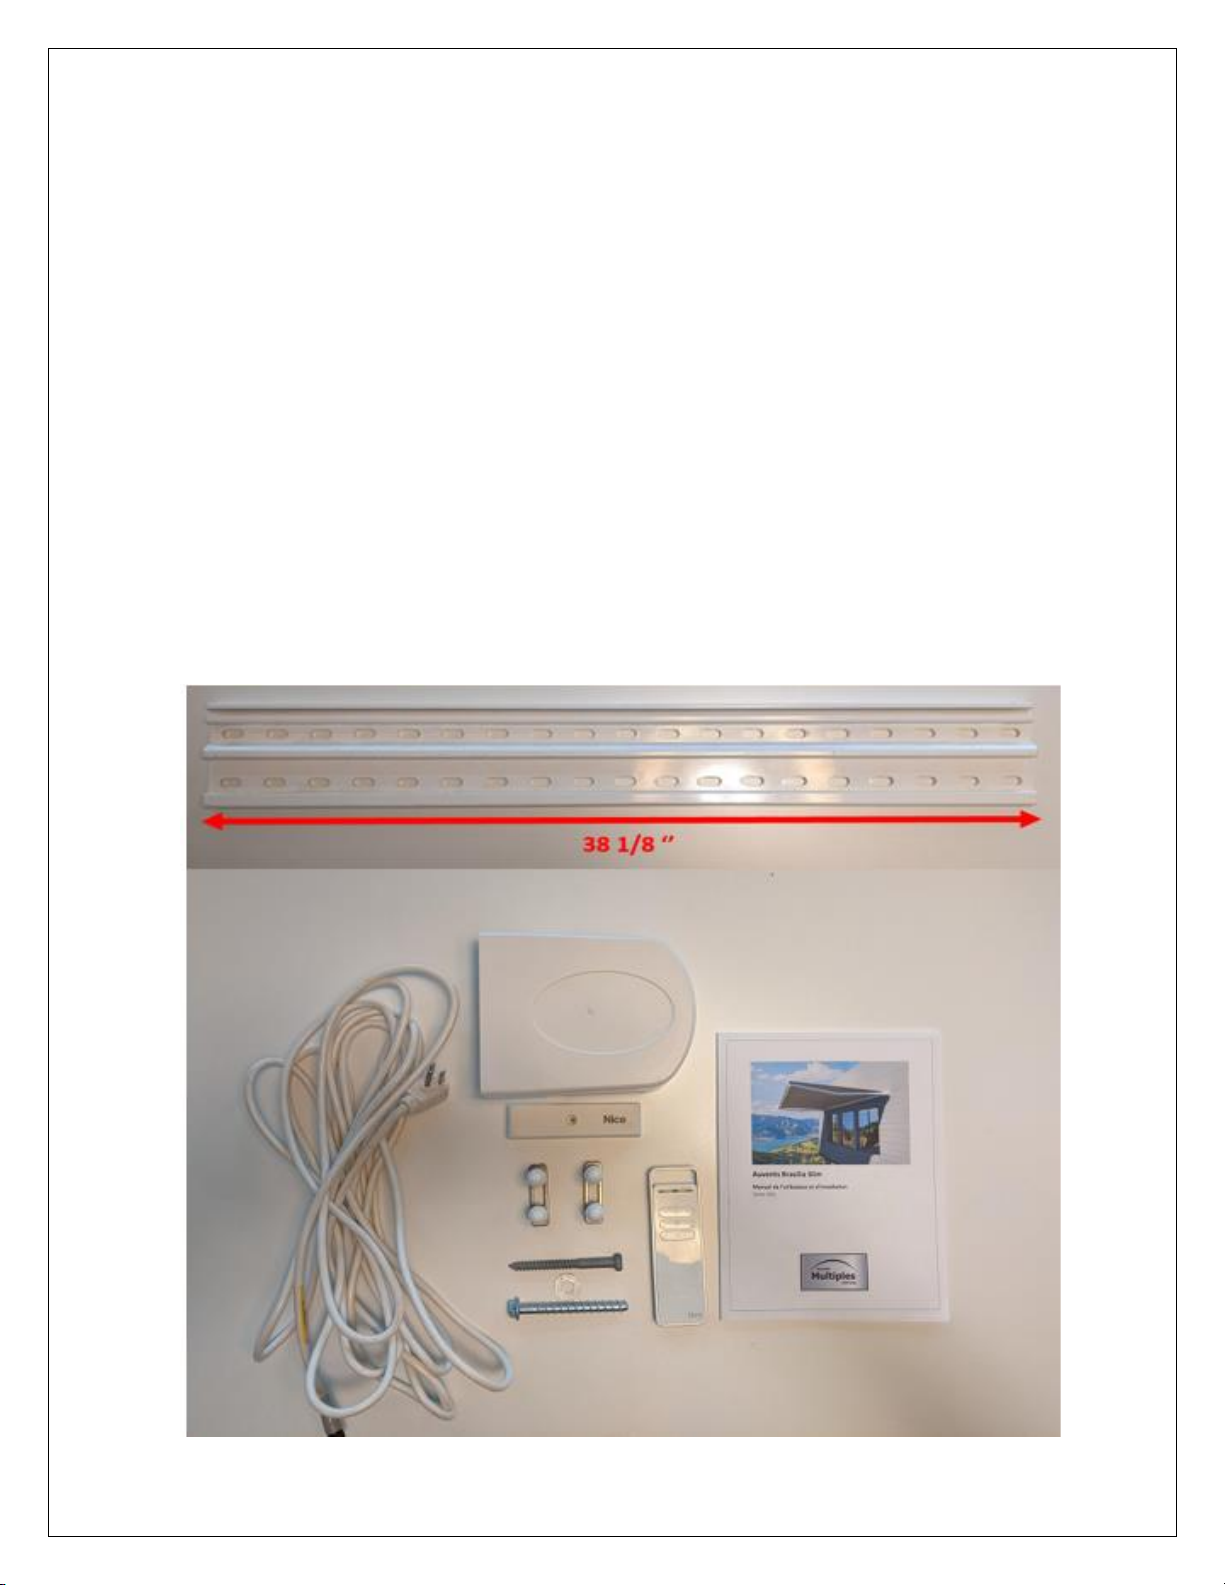
1.4. List and identification of included parts
Wrapped on the awning
1 handcrank
2 large installation plates
1 wind sensor (if motorized)
In the hardware box
1 motor’s AC cable
2 blocking blocking stoppers
(with 4 screw, 4 washers and
4 caps)
14 lag bolts and washers
14 masonry bolts and
washers
2 plastic end caps
1 remote control (if
motorized) 16’ +
1 central support (with 2 bolts
and nuts, 1 plastic sleeve, 4
small plastic caps, 1 plate and
1 hook).
Optional
• 120mm installation plates(1)
(supplied on request, in exchange
for the large brackets)
Page 9
Brasilia Slim EN March 2022 v4 9
2. Wall installation on siding walls made of
wood, vinyl or aluminum
WARNING! You will need at least one (1) other person to install the awning onto it’s
installation plates. This installation is the crucial portion of work that requires the most
time and attention to detail.
Please watch the video for the Installation procedure : https://youtu.be/7VSj0xV135s
For all buildings with internal wooden structure with wood, vinyl or aluminum siding, the
lag bolts must be firmly anchored in a structural part of the building. Installation plates
are used to distribute the load. Make sure to find the centre of the structural piece and
pre-drill before attaching the lag screw. Small installation plates could also be used.
WARNING! The small plates should only be used in solid concrete or solid wood (i.e
beams). If you use the small plates on wood, vinyl or aluminum siding due to a lack of
space, Multiple Awnings inc. cannot guarantee the solidity of the installation.
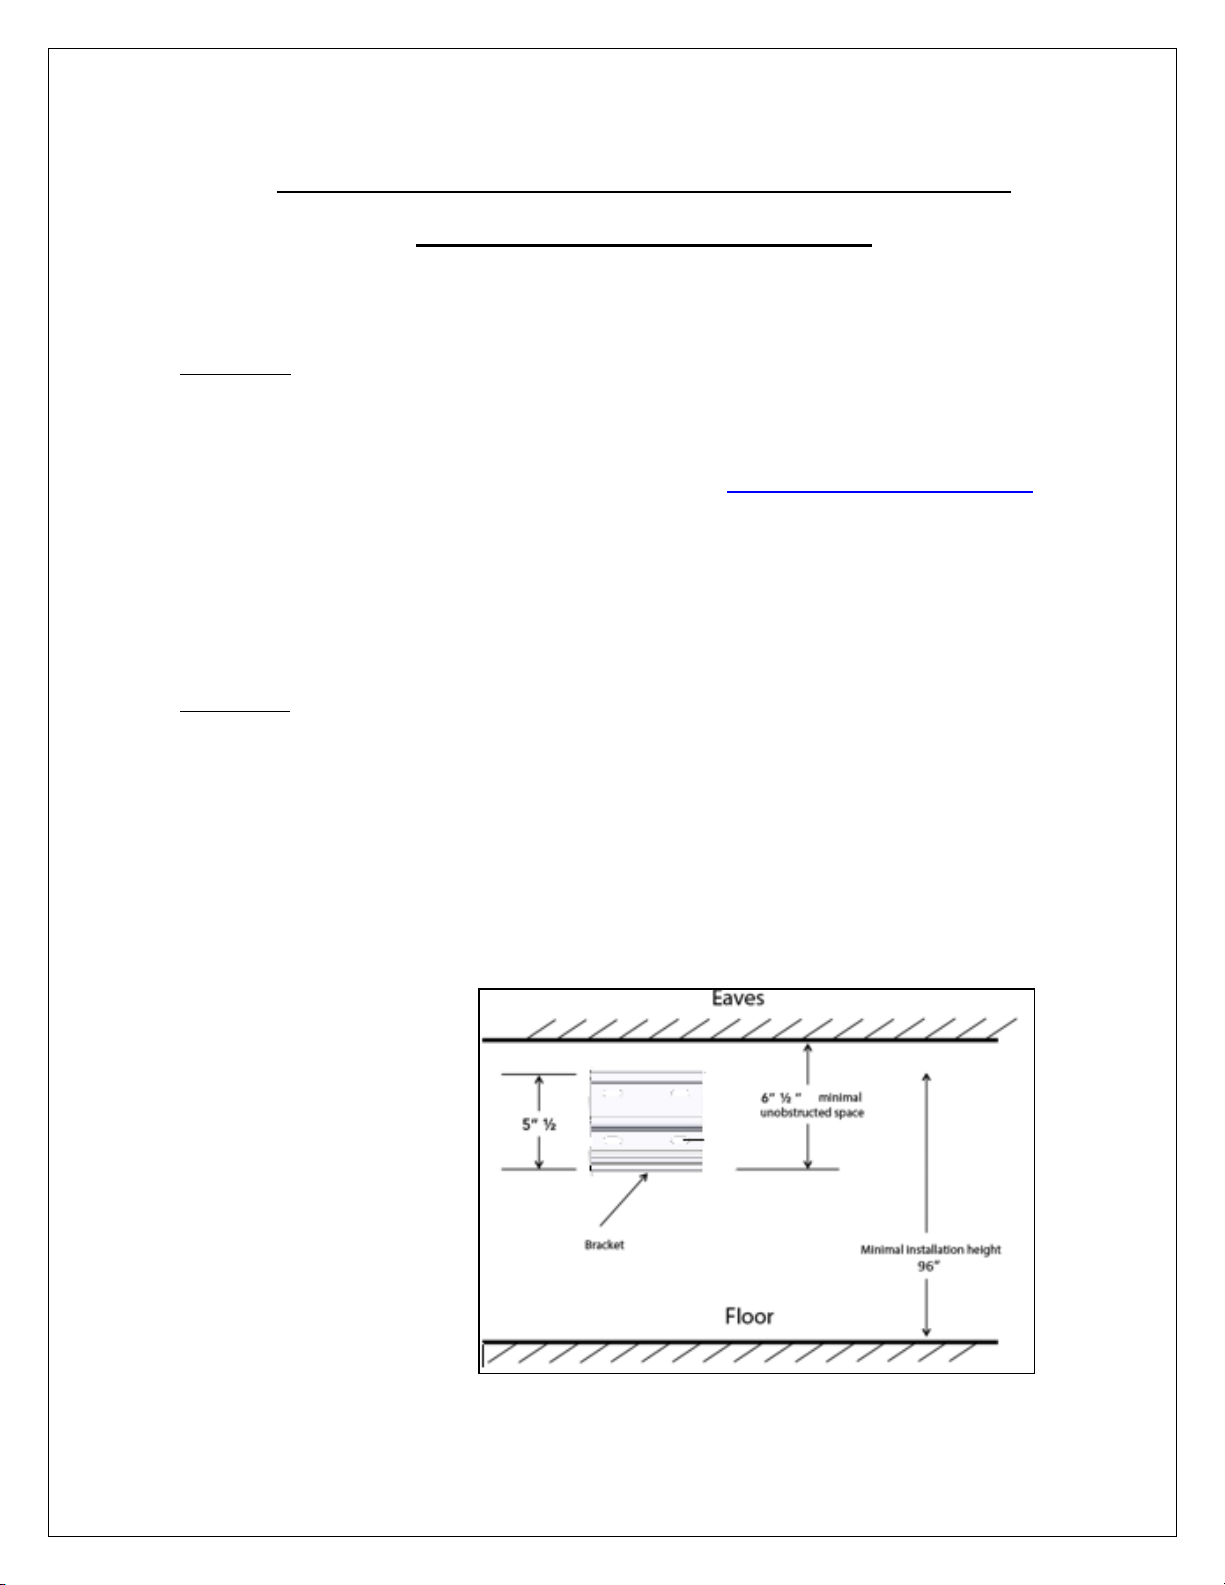
2.1. Where to install
Installation height
Make sure to leave at
least one inch (1’’)
between the top of the
installation plates and the
bottom of the eaves.
Since the awning will be
hanged over the plates,
you will need to lift it
above it to install it.
Page 10
Brasilia Slim EN March 2022 v4 10
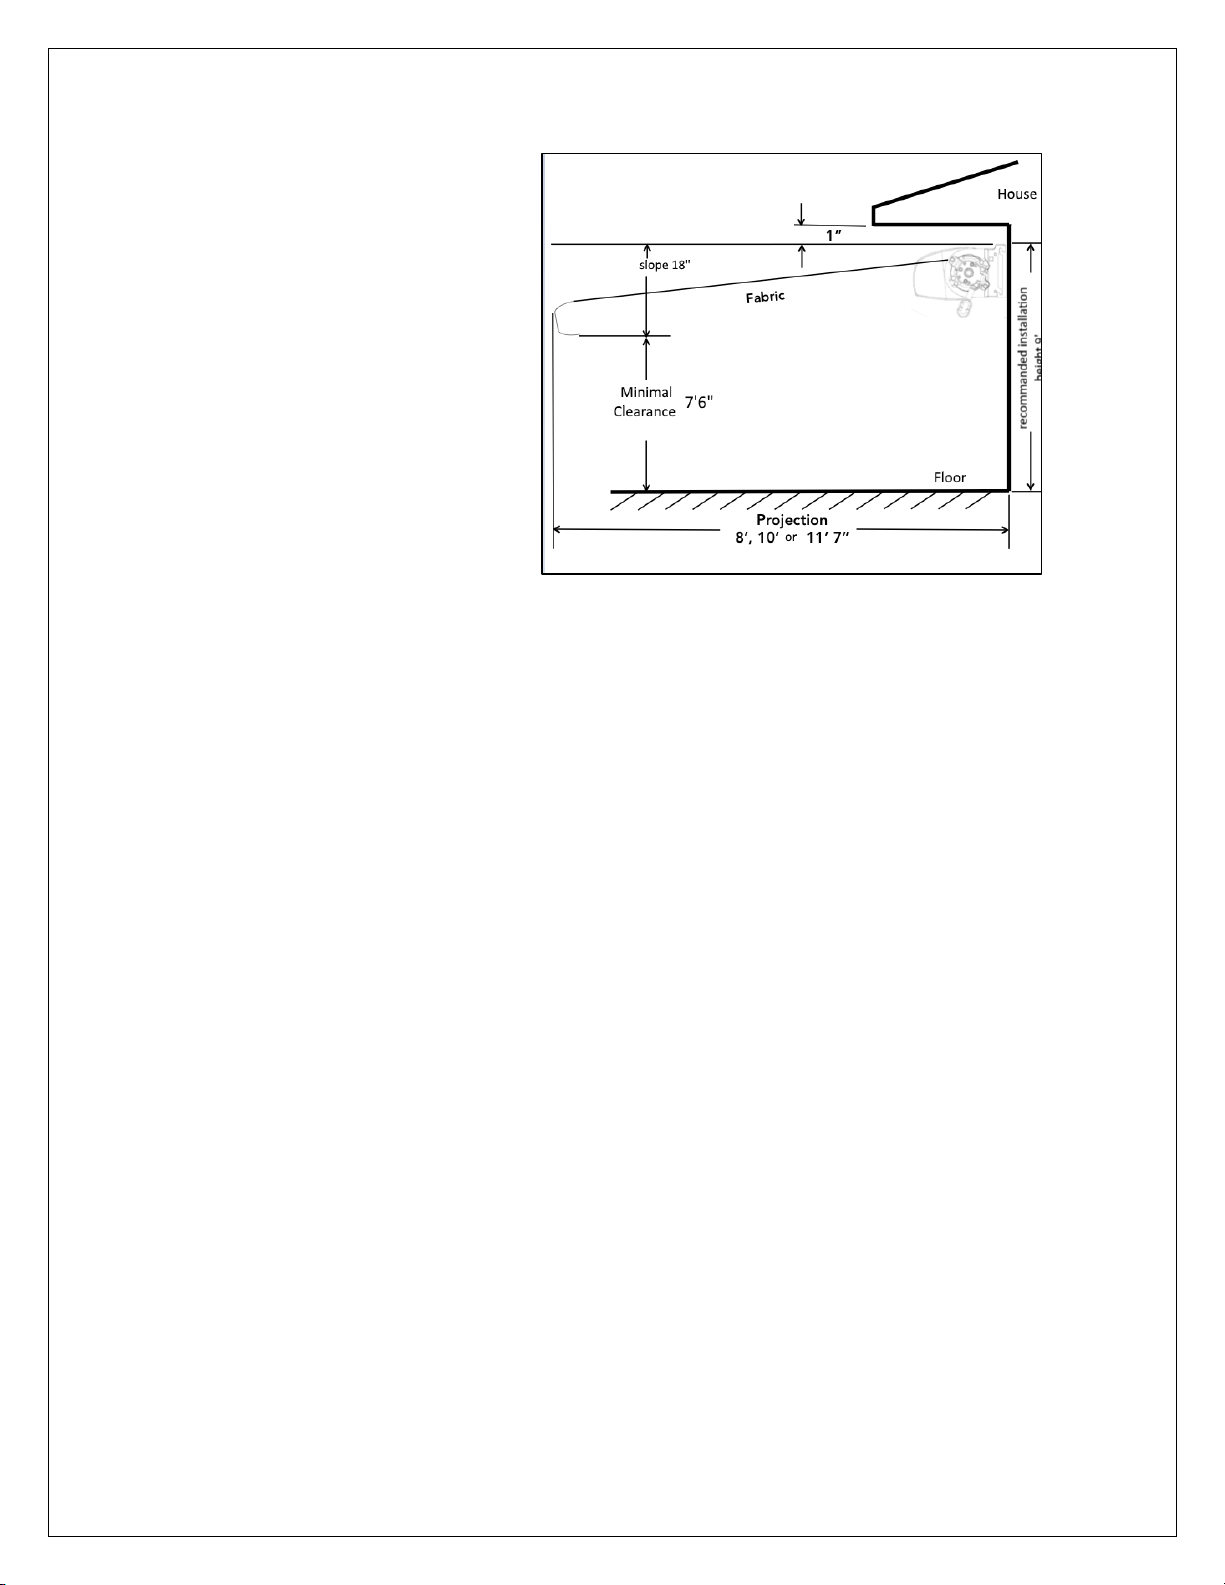
Your awning’s pitch angle and
inclination are pre-set at the
factory with an approximate
drop of eighteen inches (18‘’)
from the top of the installation
plate to the lowest point at the
front bar of the awning. For
example : If you mount the
awning on the wall at nine feet
(9’) from the deck or patio, the
lowest point at the bottom of
the front bar of the awning fully
opened will be seven feet and
six inches (7’6”) .
This pitch angle and inclination can be adjusted, see section 7.A.“Pitch inclinasion
adjustment”.
1. Where you want to install the awning, measure up from the deck or patio
floor on one side and make a mark at your desired mounting height minus
one inch (-1’’). It should be at least ninety-six inches (96”) but we
recommend one hundred and eight inches (108”).
2. Make sure the right side is installed at the same level as the left. Don’t use
the floor to level the right side as it may not be the same height side to
side. Instead, use the siding. The goal is to see the awning levelled with
the wall elements.
3. Make a second (2
nd
) mark five and a half inches (5 ½’’) below the first (1st)
mark. The space between these marks must be clear of obstructions
(doors, windows, vents, light fixtures) along the length of the wall.
4. Trace a level line on the lower mark for the length of the awning. The
bottom of the wall installation plate will rest on the lower line.
Width
1. Vertically mark the middle point and the points where the left and the
right ends of the awning will be located.
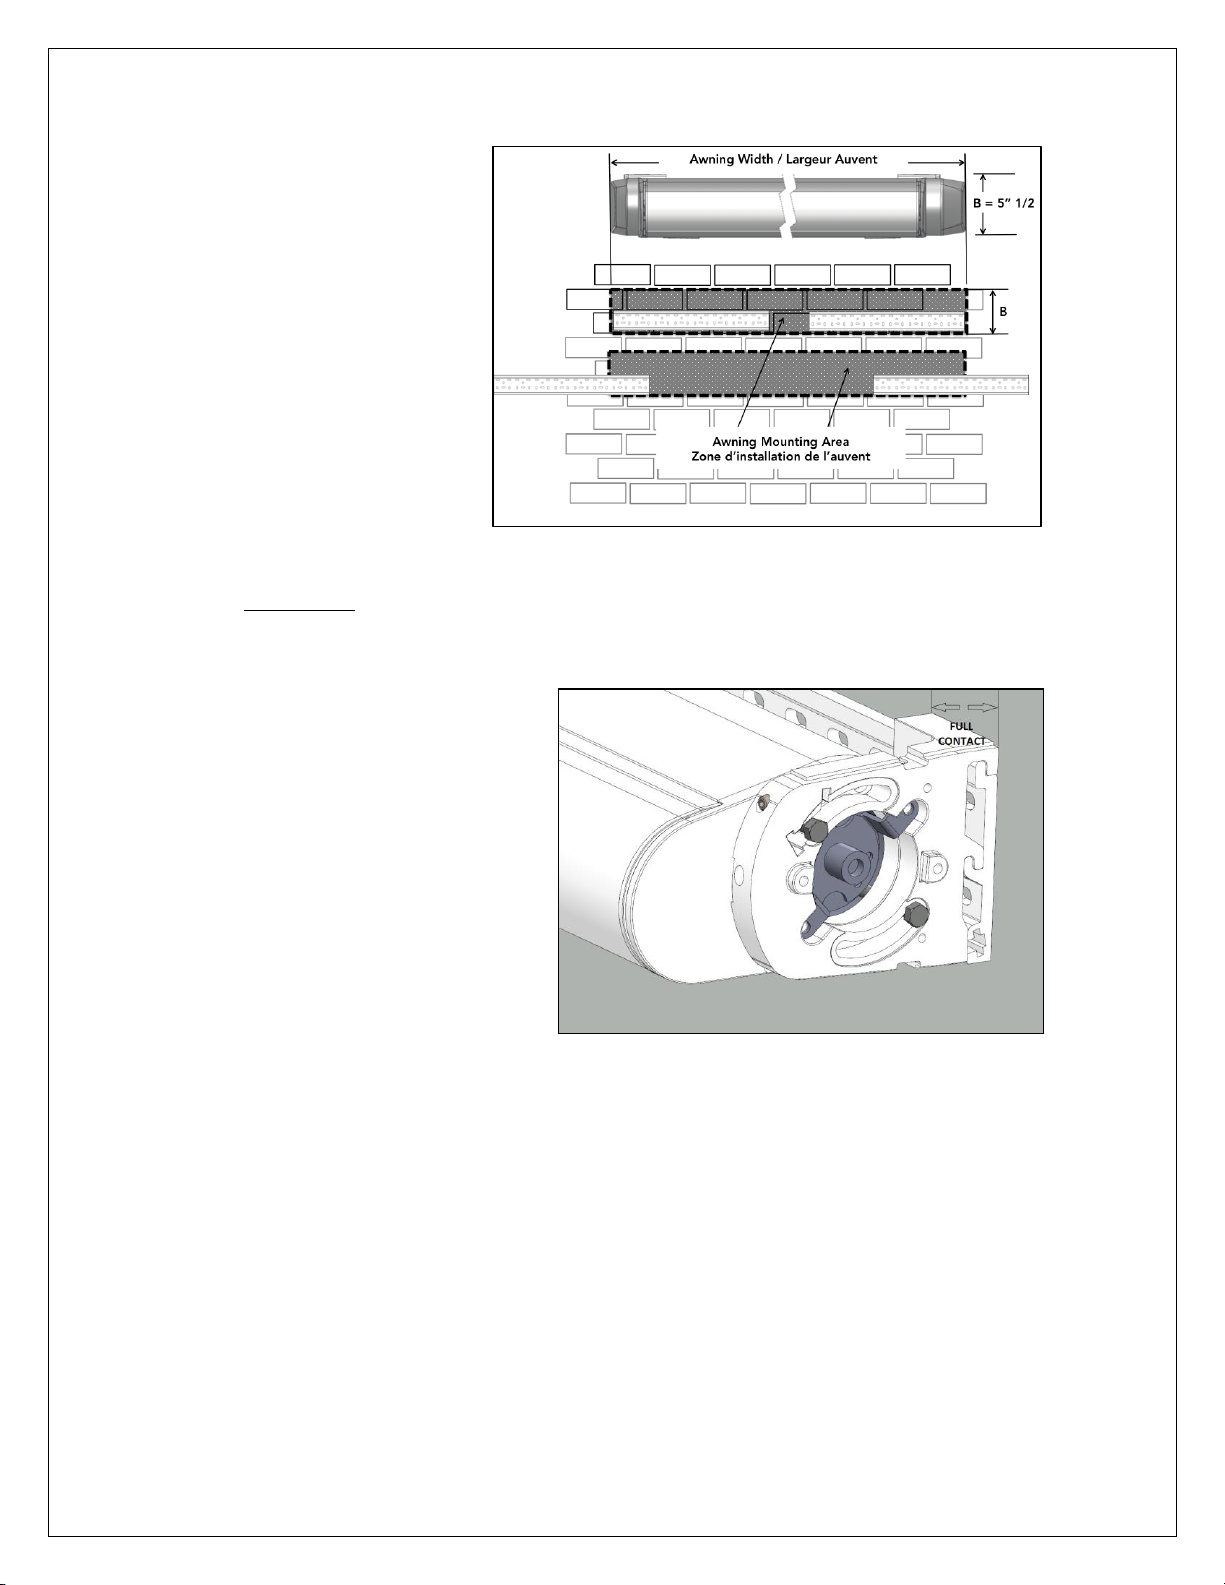
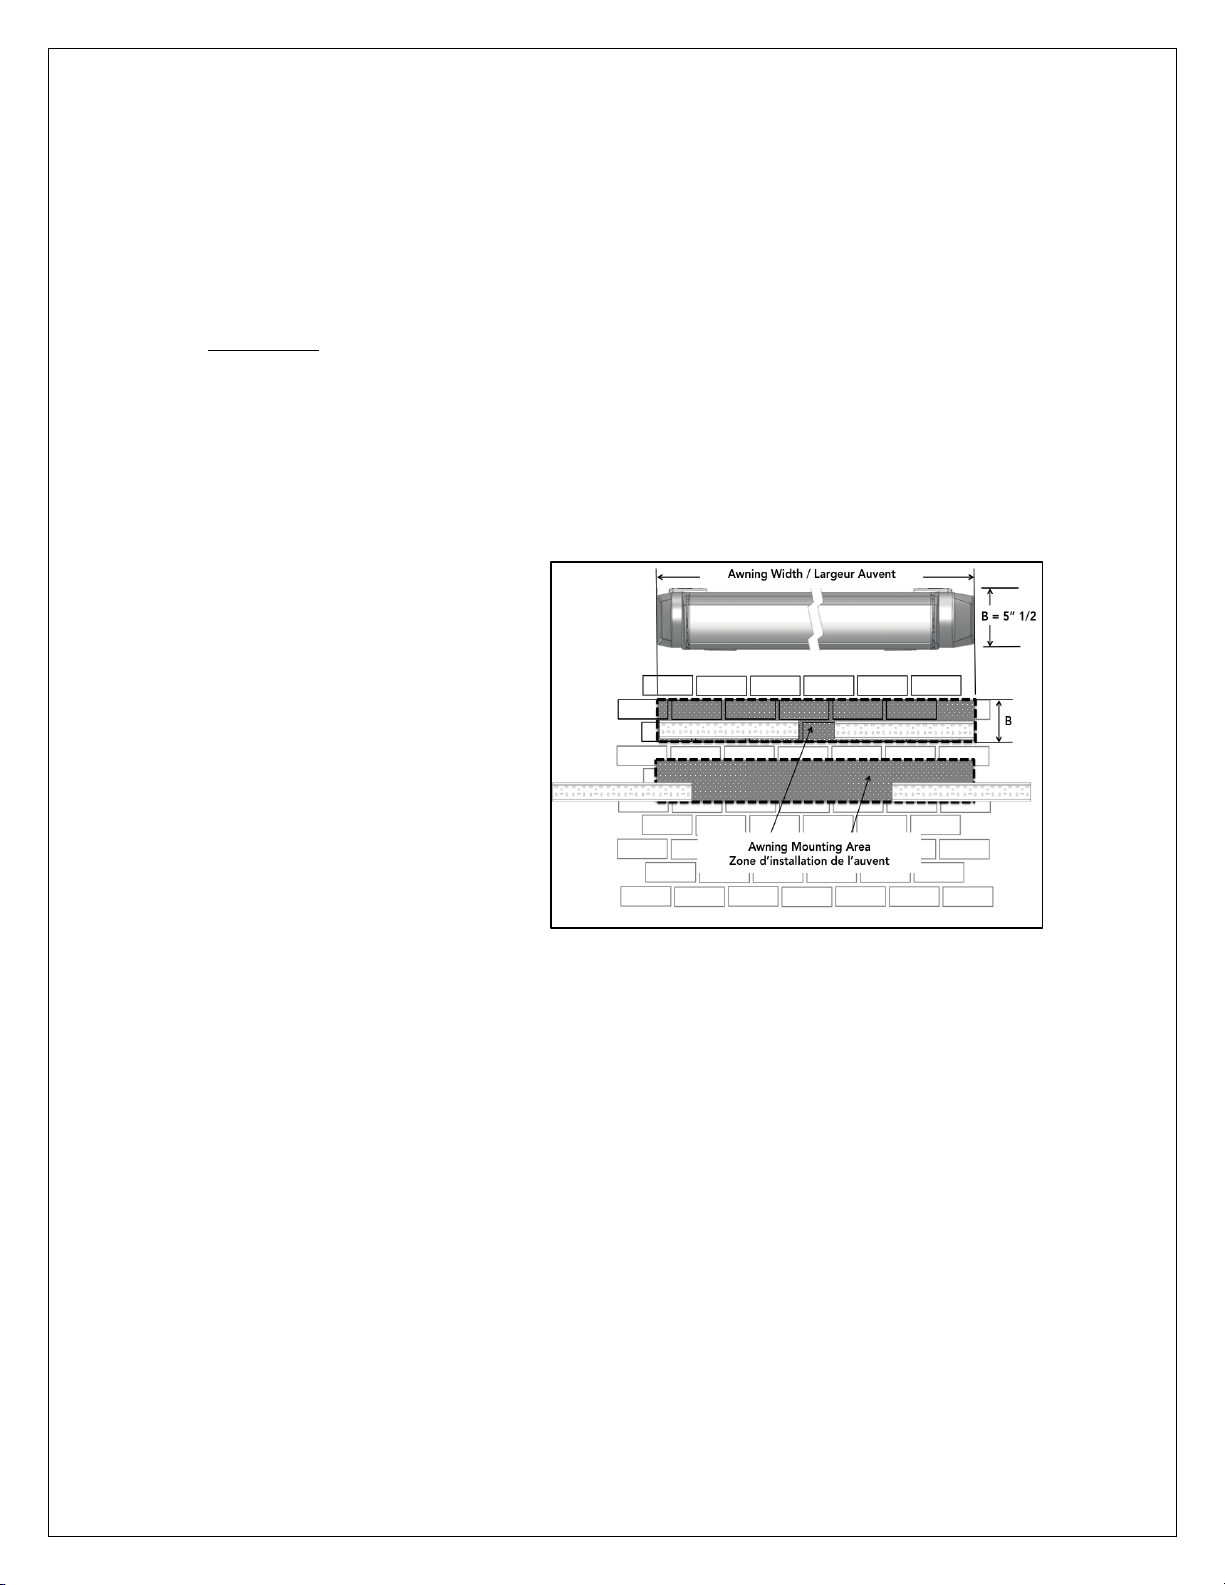
2. Then, mark two (2) horizontal lines with five and a half inches (5 ½’’) space
between. You will get the awning mounting area showing a rectangle sizes
of the width of the awning by five and a half inches (5 ½’’) high.
Page 11

Brasilia Slim EN March 2022 v4 11
2.2. Finding the beams, studs or floor joists
You must now locate the beams, studs or floor joists in the area in which each screw
must be anchored and also to where the holes of the brackets and the central support
must be drilled, as explained below.
2.2.1. Method A
The installation plates can be installed at the same width as the awning or wider,
if necessary.
If your awning is installed on a wall with a window or a door, use this opportunity
to locate the studs in your home and transfer those measurements to the
outside:
1. Use masking tape. From the inside of your home, upon the wall that
your awning will be installed, place a strip of about six inches (6’’) of
masking tape vertically on the window pane.
2. Now locate the stud on the same inside wall, and mark the centre of
the stud. Depending on the type of siding you have, you could use a
stud finder. Measure from the tape or the door to the centre of the
stud, and write the measurement down. Continue to locate the
additional studs and write down those measurements.
3. On the outside wall, using the inside measurements, measure from the
tape or the door to the centre of the studs.
4. Mark the centre of each of the studs on which a screw will be attached
to the anchor with a six and a half inches (6 ½’’) vertical line. Make sure
that the line is straight and leveled. It will facilitate the mounting of the
awning in the installation plates.
CAUTION! A proper installation of the installation plate is the most critical
aspect of the awning mounting. it is critical that all bolts are anchored to the
beams, studs, or joists, or other major structural parts of your wall.
Even a moderate wind exerts great force on the awning and the installation
plates. This is why it is important that all plates be anchored properly and
securely. Proper location will also make it easier to insert the pre-assembled
awning into the mouting supports
Page 12
Brasilia Slim EN March 2022 v4 12
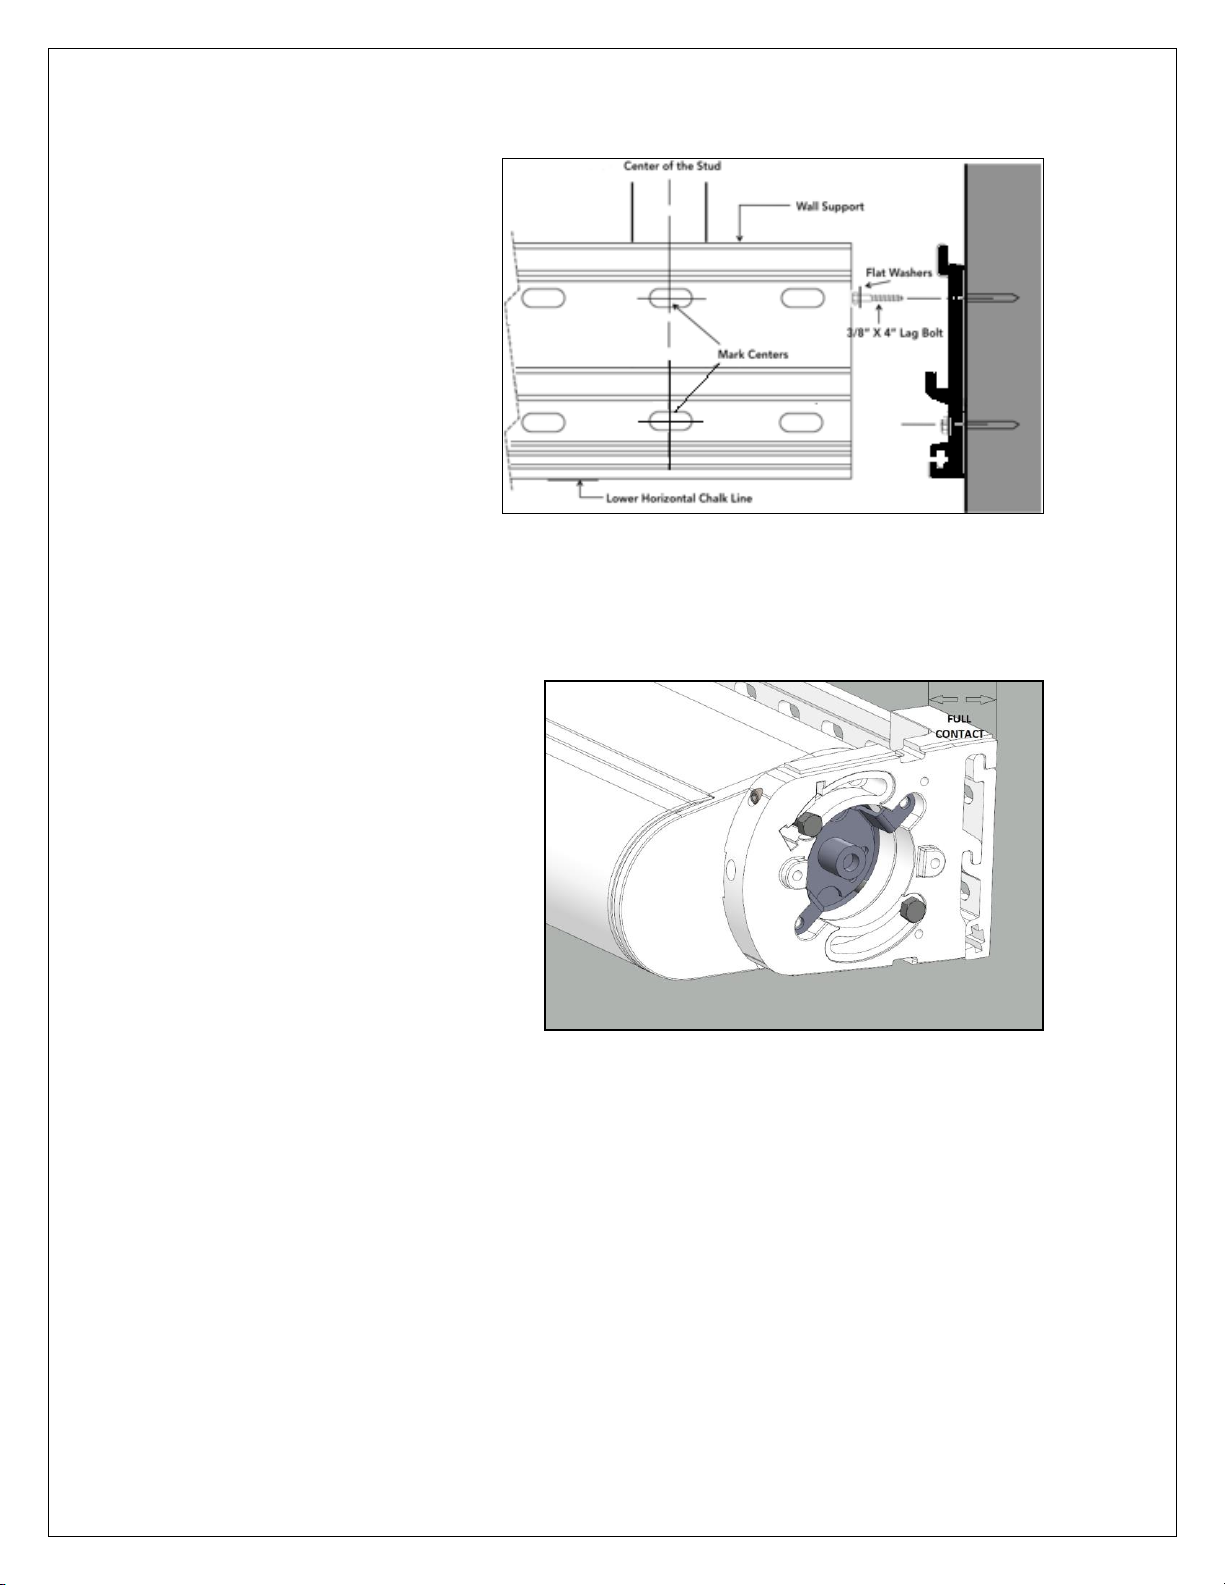
Most constructions
have a spacing of
sixteen inches (16”)
between the wall
studs, on the ground
floor. Some of the
more recent
constructions will
have twenty-four
inches (24”) spacing
between the wall
studs on the second
(2nd) story. A minimum
of eight (8) of the twelve (12) lag bolts are required to fix the two (2) installation
plates to the wall. In the case of an awning over sixteen feet (16’) wide, two (2)
more lag bolts are required to fix the central support to the wall. It means that
you have to find eight (8) or ten (10) adequate locations on the wall.
It’s important to know that
the awning is supported by
it’s mounting supports
located at each end. At
least one (1) set of screws
must be located right
underneath the mounting
supports OR on each side
of the mounting supports
if the installation plates
extends beyond the
awning.
Never install all the screws in the middle of the awning between mounting
supports, as this position will weaken your installation.
Page 13
Brasilia Slim EN March 2022 v4 13
2.2.2 Method B
To find the studs, if the above method (method A) does not work, you will have to
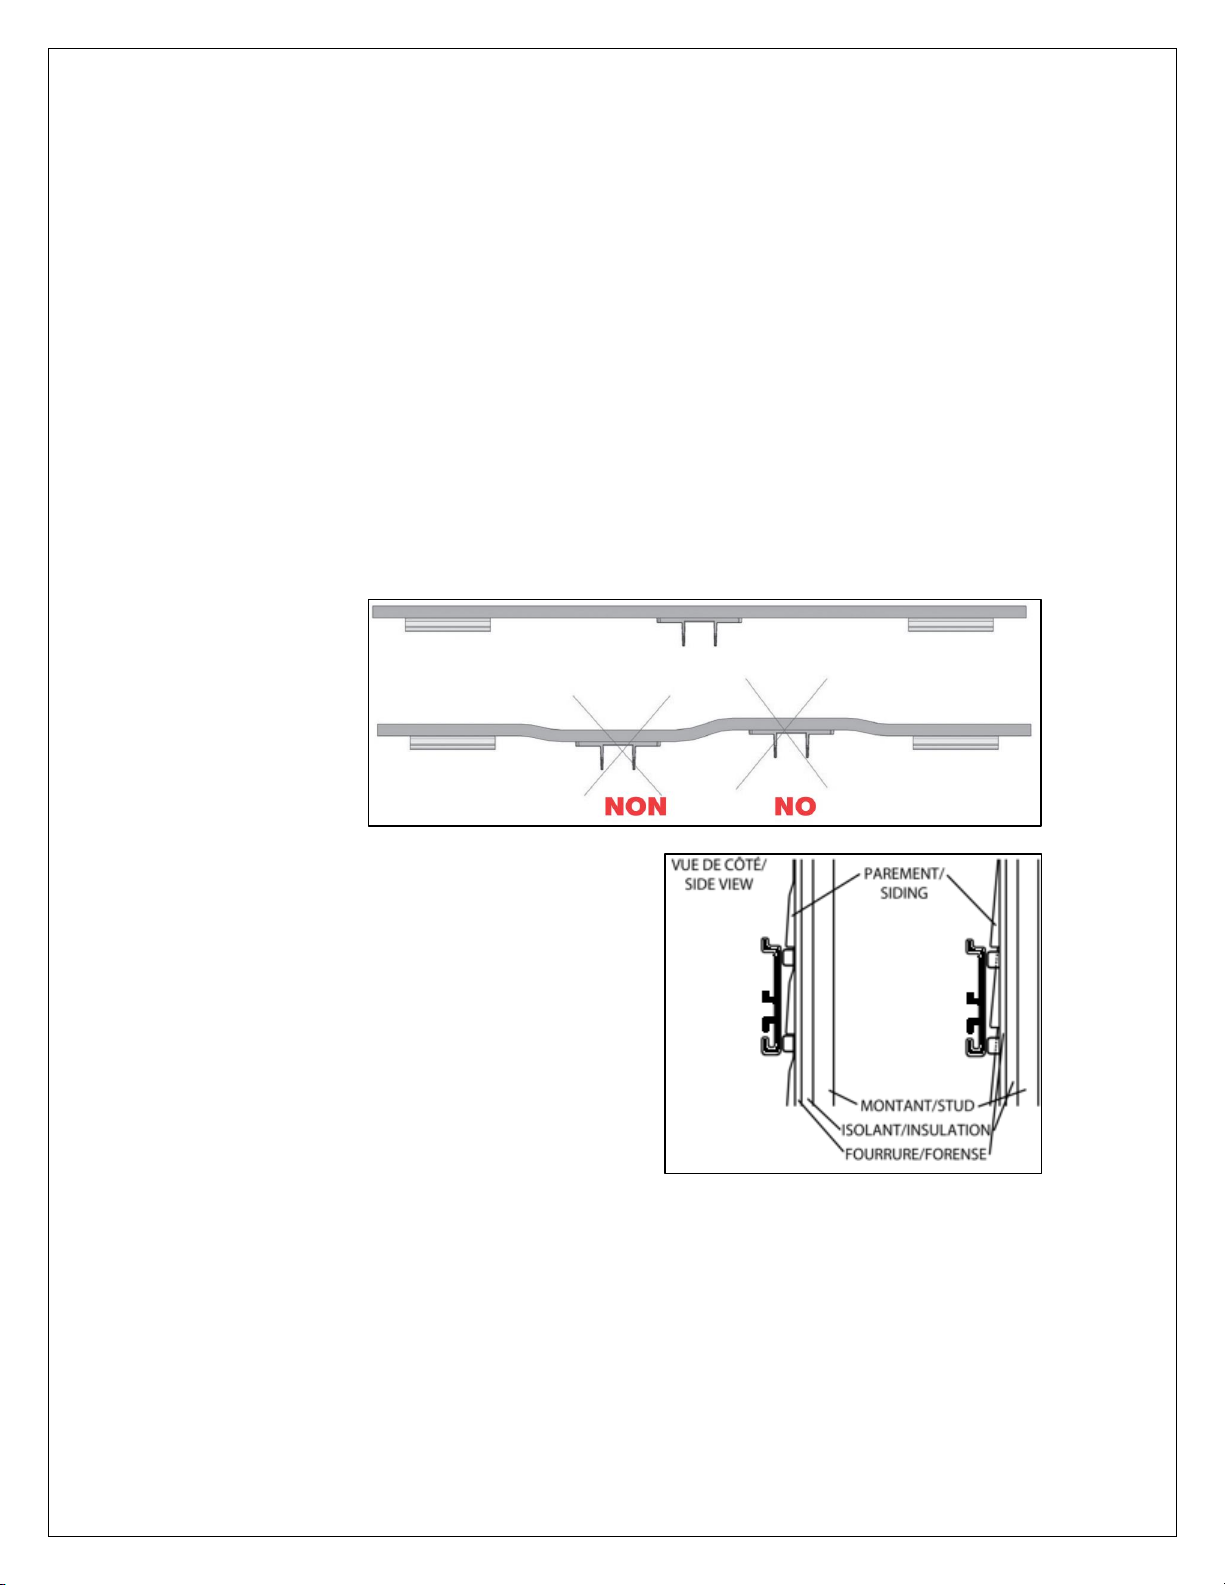
lift your siding (using a Zip tool). The insulation material often ends with a stud;
test this location by hammering a long nail, screwing in a long screw or by drilling
a small hole. A Zip tools will allow you to lift the siding without damaging it. Keep
in mind that the furring is rarely centered with the studs (structural part of the
house).
1. When taking measurements or drawing the line, you may notice that
the wall is curved/arched. In this case, it will be necessary to put more
shims under certain installation plates than on others. It is imperative
that all plates are aligned on the depth (projection) as much as on the
height.
2. Decide if the shim should go
on top, under or through the
siding. If the shim goes on top
of the siding, it is important
that it is resting against a solid
surface. The shim should
NEVER rest on fiberboard
(tentest), insulating foam or
mineral wool.
3. If there is an insulation sheet,
fiberboard or mineral wool in
between the installation plates location and the solid surface, remove
a square of the insulation material and replace it with a piece of solid
wood on top of the solid surface (wood etc.). That piece of wood needs
to be well attached and will serve to support the shim or the plate.
Page 14
Brasilia Slim EN March 2022 v4 14
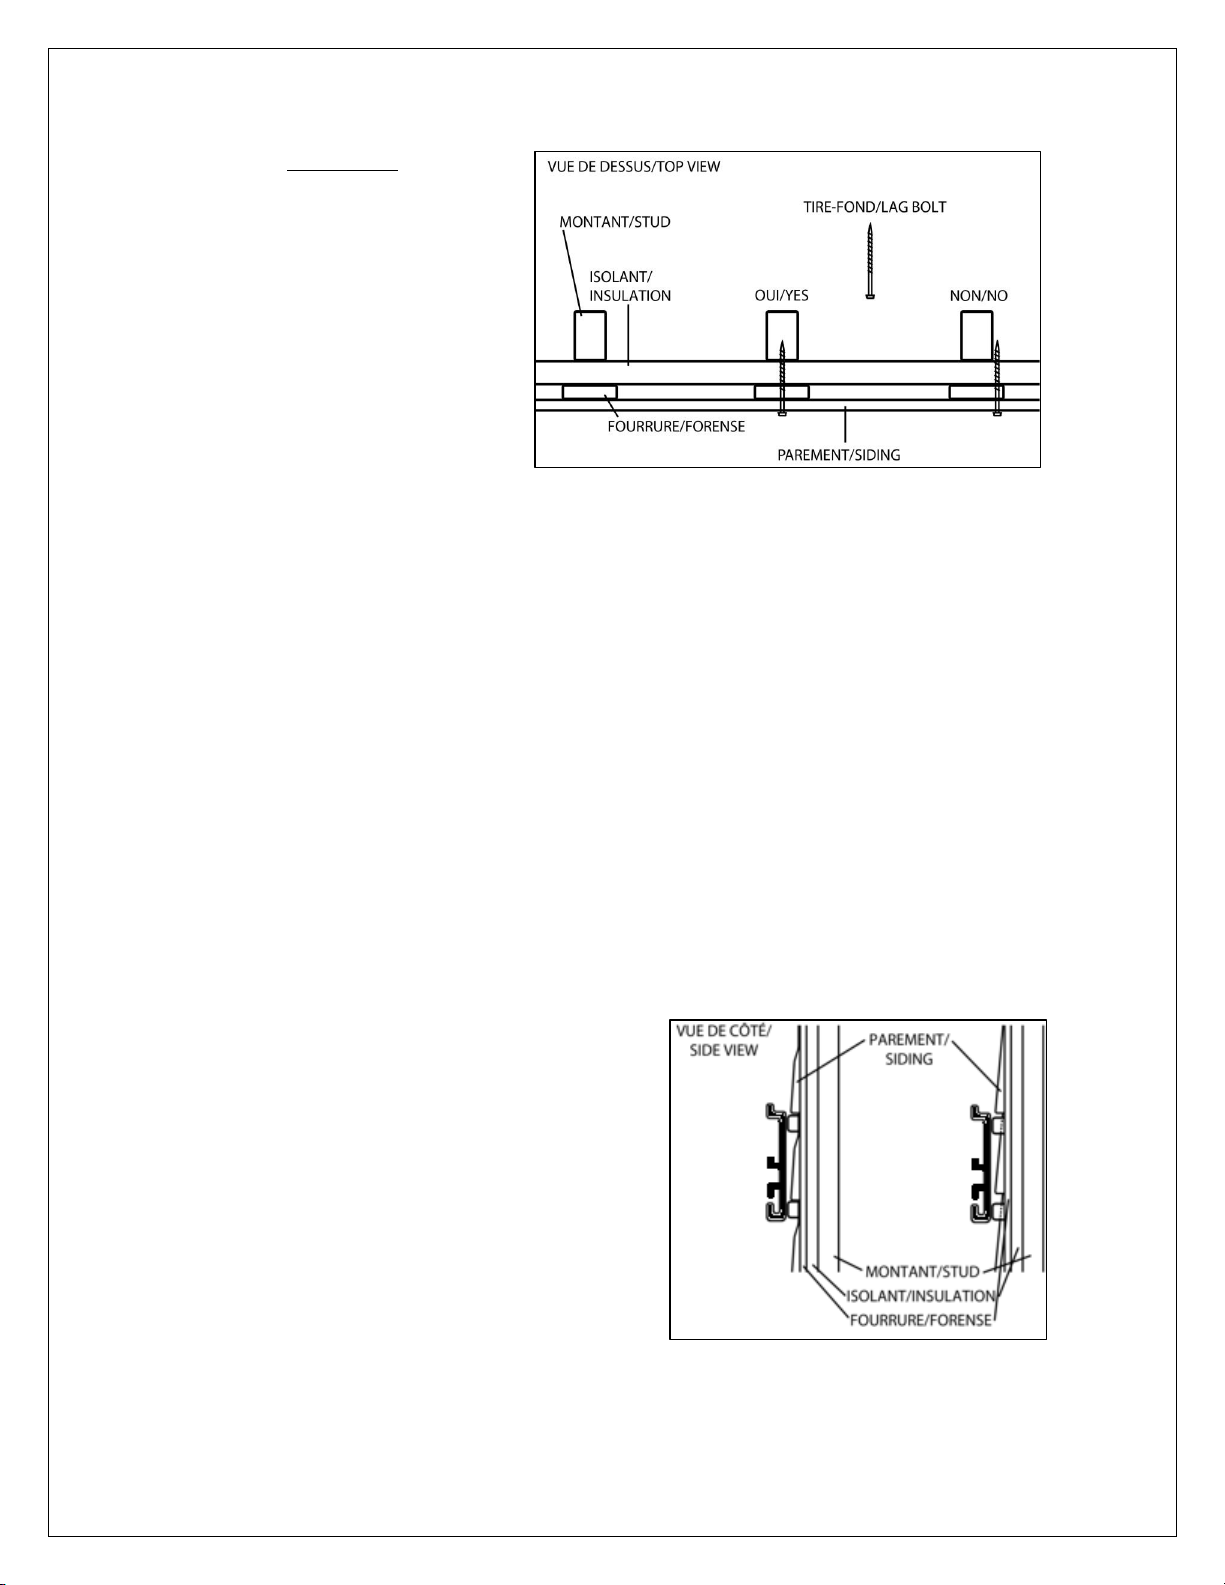
WARNING! There is
often a forense, on top
of the fiberboard,
wider than the stud.
The lag bolt must be
installed into the stud,
not just in the piece of
wood and not just in
the forense. Probe the
chosen spot with a
small drill bit before
installing, this will avoid
shattering the stud by drilling too close to it’s edge.
NOTE: Shims may be required.
2.3. Shims and solidity
Sidings, corrugated metal, stucco, decorative bricks and wood often have some empty
space between the structural components and the siding. If the siding is crushed by
the awning, the latter can move. If the awning moves, the result will be an uneven
installation. The awning could then collapse and cause personal injury as well as
material damage.
In order to have a solid installation, use appropriate shims. A good way to shim the
brackets is to use tubular shims or washers, either nylon, aluminum, copper or others
(but not metal).
The shim can be installed on top of the siding
if a sufficiently large surface is in direct
contact against a solid surface. Otherwise, the
shim can be installed underneath the siding
where a hole can be cut into the siding for the
shim to be inserted in.
NOTE : It is mandatory to put caulking around
the shims or shims to prevent corrosion and
water infiltration.
Page 15
Brasilia Slim EN March 2022 v4 15
2.4. Bracket Installation
Once the studs, beams or joists have been found and the appropriate shims have been
chosen, comes the installation of the plates and central support.
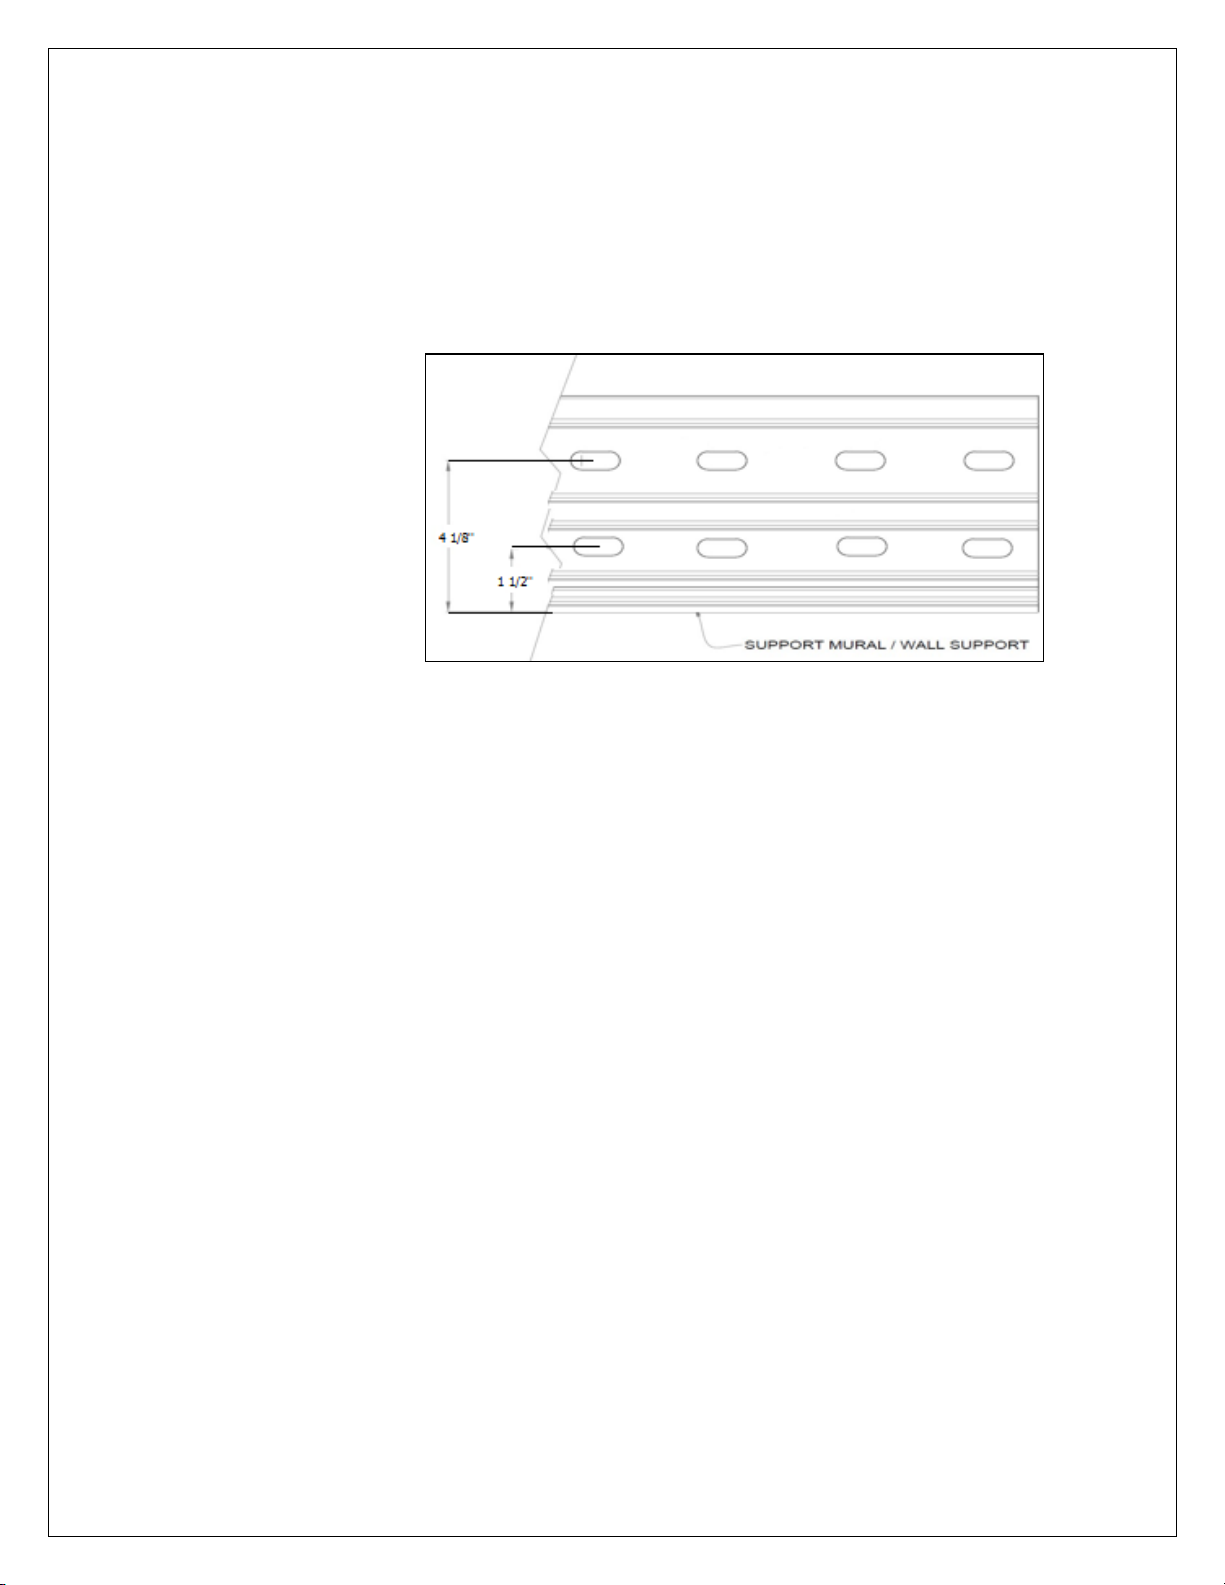
Make sure that each one of the fourteen (14) bolts required to install the brackets will
be positionned at
the centre of a stud,
beam or joist The
centre of the holes
in the brackets are
located at one and a
half inch (1 ½’’) and
at four and one
eighth inch (4 1/8”)
from the bottom of
the bracket.
1. Use a three sixteenths of an inch (3/16’’) drill bit to make the holes through the
side and the shim if necessary. The hole should go about three inches (3’’) in
the stud, beam or joist. This prevents cracking and splitting of the wood when
installing the lag bolts.
2. Using a nine sixteenth of an inch (9/16’’) socket, install both brackets and the
central support, starting with two (2) holes at the top, using the three eighth
of an inch by four or five inches (3/8’’ X 4” or 5’’) lag bolts.
3. Use the included washers between the heads of the bolts and the installation
plates.
4. While tightening the bolts, keep the plates to level. Do not over tighten the
bolts as this could split the wooden structure or weaken the bolt retaining
force.
Page 16
Brasilia Slim EN March 2022 v4 16
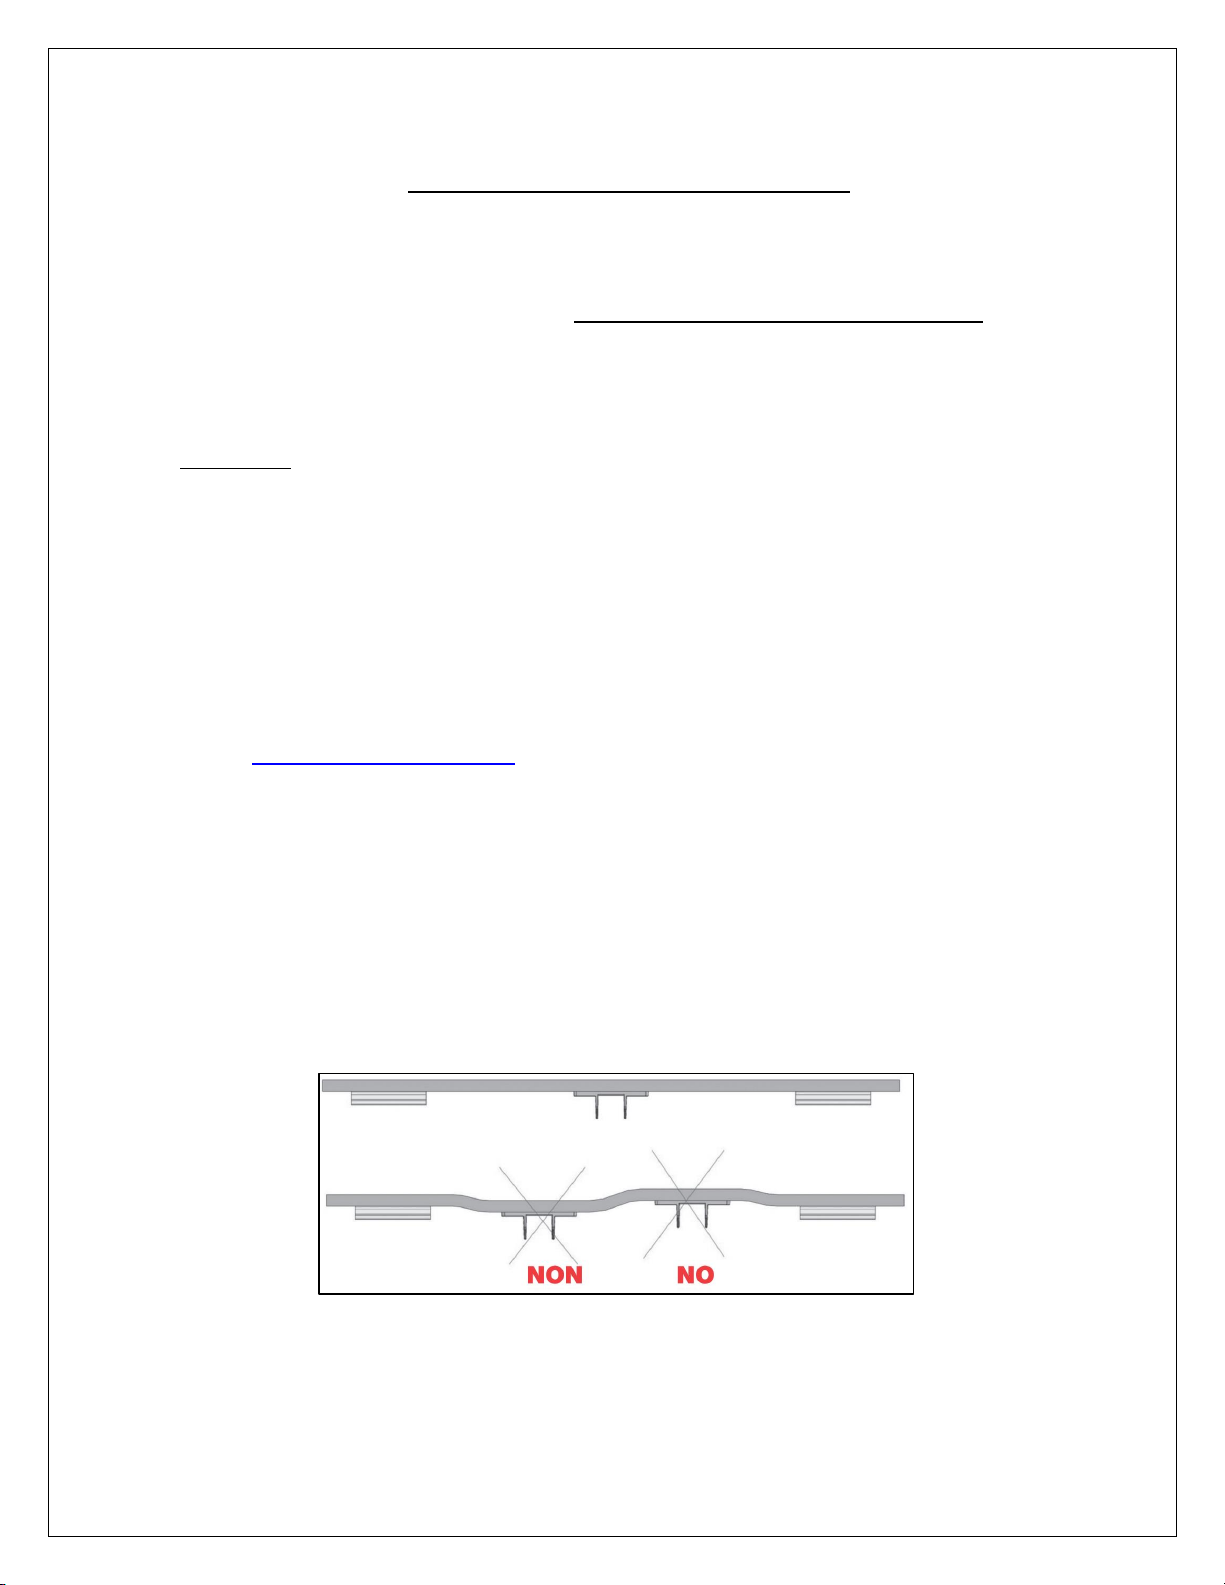
NOTE: The installation
plates are conceived to
cover at least two (2)
studs, maybe three (3).
It is necessary that each
plate is fixed to the wall
by at least four (4)
screws. To ensure a
solid installation, and
reach at least two (2)
studs, you may need to
have the plates extend
beyond the installation
width of the awning.
WARNING! If the installation plates extend beyond the width of the awning, you
will need to trim the protective caps.
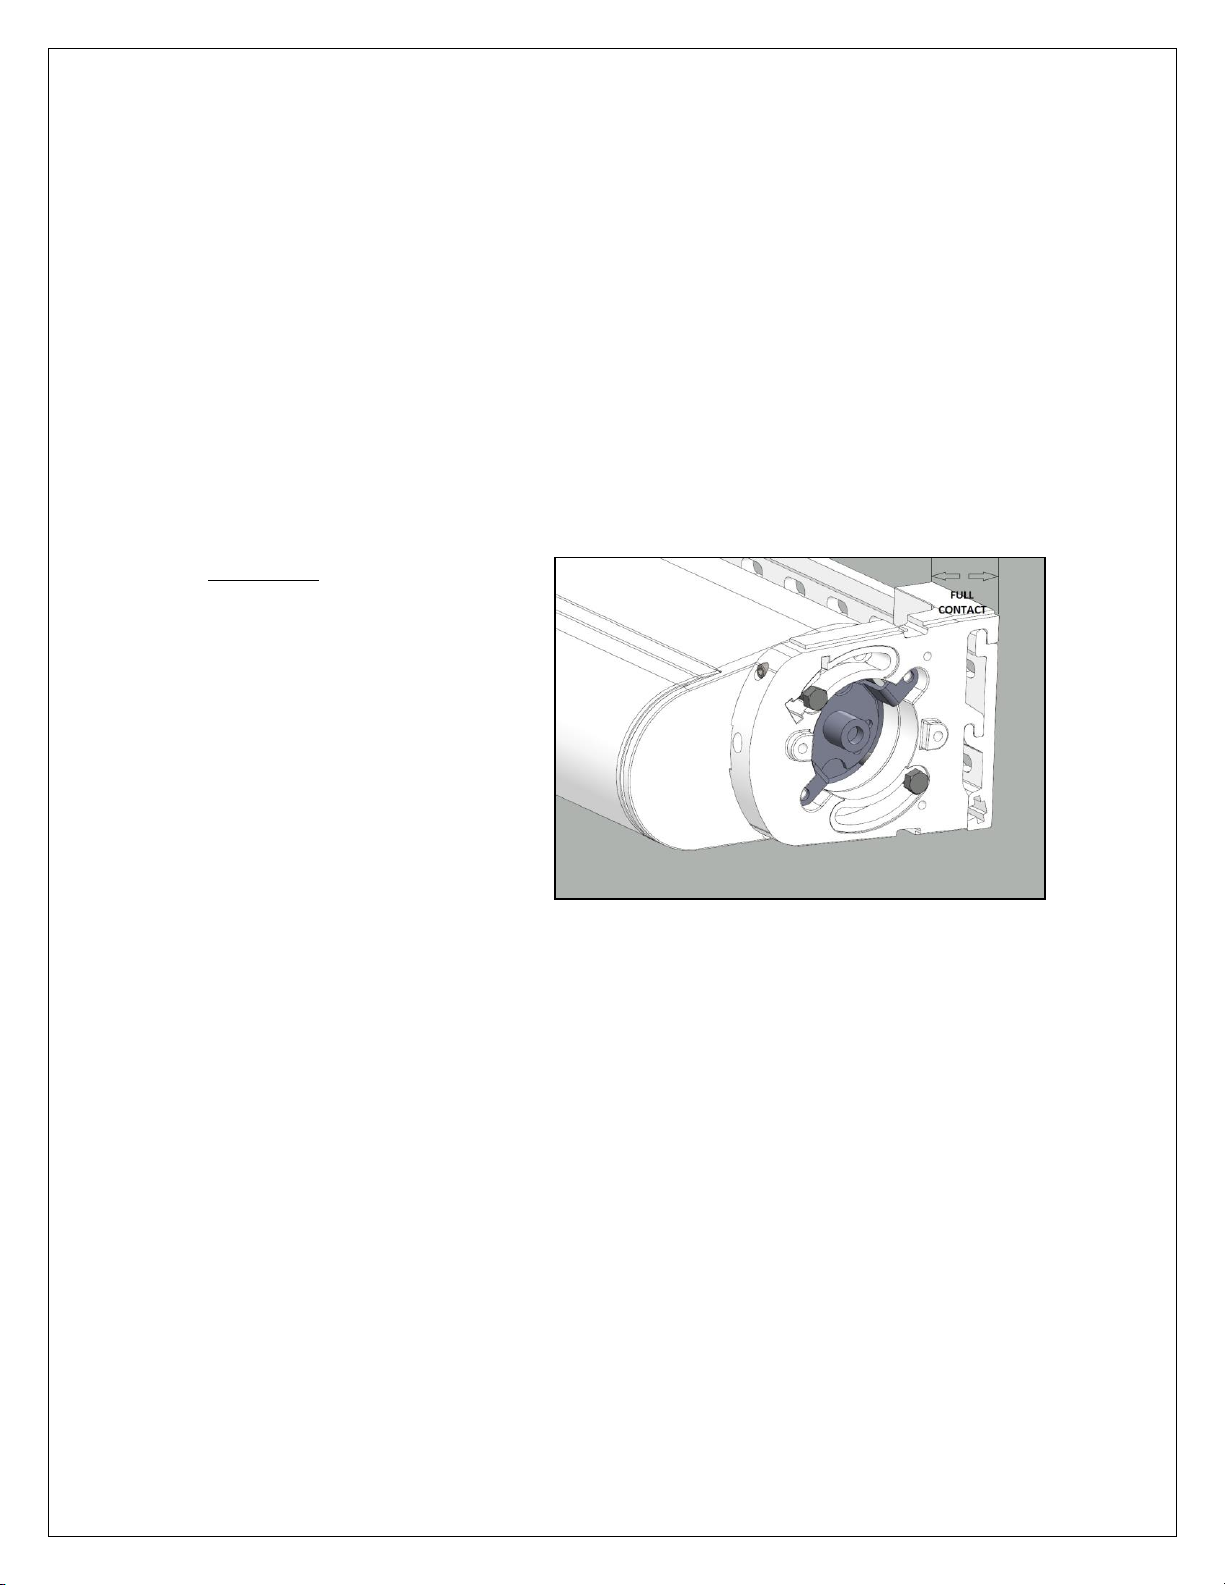
CAUTION! The two (2)
mounting supports of the
awning must be entirely and
completely resting on the
plate.
2.4.2. Central support
Awnings with sixteen feet (16’) width or more need to be supported by an
additional central support to prevent twisting of the aluminum casing
created by the weight of the arms. If installing on a brick wall, four (4) bolts
are required to safely install the central support.
Page 17
Brasilia Slim EN March 2022 v4 17
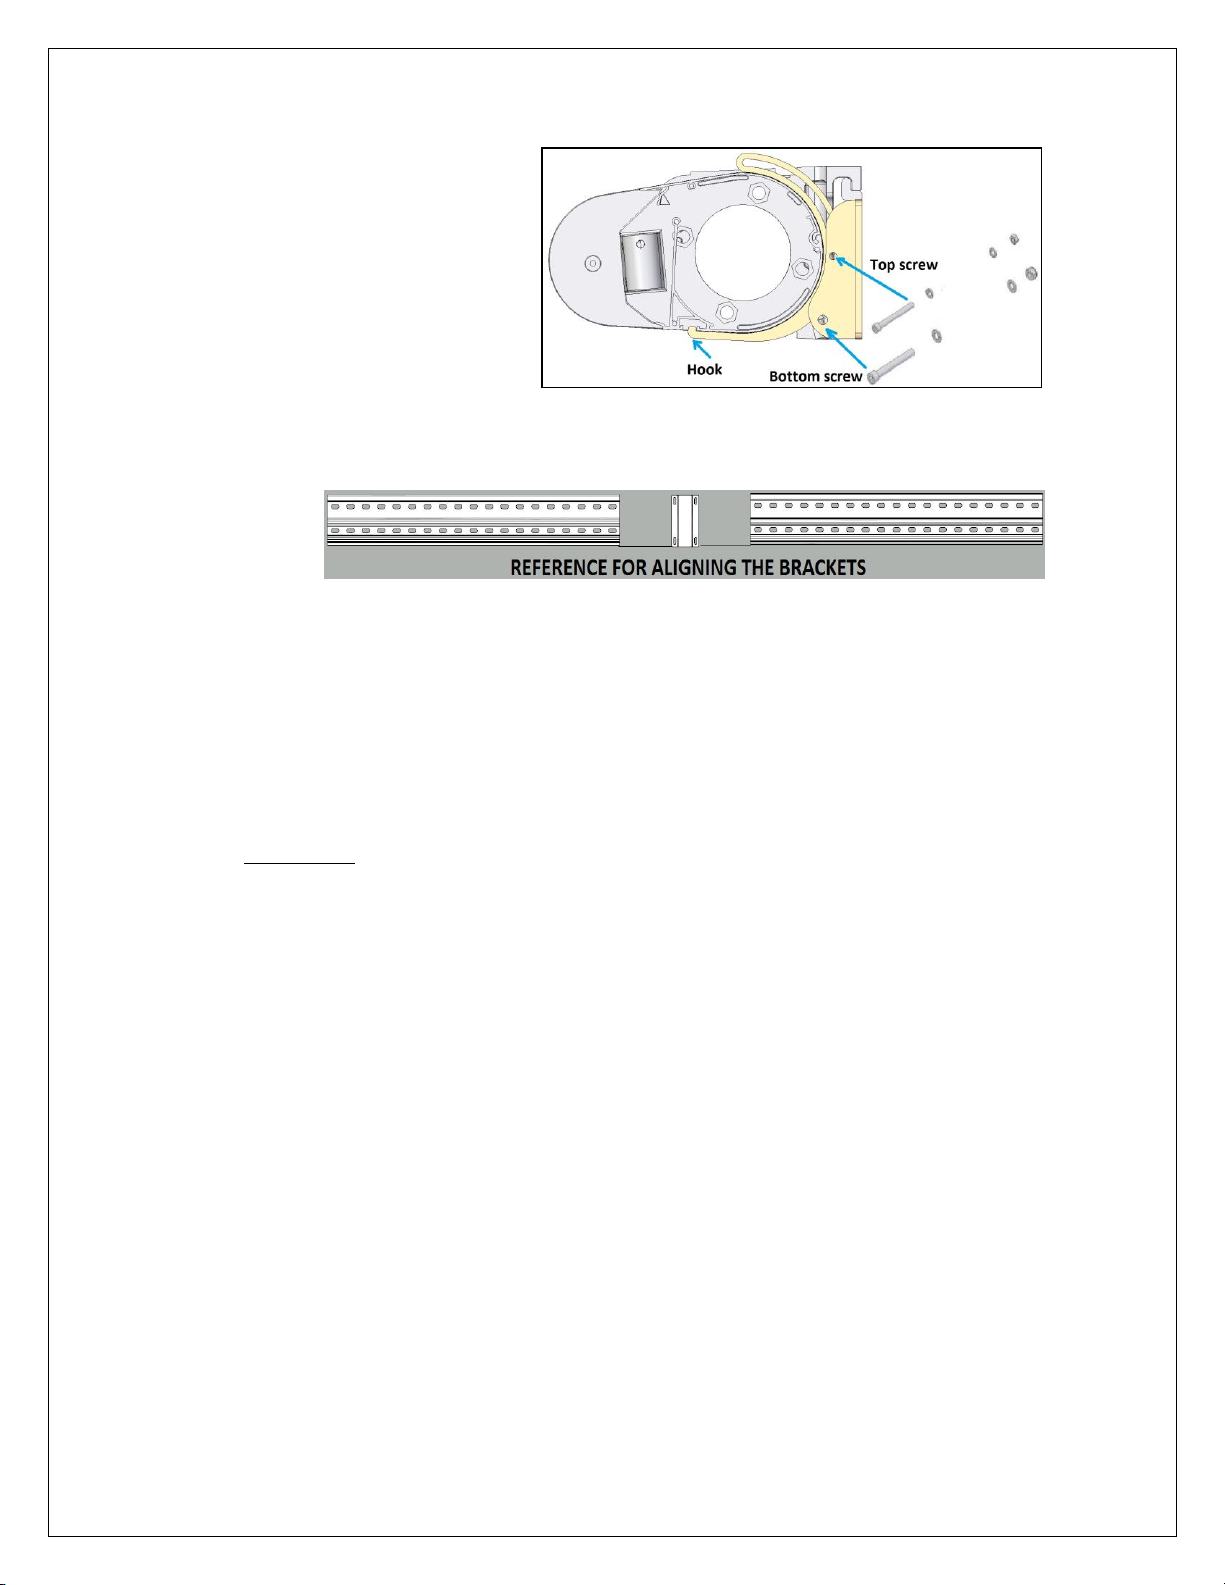
The central support
needs to be
configured with the
hook on the bottom
pointing upwards
and the larger bolt
on the bottom.
Make sure that the
central support is
aligned with the bottom of the awning mounting area.
The central support must be solidly fixed into a wall stud, beam or joist. It
doesn’t have to be perfectly centered. The central support has to be
located between the two (2) plates. If a beam is available underneath the
siding, it will be safe to use bolts on the top part of the support plate. If you
are using a stud or any other narrow vertical structure, use two (2) holes
that are one on top of the other on the installation plate. Mark the bolt
locations to fix the central support.
WARNING! You must securely anchor all the screws to the studs. Some homes may
require longer lag screws. WHEN IN DOUBT, consult a certified contractor. Failure
to do so could result in collapse of the awning and cause personal injury as well as
material damage.
Page 18
Brasilia Slim EN March 2022 v4 18
3. Installation on masonry
This installation method is meant for solid brick walls, where the masonry brick
brackets/ties are in perfect condition. This excludes all types of decorative brick. If the
brick wall is weak, you will need to find studs, and you might need to purchase longer lag
bolts than those supplied with the awning. WHEN IN DOUBT, consult a certified
contractor.
WARNING! Some brick walls might not be strong enough to safely support an awning.
The supplied bolts are not designed to attach to certain types of brick walls or to
decorative bricks. WHEN IN DOUBT, consult a certified contractor.
The large plates are meant to be used to spread the load. If you do not have the
place to install them and opt for the smaller ones. It will then be mandatory that
at least four (4) lag bolt per intsallation plate are fixed into four (4) different bricks.
To order or exchange the small plates, contact our Customer Service department:
[email protected] . Exchange for large plates is free of charge, provided
they are in perfect condition and have not been used.
When using these optional small plates; they will need to be installed where the
exterior edge is aligned with the supports of the awning or slightly inside, less than
half an inch (½”). If the small plates are wider than the awning, you will not be able
to install the blocking stoppers, see section 5.2 “Using the blocking stoppers”.
You will need to install shims if the brick surface is uneven.
Page 19
Brasilia Slim EN March 2022 v4 19
3.1. Where to install
Make sure to leave at least one inch (1’’) between the top of the bracket and the
underside of the eaves. Since the awning hooks on top of the bracket, you need space
to lift it over the bracket for installation.
WARNING! Never install brackets on the top four (4) to six (6) rows of bricks or twenty
inches (20’’) near the roof since these rows are not strong enough to support the
awning.
3.2. Location on the bricks
Make sure that each of the
fourteen (14) bolts will be
located within the awning
installation area. The centre of
the holes in the plates are at one
and a half inch (1 ½ ”) and four
and one eighth (4 1/8”) from the
bottom of the installation plate.
The bolts are not adapted for hollow construction surfaces such as hollow concrete
blocks. WHEN IN DOUBT, consult a certified contractor. Do not use included masonry
hardware for stucco walls.
Page 20
Brasilia Slim EN March 2022 v4 20
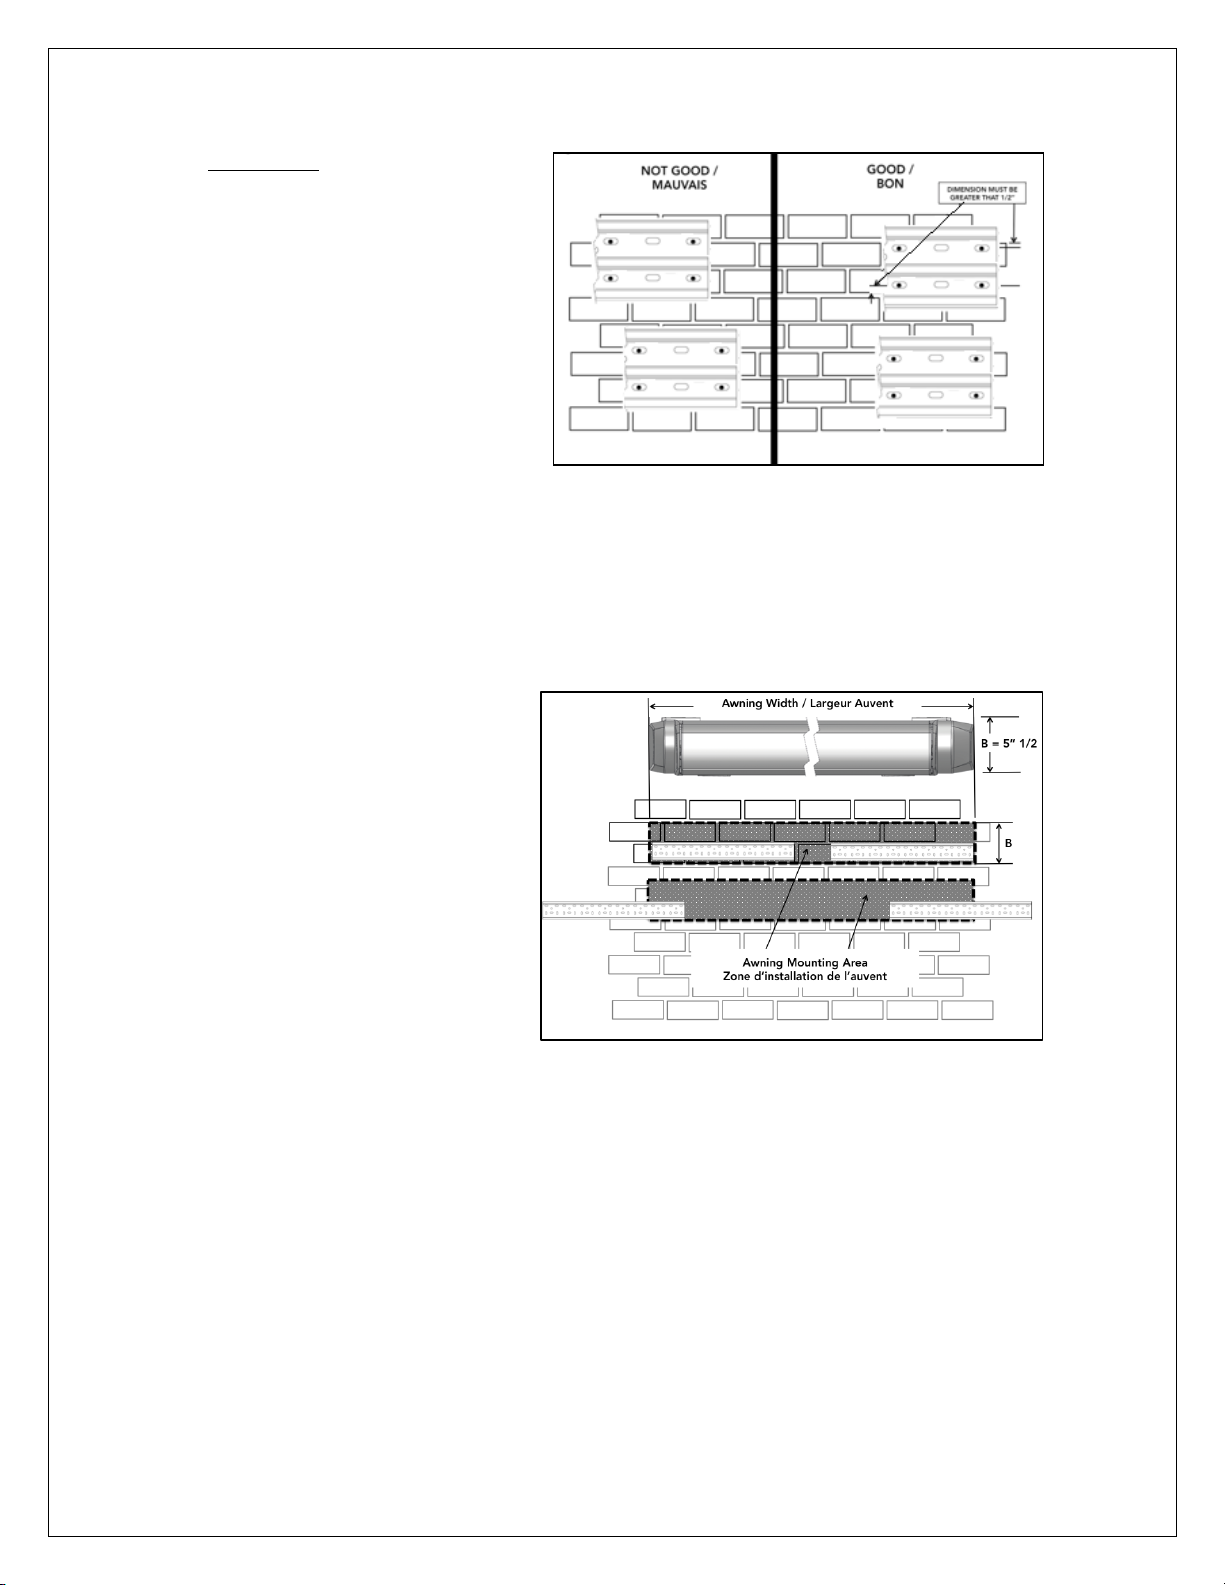
WARNING! The hardware
supplied with the awning is not
conceived to be used in
mortar/joint between the bricks.
It must be installed in the body of
the brick, at least half an inch
(1/2”) from the edge of the brick.
1. While making sure that it remains levelled, place the first (1
st
) installatin plate
at the required height (refer to the bottom line.)
2. Find the joints between the bricks and mark the six (6) locations where the
bolts holding the plates will be installed, making sure to respect minimum
distance between the edge of the brick and the holes for the bolts.
3. Repeat the same steps
for the second bracket,
and if needed, for the
central support. If
installing on a brick wall,
four (4) bolts are
required to safely install
the central support. On
other types of walls,
make sure that at least
two (2) bolts are
secured into the centre
of a stud.
Page 21
Brasilia Slim EN March 2022 v4 21
3.3. Installation of the brackets
3.3.1. Installation plates
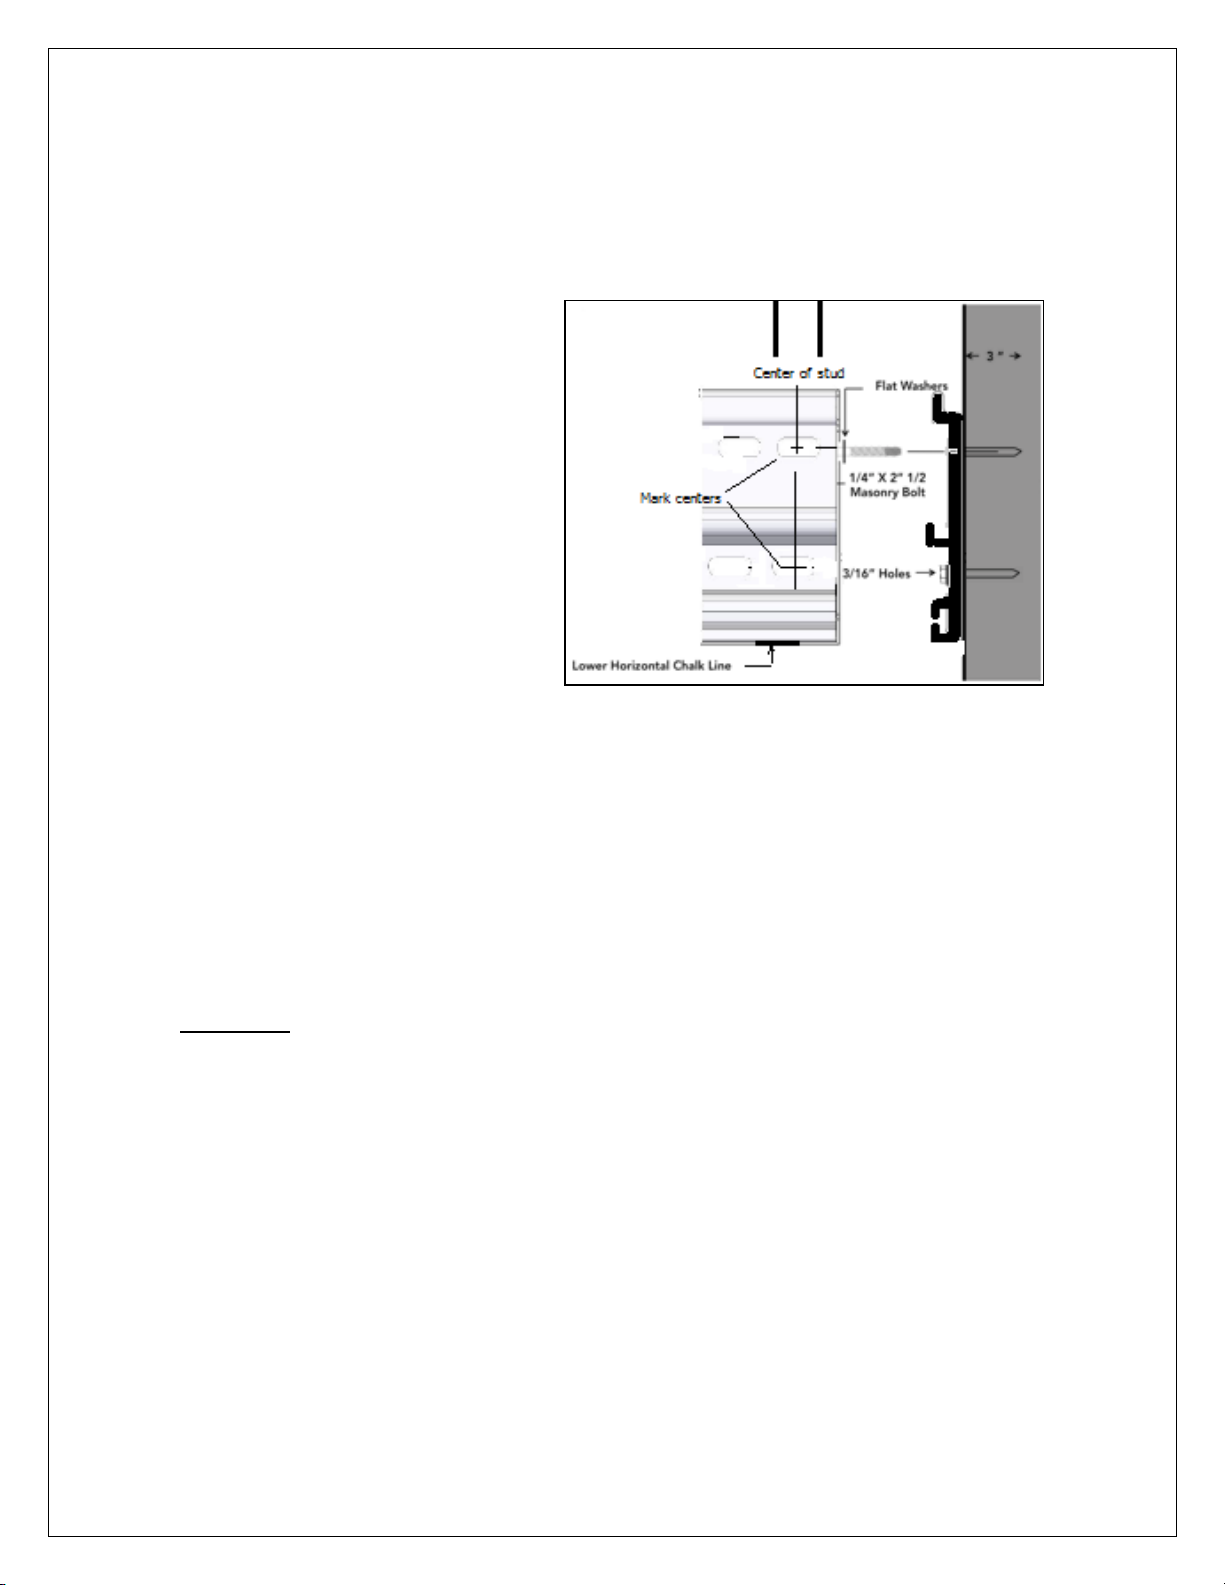
1. Use a masonry bit
of three eighth of
an inch (3/8’’) to
drill the holes.
Make sure the
holes do not
become cone
shaped or flared
during final drilling.
2. With a nine
sixteenth of an inch
(9/16’’) socket,
install both
installation plates, starting with the top three (3) holes.
3. Use the three eigthts by four inch (3/8” x 4”) masonry bolts and the
provided washers between the head of the bolt and the plate.
4. Keep the plate leveled as you tighten the bolts.
5. Do not over tighten the masonry bolts; this could erode the structure
or weaken the bolts retaining force.
WARNING! You must make sure the masonry bolts are well anchored in the holes. WHEN
IN DOUBT, consult a certified contractor.
3.3.2. Central support
Awnings that are sixteen feet (16’) and over require additional support from the
central support to prevent torsion of the casing under the weight of the arms. Four
(4) bolts are required to safely install the central support.
Page 22
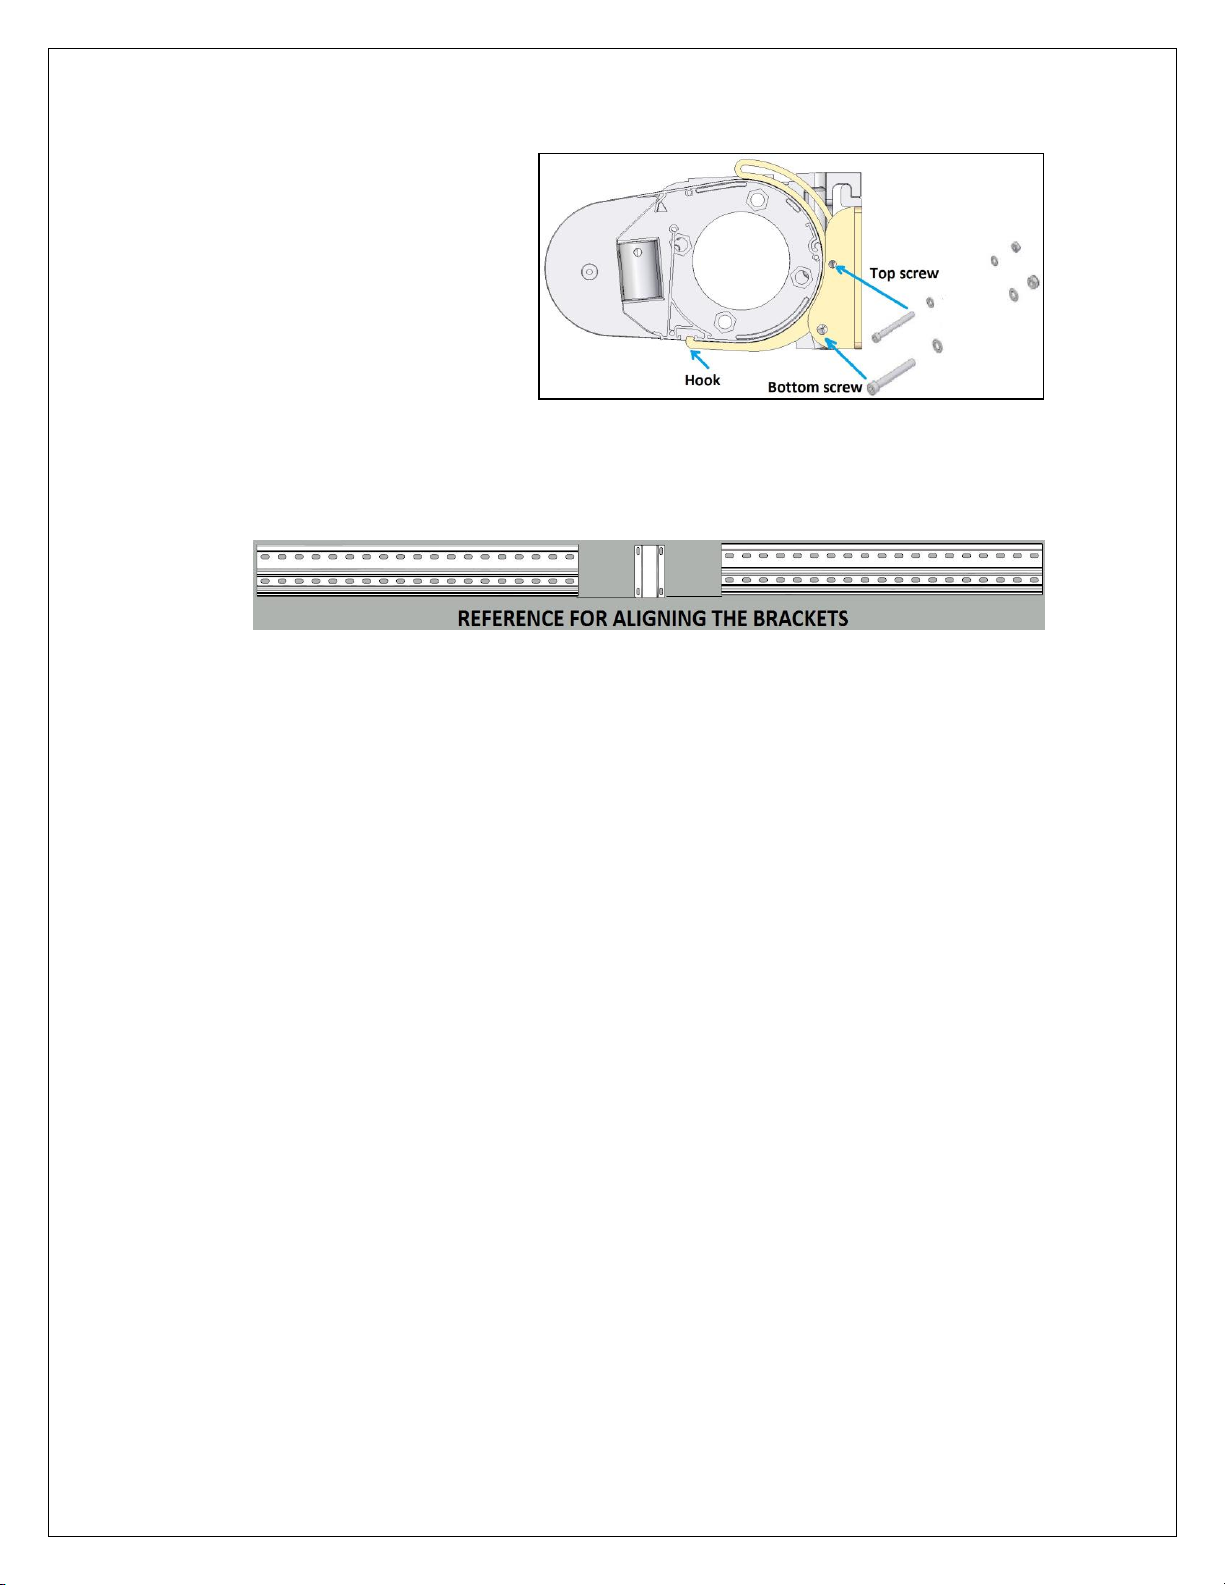
Brasilia Slim EN March 2022 v4 22
For a wall installation, the
configuration needed is
with the thin bolt at the top
and the thick bolt and hook
at the bottom.
Make sure that the central support is aligned with the bottom of the area onto
which the awning will be installed.
The central support must be firmly anchored to the body of the bricks. The central
support doesn’t need to be installed exactly in the middle of the awning. If
possible, use the holes at the top of the plate to install the supports, if not possible,
use two (2) holes which are one on top of the other. Mark the two (2) locations of
the bolts that will hold the supports and drill as instructed for the brackets.
Page 23
Brasilia Slim EN March 2022 v4 23
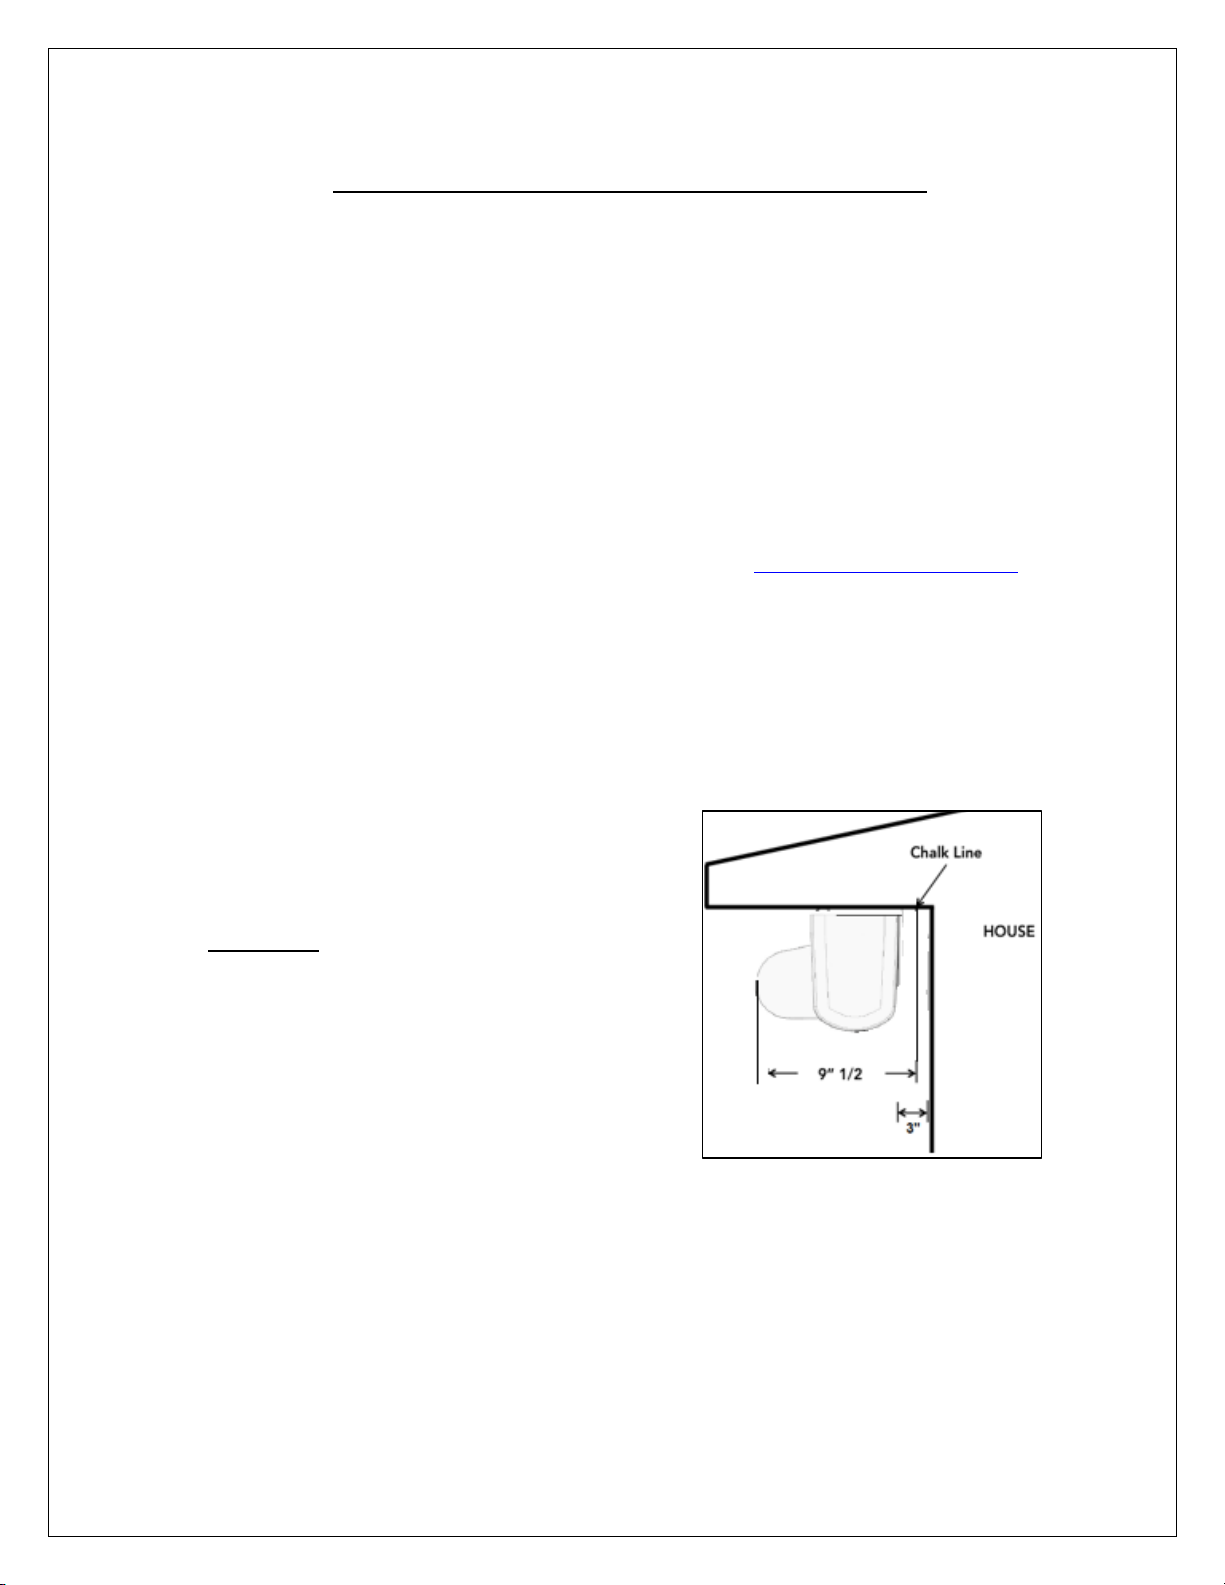
4 Installation under soffit or eaves
The following instructions are for installation under perfectly horizontal cornice or soffit.
On some cornice or angled rafter installations, it may be necessary to use a suitable rafter
support or angled shims. WHEN IN DOUBT, consult a certified contractor.
It is imperative to properly evaluate the distance between the trusses or joists and the
soffit cover or other decorative siding in order to choose appropriate shims. It is often
easier to find structural support close to the end of the eaves than close to the wall.
NOTE : Rafter adapters may be required for under soffit installation. To purchase, please
contact us: 1-866-441-4182 (CA), 1-800-736-0906 (USA) or [email protected]
4.1. Where to install
1. Trace an horizontal line under the eaves. This line has to be longer than the
awning itself. When you position your line on the soffit, take into account that
when retracted, the awning will project ten inches (10") from the line.
2. It is also important to leave three inches
(3’’) of spacing between the wall and the
casing in order to make adjustments.
WARNING! Proper location of the installation
plates is the most important aspect of the awning
mounting. It is critical that you anchor all the
screws to the rafters or other major structural
elements.
Even a moderate wind exerts great force on the awning and the installation plates. This
is why it is most important that the brackets be anchored properly and securely.
4.2. Finding trusses
You must now locate the rafters in the area in which each installation plate must be
installed. To find the rafters, use a stud finder. It is probable you might have to remove
part of the decorative cover underneath the soffit. Mark the centre of each rafter, on
Page 24
Brasilia Slim EN March 2022 v4 24
which a plate will be installed with a six inches (6”) long line.
1- Mark the center of each rafter where an installation plate is to be installed
with a six inches (6”) line.
2- Choose the final destination of your awning. Then mark the area where all of
the fourteen (14) screws will be positioned in reference to the middle of a
truss.
It’s important to note the awning is supported by it’s mounting supports located at
each end. At least one (1) set of screws must be located right underneath the
mounting supports OR on each side of the mounting supports if the plate extends
beyond the awning.
WARNING! The screws must be
anchored at the end of the
installation plate. They should be
maximized vis-a-vis the mounting
support. Otherwise, your
installation will be weakened.
4.3. Shims and solidity
Sometimes, there is a good distance between the soffit or other decorative cover and
the trusses. To make sure that you have a solid installation, use appropriate shims.
A good way to shim the installation plates is to use tubular shims or nylon, aluminum,
copper or others (but not metal) shim. If the distance is too large between trusses, it
will be preferable to install a two by six inch (2” X 6”) beam for the entire length of the
awning, or a combination of shims and beam. Make sure all your shims are very solid.
The greater the distance, the higher risk the shims will move if narrow.
Page 25
Brasilia Slim EN March 2022 v4 25
4.4. Installation of the brackets
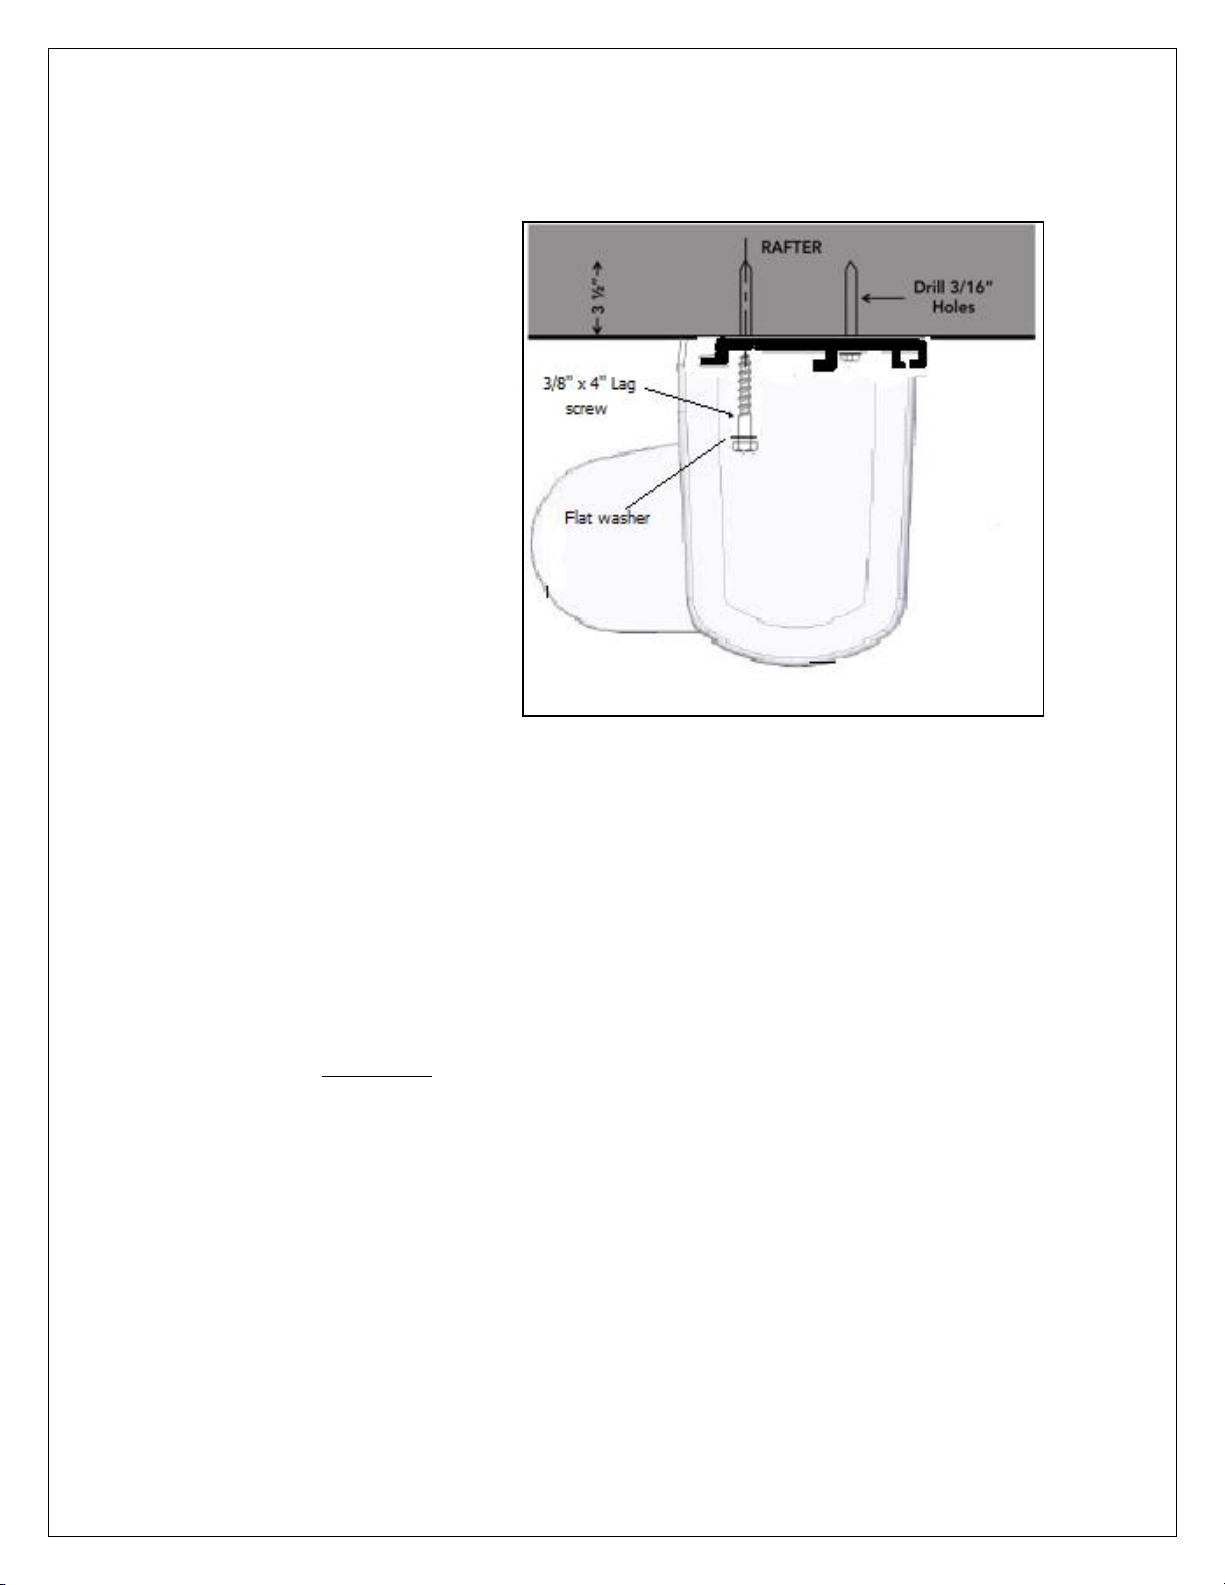
Using a three sixteenth of an
inch (3/16“) drill bit, drill all
the pilot holes into the rafters
to about three and a half
inches (3 ½”) deep. This will
help to prevent the rafters
from fraying or splitting while
installing the lag screws.
4.4.1. Installation
plates
1. Using a nine
sixteenth of an
inch (9/16”) socket, install the plates levelled with the three eighths of
an inch by four inches (3/8” X 4”) long lag screws.
2. Use the flat washer provided under the head of the screw.
3. While tightening the lag screws, keep the plates levelled. Do not
overtighten the lag screws; doing so may split the wood framing or
weaken the screw retaining force.
4. If necessary, use shims.
WARNING! You must securely anchor all the screws to the rafters. Some
homes may require more lag bolts, or longer ones. WHEN IN DOUBT,
consult a certified contractor. Failure to do so could result in collapse of
the awning and cause personal injury as well as material damage.
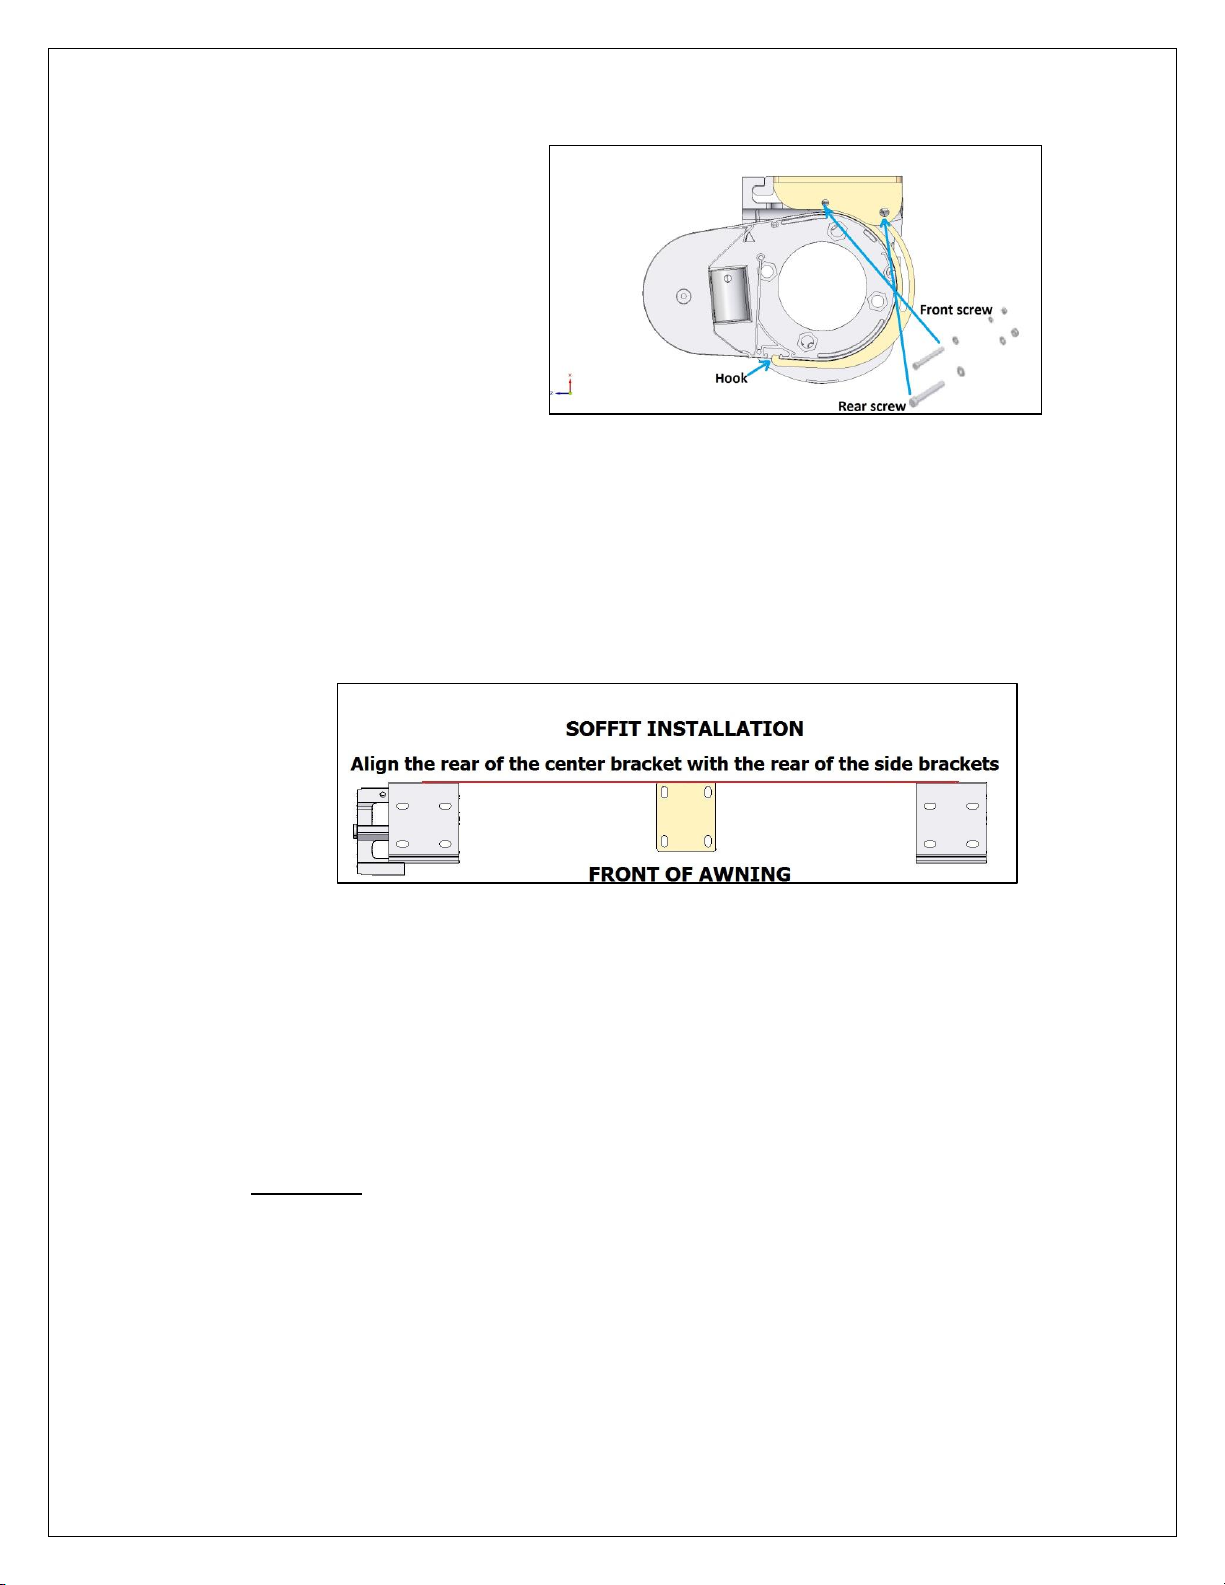
Page 26
Brasilia Slim EN March 2022 v4 26
4.4.2. Central support
Awnings that are sixteen feet
(16’) and over require an
additional support to
prevent torsion of the casing
under the weight of the
arms.
1. Make sure that at least two (2) bolts are fixed solidly to the centre of a
rafter for a secure installation of the central support.
2. Make sure that the central support is aligned with the rear line – rear of
the side brackets.
3. The central support must also be fixed in the middle of a truss or joist. The
central swupport does not need to be perfectly centered. The central
support has to be located between the two (2) installation plates. Use two
(2) holes that are on top of each other. If using an horizontal beam, also
use two (2) holes that are on top of each other. Mark the bolt locations to
fix the central support.
WARNING! You must securely anchor all the screws to the trusses. Some homes
may require longer lag screws or more. WHEN IN DOUBT, consult a certidied
contractor. Failure to do so could result in collapse of the awning and cause
personal injury as well as material damage.
Page 27
Brasilia Slim EN March 2022 v4 27
5. Installing the awning
5.1. Mounting the awning on the brackets
1. Carefully remove all the packaging material from the awning.
2. With the help of at least one (1) additional person, lift the awning with the
front bar facing you and the awnings mounting support behind. Even a small
awning weighs more than sixty kilos (60 kg) (132 lbs.).
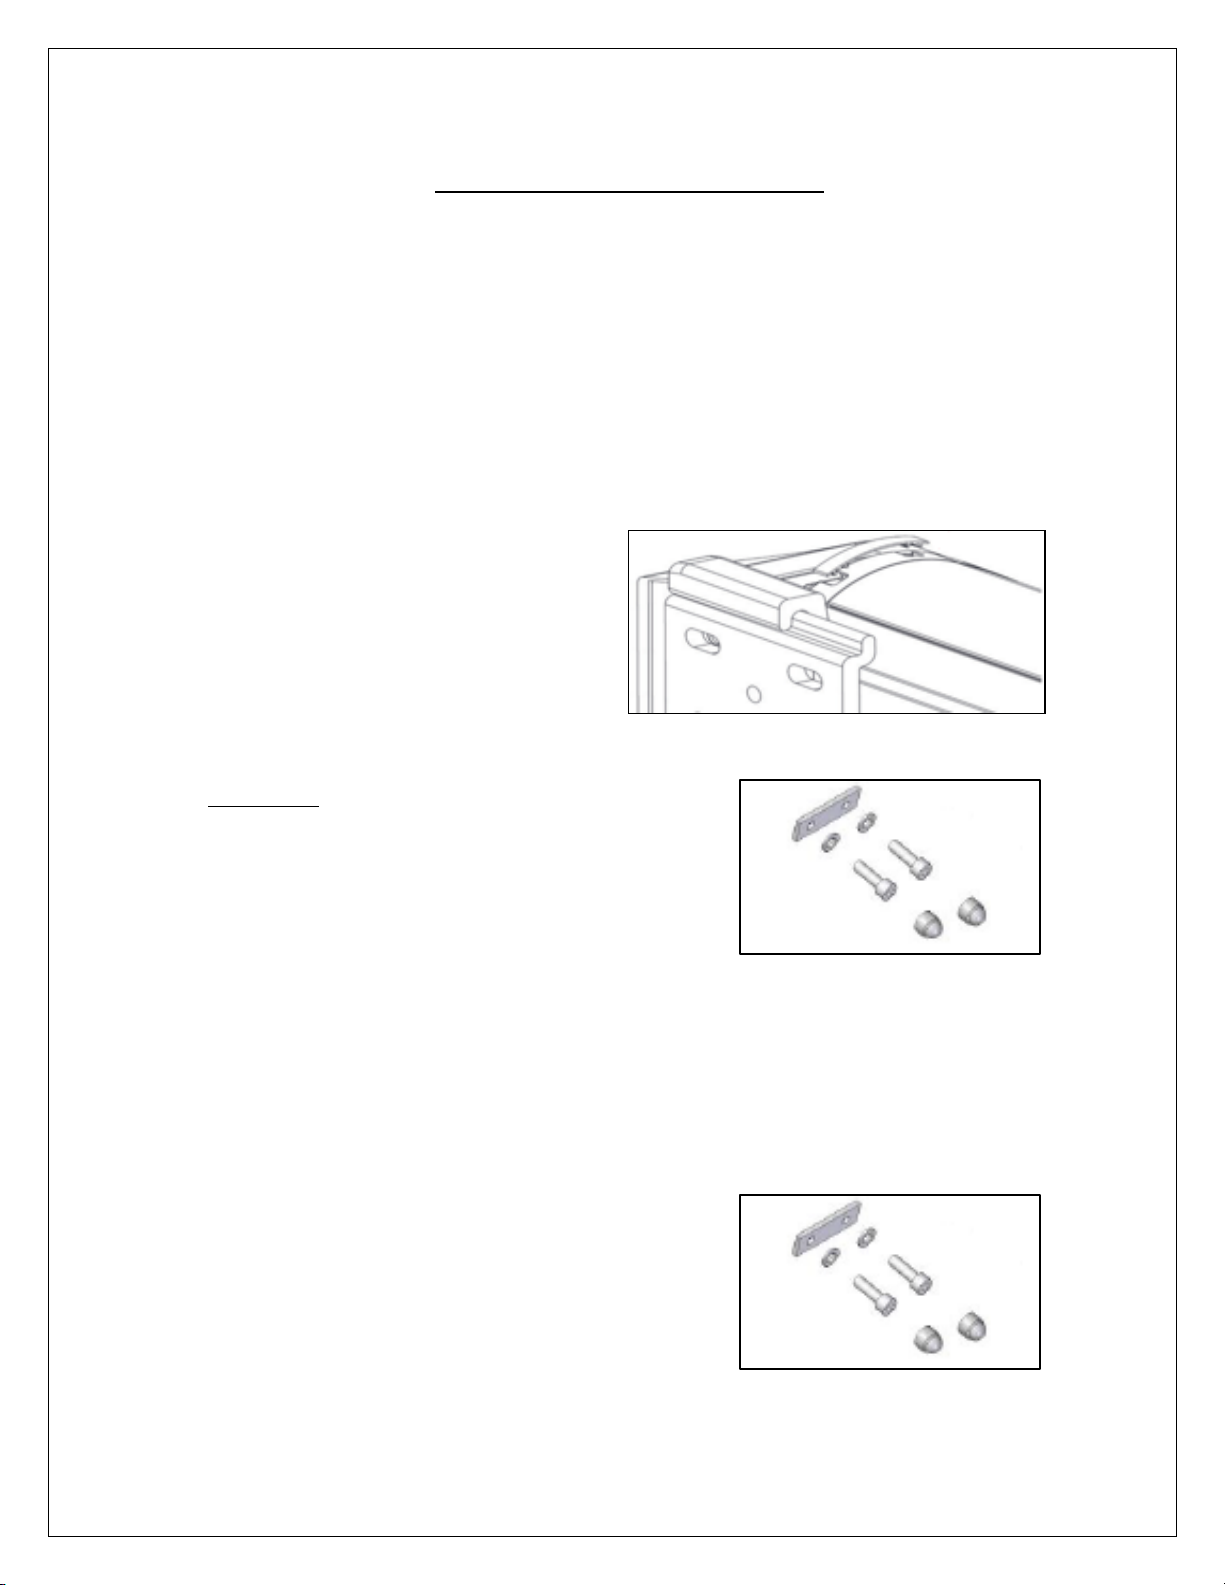
3. Lift the awning higher than the
mouting support and hang it in
the plate’s support grooves. In
the case of small optional
installation plates, make sure the
plate sides are perfectly aligned
with the edges of the awning
mounting supports.
WARNING! When installating under soffit, it is very
important to never leave the awning unsupported
without the two (2) blocking stoppers installed.
Make sure you always have someone to support the
awning on both sides until the two (2) blocking
stoppers are installed.
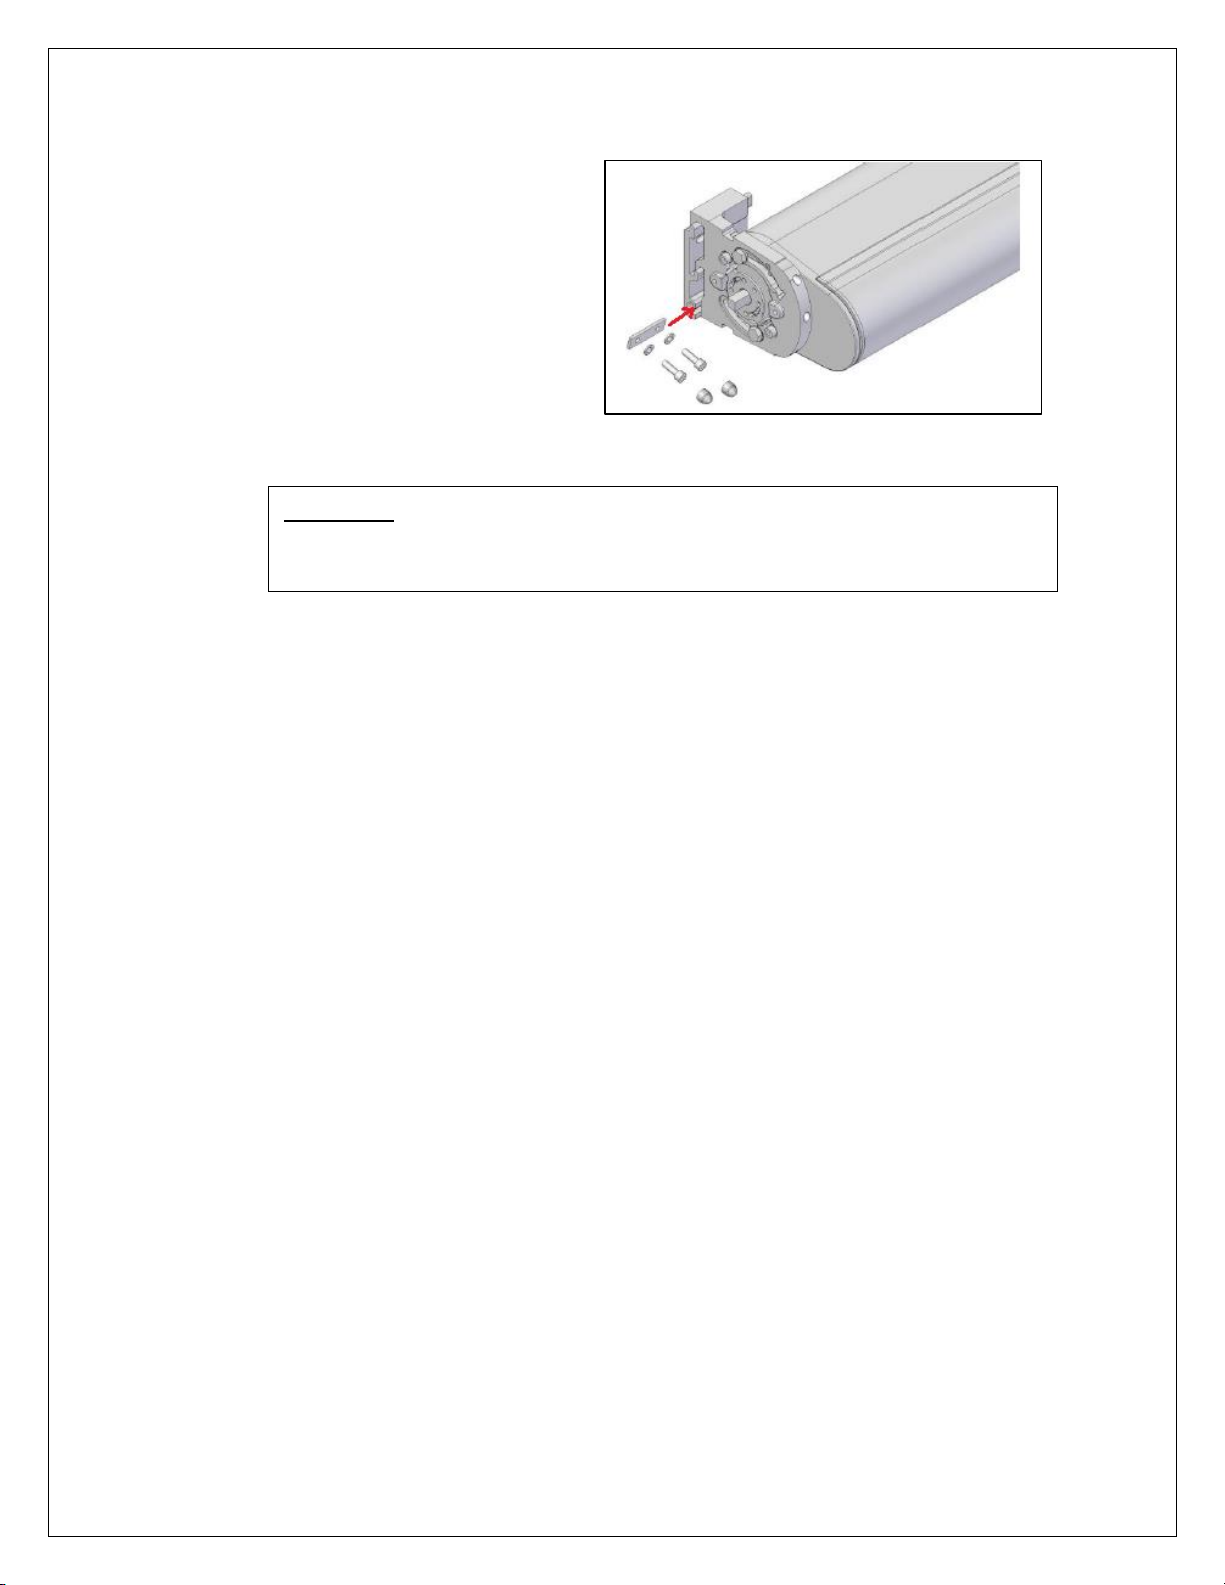
5.2. Using the blocking stoppers
1. The remaining step is to secure the awning to the installation plates. To
perform this, use the two (2) blocking stoppers supplied.
2. The blocking stoppers slide into the
bottom double lip of the installation
plate.
3. The holes in the blocking stoppers must
align to the holes in the mouting supports.
Page 28
Brasilia Slim EN March 2022 v4 28
4. Install the washers into the
screws, screw in the
blocking stoppers and
torque the screws solidly.
5. Install the caps on the
screw heads.
6. If you use the optional small
plates, you might have to
move the awning slightly to secure the blocking stoppers.
5.3. Testing your installation
1. To test the solidity of your awning, you will need a (1) helper.
2. Open your awning completely.
3. One (1) person should place themself at the wall and the other one at the front
bar. The one in front must gently support the front bar and move it.
4. When the awning is well installed and fixed securely, you should observe
movement in the arms, but the casing and the plates should not move.
5. If the casing or installation plates move, you will need to install more screws on
the plates.
5.4. Operating your awning
Plug your power cord into a GFI AC outlet.
NOTE: During a power outage, you can open or close your awning with the included
hand crank. Simply unplug awning, insert the crank into the crank loop and turn. If you
use the hand crank, it is possible that you will have to adjust the limits of your awning
again, see appendix 7.C. “Adjusting the limits of your awning”.
WARNING! The blocking stoppers must be checked and tighten at least once
a year. Failure to do so could result in the awning collapse and in material
damage and personal injury.
Page 29
Brasilia Slim EN March 2022 v4 29
5.5. The remote control and it’s support
We supply a wall hanger for the remote. It is recommended to install the wall hanger
inside the house.
WARNING! Do not expose the remote control to water or bad weather as this could
cause it to malfunction.
5.6. Last details
The limits have been programmed and tested at the factory. If you want to modify
them limits, see appendix 7.C. “Adjusting the limits of your awning”.
CAUTION! If you use the hand crank or if you make adjustments on your awning, do
not let it open past the point where the fabric sags and starts to roll up in the wrong
direction on the roller bar. This could damage the fabric.
NOTE: The first time you open the awning or when you unplug the awning, it will open
and close by itself. Let it be. The motor is readjusting its upper and lower limits. It can
even do it two (2) times in a row to complete the automatic adjustment.
1. Test your awning by pressing the “▲” and “▼” buttons on the remote control.
2. If your awning doesn’t open to it’s full projection or doesn’t seem to open and
close correctly, see see appendix 7.C. “Adjusting the limits of your awning”.
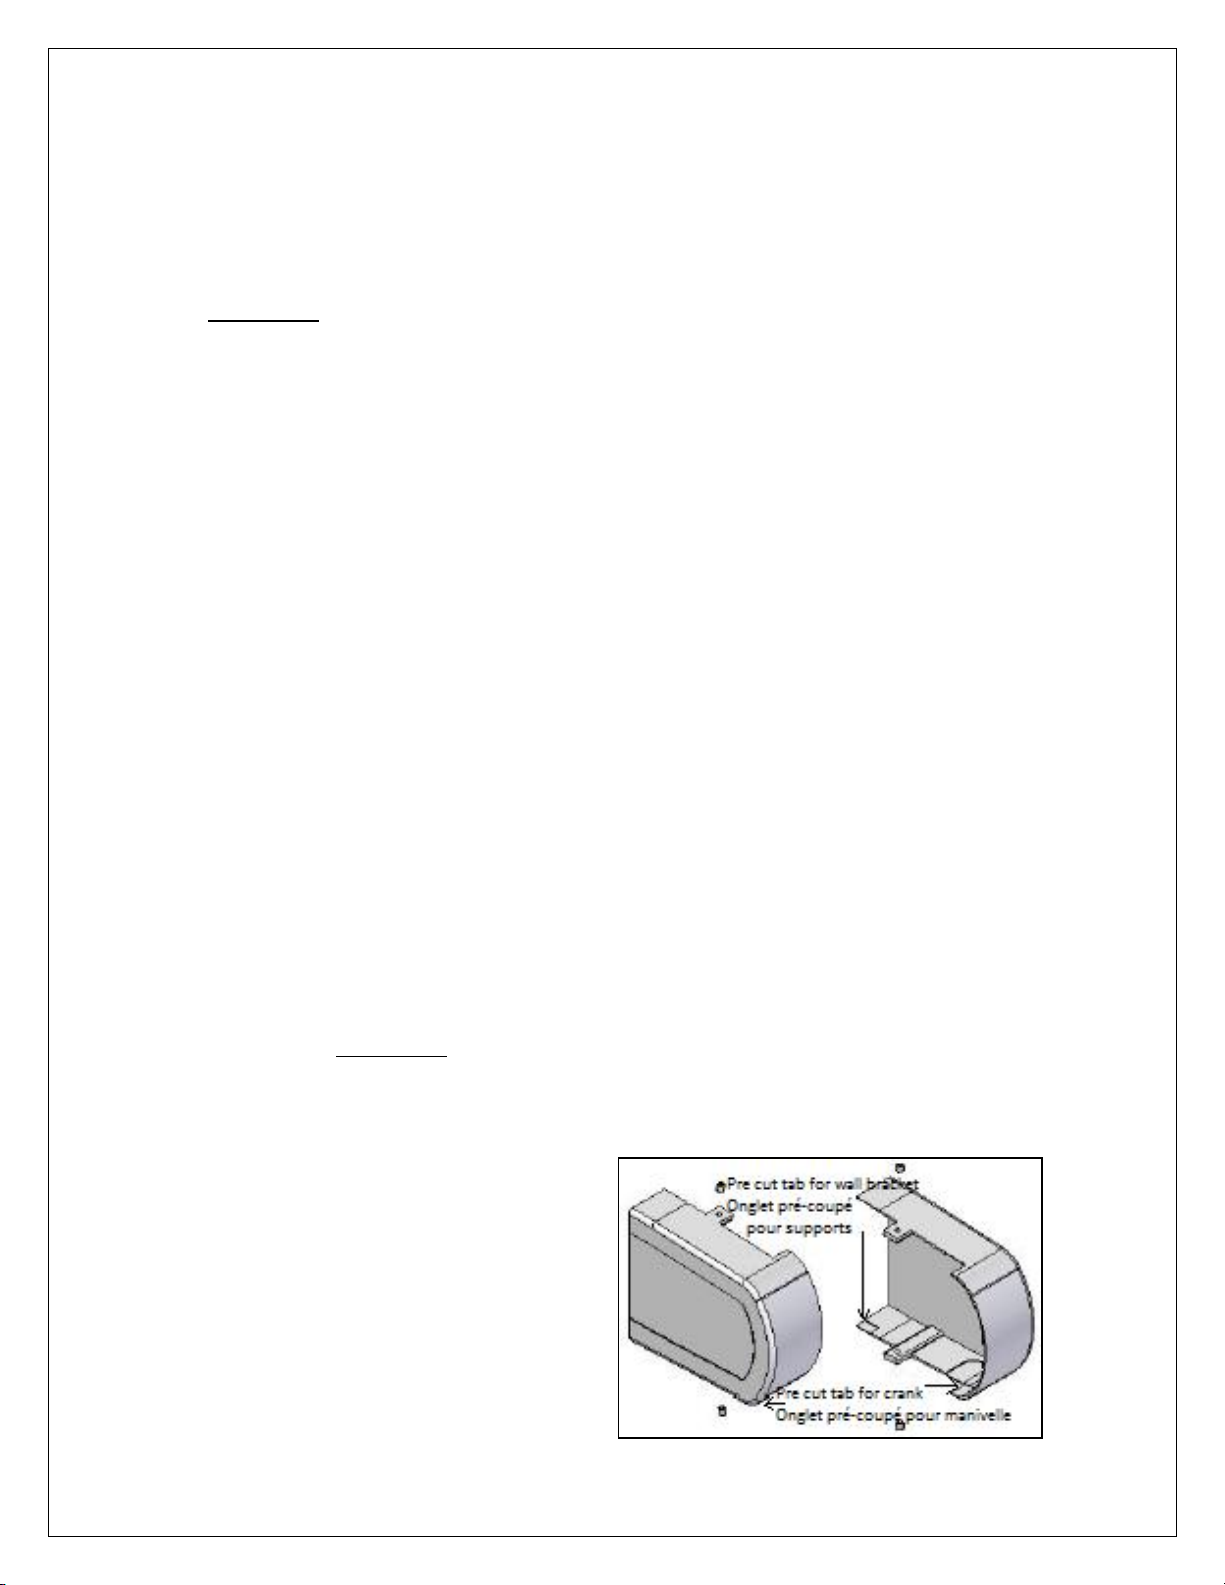
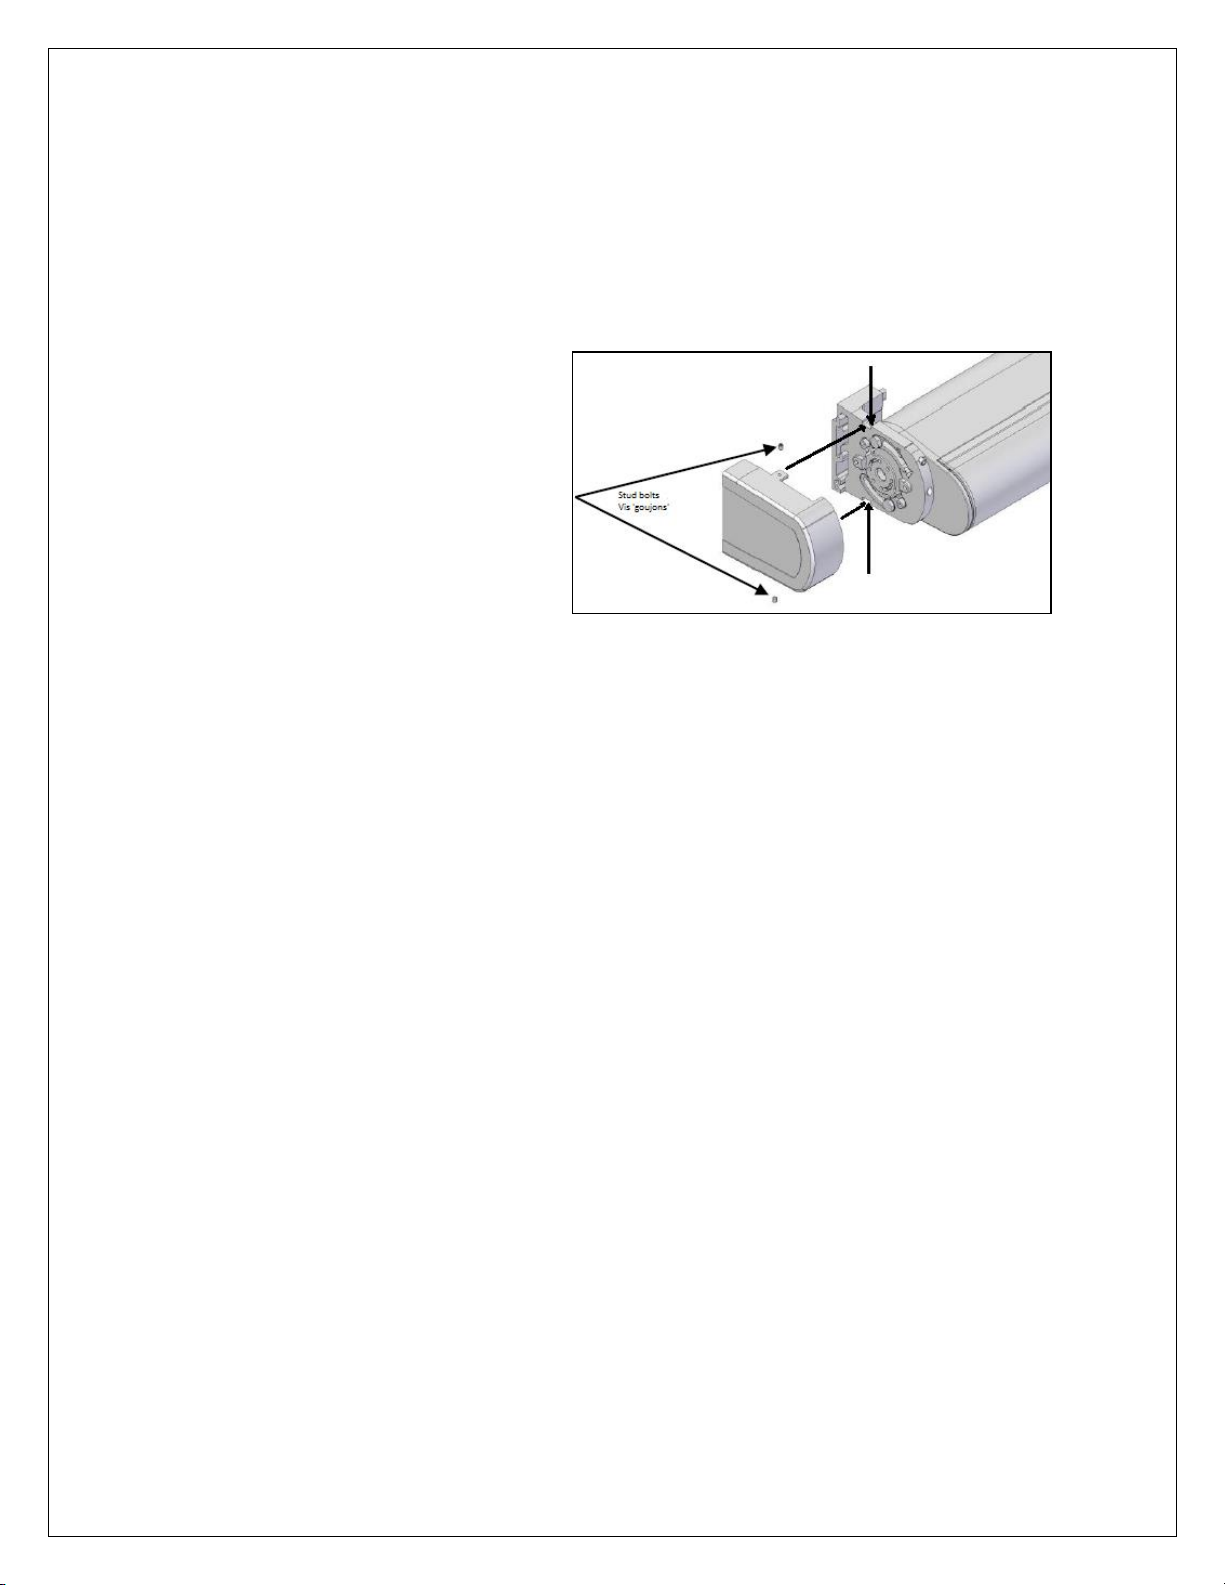
5.5.1. Installing the endcaps
WARNING! We suggest doing this step after adjusting the incline slope
only. Otherwise, you risk damaging your caps, see appendix 7.A. Tilt
slope adjustment.
1. You should have
two (2) endcaps in
your harware box,
you will need to
remove the pre-cut
tab on the motor or
crank side.
Page 30
Brasilia Slim EN March 2022 v4 30
2. You will also need to remove the lower pre cut tabs on both
endcaps so they can fit over the installation plates.
3. There are small holes on the two (2) tabs on top and bottom of
each of the two (2) endcaps. These tabs and holes must line up
with the holes in the mouting supports.
4. Once both
encaps are in
place, screw in
the stud bolts,
top and
bottom, to
secure the end
caps in place.
5. Do not overtighten the stud bolts.
Page 31

Brasilia Slim EN March 2022 v4 31
6. Safety and advice
1. CAUTION! Prior to operate the awning, make sure that no object or persons can
come in contact with it as it opens and closes. Keep children away from any
moving parts of the awning as it operates. Failure to do so could result in injury.
2. WARNING! Never hang items from any part of the awning, except accessories
supplied by the manufacturer.
3. CAUTION! NEVER attempt to repair or disassemble any part of the awning without
following replacement part procedures supplied by the manufacturers. Trying to
do so without proper instructions can result in personal injuries and cause your
awning to malfunction and subsequently void the warranty.
4. WARNING! Damage to the awning fabric, arms and mechanism caused by water
pooling, snow or ice accumulations or high winds are not covered by the
manufacturer’s warranty. Always retract your awning during periods of snow, ice
pellets, rain or high winds. Never leave your awning extended out and unattended
during periods of heavy winds.
5. CAUTION! Rainwater pooling on the fabric could result in damages or the collapse
of the awning and cause personal injuries. You must roll up your awning when
water starts pooling on the fabric. Water will drain out when the awning rolls up.
Make sure to re open your awning to dry out the fabric as soon as it is possible.
6. CAUTION! For long-term storage or non-use of the motorized awning, the motor’s
manufacturer suggests running the motor every few months to maintain the
mobility of the internal components.
7. WARNING! Never use a barbecue grill, any type of patio heater or fireplace under
your awning. Doing so could result in the fabric burning or melting and could
possibly catch fire; this would result in personal injuries as well as material
damage.
Page 32
Brasilia Slim EN March 2022 v4 32
6.1. Acrylic fabric maintenance
Multiple Awnings woven acrylic fabrics are made of 100 % solution-dyed fibers and
have a special finish, which delays the formation and the accumulation of dirt. To
preserve the fabric, you must respect the following cleaning instructions:
Thoroughly remove the dust from the dry awning fabric by vacuum
cleaning, or by gently brushing. NEVER USE A PRESSURE WASHER as
this will remove the water repellant coating and cut the threads.
Brush lightly with a mixture of lukewarm water and mild soap (organic
or baby soap).
Rinse thoroughly to remove all traces of soap.
WARNING! If an awning is retracted while wet, open it as quickly as possible to allow
the fabric to dry. Although the fabric is mold, mildew and rot resistant, this procedure
is necessary because atmospheric pollution deposits on the surface of the fabric can
create mold and mildew under damp conditions.
6.2. Maintenance of your electric motor and remote control
Electric motor
The electric motor is equipped with an automatic overheat shutoff system. If you
operate your awning several times continuously, the motor will stop its operation
before it overheats. The motor will resume normal operation after a minimum of
twenty (20) minutes of cooling down (depending on the ambient temperature).
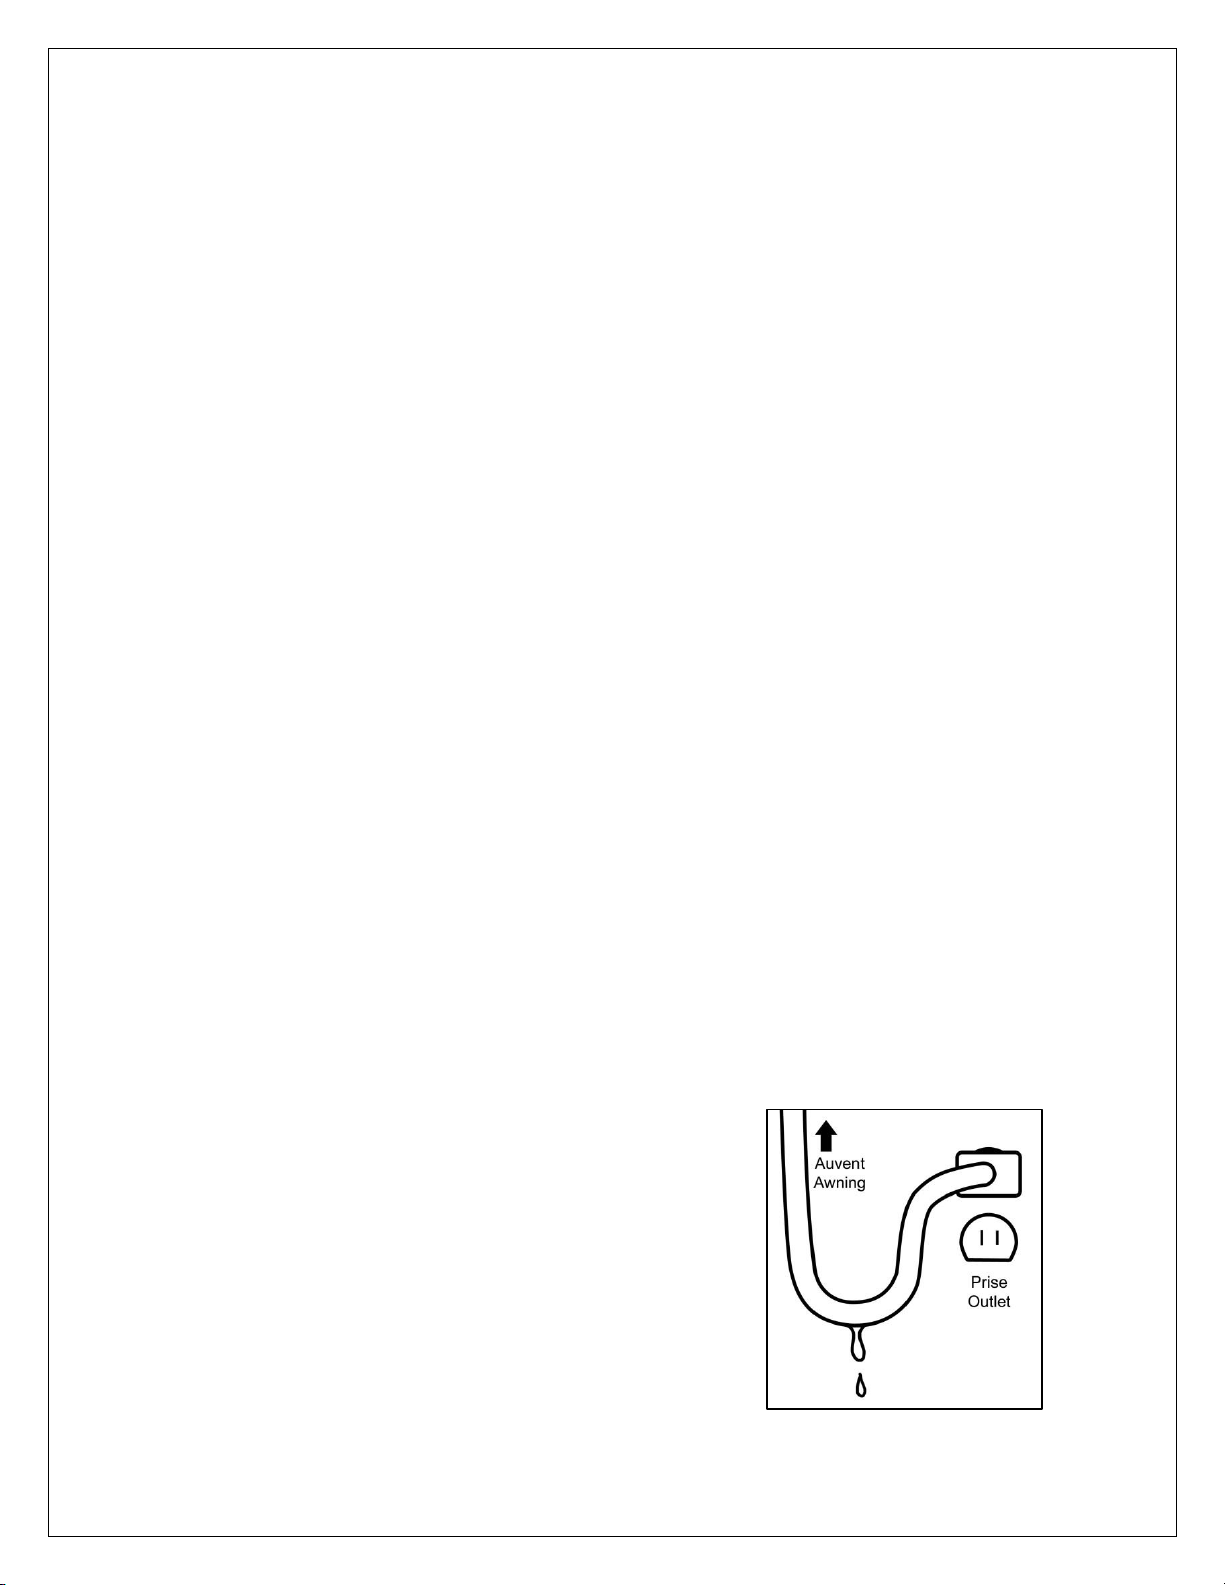
Protecting the GFI electrical outlet from water damage
when the motor cord is plugged in
To prevent water from entering the AC (GFI) wall outlet
it is recommended to form a dip loop at the end of the
power cord. It is also recommended to install a
weatherproof cover over the outlet. covers are
available at most local hardware stores.
Page 33
Brasilia Slim EN March 2022 v4 33
Preparing your awning for winter
Unplug the motor power cord from the (GFI) wall outlet and cover the
socket to prevent rain and moisture from entering the outlet which
could interfere with proper motor function in the spring.
Before rolling up your awning for the last time of the season, make sure
the fabric is clean and dry to prevent mildew from forming over the
winter.
Don’t forget to remove the batteries from the remote control and the
windsensor before closing the awning for the winter.
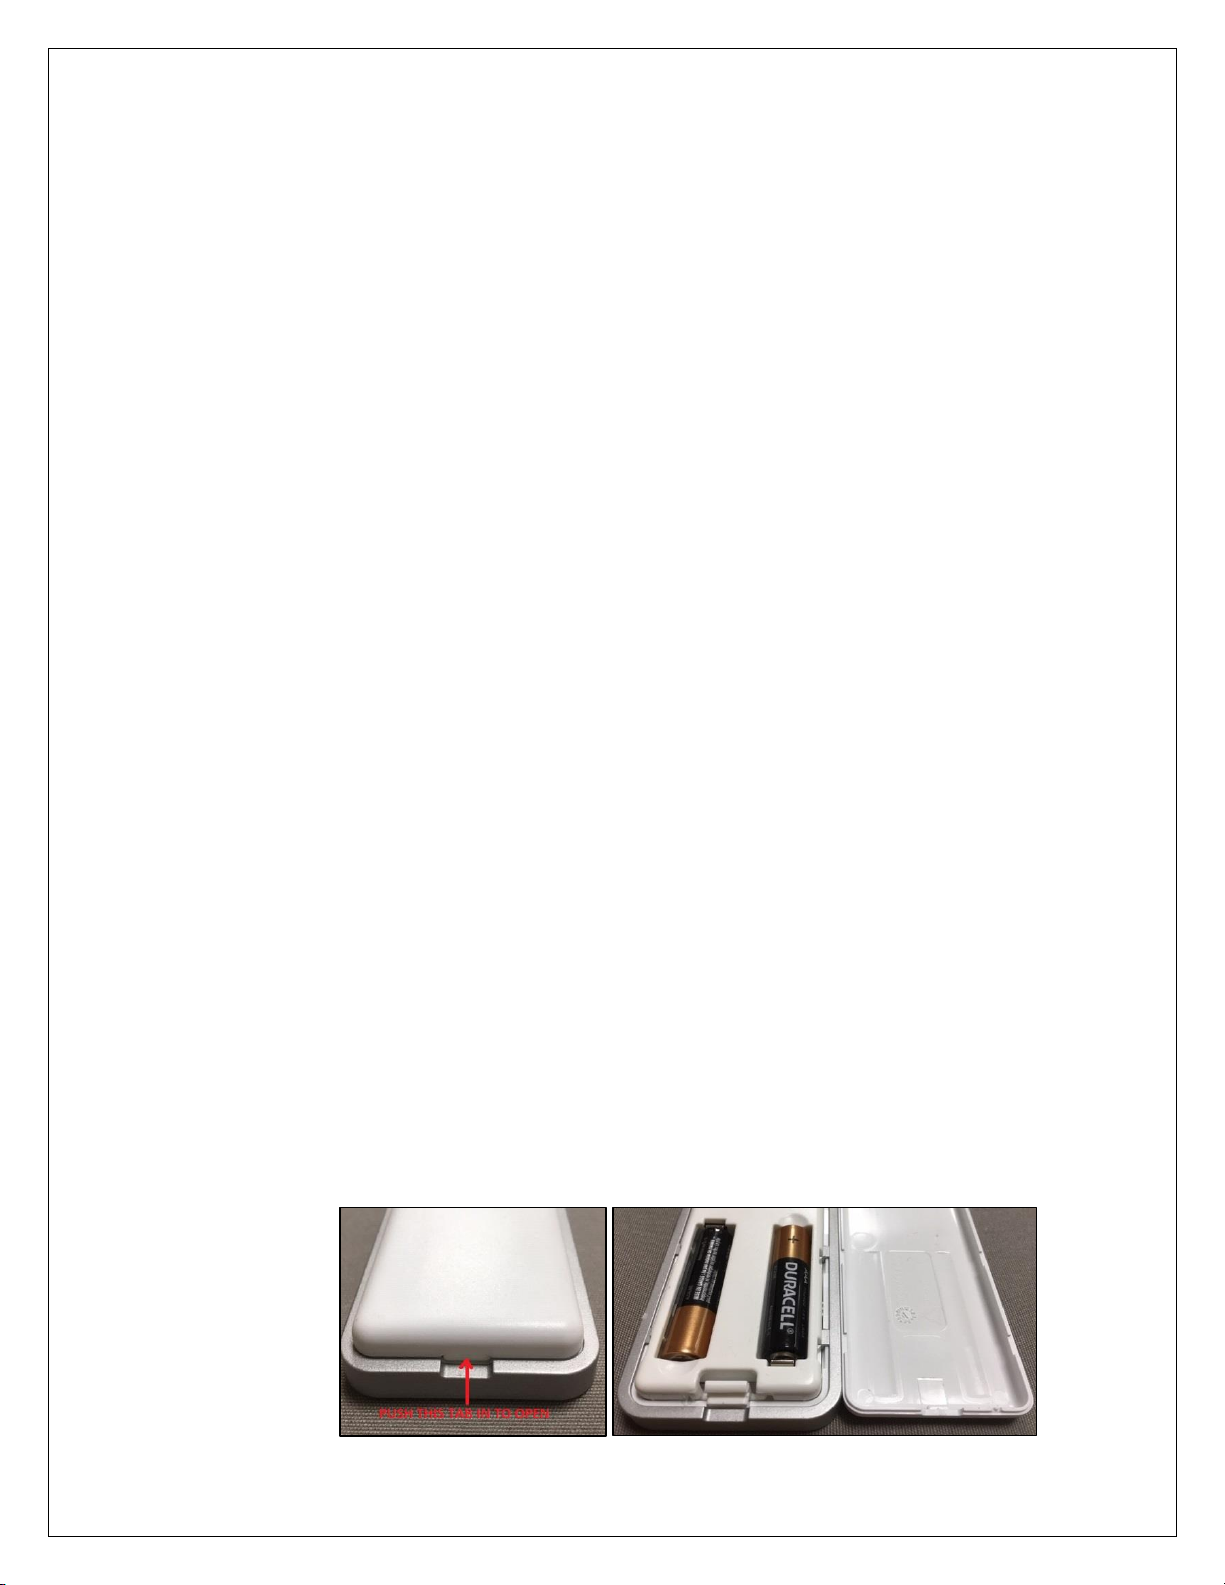
Replacement of the battery in you remote control control
Please note that you will most likely need to replace the battery in you
remote control after three (3) years, or less.
Test your remote control by keeping one (1) of the buttons pressed;
the LED indicator should flash for at least five (5) seconds, if this is not
the case, the battery needs to be replaced right away.
o You should be able to find this type of battery (2x type
AAA 1.5 volt) in just about every hardware or electronics
store.
o To replace the batteries, you will need to push in the
small tab at the back of the remote and lift the cover to
open the battery compartment. Remove the old
batteries and put in place the new ones while making
sure to respect the polarity. Re-install the battery cover
and snap it back in place.
Page 34
Brasilia Slim EN March 2022 v4 34
7.Appendix
7.A Pitch inclination adjustment
Fully open the awning using your hand crank or remote control. If motorized, unplug
the power cord from the outlet after opening the awning.
WARNING! Raising the front bar will reduce the pitch (angle) of the fabric thus
increasing the risk of rainwater pooling on the fabric. To prevent the awning from
collapsing due to rainwater load, you must retract the awning when unattended.
Failure to do so could result in personal injury and material damage.
RAISING THE FRONT BAR
NOTE : Depending on the awning size, the weight of the front bar varies (wider awnings
will have heavier front bars). This will impact how high you can raise the front bar,
using the adjustment capabilities of the arm clamps. If you reach the maximum
adjustment and are still not happy with the height of the front bar, you can shim the
installation plates upward to raise the front bar further. Make sure that all plates are
shimmed evenly and perfectly secured.
Page 35
Brasilia Slim EN March 2022 v4 35
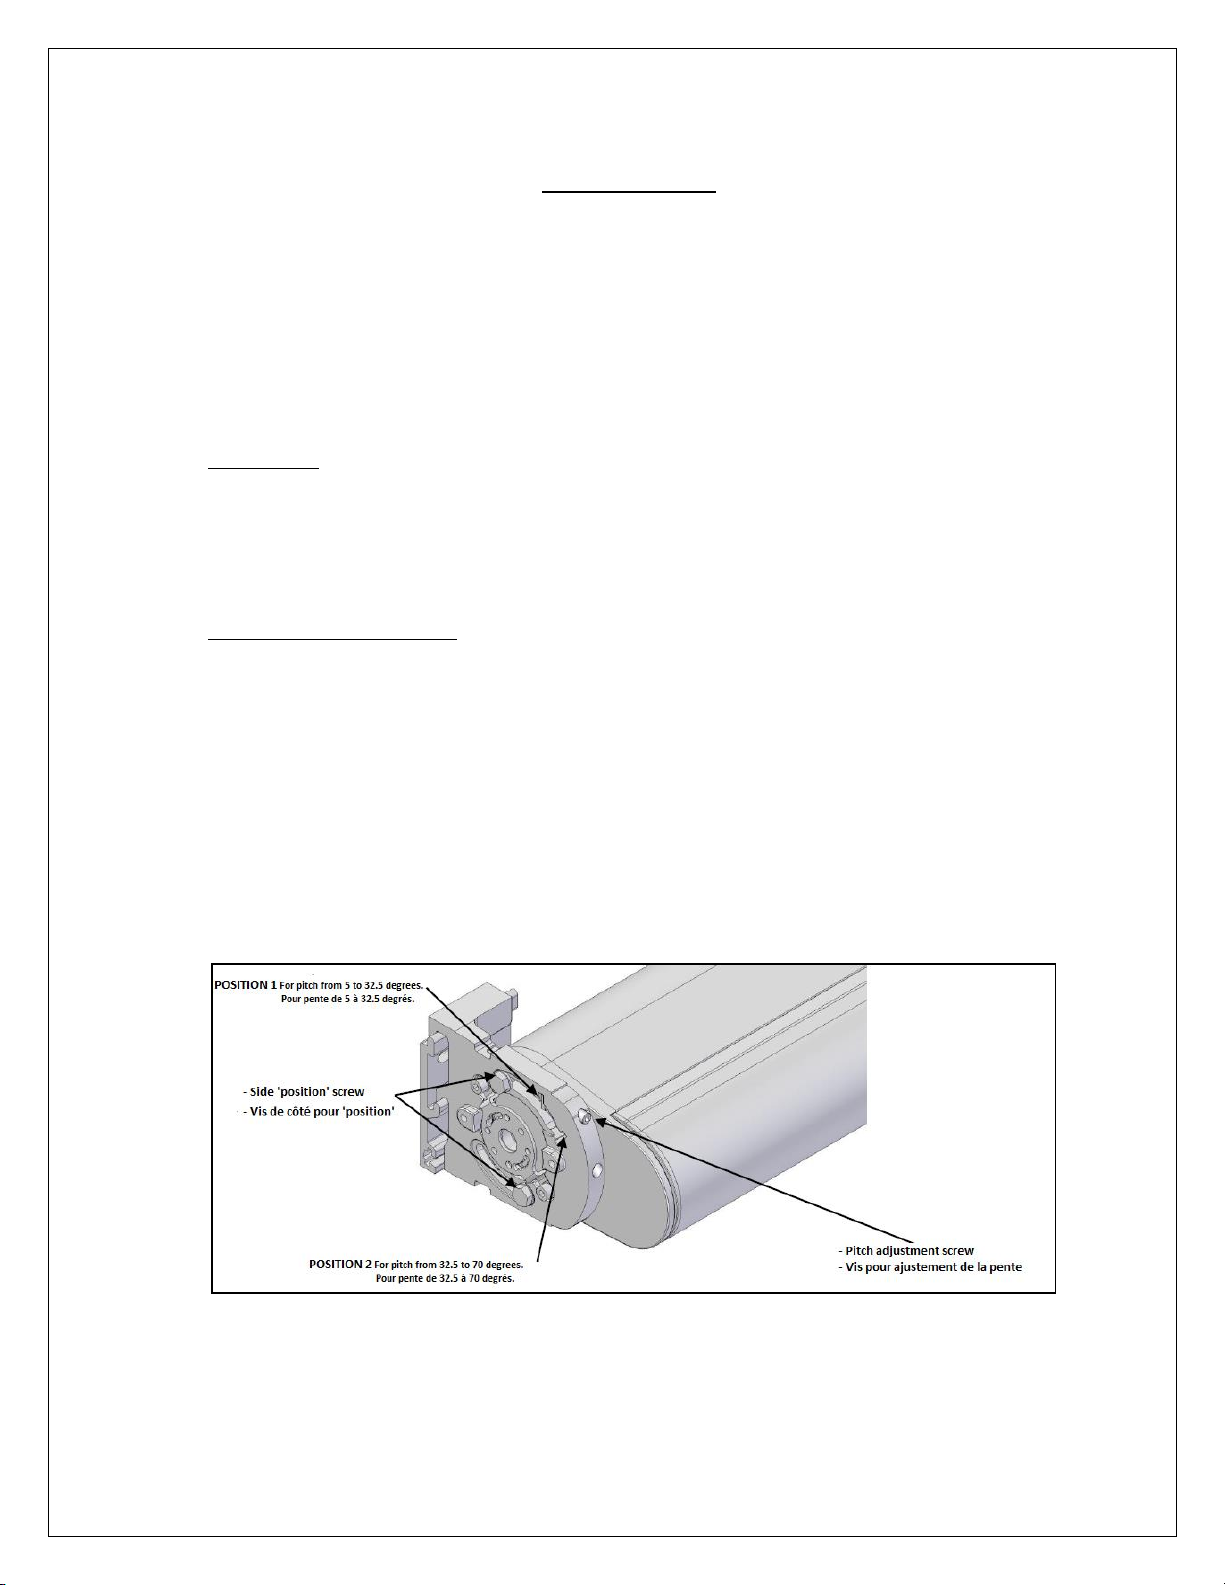
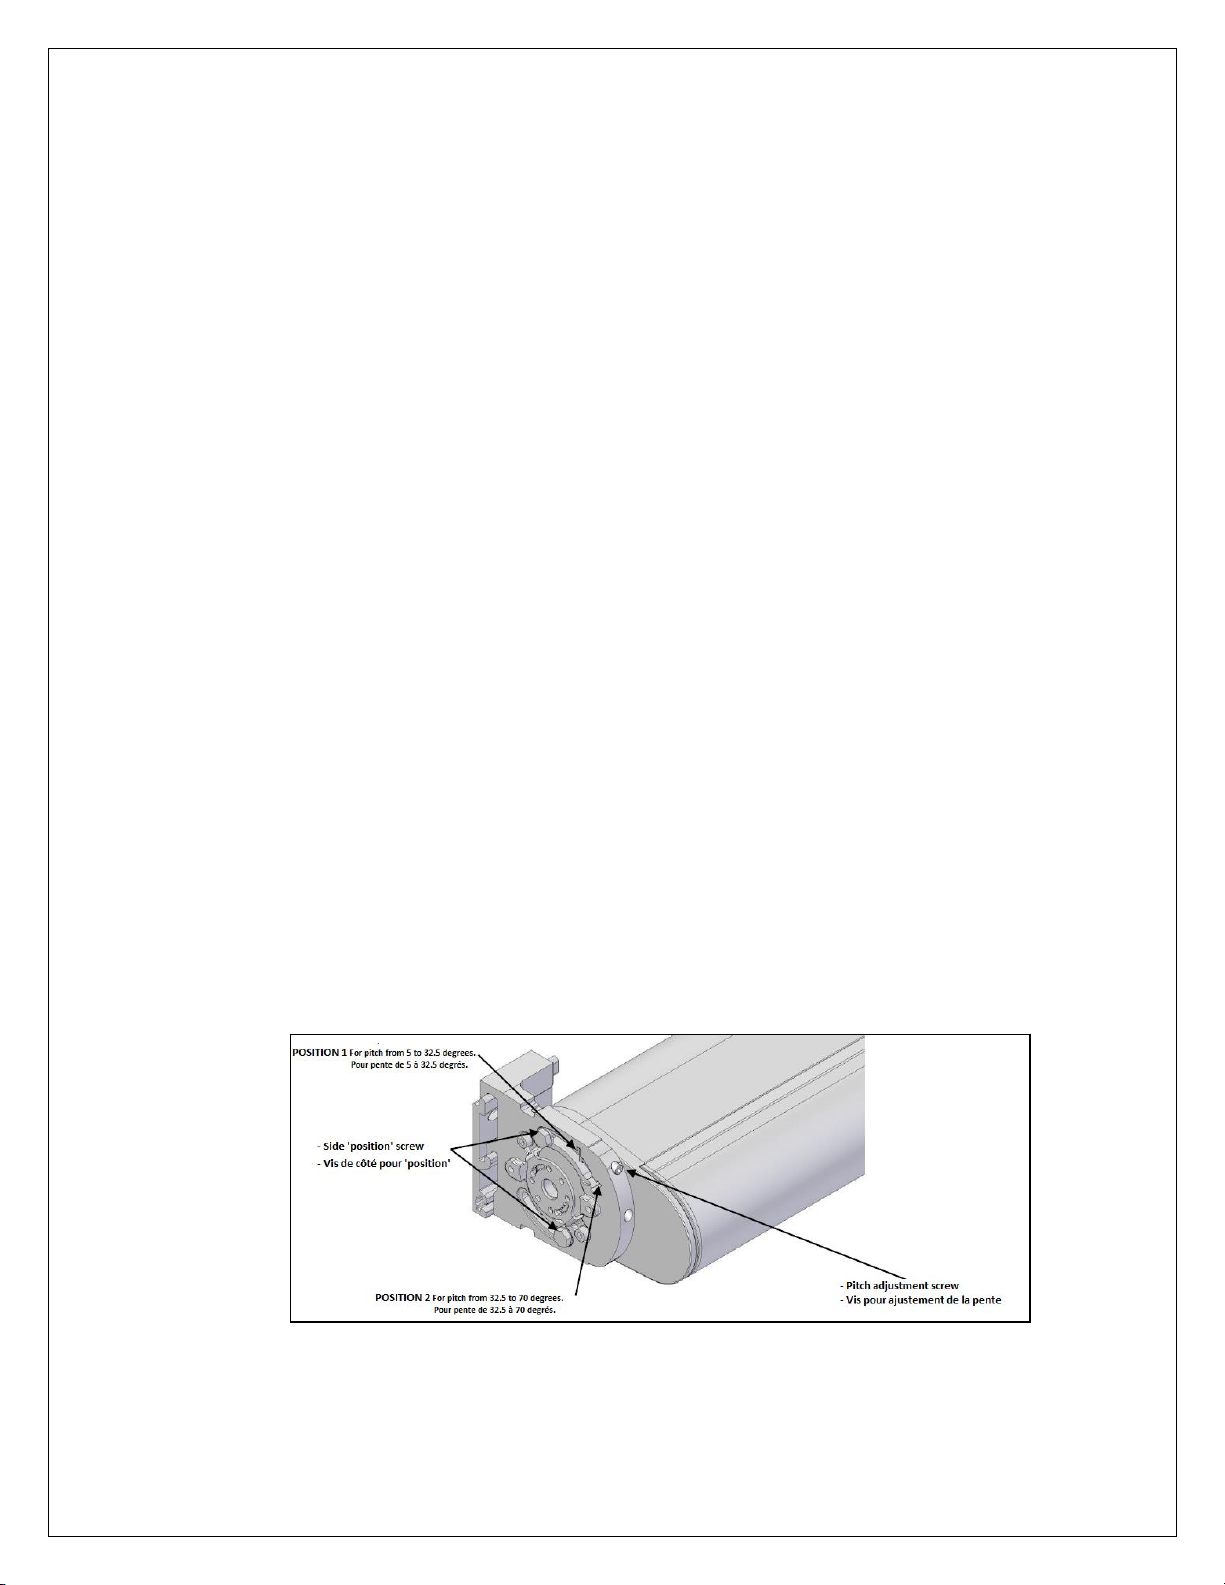
Refer to the figure below:
1. Remove the end caps.
2. Slightly loosen the two (2) side ‘’position’’ screws. Those on the motor side
will be a little more difficult to access. You may need a thinner key.
3. Have your helper lift the front bar several inches above the desired height.
4. Then rotate clockwise the pitch adjustment screw to adjust the inclination
(one (1) on each end of the awning).
5. Have your helper release the front bar to see if it reached the desired
height.
6. If you have raised the front bar too high, simply turn set screw
counterclockwise to lower the front bar.
7. If the front bar is still not high enough, continue turning the pitch
adjustment screw clockwise.
8. Once you have set the arm at the desired height, adjust the other arm the
same way.
9. The front bar should be level when viewed from the front, but we suggest
there be an inch (1”) drop from left to right for water drainage.
10. Re-tighten the two (2) side ‘’position’’ screws and reinstall the end caps.
Page 36
Brasilia Slim EN March 2022 v4 36
LOWERING THE FRONT BAR
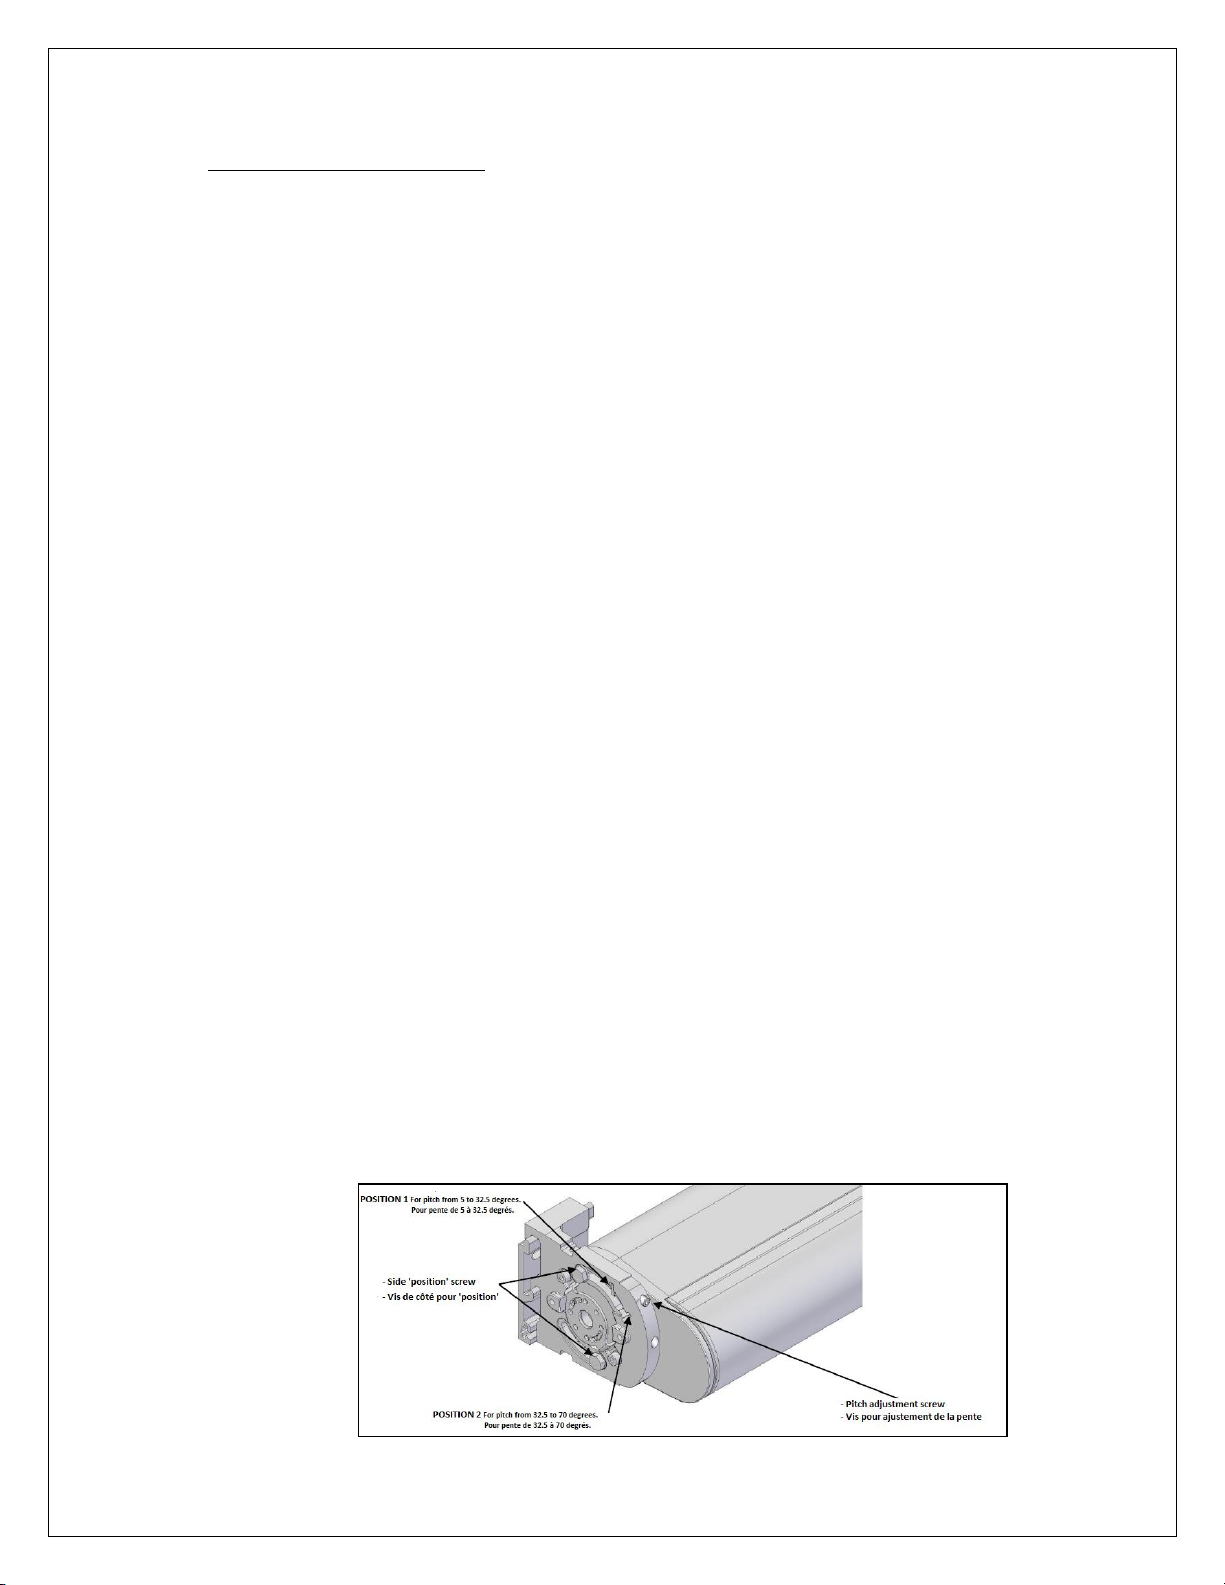
Refer to the figure above:
1. To lower the front bar of the awning, remove the end caps.
2. Slightly loosen the two (2) side ‘’position’’ screws. Those on the motor side
will be a little more difficult to access. You may need a thinner key.
3. Ask you assistant to raise the front bar many inches higher than it’s actual
position.
4. Then turn the pitch adjustment Allen screw (one (1) on each end of the
awning) counterclockwise, until you reach the desired height.
5. Ask your assistant to gently release the front bar to check if it has reached
the desired height.
6. If you have gone too far, simply turn the pitch adjustment screw clockwise
to raise the front bar. Have your helper to lift the front bar a little to take
off the weight from the set screw.
7. If the front bar is still not low enough continue turning the pitch
adjustment screw counterclockwise.
8. Once you have set the arm at the desired height, adjust the other arm the
same way.
9. The front bar should be level when viewed from the front, but we suggest
there be an inch (1”) drop from left to right for water drainage.
10. Re-tighten the two (2) side ‘position’ screws and reinstall the end caps.
11. You are now done with the installation. If you have purchased a motorized
awning plug the power cord into the AC (GFI) outlet and enjoy your new
awning!
Page 37
Brasilia Slim EN March 2022 v4 37
7.B. Resetting the motor and remotes
The Nice motor can memorise up to thirty (30) transmitters including remote control
and wind sensors.
If you are reprogramming a new remote due to a lost or defective remote, use the
following procedure to ‘’force’’ the motor into accepting the instructions from a new
one. You will then need to execute sections 7.B.1 “Putting the motor in
“programming” mode”, 7.B.2 “Erasing the motor’s memory”, 7.B.3 “Programming
the first remote control” and 7.C “Adjusting the limits of your awning”, in this exact
order.
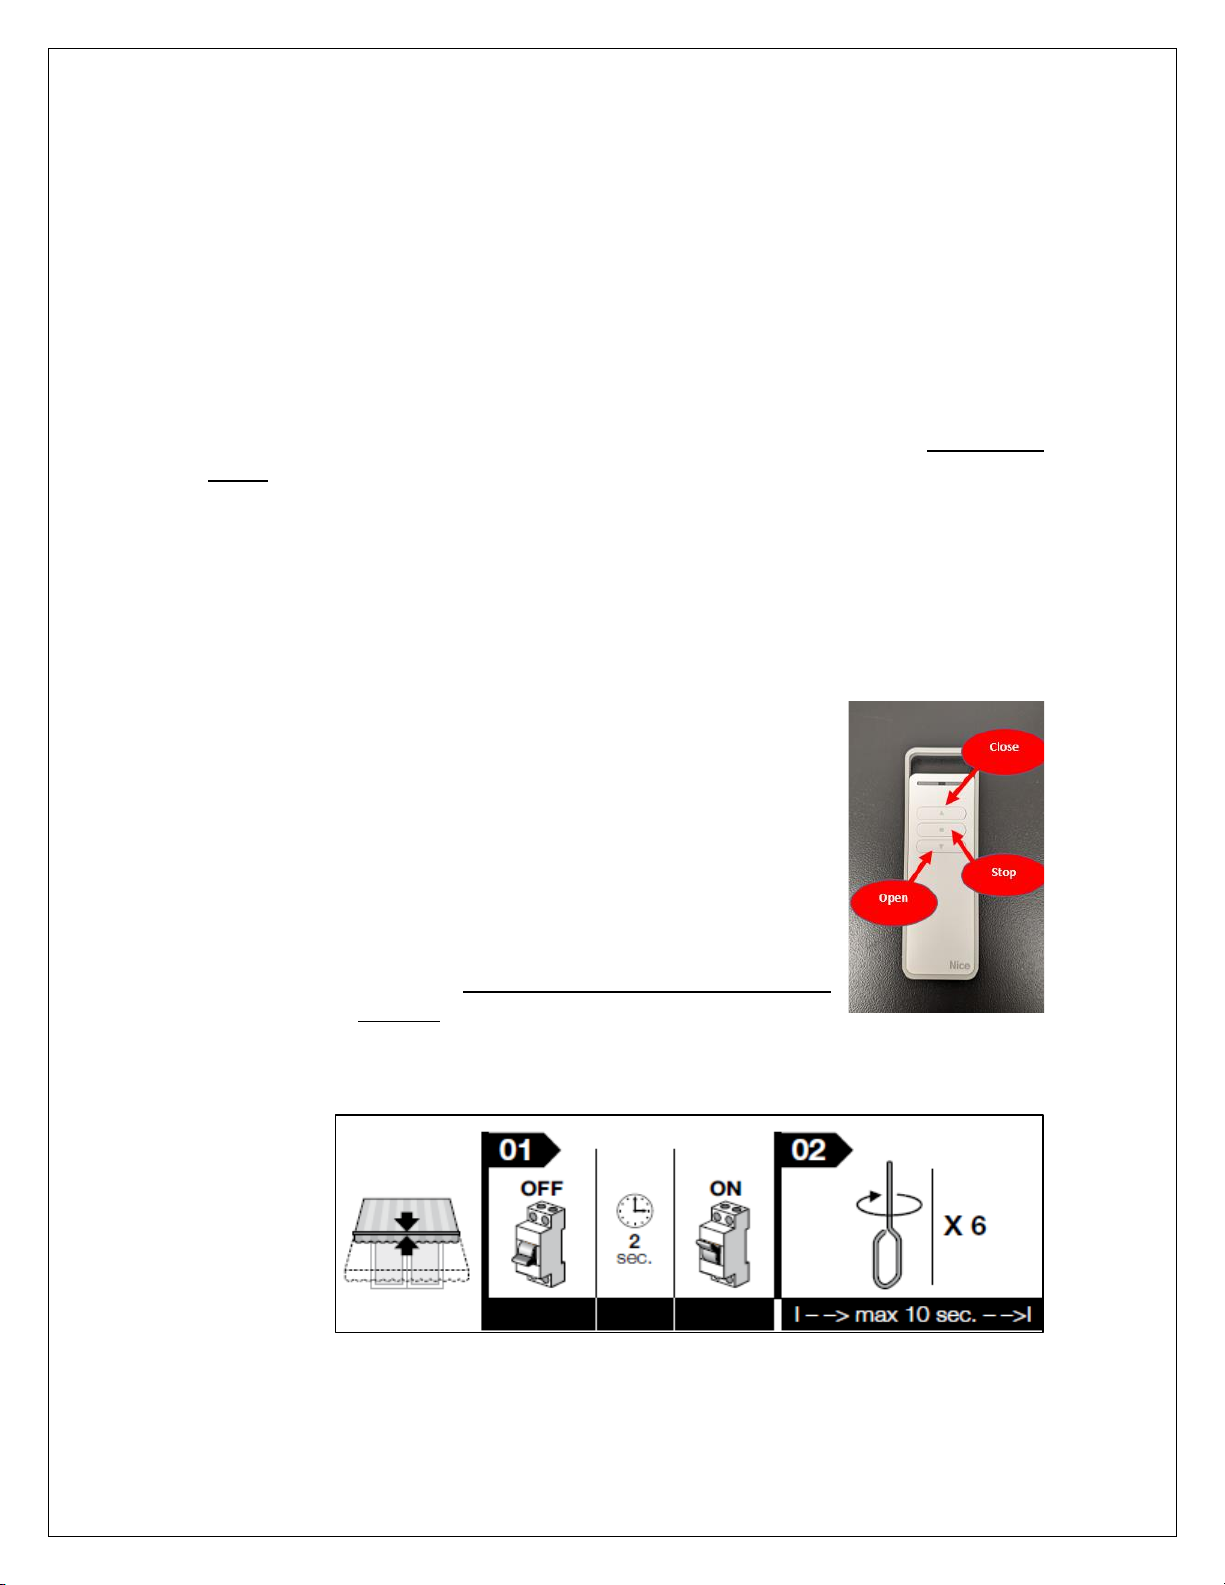
7.B.1 Putting the motor in ‘’programming mode’’ if you no longer have
your original remote control.
1. Completely close the awning.
2. Disconnect the AC supply to the motor; wait at
least two (2) seconds.
3. Then reconnect the AC supply to the motor,
install the hand crank and turn it at least 6
complete turns, as fast as possible.
4. Press the “ ■ ” button on the remote.
5. You now have one (1) minute to erase the
memory with any remote control, even if it has
not been memorised (see the next step).
Page 38
Brasilia Slim EN March 2022 v4 38
7.B.2 Erasing the motor’s memory
This procedure will allow you to completely erase the motor’s memory from your
original remote control, or if you have executed the previous procedure.
CAUTION! Steps 7.B.2 and 7.B.3 must be done one after the other with no delay
between the two (2).
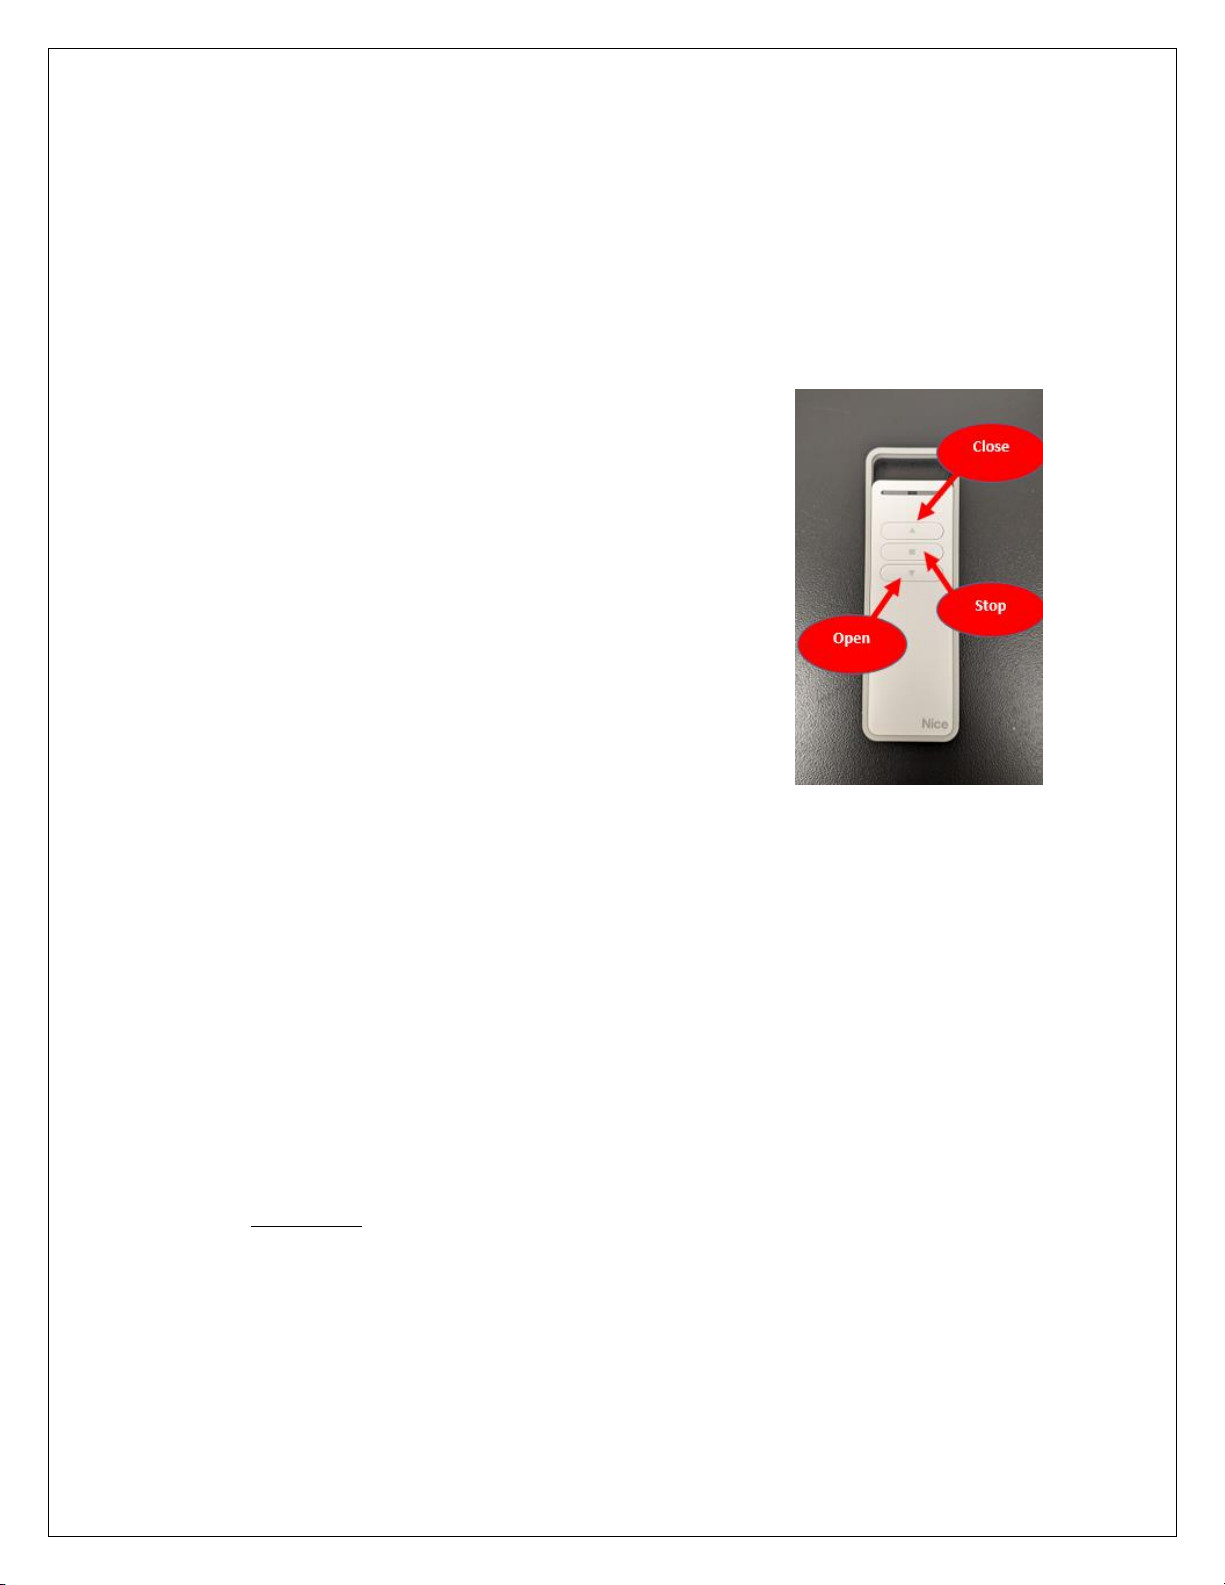
1. Open you awning halfway.
2. Keep the “ ■ ” button pressed and wait
until the motor does two (2) brief
movements. Release the button.
3. Keep the “ ▲ ” button pressed and wait
until the motor does three (3) brief
movements. Release the button.
4. Keep the “ ■ ” button pressed and wait
until the motor does three (3) brief
movements. Release the button.
5. Keep the “ ▼ ” button pressed and wait until the motor does three (3)
brief movements. Release the button.
6. Keep the “ ▲ ” and “ ▼ ” buttons simultaneously pressed and wait until
the motor does five (5) brief movements. Release the button.
7.B.3. Programming the first (1st) remote control
NOTE : When you received your awning, the remote control was already
programmed. This procedure applies only if your remote control is received
damaged and is not working.
WARNING! Each time AC power is fed to the motor, it must have at least one (1)
transmitter (remotecontrol or windsensor) as well as its limits in memory.
Otherwise, iit will do two (2) brief movement, which means it is still in
programming mode.
CAUTION! Steps 7.B.2 and 7.B.3 must be done one after the other with no delay
between the two (2).
Page 39
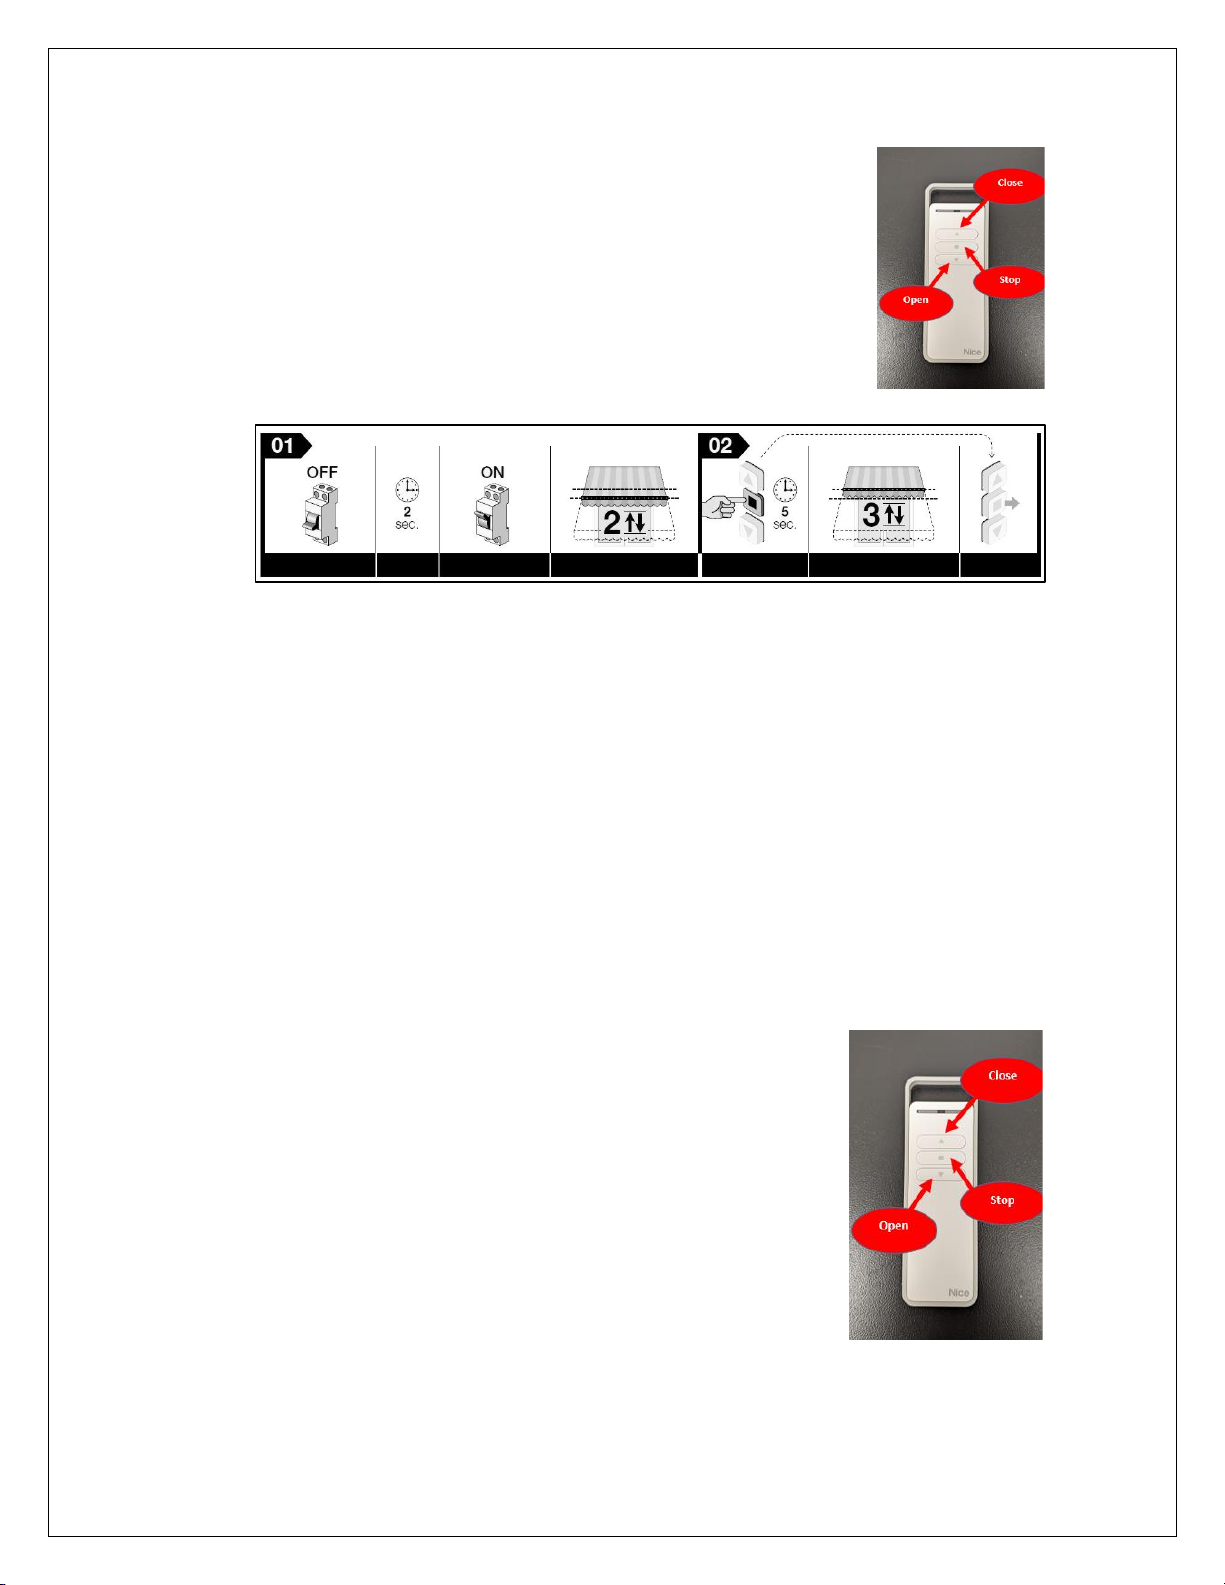
Brasilia Slim EN March 2022 v4 39
1. Cut out the AC power to the motor, wait for two (2)
seconds and put back the AC power to the motor.
The motor will move twice (2) and remain in waiting
mode without any time limit.
2. Keep the “ ■ ” button pressed until the motor
moves three (3) times. Release the button.
NOTE: Even after the remote control has been memorized, the motor has not yet
associated which button is meant to open or close the awning. This association
will be automatically made during the limits setup. Until this procedure is done,
the motor will only move in programming mode, which means in order for the
motor to execute the desired command, you will need to keep the button pressed
to whole time.
7.B.4. Memorizing an additional remote control
CAUTION! Prior to program an additional remote control, it is mandatory to have
an existing remote control already memorized.
1 Open the awning one foot (1’).
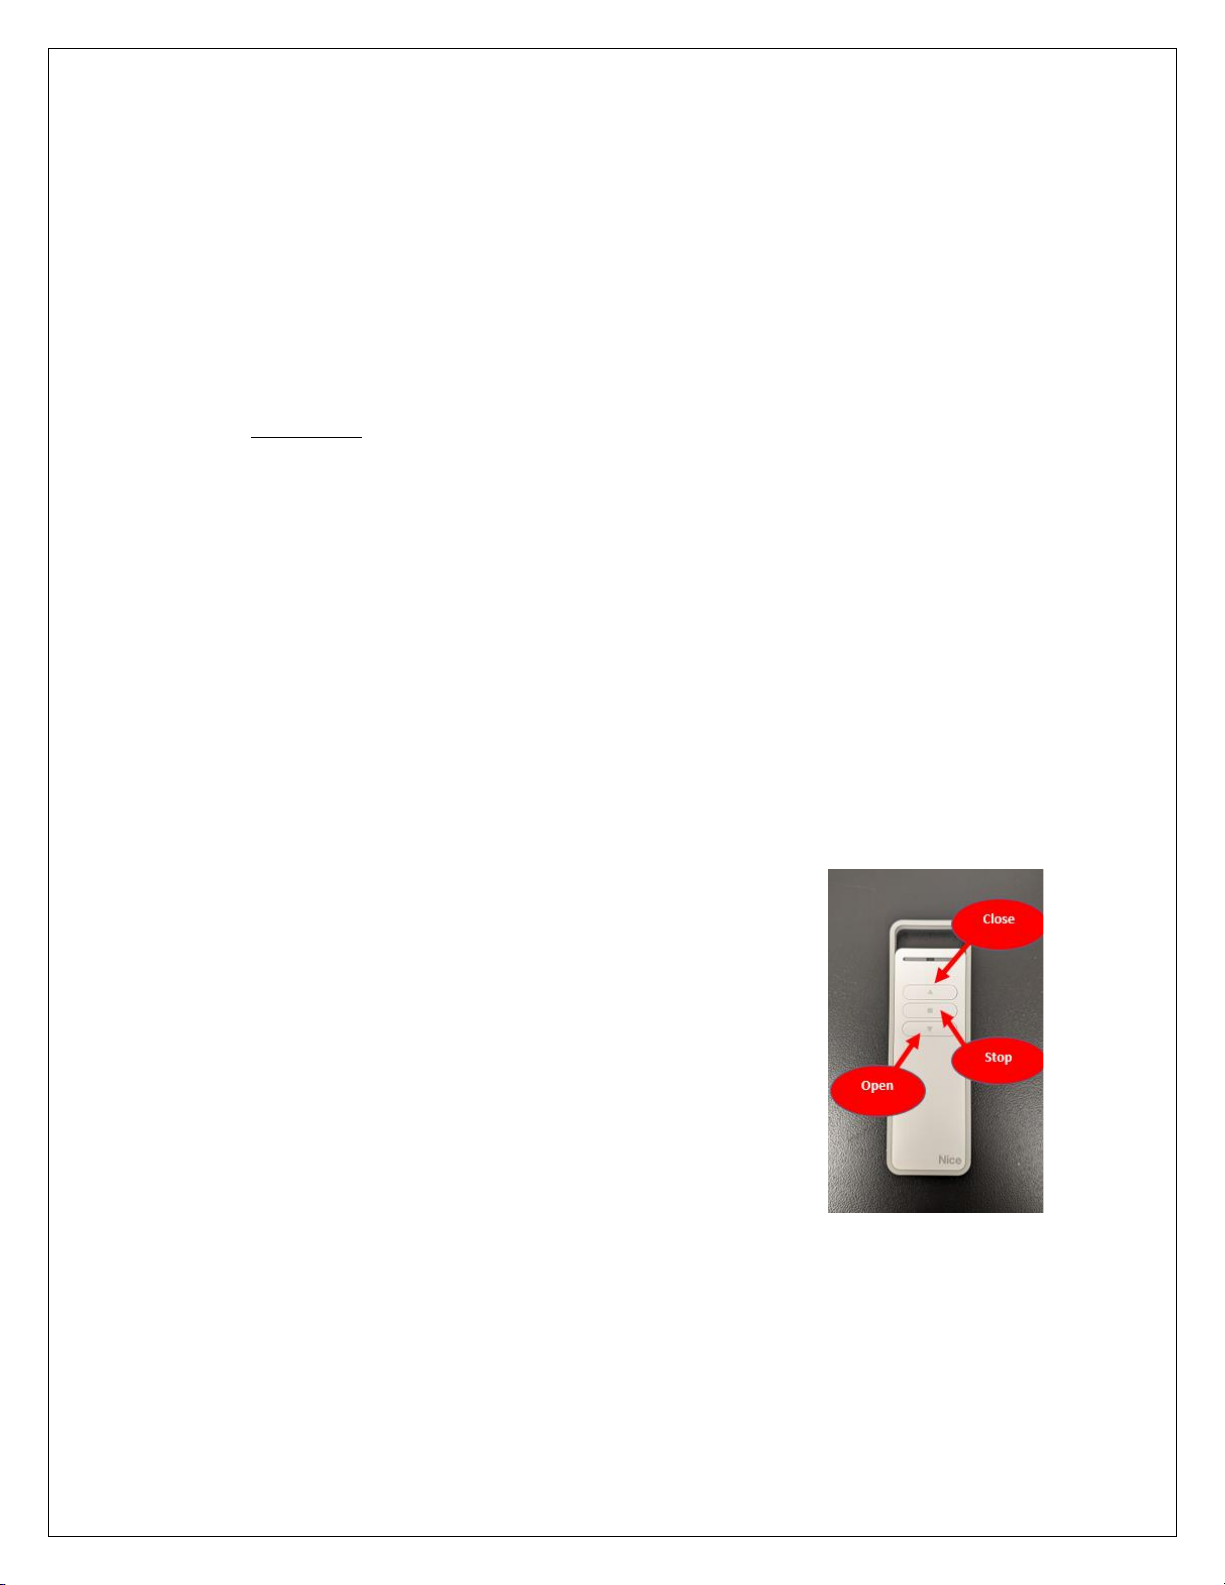
2 On the additional remote press the “ ■ ” button
for eight (8) seconds and release the button. In this
case no movement will be observed from the
motor.
3 On your existing remote, press the “ ■ ” button
briefly, three (3) times.
4 On the additional remote, press the “ ■ ” button
briefly, one (1) time.
Page 40
Brasilia Slim EN March 2022 v4 40
5 After a short while, the motor will move three (3) times to confirm it has
memorized the additional remote control.
7.C. Programing the limits of your awning
7.C.1. Programming of the limits
WARNING! This programming applies to cassette type awnings only.
CAUTION! The first (1st) limit to be established must be the closed position, with
the front bar against the structure.
The procedure below is for programming a cassette type awning only. This
procedure overwrites previously adjusted limits.
When programming the limits this way, the two (2) limits are updated regularly by
the automatic self-update function. When the motor is powered up, two (2)
movements are performed if at least one (1) transmitter and the limits are not in
memory.
Adjustment of the upper position (close)
1. Completely close your awning.
2. Unplug the awning and wait for at least two (2)
seconds.
3. Plug back the awning.
4. Install and turn the handcrank for at leat six (6)
complet turn, as fast as possible.
5. Press the “ ■ ” button once.
6. Run the closing command by keeping the “ ▲ ” button pressed and
wait for the awning to stop automatically as result of the impact against
the structure (= closed limit). Release the button.
7. The close limit is now set.
Page 41
Brasilia Slim EN March 2022 v4 41
Adjustment of the open position
1. Open the awning with the handcrank at leat one (1) foot.
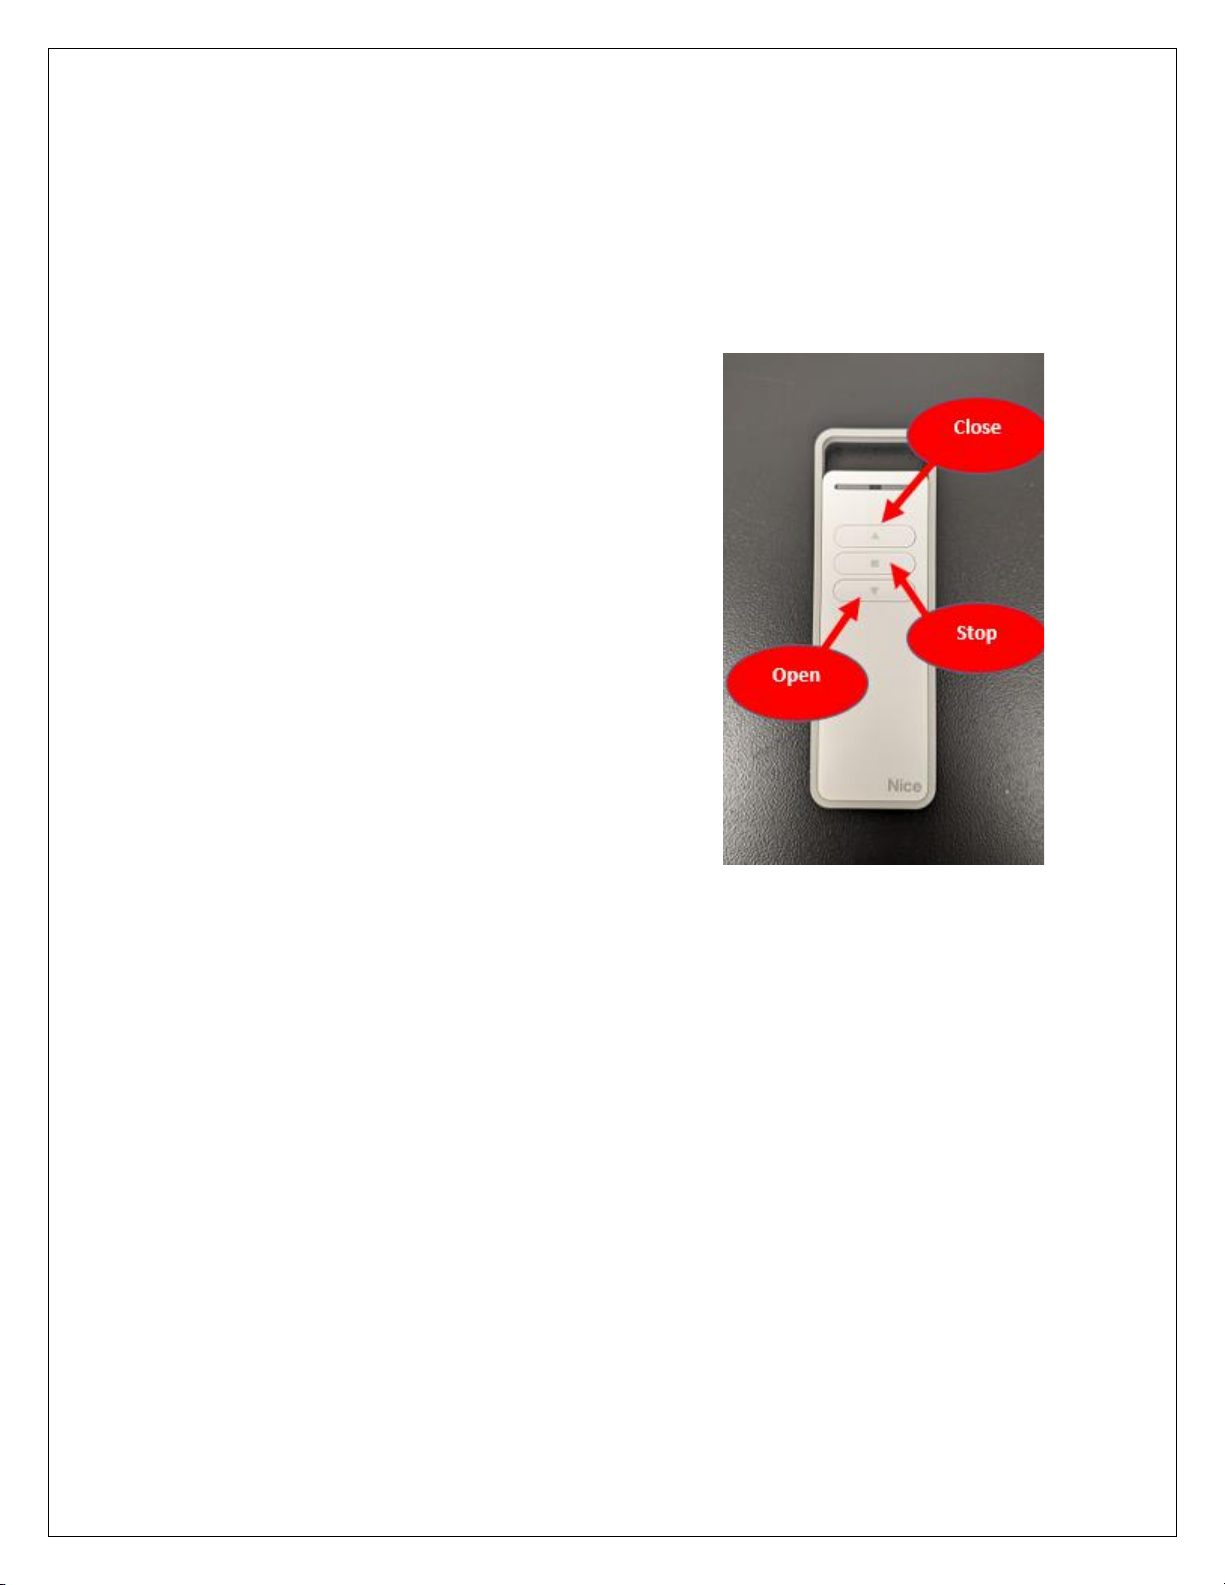
2. Keep the “ ■ ” button pressed and wait for the motor to perform two
(2) movements. Release the button.
3. Keep the “ ■ ” button pressed and
wait for the motor to perform four
(4) movements. Release the button.
4. Keep the “ ▼ ” button pressed and
wait for the motor to perform two
(2) movement. Release the button.
5. Adjustment of the open position:
Press the “ ▼ ” and “ ▲ ” buttons
until the awning reaches the open
position you want (at each pulse the
awning moves a few millimeters).
6. Keep the “ ■ ” button pressed and
wait for the motor to perform three
(3) movements. Release the button.
*If the motor makes six (6) movements, the programming has failed.
You must then repeat steps 7.B.2 “Erasing the motor’s memory” and
7.C.1 “Putting the motor in “programming” mode” from the
beginning.
NOTE: The fabric should be rolling over the top of the roller bar, not underneath.
If the fabric is rolling from the bottom of the roller bar, continue unrolling the
fabric until it rolls over the top of the roller bar. Then roll up the fabric until both
lateral arms ‘lock’ and the fabric becomes tight.
Page 42

Brasilia Slim EN March 2022 v4 42
7.C.2. Using the emergency override
The Nice motors have an emergency mechanism. The emergency mechanism
allows the awning to be moved manually, for instance during a power outage; you
can open or close your awning with the manual hand crank.
When using the emergency mechanism, or if the motor is powered off for more
than twenty-four hours (24h), the motor’s control unit loses the current position
of the awning. This situation is resolved by an automatic realignment manoeuvre;
one (1) of these two (2) commands may be sent to the motor, to which it responds
differently.
1. The closing command raises the awning until it reaches the upper
position (close).
2. The openning command lowers the awning for three (3) seconds, then
reverses until the awning reaches the upper position (close) .
7.D. Wind Sensor
WARNING! The windsensor is not a safety device capable of eliminating damage to the
awning due to strong winds, water snow or ice accumulations. Indeed, a simple power
outage can prevent the awning from being automatically retracted. The sensor is
rather part of an automation capable of protecting the awning and facilitating its use.
NOTE: Multiple Awnings inc. does not assume any liability for personal injuries nor
material damages caused by atmospheric events like high winds, water snow or ice
accumulations undetected by the device’s sensors.
The sensor is equipped with an integrated radio transmitter and autonomous power
supply with two (2) batteries. The product functions by detecting in real time any
vibrations in the end part of the awning, generated by the force of the wind. When the
value detected by the sensor exceeds the set intervention threshold, the sensor sends
a radio signal to the receiver on the motor, which in turn issues a command to close
your awning
Page 43
Brasilia Slim EN March 2022 v4 43
7.D.1. Wind sensor installation
NOTE: This procedure only applies if you need to replace your original wind sensor
1. Open the sensor by undoing the screw on the upper shell.
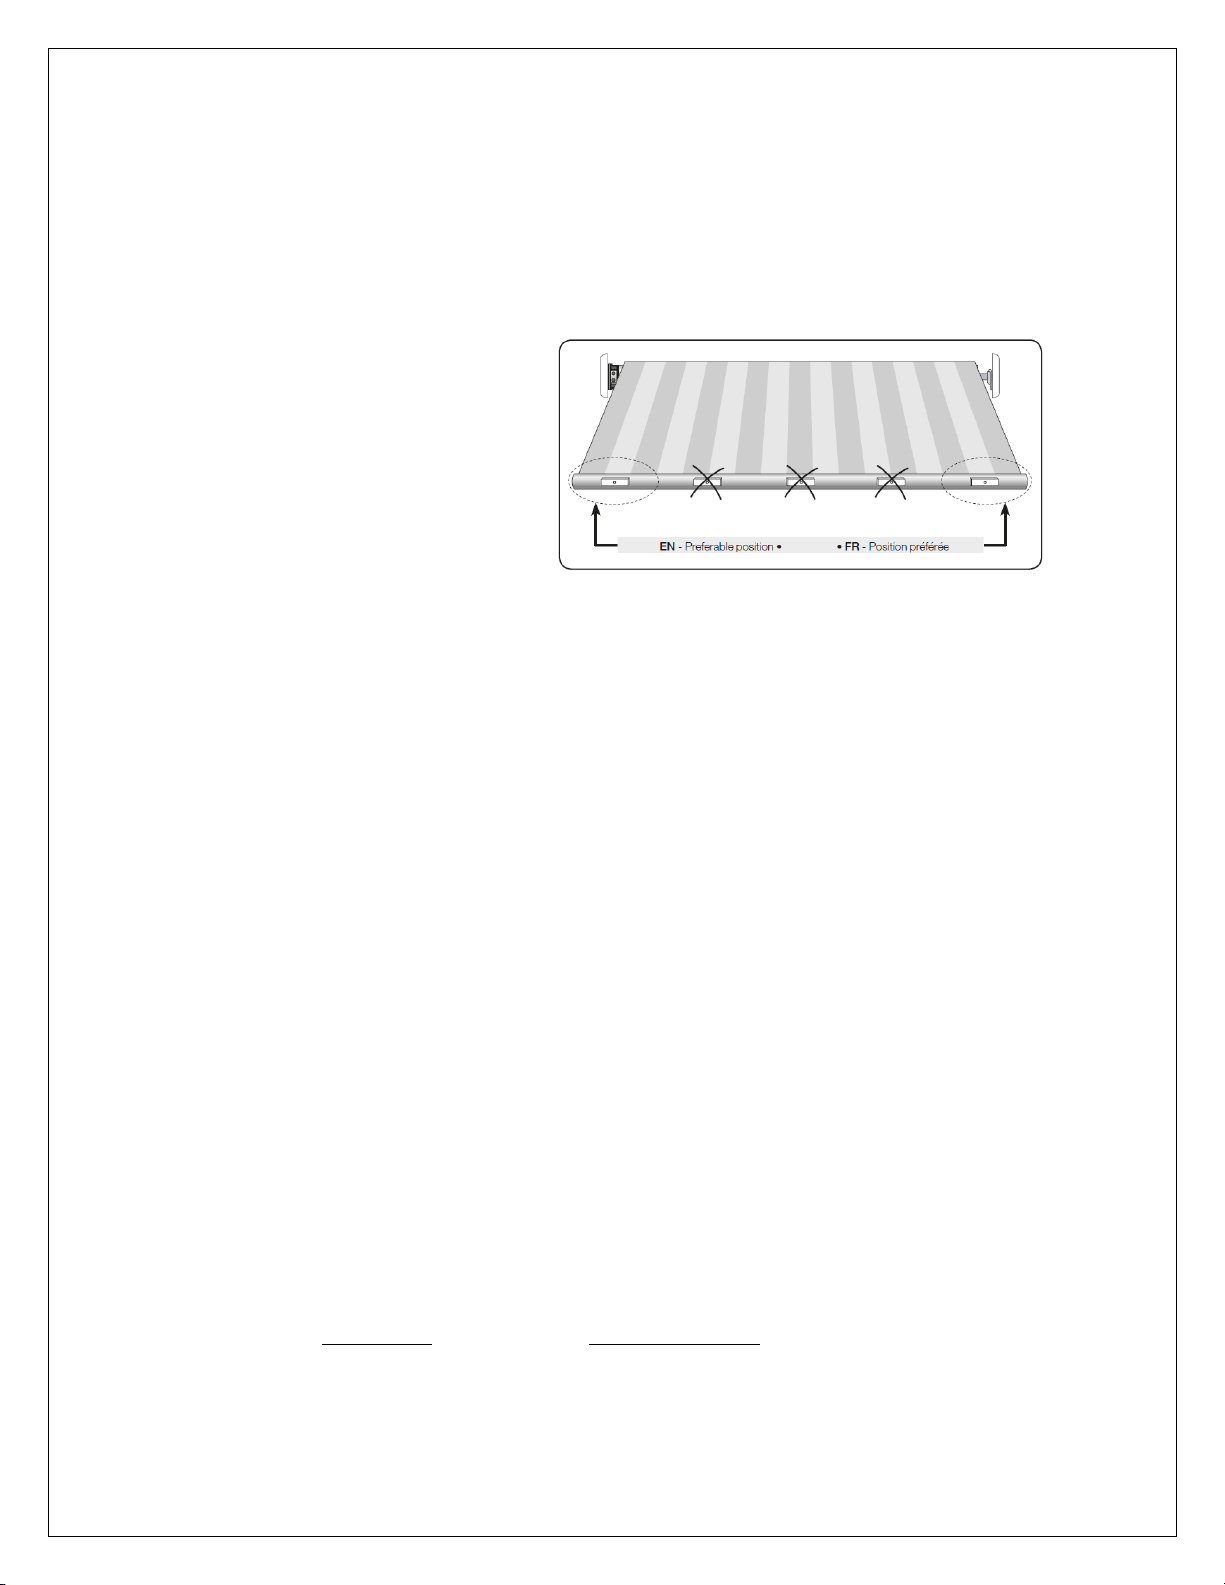
2. The wind sensor
must be installed
on the inner face
of the front bar of
the but it must not
interfere with the
full closure of the
awning. The
sensor must be
positioned near the extremity corner of the front bar of the awning,
on the motor’s side.
3. Secure the upper shell of the sensor (the one with the electronics) on
the front bar of the awning, using a strip of double-sided tape, so that
it can easily be moved during programming, if necessary..
4. Perform wind sensor memorization, see section 7.D.2. and system
calibration, see section 7.D.3.
5. Finally, replace the seal on the base, place the upper shell of the sensor
on top and secure it with the screw provided.
7.D.2. Memorizing the sensor in the motor receiver
As for any other transmitter, the wind sensor’s radio code must be memorized in
the receiver of the motor it controls, so that the sensor can send wireless
commands.
Procedure for memorizing additional transmitters using an already memorised
transmitter
WARNING! This procedure may only be used if one or more remotes have
already been memorized in the system.
Page 44
Brasilia Slim EN March 2022 v4 44
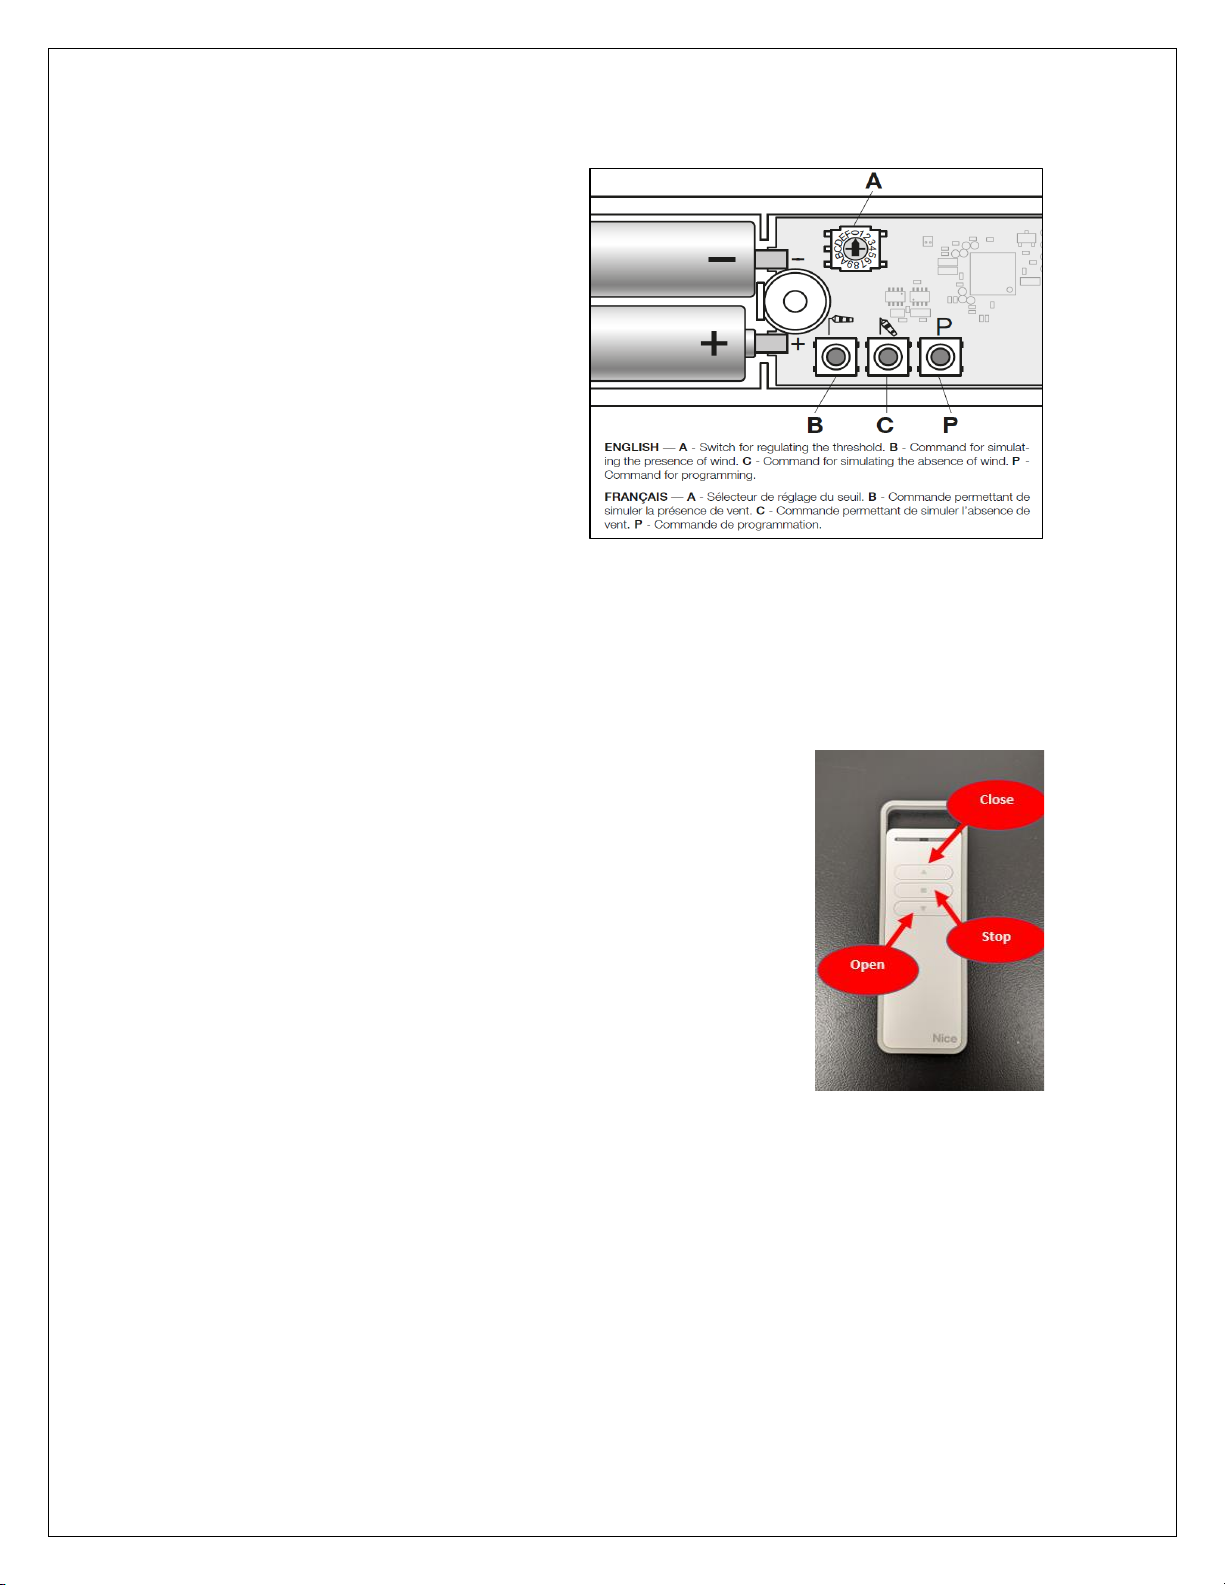
1. On the new wind
sensor, keep the ‘’P’’
button of the wind
sensor pressed for
ten (10) seconds,
then release.
2. On an already
memorized remote
control, press the
‘’ ■ ” button three (3)
times, slowly.
.
3. On the new wind sensor, keep the ‘’P’’ button pressed and wait for the
motor to perform three (3) movements. Release the button.
Testing that the sensor has been memorized
1. Cut off the AC power to the motor, wait for
two (2) seconds and then put back on the AC
power to the motor.
2. Press either the “ ▼ ” or “ ▲ ” button on the
remote control.
3. While the open or close command is
executed, press the ‘’P’’ button of the wind
sensor. If the wind sensor has been
memorized, the motor will immediately
stop.
7.D.3. Calibrating the sensor
The sensor is provided with a pre-set calibration at the factory. Nevertheless, after
installation and implementation, it is absolutely necessary to test the sensitivity of
the awning to the wind, based on local wind conditions.
Page 45
Brasilia Slim EN March 2022 v4 45
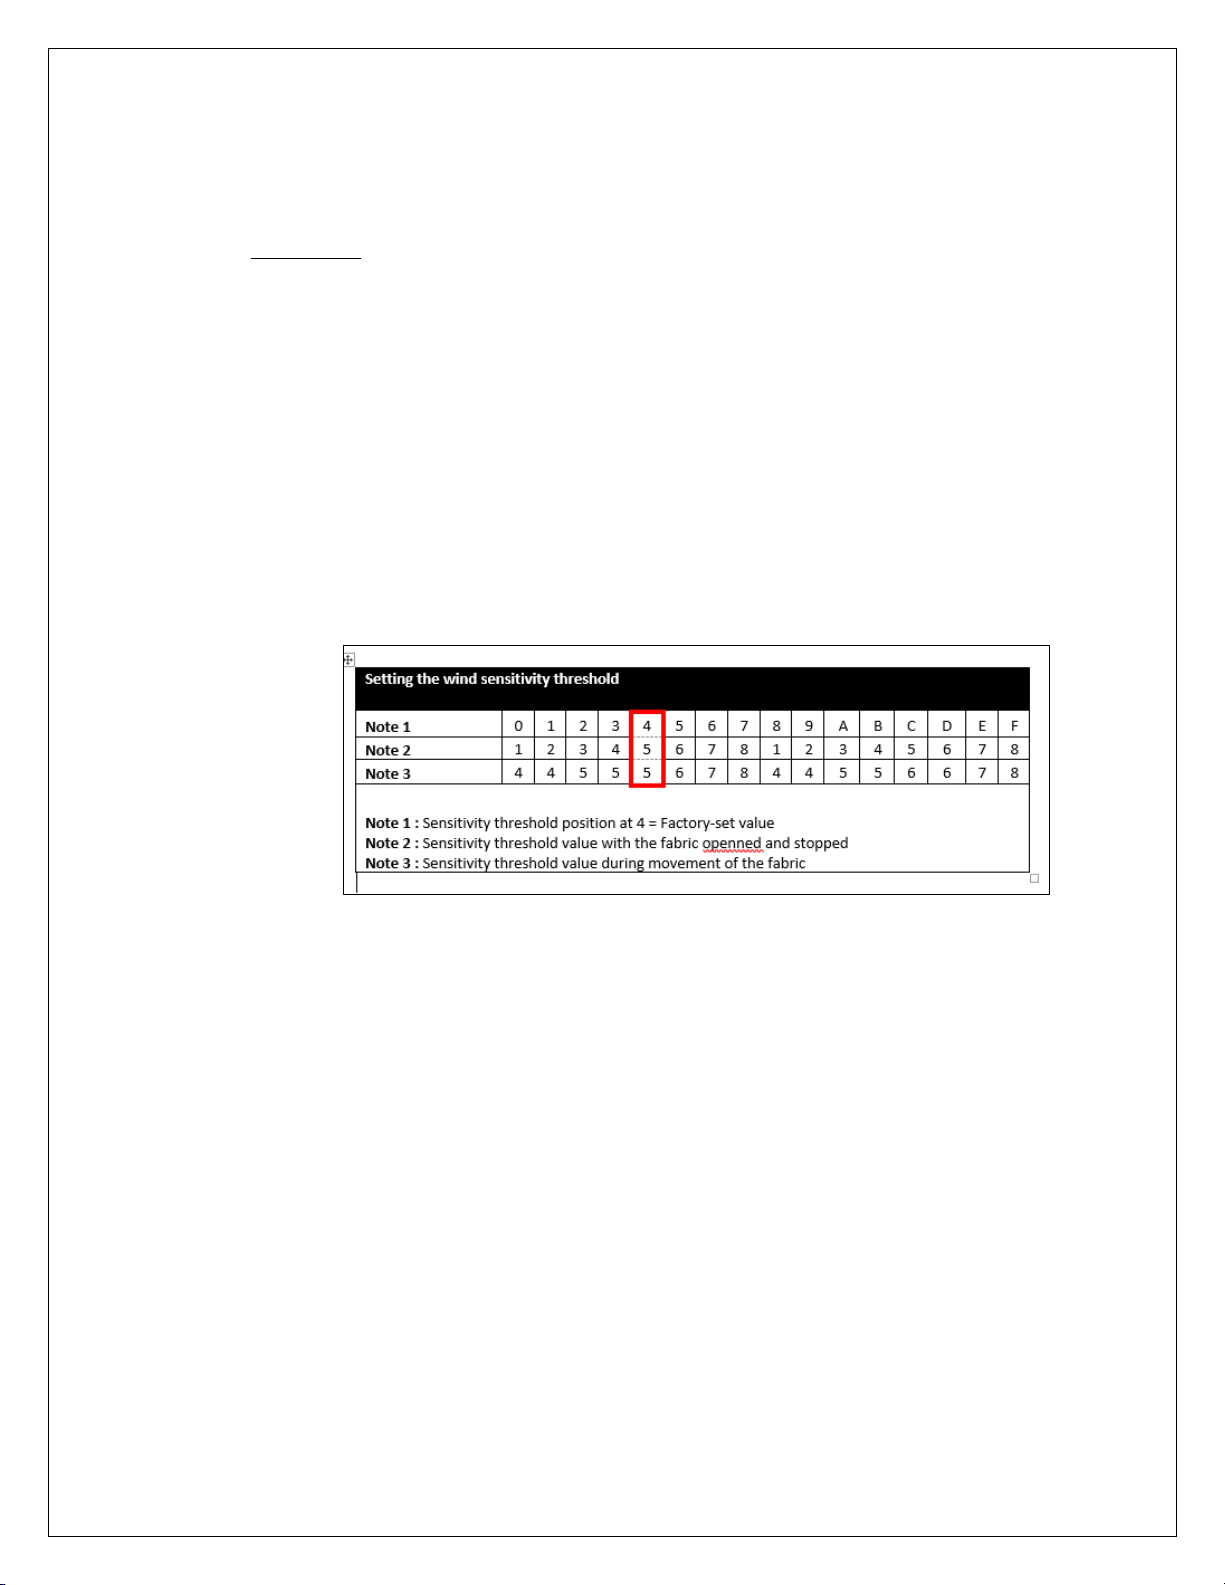
NOTE: The smaller the number, the more sensitive the wind sensor. The larger the
number, the less sensitive it will be.
WARNING! During this operation, there must be ABSOLUTELY NO WIND.
1. Open awning completely. After the motor has stopped running, wait
fourty (40) seconds before moving on to the next step!
2. Before modifying the base factory settings, you need to check whether
these settings are OK as they are. To do so, manually shake the front
bar of the awning to make it strongly vibrate (the force of the action
must be comparable to a gust of wind).
3. Based on the result (too sensitive/not sensitive enough), you must
modify the factory base settings on the threshold dial selector.
4. Lastly, repeat the test conducted in point #2.
5. If necessary, repeat the procedure several times until you find the best
setting.
NOTE: After the awning has been closed by the wind sensor, you will need to wait
at least ten (10) minutes before you are able to open it again. In this case, you will
also need to wait for the fourty (40) second delay before proceeding with the next
step (after the awning has stopped moving).
Page 46
Brasilia Slim EN March 2022 v4 46
7.D.3.1. Protecting the awning when it is moving
The wind sensor detects vibrations, even during the extension and
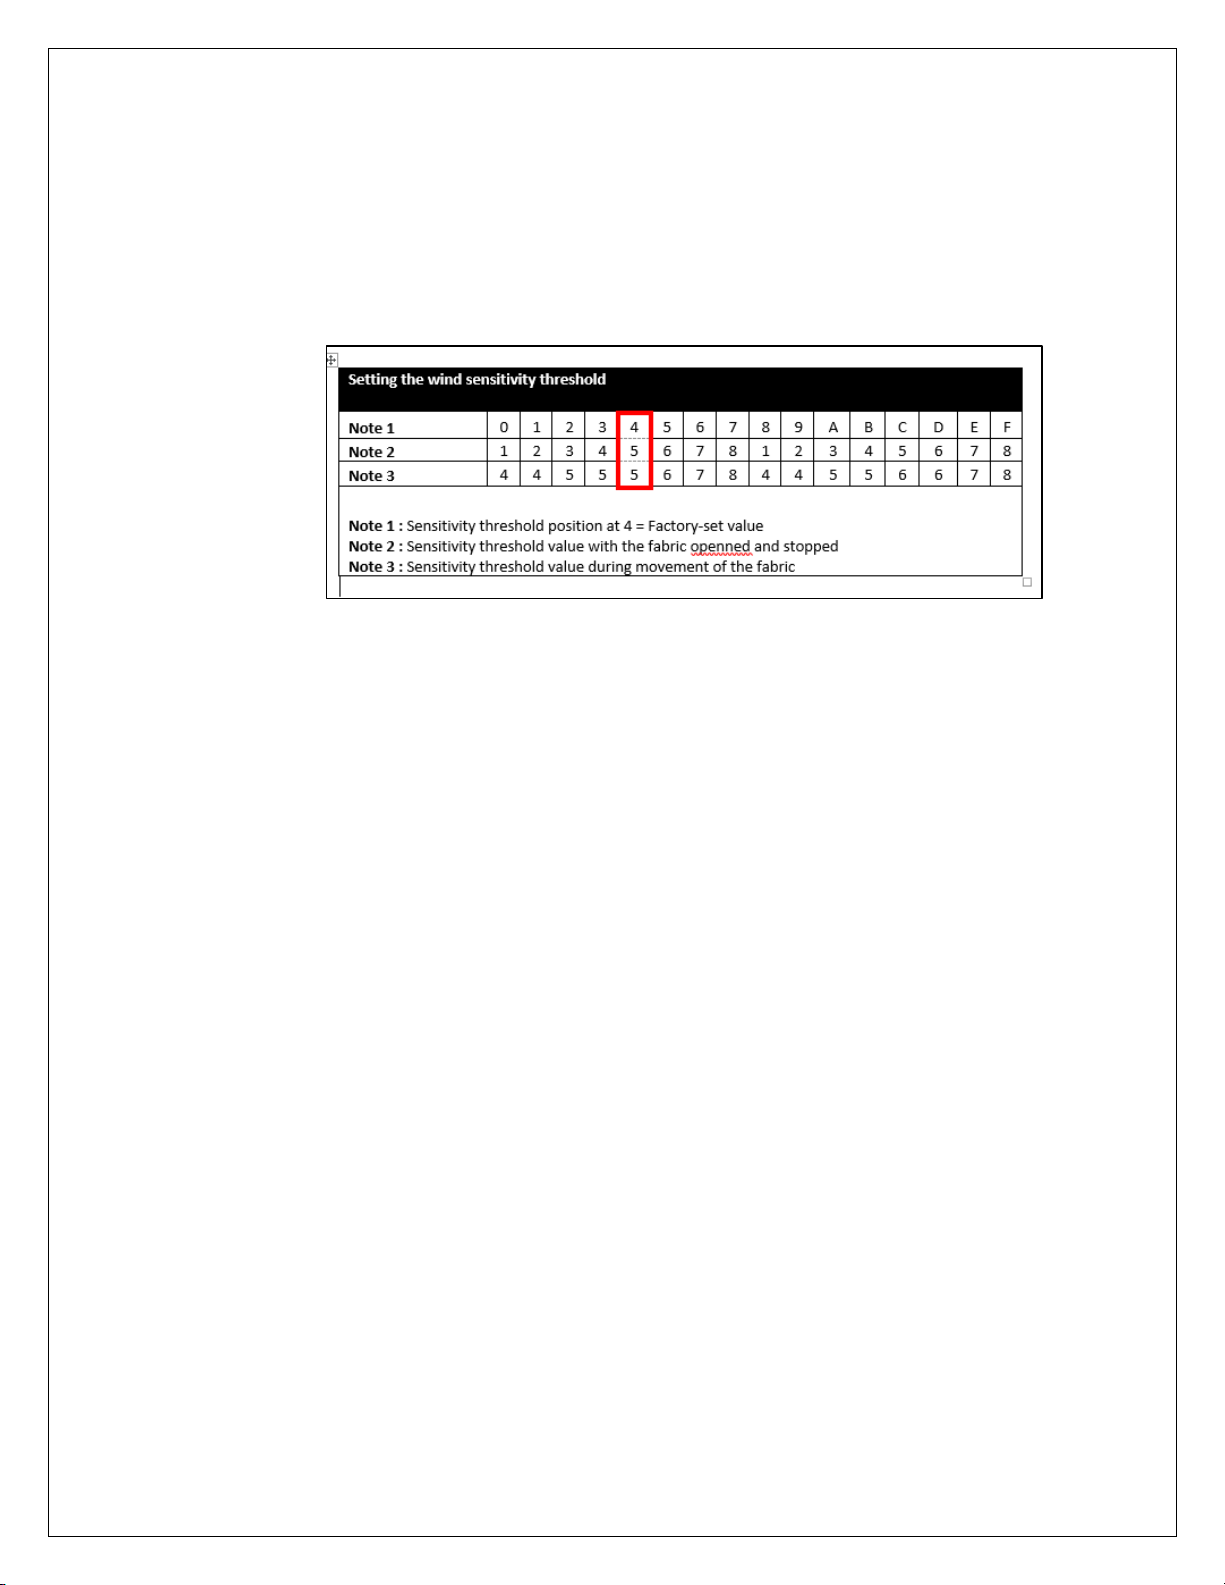
retraction movements. During these movements, the system uses a
threshold value a little higher than the one that was set.
7.D.4. Timeout after a “wind alarm”
If the awning has closed due to a “wind alarm”, it can only be opened again after
a timeout of at least ten (10) minutes. During this timeout, any command for
opening will not work.
You can also unplug and plug back the awning. It will allow you to use it without
any delay.
7.D.5. Detection of “low battery”
When the sensor detects the low battery charge condition, it sends a dummy
“wind alarm” signal to the motor to close the awning for safety purposes. The
message will be sent to the motor periodically (about once every thirty (30)
minutes until the batteries are flat) and will close the awning. Then the sensor will
no longer function correctly until the batteries are changed.
The batteries should last about three (3) years, depending on ambient
temperature. To change them, make sure you switch off the power supply to the
motor; then undo the screw on the upper shell of the sensor and replace the AA
batteries.
Page 47

Brasilia Slim EN March 2022 v4 47
7.E. Removing the awning from the brackets
Before removing the awning from the wall, or the eaves, it is imperative to close
it completely, to unplug it from the wall and to tie it down in the closed position
with some rope or bungees.
Once this is done, remove the blocking stoppers, you awning is now ready to
be removed from the installation plates.
WARNING! The arms of the Brasilia Slim are equipped with a strong spring in the
elbow and will tend to force open. The motor keeps them closed, but in case of
damage during transportation or manipulation, they could open without
warning and cause injuries and material damage.
Page 48
Brasilia Slim EN March 2022 v4 48
8. Troubleshooting Guide
Installation issues
Problem #1
Can I hardwire my awning directly to my house’s electric
system?
Solution
It is indeed possible to hardwire your awning’s motor
directly to your house’s electrical system. For that
matter, you will need to cut out the AC plug at the end of
the cable, but do bear in mind that this will void the
warranty on the motor and can also cause the
programming of the motor to become more difficult.
If you really need to go this route: never cut the wire
more than thirty (30) cm from the motor since this could
possibly cut the antenna wire.
Also, please make sure to have a power switch accessible
near the assembly to facilitate the programming
procedure.
Problem #2
What is the minimum and maximum slope of my
awning?
Solution
Five to seventy degrees (5° to 70°).
Even if it is possible to put the front of your awning
higher, you have to make sure that it has a sufficient
slope from back to front to allow the rain water to drain
completely.
The awning is not made to support accumulations of
water or snow when open and could be damaged and
cause injury and material damage.
Appearance issues
Problem #1
The fabric of my awning makes small wrinkles, all in the
same direction.
Solution #1
This means that the awning’s fabric is off centre. You
have to make sure it is equally positioned and
Page 49
Brasilia Slim EN March 2022 v4 49
centered on the roller AND on the front bar.
You will need to fully open, if it is motorized, you have to
open it past it’s limit using the manual crank. The fabric
will become loose and you will see the roller`s metal
through the opening of the casing.
Pull the fabric towards the side to which the awning
stayed partially opened when the awning is fully closed.
Position the fabric on the roller equally as on the front
bar.
Close the awning and proceed with a test.
Solution #2
If the fabric is not perfectly at the right angle, You will
need to use velcro as a wedge to thicken the roller on the
side which is too long.
Contact us for more details.
Problem #2
The fabric of my awning makes small wrinkles, on each
side of the seams, but not elsewhere.
Solution
This is normal. These small folds are caused by the
stiching which causes the fabric to be slightly thicker than
the rest of the fabric.
Problem #3
My awning closes completely on one side but it always
remains open a little on the other side.
Solution #1
This means that the awning’s fabric is off centre. You
have to make sure it is equally positioned and centered
on the roller AND on the front bar.
You will need to open fully. If it is motorized, you have to
open it past it’s limit using the manual crank. The fabric
will become loose and you will see the roller`s metal
through the opening of the casing.
Pull the fabric towards the side to which the awning
stayed partially opened when the awning is fully closed.
Position the fabric on the roller equally as on the front
bar.
Close the awning and test it.
Page 50
Brasilia Slim EN March 2022 v4 50
Solution #2
The fabric is not perfectly at right angle, you will need to
use velcro as a wedge to thicken the roller on the side
which is too long which corresponds to the side that
remains a bit opened. Contact us for more details.
Problem #4
When my awning is open, one side of the front bar is
always higher than the other.
Solution #1
Although the awning is adjusted at the factory, a
difference of a few milimeters in the positioning of the
brackets will have an impact resulting in many
centimeters on the final slope result.
Therefore, you will need to re-adjust the awning’s pitch
inclination. Please note that the pitch inclination is
adjustable independently on each of the two (2) arms,
see section 7.A. “Pitch inclinaison adjustment”.
Solution #2
This can also be caused by improper installation or a lack
of wall strength.
Make sure your installation plates are level, that they
have been anchored to a structural part of the house
and/or that shims have been used if your wall is arched
or crooked.
Problem #5
I noticed embossing or mottling on my fabric.
Is this normal?
Solution
Our fabrics are woven from an acrylic fiber. You may
notice some small irregularities after installation: slight
embossing, some mottling or small creases along the
seams. The tightness and solidity of the fabric are in no
way affected. These deformations are due, among other
things, to the handling during sewing, making and
assembly. In addition, acrylic fabrics treated with resins
may show visible mottling in backlight due to an optical
effect. Barely noticeable, these irregularities are inherent
in the nature of the acrylic fibers.
Can I make them disappear?
Yes! Although the performance of your fabric is not
altered in any way, it is possible for you to attenuate
these deformations. However, in some cases it might be
difficult to make them completely disappear. Time will be
Page 51
Brasilia Slim EN March 2022 v4 51
your ally! Simply sprinkle the farbic with a little water and
let it dry in the sun. After just a few times, the
irregularities will disappear or at least lessen.
Functions issues
Problem #1
I just finished installing my awning, but it doesn't work
at all.
Solution
Most likely the motor’s wire is incorrectly connected to
the motor. Unplug it and plug it back in. Check that the
wire connection gasket is properly aligned in the
connector.
The awning is assembled at our factory and the motor is
programmed and tested before shipping. It is unlikely
that the motor is faulty.
Problem #2
I have a wind sensor but my awning doesn’t close when
it’s windy.
Solution #1
Check if the awning opens and closes with the remote
control. If yes, replace the wind sensor’s batteries with
new ones.
Please note that you need to unplug the motor from the
AC before replacing the batteries.
If it is not the case:, see Problem #3 in the “Functions
issues” section
Solution #2
Proceed with testing the wind sensor to see if it is
programmed as it should be, see section 7.D.2 “Pair the
windsensor with the motor”.
Unscrew the wind sensor’s cover to access the internal
programming buttons; press the ‘’ B ’’ button to close the
awning. If the awning closes, this means it is programmed
properly. Continue with calibration, section 7.D.3
“Calibrating thr sensor”.
Page 52
Brasilia Slim EN March 2022 v4 52
If the awning does not close, see section 7.D.2 “Pair the
windsensor with the motor” .
Solution #3
Is the wind sensor installed properly on the front bar near
one of the extremities? If not, see section 7.D.1
“Windsensor installation”.
Please note that the wind sensor needs to be oriented
correctly; the lettering as to ‘’read’’ in the correct
direction.
Problem #3
I have a wind sensor and my awning closes even when
it’s not windy.
Solution #1
The awning closes by itself every thirty (30) minutes :
Replace the wind sensor’s batteries with new ones;
disconnect the motor from the AC before changing the
batteries.
Solution #2
The wind sensor’s sensitivity is adjusted too high.
Calibrate the wind sensor following the steps in section
7.D.3. “Calibrating the sensor”.
Problem #4
My remote control doesn’t make my awning open or
close.
Solution #1
If your awning is not fully closed, it could sometimes
refuse to close completely.
You need to open it a bit more and then close it
completely.
Solution #2
If your awning stops while opening or closing or
immediatly after it has moved, this could indicate that
the overheating protection has been triggered.
If this is the case, wait at least twenty (20) minutes and
do a second (2nd) attempt.
Solution #3
When the wind sensor triggers the awning to close, the
awning will refuse to open for at least ten (10) minutes.
Page 53
Brasilia Slim EN March 2022 v4 53
After this delay has expired, the awning will be
operational again.
Solution #4
Check if the AC outlet used is functional by plugging
something else into it, like a lamp.
If the AC outlet is indeed functional but the awning still
refuses to work, verify the remote control. Verify if the
remote control batteries are working; press on one of the
remote’s buttons: does the LED illuminate? A remote
control with weak batteries will take more time to light
up the LED and will also have a reduced range.
If the remote’s LED does not light up, replace the
batteries with new ones.
If the issue persists, erase the motor’s programming and
reprogram it, see sections 7.B.1 “Putting the motor in
“programming” mode”, 7.B.2 “Erasing the motor’s
memory”, 7.B.3 “Programming the first remote
control” and 7.C “Adjusting the limits of your awning”,
in this exact order.
Problem #5
My motor is not responding but it was working just
minutes ago.
Solution #1
If your awning is not fully closed, it could sometimes
refuse to close completely; you then need to open it a bit
more and then close it completely.
Solution #2
If your awning stops while opening or closing or
immediately after it has moved, this could indicate that
the overheating protection as been triggered,
If this is the case, wait at least twenty (20) minutes and
do a second (2nd) attempt.
Solution #3
When the wind sensor triggers the awning to close, the
awning will refuse to open for at least ten (10) minutes.
After this delay, the awning will be operational again.
Page 54
Brasilia Slim EN March 2022 v4 54
Problem #6
The fabric rubs on the lower edge of the casing.
Solution
The fabric rolls upside down (comes out from the bottom
of the roller) on the awning’s roller; the fabric should
come out from the top of the roller.
If the awning is motorized, unplug it from the AC.
You will then need to use the hand cranck (both for
motorized and manual models) and open the awning
fully until the fabric is completely loose.
Continue to turn the crank in the same direction until the
fabric re-tightens, continue until the awning closes
completely.
Please be carefull when re tightening the fabric; make
sure that it does not catch in the awning’s arms.
Please make sure that the fabric does not become loose
again since rolling it back upside down again will
eventually result in damaging the fabric prematurely.
Problem #7
The awning stops before being completely open or it
opens too much and the fabric becomes saggy.
Solution
The open limit of the motor needs to be adjusted; see
sections 7.C.1. “Adjusting the limits”.
Problem #8
The awning only opens or closes if we keep the button
pressed.
Solution
Verify if the motor might have received an intense
electrical or mechanical shock.
Erase the motor’s programming and reprogram it, see
sections 7.B.1 “Putting the motor in “programming”
mode”, 7.B.2 “Erasing the motor’s memory”, 7.B.3
“Programming the first remote control” and 7.C
“Adjusting the limits of your awning”, in this exact
order.
Problem #9
Can other remotes interfere with my awning?
Solution
No, each remote control has to be ‘’added’’ to a specific
awning.
Page 55
Brasilia Slim EN March 2022 v4 55
Other remotes like the one for your garage door cannot
communicate with your awning.
Problem #10
Can I add more than one (1) remote to my awning?
Solution
Yes, the Nice motor can memorize up to thirty (30)
transmitters including wind sensors and remote control.
Problem #11
I lost my remote and now I can’t program my new
remote.
Solution
In this case, please consult section 7.B.3 ‘’Programming
the 1st remote control’’.
You will need your handcrank.
Contact us:
Multiple Awnings Inc
1505A rue de l’Industrie
Beloeil, Qc, Canada
J3G 0S5
www.multipleawnings.com/home.html
www.zonepatio.ca (Canada)
www.zonepatio.com (USA)
By email : [email protected]
By phone (Canada): 1-866-441-4182
(USA): 1-800-736-0906
 Loading...