

v.1_20120430
NEO 180 USB
GUIA DE INSTALACION

1
TABLE OF CONTENTS
INTRODUCTION ....................................................................................... 2
FEATURES ......................................................................................... 2
PACKAGE CONTENTS ..................................................................... 2
APPLICATION .................................................................................... 3
SPECIFICATIONS .............................................................................. 4
SUPPORTED DISPLAY RESOLUTIONS .......................................... 4
MINIMUM SYSTEM REQUIREMENTS ............................................. 5
DEVICE INSTALLATION - SOFTWARE .................................................. 6
DEVICE INSTALLING - HARDWARE .................................................... 10
SPLIT-SCREEN STATION...................................................................... 11
ADJUSTING THE SCREEN RESOLUTION .......................................... 14
ADJUSTING THE SCREEN ROTATION ............................................... 17
SETTING TURN OFF ALL MONITOR ................................................... 17
SETTING POWER SAVING ................................................................... 18
DEVICE DRIVER UN-INSTALLATION .................................................. 20
VESA MOUNTING .................................................................................. 22
TROUBLESHOOTING TIPS .................................................................. 24

2
INTRODUCTION
Thank you for purchasing the MultiPoint Workstation. The MultiPoint Workstation
is designed specifically for Windows MultiPoint Server 2012. Simply connect it to
an available USB Port on the server, and attach a monitor, keyboard, and mouse
to add a new workstation. The MultiPoint Workstation features Two (Four)
high-speed USB 2.0 ports, audio and microphone ports, a VGA port that supports
resolutions up to 1680 x 1050. Add up to ten MultiPoint Workstation per server.
The MultiPoint Workstation provides an inexpensive and reliable way to expand
your Windows MultiPoint Server 2012 for school and office running “office
application”; “Home Entertainment” and “Full Screen Movie Playback” are not
recommended.
© 2013 Microsoft. All rights reserved.
Microsoft, Active Directory, MultiPoint Server, Office, .NET Framework, Windows, and Windows
Server are trademarks of the Microsoft group of companies. All other trademarks are property of
their respective owners
Simple plug and play setup
FEATURES
Eliminates the need for internal video card installation
Designed for Microsoft Windows MultiPoint Server 2012
Simplified administration
Up to 10 WorkStations per Server PC
MultiPoint Workstation
PACKAGE CONTENTS
VESA Mounting Kits
USB Cable
CD (Driver and User Manual)
3A/5V AC Power Adapter (option for NEO360 only)
3
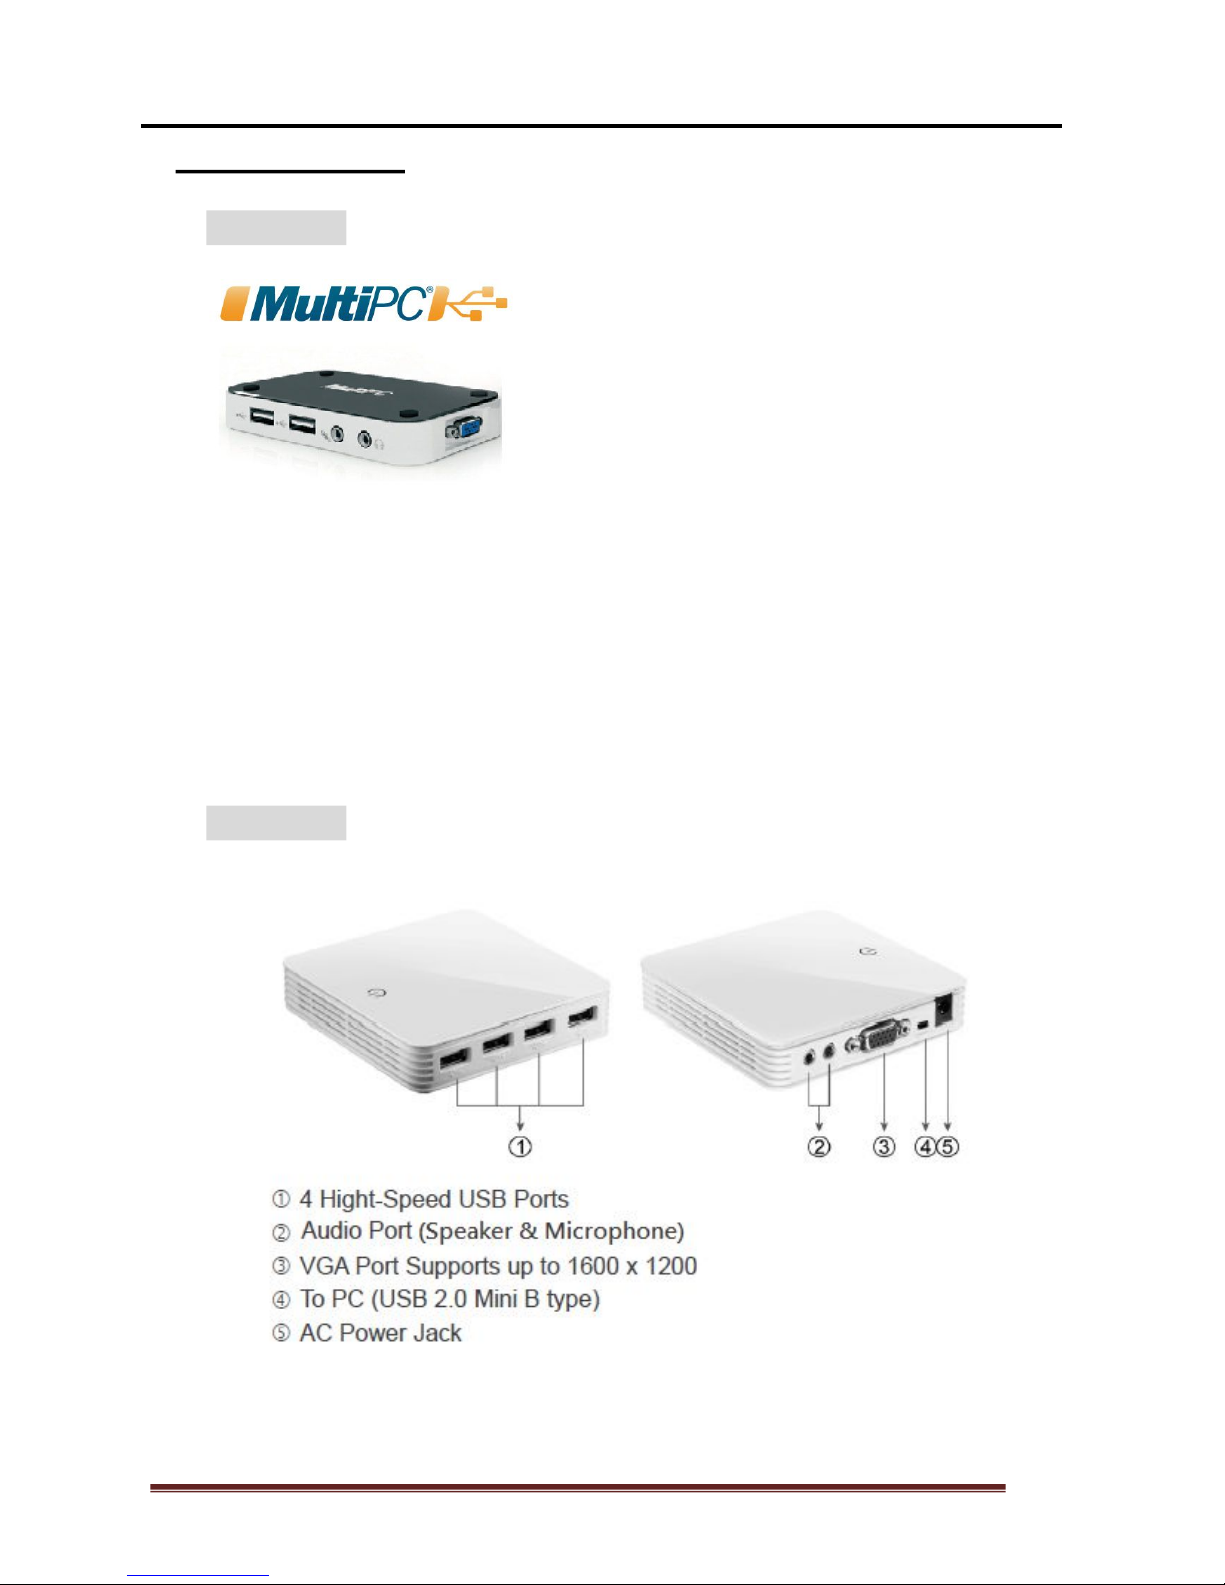
APPLICATION
NEO180
○
1 2 High-Speed USB Ports
○
2 Audio Port (Speaker & Microphone)
○
3 VGA Port Supports up to 1600 x 1200
○
4 To PC (USB 2.0 Mini B type)
NEO360
4
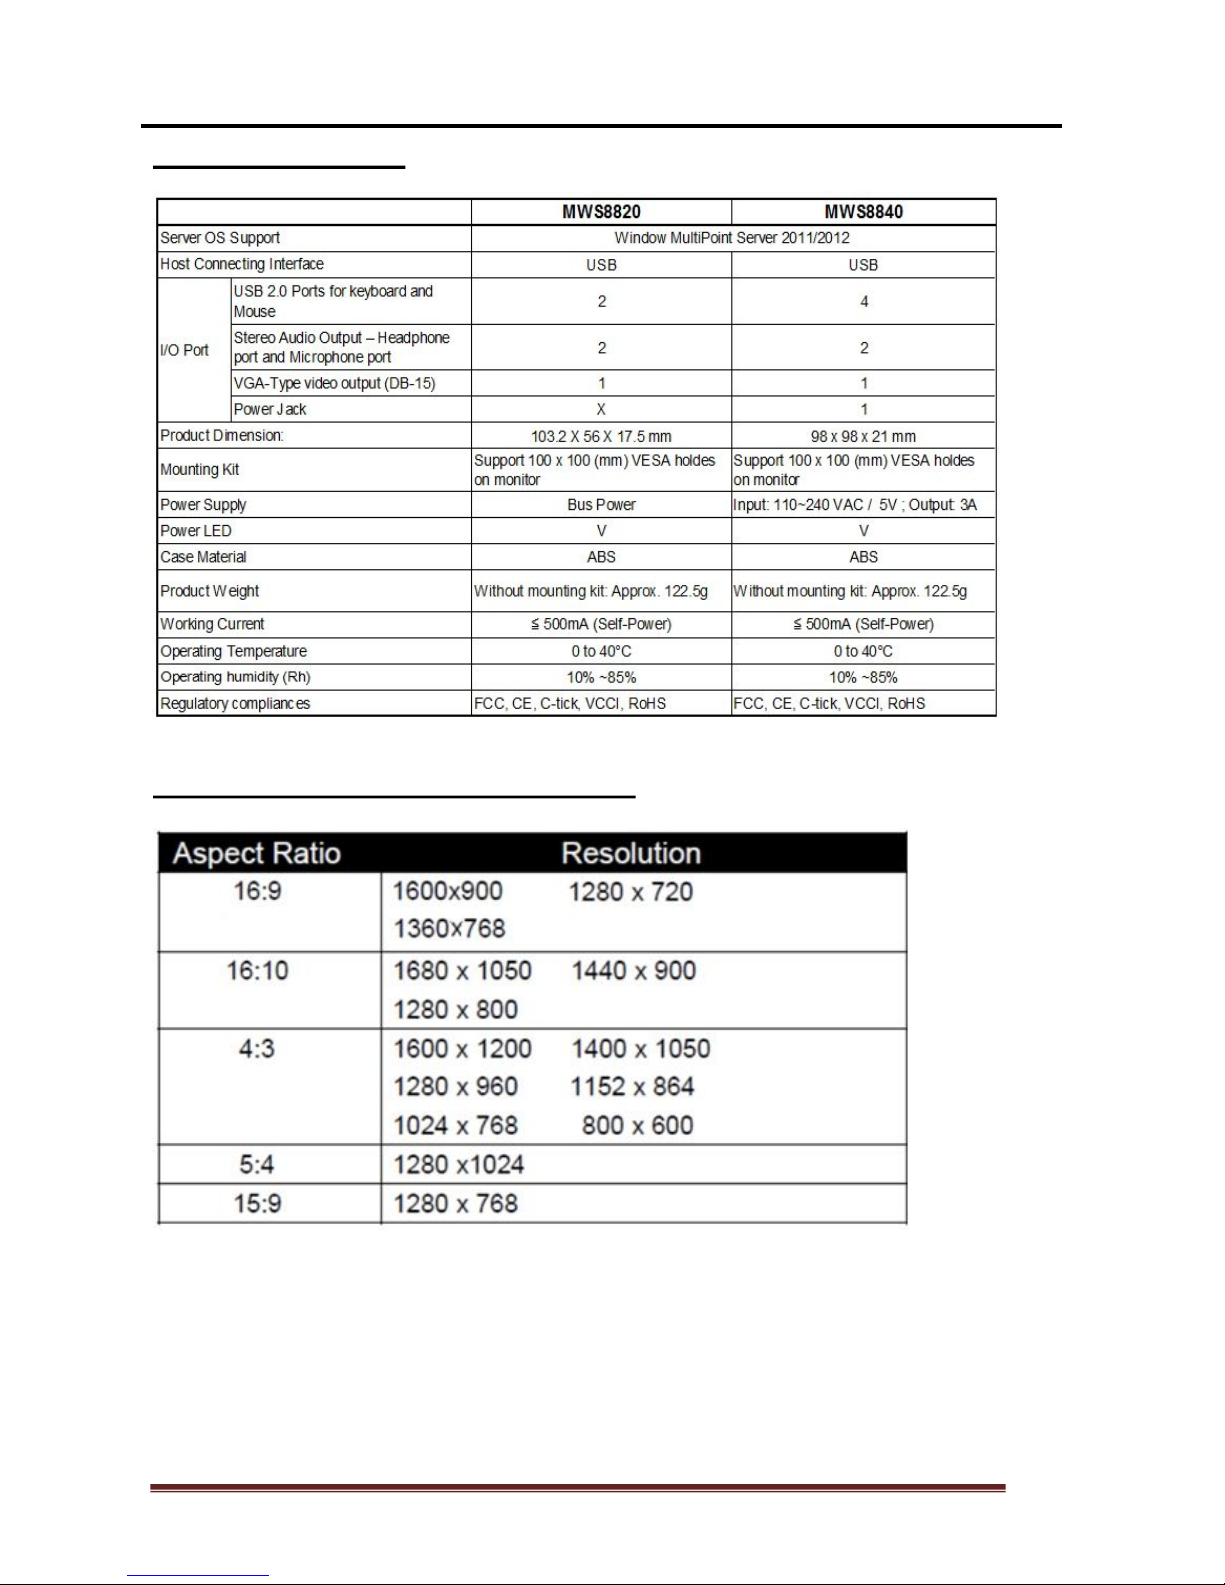
SPECIFICATIONS
SUPPORTED DISPLAY RESOLUTIONS

5
Available USB 2.0 Port
MINIMUM SYSTEM REQUIREMENTS
Number of Users 4 6 10
CPU (*Note.1)
Quad-core processor
Recommended
Intel Core i5 Intel Core i5 Intel Core i7
Main Board Chipset
Intel Ivy bridge chipset / Intel Sandy bridge chipset
RAM
3GB 4GB 8GB
Minimum disk space for
setup
32GB
*Note.1:
x64-based Intel Pentium, Intel quad core (i7, i5, i3), XEON, Intel dual core.
Compatible processor (MultiPoint Server supports up to four core & eight core CPUs
on one server)
Multi-core processor support. Support up to 4 & 8 multi-core processors; dual-core is
less powered and therefore only 2 to 3 workstation can be supported.
AMD Opteron / Athlon, AMD Embed chipset is not recommend due to unstable
keyboard/ mouse operation which may not recognize under USB1.1 device.
For Optimum Video Display.
Extended video display at full screen is not recommended; it often exhausts CPU and
force system with much lower performance.
Intel Itanium Processor is not supported
Microsoft’s license policy is restricting for 10 users per CPU under “Standard
Academic version”, you can apply for 20 users only if your computer has 2 CPU and
your OS license is a “Premium Business version”.
FOR OPTIMUM VIDEO DISPLAY
Full screen video display is not recommended, user may try one station for
full screen video play back under 720P periodically. a higher system may
required for full screen video play back, please refer to following
specification:
- i7 processor
- Intel Sandy bridge chipset
- Intel Ivy bridge chipset
Note: Extended video display at full screen is not recommended; it often
exhausts CPU and force system with much lower performance.
6
Installing the device driver enables Windows MutliPoint Server 2012 to
recognize the MultiPoint Workstation. Please make sure the MultiPoint
Workstation is unplugged from your server before executing the setup
program.
DEVICE INSTALLATION - SOFTWARE
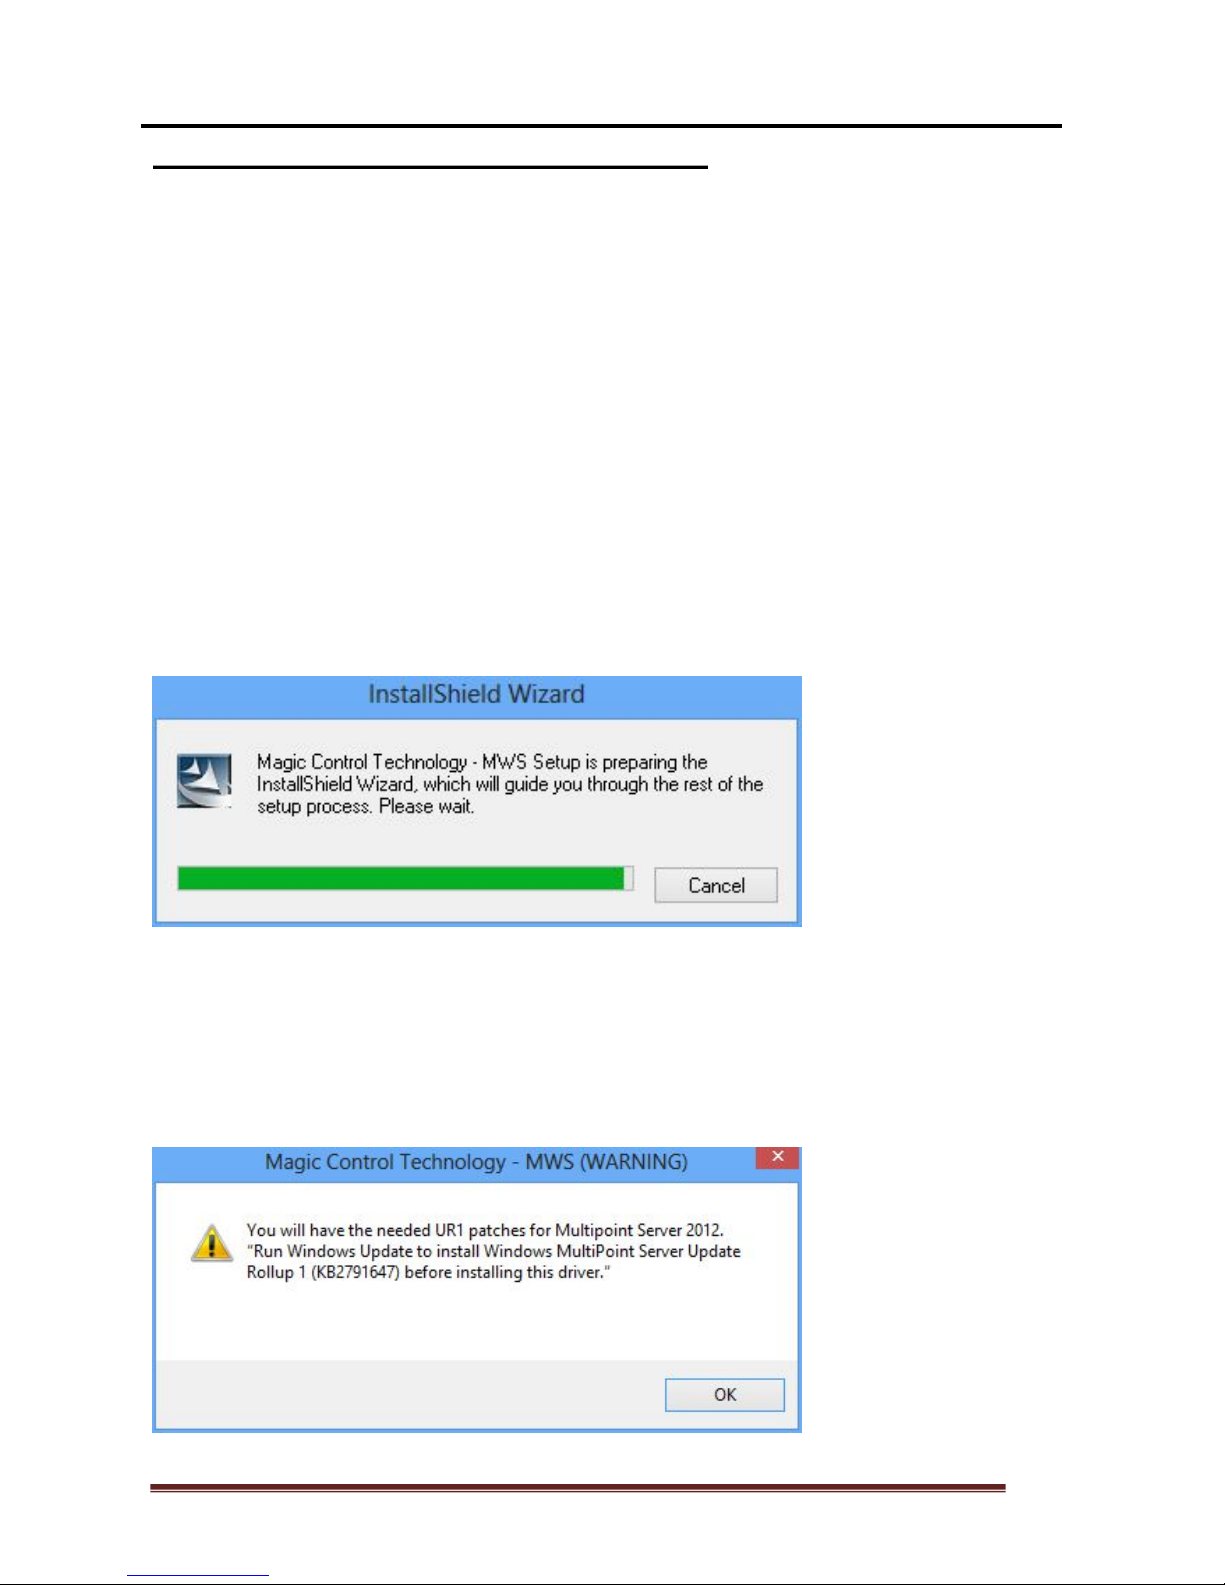
A Windows update must be completed before installing this Driver, if you have
completed Windows update you may skip step 2 and step 3
Step 1.
Insert the Driver installation CD into the CD-ROM drive. The installer should start
automatically. If it does not, double click Setup.exe to start the Installation Wizard.
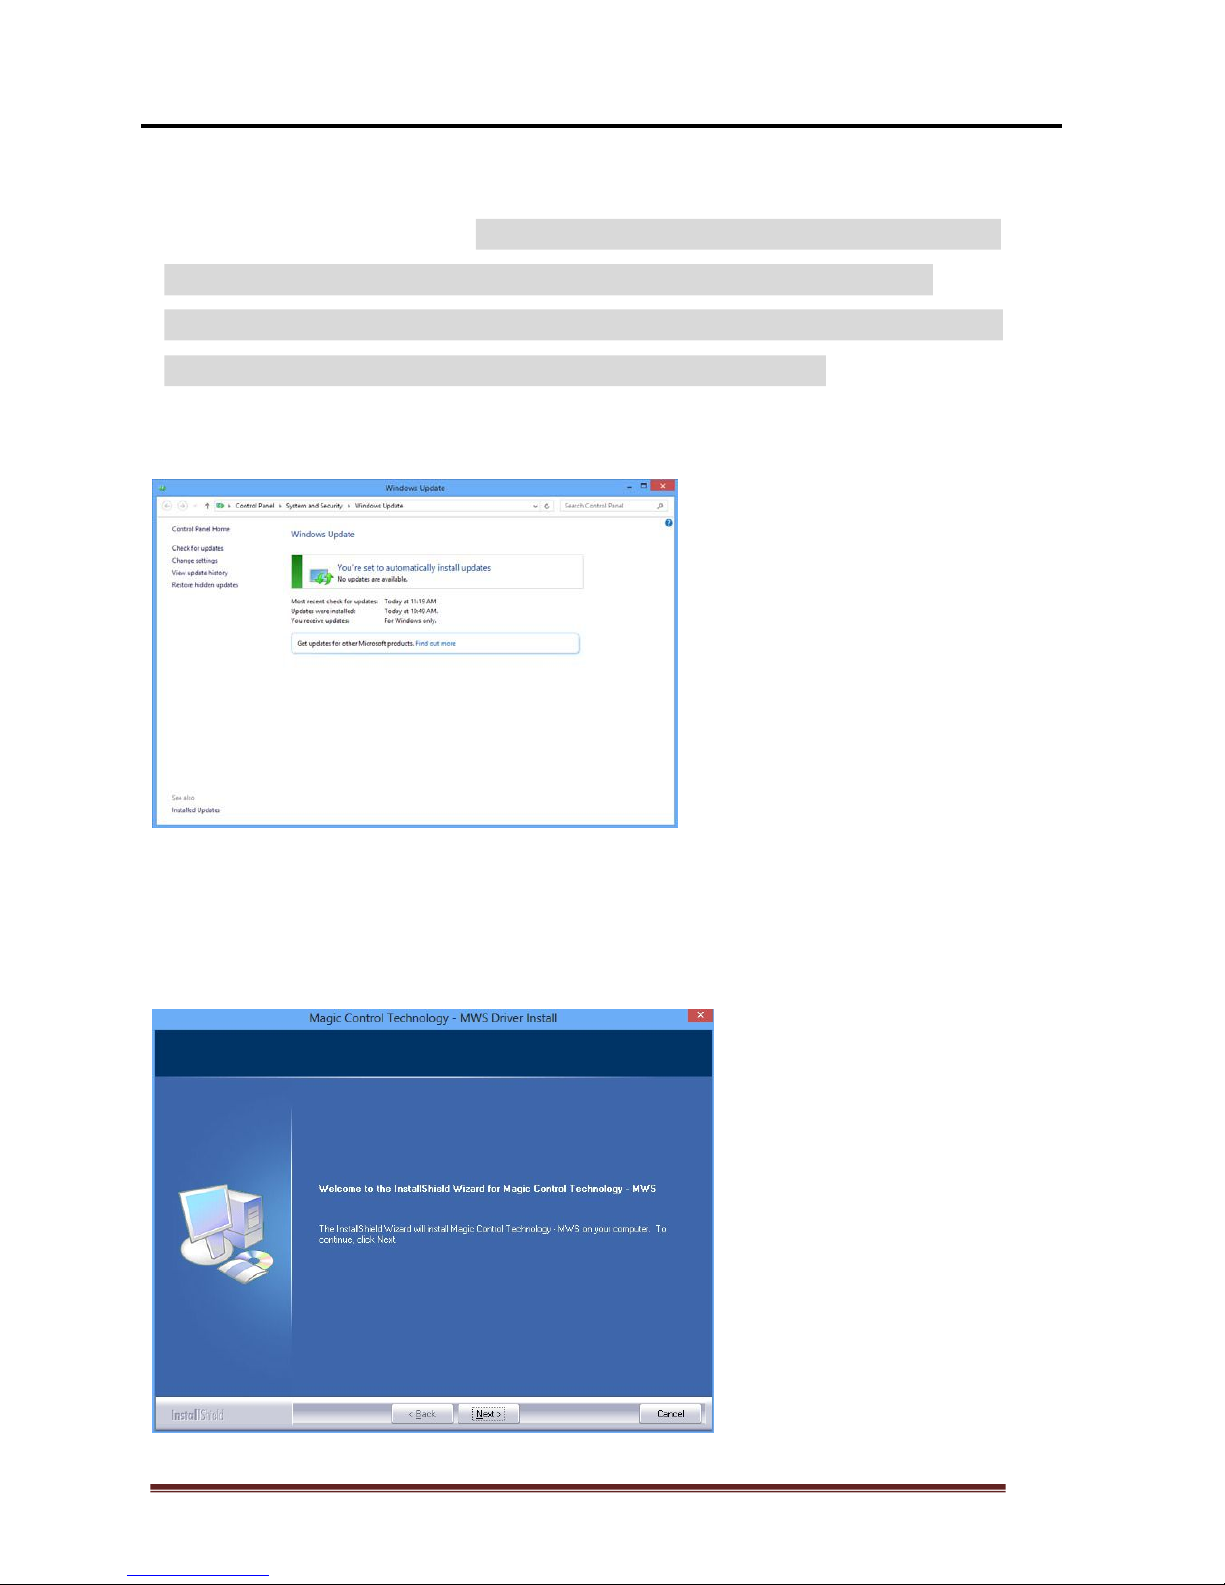
Step 2.
This Driver will detect if you had most recent Windows update, click OK to check
updates
7
Step 3.
Follow the step showed below: click “Check to Update” on the left hand. Due to
Windows update complication,
it is very important to repeat this update step
for a few times until you see “You’re set to automatically install
updates” has pop out, because there are more than 50 scalable files to
be update that requires multiple repeats to complete all.
( Note : The system might remind to restart you system for several time).
Step 4.
Driver Installation Wizard, click Next to continue

8
Step 5.
License Agreement; review it and check I accept the terms of the license
agreement Click Next to accept the License Agreement.
Step 6.
Setup is searching for installed features... *You may notice the screen flashes during
hardware installation. It is part of the normal process.

9
Step 7.
Driver Installation Wizard, click Finish to continue and restart the computer.

10
DEVICE INSTALLING - HARDWARE
Step 1
Connecting monitor to the VGA connector of the MultiPoint Workstation, turn on
the monitor. Connecting power adapter, USB cable, keyboard, and mouse to the
MultiPoint Workstation.
Step 2
Connect one end of the USB cable to the MultiPoint Workstation and the other end
to an available USB 2.0 port of your computer. The driver installation will proceed
automatically.
Step 3
Repeat steps 1 & 2 for the remaining MultiPoint Workstation on to other
workstation.
Figure 1: 10 Seats Implement of Windows MultiPoint Server 2011 with using MultiPoint
Workstation.

11
SPLIT-SCREEN STATION
Windows MultiPoint Server 2012 offers a split screen option on computers with
direct-video-connected stations or USB-zero client-connected stations. A split screen
provides the ability to create an additional station per monitor. Instead of requiring
two monitors, you can use one monitor with two station hub setups to create two
stations with one monitor. You can quickly increase the number of available stations
without purchasing additional monitors, USB-zero clients, or video cards.
Any MultiPoint Server station monitor that has a 1024x768 resolution or greater can
be split into two station screens. For the best split screen user experience, a wide
screen with a minimum 1600x900 resolution is recommended. A mini keyboard
without a number pad is also recommended to allow the two keyboards to fit in front
of the monitor.
To create split-screen stations, you set up one direct-video-connected or
USB-zero-client-connected station. Then you add an additional station hub by
plugging-in a keyboard and mouse to a USB hub that is connected to the server. You
can then convert the station into two stations by using MultiPoint Manager to split the
screen and map the new hub to half of the monitor. The left half of the screen
becomes one station and the right half becomes a second station.
After a station is split, one user can log on to the left station while another user logs
on to the right station.
Figure 2: 8 Seats Implementation of Windows MultiPoint Server 2012 in split screen with using
NEO360

12
SPLIT SCREEN SETTING
(For NEO180 Only)
Step 1
Please follow up the procedure on illustration for getting into “MultiPoint Manager” as
1. Press "Windows" key from keyboard 2. Type "WmsManager" from keyboard
3. Run "WmsManager" program to launch “MultiPoint Manager”.
Step 2
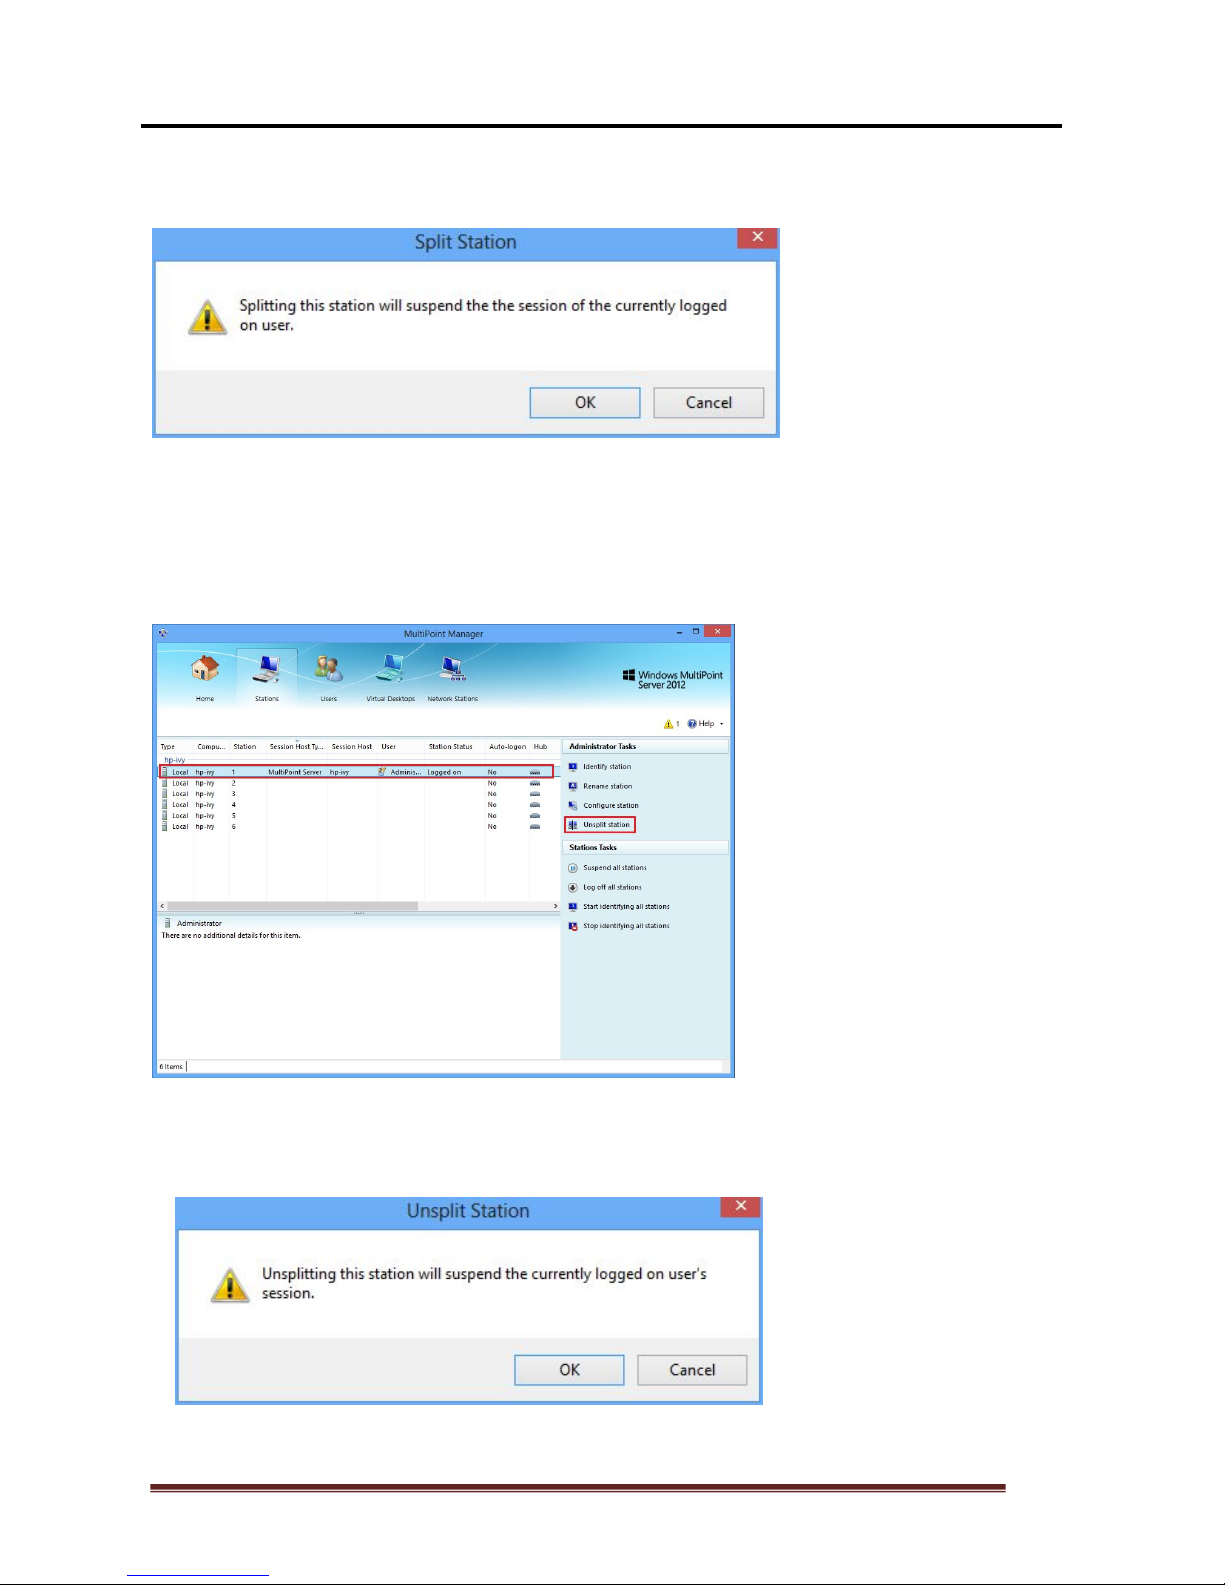
Select “Stations” on MultiPoint Manager then highlight and click the local station after
that click “Split station” under “Selected Item Tasks” as illustration.
13
Step 3
Click OK to continue
TO DISABLE SPLIT SCREEN
Same procedure as above step1 for getting onto “MultiPoint Manager” and select
“Stations” then highlight the local station and click “Unsplit station” under “Selected
Item Tasks” as illustration.
Then click “OK” on the “Unsplit station” dialog to bring back into single station on the
monitor.

14
ADJUSTING THE SCREEN RESOLUTION
By default, Windows MultiPoint Server 2012 will select the recommended resolution
for each connected display. However, if you would like to choose a different
resolution, follow these steps:
Step 1.
Before run “MultiPoint Manager”, please follow the illustration below:
1-1 Log-in as administrator and press "Windows" key from keyboard.
1-2 Type "WmsManager"
1-3 Run "WmsManager" by left click to launch “MultiPoint Manager”.

15
Step 2.
Click “Home” “Switch to Console mode”
Step 3.
Click “OK” to continue
Step 4.
Press “Ctrl + Alt + Delete” to log in administrator into “Console Mode”

16
Step 5.
Left click on the desktop task bar and choose "USB Display Device" as illustration.
Step 6.
Click "Identify" to identify all station display.
Then click on the display serial number to adjusted and choose the desired
resolution from the "Current Resolution" dropdown menu ,Then click "Apply" to
finish resolution setting.

17
ADJUSTING THE SCREEN ROTATION
Click on the display serial number to adjusted and choose the desired rotation from
the "Rotation" dropdown menu ,Then click "Apply" to finish resolution setting.
SETTING TURN OFF ALL MONITOR
*This feature can only perform under console mode, if you are at Station Mode, you
will need to switch to Console Mode.
*Turn Off All Monitor is to convenient user to identify each Monitor’s number:
Click "Turn off all " button to turn off all display/monitor, this act is only enable under
console mode, that convenient user to identify each device/monitor’s ID number.

18
SETTING POWER SAVING
*User can turn-off all display monitor without turning off computer in order to save
power from monitors, this feature is to be initiate under Console Mode and will
function on Station Mode:
1. Switch to Console Mode first, and Click "Power Saving " button:
2. The system has been set default value by -“Never”, you will need to chose your
desired time length as a time clock for the Power Saving Action and then click OK
to complete the Power Saving feature.

19
3. You will need to switch back to Station Mode, and the “Power Saving” will initiate
after the time clock you have set above, you will need to go to “Start” page in
order to initiate the Power Saving Function, this Power Saving function will not
initiate if you switch to any other display pages; your display will idol under “Start”
page for the length of the clock you have set previously, and display will turn black
after your setting clock initiated. For example: once you set Power Saving Clock by
5 minutes, the “Start” page will be idol for 5 minutes and display start turn black
afterwards.
4. To wake up Power Saving monitor: touch any key form keyboard or moving
mouse will wake up monitor.

20
DEVICE DRIVER UN-INSTALLATION
You need "switch to Console mode" Before doing the uninstall process.
The following procedure allows you to uninstall the MWS400UL device driver.
Please make sure all MWS400UL are unplugged from your server before
executing the device driver un-installation program.
Step 1.
1. Press "Windows" key from keyboard 2. Click "Control Panel" .
Step 2.
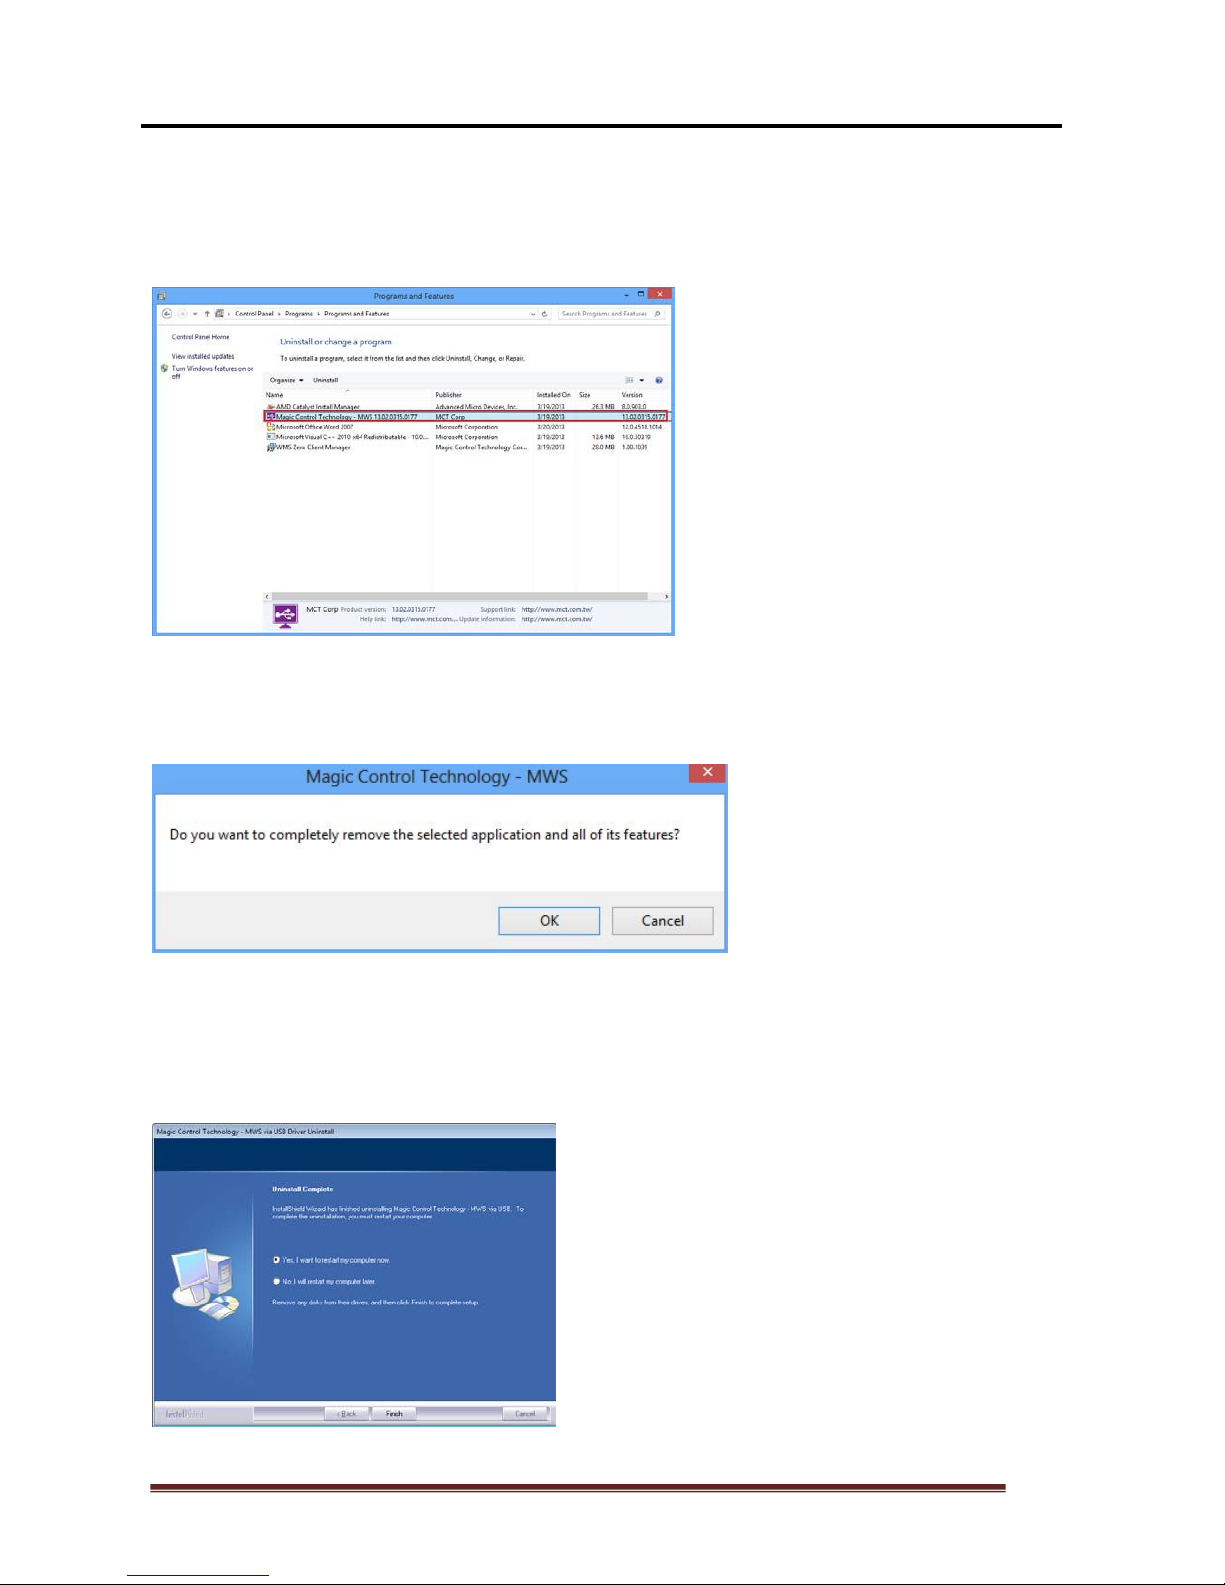
Click “Uninstall a program” as illustrated on the screen.
21
Step 3.
Select the “MultiPC-ZeroClient– xx.xx.xxxx.xxxx ” item. Click
Uninstall button.
Step 4.
Click “OK” to continue
Step 5.
Select “Yes”, I want to restart my computer now” and click “Finish” to reboot. The
driver is now uninstalled.

22
VESA MOUNTING
NEO180

23
NEO360

24
TROUBLESHOOTING TIPS
The following troubleshooting tips may help if you are experiencing any
difficulties using our device.
• Plugging keyboard/mouse directly into main system USB ports is prohibit,
administrator need to use an intermediate USB root hub for both keyboard & mouse
connections from main system.
• Check to make sure that all connectors are plugged in correctly.
• Make sure that the USB port that you are using is USB 2.0.
• Try a different USB 2.0 port
• Check to see that the monitor is connected correctly and the power is ON.
• Make sure to restart the server after the driver installation.
• Unplug the USB connector from Multipoint Workstation, re-insert after 10 seconds.
• Check the website to make sure you have the latest drivers.
• Reset/refresh/resynchronize your monitor.
• Full screen video display is not recommended; use Intel Ivy / Sandy Bridge chipset
may help with better performance.
For immediate support, visit http://www.multi-pc.com to find the latest documentation,
Knowledge Base articles, and software for your device.
Copyright© 2013 MultiPC Argentina S.R.L. All rights reserved. All trade names are registered
trademarks of their respective owners. Features and specifications are subject to change without
notice. Product may not be exactly as shown in the diagrams.
 Loading...