

Multimedia Standard QR-130 User Manual
UUsseerr M
Maannuuaall
G
Guuiiddee
MMooddeell QQRR--113300
The Movie what you really wanted to watch
The Music which is your favorite
The Photos which has your happy memories
TV Drama which you would never miss
Relax yourself wherever and whenever so far
Ultimate Digital Multimedia Player “Movie Clip”

User Manual Guide Model: QR-130
2
CONTENTS
1. Introduction..............................................................................................................................4
2. Product Specification ............................................................................................................. 5
3. Descriptions & Product Contents.......................................................................................... 7
3-1 Description .........................................................................................................................7
3-2 Product Contents............................................................................................................... 8
4. Remote Controller................................................................................................................... 9
5. SATA HDD Installation.........................................................................................................12
6. Partitioning and Formatting Hard Disk............................................................................... 14
6-1 Setting and Formatting on Windows 98/ME.................................................................. 14
6-2 Setting and Formatting on Windows 2000 / XP ............................................................ 18
6-3 Hard disk formatting and partition under Windows VISTA..........................................22
6-4 Use on Linux (Available on Linux 2.4 or later).............................................................. 24
6-5 Use on Macintosh............................................................................................................25
7. Connecting QR-130............................................................................................................... 26
7-1 TV Connection – A/V IN................................................................................................... 26
7-2 TV Connection – A/V OUT............................................................................................... 26
7-3 Connection with Y/Pb/Pr Component OUT ................................................................... 27
7-4 Connection with HDMI OUT............................................................................................27
7-5 Power Connection ........................................................................................................... 28
7-6 Ethernet Connection........................................................................................................28
7-7 WLAN Connection (by option)........................................................................................ 29
7-8 Connection with 2Ch of Normal Audio.......................................................................... 29
7-9 Connection with Optical output .....................................................................................30
7-10 First Time Usage............................................................................................................ 30
8. Getting Started.......................................................................................................................31
8-1 Selecting Video In-Live TV, Recording and Time Shift.................................................31
8-2 Selecting file copy function............................................................................................31
8-3 Selecting browser function............................................................................................. 31
8-4 Selecting Setup................................................................................................................ 32
8-5 Timer Rec.......................................................................................................................... 32
9. Setup Menu............................................................................................................................33
9-1 Changing System Settings ............................................................................................. 33
9-2 Changing Audio Settings................................................................................................ 35
9-3 Changing Video Settings ................................................................................................ 36
9-4 Changing Record Settings.............................................................................................. 38
9-5 Changing Network Settings............................................................................................ 39
10. Browser Menu...................................................................................................................... 45
10-1 Browsing All...................................................................................................................45
10-2 Browsing Music .............................................................................................................46
10-3 Browsing Photo .............................................................................................................46
10-4 Browsing Movie .............................................................................................................47
10-5 Browsing via Network ................................................................................................... 47
10-6 File Management............................................................................................................49

User Manual Guide Model: QR-130
3
10-6 Playlist ............................................................................................................................51
11. Media Recording.................................................................................................................53
11-1 Recording from Video-In Mode .................................................................................. 53
11-2 Time Record Menu .......................................................................................................53
12. File Copy Menu....................................................................................................................56
13. Firmware Upgrade...............................................................................................................58
13-1 System information ....................................................................................................... 58
13-2 Firmware Upgrade ......................................................................................................... 58
17. Frequently Asked Questions..............................................................................................60
18. Caution.................................................................................................................................64

User Manual Guide Model: QR-130
4
11.. IInnttrroodduuccttiioonn
Thank you very much for purchasing this brand-new Multimedia Player QR130 with stronger function
support. In the digital era, this product is quite suitable to be a home entertainment partner. With her
outstanding designed features, you can enjoy movies and music, view photos of precious moments, and
record your favorite TV or movie programs to make up for your regret of not being able to enjoy them in
time. The editing function provides you with an easy way to save the essential part. It's also a good choi ce
to use this product as a portable storage device for its built-in HDD and high-speed USB 2.0.
This player has the following functionality:
-
supports one button recording and schedule recording in MPG
format, can easily record programs from TV, DVD player and DV,
and save as MPEG-2 (.mpg) format; also can edit the recorded
titles;
Video Recording
-
Time shifting function;
Movie Playback -
supports VOB (DVD), IFO (DVD), MPG (MPEG-2/1), AVI (MPEG-4
ASP: XviD), DAT (VCD), and MPEG-2 TS files; resolution up to
1080i;
-
supports MP3, OGG, and WMA* files;
Music Playback
-
supports one button playlist music playback;
Photo Playback -
supports digital camera JPEG, and BMP files;
Data Storage -
works as a portable hard disk using USB 2.0 port;
Network Function -
Ethernet & WLAN streaming playback (Wireless function supported
by the optional Wireless LAN USB Adapter);
HDMI -
High-Definition Multimedia Interface transmits the highest quality
digital video and audio via a single cable, simplifies cabling and
provides high quality home theater experience.
-
supports one button recording and schedule recording in MPG
format, can easily record programs from TV, DVD player and DV,
and save as MPEG-2 (.mpg) format; also can edit the recorded
titles;
Video Recording
-
Time shifting function;
We hope that this product will bring you a lot of enjoyment. We are committed to apply multimedia
technology to work, entertainment, family, daily life, car and everywhere in the world. Welcome to be with
us. Thank you again for choosing our Home Multimedia Center.
NOTE
WMA Pro & Advanced Profile and WMA with DRM are not supported.
User Manual Guide Model: QR-130
5
22.. PPrroodduucctt SSppeecciiffiiccaattiioonn
GENERAL
Dimensions 190.5(W) x 54(H) x 183.2(L)mm
Power Supply AC 100~240V 50~60Hz
Power Consumption Approx. 35 W
Operating Temperature +5°C to +35°C (+36°F to +95°F)
Operating Humidity 5% to 80% RH
Hard Disk SATA HDD SATA HDD
Net Weight Approx 1.5 kg
CONTENT FORMATS SUPPORTED
DAT/VOB/IFO/MPG/AVI/MPEG-2 TS
MP3/OGG/WMA
Compression rate: between 32 kbps and 320 kbps
Formats
JPEG/BMP
RECORDING FORMAT
Video
HQ / SP / LP / EP / SLP mode : MPEG-2 MP@ML
Audio
HQ / SP / LP / EP / SLP mode : MP2 2-channel
CODECS SURPORTED
Video
MPEG-1 / MPEG-2 / MPEG-4 ASP: XviD
Audio
MP2/MP3 /OGG Vorbis/WMA Standard
(DRM, Pro & Advanced Profile not supported) / PCM
VIDEO RECORDING MODE
Mode 80 GB HDD 120 GB HDD 160 GB HDD
HP
16hrs 24 hrs 33 hrs
SP
32
hrs 48 hrs 66 hrs
LP
48
hrs 72 hrs 99 hrs
EP
64
hrs 96 hrs 132 hrs
SLP
96
hrs 144 hrs 198 hrs
User Manual Guide Model: QR-130
6
VIDEO OUTPUT SPECIFICATION
Composite Output
1 Vpp 75 Ohm
Y:1 Vpp 75 Ohm
Cb:0.7 Vpp 75 Ohm
Components Output
Cr:0.7 Vpp 75 Ohm
HDMI Output
HDMI (Version 1.1)
AUDIO PERFORMANCE
DA Converter
24-bit / 192kHZ
AD Converter
24-bit / 96kHZ
Signal-Noise (1kHZ)
≥ 95dB
Dynamic Range (1kHZ)
≥90dB
Channel
≥95dB
Separation Total Harmonic Distortion (1kHZ)
≤-85dB
SUBTITLE FORMATS SURPORTED
Formats
SRT, SMI, SSA, IDX/SUB, SUB
RECORDABLE DEVICE SUPPORTED
Device
Built in HDD / USB HDD
USB SUPPORTED
USB
- USB HDD
- Other USB Mass Storage Devices
- USB 2.0 Interface
NETWORK FEATURE
Ethernet
10/100Mbps Auto-Negotiation
WLAN
IEEE 802.11b/g, up to 54Mbps (supported by the optional WLAN USB Adapter)
NOTE
The specifications and design of this product are subject to change without notice.
User Manual Guide Model: QR-130
7
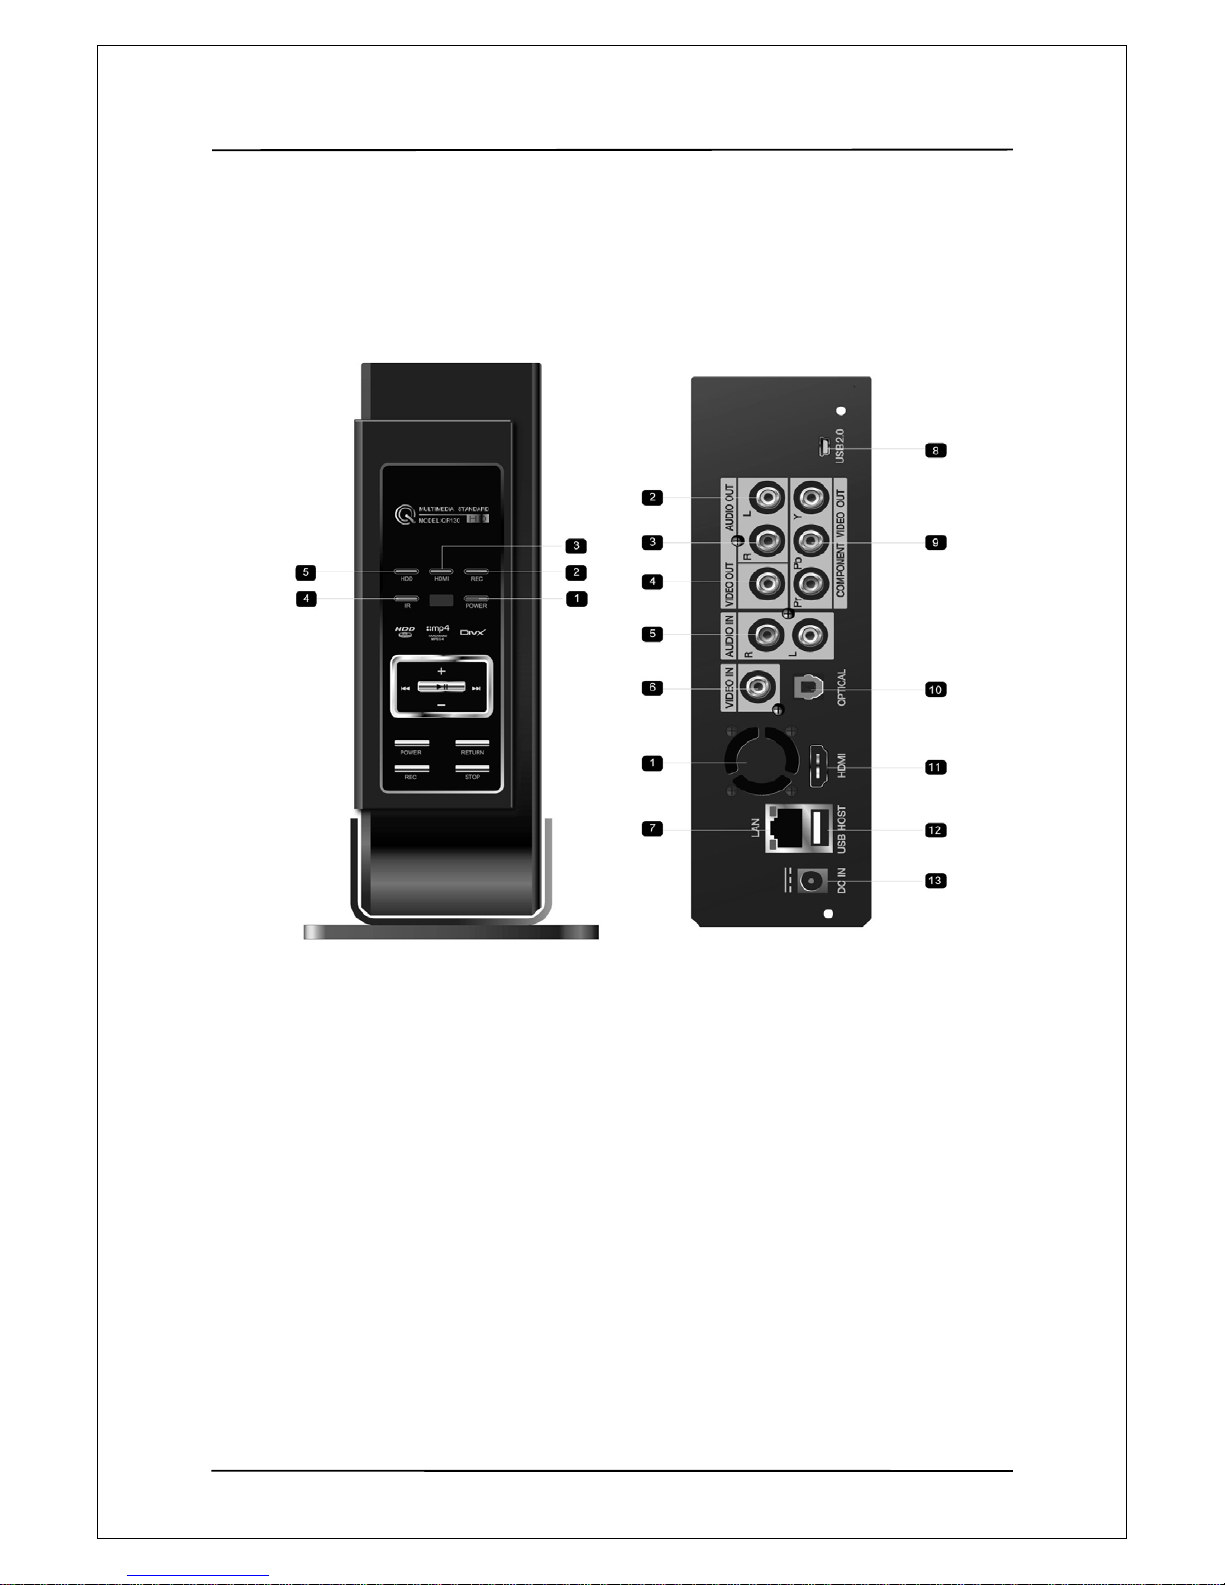
33.. DDeessccrriippttiioonnss && PPrroodduucctt CCoonntteennttss
3-1 Description
Front Panel
1 POWER
Indicator (red) turns on when the system turns on.
2 REC indicator
When Recording starts, this LED would shining in Blue.
3 HDMI
When HDMI interface was working, the HDMI Led would be shining in Blue
4 IR: Infrared receiver window
Receiving IR signals from the remote control.
5 HDD
When reading HDD files from HDD, the HDD LED would be shinning.
User Manual Guide Model: QR-130
8
Rear Panel
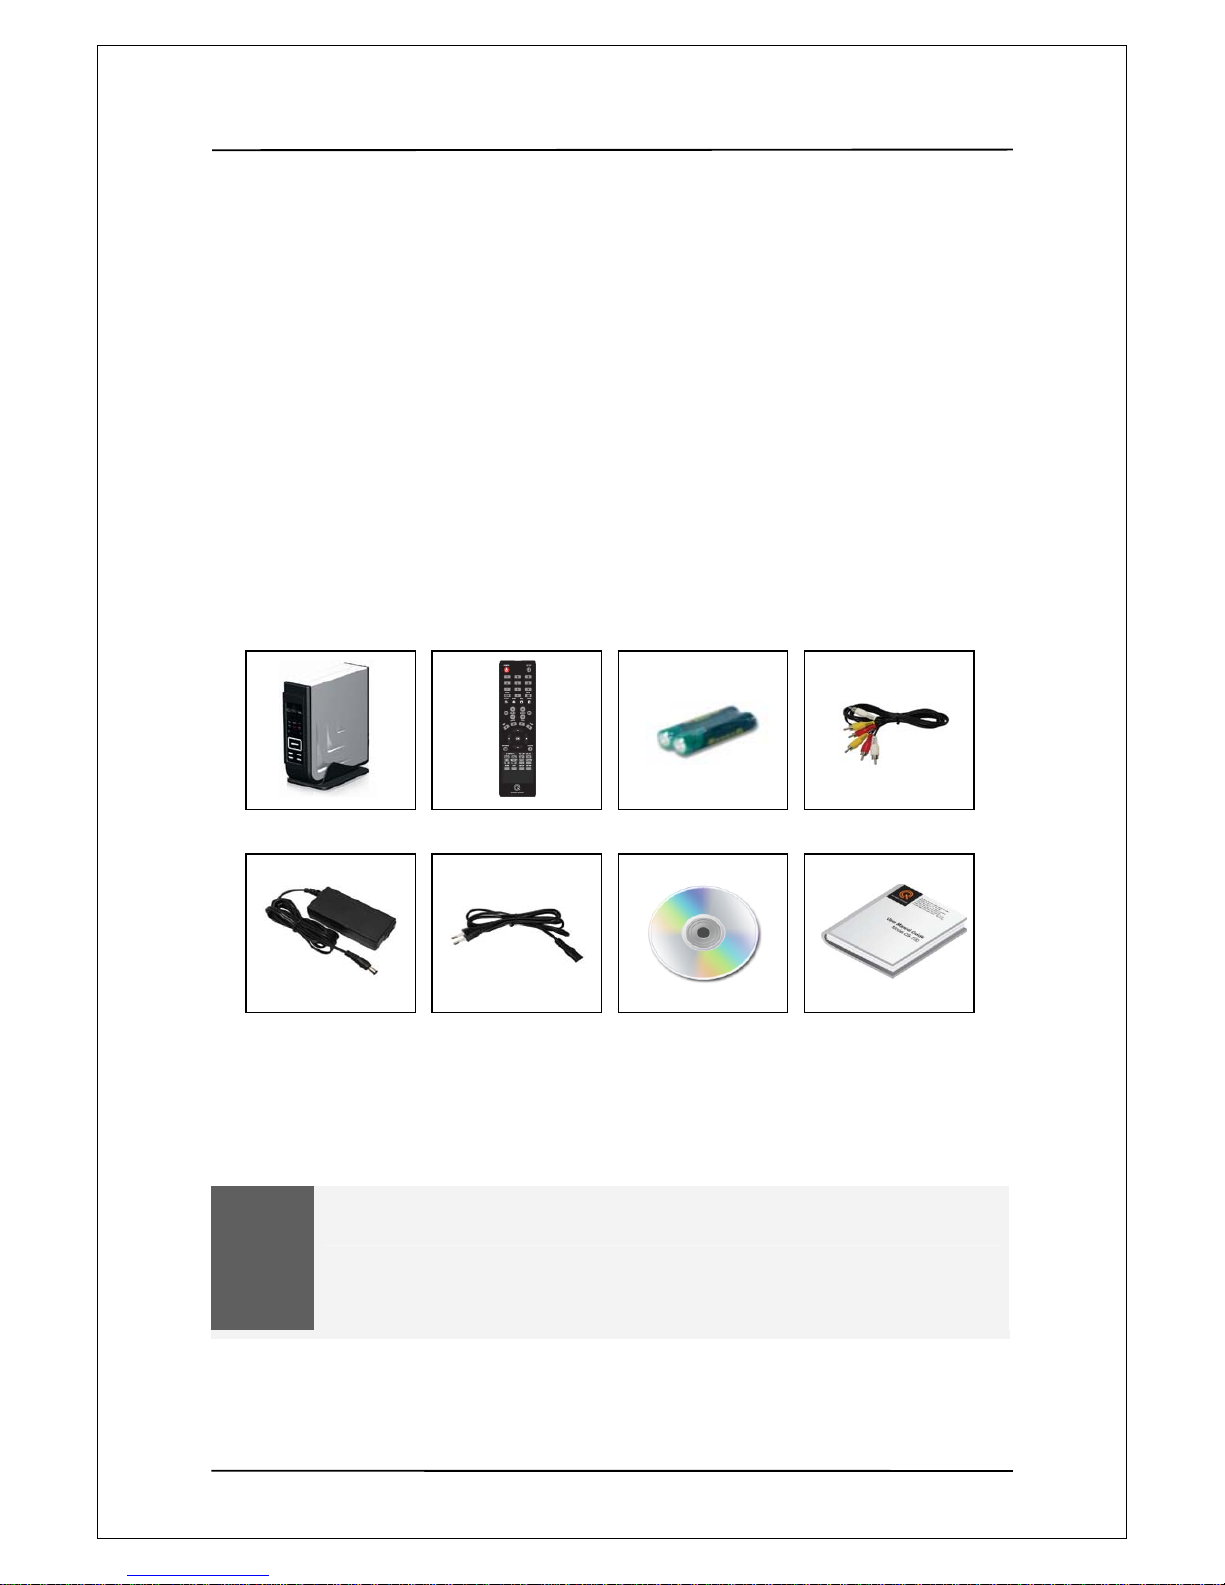
3-2 Product Contents
QR130 Remote Controller Battery A/V Cable
Power Adapter Power Cable Install CD User Guide
SCART
Adapter
USB Cable
NOTE
The actual contents in the package might be different from the packing list in this manual
1. Air Flow
2. Audio OUT jack (Left Channel)
3. AUDIO OUT jack (Right Channel)
4. VIDEO OUT jack
5. AUDIO IN jack (Right and Left Channel)
6. VIDEO IN jack
7. RJ45 LAN port
8. USB SLAVE port (MINI USB)
9. Y/Pb/Pr OUT jack (Components Video)
10. S/PDIF Optical jack
11. HDMI jack
12. USB HOST port x 1
13. DC IN jack

User Manual Guide Model: QR-130
9
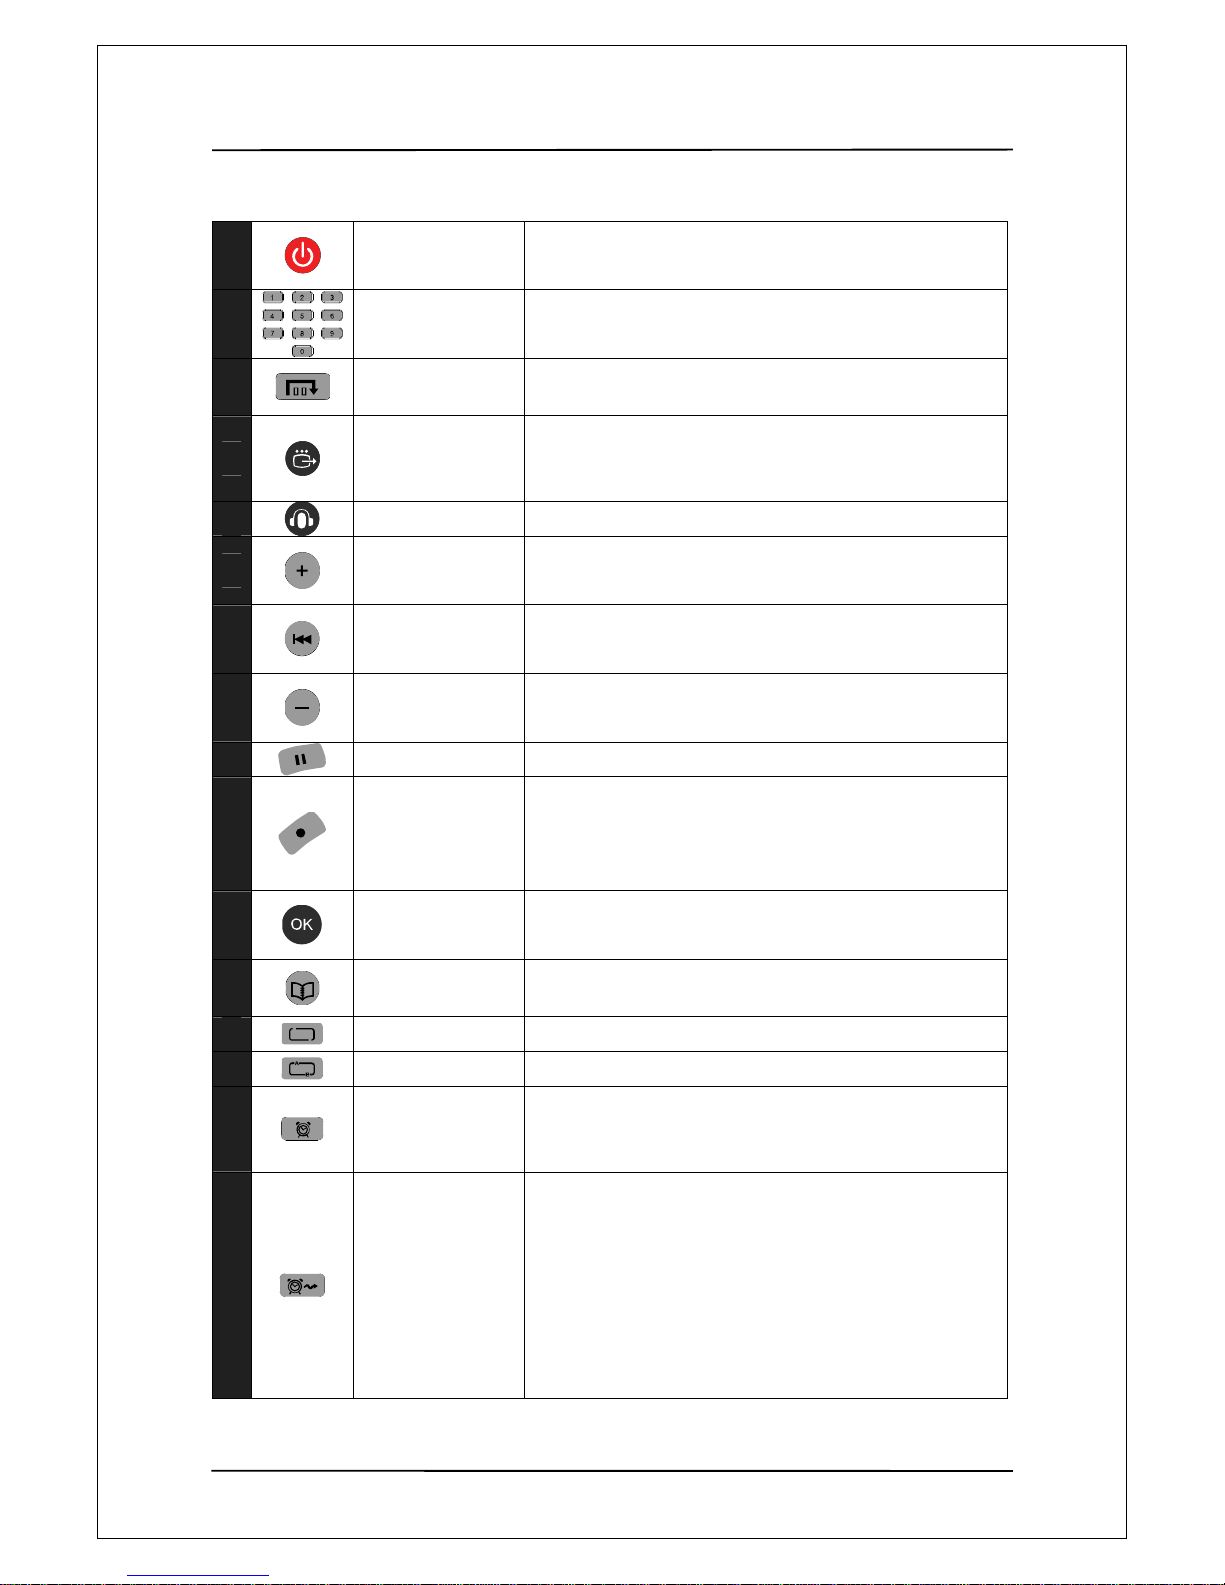
44.. RReemmoottee CCoonnttrroolllleerr
User Manual Guide Model: QR-130
10
1
Power
Press to enter standby mode or wake up
2
Numeric botton
Press to enter channel numbers or numeric input when
changing settings.
3
GOTO
Press to jump to a specific point on a title. Specify the point
using Title, Chapter and Time.
4
TV OUT
Change player video output mode according to the following
order (NTSC Composite -> NTSC Component -> NTSC
HDMI -> PAL Composite -> PAL Component ->PAL HDMI)
5
AUDIO
Press to select an audio track
6
VOLUME +
volume up
7
SKIP BACKWARD
fast reverse during video play /10 second rewind during mp3
play.
8
VOLUME - volume down
9
PAUSE
Stop play.
10
RECORD button
Press to begin recording or to resume when recording has
been paused. Press repeatedly to set one touch recording
(OTR) length (30 MIN. / 60 MIN. / 90 MIN. / 120 MIN. / 180
MIN. / 240 MIN. / Off).
11
OK
Press to select options in menus.
12
BROWSER
Press to browse music, photo, and movie files on HDD, USB,
and NET
13
REPEA T A LL
repeat all items when play video,mp3,ect.
14
REPEAT ONE
repeat one item when play video,mp3,ect.
15
TIMER
Press to enter the Timer Menu directly to add, edit and delete
recording schedules. See 5.1 Creating a New Schedule for
more details.
16
TIME SHIFT
While in Video In mode, press to activate the time shift
function, which allows you to pause live TV and resume the
program from the point you left it. While paused, the program
is recorded to the HDD or USB device, as long as space is
available. Press to activate TIME SHIFT function and wait for
the PLAY arrow to appear on the screen. Press and the
program will be paused. Press to resume viewing the
program. Time shift mode remains active until you press.
User Manual Guide Model: QR-130
11
17
SETUP
Press to access the Setup Menu directly.
18
MUTE
Press to mute audio output, and press again to resume
19
GUIDE
Press to view the Guide menu, it is the player’s home page.
20
INFO
Popup video information during Video Play.
21
SEARCH
Popup random access OSD during Video Play
22
SKIP FORWARD
Press to fast forward the current playback. Press repeatedly
to select speeds.
23
SEARCH
Popup random access OSD during Video Play.
24
PLAY
Press to begin playback of a media file or title
25
STOP
Press to stop playback
26
NAVIGATION
BOTTON
Press the arrow buttons to select menu options.
27
RETURN
Press to return to the previous screen when navigating
menus
28
SUBTITLE
Press to set subtitle option
29
DELETE
Press to delete what you want to delete
30
CONFIRM
Press to add the selected file to playlist
31
SELECT
Press to select the file to be added to playlist
32
ZOOM
Press to zoom in/out the image (photo or video)
33
COPY
Press to enter the file copy menu
34
CM SKIP
Press to forward 30 seconds when in playback or record
model
35
REPLAY
Press to backward 10 seconds of current playback
User Manual Guide Model: QR-130
12
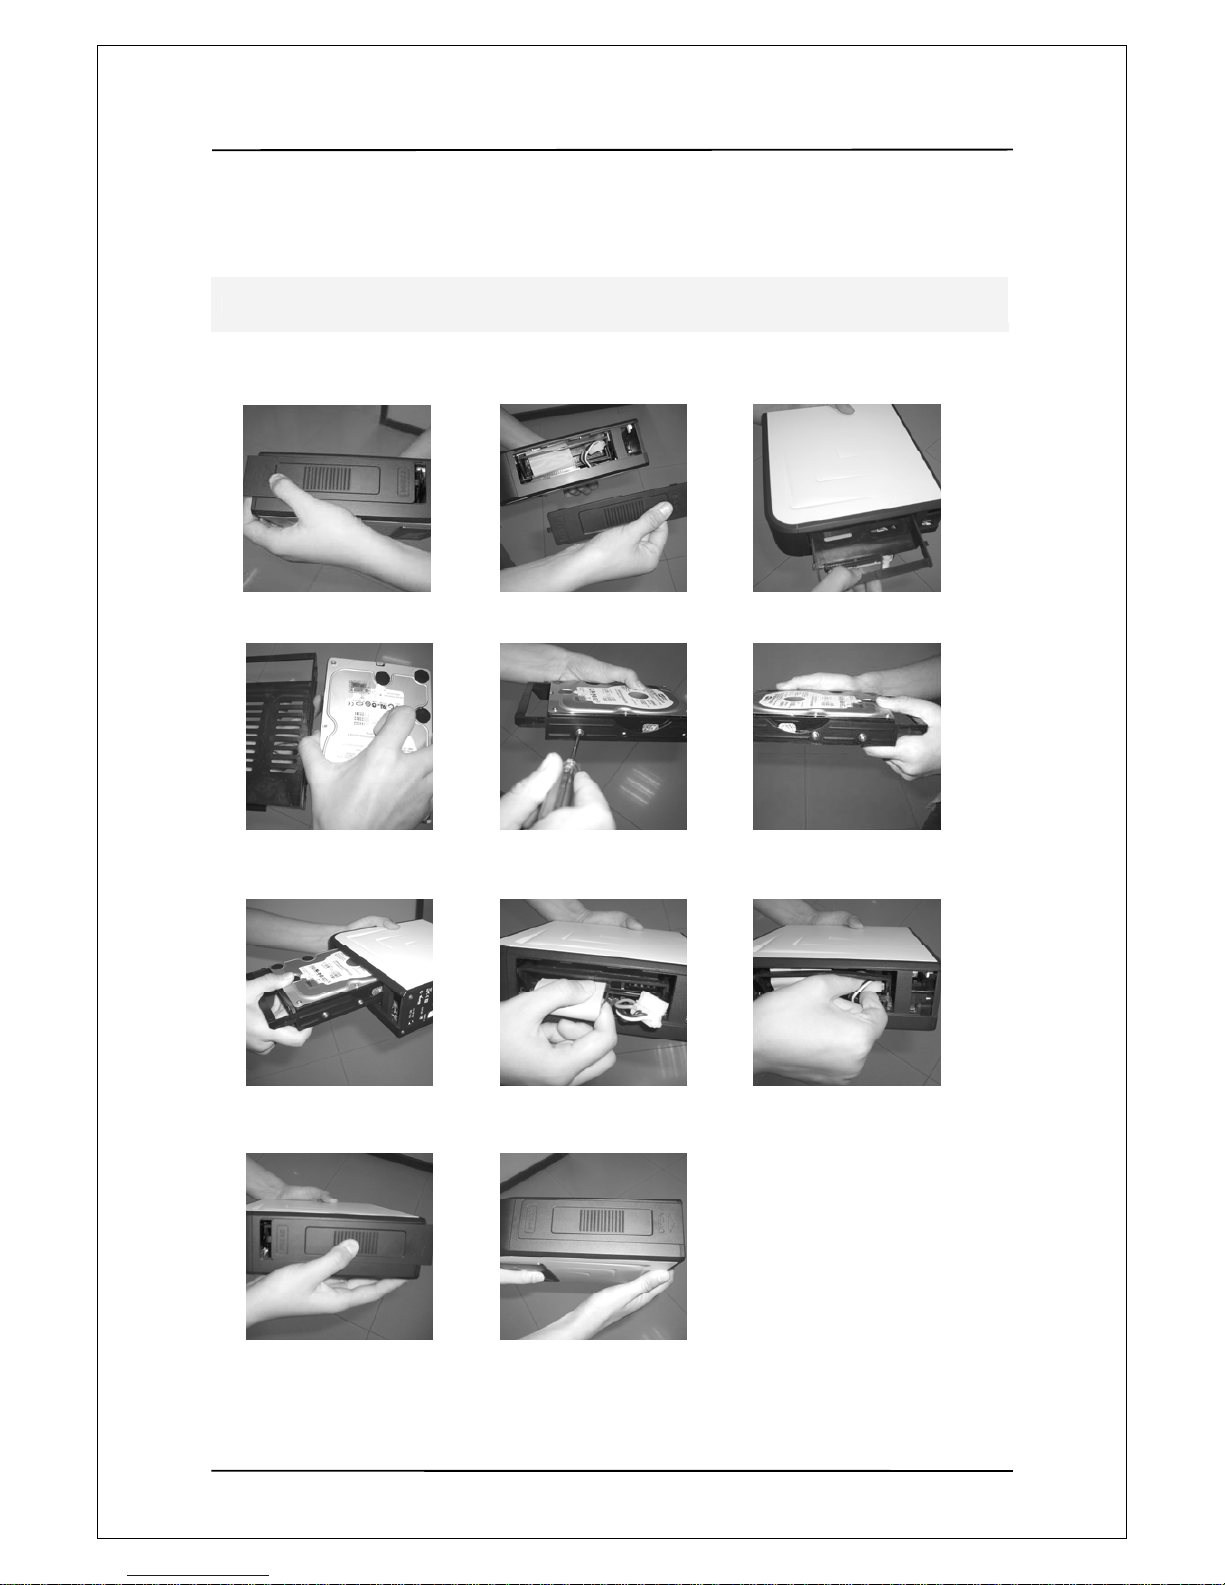
55.. SSAATTAA HHDDDD IInnssttaallllaattiioonn
Please install the player according to the following instructions.
SATA HDD Installation
1、press the bottom cover. 2、open the bottom cover. 3、pull away hard disk
bracket.
4、put hard disk in. 5、screw hard disk tightly 6、make sure all 6pcs
screws well .
7、Insert the bracket with HDD. 8、Connect SATA or IDE cable 9、Connect power cable
10、Insert bottom cover and close it. 11、Ok.

User Manual Guide Model: QR-130
13
User Manual Guide Model: QR-130
14
66.. PPaarrttiittiioonniinngg aanndd FFoorrmmaattttiinngg HHaarrdd DDiisskk
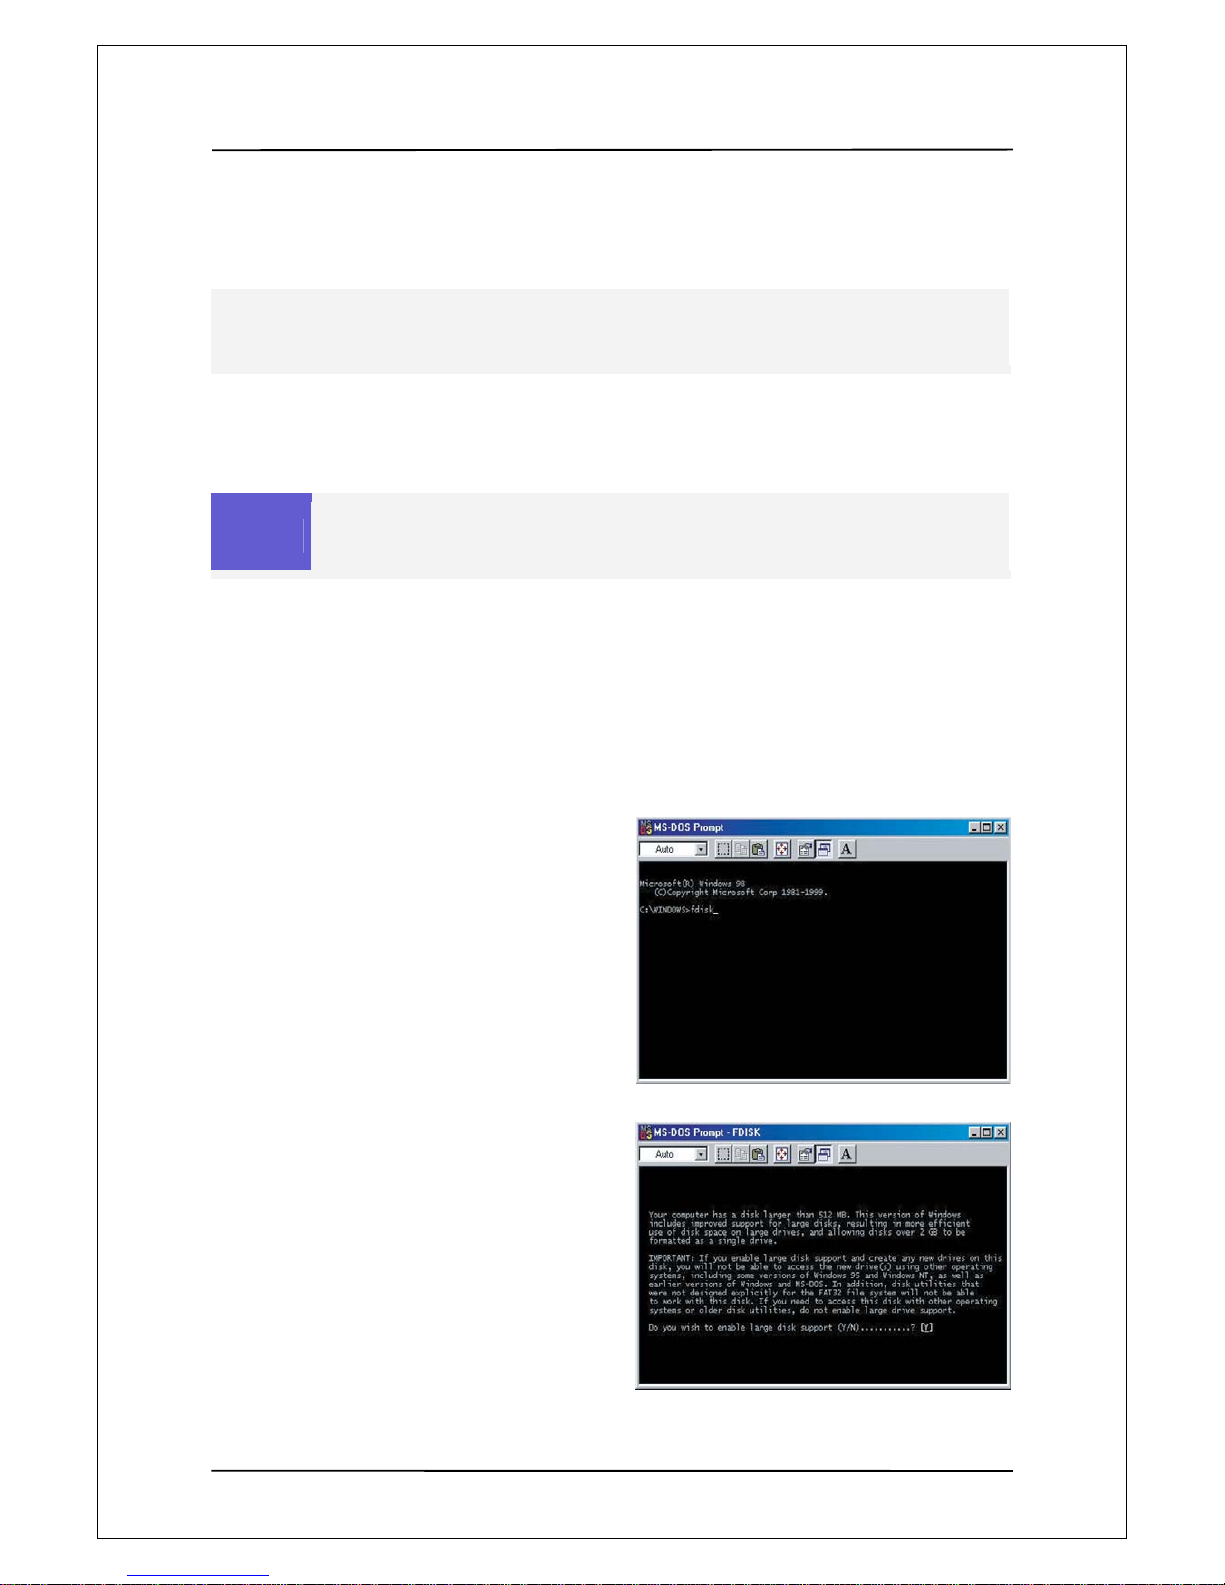
6-1 Setting and Formatting on Windows 98/ME
1. Install exclusive driver and then connect
QR130 to PC using USB cable
2. Select Window [Start>Program>MS-DOS]
to open and MS-DOS window.
3. Type fdisk command in MS-Dos window
and press the [Enter] key.
4. Say yes to enable large disk capacity by
typing “Y” and then press the [Enter] key.
Non-formatted hard disks are not detected by PC. If the hard disk is not formatted, please take the
following steps to format it. Newly purchased hard disks are not normally formatted
Caution
In Windows 98SE, install and exclusive driver before proceeding to partition and
formatting. In windows ME/2000/XP, there is no need to install exclusive driver
User Manual Guide Model: QR-130
15
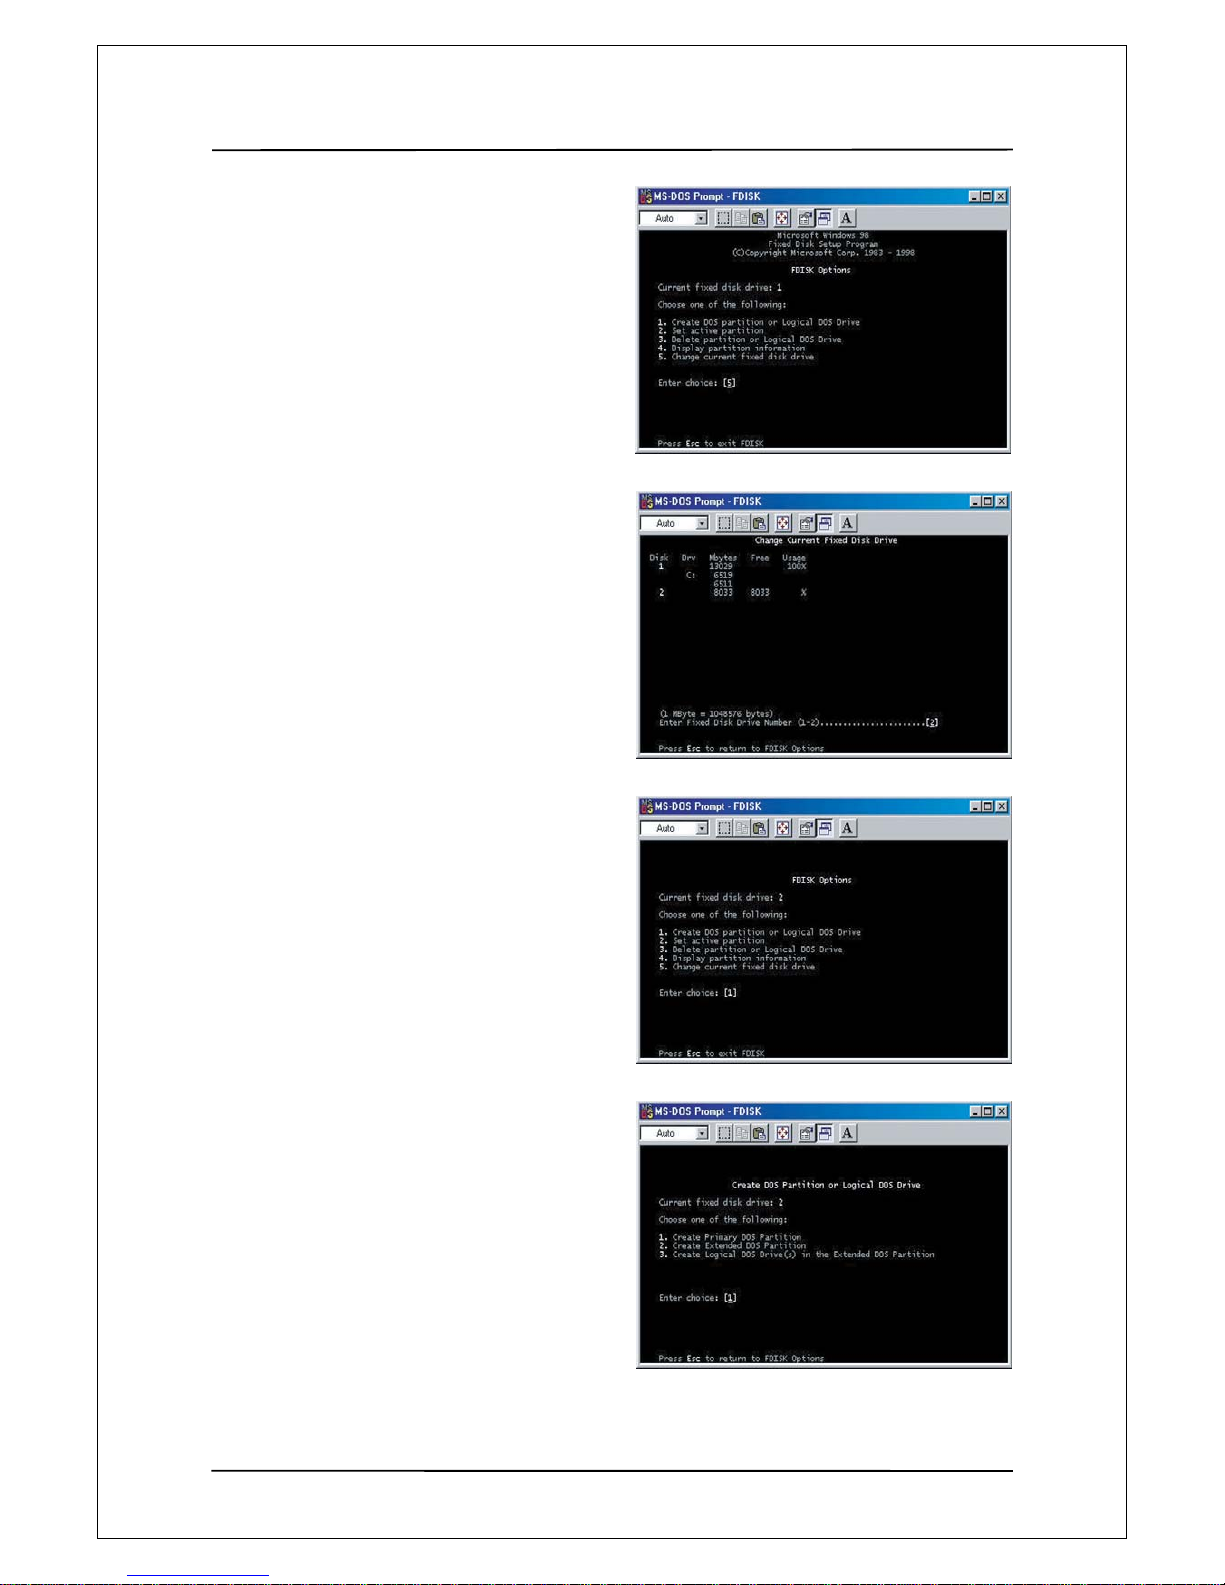
5. Among fdisk options, select options
5[change current fixed disk drive].
6. Type the hard disk number fro partitioning in
[Enter Fixed Disk Number] and press the
[Enter] key
7. Select [1.creat DOS partition or Logical DOS
Drive] in fdisk options by typing “1” and then
press the enter key
8. Select [1.Creat Primary DOS Partition] in
‘Create DOS Partition or Logical DOS Drive’
by typing “1” and then press the enter key.
User Manual Guide Model: QR-130
16
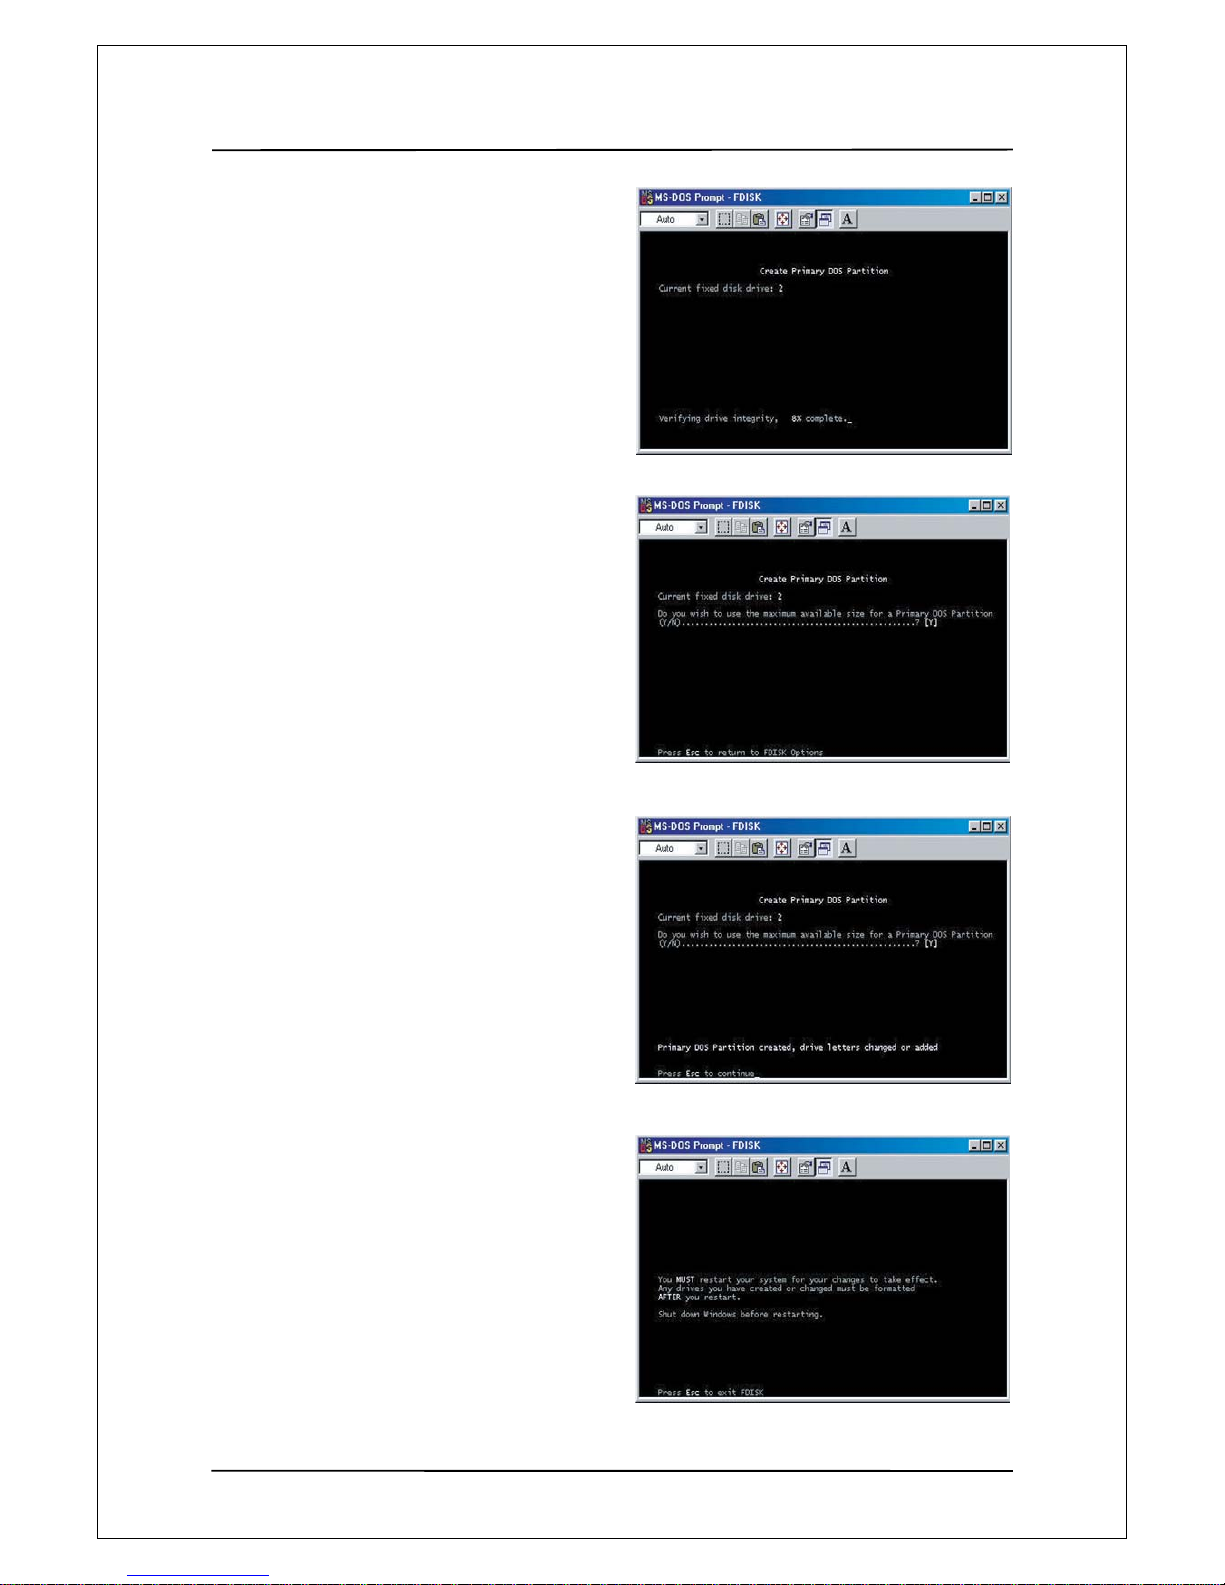
9. Wait for integrity check to be complete
as below
10. After integrity check, say yes to the message
‘Do you wish to use the maximum available
Size for a primary DOS partition and make the
Partition active( Y/N)?
By typing “Y” and press the enter key
11. Type in [capacity or % you want] and press the
enter key. If you want to use one disk
without partitioning. Type 100%.
12. Integrity check is started again. After it is
completed, A message saying Primary Dos
Partition was created, drive letter was modified
or added is displayed.
Then, press [ESC] to return to fdisk options
13. In fdisk option screen, press [ESC].
Then a message is displayed, saying that
your must restart your system.
Press [ESC] again.
User Manual Guide Model: QR-130
17
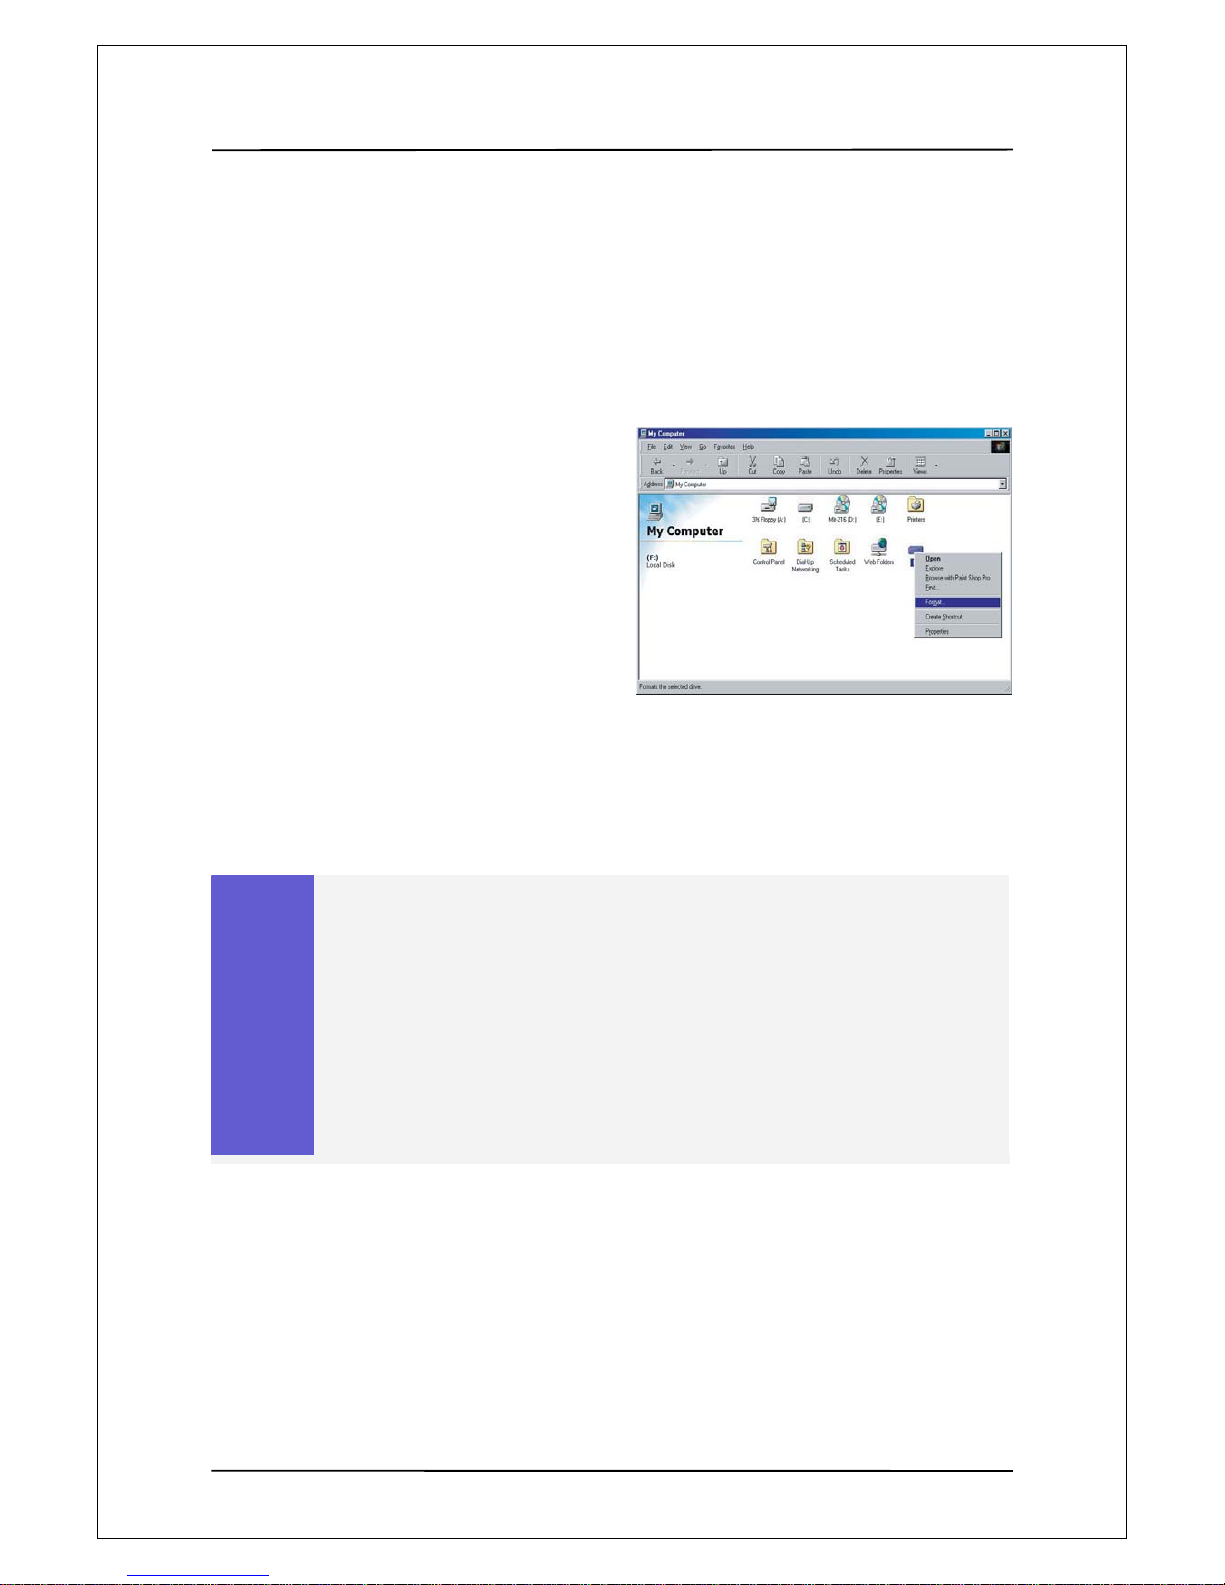
14. At hen C:\WINDOWS> prompt, type exit
and then press[ENER] to return to window
screen.
15. Disconnect QR130 from PC and then connect
it again to PC.
16. Drive letter s created in [My Computer] of
Windows Explorer.
Right-click the created drive letter and select
[Format].
17. When formattin g is completed , you can use
QR130 as an external hard disk drive by connecting
it to Computer.(I change it based on my comprehension)
Caution
For some hard disks, power supply from USB port is not enough for operation, in this
case, connect a separate power supply using the adapter supplied in the package. Then,
no problem will be experienced in operating the device connected to a PC.
For recently released PCs, there is a USB port installed on the front side of the PC for
users’ convenience. However, this expanded USB port sometimes fail to recognize
devices sending and receiving data in high speed such as external hard disk. In this case,
use the USB port in the rear side of the PC
User Manual Guide Model: QR-130
18
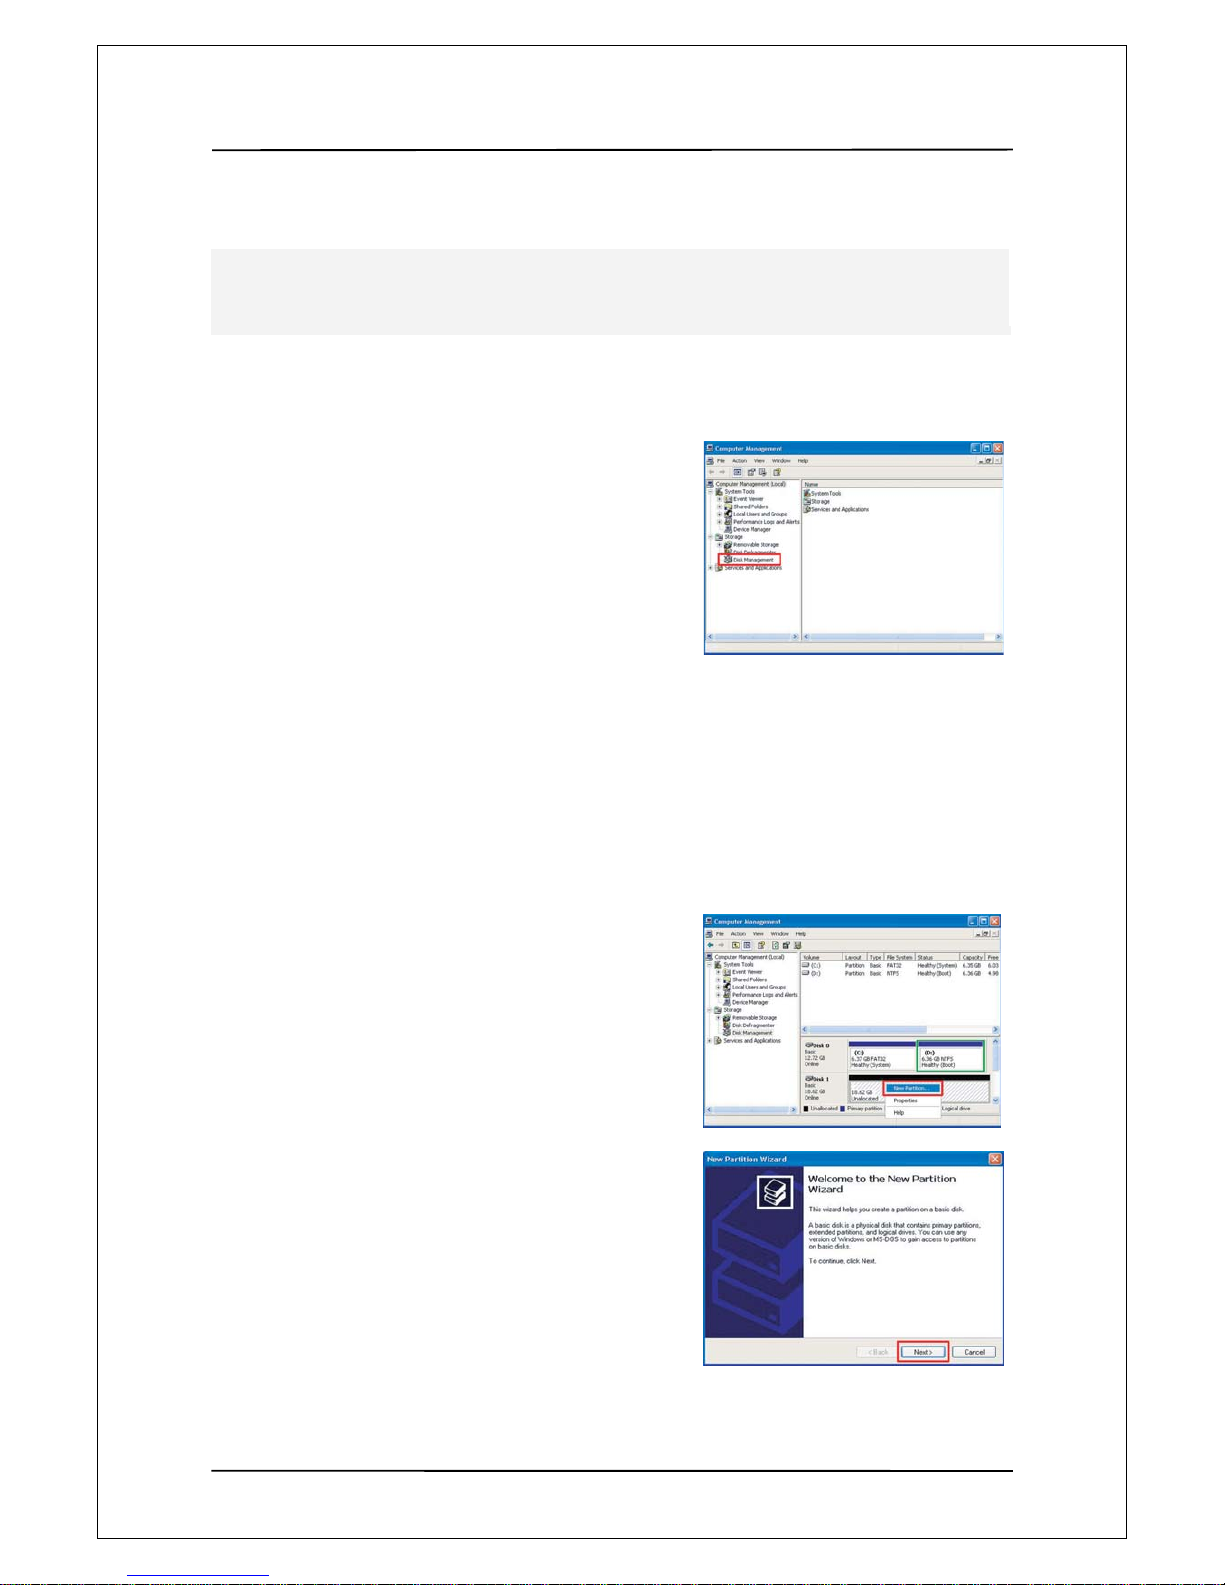
6-2 Setting and Formatting on Windows 2000 / XP
1. Connect QR130 to a PC using a USB cable
2. Select [Start> Control Panel>management
Tool>Computer Management] and then
[Disk Management] under Computer Management
menu.
3. Click [Next] to continue when write Signature
and Disk Upgrade Wizard appears
4. Select the disks you want to write a disk signature to
and Click [Next] to continue
5. When Write Signature and Disk Upgrade Wizard
is completed, Click [Finish]
6. Right-click an [Unallocated] drive in Drive Management
and select [New Partition] from the menu that appears.
7. When the New partition Wizard is shown,
Click [Next] to continue
Non-formatted hard disks are not detected by PC. If the hard disk is not formatted, please take the
following steps to format it. Newly purchased hard disks are not normally formatted
User Manual Guide Model: QR-130
19
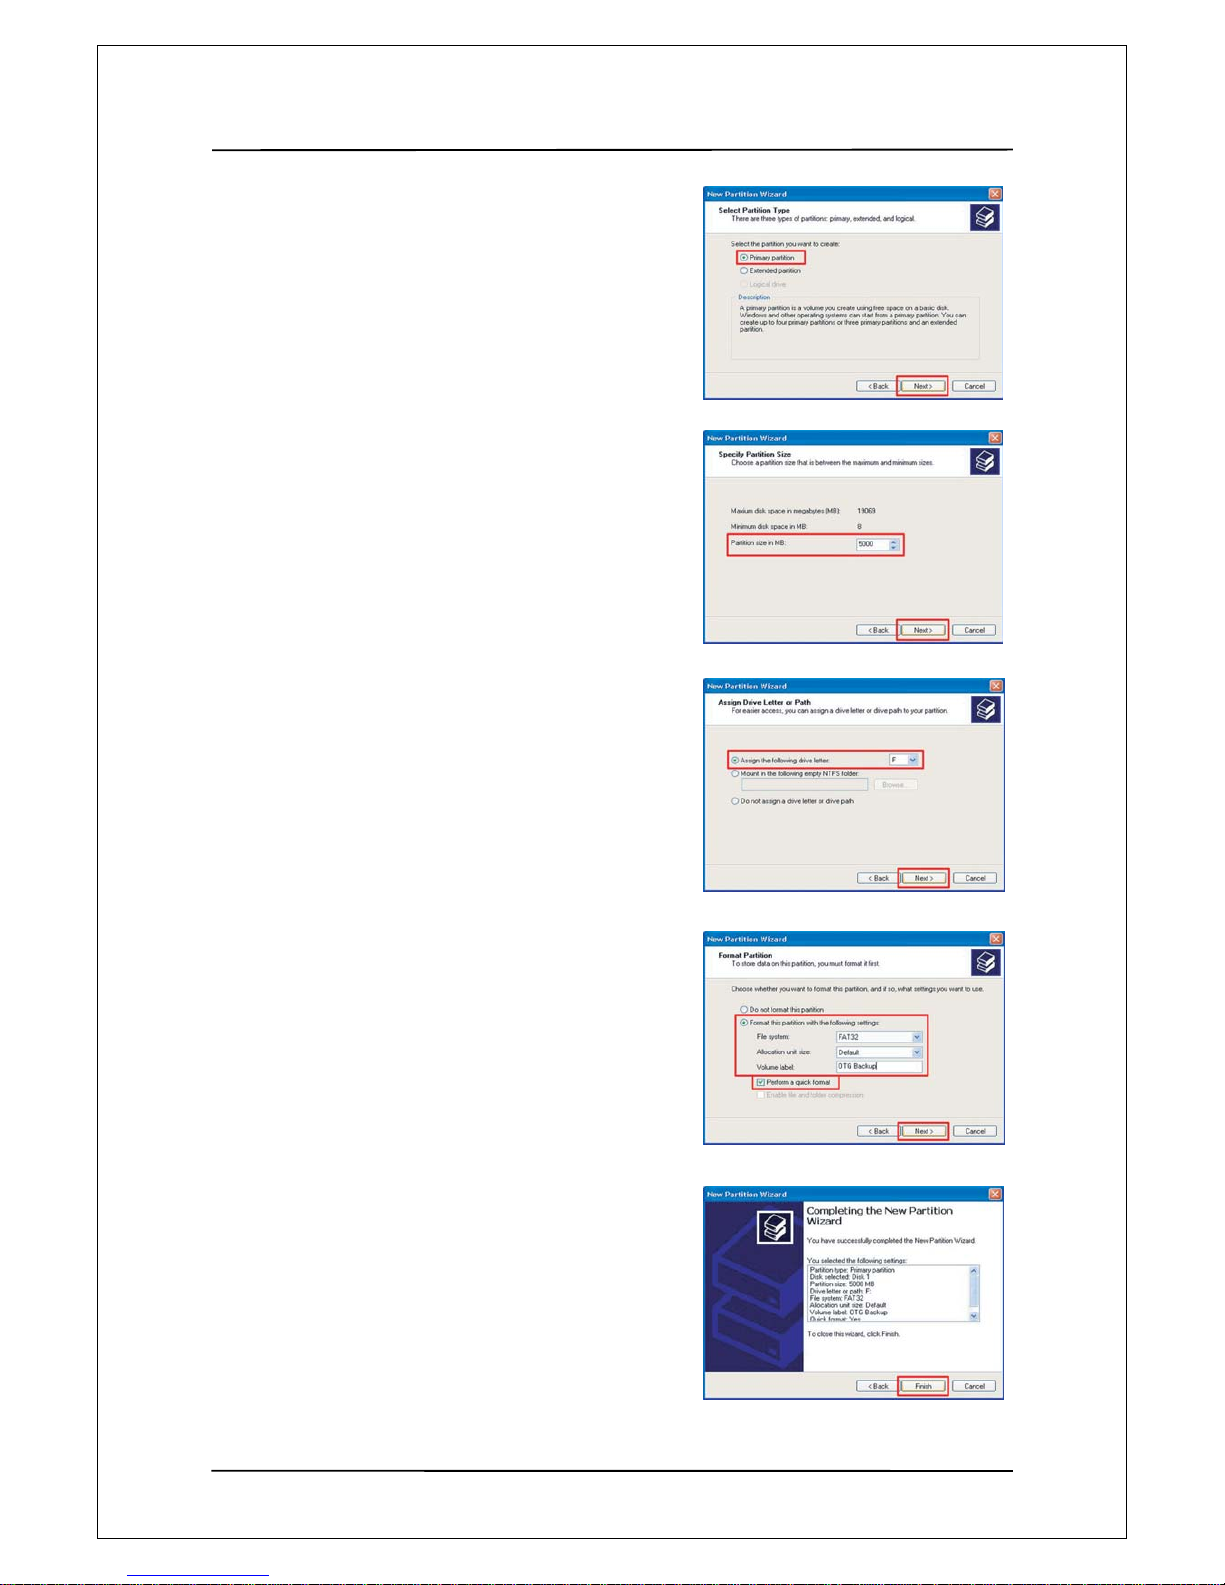
8. Select [Primary Partition(P)] and Click [Next]
to continue
9. Enter the desired partition size in [Partition size in MB]
and Click [Next] to continue.
10. When the [driver letter] is assigned, Click [Next]
11. In the format partition windows, select
[format this partition with the following settings] and
FAT32, and then check [Perform a quick format] box.
Click [Next] to continue.
12. When [Comp leting the New Partition Wizard]
appears, Click [Finish]

User Manual Guide Model: QR-130
20
13. A new NTFS partition was created.
14. Right-click an [Unallocated] drive in Drive
Management and select [New Partition] from
the menu that appears.
15. When the New partition wizard is shown
Click [Next] to continue.
16. Select [Primary Partition(p) and Click [Next]
to continue.
17. Leav e the value for [Partition size in MB]
as if appears and Click [Next] to continue.
(The partition size shown is the remaining
hard disk size unallocated.)
18. When the [drive letter] is assigned,
Click [Next]
User Manual Guide Model: QR-130
21
19. In the format partition windows select
[Format this partition with the following settings]
and NTFS, and then check [Perform a quick format]
box, Click [Next] to continue.
20. When [Comp leting the New Partition Wizard]
appears, Click [Finish].
Caution
Drives formatted with NTFS file system are detected on windows 2000/XP,
but not detected on Windows 98/ME.
Do not select to use [Compressing Files and Folder] option.
If the specification file system is FAT32 on windows 2000/XP, it is not possible
to have one drive letter on large hard disk over 32GB. In order to have one partition,
please perform partitioning and formatting on windows 98/ME.
Also, select [Primary Partition] to have multiple partitions on large hard disk over 40GB.
If [Extended Partition] is selected, drives may not be detected.
 Loading...