

Page 1
Quick Installation
Guide
rev. 22.1211.NB
Part 3: Software & Web Setup........................................................
For advanced user, the unit can be customized for alternate usage and
configured for remote access.
To access the Web User Interface for customization;
Only Outlet 1 & 2 can be remotely controlled.
!
Step 1: While in the same LAN as the
device, open a browser and type
http://Outlet or run Utility (see Part 5).
Step 2: A dialog box appears.
Username: admin
Password: (field is left blank)
1
2
Section 2
Local user
Po w e r
input Line
Po w e r
input Line
LAN
LAN
LAN
WAN
WAN
Router / Hub
Electrical
Device
DSL modem
Remote user
WWW
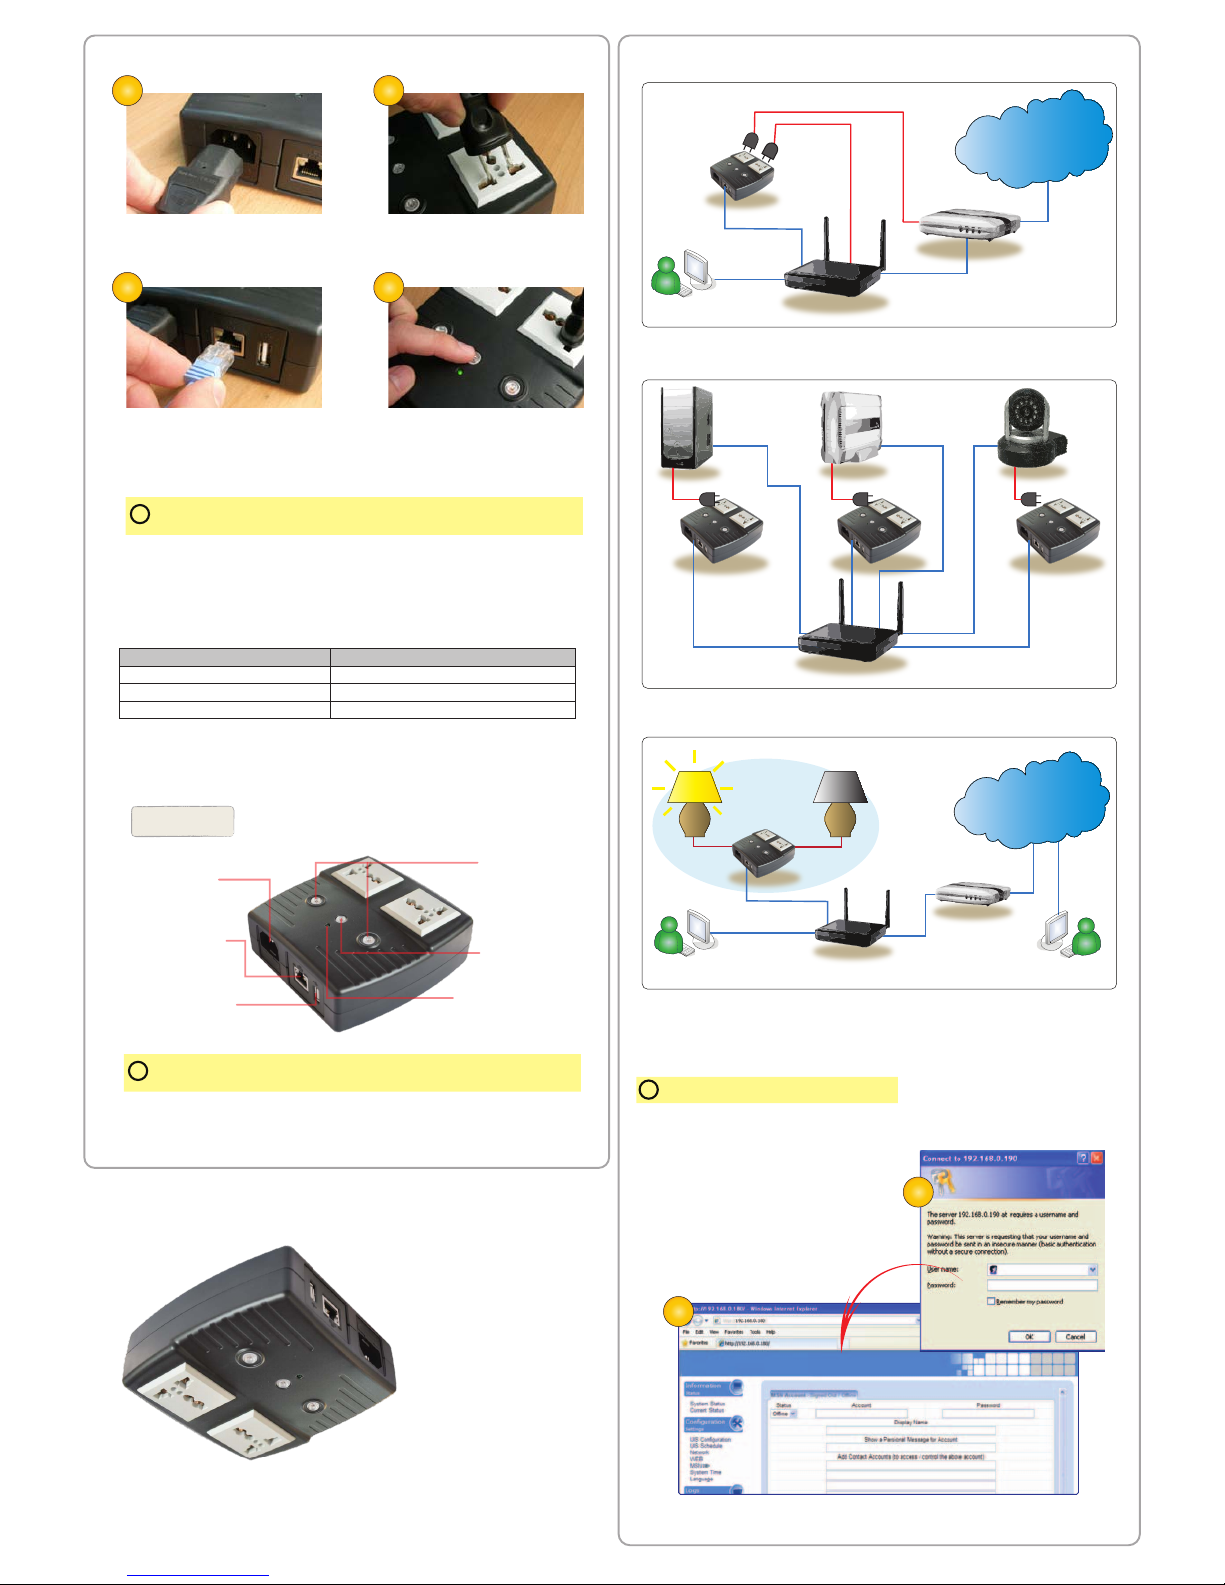
Usage #3: Device setup to remote control electrical devices. Software
setup required (see Part 3).
Server NAS
IP Cam
Router / Hub
LAN
LAN
LAN
LAN
LAN
Pow e r
input
Line
Pow e r
input
Line
Pow e r
input
Line
Usage #2: Device setup as watch-dog to keep internet device alive.
Software setup required (see Part 3).
Local user
Pow e r
input
Line
LAN
LAN
LAN
WAN
Pow e r
input
Line
Router / Hub
xDSL / cable /
3.5G modem
WWW
Usage #1: Device setup to perform automatic reset of router and
modem. No software setup required (see Part 1).
Part 2. LED Indicators....................................................................
Green LED indicator
Blinking Internet is online
No internet connection
System is currently in protect mode
ON
OFF
Description
Outlet
ON/OFF
Button
UIS
ON/OFF
Button
Fused
Power
Input
LAN Port
Internet
Online / Oine
Indicator
USB Charger
5V, 500mA
Description
!
Press UIS On/Off, Outlet 1 and Outlet 2 button for a few minutes. The indicator light
will blink, and the unit will reset to factory default.
Part 1. Hardware Setup....................................................................
Step 1: Connect the power
cord to device and wall outlet.
Step 2: Connect the router
power plug to an outlet.
Step 3: Connect LAN cable
from Router. The internet
LED will blink to show
internet is on-line.
Step 4: Press and hold (2
seconds) UIS On/Off button
to activate internet protection.
!
Press UIS on/off only when Internet LED is blinking. If Internet LED is OFF, pressing
button may result in unit performing outlet reset.
1 2
3 4
Page 2
Section 3 Section 4
Use Utility (freeware) to:
a) launch the web UI,
b) locate / change
device’s LAN IP and,
c) upgrade firmware.
Step 1: Download Utility
and latest firmware from
your reseller’s website.
Step 2: Install and run
Utility. Utility will list the
device’s LAN IP.
Step 3: Click Upgrade
Firmware. Select the
new .bin file and click
Start.
Part 5: Firmware Update via Utility..............................................
Method B: Using DDNS and setting Port Forwarding.
For complete details on port forwarding see User Manual’s Appendix A
!
This method allows user to remotely access the Web User Interface.
Step 1: Setup Port Forwarding / Virtual Server
a) Login to your Router setup / configuration page
b) Forward Port #: 80. Type / Protocol: TCP.
Step 2: Check Free Domain Name
a) Each device is pre- assigned with a unique Domain Name. This
information is located at Information --> System Status --> Network
Status --> Free Domain Name. Note down the domain name / URL.
From remote browser, enter http://3925954004.iCV99.net (example) to
log into the device’s Web User Interface.
!
S/N:3927000000
MAC: 00-03-EA-11-99-1Z
ID: admin PWD: 1A2B3C4D
II IIIII II IIIIII I III III IIIII II I I IIIIII II I
Serial Number
Master Login
Master Password
Note:
To change the Domain Name, first goto www.iCV99.net to Activate the account. The
Product Serial Number and Master Password info is labeled at the bottom of the device.
Part 4: How to Access Device from WAN...................................
Step 4: Once signed in, users
listed under Contact Account will
receive notification to add the
device as a friend.
Once added you can control the
device by chatting with it.
Step 3: The header will show the
current connection status.
Once setup, user can use MSN to get notifications, check status /
current WAN IP, turn on / off outlets.
To setup:
Step 1: From PC, run MSN Messenger or goto www.MSN.com to
register a new Windows Live ID or account.
Step 2: Once registered goto http://Outlet --> Configuration --> MSN.
Select Online and enter the new MSN login, password, Contact
Accounts and click Apply.
Method A: Using Instant Messaging Tool (eg. MSN)
WWW
WA N
WA N
Steven says (5:14 PM):
help
Demo Unit says (5:14 PM):
- Outlet Messenger Commands
Usage:
SET ON/OFF/RESET [0/1/2] (where 0=both
outlets)
GET [IP/STATUS]
Steven says (5:15 PM):
- Set On 1
Demo Unit says (5:15 PM):
- Done!
Steven says (5:15 PM):
- Set Off 2
Demo Unit says (5:15 PM):
- Done!
There are two methods to remotely control the outlets;
a. Instant Messaging tool like MSN, or
b. Web User Interface over WAN (DDNS & Port forwarding required)
3
2
4
!
Contact Accounts refers to registered MSN accounts that will be able to view and control
this device. If an account has been added and subsequently removed, that user will not
be able to command MSNswitch but will still be able to see it signing in.
 Loading...