

Page 1
AD-600
Installation Guide
Page 2

Installation Guide
AD-600
General Information
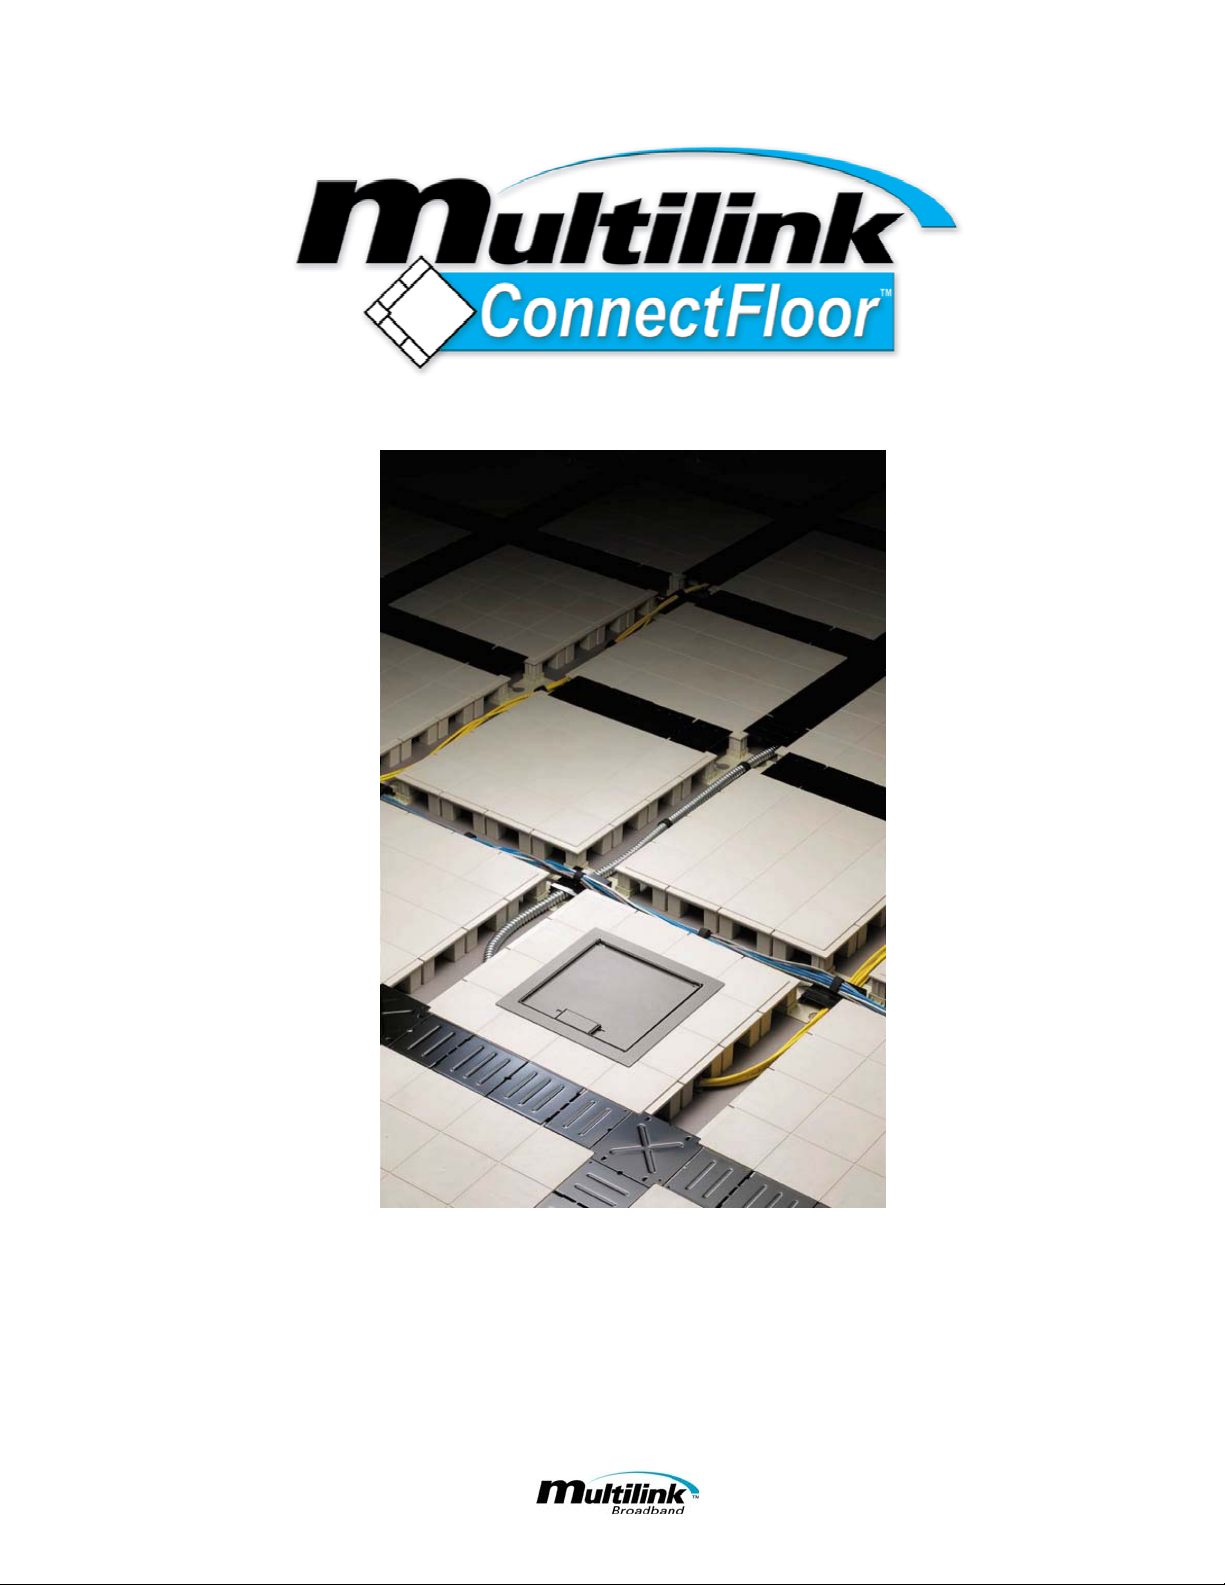
The main panels of the AD-600 are made of polypropylene and are 2.36”(6 CM) in height. Cable trench
caps are made of steel. Quick and easy installation is a strong advantage of the ConnectFloor systems.
AD-600 compromises one of the most unique, cost effective, and easily installed low-profile floors on
the market. No special tools are required. Professional quality installation can be achieved by flooring
installers such as those for carpet tiles and PVC tiles; or carpenters, handymen, and even amateurs.
Installation Time
The following estimates do not include material preparation and handling time.
For open space:
Trained installer: 900-1200 sq. feet (80-110 sq. meters) per man-day.
Newly trained or amateur: 600-800 sq. feet (55 – 75 sq. meters) per man-day.
Small rooms and irregular floor plans: may call for 20 to 30 percent more installation time. Good
preparation and job site planning are very influential to installation costs.
Recommended Tools Application
Electric Drill & Driver Perimeter & wall finish
Chalk line Marking straight line for large rooms
Pencils General Markings
Steel rule Measuring
Cutting Knife Cut UniPanel into Sub-Panels
Scroll saw Cut Wall Rail, Edge Rail at corners
Tape measures Measuring
1. Before installation
The following Instructions should be read before installation:
a. ConnectFloor systems are for in-door use only.
b. Modular carpet is the standard finish flooring for the AD-600 (3’X3’ carpet tiles are recommended).
c. Condition: UniPanel (AD-611) and adhesive should be conditioned at room temperature, not lower
than 40°F(5°C).
d. Floor Preparation: Sub-Floor must be free of grease, oil, wax, and moisture or any other foreign
material. All holes, cracks, and depressions should be filled with floor patching compound.
e. Sub-floor of the job site should be generally level. Elevation variation shall be no more than 3/8”(1
CM) within 3.3 feet (1 meter).
1
Page 3
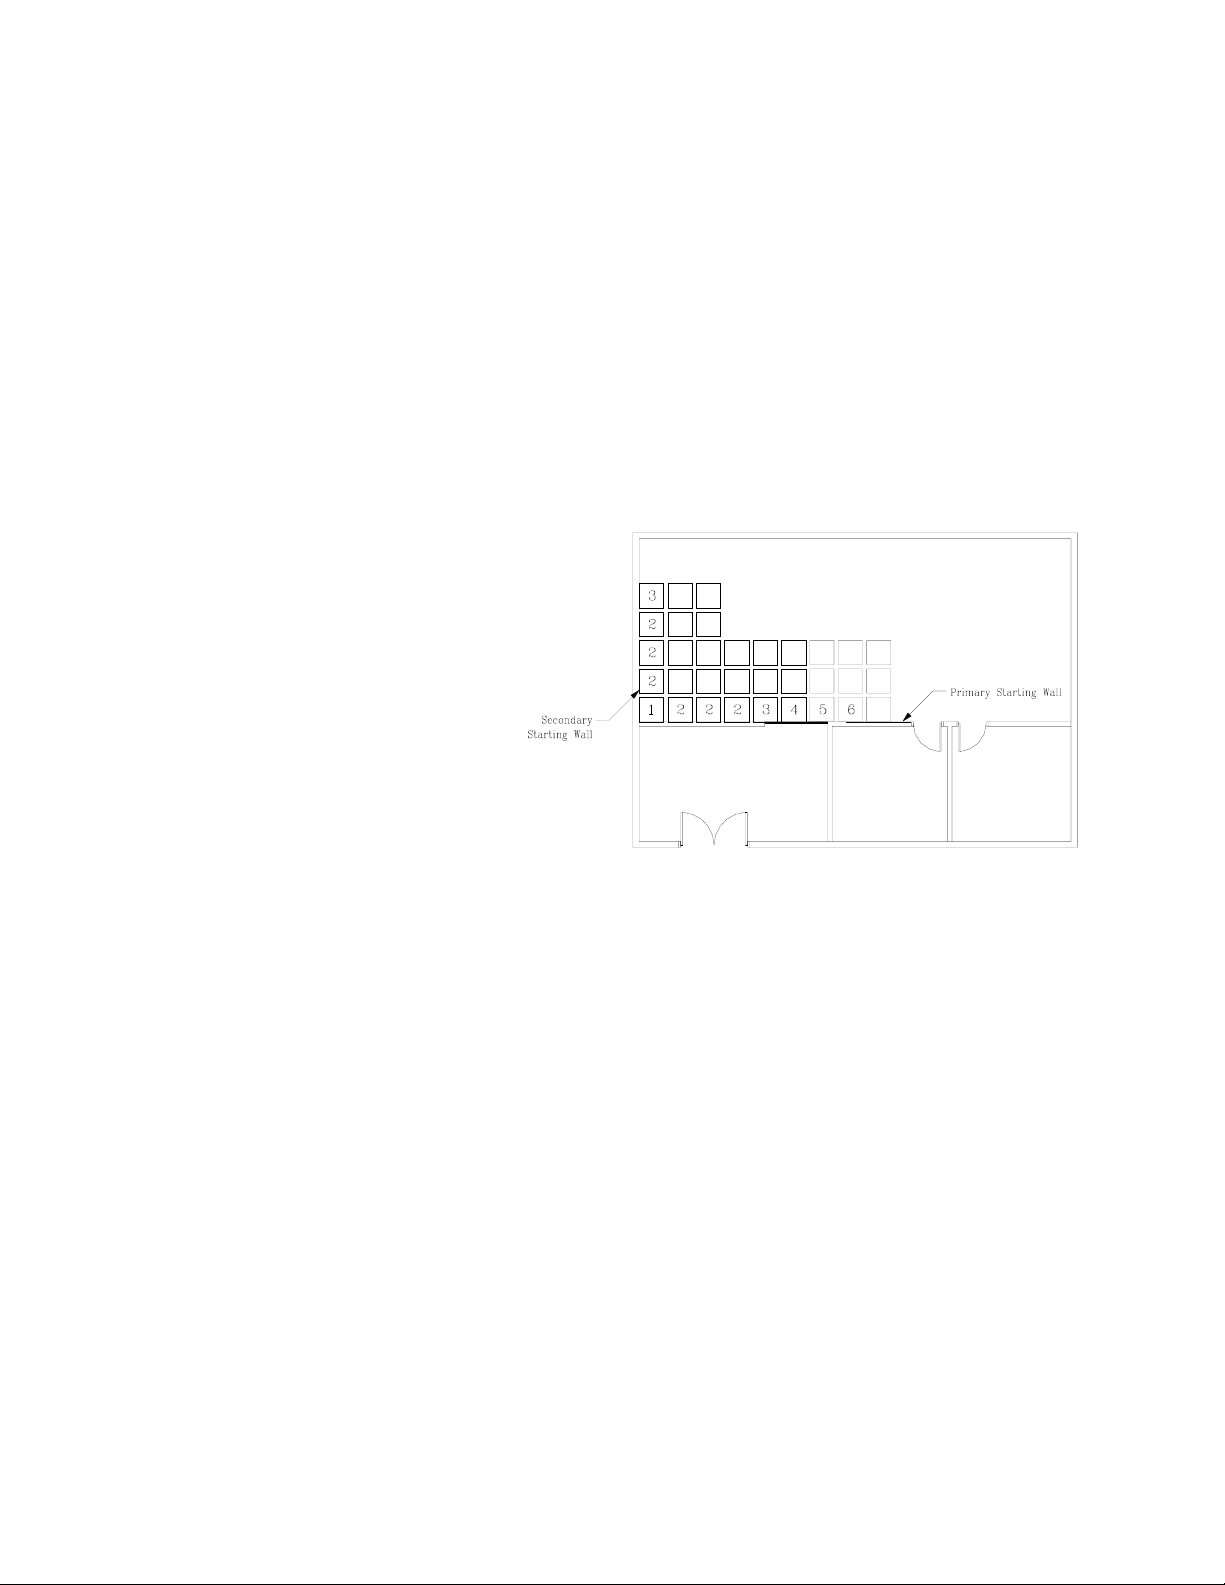
2. Starting Line – laying instructions
To maximize usage of full panels at the borders, it is recommended that you select the longest walls
or the entrance wall as starting point.
Note: Properly selecting the starting line is important. It saves labor time and materials.
Other factors that may affect choice of the starting line include: door, ramp, entry wall, other
long walls and so on.
General Office Example – (Drawing D605)
Use the longer wall as the primary starting wall. Starting from the corner, test sequence
no. 1 and no. 2 UniPanels along both walls, connected by half-Connector. If extension is not
obstructed, move on to
sequence no. 3. Be aware that
any two walls might not be
perfectly perpendicular to each
other. If the second wall is at an
angle less than 90° to the
primary starting wall, the first
UniPanel laid will need to be
strategically offset from both
walls to allow for extension of
UniPanels in both directions.
The resulting gaps to both
walls will then
with appropriate accessories. If
the gaps are greater than 1/5”(5
mm) in width, Edge Rail should work well.
Lay out entire floor with complete UniPanels until the remaining walls cannot allow
complete UniPanels up against them. Cutting or trimming pieces will be required for the
remaining walls to finish the UniPanel matrix. There will also be removal of some panels
that have been laid down to apply the ramping required at the entranceways. In figure
D605A, note that in cases where doors swing inside the room their must be a 25 sq. ft.
entrance area to maintain ADA compliancy. The actual ramping area can easily be added by
removing one UniPanel in front of the door plus an additional half of a UniPanel to account
for the length of the ramps.
be filled up
D605A
D605
2
Page 4

3. Installation
a. Apply Sound Attenuation Blanket. Spray adhesive, duct tape, or 3M adhesive tape may be used
to hold down the sound blanket to the sub floor.
b. Old carpet or resilient floor to substitute Sound Attenuation Blanket: For retrofit installation over
existing commercial rated low-pile carpet, carpet tile, PVC tile and sheet vinyl, step a and b may be
omitted. Depending on the old floor covering, Sound Attenuation Blanket may also be skipped.
However, application over thick foam-backed or cut pile carpet is not recommended.
c. Starting along the wall with half-size Base Connector:
First, use a knife or snap on a straight edge to cut Base Connector into halves.
Position original perimeter side of half-Connectors
against the wall surface, allowing a uniform
+/- .08”(2 mm) offset. Along the starting line,
connect corner feet of the first row
UniPanels. (Drawing D608)
D608
d.
Repeat installation with full size Base Connectors: Starting from the second row, use full Base
Connectors to UniPanels consecutively. No tool is needed. Extension of the Connectors and
UniPanels is simple and straightforward.
e. Cable Trench: Base Connectors connect UniPanels at their corner feet as shown, setting the panels
apart by a standard 3.54”(9 CM) gap. This automatically allows for a two-way uniform-width 3.54”
3
Page 5

grid of cable trench every 23.62”(60 CM) on center. (Drawing D609)
Accessible Cable Trench - Clearance: 2.24”(57 mm)
Width: 3.54”(90 mm)
To assemble a module of 23.63” X 23.63”(60 cm X 60 cm) coverage requires:
1 UniPanel + 1 Central Cap + 1 Base Connector + 4 Flank Caps
D609
f.
UniPanel: The main component of AD-
600 system is the UniPanel, which is a
composite panel of structurally
independent Sub-Panels. The 20.06” X
20.06”(510mm x 510mm) UniPanel
consists of 16 SubPanels each standing
on 4 integral pedestals. The SubPanels
are pre-connected by a .08”(2mm)
uniform joint line on all sides to form the
16-square UniPanels. This feature
provides maximum built-in flexibility for
the panels to easily accommodate either
any variance there might be in sub-floor
elevation--as the joints are not rigid. Or,
when encountering other architectural
elements such as walls and doorways, the
Panels can “break off” any of the
SubPanels to conform to floor area
constraints. (Drawing D610)
D610
g.
Central Cap and Flank Cap: Central Caps are to be installed at the intersection of Cable Trenches,
and Flank Caps alongside UniPanels over the Cable Trenches. There is no need of tools of any kind.
The trenches remain fully accessible--Caps can be simply lift up by hand, and re-place after cable
4
Page 6

installation or service. (Drawing D609)
Note: This ease eliminates frequent coordination conflicts between trades. Instead of the
contractors converging on job sites attempting to achieve opposite results (caps on/caps off, cables
down/ cables up), the electrical contractor can route and lay the cables after the installation of
ConnectFloor is completed. Carpeting is done when both trades are gone from the job site.
h. Ramp without Ramp Rail: The nominal width of
the Ramp part (AD-625) is 4”(10CM). Plan Ramp
installation according to width of the ramp area—this
often corresponds to the opening of the adjacent
doorway, or as required by applicable Building
Codes. Use full ramp sections and then use the Free
Standing Edge, to take up the residual space and
provide a finish edge to the triangular sides of the
ramp as well as carpeting. Use tape of sufficient
width to tape down top and bottom of Ramp.
Carpeted over, there is no visual transition between
ramps and carpet. (Drawing D612)
D612
i.
Free Standing (Skirting) Edge: It is a strip of
aluminum extrusion shaped like a letter “F” crosssection-wise, with the top channel to receive the edge
of carpeting. There is also a luminous strip on the
top of the edge that provides a luminous strip that
remains illuminated for about 6 minutes. Cut strips to
required length, drill holes on top flange as needed
and secure to UniPanels by flat-head screws. The
vertical flange provides a finished edge to the
exposed sides of ConnectFloor. (Drawing D614).
D614
j. Finish Wall / Perimeter: Various ConnectFloor
accessories are designed to “round out” UniPanel
installation by successively taking up the residual
space after installation of the last full UniPanels or
SubPanels along the finish wall. The wall may be
finished by the accessories or by cutting the
UniPanel to run +/-.08” from the wall. The optional
accessories that can be used are located under
Section 4 – Optional Trim Accessories.
k. Finish Wall of irregular shapes: Irregular perimeter spaces may be filled up by using a
combination of Wall Rail, Edge Rail and Corner Rail units. The most flexible installation is
5
Page 7

facilitated by using sections of Wall Rail cut to length with a scroll saw and set down perpendicular
to the edge of the last irregularly laid ConnectFloor part. The sections’ varying lengths are carefully
measured so that they will fill up the entire space between the wall and the ConnectFloor that is
already installed.
l. End Caps are used to trim and finish the ConnectFloor installation along the walls. Since
UniPanels there on the first row are laid on Half Connectors, a kind of “partial cap” is needed to
cap off the gap at the end of cable trenches running into the wall—hence the End Cap. (Drawing
D611).
5. Finish Floor Covering: Commercial-rated modular carpet is the standard floor covering to be used
over ConnectFloor systems. In general office area, apply adhesive in grid pattern; while for heavy traffic
areas such as entrance or aisle, apply adhesive generously throughout. Press the carpet tile down firmly.
If acceptable by the flooring manufacturer’s specifications, 1” wide or wider double-sticky tape of
sufficient viscidity may be substituted. Install as provided by the specifications.
6. Interior Partitions: Semi-permanent interior partitions can be erected on top of ConnectFloor AD-
600. They may be built directly on top of ConnectFloor’s surface, or over finished flooring such as
carpet tiles. To secure
on top of ConnectFloor, pre-drill from
partition’s floor track through UniPanel of
ConnectFloor, then, fasten with blunt tipped
screws through the pre-drilled hole to avoid
damage to cables underneath. “Ram setting”
floor track to UniPanels is not recommended.
Partitions thus installed will not interrupt the
distribution of cables and wires underneath
(Drawing D615).
partition’s floor track
D615
4. Optional Trim Accessories
6
Page 8

These following pieces of trim may be used in cases where the edge of the flooring does not butt
completely up against the wall. The UniPanels, as mentioned in previous sections, can also be cut to
meet up against the wall to finish the flooring matrix.
(1) When the residual space is less than 2.36”(6 cm) in width: Use Edge Rail (AD-623). Fasten Edge
Rail through the pre-punched holes at both ends to the UniPanel or SubPanels with type-s or flat-head
screws (Drawing D611).
(2) When the residual space is a width of 2.36”- 5.11”(6 cm ~ 13 cm): Use Wall Rail (AD-630) as a
spacer. First butt the Wall Rail directly against the last UniPanel or SubPanels. Then, as described in step
(1), fasten Edge Rail to take up the remaining gap (Drawing D611).
(3) Distance between 5.11”- 8.66”(13 cm ~ 22 cm): Use a row of SubPanels (1/4 of UniPanel) as a
spacer. Butt the SubPanels against the last UniPanels. Connect the SubPanels by Half-Connector at
trench. Then, fill the balance by single use or combined use of Edge Rail and/or Wall Rail to finish the
remaining gap (Drawing D611).
(4) The final space left in the corner after use of the last Edge Rail: Use Corner Rail (AD-629), which
has short segments that can be broken off, and each segment has a pre-punched hole to allow fastening to
adjoining parts. (Drawing D611)
Ramp Rail: When installing ramp with Ramp Rail, cut Rail to length then insert between Ramp section
and first UniPanels as shown. Pre-drill holes as needed on both the flat flange and the sloped flange, then
secure it with flat-head screws to both the adjacent UniPanels and the Ramp sections. Carpet tile edges
are tucked into the channels on top of the Rail. This provides easy rigidity and a finished look. The
visible aluminum strip also serves as a ready reminder of the sloping (Drawing D612).
Edge Trimmers are used to trim and finish the ConnectFloor installation along the walls. They are set
down on the small recessed “shelf” –on all four sides of the UniPanels designed to receive Flank Caps—
along the starting wall to bring up the finished floor to a uniform elevation. In most cases, this edge trim
is not used in typical installations. (Drawing D611).
D611
D611
(Single or Double)
7
Page 9

E-Mail: engsupport@multilinkbroadband.com
Web: www.multilinkbroadband.com
580 Ternes Avenue P.O. Box 955
Elyria, OH 44035
Phone: 440.366.6966
Fax: 440.366.6802
24 Hour Voice Messaging
Worldwide Distribution
8
 Loading...