

Page 1

Instruction Manual, DVI-6000 FTX/FRX 1
INSTRUCTION MANUAL
DVI-6000 Series
DIGITAL VIDEO FIBER OPTIC
TRANSPORT SYSTEM FOR
DVI/RGB/HDTV
Revision 5
MultiDyne
Video & Fiber Optic Systems
1-(877)-MULTIDYNE, 1-(800)-488-8378
191 Forest Avenue
Locust Valley, NY 11560-2132 USA
(516)-671-7278 FAX (516)-671-3362
techsupport@multidyne.com
www.multidyne.com
Page 2

Instruction Manual, DVI-6000 FTX/FRX 2
MULTIDYNE, the Multidyne logo, DVI-6000-FTX, DVI-6000-FRX are registered trademarks of
MULTIDYNE Electronics, Inc.
Copyright 2009 MULTIDYNE Electronics, Inc., Locust Valley, New York. Printed in the United
States of America. All Rights Reserved. Contents of this publication may not be reproduced in
any form without the written permission of MULTIDYNE Electronics, Inc.
This product was designed and manufactured in the
UNITED STATES of AMERICA
Page 3

Instruction Manual, DVI-6000 FTX/FRX 3
TABLE OF CONTENTS
INTRODUCTION 4
FEATURES AND OPERATION 5
TRANSMITTER,
RECEIVER,
POWER
REQUIREMENTS 9
DVI-6000-FTX 5
DVI-6000-FRX 8
PHOTOS, DVI-6000 10
DVI6000 GUI INSTALLATION 11
DVI6000 USB DRIVER INSTALLATION 15
DVI6000 FIRMWARE UPDATE INSTRUCTIONS 20
SPECIFICATIONS 26
PINOUT AND PANEL DRAWINGS 27
IG. 1: DIN JACK WIRING FOR BALANCED AUDIO AND DATA 27
F
IG 2: FTX FRONT AND REAR PANELS 28
F
IG. 3: FRX FRONT AND REAR PANELS 29
F
APPENDIX: 30
H
OW TO CALCULATE WHAT VIDEO RESOLUTIONS ARE SUPPORTED. 30
Page 4

Instruction Manual, DVI-6000 FTX/FRX 4
INTRODUCTION
The DVI-6000-FTX/FRX Digital Video Fiber Optic Transport System for digital video is a
single-fiber solution. It has been designed to increase the transmission distance limitations of high
resolution RGB and DVI video and computer graphics. The system will transport virtually any
VESA-compliant DVI or RGB signal from 640x480 VGA up to and including 1920 x1200 @ 60Hz
Reduced Blanking WUXGA or, with the dual link option, 2560 x 1600 WQXGA, as well as HDTV
formats from 480P up to and including 1080P with full clarity over a single fiber. A loop through
port on the FTX allows connecting a local display monitor.
The DVI-6000-FTX/FRX also supports HDTV and non-RGB video formats such as YUV,
YCrCb or YPrPb. The DVI-6000 has built in reclocking of the DVI signal to eliminate jitter. EDID
data can be obtained from a local monitor connected to the loop thru port, a built in PROM, or,
optionally, from a monitor connected to the FRX.
The DVI-6000-FTX/FRX also supports the optional transport of 2 audio channels (one
stereo pair) and optional unidirectional or bidirectional RS232 or RS4xx type data (BDD option).
The DVI-6000-FTX/FRX audio path is intended not only for line-level audio such as might be
obtained from a computer sound card, but for professional 600 ohm balanced audio applications
as well. No additional fibers are required for the audio or data options, although 2 fibers are
required for bi-directional data and remote EDID options.
The DVI-6000 supports operation and setup by the front panel switches (hardware mode).
Most functions are automatic and should not require front panle switch setup. Future firmware
updates will provide control and setup of features via a GUI (GUI mode). The optional GUI will
interface to a host PC using the front panel USB port of the DVI-6000. Firmware updates may
also be applied via the USB port.
The DVI-6000 also has a SMPTE 348M option, whereby the data stream between the FTX
and FRX is a 2.97GBPS SMPTE 348M SDTI-compliant stream (3G mode). In this mode the DVI
video signal is packetized into a proprietary format and then transported via a 3G SMPTE
envelope or physical layer signal. Instead of fiber transport, there is an optional 75 ohm coax
cable transport feature for 3G mode. (Some features not available in cable transport mode).
Applications include commodity and stock exchanges, medical and MRI displays,
advertising, digital signage, air traffic control and military tactical displays, scoreboards and much
more…
Page 5

Instruction Manual, DVI-6000 FTX/FRX 5
FEATURES and OPERATION
TRANSMITTER, DVI-6000-FTX
The transmitter module is designated by model number DVI-6000-FTX. The suffixes –50
and –52 designate singlemode operation for short or long distance, respectively. Suffix -2
denotes multimode. The suffix DL indicates dual link capability.
FTX REAR PANEL CONNECTIONS: Refer to Fig. 2. The rear panel connections are an
OPTICAL OUTPUT connector for the optical fiber going to the FRX. DVI/RGB INPUT and
DVI/RGB LOOP OUT DVI-I type connectors for the DVI or RGB input and local display monitor
output, respectively. The DVI-I loopthru output is an active, buffered output for both DVI and
RGB. The DVI-6000 normally accepts DVI type video, but can also accept, with a HD-15 to DVI-A
adapter, VESA compliant analog RGB type video, and with a HDMI to DVI-D adapter, component
HDMI (YUV or YPrPb) video, such as from a DVD or Blu Ray player, provided the video is not
HDCP encrypted. (Audio embedded in the HDMI stream will not be transported. One must
provide analog audio to the FTX audio inputs).
A 9-pin DIN connector (Fig. 1) is provided for balanced 600 ohm AUDIO LINE IN and RS
232/4xx DATA I/O and a 3.5mm line-level STEREO AUDIO IN jack is provided for unbalanced
stereo audio. A screw terminal breakout board and cable is available for the DIN connector from
MultiDyne for the balanced audio and data connections.
If the optional 75 ohm cable output is fitted, there will be a BNC for this output. There will
be a matching cable input on the FRX. Note that the cable connection is one-way, from FTX to
FRX. Thus, some features, such as bi-directional data and remote EDID capture, will not be
available if this connection is used. This connection is intended for use with 3G mode. A
9~24VDC power input jack completes the rear panel.
FTX FRONT PANEL LEDS: Refer to Fig. 2. The front panel of the unit includes a POWER LED
and 9 status LEDS. They are as follows:
An EDID led, which, if BDD is fitted, glows when valid EDID data is received from the
monitor connected to the FRX when in remote EDID mode. It will blink if the EDID data received
form the FRX is invalid. It will be dark when remote EDID mode is not asserted or BDD not fitted.
A TXLOCK LED which, when illuminated, indicates FTX health, and a RXLOCK LED to
indicate return path health if BDD is fitted. The RXLOCK LED blinks if the return path has a
problem. If BDD is not fitted, it remains dark. Both the RXLOCK and TXLOCK leds will be dark if
there is a problem with the FTX itself.
There are 3 LEDS for DVI, RGB, and DL (dual link models only), which, when illuminated,
show the presence of valid DVI or RGB input video and, if the source is outputting it, dual link
DVI, respectively. The DVI or RGB LEDs will blink if video is present but the DVI-6000 does not
recognize the video format presented to it, it exceeds the DVI-6000’s capabilities, or if it is invalid.
Page 6

Instruction Manual, DVI-6000 FTX/FRX 6
Be sure the source is outputting a resolution that is less than or equal to the maximums listed in
the Introduction, or refer to the formula in the Appendix to see if it can be transported.
There is an USB LED which indicates USB activity whenever a PC is connected to the unit
via the front panel USB connector, either for control via a GUI or to perform a firmware update.
There is a TXDATA LED to indicate forward RS 232/42x data activity, and if BDD is fitted,
a RXDATA LED to indicate return path data activity.
FTX FRONT PANEL SWITCH FUNCTIONS: Refer to Fig. 2. There are 7 switches labeled A thru
G. The functions are as follows:
Switch A is used to assign priority between a DVI source and a RGB source if both are
present at the input simultaneously. When up, it defaults to DVI, when down, RGB. If only one
input type is present, it defaults to that type regardless of the switch setting.
Switch B this switch is used to select the 3G SMPTE option when down and the 3.75G
transport options when up. If the optional cable connection is used, 3G mode should be used.
Switch C is set to gather EDID information either from a monitor connected to the
DVI/RGB LOOP OUT port, or from an internal prom that has stored in it a list of generic monitor
types. If the bi-directional data option is fitted, the EDID information can be extracted from the
monitor connected to the FRX (remote EDID mode), and written to the PROM. (Caution: enabling
this mode will overwrite the factory defaults stored there). For best results, the loopthru monitor
should be of the same type as that connected to the FRX as it is not possible for the source to
output a signal that will be optimal for 2 different types of monitor at once. When there is no
monitor connected to the loopthru, the prom or remote mode MUST be used, or the source will
not output video at all. Switch C selects PROM/REMOTE mode EDID when up, LOCAL loopthru
mode when down. (PROM vs. REMOTE is selected by a switch on the FRX).
Switch D attenuates the audio input by 12 db when down. Use for high level audio input.
Switches E, F, and G control the data protocols and termination. When switch E is down
and switch F is up, RS4xx operation is selected. When E is up and F
Other combinations of E and F are not valid. Switch G when down places a 100 ohm termination
across the data inputs for RS4xx operation.
Analog Picture Controls. The GUI provides controls to make adjustments to horizontal
and vertical picture position, as well as the sampling phase,for analog RGB and RGBHV inputs.
is down, RS232 is selected.
Page 7
Instruction Manual, DVI-6000 FTX/FRX 7
Adjustments are made using the scroll bars. Once the picture is adjusted properly, click the Save
button to store the settings in the unit. Settings for up to 25 different video resolutions can be
saved within each Transmitter. Note that Firmware Revision 7 and Software Revision 5, or
higher, are required for this feature.
Page 8

Instruction Manual, DVI-6000 FTX/FRX 8
RECEIVER, DVI-6000-FRX
The receiver module is designated by model number DVI-6000-FRX. The suffixes
designate the operation mode as above.
FRX REAR PANEL CONNECTIONS: Refer to Fig. 3. The receiver rear panel connections are:
An OPTICAL INPUT connector for the optical fiber coming from the FTX.
Two DVI-I DVI/RGB OUT connectors for connecting up to 2 video displays. For best
results, the 2 displays should be of the same type. Both DVI and analog RGB are available
simultaneously from both connectors, as the DVI-6000 transcodes DVI into RGB and vice versa.
Thus, the FRX can be used as a video DA and transcoder. One must use a DVI-A to HD-15
adapter or a DVI-D to HDMI adapter for displays having those types of inputs. Note that there will
be no embedded audio supplied to the HDMI sink, as the DVI-6000 does not transport HDMI
embedded audio. One must use the dedicated analog audio transport of the DVI-6000 to
transport any audio associated with the HDMI program source.
An unbalanced line level STEREO AUDIO OUT 3.5mm connector and a 9-pin DIN
connector (Fig. 1) for 600 ohm balanced AUDIO LINE OUT and RS 232/4xx DATA I/O. A screw
terminal breakout board and cable is available from Multidyne for the DIN connector data and
balanced audio connections.
If the optional 75 ohm cable input is fitted, there will be a BNC for this purpose. This
connects to the BNC on the FTX. If this connection is used, certain features such as remote EDID
and bi-directional data transport will be unavailable.
A 9~24VDC power connector completes the rear panel.
FRX FRONT PANEL LEDS: Refer to Fig. 3. Like the FTX, the FRX front panel has a POWER
LED and 9 status LEDs. They are as follows:
An EDID LED that indicates valid capture of EDID data from a monitor connected to either
of the 2 video outputs. The EDID LED will blink if the EDID data is invalid. It will be dark if BDD is
not fitted or EDID polling is not asserted.
There are TXLOCK and RXLOCK LEDs which indicate return path health and FRX health
respectively when illuminated. They will both be dark if there is a problem with the FRX itself. The
TXLOCK LED is only used if BDD is fitted. The RXLOCK LED will blink if there is a problem with
the link or the FTX.
The DVI, DL, and RGB LEDS function as in the FTX. Note that the RGB and DVI LEDS
will always both be active as the DVI-6000 always transcodes one type to the other.
The RXDATA led indicates incoming RS232/4xx data, and the TXDATA LED, which is
only valid if BDD is fitted, indicates return path data activity.
Page 9

Instruction Manual, DVI-6000 FTX/FRX 9
As in the FTX, there is also an USB connector and activity LED on the front panel for GUI
mode.
FRX FRONT PANEL SWITCH FUNCTIONS: Refer to Fig 3. As in the FTX, there are 7 switches
labeled A thru G. Their functions are as follows:
Switch A is used when the optional cable input is fitted. If both cable and fiber inputs are
active simultaneously, it is used to assign priority between the two. It chooses between the optical
input (up) and cable input (down). When only one type of input is present, it chooses that input
regardless of the switch position.
Switch B this switch is used to select the 3G SMPTE option when down and the 3.75G
transport options when up. If the optional cable connection is used, 3G mode should be used.
Swtich C is used to select which of the 2 DVI outputs will be used for EDID polling. Up is
OUT1, down is OUT2. This switch is not used if BDD is not fitted.
Swtich D, when down, enables polling of the chosen monitor for EDID. Caution: Enabling
this mode will overwrite any contents of the EDID PROM in the FTX. This switch is not used if
BDD is not fitted.
Switches E thru G are for data protocol setting and have the same functionality as in the
FTX. Switch G, which enables 100 ohm termination across the data inputs, is only valid when
BDD is fitted.
POWER REQUIREMENTS
@ TBDA. These are provided by 12 VDC output, 100-240 VAC input power supply modules,
included.
The DVI-6000-FTX requires 9~24VDC @ TBDA and the DVI-6000-FRX requires 9~24VDC
Page 10

Instruction Manual, DVI-6000 FTX/FRX 10
PHOTOS, DVI-6000
Image 1
Front view of DVI-6000-FTX on the top and
rear view of DVI-6000-FRX on the bottom.
The front view of DVI-6000-FRX is identical to the front of DVI-6000-FTX.
The rear of the DVI-6000-FTX is identical to the rear of the DVI-6000-FRX except that the DVI
Input is on the right and the DVI Loop Out is on the left. The audio I/Os are also inputs.
Page 11

Instruction Manual, DVI-6000 FTX/FRX 11
DVI6000 GUI Installation
NOTE: You must install the GUI software before plugging a DVI6000 into a USB Port in
order for Windows to find the driver file that is required. Failure to do so may cause
system corruption.
Browse to the location of the supplied DVI6000 Installation file.
Right-click on the DVI6000_Setup.zip file and choose Extract All…
Double-Click on Setup.exe to start the Setup Wizard.
Page 12

Instruction Manual, DVI-6000 FTX/FRX 12
Click Next.
Page 13

Instruction Manual, DVI-6000 FTX/FRX 13
You will be asked to select a folder for the installation. It is highly recommended that you choose
the default folder.
Click Next.
Page 14

Instruction Manual, DVI-6000 FTX/FRX 14
After a few moments, the installation process will complete:
Click Close to exit.
The software installation is now complete. Please note that the Microsoft .NET Framework must
be installed on the PC in order for the GUI software to run. If the PC is current with Microsoft
Service Packs and Updates, then the .NET Framework should already be installed. If not, it can
be installed by running Windows Update and choosing to install the .NET Framework 2.0 (or
higher).
Proceed to the DVI6000 USB Driver Installation to install the USB driver required to
communicate with the DVI6000 devices.
Page 15

Instruction Manual, DVI-6000 FTX/FRX 15
DVI6000 USB Driver Installation
NOTE: You must install the GUI software before plugging a DVI6000 into a USB Port in
order for Windows to find the driver file that is required. Failure to do so may cause
system corruption.
Connect a DVI6000 to the PC using a USB Type “A to Mini-B” cable. Windows should now start
its Found New Hardware Wizard.
Select “No, not at this time” when asked to connect to Windows Update to search for the USB
driver software. The DVI6000 USB driver software was installed as part of the GUI installation.
Click Next.
Page 16

Instruction Manual, DVI-6000 FTX/FRX 16
Select “Install from a list or specific location” at the next prompt:
Click Next.
Select “Search for the best driver in these locations.” in the following prompt. Check the “Include
this location in the search:” and click the Browse button:
Page 17

Instruction Manual, DVI-6000 FTX/FRX 17
Use the Browse For Folder window that appears to select the location of the USB driver file. If
the default location was chosen for the installation of the GUI, the location of the USB driver file
should be:
C:\Program Files\MultiDyne\DVI6000\drivers
Select the folder that contains the USB driver and Click OK.
Page 18

Instruction Manual, DVI-6000 FTX/FRX 18
The wizard will now install the USB driver.
Click Continue Anyway.
Page 19

Instruction Manual, DVI-6000 FTX/FRX 19
Click Finish to complete the installation. The driver is now installed and you should see a
message in the System Tray indicating that the hardware is now ready to use.
Page 20

Instruction Manual, DVI-6000 FTX/FRX 20
DVI6000 Firmware Update Instructions
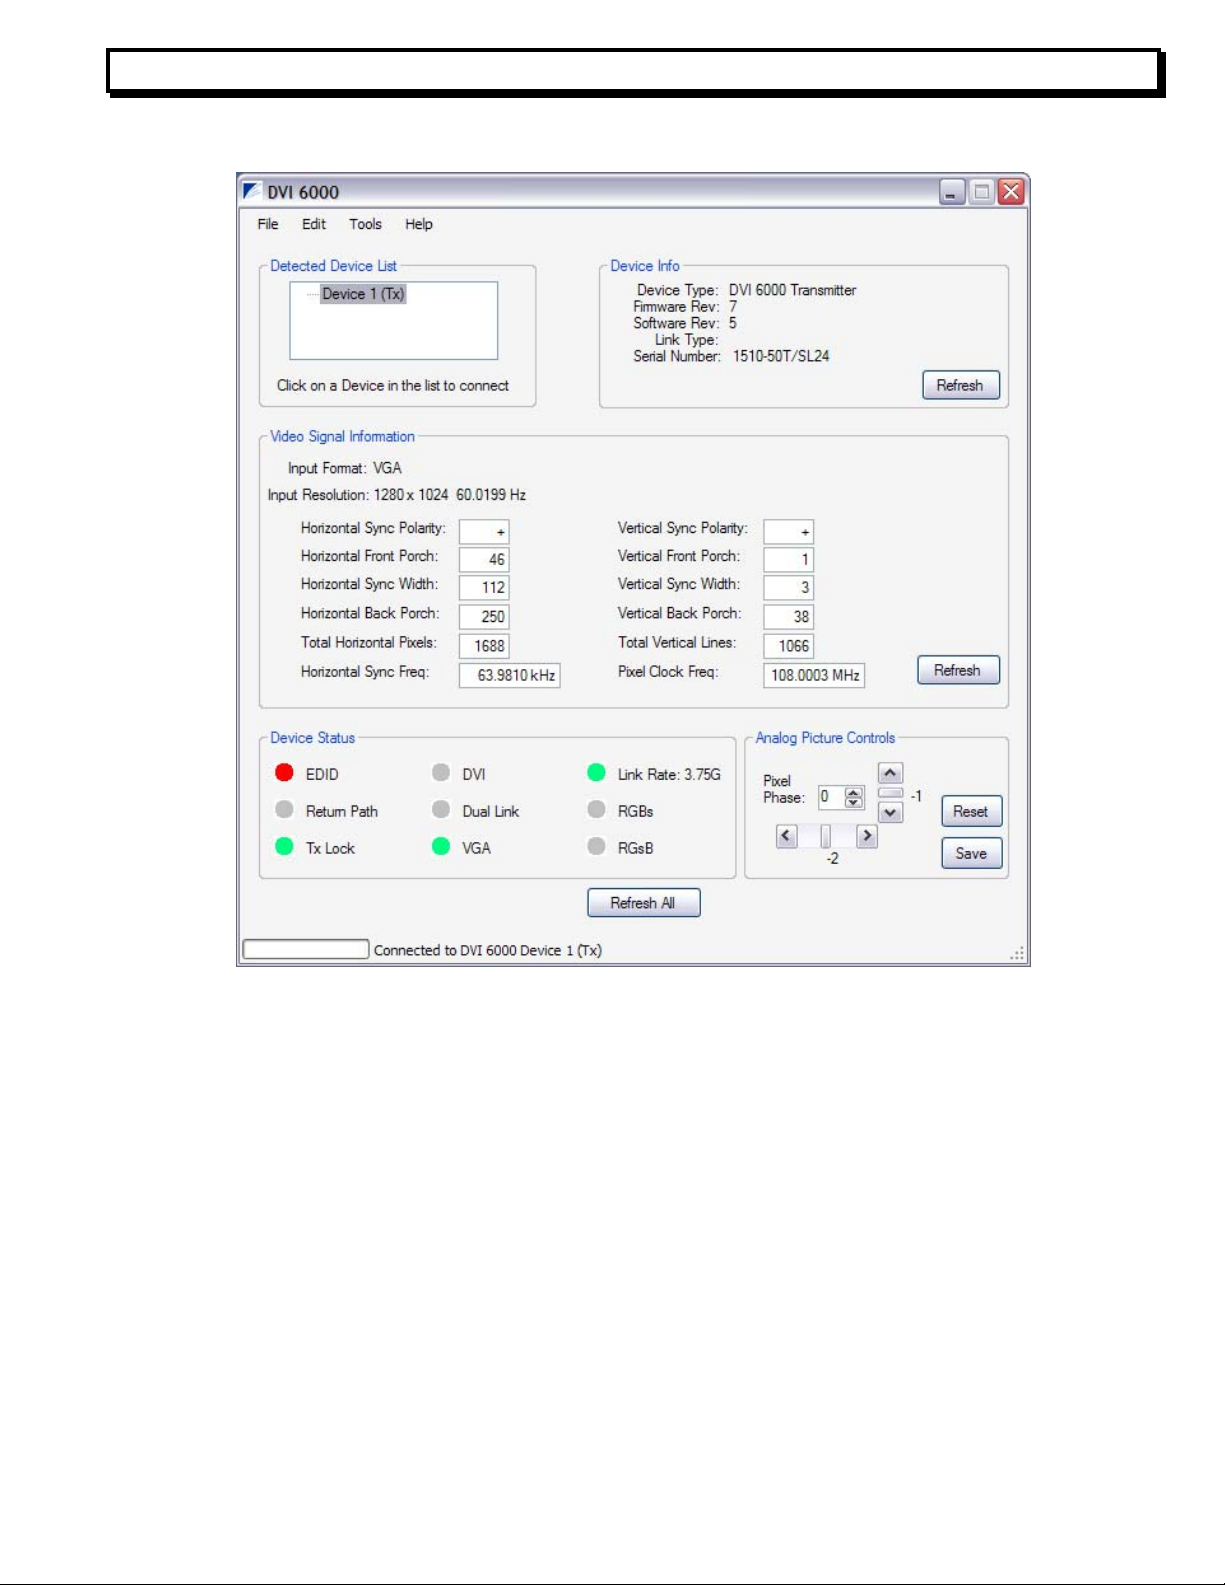
Connect the DVI6000 unit(s) you wish to update to your PC using USB cable(s) and open the
DVI6000 GUI. When the GUI first opens, it should appear similar to the image below.
If there are no devices listed in the Detected Devices List, make sure the DVI6000’s are
powered up and connected via USB cables. Then go to the Tools Menu and select Refresh
Device List.
Page 21

Instruction Manual, DVI-6000 FTX/FRX 21
Click on the DVI6000 you wish to update in the Detected Devices List to connect to the device.
The Device Info Pane will show information about the DVI6000 that is now selected. In the
example below, a DVI6000 Transmitter has been selected (connected).
Page 22

Instruction Manual, DVI-6000 FTX/FRX 22
From the Tools Menu, select Update Device Firmware.
Page 23

Instruction Manual, DVI-6000 FTX/FRX 23
You will then be prompted to select the firmware update file. Browse to the folder location on the
PC where the update file has been placed.
Select the firmware update file and click Open. The file will be checked to ensure that it is of the
proper type for the DVI6000 device that is connected.
If the file is incorrect, if you selected a Receiver Update File for a Transmitter for example, you
will receive a prompt similar to the one below and the update process will be cancelled. Start the
update process again and select the proper file.
If the file is correct, you will be prompted to Continue or Cancel.
Page 24

Instruction Manual, DVI-6000 FTX/FRX 24
The update file will now be downloaded to the DVI6000. A progress bar at the bottom of the
screen will indicate the status of the update process. All other DVI6000 functions will be greyedout to prohibit their operation during the update process.
Page 25

Instruction Manual, DVI-6000 FTX/FRX 25
You will be prompted upon completion of the update process.
You must close the GUI and perform a power-cycle on the DVI6000 that has been updated in
order for the new firmware to take effect.
Page 26

Instruction Manual, DVI-6000 FTX/FRX 26
SPECIFICATIONS
General:
Video Scan Rates: As per VESA standards.
Video Standards supported: DVI and RGB including VGA, SVGA, XGA, WXGA,
SXGA, WSXGA, UXGA, WUXGA, HDMI 480P, 720P,
1080I or 1080P (not HDCP encrypted). See Appendix
Video Resolutions Supported: Up to 2560x1600 (dual link model) or 1920x1200
(single link model)
Data Formats suported Bidirectional or unidirectional RS 232, 42x, 485 up to
TBD kbaud.(Optional)
Audio Signal to Noise Ratio: TBD db
Fibers: 1 fiber standard, 8.3/125um Singlemode (-50/52) or
62.5/125um or 50/125um Multimode (-2), 1 or 2 fibers
with BDD
Fiber Connector Type: ST, FC, SC or LC
Wavelengths: 1310 SM or 850 MM standard; 1310/1550 SM or
850/1310 MM with BDD; CWDM wavelengths available.
Optical Budget: 8 dB (-50 SM), 13 dB (-52 SM), 6 dB (-2 MM),
Maximum Transmission Distance: 4KM (-50 SM), 10KM (-52 SM), up to 89m at 3G and
70m at 3.75G over 62.5/125um; up to 290m at 3G and
150m at 3.75G over 50/125um (-2 MM),
Operating Environment: 0 – 70 degrees C
Transmitter, DVI-6000-FTX-50/52:
Video Input/Output Connectors: 1 DVI-I plus 1 DVI-I loop thru for local monitor.
Video Input Impedance: DVI: 100 ohms balanced; RGB: 75 ohms
Video Input Level: DVI:800mv p-p TMDS; RGB: 700mv p-p
Audio Input Connectors : 3.5mm Stereo unbalanced, 9 pin DIN stereo balanced
Audio Input Level: unbalanced, < +4dB, balanced, < +16dB
Audio Input Impedance: >10k unbalanced, 600 ohms balanced
Optical Output Power: -10 dBm (-50), –5 dBm (-52), –9 dBm (-2)
Power Requirement: 9~24VDC @ TBD A
Receiver, DVI-6000-FRX-50/52:
Optical Input Sensitivity: –18 dBm (-50/52), –15 dBm (-2).
Video Output Connectors: 2 DVI-I.
Video Output Impedance: DVI:100 ohms balanced; RGB: 75 ohms
Video Output Level: DVI: 800mv p-p TMDS; RGB: 700mv p-p into 75R
Audio Output Connectors: 3.5mm Stereo unbalanced, 9 pin DIN stereo balanced
Audio Output Level: Unity Gain with respect to ‘FTX
Audio Output Impedance: < 100 Ohms unbalanced, 600 ohms balanced
Power Requirement: 9~24 VDC @ TBD A
.
Specifications subject to change without notice.
Page 27

Instruction Manual, DVI-6000 FTX/FRX 27
Pinout and Panel Drawings
Fig. 1: DIN JACK WIRING FOR BALANCED AUDIO AND DATA
1. GROUND
2. RS4xx IN -, RS232 IN
3. RS4xx IN +
4. RS4xx OUT -, RS232 OUT
5. RS4xx OUT +
6. RIGHT +
7. RIGHT –
8. LEFT –
9. LEFT +
A Breakout Board with screw terminals with 6’ cable and DIN plug is also available from
Multidyne.
Page 28

Instruction Manual, DVI-6000 FTX/FRX 28
Fig 2: FTX Front and Rear Panels
Page 29

Instruction Manual, DVI-6000 FTX/FRX 29
Fig. 3: FRX Front and Rear Panels
Page 30

Instruction Manual, DVI-6000 FTX/FRX 30
Appendix:
How to calculate what video resolutions are supported.
The DVI-6000 can transport video having a pixel clock of up to 165 MHZ in single link mode or up
to 330 MHZ in dual link mode. To determine if your video can be transported by the DVI-6000, if
you are not sure of the pixel clock frequency, you can use the following formulae to estimate it.
You need to know the resolution and the refresh rate. You can determine these from Windows
Control Panel. Click on Display, then Settings.
If you are transporting analog RGB or DVI with normal blanking:
Pixel clock freq = Horizontal resolution x vertical resolution x refresh rate x 1.35
If you are transporting DVI, reduced blanking:
Pixel clock freq = Horizontal resolution x vertical resolution x refresh rate x 1.1
The results of these formulae must be less than the maximum pixel clock frequencies in order to
be supported by the DVI-6000. If they are not, you will have to reduce the refresh rate, the
resolution, or both.
 Loading...