

Page 1
INTELLAPATCH
Physical layer Switch Product Documentation
ACI-2058 User Manual
Eighteen Blade Slots • Up to 288 ports
™
www.apcon.com
A54-2058-000 • December 2006
• 503.682.4050
Page 2

December 2006
Copyright ©2006 by A
All rights reserved.
This manual is copyrighted. All rights are reserved. No part of this manual may be reproduced, transmitted, copied, or translated in any
form or by any means, electronic or mechanical, including photocopying and recording, for any purpose without the express written
permission of A
nondisclosure agreement. The hardware and software may be used or copied
against the law to
PCON
, Inc. reserves the right to revise this publication from time to time without obligation of A
A
of such revision. A
PCON
equipment. The drawings, specifications and information contained within this document are the property of A
A
unauthorized use or disclosure of the enclosed information is prohibited.
A
PCON
, I
†
All other trademarks, registered trademarks, service marks, and trade names are the property of their respective owners.
PCON
copy the software on any medium except as specifically allowed in the license or nondisclosure agreement.
PCON
NTELLAPATCH
, Inc. The hardware and software described in this document is furnished under a license agreement or
has prepared this manual for use by customers as a guide for proper installation, operation and maintenance of
, I
NTELLAZONE
, and P
OWERLINK
are trademarks of A
PCON
, Inc.
only in accordance with the terms of the agreement. It is
PCON
to notify any person or organization
PCON
, and any
PCON
, Inc.
Page 3

Contents
Contents
Chapter 1: Preface
About This Manual........................................................................................................................... 1
Contents ................................................................................................................................... 1
Text Conventions ...................................................................................................................... 2
Related Products ............................................................................................................................. 2
Contacting A
Chapter 2: Introduction
Features.......................................................................................................................................... 4
Specifications .................................................................................................................................. 6
Blades............................................................................................................................................. 6
Switch labeling ................................................................................................................................ 8
Software.......................................................................................................................................... 8
Chapter 3: Install and Set Up the Switch
Plan the Installation ......................................................................................................................... 10
Unpack the Carton........................................................................................................................... 11
Install the Switch ............................................................................................................................. 11
Rack Installation........................................................................................................................ 12
Table Top Installation................................................................................................................ 12
Install Blades and Transceivers .................................................................................................12
Power Up ........................................................................................................................................ 12
Set the IP Address........................................................................................................................... 13
Access the Switch............................................................................................................................ 13
Use Embedded Software ...........................................................................................................13
Install Optional Software ........................................................................................................... 13
Chapter 4: Connect to a Host
Overview ......................................................................................................................................... 14
Setting the IP Address ..................................................................................................................... 14
Connecting Multiple Switches .......................................................................................................... 17
Connecting Multiple Switches with Serial Ports ........................................................................ 17
Connecting Multiple Switches with LAN Ports ............................................................................ 19
Chapter 5: Maintaining the Switch
Blades............................................................................................................................................. 20
Removing Blades ..................................................................................................................... 20
Installing Blades ....................................................................................................................... 20
Transceiver Modules........................................................................................................................ 21
Removing SFP Transceiver Modules ......................................................................................... 21
Installing SFP Transceiver Modules .......................................................................................... 21
Handling and Installing Fiber Optic Cables................................................................................. 21
PCON
............................................................................................................................ 3
Disconnecting the Cable ..................................................................................................... 22
Connecting the Cable.......................................................................................................... 22
.
.
.
.
.
.
.
.
.
.
.
.
.
.
.
.
.
.
.
.
.
.
.
.
.
.
.
.
.
.
.
.
.
.
.
A54-2058-000 iii A
PCON
, Inc.
Page 4

I
NTELLAPATCH
Switches: ACI-2058 User Manual Contents
Power Supplies................................................................................................................................ 22
Removing a Power Supply.........................................................................................................22
Installing a Power Supply .......................................................................................................... 23
Switch Defaults ........................................................................................................................ 23
Appendix A: Serial Port Pinout
Index
................................................................................................................................................... 25
.................................................................................................. 24
Figures
Figure 1. ACI-2065 Port Labeling ........................................................................................................... 8
Figure 2. Installing the Switch ................................................................................................................ 10
Figure 3. ACI-2065 Rear Panel.............................................................................................................. 12
Figure 4. Configure Network Interface screen ........................................................................................ 16
Figure 5. Removing a Blade ................................................................................................................... 18
Figure 6. Inserting a Blade ..................................................................................................................... 19
Tables
Table 1. Specifications ........................................................................................................................... 6
Table 2. LED Operation.......................................................................................................................... 12
Table 3. Factory Configuration ............................................................................................................... 20
Table 4. Serial Port Pinout ..................................................................................................................... 21
.
.
.
.
.
.
.
.
.
.
.
.
.
.
.
.
A54-2058-000 iv A
PCON
, Inc.
Page 5

Chapter
Chapter 1
Preface
The A
PCON
ACI-2058 I
management at the foundation of your enterprise network or interoperability test lab—the
physical layer.
With a compact design that saves valuable rack space, the ACI-2058 provides up to 288
ports of any-to-any connectivity at full wire speed. You can populate the 11U chassis with
up to eighteen blades to support a wide array of protocols, including 1, 2, and 4Gb/s Fibre
Channel, Ethernet from 10 Mb/s to 10 Gb/s,T1/E1/J1, DS3/E3/STS-1, SONET/SDH,
and FDDI.
1.1. About This Manual
This manual assists those who automate, control, and manage networks using the ACI-2058.
This manual assumes you know how to:
• Connect and disconnect standard types of cables
• Use and configure operating systems and networks.
1.1.1. Contents
NTELLAPATCH
Chapter 1
™ physical layer switch enables efficient, cost-saving
This manual contains the following:
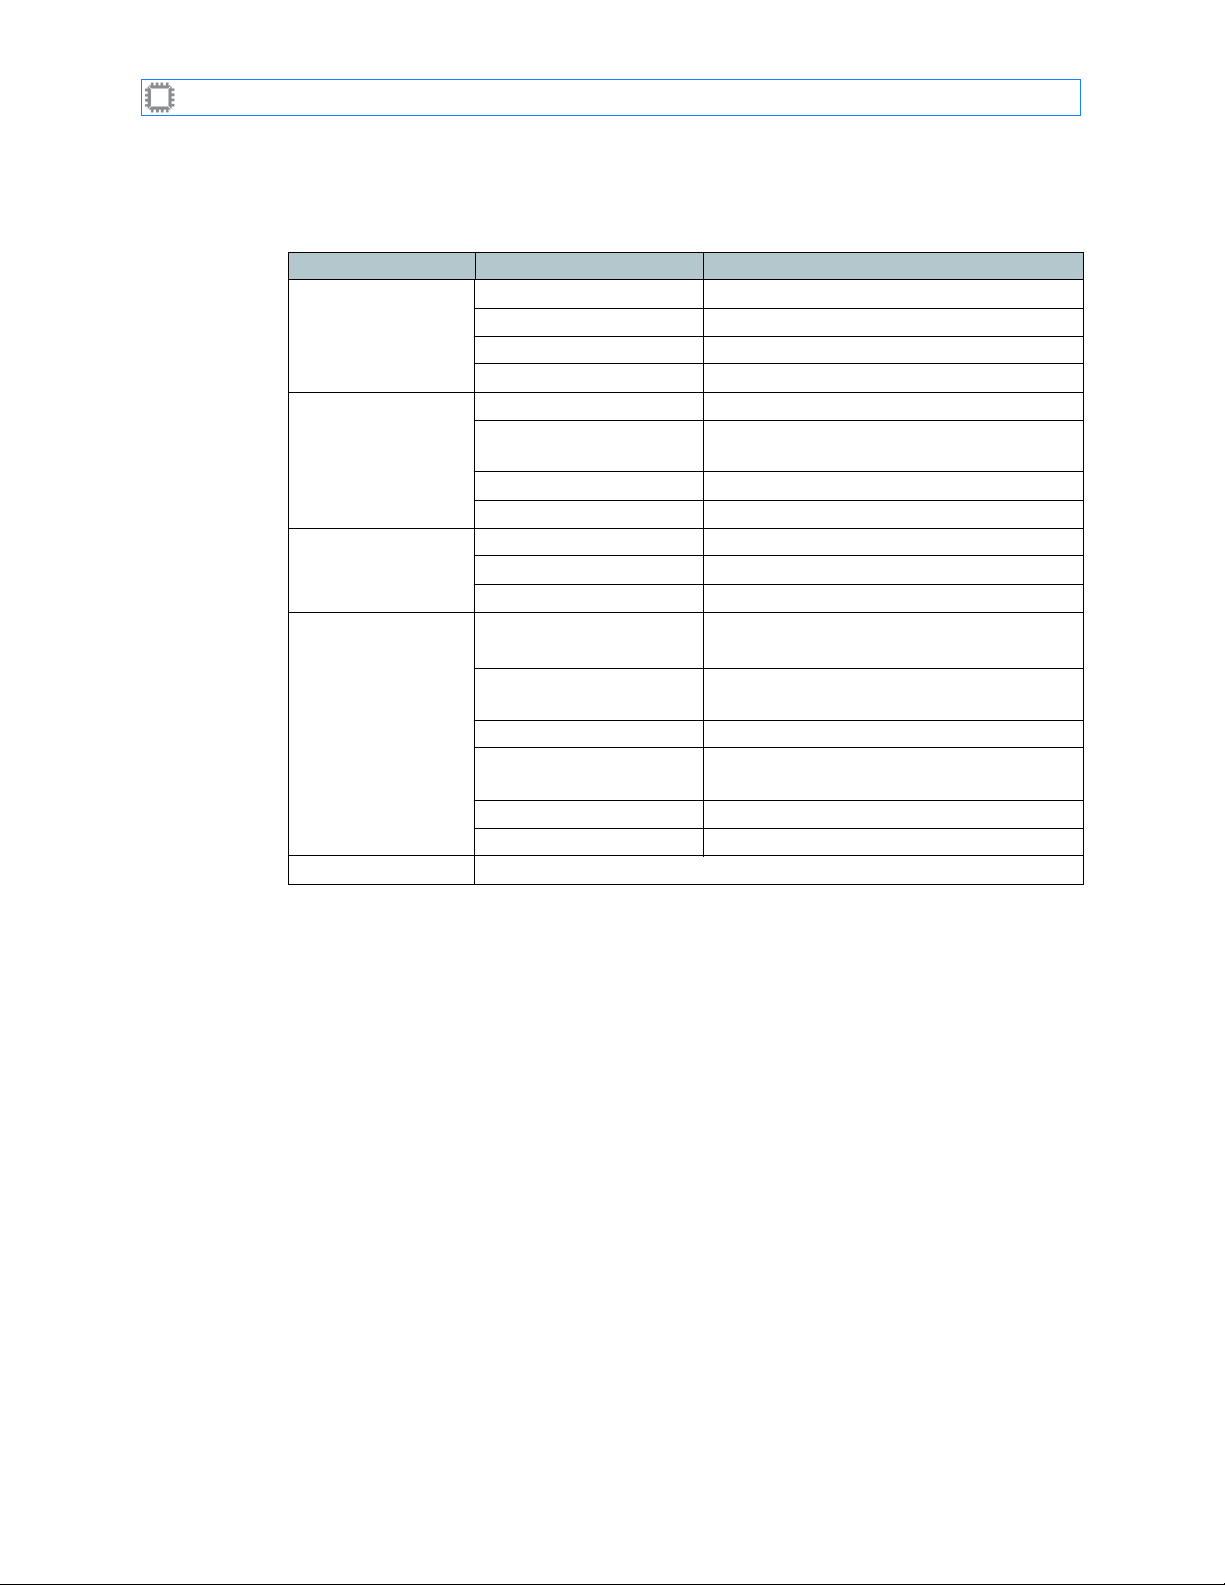
Chapter/Appendix Description
1 Preface Explains how to use this manual.
2 Introduction Describes features of the ACI-2058.
PCON
3 Install and Set Up the Switch Explains how to install A
PCON
switch, and run the software.
A
4 Connect to a Host Explains how to establish an Ethernet connection
and connect to a host computer.
5 Maintaining the Switch Explains how to remove and re-install blades,
tranceivers, and power supplies for repair or
upgrade.
A Serial Port Pinout Lists and describes each pin of the RS-232
serial port.
Index Lists product topics for quick reference.
software, access an
A54-2058-000 1 A
PCON
, Inc.
Page 6
I
NTELLAPATCH
Switches: ACI-2058 User Manual
1.1.2. Text Conventions
This manual uses the following conventions:
> Indicates the movement through menu options. For example, the sequence for
changing the switch name is:
Views>Switch Details
MonoText
MonoBold
ItalicText
ESD CAUTION
Indicates information that displays on the screen.
Indicates information you type.
Variable parameters.
Note
Indicates important information about the product.
Indicates situations that may cause damage to hardware via ESD
(ElectroStatic Discharge).
Indicates potentially hazardous situations which, if not avoided, may
CAUTION
result in minor or moderate injury, or damage to data or hardware.
It may also alert you about unsafe practices.
WARNING
DANGER
Indicates potentially hazardous situations which, if not avoided, can
result in death or serious injury.
Indicates imminently hazardous situations which, if not avoided, will
result in death or serious injury.
1.2. Related Products
A
PCON
provides these software products that you use to access and control your
NTELLAPATCH
I
•WEBX, embedded in the ACI-2058, controls the ACI-2058 remotely from a web browser
over a network or the Internet. For security, you can enable SSL.
switch(es):
•C
ONTROL
X, included on the CD that comes with your I
NTELLAPATCH
switch, provides an
easy-to-use, menu-driven drag-and-drop graphical user interface (GUI) that you use to
operate and reconfigure ports from a host computer running Windows NT, 2000, or XP, or
the Linux or Solaris operating systems.
•A
PCONCMD
X provides an interactive Telnet and SSH command line interface.
• Firmware Direct Commands, embedded in the ACI-2058, control the ACI-2058 using any
scripting language (such as Tcl or Perl) that supports reading from and writing to serial or
socket connections.
• C/C++ API provides programmatic access to the switch. To acquire this product, contact
PCON
as described in the next section.
A
Additional software can be purchased for application-specific purposes.
A54-2058-000 2 A
PCON
, Inc.
Page 7

I
NTELLAPATCH
Switches: ACI-2058 User Manual
1.3. Contacting A
You can find out more about I
•
Release notes
documentation.
•
World Wide Web
contains current information about the company and locations of sales offices, new and
existing products, contacts for sales, service, and technical support information. You can
also send email to A
• To access the A
http://www.apcon.com
• To c o n tac t A
http://www.apcon.com/support
When sending email for technical support, please include information about both
the hardware and software.
•
A
PCON
sales representative
your sales representative via email or phone.
Email
:
PCON
NTELLAPATCH
: Lists features and issues that arose too late to include in other
: A
PCON
maintains an active site on the World Wide Web. The site
PCON
using the web site.
PCON
web site, enter this URL in your web browser:
PCON
technical support, enter this URL in your web browser:
: If you purchased your product from A
sales1@apcon.com
products from these sources:
Note
PCON
, you can contact
Telephone
Fax
: 503-682-4059
: 503-682-4050
A54-2058-000 3 A
PCON
, Inc.
Page 8

Chapter
Chapter 2
Introduction
A
PCON
’s ACI-2058 I
your test lab or enterprise network. The physical layer switch cross-connects copper and
optical cables, providing easy-to-use point-to-point, multicast, and loop connectivity across a
nonblocking, full line-rate switching matrix.
2.1. Features
The ACI-2058 offers the following features:
• Electronic physical layer switch with up to 288 ports and eighteen blades in an 11U
height
• Transparent electronic switching
• Compliant with 1, 2, and 4 GB Fibre Channel, 10 Gigabit Fibre Channel, 10/100/1000
and 10 Gigabit Ethernet, SONET OC-3, OC-12 and OC-48, T1/E1/J1, DS3/E3/STS-1,
and FDDI (blade-specific)
• Small Form Factor Pluggable (SFP) transceiver module support
• Signal regeneration (blade-dependent)
• 10 Mbit to 10 Gbit/sec port data rate capability
NTELLAPATCH
Chapter 2
physical layer switch enables intelligent, flexible control of
• 1.26 Tb/sec switching capacity per chassis
• Connections from 1 meter to 10 Km (fiber optic) and up to 100 meters for copper
Ethernet (blade-specific; fiber optic varies
• Two LAN ports and two serial ports for remote software execution
•Windows†, Linux†, and Solaris† support for A
• Support for multi-user sessions
• Embedded web management software for drag-and-drop patching, SSL included
• Embedded Telnet command-line interface with SSH client support (uses A
syntax)
• Embedded ASCII command set interface (backwards-compatible with custom scripts)
• Sixteen user-defined preset patching configurations
Each switch can control up to 288 independent fiber optic or copper ports, with the ability to
connect any port to any other port. All ports are fully bi-directional, offering complete
flexibility in determining where to connect host computers, targets, switch ports, or other
network devices. You can configure fiber optic or copper connections remotely to eliminate
manual manipulation of connections.
The ACI-2058 can be externally connected to any AC input voltage between 100 and 240
volts; three hot-swappable AC power supplies provide redundant power to the unit,
by transceiver)
PCON CONTROL
X GUI software
PCONCMD
X
A54-2058-000 4 A
PCON
, Inc.
Page 9

I
NTELLAPATCH
auto-ranging input voltages between 90 V AC and 240 V AC. If one power supply fails,
operation is not affected.
The ACI-2058 has two LAN ports that support Ethernet connections and two RS-232 ports
that support the serial interface. You can connect up to 32 I
and control them using one serial port, or any number of I
LAN port.
The physical layer switch has a variety of redundant components to ensure uninterrupted
operation:
• The switch has three hot-swappable power supplies, only two of which are necessary for
• A wide variety of blades (see Blades on page 6) can be installed and removed during
The ACI-2058 increases the distance capability of each fiber optic connection by
regenerating the optical signal, thereby improving performance and reliability due to reduced
cable and interconnection losses. The ACI-2058 allows standard optical connections to
extend up to various distances, depending on the transceiver module — typically from one
meter to 300–550 meters using multimode transceivers, and up to 10 Km using single-mode
transceivers.
Copper Ethernet connections of 10, 100, or 1000 Mb/second have a signal distance limit of
one hundred meters. The ACI-2058 regenerates these signals as well, so that they can reach
an additional one hundred meters when patched to another device.
Switches: ACI-2058 User Manual
operation.
operation.
NTELLAPATCH
NTELLAPATCH
switches at once
switches using one
A54-2058-000 5 A
PCON
, Inc.
Page 10
I
NTELLAPATCH
Switches: ACI-2058 User Manual
2.2. Specifications
Item Number Description
ACI-2058-C00:
288-port chassis
Serial interface Baud Rate 9600 baud
LAN port Protocol TCP/IP
Physical Mechanical 16.75
Agency approvals UL, FCC Class A, CE
Table 1. Specifications
Number of blade slots Eighteen
Number of ports Up to 288 (depending on blade type)
Protocol Various; see Blades on page 6
Blade data rate 10 Mbit to 10Gbit/sec
Mode No parity, 8 bits, 1 stop bit, software
flow control
Maximum cable length 15 meters (50 feet)
Rear panel connectors DB-9
Interface 10/100/1000 Base-T Ethernet
Rear panel connector RJ-45
"
W x 15.00"D x 18.80"H
(42.5 cm W x 38.1 cm D x 47.8 cm H)
Weight 34 pounds (15.4 kg) without blades or
transceiver modules
Power 100 to 240 V AC 50 / 60 Hz (800 A)
0°C to 50°C (32°F to 123°F)
Temperature Operating
Storage
Humidity 0% to 90% RH (noncondensing)
Rack mount 19 inches, 11U
–40°C to 85°C (–40°F to 185°F)
2.3. Blades
The ACI-2058’s modular design enables you to manage multiple protocols and data rates in a
single chassis. You can populate the switch with up toeighteendifferent blades, each blade
having from four to sixteen ports. In addition to one-to-one, one-to-many, and loop
connectivity, blades can provide the following capabilities:
•
Media conversion.
Connect a port on a fiber optic blade to a port on a blade using copper connectors and,
dependent on the blade model, the ACI-2058 seamlessly converts signals from one
medium to the other, assuming that the optical and copper blades use the same protocol.
Optical signals can also be converted from multimode (shortwave) to single-mode
(longwave).
•
Repeater.
and then add the clock back to the signal.
•
Retimed signals.
clean up jitter, and then add a switch-generated clock back to the signal.
A54-2058-000 6 A
Most blades for the ACI-2058 extract the clock from the signal, clean up jitter,
Some blades use optical connectors while others use electrical.
Certain blades for the ACI-2058 extract the clock from the signal,
PCON
, Inc.
Page 11

I
NTELLAPATCH
The specific blades available for the ACI-2058 include:
Switches: ACI-2058 User Manual
Model Description
ACI-2059-B16-1 Blank cover panel for unused blades
ACI-2059-E16-2 16-port multi-rate, 10/100/1000 Mb/s, copper (RJ-45)
ACI-2059-E16-1M1 16-port Fast Ethernet, 100 Mb/s, 1310nm multimode optical (LC)
ACI-2059-E16-1M2 16-port Gigabit Ethernet, 1.25 Gb/s, 850nm multimode optical (LC)
ACI-2059-E16-1M3 16-port FDDI, 100 Mb/s, 1300nm, multimode optical (LC)
ACI-2059-E16-1M4 16-port Gigabit Ethernet, 500 Mb/s-1.25 Gb/s, 850nm multimode
optical (LC)
ACI-2059-E16-1M6 16-port ESCON, 200 Mb/s, 1310nm multimode optical (LC)
ACI-2059-E16-1S1 16-port Gigabit Ethernet, 1.25 Gb/s, 1310nm single-mode optical (LC)
ACI-2059-E04-3M 4-port Ethernet, 10 Gb/s, 850nm multimode optical (LC)
ACI-2059-E04-3S 4-port Ethernet, 10 Gb/s, 1310nm single-mode optical (LC)
ACI-2059-F16-1C 16-port Fibre Channel, 1 and 2 Gb/s, copper (HSSDC-2)
ACI-2059-F16-1M 16-port Fibre Channel, 1 and 2 Gb/s, 850nm multimode optical (LC)
ACI-2059-F16-1S
16-port Fibre Channel, 1 and 2 Gb/s, 1310nm single-mode optical (LC)
ACI-2059-F16-6M 16-port Fibre Channel, 1, 2 and 4 Gb/s, 850nm multimode optical (LC)
ACI-2059-F04-3S 4-port Fibre Channel, 10 Gb/s, 1310nm single-mode optical (LC)
ACI-2059-I16-3S1 16-port SONET OC-3, 155 Mb/s, 1310nm single-mode optical (LC)
ACI-2059-I16-3M2 16-port SONET OC-12, 622 Mb/s, 1310nm multimode optical (LC)
ACI-2059-I16-3S2 16-port SONET OC-12, 622 Mb/s, 1310nm single-mode optical (LC)
ACI-2059-I16-3S3 16-port SONET OC-3/OC-12/OC-48, Gigabit Ethernet, 1310nm single-
mode optical (LC)
ACI-2059-M16-1M 16-port multirate, Gigabit Ethernet, Fibre Channel 1 and 2 Gb/s,
850nm, multimode optical (LC)
ACI-2059-M16-1 16-port multirate, 100 Mb/s–3.2 Gb/s (depends on SFPs installed;
contact factory)
ACI-2059-D08-1 8-port DS3/E3/STS-1, 44.7 MHz/34.3 MHz/51.8 MHz copper (mini-
BNC)
ACI-2059-T08-1 8-port T1/E1/J1, 44.7 MHz/34.3 MHz/51.8 MHz copper (mini-BNC)
Transceiver Modules
Some blades for the ACI-2058 use Small Form Factor Pluggable (SFP) transceiver modules.
SFP modules are available for all supported data rates and protocols, with the following
features:
• SFP module types include:
•
Copper SFP transceivers
Ethernet (RJ-45).
•
Multimode (MMF) or single-mode (SMF) fiber optic SFP transceivers
for Ethernet, Fibre Channel, SONET OC-3, OC-12, OC-48 and FDDI.
• SFP transceivers have duplex LC fiber optic connections.
• Each transceiver provides built-in Serial ID capabilities. Use A
EB
X to obtain information about the transceiver’s manufacturer, part number, serial
W
number, revision, date of manufacture, and other module-specific parameters.
A54-2058-000 7 A
, available for Fibre Channel (HSSDC-2) and Gigabit
PCON
’s C
ONTROL
, available
X or
PCON
, Inc.
Page 12
I
NTELLAPATCH
• SFP transceivers used in the ACI-2058 are hot-pluggable, allowing you to change the
Switches: ACI-2058 User Manual
transceiver while the unit is operating and under power.
• You can view SFP transceivers with digital diagnostic support using A
EB
or W
X.
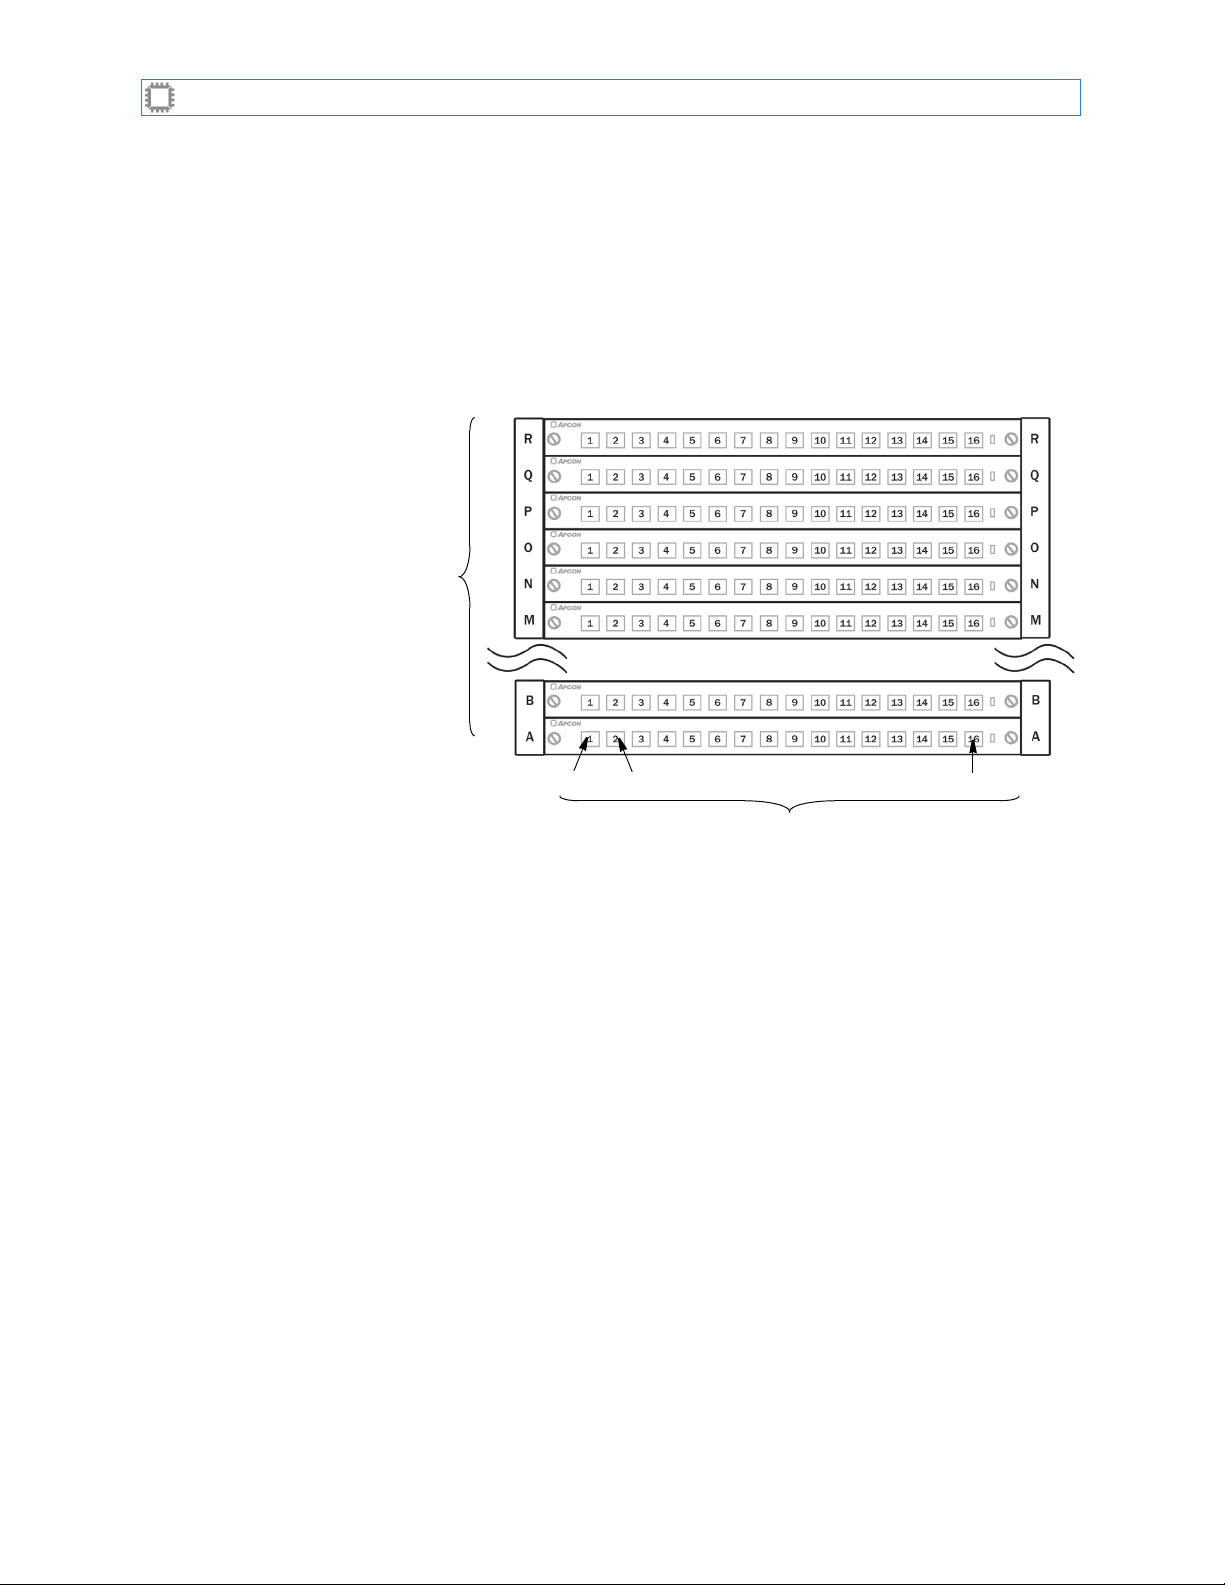
2.4. Switch labeling
To identify each port, modular switches use the following conventions:
Blade and row labels
use letters and start
at the bottom.
Modular (blade) switches
Figure 1. ACI-2058 Port Labeling
A01 A02
. . .
PCON
’s C
Ann
ONTROL
X
Blades have varying numbers of ports, and a chassis may or may not be fully populated with
blades. The greatest number on each blade and the greatest letter in each chassis varies
according to the number of ports in a blade and the number of blades installed in a chassis.
The ACI-2058
to your ports, names that indicate devices they connect to or to provide other meaningful aids
to memory.
2.5. Software
A
PCON
provides these software products that you can use to access and control your
NTELLAPATCH
I
•WEBX, embedded in the ACI-2058, controls the ACI-2058 remotely from a web browser
over a network or the Internet. For security, you can enable SSL.
•C
ONTROL
easy-to-use, menu-driven drag-and-drop graphical user interface (GUI) that you use to
operate and reconfigure ports from a host computer running Windows NT, 2000, or XP, or
the Linux or Solaris operating systems.
•A
PCONCMD
Port labels use numbers prefaced
by blade letter, and start at the left.
refers to ports using these labels. You can use the ACI-2058 to assign names
switch(es):
X, included on the CD that comes with your I
NTELLAPATCH
switch, provides an
X provides an interactive Telnet and SSH command line interface.
A54-2058-000 8 A
PCON
, Inc.
Page 13

I
NTELLAPATCH
• Firmware Direct Commands, embedded in the ACI-2058, control the ACI-2058 using any
• C/C++ API provides programmatic access to the switch. To acquire this product, contact
Additional software can be purchased for application-specific purposes.
All software interfaces provided for the ACI-2058 include these features, as well as many
others:
• Patch ports and view port status.
• Store and recall presets.
• View power supply status.
• View the chassis internal temperature, set a temperature threshold for an internal alarm.
• Configure the serial and LAN ports.
• On supported blades, set the data rate and duplex settings.
To retain configuration and setup information, the ACI-2058 has internal nonvolatile memory;
port settings and control parameters are saved as they are entered.
Switches: ACI-2058 User Manual
scripting language (such as Tcl or Perl) that supports reading from and writing to serial or
socket connections.
PCON
as described in the next section.
A
A54-2058-000 9 A
PCON
, Inc.
Page 14
Chapter
Chapter 3
Install and Set Up the Switch
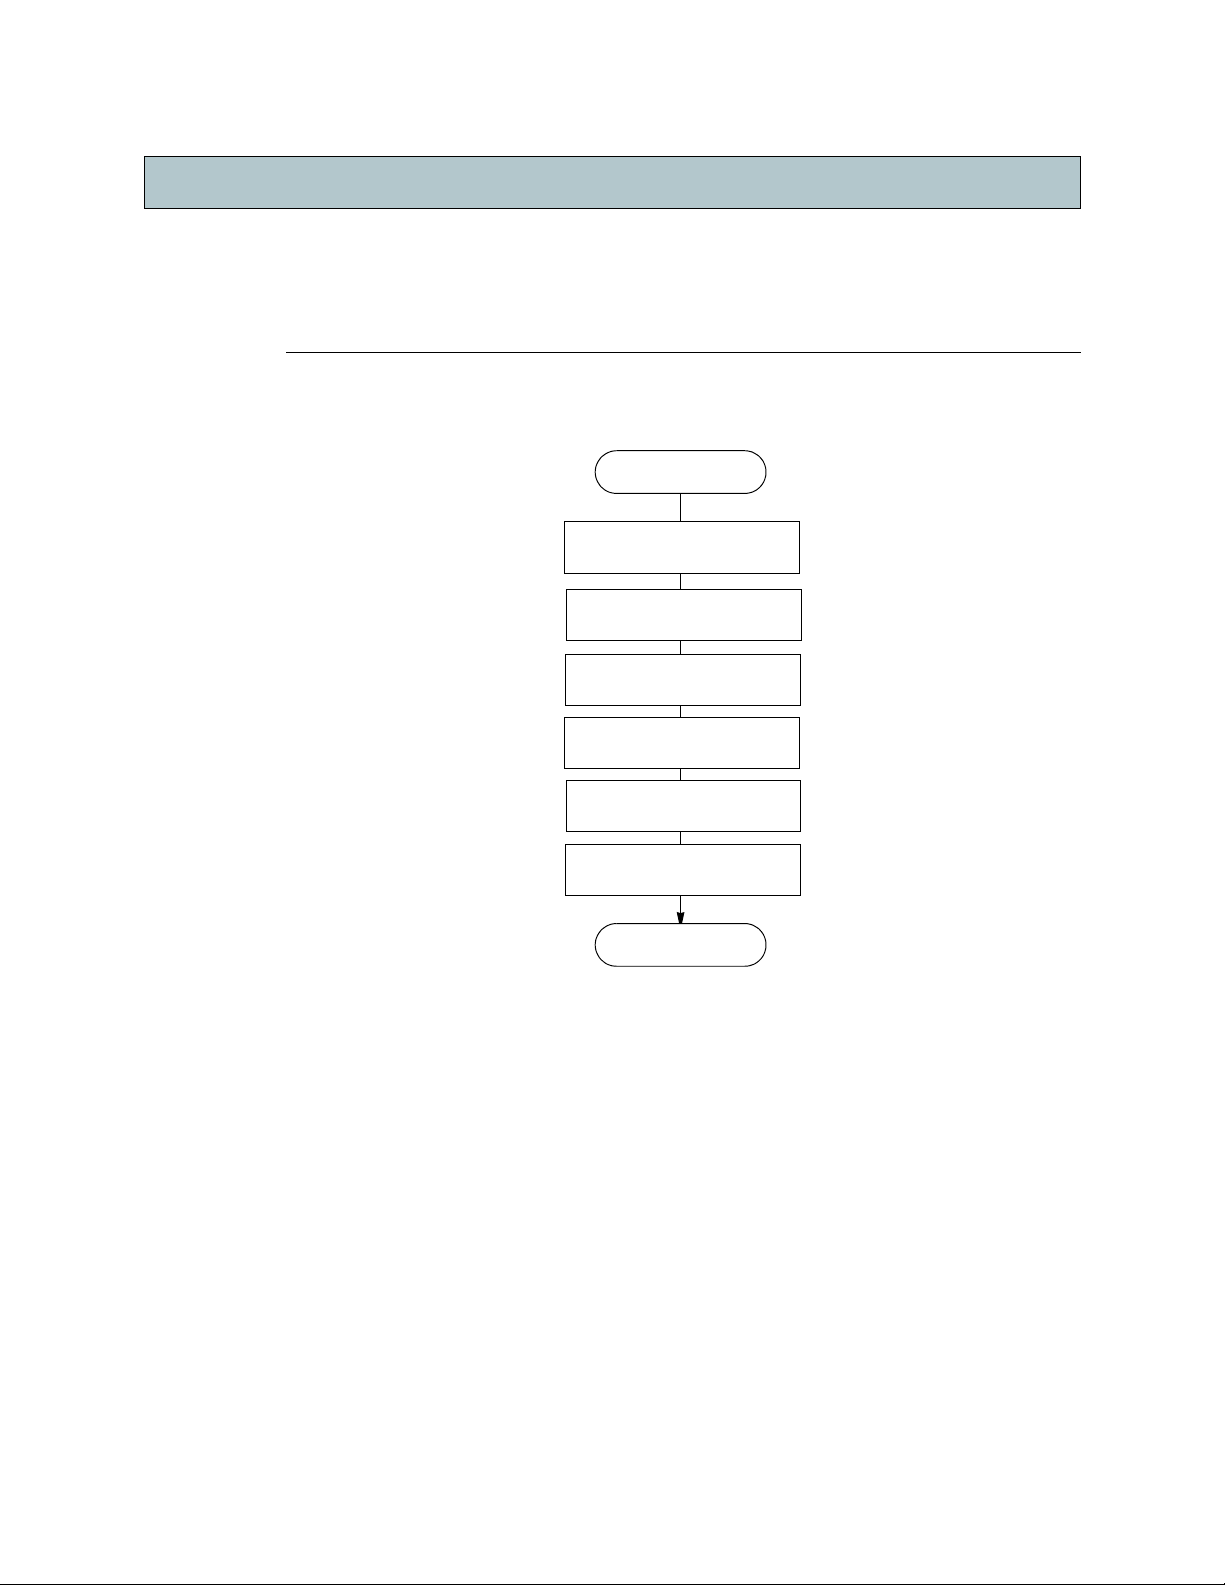
To install the ACI-2058, follow these steps:
Figure 2. Installing the Switch
Start
Plan the installation
Unpack the carton
Install the switch
Power up
Set IP Address
Access the Switch
Chapter 3
Done
The rest of this chapter details the above steps.
If you experience difficulty during installation, contact your sales office or A
PCON
Support. as described in Contacting A
on page 3.
PCON
Techn i c al
3.1. Plan the Installation
Do this planning before you start installation:
• If you plan to rack-mount the chassis, ensure you have the tools needed to mount the
chassis flanges to the rack.
• Ensure there is enough power into the rack to support all units you plan to install. For
power requirements, see the Power section in
• Plan how to route fiber-optic and Ethernet cables to the ACI-2058. Also acquire the
cables. The ACI-2058’s fiber-optic connectors are of the LC duplex type.
• Plan how to meet the chassis’ requirement for air that enters via the left side (as you face
the unit) and exits at the right.
A54-2058-000 10 A
Ta b l e 1, “Specifications,” on page 6.
PCON
, Inc.
Page 15
I
NTELLAPATCH
Switches: ACI-2058 User Manual
• Determine what optional software, if any, to use to communicate between the host
computer and the switch. If you plan to use the A
to install it as described in
3.2. Unpack the Carton
Unpack the carton(s) and do the following:
• Inspect all components for any sign of damage.
• If the shipping carton is damaged or water-stained, please contact the freight carrier
for inspection of carton and contents.
• To return a product damaged in shipment, contact A
Merchandise Authorization (RMA) number and further instructions.
• Verify you have the items you ordered. A standard ACI-2058 switch kit includes these
items:
If any modules are in ESD shielding bags, do not yet remove them from the bags.
PCON CONTROL
Install Optional Software on page 13.
Note
PCON
Note
X interface, you will need
to obtain a Return
• One ACI-2058 I
NTELLAPATCH
• Two rack mount brackets (attached to the chassis)
• Four bottom “feet” (for tabletop, non-rack mount installations)
• Three AC power cables (110 or 220 V)
Unless otherwise specified, the ACI-2058 ships with 110-volt power cords. A
offers a complete selection of replacement power cords for most countries.
• One 10 foot RS-232 cable, 9-pin male to 9-pin female
• One RS-232 adapter, 9-pin male to 25-pin female
• Blades and transceivers, as ordered
•One A
•One I
PCON
NTELLAPATCH
NTELLAPATCH
I
software CD
documentation, including this guide.
3.3. Install the Switch
You can place the ACI-2058 on any stable surface or install it in a standard 19-inch (EIA unit)
rack.
physical layer switch chassis
Note
Product Documentation binder which includes all your
PCON
CAUTION
• Ensure that the unit remains within the temperature limits detailed in Specifications on
page 6.
• Place the ACI-2058 in a location that allows adequate airflow to the fans and ventilation
slots on the sides of the unit.
• Do not place the ACI-2058 on any device that generates excessive heat.
A54-2058-000 11 A
PCON
, Inc.
Page 16
I
NTELLAPATCH
Switches: ACI-2058 User Manual
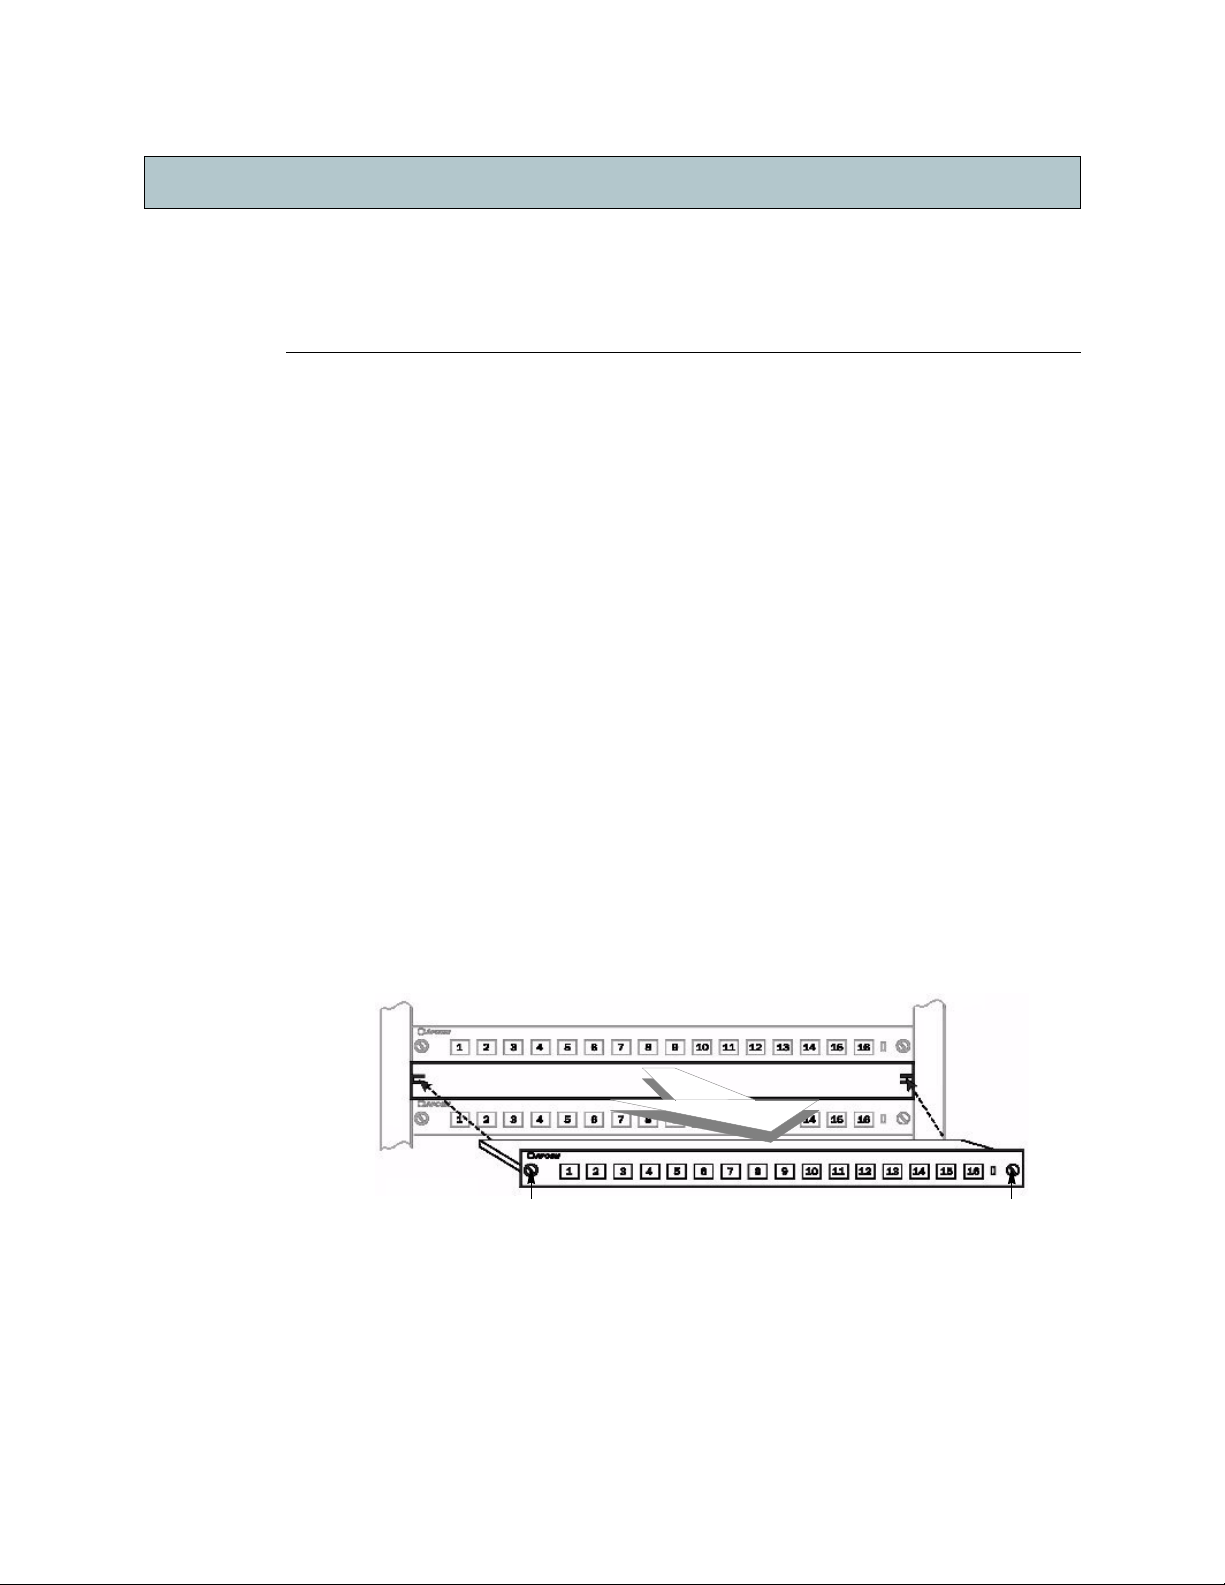
3.3.1. Rack Installation
The ACI-2058 ships with rack mount flanges attached. To install the switch in a rack:
1. Set the unit into position on the rack, aligning the mounting bracket holes with the
holes.
rack
2. Install the chassis in the rack, securing the chassis with the appropriate screws.
If the switch is installed in a rack with other equipment, ensure that you don’t overload
the wiring circuits. In all cases, make sure power strips and wall sockets are grounded.
3.3.2. Table Top Installation
The ACI-2058 ships with “feet” for installation on a flat surface, such as a workbench. To
attach the “feet” to the switch:
1. Remove the backing from a “foot”.
2. Attach the “foot” to a bottom corner of the switch.
Repeat these steps for each of the four “feet.”
Note
3.3.3. Install Blades and Transceivers
The ACI-2058 typically ships with all blades and transceivers installed. If they are not
installed or if you need to move them, see Blades on page 20 or Transceiver Modules on
page 21.
3.4. Power Up
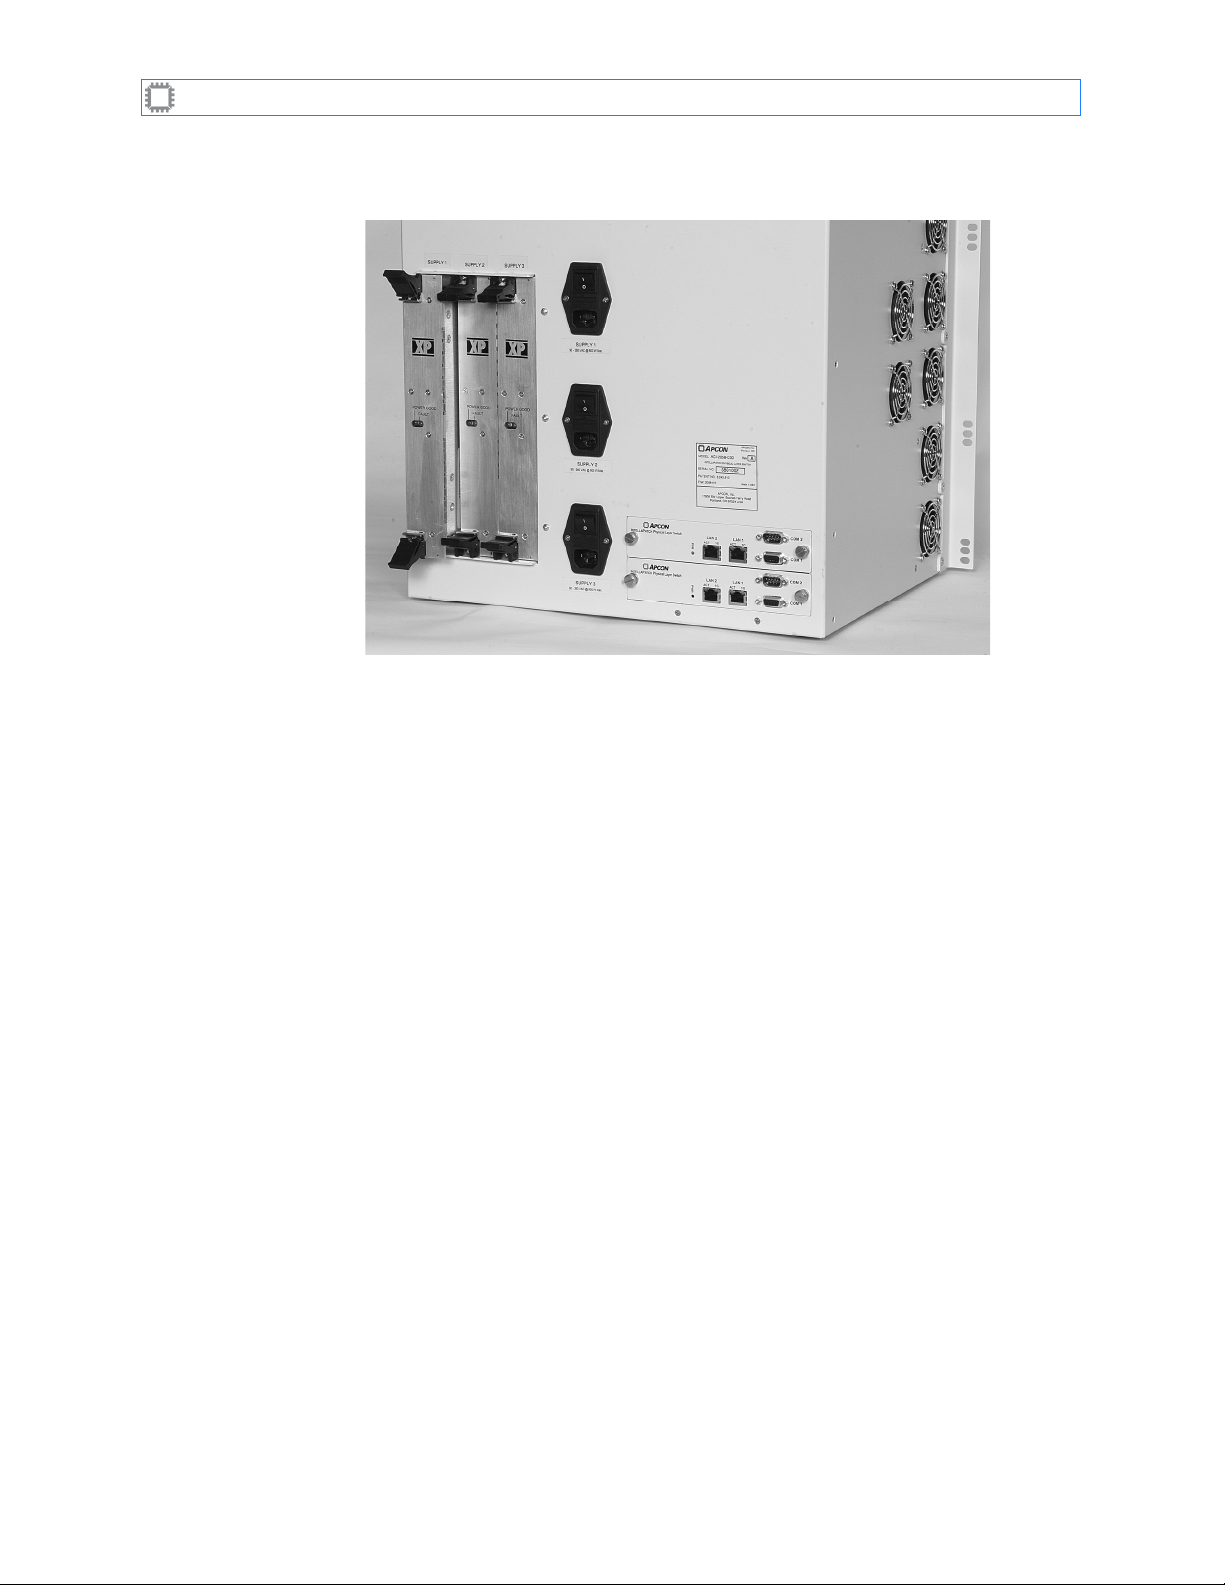
1. Turn on the ACI-2058’s three AC power switches, located on the rear panel.
2. Verify each power supply’s operation by checking the LEDs:
Table 2. LED Operation
LED state Description
Power LED lit The power supply is functioning normally.
Fault LED lit The power supply is not functioning.
Power and Fault LEDs off The power supply is not functioning.
Threehot-swappable AC power supplies provide redundant power to the unit. If one power
supply fails, operation is not affected; however, an alarm sounds and that supply’s fault LED
lights. This alarm can be turned off using any of the software interfaces; for instructions, see
the specific software manual.
A54-2058-000 12 A
PCON
, Inc.
Page 17
I
NTELLAPATCH
Switches: ACI-2058 User Manual
Figure 3. ACI-2058 Rear Panel
3.5. Set the IP Address
For details, see Setting the IP Address on page 14.
3.6. Access the Switch
3.6.1. Use Embedded Software
The following software is embedded in your ACI-2058 switch. These applications are
immediately available for use without reconfiguration or installation:
•
WEBX
, an embedded web interface.
•
A
PCONCMD
•
Firmware Direct Commands
For usage details, see the appropriate software User Manual.
3.6.2. Install Optional Software
To communicate with the switch from a host computer, you can use C
the CD-ROM that comes with the ACI-2058. To use C
you plan to use to control the ACI-2058:
1. Insert the CD into the host computer, or download the latest version from the A
website:
X
, a command line interface.
, ASCII programmatic access.
ONTROL
ONTROL
X, install it on the host computer
X, included on
PCON
http://www.apcon.com
2. Follow the onscreen prompts.
You are now ready to connect the ACI-2058 to a host. For details, see Chapter 4, Connect to a
Host.
A54-2058-000 13 A
PCON
, Inc.
Page 18

Chapter
Chapter 4
Connect to a Host
To operate the ACI-2058, you must connect the unit to a host computer running a Windows,
Linux, or Solaris operating system. Once connected, you can use one or more of these to
control the switch:
•WEBX (using standard HTTP or SSL)
•C
ONTROL
•A
PCONCMD
• Firmware Direct Commands
To use C
chapter explains how.
For information about... Go to this page...
Overview ...................................................................................................................... 14
Setting the IP Address ................................................................................................... 14
Connecting Multiple Switches ......................................................................................... 17
Connecting Multiple Switches with Serial Ports
Connecting Multiple Switches with LAN Ports
X (requires installation, as described in Install Optional Software on page 13)
X, which you can access via Telnet or SSH.
ONTROL
X, WEBX, or A
PCONCMD
X, you must establish an Ethernet connection. This
............................................................ 17
...................................................................... 19
Chapter 4
4.1. Overview
You can control the ACI-2058 using one of these methods:
•
Ethernet connection running TCP/IP
Ethernet LAN ports.To use this method, you must assign the switch a static IP address
appropriate for your network.
•
Serial connection
scripts or C
If desired, you can connect the ACI-2058 to multiple hosts, using any combination of a two
serial or two Ethernet ports.
ONTROL
: Two RS-232 serial ports. To use this method with either custom
X, you do not need to set the IP address and other TCP/IP properties.
4.2. Setting the IP Address
By default, I
mask of 255.255.255.0, and no gateway. If it’s convenient to configure your host computer
with an IP address of the form 192.168.0.x (where x is any number from 2 to 254, inclusive),
then the ACI-2058 is immediately available.
If not, then, to use the Ethernet connection, you must change this default IP address to one
appropriate for your network.
NTELLAPATCH
switches are shipped with an IP address of 192.168.0.1, a subnet
: The ACI-2058 includes two 10/100/1000
A54-2058-000 14 A
PCON
, Inc.
Page 19

I
NTELLAPATCH
You can set the IP address in a variety of ways; these instructions show you how to set the
address using W
To configure the IP address, subnet mask, and gateway:
1. Ensure that you have the following:
Switches: ACI-2058 User Manual
EB
X.
Note
If you plan to use more than one I
the same time. This avoids repeated
NTELLAPATCH
switch on your network, configure them at
temporary disconnections of the host computer from
your network.
• A web browser that supports Javascript including, but not limited to:
•Firefox† browser, version 1.x or later
• Internet Explorer, version 6.x or later
• Netscape† browser, version 7.x or later (the WEBX Interface is not compatible
with version 4.x)
•Opera
• Safari† browser
Note
Ensure that your browser’s Javascript is enabled.
• A host computer that runs one of the above web browsers. The host computer’s web
browser accesses the interfaces embedded in the ACI-2058.
• An Ethernet connection between the host computer and the switch.
• An IP address, subnet mask, and gateway (if required) appropriate for your network
to assign to the switch.
2. Connect a host computer to the ACI-2058:
A. Quit all network client applications currently running on the host computer.
B. Disconnect from your network the host computer you plan to use to assign the
address.
IP
C. Plug the host computer’s cable into one of the Ethernet ports on the back of the
NTELLAPATCH
I
switch using either a standard patch cable or a crossover cable.
The host and switch are now physically connected.
3. Enable communication between the host computer and switch.
A. Access the host computer’s current network settings according to the instructions
provided with the host’s operating system. Note them so that you can restore them at
the end of this process.
B. Temporarily change the host settings to the following:
• IP address: 192.168.0.
x
(x is any number from 2 to 254, inclusive)
• Subnet mask:
• Gateway setting:
255.255.255.0
0.0.0.0
or blank
The host and switch are now on the same network and can communicate.
A54-2058-000 15 A
PCON
, Inc.
Page 20
I
NTELLAPATCH
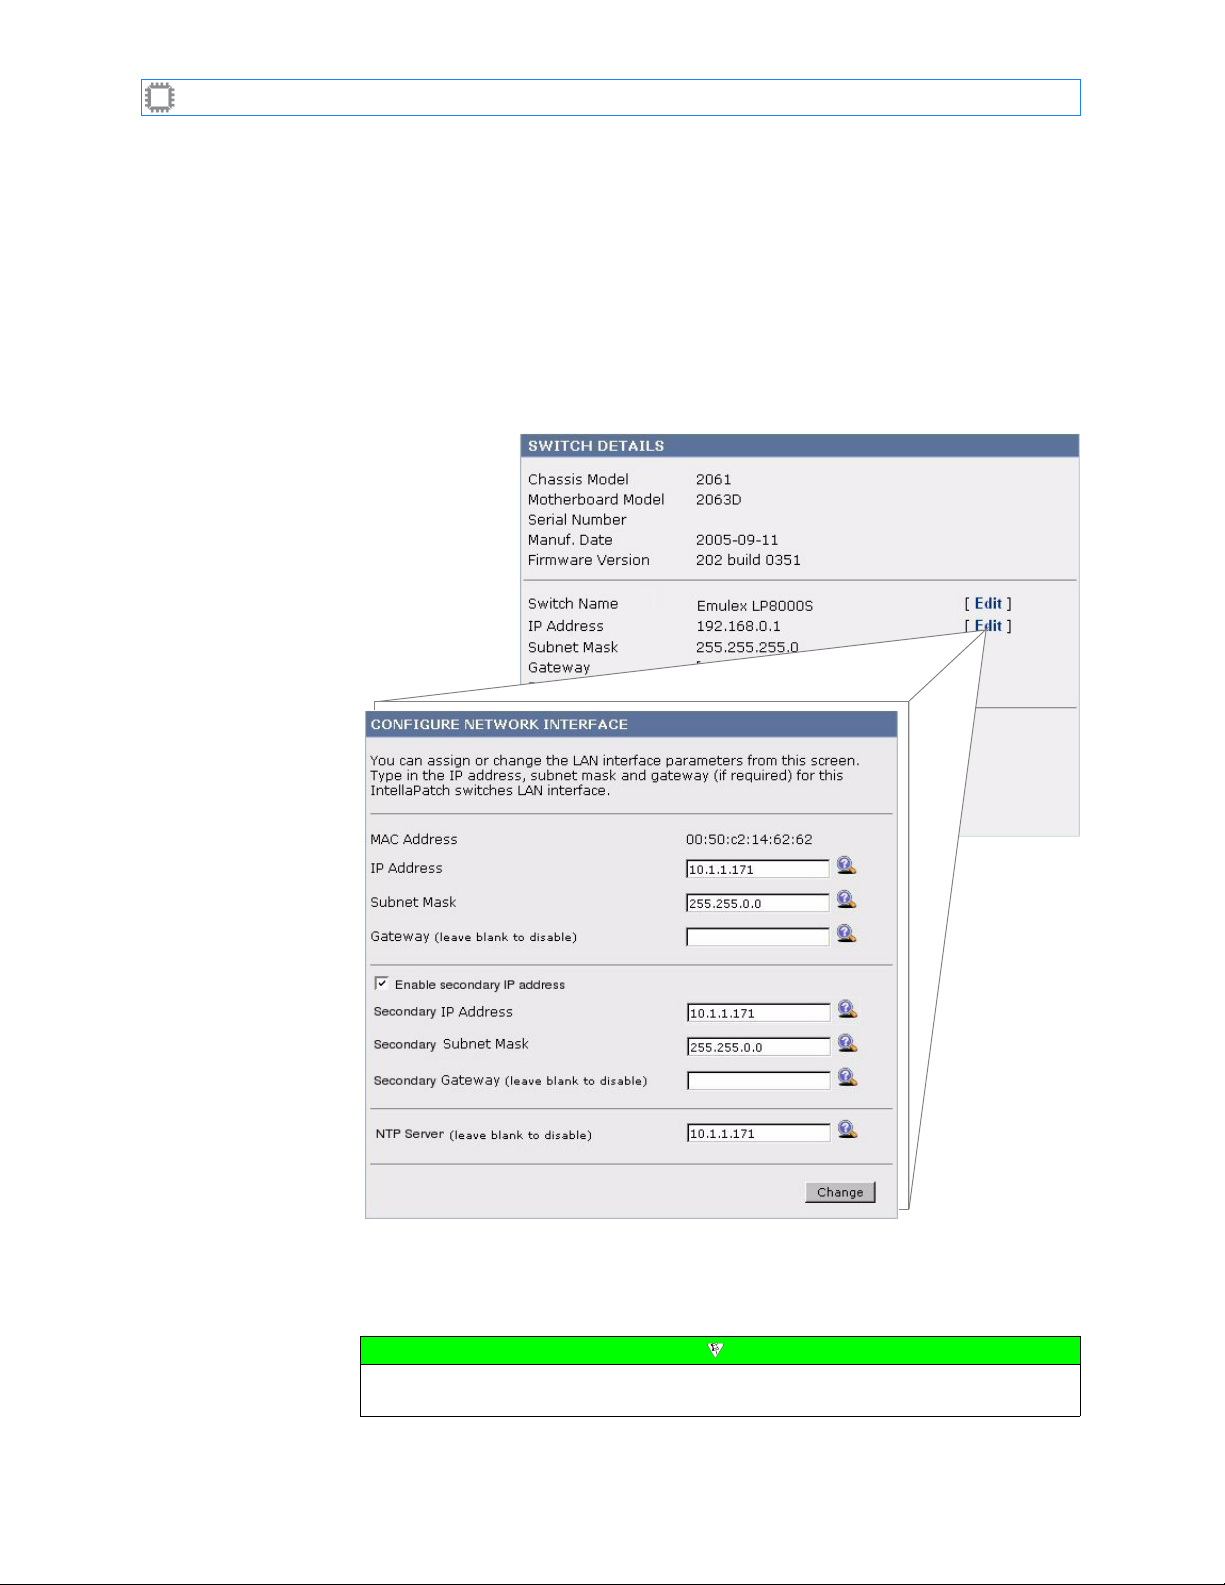
4. Access the switch’s WEBX Interface.
Switches: ACI-2058 User Manual
A. On the host computer, open a web browser.
B. If the host computer is configured to use a proxy server, disable the proxy setting.
C. In the browser’s address field, enter:
http://192.168.0.1
D. Click the Edit link, located to the right of the IP Address field. The Configure Network
Interface screen displays:
Figure 4. Configure Network Interface screen
5. Change the IP address:
A. Type the new IP address, subnet mask (if required), and gateway (if required) in the
fields provided.
Note
The subnet mask assigned to the switch must match the host computer’s
subnet mask.
A54-2058-000 16 A
PCON
, Inc.
Page 21
I
NTELLAPATCH
Switches: ACI-2058 User Manual
B. Click the Change button. The switch reroutes the browser to the new address.
C. Exit the browser.
6. Reconnect the host computer to your network.
A. Reset the host computer’s IP address, subnet mask, and gateway settings to their
original values.
B. Re-cable the host to the network.
C. Ensure that the switch is cabled to the network with a standard Ethernet patch cable.
You can now configure the ports as desired, using the software interface of your choice, and
begin using the switch.
4.3. Connecting Multiple Switches
You can configure the serial ports to operate as daisy-chained ports. Daisy-chaining switches
allows one computer or terminal to communicate with up to 32 I
You can use the LAN ports to connect any number of switches without using a hub or wall
jack.You cannot, however, mix serial and LAN port connections in a single chain.
4.3.1. Connecting Multiple Switches with Serial Ports
NTELLAPATCH
switches.
C
ONTROL
X recognizes from 1 to 32 I
NTELLAPATCH
switches when daisy-chained. If you plan to
use multiple switches daisy-chained together, you must first assign a unique device number
to each switch. To do so:
1. Connect the second switch to the host computer using the switch’s COM1 port and a
standard 9-pin straight-through serial cable. (The first switch already has its device
number set to 1 by default.)
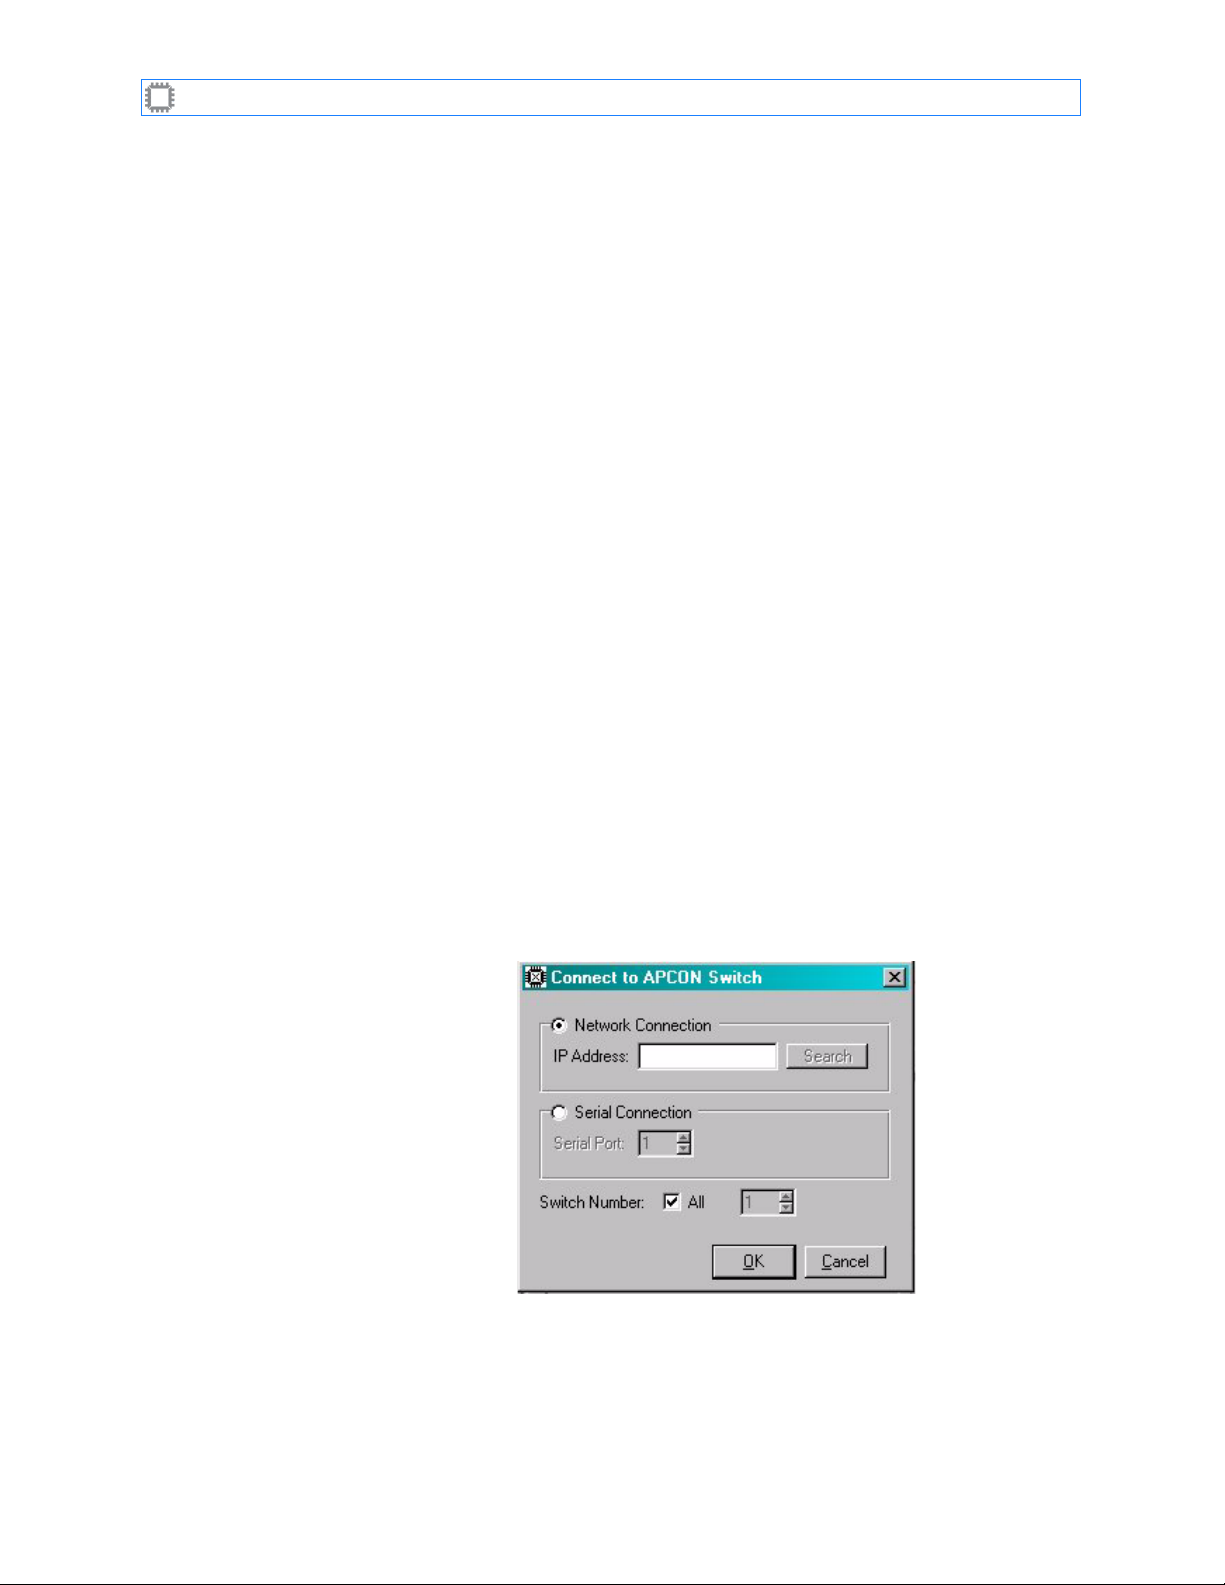
2. On the host computer, start C
ONTROL
X.
3. Select File>Connect. The Login dialog displays:
Figure 5. C
ONTROL
X Login Dialog
4. Click the Serial Connection radio button. Leave the field set to 1 for the COM1 port
change to the specific COM port number of your workstation).
(or
5. Click the OK button.
A54-2058-000 17 A
PCON
, Inc.
Page 22
I
NTELLAPATCH
Switches: ACI-2058 User Manual
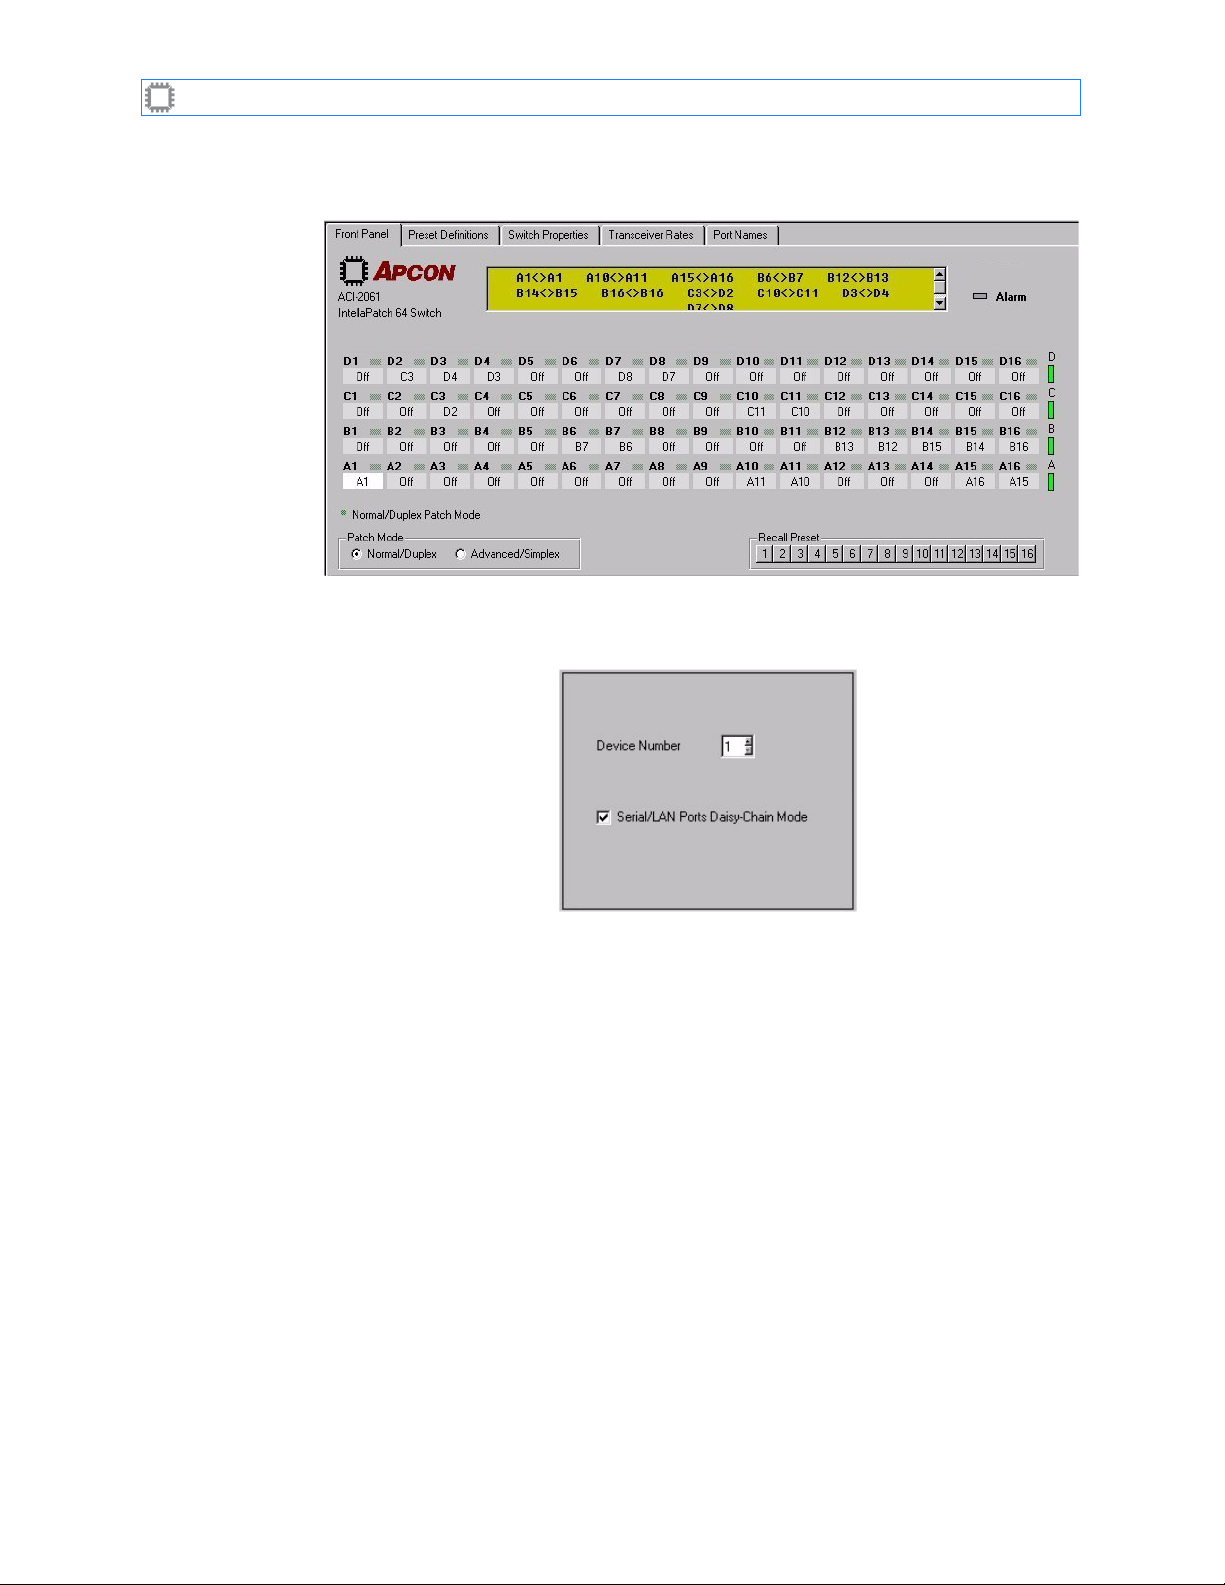
6. Click the Switch Properties tab.
Figure 6. Switch Properties
7. Click Communications in the Property List.
Figure 7. Communications Fields
8. Type 2 in the Device Number field.
9. Click the OK button to save the setting.
10. Click the OK button to exit the Switch Properties tab.
11. Exi t C
ONTROL
X.
12. Un-cable the switch and cable the host computer to the next switch.
13. Following this procedure, set the next Device Number to 3.
A54-2058-000 18 A
PCON
, Inc.
Page 23
I
NTELLAPATCH
14. Repeat the last two steps until all the switches that you wish to daisy-chain have a
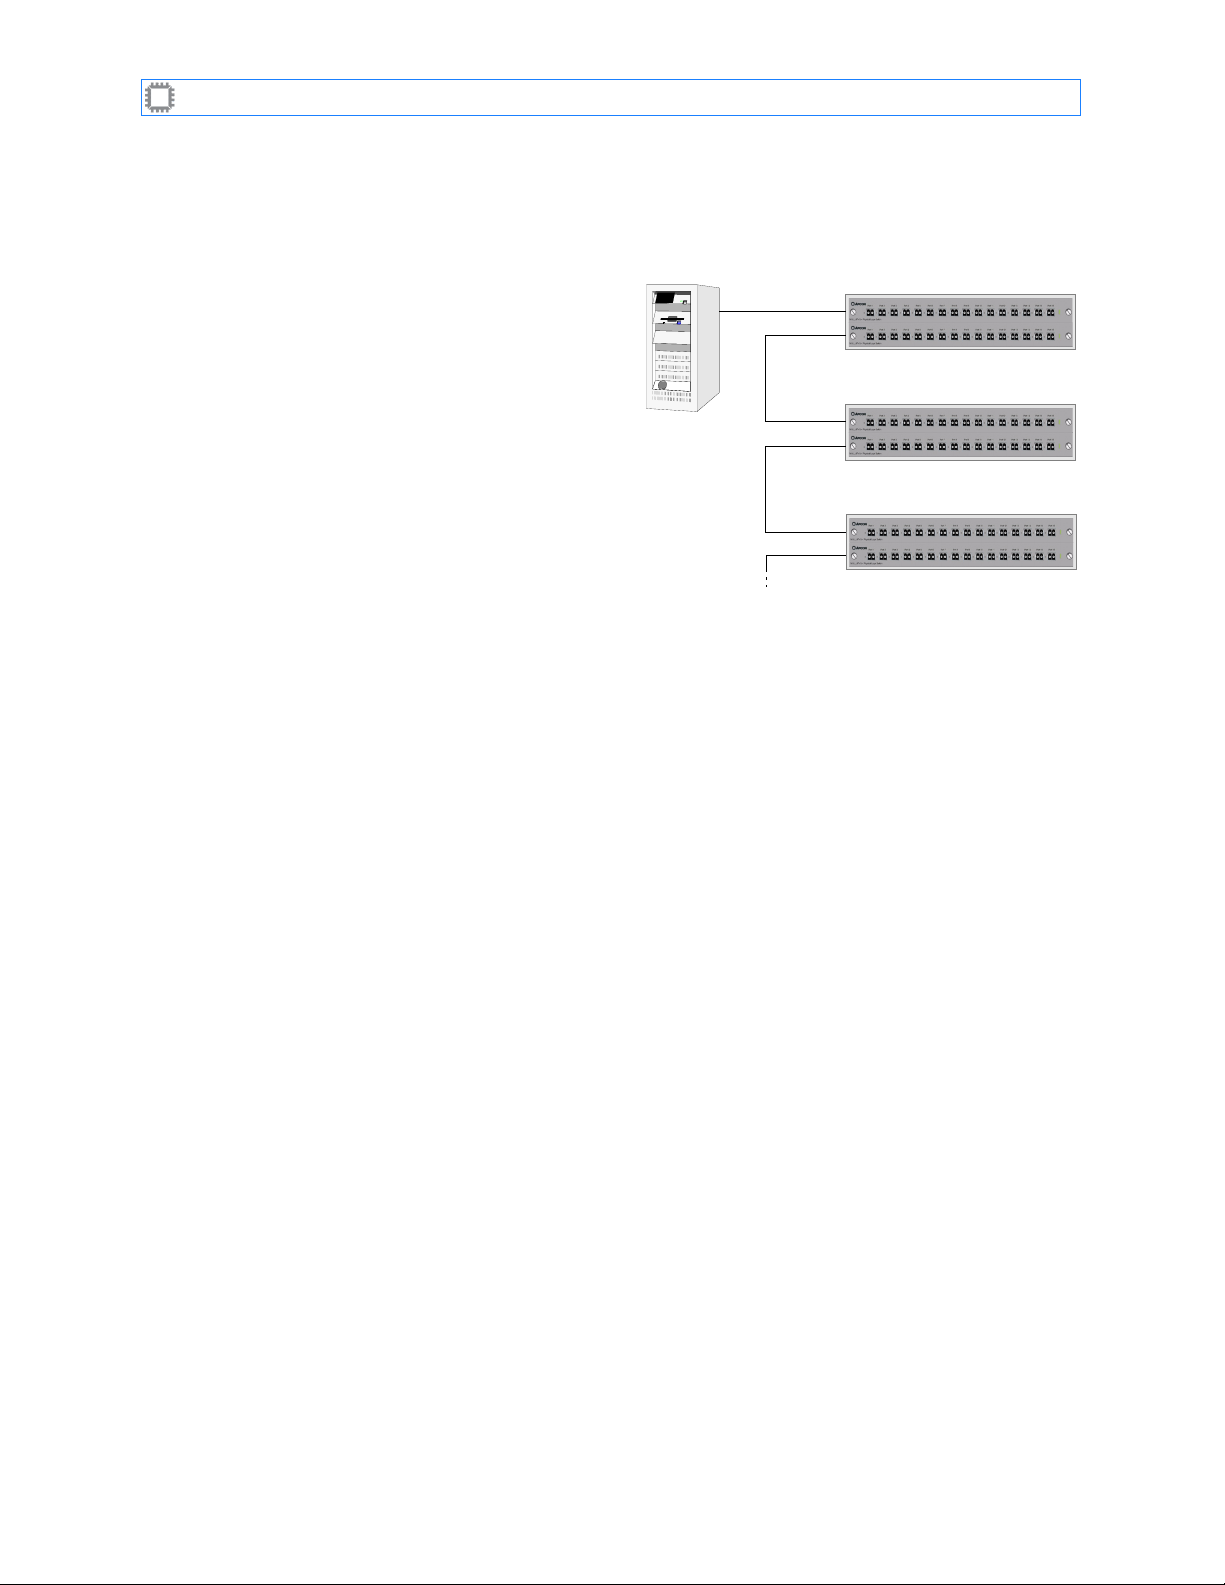
With unique device numbers, you can now daisy-chain the switches:
Switches: ACI-2058 User Manual
unique device number between 1 and 32.
1. Connect the host computer’s COM
port to the COM1 port on the first
switch (device number 1) using a
COM
COM
1
COM
standard 9-pin straight-through
serial cable.
2. Connect the COM2 port on switch 1
to the COM1 port on the switch
COM
COM
having the device number 2.
3. Connect the COM2 port on switch 2 to the
next switch, and so on until the last switch
is connected. The last switch’s COM2 port
COM
COM
remains unconnected.
4.3.2. Connecting Multiple Switches with LAN Ports
To connect more than one switch using LAN ports:
1. Assign each device a unique IP address. (For details on how to do this, see Setting the IP
Address on page 14.
2. Connect the host computer to one of the first switch’s LAN ports (using either an
Ethernet crossover cable or a straight Ethernet cable) or connect the first I
switch to an Ethernet hub or switch connected to your network.
3. Connect the first switch’s unused LAN port to either of the next switch’s LAN ports with
an Ethernet cable (either kind), or connect the next switch to the network hub.
Switch 1
Switch 1
1
2
Switch 2
1
2
Switch 3
1
2
NTELLAPATCH
4. Repeat step 3 until all switches are connected.
You can now configure the ports as desired, using the software interface of your choice, and
begin using the switch.
A54-2058-000 19 A
PCON
, Inc.
Page 24
Chapter
Chapter 5
Maintaining the Switch
Occasionally you will want to perform maintenance or upgrades on the ACI-2058 or its
blades. When this occurs, you may need to do one or more of the following:
•
Blades
install the blade. For details, see page 20.
•
Transceiver Modules
cable. For details, see page 21.
•
Power Supplies
option, then re-install the power supply. For details, see page 22.
5.1. Blades
The ACI-2058 allows you to install and remove blades, transceivers, and power supplies
without turning the power off to the I
off to the appropriate blade slot before removing or installing a blade.
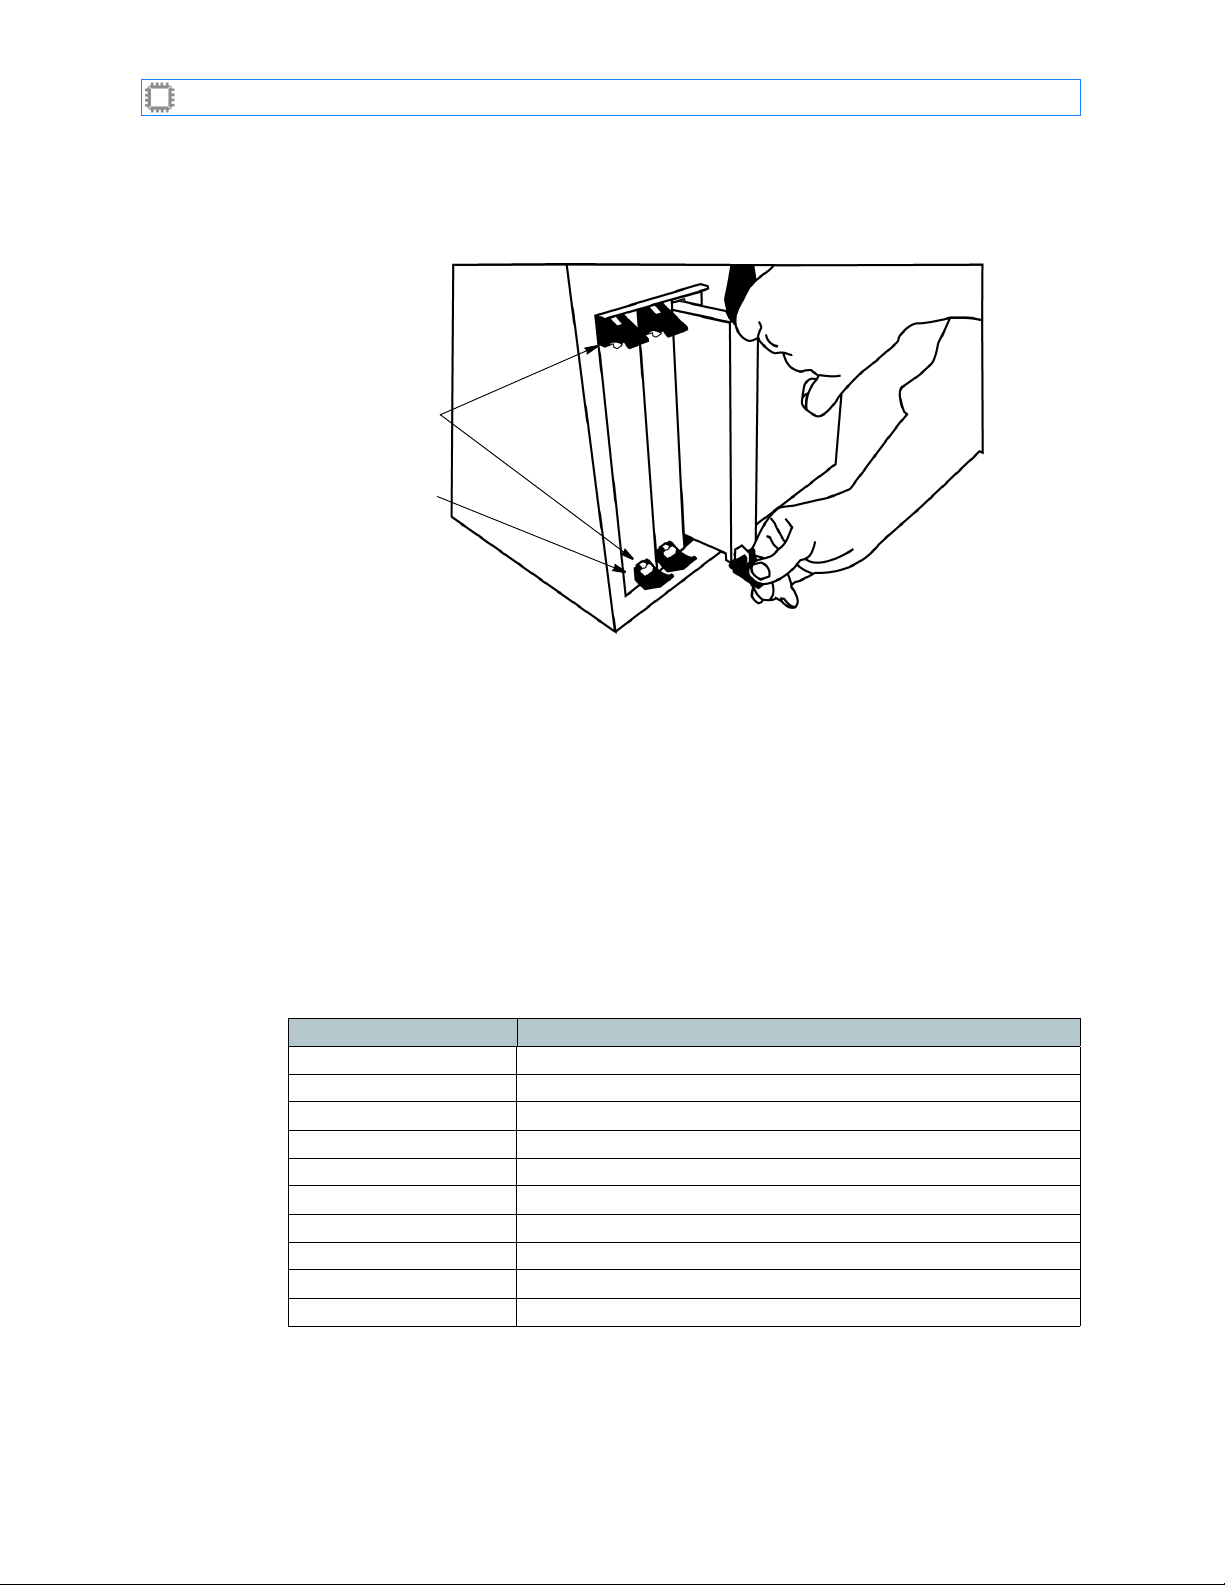
5.1.1. Removing Blades
To remove a blade:
: Remove a blade from the chassis, repair or install the desired option, then re-
: Remove a power supply from the chassis, repair or install the desired
Chapter 5
: Remove or re-locate transceivers, disconnect and reconnect the
NTELLAPATCH
switch itself, though you must turn power
1. Using the software, turn off power to the blade.
2. Unscrew the thumbscrews on either side of the blade.
3. Holding the blade straight, gently pull it towards you.
5.1.2. Installing Blades
To insert a blade:
1. Using the software, ensure that power is off to the slot in which the blade will be
installed.
2. Hold the blade by its outer edges in front of the target slot.
Thumbscrew
Figure 8. Removing a Blade
Thumbscrew
A54-2058-000 20 A
PCON
, Inc.
Page 25

I
NTELLAPATCH
3. Insert the back of the blade into the guides on each side of the slot.
Switches: ACI-2058 User Manual
4. Holding the blade straight, slide it into the guides as far as it will go.
Figure 9. Inserting a Blade
Guide
Thumbscrew
5. Press the blade into the chassis as you turn the thumbscrews to secure the blade
place.
in
The ACI-2058 automatically detects that the blade is in place and powers on the blade.
5.2. Transceiver Modules
5.2.1. Removing SFP Transceiver Modules
To remove a transceiver module:
•
Nonbail type
Carefully push the ejector pin in while pulling out the module.
:
Guide
Thumbscrew
•
Bail type
Pull the bail down and pull out the module.
:
5.2.2. Installing SFP Transceiver Modules
To insert a transceiver module:
•
Nonbail type
1. Hold the module by the housing, so that the label faces up.
2. Insert the module into the socket until you hear or feel a slight click.
•
Bail type
1. Close the bail latch if it is currently open.
2. Hold the module by the housing, so that the label faces up.
3. Insert the module into the socket until you hear or feel a slight click.
:
:
5.2.3. Handling and Installing Fiber Optic Cables
To extend the life of transceiver modules, use caution when handling and installing cables.
Do not remove the dust cover until immediately prior to mating the cable. To ensure proper
cable mating, complete the steps in the following procedures.
A54-2058-000 21 A
PCON
, Inc.
Page 26

I
NTELLAPATCH
Switches: ACI-2058 User Manual
5.2.3.1. Disconnecting the Cable
To disconnect the cable:
1. Grasp the connector while squeezing the connector housing and disconnect the
connector from the unit.
2. Cover connector ends and SFP transceivers with clean dust caps when not in use.
5.2.3.2. Connecting the Cable
Clean the cable before connecting it:
1. Thoroughly wipe the side and end of the ferrule using a lint-free, alcohol-dampened cloth.
2. Blow dry the ferrule with compressed air.
3. Visually inspect the ferrule for lint, and blow-dry it again if necessary.
4. Connect the cable.
• After every demating cycle, clean and blow-dry the ferrule before remating.
• Do not interchange connectors from one unit to another unit without first cleaning the
connector. Doing so can damage the product by transferring small particles to the
transceiver.
Note
5.3. Power Supplies
5.3.1. Removing a Power Supply
To remove a power supply:
1. Remove the screw from the latch.
2. Remove the two screws — one each from the top and bottom left and right latches.
3. Press the red buttons on the latches in while pushing the latches outward — the upper
one upwards and the lower one downwards.
4. Push the latches outward.
A54-2058-000 22 A
PCON
, Inc.
Page 27
I
NTELLAPATCH
5. Pull the supply toward you.
Switches: ACI-2058 User Manual
Figure 10. Removing a ACI-2058 Power Supply
Red buttons
Latch
5.3.2. Installing a Power Supply
To insert a power supply:
1. Make sure the latches are is in the outward position — the upper one pushed into the up
position and the lower one pushed into the down position.
2. Push the power supply in firmly until you hear the latches click.
3. Secure (turn) the two screws inside the latch areas (one per latch).
5.3.3. Switch Defaults
The ACI-2058 default configuration as shipped from the factory is:
Table 3. Factory Configuration
Setting Default value
Ports All off
Serial ports 9600 baud, 8 data bits, no parity, 1 stop bit, software flow control
LAN ports 10/100/1000 Ethernet, TCP/IP, both enabled
Device number 01
Temperature alarm 50° Celsius
IP address 192.168.0.1
Subnet mask 255.255.255.0
Gateway none
Administrator username
Administrator password
admin
secret
If the switch exceeds the set temperature limit (by default, 50° C), an alarm sounds. This
alarm can be turned off using any of the software interfaces; for instructions, see the specific
software manual.
A54-2058-000 23 A
PCON
, Inc.
Page 28

Appendix
Appendix A
Serial Port Pinout
The ACI-2058 contains two RS-232 serial ports, each using a DB9 connector. The
connectors are compatible with standard RS-232 straight-through serial cables. The next
table describes each pin.
Table 4. Serial Port Pinout
Pin Host computer COM1 COM2
1 DCD input DCD output No connection
2 Receive data input Transmit data output Receive data input
3 Transmit data output Receive data input Transmit data output
4 DTR Output Connected to pin 8 Connected to pin 8
5 Ground Ground Ground
6 DSR input DSR output No connection
7 RTS output No connection No connection
8 CTS input Connected to pin 4 Connected to pin 4
9 RI input No connection No connection
Appendix A
A54-2058-000 24 A
PCON
, Inc.
Page 29

Index
A B C D E F G H I J K L M N O P Q R S T U V W X Y Z
Index
A
AC input voltage
ACI-2058
device properties
placing
administrator
default account
alarm
power supply failure
temperature
temperature, default setting for
APCON ControlX software
Apcon WebX
ApconCmdX
ASCII command set interface
assigning
device number
5
.
18
.
11
.
23
.
13
23
.
16
.
4
.
17
.
B
blades
6
capabilities
data rate
installing
naming
number of
removing
blank cover panel
.
6
.
20
.
8
.
4
.
,
6
.
20
.
7
.
fiber optic cables
multiple switches
serial ports
switch to multiple hosts
connection distances
ControlX software
22
.
17
.
19
.
14
.
4
.
2
.
,
4
.
,
8
.
,
13
.
D
.
23
.
2
.
,
4
.
,
8
.
,
13
.
2
.
,
4
.
,
9
.
daisy-chaining multiple switches
data rate
defaults
4
.
23
.
administrator account
device number
Ethernet port setting
gateway
IP address
password
port setting
23
.
23
23
.
23
serial port setting
subnet mask
23
23
23
.
23
.
.
23
.
.
temperature alarm setting
.
.
device number
17
assigning
default
.
23
.
disconnecting fiber optic cables
distances supported
DS3/E3/STS-1
4
.
4
.
23
17
.
.
22
.
E
Ethernet
4
.
assign IP address to connect to
cable type
15
.
connecting multiple switches with
controlling switch with
data rate
6
.
default setting for port
distances
protocol
5
.
6
.
RJ-45 connector for interface
5
23
14
.
,
19
.
.
6
.
C
C/C++ API
cable
chassis
COM port, default setting for
2
.
,
9
.
for connecting multiple switches using LAN ports
19
.
for daisy-chaining
handling fiber optic
4
height
.
switching capacity
19
.
21
.
4
.
23
.
configuration
23
default
settings saved
.
9
.
Configure Network Interface screen
connecting
16
.
F
fail-safe operation
fans
11
.
FDDI
4
.
5
.
A54-2058-000 25 A
15
.
PCON
.
, Inc.
Page 30

I
NTELLAPATCH
Switches: ACI-2058 User Manual Index
A B C D E F G H I J K L M N O P Q R S T U V W X Y Z
features
4
.
fiber optic
22
connecting cable
disconnecting cable
distances
5
.
.
22
.
multimode or single-mode transceiver
Fibre Channel
4
.
G
gateway, default
Gigabit Ethernet
Gigabit Fibre Channel
23
.
4
.
4
.
H
humidity, operating range
6
.
I
installing
20
blades
power supply
rack-mounting
software
transceivers
I
NTELLAPATCH
.
13
switch
23
.
12
.
.
21
.
connecting to multiple host computers
defaults
physical dimensions
weight
23
.
6
.
6
.
IP address
14
.
,
15
assigning
default
23
.
.
J
jitter
6
.
L
labeling switches
LAN port
connecting multiple switches with
default setting for
LED fault lights
8
.
5
.
23
.
13
.
M
media conversion
memory
9
multiple hosts, connecting to
multiple switches
connecting with LAN ports
controlling
daisy-chain
multi-user sessions
6
.
.
14
5
.
17
.
4
.
17
N
nonvolatile memory
9
.
O
7
.
OC-3/OC-12/OC-48
operating systems supported
4
.
4
.
P
password, default
placing the ACI-2058
ports
bidirectional
default setting for
LAN
5
naming
number of
RS-232
power
AC input voltage
alarm
installing a power supply
overloading
removing a power supply
supplies
14
.
supplies, redundant
supply specifications
presets
4
.
proxy server
.
13
23
.
11
.
4
.
23
.
8
.
4
.
,
6
.
5
.
5
.
.
23
.
12
.
22
.
13
.
5
.
6
.
16
.
R
rack mounting
preparation
rack dimensions
redundant components
regenerating signal
removing
blades
power supply
19
.
transceivers
repeater
retimed signals
RS-232 ports
12
.
10
.
6
.
5
.
5
.
20
.
22
.
21
.
6
.
6
.
5
.
S
saving configuration
.
screens
Configure Network Interface
.
Switch Details
serial ID
7
.
serial interface
baud rate
cable length
9
.
16
.
16
.
6
.
6
.
A54-2058-000 26 A
PCON
, Inc.
Page 31

I
NTELLAPATCH
Switches: ACI-2058 User Manual Index
A B C D E F G H I J K L M N O P Q R S T U V W X Y Z
controlling switch with
daisy-chaining with
DB9 connector
properties
6
.
5
.
17
.
6
.
serial port
19
connecting
serial port, default setting
SFPSee transceiver
signal regeneration
.
23
.
4
.
4
.
software
2
.
,
9
13
.
.
ASCII command set
C/C++ API
ControlX
features
installing
security
SSL
2
.
,
9
.
2
.
,
4
.
,
8
8
.
13
.
2
.
,
8
.
2
.
,
8
.
.
,
Telnet command-line interface
web interface
WebX
SSH
2
.
,
4
.
SSL
2
.
,
4
.
,
subnet mask, default
2
.
,
8
.
16
.
,
8
.
8
.
23
.
switch
connecting to multiple host computers
cooling
defaults
labeling
physical dimensions
weight
Switch Properties tab
11
.
23
.
8
.
6
.
6
.
18
.
switching capacity
4
.
T
T1/E1/J1
TCP/IP connection
technical support
Telnet command-line interface
temperature, operating range
transceiver
2
.
,
8
.
U
UL approval
URLs, Apcon
4
.
14
.
3
.
,
13
.
digital diagnostic support
features
hot-pluggable
installing
multimode fiber optic
removing
single-mode fiber optic
7
.
8
.
21
.
7
21
.
6
.
3
.
,
13
.
2
.
,
4
.
,
8
.
6
.
8
.
.
7
.
V
ventilation
14
.
11
.
W
web management software
WebX software
16
.
Configure Network Interface screen
Switch Details
16
World-Wide Web URLs, Apcon
2
.
,
4
.
,
8
.
,
14
.
16
.
.
3
.
,
13
.
A54-2058-000 27 A
PCON
, Inc.
Page 32

INTELLAPATCH
Physical Layer Switch Product Documentation
W
EB
X
Embedded Web Interface
™
v2.50 User Manual
www.apcon.com
A54-3000-100 • Revision A
• 503.682.4050
Page 33

Copyright ©2008 by A
This manual is copyrighted. All rights are reserved. No part of this manual may be reproduced, transmitted, copied, or translated in any
form or by any means, electronic or mechanical, including photocopying and recording, for any purpose without the express written
permission of A
nondisclosure agreement. The hardware and software may be used or copied
against the law to
PCON
, Inc. reserves the right to revise this publication from time to time without obligation of A
A
of such revision. A
PCON
equipment. The drawings, specifications and information contained within this document are the property of A
A
unauthorized use or disclosure of the enclosed information is prohibited.
A
PCON
, I
†
All other trademarks, registered trademarks, service marks, and trade names are the property of their respective owners.
PCON
copy the software on any medium except as specifically allowed in the license or nondisclosure agreement.
PCON
NTELLAPATCH
, Inc. The hardware and software described in this document is furnished under a license agreement or
has prepared this manual for use by customers as a guide for proper installation, operation and maintenance of
, I
NTELLAZONE
, and P
OWERLINK
are trademarks of A
May 2008
All rights reserved.
PCON
PCON
, Inc.
only in accordance with the terms of the agreement. It is
PCON
to notify any person or organization
PCON
, and any
, Inc.
Page 34

Contents
Contents
Chapter 1: Preface
About WEBX..................................................................................................................................... 1
New in This Release.................................................................................................................. 1
About This Book .............................................................................................................................. 2
Contents ................................................................................................................................... 2
Text Conventions ...................................................................................................................... 3
Related Products ............................................................................................................................. 3
Contacting A
Chapter 2: Introducing W
Screen Layout ................................................................................................................................. 6
Toolbar ..................................................................................................................................... 6
Logout....................................................................................................................................... 7
Menus....................................................................................................................................... 7
Canvas ..................................................................................................................................... 8
Status Bar................................................................................................................................. 8
Navigation ....................................................................................................................................... 8
Mouse Techniques .................................................................................................................... 8
Terminology .............................................................................................................................. 8
Switch Labeling ............................................................................................................................... 9
Patching Ports ................................................................................................................................. 9
Assigning IP Addresses ................................................................................................................... 10
User Database Concepts ................................................................................................................. 11
Network User Authentication............................................................................................................ 12
Simplex Patching with SPAN/Monitor Ports ...................................................................................... 13
Disabling Simplex Patching with SPAN/Monitor Ports ................................................................ 15
Chapter 3: Setting Up and Accessing the Switch
Setting the IP Address ..................................................................................................................... 16
Setting Up User Authentication ........................................................................................................ 21
Logging In ....................................................................................................................................... 23
Setting Up Security.......................................................................................................................... 24
Establishing Secure (SSL) Connections..................................................................................... 24
Establishing SSH Connections .................................................................................................. 26
Running ASCII Command Scripts Over the LAN Ethernet Interface ............................................ 27
Enabling Access to A
What’s Next..................................................................................................................................... 31
Configuring Ports and Port Access ............................................................................................ 31
Logging Out ............................................................................................................................ 31
PCON
............................................................................................................................ 4
EB
X
PCON
Software........................................................................................... 29
.
.
.
.
.
.
.
.
.
.
.
.
.
.
.
.
.
.
.
.
.
.
.
.
.
.
.
.
.
.
.
.
.
.
A54-3000-100 A iii A
PCON
, Inc.
Page 35

WEBX v2.50 User Manual Contents
Chapter 4: Connections
Realtime.......................................................................................................................................... 33
Patch Mode............................................................................................................................... 36
Batch............................................................................................................................................... 37
Patch Mode............................................................................................................................... 41
By Name ......................................................................................................................................... 42
By Name: Review...................................................................................................................... 43
By Preset (Presets).......................................................................................................................... 45
With M
ONITOR
(M
ONITOR
)................................................................................................................... 46
View Patches................................................................................................................................... 47
Chapter 5: M
ONITOR
Chapter 6: Ports/Blades
Ports ............................................................................................................................................... 50
Port Properties.......................................................................................................................... 50
Rates ........................................................................................................................................ 52
Locks ........................................................................................................................................ 54
Locks: View By User tab ..................................................................................................... 55
Blades............................................................................................................................................. 57
Properties ................................................................................................................................. 57
Power ....................................................................................................................................... 59
SFP/XFP ......................................................................................................................................... 60
Properties ................................................................................................................................. 60
Alarms ...................................................................................................................................... 61
Configuration................................................................................................................................... 63
Names ...................................................................................................................................... 63
Classes..................................................................................................................................... 65
Class Members ......................................................................................................................... 67
Port Locking.............................................................................................................................. 69
Zoning....................................................................................................................................... 70
Zoning: Edit Ports Screen ................................................................................................... 71
Zoning: Edit User Dialog Box .............................................................................................. 72
Receive Monitoring.................................................................................................................... 74
Edit Presets .............................................................................................................................. 75
Chapter 7: View
Controller ........................................................................................................................................ 78
Event Log ........................................................................................................................................ 82
Logged In ........................................................................................................................................ 84
Display Options ............................................................................................................................... 85
Show Toolbar............................................................................................................................ 85
Toolbar Text Labels ................................................................................................................. 85
Chapter 8: Tools
Cable Test....................................................................................................................................... 87
Flapping .......................................................................................................................................... 89
Signal Counters ............................................................................................................................... 91
.
.
.
.
.
.
.
.
.
.
.
.
.
.
.
.
.
.
.
.
.
.
.
.
.
.
.
.
.
.
.
.
.
.
.
.
.
.
.
A54-3000-100 A iv A
PCON
, Inc.
Page 36

WEBX v2.50 User Manual Contents
Chapter 9: Maintenance
Backup/Restore ............................................................................................................................... 93
Backup Settings ........................................................................................................................ 93
Backup Users............................................................................................................................ 96
Restore Settings........................................................................................................................ 97
Switch ............................................................................................................................................. 98
License Key .............................................................................................................................. 98
Reset ........................................................................................................................................ 99
Upgrade Firmware..................................................................................................................... 101
Chapter 10: Settings
Personalization................................................................................................................................ 104
Your Password ......................................................................................................................... 104
Your Preferences ...................................................................................................................... 105
Users/Security ................................................................................................................................. 107
User Database .......................................................................................................................... 107
Local Users............................................................................................................................... 110
Permissions .............................................................................................................................. 112
SNMP v3 Users......................................................................................................................... 114
Services .......................................................................................................................................... 116
Service Properties..................................................................................................................... 117
SNMP Properties....................................................................................................................... 122
Certificates................................................................................................................................ 125
Certificates screen: Generate tab........................................................................................ 125
Certificates screen: Upload Web Cert tab............................................................................ 126
Certificates screen: Upload SSH Keys tab........................................................................... 127
Certificates screen: Download tab ....................................................................................... 128
Switch ............................................................................................................................................. 129
LAN Interface ............................................................................................................................ 129
Date/Time ................................................................................................................................. 131
Properties ................................................................................................................................. 133
Login Message.......................................................................................................................... 140
Chapter 11: Help
About .............................................................................................................................................. 142
Support ........................................................................................................................................... 143
.
.
.
.
.
.
.
.
.
.
.
.
.
.
.
.
.
.
.
.
.
.
.
.
.
.
.
.
.
.
.
A54-3000-100 A v A
PCON
, Inc.
Page 37

WEBX v2.50 User Manual Contents
Appendix A: Data File Formats
Sample SysLog File......................................................................................................................... 144
Format ...................................................................................................................................... 144
Import/Export Settings File Format ............................................................................................ 146
Import/Export File Formats............................................................................................................... 147
Export Users File Format ................................................................................................................. 148
Appendix B: Adding A
PCON
Attributes to your RADIUS Server
....................................... 149
Appendix C: Configuring the TACACS+ Server
Overview ......................................................................................................................................... 150
Configuring The Server.................................................................................................................... 150
Setting the Shared Secret.......................................................................................................... 150
Apcon Access Levels and Service ............................................................................................. 152
Assigning Authorization ............................................................................................................. 152
User Authorization ..............................................................................................................152
Group Authorization ............................................................................................................ 152
A
PCON
Switch Authorization................................................................................................. 153
Unspecified Authorization ................................................................................................... 154
Accounting ...................................................................................................................................... 155
Example: Routing Messages To TACACS+ Log ......................................................................... 155
Index
................................................................................................................................................... 157
.
.
.
.
.
.
.
.
.
.
.
.
.
.
.
.
.
.
A54-3000-100 A vi A
PCON
, Inc.
Page 38

WEBX v2.50 User Manual Contents
Figures
Figure 1. The WEBX interface ................................................................................................................. 6
Figure 2. Switch labeling ........................................................................................................................ 9
Figure 3. Single vs. multiple IP addresses .............................................................................................. 10
Figure 4. Example: multiple IP addresses and subnets ........................................................................... 10
Figure 5. User Database Architecture..................................................................................................... 11
Figure 6. Security symbol....................................................................................................................... 13
Figure 7. SPAN port symbol ................................................................................................................... 14
Figure 8. Patch Ports: Realtime and Batch screens ................................................................................ 33
Figure 9. Patch Ports: Realtime and Batch screens ................................................................................ 37
Figure 10. By Name screen .................................................................................................................... 42
Figure 11. By Name: Review dialog box ................................................................................................. 43
Figure 12. By Preset (Presets) screens .................................................................................................. 45
Figure 13. View Patches screen ............................................................................................................. 47
Figure 14. Port Properties screen ........................................................................................................... 50
Figure 15. Rates screen ......................................................................................................................... 52
Figure 16. Locks screen ......................................................................................................................... 54
Figure 17. Locks: View By User tab ........................................................................................................ 55
Figure 18. Properties screen .................................................................................................................. 57
Figure 19. Power screen ........................................................................................................................ 59
Figure 20. Properties screen .................................................................................................................. 60
Figure 21. Alarms screen ....................................................................................................................... 61
Figure 22. Names screen ....................................................................................................................... 63
Figure 23. Classes screen...................................................................................................................... 65
Figure 24. Class Members window ......................................................................................................... 67
Figure 25. Port Locking screen............................................................................................................... 69
Figure 26. Zoning screen ....................................................................................................................... 70
Figure 27. Zoning: Edit Ports Screen ...................................................................................................... 71
Figure 28. Zoning: Edit User Dialog Box ................................................................................................. 72
Figure 29. Receive Monitoring screen .................................................................................................... 74
Figure 30. Edit Presets screen ............................................................................................................... 75
Figure 31. Controller screen ................................................................................................................... 78
Figure 32. Events screen ....................................................................................................................... 82
Figure 33. Logged In screen................................................................................................................... 84
Figure 34. Cable Test screen ................................................................................................................. 87
Figure 35. Flapping screen..................................................................................................................... 89
Figure 36. Signal Counters screen ......................................................................................................... 91
Figure 37. Export screen ........................................................................................................................ 93
Figure 38. Backup Users screen............................................................................................................. 96
Figure 39. Restore Settings screen ........................................................................................................ 97
Figure 40. License Key screen ............................................................................................................... 98
Figure 41. Reset screen ......................................................................................................................... 99
Figure 42. Update Firmware screen........................................................................................................ 101
Figure 43. Your Password screen........................................................................................................... 104
Figure 44. Your Preferences screen ....................................................................................................... 105
Figure 45. User Database screen ........................................................................................................... 107
Figure 46. Local Users screen................................................................................................................ 110
Figure 47. Permissions screen ............................................................................................................... 112
.
.
.
.
.
.
.
.
.
.
.
.
.
.
.
.
.
.
.
.
.
.
.
.
.
.
.
.
.
.
.
.
.
.
.
.
.
.
.
.
.
.
.
.
.
.
.
A54-3000-100 A vii A
PCON
, Inc.
Page 39

WEBX v2.50 User Manual Contents
Figure 48. SNMP v3 Users screen.......................................................................................................... 114
Figure 49. Service Properties screen...................................................................................................... 117
Figure 50. SNMP Configuration screen................................................................................................... 123
Figure 51. Certificates screen................................................................................................................. 125
Figure 52. Certificates screen................................................................................................................. 126
Figure 53. Certificates screen................................................................................................................. 127
Figure 54. Certificates screen................................................................................................................. 128
Figure 55. LAN Interface screen............................................................................................................. 129
Figure 56. Date/Time screen .................................................................................................................. 131
Figure 57. Properties screen .................................................................................................................. 133
Figure 58. Message screen .................................................................................................................... 140
Figure 59. About screen ......................................................................................................................... 142
Figure 60. Support screen ...................................................................................................................... 143
Figure 61. Sample file formats................................................................................................................ 147
Figure 62. Setting up the shared secret .................................................................................................. 151
Figure 63. Setting up the shared secret .................................................................................................. 154
Figure 64. Configuring the syslog to match syslog server........................................................................156
.
.
.
.
.
.
.
.
.
.
.
.
.
.
.
.
.
A54-3000-100 A viii A
PCON
, Inc.
Page 40

Preface
Chapter 1
Preface
1.1. About W
This manual describes A
NTELLAPATCH
your I
You can operate W
EB
X features.
W
Since W
access the software, you first install your A
EB
X by entering the switch’s IP address. For details about accessing the WEBX, see
W
Chapter 3, Setting Up and Accessing the Switch on page 16.
1.1.1. New in This Release
This version of WEBX includes the following new features:
New graphical interface
•
detailed information when selecting W
you are familiar with W
to frequently used W
by tasks you routinely perform.
EB
X
PCON
™ switch remotely from a web browser over a network or the Internet.
EB
X with or without security, and you can control user access to various
EB
X is embedded on the I
EB
Chapter 1
’s WEBX, an embedded web interface that you use to control
NTELLAPATCH
: WEBX now includes Basic menus that you use to provide
EB
X features. Customizable menu toolbars provides quick access
X features, and the new menu structure organizes WEBX features
motherboard, no installation is required. To
PCON
switch, then start a web browser and access
EB
X features, and Power User menus to use when
•
TACACS+ support
•
SNMP
: WEBX now includes support for SNMP.
•
Logged-in user display
logged in to the switch.
• Adjustable web session timeouts
• Password strength rules
• TBD syslog
A
PCON
’s version 2.5 firmware includes the following features:
• Ability to switch between the following:
•
CLI version 3 (with CLI v2 for backward compatibility with existing scripts)
version provides a more easily parsed mode for new scripts and features and now
supports most CLI2 commands.
CLI version 2
•
that is backwards compatible with previous versions of A
: WEBX now includes support forTACACS+ servers.
: The new Logged In screen (page 84) displays users currently
. This version provides a different and less-featured command structure
PCONCMD
. This
X.
A54-3000-100 A 1 A
PCON
, Inc.
Page 41

WEBX v2.50 User Manual Chapter 1: Preface
1.2. About This Book
The purpose of this manual is to assist anyone who performs these functions related to the
software:
EB
• Patches ports using W
disconnect standard types of cables
• Configures the switch using W
configure operating systems and networks.
1.2.1. Contents
X. This also requires that you know how to connect and
EB
X. This also requires that you know how to use and
This manual contains the following chapters and appendices
:
Chapter/Appendix Description
Preface Explains how to use this manual.
1
Introducing WEBX Describes features of WEBX
2
Setting Up and Accessing
3
the Switch
Connections Describes screens available from the Connections
4
Describes how to connect to, log in, and log off the
NTELLAPATCH
I
switch.
.
menu, where you configure patch settings.
M
5
ONITOR
Describes screens available from the M
menu, which you use to connect to and control any
NTELLAPATCH
I
TCP/IP LAN connection. You use M
switch using the PC’s serial port or
ONITOR
intrusive network monitoring and to sharing
equipment.
Ports/Blades Describes screens available from the Ports/Blades
6
menu, where you configure ports and blades in
NTELLAPATCH
your I
View Describes screens available from the View menu,
7
switch.
where you can access switch information and
network status.
Tools Describes screens available from the Tools menu,
8
where you can run diagnostic tests.
Maintenance Describes screens available from the Maintenance
9
menu, where you can update or restore
configuration files.
Settings Describes screens available from the Settings
10
menu, where you can manage user access and
switch security.
Help Describes screens available from the Help menu,
11
where youcan find information about your
NTELLAPATCH
I
switch and contacting A
PCON
A Data File Formats Provides samples for system log files and
import/export files.
Index Lists product topics for quick reference.
ONITOR
for non-
.
A54-3000-100 A 2 A
PCON
, Inc.
Page 42

WEBX v2.50 User Manual Chapter 1: Preface
1.2.2. Text Conventions
This manual uses the following conventions:
> Indicates the movement through menu options. For example, the
sequence for changing the switch name is:
View>Chassis>Controller Status
bold
MonoText
Indicates a directory or a file.
Indicates information that displays on the screen.
MonoBold
ItalicText
Note
Indicates information you type.
Variable parameters.
Indicates important information about the product.
Indicates potentially hazardous situations which, if not avoided, may
CAUTION
result in minor or moderate injury, or damage to data or hardware. It may
also alert you about unsafe practices.
WARNING
DANGER
Indicates potentially hazardous situations which, if not avoided, can
result in death or serious injury.
Indicates imminently hazardous situations which, if not avoided, will
result in death or serious injury.
1.3. Related Products
I
NTELLAPATCH
A
PCON INTELLAPATCH
a modular chassis/blade design that
work with a variety of protocols and
data rates.
With this modular system, you can
populate each switch chassis with
different blades, deploying Ethernet,
SONET, Fibre Channel and other
blades in a single chassis, while
running every blade independently and simultaneously. This modular design also provides
cost-effective media conversion and scalability.
Switches
switches employ
A
PCON
’s WEBX is compatible with high-density (1") I
•
I
NTELLAPATCH
•
I
NTELLAPATCH
•
I
NTELLAPATCH
•
I
NTELLAPATCH
•
I
NTELLAPATCH
ACI-2065
ACI-2069
ACI-2061
ACI-2064
ACI-2058
:A 1u1 switch with one blade slot that supports up to 16 ports.
:A 2u switch with two blade slots that supports up to 32 ports.
: A 3u switch with four blade slots that supports up to 64 ports.
: A 6u switch with nine blade slots that supports up to 144 ports.
: An 11u switch with eighteen blade slots that supports up to
NTELLAPATCH
switches such as these:
288 ports.
1. A “u” (unit) is 1.75" or 44mm.
A54-3000-100 A 3 A
PCON
, Inc.
Page 43

WEBX v2.50 User Manual Chapter 1: Preface
A
PCON
also provides these software products that you use to access and control your
NTELLAPATCH
I
A
PCONCMD
•
switch(es):
X
, included on the CD that comes with your I
NTELLAPATCH
switch, is a
Command Line Utility (CLU) that provides an interactive command line interface.
•
Command Line Utility (CLU)
•
M
ONITOR
, included on the CD that comes with your I
controls any A
PCON INTELLAPATCH
that provides an interactive command line interface.
NTELLAPATCH
switch, connects to and
Physical Layer Switch using the PC’s serial port or
TCP/IP LAN connection. This software provides non-intrusive network monitoring and for
sharing of equipment such as traffic analyzers, network probes and Intrusion Detection
System (IDS) equipment.
Some M
features are available in WEBX. For details, see Chapter 5, M
ONITOR
,
ONITOR
starting on page 48.
•
Firmware Direct Commands (ASCII)
, embedded in your I
NTELLAPATCH
switch, control the
switch using any scripting language (such as Tcl or Perl) that supports reading from and
writing to serial or socket connections.
•
C/C++ API
, purchased separately, provides programmatic access to the switch. To
acquire this product, contact A
Additional software can be purchased for application-specific purposes.
1.4. Contacting A
You can find out more about
•
World Wide Web
contains current information about the company and locations of sales offices, new and
existing products, contacts for sales, service, and technical support information. You can
also send email to A
• To access the A
http://www.apcon.com
• To contact A
http://www.apcon.com/support
When sending email for technical support, please include information about both
the hardware and software.
•
A
PCON
sales representative
your sales representative via email or phone.
PCON
as described in the next section.
PCON
I
NTELLAPATCH
: A
PCON
maintains an active site on the World Wide Web. The site
PCON
using the web site.
PCON
web site, enter this URL in your web browser:
PCON
technical support, enter this URL in your web browser:
: If you purchased your product from A
products from these sources:
Note
PCON
, you can contact
Email
:
Telephone
Fax
: 503-682-4059
: 503-682-4050
sales1@apcon.com
A54-3000-100 A 4 A
PCON
, Inc.
Page 44

Introducing
WEBX
Chapter 2
Introducing W
This chapter describes the following WEBX features:
For information about... Go to this page...
Screen Layout ................................................................................................................. 6
Menus ......................................................................................................................... 7
Canvas ....................................................................................................................... 8
Status Bar ................................................................................................................... 8
Navigation ....................................................................................................................... 8
Mouse Techniques ....................................................................................................... 8
Terminology ................................................................................................................. 8
Switch Labeling ............................................................................................................... 9
Patching Ports ................................................................................................................. 9
Assigning IP Addresses .................................................................................................. 10
User Database Concepts ................................................................................................ 11
Network User Authentication ........................................................................................... 12
Simplex Patching with SPAN/Monitor Ports ....................................................................... 13
Disabling Simplex Patching with SPAN/Monitor Ports ..................................................... 15
EB
X
Chapter 2
A54-3000-100 A 5 A
PCON
, Inc.
Page 45

WEBX v2.50 User Manual Chapter 2: Introducing WEBX
2.1. Screen Layout
Toolbar
Menus
Canvas
WEBX provides access to the I
NTELLAPATCH
switch through your web browser. The interface
provides the easy-to-use features described in the following sections:
Figure 1. The WEBX interface
Logout
Status bar
2.1.1. Toolbar
The toolbar povides quick access to WEBX features you frequently use. The toolbar’s
appearance varies, depending on the menu you use:
Basic
:
Note
: The toolbars above display the default
factory configuration.
Clicking the arrow minimizes the Toolbar to provide more room for the Canvas, or maximizes
the Toolbar to allow access to its options.
To customize the toolbar, click the arrow at the right side of the menu or select
Settings>Personalization>Your Preferences. For information about setting preferences on
this screen, see Your Preferences on page 105.
A54-3000-100 A 6 A
Power user
PCON
, Inc.
Page 46

WEBX v2.50 User Manual Chapter 2: Introducing WEBX
2.1.2. Logout
Note
Logout links display only when the User Database (page 107) is not set to
None
The logout link displays at the far right, where you can click to log out and re-display the login
screen. Another logout link displays in the Status bar, at the screen’s lower right.
The name you specified for the switch also displays to the toolbar’s right; you can change
this name in View>Chassis>Controller.
2.1.3. Menus
WEBX provides these menus to access features:
Basic
Ribbon
Power User
.
Basic
•
: Displays available options with icons. After selecting an option, you can minimize
the menu by clicking the downward arrow in Switch Info. Use this mode to provide
EB
detailed information you can use to select the appropriate W
•
Power User
are familiar with W
: Displays available options in a pull-down menu. Use this mode when you
EB
X features.
X feature.
Both Menu and Ribbon modes include the following:
•
Connections
•
M
ONITOR
: Display switch status or current settings.
: Patch using the WEBX M
ONITOR
interface. Only available (visible) with the
proper license key. For information about keys, see License Key on page 98.
•
Ports/Blades
: Set and change switch functionality. Most options in this category require
that you log in with Advanced Operator privileges. For information about access
privileges, see Permissions on page 112.
View
•
•
•
•
: Displays switch status or current settings.
Tools
: Displays data and runs tests that you can use to troubleshoot connected devices.
Maintenance
Settings
: Transfer switch settings and store data.
: Manage switch and user options. Options on this menu are largely one-time
setup and configuration tasks, and require administrator privileges.
•
Help
: Provides information about the switch and how to contact A
PCON
for
more information.
A54-3000-100 A 7 A
PCON
, Inc.
Page 47

WEBX v2.50 User Manual Chapter 2: Introducing WEBX
2.1.4. Canvas
You use the Canvas to view switch settings or configure switch behavior. The screens and
fields that display on the Canvas vary, depending upon the option you select from the menus.
The remainder of this book explains the screens and fields that display on the Canvas, and
the values you can enter in each field.
2.1.5. Status Bar
The status bar, located at the bottom of the screen, displays the following WEBX information:
Chassis model
Chassis serial number
The user name and logout link displays only when the User Database (page 107) is not set
None
to
.
2.2. Navigation
2.2.1. Mouse Techniques
You do much of your work in the WEBX using your mouse:
•You position your cursor by moving the mouse until the tip of the cursor touches an
object.
•You hover by positioning the cursor and keeping the cursor in that location.
•You click by positioning the cursor, then pressing and quickly releasing the left mouse
button once. In this manual, the words click, highlight, and select all mean the same
thing.
Version
Note
Alarm status Current user
WEBX c
opyright info
Logout link
2.2.2. Terminology
The instructions in this manual use the terms “enter” and “type” to mean different things.
When the instructions tell you to enter something, you press the appropriate keys and press
the Enter key. When the instructions tell you to type something, you press the appropriate
keys, but do not press the Enter key.
A54-3000-100 A 8 A
PCON
, Inc.
Page 48

WEBX v2.50 User Manual Chapter 2: Introducing WEBX
2.3. Switch Labeling
To identify each port, I
NTELLAPATCH
switches use the following port labeling conventions:
Figure 2. Switch labeling
Blade labels use
letters and start
at the bottom
A01 A02
. . .
Port labels use numbers prefaced by
blade letter, and start at the left.
Ann
nn is an integer
from 01 to 16
Blades have varying numbers of ports, and a chassis may not be fully populated with blades.
The greatest number on each blade and the greatest letter in each chassis varies, therefore,
according to the number of ports in a blade and the number of blades installed in a chassis.
W
EB
X refers to ports using these labels. You can use the WEBX to assign names to your
ports, names that indicate devices they connect to or to provide other meaningful aids to
memory. For details, see Port Properties on page 50.
2.4. Patching Ports
A
PCON
’s WEBX features the following methods to patch ports:
•
Interactive patching
For details, see Realtime on page 33.
•
Batch operations
have this configuration take effect all at the same time. For details, see Realtime on
page 33.
Quick patching
•
a few quick patches. For details, see By Name on page 42.
•
Preset configurations
By Preset (Presets) on page 45.
•
Import configuration settings
another I
: Type in one or more port names, or select from a dropdown list, to make
NTELLAPATCH
: Patch ports interactively using a graphical, click-and-drop interface.
: Create a patching configuration for the entire switch at once and then
: Patch ports according to a preset configuration. For details, see
: Patch ports according to settings you exported from
switch. For details, see Restore Settings on page 97.
A54-3000-100 A 9 A
PCON
, Inc.
Page 49

WEBX v2.50 User Manual Chapter 2: Introducing WEBX
2.5. Assigning IP Addresses
When you specify only one IP address, that address is assigned to both ports and traffic
flows between the two ports. The ports act like a network switch and you can stack multiple
chassis together, plug one into the network, and daisy-chain the rest.
With two IP addresses, each LAN port is multihomed with the two IP addresses. This means
you can reach each port by either IP address. The two LAN ports on the back of the unit are
split into isolated VLAN segments and cannot pass traffic between each other. You cannot
daisy chain.
Figure 3. Single vs. multiple IP addresses
LAN 1LAN 2
LAN 1LAN 2
IP address A
IP address A
IP address A
IP address A
IP address B
IP address B
IP address A
In the multiple IP address scenario, typically each address is a different subnet. Each LAN
port plugs into the network segment containing that particular subnet. (Since each port
listens for both IP addresses, it doesn’t matter which port gets plugged into which subnet.) In
theory, both IP addresses are available on both LAN ports but, in practice, each LAN port
uses only one address.
Figure 4. Example: multiple IP addresses and subnets
LAN 2
10.1
10.1.n.n10.1.n.n
LAN 1
10.2
10.2.n.n 10.2.n.n
A54-3000-100 A 10 A
PCON
, Inc.
Page 50

WEBX v2.50 User Manual Chapter 2: Introducing WEBX
2.6. User Database Concepts
WEBX provides the tools you need to specify the default permission, or access level, for new
user accounts. You can configure or modify user accounts for access at any of these levels:
•
Guest
: Users with this permission level have read-only access. This is the lowest
permission level.
•
Operator
patch ports using only preset configurations.
•
Advanced Operator
can do, plus patch ports on an ad-hoc basis, change rates and port names, plus save
configuration settings (“presets”).
: Users with this permission level can do all that Guest-level users can do, plus
: Users with this permission level can do all that Operator-level users
Administrator
•
: Users with this permission level do everything that the other levels do,
plus set switch, blade, port, and other information as well as set and clear user and
security information. This is the highest permission level.
EB
X sends user access information to the Preferences Security database in your
W
NTELLAPATCH
I
switch.
With the flexible architecture of the user database, you can select any one of these
approaches to store user or access names:
Figure 5. User Database Architecture
•
RADIUS or TACACS+ server
points to the user names stored on a
RADIUS or TACACS+ server. This option
works in conjunction with the local User
Database. If a user exists in both
databases, the local database takes
: This option
RADIUS or
TAC ACS+ ser ver
Security
attributes
precedence.
EB
X
Internal user database
•
: This option stores
user names and access information within
the switch. This database includes
admin
an
account, which acts as a local
administrator.
I
NTELLAPATCH
authentication. W
switches support up to three different RADIUS or TACACS+ servers for user
EB
X consults them in a failover sequence. The first server is always
Security
attributes
W
Logic
consulted first and is considered the primary server. If no response, the second is consulted,
and so on. If the primary is down, this could lead to longer login times.
A54-3000-100 A 11 A
PCON
, Inc.
Page 51

WEBX v2.50 User Manual Chapter 2: Introducing WEBX
2.7. Network User Authentication
RADIUS and TACACS+ provide centralized user authorization tools. Setting up these
EB
services is outside the scope of W
examples here:
•
•
RADIUS
TACACS+
: For details, see Appendix B, Adding A
: For details, see Appendix C, Configuring the TACACS+ Server.
X documentation. However, you will find brief
PCON
Attributes to your RADIUS Server.
A54-3000-100 A 12 A
PCON
, Inc.
Page 52

WEBX v2.50 User Manual Chapter 2: Introducing WEBX
2.8. Simplex Patching with SPAN/Monitor Ports
Note
A
PCON
’s M
ONITOR
feature provides the tools to quickly perform this task. M
PCON
license key, available from A
. For details about acquiring M
sales representative as described in Contacting A
PCON
on page 4 or on the Help>Support
ONITOR
menu option. For information about license keys, see License Key on page 98..
WEBX accommodates simplex patching from SPAN ports to analyzers for enterprises that
require this level of security. When using only simplex patching with SPAN ports, you must
set up your I
NTELLAPATCH
switch as described in this section.
Note
This method requires an A
PCON
Security blade, such as the
ACI-2059-S15-2 or ACI-2059-S15-4. Security blades ensure that
ports connected and defined as SPAN ports only transmit
information. For information about acquiring such a blade, contact
PCON
as described in Contacting A
A
PCON
on page 4.
To configure Security blade ports for simplex patching:
ONITOR
, contact your A
Figure 6. Security
(Identifies Security blades)
requires a
symbol
PCON
Note
If the WEBX M
ONITOR
M
wizard, see the M
ONITOR
feature is activated, as described in License Key on page 98, the
Setup wizard automatically performs all these steps. For information about the
ONITOR
User Manual.
1. Configure the automatic transmitter:
A. Select Ports/Blades>Ports>Properties. The Properties screen displays.
B. Select TX on when no RX from the drop-down list.
C. Click the Update button.
2. Enable port classes:
To create the port classes needed to implement SPAN security, you must configure the
switch to allow port classes.
A. Select Ports/Blades>Configuration
>
Classes. The Classes screen displays.
B. Ensure that the Enforce Port Classes checkbox, located at the top of the screen, is
checked. When checked, all available port classes display.
3. Create port classes:
A. Set up these port classes on the Classes screen:
•
Analyzers
: Enter any name that consists of up to 31 characters, including
letters, numbers, spaces, and most keyboard characters.
•
SPAN port
of the name is not case-sensitive. For example,
SPAN-Lab 1
SPAN
of
s: This class name must begin with the letters “SPAN”; the beginning
are valid;
or
SPAN PORT
Lab 1 SPAN
to
SPAN
.
SPAN, SPAN Ports
is not. WEBX automatically converts entries
, and
A54-3000-100 A 13 A
PCON
, Inc.
Page 53

WEBX v2.50 User Manual Chapter 2: Introducing WEBX
Note
: The SPAN port symbol, which replaces
the port number, identifies ports assigned to the
Figure 7. SPAN port symbol
Transmit Receive
SPAN class. The arrow indicates that the port
can transmit signal; the shield indicates that the
port cannot receive signal. This prevents
accidental network flooding by blocking inbound
traffic on the SPAN port.
B. Set each class to Exclusive.
C. Save these classes by clicking the Save button.
4. Assign ports to classes:
A. Click the Class Members link, located at the top of the screen. The Class Members
screen displays.
B. Assign ports to classes as shown in the next table.
Class Comments
SPAN ports Assign to this class only ports used as SPAN ports.
Analyzers Assign to this class ports that attach to analyzers.
Set port rates
5. Set port rates:
Note
: To ensure proper operation, you must set SPAN and analyzer ports to
specific rates.
A. Select Ports/Blades>Ports
>
Rates. The Rates screen displays.
B. Set ports you plan to use as SPAN ports to a specific rate in Analyzer Tap mode.
C. Set ports you plan to use as analyzer ports to the specific rate in Analyzer Tap mode.
D. Click the Save button.
6. Set rate options:
A. Select Ports/Blades>Ports
>
Properties. The Properties screen displays.
B. (Optional) Check this box to enable passthrough negotiation on the specified blade:
ACI-2052-E16-2 passthrough negotiation
Note
: Check only if you set any analyzer ports to
PCON
recommends using a specific data rate.
A
PCON
also recommends enabling these options:
A
Analyzer Tap: Auto
.
ACI-2052-E16-2 always negotiate
ACI-2052-E16-2 always on
Note
: WEBX automatically enables Automatic SPAN Security when you insert
a Security blade.
C. Click the Update button.
You have now set up your SPAN ports, configured the switch for simplex-only connections,
and can patch SPAN ports to an analyzer.
A54-3000-100 A 14 A
PCON
, Inc.
Page 54

WEBX v2.50 User Manual Chapter 2: Introducing WEBX
2.8.1. Disabling Simplex Patching with SPAN/Monitor Ports
Do any of these:
• Remove the A
NTELLAPATCH
I
PCON
Security blade(s) from the I
switch user manual.
NTELLAPATCH
switch. For details, see your
• Disable port classes:
A. Select Ports/Blades>Configuration
>
Classes. The Classes screen displays.
B. Uncheck the Enforce Port Classes checkbox, located at the top of the screen.
• Remove ports from the SPAN port class.
A. Select Ports/Blades>Configuration
>
Classes. The Classes screen displays.
B. Click the Class Members link, located at the top of the screen. The Class Members
screen displays.
C. Uncheck SPAN class checkboxes.
D. Click the Save button.
A54-3000-100 A 15 A
PCON
, Inc.
Page 55

Setting Up and Accessing the Switch
Chapter 3
Setting Up and Accessing
the Switch
Before running WEBX, you must first set up the switch:
For information about... Go to this page...
Setting the IP Address .................................................................................................... 16
Setting Up User Authentication ........................................................................................ 21
Logging In ..................................................................................................................... 23
Setting Up Security ........................................................................................................ 24
Establishing Secure (SSL) Connections ........................................................................ 24
Running ASCII Command Scripts Over the LAN Ethernet Interface .................................. 27
Enabling Access to A
What’s Next ................................................................................................................... 31
Configuring Ports and Port Access ............................................................................... 31
Logging Out ............................................................................................................... 31
3.1. Setting the IP Address
By default, I
255.255.255.0, and no gateway. If it’s convenient to configure your host computer with an IP
address of the form 192.168.0.x (where x is any number from 2 to 254, inclusive), then W
is immediately available. If not, to use the Ethernet connection you must change this default
IP address to one appropriate for your network, using one of these:
Serial Console
•
•
Web Browser
NTELLAPATCH
PCON
Software ............................................................................. 29
switches ship with an IP address of 192.168.0.1, a subnet mask of
Chapter 3
EB
X
Note
If you plan to use more than one I
the same time. This avoids repeated temporary disconnections of the host computer from
your network.
NTELLAPATCH
switch on your network, configure them at
Before you begin
Ensure that you have an A
has adequate memory for the W
For web configuration,
• A web browser that supports Javascript including, but not limited to:
•Firefox
• Internet Explorer, version 6.x or later
Ensure that your browser’s Javascript is enabled.
• Screen resolution of 1024 x 768 or better.
A54-3000-100 A 16 A
†
browser, version 2.0 or later
PCON
ACI-2073 board in your I
EB
X 2.50 firmware.
ensure that you have the following:
Note
NTELLAPATCH
chassis. This board
PCON
, Inc.
Page 56

WEBX v2.50 User Manual Chapter 3: Setting Up and Accessing the Switch
• A host computer that runs a web browser listed in the previous bullet. The host
EB
computer’s web browser accesses the embedded W
X.
• An Ethernet connection between the host computer and the switch.
• An IP address, subnet mask, and gateway (if required) appropriate for your network
assigned to the switch.
Serial Console
For serial configuration,
ensure that you have the following:
• An availabl3e serial port on the host machine.
• A serial cable.
Changing the IP Address via Serial Console
To use the serial console to change the IP address:
1. Connect a straight-through serial cable to the switch’s COM1 port and a host computer’s
serial port.
2. Start a communications program, such as HyperTerminal.
3. Establish a connection with the following parameters:
Port: COM1
Bits per second: 9600
Data: 8 bits
Parity: None
Stop bits: 1
Flow Control: None
4. Press the ENTER key 3 times. The
If the console is configured to answer with the ASCII (slashdot) command set , enter the
following to switch to CLI mode:
<ENTER>/.|CLI<ENTER>
console>
prompt displays.
5. Set the IP address using one of these methods:
CLI2
(default):
configure ip
where the program prompts you to enter an IP address, subnet, and
A
PCONCMD
gateway, in standard TCP/IP
X
:
set switch address
optional_gateway
where
ip_address, subnet_mask
#.#.#.#
ip_address subnet_mask
IP addresses, in standard TCP/IP
format.
, and
optional_gateway
#.#.#.#
format.
For example:
set switch address 10.1.1.180 255.255.255.0 10.1.1.1
The IP address command is issued and the console banner reappears. This process may
take several seconds.
Web Browser
Changing the IP Address via Web Browser
To use A
PCON
’s WEBX software to change the IP address:
A54-3000-100 A 17 A
PCON
are
, Inc.
Page 57

WEBX v2.50 User Manual Chapter 3: Setting Up and Accessing the Switch
1. Connect a host computer to the I
NTELLAPATCH
switch:
A. Disconnect from your network the host computer you plan to use to assign the IP
address.
B. Plug the host computer’s serial cable into one of the Ethernet ports on the back of
the I
NTELLAPATCH
switch using either a standard patch cable or a crossover cable.
The host and switch are now physically connected.
2. Enable communication between the host computer and switch:
A. Access the host computer’s current network settings. Note them so that you can
restore them at the end of this process.
B. Temporarily change the host settings to the following:
• IP address:
192.168.0
.
x
(x is a number from 2 to 254)
• Subnet mask:
• Gateway setting:
The host and switch are now on the same network and can communicate.
255.255.255.0
0.0.0.0
or blank
3. Access WEBX:
A. On the host computer, open a web browser.
B. If the host computer is configured to use a proxy server, disable the proxy setting.
C. In the browser’s address field, enter:
http://192.168.0.1
A54-3000-100 A 18 A
PCON
, Inc.
Page 58

WEBX v2.50 User Manual Chapter 3: Setting Up and Accessing the Switch
The Switch Controller Status screen displays.
A54-3000-100 A 19 A
PCON
, Inc.
Page 59

WEBX v2.50 User Manual Chapter 3: Setting Up and Accessing the Switch
4. Click the Edit link, located to the right of the Primary IP Address field. The LAN Interface
screen displays:
5. Change the IP address:
A. Type the new IP address, subnet mask and gateway (if required) you previously
received from your network administrator into the fields provided.
B. Click the Save button. The switch reroutes the browser to the new address.
If the new IP address no longer exists on the same subnet as the host computer, this
may fail. Reset the host computer to its original settings as described in step 6A.
C. Exit the browser.
6. Reconnect the host computer to your network.
A. Reset the host computer’s IP address, subnet mask and gateway settings to their
original values.
B. Re-cable the host computer to the network.
C. Ensure that the switch is cabled to the network with a standard Ethernet patch cable.
A54-3000-100 A 20 A
PCON
, Inc.
Page 60

WEBX v2.50 User Manual Chapter 3: Setting Up and Accessing the Switch
3.2. Setting Up User Authentication
When you need authentication, WEBX provides the tools required to specify the default
permission, or access level, for new user accounts. With authentication enabled, you can:
• Restrict who can access general functionality and administrator-level configuration.
• Use port locking.
• Enable zoning.
•Use A
PCON
’s Security blades to share SPAN/Monitor ports.
Before setting up user accounts, however, you must decide which authentication method, if
any, you want to use:
Authenticate against an internal user database
stored on the I
NTELLAPATCH
switch
Internal user
database
User Levels
I
NTELLAPATCH
Logic
switch
Authenticate against an external
RADIUS or TACACS+server.
RADIUS or
TAC ACS+ ser ver
User Levels
To set up a user database:
1. Ensure that an IP address is set up, as described in Setting the IP Address starting on
page 16.
2. Access W
EB
X:
A. On the host computer, open a web browser.
B. If the host computer is configured to use a proxy server, disable the proxy setting.
C. In the browser’s address field, enter the switch’s IP address, in standard
TCP/IP
#.#.#.#
format. For example:
http://192.168.0.1
The WEBX main screen displays.
A54-3000-100 A 21 A
PCON
, Inc.
Page 61

WEBX v2.50 User Manual Chapter 3: Setting Up and Accessing the Switch
3. Select
Settings>Users/Security>User Database
Database screen displays:
in the Navigation pane. The User
Note
: For details about options on the User Database screen, see User Database on
page 107.
4. Set the User Database to one of these:
•
•
Internal
RADIUS
: Select this option if you plan to use the internal user database.
: Select this option if you plan to use a RADIUS server on your local area
network for user authentication.
•
TACACS+
: Select this option if you plan to use a TACACS+ server on your local area
network for user authentication.
Set any additional options that display.
5. Click the Update button. The switch automatically exits and displays the W
EB
login screen.
A54-3000-100 A 22 A
X
PCON
, Inc.
Page 62

WEBX v2.50 User Manual Chapter 3: Setting Up and Accessing the Switch
3.3. Logging In
Note
You can log in only if User Database is set to Internal, RADIUS, or TACACS+, as described
in the previous section.
After you assign the switch an IP address and add it to your network, you can log in to the
switch over the web using either an ordinary (HTTP) or a secure (HTTPS) connection. (The
first time you log in to the switch to add it to your network, a secure connection is not
available.)
Note
If you plan to use secure logins, you need an SSL certificate. For details, see Certificates on
page 125.
To log in to the switch:
1. Ensure that the following is done:
• An IP address is set up, as described in Setting the IP Address starting on page 16.
• The User Database is set to Internal, RADIUS, or TACACS+, as described in Setting
Up User Authentication starting on page 21.
2. In the browser’s address field, enter one of these:
• For an insecure connection (default):
• For a secure connection:
http://x.x.x.
https://x.x.x.
x
x
where each x is a value from 1 to 254, and the total four-part number is the IP address
assigned to the switch.
The W
EB
X login screen displays:
Connection type
Displays only for ordinary
(non-secure) HTTP connections
This is where the administrator can
enter a message that every user views
when logging in.
System Message
A message supplied by the
administrator that displays
each time a user logs in
3. Enter your User name and Password. The factory defaults are shown below:
User
:
Password
admin
:
secret
A54-3000-100 A 23 A
PCON
, Inc.
Page 63

WEBX v2.50 User Manual Chapter 3: Setting Up and Accessing the Switch
4. Press either the Login button or the Enter key.
The switch’s main screen displays.
You can now view your switch’s settings. If you have administrator permission privileges, you
can also modify switch settings. For details about permissions, see Permissions on page 112.
3.4. Setting Up Security
Set up WEBX to perform the switch security tasks you desire:
• Enable secure web (HTTPS) connections, requiring users to log in using a secure SSL
connection. You can also generate the SSL certificate required to enable secure SSL
logins.
• Enable secure command line (A
PCONCMD
X) connections, allowing users to log in using an
SSH connection. You can also generate the SSH key required to enable SSH.
• Enable one or more users to issue ASCII commands or run ASCII-command scripts over
the network.
• Change the default serial port console mode to the ASCII scripting mode.
• Enable access to A
ONITOR
and M
PCON
software products such as A
.
You set up these tasks on the Security/Services screen. For details about other options on
this screen, see Service Properties on page 117.
3.4.1. Establishing Secure (SSL) Connections
When you require all management functions—including user authentication—to run over a
secure connection, you can enable SSL as described in the following steps.
Note
SSL is slower than non-secure HTTP.
To require all users to log in using a secure SSL connection:
1. Ensure that an IP address is set up, as described in Setting the IP Address starting on
page 16. A
TACACS+, as described in Setting Up User Authentication on page 21.
PCON
recommends that you also set the User Database to Internal, RADIUS or
PCONCMD
X, C
ONTROL
X,
2. Log in as described in Logging In on page 23.
Note
If authentication is enabled, you must log in with Administrator permission privileges.
For details about permissions, see Permissions on page 112.
A54-3000-100 A 24 A
PCON
, Inc.
Page 64

WEBX v2.50 User Manual Chapter 3: Setting Up and Accessing the Switch
3. Select
Settings>Services>Certificates
. The Certificates screen displays:
4. Click the Generate SSL certificate button.
W
EB
X generates the SSL certificate. This may take up to three minutes to complete; do
not cancel or change screens during generation. When the certificate is generated, this
message displays:
Keys generated...
Service restarting...SUCCESS
5. Select
Settings>Services>Certificates
to refresh and re-display the screen.
6. Check the Force secure (HTTPS) logins checkbox, then click the Update button.
EB
You are prompted to verify your actions. W
View>Controller Status
screen.
X enables secure logins, then displays the
When users log on, it will be via a secure connection.
A54-3000-100 A 25 A
PCON
, Inc.
Page 65

WEBX v2.50 User Manual Chapter 3: Setting Up and Accessing the Switch
3.4.2. Establishing SSH Connections
When you require command line communication to run over a secure connection, you can
enable SSH as described in the following steps.
To require all users to log in using an SSH connection:
1. Ensure that an IP address is set up, as described in Setting the IP Address starting on
page 16.
2. Log in as described in Logging In on page 23.
Note
If authentication is enabled, you must log in with Administrator permission privileges.
For details about permissions, see Permissions on page 112.
3. Select
Settings>Services>Certificates
. The Certificates screen displays:
4. Click the Generate SSH key button.
EB
X generates the SSH key. This may take up to three minutes to complete; do not
W
cancel or change screens during generation. When the key is generated, this message
displays:
Keys generated...
Service restarting...SUCCESS
5. Select
6. Check the Enable SSH checkbox, then click the Update button.
A54-3000-100 A 26 A
Settings>Services>Certificates
to refresh and re-display the screen.
PCON
, Inc.
Page 66

WEBX v2.50 User Manual Chapter 3: Setting Up and Accessing the Switch
You are prompted to accept the certificate. W
Settings>Services>Certificates
7. Uncheck the Enable Telnet checkbox, then click the Update button.
Note
: This prevents both secure SSH and non-secure telnet from being simultaneously
available.
When users use telnet, it will be via a secure connection.
screen.
EB
X enables SSH, then displays the
3.4.3. Running ASCII Command Scripts Over the LAN Ethernet Interface
To Enable one or more users to issue ASCII commands or run ASCII-command scripts over
the network:
1. Ensure that an IP address is set up, as described in Setting the IP Address starting on
page 16.
2. Log in as described in Logging In on page 23.
Note
If authentication is enabled, you must log in with Administrator permission privileges.
For details about permissions, see Permissions on page 112.
A54-3000-100 A 27 A
PCON
, Inc.
Page 67

WEBX v2.50 User Manual Chapter 3: Setting Up and Accessing the Switch
3. Select
Settings>Services>Service Properties
. The Service Properties screen displays:
4. Check the Enable ASCII (Slash) commands over network checkbox. The Enable
simultaneous ASCII commands field displays.
5. (Optional) If you want more than one user to send ASCII commands over the network at
the same time, check the Enable simultaneous ASCII commands checkbox.
6. Click the Update button.
You can now run ASCII commands over the network. If you selected both checkboxes,
multiple users or scripts can concurrently run ASCII commands over the network.
A54-3000-100 A 28 A
PCON
, Inc.
Page 68

WEBX v2.50 User Manual Chapter 3: Setting Up and Accessing the Switch
3.4.4. Enabling Access to A
WEBX is set, by default, to enable network use of these A
T
ITAN
A
PCONCMD
C
ONTROL
M
ONITOR
If you plan to use any of these A
To enable network use of A
1. Ensure that the following has occurred:
2. Log in as described in Logging In on page 23.
X
These products must be installed on a computer connected to your network.
X
For a description of these products, see Related Products on page 3.
PCON
• An IP address is set up, as described in Setting the IP Address starting on page 16.
• The User Database is set to Internal, RADIUS, or TACACS+, as described in Setting
Up User Authentication starting on page 21.
If authentication is enabled, you must log in with Administrator permission privileges.
For details about permissions, see Permissions on page 112.
PCON
Software
PCON
software products:
Note
PCON
products, ensure that WEBX enables their use.
software products:
Note
A54-3000-100 A 29 A
PCON
, Inc.
Page 69

WEBX v2.50 User Manual Chapter 3: Setting Up and Accessing the Switch
3. Select
Settings>Services>Service Properties
. The Service Properties screen displays:
4. Check the Enable RPC checkbox.
5. Click the Update button.
PCON
You can now access installed A
software products.
A54-3000-100 A 30 A
PCON
, Inc.
Page 70

WEBX v2.50 User Manual Chapter 3: Setting Up and Accessing the Switch
3.5. What’s Next
3.5.1. Configuring Ports and Port Access
Although you can complete these tasks at any time, you may now want to set up
the following:
•
Data Rate Selection
•
Port names
•
Zones
. For information about zoning, see Zoning on page 70.
•
Classes
. For information about classes, see Classes on page 65.
. For information about naming ports, see Names on page 63.
. For information about data rates, see Rates on page 52.
3.5.2. Logging Out
To log out of the switch, click the Logout prompt, located on the
upper right side of the screen:
The switch automatically logs out users who have left the switch idle for over six hours.
Logout prompt
includes the current
user’s login name
Logout admin (Administrator)
Note
A54-3000-100 A 31 A
PCON
, Inc.
Page 71

Connections
Chapter 4
Connections
This chapter details the screens available from the Connections menu:
For information about... Go to this page...
Realtime ....................................................................................................................... 33
Patch Mode ............................................................................................................... 41
By Name ....................................................................................................................... 42
By Name: Review ....................................................................................................... 43
By Preset (Presets) ........................................................................................................ 45
With M
ONITOR
(M
ONITOR
) ................................................................................................ 46
View Patches ................................................................................................................. 47
Chapter 4
A54-3000-100 A 32 A
PCON
, Inc.
Page 72

WEBX v2.50 User Manual Chapter 4: Connections
4.1. Realtime
Configuring your switch’s patches in Batch mode means the patch settings immediately take
effect. Select this option when you have few changes to make or when you need to
immediately implement your changes.
Note
After setting up classes and assigning ports to those classes, you can quickly view and
modify settings for SPAN and Analyzer ports by accessing the Monitor screen. For
information about setting up classes, see Classes on page 65. For information about
ONITOR
modifying settings, see Chapter 5, M
To view and configure your switch’s current patches, select:
Connections>Patching>Realtime
This screen displays on the Canvas (this figure is truncated to more easily identify parts):
Figure 8. Patch Ports: Realtime and Batch screens
, starting on page 48.
Patch mode
Blade power
LED
Port number
Locked port (striped)
Zoned port (black)
Locked port (red)
Blade letter
Port status LED
Port name
Patched port
Patch mode
The screen includes these options:
Note
To make changes on this screen, your account must have a minimum of Advanced Operator
permission privileges. For details about permissions, see Permissions on page 112.
Field Description
Patch mode Clicking these radio buttons determines the direction of data flow:
Duplex (normal)
•
: All patching occurs in duplex, or bidirectional,
mode.
Simplex (advanced)
•
: All patching occurs in simplex, or single
direction, mode.
This option also displays at the bottom of the screen.
TRASH
Disconnects the selected port.
A54-3000-100 A 33 A
PCON
, Inc.
Page 73

WEBX v2.50 User Manual Chapter 4: Connections
Field Description
Cancel Drag Discards, without saving changes, an in-process patch.
Lock/Unlock Locks or unlocks the “picked up” port.
Search... Displays a Search screen where you type the port name (a string)
you want to locate:
Backspace key Clears characters. Use to correct entries.
Clear Clears an entry. Use to make new entries.
Up/down arrows Highlights the previous or next match, when
more than one match displays.
Enter key Selects the highlighted item.
Refresh button (Displays only on the Batch screen) Clicking this button retrieves
current information from the switch and displays it on the screen.
When data changes (or might have changed), click the Refresh
button to update the view.
Save button (Displays only on the Batch screen) Clicking this button saves
and implements your changes.
This button displays only on the
Connections>Patch ing>Batch
screen. It also displays at the bottom of the screen.
Locked port
(red and striped)
Ports highlighted in red are not available for your use. They are
reserved for the exclusive use of a specified user. Ports
highlighted in red stripes are locked by you. Although they are
reserved, you can unlock them.
For information about locked (reserved) ports, see Locks on
page 54.
Note: If locked ports are not red, clear your internet cache:
1. Close the web browser.
2. Select Start>Settings>Control Panel>Internet Options.
3. In Temporary Internet Files, click the Delete Files button, then
click the OK button.
4. Restart your web browser and access the switch.
Zoned port
(black)
Ports highlighted in black are not available for your use. These
ports belong to a zone that you do not have permission to access.
For information about zones, see Zoning on page 70
A54-3000-100 A 34 A
PCON
, Inc.
Page 74

WEBX v2.50 User Manual Chapter 4: Connections
Field Description
Port number Identifies the port and serves as a link location when patching
port to one another. To patch a port:
1. Ensure that Data flow is set to the value you want: Duplex or
Simplex.
Note
: For details about how Patch Mode affects your patching,
see Patch Mode, following this table.
2. Place the cursor over a port label or patched port textbox, then
click. The following actions occur:
• A status message at the bottom of the screen identifies the
port you selected.
• The action popup— which includes Trash, Lock Port, and
Cancel links—displays at the top of the screen.
3. Do one of these:
• Click the label of a port—the port you want the selected port
to patch to. Labels of the selected port(s) display in the
Patched Port field of one or both ports, depending on the
Data Flow you selected.
• Click the action link that produces the action you desire:
Trash
•
: Disconnects one or both ports, depending on the
Data Flow you selected.
Cancel drag
•
Lock Port
•
: Terminates the current patch operation.
: Locks the port for the number of minutes you
specify. You can optionally add a message regarding the
lock. For details about locked (reserved) ports, see
Locks on page 54.
Note
: To verify a port’s status and connections, hover the cursor
over the port. Port status displays in a popup.
Port Status LED The LED color indicates port status:
Green
•
: A signal is present. The letters indicate the rate: 10,
100, or GIGE (Gigabit Ethernet).
Gray
•
: No signal is present.
Patched port Identifies the blade and port number this port is linked to. Also
serves as a link location when patching port to one another. To
patch a port, see Port number (at top of page).
The background color indicates port status:
White
•
: An SFP transceiver is inserted in the port, or the port is
copper—which doesn’t use an SFP transceiver.
Green
•
: An SFP transceiver is inserted in the port and the port
is receiving signal, or the port is copper and it is receiving
signal.
Gray
•
: No transceiver is installed, and the port is not copper.
Patch mode Identifies the patch mode:
Simplex
Duplex
For details, see Patch Mode on page 36.
A54-3000-100 A 35 A
PCON
, Inc.
Page 75

WEBX v2.50 User Manual Chapter 4: Connections
Field Description
Blade letter Displays the blade position within the chassis.
Blade labels use letters and start at the bottom. Port labels use
numbers prefaced by blade letter, and start at the left. For more
information, see Switch Labeling on page 9.
Blade power LED The LED color indicates blade status:
Green
•
•
: This blade’s power is on.
Gray
: This blade’s power is off.
The LED is also a link which, when clicked, displays the Blade
Power screen. For details about this screen, see Power on
page 59.
4.1.1. Patch Mode
The Patch mode you select results in the following:
• Duplex (normal):
Connected ports each transmit and receive.
When you select port A01, then select port A02, the ports
connect and each port transmits or receives simultaneously.
The label of the first selected port displays in the Patched Port
field of the second selected port, and the label of the second
selected port displays in the Patched Port field of the first
selected port
This bi-directional connection is indicated at the bottom of the
screen with the “ ” symbol.
When you select either port, then click Trash, both ports
disconnect.
If you change to Simplex mode, then select a port and click
Trash, the port you selected disconnects.
Simplex (advanced)
•
: Connected ports either transmit or receive.
When you select port A01, then select port A02, port A01 sends
data to port A02. The label of the first selected port displays in
the Patched Port field of the second selected port. This singledirection connection is indicated at the bottom of the screen
with the “ ” symbol.
When you select port A01, then click Trash, the connection
between A01 and A02 remains unchanged. When you select
TRASH
port A02, then click
, the ports disconnect.
Duplex
Connecting
Disconnecting
Simplex
Connecting
A54-3000-100 A 36 A
PCON
, Inc.
Page 76

WEBX v2.50 User Manual Chapter 4: Connections
4.2. Batch
Configuring your switch’s patches in Batch mode means the patch settings take effect only
after you click the Save button. Select this option when you have multiple patches to make in
a single transaction, or for complex changes.
Note
After setting up classes and assigning ports to those classes, you can quickly view and
modify settings for SPAN and Analyzer ports by accessing the Monitor screen. For
information about setting up classes, see Classes on page 65. For information about
ONITOR
modifying settings, see Chapter 5, M
To view and configure your switch’s current patches, select:
Connections>Patching>Batch
This screen displays on the Canvas (this figure is truncated to more easily identify parts):
Figure 9. Patch Ports: Realtime and Batch screens
Patch mode
, starting on page 48.
Blade letter
Port number
Locked port (striped)
Zoned port (black)
Locked port (red)
Port status LED
Port settings
Patched port
Blade power LED
The screen includes these options:
Note
To make changes on this screen, your account must have a minimum of Advanced Operator
permission privileges. For details about permissions, see Permissions on page 112.
Field Description
Patch mode Clicking these radio buttons determines the direction of data flow:
Duplex (normal)
•
: All patching occurs in duplex, or bidirectional,
mode.
Simplex (advanced)
•
: All patching occurs in simplex, or single
direction, mode.
This option also displays at the bottom of the screen.
TRASH
Disconnects the selected port.
Cancel Drag Discards, without saving changes, an in-process patch.
A54-3000-100 A 37 A
PCON
, Inc.
Page 77

WEBX v2.50 User Manual Chapter 4: Connections
Field Description
Search... Displays a Search screen where you type the port name (a string)
you want to locate:
Backspace key Clears characters. Use to correct entries.
Clear Clears an entry. Use to make new entries.
Up/down arrows Highlights the previous or next match, when
more than one match displays.
Enter key Selects the highlighted item.
Refresh button (Displays only on the Batch screen) Clicking this button retrieves
current information from the switch and displays it on the screen.
When data changes (or might have changed), click the Refresh
button to update the view.
Save button (Displays only on the Batch screen) Clicking this button saves
and implements your changes.
This button displays only on the
Connections>Patch ing>Batch
screen. It also displays at the bottom of the screen.
Locked port
(red and striped)
Ports highlighted in red are not available for your use. They are
reserved for the exclusive use of a specified user. Ports
highlighted in red stripes are locked by you. Although they are
reserved, you can unlock them.
For information about locked (reserved) ports, see Locks on
page 54.
Note: If locked ports are not red, clear your internet cache:
1. Close the web browser.
2. Select Start>Settings>Control Panel>Internet Options.
3. In Temporary Internet Files, click the Delete Files button, then
click the OK button.
4. Restart your web browser and access the switch.
Zoned port
(black)
Ports highlighted in black are not available for your use. These
ports belong to a zone that you do not have permission to access.
For information about zones, see Zoning on page 70
A54-3000-100 A 38 A
PCON
, Inc.
Page 78

WEBX v2.50 User Manual Chapter 4: Connections
Field Description
Search... Displays a Search screen where you type the port name (a string)
you want to locate:
Backspace key Clears characters. Use to correct entries.
Clear Clears an entry. Use to make new entries.
Up/down arrows Highlights the previous or next match, when
more than one match displays.
Enter key Selects the highlighted item.
Refresh button (Displays only on the Batch screen) Clicking this button retrieves
current information from the switch and displays it on the screen.
When data changes (or might have changed), click the Refresh
button to update the view.
Save button (Displays only on the Batch screen) Clicking this button saves
and implements your changes.
This button displays only on the
Connections>Patch ing>Batch
screen. It also displays at the bottom of the screen.
Locked port
(red and striped)
Ports highlighted in red are not available for your use. They are
reserved for the exclusive use of a specified user. Ports
highlighted in red stripes are locked by you. Although they are
reserved, you can unlock them.
For information about locked (reserved) ports, see Locks on
page 54.
Note: If locked ports are not red, clear your internet cache:
1. Close the web browser.
2. Select Start>Settings>Control Panel>Internet Options.
3. In Temporary Internet Files, click the Delete Files button, then
click the OK button.
4. Restart your web browser and access the switch.
Zoned port
(black)
Ports highlighted in black are not available for your use. These
ports belong to a zone that you do not have permission to access.
For information about zones, see Zoning on page 70
A54-3000-100 A 39 A
PCON
, Inc.
Page 79

WEBX v2.50 User Manual Chapter 4: Connections
Field Description
Port number Identifies the port and serves as a link location when patching
port to one another. To patch a port:
1. Ensure that Data flow is set to the value you want: Duplex or
Simplex.
Note
: For details about how Patch Mode affects your patching,
see Patch Mode, following this table.
2. Place the cursor over a port label or patched port textbox, then
click. The following actions occur:
• A status message at the bottom of the screen identifies the
port you selected.
• Action links—Trash and Cancel drag—display at the top and
bottom of the screen.
3. Do one of these:
• Click the label of a port—the port you want the selected port
to patch to. Labels of the selected port(s) display in the
Patched Port field of one or both ports, depending on the
Data Flow you selected.
• Click the action link that produces the action you desire:
Trash
•
: Disconnects one or both ports, depending on the
Data Flow you selected.
Cancel drag
•
: Terminates the current patch operation.
Port Status LED The LED color indicates port status:
Green
•
: A signal is present. The letters indicate the rate: 10,
100, or GIGE (Gigabit Ethernet).
Gray
: No signal is present.
Port settings
[R P C]
•
Each letter within the braces is a separate option. Selecting an
option produces these results:
R (Rate Select) Displays the port’s Set Rate Selection
screen. For information about the options on this
screen, see Rates on page 52.
P (Port Properties) Displays the port’s Port Properties
screen. For information about the options on this
screen, see Port Properties on page 50.
C (Connections) Highlights all ports connected to this
port. Select this option to quickly identify ports
patched to the source.
Patched port Identifies the blade and port number this port is linked to. Also
serves as a link location when patching port to one another. To
patch a port, see Port number (at top of page).
The background color indicates port status:
White
•
: An SFP transceiver is inserted in the port, or the port is
copper—which doesn’t use an SFP transceiver.
Green
•
: An SFP transceiver is inserted in the port and the port
is receiving signal, or the port is copper and it is receiving
signal.
Gray
•
: No transceiver is installed, and the port is not copper.
A54-3000-100 A 40 A
PCON
, Inc.
Page 80

WEBX v2.50 User Manual Chapter 4: Connections
Field Description
Blade letter Displays the blade position within the chassis.
Blade labels use letters and start at the bottom. Port labels use
numbers prefaced by blade letter, and start at the left. For more
information, see Switch Labeling on page 9.
Blade power LED The LED color indicates blade status:
Green
•
•
: This blade’s power is on.
Gray
: This blade’s power is off.
The LED is also a link which, when clicked, displays the Blade
Power screen. For details about this screen, see Power on
page 59.
4.2.1. Patch Mode
The Patch mode you select results in the following:
• Duplex (normal):
Connected ports each transmit and receive.
When you select port A01, then select port A02, the ports
connect and each port transmits or receives simultaneously.
The label of the first selected port displays in the Patched Port
field of the second selected port, and the label of the second
selected port displays in the Patched Port field of the first
selected port
This bi-directional connection is indicated at the bottom of the
screen with the “< >” symbol.
When you select either port, then click Trash, both ports
disconnect.
If you change to Simplex mode, then select a port and click
Trash, the port you selected disconnects.
Simplex (advanced)
•
: Connected ports either transmit or receive.
When you select port A01, then select port A02, port A01 sends
data to port A02. The label of the first selected port displays in
the Patched Port field of the second selected port. This singledirection connection is indicated at the bottom of the screen
with the “>> ” symbol.
When you select port A01, then click Trash, the connection
between A01 and A02 remains unchanged. When you select
TRASH
port A02, then click
, the ports disconnect.
Duplex
Connecting
Disconnecting
Simplex
Connecting
A54-3000-100 A 41 A
PCON
, Inc.
Page 81

WEBX v2.50 User Manual Chapter 4: Connections
4.3. By Name
To quickly configure patch settings, select:
Connections>Patching>By Name
This screen displays on the Canvas:
Figure 10. By Name screen
The screen includes these options:
Note
To make changes on this screen, your account must have a minimum of Advanced Operator
permission privileges. For details about permissions, see Permissions on page 112.
Field Description
Patching By
Name/Number
Use the top section of the screen when you know the name
and/or number of the ports you want to connect, or to enter many
target ports in a single entry.
Source Port
•
you want to patch from—in the text box on the left.
Target Ports
•
want the selected port to patch to—in the text box on the right.
You can enter either the name or number.
Entering A00 turns the port off; A99 leaves the port unchanged.
By default, all patching occurs in duplex, or bidirectional,
mode. To change the mode, click the Review button.
Review button
•
Review dialog box where you can customize your entry. For
information about this dialog box, see By Name: Review on
page 43.
: Enter the source port name or number—the port
: Enter the target port or ports—the port(s) you
: Click this button to display the Quick Patch
A54-3000-100 A 42 A
PCON
, Inc.
Page 82

WEBX v2.50 User Manual Chapter 4: Connections
Field Description
Duplex/Simplex
Patching
Use the middle section of the screen to display a list of ports from
which you can select:
Source Port
•
from—from the drop-down list on the left.
Target Port
•
selected port to patch to—in the drop-down list on the right.
Direction
•
>> (Simplex)
: Select the source port—the port you want to patch
: Select the target port—the port(s) you want the
: Indicates the direction of data:
: Data flows from the Source to the Target.
Disconnecting
4.3.1. By Name: Review
<> (Duplex)
•
Connect button
settings.
To disconnect a port:
•
Port
: Select the port you want to disconnect from the drop-
down list.
Disconnect button
•
Note
: If the port you disconnect is bi-directionally patched to
another port, the other port also disconnects.
Figure 11. By Name: Review dialog box
: Data flows both directions.
: Click this button to save and implement your
: Click this button to disconnect the port.
The dialog box includes these options:
Note
To make changes on this screen, your account must have a minimum of Advanced Operator
permission privileges. For details about permissions, see Permissions on page 112.
Field Description
Patch this port Displays the source port—the port you want to patch from—in the
left column.
to Indicates the direction of data:
>> (Simplex)
<> (Duplex)
Note
: By default, all patching occurs in duplex, or bidirectional,
mode. You can change the mode on this screen.
A54-3000-100 A 43 A
: Data flows in only one direction.
: Data flows both directions.
PCON
, Inc.
Page 83

WEBX v2.50 User Manual Chapter 4: Connections
Field Description
this port Displays the target port or ports—the port(s) you want the
selected port to patch to—in the right column.
Save button Click this button to save and implement your settings.
A54-3000-100 A 44 A
PCON
, Inc.
Page 84

WEBX v2.50 User Manual Chapter 4: Connections
4.4. By Preset (Presets)
Saves, changes, or clears configuration settings, referred to as “presets.” You can save up to
ninety nine different switch configurations as a preset. Once you reach ninety nine saved
configurations, you must clear an existing preset configuration to make room for a new one.
To create, change, and delete switch settings, select:
Connections>Patching>Presets
These screens display simultaneously on the Canvas:
Figure 12. By Preset (Presets) screens
The screen includes these options:
Note
To make changes on this screen, your account must have a minimum of Operator
permission privileges. For details about permissions, see Permissions on page 112.
Field Description
Preset 1–99 A configuration assigned to this preset number and name.
A configuration includes only patch connections.
For information about assigning a configuration to a Preset, see
Edit Presets on page 75.
Load Preset button Sets the switch to the configuration to the preset name or number
selected in the list at left.
CAUTION
Undo Preset button
To create or edit
presets, please see:
[Edit Presets]
A54-3000-100 A 45 A
Displays the Edit Presets screen where you can set switches to a
saved configuration. For more information about this screen, see
page 75.
: This action overwrites current patch settings.
PCON
, Inc.
Page 85

WEBX v2.50 User Manual Chapter 4: Connections
4.5. With M
To access A
NTELLAPATCH
I
equipment, select:
Connections>Patching>M
The M
ONITOR
ONITOR
M
To use the M
about license keys, see License Key on page 98. To find out how to contact A
Contacting A
You can also acess this tool by selecting:
Connections>M
, starting on page 48.
ONITOR
PCON
’s M
(M
ONITOR
ONITOR
software which non-intrusively connects to and controls any
)
switch using the PC’s serial port or TCP/IP LAN connection and shares
ONITOR
screen displays. For more information about M
ONITOR
, see chapter Chapter 5,
Note
ONITOR
PCON
feature, you must fbtain a license key from A
on page 4.
PCON
. For information
PCON
Note
ONITOR
, see
A54-3000-100 A 46 A
PCON
, Inc.
Page 86

WEBX v2.50 User Manual Chapter 4: Connections
4.6. View Patches
To view your switch’s current patch connections, select:
Connections>Patching>View Patches
This screen displays on the Canvas:
Figure 13. View Patches screen
Refresh timer
The screen includes these options:
Note
To view this screen, your account needs only Guest permission privileges. For details about
permissions, see Permissions on page 112.
Field Description
Name The port name you specify. For information about naming ports,
see Names on page 63.
Port The port number. Blade labels use letters and start at the bottom.
Port labels use numbers prefaced by blade letter, and start at the
left. For details, see Switch Labeling on page 9.
Direction Indicates the direction of data:
>> (Simplex)
<> (Duplex)
Refresh timer Displays the number of seconds remaining before the data
refreshes. A refresh occurs every thirty seconds.
: Data flows in only one direction.
: Data flows both directions.
A54-3000-100 A 47 A
PCON
, Inc.
Page 87

M
ONITOR
Chapter 5
M
ONITOR
M
ONITOR
software connects to and controls any A
PCON INTELLAPATCH
Physical Layer Switch
Chapter 5
using the PC’s serial port or TCP/IP LAN connection. The software is specifically tailored for
non-intrusive network monitoring and for sharing equipment such as traffic analyzers,
network probes and Intrusion Detection System (IDS) equipment.
A powerful addition to your network administration toolset, you use A
PCON MONITOR
software to:
• Electronically move and share monitoring equipment to increase utilization of existing
equipment.
• Increase network visibility, getting a quick snapshot of network connections to monitoring
devices.
• Gather information at-a-glance about ports, connections, data rates and more.
• Employ digital diagnostics and I
NTELLAPATCH
switch monitoring.
• Control user permissions for modifying system status and software options.
Note
M
ONITOR
software is not intended for in-line monitoring/electronic tapping, wherein data is
passed through the switch, with traffic in both directions mirrored non-intrusively by the
EB
analyzer device. To implement this functionality, consider the W
X Realtime or Batch
interfaces.
ONITOR
Accessing M
how to contact A
activate the M
software through WEBX requires a license key from A
PCON
, see Contacting A
ONITOR
feature as described in License Key on page 98.
To find out more about operating M
PCON
on page 4. After obtaining the key, you must
ONITOR
software, see the M
ONITOR
PCON
. To find out
User Manual.
A54-3000-100 A 48 A
PCON
, Inc.
Page 88

Ports/Blades
Chapter 6
Ports/Blades
This chapter details the screens available from the Ports/Blades menu:
For information about... Go to this page...
Ports ............................................................................................................................ 50
Port Properties ........................................................................................................... 50
Rates ........................................................................................................................ 52
Locks ........................................................................................................................ 54
Blades .......................................................................................................................... 57
Properties .................................................................................................................. 57
Power ....................................................................................................................... 59
SFP/XFP ....................................................................................................................... 60
Properties .................................................................................................................. 60
Alarms ...................................................................................................................... 61
Configuration ................................................................................................................. 63
Names ...................................................................................................................... 63
Classes ..................................................................................................................... 65
Class Members .......................................................................................................... 67
Port Locking .............................................................................................................. 69
Zoning ...................................................................................................................... 70
Receive Monitoring ..................................................................................................... 74
Edit Presets ............................................................................................................... 75
Chapter 6
A54-3000-100 A 49 A
PCON
, Inc.
Page 89

WEBX v2.50 User Manual Chapter 6: Ports/Blades
6.1. Ports
6.1.1. Port Properties
Many transceiver modules have manufacturer-provided identification capabilities, allowing you to
determine part numbers, serial numbers, supported transmission media, protocol compliance,
maximum data rate, digital diagnostics, or other vendor-specific parameters.
To view transceiver details, select:
Ports/Blades>Ports>Properties
This screen displays on the Canvas:
Figure 14. Port Properties screen
Screen appearance
before selecting a port
Details that display
after selecting a port
Note
: Digital Diagnostics
display only for SFPs that
support this feature.
The screen includes these options:
Note
To make changes on this screen, your account needs only Guest permission privileges. For
details about permissions, see Permissions on page 112.
A54-3000-100 A 50 A
PCON
, Inc.
Page 90

WEBX v2.50 User Manual Chapter 6: Ports/Blades
Field Description
Port numbers Identifies ports. The background color indicates port status:
White
•
: An SFP transceiver is inserted in the port, but is not
receiving signal.
Green
•
: An SFP transceiver is inserted in the port and the port
is receiving signal.
Gray
•
: No transceiver is installed.
To select the port whose transceiver information you want to view,
place the cursor over port number and click. The screen enlarges
to display vendor information. You can display only one port’s
vendor information at a time.
Blades that do not support SFP transceivers (for example, copper
blades) display this message:
unsupported on Blade
n
Vendor information Displays the vendor name, part number and revision, serial
number, date, maximum data rate, and any other information the
vendor makes available.
Transmitter Technology Displays the transmitter capabilities of this SFP transceiver:
Unchecked
: The SFP transceiver does not support the
specified item.
Checked
: The SFP transceiver supports the specified item.
To determine whether the blade supports the item, see
Rates (page 52) and the blade’s data sheet.
Protocol Compliance Displays the protocols this device complies with:
Unchecked
: The SFP transceiver does not support the
specified item.
Checked
: The SFP transceiver supports the specified item.
To determine whether the blade supports the item, see
Rates (page 52) and the blade’s data sheet.
Digital Diagnostics Displays real-time digital diagnostics for SFPs that support this
feature.
Real-time parameters include transceiver temperature, laser bias
current, transmitted and received optical power, transceiver
supply voltage, and alarm status.
Transmission Media
Supported
Displays the supported transmission media supported by the
device:
Unchecked
: The SFP transceiver does not support the
specified item.
Checked
: The SFP transceiver supports the specified item.
To determine whether the blade supports the item, see
Rates (page 52) and the blade’s data sheet.
A54-3000-100 A 51 A
PCON
, Inc.
Page 91

WEBX v2.50 User Manual Chapter 6: Ports/Blades
6.1.2. Rates
Depending on the capabilities of a given port, you can change the data rate and other transmission
characteristics.
To set your switch’s data transmission rate, select:
Ports/Blades>Ports>Rates
This screen displays on the Canvas:
Figure 15. Rates screen
Port name
Current rate Rate select
The screen includes these options:
Note
To make changes on this screen, your account must have a minimum of Advanced Operator
permission privileges. For details about permissions, see Permissions on page 112.
Field Description
Blades
(Tabs A, B, C ...)
Clicking a tab displays the rate settings for the specified blade.
Tab letters match the blade numbers on your I
NETELLAPATCH
chassis. Blade labels use letters and start at the bottom. Port
labels use numbers prefaced by blade letter, and start at the left.
For details, see Switch Labeling on page 9.
A54-3000-100 A 52 A
PCON
, Inc.
Page 92

WEBX v2.50 User Manual Chapter 6: Ports/Blades
Field Description
Port name Identifies the port assignment. The port name consists of:
PortNumber:PortName
Where
PortName
name,
PortNumber
is the number assigned to the port and
is the name you specify. If you do not specify a port
Unnamed
displays.
For information about naming ports, Names on page 63.
Current rate Displays the rate at which the port currently transmits data and
the duplex setting, either full or half. Blades that do not have a
N/A
rate select option display
.
Rate select The rate at which the port transmits data. Each blade model
supports different options; some values include:
Auto
•
: The switch negotiates the fastest possible rate to
transmit data, and accommodates changing devices with
maximum flexibility.
Full/half
•
: Allows the port to transmit and receive in full duplex
mode when connected to a duplex device, but negotiate down
to half duplex automatically when necessary.
N/A
: Not applicable
•
Set all Selecting a value sets all the ports on this blade to the specified
rate when you click the Save button.
Refresh button Clicking this button retrieves current information from the switch
and displays it on the tab.
Save button Clicking this button saves and implements your changes.
A54-3000-100 A 53 A
PCON
, Inc.
Page 93

WEBX v2.50 User Manual Chapter 6: Ports/Blades
6.1.3. Locks
View By Port tab
Displays when
Port Locking is
disabled.
Displays when
Port Locking is
enabled.
See
Locks
on
page
54
Reserves the specified port(s) for your exclusive use.
To access port locking options, select:
Ports/Blades>Ports>Locks
This screen displays on the Canvas:
Figure 16. Locks screen
Port locking status
Lock details
The screen includes these options:
Note
To make changes on this screen, your account must have a minimum of Advanced Operator
permission privileges. For details about permissions, see Permissions on page 112.
Field Description
Port locking status Located at the top of the screen, this message indicates:
• Port locking status, either enabled or disabled.
• Maximum lock duration, either a fixed or unlimited number of
minutes.
• Disposition of connections when lock duration expires.
Change Clicking this link displays the Port Locking screen where you can
specify the port lock settings to allow. For details about this
screen, see page 69.
Tabs Clicking a tab displays the the following
View By Port tab
•
, shown in the above figure, that you use to
lock and unlock ports. Ports display by blade.
View By User tab
•
, shown on page 55, that you use to view ports
locks set by each user, and to unlock ports.
A54-3000-100 A 54 A
PCON
, Inc.
Page 94

WEBX v2.50 User Manual Chapter 6: Ports/Blades
Field Description
Ports Identifies the port and serves as the link location when locking
ports. To lock a port:
1. Select the port(s) you want to lock using one of these methods:
• Place the cursor over the port’s checkbox and click.
• Click the Toggle link, located on the right side of the screen,
for the blade whose ports you want to lock.
2. Specify the port lock settings, located at bottom of the screen.
3. Click the Save Changes button.
Locked ports display as red, while unlocked ports remain green.
Lock details Hovering your cursor over a port displays the following lock
information for that port:
Port number: Port name
•
: Identifies the port assignment.
PortNumber is the number assigned to the port and PortName is
the name you specify. If you do not specify a port name,
Unnamed
displays.
For information about naming ports, Names on page 63.
Locked by
•
Remaining time
•
: The login name of the user that set the lock.
: The number of minutes the lock remains in
effect.
Message (optional)
•
: A message from the user that set the lock.
Toggle Checks or unchecks all ports on the selected blade.
Port lock settings Specifies the settings for this lock operation:
Lock selected ports for n minutes with the status message abc
•
Specifies the duration of the lock and the message that displays
when users try to access a port while locked.
Note
: To change the number of minutes, you must cancel the
lock, then lock the port again with a different duration.
Unlock selected ports
•
: Releases the lock
Save button Clicking this button saves and implements your changes.
:
6.1.3.1. Locks: View By User tab
Figure 17. Locks: View By User tab
Port locking
status
User name
Locked ports
The screen includes these options:
A54-3000-100 A 55 A
PCON
, Inc.
Page 95

WEBX v2.50 User Manual Chapter 6: Ports/Blades
Note
To make changes on this screen, your account must have a minimum of Advanced Operator
permission privileges. For details about permissions, see Permissions on page 112.
Field Description
Port locking status Located at the top of the screen, this message indicates:
• Port locking status, either enabled or disabled.
• Maximum lock duration, either a fixed or unlimited number of
minutes.
Tabs Clicking a tab displays the the following
View By User tab
•
, shown in the above figure, that you use to
view ports locks set by each user, and to unlock ports.
View By Port tab
•
, shown on page 54, that you use to lock and
unlock ports. Ports display by blade.
User name Displays the user’s login name.
Locked ports Displays the ports locked by each user. You can also unlock a
ports from this screen:
Note
: Users with Administrator permission privileges can unlock
any port. Users with Advanced Operator Other permission
privileges can unlock only the ports they locked.
1. Select the port or ports you want to unlock using one of these
methods by placing the cursor over the port’s checkbox and
clicking.
2. Click the Unlock Selected Ports button. The View By Port tab
displays.
Unlock Selected Ports
Unlocks the specified ports and displays the View By Port tab.
button
A54-3000-100 A 56 A
PCON
, Inc.
Page 96

WEBX v2.50 User Manual Chapter 6: Ports/Blades
6.2. Blades
6.2.1. Properties
To view your switch’s current patches, settings, and port properties, select:
Ports/Blades>Blades>Properties
This screen displays on the Canvas:
Figure 18. Properties screen
The screen includes these options:
Note
To view this screen, your accountneeds only Guest permission privileges. For details about
permissions, see Permissions on page 112.
Field Description
Switch The screen’s top section displays information about the switch:
Switch name
•
switch.
To change the switch name, see Properties on page 57. To
change the IP address, see LAN Interface on page 129.
Power
•
A54-3000-100 A 57 A
: The name and IP address you specified for the
: Indicates whether power is supplied to the switch.
PCON
, Inc.
Page 97

WEBX v2.50 User Manual Chapter 6: Ports/Blades
Field Description
Switch •
Temperature
Green
•
Flashing red
•
: Indicates temperature and status:
: Internal temperature is within specified limits.
: Internal temperature exceeds the specified
maximum temperature threshold. If this occurs, the switch
also emits an audible alarm, provided the audible alarm is
enabled. For information about audible alarms, see
Properties on page 133.
The default temperature threshold is 50° C. To change the
default, see Properties on page 133.
Power Supply n Alarm
•
: Indicates operational status of the
specified power supply.
Green
•
•
: The power supply is functioning normally.
Flashing red
: The power supply failed. If this occurs, the
switch also emits an audible alarm, provided the audible
alarm is enabled. For information about audible alarms, see
Properties on page 133.
SFP Warnings and SFP alarms
•
: Indicates whether any SFP
warnings or alarms exist
Gray
•
•
•
: Monitoring is disabled.
Green
: No alarms exist; SFPs are functioning normally.
Flashing red
: At least one SFP warning or alarm exists.
Clicking the links to the left of the LED displays the Alarms
screen where you can view warning and alarm details. For
more information about this screen, see Alarms on page 61.
Port# The port number.
Name The port name.
Rate/Protocol Specifies the data rate and protocol the port is currently
negotiated at or hard set to. Fiber optic blades that don’t support
auto-negotiation display only
signal
or no
signal
.
SFP Indicates transceiver status:
Y (Yes)
•
: An SFP transceiver is inserted in the port, or the port is
copper.
N (No)
•
: No SFP transceiver exists.
Signal Indicates signal status:
(Green) The port currently has signal.
(Gray) The port does not have a signal.
Simplex/Duplex Displays the direction of data flow:
D (Duplex) The port is configred in duplex, or bidirectional, mode.
S (Simplex) The port is configured in simplex, or single direction,
mode.
n/c No connection.
A54-3000-100 A 58 A
PCON
, Inc.
Page 98

WEBX v2.50 User Manual Chapter 6: Ports/Blades
6.2.2. Power
Before inserting or removing a blade, power to its slot must be turned off.
To turn a blade slot’s power off or on, select:
Ports/Blades>Blades>Power
This screen displays on the Canvas:
Figure 19. Power screen
Power
Note
To make changes on this screen, your account must have a minimum of Administrator
permission privileges. For details about permissions, see Permissions on page 112.
The screen includes these options:
Field Description
Blade Identifies the blade, and therefore slot, whose power status you
want to change.
Blade labels use letters and start at the bottom. For details, see
Switch Labeling on page 9.
Power Determines the blade slot power status:
ON
: Turns blade power on. When you select this option, the
•
background changes to green.
OFF
: Turns blade power off. When you select this option, the
•
background changes to red.
ALL Sets the blade slot power status for all blades in the chassis:
ON
: Turns power on for all blades. When you select this option,
•
the background changes to green.
OFF
: Turns power off for all blades. When you select this
•
option, the background changes to red.
A54-3000-100 A 59 A
PCON
, Inc.
Page 99

WEBX v2.50 User Manual Chapter 6: Ports/Blades
6.3. SFP/XFP
6.3.1. Properties
Displays SFP transceiver information in a format you can quickly view and copy.
To display transceiver properties, select:
Ports/Blades>SFP/XFP>Properties
This screen displays on the Canvas:
Figure 20. Properties screen
Port
Company
SFP part number
Revision
Serial number
Manufacture date
RX signal strength
Internal temperature
Power supply voltage
The screen includes these options:
Note
To make changes on this screen, your account must have Administrator permission
privileges. For details about permissions, see User Levels on page 95.
Field Description
Load Clicking this link loads and displays SFP information for the blade
or blades you select.
Port Identifies the port.
Company Displays A
as the I
NTELLAPATCH
switch manufacturer.
PCON
SFP part # The SFP’s part number.
Revision The switch’s revision number.
Serial number The switch’s serial number.
Manufacture date The switch’s manufacture date.
RX signal strength Displays the SFP’s Receive signal strength.
Internal temperature Indicates SFP temperature.
Power supply voltage Indicates SFP voltage.
A54-3000-100 A 60 A
PCON
, Inc.
Page 100

WEBX v2.50 User Manual Chapter 6: Ports/Blades
6.3.2. Alarms
Indicates warning and error conditions for the SFP transceivers.
To monitor transceiver status, select:
Ports/Blades>SFP/XFP>Alarms
This screen displays on the Canvas:
Figure 21. Alarms screen
The screen includes these options:
Note
To make changes on this screen, your account must have Administrator permission
privileges. For details about permissions, see Permissions on page 112.
Error icons
A54-3000-100 A 61 A
PCON
, Inc.
 Loading...