

MultiChoice 50645 Owner's Manual

Contents
Unpacking ............................................. 2
Safety ................................................. 2
Preface ................................................ 2
Digital Satellite Services ................................. 2
Conditional Access ..................................... 3
Smart Card ............................................. 3
Inserting the Smart Card ............................. 3
The Digital Satellite Decoder (DSD) ........................ 4
Display ................................................ 4
Front Panel Keys ........................................ 4
Rear Panel Connections ................................... 4
Remote Control Unit .................................... 5
Replacing Batteries in the RCU ............................. 5
Getting Started ......................................... 6
Installation of the satellite dish and cabling to the decoder ......... 6
Installation Indemnity ................................ 6
Setting-up the System .................................... 6
Switching on the Decoder at the Mains ........................ 6
Tuning your TV .......................................... 6
Adding a Modem ......................................... 7
Standby and Normal Modes ................................ 7
Optional Decoder Connections .............................. 8
Introduction ....................................... 8
Hints to Quality TV System Configurations ............... 8
Satellite Decoder, M-Net Decoder, TV (using SCART or RF
Interfaces) ........................................ 8
Decoder, TV (SCART or RF Interfaces), Hi-Fi ............ 9
Decoder, VCR, TV ,Hi-Fi ............................ 10
Decoder, VCR, TV, Hi-Fi (using RCA Connectors) ....... 11
Two Satellite Decoders, TV, (using AUX SCART
and RF Interfaces) ................................. 12
RCU UHF Button Selection Functions ............ 12
Bouquet Selection ..................................... 13
Selecting Specific Services ............................... 13
Selecting Services Directly ........................... 13
Stepping through Services ........................... 13
Stepping using the RCU ....................... 13
Stepping using the Decoder Front Panel Keys ...... 13
Selecting Specific Services from the EPG ............... 13
Selecting Services from the Information Bar ............. 13
Controlling the Show ................................... 14
Volume Control using the RCU Keys ................... 14
Volume Control using the Decoder Keys ................ 14
Mute ............................................ 14
Displaying Subtitles or Teletext ....................... 14
Subtitles .................................... 14
Teletext .................................... 14
Clock ........................................... 14
Selecting Soundtracks .............................. 15
Power Reset ...................................... 15
Signal Source Selection ............................. 15
Open TV Electronic Programme Guide .................... 15
Using the EPG ......................................... 15
Now/Next EPG .................................... 15
Extended EPG .................................... 16
Theme Search .................................... 16
Open TV Information Bar ................................ 17
Reminders ............................................ 17
Parental Blocking ...................................... 17
Menu Navigation Route ................................. 18
Using Menus ..........................................19
Soundtrack Options ..................................... 19
Parental Guidance ...................................... 19
Setting the Parental Level ............................ 19
Changing the Parental Pin Code ...................... 20
Information Box Display Period .............................20
Organising Service ...................................... 20
Sort TV Services .................................. 20
Reset TV Services ................................. 21
Sort Audio Services ................................ 21
Reset Audio Services ............................... 21
Full Rescan ...................................... 21
Mail Messages ......................................... 21
Advanced Options ...................................... 21
Change Dish Installation ............................ 21
LNB Configuration ............................ 21
Set LNB Power ......................... 21
LNB Setup ............................. 22
Signal Setup Alternatives .......................22
Tune DSD .................................. 22
Reset to Factory Defaults ...................... 22
Loop Through Mode ........................... 22
Signal Detection ................................... 22
Information ....................................... 22
DSD Status ................................. 22
CA Status .................................. 23
Loader Status ............................... 23
TV Installation .................................... 23
TV Type ....................................23
Aspect Ratio ................................ 23
UHF Tuning .................................23
Scart Source ................................ 23
Scart Video Output ........................... 23
Change Modem Settings (if fitted) ..................... 24
Local Time ....................................... 24
DSD Upgrade ..................................... 24
Troubleshooting ....................................... 25
Specifications ......................................... 28
Multichoice DSTV Hotlines ..............................29
Installation Settings .................................... 29
Notes ................................................ 30
WARRANTY .......................................... 31

DSD 660 OPERATING INSTRUCTIONS 3
UNPACKING
Ensure that the following items are included with the Digital Satellite
Decoder (DSD):
1 x Remote Control Unit (RCU)
2 x AAA Batteries
1 x Flylead
1 x Mains Cable
1 x User Manual (Operating Instructions)
SAFETY
This decoder exceeds International Safety Standards. Please read the
following recommended safety precautions carefully.
MAINS SUPPLY: 210-250 V AC 50 Hz ONLY.
LIQUIDS: Keep liquids away from the decoder.
CLEANING: Before cleaning, disconnect the decoder from the wall socket.
Use a cloth lightly dampened with water (no solvents) to clean the exterior.
VENTILATION: Do not block the decoder ventilation holes. Ensure that
free airflow is maintained around the decoder. NEVER stand the decoder
on soft furnishings or carpets. Do not use or store the decoder where it is
exposed to direct sunlight, or near a heater. Never stack other electronic
equipment on top of the decoder.
ATTACHMENTS: Do not use any attachment that is not recommended by
the manufacturer, as it may cause a hazard or damage the equipment.
CONNECTION TO THE SATELLITE DISH LOW NOISE BLOCK (LNB):
The LNB connector cable has a voltage on its centre core. It is therefore
recommended that the decoder is disconnected from the mains power
before connecting or disconnecting this cable. FAILURE TO DO SO
COULD DAMAGE THE LNB.
SERVICING: Do not attempt to service this product yourself. Any attempt
to do so will make the warranty invalid. Refer all servicing to a qualified
service agent.
LIGHTNING: If the decoder is installed in an area subject to intense
lightning activity, protection devices for the decoder mains connector and
modem telephone line are essential. The individual manufacturer’s
instructions for safeguarding other equipment, such as TV set, Hi-Fi, etc.,
connected to the decoder, must also be followed during lightning storms.
EARTHING: The earth of the LNB cable MUST BE DIRECTLY
CONNECTED to the system earth for the satellite dish. The earthing
system must comply with local regulations.
Refer to the Installation Indemnity on page 6.
PREFACE
The digital satellite decoder introduces exciting new technology. This
manual provides full information on how to use the decoder and enjoy
the benefits of all its features.
The decoder is easy to use, even for those users unfamiliar with, or
intimidated by, modern technology. The more advanced and more
complex features can be avoided until you become comfortable with the
basic operation of the system.
The manual provides:
# Important safety precautions; please study them.
# Overview material; read only those parts that interest you. It is
not necessary to study the manual from cover to cover before
using the decoder.
# Step-by-step instructions on how to use the decoder and its
advanced features.
# Step-by-step instructions on how to install the decoder and
connect it to basic sound and TV systems. It is beyond the scope
of this manual to include all of the possible configurations or
installation procedures.
# Troubleshooting guide to assist you if you have difficulty with
operating the decoder correctly, or if technical problems occur.
The operation of the decoder can be upgraded using over-the-air signals
(typically in the morning). This manual and the menus downloaded in the
decoder are therefore subject to change at any time.
This document and the information contained herein are the subject of
copyright and intellectual property rights under international convention.
All rights are reserved. No part of this document may be reproduced,
stored in a retrieval system or transmitted in any form by any means,
electronic, mechanical or optical, in a whole or in part, without the prior
written permission of UEC Commercial (Pty) Ltd, the Manufacturer.
DIGITAL SATELLITE SERVICES
The decoder has been designed to receive and process digital signals
from the PanAmSat 4, Astra and EutelSat satellites. The satellites act
as mirrors in the transmission process, beaming the Service Provider’s
signals back to your satellite dish. Compared to conventional TV
(analogue), digital technology presents higher quality pictures, sound
comparable to that of a CD, and many more services.
Satellite technology also enables excellent reception of satellite TV
services in remote rural areas where good quality terrestrial reception
has never before been possible.
The term “Services” is used instead of “Channels” because compressed
digital TV and audio technology efficiently uses available bandwidth,
allowing several services to use the bandwidth of one channel.
In addition to the digital TV and audio signals, satellite signals also
contain data that the decoder extracts, processes and stores. This
provides up-to-date text information on the content and status of the
various services at the touch of a button. Convenient facilities are also
provided to manipulate received data in order to customise viewing and
listening preferences.
Due to the nature of compressed digital TV, many more features will
become available in the near future.
4 OPERATING INSTRUCTIONS DSD 660
CONDITIONAL ACCESS
Although some satellite TV and audio services are free to air, most TV and
audio services are only available on a subscription basis and can only be
enjoyed via the conditional access components. These are the removable
Smart Card and a built-in conditional access process already fitted into the
system.
Smart Card
You should have purchased a Smart Card from the dealer when you
purchased the decoder. The Smart Card looks similar to a credit card and
is inserted into the slot behind the right-hand front flap of the decoder.
A valid Smart Card entitles you to view and listen to all the services you
choose to subscribe to. Full details of subscription options are supplied with
the card.
Your subscription details are stored in the Smart Card.
Inserting the Smart Card
The Smart Card is the key to unlocking the decoder. The decoder will not
decode scrambled TV or audio services if the card is not inserted or is
incorrectly inserted.
Inserting the Smart Card into the decoder allows instant access to all the
services you subscribe to.
The Smart Card is not required for access to menus.
The Smart Card, which is supplied separately and forms part of your
subscription, is updated over-the-air when your subscription details change,
for instance, each time you purchase additional products (details regarding
these products will be announced in the future).
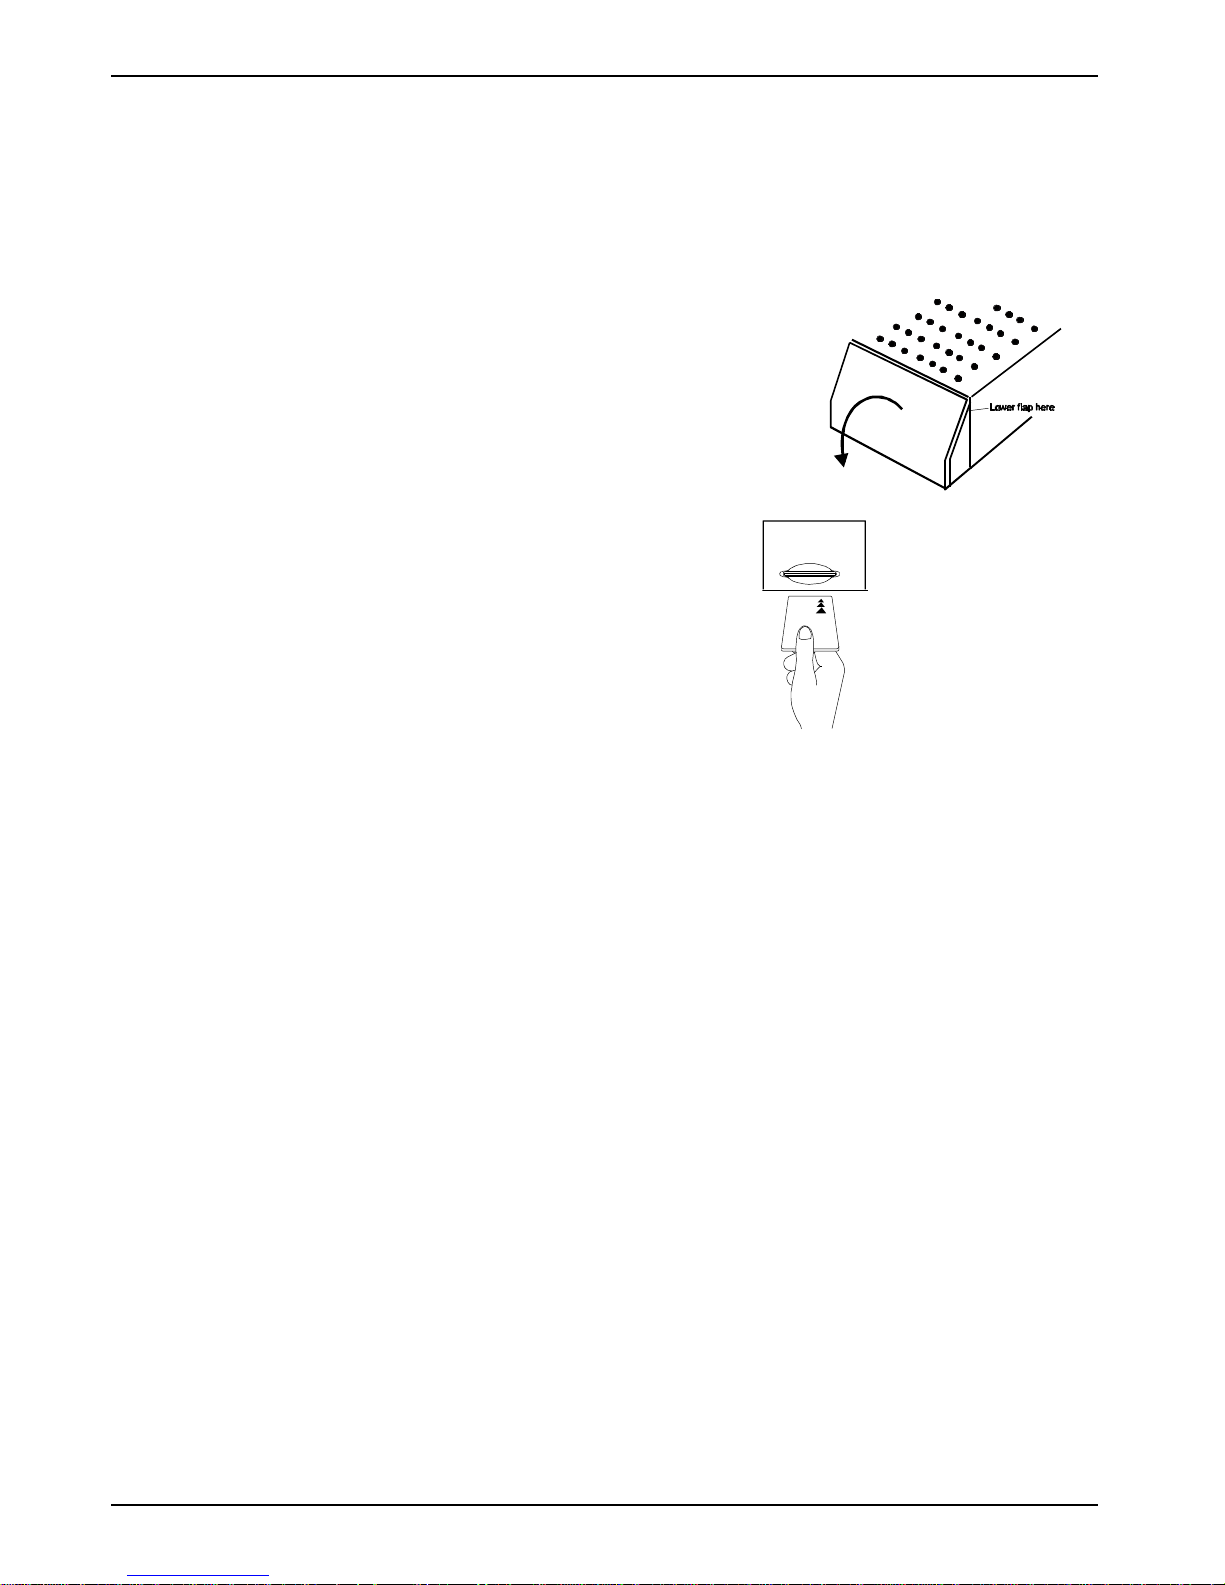
To insert the Smart Card, follow the instructions carefully.
1 Open the right hand flap on the front of the decoder (see figure)
Swing the flap downwards to expose the card slot to the right of
the row of keys.
2 Hold the Smart Card horizontally with the logo on top and the
three arrows pointed towards the front of the card. Insert the card
fully into the slot.
NOTE: Observe the buttons on the front of the decoder,
as these can be used as an alternative interface to
the decoder, for certain functions, in place of the
Remote Control Unit (RCU).
DSD 660 OPERATING INSTRUCTIONS 5
Y
G
R
Y
G
R
Y
G R Y G
R
Y G R
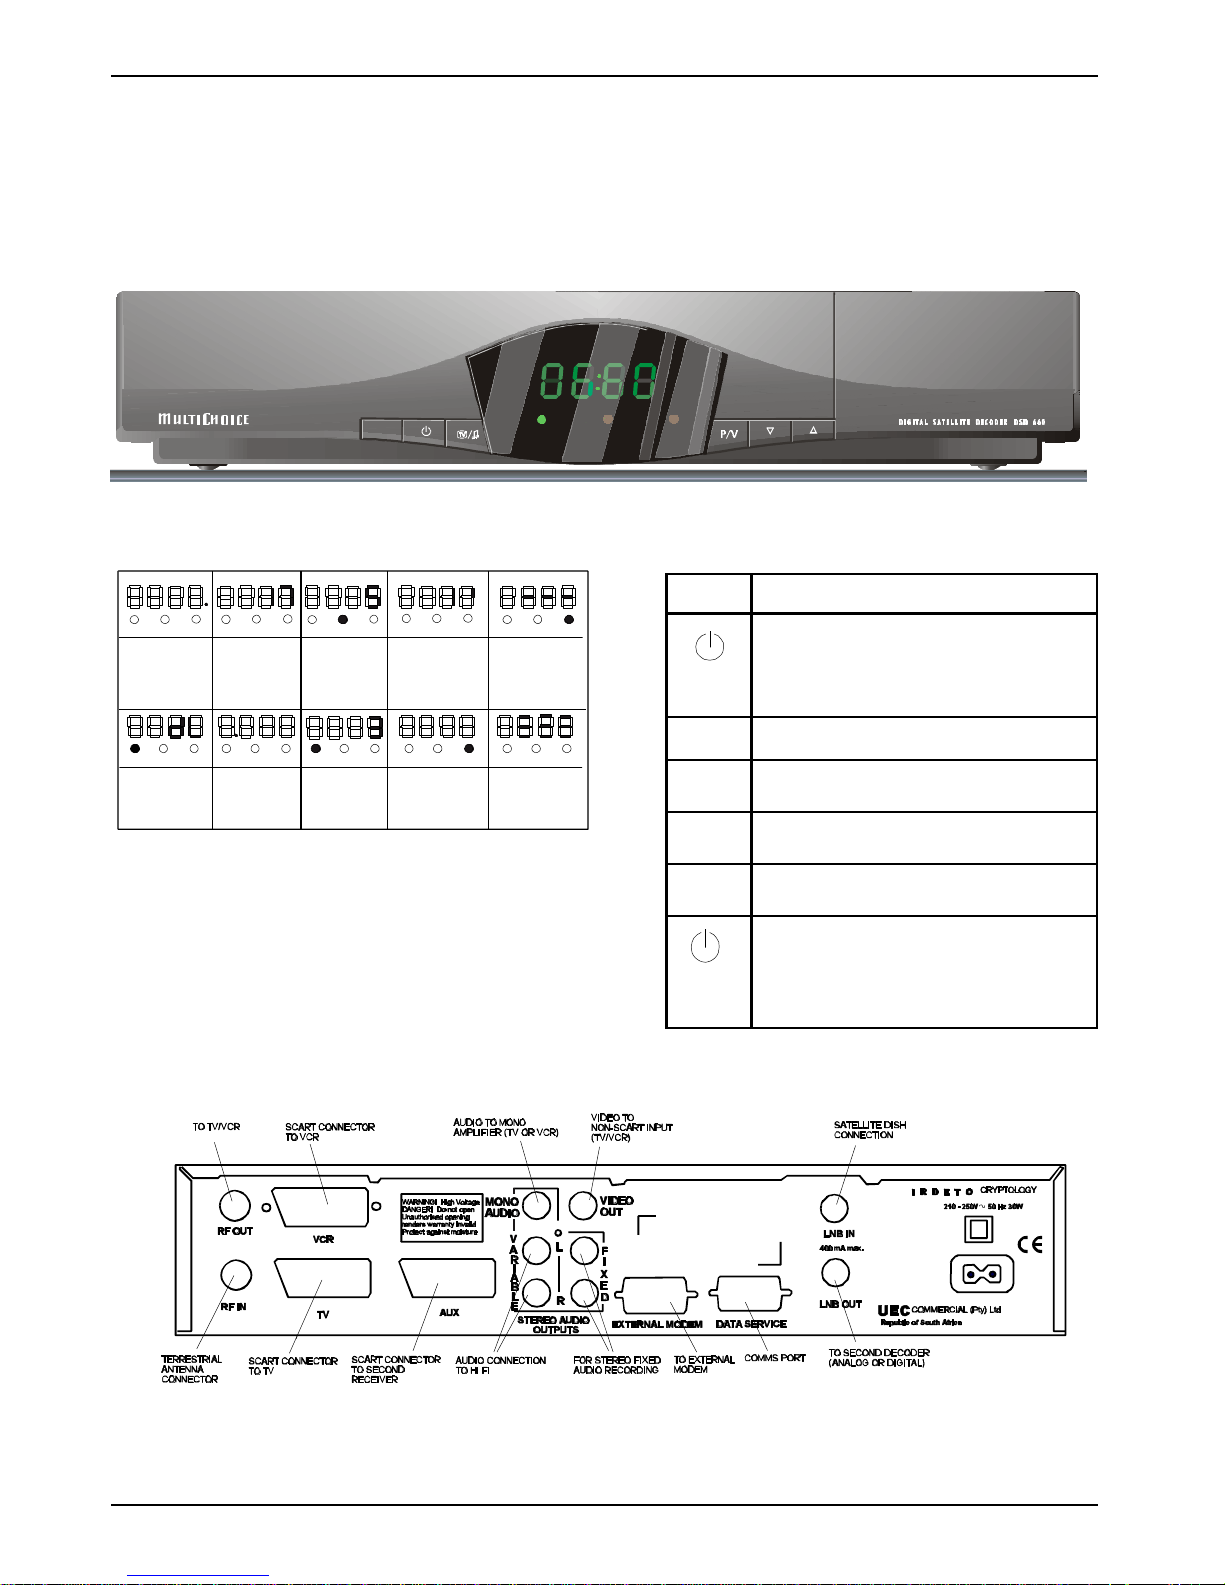
Green dot
DSD in
Standby
mode
Service No.17
selected
Green light Audio services
selected
Rotating bar.
Searching for
service
information
Three flashing
bars and red
light. Service not
found, or signal of
inferior quality
Y
G
R Y G R Y G R Y G R Y G R
Download in
Progress
Steady yellow
light
Green Dot
flashes when
RCU keys are
pressed
Yellow light
Mail message
waiting
Red light
Error indication
Menu selected
THE DIGITAL SATELLITE DECODER
(DSD)
The DSD combines a high quality MPEG-2 and DVB compliant satellite
receiver, with a sophisticated decoder in one package. The DSD provides all
that you need to exploit the exciting new satellite services that are now
available.
DISPLAY
REAR PANEL CONNECTIONS
FRONT PANEL KEYS
Key Description
Switches the decoder between normal and
standby modes.
TV / +
Switches between TV and Audio services.
P/V Switches between programme selection and
volume control.
ª
Selects next service on list or increases volume
level.
«
Selects previous service on list or decreases
volume level.
and
TV / +
When pressed simultaneously, reset the operation
of the decoder.
6 OPERATING INSTRUCTIONS DSD 660
?
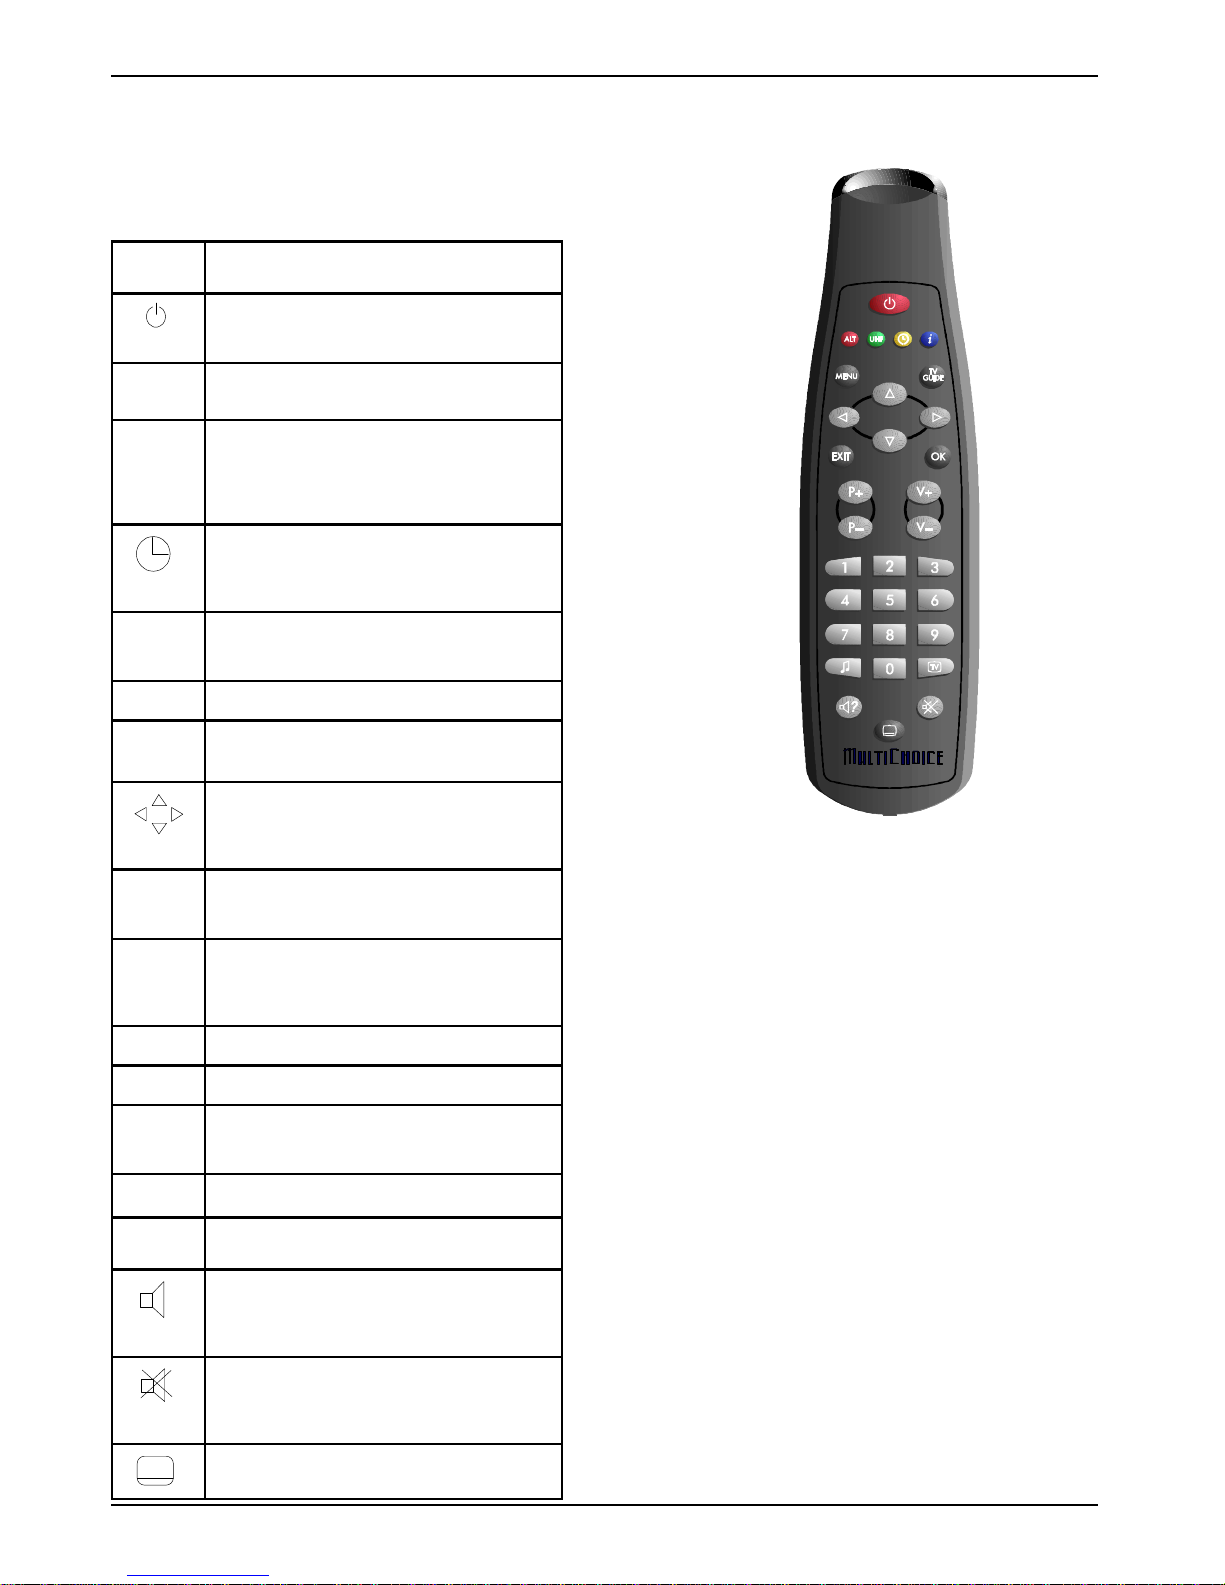
Remote Control Unit (RCU)
Easy, quick and effortless use of the decoder is possible using the Remote
Control Unit and the on-screen displays.
RCU
Keys
Description
Switches the decoder between normal and standby
modes.
ALT
Used to toggle between current and last services
UHF
Toggles between VCR, AU1, TV and IRD input
sources when pressed once and released. When
pressed, held for 5 seconds, then released, displays
the UHF tuning channel. Press once to remove the
tuning channel.
Displays the local time on the screeen for 5 seconds
or removes the local time display from the screen.
i
Displays the programme information bar on the
screen. When pressed twice displays the extended
event information screen.
MENU
Displays the Main Menu options on the TV screen.
TV
GUIDE
Displays a list of the available Electronic
Programme Guides (EPG) on the TV screen.
Cursor keys - used to step through programmes,
browse, move the highlight and move through
values in menus.
EXIT
Press to go to the previous menu, exit the menu
system when in the main menu, or exit the EPG or
Information Bar.
OK
Selects a programme when in the Electronic
Programme Guide and selects highlighted options
or values in menus. Saves any changed settings in
menus.
P+ P-
Cycles up or down through the available services.
V+ V-
Adjusts the volume up or down.
Keypad Keys 0-9-select either a TV or audio service, or
used to key in numbers in menus (e.g., parental and
installation PIN codes).
+
Selects audio services.
TV
Displays Bouquet Selection menu on TV, or when in
Audio Services, returns to TV services.
Displays the soundtrack information bar for 5
seconds.
Mute.
Switches the display of subtitles or teletext (where
Replacing Batteries in the RCU
The RCU is powered by two AAA size batteries. The life of the batteries
is about one year. Replace the batteries as required, but note the
following:
a. Insert the new batteries with their polarities (+ and -) aligned
correctly.
b. If you do not intend to use the RCU for long periods of time,
remove the batteries and store them in a cool, dry place.
c. Remove and dispose of used batteries immediately.
d. Do not use used and new batteries together. Never use an
alkaline battery with a manganese battery.
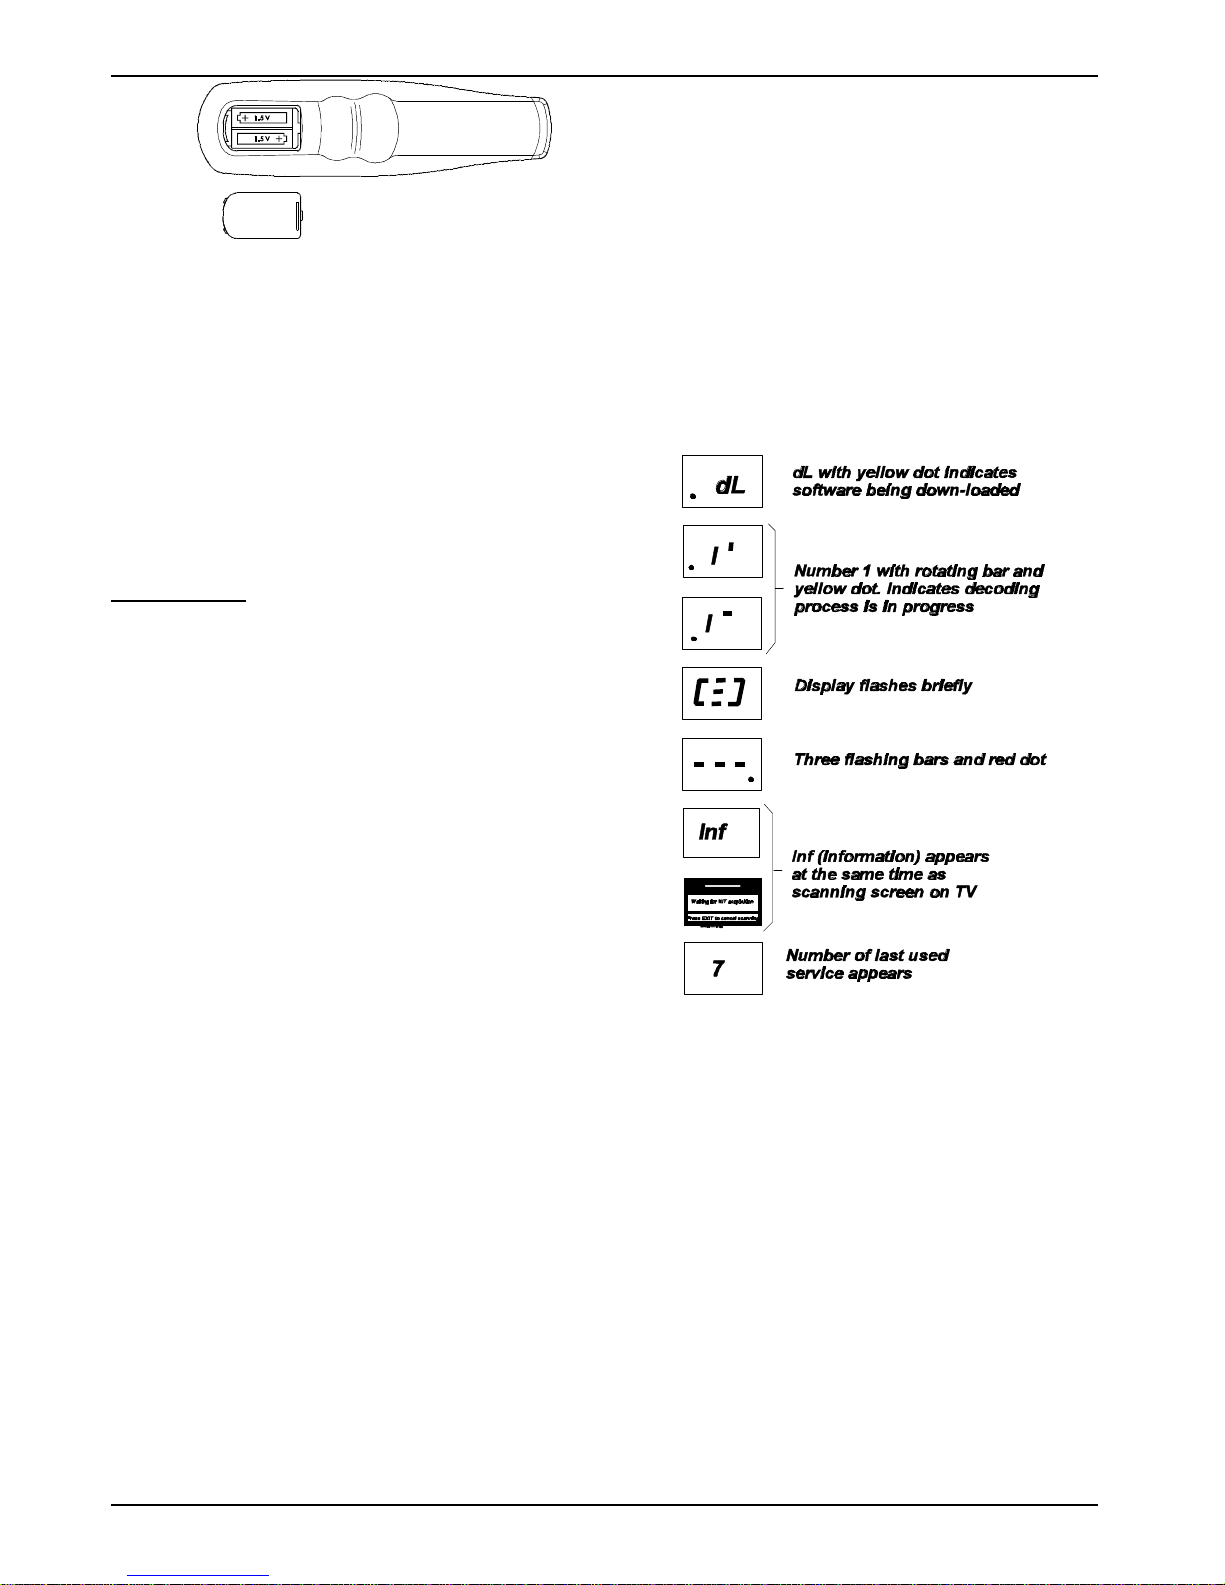
Load the batteries as follows:
1 Insert small screwdriver blade or fingernail into slot in battery
compartment lid. Press lid downwards, then lift off.
2 Insert the batteries with their polarities aligned, as indicated inside
the battery compartment.
3 Replace lid.
DSD 660 OPERATING INSTRUCTIONS 7
GETTING STARTED
NOTE: Unless absolutely necessary, do not change
installation, connections or decoder setup, or
carry out any retuning on a working system. If
changes are made, note all changed settings in
the table on page 29.
Installation of the satellite dish and cabling to the
DSD
Installation procedures for satellite dishes and cabling to DSDs are
outside the scope of this manual. Please refer to the manuals provided
with your satellite dish and associated equipment if you decide to do the
installation yourself.
Installation Indemnity
1 For the decoder to operate, it is required to correctly install and
align a satellite dish and a Low Noise Block (LNB) converter.
2 Each and every INSTALLER acts as an independent contractor
and is not a servant, sub-contractor or agent of the manufacturer.
The manufacturer is, therefore, not liable for any loss or damage
of any nature whatsoever caused by the conduct of the installer,
including but not limited to:
a. Any direct, indirect or consequential damages of any
nature or any loss of profit or other special damages of any
nature which the USER may suffer as a result of any
breach by the INSTALLER of any of its obligations to the
USER.
b. Any loss or damage to any property of the user or any third
party, situated on the USER’s premises even if loss or
damage arises out of any part of the INSTALLER.
3 The manufacturer does not directly or indirectly warrant or
guarantee or make any representations whatsoever with regard
to any equipment, including, but not limited to any dish, LNB, or
cabling, used by the INSTALLER.
4 Subject to any express warrant or guarantee given by the
manufacturer, in writing, the manufacturer does not:
a. Give any warranty or guarantee or make any
representation whatever in respect of any work carried out
by the INSTALLER.
b. Accept any liability for any latent or other defect in any
work carried out by the INSTALLER.
Setting-up the System
1 Install and align satellite dish (installer).
2 Connect the decoder to the TV set (either SCART to SCART or
RF OUT on the decoder to RF IN on the TV). (See Optional
Decoder Connections.)
Switching on the Decoder at the Mains
When you switch on the decoder at the mains, it goes through a powerup sequence, then attempts to find a signal at the specific factory-set
frequency. During this process, various indications are displayed on the
decoder display and TV, as shown in the following sequence of
drawings:
NOTE: If the TV is not tuned to the channel chosen to view the
satellite services, the sequence is still the same, but the
TV will not display the scanning screen. To tune the TV
to the decoder services, tune the TV as per Tuning Your
TV.
If your TV has been tuned to accept the decoder services, but
your smart card has not been inserted into the decoder, an
error message will appear on your TV screen.
If your decoder was in standby mode at mains power switch off,
the decoder will display a green dot when mains power is
restored. Press On/Off symbol to restore signal.
Tuning your TV
If your TV is not tuned to the decoder viewing channel, you will not be able
to view the satellite services. Your VCR, decoder and TV can also interfere
with each other unless they are tuned in correctly. The output of the decoder
can be tuned over the whole UHF band using the following recommended
method (refer to the following figures):
1 Connect the satellite dish and terrestrial antenna (installer).
2 Connect the installation as shown (if VCR installed).
3 Switch on the TV and select an unused channel to use with your
VCR.
4 Switch on your VCR, then set its test signal to ON (see VCR
instruction manual).
8 OPERATING INSTRUCTIONS DSD 660
5 Tune the TV to the test signal from the VCR. Switch off the VCR
test signal.
6 On the TV, select any unused channel on which you wish to view
your satellite programmes. Once selected, all your satellite
services will be viewed on this channel, selection of the service
being made using the RCU.
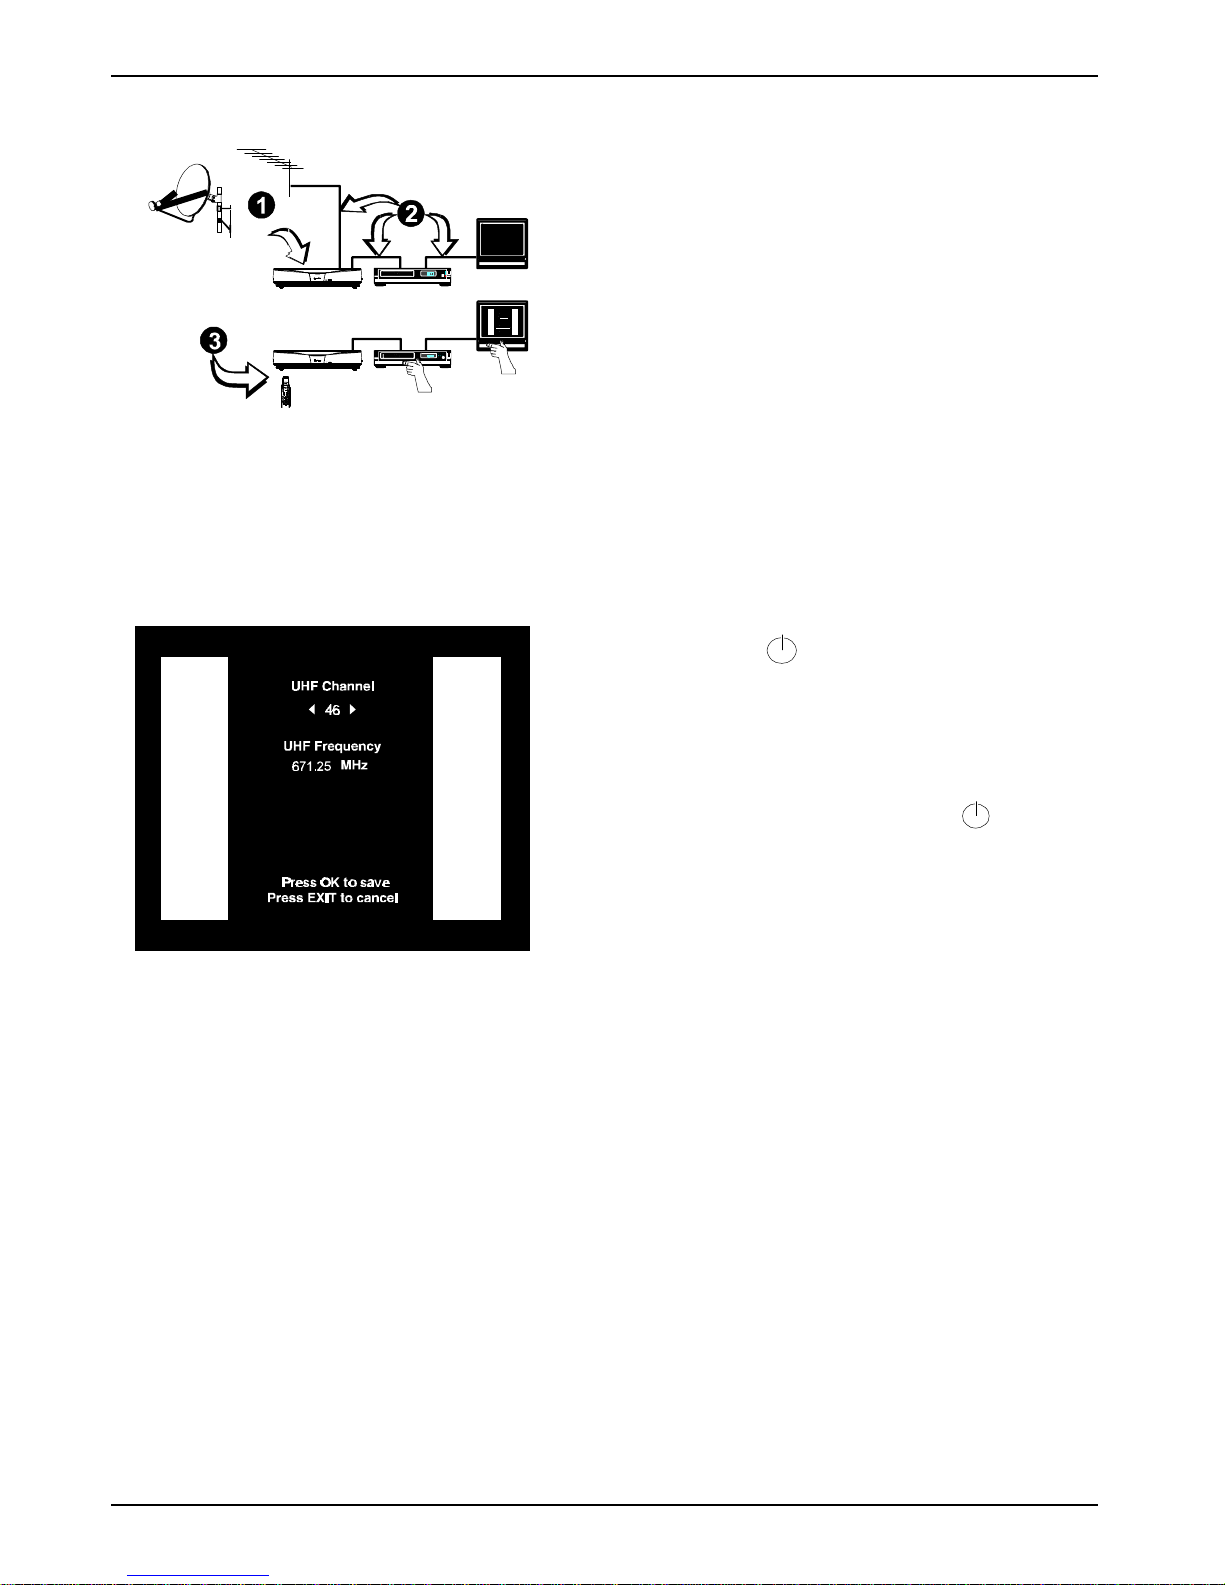
7 Press and hold UHF on the RCU for approx. 5 seconds until
UHF is displayed on the decoder display. Tune your TV set to
receive the decoder test signal display (see following figure).
A Channel number (initially 46) will be displayed on the decoder
front panel display.
Press UHF on the RCU to remove the test signal.
Check that any noise from the decoder does not interfere with
signals received on the VCR.
Check all tuned channels on the TV for interference.
8 If any interference is noticed, change the UHF channel number
as follows:
Press and hold UHF on the RCU to display UHF on the decoder
display and the UHF test screen on the TV.
Change the channel number to 2 more or 2 less than the existing
number (44 or 48) by pressing = or < twice on the RCU. Press
OK to save. The following will happen as soon as = or < is
pressed:
a. The TV display is lost because the TV is not tuned to the
new channel.
b. The new channel number is displayed on the front panel
of the decoder.
On the TV, retune the channel allocated to the decoder until the
decoder test pattern is clearly visible.
Repeat step 8 until interference on all channels is eliminated.
NOTE: After changes have been made, the decoder must not be
switched off for at least 3 minutes to allow for the new
setting to be saved.
If interference is still present, it is recommended that good quality
screened cables (preferably double screened) are used for
interconnecting all other equipments to the decoder.
Adding a Modem
Many exciting interactive features will be available in the future (Impulse Pay
Per View, Video on Demand, etc.). The decoder is ready for these features
as it can accommodate an optional built-in modem. A modem port for
connection to your telephone line via an external (faster) modem is provided
on the rear panel.
Standby and Normal Modes
The decoder does not have a mains power on/off switch and it is
recommended that, for normal viewing, it remains connected to the mains
after installation.
When the decoder is not in use, it should be switched to the standby
mode using the symbol on the front panel or on the RCU.
The standby mode is indicated by a constant small green dot on the right of
the decoder display panel. To use the decoder after the initial installation:
1 Switch on the TV and any other equipment included in the system.
2 Select the channel on the TV that you have allocated for viewing the
satellite services.
3 If the decoder is in the standby mode, press on either the
RCU or decoder front panel, to return to the normal viewing mode. A
service number will be displayed on the front panel indicator.
4 Press TV on the RCU. A Bouquet selection box is then displayed on
the TV screen (see page 13). Select the bouquet you have subscribed
to (e.g., DSTV), then press OK.
5 If you wish to select the Audio Services, press the + key on the RCU,
or + on the decoder front panel. If subscribed to, an audio service will
be heard, and the audio programme information box will be displayed
on the TV. A green indicator on the front panel display is illuminated
while the decoder is in the Audio Services mode.
Some audio services are free-to-air and do not require a subscription.
TV Services are restored by pressing TV on the RCU, or TV on
the decoder front panel.
NOTE: When switching from normal to standby then back to
normal, the decoder automatically returns to the
previously selected service.
If a SCART VCR is connected, it is not necessary to
take the decoder out of standby to view VCR play back.
6 The decoder is set up to the local default settings by the
manufacturer. If it becomes necessary to change the installation
parameters consult your local installer.
The decoder is now ready for normal use.
DSD 660 OPERATING INSTRUCTIONS 9
Optional Decoder Connections
Introduction
There are several ways of connecting the decoder to an existing
entertainment system.
The following more common examples enable you to view satellite
services and terrestrial channels, record and playback from a VCR and
listen to CD quality stereo sound on a Hi-Fi.
Consult your local installer for assistance in setting up an audio/video
configuration best suited to your requirements.
Hints to Quality TV System Configurations
# Where possible, connect cables via audio/video outputs/inputs
(SCART or RCA) instead of RF connectors.
# Use an appropriate, correctly installed satellite dish system.
# Ensure that the system is properly earthed and protected against
lightning.
# Use high quality stereo TV and Hi-Fi equipment.
# Use high quality screened cables.
NOTE: When Video and Audio Inputs/Outputs are used, it may
be necessary to select a Video mode on the VCR and TV
in place of a TV mode.
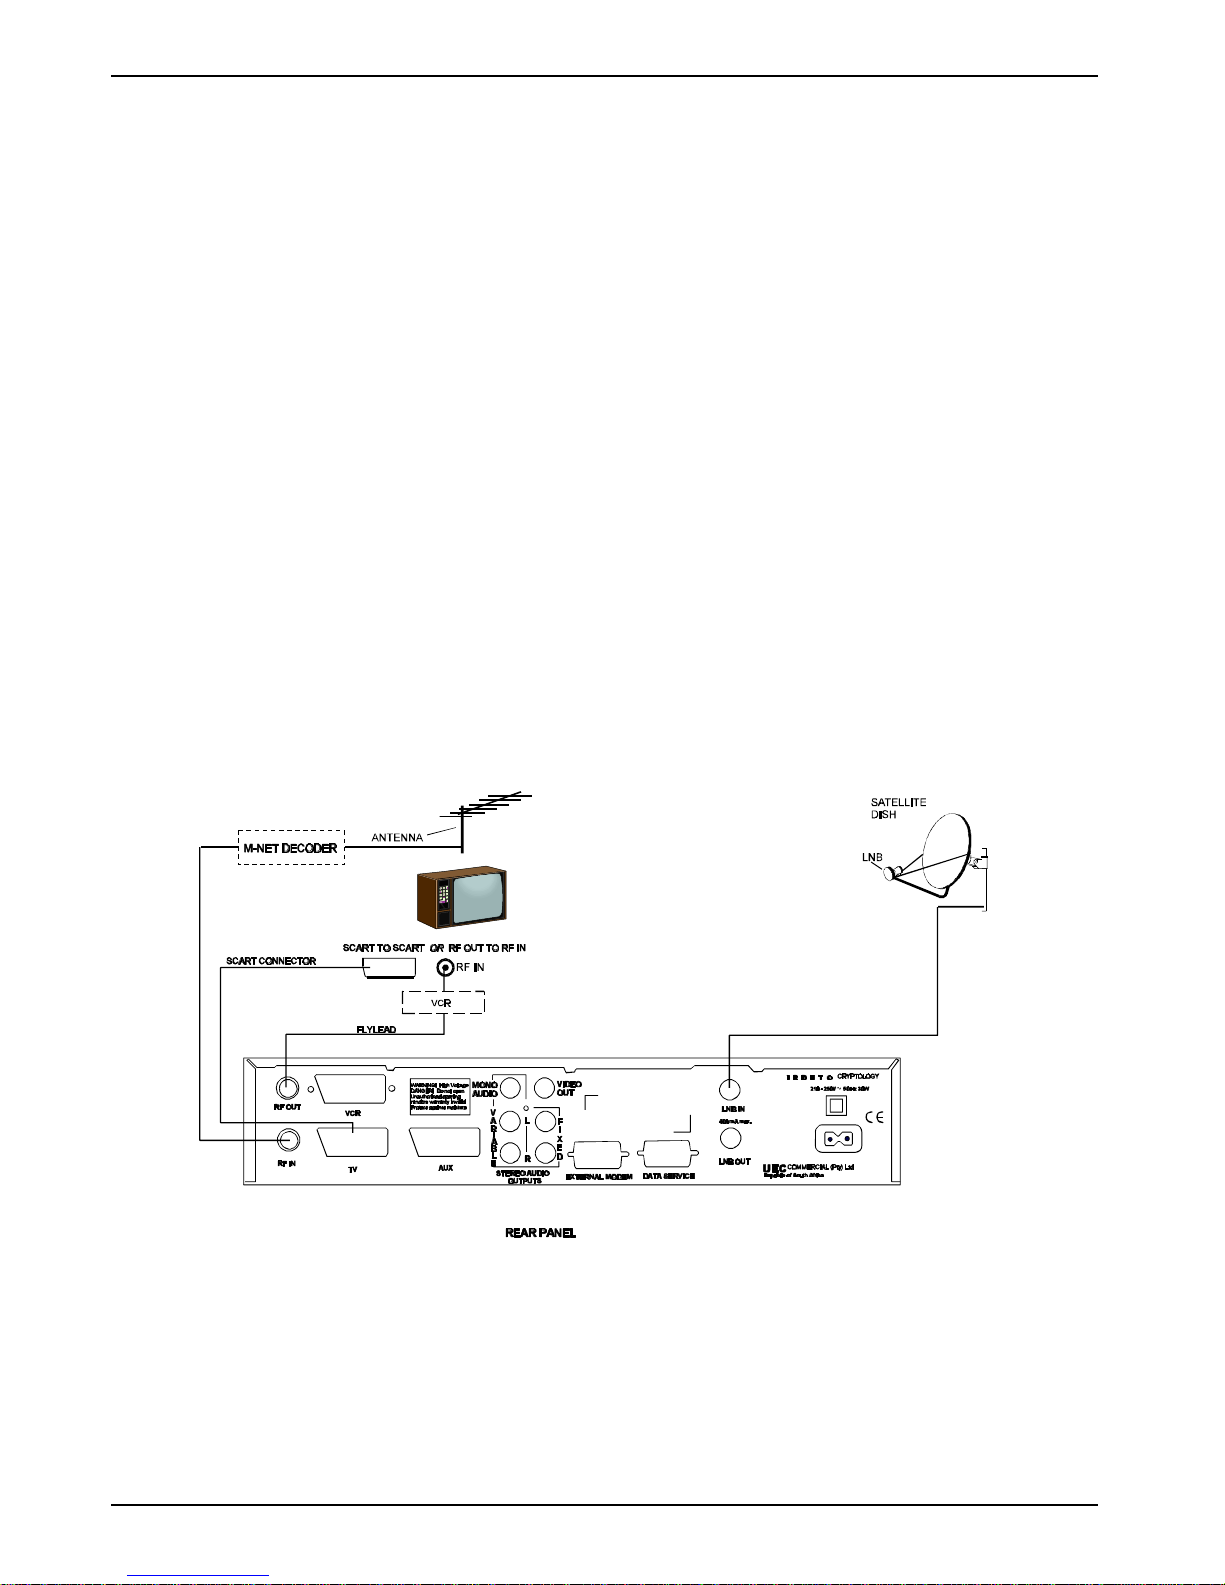
Satellite Decoder, M-Net Decoder, VCR, TV (using SCART or RF
Interface)
If several TV sets are used domestically, different TV programmes cannot
be viewed separately on each TV using just your satellite decoder. It may
therefore be desired to use your existing M-Net decoder in conjunction with
your satellite decoder.
NOTE: As the LNB carries a small voltage from the decoder on its
centre connector, it is recommended that the decoder is
switched off at the mains before connecting or
disconnecting the LNB.
1 If an M-Net decoder is used, connect the terrestrial antenna
connector to the RF IN socket on the M-Net decoder. If an M-net
decoder is not used, connect the terrestrial antenna connector to the
RF IN socket on the satellite decoder.
2 If a VCR is included in the installation, this is connected into the
system as per the diagram.
The following instruction applies if your TV has a SCART connector.
3 Using a SCART-to-SCART cable (not supplied), connect the
TV SCART socket on the decoder to the SCART socket on the TV.
The following instruction applies if your TV does not have a SCART
connector.
4 Use the supplied flylead to connect the RF OUT socket on the
decoder to the RF IN socket on the TV.
5 Connect the coaxial cable connector from the LNB on the satellite
dish into the socket marked LNB IN on the decoder. The connector
on the coaxial cable should be turned until it is finger tight.
10 OPERATING INSTRUCTIONS DSD 660
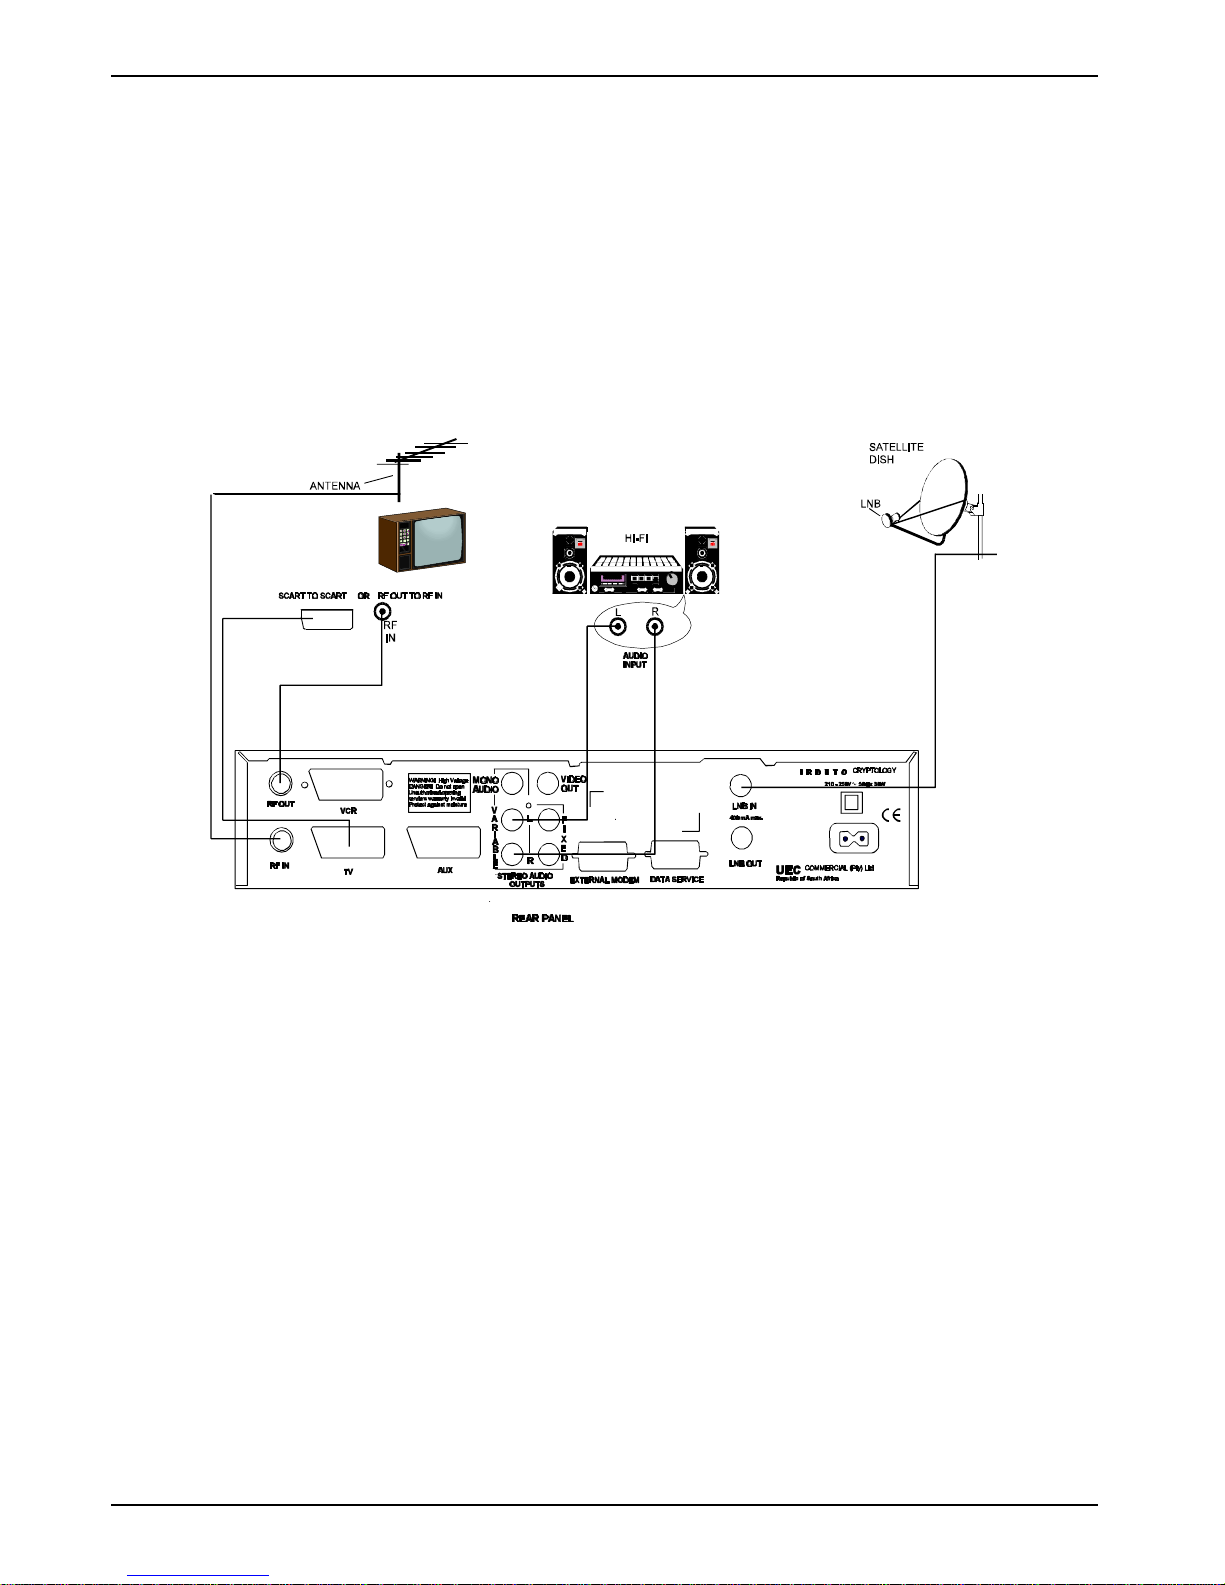
Decoder, TV (SCART or RF Interfaces), Hi-Fi
NOTE: It is recommended that you switch off the mains
supply to the decoder before connecting or
disconnecting the LNB connector.
1 Connect the terrestrial antenna connector to the RF IN socket on
the decoder.
2 Connect a flylead between the variable stereo sound outputs on
the decoder and the audio inputs on the Hi-Fi.
3 Connect the coaxial cable connector from the LNB on the satellite
dish into the connector marked LNB IN on the decoder. The
connector on the coaxial cable to the decoder should be finger
tight.
4 Using a SCART-to-SCART cable (not supplied), connect the
TV SCART socket on the decoder to the SCART socket on the TV.
5 If the TV does not have a SCART socket, use the supplied flylead to
connect the RF OUT connector on the decoder to the RF IN
connector on the TV.
 Loading...