

Page 1

STG3008-FA Manual
Page 2

Page 3

Information in this document is subject to change without notice.
No part of this document may be reproduced or transmitted without the express written
permission of Multi Channel Systems MCS GmbH.
While every precaution has been taken in the preparation of this document, the publisher and
the author assume no responsibility for errors or omissions, or for damages resulting from the use
of information contained in this document or from the use of programs and source code that may
accompany it. In no event shall the publisher and the author be liable for any loss of profit or any
other commercial damage caused or alleged to have been caused directly or indirectly by this
document.
© 2012 Multi Channel Systems MCS GmbH. All rights reserved.
Printed: 10. 01. 2012
Multi Channel Systems MCS GmbH
Aspenhaustraße 21
72770 Reutlingen
Germany
Fon +49-71 21-90 92 5 - 0
Fax +49-71 21-90 92 5 -11
info@multichannelsystems.com
www.multichannelsystems.com
Microsoft and Windows are registered trademarks of Microsoft Corporation. Products that are
referred to in this document may be either trademarks and/or registered trademarks of their
respective holders and should be noted as such. The publisher and the author make no claim
to these trademark.
Page 4

Page 5

Table of Contents
1 Introduction 1
1.1 About this Manual 1
2 Important Information and Instructions 3
2.1 Terms of Use for MC_Stimulus II 3
2.2 Limitation of Liability 3
2.3 Operator's Obligations 3
2.4 Guarantee and Liability 3
2.5 Important Safety Advice 4
3 First Use of the Stimulus Generator 5
3.1 Welcome to the STG3008-FA and MC_Stimulus II 5
3.2 Setting Up and Connecting the STG 7
3.3 Driver Installation 9
3.4 Installing the Software 9
4 Operating the STG 11
4.1 Operation Overview 11
4.2 Operating the Amplifier 13
4.3 Operating Multiple STGs 15
5 Programming Stimulus Protocols 17
5.1 MC_Stimulus II Worksheet 17
5.2 Pulse Types 18
5.3 Autorepeating Pulses and Protocols 20
5.4 Autocreating Entries and Editing Columns 23
5.5 Auto Sync for Autocreating Trigger Pulses 29
5.6 Adjusting the Stimulus Intensity Level 30
6 ASCII Import/Export 33
6.1 Loading Files 33
6.2 Exporting Files 34
6.3 Supported File Formats 34
7 Stimulus Display 43
7.1 Selecting Channels 43
7.2 Display Settings 43
7.3 Display Tools 44
8 Downloading Stimuli 47
8.1 Downloading Stimulus Files 47
iii
Page 6

STG3008-FA Manual
9
General Software Features 49
9.1 Customizing the Main Window 49
9.2 Menu Bar 49
9.3 Toolbar 50
9.4 Shortcut Keys 50
9.5 File Menu 51
9.6 Settings Menu 52
10 Synchronizing Events 53
10.1 Digital Output Signals (Sync Out) 53
10.2 Triggering Stimulation (Trigger In) 53
10.3 Trigger Settings 55
10.4 Batch Mode 57
11 Analog Output Signals 59
11.1 Output Modes 59
11.2 Voltage Mode 60
11.3 Current Mode 62
11.4 Rise Time 63
11.5 Comparison of Output Signals in Current Mode 71
11.6 Capacitive Behavior of Stimulation Electrodes 77
12 Troubleshooting 79
12.1 About Troubleshooting 79
12.2 Technical Support 79
12.3 Error Messages 80
12.4 Signal terminated when using Trigger In 82
12.5 Signal is not Repeated / Pulse Train Fails 82
12.6 Strong Peak Artifacts 83
13 Appendix 84
13.1 Technical Specifications STG3008-FA 84
13.2 Pin Layout 86
13.3 Contact Information 87
14 Index 89
iv
Page 7

1 Introduction
1.1 About this Manual
This manual comprises all important information about the installation and operation of the
stimulus generator STG3000 series and MC_Stimulus II software. It is assumed that you have
already a basic understanding of technical and software terms. No special skills are required
to read this manual.
This documentation refers only to the STG hardware and MC_Stimulus II software. For more
information on the STG's DLL functions and programming of custom programs, please read the
separate documentation in the documentation folder in the MC_Stimulus II program directory.
If you are using the STG for the first time, please read the important safety advice before
installing the hardware and software (see Important Safety Advice, where you will find
important information about the installation and first steps).
The printed manual and help are basically the same, so it is up to you which one you will use.
The help offers you the advantage of scrolling through the text in a non-linear fashion, picking
up all information you need, especially if you use the index and the search function. If you are
going to read larger text passages, however, you may prefer the printed manual.
The device and the software are part of an ongoing developmental process. Please understand
that the provided documentation is not always up to date. Check also the MCS web site
(www.multichannelsystems.com) from time to time for downloading up-to-date manuals
and new software versions.
1
Page 8

Page 9

2 Important Information and Instructions
2.1 Terms of Use for MC_Stimulus II
You are free to use MC_Stimulus II for its intended purpose. You agree that you will not
decompile, reverse engineer, or otherwise attempt to discover the source code of the software.
2.2 Limitation of Liability
Multi Channel Systems MCS GmbH makes no guarantee as to the accuracy of any and all tests
and data generated by the use the MC_Stimulus II software. It is up to the user to use good
laboratory practice to establish the validity of his findings.
To the maximum extent permitted by applicable law, in no event shall Multi Channel Systems
MCS GmbH or its suppliers be liable for any special, incidental, indirect, or consequential damages
whatsoever (including, without limitation, injuries, damages for data loss, loss of business profits,
business interruption, loss of business information, or any other pecuniary loss) arising out of the
use of or inability to use MC_Stimulus II or the provision of or failure to provide Support Services,
even if Multi Channel Systems MCS GmbH has been advised of the possibility of such damages.
2.3 Operator's Obligations
The operator is obliged to allow only persons to work on the device, who
are familiar with the safety at work and accident prevention regulations and have been
instructed how to use the device;
are professionally qualified or have specialist knowledge and training and have received
instruction in the use of the device;
have read and understood the chapter on safety and the warning instructions in this manual
and confirmed this with their signature.
It must be monitored at regular intervals that the operating personnel are working safely.
Personnel still undergoing training may only work on the device under the supervision
of an experienced person.
2.4 Guarantee and Liability
The General conditions of sale and delivery of Multi Channel Systems MCS GmbH always apply.
The operator will receive these no later than on conclusion of the contract.
Multi Channel Systems MCS GmbH makes no guarantee as to the accuracy of any and all tests
and data generated by the use of the device or the software. It is up to the user to use good
laboratory practice to establish the validity of his findings.
Guarantee and liability claims in the event of injury or material damage are excluded when
they are the result of one of the following.
Improper use of the device.
Improper installation, commissioning, operation or maintenance of the device.
Operating the device when the safety and protective devices are defective and/or inoperable.
Non-observance of the instructions in the manual with regard to transport, storage, installation,
commissioning, operation or maintenance of the device.
Unauthorized structural alterations to the device.
3
Page 10
STG3008-FA Manual
Unauthorized modifications to the system settings.
Inadequate monitoring of device components subject to wear.
Improperly executed and unauthorized repairs.
Unauthorized opening of the device or its components.
Catastrophic events due to the effect of foreign bodies or acts of God.
2.5 Important Safety Advice
Warning: Make sure to read the following advice prior to install or to use the device
and the software. If you do not fulfill all requirements stated below, this may lead to
malfunctions or breakage of connected hardware, or even fatal injuries.
Warning: Obey always the rules of local regulations and laws. Only qualified personnel
should be allowed to perform laboratory work. Work according to good laboratory
practice to obtain best results and to minimize risks.
The product has been built to the state of the art and in accordance with recognized safety
engineering rules. The device may only
be used for its intended purpose;
be used when in a perfect condition.
Improper use could lead to serious, even fatal injuries to the user or third parties and damage
to the device itself or other material damage.
Warning: The device and the software are not intended for medical uses and must
not be used on humans.
Malfunctions which could impair safety should be rectified immediately.
High Voltage
Electrical cords must be properly laid and installed. The length and quality of the cords must
be in accordance with local provisions.
Only qualified technicians may work on the electrical system. It is essential that the accident
prevention regulations and those of the employers' liability associations are observed.
Each time before starting up, make sure that the mains supply agrees with the specifications
of the product.
Check the power cord for damage each time the site is changed. Damaged power cords should
be replaced immediately and may never be reused.
Check the leads for damage. Damaged leads should be replaced immediately and may never
be reused.
Do not try to insert anything sharp or metallic into the vents or the case.
Liquids may cause short circuits or other damage. Keep the device and the power cords always
dry. Do not handle it with wet hands.
Requirements for the installation
Make sure that the device is not exposed to direct sunlight. Do not place anything on top of the
device, and do not place it on top of another heat producing device. Otherwise, the device may
overheat.
4
Page 11
3 First Use of the Stimulus Generator
3.1 Welcome to the STG3008-FA and MC_Stimulus II
Product Line Overview
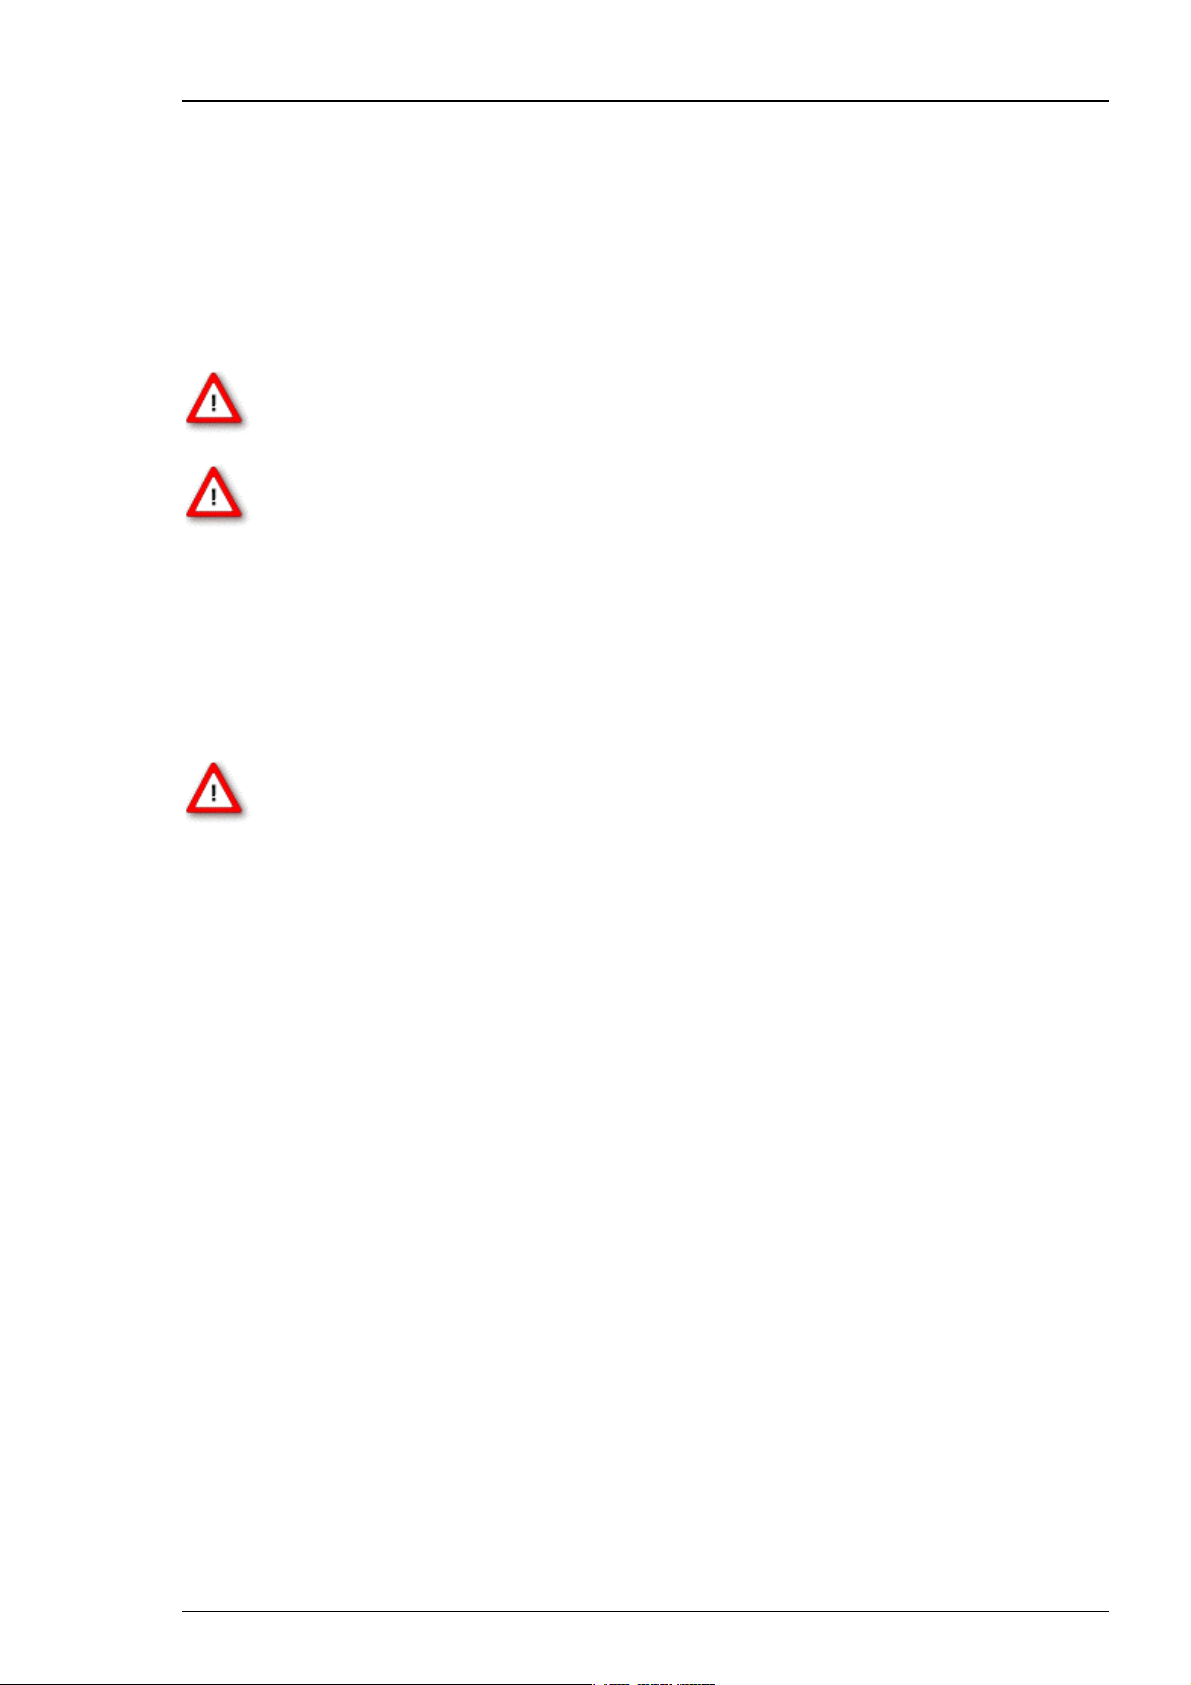
Stimulus generator of the 3000 series are general purpose stimulators designed for a wide variety
of applications, both in vitro and in vivo. The STG3008-FA is a special version for use with
cardiovascular catheter microelectrodes for animals.
The STG is additionally equipped with a filter amplifier FA and has the advantage that the device
can be used for both, for stimulation and for recording. You switch software controlled between
the two operation modes recording and stimulation.
The filter amplifier of the STG3008-FA provides four different gain factors 100, 200, 500, or 1000
and has a band pass filter with a bandwidth of 1 Hz to 2,2 kHz.
The stimulus generator STG3008-FA is available for simultaneous stimulation on up to eight
completely independent stimulation channels. Each channel is freely programmable, combination
of channels to achieve complex stimulation patterns is not necessary.
Flexible and easy-to-use MC_Stimulus II software enables complex stimulus waveforms (both
current and voltage) in Download mode and Streaming mode. Waveforms designed in the
program or imported from an external ASCII file are converted into pulses, which are sent to
the stimulation electrodes.
Note: Please note that not all software features of MC_Stimulus II are supported by the hardware.
A trigger input and a Sync output for TTL signals allows to synchronize the stimulus generator
with other instruments. Triggering of other devices via programmable TTL pulses (Sync Out)
is possible, as well as triggering of the STG by external devices via the Trigger In input. For
example, you can synchronize stimulation and recording with a TTL signal sent from the
Sync Out output of the STG to the data acquisition system, for example, the MC_Card or
an USB based data acquisition system.
The real-time stimulus generator STG3008-FA has two operating modes: Download mode
and Streaming mode.
In Download mode, you can control the STG either by the MC_Stimulus II or by a custom
program. Stimulus protocols are created in MC_Stimulus II or the custom program; complete
protocols are downloaded onto the STG, and can after the download be executed without
a computer connection.
5
Page 12
STG3008-FA Manual
In the Streaming mode, you can control the STG either by the Stimulus Streamer or by a custom
program. If you use the Stimulus Streamer, you can load stimulus protocols in Mono-MP3 or binary
file format of unlimited size that were generated by a custom application and are then sent
continuously from the computer to the STG in small data packets. If you use a custom program
for controlling the STG, this program can generate and send the stimulation protocols in parallel
from the computer to the STG.
Custom applications for the Download or the Streaming mode can be programmed in Matlab,
Labview, C/C++, and Visual Basic. This documentation refers only to the STG hardware and
MC_Stimulus II software. For more information on the STG's DLL functions and programming
of custom software, please read the separate documentation of the Documentation folder in
the MC_Stimulus II program directory.
MC_Stimulus II
Stimuli are created user-friendly by entering the desired pulses (rectangular, ramp, or sine
waveforms) into a worksheet. Waveforms can be combined freely to create virtually any stimulus
pattern.
For even more convenience, repetitive stimulus patterns do not have to be entered separately,
but can be grouped and looped. You can also import waveforms in ASCII file format and use
them for stimulation. You can print and save stimuli and comments for later use and
documentation of your experiments.
Created stimuli are displayed in a WYSIWYG stimulus display. All channels are set up
separately.
6
Page 13

First Use of the Stimulus Generator
3.2 Setting Up and Connecting the STG
Note: You can use an USB hub for connecting the STG to the computer, for example, if you have
no free USB port or if you need to extend the USB cable. Do not use a hub in Streaming mode!
Please note that if you want to use the STG in Streaming mode, you cannot connect a second
device that sends or receives continuous data streams, for example a web cam or USB speakers, to
the same USB port, because the STG needs a broad bandwidth for the data transmission. This does
not matter if you want to use the Download mode (via MC_Stimulus II or custom program) only.
Provide a power supply and a computer with USB port in the immediate vicinity of the
installation site. Make sure the STG is switched off before you connect it to the power supply.
1. Place the STG on a stable surface, where the air can circulate freely and the STG is not exposed
to direct sunlight.
2. Connect the external power supply to the STG.
3. Connect the external power supply to the power outlet.
4. Connect the USB connector to the USB port of the computer. The computer connection
is necessary for programming the STG, but not for operating it (except in Batch mode).
5. Connect the catheter to the Stimulus IN / Raw data OUT connector of the STG3008-FA.
6. (Optional) Connect the required Trigger In input with BNC cables to instruments that produce
TTL signals for triggering the STG.
7. (Optional) Connect the Sync Out output with BNC cables to following instruments that you want
to be triggered by TTL signals from the STG, for example to one of the 16 digital inputs of the
MC_Card, or of an USB based data acquisition.
8. Switch the STG on by pressing the toggle switch on the rear panel.
7
Page 14
STG3008-FA Manual
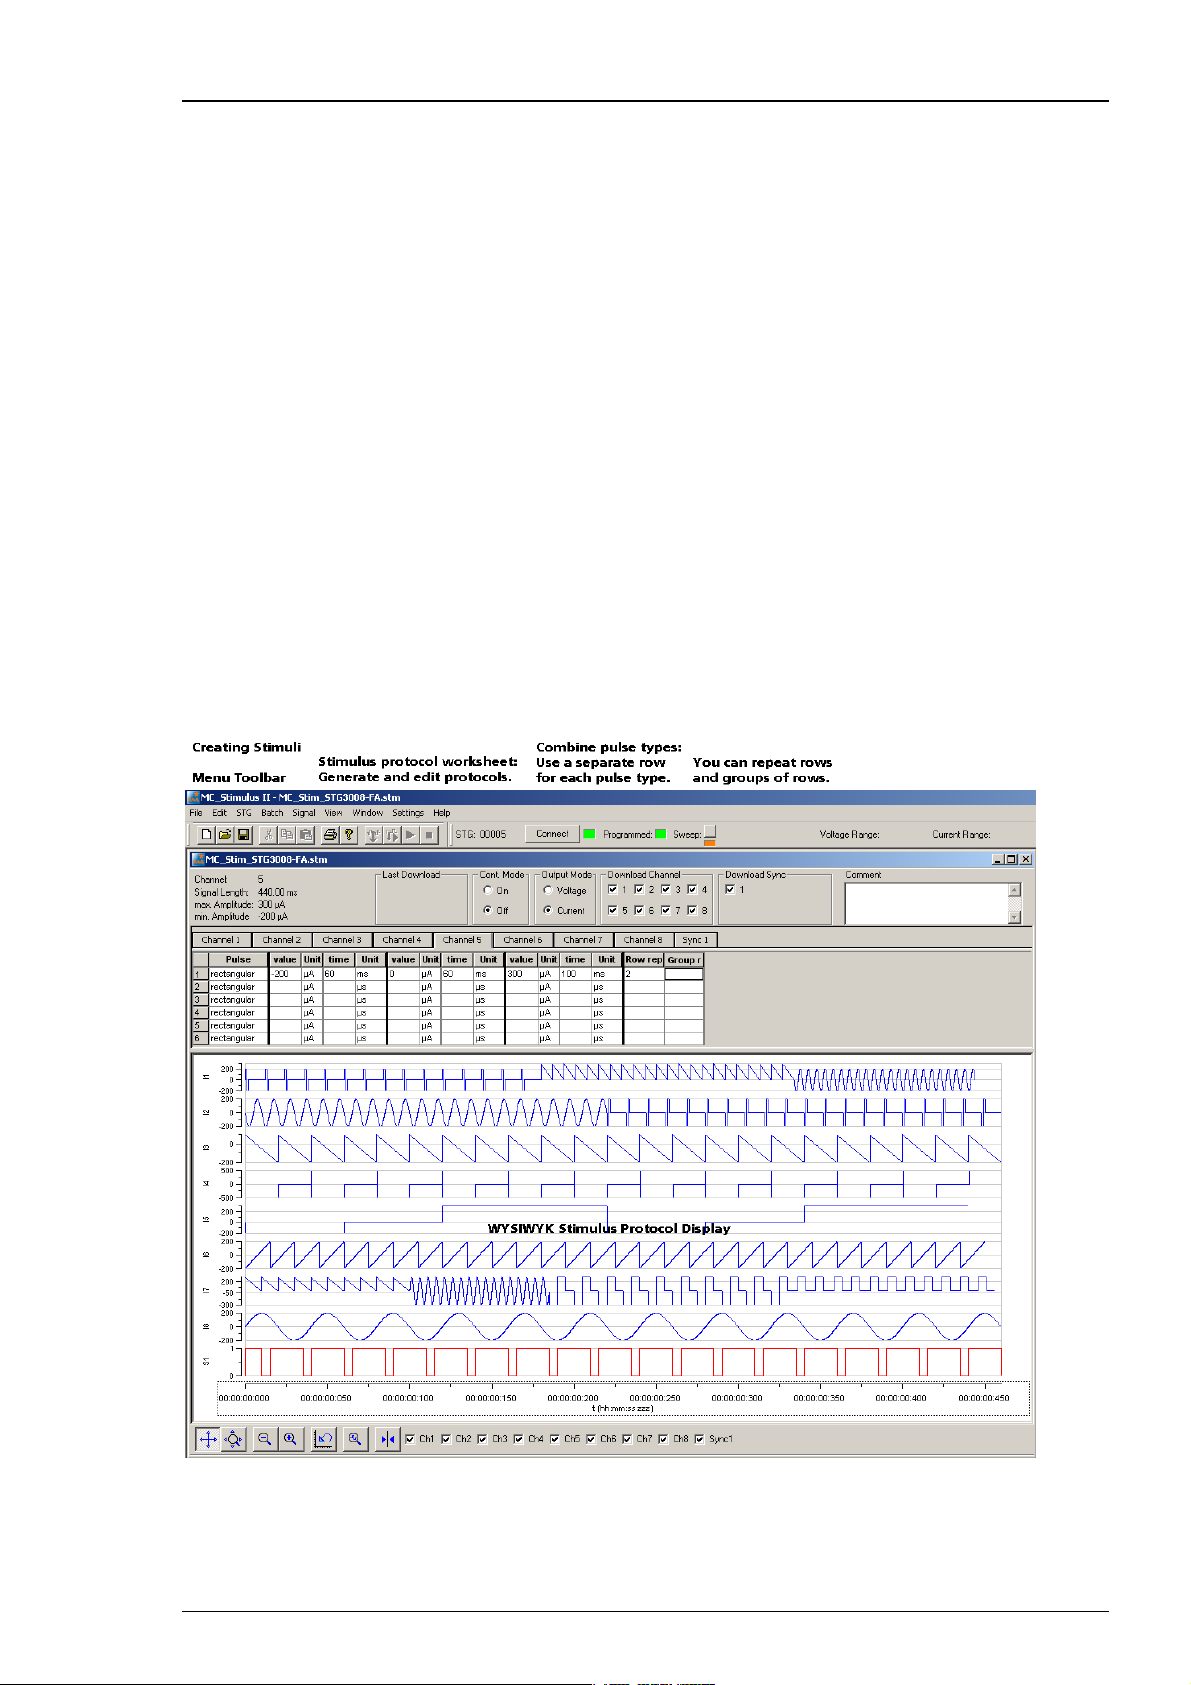
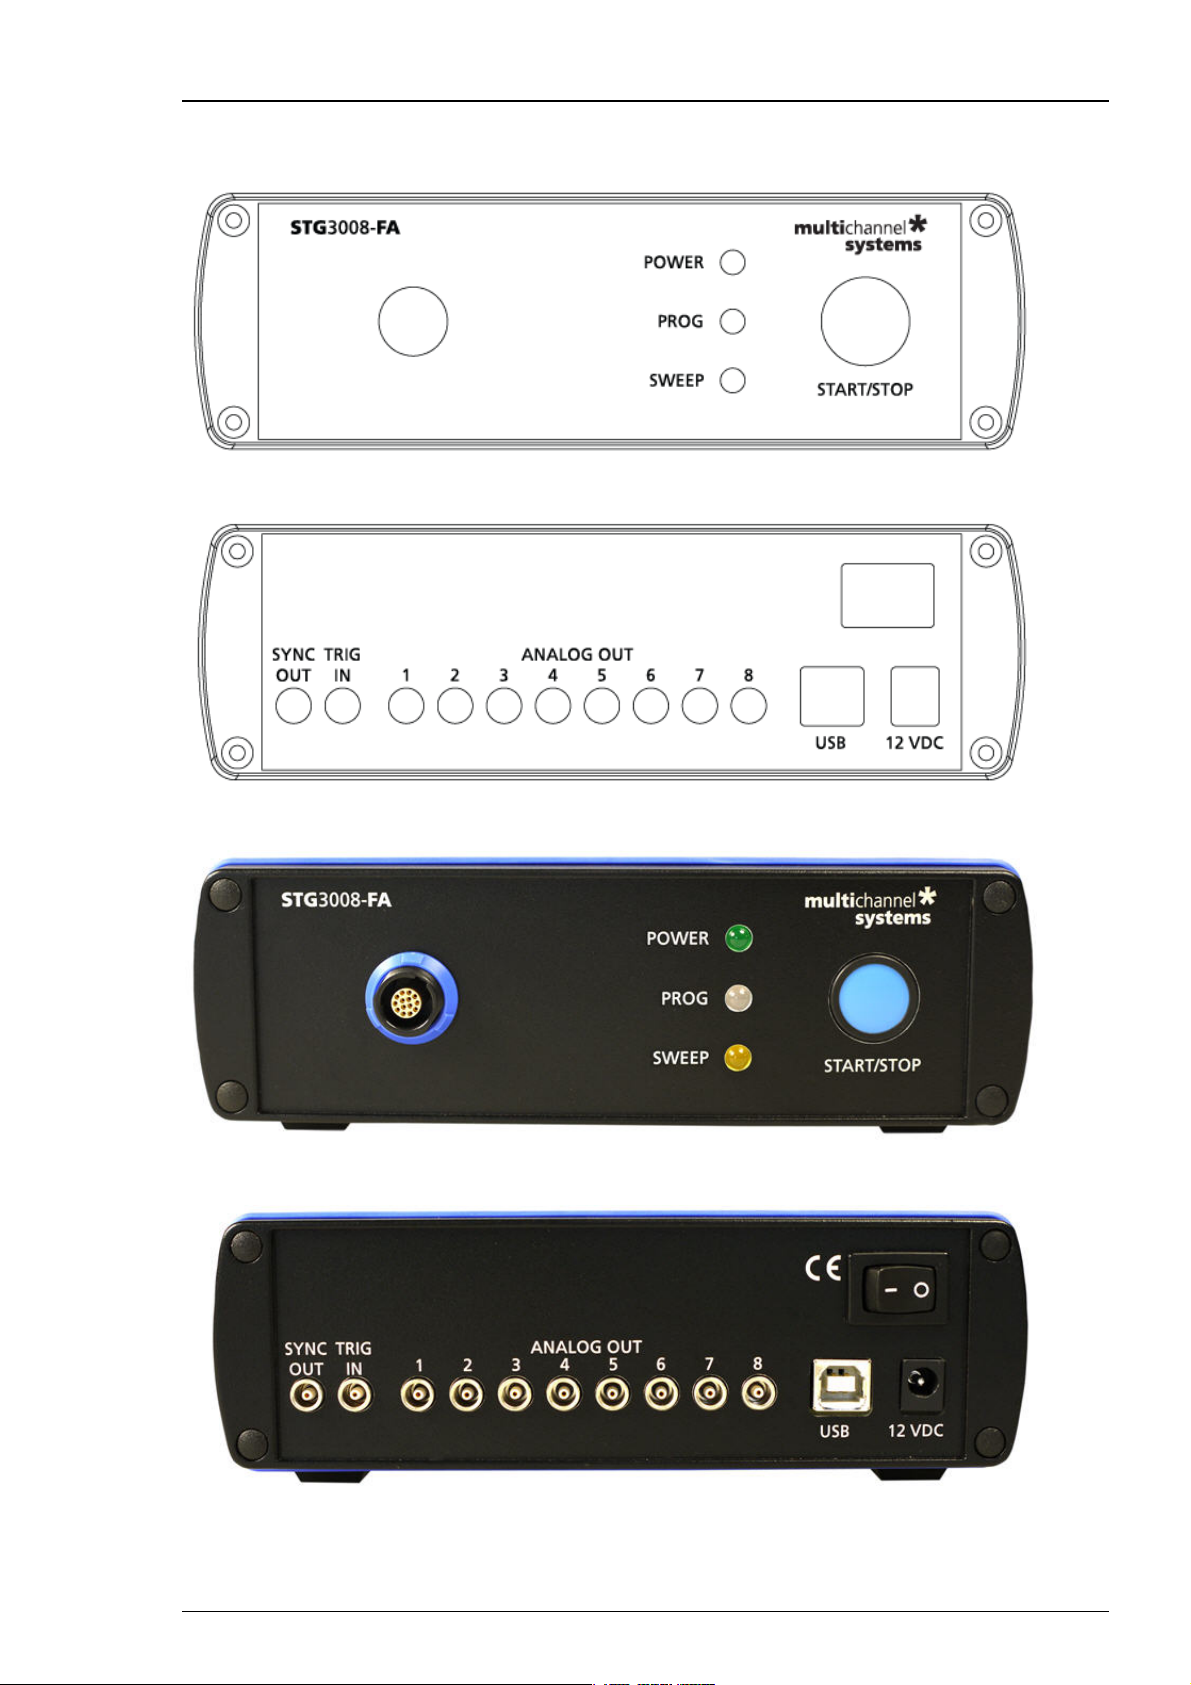
Illustration of the STG3008-FA front and rear panel with connectors
STG3008-FA Front Panel
STG3008-FA Rear Panel
STG3008-FA Front Panel
STG3008-FA Rear Panel
8
Page 15
3.3 Driver Installation
The stimulus generator is a plug and play device. The driver is automatically installed together
with the MC_Stimulus II program.
The Windows operating system detects a new hardware when the stimulus generator is connected
to the computer, if the program has not been installed beforehand. Simply cancel the driver
installation and proceed with the installation of the MC_Stimulus II program.
Important: Please make sure that you have full control over your computer as an administrator.
Otherwise, it is possible that the installed hardware does not work properly.
If there are any problems, and you need to install or update the driver manually, please see
the MC_Stimulus II Help for more information.
3.4 Installing the Software
System requirements
Software: One of the following Microsoft Windows ® operating systems is required:
Windows 7, Vista or Windows XP (English and German versions supported).
Hardware: USB port (2.0 High Speed)
First Use of the Stimulus Generator
Installing the software
Please check the system requirements before you install the software. MCS cannot guarantee
that the software works properly if these requirements are not fulfilled.
Important: Please make sure that you have full control over your computer as an administrator.
Otherwise, is possible that the installed software does not work properly.
1. Double-click Setup.exe on the installation volume. The installation assistant will show up
and guide you through the installation procedure.
2. Follow the instructions of the installation assistant.
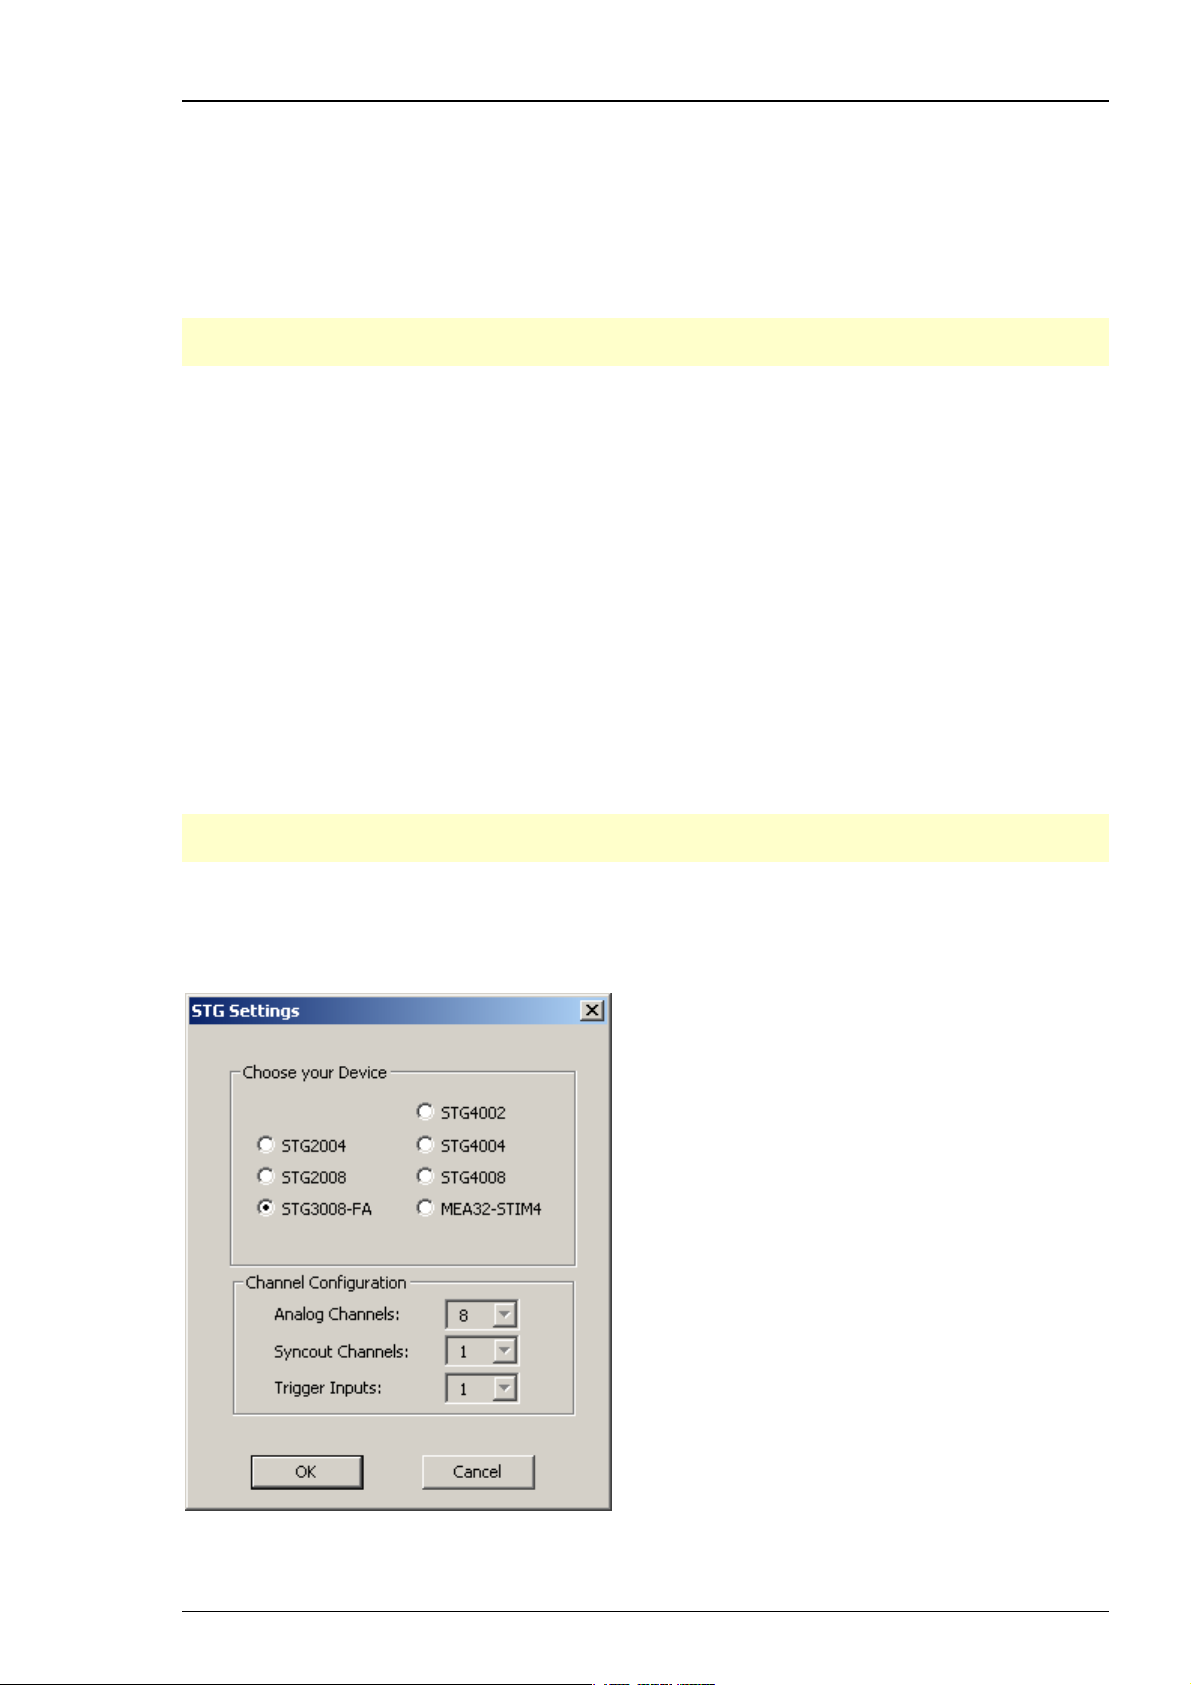
Select radio button "STG3008-FA". When you have finished the installation of the MC_Stimulus II
software and the STG driver, you can now operate the STG3008-FA.
9
Page 16

Page 17
4 Operating the STG
4.1 Operation Overview
Warning: Make sure that you do not come in contact with the cables or the connectors of
the STG after you have started the STG. The high voltage and power can lead to injuries.
Warning: Do not start the STG if you are unsure about the channel configuration or the nature
of the downloaded file.
1. Set up your experiment.
2. Switch the STG3008-FA on.
3. Set up your stimuli with the MC_Stimulus II program.
4. Send the stimulus sequence from a MC_Stimulus II file to the STG.
5. Start the STG either manually by pressing the Start / Stop button on the front panel,
with the software controls, or with an external trigger.
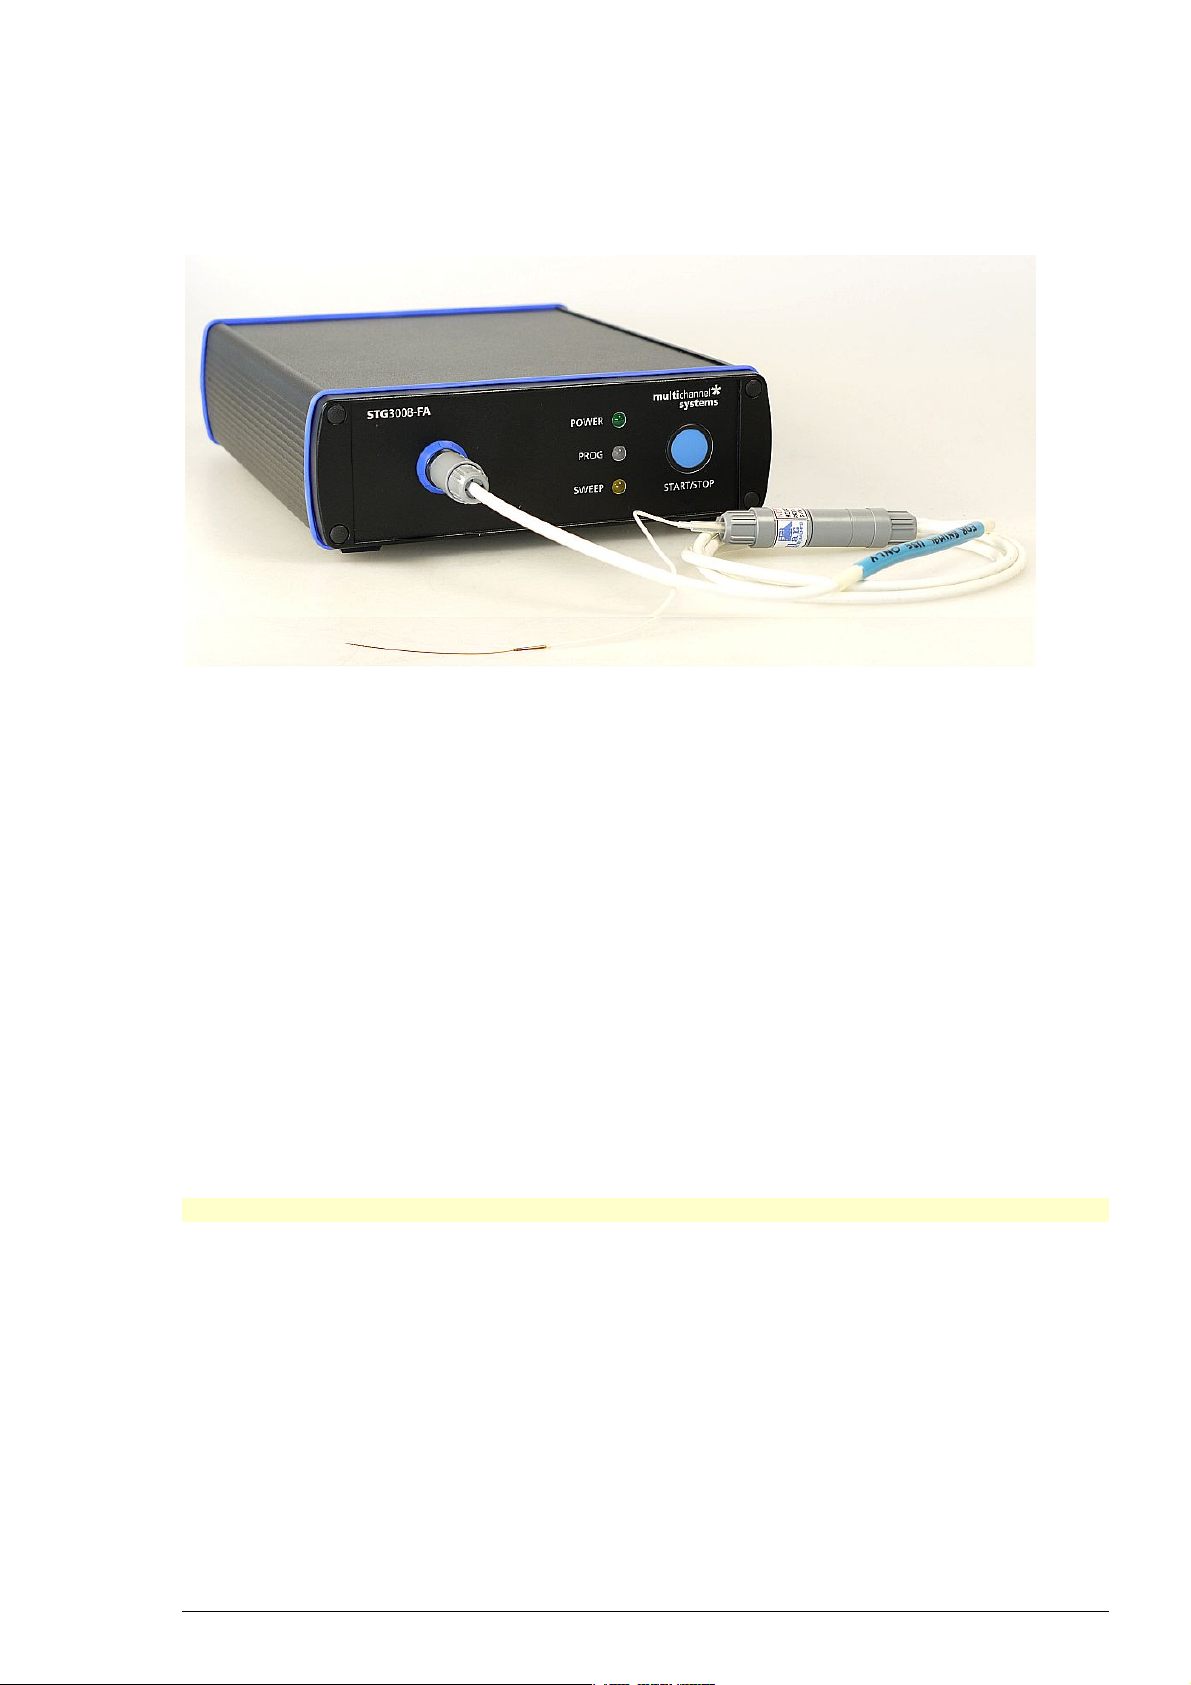
Creating stimuli
Stimuli are created user-friendly by entering the desired pulses (rectangular, ramp, or sine
waveforms) into a MC_Stimulus worksheet. Waveforms can be combined freely to create virtually
any stimulus pattern. Created stimuli are displayed in a WYSIWYG window.
Starting stimulation
Note: You need a computer connection only when you are using the software controls for starting
and stopping the stimulus generator. When you are using the STG interface or an external control
(trigger, you can disconnect the stimulus generator from the computer and operate it
independently. But you cannot remove the STG from the power connection. The memory
is cleared when the STG has lost power.
After the download of the stimulus file on the STG, you can start the stimulation. There are
several ways to start the STG.
MC_Stimulus
II interface:
You can start the stimulation directly after the download (with the command
Download and Start
stop stimulation with the command Stop
Start command is considered as activating the trigger input and the Sync Out
output. Likewise, all channels are stopped when you click Stop.
You can start the stimulation after download
or also later with the command Start . You can
. Starting the STG by using the
on the trigger. Please use
STG
interface:
the combined LED / Start / Stop buttons
stimulation manual whenever you want by clicking the corresponding LED /
Start / Stop button. The LED indicates the status: Grey means trigger off, red
means trigger on. In STG3008-FA only trigger 1 is available.
You can start the stimulation by pressing the Start / Stop button on the front
panel of the STG. Press the button again to stop the stimulation. Starting the
STG by pressing the Start / Stop button is considered as activating the trigger
input, that is, all channels are started and stopped, and the Sync Out output is
active when the STG is started. Pressing the Start / Stop button stops the
stimulation if at least
one channel is still active in the moment of the trigger
. You can start and stop the
11
Page 18

STG3008-FA Manual
event (indicated by the lighting SWEEP LED). Pressing the button starts
stimulation only if no channel is active (dark SWEEP LED)
External
control:
You can start the stimulation on a trigger from an external device, for example,
a switch. You can use the trigger input to trigger the analog output channels
that you have assigned to it. The trigger works in a similar way as when you
press the Start / Stop button. You can choose the action that will be taken when
one of the channels that are assigned to the trigger input is still active. Either
the stimulus protocols on the triggered channels are stopped or restarted; or
the trigger event is ignored. You can assign the Sync Out to the trigger input.
The default settings define that Sync Out is active when Trigger In is triggered.
Please see chapter "Trigger Settings" for more details.
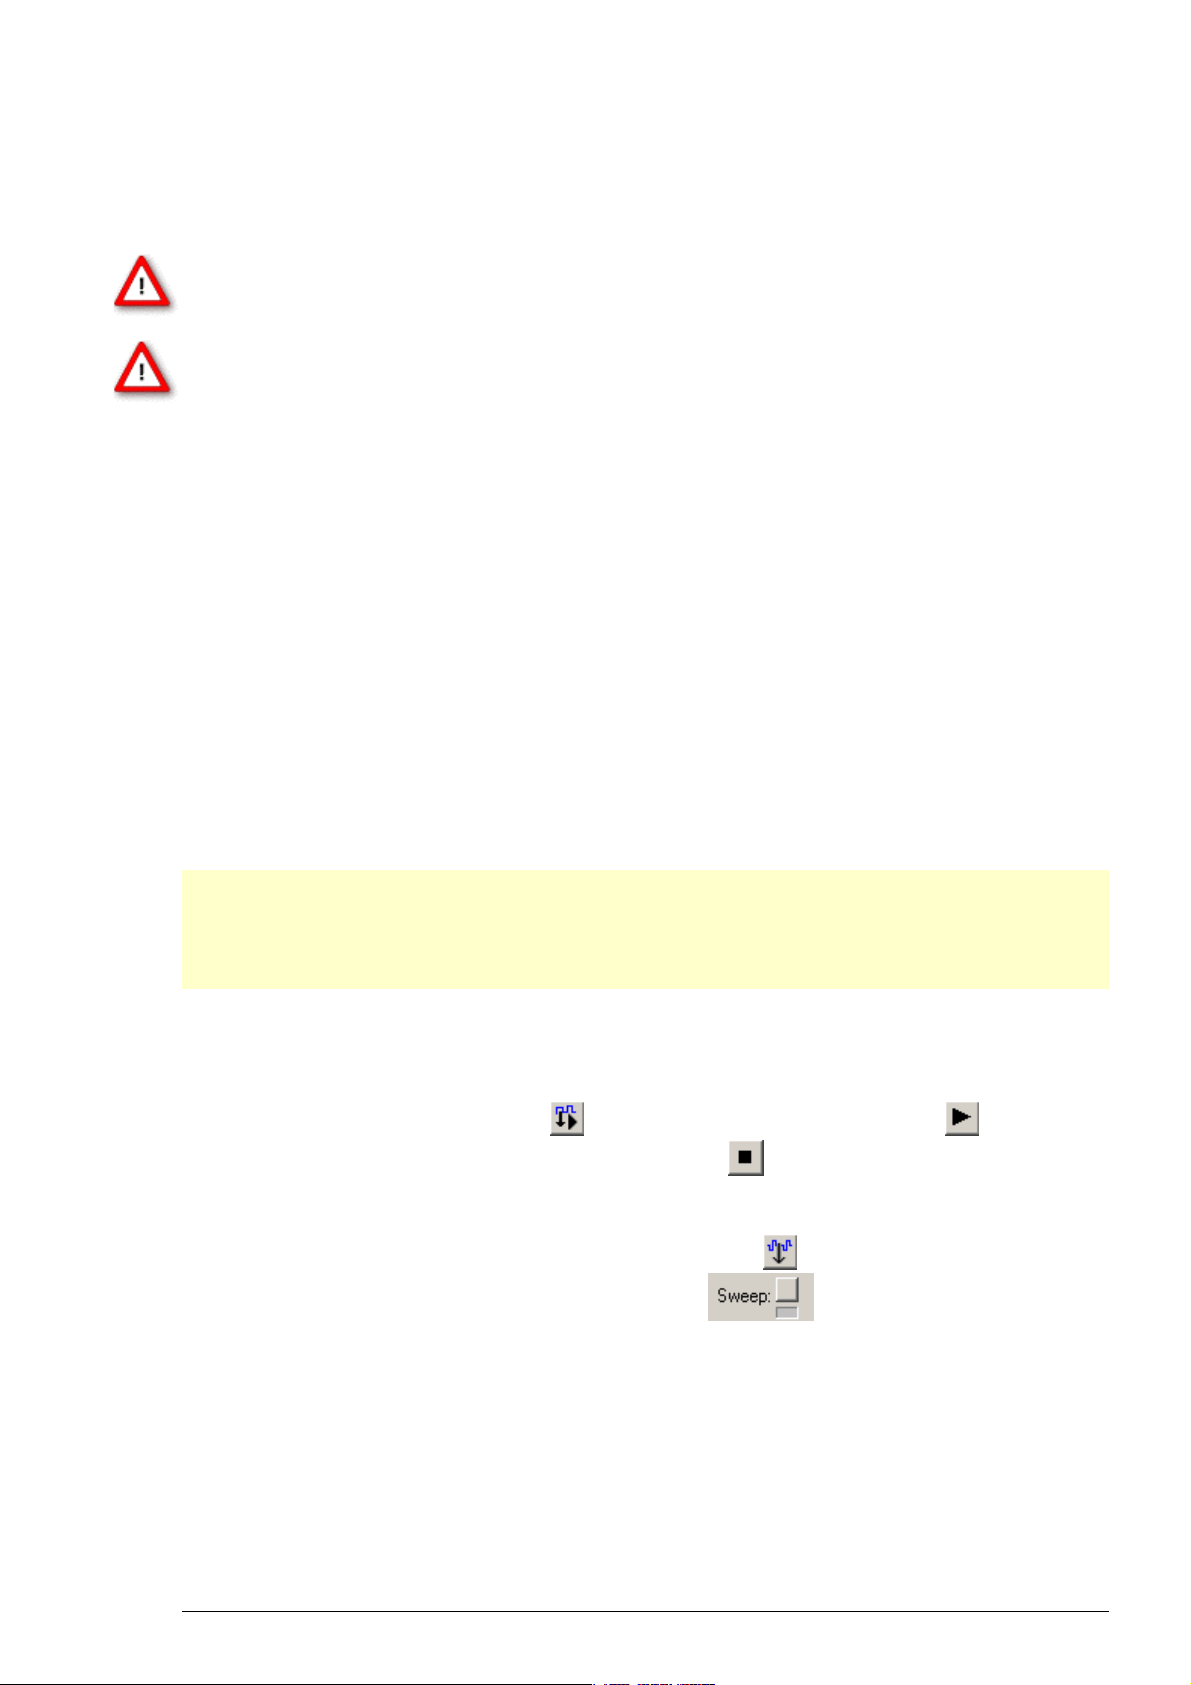
STG status control
Three status control LEDs (light-emitting diode) are present on the front panel of the STG
to give you a quick overview on its status.
POWER
PROG
SWEEP
STG has been switched on.
Stimulus file was downloaded to STG. STG is now ready for operation.
Stimulation is running, that is, at least one output channel is active.
MC_Stimulus II status control
The top part of the MC_Stimulus II status control refers to the active instance of the MC_Stimulus
II program instance and the STG that is controlled by this instance. All information in this part
is saved on the STG. The information is updated in the MC_Stimulus II main window when the
connection to the STG is changed or interrupted.
Status light Color Meaning
Connected
Green STG is connected and switched on. The serial number serves as an ID for
the controlled STG and is displayed on the left. On the STG menu, click
Select Device to select another STG connected to a different USB port
from the drop-down list to switch STGs.
Programmed
Green Stimulus file in voltage mode has been downloaded to STG. STG is now
ready for operation. File name and path of the *.stm file that was
downloaded onto the STG are displayed on the right.
Orange Stimulus file in current mode has been downloaded to STG. STG is now
ready for operation. File name and path of the *.stm file that was
downloaded onto the STG are displayed on the right.
Sweep
Red
Indicates the active trigger (up to eight). Each stimulation channel can
be assigned to any trigger. If all eight channels are assigned to trigger
one for example, only one sweep indicator will light up, even though
all stimulation channels can be active. See also chapter "Triggering
Stimulation".
12
Page 19
STG and Stimulus Protocol Information:
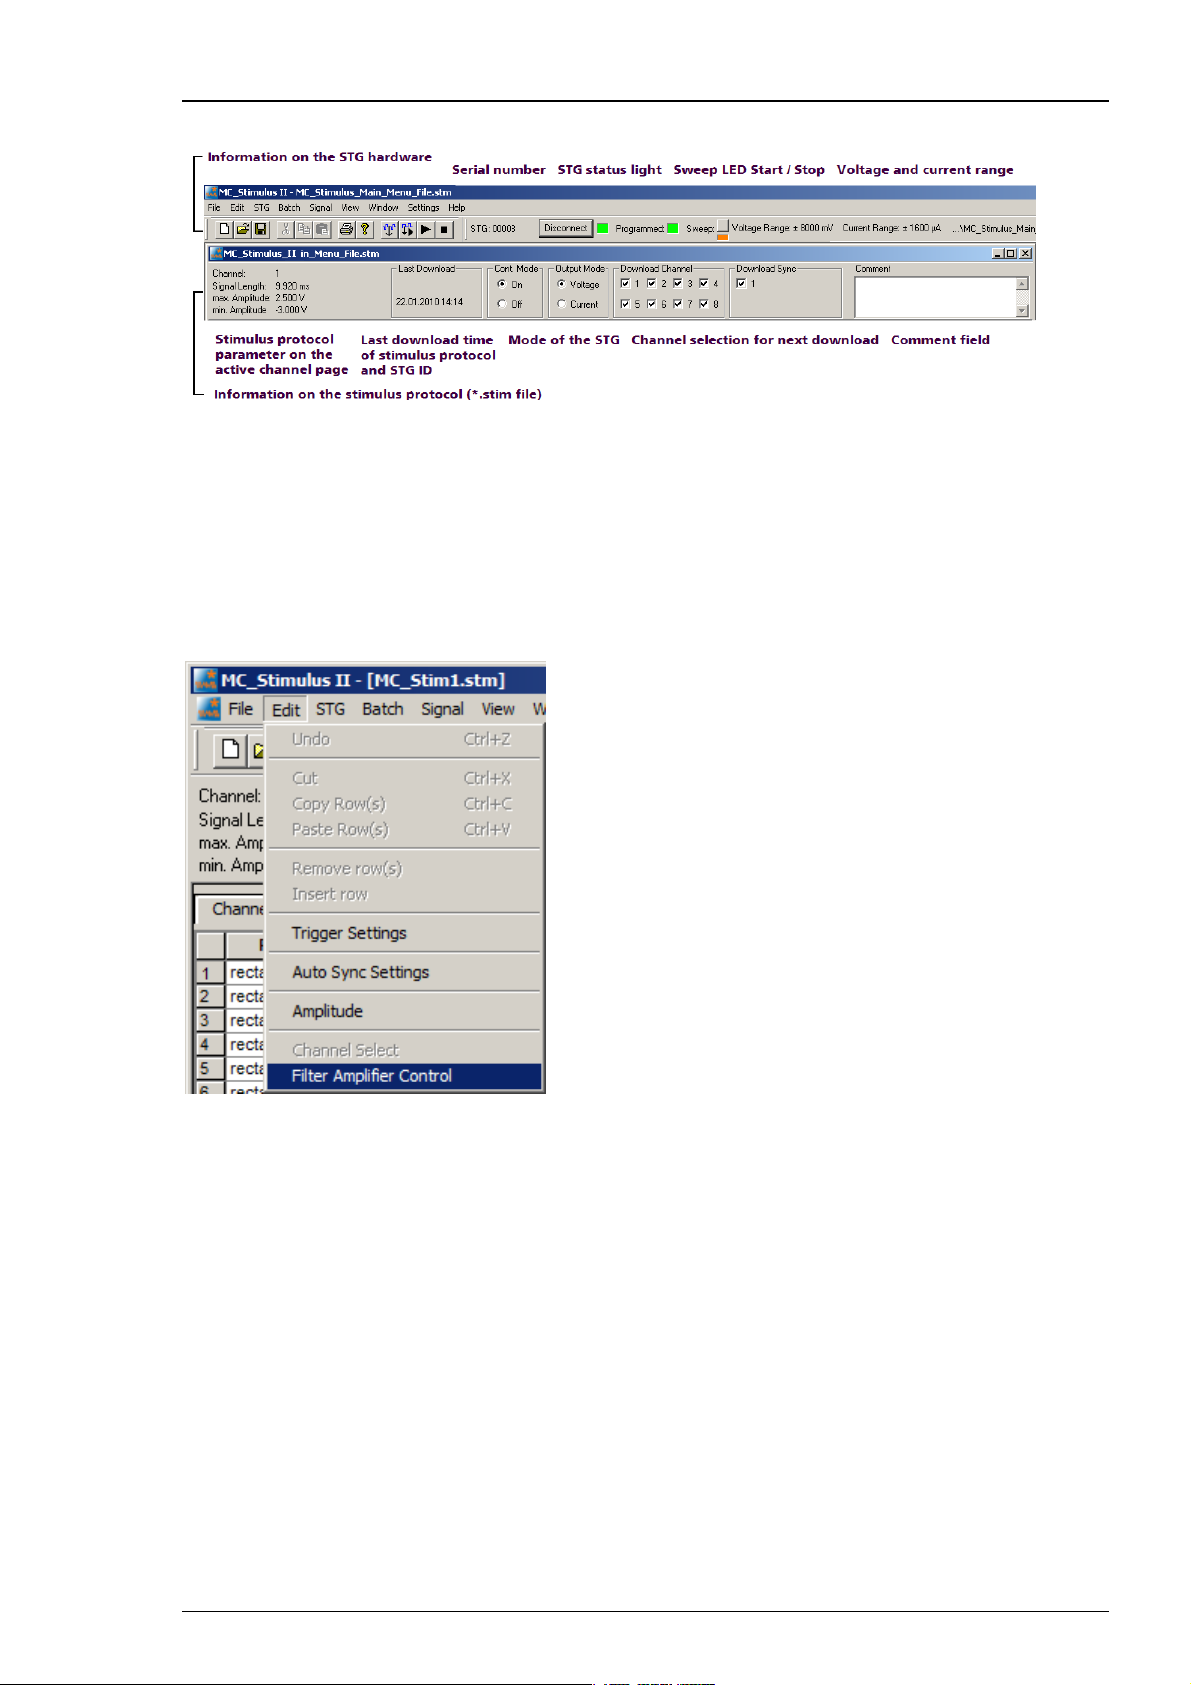
4.2 Operating the Amplifier
Switching between Stimulation and Recording Mode
The STG3008-FA is a stimulus generator of STG3000 series combined with a filter amplifier
with four selectable gain factors: 100, 200, 500, or 1000.
Please click "Edit" menu and select "Filter Amplifier Control".
Operating the STG
The “Filter Amplifier Control” settings are saved in the current MC_Stimulus II protocol.
After download, the STG3008-FA is set accordingly.
Thus, it is easy to switch between different measuring or stimulation settings by loading several
MC_Stimulus II worksheets. Then you can download the protocol with the desired settings.
If the STG3008-FA is switched off and on again, the settings for all eight channels are reset
to “Measure”, and the last downloaded filter amplifier gain is retained. This reset enables
measurements with the STG3008-FA without using the MC_Stimulus II software, of course
without stimulation, respectively.
13
Page 20
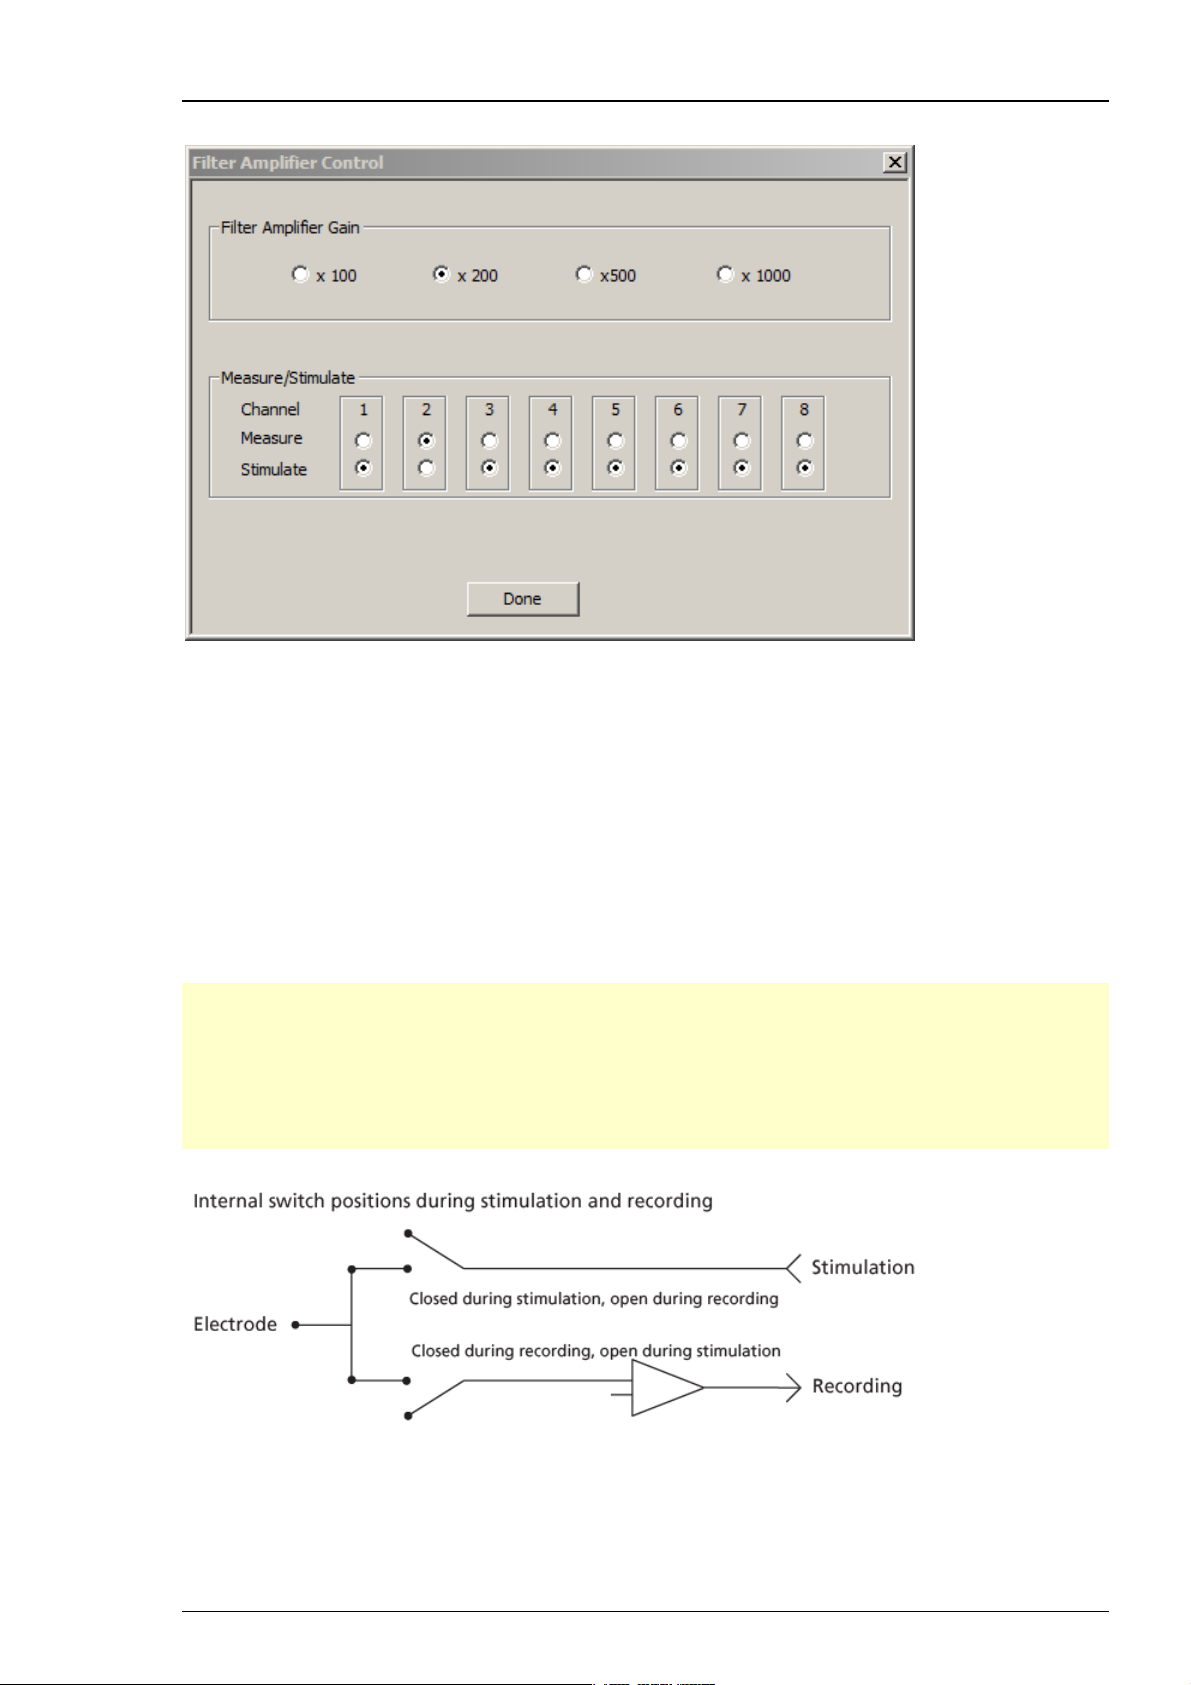
STG3008-FA Manual
The "Filter Amplifier Control" dialog.
Selecting the "Filter Amplifier Gain"
You can choose among four gain settings from factor 100 to 1000.
In the "Filter Amplifier Gain" window, please click one of the radio buttons to select the gain
factor.
Selecting the "Measure / Stimulate" mode
In the "Measure / Stimulate" window you can toggle between stimulation and recording mode
for each of the eight channels separately.
Please click the respective radio buttons for the channels in use.
Important: A ground electrode connected to the ground of the STG3008-FA amplifier is required
for proper use. The ground of the stimulation is connected to the ground of the amplifier inside
the device. The amplifier ground is the reference point for both stimulation and recording.
Without an appropriate grounding, the behavior of the system becomes unpredictable. The
ground electrode should have a large surface area, for example, a liquid gel adhesive electrode.
It is best positioned in an electrically inactive region (not near muscle, nor heart), but as near to
the recording site as possible, for example, at the belly.
14
Page 21
Operating the STG
4.3 Operating Multiple STGs
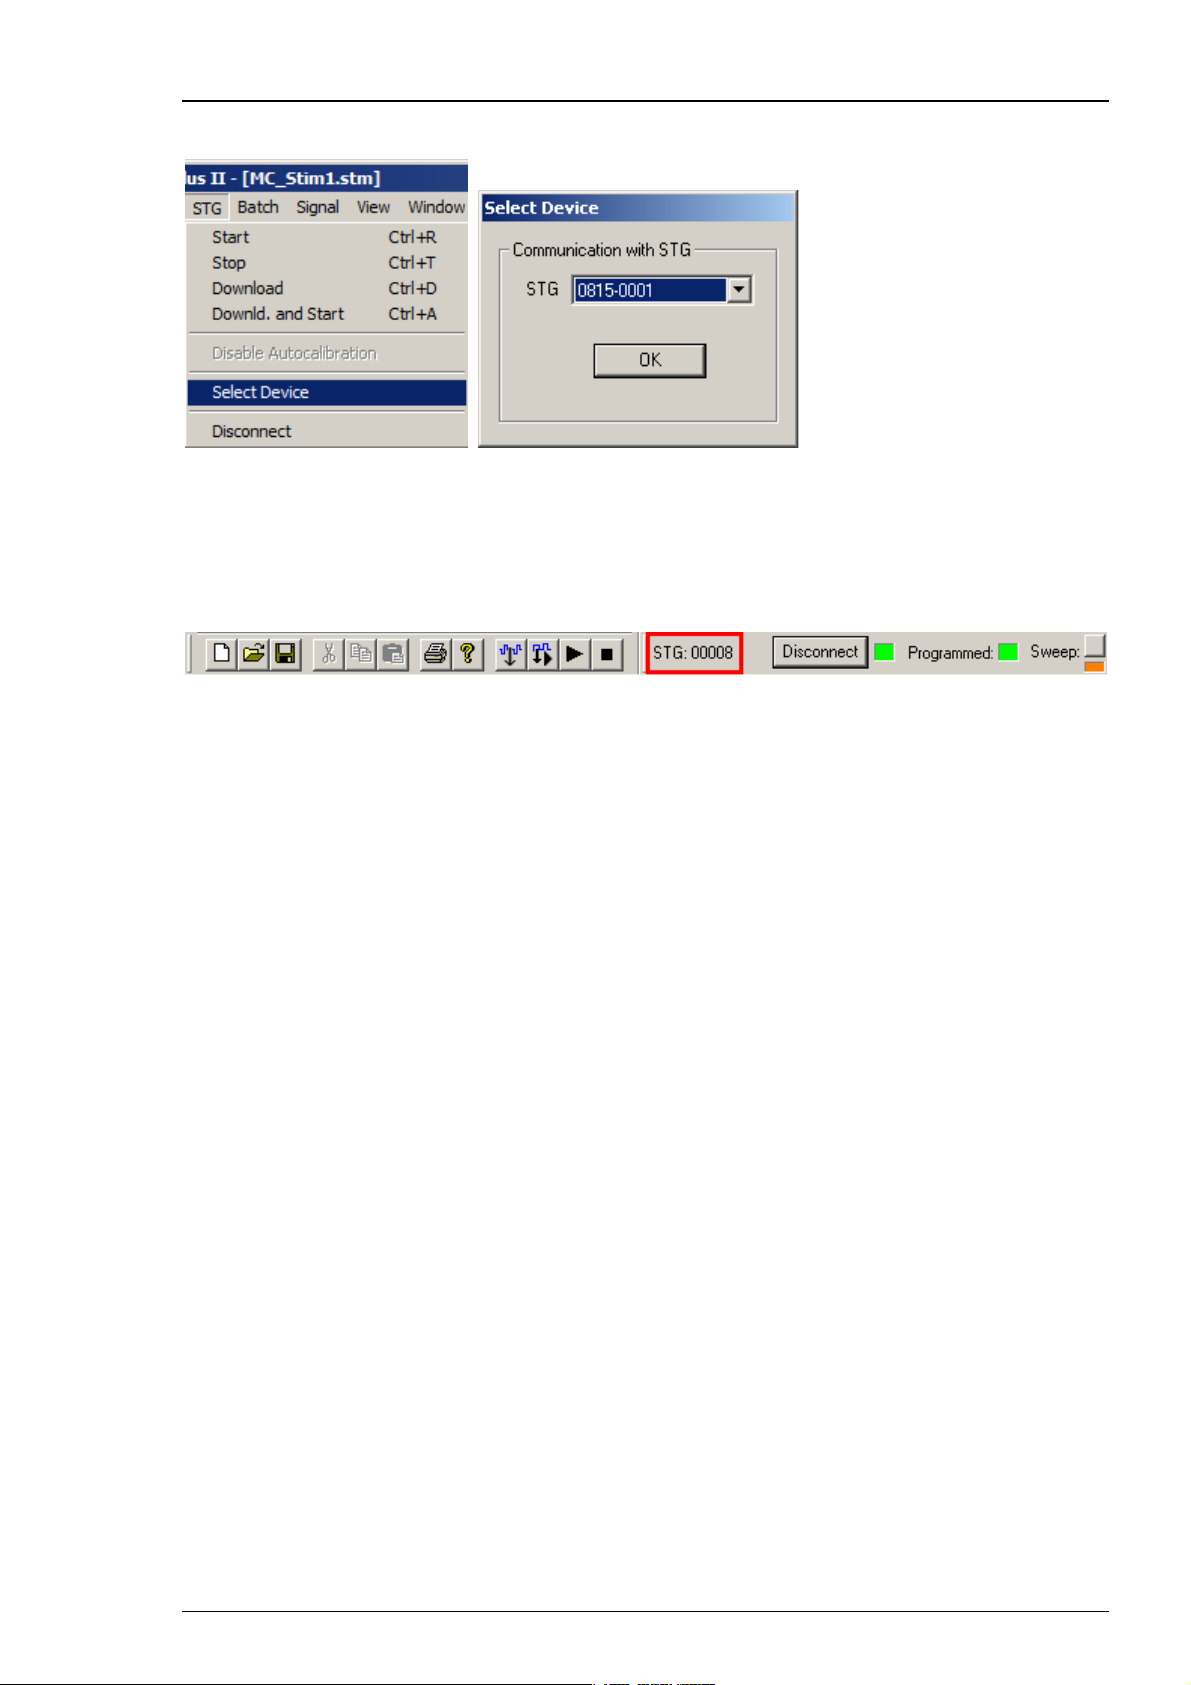
If you have more than one STG connected to the same computer, please click "Select Device"
under "STG" in main menu. In the "Select Device" dialog you can choose via serial number which
STG you like to control from the currently active MC_Stimulus II program.
The serial number is printed on the STG's case. The serial number of the currently active STG
is displayed on the status bar of the currently active instance of the MC_Stimulus II program.
Click Select Device under "STG" in main menu. Select the serial number of the desired STG from
the STG list.
You can open multiple instances of the MC_Stimulus II program and control multiple STGs at the
same time. Please make sure that you control each STG only by one MC_Stimulus II instance.
You can also open only one MC_Stimulus II instance and control multiple STGs one after the
other by the same instance. Simply change the settings in the Select Device dialog and select
the next STG when you have finished to program the first. The STGs can be operated without
a computer connection.
15
Page 22

Page 23
5 Programming Stimulus Protocols
5.1 MC_Stimulus II Worksheet
You can freely combine any pulse types. Use a separate row for each pulse type.
Hint: Several tools are provided for editing whole columns at once or autocreating entries.
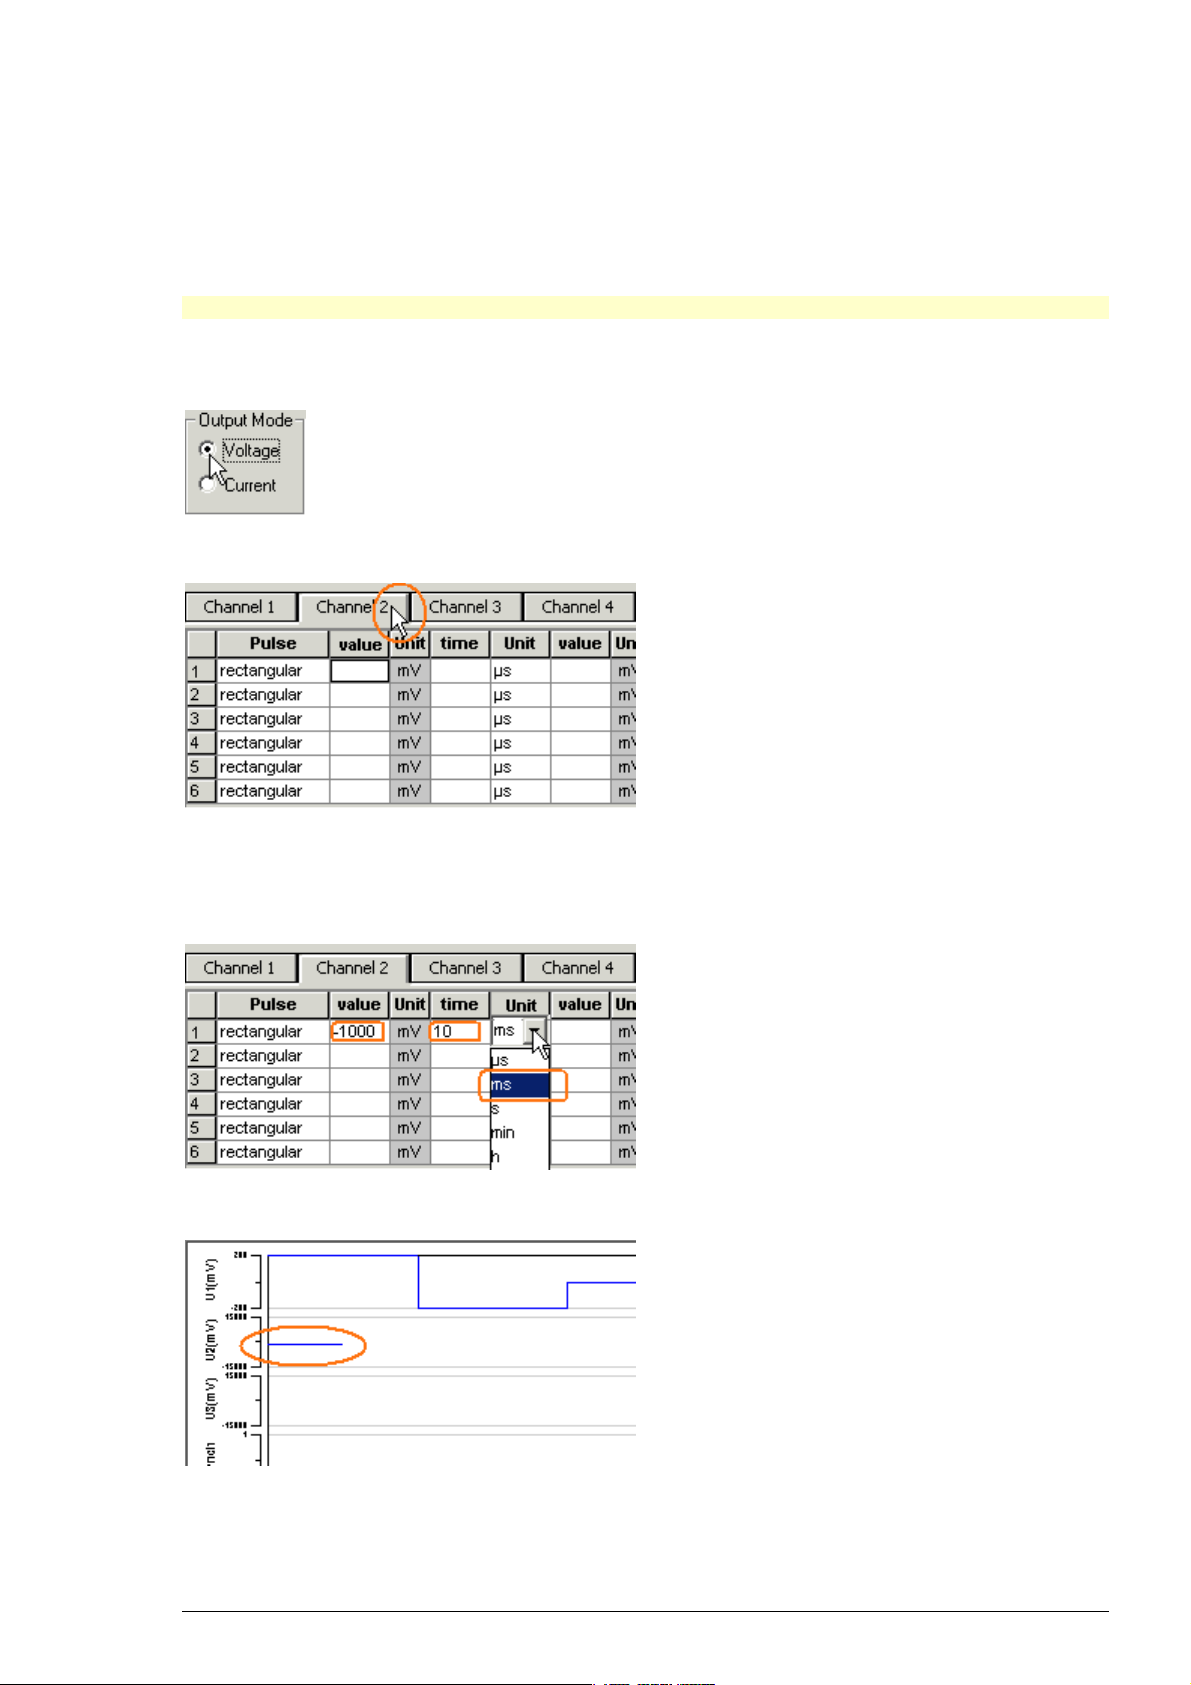
1. Select the desired output type first. Click either Voltage or Current under Output Mode
on the file window of MC_Stimulus.
2. Click a tab to select an output channel. The according channel worksheet is brought to front.
3. Now you can enter the pulses into the worksheet. Select a Pulse type (either rectangular,
ramp, or sine).
4. Enter the desired voltage steps and a time length for each step.
The according pulse is displayed in the WYSIWYG display at once.
17
Page 24
STG3008-FA Manual
5.2 Pulse Types
Three basic pulse types are available in MC_Stimulus II. You can create virtually any pulse by
combining different types.
Rectangular
Ramp
Sine wave
Note: The time resolution is 20 μs. When you enter time steps that are not a multiple of 20 μs,
the length of the step is internally adjusted (rounded arithmetically, that is, 249 μs would be
rounded down to 240 μs, 250 would be rounded up to 260 μs) to a valid value. The minimum
voltage resolution is 1 mV, the current resolution is 200 nA. Please regard also the minimum
and maximum output voltage / current of your STG version. If you enter voltage or current
values outside the STG's limit, the invalid value will be changed automatically when you download
the protocol. Cells with changed values will be highlighted in yellow.
Note: If you work near the resolution limits of the STG, the output pulses may differ from the
programmed pulses. In this case, you should check the output with an oscilloscope. Please see
also the "Analog Output Signals" chapter.
Please note that the memory of the STG3008-FA is limited (64 MB). You will get an error message
if the memory is full.
For the digital Sync Out channel, only TTL pulses with bit patterns of 0 (LOW) and 1 (HIGH) can
be programmed. A logical state of 1 (HIGH) results in a 3.3 V output signal, and a logical state
of 0 (LOW) results in a 0 V output. Please note that the digital output is sent about 20 μs faster
than the analog output. Please see also the "Triggering Stimulation" chapter.
Rectangular pulse type
18
Page 25
Programming Stimulus Protocols
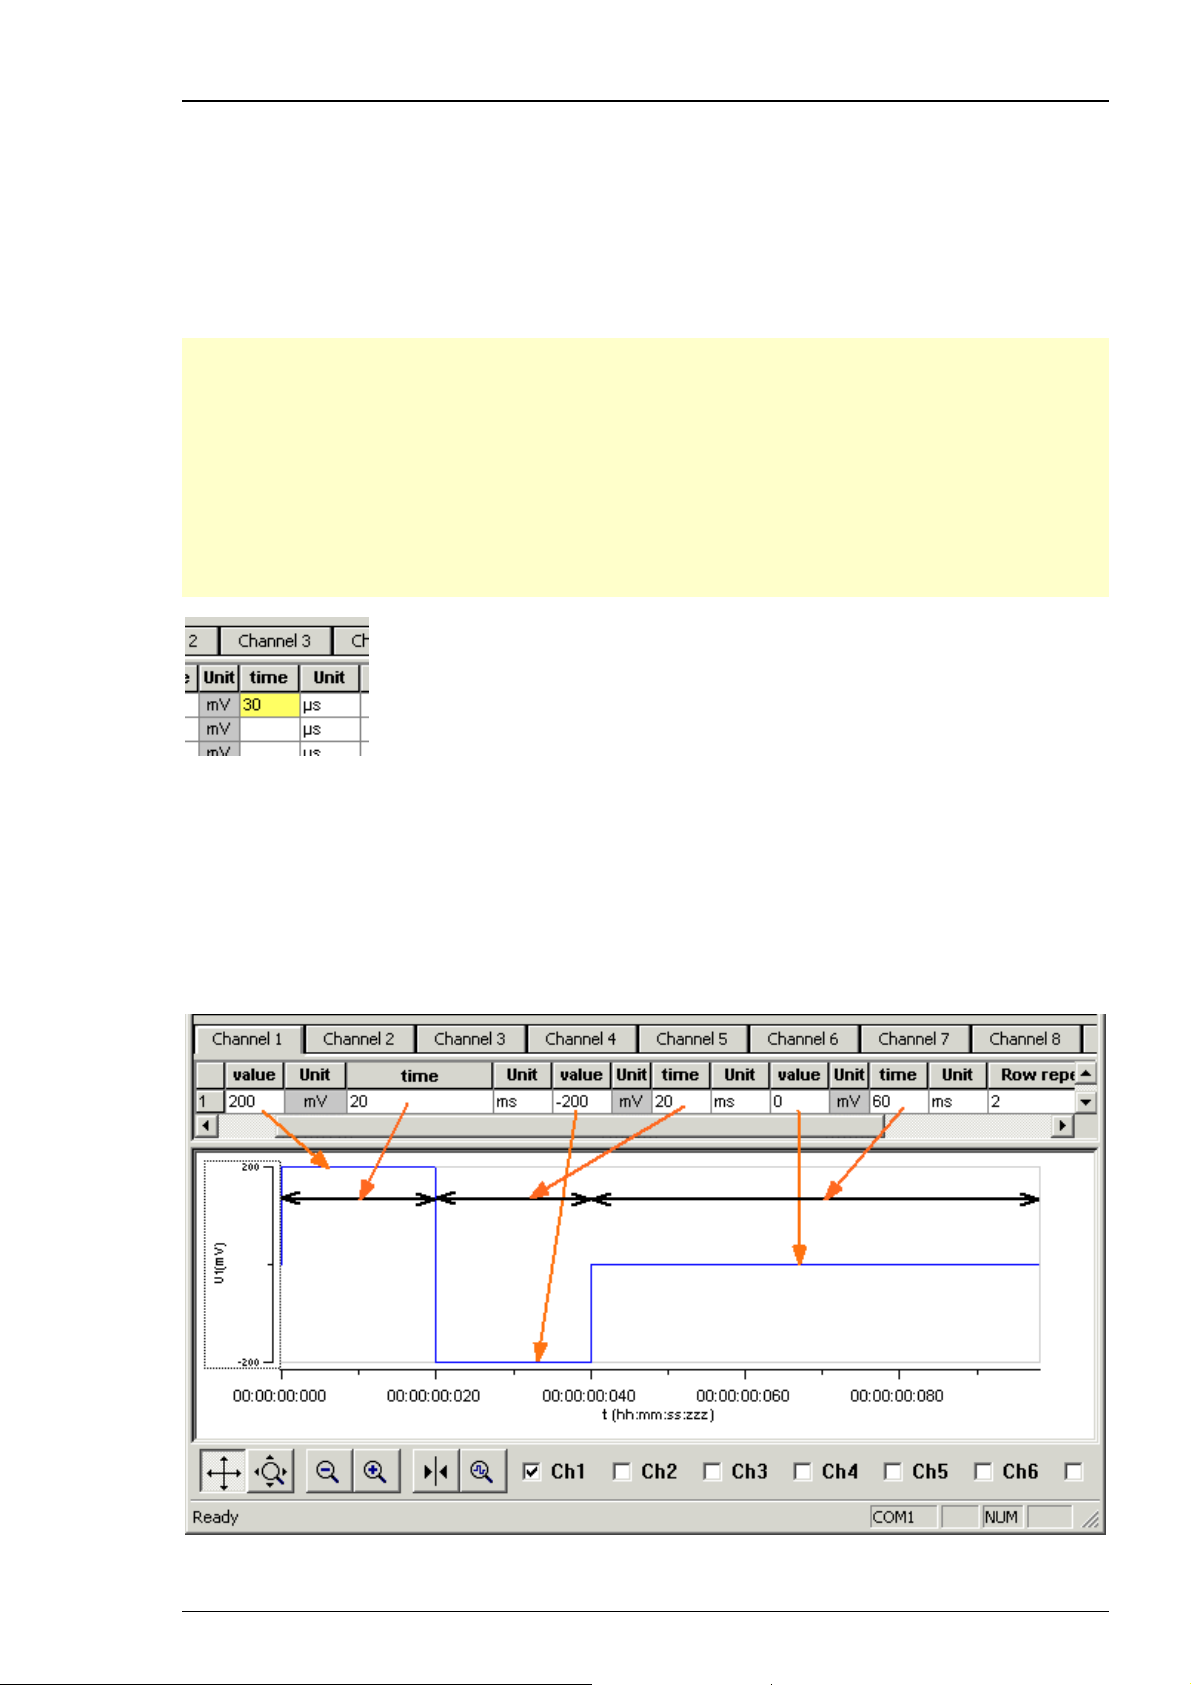
Enter each voltage / current level and the duration of the pulse. The voltage / current jumps
directly to the specified level. In one row, you can enter up to three voltage / current levels. Use
the next row for programming more levels.
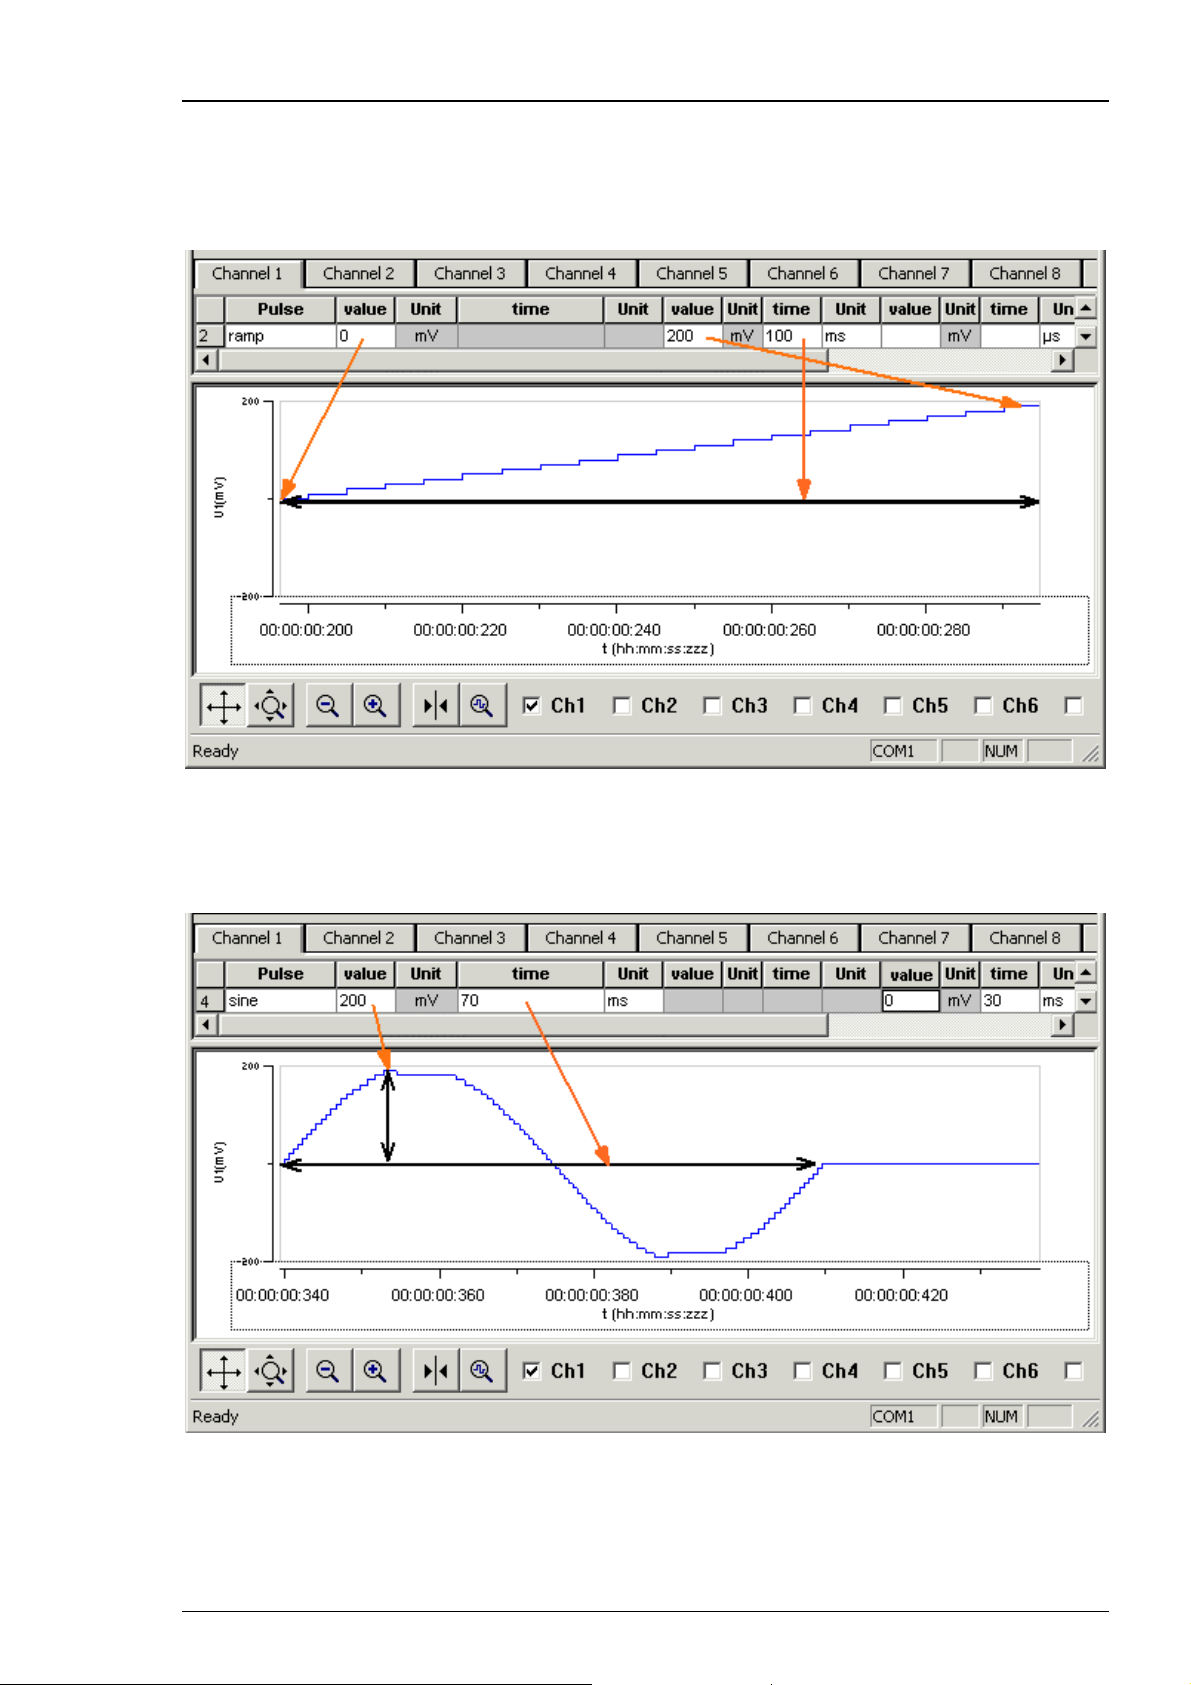
Ramp pulse type
Define the starting point, end point, and the length of the ramp. The ramp is then build
according to these parameters in small single steps of 20 μs.
Sine wave pulse type
Define the amplitude and the period of the sine wave. The sine wave is then computed
according to these parameters with a minimum resolution of 1 mV and 20 μs. If you enter
a negative amplitude, the sine wave starts with its negative alternation.
19
Page 26

STG3008-FA Manual
5.3 Autorepeating Pulses and Protocols
For entering complex stimuli easier and faster, you can repeat rows and groups instead of
entering the pulses several times into the worksheet. You can repeat each single row. In the
preceding example, the rectangular pulse in row 1 is repeated twice. You can also group several
rows and repeat them altogether. In the example, pulses from rows 1 to 4 are grouped and
repeated three times.
Repeating rows
Type the number of repeats into the Row Repeat cell of the appropriate row.
The pulses of the complete row are repeated the specified number of times.
Grouping and repeating groups
1. Select several cells by clicking and dragging cells in the Group Repeat column.
Selected cells are highlighted in black.
2. Point to the selected cells and right-click to open the context menu.
3. Click Group / Ungroup. The corresponding rows are grouped now. This is indicated by a merging
of the Group Repeat cells.
20
Page 27
Programming Stimulus Protocols
4. Type the number of repeats into the merged Group Repeat cell.
Repeating complete pulse protocols (autorepeat function), Continuous Mode
You can repeat the complete stimulus on all output channels that are triggered by the same
trigger. This means, each time when a trigger event occurs, the complete stimuli on all
corresponding output channels are repeated for the specified number of times. If the stimuli have
different lengths, the starting points are synchronized. For example, if channel 1 has a stimulus
with a length of 500 ms, and channel 2 of 1000 ms, and both are triggered by the same trigger
event, channel 1 waits 500 ms for the repeat until the output stream of channel 2 has been
finished.
Note: The Sync Out signal for the corresponding trigger is repeated as well each time the stimulus
is repeated.
Hint: You can repeat the complete stimulus protocol that is assigned to a trigger continuously
by using the Continuous Mode setting. Continuous mode can be activated in the main window
or under Trigger Settings. The STG has then to be stopped manually by the user. You can use this
feature regardless whether you use an external trigger input or not. When you press the Start
button, this is considered as if all four trigger inputs were active. When you use Continuous Mode,
the repeats entered in the Trigger Settings dialog box are disabled.
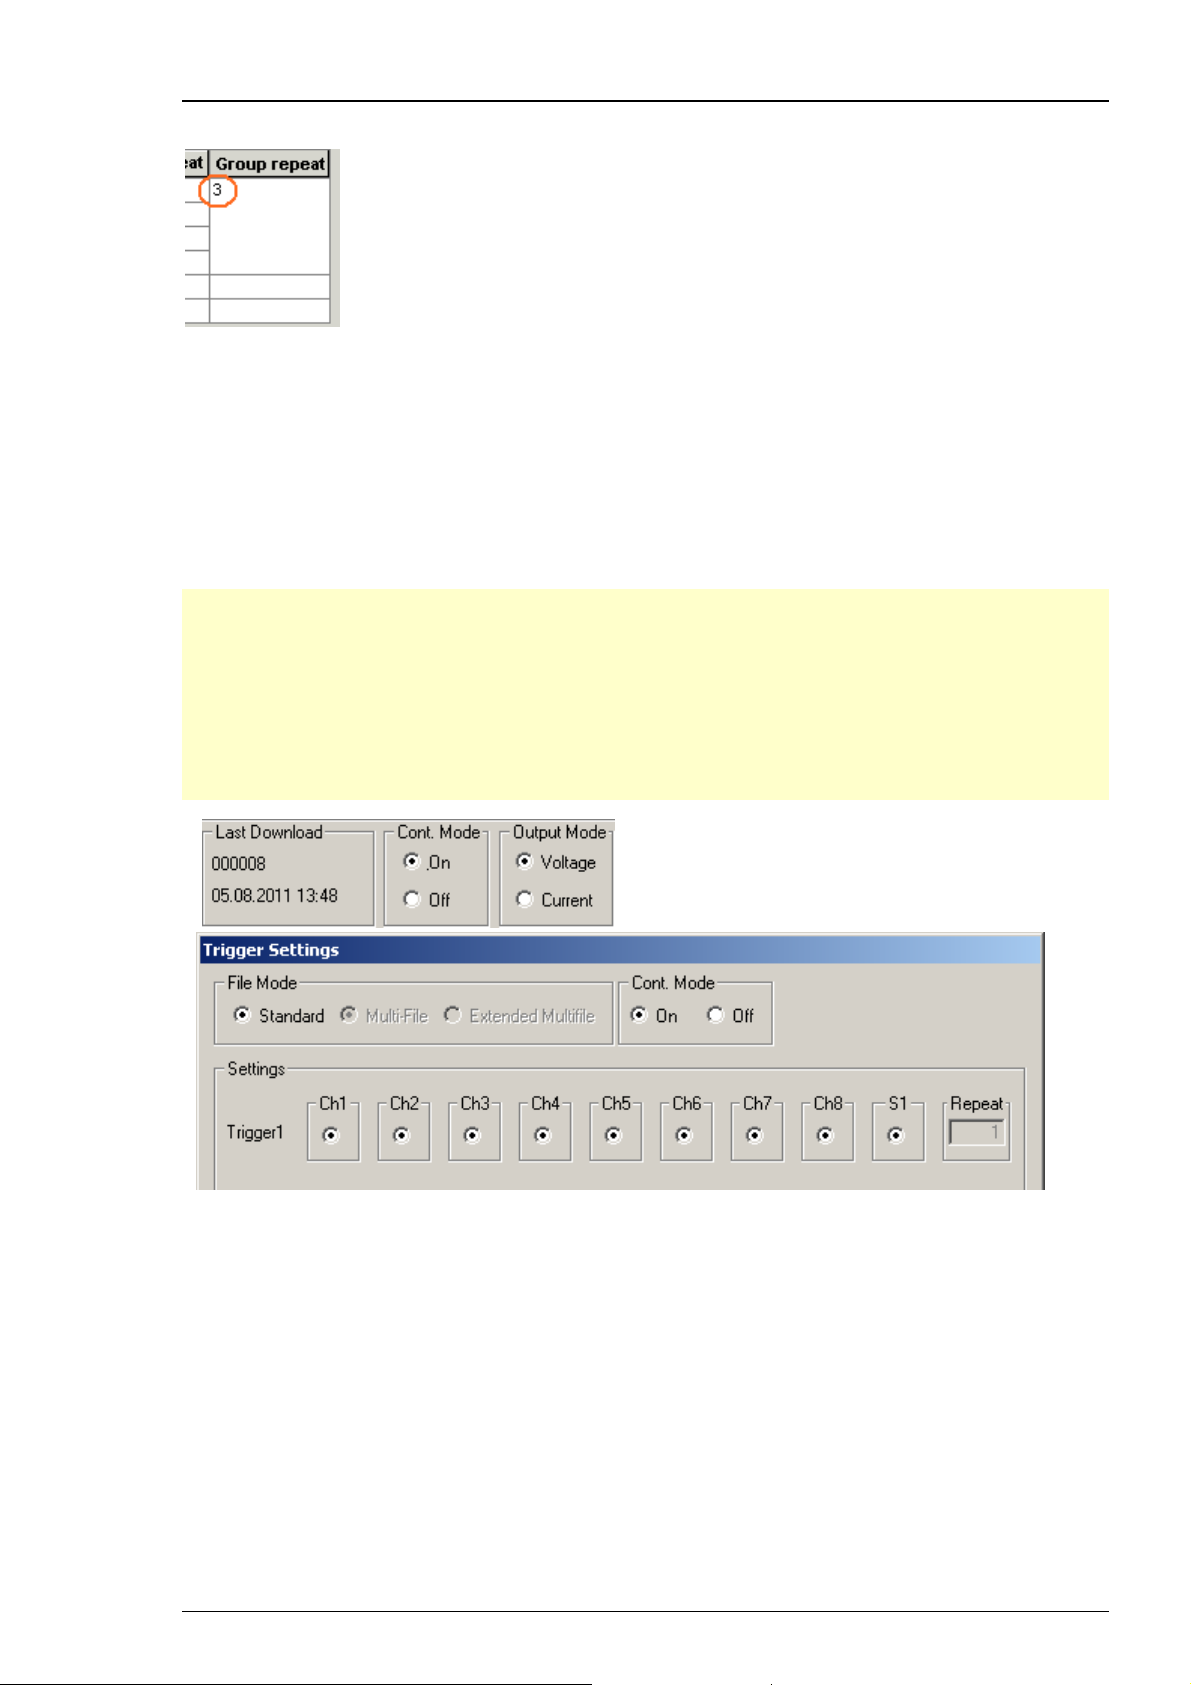
1. On the STG menu, click Trigger Settings.
2. Enter the number of repeats for each trigger separately. 0 repeats the output signals
continuously.
21
Page 28
STG3008-FA Manual
In the following example, the stimuli on output channels 1, 2, 4, 5 and channel 7 and 8,
that are all triggered by Trigger 1, are repeated five times after the trigger event, each time
accompanied by the Sync Out 1 output.
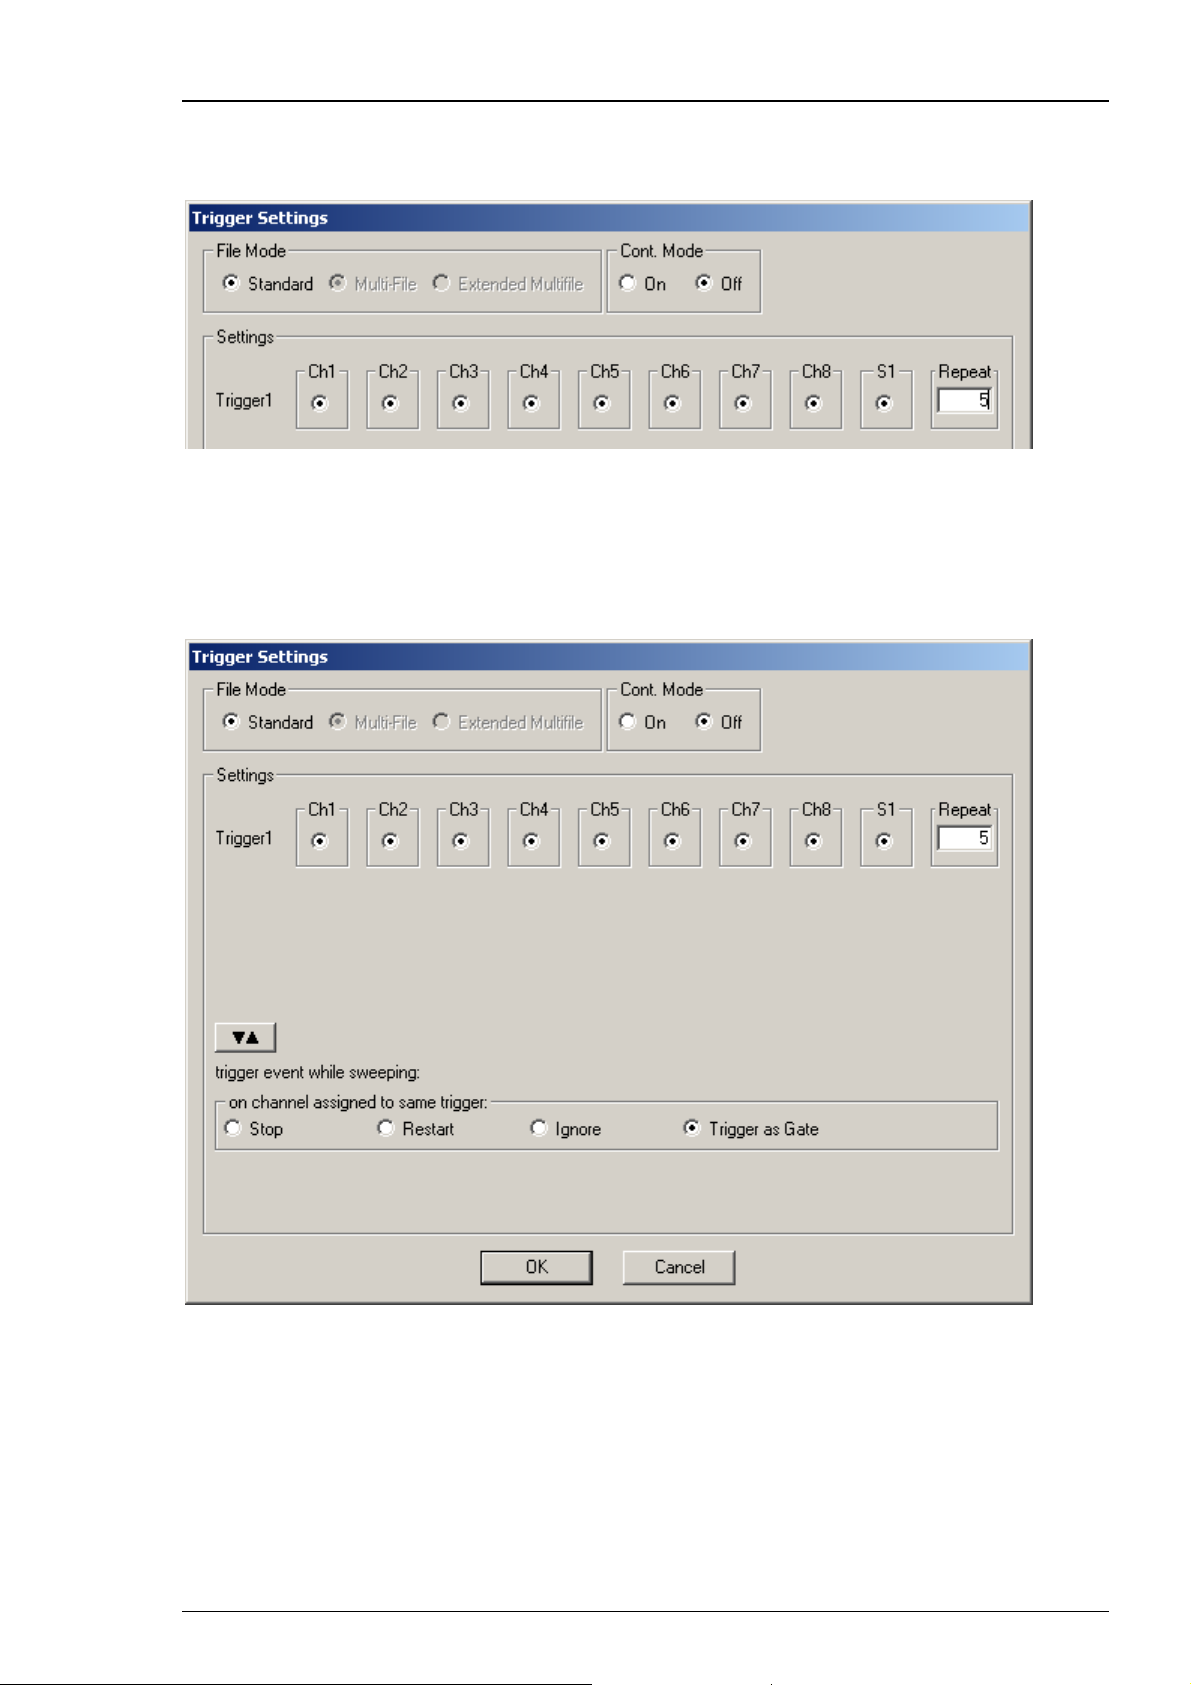
Repeating complete pulse protocols, Gating Trigger
Repeated stimulation of complete protocols can also be controlled by a gating trigger. Channels
associated with the Trigger input will be active as long as the condition of the Trigger is 1 (HIGH)
and switched off as soon as the condition becomes 0 (LOW). Gating trigger function can be
enabled in the Trigger Settings menu.
22
Page 29
Programming Stimulus Protocols
5.4 Autocreating Entries and Editing Columns
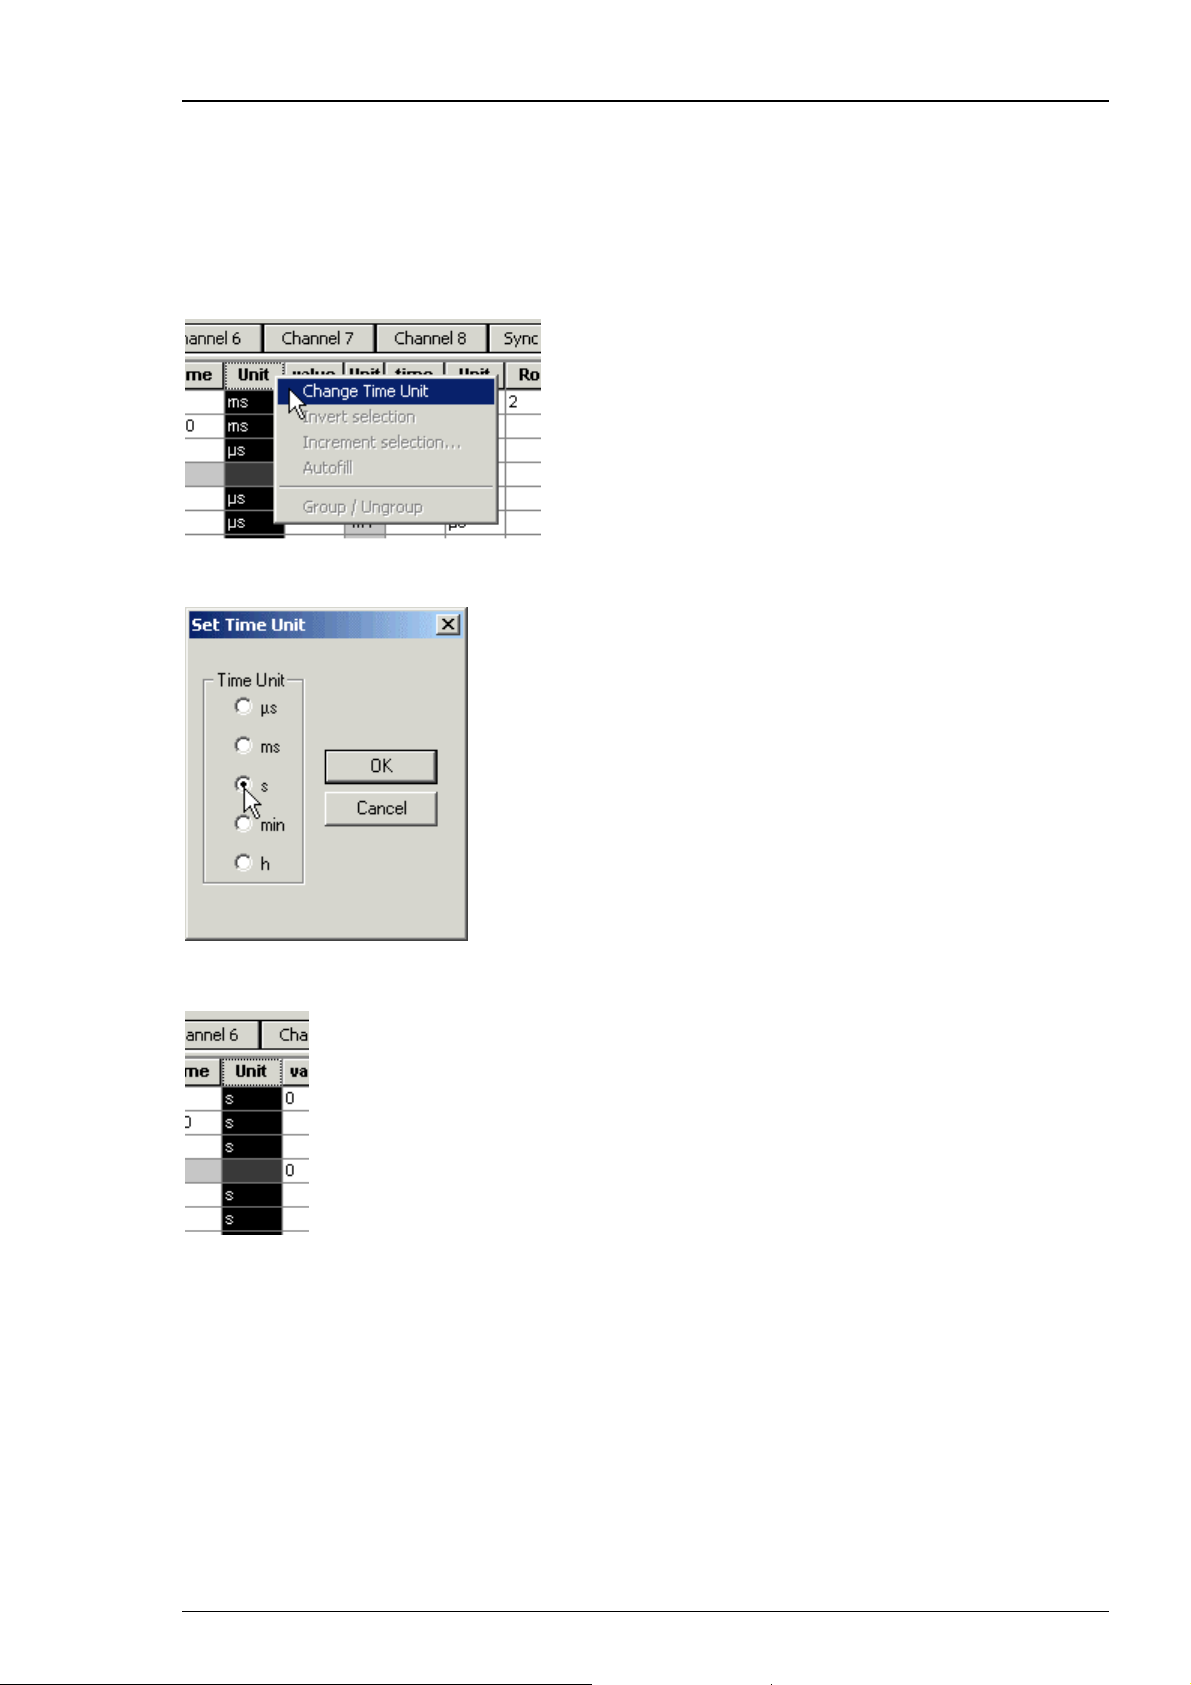
Changing time units for a complete column
1. Click any Unit column header to select a column. The selected column is highlighted in black.
2. Right-click and click Change Time Unit.
3. Select the desired time unit.
All units in the column are set to the selected time unit.
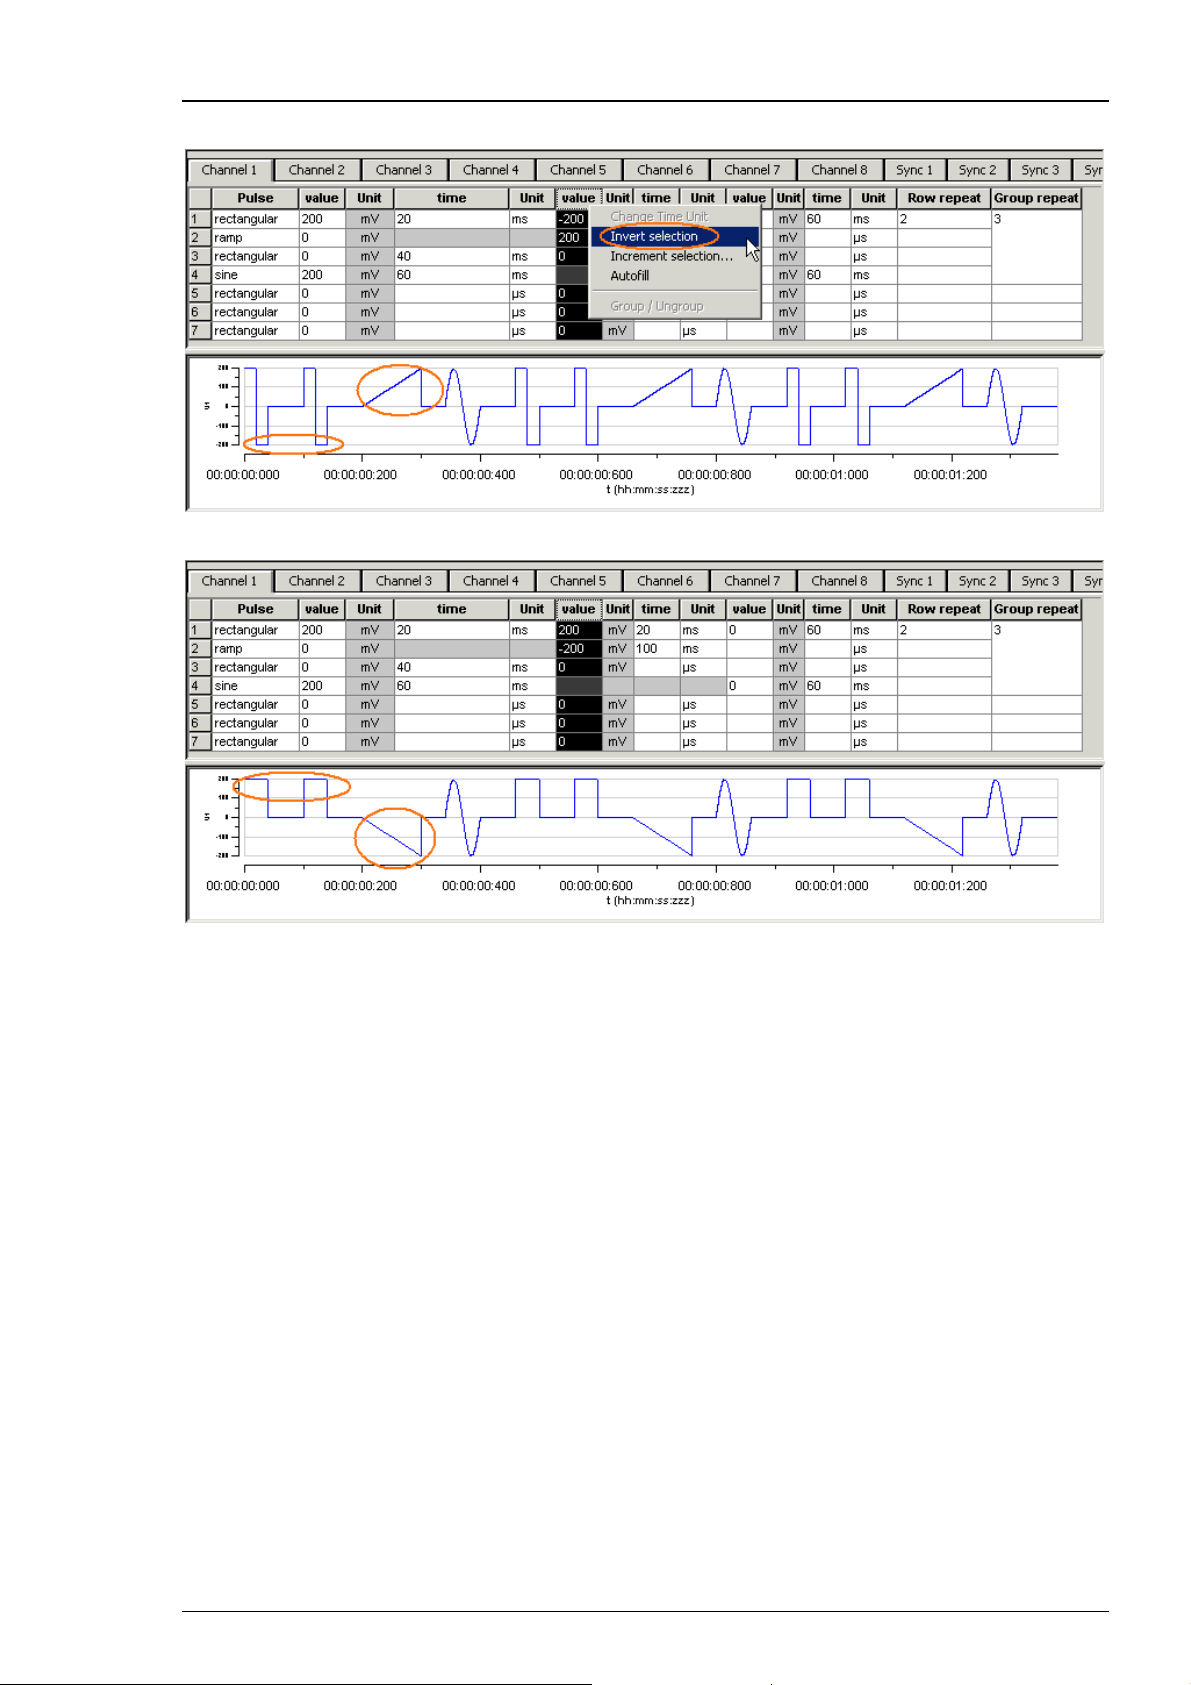
Inverting pulses in a column
1. Click any Value column header to select a column. The selected column is highlighted in black.
23
Page 30
STG3008-FA Manual
2. Right-click and click Invert Selection.
The polarity of the signals is switched from positive to negative and vice versa.
Incrementing columns
This feature is very convenient for setting up long and complex stimuli without entering
each value manually. You can enter and edit multiple voltage values or time lengths.
You can keep all zero values unchanged with the option Keep Zero.
Apart from an absolute shift or increment factor, you can modify values by the percentage
as well.
Shifting time or voltage / current values
You enter a value, which is added arithmetically to all values in the selected column. For example,
if you enter "-50", -50 is added to all values.
1. Click any Value or Time column header to select a column. The selected column is highlighted
in black.
24
Page 31

2. Right-click and click Increment Selection.
3. Under Type of Increment, select Shift.
4. Enter the desired value.
Programming Stimulus Protocols
All values in the selected column are modified by the selected factor. In the example, 100 is added
to all values, resulting in a total of 100 because the initial value has been 0.
25
Page 32

STG3008-FA Manual
Creating time or voltage / current increments
With this option, you enter a base value for modification of all values in the selected column.
The first row is modified by the base value. The second row is modified by the double value,
the third row by thrice the base value, and so on. With this feature, you can easily set up time
or voltage increments.
1. Under Type of Increment, select Count.
2. Enter the desired start value.
The value in the first row is incremented by the selected start value of 10. The next value is
modified by the double value (20), and so on.
26
Page 33

Programming Stimulus Protocols
You can now fill further columns in the same way. Thus, you can easily set up a stimulus with
incremented pulse lengths like this with only a few mouse-clicks.
In the same way, you can set up a stimulus with voltage / current increments.
Shifting absolute time or voltage values
With this option, the signs of the selected values are ignored. Zeros are never changed, that is,
the option Keep Zero cannot be deselected.
1. Under Type of Increment, select Absolute Value.
2. Enter the desired shift factor.
27
Page 34

STG3008-FA Manual
The absolute values of 200 and 200 are both 200. This absolute value of 200 is modified by the
shift factor of 50, resulting in 250. The negative value is now 250, and the positive value is 250.
(If you had chosen the option Shift instead, the computed result would have been 200 + 50 =
150.) All zero values are not changed.
Autocreating entries
You can use the Autofill feature to set up advanced time or voltage/current increments. You
define the Start and End value and either the Step Size (Start - Stop - Step Size) or the
number of Steps (Start - Stop - # of Steps). Alternatively, you can enter the Step Size and
the Number of Steps (Start - Step Size - # of Steps). According to these specifications,
rows are inserted and the column is filled automatically.
In the following example, the Autofill feature has been used to create a voltage step series
from 20 mV to 500 mV with an increment of 20 mV.
1. Click any Value or Time column header to select a column. The selected column is highlighted
in black.
2. Right-click and click Autofill.
3. Select one out of three commands and fill in the white text boxes.
28
Page 35

The column is filled according to the specifications.
Programming Stimulus Protocols
5.5 Auto Sync for Autocreating Trigger Pulses
If you want to synchronize other devices with the stimulus generator STG3008-FA, you have
to set up the digital output of the Sync Out channel in synchrony to the stimulus pulses. This
may sometimes be a bit tricky and time consuming, especially for complex stimulus protocols.
The Auto Sync feature is intended for making the work with MC_Stimulus II more efficient:
Digital Sync Out TTL pulses synchronous to stimulus pulses are generated automatically by this
feature. Each time an analog channel generates a pulse (that is, its value is not equal to zero),
the logical state of the Sync Out channel is set to HIGH (=1). You can set the time offset of the
TTL's rising edge before the stimulus pulse and of the TTL's falling edge after the pulse. If you
change the stimulus protocol, corresponding Auto Sync pulses are updated on the fly.
On the Edit menu, click Auto Sync Settings. The Auto Sync Settings dialog box appears.
1. Assign the analog stimulus channels that will be used as the basis for autocreating the protocols
on the Sync Out channel. For example, if you use only stimulus channel 1, select Ch1 in Sync1.
2. Set the time offset of the TTL’s rising edge before the stimulus pulse (Pre Time) and of the TTL’s
falling edge after the pulse (Post Time)
29
Page 36

STG3008-FA Manual
3. On the Settings menu, click Auto Sync to enable the Auto Sync feature. The Sync Out protocols
will be autocreated in synchrony with the pulse protocols on the assigned channels, will show up
in the WYSIWYG window immediately, and will be downloaded onto the STG with your next
download. (Please make sure that the display and download options are appropriate, that is,
all necessary Sync Out channels are selected.) The worksheets of the Sync Out channels assigned
to the Auto Sync feature will be unavailable, that is, you cannot edit them manually. The
following screen shot shows an example of a monophasic 100 μs voltage pulse on channel 1
and the corresponding Auto Sync pulse (Pre Time 0 μs, Post Time 100 μs) on Sync Out 1.
4. If you later choose to edit the Sync Out worksheets of the active file manually, you can deselect
the Auto Sync feature on the Settings menu. Any information in the Sync Out worksheets that
was there before the Auto Sync option was enabled will be restored; and all worksheets will be
available for manual editing.
5.6 Adjusting the Stimulus Intensity Level
After having programmed the stimulus protocol, you can either download the protocol "as is", or
you can adjust the stimulus intensity level, that is, choose a percentage (from 0 to 200 percent)
of the programmed amplitudes, independently for each of the up to 8 channels. You can adjust
the level offline and download the information onto the stimulus generator manually
afterward, or you can adjust the level on-the-fly, without stopping the running stimulation.
This feature is especially convenient for testing out thresholds that evoke a biological response.
Note: The error messages that are displayed when the stimulus amplitude is not set to zero at
the end of the protocol or when the time length of stimulus protocols is different on individual
channels can present a nuisance when adjusting the level on-the-fly. These error messages can
be switched off by deselecting the option Enable Compiler Warnings on the Settings menu.
1. On the Edit menu, click Amplitude. The Amplitude dialog box opens. You can drag and drop
it anywhere you like on the screen, also outside the main window of the MC_Stimulus II program.
This is especially convenient when you are using two monitors.
2. Select the option Auto Download if you want to adjust the stimulus intensity level on-the-fly.
Deselect the option if you want to download the changes manually later.
3. Select the option Change All if you want to adjust the stimulus intensity to the same level
on all channels. Deselect the option if you want to set individual channels to different levels.
4. Drag the slider with the mouse for adjusting the stimulus intensity in the range of 0 to200
percent of the programmed stimulus amplitudes.
The WYSIWYG display is updated automatically. The worksheet is not updated. It always relates
to the stimulus protocol that you programmed initially. If Auto Download is selected, changes
are immediately downloaded onto the stimulator after releasing the slider, and the stimulus
protocol is restarted from the beginning, with the adjusted stimulus intensity level.
5. If Auto Download was not selected, you need to download the stimulus protocol manually
for changes to take place.
30
Page 37

Programming Stimulus Protocols
6. You can click the Reset All button to set the level on all channels back to 100 percent.
Stimulus Intensity dialog box of the STG3008-FA
Channel 1 is set to 100 %, that is, the stimulus protocol will be downloaded onto the stimulus
generator as it was programmed in the worksheet. Channel 2 is set to 50 %, that is, all stimulus
amplitudes programmed on channel 2 are half, channel 3 is set to 150 %, and channel 4 is set
to 100 %,channel 5 and 6 are set to 200, that is, all stimulus amplitudes are doubled.
31
Page 38

Page 39

6 ASCII Import/Export
6.1 Loading Files
The ASCII import filter is used to load stimulus protocols from an ASCII file into the stimulus
worksheet of MC_Stimulus II. You can use this feature for feeding recorded signals (for example,
exported from MC_Rack, see the MC_Rack manual) into the stimulus generator. You can also
export the data from MC_Stimulus, modify it with your custom text or spreadsheet editor,
and reimport it into MC_Stimulus II.
The current version of the import filter is version 3.1.2
ASCII import example: Stimulating with biopotential waveforms
Shown is a single spike recorded from an organotypic hippocampal culture. The spike waveform
was exported as ASCII from MC_Rack and imported into the MC_Stimulus II program.
Warning: All previous records in the active MC_Stimulus II file (.*.stm) file are
overwritten. Please create a new file and import the data into an empty worksheet
to avoid data loss.
1. On the File menu, click Import ASCII File. The Open dialog box appears.
2. Select an appropriate ASCII file and click Open. The stimuli from the ASCII file are loaded into the
active MC_Stimulus worksheet. All previous records are overwritten. Channels that are not present
in the ASCII file are empty. You can now edit and download the stimulus file as usual.
If the file does not fulfill the requirements of a stimulus file, an error message will show up and
tell you in which line the first error occurs. See "Supported File Format" for more information
about supported ASCII files.
33
Page 40

STG3008-FA Manual
6.2 Exporting Files
1. On the File menu, click Export ASCII File. The Save As dialog box appears.
2. Browse to the target folder and enter a file name.
3. Click Save to generate the ASCII file.
All pulse protocols from the active file will be saved in ASCII file format. The MC_Stimulus II
ASCII format type is format type 4. For your convenience, the generated ASCII file includes
the header that is required for reimporting the file into MC_Stimulus II.
6.3 Supported File Formats
The ASCII text must exactly follow the specifications below. The parameters in angle brackets
are placeholders for any valid numbers or strings.
Hint: You can set up files conveniently in any standard spreadsheet program and save them
as tab-delimited ASCII.
General
The file name and the file name extension are not important. You can use any extension
you like, for example *.txt, or *.dat, or any other.
Comments are introduced by the number sign #. The rest of the line after # is only for your
information; it is completely ignored when executing the stimulus file. (You do not need
comments, of course, but it is convenient for documentation.)
Hint: Use # to comment lines out. That is, you can disable lines without removing it from the file.
Thus, you can keep the lines for later uses.
Blank lines are ignored.
The spelling is strict. The MC_Stimulus II program does not recognize a keyword if it is misspelled
or if even only one character is missing, but it is not case-sensitive.
The file has the following structure.
1. File header
2. Data
File header
The first two non comment lines have to be the following lines. Files for older versions of the
import filter (version 1.00) can be imported with the current version as well.
Multi Channel Systems MC_Stimulus II
ASCII import Version 1.10
The next three lines have to be the following lines (in any order).
channels: <number>
output mode: <mode>
format: <format number>
Make sure you define the total number of channels for the used STG properly (4 channels for a
STG with 4 channels, 8 channels for a STG with 8 channels, and so on), according to the software
version. You can select the maximum number of channels during the installation of MC_Stimulus
II. On the Help menu, click About MC_Stimulus II to check your current software version.
34
Page 41

ASCII Import/Export
Example:
You have to include the following line in the ASCII file if you have installed MC_Stimulus II for
STG3008-FA
channels: 4
Output mode is either voltage or current.
Example:
output mode: voltage
Six different format types are available: 1, 2, 3, 4, 5, 6.
Example:
format: 3
Data
Preceding the data, the output channel number has to be specified by the following line.
channel: <channel number>
You can specify analog output channels from 1 to 8 (limited by the number of analog output
channels of the connected STG, of course).
The data follows after the channel specification line; three format types are available. All format
types follow the MC_Stimulus II worksheet's structure of rows and columns. See the description
of the worksheet for more details. Columns are separated by blanks or tabs. The first line has
to contain the column headers. The following lines contain the voltage/current and time values.
Rows/lines are separated by a carriage return or line feed (CR / LF). This is the Windows standard
control character inserted when you press the ENTER key.
The voltage unit is mV and the current unit is μA. Please make sure that all values are in the
ranges specified for the STG you use. For the Sync Out channel, only values of 0 and 1 are allowed.
The time unit is μs. Time values can be in the range from 20 to 18.000.000.000 (20 μs to 5 h).
Time base of the STG is 20 μs, so only times that are multiples of 20 μs are valid.
Note: Please make sure that there are no additional tabs or characters, which would lead to an
error message. Show tabs and spaces in your text editor and check the file before importing it.
Format type 1
This is a basic format with two columns of Value and Time each, without Repeat functionality.
value time value time
Format type 2
With this format, you can repeat rows in the same way as described for the worksheet.
Group repeat is not available.
value time value time repeat
35
Page 42

STG3008-FA Manual
Format type 3
This format type is available only in the current version of the import filter. It allows you to use
a third column of Value and Time.
value time value time value time repeat
Example:
The following picture shows an ASCII stimulus file opened in a standard spreadsheet program.
The same file would look like this in a standard text editor program. You can see the tabs, spaces,
and CR/LF.
36
Page 43

ASCII Import/Export
After loading the file into the MC_Stimulus II worksheet, you can edit and download the file
as usual.
Format type 4
This format type is available only in the current version of the import filter. It is the plainest
format with only one column for the voltage / current values and one column for the time
lengths. This format is the standard format if you want to import data for example from Excel.
This format type is generated when exporting MC_Stimulus II files as ASCII.
value time
Format type 5
This format type is available only in the current version of the import filter. It allows you to use
ramp and sine waveforms as well as rectangular waveforms. You specify the Pulse type in the
first column, and the waveform in the three following columns. The general rules for setting up
ramp and sine waveforms fully apply (see also Pulse Types). The pulse types are defined by the
following numbers: Rectangular = 0, ramp = 1, sine = 2.
You can only use the rectangular type (0) for the Sync Out channels.
Important: When setting up rectangular or sine waveforms in this format type, you need only
one value column for defining the amplitude, but you have to define both value columns even so.
The first value column is ignored for rectangular and sine pulse types by the MC_Stimulus II
program.
pulse (0, 1, 2) value value time
37
Page 44

STG3008-FA Manual
Example:
This is an ASCII file viewed in a standard text editor program. You can see the tabs, spaces,
and CR /LF.
For demonstration purposes, a ramp type pulse was programmed on the first channel, a sine wave
on the second channel, a rectangular waveform on the third channel, and mixed pulse types on
the fourth channel.
38
Page 45

ASCII Import/Export
After loading the file into the MC_Stimulus II worksheet, you can edit and download the file
as usual.
Format type 6
Note: This file format is used by MC_Rack ASCII export!
This format type is available only in the current version of the import filter. This is a basic format
with two columns: The absolute time in seconds, and the absolute value of voltage in microvolts
(μV) or current in microamper (μA). This file format is used by MC_Rack ASCII export. You can
directly import the MC_Rack export files into MC_Stimulus II.
time value
You can use this format with or without header.
Example:
The following picture shows a file of format type 6 without header.
39
Page 46

STG3008-FA Manual
The following picture shows a file of format type 6 with header.
Using the format type 6 without header, only the first channel of the MC_Rack raw data file can
be imported.
Using the format type 6 with header you choose how many channels are imported in "channels",
line 3. The output mode in line 4 has to be voltage. You choose which channel should be
imported first in "channels" line 6. You can add the channels you also want to import one after
the other in any order.
The value microvolt is normally used for data recording in voltage mode of MC_Rack. The STG
generates voltage pulses in values of millivolt. Please use the “Amplification” factor of the ASCII
Import Dialog to convert μV in mV, otherwise the output of the STG is zero.
The amplification factor is generally applied in files with and without header.
ASCII Import of Files
For ASCII import of files, please use the command ASCII Import in main menu "Settings".
40
Page 47

The dialog "ASCII Import Settings" will open.
Settings for ASCII import files without header:
ASCII Import/Export
Select the format type from one to six from the drop down menu "Format".
Select the number of the row from which the file should be imported. Row numbers are available
from one to ten from the drop down menu "From row".
Select the "Output Mode" in the check boxes: Voltage or Current.
Settings for ASCII import files with or without header:
Please choose the factor of amplification in "Amplification". This is very helpful, for example,
for importing data recorded in microvolt μV and now needed in millivolt mV. That means, the
factor is 1000 or – for higher stimulation signals - may be 10000. Please see chapter "Format
Type 6" above.
Important: MC_Stimulus II uses the header of an ASCII import file, if a header is available.
If no header is available, MC_Stimulus II applies the settings of the dialog "ASCII Import Setting".
41
Page 48

Page 49

7 Stimulus Display
7.1 Selecting Channels
To enlarge the display size of the channels, we suggest that you show only those channels
you are currently working with.
Note: This will affect only the display. It has no effect on the download of signals. To select
or deselect channels for downloading, click the Download Channel check boxes in the main
window of the program.
Clear the check box of all channels that are not in use. All channels that are not selected
are removed from the display.
7.2 Display Settings
You can toggle between a decimal time scale in seconds (floating point numbers) and a time
of day scale in the format hh:mm:ss:zzz, where h means hour, m is minute, s is second, and z
is millisecond.
Under Settings, click X Axis Time Format. Select the option to enable the time of day scale.
Deselect the option to switch to the decimal time scale.
43
Page 50

STG3008-FA Manual
7.3 Display Tools
Several tools are provided to optimize the graphical presentation of the stimuli. If you later
choose to display channels, the axes of the new displays are set to the default values.
The time axis can display only positive values.
The y-axis of the Sync Out channels cannot be adjusted, because only values of 0 and 1
are available for these channels.
Enable scrolling
Enable scaling
Zoom out
Zoom in
Reset
Size to fit
Show measure
tool
Scrolling the axes
You can scroll the stimuli forward and backward along the time axis, and up and down along the
voltage/current axis.
1. Click
to enable the scrolling.
Scroll the axes by clicking and dragging with your mouse.
Zoom the axes by clicking and dragging with your mouse.
Reduces the time scale.
Magnifies the time scale.
Resets the axes of all channels to the default values.
Adjusts the ranges to fit the largest displayed stimulus.
A horizontal bar is shown that displays the current / voltage and the
time value of the intersection point. Drag the bar with the mouse.
2. Click the axis you like to scroll.
The mouse pointer becomes a hand.
3. While holding down the mouse button, move the axis to the left and right, or up and down.
- OR You can use the keyboard: Press LEFT ARROW or DOWN ARROW to move the axis to the left
(down), RIGHT ARROW or UP ARROW to move the axis to the right (up).
- OR -
Use the PAGE UP and PAGE DOWN keys for a faster scrolling (larger steps): PAGE DOWN
to move to the left (down), PAGE UP to move to the right (up).
44
Page 51

Zooming the display
Stimulus Display
1. Click
to enable the scaling.
2. 2. Click the axis you like to scale.
The mouse pointer becomes an arrow.
3. While holding down the mouse button, move the mouse up/right to zoom the axis in,
and move the mouse down/left to zoom the axis out.
- OR -
You can use the keyboard: Press LEFT ARROW or DOWN ARROW to zoom the axis out,
RIGHT ARROW or UP ARROW to zoom the axis in.
- OR -
Use the PAGE UP and PAGE DOWN keys for a faster scrolling (larger steps): PAGE DOWN
to zoom out, PAGE UP to zoom in.
Size to fit
Click
to size the display to fit.
The ranges are automatically adjusted to fit the maximum amplitude of each stimulus.
The range of the time axis will be set to fit the longest signal.
45
Page 52

Page 53

8 Downloading Stimuli
8.1 Downloading Stimulus Files
After having set up the stimulus file, you can download the file to the connected STG.
You can select the channels that you want to download or download the complete file.
You can start the stimulation directly after the download, or start it manually with the software
or hardware controls, or start it on a trigger. See also chapter "Operating the STG" for more
information.
Warning: Check the file thoroughly before downloading it on the STG. The stimulus
display is independent from the worksheet and from the download. Verify that you
download only the channels that you want to use. Do not start the STG if you are not
sure about the channel configuration or the nature of the downloaded file.
Select the channels for downloading under Download Channel and Download Sync.
On the STG menu, click Download or click
channels onto the STG or Download and Start
and start the stimulation directly after the complete download.
When downloading files created in MC_Stimulus II software to a stimulus generator of the
STG3000 series for each download all channels are stopped and cleared before the new paradigm
is downloaded. All available channels are downloaded one after the other regardless of the space
each channel needs, which means that the available memory is optimally used. This mode should
always be used when large and complicated stimulation patterns are used, for example white
noise stimulation.
Disable / enable warning messages
Cancel this option to disable the message boxes displaying compiler warnings during stimulus
download.
The two error messages that can be disabled are: "warning: signal length shorter than the
maximum" and "warning: non zero last amplitude value". They may present a nuisance
if you download multiple stimulus files in batch mode.
On the Settings menu, select or deselect Enable Compiler Warnings.
on the toolbar to download only the selected
to download only the selected channels
47
Page 54

Page 55

9 General Software Features
9.1 Customizing the Main Window
You can customize the size and position of open file windows and the toolbar in MC_Stimulus II.
You can hide the toolbar and the status bar by deselecting them on the View menu.
You can arrange the windows with the commands on the Window menu.
Cascade: Use this command to arrange multiple opened windows in an overlapped fashion.
The windows are resized to the standard size.
Tile: Use this command to arrange the windows so that they are not overlapping.
Arrange Icons: Use this command to line up minimized windows.
You can resize the windows with your mouse.
Click an empty area on the toolbar, and then drag the toolbar to a new position.
9.2 Menu Bar
You will find most software features in the pull-down menus of the main window. Each menu
displays a list of commands. Commands that are not available at the moment appear shaded.
Use the ...
File menu to create new files, save files, import ASCII files, and print the stimulus worksheet.
Edit menu for general editing features like copy and paste rows, remove the last entered value
(Undo), remove and insert rows into the active worksheet. You can also right-click on a row
and select these commands. Click Clear Signal to delete all values in the active worksheet.
You can also specify the output ranges according to the connected STG on this menu.
Please see the technical specifications of your STG.
The STG menu contains all commands directly relating to the hardware, for example download
commands, start and stop the STG, and trigger configurations.
You can open, start, and stop a batch run of several files on the Batch menu.
Signal menu for nice editing features like editing whole columns, and autocreate signals.
You can also right-click on a column and select these commands.
View and Window menu to customize the main window.
Settings menu to define general settings of the software.
Help menu to open the MC_Stimulus II Help and to display the About dialog where you
can find information about the hardware, software, and firmware versions. You will need this
information when you contact the support.
49
Page 56

STG3008-FA Manual
9.3 Toolbar
For your convenience, you will find some of the more commonly used commands as a button
on the toolbar.
New File
Open File
Save File
Cut Row
Copy Row
Paste Row
Print
Information Opens the About dialog, where you can find information about the
Download Downloads stimulation file to the connected STG (only available if STG
Download
and Start
Start
Stop
Creates a new MC_Stimulus II file (*.stm) file.
Opens a previously saved MC_Stimulus II file (*.stm) file.
Saves the *.stm file to the chosen destination.
Deletes selected row(s) and sends deleted row(s) to clipboard.
Sends selected row(s) to clipboard.
Pastes row(s) from clipboard and overwrites row(s) starting at the selected
row.
Prints active channel of active worksheet.
hardware, software, and firmware versions.
has active computer connection).
Downloads and starts stimulation file to the connected STG (only available
if STG has active computer connection).
Starts downloaded stimulation file (only available if STG has active
computer connection).
Stops downloaded stimulation file (only available if STG has active computer
connection).
9.4 Shortcut Keys
Shortcut keys offer you another way to accomplish common tasks. Using a shortcut key usually
consists of pressing and holding one key while pressing a second key.
See the list of shortcut keys available in the software.
Shortcut key
CTRL+C
CTRL+D
CTRL+A
CTRL+N
CTRL+O
CTRL+P
CTRL+R
CTRL+S
CTRL+T
CTRL+V
CTRL+X
CTRL+Z
Copy Row
Download
Download and Start
Create New File
Open File
Print
Start
Save file
Stop
Paste Row
Cut Row
Undo
50
Page 57

Hint: Shortcut key combinations are also listed on the toolbar menus. For example, the File menu
shows that the shortcut key for Save is CTRL+S.
9.5 File Menu
You can save MC_Stimulus II files for later use. This is very convenient if you have various similar
experimental setups, or if you like to repeat an experiment later.
Open a file
You may open previously saved files for similar experimental setups.
General Software Features
1. On the File menu or on the toolbar, click Open
2. Browse your folders and choose the desired file. You may only open MC_Stimulus II files (*.stm).
3. Click Open.
The selected file opens.
Save a file
1. On the File menu or on the toolbar, click Save
The currently active worksheet is now saved.
You may open the file using MC_Stimulus II later on to continue your experiment.
Save as
Use this command to save your file under a new name, for example, if you like to use
a file as a template for a new file.
1. On the File menu, click Save As.
2. Browse your folders and enter a file name.
3. Click Save.
The current worksheet is now saved under the new name.
.
.
You may open the file using MC_Stimulus II later on to continue your experiment.
Import ASCII File
Please see the chapter " ASCII Import / Export".
Export ASCII File
Please see chapter "ASCII Imort / Export"
Printing a channel
1. On the File menu, click Print Setup to select a printer, paper format, and so on.
2. Click Print Preview to preview the print output.
3. Click Print
to print out the active channel of the active worksheet.
51
Page 58

STG3008-FA Manual
9.6 Settings Menu
Enable Compiler Warnings
Cancel this option to disable the message boxes displaying compiler warnings during stimulus
download.
The two error messages that can be disabled are: "Warning: Signal length shorter than the
maximum" and "Warning: Non zero last amplitude value". They may present a nuisance if you
download multiple stimulus files in batch mode, or if you want to adjust the stimulus intensity
level on the fly.
On the Settings menu, select or deselect Enable Compiler Warnings.
52
Page 59

10 Synchronizing Events
10.1 Digital Output Signals (Sync Out)
The output of the digital Sync Out output is a 3.3 V TTL signal. A logic state of 1 means 3.3 V,
and a logic state of 0 means 0 V. Please note that the digital output is about 15 μs faster than
the analog output. This small offset is generally sufficient to make sure that the Sync Out signal
precedes the stimulation, which is important for synchronizing events.
You can program the output signal of the Sync Out channel in the same way as the analog output
signals, but due to the nature of a digital signal, only values of 0 and 1 are allowed. A Sync Out
signal is generated each time when the STG is started.
The output signal can be used for triggering external devices, for example, the any data
acquisition devices.
Note: Please note that if you use it for triggering the MC_Card, you should use output signals that
have a duration of at least 200 μs. Otherwise, it can happen that the MC_Card ignores trigger
events.
The Sync Out output is active when the STG is started by pressing the Start / Stop button,
or by using the software command Start on the STG menu.
If you are using the Trigger In input for starting the STG, ther Sync Out channel is controlled
by the Trigger In channel. Sync Out 1 is active when Trigger In 1 is triggered.
If you use the Repeat feature in the Trigger Settings dialog box, the Sync Out signal is repeated
as well as the selected analog output signals.
Note: No Sync Out signal is sent when the STG is stopped on a trigger event or by pressing the
Start / Stop button, that is, if the trigger event occurs or the button is pressed when the STG
has still been active.
10.2 Triggering Stimulation (Trigger In)
The external trigger input has to be a TTL signal of at least 40 +/- 10 μs length. TTL pulses
shorter than that may not be recognized by the stimulus generator.
A TTL pulse is defined as a digital signal for communication between two devices. A voltage
between 0 V and 0.8 V is considered as a logical state of 0 (LOW), and a voltage between 2 V
and 3.3 V means a 1 (HIGH). It is the same kind of signal as the output signal of the Sync Out
output of the STG.
In STG3008-FA there is one Sync Out output for one trigger input. You can assign the Sync Out
and the analog channels to the trigger input in the Trigger Settings dialog box. The default
settings is that Sync Out 1 is active when Trigger In 1 is triggered. See also "Digital Output
Signals" for more information on the Sync Out channel.
The Sweep status display (LED Start / Stop buttons) in the main window
program shows active sweeps that were started by the trigger. That means, the status lamp that
corresponds to trigger 1 lights red as long as any channel triggered by trigger 1 is active. Please
note that the number of the analog output channel is irrelevant, the Sweep status lamp refers
only to the trigger. Example: Assume that channel 4 is assigned to trigger 1. When channel 4
is active, the Sweep lamp lights red
, because the Sweep lamp refers to trigger 1.
of the
53
Page 60

STG3008-FA Manual
You can start and stop the trigger manually at any time using the LED Start / Stop buttons.
Custom switch for "remote-controlling" of the STG
You can connect any device that produces TTL outputs to the Trigger In connector of the STG,
for example a switch. For example, you can use a trigger for remote controlling the STG if it is
not within reach during an experiment. It is also possible to set up advanced experiments where
stimulation depends on preceding activities of the studied object.
The following picture shows a suggested circuit diagram for a switch used for remote controlling.
The resistor and capacitor work as a low-pass filter on the TTL signal and are necessary to reduce
ringing of the signal.
54
Page 61

10.3 Trigger Settings
Triggering output channels (Standard mode)
You can use the trigger input for triggering the output channel. The trigger settings are saved in
the currently active MC_Stimulus output file (*.stm). All eight analog output channels are assigned
to “Trigger 1” by default in the “Trigger Settings” dialog box in the “Edit” menu.
The “Multi-File” and the “Extended Multi-File” mode are not available in STG3008-FA.
Triggered action when channel(s) still active
Synchronizing Events
You can define what action should be taken when any of the channels assigned to the trigger
are still active. Please click the expand button
Stop: A following trigger input stops the stimulation on the assigned channels if at least one
channel that has been assigned to this particular trigger is still active in the moment of the trigger
event. The trigger event starts stimulation only if no channel that has been assigned to this
trigger is active.
Restart: The stimulus protocols on all channels assigned to this trigger are started at the trigger
event, regardless of the activity on these channels.
to show the advanced options:
Ignore: The trigger event is ignored when any channel assigned to this trigger is active. The
trigger event starts stimulation only if no channel that has been assigned to this trigger is active.
55
Page 62

STG3008-FA Manual
Use Trigger as Gate
Channels associated with a Trigger input will be active as long as the condition of that trigger is
1 (HIGH) and switched off as soon as the condition becomes 0 (LOW). If the stimulation protocol
is shorter than the gate, it will stop at the predefined time, regardless of the gating trigger. If
the stimulation protocol is longer than the gating trigger, stimulation will stop when the gating
trigger ends. For example, if you want to produce a repeated rectangular pulses that last as long
as the gating trigger is HIGH, you can do the following: program a single rectangular pulse and
activate the continuous mode. The pulses will start as soon as the gating trigger becomes HIGH,
and stop as soon as the gating trigger becomes LOW. If the voltage of the stimulation channel is
different from 0 at the time the gating trigger ends, the channel will be switched off immediately.
If you stop the stimulating protocol manually during the gating trigger in HIGH, stimulation is
stopped but immediately restarted, and goes on until the gating trigger ends.
Warning: Once selected, this setting will become the default setting for all opened files,
until unselected. So if you observe unexpected behaviour when triggering the STG, check
the Trigger settings.
Sweep Count
The number of sweeps are counted and displayed for each of the four triggers at the bottom
of the main window.
Please note that not the number of stimuli but the number of sweeps is counted, whereby one
sweep is defined as one complete run of the programmed stimulation pattern, as displayed in the
main window. So, if five stimuli are programmed, and the repeat rate in the Trigger Setting menu
is set to six, 30 stimuli will be delivered but the sweep count will be six.
Sweeps are not counted online, the final number is displayed after the STG has been stopped.
The number of sweeps per channel is not put to zero automatically every time the stimulation
is started. Instead, a reset only happens if a trigger is again used in the new stimulation. So,
if a stimulation file uses trigger one and two with a repeat of three each, the display will show
1:3 2:3 3:0 4:0 at the end of the stimulation. If afterwards for example a stimulation file
is started which uses only trigger four in continuous mode, and this file is stopped after 15
repeats of the programmed stimulation pattern, the display will show 1:3 2:3 3:0 4:15.
56
Page 63

Synchronizing Events
10.4 Batch Mode
You can download and run several stimulus files one after the other in the Batch mode. The first
file in the list is downloaded and started directly after the download, or started manually with the
software or hardware controls, or started on a trigger. After the first file has been run, the next
file in the list is downloaded, and so on, until the last file in the batch list has been run.
Triggering a sequence of stimulation protocols
The Batch mode is useful if you want to start a sequence of different stimulation protocols
one after the other on the same trigger (Trigger 1). Please make sure that you have assigned all
channels to Trigger 1 in the Trigger Settings dialog box. You set up the protocols and save them
as separate stimulus files. Then, you set up a batch file with a list of the desired stimulus files.
The first trigger event starts the first file in the list.
When a file has been completed, the next file in the list is downloaded automatically.
When a trigger event occurs after the file has been run, the next file is started, and so on.
When a trigger event occurs during the run of a file, the run is stopped, and the next file
in the list is downloaded. The next trigger event starts the next file.
Deselect the option Start STG after Batch Download on the Settings menu if you want to start
the protocols on a trigger or manually with the software or hardware controls. If the option
Start STG after Batch Download on the Settings menu is selected, the STG starts each file
directly after the download without waiting for a trigger event.
Note: Only Trigger 1 is available for triggering in Batch mode. Do not use any other trigger
inputs.
Splitting up stimulation protocols to circumvent the memory limitation
If the option Start STG after Batch Download on the Settings menu is selected, the STG starts
each file directly after the download, which is only useful in the (unlikely) case that you need to
circumvent the memory limitation of the STG. Split up your pulse protocol into several stimulus
files and run them in Batch mode.
Setting up a batch file
You have to set up a batch file (.stb) first, which lists the full path of all files that you like to
download as a batch. The batch file has to be exactly in the following format. This example is a
batch list with three different pulse protocols. Replace the file paths with the correct path of the
files of your choice.
Multi Channel Systems MCS MC_Stimulus
Batch Control File
Version 1.00
c:\Program Files\Multi Channel Systems\MC_Stimulus
II\BatchExample\Baseline.stm
c:\Program Files\Multi Channel Systems\MC_Stimulus
II\BatchExample\Tetanus.stm
c:\Program Files\Multi Channel Systems\MC_Stimulus
II\BatchExample\TestResponse.stm
57
Page 64

STG3008-FA Manual
Operating the STG in Batch mode
Important: You can operate the STG in Batch mode only with a valid computer connection.
A file in the batch list is only downloaded after the preceding file has been run.
1. On the Batch menu, click Open to open a batch file.
The Open dialog box appears.
2. Browse your folders and select a valid batch file, for example the sample file TetanusBatch.stb
in the MC_Stimulus II program folder.
3. The Batch Status Display opens. It lists all stimulus files in the batch and the duration
of stimulation.
4. On the Batch menu, click Start to start the download of the first file in the batch list and the STG
if the option Start STG after Batch Download on the Settings menu is selected. The progress
of the pulse protocol is displayed in the Status column of the Batch Status Display.
5. Click Stop on the Batch menu to stop the batch if necessary.
6. Close the Batch Status Display with the Close command.
Warning: The STG starts immediately after the download if the option Start STG after Batch
Download on the Settings menu has been selected. Make sure to deselect this option if you
do not want to start the stimulation right away.
Autorepeat option
If you select the Autorepeat Batch Mode option on the Settings menu, the batch is restarted
with the first file after the last file in the batch has been finished.
58
Page 65

11 Analog Output Signals
11.1 Output Modes
The stimulus generator operates in voltage and current mode. Choose voltage or current mode
in the main window of MC_Stimulus II. Please make sure that you use the appropriate stimulation
mode for your experiment. The difference between current and voltage controlled stimulation
is described in the following.
In voltage mode, the voltage level is held constant and the current output depends on the
electrode resistance (the higher the electrode resistance, the lower is the output current).
In current mode, the stimulus generator guarantees a stable current output independent of
the electrode resistance, where the voltage is defined by Ohm's law. The higher the electrode
resistance, the higher is the output voltage. Therefore, the kinetic properties of the stimulus
output is affected by the load resistance,which is usually the electrode resistance. If the
resistance is too high, the output current is limited by the compliance voltage, that is,
too high resistances will result in a clipping of the output signal.
Please consider the time and voltage / current resolution of the stimulus generator. The
minimum pulse has an amplitude of 1 mV in voltage mode or 200 nA in current mode (supported
by MC_Stimulus II; the firmware / DLL supports a 14 bit resolution, which means 200 nA for an
output current range of 0.8 mA, and a time length of 20 μs. Please note that if you work near
these limits, that is, if you use very small amplitudes or very short pulses, the output waveform
may not exactly match the programmed waveform.
Resolution Limits
Ground
All stimulation channels of the STG are optically isolated from each other. Each channel has an
independent ground (GND), which is usually connected to the ground of the experimental setup,
for example, the amplifier, so that all devices refer to the same ground. Please make sure that you
always use the appropriate ground for the channel in use.
59
Page 66

STG3008-FA Manual
11.2 Voltage Mode
If you want to operate the STG in voltage mode, you have to select "Voltage" in Output Mode
of the main window of MC_Stimulus II. You will usually use the + and GND outputs. The output
signal is identical with the programmed signal in the normal ranges of the electronics' accuracy.
The output signals are inverted (multiplied by -1) if you use the - outputs.
In the following example, you see a signal in the MC_Stimulus II display and the resulting
output signals for the different connection options (viewed in a MC_Rack Data Display).
Programmed stimulus protocol viewed in MC_Stimulus:
STG output signals:
Programmed stimulus protocol viewed in MC_Stimulus II.
60
Page 67

Voltage output 1 V and Sync Out.
Analog Output Signals
The time lag between the Sync Out output, the trigger, and the voltage output
is approximately 15 μs (+/- 2 μs)
61
Page 68

STG3008-FA Manual
11.3 Current Mode
If you want to operate the STG in current mode, you have to select "Current" in Output Mode
of the main window of MC_Stimulus II.
The output signals are inverted (multiplied by -1) if you use the - outputs.
If the load resistance, that is, the electrode impedance is very high, the output voltage can
get very high, too. The stimulus generator limits the output voltage to 75 V between + or - and
GND. The guaranteed compliance voltage is +/- 60 V.
The current output of the STG is limited by the compliance voltage and the electrode
impedance. If the maximum load resistance for a given current output is exceeded, the
compliance voltage (60 V between +I and GND) of the STG will not be sufficient for delivering
enough current, and the output will be clipped. You can calculate the maximum load resistance
by Ohm's law. For example, if you want to program a 100 μA pulse, the maximum load resistance
will be 600 k. According to Ohm's law: R = U / I = 60 V / 100 μA = 600 k, that is, 60 V are
sufficient for delivering a current of 100 μA at a load resistance of 600 kherefore, if you use
current driven stimulation, you should always take the impedance of the stimulating electrodes
into account when planning your stimulus protocol. You should also keep in mind that most
electrodes or amplifiers support only limited voltages.
Screen shot from a standard oscilloscope triggered on the Sync Out pulse. Green trace = current
output (+I), red trace = inverted current output (I), pink trace = TTL output from the Sync Out.
Current output 200 μA and Sync Out.
The time lag between the Sync Out output and the current output is approximately
15 μs (+/- 2 μs).
62
Page 69

11.4 Rise Time
The rise time of the voltage output is constant and independent from the stimulus protocol.
The rise time of the current output is no fixed hardware property. The kinetics depend on the
amplitude of the current pulse and the load resistance, that is, generally the electrode
impedance. The resistance affects the kinetics much stronger than the amplitude.
Generally, this does not make much difference for biological applications. If you have very time-
critical applications, or if you use very short pulses, you should check the output of the STG
with an oscilloscope before starting the experiment.
Amplitude dependency of rise time
The rise time is independent from the current amplitude in the common range of amplitudes.
The rise time (10 % /90 %) was measured with increasing current amplitudes (100 μA to 1600 μA)
and a constant load resistance of 10 k. The output current is nearly constant up to amplitudes
of 1100 μA, but increases about 0.3 μs until the maximum of 1600 μA amplitude is reached. The
relationship is not linear as shown by the following curve.
Analog Output Signals
63
Page 70

STG3008-FA Manual
Resistance dependency of rise time
The higher the load resistance, the higher will be the rise time. The rise time (10 % / 90 %)
was measured with increasing load resistances and a constant current amplitude of 50 μA.
For 50 μA pulses, the relationship is linear up to the maximum load resistance (please see
"Current Mode") as shown by the following curve. Not shown are the results of the same
measurement under the same conditions, except of the amplitude with a constant current
amplitude of 100 μA. Up to a load resistance of 450 k, the results are congruent with 50 μA
amplitude.
Stimulus output comparison
The following figures are examples for demonstrating how the amplitude and resistance will
affect the kinetics of a current pulse. These images document also that in contrast to the
current mode, in voltage mode, the rise time is constant and not dependent on the amplitude
or load resistance.
The graphs were generated by a standard oscilloscope. The devices were set up according to the
recommendations under "Voltage Mode" and "Current Mode". The same pulse protocol and the
same channel number of the STG outputs were used for measuring the voltage and the current
output.
64
Page 71

Analog Output Signals
Example 1a: Voltage Mode: The green trace shows the voltage (+U) output; and the pink trace
shows the TTL output from the Sync Out that was used for triggering the oscilloscope
Rise time with programmed 500 mV and 50 μA pulses, 10 k load resistance.
Rise time (10 % / 90 %) = 3 μs
Example 1b: Current Mode: The green trace shows the current output (+I) with a load resistance
of 10 k and the pink trace shows the TTL output from the Sync Out that was used for
triggering the oscilloscope
65
Page 72

STG3008-FA Manual
Rise time with programmed 500 mV and 50 μA pulses, 10 k load resistance.
Rise time (10 % / 90 %) = 3 μs
Result of Example 1: The rise time is about 3 μs for the 500 mV voltage pulse,
and about 3 μs for the 50 μA current pulse.
66
Page 73

Analog Output Signals
Example 2a: Voltage Mode: The green trace shows the voltage (+U) output; and the pink trace
shows the TTL output from the Sync Out that was used for triggering the oscilloscope
Rise time with programmed 5 V and 500 μA pulses, 10 k load resistance.
Rise time (10 % / 90 %) = 3 μs
67
Page 74

STG3008-FA Manual
Example 2b: Current Mode: The green trace shows the current output (+I) with a load resistance
of 10 k; and the pink trace shows the TTL output from the Sync Out that was used for
triggering the oscilloscope
Rise time with programmed 5 V and 500 μA pulses, 10 k load resistance.
Rise time (10 % / 90 %) = 3 μs
Result of Example 2: The kinetics and the rise time of the 5 V voltage pulse are comparable to
the 500 mV pulse. The approximate 3 μs rise time of the 500 μA current pulse is not higher than
the rise time of the 50 μA pulse.
68
Page 75

Analog Output Signals
Example 3a: Current Mode: The red trace shows the current output (+I) with a load resistance of
100 k; and the pink trace shows the TTL output from the Sync Out that was used for
triggering the oscilloscope
Rise time with programmed 5 V and 500 μA pulses, 100 k load resistance.
Rise time (10 % / 90 %) = 12 μs
69
Page 76

STG3008-FA Manual
Example 3b: Current Mode: The green trace shows the current output (+I) with a load resistance
of 1 M and the pink trace shows the TTL output from the Sync Out that was used for
triggering the oscilloscope
Rise time with programmed 5 V and 500 μA pulses, 1 M load resistance.
Rise time (10 % / 90 %) = 120 μs
Result of Example 3: With a higher load resistance, the current pulse shows a different kinetic
behavior: The rise time increases significantly (about 100 μs). Please keep in mind that the
resistance of the oscilloscope probe with 10 M is parallel to the 1 M load resistance.
That means, that the maximum of the load resistance is reduced to 900 k only.
70
Page 77

11.5 Comparison of Output Signals in Current Mode
To show the different behavior of the output signals in current mode, there are some examples
to get an idea how the stimulus generator will deliver the stimulus pulses. The screen shots are
from a standard oscilloscope triggered on the Sync Out pulse
Example 1: Influence of the length of a current pulse 100 μs versus 20 μs with an amplitude of
1600 μA, which is at the maximum capacity of the STG3000 series (constant amplitude and load
resistance).
Example 1a: Current pulse with programmed 1600 μA for 100 μs and 20 μs interval and 10 k
load resistance.
The pulse is biphasic, and 1600 μA which is the limit of the maximum capacity of the STG3000
series. Green trace = current output (+I), pink trace = TTL trigger output from the Sync Out.
Analog Output Signals
71
Page 78

STG3008-FA Manual
Example 1b: Current pulse with programmed 1600 μA for 20 μs and 20 μs interval and 10 k
load resistance.
The pulse is biphasic, and 1600 μA which is the limit of the maximum capacity of the STG3000
series. Green trace = current output (+I), pink trace = TTL trigger output from the Sync Out.
Result of Example 1: The current output signal is delivered unmodified without any influence
of the length of the pulse with an amplitude of 1600 μA which is at the maximum capacity of the
STG3000 series.
72
Page 79

Analog Output Signals
Example 2: Influence of the length of a current pulse 100 μs versus 20 μs with an amplitude of
16 μA which is a hundredth of the limit of the maximum capacity of the STG3000 series (constant
amplitude and load resistance).
Example 2a: Current pulse with programmed 16 μA for 100 μs and 20 μs interval and 10 k load
resistance.
The pulse is biphasic,16 μA Green trace = current output (+I), pink trace = TTL trigger output from
the Sync Out.
73
Page 80

STG3008-FA Manual
Example 2b: Current pulse with programmed 16 μA for 20 μs and 20 μs interval and 10 k load
resistance.
The pulse is biphasic,16 μA. Green trace = current output (+I), pink trace = TTL trigger output from
the Sync Out.
Result of Example 2: The current output signal is delivered unmodified without any influence
of the length of the pulse, and an amplitude of 16 μA which is a hundredth of the limit of the
maximum capacity of the STG3000 series
74
Page 81

Analog Output Signals
Example 3: Influence of the length of a current pulse and a high load resistance. Current pulse
with programmed 16 μA for 100 μs and 20 μs interval and 1 M load resistance. The load
resistance is very high. Please keep in mind that the load resistance of 1 Mis parallel toM
of the probe of the oscilloscope. That means, the load resistance is reduced to 900 konly
The pulse is biphasic, and 16 μA which is a hundredth of the limit of the maximum capacity of the
STG3000 series. Green trace = current output (+I), pink trace = TTL trigger output from the Sync
Out.
Result of Example 3: The current output signal is delivered strongly modified because of the
high load resistance of 1 M, and the duration of the pulse, 100 μs and the interval. Before the
pulse is reaching its maximum, it has to turn into its invert phase. Before the pulse is reaching its
minimum, it is cut off. Please see example 4: If the duration of pulse and interval is much longer,
1 ms, the pulse shape of the delivered signal is much better.
75
Page 82

STG3008-FA Manual
Example 4: Influence of the length of a current pulse and a high load resistance. Current pulse
with programmed 50 μA for 1 ms and 1 ms interval and 1 M load resistance. The load resistance
is very high, the duration of the pulse and the interval are long. Please keep in mind that the load
resistance of 1 Mis parallel toMof the probe of the oscilloscope. That means, the load
resistance is reduced to 900 konly
The long pulse is biphasic, 50 μA. Green trace = current output (+I), pink trace = TTL trigger output
from the Sync Out.
Result of Example 4: The current output signal is delivered negligible modified when
the duration of the signal and the duration of the interval is long, for example 1 ms.
76
Page 83

11.6 Capacitive Behavior of Stimulation Electrodes
Regarding the generally used stimulus pulses, stimulating electrodes behave as plate capacitors.
They need some time to discharge themselves after stimulation. As a result, artifacts interfere with
the recording, and electrodes deteriorate over time due to electrolysis. This effect takes place
especially in current mode because the current cannot flow back to the stimulus generator due to
the high output resistance in current mode and thus is kept in the electrode. A current source can
constantly produce small currents, even though the current is set to zero. This might damage the
connected electrodes over time. To avoid this problem, the STG3008-FA is equipped with switches
that automatically disconnect the current outputs from the current source 1s after each
programmed current stimulus. For the next stimulus, the current source is automatically
reconnected.
To reduce the effect described above in current mode, you should use biphasic pulses for
stimulation. The stimulus signal should be immediately followed by an inverse signal of the same
area (product of current and time), which helps to discharge the electrode. The easiest way is to
use the same signal amplitude with an opposite polarity.
Multi Channel Systems recommends using voltage driven stimulation. In voltage mode, it is not
necessary to use biphasic stimulation for discharging the electrodes, because the electrode should
be discharged at a voltage of 0, that is, it would be sufficient to apply the negative phase only.
Warning: When using MEA electrodes of TiN material, stimulation with higher amplitudes is
possible if you apply the negative pulse first. Also, regard the safe charge-injection limit
as described in the MEA manual. Otherwise, electrodes can be damaged during stimulation.
Analog Output Signals
The following illustration shows the effect of a biphasic current pulse on the discharge of the
stimulation electrode. As you can see, the first monophasic pulse is followed immediately by
a pulse of the opposite polarity and the same product of current and time.
Effect of a bipolar current pulse on the electrode voltage
77
Page 84

Page 85

12 Troubleshooting
12.1 About Troubleshooting
Most problems occur seldom and only under specific circumstances. In most cases, it is only a minor
problem that can be easily avoided or solved.
If the problem persists, please contact your local retailer. The highly qualified staff will be glad to
help you. Please inform your local retailer as well, if other problems that are not mentioned in this
documentation occur, even if you have solved the problem on your own. This helps other users,
and it helps MCS to optimize the instrument and the documentation.
Please pay attention to the safety and service information (chapter "Important Safety Advice" in
the manual or help). Multi Channel Systems MCS GmbH has put all effort into making the product
fully stable and reliable, but like all high-performance products, it has to be handled with care.
12.2 Technical Support
Contact your local retailer immediately if the cause of trouble remains unclear. Please understand
that information on your hardware and software configuration is necessary to analyze and finally
solve the problem you encounter.
If you have any questions or if any problem occurs that is not mentioned in this document,
please contact your local retailer. The highly qualified staff will be glad to help you.
Please keep information on the following at hand
Description of the error (the error message text or any other useful information) and of the
context in which the error occurred. Try to remember all steps you had performed immediately
before the error occurred. The more information on the actual situation you can provide, the
easier it is to track the problem.
The serial number of the device. You will find it on the device or click on the Help menu,
click About .
The software (SW) and hardware (HW) version you are currently using. On the Help menu,
click About. The displayed dialog box shows the version numbers.
The operating system and service pack number on the connected computer.
The hardware configuration (microprocessor, frequency, main memory, hard disk) of the
connected computer. This information is especially important if you have modified the computer
or installed new hard- or software recently.
79
Page 86

STG3008-FA Manual
12.3 Error Messages
This chapter explains error messages to you that may occur during normal operation. They do not
present a reason to worry and can be easily avoided.
Download
These error messages may occur during download on the STG. Please note that you can switch
off some of these messages if they disturb your experiment. See chapter "Downloading Stimuli"
for more details on downloading.
The worksheet is empty. No data is present that
can be downloaded.
There is no stimulus generator connected to
the computer or the STG may be switched off.
Please check the computer connection and the
status lamp of the STG.
There is no valid connection to an STG.
Download of data is not possible. Please check
the computer connection and the status lamp
of the STG.
The last voltage / current values of the named
channels are not zero. The current / voltage
levels are set to zero after the last value. The last
used values of these channels are kept until the
STG is stopped.
80
Page 87

Appendix
ASCII Import
These error messages relate to a wrong file format. Please see chapter "Supported File Format"
for more information.
The named line contains
an unexpected character.
The channel number
specification has to precede
the data. The channel
number either lacks or the
specified number does not
exist (for example, number
13).
Each data column must
have a header (value, time,
or repeat).
The number of data columns
has to be consistent for all
lines in a given ASCII file
(for example, value, time,
value, time). This error
message indicates that there
is a current / voltage value
or a time point missing in
line 12.
The ASCII file contains
current / voltage values
outside the STG's range.
For example, if the STG's
output range is +8000 mV,
all values above +8000 mV
are set to +8000 mV.
81
Page 88

STG3008-FA Manual
12.4 Signal terminated when using Trigger In
If you use the Trigger In to start the STG and the stimulation protocol is terminated right after
start, check the Trigger Settings. If the Use Trigger as Gate function is selected, a protocol will
only be active as long as the Trigger is HIGH. If the Single Trigger function is selected, the STG
is armed and waits for an external trigger to execute the stimulus protocol one time only.
Switch to Stop, Restart or Ignore.
12.5 Signal is not Repeated / Pulse Train Fails
The STG fails to generate a train of pulses. When a pulse is programmed in MC_Stimulus II and
then repeated (in the Trigger Settings dialog box) (with the Repeat option), the STG abruptly
stops after it has generated the waveform only once. (If another STG is connected to the computer
to run the same protocol, the stimulator has no problems on repeating the pulse.)
Possible causes:
? If you change the stimulus protocol after the download, even if only the number of repeats
were changed, you need to download the modified stimulus protocol to the STG. Otherwise,
the changes will not be applied. (If another STG is connected to the computer, you will have
to download the stimulus protocol, including the changes, to be able to stimulate at all.)
Select Download or Download and Start on the STG menu (or on the toolbar) after you made
any changes to the stimulus protocol in the MC_Stimulus program.
82
Page 89

Appendix
Output Signal Does not Match Programmed Signal
The amplitude or the duration of the output pulses differs from the programmed signal.
Possible causes:
? The stimulus protocol works near the resolution limits of the STG, that is, the pulses are very short
or the amplitudes very low (smaller than 50 mV or 10 μA).
Check the output signals with an oscilloscope and modify the pulse protocol so that the amplitude
and timing of the pulses will match your requirements.
? You operate the STG in current mode, and the electrode resistance of the stimulating
electrodes is too high. According to Ohm's law, the electrode resistance directly affects the
kinetics of the current output. The rise time increases with an increasing electrode resistance.
If the electrode resistance is too high for the compliance voltage, the output signal will be clipped.
Try to stimulate in voltage mode.
Try to use stimulating electrodes with a lower impedance.
Check the output signals with an oscilloscope and modify the pulse protocol so that the amplitude
and timing of the pulses will match your requirements.
12.6 Strong Peak Artifacts
Strong discharges or other artefacts of the output voltage or current.
Possible causes:
? One or both current outputs are open, that is, nothing is connected to them. The stimulus
generator tries to hold a stable current against the indefinite resistance of the open current
output. Therefore, the stimulus generator will increase the output voltage on the open current
outputs to its maximum, which will result in a heavy load on the power supply. This situation
may cause the power supply to become unstable, which may lead to artifacts on all channels.
In current mode: Connect the unused current output to ground (GND). Please see also
the recommended setups in the chapter “Current Mode”.
83
Page 90

STG3008-FA Manual
13 Appendix
13.1 Technical Specifications STG3008-FA
European Standard: EN 55011, EN 61000-6-1
General characteristics
Operating temperature 10 °C to 50 °C
Storage temperature 0 °C to 70 °C
Dimensions (W x D x H) 220 mm x 170 mm x 60 mm
Weight 1050 g
Fuse internal, 3.15 A slow blow
Supply voltage (external power supply) 100 to 240 VAC @ 47 to 63 Hz
Stimulus Generator
Number of stimulus generators 8
Output voltage range -8 V to + 8 V @ max. ± 20 mA
Output voltage resolution 1 mV
Rise time (10 % - 90 %) voltage 1.7 μs @ delta U = 8 V
Time lag between Sync Out and voltage
output
15 μs ± 2 μs for continuous pulses
40 μs ± 5 μs for a first or a single pulse
Output current -1.6 mA to +1.6 mA @ max.± 120 V compliance
voltage (between +I and I)
Output current resolution 200 nA
Output current slope
Time lag between Sync Out and current
600 μA/μs @ R
15 μs ± 2 μs @ R
= 10 k
L
= 10 k
L
output, 0 - 100 μA
Rise time (10 % - 90 %) current, 0 - 100 μA
1.4 μs @ R
= 10 k
L
Resolution 14 bit
Time resolution 20 μs
Output signals Freely programmable (rectangular, ramp, sinus,
arbitrary
Maximum frequency (rectangular waveform) 25 kHz
Memory capacity for stores waveforms 64 MB
84
Page 91

Timing on external trigger
Minimum time length of trigger input (TTL) 40 ± 10 μs
Time lag between trigger input and Sync Out 30 ± 10 μs
Maximum trigger input frequency 10 kHz
Interface and connectors
Sync Out for synchronization with following devices 1 Lemo connector
Trigger In for synchronization with preceding devices 1 Lemo connector
Analog Out for analog channels 8 Lemo connectors
Interface (connection to computer) USB 2.0 High Speed
Filter Amplifier
Number of amplifier 8
Input voltage range ± 500 mV
Input impedance
9
parallel to 10 pF
>10
Input noise < 1 μV RMS (full bandwidth, inputs short circuited)
Noise density en = 9 nV / rout Hz
Appendix
Output voltage range ± 5 V
Output current 10 mA
Bandwidth 1 Hz to 2200 Hz
Gain options 100, 200, 500 or 1000
MC_Stimulus program
MC_Stimulus II Version 3.4.0 and higher
Operating system Microsoft Windows ® 7, XP or Vista with NTFS
English and German versions supported
Data import and export ASCII file format
85
Page 92

STG3008-FA Manual
13.2 Pin Layout
Pin layout of the STG3008-FA Amplifier
Pin 1 to 8 Electrode IN 1 to 8 and Stimulus OUT 1 to 8 (+U / +I)
Stimulus Out and Electrode IN
Pin 9 to 13 Not connected
Pin 14 Ground (GND)
The STG3008-FA can software controlled toggle between recording and stimulation mode
on pins 1 to 8.
Pin 14 connected to ground
Internal switch positions during stimulation and recording
86
Page 93

13.3 Contact Information
Local retailer
Please see the list of official MCS distributors on the MCS web site.
User forum
The Multi Channel Systems User Forum provides the opportunity for you to exchange your
experience or thoughts with other users worldwide.
Mailing list
If you have subscribed to the mailing list you will be automatically informed about new software
releases, upcoming events, and other news on the product line. You can subscribe to the list on
the contact form of the MCS web site.
Appendix
www.multichannelsystems.com
87
Page 94

Page 95

14 Index
89
Page 96

STG3008-FA Manual
90
Page 97

A
About dialog 49
Adjusting
Stimulus Intensity Level ....................30
Amplifier
blanking.............................................53
connecting...................................60, 62
Amplitude
adjusting stimulus intensity level.....30
effects on rise time ...........................63
of sine wave ......................................18
Analog
current output...................................62
input ....................................................7
voltage output ..................................60
Arrange Icons 49
ASCII
Import without Header ....................34
importing ASCII files .........................33
supported file format .......................34
Assign
channels to Auto Sync ......................29
trigger to channels............................55
trigger to Sync Outs..........................55
Auto Download
stimulus intensity level .....................30
Autocalibration 11
disable................................................11
Autocreating
stimuli ................................................23
Autofill 23
Autorepeat
pulses or complete pulse protocols .20
Cascade 49
Change All
stimulus intensity level..................... 30
Change Time Unit 23
Channels
connecting ..........................................7
displaying ..........................................43
downloading..................................... 47
editing ...............................................17
Compiler warnings 52
Connecting
the STG to an amplifier...................... 7
Contact
information....................................... 87
Continuous
stimulation ........................................20
Copy
row..................................................... 50
shortcut key ......................................50
Count 23
Creating
Autosync pulses ................................29
Stimuli ............................................... 17
Current
capacitive behavior of electrodes.... 77
electrode impedance........................ 63
maximum output current ..........62, 84
oscilloscope ....................................... 62
output mode.........................17, 59, 62
resolution ..........................................18
Cursor 44
Cut
rows ...................................................50
shortcut key ......................................50
B
Back panel 7
Batch
menu..................................................49
mode..................................................57
Batch Mode 57
Biphasic pulse 18, 77
Blanking
amplifier ............................................53
autocreating blanking pulses...........29
signal..................................................53
BNC
connectors ...........................................7
C
Cables
shielding ......................................60, 62
twisted pair .......................................60
Capacitive
behavior of electrodes......................77
D
Data
ASCII file format ...............................34
download ..........................................47
save.................................................... 51
Digital
blanking signal .................................53
input ..............................................7, 53
output ...........................................7, 53
port...................................................... 7
Display
Auto Sync output.............................. 29
scrolling .............................................44
selecting channels............................. 43
settings ..............................................43
zooming ............................................ 44
Downloading
batch mode ....................................... 57
shortcut key ......................................50
stimulus files .....................................47
Driver
91
Page 98

STG3008-FA Manual
installation...........................................9
Duration
pulse...................................................18
E
Edit
Auto Sync Settings ............................29
menu..................................................49
Trigger Settings.................................55
Electrode
capacitive behavior...........................77
End
point of ramp ....................................18
run......................................................11
Error Messages 80
F
Faraday cage
connecting...................................60, 62
File
Batch mode .......................................57
importing ASCII files .........................33
menu..................................................49
new ....................................................50
open...................................................50
save ....................................................50
Format
ASCII file ............................................34
time axis.............................................43
G
Gain settings 13
GND outputs
about .................................................59
connecting...................................60, 62
Ground
connecting...................................60, 62
input ....................................................7
outputs ..............................................59
Group
Group Repeat ....................................20
Group/Ungroup.................................20
H
H 13
Header
of ASCII file........................................34
Help
menu..................................................49
HL 13
I
I outputs
about ...........................................59, 62
Icons
arrange ..............................................49
Ignore
trigger events if channels still active55
Importing
ASCII files........................................... 33
supported ASCII file format .............34
Incrementing
values in a column ............................ 23
Input
analog .................................................7
MC_Card.............................................. 7
MEA1060 .............................................7
trigger settings .................................55
TTL .....................................................53
Installing
Software.............................................. 9
STG driver............................................ 9
Inverting
pulses................................................. 23
selection ............................................ 23
K
Keep Zero 23
L
L 13
Length
of pulse.............................................. 18
Load resistance
effects on rise time........................... 63
Loading
ASCII files........................................... 33
files in Batch mode........................... 57
M
MC_Card
connecting ..........................................7
MEA1060
connecting ..........................................7
Measure tool 44
Message boxes
warning messages ............................52
Monophasic pulse 77
Multiple STGs
controlling......................................... 11
Operating.......................................... 15
N
New File 50
O
Open
ASCII files........................................... 33
file...................................................... 50
shortcut key ......................................50
stimulus files .....................................51
Oscilloscope
comparing STG current signals ........ 71
measuring current signals................ 62
92
Page 99

measuring STG signals ......................60
Output
analog output signals.......................59
autocreating Sync Out pulses...........29
doubling amplitude..........................60
mode..................................................17
signal inversion ...........................60, 62
Sync Out settings...............................55
P
Panel
rear panel ............................................7
Paste
rows ...................................................50
shortcut key.......................................50
Period
of sine wave ......................................18
Port
digital...................................................7
serial.....................................................7
USB.......................................................7
Post Time 29
Pre Time 29
Print
preview ..............................................51
printing worksheet ...........................51
setup ..................................................51
shortcut key.......................................50
Pulse
Autocreating Sync Out pulses ..........29
duration.............................................18
length ................................................18
types...................................................18
R
Ramp
pulse type ..........................................18
Rear panel 7
Rectangular
pulse type ..........................................18
Repeating
a group of rows.................................20
continuously ......................................20
on a trigger .......................................20
pulses .................................................20
rows ...................................................20
Requirements
system ..................................................9
Reset
display................................................44
STG .....................................................49
Reset All
stimulus intensity level .....................30
Resolution
current ...............................................18
time....................................................18
voltage...............................................18
Index
Restart
channels on a trigger .......................55
Rise Time 63
Rising edge
of TTL signal...................................... 53
time offset (Auto Sync) ....................29
Row Repeat 20
Run
STG..................................................... 11
S
Save
file...................................................... 50
shortcut key ......................................50
stimulus files .....................................51
trigger settings .................................55
Scrolling 44
Select Device 11
change............................................... 11
multiple .............................................11
Serial port 7
Settings
Auto Sync ..........................................29
menu .................................................49
Sync Out ............................................ 55
trigger ...............................................55
shielding
cables........................................... 60, 62
Shifting
values................................................. 23
Show
Auto Sync output.............................. 29
measure tool ..................................... 44
Signal
blanking ............................................ 53
current mode .................................... 62
menu .................................................49
Sync Out ............................................ 53
voltage mode.................................... 60
Sine wave
pulse type.......................................... 18
Single Trigger 55
Size to fit 44
Software
installation .......................................... 9
requirements....................................... 9
Start
channels on trigger ..........................55
shortcut key ......................................50
STG..................................................... 11
Starting
point of ramp.................................... 18
STG
connecting ..........................................7
installing.............................................. 9
menu .................................................49
93
Page 100

STG3008-FA Manual
starting ........................................11, 53
Stimuli
creating..............................................17
Stimulus Files
ASCII Import without Header...........34
downloading .....................................47
Stimulus Intensity Level
Adjusting ...........................................30
Stop
Batch menu .......................................57
channels on a trigger........................55
shortcut key.......................................50
STG .....................................................50
stopping STG .....................................11
Support 79
Sweep
LED Start/Stop buttons .....................11
starting STG on trigger.....................11
status lamp ........................................53
sweep count ......................................55
triggering ..........................................55
triggering sweeps .............................53
Switch
circuit diagram ..................................53
Sync Out
autocreating Sync Out pulses...........29
connectors ...........................................7
digital TTL outputs............................53
settings ..............................................55
System requirements 9
T
Tile 49
Time
axis format.........................................43
change time units .............................23
resolution ..........................................18
rise time .............................................63
time offset for Auto Sync .................29
Timing
blanking of amplifier........................53
rise time .............................................63
Toolbar
position..............................................49
Trigger
blanking signal..................................53
connectors ...........................................7
continuous mode ........................20, 55
gate..............................................20, 55
gating trigger..............................20, 55
input ..................................................53
LED Start/Stop Button ......................11
manual ..............................................11
output ...............................................53
repeating pulses ...............................20
separate............................................. 11
settings ..............................................55
single trigger..................................... 55
STG............................................... 11, 53
triggering multiple files on same
trigger (Batch mode)........................ 57
Troubleshooting 79
TTL
autocreating Sync Out pulses .......... 29
blanking signal .................................53
digital output.................................... 53
Sync Out settings .............................. 55
trigger settings .................................55
triggering ..........................................53
twisted pair cables 60
U
U outputs
about ...........................................59, 60
oscilloscope ....................................... 60
voltage mode.................................... 60
Undo
shortcut key ......................................50
Update
software .............................................. 9
USB connector 7
USB-MEA32-STIM4-System 15
Select Stimulation Channels ............ 15
V
View
menu .................................................49
Voltage
maximum output........................ 60, 84
output mode.........................17, 59, 60
resolution ..........................................18
W
Warning messages
disabling............................................ 47
Window
menu .................................................49
WYSIWYG window..................... 43, 44
Z
Zooming 44
94
 Loading...