

Page 1
Cardio2D Manual
Page 2

Information in this document is subject to change without notice.
No part of this document may be reproduced or transmitted without the express written
permission of Multi Channel Systems MCS GmbH.
While every precaution has been taken in the preparation of this document, the publisher
and the author assume no responsibility for errors or omissions, or for damages resulting from
the use of information contained in this document or from the use of programs and source code
that may accompany it. In no event shall the publisher and the author be liable for any loss of
profit or any other commercial damage caused or alleged to have been caused directly or
indirectly by this document.
© 2014 Multi Channel Systems MCS GmbH. All rights reserved.
Printed: 14. 02. 2014
Multi Channel Systems
MCS GmbH
Aspenhaustraße 21
72770 Reutlingen
Germany
Fon +49-71 21-90 92 5 - 0
Fax +49-71 21-90 92 5 -11
info@multichannelsystems.com
www.multichannelsystems.com
Microsoft and Windows are registered trademarks of Microsoft Corporation. Products that are
referred to in this document may be either trademarks and/or registered trademarks of their
respective holders and should be noted as such. The publisher and the author make no claim
to these trademark.
Page 3

Table of Contents
Introduction 1
About this Manual 1
Welcome to Cardio2D and Cardio2D+ 1
Important Information and Instructions 3
Important Safety Advice 3
Guarantee and Liability 4
Operator's Obligations 4
Terms of Use for the Program 5
Limitation of Liability 5
Software and Hardware Installation 7
Installing the Cardio2D Software 7
First Use of Cardio2D after Installation 9
Data Acquisition Hardware 10
Cardio 2D Software 17
The Cardio2D Program : Overview 17
Control Window 25
Control View 26
Viability 27
Labbook 27
Compound / Basic 29
Stimulation of MEA Electrodes 33
Stimulation with MEA2100-System 37
Analyzer Settings 47
Start / Stop 50
Log File 50
Summary Window 51
MEA Window 52
MEA Electrodes 53
Single Channel View 54
Latency / Velocity Window 56
Color Map 58
General Software Features 62
Experimental Proceeding 65
General Performance / Noise Level 65
Detection Parameter 66
Automated Waveform Detection 67
iii
Page 4

Cardio2D Manual
Cardio 2D+ Analyzer Software 69
The Cardio2D+ Analyzer Program: Overview 69
Control Window Cardio2D+ 82
MEA Window Cardio2D+ 84
Field Potential Cardio2D+ 85
ROI Selection 93
Heartbeat Cardio2D+ 95
HB Averager 103
Analysis of Field Potential Duration 106
Troubleshooting 109
Troubleshooting 109
Error Messages 109
Theoretical Background 111
Cardiac Action Potential 111
Appendix 113
Technical Support 113
Test Model Probe 113
Contact Information 114
Index 115
iv
Page 5

1 Introduction
1.1 About this Manual
This manual comprises all important information about the first installation of the hardware
and software, and about the daily work with the instrument. It is assumed that you have already
a basic understanding of technical and software terms. No special skills are required to read this
manual.
If you are using the device for the first time, please read the important safety advice before
installing the hardware and software, where you will find important information about the
installation and first steps.
The printed manual and help are basically the same, so it is up to you which one you will use.
The help offers you the advantage of scrolling through the text in a non-linear fashion, picking
up all information you need, especially if you use the index, and the search function. If you are
going to read larger text passages, however, you may prefer the printed manual.
The device and the software are part of an ongoing developmental process. Please understand
that the provided documentation is not always up to date. The latest information can be found
in the help. Check also the MCS web site (www.multichannelsystems.com) for downloading up-todate manuals and help files.
1.2 Welcome to Cardio2D and Cardio2D+
The Cardio2D software consists of two main parts: The recording part is called Cardio2D program.
It is for controlling the amplifier, the stimulator, and for scheduling and running the experiments.
The offline analyzer part is called Cardio2D+. The Cardio2D+ analyzer program is intended for
reviewing and graphical representation of recorded experiments and for preparing the graphical
results as far as possible for a publication.
Raw data is recorded in 24 bit resolution when using the MEA2100-System. The other data
acquisition systems record raw data with 16 bit resolution.
1
Page 6

Page 7
2 Important Information and Instructions
2.1 Important Safety Advice
Warning: Make sure to read the following advice prior to install or to use the device and the
software. If you do not fulfill all requirements stated below, this may lead to malfunctions or
breakage of connected hardware, or even fatal injuries.
Warning: Obey always the rules of local regulations and laws. Only qualified personnel should
be allowed to perform laboratory work. Work according to good laboratory practice to obtain
best results and to minimize risks.
The product has been built to the state of the art and in accordance with recognized safety
engineering rules. The device may only
be used for its intended purpose;
be used when in a perfect condition.
Improper use could lead to serious, even fatal injuries to the user or third parties and damage
to the device itself or other material damage.
Warning: The device and the software are not intended for medical uses and must not be used
on humans.
Malfunctions which could impair safety should be rectified immediately.
High Voltage
Electrical cords must be properly laid and installed. The length and quality of the cords must be
in accordance with local provisions.
Only qualified technicians may work on the electrical system. It is essential that the accident
prevention regulations and those of the employers' liability associations are observed.
Each time before starting up, make sure that the mains supply agrees with the specifications
of the product.
Check the power cord for damage each time the site is changed. Damaged power cords should
be replaced immediately and may never be reused.
Check the leads for damage. Damaged leads should be replaced immediately and may never be
reused.
Do not try to insert anything sharp or metallic into the vents or the case.
Liquids may cause short circuits or other damage. Keep the device and the power cords always
dry. Do not handle it with wet hands.
Requirements for the installation
Make sure that the device is not exposed to direct sunlight. Do not place anything on top of
the device, and do not place it on top of another heat producing device. Never cover the vents,
not even partially, so that the air can circulate freely. Otherwise, the device may overheat.
3
Page 8

Cardio2D Manual
2.2 Guarantee and Liability
The General conditions of sale and delivery of Multi Channel Systems MCS GmbH always apply.
The operator will receive these no later than on conclusion of the contract.
Multi Channel Systems MCS GmbH makes no guarantee as to the accuracy of any and all tests
and data generated by the use of the device or the software. It is up to the user to use good
laboratory practice to establish the validity of his findings.
Guarantee and liability claims in the event of injury or material damage are excluded when
they are the result of one of the following.
Improper use of the device.
Improper installation, commissioning, operation or maintenance of the device.
Operating the device when the safety and protective devices are defective and/or inoperable.
Non-observance of the instructions in the manual with regard to transport, storage, installation,
commissioning, operation or maintenance of the device.
Unauthorized structural alterations to the device.
Unauthorized modifications to the system settings.
Inadequate monitoring of device components subject to wear.
Improperly executed and unauthorized repairs.
Unauthorized opening of the device or its components.
Catastrophic events due to the effect of foreign bodies or acts of God.
2.3 Operator's Obligations
The operator is obliged to allow only persons to work on the device, who
are familiar with the safety at work and accident prevention regulations and have been
instructed how to use the device;
are professionally qualified or have specialist knowledge and training and have received
instruction in the use of the device;
have read and understood the chapter on safety and the warning instructions in this manual
and confirmed this with their signature.
It must be monitored at regular intervals that the operating personnel are working safely.
Personnel still undergoing training may only work on the device under the supervision of
an experienced person.
4
Page 9

2.4 Terms of Use for the Program
You are free to use the program for its intended purpose. You agree that you will not decompile,
reverse engineer, or otherwise attempt to discover the source code of the software.
2.5 Limitation of Liability
Multi Channel Systems MCS GmbH makes no guaranty as to the accuracy of any and all tests and
data generated by the use the software. It is up to the user to use good laboratory practice to
establish the validity of his findings.
To the maximum extent permitted by applicable law, in no event shall Multi Channel Systems
MCS GmbH or its suppliers be liable for any special, incidental, indirect, or consequential damages
whatsoever (including, without limitation, injuries, damages for data loss, loss of business profits,
business interruption, loss of business information, or any other pecuniary loss) arising out of the
use of or inability to use the program or the provision of or failure to provide Support Services,
even if Multi Channel Systems MCS GmbH has been advised of the possibility of such damages.
Important Information and Instructions
5
Page 10

Page 11

3 Software and Hardware Installation
3.1 Installing the Cardio2D Software
System Requirements
Software: One of the following Microsoft Windows ® operating systems is required:
XP, Vista, Windows 8.1 or Windows 7 (English and German versions supported) with
the NT file system. Other language versions may lead to software errors.
Hardware: Please read chapter "Hardware Acquisition Systems". One of the listed data
acquisition hardware system (MEA2100-System, USB-ME-Systems, USB-MEA256-System,
USB-ME32-FAI-Systems or MC_Card) is recommended by MCS. Due to the amount of recorded
data, a computer with low performance may lead to performance problems; therefore,
Multi Channel Systems recommends an up-to-date computer. Please contact MCS or your local
retailer for more information on recommended computer hardware specification. Please note
that there are sometimes hardware incompatibilities of the data acquisition system and computer
components; or that an inappropriate computer power supply may lead to artefact signals.
Important: You need to have installed the latest data acquisition driver to operate the device,
which is automatically installed with Cardio2D. The installation may be invalid if the data
acquisition does not respond. Please contact Multi Channel Systems MCS GmbH or your local
retailer in this case.
Recommended Operating System Settings
The following automatic services of the Windows operating system interfere with the data
storage on the hard disk and can lead to severe performance limits in Cardio2D. These routines
were designed for use on office computers, but are not very useful for a data acquisition
computer.
Deselect Windows Indexing Service for all local disks.
Turn off Optimize hard disk when idle (automatic disk fragmentation).
It is also not recommended to run any applications in the background when using Cardio2D.
Remove all applications from the Autostart folder.
Important: Please do not run MC_Rack software program from Multi Channel Systems MCS GmbH
in parallel to Cardio2D software!
Please check the system requirements before you install the software. MCS cannot guarantee
that the software works properly if these requirements are not fulfilled.
Important: Please make sure that you have full control over your computer as an administrator.
Otherwise, it is possible that the installed software does not work properly.
7
Page 12
Cardio2D Manual
Installing the Cardio2D Software
Make sure to have a valid license for the Cardio2D software! Please ask
license@multichannelsystems.com.
You do not need a license for the Cardio2D software if you like to test the software for getting
an idea of how it works and what is possible. You can test all functions, run the viability test to
see your data, but you are not able to start an experiment.
Please contact license@multichannelsystems.com to receive a valid license key.
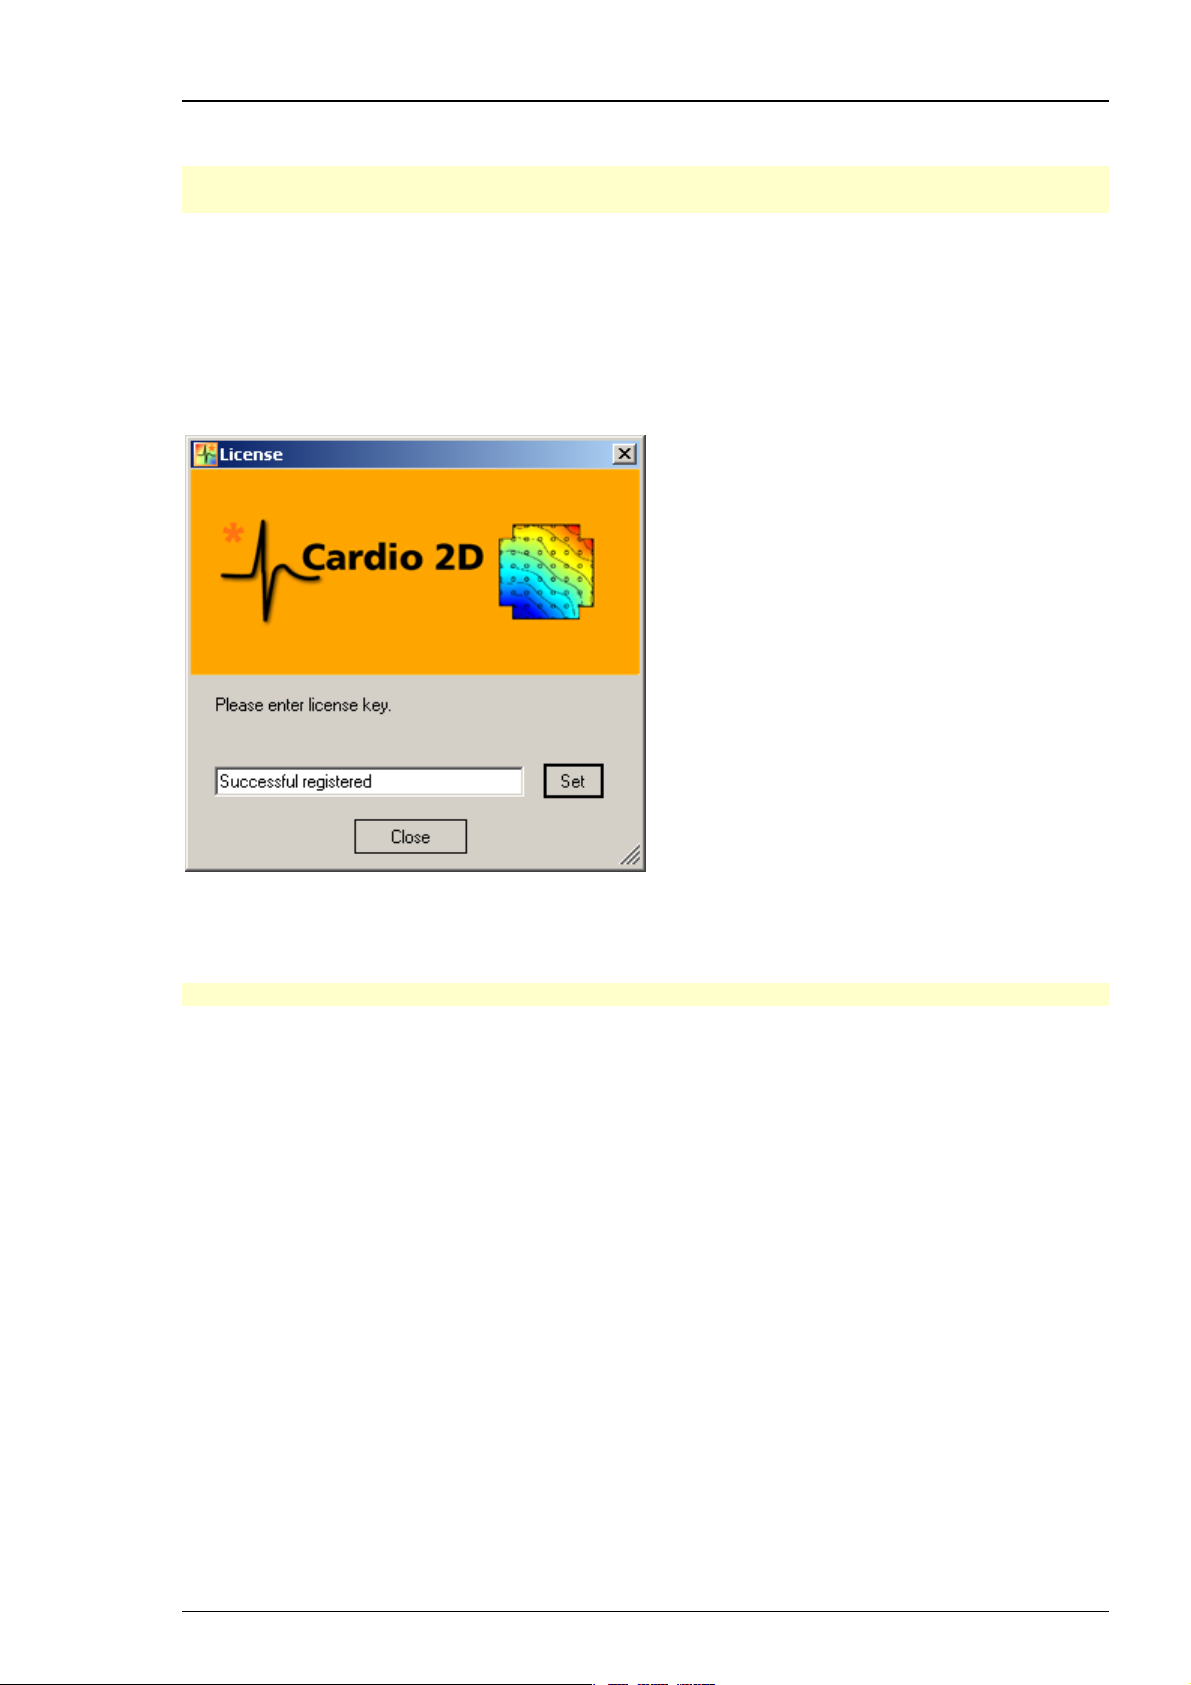
To enter the following dialog, select "License Key" in menu "Help". Please type the key into
the window "Please enter license key" and confirm the key with "Set".
Double-click the Cardio2D.exe on the installation volume. The installation assistant will show
up and guide you through the installation procedure. Follow the instructions of the installation
assistant.
Note: The hardware driver is installed (or updated) automatically.
Installing the Cardio2D+ Analyzer Software
Double-click the Cardio2D+.exe on the installation volume. The installation assistant will show
up and guide you through the installation procedure. Follow the instructions of the installation
assistant.
You will again be asked for a path to put the log and data files. Cardio2D+ does not produce raw
data files, result files only. Raw data files created by Cardio2D are never changed by Cardio2D+,
but analyzed and saved as result files. It is advisable to use the same subfolders as used by the
Cardio2D.
8
Page 13
Software and Hardware Installation
3.2 First Use of Cardio2D after Installation
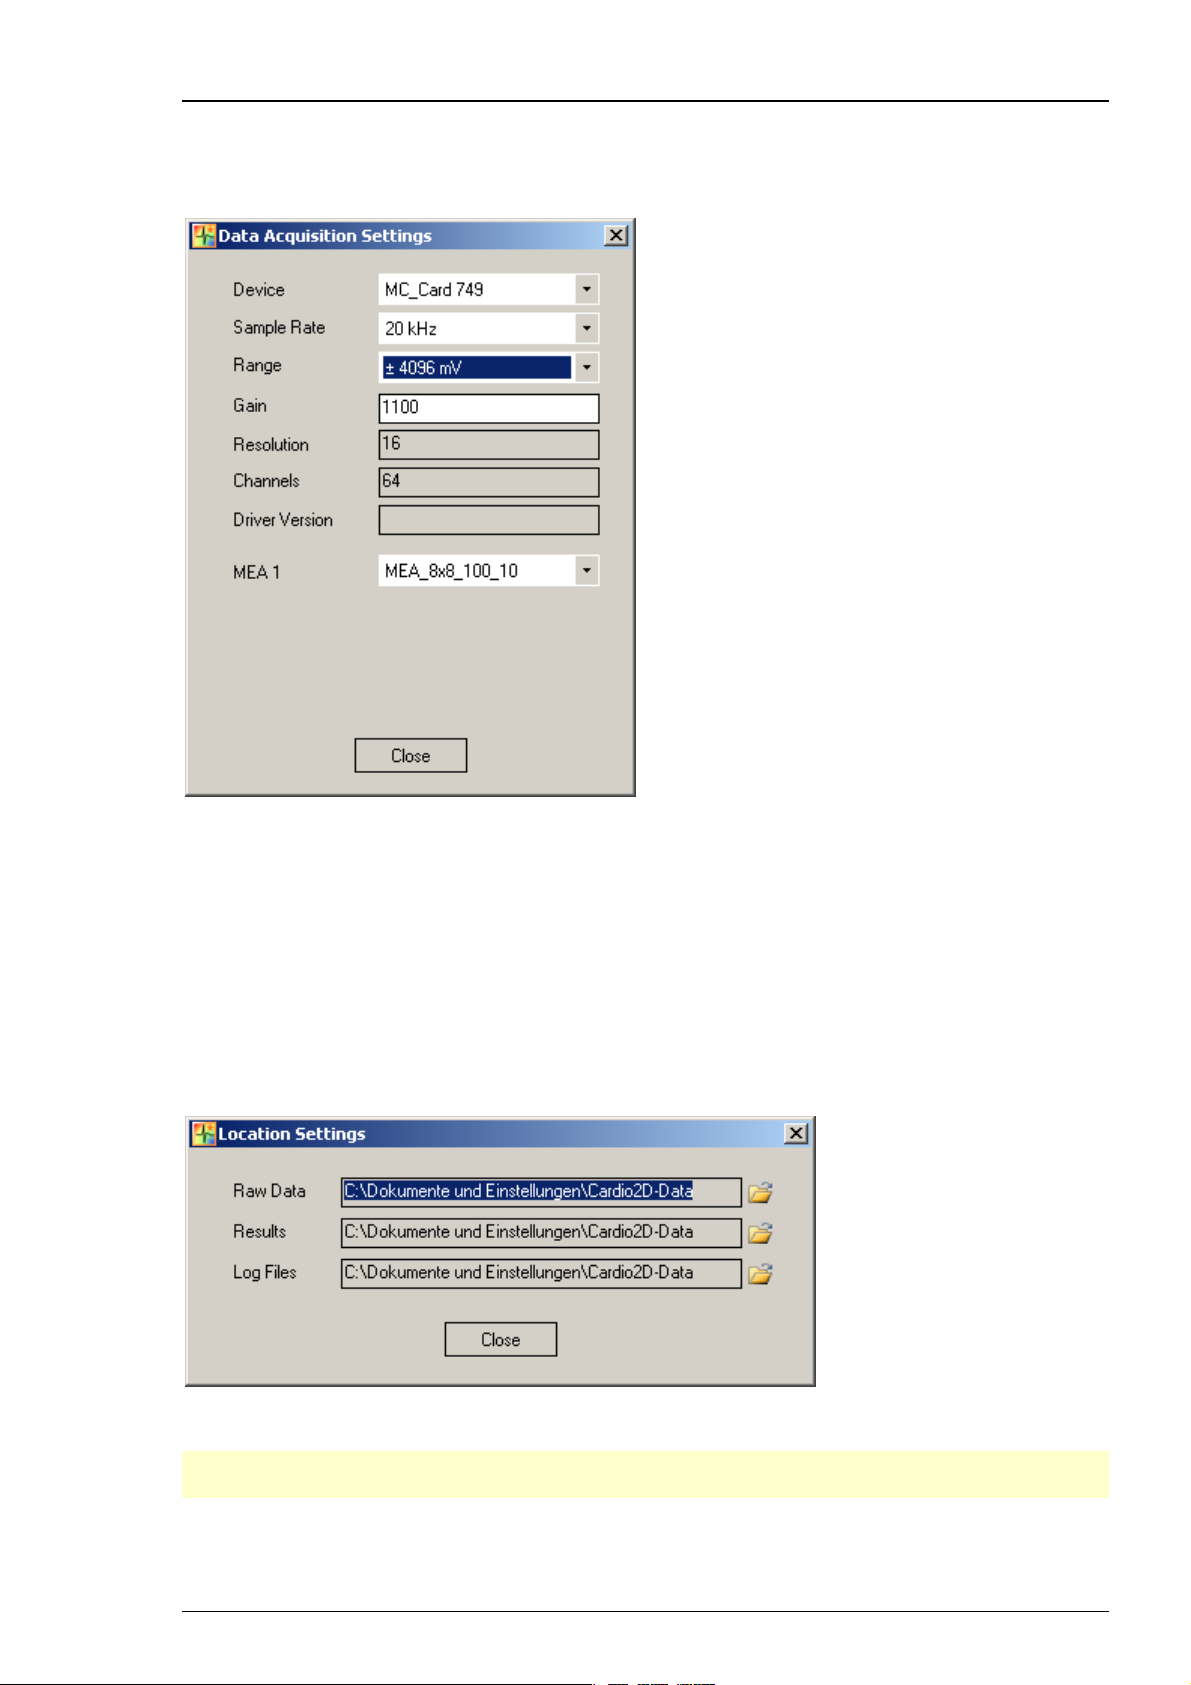
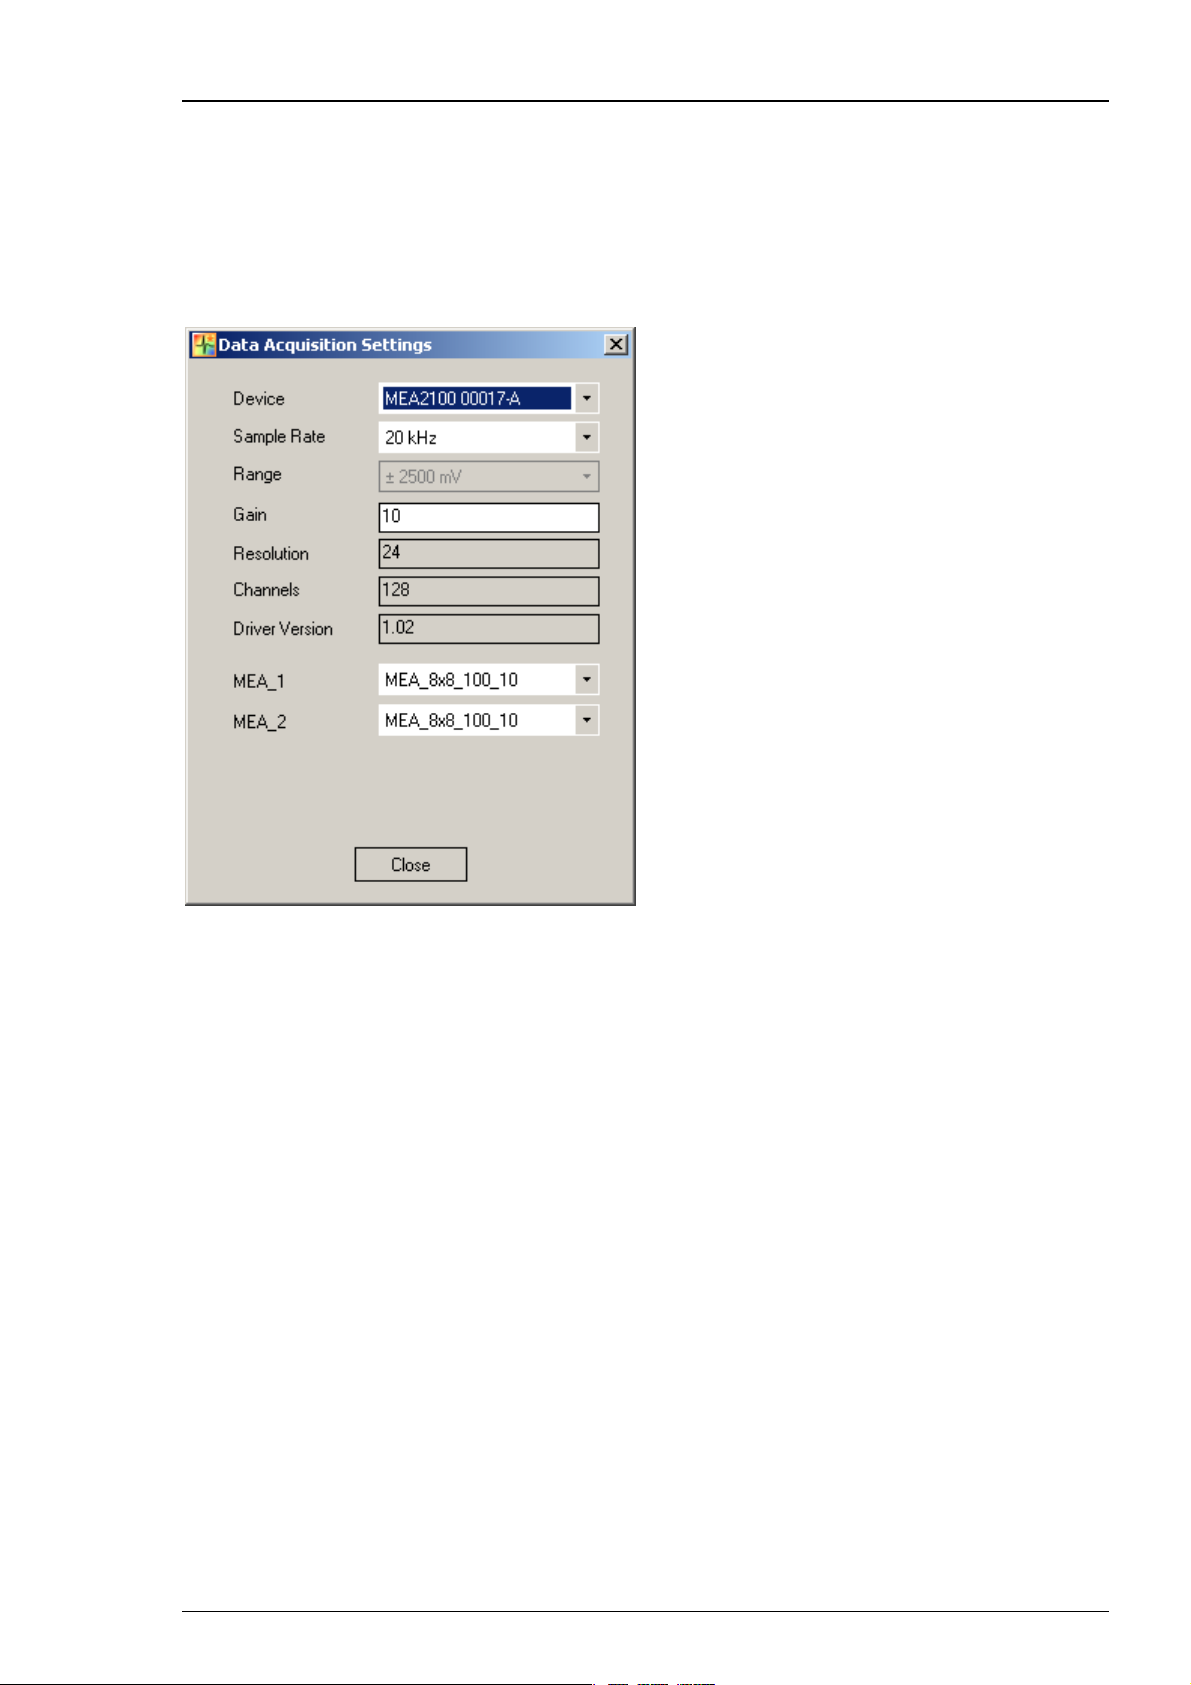
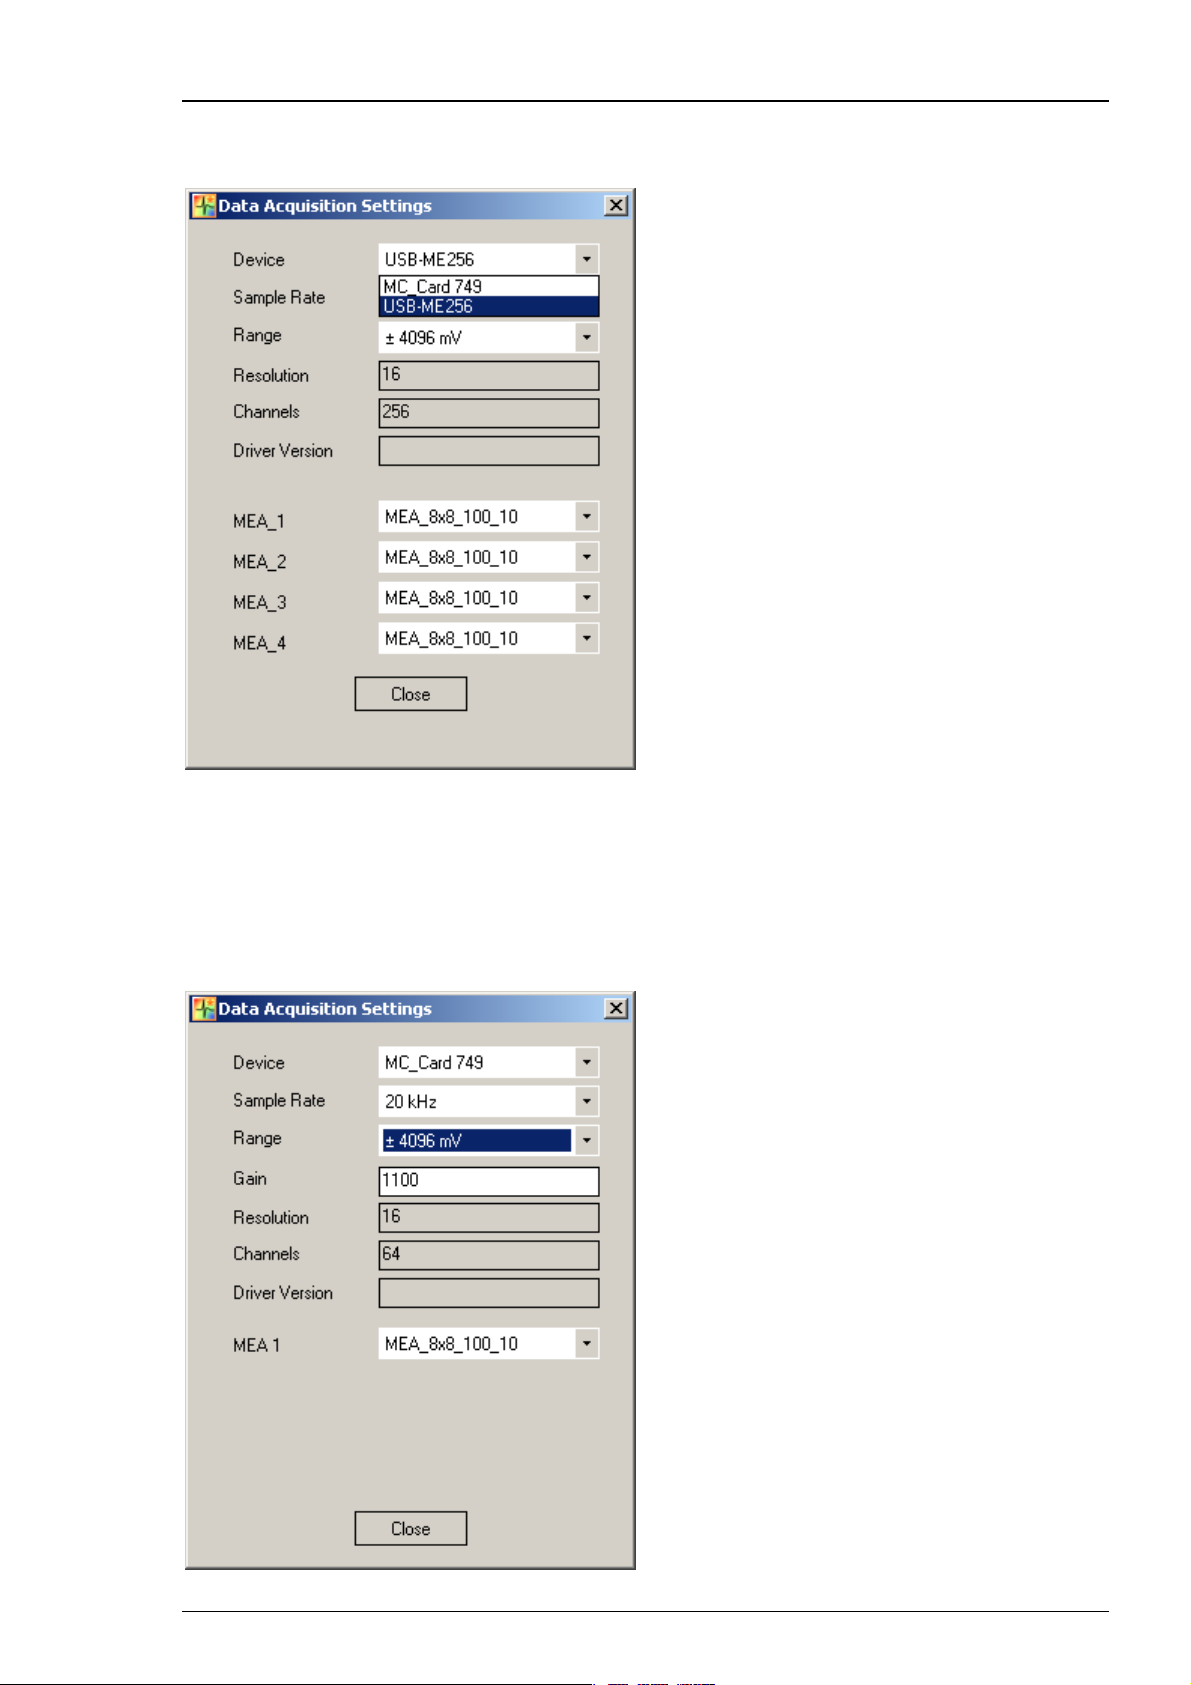
Double-click the Cardio2D program icon. The "Data Acquisition Settings" dialog appears.
You have to select the data acquisition device, if more than one data acquisition is available.
Select the "Sample Rate", the "Range" (when using the MC_Card only), and the gain as an
intrinsic property of the connected amplifier. The "Resolution", the number of "Channels" and
the "Driver Version" are displayed. Select the type of MEA or FlexMEA. Please save these entries
with the command "Save Defaults". Otherwise the dialog will appear each time you want to start
Cardio2D. It is possible to change the default settings or to save several default files if you work
with different configuration. The dialog is also available in the "Settings" menu in "Data
Acquisition".
You will be asked for a path to put the log and data files. The program will create subfolders for
each of these file types. It is advisable to put all three subfolders in a common Cardio2D directory.
These settings can be changed later, please see main menu "Settings", "File Location".
In case you have to reinstall the software, you will be asked for the file locations again.
Note: It is recommended to save the settings in the "Data Acquisition Settings" dialog as default.
This way you do not have to type them in again, when restarting Cardio2D.
9
Page 14

Cardio2D Manual
For saving the settings as default, please enter "File" menu "Save Defaults".
3.3 Data Acquisition Hardware
Caution: You have acquired a high performance data acquisition and analysis computer. Do not
modify the system, do not install new hard- or software, or another operating system without
asking MCS or your local retailer for advice. Cardio2D do not install virus scanners or firewalls
because these programs are known to interfere with the data transfer to the hard disk. MCS
cannot guarantee that a modified system is fully operational. Even data loss may occur.
Warning: The operating system settings of the data acquisition computer were
preconfigured by MCS and should not be changed by the user. Changing these
settings can lead to program instabilities and data loss.
Please read chapter "Data Acquisition Settings" in "First Use of Cardio2D after Installation".
10
Page 15
Software and Hardware Installation
Data Acquisition with the MEA2100-Systems
The MEA2100 recording system is an all-in one solution consisting of headstage and interface
board. The MEA2100-System with integrated amplification, data acquisition, online signal
processing, and integrated stimulus generator. You can connect one or two headstages to the
interface board. The MEA2100-System uses an USB 2.0 connector per headstage to transfer
digitized data to any computer. Please read the MEA2100-System manual for detailed
information.
Data Acquisition with the USB-ME-Systems
The external data acquisition board USB-ME256-System is a stand-alone solution for acquiring
data from up to 256 channels from up to four MEAs. It can replace the internal computer
hardware MC_Card. The analog input signals are acquired and digitized by the USB-ME256-System
and the digital electrode signals are transmitted to the connected computer via universal serial
bus (High Speed USB 2.0). Thus, it is possible to use any computer for data processing. Recorded
data is graphed, analyzed, and reviewed with Cardio2D and Cardio2D+ program. The USB-ME256System supports 256 channels with an amplification factor 1, that means no amplification, data
acquisition only. You can connect, for example, up to four MEA1060 amplifiers via 68-pin MCS
high grade cables.
11
Page 16
Cardio2D Manual
The USB-ME128-System and the USB-ME64-System are in principle the same devices as the
USB-ME256-System, but with 128 or 64 electrode channels respectively.
Data Acquisition with the MC_Card
The data acquisition computer with the with the internal data acquisition board MC_Card comes
preinstalled and preconfigured by MCS for a flawless operation. You should contact your local
retailer for assistance if you want to install additional hard- or software, or if you want to replace
the computer, as incompatibilities of hardware components or software settings with the
MC_Card or Cardio2D may occur.
12
Page 17

Software and Hardware Installation
Data Acquisition with the USB-MEA256-Systems
The USB-MEA256-System is a compact and portable stand-alone solution for MEA recordings with
integrated amplification, data acquisition, and analog / digital conversion. The system acquires
data from up to 252 electrode channels, four additional analog channels, and 16 digital IN / OUT
channels. The digitized electrode data is transmitted to the connected computer via universal
serial bus (High Speed USB 2.0). Thus, it is possible to use any computer as a data acquisition
computer, also a laptop. Recorded data is graphed, analyzed, and reviewed with Cardio2D and
Cardio2D+ program. The integrated filter amplifier supports 252 electrode channels. The gain
of 1100 is fixed. The bandwidth of 1 Hz to 3 kHz is suitable for a broad range of applications.
Data Acquisition with the USB-ME32-FAI-Systems
The USB-ME32-FAI-System is a very compact and portable stand-alone solution. It features an
integrated 32-channel filter amplifier and data acquisition. The digitally converted electrode
signals are transmitted to the connected computer via universal serial bus (High Speed USB 2.0).
As in other USB-ME-Systems, it is possible to use any computer as a data acquisition computer,
also a laptop. The size of the complete system is small enough to fit into a laptop bag together
with the computer. The system is for use with a 32-channel miniature amplifier MPA32I. You can
directly connect the EcoFlexMEA36 to the 32-channel miniature preamplifier for recording with
Cardio2D.
Overview: Possible Configuration of Data Acquisition System and Microelectrode Array
MEA
MEA2100:
MEA2100-HS120:
MEA_12x12_200_30
MEA2100-HS2x60:
MEA_6Well_60MEA_200_30
MEA_8x8_100_10
MEA_8x8_200_30
MEA_8x8_1000_30
MEA_6x10_500_10
MEA_6x10_500_30
MEA2100-HS60:
MEA_6Well_60MEA_200_30
MEA_8x8_100_10
MEA_8x8_200_30
MEA_8x8_1000_30
MEA_6x10_500_10
MEA_6x10_500_30
13
Page 18

Cardio2D Manual
MC_Card 64:
MEA_6Well_60MEA_200_30
MEA_8x8_100_10
MEA_8x8_200_30
MEA_8x8_1000_30
MEA_6x10_500_10
MEA_6x10_500_30
FlexMEA72_750_100
FlexMEA_6x6_300_30 Note: It is possible to connect one or two FlexMEAs!
EcoFlexMEA_6x6_300_50 Note: It is possible to connect one or two EcoFlexMEAs!
MC_Card 128:
MEA_6Well_60MEA_200_30
MEA_8x8_100_10
MEA_8x8_200_30
MEA_8x8_1000_30
MEA_6x10_500_10
MEA_6x10_500_30
FlexMEA72_750_100
FlexMEA_6x6_300_30 Note: It is possible to connect one or two FlexMEAs
per 68-pin MCS standard connector!
EcoFlexMEA_6x6_300_50 Note: It is possible to connect one or two EcoFlexMEAs
per 68-pin MCS standard connector!
14
Page 19

USB-MEA64:
MEA_6Well_60MEA_200_30
MEA_8x8_100_10
MEA_8x8_200_30
MEA_8x8_1000_30
MEA_6x10_500_10
MEA_6x10_500_30
USB-MEA256:
MEA_16x16_100_30
MEA_9Well_256MEA_300_30
USB-ME32
Software and Hardware Installation
EcoFlexMEA_6x6_300_50
FlexMEA_6x6_300_30
USB-ME64:
MEA_6Well_60MEA_200_30
MEA_8x8_100_10
MEA_8x8_200_30
MEA_8x8_1000_30
MEA_6x10_500_10
MEA_6x10_500_30
FlexMEA72_750_100
FlexMEA_6x6_300_30 Note: It is possible to connect one or two FlexMEAs!
EcoFlexMEA_6x6_300_50 Note: It is possible to connect one or two EcoFlexMEAs!
15
Page 20

Cardio2D Manual
USB-ME128:
MEA_6Well_60MEA_200_30
MEA_8x8_100_10
MEA_8x8_200_30
MEA_8x8_1000_30
MEA_6x10_500_10
MEA_6x10_500_30
FlexMEA72_750_100
FlexMEA_6x6_300_30 Note: It is possible to connect one or two FlexMEAs
per 68-pin MCS standard connector!
EcoFlexMEA_6x6_300_50 Note: It is possible to connect one or two EcoFlexMEAs
per 68-pin MCS standard connector!
USB-ME256:
MEA_6Well_60MEA_200_30
MEA_8x8_100_10
MEA_8x8_200_30
MEA_8x8_1000_30
MEA_6x10_500_10
MEA_6x10_500_30
FlexMEA72_750_10
FlexMEA_6x6_300_30 Note: It is possible to connect one or two FlexMEAs
per 68-pin MCS standard connector!
EcoFlexMEA_6x6_300_50 Note: It is possible to connect one or two EcoFlexMEAs
per 68-pin MCS standard connector!
16
Page 21
4 Cardio 2D Software
4.1 The Cardio2D Program : Overview
Main Window: Overview
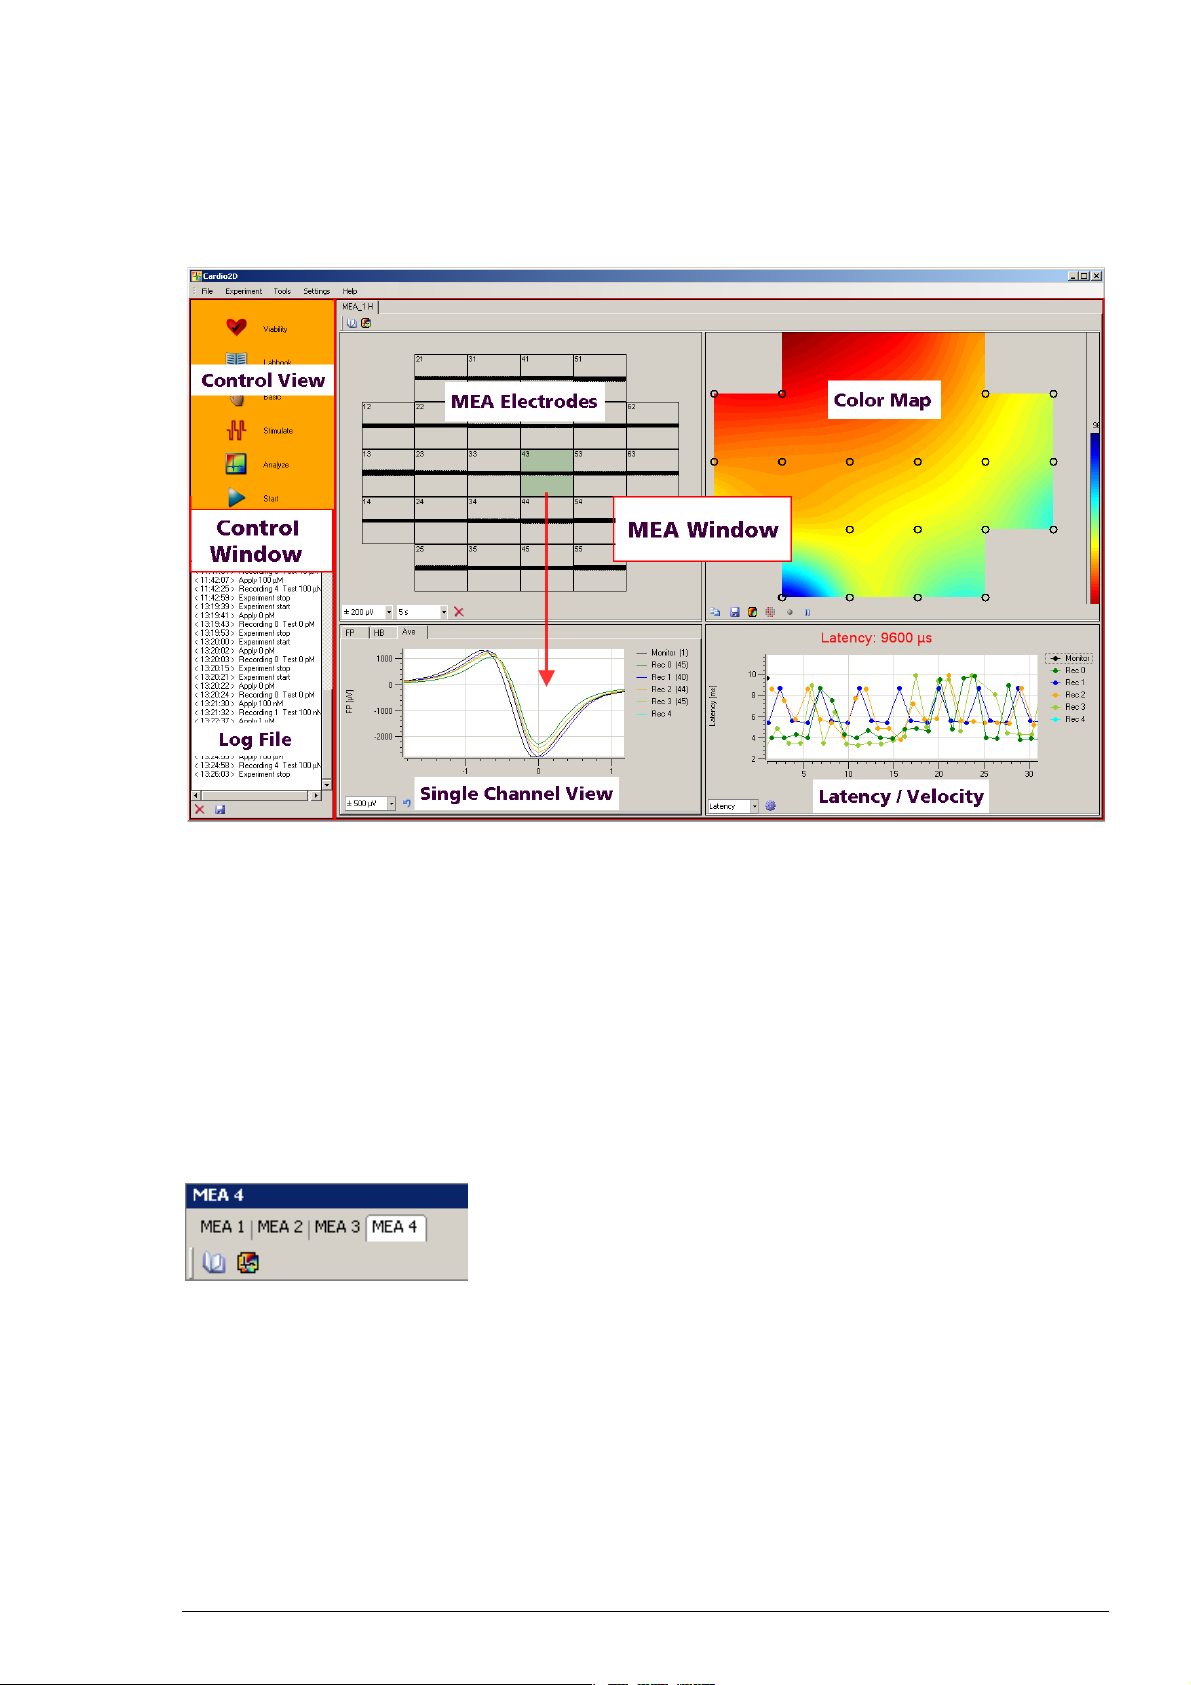
The main window of Cardio2D consists of two in case of several connected MEAs of three window
panes. The left "Control Window" is for controlling and documentation of the experiment.
The bigger window on the right side, the "MEA Window" displays heartbeats in different
characteristics in real-time monitoring. The "Summary" window is only available, if more than
one MEA is connected.
You have one single "Control Window" only, but depending on the connected hardware you can
have up to nine different MEA tabbed pages in the "MEA Window" which correspond with the
"Summary" window respectively. If you connect, for example, an USB-MEA256-System for data
acquisition, you can use it together with a 256-9wellMEA and each of the nine wells is displayed
and controlled separate in nine MEA window tabs, MEA A to MEA I.
If you connect, for example, an USB-ME256-System for data acquisition, it is possible to connect up
to four MEAs, MEA_1 to MEA_4. Each MEA window tab will display the heartbeats with different
settings in the four views of the "MEA Tabbed Pages" in the "MEA Window" independent from
each other. Via the "Control Window" you start and stop the experimental protocol
simultaneously.
17
Page 22

Cardio2D Manual
Control Window
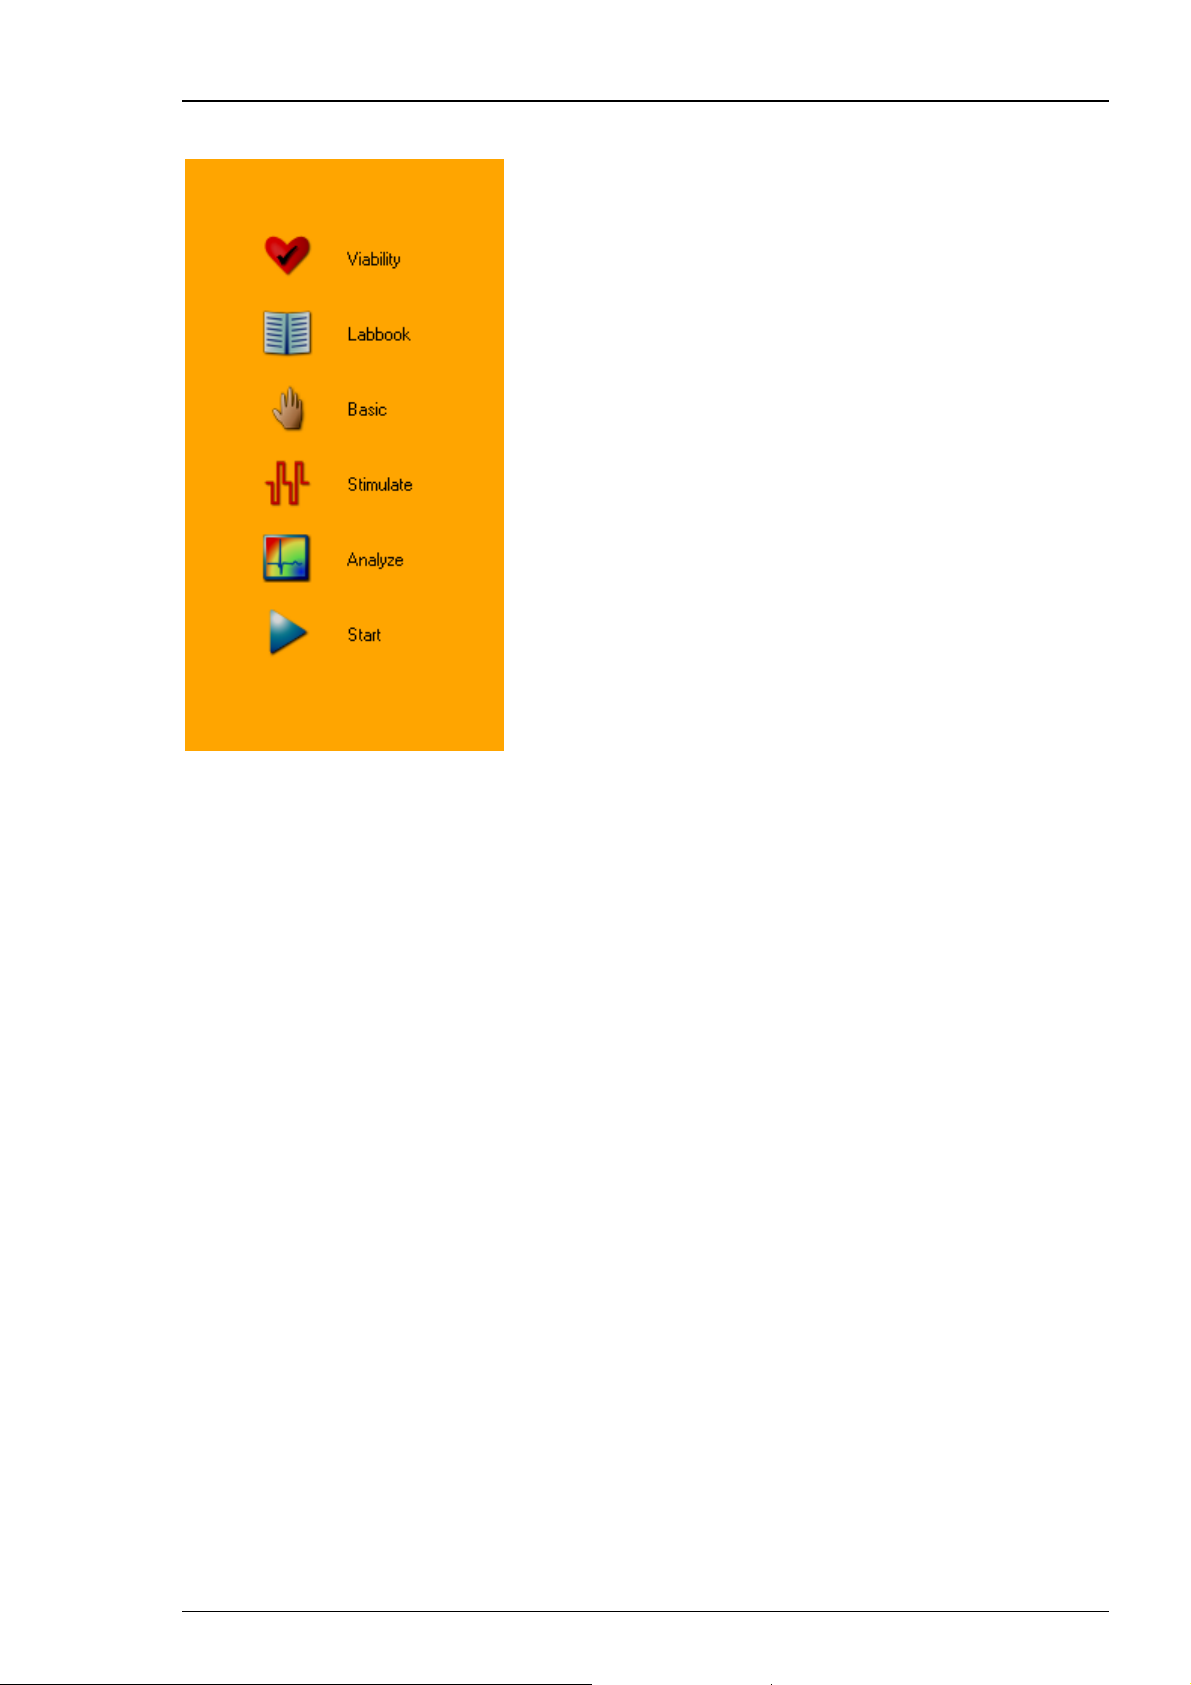
The experimental protocol is visualized by three icons on the left orange control view.
The icons can be clicked for editing the protocol. Below the control view the log file
documents the ongoing experimental proceedings.
Summary Window
The "Summary" window is only available, if more than one MEA is connected. It presents
an overview about the layout of the MEAs which are connected and you can select or deselect
the recording of connected MEAs. The summary corresponds with the MEA tabbed pages in the
"MEA Window".
MEA Window
The "MEA Window" is divided into four single views. All of them display heartbeats in different
characteristics. If more than one MEA is connected to the experimental setup, each MEA can be
operated separately via the "MEA Tabbed Pages". Depending on the hardware up to nine MEAs
(for nine wells of the 256-9wellMEA) are available. Select the respective MEA in the "Summary"
window to display the data traces in the MEA window. If a MEA is disabled via check box in the
"Summary" window, the corresponding MEA tabbed page will be removed from the display,
and no data is recorded.
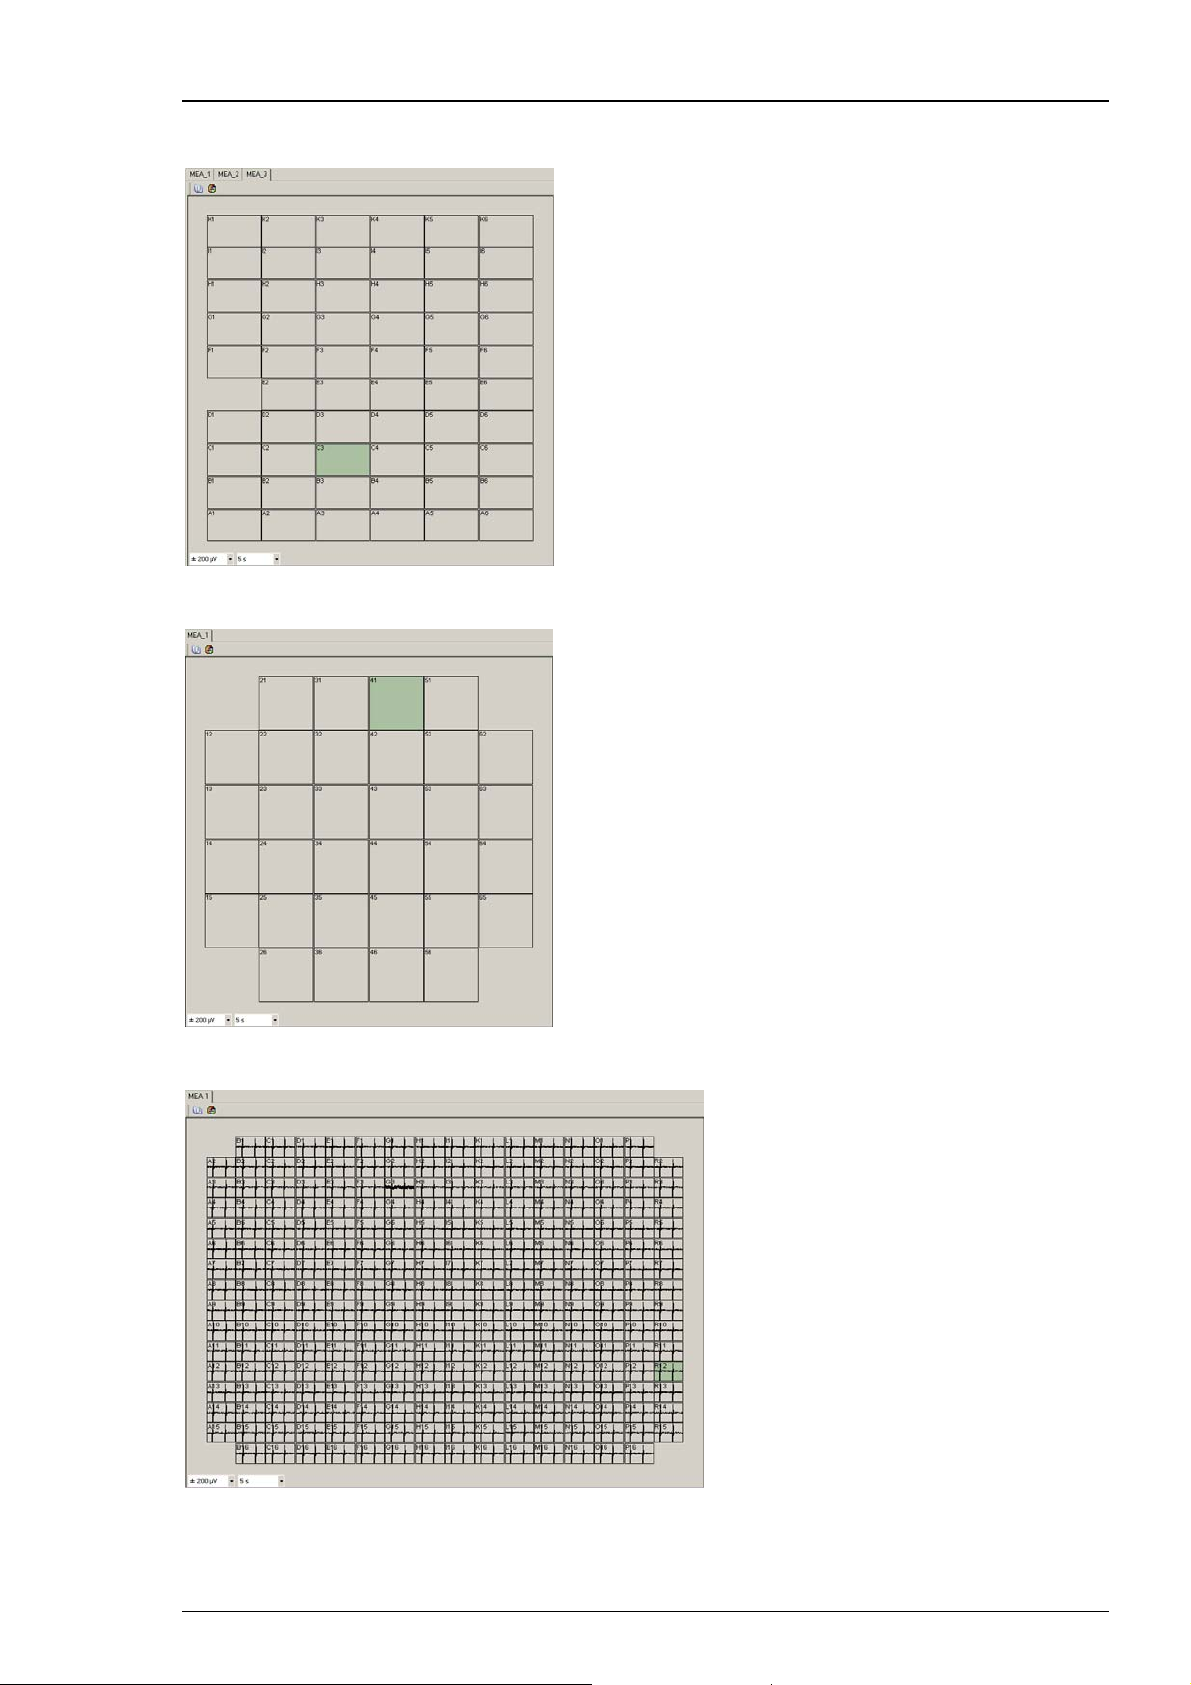
Five different types of MEAs are implemented: The standard MEA with an 8 x 8 electrode layout
grid (the diameter of the MEA electrodes and the spacing between them differs), a MEA with a
6x10 electrode layout grid, the 256MEA with a 16 x 16 layout grid, the 256-9wellMEA with nine
separate wells (shown in the picture above), or the EcoFlexMEA36 with 6 x 6 electrode layout grid.
The design of the MEA window is automatically adjusted to the type of the MEA, please see
chapter "Data Acquisition Settings" in First Use of Cardio2D after Installation.
Recorded data traces are displayed in the MEA electrodes pane. You can zoom to any channel
by clicking on a channel in the MEA electrodes plate. The zoomed channel is displayed in the
larger single channel view. The single channel view has three tabs, "FP" field potential, "HB"
heartbeat and "Ave" average. The heartbeat window shows either a diagram of the RR interval
or of the frequency of the heartbeats, the heart rate. The current values of the RRI or the
frequency are displayed above in red numbers.
The color map displays the propagation of a heartbeat from the pacemaker to the outer regions
of the cardiac cell culture or tissue. The isochrones are indicated by black lines. The colors indicate
the latency distribution over the MEA. Red color represents the pacemaker when using the color
map "jet inverse".
The latency / velocity window shows the latency of the heartbeat in units of μs or the velocity
in units of mm per ms. Both parameters are measured between the first and the last detected
electrode in the range. The current absolute values are displayed in red letters above the plot.
18
Page 23
Cardio 2D Software
Main Menu
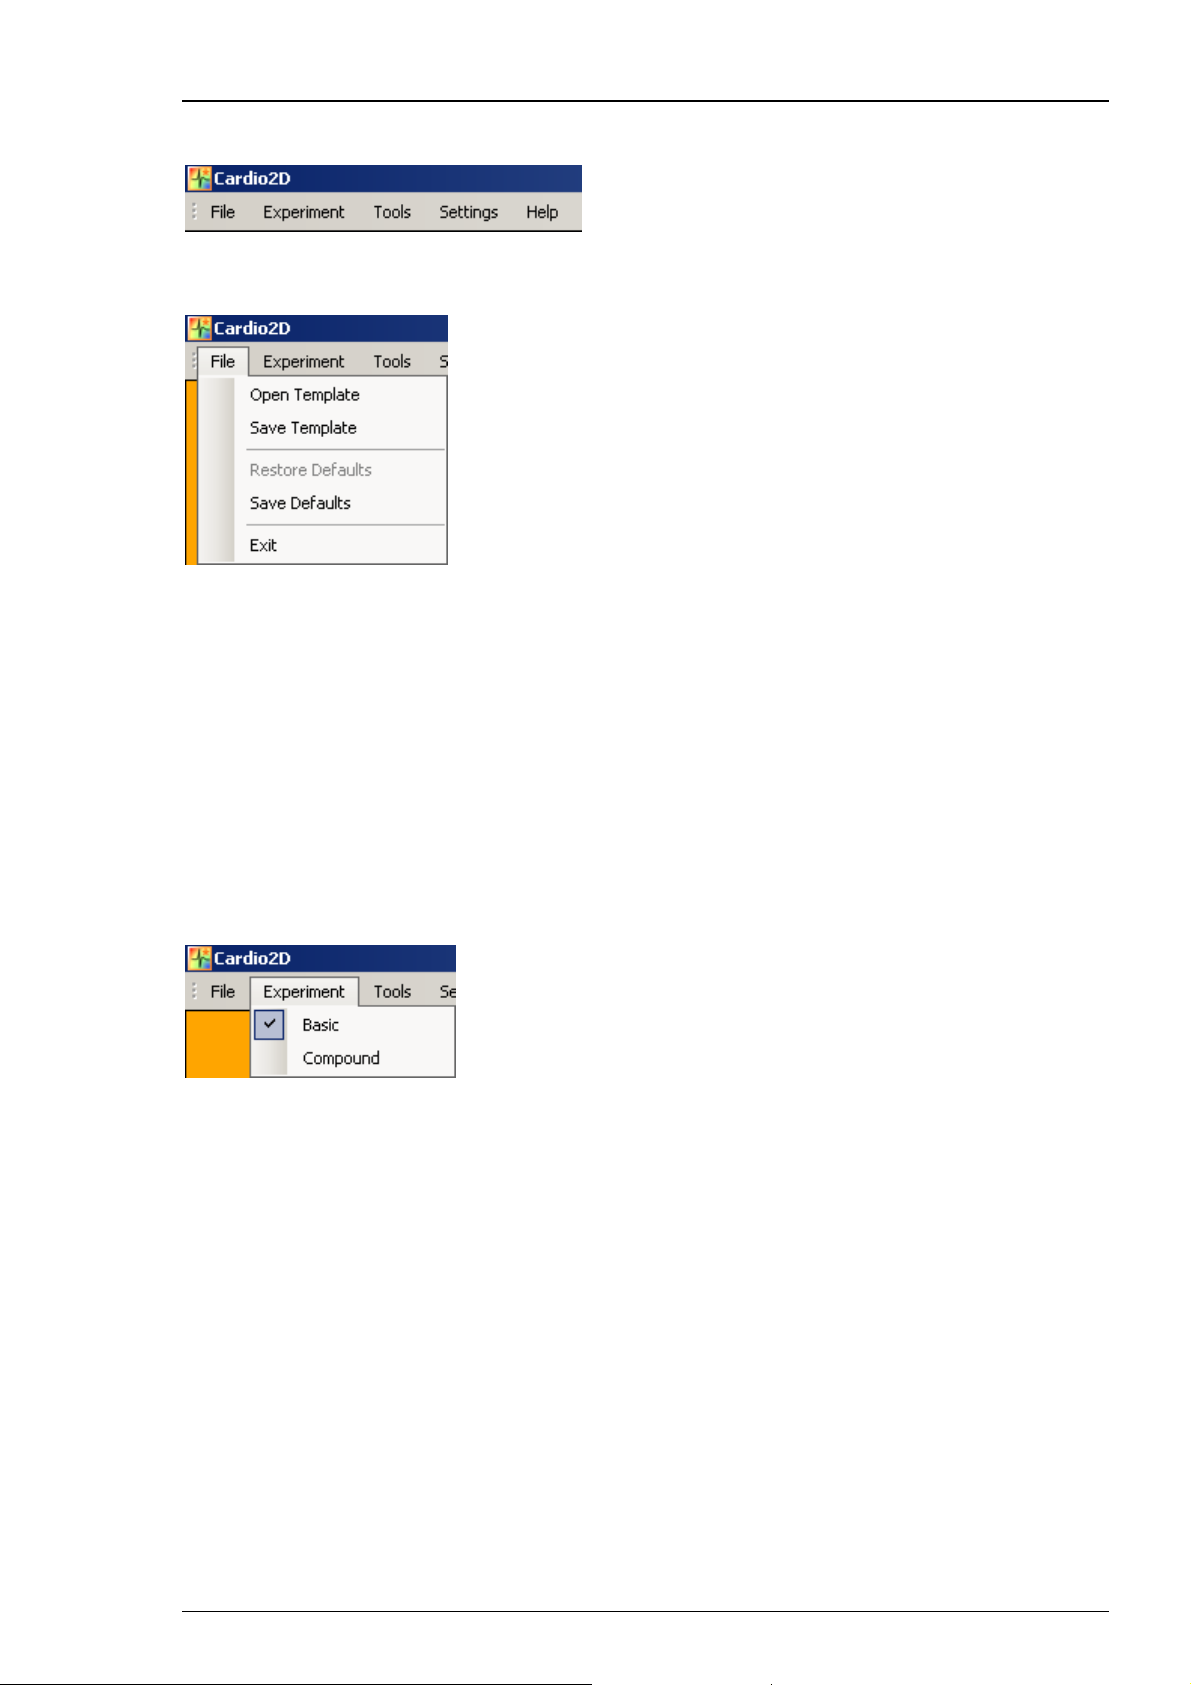
File
Menu to open or save templates, to restore and save defaults, and to exit the program.
If you design experiments for a certain purpose, and you want to reuse the experimental schedule,
please save the file as a template. You can reuse the template file as often as necessary. You can
save as much templates as needed. You can also save local and global settings as a template.
The inscriptions appear as soon as you open the template and there is no need to fill in again.
Factory set defaults are the setting parameters, which are used when starting Cardio2D for the
first time. Please enter your own defaults, for example, in "Data Acquisition Settings" dialog after
installing the software. Click "Save Defaults" to save your settings as a default. This way your
setting parameters will be present, each time you start Cardio2D. To restore default settings,
please select "Restore Defaults".
Experiment
Menu to schedule an experiment. Selecting "Basic" or "Compound" changes the icons in the
"Control Window". "Basic" defines the default settings for an usual experiment, "Compound"
gives the possibility to apply an user defined series of compounds.
19
Page 24
Cardio2D Manual
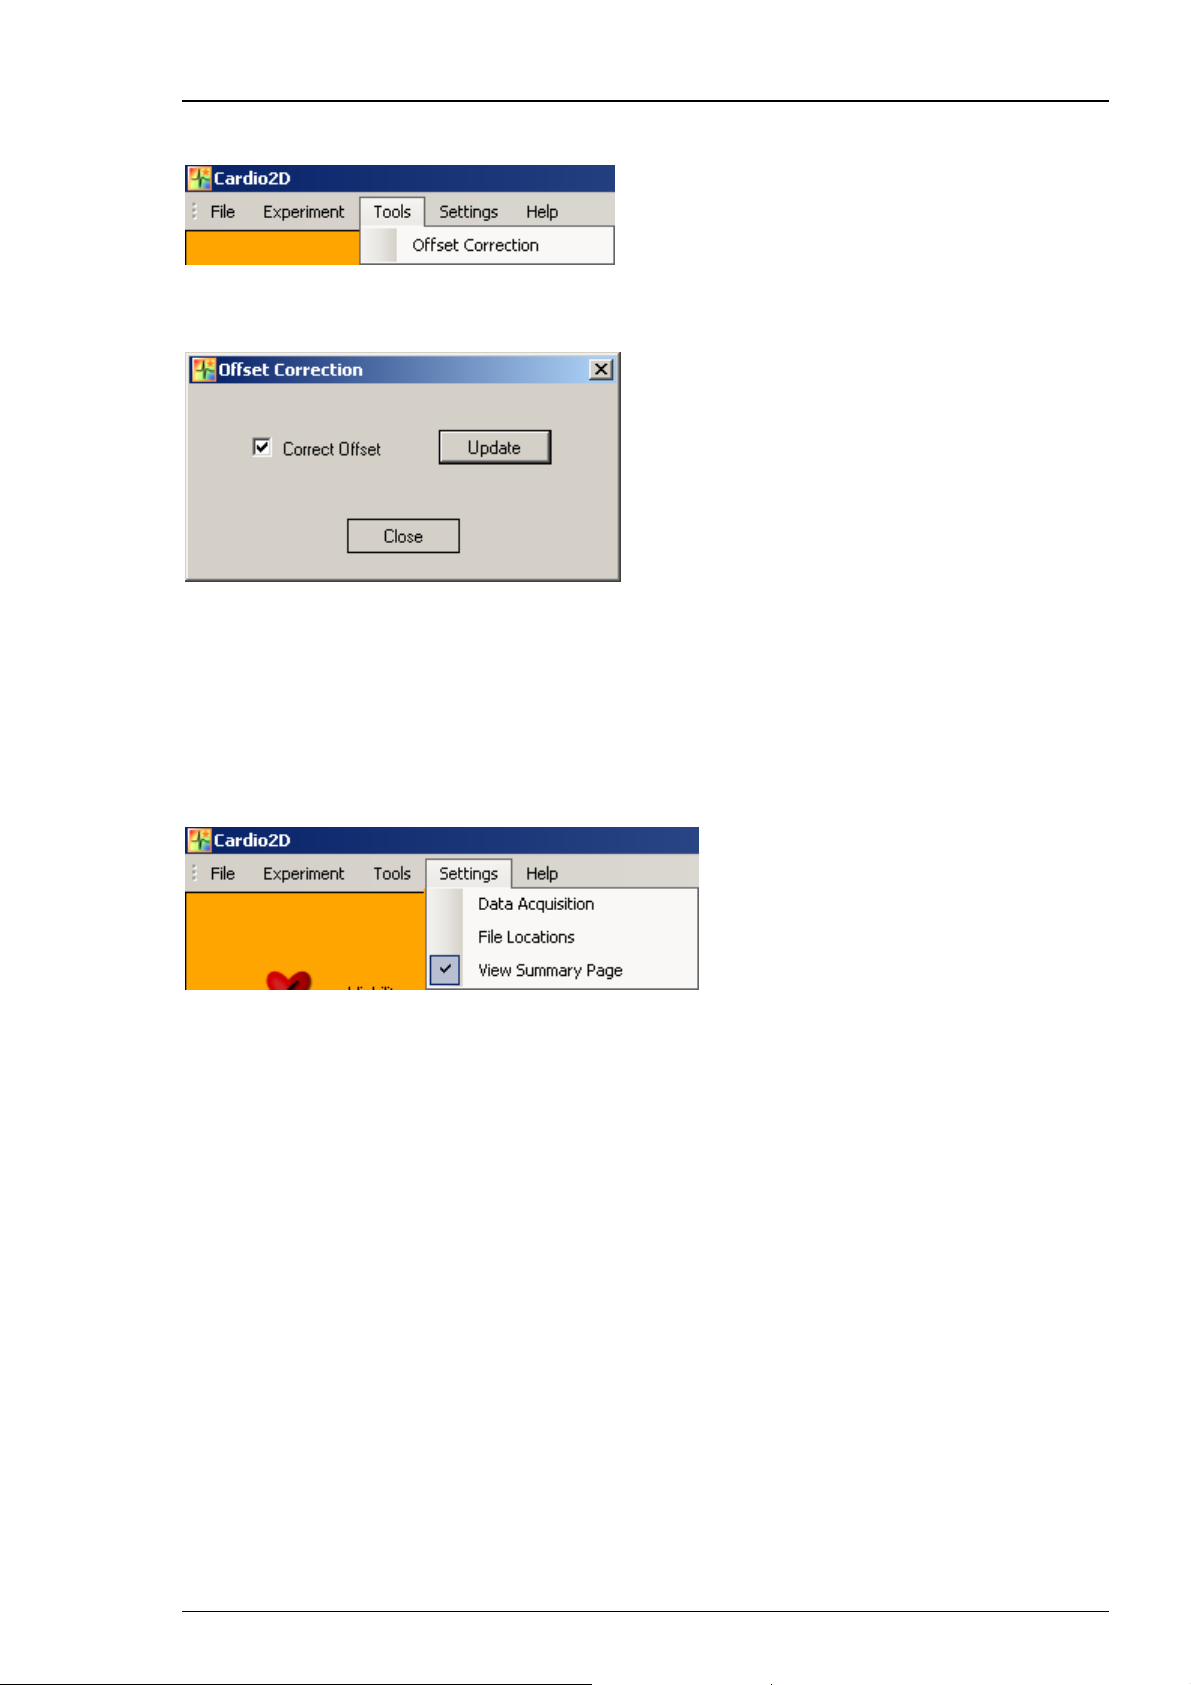
Tools
Menu to activate the offset correction, if necessary. Enable the option "Offset Correction" and the
following dialog appears.
An offset correction may be necessary, if you observe disturbing voltage offset on the input
channels. Click the check box "Correct Offset" and Cardio2D takes 100 ms of the recorded data in
the moment when the check box is selected to calculate the DC offset. The mean of this 100 ms
sweep is subtracted from the recorded data as long as the "Correct Offset" check box is activated.
The offset correction works separately for each available channel. Click the "Update" button to
update the calculation of the offset correction. This option is available when Cardio2D is running.
Settings
Menu to define the data acquisition device and to determine the path for the data and log files.
20
Page 25
Cardio 2D Software
Click "Data Acquisition" in the Settings menu. The "Data Acquisition Settings" dialog opens. This
dialog is the same which shows up before starting Cardio2D for the first time. Please see above.
Please enter the drop down menus to select the current data acquisition. In dependency of the
data acquisition device you can modify the "Sample 'Rate" and the "Range". The "Resolution",
"Number of Channel", and the "Driver Version" will be displayed. Define the type of MEAs used
in the experiment.
Click "File Location" in the Settings menu. The "Location Settings" dialog opens.
Please define the file path for the raw data and the corresponding setting files, the result and
the log files.
When using an USB-ME256 device for data acquisition it is possible to connect up to four MEA
amplifiers, which can be operated independent from each other: That means you can select the
settings for each MEA separately, but the starting and stopping of the experimental protocol is
synchronous for all connected MEAs.
The design of the MEA tab is different depending on the type of the connected MEA.
21
Page 26
Cardio2D Manual
Design of the MEA window when connecting three MEAs, and using a MEA with a 6 x 10 layout
grid in MEA_3 tab.
Design of the MEA window when using one EcoFlexMEA36 with a 6 x 6 layout grid.
Design of the MEA window when using a 256MEA with a 16 x16 layout grid.
22
Page 27

Cardio 2D Software
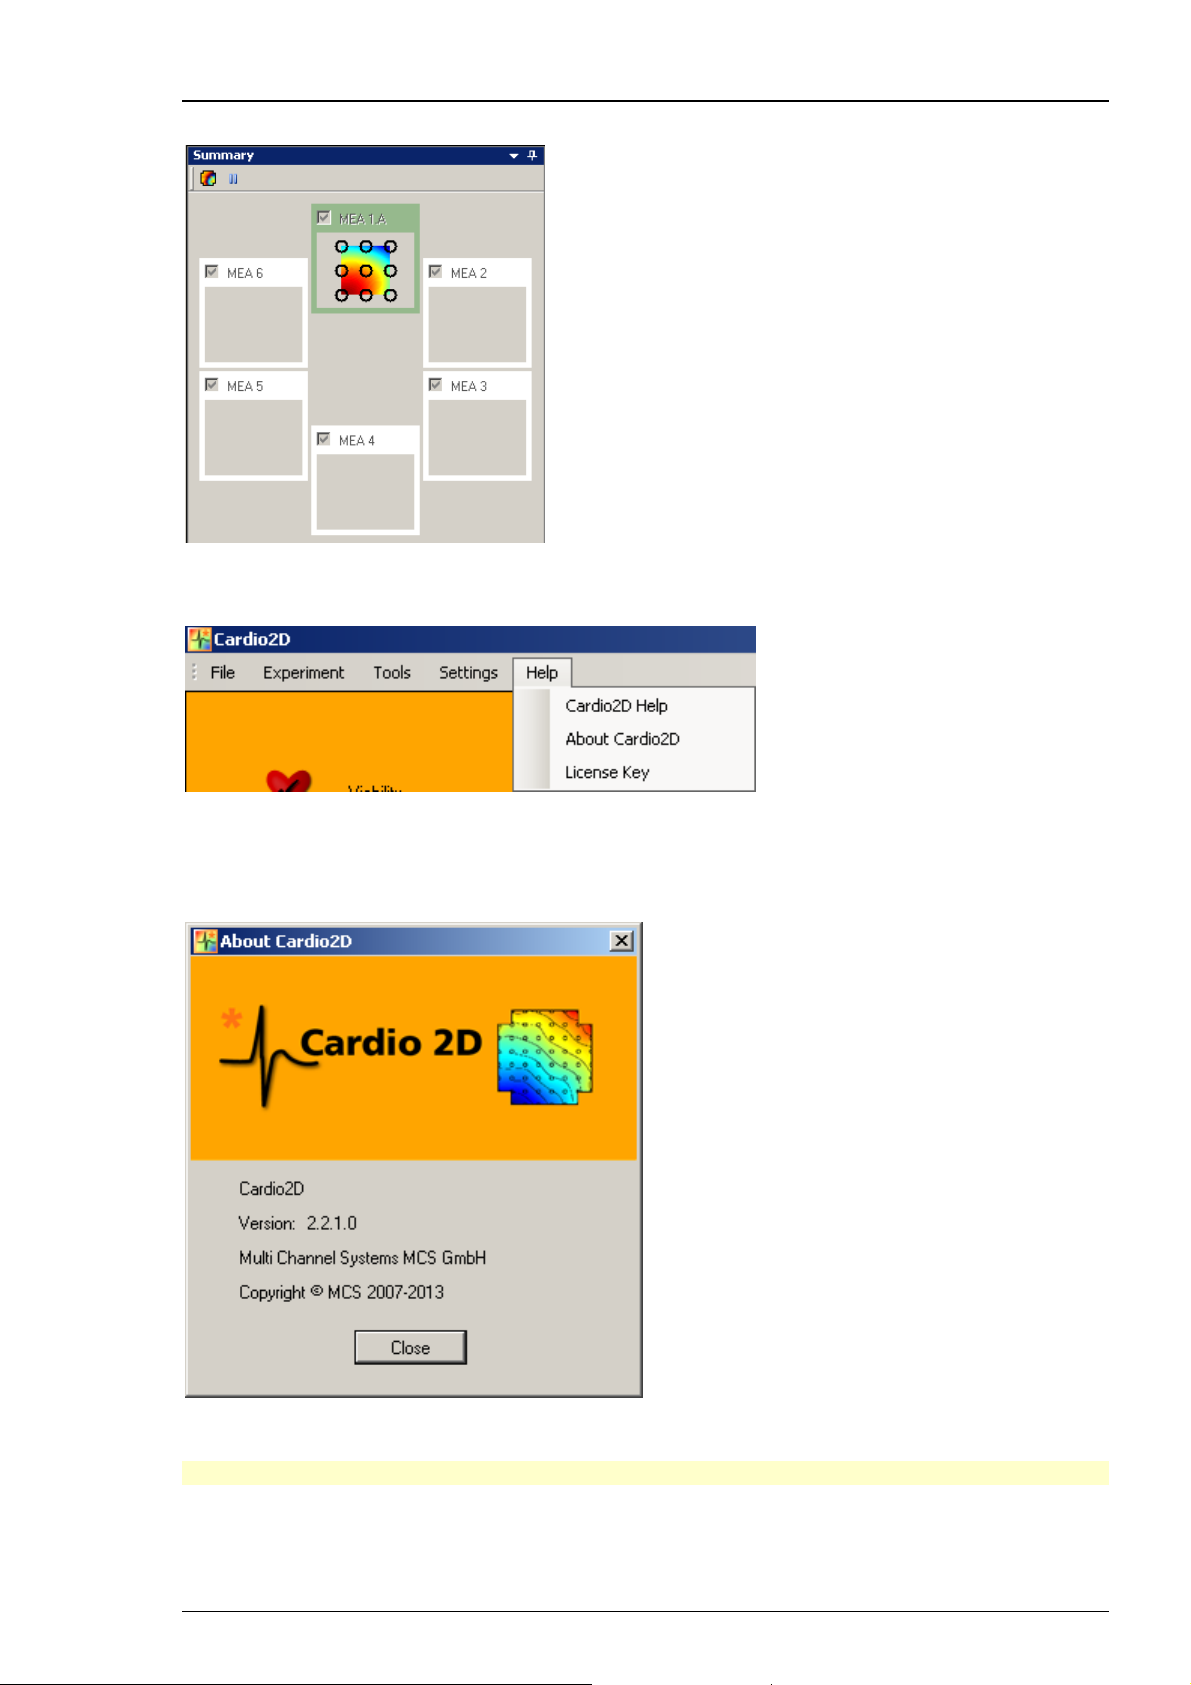
Click "View Summary Page" to open the "Summary" window. This window is only available, if
more than one MEA at a time is connected. The window presents an overview and all connected
MEAs are visible. The dark green color code spotlights the MEA which is displayed in the MEA
tabbed page. The layout of the MEA is displayed respectively.
You can uncouple the "Summary" window to move it to a different place on the monitor. Click
the
monitoring the color map via "Start" and "Stop" icon.
"Map Settings" icon to open the "Summary Map Settings" dialog and start or stop
23
Page 28
Cardio2D Manual
In this example the "Summary" page shows 60-6wellMEAs with adapted color map.
Help
Menu for starting the Cardio2D online help, to monitor the dialog "About Cardio2D", and to
enter the license key. For a valid license please read chapter "Installing Cardio2D Software".
Select "About Cardio2D".
The dialog shows basic information about the version of Cardio2D.
Note: Please keep in mind that the information of this dialog is necessary in case of support!
24
Page 29

4.2 Control Window
Cardio 2D Software
The "Control Window" is divided into two window panes.
The "Control View" controls the experimental protocol, and the "Log File" documents
the experimental proceedings.
25
Page 30
Cardio2D Manual
4.3 Control View
In the Control window you can enter the settings for setting up and running an experiment. If
more than one MEA is connected each MEA is represented via a tabbed page in "MEA Window".
In "Control View" it is possible to set different parameters for each MEA and to start and stop all
MEAs simultaneously.
26
Page 31

4.4 Viability
Cardio 2D Software
Click Viability. The "Viability" icon
the viability test is counted up in hours, minutes and seconds. Stop the viability test manually by
clicking on "Stop" icon.
Running a viability test
Before you start recording, a viability test is recommended. The data is not recorded.
The viability test monitors whether the MEA electrodes are acceptable for recording, and the
cell culture or tissue is fine. You can check the signal detection parameters, and focus onto single
channels. If the settings are too rigid the cardiac signal is not detected at all. Too loose settings
will lead to a wrong signal detection, and thus to wrong results.
After adjusting all parameters in the different window panes you can start recording. The log file
documents the experimental proceeding.
It is possible to change analysis parameter during viability test is running to check the differences
immediately. This option is not available during recording, the settings have to be constant during
the whole time of recording.
changes into "Stop" icon , and the duration of
4.5 Labbook
Click "Labbook" icon
In this dialog you fill in data referring to your experiment. The "Labbook Settings" will be stored
in the settings file *.c2s.
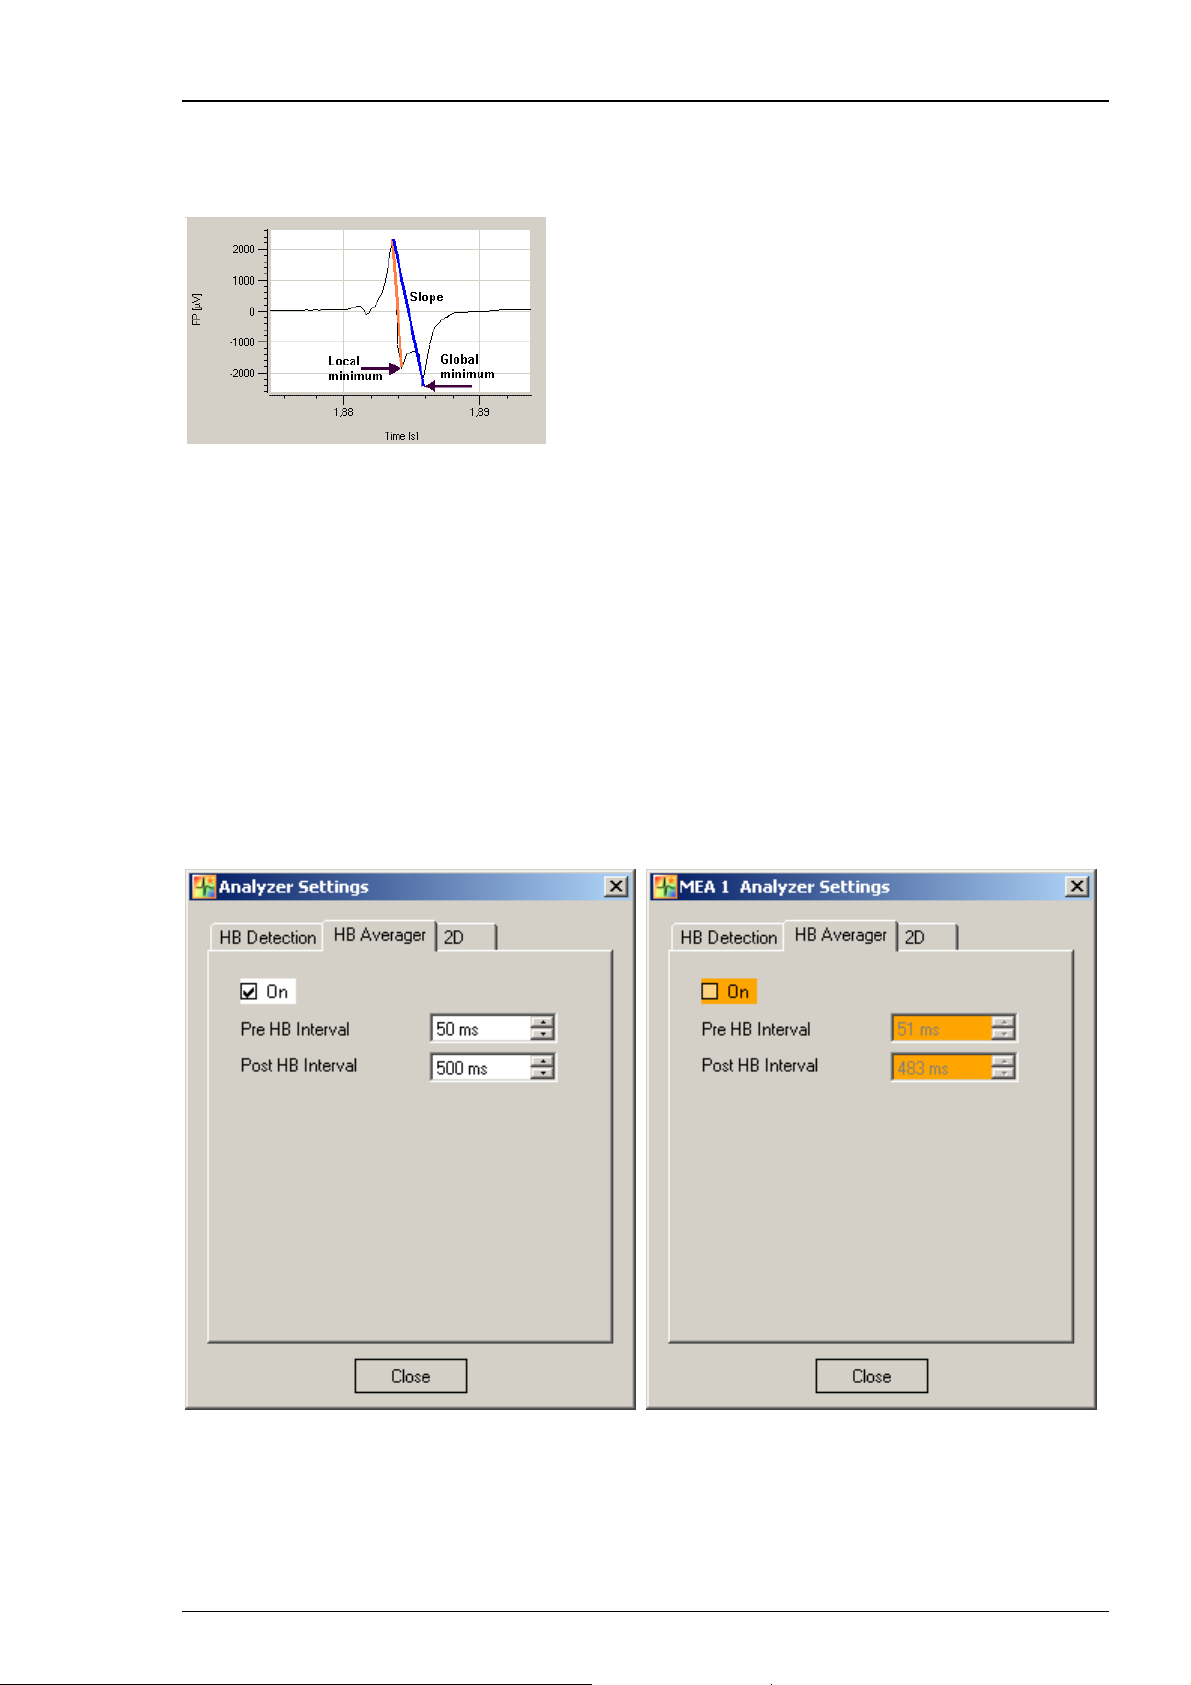
Comparing "Local" and "Global" Settings
If more than one MEA is connected to the experimental setup or a multi well MEA you can control
each MEA or each well separately via "local" settings or you can control all MEAs together via
"global" settings. Please use the "Labbook" icon in the MEA window for "local" settings and the
icon in the "Control View" for global settings. Please use the "global" settings which apply to all
available MEAs or wells as well whereas changes in local settings will apply to a single MEA or a
single well. Changes in global settings will of course overwrite local settings. If local and global
settings are different, the respective input field will be highlighted in orange.
. The dialog "Labbook Settings" will open. Click "Study" tab.
27
Page 32

Cardio2D Manual
For example: Type the desired settings into the "Study" tabbed page of the global labbook
selected by the icon in the "Control View". Confirm the entry with "Enter". During writing
the background of the input field will be orange, after confirming the window is white again.
Close the global "Labbook Settings" dialog.
Open the local labbook via icon
The other way round when changing settings locally differing values will be highlighted in
orange in both dialogs.
This feature comparing global and local settings is also available for settings in the “Analyzer
Settings” dialog.
in the MEA window. The local settings will be changed.
Click "General" tab in "Labbook Settings" dialog.
In this dialog you fill in general data referring to your experiment.
28
Page 33

4.6 Compound / Basic
Compound
Click "Compound" in main menu "Experiment".
The "Basic" icon is replaced by the "Compound" icon.
Cardio 2D Software
Click the "Compound" icon
In this dialog you can choose series of compounds which are applied to the cardiac cells or tissue
on the MEA. In parallel to the "Basic Settings" dialog the options referring to the recording
phases are available. Please see above. There are two series of compounds provided: The dilution
factor in "Series 1:10" is ten, and in "Series 1:3" the factor three. But you can create a user
defined compound series by overwriting the given example in the window. Please consider the
syntax, otherwise you get a syntax error message.
. The "Compound Settings" dialog appears.
The functionality of the settings in the "Switch Recording" drop down menu is the same as in the
"Basic" settings. Define the duration o f the test phase in the "Test Duration" drop down menu.
Enable the check box "Record Apply Phase" if you want to save all data inclusive the data of the
apply phase in the recording file.
29
Page 34

Cardio2D Manual
In the control window beneath the "Compound" icon, the currently applied dose of compound
is displayed. When clicking on the "Compound" icon the "Set Marker" dialog appears which
is called here "Apply Compound" dialog In the header, the next dose to apply is additionally
displayed. Type your comments in the "Comment" window.
Basic
Click "Basic" in main menu "Experiment".
The "Compound" icon is replaced by the "Basic" icon.
The recordings are counted up and displayed.
Click Basic. The "Basic Settings" dialog appears.
The "Basic Settings" dialog is for scheduling the recordings.
30
Page 35

Cardio 2D Software
There are different ways to influence the recordings.
1. Select "Timer" in the "Switch" drop down menu and define the phase duration (1 s to 30 min)
from the "Duration" drop down menu. Start the recording manually. A new recording phase will
start automatically after the predefined recording interval is finished. Stop the recording manually
whenever it is reasonable.
Timer: The recording time span is fixed.
2. Select "Timer" and define a "Duration" of a recording phase. Enable the check box "Count" and
select the number of recordings in the up down box. Start the recording manually. The recording
will stop automatically after the selected number of repeats.
3. Select "Click Icon" in the "Switch" drop down menu. Now you define the recording time manually
by clicking onto the icon. Start the recording manually. A new recording phase will start
immediately after clicking the icon. Stop the recording manually whenever it is reasonable.
Icon: The recording time span is user defined.
In these types of recording described above, the data of each recording interval is completely
saved in the recording file. To avoid a big amount of data it is additionally possible to save the
data of a recording only, while the "Apply Phases" between the recordings are displayed but
excluded from the data file. This may be the phase during experimental manipulation, for
example while pipetting new compounds and waiting for the effect.
4. Enable the check box "Apply Phase". Start the recording manually. The first phase of this
experiment is the "Apply" phase and the dialog "Set Marker" show up. Write a comment
if necessary and manipulate the experiment. To finish the "Apply Phase" and to start the
recording phase, please click the button "Set Marker".
The data of the recording phase is saved, the data of the apply phase is not saved in the recording
file. The data of the apply phase is displayed in the single channel view, marked by the term
"Monitor".
31
Page 36

Cardio2D Manual
Apply Phase: The recording time is user defined. The data of the recording phase is saved,
the data of the apply phase is excluded from the data file.
The log file on the left side of the window shows following entries:
5. Enable the check box "Apply Phase" and the check box "Record". Start the recording manually.
The first phase of this experiment is the "Apply" phase and the dialog "Set Marker" show up.
Write a comment if necessary and manipulate the experiment. To finish the "Apply Phase" and to
start the recording phase, please click the button "Set Marker". The data of the recording phase
and the data of the apply phase is saved in the recording file. Additionally the different types of
data in the file are marked as data from the apply or the recording phase.
Apply Phase and Record: The recording time is user defined. The data of the recording phase
and the data of the apply phase is saved in the data file.
The log file on the left side of the window shows following entries:
32
Page 37

4.7 Stimulation of MEA Electrodes
Cardio 2D Software
Click "Stimulate" icon
.
The stimulation feature gives the possibility for voltage driven stimulation of a MEA electrode.
This is useful, for example, if a cardiomyocyte culture did not form a pacemaker. This dialog allows
to connect a stimulus generator STG, and to design the stimulation pulse.
You can connect either one stimulus generator STG with more than one channels, or several STGs
to stimulate the different MEA amplifiers. Define either the channel number from the "Channel"
drop down menu when using one STG, or the devices from the "Device" drop down menu when
using several STGs.
33
Page 38

Cardio2D Manual
Stimulus Pulse
In the "Stimulus" menu you design the stimulus pulse.
The pulse shape of a stimulus pulse is usually biphasic symmetric rectangular. The parameters
are the negative or positive sign of the first pulse phase, the duration of each phase, and the
amplitude of the pulse. Click the check box "Symmetric", and the pulse will automatically be
symmetric and biphasic. To design the pulse shapes, please use the numeric up-down controls
"Phase 1" and "Phase 2". The "IPI", the inter pulse interval, is the time frame between two
pulses in sequence.
The red line indicates the stimulus pulse, the blue line indicates the TTL blanking pulse.
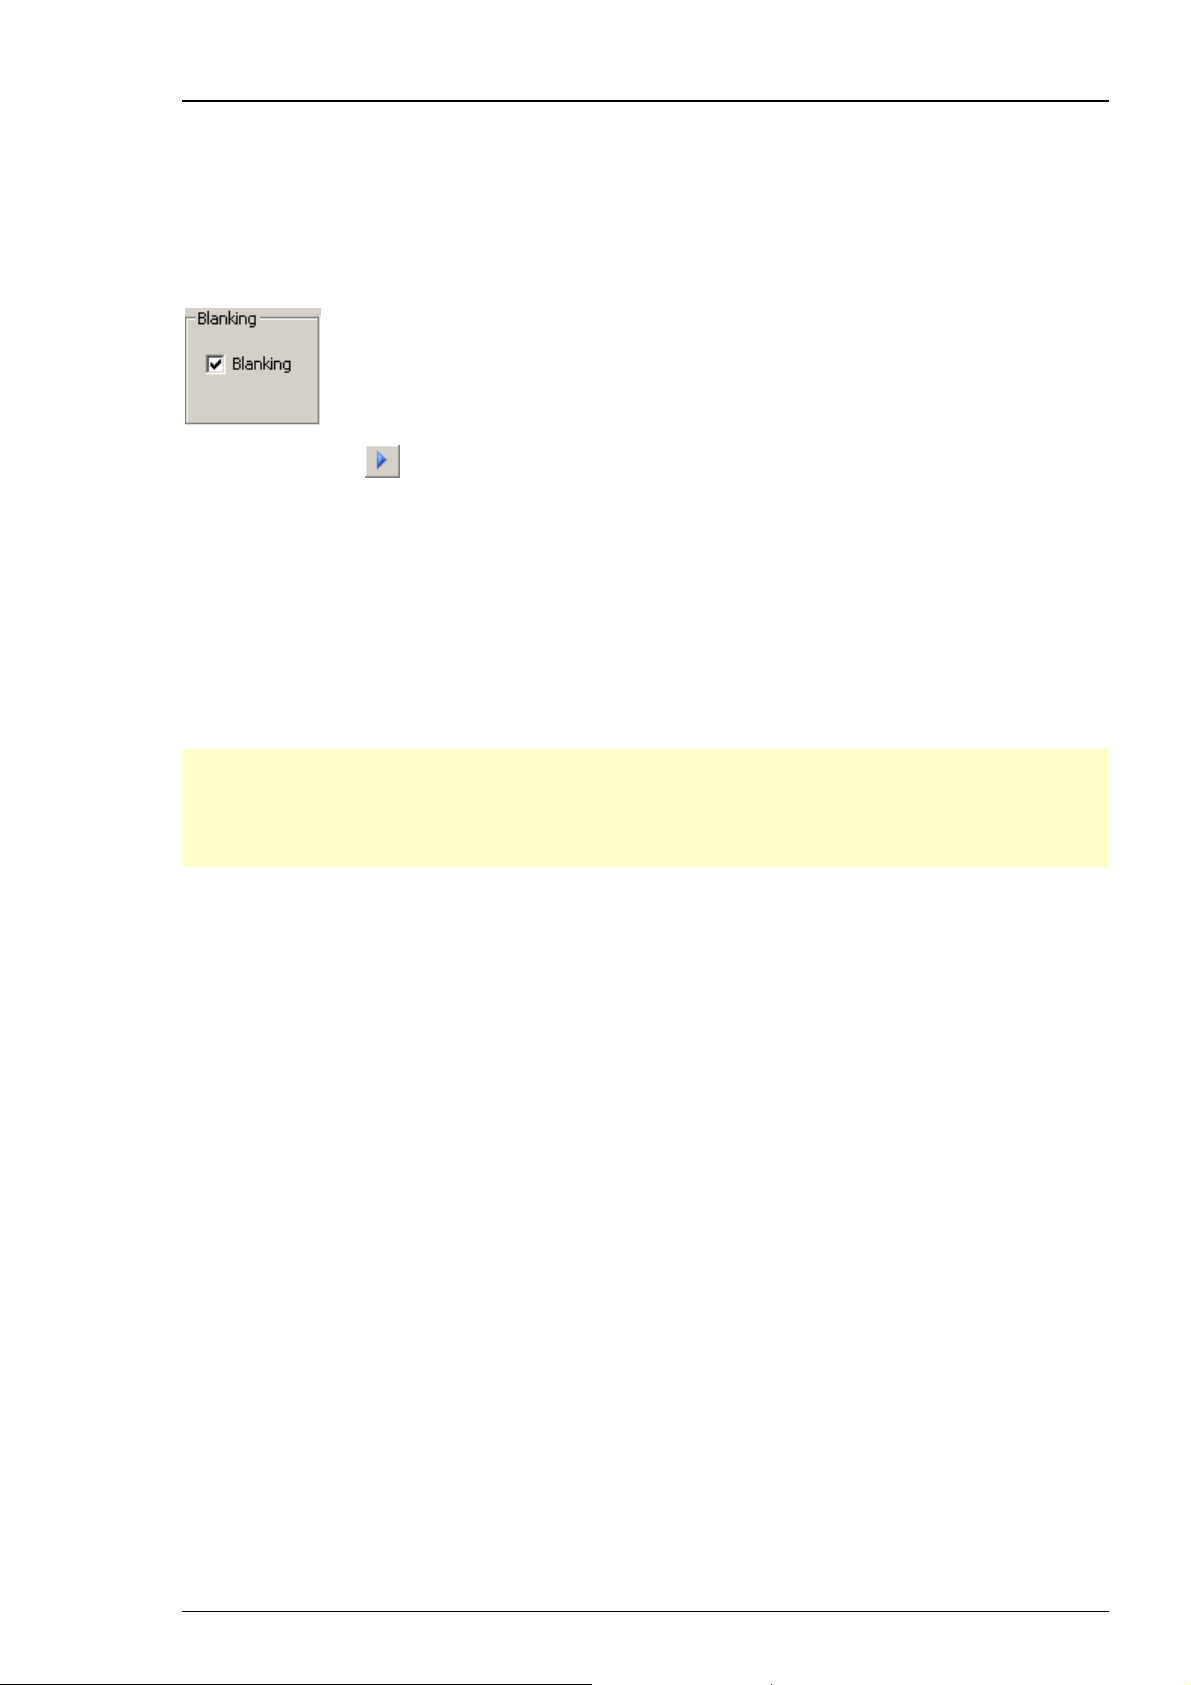
Blanking Pulse
The "Sync Out" menu is for the blanking feature if an amplifier with blanking circuit
is connected.
34
Page 39
Cardio 2D Software
When using the blanking feature, please enable the "Sync Out" check box. You have to define
the time of "Extension". The TTL pulse for the blanking signal starts synchronal to the stimulus
pulse, but it should last longer to avoid stimulus artefacts. This time interval is called extension
time. The extension time varies between 0 and 1000 μs, the default is 300 μs.
In some cases it may be necessary to see the stimulus artefacts. Please deselect the check box
"Sync Out" to switch off the Sync Out signal. Additional please select blanking feature in the
MEA_Select program, please see chapter “MEA_Select”.
Click the Start icon
.
If your experimental schedule will always need the same pulse paradigm, please store the settings
in "File" menu "Save Defaults". This way the settings appear in a new file, and you do not have to
type in them again.
Stimulus Generator STG
It is recommended to use a stimulus generator STG of the 2000 or 4000 series from Multi Channel
Systems MCS GmbH.
Important: When working, for example, with four amplifiers with blanking circuit BC, you have
to connect a STG4004 or a STG2004. The TTL blanking signal and the stimulation pulse must be
synchronized, that is, you have to connect the stimulus pulse of channel 1 on MEA amplifier 1 to
the TTL blanking pulse of Sync Out 1 of the STG, channel 2 to Sync Out 2, channel 3 to Sync Out 3
and channel 4 to Sync Out 4 respectively.
When using an USB-ME256 device for data acquisition you can connect up to four MEA amplifiers.
You define the stimulation settings for each of the connected MEA amplifier independent from
each other, and you can start and stop the stimulation independent from each other.
Amplifier without Blanking Circuit BC
The stimulation electrode is manual selected directly on the amplifier via connector pins around
the MEA. You will see the answer of the stimulation during data recording because of the
stimulus artefacts, and the spreading of the field potential. It does not matter whether the
"Sync Out" check box in the stimulation dialog is selected or not, it will have no effect.
Amplifier with Blanking Circuit BC
The blanking feature is used to reduce stimulus artefacts in MEA recordings. A TTL pulse, the
blanking signal, that has to be timed exactly with the stimulus pulse triggers both, the stimulation
and the blanking. During the blanking signal, both stimulus inputs are connected to the software
selected stimulation electrode(s), while all recording electrodes are disconnected from the
amplifier. The last signal value on all electrode channels before the blanking pulse will be saved
and then kept until the channels are reconnected to the amplifier. This avoids that the amplifier
gets saturated on all channels during stimulation (which is the case with amplifiers without
blanking circuit).
35
Page 40
Cardio2D Manual
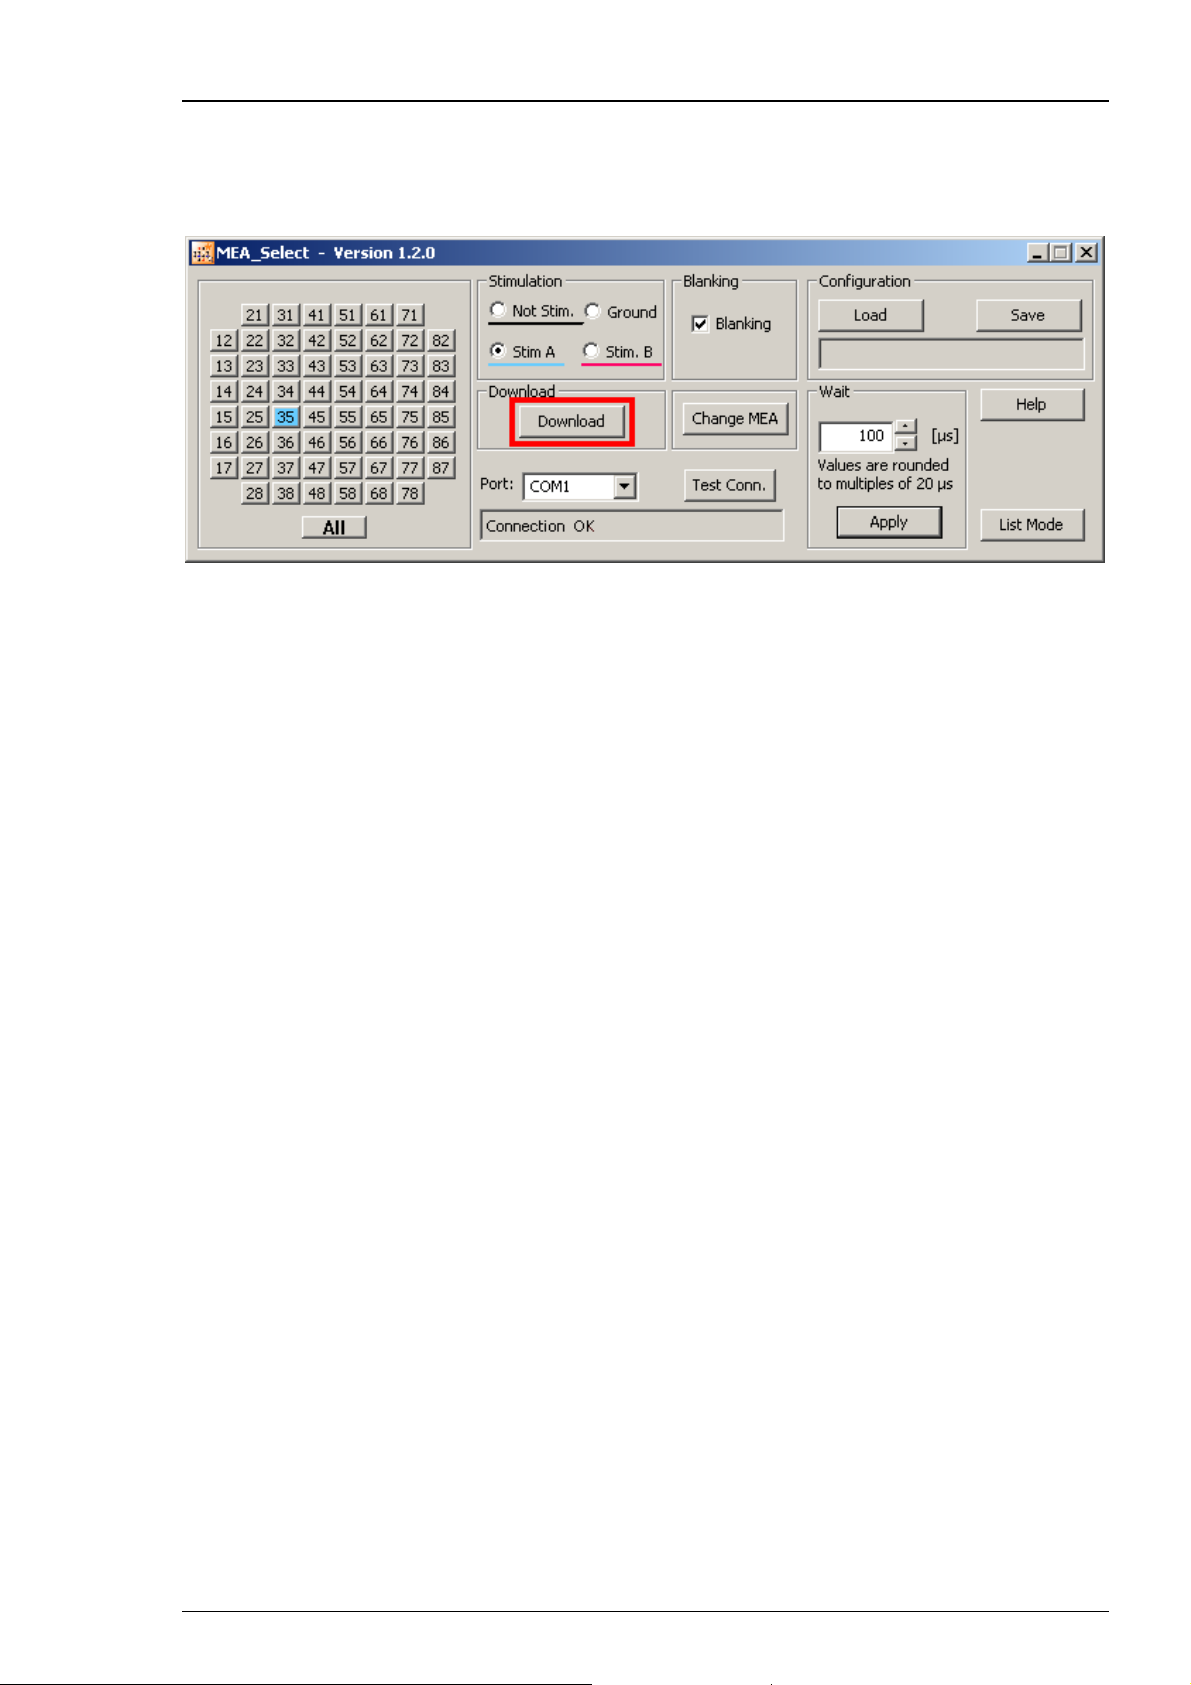
MEA_Select
MEA_Select is a software program for controlling the blanking circuit of the MEA amplifier. With
MEA_Select it is possible to select the MEA electrode you want to stimulate. Start MEA_Select
parallel to Cardio2D. The MEA_Select main window appears.
When using more than one MEA amplifiers, in "Port" drop down menu, for example, COM1
defines MEA amplifier 1, COM 2 belongs to amplifier 2 and so on. Press "Test Connection" to
be sure that amplifier and the computer are correct connected. Select "Stim A" or "Stim B" in
menu "Stimulation". Enable the check box "Blanking". Select the desired stimulation electrode
on the electrode field. The button will appear in blue, when using "Stim A" or in red when using
"Stim B". Click "Download" for downloading the information to the MEA amplifier.
36
Page 41

4.8 Stimulation with MEA2100-System
Cardio 2D Software
Click "Stimulate" icon
When working with Cardio2D and any type of MEA2100-Systems with integrated stimulus
generator STG the "Stimulate" dialog provides the possibility of stimulating via three different
stimulation patterns on user defined electrodes.
.
The dialog mirrors the layout of the currently used MEAs, in this case a MEA2100-2x60-System
with two slots for two 60 electrode MEAs. Use the tool bar thereunder to define the stimulation
sites.
Tool Bar
The tool bar in the stimulate dialog is divided into three sections: A position indicator,
controls for single stimulus patterns, and controls that affect all three stimulus patterns.
First section: The position indicator helps to navigate through the MEA electrodes.
It shows the position of the mouse on the left MEA 1 or on the right MEA 2
The numbering of MEA electrodes in the 8x8 grid follows the standard numbering scheme
for square grids: The first digit is the column number, and the second digit is the row number.
For example, electrode 23 is positioned in the second column and the third row.
.
37
Page 42

Cardio2D Manual
Second section: Click one of the three color coded "Select Stimulus" icons to select
the respective stimulus pattern for further processing. You can define the location of the selected
stimulus by clicking on electrodes in the electrode panel or by drawing rectangles over the desired
area. Each stimulation electrode accepts one stimulus pattern at a time. It is not possible to
overlap patterns, but to overwrite them with a new selection or to clear the sites. To remove the
currently selected stimulus from all sites, please use the "Clear selected stimulus sites" icon
.
All created sites of the selected pattern will be removed. To remove stimuli from single electrodes
only, cancel the current stimulus pattern selection first by clicking on the “Select Stimulus” icon
again, then click on the electrode you would like to remove.
Clicking the “Define Stimulus” icon
will open a new dialog enabling the definition of the
stimulus pattern as explained on the following pages. To start stimulation with the currently
selected pattern only, click the “Start” icon
Third section: To clear all sites, click the "Clear all stimulus sites" icon
Start all stimulus patterns simultaneously via the "Start" icon
in the second section of the tool bar.
.
in this section.
Stimulation of electrodes produces stimulation artefacts, which can be eliminated. To select the
blanking artefact suppression, please click the "Blanking" icon
. ”Blanking” will blank all
recording electrodes on a MEA while a stimulus pattern is applied to any electrode of the same
MEA. Choosing the ”Dedicated Electrode” icon
all selected electrodes will be defined to
be dedicated stimulation electrodes. These electrodes will be permanently isolated from the
amplifier, hence recording from these electrodes will be stopped.
Note: It is not possible to select electrode 15 for stimulation, because this electrode is connected
to the internal reference.
Viability Test
Before you start recording, a viability test is recommended. The data is not recorded. During
viability test it is possible to change the stimulation electrodes and stimulation pattern without
stopping the display of the data.
Such changes are not possible during data acquisition! You first have to set stimulation electrodes
and stimulation parameters which are fix and then start the experiment.
Important: If you remove electrodes from the screen, data streams of these electrodes are not
saved in the data file.
38
Page 43

Cardio 2D Software
Stimulation Pattern
To open the "Define Stimulus 1" dialog, please select the first "Select Stimulus 1" icon.
The "Define Stimulus" icon
in the "Stimulation" window will be available. Each stimulus
can be defined independently, so the dialog corresponds with the previous selected stimulus
pattern 1, 2 or 3. The dialog for the settings of the stimulus patterns are build analog, here,
for example the "Define Stimulus 1" dialog.
The "Define Stimulus" dialog is divided in an upper and a lower section. The upper part includes
the icons for the provided stimulus patterns, such as flat line, rectangle pulse, ramp or sine waves.
The last icon represents biological signals, for example, which can be imported into the Cardio2D
software.
The lower section of the dialog shows the "Complete Stimulus Pattern" and a tool bar. The
settings in the tool bar influence the complete sequence of the stimulus patterns which are
immediately displayed in the window for the "Complete Stimulus Pattern".
The white menu bar "Building a Stimulus Pattern" in the middle of the dialog is for creating
the desired stimulus pattern from the provided default stimulus patterns, called "Primitives"
or for the import of external created stimulus patterns. You can modulate each "Primitive"
pattern via individual "Parameter Settings" and the modulation will be immediately displayed
in the "Single Pattern" view and also in the view for the "Complete Stimulus Pattern".
39
Page 44

Cardio2D Manual
Building Stimulation Patterns
On the left side of the upper section you can choose the provided default stimulus pattern. Move
the primitive icon via drag and drop into the white field in the middle of the dialog for creating
a user defined stimulation pattern. Add as much primitives as needed. It is possible to change the
sequence of the primitives by drag and drop. For deleting one of the pattern, please drop it into
the bin.
Set Marker Signal
Additionally it is possible to set a marker signal. Open the "Set Marker Signal" dialog by clicking
the check box "Set Marker"
in the window for parameter settings.
Click the check box "Set Marker" and click "Repeat" if you want to repeat the marker signal at
each cycle of the stimulation pattern. Adjust the "Offset" in μs and the "Duration" in μs of the
marker signal via the up-down boxes. The orange colored marker signal will be displayed in the
window for the "Complete Stimulus Pattern".
40
Page 45

Cardio 2D Software
Modulation of the provided Stimulation Patterns
Initially the provided stimulation patterns are default. To adjust a primitive to your requirements,
please click onto the icon, which will be highlighted in pale blue. In the upper part of the dialog
the setting parameters for this pattern appears on the left and a picture of the actual shape of
the pattern on the right. Immediately after changing a pattern, the modulation is visible in the
“Single Pattern” view and in the “Complete Stimulus Pattern” view. Save the stimulus pattern
as default by clicking the "Save Primitive as Default" icon
beside the "Marker" check box.
Most of the parameters have to be adjusted with up-down boxes. Please click into the up-down
box and move the wheel of your mouse for quick adjustments in wide steps. Use the arrows for
fine tuning. The modulation is immediately displayed in the single pattern and in the complete
pattern window. Overwrite the letter in the up-down box, the modulation will be displayed after
confirming the value with “Enter” or after clicking into another box. Playing with the different
possibilities for adjustment allows to create each shape of pulse which could be necessary.
Additionally it is possible to modulate the shape, when repeating pulses in relationship
to each other.
Stimulus Pattern: Flat Line
The first provided primitive is a flat line stimulus. To adjust the duration, please use the respective
up-down boxes: Hour, minute, second, millisecond and microsecond. Define the value of the
pattern in the "Amplitude (mV)" up-down box.
41
Page 46

Cardio2D Manual
Stimulus Pattern: Sine Wave
Modulate the amplitude "PP Amp (mV)", the period "Period (μs), the shift "Shift" and the phase
"Phase (') of the sine wave pattern via up-down boxes. Setting the number of cycles to more than
one enables the inter stimulus interval "ISI (μs)" up-down box. Additionally the “Arrow” button
will be enabled.
When using more than one cycle you can click onto the arrow symbol
for additional options:
A highlighted parameter field appears to modulate the amplitude and the period of the sine
waves in relationship to each other. In this example increases the amplitude of each sine wave at
23 mV in comparison to the sine wave before. Choosing a negative value from the up-down box,
the amplitude will decrease in comparison to the wave before. Analogous you can adjust the
value of the period in μs in relation to the wave sequences. The window "Single Pattern" shows
the sine waves in an overlay plot. The lower window "Complete Stimulation Pattern" shows the
combined sequence of all stimulus pulses.
42
Page 47

Cardio 2D Software
Stimulus Pattern: Rectangle
Modulate the amplitude "Amplitude (mV)" of the ascending and the descend part of the pulse
and the duration "Duration (μs)”, of the rectangle pulse via up-down boxes. Setting the number
of cycles to more than one enables the inter stimulus interval "ISI (μs)" up-down box. Additionally
the “Arrow” button will be enabled.
When using more than one cycle you can click onto the arrow symbol
for additional options:
A highlighted parameter field appears to modulate the amplitude and the duration of the
rectangle pulses in relationship to each other, again independently for both parts of the pulse
and for the duration between the ascending and descend arm. The window "Single Pattern"
shows the rectangle pulse in an overlay plot. The lower window "Complete Stimulation Pattern"
shows the combined sequence of all stimulus pulses.
43
Page 48

Cardio2D Manual
Stimulus Pattern: Ramp
Modulate the amplitude "Amplitude (mV)" and the duration "Duration (μs)” of the ramp pulse
via up-down boxes. To adjust the steepness of the arms of the pulse, please use the three updown boxes for the ascending part, the plateau and the descend arm independent from each
other. Setting the number of cycles to more than one enables the inter stimulus interval "ISI (μs)"
up-down box. Additionally the “Arrow” button will be enabled.
When using more than one cycle you can click onto the arrow symbol
for additional options:
A highlighted parameter field appears to modulate the amplitude and the duration of the ramp
pulse in relationship to each other. The window "Single Pattern" shows the ramp pulse in an
overlay plot. The lower window "Complete Stimulation Pattern" shows the combined sequence
of all stimulus pulses.
44
Page 49

Cardio 2D Software
Stimulus Pattern: Biological Pulse
If you like to use, for example, a biological signal as stimulus pulse, you can import signals by
clicking the “Import” button. The imported file must mandatory have the following format:
Timestamp Voltage Value
Timestamp Voltage Value
Timestamp Voltage Value
...
The unit for the timestamp is μs and for the voltage value nV. The units are not part of the file.
Cardio2D software accepts integers only and commas, tabulators or spaces to separate the
timestamp and the voltage value. Please remove a possible header and use a new line for each
integer pair. Save the file with the extension “*.dat”. Adapt the amplitude of the signal in
percent (%) via up-down box. Setting the number of cycles to more than one enables the inter
stimulus interval "ISI (μs)" up-down box. Additionally the “Arrow” button will be enabled.
45
Page 50

Cardio2D Manual
When using more than one cycle you can click onto the arrow symbol for one additional
option: A highlighted parameter field appears to modulate the “Amplitude (%)” in relationship
to each circle of the signal. The window "Single Pattern" shows the imported pulse as overlay
plot. The lower window "Complete Stimulation Pattern" shows the combined sequence of all
stimulus pulses.
Tool Bar
The settings in this tool bar influence the complete sequence of the stimulus patterns.
Modulate the “Amplitude (%)” and the “Offset (mV)” of the complete pattern via up-down
boxes.
Clicking the "Loop"
Load a previous created stimulus pattern, save or delete the pattern
button enables you to infinitely repeat the defined stimulus pattern.
. When
using marker signals, you have to define which one of the Digital Out ports should show
the corresponding TTL signals. Select one of the marker ports from the drop down menu
and connect a TTL signal source to the port.
Download and start the created stimulus pattern via the "Download" icon
is not necessary, the icon is not available
. This way you have an optical feedback for the
. If downloading
download.
46
Page 51

Analyzer Settings
Cardio 2D Software
Click "Analyze" icon
As in the "Labbook" settings the same is in "Analyzer" settings: You can have local settings on
each MEA or each well of a MEA or you control all MEAs at a time via global settings. The global
settings (white background) overwrite the local settings (orange background).
. The "Analyzer Settings" dialog will open. Click "HB Detection" tab.
In this dialog you define the parameter for detecting the waveform of a field potential.
Please see also "Automated Waveform Detection" and "Detection Parameter".
The feature "Comparing "Local" and "Global" Settings" is also available for this dialog.
Please read chapter "Labbook".
The first parameter for detection is the "Rise Time". Select the minimum and the maximum
of the rise time from the drop down menus. The range involves 100 μs to 2 ms for the minimum
rise time, and 200 μs to 5 ms for the maximum rise time.
Next parameter is the "Amplitude" You can decide to have a fixed amplitude for detection
or a signal dependent amplitude. The fixed amplitude involves a voltage range from -10 μV
up to -1 mV. Using the signal dependent amplitude, the waveform detection is more flexible:
The detection routine detects the amplitude in relationship to the background noise. The
amplitude is calculated by the standard deviation of the signal times the factor you can choose.
It is recommended to use a signal dependent amplitude.
The following parameters characterize the detected field potential. "Detection Deadtime"
defines the time in which no detection is performed.
47
Page 52
Cardio2D Manual
The drop down menu "Min/Max Type" describes the type of the minimum or maximum "Local"
or "Global". These options refer to one single field potential signal: "Local" means the first
detected minimum or maximum, "global" means the deepest minimum or highest maximum
in the field potential within the Min./Max. search interval. Please see the picture.
Whether you select the local or the global minimum or maximum, depends on the aim of the user:
If you are interested in the maximal slope of the action potential, you have to select the first local
minimum or maximum. If you are interested in absolute minimal or maximal values, you have to
select the global minimum or maximum.
Please select the time used for searching the minimum or maximum of the field potential
"Min/Max Search" from the drop down menu (range from +/- 1 ms up to +/- 200 ms).
You can set a "HB timestamp" to each detected field potential either to the maximum or to the
minimum or to the maximal slope of the field potential. This timestamp is visualized in the plot
with a black dot, and stored in the raw data file.
Please read also chapter "Detection Parameter".
Click "HB Average" tab in Analyzer Settings.
It is possible to display several recordings of an electrode channel in overlay and to average the
values. In this dialog the pre and post time before and after a heartbeat can be selected via up
down box. Enable the check box "On" to display and save the averaged data traces. If you do not
need the average function, disable the check box to save computer performance and disk space.
48
Page 53

Click "2D" tab in Analyzer Settings.
Cardio 2D Software
In this dialog you can define the time span from the drop down menu in a range of 1 to 200 ms
in which the "Propagation Time" should be calculated. The action potential runs over the heart
cell culture or tissue or whole heart from the pacemaker to the peripheral regions of the
syncytium. The excitation propagation is measured in high spatial resolution by the MEA
electrodes detecting cardiac field potentials and extracting local activation times. The propagation
time is the longest possible period for passing of the excitation from the first detected excited
electrode to the last detected excited electrode of one cluster. If the propagation time is too
short, you miss data for the complete heartbeat. If the propagation time is too long, the next
heartbeat starts and the results are incorrect. So, the appropriate time has to be tested empirical,
depending on the experiment.
The "Min Cluster Channels" gives the minimum number of channels at which heartbeats have
to be detected to form a cluster. For example, if a syncytium covers all 60 electrodes of a MEA
it could be 10, otherwise it should be less than 10.
49
Page 54

Cardio2D Manual
4.9 Start / Stop
Start
Click Start to start recording. The "Start" icon
the duration of recording is counted up in seconds. Stop recording manually by clicking on
"Stop" icon.
Cardio2D generates three types of files, the Raw Data file (*.c2d), the Result file (*.c2r),
and the Settings file (*.c2s). Raw data file and the associated settings file always belong
together, in the result file the settings file is included. The log file is not automatically
generated, but by users command.
4.10 Log File
Below the control window is the log file window. Each step of your experiment is documented
together with its timestamp. You can save the log file by clicking on the "Save" icon
file has the extension *.xml. Under "Settings" in "File Location" you define the path for the log
file To clear the log file display, please click the "Clear" icon
changes into "Stop" icon , and
. The log
. The message "Cleared Log"
will appear.
50
Page 55

4.11 Summary Window
Cardio 2D Software
Click "View Summary Page" in main menu "Settings" to open or to remove the "Summary"
window. This "Summary" window is only available, if more than one MEA at a time is connected.
The window presents an overview and all connected MEAs are visible. The dark green color code
spotlights the MEA which is displayed in the MEA tabbed page. The layout of the MEA is displayed
respectively.
The screenshot for the example above was taken with a MEA2100-2x60-System. This system has
two slots for MEAs with 60 electrodes. When using 60-6wellMEAs each of the MEA has six
separate chambers with nine electrodes and a reference electrode in each well. The layout of the
MEA is displayed in the summary page, the well which is highlighted in dark green appears in the
MEA window tabbed page and can be operated via control window. Deselect the check box of
a well to exclude the electrodes from recording.
Click the "Map Setting" icon
Click "Pause Monitoring" icon to stop displaying the color map to save performance capacity.
to adapt the color maps in the summary page.
The summary page is dockable to different places on the monitor. Click the icon "Window
Position"
push the window wherever you want. It is also possible to drag and drop each window into
the desired position. Click the "Auto Hide" icon
and decide where to place the summary window. In "Floating " mode you can
and the summary page will be hidden.
51
Page 56

Cardio2D Manual
When clicking on the "Summary" button the window will be visible again.
4.12 MEA Window
The "MEA Window" is divided into four window panes, all showing heartbeats in different
characteristics. The settings made in MEA Window influence all four smaller windows respectively.
The prominent "MEA Electrode" view displays electrode activity of all electrodes in the layout.
The "Single Channel View" displays an user defined single channel to have a closer view.
You can display the "FP" field potential, the "HB" heartbeat and the "Ave" average.
The "Color Map" displays the propagation of a heartbeat from the pacemaker to the outer
regions of the cardiac cell culture or tissue.
The "Latency / Velocity" view displays the latency or the velocity between the first and the last
detected electrode channel.
52
Page 57

The "MEA Window" changes depending on the connected hardware. If you connect, for example,
an USB-MEA256-System for data acquisition, you can use it together with a 256-9wellMEA and
each of the nine wells is displayed and controlled separate in nine MEA window tabs, MEA A to
MEA I.
If you connect, for example, an USB-ME256-System for data acquisition, it is possible to connect
up to four MEAs, MEA_1 to MEA_4.
You can switch between the different "MEA window tabs" to set different setting parameters
in the four views of the "MEA Window" independent from each other. Via "Control Window"
you start and stop the experimental protocol of the connected MEAs simultaneously.
4.13 MEA Electrodes
Cardio 2D Software
The MEA electrodes window allows real-time monitoring of field potential data. The electrode
channels are arranged in a grid according to the MEA layout. The channel identifier refers to the
columns and rows of the MEA layout grid. The drop down menus at the bottom of the window
are for scaling the axes.
The electrodes number 15 and 32 without field potentials are grounded. The electrode number
56, highlighted in dark green is the electrode which is displayed in the “Single channel view”.
Please read the next chapter.
53
Page 58

Cardio2D Manual
4.14 Single Channel View
Click field potential "FP" tab in single channel view.
The single channel view allows a closer view to one of the MEA electrode channels. You can
zoom to any channel by clicking on a channel in the MEA electrodes plate. The zoomed channel
is displayed in the larger single channel view. The plot shows the field potential (μV) against the
time (s). To scale the axes, please use the drop down menus. The range for the field potential is
+/- 1 μV to +/- 5000 μV, the time can vary between 1 and 60 seconds. Reset the axes by clicking
on the "Reset" icon
The detected heartbeats are marked with black dots. The detection timestamp can be set to
minimum or maximum or maximum slope in the "HB Timestamp" drop down menu in the
"Analyzer" dialog. Please click on the "Analyzer" icon
enter the "HB Detection" tab in Analyzer Settings.
The red line, labeled with the identifier of the selected channel, indicates that the zoomed
MEA channel was switched.
Click "Edit Plot" icon
With the help of the plot menu it is possible to modify a lot of plot parameters. For example,
you can adapt the figure to a special layout wanted for a publication. Please see also chapter
"General Software Features".
.
in the MEA Electrodes plate, and
. A plot menu appears.
54
Page 59

Cardio 2D Software
Click heartbeat "HB" tab in single channel view.
The HB tab shows a diagram of the duration of the RR interval in ms if you select "RRI (ms)"
from the drop down menu. In whole heart experiments the RR interval is defining one complete
heartbeat from one ventricular depolarization to the next ventricular depolarization. 1/RR is the
beating frequency of the heart. Any modulation of the beating frequency is an indicator for
possible arrhythmia. So arrhythmia or proarhythmic events can be detected. In cell cultures ECG
terminology does not apply. However the depolarization driven by rapid sodium channels causes
an as distinctive peak as the QRS complex in the ECG. Analysis can be performed in strict analogy
to the ECG analysis in respect of signal propagation patterns and conduction velocity.
If you select "Heart Rate (Hz)", the rate of the heartbeats is calculated from the reciprocal value
of the RR interval. The last actual value of the RRI (ms) or of the heart rate (Hz) is displayed in red
above the plot.
Click the "Edit Plot" icon
. A plot menu will open.
With the help of the plot menu it is possible to modify a lot of plot parameters. For example,
you can adapt the figure to a special layout wanted for a special publication. Please see also
chapter "General Software Features".
55
Page 60

Cardio2D Manual
Click average "Ave" tab in single channel view.
The recordings of one user defined electrode channel are displayed in a color coded overlay plot.
Each recording represents, for example one concentration indicated by a different color. The
number of the recording is displayed beside the plot and the number of averaged segments are
denoted in the brackets behind.
Please specify the length of the averaged segments in "Analyzer Settings" "HB Average" tab.
The data in "Monitor" are displayed but not saved in the data file. Please read also chapter
“Basic” in “Control Window”.
4.15 Latency / Velocity Window
56
Page 61

Cardio 2D Software
The diagram of Latency window shows the latency (μs) of the excitation calculated between
the first and the last detected electrode as a function of the time (s) whereupon the time is
the duration of the experiment from starting the recording. The actual value of the latency is
displayed above the plot in red letters. The different recording phases are displayed color coded
in overlay.
When defining a propagation path in the color map window
, the latency is calculated via the
propagation path. The latency is added up from point to point, that means the result is not zero
when defining a circular path. Please start a viability test and define the propagation path. Do not
change the path later during the experiment is running. Please read also chapter "Propagation
Path" in "Color Map".
Click "Edit Plot" icon
. A plot menu appears.
With the help of the plot menu it is possible to modify a lot of plot parameters. For example,
you can adapt the figure to a special layout wanted for a publication. Please see also chapter
"General Software Features".
Change the latency window via drop down menu to velocity window.
The diagram of Velocity window shows the velocity (mm/ms) of the excitation calculated
between the maximum and the minimum of excitation as a function of the time (ms) whereupon
the time is the duration of the experiment from starting the recording. The actual value of the
velocity is displayed above the plot in red letters. The different recording phases are displayed
color coded in overlay.
When defining a propagation path in the color map window
, the velocity is calculated via the
propagation path. The velocity is added up from point to point, that means the result is not zero
when defining a circular path. Please start a viability test and define the propagation path. Do not
change the path later during the experiment is running. Please read also chapter "Propagation
Path" in "Color Map".
57
Page 62

Cardio2D Manual
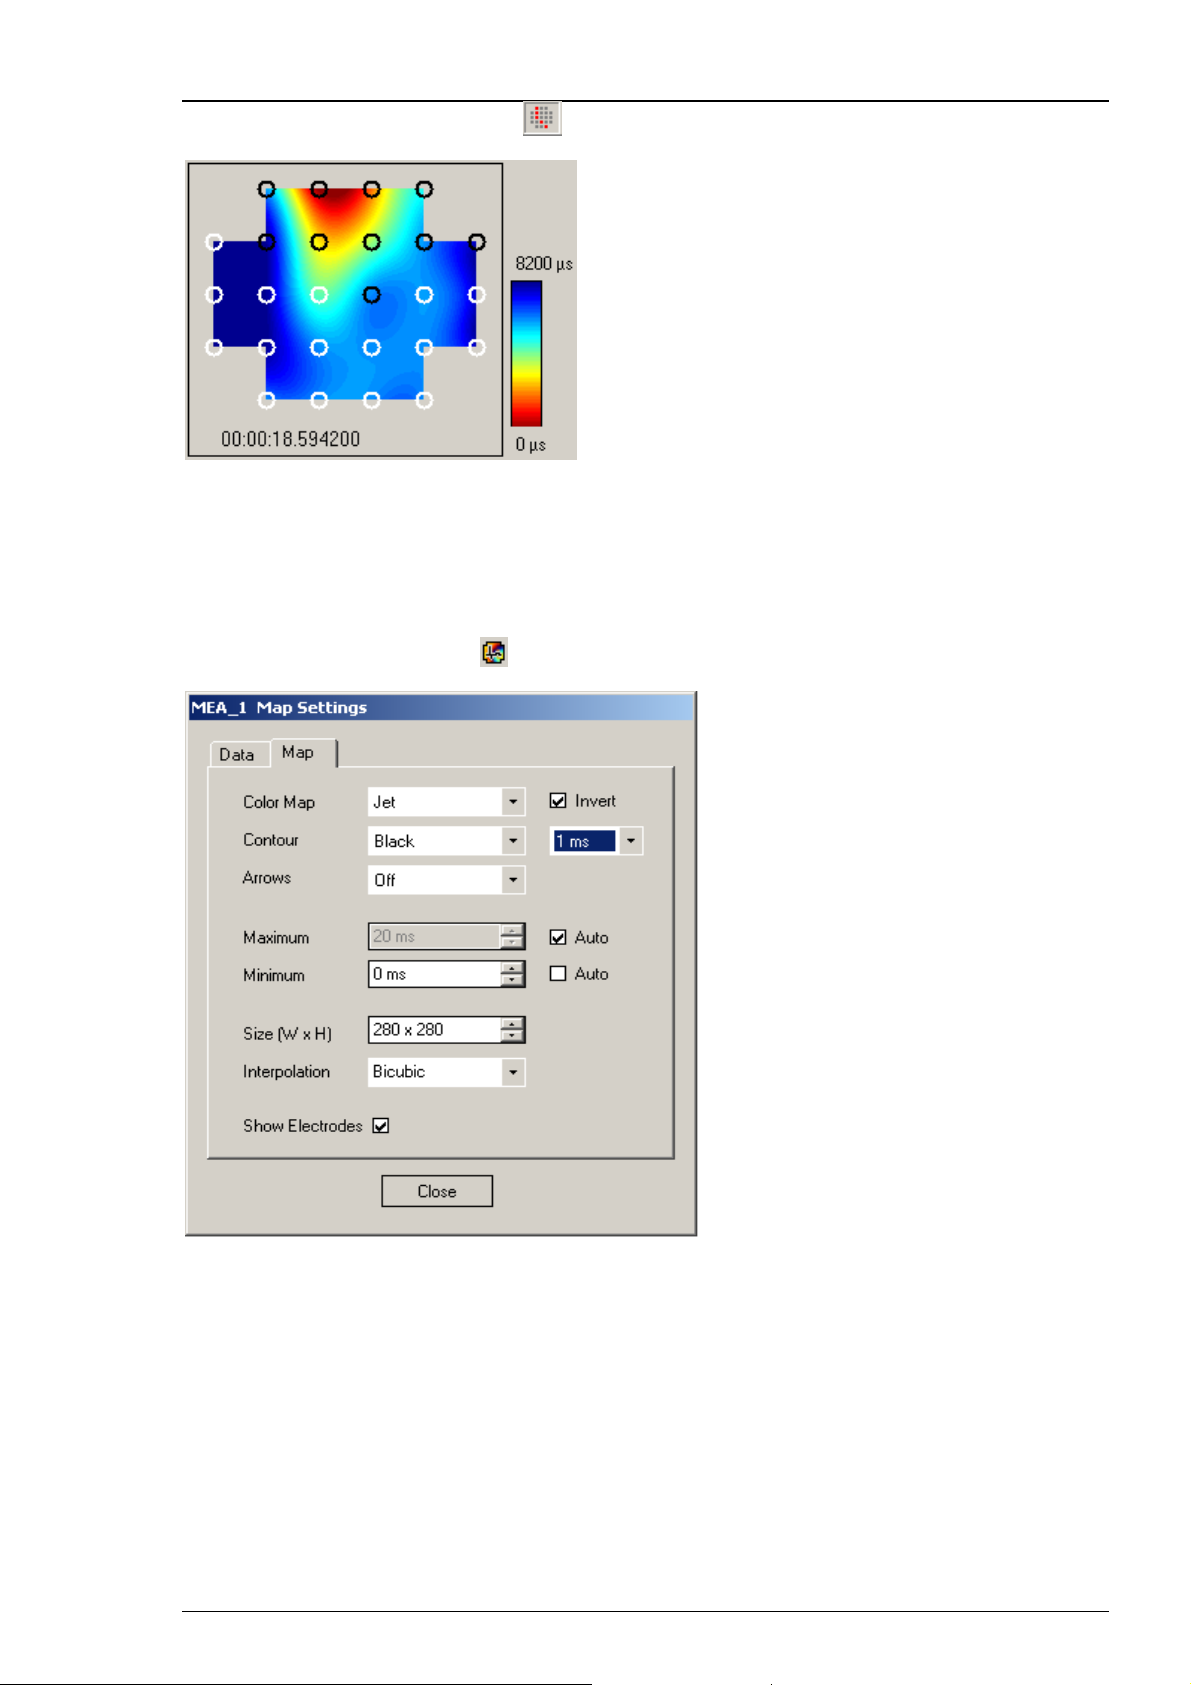
4.16 Color Map
The color map displays the propagation of each heartbeat across the MEA. The isochrones
are indicated by black lines in this screenshot, but the user can change their color in “Contour”.
The colors map is represented as false color. Below the map the actual timestamp is displayed.
In the screenshot above one well of a 256-9wellMEA with a 6 x 5 electrode grid is displayed.
Different layout grids are possible, please see chapter “Data Acquisition Settings”. Using
a different type of a MEA, for example a 256MEA with a 16 x 16 layout grid or a standard
MEA with an 8 x 8 grid, the layout will be adapted.
The Color Map Toolbar
Click the "Copy to Clipboard" icon
to copy the color map to the clipboard.
Click the "Save Picture" icon
Click the "Start" icon
to stop real-time monitoring.
Note: Stopping the real-time monitoring saves computer load!
58
to start real-time monitoring. Click the "Pause" icon
to save the color map as a picture in *.png format.
Page 63
Cardio 2D Software
Click the "Propagation Path" icon to set the propagation path.
The electrodes on the MEA are symbolized by circles: Black circles indicate a detection of a
heartbeat on this electrode in the currently displayed cluster, white circles indicate no detection
of a heartbeat in the currently displayed cluster, but the color map is completed by interpolation
of data.
Click the "Map Settings" icon
. The dialog "Map Settings" appears. Select "Map" tab.
In this dialog you can define the settings for the color map.
59
Page 64

Cardio2D Manual
Color Map: The usual used color map for cardiac issues is the "Jet Invers" map, but you can also
choose "Hot, Cool or Grey" maps. To remove the colors from the map, click "Off". The isochrones
will remain only.
Contour: The drop down menu is for changing the color of the contour for the isochrones into
"Black, Jet, Hot, Cool and Grey". Or you can remove the lines with "Off". The time step is defined
in the dialog.
Arrows: The feature is not yet implemented in this version of Cardio2D. As soon as it will be
implemented, you find a Read Me on the MCS web site, where you will be able to download the
new version of Cardio2D.
Minimum / Maximum: You have to define the minimum and the maximum of the scale of the
color map. That means, you define the time frame in which the excitation pattern are displayed in
the color map. Usually you start with zero in the minimum. The excitation pattern will run from
the pacemaker over the map to the maximum. The widest selectable time frame for the color map
spans from 0 μs in the minimum to 10000 ms in the maximum.
Auto: The Cardio2D program automatically finds the minimum and maximum of each heartbeat,
and adapts the scaling of the color map. It is recommended to use the auto scaling function.
Size (W x H): You can modify the size of the color map.
Interpolation: Interpolation is a mathematic method to calculate missing information in-
between two points of a line. The bilinear interpolation uses four points of the nearest vicinity
to calculate the interpolated point. The bicubic method uses eight points to calculate the
interpolated point. The interpolation method of the "nearest neighbor" uses the mean value
of four or five points to calculate the interpolated point.
Show Electrodes: Click the check box for displaying the black circles indicating the electrodes
in the color map
60
Page 65

Select "Data" tab in "Map Settings" dialog.
Cardio 2D Software
Interpolation: In the "Map" tab of the "Map Settings" dialog the interpolation parameter refers
to points between measured data. In the "Data" tab the interpolation parameter refers to the
data, generating the map. Default is the interpolation method "Nearest Neighbor". Please see
above. It is possible to interpolate "Missing Data" or "Missing Channel".
Show Timestamp: You can add the heartbeat timestamp to the color map using the option
"Show Timestamp". Different settings are offered for the actual timestamp, which is displayed
below the color map. For displaying heartbeats, for example, a timestamp in milliseconds (ms) will
be enough, for potential spreading you can use the timestamp option hours, minutes, seconds and
microseconds (hhmmss_μs).
Click the "Record Movie" icon
. The dialog "Movie Recorder" appears.
The movie of the color map will be recorded in *.AVI format. The *.AVI format is a common
format. You just need a Media Player to replay the video. You can choose the "Frame Rate"
between one and hundred frames per second. Select "Compression" of the movie with "On",
or deselect the compression with "Off".
Save the movie by clicking the "Save" icon
and select a file name, and the path to the folder
you want to store it. Recording the color map movie starts as soon as you click "Start".
61
Page 66

Cardio2D Manual
4.17 General Software Features
Tracking Axes
For tracking the axis manually, click on the axis and the mouse pointer will change into a hand
To scroll the axes, please move the mouse with the hand pointer. For zooming the axes,
press the CTRL key and keep it pressed while moving the mouse or the wheel of the mouse.
The mouse pointer turns into a double arrow symbol
A right mouse click on the axes gives four options:
.
"Edit", "Tracking Enabled", "Update Rescue Values", and "Zoom to Fit". With the command
"Tracking enabled" you can move the axis by moving the mouse or by moving the mouse wheel
in horizontal direction on the x-axis, and in vertical direction on the y-axis.
Edit
Click "Edit" and the "Plot Axis Editor" appears. You can adjust general and specific parameters
for your plot layout.
62
Page 67

Click the "Plot" icon .
The following toolbar appears.
Cardio 2D Software
Tracking
Scroll axes
Zoom axes
Zoom in and zoom out
Select
Zoom box
Data and Cursor
Edit
Copy to clipboard
Save
Print
Preview
63
Page 68

Cardio2D Manual
Click "Edit" icon . The following dialog appears.
Now it is possible to format the plot.
64
Page 69

5 Experimental Proceeding
5.1 General Performance / Noise Level
Please use the provided model test probe to test the amplifier immediately after installation.
The test model probe is already mounted on the amplifier. It simulates a MEA with a resistor of
220 k and a 1 nF capacitor between bath and electrode. Use the Cardio2D program to record
from the test model probe and to check the amplifier. This also presents an opportunity for you
to learn about the program before starting a real experiment.
Please keep the test model probe at a safe place in case that you will need it later for
troubleshooting.
Starting the recording
For testing the amplifier, it is not necessary to run a complete experiment. You may choose
to do so to learn to know the program.
1. On the Control panel, click the Viability icon. Data is not recorded.
2. You see the raw data streams of all 60 channels in the typical MEA layout grid.
3. You may have to adjust the position and span of the axes until you can clearly see
the noise level.
4. Click any channel to zoom into this channel.
Following screen shot shows the typical behaviour of a MEA amplifier with test model probe.
65
Page 70

Cardio2D Manual
5.2 Detection Parameter
Under the tab "HB Detection" in "Analyzer Settings" of the MEA electrodes plate
Cardio2D program you can adjust the parameters for the field potential detection. Sometimes
it will be necessary to play with this parameters until you find the best configuration for your
experiment.
of the
Click "Analyze Raw Data" in menu "Tools" in Cardio2D+ program. The same dialog will appear as
in the "HB Detection" tab in "Analyzer Settings" of the MEA electrodes plate
program, please see above. In the dialog "Analyze" you can adjust the parameters for the field
potential detection as well.
66
of the Cardio2D
Page 71

Experimental Proceeding
The sodium current is detected by the rapid change in the field potential, indicated by the rise
time. The rise time refers to the time required for a signal to change from a specified low value to
a specified high value. Typically, these values are 10 % and 90 % of the step height. The output
signal of a system is characterized also by fall time. If the rise time is chosen very short, the slope
of the peak is very steep, if the rise time is longer, the slope will be smooth. You have to try out,
which time is the best to characterize the Na-Peak, you want to detect.
You can either define a fixed value for the amplitude of the field potential, for example, 100 μV.
Using the signal dependent amplitude, the waveform detection is more flexible: The detection
routine detects amplitudes in relationship to the noise level. The amplitude is calculated with
its standard deviation in a range from -1 to -50. It is recommended to use a signal dependent
amplitude. The standard deviation is used to estimate the individual amplitude change for each
channel separately. A time interval of 1 s is used to calculate the standard deviation. You set
the factor, by which the standard deviation is multiplied (-1 to -50). To compensate individual
differences in the noise level of channels, it is recommended to use the signal dependent
amplitude as detection parameter. The data is scanned for a situation, where the minimum
amplitude (either fixed or relative to the standard deviation) is met and the rise time is in the
defined range as well. Limit the rise time range to exclude artifact signals that are in the range
of the defined amplitude. As the sodium peak is generally very fast, small rise times such as
100 to 400 μs can usually be used. The higher you define the FP change parameter, the higher
you need to set the rise time as well, as a higher FP change needs longer than a smaller one.
The rise time and the amplitude of the Na-Peak are used to detect only signals that show the
expected kinetics of the waveform. Slow potential shifts are excluded.
5.3 Automated Waveform Detection
This illustration shows how the Cardio2D routine detects the fast sodium peak by the three
parameters field potential change, minimum and maximum rise time. The software scans
the recorded data points, and it checks whether following data points meet the required criteria.
For example, when the waveform detection routine arrives at the data point marked with the red
line in the figure, the following data points meet the amplitude criterion (shaded in gray). The
signal reaches this field potential change in the preset range of the rise time (shaded in green).
The data point, at which both the FP change and the rise time criteria are met is marked with
a red dot in this figure. Would the signal be smaller than the minimum FP change or faster or
slower, it would not be detected. In other words, the signal needs to cross the bottom border
of the green shaded area.
Any signal component that matches the criteria will be detected. The FP change parameter is the
main parameter that should discriminate biological signals from noise. The rise time parameter
ensures that biological or artefact signals that meet the FP change criterion, but have a shorter
or longer rise time than the sodium peak, are not detected.
Please read the next chapter "HB Detection" in "The Cardio2D+ Analyzer Program: Overview"
about detection parameters in Cardio2D+.
67
Page 72

Cardio2D Manual
Slope Calculation
The calculation of the slope of each data point (P) is achieved by linear regression. This linear
regression is performed within a time interval around each data point. Increasing the interval
will help to reduce noise on the slope.
The time interval around a data point P can be defined by the user in the "Analyze" dialog
of the "QT-related Analysis" tab in Cardio2D+. Please read also chapter "QT-related Analysis".
Select time span for the "Slope Calculation" in ms in the up down box to define the size of the
time interval which is used for slope calculation of each point of the signal. Please see the picture.
68
Page 73

6 Cardio 2D+ Analyzer Software
6.1 The Cardio2D+ Analyzer Program: Overview
Main Window: Overview
The main window of Cardio2D+ is divided in two main windows. On the left side is the "Control
Window", and on the right side the "MEA Window" with the "Field Potential", "ROI Selection",
"Heartbeat", "HB Averager", and the "QT-related Analysis" tabbed page.
Control Window
In the "Recording control" window on top of the left side, the name(s) of the currently analyzed
raw data and / or result file is displayed. You find additional information about the file in the
table.
The "Channel control" window thereunder shows the MEA electrodes. You can zoom to any
electrode by clicking on the electrode. The zoomed channel is displayed in the larger single
channel view. It is possible to define a clusters, in case of formation of a cluster. Please see
also the "2D" tab in "Tools" "Analyze " dialog.
In the "Settings file" all information about the currently analyzed Cardio2D result or raw data
file is displayed in a tree view.
69
Page 74

Cardio2D Manual
MEA Window
The window on the right side is divided into four separate window panes and has five tabs:
"Field Potential", "ROI Selection", "Heartbeat", "HB Averager" and "QT-related Analysis".
The setting of the tabs influences each of the separate windows in the tab.
Select "Field Potential" tab. Please see the upper picture.
The single channel view on top of the right window panes shows field potentials: Recorded
data traces are displayed in the MEA electrodes pane.
If you select one or more than one MEA electrodes in this window pane by clicking on the desired
channel, they are displayed in the overlay plot window below.
The color map displays the spreading of the excitation of a heartbeat from the pacemaker (or
the earliest time point detected if the pacemaker is not on the MEA) to the outer regions of the
cardiac cell culture or tissue. The isochrones are indicated by black lines. The colors indicates the
time distance between the first signal and outer regions of excitation. Red color represents the
pacemaker when using the color map "jet inverse". Below the map the actual timestamp is
displayed. The color map corresponds with the single channel view, and with the field potential
windows.
70
Page 75

Select "ROI Selection" tab. Please see the picture below.
Cardio 2D+ Analyzer Software
This tabbed page lists the single recording sequences from one electrode. Select the electrode
in the "Channel control" field of the "Control Window". Via ROI you can discard one part or
several parts of the recording sequence which are now excluded from the analysis. Additionally
it is possible to discard a complete recording sequence by deselecting the respective check box.
The data in the ROI will not be included in the analysis.
Select "Heartbeat" tab. Please see the picture below.
The single channel view on top of the tab page shows amplitude and rate of the heartbeats
of one recording phase.
The MEA electrode window corresponds directly with the color map. The field potential of that
single electrode is shown in MEA electrode window which is selected via mouse in the color map.
Select a plot of "Latency" or a plot of "Velocity" from the drop down menu in the Latency
window.
71
Page 76

Cardio2D Manual
The color map corresponds with the single channel view, and shows the excitation patterns
of that heartbeat marked with the blue arrow in single channel view.
Select "HB Averager" tab. Please see the picture below.
Important: Please pay attention to the "Analyze" dialog. To use the average tool, you have to
enable the check box in the "HB Average" tab of the "Analyze" dialog in main menu "Tools".
72
Page 77

Cardio 2D+ Analyzer Software
The "MEA electrode field" window corresponds directly with the "Channel overlay" view.
The field potential of one selected channel or of several selected channels are shown in overlay in
the "Channel overlay" window. Select the channel(s) via mouse click in the MEA electrode field.
Select one channel from the "Heartbeat" window pane of the "Control Window" and the
desired channel will be displayed with its different recordings in the "Recording Overlay"
window. You can choose whether you want to display all phases or test or apply phase only
from the drop down menu.
Select "QT-related Analysis" tab. Please see the picture below.
Important: Please pay attention to the "Analyze" dialog. To use the QT-related Analysis tool,
you have to enable the check box in the "HB Average" tab of the "Analyze" dialog in main
menu "Tools" and the respective check box in the "QT-related Analysis" tab.
73
Page 78

Cardio2D Manual
Select one channel from the "Heartbeat" window pane of the "Control Window" and the
desired channel will be displayed with its different recording phases in the "QT-related
Analysis" window on the left side.
If possible, a dose responds curve of this channel will be calculated and displayed in the "QT-like
Interval" window of the right side. You can choose whether you want to display a normalized
or an absolute curve from the drop down menu.
74
Page 79

Cardio 2D+ Analyzer Software
Main Menu
File
Menu to open or save result files, to open raw data files, and to exit the program.
Cardio2D generates different types of files, the Raw Data file (*.c2d), the Result file (*.c2r), and
the Settings file (*.c2s). Raw data file and the associated settings file always belong together,
in the result file the settings file is included. The log file is not automatically generated, but by
users command. If the "Averager" tool is activated during recording, you generate additionally
an "Averager file" (*.c2a).
The Cardio2D+ Analyzer program deals with raw data and result files. It is not possible to change
the data of a raw data file which was recorded with Cardio2D. But you can re-analyze a raw data
file with Cardio2D+ Analyzer as often as necessary and save the new information in a result file.
When a result file is re-analyzed no data will be overwritten, but a backup file of the old result
data is generated (*....backup). Additionally an analysis file can be generated, when a result file
is analyzed with the heartbeat average feature (*.c2a).
Tools
Menu to open the "Analyze" dialog. Click "Analyze Raw Data".
75
Page 80

Cardio2D Manual
Click "HB Detection" tab in the "Analyze" dialog.
In this dialog you define the parameter for detecting the waveform of a field potential. Please see
also chapter "Automated Waveform Detection". Because you have to define these settings before
recording data, the same dialog appears in Cardio2D (MEA electrode window,
"Analyzer
Settings").
The first parameter for detection is the "Rise Time". Select the minimum and the maximum of
the rise time from the drop down menus. The range involves 100 μs to 2 ms for the minimum rise
time, and 200 μs to 5 ms for the maximum rise time.
Next parameter is the "Amplitude". You can decide to have a fixed amplitude for detection
or a signal dependent amplitude. The fixed amplitude involves a voltage range from -10 μV
up to -1 mV. Using the signal dependent amplitude, the waveform detection is more flexible:
The detection routine detects the amplitude in relationship to the background noise. The
amplitude is calculated with its standard deviation in a range from -1 to -50. It is recommended
to use a signal dependent amplitude.
The following parameters characterize the detected field potential. "Detection Deadtime"
defines the time span in between no further field potential should be detected. The detection
dead time has to be longer than the time used for searching the minimum or maximum,
otherwise the following error message appears.
76
Page 81

Cardio 2D+ Analyzer Software
The drop down menu "Min/Max Type" describes the type of the minimum or maximum "Local"
or "Global". These options refer to one single field potential signal: "Local" means the first
detected minimum or maximum, "global" means the deepest minimum or highest maximum
in the field potential. Please see the picture.
Whether you select the local or the global minimum or maximum, depends on the aim of the user:
If you are interested in the maximal slope of the action potential, you have to select the first local
minimum or maximum. If you are interested in absolute minimal or maximal values, you have to
select the global minimum or maximum.
Please select the time used for searching the minimum or maximum of the field potential
"Min/Max Search" from the drop down menu (range from +/- 1 ms up to +/- 200 ms).
You can set a "HB timestamp" to each detected field potential either to the maximum or to the
minimum or to the maximal slope of the field potential. This timestamp is visualized in the plot
with a black dot, and stored in the raw data file.
Please read also chapter "Detection Parameter".
"Re-analyzing"
If you change in any tab of the "Analyze" dialog parameters for the analyzed file, it is possible
to re-analyze the data with the new settings.
Click the "Start" icon
.
The progress of analyzing in dependency of the different recording phases is displayed.
77
Page 82

Cardio2D Manual
Click "HB Average" tab in "Analyze" dialog.
If the heartbeat average feature is welcome, please enable the check box "On". If you do not use
this feature, do not enable the check box to save computer performance.
Select the "Recording" for the heartbeat average from the drop down menu. Define the time
interval before a heartbeat "Pre HB Interval" and the interval after a heartbeat "Post HB Interval"
from the up down boxes. During these time spans, no additional heartbeat should be detected.
Make sure to keep these intervals shorter than the shortest heartbeat to heartbeat interval.
Click the button "Apply to all Recordings" and the settings are applied to all available recordings
phases. Otherwise you can define different settings for each single recording phase.
If different values for different recordings are set, this will be indicated by the orange background
color of the drop down box. Please see the next picture.
78
Page 83

Click "2D" tab in "Analyze" dialog.
Cardio 2D+ Analyzer Software
The first up down box in this tab of the dialog defines the minimal number of cluster channels.
The "Min Cluster Channels" gives the minimum number of channels at which heartbeats have
to be detected to form a cluster. For example, for a MEA electrode layout with 60 electrodes
it could be 10, but if less than 60 electrodes are involved, it could be 5 or 2.
The second up down box defines the maximum propagation time of the heartbeat within
a cluster, for example the maximum duration between the first and the following detection
of a heartbeat on different electrodes.
79
Page 84

Cardio2D Manual
Click "QT" tab in "Analyze" dialog.
This dialog defines the parameters for the QT-related Analysis. QT-related Analysis is possible only
if the heartbeat average is enabled. QT-related Analysis will always be performed on the interval
from the heartbeat time stamp to the last data point of the average heartbeat. The parameter
"Detection Deadtime" defines a time window after the heartbeat time stamp within which no
analysis will be performed, to avoid detections on artefacts originating from the sodium peak.
80
Page 85

Cardio 2D+ Analyzer Software
Help
Menu for activating the online help for Cardio2D+, and for displaying the dialog
"About Cardio2D+".
The dialog shows basic information about Cardio2D+.
Note: Please keep in mind that the information of this dialog is necessary in case of support!
81
Page 86

Cardio2D Manual
6.2 Control Window Cardio2D+
The control window of Cardio2D+ is divided in three separate windows: The "Recording control"
on top, the "Selection control" view and the "Settings file" below.
82
Page 87

Cardio 2D+ Analyzer Software
Recording Control of Cardio2D+
In the recording control window the name(s) of the currently analyzed Cardio2D raw data and / or
result file is displayed. Additional the information about the recordings saved in this experiment
are listed in a table. To select one recording phase to be analyzed, please click onto the desired
row, which will be highlighted in dark blue and displayed in the single channel view of the MEA
window. To view raw data and results of a recording phase in the MEA window, please click onto
the desired row in the table. The currently selected recording phase will be highlighted in dark
blue.
The table has five columns: the "ID" of the recording phase, the "Type" of the phase, was it an
apply "A" or a test phase "T". The "Dose" of the recording phase with its unit, the "Compound"
and the "Duration".
Channel control of Cardio2D+
The channel control window is similar build to the heartbeat window in Cardio2D, but the
function is different. It also shows the MEA electrodes in the electrode grid. You can zoom
to any electrode by clicking on the icon "Show Channel Data"
, and on the electrode.
The zoomed electrode is displayed in the larger single channel view.
83
Page 88

Cardio2D Manual
In this screenshot a MEA electrode grid 8 x 8 is displayed. Different layout grids are possible,
depending on the selected raw data file. The numbers of the electrodes refer to their position
in the grid, to rows and columns. Using a different type of a MEA, for example, the layout will
be adapted.
If you have different clusters of cells with different pacemakers on the MEA, you have to analyze
each cluster separate. Mark the electrodes belonging to the first cluster by using the "Add
Channel" icon
Channels" icon
cluster for running a second analysis.
Settings File
to select channels. Deselect the other electrodes by clicking the "Remove
. Run the analysis and save the results. After doing this, you can mark the next
In the "Settings file" all settings of the currently analyzed Cardio2D result or raw data file are
displayed in a tree view. The window contains all information saved during recording the file,
and you can read any information you need for analyzing the file. It is not useful, and therefore
not possible to change these information in a Cardio2D raw data file. If you re-analyze a raw data
file with new parameters you can save the new results in a new Cardio2D result file.
6.3 MEA Window Cardio2D+
The MEA window on the right side is divided into separate window panes, and has five tabs:
"Field Potential", "ROI Selection", "Heartbeat", "HB Averager" and "QT-related Analysis".
Switching between the tabs influences the settings of each of the separate windows. Select
the single channels of each tab via "Selection control" window of the "Control Window"
of Cardio2D+.
84
Page 89

6.4 Field Potential Cardio2D+
Click "Field Potential" tab.
Cardio 2D+ Analyzer Software
The "Field Potential" tab is divided in four separate windows: The "Single channel view",
the "MEA electrode field", the "Channel overlay" and the "Color map".
Single Channel View
The single channel view displays the field potentials of one recording phase of the MEA electrode
selected in the "Channel control".
With the "Zoom Box" icon
Click the "Reset Axes" icon
you can zoom to any region of the data trace.
to reset the default settings of the axes.
85
Page 90

Cardio2D Manual
Click "Edit Plot" icon . A plot menu appears.
With the help of the plot menu it is possible to modify a lot of plot parameters. For example,
you can adapt the figure to a special layout wanted for a special publication. Please see also
chapter "General Software Features".
The two red bars in the heartbeat plot of the single channel view represent the region of
interest ROI. Click on the middle of one red bar near to the zero line. The mouse pointer will
turn into an arrow with two arrowheads. Keep the mouse button pressed. Now you are able to
vary the breadth of the ROI. The displays in the MEA electrodes window, and in the overlay plot
window are adapted immediately. Additional you can click anywhere on one of the red bars, and
the mouse pointer will turn into a cross with four arrowheads. Keep the mouse button pressed.
Now you can move the ROI with constant breadth to any region you want to analyze closer.
Again the displays in the MEA electrodes window, and in the overlay plot window are adapted
immediately.
Click with the right mouse button on one of the red bars. The "Edit" menu appears.
86
Page 91

Cardio 2D+ Analyzer Software
MEA Electrode Field
Recorded data traces are displayed in the MEA electrode field. To adapt the y-axis, please use
the drop down menu.
The MEA electrode field corresponds with the overlay plot window. The data traces of the MEA
electrodes, selected in the MEA electrode field, and highlighted in white are displayed in the
overlay plot window in different colors.
The MEA electrode field refers also to the single channel view. In single channel view you define
the region of interest. Data of this ROI frame are shown in each channel of the MEA electrode
field, and in the overlay plot window. If the ROI will be modified in the single channel view,
data traces in MEA electrode field and in overlay plot window are adapted immediately.
87
Page 92

Cardio2D Manual
Channel Overlay
If you select one or more than one MEA electrodes in the MEA electrode field, they are displayed
in an overlay plot in the Channel overlay window. To adjust the y-axis, please use the drop
down menu.
There is a prominent red bar in the diagram. The function is different compared to the two red
bars in single channel view, limiting the ROI. This red bar here defines the timestamp, belonging
to the currently shown excitation patterns of the color map. Please expand the x-axis to have
a closer view to the displayed field potentials.
Click the icon "Snapshot"
the icons "Step Backward" and "Step Forward"
to move the red bar timestamp step by step, please click on
. The color map will be immediately
adapted.
To create a movie of the excitation patterns, click on the icon "Create Movie". A second red
bar appears. Now the function of the red bars is similar to the function of the red bars in single
channel view. The two red bars here limit the time span for the movie, a region of interest too.
Click on the point in the middle of the bars. The mouse pointer turns in an arrow with two
arrowheads, and you can vary the time span between the two bars. Click on any other point of
the red bars. The mouse pointer turns in a cross with four arrowheads, and you can move both
bars to the section of the field potential you want to save in a movie.
Click the icon "Create Movie"
.. Click on the icon "Start" .
While recording the movie the blue arrow indicates the progress of recording. You can disrupt
the movie by clicking the icon "Pause Movie"
The inter-picture timing
in μs allows adjusting speed and duration of a movie generated
.
by using the above described functions.
88
Page 93

Cardio 2D+ Analyzer Software
Color Map
The color map displays the field potentials on the MEA electrodes at a time stamp, defined by
the channel overlay display. It shows the excitation of a heartbeat from the pacemaker (or the
earliest time point detected, if the pacemaker is not on the MEA) to the outer regions of the
cardiac cell culture or tissue. The isochrones are indicated by black lines. The colors indicates the
time distance between the first signal and outer regions of excitation. Red color represents the
pacemaker when using the color map "jet inverse". The color map corresponds with the single
channel view, and with the MEA electrode field.
Click the "Copy to Clipboard" icon
Click the "Save Picture" icon
Note: Stopping the real-time monitoring saves computer performance!
to save the color map as a picture in *.png format.
to copy the color map to the clipboard.
89
Page 94

Cardio2D Manual
Click the "Map Settings" icon . The dialog "Map Settings" appears. Click "Map" tab.
In this dialog you have to define the settings for the color map.
Color Map: The usual used color map for cardiac issues is the "Jet Invers" map, but you can also
choose "Hot, Cool or Grey" maps. To remove the colors from the map, click "Off". The isochrones
will remain only.
Contour: The drop down menu is for changing the color of the contour for the isochrones into
"Black, Jet, Hot, Cool and Grey". Or you can remove the lines with "Off". Adjust the number of
the contour lines from the numeric box beside; up to 100 contour lines are possible.
Arrows: The feature is not yet implemented in this version of Cardio2D+. As soon as it will be
implemented, you find a Read Me on the MCS web site, where you will be able to download the
new version of Cardio2D+.
Minimum / Maximum: You have to define the minimum and the maximum of the scale of the
color map. That means, you define the time frame in which the excitation pattern are displayed in
the color map. Usually you start with zero in the minimum, that is the pacemaker. The excitation
pattern will run from the pacemaker over the map to the maximum. The widest selectable time
frame for the color map spans from 0 μs in the minimum to 10000 ms in the maximum. To change
the colors of the map, please use the first drop down menu "Color Map".
90
Page 95

Cardio 2D+ Analyzer Software
Auto: Click the check box "Auto" in "Maximum" option. The "Minimum" is zero, you are not
allowed to modify it in Cardio2D.The Cardio2D program automatically finds for the maximum
of each heartbeat, and adapts the scaling of the color map. It is recommended to use the auto
scaling function.
Size (W x H): You can modify the size of the color map.
Interpolation: Interpolation is a mathematic method to calculate missing information between
two points of a line. The bilinear interpolation uses four points of the nearest vicinity to calculate
the interpolated point. The bicubic method uses eight points to calculate the interpolated point.
The interpolation method of the "nearest neighbor" uses the mean value of four or five points
to calculate the interpolated point.
Show Electrodes: Click the check box for displaying the black circles indicating the electrodes
in the color map
Click the "Map Settings" icon
. The dialog "Map Settings" appears. Click "Data" tab.
In the "Map" tab of the "Map Settings" dialog the interpolation parameter refers to the color of
the map. In the "Data" tab the interpolation parameter refers to the data, generating the map.
Default is the interpolation method "Nearest Neighbor". Please see above.
With the method of interpolation you can substitute missing channels also. The program uses
the same "Nearest Neighbor" method for interpolation: If you do not want to substitute missing
channels, click "Off".
In the drop down menu "Show Timestamp" you can choose the type of the timestamp you want
to be displayed below the color map.
91
Page 96

Cardio2D Manual
Click the "Record Movie" icon . The dialog "Movie Recorder" appears.
The movie of the color map will be recorded in *.AVI format. The *.AVI format is a common
format. You just need a Media Player to replay the video. You can choose the "Frame Rate"
between one and hundred frames per second. Select "Compression" of the movie with "On",
or deselect the compression with "Off".
Save the movie by clicking the "Save" icon
you want to store it.
For recording the color map movie please click "Start" and press "Play" in the "Channel overlay"
window.
and select a file name, and the path to the folder
92
Page 97

6.5 ROI Selection
Click "ROI Selection" tab.
Cardio 2D+ Analyzer Software
93
Page 98

Cardio2D Manual
The "ROI Selection" tabbed page lists the single recording sequences from one electrode. Select
the electrode in the "Channel control" field of the "Control Window". Via ROI you can discard
one part or several parts of the recording sequence which are now excluded from the analysis.
Additionally it is possible to discard a complete recording sequence by deselecting the respective
check box. The data in the ROI will not be included in the analysis.
To set a "Region of Interest ROI", please click with the mouse into the desired recording sequence
and draw a red box by keeping the left mouse button pressed. To change the breadth of a ROI,
use the red buttons on the left and on the right side, to replace a complete ROI, click into the red
field and move it with the mouse.
To delete the ROI, click with the right mouse button into the red box The command
"Remove Marker" will appear. Or click onto the ROI to select it and press the delete key.
Select an value in μV from the drop down box to scale the axes of all recording sequences.
Use the buttons for zooming in and resetting the axes for each recording phase separately.
94
Page 99

6.6 Heartbeat Cardio2D+
Click "Heartbeat" tab.
Cardio 2D+ Analyzer Software
The "Field Potential" tab is divided in four separate windows: The "Single channel view",
the "MEA electrode", the "Latency" and the "Color map".
Single Channel View
The single channel view displays the amplitude and the beating rate of all heartbeats of one
recording phase. Select the number of the displayed MEA electrode in the "Selection control"
window of the "Control" window on the left side.
95
Page 100

Cardio2D Manual
Single channel view and the color map of the "Heartbeat" tab correspond with each other: The
excitation pattern of that heartbeat marked with a blue arrow is exactly shown in the color map.
Selecting a new heartbeat with the blue arrow, the color map will be adapted immediately. The
user has four possibilities to analyse the heartbeats: Click near to any heartbeat, and it will be
marked with the blue arrow. This way you can jump to any heartbeat of that recording phase.
Or you can analyze each single heartbeat and the related color map step by step by clicking the
icons "Previous"
"Play"
and stop the performance with "Stop" . Or you can click onto a data point in the
and "Next" . Or you can run through all heartbeats automatically with
plot of the "Latency / Velocity" window.
MEA Electrode
In the MEA electrode window the field potential of exactly that electrode is displayed which
is selected in the color map via mouse. To adjust the size of the displayed raw data interval,
please use the up down control box.
Click "Edit Plot" icon
. A plot menu appears.
With the help of the plot menu it is possible to modify a lot of plot parameters. For example, you
can adapt the figure to a special layout wanted for a special publication. Please see also chapter
"General Software Features".
96
 Loading...